Embed Size (px)
Citation preview

PREFACE
The U.S. Department of Transportation (DOT), National Highway Traffic Safety Administration(NHTSA) has the responsibility for the development of training courses that are responsive to theguidelines established by the Highway Safety Act of 1966 (amended). One of the most compellinghighway safety justifications for an Emergency Vehicle Operators Course is that such a course wouldreduce the incidence of emergency vehicle collisions. In 1978, NHTSA developed the: TrainingProgram for Operation of Emergency Vehicles: A National Standard Curriculum (EVOC). Vehicletechnology and ambulance design have moved rapidly since 1978. In order for DOT curricula to beresponsive to the constituency it must serve, curricula must be accurate, current, and assure thateffective adult learning techniques are utilized.
The 1978 edition of the EVOC course has been revised to the Emergency Vehicle Operator Course(Ambulance): National Standard Curriculum, to ensure that it is accurate, current, and that itincorporates adult learning strategies. The revised curriculum will address only emergency vehicleoperations as they relate to the operation of ambulances. The new course is recommended for anyonewho operates an ambulance. The revised curriculum is appropriate for either rural or urban operations. The curriculum is made up of an instructor guide and participant manual which allow for the inclusion oflocal and State laws and organizational operation procedures. The revised curriculum will consist ofthree modules. Module A is approximately sixteen hours of classroom teaching. Module B allowsparticipants to practice ambulance operator skills on a driving range and includes a driving rangepractice checklist. Module C is designed to provide an on-the-job performance assessment of the skillslearned in the course through the use of an on-the-job checklist.
The Emergency Vehicle Operator Course (Ambulance) curriculum provides the knowledge and skillpractice necessary for individuals to learn how to safely operate all types of ambulances.

ACKNOWLEDGEMENT
Star Mountain, Inc. of Alexandria, Virginia was selected to revise the EVOC. They were charged withdeveloping a user friendly curriculum geared to adult learners that could be utilized by the States in theirefforts to standardize ambulance operation training. Star Mountain utilized a NHTSA sponsoredCurriculum Development Group (CDG) representing five major Emergency Medical Serviceorganizations. The CDG was actively involved in the design and review of the revised curriculum. NHTSA gratefully acknowledges the contributions of the CDG members and the organizations theyrepresented.
Curriculum Development Group (CDG)
National Council of State EMS Training CoordinatorsRepresentative: Gail A. Stewart, EMT-P
American Society for Testing and MaterialsRepresentative: James A. Lawrence, RN, EMT-P
National Association of State EMS DirectorsRepresentative: Dan Manz, EMT-D
National Association of Emergency Medical TechniciansRepresentative: Patrick Moore, EMT-I
American Ambulance AssociationRepresentative: Bill Leonard
Organizations Visited
Star Mountain visited the following organizations to collect information on ambulance operations. Theinformation was used to prepare the working documents for the CDG meeting. NHTSA greatlyappreciated the full cooperation of these organizations.
District of Columbia Fire Department Training Academy
Virginia Association of Volunteer Rescue Squads, Inc.Forest View Rescue, Chesterfield, VirginiaVolunteer Rescue Squad, Madison County, Virginia
Maryland Institute of Emergency Medical ServicesCommunity Rescue Service, Inc. Hagerstown, MarylandFire Training Academy, Anne Arundel County, Maryland

Federal Agencies
General Services Administration. M.L. Globerman, Chief, Vehicle Engineering Branch was very helpfulin reviewing the curriculum involving the ambulance specifications. He also provided expert advice onthe Federal Specification for Ambulances, Emergency Medical Care Surface Vehicles, KKK-A-1822C.
United States Fire Administration. William J. Troup provided numerous documents and contributed tothe discussions about the overall curriculum development.
Individuals
Many individuals contributed by providing comments and ideas for the revision of the curriculum. Thededicated people doing the job as paid and volunteer Emergency Medical Technicians, Paramedics andAmbulance Operators were an inspiration for this program.

PILOT TESTS
Pennsylvania and Florida were selected to support the pilot testing because both require training forambulance operators. Star Mountain conducted instructor training at the County of Bucks inPennsylvania for rural operations and Randle-Eastern Ambulance Service, Inc., an American MedicalResponse, Inc. company in Miami, Florida for urban operations.
Joseph W. Schmider, Director, Department of Emergency Health Services, County of Bucks,coordinated the instructor training and conduct of the course by the recently trained instructors. Because most of the participants in Bucks County were volunteers, the course was conducted over twoweekends.
Robert W. Trinkleback, CSP, Corporate Director of Safety and Health coordinated the AmericanMedical Response participation. Captain Robert R. Crowel, Director, Safety/Risk Management atRandle-Eastern coordinated the instructor training and conduct of the course during three days oftraining.
The instructors did an excellent job of integrating the state, local and organizational requirements into thecurriculum. The participant and instructor evaluations of the course were excellent. NHTSAappreciated the outstanding support at both of these organizations.
ORGANIZING YOUR PARTICIPANT MANUAL
It is recommended that each user obtain separator sheets with tabs to separate the modules, lessonswithin each module, and the appendixes. You will need separators labeled A, B, and C for theModules. Module A has 10 lessons and the Appendixes go from A to G. Adding the separators withtabs will make it easier to use the participant manual.


Participant Manuali
TABLE OF CONTENTS
MODULE A Page
Lesson 1 - Introduction to the National Standard Curriculumfor Ambulance Operations...................................................................................1-1
Lesson 2 - Legal Aspects of Ambulance Operation ....................................................................2-1
Lesson 3 - Communication and Reporting Rolesand Responsibilities..............................................................................................3-1
Lesson 4 - Ambulance Type and Operation.................................................................................4-1
Lesson 5 - Ambulance Inspection, Maintenance, and Repair.......................................................5-1
Lesson 6 - Navigation and Route Planning .................................................................................6-1
Lesson 7 - Basic Maneuvers and Normal Operating Situations ..................................................7-1
Lesson 8 - Operations in Emergency Mode and Unusual Situations............................................8-1
Lesson 9 - Safety: Special Considerations....................................................................................9-1
Lesson 10 - The Run...................................................................................................................10-1
MODULE B
Ambulance Operation: Demonstration and Practice........................................................................1
MODULE C
Ambulance Operator Internship: Guidelines For Additional On-The-JobTraining and Documentation...........................................................................................................1

Participant Manual ii
APPENDIXES
Appendix A - Area Motor Vehicle Operation Guidelines..............................................................A
Appendix B - Interpreting Hand Signals.........................................................................................B
Appendix C - Sample Checklist: Quick Check...............................................................................C
Appendix D - Sample Checklist: Full Check..................................................................................D
Appendix E - Sample Work request................................................................................................E
Appendix F - Glossary.....................................................................................................................F
Appendix G - References................................................................................................................G

Participant Manual-i
COURSE: EMERGENCY VEHICLE OPERATOR COURSE(AMBULANCE): NATIONAL STANDARD CURRICULUM
MODULE A: Ambulance Operation: The Basics
LESSON 1: Introduction to the National Standard Curriculum forAmbulance Operators
COURSE GOAL: To provide ambulance operators with knowledge and skills tooperate their vehicles so that vehicle, equipment, crew, andpatients will be delivered safely and efficiently, and the safety ofthe public will be assured during all phases of the delivery ofEmergency Medical Services (EMS) involving the ambulance
MODULE GOAL: To provide ambulance operators with the knowledge required tosafely and efficiently operate an ambulance in both nonemergencyand emergency modes
LESSON GOAL: To introduce the course by describing its organization andschedule and reviewing course materials
PERFORMANCEOBJECTIVE(S):
! Identify ambulance operator selection requirements
PM APPENDIX:

Participant Manual -ii
PARTICIPANTMATERIALS:
Participant Manual
ICON LEGEND
Notes Response Appendix Local Requirements
Participant Manual-iii
INTRODUCTION
Welcome
Participant Introductions
COURSE OVERVIEW
In this course you will learn about--
! legal aspects of ambulance operation, including appropriate vehicleprocedures based upon federal, state, local, and organizationregulations; due regard; true emergencies; negligence;abandonment; good Samaritan provisions; and patient's rights.
! communications responsibilities for receiving and sending radiomessages and for interpreting hand signals
! ambulance types and operation, including general guidelines about

Participant Manual -iv
weight restrictions and operation for each type
! ambulance readiness, including inspection, maintenance, and repair
! navigation and route planning, including selecting the safest route tothe emergency scene and the medical facility
! normal and high-risk driving situations and the appropriate drivingskills for situations from routine traffic to hazardous weather andtraffic conditions
! safety considerations for ensuring safety of passengers, patients andtheir family, the ambulance, and the crew
MODULE OVERVIEWS

Participant Manual-v
This course will provide the following:
First: the knowledge you need to operate your vehicle safelyand efficiently. This information is contained in ModuleA.
Second: recommendations and methods for practice. Thisinformation is contained in Module B.
Third: methods for evaluating your performance on-the-job. This information is contained in Module C.
Module A provides learning evaluation using a brief multiple choice test onthe information we cover during this class.
Module B provides a series of checklists that you will be evaluated onwhile driving on a protected range.
And Module C provides a series of checklists that can be used by yoursupervisors to provide you with feedback on your performance ofambulance operator duties on the job.
This course will not cover pursuit driving or high-speed operation ofan ambulance. The statistics are overwhelming in favor ofoperating at or below the posted speed limits and getting to thescene safely.
Once you have your ambulance at the scene and patient care begins, thechances are that the patient will survive.
You will also learn that with the patient on board you want to provide the
Participant Manual -vi
smoothest ride possible in a nonemergency mode. Statistics show that ifthe patient gets to the medical facility within one hour, the chances ofsurviving are greater than 90 percent.
Relationship to Other NHTSA courses
This course is part of the National Standard Curricula being developed orrevised by the National Highway Traffic Safety Administration (NHTSA)for EMS providers. That curriculum includes training for bystanders, forfirst responders, for Emergency Medical Technicians (EMT-B, EMT-I,and EMT-P), for dispatchers, and EMS Instructors.
Schedule
The course instructor will provide a schedule for the course.
TRAINING MATERIALS
Each lesson in your participant manual begins with a page showing --
! the name of the lesson
! the learning goals of the lesson

Participant Manual-vii
! the objectives (that is, what you can expect to learn during thelesson)
! appendix items that go with the lesson
! "actions" you might perform during the lesson.
This icon shows were you will add local policies and procedures.
At the end of this course, you will have a useful reference that you can takeback to the job and refer to whenever you have questions.
Appendixes/References/Glossary

Participant Manual -viii
Some very important information is included at the back of your participantmanual. The appendixes include these items for your use:
! motor vehicle operation guidelines for our area
! hand signals for use by ground spotters
! sample checklists for the quick check and full check of theambulance
! sample vehicle repair work requests
! a glossary that defines terms used in these training materials and onyour job
! list of references used for this course
! additional references if you want further background
Your organization should have a reference library of materials for yourrefresher training and on-the-job training.
WHO THIS COURSE IS FOR
This course is designed for ALL ambulance operators whether you--
! are new hires or experienced operators who want refresher training
Participant Manual-ix
! work in large cities or small towns
! belong to paid professional or volunteer organizations
HOW YOU GOT TO BE AN AMBULANCE OPERATOR
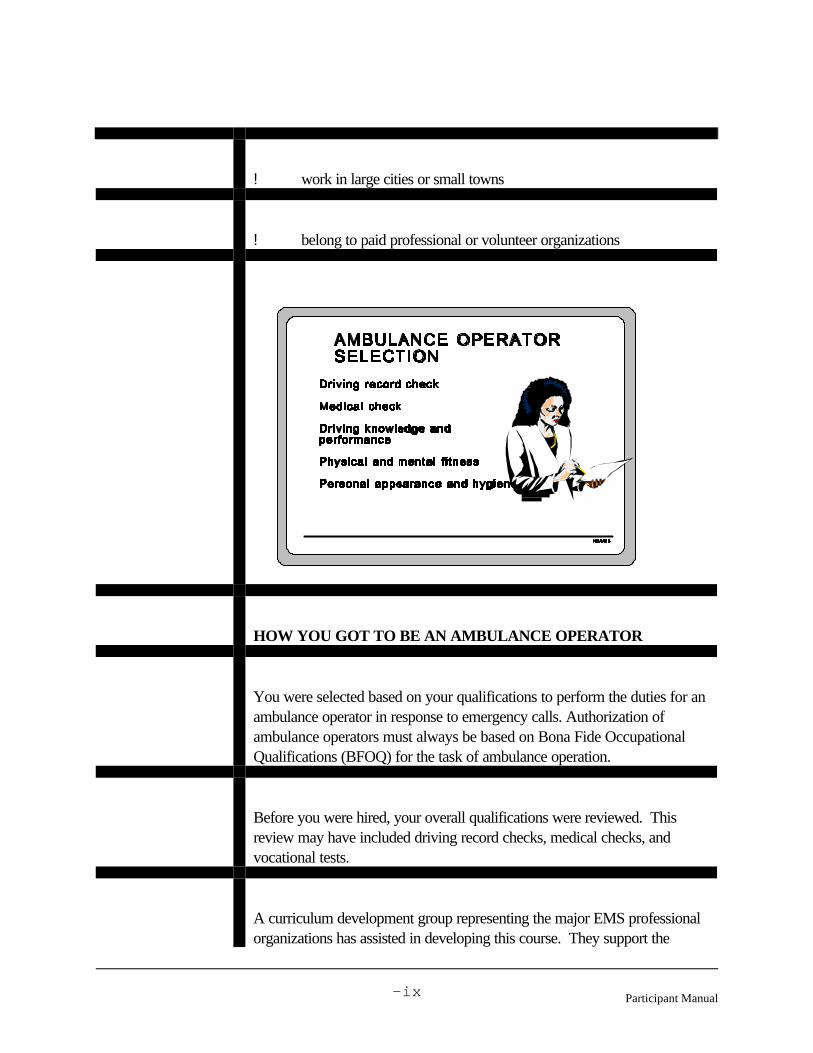
You were selected based on your qualifications to perform the duties for anambulance operator in response to emergency calls. Authorization ofambulance operators must always be based on Bona Fide OccupationalQualifications (BFOQ) for the task of ambulance operation.
Before you were hired, your overall qualifications were reviewed. Thisreview may have included driving record checks, medical checks, andvocational tests.
A curriculum development group representing the major EMS professionalorganizations has assisted in developing this course. They support the

Participant Manual -x
following recommendations for driving checks, medical check, drivingknowledge and performance evaluation, and physical fitness.
Our organization has the following selection qualifications:
Driving Checks
Driving record checks and license checks should be preconditions to hiringor acceptance into an EMS organization.
State Motor Vehicle Record Check
A review of state motor vehicle records for the previous threeyears should have been conducted when you were first hired.
This review should have been checked for any speeding, carelessor reckless driving, driving under the influence of alcohol or othermind-altering substances, or moving violations.
Motor Vehicle Accident Check
Your driving record should have been checked for any accidents

Participant Manual-xi
you have had in the previous five years.
Our organization requires these driving record checks:
License Check
Your driver's license should have been checked to make sure thatyou are licensed and qualified to operate the class of vehicle youwill be driving.
Our organization requires these licensing checks--
Medical Check
A licensed physician determines if someone is physically able to performthe job of ambulance operator under all conditions. The medical exam
Participant Manual -xii
should reveal no medical or physical condition which would provedetrimental to operating an ambulance.
The examination identifies drivers who may be impaired by--
- loss of consciousness
- cardiovascular disease
- neurological/neurovascular disorder
- mental illness
- substance abuse/dependency
- insulin-dependent diabetes
- rheumatic, arthritic, orthopedic, muscular, neuromuscular,or vascular disease which interferes with the ability tocontrol and operate a motor vehicle
The presence of a medical condition alone may not indicate an impairedoperator. However, it can identify an area to consider when determining aperson's medical fitness to operate an ambulance.
Our organization requires these initial medical checks and physicalqualifications:

Participant Manual-xiii
Driving Knowledge and Performance
You should also pass this ambulance operator course written test anddriving test. That should be followed by a period of on-the-job training toevaluate your performance under actual job conditions. Followingsuccessful completion of the written test, the driving test, the on-the-jobevaluation, and any local requirements, your supervisor should consideryou a qualified ambulance operator.
Our local guidelines and policy for testing are--
Operator Qualification
In addition to the initial driving and medical checks you may have taken toqualify as an ambulance operator, you should maintain your qualificationsby--
Participant Manual -xiv
! keeping your license up-to-date and valid
! reporting any violation you receive when driving your personalvehicle
! remaining physically and mentally fit
! participating in training when available
Licensing
An operator with an expired state driving license is no use to theorganization. Remember to renew your license before the expiration date. Keep abreast of changes in licensing requirements.
Physical and Mental Fitness
Your physical and mental condition affects the daily performance of yourjob. You are expected to be mentally and physically fit for every run.
Your physical fitness may be affected by your health and the amount ofrest you are getting. For example--
! If you have the flu, you may not be at your best and alert.
! A shoulder injury may affect your ability to maneuver your vehicle.

Participant Manual-xv
! Over-the-counter medications may make you sleepy.
! Lack of sleep can make your response time slower.
If you are not in good physical condition it is better not to drive.
Our organization's physical fitness policy includes--
Having a good attitude is the best influence on doing a good job.
Your mental fitness may be affected by a lack of concentration or the useof alcohol or drugs.
If you are worried about a sick family member, money problems, orproblems concerning children, you may be distracted and not perform atyour best. It is better not to drive until you are better able to concentrate.
You can be distracted when you are angry about something. If you areangry, you may lose patience and take risks you normally wouldn'tconsider. Calm down before driving.
It is illegal to drink and drive. Don't drink at all when you may have todrive.

Participant Manual -xvi
Illegal drugs are never acceptable, under any circumstances, and shouldnever be used while on or off duty.
Consider your physical and mental condition every time you go on a run toensure your safety and the safety of your crew and patients.
Personal Appearance and Hygiene
While not exactly a part of physical and mental fitness, your physicalappearance and hygiene have a lot to do with how well you perform yourjob duties.
A professional physical appearance builds confidence in patients and othercivilians that you might need to direct. Your professional bearing will be acredit to your organization.
Secondly, your personal hygiene and patient handling precautions arerequired to prevent the spread of infection. If you get sick, you will not beof much use to your organization.
Professional appearance relates not only to your person but also to yourequipment. Clean, properly stowed equipment makes your task--drivingthe ambulance and transporting patients--safer and easier, and makes theresults more positive.
Participation in Training
After you have been selected to be an ambulance operator, your mostimportant task is to improve your job performance at every opportunity. Training programs like this one are a part of that experience.

Participant Manual-xvii
Often this is the beginning of several years of training. Many of you will berequired to complete the EMT-BASIC within a certain time. Many of youalready may be qualified EMTs.
The ambulance crew should strive to become as qualified as possible withintheir organization. When possible, all crew members should be working tobecome paramedics operating advanced life support-equippedambulances.
Participant Manual -xviii
POINTS TOREMEMBER
Ambulance operators are selected based on their qualifications toperform the duties required of them.
A driving record check and license check is a precondition to hiring.
A medical evaluation should be required to determine physical ability toperform the job under all conditions.
You should pass this ambulance operator course written test anddriving test, then pass the on-the-job driving evaluation.
You are expected to be mentally and physically fit for every run.
Your personal appearance and hygiene have a lot to do with how wellyou perform your job.
You're here because you have an important job to do, driving anambulance, and this training course will offer you the training designedfor all aspects of that job.
The training will be presented in the classroom, behind the wheel, andon the job. When you have successfully completed all three modules,you will be recommended to certification as an ambulance operator.

Lesson 2: Legal Aspects of Ambulance Operation
Module A Participant ManualAmbulance Operation: The Basics
-xix
COURSE: EMERGENCY VEHICLE OPERATOR COURSE(AMBULANCE): NATIONAL STANDARD CURRICULUM
MODULE A: Ambulance Operation: The Basics
LESSON 2: Legal Aspects of Ambulance Operation
COURSE GOAL: To provide ambulance operators with the knowledge and skills tooperate their vehicles so that their vehicle, equipment, crew, andpatients will be delivered safely and efficiently and the safety of thepublic will be assured during all phases of the delivery ofEmergency Medical Services (EMS) involving the ambulance
MODULE GOAL: To provide ambulance operators with the knowledge and skills tosafely and efficiently operate an ambulance in both nonemergencyand emergency modes
LESSON GOAL: To provide participants with knowledge of the federal, state,and local laws and of how to apply the laws when operatingan ambulance
PERFORMANCEOBJECTIVE(S):
! Identify types of laws that apply to ambulance operation
! Identify how specific laws apply to ambulance operation

Lesson 2: Legal Aspects of Ambulance Operation
Participant Manual Module AAmbulance Operation: The Basics
-xx
PM APPENDIX: Appendix A, Job Aid - Area Motor Vehicle Operation Guidelines
PARTICIPANTMATERIALS:
ICON LEGEND
Notes Response Appendix Local Requirements

Lesson 2: Legal Aspects of Ambulance Operation
Module A Participant ManualAmbulance Operation: The Basics
-xxi
INTRODUCTION
As an ambulance operator, you are responsible for the safe and efficienttransportation of your patients and crew. At the same time, you must lookout for the safety of the public. The very nature of your job requires you towork with others during a time of crisis and with this comes certain risks. You need to be aware that at all times while performing your job, you arebeing held "legally accountable" for your actions.
DEFINING THE LAW
Types of Regulations
There are several types of regulations that tell how to conduct emergencyvehicle operation. These regulations are for all types of emergency vehiclesincluding ambulances.
Constitutional laws come from the U.S. Constitution. The Constitutionguarantees the rights of the individual. These laws explain patients' rightsbefore, during, and after transport.
Statutory laws come from legislative acts. Each state has various laws orstatutes that tell how to operate emergency vehicles. The laws vary fromstate to state.
Ordinances are guidelines enacted by a governing municipal body or itsagent. These guidelines usually include city or county codes.
Rules and regulations are guidelines enacted by an agency that have theforce of law. The rules and regulations are intended to provide moreinformation about statutory laws. These are often referred to as the

Lesson 2: Legal Aspects of Ambulance Operation
Participant Manual Module AAmbulance Operation: The Basics
-xxii
organizational policies and procedures or Standard Operating Procedures(SOP).
Understanding the Regulations
There are several things about emergency vehicle operation laws that youneed to know. You need to know how the laws work and when you areexempt from doing what the law says to do.
With so many regulations telling how to operate emergency vehicles, youmust know which law applies in a given situation. You may feel like theremay be a conflict of policy about how you do your job. Here are somesuggested guidelines for EMS ambulance operators:
All organizational policy should incorporate the principles of statelaws, local ordinances, rules, and regulations into guidelines for theambulance operator.
Lesson 2: Legal Aspects of Ambulance Operation
Module A Participant ManualAmbulance Operation: The Basics
-xxiii
This means that all organizational policies and procedures should includeand must not contradict federal, state, and local laws concerning theambulance operation under all conditions. Your organization's policies maybe formal or informal, but all policies should be in writing. This can provideprotection from liability issues. As an operator, you must know yourorganization's policies.
Local policies include--
There are times when you will be exempt from certain guidelines listed inthe regulations. As part of your job, you are required to make decisionsconcerning the operation of your vehicle. Good training provides you withthe knowledge and ability to make appropriate decisions when faced withan emergency situation. Knowing ahead of time what the law says doesnot apply in the situation is important. Keep the following three principlesin mind when approaching the idea of exemptions:
1. Ambulance operators are subject to all traffic regulations unless aspecific exemption is made in the state or local statutes.
2. Exemptions are legal only in the emergency mode.
3. Even with an exemption, operators can be found criminally orcivilly liable if involved in a crash.

Lesson 2: Legal Aspects of Ambulance Operation
Participant Manual Module AAmbulance Operation: The Basics
-xxiv
What is meant by "specific exemption"?
Scenario
Below is a situation you may encounter as an ambulance operator. Readthe scenario and answer the questions that follow.
Your state has a specific exemption for emergency vehicles proceedingthrough an intersection with a red signal light or stop sign. The exemptionreads, "Emergency vehicles may proceed through an intersection with a redlight signal or stop sign if the vehicle is brought to a complete stop, properclearance is observed, and the vehicle proceeds through the intersectionwith caution."
During a run, you are following behind another emergency vehicleresponding to an emergency call. You are approaching the intersectionwhen you notice a red light. The other emergency vehicle stops, checks tosee the intersection is clear, and then proceeds through the intersection.You then follow right behind the other vehicle through the light. Was youraction within the law? Why?

Lesson 2: Legal Aspects of Ambulance Operation
Module A Participant ManualAmbulance Operation: The Basics
-xxv
INTERPRETING THE LAW
Law of Due Regard
All patients and crew members have the right to know that while beingentrusted in your care, you are exercising "due regard" for their safety. Ifever a crash should occur while you are operating an emergency vehicle,the courts will judge your actions according to this principle.
Deciding whether an ambulance operator has exercised "due regard" forthe safety of others is always based on a specific set of circumstances. Certain rules, however, should act as guidelines for your actions. Alwayskeep these points in mind when thinking about the Law of Due Regard andthe safety of others.

Lesson 2: Legal Aspects of Ambulance Operation
Participant Manual Module AAmbulance Operation: The Basics
-xxvi
Ask yourself these questions:
! Am I responding "like" others would in the same situation?
! Am I giving "enough notice" of my vehicle's approach to allowother motorists and pedestrians to clear a path and protectthemselves?
[Notice is given by using appropriate signaling equipment (i.e.,lights and siren) in accordance with statutes. Enough isdifficult to define. If motorists have the windows up or theheater or air conditioner and radio on, it may take them a longtime to respond.]
! Am I using the signaling equipment appropriately? Is it necessaryto use it? Can motorists and pedestrians hear and see mysignals?
! Am I exercising extreme caution? I must never travel at a speedthat does not permit complete control of my vehicle.
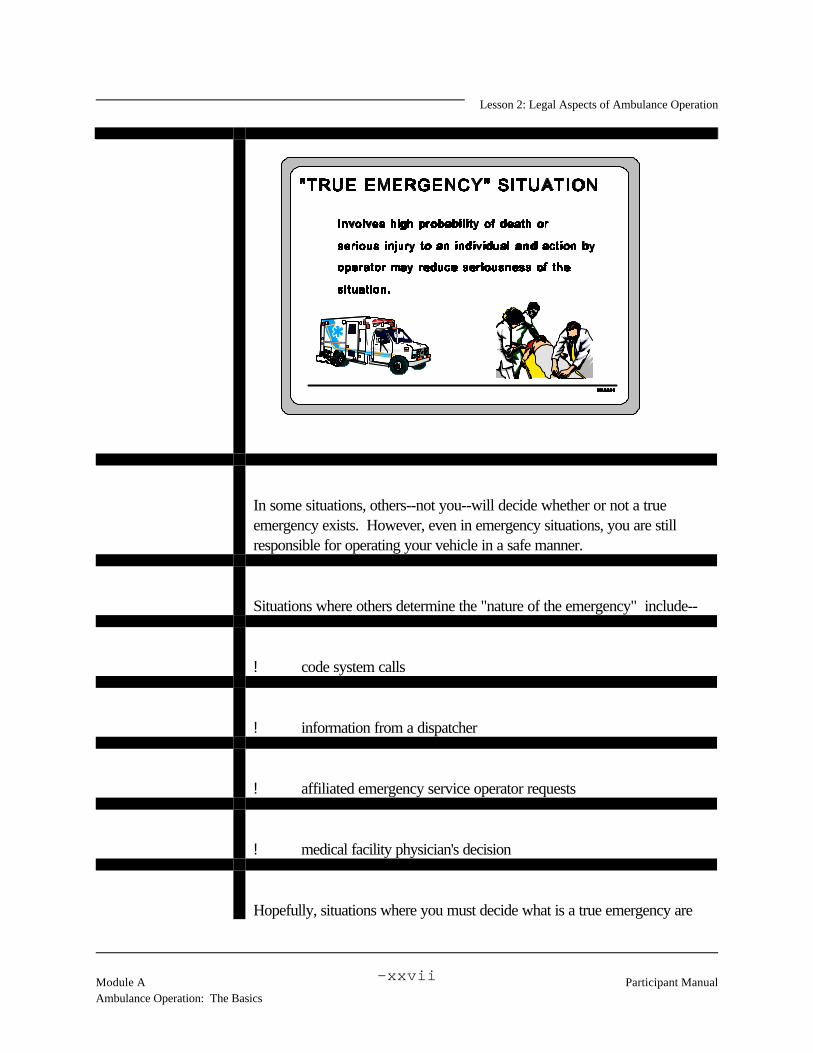
True Emergency Situation
Others also will judge your liability in a situation by determining whether ornot the situation involved a "true emergency."
Lesson 2: Legal Aspects of Ambulance Operation
Module A Participant ManualAmbulance Operation: The Basics
-xxvii
In some situations, others--not you--will decide whether or not a trueemergency exists. However, even in emergency situations, you are stillresponsible for operating your vehicle in a safe manner.
Situations where others determine the "nature of the emergency" include--
! code system calls
! information from a dispatcher
! affiliated emergency service operator requests
! medical facility physician's decision
Hopefully, situations where you must decide what is a true emergency are

Lesson 2: Legal Aspects of Ambulance Operation
Participant Manual Module AAmbulance Operation: The Basics
-xxviii
the exception rather than the rule. However, if faced with these situations,keep these points in mind.
Ask yourself these questions:
! Is there a high probability of death or serious injury to the patient?
! Will my actions reduce the seriousness of the incident?
Negligence
You may also be held liable in a court of law if you were in some waycareless while performing your duties as an ambulance operator.
What this means is that as an operator something you SHOULD HAVE

Lesson 2: Legal Aspects of Ambulance Operation
Module A Participant ManualAmbulance Operation: The Basics
-xxix
done was not done or was done incorrectly. As a direct result, a personwas injured or killed or property was damaged. No court can replacelives, but they can attempt to compensate the injured or their families withmoney.
In a lawsuit involving negligence, proving operator negligence is difficult. Itmust be proven that the negligence was willfully done. Certain facts mustbe established in the case. To avoid being caught in a negligence issue,keep the following in mind.
Ask yourself these questions:
! Do I have a "duty to act" towards the other person?
! What must I do to avoid a "breach of duty?" (For example, youmust not fail to respond.)
! How can I avoid the other person suffering injury or loss becauseof my duty? (The actual cause of the other person's injury orloss must be a direct result of breach of duty, such as a violationof a traffic regulation.)
State and local policies on negligence include--

Lesson 2: Legal Aspects of Ambulance Operation
Participant Manual Module AAmbulance Operation: The Basics
-xxx
Abandonment
Another area that you need to be "legally" concerned with is abandonment.
Once you begin to help someone having a medical emergency or someonewho is injured, you have legally initiated a patient/provider contract. Whatthis means is you must continue the responsibility for the patient's care untilyou have transported the patient to another medical provider of equal orhigher qualifications.
This idea exists to make sure that the required care is completed. Also, itexists to avoid situations in which someone else does not stop to providetransportation thinking you are taking responsibility for the patient and willstay with the patient until another provider is reached.

Lesson 2: Legal Aspects of Ambulance Operation
Module A Participant ManualAmbulance Operation: The Basics
-xxxi
Each state views abandonment differently. You need to know your statesrule's and how you can be held liable regarding this issue. An instance thatcould be viewed as abandonment would be not responding to a call orfailing to complete a run.
State and local policies on abandonment include--
Good Samaritan Provision
As part of the EMS team, you need to be aware that there are "GoodSamaritan" provisions in the law applying to emergency operation and care.

Lesson 2: Legal Aspects of Ambulance Operation
Participant Manual Module AAmbulance Operation: The Basics
-xxxii
These provisions provide immunity to liability in cases in which yourendered care or were unable to render care. Most of the time the law willgrant immunity from liability if the rescuer acts in good faith. Each statevaries in regard to the issue of immunity. In some states, Good Samaritanprovisions do not apply to volunteer ambulance crews. These states havedetermined that because the volunteers are acting as agents of anemergency response organization, the public can rightly expect a certainlevel of competence and training.
State and local Good Samaritan provisions include--

Lesson 2: Legal Aspects of Ambulance Operation
Module A Participant ManualAmbulance Operation: The Basics
-xxxiii
Patient Rights
As part of the EMS team, you need to know the rights of patients during amedical emergency transport. Patients have certain rights before, during,and after transport. You need to be aware of these rights so you do notbecome legally liable for violating the rights of the patient. Each state hasspecific laws regarding patient rights. Here are a few of these rights andwhat they mean.
The consent to perform medical treatment is either actual consent, whenpatients are conscious and mentally competent, OR implied consent whenthe patients are unconscious or for other reasons unable to give you theiractual consent.
Adults who are conscious and mentally competent have the RIGHT TOREFUSE CARE! This refusal may be either informed or implied.
Lesson 2: Legal Aspects of Ambulance Operation
Participant Manual Module AAmbulance Operation: The Basics
-xxxiv
When dealing with patient consent, here are a few guidelines you and therest of the EMS team must follow.
! Respect the patient's right to refusal--do not restrain patients whohave refused treatment, demand they be treated, or argue withthem concerning the treatment.
! Have someone witness that your EMS team has offered care andthe patient refused.
! Document that your EMS team offered care and the patientrefused. Report immediately to dispatcher the refusal of care.
Even though many states do not have specific laws governing confidentialityand EMS care, you must as a team prevent the intentional invasion of aperson's privacy. Confidentiality applies not only to cases of physical injurybut also to cases involving possible infectious diseases, illnesses, andemotional and psychological emergencies. In some states, legal action canbe brought against you if this patient right is violated.
When dealing with patient confidentiality, here are a few guidelines that youand the rest of the EMS team must follow.
! Do not speak to the press, your family, friends, or other membersof the public about the service provided.
! Do not relate specifics about what a patient may have said, whothe person was or was with, anything unusual about the patient'sbehavior, or any descriptions of personal appearance.
State and local policies regarding patient's rights include--
Lesson 2: Legal Aspects of Ambulance Operation
Module A Participant ManualAmbulance Operation: The Basics
-xxxv
Other Legal Liability Issues
As part of the EMS team, you have other responsibilities during themedical emergency service operation that may carry legal implications ifcarried out in an inappropriate matter.
Other things your team must consider include--
! responsibility for passenger possessions
! accident reporting (must follow state guidelines)
! exceeding load capacity of vehicle weight restrictions
! failure to conduct/record ambulance inspections
! failure to provide training
! failure to maintain training records

Lesson 2: Legal Aspects of Ambulance Operation
Participant Manual Module AAmbulance Operation: The Basics
-xxxvi
! failure to maintain written records of safety meetings
Scenarios
Here are some situations you may encounter as an ambulance operator. Consider what was just discussed about operator liability and patient'srights. Read the scenarios and write down your response to thequestion(s) asked concerning the scenario.
Scenario 1: You are returning from a run when a car pulls up beside youwhile you are stopped at a traffic light. The individual informs you that athree-vehicle crash has just occurred on the nearby interstate. No otheremergency vehicles are at the scene. The individual informs you thatseveral of the victims are trapped in the cars. The severity of the injuries isunknown. Is this a true emergency situation? Why?
Scenario 2: Your ambulance is traveling the wrong way down a one-waystreet while enroute to a fire at a large apartment complex where peopleare reported injured. You are using all signaling equipment. Are youobserving "due regard"? Why?

Lesson 2: Legal Aspects of Ambulance Operation
Module A Participant ManualAmbulance Operation: The Basics
-xxxvii
Scenario 3: A dispatcher reports that a man phoned requesting aid. Theman is hysterical and the dispatcher can not determine the extent of theinjuries. You respond in an emergency mode. In route, you receive a callfrom the dispatcher. He reports the man has calmed down and the manthinks his son may have broken his ankle; there is some pain and swelling. Is this a true emergency situation? Why?
IDENTIFYING SPECIFIC STATE AND LOCALMOTOR VEHICLE OPERATION LAWS
Appendix A: AreaMotor VehicleOperationGuidelines
All states have statutes governing the operation of motor vehicles. It isimportant that you understand the statutes dealing with operating anambulance. The "Area Motor Vehicle Operation Guidelines" handoutoutlines some specific state and local traffic regulations that apply toemergency vehicles.

Lesson 2: Legal Aspects of Ambulance Operation
Participant Manual Module AAmbulance Operation: The Basics
-xxxviii
POINTS TOREMEMBER
In defining the law, we learned that--
• federal, state, and local guidelines dictate Emergency VehicleOperation
• organizational requirements must incorporate and not contradictfederal, state, or local requirements
• there are certain situations where the ambulance operator maybe exempt from the regulations--know the exemptions for yourstate
In interpreting the law, we learned that--
• operators must exercise due regard for the safety of all patientsand passengers
• operators should not operate under emergency responseconditions unless a true emergency exists
• operators need to "think safety" to avoid negligence charges
• operators have an obligation to continue providing care untilrelieved by other care providers once the operator begins thepatient/provider relationship
• operators need to know about the "Good Samaritan"provisions and how they affect them
• patients have rights such as consent and confidentiality inmedical emergency situations
By knowing specific state and local laws, you can protect yourselfagainst liability situations and can act appropriately when faced withemergency medical situations in your area.

Lesson 3: Communication and Reporting Roles and Responsibilities
Module A Participant ManualAmbulance Operation: The Basic
-xxxix
COURSE: EMERGENCY VEHICLE OPERATOR COURSE(AMBULANCE): NATIONAL STANDARD CURRICULUM
MODULE A: Ambulance Operation: The Basics
LESSON 3: Communication and Reporting Roles and Responsibilities
COURSE GOAL: To provide ambulance operators with the knowledge and skills tooperate their vehicles so that their vehicle, equipment, crew, andpatients will be delivered safely and efficiently and the safety of thepublic will be assured during all phases of the delivery of EMSinvolving the ambulance
MODULE GOAL: To provide ambulance operators with the knowledge required tosafely and efficiently operate an ambulance in both nonemergencyand emergency modes
LESSON GOAL: To provide participants with knowledge of thecommunication roles and responsibilities and protocols forreceiving and sending messages
PERFORMANCEOBJECTIVE(S):
! Identify communication roles and responsibilities
! Identify communication guidelines for receiving messages
! Identify communication guidelines for sending messages

Lesson 3: Communication and Reporting Roles and Responsibilities
Participant Manual Module AAmbulance Operation: The Basics
-xl
PM APPENDIX: Appendix B, Interpreting Hand Signals
PARTICIPANTMATERIALS:
ICON LEGEND
Notes Response Appendix Local Requirements

Lesson 3: Communication and Reporting Roles and Responsibilities
Module A Participant ManualAmbulance Operation: The Basic
-xli
INTRODUCTION
This lesson discusses your responsibilities for routine communication duringa run.
Communication is an important part of your vehicle operation role. Whenyou communicate, you tell others where you are and where you're goingduring a run. This helps dispatchers and other responders to do their jobsand take related actions.
COMMUNICATION RESPONSIBILITIES
You, the ambulance operator, and the entire EMS crew are responsible forroutine communications at many points in a run.
Together you must operate as a team and all team members have tasks thatthey perform for every situation they are faced with.
Knowing these tasks and what to expect from each other will make yourjob easier.
Let's discuss when communication is required from the ambulance. Theroutine reporting points for the ambulance crew are--
! prerun
! when dispatched on a run
! upon scene arrival
Lesson 3: Communication and Reporting Roles and Responsibilities
Participant Manual Module AAmbulance Operation: The Basics
-xlii
! at the scene to give an update/overview/situation report
! before scene departure
! enroute to the medical facility
! after arriving at the medical facility
! when headed back to the station
Emergency Medical Technician (EMT) CommunicationResponsibility
The EMT in the passenger seat is responsible for communication when theoperator is driving. The EMT communicates with the dispatcher, themedical facility, and other agencies.
During the most critical phase of the run--getting to the scene--it isimportant for the operator to focus on operating the ambulance. The EMTin the passenger seat does the communicating.
The EMT in the passenger seat should also write down the information youare receiving and direct you to the scene.
Unless it is absolutely necessary, do not communicate on the radio andoperate the ambulance at the same time.

Lesson 3: Communication and Reporting Roles and Responsibilities
Module A Participant ManualAmbulance Operation: The Basic
-xliii
Dispatcher Responsibility
The dispatcher is another key member of the EMS communication team. The dispatcher coordinates all calls for an agency.
The dispatcher's specific responsibilities vary across locations. Often thedispatcher receives calls for emergency services and determines whichcrew will handle the call. The dispatcher will alert EMS and may alertadditional assistance such as law enforcement, the fire department, heavyrescue, and harbor patrol. Some of these units may be from the samedepartment.
The dispatcher may coordinate with other services responding to anincident.
Operator's Communication Responsibility
Your first responsibility is for safe and efficient operation of the vehicle.

Lesson 3: Communication and Reporting Roles and Responsibilities
Participant Manual Module AAmbulance Operation: The Basics
-xliv
You, the operator, must report to the dispatcher at these points in your run:
! before leaving the scene for the medical facility
! after arriving at the medical facility
(Note to Remember: the EMT generally reports before leaving the station.)
Communicating to the dispatcher at these two points lets the dispatcherfollow your movements and coordinate with others as necessary.
Report Before Leaving the Scene
Lesson 3: Communication and Reporting Roles and Responsibilities
Module A Participant ManualAmbulance Operation: The Basic
-xlv
When you are ready to leave the scene for the medical facility, you will callthe dispatcher. Report that you are leaving and proceeding to the medicalfacility.
The EMT in the patient compartment will establish communication with thehospital, if necessary, to report on the patient's condition and talk with thephysicians.
Reporting when you are ready to leave the scene enroute to the medicalfacility allows you to get information to plan the route you should take fromthe scene to that facility.
This is information that may not have been available from dispatch beforeyou started your ambulance run because it is fast changing situation. Forexample, sometimes you will not know which medical facility you will driveto until your EMT diagnoses the medical situation at the scene.
Or if you are in an urban area, you will need information about fast-changing traffic congestion or incidents that could affect your drive from thescene to the medical facility. Also, during severe weather conditions, forexample, you may need up-to-the-minute information about ice, snow,flooding, or other hazards on the roads you will drive to the medical facility.
You or your crew should report to dispatch any hazardous condition youfind, such as traffic or route problems. This allows the dispatcher todescribe up-to-the-minute route conditions for other emergency vehicles asneeded.
Report When You Arrive at the Medical Facility
Reporting after you arrive at the medical facility lets the dispatcher knowthat your crew and vehicle will soon be ready to respond to another service

Lesson 3: Communication and Reporting Roles and Responsibilities
Participant Manual Module AAmbulance Operation: The Basics
-xlvi
call.
Other Possible Reporting Situations
Tell the dispatcher whenever you are leaving the vehicle. This is importantfor those of you who do not carry a portable radio when away from yourvehicle at a scene. Reporting when leaving the vehicle saves the dispatchertime searching for you.
Local guidelines require ambulance operators to report at these pointsduring a run:
When do you, the operator, report to the dispatcher?

Lesson 3: Communication and Reporting Roles and Responsibilities
Module A Participant ManualAmbulance Operation: The Basic
-xlvii
RECEIVING MESSAGES
Messages you receive may be for a run from the station or for another runafter you have delivered a patient to the medical facility and beforereturning to the station.
Critical Items to Know for Every Run
The EMT will generally receive the initial service call from the dispatcherand give the information to you, the operator. All information should berecorded on log sheets by the receiving member of your crew.
Be sure you know the following information before starting a run.
Know the Location

Lesson 3: Communication and Reporting Roles and Responsibilities
Participant Manual Module AAmbulance Operation: The Basics
-xlviii
As the operator, the key information you must have is the address orlocation of the emergency.
You must have the specific location of the emergency to be able to planyour route. Get locator information such as street or highway, housenumber, nearest intersection and milepost markers. Or get exactdirections. Directions may vary from "the Jackson farm" for rural situationsto "15th and Main Streets, Northwest" for urban locations.
Know exactly where you are going before you depart.
What kinds of location information do you need in your area to get to anyscene?
Description of the Emergency
You also will need a description of the emergency. This information willvary greatly based on local practices and who called the operations center. The information known before you arrive at the scene may even beincorrect, especially if given by someone under great stress from anincident.
Lesson 3: Communication and Reporting Roles and Responsibilities
Module A Participant ManualAmbulance Operation: The Basic
-xlix
It is even possible that your operations center may give only generalinformation to discourage the tendency to take driving risks in lifethreatening situations.
However, some communities may give response priority as standardinformation. Sometimes the response priority is given in code.
If possible, you and your crew should know what is involved in theemergency. For example, are vehicles involved? What kind are they andhow large are they? You should also know the type of injury, number ofpatients, and known hazards at the scene, such as downed power linesand/or hazardous materials.
Also, it will help you to know if other units are responding. Someorganizations have a standard response that includes fire apparatus, police,and crash trucks. Other organizations will only have multiple respondingunits when conditions at the scene are known to require them.
If you know others are responding, you can anticipate other emergencyvehicles on the route. They may be behind you. Or they may beapproaching an intersection at the same time you are. While you willalways be alert for all other vehicles on the road, it is helpful to know ifother emergency vehicles are responding.
Locally there are guidelines for information that will be given for everyambulance run:

Lesson 3: Communication and Reporting Roles and Responsibilities
Participant Manual Module AAmbulance Operation: The Basics
-l
Review Receiving Messages
Before you leave on a run, you need to have the following informationcommunicated from the dispatcher:
! address (location) and other identification to help you find thescene
! description of the emergency
Are there any questions about the communication you will receive?
SENDING MESSAGES
We've talked about when you need to report while on a run and whatinformation you need to get before you depart on a run. Now we'll talkabout how to report or communicate using the equipment in the ambulanceyou will drive.
The radio is the most common type of equipment in use.
Radio Communication Frequencies

Lesson 3: Communication and Reporting Roles and Responsibilities
Module A Participant ManualAmbulance Operation: The Basic
-li
You will need to know the frequencies for the various agencies you willcommunicate with on a variety of runs. There will usually be one frequencythat will be the control frequency. All emergency vehicles can send andreceive information from the dispatcher on that frequency.
The EMS, law enforcement agencies, and fire departments often haveanother frequency to communicate with their own organization.
If you respond to calls to assist other organizations in different cities orcounties, those other cities and counties will probably have differentfrequencies. You will need to know how to communicate with them.
When you respond to an emergency involving several differentorganizations you need to know how to communicate with the organizationthat is in charge at the scene. If you don't have the correct frequencies,your operations center can relay information to you.
Some ambulances may have three or more radios that can receive and
Lesson 3: Communication and Reporting Roles and Responsibilities
Participant Manual Module AAmbulance Operation: The Basics
-lii
transmit on different frequencies. Some of these radios will have a switchthat will allow you to select a different frequency on the same radio. Theambulance can become a confusing place with several radios all going atthe same time.
Communication Security
Most radio transmissions can be heard by anyone who has a radio with theemergency frequency. You must have a policy that protects individual'sprivacy.
Keeping security in mind, you must limit your transmission to only thatwhich is necessary. Never joke about a situation.
Remember that anyone can listen to the conversation.
What to Say and How to Say It
Lesson 3: Communication and Reporting Roles and Responsibilities
Module A Participant ManualAmbulance Operation: The Basic
-liii
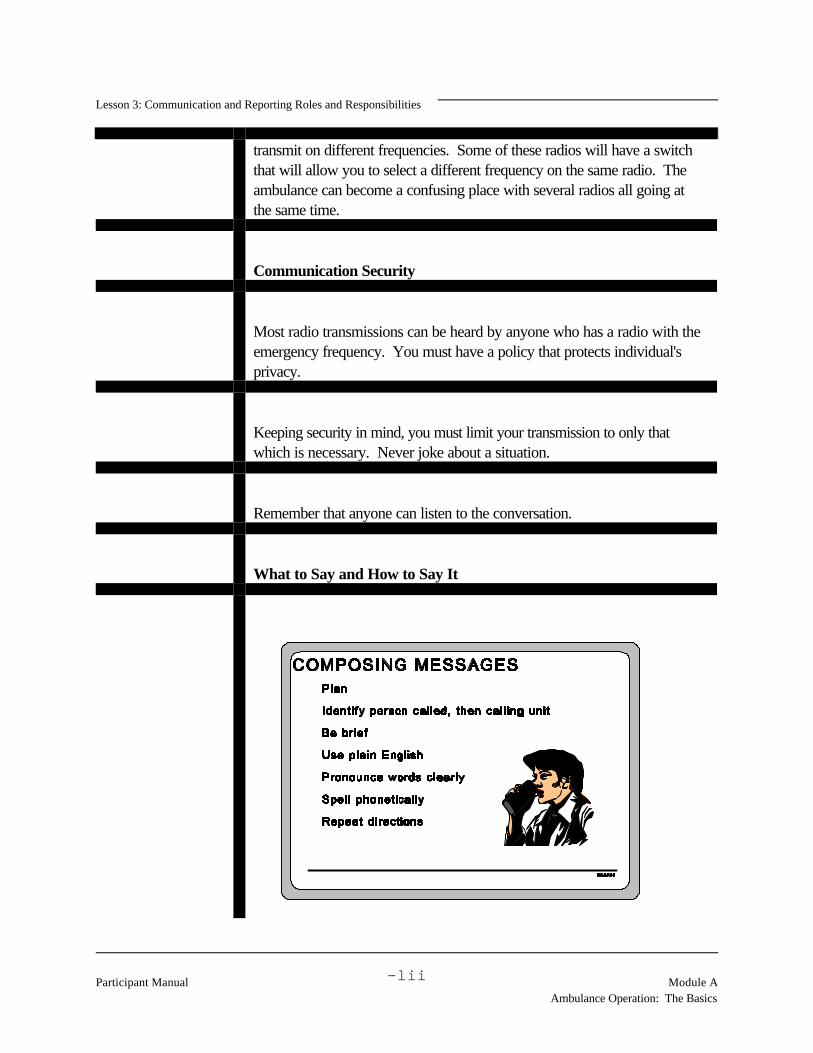
Before you pick up the microphone or other communication device, collectyour thoughts and decide what you need to say. It has to be brief.
Your messages to the dispatcher need to include certain information and bepresented the same way each time. Messages generally begin with thedesignation of the unit being called, followed by the designation of thecalling unit. You must identify who you are calling, then identify your unit. You are not required to identify yourself by name.
For example, if you are unit 42 calling the dispatcher, you will begin"Dispatch, unit four two."
Brief message formats can be developed locally for routine reports. If youuse the same format every time, you will be less likely to forget anything orgive too much information.
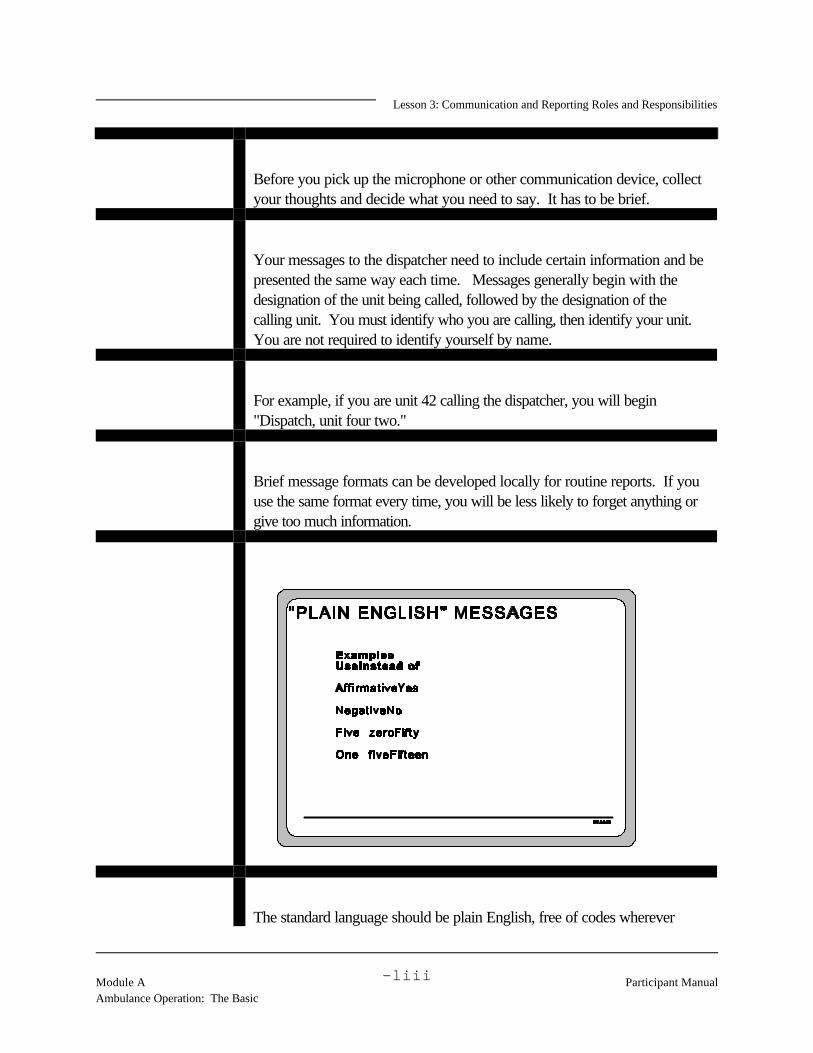
The standard language should be plain English, free of codes wherever

Lesson 3: Communication and Reporting Roles and Responsibilities
Participant Manual Module AAmbulance Operation: The Basics
-liv
possible.
Choose words that can be easily understood. For example, "affirmative" iseasier to understand than "yes."
Do not use filler words such as "Uh" and "well."
Give numbers in singular form, such as "five-oh" for fifty and "one five" forfifteen so that they cannot be confused. Route 495 is given as "route fournine five." Always pronounce the number "0" as zero.
Many organizations like to use ten codes to reduce air time and identifyspecific situations or events. However, codes can be misunderstood,especially if you are communicating with some other organization thatdoesn't use the codes. Numerous organizations are moving away from tencodes and are using plain language instead.
Plain language is less likely to cause confusion. Use codes only if they area requirement of your organization and you are sure the person receivingyour communication knows the codes.
Pronounce words clearly and crisply. Speak as clearly as possible andwithout emotion so you will be understood. Speaking crisply means sayingwords in full, like "going" instead of "goin'."
Phonetic Alphabet
It is often hard to understand what is being received or transmitted,particularly when reception is poor. For example, we know that similarstreet names, like "Henry" and Emery," cause confusion.

Lesson 3: Communication and Reporting Roles and Responsibilities
Module A Participant ManualAmbulance Operation: The Basic
-lv
Your organization should pick one of the phonetic alphabets and use themwhen needed. The following is the standard phonetic alphabet adopted bythe Department of Transportation--
A - ALFA
B - BRAVO
C - CHARLIE
D - DELTA
E - ECHO
F - FOXTROT
G - GOLF
H - HOTEL
I - INDIA
J - JULIETT
K - KILO

Lesson 3: Communication and Reporting Roles and Responsibilities
Participant Manual Module AAmbulance Operation: The Basics
-lvi
L - LIMA
M - MIKE
N - NOVEMBER
O - OSCAR
P - PAPA
Q - QUEBEC
R - ROMEO
S - SIERRA
T - TANGO
U - UNIFORM
V - VICTOR
W - WHISKEY
X - X-RAY

Lesson 3: Communication and Reporting Roles and Responsibilities
Module A Participant ManualAmbulance Operation: The Basic
-lvii
Y - YANKEE
Z - ZULU
How do you use it? You use it when you are having trouble gettingsomeone to understand or when you can't understand. For example, tospell "Smythe" Street say this:
"Smythe Street: Sierra Mike Yankee Tango Hotel Echo. Smythe."
Repeat all of the directions to be sure that you have them right.
What are some examples of names or words that can be easilymisunderstood over a radio or telephone?
How to Use the Radio Equipment

Lesson 3: Communication and Reporting Roles and Responsibilities
Participant Manual Module AAmbulance Operation: The Basics
-lviii
These are rules to remember when using a radio:
! Listen to the frequency to be sure it is clear traffic. If others aretalking, wait for them to sign off before using the frequency.
! Press the microphone transmit key for a half second beforespeaking. If you're too quick to begin talking, your first word orsyllable may be cut off.
! Keep your mouth close to the microphone, no more than 1-1/2inches away.
! Clear the frequency when you finish. The word "out" is a standardway to signal the end of a radio transmission. Example: Unit 43out.
Review Sending Messages
Lesson 3: Communication and Reporting Roles and Responsibilities
Module A Participant ManualAmbulance Operation: The Basic
-lix
Remember, when sending messages--! plan your message! identify unit being called, then your own unit! use brief formats! use plain English where possible! pronounce words clearly! spell names phonetically! repeat all directions
When using a radio--! listen for a clear frequency! depress the key and hold! keep your mouth close to microphone to speak! clear the frequency
You use this kind of equipment in your locality--
This is how our local equipment is different from using a radio--

Lesson 3: Communication and Reporting Roles and Responsibilities
Participant Manual Module AAmbulance Operation: The Basics
-lx
To send messages using our equipment, you need to do the following:
Practice Composing and Sending Messages
Review the following radio dialogue.
SCRIPT 1:
Operator: "Dispatch, Unit Four Two."Dispatcher: "Unit Four Two, dispatch. Ready to copy."Operator: "Unit Four Two on scene."Dispatcher: "Copy Four Two."Operator: "Four Two changing to hospital frequency."Dispatcher: "Copy Four Two. Out"
What was done right in that demonstration?

Lesson 3: Communication and Reporting Roles and Responsibilities
Module A Participant ManualAmbulance Operation: The Basic
-lxi
What was wrong in that demonstration?
SCRIPT 2:
Operator: "This is Unit four two calling the dispatcher. Come in,dispatcher."
Dispatcher: "Unit four two, this is your dispatcher. Ready to copy."Operator: "Unit four two is on the scene at Henry Street and Fourth
Avenue."Dispatcher: "Copy four two."Operator: "This is Unit four two changing to hospital frequency."Dispatcher: "Copy four two. Out."
What was right with this demonstration?
Lesson 3: Communication and Reporting Roles and Responsibilities
Participant Manual Module AAmbulance Operation: The Basics
-lxii
What was wrong with that demonstration?
INTERPRETING HAND SIGNALS
Appendix B:Interpreting HandSignals
Another kind of communication that an ambulance operator mustunderstand is the method of signaling that a ground guide will do. Turn toAppendix B for a description of recommended hand signals that should beadopted by you and your crew who serve as your ground guides forbacking and other driving situations. Your organization should adopt asystem of hand signals such as this.
SUMMARY
Your first responsibility is operating the ambulance. The EMT in thepassenger seat communicates when you are driving.
The dispatcher coordinates calls for an agency. Dispatcher's specificresponsibilities vary.

Lesson 3: Communication and Reporting Roles and Responsibilities
Module A Participant ManualAmbulance Operation: The Basic
-lxiii
The operator usually communicates with the dispatcher at only these twopoints in your ambulance run:
! before leaving the scene for the medical facility! after arriving at the medical facility
When beginning a run you must have the address or location of theemergency and a description of the emergency.
You should keep in your ambulance at all times an up-to-date list of radiofrequencies for your locality.
Limit your radio transmission to only that which is necessary. Anyone canlisten to your conversation.
To send a message--! plan messages before you talk! identify the person called and the calling unit! be brief! use plain English! pronounce words clearly! spell confusing names phonetically! repeat directions
When using radio equipment--! listen! depress microphone key! talk with mouth close to microphone! clear the frequency
Learn to recognize standard hand signals from your ground guide.

Lesson 3: Communication and Reporting Roles and Responsibilities
Participant Manual Module AAmbulance Operation: The Basics
-lxiv
POINTS TOREMEMBER
Your first responsibility is operating the ambulance. The EMT in thepassenger seat communicates when you are driving.
The dispatcher coordinates calls for an agency. Dispatcher's specificresponsibilities vary.
The operator usually communicates with the dispatcher at only thesetwo points in your ambulance run--! before leaving the scene for the medical facility! after arriving at the medical facility
When beginning a run you must have the address or location of theemergency and a description of the emergency.
You should keep in your ambulance at all times an up-to-date list ofradio frequencies for your locality.
Limit your radio transmission to only that which is necessary. Anyonecan listen to your conversation for the price of a radio.
To send a message--! plan messages before you talk! identify the person called and the calling unit! be brief! use plain English! pronounce words clearly! spell confusing names phonetically! repeat directions
When using radio equipment--! listen! depress microphone key! talk with mouth close to microphone! clear the frequency
Learn to recognize standard hand signals from your ground guide.

Lesson 4: Ambulance Types and Operation
Module A Participant ManualAmbulance Operation: The Basics
-lxv
COURSE: EMERGENCY VEHICLE OPERATOR COURSE(AMBULANCE): NATIONAL STANDARD CURRICULUM
MODULE A: Ambulance Operation: The Basics
LESSON 4: Ambulance Types and Operation
COURSE GOAL: To provide ambulance operators with knowledge and skills tooperate their vehicles so that their vehicle, equipment, crew, andpatients will be delivered safely and efficiently and the safety of thepublic will be assured during all phases of the delivery of theEmergency Medical Services (EMS) involving the ambulance
MODULE GOAL: To provide ambulance operators with the knowledge required tosafely and efficiently operate an ambulance in both non-emergencyand emergency modes
LESSON GOAL: To provide participants with knowledge of ambulance types,weight restrictions, and operation
PERFORMANCEOBJECTIVE(S):
• Identify the types of ambulances
• Identify how size and weight affects the operation andcontrol of an ambulance
PM APPENDIX:

Lesson 4: Ambulance Types and Operation
Participant Manual Module AAmbulance Operation: The Basics
-lxvi
PARTICIPANTMATERIALS:
ICON LEGEND
Notes Response Appendix Local Requirements

Lesson 4: Ambulance Types and Operation
Module A Participant ManualAmbulance Operation: The Basics
-lxvii
INTRODUCTION
Ambulance types vary according to location. This lesson gives a briefoverview of the different ambulance types, general operating guidelines,and weight restrictions.
AMBULANCE TYPES
The KKK-A-1822C Federal Specification standards, published by theGeneral Services Administration (GSA), recognize three types ofambulances--Type I, Type II, and Type III.
The "Star of Life" emblem may be displayed on the ambulance when themanufacturer certifies to the purchaser that the ambulance, it's componentsand equipment meet or exceed the tests in the KKK specification. Thisemblem certifies that the ambulance meets minimum specifications andpassed certain tests, as well as design, performance, equipment, andappearance requirements.

Lesson 4: Ambulance Types and Operation
Participant Manual Module AAmbulance Operation: The Basics
-lxviii
In this lesson we will only discuss the body types, service capability,classes, and weight restrictions of these three types of ambulances.
Type I Ambulance
Body type: Conventional Truck, Cab-Chassis with ModularBody Ambulance
Service Capacity: Basic Life Support (BLS) orAdvanced Life Support (ALS)
Classes: Class 1 - Two-Rear-Wheel Drive orClass 2 - Four-Wheel Drive
Type II Ambulance

Lesson 4: Ambulance Types and Operation
Module A Participant ManualAmbulance Operation: The Basics
-lxix
Body type: Standard Van, Integral Cab-Body Ambulance
Service Capacity: Basic Life Support (BLS) orLimited Advanced Life Support (ALS)
Classes: Class 1 - Two-Rear-Wheel Drive orClass 2 - Four-Wheel Drive
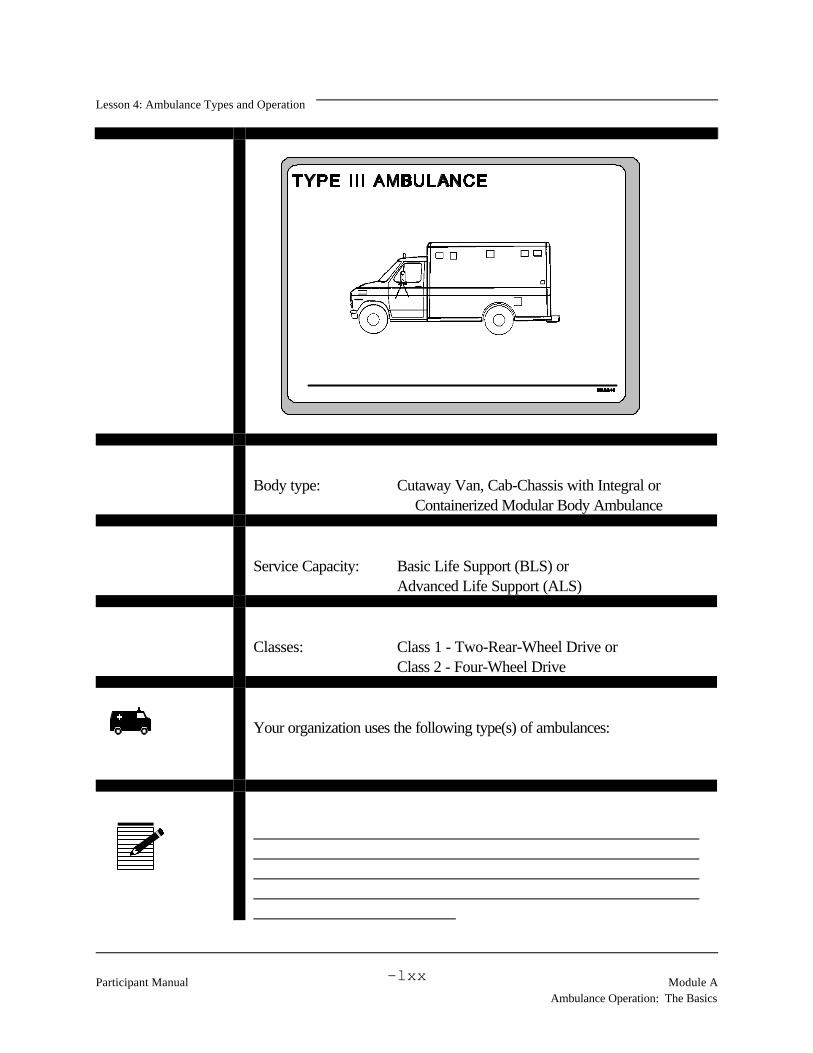
Type III Ambulance
Lesson 4: Ambulance Types and Operation
Participant Manual Module AAmbulance Operation: The Basics
-lxx
Body type: Cutaway Van, Cab-Chassis with Integral orContainerized Modular Body Ambulance
Service Capacity: Basic Life Support (BLS) orAdvanced Life Support (ALS)
Classes: Class 1 - Two-Rear-Wheel Drive orClass 2 - Four-Wheel Drive
Your organization uses the following type(s) of ambulances:
Lesson 4: Ambulance Types and Operation
Module A Participant ManualAmbulance Operation: The Basics
-lxxi
If you usually operate the same type of ambulance, you will get to know allof the operating equipment and how to use it in a variety of situations.
If you might be assigned to drive a type of ambulance you have neverdriven before, have your supervisor (or another qualified operator) giveyou an orientation to the new ambulance. You should have an opportunityto PRACTICE driving a new ambulance type and pass a written andperformance test before you operate the ambulance.
Weight Restrictions
No matter what type of ambulance you drive, you must know yourambulance's weight restrictions in order to operate safely during all drivingconditions.
When an ambulance arrives at your facility from the manufacturer it islabeled with a gross weight. You can usually find this information on theweight/payload certification sticker mounted on the body in a conspicuouslocation.
Payload capacity information is found in:

Lesson 4: Ambulance Types and Operation
Participant Manual Module AAmbulance Operation: The Basics
-lxxii
The payload capacity is used to determine--after considering equipmentweight--how many crew members and patients it is safe to transport. Thenational standard for determining the weight of one person is 175 poundsper person.
With a crew of ____________________________our ambulances can safely carry ______ poundsor ______________________________ patients.
With a crew of ____________________________our ambulances can safely carry ______ poundsor ______________________________ patients.
Each ambulance organization should have a current loading plan in theambulance log book. The loading plan should have the current payload,i.e., how much the ambulance can carry.
The loading plan should distribute the weight of the patient, crew, andequipment evenly. Too much weight in one location can change thehandling characteristics of the ambulance.
As equipment is added to the ambulance, the new weight should be figuredand the loading plan updated. Remember that for each piece of equipmentadded, the patient and passenger weight that can be safely carrieddecreases.
Knowing how many people you can carry and keeping an accurate loadingplan will help you decide how to load your ambulance.
Just because you have seats available does not mean that you can load apatient or passenger into each one.

Lesson 4: Ambulance Types and Operation
Module A Participant ManualAmbulance Operation: The Basics
-lxxiii
And just because your ambulance is designed to carry only two patientsdoes not mean that you leave a third patient at a crash scene rather thanloading them.
Two children might actually equal one adult person. Remember that anaverage weight of 175 pounds is used to calculate passenger and patientcapacity.
The most important thing for you to know and remember about ambulancetypes and weight restrictions is HOW MANY PATIENTS ANDPASSENGERS YOU CAN SAFELY TRANSPORT.
Your good judgment is needed. If you are the only ambulance at a crashscene, you may have to load more weight than ideally recommended. Ifyou know that your ambulance is overweight, you can adjust your drivingto accommodate the situation.
OPERATION
Besides the limitations put on you by the weight restrictions of yourambulance, there is a difference between driving a car and driving anambulance. These differences make an ambulance harder to drive than acar. You need to know these differences and understand how they affectyour ability to operate the ambulance safely.
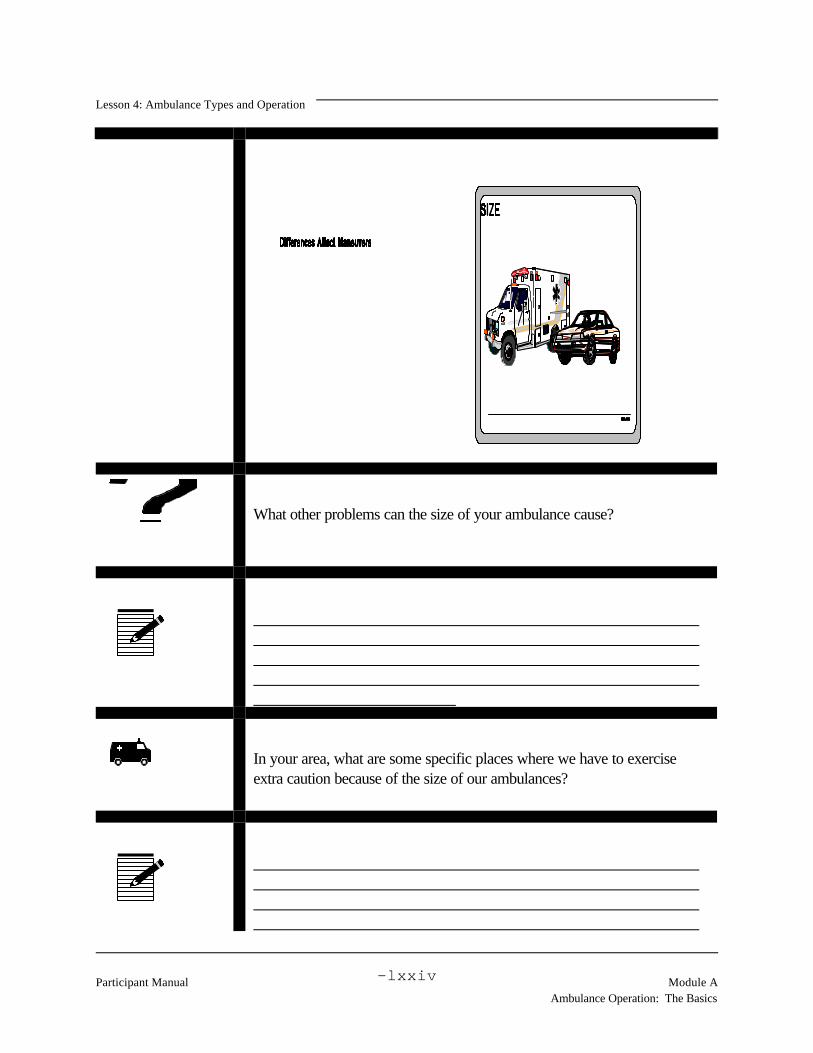
Size
An ambulance is larger than a standard car. It is wider, longer, and tallerwhich makes it harder to maneuver. The ambulance's width and lengthaffects turning; its height means you must be aware of height clearances (forexample, parking garages, bridges or overpasses, covered entrances).
Lesson 4: Ambulance Types and Operation
Participant Manual Module AAmbulance Operation: The Basics
-lxxiv
What other problems can the size of your ambulance cause?
In your area, what are some specific places where we have to exerciseextra caution because of the size of our ambulances?

Lesson 4: Ambulance Types and Operation
Module A Participant ManualAmbulance Operation: The Basics
-lxxv
Weight
An ambulance may weigh more than a car. This is important to rememberbecause it takes longer to accelerate and brake. When pulling out intotraffic, for example, an ambulance will not move out as quickly as a car. When braking, you will need more room to come to a complete stop.
Visibility
Because of an ambulance's size and style, there are blind spots that canblock your view of objects and vehicles around you. You must rely heavilyon your side view mirrors since a rear view mirror is not always available.
Lesson 4: Ambulance Types and Operation
Participant Manual Module AAmbulance Operation: The Basics
-lxxvi
Even when a rear view mirror is provided, it may not be as usable as youwould like. Rear view mirrors are mostly useless even in Type IIambulances. Activities in the patient compartment may block your viewout of the back of the ambulance. Plan on using your side mirrors only.
This is why you should ALWAYS use a ground guide when backing up.
What are some other situations when your vision might be blocked? Whatcan you do about it?
Lesson 4: Ambulance Types and Operation
Module A Participant ManualAmbulance Operation: The Basics
-lxxvii
POINTS TOREMEMBER
There are three KKK-recognized types of ambulances--Type I, TypeII, and Type III.
Weight restrictions of the ambulance type determines the maximumnumber of crew and patients you can safely carry.
All ambulance types require extra caution when driving because of theirsize, weight, and visibility.

Lesson 5: Vehicle Inspection, Maintenance, and Repair
Participant Manual Module AAmbulance Operation: The Basics
-lxxviii
COURSE: EMERGENCY VEHICLE OPERATOR COURSE(AMBULANCE): NATIONAL STANDARD CURRICULUM
MODULE A: Ambulance Operation: The Basics
LESSON 5: Vehicle Inspection, Maintenance, and Repair
COURSE GOAL: To provide ambulance operators with the knowledge and skills tooperate their vehicles so that their vehicle, equipment, crew, andpatients will be delivered safely and efficiently and the safety of thepublic will be assured during all phases of the delivery of theEmergency Medical Services (EMS) involving the ambulance
MODULE GOAL: To provide ambulance operators with the knowledge required tosafely and efficiently operate an ambulance in both nonemergencyand emergency modes
LESSON GOAL: To provide participants with knowledge of ambulanceoperator responsibilities for vehicle inspections andmaintenance
PERFORMANCEOBJECTIVE(S):
! Select from a list the operator's responsibilities for vehicleinspection
! Select from a list the operator's responsibilities for vehiclemaintenance and repair
C: Sample Checklist: Quick Check

Lesson 5: Vehicle Inspection, Maintenance, and Repair
Module A Participant ManualAmbulance Operation: The Basics
-lxxix
PM APPENDIX: D: Sample Checklist: Full Check
E: Sample Work Request
PARTICIPANTMATERIALS:
ICON LEGEND
Notes Response Appendix Local Requirements

Lesson 5: Vehicle Inspection, Maintenance, and Repair
Participant Manual Module AAmbulance Operation: The Basics
-lxxx
INTRODUCTION
Normal ambulance operation puts great demands on the vehicle. As theoperator, you may be held legally responsible for any preventablemechanical failures that lead to accidents or loss of life.
When you place a vehicle in service by taking it out on a run, you areassuming personal responsibility for its operating condition.
How can you ensure that your ambulance is in a safe operating condition?
You ensure the safe operating condition of your vehicle by--
! inspecting the vehicle according to established procedures
Lesson 5: Vehicle Inspection, Maintenance, and Repair
Module A Participant ManualAmbulance Operation: The Basics
-lxxxi
! checking that all scheduled maintenance has been performed
! checking that all needed repairs have been made
If a vehicle is NOT in a safe operating condition, you, as the operator havethe responsibility to take the vehicle out of service until the problems havebeen fixed.
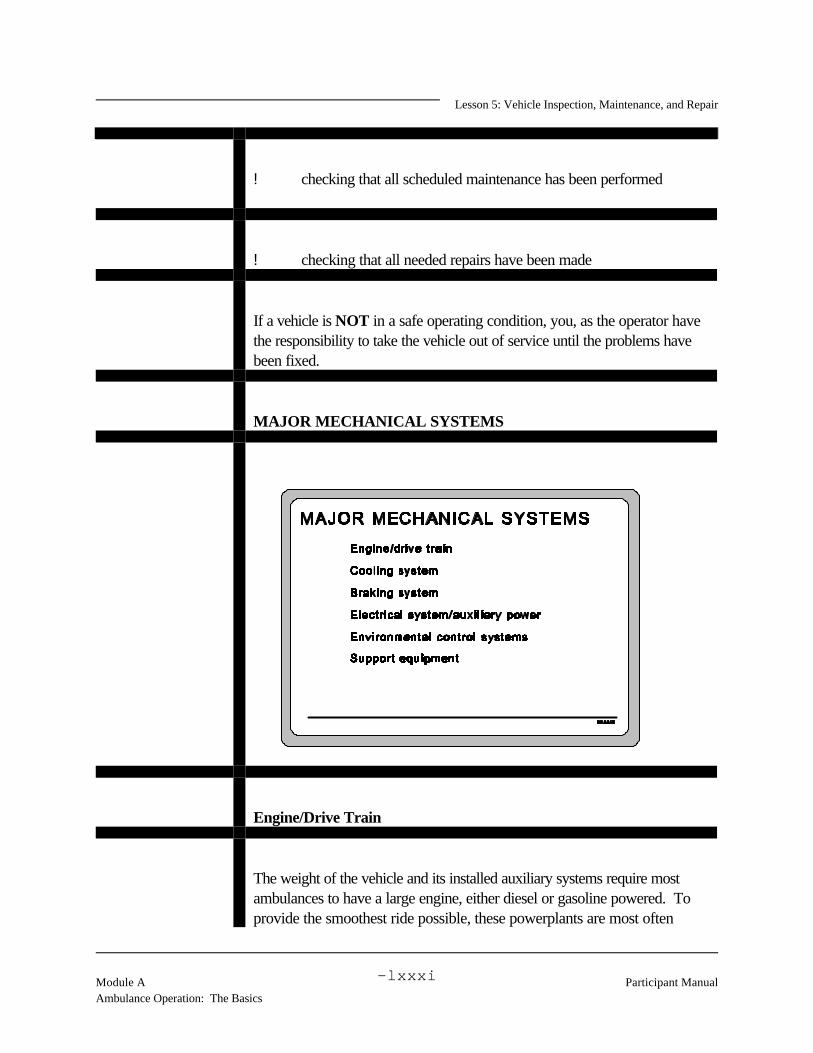
MAJOR MECHANICAL SYSTEMS
Engine/Drive Train
The weight of the vehicle and its installed auxiliary systems require mostambulances to have a large engine, either diesel or gasoline powered. Toprovide the smoothest ride possible, these powerplants are most often

Lesson 5: Vehicle Inspection, Maintenance, and Repair
Participant Manual Module AAmbulance Operation: The Basics
-lxxxii
connected to automatic transmissions.
For our discussions, we will use a engine and transmission.
Cooling System
It is critical that you check the fluid level of the cooling system every day,especially in hot weather. Remember to follow the correct procedures foryour vehicle. Severe burns can be the result of doing this check wrong.
Braking System
There are two types of brake systems in use today. The older, drum-typebrakes are still used extensively in trucks. Many of the newer vehicles usethe more reliable disc brakes. These two types are often used together,with the disc brakes installed on the front wheels, where most of thebraking effort occurs, and drum brakes on the rear. Anti-lock brakingsystems are now available from some truck manufacturers and areespecially efficient on snow and ice.
Brake systems on our vehicles are--

Lesson 5: Vehicle Inspection, Maintenance, and Repair
Module A Participant ManualAmbulance Operation: The Basics
-lxxxiii
Electrical System/Auxiliary Power
The electrical system is a vital component of your ambulance. Theseheavy-duty systems require careful attention and monitoring to ensure thatthey retain peak efficiency.
To provide electrical power while parked, without drawing from theambulance's battery(ies), many units have auxiliary power systems installed. An auxiliary power system is a small, engine-powered generator, such as aportable generator. It is independent of the ambulance's electrical systemand is used during heavy electrical load conditions. Auxiliary powersystems are normally mounted in the rear of the ambulance and are used topower the lights and basic life support equipment while parked.
Most ambulances are equipped with a DC to AC inverter to provide ACpower. The inverter provides a constant 115 volt AC power source foronboard AC systems. The patient compartment has AC outlets for usingAC systems. Some of your lighting is also powered by AC. The crew willselect AC power when needed to supply certain systems in the ambulance. When they activate the inverter a red light indicator will be illuminated. Your supervisor will cover the operation of the inverter when you get yourorientation on the ambulance that you will be driving. For more informationabout inverters and AC power supplies, check with your maintenancesupervisor and consult the General Services Administration FederalSpecification for Ambulances, KKK-A-1822C.
Your vehicles have (do not have) auxiliary power systems.

Lesson 5: Vehicle Inspection, Maintenance, and Repair
Participant Manual Module AAmbulance Operation: The Basics
-lxxxiv
Environmental Control Systems
Environmental control systems are the heating and air conditioning systems.
Support Equipment
All ambulances have similar basic medical support equipment installed bythe manufacturer. Each organization then customizes its vehicles withadditional equipment, often outfitting vehicles to meet specific requirements. So, not all vehicles will carry the same equipment.
When the typical ambulance leaves the factory, it is designed to carry adriver and an EMT at 175 lbs. each, two patients at 175 lbs. each, and thefollowing medical support equipment:
! main and portable oxygen bottles! stretchers, cots, and patient handling equipment! portable, removable medical devices! durable and disposable medical items! optional vehicle equipment such as battery charger, inverter, or
auxiliary power unit! communications equipment! extrication and rescue equipment
In addition to this equipment, carry the following equipment in yourvehicles:

Lesson 5: Vehicle Inspection, Maintenance, and Repair
Module A Participant ManualAmbulance Operation: The Basics
-lxxxv
As the operator, you will be responsible for inspecting your vehicle and forproperly operating its mechanical systems. You may also be responsiblefor providing routine servicing and preventive maintenance for each systemand its components.
For other maintenance and repairs, you will--
VEHICLE INSPECTION

Lesson 5: Vehicle Inspection, Maintenance, and Repair
Participant Manual Module AAmbulance Operation: The Basics
-lxxxvi
By conducting regular, systematic vehicle inspections, you are able to--
! find and report problems that need to be fixed
! keep track of preventive maintenance requirements
! document the overall condition of the vehicle
Inspection Standards
The ASTM Standard Guide for Training Emergency Medical ServicesAmbulance Operators inspection standards were used to develop theinspection procedures presented in this lesson and may be adopted inwhole or in part by your organization. These standards provide aminimum acceptable level of vehicle inspection.
Lesson 5: Vehicle Inspection, Maintenance, and Repair
Module A Participant ManualAmbulance Operation: The Basics
-lxxxvii
Inspection Methodology
To ensure that vehicle inspections are consistent, thorough, and accurate,each EMS organization develops specific vehicle inspection proceduresand checklists to meet its needs. The completed checklists are then kepton file and are used to document the condition of the vehicles.
Importance of Maintaining Records
If an emergency vehicle is involved in a crash, and there is the possibilitythat a mechanical malfunction was the cause, the courts would be veryinterested in reviewing the maintenance records of the ambulance. If theoperating organization knew in advance of the malfunction and continued tooperate the vehicle, it may be found negligent and held liable for alldamages resulting from the crash.
Maintenance organizations must be able to document in writing theservicing, maintenance, and repair of their vehicles and equipment. A goodgeneral guideline for documenting inspections and maintenance actions is: "If it's not in writing, it did not happen."
Inspection Schedule
The schedule below is a recommendation and may be different from theone used in your organization. Whether you inspect by number of runs perweek, by hours of operation, or by specific days of the week, theimportant thing is that you inspect according to a specific schedule and thatyou strictly stick to that schedule.

Lesson 5: Vehicle Inspection, Maintenance, and Repair
Participant Manual Module AAmbulance Operation: The Basics
-lxxxviii
An organization's inspection schedule is determined by a number of factors,including vehicle age and mileage, insurance requirements, and pastexperience.
Our organization's inspection schedule is--
How are our inspection procedures different from the recommendedprocedures?

Lesson 5: Vehicle Inspection, Maintenance, and Repair
Module A Participant ManualAmbulance Operation: The Basics
-lxxxix
Inspection Types
There are two types of vehicle inspections recommended for ambulances:
! The Quick Check covers those systems that should be checkedmost often.
! The Full Check covers all vehicle systems that can be checkedwithout special equipment or facilities.

Lesson 5: Vehicle Inspection, Maintenance, and Repair
Participant Manual Module AAmbulance Operation: The Basics
-xc
QUICK CHECK
Checklist
Appendix C
Sample Checklist:Quick Check
A Sample Checklist for the Quick Check can be found in Appendix C.
The first things you should fill out are the unit or ambulance number, thestation where it is located, and the date and time of the inspection.
When you conduct the inspection, you should--

Lesson 5: Vehicle Inspection, Maintenance, and Repair
Module A Participant ManualAmbulance Operation: The Basics
-xci
! inspect each item and place a check mark in the column labelledOK if there are no problems. By checking off an item as OK,you verify that you (1) inspected it and, (2) found no problemswith it.
! fix any problems found, if you are capable and authorized to do so,and document that you did so in the Work Completed block,OR file a work request for the problem(s) found
Note that any starred (*) problems must be fixed before the vehicleis placed in service.
! decide whether or not to place the vehicle in service and documentyour decision by circling the appropriate word in the printedstatement above your signature
! sign and date the checklist
Checklist Format
Ambulance Diagram
Inspection Sequence
The inspection is divided into specific areas of the ambulance. There are several items to inspect in each area. The sequence isdesigned so that you inspect all the listed items in one area beforemoving clockwise around the vehicle to the next area. Because allthe items to be inspected are listed by area, there is less chancethat you will forget an item that was called out in a previous area.

Lesson 5: Vehicle Inspection, Maintenance, and Repair
Participant Manual Module AAmbulance Operation: The Basics
-xcii
Area Rows
These are the areas that you will check and in the recommendedsequence.
Items Column
These are the items that you will check in each area.
Check Column
For each item listed, this is what you are to check.
Problem Column
In this area, briefly describe any problems discovered. If you thinkthe problem makes the vehicle unserviceable, put a star (*) to theleft of the description of the problem. These starred items (*) mustbe corrected before placing the vehicle in service.
Our organization has (does not have) such a list. It is located--

Lesson 5: Vehicle Inspection, Maintenance, and Repair
Module A Participant ManualAmbulance Operation: The Basics
-xciii
A single problem without a star may not keep you from placing the vehiclein service.
Example 1: Suppose a vehicle you have inspected has one cracked turnsignal lens and a slow oil leak. Depending on organization guidelines andother circumstances, you may or may not place the vehicle in service. Before making your decision, you may want to talk to a supervisor and/ormaintenance.
Our organization would handle this example by--
Example 2: One organization might let a vehicle go on a run with a brokenwindshield wiper on a clear day; another organization might take the vehicleout of service. In either case, the problem should be documented and therepairs made as soon as possible.
Our organization would handle this example by--
Lesson 5: Vehicle Inspection, Maintenance, and Repair
Participant Manual Module AAmbulance Operation: The Basics
-xciv
OK Column
Check here if there are no problems in the area inspected OR ifyou found a problem and have fixed the problem yourself.
Work Request Column
If you find a problem and are not able or are not authorized to fix ityourself, file a work request with your maintenance organization.
Work Completed/Other Remarks Column
Organization policies and procedures will tell you which specificitems you are authorized to service or repair yourself. Note allwork you did and any other information about the problem.
Preparation
To prepare for performing the Quick Check, you need to do three things:
! Arrange for another crew member to help you check the lights.

Lesson 5: Vehicle Inspection, Maintenance, and Repair
Module A Participant ManualAmbulance Operation: The Basics
-xcv
! Place wheel chocks where you can quickly retrieve them ifrequired.
! Get a blank checklist and fill out the administrative information.
Inspection Sequence
There are eight specific areas to be checked during the quick checkinspection. They are--
1) Overall Appearance
2) Operator Compartment
3) Exterior: Operator's Side

Lesson 5: Vehicle Inspection, Maintenance, and Repair
Participant Manual Module AAmbulance Operation: The Basics
-xcvi
4) Exterior: Front
5) Engine Compartment
6) Exterior: Passenger's Side
7) Patient Compartment
8) Exterior: Rear
1) Overall Appearance
! Check vehicle cleanliness.
Your overall appearance to the public as a professionalorganization is enhanced by a clean, well-maintained vehicle.
! Check general vehicle condition.
Is the vehicle sitting level?
Are there any puddles or other signs of visible fluid leaks?
Are there any signs of new, unreported body damage?

Lesson 5: Vehicle Inspection, Maintenance, and Repair
Module A Participant ManualAmbulance Operation: The Basics
-xcvii
2) Operator Compartment
! Check the vehicle log.
The most recently completed Full Check and Quick Checkchecklists should be in the log, along with blank copies of the runreport and a complete inventory list of installed equipment.
! Check for stowage of items.
! Be sure switches for lights and communication equipment are in the"off" position.
! Adjust the seat, seat belt, and side view mirrors.
! Release the hood latch.
! Turn the key to the ON position and check the fuel gauge.
Routine refueling should occur when the fuel level is between 1/2and 3/4 empty. Follow your organization's procedures forrefueling.
Your organization uses the following refueling procedures:

Lesson 5: Vehicle Inspection, Maintenance, and Repair
Participant Manual Module AAmbulance Operation: The Basics
-xcviii
3) Exterior Walk-around: Operator's Side
! Check left outside mirror bracket for general condition.
! Check left side window for general condition.
! Check left side of windshield, left wiper for general condition.
! Check the left front wheel and tire for general condition.
! Check the tire for a properly inflated appearance, but do not checktire pressure.
! Check left front fender for general condition.
4) Exterior Walk-around: Front
! Inspect front of vehicle and grill for general condition.
Remove any obstructions to the grill, radiator, or lights.
! Visually check condition of headlights and turn signals.

Lesson 5: Vehicle Inspection, Maintenance, and Repair
Module A Participant ManualAmbulance Operation: The Basics
-xcix
! Visually check condition of emergency lights from the front.
5) Engine Compartment
! Open hood and visually check engine for signs of leaks.
! Visually check condition of belts.
! Visually check condition of battery(ies).
! Check levels of engine oil, windshield washer fluid, and coolingsystem.
Check coolant level at overflow reservoir; do not remove radiatorcap to check.
Replenish fluids according to local organization's requirements.
Always replenish the engine oil when it is one quart low. Inaddition, our fluid replenishment requirements are--
! Close the hood and ensure that it is latched.

Lesson 5: Vehicle Inspection, Maintenance, and Repair
Participant Manual Module AAmbulance Operation: The Basics
-c
6) Exterior Walk-around: Passenger's Side
! Check right front fender for general condition.
! Check the right front wheel and tire for general condition.
! Check the tire for a properly inflated appearance, but do not checktire pressure.
! Check right side of windshield, right wiper for general condition.
! Check right side window for general condition.
! Check right outside mirror bracket for general condition.
! Check right rear fender for general condition.
! Check the right rear wheel and tire for general condition.
! Check the tire for a properly inflated appearance, but do not checktire pressure.
7) Patient Compartment
! Open rear doors and visually check general condition of patientcompartment.
Lesson 5: Vehicle Inspection, Maintenance, and Repair
Module A Participant ManualAmbulance Operation: The Basics
-ci
Check that all equipment is properly secured.
Verify that no new equipment that may change vehicle weight hasbeen added to patient compartment.
! Close rear doors and ensure that they are properly latched.
8) Exterior Walk-around: Rear
! Visually check the condition of emergency lights from the rear.
! Visually check the condition of rear lights and turn signals.
! Visually check the condition of external flood lights, if installed.
! Check the left rear fender for general condition.
! Check the left rear wheel and tire for general condition.
! Check the tire for a properly inflated appearance, but do not checktire pressure.
When you finish the check, decide whether or not to place the vehicle intoservice and sign and date the form. Place your completed checklist into thevehicle log.

Lesson 5: Vehicle Inspection, Maintenance, and Repair
Participant Manual Module AAmbulance Operation: The Basics
-cii
NOTE:If your organization requires an operational check of thecommunications and emergency warning equipment,perform those checks after completing the visualinspection.
To conduct operational checks--
! start the vehicle and drive it outdoors
! check the communications equipment, following localprocedures
! operate and have the other crew member check theemergency lights
! check the siren, following local procedures
! secure the communications and emergency equipment andreturn the vehicle to its parking space
Our organization requires (does not require) operational checks of thecommunications and emergency warning equipment. The local proceduresareB

Lesson 5: Vehicle Inspection, Maintenance, and Repair
Module A Participant ManualAmbulance Operation: The Basics
-ciii
FULL CHECK
Appendix D
Sample Checklist:
Full Check
A Sample Checklist for the Full Check can be found in Appendix D.
The same headings are used for both the Full and Quick Checks. The FullCheck includes additional items and should be adapted to meet eachorganization's requirements.
The Full Check also follows the same basic clockwise rotation to ensure asystematic inspection.
Your organization requires that you perform the following vehiclemaintenance checks before you place a vehicle in serviceB

Lesson 5: Vehicle Inspection, Maintenance, and Repair
Participant Manual Module AAmbulance Operation: The Basics
-civ
How is your organization's checklist different from the recommendedchecklist for the Quick/Full Check?
Negligence Related to Inspection
An operator might be judged to be negligent with regard to vehicleinspection for two main reasons:

Lesson 5: Vehicle Inspection, Maintenance, and Repair
Module A Participant ManualAmbulance Operation: The Basics
-cv
! failing to inspect a vehicle thoroughly according to theorganization's requirements
! knowingly operating a vehicle with a problem that should havecaused it to be taken out of service
Negligence: Case study
The following is an example of negligence related to vehicle inspection.
Background: A crew was taking a patient to a hospital in the next county. The ambulance maintenance log, which contains information aboutprevious inspections and work requested and completed, was kept in aroom upstairs from the vehicle. The crew was in a hurry, so they did notreview the log before they left, contrary to the organization's procedures. They also did not perform a Quick Check.
Midway through the trip, the oil pressure warning light came on, and theengine temperature rose. The crew pulled over and called for areplacement vehicle.
Investigation: The follow-up inquiry included a review of the ambulancemaintenance log. The two most recent vehicle checks each noted a slowoil leak. The maintenance log contained a note to the operator to checkthe oil level before each trip. The log showed that repairs were scheduledfor the following Monday, when the regular mechanic returned fromvacation.
How might the operator be judged negligent in this situation?

Lesson 5: Vehicle Inspection, Maintenance, and Repair
Participant Manual Module AAmbulance Operation: The Basics
-cvi
How might the organization also be found at fault?
Refusing to Drive an Unsafe Vehicle
You should never operate a vehicle that is not in safe operating condition.
A Federal program, the Injury/Illness Prevention Program (IIP), supportsan operator's right to refuse to drive an unsafe vehicle.
Guidelines for this program are available from the Occupational Safety andHealth Administration (OSHA).
In our organization these guidelines are located--

Lesson 5: Vehicle Inspection, Maintenance, and Repair
Module A Participant ManualAmbulance Operation: The Basics
-cvii
What three things should you know before you decide that your vehicle isready for service?
How do you decide whether a vehicle is in safe operating condition?
OPERATOR RESPONSIBILITY FOR VEHICLEMAINTENANCE
Vehicle maintenance is a critical part of an effective emergency medicalresponse organization. If vehicles are not ready to respond to a service
Lesson 5: Vehicle Inspection, Maintenance, and Repair
Participant Manual Module AAmbulance Operation: The Basics
-cviii
call, or if they break down during a run, the organization cannot transportpatients effectively.
Comprehensive Maintenance Programs
A comprehensive maintenance program anticipates the need formaintenance and completes it before a failure occurs and repairs areneeded.
Comprehensive Inspection and Maintenance Programs
A comprehensive program--
! uses information from regular inspections to identify maintenancethat may be needed
! documents all inspections, work requests, and work completed
! includes preventive maintenance
Advantages of Preventive Maintenance

Lesson 5: Vehicle Inspection, Maintenance, and Repair
Module A Participant ManualAmbulance Operation: The Basics
-cix
Preventive maintenance relies on fixing minor problems before they becomemajor ones. It has several important advantages over repairing equipmentwhen it breaks:
! It ensures safe, reliable vehicle operation.
! It reduces the total cost of repairs.
! It minimizes major equipment failure.
Your organization's preventive maintenance program--

Lesson 5: Vehicle Inspection, Maintenance, and Repair
Participant Manual Module AAmbulance Operation: The Basics
-cx
Operator Responsibilities for Maintenance
You are an important part of the maintenance program.
Your primary responsibilities for maintenance are--
! to document any needed maintenance you find
! to make sure needed maintenance has been completed before youplace the vehicle in service
Lesson 5: Vehicle Inspection, Maintenance, and Repair
Module A Participant ManualAmbulance Operation: The Basics
-cxi
! to perform any maintenance for which your organization makes youresponsible
You will document needed maintenance on your inspection checklist orother form as required by your organization.
Before you place your vehicle in service, you will make sure neededmaintenance has been completed following your organization's procedures.
Performing Maintenance
In our organization the operator is responsible for these maintenance items--
Work Requests
A work request tells maintenance the work that is needed on a vehicle. When maintenance finishes the work, they record on the form the workperformed, tests run, and the results of their efforts.
Refer to Appendix E, the Sample Work Request.

Lesson 5: Vehicle Inspection, Maintenance, and Repair
Participant Manual Module AAmbulance Operation: The Basics
-cxii
Appendix E: SampleWork Request
As you can see, this work request covers those problems that you findduring an inspection as well as routine preventive maintenance.
An organization may or may not use a work request to track maintenanceand repairs.
Our organization uses (does not use) a work request. The procedures are--
Vehicle Maintenance Logs
Information from the inspection checklists and work requests are writteninto a vehicle maintenance log.
The vehicle maintenance log is a vehicle's central record--
! to list all maintenance needed and done, including routinemaintenance and problems identified by inspections
! to support the preventive maintenance program
Lesson 5: Vehicle Inspection, Maintenance, and Repair
Module A Participant ManualAmbulance Operation: The Basics
-cxiii
! to document that the vehicle has been properly maintained
Our organization uses this system to request and track maintenance andrepairs:
OPERATOR'S RESPONSIBILITIES FOR VEHICLE REPAIRS
Your primary responsibilities for repairs are--
! to document any needed repairs you find during an inspection orduring a run
! to make sure needed repairs have been completed before youplace the vehicle in service
! to make any repairs for which your organization makes youresponsible
You will document needed repairs on your inspection checklist or otherform as required by your organization.

Lesson 5: Vehicle Inspection, Maintenance, and Repair
Participant Manual Module AAmbulance Operation: The Basics
-cxiv
Before you place your vehicle in service, you will make sure needed repairshave been completed following your organization's procedures.
Making Repairs
In some organizations, operators make a variety of repairs to their vehicles. In others, the operator is responsible for only minimal repairs.
You should only perform repairs for which you are trained andauthorized.
In our organization, the operator is expected to be trained and authorizedto make these repairs:
Malfunctions During a Run
When this happens, think your situation through carefully before you takeaction. You should also use communications to give you more options.
Proper patient care should always be your first consideration.

Lesson 5: Vehicle Inspection, Maintenance, and Repair
Module A Participant ManualAmbulance Operation: The Basics
-cxv
Decision Aid for Vehicle Malfunctions During a Run
! Are you trained and authorized to make the repair?
The operator should be both trained and authorized to make anyrepair. If you should not fix the problem yourself, call for help.
! Is a backup readily available?
Use your communication system to inform dispatch of yoursituation and to find out if a backup is available. Develop a planbefore you start any repair, in case the repair fails.
If you are operating outside your normal service area, you may
Lesson 5: Vehicle Inspection, Maintenance, and Repair
Participant Manual Module AAmbulance Operation: The Basics
-cxvi
need to coordinate with an organization based in that service area.
! How quickly can you make the repair?
! What is the patient's condition?
! Can the vehicle's electrical system meet the demands made on itduring the repair?
Our organization policies and procedures for malfunctions are--
Repairs You May Make on the Spot
An operator is generally expected or allowed to make only the most minorrepairs during a run. For example--
! change a flat tire
! use duct tape to make temporary repairs to a broken radiator hose(usually the upper radiator hose)
Lesson 5: Vehicle Inspection, Maintenance, and Repair
Module A Participant ManualAmbulance Operation: The Basics
-cxvii
Our organization trains and authorizes operators to make these repairsduring a run:
Problems That May Allow You to Drive the Vehicle Safely
You may find yourself in a situation where your vehicle has malfunctionedbut is still driveable.
Your decision about whether you continue to drive the vehicle should bebased on your organization's policies and procedures.
Our organization policies and procedures about driving malfunctioningvehicles are--
Practice: Vehicle Malfunction Decision-Making
Suppose that you have just loaded a stable patient into your vehicle a few

Lesson 5: Vehicle Inspection, Maintenance, and Repair
Participant Manual Module AAmbulance Operation: The Basics
-cxviii
miles from your usual station. Before leaving the scene, you notice that theleft rear tire is flat.
What should you think through in deciding whether to change the tire or callfor help?
How our organization's guidelines would affect this decision:
This time, you have just loaded a critical patient into your vehicle a fewmiles from your usual station. Before leaving the scene, you notice thatyour radiator is leaking and the temperature gauge is showing engineoverheating. The patient is on a life support system.
What would your decision be?
Lesson 5: Vehicle Inspection, Maintenance, and Repair
Module A Participant ManualAmbulance Operation: The Basics
-cxix
How our organization's guidelines would affect this decision:
Discussion
What procedure does our organization use to place a vehicle in service?

Lesson 5: Vehicle Inspection, Maintenance, and Repair
Participant Manual Module AAmbulance Operation: The Basics
-cxx
POINTS TOREMEMBER
You should inspect your vehicle to decide whether it is in safe operatingcondition or whether it should not be driven.
You may be found negligent for driving a vehicle that is not in safeoperating condition.
When you place your vehicle in service, you should indicate that thevehicle is in safe operating condition.
To determine whether the vehicle is in safe operating condition, youmust know whether required maintenance has been performed.
You must understand your organization's maintenance program in orderto know your vehicle's maintenance status.
You are responsible for documenting any needed repairs you findduring an inspection or during a run.
Before you place a vehicle in service, make sure that needed repairshave been completed.
You and your organization should have a strategy for dealing withvehicle malfunctions during a run.

Lesson 6: Navigation and Route Planning
Module A Participant ManualAmbulance Operation: The Basics
-cxxi
COURSE: EMERGENCY VEHICLE OPERATOR COURSE(AMBULANCE): NATIONAL STANDARD CURRICULUM
MODULE A: Ambulance Operation: The Basics
LESSON 6: Navigation and Route Planning
COURSE GOAL: To provide ambulance operators with the knowledge and skills tooperate their vehicles so that their vehicle, equipment, crew, andpatients will be delivered safely and efficiently and the safety of thepublic will be assured during all phases of the delivery of theEmergency Medical Services (EMS) involving the ambulance
MODULE GOAL: To provide ambulance operators with the knowledge required tosafely and efficiently operate an ambulance in both nonemergencyand emergency modes
LESSON GOAL: To provide participants with knowledge of strategies used toselect the safest route to the emergency scene
PERFORMANCEOBJECTIVE(S):
• Identify those factors used for route planning
PM APPENDIX:
Lesson 6: Navigation and Route Planning
Participant Manual Module AAmbulance Operation: The Basics
-cxxii
PARTICIPANTMATERIALS:
ICON LEGEND
Notes Response Appendix Local Requirements
Lesson 6: Navigation and Route Planning
Module A Participant ManualAmbulance Operation: The Basics
-cxxiii
INTRODUCTION
Route selection is a key decision for both urban and rural area driving. Each time you prepare to leave for a run, you must decide on a route that isquick and avoids potential hazards or delays.
This lesson presents general information you need to help you decide whichroute to take to an emergency scene.
ROUTE SELECTION: PROCEDURES
Effective route selection considers procedures such as route planning,predetermined routes, and operator familiarization.
Route Planning
Safety is the most important factor when driving to the scene. You musthave a route plan if you want to get to the emergency scene quickly andcarefully.
Route planning involves learning the geographic and local conditions,individual characteristics of the area, and your organization's procedures tomap out the most efficient route to the emergency scene.

Lesson 6: Navigation and Route Planning
Participant Manual Module AAmbulance Operation: The Basics
-cxxiv
Geographic and Local Conditions
When you plan a route, think about the geographic and localconditions affecting the roads you will be using.
Be aware of and prepare yourself for the conditions in the type ofarea you will be driving in.
Special considerations must be made when planning a route in arural area. What conditions could you expect in a rural area?

Lesson 6: Navigation and Route Planning
Module A Participant ManualAmbulance Operation: The Basics
-cxxv
Street and road signs in rural areas may be limited, and directionsare often given in reference to buildings, gas stations, race tracks,or other past or present landmarks. Farms are commonlyreferenced since farm names never change.
When responding to an emergency in a rural area, the distance youdrive is usually greater. The road conditions may not always beknown, and the police may not even get a call.
When you head out to the emergency scene, communicate withdispatch or directly with the first responder. In rural areas, a firstresponder may get to the scene before the ambulance. The firstresponder will have information about the patient, road, andweather conditions.
Plan ahead so you don't waste time on a run. Make sure you staywithin the speed limit! Choose routes that--
! minimize stops and turns
! avoid intersections
! avoid residential streets--the posted speed limits will beslower; you must be careful of pets, children, carsbacking out, and so on
Organization Procedures
A variety of resources can be used to help you with route planning. Each organization should have a procedure for updating special

Lesson 6: Navigation and Route Planning
Participant Manual Module AAmbulance Operation: The Basics
-cxxvi
events, road conditions, and other factors on a daily basis.
Your shift supervisor should conduct a briefing at the shift change. This briefing should cover any special events, route problems,personnel assignments, and so on.
Our local procedures include--
Predetermined Route Procedures
Predetermined routes are standard response routes that are prepared inadvance. These routes have been selected to avoid potential problems.
Routes should be developed and maintained by your organization orcoordinated with other emergency services in the area.
Route planning includes the best way to get to the emergency scene ANDthe best way to get from the scene to the medical facility.
On the way to the emergency scene, you and your crew shouldcommunicate and navigate the route together. It is a good idea to have atleast one experienced person on your crew who knows the area.

Lesson 6: Navigation and Route Planning
Module A Participant ManualAmbulance Operation: The Basics
-cxxvii
After you pick up the patient and are on the way to the medical facility, theEMT will be busy caring for the patient and will not be able to help younavigate.
Make sure you know the route from the scene to the medical facility beforethe EMT begins attending to the patient.
Follow your organization's standard procedures so any two members canwork together and understand what to do.
Take every opportunity to practice communicating with the crew. Example: operator calls out road conditions, RR crossing, other bumps onthe route. EMT in patient compartment calls out what they are doing toalert the ambualnce operator. The operator should tell the EMT in thepatient comartment of any conditions that will limit medical attention.
A good time to practice is during a practice run or when you are returningfrom the medical facility and are returning to your station.
Primary and Alternate Routes
When planning routes, primary and alternate routes should beidentified.
Alternate routes must be available in case of bad road conditions,weather, or other situations that effect primary routes.
Navigation at night can be difficult, especially if you can't see the

Lesson 6: Navigation and Route Planning
Participant Manual Module AAmbulance Operation: The Basics
-cxxviii
street signs, hazards, or other problems. Communicate as a teamand follow your organization's standard procedure for givingdirections.
To make it easier to choose an alternate route, map out the localareas commonly used and refer to these maps when deciding whichway to go to the scene.
! Use a grid system to show any short cuts, one-way streets,expressways, and so on.
! Add useful information that is not included on the map,such as dirt roads, dangerous intersections, very steepgrades, roads or lanes on roads that change directionaccording to the time of day.
Our local procedure for primary and alternate routes includes--
Operator Familiarization
Operator familiarization involves your awareness of daily route information,procedures to identify local information, height restrictions, and map

Lesson 6: Navigation and Route Planning
Module A Participant ManualAmbulance Operation: The Basics
-cxxix
reading.
When you get a call from dispatch, you are responsible for knowing how toget to the scene safely and without taking unnecessary risks. If you don'tknow the streets and the area you'll be driving the ambulance in, you couldeasily get lost.
Daily Route Information
Become familiar with your area to prevent getting lost.
! Review the primary and alternate routes you usually drive.
! Find out if there are new developments and buildings underconstruction.
! If you are in an area with limited road and street signs,learn the local references, such as buildings, farms, gasstations, and so on.
! Review and learn about different activities that may affectthe traffic flow of your route each day.
Your area has buildings that you need to pay particular attention toeveryday. Can you think of types of buildings that may have scheduledactivities in which you need to be aware of?

Lesson 6: Navigation and Route Planning
Participant Manual Module AAmbulance Operation: The Basics
-cxxx
Keep in mind the approximate busy times for the buildings we justlisted. Expect delays in high traffic building areas during thesetimes:
! beginning and end of normal work and school day
! shift-change times for large factories, hospitals, and so on
Your daily route can be effected by the weather and otherenvironmental reasons:
! emergency snow routes
! roads closed due to flooding
Watch for changes in the condition of local roads and streets.Potholes and bumps can give the patient greater discomfort andpossibly aggravate the patient's medical condition.
Be aware of the following conditions of local roads and streets:
! damage, potholes, badly rutted roads
! expressway utilization policies during rush hour orconstruction

Lesson 6: Navigation and Route Planning
Module A Participant ManualAmbulance Operation: The Basics
-cxxxi
! detours, closed roads
! speed bumps, dips, bumps
! areas of standing water
Dispatch can help when it is absolutely necessary; however, it isyour responsibility to know the conditions of the area before youleave.
Procedures to Identify Local Information
How could you find out about different activities in the area thatmay affect your route?
Height Restrictions
When would ambulance height be important in route planning?

Lesson 6: Navigation and Route Planning
Participant Manual Module AAmbulance Operation: The Basics
-cxxxii
Keep the height posted in the vehicle where you can quickly see itduring the run. The dashboard or visor would be good places topost the vehicle height.
If you and your partner were on your way back to the station aftera run and had to pass under this overpass, could your vehicle passunder this height obstacle?
Lesson 6: Navigation and Route Planning
Module A Participant ManualAmbulance Operation: The Basics
-cxxxiii
Why is route planning important?
When you plan a route, what factors should be considered?
Why must alternate routes be available?

Lesson 6: Navigation and Route Planning
Participant Manual Module AAmbulance Operation: The Basics
-cxxxiv
What do you need to be familiar with so you can get to the emergencyscene quickly and carefully?

Lesson 6: Navigation and Route Planning
Module A Participant ManualAmbulance Operation: The Basics
-cxxxv
POINTS TOREMEMBER
Route selection is necessary for you to get to the scene quickly andcarefully. Route planning, predetermined route procedures, andoperator familiarization all contribute to effective route selection.
Choose a route to arrive at the emergency in the most efficient way. Minimize travel time, minimize crash exposure, and allow the operatorto focus attention on driving.
When planning a route--
! consider geographic and local conditions! utilize your organization's procedures! Use predetermined routes to avoid potential problems
on the road.! If primary routes are not in good condition, use
alternate routes.
You should be familiar with--
! daily route information! procedures to identify local information! height restrictions! how to read a map
Lesson 6: Navigation and Route Planning
Participant Manual Module AAmbulance Operation: The Basics
-cxxxvi
COURSE: EMERGENCY VEHICLE OPERATOR COURSE(AMBULANCE): NATIONAL STANDARD CURRICULUM
MODULE A: Ambulance Operations: The Basics
LESSON 7: Basic Maneuvers and Normal Operating Situations
COURSE GOAL: To provide ambulance operators with the knowledge and skills tooperate their vehicles so that their vehicle, equipment, crew, andpatients will be delivered safely and efficiently and the safety of thepublic will be assured during all phases of the delivery of theEmergency Medical Services (EMS) involving the ambulance
MODULE GOAL: To provide ambulance operators with the knowledge required tosafely and efficiently operate an ambulance in both nonemergencyand emergency modes
LESSON GOAL: To provide participants with knowledge of how to operate anambulance in order to improve the safety and quality of ridefor an ambulance patient
PERFORMANCEOBJECTIVE(S):
! Identify five road construction and engineering factorsaffecting ambulance control and ride quality for anambulance patient
! Identify driving skills that affect the ride quality for anambulance patient
! Identify things an operator must do to maintain a safetycushion around the ambulance
! For each basic driving maneuver listed, select the

Lesson 6: Navigation and Route Planning
Module A Participant ManualAmbulance Operation: The Basics
-cxxxvii
recommended procedure to be followed when drivingan ambulance

Lesson 7: Basic Maneuvers and Normal Operating Situations
Participant Manual Module AAmbulance Operations: The Basics
-cxxxviii
PM APPENDIX:
PARTICIPANTMATERIALS:
ICON LEGEND
Notes Response Appendix Local Requirements

Lesson 7: Basic Maneuvers and Normal Operating Situations
Module A Participant ManualAmbulance Operations: The Basics
-cxxxix
INTRODUCTION
When you have a medical team and a patient in the back of yourambulance, they are counting on you to get them quickly to the hospitalwithout making the patient's condition any worse than it already is.
ROAD CONSTRUCTION AND ENGINEERING
Road Surfaces
While the road surface greatly influences the quality of the ride, you can'tcontrol it or change it. You must learn how to adjust your driving to matchthe road conditions.
When roads are built, engineers plan each road to handle different kinds oftraffic and use different materials to build each road.
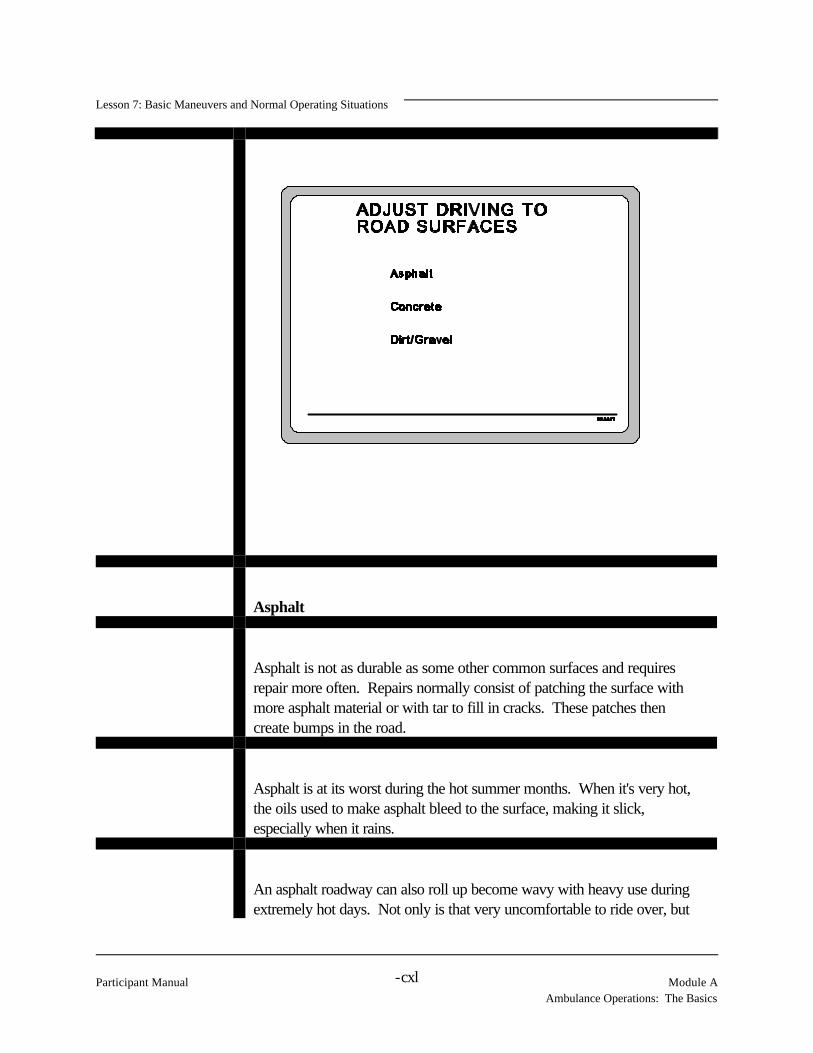
Lesson 7: Basic Maneuvers and Normal Operating Situations
Participant Manual Module AAmbulance Operations: The Basics
-cxl
Asphalt
Asphalt is not as durable as some other common surfaces and requiresrepair more often. Repairs normally consist of patching the surface withmore asphalt material or with tar to fill in cracks. These patches thencreate bumps in the road.
Asphalt is at its worst during the hot summer months. When it's very hot,the oils used to make asphalt bleed to the surface, making it slick,especially when it rains.
An asphalt roadway can also roll up become wavy with heavy use duringextremely hot days. Not only is that very uncomfortable to ride over, but
Lesson 7: Basic Maneuvers and Normal Operating Situations
Module A Participant ManualAmbulance Operations: The Basics
-cxli
you do not have full control of your ambulance since your tires are incontact with the road only half the time.
Concrete
During hot weather, concrete expands and may break up at its joints,leaving a hole in the surface.
Concrete also settles more than other road surfaces. As the earth under itsettles, the concrete sections develop severe dips, causing the ambulanceto bounce heavily between dips.
Concrete road surfaces also glaze over very quickly in freezing conditions,much more so than asphalt.
Dirt/Gravel
Dirt and gravel roads are tricky to drive on if you're not used to them. Because of the irregular shape, size, and weight of the stones, they moveabout easily. This movement can cause a vehicle to go out of control withonly a slight action by the operator. Braking on gravel can cause a vehicleto slide easily.
When following another vehicle on dirt and gravel roads, stay back toincrease visibility and to avoid flying stones.
Transitions Between Surface Types
When transitioning from one surface type to another, such as from hardsurface to gravel, you must change your driving style before moving onto

Lesson 7: Basic Maneuvers and Normal Operating Situations
Participant Manual Module AAmbulance Operations: The Basics
-cxlii
the gravel road or you could loose control of your ambulance.
Road Conditions
What road conditions might effect your ride?
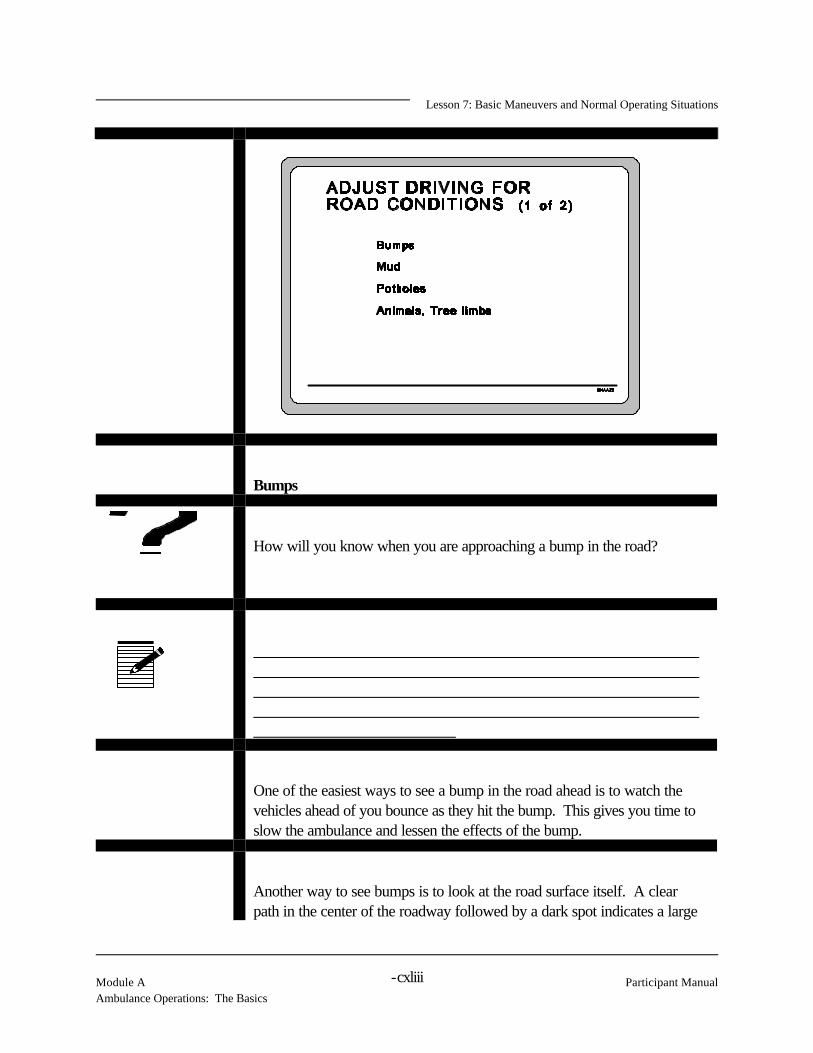
Lesson 7: Basic Maneuvers and Normal Operating Situations
Module A Participant ManualAmbulance Operations: The Basics
-cxliii
Bumps
How will you know when you are approaching a bump in the road?
One of the easiest ways to see a bump in the road ahead is to watch thevehicles ahead of you bounce as they hit the bump. This gives you time toslow the ambulance and lessen the effects of the bump.
Another way to see bumps is to look at the road surface itself. A clearpath in the center of the roadway followed by a dark spot indicates a large

Lesson 7: Basic Maneuvers and Normal Operating Situations
Participant Manual Module AAmbulance Operations: The Basics
-cxliv
dip or bump in the road. When vehicles hit the bump, loose oil and debrisunder the car fall off, creating the dark spot.
Mud
Mud on the roadway causes problems, first by creating a slick surface, andsecond, by filling the tread pattern of the tire and making the reaction abilityof the tire very slow.
Potholes
Potholes are holes in the road surface, sometimes at the joint of a concreteroad or, more commonly, where a asphalt surface has failed. Potholescannot be easily fixed and keep returning, getting wider and deeper eachtime they reappear.
Potholes give us two problems. First, they can destroy the ambulance'stires or suspension system. Second, they can cause you to loose control asone corner of the ambulance drops into the hole and the ambulance frametwists. Both problems cause hardship for the medical personnel andincrease the pain level of your patient.
During your prerun route planning, be sure that you select roads known tobe free of potholes. And, if you discover potholes during your run, passthis information on to the dispatcher so that the route information can beupdated.
The best way to handle a pothole is to try to drive around it.
If you must drive through a pothole--

Lesson 7: Basic Maneuvers and Normal Operating Situations
Module A Participant ManualAmbulance Operations: The Basics
-cxlv
! release your brakes just as you get to the pothole
! hit the pothole squarely, rather than on the side of the tire
Animals, Tree Limbs, and Miscellaneous Objects
Everyone's natural reaction is to swerve to avoid hitting objects in the road,but this often causes more problems than the object itself. Instead ofswerving--
! if it is a small object, hit the object head-on
! if it is a large animal or object, maintain control of your vehicle andattempt to avoid a head-on collision

Lesson 7: Basic Maneuvers and Normal Operating Situations
Participant Manual Module AAmbulance Operations: The Basics
-cxlvi
Bridges and Ramps
Bridges often have an open metal grating over the main expanse of thebridge. When the ambulance's tires cross this grating, the tire tread tries toalign itself with the grating, causing the wheels to jump and jerk. The bestway to handle the grating is to slow while approaching the bridge and thenhold the steering wheel firmly in both hands. There will still be some jerkingof the wheel, but you should be able to control it by using both hands.
Bridges and ramps often have a reinforced concrete bed, which will freezebefore the roadway on either side. This is because, as the temperaturedrops, the cold air circulates around the concrete bed of the bridge orramp and the concrete becomes cold faster than the roadway that is builton the warmer ground. Use caution when driving on bridges and rampsduring freezing temperatures.
Curves
When highway engineers design a new roadway, they use the naturalcontour of the land. Most of the time, they can reform the land slightly andcreate comfortable roads. Sometimes, they can't. In hilly or mountainousareas, following the land's natural contour often results with roads designedwith deep or multiple curves.
Never take a curve for granted. Enter a curve carefully, following theposted recommended speed limit for the curve, and watch how the curvechanges as you continue. If it gets tighter, slow down even more to retaincontrol of your ambulance.
Banking
Most curves in today's highways are banked to help maintain

Lesson 7: Basic Maneuvers and Normal Operating Situations
Module A Participant ManualAmbulance Operations: The Basics
-cxlvii
speed while going through the turn. If a roadway is built so that theinside of the curve is lower than the outside edge, then it is bankedproperly. If the inside edge is level with or higher than the outsideedge, you will have to slow down in order to complete the curve.
Posted speed limits
The speed limits posted at the beginning of most curves is therecommended speed that allows you to safely continue through thecurve. This speed is often lower than the prevailing highway speedbecause of the amount of banking or because the curve is acompound curve.
Crown
Older roads and those in areas that receive a lot of rain often have a crownin the middle of the road. When a road has a crown, the center of the roadis higher than both edges. Since the crown is normally not very high, itdoes not pose a problem on a straight road, but in a corner, the crown actslike improper banking and works against the vehicle going around thecorner. Slow down in order to retain control of your ambulance.
Water Drainage
Road crowns are essential for good water drainage during rainy periods. When water drains quickly from the road surface, the danger ofhydroplaning is reduced. Some concrete roads accomplish drainage bycutting grooves into the road surface.
Hopefully, the water will drain completely away from the road, thuseliminating the dangers of hydroplaning and possibly losing control of yourvehicle. You must look ahead and remain clear of areas of standing water

Lesson 7: Basic Maneuvers and Normal Operating Situations
Participant Manual Module AAmbulance Operations: The Basics
-cxlviii
and water collected alongside the roadway.
Roadside Engineering
Roadside engineering consists of all the signs, guardrails, and barriers alongthe roadway. These include your speed limit, no passing, and intersectionsigns, and the safety barriers beside deep ditches or bridges.
How could roadside engineering effect the quality of ride you give yourpatient?
Are you more likely to have control problems going from concrete togravel, or from gravel to concrete?
Lesson 7: Basic Maneuvers and Normal Operating Situations
Module A Participant ManualAmbulance Operations: The Basics
-cxlix
If you are driving down a highway with very little traffic and in your laneahead, you notice a dark spot in the middle of your lane, what would thatindicate and what would you do?
You are driving through a hilly area after picking up a teen-aged boy with abroken leg, it has been raining heavily, and there is a lot of traffic on theroad. Up ahead, it looks like some mud has slid from someone's yard ontothe roadway. What is the problem and what would you do?
Just before you get to the mud, a small tree branch falls into the roadway infront of you. What would you do?

Lesson 7: Basic Maneuvers and Normal Operating Situations
Participant Manual Module AAmbulance Operations: The Basics
-cl
What problems might you have on asphalt in August when the temperatureis 101 degrees?
As you round a curve in the highway at 50 mph, with a patient on board,you see a deep pothole in the right tire track on your side of the highway. You firmly press your brakes to slow, but realize that you cannot changelanes and are going to hit the pothole. What should you do?
It's night and you come over a hill. In your lane stands a full-grown deer

Lesson 7: Basic Maneuvers and Normal Operating Situations
Module A Participant ManualAmbulance Operations: The Basics
-cli
looking at you. There is a car coming toward you in the other lane andthere is a deep ditch on your right. What should you do?
DRIVING SKILLS WHICH INFLUENCE THE QUALITY OFTHE PATIENT'S RIDE
Adverse Effects on Patient When Riding in an Ambulance
What would be some of the adverse effects of riding in an ambulance? First, consider the patient.
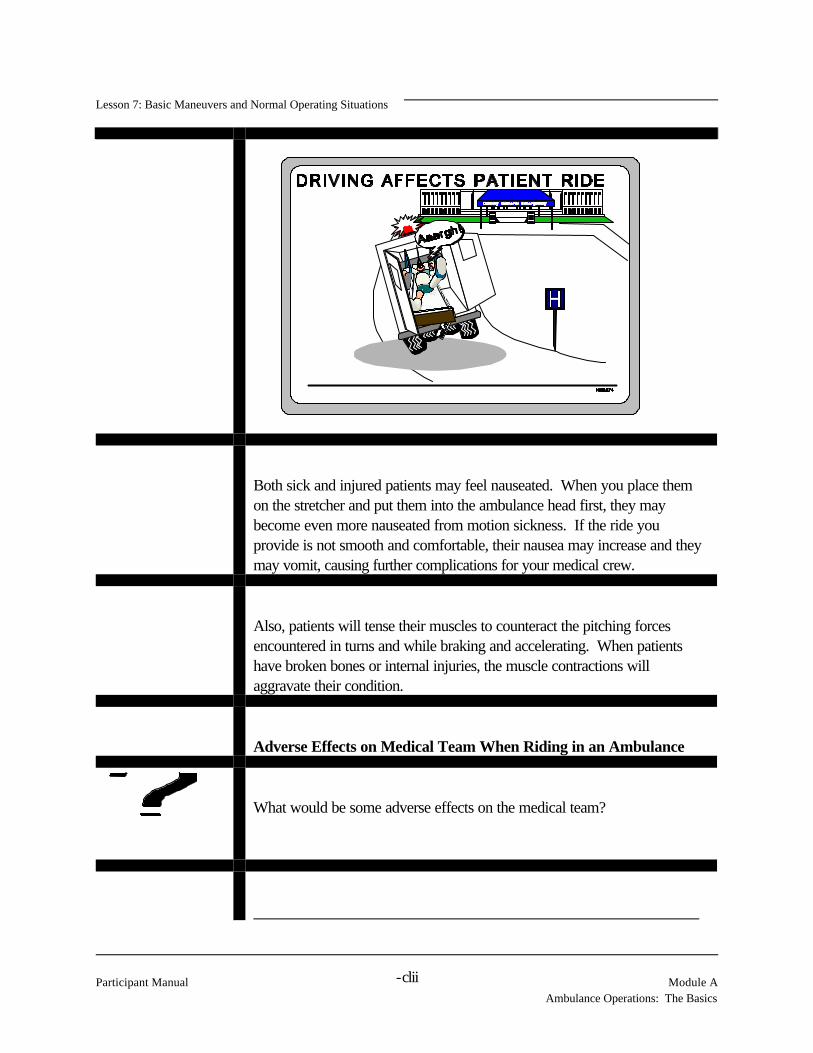
Lesson 7: Basic Maneuvers and Normal Operating Situations
Participant Manual Module AAmbulance Operations: The Basics
-clii
Both sick and injured patients may feel nauseated. When you place themon the stretcher and put them into the ambulance head first, they maybecome even more nauseated from motion sickness. If the ride youprovide is not smooth and comfortable, their nausea may increase and theymay vomit, causing further complications for your medical crew.
Also, patients will tense their muscles to counteract the pitching forcesencountered in turns and while braking and accelerating. When patientshave broken bones or internal injuries, the muscle contractions willaggravate their condition.
Adverse Effects on Medical Team When Riding in an Ambulance
What would be some adverse effects on the medical team?

Lesson 7: Basic Maneuvers and Normal Operating Situations
Module A Participant ManualAmbulance Operations: The Basics
-cliii
Patient care cannot continue if your medical team has to hold on to survive. Patient care must continue uninterrupted while enroute to the hospital.
Several basic and advanced life support skills are difficult to perform in amoving ambulance, no matter how smoothly it is driven. These skills areimpossible if the ambulance is bouncing and swaying as it is driven downthe road. For example, studies have demonstrated that CPR is bestperformed in a moving ambulance that is being driven at speeds below 25mph and not being driven in the emergency mode.
How Driving Skills Influence the Quality of the Patient's Ride
There are four main driving skills that we are going to talk about. They arecornering, braking, accelerating, and maintaining appropriate speed.
Ambulance Suspension System
Remember, like most cars and trucks, the ambulance is a body that isattached to the engine and wheels with a suspension system. Thesuspension system is designed to do two things. First, it is designed tokeep all four wheels firmly on the ground, no matter what the surface islike, so that you can steer, have brakes, and accelerate. And second, it isdesigned to isolate the body and its occupants from the bouncing of thewheels when they hit bumps and uneven road surfaces.
Because of the way the suspension system is designed, when you speedup, brake, or take corners, the body leans. Because an ambulance is a
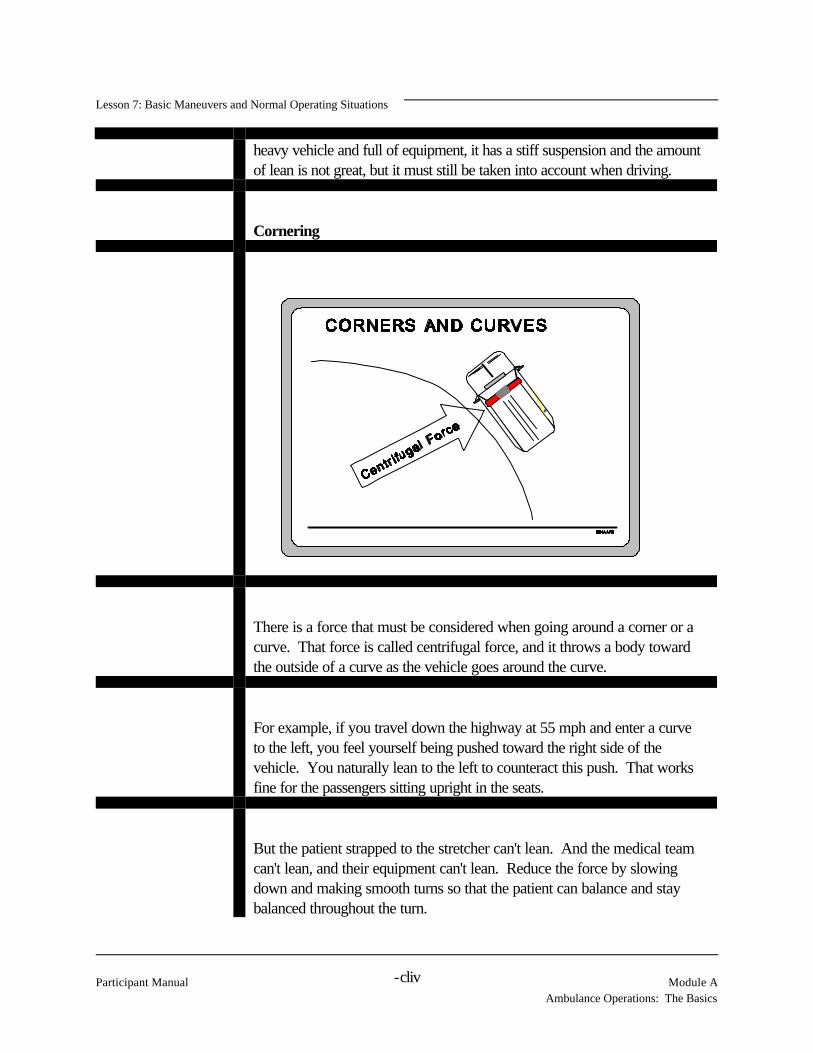
Lesson 7: Basic Maneuvers and Normal Operating Situations
Participant Manual Module AAmbulance Operations: The Basics
-cliv
heavy vehicle and full of equipment, it has a stiff suspension and the amountof lean is not great, but it must still be taken into account when driving.
Cornering
There is a force that must be considered when going around a corner or acurve. That force is called centrifugal force, and it throws a body towardthe outside of a curve as the vehicle goes around the curve.
For example, if you travel down the highway at 55 mph and enter a curveto the left, you feel yourself being pushed toward the right side of thevehicle. You naturally lean to the left to counteract this push. That worksfine for the passengers sitting upright in the seats.
But the patient strapped to the stretcher can't lean. And the medical teamcan't lean, and their equipment can't lean. Reduce the force by slowingdown and making smooth turns so that the patient can balance and staybalanced throughout the turn.

Lesson 7: Basic Maneuvers and Normal Operating Situations
Module A Participant ManualAmbulance Operations: The Basics
-clv
Braking
Body lean is a very important factor when you brake or when youaccelerate. When you brake hard, the nose of the ambulance dropsdownward and all the weight of the ambulance, and its occupants, shiftstoward the front. When you accelerate hard, just the reverse happens. Everything shifts toward the back.
Just like when cornering, body lean is not a big problem for you becauseyou are sitting upright in a seat with your seat belt on. But the medical teamand the patient aren't so lucky. They are being thrown forward andbackward as you brake hard and then accelerate. And they can't seewhat's coming so that they can brace themselves. You have to protectthem by braking no harder than necessary and by accelerating smoothlyand steadily.
When braking, you must take two factors into consideration: reaction timeand braking time

Lesson 7: Basic Maneuvers and Normal Operating Situations
Participant Manual Module AAmbulance Operations: The Basics
-clvi
Reaction time is a combination of the time it takes you to see andunderstand that you will have to brake and to actually move your foot tothe brake pedal.
Braking time is the time it takes your brakes to bring the ambulance to acomplete stop.
Total stopping distance, then, is equal to the reaction time plus the brakingtime.
Training can reduce reaction time. When the brain is under stress, as it iswhen you recognize a problem ahead, the body will react the way it wastrained to react.
In Lesson 1 we talked about factors that can affect your reaction time--illness (e.g., cold, flu), a physical injury that could affect your ability tomaneuver the ambulance, medication(s), and lack of sleep.
All of these factors influence your reaction time and ultimately determine ifyou will be able to stop in the time (distance) available. You need a way tomaximize the time and distance available for braking by placing yourambulance in the safest position.
2-4-12 Rule

Lesson 7: Basic Maneuvers and Normal Operating Situations
Module A Participant ManualAmbulance Operations: The Basics
-clvii
The 2-4-12 rule says--
! maintain a 2 second interval between your ambulance andthe vehicle ahead for speeds below 55 mph
! increase the following distance to 4 seconds when speedsget above 55 mph to allow for increased stoppingdistances at higher speeds
! give yourself a 12 second visual lead time. In other words,look ahead for possible hazards and alternate paths oftravel should an emergency arise
Use your 12-second visual lead time to constantly make speed andposition adjustments. Simplify your choices as much as possible. Don't tackle more hazards than you absolutely have to.
Lesson 7: Basic Maneuvers and Normal Operating Situations
Participant Manual Module AAmbulance Operations: The Basics
-clviii
For example, if you are looking 12 seconds ahead, you will see thetraffic light almost a block away turn red. You are able to respondby removing your foot from the accelerator and begin slowingearly. Then by smoothly applying the brakes, you can bring theambulance to a stop without having to slam on the brakes. Whentraffic clears and you can proceed forward, you can gently releasethe brakes and begin to accelerate at a steady pace. As youcontinue to look ahead, you begin slowing for that next corner andmake a smooth turn that doesn't throw the patient from one side tothe other.
Look ahead, see what is happening all around you, and begin youractions early. Your driving will improve and you will beginproviding a smooth ride for your crew and your patient.
Accelerating
To reduce body lean and strain on the patient and the medical team,accelerate smoothly and steadily.
Provide a comfortable ride by using a smooth, slow rate of acceleration.
This method requires that initially you apply a feather-touch to theaccelerator and then continue to move the accelerator pedal downwardgradually but steadily. As you approach the desired speed, hold theaccelerator still for a moment and begin to ease up on the accelerator to thepoint where you are using just enough engine power to maintain theselected speed.

Lesson 7: Basic Maneuvers and Normal Operating Situations
Module A Participant ManualAmbulance Operations: The Basics
-clix
To practice, you can do two things. First, pretend there is a raw eggbetween your right foot and the accelerator pedal. Try not to break theegg. The second thing is something you should practice but not do on arun. Place a half-full glass of water on the dash and try to accelerate (andbrake and take corners) without spilling any of the water.
Speed
If two ambulances are going down the same road, one at 55 mph and oneat 35 mph, which one do you think is providing the smoother ride?

Lesson 7: Basic Maneuvers and Normal Operating Situations
Participant Manual Module AAmbulance Operations: The Basics
-clx
High speed makes the ride rougher than lower speed does. The faster anambulance goes, the more it bounces. Each turn of the steering wheelthrows the ambulance harder from side to side.
Our local regulations concerning speed include--
High speed normally makes the patient's ride so much worse that it isactually detrimental to the patient, not beneficial. You may get to thehospital faster, but you may have made the patient's injuries worse justfrom the bouncing. And the medical team hasn't been able to workbecause they had to hold on to counteract the effects of a less than smoothride.
Most patients are stabilized and on life support, if necessary, before theambulance leaves the emergency scene. Therefore, speed is not asnecessary when transporting the patient to the medical facility.
Slow down for curves and corners and take them smoothly. Brake

Lesson 7: Basic Maneuvers and Normal Operating Situations
Module A Participant ManualAmbulance Operations: The Basics
-clxi
smoothly and no more than is required. Accelerate smoothly and steadilyand go no faster than necessary.
The driving skills we want to improve are involved in what four phases ofdriving?
What's the best way to improve these driving skills?
Total stopping distance equals?

Lesson 7: Basic Maneuvers and Normal Operating Situations
Participant Manual Module AAmbulance Operations: The Basics
-clxii
There is a delicate balance between the operator, the machine, and theenvironment:
! The machine, your ambulance, is the most reliable and isresponsible for only one percent of crashes.
! The environment is constantly changing and is responsible forapproximately ten percent of the crashes.
! The operator is responsible for a large percent of ambulancecrashes. The operator is also responsible for the successfulmerging of the three-part relationship.
Preventable Collisions
Most collisions are preventable.
The key to preventing collisions is called situational awareness. Thismeans that you must be constantly aware of your situation by remainingalert at all times, knowing what's going on all around the ambulance, anddriving defensively.
Defensive Driving
What is defensive driving?

Lesson 7: Basic Maneuvers and Normal Operating Situations
Module A Participant ManualAmbulance Operations: The Basics
-clxiii
Defensive driving means doing everything reasonably possible to avoidbeing involved in a preventable crash, regardless of what the law is, whatthe other driver does, or adverse driving conditions.
Defensive driving requires continual exercise of good judgment and gooddriving habits with an awareness that all other drivers cannot be relied uponto drive properly and safely.
Expect the unexpected and be prepared to act. Have a plan of action at alltimes. Remember, you have the final responsibility for your safety and thatof your passengers.
Maintaining a Safety Cushion

Lesson 7: Basic Maneuvers and Normal Operating Situations
Participant Manual Module AAmbulance Operations: The Basics
-clxiv
What do you think "maintaining a safety cushion" means?
Maintaining a safety cushion means driving so that you position your vehiclein relation to other vehicles and possible hazards so that you have a cushionof empty space completely surrounding your ambulance.

Lesson 7: Basic Maneuvers and Normal Operating Situations
Module A Participant ManualAmbulance Operations: The Basics
-clxv
You want to allow enough room around the ambulance so that you canidentify possible hazards, decide on a course of action, and react by eitherbringing the ambulance to a controlled stop or maneuvering to avoid thehazard.
Why would you want to maintain a safety cushion of empty space aroundthe ambulance?
In a road emergency, you don't want to get boxed in without an escaperoute. Maintaining a safety cushion around your ambulance, reduces yourchances of being involved in a crash.
Obviously, the safest position for the ambulance is as far away as possiblefrom any possible collision. It's easy to be involved in a crash when thereare vehicles in front, beside, and behind you.
Why should you be concerned about vehicles behind you?

Lesson 7: Basic Maneuvers and Normal Operating Situations
Participant Manual Module AAmbulance Operations: The Basics
-clxvi
Tailgaters
Tailgaters are people who follow too closely behind the vehicle in front ofthem. Normally, they are so close that if you have to stop suddenly, theydon't have time to stop or prevent running into the back of your ambulance.
Don't allow other drivers to tailgate you. Use any method to make thempass or fall back. If necessary, slow and pull to the right of your lane toencourage them to pass. Tailgaters are safer for you if they are tailgatingthe vehicle in front off you. You at least can see them and plan your actionif they run into the other vehicle.
Multiple Responding Units
Why would multiple responding units be a problem behind yourambulance?
Emergency units responding along the same route should maintain 300 to400 feet of distance between them. To make sure the other motoristsknow there is more than one emergency unit in the area, use a differentsiren tone than the vehicle ahead of you. Change tones at intersections andallow your siren to partially wind down prior to the intersection so that bothyou and the other motorists will be alerted that there are multipleemergency vehicles in the area.

Lesson 7: Basic Maneuvers and Normal Operating Situations
Module A Participant ManualAmbulance Operations: The Basics
-clxvii
Local regulations regarding multiple responding units include--
Communication
To get the maximum advantage from proper positioning, your safetycushion, and defensive driving, you must communicate with other drivers.
How can you, when driving the ambulance, communicate with otherdrivers?
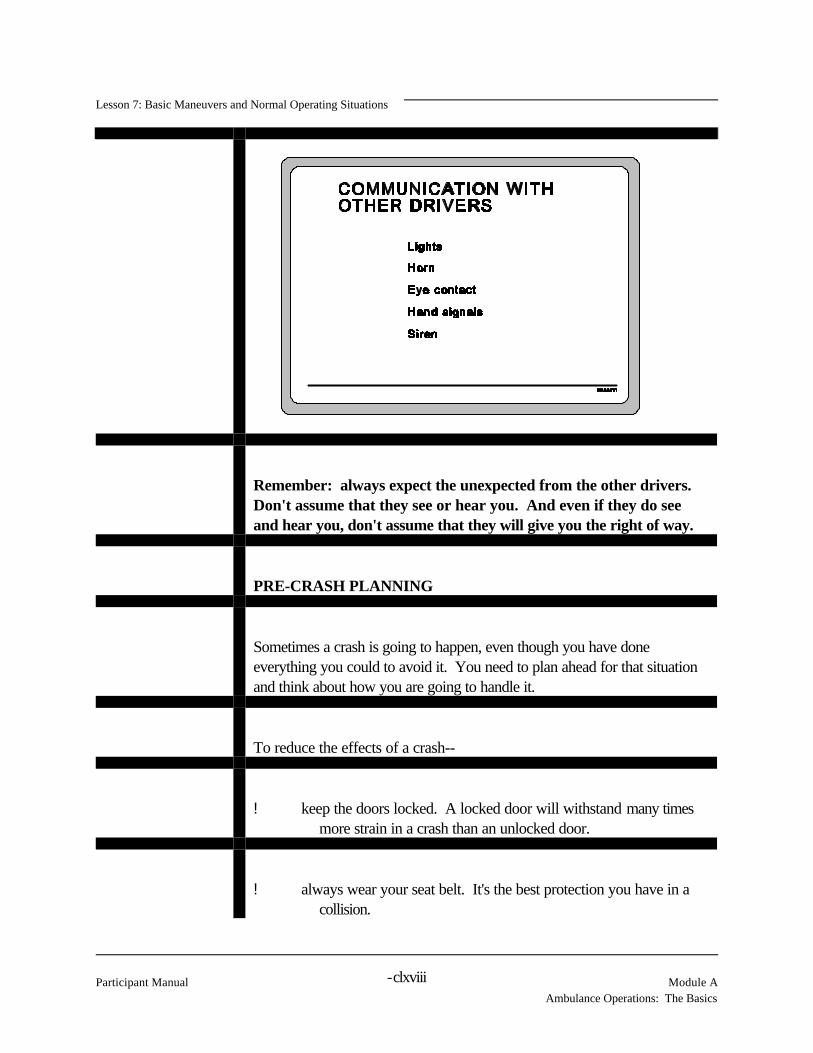
Lesson 7: Basic Maneuvers and Normal Operating Situations
Participant Manual Module AAmbulance Operations: The Basics
-clxviii
Remember: always expect the unexpected from the other drivers. Don't assume that they see or hear you. And even if they do seeand hear you, don't assume that they will give you the right of way.
PRE-CRASH PLANNING
Sometimes a crash is going to happen, even though you have doneeverything you could to avoid it. You need to plan ahead for that situationand think about how you are going to handle it.
To reduce the effects of a crash--
! keep the doors locked. A locked door will withstand many timesmore strain in a crash than an unlocked door.
! always wear your seat belt. It's the best protection you have in acollision.

Lesson 7: Basic Maneuvers and Normal Operating Situations
Module A Participant ManualAmbulance Operations: The Basics
-clxix
Our local regulations for seat belt use include--
! Keep loose items, such as clipboards, secured. Properly secureyour equipment to reduce the number of potential missiles insideyour ambulance.
PREPARING FOR THE INEVITABLE CRASH
Your first priority is to protect yourself and your passengers from death orinjury. The next priority is to reduce vehicle damage. But remember, youand your crew are more important than your vehicle.
The key to surviving an inevitable crash is to REDUCE. First, reduce thespeed of the impact. The lower the speed, the lower the energy levelsinvolved and the lower the probability of death or serious injury.
Next, reduce the angle of impact. Try for a glancing blow rather than adirect blow, such as a head-on collision.
Third, reduce the size and hardness of the object you are going to hit. Forinstance, if you are going to leave the road, try to steer into a grassy fieldinstead of trees, or into small saplings and bushes rather than into largertrees.
Lesson 7: Basic Maneuvers and Normal Operating Situations
Participant Manual Module AAmbulance Operations: The Basics
-clxx
If you are absolutely sure that you are going to strike something, try to hit itwith the part of the ambulance the furthest from you--the right front or rightrear--even if it places your passengers in greater jeopardy. Remember,only the operator can control the ambulance after the initial impact. Youmay still need to steer the ambulance to reduce injury and damage, not onlyto yourself, but to others.
If I notice that I have a tailgater riding my bumper, what should I try to do?
Why do I want to maintain a safety cushion around my ambulance?
In order to prevent crashes, how can I communicate with other drivers?
Lesson 7: Basic Maneuvers and Normal Operating Situations
Module A Participant ManualAmbulance Operations: The Basics
-clxxi
BASIC MANEUVERS

Lesson 7: Basic Maneuvers and Normal Operating Situations
Participant Manual Module AAmbulance Operations: The Basics
-clxxii
Braking and Stopping
Braking is very effective in stopping your ambulance if it is done properly,but it can be hazardous if you do it improperly. If you apply too muchpressure and lock the brakes, the wheels will skid and you will loosesteering control. If all four wheels skid, the rear end of the ambulance mayslide to the side and you will lose control of the vehicle. To avoid theseproblems, you must keep the wheels turning.
Apply pressure on the brake pedal with the upper half of the right foot,preferably with the heel contacting the floor. Try to pivot on the heel forgreater sensitivity on the pedal. This involves fewer leg muscles andreduces unwanted "pumping" or "lock-up" of the brakes.
In a straight line, the most efficient way to brake to a stop on any surface isby gently but firmly pumping the brakes. Braking, when properly done,involves firmly pressing the brakes to the point before lockup, then gentlyreleasing them so that there is a minimum amount of front-end weightchange and bounce. The main point is to never lock-up the brakes.

Lesson 7: Basic Maneuvers and Normal Operating Situations
Module A Participant ManualAmbulance Operations: The Basics
-clxxiii
Avoid staring at the front hood of the ambulance while braking. Check theconditions to the rear to avoid being hit from behind. Check conditions tothe side in an effort to find an escape route. Search 12 seconds ahead tosee if the conditions which forced your braking actions have changed.
Making Lane Changes
When making lane changes on a multilane road, use the 12-second methodand plan your lane change well in advance. Signal your intentions and lookfor reactions from the other drivers. If the new lane remains clear, gentlysteer into the new lane and continue straight ahead. A properly executedlane change should be smooth, and your passengers should never feel thechange in the position of the ambulance.
When changing lanes for passing on multilane highways--
! check other lanes for problems and a clear path

Lesson 7: Basic Maneuvers and Normal Operating Situations
Participant Manual Module AAmbulance Operations: The Basics
-clxxiv
! check your mirrors to find an opening in the adjacent lane
! signal your intentions by having the signal lever in the "on" positionfor at least three seconds before changing lanes
! check your blind spot by making a quick glance over your shoulderin the direction the vehicle is to travel
! slightly turn the wheel for a smooth, gradual, accurate movement
! control your speed with a slight increase in speed, if required.
! time vehicle arrival into the adjacent lane to avoid interfering withother traffic
Passing
Passing on two-lane roads

Lesson 7: Basic Maneuvers and Normal Operating Situations
Module A Participant ManualAmbulance Operations: The Basics
-clxxv
Passing on a two-lane road is a very dangerous maneuver because,for several moments, you are in the lane of approaching traffic. Your closing speed on the approaching vehicle is the total of yourspeed and their speed. When passing at 55 mph, your vehicle andthe oncoming vehicle will be about 1/2 mile closer at the end of thepassing maneuver than when you started. You have to ask yourselfwhether you have the space and if the risk is worth the fewseconds saved.
To pass a slower vehicle on a two-lane road, visually clear theoncoming lane, change lanes, accelerate past the slower vehicle,and smoothly pull back into your lane in just a matter of a fewseconds.
Passing Stopped Traffic

Lesson 7: Basic Maneuvers and Normal Operating Situations
Participant Manual Module AAmbulance Operations: The Basics
-clxxvi
Attempting to pass stopped traffic is a hazardous situation. Youshould pass stopped traffic only when you are able to determinethe reason for their stopping. While you are passing stoppedtraffic, part of your escape route has been eliminated and ifoncoming traffic suddenly appears or one of the stopped driverssuddenly pulls in front of you, you may have nowhere to go.
Backing

Lesson 7: Basic Maneuvers and Normal Operating Situations
Module A Participant ManualAmbulance Operations: The Basics
-clxxvii
Childs and Ptacnik, in Emergency Ambulance Driving, report thatbacking accidents account for 85 percent of all single-vehicle crashesinvolving ambulances. This is normally a very slow maneuver, butremember that the area directly behind the ambulance is not visible to theoperator. If backing is going to be necessary, it is best to do the backingwhen you first arrive at the scene.
Always use a ground guide positioned at the left rear of the ambulance tohelp. Position the guide so that you can see him or her in your side viewmirrors and so that the guide can see all the obstacles behind theambulance. Use agreed-on hand signals and, if there is any confusion, stopand clear up the confusion before continuing. When backing, you willeither back in a straight line or make turns while backing. For straight linebacking--
! position your body so that you can properly use the side viewmirrors
! position both hands on the wheel, either at ten and two o'clock orat nine and three o'clock

Lesson 7: Basic Maneuvers and Normal Operating Situations
Participant Manual Module AAmbulance Operations: The Basics
-clxxviii
! make sure that you have a clear view to the rear
! begin to accelerate slowly
! keep hand movement on the steering wheel to a minimum
For turning while backing--
! position your body so that you can properly use the side viewmirrors
! position both hands on the wheel, either at ten and two o'clock orat nine and three o'clock
! frequently check the front corners of the vehicle--remember that,as you turn, it is the front end that moves sideways
! begin to accelerate slowly
! turn the steering wheel while maintaining firm control, alwayskeeping your hands on the wheel
! maintain speed control; in close quarters, creep the vehicle
Parking
Correct parking of the ambulance prevents it from being hit by other

Lesson 7: Basic Maneuvers and Normal Operating Situations
Module A Participant ManualAmbulance Operations: The Basics
-clxxix
vehicles at the scene of a crash or at the hospital. Parking in an urbansetting is the toughest parking problem because you have to search for aplace to park and then squeeze your ambulance into a tight space whiletrying to keep from impeding other traffic or getting your ambulance hit byother vehicles.
Our local policy on parking at crash sites and hospitals is--
Perpendicular or Stall Parking

Lesson 7: Basic Maneuvers and Normal Operating Situations
Participant Manual Module AAmbulance Operations: The Basics
-clxxx
Backing into a perpendicular parking space is highlyrecommended. To park in a perpendicular space--
! use a ground guide
! position the ambulance two to three feet from the parkedvehicles on your right
! stop the ambulance when the operator's body appears tobe lined up with the center of the parking space
! select a 45 degree target--use the left corner post blindspot of the windshield as a target guide
! creep forward while rapidly turning the steering wheels--check for traffic. Aim for the 45 degree target. Set thetires straight.
! shift into reverse
! line your vehicle up with the space and, looking over yourright shoulder, aim the vehicle for the space
! back to the rear pivot point
! creep backward and turn the steering wheel

Lesson 7: Basic Maneuvers and Normal Operating Situations
Module A Participant ManualAmbulance Operations: The Basics
-clxxxi
! get the vehicle straight in the space
! creep backward and straighten the wheels
! back to the rear parking line
Angle Parking
Angle parking is used when there are 30 to 45 degree angleparking spaces. This type of parking is designed for head-inparking. Follow these steps when parking in an angled space:
! before parking, check the side view mirrors and check theparking space

Lesson 7: Basic Maneuvers and Normal Operating Situations
Participant Manual Module AAmbulance Operations: The Basics
-clxxxii
! position the ambulance at least six to eight feet away fromthe side of the parked vehicles
! see the center of the space without your line of sightcurving across the parking line
! creep forward and turn the wheel
! line up with target in center of space
! straighten the wheels
! stop at front parking line
To back out of the angle parking space--
! use a ground guide
! back slowly
! check the traffic as you back up
! check all corners of the vehicle
! clear the fender of the car on the left, then turn the steeringwheel hard

Lesson 7: Basic Maneuvers and Normal Operating Situations
Module A Participant ManualAmbulance Operations: The Basics
-clxxxiii
! straighten the wheels
! shift to drive and move forward
Turning
The simplest turns are the right and left corners.
On two-way streets, which takes more time and space to accomplish, aright turn or a left turn at a corner?
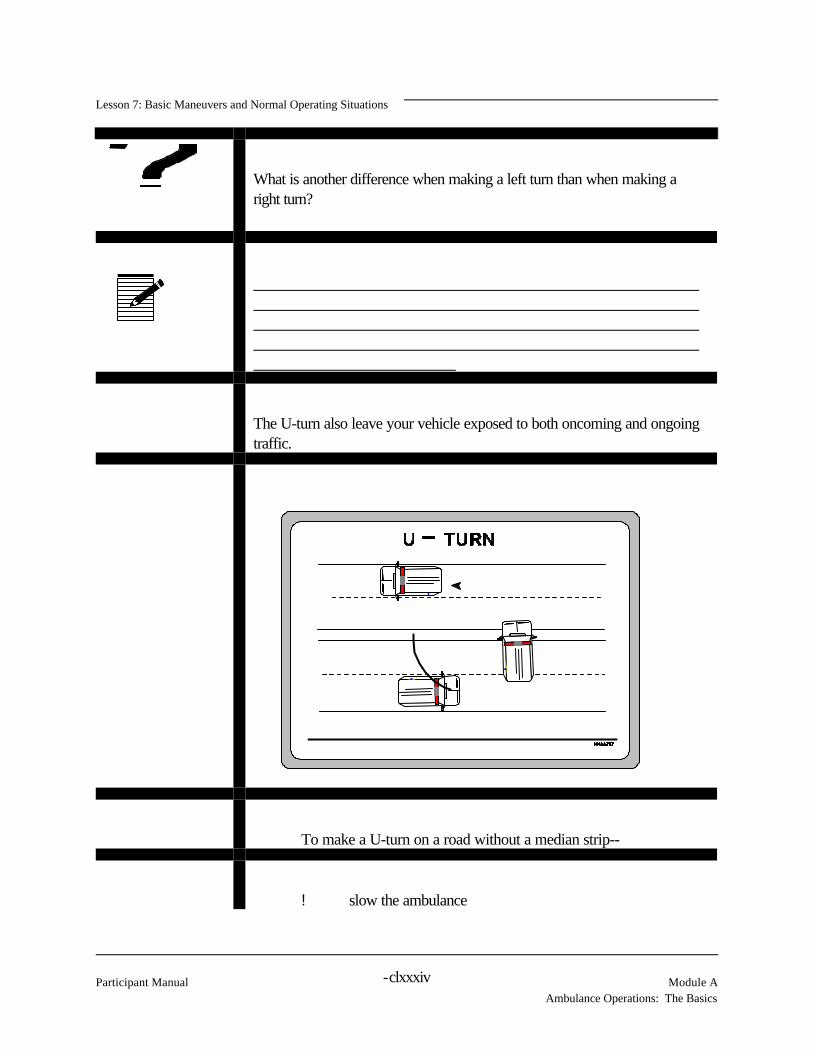
Lesson 7: Basic Maneuvers and Normal Operating Situations
Participant Manual Module AAmbulance Operations: The Basics
-clxxxiv
What is another difference when making a left turn than when making aright turn?
The U-turn also leave your vehicle exposed to both oncoming and ongoingtraffic.
To make a U-turn on a road without a median strip--
! slow the ambulance

Lesson 7: Basic Maneuvers and Normal Operating Situations
Module A Participant ManualAmbulance Operations: The Basics
-clxxxv
! pull to the extreme right of lane or onto the shoulder
! check traffic in both directions
! signal intent to turn
! turn steering wheel hard in the direction of the turn
! when traffic is clear in both directions, move forward andcomplete the turn as quickly as possible
! do not accelerate until after the turn is completed
! and if the turn cannot be completed in one motion, backonly as far as necessary for completion of the turnabout
Turning around by using the right side of the roadway or bybacking into a driveway requires a two-lane roadway.

Lesson 7: Basic Maneuvers and Normal Operating Situations
Participant Manual Module AAmbulance Operations: The Basics
-clxxxvi
To complete such a backaround--
! use a two-lane roadway
! use the same method as backing into a perpendicularparking space
! check roadway for traffic before and during the maneuver
! avoid driving head-in into a driveway, as this reducesmaneuverability when exiting the driveway
Urban Driving
Urban driving can be one of the most challenging experiences an operatorwill face. In urban traffic, your ambulance is surrounded by others being

Lesson 7: Basic Maneuvers and Normal Operating Situations
Module A Participant ManualAmbulance Operations: The Basics
-clxxxvii
driven closer together than is considered safe. Traffic is constantlychanging speed, some traffic may be stopped, and vehicles are entering andexiting the traffic flow from all directions.
Our local regulations about urban driving include--
Obviously, you must be at your peak of alertness to safely drive in heavyurban traffic. In order for an ambulance operator to drive a safeemergency response in heavy urban traffic, he must first understand and beable to drive routinely in heavy traffic. Urban driving requires that theoperator be observant and learn to fit well within traffic.
When operating in congested city traffic, there are usually a lot of thingshappening. It is most helpful to have a second pair of eyes assist you. Since the most critical part of your run is getting to the patient and yourprimary duty is to drive the ambulance safely, have the EMT sit in thepassenger seat to help navigate and watch the traffic.
The EMT may also use the radio to request alternate routes from dispatchshould you run into stopped traffic or unforecasted road repairs.
When it is not possible to have two people in the cab of the ambulance,slow down and always look twice. This is critical when proceeding

Lesson 7: Basic Maneuvers and Normal Operating Situations
Participant Manual Module AAmbulance Operations: The Basics
-clxxxviii
through busy intersections.
Large buildings will limit visibility at intersections. Large buildings also limitthe range of your siren and confuse people about which direction the sirenis coming. Your siren may get lost in all the other city noises unless youchange modes often, such as from wail to yelp.
In urban settings--
! be alert for traffic entering the roadway from alleys, parking lots,driveways, and intersections
! be alert for children playing in the streets, people exiting deliveryvehicles, drivers opening doors to exit parked vehicles,bicyclists, and pedestrians at school crossings and crosswalks
Rural Driving
Our local regulations about rural driving include--
! Be alert for loose livestock and pets.
Lesson 7: Basic Maneuvers and Normal Operating Situations
Module A Participant ManualAmbulance Operations: The Basics
-clxxxix
! Be alert for bicyclists, school buses, and children waiting for buses.
! At the higher speeds of driving in rural areas, drivers may have theirwindows up and the radio on and will not be able to hear thesiren until you are close to them.
! Be alert for slow-moving vehicles, such as tractors, farmequipment, trucks, and horses and buggies.
Two-lane Highway Driving
Two-lane highways are dangerous because it is difficult to maneuveraround other vehicles, making you contend with slower traffic. Do not takeunwarranted chances in the hopes of getting to your destination faster. Studies have shown that the chances taken are not worth the few secondssaved by passing a slower vehicle.
Our local regulations concerning two-lane highway driving include--
Remain calm and patient and allow the other drivers sufficient time to slowand pull over so that you may pass without endangering yourself, yourpassengers, or the other drivers.

Lesson 7: Basic Maneuvers and Normal Operating Situations
Participant Manual Module AAmbulance Operations: The Basics
-cxc
Highway/interstate Highway Driving
The special challenges of highway or interstate driving are directly relatedto the increased number of vehicles on the road and the increased speed ofthose vehicles.
Our local regulations about interstate highway driving include--
Use the 12-second rule to constantly read the subtle changes that occur intraffic.
Prerun route planning, which is covered in Lesson 6, means not onlypicking a route but knowing the route, including the corners where you willturn and the exits you will take off the interstate road. Sudden moves, suchas quickly changing lanes to get to an approaching exit or the reflex tobrake after you miss an exit, are the cause of many interstate crashes. Know the exit you're supposed to take by at least one exit preceding it.
Be aware of how other drivers may respond to the emergency vehicle.
When exiting an interstate roadway, maintain your present speed until yourambulance is completely off the interstate and use the exit ramp for

Lesson 7: Basic Maneuvers and Normal Operating Situations
Module A Participant ManualAmbulance Operations: The Basics
-cxci
decelerating. Remember that shorter ramps will require a greater rate ofdeceleration.
When entering an interstate roadway, use the entrance ramp to accelerateto the speed of traffic. Once on the interstate, progress lane by lane to theextreme left or "fast" lane. The siren should be in the yelp mode whenmaking lane changes as this promotes vehicle recognition.
Use extreme caution while on the interstate. Most people mean well andare really trying to clear the path for your vehicle. A little patience will helpkeep you in good stead with the public and out of potential crash situations.
About how much distance must there be between my vehicle and anoncoming vehicle if I want to pass a slower vehicle at 55 mph on a two-lane road?
The best way to back the ambulance is with the aid of what?
Lesson 7: Basic Maneuvers and Normal Operating Situations
Participant Manual Module AAmbulance Operations: The Basics
-cxcii
Why don't I want to lock the brakes in an emergency situation?
Perpendicular parking is best performed by which: backing in or drivingforward into the spot?
The 12 second rule should only be used on the highway because you can'tsee 12 seconds ahead when driving in a city. True or false, and why?

Lesson 7: Basic Maneuvers and Normal Operating Situations
Module A Participant ManualAmbulance Operations: The Basics
-cxciii

Lesson 7: Basic Maneuvers and Normal Operating Situations
Participant Manual Module AAmbulance Operations: The Basics
-cxciv
POINTS TOREMEMBER
Road construction and engineering factors affect ambulance control andquality of ride. Some of the factors to be considered are--
! different types of road surfaces and the transition between roadsurfaces
! road conditions and roadside engineering
! design of curves
! road crown
! water drainage
The four driving skills which effect the quality of ride are--
! cornering
! braking
! accelerating
! maintaining appropriate speed
You maintain a safety cushion around the ambulance by--
! encouraging tailgaters to pass
! making the public aware of the existence of multiple respondingunits
! driving defensively
! communicating with the other drivers on the road
Basic maneuvers you perform every day include--
! braking and stopping
! making lane changes
! passing on two lane roads and passing stopped traffic
! backing
! parking
! turning

Lesson 7: Basic Maneuvers and Normal Operating Situations
Module A Participant ManualAmbulance Operations: The Basics
-cxcv
You must be accomplished in driving on all road types and for all roadconditions that you may encounter in your area.
COURSE: EMERGENCY VEHICLE OPERATOR COURSE(AMBULANCE): NATIONAL STANDARD CURRICULUM
MODULE A: Ambulance Operation: The Basics
LESSON 8: Operations in Emergency Mode and Unusual Situations
COURSE GOAL: To provide ambulance operators with the knowledge and skills tooperate their vehicles so that their vehicle, equipment, crew, andpatients will be delivered safely and efficiently and the safety of thepublic will be assured during all phases of the delivery of theEmergency Medical Services (EMS) involving the ambulance
MODULE GOAL: To provide ambulance operators with the knowledge required tosafely and efficiently operate an ambulance in both non-emergencyand emergency modes

Lesson 8: Operations in Emergency Mode and Unusual Situations
Module A Participant ManualAmbulance Operation: The Basics
-cxci
LESSON GOAL: To provide participants with knowledge of how to operate anambulance under emergency driving and other high riskdriving situations in order to reduce ambulance crashes
PERFORMANCEOBJECTIVE(S):
! For each emergency driving situation presented, select therecommended procedure to be followed when drivingan ambulance
! Identify the problem(s) associated with each adversedriving condition listed
! For each adverse driving condition listed, select therecommended procedure to be followed when drivingan ambulance
! For each driving scenario listed, select the recommendedcrash avoidance technique to be followed when drivingan ambulance
! For each driving scenario listed, select the recommendedvehicle recovery technique to be followed when drivingan ambulance

Lesson 8: Operations in Emergency Mode and Unusual Situations
Participant Manual Module AAmbulance Operation: The Basics
-cxcii
PM APPENDIX:
PARTICIPANTMATERIALS:
ICON LEGEND
Notes Response Appendix Local Requirements

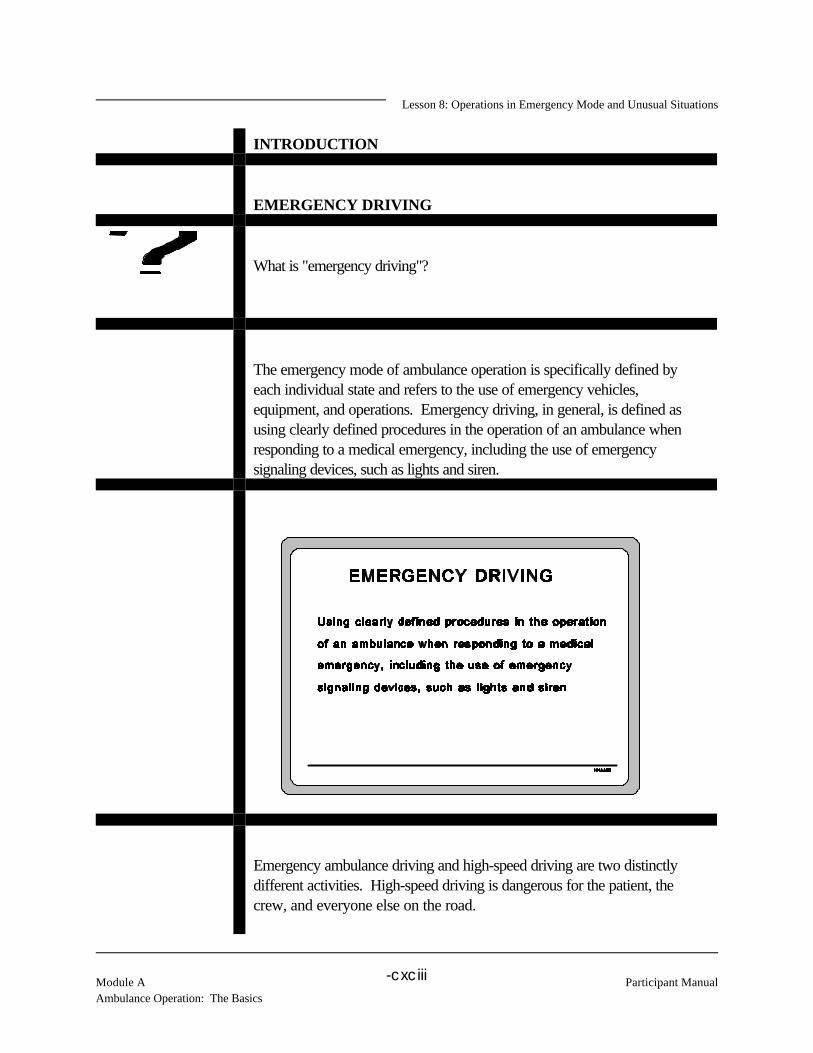
Lesson 8: Operations in Emergency Mode and Unusual Situations
Module A Participant ManualAmbulance Operation: The Basics
-cxciii
INTRODUCTION
EMERGENCY DRIVING
What is "emergency driving"?
The emergency mode of ambulance operation is specifically defined byeach individual state and refers to the use of emergency vehicles,equipment, and operations. Emergency driving, in general, is defined asusing clearly defined procedures in the operation of an ambulance whenresponding to a medical emergency, including the use of emergencysignaling devices, such as lights and siren.
Emergency ambulance driving and high-speed driving are two distinctlydifferent activities. High-speed driving is dangerous for the patient, thecrew, and everyone else on the road.
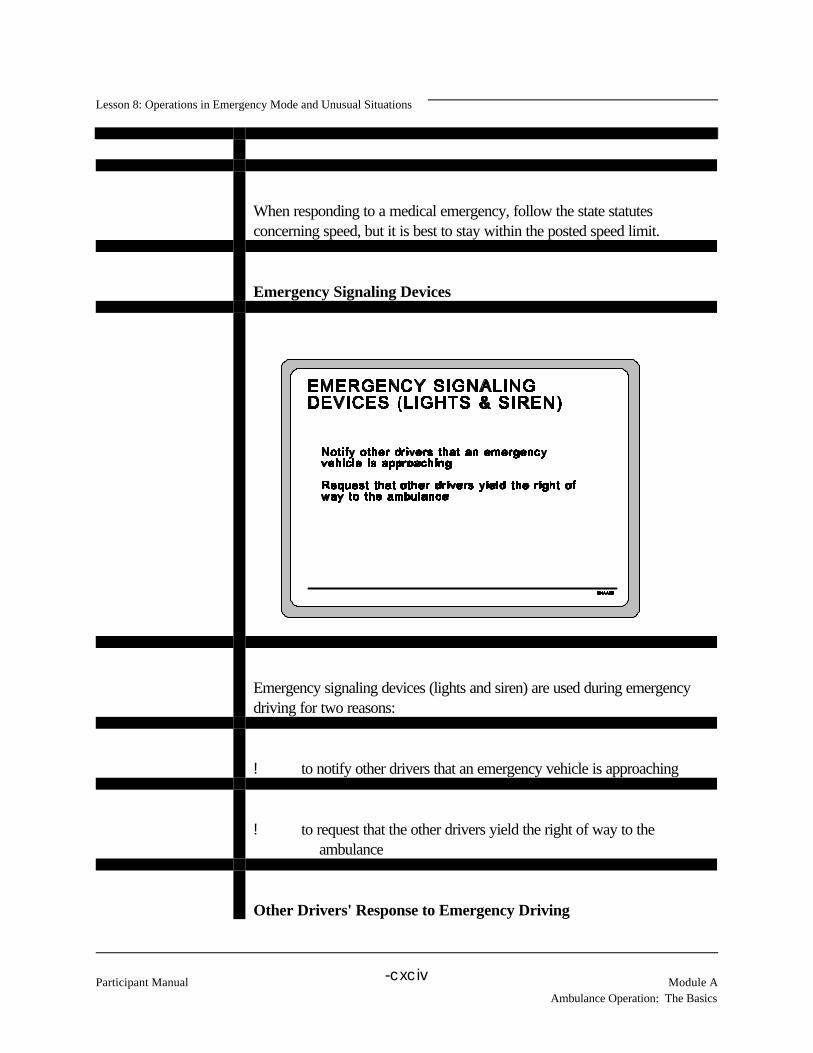
Lesson 8: Operations in Emergency Mode and Unusual Situations
Participant Manual Module AAmbulance Operation: The Basics
-cxciv
When responding to a medical emergency, follow the state statutesconcerning speed, but it is best to stay within the posted speed limit.
Emergency Signaling Devices
Emergency signaling devices (lights and siren) are used during emergencydriving for two reasons:
! to notify other drivers that an emergency vehicle is approaching
! to request that the other drivers yield the right of way to theambulance
Other Drivers' Response to Emergency Driving
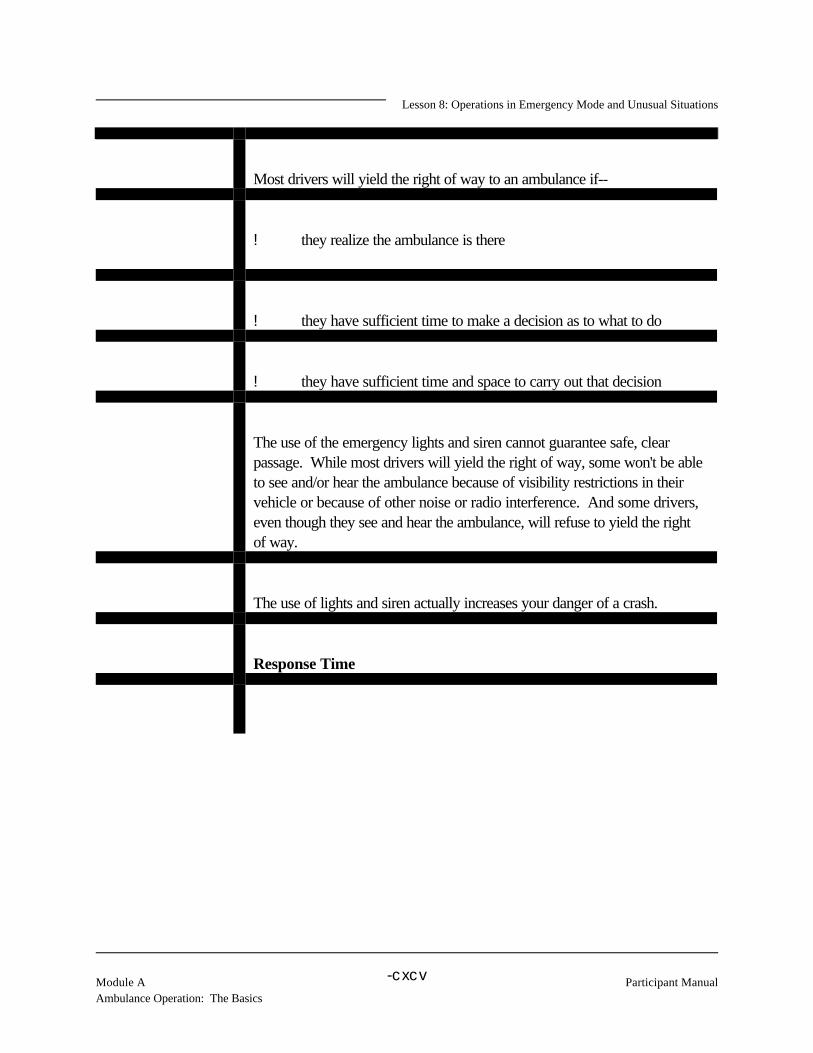
Lesson 8: Operations in Emergency Mode and Unusual Situations
Module A Participant ManualAmbulance Operation: The Basics
-cxcv
Most drivers will yield the right of way to an ambulance if--
! they realize the ambulance is there
! they have sufficient time to make a decision as to what to do
! they have sufficient time and space to carry out that decision
The use of the emergency lights and siren cannot guarantee safe, clearpassage. While most drivers will yield the right of way, some won't be ableto see and/or hear the ambulance because of visibility restrictions in theirvehicle or because of other noise or radio interference. And some drivers,even though they see and hear the ambulance, will refuse to yield the rightof way.
The use of lights and siren actually increases your danger of a crash.
Response Time
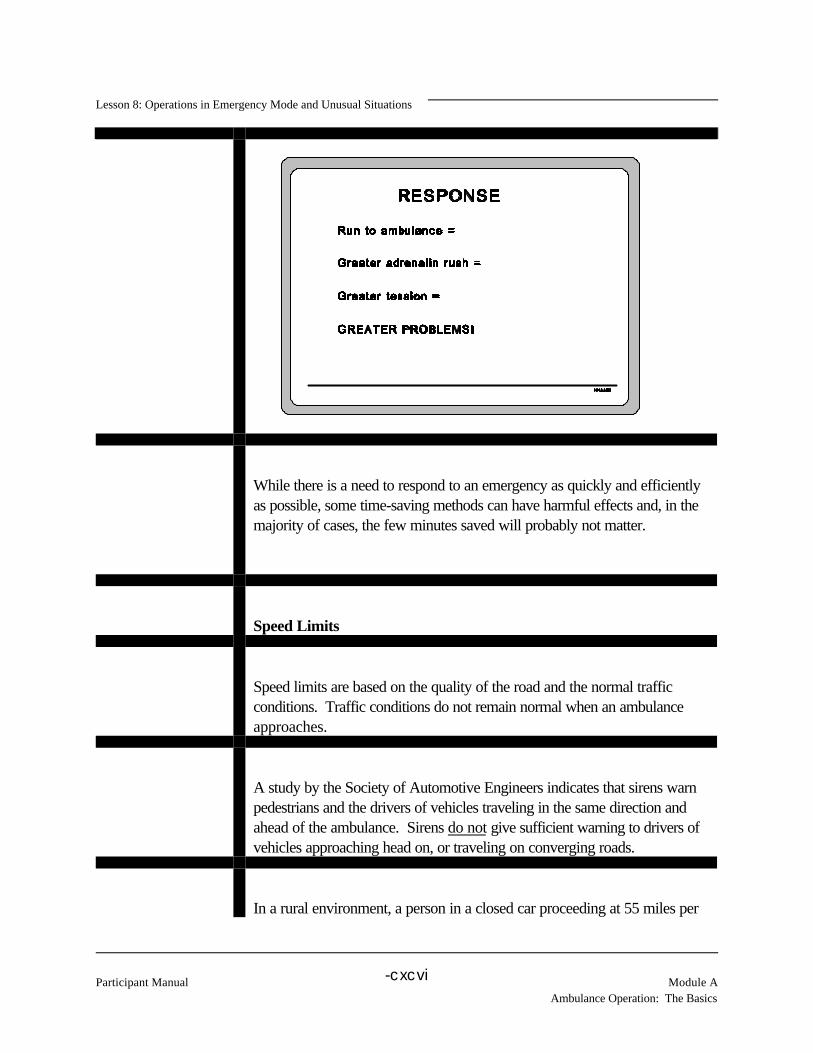
Lesson 8: Operations in Emergency Mode and Unusual Situations
Participant Manual Module AAmbulance Operation: The Basics
-cxcvi
While there is a need to respond to an emergency as quickly and efficientlyas possible, some time-saving methods can have harmful effects and, in themajority of cases, the few minutes saved will probably not matter.
Speed Limits
Speed limits are based on the quality of the road and the normal trafficconditions. Traffic conditions do not remain normal when an ambulanceapproaches.
A study by the Society of Automotive Engineers indicates that sirens warnpedestrians and the drivers of vehicles traveling in the same direction andahead of the ambulance. Sirens do not give sufficient warning to drivers ofvehicles approaching head on, or traveling on converging roads.
In a rural environment, a person in a closed car proceeding at 55 miles per
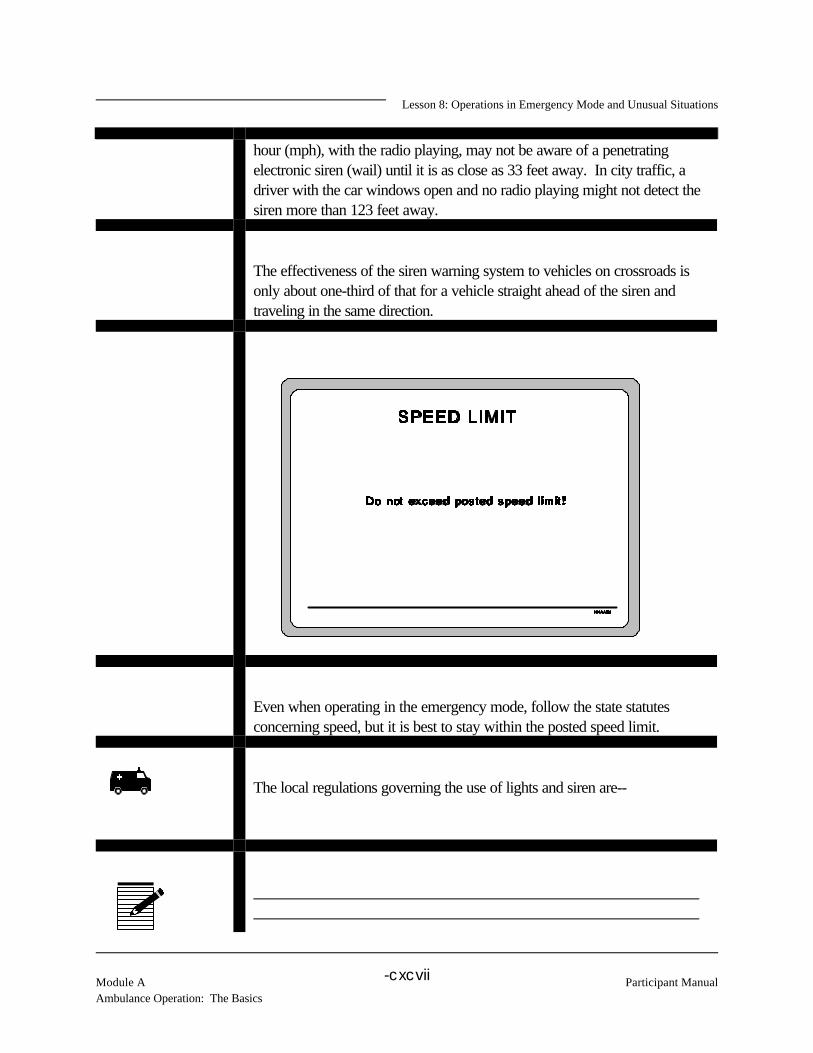
Lesson 8: Operations in Emergency Mode and Unusual Situations
Module A Participant ManualAmbulance Operation: The Basics
-cxcvii
hour (mph), with the radio playing, may not be aware of a penetratingelectronic siren (wail) until it is as close as 33 feet away. In city traffic, adriver with the car windows open and no radio playing might not detect thesiren more than 123 feet away.
The effectiveness of the siren warning system to vehicles on crossroads isonly about one-third of that for a vehicle straight ahead of the siren andtraveling in the same direction.
Even when operating in the emergency mode, follow the state statutesconcerning speed, but it is best to stay within the posted speed limit.
The local regulations governing the use of lights and siren are--

Lesson 8: Operations in Emergency Mode and Unusual Situations
Participant Manual Module AAmbulance Operation: The Basics
-cxcviii
Controlled Intersection Procedure
What is a "controlled intersection?"
Dangers

Lesson 8: Operations in Emergency Mode and Unusual Situations
Module A Participant ManualAmbulance Operation: The Basics
-cxcix
The New York State Department of Health reported in the "AmbulanceAccident Prevention Seminar" that 60 percent of ambulance crashes occurat intersections with stop signs or traffic lights.
If the intersection is controlled, why would ambulances have so manycrashes?
At an intersection controlled with stop lights, who has the right of way, theapproaching ambulance or the cars with the green light?
Due Regard

Lesson 8: Operations in Emergency Mode and Unusual Situations
Participant Manual Module AAmbulance Operation: The Basics
-cc
The Law of Due Regard says that "a reasonably careful person, performingsimilar duties and under similar circumstances, would act in the samemanner."
The Law of Due Regard requires that the courts look at each crash anddetermine if the ambulance operator was abiding by the law of due regardat the time a traffic crash occurred. To do so, they must get answers toquestions like the following:
! Was it necessary to use the emergency warning system under thecircumstances of the call you were responding to and themedical condition of the patient you were transporting?
! Did the ambulance operator give enough warning of the vehicle'sapproach to allow other motorists and pedestrians to clear theway for the emergency vehicle?
Lesson 8: Operations in Emergency Mode and Unusual Situations
Module A Participant ManualAmbulance Operation: The Basics
-cci
! Was the emergency warning system activated and operating priorto the crash?
! Was the ambulance operator using the emergency warning systemin the manner for which the system was designed to be used?
! Was the operator of the ambulance operating the vehicle at aspeed greater than necessary to allow the complete control ofthe ambulance in relation to traffic, road, and weatherconditions?
Your performance as the operator is going to be closely looked at inrelation to the nature of the emergency and the traffic, road, and weatherconditions.
The National Voluntary Consensus Standard
The standards have used the ASTM guideline as a reference. Thestandards for controlled intersection management during emergencyresponse mode are--
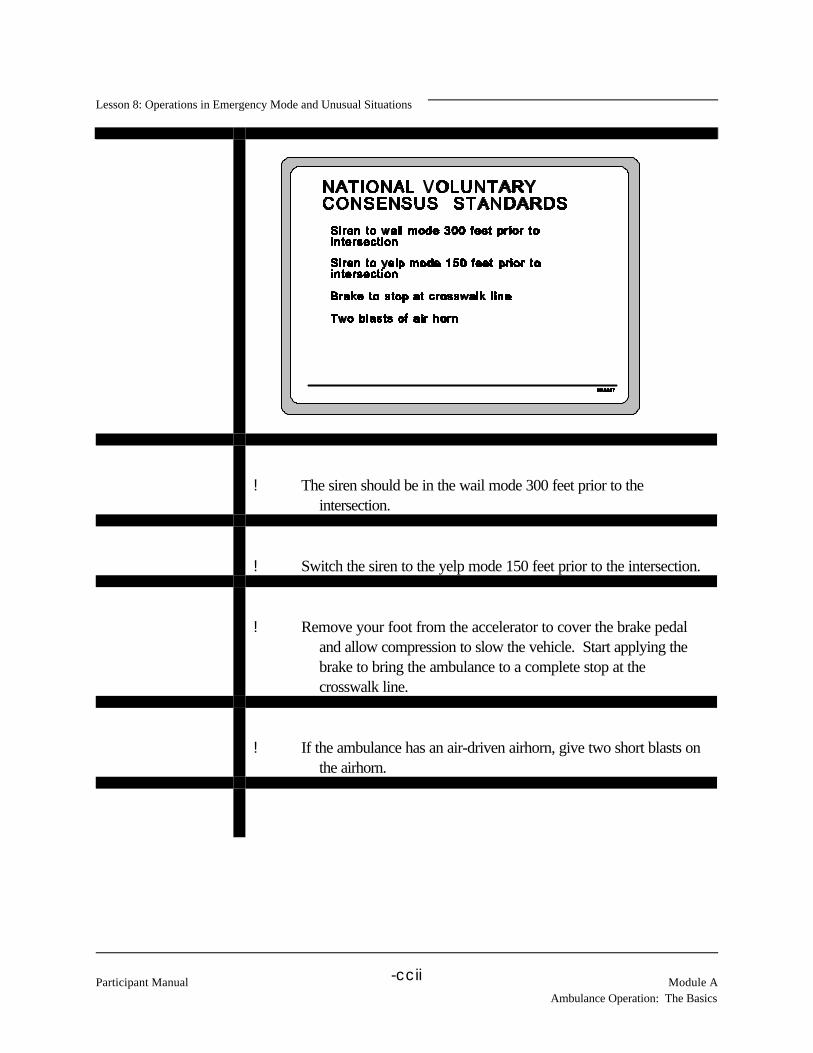
Lesson 8: Operations in Emergency Mode and Unusual Situations
Participant Manual Module AAmbulance Operation: The Basics
-ccii
! The siren should be in the wail mode 300 feet prior to theintersection.
! Switch the siren to the yelp mode 150 feet prior to the intersection.
! Remove your foot from the accelerator to cover the brake pedaland allow compression to slow the vehicle. Start applying thebrake to bring the ambulance to a complete stop at thecrosswalk line.
! If the ambulance has an air-driven airhorn, give two short blasts onthe airhorn.

Lesson 8: Operations in Emergency Mode and Unusual Situations
Module A Participant ManualAmbulance Operation: The Basics
-cciii
! Make a complete stop. Look to the left, look to the immediatefront, look to the right, and then again to the left. You may thenproceed through the intersection under 10 mph if traffic isstopped in all lanes to the left, in front of and to the right of theambulance. After you have made eye contact with all stoppedvehicle drivers, you may proceed through the intersectionexercising the highest degree of care.
! Continue with the siren in yelp mode and proceed through theintersection exercising the highest degree of care.
! When there are vacant lanes to the left or right, you must completethe previous steps of clearing each lane of traffic prior tocrossing that lane.
! You should expect that any vacant lane to your left or right maybecome occupied by another vehicle which did not see or hearthe ambulance's warning systems.

Lesson 8: Operations in Emergency Mode and Unusual Situations
Participant Manual Module AAmbulance Operation: The Basics
-cciv
! You should be aware that other emergency vehicles may beapproaching the same intersection that you have taken controlof. You should not enter the intersection until the other vehicleshave stopped or proceeded through the intersection.
! You should avoid passing stopped vehicles on their right.
! You should turn right at the intersection only after all vehicles havestopped and drivers on the right are aware of the ambulance.
! You should expect that any vehicles in front may make anunexpected left turn in front of the ambulance after it has startedto enter the intersection.
! You must be aware of other hazards at the intersection, forexample, pedestrians, road hazards, defective traffic controlsystems.
Lesson 8: Operations in Emergency Mode and Unusual Situations
Module A Participant ManualAmbulance Operation: The Basics
-ccv
The local rules for driving through controlled intersections are:
Typical local intersection--
Dangerous intersections--
Driving Against Traffic
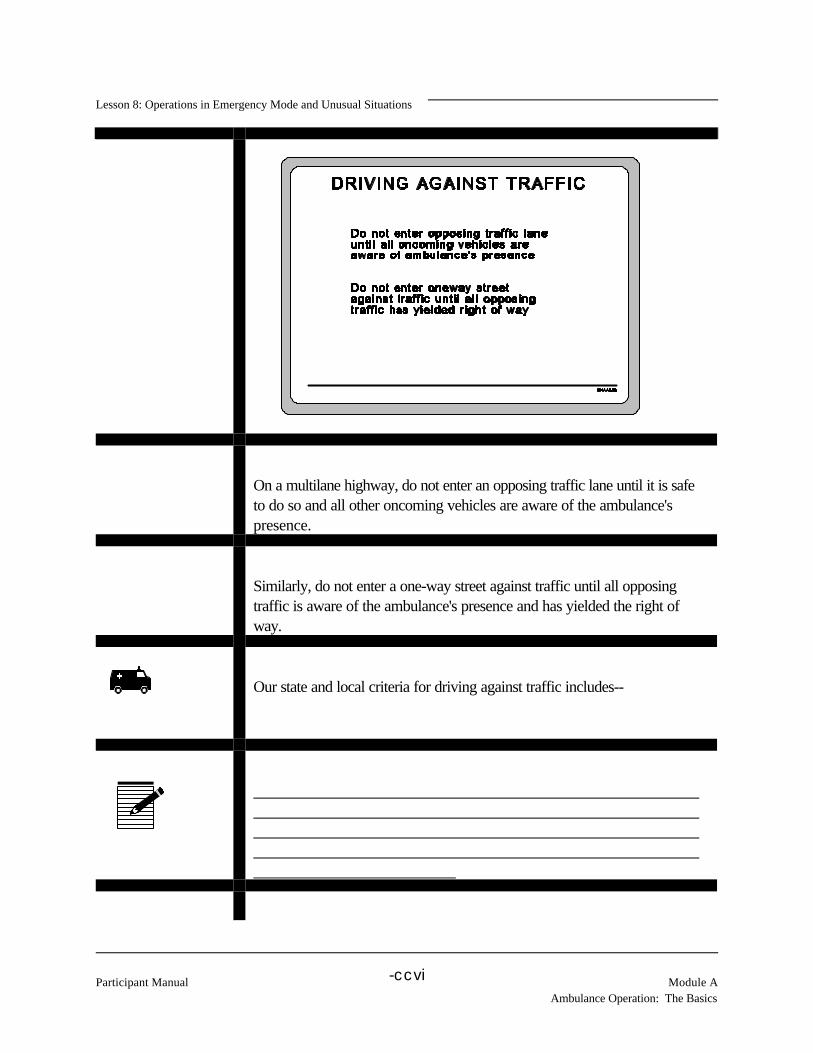
Lesson 8: Operations in Emergency Mode and Unusual Situations
Participant Manual Module AAmbulance Operation: The Basics
-ccvi
On a multilane highway, do not enter an opposing traffic lane until it is safeto do so and all other oncoming vehicles are aware of the ambulance'spresence.
Similarly, do not enter a one-way street against traffic until all opposingtraffic is aware of the ambulance's presence and has yielded the right ofway.
Our state and local criteria for driving against traffic includes--
Lesson 8: Operations in Emergency Mode and Unusual Situations
Module A Participant ManualAmbulance Operation: The Basics
-ccvii
There are two reasons why we use emergency signaling devices. What arethey?
You are in the emergency response mode and are driving to the scene of amultiple-car crash. The weather conditions are good, traffic is light, and thespeed limit is 55 mph. What is the maximum speed you may drive?
Three hundred feet prior to approaching a controlled intersection, yoursiren should be in which mode? And, 150 feet prior to the intersection,change the siren to which mode?

Lesson 8: Operations in Emergency Mode and Unusual Situations
Participant Manual Module AAmbulance Operation: The Basics
-ccviii
Prior to entering a one-way street against traffic, what must you do?
After coming to a complete stop for a red light at a controlled intersection,what must the operator do prior to proceeding through the intersection?
ADVERSE CONDITIONS
One of your goals is to provide a smooth, uneventful ride for your patient,not the fastest ride possible.
Smooth driving keeps the ambulance balanced. When the ambulance isbalanced, its weight is distributed evenly to all four wheels, the suspensionis stable, and steering and braking are most effective.

Lesson 8: Operations in Emergency Mode and Unusual Situations
Module A Participant ManualAmbulance Operation: The Basics
-ccix
Adverse conditions affect--
! Traction
! Vision
Conditions Affecting Traction
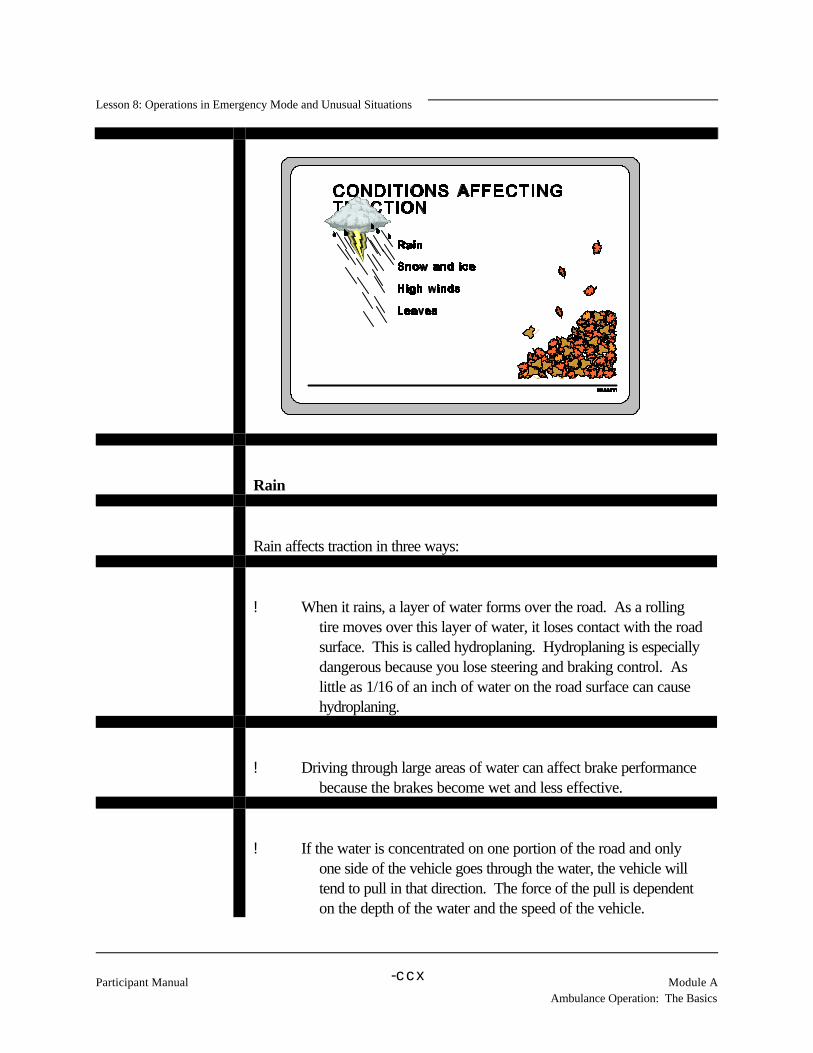
Lesson 8: Operations in Emergency Mode and Unusual Situations
Participant Manual Module AAmbulance Operation: The Basics
-ccx
Rain
Rain affects traction in three ways:
! When it rains, a layer of water forms over the road. As a rollingtire moves over this layer of water, it loses contact with the roadsurface. This is called hydroplaning. Hydroplaning is especiallydangerous because you lose steering and braking control. Aslittle as 1/16 of an inch of water on the road surface can causehydroplaning.
! Driving through large areas of water can affect brake performancebecause the brakes become wet and less effective.
! If the water is concentrated on one portion of the road and onlyone side of the vehicle goes through the water, the vehicle willtend to pull in that direction. The force of the pull is dependenton the depth of the water and the speed of the vehicle.
Lesson 8: Operations in Emergency Mode and Unusual Situations
Module A Participant ManualAmbulance Operation: The Basics
-ccxi
Precautions--
! Slow down before hitting water
! Gently apply your brakes for a few moments as you exit the deeperpuddles to heat the brake shoes and dry them
Snow and Ice
Snow and ice form an extremely slick barrier between your tires and theroadway. Extreme caution must be taken when driving on snow and ice toavoid sliding when turning, braking, and accelerating.
Bridges and shaded roadways freeze first.
When driving through deep snow, proceed slowly and shift into a lowergear before entering the snow and attempt to keep the ambulance movingthrough the snow.
High Winds
The ambulance is very susceptible to the effects of the wind.
Cross-winds can blow the vehicle off the road or across the center line,particularly in curves and corners and especially when it's raining, snowing,or icy and traction with the road is already reduced.

Lesson 8: Operations in Emergency Mode and Unusual Situations
Participant Manual Module AAmbulance Operation: The Basics
-ccxii
Wind shifts occur as you pass buildings, travel through an underpass, orpass large trucks. Reduce speed to lessen the effects of these wind shifts.
Leaves
Wet leaves on the roadway can become as slick as ice or snow. Slowdown and treat them as you would a large patch of ice.
Increasing Traction with Traction Devices
When it starts to rain, retain control by reducing speed and apply smoothsteering, braking, and acceleration.
Snow Tires
Snow tires have a tread pattern that is different than normal highway tires.

Lesson 8: Operations in Emergency Mode and Unusual Situations
Module A Participant ManualAmbulance Operation: The Basics
-ccxiii
This open, deeply grooved tread pattern increases the tire's grip on thesnow and is designed to clean itself as the tire rotates.
Chains
Chains can be carried in the vehicle and installed when needed. Whenusing chains, reduce your speed to keep them from banging against theambulance. Chains should be removed before driving on bare roads, ifpossible.
Conditions Affecting Vision
Your vision can be affected in three ways. First, the environment may giveyou problems. Second, your vehicle and the way you care for it may affectthe way you are able to see things. And finally, your physical condition andpreparation for duty will affect your eye's ability to see.

Lesson 8: Operations in Emergency Mode and Unusual Situations
Participant Manual Module AAmbulance Operation: The Basics
-ccxiv
Driving at Night
Even under the best of weather conditions, visibility is decreased at night. Because there is less light, your eyes work differently, and you see thingsdifferently than in the daytime.
Because of the way your eyes are designed, you have a blind spot in thecenter of your field of vision. At night, the blind spot may hide small,poorly lit objects if you try to stare at them. To compensate, you mustconstantly scan the different parts of the area ahead.
Some other problems you encounter when driving at night are--
! Darkness conceals hazards and you must make decisions based onincomplete information.
! It is more difficult to judge the speed and position of anothervehicle because you do not have distinct shadows and otherobjects as reference points.
! Your peripheral vision is reduced if you smoke. This makes itmore difficult to judge the speed and position of other vehicles,especially at night.
! Adequate highway lighting is limited.
! Glare from roadside lighting and oncoming vehicle headlights impairyour visibility.
Night Driving Techniques

Lesson 8: Operations in Emergency Mode and Unusual Situations
Module A Participant ManualAmbulance Operation: The Basics
-ccxv
A few night driving techniques can help reduce the dangers:
! Keep dash and panel lights dim for better vision, but always haveenough light to read the speedometer.
! Reduce speed so that you can stop within the visible distance.
! Increase sight distance by keeping the headlights clean andproperly aimed and the windshield clean.
! Watch beyond the headlights on or near the roadway for slow-moving or unlighted vehicles, curves, T-intersections, roadobstructions or defects, trains, pedestrians, and animals.
! Keep your eyes moving so that your blind spot does not hideobjects ahead.
Lesson 8: Operations in Emergency Mode and Unusual Situations
Participant Manual Module AAmbulance Operation: The Basics
-ccxvi
Maintaining Night Vision
To increase your ability to see at night--
! Don't move immediately from a brightly-lit room to a dark vehicleand begin driving.
! Avoid looking directly into glaring headlights of oncoming vehicles.
! Don't smoke.
! Don't wear sunglasses at night.
Rain and Fog
Rain and fog affect visibility in two ways:
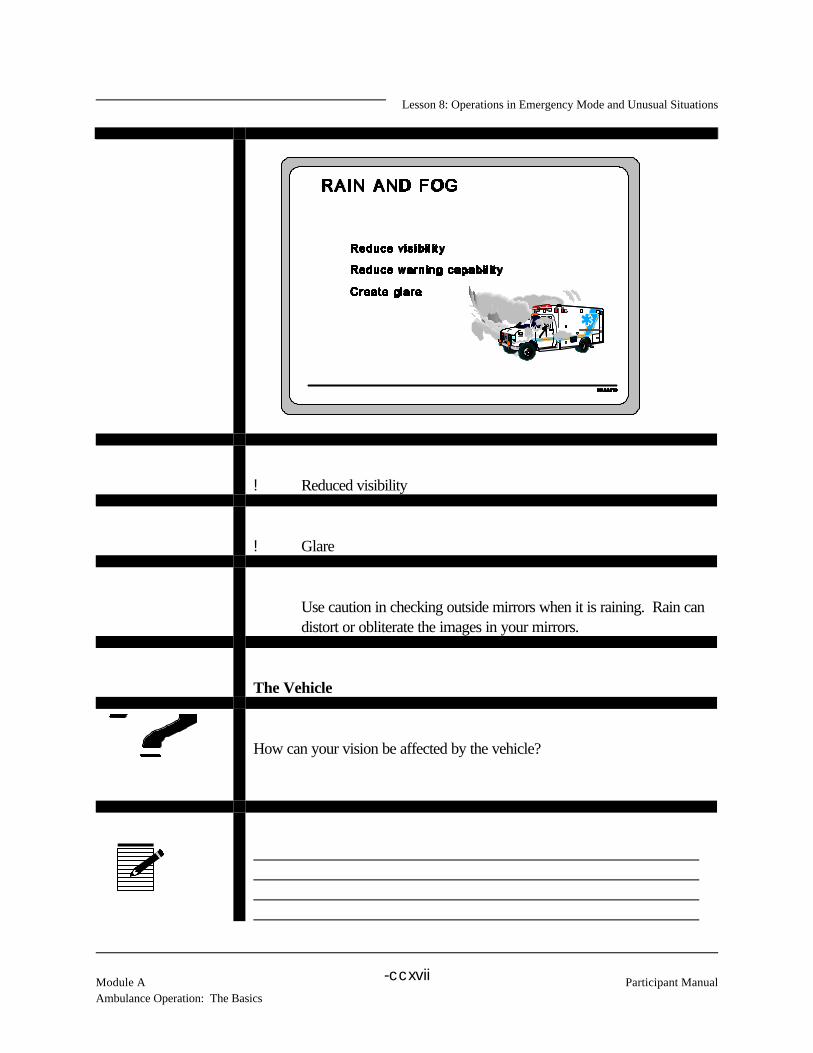
Lesson 8: Operations in Emergency Mode and Unusual Situations
Module A Participant ManualAmbulance Operation: The Basics
-ccxvii
! Reduced visibility
! Glare
Use caution in checking outside mirrors when it is raining. Rain candistort or obliterate the images in your mirrors.
The Vehicle
How can your vision be affected by the vehicle?

Lesson 8: Operations in Emergency Mode and Unusual Situations
Participant Manual Module AAmbulance Operation: The Basics
-ccxviii
Windshield/Wipers
Have broken or cracked windshields fixed or replaced, and keep yourwindshield clean and your wipers operative so that you may clean thewindshield.
Visors
Use the visors mounted above the windshield to prevent looking directlyinto the sun. Move the visors to the side to reduce glare and the hypnoticeffect of the sun flashing through trees.
Bug Screens
Plastic bug screens mounted on the front of the hood are very effective indeflecting bugs, and even light rain and snow, up and over the windshield.
Headlights
Keep your headlights clean and operative to provide maximum lighting atnight and in adverse weather conditions.
Side View Mirrors
Keep your side view mirrors clean and properly adjusted so that you areable to see to down both sides of the vehicle. If necessary, adjust a mirrorslightly to prevent glare when the sun is behind you.

Lesson 8: Operations in Emergency Mode and Unusual Situations
Module A Participant ManualAmbulance Operation: The Basics
-ccxix
The Driver
What things might you do that affect your own vision?
Compensating for Visibility Problems
These are some additional ways to compensate for visibility problems:

Lesson 8: Operations in Emergency Mode and Unusual Situations
Participant Manual Module AAmbulance Operation: The Basics
-ccxx
! Prepare yourself.
! Turn on low beam headlights and the wipers, if needed.
! Watch for slow moving and stopped vehicles.
! Check the side view mirrors frequently for vehicles approachingquickly from the rear.
! Be alert for patches of fog in valleys and low-lying areas.
! Drive slowly, but keep moving.
! If conditions are too bad to continue, pull over as far as possible,stop, leave lights on, and activate hazard lights.
Lesson 8: Operations in Emergency Mode and Unusual Situations
Module A Participant ManualAmbulance Operation: The Basics
-ccxxi
Hydroplaning occurs when it rains and a layer of water forms between thetire and the road surface. Why is hydroplaning dangerous?
After it has rained and there are puddles of standing water, how can youreduce the effects of hydroplaning?
What is the problem associated with high cross-winds?
While on a run at night, you remember from this course that your eyes

Lesson 8: Operations in Emergency Mode and Unusual Situations
Participant Manual Module AAmbulance Operation: The Basics
-ccxxii
work differently and that you have a blind spot in the center of your field ofvision. What do you do to compensate for this blind spot?
What things improve your night vision?
CRASH AVOIDANCE TECHNIQUES
What is "crash avoidance"?
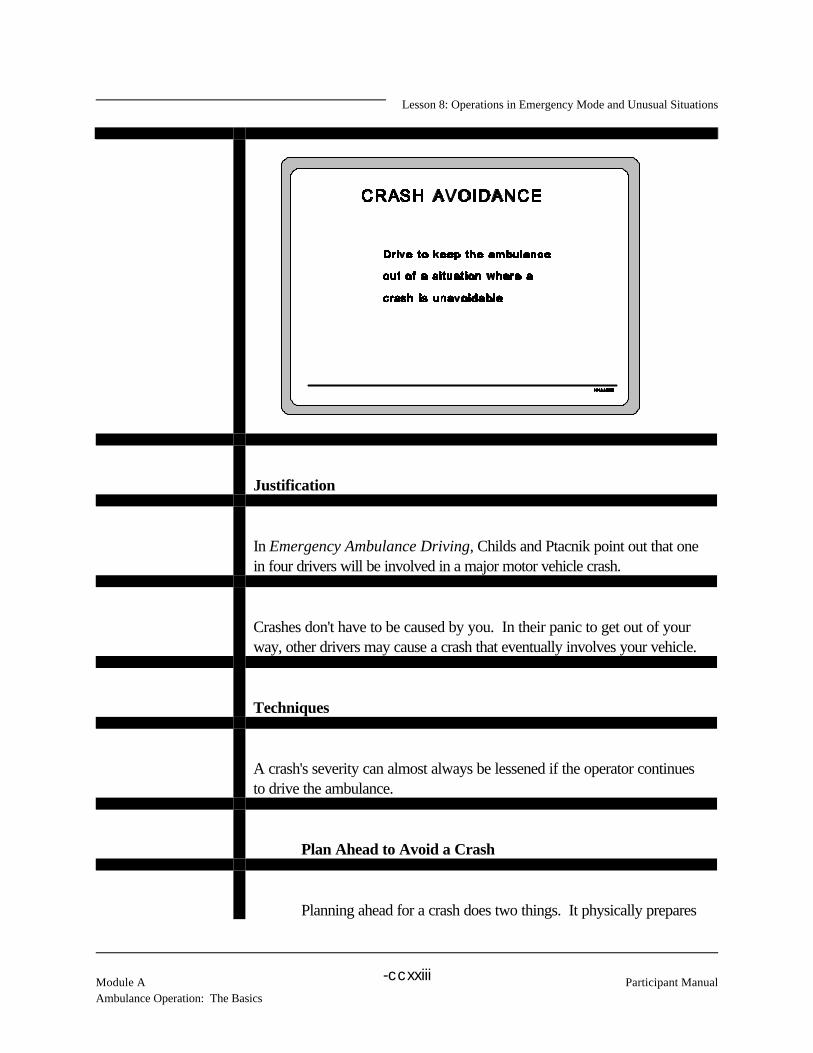
Lesson 8: Operations in Emergency Mode and Unusual Situations
Module A Participant ManualAmbulance Operation: The Basics
-ccxxiii
Justification
In Emergency Ambulance Driving, Childs and Ptacnik point out that onein four drivers will be involved in a major motor vehicle crash.
Crashes don't have to be caused by you. In their panic to get out of yourway, other drivers may cause a crash that eventually involves your vehicle.
Techniques
A crash's severity can almost always be lessened if the operator continuesto drive the ambulance.
Plan Ahead to Avoid a Crash
Planning ahead for a crash does two things. It physically prepares

Lesson 8: Operations in Emergency Mode and Unusual Situations
Participant Manual Module AAmbulance Operation: The Basics
-ccxxiv
your vehicle for the effects of a crash. And, it prepares youmentally by making you think about avoiding the crash.
Securing Your Equipment
Store items in cabinets or tie them down so that they do notbecome missiles during a crash.
Check your ambulance for items that may come loose and doorsor drawers that may open. Try to find ways to fasten them so thatthey remain closed or tied down when not in use.
Use padding to cushion sharp corners and prevent injury.
Wear Seat Belts
Always wear your seat belts and have your passengers wear theirs.
Keep the patient belted to the stretcher and the stretcher securedto the chassis.
Mentally Prepare Yourself
Plan your escape route from every situation around you.
Decide which item to hit if a crash is unavoidable. You have twochoices, but always hit at an angle rather than head-on. Choose tohit items that will absorb the impact rather than solid objects.
Lesson 8: Operations in Emergency Mode and Unusual Situations
Module A Participant ManualAmbulance Operation: The Basics
-ccxxv
Maintain Rear and Side Space Cushion
The further other vehicles are from your ambulance, the moredifficult it is to be involved in a crash with them.
Back With a Ground Guide
Use all the help you can to avoid backing into other vehicles oritems on the ground. Back with a ground guide.
Multiple Responding Units/Multiple Agency Response
Anticipate other units responding to the same emergency, or toother emergencies in the vicinity. Look out for their lights. Changethe volume of your siren so that you can hear the sirens of otherunits.
Clearing a Controlled Intersection
The only way you can prevent a crash with other drivers at anintersection is to look each driver in the eye and see that they haveacknowledged your presence and have agreed to yield the right ofway.
Then, and only then, are you safe to proceed toward the nextintersection. Or are you? Is there another driver hidden behindthat truck beside you or around the corner? Always be alert andnever get careless.

Lesson 8: Operations in Emergency Mode and Unusual Situations
Participant Manual Module AAmbulance Operation: The Basics
-ccxxvi
Faced with the certainty of a crash, there are three things a drivercan do: brake, accelerate, or turn to avoid it or lessen the impact.
Braking
Braking takes time and distance to be effective. If brakes arerequired, apply them smoothly and firmly. Do not lock the brakes.
Acceleration
If, when crossing an intersection, you realize that you are about tobe hit from the side or rear, you may be able to avoid a crash byaccelerating as smoothly and rapidly as possible without spinningthe wheels.
Steering Out of the Way
Lesson 8: Operations in Emergency Mode and Unusual Situations
Module A Participant ManualAmbulance Operation: The Basics
-ccxxvii
There are many times where steering out of the way is the only wayto avoid a crash. To do so, the vehicle must be moved sidewaysas far as required and as quickly as possible to clear the hazard. Even if you only partially clear the object, you will hit it with aglancing blow instead of head-on.
Practice driving with your hands at the ten and two o'clock or nineand three o'clock positions so that you are always prepared toexecute a smooth, but rapid, turn.
What are some of the things you can do to mentally prepare yourself toavoid a crash?
Sometimes, despite all the planning you do, crashes happen. Faced withthe certainty of a crash, there are three things a driver can do. What arethey?

Lesson 8: Operations in Emergency Mode and Unusual Situations
Participant Manual Module AAmbulance Operation: The Basics
-ccxxviii
As you are moving through a controlled intersection, you suddenly notice acar moving rapidly toward you from your left side. What is probably thebest way to avoid a crash?
You are driving down the interstate in the left lane doing 55 mph. All thetraffic has been responsive to your lights and siren and have moved into theright lane. Suddenly, a car ahead pulls from the right lane into your laneright in front of you. What two things can you do to avoid the crash?
You have been parked at the crash scene for 20 minutes. As you getready to leave, you notice that other vehicles have blocked you fromdriving forward. Prior to backing out of your parking spot, what shouldyou do to help you avoid colliding with equipment behind your ambulance?
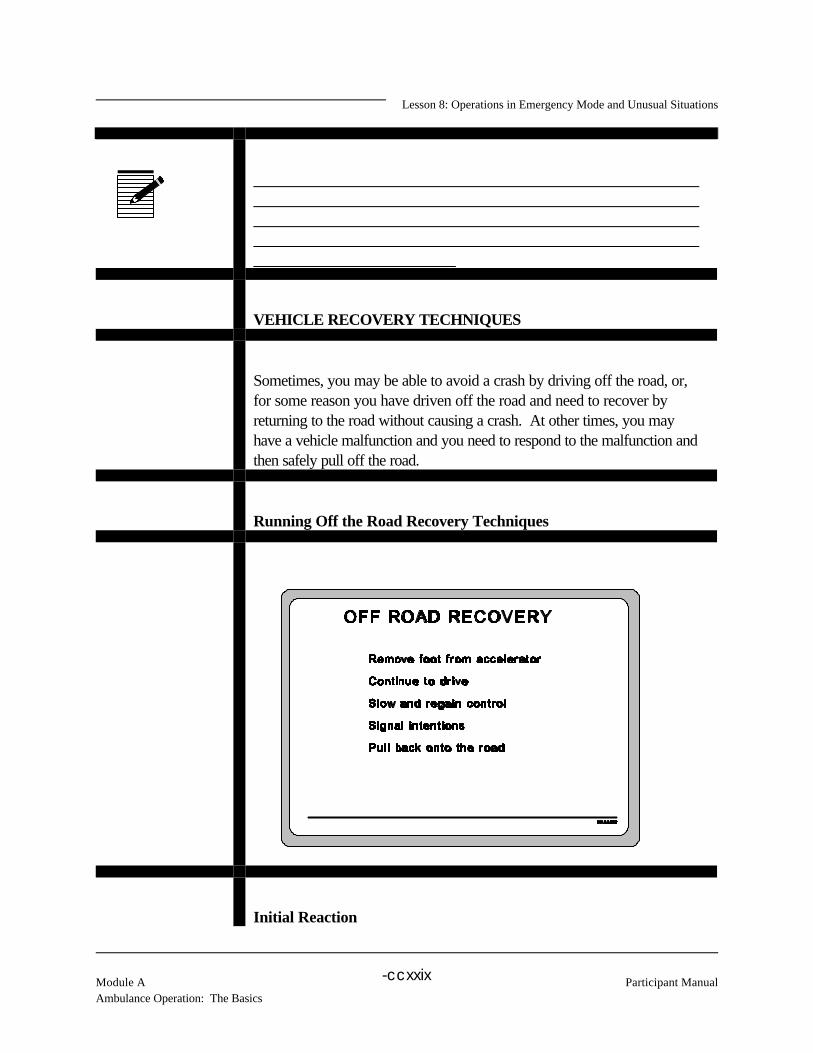
Lesson 8: Operations in Emergency Mode and Unusual Situations
Module A Participant ManualAmbulance Operation: The Basics
-ccxxix
VEHICLE RECOVERY TECHNIQUES
Sometimes, you may be able to avoid a crash by driving off the road, or,for some reason you have driven off the road and need to recover byreturning to the road without causing a crash. At other times, you mayhave a vehicle malfunction and you need to respond to the malfunction andthen safely pull off the road.
Running Off the Road Recovery Techniques
Initial Reaction

Lesson 8: Operations in Emergency Mode and Unusual Situations
Participant Manual Module AAmbulance Operation: The Basics
-ccxxx
The most common reaction when leaving the road surface is to quickly tryto get back onto the road. This reaction frequently causes a head-on crashbecause you overcorrect and cross the center line into the oncoming lane.
Control
To avoid over-correcting, immediately remove your foot from theaccelerator and continue to drive the ambulance. Do not brake heavily oryou may be pulled further from the road. If no obstacles are directlyahead, continue to slow and regain steering control in preparation forpulling back onto the road.
Pulling Back Onto the Road
Check your side view mirrors and signal drivers behind you that you planto return to the road. Smoothly turn the steering wheel and drive backonto the road.
In the event an additional hazard (such as a pole or guard rail) is directlyahead on the shoulder of the road, you may have to drive immediately backonto the road, even though you may not be fully prepared.
To do so, smoothly turn the steering wheel toward the road and thenimmediately straighten it as the front tire makes contact with the edge of theroadway. The brief period between the steering input and the resultingaction should allow the rear tire to also climb onto the road. This rapidmaneuver will allow the steering to be corrected before the ambulance isdriven into oncoming traffic.
Responding to Vehicle Malfunction

Lesson 8: Operations in Emergency Mode and Unusual Situations
Module A Participant ManualAmbulance Operation: The Basics
-ccxxxi
Tire Blowout
If a front tire blows out, the vehicle immediately swerves in the direction ofthe destroyed tire. It a rear tire is involved, the back of the vehicle swaysback and forth.
In either situation, hold the steering wheel firmly and steer enough tomaintain your lane position. Ease off the accelerator, but do not brake. Rapid deceleration or braking may make steering control more difficult.
Once speed has been reduced to the point where you can steer, slowlybegin braking, signal your intentions, and move off to the side of the road.
Brake Failure
If brake failure occurs, try the brakes again. If pumping the brakes does

Lesson 8: Operations in Emergency Mode and Unusual Situations
Participant Manual Module AAmbulance Operation: The Basics
-ccxxxii
not work, shift into a lower gear and use the engine to brake. Carefullyapply the parking brakes. The parking brakes only work on the rearbrakes and stopping distances will be much longer. Continue to steer andmaneuver to where you can safely leave the road.
If brake failure occurs while going down a hill and engine braking and useof the parking brake are not effective, you may have to sideswipe parkedcars, guard rails, small trees, or dirt banks to slow sufficiently.
Steering Failure
Today's ambulances are equipped with power steering. In these vehicles,steering failure occurs whenever the engine quits. It may also occur if allpower steering fluid is lost. In either case, the ambulance can still besteered, but it will take more physical strength since the operator has toovercome the failure of the hydraulic system.
If steering failure occurs, slow the vehicle and pull off the road. Do notbrake heavily in case the vehicle pulls to one side; you do not have thestrength to overcome this extra force.
Stuck Accelerator
Shift the transmission into neutral and get the vehicle off the road andstopped as quickly as possible. Understand though, that once theresistance of the drive train is released by the transmission, the engine willrev up quickly. If the engine is not shut off quickly, it will probably fail,resulting in the loss of steering control and brakes.
Released Hood

Lesson 8: Operations in Emergency Mode and Unusual Situations
Module A Participant ManualAmbulance Operation: The Basics
-ccxxxiii
If the hood releases and breaks your vision, try to find a small gap throughwhich you can look at the base of the hood and pull the ambulance off theroad. If all forward visibility is blocked, quickly get your head out the sidewindow and drive the vehicle to the side of the road and stop.
Techniques for Pulling Off the Road
Planning
Plan your exit with the time available. Signal your intentions and use thefirst available parking area.
Braking
Most vehicle malfunctions require rapid deceleration. Remove your footfrom the accelerator and begin smooth, firm braking. You may have torelease some of the braking pressure if it becomes difficult to control the

Lesson 8: Operations in Emergency Mode and Unusual Situations
Participant Manual Module AAmbulance Operation: The Basics
-ccxxxiv
steering. Continue to drive the ambulance and do not just jam on thebrakes.
Parking
Once you have driven off the roadway, stop the ambulance where it willnot be hit by other traffic. Turn on your emergency flashers and turn offyour emergency lights and siren.
As you are taking a patient to the medical facility, you hit a deep potholeand your left front tire blows out. How should you recover?
After stopping and visually clearing a controlled intersection, you acceleratenormally and begin a right turn toward the medical facility. You notice thatit is taking a lot of effort to turn the steering wheel. What is the probablefailure and what do you do to recover?
You are on a run in the country on a two lane asphalt road and notice thatthe farm tractor coming toward you is wider than normal and is crowding

Lesson 8: Operations in Emergency Mode and Unusual Situations
Module A Participant ManualAmbulance Operation: The Basics
-ccxxxv
the center line. As you pull to the right to avoid hitting the tractor, yourright wheels run off the hard surface onto the soft shoulder and you feel theambulance pull hard to the right. What should you do to recover?
If, in the previous situation, you saw a car parked on the edge of the roadjust ahead of where you came off the road, what procedures would youuse to quickly pull back onto the road?

Lesson 8: Operations in Emergency Mode and Unusual Situations
Participant Manual Module AAmbulance Operation: The Basics
-ccxxxvi
POINTS TOREMEMBER
In the emergency mode you use emergency signaling devices whileresponding to a true medical emergency. Even in the emergency mode,you should not exceed the posted speed limit. Safe, controlled drivingwill get you to the emergency scene and the medical facility withoutendangering you, your crew, or the patient
Emergency signaling devices are used during emergency driving--
! to notify other drivers that an emergency vehicle is approaching
! to request that the other drivers yield the right of way to theambulance
When approaching other drivers with your lights and siren on, alwaysexpect the unexpected.
The controlled intersection is the most dangerous part of any run. Approach each intersection slowly and carefully, and thoroughly ensurethat you have the right of way before proceeding through theintersection.
Adverse weather conditions affect traction and vision. To improvetraction, slow down. To improve vision, make sure windshield andmirrors are clean. To improve performance, make sure that you arewell rested and not under the influence of drugs or alcohol.
When faced with an impending crash, try to avoid the crash by braking,accelerating, or steering. Before a crash occurs, prepare your vehicleand prepare yourself.
The Law of Due Regard puts the burden on you to ensure that youractions are necessary and appropriate for the situation.

Lesson 9: Safety: Special Considerations
Module A Participant ManualAmbulance Operations: The Basics
-ccxxxvii
COURSE: EMERGENCY VEHICLE OPERATOR COURSE(AMBULANCE): NATIONAL STANDARD CURRICULUM
MODULE A: Ambulance Operations: The Basics
LESSON 9: Safety: Special Considerations
COURSE GOAL: To provide ambulance operators with the knowledge and skills tooperate their vehicles so that their vehicle, equipment, crew, andpatients will be delivered safely and efficiently and the safety of thepublic will be assured during all phases of the delivery of theEmergency Medical Services (EMS) involving the ambulance
MODULE GOAL: To provide ambulance operators with the knowledge required tosafely and efficiently operate an ambulance in both nonemergencyand emergency modes
LESSON GOAL: To provide participants with knowledge of safetyrequirements and how to comply with them while operatingthe ambulance
PERFORMANCEOBJECTIVE(S):
• Identify obligations for ensuring passenger safety
• Identify responsibilities for ensuring safety of the patient'sfamily

Lesson 9: Safety: Special Considerations
Participant Manual Module AAmbulance Operations: The Basics
-ccxxxviii
• Identify activities for protecting the vehicle and crew at thescene
• Identify requirements for handling ambulance fires
PM APPENDIX:
PARTICIPANTMATERIALS:
ICON LEGEND
Notes Response Appendix Local Requirements
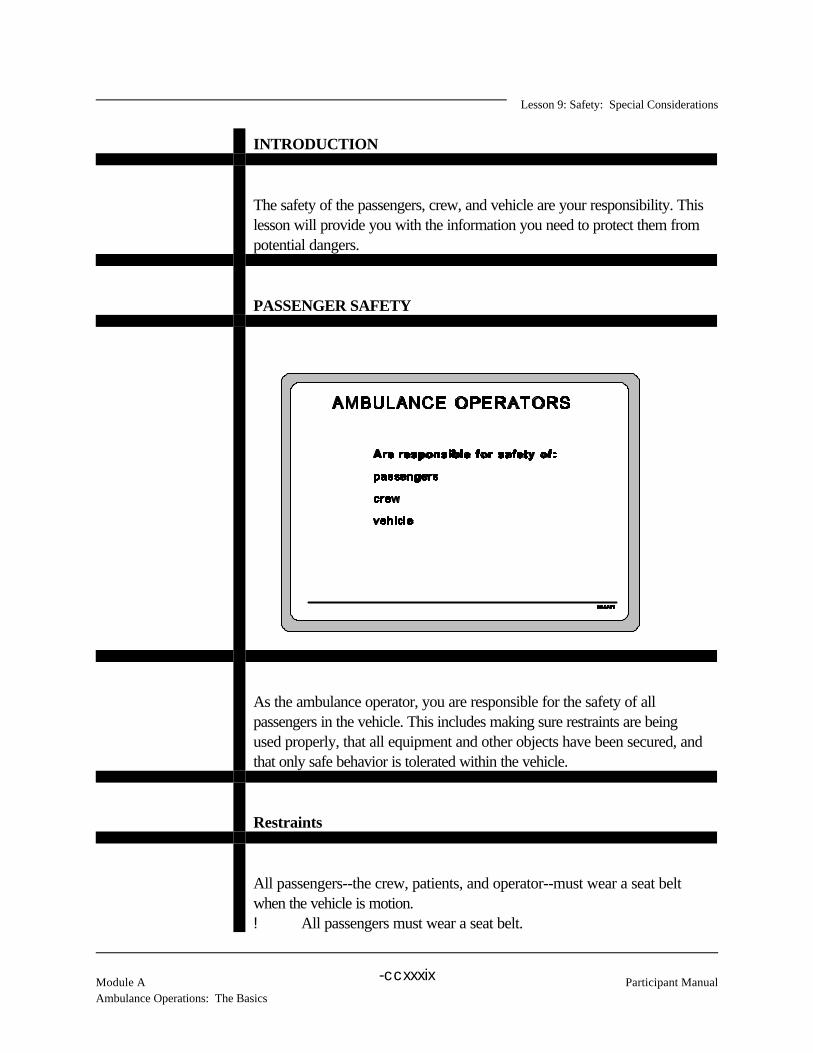
Lesson 9: Safety: Special Considerations
Module A Participant ManualAmbulance Operations: The Basics
-ccxxxix
INTRODUCTION
The safety of the passengers, crew, and vehicle are your responsibility. Thislesson will provide you with the information you need to protect them frompotential dangers.
PASSENGER SAFETY
As the ambulance operator, you are responsible for the safety of allpassengers in the vehicle. This includes making sure restraints are beingused properly, that all equipment and other objects have been secured, andthat only safe behavior is tolerated within the vehicle.
Restraints
All passengers--the crew, patients, and operator--must wear a seat beltwhen the vehicle is motion.! All passengers must wear a seat belt.

Lesson 9: Safety: Special Considerations
Participant Manual Module AAmbulance Operations: The Basics
-ccxl
! A child must be properly restrained in a safety seat.! All patients must be properly secured.
Only the medical technician is exempt from wearing restraints and onlywhen attending to the patient in the patient compartment.
Secure Equipment
Secure all equipment in the operator and patient compartments to preventan injury if the vehicle has to suddenly stop or swerve. When leaving thescene, all equipment used on the scene should be secured in the vehicle.This includes such things as clipboards, portable radios, and flashlights. Ifany of the patient's personal effects are being transported, be sure they areproperly secured.
Unsafe Behavior
While the vehicle is in motion, if you notice unsafe behavior in theambulance, it is your responsibility to stop it. If someone is interfering withpatient care or vehicle operation, demand that it stops.
Who must wear restraints?

Lesson 9: Safety: Special Considerations
Module A Participant ManualAmbulance Operations: The Basics
-ccxli
Why should all equipment be secure?
What are some examples of unsafe behavior?
What should you do if you notice unsafe behavior in the vehicle?
PATIENT'S FAMILY

Lesson 9: Safety: Special Considerations
Participant Manual Module AAmbulance Operations: The Basics
-ccxlii
Often the family of a patient will be at the emergency scene. Yourresponsibilities to the family may include--! transporting them! ensuring their safety! communicating certain information to them
When to Transport
Safety As Passengers

Lesson 9: Safety: Special Considerations
Module A Participant ManualAmbulance Operations: The Basics
-ccxliii
Guidelines for Following the Ambulance
If a family member is going to the medical facility in another vehicle, explainwhere you will be taking the patient and why you will or will not be usingthe emergency warning devices. If you will be transporting in theemergency mode, be sure to tell the family NOT to try to follow theambulance. Tell them they must obey all traffic laws.
If the family does not know the area or where the medical facility is, brieflygive them directions. If you won't be transporting in emergency mode,suggest that they follow you to the medical facility.
When is it appropriate to transport members of the patient's family?
Lesson 9: Safety: Special Considerations
Participant Manual Module AAmbulance Operations: The Basics
-ccxliv
What should you do to ensure the safety of a family member traveling in theambulance?
What information should you give a family member who is traveling to themedical facility in another vehicle?
SAFETY ON SCENE
To ensure the safety of the crew and ambulance while on scene, youshould--! look for dangers when approaching the scene! be aware of other emergency vehicles/services! be aware of problems improper placement of the ambulance can
create! know the correct way to use warning devices to protect the crew,
patient, and vehicle from danger while at the scene
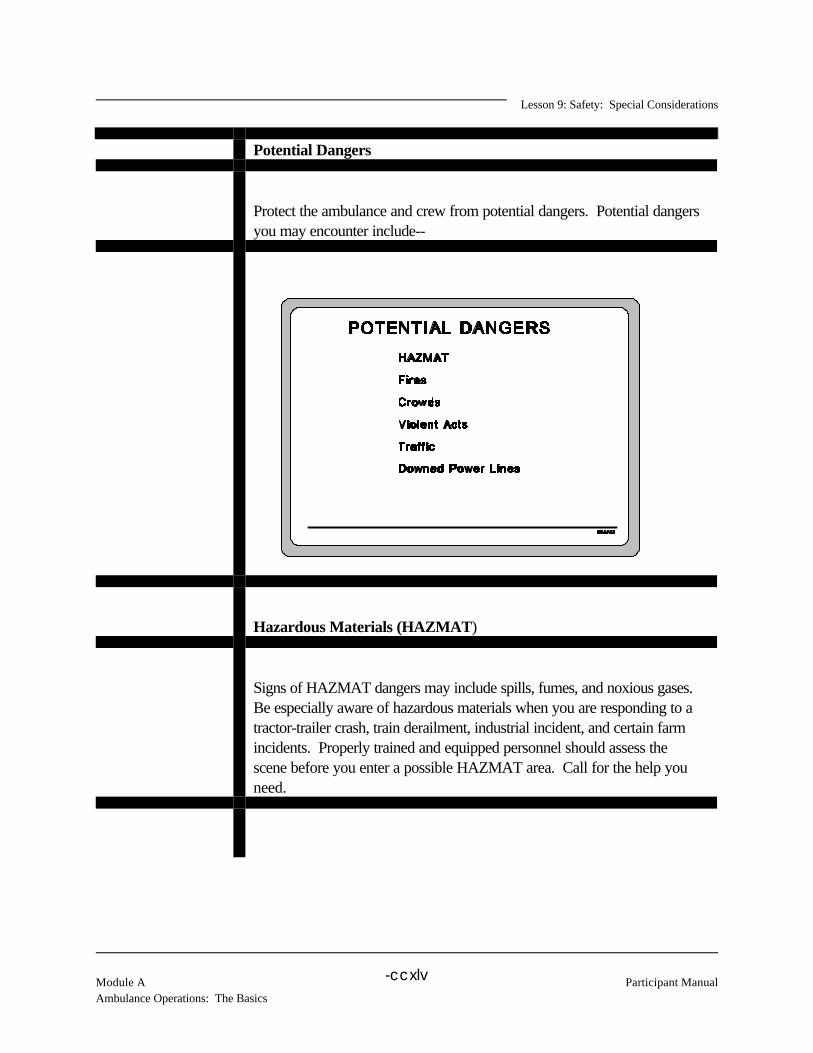
Lesson 9: Safety: Special Considerations
Module A Participant ManualAmbulance Operations: The Basics
-ccxlv
Potential Dangers
Protect the ambulance and crew from potential dangers. Potential dangersyou may encounter include--
Hazardous Materials (HAZMAT)
Signs of HAZMAT dangers may include spills, fumes, and noxious gases. Be especially aware of hazardous materials when you are responding to atractor-trailer crash, train derailment, industrial incident, and certain farmincidents. Properly trained and equipped personnel should assess thescene before you enter a possible HAZMAT area. Call for the help youneed.

Lesson 9: Safety: Special Considerations
Participant Manual Module AAmbulance Operations: The Basics
-ccxlvi
The standard operating procedures for responding to HAZMAT calls are--
Fires
Approach the scene of a fire very slowly. Avoid driving into a wet area;the liquid may be flammable. Also avoid driving over hoses. If smokeclouds are present, be cautious; they may contain lethal, toxic gases. Coordinate your efforts with fire fighters, but allow the trained fire fightersto fight the fire. Call for help if you need it.

Lesson 9: Safety: Special Considerations
Module A Participant ManualAmbulance Operations: The Basics
-ccxlvii
Crowds
When approaching a scene where a crowd has gathered, use extremecaution. People, recognizing you as "help," may run to the ambulance in apanicked state, placing themselves in danger. Crowds can also becomehostile to EMS operators. Be sure you are safe. When in doubt, wait onthe law enforcement officers to arrive. Allow law enforcement or a scenecommander to control crowds. If necessary, call for help.

Lesson 9: Safety: Special Considerations
Participant Manual Module AAmbulance Operations: The Basics
-ccxlviii
Violent Acts
There may be times when an emergency call concerns a violent situation. Let law enforcement personnel deal with violent or hostile persons and donot hesitate to call for help if needed. Make sure that the vehicle remainssecure and attended and out of range of gun fire and other violence. Workclosely with the law enforcement officer to safely treat and load patients inthe ambulance.

Lesson 9: Safety: Special Considerations
Module A Participant ManualAmbulance Operations: The Basics
-ccxlix
Traffic
The ambulance must be parked away from the flow of traffic in order toprotect the crew, patient, and vehicle. (Vehicle placement will bediscussed later in this lesson.) Remember that curious drivers often paymore attention to the incident than to their driving. If a reckless motoristdisables your ambulance, then you will be unable to transport the patient. Allow law enforcement personnel or scene commander to divert traffic. Ifneeded, call for help. The standard operating procedure will provideguidance if you are the only one on the scene.
The standard operating procedures for diverting traffic areB
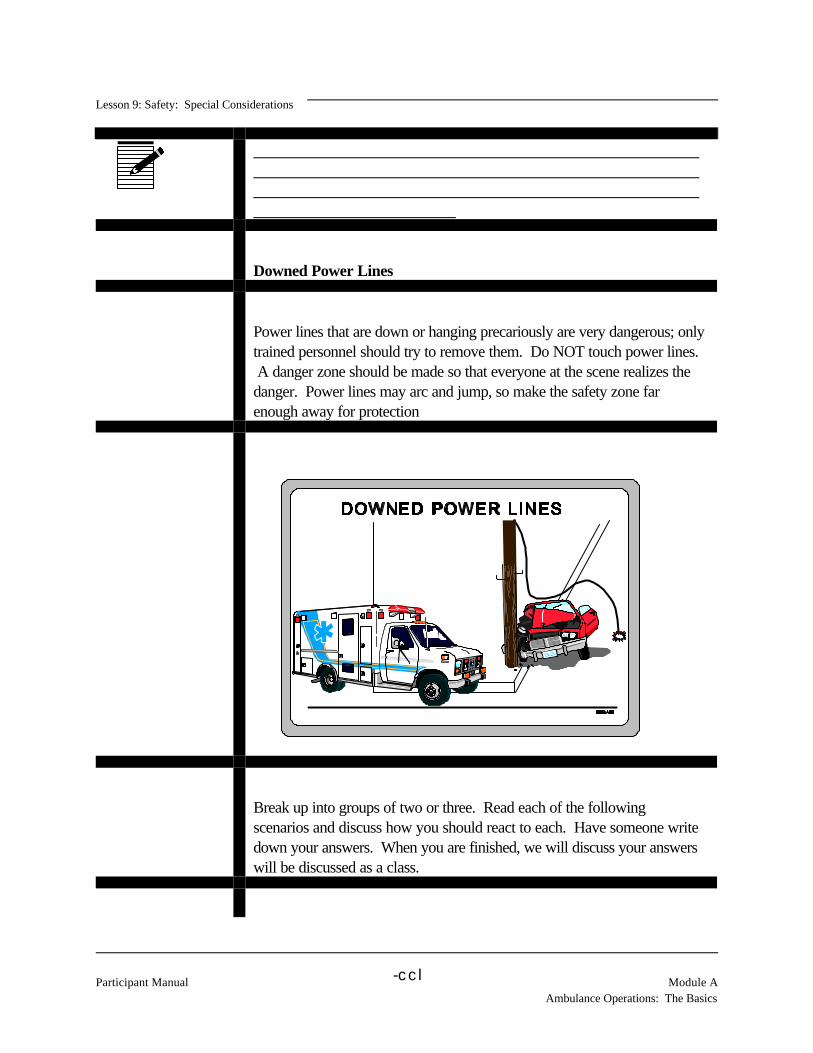
Lesson 9: Safety: Special Considerations
Participant Manual Module AAmbulance Operations: The Basics
-ccl
Downed Power Lines
Power lines that are down or hanging precariously are very dangerous; onlytrained personnel should try to remove them. Do NOT touch power lines. A danger zone should be made so that everyone at the scene realizes thedanger. Power lines may arc and jump, so make the safety zone farenough away for protection
Break up into groups of two or three. Read each of the followingscenarios and discuss how you should react to each. Have someone writedown your answers. When you are finished, we will discuss your answerswill be discussed as a class.
Lesson 9: Safety: Special Considerations
Module A Participant ManualAmbulance Operations: The Basics
-ccli
Scenario 1
You are approaching the scene where the injuries have been caused by agang fight. You are first to arrive on the scene. What should you do?
Scenario 2
You are approaching an emergency scene where a large crowd hasformed. What should you do?
Scenario 3
You are approaching an emergency scene where a tanker truck markedwith a HAZMAT symbol has been in a wreck. What should you do?

Lesson 9: Safety: Special Considerations
Participant Manual Module AAmbulance Operations: The Basics
-cclii
Vehicle Placement
When you arrive at the emergency scene, your first instinct may be to parkthe vehicle in the first available open area and abandon it to assist withpatient care. This practice may lead to more problems and delays becauseaccess to the ambulance and equipment may become dangerous and/orlengthy. There are four issues to consider for vehicle placement at theemergency scene. They are--safety, traffic flow, ease of departure,distance from patient.
Safety
Safety includes not only the safety of the ambulance but also the safety of
Lesson 9: Safety: Special Considerations
Module A Participant ManualAmbulance Operations: The Basics
-ccliii
the crew. Ambulance and crew safety can be affected by restricted accessto the ambulance, using the ambulance for scene protection, and variousdanger zones.
Access
The safety of the crew when accessing the vehicle and theequipment housed in the vehicle is an important consideration forvehicle placement. If one or two sides of the vehicle are along theflow of traffic it will be dangerous for crew members to get to thematerials needed for patient care. Park where access to allcompartments is out of dangerous traffic flow. Be aware ofobstacles such as guard rails and bushes which may restrict accessto parts of the vehicle if you park too close to them.
Scene Protection
To keep the vehicle out of traffic flow, it should not be used forscene protection. The ambulance is needed for patient transportand carries essential patient care equipment. Therefore, theambulance should not be used as the sacrificial barrier. A police orfire vehicle would be a better choice (if available.) Follow standardoperating procedures for the situation, whether you are first on thescene or one of many responders. Call for help if necessary.
The standard operating procedures for scene protection are--
Lesson 9: Safety: Special Considerations
Participant Manual Module AAmbulance Operations: The Basics
-ccliv
Danger Zones
If the emergency is a fire, HAZMAT, or other such incident, parkthe ambulance far enough away to protect the crew and the patient. Don't park near damaged vehicles, because they might catch fireand explode. In the case of a vehicle wreck, park at least 50 feetaway from the wreckage. This will protect the ambulance frombroken glass and debris from the wreckage. Also be aware of anyfuel leaking from wrecked vehicles. The scene commander shoulddirect you to a location. In addition, avoid parking the ambulancewhere it will be an obstacle to other emergency personnel.
If you must park on a hill, exercise special care. Be sure to set theambulance's parking brake. Remember that stretchers can roll. Your organization must use wheel chucks as a further safetyfeature. In addition, position the front wheels so that if the vehiclestarts to roll the wheels will hit the curb.
Traffic Flow
The ambulance should be parked so that it does not block traffic. If anambulance is parked in such a way that it's causing traffic problems, then atleast one side of the vehicle is unsafe for access by the crew.
However, there may be times when you must place the vehicle amidsttraffic flow. When responding to an emergency in a business district, youmay need to double-park or otherwise inconvenience motorists. Your firstpriority should be patient care.

Lesson 9: Safety: Special Considerations
Module A Participant ManualAmbulance Operations: The Basics
-cclv
Ease of Departure
Park the vehicle in a position which provides for an easy departure and inthe direction of the medical facility. Avoid having to back into traffic orsteer around obstacles once the patient has been loaded.
When responding to a home, it may be better to park in the street ratherthan a driveway. This is especially true if the house is near the street, or ifthe driveway is steep or narrow. Parking on the street will prevent havingto back into or out of a driveway. This can be difficult and dangerous onresidential streets due to the presence of children, pets, and obstacles likebushes and parked cars.
Distance from Patient
Unfortunately, the need to be near to the patient frequently overrides thefirst three issues--safety, traffic flow, and ease of departure.
The patient care equipment is stored in the ambulance, and the patient willmost likely be transported in the ambulance. Therefore, the back doors ofthe ambulance should be placed close to the patient. However, don't parkso close that fumes from the engine overcome the crew or the patient.
The key to protecting the vehicle and crew is to think ahead about theconsequences of your actions. Before parking the ambulance, rememberto consider each of these factors--! safety! traffic flow! ease of departure! distance from patient.
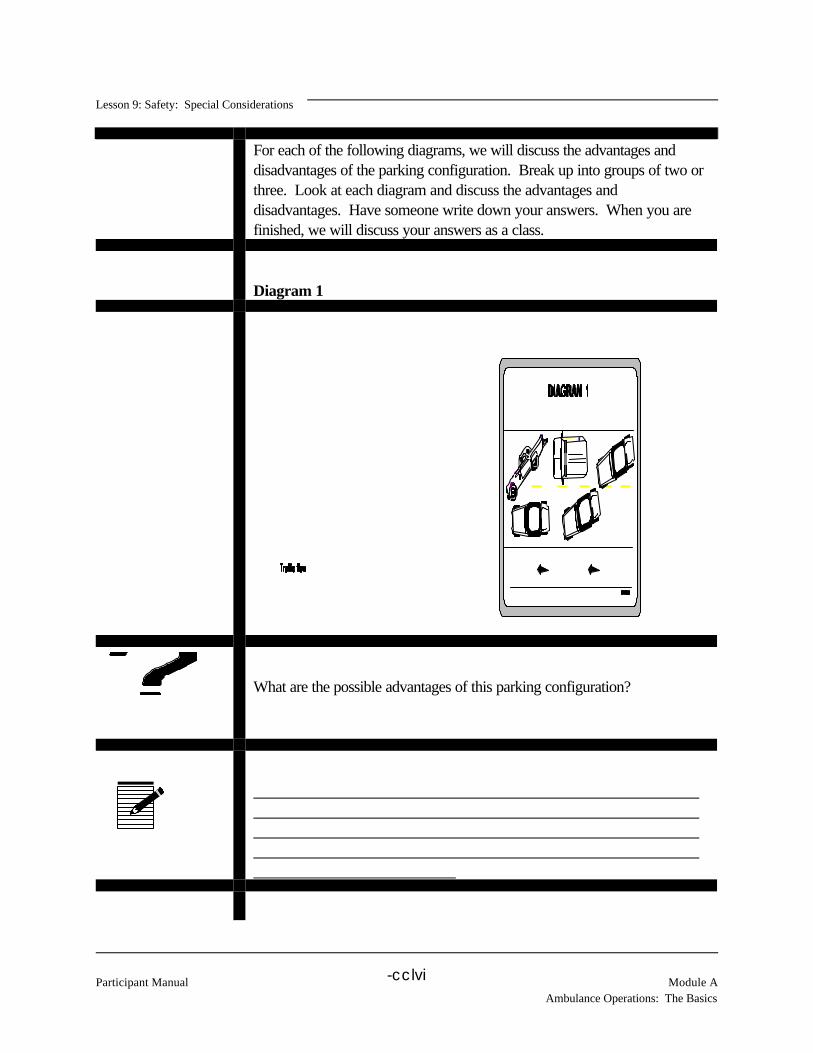
Lesson 9: Safety: Special Considerations
Participant Manual Module AAmbulance Operations: The Basics
-cclvi
For each of the following diagrams, we will discuss the advantages anddisadvantages of the parking configuration. Break up into groups of two orthree. Look at each diagram and discuss the advantages anddisadvantages. Have someone write down your answers. When you arefinished, we will discuss your answers as a class.
Diagram 1
What are the possible advantages of this parking configuration?
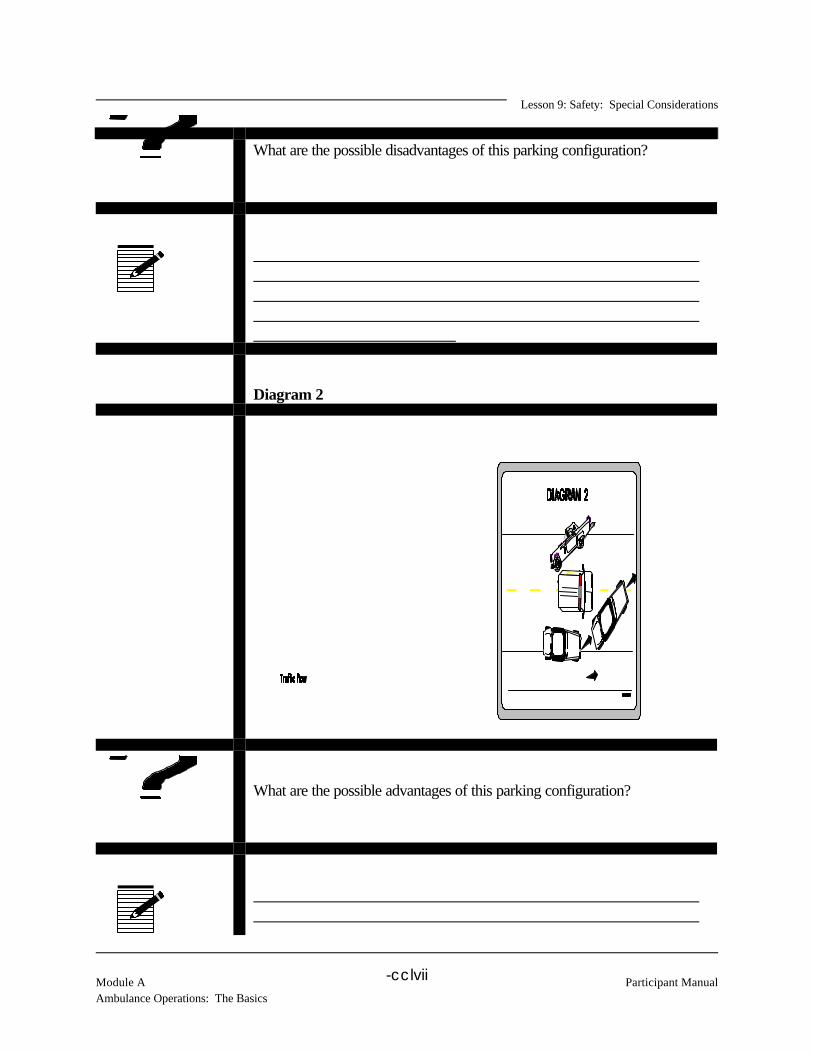
Lesson 9: Safety: Special Considerations
Module A Participant ManualAmbulance Operations: The Basics
-cclvii
What are the possible disadvantages of this parking configuration?
Diagram 2
What are the possible advantages of this parking configuration?

Lesson 9: Safety: Special Considerations
Participant Manual Module AAmbulance Operations: The Basics
-cclviii
What are the possible disadvantages of this parking configuration?
Diagram 3
What are the possible advantages of this parking configuration?
Lesson 9: Safety: Special Considerations
Module A Participant ManualAmbulance Operations: The Basics
-cclix
What are the possible disadvantages of this parking configuration?
Diagram 4

Lesson 9: Safety: Special Considerations
Participant Manual Module AAmbulance Operations: The Basics
-cclx
What are the possible advantages of this parking configuration?
What are the possible disadvantages of this parking configuration?
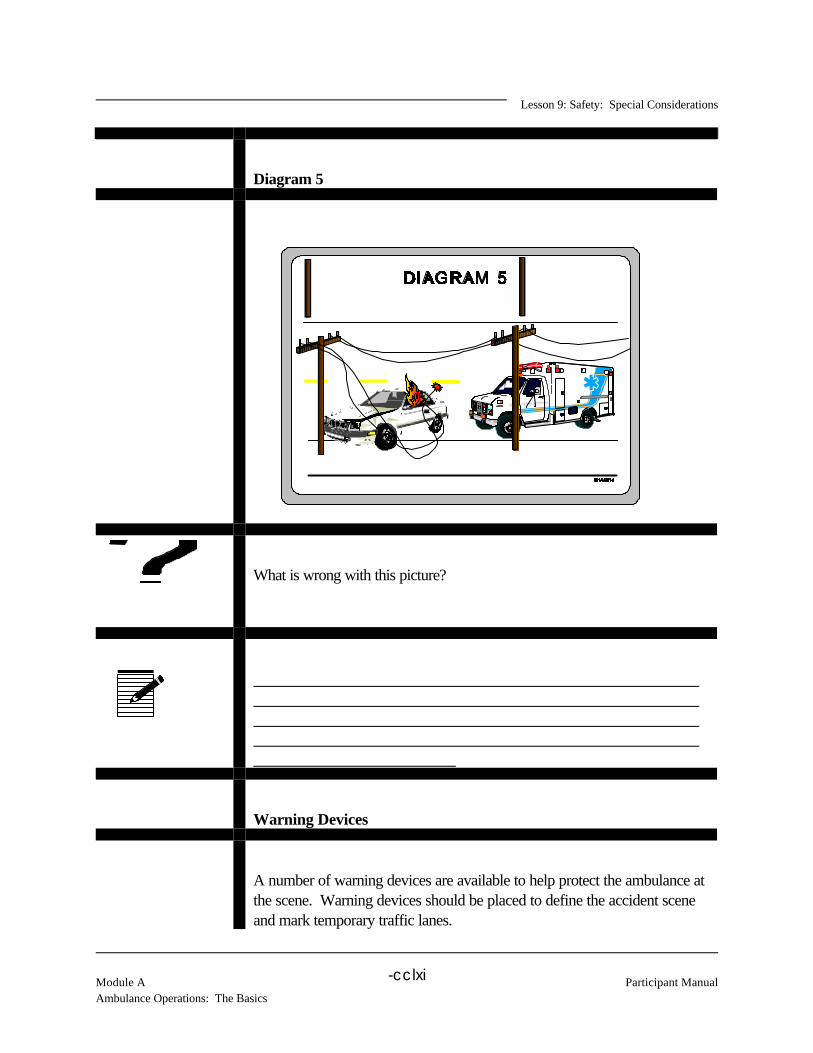
Lesson 9: Safety: Special Considerations
Module A Participant ManualAmbulance Operations: The Basics
-cclxi
Diagram 5
What is wrong with this picture?
Warning Devices
A number of warning devices are available to help protect the ambulance atthe scene. Warning devices should be placed to define the accident sceneand mark temporary traffic lanes.

Lesson 9: Safety: Special Considerations
Participant Manual Module AAmbulance Operations: The Basics
-cclxii
The standard operating procedures for using warning devices are--
There are several choices of warning devices which serve various purposesfor protecting the scene. Flares and warning triangles are generally placedon the ground, whereas cyalumes (hand-held chemical light sticks),flashlights, and vests are held or worn by someone to warn others of thepotential danger.
Flares
A flare is a stick made of combustible material which burns brightly for acertain length of time. A flare may not burn long enough for the situation. If the flare is not long enough for the incident, lay a flare on the ground andplace the head of a second flare, with the cap removed, on the base of thefirst flare. The first flare will ignite the second flare. Don't put flares wherethey'll be extinguished or washed away by washdown hoses.
Lesson 9: Safety: Special Considerations
Module A Participant ManualAmbulance Operations: The Basics
-cclxiii
Be very careful when igniting a flare. They burn at very high temperaturesand drip when burning. Follow the manufacturer's instructions for ignitingthe flare. Never light the flare inside a vehicle. Don't use flares ifcombustible liquids or vapors are present. Don't place flares near dryvegetation.
What are the precautions for using flares?
When an emergency scene is limited to one side of the roadway, one flareshould be placed alongside the scene; a second flare should be placedabout 150 to 200 feet towards approaching traffic; the third flare should be
Lesson 9: Safety: Special Considerations
Participant Manual Module AAmbulance Operations: The Basics
-cclxiv
placed about 300 feet from the scene. If the emergency scene is on a two-lane road, you may want to place an additional flare 100-150 feet in frontof the scene to warn oncoming traffic of the danger. In some cases youmay find it necessary to place more flares in order to protect the scene.
What are some situations which may require the use of more warningdevices?
An easy and efficient way to estimate the distance for flare placement is tocount your steps as you walk quickly. The average pace is slightly morethan two feet. For example, 50 paces is approximately 100 feet.
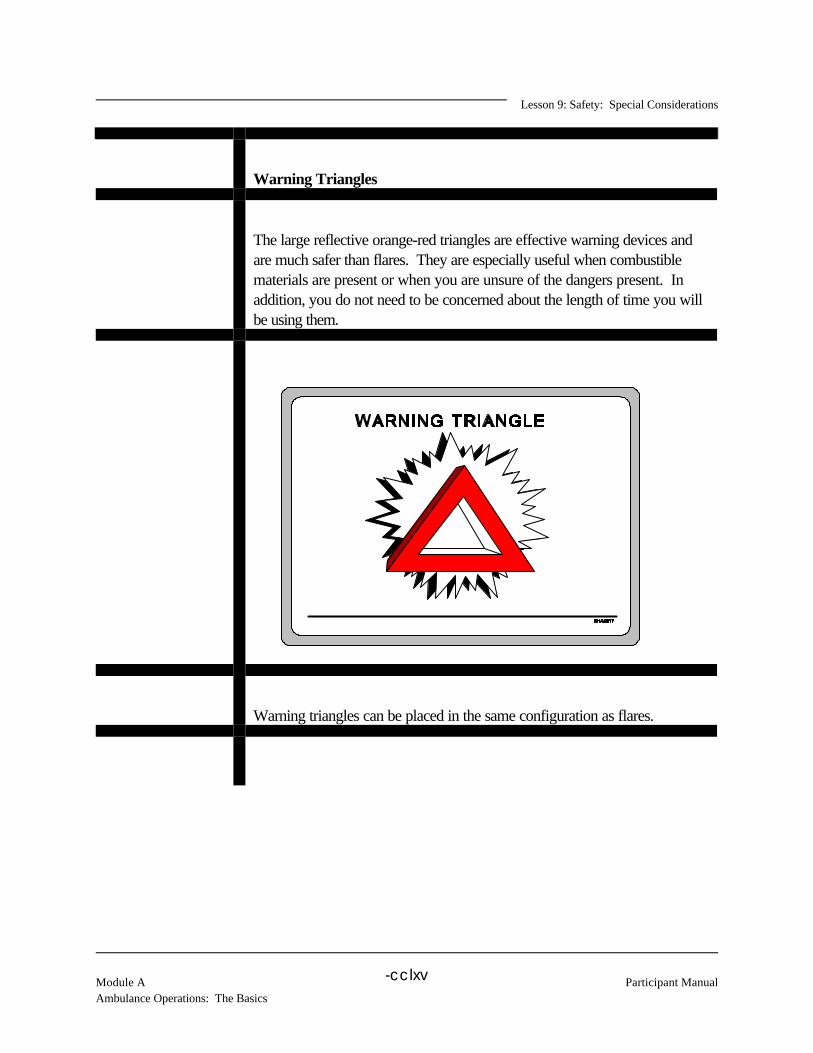
Lesson 9: Safety: Special Considerations
Module A Participant ManualAmbulance Operations: The Basics
-cclxv
Warning Triangles
The large reflective orange-red triangles are effective warning devices andare much safer than flares. They are especially useful when combustiblematerials are present or when you are unsure of the dangers present. Inaddition, you do not need to be concerned about the length of time you willbe using them.
Warning triangles can be placed in the same configuration as flares.
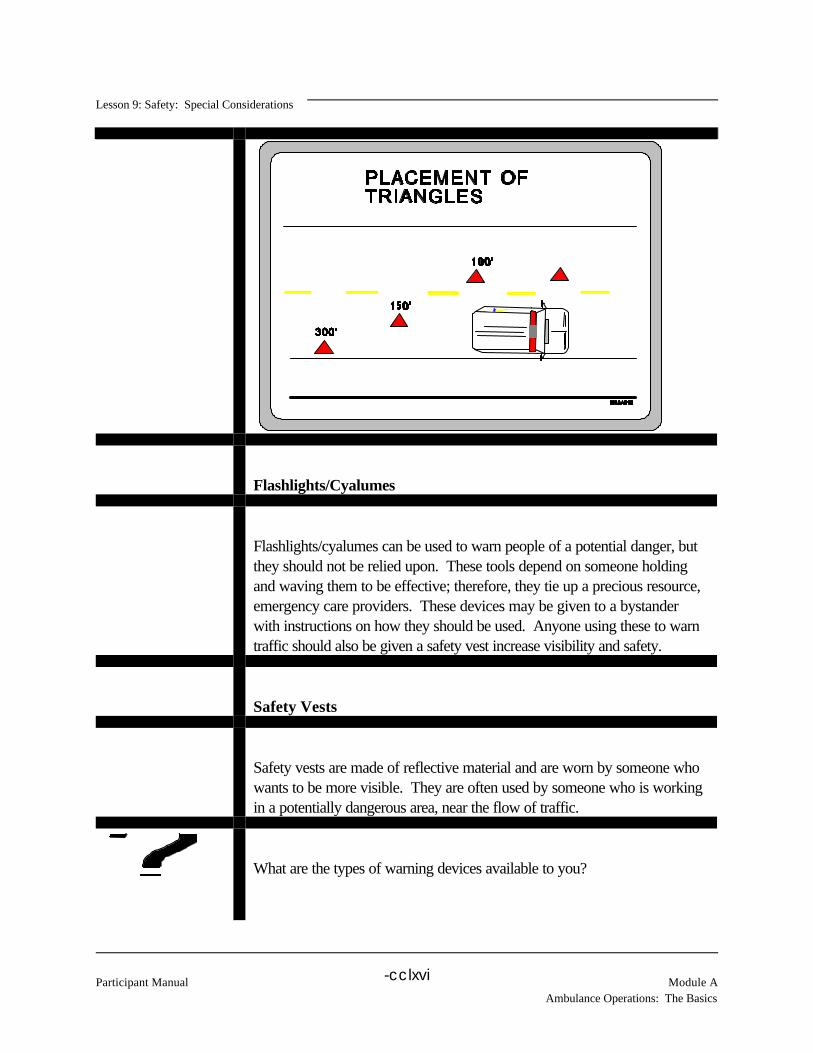
Lesson 9: Safety: Special Considerations
Participant Manual Module AAmbulance Operations: The Basics
-cclxvi
Flashlights/Cyalumes
Flashlights/cyalumes can be used to warn people of a potential danger, butthey should not be relied upon. These tools depend on someone holdingand waving them to be effective; therefore, they tie up a precious resource,emergency care providers. These devices may be given to a bystanderwith instructions on how they should be used. Anyone using these to warntraffic should also be given a safety vest increase visibility and safety.
Safety Vests
Safety vests are made of reflective material and are worn by someone whowants to be more visible. They are often used by someone who is workingin a potentially dangerous area, near the flow of traffic.
What are the types of warning devices available to you?

Lesson 9: Safety: Special Considerations
Module A Participant ManualAmbulance Operations: The Basics
-cclxvii
AMBULANCE FIRES
In the event of a fire in the ambulance or the potential for fire due to a crashinvolving the ambulance, you are responsible for ensuring the safety of thepassengers and crew. If a fire in the ambulance is detected, you shouldsafely pull off the road and order the evacuation of the vehicle. (Refer toLesson 8 for safe procedures for pulling off of the road.) Be sure to takenecessary equipment for patient care and protection from the weather.
If the ambulance is involved in a crash, reduce the possibility for fire byshutting of the engine, any unnecessary electrical power, and oxygen/airtanks.
The ambulance should have at least two fire extinguishers aboard, one inthe operator compartment and one in the patient compartment. If trained,you may want to attempt to extinguish a fire in the ambulance. Fire fightingshould be left to trained individuals. Call for help if necessary.

Lesson 9: Safety: Special Considerations
Participant Manual Module AAmbulance Operations: The Basics
-cclxviii
POINTS TOREMEMBER
Passenger safety is your responsibility.
Ensure the safety of the patient's family if they go to the medical facility.
Once at the scene, ensure that it is safe for the vehicle and crew toenter the area.
Park the ambulance so it does not cause a risk for the crew or vehicle.
Ensure the safety of all passengers and crew if there is an ambulancefire.

Lesson 10: The Run
Module A Participant ManualAmbulance Operations: The Basics
-cclxix
COURSE: EMERGENCY VEHICLE OPERATOR COURSE(AMBULANCE): NATIONAL STANDARD CURRICULUM
MODULE A: Ambulance Operations: The Basics
LESSON 10: The Run
COURSE GOAL: To provide ambulance operators with the knowledge and skills tooperate their vehicles so that their vehicle, equipment, crew, andpatients will be delivered safely and efficiently and the safety of thepublic will be assured during all phases of the delivery of theEmergency Medical Services (EMS) involving the ambulance
MODULE GOAL: To provide ambulance operators with the knowledge required tosafely and efficiently operate an ambulance in both non-emergencyand emergency modes
LESSON GOAL: To provide participants with knowledge on how to plan andcarry out a successful run
PERFORMANCEOBJECTIVE(S):
• Identify prerun activities
• Identify operational activities
• Identify postrun activities
PM APPENDIX:

Lesson 10: The Run
Participant Manual Module AAmbulance Operations: The Basics
-cclxx
PARTICIPANTMATERIALS:
ICON LEGEND
Notes Response Appendix Local Requirements

Lesson 10: The Run
Module A Participant ManualAmbulance Operations: The Basics
-cclxxi
INTRODUCTION
A lot of information has been covered in this course so far. You havelearned about--! legal issues affecting ambulance operations! the basics of communications! vehicle types and dynamics! making sure your vehicle is ready for a run! making sure you and the crew are ready for a run! driving techniques for normal situations! recognizing and driving in high-risk situations! safety considerations during the run.
Now it's time to put it all together as it would happen. A run has threephases--prerun, operations, and postrun.
The prerun phase typically consists of--! ensuring that you and the crew are ready! ensuring that your ambulance is ready! knowing primary and alternate routes
The operations phase typically consist of--! leaving for the scene! driving to the scene! emergency scene operations! transporting the patient! operations at the medical facility
During the postrun phase you get your ambulance resupplied, cleaned, anddecontaminated, if needed, and ready to make the next run.
Consider the following scenario and questions. Responses to questions willbe discussed as a group.

Lesson 10: The Run
Participant Manual Module AAmbulance Operations: The Basics
-cclxxii
SCENARIO
You and several others are arriving at the station to begin your shift. Whileyou are settling in, you find out one of the crew only had an hour of sleepbecause of a sick child.
What should you do?
Why should you be concerned with another crew member's state of mind?

Lesson 10: The Run
Module A Participant ManualAmbulance Operations: The Basics
-cclxxiii
The supervisor has handled the problem of the tired EMT by making himget some sleep and bringing someone as a replacement. You have madesure the crew is ready to go on a run. You check the bulletin board for anyimportant information which may affect a run today. The shift supervisorprovides a briefing on the current conditions in your area which may affectoperations on your shift. There is construction on Main Street with onelane blocked; there is a baseball game at the stadium; and there is apossibility of thunderstorms in the afternoon.
How will such conditions affect operations during a shift?

Lesson 10: The Run
Participant Manual Module AAmbulance Operations: The Basics
-cclxxiv
After the briefing, the supervisor tells you to check the ambulances. Ambulance A is still on a run, so you do a quick check or full check ofambulance B at the station. Ambulance A returns from the run, but it is amess.
What should you do to prepare ambulance A for another run?
You inspect the ambulance while another crew member checks the patientcompartment. You notice that the brake lights on the back of the
Lesson 10: The Run
Module A Participant ManualAmbulance Operations: The Basics
-cclxxv
ambulance are not working.
What should you do?
Ambulance A has been repaired and returned to you. You inspect it againand it passes with flying colors. You report to your supervisor that you andyour ambulance are ready to go when needed.
A true emergency call comes in from dispatch. You are to respond to aninjury on one of the town's busiest roads. Dispatch gives you the location.
You and the crew get ready to leave.
What should you do before you move the ambulance?
Lesson 10: The Run
Participant Manual Module AAmbulance Operations: The Basics
-cclxxvi
You have left the station in an emergency response mode and are on yourway to the scene, using your predetermined primary route. You are drivingas smoothly as possible, while obeying all traffic laws.
Dispatch tells you there's flooding on one of the roads on your plannedroute. What do you do?
You have successfully navigated around the flooding but now have to cleara major controlled intersection before reaching the scene.

Lesson 10: The Run
Module A Participant ManualAmbulance Operations: The Basics
-cclxxvii
How would you clear this controlled intersection?

Lesson 10: The Run
Participant Manual Module AAmbulance Operations: The Basics
-cclxxviii

Lesson 10: The Run
Module A Participant ManualAmbulance Operations: The Basics
-cclxxix
You have successfully cleared the intersection with no problems. You aretraveling on a two-lane road at about 40 mph. You are going north. Theopposing lane is clear. There are buildings and a sidewalk along the rightside of the road. Suddenly a car backs out of a hidden driveway into yourpath, 50 yards in front of you. The driver can't see you because of thebuilding. (If you drive in a rural area, change the scenario to a deer thatruns into your path, 50 yards in front of you.)

Lesson 10: The Run
Participant Manual Module AAmbulance Operations: The Basics
-cclxxx
How would you avoid a crash?
That was close. But you made it without any problems. You are nowapproaching the scene of the emergency.
What would you do if there are already other emergency vehicles andpersonnel on the scene?

Lesson 10: The Run
Module A Participant ManualAmbulance Operations: The Basics
-cclxxxi
What if you are the first to arrive at the scene? What should you belooking for to protect the ambulance and crew?
What should you do if you detect downed power lines?
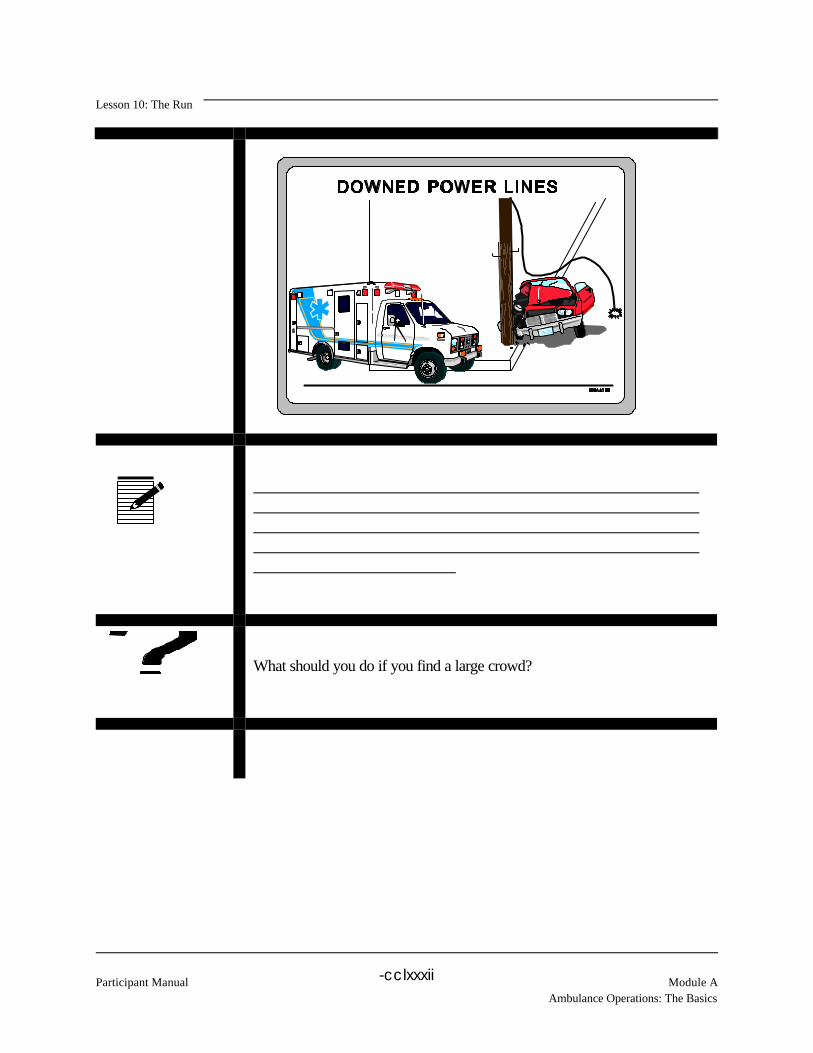
Lesson 10: The Run
Participant Manual Module AAmbulance Operations: The Basics
-cclxxxii
What should you do if you find a large crowd?
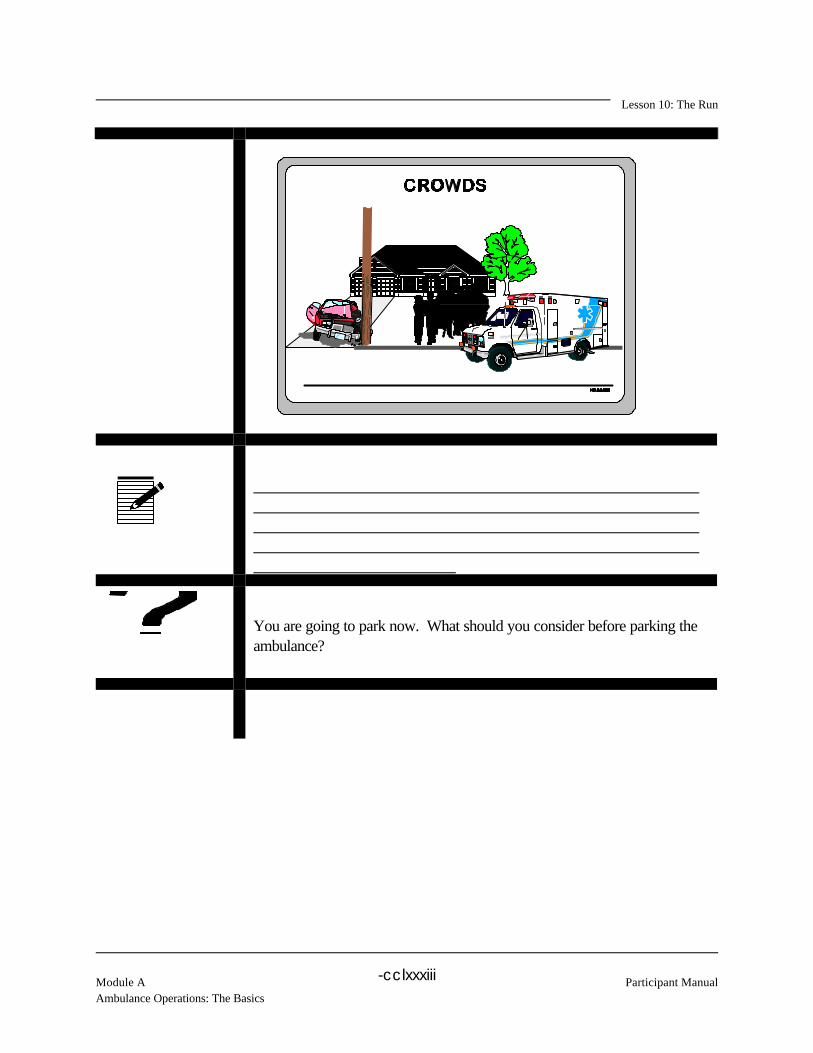
Lesson 10: The Run
Module A Participant ManualAmbulance Operations: The Basics
-cclxxxiii
You are going to park now. What should you consider before parking theambulance?
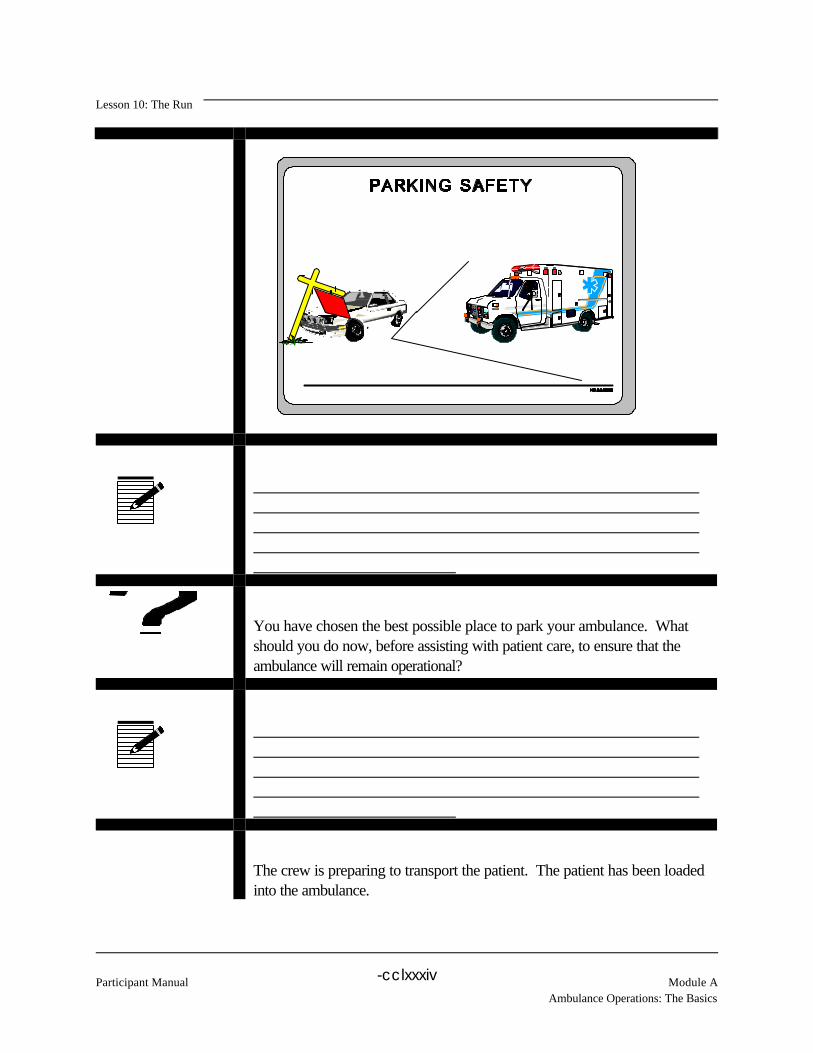
Lesson 10: The Run
Participant Manual Module AAmbulance Operations: The Basics
-cclxxxiv
You have chosen the best possible place to park your ambulance. Whatshould you do now, before assisting with patient care, to ensure that theambulance will remain operational?
The crew is preparing to transport the patient. The patient has been loadedinto the ambulance.
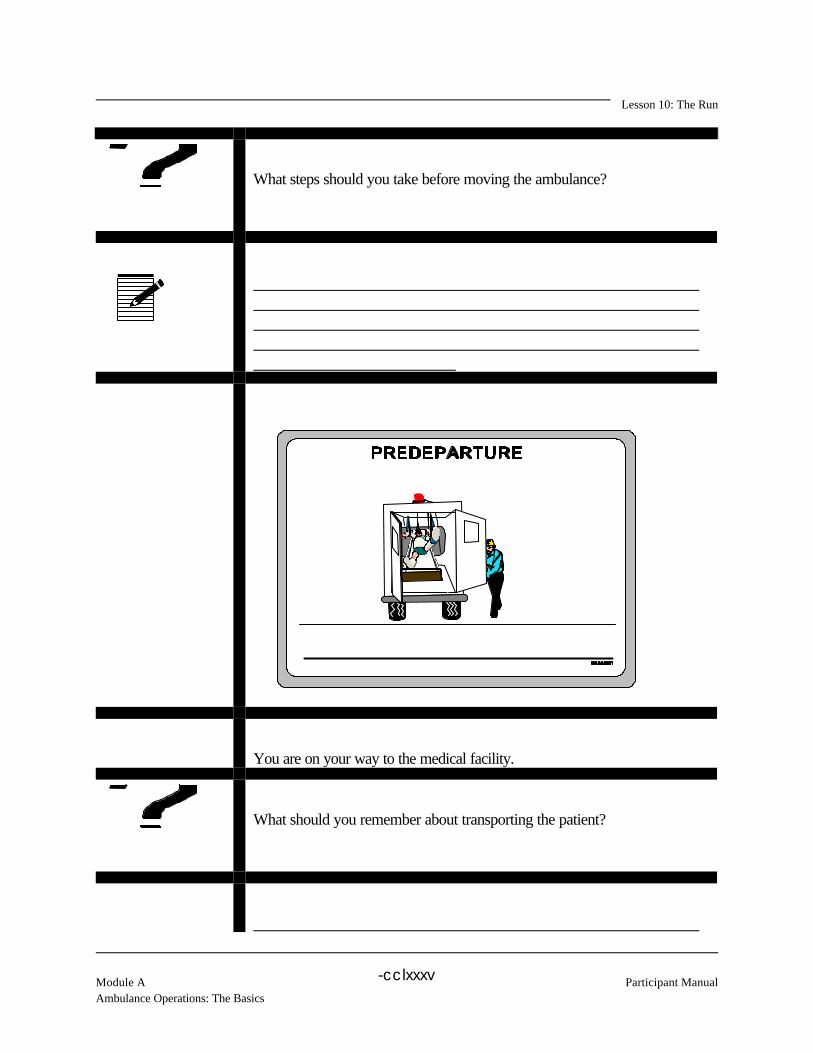
Lesson 10: The Run
Module A Participant ManualAmbulance Operations: The Basics
-cclxxxv
What steps should you take before moving the ambulance?
You are on your way to the medical facility.
What should you remember about transporting the patient?
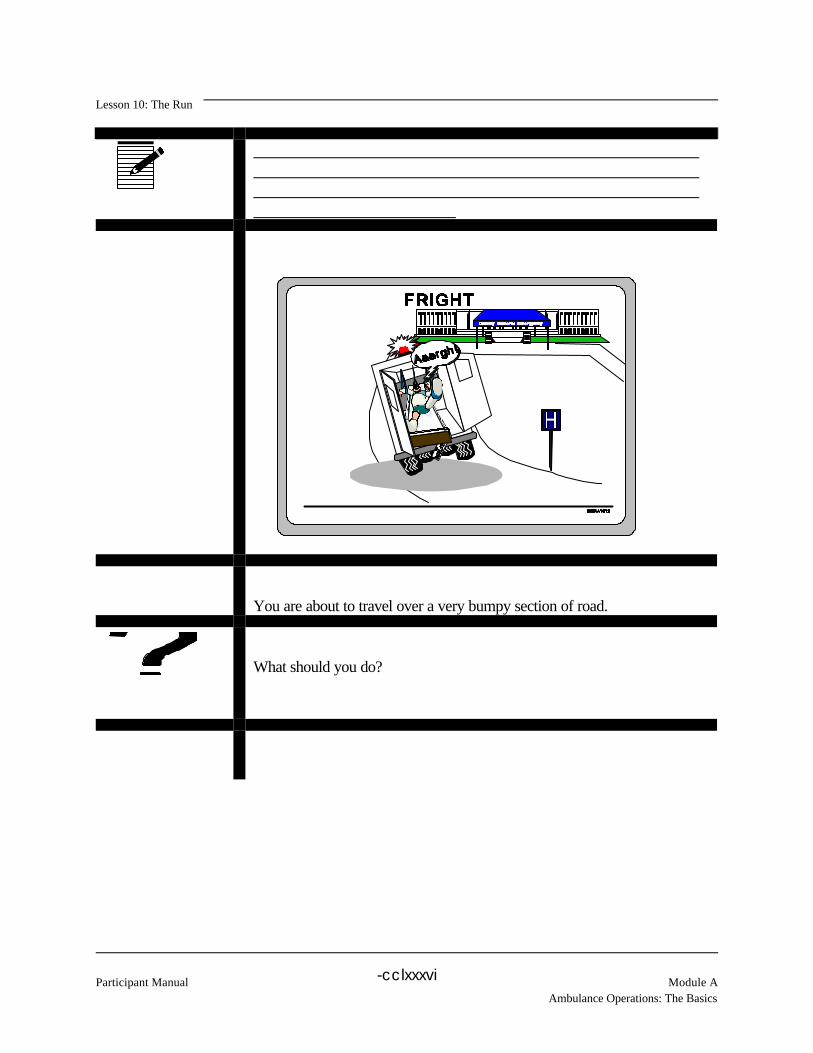
Lesson 10: The Run
Participant Manual Module AAmbulance Operations: The Basics
-cclxxxvi
You are about to travel over a very bumpy section of road.
What should you do?

Lesson 10: The Run
Module A Participant ManualAmbulance Operations: The Basics
-cclxxxvii
You have arrived at the medical facility and have parked the ambulancenear the doors of the building for patient unloading.
What should you do?

Lesson 10: The Run
Participant Manual Module AAmbulance Operations: The Basics
-cclxxxviii
The patient has been released into the care of the medical facility.
What should you do to get the ambulance ready for the next run?

Lesson 10: The Run
Module A Participant ManualAmbulance Operations: The Basics
-cclxxxix
POINTS TOREMEMBER
The three phases of a run are--
1. prerun
2. operational activities
3. postrun
Prerun consists of ensuring operator readiness, ensuring vehiclereadiness, and route familiarization.
Operations consists of departing for the scene, driving to the scene,emergency scene operations, transporting the patient, and operations atthe medical facility.
Postrun consists of any activities you did not perform in any otherphase which prepares you or the ambulance for the next run.
The next step in the course is observation and practice of the skillsneeded to operate the ambulance safely and efficiently.
The final step in the course is evaluation of your performance on thejob.


Module B Participant ManualAmbulance Operation: Demonstration and Practice
1
MODULE BAMBULANCE OPERATION: DEMONSTRATION AND PRACTICE
MODULE GOAL
The goal of this module is to provide ambulance operators with the skills to safely and efficiently operatean ambulance.
MODULE OVERVIEW
It is important that you be able to identify those situations that result in a high number of ambulancecrashes. Crash prevention requires that the operator learn the appropriate procedures and developlow-risk habits.
Ambulance operators often are involved in crashes at intersections, when backing, parking at themedical facility, turning around, and changing lanes. The exercises in Module B are designed for you tolearn how to perform each of these maneuvers safely.
You will learn to inspect and operate an ambulance on a driving range prior to operating in a jobenvironment. Module C describes the on-the-job training where all the skills and knowledge fromModules A and B will be used to perform the job.
MODULE EXERCISES
There are ten exercises in this module. The order in which these exercises are conducted may bemodified.
PageThe Serpentine 6Diminishing Clearance 11Braking While Turning 15Straight Line Braking 19U-Turn 23Three-Point Turn 27Right Side Road Turn 31Left Side Road Turn 35Slow Speed Lane Change 39Perpendicular Parking, Back In and Drive Out 43

Participant Manual Module BAmbulance Operation: Demonstration and Practice
2

Instructions to Participants
Module B Participant ManualAmbulance Operation: Demonstration and Practice
3
HOW TO CONDUCT EXERCISES
The exercises are conducted using the concept of performance-oriented training. This concept is verysimple and is success oriented. The following steps implement this concept. Each instructor willexplain, demonstrate, coach, and let you practice before you are evaluated. For some exercises, theremay be additional participants in the ambulance playing the role of the patient on the stretcher and/or theEmergency Medical Technician in the patient compartment.
The instructor will follow these procedures for each exercise:
1. Explain to you what is to be accomplished and the acceptable performance standard.
• Be sure you understand what is expected.
• Use the exercise sheet to follow along with the instructor's explanation.
2. Demonstrate the procedure to you.
• Watch and listen to the instructor's demonstration.
• You will integrate several different actions.
• Ask questions about any part of the exercise.
3. Coach you while you practice the task.
• Start each exercise slowly.
• Stop if you don't understand something.
• Ask questions about any part of the exercise.
4. Let you practice the task until you can meet the standard.
• Practice the correct procedure.
• Practice until you have met the performance standard.
• Tell the instructor when you are ready to be evaluated.

Instructions to Participants
Participant Manual Module BAmbulance Operation: Demonstration and Practice
4
• Ask questions about any part of the exercise.

Instructions to Participants
Module B Participant ManualAmbulance Operation: Demonstration and Practice
5
5. Evaluate your performance of each task.
• You have practiced and know how to do the task properly.
• Do your best.
MODULE EXERCISE SHEETS
Each module exercise contains three sheets.
The first sheet shows a diagram of the exercise as it is laid out on the course. It shows the dimensionsof the exercise and where the traffic cones will be placed. For the driving range, some of these conesmay be changed somewhat, and these changes will be pointed out to you prior to conducting theexercise.
The second sheet provides general exercise information, such as the purpose of the exercise, how itis to be performed, and some of the things you and the instructor will be doing during the exercise.
The third sheet is an evaluation rating form the instructor uses when testing the performance of theexercise. Remember, you won't be evaluated until you have had a chance to practice and have told theinstructor that you are ready.
The rows of boxes are a guide to the number of practices you may need to achieve the standard. However, you may achieve the standard on your first attempt. These sheets will become a part of yourtraining record.
TRAINING AMBULANCES
The ambulances used during Module B should be those that you will operate when on the job. If this isnot possible, similar models will be used and the differences pointed out to you. Each ambulance shouldbe in safe working condition, but may have discrepancies and require servicing or repair to add realismto the training. Those used on the driving range must be fully equipped and mechanically sound withhigh quality tires and fully functional safety and communication equipment.
If more than one ambulance will be used on the course, communication must be established between thevehicles to prevent accidents.

Instructions to Participants
Participant Manual Module BAmbulance Operation: Demonstration and Practice
6
THE COURSE
Any half-mile or greater stretch of straight, four-lane roadway that can be closed off, or abandonedairport runways, may be used. The dimensions of the exercises used in this module may be altered toprovide the most training in the space available.
Your organization may have a permanent range that is used for emergency vehicle operator training. Permanent ranges may or may not provide enough space to set up all of the exercises. This may also bethe case if a vacant field or parking lot is used to set up the course.
DRIVING SPEED
All driving exercises are designed for you to learn the control and handling of the ambulance, not itsspeed capabilities. Each exercise will be run slowly at first and the speed gradually increased as yourproficiency improves. None of the exercises is designed to be run at highway speeds.
USE OF GROUND GUIDES
You should use ground guides when backing an ambulance and operating in a congested area such as acrash scene. However, during the initial backing exercises, you will learn to use the mirrors; the exerciseshould first be performed using the mirrors only. Once you can use the mirrors to back successfullywhile turning in both directions and to stop at a designated point, the ground guide should be added forall subsequent backing maneuvers. The hand signals discussed in lesson 3 will be demonstrated by theinstructor. You and the ground guide will have a chance to practice them and using the mirror prior topracticing backing the ambulance with the ground guide.
RANGE RULES
There are several rules that must be followed at all times while on the driving range unless otherwise toldto disregard for a particular exercise.
! No food or drinks in ambulances.! No smoking in ambulances.! No alcoholic beverages on the driving range.! Seat belts shall be worn at all times.

Instructions to Participants
Module B Participant ManualAmbulance Operation: Demonstration and Practice
7
! Do not exceed speed limits established locally at any time on the range.
! Unsafe vehicles will not be allowed on the range.! Report all equipment malfunctions immediately.! Ambulance operators must have a state automobile or higher driver's license before operating
on the range.! Follow directions of the instructors at all times.
These are sample rules. Each organization will have a list of local rules that will be appropriate for theircourse. The course rules will be discussed with you before going to the course.
EVALUATING YOUR PERFORMANCE
You either pass or fail the exercise based on your ability to perform the maneuver as outlined on theevaluation sheet. If you have difficulty with a certain aspect of the exercise, the instructor will decide ifadditional coaching, practice, or both will be necessary for you to achieve the standard. Each exercisewill have a locally developed standard based on the actual exercise layout and type ambulance used. Time will not be a part of the standard. A sample standard : Without hitting a cone, move theambulance forward so that the front bumper is within 12 inches.
CONCURRENT TRAINING
The training manager will decide how many participants go to the course. The size of the course,number of ambulances and instructors available for training, and other factors can limit the number ofparticipants that can be accommodated in a training session. If participants will be idle, the trainingmanager will consider establishing concurrent training stations. These stations could provide additionaltraining on a variety of subjects such as vehicle inspections, communications, and emergencyprocedures. The concurrent training can be conducted by a participant or by an instructor.

Exercises
Participant Manual Module BAmbulance Operation: Demonstration and Practice
8

Exercises
Module B Participant ManualAmbulance Operation: Demonstration and Practice
9
Serpentine
Purpose:To develop the basic skills of coordinating acceleration, timing of steering movements, and the use of the 9 - 3 hand position. Italso develops the ability to judge the relationship of fixed objects to the vehicle.
This exercise does not simulate a real world situation. It develops the skills for use in other exercises and gives you theopportunity to become familiar with how the vehicle handles and to build confidence. It will be taught before exercises using the9 - 3 hand position.
Procedure:Begin from a standstill and accelerate smoothly. Maintain steady speed on course. Begin braking at the assigned point and bringambulance to a full stop at the stop line.
Instructor:
1. Explains purpose of exercise and key factors of the exercise.
2. Demonstrates exercise at moderate speed.
3. Demonstrates exercise at required speed.
Participant:
1. Assumes proper driving position; seat, mirrors, seat belt.
2. Accelerates smoothly.
3. Negotiates the course smoothly.
4. Keeps steering movements constant and even.
5. Maintains 9 - 3 hand position.
6. Maintains constant speed throughout the course once assigned speed is reached.
7. Passes closely to the cones.
8. Brakes smoothly to a full stop.

Exercises
Participant Manual Module BAmbulance Operation: Demonstration and Practice
10
THIS PAGE INTENTIONALLY LEFT BLANK.

Exercises
Module B Participant ManualAmbulance Operation: Demonstration and Practice
11
Serpentine Exercise Rating
Participant's name Date Vehicle make/number
Practice Exercises1 2 3 4
A. Accelerated smoothly................... G G G GB. Maintained required speed............. G G G GC. 9-3 hand position........................ G G G GD. Maintained constant speed............. G G G GE. Steering control.......................... G G G GF. Accelerator, steering coordination.... G G G GG. Foot movement.......................... G G G GH. Use of brakes............................. G G G G
Number of cones hit
Reaction time was adequate. YES NO
Vehicle remained under control at all time. YES NO
Describe negative actions or attitudes. Failed to complete exercise because
All requirements were met. YES NO
GENERAL REMARKS:
Instructor's signature Date
I have seen the completed form and have been given an explanation of my performance and rating.
Participant's signature Date

Exercises
Participant Manual Module BAmbulance Operation: Demonstration and Practice
12
THIS PAGE INTENTIONALLY LEFT BLANK.

Exercises
Module B Participant ManualAmbulance Operation: Demonstration and Practice
13

Exercises
Participant Manual Module BAmbulance Operation: Demonstration and Practice
14
Diminishing Clearance
Purpose:To give the operator the sensation of driving in a street that starts out at 10 ft. 6 inches and ends up at 7 ft. 6 inches. Judges theoperator's ability to perceive change in dimension while driving forward and to use mirrors while backing.
Procedure:Begin from a standstill facing perpendicular to the course. Accelerate and turn to enter the course. Maintain a steady speed whileon the course. Keep the ambulance on the centerline of the course and begin braking at the assigned point to bring the ambulanceto a full stop at the stop line. The distance over or behind the stop line will be recorded. Ambulance will then be backed fulllength of course and stopped at course entry points.
Instructor:
1. Explains purpose of exercise and key factors of the exercise.
2. Demonstrates exercise at slow speed.
3. Demonstrates exercise at required speed.
USE A GROUND GUIDE WHEN BACKING
Participant:
1. Assumes proper driving position; seat, mirrors, seat belt.
2. Accelerates smoothly.
3. Negotiates the course smoothly.
4. Keeps steering movements constant and even.
5. Maintains 9 - 3 hand position.
6. Maintains constant speed throughout the course.
7. Maintains ambulance on course centerline.
8. Brakes smoothly to a full stop.
9. Uses mirrors while backing.
10. Accelerates smoothly in reverse and maintains slow steady speed while in reverse.
11. Brakes smoothly to full stop at course entry point.

Exercises
Module B Participant ManualAmbulance Operation: Demonstration and Practice
15
Diminishing Clearance Exercise Rating
Participant's name Date Vehicle make/number
Practice Exercises1 2 3 4
A. Accelerated smoothly................... G G G GB. Maintained required speed............. G G G GC. 9-3 hand position........................ G G G GD. Maintained constant speed............. G G G GE. Steering control.......................... G G G GF. Accelerator, steering coordination.... G G G GG. Maintained centerline position......... G G G GH. Foot movement.......................... G G G GI . Use of brakes............................. G G G GJ . Use of mirrors........................... G G G G
Number of cones hit
Reaction time was adequate. YES NO
Vehicle remained under control at all time. YES NO
Distance OVER/BEHIND stop line feet inches
Describe negative actions or attitudes.
Failed to complete exercise because
All requirements were met. YES NO
GENERAL REMARKS:
Instructor's signature Date
I have seen the completed form and have been given an explanation of my performance and rating.
Participant's signature Date

Exercises
Participant Manual Module BAmbulance Operation: Demonstration and Practice
16
THIS PAGE INTENTIONALLY LEFT BLANK.
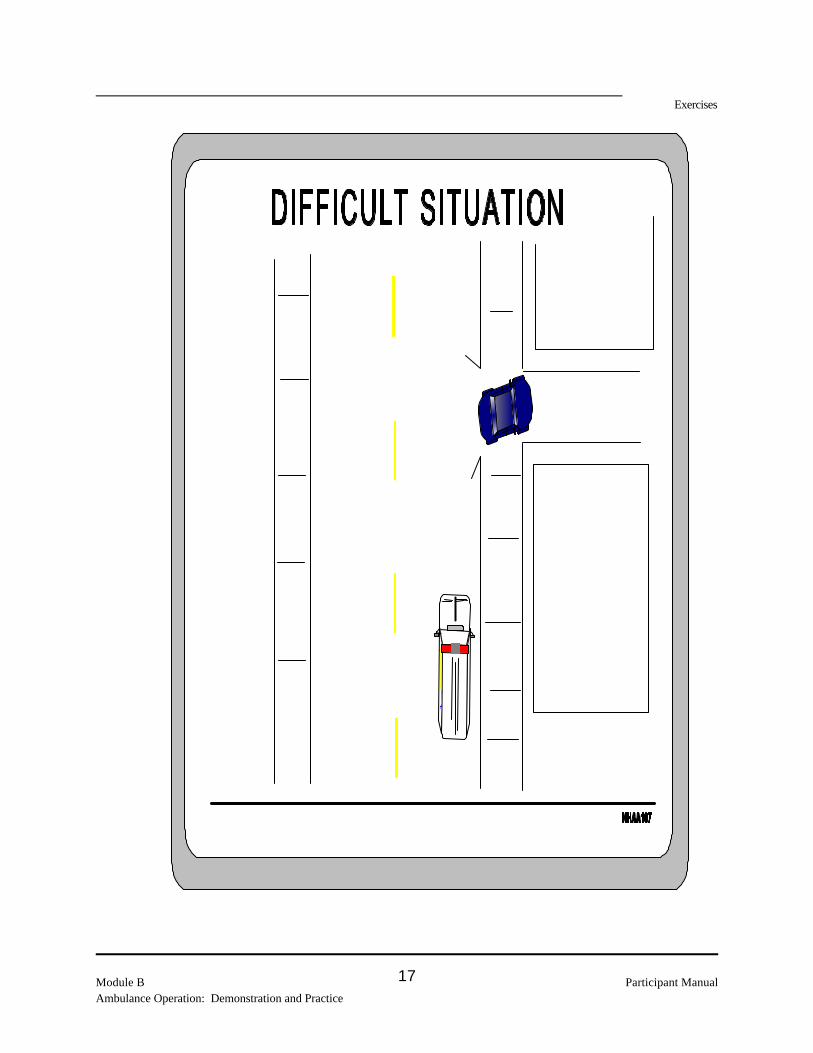
Exercises
Module B Participant ManualAmbulance Operation: Demonstration and Practice
17
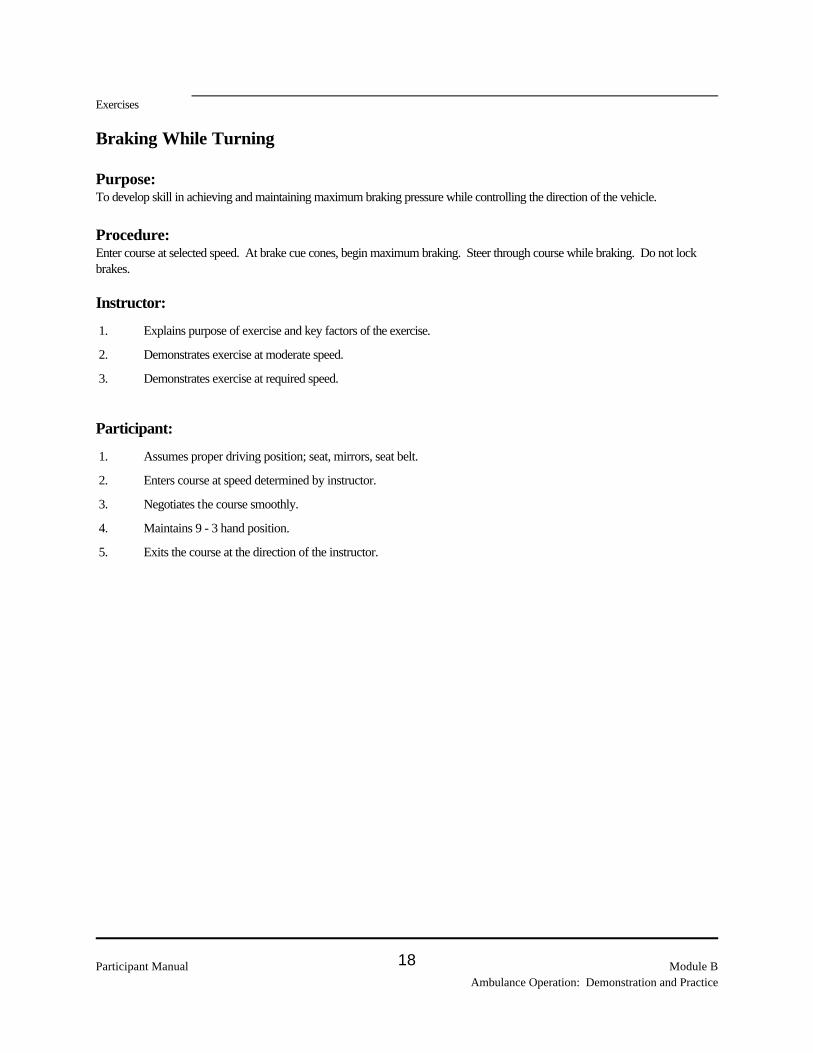
Exercises
Participant Manual Module BAmbulance Operation: Demonstration and Practice
18
Braking While Turning
Purpose:To develop skill in achieving and maintaining maximum braking pressure while controlling the direction of the vehicle.
Procedure:Enter course at selected speed. At brake cue cones, begin maximum braking. Steer through course while braking. Do not lockbrakes.
Instructor:
1. Explains purpose of exercise and key factors of the exercise.
2. Demonstrates exercise at moderate speed.
3. Demonstrates exercise at required speed.
Participant:
1. Assumes proper driving position; seat, mirrors, seat belt.
2. Enters course at speed determined by instructor.
3. Negotiates the course smoothly.
4. Maintains 9 - 3 hand position.
5. Exits the course at the direction of the instructor.

Exercises
Module B Participant ManualAmbulance Operation: Demonstration and Practice
19
Braking While Turning Exercise Rating
Participant's name Date Vehicle make/number
Practice Exercises1 2 3 4
A. Entered course correctly................ G G G GB. Maintained required speed.............. G G G GC. 9 - 3 hand position...................... G G G GD. Controlled acceleration.................. G G G GE. Steering control........................... G G G GF. Accelerator, steering coordination.... G G G GG. Smooth acceleration...................... G G G GH. Foot movement.......................... G G G GI . Use of brakes............................ G G G G
Number of cones hit
Reaction time was adequate. YES NO
Vehicle remained under control at all time. YES NO
Describe negative actions or attitudes.
Failed to complete exercise because
All requirements were met. YES NO
GENERAL REMARKS:
Instructor's signature Date
I have seen the completed form and have been given an explanation of my performance and rating.
Participant's signature Date

Exercises
Participant Manual Module BAmbulance Operation: Demonstration and Practice
20
THIS PAGE INTENTIONALLY LEFT BLANK.

Exercises
Module B Participant ManualAmbulance Operation: Demonstration and Practice
21

Exercises
Participant Manual Module BAmbulance Operation: Demonstration and Practice
22
Straight Line Braking
Purpose:To teach operator to brake quickly and smoothly on demand. Combines reaction time, smooth braking, and steering skills.
Procedure:Enter course at selected speed. At instructor command, quickly bring ambulance to smooth, full stop. Maintain straight directionand stop without locking brakes.
Instructor:
1. Explains purpose of exercise and key factors of the exercise.
2. Demonstrates exercise at moderate speed.
3. Demonstrates exercise at required speed.
Participant:
1. Assumes proper driving position; seat, mirrors, seat belt.
2. Enters course at speed determined by instructor.
3. Negotiates the course smoothly.
4. Keeps steering movements constant and even.
5. Maintains 9 - 3 hand position.
6. Maintains constant speed throughout the course.
7. Passes closely to the cones.
8. Brakes smoothly on instructor command without locking brakes.

Exercises
Module B Participant ManualAmbulance Operation: Demonstration and Practice
23
Straight Line Braking Exercise Rating
Participant's name Date Vehicle make/number
Practice Exercises1 2 3 4
A. Entered course correctly................ G G G GB. Maintained required speed.............. G G G GC. 9 - 3 hand position...................... G G G GD. Controlled acceleration.................. G G G GE. Steering control........................... G G G GF. Accelerator, steering coordination.... G G G GG. Smooth acceleration...................... G G G GH. Foot movement.......................... G G G GI . Use of brakes............................ G G G G
Number of cones hit
Reaction time was adequate. YES NO
Vehicle remained under control at all time. YES NO
Describe negative actions or attitudes.
Failed to complete exercise because
All requirements were met. YES NO
GENERAL REMARKS:
Instructor's signature Date
I have seen the completed form and have been given an explanation of my performance and rating.
Participant's signature Date

Exercises
Participant Manual Module BAmbulance Operation: Demonstration and Practice
24
THIS PAGE INTENTIONALLY LEFT BLANK.

Exercises
Module B Participant ManualAmbulance Operation: Demonstration and Practice
25

Exercises
Participant Manual Module BAmbulance Operation: Demonstration and Practice
26
U-Turn
Purpose:To develop the coordination of acceleration, turning, judgment of road width, and signaling.
Procedure:Enter course and begin braking. Signal, check mirrors, and begin turn. Use shoulder areas to complete turn in one motion.
Instructor:
1. Explains purpose of exercise and key factors of the exercise.
2. Demonstrates exercise at moderate speed.
3. Demonstrates exercise at required speed.
Participant:
1. Assumes proper driving position; seat, mirrors, seat belt.
2. Enters course at speed determined by instructor.
3. Signals for a right turn at least 100 feet in advance.
4. Pauses momentarily to check for oncoming traffic.
5. Follows through with the counter clockwise turn.
6. Avoids situations with considerable cross traffic or pedestrians.
7. Crosses minimum number of traffic lanes (considerably safer).
8. Negotiates the course smoothly.
9. Keeps steering movements constant and even.
10. Maintains 9 - 3 hand position.
11. Exits the course at the direction of the instructor.

Exercises
Module B Participant ManualAmbulance Operation: Demonstration and Practice
27
U-Turn Exercise Rating
Participant's name Date Vehicle make/number
Practice Exercises1 2 3 4
A. Entered course correctly................ G G G GB. Maintained required speed.............. G G G GC. 9 - 3 hand position..................... G G G GD. Controlled acceleration.................. G G G GE. Steering control........................... G G G GF. Accelerator, steering coordination.... G G G GG. Smooth acceleration..................... G G G GH. Foot movement.......................... G G G GI . Use of brakes............................ G G G GJ . Signaled intention....................... G G G GK. Checked mirror.......................... G G G GL. Turned head.............................. G G G G
Number of cones hit
Reaction time was adequate. YES NO
Vehicle remained under control at all time. YES NO
Describe negative actions or attitudes.
Failed to complete exercise because
All requirements were met. YES NO
GENERAL REMARKS:
Instructor's signature Date
I have seen the completed form and have been given an explanation of my performance and rating.
Participant's signature Date

Exercises
Participant Manual Module BAmbulance Operation: Demonstration and Practice
28
THIS PAGE INTENTIONALLY LEFT BLANK.

Exercises
Module B Participant ManualAmbulance Operation: Demonstration and Practice
29
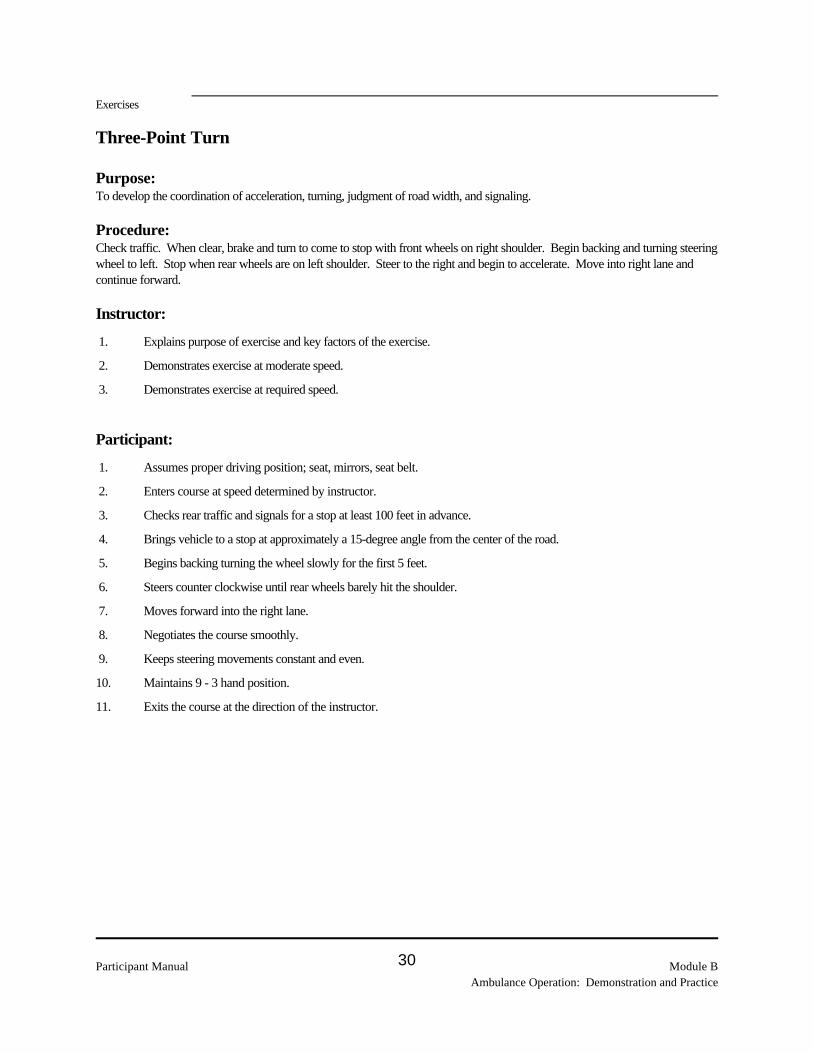
Exercises
Participant Manual Module BAmbulance Operation: Demonstration and Practice
30
Three-Point Turn
Purpose:To develop the coordination of acceleration, turning, judgment of road width, and signaling.
Procedure:Check traffic. When clear, brake and turn to come to stop with front wheels on right shoulder. Begin backing and turning steeringwheel to left. Stop when rear wheels are on left shoulder. Steer to the right and begin to accelerate. Move into right lane andcontinue forward.
Instructor:
1. Explains purpose of exercise and key factors of the exercise.
2. Demonstrates exercise at moderate speed.
3. Demonstrates exercise at required speed.
Participant:
1. Assumes proper driving position; seat, mirrors, seat belt.
2. Enters course at speed determined by instructor.
3. Checks rear traffic and signals for a stop at least 100 feet in advance.
4. Brings vehicle to a stop at approximately a 15-degree angle from the center of the road.
5. Begins backing turning the wheel slowly for the first 5 feet.
6. Steers counter clockwise until rear wheels barely hit the shoulder.
7. Moves forward into the right lane.
8. Negotiates the course smoothly.
9. Keeps steering movements constant and even.
10. Maintains 9 - 3 hand position.
11. Exits the course at the direction of the instructor.

Exercises
Module B Participant ManualAmbulance Operation: Demonstration and Practice
31
Three-Point Turn Exercise Rating
Participant's name Date Vehicle make/number
Practice Exercises1 2 3 4
A. Entered course correctly................ G G G GB. Maintained required speed.............. G G G GC. 9 - 3 hand position (going forward). G G G GD. Controlled acceleration.................. G G G GE. Steering control........................... G G G GF. Accelerator, steering coordination.... G G G GG. Smooth acceleration..................... G G G GH. Foot movement.......................... G G G GI . Use of brakes............................ G G G GJ . Signaled intention....................... G G G GK. Checked mirror.......................... G G G GL. Turned head.............................. G G G G
Number of cones hit
Reaction time was adequate. YES NO
Vehicle remained under control at all time. YES NO
Describe negative actions or attitudes.
Failed to complete exercise because
All requirements were met. YES NO
GENERAL REMARKS:
Instructor's signature Date
I have seen the completed form and have been given an explanation of my performance and rating.
Participant's signature Date

Exercises
Participant Manual Module BAmbulance Operation: Demonstration and Practice
32
THIS PAGE INTENTIONALLY LEFT BLANK.

Exercises
Module B Participant ManualAmbulance Operation: Demonstration and Practice
33

Exercises
Participant Manual Module BAmbulance Operation: Demonstration and Practice
34
Right Side Road Turn
Purpose:To develop the skill of coordinating turning, braking, signaling, and making traffic observations.
Procedure:Enter course, slow, and stop just past side road. Back into side road. Stop with front bumper clear of roadway. Check traffic,signal, and pull into opposite lane. Accelerate and exit course.
Instructor:
1. Explains purpose of exercise and key factors of the exercise.
2. Demonstrates exercise at moderate speed.
3. Demonstrates exercise at required speed.
Participant:
1. Assumes proper driving position; seat, mirrors, seat belt.
2. Enters course at speed determined by instructor.
3. Selects side road, checks rear traffic, and signals for a stop at least 100 feet in advance.
4. Keeps close to right edge of road and brings vehicle to a stop approximately 10 feet past the side road.
5. Allows traffic from the rear to pass.
6. Looks over the right shoulder and rechecks traffic.
7. Backs into the side road on the right.
8. Checks traffic in both directions, signals for left turn and re-enters the roadway.
9. Negotiates the course smoothly.
10. Keeps steering movements constant and even.
11. Maintains 9 - 3 hand position.
12. Exits the course at the direction of the instructor.

Exercises
Module B Participant ManualAmbulance Operation: Demonstration and Practice
35
Right Side Road Turn Exercise Rating
Participant's name Date Vehicle make/number
Practice Exercises1 2 3 4
A. Entered course correctly................ G G G GB. Maintained required speed.............. G G G GC. 9 - 3 hand position (going forward). G G G GD. Controlled acceleration.................. G G G GE. Steering control........................... G G G GF. Accelerator, steering coordination.... G G G GG. Smooth acceleration..................... G G G GH. Foot movement.......................... G G G GI . Use of brakes............................ G G G GJ . Signaled intention....................... G G G GK. Checked mirror.......................... G G G GL. Turned head.............................. G G G G
Number of cones hit
Reaction time was adequate. YES NO
Vehicle remained under control at all time. YES NO
Describe negative actions or attitudes.
Failed to complete exercise because
All requirements were met. YES NO
GENERAL REMARKS:
Instructor's signature Date
I have seen the completed form and have been given an explanation of my performance and rating.
Participant's signature Date

Exercises
Participant Manual Module BAmbulance Operation: Demonstration and Practice
36
THIS PAGE INTENTIONALLY LEFT BLANK.

Exercises
Module B Participant ManualAmbulance Operation: Demonstration and Practice
37

Exercises
Participant Manual Module BAmbulance Operation: Demonstration and Practice
38
Left Side Road Turn
Purpose:To develop the skill of coordinating turning, braking, signaling, and making traffic observations.
Procedure:Enter course, slow, and signal for left turn. Check traffic and turn left into side road. Stop with rear bumper clear of roadway. Check traffic and back into lane. Stop. Accelerate forward and exit course.
Instructor:
1. Explains purpose of exercise and key factors of the exercise.
2. Demonstrates exercise at moderate speed.
3. Demonstrates exercise at required speed.
Participant:
1. Assumes proper driving position; seat, mirrors, seat belt.
2. Enters course at speed determined by instructor.
3. Selects side road, checks rear traffic, and signals for a turn at least 100 feet in advance.
4. Keeps to the right of the centerline and stops approximately 20 feet from roadway.
5. Checks traffic and proceeds ahead.
6. Moves forward.
7. Negotiates the course smoothly.
8. Keeps steering movements constant and even.
9. Maintains 9 - 3 hand position.
10. Exits the course at the direction of the instructor.

Exercises
Module B Participant ManualAmbulance Operation: Demonstration and Practice
39
Left Side Road Turn Exercise Rating
Participant's name Date Vehicle make/number
Practice Exercises1 2 3 4
A. Entered course correctly................ G G G GB. Maintained required speed.............. G G G GC. 9 - 3 hand position (going forward). G G G GD. Controlled acceleration.................. G G G GE. Steering control........................... G G G GF. Accelerator, steering coordination.... G G G GG. Smooth acceleration..................... G G G GH. Foot movement.......................... G G G GI . Use of brakes............................ G G G GJ . Signaled intention....................... G G G GK. Checked mirror.......................... G G G GL. Turned head.............................. G G G G
Number of cones hit
Reaction time was adequate. YES NO
Vehicle remained under control at all time. YES NO
Describe negative actions or attitudes.
Failed to complete exercise because
All requirements were met. YES NO
GENERAL REMARKS:
Instructor's signature Date
I have seen the completed form and have been given an explanation of my performance and rating.
Participant's signature Date

Exercises
Participant Manual Module BAmbulance Operation: Demonstration and Practice
40
THIS PAGE INTENTIONALLY LEFT BLANK.

Exercises
Module B Participant ManualAmbulance Operation: Demonstration and Practice
41

Exercises
Participant Manual Module BAmbulance Operation: Demonstration and Practice
42
Slow Speed Lane Change
Purpose:To develop confidence in controlling the vehicle and to experience vehicle stability. The exercise assists in developingcoordination of steering and acceleration as well as the recognition of the relationship of fixed objects with respect to the vehicle.
Procedure:Enter course at selected speed. Maintain speed as lane changes are made. Signal for turn when first entering lanes, change lanes,change signal for opposite lane change.
Instructor:
1. Explains purpose of exercise and key factors of the exercise.
2. Demonstrates exercise at moderate speed.
3. Demonstrates exercise at required speed.
Participant:
1. Assumes proper driving position; seat, mirrors, seat belt.
2. Enters course at speed determined by instructor.
3. Negotiates the course smoothly.
4. Keeps steering movements constant and even.
5. Maintains 9 - 3 hand position.
6. Maintains constant speed throughout the course.
7. Does not use brakes.
8. Passes closely to the cones.
9. Exits the course at the direction of the instructor.

Exercises
Module B Participant ManualAmbulance Operation: Demonstration and Practice
43
Slow Speed Lane Change Exercise Rating
Participant's name Date Vehicle make/number
Practice Exercises1 2 3 4
A. Entered course correctly................ G G G GB. Maintained required speed.............. G G G GC. 9 - 3 hand position...................... G G G GD. Controlled acceleration.................. G G G GE. Steering control........................... G G G GF. Counter steering......................... G G G GG. Accelerator, steering coordination.... G G G GH. Checked mirrors......................... G G G GI . Turned head.............................. G G G GJ . Foot movement.......................... G G G GK. Use of brakes............................ G G G G
Number of cones hit
Reaction time was adequate. YES NO
Vehicle remained under control at all time. YES NO
Describe negative actions or attitudes.
Failed to complete exercise because
All requirements were met. YES NO
GENERAL REMARKS:
Instructor's signature Date
I have seen the completed form and have been given an explanation of my performance and rating.
Participant's signature Date

Exercises
Participant Manual Module BAmbulance Operation: Demonstration and Practice
44
THIS PAGE INTENTIONALLY LEFT BLANK.

Exercises
Module B Participant ManualAmbulance Operation: Demonstration and Practice
45

Exercises
Participant Manual Module BAmbulance Operation: Demonstration and Practice
46
Perpendicular Parking, Back In and Drive Out
Purpose:To develop skill in backing a vehicle into a stall controlling front end swing and recognizing the relationship of the vehicle to fixedobjects. Develops use of mirrors and use of ground guide and mirrors.
Procedure:Drive forward at steady speed. Brake to stop at forward cone line. Back into space while turning. Stop at cone line. Maintaincenterline of parking space. First tries to be conducted using mirrors only. Add ground guide for subsequent tries.
Instructor:
1. Explains purpose of exercise and key factors of the exercise.
2. Demonstrates exercise at moderate speed.
3. Demonstrates exercise at required speed.
Participant:
1. Assumes proper driving position; seat, mirrors, seat belt.
2. Enters course at speed determined by instructor.
3. Drives the vehicle beyond the stall, which is perpendicular to the road.
4. Backs the vehicle into the center of the stall.
5. Drives forward using the 9 - 3 steering method.
6. Turns into designated parking space using hand-over-hand or shuffle steering.
7. Centers vehicle in parking space.
8. Drives out, turning steering wheel to the desired direction selected.
9. Makes final adjustments and drives forward.
10. Exits course at direction of instructor.
11. Uses ground guide and proper hand signals.
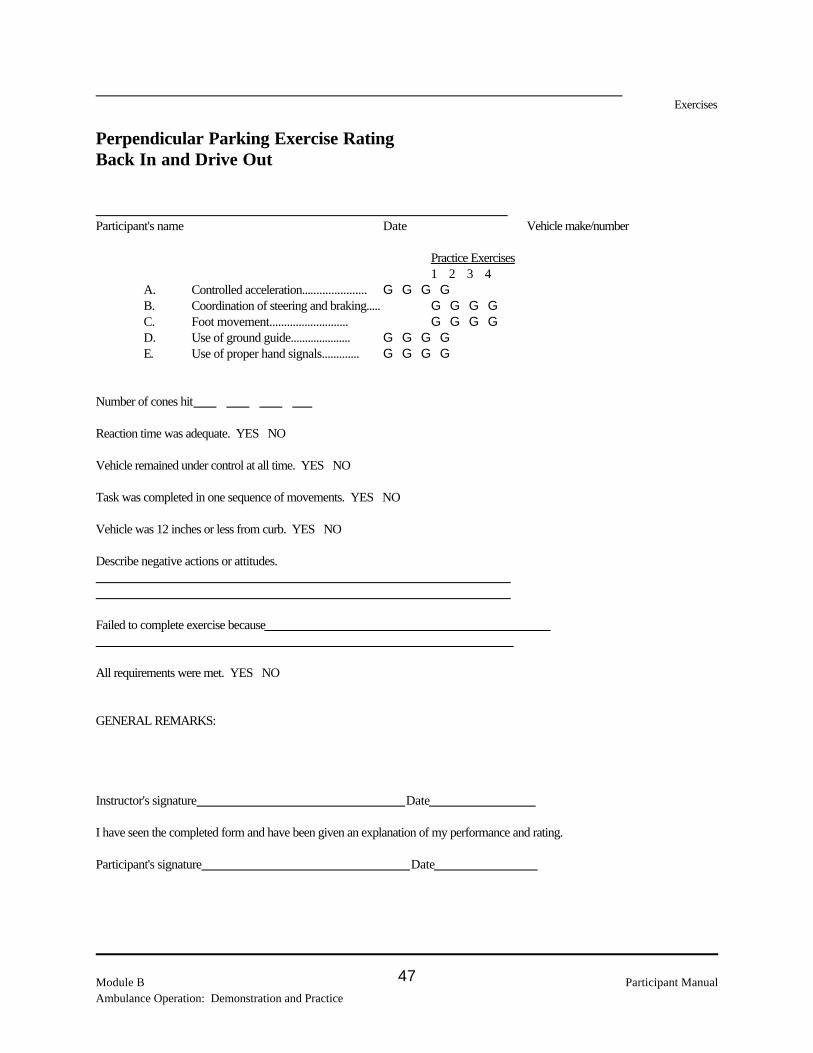
Exercises
Module B Participant ManualAmbulance Operation: Demonstration and Practice
47
Perpendicular Parking Exercise RatingBack In and Drive Out
Participant's name Date Vehicle make/number
Practice Exercises1 2 3 4
A. Controlled acceleration...................... G G G GB. Coordination of steering and braking..... G G G GC. Foot movement........................... G G G GD. Use of ground guide..................... G G G GE. Use of proper hand signals............. G G G G
Number of cones hit
Reaction time was adequate. YES NO
Vehicle remained under control at all time. YES NO
Task was completed in one sequence of movements. YES NO
Vehicle was 12 inches or less from curb. YES NO
Describe negative actions or attitudes.
Failed to complete exercise because
All requirements were met. YES NO
GENERAL REMARKS:
Instructor's signature Date
I have seen the completed form and have been given an explanation of my performance and rating.
Participant's signature Date

Exercises
Participant Manual Module BAmbulance Operation: Demonstration and Practice
48
THIS PAGE INTENTIONALLY LEFT BLANK.
Module C Participant ManualAmbulance Operator Internship
1
MODULE CAMBULANCE OPERATOR INTERNSHIP: GUIDELINES FOR
ADDITIONAL ON-THE-JOB TRAINING AND DOCUMENTATION
MODULE GOAL
The goal of this module is to provide ambulance operators with the skills to safely and efficiently operatean ambulance while performing on-the-job training (OJT) runs.
MODULE OVERVIEW
This module builds on the knowledge and skills you learned in Modules A and B. You will now begin aseries of supervised on-the-job training sessions. This training is necessary because there areoperational tasks that cannot be evaluated in other than an operational setting. You may do an excellentjob on the driving course but not be able to cope with an emergency response, traffic congestion, andnavigating to different medical facilities. This is the final phase of the training to qualify as an ambulanceoperator. You should be asssigned to a partner who is qualified to coach and evaluate yourperformance. Training should never stop. There is always something to learn or practice to maintain aprofessional level of performance.
ORIENTATION
An experienced person should conduct an orientation for you. This should include a completediscussion of the traffic situation in the operational area and practice runs without patients to the medicalfacilities. If there are any particular areas the organization responds to frequently, the reason for theresponses should be explained and the best routes identified. Navigation training should begin andcontinue so that you can find the medical facilities from any location in the operational area. Throughoutthe OJT, the training manager will monitor your progress by discussing your progress with you and thesupervisor and by reviewing the checklists. When the performance standard has been achieved in eachphase of the OJT, you will be told and the entries made to your training record.
Each ambulance crew should continue training by practicing during every opportunity. They should alsocritique each run to review what they did that could be improved and to determine how the next runcould be better.
If you have a busy organization that makes many runs daily, the OJT period may be completed in a fewdays. In less busy organizations, the training may take weeks. Try to get all training completed as soonas possible.

Instructions to Participants
Participant Manual Module CAmbulance Operator Internship
2
CHECKLIST ORGANIZATION
Each of the checklists listed below covers a related group of tasks that must be performed.
Checklists
Ambulance FamiliarizationAmbulance Inspection, Maintenance, and RepairNormal and High Risk Operating SituationsOperational Driving
Beside each task statement on the checklist is a series of boxes. The number of boxes signifies aprojected number of times you might need to perform the task under supervision on an actual run. Youmay perform to the standard on the first run, and this should be indicated. Space is included on eachchecklist for the evaluator=s comments. These comments provide a running narrative of your progress. The checklist should be filled out at the end of each run, and you should be briefed on your performanceresults. Completed checklists become a valuable training record, and they are placed in your permanenttraining record.
Depending on the tasks performed during each supervised run, the evaluator may be able to sign offtask accomplishment on more than one checklist, and is encouraged to do so.
HOW TO USE THE CHECKLISTS
The checklists are designed to record how you did your job in an operational setting or simulatedpractice. The checklists show the tasks that you will be expected to perform during your on-the-jobtraining. You can use the checklists as a study guide for your organization. You will need to study yourorganization's Standard Operating Procedures (SOP). The SOP will describe the procedures for avariety of routine situations that you will encounter and what to do when you need assistance. Takeeach checklist and try to match up the tasks with the information in the SOP. If the SOP does notcover a task, ask your supervisor to tell you how to do that task.
In an operational setting, the type of run will not be known until the ambulance is dispatched and the runis completed. During this time the crew must focus on doing the job. When the run is completed, thesupervising crew member (evaluator) gets a copy of the checklist most appropriate for the type of runcompleted. In most cases, all of the tasks on the checklist will not be performed on a single run. Theevaluator will go over the run with you in private.

Instructions to Participants
Module C Participant ManualAmbulance Operator Internship
3
It's always best for the evaluator to let you know if your performance was satisfactory or not. You willbe briefed on your performance throughout your OJT. The evaluators should tell you what you did thatwas good and met the standard and any areas that you could improve. This should be a positiveexperience, and you should not challenge the evaluator or argue about your view of how you did. If youbelieve that the evaluator is being unfair, you can discuss what you think is unfair. If the evaluator saysthat you did not make a complete stop and clear the intersection properly before proceeding, then thechances are that you did not stop completely. The evaluator wants you to succeed and become a fullyqualified ambulance operator. Evaluators also must ensure that you have demonstrated the skills,knowledge, proper attitude, and temperament in an operational setting.
When you have demonstrated satisfactory performance for a task, you get a check mark in the box. Leaving a box blank means the participant did not perform the task or was not observed by anevaluator when he did perform the task.
The organization training manager or supervisor should review all checklists and discuss your progresswith the evaluators.
The designated authority to issue operator certificates will be notified when you have demonstratedsatisfactory performance in all tasks. A certificate of completion should be issued to you, at anappropriate ceremony.
THE EVALUATOR
The evaluator should be the training supervisor or a person qualified to evaluate the participant=sperformance during actual runs. As with the driving range training in Module B, all evaluators areencouraged to maintain a positive, ?let me help you succeed@ attitude. If a participant does havedifficulty with a certain aspect of ambulance operations, it is usually more beneficial to recommendadditional practice in that area rather than eliminate the person as an operator. The evaluator=s inputand recommendations are invaluable in keeping a participant motivated and progressing during this finalphase of training.

Instructions to Participants
Participant Manual Module CAmbulance Operator Internship
4
THIS PAGE INTENTIONALLY LEFT BLANK.
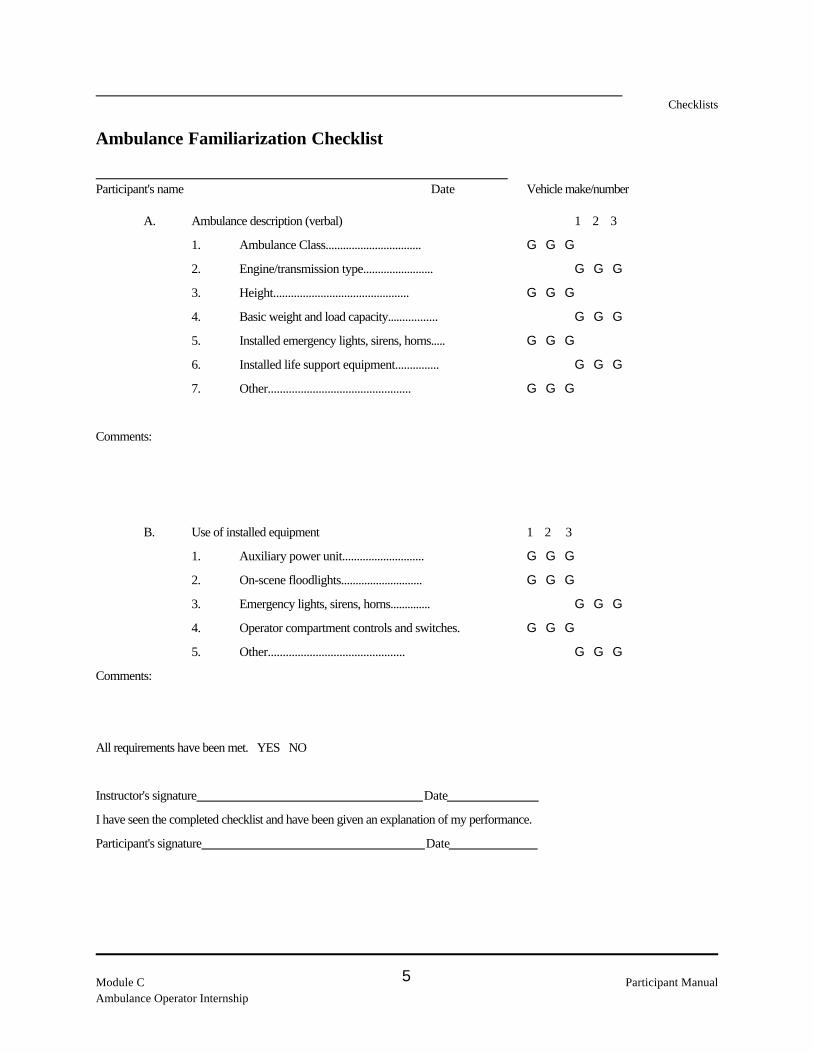
Checklists
Module C Participant ManualAmbulance Operator Internship
5
Ambulance Familiarization Checklist
Participant's name Date Vehicle make/number
A. Ambulance description (verbal) 1 2 3
1. Ambulance Class................................. G G G
2. Engine/transmission type........................ G G G
3. Height.............................................. G G G
4. Basic weight and load capacity................. G G G
5. Installed emergency lights, sirens, horns..... G G G
6. Installed life support equipment............... G G G
7. Other................................................ G G G
Comments:
B. Use of installed equipment 1 2 3
1. Auxiliary power unit............................ G G G
2. On-scene floodlights............................ G G G
3. Emergency lights, sirens, horns.............. G G G
4. Operator compartment controls and switches. G G G
5. Other.............................................. G G G
Comments:
All requirements have been met. YES NO
Instructor's signature Date
I have seen the completed checklist and have been given an explanation of my performance.
Participant's signature Date

Checklists
Participant Manual Module CAmbulance Operator Internship
6
THIS PAGE INTENTIONALLY LEFT BLANK.

Checklists
Module C Participant ManualAmbulance Operator Internship
7
Ambulance Inspection, Maintenance, and Repair Checklist
Participant's name Date Vehicle make/number
A. Quick Check 1 2 3 4
1. Use of checklist.................................. G G G G
2. Documentation of discrepancies............... G G G G
3. Completion of Work Request.................. G G G G
4. Appropriate vehicle in-service decision..... G G G G
5. Recordkeeping.................................... G G G G
Comments:
B. Full check 1 2 3 4
1. Use of checklist................................. G G G G
2. Documentation of discrepancies.............. G G G G
3. Completion of Work Request.................. G G G G
4. Appropriate vehicle in-service decision...... G G G G
5. Recordkeeping................................... G G G G
Comments:
C. Maintenance and Repair 1 2 3
1. Use of Work Request........................... G G G
2. Preventive maintenance program............. G G G
3. Maintenance and repair follow-up............ G G G
4. Maintenance procedures for enroute malfunctions G G G
Comments:
All requirements have been met. YES NO
Instructor's signature Date
I have seen the completed checklist and have been given an explanation of my performance.
Participant's signature Date

Checklists
Participant Manual Module CAmbulance Operator Internship
8
THIS PAGE INTENTIONALLY LEFT BLANK.

Checklists
Module C Participant ManualAmbulance Operator Internship
9
Normal and High Risk Situations Checklist
Participant's name Date Vehicle make/number
A. Ambulance Operation Under Normal Conditions 1 2 3 4 5
1. Road surfaces--asphalt, concrete, gravel, transition G G G
2. Road surfaces--bumps, mud, potholes, misc. objects G G G
3. Road construction--bridges, ramps, curves G G G
4. Cornering skills.................................. G G G G
5. Braking skills...................................... G G G G
6. Accelerating skills............................... G G G G
7. Speed Control..................................... G G G G
8. Lane changes..................................... G G G G
9. Passing other vehicles.......................... G G G G
10. Backing--uses ground guide................... G G G G G
11. Parking............................................ G G G G
12. Turning around.................................. G G G G
13. Operating on two-lane roads.................. G G G
14. Operating on interstate highways............. G G G
15. Overall ambulance control..................... G G G G
16. Use of lights and turn signals................. G G G G
17. Use of mirrors................................... G G G G
Comments:
B. Ambulance operation under high risk conditions 1 2 3 4 5
1. Use of lights and siren......................... G G G G G
2. Compliance with state and local regulations
for emergency vehicles......................... G G G G G
3. Adherence to speed limits..................... G G G G G
4. Maintains safety cushion....................... G G G G G
5. Use of 2-4-12 Rule............................. G G G G G
6. Drives defensively.............................. G G G G G
7. Response to potential crash situations....... G G G
8. Communicates with other drivers............ G G G G G

Checklists
Participant Manual Module CAmbulance Operator Internship
10
9. Performs pre-crash planning.................. G G G G G
10. Controlled intersections
a. Use of lights and siren.............. G G G G G
b. Approaches intersection cautiously G G G G G
c. Communicates with other drivers.. G G G G G
d. Looks to clear all other traffic..... G G G G G
e. Anticipates reactions of other drivers G G G G G
f. Moves through intersections with
caution.................................. G G G G G
11. Compliance with Law of Due Regard....... G G G G G
12. Driving against traffic.......................... G G G
13. Adverse weather
a. Preparation of ambulance........... G G G G
b. Response to visibility problems.... G G G G
c. Response to traction problems...... G G G G
d. Response to high winds............. G G G G
14. Night driving
a. Maintains night vision capabilities. G G G G
b. Use of headlights..................... G G G G
c. Ambulance control at night......... G G G G
15. Response when ambulance runs off the edge
of the road........................................ G G G
16. Response to enroute malfunctions
a. Control of ambulance................ G G G
b. Pulling off the road and parking... G G G
c. Maintenance performed............. G G G
Comments:
All requirements have been met. YES NO
Instructor's signature Date I have seen the completed checklist
and have been given an explanation of my performance.

Checklists
Module C Participant ManualAmbulance Operator Internship
11
Participant's signature Date
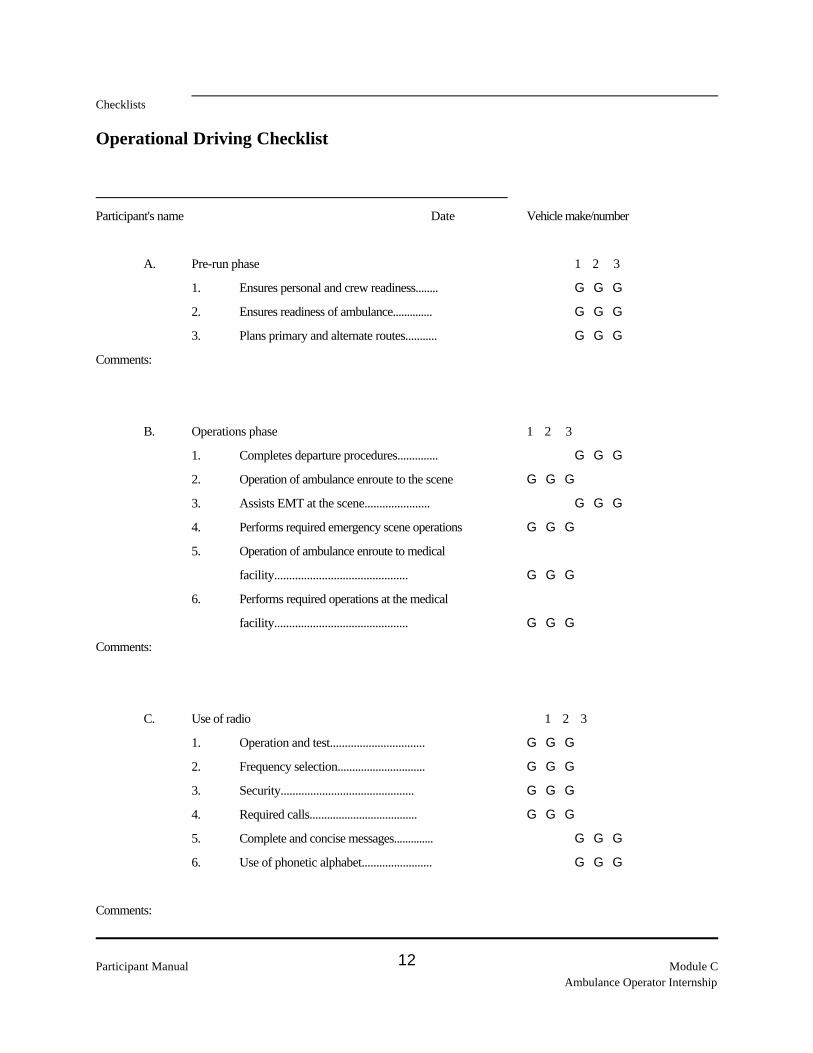
Checklists
Participant Manual Module CAmbulance Operator Internship
12
Operational Driving Checklist
Participant's name Date Vehicle make/number
A. Pre-run phase 1 2 3
1. Ensures personal and crew readiness........ G G G
2. Ensures readiness of ambulance.............. G G G
3. Plans primary and alternate routes........... G G G
Comments:
B. Operations phase 1 2 3
1. Completes departure procedures.............. G G G
2. Operation of ambulance enroute to the scene G G G
3. Assists EMT at the scene...................... G G G
4. Performs required emergency scene operations G G G
5. Operation of ambulance enroute to medical
facility............................................. G G G
6. Performs required operations at the medical
facility............................................. G G G
Comments:
C. Use of radio 1 2 3
1. Operation and test................................ G G G
2. Frequency selection.............................. G G G
3. Security............................................. G G G
4. Required calls..................................... G G G
5. Complete and concise messages.............. G G G
6. Use of phonetic alphabet........................ G G G
Comments:

Checklists
Module C Participant ManualAmbulance Operator Internship
13
D. Verbal communications 1 2 3
1. With EMT enroute to scene.................... G G G
2. With individuals at the scene.................. G G G
3. With EMT enroute medical facility.......... G G G
Comments:
E. Post-run phase 1 2 3
1. Resupplies ambulance.......................... G G G
2. Cleans and decontaminates ambulance...... G G G
3. Prepares ambulance for next run............. G G G
Comments:
All requirements have been met. YES NO
Instructor's signature Date
I have seen the completed checklist and have been given an explanation of my performance.
Participant's signature Date

Appendixes
Participant Manual Emergency Vehicle Operator (Ambulance)Training Course
-14
Appendix A
Area Motor Vehicle Operations Guidelines

Appendixes
Emergency Vehicle Operator (Ambulance) Participant ManualTraining Course
-15
RELEVANT STATE STATUTESRELEVANT STATE STATUTES
Motor Vehic le Code, State of _ _ _ _ _ _ _ _ _ _ _ _Motor Vehic le Code, State of _ _ _ _ _ _ _ _ _ _ _ _
Topic Local Policy/Ordinance
Definition of Emergency Vehicle
Proceeding past red lights and stop signals
Recognized warning devices

Appendixes
Participant Manual Emergency Vehicle Operator (Ambulance)Training Course
-16
RELEVANT STATE STATUTESRELEVANT STATE STATUTES
Motor Vehic le Code, State of _ _ _ _ _ _ _ _ _ _ _ _Motor Vehic le Code, State of _ _ _ _ _ _ _ _ _ _ _ _
Topic Local Policy/Ordinance
Violating traffic flow and turn regulations
Passing
Parking at the scene of an emergency

Appendixes
Emergency Vehicle Operator (Ambulance) Participant ManualTraining Course
-17
RELEVANT STATE STATUTESRELEVANT STATE STATUTES
Motor Vehic le Code, State of _ _ _ _ _ _ _ _ _ _ _ _Motor Vehic le Code, State of _ _ _ _ _ _ _ _ _ _ _ _
Topic Local Policy/Ordinance
Exceeding posted speed limits
Definition of an emergency
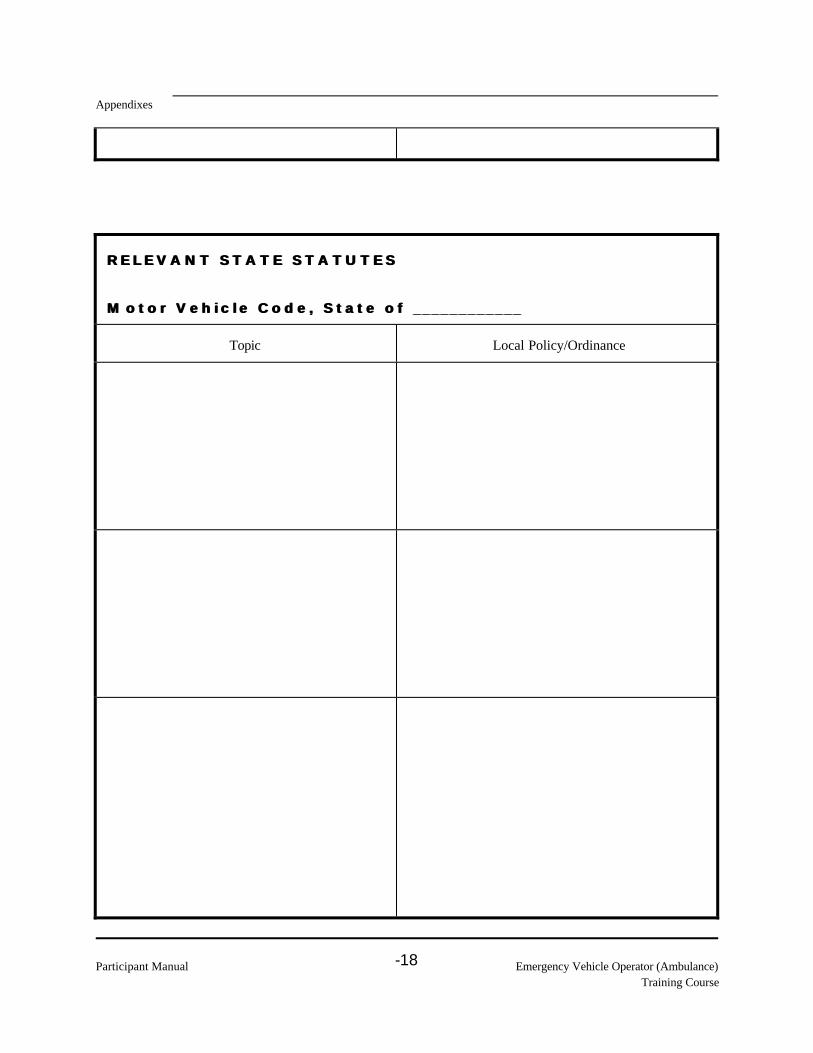
Appendixes
Participant Manual Emergency Vehicle Operator (Ambulance)Training Course
-18
RELEVANT STATE STATUTESRELEVANT STATE STATUTES
Motor Vehic le Code, State of _ _ _ _ _ _ _ _ _ _ _ _Motor Vehic le Code, State of _ _ _ _ _ _ _ _ _ _ _ _
Topic Local Policy/Ordinance

Appendixes
Emergency Vehicle Operator (Ambulance) Participant ManualTraining Course
-19

Appendixes
Participant Manual Emergency Vehicle Operator (Ambulance)Training Course
-20
Appendix B
Interpreting Hand Signals

Appendixes
Emergency Vehicle Operator (Ambulance) Participant ManualTraining Course
-21

Appendixes
Participant Manual Emergency Vehicle Operator (Ambulance)Training Course
-22

Appendixes
Emergency Vehicle Operator (Ambulance) Participant ManualTraining Course
-23

Appendixes
Participant Manual Emergency Vehicle Operator (Ambulance)Training Course
-24

Appendixes
Emergency Vehicle Operator (Ambulance) Participant ManualTraining Course
-25

Appendixes
Participant Manual Emergency Vehicle Operator (Ambulance)Training Course
-26

Appendixes
Emergency Vehicle Operator (Ambulance) Participant ManualTraining Course
-27

Appendixes
Participant Manual Emergency Vehicle Operator (Ambulance)Training Course
-28
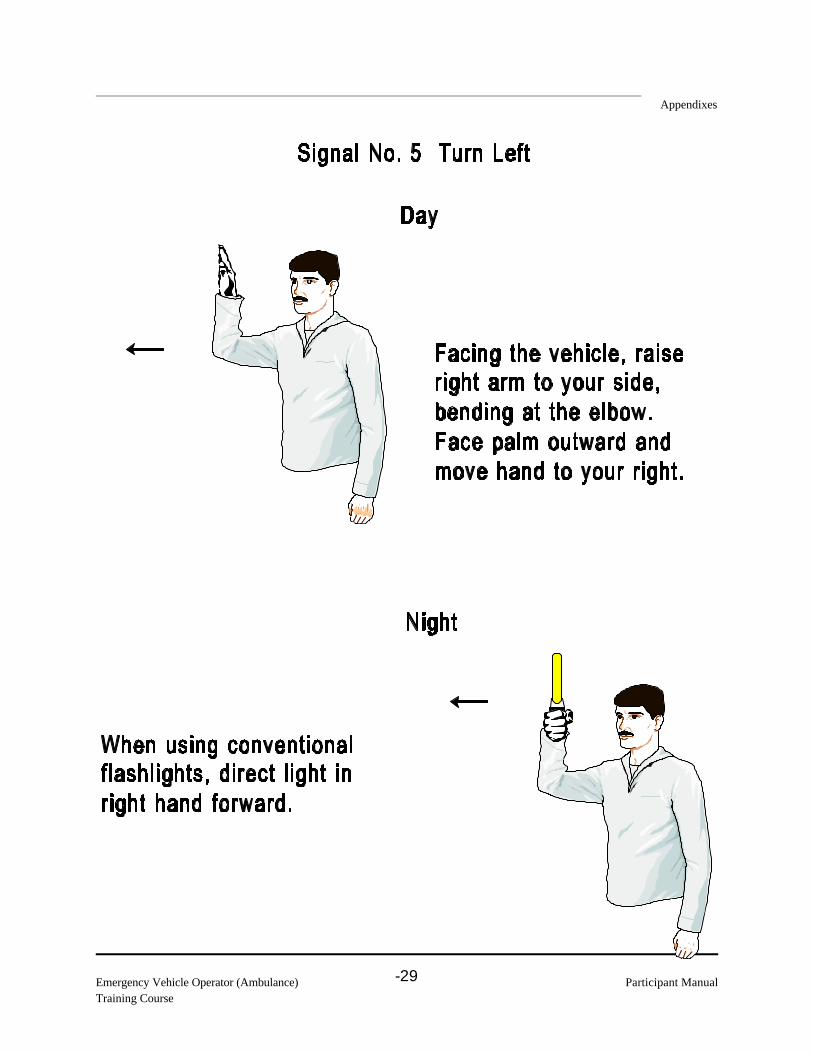
Appendixes
Emergency Vehicle Operator (Ambulance) Participant ManualTraining Course
-29

Appendixes
Participant Manual Emergency Vehicle Operator (Ambulance)Training Course
-30
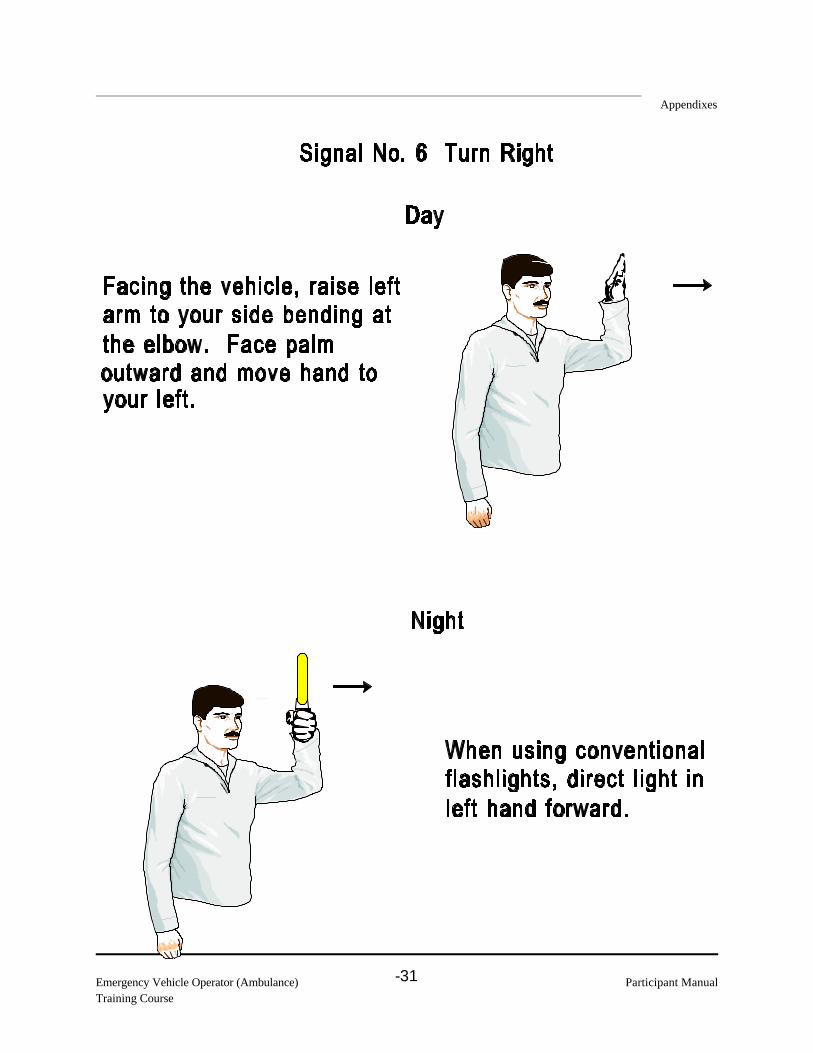
Appendixes
Emergency Vehicle Operator (Ambulance) Participant ManualTraining Course
-31

Appendixes
Participant Manual Emergency Vehicle Operator (Ambulance)Training Course
-32
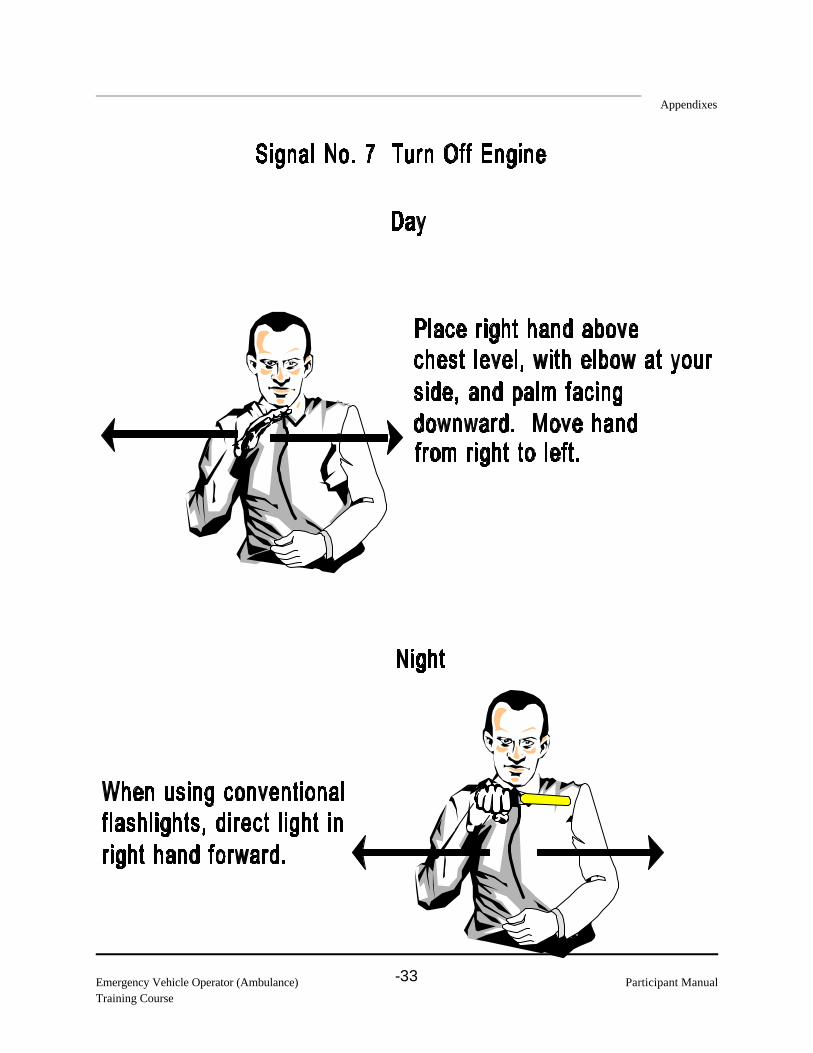
Appendixes
Emergency Vehicle Operator (Ambulance) Participant ManualTraining Course
-33

Appendixes
Participant Manual Emergency Vehicle Operator (Ambulance)Training Course
-34

Appendixes
Emergency Vehicle Operator (Ambulance) Participant ManualTraining Course
-35

Appendixes
Participant Manual Emergency Vehicle Operator (Ambulance)Training Course
-36

Appendixes
Emergency Vehicle Operator (Ambulance) Participant ManualTraining Course
-37

Appendixes
Participant Manual Emergency Vehicle Operator (Ambulance)Training Course
-38

Appendixes
Emergency Vehicle Operator (Ambulance) Participant ManualTraining Course
-39

Appendixes
Participant Manual Emergency Vehicle Operator (Ambulance)Training Course
-40

Appendixes
Emergency Vehicle Operator (Ambulance) Participant ManualTraining Course
-41

Appendixes
Participant Manual Emergency Vehicle Operator (Ambulance)Training Course
-42
Appendix C
Sample Checklist: Quick Check


Appendixes
Participant Manual Emergency Vehicle Operator (Ambulance)Training Course
-34
SAMPLE CHECKLIST: QUICK CHECK
UNIT NUMBER: STATION: DATE: TIME:
I n s t r u c t i o n s :I n s t r u c t i o n s : ! Inspect each item and check ü OK if there are no problems.
! If you find a problem, fix it and list repairs under Work Completed, OR file work
request.
! Decide whether or not to place the vehicle in service. Sign and date the checklist.
! Any starred (*) problem must be fixed before the ambulance is placed in service.
1) Overall Appearance 2) Operator Compartment 3) Exterior: Operator's Side 4) Exterior: Front 5) Engine Compartment 6) Exterior: Passenger's Side 7) Exterior: Rear 8) Patient Compartment
I t e m sI t e m s C h e c kC h e c k P r o b l e mP r o b l e m
OKOK
üü
WorkWork
R e q u e sR e q u e s
tt
üü
WorkWork
C o m p l e t e d / O tC o m p l e t e d / O t
h e r R e m a r k sh e r R e m a r k s
O V E R A L L A P P E A R A N C E ( 1 )O V E R A L L A P P E A R A N C E ( 1 )
Vehicle Cleanliness

Appendixes
Emergency Vehicle Operator (Ambulance) Participant ManualTraining Course
-35
I t e m sI t e m s C h e c kC h e c k P r o b l e mP r o b l e m
OKOK
üü
WorkWork
R e q u e sR e q u e s
tt
üü
WorkWork
C o m p l e t e d / O tC o m p l e t e d / O t
h e r R e m a r k sh e r R e m a r k s
General Condition
O P E R A T O R C O M P A R T M E N T ( 2 )O P E R A T O R C O M P A R T M E N T ( 2 )
Interior Items Properly Stowed
Vehicle Log Previous Inspection
Forms, Blank Run Forms
Lights and Communication
Equipment
Switches "OFF"
Seat, Belt, Mirrors Adjust
Hood Latch Release
Fuel Gauge Check Fuel Quantity
E X T E R I O R : O P E R A T O R ' S S I D E ( 3 )E X T E R I O R : O P E R A T O R ' S S I D E ( 3 )
Mirror Bracket Condition
Side Window Condition
Windshield/Wiper Condition
Front Wheel/Tire Condition, Inflation
Front Fender Condition
E X T E R I O R : F R O N T ( 4 )E X T E R I O R : F R O N T ( 4 )
Hood, Bumper, Grill Condition, Remove
Debris
Antennas Condition
Headlights, Turn Signals Lens Condition
Emergency Lights Lens Condition
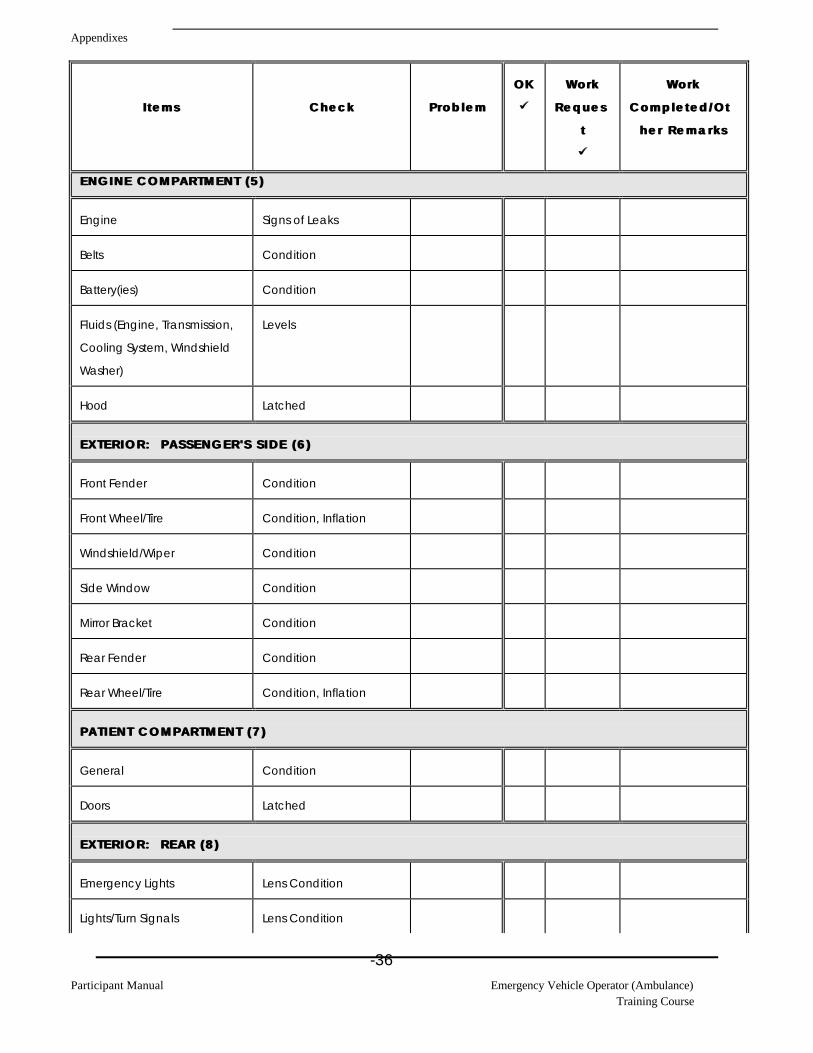
Appendixes
Participant Manual Emergency Vehicle Operator (Ambulance)Training Course
-36
I t e m sI t e m s C h e c kC h e c k P r o b l e mP r o b l e m
OKOK
üü
WorkWork
R e q u e sR e q u e s
tt
üü
WorkWork
C o m p l e t e d / O tC o m p l e t e d / O t
h e r R e m a r k sh e r R e m a r k s
E N G I N E C O M P A R T M E N T ( 5 )E N G I N E C O M P A R T M E N T ( 5 )
Engine Signs of Leaks
Belts Condition
Battery(ies) Condition
Fluids (Engine, Transmission,
Cooling System, Windshield
Washer)
Levels
Hood Latched
E X T E R I O R : P A S S E N G E R ' S S I D E ( 6 )E X T E R I O R : P A S S E N G E R ' S S I D E ( 6 )
Front Fender Condition
Front Wheel/Tire Condition, Inflation
Windshield/Wiper Condition
Side Window Condition
Mirror Bracket Condition
Rear Fender Condition
Rear Wheel/Tire Condition, Inflation
P A T I E N T C O M P A R T M E N T ( 7 )P A T I E N T C O M P A R T M E N T ( 7 )
General Condition
Doors Latched
E X T E R I O R : R E A R ( 8 )E X T E R I O R : R E A R ( 8 )
Emergency Lights Lens Condition
Lights/Turn Signals Lens Condition

Appendixes
Emergency Vehicle Operator (Ambulance) Participant ManualTraining Course
-37
I t e m sI t e m s C h e c kC h e c k P r o b l e mP r o b l e m
OKOK
üü
WorkWork
R e q u e sR e q u e s
tt
üü
WorkWork
C o m p l e t e d / O tC o m p l e t e d / O t
h e r R e m a r k sh e r R e m a r k s
Flood Lights Lens Condition
Rear Fender Condition
Rear Wheel/Tire Condition, Inflation
I h a v e c o m p l e t e d t h e a b o v e i n s p e c t i o n . T h i s v e h i c l e s h o u l d / s h o u l d n o t b e p l a c e d i n t oI h a v e c o m p l e t e d t h e a b o v e i n s p e c t i o n . T h i s v e h i c l e s h o u l d / s h o u l d n o t b e p l a c e d i n t os e r v i c e .s e r v i c e .
N A M E : N A M E : D A T E : D A T E :

Appendixes
Participant Manual Emergency Vehicle Operator (Ambulance)Training Course
-38
Appendix DSample Checklist: Full Check

Appendixes
Emergency Vehicle Operator (Ambulance) Participant ManualTraining Course
-39
SAMPLE CHECKLIST: FULL CHECKUNIT NUMBER: STATION: DATE: TIME:
I n s t r u c t i o n s :I n s t r u c t i o n s : ! Inspect each item and check ü OK if there are no problems.! If you find a problem, fix it and list repairs under Work Completed, or file work request
.! Decide whether or not to place the vehicle in service. Sign and date the checklist.! Any starred (*) problem must be fixed before the ambulance is placed in service.
1) Overall Appearance 2) Operator Compartment 3) Exterior: Operator's Side 4) Exterior: Front 5) Engine Compartment 6) Exterior: Passenger's Side 7) Exterior: Rear 8) Patient Compartment
I t e m sI t e m s C h e c kC h e c k P r o b l e mP r o b l e m O KO Küü
W o r kW o r k
R e q u eR e q u es ts tüü
W o r kW o r kC o m p l e t e d / OC o m p l e t e d / Ot h e rt h e r
R e m a r k s R e m a r k s
O V E R A L L A P P E A R A N C E ( 1 )O V E R A L L A P P E A R A N C E ( 1 )
Vehicle Cleanliness
Body Lean/Balance
Leaks
Damage
Paint
General Condition
O P E R A T O R C O M P A R T M E N T ( 2 )O P E R A T O R C O M P A R T M E N T ( 2 )
Interior Items Properly Stowed
Vehicle Log Previous Inspection Forms, Blank RunForms
DMV Registration, On Board
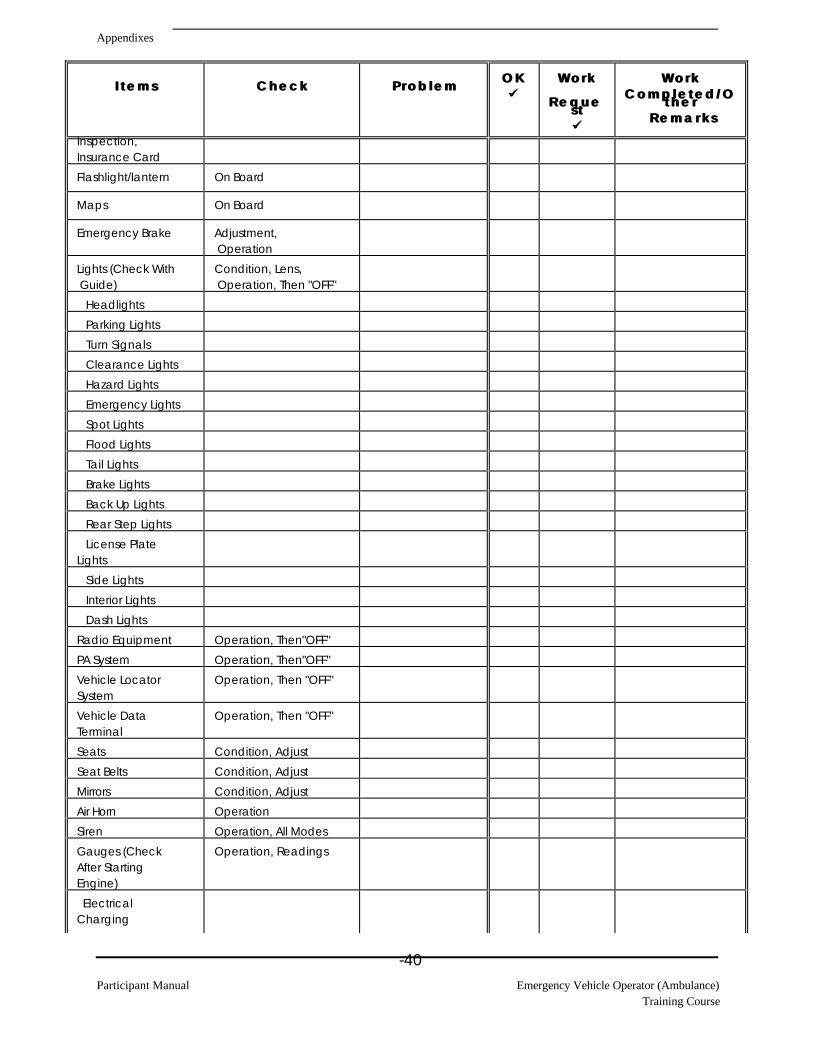
Appendixes
Participant Manual Emergency Vehicle Operator (Ambulance)Training Course
-40
I t e m sI t e m s C h e c kC h e c k P r o b l e mP r o b l e m O KO Küü
W o r kW o r k
R e q u eR e q u es ts tüü
W o r kW o r kC o m p l e t e d / OC o m p l e t e d / Ot h e rt h e r
R e m a r k s R e m a r k s
Inspection,Insurance Card
Flashlight/lantern On Board
Maps On Board
Emergency Brake Adjustment, Operation
Lights (Check With Guide)
Condition, Lens, Operation, Then "OFF"
Headlights
Parking Lights
Turn Signals
Clearance Lights
Hazard Lights
Emergency Lights
Spot Lights
Flood Lights
Tail Lights
Brake Lights
Back Up Lights
Rear Step Lights
License PlateLights
Side Lights
Interior Lights
Dash Lights
Radio Equipment Operation, Then"OFF"
PA System Operation, Then"OFF"
Vehicle LocatorSystem
Operation, Then "OFF"
Vehicle DataTerminal
Operation, Then "OFF"
Seats Condition, Adjust
Seat Belts Condition, Adjust
Mirrors Condition, Adjust
Air Horn Operation
Siren Operation, All Modes
Gauges (CheckAfter StartingEngine)
Operation, Readings
Electrical Charging

Appendixes
Emergency Vehicle Operator (Ambulance) Participant ManualTraining Course
-41
I t e m sI t e m s C h e c kC h e c k P r o b l e mP r o b l e m O KO Küü
W o r kW o r k
R e q u eR e q u es ts tüü
W o r kW o r kC o m p l e t e d / OC o m p l e t e d / Ot h e rt h e r
R e m a r k s R e m a r k s
System
Auxiliary Generator/Inverter
Brakes
Fuel
Oil Pressure
Tachometer
Engine Temperature
Windshield Washer
Windshield Wipers
Hood Latch Release
E X T E R I O R : O P E R A T O R ' S S I D E ( 3 )E X T E R I O R : O P E R A T O R ' S S I D E ( 3 )
Door Condition, Alignment
Mirror Bracket Condition
Side Window Condition
Windshield/Wiper Condition
Front Wheel Condition, Lug Nut Tightness
Tire Condition, Tire Inflation Reading, Tread Depth
Front Fender Condition
E X T E R I O R : F R O N T ( 4 )E X T E R I O R : F R O N T ( 4 )
Hood, Bumper, Grill Condition, Remove Debris
Antennas Condition
E N G I N E C O M P A R T M E N T ( 5 )E N G I N E C O M P A R T M E N T ( 5 )
Engine Signs of Leaks
Belts Condition, Tension
Battery(ies) Condition, Water Level, HydrometerCheck, Terminals, Cables
Fluids (Engine, Transmission, Cooling System, Windshield Washer, Brakes, Power-Steering)
Condition, Levels
Hoses/Lines Condition
Hood Latched
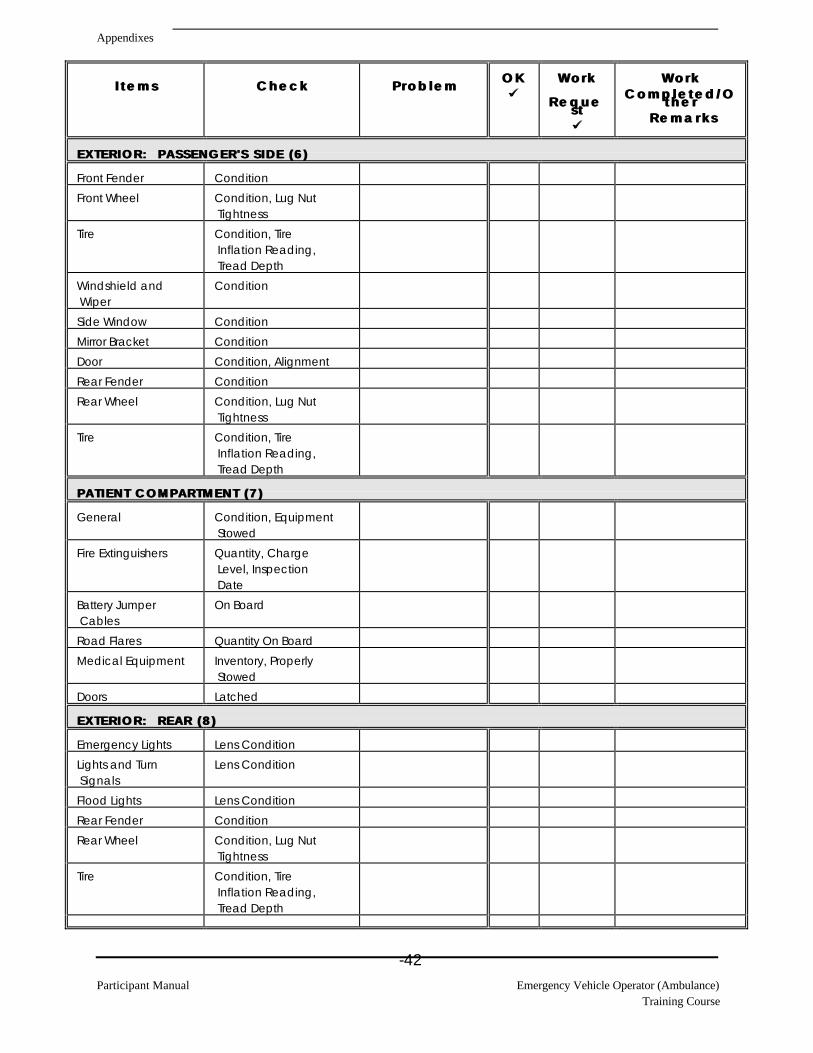
Appendixes
Participant Manual Emergency Vehicle Operator (Ambulance)Training Course
-42
I t e m sI t e m s C h e c kC h e c k P r o b l e mP r o b l e m O KO Küü
W o r kW o r k
R e q u eR e q u es ts tüü
W o r kW o r kC o m p l e t e d / OC o m p l e t e d / Ot h e rt h e r
R e m a r k s R e m a r k s
E X T E R I O R : P A S S E N G E R ' S S I D E ( 6 )E X T E R I O R : P A S S E N G E R ' S S I D E ( 6 )
Front Fender Condition
Front Wheel Condition, Lug Nut Tightness
Tire Condition, Tire Inflation Reading, Tread Depth
Windshield and Wiper
Condition
Side Window Condition
Mirror Bracket Condition
Door Condition, Alignment
Rear Fender Condition
Rear Wheel Condition, Lug Nut Tightness
Tire Condition, Tire Inflation Reading, Tread Depth
P A T I E N T C O M P A R T M E N T ( 7 )P A T I E N T C O M P A R T M E N T ( 7 )
General Condition, Equipment Stowed
Fire Extinguishers Quantity, Charge Level, Inspection Date
Battery Jumper Cables
On Board
Road Flares Quantity On Board
Medical Equipment Inventory, Properly Stowed
Doors Latched
E X T E R I O R : R E A R ( 8 )E X T E R I O R : R E A R ( 8 )
Emergency Lights Lens Condition
Lights and Turn Signals
Lens Condition
Flood Lights Lens Condition
Rear Fender Condition
Rear Wheel Condition, Lug Nut Tightness
Tire Condition, Tire Inflation Reading, Tread Depth

Appendixes
Emergency Vehicle Operator (Ambulance) Participant ManualTraining Course
-43
I t e m sI t e m s C h e c kC h e c k P r o b l e mP r o b l e m O KO Küü
W o r kW o r k
R e q u eR e q u es ts tüü
W o r kW o r kC o m p l e t e d / OC o m p l e t e d / Ot h e rt h e r
R e m a r k s R e m a r k s
Spare Tire, Tools Condition, On Board
I h a v e c o m p l e t e d t h e a b o v e i n s p e c t i o n . T h i s v e h i c l e s h o u l d / s h o u l d n o t b e p l a c e d i n t oI h a v e c o m p l e t e d t h e a b o v e i n s p e c t i o n . T h i s v e h i c l e s h o u l d / s h o u l d n o t b e p l a c e d i n t os e r v i c e .s e r v i c e .N A M E : N A M E : D A T E : D A T E :

Appendix ESample Work Request
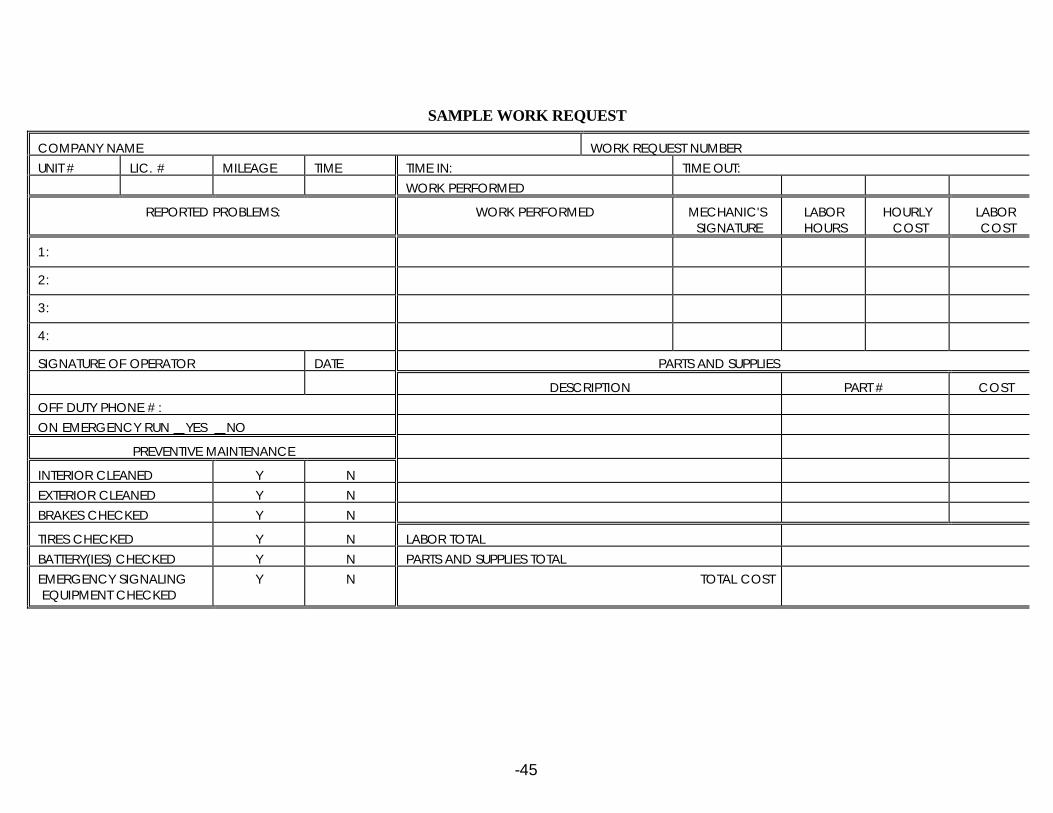
-45
SAMPLE WORK REQUEST
COMPANY NAME WORK REQUEST NUMBER
UNIT # LIC. # MILEAGE TIME TIME IN: TIME OUT:
WORK PERFORMED
REPORTED PROBLEMS: WORK PERFORMED MECHANIC'S SIGNATURE
LABOR HOURS
HOURLY COST
LABOR COST
1:
2:
3:
4:
SIGNATURE OF OPERATOR DATE PARTS AND SUPPLIES
DESCRIPTION PART # COST
OFF DUTY PHONE #:
ON EMERGENCY RUN YES NO
PREVENTIVE MAINTENANCE
INTERIOR CLEANED Y N
EXTERIOR CLEANED Y N
BRAKES CHECKED Y N
TIRES CHECKED Y N LABOR TOTAL
BATTERY(IES) CHECKED Y N PARTS AND SUPPLIES TOTAL
EMERGENCY SIGNALING EQUIPMENT CHECKED
Y N TOTAL COST
Appendixes
Participant Manual Emergency Vehicle Operator (Ambulance)Training Course
-46
Appendix FGlossary
Source:"Standard Guide for Scope of Performance of Emergency Medical Services Ambulance
Operations." ASTM, F1517, April 1994.

Appendixes
Emergency Vehicle Operator (Ambulance) Participant ManualTraining Course
-47
Term Definition
ambulance operations the efficient delivery of the ambulance, equipment, crew, passengers and patients, during all phases of the delivery ofEMS involving the ambulance, at all times exercising thehighest degree of care for the safety of the public
ambulance service provider a person, company, corporation, or political entityresponsible for operation, maintenance and/or policy makingregarding emergency vehicle operations
Bona Fide Occupational Qualification (BFOQ)
the skills and knowledge relevant to the performance of aspecific task
departure check the visual check of the vehicle and surrounding areaensuring that equipment and supplies have been retrievedand properly stored and that all compartment doors aresecured
egress checkthe visual check of the vehicle and surrounding area prior tooperating the ambulance
emergency mode as defined by individual state statues that refer to emergencyvehicles, equipment and operations
full check a comprehensive and systematic evaluation of theambulance at specified intervals, including documentationof the inspection, deficiencies, and corrective actions
operator a person who operates or assists with the operation of anambulance
prerun all aspects of assuring response readiness
postrun the managed return of the ambulance and operators tooptimal pre-run readiness
quick check an abbreviated version of the full check, focusing on the

Appendixes
Participant Manual Emergency Vehicle Operator (Ambulance)Training Course
-48
Term Definitionmajor operational functions of the vehicle

References
Ambulance Operations: The Basics 49 Instructor Guide-49
Appendix GReferences

Appendixes
Participant Manual Emergency Vehicle Operator (Ambulance)Training Course
-50
The following references were used in course development:
American Society for Testing and Materials. Standard Guide for Performance of EmergencyMedical Services Ambulance Operators. Atlanta Draft. 20 April, 1993.
American Society for Testing and Materials. Standard Guide for Training Emergency MedicalServices Ambulance Operators. Las Vegas Draft #4. 11-13 February, 1994.
AzStar Center for Safety & Risk Management Operator/Driver Instructor Course. AzStarCasualty Co. Version IV. August 1991.
Childs, B., and D. Ptacnik. Emergency Ambulance Driving. Englewood Cliffs, NJ: Prentice Hall,1986.
Driver Marine Division. Vehicle Dynamics. Glynco, GA:Federal Law EnforcementTraining Center.
Emergency Medical Services Program. Ambulance Accident Prevention Seminar. NewYork State Department of Health.
Grant, H.D. R.H. Murray, and J.D. Bergeron. Brady Emergency Care. 5th ed. EnglewoodCliffs, NJ: Prentice Hall, 1990.
Klein, M.E. Emergency Vehicle Operator's Course. Apopka, FL: Florida Central Educational Clinic, 1993.
Minnesota Dept. of Public Safety. Emergency Vehicle Driving Program. St. Paul: MinnesotaTechnical College System.
United States. Dept. of Transportation, National Highway Traffic Safety Administration.Training Program for Operation of Emergency Vehicles.
United States. General Services Administration, Federal Supply Service. KKK-A-1822C Federal

Appendixes
Emergency Vehicle Operator (Ambulance) Participant ManualTraining Course
-51
Specification for Ambulances. Washington: Federal Supply Service, 1 January 1990.

Appendixes
Participant Manual Emergency Vehicle Operator (Ambulance)Training Course
-52
Other Recommended Reference Materials
FEDERAL
National Safety Council. Coaching the Emergency Vehicle Operator. Princeton, NJ:FLI LearningSystems, Inc. 1991.
United States. Dept. of Transportation, National Highway Traffic Safety Administration. Emergency Vehicle Operator Courses & Materials. March 1992.
United States. Dept. of Transportation, National Highway Traffic Safety Administration.Emergency Medical Services: First Responder Training Course (formerly titled: Crash Injury Management forTraffic Law Enforcement Officers). Washington, D.C.
United States. Federal Emergency Management Agency, United States Fire Administration.Emergency Preparedness U.S.A. Course. HS-2. September 1992.
United States. Federal Emergency Management Agency, United States Fire Administration.Emergency Vehicle Driver Training. FA-110. September 1991.
STATE
Office of Advisory Council. Driver Training Manual. Phoenix, AZ:Arizona Law EnforcementAdvisory Council. August 1989
Texas Dept. of Transportation. Emergency Medical Service Driver Instructor Course - VolumesI & II. Law Enforcement and Security Training Division, Texas Engineering Extension Service, Texas A & MUniversity. 1992
Texas Dept. of Transportation. Emergency Medical Service Driving Range Technician CourseCurriculum. Law Enforcement and Security Training Division, Texas Engineering Extension Service, Texas A & MUniversity. 1992
Texas Dept. of Transportation. Emergency Medical Service Emergency Vehicle Operator CourseCurriculum. Law Enforcement and Security Training Division, Texas Engineering Extension Service, Texas A & MUniversity. 1994
Appendixes
Emergency Vehicle Operator (Ambulance) Participant ManualTraining Course
-53
Commonwealth of Virginia. Emergency Vehicle Operator's Curriculum Guide - Instructor &Student Manuals. Virginia Association of Volunteer Rescue Squads Inc. and Commonwealth of Virginia FirePrograms/Fire Services Board.
Minnesota Technical College System. Emergency Vehicle Driving Program. St. Paul, MN:FireDepartments & EMS Ambulance Services. 1993
Indiana Emergency Medical Services. Certified Driver. Indianapolis, IN:Indiana EmergencyMedical Services Commission.
OTHER
OPERATOR STANDARDS/REQUIREMENTS/TESTING
Commercial Driver Testing and Licensing Standards:Final Rule. 49 CFR 391. Federal Register.
Qualification of Drivers: Final Rule. 49 CFR 383. Federal Register.
United States. Dept. of the Army. Prehospital Emergency Care & Transportation.Army Ambulance Requirements. HSC Pamphlet 40-7-18. 21 July, 1992.
United States. Dept. of Transportation, National Highway Traffic Safety AdministrationFunctional Aspects of Driver Impairment: A Guide for State Medical Advisory Boards.
United States. Dept. of Transportation, National Highway Traffic Safety Administration.Screening for Driver Limitation. October 1976.
United States. Dept. of Transportation, National Highway Traffic Safety Administration. Statusof Medical Review in Driver Licensing: Policies, Programs & Standards. March 1992
GENERAL INFORMATION/TRAINING HINTS
Clawson, J.J. "The Maximal Response Disease: `Red Lights and Siren' Syndrome in Priority
Appendixes
Participant Manual Emergency Vehicle Operator (Ambulance)Training Course
-54
Dispatching". Journal of Emergency Medical Services. January 1987.
Clawson, J.J. and R.L. Martin. "Modern Priority Dispatch." Emergency Training. January 1990.
Emergency Medical Response Task Force (J.J. Clawson et al.) "Use of Warning Lights and Sirenin Emergency Medical Vehicle Response and Patient Transport." Prehospital and Disaster Medicine. Vol. 9, No.2. April-June 1994.
Federal Emergency Management Agency, Emergency Management Institute. Catalog ofActivities 1993-1994. Emmitsburg, MD.
Federal Emergency Management Agency, United States Fire Administration. Alive on Arrival.Washington, DC. August 1992
Federal Emergency Management Agency, United States Fire Administration. Federal Agenciesin EMS. Washington, DC. August 1993
Federal Emergency Management Agency, United States Fire Administration. Resources on Fire& Emergency Medical Services (EMS). September 1993.
Pirrallo, R.G. "Fatal Ambulance Crashes During Emergency & Non-Emergency Operation." Emergency Training.
Virginia Association of Volunteer Rescue Squads, Inc. Training Brochure. 13 October 1993.
SURVEYS & ANALYSES
Pirrallo, R.G. and R.A. Swor. "Characteristics of Fatal Ambulance Crashes During Emergencyand Non-emergency Operation." Prehospital and Disaster Medicine. Vol. 9, No. 2. April-June 1994.
Saunders, C.E. and C.J. Heye. "Ambulance Collisions in an Urban Environment." Prehospitaland Disaster Medicine. Vol. 9, No. 2. April-June 1994.
United States Fire Administration. Survey of Fire Apparatus Driver Training Programs.Arlington, VA:TriData Corporation. October 1991.
United States. Dept. of Transportation, National Highway Traffic Safety Administration.Emergency Medical Services - 1990 and Beyond. Washington, DC. October 1990.

Appendixes
Emergency Vehicle Operator (Ambulance) Participant ManualTraining Course
-55