Embed Size (px)
Citation preview

Lab #1 CSCI 201
1/29
CSCI 201 Lab 1 Environment Setup
"The journey of a thousand miles begins with one step." - Lao Tzu Introduction This lab document will go over the steps to install and set up Eclipse, which is a Java integrated development environment (IDE). Once set up, some important things will be covered, such as creating a new Java Project, exporting a Java Project, and importing an existing Java Project. I realize this lab seems really long, but the installation should not take that much time, and the length of this document is based on the screenshots and detailed tutorial we have provided. If you have programmed in Java and have used Eclipse before, please follow the guide anyway. There are some important steps that will ensure you are able to submit your homework assignments properly. Part 1 – Downloading Java and Eclipse To be able to program in Java, it is necessary to have a Java Development Kit (JDK). You can find the download links here: http://www.oracle.com/technetwork/java/javase/downloads/jdk8-downloads-2133151.html Make sure you download JDK 8. If you already have a JDK, make sure it is the latest version. Do not download the JRE, download the JDK! The JRE is the Java Runtime Environment, and it only contains the executables for running Java programs but not for compiling them. Note: If you have any previous version of Java installed, you must install JDK 1.8 on top of that version. Otherwise in future assignments your programs may not work! For this class, you will be programming in Eclipse. You can find the download links here: https://eclipse.org/downloads/ For Windows users, it doesn’t really matter whether you pick the 32-bit or 64-bit version of Eclipse. However, make sure that you match the JDK and Eclipse. 32-bit goes with X84 and 64-bit goes with X64. You can probably use 64-bit, unless you have a really old computer. To find out what hardware you have, you can go to your system properties in the Control Panel. There should be some link that says something along the lines of “System” or “Properties.” There you will see whether your hardware is 32-bit or 64-bit. For Mac users, pick 64-bit since it’s the only flavor offered.

Lab #1 CSCI 201
2/29
Part 2 – Installing Java and Eclipse Windows: Regardless whether you picked 32-bit or 64-bit, the instructions are the same. Now that you have the files, go ahead and install them. The JDK should be very straightforward. Next-> Next-> Next -> Close. Perhaps change the install directory if you really want to for some reason, but I’d recommend leaving it as the default!

Lab #1 CSCI 201
3/29
Now let’s install Eclipse. You should have a .zip file that needs to be extracted. This is as simple as clicking and dragging the contents into another folder. I recommend a place close to the root of your C: drive. Note: For some people, weird issues come up unless the folder is extracted into C:. If your desired directory doesn’t work out, try extracting the folder right into the root of your C: drive.

Lab #1 CSCI 201
4/29
You should now have an “eclipse” folder. Make a shortcut to “eclipse.exe” and place it on your desktop if you wish.

Lab #1 CSCI 201
5/29
Run Eclipse! Pick a folder to be your ‘workspace’. This will be the directory that contains ALL of your projects and code. Make sure to remember where you put this, but as long as you don’t check that box that says, “Use this as the default and do not ask again,” you will be prompted for the workspace directory every time you run Eclipse.

Lab #1 CSCI 201
6/29
OSX: Now that you have the files, go ahead and install them. Simply double-click the icon to install the JDK. It’s fairly simple.
Lab #1 CSCI 201
7/29
Continue->Install->Close

Lab #1 CSCI 201
8/29
Now let’s install Eclipse. You should see this open in a folder.
You can move the eclipse folder somewhere else if you’d like. Open the folder. Run the eclipse executable! Pick a folder to be your ‘workspace’. This will be the directory that contains ALL of your projects and code. Make sure to remember where you put this, but as long as you don’t check that box that says, “Use this as the default and do not ask again,” you will be prompted for the workspace directory every time you run Eclipse.

Lab #1 CSCI 201
9/29

Lab #1 CSCI 201
10/29
Part 3 – Creating a project This tutorial will use a Windows computer, though everything is the same for OSX or Linux. Close out of the Welcome menu.
You should see the following screen:

Lab #1 CSCI 201
11/29
Go to File->New…->Java Project. Make sure that 1.8 is selected under the execution environment. For the project name, use the following convention: username_CSCI201L_Assignment# For example, if your email is [email protected], you would submit your Assignment1 for grading with the project name careymd_CSCI201L_Assignment1. For now, go ahead and name the project username_CSCI201L_Lab1. Press ‘Finish’.
Lab #1 CSCI 201
12/29
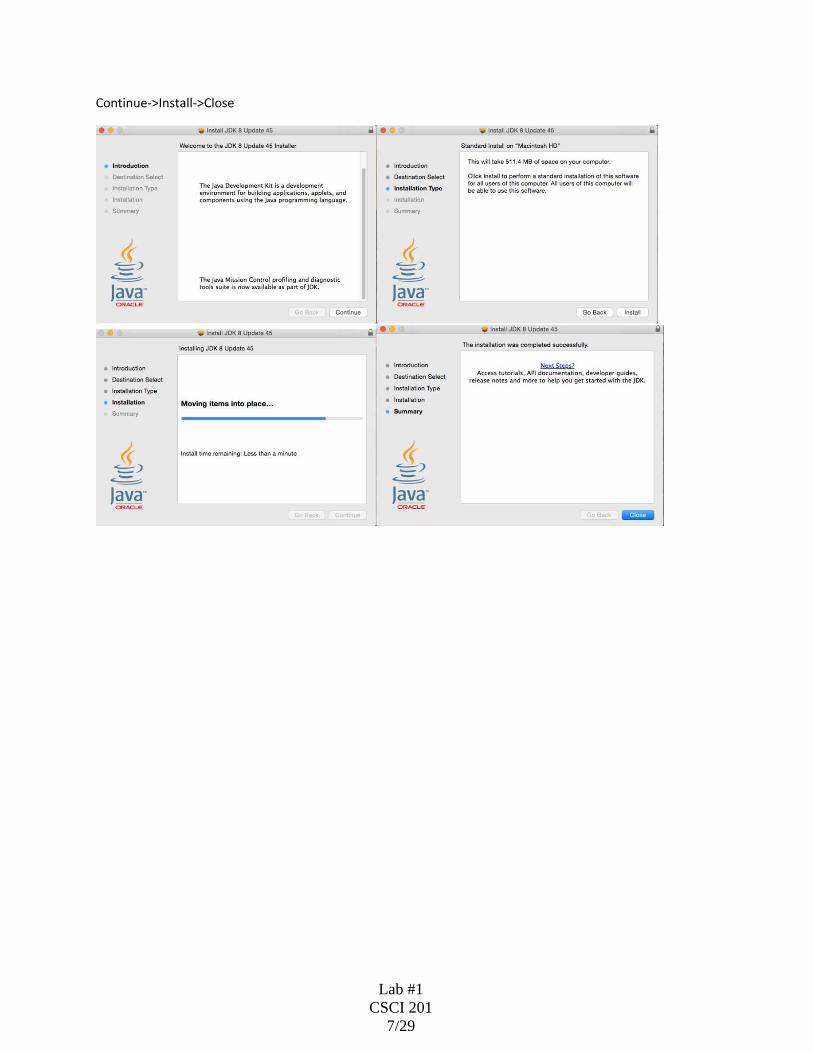
Part 4 – Hello World The time has finally come to write a program. Go to File->New…->Class You can name classes anything you want for homework assignments, but go ahead and make a ‘HelloWorld’ class. Just type the name and press ‘Finish’.

Lab #1 CSCI 201
13/29
Eclipse will generate a HelloWorld.java file for us, as well as create a package in our project. Packages just correspond to directories on your file system, but they do have some significance that you’ll learn about in class. Now we need to make a main method.
Lab #1 CSCI 201
14/29
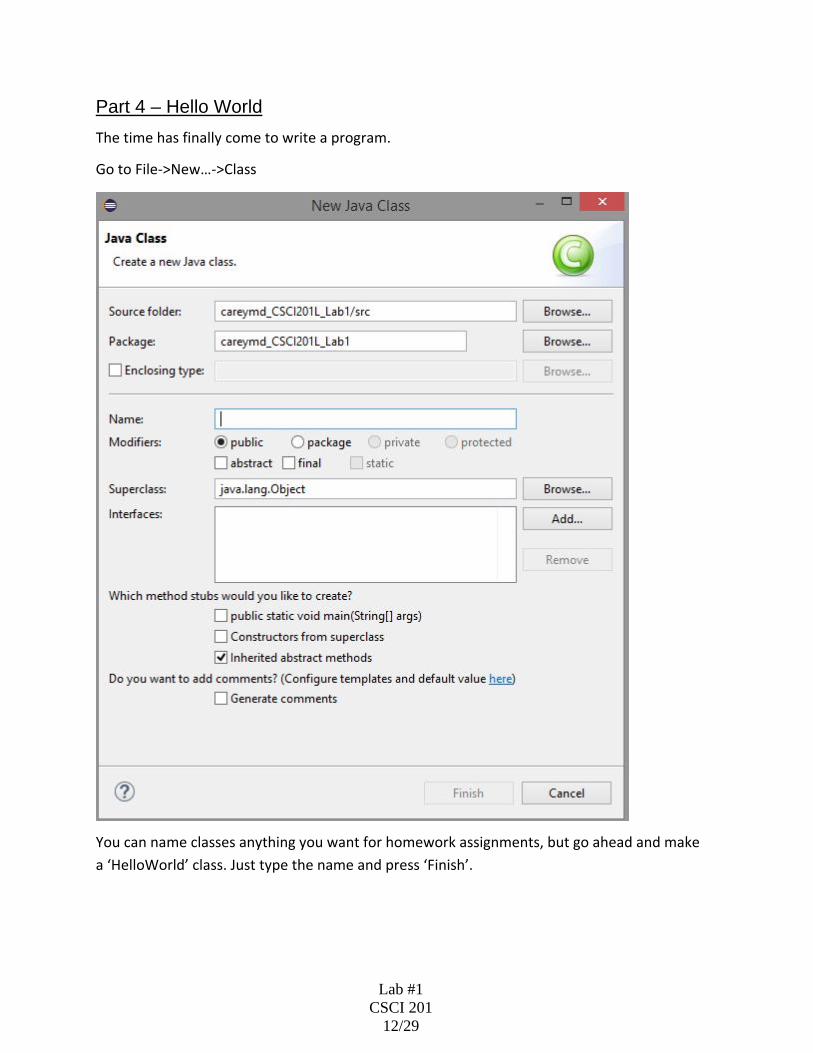
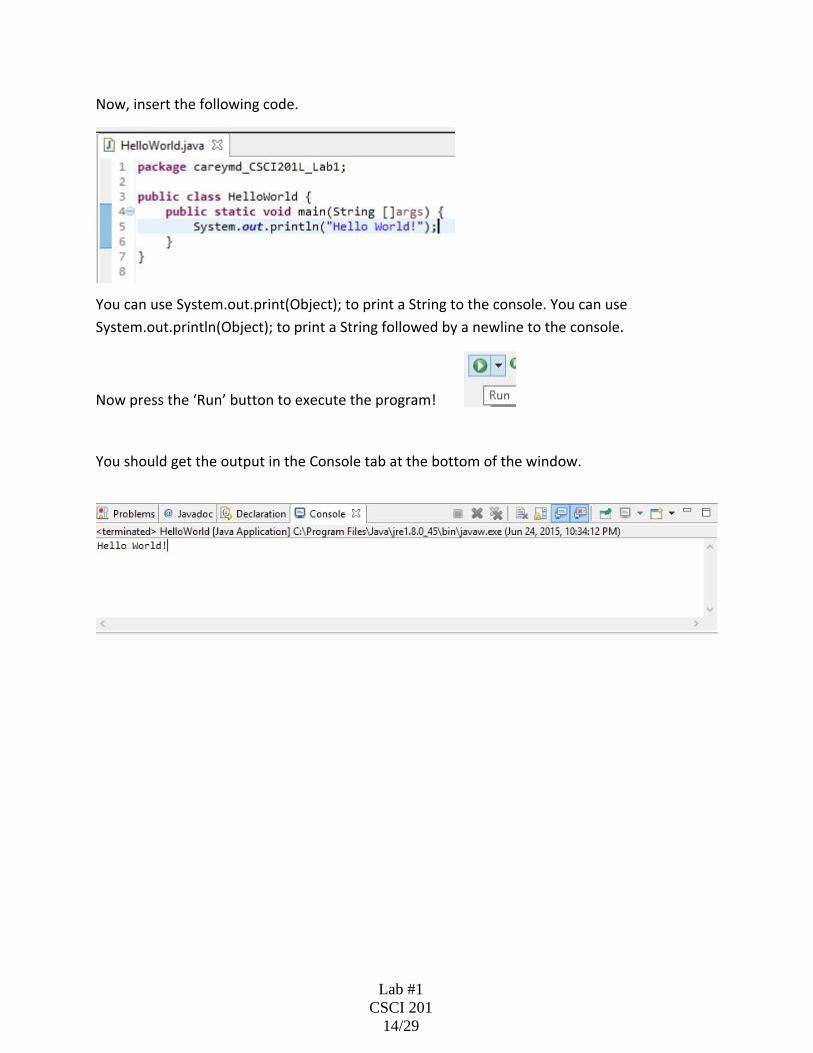
Now, insert the following code. You can use System.out.print(Object); to print a String to the console. You can use System.out.println(Object); to print a String followed by a newline to the console. Now press the ‘Run’ button to execute the program! You should get the output in the Console tab at the bottom of the window.

Lab #1 CSCI 201
15/29
Part 5 – Debugging Type the following code into your main method: For some reason, this code doesn’t seem to work! It will run, but it throws an exception! Let’s see what’s happening by putting breakpoints on line 6 and 7. Do this by double clicking on the left side-bar.

Lab #1 CSCI 201
16/29
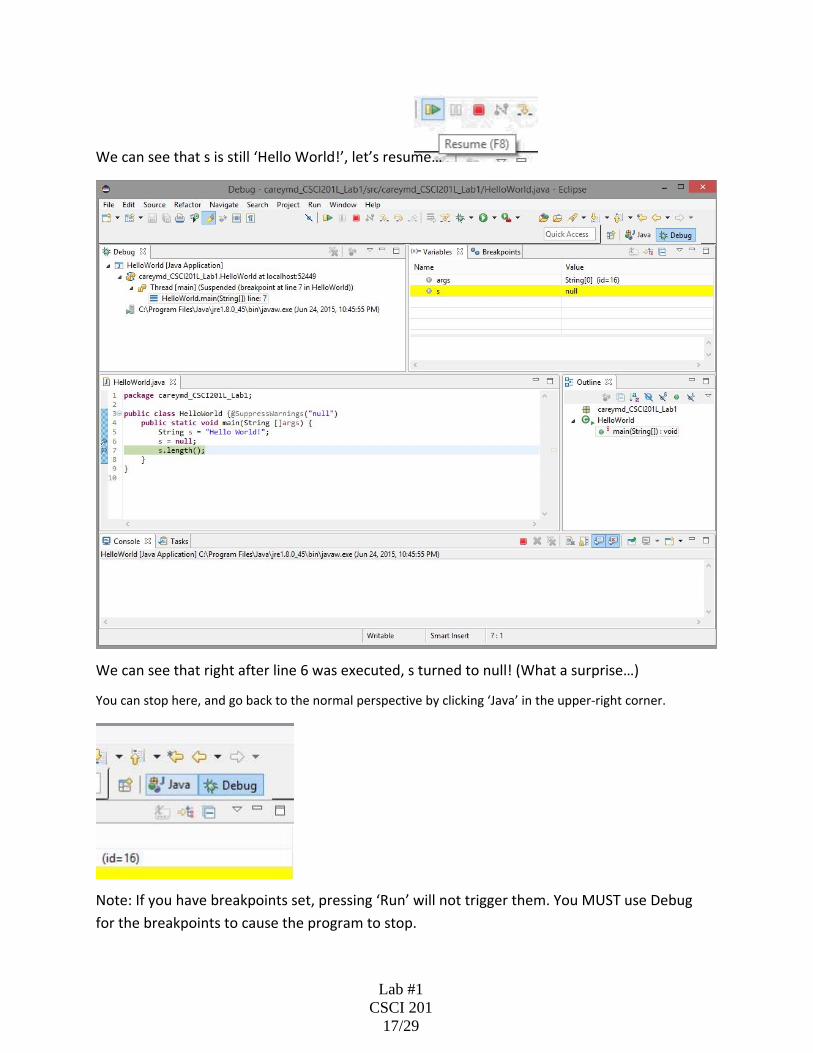
Click the Debug button. Press ‘Yes’. You will now see this perspective:
Lab #1 CSCI 201
17/29
We can see that s is still ‘Hello World!’, let’s resume… We can see that right after line 6 was executed, s turned to null! (What a surprise…) You can stop here, and go back to the normal perspective by clicking ‘Java’ in the upper-right corner. Note: If you have breakpoints set, pressing ‘Run’ will not trigger them. You MUST use Debug for the breakpoints to cause the program to stop.

Lab #1 CSCI 201
18/29
Part 6 – Exporting a Java Project Now let’s export our Java Project to a .zip archive. Make sure the project folder is highlighted, and go to File->Export. Select General->Archive File

Lab #1 CSCI 201
19/29
Press ‘Browse…’, and save the file with the same convention as you did with the project name.

Lab #1 CSCI 201
20/29
Press ‘Save’ and ‘Finish’ You will now have a .zip file containing the project. If you are worried that the project did not export correctly, simply re-import the project into a different workspace. Importing projects is explained in the next section. It is recommended that you do this for each assignment before submitting to ensure your program was exported correctly. If you can import your project into a fresh workspace and the program still works, the program will work for the grader.
Lab #1 CSCI 201
21/29
Lab 1.1: Eclipse and Web Development
Introduction This lab document will go over the steps required to integrate Eclipse into your web solution stack. A web stack refers to the technologies and components used to create and serve web content. At the very minimum, it contains:
- an operating system - a web server technology - a database - frontend and backend programming languages
You will often see web solution stacks abbreviated as four-lettered words that describe the technologies used. Common combinations include:
- LAMP (Linux, Apache, MySQL, PHP) - WISA (Windows, IIS, Microsoft SQL Server, and ASP) - More examples: https://en.wikipedia.org/wiki/Solution_stack
You may use the OS on your personal computer (Mac, Windows, or Linux) to run a web server. For the purposes of this class, Java will be our backend language. In this lab we will set up the web server using Apache Tomcat. We will setup our database in a future lab.
Please reference the Common Problems Guide at any point you get stuck!
Part 1 – Installing Apache Tomcat Apache Tomcat is an open source web server technology made specific for Java and JavaServlets. A web server is a program that serves web content via Hypertext Transfer Protocol (HTTP) from a server to a client (e.g. your browser). After installing Apache Tomcat, you will essentially transform your personal computer into a web server, capable of serving content to anyone who knows how to reach your computer. Windows
1. Go to http://tomcat.apache.org/ 2. Under 'Downloads'
a. Select Tomcat 9 b. Select and download the Windows Service Installer for version 9.0.
3. Once the .exe is downloaded, run and install

Lab #1 CSCI 201
22/29
a. During installation, make note of where you install Tomcat, because we will need this path later!
b. At one point during the installation, you will be asked to provide the path of your jdk - make sure you know where it is. This should’ve been done in the previous lab [Environment Setup].
MacOS Mac users will have to use the command line to install Tomcat. Fun! The instructions given here are derived from https://wolfpaulus.com/mac/tomcat/. If anything is unclear, be sure to check out the link for more information.
1. Go to http://tomcat.apache.org/download-90.cgi 2. Under 'Downloads'
a. Select Tomcat 9, and download a binary distribution of Tomcat. b. Note: this is the tar.gz option
3. Unarchive the file. This will create a folder in your Downloads folder. a. Note: my file is named “apache-tomcat-9.0.0.M15” but yours may have a
different version number. Replace it in the following commands accordingly. 4. Open up Terminal:
sudo mkdir -p /usr/local sudo mv ~/Downloads/apache-tomcat-9.0.0.M15 /usr/local sudo ln -s /usr/local/apache-tomcat-9.0.0.M15 /Library/Tomcat sudo chown -R your_username_here /Library/Tomcat sudo chmod +x /Library/Tomcat/bin/*.sh
NOTE: mind the spaces in the commands above! It is recommended that you simply copy/paste the commands into a text editor, replace the appropriate words (e.g. your username), and paste them into Terminal. The last two lines changes ownership (permissions) of the /Library/Tomcat folder hierarchy, and then makes all shell scripts within it executable. Replace your_username_here to the username of your computer (without brackets) which can be found in your Terminal commands in the form of ComputerName:~ my_username$

Lab #1 CSCI 201
23/29
Part 2 – Linking Tomcat to Eclipse We now need Install Java EE onto Eclipse, which is a plugin to support web development. In Eclipse:
1. Help > Install New Software 2. Next to “Work with” enter “Neon” (which must be your version of Eclipse) and select
it from the dropdown 3. In the list that loads below, select “Web, XML, Java EE and OSGi Enterprise
Development” 4. Select Next → Next → I accept… → Finish 5. The new plugin should be installed in Eclipse after a few minutes. 6. Restart Eclipse when prompted. 7. Find the Servers tab. If it is not visible, go to:
Window > Perspective > Open Perspective > Other... > Web. 8. You should see a clickable link that asks you to add a server. Click on it.

Lab #1 CSCI 201
24/29
9. Next, Eclipse will ask for a server. You should see an Apache folder, and a bunch of sub files with different versions of Tomcat. Select Tomcat v9.0 Server.
10. Eclipse asks for the path to our installed version of Tomcat.
a. Windows: Apache Software Foundation/Tomcat 9.0/ b. Mac: /Library/Tomcat
11. Click Finish. You should now see Tomcat v9.0 Server at localhost. Right click this and select Start.

Lab #1 CSCI 201
25/29
Part 3 – Testing NOTE: Web development is “platform dependent” to the web browser. In the industry, you want to develop code that is supported by all (mainstream) browsers. For consistency amongst the labs, it is required that you install a well-supported, modern web browser (e.g. Google Chrome, Mozilla Firefox). Since these labs were developed in Google Chrome, we recommend you use that browser to complete the labs. Test if web server is serving
1. After starting the server, open up a web browser and type localhost:8080. a. This is ‘localhost’ at port 8080. Localhost is the IP address of your own
computer, and is only accessible through your own computer. b. You should get an HTTP 404 message, but the error page should be served by
Tomcat which is what we want for now.
Replace 404 message with a default static website
2. To change the page that is shown by default, we need to copy some files over from our Tomcat directory into Eclipse
a. Windows: Navigate to Apache Software Foundation/Tomcat 9.0/webapps b. Mac: Open Finder, press Command + Shift + G and paste:
/usr/local/apache-tomcat-9.0.0.M15/webapps 3. Copy the ROOT folder. 4. Now navigate to:
your_eclipse_workspace/.metadata/.plugins/org.eclipse.wst.server.core/tmp0/wtpwebapps and paste the ROOT folder you just copied. (To find your_eclipse_workspace path, see Troubleshooting.)
5. If prompted, select yes to replacing the existing file. NOTE: You will only see the tmp0 folder if you launched the server as directed in the previous section

Lab #1 CSCI 201
26/29
6. Restart Tomcat from within Eclipse (Stop it and then Start it). 7. Now open your web browser and type localhost:8080. You should now see Tomcat’s
default page. Display custom content
1. In Eclipse go to: File > New > Dynamic Web Project 2. Give the project the name HelloWorld. 3. Click Finish. If prompted to open the project in Java EE perspective, click Yes. 4. Right-click project > Properties > Targeted Runtimes > Check Apache Tomcat v9.0 >
Apply > OK
5. Under the WebContent folder of your new project, add an index.html file. You can do
this by right clicking on the WebContent folder and going to new html file. This will generate some stock code for you.
6. Between the <body> and </body> tags, add <h1> Hello World! </h1> 7. Save your code. Stop your server if it is currently running. 8. Now right click on your index.html file, and select:
Run as… > Run on Server > Finish a. If “Run on Server” does not show up as an option, see Troubleshooting b. If you go to localhost:8080/HelloWorld/index.html in your web browser, you
should now see your web page! It also should have displayed in an internal browser in Eclipse.

Lab #1 CSCI 201
27/29
Make Chrome Eclipse’s default browser
1. Windows > Preferences > General > Web Browser 2. Select “Use external web browser” 3. If Chrome isn’t listed under “External web browsers,” click New 4. Browse > select Chrome from your applications > Name it Chrome > Ok > Apply
Now, instead of launching its internal browser when run, Eclipse will run your project in Chrome.

Lab #1 CSCI 201
28/29
Troubleshooting “A Tomcat x.x installation is expected.” If you are running Windows, you will need an archive tool such as 7Zip or WinRar. Install one of these if you do not have one of them already.
1. Find your Archive tool application (Make sure to run as administrator if you are using Windows). For 7zip, this program is called 7zFM.
2. Navigate to 'Apache Software Foundation/TomCat 9.0/lib' (Your naming might be slightly different, but it is the directory created when installing Tomcat).
3. Open up Catalina.jar and then navigate to 'org/apache/catalina/util' and right click on 'ServerInfo.properties' and select edit
4. We want to change the following lines from: server.info=Apache Tomcat/8.5.04 server.number=8.5.4.0 to server.info=Apache Tomcat/8.0.0 server.number=8.0.0
5. Save this and exit. If prompted to save/update the archive, select yes’
Finding Your Workspace Path your_eclipse_workspace path can be found by searching for the name of your workspace on your computer.
1. Windows: the path should appear in the top bar once you select the workspace folder 2. Mac: right-click the workspace folder, click “Get Info” and copy the path next to
“Where:” and add the name of your workspace after Mac example:
Workspace Name: CSCI 201 CP

Lab #1 CSCI 201
29/29
your_eclipse_workspace path: /Users/howardgil/Desktop/Spring 2017/CSCI 201 CP Other Common Issues Windows
• When starting the server, if Eclipse says "port already in use," open up Task Manager -> Services and end
Tomcat • Tomcat v9.0 Server not shown under Apache folder. Make sure you have Eclipse Neon. If you do, when
installing the plugin during step 3 of page 24, be sure to scroll to the bottom to find "Web, XML, Java EE and OSGi Enterprise Development" instead of searching for it.
Mac
• The tar.gz file may download as apache-tomcat-9.0.0.M15. Remember to use this name in all of the
Terminal commands (as opposed to apache-tomcat-9.0) • If you're having issues using the sudo command, make sure you are logged in as an Admin on your
computer • "Not a file or directory" after entering any command into Terminal. Mind the spaces in the Terminal
commands. • Tomcat is not a folder in /Library (Finder -> Command+Shift+G -> /Library). If Tomcat is white and not
blue, you have this issue. In Terminal, type sudo rm -rf /usr/local, delete the white Tomcat file in the /Library folder, empty Trash and start the command prompts over.
General
• Make sure you downloaded the right tar.gz file (Under Core in Binary Distributions)