Embed Size (px)
Citation preview
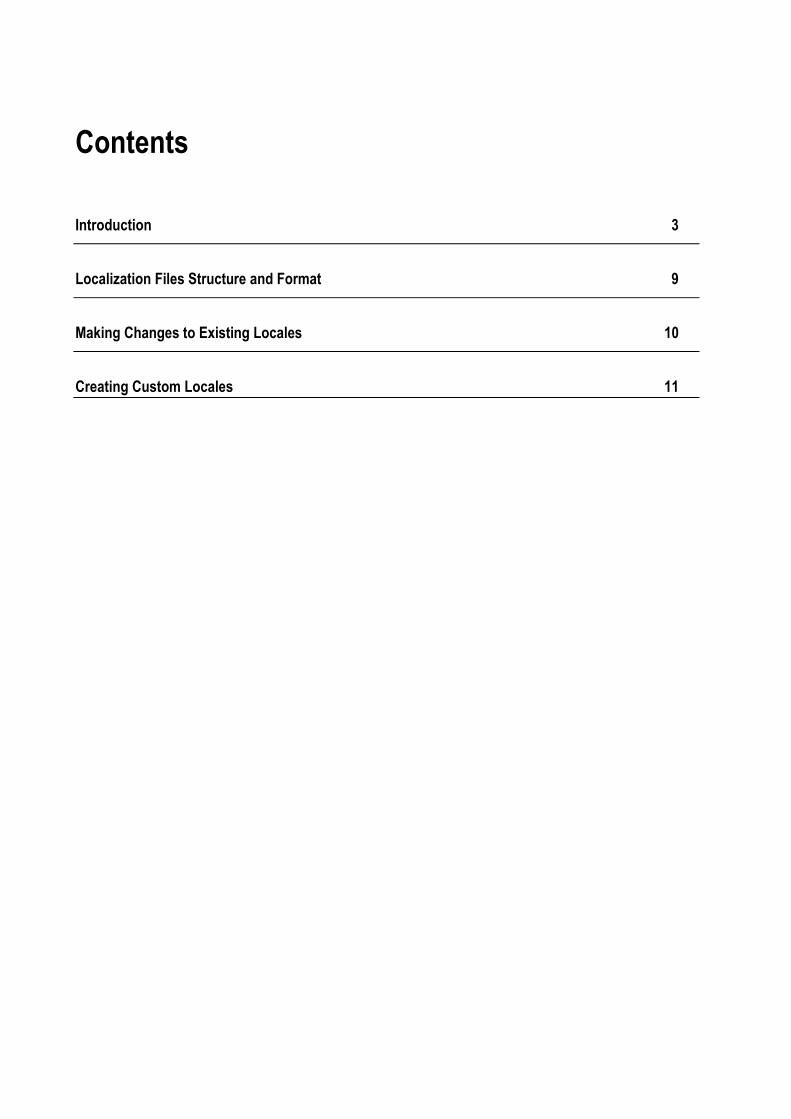
Contents
Introduction 3
Localization Files Structure and Format 9
Making Changes to Existing Locales 10
Creating Custom Locales 11

This document is intended for hosting providers who want to customize the locales (interface languages) shipped with Presence Builder, or translate Presence Builder into other languages and apply their new locales to Presence Builder installations.
Presence Builder is shipped with the following interface languages:
American English
British English
Brazilian Portuguese
Dutch
French
German
Italian
Japanese
Korean
Polish
Russian
Simplified Chinese
Spanish
Traditional Chinese
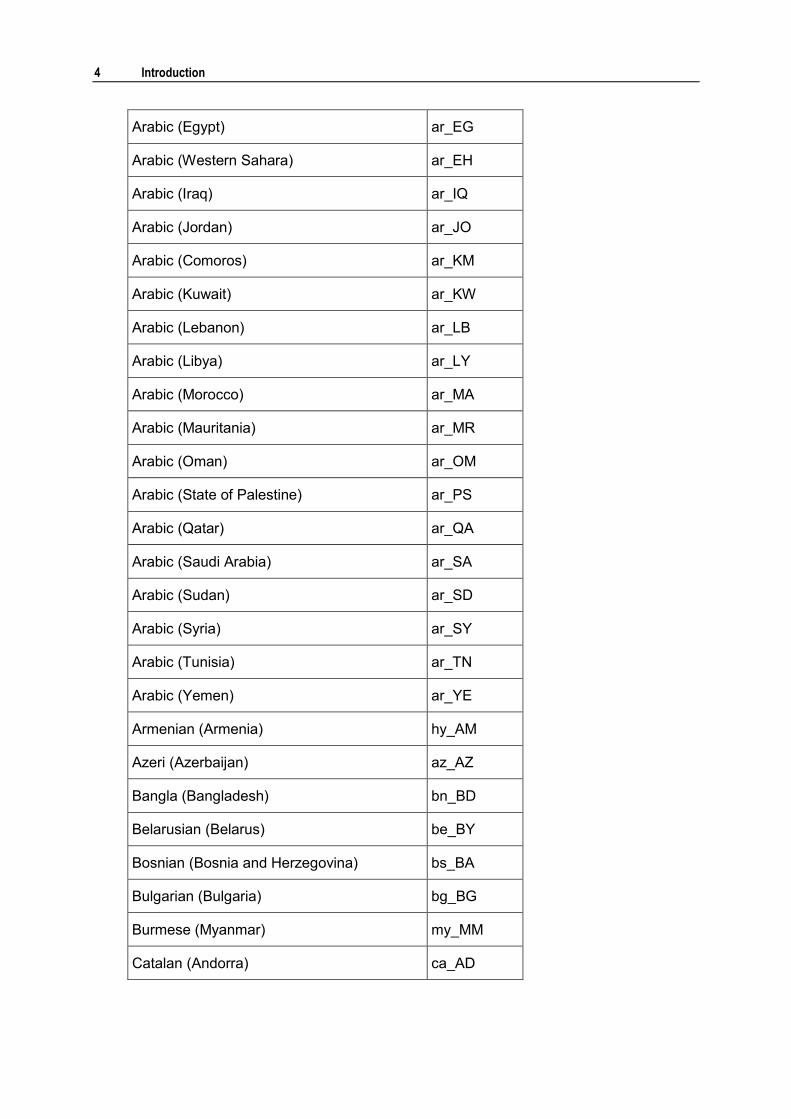
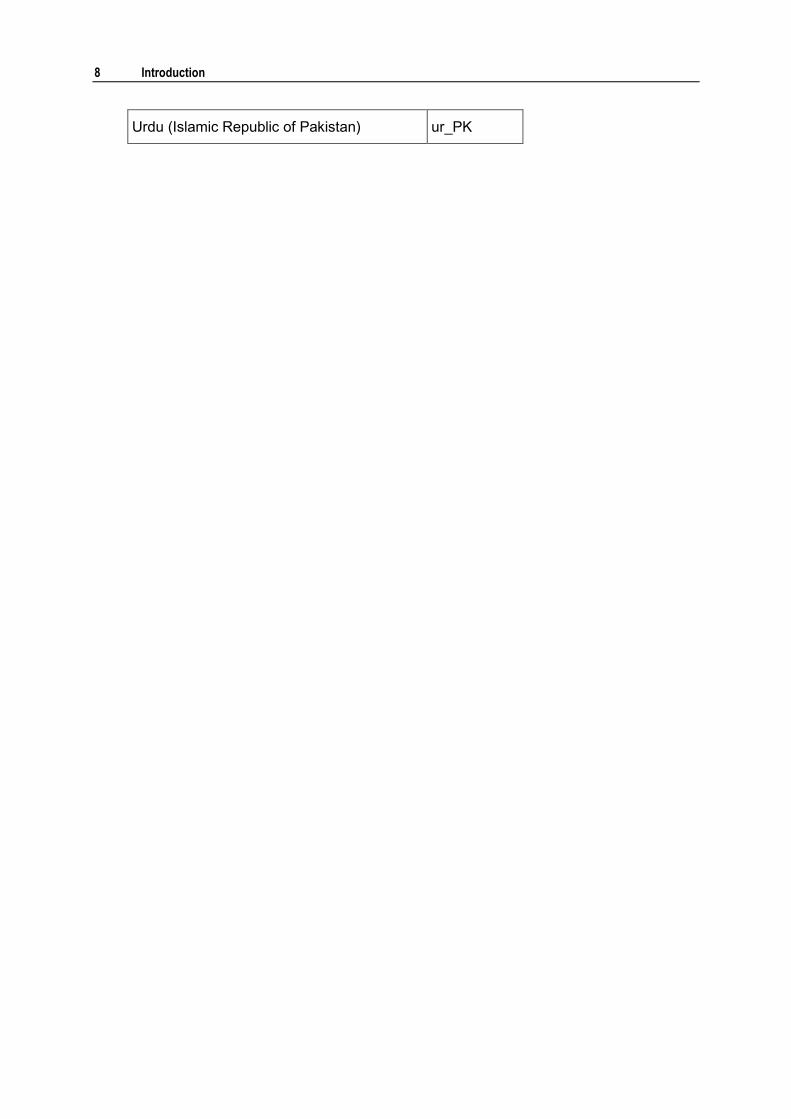
If your language is not shipped with Presence Builder, you can translate Presence Builder into your language if it is listed in the table below. The table shows all the supported languages and their corresponding locale codes.
Although locale codes are commonly formed with a hyphen between a language code and a country code, localization of Presence Builder requires the use of an underscore in locale names.
Language and country Locale code
Afar (Djibouti) aa_DJ
Akan (Ghana) ak_GH
Albanian (Albania) sq_AL
Arabic (U.A.E.) ar_AE
Arabic (Algeria) ar_DZ
Arabic (Bahrain) ar_BH
C H A P T E R 1
Introduction
4 Introduction
Arabic (Egypt) ar_EG
Arabic (Western Sahara) ar_EH
Arabic (Iraq) ar_IQ
Arabic (Jordan) ar_JO
Arabic (Comoros) ar_KM
Arabic (Kuwait) ar_KW
Arabic (Lebanon) ar_LB
Arabic (Libya) ar_LY
Arabic (Morocco) ar_MA
Arabic (Mauritania) ar_MR
Arabic (Oman) ar_OM
Arabic (State of Palestine) ar_PS
Arabic (Qatar) ar_QA
Arabic (Saudi Arabia) ar_SA
Arabic (Sudan) ar_SD
Arabic (Syria) ar_SY
Arabic (Tunisia) ar_TN
Arabic (Yemen) ar_YE
Armenian (Armenia) hy_AM
Azeri (Azerbaijan) az_AZ
Bangla (Bangladesh) bn_BD
Belarusian (Belarus) be_BY
Bosnian (Bosnia and Herzegovina) bs_BA
Bulgarian (Bulgaria) bg_BG
Burmese (Myanmar) my_MM
Catalan (Andorra) ca_AD

Introduction 5
Chinese Simplified (People's Republic of China)
zh_CN
Chinese Traditional (Hong Kong S.A.R.) zh_HK
Chinese Traditional (Macao S.A.R.) zh_MO
Chinese Traditional (Taiwan) zh_TW
Croatian (Croatia) hr_HR
Czech (Czech Republic) cs_CZ
Danish (Denmark) da_DK
Dhivehi (Maldives) dv_MV
Dutch (Aruba) nl_AW
Dutch (Belgium) nl_BE
Dutch (Netherlands) nl_NL
Dzongkha (Bhutan) dz_BT
English (United Kingdom) en_GB
English (United States) en_US
Estonian (Estonia) et_EE
Faroese (Faroe Islands) fo_FO
Filipino (Philippines) fil_PH
Finnish (Finland) fi_FI
French (France) fr_FR
Georgian (Georgia) ka_GE
German (Germany) de_DE
Greek (Cyprus) el_CY
Greek (Greece) el_GR
Hausa (Niger) ha_NE
Hebrew (Israel) he_IL
Hindi (Fiji) hi_FJ
Hindi (India) hi_IN

6 Introduction
Hungarian (Hungary) hu_HU
Indonesian (Indonesia) id_ID
Icelandic (Iceland) is_IS
Italian (Italy) it_IT
Inuktitut (Greenland) iu_GL
Japanese (Japan) ja_JP
Kazakh (Kazakhstan) kk_KZ
Khmer (Cambodia) km_KH
Kinyarwanda (Rwanda) rw_RW
Korean (Democratic People's Republic of Korea)
ko_KP
Korean (Republic of Korea) ko_KR
Kyrgyz (Kyrgyzstan) ky_KG
Lao (Lao P.D.R.) lo_LA
Latvian (Latvia) lv_LV
Lithuanian (Lithuania) lt_LT
Macedonian (Macedonia) mk_MK
Malay (Cocos [Keeling] Islands) ms_CC
Malay (Brunei Darussalam) ms_BN
Malay (Malaysia) ms_MY
Maltese (Malta) mt_MT
Mongolian (Mongolia) mn_MN
Nepali (Nepal) ne_NP
Norwegian Bokmal (Norway) nb_NO
Norwegian Bokmal (Svalbard and Jan Mayen)
nb_SJ
Nyanja (Malawi) ny_MW
Persian (Afghanistan) fa_AF

Introduction 7
Persian (Iran) fa_IR
Polish (Poland) pl_PL
Portuguese (Brazil) pt_BR
Portuguese (Portugal) pt_PT
Romanian (Moldova) ro_MD
Romanian (Romania) ro_RO
Russian (Russia) ru_RU
Serbian (Serbia) sr_RS
Serbian (Montenegro) sr_ME
Sinhala (Sri Lanka) si_LK
Slovak (Slovakia) sk_SK
Slovenian (Slovenia) sl_SI
Southern Sotho (Lesotho) st_LS
Spanish (Spain) es_ES
Swahili (Democratic Republic of the Congo) sw_CD
Swahili (Somalia) sw_SO
Swahili (Tanzania) sw_TZ
Swahili (Uganda) sw_UG
Swedish (Åland Islands) sv_AX
Swedish (Sweden) sv_SE
Tajik (Tajikistan) tg_TJ
Thai (Thailand) th_TH
Tigrinya (Eritrea) ti_ER
Tonga (Tonga) to_TO
Turkish (Turkey) tr_TR
Ukrainian (Ukraine) uk_UA
Uzbek (Uzbekistan) uz_UZ
8 Introduction
Urdu (Islamic Republic of Pakistan) ur_PK
Presence Builder locale files are plain text (INI) files with the .lng extension. They
contain strings in the following format:
<localization_key> = "<text>"
where <localization_key> is a unique identifier and <text> is the text in a human
language that can be translated or edited.
You can encounter HTML tags in text. Be sure to preserve the HTML syntax during translation.
If you want to use quotation marks in text, escape them by placing a backslash before
them. For example: "text" should be typed as \"text\".
Do not change the encoding of the locale files: it must be UTF-8. Otherwise, the translated messages may be displayed incorrectly.
C H A P T E R 2
Localization Files Structure and Format
To make changes to an existing locale, do the following:
1. Go to the directory where localization files are stored. For example:
/usr/local/sb/resources/locale/en_US.
2. Make a search in that directory to locate the file that contains the locale strings that you want to change.
3. Once you know which file to edit, go to the directory that contains it and
create a plain-text file with the name like <original file
name>.custom. If you want to correct multiple locale strings from that
file, make a copy of the file and save it as <original file
name>.custom.
For example: If the file that contains the locale strings is Editor.lng, then you
need to create a file with the name Editor.lng.custom.
Of course, you can make changes to the original files, but we advise against doing so - your changes will be lost during an upgrade to a later version.
4. Copy the locale strings that you want to edit to the file you created. If you made a copy of the entire file, then skip this step.
5. Edit the locale strings. The strings are in the following format:
<localization_key> = "<text>"
where
<localization_key> is a unique identifier and <text> is the text in a human
language that you need to edit.
6. When finished with correcting locale strings, save the files and issue the following command in the console:
On Linux systems running Parallels Plesk Panel with Presence Builder:
/usr/local/psa/bin/sw-engine-pleskrun
/usr/local/sb/utils/updateResources.php locale
On Linux systems running Parallels Presence Builder Standalone:
/usr/bin/sw-engine /usr/local/sb/utils/updateResources.php
locale
On Windows systems running Parallels Plesk Panel with Presence Builder:
“C:\Program Files (x86)\Parallels\Plesk\admin\bin\php.exe" -c
"C:\Program Files (x86)\Parallels\Plesk\admin\php.ini" -
dauto_prepend_file="" "C:\Program Files (x86)
\Parallels\Plesk\sb\utils\updateResources.php" locale
C H A P T E R 3
Making Changes to Existing Locales
Before you start creating a new locale for Presence Builder, make sure that your language is supported. All supported languages and the corresponding locale codes are listed in the table in Introduction (on page 3).
To create a custom locale:
1. Copy the contents of the directory sb/resources/locale/en_US to
the directory sb/resources/locale/<locale code>, where
<locale code> is the code corresponding to your language.
To learn your language code, see the table in Introduction (on page 3).
2. In the info.xml file, specify appropriate values for the following
elements:
<locale code> - your locale code, as specified in the table in Introduction (on
page 3).
<native_name> - your language and country written in your own language.
<english_name> - your language and country written in English.
<decimal_point> - the decimal mark that separates the integer part from
the fractional part in numbers.
<monetary_unit_code> - currency code, as defined by the ISO 4217
standard. For example: EUR.
<currency_symbol_left> and <currency_symbol_right> - a symbol
that represents your currency, for example: €.
If it is placed to the left of a number in your country, place it in
<currency_symbol_left>, and leave the <currency_symbol_right>
value blank.
If the symbol should be placed to the right of a number, place it in
<currency_symbol_right> and leave the <currency_symbol_left>
value blank.
<date_format> and <time_format> - date and time display format
represented by symbols according to the following article: http://www.php.net/manual/en/function.date.php.
<week_begin> - the first day of the week in your culture, represented by 1 (for
Monday) or 7 (for Sunday).
3. In the lng files, translate the values in the right part of locale strings. The strings are in the following format:
<localization_key> = "<text>"
C H A P T E R 4
Creating Custom Locales

12 Creating Custom Locales
where <localization_key> is a unique identifier and <text> is the text in a
human language that you need to edit.
4. To localize extjs, go to the directory
sb/htdocs/js/externals/extjs/src/locale/, and see if there
is a file titled like ext-lang-<locale code>.js.
If this file is not present, you need to make a copy of the ext-lang-en.js file,
rename it to ext-lang-<locale code>.js, and translate its contents.
5. To localize TinyMCE, go to the directory
sb/htdocs/js/externals/tinymce/langs/, and see if there is a
file titled like <locale code>.js.
If this file is not present, you need to either download a language pack from http://www.tinymce.com/i18n3x/index.php?ctrl=lang&act=download&pr_id=1 and
use the file from the archive (tinymce_language_pack/langs/<locale
code>.js), or make a copy of the en.js file, rename it to <locale code>.js,
and translate its contents.
6. To localize the TinyMCE theme, go to the directory
sb/htdocs/js/externals/tinymce/themes/sbt/langs/, and
see if the files <locale code>.js and <locale code>_dlg.js
are present.
If these files are not present, you need to either download a language pack from http://www.tinymce.com/i18n3x/index.php?ctrl=lang&act=download&pr_id=1 and use the files from the archive
(tinymce_language_pack/themes/advanced/langs/<locale code>.js
and <locale code>_dlg.js), or make copies of their English versions, rename
the files to <locale code>.js and <locale code>_dlg.js and translate
their contents.
When copying locale files from the advanced theme, correct the theme identifier at
the beginning of the files - replace the line tinyMCE.addI18n('<locale
code>.advanced' with tinyMCE.addI18n('<locale code>.sbt', and
replace the line tinyMCE.addI18n('<locale code>.advanced_dlg' with
tinyMCE.addI18n('<locale code>.sbt_dlg'.
7. To localize the TinyMCE plugin "tablewithalign", move the entire directory sb/htdocs/js/externals/tinymce/plugins/table/langs to sb/htdocs/js/externals/tinymce/plugins/tablewithalign/langs.
8. When finished with working on locale strings, issue the following command in the console:
On Linux systems running Parallels Plesk Panel with Presence Builder:
/usr/local/psa/bin/sw-engine-pleskrun
/usr/local/sb/utils/updateResources.php locale
On Linux systems running Parallels Presence Builder Standalone:
/usr/bin/sw-engine /usr/local/sb/utils/updateResources.php
locale
On Windows systems running Parallels Plesk Panel with Presence Builder:

Creating Custom Locales 13
“C:\Program Files (x86)\Parallels\Plesk\admin\bin\php.exe" -c
"C:\Program Files (x86)\Parallels\Plesk\admin\php.ini" -
dauto_prepend_file="" "C:\Program Files (x86)
\Parallels\Plesk\sb\utils\updateResources.php" locale