Embed Size (px)
DESCRIPTION
This document is to be read in conjunction with the HGFA Towing procedures manual.
Citation preview
ACTHPA/Fitz stationary winch procedures manual-Paraglider 1
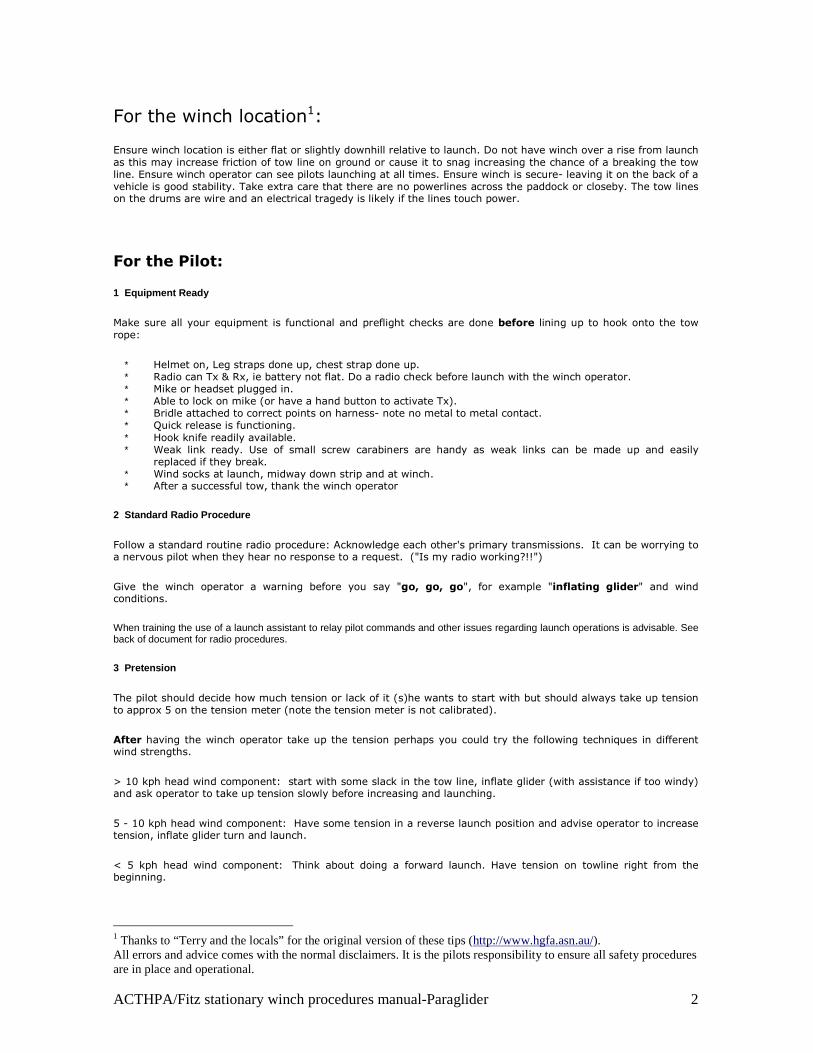
Picture 3: Operation control
Tension
meter Hand
brake
Gear
lever
Picture 2: Left hand winch drum (on green rim)
PARAGLIDER Winch operations using the ACTHPA/Fitz Pay-in winch.
Version 1: 20 August 2009 All normal disclaimers apply. This document is a guide only.
This document is to be read in conjunction with the HGFA Towing procedures manual.
Winch information
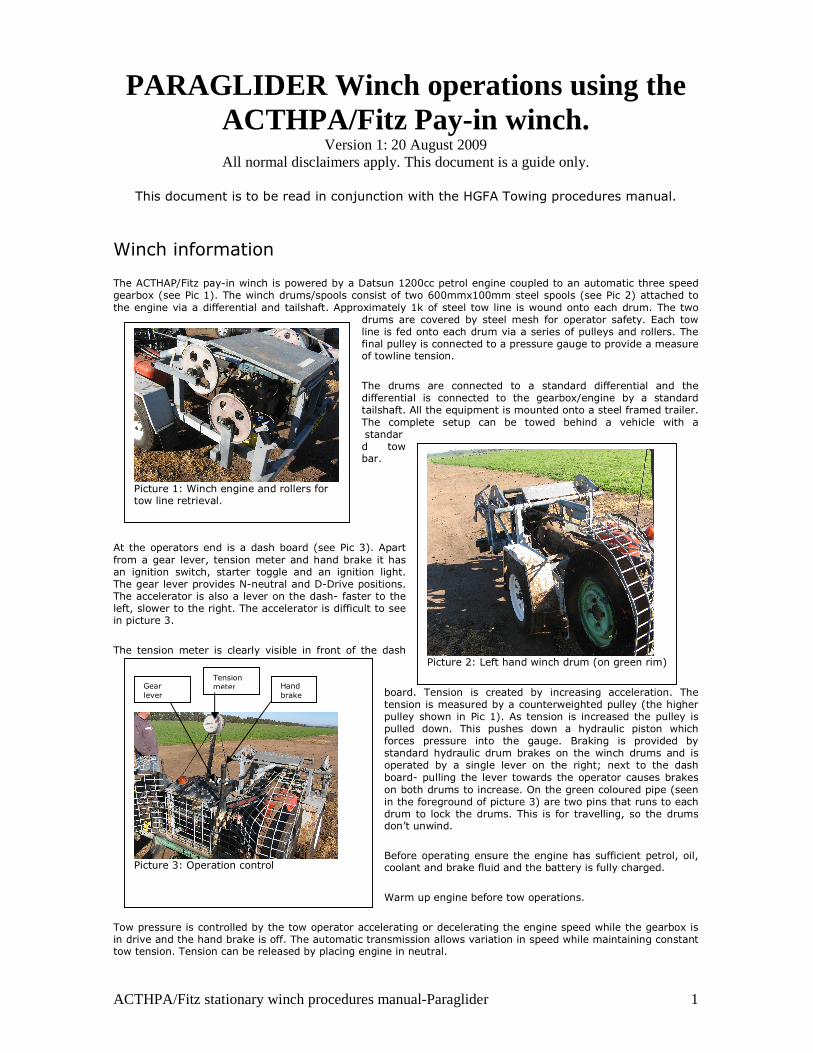
The ACTHAP/Fitz pay-in winch is powered by a Datsun 1200cc petrol engine coupled to an automatic three speed gearbox (see Pic 1). The winch drums/spools consist of two 600mmx100mm steel spools (see Pic 2) attached to
the engine via a differential and tailshaft. Approximately 1k of steel tow line is wound onto each drum. The two drums are covered by steel mesh for operator safety. Each tow line is fed onto each drum via a series of pulleys and rollers. The final pulley is connected to a pressure gauge to provide a measure of towline tension.
The drums are connected to a standard differential and the differential is connected to the gearbox/engine by a standard tailshaft. All the equipment is mounted onto a steel framed trailer.
The complete setup can be towed behind a vehicle with a standard tow bar.
At the operators end is a dash board (see Pic 3). Apart
from a gear lever, tension meter and hand brake it has an ignition switch, starter toggle and an ignition light. The gear lever provides N-neutral and D-Drive positions. The accelerator is also a lever on the dash- faster to the left, slower to the right. The accelerator is difficult to see in picture 3.
The tension meter is clearly visible in front of the dash
board. Tension is created by increasing acceleration. The tension is measured by a counterweighted pulley (the higher pulley shown in Pic 1). As tension is increased the pulley is pulled down. This pushes down a hydraulic piston which forces pressure into the gauge. Braking is provided by standard hydraulic drum brakes on the winch drums and is operated by a single lever on the right; next to the dash
board- pulling the lever towards the operator causes brakes
on both drums to increase. On the green coloured pipe (seen in the foreground of picture 3) are two pins that runs to each drum to lock the drums. This is for travelling, so the drums don’t unwind.
Before operating ensure the engine has sufficient petrol, oil, coolant and brake fluid and the battery is fully charged.
Warm up engine before tow operations.
Tow pressure is controlled by the tow operator accelerating or decelerating the engine speed while the gearbox is in drive and the hand brake is off. The automatic transmission allows variation in speed while maintaining constant tow tension. Tension can be released by placing engine in neutral.
Picture 1: Winch engine and rollers for tow line retrieval.
ACTHPA/Fitz stationary winch procedures manual-Paraglider 2
For the winch location1:
Ensure winch location is either flat or slightly downhill relative to launch. Do not have winch over a rise from launch
as this may increase friction of tow line on ground or cause it to snag increasing the chance of a breaking the tow line. Ensure winch operator can see pilots launching at all times. Ensure winch is secure- leaving it on the back of a vehicle is good stability. Take extra care that there are no powerlines across the paddock or closeby. The tow lines on the drums are wire and an electrical tragedy is likely if the lines touch power.
For the Pilot:
1 Equipment Ready
Make sure all your equipment is functional and preflight checks are done before lining up to hook onto the tow rope:
∗ Helmet on, Leg straps done up, chest strap done up. ∗ Radio can Tx & Rx, ie battery not flat. Do a radio check before launch with the winch operator. ∗ Mike or headset plugged in. ∗ Able to lock on mike (or have a hand button to activate Tx). ∗ Bridle attached to correct points on harness- note no metal to metal contact. ∗ Quick release is functioning.
∗ Hook knife readily available. ∗ Weak link ready. Use of small screw carabiners are handy as weak links can be made up and easily
replaced if they break. ∗ Wind socks at launch, midway down strip and at winch. ∗ After a successful tow, thank the winch operator
2 Standard Radio Procedure
Follow a standard routine radio procedure: Acknowledge each other's primary transmissions. It can be worrying to a nervous pilot when they hear no response to a request. ("Is my radio working?!!")
Give the winch operator a warning before you say "go, go, go", for example "inflating glider" and wind conditions.
When training the use of a launch assistant to relay pilot commands and other issues regarding launch operations is advisable. See back of document for radio procedures.
3 Pretension
The pilot should decide how much tension or lack of it (s)he wants to start with but should always take up tension to approx 5 on the tension meter (note the tension meter is not calibrated).
After having the winch operator take up the tension perhaps you could try the following techniques in different wind strengths.
> 10 kph head wind component: start with some slack in the tow line, inflate glider (with assistance if too windy) and ask operator to take up tension slowly before increasing and launching.
5 - 10 kph head wind component: Have some tension in a reverse launch position and advise operator to increase tension, inflate glider turn and launch.
< 5 kph head wind component: Think about doing a forward launch. Have tension on towline right from the beginning.
1 Thanks to “Terry and the locals” for the original version of these tips (http://www.hgfa.asn.au/). All errors and advice comes with the normal disclaimers. It is the pilots responsibility to ensure all safety procedures are in place and operational.
ACTHPA/Fitz stationary winch procedures manual-Paraglider 3
4 Launch Conditions
The wind does not have to be 5kts straight up the strip for a successful launch. True, this will allow an easy,
effortless launch but on light wind days the thermal is probably behind you and you will be back on the ground in 5
mins wondering why everyone else is away 1st tow.
When training, try to ensure the best possible conditions. A slight headwind is ideal, where the glider can be inflated and kited without problem.
Launch conditions will dictate the launch procedure. If a front launch is being attempted have slack glider lines and tension on the tow line. When ready yell ‘go, go, go’ to the winch operator and run forward. If the launch is successful the winch operator should gradually increase tension until you are airborn. If there is any problem such
as the glider coming up crooked and you can’t correct it, yell ‘stop, stop, stop’. The winch operator should stop the winch and you should reorganise yourself again. Don’t say ‘no, no, no’ as it can be easily mistaken for ‘go, go, go’.
The wind strength will be a factor in the technique you use to launch. If a reverse launch is being attempted then the wind is usually quite strong. If the wind strength is weak a forward launch is morel likely. In a forward launch case have tension on the line and when glider is inflated yell ‘go, go, go’. If tension is increased before the glider is fully inflated and is not being kited above the pilot it can stall. If the wind is stronger, have slack in the tow line.
Get the wing kited and then have winch operator slowly increase tension. Be aware that when there’s a strong wind the glider will begin to fly as soon as tension is slightly increased.
5 Release
Prior to releasing the tow line the pilot should indicate to winch operator that they are about to release. Saying ‘releasing in 5 secs’ is enough time for the winch operator to reduce tension. This allows pressure to be reduced for less chance of a surge of the glider. If communications has failed, spread you legs if you want the winch operator to stop the tow. Generally, as you approach the end of the tow your variometer will reduce in height gain signalling
that you are approaching maximum winch height. This is a good time to release (remember after advising winch operator you are releasing in 5 secs).
6 PTT Locked On
If you have locked on your radion, unlock it once at a safe height to reduce annoyance to other radio users (eg 300'). Ensure you have heard the winch operator or other transmissions to confirm you have unlocked your mike. Some simple procedure like an elastic band over the press-to-talk (PTT) button on speaker mics works. This can then be simply flicked off to release. Some newer radios have a “Time Out Transmit” which automatically switches off Tx with a warning beep if its set – normal tows do not take longer than 2 minutes. While others have a feature that allows you to begin transmitting by a press of the PTT button and stops when it is pressed again (this may not work on external speaker mics). In all cases reliable communications is a very important aspect of tow operations.
Local rule – If you leave your mike locked on you buy a carton of beer for the team.
For training, it is better to have a PTT button on your finger so you can communicate and hear communications from the winch operator.
However, communications from pilot to winch operator are critical and a locked-on transmitter is safer than situations where hands must be removed from brake toggles to enable you to talk. Regardless of the method good and reliable communications is very important.
7. Unexpected
Common unexpected events include weak link breakages and line breakages. When these happen the effects will depend upon the extent of tow tension. The greater the tension the greater the effect. Essentially, when a glider is under maximum tension it has the greatest angle of attack. A weak link or line break under maximum tension will result in the glider surging. To prevent a frontal collapse it must be caught quickly. When the level of tension is lower the surge will be less. It is on this point if a pilot is closer to the ground then lower tension is safer than higher tension.
If the release mechanism fails it usually causes considerable panic. However, generally in such cases all that is
needed is for the tow operator to stop the tow. With the tow line still attached it is possible to fly the glider in figure eights behind the winch. Alternatives include cutting the tow line, however more than likely the only thing
the pilot can do is to cut the bridle. This requires the use of a hook knife and hence the brakes should be put in one hand so control isn’t lost. If the glider is under strong tension then catching the surge after the bridle is cut is will be a challenge. The tow operator should be informed as soon as possible of any problem. In all cases if there is any doubt the tow should be stopped.
ACTHPA/Fitz stationary winch procedures manual-Paraglider 4
For the winch operator:
1 Pretension & Launch Technique
Ensure winch is secure (on towbar of vehicle is good).
Ensure locks (pins that lock the drums/spools) on the winches are both unlocked.
Remove line ends and lay out in front of winch.
Attach drogue and plastic/polyester rope to provide some elasticity in line. Try and ensure a strong swivel is between drogue and line to prevent build up of twist (this happens when tow is released and when drogue returns line to ground it spins around twisting the tow line).
Attach tow line to another vehicle and run out line. Use the hand brake on winch in the initial part of line run out as it is often quite jerky. This settles down as more line is run out. If both lines are being run out ensure the distance between the line is maximised (ie from the back corner of the car. If the lines get close together they are prone to twist around each other.
When driving out line state over radio how far vehicle is from launch position. If it is the first time the line is run out the operator must tell the vehicle towing the line when the line is nearing the end. Advising the operator when the vehicle is close to launch area allows the winch operator to increase brake pressure so line doesn’t overrun due to drum momentum. Double check there are no powerlines in the area. Check again there are no powerlines in the area.
After all line is run out check to ensure there is no slack line and it isn’t caught on anything.
When running out line tow operator should have hand on brake to stop overruns if the vehicle stops. Good communications are essential.
Ensure winch engine is in neutral. Pull on brake and start engine.
Warm engine up. A warm engine has better torque conversion and will be less jerky on tow as it changes gear.
If the pilot wants to increase tension, put engine into drive, slowly release brake and slowly increase tension to about 5 on gauge. The idling engine should have enough torque to increase tension without acceleration. The line should wind in and tension increase.
When the pilot is ready and signals ‘go, go, go’, release brake and increase accelerator. Keep watch on the tension meter. Slowly but steadily increase tension as pilot launches. This requires slow and steady coordination of acceleration. Keep eye on tension meter, pilot and ear on radio. As pilot increases height above ground increase acceleration and tension to standard towing tension range on gauge (this is marked by a black line).
If any line breaks or weak link failure occurs advise pilot immediately and apply hand brake to stop over winding of drum. Reduce acceleration and place gear in neutral. Turn off engine. Watch pilot land safely before resolving broken line etc.
Under normal tow operations pilot should advise winch operator 5 seconds before release. When pilot indicates five seconds before release, slowly reduce tension until pilot releases and line falls clear.
After a clean release, rewind line as fast as possible to save it dragging along the ground. Be careful not to wind line in past connection with rope. The drogue should keep inflated and keep the line off the ground to nearly full retrieve. It comes in quite fast so the tow operator should have their hand on the brake at all times to stop the tow line when it reaches its return point.
The use of a launch assistant when training to relay pilot commands and other issues regarding launch operations is advisable.
The tow operator should have on hand a good pair of wire cutting pliers as a guillotine if required.
2 "Airborne!"
Many winch operators do not realise that for the first couple of seconds the pilot is holding back allowing the tension to build up before taking the first step. This means that when pilot indicates ‘go, go, go’ tension needs to be increased quickly but gradually. Keep one hand on brake at all times, so if a weak link or line break occurs the brake can be applied rapidly to prevent overrun of tow line.
ACTHPA/Fitz stationary winch procedures manual-Paraglider 5
3 Meter Monitoring & Tow Tension
At launch give the tension meter approximately 40% of your attention and 60% to the pilot. As pilot increases in height direct your attention more to the tension meter. Tow tension can rise and drop suddenly and break a weak link. Be ready to brake the winch suddenly if there is a tow line failure. The quicker the tension rises the more urgent a response is required.
The more thermic the conditions, the lower the desired tension. In strong thermic conditions maintain the tow line tension near 50% of the weak link rating to give adequate margin to avoid a weak link break. Once the weak link breaks the tow is finished and the pilot can only make the best of their present situation. The pilot can aid the driver by telling them they are encountering a thermal or "noisy air". This warns the driver before any indication on the tow gauge and if their attention is wandering, brings it back to the tow gauge.
4 Rope Return
As soon as the release occurs increase the acceleration and rewind the line. Be careful not to wind the line in too far as the connections for the nylon rope will foul on the winch pulley. This will require a vehicle to pull it out. In the first part of the release from the winch it is usually quite jerky so the vehicle should be driven very carefully so as to not break the weak link or line. Note the line should be tied onto the vehicle with a weak link so if there is a problem with the line running out the line isn’t broken but the weak link. Once the winch is running out smoothly
speed of the vehicle can be increased but always keep speed below 10kph to save putting stress on the line or weak link.
5 Communication
All persons involved in the tow operations should be in radio communication with each other. It is critical that there is good communication between the pilot and the winch operator during the tow. This is best achieved by a locked-on transmission but can be also effective with a press to talk button on the pilots finger. At the winch, the
winch operator often has trouble hearing due to the noise of the winch engine- a headset is preferred. There are a range of voice-activated switches on the market but their reliability in noisy environments may make them unsuitable. Some of these may have a lock-on feature which would be useful for the pilot.
6 Beside Fences
If your team is towing near the edge of the paddock your rope may drop over the fence. Don’t retrieve the line by winding it in over the fence. It could get snagged and damage the line or fence. Manually lift it off the fence.
7 Windsock at Vehicle Start Point
Stand a small windsock or streamer just in front of the launch start point. This makes it easier for the vehicle driver to quickly find the end of the rope as (s)he tows the line back to the start point, especially when looking into the sun.
8 Remote Release
Install a remote release on the winch (or have a pair of strong pliers) which the operator can guillotine the line if needed. When returning the rope to launch, glance behind occasionally to check that you still have the tow rope attached. It is a bit embarrassing if you turn up at launch empty handed and also time consuming to find the end again. A remote release also adds safety if a pilot locks out or gets into other difficulty.
9 Rope Join & Repair
The operator should be familiar with an appropriate in-line joining facility. This could be a crimping approach.
10 Rope Knots, kinks and twists
After release from the glider a loose falling rope can put knots or kinks in itself. This is more likely after a high
release in light and variable wind conditions. Typically, knots form near the glider end of the rope as it falls through itself. Most are within the first 10 feet but may be up to 50 feet from the end. The tension of a couple of tows will seat these knots firmly and you will not be able to undo them. If ignored the knot will be a wear point leading to a rope break. Glance back down the rope as you attach it to the vehicle to check for these knots and undo them then. If you find a knot a bit too late, run some tape around it to prevent wear. Similarly but less common, loop-through knots can form anywhere along the rope. When the line is released and clear a speedy retrieve will ensure little line touches the ground. A heavy swivel between the drogue and the line will help reduce twist which invariably occurs when the line is released.

ACTHPA/Fitz stationary winch procedures manual-Paraglider 6
SUMMARY CHECKLIST and PROCEDURE FOR ACTHPA/FITZ WINCH OPERATOR PRIOR TO LAUNCH2
Winch preparation checklist • Winch properly anchored to ground to avoid rolling
• Winch engine inspected- fuel tank full, radiator and oil ok • Drive belts or chain lubrication, oil levels, brake fluid levels ok • Level wind system checked and ready • System hydraulic pressure and tension displays for operating functioning properly • Test pulls completed and all ok. • Retrieval parachute inspected and properly installed on towline • Motorbike or ATV or other vehicle ready to haul towline back to launch.
• Hook knife ready or guillotine system inspected for winch operator • Radios installed and working well. • Wind socks visible and not obstructing launch and landing areas • All obstructions removed at tow site.
• All pilots and crew briefed, procedures reviewed and special issues addressed. • White cross indicating gliding operations pegged out.
Winch pre-tow checklist • Emergency tension release (if equipped) cycled and working ok
• Emergency guillotine set. • Automatic tension controls (if equipped) such as hydraulic pressure regulator properly set • Tension monitor system functioning properly • Line exiting winch properly • Any fluid leaks or other noticeable problems • Engine operating properly and gauges displaying satisfactory values • Communication with pilot clear.
• Tow line all clear. Check for powerlines AGAIN. • Check conditions for gusts or thermals of concern moving through • Check for air traffic or vehicle traffic of concern.
Winch tow checklist • See radio procedure for tow. • As pilot indicates tension needed pull on brake and place winch in gear. Tension as needed
• When hear ‘go, go, go’ release brake and slowly increase accelerator. • Keep eye on pilot, tension meter and ear on radio. Keep one hand on brake at all times and the other on
accelerator. • After hearing ‘releasing in 5 secs’ reduce tension slowly over 5secs • Once clean release, retrieve line on full throttle- be careful as it comes in fast.
2 This checklist is drawn heavily from Pagen, A., and Bryden, B., 1998, Towing Aloft, Sport Aviation Publications, Mingoville, PA. ISBN 0-936310-13-8.
ACTHPA/Fitz stationary winch procedures manual-Paraglider 7
SUMMARY CHECKLIST and PROCEDURE FOR PARAGLIDER PILOT
Pre-flight inspection • Check the canopy for holes, tears, damage • Check suspension lines for damage abrasion, cuts and tangles
• Check the risers- are brake toggles free and clear? • Check harness stitching, buckles, straps and carabiners • Check emergency parachute- is it stowed properly • Check the tow bridle condition and connection • Check bridle release for condition and function • Check release trip line or trigger for position and entanglement • Check the weak link. Make sure it is the correct size, unabraded and properly connected
• Check protective equipment including helmet, gloves, eye protection, hook knife etc for ease of access and condition
• Check radio and vario for installation and operation • Check launch procedures and flight plans with the tow team
Launch inspection • Is the pre-flight inspection complete?
• Check protective equipment: helmet, gloves, eye protection, hook knife etc. • Check the canopy layout for proper horseshoe shape and clear lines • Check harness leg and chest straps and helmet on. • Check the carabiners, tow bridle, release and weak link • Check the towline retrieval chute, if used, for proper rigging • Check to make sure the tow team checks are completed and ready • Check the air traffic- the marshal or other team members should help here. • Check the wind for acceptable strength and direction • Radio can Tx & Rx, ie battery not flat. Able to lock on mike (or have a hand button to activate Tx).
Tow launch technique • See radio commands below for procedure on tow. • Lay out canopy perpendicular to the wind as normal • Check for removal of tow line slack • Check the wind • Inflate canopy as normal
• With the canopy solidly above you, call for launch pressure while moving forward to maintain inflation in zero winds
• As the force rises, resist a bit but move with it while using long strides • Once you are airborne get off the brakes and monitor the canopy for folds and direction with respect to
the towline • Be ready to run again if the towline force lightens.
Climbout checklist • Use minimum brakes- steer with weight shift as much as possible • Watch your canopy
• Maintain your canopy directly aligned with the towline at all times • In crosswinds let the canopy drift downwind and point at the towline • During turns, point at the towline or follow the boats wake. • When releasing apply brakes as necessary to avoid a forward canopy surge • Avoid releasing under high tow pressure or at a low tow angle except in an emergency

ACTHPA/Fitz stationary winch procedures manual-Paraglider 8
Radio commands that should ALWAYS be used3:
Pilot radio command/response Tow operator command/response
“Ready to take up tension”
“Take up tension”
“Tension is on”
“Locking on mic”
“Mike locked on” “Confirming Mic locked” (if pilot hears this then mic
is not locked on)
“Inflating glider”
“Wind is good”
“GO! GO! GO!”
“Airborne” (then:)
“Less tension” or
“More tension” or
“Tension good”
“STOP! STOP! STOP!” (means stop tow immediately)
“Releasing in 5 secs”
“Safe Release”
“Unlocking mic”
“Confirmed mic is unlocked”
“Thanks for the tow”
3 Thanks to Tove Heaney for the original version of these commands.
ACTHPA/Fitz stationary winch procedures manual-Paraglider 9
Establishing lock-on radio transmission using Icom hand held radios. ICOM 41S The PTT switch can be operated as a one-touch PTT switch (each push toggles between transmit/receive). Using this function you can transmit without pushing and holding the PTT switch. To prevent accidental, continuous transmission with this function, the time-out timer function is automatically set to the transceiver. See p. 12 of manual for details.
• q Turn the power OFF. • w While pushing and holding [PTT], rotate [VOL] to turn power ON to turn the PTT hold function ON. • “P-HOLD ON” is displayed for 1 sec. • e Push [PTT] to transmit and push again to receive. • “ ” appears while transmitting.
Repeat steps q and w to turn the PTT hold function OFF. NOTE for the optional microphone operation: This function does not activate when the PTT switch on the optional microphone is pushed. And even if the transceiver transmits with this function, the PTT switch on the optional microphone must be pushed to speak. ICOM 40S The 40S doesn’t have a switch to lock-on transmission so the solution is to set the time-out timer to approximately 2 mins. Use a modified mic with lockout button. Just before launch switch it on. After two minutes it will turn off which should be sufficient time to launch to max height. It beeps 5secs before it times out. Then you need to release the button and it will reset to normal operations. Time-out timer To prevent continuous, extend transmissions, the transceiver has a time-out timer. This timer turns a transmission OFF 1,2, 3 or 4 min. after it starts. This timer can be cancelled. Approx. 5 sec. before the time-out time elapses, the transceiver emits a beep tone.
• Push [LOW] for 2 sec. to enter set mode. • Push [LOW] several times until “tt” appears. • Push the chanel up or down button to select the time-out time or to turn the function OFF. •
- 1, 2, 3 and 4 minutes and OFF are available. Push [LOW] for 2 sec. to exit set mode.