Embed Size (px)
Citation preview

Contact Us at: [email protected]
Find our guides at: http://www.fnha.ca/what-we-do/communicable-disease-control/panorama
Panorama User Guide #1
TB Screening Data Entry
Negative Screen –
No Signs & Symptoms, No Risk Factors
Version 3.2
Version 1.0

TB Guide #1: Negative TB Screen *This Guide is to be used in conjunction with FNHA Panorama training
Feb 2017; Revised August 2019 [email protected] Page 2 of 18
Table of Contents
Please Note: ............................................................................................................................................................................ 3
Search and Update Client Information ................................................................................................................................... 4
Create Consent Directive ........................................................................................................................................................ 7
End Dating old TST consents ............................................................................................................................................... 8
Viewing Consents ................................................................................................................................................................ 8
Update TB History Summary ................................................................................................................................................. 10
BCG History from iPHIS ..................................................................................................................................................... 12
Create TB Skin Test ............................................................................................................................................................... 13
TB Skin Test – GIVE ............................................................................................................................................................ 13
TB Skin Test – READ .......................................................................................................................................................... 15
Client No Show for TB Skin Test Read ............................................................................................................................... 17
Entering a Historical TST ................................................................................................................................................... 18

TB Guide #1: Negative TB Screen *This Guide is to be used in conjunction with FNHA Panorama training
Feb 2017; Revised August 2019 [email protected] Page 3 of 18
Please Note:
It is required for CHNs working in FN communities with Panorama access to have training with the FNHA
Panorama team prior to use of the Panorama system. Panorama guides are to be used in conjunction
with formal FNHA Panorama training. To arrange a training session, please contact
This guide is only appropriate for negative screening for clients with a negative TST, no
signs/symptoms and no risk factors, including children (school screening).
Use the tool “Which Panorama TB Guide Should I Use?” To help you to determine how to enter your
screens.
For contacts to an active case, clients requiring follow-up, or those with signs/symptoms or risk
factors, please follow the document “Panorama User Guide #2: TB Screening Data Entry With Skin Test”
instructions. Please use the “Which Panorama TB Guide Should I Use?” tool to show you which TB guide
to use for entering your TB screen.
This detailed guide will take you through the steps in entering your client’s negative TB screening
information:
Search and update client information (Last/First Name, DOB; Jurisdictional Registry)
o Review/Edit Client Demographics
o Add/Update Indigenous Information
o Add Immigration Information
o Add Allergies
Enter Consent
Enter/Update TB History
Enter TB Skin Test
This guide accompanies Panorama TB Screening Data Entry – QuickGuide (for TB Guide #1)

TB Guide #1: Negative TB Screen *This Guide is to be used in conjunction with FNHA Panorama training
Feb 2017; Revised August 2019 [email protected] Page 4 of 18
Search and Update Client Information
For more information about searching and
opening client charts please see our Core Guide
In the INVESTIGATIONS Module:
1. SEARCH/CREATE CLIENT
LHN > Search > Search Clients
a) Search client following your choice of search options
(See Panorama Core Guide).
b) Using the search results table, choose a single client by
selecting the checkbox next to the Client ID column
c) Under Row actions, you will have several choices
depending upon which module you are in. Select View
Subject Summary.
d) Alternately, you can select Create Client if you have
done a thorough search and the client does not have a
chart in Panorama. You can then create the client’s
chart.
Ensure you have done a thorough search for the
correct client and that all demographic information are
correct and up-to-date
2. EDIT/UPDATE CLIENT INFORMATION
Client Demographics
LHN > Subject > Client Details > Client Demographics
a) Ensure Health Region Organization is correct. Use the
ADD button to add the most recent location of
residence (ie. The associated Public Health Unit for
their Health Centre/Nursing Station). End Date old
Health Regions.
Eg. For Stolo Nation, their closest Regional Health Authority
branch is Chilliwack

TB Guide #1: Negative TB Screen *This Guide is to be used in conjunction with FNHA Panorama training
Feb 2017; Revised August 2019 [email protected] Page 5 of 18
b) Ensure Phone Numbers and Addresses are correct
including Address Located On Reserve information if
appropriate. ADD and SAVE your changes to the table
for each section. End date any old phone numbers and
addresses. DO NOT DELETE old numbers or addresses
c) Ensure all other fields in the Client Demographics page
are up-to-date (if information is known)
d) SAVE your work
For more detailed information on how to search and
update client information, please see the Panorama Core
Guide
3. UPDATE INDIGENOUS INFORMATION
Indigenous Information
LHN > Subject > Client Details > Indigenous Information
a. Complete the Indigenous Information questions and add
your client’s current Aboriginal Organization (use (I)
location). SAVE your work
For more detailed information on how to update
Indigenous Information, please see the Panorama Core
Guide or Completing Indigenous Information Guide

TB Guide #1: Negative TB Screen *This Guide is to be used in conjunction with FNHA Panorama training
Feb 2017; Revised August 2019 [email protected] Page 6 of 18
4. UPDATE IMMIGRATION INFORMATION
Immigration Information
LHN > Subject > Client Details > Immigration Information
a. For TB screens, the Immigration Information section
must be entered.
b. Indicate if Canadian citizen (yes/no)
c. Country Born In:
If born in Canada, indicate Province (if known)
d. Complete the other fields if known/applicable
e. SAVE your work
5. ADD CLIENT ALLERGIES
Allergies
LHN > Subject > Allergies
a) If client has no allergies, select SET NKA or
CONFIRM NKA or
b) Select ADD and enter client’s allergies.
For more detailed information on how to update client
allergies, please see the Panorama Core Guide

TB Guide #1: Negative TB Screen *This Guide is to be used in conjunction with FNHA Panorama training
Feb 2017; Revised August 2019 [email protected] Page 7 of 18
Create Consent Directive
If a previous consent is present, end-date the current
consent and enter new one.
LHN >Subject >Consent Directives > All Services
1. Select ADD to add a new consent directive
2. A Consent Directive modal will appear. Complete
fields:
a. Directive Category = Service
b. Directive Sub Category = TB Skin Test
c. Instruction: Select either the Grant or Refuse
Radio Button
d. Status = select Confirmed radio button
e. Effective From Date defaults to today’s date (can be
back dated).
f. Effective To Date: Enter anticipated date of TST read
(ie. 48-72 hours post TST give)
g. Choose the Form of Consent from the drop down
list
h. Consent Given By: (three choices):
i. Not Specified
ii. Related Client – will appear as an option if the
client is linked to a family member
iii. Other – Select the Relationship Type and use
the free-text field to enter the name of the
person giving consent on behalf of the client.
i. Consent Given To: - select the Name radio button.
Select CURRENT USER button and your name will
populate in the field. You can also enter the name
of the provider that obtained the consent.
j. Comments can be entered if needed in the free text
box.
3. Select APPLY and SAVE your consent.

TB Guide #1: Negative TB Screen *This Guide is to be used in conjunction with FNHA Panorama training
Feb 2017; Revised August 2019 [email protected] Page 8 of 18
End Dating old TST consents
In Panorama, you cannot have 2 consents for a TST with
overlapping dates. If you run into this issue, you will need
to end date one of the consents.
LHN > Subject > Consent Directives > All Services
1. From the Consent Directives page, in the table, select
the checkbox next to the consent you wish to end
date.
2. The Row Action buttons will become available at the
top of the table. Select UPDATE
3. Once the consent is opened, you can add in the
Effective To Date (ie end date)
4. SUBMIT and the consent will update into the table with
the end date
Viewing Consents
You can review all of your client consents on the table, and
filter them as needed. You can use the expand/collapse
column (2nd column) on the table to see additional consent
details.

TB Guide #1: Negative TB Screen *This Guide is to be used in conjunction with FNHA Panorama training
Feb 2017; Revised August 2019 [email protected] Page 9 of 18
Alternately, you can select any individual consent using the
checkbox and select VIEW. The consent details will
appear in a modal.

TB Guide #1: Negative TB Screen *This Guide is to be used in conjunction with FNHA Panorama training
Feb 2017; Revised August 2019 [email protected] Page 10 of 18
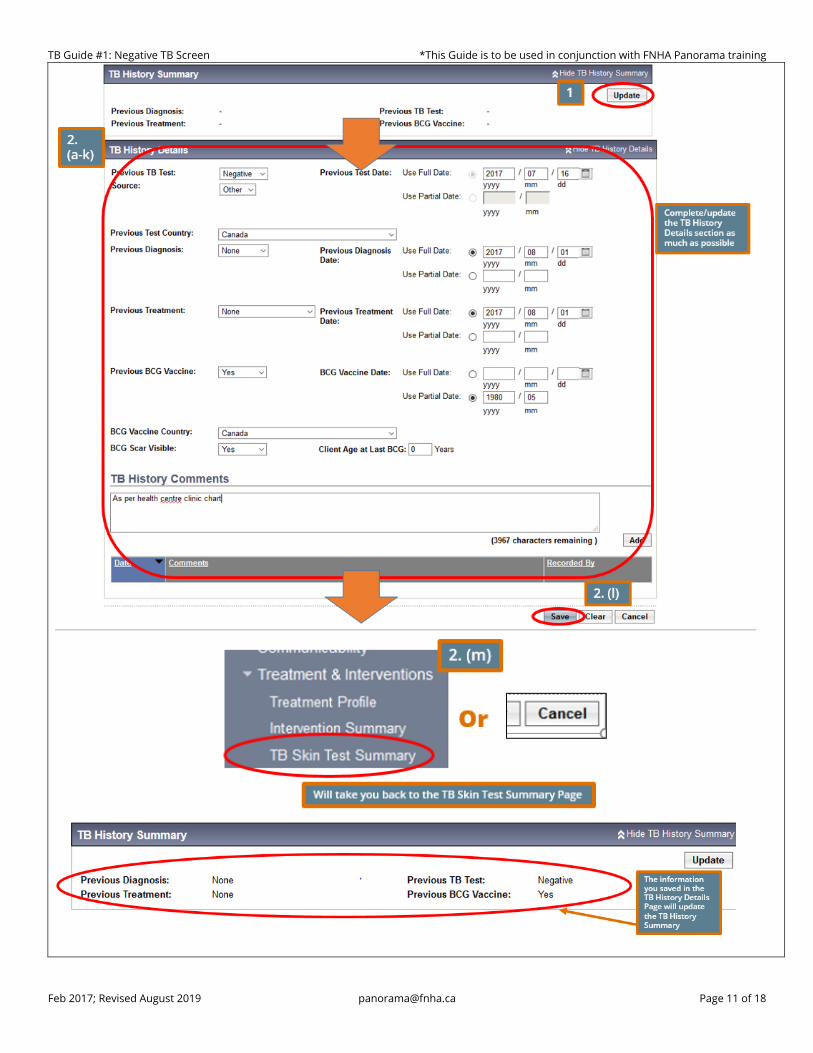
Update TB History Summary
If selecting None or Unknown for Previous
Diagnosis, or Previous Treatment, enter date of client
TB screen. You will not be able to save your entry
without a date entered.
If Previous Vaccine is selected Yes, a date must be
entered. If only year of BCG known, enter the
month the client was born.
Before entering the client TST, first review and update your
client’s TB history summary.
LHN > Investigation > Treatment & Interventions > TB Skin
Test Summary
1. Scroll down to the TB History Summary section of the
page. Select UPDATE
2. The TB History Details page opens where you can review
and update client information:
a. Previous TB Test: Can select Negative, None, Positive,
or Unknown from the drop down menu
b. Source: Source where you received the previous TB
test information from. Choose Client or Other
c. Previous Test Date: Enter date the last TST was given.
If Full Date is not known, you can use the radio ()
button to enter a Partial Date (year/month)
d. Previous Test Country: Use the drop down to select
the Country where client received her last TST
e. Previous Diagnosis: Select Active TB, Latent TB, None,
or Unknown. Enter the Previous Diagnosis Date (Full or
Partial Date)
f. Previous Treatment: Select Active TB, None,
Prophylaxis Complete, Prophylaxis Incomplete,
Prophylaxis Unknown, Unknown Treatment, or
Untreated. Enter the Previous Treatment Date (Full or
Partial)
g. Previous BCG Vaccine: Select No, Unknown, or Yes.
Enter the BCG Vaccine Date (Full or Partial Date).
h. BCG Vaccine Country: Enter the country where client
received BCG vaccine
i. BCG scar visible: Enter your assessment of client’s
BCG scar. Select No, Unknown, or Yes
j. Client Age at Last BCG: Enter age of client when they
received BCG (in years) if applicable/known.
k. There is a free text field under TB History Comments
where you can add additional information such as
any changed or updated fields you have updated, or
any relevant comments regarding TB History. Select
ADD after adding additional comments to put into
the comment table.
l. SAVE your work.
m. Select CANCEL or LHN > Investigation > Treatment &
Interventions > TB Skin Test Summary to take you
back to the TB History Details page
TB Guide #1: Negative TB Screen *This Guide is to be used in conjunction with FNHA Panorama training
Feb 2017; Revised August 2019 [email protected] Page 11 of 18

TB Guide #1: Negative TB Screen *This Guide is to be used in conjunction with FNHA Panorama training
Feb 2017; Revised August 2019 [email protected] Page 12 of 18
BCG History from iPHIS
In many client charts transferred from the old iPHIS system,
their BCG history has been placed in the TB History Comments
section. If you see this information in the comments section,
transfer the information to the TB History Details section

TB Guide #1: Negative TB Screen *This Guide is to be used in conjunction with FNHA Panorama training
Feb 2017; Revised August 2019 [email protected] Page 13 of 18
Create TB Skin Test
TB Skin Test – GIVE
Ensure your Client and Investigation is in context:
LHN > Investigation > Treatment and interventions > TB Skin
test Summary
From the TB History Details page, select CREATE TB SKIN TEST
from the TB Skin Test and Follow Up Summary section. For
Encounter Group, select Tuberculosis Disease Investigation
from the dropdown menu
1. In the Clinical Information section:
a. Other TB Case Contact – select from dropdown
menu No, Unknown, or Yes.
b. Recent Illness – choose from No, Unknown, Yes.
Enter date if Yes is selected.
c. Enter Clinical Comments in the free text field if
applicable. Select ADD if comments are entered.
2. Test Given Details section
a. Select the Historical checkbox if entering a TST
give done by another agency/clinic (See Entering
a Historical TST entry section)

TB Guide #1: Negative TB Screen *This Guide is to be used in conjunction with FNHA Panorama training
Feb 2017; Revised August 2019 [email protected] Page 14 of 18
When searching for provider, providers are listed by
Lastname, Firstname, Designation –
Community/Clinic
b. Select Reason for Testing from the Drop-down list
(codes as per TB screening form)
c. Organization and Location/SDL will default to your
Organization (can be changed using FIND and
SELECT)
d. Given by – either FIND and SELECT yourself or
another provider as the Provider. Providers are
listed [last name, first name, designation]. If the
name is not listed in the provider list, use the
radio button () in the Other Provider area and
enter the provider name in the free text field.
If you select Use Other Provider, please type the provider
name by:
LASTNAME, Firstname, Designation (See example on left)
Eg. SMITH, Jane, RN

TB Guide #1: Negative TB Screen *This Guide is to be used in conjunction with FNHA Panorama training
Feb 2017; Revised August 2019 [email protected] Page 15 of 18
e. Date Test Given defaults to today’s date – change if
needed f. TB Serum Agent - Choose PPD g. Choose Lot number – Lot# details will be
populated h. Choose Body Site – Left inner forearm, right inner
forearm or other i. Select SAVE.
3. To get back to the TB Skin Test Summary page, you can
select CANCEL at the top or bottom of the page, OR
LHN > Investigation > Treatment & Interventions > TB
Skin Test Summary
2.
You will see your skin test give in the table. You can continue
with the follow up/TB Skin Test read/follow up in 48-72
hours.
What your Skin Test Give looks like on the table (ie. Not yet read)
For more information about navigating the
Investigation Module Subject Summary page, refer
to the Subject Summary section of TB Guide #2 or
TB Guide #3
TB Skin Test – READ
To return to your TB Skin Test, search for your client.
LHN > Investigation > Treatments & Interventions > TB Skin
Test Summary
1. In the TB Skin Test and Follow Up Summary section, use the
radio button () to select your TB Skin Test from the
table and select VIEW/UPDATE.
2. Scroll down to the Test Read Details section
a. Enter Date Test Read
b. Organization and Location/SDL will default to your
Organization (can be changed)
c. Read by – either FIND yourself or another
provider as the Provider or enter information in
the Other Provider area
d. Choose Interpreted Result as Negative
e. Enter Reaction Size in mm

TB Guide #1: Negative TB Screen *This Guide is to be used in conjunction with FNHA Panorama training
Feb 2017; Revised August 2019 [email protected] Page 16 of 18
3. TB Follow Up section:
a. Follow Up: Select No Follow Up Required
b. Under the Follow Up Details, there is a free text
field where you can add details such as:
“Client can return for follow up community
TB screen in 1 year or as needed”
4. Select SAVE.

TB Guide #1: Negative TB Screen *This Guide is to be used in conjunction with FNHA Panorama training
Feb 2017; Revised August 2019 [email protected] Page 17 of 18
To get back to the TB Skin Test Summary page, you can select
CANCEL at the top or bottom of the page,
OR
LHN > Investigation > Treatment & Interventions > TB Skin
Test Summary
You will see your completed skin test in the table
What your completed Skin Test Read and Give will look like on the table:
Your TB skin test entry (give and read) will show as an
Unassociated Encounter (Non-Investigation) when you go to
the client’s Subject Summary page
LHN > Investigation > Subject Summary
Client No Show for TB Skin Test Read
If your client does not attend the TB skin test read
appointment, you can document as follows:
1. Complete steps 1-2c in the TB Skin Test Read section of
this guide
2. For Interpreted Result, select Not Read from the drop
down menu

TB Guide #1: Negative TB Screen *This Guide is to be used in conjunction with FNHA Panorama training
Feb 2017; Revised August 2019 [email protected] Page 18 of 18
3. TB Follow Up section: select Repeat Skin Test in the
Follow Up field. Enter notes in the Follow Up Details field
as needed.
4. SAVE your work. When you go back to the TB Test
Summary page you will see your no show appointment
in the table
What a No Show Skin Test will look like on the table:
Please Note: Historical entries are meant to be used
for TST entries where information about the client
TST is unknown or incomplete. Vaccinations given by
Panorama users should not be entered as historic
immunizations.
Entering a Historical TST
Historical TST entries are meant to be used when
information about a client TST is unknown (ie. Unknown lot
number, site, route, provider, organization, SDL). Two
examples where a TST may need to be entered as historic:
1. Transfer of a TST entry from a paper chart into
Panorama and the provider, lot number, site, or
route is not known.
2. Client has record of TST given from outside of the
province and the provider, lot number, site, or route
is not known.
To enter a historical TST in Panorama you will need to check
off the checkbox next to Historical in the Test Given
Details section.