Embed Size (px)
Citation preview

Panduit Physical Infrastructure Reference Guide
Revision: H1CY11

2The Purpose of this Document
The Purpose of this Document
This guide is a supplemental document to the Cisco Smart Business Architecture for Midsize Organizations design and deployment guides.
Who Should Read This GuideThis guide is for the reader who:
• Has already read the Cisco SBA for Midsize Organizations—Borderless Networks Foundation Deployment Guide or Data Center Deployment Guide and is looking for guidance on mapping the logical architectures to a small, on-premises physical infrastructure
• Is seeking to gain greater efficiencies and cost-effectiveness through the proper design of their physical infrastructure
• Wants to discover the best practices surrounding the design and configuration of cabinets, racks, cabling, cable management, pathways, identification, cooling infrastructures, power distribution, and grounding and bonding systems on a smaller scale
• Is redesigning their data center or computer room and needs guidance on the physical layer
• Wants a better foundation for communicating with facilities personnel about their IT need.
Panduit solutions also extend beyond the rack and cabinets to address all areas of the enterprise network including LAN, WAN, and wireless applications. For more information on these and other solutions, please visit www.panduit.com.
Related DocumentsBefore reading this guide, review the following:
Foundation Design Overview
Foundation Deployment Guide
Data Center Deployment Guide
Panduit Foundation
Design Guides Deployment Guides
You are Here
Supplemental Guides
Data Center
Deployment GuidesDesign Guides Supplemental Guides

Table of Contents
ALL DESIGNS, SPECIFICATIONS, STATEMENTS, INFORMATION, AND RECOMMENDATIONS (COLLECTIVELY, "DESIGNS") IN THIS MANUAL ARE PRESENTED "AS IS," WITH ALL FAULTS. CISCO AND ITS SUP-PLIERS DISCLAIM ALL WARRANTIES, INCLUDING, WITHOUT LIMITATION, THE WARRANTY OF MERCHANTABILITY, FITNESS FOR A PARTICULAR PURPOSE AND NONINFRINGEMENT OR ARISING FROM A COURSE OF DEALING, USAGE, OR TRADE PRACTICE. IN NO EVENT SHALL CISCO OR ITS SUPPLIERS BE LIABLE FOR ANY INDIRECT, SPECIAL, CONSEQUENTIAL, OR INCIDENTAL DAMAGES, INCLUDING, WITHOUT LIMITATION, LOST PROFITS OR LOSS OR DAMAGE TO DATA ARISING OUT OF THE USE OR INABILITY TO USE THE DESIGNS, EVEN IF CISCO OR ITS SUPPLIERS HAVE BEEN ADVISED OF THE POS-SIBILITY OF SUCH DAMAGES. THE DESIGNS ARE SUBJECT TO CHANGE WITHOUT NOTICE. USERS ARE SOLELY RESPONSIBLE FOR THEIR APPLICATION OF THE DESIGNS. THE DESIGNS DO NOT CONSTI-TUTE THE TECHNICAL OR OTHER PROFESSIONAL ADVICE OF CISCO, ITS SUPPLIERS OR PARTNERS. USERS SHOULD CONSULT THEIR OWN TECHNICAL ADVISORS BEFORE IMPLEMENTING THE DESIGNS. RESULTS MAY VARY DEPENDING ON FACTORS NOT TESTED BY CISCO.
Any Internet Protocol (IP) addresses used in this document are not intended to be actual addresses. Any examples, command display output, and figures included in the document are shown for illustrative pur-poses only. Any use of actual IP addresses in illustrative content is unintentional and coincidental. Cisco Unified Communications SRND (Based on Cisco Unified Communications Manager 7.x)
© 2010 Cisco Systems, Inc. All rights reserved.
Table of Contents
SBA Overview . . . . . . . . . . . . . . . . . . . . . . . . . . . . . . . . . . . . . . . . . . . . .1
Panduit Business Overview . . . . . . . . . . . . . . . . . . . . . . . . . . . . . . . . . . .2
Panduit Technical Overview . . . . . . . . . . . . . . . . . . . . . . . . . . . . . . . . . . .3Design State One – SBA Foundation . . . . . . . . . . . . . . . . . . . . . . . . 3
Top Down Room View . . . . . . . . . . . . . . . . . . . . . . . . . . . . . . . . . . 3
Rack Elevations . . . . . . . . . . . . . . . . . . . . . . . . . . . . . . . . . . . . . . . 4
Cable Routing and Management . . . . . . . . . . . . . . . . . . . . . . . . . . 6
Pathways . . . . . . . . . . . . . . . . . . . . . . . . . . . . . . . . . . . . . . . . . . . 9
Environmental Design . . . . . . . . . . . . . . . . . . . . . . . . . . . . . . . . . 10
Cooling System . . . . . . . . . . . . . . . . . . . . . . . . . . . . . . . . . . . . 10
Power Distribution . . . . . . . . . . . . . . . . . . . . . . . . . . . . . . . . . . 12
Grounding and Bonding . . . . . . . . . . . . . . . . . . . . . . . . . . . . . . 12
Design State Two – SBA Data Center . . . . . . . . . . . . . . . . . . . . . . 14
Top Down Room View . . . . . . . . . . . . . . . . . . . . . . . . . . . . . . . . . 14
Rack Elevations . . . . . . . . . . . . . . . . . . . . . . . . . . . . . . . . . . . . . . 15
Cable Routing and Management . . . . . . . . . . . . . . . . . . . . . . . . . 16
Environmental Design . . . . . . . . . . . . . . . . . . . . . . . . . . . . . . . . . 18
Cooling System . . . . . . . . . . . . . . . . . . . . . . . . . . . . . . . . . . . . 18
Power Distribution . . . . . . . . . . . . . . . . . . . . . . . . . . . . . . . . . . 19
Grounding and Bonding . . . . . . . . . . . . . . . . . . . . . . . . . . . . . . 19
Identification . . . . . . . . . . . . . . . . . . . . . . . . . . . . . . . . . . . . . . . . 19
Conclusion . . . . . . . . . . . . . . . . . . . . . . . . . . . . . . . . . . . . . . . . . . . . . . .22
Appendix A: Bill of Materials . . . . . . . . . . . . . . . . . . . . . . . . . . . . . . . . .23 About Panduit . . . . . . . . . . . . . . . . . . . . . . . . . . . . . . . . . . . . . . . . 25
Appendix B: SBA for Enterprise Organizations Document System . . . . .26

1SBA Overview
SBA Overview
The Cisco® Smart Business Architecture (SBA) is a comprehensive design for networks with up to 2500 users. This out-of-the-box design is simple, fast, affordable, scalable, and flexible. There are three options based on your scaling needs: up to 600 users, 1000 users, and up to 2500 users.
The Cisco SBA for Midsize Organizations incorporates LAN, WAN, wireless, security, WAN optimization, and unified communication technologies tested together as a solution. This solution-level approach simplifies the system integration normally associated with multiple technologies, allowing you to select the modules that solve your organization’s problems rather than worrying about the technical details.
We have designed the Cisco Smart Business Architecture to be easy to configure, deploy, and manage. This architecture:
• Provides a solid network foundation
• Makes deployment fast and easy
• Accelerates ability to easily deploy additional services
• Avoids the need for re-engineering of the core network
By deploying the Cisco Smart Business Architecture, your organization can gain:
• A standardized design, tested and supported by Cisco.• Optimized architectures for midsize organizations with up to 2500 users.• WAN with up to 75 remote sites with a headquarters site, regional site,
and approximately 25 users per remote site.• Flexible architecture to help ensure easy migration as the organization grows.• Seamless support for quick deployment of wired and wireless network
access for data, voice, teleworker, and wireless guest.• Security and high availability for corporate information resources,
servers, and Internet-facing applications.• Improved WAN performance and cost reduction through the use
of WAN optimization.• Simplified deployment and operation by IT workers with CCNA®
certification or equivalent experience.• Cisco enterprise-class reliability in products designed for
midsize organizations.
Guiding PrinciplesWe divided the deployment process into modules according to the following principles:
• Ease of use: A top requirement of Cisco SBA was to develop a design that could be deployed with the minimal amount of configuration and day-two management.
• Cost-effective: Another critical requirement as we selected products was to meet the budget guidelines for midsize organizations.
• Flexibility and scalability: As the organization grows, so too must its infrastructure. Products selected must have the ability to grow or be repurposed within the architecture.
• Reuse: We strived, when possible, to reuse the same products throughout the various modules to minimize the number of products required for spares.
UserServices
NetworkServices
NetworkFoundation
Voice,Video,
Web Meetings
Security, WAN Optimization,
Guest Access
Routing, Switching,Wireless, and Internet
The Cisco Smart Business Architecture can be broken down into the following three primary, modular yet interdependent components for the midsize organization.
• Network Foundation: A network that supports the architecture
• Network Services: Features that operate in the background to improve and enable the user experience without direct user awareness
• User Services: Applications with which a user interacts directly

2Panduit Business Overview
Panduit Business Overview
Mission-critical applications and reliable, real-time data drive the modern business. The data center has become a centralized information-processing resource capable of empowering executive stakeholders to make meaningful decisions at the right time. In addition, IT depart-ments are expected to contain costs while ensuring greater reliability and performance from their networks. They must adapt their workload and environment to accommodate a broad array of rapidly changing demands including:
• Application agility that allows ease of flexibility, scalability, and interoperability of software platforms or technologies to meet current and future business needs.
• Compliance to regulatory demands around documentation, energy management, policies, and more.
• Disaster recovery plans in the event of a catastrophic event.
• Limited space, power, and cooling available for necessary opera-tion and/or expansion.
• Multiple offices or locations located locally, regionally, nationally and/or globally.
• Security against unauthorized access or attacks.
Addressing these issues creates opportunities for IT enterprises to utilize their technology assets to increase revenue by:
• Driving process efficiencies across project lifecycles, enabling stake-holders to realize improved operational benefits such as lower total cost of ownership (TCO) and optimized facility management.
• Increasing collaboration between employees to create a more dynamic and responsive work force.
• Increasing labor efficiencies by optimizing staffing and enhancing worker productivity, aggregating network requirements and reducing time to install.
Midsized organizations face the same challenges and opportuni-ties as large enterprises. Panduit knows that the server rooms and data centers of midsized organizations will continue to face stringent demands. Due to the complexities of these demands on the physical infrastructures, the next generation architecture must analyze both physical and logical layers to effectively drive business advantages and overall success. By addressing networking, computing, storage, and unified operations, Panduit Smart Data Center solutions help build a smarter, unified business foundation.
The Smart Data Center solution is one of three application solutions that form the foundation of Panduit’s Unified Physical InfrastructureSM approach. Panduit’s end-to-end UPI solutions across information technology, manufacturing operations and management systems connect, manage, and automate all critical systems, including commu-nication, computing, control, power, and security. Employing the UPI approach increases business agility and sustainability while lowering risk and cost.
This guide offers direction to midsized organizations designing all aspects of the physical infrastructure of a Cisco Smart Business Architecture including:
• Green Data Cabinets and Racks
• Overhead Pathways
• Copper and Fiber Optic Cabling
• Cable Routing and Management
• Power Distribution and Cooling
• Grounding and Bonding
• Identification

3Panduit Technical Overview
Panduit Technical Overview
This Panduit Deployment Guide presents the mapping between the logical layer architectures in the SBA Foundation and Data Center Deployment Guides with Panduit Smart Data Center physical infra-structure solutions. By considering the logical and physical layers in a holistic manner, this design delivers on the following principles:
• Ease of use: A top requirement was to develop a design that could be deployed with the minimal amount of configuration and day-two management.
• Cost-effective: Another critical requirement in the selection of products was to meet the budget guidelines for midsize companies.
• Flexibility and Scalability: As the company grows, so too must its infrastructure. Products selected need to have the ability to grow or be repurposed within the architecture.
• Reuse: The goal, when possible, was to reuse the same products throughout the various modules to minimize the number of products required for spares.
Two design states are examined in this guide—the first for the SBA Foundation, and the second for the SBA Data Center. In addition to creating modular and optimized physical infrastructures for these design states today, it is imperative to ensure a smooth transition between states tomorrow. This means that very little business disruption or redesign costs are necessary to logically and physically migrate from a Foundation to Data Center architecture. However, it is also possible for IT stakeholders to adopt the Data Center architecture on day one and achieve a high level of agility, availability, and security. In this guide, Panduit provides clear guidance on how to use a modular and organized approach for implementing both design states and shows how the infrastructure can be effectively and efficiently managed.
Design State One – SBA Foundation
Top Down Room View
Figure 1 illustrates how the Network Architecture Baseline of the SBA Foundation maps to physical elements on premises. The room designated for this installation should measure approximately 11 ft × 13 ft (3.35 m × 3.96 m) totaling 143 ft2 (13 m2). This footprint recom-mendation is based on the TIA-569-B standardized descriptions of a common equipment room (CER) or common telecommunications room (CTR) in a typical multi-tenant building space.
One Panduit® Net-Serv™ Cabinet labeled C1 and one Panduit® 4 Post Rack System labeled R1 reside at the left-center of the room and provide housing for IT devices in all Foundation modules. One Liebert® CRV™ Row-Based Cooling unit (20kW) labeled M1 is also placed next to the rack to provide adequate cooling for all equipment. In addition, two types of overhead pathways exist for proper routing and termina-tion of telecommunications and grounding cables. Finally, adequate free space exists for unobstructed access to equipment during routine maintenance and for proper airflow.

4Panduit Technical Overview
Figure 1 . Top down view of SBA Foundation CER or CTR mapped to logical architecture
Net-Serv™ Cabinet C1 contains the Server Room elements of the Campus Module and the servers indicated in the Application Acceleration Module.
This cabinet also includes all existing servers owned by the organiza-tion adopting the design, hosts providing the capabilities in the Unified Communications Module, and the server farm switches. The 4-post rack, R1, consists of the resilient core/distribution and client access switches along with the network appliances that provide functionality in the Wide-Area Network, QoS, Wireless, and Security Modules. Cabling, cable managers, patch panels, grounding kits, and Power Outlet Units (POU) are interspersed with the IT equipment to provide the physical infrastructure capabilities detailed throughout this guide.
Rack Elevations
Figure 2 shows a rack elevation of the front of the cabinet and rack. Both structures reside on a concrete slab floor. As mentioned in TIA-569-B, a suspended ceiling is not provided within a typical CER or CTR. Because the height of the cabinet, rack, and two tiers of overhead cabling pathways is in excess of 9.5 ft (2.6 m), the total room height should be a minimum of 11 ft (3.4 m) off the slab floor to allow the proper amount of buffer space between the physical infrastructure elements and the building spaces.
Figure 2 . Rack elevation of SBA Foundation - Front View

5Panduit Technical Overview
The cabinet and rack involved in this design both have the same standard-ized elements. Approved IT equipment in the Foundation Deployment Guide are arranged within the cabinet and rack with the following priorities in mind:
• Whenever possible, devices with the greatest weight, depth, and airflow measured in Cubic Feet per Minute (CFM) are placed toward the bottom of the cabinet. This is to allow for greatest stability and optimal airflow.
• Some devices, especially network appliances in the Security Module, have opposing airflow characteristics. These devices are all mounted in the 4-post open rack, which allows for greatest cooling optimization.
• The logical architecture also drives the physical layout. For example, the Cisco ASA5510 Security Appliance and Cisco IPS4255 Appliance from the Security Module are placed in close proximity in rack R1 because of their logical interrelationship.
• Blanking panels are used heavily to reserve space around devices for future hardware upgrades that require larger form factors and for completely new devices introduced to the design.
Figure 3 again illustrates the rack elevation but from the rear view. In this depiction, the elements are labeled and mapped from the logical archi-tecture. The figure also displays the two tiers of cabling pathways that are mounted above the structures. According to the TIA-942 Standard, it is important to keep copper and fiber optic cabling separated to improve administration, operation, and minimize damage to smaller diameter fiber cables. In this design, the Panduit® Wyr-Grid™ Cable Tray System is used to route copper cabling and the Panduit® FiberRunner® Pathway System is used to route fiber optic cabling.
Figure 3 . Rack elevation of SBA Foundation – Rear View
One option available with this design is to use a Catalyst 3750 stack con-figured with Cisco StackWise technology in anticipation of a later migration to a Catalyst 4507R-E chassis-based switch. The layout of the rack in this situation looks similar to the Catalyst 4507R-E scenario.

6Panduit Technical Overview
Figure 4 illustrates the alternative layout if a Catalyst 3750 stack is used. The fixed switches are placed in the same rack units as those consumed by the chassis-based switch. This is done in case business growth demands migration to the Catalyst 4507R-E in the future.
Figure 4 . Rack R1 optional device arrangement using Catalyst 3750 Resilient Core
Cable Routing and Management
By employing cable routing and management best practices, the design of the cabinet and rack provides easy access to device components during maintenance windows and ensures proper cooling efficiency. It is imperative that cabling does not block easy insertion and removal of Field Replaceable Units (FRU) on any equipment or block hot air exhaust outlets. The patch cords themselves should also be easy to trace in troubleshooting scenarios and easy to move, add, or change during proactive maintenance routines. The following table summarizes additional configuration best practices related to effective cable routing and management in the cabinet and rack:
Configuration Best Practices ✔ or ✗ for Cisco SBACabinets and RacksSelect cabinets and racks large enough to provide optimal cable routing within vertical pathways.
✔ 28 in. (700 mm), 45 RU Net-Serv™ Cabinet provides four wide, vertical pathways. 8 in. (203 mm) wide PatchRunner™ Vertical Cable Management System provides this functionality for the 4-post rack.
Cabinets must include appropriate accessories to ensure proper bend radius control and cable routing flexibility.
✔ Net-Serv™ Cabinet in high density configuration provides L-rings and vertical cable management finger sections that align with rack spaces. PatchRunner™ System also includes manage-ment fingers and slack management spools.
Vertical footprint of cabinets and racks must be sufficient to accom-modate all equipment and future needs.
✔ 52 RU, 4-post open rack and 45 RU cabinet provide a significant amount of vertical space for current and future needs. Flexibility is a top requirement in case new equipment or existing device upgrades with larger form factors are inserted into the design.
Use blanking panels in racks and cabinets to direct airflow and reserve rack space for future use.
✔ 1 RU and 2 RU Panduit tool-less blanking panels are leveraged throughout the design to achieve this design goal. One example of reserving rack space is around the 1 RU Cisco ASA 5510 appliances. Significant space is reserved to be able to upgrade to Cisco ASA 5580s in the future, which each can measure up to 4 RU.
Patch Field ManagementSelect high density patch panels to conserve on valuable rack space.
✔ Panduit® QuickNet™ 48-port Angled Patch Panels in a 1 RU form factor are used to save rack space.
Select patch panels that provide proper bend radius control and cable routing flexibility.
✔ QuickNet™ Angled Patch Panels facilitate proper bend radius control and minimize the need for horizontal cable managers, which saves addi-tional rack units.
Patch panels should be simple to work with allowing for faster moves, adds, and changes.
✔ Patch panels use pre-terminated QuickNet™ SFQ Series MTP Fiber Optic Cassettes and QuickNet™ Copper Cable Assemblies which snap in and out with one hand for faster deploy-ment of distribution cabling between cabinet and rack.
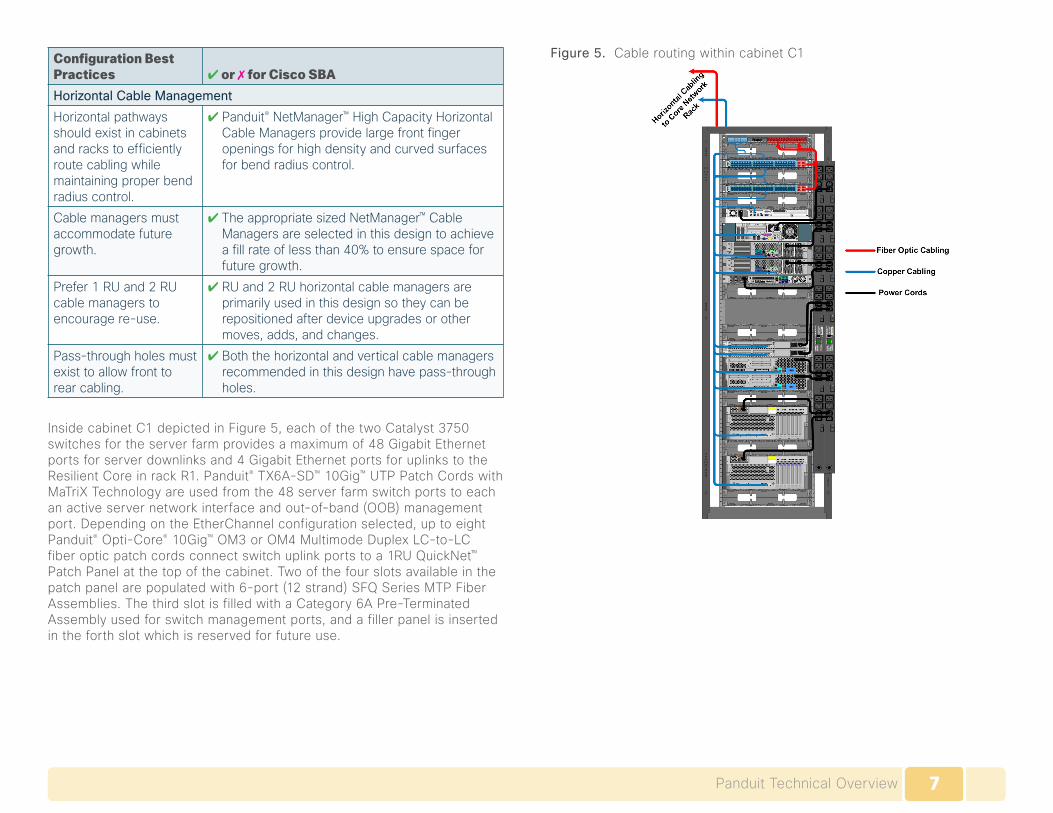
7Panduit Technical Overview
Configuration Best Practices ✔ or ✗ for Cisco SBAHorizontal Cable ManagementHorizontal pathways should exist in cabinets and racks to efficiently route cabling while maintaining proper bend radius control.
✔ Panduit® NetManager™ High Capacity Horizontal Cable Managers provide large front finger openings for high density and curved surfaces for bend radius control.
Cable managers must accommodate future growth.
✔ The appropriate sized NetManager™ Cable Managers are selected in this design to achieve a fill rate of less than 40% to ensure space for future growth.
Prefer 1 RU and 2 RU cable managers to encourage re-use.
✔ RU and 2 RU horizontal cable managers are primarily used in this design so they can be repositioned after device upgrades or other moves, adds, and changes.
Pass-through holes must exist to allow front to rear cabling.
✔ Both the horizontal and vertical cable managers recommended in this design have pass-through holes.
Inside cabinet C1 depicted in Figure 5, each of the two Catalyst 3750 switches for the server farm provides a maximum of 48 Gigabit Ethernet ports for server downlinks and 4 Gigabit Ethernet ports for uplinks to the Resilient Core in rack R1. Panduit® TX6A-SD™ 10Gig™ UTP Patch Cords with MaTriX Technology are used from the 48 server farm switch ports to each an active server network interface and out-of-band (OOB) management port. Depending on the EtherChannel configuration selected, up to eight Panduit® Opti-Core® 10Gig™ OM3 or OM4 Multimode Duplex LC-to-LC fiber optic patch cords connect switch uplink ports to a 1RU QuickNet™ Patch Panel at the top of the cabinet. Two of the four slots available in the patch panel are populated with 6-port (12 strand) SFQ Series MTP Fiber Assemblies. The third slot is filled with a Category 6A Pre-Terminated Assembly used for switch management ports, and a filler panel is inserted in the forth slot which is reserved for future use.
Figure 5 . Cable routing within cabinet C1

8Panduit Technical Overview
Figure 6 provides a close-up view of the server farm at the bottom of the cabinet to emphasize two important cable routing points. First, notice how the horizontal cable managers are used to route power cords around the secondary power supply bays of the 4 RU servers. If redundant, hot-swappable power supplies are needed in the future, they can be easily inserted without any obstructions. In addition, adequate distance is kept between power cords and copper cabling to avoid possible performance degradation.
Figure 6 . Server farm cable routing close up
Inside rack R1 depicted in Figure 7 each of the two Catalyst 3750 switches for the Client Access portion of the Campus Module provides a maximum of 48 Gigabit Ethernet ports for end-user devices on the office floor. Four Gigabit Ethernet ports on these switches provide uplinks to the Catalyst 4507R-E or Catalyst 3750 Resilient Core located at the bottom of the rack. Panduit® TX6A-SD™ 10Gig™ UTP Patch Cords with MaTriX Technology are routed from each 48-port Client Access switch to the QuickNet™ Angled Patch Panels at the top of the rack. These same Cat 6A patch cords are also used to connect appliances from the Security, QoS, and WAN Modules to the Resilient Core. If the Catalyst 4507R-E is selected for the Resilient Core, a mixture of copper and fiber optic line cards are inserted into the chassis along with the redundant supervisor modules. If the
Catalyst 3750 stack is used, there will be separate Catalyst 3750 switches designated for fiber optic and copper connectivity.
Five QuickNet™ Angled Patch Panels exist at the top of this rack. The left side of this combined patch field is populated with 6-port QuickNet™ Cat 6A Pre-Terminated Assemblies that run to other telecommunications closets and the patch field in cabinet C1. The right side of the patch field is filled with SFQ Series MTP Fiber Assemblies. These assemblies replicate patch panel ports in C1 and will also be used to replicate ports in other cabinets added in a future transition to the Data Center architecture. Splitting the copper and fiber optic patch fields facilitates easier cable routing and management within the rack and ensures adequate space between these cables as recommended by TIA-942.
Figure 7 . Cable routing within rack R1

9Panduit Technical Overview
Figure 8 zooms in on the Catalyst 4507 in rack R1 to highlight several important cable routing points. First, notice that the 3 RU horizontal cable manager at the bottom of the rack is used to direct copper cabling up the PatchRunner™ Vertical Cable Manager located on the front-left side to ensure proper separation of the copper cabling from the fiber optic cabling and power cords. Also, all cabling is routed to the right of the chassis-based switch to avoid obstructing access to the field replaceable fan module on the left of the switch. Finally, power cords are run through the pass-through holes in the PatchRunner™ System to POUs mounted in the back of the rack.
Figure 8 . Resilient core routing close up
Pathways
Structures must also exist to provide a robust and modular pathway through which bulk cabling can be effectively routed between the SBA Foundation cabinet and rack. In addition, bulk cabling from access devices and other telecommunications rooms throughout the building must be routed through an opening in the Foundation CER or CTR to rack R1. Since there is a slab floor used in this design, the only option is to route cabling within overhead pathways. Figure 9 provides a close-up of how the grounding, copper, and fiber optic cabling routes to R1 via the over-head pathways.
Figure 9 . Close-up of pathways and cabling over rack R1
Cabling from the rest of the building should be fed into the room close to either end of the overhead pathways as depicted by the red circles in Figure 10. This configuration allows an easier transition for thick cable bundles into the pathways and over to rack R1.
Figure 10 . Example locations where bulk cabling enters the CER or CTR

10Panduit Technical Overview
Two different types of overhead pathways are used to keep copper and fiber optic cabling separated as recommended in the TIA 942 Standard. Other key configuration best practices related to pathways include the following:
Configuration Best Practices ✔ or ✗ for Cisco SBAPathwaysMaintain adequate distances between cabinet, rack, overhead pathways, and the ceiling per the standards.
✔ Panduit® Wyr-Grid™ System mounts 4 in. (102 mm) above top of cabinets, and FiberRunner® System Channels mount 12 in. (305 mm) above the bottom of the Wyr-Grid™ System. An 18 in. (457 mm) buffer is kept between the ceiling and top of the FiberRunner® System.
Use different pathways to keep adequate separation between copper and fiber optic cabling.
✔ Wyr-Grid™ System routes the Cat6 copper cabling connecting the QuickNet™ Assemblies between patch panels in the cabinet and rack. The FiberRunner® System routes the flat-ribbon cable assemblies between the SFQ Series MTP Fiber Assemblies in the patch panels. In addition, knockouts on the roof of the cabinet allow for proper cable entry.
Provide adequate room in pathways for future expansion
✔ Pathways have been sized to ensure a best practice channel fill rate of less than 50%. A 2 in. (51 mm) × 2 in. (51 mm) channel size is used for the FiberRunner® System. The Wyr-Grid™ System is 12 in. (305 mm) wide with 4 in. (102 mm) high sidewalls.
Configuration should allow for simple moves, adds, and changes.
✔ QuikLock™ Assembly features on the FiberRunner® Systems eliminate or minimize the need for tools to assemble the system. Also, multiple spillout options provide versatility to make transitions to cabinets.
Ensure proper protection for cabling into pathways.
✔ FiberRunner® System fittings provide minimum 2 in. (50.8 mm) bend radius to protect against signal loss due to excessive cable bends.
Spill out options should provide bend radius pro-tection for both copper and fiber optic cables.
✔ FiberRunner® System and Wyr-Grid™ System both provide spill out accessories that ensure bend radius control for cable protection.
Properly seal open-ings made to transition cabling to pathways.
✔ Cool Boot® Cabinet Top Air Sealing Fitting is used on the Net-Serv™ Cabinet to keep the open cutouts sealed.
Two other types of cables that must be routed outside the cabinet and rack are power distribution and grounding cables. Besides maintaining separation between copper and fiber optic cables, the TIA-942 Standard also recommends keeping an adequate distance between power and tele-communications cables. This separation is especially necessary to minimize longitudinal coupling between power cabling and twisted-pair copper cables. Since the Foundation cabinet and rack are situated on a slab floor, these cables must also run in the overhead space. A more detailed discussion of power distribution, grounding and bonding configuration, and their associated cabling appears in the next section, Environmental Design.
Environmental Design
To achieve maximum efficiency and optimization in this design, the appropriate cooling design, power distribution, and grounding and bonding configurations must be employed. Best practices followed in larger data center implementations are also applicable here. In the cooling design, the objective is to provide adequate cold air supply to the IT equipment and properly remove hot exhaust air. With a properly implemented power distribution system, IT equipment remains available even during power outages or service disruptions. Finally, the grounding and bonding systems must be able to maximize equipment uptime, maintain system performance, and protect personnel.
Cooling System
A sustainable cooling system design that follows industry best practices is essential to the success of the Smart Business Architecture deployments. Not only is IT equipment safe from unplanned downtime due to overheating, but significant OpEx savings are realized through more efficient energy usage.
Airflow direction is a particular challenge in the R1 Core rack. Network services appliances found in the Security, QoS, and WAN Modules have varied airflow characteristics that make proper cooling efficiency a challenge. Therefore, a 4-post open rack system is selected for hosting these devices. In addition, special attention is given to the proper vertical arrangement of this equipment to achieve inlet temperatures of 80.6° F (27° C) or less, which is deemed acceptable by the ASHRAE industry standard.

11Panduit Technical Overview
The total IT equipment heat load and airflow for the room is estimated to be 8 kilowatts (kW) and 1020 CFM, respectively. This is based on a typical device utilization of 50% of nameplate power. Based on manufacturer’s specifications, one Liebert® CRV™ Row-Based Cooling unit (20 kW; 2453 CFM) placed next to the 4-post rack provides sufficient cooling airflow and cooling capacity for the heat load of the room. All electrical and coolant piping connections can be made from the top and/or bottom of the unit to accommodate the building’s plumbing configuration. Figure 11 and Figure 12 show the results of a Computational Fluid Dynamics (CFD) analysis on the Foundation CER or CTR. CFD analysis models are an integral part of designing and validating any size technology deployment.
Figure 11 . Cross-sectional view of R1 temperature distribution through center line of rack
Figure 12 . Cross-sectional view of C1 temperature distribution through center line of cabinet
The CFD analysis reveals the following pertinent details:
• The maximum inlet temperature for the IT equipment is 81°F (27.2° C). Liebert® CRV™ supply temperature set point of 55° F is necessary to maintain this acceptable inlet temperature.
• The open rack allows an adequate amount of cool air to reach all the varied inlet locations (front, rear, and side) of the network gear.
• The Catalyst 4507 switch exhaust is prevented from entering the server inlets because the hot air is buffered by the PatchRunner™ System and C1’s side panel.
• Devices like the Cisco 3845 Integrated Service Router with left side inlets should not be located directly above the Catalyst 4507 switch since the switch exhausts air out the left side of the chassis.
• The servers in cabinet C1 are sufficiently cooled, but the Catalyst 3750 switches in the top of the cabinet are at 80° F (26.7° C) since their inlets are in the rear of the cabinet and take in exhaust air from the servers.
12Panduit Technical Overview
Power Distribution
The use of an Uninterruptable Power Supply (UPS) is recommended for this design to provide high availability in the event of a power outage from the utility. This UPS should be placed outside of the room to avoid addi-tional space and power consumption. Two redundant panel boards inside the room are fed from the UPS and provide the maximum required 16 kW of power at 208 Volts to all active equipment.
Power is delivered via conduit from the panel boards to junction boxes mounted over the rack, cabinet, and cooling unit. In this design, the cooling unit is also protected by the UPS because a room of this size is especially vulnerable to rapid overheating in the absence of cold air delivery.
Inside the cabinet and rack, each of two Panduit 60 Amp, 208 Volt, Three Phase Power Outlet Units (POU) feed one of two redundant power supplies in all IT equipment. During typical operation, each POU carries no more than 50% of the nameplate rated load. However, each is sized to carry 100% of the load in case one of the power paths fails. Input cords from these POUs route to the overhead junction boxes.
Grounding and Bonding
The grounding system is an active functioning network designed to maximize equipment uptime, maintain system performance, and protect personnel. Proper grounding and bonding is essential for efficient data center performance. The purpose of the grounding system is to create a robust path for electrical surges and transient voltages to return either to their source power system or to earth. Lightning, fault currents, circuit switching, activation of surge protection devices (SPD), and electrostatic discharge (ESD) are common causes of these electrical surges and tran-sient voltages. An effective grounding system can minimize or eliminate the detrimental effects of these events.
The Panduit® StructuredGround™ Grounding System complies with BICSI TDM Manual, 10TH Edition and J-STD-607-A, TIA-942, IEEE Std 1100 (IEEE Emerald Book), UL, and CSA. These standards require that well designed grounding systems be:
• Intentional
• Visually verifiable
• Adequately sized to handle expected currents safely
• Designed to direct potentially damaging currents away from sensitive communications equipment
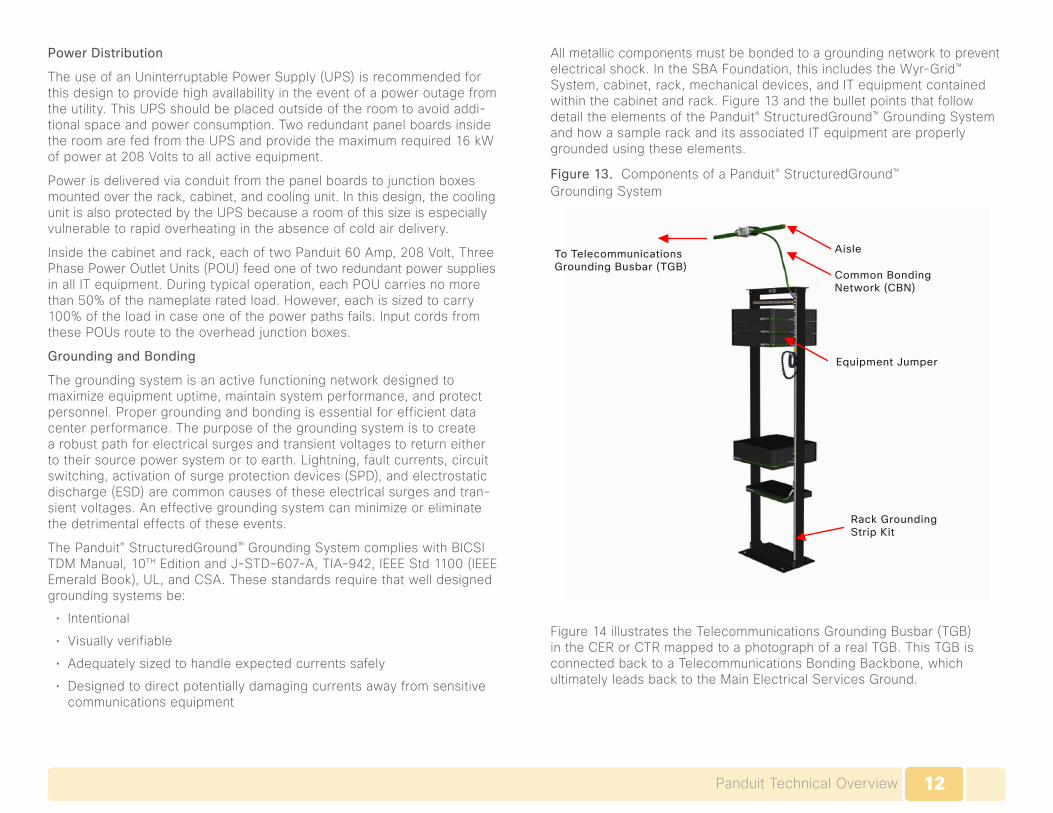
All metallic components must be bonded to a grounding network to prevent electrical shock. In the SBA Foundation, this includes the Wyr-Grid™ System, cabinet, rack, mechanical devices, and IT equipment contained within the cabinet and rack. Figure 13 and the bullet points that follow detail the elements of the Panduit® StructuredGround™ Grounding System and how a sample rack and its associated IT equipment are properly grounded using these elements.
Figure 13 . Components of a Panduit® StructuredGround™ Grounding System
Figure 14 illustrates the Telecommunications Grounding Busbar (TGB) in the CER or CTR mapped to a photograph of a real TGB. This TGB is connected back to a Telecommunications Bonding Backbone, which ultimately leads back to the Main Electrical Services Ground.
To Telecommunications Grounding Busbar (TGB)
Aisle
Common BondingNetwork (CBN)
Equipment Jumper
Rack Grounding Strip Kit

13Panduit Technical Overview
Figure 14 . Telecommunications Grounding Busbar (TGB)
• An Aisle Ground, typically #2 AWG insulated copper code conductor, bonds to the TGB and runs along the side of the Wyr-Grid™ System as depicted in Figure 14.
• A Rack Grounding Strip (RGS) Kit is affixed to both the cabinet and rack, which provides the lowest impedance path to ground.
• Equipment Jumper Kit bonds network equipment to the grounding strip of the rack or cabinet. Cisco requires that all Cisco equipment be prop-erly grounded or the warranty could be voided. Instructions provided for each device details how to attach the Jumper Kit to the equipment. Figure 15 illustrates the components involved in properly grounding a UCS 6120XP Fabric Interconnect.
Figure 15 . Elements used to ground a UCS 6120XP Fabric Interconnect
1 . Equipment Jumper Kit cable2 . Screws, M4, with square cones washers3 . NRTL listed grounding lub4 . Close-up of grounding pad on the chassis
192758
23
4
1
• The Common Bonding Network (CBN) Jumper Kit connects the rack grounding strip and rack to the Aisle Ground conductor via a copper compression HTAP. The Aisle Ground conductor runs along side of the Wyr-Grid™ System and is supported by auxiliary cable brackets every 18 in. (457 mm) to 24 in. (610 mm).
• The Wyr-Grid™ System must be bonded to the TGB via a minimum 6 AWG jumper in at least one location as depicted in Figure 14.
• The Liebert® CRV™ Row-Based Cooling unit is also properly bonded to the TGB via a CBN Jumper Kit.

14Panduit Technical Overview
Design State Two – SBA Data CenterAs small organizations continue to grow and require greater technological capabilities, a larger footprint is needed to house the accumulation of IT equipment and their supporting power and cooling facilities. A more robust architecture like that presented in the Cisco SBA Data Center for Midsize Organizations Deployment Guide becomes necessary. The logical architecture and physical configuration of the Foundation presented in the last section is designed with maximum modularity for an easy transition to this data center when necessary.
Top Down Room View
The room selected for this design is only a slight variation on the Foundation CER or CTR. The width of the room is kept the same at 13 ft (3.96 m) but the length is extended to 18 ft (5.49 m) to accommodate two new cabinets for a total of 234 ft2 (21.74 m2). As depicted in Figure 16, Foundation cabinet C1 and rack R1, along with their supporting Liebert® CRV™ Row-Based Cooling unit (20 kW) M1, have been moved into this larger footprint. Two Panduit® Net-Serv™ Cabinets labeled C2 and C3 and an additional cooling unit labeled M2 have also been inserted into the design. In addition, the overhead pathways are reprovisioned and extended for proper routing of telecommunications and grounding cables. Adequate free space is included for unobstructed access to equipment for routine maintenance activities and for proper airflow.
Figure 16 . Top down view of SBA Data Center mapped to the logical architecture

15Panduit Technical Overview
Net-Serv™ Cabinet C3 contains the storage elements of the Fibre Channel Data Center Design Module. This includes a storage array composed of a dual-headed controller, disk shelves, and SAN switches located at the top of the cabinet. Net-Serv™ Cabinet C2 consists of the switches outlined in the Ethernet Data Center Design and Cisco UCS nodes for compute resources. The only change to either cabinet C1 or rack R1 is the addition of ACE appliances into R1, which are detailed in the Resilient Server Design Module. Cabling, cable managers, patch panels, grounding kits, and Power Outlet Units (POU) are interspersed with the IT equipment to provide the physical infrastructure capabilities detailed throughout this Panduit Deployment Guide.
Rack Elevations
Since C1 and R1 from the SBA Foundation are easily transitioned to this configuration, they will not be readdressed here. Figure 17 shows a rack elevation of the front of all equipment in the new data center footprint. Just like the Foundation room layout, this data center has a concrete slab floor that supports all four structures. In addition, no suspended ceiling is installed in this new footprint. The total room height should also remain at a minimum of 11 ft (3.4 m) off the slab floor to allow the proper amount of buffer space between the cabinets, rack, overhead pathways, and the building spaces.
Figure 17 . Rack elevation of SBA Data Center - Front View
The priorities used to arrange the IT equipment in the SBA Data Center Deployment Guide do not change from the Foundation Guide. The new elements of the logical architecture—storage and compute optimized for virtualization—are organized together and kept in separate cabinets from the core networking and rackmount server farm cabinets transitioned over from the Foundation.
Figure 18 again illustrates the rack elevation from the rear view. In this depiction, the elements are labeled and mapped from the logical archi-tecture. The same two tiers of overhead cable routing pathways are kept from the SBA Foundation design. The Wyr-Grid™ System and FiberRunner® System have been engineered with scalability and modularity in mind so that it is easy to extend their reach to the newly added cabinets required by the Data Center design.
Figure 18 . Rack elevation of SBA Data Center - Rear View

16Panduit Technical Overview
Cable Routing and Management
The benefits and key configuration best practices for cable routing and management do not differ in the Data Center Design versus the Foundation Design. By employing cable routing and management best practices, this design provides easy access to device components during maintenance windows and ensures proper cooling efficiency. Refer to the bullet points under the Cable Routing and Management subsection of the Foundation portion of this guide to review the best practices.
Cabinet C3 as shown in Figure 19 is comprised almost completely of fiber optic cabling. Panduit® Opti-Core® 10Gig™ OM3 or OM4 Multimode Duplex LC to LC fiber optic patch cords connect the NetApp FAS3140 control-lers to the Cisco MDS 9148 switches near the top of the cabinet for Fibre Channel SAN connectivity. A maximum of 40 front-end connections from a two controller, active-active configuration can be used. These same patch cords also connect the NetApp controllers to the disk shelves. SFQ Series MTP Fiber Assemblies are installed in the 1RU QuickNet™ Angled Patch Panel at the top of the cabinet. Several assemblies route to cabinet C2 for the Fibre Channel traffic sent from the Cisco Nexus 5010 switch and the UCS 6120XP Fabric Interconnect. A mixture of Cat 6A Pre-Terminated Assemblies and SFQ Series MTP Fiber Assemblies are also inserted into this patch panel for switch management and Ethernet packets from the NetApp controllers for the iSCSI storage protocol to rack R1.
Figure 19 . Cable routing within cabinet C3
17Panduit Technical Overview
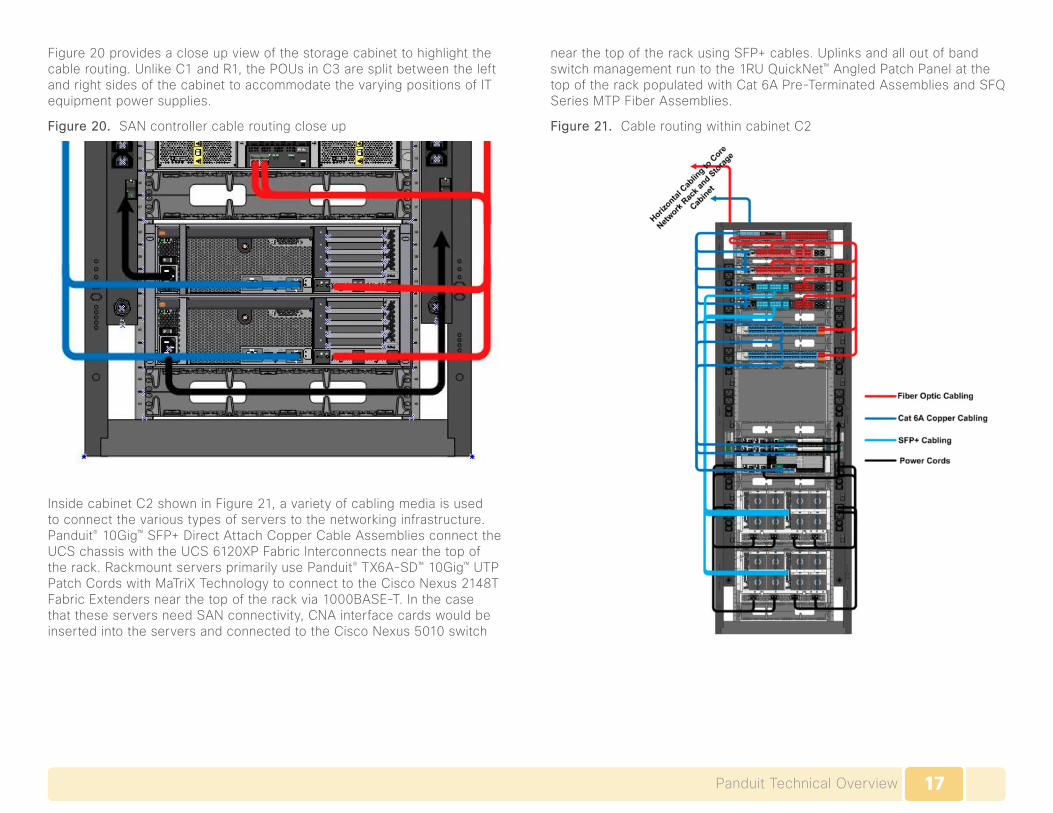
Figure 20 provides a close up view of the storage cabinet to highlight the cable routing. Unlike C1 and R1, the POUs in C3 are split between the left and right sides of the cabinet to accommodate the varying positions of IT equipment power supplies.
Figure 20 . SAN controller cable routing close up
Inside cabinet C2 shown in Figure 21, a variety of cabling media is used to connect the various types of servers to the networking infrastructure. Panduit® 10Gig™ SFP+ Direct Attach Copper Cable Assemblies connect the UCS chassis with the UCS 6120XP Fabric Interconnects near the top of the rack. Rackmount servers primarily use Panduit® TX6A-SD™ 10Gig™ UTP Patch Cords with MaTriX Technology to connect to the Cisco Nexus 2148T Fabric Extenders near the top of the rack via 1000BASE-T. In the case that these servers need SAN connectivity, CNA interface cards would be inserted into the servers and connected to the Cisco Nexus 5010 switch
near the top of the rack using SFP+ cables. Uplinks and all out of band switch management run to the 1RU QuickNet™ Angled Patch Panel at the top of the rack populated with Cat 6A Pre-Terminated Assemblies and SFQ Series MTP Fiber Assemblies.
Figure 21 . Cable routing within cabinet C2

18Panduit Technical Overview
Figure 22 provides a close up view of the UCS chassis to highlight the cable routing. As with the other cabinets and rack, horizontal cable man-agers are used to route cabling around FRUs.
Figure 22 . UCS Chassis cable routing close up
Environmental Design
As with the Foundation Design, maximum efficiency and optimization for the SBA Data Center requires the appropriate cooling design, power distri-bution, and grounding and bonding configurations. Because the physical infrastructure of the Foundation uses modularity as a key design param-eter, the transition to the Data Center is very straightforward. Existing cooling and power elements are simply moved to the new location.
Cooling System
The total IT equipment heat load and airflow for the SBA Data Center footprint is estimated to be 15 kilowatts (kW) and 2405 CFM, respectively. This is based on a typical device utilization of 50% of nameplate power. Based on manufacturer’s specifications, a second Liebert® CRV™ Row-Based Cooling unit (20 kW; 2453 CFM) needs to be added to this design to provide sufficient cooling airflow and cooling capacity for the increased heat load of this data center. This second CRV™ unit also adds N+1 redun-dancy to the cooling infrastructure of the room. All electrical and coolant
piping connections can be made from the top and/or bottom of unit M2 to accommodate the building’s plumbing configuration. Figure 23 and Figure 24 show the results of a Computational Fluid Dynamics (CFD) analysis on the data center.
Figure 23 . Cross-sectional view of R1 temperature distribution through center line of rack
Figure 24 . Cross-sectional view of C2 temperature distribution through center line of cabinet

19Panduit Technical Overview
The CFD analysis reveals the following pertinent details:
• The maximum inlet temperature for the IT equipment is 79°F (26.1°C). Liebert® CRV™ supply temperature set point of 55° F is necessary to maintain this acceptable inlet temperature.
• Rack R1 and server farm cabinet C1 from the Foundation are transi-tioned into this room and have almost the same inlet temperatures that were seen in the foundation CFD results.
• The second CRV™ unit provides plenty of airflow even for the virtualiza-tion cabinet, C2, which has high airflow requirements. The maximum inlet temperature for this cabinet is 61° F (16.1° C). Additional rack mount servers or an additional UCS chassis could be added to this cabinet.
• Storage cabinet, C3, has an inlet temperature of 59° F. (15°C). Additional disk shelves can easily be added to this cabinet for greater storage capacity.
• Multiple CFD analysis runs were performed to ensure the most optimal arrangement of the cabinets and rack. The lineup indicated in Figure 23 provided the lowest inlet temperatures to all IT equipment.
Power Distribution
Similarly to the SBA Foundation, the SBA Data Center design also uses an Uninterruptable Power Supply (UPS) located outside the room to feed two panel boards. However, the UPS will require additional capacity to service the increased load to a maximum of 30 kW at 208 Volts for all equipment. Once again, power is delivered via conduit from the panel boards to junc-tion boxes mounted over the rack, cabinets, and cooling unit. Then, input cords from POUs mounted inside the cabinets and rack route to these overhead junction boxes. The same Panduit 60 Amp, 208 Volt, Three Phase POUs from the Foundation design are used in newly added cabinets C2 and C3 to maintain standardization of components within the cabinets and rack.
Grounding and Bonding
As with the cooling system and power distribution designs, very little change is necessary to the grounding system after migrating from the SBA Foundation to Data Center. After inserting the IT equipment called for by the architecture into cabinets C2 and C3, they each must be properly bonded to the Rack Grounding Strip using the Equipment Jumper Kits just like the devices in C1 and R1. Then, a Common Bonding Network (CBN) Jumper Kit connects the rack grounding strip to the Aisle Ground conduc-tor running along side of the Wyr-Grid™ System using a copper compres-sion HTAP and clear cover HTWC.
Identification
To easily identify and manage all the elements of the SBA Foundation and Data Center architectures, an effective labeling strategy must be employed. Proper labeling provides two very important benefits: determining locations of components and defining system connections. It is this combination of determining and defining that allows the quick, clear communication that is required to accurately install, maintain, and repair critical infrastructure components and that results in efficient and consistent data center maintenance.
The following subsections define the various identifiers needed for the physical infrastructure. They are applicable for both SBA architectures:
Space Identifier
A space identifier should have a format of:sWhere
s = any object consuming floor space is labeled with the letters C for cabinet, R for rack, or M for mechanical device, plus a sequential number
Example:C1
This is cabinet number 1 when counting sequentially from left to right and standing in front of the equipment
Equipment Identifiers
Equipment identifier should have a format of:s-aWhere
s = any object consuming floor space is labeled with the letters C for cabinet, R for rack, or M for mechanical device, plus a sequential number
a = location of equipment in the cabinet based on the RU position of the top left corner of the equipment mounting flange
Example:C1-24

20Panduit Technical Overview
This identifies that the equipment is located at RU space 24 in Cabinet C1 of the SBA architecture as shown in Figure 25.
Figure 25 . Equipment at RU space 24
As an option, if there are dual sides in the equipment the RU identifier can be modified to indicate the side.
For example:C1-16A
Equipment Port Identifiers
The port identifier should have a format of:s-a:b.nWhere
s = any object consuming floor space is labeled with the letters C for cabinet, R for rack, or M for mechanical device, plus a sequential number
a = location of equipment in the cabinet based on the RU position of the top left corner of the equipment mounting flange
b = optional identifier to be used if the equipment has slots or cards added
n = one or two characters that correspond to the port number on the equipment back or slot or card. If there are connections for mixed media then the port identifier should include either an E for Ethernet or F for Fibre Channel that precedes the port number.
Example:R1-30:1.F4
This identifies the port as Fibre Channel connection 4 on Card 1 in the equipment located at the RU 30 in Rack R1 as shown in Figure 26.
Figure 26 . Identifying a port on a UCS I/O Module
Example:C3-28:2.F3
This identifies the port as Fibre Channel connection 3 on Slot 2 in the equipment located at the RU 28 in Cabinet C3 as show in Figure 27.
Figure 27 . Uplink a port on a UCS Fabric Interconnect
In addition, the following characters can be used to define ports:CPn = Console port n

21Panduit Technical Overview
For example C1-24:CP1 as shown in Figure 28
Figure 28 . Console port on a Cisco switch
MPn = Management port n
For example:C1-24:MP0
Cable Identifier
Cable labels shall have a format of:s1-a1:b1.n1/ s2-a2:b2.n2Where
s1-a1:b1 .n1 = the near-end equipment connection
s2-a2:b2 .n2 = the far-end equipment connection
Cable labeling shall be accomplished via machine printed labels. Labels shall be affixed to both ends of the cable so that cables are connected in the appropriate ports.
For example:C1-07:1.F1/R1-14:F1
This identifies the near-end connection Fibre Channel port 1 on Slot1 in the equipment located at RU 07 in Cabinet C1 to the far- end connection Fibre Channel port 1 in the equipment located at RU14 in Rack R1.

22Conclusion
Conclusion
This Guide presents the mapping between the logical layer architectures in the Cisco SBA Foundation and Data Center Deployment Guides with Panduit Smart Data Center physical infrastructure solutions. By considering the logical and physical layers in a holistic manner, this design delivers on the design principals of ease of use, cost effective-ness, flexibility and scalability, and reuse. IT architects and engineers can use this guide in conjunction with the other documents in the Cisco Smart Business Architecture library to produce technical landscapes that are highly available, agile, and secure. A stakeholder can begin with either design phase or build the Foundation version and transition to the Data Center version when more capabilities are required.

23Appendix A: Bill of Materials
Appendix A: Bill of Materials
Part Number DescriptionC100X050A8T Desktop Labeling System – Equipment Labels,
Qty 1 per piece of equipment
C200X100YPC Handheld Labeling System – Cabinet Labels, Qty 4 per cabinet
C300X100APT Desktop Labeling System – Cabinet Labels, Qty 4 per cabinet
CLT150F-X4 Slit Corrugated Loom Tubing
CPAF1BLY Angled filler panel
CPAF2BLY Angled filler panel
CPATCBL Transitional cover for angled patch panels that occupies zero rack space
CTG3X8 Cool Boot® Cabinet Top Air Sealing Fitting
FBC2X2YL 2x2 FiberRunner® System QuikLock™ Coupler
FHDEC2X2YL 2x2 Hinged Channel End Cap Fitting
FIDT2X2YL 1-Port Spill-Out to 1.5” (38 mm) Inside Diameter Corrugated Tubing
FQZO-12-10 10Gig™50/125μm (OM4) MM SFQ Series MTP Cassette
FTRBN12 Threaded rod bracket for Fiber-Duct system
FVTHD2X2YL 2x2 Vertical Tee Fitting
FZE10-10M**Y LC to LC 10Gig OM4 Multimode Duplex Patch Cord
GACB2 Grounding Hanger Bracket for supporting grounding conductors from wire basket.
GB2B0306TPI-1 Telecommunications Grounding Busbar (TGB). ¼” Thick x 2” Width x 12” Length. Tin-plated, copper bar with pre-configured isolators and mounting brackets.
Part Number DescriptionGJS660U Equipment Jumper Kit for grounding Cisco
equipment chassis. 6 AWG, green w/yellow stripe, pre-connectorized at one end with a 2-hole copper compression lug.
HC2YL6 2x2 Snap-On Hinged Cover
HDW3/8-KT 3/8” Stainless Steel Hardware Kit for attaching lugs to TGB.
HS2X2YL2NM 2x2 FiberRunner® System Channel
LCC2-38DW-Q 2-hole copper compression lug for attaching aisle ground to TGB.
LS8EQ-KIT Handheld Labeling System – Printer, Qty 1
NMF* Horizontal cable mgr front only; * can be a number 1 – 4 for # RU spaces consumed
QAPP24BL QuickNet™ Angled Patch Panel, 24 Port, 1 RU
QAPP48HDBL QuickNet™ Angled Patch Panel, 48 Port, 1 RU
QARBCBCBXX** QuickNet™ Cat6A Cable Assembly with pre-terminated jack module cassettes on each end (** = specify length in feet)
QCPBCBCBXX***N Plenum, CAT 6A, cassette to cassette assembly (*** = specify length in feet)
QPP24BL QuickNet™ Flat Patch Panel, 24 Port, 1 RU
QPP48HDBL QuickNet™ Flat Patch Panel, 48 Port, 1 RU
QPPBBL QuickNet™ Patch Panel Blank
R100X125V1C Handheld Labeling System – Fiber Patch Cord Labels, Qty 2 per cord
R100X125V1T Desktop Labeling System – Fiber Cable Labels, Qty 2 per cord
R100X150V1C Handheld Labeling System – Copper Patch Cord Labels, Qty 2 per cord

24Appendix A: Bill of Materials
Part Number DescriptionR100X150V1T Desktop Labeling System – Copper Cable Labels,
Qty 2 per cord
R100X225V1C Handheld Labeling System – Power Patch Cord Labels, Qty 2 per cord
R100X225V1T Desktop Labeling System – Power Cable Labels, Qty 2 per cord
R4P4296 4 Post EIA rack with #12-24 threaded rails.
RGCBNJ660P22 Common Bonding Network (CBN) Kit for attaching racks and cabinets to the Aisle Ground. 6 AWG green w/yellow stripe, pre-connectorized at one end with a two-hole compression lug and includes copper compression tap and mounting hardware.
RGS134-1Y Grounding Strip Kit for Threaded Rails. Used for racks and cabinets with threaded hole equipment mounting rails.
RGS134B-1 Grounding Strip Kit for Cage Nut Rails. Used for racks and cabinets with cage nut equipment mounting rails.
S752C122H 45ru x 700mm Wide Cabinet With Full Perforated Front Door, Split Perforated Rear Door, and Solid Side Panels
T050X000VXC-BK Handheld Labeling System – Equipment Labels, Qty 1 per piece of equipment
TDP43MY Desktop Labeling System – Printer, Qty 1
TLBP1R-V 1 RU Tool-less blanking panel for round tapped holes
TLBP1S-V 1 RU Tool-less blanking panel for square holes with or without cage nuts
TLBP2R-V 2 RU Tool-less blanking panel for round tapped holes
TLBP2S-V 2 RU Tool-less blanking panel for square holes with or without cage nuts
UTP6A** 10 G UTP Patch Cord (** = specify length in feet)
WG12BL10 Wyr-Grid™ System 12" Wide Straight Section
WGBTMWFBL Wyr-Grid™ System Bottom Waterfall
WGSDWL4BL Wyr-Grid™ System 4" Sidewall
Part Number DescriptionWGSPL1218BL Wyr-Grid™ System Splice Connector for 12” and
18” Width
WGTB12BL Wyr-Grid™ System 12" Wide Trapeze Bracket
WGWMTB12BL Wyr-Grid™ System Wall Mount Termination Bracket
Please see www.panduit.com for a complete listing of parts, products, and solutions.

25About Panduit
About Panduit
Panduit is a world-class developer and provider of leading-edge solu-tions that help customers optimize the physical infrastructure through simplification, increased agility and operational efficiency. Panduit’s Unified Physical InfrastructureSM (UPI) based solutions give enterprises the capabilities to connect, manage and automate communications, computing, power, control and security systems for a smarter, unified business foundation. Panduit provides flexible, end-to-end solutions tailored by application and industry to drive performance, operational and financial advantages. Panduit’s global manufacturing, logistics, and e-commerce capabilities along with a global network of distribution partners help customers reduce supply chain risk. Strong technology relationships with industry leading systems vendors and an engaged partner ecosystem of consultants, integrators and contractors together with its global staff and unmatched service and support make Panduit a valuable and trusted partner.
www.panduit.com•[email protected]•800-777-3300
Copyright and Trademark InformationNetApp, the NetApp logo, Go further, faster, Data ONTAP, FlexClone, FlexVol, NOW, RAID-DP, SnapManager, SnapMirror, Snapshot, and SnapVault are trademarks or registered trademarks of NetApp, Inc. in the U.S. and other countries.
Emerson Network Power is a trademark of Emerson Electric Co.
NOTE: The information contained herein is intended as a guide for use by persons having technical skill at their own discretion and risk. PANDUIT disclaims any liability arising from any information contained herein or for the absence of same.

26
Appendix B: SBA for Midsize Organizations Document System
Appendix B: SBA for Midsize Organizations Document System
Panduit
Wireless CleanAir
Web Security
Email Security
Ipswitch
ScienceLogic
SolarWinds
Network Management
Configuration Files
Foundation
Business Continuance
IPv6 Addressing
IPv4 Addressing
FoundationDesign Overview
3G Wireless Remote Site
Design Guides Deployment Guides
You are Here
Supplemental Guides

27
Cisco has more than 200 offices worldwide. Addresses, phone numbers, and fax numbers are listed on the Cisco Website at www.cisco.com/go/offices.
Cisco and the Cisco Logo are trademarks of Cisco Systems, Inc. and/or its affiliates in the U.S. and other countries. A listing of Cisco's trademarks can be found at www.cisco.com/go/trademarks. Third party trademarks mentioned are the property of their respective owners. The use of the word partner does not imply a partnership relationship between Cisco and any other company. (1005R)
Americas HeadquartersCisco Systems, Inc.San Jose, CA
Asia Pacific HeadquartersCisco Systems (USA) Pte. Ltd.Singapore
Europe HeadquartersCisco Systems International BVAmsterdam, The Netherlands
C07-635087-00 01/11