Embed Size (px)
Citation preview

EP
Operating InstructionsSD Video Camera
Model No. SDR-S10
Before use, please read these instructions completely.
VQT1E14EB EP GC GN
VQT1E14(EB_GC_ENG).book 1 ページ 2007年2月28日 水曜日 午後2時23分

2VQT1E14
Caution for AC mains lead (For United Kingdom)For your safety, please read the following text carefully.
This appliance is supplied with a moulded three pin mains plug for your safety and convenience.A 5-ampere fuse is fitted in this plug.Should the fuse need to be replaced please ensure that the replacement fuse has a rating of 5-ampere and that it is approved by ASTA or BSI to BS1362.Check for the ASTA mark Ï or the BSI mark Ì on the body of the fuse.
If the plug contains a removable fuse cover you must ensure that it is refitted when the fuse is replaced.If you lose the fuse cover the plug must not be used until a replacement cover is obtained.A replacement fuse cover can be purchased from your local dealer.
If a new plug is to be fitted please observe the wiring code as stated below.If in any doubt please consult a qualified electrician.
IMPORTANTThe wires in this mains lead are coloured in accordance with the following code:Blue: Neutral, Brown: Live.As these colours may not correspond with the coloured markings identifying the terminals in your plug, proceed as follows:The wire which is coloured Blue must be connected to the terminal which is marked with the letter N or coloured Black or Blue.The wire which is coloured Brown must be connected to the terminal which is marked with the letter L or coloured Brown or Red.
WARNING: DO NOT CONNECT EITHER WIRE TO THE EARTH TERMINAL WHICH IS MARKED WITH THE LETTER E, BY THE EARTH SYMBOL Ó OR COLOURED GREEN OR GREEN/YELLOW.
THIS PLUG IS NOT WATERPROOF—KEEP DRY.
Dear Customer,We would like to take this opportunity to thank you for purchasing this Panasonic SD Video Camera. Please read these Operating Instructions carefully and keep them handy for future reference. Please note that the actual controls and components, menu items, etc. of your SD Video Camera may look somewhat different from those shown in the illustrations in these Operating Instructions.
CAUTION!IF THE FITTED MOULDED PLUG IS UNSUITABLE FOR THE SOCKET OUTLET IN YOUR HOME THEN THE FUSE SHOULD BE REMOVED AND THE PLUG CUT OFF AND DISPOSED OF SAFELY.THERE IS A DANGER OF SEVERE ELECTRICAL SHOCK IF THE CUT OFF PLUG IS INSERTED INTO ANY 13-AMPERE SOCKET.
VQT1E14(EB_GC_ENG).book 2 ページ 2007年2月28日 水曜日 午後2時23分
3VQT1E14
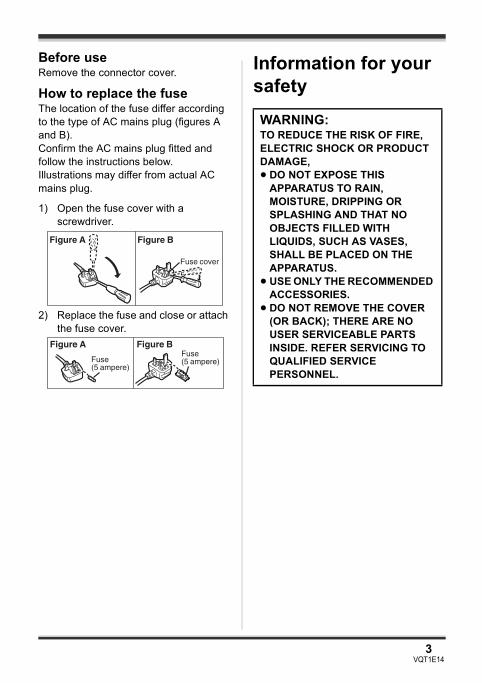
Before useRemove the connector cover.
How to replace the fuseThe location of the fuse differ according to the type of AC mains plug (figures A and B).Confirm the AC mains plug fitted and follow the instructions below.Illustrations may differ from actual AC mains plug.
1) Open the fuse cover with a screwdriver.
2) Replace the fuse and close or attach the fuse cover.
Information for your safety
Fuse cover
Figure A Figure B
Figure A Figure BFuse(5 ampere)Fuse
(5 ampere)
WARNING:TO REDUCE THE RISK OF FIRE, ELECTRIC SHOCK OR PRODUCT DAMAGE,≥ DO NOT EXPOSE THIS
APPARATUS TO RAIN, MOISTURE, DRIPPING OR SPLASHING AND THAT NO OBJECTS FILLED WITH LIQUIDS, SUCH AS VASES, SHALL BE PLACED ON THE APPARATUS.
≥ USE ONLY THE RECOMMENDED ACCESSORIES.
≥ DO NOT REMOVE THE COVER (OR BACK); THERE ARE NO USER SERVICEABLE PARTS INSIDE. REFER SERVICING TO QUALIFIED SERVICE PERSONNEL.
VQT1E14(EB_GC_ENG).book 3 ページ 2007年2月28日 水曜日 午後2時23分
4VQT1E14
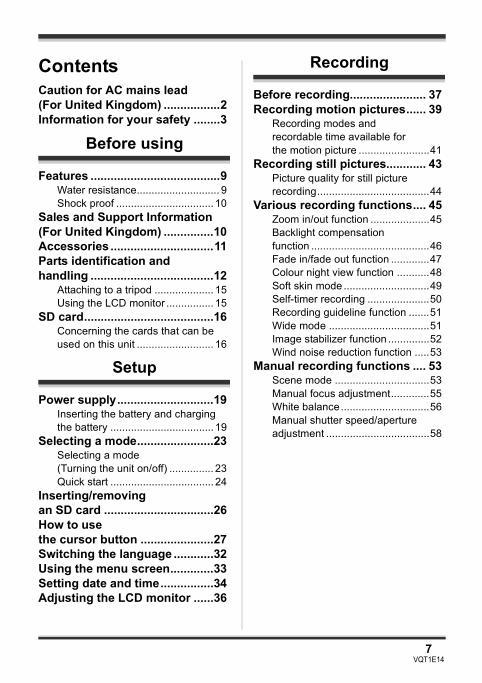
∫ EMC Electric and magnetic compatibility
This symbol (CE) is located on the rating plate. (EB/EP only)
IF THE POWER CORD OF THIS EQUIPMENT IS DAMAGED, IT MUST BE REPLACED WITH AN ELECTRICALLY APPROVED POWER CORD.
Use only the recommended accessories.≥ Do not use any other AV cables and
USB connection cables except the supplied one.
≥ When you use the cable which are sold separately, please make sure to use the one whose length is less than 3 m.
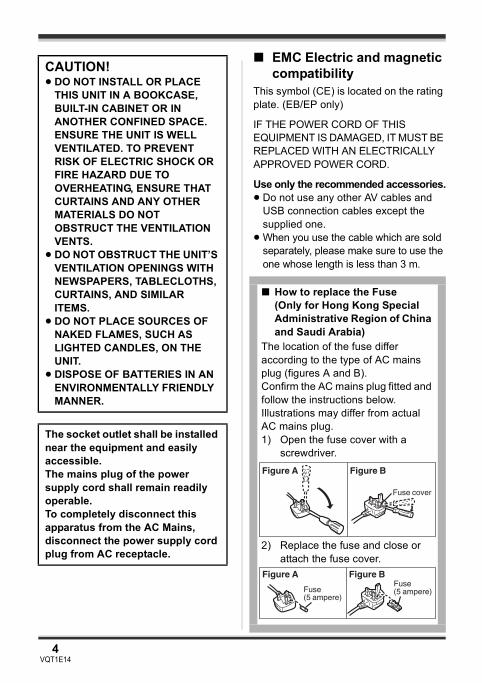
CAUTION!≥ DO NOT INSTALL OR PLACE
THIS UNIT IN A BOOKCASE, BUILT-IN CABINET OR IN ANOTHER CONFINED SPACE. ENSURE THE UNIT IS WELL VENTILATED. TO PREVENT RISK OF ELECTRIC SHOCK OR FIRE HAZARD DUE TO OVERHEATING, ENSURE THAT CURTAINS AND ANY OTHER MATERIALS DO NOT OBSTRUCT THE VENTILATION VENTS.
≥ DO NOT OBSTRUCT THE UNIT’S VENTILATION OPENINGS WITH NEWSPAPERS, TABLECLOTHS, CURTAINS, AND SIMILAR ITEMS.
≥ DO NOT PLACE SOURCES OF NAKED FLAMES, SUCH AS LIGHTED CANDLES, ON THE UNIT.
≥ DISPOSE OF BATTERIES IN AN ENVIRONMENTALLY FRIENDLY MANNER.
The socket outlet shall be installed near the equipment and easily accessible.The mains plug of the power supply cord shall remain readily operable.To completely disconnect this apparatus from the AC Mains, disconnect the power supply cord plug from AC receptacle.
∫ How to replace the Fuse(Only for Hong Kong Special Administrative Region of China and Saudi Arabia)
The location of the fuse differ according to the type of AC mains plug (figures A and B).Confirm the AC mains plug fitted and follow the instructions below.Illustrations may differ from actual AC mains plug.1) Open the fuse cover with a
screwdriver.
2) Replace the fuse and close or attach the fuse cover.
Fuse cover
Figure A Figure B
Figure A Figure BFuse(5 ampere)Fuse
(5 ampere)
VQT1E14(EB_GC_ENG).book 4 ページ 2007年2月28日 水曜日 午後2時23分

5VQT1E14
-If you see this symbol-
∫ Indemnity concerning recording contentThe manufacturer shall in no event be liable for the loss of recordings due to malfunction or defect of this unit, its accessories or recordable media.
∫ Carefully observe copyright lawsRecording of pre-recorded tapes or discs or other published or broadcast material for purposes other than your own private use may infringe copyright laws. Even for the purpose of private use, recording of certain material may be restricted.
∫ For the purposes of these operating instructionsSD Memory Card and SDHC Memory Card are referred to as the “SD card”.
≥ SDHC Logo is a trademark.≥ miniSD Logo is a trademark.
Information on Disposal for Users of Waste Electrical & Electronic Equipment (private households)
This symbol on the products and/or accompanying documents means that used electrical and electronic products should not be mixed with general household waste.For proper treatment, recovery and recycling, please take these products to designated collection points, where they will be accepted on a free of charge basis. Alternatively, in some countries you may be able to return your products to your local retailer upon the purchase of an equivalent new product.
Disposing of this product correctly will help to save valuable resources and prevent any potential negative effects on human health and the environment which could otherwise arise from inappropriate waste handling. Please contact your local authority for further details of your nearest designated collection point.Penalties may be applicable for incorrect disposal of this waste, in accordance with national legislation.
For business users in the European UnionIf you wish to discard electrical and electronic equipment, please contact your dealer or supplier for further information.
Information on Disposal in other Countries outside the European UnionThis symbol is only valid in the European Union.If you wish to discard this product, please contact your local authorities or dealer and ask for the correct method of disposal.
VQT1E14(EB_GC_ENG).book 5 ページ 2007年2月28日 水曜日 午後2時23分

6VQT1E14
≥ Microsoft®, Windows® and DirectX® are either registered trademarks or trademarks of the Microsoft Corporation in the United States and/or other countries.
≥ Microsoft product screen shot(s) reprinted with permission from Microsoft Corporation.
≥ IBM and PC/AT are registered trademarks of International Business Machines Corporation of the U.S.
≥ Celeron®, Intel®, Intel® CoreTM Solo and Pentium® are the registered trademarks or trademarks of the Intel Corporation in the United States and other countries
≥ Apple and Mac OS are trademarks of Apple Inc.≥ Other names of systems and products mentioned in these instructions are usually the
registered trademarks or trademarks of the manufacturers who developed the system or product concerned.
VQT1E14(EB_GC_ENG).book 6 ページ 2007年2月28日 水曜日 午後2時23分
7VQT1E14
Caution for AC mains lead (For United Kingdom) .................2Information for your safety ........3
Before using
Features .......................................9Water resistance............................ 9Shock proof ................................. 10
Sales and Support Information (For United Kingdom) ...............10Accessories ...............................11Parts identification and handling .....................................12
Attaching to a tripod .................... 15Using the LCD monitor ................ 15
SD card.......................................16Concerning the cards that can be used on this unit .......................... 16
Setup
Power supply.............................19Inserting the battery and charging the battery ................................... 19
Selecting a mode.......................23Selecting a mode (Turning the unit on/off) ............... 23Quick start ................................... 24
Inserting/removing an SD card .................................26How to use the cursor button ......................27Switching the language ............32Using the menu screen.............33Setting date and time................34Adjusting the LCD monitor ......36
Recording
Before recording....................... 37Recording motion pictures...... 39
Recording modes and recordable time available for the motion picture ........................41
Recording still pictures............ 43Picture quality for still picture recording......................................44
Various recording functions.... 45Zoom in/out function ....................45Backlight compensation function ........................................46Fade in/fade out function .............47Colour night view function ...........48Soft skin mode .............................49Self-timer recording .....................50Recording guideline function .......51Wide mode ..................................51Image stabilizer function ..............52Wind noise reduction function .....53
Manual recording functions .... 53Scene mode ................................53Manual focus adjustment.............55White balance..............................56Manual shutter speed/aperture adjustment ...................................58
Contents
VQT1E14(EB_GC_ENG).book 7 ページ 2007年2月28日 水曜日 午後2時23分
8VQT1E14
Playback
Motion picture playback ...........60Still picture playback ................64
Editing
Editing ........................................66Deleting scenes........................... 66Locking scenes............................ 68DPOF setting............................... 69
Card management.....................70Formatting an SD card ................ 70
With other products
With a TV....................................71Playback on TV ........................... 71
With a DVD recorder .................73Copying (dubbing) recordings onto a DVD recorder ................... 73
With a VCR.................................74Recording (dubbing) images onto other video devices ............. 74
With a printer (PictBridge)........75
With a computer
With a computer (Windows) .... 78What you can do with a computer ...........................78
End User License Agreement................................. 79
Operating environment ................80Installing MotionSD STUDIO .......83Reading the MotionSD STUDIO operating instructions ..................85Connection and recognition procedures...................................85Verifying that the unit is correctly recognised by the computer ........87About the computer display .........88Using MotionSD STUDIO ............89To disconnect the USB cable safely ...................90Software uninstallation.................90
With a computer (Macintosh) ............................... 91
Operating environment ................91
Others
Menus ........................................ 92Menu list ......................................92Menus related to [SETUP] ...........94
Indications ................................ 96Indications ...................................96Messages ....................................98
Functions that cannot be used simultaneously............................ 100Troubleshooting ..................... 101Cautions for use ..................... 108Explanation of terms.............. 112Specifications ......................... 114
Number of recordable pictures on an SD card............................ 117
Index ........................................ 118
VQT1E14(EB_GC_ENG).book 8 ページ 2007年2月28日 水曜日 午後2時23分
9VQT1E14
Before using
Before using
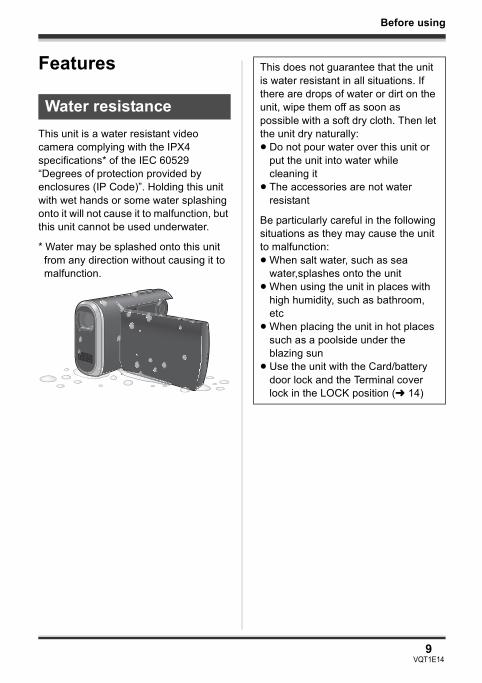
Features
This unit is a water resistant video camera complying with the IPX4 specifications* of the IEC 60529 “Degrees of protection provided by enclosures (IP Code)”. Holding this unit with wet hands or some water splashing onto it will not cause it to malfunction, but this unit cannot be used underwater.
* Water may be splashed onto this unit from any direction without causing it to malfunction.
Water resistance
This does not guarantee that the unit is water resistant in all situations. If there are drops of water or dirt on the unit, wipe them off as soon as possible with a soft dry cloth. Then let the unit dry naturally:≥ Do not pour water over this unit or
put the unit into water while cleaning it
≥ The accessories are not water resistant
Be particularly careful in the following situations as they may cause the unit to malfunction:≥ When salt water, such as sea
water,splashes onto the unit≥ When using the unit in places with
high humidity, such as bathroom, etc
≥ When placing the unit in hot places such as a poolside under the blazing sun
≥ Use the unit with the Card/battery door lock and the Terminal cover lock in the LOCK position (l 14)
VQT1E14(EB_GC_ENG).book 9 ページ 2007年2月28日 水曜日 午後2時23分
10VQT1E14
Before using
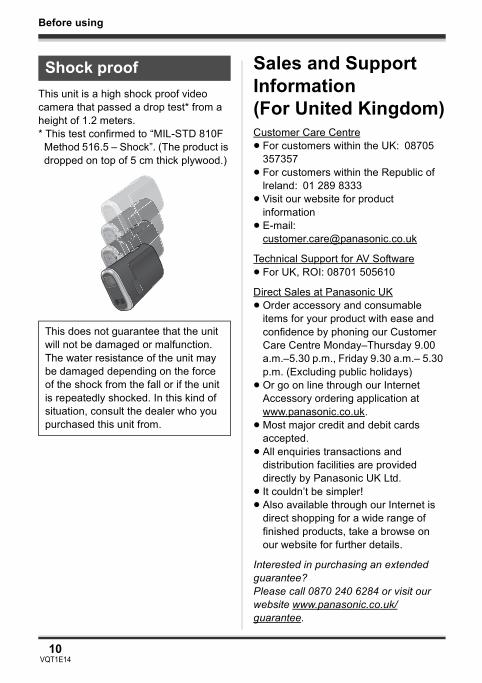
This unit is a high shock proof video camera that passed a drop test* from a height of 1.2 meters.* This test confirmed to “MIL-STD 810F Method 516.5 – Shock”. (The product is dropped on top of 5 cm thick plywood.)
Sales and Support Information (For United Kingdom)Customer Care Centre≥ For customers within the UK: 08705
357357 ≥ For customers within the Republic of
lreland: 01 289 8333≥ Visit our website for product
information≥ E-mail:
Technical Support for AV Software≥ For UK, ROI: 08701 505610
Direct Sales at Panasonic UK≥ Order accessory and consumable
items for your product with ease and confidence by phoning our Customer Care Centre Monday–Thursday 9.00 a.m.–5.30 p.m., Friday 9.30 a.m.– 5.30 p.m. (Excluding public holidays)
≥ Or go on line through our Internet Accessory ordering application at www.panasonic.co.uk.
≥ Most major credit and debit cards accepted.
≥ All enquiries transactions and distribution facilities are provided directly by Panasonic UK Ltd.
≥ It couldn’t be simpler!≥ Also available through our Internet is
direct shopping for a wide range of finished products, take a browse on our website for further details.
Interested in purchasing an extended guarantee?Please call 0870 240 6284 or visit our website www.panasonic.co.uk/guarantee.
Shock proof
This does not guarantee that the unit will not be damaged or malfunction.The water resistance of the unit may be damaged depending on the force of the shock from the fall or if the unit is repeatedly shocked. In this kind of situation, consult the dealer who you purchased this unit from.
VQT1E14(EB_GC_ENG).book 10 ページ 2007年2月28日 水曜日 午後2時23分
11VQT1E14
Before using
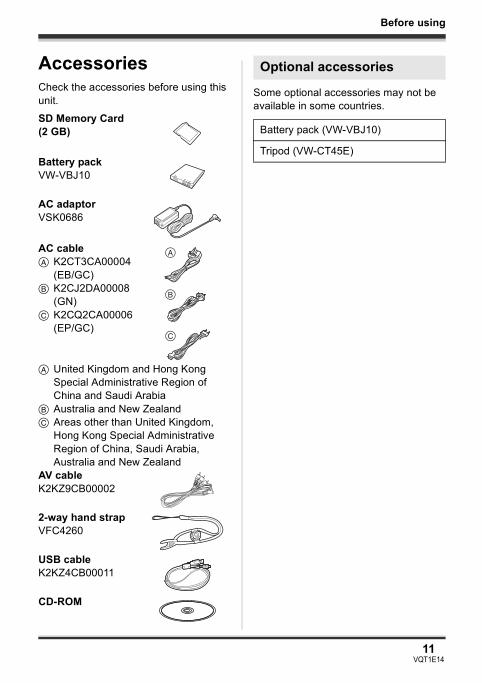
AccessoriesCheck the accessories before using this unit.
Some optional accessories may not be available in some countries.
SD Memory Card (2 GB)
Battery packVW-VBJ10
AC adaptorVSK0686
AC cableA K2CT3CA00004
(EB/GC)B K2CJ2DA00008
(GN)C K2CQ2CA00006
(EP/GC)
A United Kingdom and Hong Kong Special Administrative Region of China and Saudi Arabia
B Australia and New ZealandC Areas other than United Kingdom,
Hong Kong Special Administrative Region of China, Saudi Arabia, Australia and New Zealand
AV cableK2KZ9CB00002
2-way hand strapVFC4260
USB cableK2KZ4CB00011
CD-ROM
Optional accessories
Battery pack (VW-VBJ10)
Tripod (VW-CT45E)
VQT1E14(EB_GC_ENG).book 11 ページ 2007年2月28日 水曜日 午後2時23分

12VQT1E14
Before using
Parts identification and handling
1 Lens2 White balance sensor (l 57)3 Microphone (built-in, stereo)
4 LCD monitor open part (l 15)5 Status indicator (l 23)6 Record button (l 39, 43)7 Strap fixture (l 14)
8 When recording: Zoom button [W/T] (l 45)When playing back: Volume button [sVOLr] (l 62)
9 Attachment screw for tripod adaptor (l 14)
10 Card access lamp [ACCESS] (l 27, 86)
11 Card/battery door lock [LOCK 21 OPEN] (l 14, 19, 26)
12 Card/battery door (l 14, 19, 26)13 Battery slot [BATT] (l 19)14 Card slot [SD CARD] (l 26)
2
1
3
6
5
7
4
8
13
14
9 10 11 12
VQT1E14(EB_GC_ENG).book 12 ページ 2007年2月28日 水曜日 午後2時23分
13VQT1E14
Before using
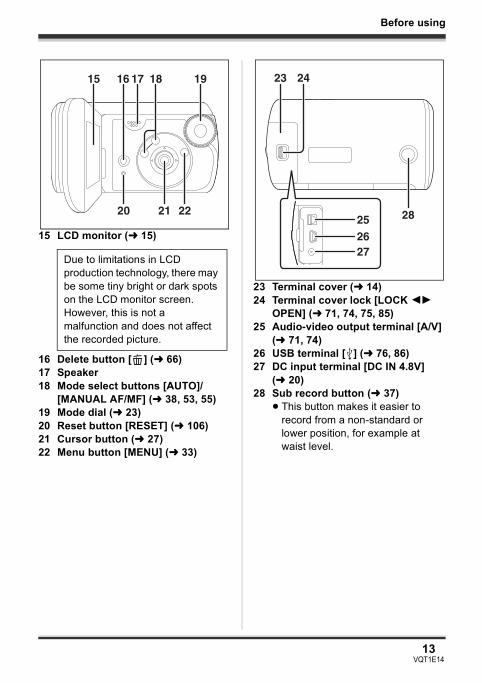
15 LCD monitor (l 15)
16 Delete button [ ] (l 66)17 Speaker18 Mode select buttons [AUTO]/
[MANUAL AF/MF] (l 38, 53, 55)19 Mode dial (l 23)20 Reset button [RESET] (l 106)21 Cursor button (l 27)22 Menu button [MENU] (l 33)
23 Terminal cover (l 14)24 Terminal cover lock [LOCK 21
OPEN] (l 71, 74, 75, 85)25 Audio-video output terminal [A/V]
(l 71, 74)26 USB terminal [ ] (l 76, 86)27 DC input terminal [DC IN 4.8V]
(l 20)28 Sub record button (l 37)
≥ This button makes it easier to record from a non-standard or lower position, for example at waist level.
Due to limitations in LCD production technology, there may be some tiny bright or dark spots on the LCD monitor screen. However, this is not a malfunction and does not affect the recorded picture.
15 17 1816 19
222120252627
23 24
28
VQT1E14(EB_GC_ENG).book 13 ページ 2007年2月28日 水曜日 午後2時23分
14VQT1E14
Before using
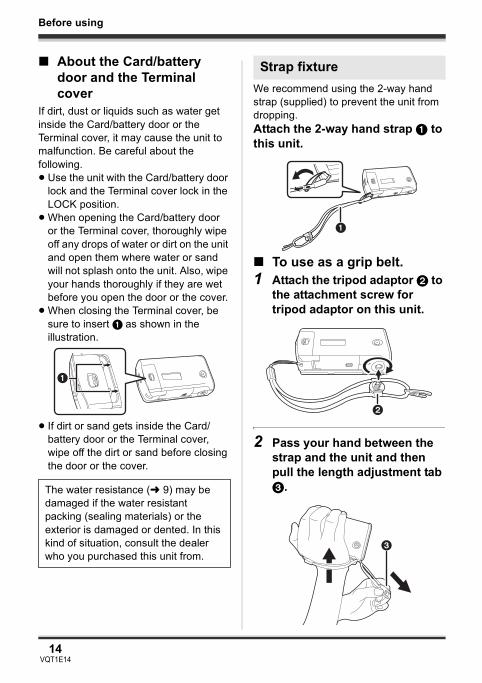
∫ About the Card/battery door and the Terminal cover
If dirt, dust or liquids such as water get inside the Card/battery door or the Terminal cover, it may cause the unit to malfunction. Be careful about the following.≥ Use the unit with the Card/battery door
lock and the Terminal cover lock in the LOCK position.
≥ When opening the Card/battery door or the Terminal cover, thoroughly wipe off any drops of water or dirt on the unit and open them where water or sand will not splash onto the unit. Also, wipe your hands thoroughly if they are wet before you open the door or the cover.
≥ When closing the Terminal cover, be sure to insert 1 as shown in the illustration.
≥ If dirt or sand gets inside the Card/battery door or the Terminal cover, wipe off the dirt or sand before closing the door or the cover.
We recommend using the 2-way hand strap (supplied) to prevent the unit from dropping.Attach the 2-way hand strap 1 to this unit.
∫ To use as a grip belt.1 Attach the tripod adaptor 2 to
the attachment screw for tripod adaptor on this unit.
2 Pass your hand between the strap and the unit and then pull the length adjustment tab 3.The water resistance (l 9) may be
damaged if the water resistant packing (sealing materials) or the exterior is damaged or dented. In this kind of situation, consult the dealer who you purchased this unit from.
1
Strap fixture
1
2
3
VQT1E14(EB_GC_ENG).book 14 ページ 2007年2月28日 水曜日 午後2時23分
15VQT1E14
Before using
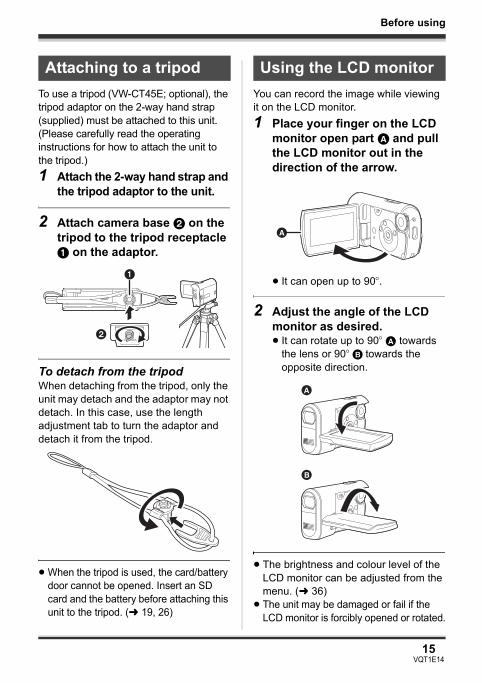
To use a tripod (VW-CT45E; optional), the tripod adaptor on the 2-way hand strap (supplied) must be attached to this unit. (Please carefully read the operating instructions for how to attach the unit to the tripod.)1 Attach the 2-way hand strap and
the tripod adaptor to the unit.
2 Attach camera base 2 on the tripod to the tripod receptacle 1 on the adaptor.
To detach from the tripodWhen detaching from the tripod, only the unit may detach and the adaptor may not detach. In this case, use the length adjustment tab to turn the adaptor and detach it from the tripod.
≥ When the tripod is used, the card/battery door cannot be opened. Insert an SD card and the battery before attaching this unit to the tripod. (l 19, 26)
You can record the image while viewing it on the LCD monitor.1 Place your finger on the LCD
monitor open part A and pull the LCD monitor out in the direction of the arrow.
≥ It can open up to 90o.
2 Adjust the angle of the LCD monitor as desired.≥ It can rotate up to 90o A towards
the lens or 90o B towards the opposite direction.
≥ The brightness and colour level of the LCD monitor can be adjusted from the menu. (l 36)
≥ The unit may be damaged or fail if the LCD monitor is forcibly opened or rotated.
Attaching to a tripod
1
2
Using the LCD monitor
A
A
B
VQT1E14(EB_GC_ENG).book 15 ページ 2007年2月28日 水曜日 午後2時23分
Before using
16VQT1E14
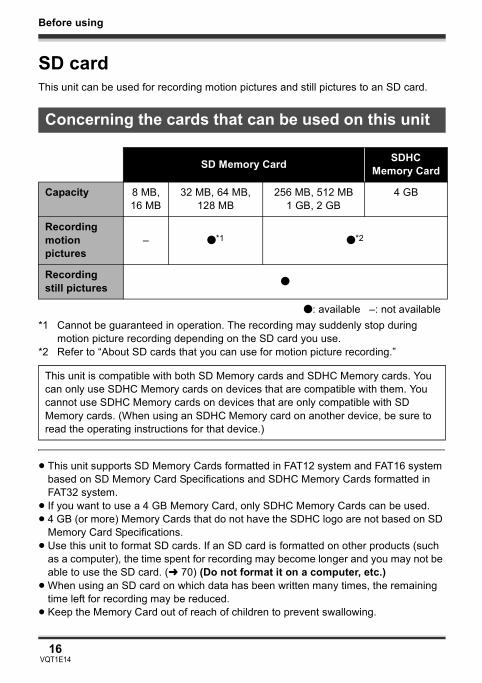
SD cardThis unit can be used for recording motion pictures and still pictures to an SD card.
*1 Cannot be guaranteed in operation. The recording may suddenly stop during motion picture recording depending on the SD card you use.
*2 Refer to “About SD cards that you can use for motion picture recording.”
≥ This unit supports SD Memory Cards formatted in FAT12 system and FAT16 system based on SD Memory Card Specifications and SDHC Memory Cards formatted in FAT32 system.
≥ If you want to use a 4 GB Memory Card, only SDHC Memory Cards can be used.≥ 4 GB (or more) Memory Cards that do not have the SDHC logo are not based on SD
Memory Card Specifications.≥ Use this unit to format SD cards. If an SD card is formatted on other products (such
as a computer), the time spent for recording may become longer and you may not be able to use the SD card. (l 70) (Do not format it on a computer, etc.)
≥ When using an SD card on which data has been written many times, the remaining time left for recording may be reduced.
≥ Keep the Memory Card out of reach of children to prevent swallowing.
Concerning the cards that can be used on this unit
SD Memory Card SDHC Memory Card
Capacity 8 MB, 16 MB
32 MB, 64 MB, 128 MB
256 MB, 512 MB 1 GB, 2 GB
4 GB
Recording motion pictures
– ¥*1 ¥*2
Recording still pictures ¥
¥: available –: not available
This unit is compatible with both SD Memory cards and SDHC Memory cards. You can only use SDHC Memory cards on devices that are compatible with them. You cannot use SDHC Memory cards on devices that are only compatible with SD Memory cards. (When using an SDHC Memory card on another device, be sure to read the operating instructions for that device.)
VQT1E14(EB_GC_ENG).book 16 ページ 2007年2月28日 水曜日 午後2時23分
Before using
17VQT1E14
≥ A MultiMediaCard cannot be used on this unit.
≥ When the write-protect switch A on SD card is locked, no recording, deletion or editing will be possible on the card.
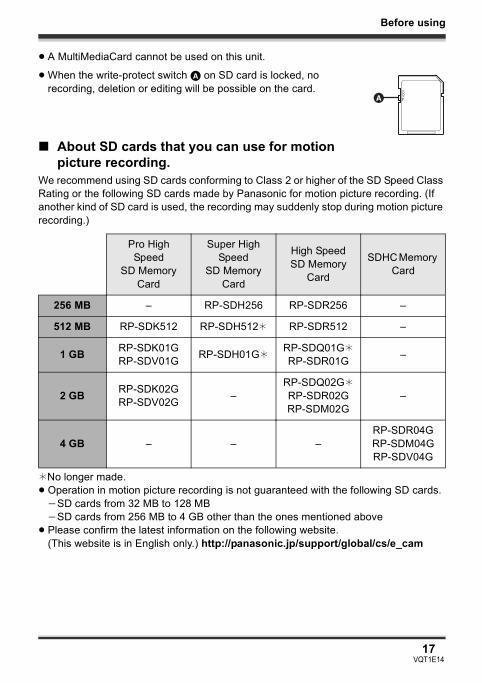
∫ About SD cards that you can use for motion picture recording.
We recommend using SD cards conforming to Class 2 or higher of the SD Speed Class Rating or the following SD cards made by Panasonic for motion picture recording. (If another kind of SD card is used, the recording may suddenly stop during motion picture recording.)
¢No longer made.≥ Operation in motion picture recording is not guaranteed with the following SD cards.
jSD cards from 32 MB to 128 MBjSD cards from 256 MB to 4 GB other than the ones mentioned above
≥ Please confirm the latest information on the following website. (This website is in English only.) http://panasonic.jp/support/global/cs/e_cam
Pro High Speed
SD Memory Card
Super High Speed
SD Memory Card
High SpeedSD Memory
Card
SDHC Memory Card
256 MB – RP-SDH256 RP-SDR256 –
512 MB RP-SDK512 RP-SDH512¢ RP-SDR512 –
1 GB RP-SDK01GRP-SDV01G RP-SDH01G¢
RP-SDQ01G¢RP-SDR01G –
2 GB RP-SDK02GRP-SDV02G –
RP-SDQ02G¢RP-SDR02GRP-SDM02G
–
4 GB – – –RP-SDR04GRP-SDM04GRP-SDV04G
A
VQT1E14(EB_GC_ENG).book 17 ページ 2007年2月28日 水曜日 午後2時23分
Before using
18VQT1E14
∫ Handling precautions≥ Do not touch the terminals on the back of the card.≥ Do not expose the terminals of the card to water, garbage or dust.≥ Do not place in the following areas:
jIn direct sunlight.jIn very dusty or humid areas.jNear a heater.jLocations susceptible to significant difference in temperature (condensation can
occur).jWhere static electricity or electromagnetic waves occur.
≥ Put the card back in its bag or case for protection when not using it.≥ Electrical noise, static electricity, or the failure of this unit or the SD card may damage
or erase the data stored on the SD card. Save important data recorded on this unit to a computer using the USB cable (supplied), MotionSD STUDIO etc. (l 78) (We recommend using MotionSD STUDIO etc. to acquire data recorded on this unit.)
∫ (SD Speed Class Rating Class 2)This indicates a Class 2 rating in the high speed standards (SD Speed Class) stipulated by the SD Card Association for high speed writing between SD compatible products and SD Memory cards.If you use a Class 2 card compatible with the SD Speed Class in an SD compatible product, you can obtain stable recording by using an SD card conformed with Class 2 or more.
VQT1E14(EB_GC_ENG).book 18 ページ 2007年2月28日 水曜日 午後2時23分
19VQT1E14
Setup
Setup
Power supply
The unit is in the standby condition when the AC adaptor is connected. The primary circuit is always “live” as long as the AC adaptor is connected to an electrical outlet.
When this unit is purchased, the battery is not charged. Charge the battery before using this unit.
¬Rotate the mode dial to select OFF.
≥ The battery will not be charged if the power is turned on.
≥ Always use genuine Panasonic batteries (l 22).
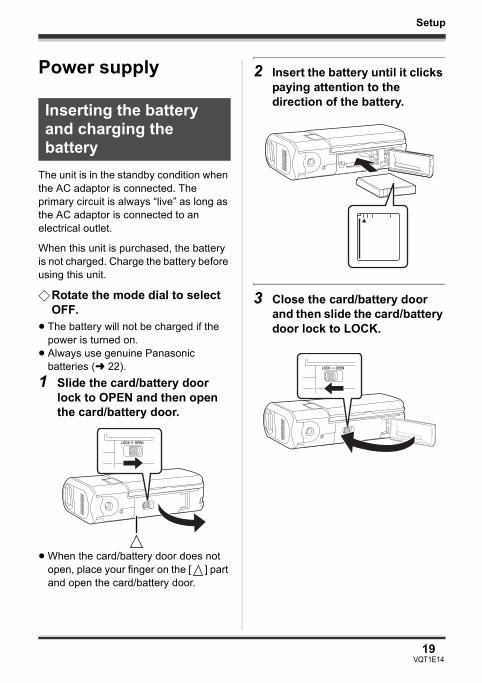
1 Slide the card/battery door lock to OPEN and then open the card/battery door.
≥ When the card/battery door does not open, place your finger on the [ ] part and open the card/battery door.
2 Insert the battery until it clicks paying attention to the direction of the battery.
3 Close the card/battery door and then slide the card/battery door lock to LOCK.
Inserting the battery and charging the battery
VQT1E14(EB_GC_ENG).book 19 ページ 2007年2月28日 水曜日 午後2時23分
20VQT1E14
Setup
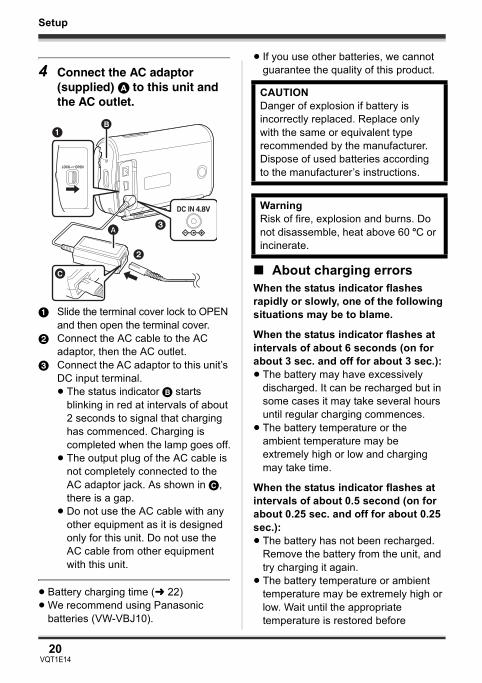
4 Connect the AC adaptor (supplied) A to this unit and the AC outlet.
1 Slide the terminal cover lock to OPEN and then open the terminal cover.
2 Connect the AC cable to the AC adaptor, then the AC outlet.
3 Connect the AC adaptor to this unit’s DC input terminal.≥ The status indicator B starts
blinking in red at intervals of about 2 seconds to signal that charging has commenced. Charging is completed when the lamp goes off.
≥ The output plug of the AC cable is not completely connected to the AC adaptor jack. As shown in C, there is a gap.
≥ Do not use the AC cable with any other equipment as it is designed only for this unit. Do not use the AC cable from other equipment with this unit.
≥ Battery charging time (l 22)≥ We recommend using Panasonic
batteries (VW-VBJ10).
≥ If you use other batteries, we cannot guarantee the quality of this product.
∫ About charging errorsWhen the status indicator flashes rapidly or slowly, one of the following situations may be to blame.
When the status indicator flashes at intervals of about 6 seconds (on for about 3 sec. and off for about 3 sec.):≥ The battery may have excessively
discharged. It can be recharged but in some cases it may take several hours until regular charging commences.
≥ The battery temperature or the ambient temperature may be extremely high or low and charging may take time.
When the status indicator flashes at intervals of about 0.5 second (on for about 0.25 sec. and off for about 0.25 sec.):≥ The battery has not been recharged.
Remove the battery from the unit, and try charging it again.
≥ The battery temperature or ambient temperature may be extremely high or low. Wait until the appropriate temperature is restored before
1B
4.8V
3
2
AA
C
CAUTIONDanger of explosion if battery is incorrectly replaced. Replace only with the same or equivalent type recommended by the manufacturer. Dispose of used batteries according to the manufacturer’s instructions.
WarningRisk of fire, explosion and burns. Do not disassemble, heat above 60 xC or incinerate.
VQT1E14(EB_GC_ENG).book 20 ページ 2007年2月28日 水曜日 午後2時23分
21VQT1E14
Setup
charging the battery again. If the battery still fails to charge, something may be wrong with the unit, battery, AC adaptor etc. Contact your dealer.
When the status indicator is off:≥ Charging is completed.≥ When the status indicator does not
flash, reinsert the battery or the AC adaptor. If the status indicator still does not flash, there may be a problem with the battery or the AC adaptor. Contact your dealer.
∫ Connecting to the AC outlet
Be sure to set the mode dial to OFF when connecting the AC adaptor to this unit.If you turn on this unit while charging the battery using the AC adaptor, you can use the power supplied from the AC outlet to power the unit for use. (While it is in use, the battery will not be charged.)
≥ Be sure to set the mode dial to OFF and check that the status indicator is off before removing the battery.
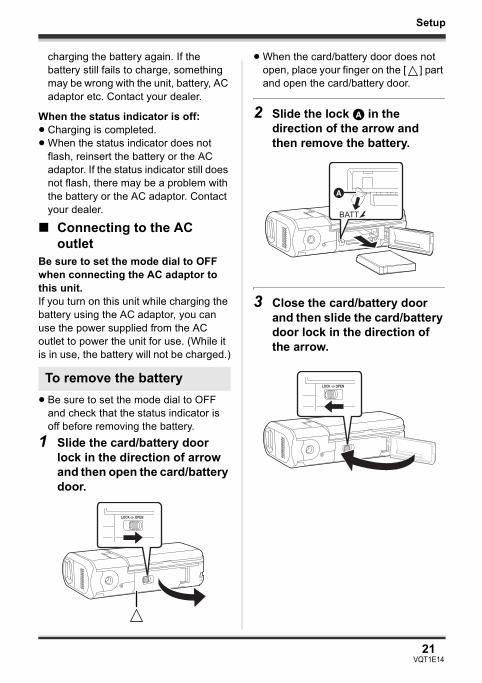
1 Slide the card/battery door lock in the direction of arrow and then open the card/battery door.
≥ When the card/battery door does not open, place your finger on the [ ] part and open the card/battery door.
2 Slide the lock A in the direction of the arrow and then remove the battery.
3 Close the card/battery door and then slide the card/battery door lock in the direction of the arrow.
To remove the battery
A
BATT
VQT1E14(EB_GC_ENG).book 21 ページ 2007年2月28日 水曜日 午後2時23分
Setup
22VQT1E14
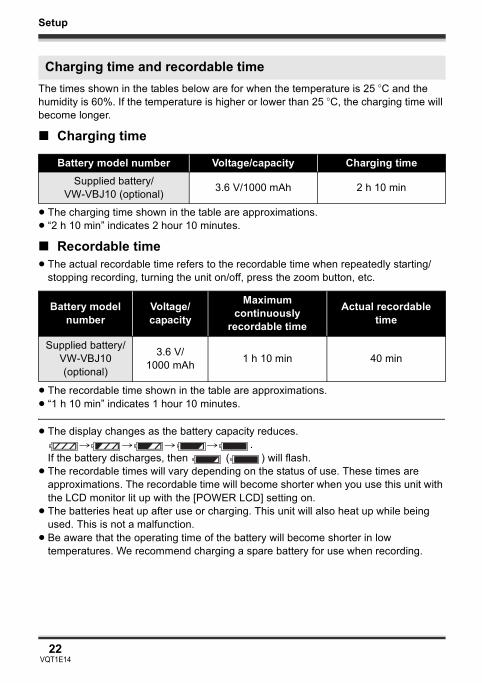
The times shown in the tables below are for when the temperature is 25 oC and the humidity is 60%. If the temperature is higher or lower than 25 oC, the charging time will become longer.
∫ Charging time
≥ The charging time shown in the table are approximations.≥ “2 h 10 min” indicates 2 hour 10 minutes.
∫ Recordable time≥ The actual recordable time refers to the recordable time when repeatedly starting/
stopping recording, turning the unit on/off, press the zoom button, etc.
≥ The recordable time shown in the table are approximations.≥ “1 h 10 min” indicates 1 hour 10 minutes.
≥ The display changes as the battery capacity reduces.# # # # .
If the battery discharges, then ( ) will flash.≥ The recordable times will vary depending on the status of use. These times are
approximations. The recordable time will become shorter when you use this unit with the LCD monitor lit up with the [POWER LCD] setting on.
≥ The batteries heat up after use or charging. This unit will also heat up while being used. This is not a malfunction.
≥ Be aware that the operating time of the battery will become shorter in low temperatures. We recommend charging a spare battery for use when recording.
Charging time and recordable time
Battery model number Voltage/capacity Charging timeSupplied battery/
VW-VBJ10 (optional) 3.6 V/1000 mAh 2 h 10 min
Battery model number
Voltage/capacity
Maximum continuously
recordable time
Actual recordable time
Supplied battery/VW-VBJ10 (optional)
3.6 V/1000 mAh 1 h 10 min 40 min
VQT1E14(EB_GC_ENG).book 22 ページ 2007年2月28日 水曜日 午後2時23分
23VQT1E14
Setup
Selecting a mode
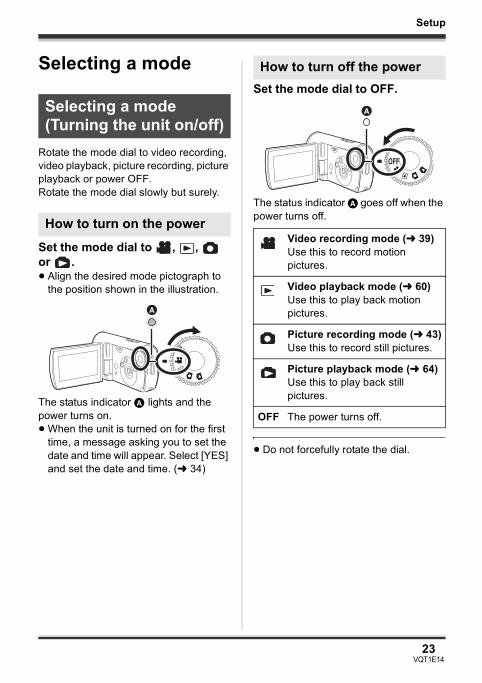
Rotate the mode dial to video recording, video playback, picture recording, picture playback or power OFF.Rotate the mode dial slowly but surely.
Set the mode dial to , , or .≥ Align the desired mode pictograph to
the position shown in the illustration.
The status indicator A lights and the power turns on.≥ When the unit is turned on for the first
time, a message asking you to set the date and time will appear. Select [YES] and set the date and time. (l 34)
Set the mode dial to OFF.
The status indicator A goes off when the power turns off.
≥ Do not forcefully rotate the dial.
Selecting a mode (Turning the unit on/off)
How to turn on the power
A
How to turn off the power
Video recording mode (l 39)Use this to record motion pictures.
Video playback mode (l 60)Use this to play back motion pictures.
Picture recording mode (l 43)Use this to record still pictures.
Picture playback mode (l 64)Use this to play back still pictures.
OFF The power turns off.
A
VQT1E14(EB_GC_ENG).book 23 ページ 2007年2月28日 水曜日 午後2時23分

24VQT1E14
Setup
The power can be turned on and off with the LCD monitor when the mode dial is set to or .
∫ To turn on the powerOpen the LCD monitor.
The status indicator lights and the power turns on.
∫ To turn off the powerClose the LCD monitor.
The status indicator goes off and the power turns off. (If [QUICK START] is set to [ON], the unit goes into quick start standby mode and the status indicator flashes green.)≥ The power will not turn off while
recording motion pictures even if the LCD monitor is closed.
When quick start is ON the battery power is still being consumed, even when the LCD monitor is closed.This unit will resume recording/pause mode about 1.7 seconds after the LCD monitor is reopened.≥ When in quick start standby mode,
about half of the power used in recording pause mode is being consumed, so the recording time will be reduced.
≥ This is only activated in the following cases.jWhile using the battery
When the mode dial is set to or and an SD card is inserted.
jWhile using the AC adaptorWhen the mode dial is set to or
, quick start can be used even if an SD card is not inserted.
1 Press the MENU button then select [SETUP] # [QUICK START] # [ON] and then press the cursor button in the centre.
How to turn the power on and off with the LCD monitor
Set the mode dial to OFF when the unit is not being used.
Quick start
VQT1E14(EB_GC_ENG).book 24 ページ 2007年2月28日 水曜日 午後2時23分
25VQT1E14
Setup
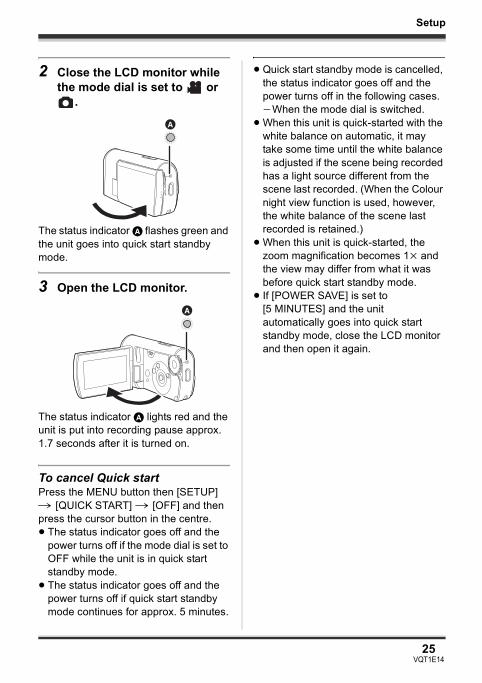
2 Close the LCD monitor while the mode dial is set to or
.
The status indicator A flashes green and the unit goes into quick start standby mode.
3 Open the LCD monitor.
The status indicator A lights red and the unit is put into recording pause approx. 1.7 seconds after it is turned on.
To cancel Quick startPress the MENU button then [SETUP] # [QUICK START] # [OFF] and then press the cursor button in the centre.≥ The status indicator goes off and the
power turns off if the mode dial is set to OFF while the unit is in quick start standby mode.
≥ The status indicator goes off and the power turns off if quick start standby mode continues for approx. 5 minutes.
≥ Quick start standby mode is cancelled, the status indicator goes off and the power turns off in the following cases.jWhen the mode dial is switched.
≥ When this unit is quick-started with the white balance on automatic, it may take some time until the white balance is adjusted if the scene being recorded has a light source different from the scene last recorded. (When the Colour night view function is used, however, the white balance of the scene last recorded is retained.)
≥ When this unit is quick-started, the zoom magnification becomes 1k and the view may differ from what it was before quick start standby mode.
≥ If [POWER SAVE] is set to [5 MINUTES] and the unit automatically goes into quick start standby mode, close the LCD monitor and then open it again.
A
A
VQT1E14(EB_GC_ENG).book 25 ページ 2007年2月28日 水曜日 午後2時23分

26VQT1E14
Setup
Inserting/removing an SD cardBe sure to set the mode dial to OFF before inserting/removing an SD card.
1 Set the mode dial to OFF.≥ Check that the status indicator has
gone off.
2 Slide the card/battery door lock in the direction of the arrow and then open the card/battery door.
≥ When the card/battery door does not open, place your finger on the [ ] part and open the card/battery door.
3 Insert/remove the SD card into/from the card slot.
≥ When inserting an SD card, face the label side A upwards and press it straight in as far as it goes.
≥ When removing the SD card, press the centre of the SD card and then pull it straight out.
4 Close the card/battery door and then slide the card/battery door lock in the direction of the arrow.
≥ If the card/battery door cannot be completely closed, remove the card and then insert it again.
If the SD card is inserted or removed while the power is on, this unit may malfunction or the data recorded on the SD card may be lost.
A
VQT1E14(EB_GC_ENG).book 26 ページ 2007年2月28日 水曜日 午後2時23分

27VQT1E14
Setup
∫ Card access lamp
≥ When this unit accesses the SD card (reading, recording, playback, erasing, etc.), the access lamp lights up.
≥ If the following operations are performed when the access lamp is lit, then the SD card or the recorded data may be damaged or this unit may malfunction.sOpening the card/battery doorsRemoving the SD cardsOperating the mode dialsRemoving the battery or
disconnecting the AC adaptor
How to use the cursor buttonThis unit has a cursor button for selecting functions, performing operations, etc..
Operations on the menu screen and selection of files on the thumbnail view screen, etc.Press the cursor button up, down, left or right to select an item or scene and then press the cursor button in the centre to set it.
≥ Menu screen operations (l 33)
Basic operations
1 Up2 Down3 Left4 Right5 Press to select the item
1
3 4
2
5
VQT1E14(EB_GC_ENG).book 27 ページ 2007年2月28日 水曜日 午後2時23分
28VQT1E14
Setup
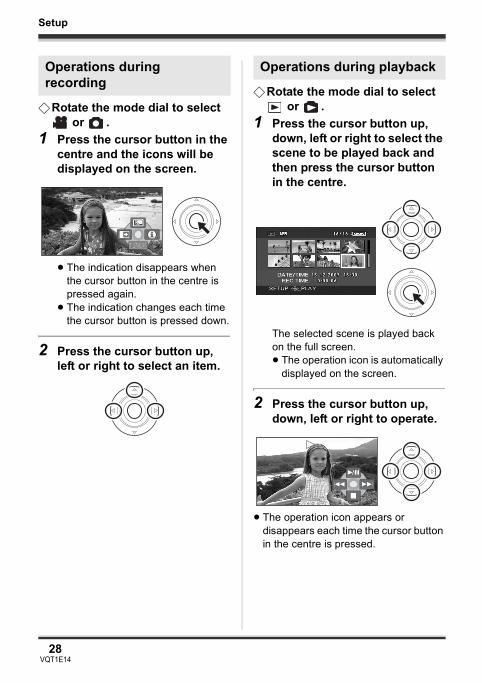
¬Rotate the mode dial to select or .
1 Press the cursor button in the centre and the icons will be displayed on the screen.
≥ The indication disappears when the cursor button in the centre is pressed again.
≥ The indication changes each time the cursor button is pressed down.
2 Press the cursor button up, left or right to select an item.
¬Rotate the mode dial to select or .
1 Press the cursor button up, down, left or right to select the scene to be played back and then press the cursor button in the centre.
The selected scene is played back on the full screen.≥ The operation icon is automatically
displayed on the screen.
2 Press the cursor button up, down, left or right to operate.
≥ The operation icon appears or disappears each time the cursor button in the centre is pressed.
Operations during recording
1/21/2 NEXTNEXT1/2 NEXT
Operations during playback
VQT1E14(EB_GC_ENG).book 28 ページ 2007年2月28日 水曜日 午後2時23分
Setup
29VQT1E14
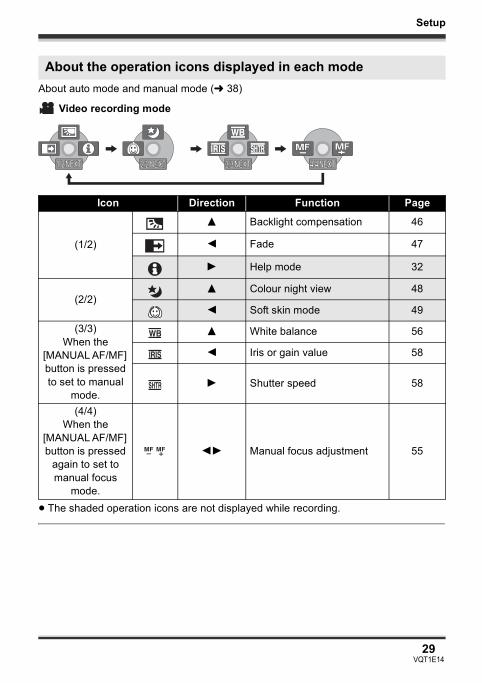
About auto mode and manual mode (l 38)
Video recording mode
≥ The shaded operation icons are not displayed while recording.
About the operation icons displayed in each mode
Icon Direction Function Page
(1/2)
3 Backlight compensation 46
2 Fade 47
1 Help mode 32
(2/2)3 Colour night view 48
2 Soft skin mode 49
(3/3)When the
[MANUAL AF/MF] button is pressed to set to manual
mode.
3 White balance 56
2 Iris or gain value 58
1 Shutter speed 58
(4/4)When the
[MANUAL AF/MF] button is pressed
again to set to manual focus
mode.
21 Manual focus adjustment 55
1/21/2 NEXTNEXT1/2 NEXT 2/22/2 NEXTNEXT2/2 NEXT 3/33/3 NEXTNEXT3/3 NEXT 4/44/4 NEXTNEXT4/4 NEXT
VQT1E14(EB_GC_ENG).book 29 ページ 2007年2月28日 水曜日 午後2時23分
Setup
30VQT1E14
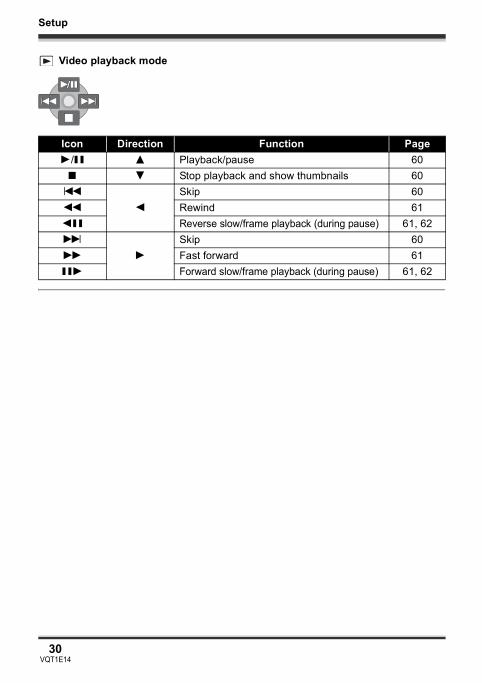
Video playback mode
Icon Direction Function Page1/; 3 Playback/pause 60
∫ 4 Stop playback and show thumbnails 60:
2
Skip 606 Rewind 612; Reverse slow/frame playback (during pause) 61, 629
1
Skip 605 Fast forward 61;1 Forward slow/frame playback (during pause) 61, 62
VQT1E14(EB_GC_ENG).book 30 ページ 2007年2月28日 水曜日 午後2時23分
Setup
31VQT1E14
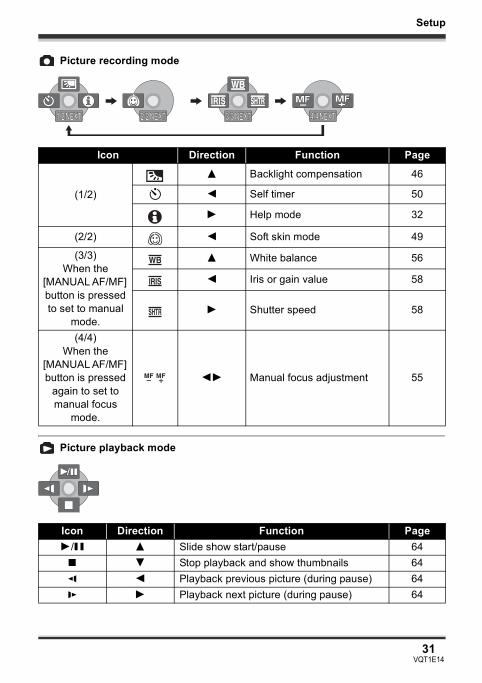
Picture recording mode
Picture playback mode
Icon Direction Function Page
(1/2)
3 Backlight compensation 46
Ø 2 Self timer 50
1 Help mode 32
(2/2) 2 Soft skin mode 49
(3/3)When the
[MANUAL AF/MF] button is pressed to set to manual
mode.
3 White balance 56
2 Iris or gain value 58
1 Shutter speed 58
(4/4)When the
[MANUAL AF/MF] button is pressed
again to set to manual focus
mode.
21 Manual focus adjustment 55
Icon Direction Function Page1/; 3 Slide show start/pause 64
∫ 4 Stop playback and show thumbnails 64E 2 Playback previous picture (during pause) 64D 1 Playback next picture (during pause) 64
1/21/2 NEXTNEXT1/2 NEXT 2/22/2 NEXTNEXT2/2 NEXT 3/33/3 NEXTNEXT3/3 NEXT 4/44/4 NEXTNEXT4/4 NEXT
VQT1E14(EB_GC_ENG).book 31 ページ 2007年2月28日 水曜日 午後2時23分
32VQT1E14
Setup
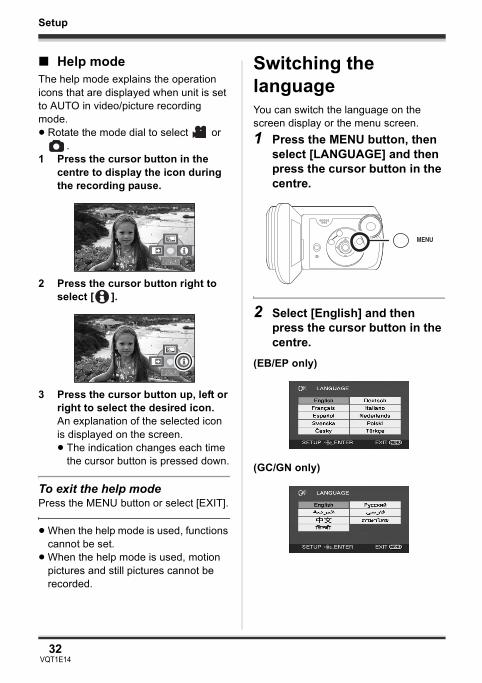
∫ Help modeThe help mode explains the operation icons that are displayed when unit is set to AUTO in video/picture recording mode.≥ Rotate the mode dial to select or
.1 Press the cursor button in the
centre to display the icon during the recording pause.
2 Press the cursor button right to select [ ].
3 Press the cursor button up, left or right to select the desired icon.An explanation of the selected icon is displayed on the screen.≥ The indication changes each time
the cursor button is pressed down.
To exit the help modePress the MENU button or select [EXIT].
≥ When the help mode is used, functions cannot be set.
≥ When the help mode is used, motion pictures and still pictures cannot be recorded.
Switching the languageYou can switch the language on the screen display or the menu screen.1 Press the MENU button, then
select [LANGUAGE] and then press the cursor button in the centre.
2 Select [English] and then press the cursor button in the centre.
(EB/EP only)
(GC/GN only)
1/3 NEXT1/21/2 NEXTNEXT1/2 NEXT
1/21/2 NEXTNEXT1/2 NEXT
VQT1E14(EB_GC_ENG).book 32 ページ 2007年2月28日 水曜日 午後2時23分
33VQT1E14
Setup
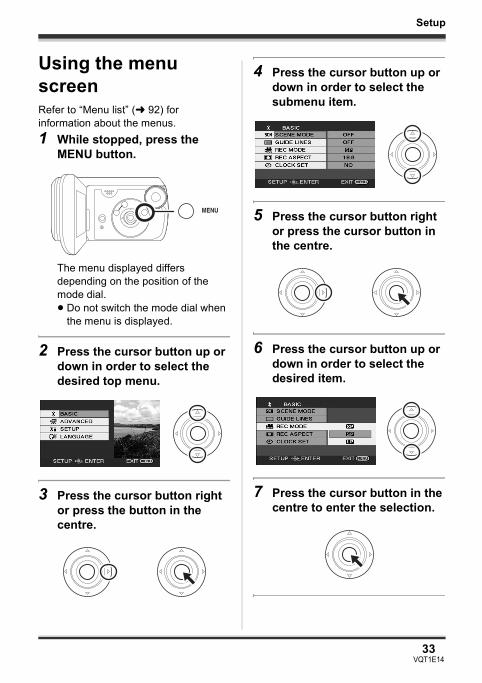
Using the menu screenRefer to “Menu list” (l 92) for information about the menus.1 While stopped, press the
MENU button.
The menu displayed differs depending on the position of the mode dial.≥ Do not switch the mode dial when
the menu is displayed.
2 Press the cursor button up or down in order to select the desired top menu.
3 Press the cursor button right or press the button in the centre.
4 Press the cursor button up or down in order to select the submenu item.
5 Press the cursor button right or press the cursor button in the centre.
6 Press the cursor button up or down in order to select the desired item.
7 Press the cursor button in the centre to enter the selection.
VQT1E14(EB_GC_ENG).book 33 ページ 2007年2月28日 水曜日 午後2時23分
34VQT1E14
Setup
To get back to the previous screenPress the cursor button left.
To exit the menu screenPress the MENU button.
≥ The menu screen does not appear during recording or playing. You cannot start other operations while the menu screen appears.
Setting date and timeWhen the unit is turned on for the first time, a message asking you to set the date and time will appear.≥ Select [YES] and press the cursor
button in the centre. Perform steps 2 and 3 below to set the date and time.
If the screen shows the incorrect date and time, then adjust it.
¬Rotate the mode dial to select or .
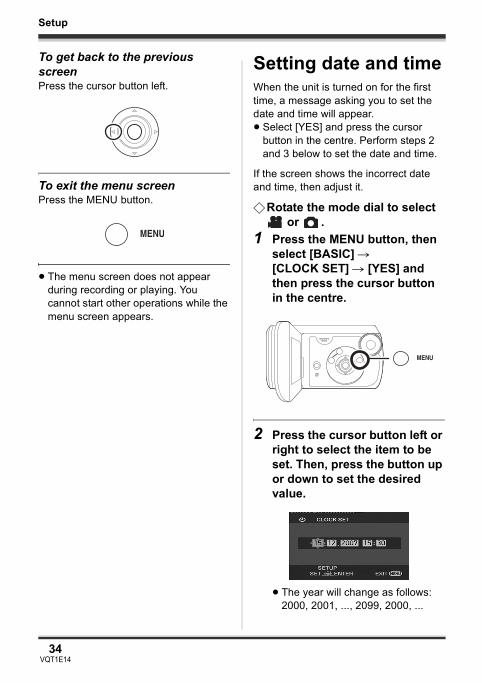
1 Press the MENU button, then select [BASIC] # [CLOCK SET] # [YES] and then press the cursor button in the centre.
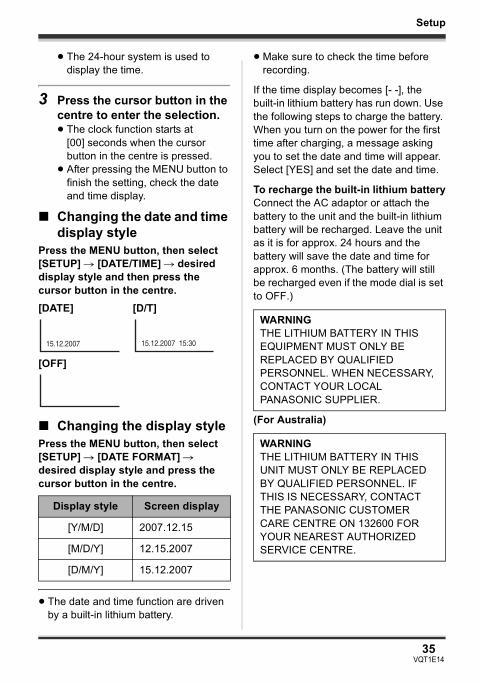
2 Press the cursor button left or right to select the item to be set. Then, press the button up or down to set the desired value.
≥ The year will change as follows:2000, 2001, ..., 2099, 2000, ...
VQT1E14(EB_GC_ENG).book 34 ページ 2007年2月28日 水曜日 午後2時23分
35VQT1E14
Setup
≥ The 24-hour system is used to display the time.
3 Press the cursor button in the centre to enter the selection.≥ The clock function starts at
[00] seconds when the cursor button in the centre is pressed.
≥ After pressing the MENU button to finish the setting, check the date and time display.
∫ Changing the date and time display style
Press the MENU button, then select [SETUP] # [DATE/TIME] # desired display style and then press the cursor button in the centre.
∫ Changing the display stylePress the MENU button, then select [SETUP] # [DATE FORMAT] # desired display style and press the cursor button in the centre.
≥ The date and time function are driven by a built-in lithium battery.
≥ Make sure to check the time before recording.
If the time display becomes [- -], the built-in lithium battery has run down. Use the following steps to charge the battery. When you turn on the power for the first time after charging, a message asking you to set the date and time will appear. Select [YES] and set the date and time.
To recharge the built-in lithium batteryConnect the AC adaptor or attach the battery to the unit and the built-in lithium battery will be recharged. Leave the unit as it is for approx. 24 hours and the battery will save the date and time for approx. 6 months. (The battery will still be recharged even if the mode dial is set to OFF.)
(For Australia)
[DATE] [D/T]
[OFF]
Display style Screen display
[Y/M/D] 2007.12.15
[M/D/Y] 12.15.2007
[D/M/Y] 15.12.2007
15.12.2007 15.12.2007 15:30
WARNINGTHE LITHIUM BATTERY IN THIS EQUIPMENT MUST ONLY BE REPLACED BY QUALIFIED PERSONNEL. WHEN NECESSARY, CONTACT YOUR LOCAL PANASONIC SUPPLIER.
WARNINGTHE LITHIUM BATTERY IN THIS UNIT MUST ONLY BE REPLACED BY QUALIFIED PERSONNEL. IF THIS IS NECESSARY, CONTACT THE PANASONIC CUSTOMER CARE CENTRE ON 132600 FOR YOUR NEAREST AUTHORIZED SERVICE CENTRE.
VQT1E14(EB_GC_ENG).book 35 ページ 2007年2月28日 水曜日 午後2時23分
36VQT1E14
Setup
Adjusting the LCD monitor
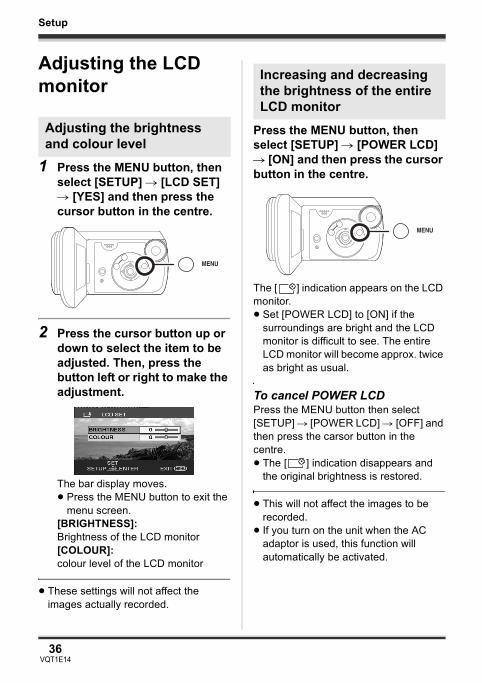
1 Press the MENU button, then select [SETUP] # [LCD SET] # [YES] and then press the cursor button in the centre.
2 Press the cursor button up or down to select the item to be adjusted. Then, press the button left or right to make the adjustment.
The bar display moves.≥ Press the MENU button to exit the
menu screen.[BRIGHTNESS]:Brightness of the LCD monitor[COLOUR]:colour level of the LCD monitor
≥ These settings will not affect the images actually recorded.
Press the MENU button, then select [SETUP] # [POWER LCD] # [ON] and then press the cursor button in the centre.
The [ ] indication appears on the LCD monitor.≥ Set [POWER LCD] to [ON] if the
surroundings are bright and the LCD monitor is difficult to see. The entire LCD monitor will become approx. twice as bright as usual.
To cancel POWER LCDPress the MENU button then select [SETUP] # [POWER LCD] # [OFF] and then press the carsor button in the centre.≥ The [ ] indication disappears and
the original brightness is restored.
≥ This will not affect the images to be recorded.
≥ If you turn on the unit when the AC adaptor is used, this function will automatically be activated.
Adjusting the brightness and colour level
Increasing and decreasing the brightness of the entire LCD monitor
VQT1E14(EB_GC_ENG).book 36 ページ 2007年2月28日 水曜日 午後2時23分
Recording
37VQT1E14
Recording
Before recordingFirst, format the SD card if one which has been used on another device is going to be used for the first time on this unit. (l 70) When the SD card is formatted, all of the recorded data is deleted. Once the data is deleted, it cannot be restored. Copy valuable data onto a computer or other device before proceeding with the formatting. We recommend using MotionSD STUDIO etc. to import data recorded on this unit. (l 78)
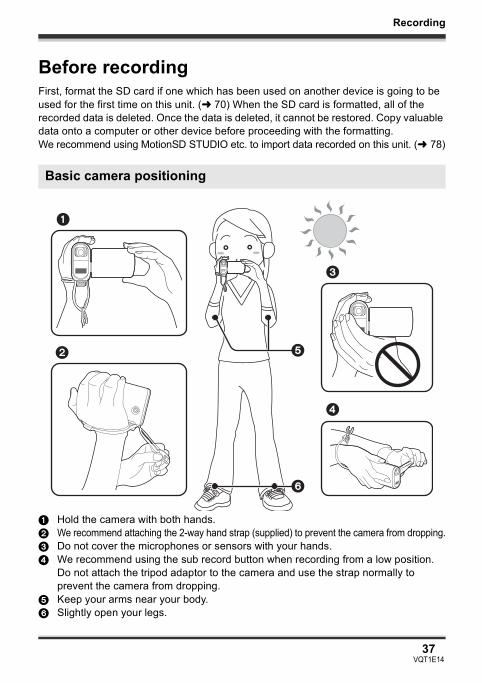
1 Hold the camera with both hands.2 We recommend attaching the 2-way hand strap (supplied) to prevent the camera from dropping.3 Do not cover the microphones or sensors with your hands.4 We recommend using the sub record button when recording from a low position.
Do not attach the tripod adaptor to the camera and use the strap normally to prevent the camera from dropping.
5 Keep your arms near your body.6 Slightly open your legs.
Basic camera positioning
4
1
2
3
5
6
VQT1E14(EB_GC_ENG).book 37 ページ 2007年2月28日 水曜日 午後2時23分
Recording
38VQT1E14
≥ This unit has lens-protecting glass to prevent drops of water getting in the lens. If there is dirt or drops of water on the lens-protecting glass, wipe them off before recording. We recommend using the cleaning cloth.
≥ If there are drops of water on the microphone, the recorded sound will be distorted. Wipe off any drops of water on the microphone.
≥ When you are outdoors, record pictures with the sunlight behind you. If the subject is backlit, it will become dark in the recording.
≥ When recording, make sure your footing is stable and there is no danger of colliding with another person or an object.
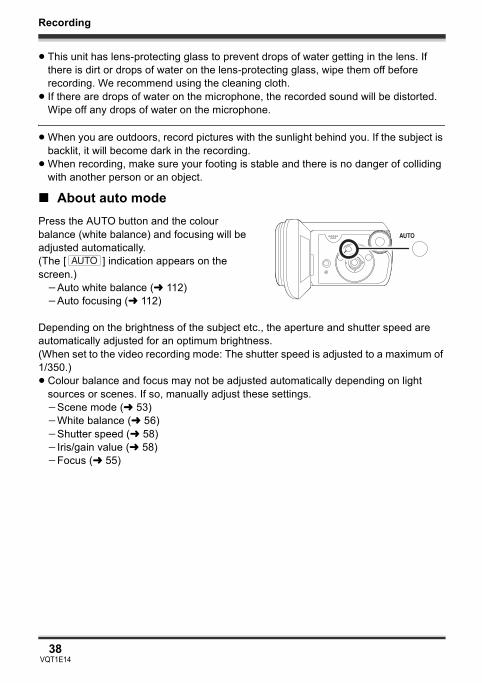
∫ About auto modePress the AUTO button and the colour balance (white balance) and focusing will be adjusted automatically.(The [ ] indication appears on the screen.)
jAuto white balance (l 112)jAuto focusing (l 112)
Depending on the brightness of the subject etc., the aperture and shutter speed are automatically adjusted for an optimum brightness. (When set to the video recording mode: The shutter speed is adjusted to a maximum of 1/350.)≥ Colour balance and focus may not be adjusted automatically depending on light
sources or scenes. If so, manually adjust these settings.jScene mode (l 53)jWhite balance (l 56)jShutter speed (l 58)jIris/gain value (l 58)jFocus (l 55)
AUTO
VQT1E14(EB_GC_ENG).book 38 ページ 2007年2月28日 水曜日 午後2時23分

Recording
39VQT1E14
Recording motion pictures≥ When the unit is purchased, the aspect ratio is set to [16:9] for recording images
compatible with a wide-screen TV. To watch images on a regular TV (4:3), change the aspect ratio setting (l 51) before recording the images or when watching them on the connected TV (l 72).
≥ Use an SD card that can be used for motion picture recording. (l 17)
1 Rotate the mode dial to select .
2 Press the record button to start recording.≥ While motion picture recording is in
process, the recording will not stop even if the LCD monitor is closed.
To end the recordingPress the record button again to pause recording.≥ [¥] and [;] are red during recording. Do
not move this unit until [;] is green.
The images recorded between pressing the record button to start recording and pressing it again to pause recording become one scene.≥ When about 5 minutes have passed without any operation in recording pause, the
unit automatically turns off to prevent the battery from running down. When you want to use the unit, turn it on again.This setting can also be set to [OFF]. (l 94, [POWER SAVE])
VQT1E14(EB_GC_ENG).book 39 ページ 2007年2月28日 水曜日 午後2時23分
Recording
40VQT1E14
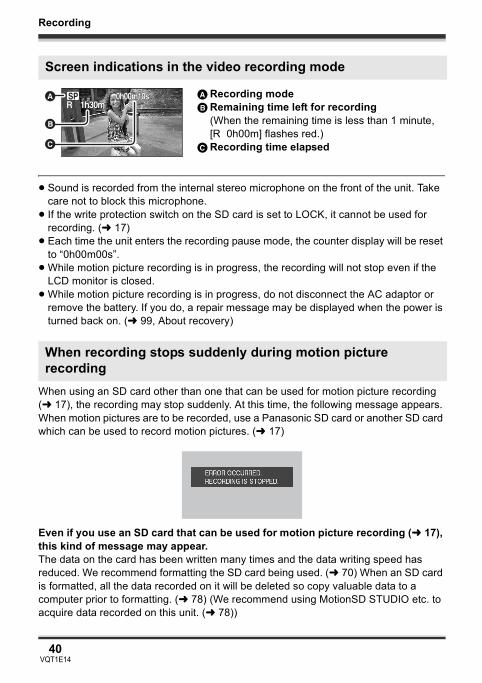
A Recording modeB Remaining time left for recording
(When the remaining time is less than 1 minute, [R 0h00m] flashes red.)
C Recording time elapsed
≥ Sound is recorded from the internal stereo microphone on the front of the unit. Take care not to block this microphone.
≥ If the write protection switch on the SD card is set to LOCK, it cannot be used for recording. (l 17)
≥ Each time the unit enters the recording pause mode, the counter display will be reset to “0h00m00s”.
≥ While motion picture recording is in progress, the recording will not stop even if the LCD monitor is closed.
≥ While motion picture recording is in progress, do not disconnect the AC adaptor or remove the battery. If you do, a repair message may be displayed when the power is turned back on. (l 99, About recovery)
When using an SD card other than one that can be used for motion picture recording (l 17), the recording may stop suddenly. At this time, the following message appears. When motion pictures are to be recorded, use a Panasonic SD card or another SD card which can be used to record motion pictures. (l 17)
Even if you use an SD card that can be used for motion picture recording (l 17), this kind of message may appear.The data on the card has been written many times and the data writing speed has reduced. We recommend formatting the SD card being used. (l 70) When an SD card is formatted, all the data recorded on it will be deleted so copy valuable data to a computer prior to formatting. (l 78) (We recommend using MotionSD STUDIO etc. to acquire data recorded on this unit. (l 78))
Screen indications in the video recording mode
When recording stops suddenly during motion picture recording
R R 1h30m1h30mR 1h30m0h00m10s0h00m10s0h00m10sA
B
C
SP
VQT1E14(EB_GC_ENG).book 40 ページ 2007年2月28日 水曜日 午後2時23分
Recording
41VQT1E14
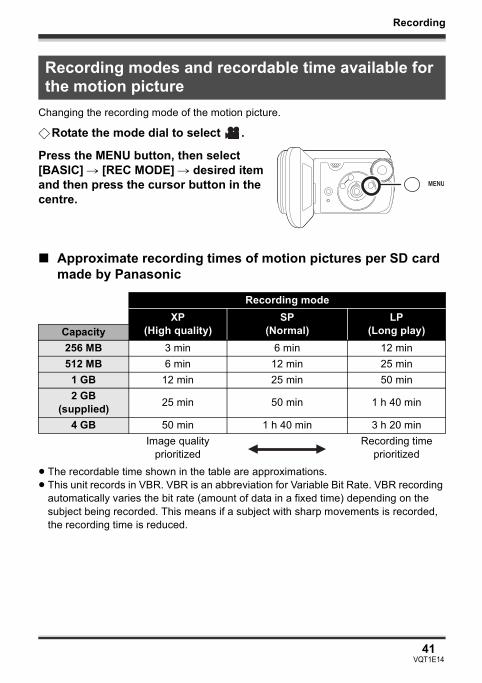
Changing the recording mode of the motion picture.
¬Rotate the mode dial to select .
Press the MENU button, then select [BASIC] # [REC MODE] # desired item and then press the cursor button in the centre.
∫ Approximate recording times of motion pictures per SD card made by Panasonic
≥ The recordable time shown in the table are approximations.≥ This unit records in VBR. VBR is an abbreviation for Variable Bit Rate. VBR recording
automatically varies the bit rate (amount of data in a fixed time) depending on the subject being recorded. This means if a subject with sharp movements is recorded, the recording time is reduced.
Recording modes and recordable time available for the motion picture
Recording modeXP
(High quality)SP
(Normal)LP
(Long play)Capacity256 MB 3 min 6 min 12 min512 MB 6 min 12 min 25 min
1 GB 12 min 25 min 50 min2 GB
(supplied) 25 min 50 min 1 h 40 min
4 GB 50 min 1 h 40 min 3 h 20 minImage quality
prioritizedRecording time
prioritized
VQT1E14(EB_GC_ENG).book 41 ページ 2007年2月28日 水曜日 午後2時23分
Recording
42VQT1E14
≥ Recordable time using the battery (l 22)≥ 8 MB and 16 MB SD cards cannot be used for motion picture recording.≥ If an SD card is recorded on or erased many times, it may no longer be possible to
record motion pictures even if there is available memory on the SD card. In this case, after saving the data on computer, format the SD card.
≥ Mosaic-pattern noise may appear on a playback image in the following cases.jWhen there is a complicated pattern in the backgroundjWhen the unit is moved too much or too fastjWhen a subject with sharp movements has been recorded
(Particularly if it has been recorded in [LP] mode.)
VQT1E14(EB_GC_ENG).book 42 ページ 2007年2月28日 水曜日 午後2時23分
Recording
43VQT1E14
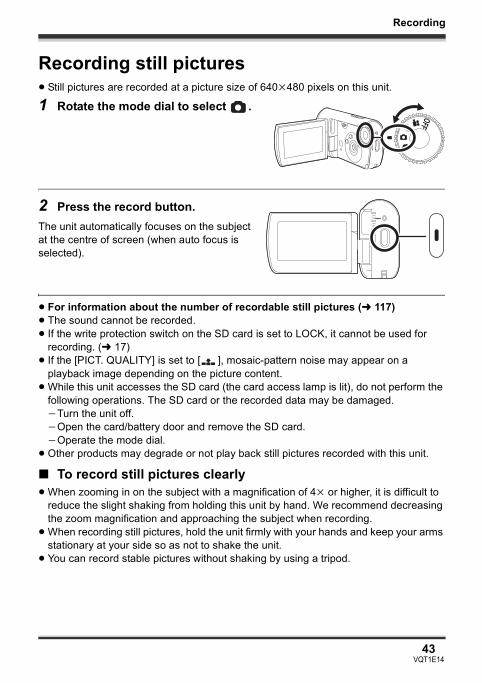
Recording still pictures≥ Still pictures are recorded at a picture size of 640k480 pixels on this unit.
1 Rotate the mode dial to select .
2 Press the record button.The unit automatically focuses on the subject at the centre of screen (when auto focus is selected).
≥ For information about the number of recordable still pictures (l 117)≥ The sound cannot be recorded.≥ If the write protection switch on the SD card is set to LOCK, it cannot be used for
recording. (l 17)≥ If the [PICT. QUALITY] is set to [ ], mosaic-pattern noise may appear on a
playback image depending on the picture content.≥ While this unit accesses the SD card (the card access lamp is lit), do not perform the
following operations. The SD card or the recorded data may be damaged.jTurn the unit off.jOpen the card/battery door and remove the SD card.jOperate the mode dial.
≥ Other products may degrade or not play back still pictures recorded with this unit.
∫ To record still pictures clearly≥ When zooming in on the subject with a magnification of 4k or higher, it is difficult to
reduce the slight shaking from holding this unit by hand. We recommend decreasing the zoom magnification and approaching the subject when recording.
≥ When recording still pictures, hold the unit firmly with your hands and keep your arms stationary at your side so as not to shake the unit.
≥ You can record stable pictures without shaking by using a tripod.
VQT1E14(EB_GC_ENG).book 43 ページ 2007年2月28日 水曜日 午後2時23分

Recording
44VQT1E14
A Size of still picturesB Remaining number of still pictures
(Flashes in red when [R 0] appears.) C Quality of still pictures
You can add a shutter sound when recording still pictures.
Press the MENU button, then select [ADVANCED] # [SHTR EFFECT] # [ON] and then press the cursor button in the centre.
≥ This function’s default setting is [ON].
∫ [PICT. QUALITY]Selecting the picture quality.
Press the MENU button, then select [BASIC] # [PICT. QUALITY] # desired item and then press the cursor button in the centre.
Screen indications in picture recording mode
Recording with a shutter operation effect
Picture quality for still picture recording
:Still pictures with a high picture quality are recorded.
: Priority is given to the number of still pictures recorded. Still pictures are recorded in normal picture quality.
R 12345R 12345R 12345A
B
C
0.3M
VQT1E14(EB_GC_ENG).book 44 ページ 2007年2月28日 水曜日 午後2時23分
45VQT1E14
Recording
Various recording functions
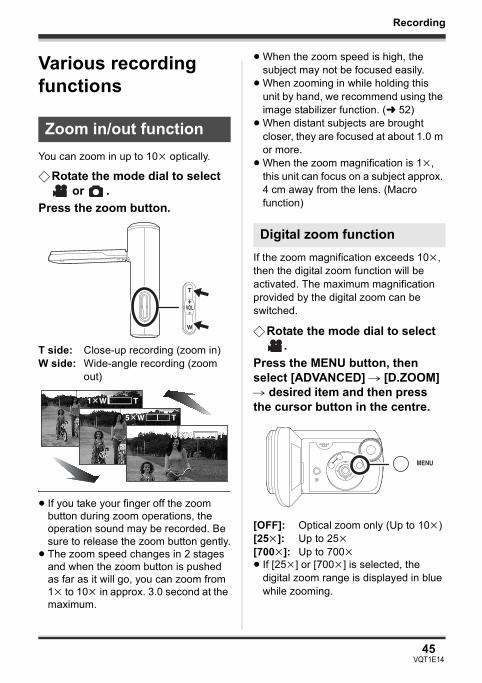
You can zoom in up to 10k optically.
¬Rotate the mode dial to select or .
Press the zoom button.
≥ If you take your finger off the zoom button during zoom operations, the operation sound may be recorded. Be sure to release the zoom button gently.
≥ The zoom speed changes in 2 stages and when the zoom button is pushed as far as it will go, you can zoom from 1k to 10k in approx. 3.0 second at the maximum.
≥ When the zoom speed is high, the subject may not be focused easily.
≥ When zooming in while holding this unit by hand, we recommend using the image stabilizer function. (l 52)
≥ When distant subjects are brought closer, they are focused at about 1.0 m or more.
≥ When the zoom magnification is 1k, this unit can focus on a subject approx. 4 cm away from the lens. (Macro function)
If the zoom magnification exceeds 10k, then the digital zoom function will be activated. The maximum magnification provided by the digital zoom can be switched.
¬Rotate the mode dial to select .
Press the MENU button, then select [ADVANCED] # [D.ZOOM] # desired item and then press the cursor button in the centre.
≥ If [25k] or [700k] is selected, the digital zoom range is displayed in blue while zooming.
Zoom in/out function
T side: Close-up recording (zoom in)W side: Wide-angle recording (zoom
out)
Digital zoom function
[OFF]: Optical zoom only (Up to 10k)[25k]: Up to 25k[700k]: Up to 700k
VQT1E14(EB_GC_ENG).book 45 ページ 2007年2月28日 水曜日 午後2時23分
46VQT1E14
Recording
≥ The larger the digital zoom magnification, the more the image quality is degraded.
≥ This function cannot be used in picture recording mode.
The zoom microphone is linked to the zooming operation so that far-away sounds with a tele-shot and close-up sounds with a wide-angle shot are recorded more clearly.
¬Rotate the mode dial to select .
Press the MENU button, then select [ADVANCED] # [ZOOM MIC] # [ON] and then press the cursor button in the centre.
Use this function when the light is emanating from behind the subject and the subject appears dark.
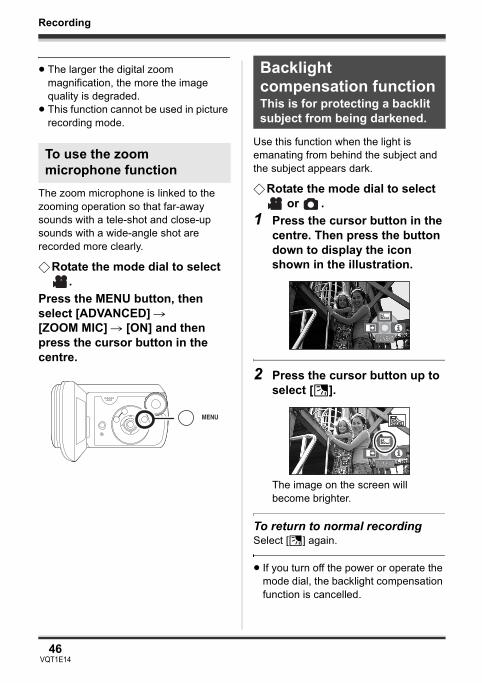
¬Rotate the mode dial to select or .
1 Press the cursor button in the centre. Then press the button down to display the icon shown in the illustration.
2 Press the cursor button up to select [ª].
The image on the screen will become brighter.
To return to normal recordingSelect [ª] again.
≥ If you turn off the power or operate the mode dial, the backlight compensation function is cancelled.
To use the zoom microphone function
Backlight compensation functionThis is for protecting a backlit subject from being darkened.
1/21/2 NEXTNEXT1/2 NEXT
1/21/2 NEXTNEXT1/2 NEXT
VQT1E14(EB_GC_ENG).book 46 ページ 2007年2月28日 水曜日 午後2時23分
47VQT1E14
Recording
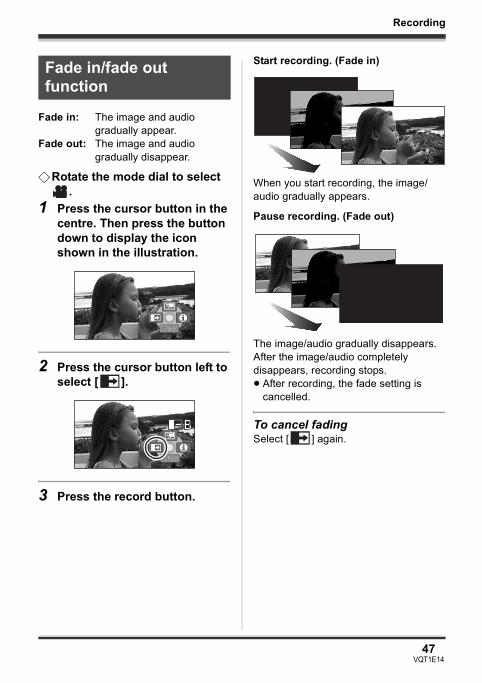
¬Rotate the mode dial to select .
1 Press the cursor button in the centre. Then press the button down to display the icon shown in the illustration.
2 Press the cursor button left to select [ ].
3 Press the record button.
Start recording. (Fade in)
When you start recording, the image/audio gradually appears.
Pause recording. (Fade out)
The image/audio gradually disappears. After the image/audio completely disappears, recording stops.≥ After recording, the fade setting is
cancelled.
To cancel fadingSelect [ ] again.
Fade in/fade out function
Fade in: The image and audio gradually appear.
Fade out: The image and audio gradually disappear.
1/21/2 NEXTNEXT1/2 NEXT
1/21/2 NEXTNEXT1/2 NEXT
VQT1E14(EB_GC_ENG).book 47 ページ 2007年2月28日 水曜日 午後2時23分
48VQT1E14
Recording
To select the colour for fade in/outThe colour which appears in fading pictures can be selected.Press the MENU button, then select [ADVANCED] # [FADE COLOUR] # [WHITE] or [BLACK] and then press the cursor button in the centre.
≥ If you turn off the power, the fade function is cancelled.
≥ While the fade in/fade out function is selected, it takes several seconds to display the image when you start recording. It also takes several seconds to pause recording.
≥ The thumbnails of scenes recorded using fade in become black (or white).
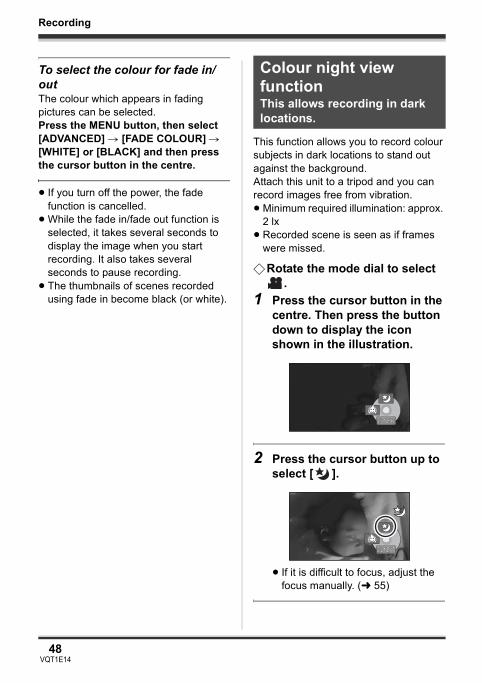
This function allows you to record colour subjects in dark locations to stand out against the background.Attach this unit to a tripod and you can record images free from vibration.≥ Minimum required illumination: approx.
2 lx≥ Recorded scene is seen as if frames
were missed.
¬Rotate the mode dial to select .
1 Press the cursor button in the centre. Then press the button down to display the icon shown in the illustration.
2 Press the cursor button up to select [ ].
≥ If it is difficult to focus, adjust the focus manually. (l 55)
Colour night view functionThis allows recording in dark locations.
2/22/2 NEXTNEXT2/2 NEXT
2/22/2 NEXTNEXT2/2 NEXT
VQT1E14(EB_GC_ENG).book 48 ページ 2007年2月28日 水曜日 午後2時23分
49VQT1E14
Recording
To cancel the Colour night view functionSelect [ ] again.
≥ The Colour night view function makes the signal charging time of CCD up to approximately 25k longer than usual, so that dark scenes can be recorded brightly. For this reason, bright dots that are usually invisible may be seen, but this is not a malfunction.
≥ If you turn off the power or operate the mode dial, the Colour night view function is cancelled.
≥ If set in a bright place, the screen may become whitish for a while.
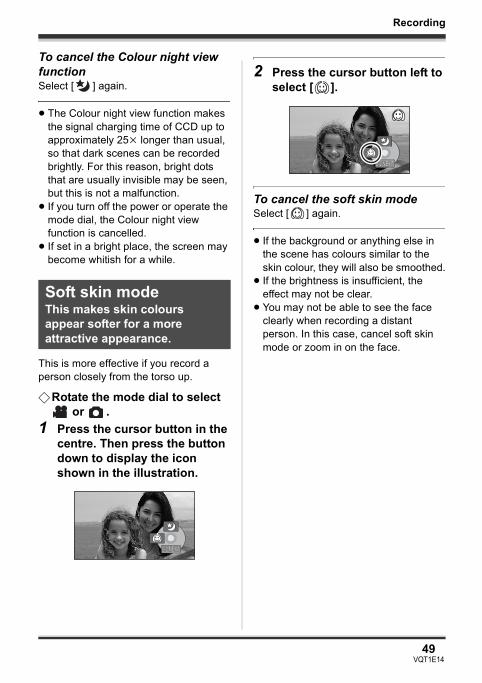
This is more effective if you record a person closely from the torso up.
¬Rotate the mode dial to select or .
1 Press the cursor button in the centre. Then press the button down to display the icon shown in the illustration.
2 Press the cursor button left to select [ ].
To cancel the soft skin modeSelect [ ] again.
≥ If the background or anything else in the scene has colours similar to the skin colour, they will also be smoothed.
≥ If the brightness is insufficient, the effect may not be clear.
≥ You may not be able to see the face clearly when recording a distant person. In this case, cancel soft skin mode or zoom in on the face.
Soft skin modeThis makes skin colours appear softer for a more attractive appearance.
2/22/2 NEXTNEXT2/2 NEXT
2/22/2 NEXTNEXT2/2 NEXT
VQT1E14(EB_GC_ENG).book 49 ページ 2007年2月28日 水曜日 午後2時23分
50VQT1E14
Recording
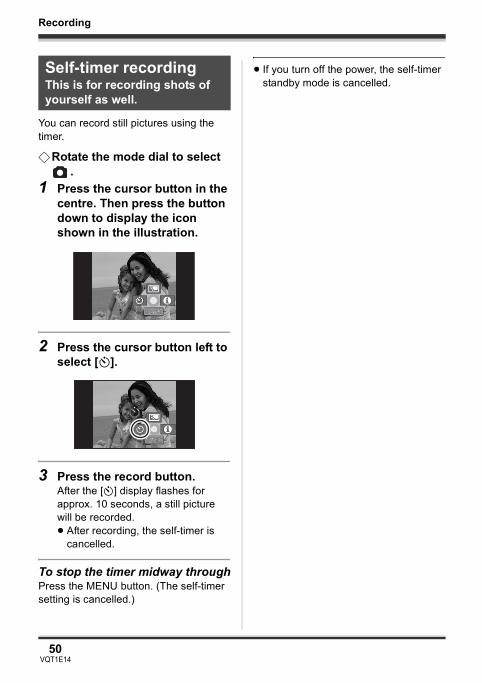
You can record still pictures using the timer.
¬Rotate the mode dial to select .
1 Press the cursor button in the centre. Then press the button down to display the icon shown in the illustration.
2 Press the cursor button left to select [Ø].
3 Press the record button.After the [Ø] display flashes for approx. 10 seconds, a still picture will be recorded.≥ After recording, the self-timer is
cancelled.
To stop the timer midway throughPress the MENU button. (The self-timer setting is cancelled.)
≥ If you turn off the power, the self-timer standby mode is cancelled.
Self-timer recordingThis is for recording shots of yourself as well.
1/21/2 NEXTNEXT1/2 NEXT
1/21/2 NEXTNEXT1/2 NEXT
VQT1E14(EB_GC_ENG).book 50 ページ 2007年2月28日 水曜日 午後2時23分
51VQT1E14
Recording
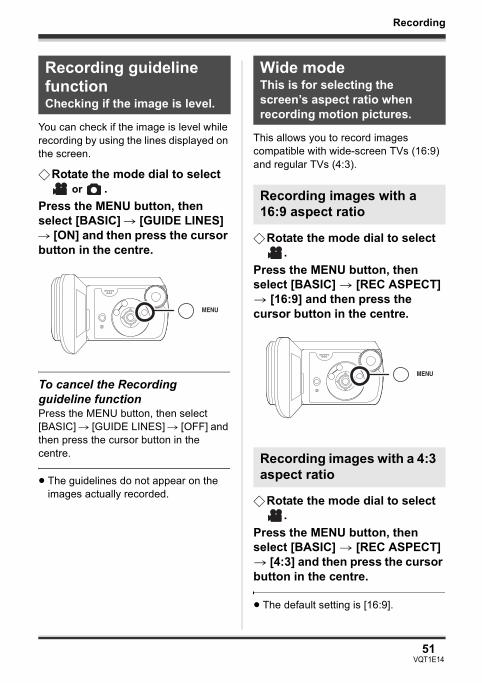
You can check if the image is level while recording by using the lines displayed on the screen.
¬Rotate the mode dial to select or .
Press the MENU button, then select [BASIC] # [GUIDE LINES] # [ON] and then press the cursor button in the centre.
To cancel the Recording guideline functionPress the MENU button, then select [BASIC] # [GUIDE LINES] # [OFF] and then press the cursor button in the centre.
≥ The guidelines do not appear on the images actually recorded.
This allows you to record images compatible with wide-screen TVs (16:9) and regular TVs (4:3).
¬Rotate the mode dial to select .
Press the MENU button, then select [BASIC] > [REC ASPECT] > [16:9] and then press the cursor button in the centre.
¬Rotate the mode dial to select .
Press the MENU button, then select [BASIC] > [REC ASPECT] > [4:3] and then press the cursor button in the centre.
≥ The default setting is [16:9].
Recording guideline functionChecking if the image is level.
Wide modeThis is for selecting the screen’s aspect ratio when recording motion pictures.
Recording images with a 16:9 aspect ratio
Recording images with a 4:3 aspect ratio
VQT1E14(EB_GC_ENG).book 51 ページ 2007年2月28日 水曜日 午後2時23分
52VQT1E14
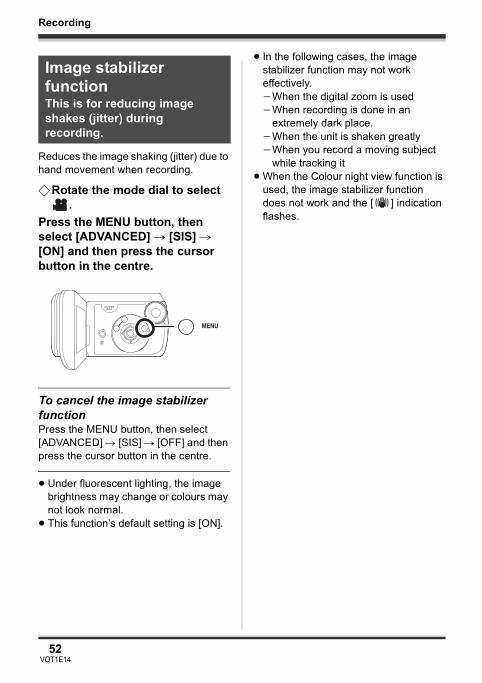
Recording
Reduces the image shaking (jitter) due to hand movement when recording.
¬Rotate the mode dial to select .
Press the MENU button, then select [ADVANCED] # [SIS] # [ON] and then press the cursor button in the centre.
To cancel the image stabilizer functionPress the MENU button, then select [ADVANCED] # [SIS] # [OFF] and then press the cursor button in the centre.
≥ Under fluorescent lighting, the image brightness may change or colours may not look normal.
≥ This function’s default setting is [ON].
≥ In the following cases, the image stabilizer function may not work effectively.jWhen the digital zoom is usedjWhen recording is done in an
extremely dark place.jWhen the unit is shaken greatlyjWhen you record a moving subject
while tracking it≥ When the Colour night view function is
used, the image stabilizer function does not work and the [ ] indication flashes.
Image stabilizer functionThis is for reducing image shakes (jitter) during recording.
VQT1E14(EB_GC_ENG).book 52 ページ 2007年2月28日 水曜日 午後2時23分
53VQT1E14
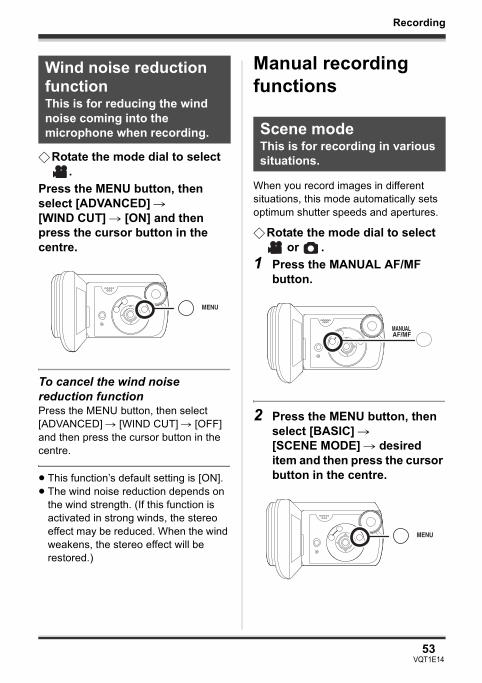
Recording
¬Rotate the mode dial to select .
Press the MENU button, then select [ADVANCED] # [WIND CUT] # [ON] and then press the cursor button in the centre.
To cancel the wind noise reduction functionPress the MENU button, then select [ADVANCED] # [WIND CUT] # [OFF] and then press the cursor button in the centre.
≥ This function’s default setting is [ON].≥ The wind noise reduction depends on
the wind strength. (If this function is activated in strong winds, the stereo effect may be reduced. When the wind weakens, the stereo effect will be restored.)
Manual recording functions
When you record images in different situations, this mode automatically sets optimum shutter speeds and apertures.
¬Rotate the mode dial to select or .
1 Press the MANUAL AF/MF button.
2 Press the MENU button, then select [BASIC] # [SCENE MODE] # desired item and then press the cursor button in the centre.
Wind noise reduction functionThis is for reducing the wind noise coming into the microphone when recording. Scene mode
This is for recording in various situations.
VQT1E14(EB_GC_ENG).book 53 ページ 2007年2月28日 水曜日 午後2時23分
54VQT1E14
Recording
[5] SportsTo record sports scenes or scenes where there are quick motions
[ ] PortraitTo make people stand out against the background
[ ] Low lightTo make the scene brighter in dark conditions
[ ] SpotlightTo make the subject under a spotlight look more attractive
[ ] Surf & snowTo record images in bright places such as ski slopes and beaches
To cancel the scene mode functionPress the MENU button, then select [BASIC] # [SCENE MODE] # [OFF] and then press the cursor button in the centre.≥ You can also cancel the scene mode
function by pressing the AUTO button.
Sports mode≥ For slow-motion playback or playback
pause of recorded pictures, this mode helps diminish camera shake.
≥ During normal playback, the image movement may not look smooth.
≥ Avoid recording under fluorescent light, mercury light or sodium light because the colour and brightness of the playback image may change.
≥ If you record a subject illuminated with strong light or a highly reflective subject, vertical lines of light may appear.
≥ If the brightness is insufficient, the sports mode does not function. The [5] display flashes.
≥ If this mode is used indoors, the screen may flicker.
Portrait mode≥ If this mode is used indoors, the
screen may flicker. If so, change the scene mode setting to [OFF].
Low light mode≥ Extremely dark scenes may not be
able to be recorded finely.Spotlight mode≥ If the recording subject is extremely
bright, the recorded image may become whitish and the periphery of the recorded image extremely dark.
Surf & snow mode≥ If the subject is extremely bright, the
recorded image may become whitish.
VQT1E14(EB_GC_ENG).book 54 ページ 2007年2月28日 水曜日 午後2時23分
55VQT1E14
Recording
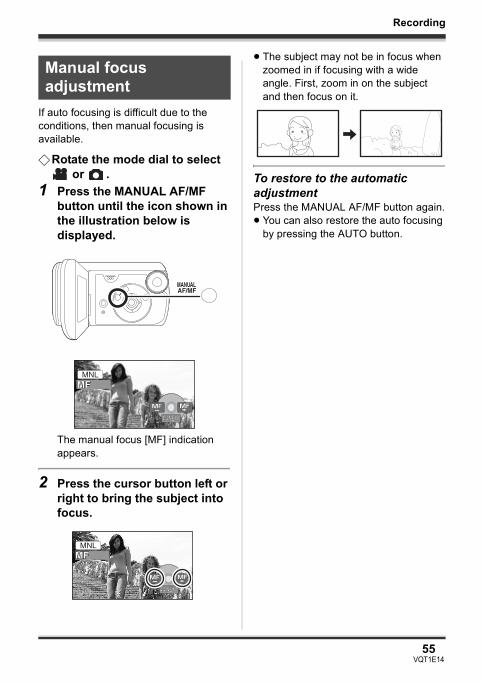
If auto focusing is difficult due to the conditions, then manual focusing is available.
¬Rotate the mode dial to select or .
1 Press the MANUAL AF/MF button until the icon shown in the illustration below is displayed.
The manual focus [MF] indication appears.
2 Press the cursor button left or right to bring the subject into focus.
≥ The subject may not be in focus when zoomed in if focusing with a wide angle. First, zoom in on the subject and then focus on it.
To restore to the automatic adjustmentPress the MANUAL AF/MF button again.≥ You can also restore the auto focusing
by pressing the AUTO button.
Manual focus adjustment
MNL
4/44/4 NEXTNEXT4/4 NEXT
MNL
4/44/4 NEXTNEXT4/4 NEXT
VQT1E14(EB_GC_ENG).book 55 ページ 2007年2月28日 水曜日 午後2時23分
56VQT1E14
Recording
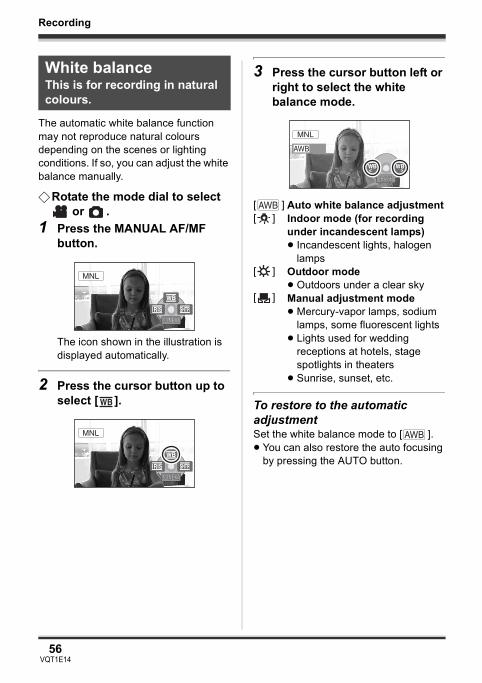
The automatic white balance function may not reproduce natural colours depending on the scenes or lighting conditions. If so, you can adjust the white balance manually.
¬Rotate the mode dial to select or .
1 Press the MANUAL AF/MF button.
The icon shown in the illustration is displayed automatically.
2 Press the cursor button up to select [ ].
3 Press the cursor button left or right to select the white balance mode.
To restore to the automatic adjustmentSet the white balance mode to [ ].≥ You can also restore the auto focusing
by pressing the AUTO button.
White balanceThis is for recording in natural colours.
MNL
3/33/3 NEXTNEXT3/3 NEXT
MNL
3/33/3 NEXTNEXT3/3 NEXT
[ ] Auto white balance adjustment[ ] Indoor mode (for recording
under incandescent lamps)≥ Incandescent lights, halogen
lamps[ ] Outdoor mode
≥ Outdoors under a clear sky[ ] Manual adjustment mode
≥ Mercury-vapor lamps, sodium lamps, some fluorescent lights
≥ Lights used for wedding receptions at hotels, stage spotlights in theaters
≥ Sunrise, sunset, etc.
MNL
BACKBACKBACK
AWB
AWB
VQT1E14(EB_GC_ENG).book 56 ページ 2007年2月28日 水曜日 午後2時23分
57VQT1E14
Recording
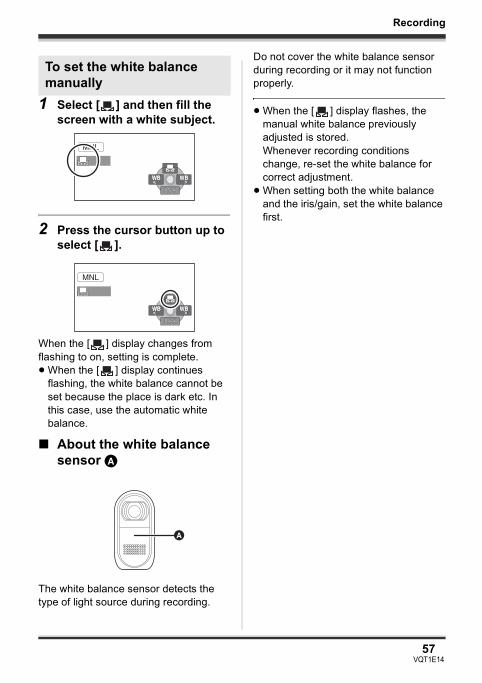
1 Select [ ] and then fill the screen with a white subject.
2 Press the cursor button up to select [ ].
When the [ ] display changes from flashing to on, setting is complete.≥ When the [ ] display continues
flashing, the white balance cannot be set because the place is dark etc. In this case, use the automatic white balance.
∫ About the white balance sensor A
The white balance sensor detects the type of light source during recording.
Do not cover the white balance sensor during recording or it may not function properly.
≥ When the [ ] display flashes, the manual white balance previously adjusted is stored.Whenever recording conditions change, re-set the white balance for correct adjustment.
≥ When setting both the white balance and the iris/gain, set the white balance first.
To set the white balance manually
MNL
BACKBACKBACKBACK
MNL
BACKBACKBACK
A
VQT1E14(EB_GC_ENG).book 57 ページ 2007年2月28日 水曜日 午後2時23分
58VQT1E14
Recording
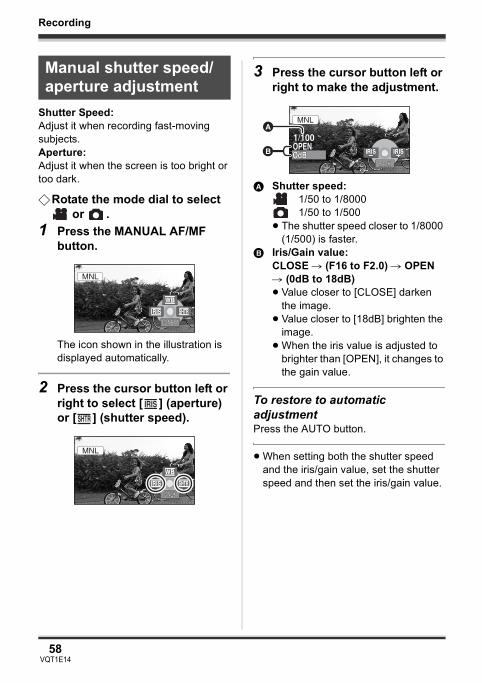
Shutter Speed:Adjust it when recording fast-moving subjects. Aperture:Adjust it when the screen is too bright or too dark.
¬Rotate the mode dial to select or .
1 Press the MANUAL AF/MF button.
The icon shown in the illustration is displayed automatically.
2 Press the cursor button left or right to select [ ] (aperture) or [ ] (shutter speed).
3 Press the cursor button left or right to make the adjustment.
A Shutter speed:1/50 to 1/80001/50 to 1/500
≥ The shutter speed closer to 1/8000 (1/500) is faster.
B Iris/Gain value:CLOSE # (F16 to F2.0) # OPEN # (0dB to 18dB)≥ Value closer to [CLOSE] darken
the image. ≥ Value closer to [18dB] brighten the
image.≥ When the iris value is adjusted to
brighter than [OPEN], it changes to the gain value.
To restore to automatic adjustmentPress the AUTO button.
≥ When setting both the shutter speed and the iris/gain value, set the shutter speed and then set the iris/gain value.
Manual shutter speed/aperture adjustment
MNL
3/33/3 NEXTNEXT3/3 NEXT
MNL
3/33/3 NEXTNEXT3/3 NEXT
OPENOPEN1/1001001/100OPEN
MNL
BACKBACKBACK
A
B
VQT1E14(EB_GC_ENG).book 58 ページ 2007年2月28日 水曜日 午後2時23分
59VQT1E14
Recording
∫ Manual shutter speed adjustment
≥ Avoid recording under fluorescent light, mercury light or sodium light because the colour and brightness of the playback image may change.
≥ If you increase the shutter speed manually, the gain value will increase automatically depending on how much the sensitivity lowers and the noise on the screen may increase.
≥ You may see vertical lines of light in the playback image of a brightly shining subject or highly reflective subject, but this is not a malfunction.
≥ During normal playback, image movement may not look smooth.
≥ When recording in an extremely bright place, the screen may change colour or flicker. If so adjust the shutter speed manually to [1/50] or [1/100].
∫ Manual iris/gain adjustment
≥ If the gain value is increased, the noise on the screen increases.
≥ Depending on the zoom magnification, there are iris values that are not displayed.
VQT1E14(EB_GC_ENG).book 59 ページ 2007年2月28日 水曜日 午後2時23分
Playback
60VQT1E14
Playback
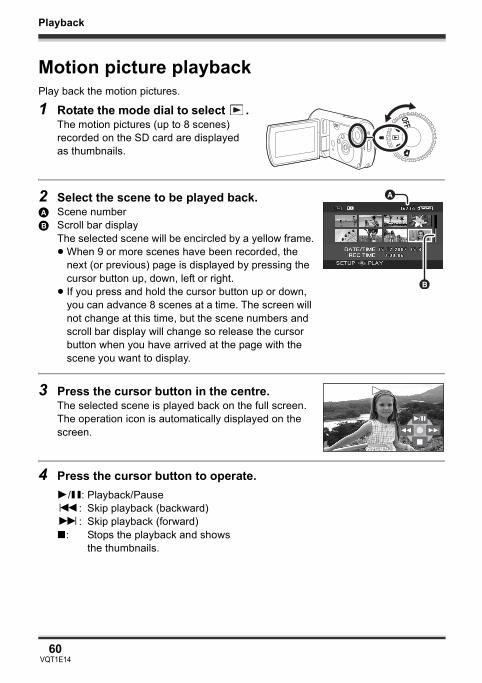
Motion picture playbackPlay back the motion pictures.
1 Rotate the mode dial to select .The motion pictures (up to 8 scenes) recorded on the SD card are displayed as thumbnails.
2 Select the scene to be played back.A Scene numberB Scroll bar display
The selected scene will be encircled by a yellow frame.≥ When 9 or more scenes have been recorded, the
next (or previous) page is displayed by pressing the cursor button up, down, left or right.
≥ If you press and hold the cursor button up or down, you can advance 8 scenes at a time. The screen will not change at this time, but the scene numbers and scroll bar display will change so release the cursor button when you have arrived at the page with the scene you want to display.
3 Press the cursor button in the centre.The selected scene is played back on the full screen.The operation icon is automatically displayed on the screen.
4 Press the cursor button to operate.1/;: Playback/Pause:: Skip playback (backward)9: Skip playback (forward)∫: Stops the playback and shows
the thumbnails.
A
B
VQT1E14(EB_GC_ENG).book 60 ページ 2007年2月28日 水曜日 午後2時23分
Playback
61VQT1E14
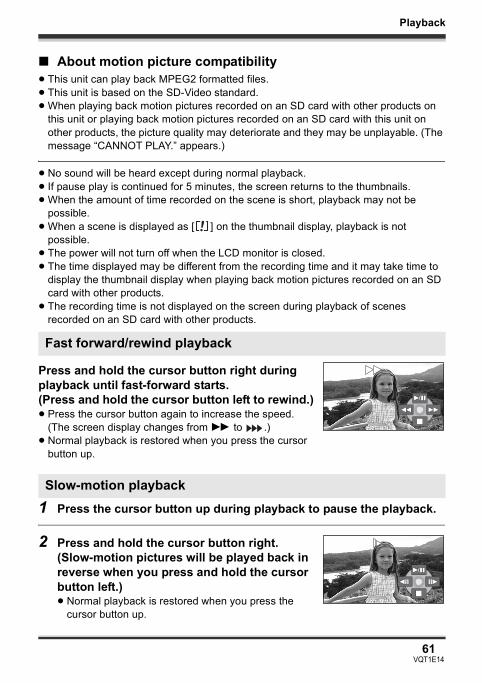
∫ About motion picture compatibility≥ This unit can play back MPEG2 formatted files.≥ This unit is based on the SD-Video standard.≥ When playing back motion pictures recorded on an SD card with other products on
this unit or playing back motion pictures recorded on an SD card with this unit on other products, the picture quality may deteriorate and they may be unplayable. (The message “CANNOT PLAY.” appears.)
≥ No sound will be heard except during normal playback.≥ If pause play is continued for 5 minutes, the screen returns to the thumbnails.≥ When the amount of time recorded on the scene is short, playback may not be
possible.≥ When a scene is displayed as [ ] on the thumbnail display, playback is not
possible.≥ The power will not turn off when the LCD monitor is closed.≥ The time displayed may be different from the recording time and it may take time to
display the thumbnail display when playing back motion pictures recorded on an SD card with other products.
≥ The recording time is not displayed on the screen during playback of scenes recorded on an SD card with other products.
Press and hold the cursor button right during playback until fast-forward starts.(Press and hold the cursor button left to rewind.)≥ Press the cursor button again to increase the speed.
(The screen display changes from 5 to .)≥ Normal playback is restored when you press the cursor
button up.
1 Press the cursor button up during playback to pause the playback.
2 Press and hold the cursor button right.(Slow-motion pictures will be played back in reverse when you press and hold the cursor button left.)≥ Normal playback is restored when you press the
cursor button up.
Fast forward/rewind playback
Slow-motion playback
VQT1E14(EB_GC_ENG).book 61 ページ 2007年2月28日 水曜日 午後2時23分
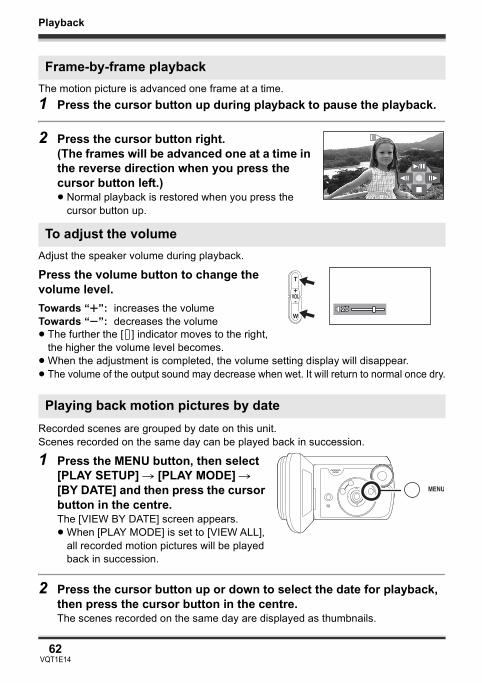
Playback
62VQT1E14
The motion picture is advanced one frame at a time.1 Press the cursor button up during playback to pause the playback.
2 Press the cursor button right. (The frames will be advanced one at a time in the reverse direction when you press the cursor button left.)≥ Normal playback is restored when you press the
cursor button up.
Adjust the speaker volume during playback.
Press the volume button to change the volume level.
≥ The further the [ ] indicator moves to the right, the higher the volume level becomes.
≥ When the adjustment is completed, the volume setting display will disappear.≥ The volume of the output sound may decrease when wet. It will return to normal once dry.
Recorded scenes are grouped by date on this unit.Scenes recorded on the same day can be played back in succession.
1 Press the MENU button, then select [PLAY SETUP] # [PLAY MODE] # [BY DATE] and then press the cursor button in the centre.The [VIEW BY DATE] screen appears.≥ When [PLAY MODE] is set to [VIEW ALL],
all recorded motion pictures will be played back in succession.
2 Press the cursor button up or down to select the date for playback, then press the cursor button in the centre.The scenes recorded on the same day are displayed as thumbnails.
Frame-by-frame playback
To adjust the volume
Towards “r”: increases the volumeTowards “s”: decreases the volume
Playing back motion pictures by date
VQT1E14(EB_GC_ENG).book 62 ページ 2007年2月28日 水曜日 午後2時23分

Playback
63VQT1E14
3 Select the scene to be played back.
≥ The playback setting returns to [VIEW ALL] if the unit is turned off or the mode dial is operated.
≥ Even if scenes are recorded on the same day, they are grouped separately when the number of scenes exceeds 99.
If playback of a scene is stopped halfway, the playback can be resumed from where it was stopped.
Press the MENU button, then select [PLAY SETUP] # [RESUME PLAY] # [ON] and then press the cursor button in the centre.If playback of a motion picture is stopped, [R] appears on the thumbnail view of the stopped scene.
≥ The resume position memorised is cleared if you operate the mode dial, etc. (The [RESUME PLAY] setting is kept.)
≥ [RESUME PLAY] is set to [OFF] if an SD card with the write protection switch at the LOCK position is inserted. (l 17)
Resuming the previous playback
VQT1E14(EB_GC_ENG).book 63 ページ 2007年2月28日 水曜日 午後2時23分
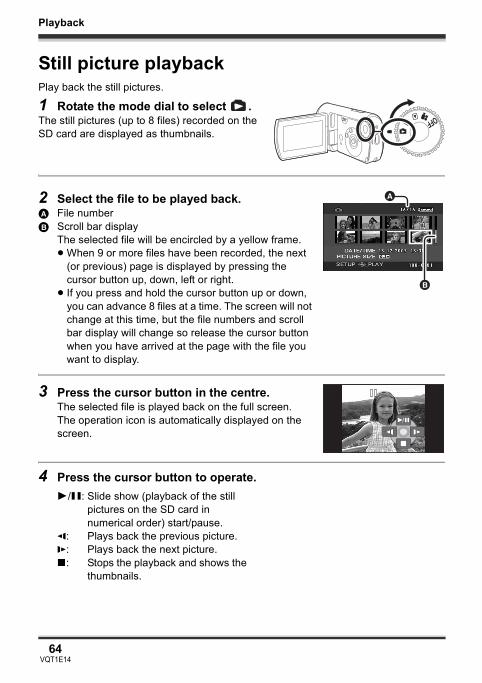
Playback
64VQT1E14
Still picture playbackPlay back the still pictures.
1 Rotate the mode dial to select .The still pictures (up to 8 files) recorded on the SD card are displayed as thumbnails.
2 Select the file to be played back.A File numberB Scroll bar display
The selected file will be encircled by a yellow frame.≥ When 9 or more files have been recorded, the next
(or previous) page is displayed by pressing the cursor button up, down, left or right.
≥ If you press and hold the cursor button up or down, you can advance 8 files at a time. The screen will not change at this time, but the file numbers and scroll bar display will change so release the cursor button when you have arrived at the page with the file you want to display.
3 Press the cursor button in the centre.The selected file is played back on the full screen.The operation icon is automatically displayed on the screen.
4 Press the cursor button to operate.1/;: Slide show (playback of the still
pictures on the SD card in numerical order) start/pause.
E: Plays back the previous picture.D: Plays back the next picture.∫: Stops the playback and shows the
thumbnails.
A
B
VQT1E14(EB_GC_ENG).book 64 ページ 2007年2月28日 水曜日 午後2時23分
Playback
65VQT1E14
∫ About still picture compatibility≥ This unit is compliant with the unified standard DCF (Design rule for Camera File
system) established by JEITA (Japan Electronics and Information Technology Industries Association).
≥ The file format supported by this unit is JPEG. (Not all JPEG formatted files will be played back.)
≥ If a non-standard file is played back, the folder/file number may not be displayed.≥ This unit may degrade or not play back data recorded or created on another product
and another product may degrade or not play back data recorded on this unit.
≥ Do not operate the mode dial during the slide show.≥ If pause play is continued for 5 minutes, the screen returns to the thumbnails.≥ While this unit accesses the SD card (the access lamp is lit), do not remove the SD
card.≥ It takes time to display the file depending on the number of pixels of the file.≥ When a file is displayed as [ ] on the thumbnail display, playback is not possible.≥ If you attempt to play back file recorded in a different format or file data is defective,
an error message may appear.≥ The time displayed may be different from the recording time and it may take time to
display the thumbnail display when playing back still pictures recorded on an SD card with other products.
≥ The power will not turn off when the LCD monitor is closed.
VQT1E14(EB_GC_ENG).book 65 ページ 2007年2月28日 水曜日 午後2時23分
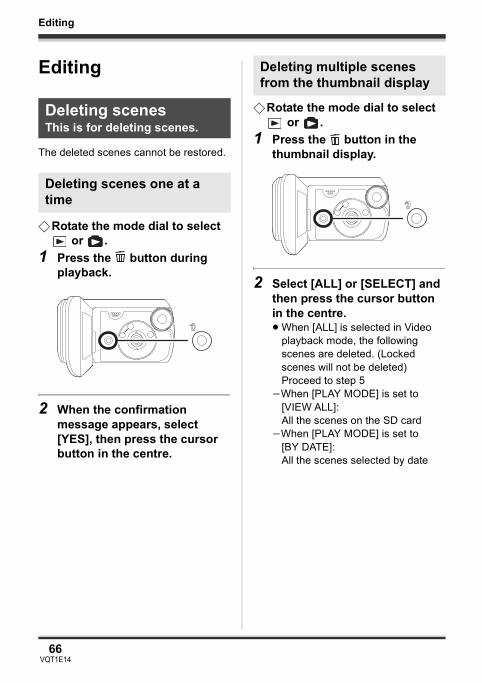
66VQT1E14
Editing
Editing
Editing
The deleted scenes cannot be restored.
¬Rotate the mode dial to select or .
1 Press the button during playback.
2 When the confirmation message appears, select [YES], then press the cursor button in the centre.
¬Rotate the mode dial to select or .
1 Press the button in the thumbnail display.
2 Select [ALL] or [SELECT] and then press the cursor button in the centre.≥ When [ALL] is selected in Video
playback mode, the following scenes are deleted. (Locked scenes will not be deleted) Proceed to step 5
jWhen [PLAY MODE] is set to [VIEW ALL]:All the scenes on the SD card
jWhen [PLAY MODE] is set to [BY DATE]:All the scenes selected by date
Deleting scenesThis is for deleting scenes.
Deleting scenes one at a time
Deleting multiple scenes from the thumbnail display
VQT1E14(EB_GC_ENG).book 66 ページ 2007年2月28日 水曜日 午後2時23分
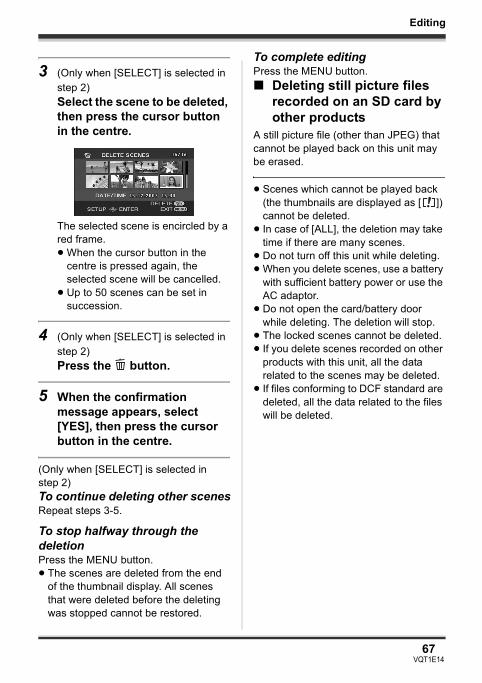
67VQT1E14
Editing
3 (Only when [SELECT] is selected in step 2)Select the scene to be deleted, then press the cursor button in the centre.
The selected scene is encircled by a red frame.≥ When the cursor button in the
centre is pressed again, the selected scene will be cancelled.
≥ Up to 50 scenes can be set in succession.
4 (Only when [SELECT] is selected in step 2)Press the button.
5 When the confirmation message appears, select [YES], then press the cursor button in the centre.
(Only when [SELECT] is selected in step 2)To continue deleting other scenesRepeat steps 3-5.
To stop halfway through the deletionPress the MENU button.≥ The scenes are deleted from the end
of the thumbnail display. All scenes that were deleted before the deleting was stopped cannot be restored.
To complete editingPress the MENU button.∫ Deleting still picture files
recorded on an SD card by other products
A still picture file (other than JPEG) that cannot be played back on this unit may be erased.
≥ Scenes which cannot be played back (the thumbnails are displayed as [ ]) cannot be deleted.
≥ In case of [ALL], the deletion may take time if there are many scenes.
≥ Do not turn off this unit while deleting.≥ When you delete scenes, use a battery
with sufficient battery power or use the AC adaptor.
≥ Do not open the card/battery door while deleting. The deletion will stop.
≥ The locked scenes cannot be deleted.≥ If you delete scenes recorded on other
products with this unit, all the data related to the scenes may be deleted.
≥ If files conforming to DCF standard are deleted, all the data related to the files will be deleted.
VQT1E14(EB_GC_ENG).book 67 ページ 2007年2月28日 水曜日 午後2時23分
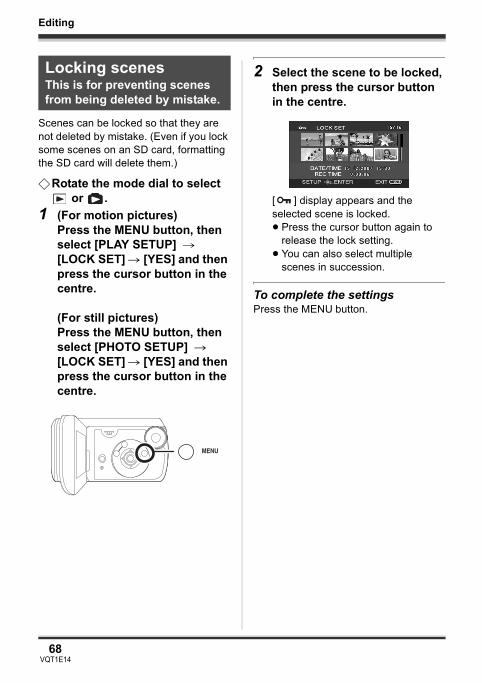
68VQT1E14
Editing
Scenes can be locked so that they are not deleted by mistake. (Even if you lock some scenes on an SD card, formatting the SD card will delete them.)
¬Rotate the mode dial to select or .
1 (For motion pictures)Press the MENU button, then select [PLAY SETUP] # [LOCK SET] # [YES] and then press the cursor button in the centre.
(For still pictures)Press the MENU button, then select [PHOTO SETUP] # [LOCK SET] # [YES] and then press the cursor button in the centre.
2 Select the scene to be locked, then press the cursor button in the centre.
[ ] display appears and the selected scene is locked.≥ Press the cursor button again to
release the lock setting.≥ You can also select multiple
scenes in succession.
To complete the settingsPress the MENU button.
Locking scenesThis is for preventing scenes from being deleted by mistake.
VQT1E14(EB_GC_ENG).book 68 ページ 2007年2月28日 水曜日 午後2時23分

69VQT1E14
Editing
You can write the data of the still pictures to be printed and the number of prints (DPOF data) onto the SD card.
¬Rotate the mode dial to select .
1 Press the MENU button, then select [PHOTO SETUP] # [DPOF SET] # [SET] and then press the cursor button in the centre.
2 Select the file to be set, then press the cursor button in the centre.
The number of prints set to be in DPOF is displayed.
3 Press the cursor button up or down to select the number of prints, then press the cursor button in the centre.
≥ You can select from 0 to 999. (The selected number of pictures can be printed with the printer supporting DPOF.)
≥ To cancel the setting, set the number of prints to [0].
≥ You can also select multiple files in succession.
To complete the settingsPress the MENU button.
To cancel all DPOF settingsPress the MENU button, then select [PHOTO SETUP] # [DPOF SET] # [CANCEL ALL] and then press the cursor button in the centre.≥ When the confirmation message
appears, select [YES], then press the cursor button in the centre.
∫ What is DPOF?DPOF stands for Digital Print Order Format. This enables picture printing information to be written onto an SD card so that it can be used on a system supporting DPOF.
≥ The DPOF setting can be established for up to 999 files.
≥ DPOF setting made on other devices may not be recognised by this unit. Please perform the DPOF settings on this unit.
≥ You cannot add the recording date to pictures to be printed with the DPOF settings.
DPOF settingThis is for writing the printing data on an SD card.
VQT1E14(EB_GC_ENG).book 69 ページ 2007年2月28日 水曜日 午後2時23分
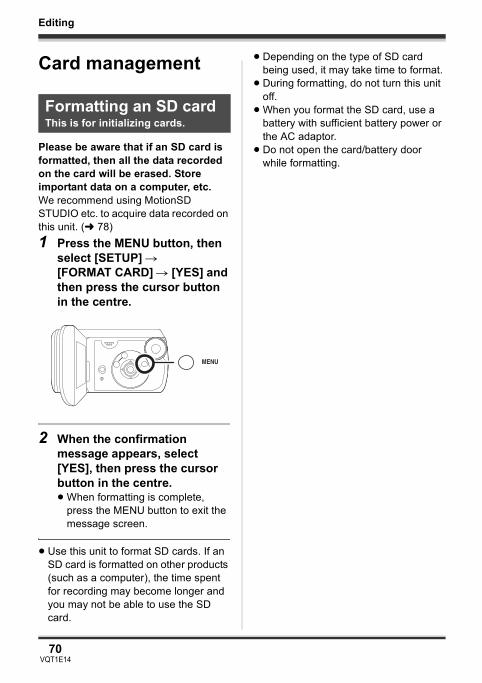
70VQT1E14
Editing
Card management
Please be aware that if an SD card is formatted, then all the data recorded on the card will be erased. Store important data on a computer, etc.We recommend using MotionSD STUDIO etc. to acquire data recorded on this unit. (l 78)1 Press the MENU button, then
select [SETUP] # [FORMAT CARD] # [YES] and then press the cursor button in the centre.
2 When the confirmation message appears, select [YES], then press the cursor button in the centre.≥ When formatting is complete,
press the MENU button to exit the message screen.
≥ Use this unit to format SD cards. If an SD card is formatted on other products (such as a computer), the time spent for recording may become longer and you may not be able to use the SD card.
≥ Depending on the type of SD card being used, it may take time to format.
≥ During formatting, do not turn this unit off.
≥ When you format the SD card, use a battery with sufficient battery power or the AC adaptor.
≥ Do not open the card/battery door while formatting.
Formatting an SD cardThis is for initializing cards.
VQT1E14(EB_GC_ENG).book 70 ページ 2007年2月28日 水曜日 午後2時23分

71VQT1E14
With other products
With other products
With a TV
The motion pictures and still pictures recorded by this unit can be played back on a TV.≥ Use the AC adaptor to free you from
worrying about the battery running down.
1 Slide the terminal cover lock to OPEN and then open the terminal cover.
2 Connect this unit to the TV.
A AV cable (supplied)≥ Insert the plugs as far as they will
go.≥ Do not use any other AV cables
except the supplied one.≥ If your TV is not equipped with AV
Input Sockets, the 21-pin Adaptor B (optional) is necessary. Consult your dealer.
3 Rotate the mode dial to select or .
4 Change the input channel on the TV.
Playback on TV
VIDEO IN
AUDIO IN
A
B
VQT1E14(EB_GC_ENG).book 71 ページ 2007年2月28日 水曜日 午後2時23分

72VQT1E14
With other products
≥ The channel set will differ depending on the terminal to which the unit is connected.
5 Start playback on this unit.The image and audio are output on the TV.
∫ If the image or audio from this unit is not output on the TV
≥ Check that the plugs are inserted as far as they go.
≥ Check the connected terminal.≥ Check the TV’s input setting (input
switch). (For more information, please read the operating instructions for the TV.)
≥ If you have a TV with an SD card slot, the motion pictures and still pictures recorded on the SD card maybe played back on the TV. (Refer to the operating instructions of the TV for details about TV compatibility.)
≥ If the images are not displayed correctly on a wide-screen TV, adjust the aspect setting on the TV. (Refer to the operating instructions of the TV for details.) If the pictures are displayed squeezed horizontally on a regular TV (4:3), change the [TV ASPECT] setting on this unit.
∫ To watch images with a 16:9 aspect ratio on a regular TV (4:3)
When playing back motion pictures recorded with a 16:9 aspect ratio ([REC ASPECT] was set to [16:9]) on a TV with a 4:3 aspect ratio, the images may be squeezed horizontally. In this
case, change the menu setting to play back the pictures in the original aspect ratio. (Depending on the TV setting, the pictures may not be displayed correctly. For more information, please read the operating instructions of your TV.)Press the MENU button, then select [SETUP] # [TV ASPECT] # [4:3] and then press the cursor button in the centre.Example of images with a 16:9 aspect ratio on a regular TV (4:3)
≥ This function’s default setting is [16:9].
∫ To display the on-screen information on the TV screen
The information displayed on the screen (operation icon, time code, etc.) can be displayed on the TV.Press the MENU button, then select [SETUP] # [EXT. DISPLAY] # [ON] and then press the cursor button in the centre.≥ Set [SETUP] # [EXT. DISPLAY] #
[OFF] to erase the information.≥ The screen on this unit will not change.
[TV ASPECT] setting
[16:9] [4:3]
VQT1E14(EB_GC_ENG).book 72 ページ 2007年2月28日 水曜日 午後2時23分
73VQT1E14
With other products
With a DVD recorder
If you have a DVD recorder with an SD card slot, images recorded by this unit can be copied (dubbed) onto the hard disk or a DVD disc.Refer to the operating instructions of your DVD recorder for information about whether or not it supports copying (dubbing) from an SD card.≥ If your DVD recorder does not support
copying (dubbing) from an SD card, connect this unit and the DVD recorder with the AV cable (supplied) and then copy (dub). (l 74)
Insert the SD card into the SD card slot on the DVD recorder, then copy (dub) the contents onto the hard disk or a disc.≥ For details on how to copy (dub) the
images, refer to the operating instructions of the DVD recorder.
≥ The images recorded on the hard disk or DVD-RAM are converted to the DVD video recording format. Once converted, you cannot copy them at high speed onto a DVD-R or copy them onto an SD card using the MPEG2 format.
Copying (dubbing) recordings onto a DVD recorder
If you record (dub) images directly from the SD card or with the AV cable and then play them back on a wide-screen TV, they may be squeezed horizontally. In this case, refer to the operating instructions of the device you are recording (dubbing) to or read the operating instructions of the wide-screen TV and set the aspect setting to 16:9 (Full).
VQT1E14(EB_GC_ENG).book 73 ページ 2007年2月28日 水曜日 午後2時23分
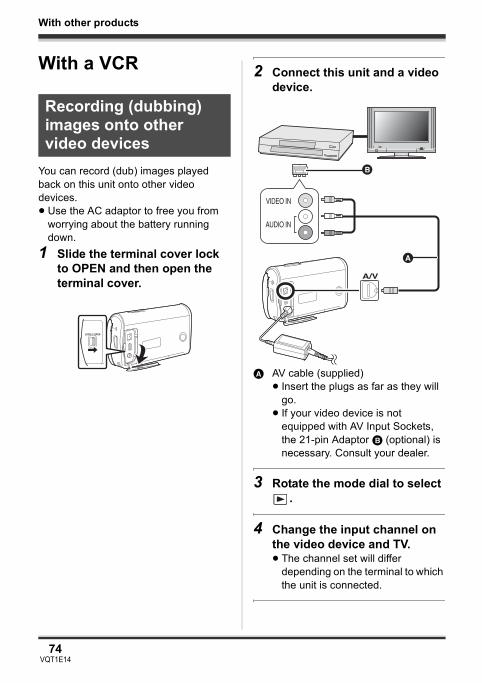
74VQT1E14
With other products
With a VCR
You can record (dub) images played back on this unit onto other video devices.≥ Use the AC adaptor to free you from
worrying about the battery running down.
1 Slide the terminal cover lock to OPEN and then open the terminal cover.
2 Connect this unit and a video device.
A AV cable (supplied)≥ Insert the plugs as far as they will
go.≥ If your video device is not
equipped with AV Input Sockets, the 21-pin Adaptor B (optional) is necessary. Consult your dealer.
3 Rotate the mode dial to select .
4 Change the input channel on the video device and TV.≥ The channel set will differ
depending on the terminal to which the unit is connected.
Recording (dubbing) images onto other video devices
VIDEO IN
AUDIO IN
A
B
VQT1E14(EB_GC_ENG).book 74 ページ 2007年2月28日 水曜日 午後2時23分
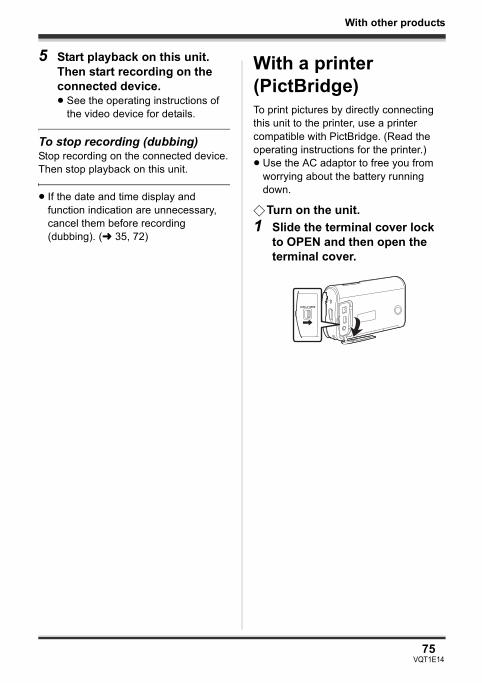
75VQT1E14
With other products
5 Start playback on this unit.Then start recording on the connected device.≥ See the operating instructions of
the video device for details.
To stop recording (dubbing)Stop recording on the connected device.Then stop playback on this unit.
≥ If the date and time display and function indication are unnecessary, cancel them before recording (dubbing). (l 35, 72)
With a printer (PictBridge)To print pictures by directly connecting this unit to the printer, use a printer compatible with PictBridge. (Read the operating instructions for the printer.) ≥ Use the AC adaptor to free you from
worrying about the battery running down.
¬Turn on the unit.1 Slide the terminal cover lock
to OPEN and then open the terminal cover.
VQT1E14(EB_GC_ENG).book 75 ページ 2007年2月28日 水曜日 午後2時23分
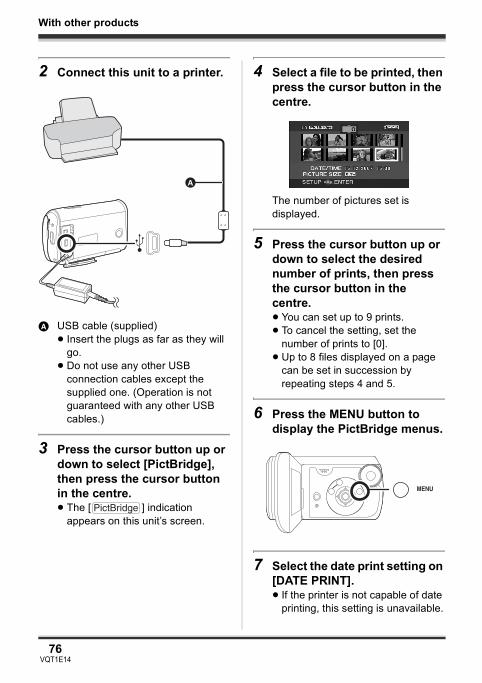
76VQT1E14
With other products
2 Connect this unit to a printer.
A USB cable (supplied)≥ Insert the plugs as far as they will
go.≥ Do not use any other USB
connection cables except the supplied one. (Operation is not guaranteed with any other USB cables.)
3 Press the cursor button up or down to select [PictBridge], then press the cursor button in the centre.≥ The [ ] indication
appears on this unit’s screen.
4 Select a file to be printed, then press the cursor button in the centre.
The number of pictures set is displayed.
5 Press the cursor button up or down to select the desired number of prints, then press the cursor button in the centre.≥ You can set up to 9 prints.≥ To cancel the setting, set the
number of prints to [0].≥ Up to 8 files displayed on a page
can be set in succession by repeating steps 4 and 5.
6 Press the MENU button to display the PictBridge menus.
7 Select the date print setting on [DATE PRINT].≥ If the printer is not capable of date
printing, this setting is unavailable.
A
VQT1E14(EB_GC_ENG).book 76 ページ 2007年2月28日 水曜日 午後2時23分
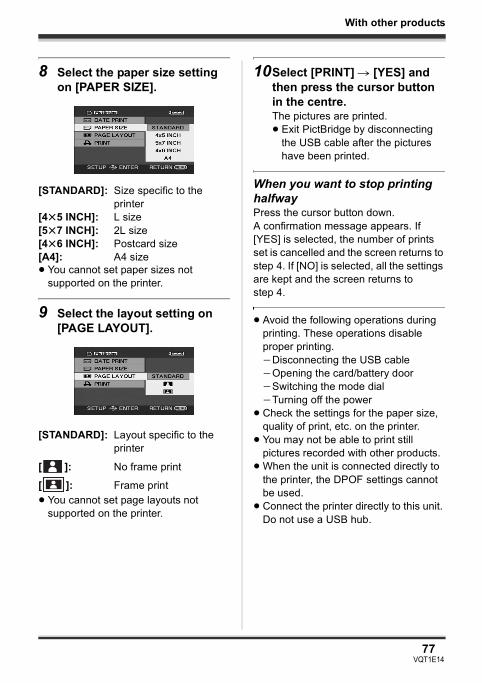
77VQT1E14
With other products
8 Select the paper size setting on [PAPER SIZE].
≥ You cannot set paper sizes not supported on the printer.
9 Select the layout setting on [PAGE LAYOUT].
≥ You cannot set page layouts not supported on the printer.
10Select [PRINT] # [YES] and then press the cursor button in the centre.The pictures are printed.≥ Exit PictBridge by disconnecting
the USB cable after the pictures have been printed.
When you want to stop printing halfwayPress the cursor button down.A confirmation message appears. If [YES] is selected, the number of prints set is cancelled and the screen returns to step 4. If [NO] is selected, all the settings are kept and the screen returns to step 4.
≥ Avoid the following operations during printing. These operations disable proper printing. jDisconnecting the USB cablejOpening the card/battery doorjSwitching the mode dialjTurning off the power
≥ Check the settings for the paper size, quality of print, etc. on the printer.
≥ You may not be able to print still pictures recorded with other products.
≥ When the unit is connected directly to the printer, the DPOF settings cannot be used.
≥ Connect the printer directly to this unit. Do not use a USB hub.
[STANDARD]: Size specific to the printer
[4t5 INCH]: L size[5t7 INCH]: 2L size[4t6 INCH]: Postcard size[A4]: A4 size
[STANDARD]: Layout specific to the printer
[ ]: No frame print
[ ]: Frame print
VQT1E14(EB_GC_ENG).book 77 ページ 2007年2月28日 水曜日 午後2時23分
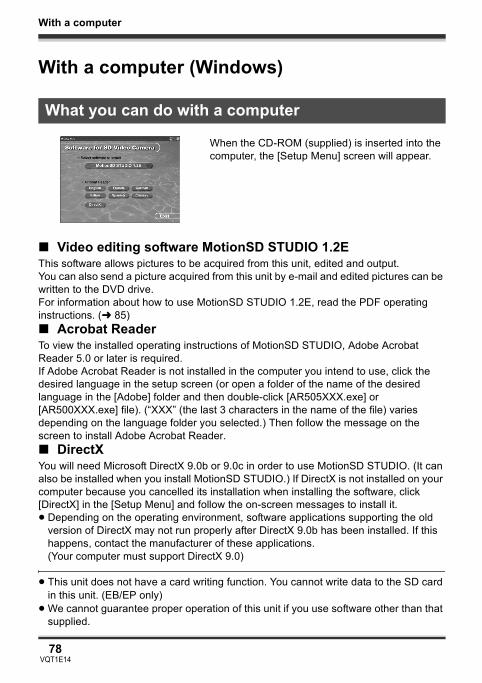
With a computer
78VQT1E14
With a computer
With a computer (Windows)
When the CD-ROM (supplied) is inserted into the computer, the [Setup Menu] screen will appear.
∫ Video editing software MotionSD STUDIO 1.2EThis software allows pictures to be acquired from this unit, edited and output.You can also send a picture acquired from this unit by e-mail and edited pictures can be written to the DVD drive.For information about how to use MotionSD STUDIO 1.2E, read the PDF operating instructions. (l 85)∫ Acrobat ReaderTo view the installed operating instructions of MotionSD STUDIO, Adobe Acrobat Reader 5.0 or later is required.If Adobe Acrobat Reader is not installed in the computer you intend to use, click the desired language in the setup screen (or open a folder of the name of the desired language in the [Adobe] folder and then double-click [AR505XXX.exe] or [AR500XXX.exe] file). (“XXX” (the last 3 characters in the name of the file) varies depending on the language folder you selected.) Then follow the message on the screen to install Adobe Acrobat Reader.∫ DirectXYou will need Microsoft DirectX 9.0b or 9.0c in order to use MotionSD STUDIO. (It can also be installed when you install MotionSD STUDIO.) If DirectX is not installed on your computer because you cancelled its installation when installing the software, click [DirectX] in the [Setup Menu] and follow the on-screen messages to install it.≥ Depending on the operating environment, software applications supporting the old
version of DirectX may not run properly after DirectX 9.0b has been installed. If this happens, contact the manufacturer of these applications. (Your computer must support DirectX 9.0)
≥ This unit does not have a card writing function. You cannot write data to the SD card in this unit. (EB/EP only)
≥ We cannot guarantee proper operation of this unit if you use software other than that supplied.
What you can do with a computer
VQT1E14(EB_GC_ENG).book 78 ページ 2007年2月28日 水曜日 午後2時23分
With a computer
79VQT1E14
Before opening the CD-ROM package, please read the following.
End User License AgreementYou (“Licensee”) are granted a license for the Software defined in this End User License Agreement (“Agreement”) on condition that you agree to the terms and conditions of this Agreement. If Licensee does not agree to the terms and conditions of this Agreement, promptly return the Software to Matsushita Electric Industrial Co., Ltd. (“Matsushita”), its distributors or dealers from which you made the purchase.
Article 1 LicenseLicensee is granted the right to use the Software, including the information recorded or described on the CD-ROM, instruction manuals, and any other media provided to Licensee (collectively “Software”), but all applicable rights to patents, copyrights, trademarks and trade secrets in the Software are not transferred to Licensee.
Article 2 Use by a Third PartyLicensee may not use, copy, modify, transfer or allow any third party, whether free of charge or not, to use, copy or modify the Software, except as expressly provided for in this Agreement.
Article 3 Restrictions on Copying the SoftwareLicensee may make a single copy of the Software in whole or in part solely for back-up purpose.
Article 4 ComputerLicensee may use the Software only on one computer, and may not use it on more than one computer.
Article 5 Reverse Engineering, Decompiling or DisassemblyLicensee may not reverse engineer, decompile, or disassemble the Software, except to the extent either of them is permitted under law or regulation of the country where Licensee resides. Matsushita, or its distributors will not be responsible for any defects in the Software or damage to Licensee caused by Licensee’s reverse engineering, decompiling, or disassembly of the Software.
Article 6 IndemnificationThe Software is provided “AS-IS” without warranty of any kind, either expressed or implied, including, but not limited to, warranties of non-infringement, merchantability and/or fitness for a particular purpose. Further, Matsushita does not warrant that the operation of the Software will be uninterrupted or error free. Matsushita or any of its distributors will not be liable for any damage suffered by Licensee arising from or in connection with Licensee’s use of the Software.
Article 7 Export ControlLicensee agrees not to export or re-export to any country the Software in any form without the appropriate export licenses under regulations of the country where Licensee resides, if necessary.
Article 8 Termination of LicenseThe right granted to Licensee hereunder will be automatically terminated if Licensee contravenes any of the terms and conditions of this Agreement. Upon termination hereof, Licensee must destroy the Software and related documentation together with all the copies thereof at Licensee’s own expense.
VQT1E14(EB_GC_ENG).book 79 ページ 2007年2月28日 水曜日 午後2時23分
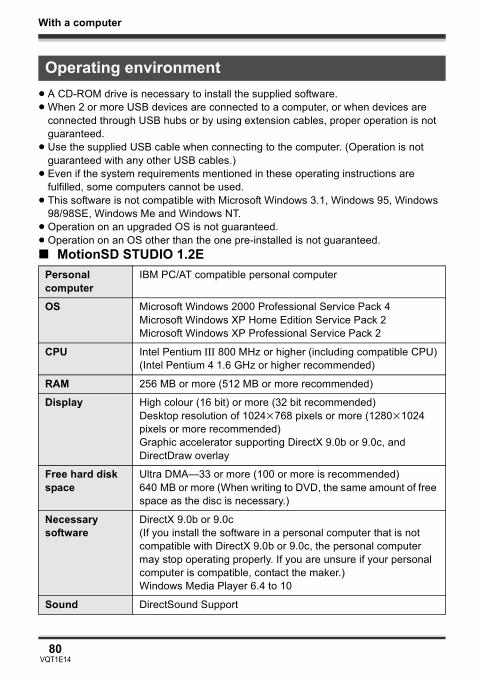
With a computer
80VQT1E14
≥ A CD-ROM drive is necessary to install the supplied software.≥ When 2 or more USB devices are connected to a computer, or when devices are
connected through USB hubs or by using extension cables, proper operation is not guaranteed.
≥ Use the supplied USB cable when connecting to the computer. (Operation is not guaranteed with any other USB cables.)
≥ Even if the system requirements mentioned in these operating instructions are fulfilled, some computers cannot be used.
≥ This software is not compatible with Microsoft Windows 3.1, Windows 95, Windows 98/98SE, Windows Me and Windows NT.
≥ Operation on an upgraded OS is not guaranteed.≥ Operation on an OS other than the one pre-installed is not guaranteed.∫ MotionSD STUDIO 1.2E
Operating environment
Personal computer
IBM PC/AT compatible personal computer
OS Microsoft Windows 2000 Professional Service Pack 4Microsoft Windows XP Home Edition Service Pack 2Microsoft Windows XP Professional Service Pack 2
CPU Intel Pentium III 800 MHz or higher (including compatible CPU)(Intel Pentium 4 1.6 GHz or higher recommended)
RAM 256 MB or more (512 MB or more recommended)
Display High colour (16 bit) or more (32 bit recommended)Desktop resolution of 1024k768 pixels or more (1280k1024 pixels or more recommended)Graphic accelerator supporting DirectX 9.0b or 9.0c, and DirectDraw overlay
Free hard disk space
Ultra DMA—33 or more (100 or more is recommended)640 MB or more (When writing to DVD, the same amount of free space as the disc is necessary.)
Necessary software
DirectX 9.0b or 9.0c(If you install the software in a personal computer that is not compatible with DirectX 9.0b or 9.0c, the personal computer may stop operating properly. If you are unsure if your personal computer is compatible, contact the maker.)Windows Media Player 6.4 to 10
Sound DirectSound Support
VQT1E14(EB_GC_ENG).book 80 ページ 2007年2月28日 水曜日 午後2時23分
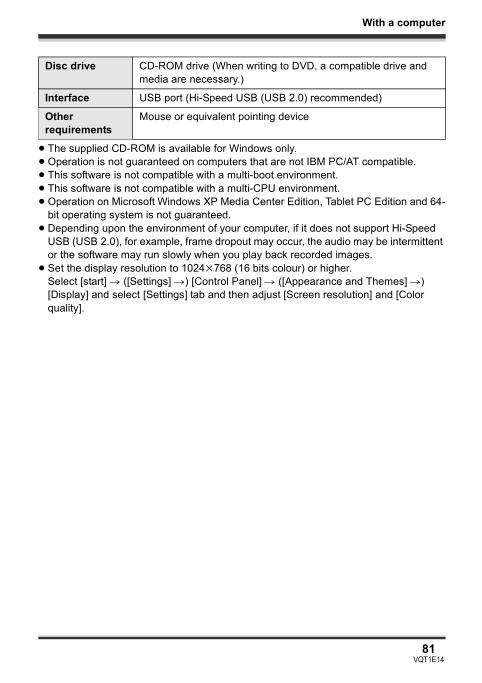
With a computer
81VQT1E14
≥ The supplied CD-ROM is available for Windows only.≥ Operation is not guaranteed on computers that are not IBM PC/AT compatible.≥ This software is not compatible with a multi-boot environment.≥ This software is not compatible with a multi-CPU environment.≥ Operation on Microsoft Windows XP Media Center Edition, Tablet PC Edition and 64-
bit operating system is not guaranteed.≥ Depending upon the environment of your computer, if it does not support Hi-Speed
USB (USB 2.0), for example, frame dropout may occur, the audio may be intermittent or the software may run slowly when you play back recorded images.
≥ Set the display resolution to 1024k768 (16 bits colour) or higher.Select [start] # ([Settings] #) [Control Panel] # ([Appearance and Themes] #) [Display] and select [Settings] tab and then adjust [Screen resolution] and [Color quality].
Disc drive CD-ROM drive (When writing to DVD, a compatible drive and media are necessary.)
Interface USB port (Hi-Speed USB (USB 2.0) recommended)
Other requirements
Mouse or equivalent pointing device
VQT1E14(EB_GC_ENG).book 81 ページ 2007年2月28日 水曜日 午後2時23分
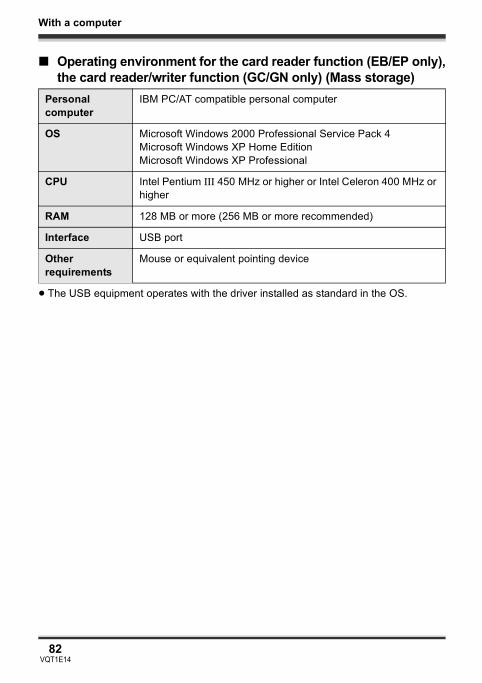
With a computer
82VQT1E14
∫ Operating environment for the card reader function (EB/EP only),the card reader/writer function (GC/GN only) (Mass storage)
≥ The USB equipment operates with the driver installed as standard in the OS.
Personal computer
IBM PC/AT compatible personal computer
OS Microsoft Windows 2000 Professional Service Pack 4Microsoft Windows XP Home EditionMicrosoft Windows XP Professional
CPU Intel Pentium III 450 MHz or higher or Intel Celeron 400 MHz or higher
RAM 128 MB or more (256 MB or more recommended)
Interface USB port
Other requirements
Mouse or equivalent pointing device
VQT1E14(EB_GC_ENG).book 82 ページ 2007年2月28日 水曜日 午後2時23分

83VQT1E14
With a computer
When installing the software, log on to your computer as the Administrator or with a user name with equivalent authorization. (If you do not have authorization to do this, consult your manager.)≥ Before starting the installation, close
any other software applications which are running.
≥ Do not perform any other operations on your computer while the software is being installed.
1 Insert the CD-ROM into the computer.
The [Setup Menu] screen is displayed.≥ If the [Setup Menu] screen is not
displayed, double-click the CD-ROM drive icon containing the CD-ROM in [My Computer].
2 Click [MotionSD STUDIO 1.2E].
≥ The software application may not run properly if you cancel the installation at any point e.g. by pressing [Cancel].
3 Click [Next].
≥ Continue to follow the on-screen messages to install it.
4 Select the video system.
Installing MotionSD STUDIO
VQT1E14(EB_GC_ENG).book 83 ページ 2007年2月28日 水曜日 午後2時23分
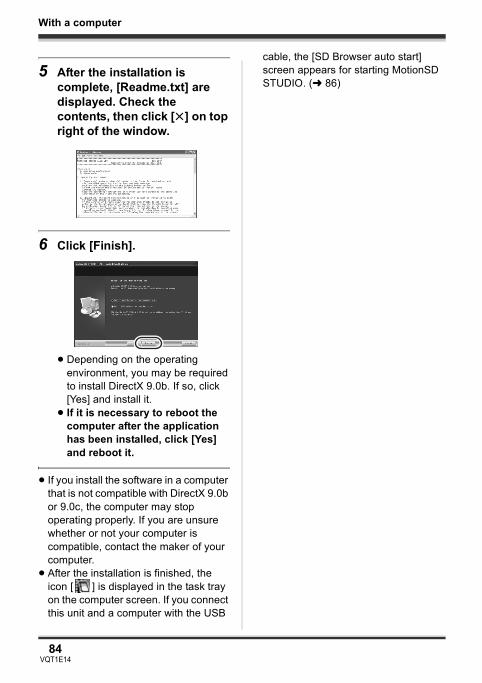
84VQT1E14
With a computer
5 After the installation is complete, [Readme.txt] are displayed. Check the contents, then click [t] on top right of the window.
6 Click [Finish].
≥ Depending on the operating environment, you may be required to install DirectX 9.0b. If so, click [Yes] and install it.
≥ If it is necessary to reboot the computer after the application has been installed, click [Yes] and reboot it.
≥ If you install the software in a computer that is not compatible with DirectX 9.0b or 9.0c, the computer may stop operating properly. If you are unsure whether or not your computer is compatible, contact the maker of your computer.
≥ After the installation is finished, the icon [ ] is displayed in the task tray on the computer screen. If you connect this unit and a computer with the USB
cable, the [SD Browser auto start] screen appears for starting MotionSD STUDIO. (l 86)
VQT1E14(EB_GC_ENG).book 84 ページ 2007年2月28日 水曜日 午後2時23分
85VQT1E14
With a computer
For details on how to use MotionSD STUDIO, read the PDF instructions.Select [start]>[All Programs (Programs)]>[Panasonic]>[MotionSD STUDIO 1.2E]>[Manual].
≥ After starting the software, on the menu select [Help]>[Manual] to display the help files.
≥ You will need Adobe Acrobat Reader 5.0 or later to read the PDF operating instructions. (l 78)
After the software is installed, the unit must be connected to the computer and be correctly recognised by the computer.≥ Connect after installing the software.≥ If the supplied CD-ROM is inserted in
the computer, remove it. (If the installer setup is running, wait until it finishes, then remove the CD-ROM.)
≥ If the recognition procedure is not accomplished properly, operation will not be possible after connecting the unit to the computer.
≥ If the unit fails to operate normally, it may mean that you have not conducted the installation or recognition procedure properly.
1 Slide the terminal cover lock to OPEN and then open the terminal cover.
2 Connect this unit to the AC adaptor and turn on the unit.≥ Be sure to set the mode dial to
OFF when connecting the AC adaptor to this unit.
Reading the MotionSD STUDIO operating instructions
Connection and recognition procedures
VQT1E14(EB_GC_ENG).book 85 ページ 2007年2月28日 水曜日 午後2時23分
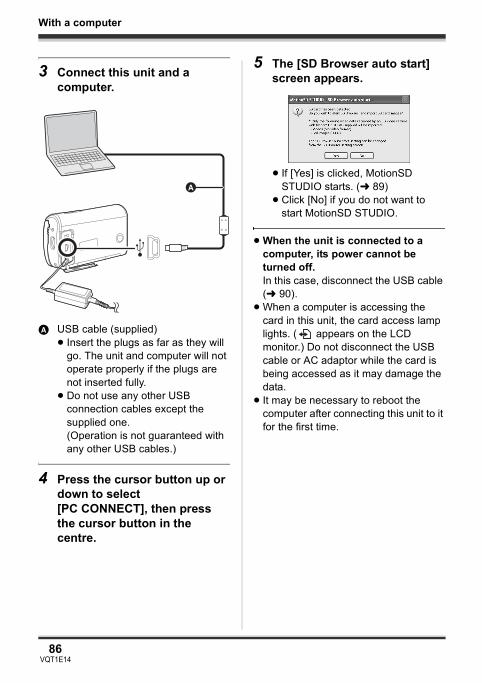
86VQT1E14
With a computer
3 Connect this unit and a computer.
A USB cable (supplied)≥ Insert the plugs as far as they will
go. The unit and computer will not operate properly if the plugs are not inserted fully.
≥ Do not use any other USB connection cables except the supplied one. (Operation is not guaranteed with any other USB cables.)
4 Press the cursor button up or down to select [PC CONNECT], then press the cursor button in the centre.
5 The [SD Browser auto start] screen appears.
≥ If [Yes] is clicked, MotionSD STUDIO starts. (l 89)
≥ Click [No] if you do not want to start MotionSD STUDIO.
≥ When the unit is connected to a computer, its power cannot be turned off.In this case, disconnect the USB cable (l 90).
≥ When a computer is accessing the card in this unit, the card access lamp lights. ( appears on the LCD monitor.) Do not disconnect the USB cable or AC adaptor while the card is being accessed as it may damage the data.
≥ It may be necessary to reboot the computer after connecting this unit to it for the first time.
A
VQT1E14(EB_GC_ENG).book 86 ページ 2007年2月28日 水曜日 午後2時23分
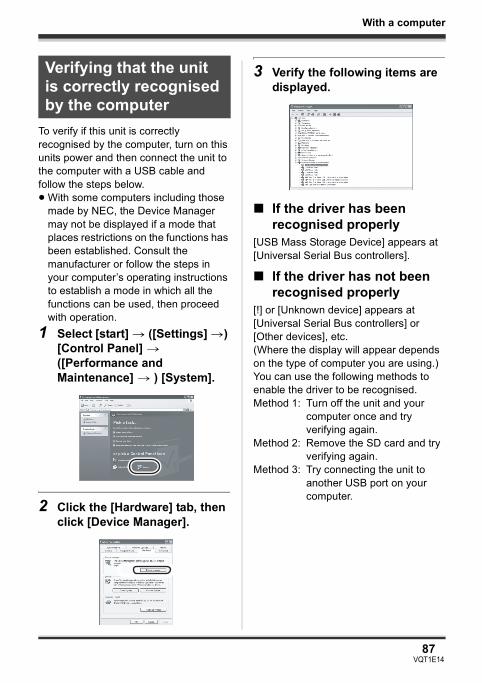
87VQT1E14
With a computer
To verify if this unit is correctly recognised by the computer, turn on this units power and then connect the unit to the computer with a USB cable and follow the steps below.≥ With some computers including those
made by NEC, the Device Manager may not be displayed if a mode that places restrictions on the functions has been established. Consult the manufacturer or follow the steps in your computer’s operating instructions to establish a mode in which all the functions can be used, then proceed with operation.
1 Select [start] > ([Settings] >) [Control Panel] > ([Performance and Maintenance] > ) [System].
2 Click the [Hardware] tab, then click [Device Manager].
3 Verify the following items are displayed.
∫ If the driver has been recognised properly
[USB Mass Storage Device] appears at [Universal Serial Bus controllers].
∫ If the driver has not been recognised properly
[!] or [Unknown device] appears at [Universal Serial Bus controllers] or [Other devices], etc.(Where the display will appear depends on the type of computer you are using.)You can use the following methods to enable the driver to be recognised.Method 1: Turn off the unit and your
computer once and try verifying again.
Method 2: Remove the SD card and try verifying again.
Method 3: Try connecting the unit to another USB port on your computer.
Verifying that the unit is correctly recognised by the computer
VQT1E14(EB_GC_ENG).book 87 ページ 2007年2月28日 水曜日 午後2時23分

88VQT1E14
With a computer
When the unit is connected to a computer, it is recognised as an external drive.
∫ Drive icons[Removable Disk] is displayed in [My Computer].≥ Windows XP:
≥ Windows 2000:
∫ Example folder structure
≥ SD-Video format motion pictures are stored in the [PRG¢¢¢] folder. (“¢¢¢” denotes a number from 001 to 4095.)
≥ Up to 99 files can be recorded in the [PRG¢¢¢] folder.
≥ JPEG format still pictures (IMGA0001.JPG etc.) are stored in the [100CDPFP] folder.These can be opened with picture software that supports JPEG pictures.
≥ Up to 999 files can be recorded in the [100CDPFP] or other such folder.
≥ The DPOF setting files are recorded in the [MISC] folder.
≥ Do not use the computer to delete the SD card’s folders. Otherwise, it may no longer be possible for this unit to read the SD card.
≥ Always use this unit to format SD cards.
≥ When data not supported by this unit has been recorded on a computer, it will not be recognised by this unit.
About the computer display
If you wish to acquire the scenes recorded on this unit using Explorer etc., refer to the operating instructions for MotionSD STUDIO (PDF file).
VQT1E14(EB_GC_ENG).book 88 ページ 2007年2月28日 水曜日 午後2時23分
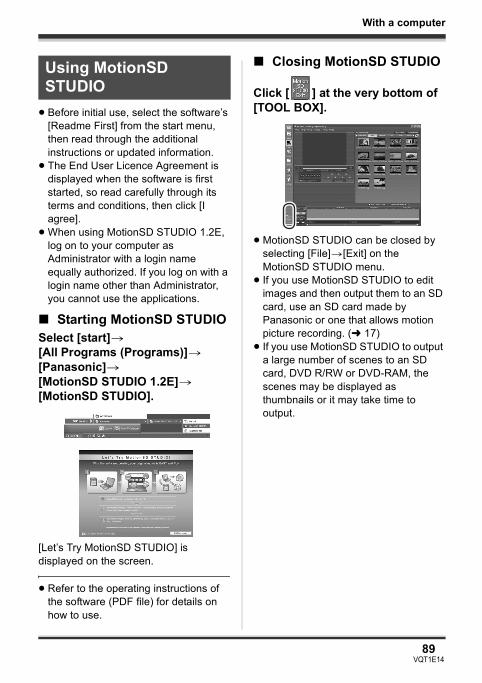
89VQT1E14
With a computer
≥ Before initial use, select the software’s [Readme First] from the start menu, then read through the additional instructions or updated information.
≥ The End User Licence Agreement is displayed when the software is first started, so read carefully through its terms and conditions, then click [I agree].
≥ When using MotionSD STUDIO 1.2E, log on to your computer as Administrator with a login name equally authorized. If you log on with a login name other than Administrator, you cannot use the applications.
∫ Starting MotionSD STUDIOSelect [start]>[All Programs (Programs)]>[Panasonic]>[MotionSD STUDIO 1.2E]>[MotionSD STUDIO].
[Let’s Try MotionSD STUDIO] is displayed on the screen.
≥ Refer to the operating instructions of the software (PDF file) for details on how to use.
∫ Closing MotionSD STUDIO
Click [ ] at the very bottom of [TOOL BOX].
≥ MotionSD STUDIO can be closed by selecting [File]>[Exit] on the MotionSD STUDIO menu.
≥ If you use MotionSD STUDIO to edit images and then output them to an SD card, use an SD card made by Panasonic or one that allows motion picture recording. (l 17)
≥ If you use MotionSD STUDIO to output a large number of scenes to an SD card, DVD R/RW or DVD-RAM, the scenes may be displayed as thumbnails or it may take time to output.
Using MotionSD STUDIO
VQT1E14(EB_GC_ENG).book 89 ページ 2007年2月28日 水曜日 午後2時23分
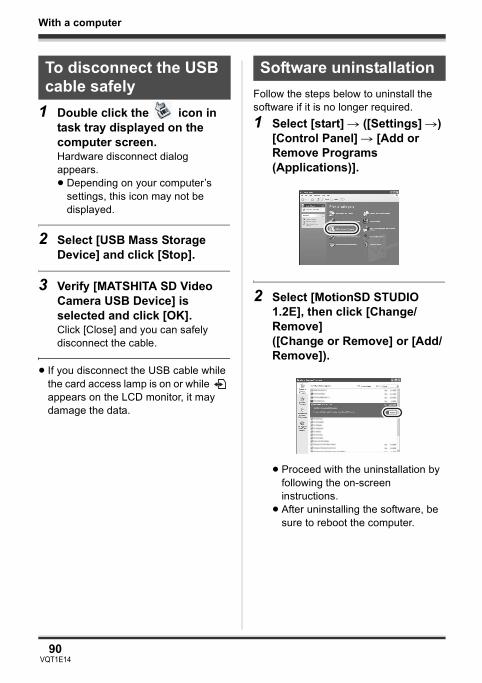
90VQT1E14
With a computer
1 Double click the icon in task tray displayed on the computer screen.Hardware disconnect dialog appears.≥ Depending on your computer’s
settings, this icon may not be displayed.
2 Select [USB Mass Storage Device] and click [Stop].
3 Verify [MATSHITA SD Video Camera USB Device] is selected and click [OK].Click [Close] and you can safely disconnect the cable.
≥ If you disconnect the USB cable while the card access lamp is on or while appears on the LCD monitor, it may damage the data.
Follow the steps below to uninstall the software if it is no longer required.1 Select [start] # ([Settings] #)
[Control Panel] # [Add or Remove Programs (Applications)].
2 Select [MotionSD STUDIO 1.2E], then click [Change/Remove] ([Change or Remove] or [Add/Remove]).
≥ Proceed with the uninstallation by following the on-screen instructions.
≥ After uninstalling the software, be sure to reboot the computer.
To disconnect the USB cable safely
Software uninstallation
VQT1E14(EB_GC_ENG).book 90 ページ 2007年2月28日 水曜日 午後2時23分
With a computer
91VQT1E14
With a computer (Macintosh)
≥ Even if the system requirements mentioned in these operating instructions are fulfilled, some computers cannot be used.
≥ Apple and Mac OS are trademarks of Apple Inc.≥ PowerPC is a trademark of International Business Machines Corporation.≥ Intel® CoreTM Solo and Intel® CoreTM Duo are either registered trademarks or
trademarks of Intel Corporation in the United States and/or other countries.
∫ Operating environment for the card reader function (EB/EP only),the card reader/writer function (GC/GN only) (Mass storage)
≥ Use an OS standard driver for operation.≥ The supplied CD-ROM is only available for Windows.
∫ Copying still pictures onto the computer1 Connect this unit to the personal computer via the supplied USB connection
cable.2 Double-click [NO_NAME] or [Untitled] displayed on the desktop.
≥ Files are stored in [100CDPFP] folder in the [DCIM] folder.3 Using a drag-and-drop operation, move the pictures you want to acquire or
the folder storing those pictures to any different folder on the personal computer.
∫ To disconnect USB cable safelyDrag the [NO_NAME] or [Untitled] icon to the [Trash] and then disconnect the USB connection cable.
Operating environment
Personal computer
Macintosh
OS Mac OS X 10.3 to 10.4CPU PowerPC G3 (400 MHz or higher), PowerPC G4, PowerPC G5
Intel Core Duo, Intel Core SoloRAM 64 MB or moreInterface USB port
VQT1E14(EB_GC_ENG).book 91 ページ 2007年2月28日 水曜日 午後2時23分
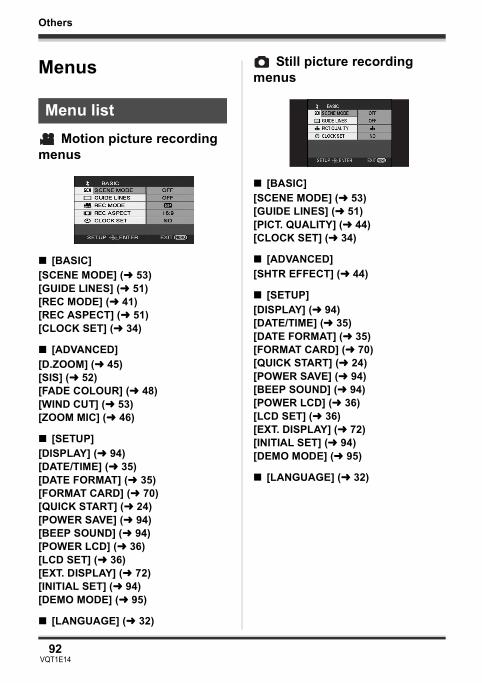
92VQT1E14
Others
Others
Menus
Motion picture recording menus
∫ [BASIC][SCENE MODE] (l 53)[GUIDE LINES] (l 51)[REC MODE] (l 41)[REC ASPECT] (l 51)[CLOCK SET] (l 34)
∫ [ADVANCED][D.ZOOM] (l 45)[SIS] (l 52)[FADE COLOUR] (l 48)[WIND CUT] (l 53)[ZOOM MIC] (l 46)
∫ [SETUP][DISPLAY] (l 94)[DATE/TIME] (l 35)[DATE FORMAT] (l 35)[FORMAT CARD] (l 70)[QUICK START] (l 24)[POWER SAVE] (l 94)[BEEP SOUND] (l 94)[POWER LCD] (l 36)[LCD SET] (l 36)[EXT. DISPLAY] (l 72)[INITIAL SET] (l 94)[DEMO MODE] (l 95)
∫ [LANGUAGE] (l 32)
Still picture recording menus
∫ [BASIC][SCENE MODE] (l 53)[GUIDE LINES] (l 51)[PICT. QUALITY] (l 44)[CLOCK SET] (l 34)
∫ [ADVANCED][SHTR EFFECT] (l 44)
∫ [SETUP][DISPLAY] (l 94)[DATE/TIME] (l 35)[DATE FORMAT] (l 35)[FORMAT CARD] (l 70)[QUICK START] (l 24)[POWER SAVE] (l 94)[BEEP SOUND] (l 94)[POWER LCD] (l 36)[LCD SET] (l 36)[EXT. DISPLAY] (l 72)[INITIAL SET] (l 94)[DEMO MODE] (l 95)
∫ [LANGUAGE] (l 32)
Menu list
VQT1E14(EB_GC_ENG).book 92 ページ 2007年2月28日 水曜日 午後2時23分

93VQT1E14
Others
Motion picture playback menus
∫ [PLAY SETUP][PLAY MODE] (l 62)[RESUME PLAY] (l 63)[LOCK SET] (l 68)
∫ [SETUP][DISPLAY] (l 94)[DATE/TIME] (l 35)[DATE FORMAT] (l 35)[FORMAT CARD] (l 70)[POWER SAVE] (l 94)[BEEP SOUND] (l 94)[POWER LCD] (l 36)[LCD SET] (l 36)[TV ASPECT] (l 72)[EXT. DISPLAY] (l 72)
∫ [LANGUAGE] (l 32)
Still picture playback menus
∫ [PHOTO SETUP][LOCK SET] (l 68)[DPOF SET] (l 69)
∫ [SETUP][DISPLAY] (l 94)[DATE/TIME] (l 35)[DATE FORMAT] (l 35)[FORMAT CARD] (l 70)[POWER SAVE] (l 94)[BEEP SOUND] (l 94)[POWER LCD] (l 36)[LCD SET] (l 36)[TV ASPECT] (l 72)[EXT. DISPLAY] (l 72)
∫ [LANGUAGE] (l 32)
VQT1E14(EB_GC_ENG).book 93 ページ 2007年2月28日 水曜日 午後2時23分
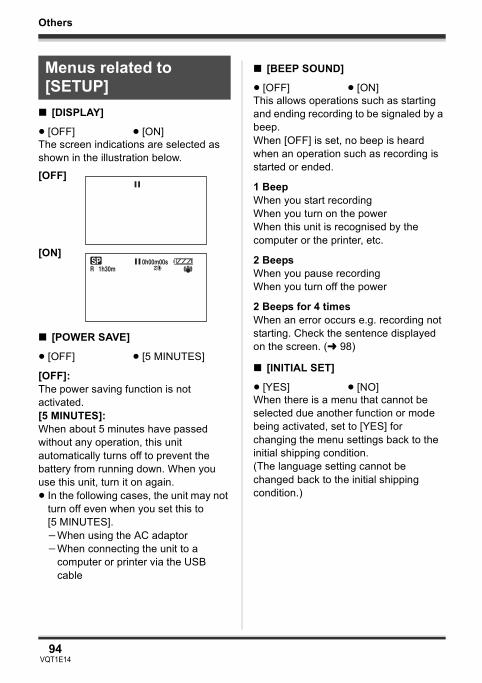
94VQT1E14
Others
∫ [DISPLAY]
The screen indications are selected as shown in the illustration below.
∫ [POWER SAVE]
[OFF]:The power saving function is not activated.[5 MINUTES]:When about 5 minutes have passed without any operation, this unit automatically turns off to prevent the battery from running down. When you use this unit, turn it on again.≥ In the following cases, the unit may not
turn off even when you set this to [5 MINUTES].jWhen using the AC adaptorjWhen connecting the unit to a
computer or printer via the USB cable
∫ [BEEP SOUND]
This allows operations such as starting and ending recording to be signaled by a beep.When [OFF] is set, no beep is heard when an operation such as recording is started or ended.
1 BeepWhen you start recordingWhen you turn on the powerWhen this unit is recognised by the computer or the printer, etc.
2 BeepsWhen you pause recordingWhen you turn off the power
2 Beeps for 4 timesWhen an error occurs e.g. recording not starting. Check the sentence displayed on the screen. (l 98)
∫ [INITIAL SET]
When there is a menu that cannot be selected due another function or mode being activated, set to [YES] for changing the menu settings back to the initial shipping condition.(The language setting cannot be changed back to the initial shipping condition.)
Menus related to [SETUP]
≥ [OFF] ≥ [ON]
[OFF]
[ON]
≥ [OFF] ≥ [5 MINUTES]
;
; 0h00m00sR 1h30mSP
≥ [OFF] ≥ [ON]
≥ [YES] ≥ [NO]
VQT1E14(EB_GC_ENG).book 94 ページ 2007年2月28日 水曜日 午後2時23分
95VQT1E14
Others
∫ [DEMO MODE]
This item is used to start the unit demonstration.(Only when using the AC adaptor and the mode dial is at the or position)If you set this to [ON] without inserting an SD card, this unit is automatically set to the demonstration mode for introducing its functions. If buttons other than the Mode select buttons [AUTO]/[MANUAL AF/MF] are pressed or operated, the demonstration mode is cancelled.If no operations take place for approx. 10 minutes, the demonstration mode automatically starts. To terminate the demonstration mode, insert an SD card or set this to [OFF]. For normal use, set this function to [OFF].
≥ [OFF] ≥ [ON]
VQT1E14(EB_GC_ENG).book 95 ページ 2007年2月28日 水曜日 午後2時23分
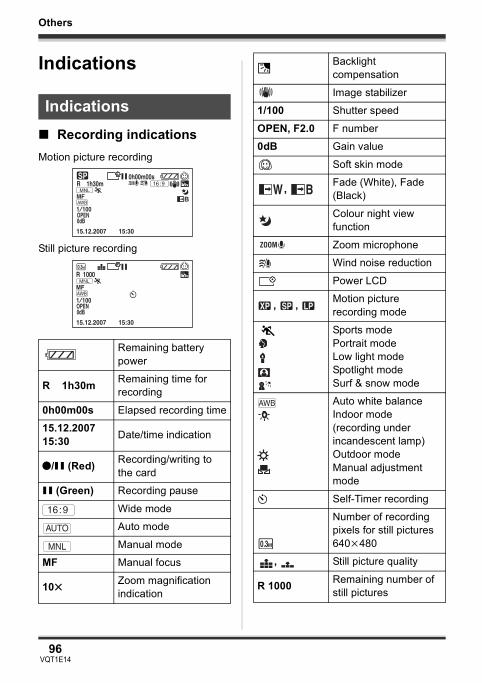
96VQT1E14
Others
Indications
∫ Recording indications
Indications
Motion picture recording
Still picture recording
Remaining battery power
R 1h30m Remaining time for recording
0h00m00s Elapsed recording time
15.12.200715:30 Date/time indication
¥/; (Red) Recording/writing to the card
; (Green) Recording pause
Wide mode
Auto mode
Manual mode
MF Manual focus
10tZoom magnification indication
; 0h00m00sR 1h30mSP
15.12.2007 15:30
AWB1/100OPEN0dB
MNL16:9
AWB1/100OPEN0dB
MNL
15.12.2007 15:30
R 10000.3M ;
16:9
AUTO
MNL
ª Backlight compensation
Image stabilizer
1/100 Shutter speed
OPEN, F2.0 F number
0dB Gain value
Soft skin mode
, Fade (White), Fade (Black)
Colour night view function
Zoom microphone
Wind noise reduction
Power LCD
, , Motion picture recording mode
5 Sports modePortrait modeLow light modeSpotlight modeSurf & snow mode
Auto white balanceIndoor mode (recording under incandescent lamp)Outdoor modeManual adjustment mode
Ø Self-Timer recording
Number of recording pixels for still pictures640k480
, Still picture quality
R 1000 Remaining number of still pictures
ZOOM
XP SP LP
AWB
0.3M
VQT1E14(EB_GC_ENG).book 96 ページ 2007年2月28日 水曜日 午後2時23分

97VQT1E14
Others
∫ Playback indications
∫ Confirmatory indications
Motion picture playback
Still picture playback
1 Playback
; Pause
5, /6, Fast forward/rewind
7/8 Last/first scene paused
9/: Skip playback
D/E Slow motion playback
;1/2;Frame-by-frame playback
0h00m00s Motion picture playback time
Play modeAll scenes on the media displayedScenes recorded on the selected date displayed
No.10 Scene number
Volume adjustment
R Resume playback
100-0001 Still picture folder/file number display
When a printer compatible with PictBridge is connected
Accessing the card (When connected to a computer)
001 DPOF already set (to more than 1)
Locked motion pictures and still pictures
Number of recording pixels for still pictures640k480
The picture size is not displayed for still pictures recorded with other products that have different picture sizes from the size shown above.
–– (Time display)
The built-in battery is low. (l 35)
No SD card is inserted/unusable card.
0.3M
VQT1E14(EB_GC_ENG).book 97 ページ 2007年2月28日 水曜日 午後2時23分
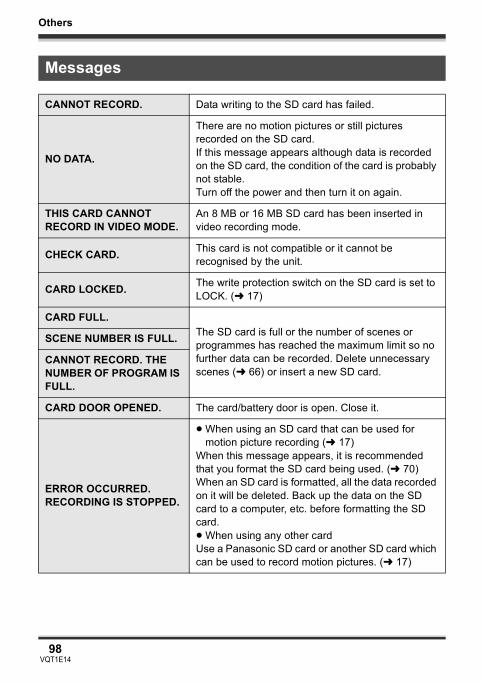
Others
98VQT1E14
Messages
CANNOT RECORD. Data writing to the SD card has failed.
NO DATA.
There are no motion pictures or still pictures recorded on the SD card.If this message appears although data is recorded on the SD card, the condition of the card is probably not stable.Turn off the power and then turn it on again.
THIS CARD CANNOT RECORD IN VIDEO MODE.
An 8 MB or 16 MB SD card has been inserted in video recording mode.
CHECK CARD. This card is not compatible or it cannot be recognised by the unit.
CARD LOCKED. The write protection switch on the SD card is set to LOCK. (l 17)
CARD FULL.The SD card is full or the number of scenes or programmes has reached the maximum limit so no further data can be recorded. Delete unnecessary scenes (l 66) or insert a new SD card.
SCENE NUMBER IS FULL.
CANNOT RECORD. THE NUMBER OF PROGRAM IS FULL.
CARD DOOR OPENED. The card/battery door is open. Close it.
ERROR OCCURRED. RECORDING IS STOPPED.
≥ When using an SD card that can be used for motion picture recording (l 17)
When this message appears, it is recommended that you format the SD card being used. (l 70) When an SD card is formatted, all the data recorded on it will be deleted. Back up the data on the SD card to a computer, etc. before formatting the SD card.≥ When using any other cardUse a Panasonic SD card or another SD card which can be used to record motion pictures. (l 17)
VQT1E14(EB_GC_ENG).book 98 ページ 2007年2月28日 水曜日 午後2時23分

Others
99VQT1E14
It is possible that the system cannot complete writing of a file normally when, for example, power is turned off for some reason during recording or editing.If faulty management information is found when the card is accessed, the following message may appear. Be sure to follow the messages. (Repairing may take time depending on the error.)
≥ When you repair the data, use a battery with sufficient battery power or the AC adaptor. Even if the power is turned off without repairing the data, you can repair the data when you turn the power on again.
≥ Depending on the condition of the data, it may not be possible to completely repair the data.
≥ Do not repair a card that has been recorded on another device. This may cause the loss of data or the card.
≥ If the recovery fails, you will no longer be able to playback the scenes recorded before the power went off.
≥ If the recovery fails, format the SD card on this unit. Please be aware that if an SD card is formatted, then all the data recorded on the card will be erased.
EXIT THE MENU THEN CHANGE TO MANUAL MODE. You are attempting to use a function that cannot be
used simultaneously.CANCEL NIGHT VIEW MODE
PLEASE CONNECT AC ADAPTOR
You are attempting to connect to a computer when the AC adaptor is not connected.
PUSH THE RESET SWITCH.
An irregularity in the unit has been detected. Remove the SD card then press the RESET button to restart the unit. (l 106)
DISCONNECT USB CABLE.
The unit cannot correctly establish the connection to the computer or printer. Disconnect and reconnect the USB cable and then select the desired USB function again.
CANNOT OPERATE WHILE USB CONNECTED.
The unit’s power cannot be turned off when the unit is connected to the computer.
About recovery
CARD ERROR DETECTED. NOW REPAIRING DATA.
VQT1E14(EB_GC_ENG).book 99 ページ 2007年2月28日 水曜日 午後2時23分
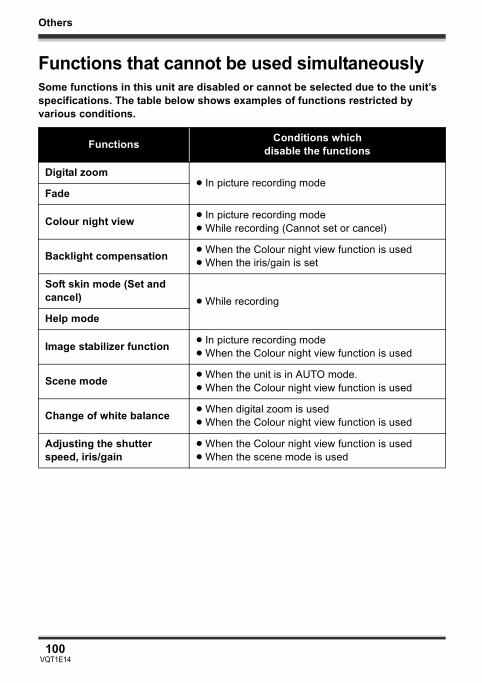
Others
100VQT1E14
Functions that cannot be used simultaneouslySome functions in this unit are disabled or cannot be selected due to the unit’s specifications. The table below shows examples of functions restricted by various conditions.
Functions Conditions whichdisable the functions
Digital zoom≥ In picture recording mode
Fade
Colour night view ≥ In picture recording mode≥ While recording (Cannot set or cancel)
Backlight compensation ≥ When the Colour night view function is used≥ When the iris/gain is set
Soft skin mode (Set and cancel) ≥ While recordingHelp mode
Image stabilizer function ≥ In picture recording mode≥ When the Colour night view function is used
Scene mode ≥ When the unit is in AUTO mode.≥ When the Colour night view function is used
Change of white balance ≥ When digital zoom is used≥ When the Colour night view function is used
Adjusting the shutter speed, iris/gain
≥ When the Colour night view function is used≥ When the scene mode is used
VQT1E14(EB_GC_ENG).book 100 ページ 2007年2月28日 水曜日 午後2時23分

Others
101VQT1E14
Troubleshooting
Problem Check points
This unit cannot be turned on.
The status indicator flashes when the unit is turned on while using the battery.
≥ Is the battery fully charged?# Charge the battery using the AC adaptor. (l 20)
This unit is turned off automatically.
≥ If you do not use the unit for approximately 5 minutes, the power is automatically turned off to conserve the battery charge. To resume recording, turn the power back on.The power will not turn off automatically when the power save function (l 94) is set to [OFF].
This unit does not stay on long enough.
≥ Is the battery low?# If the remaining battery power indication is flashing or
the message “LOW BATTERY.” is displayed, the battery has run down. Charge the battery. (l 20)
Battery runs down quickly.
≥ Is the battery fully charged?# Charge it with the AC adaptor. (l 20)
≥ Are you using the battery in an extremely cold place?# The battery is affected by ambient temperature. In cold
places, the operating time of the battery becomes shorter.
≥ Has the battery worn out?# The battery has a limited life. If the operating time is
still too short even after the battery is fully charged, the battery has worn out and can no longer be used.
VQT1E14(EB_GC_ENG).book 101 ページ 2007年2月28日 水曜日 午後2時23分
Others
102VQT1E14
This unit cannot be operated though it is turned on.
This unit does not operate normally.
≥ The unit cannot be operated unless you open the LCD monitor.
≥ Remove the SD card then press the RESET button. (l 106) If normal conditions are not restored yet, remove the battery or AC adaptor, wait about 1 minute and then reconnect the battery or AC adaptor. Then about 1 minute later, turn on the power again. (Conducting the above operation when the access lamp is on may destroy the data on the card.)
The screen has changed suddenly.
≥ Has the demonstration started?# If you set [DEMO MODE] to [ON] without inserting a
card in video recording mode or picture recording mode, the unit is automatically set to the demonstration mode for introducing its functions. Normally this should be set to [OFF]. Press the MENU button, then select [SETUP] # [DEMO MODE] # [OFF] and press the cursor button in the centre.
A function indication such as the remaining time indication or the elapsed time indication is not shown.
≥ If you set [SETUP]>[DISPLAY]>[OFF], indications other than warnings and date indications disappear.
Problem Check points
VQT1E14(EB_GC_ENG).book 102 ページ 2007年2月28日 水曜日 午後2時23分
Others
103VQT1E14
Recording does not start although the power is supplied to this unit and the SD card is correctly inserted.
≥ Has the SD card’s write protect switch been set to LOCK?# No recording is possible while the write protect switch
is set to LOCK. (l 17)≥ Is the memory of the card full?
# If the card has no more available memory, free up some memory by deleting unnecessary scenes (l 66) or use a new card.
≥ Is the unit set to the video recording mode or picture recording mode?# No recording is possible unless the mode dial is at
or .≥ Is the card/battery door open?
# If the card/battery door is open, this unit will not operate normally. Close the card/battery door and slide the card/battery door lock to LOCK.
Recording stops suddenly during motion picture recording on a card.
≥ When using an SD card on which data has been written many times and the data writing speed has reduced, the recording may suddenly stop during motion picture recording.# Use a card recommended as suitable for motion
picture recording. (l 17)If the recording stops even when a suitable SD card is used, back up the data on the card to a computer, etc. and then format the card. (l 70)
Recorded still pictures are not clear.
≥ Are you trying to record small or finely detailed objects with [PICT. QUALITY] set at [ ]?# If you try to record small or finely detailed objects with
[PICT. QUALITY] set at [ ], the images may break up into a mosaic-like pattern. Record with [PICT. QUALITY] set at [ ] instead. (l 44)
Problem Check points
VQT1E14(EB_GC_ENG).book 103 ページ 2007年2月28日 水曜日 午後2時23分
Others
104VQT1E14
Auto focus function does not work.
≥ Is manual focus mode selected?# Set the unit to auto focus mode by pressing the AUTO
button.≥ Are you trying to record a scene which is hard to
bring into focus in auto focus mode?# There are some recording subjects and surroundings
for which the auto focus does not operate correctly. (l 112) If so, use the manual focus mode to adjust the focus. (l 55)
Sound is not played back from the built-in speaker of this unit.
≥ Is the volume too low?# During playback, press the volume button to display
the volume indication and adjust it. (l 62)
During playback, the sound from the camera’s motor is heard in the recording.
≥ This is a mechanical sound of the camera, but it is not a malfunction.
≥ Are there drops of water on the microphone?# The recorded mechanical sound may become louder
and the microphone’s sensitivity may decrease when there are drops of water on the microphone.Wipe off any drops of water and then leave the unit to dry naturally.
The speaker volume during playback is low.
≥ Are there drops of water on the microphone?# The volume of the output sound may decrease when
the speaker is wet.After wiping off any drops of water and then leaving the unit to dry naturally, it will return to normal.
Although this unit is correctly connected to a TV, playback images cannot be seen.
The playback images are squeezed horizontally.
≥ Have you selected video input on the TV? # Please read the operating instructions of your TV and
select the channel that matches the input used for the connection.
≥ Is the [TV ASPECT] setting correct?# Change the setting to match the aspect ratio of the TV.
Press the MENU button, then select [SETUP] # [TV ASPECT] # [16:9] or [4:3] and press the cursor button in the centre.
Problem Check points
VQT1E14(EB_GC_ENG).book 104 ページ 2007年2月28日 水曜日 午後2時23分
Others
105VQT1E14
Scenes or files cannot be deleted or edited.
≥ Are the scenes or the files locked?# Locked scenes or files cannot be deleted. Release the
lock setting. (l 68)≥ It may not be possible to delete scenes that are
displayed as [ ] on the thumbnail display. If the scenes are unnecessary, format the card to erase the data. (l 70) Please be aware that if the card is formatted then all the data recorded on the card will be erased.
≥ If the SD card’s write protect switch is set to LOCK, then deletion is disabled. (l 17)
The images on the SD card do not look normal.
≥ The data may be destroyed. It may have been destroyed by static or electromagnetic waves. Store important data on a computer or other products as well.
Even if the card is formatted, it cannot be used.
≥ Either this unit or the card may be damaged. Please consult a dealer. About cards that can be used on this unit. (l 17)
If the SD card is inserted in this unit, it is not recognised.
≥ Is the SD card formatted on a computer inserted?# Use this unit to format SD cards. Please be aware that
if an SD card is formatted, then all the data recorded on the card will be erased. (l 70)
The indication disappears.
The screen is frozen.
No operation can be performed.
≥ Is this unit connected to a computer?# No operation can be performed on this unit when it is
connected to a computer.≥ Turn off the power to this unit. If the power cannot be
turned off, remove the SD card then press the RESET button or remove the battery or AC adaptor and then reattach it. After that, turn on the power again. If normal operation is still not restored, detach the power connected, and consult the dealer who you purchased this unit from.
Problem Check points
VQT1E14(EB_GC_ENG).book 105 ページ 2007年2月28日 水曜日 午後2時23分

Others
106VQT1E14
“PUSH THE RESET SWITCH.” is displayed.
≥ The unit has automatically detected an error. To protect the data, remove the SD card and then press the RESET button with a pointed object. This will restart the unit.
≥ If you do not press the RESET button, the power to this unit is turned off automatically about 1 minute later.
≥ Even after you press the RESET button, the indication may still appear repeatedly. If so, this unit needs repair. Detach the power connected, and consult the dealer who you purchased this unit from. Do not attempt to repair the appliance by yourself.
If the SD card is inserted in another device, it is not recognised.
≥ Check that the device is compatible with the capacity or type of SD card (SD Memory Card/SDHC Memory Card) that you inserted.# Refer to the operating instructions of the device for
details.
Problem Check points
VQT1E14(EB_GC_ENG).book 106 ページ 2007年2月28日 水曜日 午後2時23分
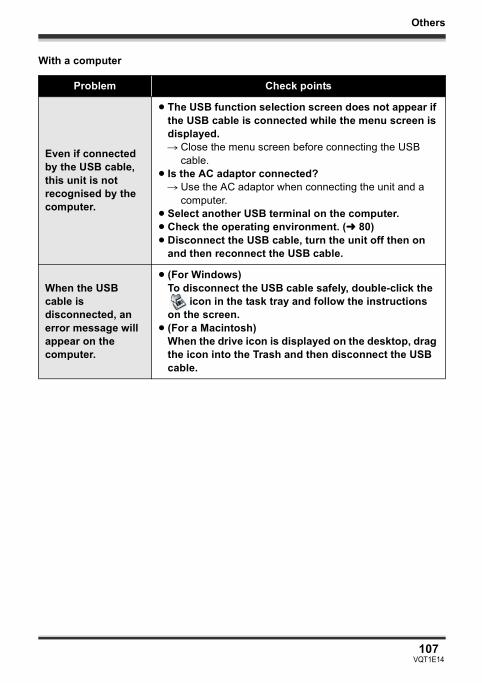
Others
107VQT1E14
With a computer
Problem Check points
Even if connected by the USB cable, this unit is not recognised by the computer.
≥ The USB function selection screen does not appear if the USB cable is connected while the menu screen is displayed.# Close the menu screen before connecting the USB
cable.≥ Is the AC adaptor connected?
# Use the AC adaptor when connecting the unit and a computer.
≥ Select another USB terminal on the computer.≥ Check the operating environment. (l 80)≥ Disconnect the USB cable, turn the unit off then on
and then reconnect the USB cable.
When the USB cable is disconnected, an error message will appear on the computer.
≥ (For Windows) To disconnect the USB cable safely, double-click the
icon in the task tray and follow the instructions on the screen.
≥ (For a Macintosh)When the drive icon is displayed on the desktop, drag the icon into the Trash and then disconnect the USB cable.
VQT1E14(EB_GC_ENG).book 107 ページ 2007年2月28日 水曜日 午後2時23分
108VQT1E14
Others
Cautions for use(For Australia)
In the event of abnormal operation (e.g. if the unit emits smoke or an unusual smell), immediately stop operating the unit and consult the Panasonic Customer Care Centre on 132600.
≥ The unit and card become warm after long operation, but this is not a malfunction.
Keep the SD Video Camera as far away as possible from electromagnetic equipment (such as microwave ovens, TVs, video games etc.).≥ If you use the SD Video Camera on top
of or near a TV, the pictures and sound on the SD Video Camera may be disrupted by electromagnetic wave radiation.
≥ Do not use the SD Video Camera near cell phones because doing so may result in noise adversely affecting the pictures and sound.
≥ Recorded data may be damaged, or pictures may be distorted, by strong magnetic fields created by speakers or large motors.
≥ Electromagnetic wave radiation generated by microprocessors may adversely affect the SD Video Camera, disturbing the pictures and sound.
≥ If the SD Video Camera is adversely affected by electromagnetic equipment and stops functioning properly, turn the SD Video Camera off and remove the battery or disconnect AC adaptor.
Then reinsert the battery or reconnect AC adaptor and turn the SD Video Camera on.
Do not use the SD Video Camera near radio transmitters or high-voltage lines.≥ If you record near radio transmitters or
high-voltage lines, the recorded pictures and sound may be adversely affected.
Make sure to use the supplied cords and cables. If you use optional accessories, use the cords and the cables supplied with them.Do not extend the cords and the cables.
Do not spray insecticides or volatile chemicals onto the unit.≥ If the unit is sprayed with such
chemicals, its body may be marred and the surface finish may peel off.
≥ Do not leave rubber or plastic products in contact with the unit for a long time.
When you use the unit in a sandy or dusty place such as a beach, do not let sand or fine dust get into the body and terminals of the unit.Also, keep the unit away from sea water.≥ Sand or dust may damage the unit.
(Care should be taken when inserting and removing a card.)
≥ If sea water splashes onto the unit, wipe off the water with a well wrung cloth. Then wipe the unit again with a dry cloth.
When carrying the unit, do not drop or bump it.≥ A strong impact can break the unit’s
casing, causing it to malfunction.
About this unit
VQT1E14(EB_GC_ENG).book 108 ページ 2007年2月28日 水曜日 午後2時23分
109VQT1E14
Others
Do not use benzine, paint thinner or alcohol for cleaning the unit.≥ Before cleaning, detach the battery or
pull out the AC cable from the AC outlet.
≥ The camera body may be discoloured and the surface finish may peel off.
≥ Wipe the unit with a soft dry cloth to remove dust and fingerprints. To remove stubborn stains, thoroughly wring a cloth that has been soaked in a neutral detergent diluted with water and wipe the unit with it. Afterwards, wipe it with a dry cloth.
≥ When you use a chemical dust cloth, follow the instructions that came with the cloth.
Do not use the unit for surveillance purposes or other business uses.≥ If you use the unit for a long time, heat
will build up inside it and this may cause a malfunction.
≥ This unit is not intended for business use.
When you are not going to use the unit for an extended time≥ Be sure to wipe off any water or dirt
with a dry soft cloth and then leave the unit to dry naturally before storing.
≥ When storing the unit in a cupboard or cabinet, it is recommended that you place a desiccant (silica gel) in with it.
The battery used in this unit is a rechargeable lithium-ion battery. It is susceptible to humidity and temperature and the effect increases the more the temperature rises or falls. In cold areas, the full charge indication may not appear
or the low battery indication may appear about 5 minutes after starting use. At high temperatures, the protection function may be triggered, making it impossible to use the unit.
Be sure to detach the battery after use.≥ If the battery is left inserted, a minute
amount of current continues to flow even if the unit’s power is off. Keeping the unit in this state may result in over discharge of the battery. The battery may become unusable after it is charged.
≥ The battery should be stored in the vinyl bag so metal does not come into contact with the terminals.
≥ The battery should be stored in a cool place free from humidity, with as constant temperature as possible. (Recommended temperature: 15 oC to 25 oC, Recommended humidity: 40% to 60%)
≥ Extremely high temperatures or low temperatures will shorten the life of the battery.
≥ If the battery is kept in high-temperature, high-humidity or oily-smoky places, the terminals may rust and cause malfunctions.
≥ To store the battery for a long period of time, we recommend you charge it once every year and store it again after you have completely used up the charged capacity.
≥ Dust and other matter attached to the battery terminals should be removed.
Prepare spare batteries when going out for recording.≥ Charge batteries enough to last for 3 to
4 times the period during you want to record pictures in. In cold places such
About the battery
VQT1E14(EB_GC_ENG).book 109 ページ 2007年2月28日 水曜日 午後2時23分
110VQT1E14
Others
as a ski resort, the period during which you can record pictures is shortened.
≥ When you travel, do not forget to bring an AC adaptor (supplied) so that you can recharge the batteries at your destination.
If you drop the battery accidentally, check to see if the terminals are damaged.≥ Attaching a battery with damaged
terminals can damage the unit.
Do not throw old battery into fire.≥ Heating a battery or throwing it into a
fire may result in an explosion.
If the operating time is very short even after the battery has been recharged, the battery has worn out. Please purchase a new battery.
≥ If the temperature of the battery is extremely high or extremely low, charging may take time or the battery may not be charged.
≥ Be sure to use the supplied AC adaptor.
≥ If you use the AC adaptor near a radio, radio reception may be disturbed. Keep the AC adaptor 1 m or more away from the radio.
≥ When using the AC adaptor, it may generate whirring sounds. However, this is normal.
≥ After use, be sure to disconnect the AC adaptor. (If it is left connected, about 0.1 W of current is consumed at most.)
≥ Always keep the electrodes of the AC adaptor and battery clean.
Put this unit near the outlet to make it easy for the interrupting device (plug) to reach it.
≥ The memory capacity indicated on the label of an SD card is the total of the capacity for copyright protection and management and the capacity which can be used on the unit, a computer etc.
≥ During prolonged use, the unit’s surfaces and the SD card will heat up slightly. This is normal.
When inserting or removing the SD card, always set the mode dial to OFF.
While this unit accesses the SD card (while is being displayed/the access lamp is lit), do not open the card/battery door and remove the SD card, operate the mode dial, turn off the power, or shake or impact the unit.
∫ About the miniSD Card≥ Be sure to insert miniSD Cards in the
dedicated card adaptor before use. Inserting a card in this unit without the adaptor may damage the unit or the card.
≥ Do not insert an empty card adaptor in this unit. Do not leave the adaptor in this unit while inserting or removing miniSD Cards. This may cause the unit to malfunction.
About the AC adaptor
About the SD card
VQT1E14(EB_GC_ENG).book 110 ページ 2007年2月28日 水曜日 午後2時23分
111VQT1E14
Others
≥ When the LCD monitor gets dirty, wipe it with a dry soft cloth.
≥ In a place with drastic temperature changes, condensation may form on the LCD monitor. Wipe it with soft dry cloth.
≥ When the unit has become very cold, for example due to storage in a cold area, its LCD monitor will be slightly darker than usual immediately after the power is turned on. The normal brightness will be restored when the unit’s internal temperature rises.
If condensation forms on the unit, the lens will cloud up, the SD card may be damaged and the unit may not work properly. Make every effort to ensure that condensation does not form. If it does form, take the actions described below.
∫ Causes of condensationCondensation takes place when the ambient temperature or humidity is changed as follows.≥ When this unit is brought inside from
the cold (e.g. a ski slope) to a warm room.
≥ When this unit is moved from an air-conditioned car to outside.
≥ When a cold room has been warmed up quickly.
≥ When cool wind from an air conditioner is directly blown onto this unit.
≥ After summer afternoon showers of rain.
≥ When this unit is in a very humid place where the air is thick with steam. (e.g. a heated swimming pool)
When this unit is taken to a location with a significant temperature difference such as from a cold place to a hot place.If, for example, you have used this unit for recording on a ski slope and are taking it into a heated room, place the unit inside a plastic bag, remove as much of the air from inside the bag as possible, then seal the bag. Leave the unit for about an hour in the room so the temperature of the unit is close to the ambient temperature of the room, then use it.
∫ What to do if the lens is fogged up.Remove the battery or AC adaptor and leave the unit for about 1 hour with the card/battery door open. When the unit becomes close to the ambient temperature, the fog disappears naturally.
LCD monitor
Extremely high precision technology is employed to produce the LCD Monitor screen featuring a total of approximately 123,000 pixels. The result is more than 99.99% effective pixels with a mere 0.01% of the pixels inactive or always lit. However, this is not a malfunction and does not affect the recorded picture.
About condensation
VQT1E14(EB_GC_ENG).book 111 ページ 2007年2月28日 水曜日 午後2時23分
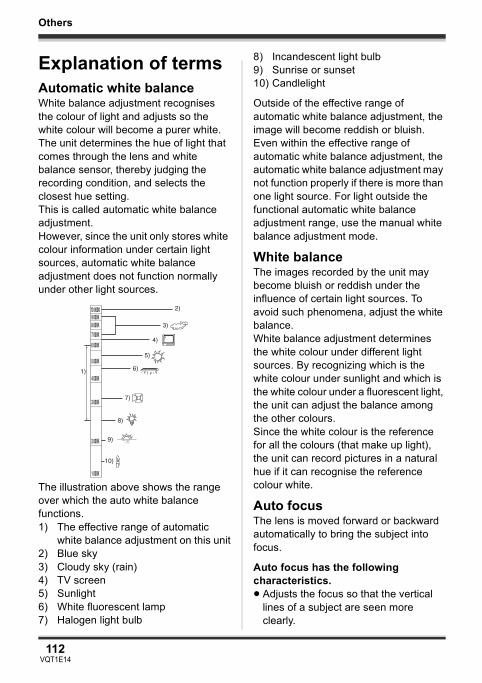
112VQT1E14
Others
Explanation of termsAutomatic white balanceWhite balance adjustment recognises the colour of light and adjusts so the white colour will become a purer white. The unit determines the hue of light that comes through the lens and white balance sensor, thereby judging the recording condition, and selects the closest hue setting.This is called automatic white balance adjustment.However, since the unit only stores white colour information under certain light sources, automatic white balance adjustment does not function normally under other light sources.
The illustration above shows the range over which the auto white balance functions. 1) The effective range of automatic
white balance adjustment on this unit2) Blue sky3) Cloudy sky (rain)4) TV screen 5) Sunlight6) White fluorescent lamp7) Halogen light bulb
8) Incandescent light bulb9) Sunrise or sunset10) Candlelight
Outside of the effective range of automatic white balance adjustment, the image will become reddish or bluish. Even within the effective range of automatic white balance adjustment, the automatic white balance adjustment may not function properly if there is more than one light source. For light outside the functional automatic white balance adjustment range, use the manual white balance adjustment mode.
White balanceThe images recorded by the unit may become bluish or reddish under the influence of certain light sources. To avoid such phenomena, adjust the white balance.White balance adjustment determines the white colour under different light sources. By recognizing which is the white colour under sunlight and which is the white colour under a fluorescent light, the unit can adjust the balance among the other colours.Since the white colour is the reference for all the colours (that make up light), the unit can record pictures in a natural hue if it can recognise the reference colour white.
Auto focusThe lens is moved forward or backward automatically to bring the subject into focus.
Auto focus has the following characteristics.≥ Adjusts the focus so that the vertical
lines of a subject are seen more clearly.
10 000K9 000K8 000K7 000K
6 000K
5 000K
4 000K
3 000K
2 000K
1 000K
2)
1)
3)
4)
5)
6)
7)
8)
9)
10)
VQT1E14(EB_GC_ENG).book 112 ページ 2007年2月28日 水曜日 午後2時23分
113VQT1E14
Others
≥ Attempts to bring an object with higher contrast into focus.
≥ Focuses on the screen centre only.
Due to these characteristics, auto focus does not work correctly in the following situations. Record pictures in the manual focus mode.
Recording distant and close-up objects at the same timeSince the unit focuses on whatever is at the centre of the screen, it is difficult to bring the background into focus when close-up objects are placed in focus. When recording people with distant mountains in the background, you cannot focus on both the subject which is close-up and the objects which are in the distance.
Recording a subject behind dirty or dusty windowThe subject behind the window will not be focused because the focus is on the dirty window.Similarly, when recording something on the opposite side of a road with heavy traffic, a vehicle that happens to pass by may be brought into focus.
Recording a subject that is surrounded by objects with glossy surfaces or by highly reflective objectsSince whatever is shiny or glistens is brought into focus, it is hard to focus on the subject to be recorded. The focus may become blurry when recording subjects at the beach, at night views or in scenes involving fireworks or special lights.
Recording a subject in dark surroundingsThe unit cannot focus correctly because the light information that comes through the lens decreases considerably.
Recording a fast-moving subjectAs the focus lens-inside moves mechanically, it cannot keep up with a fast-moving subject.When, for example, recording a sports event with fast-moving subjects, the focus may lose its sharpness.
Recording a subject with little contrastIt is easy to bring subjects with a sharp contrast or vertical lines or stripes into focus. This means that a subject with little contrast, such as a white wall, may become blurry because the unit achieves focus based upon the vertical lines of an image.
Concerning MPEG2 motion pictures“MPEG” stands for Moving Pictures Experts Group. It refers to a format for compressing video.MPEG2 enables motion pictures to be played back more smoothly and attractively by sending the image data at a rate of 25 frames per second.
VQT1E14(EB_GC_ENG).book 113 ページ 2007年2月28日 水曜日 午後2時23分
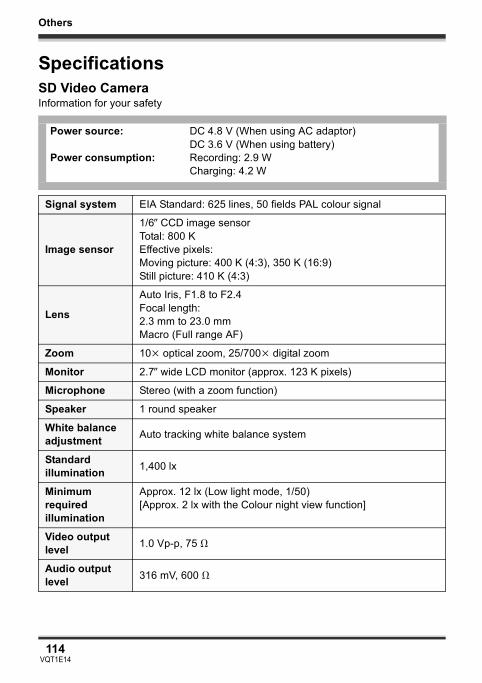
Others
114VQT1E14
SpecificationsSD Video CameraInformation for your safety
Power source:
Power consumption:
DC 4.8 V (When using AC adaptor)DC 3.6 V (When using battery)Recording: 2.9 WCharging: 4.2 W
Signal system EIA Standard: 625 lines, 50 fields PAL colour signal
Image sensor
1/6z CCD image sensorTotal: 800 KEffective pixels:Moving picture: 400 K (4:3), 350 K (16:9)Still picture: 410 K (4:3)
Lens
Auto Iris, F1.8 to F2.4Focal length:2.3 mm to 23.0 mmMacro (Full range AF)
Zoom 10k optical zoom, 25/700k digital zoom
Monitor 2.7z wide LCD monitor (approx. 123 K pixels)
Microphone Stereo (with a zoom function)
Speaker 1 round speaker
White balance adjustment Auto tracking white balance system
Standard illumination 1,400 lx
Minimum required illumination
Approx. 12 lx (Low light mode, 1/50)[Approx. 2 lx with the Colour night view function]
Video output level 1.0 Vp-p, 75 ™
Audio output level 316 mV, 600 ™
VQT1E14(EB_GC_ENG).book 114 ページ 2007年2月28日 水曜日 午後2時23分

Others
115VQT1E14
Motion pictures
USB
Card reader function (EB/EP only), Card reader/writer function (GC/GN only) (No copyright protection support)Hi-Speed USB (USB 2.0) compliant, USB terminal Type miniBPictBridge-compliant
Dimensions(excluding the projecting parts)
31 mm (W) k 63 mm (H) k 114 mm (D)
Mass Approx. 182 g(without supplied battery and an SD card)
Mass in operation
Approx. 204 g(with supplied battery and an SD card)
Operating temperature 0 °C to 40 °C
Operating humidity 10% to 80%
Battery operation time Refer to page 22.
Recording media
SD Memory Card:256 MB/512 MB/1 GB/2 GB (FAT12 and FAT16 format corresponding)SDHC Memory Card:4 GB (FAT32 format corresponding)
Picture size 704k576
Recordable time Refer to page 41.
Compression MPEG2 (SD-Video standard compliant)
Recording mode and transfer rate
XP: 10 Mbps (VBR)SP: 5 Mbps (VBR)LP: 2.5 Mbps (VBR)
Audio compression MPEG1-Layer2 compliant (stereo)
VQT1E14(EB_GC_ENG).book 115 ページ 2007年2月28日 水曜日 午後2時23分
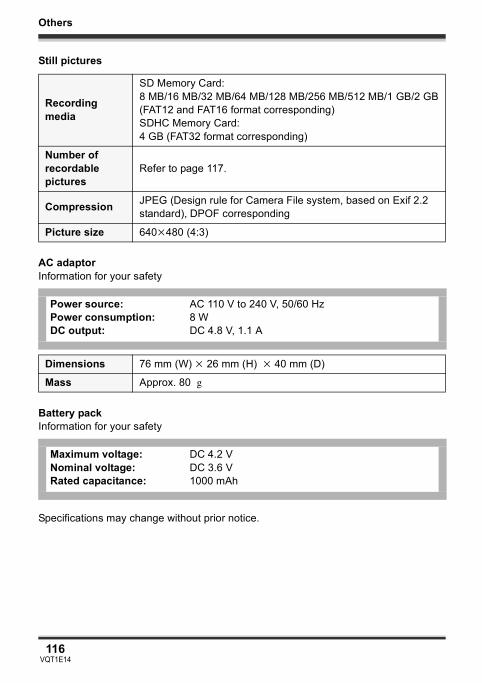
Others
116VQT1E14
Still pictures
AC adaptorInformation for your safety
Battery packInformation for your safety
Specifications may change without prior notice.
Recording media
SD Memory Card:8 MB/16 MB/32 MB/64 MB/128 MB/256 MB/512 MB/1 GB/2 GB (FAT12 and FAT16 format corresponding)SDHC Memory Card:4 GB (FAT32 format corresponding)
Number of recordable pictures
Refer to page 117.
Compression JPEG (Design rule for Camera File system, based on Exif 2.2 standard), DPOF corresponding
Picture size 640k480 (4:3)
Power source:Power consumption:DC output:
AC 110 V to 240 V, 50/60 Hz8 WDC 4.8 V, 1.1 A
Dimensions 76 mm (W) k 26 mm (H) k 40 mm (D)
Mass Approx. 80 g
Maximum voltage:Nominal voltage:Rated capacitance:
DC 4.2 VDC 3.6 V1000 mAh
VQT1E14(EB_GC_ENG).book 116 ページ 2007年2月28日 水曜日 午後2時23分
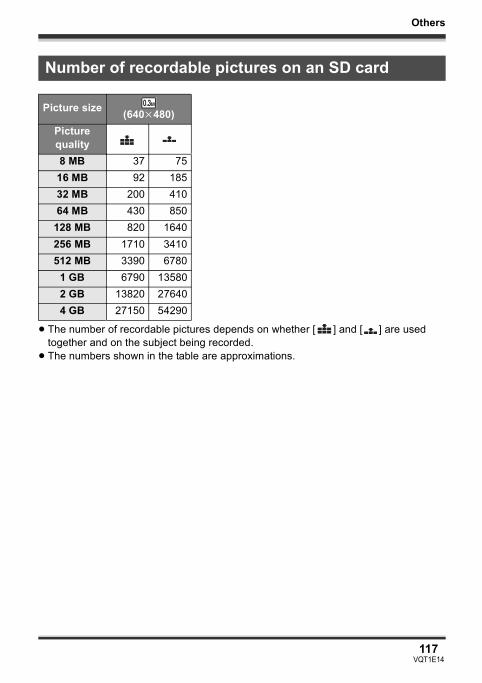
Others
117VQT1E14
≥ The number of recordable pictures depends on whether [ ] and [ ] are used together and on the subject being recorded.
≥ The numbers shown in the table are approximations.
Number of recordable pictures on an SD card
Picture size (640k480)Picture quality8 MB 37 7516 MB 92 18532 MB 200 41064 MB 430 850
128 MB 820 1640256 MB 1710 3410512 MB 3390 6780
1 GB 6790 135802 GB 13820 276404 GB 27150 54290
0.3M
VQT1E14(EB_GC_ENG).book 117 ページ 2007年2月28日 水曜日 午後2時23分

118VQT1E14
Others
Others
Index∫ Numerics2-way hand strap . . . . . . . . . . . . . . . 14∫ AAC adaptor . . . . . . . . . . . . . 20, 21, 110Adobe Acrobat Reader . . . . . . . . . . 78Aperture . . . . . . . . . . . . . . . . . . . . . . 58Auto focus . . . . . . . . . . . . . . . . . . . 112Automatic white balance . . . . . 56, 112∫ BBacklight compensation . . . . . . . . . . 46Battery . . . . . . . . . . . . . . . . 19, 22, 109Beep sound . . . . . . . . . . . . . . . . . . . 94∫ CCard . . . . . . . . . . . . . . . 16, 26, 70, 110Charging time . . . . . . . . . . . . . . . . . 22Colour night view function . . . . . . . . 48Cursor button . . . . . . . . . . . . . . . . . . 27∫ DDate and time display . . . . . . . . . . . 35Delete Scene . . . . . . . . . . . . . . . . . . 66Demo mode . . . . . . . . . . . . . . . . . . . 95Digital zoom . . . . . . . . . . . . . . . . . . . 45DirectX . . . . . . . . . . . . . . . . . . . . . . . 78Display . . . . . . . . . . . . . . . . . . . . . . . 94Display style . . . . . . . . . . . . . . . . . . . 35DPOF setting . . . . . . . . . . . . . . . . . . 69Dubbing . . . . . . . . . . . . . . . . . . . 73, 74∫ FFade . . . . . . . . . . . . . . . . . . . . . . . . . 47Format Card . . . . . . . . . . . . . . . . . . . 70Frame-by-frame playback . . . . . . . . 62∫ GGain . . . . . . . . . . . . . . . . . . . . . . . . . 58Guideline . . . . . . . . . . . . . . . . . . . . . 51∫ HHelp mode . . . . . . . . . . . . . . . . . . . . 32∫ IImage stabilizer function . . . . . . . . . 52
Initial setting . . . . . . . . . . . . . . . . . . .94Iris . . . . . . . . . . . . . . . . . . . . . . . . . . .58∫ LLanguage . . . . . . . . . . . . . . . . . . . . .32LCD monitor . . . . . . . . . . . . 15, 36, 111Locking scenes . . . . . . . . . . . . . . . . .68∫ MManual focus . . . . . . . . . . . . . . . . . . .55Menu . . . . . . . . . . . . . . . . . . . . . . . . .33Menu list . . . . . . . . . . . . . . . . . . . . . .92Mode dial . . . . . . . . . . . . . . . . . . . . .23Motion picture compatibility . . . . . . . .61Motion picture playback . . . . . . . . . .60Motion picture recording . . . . . . . . . .39MPEG2 . . . . . . . . . . . . . . . . . . . 61, 113∫ NNumber of recordable pictures . . . . 117∫ OOperation icons . . . . . . . . . . . . . . . . .29∫ PPictBridge . . . . . . . . . . . . . . . . . . . . .75Picture quality . . . . . . . . . . . . . . . . . .44Playing back motion pictures by date . . . . . . . . . . . . . . . . . . . . . . .62Power LCD . . . . . . . . . . . . . . . . . . . .36Power save . . . . . . . . . . . . . . . . . . . .94∫ QQuick start . . . . . . . . . . . . . . . . . . . . .24∫ RRecord button . . . . . . . . . . . . . . .39, 43Recordable time . . . . . . . . . . . . . . . .41Recording modes . . . . . . . . . . . . . . .41Recording time elapsed . . . . . . . . . .40Recovery . . . . . . . . . . . . . . . . . . . . . .99Remaining number of still pictures . . . . . . . . . . . . . . . . . . . .44Remaining time . . . . . . . . . . . . . . . . .40Resume playback . . . . . . . . . . . . . . .63
VQT1E14(EB_GC_ENG).book 118 ページ 2007年2月28日 水曜日 午後2時23分
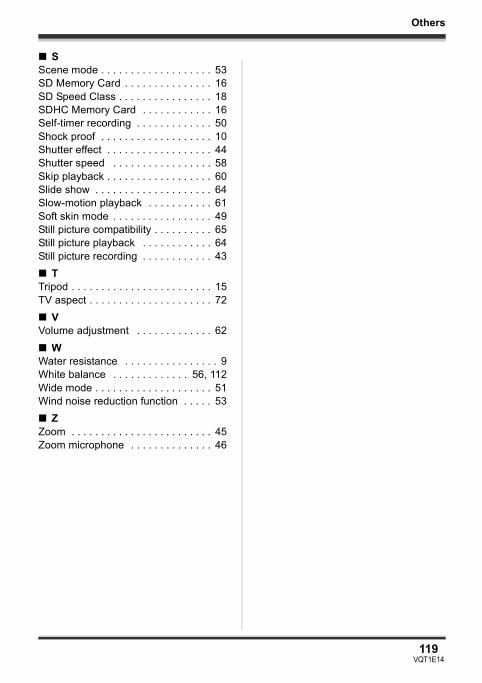
119VQT1E14
Others
∫ SScene mode . . . . . . . . . . . . . . . . . . . 53SD Memory Card . . . . . . . . . . . . . . . 16SD Speed Class . . . . . . . . . . . . . . . . 18SDHC Memory Card . . . . . . . . . . . . 16Self-timer recording . . . . . . . . . . . . . 50Shock proof . . . . . . . . . . . . . . . . . . . 10Shutter effect . . . . . . . . . . . . . . . . . . 44Shutter speed . . . . . . . . . . . . . . . . . 58Skip playback . . . . . . . . . . . . . . . . . . 60Slide show . . . . . . . . . . . . . . . . . . . . 64Slow-motion playback . . . . . . . . . . . 61Soft skin mode . . . . . . . . . . . . . . . . . 49Still picture compatibility . . . . . . . . . . 65Still picture playback . . . . . . . . . . . . 64Still picture recording . . . . . . . . . . . . 43∫ TTripod . . . . . . . . . . . . . . . . . . . . . . . . 15TV aspect . . . . . . . . . . . . . . . . . . . . . 72∫ VVolume adjustment . . . . . . . . . . . . . 62∫ WWater resistance . . . . . . . . . . . . . . . . 9White balance . . . . . . . . . . . . . 56, 112Wide mode . . . . . . . . . . . . . . . . . . . . 51Wind noise reduction function . . . . . 53∫ ZZoom . . . . . . . . . . . . . . . . . . . . . . . . 45Zoom microphone . . . . . . . . . . . . . . 46
VQT1E14(EB_GC_ENG).book 119 ページ 2007年2月28日 水曜日 午後2時23分

VQT1E14F0307Kk0 ( 8000 A )
E
Matsushita Electric Industrial Co., Ltd.Web Site: http://panasonic.net
VQT1E14(EB_GC_ENG).book 120 ページ 2007年2月28日 水曜日 午後2時23分