Embed Size (px)
Citation preview

§21. The Common Finesse.
Teaching notes §21 www.vubridge.com © Paul Bowyer 2018
Notes on the basic principles to be taught in this section.
• This section is all about the common finesse; §19 was about the marked finesse, so studentsshould have some idea about the concept.
• The definition of the finesse given at the start of the student notes is not one to be learnt, it isthere “for amusement only”. The focus here is on the principle of what a finesse actually is.
• Note that some card combinations without tenaces do count as “finesses”. Example 1 in thestudent notes (♠K × facing ♠× × ×) certainly is a finesse as success depends on the 50-50location of the ♠A.
• In this chapter we are talking about hoping where a key card is, rather than knowing about thelayout of a suit (as is the case with the marked finesse in §19).
• There is an ever-present link with entries, a connection that needs to be made explicit withmany of these examples.
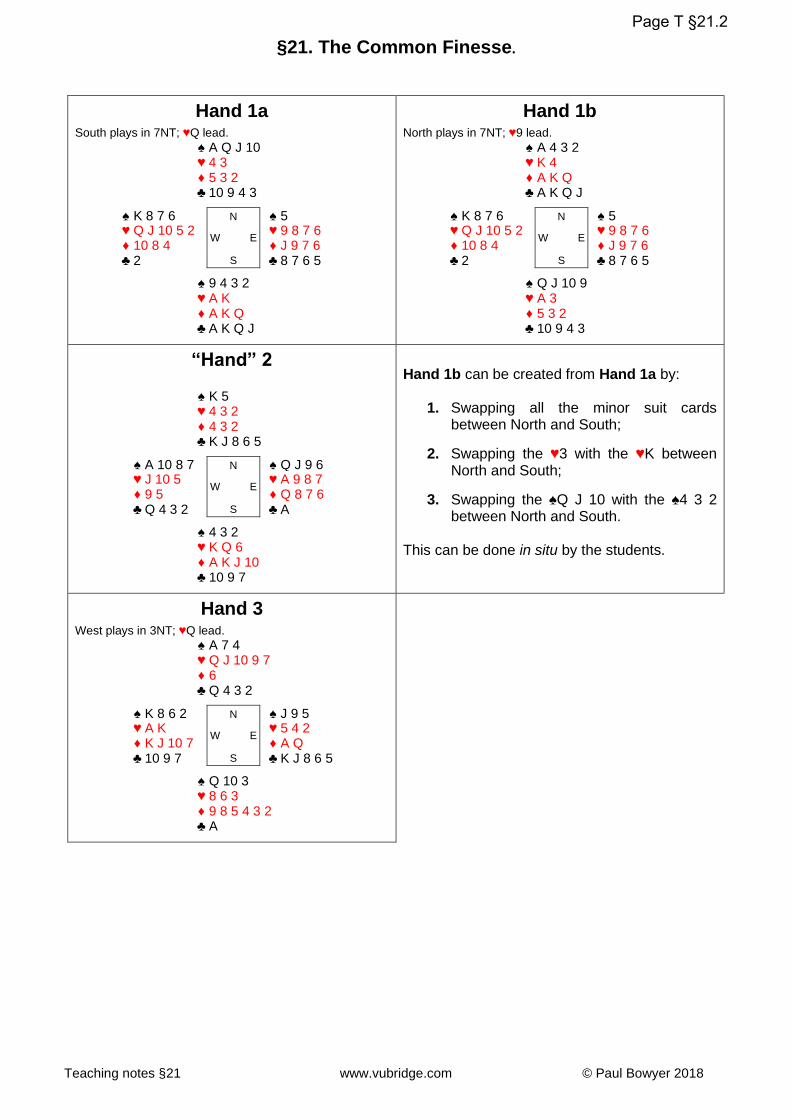
Three hands need setting up (overleaf), Hands 1a, “2” and 3. Only Hands 1a, 1b and 3 are full deals.
Hand 1a (Hand 1 in the student notes, played by South in 7NT) is the first grand slam of the course.
The hand is all about how to play Spades for four tricks (or no losers). This requires three finesses in the suit and, therefore ways of getting back to hand so that Spades may be led through West.
Spades should be tackled ASAP – in practice, many beginners would cash all of Souths winners early, removing critical entries. This is an important point that needs emphasising.
It may be worth pointing out that 7NT would be all but hopeless if the Spades were transposed, so that South held:
♠ A Q J 10♥ A K♦ A K Q♣ A K Q J
and North held a Yarborough. This reinforces the need for entries.
Hand 1b (Hand 2 in the student notes but rotated 180˚ so that North is declarer in 7NT) can be created from Hand 1 by major surgery. All the minor-suit cards need swapping between North and South, then the ♥3 and ♥K need swapping and, finally, the ♠Q J 10 need swapping with the ♠4 3 2.
7NT now is made by North by taking the ♥9 lead on table and running the ♠Q. It is worth emphasising that it is the player to declarer’s right who has to have the critical King this time, not the player to declarer’s left.
“Hand” 2 illustrates various suit combinations referred to in the student notes, albeit rotated.
Within the student notes: Example 1 is the Spade suit, Example 2 is the Heart suit, Example 3 is the Diamond suit and Example 4 is the Club suit. Each suit should be examined independently.
Hand 3 (Hand 3 in the student notes, but rotated 90˚ so that West is declarer in 3NT) with only declarer and dummy’s cards displayed.
The Club suit in Example 4 is placed into a full deal, in the inevitable 3NT. To make the contract West’s Count and Plan shows five top tricks, so declarer needs four Club tricks. West must win the Heart lead and run the ♣10. If that should lose to the ♣Q then the contract would have too many losers. If it draws the Ace of Clubs (or holds the trick) then 3NT is coming home with four Club tricks.
The position of the ♣A is not relevant, it is only the location of the ♣Q which is pertinent
Page T §21.1
§21. The Common Finesse.
Teaching notes §21 www.vubridge.com © Paul Bowyer 2018
Hand 1a
South plays in 7NT; ♥Q lead. ♠ A Q J 10 ♥ 4 3 ♦ 5 3 2 ♣ 10 9 4 3 ♠ K 8 7 6 N ♠ 5 ♥ Q J 10 5 2
W E ♥ 9 8 7 6
♦ 10 8 4 ♦ J 9 7 6 ♣ 2 S ♣ 8 7 6 5 ♠ 9 4 3 2 ♥ A K ♦ A K Q ♣ A K Q J
Hand 1b
North plays in 7NT; ♥9 lead. ♠ A 4 3 2 ♥ K 4 ♦ A K Q ♣ A K Q J ♠ K 8 7 6 N ♠ 5 ♥ Q J 10 5 2
W E ♥ 9 8 7 6
♦ 10 8 4 ♦ J 9 7 6 ♣ 2 S ♣ 8 7 6 5 ♠ Q J 10 9 ♥ A 3 ♦ 5 3 2 ♣ 10 9 4 3
“Hand” 2 ♠ K 5 ♥ 4 3 2 ♦ 4 3 2 ♣ K J 8 6 5 ♠ A 10 8 7 N ♠ Q J 9 6 ♥ J 10 5
W E ♥ A 9 8 7
♦ 9 5 ♦ Q 8 7 6 ♣ Q 4 3 2 S ♣ A ♠ 4 3 2 ♥ K Q 6 ♦ A K J 10 ♣ 10 9 7
Hand 1b can be created from Hand 1a by:
1. Swapping all the minor suit cards between North and South;
2. Swapping the ♥3 with the ♥K between North and South;
3. Swapping the ♠Q J 10 with the ♠4 3 2 between North and South.
This can be done in situ by the students.
Hand 3
West plays in 3NT; ♥Q lead. ♠ A 7 4 ♥ Q J 10 9 7 ♦ 6 ♣ Q 4 3 2 ♠ K 8 6 2 N ♠ J 9 5 ♥ A K
W E ♥ 5 4 2
♦ K J 10 7 ♦ A Q ♣ 10 9 7 S ♣ K J 8 6 5 ♠ Q 10 3 ♥ 8 6 3 ♦ 9 8 5 4 3 2 ♣ A
Page T §21.2

The Common Finesse www.vubridge.com © Paul Bowyer 2018
§21. The Common Finesse.
By the end of this chapter you should understand the following term:
The finesse: The attempt to gain power for lower ranking cards by taking advantage of the favourable position of higher ranking cards held by the opposition.
Most bridge hands contain (somewhere or other), tenaces. Where they do, declarer can hope to take advantage of a possible favourable lie of the cards by taking a finesse. A relatively simple example of the common finesse is shown below, in a grand slam. How might you plan to take all the tricks here?
Hand 1 South plays in 7NT. West leads the ♥Q.
♠ A Q J 10♥ 4 3♦ 5 3 2♣ 10 9 4 3
Dummy
W E
Declarer
♠ 9 4 3 2♥ A K♦ A K Q♣ A K Q J
Your Count and Plan shows you that you have ten top tricks in 7NT (to wit: one Spade, two Hearts, three Diamonds and four Clubs), so must make three more. The only suit offering a possibility of extra tricks is Spades, where there is a tenace holding; the other three suits are said to be solid.
Your only chance is that West has the ♠K (so that it lies under the ♠A). The correct play, after winning the opening lead, is to play a Spade from the closed hand through West at trick two. If he holds the ♠K, that player is helpless. When he follows with a small card you call for dummy’s ♠10 (or the ♠J, orthe ♠Q). When this holds the trick you need to repeat the manoeuvre – you cross back to the Southhand using one of your many entries and lead another Spade through West for another finesse.Provided you lead through your victim there is nothing your quarry can do except grin and bear it. Notethat a finesse is a precise 50-50 shot – if East were to hold the ♠K he would make a trick with it byvirtue of its position, over the ♠A. You win some, you lose some. Can you see:
1. Why cashing all the top tricks in the South hand before playing on Spades would be poor play?
2. Why 7NT would be near impossible if the North and South Spade holdings were transposed?
Bridge is a contrary game, however, and there are card combinations where you can retain the lead in the desired hand. If we take Hand 1 and give it a twist we come up with Hand 2. How might you secure the grand slam now?
Hand 2 South plays in 7NT. West leads the ♥9.
♠ Q J 10 9♥ A 3♦ 5 3 2♣ 10 9 4 3
Dummy
W E
Declarer
♠ A 4 3 2♥ K 4♦ A K Q♣ A K Q J
Here we don’t have a classic looking tenace position in Spades but this combination will suffice. Also, in this layout, dummy has one outside entry with the ♥A. This is crucial.
In this layout you should win trick one in the North hand with the ♥A and must then lead a Spade (any Spade) through East. This time it’s East who needs to have the ♠K, not West. If East does have the King what could he do? Absolutely nothing. If he played low then the Spade would win the trick (you’d follow with a small card, of course) and the lead is retained in the North hand. The process is repeated until East is forced to play his ♠K, at which point you’d crush it with the ♠A and claim your contract.
Page S §21.1

The Common Finesse www.vubridge.com © Paul Bowyer 2018
Now that the idea of a finesse is clear it is time to show that there are many other card combinations without tenaces that are effectively finesses.
Ex 1. ♠ K 5 Ex 2. ♥ K Q 5
Dummy
Dummy
W E W E Declarer Declarer
♠ 4 3 2 ♥ 4 3 2 In Example 1 North-South may be due a Spade trick or they may not, it all depends where the ♠A is. If
the ♠K lies over the ♠A (or we might say if the ♠A is onside) then the ♠K would score a trick. If East has the ♠A over the ♠K then the King is mincemeat. To make a trick you must lead a Spade through West’s hoped-for ♠A towards the ♠K and wait to see what West does. If the ♠A is well placed then the ♠K is due score a trick sometime; West has the two-way losing choice of playing low or playing the ♠A “on air”. If East has the Ace – c’est la vie. It is hopeless to broach the suit by leading a Spade from the dummy as that would be won by an opponent cheaply, the ♠K later being crushed by the ♠A.
We can extend this idea to Example 2. How many Heart tricks do North-South have? Well, one slow trick for certain, but can they make two tricks? The answer is Yes, but only if the ♥A lies with West. You must lead a Heart through West’s assumed ♥A up to dummy’s ♥K Q and wait to see what West does. If West plays his ♥A “on air” (which would be poor play on his part, incidentally) then the two Heart winners would be immediately established. If West plays small (best defence) then the ♥Q would win the trick; you’d need an entry in the South hand now in another suit so that you can repeat the process by leading another Heart through the West hand and up to the remaining ♥K 5.
It is possible (and a common play) to finesse for Queens as well:
Ex 3. ♦ A K J 10 Ex 4. ♣ K J 8 6 5
Dummy
Dummy
W E W E Declarer Declarer
♦ 4 3 2 ♣ 10 9 7 In Example 3, let’s say that you are declarer in 3NT and need to make four tricks in Diamonds. The
simplest method is to lead a Diamond from the South hand and finesse dummy’s ♦10. If that wins (as it will do precisely 50% of the time) then the process is repeated; You have to place the lead in your own hand and lead another Diamond through West and finesse the ♦J. Whenever West has the ♦Q you’ll makes four Diamond tricks. When East has it you must lose one trick and will make three tricks.
Example 4 is a common card combination, requiring a finesse for the ♣Q. Suppose you have to tackle this suit in No-trumps. The best hope is that West has the ♣Q and correct play is to lead and “run” the ♣10. If West does hold the ♣Q then either the ♣10 will win the trick (in which case you’d lead another Club and finesse again) or it forces East’s ♣A. When on lead again you take another Club finesse by running the ♣9 and pick up four Club tricks. If East has the ♣Q then two Club losers are inevitable.
Let’s put this suit into the context of a full deal, played in 3NT.
Hand 3 South plays in 3NT. West leads the ♥Q.
♠ J 9 5 ♥ 5 4 ♦ A Q 7 ♣ K J 8 6 5
Dummy
W E
Declarer
♠ K 8 6 2 ♥ A K 2 ♦ K J 10 ♣ 10 9 7
Your Count and Plan shows five top tricks (two Hearts and three Diamonds), and so you need four Club tricks for your contract. You should win opening lead and, as discussed in Ex. 4 (above), run the ♣10, hoping that West has the ♣Q. If East wins the ♣A (or the ♣10 wins) the process is repeated.
Page S §21.2

The Common Finesse V-Blue Y1 Issue 17 © Paul Bowyer 2017
§21. Example hands 1 to 4.
Hand 1 Dealer North ♠ A 10 8 ♥ Q 10 9 3 2 7 2 ♣ 6 5 3 ♠ 6 4 3 N ♠ Q 9 7 ♥ A 7 4
W E ♥ K 8 6
A Q J 10 8 6 5 3 ♣ 10 9 8 S ♣ A K Q ♠ K J 5 2 ♥ J 5 K 9 4 ♣ J 7 4 2
West North East South Pass 1NT Pass
2NT Pass 3NT All Pass
3NT by East Opening lead: ♠2
East plays in game after an invitational sequence to 3NT. South leads the fourth-highest-of-his-longest-and-strongest (the ♠2) and East has to Count and Plan. With Spades a weakness declarer has to pin his hopes on making four tricks in Diamonds, to go with two Hearts and three Clubs. How can he make four Diamonds? By finessing for the King through South. If North has the ♦K the contract is doomed; c’est la vie. North takes the ♠A and returns his partner’s suit, North-South cashing four Spade tricks before switching to, say, a Club. East takes that and plays a low Diamond to the ♦10. It wins! Crossing to hand he plays another Diamond to the ♦J. When North follows suit, East cashes the ♦A and claims.
Hand 2 Dealer East ♠ K J 5 2 ♥ J 5 K 9 4 2 ♣ 6 5 3 ♠ Q 9 7 N ♠ 6 4 3 ♥ K 8 6
W E ♥ A 7 4
8 6 5 3 A Q J 10 ♣ A K Q S ♣ 10 9 8 ♠ A 10 8 ♥ Q 10 9 3 2 7 ♣ J 7 4 2
West North East South Pass Pass
1NT Pass 2NT Pass 3NT Pass Pass Pass
3NT by West Opening lead: ♠2
Yes, the East-West cards are identical to the East-West cards of Hand 1. What’s the difference, then, between this deal and the last? It’s just that Diamonds are 4-1, so declarer must finesse in Diamonds three times, not just twice. After North leads a low Spade against 3NT North-South cash the first four Spade tricks, leaving the contract “tight”. West takes the next lead (a Heart or a Club) and plays a low Diamond to the Ten. Crossing back to hand he plays another Diamond to the Jack. When South shows out, West must return to hand once again and play a Diamond to the Queen. Three Diamond finesses bring home the bacon. 3NT made.
Hand 3 Dealer South ♠ Q J 9 7 ♥ K J K 9 6 4 2 ♣ J 10 ♠ None N ♠ K 6 4 2 ♥ 9 8 7 2
W E ♥ 10 5 4 3
7 5 3 A 8 ♣ A K 9 7 4 2 S ♣ 6 5 3
♠ A 10 8 5 3 ♥ A Q 6 Q J 10 ♣ Q 8
West North East South 1♠
Pass 3♠ Pass 4♠
4♠ by South Opening lead: ♣A
South plays in 4♠ after an invitational raise in Spades. West cashes the ♣A K and then switches to a Heart. With the ♦A to lose declarer cannot afford to lose a trump trick as well. So, the play is to take the Spade finesse through East and then set up the Diamonds. Thus, South should win trick three with dummy’s ♥J and immediately lead the ♠Q off the dummy. When East plays low that should be allowed to run. When West shows out the hand is an open book. Declarer can now play the ♠J and run it and follow that with a Spade to the ♠10. Now the ♠A can be cashed (felling the ♠K) and the ♦A knocked out. If East wants to play his ♠K at any earlier point he is welcome – South can just bash that with the ♠A.
Hand 4 Dealer West ♠ 10 8 6 ♥ A Q J 10 7 6 J 10 3 ♣ A ♠ J 9 5 3 N ♠ A K Q ♥ K 9 5
W E ♥ 3
7 6 9 8 5 4 2
♣ J 5 3 2 S ♣ 10 9 8 7
♠ 7 4 2 ♥ 8 4 2 A K Q ♣ K Q 6 4
West North East South Pass 1♥ Pass 2♣ Pass 2♥ Pass 4♥
4♥ by North Opening lead: ♠A
South responds 2♣ initially to North’s opening 1♥ bid and then raises North’s 2♥ rebid (showing at least five Hearts) to game. East cashes the first three Spade tricks and switches to a Club. Now the whole hand depends on not losing a trump trick, so North needs West to hold the ♥K. Winning the Club switch with the ♣A, perforce, North must place the lead in the South hand to lead Hearts through West. So, the play must be: a low Diamond to dummy, then a Heart lead to North’s ♥10. When that wins the trick the procedure is repeated. A Diamond to dummy and a Heart lead to North’s ♥J. At this point the ♥K is the only Heart out so the ♥A can be cashed and declarer has the rest. There is nothing West can do but weep.
Page S §21.3

The Common Finesse V-Blue Y1 Issue 17 © Paul Bowyer 2017
§21. Example hands 5 to 8.
Hand 5 Dealer North ♠ J 10 ♥ A 8 5 3 ♦ A K 8 2 ♣ A 7 4 ♠ 7 5 3 N ♠ Q 9 8 6 ♥ Q J 10 7
W E ♥ 6 2
♦ Q J 7 5 ♦ 10 3 ♣ 6 5 S ♣ Q J 10 9 2 ♠ A K 4 2 ♥ K 9 4 ♦ 9 6 4 ♣ K 8 3
West North East South 1♥ Pass 1♠
Pass 1NT Pass 3NT
3NT by North Opening lead: ♣Q
North-South reach 3NT after North shows 15-16 points and a balanced hand. East leads the top-of-a-sequence ♣Q and declarer has to Count and Plan. North has eight on top (two Spades, two Hearts, two Diamonds and two Clubs), so just needs to generate one extra. That can come from Spades – so North wins the ♣A in hand and immediately runs the ♠10. As East holds the Queen the finesse is successful, so North has his ninth trick. Note that 3NT would have made even if West had the ♠Q; the ♠J would still have been a third winner in the suit. Note also (a subtle point) that declarer cannot make four Spade tricks. If East puts the ♠Q on one of North’s honours declarer only has three winners in the suit.
Hand 6 Dealer East ♠ 10 9 7 4 ♥ Q 10 6 2 ♦ 9 7 ♣ 10 8 2 ♠ Q 5 2 N ♠ K J 6 3 ♥ 8 4
W E ♥ A 7
♦ A K J 10 ♦ 8 6 4 ♣ A J 6 4 S ♣ K Q 7 5 ♠ A 8 ♥ K J 9 5 3 ♦ Q 5 3 2 ♣ 9 3
West North East South 1NT Pass
3NT Pass Pass Pass
3NT by East Opening lead: ♥5
East-West reach 3NT by a rapid route and appear to have plenty of points. However, all is not rosy – a Heart lead exposes declarer’s weakness in the suit. A Count and Plan shows only seven top tricks, any attempt to set up two Spade tricks would allow North-South in to cash all their Hearts. That would be a rapid demise. Instead, East must rely on making four tricks in Diamonds, and that could only happen if South held the ♦Q. Well, a 50-50 shot is better than no chance, so declarer should take the ♥A and play a Diamond to the ♦10. Should that lose North-South would cash all their Hearts and take the ♠A as well. However, here it wins. So East crosses to hand and repeats the dose, playing a Diamond to the ♦J.
Hand 7 Dealer South ♠ 7 ♥ K J 8 7 ♦ 10 9 8 7 ♣ 10 5 4 3 ♠ A Q J 8 6 N ♠ K 10 5 2 ♥ A 5 3
W E ♥ Q 6 4
♦ J 5 ♦ 6 3 2 ♣ A K 7 S ♣ Q J 9 ♠ 9 4 3 ♥ 10 9 2 ♦ A K Q 4 ♣ 8 6 2
West North East South Pass
1♠ Pass 2♠ Pass 4♠ Pass Pass Pass
4♠ by West Opening lead: ♦10
West reaches 4♠ and North leads the top-of-a-sequence ♦10, finding South well at home in the suit. South cashes two top Diamonds and attempts to cash a third; West ruffs and applies a Count and Plan. With two losers already it is essential not to lose two Hearts (or, put another way, to make two Heart tricks). The focus, then, is how to play the Heart suit. First things first, West draws trumps. Next, he has to play Hearts to best advantage. How? By cashing the ♥A and playing a Heart towards the Queen in dummy. If North has the King (as here) he has the charming choice of playing low or of playing the King “on air”. Heads West wins, tails North loses.
Hand 8 Dealer West ♠ A 7 ♥ 8 6 4 2 ♦ K 2 ♣ A K Q J 6 ♠ J 10 6 N ♠ 9 8 4 3 ♥ 10 5
W E ♥ A J 9
♦ Q J 10 8 3 ♦ A 7 5 ♣ 9 7 3 S ♣ 10 8 2 ♠ K Q 5 2 ♥ K Q 7 3 ♦ 9 6 4 ♣ 5 4
West North East South Pass 1♣ Pass 1♥ Pass 3♥ Pass 4♥ Pass Pass Pass
4♥ by South Opening lead: ♦Q
South reaches 4♥ after an invitational sequence. West leads the top-of-a-sequence ♦Q and declarer can see that dummy’s ♦K is so much waste paper. Tough bananas. With two sure Diamond losers it is essential not to lose two trump tricks, so the focus is how to play Hearts (how to draw trumps, if you will). Declarer takes trick three and must play a Heart from dummy towards the ♥K Q × × in hand. Essentially, South needs East to have the ♥A and for trumps to split 3-2. Not a great chance but better than no chance. When the ♥Q wins (East has no cause to play the ♥A “on air”) declarer crosses to table to play another trump. East has no winning defence now.
Page S §21.4

The Common Finesse www.vubridge.com © Paul Bowyer 2017
§21. Quiz on The Common Finesse.
In all of the questions below you are South, declarer, trying to make some tricks with these card combinations in Clubs. Assuming that you have entries to both dummy and the closed hand…
1. What is the critical card that is missing, and where do you want it to be (with West or East)?
2. How should you tackle these suits?
3. How many tricks might you make if your luck is in?
Answers overleaf.
Q1. ♣ A Q J Q2. ♣ Q J 10
Dummy
Dummy
W E W E
Declarer Declarer
♣ 4 3 2 ♣ A 3 2
Q3. ♣ A Q 8 7 Q4. ♣ Q 10 8 7
Dummy
Dummy
W E W E
Declarer Declarer
♣ J 10 9 ♣ A J 9 6
Q5. ♣ A 10 2 Q6. ♣ J 10 3
Dummy
Dummy
W E W E
Declarer Declarer
♣ Q J 3 ♣ A K 2
Q7. ♣ A J 4 Q8. ♣ Q J 10 2
Dummy
Dummy
W E W E
Declarer Declarer
♣ K 3 2 ♣ A 5 4 3
Q9. ♣ K Q 5 2 Q10. ♣ Q 10 9
Dummy
Dummy
W E W E
Declarer Declarer
♣ 7 6 4 3 ♣ 4 3 2
Q11. ♣ 4 3 2 Q12*. ♣ A K Q 10
Dummy
Dummy
W E W E
Declarer Declarer
♣ K J 10 ♣ 2
Page S §21.5

The Common Finesse www.vubridge.com © Paul Bowyer 2017
Answers to the Quiz on The Common Finesse.
A1. You require West to have the ♣K. Place the lead in the South hand and lead a Club to the ♣J. If it wins, cross to the closed hand again and repeat the process, this time leading a Club to the ♣Q. You hope to make three tricks.
A2. You require East to have the ♣K. Place the lead in dummy (North) and lead the ♣Q (or any Club as they are all equals). If East follows with a small card you play low from hand, allowing the ♣Q to “run”. If East plays the King, you kill it with the Ace. You hope to make three tricks.
A3. You require West to hold the ♣K. Place the lead in the closed hand (South) and lead a Club (any Club). If West plays low just let the Club run (in other words, play small from table). If that wins the trick, then lead another Club and repeat the process. You hope to make four tricks.
A4. You require East to have the ♣K. Place the lead in dummy (North) and lead the ♣Q (or any Club as they are all equals). If East follows with a small card you play low from hand, allowing the ♣Q to “run”. If East plays the King, you kill it with the Ace. You hope to make four tricks.
A5. You need West to hold the ♣K. Place the lead in the South hand and lead the ♣Q (or ♣J) and let it run unless West puts the ♣K on it. If the ♣Q wins then lead a Club to dummy’s ♣10. You hope to make three tricks.
A6. You need East to hold the ♣Q. Place the lead in the dummy (North) and lead the ♣J (or the ♣10, it hardly matters as they are equals) and let it run unless East covers it with the ♣Q. You hope to make three tricks.
A7. You need West to hold the ♣Q. Cash the ♣K first (in any case, that might be the best way of placing the lead in the closed hand) and then play a Club through West to the ♣J in dummy. You hope to make three tricks.
A8. You require East to have the ♣K and, for good measure, you need the suit to break 3-2. Place the lead in dummy (North) and a Club honour, allowing it to run if East plays low. If East plays the King you kill it with the Ace, of course. You hope to make four tricks.
A9. You require West to have the ♣A and, for good measure, you need the suit to break 3-2. Place the lead in the closed hand and lead a Club towards the ♣K Q and through West. If the ♣Q wins the trick, and the Ace has not appeared “on air” cross back to the South hand and lead another Club, playing the ♣K if the ♣A has not appeared. You hope to make three tricks.
A10. You require West to have the ♣J. Place the lead in the South hand and lead a low Club to the ♣9. You have to hope that West has the ♣J and that the ♣9 forces the ♣K or the ♣A. When on lead again place the lead in the closed hand and play a Club to the ♣10. This way you may force one trick from this holding – the best you can hope to do.
A11. You require East to hold the ♣Q. Place the lead in the dummy and lead a Club through East, playing the ♣10. If that wins the trick (or if West takes the ♣A) then repeat the process (when you can) of leading from North and putting the ♣J on. You hope to make two tricks. The location of the ♣A, you may note, is irrelevant.
A12. You require West to have the ♣J. Place the lead in the South hand and lead a low Club to the ♣10. With luck, that will win the trick and the ♣A K Q will be yours to take. The alternative line (of cashing the ♣A K Q hoping the ♣J falls) is against the odds. You hope to make four tricks.
Page S §21.6