Embed Size (px)
DESCRIPTION
Page Orientation Page Setup You can choose either portrait (vertical) or landscape (horizontal) orientation for all or part of your document. 1.On the Page Layout tab, in the Page Setup group, click Orientation. 2. Click Portrait or Landscape. Landscape Portrait DOCUMENTATION TECHNIQUES
Citation preview

Page Layout
You can quickly and easily format the entire document to give it a professional and modern look by applying a document theme. A document theme is a set of formatting choices that can include a color scheme (a set of colors), a font scheme (a set of heading and body text fonts), and an effects scheme (a set of lines and fill effects).
DOCUMENTATION TECHNIQUES

Page Setup - Columns
You can split your text into two or more columns. By this way you can save space in your document.
Columns
Column 1
Column 2Column 3
DOCUMENTATION TECHNIQUES

Page Orientation
Page Setup
You can choose either portrait (vertical) or landscape (horizontal) orientation for all or part of your document.
1.On the Page Layout tab, in the Page Setup group, click Orientation.
2. Click Portrait or Landscape.
LandscapePortrait
DOCUMENTATION TECHNIQUES

Page Break
Page Break is used in cases where you need to have text begin on a new page, such as the beginning of a new chapter
Insert a manual page break at the point where you want the new page to begin.
To insert a manual page break, follow these steps:1. Click where you want to insert the page break.2. On the Insert menu, click Page Break.
DOCUMENTATION TECHNIQUES
.NOTE: Don’t press the Enter key repeatedly until a new page begins

Section Break
Section breaks is used to divide the document in sections. A section break allows you to format each section differently.
For each section, it is possible to specify different formatting, such as header and footer appearance, sequence of page numbers, page orientation (portrait or landscape), and page margins.
For example, one section can have page numbering in Roman numerals, while another section has Arabic numbers.
Differences between page break and section breakA page break is just used to insert a new page and keeps the same page formatting.
DOCUMENTATION TECHNIQUES

Section Break
Follow these steps to insert a section break :1. Click where you want to insert the section
break.2. On the Page Layout tab, click on Breaks3. Then under Section Breaks, click Next
Page. (This will insert the section break, and text following the section break will begin on a new page.)
4. If you want the text to continue on the same page, under Section Breaks, click Continuous.
DOCUMENTATION TECHNIQUES

DOCUMENT CORRECTION
Editing Group
Home Tab – Editing Group
On the Home tab, in the Editing group, you can find any text or object and replace it with a given key word.
NOTE: Beside finding or replacing a text; you can find or replace specific formatting types, paragraph breaks, page breaks, and other items, specific letters, formatting, fields, or special characters.
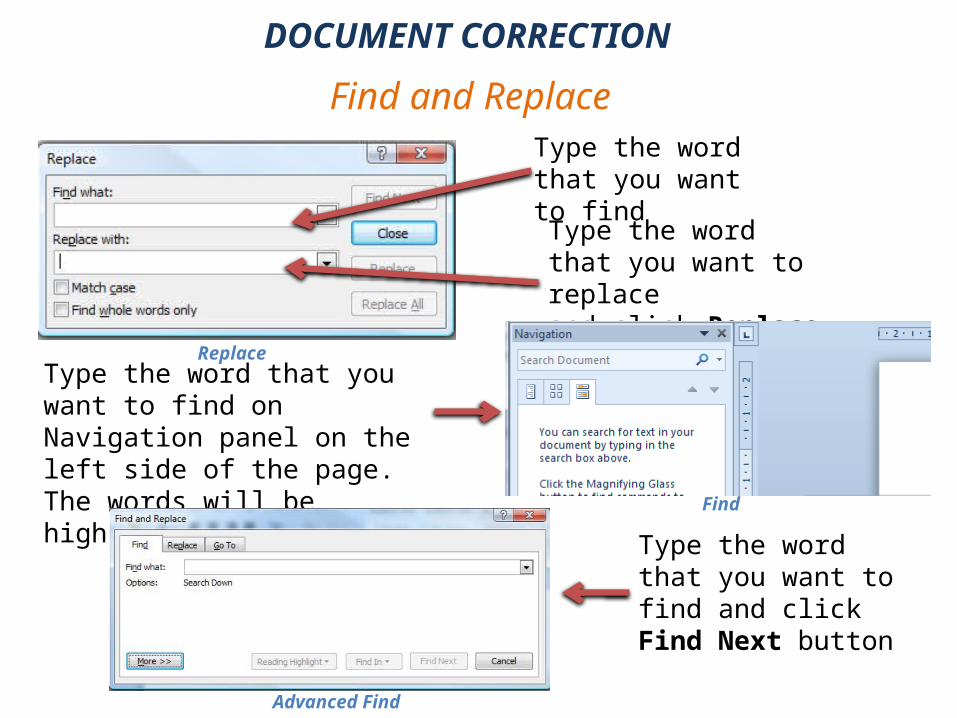
Find and Replace
Replace
Find
Type the word that you want to find
Type the word that you want to replace and click Replace button
Type the word that you want to find on Navigation panel on the left side of the page. The words will be highlighted
DOCUMENT CORRECTION
Advanced Find
Type the word that you want to find and click Find Next button

Proofing – Grammer & Spell Check
Review Tab – Proofing and Language Group
Checking the spelling and grammar is useful when you want to proof your text. You can check for possible mistakes and then confirm each correction. To do this follow the instruction; •Open the Review tab•In the Proofing group, click Spelling & Grammar.
Find & replace and Spelling & Grammar
DOCUMENT CORRECTION

Spell Check - Automatically
When you check spelling automatically while you type, you can be more confident that you won't need to correct a lot of spelling mistakes when you are ready to deliver your file. Microsoft Office programs can flag misspelled words as in the following example.
You can right-click the misspelled word to see suggested corrections on the shortcut menu. Right-clicking a word can provide you with other options on the shortcut menu, such as adding the word to your custom dictionary.
Correction
DOCUMENT CORRECTION
Grammar Check - Automatically
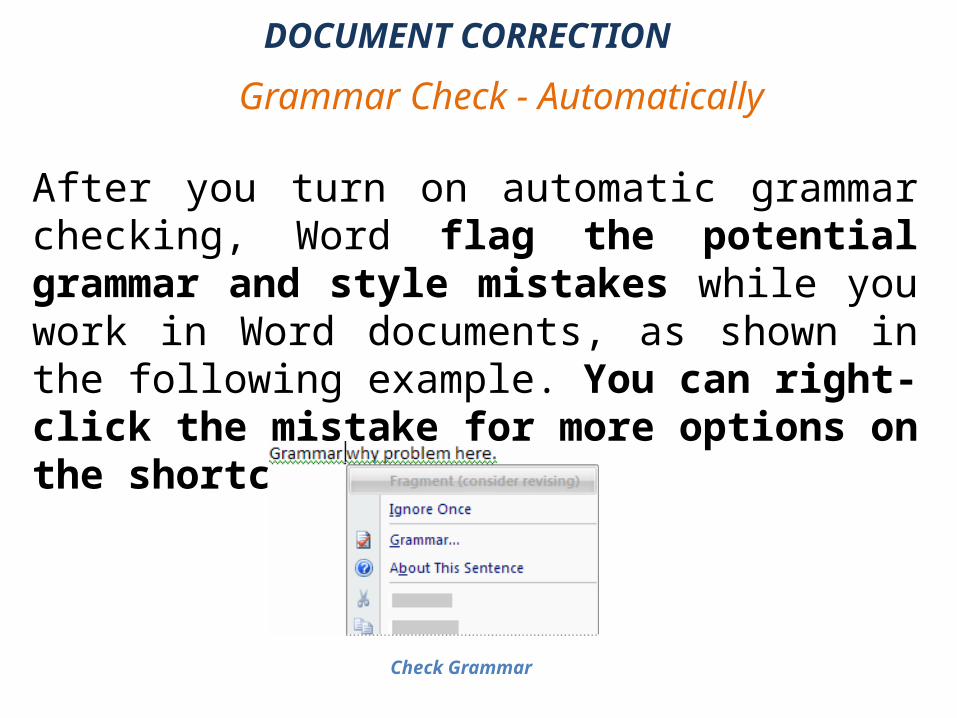
After you turn on automatic grammar checking, Word flag the potential grammar and style mistakes while you work in Word documents, as shown in the following example. You can right-click the mistake for more options on the shortcut menu.
Check Grammar
DOCUMENT CORRECTION
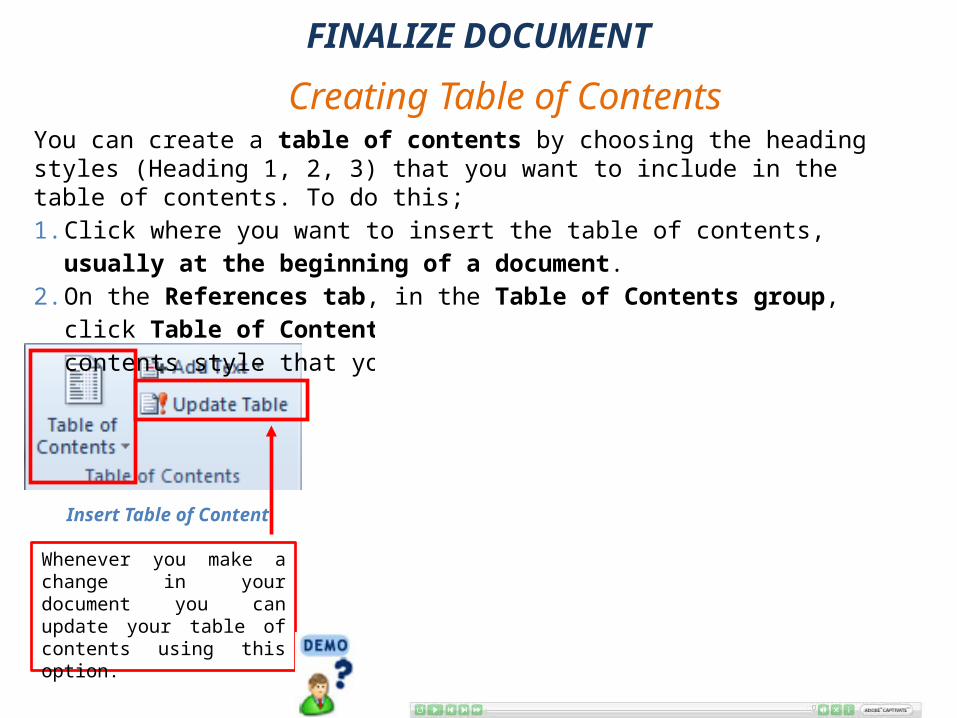
Creating Table of Contents
Insert Table of Content
You can create a table of contents by choosing the heading styles (Heading 1, 2, 3) that you want to include in the table of contents. To do this;1. Click where you want to insert the table of contents, usually at the beginning of a
document. 2. On the References tab, in the Table of Contents group, click Table of Contents, and
then click the table of contents style that you want to use.
Whenever you make a change in your document you can update your table of contents using this option.
FINALIZE DOCUMENT

Insert Bibliography
A bibliography is a list of sources, usually placed at the end of a document, that you consulted or cited in creating the document. To create a bibliography, you can use References tab >> Citations & Bibliography group
List of Reference
Insert Citation and Bibliography
FINALIZE DOCUMENT

Creating Reference
Indexing
• To create a reference in the bibliography list, click Insert Citation on the References tab, in the Citations & Bibliography group.• To add the source information, click Add New Source.• To list your citation and references list at the end of your
document, click Bibliography link and select one of the bibliography types. • To update your Citation and references list click Update
Citation and Bibliography link.
NOTE: See details of Referencing and Bibliography in the Word Tutorial.
FINALIZE DOCUMENT

Indexing
An index lists the terms and topics that are discussed in a document, along with the pages that they appear on. To create an index, use Indexing group on the References Tab. An index is a list of keywords in the document along with the page numbers where the words appear on.
Indexing
FINALIZE DOCUMENT

Creating Index
Indexing
You can create an index entry:• For an individual word, phrase, or symbol • For a topic that spans a range of pages • That refers to another entry, such as "Transportation. See
Bicycles“
NOTE: See details of INDEXING in the Week 6-7 Tutorial.
FINALIZE DOCUMENT

WORD 2010 BASICS
Please note that, in Word 2010 the extension of a default Word 2010 document is ‘.docx’ whereas Word2003 and earlier versions automatically saves a document with an extension of ‘.doc’.
The first time you save a NEW document, you must firstly name the file before you save it.
NOTE: Latest version, Word 2010 recognizes earlier versions of Word document however the reverse is NOT TRUE.
Format of a Word Document

What we have learnt so far...
SUMMARY