Embed Size (px)
Citation preview

Peoria Area EMS System Prehospital Care Manual
Procedures
Section
Page
Effective Oct 1, 2021 Procedures Title Page
Peoria Area EMS System Prehospital Care Manual
Procedures
Section
Page 43
Effective Oct 1, 2021 Pain Control Procedure
PAEMS
Procedures Section

Peoria Area EMS Procedures Section
Table of Contents Click any heading below to jump to each respective section
Procedures Title Page ................................................................................................................................................... 1
Pain Control Procedure ................................................................................................................................................ 3
Pain Control Dosing Chart ............................................................................................................................................ 5
Basic Airway Control Procedure ................................................................................................................................... 6
Advanced Airway Control Procedure ............................................................................................................................ 9
Advanced Airway Expanded Scope Only ......................................................................................................................11
Bougie/ OG Tube Procedure ........................................................................................................................................15
Intraosseous/ Jamshidi Procedure ...............................................................................................................................16
Central Lines and Fistulas Procedure ...........................................................................................................................18
Medication Administration Procedure .........................................................................................................................19
Universal Patient Care Procedure ................................................................................................................................20
Universal Trauma Patient Care Procedure ...................................................................................................................22
Spinal Assessment and Clearance Procedure ...............................................................................................................25
Field Triage Scheme Procedure ...................................................................................................................................26
Tourniquet Procedure .................................................................................................................................................27
Needle Thoracentesis Procedure .................................................................................................................................28
Push Dose Epi Procedure.............................................................................................................................................29
Immunization Administration Procedure .....................................................................................................................30
START and JUMP START Triage Procedure ...................................................................................................................31

Peoria Area EMS System Prehospital Care Manual
Procedures
Section
Page
Effective Oct 1, 2021 Pain Control Procedure 3
First Responder and BLS Care should focus on the reduction of the patient’s anxiety due to the pain.
1. Render initial care in accordance with the Universal Patient Care Protocol. 2. Assess level of pain using the Pain Assessment Scale (0-10) or the Wong-Baker Faces Pain Rating
Scale. 3. Place patient in a position of comfort. 4. Reassure the patient. 5. Consider ice or splinting. 6. Reassess level of pain using the approved pain scale. 7. Initiate ALS intercept, if indicated.
ILS/ ALS Care should focus on the reduction of the patient’s anxiety due to the pain.
1. Continue care following the procedures found in EMR and BLS Care.
2. Patient care according to Protocol based on specific complaint.
3. Pain severity ≥ 6 out of 10 or indication for IV/IM/IN pain medication.
4. If the medical or trauma patient is hemodynamically stable the provider should manage patient’s pain by using the following medication.
Fentanyl
IV/IO 50 mcg IV, over 2 minutes for pain. Fentanyl 50 mcg IV or IO may be repeated every 5 minutes
to a total of 200 mcg. Fentanyl
IM/IN If unable to establish IV access, may administer Fentanyl 50 mcg IM. May be repeated as
needed to a total of 200 mcg.
If unable to establish IV/ IO access, may administer 2mcg/kg IN + 0.1ml dead space volume for waste within the MAD (See dosing chart for IN dosages)
ALS Trauma Care should focus on the reduction of the patient’s anxiety and distress due to pain caused from a traumatic injury. Ketamine may be utilized as an analgesia when the patient is showing signs of hypo perfusion due to a traumatic injury. Ketamine has limited effects upon respiratory drive and blood pressure which make it an ideal analgesic for traumatic injuries where hypo perfusion is noted. Indications-Acute musculoskeletal traumatic injuries (eg. fractures, dislocations, lacerations, and burns), Penetrating traumatic injuries (eg. gunshot wounds, stab wounds, and impaled objects) 1. If the patient is hemodynamically unstable due to traumatic injury the provider should manage the
patient’s pain by using the following medication.

4
Ketamine IV/IO 0.3mg/kg slow IV/IO Push every 20 minutes to a maximum 3 doses
Ketamine IM 0.5mg/kg slow IM Push

Peoria Area EMS System Prehospital Care Manual
Procedures
Section
Page
Effective Oct 1, 2021 Pain Control Dosing Chart 5
Dose (mL) Dose (mL)
0.7 ml 0.3 mL
1.3 ml 0.4 mL
2.1 ml 0.5 mL
2.9 ml 0.7 mL
3.3 ml 0.8 mL
3.8 ml 0.9 mL
4.1 ml 1.0 mL
4.5 ml 1.0 mL
4.9 ml 1.1 mL
5.3 ml 1.2 mL
5.7 ml 1.3 mL
6.1 ml 1.4 mL
6.5 ml 1.4 mL
6.9 ml 1.5 mL
8.1 ml 1.8 mL
10.1 ml 2.0 mL
Dose (mg)
Patient Age Weight 5mg/5mL Concentration 10mg/2mL Concentration
(years)
*Volume is based on the calculated dose PLUS 0.10 mL dead space in the device. The total volume is then rounded off to the next highest 0.1 mL. In some children a higher dose may be needed (0.3 mg/kg).
10
11
12
For Children: Total weight (kg) X 0.2 mg = total mg dose of Midazolam, maximum dose of 10 mg
Full Grown Teen or Adult
6.8 mg
>50kg (>110) Lbs
Small Teenager
10.0 mg10.0 mg
6.4 mg
8.0 mg40kg (88) Lbs
30kg (66) Lbs
32kg (70) Lbs
Intranasal Versed (Midazolam) Dosing Chart
Neonate
<1 yr
2
1
3kg (6)Lbs
6kg (13) Lbs
10kg (22) Lbs
14kg (30) Lbs
0.6 mg
1.2 mg
2.8 mg
0.6 mg
1.2 mg
2.0 mg
Dose (mg)
34kg (75) Lbs
3.6 mg
4.4 mg
6.0 mg
5.2 mg
20kg (44) Lbs
22kg (48) Lbs
24kg (53) Lbs
26kg (57) Lbs
28kg (62) Lbs
2.0 mg
4.0 mg
4.8 mg
5.6 mg
3
4
5
16kg (35) Lbs
18kg (40) Lbs
6
8
7
9
3.2 mg
4.4 mg
4.8 mg
5.2 mg
8.0 mg
2.8 mg
3.2 mg
3.6 mg
4.0 mg
5.6 mg
6.0 mg
6.4 mg
6.8 mg
No Extra
**Divide dose in 1/2 and administer 10 minutes apart to reduce runoff**
200 mcg (4.0 ml)
(+ 0.1 ml)
(+ 0.1 ml)
(+ 0.1 ml)
(+ 0.1 ml)
(+ 0.1 ml)
(+ 0.1 ml)
(+ 0.1 ml)
(+ 0.1 ml)
(+ 0.1 ml)
No Extra
**(+ 0.1 ml)**
**(+ 0.1 ml)**
**(+ 0.1 ml)**
**(+ 0.1 ml)**
**(+ 0.1 ml)**
20 mcg (0.4 ml)
30 mcg (0.6 ml)
40 mcg (0.8 ml)
50 mcg (1.0 ml)
60 mcg (1.2 ml)
90 mcg (1.8 ml)
100 mcg (2.0 ml)
110 mcg (2.2 ml)
120 mcg (2.4 ml)
21-25kg (46-55 Lbs)
26-30kg (57-66 Lbs)
31-35kg (68-77 Lbs) 70 mcg (1.4 ml)
80 mcg (1.6 ml)36-40kg (79-88 Lbs)
Intranasal Fentanyl Dosing Chart
6-10kg (13-22 Lbs)
16-20kg (35-44 Lbs)
11-15kg (24-33 Lbs)
3-5kg (6-11 Lbs) 10 mcg (0.2 ml)
Patient Weight Dosage (2mcg/kg) Dead Space Volume
41-45kg (90-99 Lbs)
91-100kg (200-220 Lbs)
81-90kg (178-198 Lbs)
140 mcg (2.8 ml)
160 mcg (3.2 ml)
180 mcg (3.6 ml)
46-50kg (101-110 Lbs)
51-55kg (112-121 Lbs)
56-60kg (123-132 Lbs)
61-70kg (134-154 Lbs)
71-80kg (156-176 Lbs)

Peoria Area EMS System Prehospital Care Manual
Procedures
Section
Page
Effective Oct 1, 2021 Basic Airway Control Procedure 6 Establishing and maintaining an open airway and assuring adequate ventilation is a treatment priority with all patients.
1. Assure an open airway by utilizing either the head tilt/chin lift maneuver, the modified jaw thrust maneuver or the tongue-jaw lift maneuver. The head tilt/chin lift maneuver is NOT to be used if there is any possibility of cervical spine injury.
2. Expose the chest and visualize for chest rise and movement, simultaneously listen and feel for air movement at the mouth and nose. This procedure will need to be done initially and after correcting an obstruction and securing the airway.
3. If the chest is not rising and air exchange cannot be heard or felt:
a) Deliver two positive-pressure ventilations. If resistance continues, follow AHA sequences for obstructed airway rescue.
b) Reassess breathing and check for a carotid pulse. c) If spontaneous respirations return and a pulse is present, provide supplemental Oxygen by non-
rebreather mask or assist respirations with bag-valve mask (BVM) at 15 L/min. d) If the patient remains breathless and a pulse is present, initiate ventilations with a BVM at 15
L/min at a rate of 12 breaths per minute. e) If the patient remains breathless and a pulse is not present, initiate CPR and institute the
appropriate cardiac protocol.
4. If the patient presents with stridor, “noisy breathing” or snoring respirations, render treatment for partial airway obstruction in accordance with AHA guidelines.
a) Reassess effectiveness of the airway maneuver. b) If initially unable to resolve partial airway obstruction, suction the airway and visualize the
pharynx for any evidence of foreign objects. If the object is visible utilize the appropriate method to retrieve.
c) If partial airway obstruction persists, treat according to AHA guidelines for resolving a complete airway obstruction.
5. Once the obstruction has been corrected assess the airway and utilize an appropriate airway adjunct. For your level of care and observe for adequate chest rise and fall.
6. Supplemental oxygen should be delivered to any patient who exhibits signs of difficulty breathing, sensation of shortness of breath, respiratory rate > 20 breaths per minute, use of accessory muscles, altered level of consciousness/altered mental status, cyanosis, cardiac symptoms, head injury or any indications of shock.
7. Bag-valve mask ventilation with supplemental oxygen at 15 L/min should be initiated at the rate of 12/min if respirations are absent, there is evidence of inadequate ventilation, respiratory rate is < 8/min, absent or diminished breath sounds or wounds to the chest wall.
Contraindications and Procedure for the use of an i-gel
• Active gag reflex • Ingestion of a caustic substance (e.g. gasoline, drain cleaner, etc.) • Use caution with pregnant patients.

7 • Morbidly obese • Tracheostomy (will be ineffective with esophageal placement)
1. Apply proper BSI including face shield and/ or N95 mask 2. Open the i-gel package, and on a flat surface take out the protective cradle containing the device. 3. In the final minute of pre-oxygenation, remove the i-gel and transfer it to the palm of the same hand that is holding the protective cradle, supporting the device between the thumb and index finger. Place a small bolus of a water-based lubricant, such as K-Y Jelly, onto the middle of the smooth surface of the cradle in preparation for lubrication. Do not use silicone based lubricants. 4. Grasp the i-gel with the opposite (free) hand along the integral bite block and lubricate the back, sides and front of the cuff with a thin layer of lubricant. This process may be repeated if lubrication is not adequate, but after lubrication has been completed, check that no BOLUS of lubricant remains in the bowl of the cuff or elsewhere on the device. Avoid touching the cuff of the device with your hands. 5. Place the i-gel back into the cradle in preparation for insertion.
The i-gel must always be separated from the cradle prior to insertion. The cradle is not an introducer and must never be inserted into the patient’s mouth.
i-gel Size 1 1.5 2 2.5 3 4 5 Patient
Criteria
2-5kg ILS and ALS
only
5-12kg ILS and ALS
only
10 - 25kg ILS and ALS
only
25 - 35kg ILS and ALS
only
30 - 60kg (Based On Ideal Body Weight)
50 - 90kg (Based On Ideal Body Weight)
90 + kg (Based On Ideal Body Weight)
Patient Size Neonate ALS Only
Infant ALS Only
Toddler ALS Only
Child ALS Only
Small Adult
Medium Adult
Large Adult
Make sure the appropriate size of i-gel has been prepared prior to insertion. Always have a smaller and/or larger size of the i-gel readily available. Adequate preparation, proper lubrication of the device and correct positioning of the head and neck with optimum mouth opening is the key to a successful insertion of i-gel. Always pre-oxygenate.
WARNING: The i-gel is supplied in a protective cradle or cage pack to ensure the device is retained in the correct flexion prior to use and also acts as a base for lubrication. The i-gel must always be separated from the cradle or cage pack prior to insertion. The cradle and cage pack are not introducers and must never be inserted into the patient’s mouth.
A proficient user can achieve insertion of the i-gel in less than 5 seconds.
1. Grasp the lubricated i-gel firmly along the integral bite block. Position the device so that the i-gel cuff outlet is facing towards the chin of the patient. 2. The patient should be in the sniffing position with head extended and neck flexed. The chin should be gently pressed down before proceeding to insert the i-gel. 3. Introduce the leading soft tip into the mouth of the patient in a direction towards the hard palate. 4. Glide the device downwards and backwards along the hard palate with a continuous but gentle push until a definitive resistance is felt.

8
WARNING: Do not apply excessive force on the device during insertion. It is not necessary to insert fingers or thumbs into the patient’s mouth during the process of inserting the device.
5. At this point the tip of the airway should be located into the upper esophageal opening and the cuff should be located against the laryngeal framework. The incisors should be resting on the integral bite-block.
WARNING: In order to avoid the possibility of the device moving up out of position prior to being secured in place, it is essential that as soon as insertion has been successfully completed, the i-gel is held in the correct position until the device is secured in place.

Peoria Area EMS System Prehospital Care Manual
Procedures
Page
Effective Oct 1, 2021 Advanced Airway Control Procedure 9
1. Implement basic airway measures in accordance with the Basic Airway Control Procedure.
2. Conduct a pre-intubation assessment using the Cormack-Lehane scale: GRADE 1 GRADE 2 GRADE 3 GRADE 4
3. Consider using a Bougie (See Endotracheal Tube Introducer Procedure)
4. Select the proper tube size (based on patient size) and attach a 10mL syringe. Inflate the cuff to be sure it does not leak (the cuff must be deflated prior to insertion).
5. Have suction, BVM, stethoscope, colormetric end-tidal CO2 detector/capnography and commercial ETT holder readily available.
6. Suction the pharynx, lubricate the tube, and pre-oxygenate the patient.
7. Insert the blade into the mouth on the right side, moving the tongue to the left. Follow the natural contour of the pharynx, lifting the tongue (not prying) until you can see the glottic opening.
a) If you are using a straight blade (Miller), insert it until you can see the epiglottis. With the tip of the blade, lift up on the epiglottis so that you can visualize the vocal cords and glottic opening. If needed, have someone gently press down on the cricoid cartilage (Sellick Maneuver) so that you can see the cords well.
b) If you are using a curved blade (Macintosh), insert the tip into the vallecula and lift up. This will lift the epiglottis and expose the vocal cords and glottic opening. If needed, have someone gently press down on the cricoid cartilage (Sellick Maneuver) so that you can see the cords well.
8. After visualizing the glottic opening, grasp the ETT with your right hand and advance the tube from the right corner of the mouth. Insert the tube into the glottic opening between the vocal cords, just far enough to pass the cuff of the tube past the opening.
9. Verify proper position by ventilating the patient through the tube with a bag-valve device while listening to each side of the chest with a stethoscope to be sure air is entering both lungs. Also, check for inadvertent esophageal intubation by listening for air movement in the epigastric area during ventilations.
10. Utilize end-tidal CO2 (ETCO2) or capngraphy.
If the pre-intubation assessment is GRADE 3 or GRADE 4, do not attempt intubation. Proceed to insertion of King LTS-D Airway or return to basic airway control measures using a BVM with OPA or NPA.
10
11. If breath sounds are heard on both sides of the chest, no epigastric sounds are heard colormetric ETCO2 detector/capnography indicate proper placement, inflate the cuff with 10mL of air and secure the tube with a commercial ETT holder.
a) If you have inserted the ETT too far, it will usually go into the right main stem bronchus. Therefore, if you hear breath sounds only on the right, you should pull the tube back ½ inch at a time until you hear bilateral breath sounds. Inflate the cuff with 10mL of air and secure the ETT with a commercial holder.
b) If you hear no breath sounds, you are in the esophagus and must remove the ETT immediately. Ventilate patient and proceed to King LTS-D Airway insertion or continue basic airway control measures.
12. Frequently reassess breath sounds to be sure that the ETT is still in place.
13. Ventilate the patient at a rate of 12 times per minute.
14. If intubation is unsuccessful after one (1) attempt, refer to the BIAD Airway Procedure or Basic Airway Control Procedure.
Trauma Patients: Any type of airway manipulation may be dangerous during airway control of the suspected spinal injury patient. Maintain in-line stabilization and refer to the BLS Airway Procedure or Advanced Airway procedure.
1. A minimum of two (2) trained rescuers is needed to assure special attention to spinal precautions.
2. One rescuer will apply manual in-line stabilization by placing the rescuers hands about the patient’s ears with the little fingers under the occipital skull and the thumbs on the face over the maxillary sinuses.
3. The rescuer performing airway placement should be at the head.
4. Maintain the patient’s head in a neutral position and place the BIAD or ET Tube without cervical manipulation.
Critical Thinking Elements
● The definition of an “attempt” is actually trying to pass the ET tube through the vocal chords.
● Verification of proper ETT placement is of vital importance. Utilize multiple methods of verifying placement including direct visualization of the ETT passing through the cords, auscultation of bilateral breath sounds, absence of epigastric sounds during ventilation, and positive color change (purple to yellow) with ETCO2 or capnography levels between 35-45mmHg. Document findings.

Peoria Area EMS System Prehospital Care Manual
Procedures
Page
Effective Oct 1, 2021 Advanced Airway Expanded Scope Only 11 Surgical Airway Procedure (ALS Advanced Practice Only) for percutaneous procedure, see Melker kit INDICATIONS:
Surgical Cricothyroidotomy is an emergent procedure for patient > 12 years of age who are in need of emergent airway support, but cannot be intubated due to anatomic or traumatic distortion of the airway, or who have an upper airway obstruction that precludes successful endotracheal intubation. Indications may include any of the following:
• Upper airway obstruction due to edema, infection, caustic ingestion, allergic reaction, inhalation injuries or foreign body.
• Maxillofacial Trauma • Unsuccessful tracheal intubation
CONTRAINDICATIONS:
Surgical Cricothyroidotomy should not be considered in the following situation:
• Crush injury to the larynx • Penetrating neck trauma
RELATIVE CONTRAINDICATIONS:
• Known coagulopathy
EQUIPMENT:
• Personal protection equipment • #11 Scalpel • Betadine swabs • 4x4 gauze pads • Trach hook • Syringe • Endotracheal tube 5.5-6.0 • Endotracheal tube securing device • Bag-valve-mask • Oxygen source
PROCEDURE:
1. Attempt to oxygenate patient with 100% oxygen while equipment is assembled.
2. Maintain neutrality of the cervical spine.
3. Inflate endotracheal tube cuff and observe for any air leaks. Deflate cuff.
4. Identify the cricothyroid membrane just below the thyroid cartilage. Make a vertical skin incision over this area.
5. Stabilize the larynx with the non-operating hand. Do not let go.

12
6. Make a transverse incision the width of the cricothyroid space with the tip of the #11 blade scalpel.
7. As the airway is entered, a rush of air or bubbling is noted.
8. Dilate the incision (May be performed with a curved forceps or with handle of the scalpel).
9. Insert the endotracheal tube and inflate the cuff.
10. Confirm correct placement then secure the tube.
11. Ventilate the patient with Bag-valve-mask and 100% oxygen.
12. Documentation of the procedure should include:
Indications for the procedure Number of attempts and by whom Size of endotracheal tube utilized Pulse oximetry, chest expansion, breath sounds, skin color, vital signs Complications which may include:
• Asphyxia • Subglottic stenosis/edema • Hemorrhage • Subcutaneous emphysema • Mediastinal emphysema • Creation of a false passage • Laryngeal stenosis • Laceration of the esophagus or trachea • Right main stem intubation
Rapid Sequence Induction/ Intubation (RSI) (ALS Advanced Practice Only) will be the preferred method for establishing a secure airway unless patient condition or circumstances dictate otherwise.
Procedure: Step 1: PRE-OXYGENATE: Position the patent and pre-oxygenate with high flow oxygen by mask for 2-5
minutes. Do not manually ventilate the patient unless ventilatory assistance is needed; if so, use BVM to provide respiratory support.
Step 2: PREPARE: Assess for difficult airway and likelihood of difficulty with bag and mask ventilation. Have airway adjuncts and alternative airway readily available. If you anticipate difficulty with intubation or bag and mask ventilation call for help early and have a primary and secondary plan for airway management consider using video laryngoscopy initially. Assemble the required equipment and draw up the medications in labeled syringes. Ensure that the IV functions well. Continuously monitor the cardiac rhythm and pulse oximetry if conditions allow. Have immediately available an igel or BIAD, video laryngoscope, bougie, and the emergency cricothyrotomy kit.

13
Step 3: PRE-MEDICATION: Fentanyl 1-3 mcg/kg IV slowly over several minutes
SEDATION: May use 1 of the following:
Midazolam (Versed) 0.1-0.2mg/kg IV
Ketamine 1-2mg/kg IV Preferred agent for status asthmaticus
Etomidate 0.3mg/kg IV Preferred for increased ICP-minimal CV effect
Continue pre-oxygenation for 2-3 minutes (allows medications to work) prior to Step 4, if time allows and the patient has effective respiratory effort/support.
• Consider removing the C-collar if present while providing in-line manual immobilization of the head and neck to aid intubation, also consider using video laryngoscopy as a first line in these patients.
Step 4: PARALYZE, then INTUBATE: Paralytic medications: (Choose 1 or the other)
Succinylcholine (Anectine) 1.5-2mg/kg IV
i. Succinylcholine contraindications include:
1. 5 days or more post-burn or major trauma
2. Patient with a history of chronic paralysis, malignant hyperthermia, know pseudocholinesterase deficiency, neuromuscular disorder (i.e. MS), acute spinal cord injury, or crush injury.
3. Known hyperkalemia, chronic renal failure or hemodialysis
Rocuronium (Zemuron) 1 mg/kg IV
ii. Preferred agent for pediatric intubations unless known or predicted difficult airway
iii. Preferred agent if known or suspected contraindications to Succinylcholine
• Apnea, jaw relaxation, and decreased resistance to bag/mask ventilations indicate that the patient is sufficiently relaxed to proceed with intubation.
• Intubate, verify tube placement, secure the tube, and continue to assist respirations.
Step 5: For CONTINUED NEUROMUSCULAR BLOCKADE after intubation, administer:
Rocuronium (Zemuron) 0.5-1.0 mg/kg IVP
For CONTINUED SEDATION: Continue with the sedation med utilized in Step 3
Midazolam (Versed 0.05mg/kg 3-5mg for adults every 15-30 mins as needed
Ketamine 0.5-1.5mg/kg Every 5- 10 minutes as needed
Fentanyl 1-3mcg/kg Over 2 minutes
Step 6: UNSUCCESSFUL PLACEMENT: If endotracheal intubation is unsuccessful, and you are unable to ventilate the patient with BVM, consider attempting to gain airway control using one of the following techniques: (Refer to the Advanced Procedure Manual: Airway Procedures: Failed Airway Algorhythm (510.010)) a) Use a bougie see ET Tube Inducer Procedure
b) Use video laryngoscope

14
c) Place iGel see BIAD Igel Procedure
d) Attempt placing bougie through iGel, and exchanging for ETT (only if iGel ineffective)
e) Consider surgical airway if the above methods are unsuccessful
NOTE: If intubation is unsuccessful and additional paralytics are needed, a non-depolarizing agent should be considered after ease of bagging and airway back up has been carefully considered.

Peoria Area EMS System Prehospital Care Manual
Procedures
Section
Page
Effective Oct 1, 2021 Bougie/ OG Tube Procedure 15
Patient meets clinical indications for endotracheal intubation. Pre-intubation assessment predicts a difficult intubation. Studies have shown increased 1st time pass rate utilizing the Bougie.
1. See the Advanced Airway Control Procedure. 2. Slide the ET Tube over the Bougie allowing for a few inches at the tip to visualize the Bougie during
insertion. 3. Introduce the Bougie with curved tip anteriorly and visualize the tip passing the vocal cords or above the
arytenoids if the cords cannot be visualized. 4. Once inserted, gently advance the Bougie until you meet resistance or “hold-up” (if you do not meet
resistance you have a probable esophageal intubation and insertion should be reattempted or manage the airway using a BIAD).
5. Withdraw the Bougie ONLY to a depth sufficient to allow passage of the ETT while maintaining proximal control of the Bougie.
6. Gently advance the loaded ET tube until you have passed through the vocal cords, thereby assuring tracheal placement and minimizing the risk of accidental displacement of the Bougie.
7. If you are unable to advance the ETT into the trachea and the Bougie and ETT are adequately lubricated, withdraw the ETT slightly and rotate the ETT 90 degrees COUNTER clockwise to turn the bevel of the ETT posteriorly. If this technique fails to facilitate passing of the ETT you may attempt direct laryngoscopy while advancing the ETT (this will require an assistant to maintain the position of the Bougie and, once the vocal cords are visualized, advance the ETT).
8. Once the ETT is correctly placed, hold the ET tube securely and remove the Bougie. 9. Confirm tracheal placement according to the intubation protocol, inflate the cuff with 3 to 10 cc of air,
auscultate for equal breath sounds and reposition accordingly. 10. When final position is determined secure the ET tube, reassess breath sounds, apply end tidal CO2
capnography monitor, and record and monitor readings to assure continued tracheal intubation. Indication for orogastric (OG) tube placement in the Peoria Area EMS System is:
• Gastric decompression of an adult cardiac arrest patient after endotracheal intubation has been performed and placement verified; OR with use of the KING LTS-D Airway.
• Known esophageal varices, esophageal stricture, esophageal or stomach cancer, esophagostomy or partial gastrectomy, gastric bypass, or penetrating neck trauma
1. Estimate the length of the tube needed to reach the stomach by measuring the tube from the corner of the mouth to the earlobe and down to the xiphoid process. Mark the length with tape.
2. Lubricate the Salem sump tube (18F) with a water soluble lubricant (e.g. K Y Jelly). 3. Insert the tube through the oropharynx or through the gastric access lumen on the KING LTS-D Airway until the
marked depth is reached. 4. If the tube coils in the posterior pharynx, direct laryngoscopy can be utilized to place the tube in the esophagus. 5. Verify placement by using a 60mL catheter tip syringe, instill 30mL of air into tube and auscultate over
epigastrium for air sounds. 6. Aspirate for gastric contents and assess for cloudy, green, tan, brown, bloody or off-white color contents
consistent with gastric contents. 7. Secure tube with tape.

Peoria Area EMS System Prehospital Care Manual
Procedures
Section
Page
Effective Oct 1, 2021 Intraosseous/ Jamshidi Procedure 16 The intraosseous space may be viewed as a non-collapsible, easily accessed space for any fluid or medication. Intraosseous infusion is preferred over endotracheal routes of medication administration and is a viable alternative when IV therapy is not available or not accessible. Intraosseous infusion is immediately available, safe and effective.
1. Intravenous fluids and medications are emergently needed, a peripheral IV cannot be established in two (2) attempts AND the patient demonstrates one of the following:
• An altered mental status (GCS of 8 or less) with loss of protective airway reflexes (with notable exception of known diabetic with symptomatic hypoglycemia)
• Clinical signs of shock from any cause (hypovolemia from severe dehydration or trauma, cardiogenic, anaphylactic, septic or Neurogenic) with a systolic BP less than 80mmHg
• Patients in extremis (at risk of death or disability) with immediate need for delivery of medications and fluids (e.g. multi-system trauma, anaphylaxis, status asthmaticus, status epilepticus, life-threatening dysrhythmia or bradycardia, severe respiratory distress with hypoxia and/or alteration in consciousness, respiratory arrest, and overdose associated with alteration in vital signs, mental status and/or dysrhythmia)
• If a patient is assessed to be in need of intraosseous access and does not fit any of the above, contact Medical Control for further guidance and orders.
2. EZ-IO insertion may be considered PRIOR to peripheral IV attempts if the patient is in cardiac arrest (medical or traumatic).
Contraindications:
1. Fracture of the bone selected for IO infusion (consider another approved site of insertion) 2. Excessive tissue at insertion site with absence of anatomical landmarks (consider another approved
site of insertion) 3. Previous significant orthopedic procedures (i.e. prosthesis or hardware placement) (consider another
approved site of insertion). 4. Infection at the site selected for insertion (consider another approved site of insertion)
Flow rates will be slower than achieved with intravenous (IV) access. To improve continuous infusion rates, use a pressure infusion bag (or BP cuff). Insertion of the EZ-IO in conscious patients or patients responsive to pain has been noted to cause mild to moderate discomfort comparable to the insertion of a large bore IV catheter. IO infusion, however, has been noted to cause severe discomfort. Procedure:
1. Observe universal precautions. 2. Prepare the EZ-IO driver and needle set:
a) 15ga, 15mm long needle for patients weighing between 3kg and 39kg. b) 15ga, 25mm long needle for patients weighing greater than 40kg. c) 15ga. 45mm long needle for patients with excess tissue (optional).
3. Locate an appropriate insertion site. Approved sites include: • Proximal Tibia • Distal Tibia • Proximal Humerus
4. Prep the site with Betadine and set up infusion solution as for regular IV. 5. Stabilize site and insert appropriate needle set.
17 6. Remove EZ-IO driver from needle set while stabilizing catheter hub. 7. Remove stylet from the catheter; place stylet in EZ-IO shuttle or approved sharps container. 8. Attach 5-10mL syringe and aspirate bone marrow to confirm placement.
a) IO catheter should be at a 90 degree angle and firmly seated in the tibial bone. b) Blood may be visible at the tip of the stylet. c) The IO catheter should flush freely without difficulty or extravasation.
9. Connect the luer-lock equipped IV administration set. 10. For conscious patients (or for previously unresponsive patients who become conscious): Lidocaine:
30mg IO (slowly) to reduce discomfort from infusion. 0.5mg/kg for Pediatric Patients(Max 30mg). 11. Flush the IO catheter with 10mL of normal saline. 12. Utilize a pressure bag for continuous infusions where applicable. If a pressure bag is not available,
wrap a BP cuff around the bag of normal saline and inflate the cuff until desired flow rate is achieved. 13. Dress site, secure tubing and apply wristband as directed. 14. If needed, further manage the patient’s pain by using one of the following medications.
Fentanyl (ALS &
ILS)
50 mcg IO, over 2 minutes for pain. Fentanyl 50 mcg IO may be repeated every 5 minutes to a total of 200 mcg.
May administer Fentanyl 50 mcg IM or IN. May be repeated as needed to a total of 200 mcg. (See dosing sheets for IN)
NOTE: The EZ-IO System is the preferred Pediatric device. However, this device can only be used on children greater than 3kg. For children < 3kg, refer to the below Jamshidi procedure.
The Jamshidi should be utilized on patients less than 3 kg and or less than 3 years of age. 1. Observe universal precautions. 2. Assemble and prepare equipment. 3. Locate landmarks of insertion site by palpating the anterior surface of the tibial bone 1-3 cm below
the tibial tuberosity and slightly medial. Landmark for insertion must avoid the joint and epiphyseal plate.
4. Prep the site with Betadine and set up infusion solution as for regular IV. 5. With sterile technique, using a commercial IO (Jamshidi) needle, insert needle at a 90 degree angle
and slightly 10-15 degrees inferior through the bone using firm downward pressure with a twisting motion. You should feel a “pop” when the needle goes into the medullary space.
6. Remove the inner stylet and attach a 5-10mL syringe. Aspirate for bone marrow contents, and then connect a conventional IV line with pressure infuser (or BP cuff).
7. Secure the line with tape and or dressing. 8. Administer drugs and fluids as needed. 9. Assess sight for signs of infiltration or leakage. Discontinue IO line if either of these occurs.
Critical Thinking Element
• If respiratory depression or hypotension occurs after administration of Dilaudid or Fentanyl, ventilate the patient as necessary and administer Narcan.
• Monitor respiratory status, SPO2 and or Waveform Capnography if available. ● Do not use an area previously used for IO attempts. ● Sometimes marrow cannot be aspirated and does not necessarily indicate improper placement. ● Excessive movement of the IO needle may result in leakage. ● Do not place more than one IO unless absolutely necessary.

Peoria Area EMS System Prehospital Care Manual
Procedures
Section
Page
Effective Oct 1, 2021 Central Lines and Fistulas Procedure 18 Central Lines: A central line is an indwelling catheter that provides access to large central veins:
1. May be used if unable to establish a peripheral IV in patients with a systolic BP < 80mmHg.
2. May be used if the patient is in cardiac arrest.
3. Do NOT administer benzodiazepines (i.e. Versed) via central line.
4. A 10mL syringe or larger must be used when accessing any central line to prevent excess infusion pressure that could damage the internal wall of the catheter.
5. Always aspirate 5mL of blood from the central line and discard prior to administration of medications or IV fluids to remove Heparin from the line.
6. Strictly adhere to aseptic technique when handling a central line:
• Cleanse injection port twice with an alcohol prep (using a new alcohol prep each time) prior to accessing.
7. Do not remove the injection cap.
8. Do not allow IV fluids to run dry.
9. Always expel all air from syringes and IV tubing prior to administration.
10. Should damage occur to the external catheter, immediately clamp the catheter between the skin and the damaged area.
Fistulas “Shunts”:
A fistula (“shunt”) is a surgically created subcutaneous arterio-venous vessel anastomosis used for patients requiring hemodialysis and should NOT be routinely accessed by prehospital personnel.
1. May only be used if the patient is in cardiac arrest and peripheral IV, IO or external jugular access cannot be established.
2. Access must be made using a 14g or 16g IV catheter. Do not use anything smaller.
3. Do not use an arm with a fistula, shunt or arterio-venous (AV) graft to obtain a blood pressure.
4. Do not use an arm with a fistula, shunt or AV graft to establish peripheral IV access.
5. In the event the shunt tubing is pulled out of the entrance site: apply direct pressure, elevate the arm and transport immediately to the hospital.

Peoria Area EMS System Prehospital Care Manual
Procedures
Section
Page
Effective Oct 1, 2021 Medication Administration Procedure 19 Endotracheal Tube (ETT) procedure which has previously been established and proper placement has been confirmed. Only certain medications may be given via the ETT as specified by protocol.
1. Hyperventilate the patient. 2. Disconnect the BVM if needed. 3. If CPR is being performed, stop chest compressions. 4. Dilute the medication and/or double the dose of the medication. 5. Place the needle or syringe into the lumen of the ETT (or attach to MADett™) and forcefully inject the
desired amount of the drug into the lumen. 6. If it was disconnected, re-connect the BVM and resume ventilations (while withholding chest
compressions for 5 seconds) and then resume chest compressions if indicated. 7. Document the name of the medication, the dose of the medication, the route of administration and
the time that the drug was administered. 8. Properly dispose of the contaminated equipment. 9. Monitor and document the patient’s response to the medication.
Intramuscular (IM) injections in the prehospital setting are relatively uncommon. IM injections are administered into the muscle tissue and require adequate perfusion for absorption.
1. Identify an injection site (the deltoid muscle of the upper arm and the upper outside quadrant of the gluteus muscle are commonly used). Note: The only approved site for the EMT-Basic & Intermediate level agencies is the left or right deltoid.
2. Clean the injection site with an alcohol prep. 3. Stretch or “flatten” the skin overlying the site with your fingers. 4. Advise the patient to expect a “stick” and to try to relax. 5. Insert the needle (preferably a 2-inch, 22g needle) at a 90 degree angle into the muscle tissue. 6. Pull back (aspirate) on the syringe to confirm that the needle is not in a vessel by observing for blood
return. • If blood is aspirated into the syringe, discontinue the injection and start the procedure over. • If blood is not aspirated into the syringe, slowly inject the drug into the muscle tissue.
7. Withdraw the needle and apply pressure to the site with a gauze pad. 8. Document the name of the medication, the dose of the medication, the route of administration and
the time that the drug was administered. 9. Properly dispose of the contaminated equipment. 10. Monitor and document the patient’s response to the medication.
Intranasal (IN) administration may be considered when IV access is unavailable and/or when a needleless delivery system is desired because of patient agitation, combativeness, or similar conditions that may pose a safety risk to personnel. Contraindicated when nasal trauma or bleeding is present.
1. Draw up appropriate dose (volume) of medication. Allow an additional 0.1 ml in the syringe to account for the device “dead space” and attach the MAD to the end of the syringe
2. Prepare and position the patient in a supine or recumbent position. If the patient is sitting, compress the nares after administration.
3. Rapidly administer one half of the dose of medication, briskly pushing the plunger 4. Repeat with the other nostril delivering the remaining volume of medication
• Do NOT administer more than 1mL per nostril.

Peoria Area EMS System Prehospital Care Manual
Procedures
Section
Page
Effective Oct 1, 2021 Universal Patient Care Procedure 20
EMR and BLS Care should be directed at conducting a thorough patient assessment, providing care to treat for shock and preparing or providing patient transportation. 1. Initiate body substance isolation (BSI) precautions prior to arrival at the scene for all patient contacts. Apply appropriate personal protective equipment (PPE) based up[on patient chief complaint and presentation. Use special care in the handling of sharps, contaminated objects, linens, etc. 2. Assure the well-being of the EMS crew by assessing scene safety. If the scene is not safe, do not enter until appropriate authorities have secured the area (i.e. violent crime calls, domestic violence calls, hazardous materials, etc.). 3. Determine the mechanism of injury, number of patients and need for additional resources. Initial Assessment (Primary Survey) a) Airway: Assess airway patency and assess for possible spinal injury. b) Breathing: Assess for respiratory distress, bilateral chest expansion, rate, pattern & depth of ventilations, adequacy of gas exchange, use of accessory muscles and lung sounds. c) Circulation: Assess rate, quality & regularity of pulses, skin condition, hemodynamic status, and neck veins. Evaluate and record cardiac rhythm if indicated. d) Disability: Mini-neuro exam to include brief pupil check and assessment of mental status: • A – Alert • V – Not alert but responds to verbal stimuli • P – Not alert but responds to painful stimuli • U – Unresponsive to all stimuli e) Expose: Examine patient as indicated. 2. Focused History and Physical Exam (Secondary Survey) or Detailed Physical Exam a) Vitals signs and Glasgow Coma Score b) Chief complaint and history of present illness c) Past medical history, current medications and allergies d) Systematic head-to-toe assessment (detailed exam/secondary survey) 1. Airway: Establish and maintain a patient’s airway by using appropriate patient positioning, airway adjuncts, suctioning and advanced airway control (intubation). 2. Breathing: Evaluate adequacy of respirations by assessing chest movement, lung sounds and skin condition. Initiate oxygen therapy if indicated and provide or assist ventilations as necessary. 3. Circulation: Evaluate perfusion status by assessing carotid and peripheral pulses and skin condition. Initiate CPR and early defibrillation if indicated. Control any external hemorrhage and establish IV access of .9% Normal Saline if indicated. No more than two (2) attempts should be made to establish an IV on scene unless requested by Medical Control.

21 4. Evaluate pain. Ask the patient to rate any pain on a scale of “0-10” with “0” indicating a pain-free state and “10” being the worst pain imaginable. 5. Recheck and record vital signs and patient responses at least every 15 minutes for stable patients, every 5 minutes for critical patients and after each intervention. Be sure to accurately document the times the vitals were obtained. 6. Establish Medical Control contact as indicated & transport to the closest appropriate hospital. NOTE: Follow System-specific policies regarding patient destination and bypass procedures 7. BLS providers may attach cardiac monitor, obtain 12-lead ECG and print rhythm strip for documentation, if indicated by symptoms *Cardiac Monitoring is not in the EMT scope of practice. 8. Transport should be initiated at the earliest possible opportunity & continually reassess the patient. ILS Care should be directed at conducting a thorough patient assessment, providing care to treat for shock and preparing or providing patient transportation. The necessity of establishing IV access is determined by the patient’s condition and chief complaint. Consideration should also be given to the proximity of the receiving facility. ALS Care should be directed at conducting a thorough patient assessment, providing care to treat for shock and preparing or providing patient transportation. The necessity of establishing IV access is determined by the patient’s condition and chief complaint. Consideration should also be given to the proximity of the receiving facility.
1. If indicated, ILS and ALS providers should establish IV access using a 1000mL solution of .9% Normal Saline with macro drip or blood tubing. No more than two (2) attempts should be made on scene. Infuse at a rate to keep the vein open (TKO) – approximately 8 to 15 drops (gtts) per minute.

Peoria Area EMS System Prehospital Care Manual
Procedures
Section
Page
Effective Oct 1, 2021 Universal Trauma Patient Care Procedure 22 Assessment and management of patients with injury or suspected injury shall be conducted in accordance with ITLS guidelines. Time from injury to definitive trauma center care is a critical factor in the morbidity and mortality of the injured patient. First Responder Care, BLS Care, ILS Care, ALS Care
1. Scene Assessment (Scene Size-Up) • Ensure scene safety – identify any hazards (e.g. fire, downed power lines, unstable vehicle, leaking fuel,
weapons). • Determine the number of patients. • Identify the mechanism of injury (gunshot wound, vehicle rollover, high speed crash, ejection from the
vehicle). • Identify special extrication needs, if any. • Call for additional resources if needed.
2. Primary Survey (Initial Assessment)
The purpose of the primary assessment is for the prehospital provider to rapidly identify and manage life-threatening conditions:
• Obtain a general impression of the patient’s condition. • Assess, secure and maintain a patent airway while simultaneously using C-spine precautions. • Assess breathing and respiratory effort:
• Approximate respiratory rate. • Assess quality of respiratory effort (depth of ventilation and movement of air). • Oxygen: 15 L/min via non-rebreather mask or 6 L/min via nasal cannula if the patient cannot
tolerate a mask. Be prepared suction the airway and support the patient’s respirations with BVM if necessary.
• Needle Chest Decompression ALS / ILS: if patient is in severe respiratory distress or cardiac arrest with s/s of tension pneumothorax.
• Assess circulation: • Evaluate carotid and radial pulses. • Evaluate skin color, temperature and condition. • Immediately control major external bleeding.
• Critical Decision (based on mechanism of injury & initial exam):
• Limit scene time to 10 minutes or less if the patient has a significant mechanism of injury or meets “Load & Go” criteria.
• Determine disability (level of consciousness): • A – Alert • V – Responds to verbal stimuli • P – Responds to painful stimuli • U – Unresponsive
• Expose the patient-Cut the patient’s clothing away quickly to adequately assess for the presence (or absence) of injuries.
3. Secondary Survey (Focused History & Physical Exam)
The secondary survey is a hear-to-toe evaluation of the patient. The object of this survey is to identify injuries or problems that were not identified during the primary survey.

23 • Examine the head:
• Search for any soft tissue injuries. • Palpate the bones of the face & skull to identify deformity, depression, crepitus or other
injury. • Check pupils for size, reactivity to light, equality, accommodation, roundness and shape.
• Examine the neck: • Examine for contusions, abrasions, lacerations or other injury. • Check for JVD, tracheal deviation, deformity. • Palpate the c-spine for deformity & tenderness.
• Examine the chest: • Closely examine for deformity, contusions, redness, abrasions, lacerations, penetrating
trauma or other injury. • Look for flail segments, paradoxical movement & crepitus. • Auscultate breath sounds. • Watch for supraclavicular and intercostals retractions.
• Examine the abdomen: • Examine for contusions, redness, abrasions, lacerations, penetrating trauma or other injury. • Palpate the abdomen and examine for tenderness, rigidity and distention.
• Examine the pelvis: • Examine for contusions, redness, abrasions, lacerations, deformity or other injury. • Palpate for instability and crepitus
• Examine the back: • Log roll with a minimum of 2 rescuers protecting the spine. • Look for contusions, abrasions, lacerations, penetrating trauma, deformity or any other injury. • Log roll onto long spine board and immobilize.
• Examine the extremities: • Examine for contusions abrasions, lacerations, penetrating trauma, deformity or any other
injury. • Manage injuries en route to the hospital.
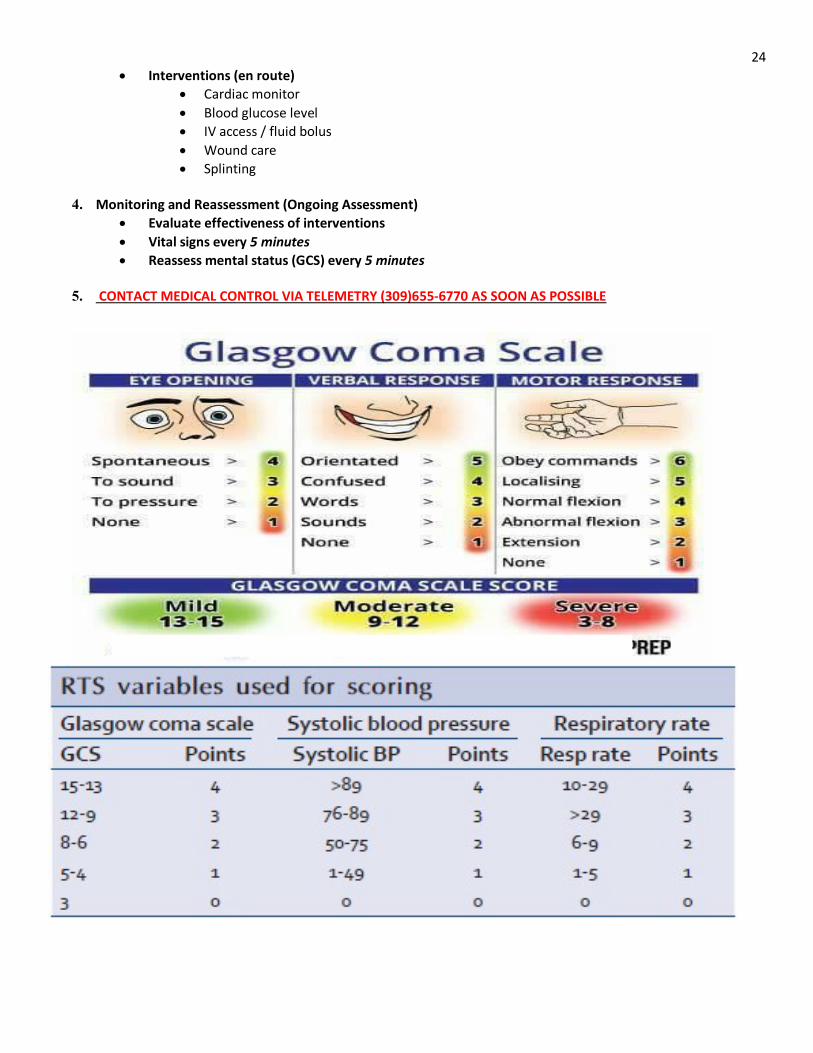
• Neurological exam: • Calculate Glasgow Coma Scale (GCS) • Reassess pupils • Assess grip strength & equality and sensation. • Calculate Revised Trauma Score (RTS)
• Vital signs: • Blood pressure • Pulse • Respirations • Pulse Oximetry/ EtCO2
• History: • Obtain a SAMPLE history if possible. • Signs & symptoms • Allergies • Medications • Past medical history • Last oral intake • Events of the incident
24 • Interventions (en route)
• Cardiac monitor • Blood glucose level • IV access / fluid bolus • Wound care • Splinting
4. Monitoring and Reassessment (Ongoing Assessment)
• Evaluate effectiveness of interventions • Vital signs every 5 minutes • Reassess mental status (GCS) every 5 minutes
5. CONTACT MEDICAL CONTROL VIA TELEMETRY (309)655-6770 AS SOON AS POSSIBLE

Peoria Area EMS System Prehospital Care Manual
Procedures
Section
Page
Effective Oct 1, 2021 Spinal Assessment and Clearance Procedure 25 The spine assessment procedure evaluates the risk of spine injury in patients with definite or potentially questionable mechanism of injury. This procedure is utilized to balance the risks and benefits of spine motion restriction. Follow ITLS guidelines and assessment procedures.
• Any patient meeting or potentially meeting trauma triage criteria based on the Field Triage Decision Scheme and transfers to a trauma center require full spine motion restriction.
• All patients with a definite potential or questionable mechanism of injury (MOI) for head injury or spine injury will be assessed using the Spine Assessment Procedure.
• Spine motion restriction may be deferred for patients meeting all exclusion criteria listed in the Spine Assessment Procedure.
• Only cervical spine splinting with an appropriate sized C-collar is required for patients who do not fall into trauma triage criteria, but are unable to meet all exclusionary criteria of the PAEMS Spine Assessment
• Long spine board, straps, and head blocks may be used for these patients with the EMS provider’s discretion. • Patients, for whom spinal restriction is deferred, must meet all exclusionary criteria as indicated in the Spine
Assessment Procedure. • Victims of isolated penetrating trauma to the head, neck, and/or torso SHOULD NOT have spine motion
restriction applied unless there is an obvious neurologic deficit to the extremities or if there is a significant secondary blunt MOI.
• Pediatric patients will be assessed by the EMS Provider to determine the most appropriate method of spinal immobilization (car seat, towel rolls, cervical collar, KED, or specialized pediatric device).
• If there is any doubt of potential spine injury, initiate spinal motion restriction.
If a C-collar is applied, the patient needs to remain supine. If patient comfort is a factor, the head can be elevated to a maximum of 30 degrees.
Clinical indications: patients with traumatic neck/back pain, head injury or facial trauma, or with a significant or uncertain MOI or high index of suspicion for spinal trauma (e.g. axial load (diving), MVC or bicycle, falls…). In high-risk patients (e.g.
elderly, osteoporotic, degenerative disorders) less forceful mechanisms can cause significant injuries.
Unreliable Patient? **
(Intoxication/Altered LOC/ Acute stress reaction)
Spinal Motion Restriction Not Required
Splint cervical spine using an appropriate sized C-collar
Distracting Injury? ***
Abnormal Sensory or Motor Exam? ****
YES YES
Apply full spinal motion restriction
**Exception: Penetrating trauma without neurological deficits**
YES
NO
NO
NO
NO Spine Pain/Tenderness?
YES NO
YES Does the patient meet
Field Trauma Criteria?

Peoria Area EMS System Prehospital Care Manual
Procedures
Section
Page
Effective Oct 1, 2021 Field Triage Scheme Procedure 26 The Trauma Service patient will be defined as any patient with significant injury that involves single or multiple organ system(s) who is at risk for loss of life or limb. The Trauma Service patient will be categorized as Category I or Category II. Category I: Blunt or Penetrating Trauma with Unstable Vital Signs and/or: 1. Hemodynamic Compromise as Evidenced By: Adults -- BP < 90 systolic Pediatric patients – BP < 70 + (2 x age in years) 2. Respiratory Compromise as Evidenced By: Respiratory Rate < 10 or > 29 3. Altered Mentation as Evidenced By: Glasgow Coma Scale < 10 Anatomical Injury: 1. Penetrating injury of head, neck, torso, groin 2. Two or more body regions with potential life or limb threat 3. Combination trauma with > 20% TBSA burn 4. Amputation above wrist or ankle 5. Limb paralysis and/or sensory deficit above the wrist and ankle 6. Clinically significant flail chest 7. Two or more proximal long bone fractures 8. Transfer from another hospital receiving blood to maintain vital signs 9. At the discretion of the ED Physician Category II: Based upon mechanism of injury only: 1. Ejection from motor vehicle 2. Death in same passenger compartment 3. Rollover

Peoria Area EMS System Prehospital Care Manual
Procedures
Section
Page
Effective Oct 1, 2021 Tourniquet Procedure 27 Use of tourniquets does not require on-line medical direction however; there may be situations in which medical direction consultation is advised. The goal of tourniquet application is to control previously uncontrollable/fatal hemorrhage. Indications: • To control potentially fatal hemorrhage from wounds or traumatic amputations when significant extremity
bleeding cannot be stopped using simpler methods. • Tourniquets may also be indicated in tactical or safety situations, those involving prolonged extrication,
remote locations, multiple casualties • Tourniquets may be considered when treating patients who have had prolonged compression of an
entrapped extremity in order to decrease the life-threatening release of Potassium and acids from the ischemic limb.
Contraindications: • Venous, bony and small vessel bleeding. • Tourniquet application is generally unnecessary when wound bleeding is adequately controlled using
direct pressure, pressure dressings, elevation, or any other simpler method. • Non-extremity hemorrhage Procedure:
1. Commercially made tourniquets are preferred over improvised devices with the exception of pediatric patients (as there exists no effective commercial device designed for a pediatric patient).*
2. Apply device approximately 3 inches proximal to wound. If the wound is on a joint, or just distal to the joint, apply the tourniquet above the joint.
3. Tighten until bleeding stops (venous oozing is acceptable) and/or distal pulse is absent. 4. If one tourniquet is not sufficient a second should be applied just proximal to the first. 5. Do not cover the tourniquet with a dressing. 6. Once a tourniquet has been applied, do not remove or loosen it unless ordered by medical direction. 7. Note time of tourniquet application and communicate this to the receiving care providers. 8. Dress wounds per general wound care procedure. 9. Document application time, location, and patient response on the Patient Care Report (PCR) * The commercially made tourniquets recommended in the PAEMS System include the Combat Application Tourniquet (CAT) and the Special Operations Forces Tourniquet (SOFT-T).

Peoria Area EMS System Prehospital Care Manual
Procedures
Section
Page
Effective Oct 1, 2021 Needle Thoracentesis Procedure 28 Thoracic decompression involves placement of a needle through the chest wall of a critical patient who has a life-threatening tension pneumothorax and is rapidly deteriorating due to intrathoracic pressure.
Signs and symptoms of tension pneumothorax include:
• Restlessness and agitation • Severe respiratory distress • Increased airway resistance with ventilations • JVD • Tracheal deviation • Subcutaneous emphysema • Unequal breath sounds • Absent lung sounds on the affected side • Hyper resonance to percussion on the affected side • Hypotension • Cyanosis • Respiratory arrest • Traumatic cardiac arrest
Initiate Universal Trauma Care. If a tension pneumothorax is identified:
1. Locate the 2nd intercostal space in the midclavicular line on the side of the pneumothorax. 2. Cleanse the site with providone-iodine preps and maintain as much of a sterile field as possible. 3. Attach a 10-20mL syringe to a 2 inch, 14g IV catheter. 4. Puncture the skin perpendicularly, just superior to the 3rd rib (in the 2nd intercostal space). Direct the
needle just over the 3rd rib and into the thoracic cavity. A “pop” should be felt as well as a “rush of air” along with the plunger of the syringe moving outward.
5. Advance the catheter while removing the needle and syringe. 6. Secure the catheter in the chest will with a dressing and tape. 7. Monitor the patient closely and continue to reassess.
Peoria Area EMS System Prehospital Care Manual
Procedures
Section
Page
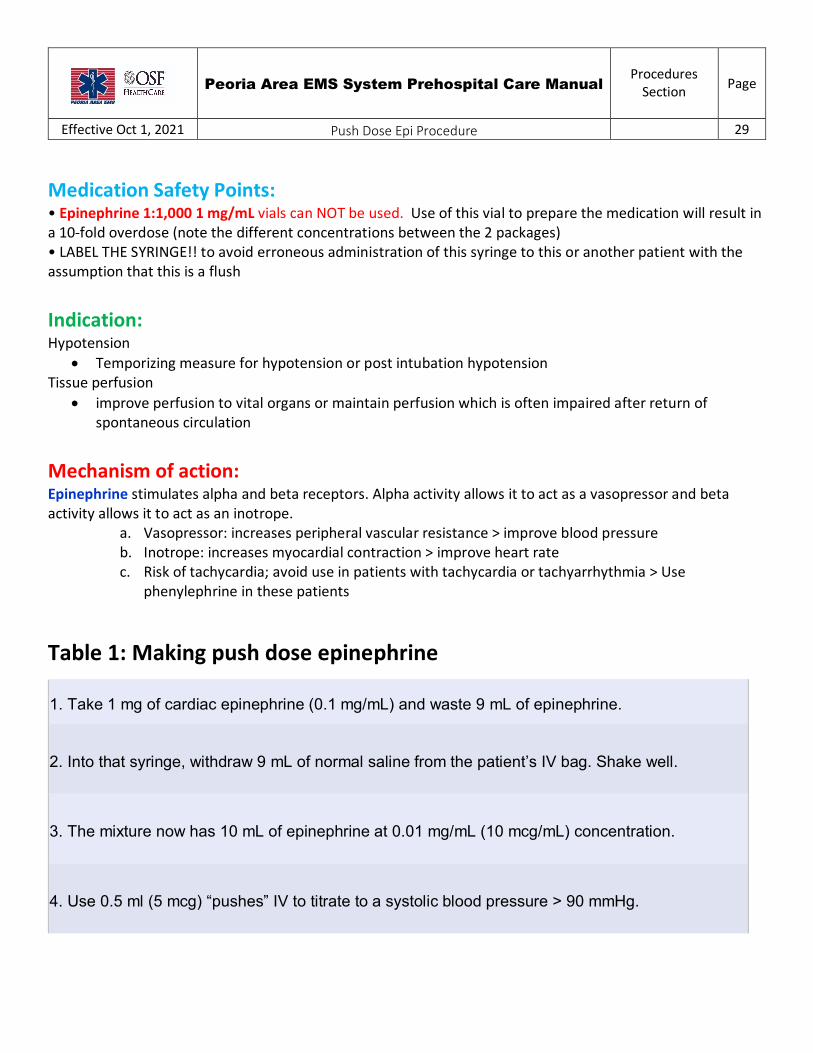
Effective Oct 1, 2021 Push Dose Epi Procedure 29 Medication Safety Points: • Epinephrine 1:1,000 1 mg/mL vials can NOT be used. Use of this vial to prepare the medication will result in a 10-fold overdose (note the different concentrations between the 2 packages) • LABEL THE SYRINGE!! to avoid erroneous administration of this syringe to this or another patient with the assumption that this is a flush Indication: Hypotension
• Temporizing measure for hypotension or post intubation hypotension Tissue perfusion
• improve perfusion to vital organs or maintain perfusion which is often impaired after return of spontaneous circulation
Mechanism of action: Epinephrine stimulates alpha and beta receptors. Alpha activity allows it to act as a vasopressor and beta activity allows it to act as an inotrope.
a. Vasopressor: increases peripheral vascular resistance > improve blood pressure b. Inotrope: increases myocardial contraction > improve heart rate c. Risk of tachycardia; avoid use in patients with tachycardia or tachyarrhythmia > Use
phenylephrine in these patients
Table 1: Making push dose epinephrine
1. Take 1 mg of cardiac epinephrine (0.1 mg/mL) and waste 9 mL of epinephrine.
2. Into that syringe, withdraw 9 mL of normal saline from the patient’s IV bag. Shake well.
3. The mixture now has 10 mL of epinephrine at 0.01 mg/mL (10 mcg/mL) concentration.
4. Use 0.5 ml (5 mcg) “pushes” IV to titrate to a systolic blood pressure > 90 mmHg.

Peoria Area EMS System Prehospital Care Manual
Procedures
Section
Page
Effective Oct 1, 2021 Immunization Administration Procedure 30 EMS providers may be tasked with administering vaccinations in certain specific health emergencies. As healthcare providers authorized to administer such vaccinations there are specific procedures required for specific vaccines. Any questions should be directed to the EMS office and/ or the Medical Director. Prior to vaccination:
1. Provide the patient with the CDC Vaccination Information Sheet (VIS). 2. The patient must complete the Patient Vaccination Administration Record (VAR). 3. Review the patient self-reported risk questionnaire.
a. If there are any contraindications or if it is poorly filled out seek Medical Director guidance.
4. Ensure all documentation is complete and accurate. 5. Verify patient’s Name and Birth Date.
Vaccination Administration: Verify the correct vaccine, and obey the 6 rights of medication administration… Right patient, Right Vaccine, Right dose, Right route, Right time, Right documentation Complete the Vaccination Administration Record (VAR) with the following:
a. Date administered b. Vaccine c. Lot # d. Route, anatomical location, and depth of administration e. Vaccinator name and signature f. Vaccination Information Sheet (VIS) publication date
Post Vaccination: Observe the patient for minimum of 5 minutes for any reaction. If there is an observed reaction refer to the Allergic reaction/ Anaphylaxis protocol. If there is a reaction the patient should be transported to the ED for evaluation

Peoria Area EMS System Prehospital Care Manual
Procedures
Page
Effective Oct 1, 2021 START and JUMP START Triage Procedure 31
In order to prioritize treatment and transport of patients involved in a mass casualty incident the PAEMS System utilizes the START and JUMP START triage system to establish such priorities.
START triage system is to be utilized for adult patients and the JUMP START triage system is to be utilized for
pediatric patients.
Due to physiologic differences the pediatric patient may become apneic easier during poor positioning following a traumatic incident. Therefor the JUMP Start system has additional steps designed to open the airway and provide airway assistance in order to give the pediatric patient an opportunity to breathe and
improve clinical outcomes.
START Triage System