Embed Size (px)
Citation preview

Packet Analysis Using Wireshark December 13, 2011
By Joseph Gehring
Instructor: Janusz Zalewski
Software Projects with Computer Networks
CNT 4104
Florida Gulf Coast University
Fort Myers, Florida
Fall 2011

2
1. Introduction
Wireshark is a network protocol analyzer, formerly released under the name Ethereal. As
a result of certain copyright restrictions, when the primary developer left his former company,
Ethereal changed its name to Wireshark, but remains the same program and has many of the
same core developers that worked on Ethereal. This program is able to intercept packets
transmitted over the network and compile statistics about network usage, allow the user to view
content that is being accessed by other network users, and store usage information for offline
access.
As shown in Figure 1 [3], Wireshark allows the user to view a list of captured packets,
analyze data about each packet, and view, in hexadecimal format, the data contained in that
packet. Wireshark has built-in color-coding features that help the user to identify particular
types of network traffic, such as DNS in blue and HTTP in green. Most of the information
displayed in the figure can be used to set up sorting filters, simplifying the process of analyzing
data. Filters can often be set up to cover anything from protocol type to source or destination
address, and even to focus on packets that lack certain data. The versatility of these filters makes
sorting through the data much simpler, but the process still requires a keen understanding of what
information is displayed and how to interpret it.
Wireshark is an open-source program, with an active support and development
community, and held its fourth Annual Developer and User Conference in June 2011 [1]. With
the support of this community, Wireshark has expanded over the years to offer support on
hundreds of network protocols, with more being added all the time. As a result, Wireshark has
established itself as the standard among commercial and educational institutions for network
analysis.

3
Wireshark software has been developed to work on Microsoft Windows, Linux, Solaris,
and Mac OS X. Support for all these major operating systems has further increased the market
strength of Wireshark. On a Windows network or computer, Wireshark must be used along with
the application WinPCap, which stands for Windows Packet Capture. This software allows the
capturing of packets in Windows, and those files can then be analyzed using Wireshark.
Similarly, Wireshark can be used to view packet information obtained by many other packet
capture programs.
Figure 1: Wireshark Screencap [3]

4
2. Definition of the Problem
The goal of this project is to develop an educational report detailing how to install, setup,
and operate Wireshark on the Florida Gulf Coast University network, as well as how to use it for
data analysis. The greater part of this report focuses on the steps required to accomplish these
tasks, culminating in a practical demonstration of Wireshark's capabilities.
For the practical demonstration, this report discusses how to perform wireless packet
capture using a lab computer, a Riverbed Technology wireless packet capture device[5], and the
FGCU wireless network. Figure 2 shows a generalization of the computer network on which the
packet capture is carried out.
Figure 2: Network Configuration

5
3. Prospective Solution
To address the first portion of the problem, i.e. the installation, setup, and operation of
Wireshark, this report provides an uninitiated user with the information necessary to install
Wireshark on a computer in the FGCU Computer Science Lab. The second step is to address the
installation of the Riverbed Technology wireless packet capture device. Finally, the user is
provided with the necessary steps to use the software and hardware together to capture wireless
data packets from the FGCU wireless network.
Additionally, the user is shown how to set up filters for viewing specific packets. This
includes filtering by protocol type, source address, and destination address. Additionally, one
negative filter is introduced, showing how to display packets that lack a certain characteristic.
The information available about each captured packet allows users to perform some very
specific and impressive tasks with this software (see Figure 3, from [4]). However, on a
switched network, such as the one at FGCU, only a limited number of packets can actually be
captured [7]. In particular, on a switched network, wireless capture only reveals traffic to/from
the capturing machine and broadcast traffic to the entire network. As a result, it is impossible to
view the packets that reveal which websites are being visited by network users or what files are
being downloaded to which computer. These limitations restrict the usefulness that Wireshark
offers to corporations, but do not completely remove the ability to use the program as a teaching
tool. Even with only broadcast traffic, it remains a very possible task to convey the generalities
of using Wireshark, show what information is available to a user, and point in the direction of
further information that may be useful to someone working on a less restricted network.

6
Figure 3: Things to do with Wireshark

7
4. Implementation
4.1. Installation of Wireshark
As stated in Section 3, Wireshark is installed on a computer in the FGCU Computer
Science Lab or can be installed on some other computer that is connected to this network. In the
following figures, the captions step the user through the installation process (Figure 4 through
Figure 19). Although this report provides a full installation guide, additional information can be
obtained from the Wireshark User's Guide [2].
Figure 4: Go to wireshark.org and click "Download"

8
Figure 5: Choose the option for your OS, then download and run the installer
Figure 6: Click "Next"

9
Figure 7: Click "I Agree"
Figure 8: Click "Next"

10
Figure 9: Choose desired shortcut options, then click "Next"
Figure 10: Choose your destination folder, then click "Next"

11
Figure 11: Ensure box is selected to install WinPCap, then click "Install"
Figure 12: Wireshark will begin to install, self-interrupting midway to install WinPCap

12
Figure 13: Click "Next"
Figure 14: Click "Next"

13
Figure 15: Click "I Agree"
Figure 16: Click "Install"

14
Figure 1: WinPCap is now installed. Click "Finish" to resume Wireshark installation
Figure 2: Click "Next"

15
Figure 3: Leave boxes unchecked. Click "Finish"
4.2. Installation of the Wireless Packet Capture Device
Next, the user needs to install the driver for the Riverbed Technology wireless packet capture
device. These steps need to be executed before the device is plugged into the computer. For this
project, we are using the Tx version of the device, which looks similar to the image on the left
side of Figure 20. The properties of this device, and others in this family of devices, are shown
in Figure 21. [5]
Figure 20: AirPCap devices
Although the Tx offers packet insertion capability, that feature is not used in this project.
Additionally, the FGCU network only requires users to have technology compatible with
802.11b/g [6], so the Nx device provides unnecessary features.

16
Figure 21: AirPCap device features
In order to use the AirPCap device, the device must be installed so that it can be accessed
by Wireshark. The installation process for the necessary drivers and software is covered in
Figure22 through Figure 28, with the specific action listed in the figure captions.
Figure 22: Insert and run the included CD, then click "Install Driver"

17
Figure 23: Click "OK"
Figure 24: Click "Next"

18
Figure 25: Click "I Agree"
Figure 26: Ensure box is only checked if CD version of WinPCap is newer than the version installed with Wireshark. Then click "Install"

19
Figure 27: Installer will run
Figure 28: Click "Finish"

20
Now that the software is installed, it is time to connect the hardware to the computer.
After the driver installer finishes, close the program and eject the disc. After installation, the
popup window shown in Figure 29 guides the user through connecting the hardware. These
instructions should only be necessary in the event that Windows does not recognize the device.
This is unlikely, because the required drivers were just installed.
Figure 29: Automatic popup window after installation finishes, offering information on connecting the hardware.
4.3. Using Wireshark for Wireless Packet Capture
Now that the software is installed and the hardware is connected, it is time to start using
Wireshark. Open the program using one of the shortcut options selected previously, or launching
the ".exe" file from the installation directory. Figures 30-32 show how to perform a capture
session using the WinPCap device.

21
Figure 30: In the Capture box, select the AirPCap device
Figure 31: Capture should begin automatically. If no packets are being displayed, you may need to minimize then maximize the window.

22
Figure 32: Sample capture data
In the capture window, Figure 32, several key pieces of data are available. "Time"
represents the number of seconds that passed after capture was initiated until that packet was
caught. "Source" and "Destination" provide the user with key packet information, and may
include a specific IP address, a router, or a broadcast message. The color coding for each packet
is determined by the "Protocol" type, and makes certain common protocols easier to identify.
To test this program on a computer outside of the designated lab, or without the WinPCap
device, it may be necessary to change another setting in Wireshark. The default capture mode of
Wireshark is "promiscuous," but the Windows OS may not allow the user to operate a wireless
network card in such a fashion [7]. To perform wireless packet capture using an integrated
wireless networking card on a Windows-based computer, it will likely be necessary to change
the promiscuous mode setting in Wireshark. From the application start screen, Figure 30, choose
"Capture Options." In the options window shown in Figure 33, deselect the checkbox labeled
"Capture packets in promiscuous mode," then click "Start." This should allow the capture to take
place, but may result in a less robust capture session.

23
Figure 33: Capture Options
4.4. Capture Filters
As specified in Section 3, it is possible to apply a variety of filters to the Wireshark
capture data. By doing so, it becomes possible to reduce an unmanageable amount of data down
to only that information applicable to the current problem. All these filters are entered in the
"Filter" text box, towards the top left of the capture window, shown in Figures 31 and 32.
When it is necessary to view only traffic to or from a particular machine, there are three
filters which can be applied, depending on the specific need. To view only that traffic flowing to
the machine with IP address 10.100.37.49, apply the filter "ip.dst == 10.100.37.49". For traffic
from this machine, replace "ip.dest" with "ip.src" in the preceding filter. Using "ip.addr" will
show traffic flowing in both directions, i.e. to and from the specified IP address. Similarly, the
traffic to a specified machine can be filtered out using a negative filter, such as "ip.dst !=
10.100.37.49".
Filtering by protocol type is incredibly simple. Simply type the protocol name into the
filter box and click "Apply". A few examples include "arp," "http," or "tcp." Other filter types
exist, and are described in detail in references [8] and [9].

24
4.5. Packet Analysis
To show how to perform a detailed analysis of captured packets, data from a 10-minute
capture session is used. During the course of this capture session, nearly 200,000 packets were
captured, of strictly broadcast type traffic (Figure 34). Filters can be applied to reduce the
volume of information to cover only the packets of interest.
Figure 34: Packet Capture from 01 December 2011, 10:20AM to 10:30AM
Applying the filter "cups" limits the packets to only those packets using the Common
Unix Printing System protocol. On this capture session, the number of packets is reduced to 52
packets, significantly less than 1% of the original number of packets. The filtered list is shown
in Figure 35, with the new packet count and filter circled in red.
This filter reduces the capture session to a small collection of packets related to network
printers. Double-clicking on any one of these packets will open the packet information in a new
window, making it easier to view the available data. A larger view of packet number 465 is
shown in Figure 36. The frame number and IP addresses of the source and destination are
circled in red.

25
Figure 35: Capture with CUPS filter applied
Figure 36: Data for Packet Number 465
26
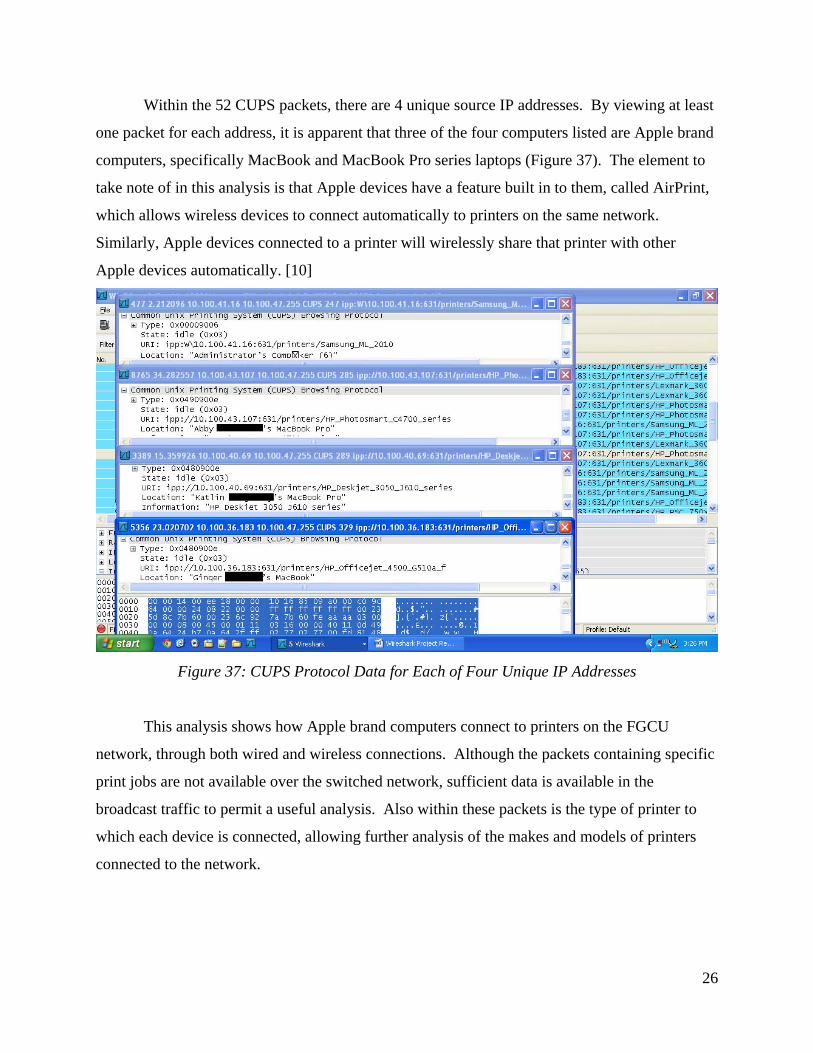
Within the 52 CUPS packets, there are 4 unique source IP addresses. By viewing at least
one packet for each address, it is apparent that three of the four computers listed are Apple brand
computers, specifically MacBook and MacBook Pro series laptops (Figure 37). The element to
take note of in this analysis is that Apple devices have a feature built in to them, called AirPrint,
which allows wireless devices to connect automatically to printers on the same network.
Similarly, Apple devices connected to a printer will wirelessly share that printer with other
Apple devices automatically. [10]
Figure 37: CUPS Protocol Data for Each of Four Unique IP Addresses
This analysis shows how Apple brand computers connect to printers on the FGCU
network, through both wired and wireless connections. Although the packets containing specific
print jobs are not available over the switched network, sufficient data is available in the
broadcast traffic to permit a useful analysis. Also within these packets is the type of printer to
which each device is connected, allowing further analysis of the makes and models of printers
connected to the network.
27
5. Conclusion
This project has proven successful, although this may be attributable in part to the simple
goals established at the outset. Wireshark, WinPCap, and the AirPCap device have been
successfully installed and tested on a computer in the FGCU CS Lab. Figures 31 and 32 above
show actual captures that took place in the aforementioned lab using the Tx device. However,
seeing that these actions can be performed in the school computing environment, it becomes
apparent that work remains to be done to employ this technology at its full potential.
Because the FGCU wireless network is a switched network, the capture sessions may be
limited to broadcast traffic and that traffic destined for and departing from the computer on
which Wireshark is running [7]. This is an obvious limitation of the program, and may be
overcome by setting up a smaller wireless network within the lab, and which does not include the
restrictive switching.
Additionally, no packet insertion was performed during this project. Initially, the
hardware ordered for the project was the Classic AirPCap device, which does not provide such a
capability. When the order was changed to the Tx device, and by the time that device was
received, there did not remain sufficient leeway in the project timeline to accommodate the
additional research and testing to employ the packer insertion capability.
Future work with this software could include packet capture at a network switch, rather
than over the wireless connection, to better monitor the network's traffic flow, or work with
packet insertion using the Tx device. Even without these elements included, this report provides
a new user with sufficient information to begin basic packet capture and analysis.

28
6. References
[1] Wireshark Foundation, 19 September 2011, http://sharkfest.wireshark.org/sharkfest.11/
[2] Wireshark Foundation, 15 October 2011,
http://www.wireshark.org/docs/wsug_html_chunked/
[3] Wireshark Foundation, 16 October 2011,
http://www.wireshark.org/docs/wsug_html_chunked/ChapterIntroduction.html#ChIntroFig1
[4] Riverbed Technology, 20 November 2011, http://www.cacetech.com/resources.html
[5] Riverbed Technology, 20 November 2011,
http://www.riverbed.com/us/products/cascade/airpcap.php
[6] Florida Gulf Coast University, 20 November 2011, http://wireless.fgcu.edu/
[7] Wireshark Foundation, 20 November 2011, http://www.wireshark.org/faq.html#q7.1
[8] Sanders, C. Practical Packet Analysis: Using Wireshark to Solve Real-World Network
Problems. No Starch Press, Inc. San Francisco, CA. 2011.
[9] Wireshark Foundation, 03 December 2011, http://wiki.wireshark.org/CaptureFilters
[10] Apple, Inc., 13 December 2011, http://support.apple.com/kb/ht4356


![Packet Capture Wireshark - start [APNIC TRAINING WIKI] · Packet Capture Wireshark APNIC42 28 September–5 October 2016 Colombo, Sri Lanka [31-12-2015] [V.1] Fakrul Alam Senior Training](https://img.dokumen.tips/doc/110x75/5e13753d62dfcd3332148625/packet-capture-wireshark-start-apnic-training-wiki-packet-capture-wireshark.jpg)


