Embed Size (px)
Citation preview

Pacemaker Remote
Scaling High Availablity Clusters
, Written by the Pacemaker project contributors

Pacemaker Remote: Scaling High Availablity Clusters
by
Abstract
The document exists as both a reference and deployment guide for the Pacemaker Remote service.
The example commands in this document will use:
1. CentOS 7.4 as the host operating system
2. Pacemaker Remote to perform resource management within guest nodes and remote nodes
3. KVM for virtualization
4. libvirt to manage guest nodes
5. Corosync to provide messaging and membership services on cluster nodes
6. Pacemaker 1.1.16 1 to perform resource management on cluster nodes
7. pcs as the cluster configuration toolset
The concepts are the same for other distributions, virtualization platforms, toolsets, and messaging layers, and shouldbe easily adaptable.
Copyright © 2013-2019 The Pacemaker project contributors.
The text of and illustrations in this document are licensed under version 4.0 or later of the Creative CommonsAttribution-ShareAlike International Public License ("CC-BY-SA")2.
In accordance with CC-BY-SA, if you distribute this document or an adaptation of it, you must provide the URL forthe original version.
In addition to the requirements of this license, the following activities are looked upon favorably:
1. If you are distributing Open Publication works on hardcopy or CD-ROM, you provide email notification to theauthors of your intent to redistribute at least thirty days before your manuscript or media freeze, to give the authorstime to provide updated documents. This notification should describe modifications, if any, made to the document.
2. All substantive modifications (including deletions) be either clearly marked up in the document or else describedin an attachment to the document.
3. Finally, while it is not mandatory under this license, it is considered good form to offer a free copy of any hardcopyor CD-ROM expression of the author(s) work.
1 While this guide is part of the document set for Pacemaker 2.0, it demonstrates the version available in the standard CentOS repositories2 An explanation of CC-BY-SA is available at https://creativecommons.org/licenses/by-sa/4.0/

Table of Contents1. Scaling a Pacemaker Cluster ............................................................................................. 1
Overview ................................................................................................................... 1Terms ....................................................................................................................... 1Guest Nodes .............................................................................................................. 2Remote Nodes ............................................................................................................ 3Expanding the Cluster Stack ......................................................................................... 3
2. Guest Node Quick Example .............................................................................................. 4Mile-High View of Configuration Steps .......................................................................... 4Using a Guest Node .................................................................................................... 5
3. Configuration Explained ................................................................................................... 7Resource Meta-Attributes for Guest Nodes ...................................................................... 7Connection Resources for Remote Nodes ........................................................................ 8Environment Variables for Daemon Start-up ................................................................... 8Removing Remote Nodes and Guest Nodes ..................................................................... 8
4. Guest Node Walk-through ............................................................................................... 10Configure the Physical Host ........................................................................................ 10
Configure Firewall on Host ................................................................................. 10Install Cluster Software ...................................................................................... 11Configure Corosync ........................................................................................... 11Configure Pacemaker for Remote Node Communication .......................................... 11Verify Cluster Software ...................................................................................... 12Disable STONITH and Quorum .......................................................................... 13Install Virtualization Software ............................................................................. 13
Configure the KVM guest .......................................................................................... 14Create Guest .................................................................................................... 14Configure Firewall on Guest ............................................................................... 14Verify Connectivity ........................................................................................... 14Configure pacemaker_remote .............................................................................. 14Verify Host Connection to Guest ......................................................................... 15
Integrate Guest into Cluster ........................................................................................ 15Start the Cluster ................................................................................................ 15Integrate as Guest Node ..................................................................................... 15Starting Resources on KVM Guest ....................................................................... 16Testing Recovery and Fencing ............................................................................. 17Accessing Cluster Tools from Guest Node ............................................................. 19
5. Remote Node Walk-through ............................................................................................ 20Configure Remote Node ............................................................................................. 20
Configure Firewall on Remote Node .................................................................... 20Configure pacemaker_remote on Remote Node ...................................................... 21
Verify Connection to Remote Node .............................................................................. 21Configure Cluster Nodes ............................................................................................ 22
Configure Firewall on Cluster Nodes .................................................................... 22Install Pacemaker on Cluster Nodes ..................................................................... 22Copy Authentication Key to Cluster Nodes ............................................................ 22Configure Corosync on Cluster Nodes .................................................................. 22Start Pacemaker on Cluster Nodes ....................................................................... 23
Integrate Remote Node into Cluster .............................................................................. 23Starting Resources on Remote Node ............................................................................. 24Fencing Remote Nodes .............................................................................................. 24Accessing Cluster Tools from a Remote Node ............................................................... 24
6. Alternative Configurations .............................................................................................. 26
iii

Pacemaker Remote
Virtual Machines as Cluster Nodes .............................................................................. 26Virtual Machines as Remote Nodes .............................................................................. 26Containers as Guest Nodes ......................................................................................... 26
A. Revision History ........................................................................................................... 28Index ............................................................................................................................... 29
iv

List of Figures1.1. Traditional HA Stack .................................................................................................... 31.2. HA Stack With Guest Nodes .......................................................................................... 3
v

List of Tables3.1. Meta-attributes for configuring VM resources as guest nodes ................................................ 7
vi

Chapter 1. Scaling a PacemakerCluster
Table of ContentsOverview ........................................................................................................................... 1Terms ............................................................................................................................... 1Guest Nodes ...................................................................................................................... 2Remote Nodes .................................................................................................................... 3Expanding the Cluster Stack ................................................................................................. 3
OverviewIn a basic Pacemaker high-availability cluster,1 each node runs the full cluster stack of corosync and allPacemaker components. This allows great flexibility but limits scalability to around 16 nodes.
To allow for scalability to dozens or even hundreds of nodes, Pacemaker allows nodes not running thefull cluster stack to integrate into the cluster and have the cluster manage their resources as if they werea cluster node.
Termscluster node A node running the full high-availability stack of corosync
and all Pacemaker components. Cluster nodes may runcluster resources, run all Pacemaker command-line tools(crm_mon, crm_resource and so on), execute fencingactions, count toward cluster quorum, and serve as thecluster’s Designated Controller (DC).
pacemaker_remote A small service daemon that allows a host to be used asa Pacemaker node without running the full cluster stack.Nodes running pacemaker_remote may run cluster resourcesand most command-line tools, but cannot perform otherfunctions of full cluster nodes such as fencing execution,quorum voting or DC eligibility. The pacemaker_remotedaemon is an enhanced version of Pacemaker’s localresource management daemon (LRMD).
remote node A physical host running pacemaker_remote. Remote nodeshave a special resource that manages communication withthe cluster. This is sometimes referred to as the baremetalcase.
guest node A virtual host running pacemaker_remote. Guest nodesdiffer from remote nodes mainly in that the guest node isitself a resource that the cluster manages.
1 See the Pacemaker documentation [http://www.clusterlabs.org/doc/], especially Clusters From Scratch and Pacemaker Explained, for basicinformation about high-availability using Pacemaker
1

Scaling a Pacemaker Cluster
Note
Remote in this document refers to the node not being a part of the underlying corosync cluster. Ithas nothing to do with physical proximity. Remote nodes and guest nodes are subject to the samelatency requirements as cluster nodes, which means they are typically in the same data center.
Note
It is important to distinguish the various roles a virtual machine can serve in Pacemaker clusters:
• A virtual machine can run the full cluster stack, in which case it is a cluster node and is notitself managed by the cluster.
• A virtual machine can be managed by the cluster as a resource, without the cluster having anyawareness of the services running inside the virtual machine. The virtual machine is opaqueto the cluster.
• A virtual machine can be a cluster resource, and run pacemaker_remote to make it a guestnode, allowing the cluster to manage services inside it. The virtual machine is transparent tothe cluster.
Guest Nodes
"I want a Pacemaker cluster to manage virtual machine resources, but I also want Pacemaker to beable to manage the resources that live within those virtual machines."
Without pacemaker_remote, the possibilities for implementing the above use case have significantlimitations:
• The cluster stack could be run on the physical hosts only, which loses the ability to monitor resourceswithin the guests.
• A separate cluster could be on the virtual guests, which quickly hits scalability issues.
• The cluster stack could be run on the guests using the same cluster as the physical hosts, which also hitsscalability issues and complicates fencing.
With pacemaker_remote:
• The physical hosts are cluster nodes (running the full cluster stack).
• The virtual machines are guest nodes (running the pacemaker_remote service). Nearly zeroconfiguration is required on the virtual machine.
• The cluster stack on the cluster nodes launches the virtual machines and immediately connects to thepacemaker_remote service on them, allowing the virtual machines to integrate into the cluster.
The key difference here between the guest nodes and the cluster nodes is that the guest nodes do not runthe cluster stack. This means they will never become the DC, initiate fencing actions or participate inquorum voting.
On the other hand, this also means that they are not bound to the scalability limits associated with thecluster stack (no 16-node corosync member limits to deal with). That isn’t to say that guest nodes can scaleindefinitely, but it is known that guest nodes scale horizontally much further than cluster nodes.
2

Scaling a Pacemaker Cluster
Other than the quorum limitation, these guest nodes behave just like cluster nodes with respect to resourcemanagement. The cluster is fully capable of managing and monitoring resources on each guest node. Youcan build constraints against guest nodes, put them in standby, or do whatever else you’d expect to be ableto do with cluster nodes. They even show up in crm_mon output as nodes.
To solidify the concept, below is an example that is very similar to an actual deployment we test in ourdeveloper environment to verify guest node scalability:
• 16 cluster nodes running the full corosync + pacemaker stack
• 64 Pacemaker-managed virtual machine resources running pacemaker_remote configured as guestnodes
• 64 Pacemaker-managed webserver and database resources configured to run on the 64 guest nodes
With this deployment, you would have 64 webservers and databases running on 64 virtual machines on 16hardware nodes, all of which are managed and monitored by the same Pacemaker deployment. It is knownthat pacemaker_remote can scale to these lengths and possibly much further depending on the specificscenario.
Remote Nodes
"I want my traditional high-availability cluster to scale beyond the limits imposed by the corosyncmessaging layer."
Ultimately, the primary advantage of remote nodes over cluster nodes is scalability. There are likely someother use cases related to geographically distributed HA clusters that remote nodes may serve a purposein, but those use cases are not well understood at this point.
Like guest nodes, remote nodes will never become the DC, initiate fencing actions or participate in quorumvoting.
That is not to say, however, that fencing of a remote node works any differently than that of a cluster node.The Pacemaker scheduler understands how to fence remote nodes. As long as a fencing device exists, thecluster is capable of ensuring remote nodes are fenced in the exact same way as cluster nodes.
Expanding the Cluster StackWith pacemaker_remote, the traditional view of the high-availability stack can be expanded to includea new layer:
Figure 1.1. Traditional HA Stack
Figure 1.2. HA Stack With Guest Nodes
3

Chapter 2. Guest Node Quick Example
Table of ContentsMile-High View of Configuration Steps ................................................................................. 4Using a Guest Node ............................................................................................................ 5
If you already know how to use Pacemaker, you’ll likely be able to grasp this new concept of guest nodesby reading through this quick example without having to sort through all the detailed walk-through steps.Here are the key configuration ingredients that make this possible using libvirt and KVM virtual guests.These steps strip everything down to the very basics.
Mile-High View of Configuration Steps• Give each virtual machine that will be used as a guest node a static network address and unique
hostname.
• Put the same authentication key with the path /etc/pacemaker/authkey on every cluster nodeand virtual machine. This secures remote communication.
Run this command if you want to make a somewhat random key:
dd if=/dev/urandom of=/etc/pacemaker/authkey bs=4096 count=1
• Install pacemaker_remote on every virtual machine, enabling it to start at boot, and if a local firewall isused, allow the node to accept connections on TCP port 3121.
yum install pacemaker-remote resource-agentssystemctl enable pacemaker_remotefirewall-cmd --add-port 3121/tcp --permanent
Note
If you just want to see this work, you may want to simply disable the local firewall and putSELinux in permissive mode while testing. This creates security risks and should not be doneon a production machine exposed to the Internet, but can be appropriate for a protected testmachine.
• Create a Pacemaker resource to launch each virtual machine, using the remote-node meta-attribute tolet Pacemaker know this will be a guest node capable of running resources.
# pcs resource create vm-guest1 VirtualDomain hypervisor="qemu:///system" config="vm-guest1.xml" meta remote-node="guest1"
The above command will create CIB XML similar to the following:
<primitive class="ocf" id="vm-guest1" provider="heartbeat" type="VirtualDomain"> <instance_attributes id="vm-guest-instance_attributes"> <nvpair id="vm-guest1-instance_attributes-hypervisor" name="hypervisor" value="qemu:///system"/> <nvpair id="vm-guest1-instance_attributes-config" name="config" value="guest1.xml"/> </instance_attributes> <operations> <op id="vm-guest1-interval-30s" interval="30s" name="monitor"/>
4

Guest Node Quick Example
</operations> <meta_attributes id="vm-guest1-meta_attributes"> <nvpair id="vm-guest1-meta_attributes-remote-node" name="remote-node" value="guest1"/> </meta_attributes> </primitive>
In the example above, the meta-attribute remote-node="guest1" tells Pacemaker that this resourceis a guest node with the hostname guest1. The cluster will attempt to contact the virtual machine’spacemaker_remote service at the hostname guest1 after it launches.
Note
The ID of the resource creating the virtual machine (vm-guest1 in the above example) must bedifferent from the virtual machine’s uname (guest1 in the above example). Pacemaker will createan implicit internal resource for the pacemaker_remote connection to the guest, named with thevalue of remote-node, so that value cannot be used as the name of any other resource.
Using a Guest NodeGuest nodes will show up in crm_mon output as normal:
Example crm_mon output after guest1 is integrated into cluster.
Stack: corosyncCurrent DC: node1 (version 1.1.16-12.el7_4.5-94ff4df) - partition with quorumLast updated: Fri Jan 12 13:52:39 2018Last change: Fri Jan 12 13:25:17 2018 via pacemaker-controld on node1
2 nodes configured2 resources configured
Online: [ node1 guest1]
vm-guest1 (ocf::heartbeat:VirtualDomain): Started node1
Now, you could place a resource, such as a webserver, on guest1:
# pcs resource create webserver apache params configfile=/etc/httpd/conf/httpd.conf op monitor interval=30s# pcs constraint location webserver prefers guest1
Now, the crm_mon output would show:
Stack: corosyncCurrent DC: node1 (version 1.1.16-12.el7_4.5-94ff4df) - partition with quorumLast updated: Fri Jan 12 13:52:39 2018Last change: Fri Jan 12 13:25:17 2018 via pacemaker-controld on node1
2 nodes configured2 resources configured
Online: [ node1 guest1]
vm-guest1 (ocf::heartbeat:VirtualDomain): Started node1webserver (ocf::heartbeat::apache): Started guest1
5

Guest Node Quick Example
It is worth noting that after guest1 is integrated into the cluster, nearly all the Pacemaker command-line tools immediately become available to the guest node. This means things like crm_mon,crm_resource, and crm_attribute will work natively on the guest node, as long as the connectionbetween the guest node and a cluster node exists. This is particularly important for any promotable cloneresources executing on the guest node that need access to crm_master to set transient attributes.
6
Chapter 3. Configuration Explained
Table of ContentsResource Meta-Attributes for Guest Nodes .............................................................................. 7Connection Resources for Remote Nodes ................................................................................ 8Environment Variables for Daemon Start-up ........................................................................... 8Removing Remote Nodes and Guest Nodes ............................................................................. 8
The walk-through examples use some of these options, but don’t explain exactly what they mean or do. Thissection is meant to be the go-to resource for all the options available for configuring pacemaker_remote-based nodes.
Resource Meta-Attributes for Guest NodesWhen configuring a virtual machine as a guest node, the virtual machine is created using one of the usualresource agents for that purpose (for example, ocf:heartbeat:VirtualDomain or ocf:heartbeat:Xen), withadditional metadata parameters.
No restrictions are enforced on what agents may be used to create a guest node, but obviously theagent must create a distinct environment capable of running the pacemaker_remote daemon and clusterresources. An additional requirement is that fencing the host running the guest node resource must besufficient for ensuring the guest node is stopped. This means, for example, that not all hypervisorssupported by VirtualDomain may be used to create guest nodes; if the guest can survive the hypervisorbeing fenced, it may not be used as a guest node.
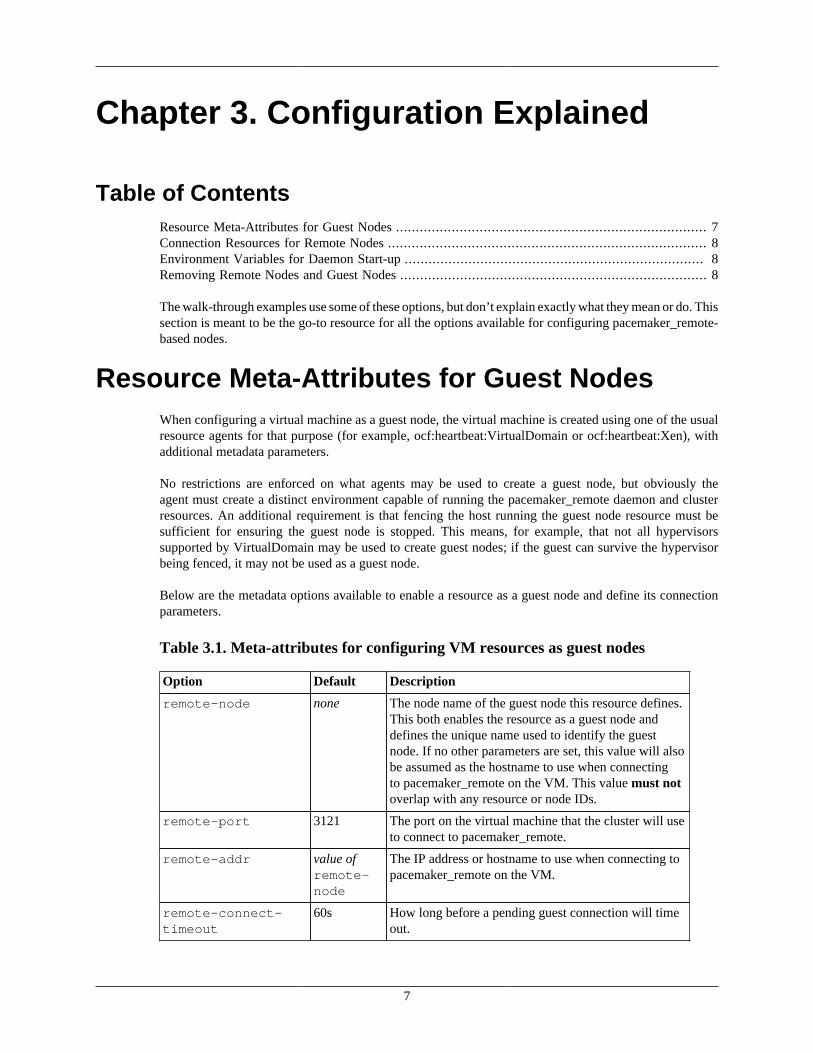
Below are the metadata options available to enable a resource as a guest node and define its connectionparameters.
Table 3.1. Meta-attributes for configuring VM resources as guest nodes
Option Default Description
remote-node none The node name of the guest node this resource defines.This both enables the resource as a guest node anddefines the unique name used to identify the guestnode. If no other parameters are set, this value will alsobe assumed as the hostname to use when connectingto pacemaker_remote on the VM. This value must notoverlap with any resource or node IDs.
remote-port 3121 The port on the virtual machine that the cluster will useto connect to pacemaker_remote.
remote-addr value ofremote-node
The IP address or hostname to use when connecting topacemaker_remote on the VM.
remote-connect-timeout
60s How long before a pending guest connection will timeout.
7

Configuration Explained
Connection Resources for Remote NodesA remote node is defined by a connection resource. That connection resource has instance attributes thatdefine where the remote node is located on the network and how to communicate with it.
Descriptions of these instance attributes can be retrieved using the following pcs command:
# pcs resource describe remoteocf:pacemaker:remote - remote resource agent
Resource options: server: Server location to connect to. This can be an ip address or hostname. port: tcp port to connect to. reconnect_interval: Interval in seconds at which Pacemaker will attempt to reconnect to a remote node after an active connection to the remote node has been severed. When this value is nonzero, Pacemaker will retry the connection indefinitely, at the specified interval.
When defining a remote node’s connection resource, it is common and recommended to name theconnection resource the same as the remote node’s hostname. By default, if no server option is provided,the cluster will attempt to contact the remote node using the resource name as the hostname.
Example defining a remote node with the hostname remote1:
# pcs resource create remote1 remote
Example defining a remote node to connect to a specific IP address and port:
# pcs resource create remote1 remote server=192.168.122.200 port=8938
Environment Variables for Daemon Start-upAuthentication and encryption of the connection between cluster nodes and nodes runningpacemaker_remote is achieved using with TLS-PSK [https://en.wikipedia.org/wiki/TLS-PSK] encryption/authentication over TCP (port 3121 by default). This means that both the cluster node and remote nodemust share the same private key. By default, this key is placed at /etc/pacemaker/authkey on eachnode.
You can change the default port and/or key location for Pacemaker and pacemaker_remote via environmentvariables. How these variables are set varies by OS, but usually they are set in the /etc/sysconfig/pacemaker or /etc/default/pacemaker file.
#==#==# Pacemaker Remote# Use a custom directory for finding the authkey.PCMK_authkey_location=/etc/pacemaker/authkey## Specify a custom port for Pacemaker Remote connectionsPCMK_remote_port=3121
Removing Remote Nodes and Guest NodesIf the resource creating a guest node, or the ocf:pacemaker:remote resource creating a connection to aremote node, is removed from the configuration, the affected node will continue to show up in output asan offline node.
8

Configuration Explained
If you want to get rid of that output, run (replacing $NODE_NAME appropriately):
# crm_node --force --remove $NODE_NAME
Warning
Be absolutely sure that there are no references to the node’s resource in the configuration beforerunning the above command.
9

Chapter 4. Guest Node Walk-through
Table of ContentsConfigure the Physical Host ................................................................................................ 10
Configure Firewall on Host ......................................................................................... 10Install Cluster Software .............................................................................................. 11Configure Corosync ................................................................................................... 11Configure Pacemaker for Remote Node Communication .................................................. 11Verify Cluster Software ............................................................................................. 12Disable STONITH and Quorum .................................................................................. 13Install Virtualization Software ..................................................................................... 13
Configure the KVM guest .................................................................................................. 14Create Guest ............................................................................................................ 14Configure Firewall on Guest ....................................................................................... 14Verify Connectivity ................................................................................................... 14Configure pacemaker_remote ...................................................................................... 14Verify Host Connection to Guest ................................................................................. 15
Integrate Guest into Cluster ................................................................................................ 15Start the Cluster ........................................................................................................ 15Integrate as Guest Node ............................................................................................. 15Starting Resources on KVM Guest ............................................................................... 16Testing Recovery and Fencing .................................................................................... 17Accessing Cluster Tools from Guest Node .................................................................... 19
What this tutorial is: An in-depth walk-through of how to get Pacemaker to manage a KVM guest instanceand integrate that guest into the cluster as a guest node.
What this tutorial is not: A realistic deployment scenario. The steps shown here are meant to get usersfamiliar with the concept of guest nodes as quickly as possible.
Configure the Physical HostNote
For this example, we will use a single physical host named example-host. A production clusterwould likely have multiple physical hosts, in which case you would run the commands here oneach one, unless noted otherwise.
Configure Firewall on Host
On the physical host, allow cluster-related services through the local firewall:
# firewall-cmd --permanent --add-service=high-availabilitysuccess# firewall-cmd --reloadsuccess
10

Guest Node Walk-through
Note
If you are using iptables directly, or some other firewall solution besides firewalld, simply openthe following ports, which can be used by various clustering components: TCP ports 2224, 3121,and 21064, and UDP port 5405.
If you run into any problems during testing, you might want to disable the firewall and SELinuxentirely until you have everything working. This may create significant security issues and shouldnot be performed on machines that will be exposed to the outside world, but may be appropriateduring development and testing on a protected host.
To disable security measures:
[root@pcmk-1 ~]# setenforce 0[root@pcmk-1 ~]# sed -i.bak "s/SELINUX=enforcing/SELINUX=permissive/g" /etc/selinux/config[root@pcmk-1 ~]# systemctl mask firewalld.service[root@pcmk-1 ~]# systemctl stop firewalld.service[root@pcmk-1 ~]# iptables --flush
Install Cluster Software# yum install -y pacemaker corosync pcs resource-agents
Configure CorosyncCorosync handles pacemaker’s cluster membership and messaging. The corosync config file is located in/etc/corosync/corosync.conf. That config file must be initialized with information about thecluster nodes before pacemaker can start.
To initialize the corosync config file, execute the following pcs command, replacing the cluster nameand hostname as desired:
# pcs cluster setup --force --local --name mycluster example-host
Note
If you have multiple physical hosts, you would execute the setup command on only one host, butlist all of them at the end of the command.
Configure Pacemaker for Remote Node CommunicationCreate a place to hold an authentication key for use with pacemaker_remote:
# mkdir -p --mode=0750 /etc/pacemaker# chgrp haclient /etc/pacemaker
Generate a key:
# dd if=/dev/urandom of=/etc/pacemaker/authkey bs=4096 count=1
Note
If you have multiple physical hosts, you would generate the key on only one host, and copy itto the same location on all hosts.
11

Guest Node Walk-through
Verify Cluster SoftwareStart the cluster
# pcs cluster start
Verify corosync membership
# pcs status corosync
Membership information---------------------- Nodeid Votes Name 1 1 example-host (local)
Verify pacemaker status. At first, the output will look like this:
# pcs statusCluster name: myclusterWARNING: no stonith devices and stonith-enabled is not falseStack: corosyncCurrent DC: NONELast updated: Fri Jan 12 15:18:32 2018Last change: Fri Jan 12 12:42:21 2018 by root via cibadmin on example-host
1 node configured0 resources configured
Node example-host: UNCLEAN (offline)
No active resources
Daemon Status: corosync: active/disabled pacemaker: active/disabled pcsd: active/enabled
After a short amount of time, you should see your host as a single node in the cluster:
# pcs statusCluster name: myclusterWARNING: no stonith devices and stonith-enabled is not falseStack: corosyncCurrent DC: example-host (version 1.1.16-12.el7_4.5-94ff4df) - partition WITHOUT quorumLast updated: Fri Jan 12 15:20:05 2018Last change: Fri Jan 12 12:42:21 2018 by root via cibadmin on example-host
1 node configured0 resources configured
Online: [ example-host ]
No active resources
Daemon Status:
12

Guest Node Walk-through
corosync: active/disabled pacemaker: active/disabled pcsd: active/enabled
Disable STONITH and QuorumNow, enable the cluster to work without quorum or stonith. This is required for the sake of getting thistutorial to work with a single cluster node.
# pcs property set stonith-enabled=false# pcs property set no-quorum-policy=ignore
Warning
The use of stonith-enabled=false is completely inappropriate for a production cluster.It tells the cluster to simply pretend that failed nodes are safely powered off. Some vendors willrefuse to support clusters that have STONITH disabled. We disable STONITH here only to focusthe discussion on pacemaker_remote, and to be able to use a single physical host in the example.
Now, the status output should look similar to this:
# pcs statusCluster name: myclusterStack: corosyncCurrent DC: example-host (version 1.1.16-12.el7_4.5-94ff4df) - partition with quorumLast updated: Fri Jan 12 15:22:49 2018Last change: Fri Jan 12 15:22:46 2018 by root via cibadmin on example-host
1 node configured0 resources configured
Online: [ example-host ]
No active resources
Daemon Status: corosync: active/disabled pacemaker: active/disabled pcsd: active/enabled
Go ahead and stop the cluster for now after verifying everything is in order.
# pcs cluster stop --force
Install Virtualization Software# yum install -y kvm libvirt qemu-system qemu-kvm bridge-utils virt-manager# systemctl enable libvirtd.service
Reboot the host.
Note
While KVM is used in this example, any virtualization platform with a Pacemaker resource agentcan be used to create a guest node. The resource agent needs only to support usual commands
13

Guest Node Walk-through
(start, stop, etc.); Pacemaker implements the remote-node meta-attribute, independent of theagent.
Configure the KVM guest
Create Guest
We will not outline here the installation steps required to create a KVM guest. There are plenty of tutorialsavailable elsewhere that do that. Just be sure to configure the guest with a hostname and a static IP address(as an example here, we will use guest1 and 192.168.122.10).
Configure Firewall on Guest
On each guest, allow cluster-related services through the local firewall, following the same procedure asin the section called “Configure Firewall on Host”.
Verify Connectivity
At this point, you should be able to ping and ssh into guests from hosts, and vice versa.
Configure pacemaker_remote
Install pacemaker_remote, and enable it to run at start-up. Here, we also install the pacemaker package; itis not required, but it contains the dummy resource agent that we will use later for testing.
# yum install -y pacemaker pacemaker-remote resource-agents# systemctl enable pacemaker_remote.service
Copy the authentication key from a host:
# mkdir -p --mode=0750 /etc/pacemaker# chgrp haclient /etc/pacemaker# scp root@example-host:/etc/pacemaker/authkey /etc/pacemaker
Start pacemaker_remote, and verify the start was successful:
# systemctl start pacemaker_remote# systemctl status pacemaker_remote
pacemaker_remote.service - Pacemaker Remote Service Loaded: loaded (/usr/lib/systemd/system/pacemaker_remote.service; enabled) Active: active (running) since Thu 2013-03-14 18:24:04 EDT; 2min 8s ago Main PID: 1233 (pacemaker_remot) CGroup: name=systemd:/system/pacemaker_remote.service ##1233 /usr/sbin/pacemaker-remoted
Mar 14 18:24:04 guest1 systemd[1]: Starting Pacemaker Remote Service... Mar 14 18:24:04 guest1 systemd[1]: Started Pacemaker Remote Service. Mar 14 18:24:04 guest1 pacemaker-remoted[1233]: notice: lrmd_init_remote_tls_server: Starting a tls listener on port 3121.
14

Guest Node Walk-through
Verify Host Connection to GuestBefore moving forward, it’s worth verifying that the host can contact the guest on port 3121. Here’s a trickyou can use. Connect using ssh from the host. The connection will get destroyed, but how it is destroyedtells you whether it worked or not.
First add guest1 to the host machine’s /etc/hosts file if you haven’t already. This is required unlessyou have DNS setup in a way where guest1’s address can be discovered.
# cat << END >> /etc/hosts192.168.122.10 guest1END
If running the ssh command on one of the cluster nodes results in this output before disconnecting, theconnection works:
# ssh -p 3121 guest1ssh_exchange_identification: read: Connection reset by peer
If you see one of these, the connection is not working:
# ssh -p 3121 guest1ssh: connect to host guest1 port 3121: No route to host
# ssh -p 3121 guest1ssh: connect to host guest1 port 3121: Connection refused
Once you can successfully connect to the guest from the host, shutdown the guest. Pacemaker will bemanaging the virtual machine from this point forward.
Integrate Guest into ClusterNow the fun part, integrating the virtual machine you’ve just created into the cluster. It is incredibly simple.
Start the ClusterOn the host, start pacemaker.
# pcs cluster start
Wait for the host to become the DC. The output of pcs status should look as it did in the sectioncalled “Disable STONITH and Quorum”.
Integrate as Guest NodeIf you didn’t already do this earlier in the verify host to guest connection section, add the KVM guest’s IPaddress to the host’s /etc/hosts file so we can connect by hostname. For this example:
# cat << END >> /etc/hosts192.168.122.10 guest1END
We will use the VirtualDomain resource agent for the management of the virtual machine. This agentrequires the virtual machine’s XML config to be dumped to a file on disk. To do this, pick out the nameof the virtual machine you just created from the output of this list.
15

Guest Node Walk-through
# virsh list --all Id Name State---------------------------------------------------- - guest1 shut off
In my case I named it guest1. Dump the xml to a file somewhere on the host using the following command.
# virsh dumpxml guest1 > /etc/pacemaker/guest1.xml
Now just register the resource with pacemaker and you’re set!
# pcs resource create vm-guest1 VirtualDomain hypervisor="qemu:///system" \ config="/etc/pacemaker/guest1.xml" meta remote-node=guest1
Note
This example puts the guest XML under /etc/pacemaker because the permissions and SELinuxlabeling should not need any changes. If you run into trouble with this or any step, try disablingSELinux with setenforce 0. If it works after that, see SELinux documentation for how totroubleshoot, if you wish to reenable SELinux.
Note
Pacemaker will automatically monitor pacemaker_remote connections for failure, so it is notnecessary to create a recurring monitor on the VirtualDomain resource.
Once the vm-guest1 resource is started you will see guest1 appear in the pcs status output as a node.The final pcs status output should look something like this.
# pcs statusCluster name: myclusterStack: corosyncCurrent DC: example-host (version 1.1.16-12.el7_4.5-94ff4df) - partition with quorumLast updated: Fri Jan 12 18:00:45 2018Last change: Fri Jan 12 17:53:44 2018 by root via crm_resource on example-host
2 nodes configured2 resources configured
Online: [ example-host ]GuestOnline: [ guest1@example-host ]
Full list of resources:
vm-guest1 (ocf::heartbeat:VirtualDomain): Started example-host
Daemon Status: corosync: active/disabled pacemaker: active/disabled pcsd: active/enabled
Starting Resources on KVM GuestThe commands below demonstrate how resources can be executed on both the guest node and the clusternode.
16

Guest Node Walk-through
Create a few Dummy resources. Dummy resources are real resource agents used just for testing purposes.They actually execute on the host they are assigned to just like an apache server or database would, excepttheir execution just means a file was created. When the resource is stopped, that the file it created isremoved.
# pcs resource create FAKE1 ocf:pacemaker:Dummy# pcs resource create FAKE2 ocf:pacemaker:Dummy# pcs resource create FAKE3 ocf:pacemaker:Dummy# pcs resource create FAKE4 ocf:pacemaker:Dummy# pcs resource create FAKE5 ocf:pacemaker:Dummy
Now check your pcs status output. In the resource section, you should see something like thefollowing, where some of the resources started on the cluster node, and some started on the guest node.
Full list of resources:
vm-guest1 (ocf::heartbeat:VirtualDomain): Started example-host FAKE1 (ocf::pacemaker:Dummy): Started guest1 FAKE2 (ocf::pacemaker:Dummy): Started guest1 FAKE3 (ocf::pacemaker:Dummy): Started example-host FAKE4 (ocf::pacemaker:Dummy): Started guest1 FAKE5 (ocf::pacemaker:Dummy): Started example-host
The guest node, guest1, reacts just like any other node in the cluster. For example, pick out a resource thatis running on your cluster node. For my purposes, I am picking FAKE3 from the output above. We canforce FAKE3 to run on guest1 in the exact same way we would any other node.
# pcs constraint location FAKE3 prefers guest1
Now, looking at the bottom of the pcs status output you’ll see FAKE3 is on guest1.
Full list of resources:
vm-guest1 (ocf::heartbeat:VirtualDomain): Started example-host FAKE1 (ocf::pacemaker:Dummy): Started guest1 FAKE2 (ocf::pacemaker:Dummy): Started guest1 FAKE3 (ocf::pacemaker:Dummy): Started guest1 FAKE4 (ocf::pacemaker:Dummy): Started example-host FAKE5 (ocf::pacemaker:Dummy): Started example-host
Testing Recovery and FencingPacemaker’s scheduler is smart enough to know fencing guest nodes associated with a virtual machinemeans shutting off/rebooting the virtual machine. No special configuration is necessary to make thishappen. If you are interested in testing this functionality out, trying stopping the guest’s pacemaker_remotedaemon. This would be equivalent of abruptly terminating a cluster node’s corosync membership withoutproperly shutting it down.
ssh into the guest and run this command.
# kill -9 $(pidof pacemaker-remoted)
Within a few seconds, your pcs status output will show a monitor failure, and the guest1 node willnot be shown while it is being recovered.
# pcs status
17

Guest Node Walk-through
Cluster name: myclusterStack: corosyncCurrent DC: example-host (version 1.1.16-12.el7_4.5-94ff4df) - partition with quorumLast updated: Fri Jan 12 18:08:35 2018Last change: Fri Jan 12 18:07:00 2018 by root via cibadmin on example-host
2 nodes configured7 resources configured
Online: [ example-host ]
Full list of resources:
vm-guest1 (ocf::heartbeat:VirtualDomain): Started example-host FAKE1 (ocf::pacemaker:Dummy): Stopped FAKE2 (ocf::pacemaker:Dummy): Stopped FAKE3 (ocf::pacemaker:Dummy): Stopped FAKE4 (ocf::pacemaker:Dummy): Started example-host FAKE5 (ocf::pacemaker:Dummy): Started example-host
Failed Actions:* guest1_monitor_30000 on example-host 'unknown error' (1): call=8, status=Error, exitreason='none', last-rc-change='Fri Jan 12 18:08:29 2018', queued=0ms, exec=0ms
Daemon Status: corosync: active/disabled pacemaker: active/disabled pcsd: active/enabled
Note
A guest node involves two resources: the one you explicitly configured creates the guest, andPacemaker creates an implicit resource for the pacemaker_remote connection, which will benamed the same as the value of the remote-node attribute of the explicit resource. When wekilled pacemaker_remote, it is the implicit resource that failed, which is why the failed actionstarts with guest1 and not vm-guest1.
Once recovery of the guest is complete, you’ll see it automatically get re-integrated into the cluster. Thefinal pcs status output should look something like this.
Cluster name: myclusterStack: corosyncCurrent DC: example-host (version 1.1.16-12.el7_4.5-94ff4df) - partition with quorumLast updated: Fri Jan 12 18:18:30 2018Last change: Fri Jan 12 18:07:00 2018 by root via cibadmin on example-host
2 nodes configured7 resources configured
Online: [ example-host ]GuestOnline: [ guest1@example-host ]
Full list of resources:
18

Guest Node Walk-through
vm-guest1 (ocf::heartbeat:VirtualDomain): Started example-host FAKE1 (ocf::pacemaker:Dummy): Started guest1 FAKE2 (ocf::pacemaker:Dummy): Started guest1 FAKE3 (ocf::pacemaker:Dummy): Started guest1 FAKE4 (ocf::pacemaker:Dummy): Started example-host FAKE5 (ocf::pacemaker:Dummy): Started example-host
Failed Actions:* guest1_monitor_30000 on example-host 'unknown error' (1): call=8, status=Error, exitreason='none', last-rc-change='Fri Jan 12 18:08:29 2018', queued=0ms, exec=0ms
Daemon Status: corosync: active/disabled pacemaker: active/disabled pcsd: active/enabled
Normally, once you’ve investigated and addressed a failed action, you can clear the failure. HoweverPacemaker does not yet support cleanup for the implicitly created connection resource while the explicitresource is active. If you want to clear the failed action from the status output, stop the guest resourcebefore clearing it. For example:
# pcs resource disable vm-guest1 --wait# pcs resource cleanup guest1# pcs resource enable vm-guest1
Accessing Cluster Tools from Guest NodeBesides allowing the cluster to manage resources on a guest node, pacemaker_remote has one other trick.The pacemaker_remote daemon allows nearly all the pacemaker tools (crm_resource, crm_mon,crm_attribute, crm_master, etc.) to work on guest nodes natively.
Try it: Run crm_mon on the guest after pacemaker has integrated the guest node into the cluster. Thesetools just work. This means resource agents such as promotable resources (which need access to tools likecrm_master) work seamlessly on the guest nodes.
Higher-level command shells such as pcs may have partial support on guest nodes, but it is recommendedto run them from a cluster node.
19

Chapter 5. Remote Node Walk-through
Table of ContentsConfigure Remote Node ..................................................................................................... 20
Configure Firewall on Remote Node ............................................................................ 20Configure pacemaker_remote on Remote Node .............................................................. 21
Verify Connection to Remote Node ..................................................................................... 21Configure Cluster Nodes .................................................................................................... 22
Configure Firewall on Cluster Nodes ............................................................................ 22Install Pacemaker on Cluster Nodes ............................................................................. 22Copy Authentication Key to Cluster Nodes .................................................................... 22Configure Corosync on Cluster Nodes .......................................................................... 22Start Pacemaker on Cluster Nodes ............................................................................... 23
Integrate Remote Node into Cluster ..................................................................................... 23Starting Resources on Remote Node ..................................................................................... 24Fencing Remote Nodes ...................................................................................................... 24Accessing Cluster Tools from a Remote Node ....................................................................... 24
What this tutorial is: An in-depth walk-through of how to get Pacemaker to integrate a remote node intothe cluster as a node capable of running cluster resources.
What this tutorial is not: A realistic deployment scenario. The steps shown here are meant to get usersfamiliar with the concept of remote nodes as quickly as possible.
This tutorial requires three machines: two to act as cluster nodes, and a third to act as the remote node.
Configure Remote Node
Configure Firewall on Remote NodeAllow cluster-related services through the local firewall:
# firewall-cmd --permanent --add-service=high-availabilitysuccess# firewall-cmd --reloadsuccess
Note
If you are using iptables directly, or some other firewall solution besides firewalld, simply openthe following ports, which can be used by various clustering components: TCP ports 2224, 3121,and 21064, and UDP port 5405.
If you run into any problems during testing, you might want to disable the firewall and SELinuxentirely until you have everything working. This may create significant security issues and shouldnot be performed on machines that will be exposed to the outside world, but may be appropriateduring development and testing on a protected host.
To disable security measures:
# setenforce 0
20

Remote Node Walk-through
# sed -i.bak "s/SELINUX=enforcing/SELINUX=permissive/g" /etc/selinux/config# systemctl mask firewalld.service# systemctl stop firewalld.service# iptables --flush
Configure pacemaker_remote on Remote NodeInstall the pacemaker_remote daemon on the remote node.
# yum install -y pacemaker-remote resource-agents pcs
Create a location for the shared authentication key:
# mkdir -p --mode=0750 /etc/pacemaker# chgrp haclient /etc/pacemaker
All nodes (both cluster nodes and remote nodes) must have the same authentication key installed for thecommunication to work correctly. If you already have a key on an existing node, copy it to the new remotenode. Otherwise, create a new key, for example:
# dd if=/dev/urandom of=/etc/pacemaker/authkey bs=4096 count=1
Now start and enable the pacemaker_remote daemon on the remote node.
# systemctl enable pacemaker_remote.service# systemctl start pacemaker_remote.service
Verify the start is successful.
# systemctl status pacemaker_remotepacemaker_remote.service - Pacemaker Remote Service Loaded: loaded (/usr/lib/systemd/system/pacemaker_remote.service; enabled) Active: active (running) since Fri 2018-01-12 15:21:20 CDT; 20s ago Main PID: 21273 (pacemaker_remot) CGroup: /system.slice/pacemaker_remote.service ##21273 /usr/sbin/pacemaker-remoted
Jan 12 15:21:20 remote1 systemd[1]: Starting Pacemaker Remote Service...Jan 12 15:21:20 remote1 systemd[1]: Started Pacemaker Remote Service.Jan 12 15:21:20 remote1 pacemaker-remoted[21273]: notice: crm_add_logfile: Additional logging available in /var/log/pacemaker.logJan 12 15:21:20 remote1 pacemaker-remoted[21273]: notice: lrmd_init_remote_tls_server: Starting a tls listener on port 3121.Jan 12 15:21:20 remote1 pacemaker-remoted[21273]: notice: bind_and_listen: Listening on address ::
Verify Connection to Remote NodeBefore moving forward, it’s worth verifying that the cluster nodes can contact the remote node on port3121. Here’s a trick you can use. Connect using ssh from each of the cluster nodes. The connection willget destroyed, but how it is destroyed tells you whether it worked or not.
First, add the remote node’s hostname (we’re using remote1 in this tutorial) to the cluster nodes' /etc/hosts files if you haven’t already. This is required unless you have DNS set up in a way where remote1’saddress can be discovered.
Execute the following on each cluster node, replacing the IP address with the actual IP address of theremote node.
21

Remote Node Walk-through
# cat << END >> /etc/hosts192.168.122.10 remote1END
If running the ssh command on one of the cluster nodes results in this output before disconnecting, theconnection works:
# ssh -p 3121 remote1ssh_exchange_identification: read: Connection reset by peer
If you see one of these, the connection is not working:
# ssh -p 3121 remote1ssh: connect to host remote1 port 3121: No route to host
# ssh -p 3121 remote1ssh: connect to host remote1 port 3121: Connection refused
Once you can successfully connect to the remote node from the both cluster nodes, move on to setting upPacemaker on the cluster nodes.
Configure Cluster Nodes
Configure Firewall on Cluster NodesOn each cluster node, allow cluster-related services through the local firewall, following the sameprocedure as in the section called “Configure Firewall on Remote Node”.
Install Pacemaker on Cluster NodesOn the two cluster nodes, install the following packages.
# yum install -y pacemaker corosync pcs resource-agents
Copy Authentication Key to Cluster NodesCreate a location for the shared authentication key, and copy it from any existing node:
# mkdir -p --mode=0750 /etc/pacemaker# chgrp haclient /etc/pacemaker# scp remote1:/etc/pacemaker/authkey /etc/pacemaker/authkey
Configure Corosync on Cluster NodesCorosync handles Pacemaker’s cluster membership and messaging. The corosync config file is located in/etc/corosync/corosync.conf. That config file must be initialized with information about thetwo cluster nodes before pacemaker can start.
To initialize the corosync config file, execute the following pcs command on both nodes, filling in theinformation in <> with your nodes' information.
# pcs cluster setup --force --local --name mycluster <node1 ip or hostname> <node2 ip or hostname>
22

Remote Node Walk-through
Start Pacemaker on Cluster NodesStart the cluster stack on both cluster nodes using the following command.
# pcs cluster start
Verify corosync membership
# pcs status corosyncMembership information---------------------- Nodeid Votes Name 1 1 node1 (local)
Verify Pacemaker status. At first, the pcs cluster status output will look like this.
# pcs statusCluster name: myclusterStack: corosyncCurrent DC: NONELast updated: Fri Jan 12 16:14:05 2018Last change: Fri Jan 12 14:02:14 2018
1 node configured0 resources configured
After about a minute, you should see your two cluster nodes come online.
# pcs statusCluster name: myclusterStack: corosyncCurrent DC: node1 (version 1.1.16-12.el7_4.5-94ff4df) - partition with quorumLast updated: Fri Jan 12 16:16:32 2018Last change: Fri Jan 12 14:02:14 2018
2 nodes configured0 resources configured
Online: [ node1 node2 ]
For the sake of this tutorial, we are going to disable stonith to avoid having to cover fencing deviceconfiguration.
# pcs property set stonith-enabled=false
Integrate Remote Node into ClusterIntegrating a remote node into the cluster is achieved through the creation of a remote node connectionresource. The remote node connection resource both establishes the connection to the remote node anddefines that the remote node exists. Note that this resource is actually internal to Pacemaker’s controller.A metadata file for this resource can be found in the /usr/lib/ocf/resource.d/pacemaker/remote file that describes what options are available, but there is no actual ocf:pacemaker:remoteresource agent script that performs any work.
23

Remote Node Walk-through
Define the remote node connection resource to our remote node, remote1, using the following commandon any cluster node.
# pcs resource create remote1 ocf:pacemaker:remote
That’s it. After a moment you should see the remote node come online.
Cluster name: myclusterStack: corosyncCurrent DC: node1 (version 1.1.16-12.el7_4.5-94ff4df) - partition with quorumLast updated: Fri Jan 12 17:13:09 2018Last change: Fri Jan 12 17:02:02 2018
3 nodes configured1 resources configured
Online: [ node1 node2 ]RemoteOnline: [ remote1 ]
Full list of resources:
remote1 (ocf::pacemaker:remote): Started node1
Daemon Status: corosync: active/disabled pacemaker: active/disabled pcsd: active/enabled
Starting Resources on Remote NodeOnce the remote node is integrated into the cluster, starting resources on a remote node is the exact sameas on cluster nodes. Refer to the Clusters from Scratch [http://clusterlabs.org/doc/] document for examplesof resource creation.
Warning
Never involve a remote node connection resource in a resource group, colocation constraint, ororder constraint.
Fencing Remote NodesRemote nodes are fenced the same way as cluster nodes. No special considerations are required. Configurefencing resources for use with remote nodes the same as you would with cluster nodes.
Note, however, that remote nodes can never initiate a fencing action. Only cluster nodes are capable ofactually executing a fencing operation against another node.
Accessing Cluster Tools from a Remote NodeBesides allowing the cluster to manage resources on a remote node, pacemaker_remote has one other trick.The pacemaker_remote daemon allows nearly all the pacemaker tools (crm_resource, crm_mon,crm_attribute, crm_master, etc.) to work on remote nodes natively.
24

Remote Node Walk-through
Try it: Run crm_mon on the remote node after pacemaker has integrated it into the cluster. These toolsjust work. These means resource agents such as promotable resources (which need access to tools likecrm_master) work seamlessly on the remote nodes.
Higher-level command shells such as pcs may have partial support on remote nodes, but it isrecommended to run them from a cluster node.
25

Chapter 6. Alternative Configurations
Table of ContentsVirtual Machines as Cluster Nodes ...................................................................................... 26Virtual Machines as Remote Nodes ...................................................................................... 26Containers as Guest Nodes ................................................................................................. 26
These alternative configurations may be appropriate in limited cases, such as a test cluster, but are notthe best method in most situations. They are presented here for completeness and as an example ofPacemaker’s flexibility to suit your needs.
Virtual Machines as Cluster NodesThe preferred use of virtual machines in a Pacemaker cluster is as a cluster resource, whether opaque oras a guest node. However, it is possible to run the full cluster stack on a virtual node instead.
This is commonly used to set up test environments; a single physical host (that does not participate in thecluster) runs two or more virtual machines, all running the full cluster stack. This can be used to simulatea larger cluster for testing purposes.
In a production environment, fencing becomes more complicated, especially if the underlying hosts run anyservices besides the clustered VMs. If the VMs are not guaranteed a minimum amount of host resources,CPU and I/O contention can cause timing issues for cluster components.
Another situation where this approach is sometimes used is when the cluster owner leases the VMs from aprovider and does not have direct access to the underlying host. The main concerns in this case are properfencing (usually via a custom resource agent that communicates with the provider’s APIs) and maintaininga static IP address between reboots, as well as resource contention issues.
Virtual Machines as Remote NodesVirtual machines may be configured following the process for remote nodes rather than guest nodes (i.e.,using an ocf:pacemaker:remote resource rather than letting the cluster manage the VM directly).
This is mainly useful in testing, to use a single physical host to simulate a larger cluster involving remotenodes. Pacemaker’s Cluster Test Suite (CTS) uses this approach to test remote node functionality.
Containers as Guest NodesContainers,1 and in particular Linux containers (LXC) and Docker, have become a popular method ofisolating services in a resource-efficient manner.
The preferred means of integrating containers into Pacemaker is as a cluster resource, whether opaque orusing Pacemaker’s bundle resource type.
However, it is possible to run pacemaker_remote inside a container, following the process for guestnodes. This is not recommended but can be useful, for example, in testing scenarios, to simulate a largenumber of guest nodes.
1 https://en.wikipedia.org/wiki/Operating-system-level_virtualization
26

Alternative Configurations
The configuration process is very similar to that described for guest nodes using virtual machines. Keydifferences:
• The underlying host must install the libvirt driver for the desired container technology — for example,the libvirt-daemon-lxc package to get the libvirt-lxc [http://libvirt.org/drvlxc.html] driver forLXC containers.
• Libvirt XML definitions must be generated for the containers. The pacemaker-cts package includesa script for this purpose, /usr/share/pacemaker/tests/cts/lxc_autogen.sh. Run itwith the --help option for details on how to use it. It is intended for testing purposes only, andhardcodes various parameters that would need to be set appropriately in real usage. Of course, you cancreate XML definitions manually, following the appropriate libvirt driver documentation.
• To share the authentication key, either share the host’s /etc/pacemaker directory with the container,or copy the key into the container’s filesystem.
• The VirtualDomain resource for a container will need force_stop="true" and an appropriatehypervisor option, for example hypervisor="lxc:///" for LXC containers.
27

Appendix A. Revision HistoryRevision HistoryRevision 1-0 Tue Mar 19 2013 DavidVossel<[email protected]>Import from Pages.appRevision 2-0 Tue May 13 2013 DavidVossel<[email protected]>Added Future Features SectionRevision 3-0 Fri Oct 18 2013 DavidVossel<[email protected]>Added Baremetal remote-node feature documentationRevision 4-0 Tue Aug 25 2015 KenGaillot<[email protected]>Targeted CentOS 7.1 and Pacemaker 1.1.12+, updated for current terminology and practiceRevision 5-0 Tue Dec 8 2015 KenGaillot<[email protected]>Updated for Pacemaker 1.1.14Revision 6-0 Tue May 3 2016 KenGaillot<[email protected]>Updated for Pacemaker 1.1.15Revision 7-0 Mon Oct 31 2016 KenGaillot<[email protected]>Updated for Pacemaker 1.1.16Revision 7-1 Fri Jan 12 2018 KenGaillot<[email protected]>Update banner for Pacemaker 2.0 and content for CentOS 7.4 with Pacemaker 1.1.16Revision 7-2 Mon Jan 29 2019 JanPokorný<[email protected]>Minor reformattingRevision 7-3 Tue Oct 15 2019 KenGaillot<[email protected]>Minor update for dynamic recheck interval
28

IndexCcluster node, 1, 1configuration, 7
Gguest node, 1, 1, 2, 2, 4, 4
Nnode
cluster node, 1guest node, 1, 2, 4remote node, 1, 3
Ppacemaker_remote, 1
Rremote node, 1, 1, 3, 3
29