Embed Size (px)
Citation preview
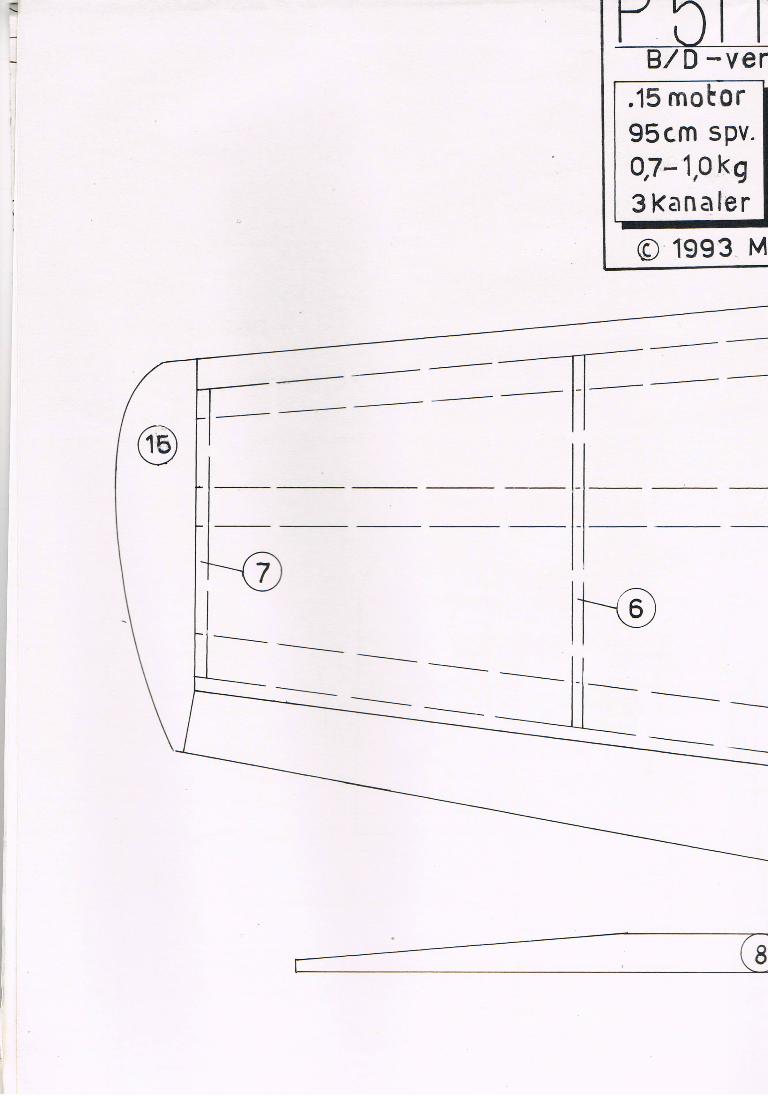
P51B/D Mustang
Created by: Martin Elmberg (C) 1993 and 2013
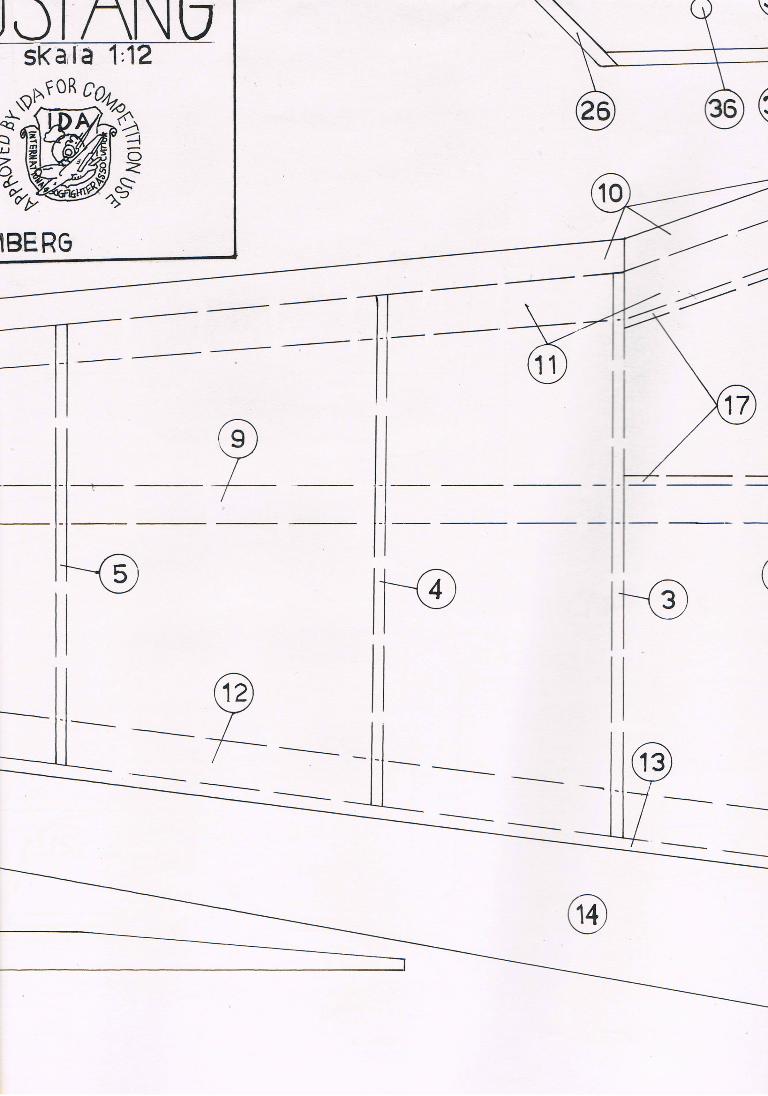
Scale 1/12th
Made for 1/12th scale combat - Aircombat
Engine: .15 IC or 200-400W electro
3-4 servos, 3 channel (aileron, elevator, engine)
You have downloaded this plan+instructions+articles as a kind of freeware. To use it, you must accept the following:
You may:
* Build how many models according to the shipped plan as you wish! :)
* Copy the plan and give it to other pilots.
* Copy the complete Mustang -file kit, and distribute to others.
* Reproduce the plan in any sort of magazine, as long as you don't take money for it. If you publish the plan+articles, you
must mention who originally wrote them, and also send me a copy of the magazine, whatever language it is published in.
* You may translate the building-instructions+articles into another language.
You may not:
* Alter the plan, instructions or articles contained in this kit.
* Publish or sell anything contained in this package, for money.
* Make kits of this design, and sell.
November 1993 (Updated February 2013)
Martin Elmberg
Bergmov. 6A
146 37 Tullinge
Sweden

Instructions P51B/D Mustang 2002
You can choose between either the B- or D-version
of the Mustang. The D-version is the most famous,
but it is at the same time the most difficult to make
a transparent canopy.
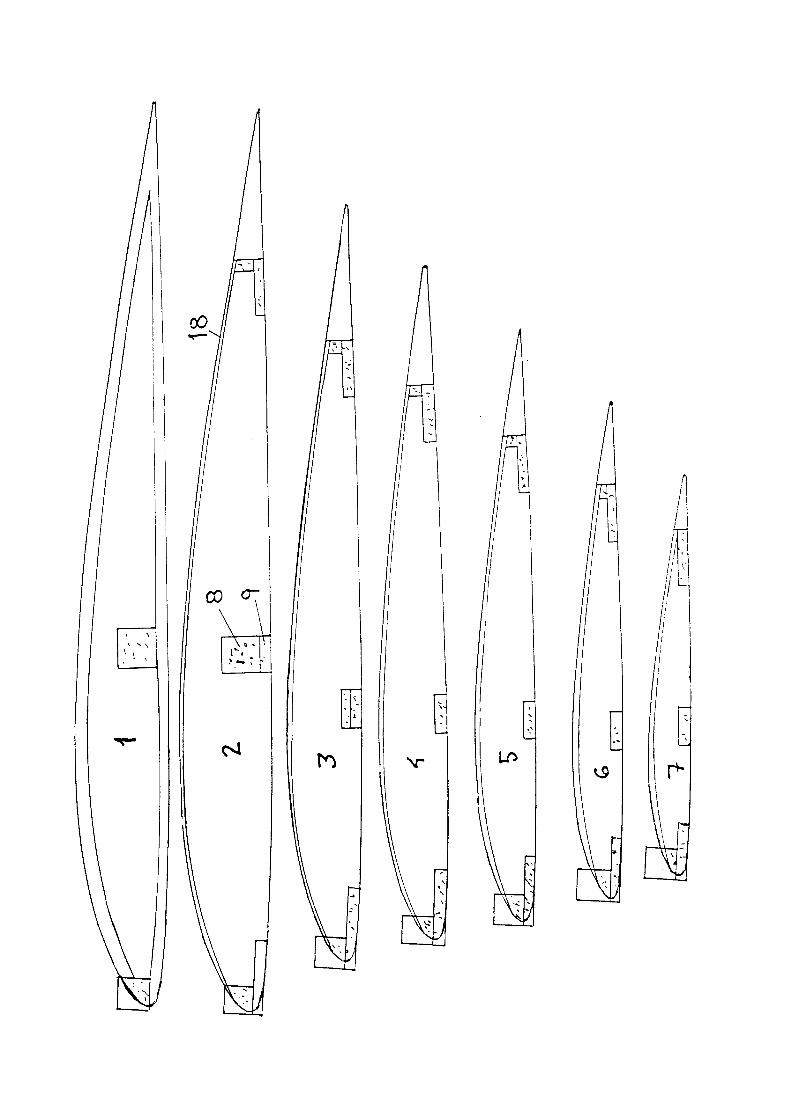
The wing:
Glue four 1,5mm balsa sheets together so that you
get two single sheets. You do this easiest by
attaching tape across the two sheets where you are
to place glue. Attach glue and lay the sheets on a
flat surface with some pressure on it, and let it dry.
Place 9 on your building surface, with needles. Glue
2-7 to 9.
Glue 10 and 13 to the wing.
Do the same with the other winghalf. Sand 10 and
13, so that they fit with the profile of the airfoil.
Attach the bottom sheeting of the wing.
Place something under the rear of the wing tip, so
that it is raised 5mm. Now attach the top sheeting.
Connect the two wing halves with 8. You get V-
angle in wing due to the shape of 8. Take care the
wing is not warped.
Glue 10 to the middle of the wing.
Glue 1. Glue 15. Fit the aileron-linkage into place.
Cover the middle of the wing with 19.
Sand the wing.
Cut out 14 and sand into shape. Make slots for
hinges in 13 and 14.
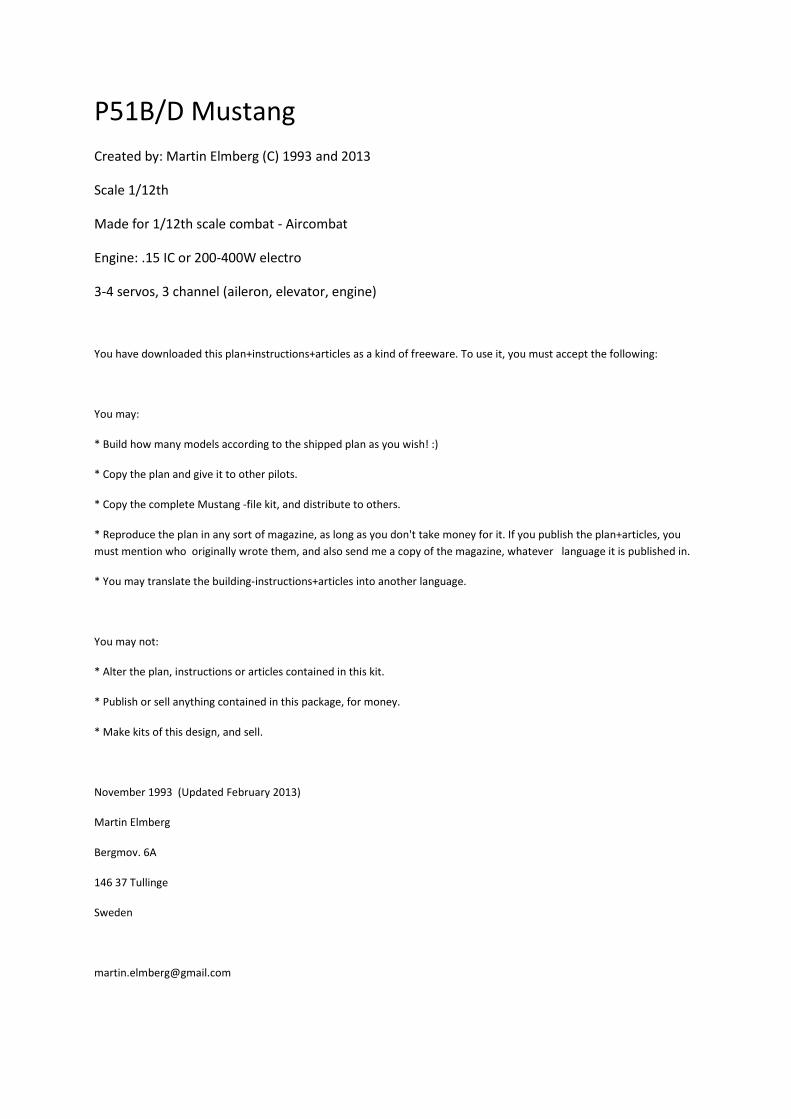
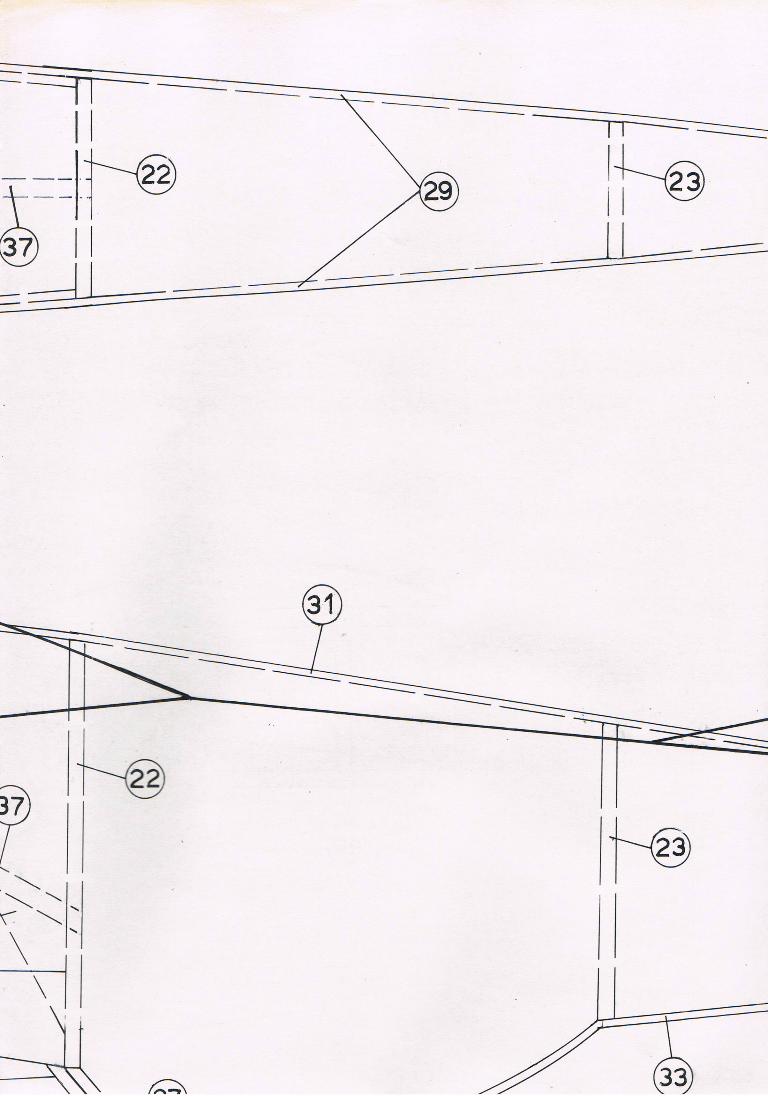
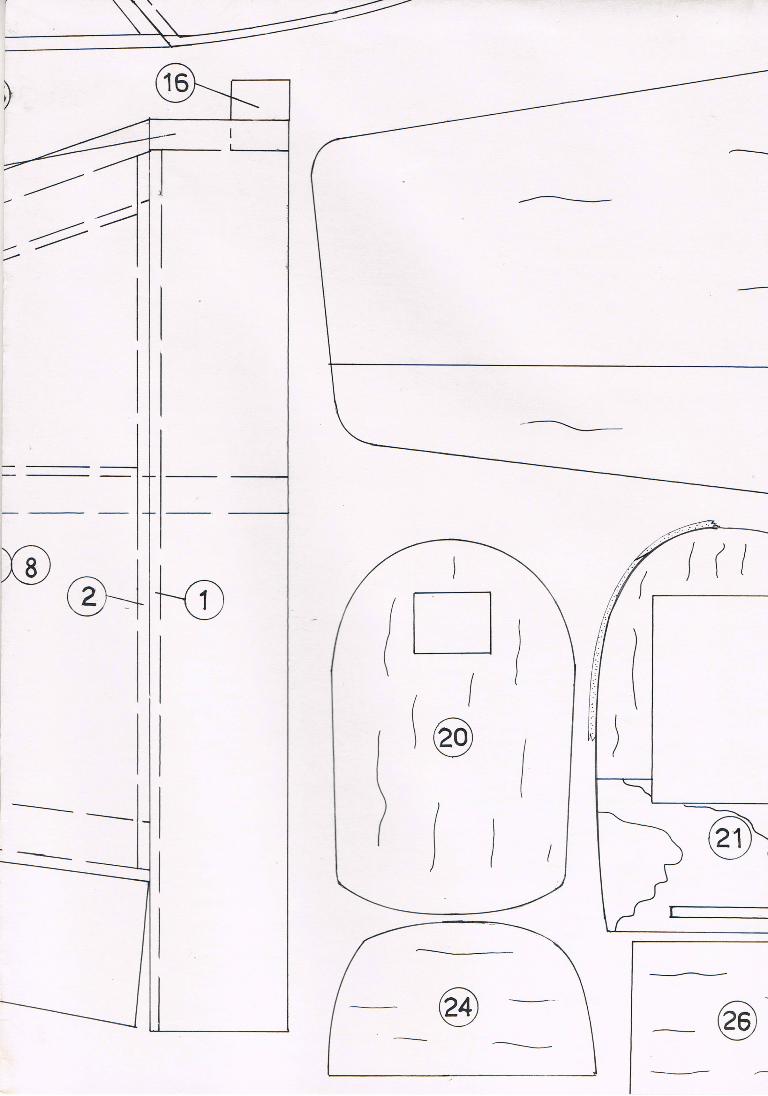
The fuselage:
Glue four 2mm balsa sheets to form two bigger
sheets.
Glue plywood reinforcements to 20.
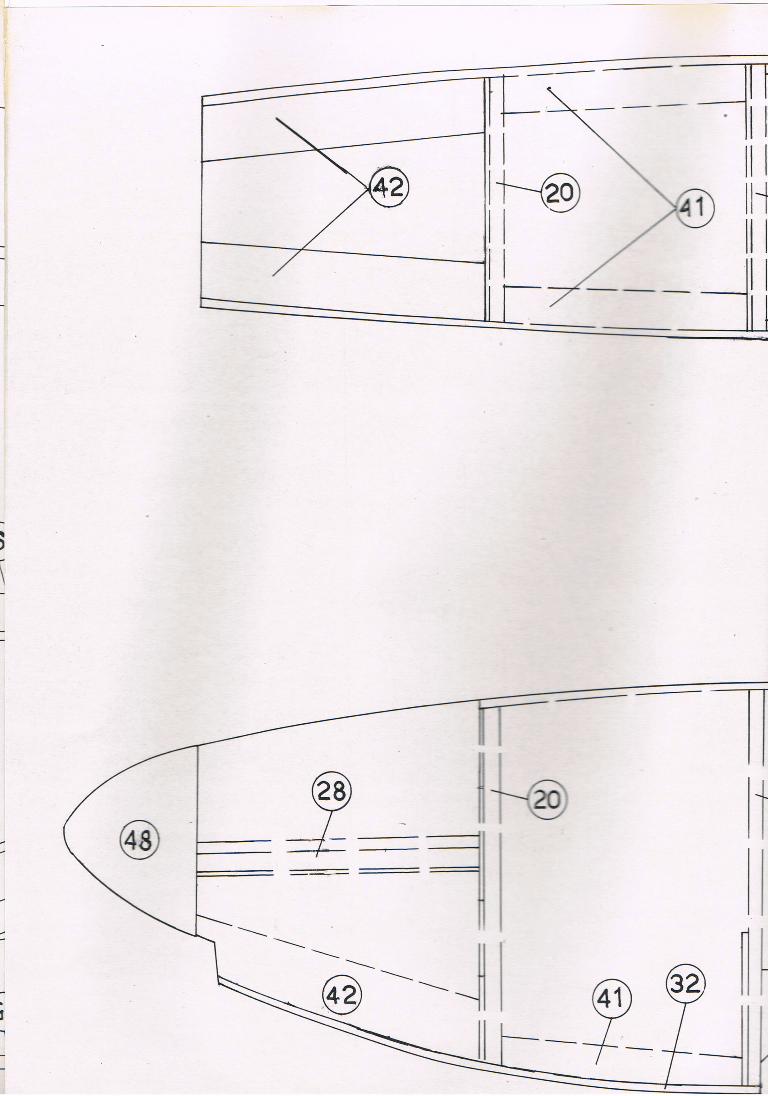
If you are building the D-version you should use the
smaller versions of 23 and 24.
Cut out 29 out of the two big 2mm sheets. Sand the
rear part of 29, to get a surface to glue.
Glue 21, 22, and 23 to one of the two 29.
Glue together the rear parts of the two 29s, and glue
the second 29 to 21, 22, and 23. Be aware of getting
it all straight! You might use masking tape to hold it
all together while the glue dries.
Prepare 20 for attachment of 28 (or attach 28
permanently to 20).
Attach 20, preferably with epoxy. Be aware of
angles! The engine should be pointed 2-3 degrees
down and to the right.
If you are building the B-version: Attach 24 and 25.
Install push rods to elevator and engine.
Sand the upper parts of the two 29s, so that the
upper covering fits. Note 30 and 31 are to overlap
29 a bit.
Attach 27 and 39 to the 29s.
Attach 33 with fibres aligned across the fuselage
length.
When 30 and 31 has dried, you should sand these
until they fit in shape with the 29s.
If you build the B-version: Attach 40 to the
fuselage. Cut out the rear "peepholes" with a sharp
knife.
If you build the D-version: Take a scrap bit of 3mm
balsa and attach it to cover the hole in the cockpit.
Attach 38 to the fuselage sides. Drill holes for 37.
Attach 37.
Scope
When the fuselage is ready, you can start with the
scope. Attach 27 so that the wing fits to the
fuselage.
Glue 34 to the wing. Glue 26.
Finally you should cover your wing with fabric
covering.
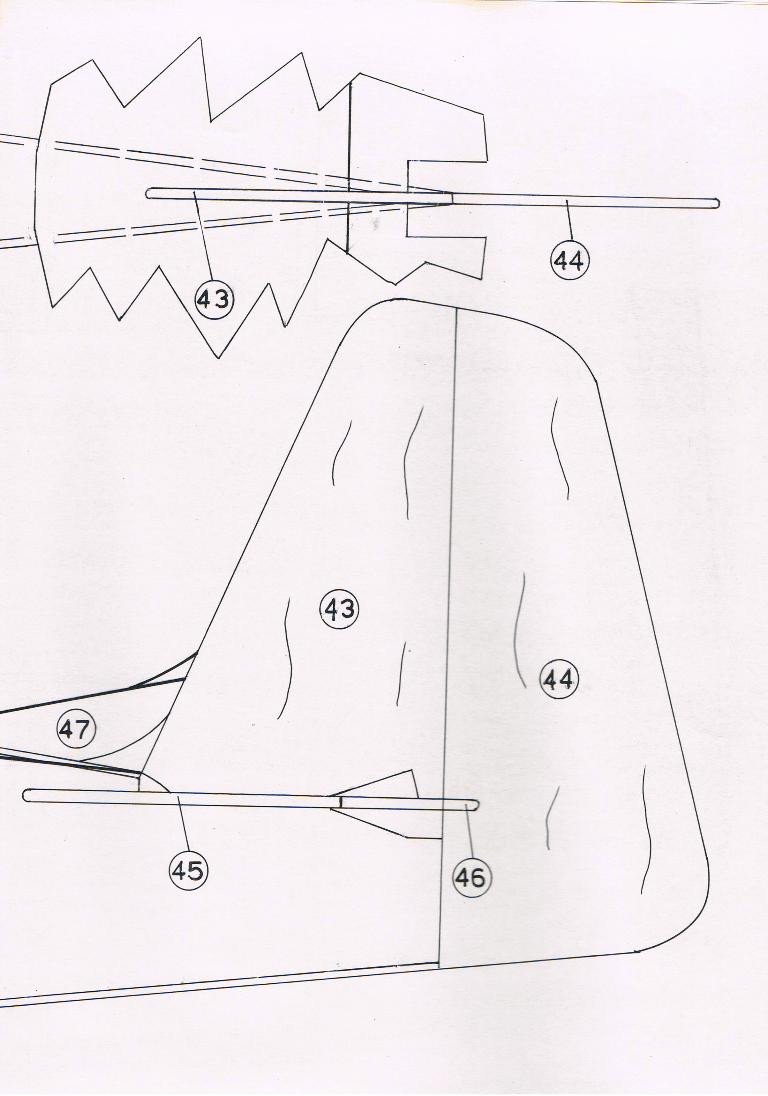
Stabiliser and fin:
Install hinges in 45 and 46.
Glue 43 and 44 together.
Attach 45 to the fuselage. Be careful to attach 45 in
0 degree angle.
Before you attach 43 and 44 to the fuselage, 46
should be in place, and covered if you are planning
to cover your model with film/fabric.
Attach 43 and 44 to the fuselage. Be careful with
angles!
Attach the type of 47 you like. The bigger type was
used on later D-versions.
Canopy and enginehood:
B-version: Attach a front 25. Cover hood with
transparent plastic.
D-version and enginehood: There are a lot of ways
to make a "bubble"-canopy and a enginehood. You
can make it yourself by warming up plastics and
push it down over a plug. You can build one out of
balsa, foam or by means of papier-maché. You can
also try to find a ready-made hood, and try to adjust
it. The choice is yours...
Installation:
Adjust wing so that it fits well to the fuselage. The
alpha on the wing should be about 1-2 degrees.
Place the batteries under or side by side with the
fuel tank, to get the CG correct.
Check out where CG is. This is important! CG
might be a little rearward compared to what is
marked out on the plan, but not very much. A
dogfighter with CG too far aft usually only flies
once!
Covering:
The design demands an outer covering of fabric.
You might use fabric which is already coloured in
olive drab or aluminium, to save weight. This is
important - you should try to avoid building up
weight in finishing your fighter. Decorate by your

own heart. There are a lot of alternative paintings
on this bird!
Flight:
Be aware of that this is a fighter! If you are not
experienced as a pilot, you should take help the first
couple of flights. It might be good if there is a little
head-wind on the premiere flight. The Mustang
might need this during the first few seconds of
flying. If you have the opportunity, you should try
to fly the first flight over higher grass or snow. In
this way you minimise damage in smaller
escapades.
Use a helper to launch your aircraft. He should
throw the aircraft a little bit upwards. Hopefully
your model should fly in straight level, but if it does
not you should be alert and correct its level. Be
aware of the throttle, when you have come to some
height. If you are not used to fast aircraft, you
should take it a little easy. It is easy to build up
speed, and this might become a chock!
Be sure to keep up speed in landing. Otherwise it's
likely the aircraft will stall and crash. In this case,
it's preferable to be over high grass!
Materials:
4pcs 1,5x100x1000mm balsa
5pcs 2x100x1000mm balsa
3pcs 3x100x1000mm balsa
1pcs 4x100x1000mm balsa
1pcs 10x100x1000mm balsa
(1pcs 3x5x1000mm balsa)
(1pcs 3x10x1000mm balsa)
1pcs 8x8x1000mm balsa
1pcs 10x10x1000mm balsa
(1pcs 10x40x1000mm wedgedbalsa)
1pcs 1,5x100x1000mm plywood
(1pcs 3x100x1000mm plywood)
1pcs 5mm rod
Materials within paranthesis can be made out of
other materials - 3mm plywood can be made out
2x1,5mm plywood, etc.
Numbered parts:
(Some numbers are missing, this is correct)
1. 3mm balsa
2. 3mm balsa
3. 3mm balsa
4. 3mm balsa
5. 3mm balsa
6. 3mm balsa
7. 3mm balsa
8. 10x10 balsa
9. 3x10 balsa (3mm balsa)
10. 8x8 balsa
13. 3x5 balsa (3mm balsa)
14. 10x40 wedged (10mm balsa)
15. 10mm balsa
18. 1,5mm balsa
19. 3mm balsa
20. 1,5mm plywood+4mm balsa+1,5mm plywood
21. 4mm balsa
22. 4mm balsa
23. 4mm balsa
24. 4mm balsa
25. 4mm balsa
26. 3mm balsa
27. 3mm balsa
28. Nylon engine mount
29. 2mm balsa
30. 2mm balsa
31. 2mm balsa
32. 10mm balsa
33. 2mm balsa
34. 3mm balsa
35. 3mm balsa
37. 5mm rod
38. 1,5mm plywood
39. 3mm balsa
40. 2mm balsa
43. 3mm balsa
44. 3mm balsa
45. 3mm balsa
46. 3mm balsa
47. 3mm balsa
48. 50-60mm dia spinner (Dependant on fuselage
width)
49. 100cc tank
Good luck and good hunting!
r 1 i