Embed Size (px)
Citation preview

F o r d F l e e t C a r e P r o g r a m
F o r d M o t o r C o m p a n y
E m a i l : f f c a d m i n @ f o r d . c o m
P h o n e : 1 - 8 0 0 - 3 6 7 - 3 2 2 1
F a x : 1 - 3 1 3 - 3 9 0 - 3 5 5 5 o r 1 - 3 1 3 - 3 9 0 - 7 2 2 7
3 / 1 / 2 0 1 7
OWS Instructions for the
Ford Fleet Care Program
V1.1
The information contained in this program manual
supports the Dealers Service and Wholesale Parts
Department by providing information about how to
submit, change and appeal Ford Fleet Care claims in
the OWS (One Warranty Solution) System.
V e r s i o n 1 . 1

Table of Contents
Introduction to the Ford Fleet Care Program 3
Ford Fleet Care Service Billing Program – Customer Benefits 3 Ford Fleet Care Parts Billing – Customer Benefits 3 Ford Fleet Care – Dealership Benefits 3 Getting Started – Enrollment 4 Account Setup and VIN Maintenance 5 Monthly Billing 5
Service Advisor Information - Identifying a Ford Fleet Care Vehicle 6
Parts Department Guide - Identifying a Ford Fleet Care Parts Billing Customer 8 Introduction to OWS (One Warranty Solution) 9 OWS Homepage/ Main Web-Portal Page 10
Getting Started 11 Repair Order Creation Screen 12 Claim Entry Screen 13 Repair Information 14 Comments Information Supporting OSP, OSL, Misc. and Other 15 Parts Information 15 Labor Information 16 Miscellaneous Information 16 Repair Line Subtotal 16 Action Buttons 17
Ford Fleet Care Program Claim Type 18 Starting a Claim Entry 19
Claim Entry Information 19 Claim File and Claim Unit Numbers 20 Editing Claim Information 20 Save, Print, PreValidate and Submit a Claim 21
Submitting a Claim for a Ford, Lincoln and Mercury Vehicle Maintenance Service 22 Diagnostics Test without a Repair 25 Customer Paid Repair 28 Customer Paid Repair with Non-Ford Parts 31 Customer Paid Repair for Tires (DOT Code Entry) 34 State Emissions Test 37 Customer Paid Body Shop Repair 40 Ford Protect Deductible 43 Courtesy Delivery Inspection on Ford Motor Company Vehicles 45

Submitting a Claim for a Non-Ford Vehicle Maintenance Service 49 Diagnostics Test without a Repair 52 Customer Paid Repair 55 Customer Paid Repair for Tires 58 State Emissions Test 61
Submitting a Claim for a Part Purchase 64 Appealing the Claim
Change Price of Part and/or Labor and/or Misc. 67 Add Part and/or Labor and/or Misc. 72
Parts Return 77 Core Return 82
Index 87 Service Advisor Guide - Penske Vehicles enrolled in Ford Fleet Care 88 Parts Department Guide - National Fleet Parts Pricing Program 90 HERZOG DOT Inspection Process 94 Frequently Asked Questions 95 Claim Entry Tips and Reminders 96 Helpful Hints for Ford Fleet Care Claim Entry 97

Introduction to the Ford Fleet Care Program and its background
The Ford Fleet Care program is a comprehensive consolidated billing program for fleet customers. The Service Billing Program provides a fleet customer a consolidated monthly bill and enables a single payment for all maintenance and repair services. Ford Protect Extended Service Plan covered repair detail is also provided to the customer. Enrolled vehicles may use any Ford or Lincoln dealership and Quick Lane Tire & Auto Center in the United States or Canada for service. The Parts Billing Program extends consolidated billing convenience to include the purchase of Ford or Motorcraft branded parts direct from any Ford or Lincoln dealership in the United States or Canada.
Ford Fleet Care Service Billing Program – Customer Benefits
• No enrollment fee • No administrative fee • No monthly or per vehicle fees • No credit card or cash for customer payment • No membership card needed • Non-Ford vehicle eligibility – All competitive-make vehicles eligible for enrollment • Pre-set Spending Limit – Repair visits exceeding the pre-set limit require fleet approval prior to start of
repair work (excluding warranty and Ford Protect Extended Service Plan deductibles) • Consolidated Billing – One bill for services performed by USA and Canada approved service providers • National Programs – Enhanced Roadside Assistance and Glass repair/replacement • My Fleet Care – Online account management tool • Website – No-charge business reports and program information available • Electronic billing and EFT payment available
Ford Fleet Care Parts Billing – Customer Benefits
• No enrollment fee • No administrative fee • No monthly fee • No credit card or cash for customer payment • Purchase Control - All purchases require customer approval • Consolidated Billing – One bill for parts purchased from USA and Canada approved service providers • My Fleet Care – Online account management tool • Website – No-charge business reports and program information available • Electronic billing and EFT payment available
Ford Fleet Care – Dealership Benefits
• No merchant or transaction fees • Payment to Dealer Parts Statement • Parts billed through Ford Fleet Care eligible for WINS • Online reports available at www.fleetcare.ford.com • Program and claim entry assistance available from Ford Fleet Program Headquarters at 1-800-367-3221.
Table of Contents

Getting Started - Enrollment
All customers must complete the Ford Fleet Care Credit Application prior to enrollment. The application can be downloaded and printed online from the Ford Fleet Care website (www.Fleetcare.ford.com). Before submitting a credit application to Ford Fleet Program Headquarters, please ensure that the provisions has been reviewed with the customer. This is located on the back of the Credit Application for your convenience.
Incomplete, incorrect or obsolete applications cannot be processed and will be returned to the customer or dealership for correction or additional information. When completing the Ford Fleet Care Credit Application, remember to:
• Use the most current application (found online at www.fleetcare.ford.com)
• Print or type all information legibly
• Fully complete the Repair Service and Parts Authorization section
• Include tax exemption forms (if applicable)
• Identify and include any additional forms (corporate vendor, state requirements)
• Indicate payment method
All applicants are subject to credit verification through a National Credit Bureau prior to acceptance. Please inform the customer of the credit evaluation prior to submitting the credit application for review. Ford Fleet Program Headquarters will provide notification of application approval or denial directly to the customer by mail. The enrolling dealership will also be notified of customer acceptance or denial. Approved applicants will receive a welcome packet including program information and answers to frequently asked questions. Approved applicants for the Ford Fleet Care parts billing program will receive a Ford Fleet Care Parts Billing Card. The billing account number will be preprinted on the card, along with fleet customer contact information. This will also be sent along with the customer welcome packet upon enrollment.
Table of Contents
Submit the Credit Application to Ford Fleet Program Headquarters: Fax to 1-313-390-3555 or 1-313-390-7227 Email [email protected]
Mail to Ford Fleet Program Headquarters, 19855 W. Outer Drive, GPE #500, Dearborn, MI 48124

Account Setup and VIN Maintenance
After a fleet customer has been approved for enrollment, a list of vehicles must be provided to Ford Fleet Program Headquarters in order to activate the customer account. VIN listings should be sent in electronically – preferably in a Microsoft Excel format to expedite enrollment.
Fleet customers are responsible for notifying Ford Fleet Care Headquarters when a vehicle is taken out of service. Always verify through the OASIS system that a vehicle is currently enrolled in the program before performing service (see the Service Advisor Information section for additional details). Fleet customers will be responsible for charges incurred on vehicles not removed from the program.
For account maintenance or questions, such as:
• Vehicle additions and removal
• Address and contact information changes
• Changing the pre-set repair authorization limit
• Billing disputes or corrections
Monthly Billing
For each billing period, customers will receive a consolidated bill of all repair services performed or parts purchased from authorized service providers. The billing packet will include a statement of account, an invoice for the billing period, summary and detail of charges.
Table of Contents
Dealership personnel and fleet customers can contact Ford Fleet Program Headquarters at 1-800-367-3221.

Service Advisor Information - Identifying a Ford Fleet Care Vehicle
A vehicle can be identified by the OASIS system.
• Always verify through the OASIS system that the vehicle is currently enrolled in the program. This should be done prior to writing the repair order. Remember to write down the Fleet approval amount and to contact the customer for approval as needed.
Table of Contents
Ford Protect ESP Contract Coverage
Information
FORD FLEET CARE Enrollment Information
Fleet Approval Amount and Fleet Customer Contact
Information
IMPORTANT! If there is a Ford Protect Extended Service Plan (Ford Protect ESP) registered to the vehicle, verify repair coverage. If the repair is covered by the Ford Protect ESP plan, make sure to write the repair as a Ford
Protect ESP covered repair – NOT as a customer paid repair. Incorrectly submitting a covered claim will result in a charge to the fleet customer and potential chargeback of the claim to the submitting dealer.
Important Tax Note:
Be sure to charge applicable tax as required on a retail repair unless the account is tax exempt as
noted in OASIS or advised by the customer

Service Advisor Information - Identifying a Ford Fleet Care Vehicle (cont.)
Prepare Estimate and Obtain Approval
If the estimated Total Customer Paid Repair amount exceeds the Fleet approval amount displayed in OASIS:
Contact the Fleet Company Representative (displayed in OASIS) for approval prior to performing the repair. If
the estimate changes, re-contact the Fleet Administrator for approval for the added costs.
NOTE: Repairs performed without the Fleet Company Representative approval or exceed the authorized amount the claim will be charged back.
If the estimated Total Customer Paid Repair amount does not exceed the fleet prior approval limit:
Do not contact the Fleet Administrator – proceed with the repair up to the dollar limit displayed in OASIS. NOTE: Ford Protect Extended Service Plan Deductibles do not require an authorization code.
IMPORTANT: Drivers must sign and be provided with a copy of the Retail Repair Order indicating the amount the fleet will be billed.
Submit for Payment
Submit claim in OWS with either Sub Code:
• QFC (Ford, Lincoln, Mercury Vehicles) • QFCC (Competitive Make Vehicles and trailers)
Detailed claiming instructions available in the Dealer Program Manual located at www.fleetcare.ford.com For submitted claims returned unpaid, contact Fleet Program Headquarters at 1-800-367-3221 for assistance.
Charging Tax
Tax should be billed as required on a retail repair, unless the customer is tax exempt as advised by the customer or noted on OASIS. If a customer is tax exempt, the tax exemption number should be noted on the repair write-up. Repairs submitted through OWS for payment without a tax entry will be returned to the dealership.
NOTE: Tax should be billed as required on a retail repair, unless the fleet account is tax exempt as noted on OASIS, or as advised by the customer.
Table of Contents

Parts Department Guide – Identifying Ford Fleet Care Wholesale Parts Billing Customer
All participants of the Ford Fleet Care Parts Billing program are issued a membership card. To ensure the customer is still an active member of the Ford Fleet Care Parts Billing program, please verify the status of billing customer privileges on the Ford Fleet Care website at www.fleetcare.ford.com and select the NFPP/Parts Billing Tab.
Purchase Order Write-Up
Preparing a parts purchase order write-up is a simple three-step process:
Step One - Verify Consolidated Billing Account Status • Access the Ford Fleet Care website at: www.fleetcare.ford.com • Select the tab labeled: "NFPP/Parts Billing" • Select the link labeled: "Consolidated Billing Account Enrolled Fleets" • View the spreadsheet to verify if the customer is still an active participant
IMPORTANT! If the fleet account is not listed, the customer is not eligible for Ford Fleet Care Parts Billing Program and payment arrangements for the parts purchase should be made directly with the customer.
Step Two - Obtain Customer Approval • All parts purchased must be approved by the fleet account • Contact the Fleet Administrator at the telephone number located on the back of the card with the
• Obtain a purchase order for the full amount of the transaction
Step Three - Bill Parts Purchase using OWS • Obtain the Customer’s 11 Digit Consolidated Billing Account Number • Refer to page 64 for claiming instructions
Questions: Contact Ford Fleet Program Headquarters at 1-800-367-3221 or by email at: [email protected]
Table of Contents
IMPORTANT! Tax should be billed as required on a wholesale part sale, unless the customer is tax exempt as advised by the customer. If the customer is tax exempt, the tax exemption number
should be noted on the purchase order write-up. Claims submitted through OWS

Introduction to OWS
The information contained in this user guide is to support the Dealers by providing information about how to submit Ford Fleet Care claims (claim type 61) in the ONE Warranty Solution (OWS) system. OWS provides a single interface to manage many aspects dealing with submitting, tracking and managing the claiming process including:
• Initial Preparation and Submission of Claims • Tracking and Updating Claims when further action is required • Appealing a Claim decision • Tracking and Managing the Return of Parts • Accounting (credits, debits and account reconciliation) • Dealership Management System (DMS) connectivity with OWS
OWS is the Ford Motor Company warranty claim processing system. Integrate seamlessly with OWS online version to submit claims. This user guide does NOT cover:
• DMS operation
If a dealer uses a DMS to electronically submit claims to Ford, this guide does not address operation of the DMS (including DMS screens which are called “OWS” or “One Warranty Solutions”). There are more than 150 DMS providers to Ford globally. Each DMS has a unique screen display. Please contact your DMS if support is required.
• Warranty Policies or other published policies
Please refer to the Warranty & Policy Manual for your specific country, along with other coverage and policy programs.
DMS Submission Due to the variety of Dealer Service Providers (DSPs) and the various software platforms they provide, it is not possible for Ford to provide detailed instructions as to the usage of these dealership “in-house” software systems. It is recommended that you refer to the documentation provided by your DSP and/or contact them for assistance with your software.
Table of Contents
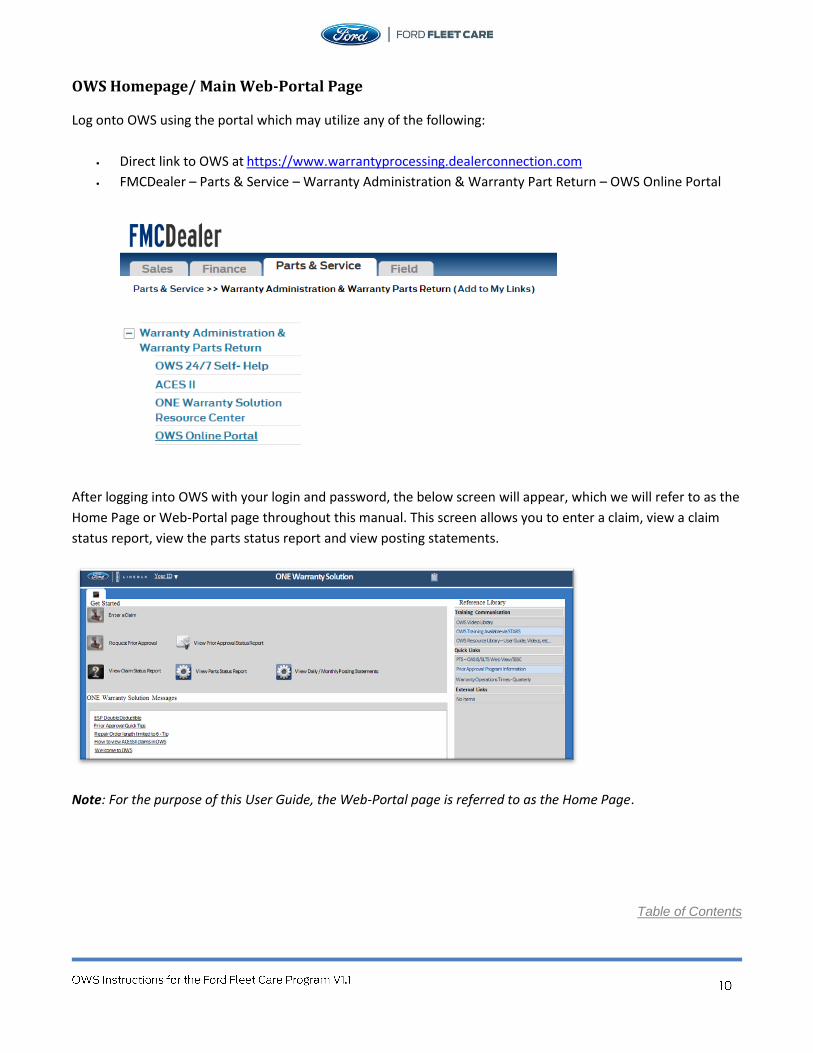
OWS Homepage/ Main Web-Portal Page
Log onto OWS using the portal which may utilize any of the following:
• Direct link to OWS at https://www.warrantyprocessing.dealerconnection.com
• FMCDealer – Parts & Service – Warranty Administration & Warranty Part Return – OWS Online Portal
After logging into OWS with your login and password, the below screen will appear, which we will refer to as the
Home Page or Web-Portal page throughout this manual. This screen allows you to enter a claim, view a claim
status report, view the parts status report and view posting statements.
Note: For the purpose of this User Guide, the Web-Portal page is referred to as the Home Page.
Table of Contents

OWS Homepage/ Main Web-Portal Page (cont.)
Getting Started Let’s take a look at the screens that will be used to submit a Ford Fleet Care Program claim. Below is a close up view of the Home page. Note that after you log in your ID will show on the top bar to the right of the Ford and Lincoln logo. Click the “Enter a Claim” link to start the claim process.
Table of Contents

Repair Order Creation Screen Once you click the “Enter a Claim” on the Home Page, the “Repair Order Creation” screen will appear. All fields with an asterisk are required to create the claim, however the more information entered, the more detailed the claim will be. Once you have entered the information on this screen, click the “Create” button to start creating the claim. Note: Your Dealership Name and Dealer Code will be displayed in the appropriate space where the arrows are pointing in the below image.
VIN Vehicle Identification Number or Part Sale Number.
Service Advisor ID A unique 9 digit number for the Service Advisor.
Repair Order Number A unique number given for each Repair Order up to 10 digits.
Repair Order Open Date The date that the Repair Order was opened.
Odometer at Repair Order Open
The odometer reading when the Repair Order was opened. For a QFCP (Parts only purchase) claim, the mileage is 20.
Special Use Vehicle Description
Description of the special vehicle like dump truck (may be specified by customer.
Engine Operating Hours at Repair Order Open
Mostly diesel utility vehicles engine operating hours.
License Location The location of the repair state.
Table of Contents

Claim Entry Screen
Information will be displayed in the upper section from the information that was inputted onto the previous screen called the “Repair Order Creation” screen. This screen will need more information to complete the claim. This image shows the screen in its entirety. We will look at the different sections in further detail next.
Table of Contents
Causal PartNum

Repair Information
Repair Line Number The item entered into the field is a number, letter or alphanumeric character associated with each unique repair on the repair order.
Claim Type A two digit code identifies the claim repair type or category used to process a claim, for Ford Fleet Care use 61.
Sub-Codes Use QFC for service on a Ford vehicle, QFCC for service on a non-Ford vehicle or trailer or QFCP for Wholesale Parts Purchase.
Repair Line Completion Date The date can be typed using this format “mm/dd/yyyy” or just click the calendar icon next to the date field to select a date.
Odometer Reading at Repair Completion
The odometer reading at the time of the repair line completion. For a QFCP (Parts only purchase) claim, the mileage is 20.
Customer Concern Codes Use customer concern code A99 only.
Approval Code
Enter each Approval code for each item needing an Approval code. If other approval codes are needed, click the “+” icon. Mostly used for dealer self-approval codes for time or mileage issues. Not used for Fleet customer Purchase Order numbers.
Pre-Defined Repair Code A code that defines the authorized repair bill of material as identified in service publication. The code is entered by the dealer and will auto populate all individual parts, labor and miscellaneous amounts for that claim.
Condition Codes Use condition code “82” only .
Engine Operating Hours at Repair Completion
Reading of engine operating hours if present in vehicle (e.g. diesel, industrial) at Repair Line close.
Manual Review Required Indicator
Dealer request that an assessor review the claim, prior to final disposition.
Dealer Participation Special pricing or discount is entered here.
License Num The license plate number.
Driver Name Name of the Driver or ID number for the Fleet .
Fleet Company Name Name of the Fleet Company.
Fleet Approved Amount Provide the dollar amount of the Purchase Order (PO) value approved by the Fleet Administrator.
Driver Card ID If available.
Fleet Purchase Order Num This is required on QFC and QFCC claims that exceed the Fleet Approval Amount For QFCP claims, a call to the Fleet Administrator is required.
Table of Contents

Comments Information Supporting OSP, OSL, Misc. and Other
Technician Comments are mandatory for getting claims paid and having detail information about what parts
and/or labor are used including the cost. Here are technician comments that are required to get a claim through
the approval process quicker and examples of how they should be spelled out:
Outside Purchased Part (OSP) is used for any part that is not a Ford or Motor craft part
OSP for $$$ is for part description (OSP FOR $50.00 IS FOR SPARK PLUGS)
Outside Labor (OSL) is used for any labor outside the dealership
OSL for $$$ is for labor description (OSL FOR $150 IS FOR GLASS REPAIR BY OUTSIDE VENDOR
NAME)
Misc. for $$$ is for item description ( MISC. FOR $10.00 IS FOR TIRE DISPOSAL)
Other for $$$ for item description (OTHER FOR $100 IS FOR SHOP SUPPLIES)
Misc. and Other include environmental fees, shop supplies, special disposal fees (tires/batteries), tire taxes, etc.
Note: If you get a claim returned, read the entire message from the Claim Specialist and return the claim with the needed
information. If the information is incomplete, the Claim Specialist will return the claim until all the information has been given.
Parts Information
Ford/Motorcraft/Omnicraft part numbers must be typed in without spaces or hyphens
Up to 200 additional lines can be added by clicking the “+” icon
Pseudo Part Numbers are listed within the search icon if needed can be used in place of Ford, Motorcraft or Omnicraft recognized part numbers. However, an explanation will be required in the Technicians Comments to explain what is being entered.
When specialty part is required from an outside source, use labor code OSP, add the Invoice Number,
the amount being claimed and explain in the Technicians Comments section.
Note: OWS will NOT automatically price the claim.
Table of Contents
Customer Comment field has a limit of 2,000 characters. Technician Comments field has a limit of 2,000 characters. This is a mandatory field for the Ford Fleet Care Program. Note: The detail within the Technical Comments section is
provided to the Fleet Customer when billed.
Causal PartNum

Labor Information
• Labor code for Ford Fleet Care is L001. Note the code is the letter L followed by 2 zeros and
the then number 1. All requested labor should be totaled and entered on this line.
• Additional lines can be added by clicking the “+” icon.
• When specialty labor is required from an outside source, use labor code OSL, add the Invoice
Number, the amount being claimed and explain in the Technicians Comments section.
Miscellaneous Information
• Additional lines can be added by clicking the “+” icon
• Click on the search icon to display ALL miscellaneous codes
Note: Information listed under Miscellaneous Information section must have a Technician note describing the amount and what part or labor was used. An example is “Misc. for $$$$ is for tire disposal fee”.
Repair Line Subtotal
• The Repair Line Subtotal section automatically displays the sub totals for Parts, Labor, and
Miscellaneous as well as any previously noted Customer/Dealer Participation.
• The Subtotal section will also apply the appropriate Tax and any needed deductions.
• This section gives the user a view of the financial impact of the claim to be submitted once
PreValidation has been run.
Table of Contents
All QFC, QFCC and QFCP claims require a tax line entry even if there is no tax being charged. Enter 0.00 if the Fleet is tax exempt.

Action Buttons
• Next Repair: Triggers PreValidation of current Repair Line and allows access to the next
Repair Line
• PreValidate: Allows OWS to instantly check a claim for most common exceptions
before it is submitted. Make corrections as needed and pre-validate again until no
exceptions appear.
• Submit: Allows the claim to be submitted if no critical exceptions are discovered.
• Cancel RL: Allows the user to cancel the displayed repair line prior to submission.
• Cancel RO: Allows the user to cancel an entire Repair Order.
Note: Selecting Submit triggers all applicable rules needed for the claim to be submitted to Ford. Any exceptions will appear in the top left area of the claim and will need to be corrected before the claim can be submitted.
If no exceptions are found, the claim will display a Green Check Mark with a successful submission note above the Repair Information section of the claim.
Table of Contents

Ford Fleet Care Program Claim Type The chart below describes the Ford Fleet Care Program Claim Type and show examples of how Sub Codes relate to Claim
Type. New Sub Codes may be added based on program needs and therefore are subject to change.
Sub Code/Program Code Explanation QFC, QFCC and QFCP are the 3 codes used for Ford Fleet Care Program.
• QFC is used to claim customer paid maintenance/repairs services for Ford/Lincoln/Mercury vehicles.
• QFCC is use used to claim customer paid maintenance/repair services for non-Ford vehicles.
• QFCP is used for parts purchased over the counter.
Table of Contents

Starting a Claim Entry
The Claim Entry process begins with selecting “Enter a Claim” on the OWS homepage which will take you to the Repair
Order creation page.
Claim Entry Information A Repair Order (RO) is the form which all repairs for a single repair visit are recorded or linked. A repair visit may have one or several repair lines and documents a repair visit.
• An RO is created by entering the RO Number (up to 10 digits) and entering an RO Open Date (as identified by the Red *). Once the RO is saved, these fields cannot be edited.
The following fields are commonly required and are available to input when creating the RO. • VIN - Vehicle Information Number • Service Advisor ID (STARS ID or 9 digit number) • Odometer
• Special Use Vehicle Description • Engine Operating Hours at Repair Order Open • License Location
Click the “Create” once the RO information is inputted at the bottom of this section.
Table of Contents

Claim File and Claim Unit Numbers
The Claim File and Unit Number is a filing tool within the OWS system and are not searchable or required by the Dealer.
• OWS Online Claim - Claim File and Claim Unit numbers are automatically assigned by OWS when a Claim is
created
• DMS submitted Claim - Claim File and Claim Unit numbers are assigned when OWS receives the information
Note: Users are not required to track Claim File or Claim Unit numbers
Editing Claim Information
Once the RO is saved, all fields within the RO can be edited except the following:
• Repair Order Number
• Repair Order Open Date
Note: If an error was made to the RO Number or RO Open Date you must Cancel the RO and create a new one.
Note: If a claim has been submitted and an edit needs to be made the Claim Report will need to be accessed.
Table of Contents

Save, Print, PreValidate and Submit a Claim
A Claim may be saved by clicking either “Save” at the top of the page or “PreValidate” at the bottom of the page. Until the Submit button has been clicked, the claim has not been entered into OWS for processing. These statuses will be displayed in the Claim Status Report.
1. Save - system will save the Claim as “Saved incomplete”
2. Print – system will print the Claim
3. PreValidate – system will save the claim as “Dealer Action Required”
4. Submit – system will submit the Claim
Table of Contents

Submitting a Claim for a Maintenance Service for a Ford, Lincoln and Mercury Vehicle
In this example, the customer needs an oil change on an Escape. Note that this example is to show what information is needed to complete the claim for a maintenance services.
1. After clicking the “Enter a Claim” button on the Home Page, enter the VIN, Vehicle, Service Advisor
ID, Repair Order Number, Repair Order Open Date, Odometer at Repair Order Open, select “M” for
miles or “KM” for kilometers, Special Use Vehicle if applicable and License Location (State).
2. Click the “Create” button to continue entering the claim.
3. The information will populate into the “Repair Order Creation” screen in the top section.
4. Enter the additional information in the Repair Information section including the Repair Line Number, Claim
Type (61-FLEET), Sub-Code (QFC for Ford/Lincoln/Mercury vehicles with parts and labor), Repair Line
Completion Date, Odometer Reading at Repair Completion with M or KM selected from the drop down,
Customer Concern Code (A99), Condition Code (82), License Number, Driver Name, Driver ID, Fleet Company
Name, and Fleet Approval Amount are mandatory fields and the rest are if applicable to the claim.
Service Advisor ID has 9 digits. Add zeros before the number to make it 9 digits long.
Note: Enter Fleet Approval Amount and a P.O. Number from the Fleet if repair exceeds pre-authorization value.

Submitting a Claim for a Maintenance Service for a Ford, Lincoln and Mercury Vehicle (cont.)
5. Scroll down to the Comments section of the claim. Enter the Customer Comments and detailed Technicians
Comments.
6. Add the parts used in the Parts Information section. Note: For each line/part, enter the quantity used and
total amount including mark up. The system will calculate the Unit Price automatically.
7. Enter the total labor of the claim in the Labor Information section by using the L001 labor code.
Use L001 as the Labor Operation – Labor code L001 is the letter L with 2 zeros and then the number 1.
Include the markup in the total amount. The system will not automatically add the markup.
If also using OSP, OSL, Misc. or Other an explanation is required in the Technicians Comments to assist in claim approval. Note: The Technicians Comments are printed on the customers invoice.
See Page for details on OSP, OSL, Misc. or Other
Causal PartNum
Enter the Labor Hours being charged for the repair.
0.2

Submitting a Claim for a Maintenance Service for a Ford, Lincoln and Mercury Vehicle (cont.)
8. Scroll down the webpage to the Miscellaneous Information section, add any Misc, Other and Tax into this
section. A tax line is required for every claim. If the customer is tax exempt, or if tax is not applicable, enter
amount as $0.00. If the customer is tax exempt, or if tax is not applicable, enter amount as $0.00.
9. The Parts, Labor and Miscellaneous will total up in the Repair Line Sub Total automatically.
10. Click the PreValidate button to verify if additional information is needed or if there are any common errors
that require correction prior to submitting.
11. Click the submit button when the claim is ready to be submitted.
Table of Contents
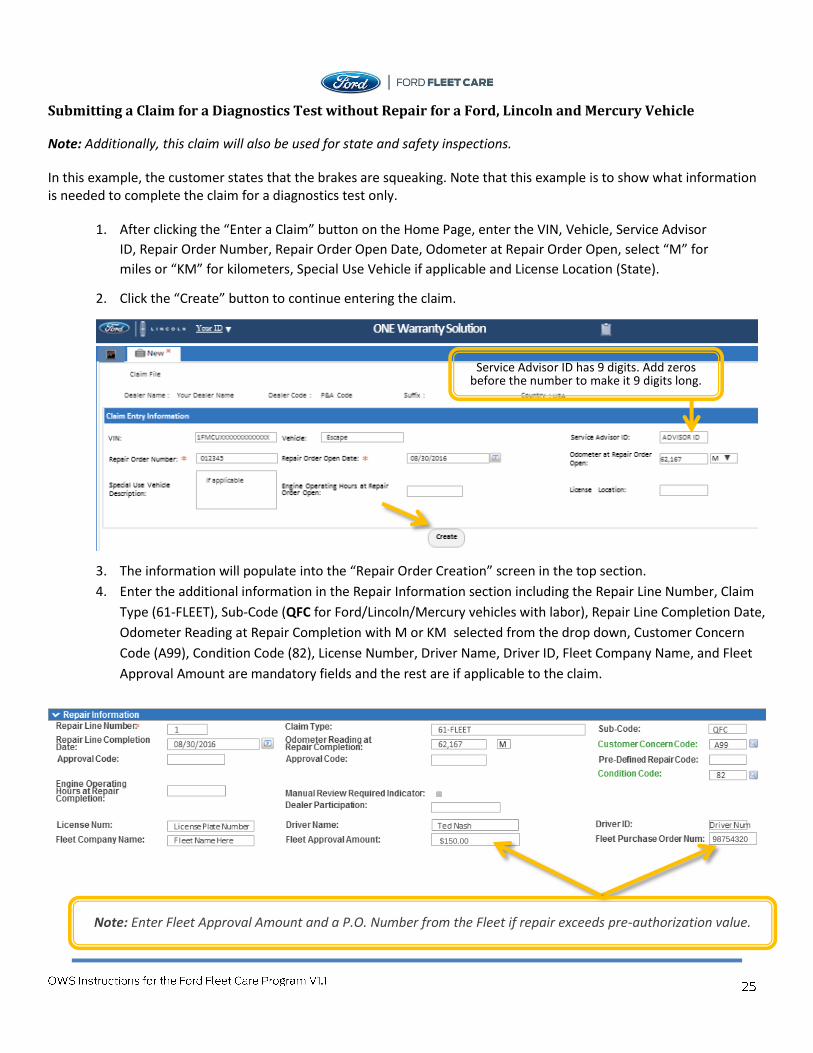
Submitting a Claim for a Diagnostics Test without Repair for a Ford, Lincoln and Mercury Vehicle
Note: Additionally, this claim will also be used for state and safety inspections.
In this example, the customer states that the brakes are squeaking. Note that this example is to show what information is needed to complete the claim for a diagnostics test only.
1. After clicking the “Enter a Claim” button on the Home Page, enter the VIN, Vehicle, Service Advisor
ID, Repair Order Number, Repair Order Open Date, Odometer at Repair Order Open, select “M” for
miles or “KM” for kilometers, Special Use Vehicle if applicable and License Location (State).
2. Click the “Create” button to continue entering the claim.
3. The information will populate into the “Repair Order Creation” screen in the top section.
4. Enter the additional information in the Repair Information section including the Repair Line Number, Claim
Type (61-FLEET), Sub-Code (QFC for Ford/Lincoln/Mercury vehicles with labor), Repair Line Completion Date,
Odometer Reading at Repair Completion with M or KM selected from the drop down, Customer Concern
Code (A99), Condition Code (82), License Number, Driver Name, Driver ID, Fleet Company Name, and Fleet
Approval Amount are mandatory fields and the rest are if applicable to the claim.
Service Advisor ID has 9 digits. Add zeros before the number to make it 9 digits long.
98754320 $150.00
Note: Enter Fleet Approval Amount and a P.O. Number from the Fleet if repair exceeds pre-authorization value.

Submitting a Claim for a Diagnostics Test without Repair for a Ford, Lincoln and Mercury Vehicle (cont.)
5. Scroll down to the Comments section of the claim. Enter the Customer Comments and detailed Technicians
Comments.
6. In the Parts Information section, click the magnifying glass to scroll and select DTEST for the Casual Part
Number. Note: Only used as the Causal Part, enter “0” in the Quantity and Amount fields.
7. Enter the total labor of the claim in the Labor Information section by using the L001 labor code.
If also using OSP, OSL, Misc. or Other an explanation is required in the Technicians Comments to assist in claim approval. Note: The Technicians Comments are printed on the customers invoice.
See Pages 15-16 for details on OSP, OSL, Misc. or Other
Include the markup in the total amount. The system will not automatically add the markup.
Causal PartNum
Use L001 as the Labor Operation – Labor code L001 is the letter L with 2 zeros and then the number 1.
Enter the Labor Hours being charged for the repair.

Submitting a Claim for a Diagnostics Test without Repair for a Ford, Lincoln and Mercury Vehicle (cont.)
8. Scroll down the webpage to the Miscellaneous Information section, add any Misc, Other and Tax into this
section. A tax line is required for every claim. If the customer is tax exempt, or if tax is not applicable, enter
amount as $0.00.
9. The Parts, Labor and Miscellaneous will total up in the Repair Line Sub Total automatically.
10. Click the PreValidate button to verify if additional information is needed or if there are any common errors
that require correction prior to submitting.
11. Click the submit button when the claim is ready to be submitted.
Table of Contents

Submitting a Claim for a Customer Paid Repair for a Ford, Lincoln and Mercury Vehicle
In this example, the customer states that the fan only works on low speed. Note that this example is to show what information is needed to complete the claim for a customer paid repair.
1. After clicking the “Enter a Claim” button on the Home Page, enter the VIN, Vehicle, Service Advisor
ID, Repair Order Number, Repair Order Open Date, Odometer at Repair Order Open, select “M” for
miles or “KM” for kilometers, Special Use Vehicle if applicable and License Location (State).
2. Click the “Create” button to continue entering the claim.
3. The information will populate into the “Repair Order Creation” screen in the top section.
4. Enter the additional information in the Repair Information section including the Repair Line Number, Claim
Type (61-FLEET), Sub-Code (QFC for Ford/Lincoln/Mercury vehicles with parts and labor), Repair Line
Completion Date, Odometer Reading at Repair Completion with M or KM selected from the drop down,
Customer Concern Code (A99), Condition Code (82), License Number, Driver Name, Driver ID, Fleet Company
Name, and Fleet Approval Amount are mandatory fields and the rest are if applicable to the claim.
Service Advisor ID has 9 digits. Add zeros before the number to make it 9 digits long.
$300.00 98774563
Note: Enter Fleet Approval Amount and a P.O. Number from the Fleet if repair exceeds pre-authorization value.

Submitting a Claim for a Customer Paid Repair for a Ford, Lincoln and Mercury Vehicle (cont.)
5. Scroll down to the Comments section of the claim. Enter the Customer Comments and detailed Technicians
Comments.
6. Add the parts used in the Parts Information section. Note: For each line/part, enter the quantity used and
total amount including mark up. The system will calculate the Unit Price automatically.
7. Enter the total labor of the claim in the Labor Information section by using the L001 labor code.
If also using OSP, OSL, Misc. or Other an explanation is required in the Technicians Comments to assist in claim approval. Note: The Technicians Comments are printed on the customers invoice.
See Pages 15-16 for details on OSP, OSL, Misc. or Other
Include the markup in the total amount. The system will not automatically add the markup.
Causal PartNum Causal PartNum
Use L001 as the Labor Operation – Labor code L001 is the letter L with 2 zeros and then the number 1.
Enter the Labor Hours being charged for the repair.

Submitting a Claim for a Customer Paid Repair for a Ford, Lincoln and Mercury Vehicle (cont.)
8. Scroll down the webpage to the Miscellaneous Information section, add any Misc, Other and Tax into this
section. A tax line is required for every claim. If the customer is tax exempt, or if tax is not applicable, enter
amount as $0.00.
9. The Parts, Labor and Miscellaneous will total up in the Repair Line Sub Total automatically.
10. Click the PreValidate button to verify if additional information is needed or if there are any common errors
that require correction prior to submitting.
11. Click the submit button when the claim is ready to be submitted.
Table of Contents

Submitting a Claim for a Customer Paid Repair for non-Ford Parts for a Ford, Lincoln and Mercury Vehicle
In this example, the customer states that the front brakes need to be replaced. Note that this example is to show what information is needed to complete the claim for a customer paid repair for brakes.
1. After clicking the “Enter a Claim” button on the Home Page, enter the VIN, Vehicle, Service Advisor
ID, Repair Order Number, Repair Order Open Date, Odometer at Repair Order Open, select “M” for
miles or “KM” for kilometers, Special Use Vehicle if applicable and License Location (State).
2. Click the “Create” button to continue entering the claim.
3. The information will populate into the “Repair Order Creation” screen in the top section.
4. Enter the additional information in the Repair Information section including the Repair Line Number, Claim
Type (61-FLEET), Sub-Code (QFC for Ford/Lincoln/Mercury vehicles with parts and labor), Repair Line
Completion Date, Odometer Reading at Repair Completion with M or KM selected from the drop down,
Customer Concern Code (A99), Condition Code (82), License Number, Driver Name, Driver ID, Fleet Company
Name, and Fleet Approval Amount are mandatory fields and the rest are if applicable to the claim.
Service Advisor ID has 9 digits. Add zeros before the number to make it 9 digits long.
Note: Enter Fleet Approval Amount and a P.O. Number from the Fleet if repair exceeds pre-authorization value.

Submitting a Claim for a Customer Paid Repair for non-Ford Parts for a Ford, Lincoln and Mercury Vehicle (cont.)
5. Scroll down to the Comments section of the claim. Enter the Customer Comments and detailed Technicians
Comments.
6. If using OSP, OSL, Misc. or Other an explanation is needed in the Technicians Comments section to assist the
claim getting approved the first submission.
• The recommended format is “OSP FOR $59.95 IS FOR BRAKING PADS”
7. Add the parts used in the Parts Information section. Note: For each line/part, enter the quantity used and
total amount including mark up. The system will calculate the Unit Price automatically.
8. Enter the total labor of the claim in the Labor Information section by using the L001 labor code.
If also using OSP, OSL, Misc. or Other an explanation is required in the Technicians Comments to assist in claim approval. Note: The Technicians Comments are printed on the customers invoice.
See Pages 15-16 for details on OSP, OSL, Misc. or Other
Include the markup in the total amount. The system will not automatically add the markup.
Causal PartNum
Use L001 as the Labor Operation – Labor code L001 is the letter L with 2 zeros and then the number 1.
Enter the Labor Hours being charged for the repair.
FRONT PADS AT 2MM AND REQUIRE REPLACEMENT. FORD MOTORCRAFT PARTS NOT IN STOCK CUSTOMER AUTHORIZED AFTER MARKET PADS OSP FOR $59.95 IS FOR BRAKING PADS

Submitting a Claim for a Customer Paid Repair for non-Ford Parts for a Ford, Lincoln and Mercury Vehicle (cont.)
9. Scroll down the webpage to the Miscellaneous Information section, add any Misc, Other and Tax into this
section. A tax line is required for every claim. If the customer is tax exempt, or if tax is not applicable, enter
amount as $0.00.
10. The Parts, Labor and Miscellaneous will total up in the Repair Line Sub Total automatically.
11. Click the PreValidate button to verify if additional information is needed or if there are any common errors
that require correction prior to submitting.
12. Click the submit button when the claim is ready to be submitted.
Table of Contents

Submitting a Claim for a Customer Paid Repair for Tires for a Ford, Lincoln and Mercury Vehicle
In this example, the customer states that the front 2 tires need to be replaced. Note that this example is to show what information is needed to complete the claim for a customer paid repair for tires.
1. After clicking the “Enter a Claim” button on the Home Page, enter the VIN, Vehicle, Service Advisor
ID, Repair Order Number, Repair Order Open Date, Odometer at Repair Order Open, select “M” for
miles or “KM” for kilometers, Special Use Vehicle if applicable and License Location (State).
2. Click the “Create” button to continue entering the claim.
3. The information will populate into the “Repair Order Creation” screen in the top section.
4. Enter the additional information in the Repair Information section including the Repair Line Number, Claim
Type (61-FLEET), Sub-Code (QFC for Ford/Lincoln/Mercury vehicles with parts and labor), Repair Line
Completion Date, Odometer Reading at Repair Completion with M or KM selected from the drop down,
Customer Concern Code (A99), Condition Code (82), License Number, Driver Name, Driver ID, Fleet Company
Name, and Fleet Approval Amount are mandatory fields and the rest are if applicable to the claim.
Service Advisor ID has 9 digits. Add zeros before the number to make it 9 digits long.
$400.00 3216662
Note: Enter Fleet Approval Amount and a P.O. Number from the Fleet if repair exceeds pre-authorization value.

Submitting a Claim for a Customer Paid Repair for Tires for a Ford, Lincoln and Mercury Vehicle (cont.)
5. Scroll down to the Comments section of the claim. Enter the Customer Comments and detailed Technicians
Comments.
6. Add the parts used in the Parts Information section. Note: For each line/part, enter the quantity used and
total amount including mark up. The system will calculate the Unit Price automatically.
7. Enter the total labor of the claim in the Labor Information section by using the L001 labor code.
If also using OSP, OSL, Misc. or Other an explanation is required in the Technicians Comments to assist in claim approval. Note: The Technicians Comments are printed on the customers invoice.
See Pages 15-16 for details on OSP, OSL, Misc. or Other
Include the markup in the total amount. The system will not automatically add the markup.
Causal PartNum
Use L001 as the Labor Operation – Labor code L001 is the letter L with 2 zeros and then the number 1.
Enter the Labor Hours being charged for the repair.

Submitting a Claim for a Customer Paid Repair for Tires for a Ford, Lincoln and Mercury Vehicle (cont.)
8. Scroll down the webpage to the Miscellaneous Information section, add any Misc, Other and Tax into this
section. A tax line is required for every claim. If the customer is tax exempt, or if tax is not applicable, enter
amount as $0.00.
9. Scroll to Test Results and click the down arrow to the left of the words.
10. Select from the drop down list “REPLACED TIRE DOT CODE” for the tires being replaced and enter all the
code from the tire to the fields under the Code section.
11. Select from the drop down list “REPLACMENT TIRE DOT CODE” for the new tires and enter all the code from
the tire to the fields under the Code section.
12. The Parts, Labor and Miscellaneous will total up in the Repair Line Sub Total automatically.
13. Click the PreValidate button to verify if additional information is needed or if there are any common errors
that require correction prior to submitting.
14. Click the submit button when the claim is ready to be submitted.
Table of Contents
ACX844P4304 ACX844P4305

Submitting a Claim for a State Emissions Test for a Ford, Lincoln and Mercury Vehicle
In this example, the customer request for a state emissions test to be completed on the vehicle. Note that this
example is to show what information is needed to complete the claim for a state emissions test.
1. After clicking the “Enter a Claim” button on the Home Page, enter the VIN, Vehicle, Service Advisor
ID, Repair Order Number, Repair Order Open Date, Odometer at Repair Order Open, select “M” for
miles or “KM” for kilometers, Special Use Vehicle if applicable and License Location (State).
2. Click the “Create” button to continue entering the claim.
3. The information will populate into the “Repair Order Creation” screen in the top section.
4. Enter the additional information in the Repair Information section including the Repair Line Number, Claim
Type (61-FLEET), Sub-Code (QFC for Ford/Lincoln/Mercury vehicles with parts and labor), Repair Line
Completion Date, Odometer Reading at Repair Completion with M or KM selected from the drop down,
Customer Concern Code (A99), Condition Code (82), License Number, Driver Name, Driver ID, Fleet Company
Name, and Fleet Approval Amount are mandatory fields and the rest are if applicable to the claim.
Service Advisor ID has 9 digits. Add zeros before the number to make it 9 digits long.
Note: Enter Fleet Approval Amount and a P.O. Number from the Fleet if repair exceeds pre-authorization value.

Submitting a Claim for a State Emissions Test for a Ford, Lincoln and Mercury Vehicle (cont.)
5. Scroll down to the Comments section of the claim. Enter the Customer Comments and detailed Technicians
Comments.
6. Add the parts used in the Parts Information section. Note: For each line/part, enter the quantity used and
total amount including mark up. The system will calculate the Unit Price automatically.
7. Enter the total labor of the claim in the Labor Information section by using the L001 labor code.
If also using OSP, OSL, Misc. or Other an explanation is required in the Technicians Comments to assist in claim approval. Note: The Technicians Comments are printed on the customers invoice.
See Pages 15-16 for details on OSP, OSL, Misc. or Other
Include the markup in the total amount. The system will not automatically add the markup.
Causal PartNum
Use L001 as the Labor Operation – Labor code L001 is the letter L with 2 zeros and then the number 1.
Enter the Labor Hours being charged for the repair.
0.1

Submitting a Claim for a State Emissions Test for a Ford, Lincoln and Mercury Vehicle (cont.)
8. Scroll down the webpage to the Miscellaneous Information section, add any Misc, Other and Tax into this
section. A tax line is required for every claim. If the customer is tax exempt, or if tax is not applicable, enter
amount as $0.00.
9. The Parts, Labor and Miscellaneous will total up in the Repair Line Sub Total automatically.
10. Click the PreValidate button to verify if additional information is needed or if there are any common errors
that require correction prior to submitting.
11. Click the submit button when the claim is ready to be submitted.
Table of Contents
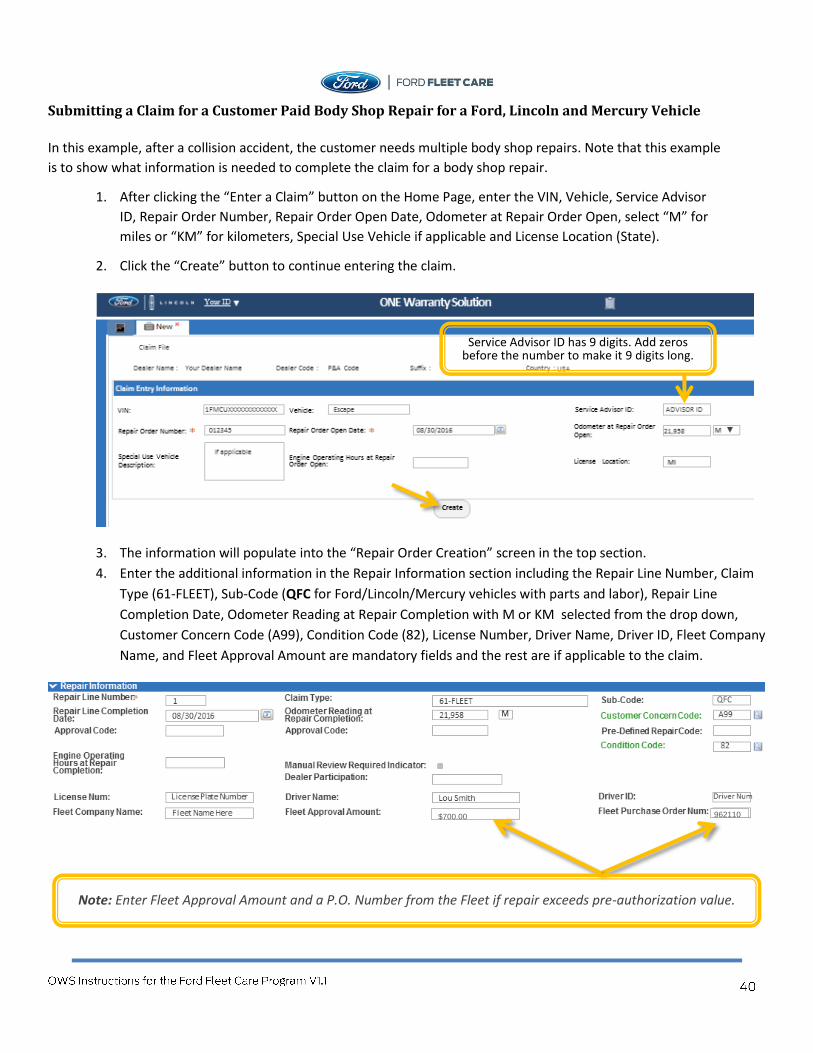
Submitting a Claim for a Customer Paid Body Shop Repair for a Ford, Lincoln and Mercury Vehicle
In this example, after a collision accident, the customer needs multiple body shop repairs. Note that this example
is to show what information is needed to complete the claim for a body shop repair.
1. After clicking the “Enter a Claim” button on the Home Page, enter the VIN, Vehicle, Service Advisor
ID, Repair Order Number, Repair Order Open Date, Odometer at Repair Order Open, select “M” for
miles or “KM” for kilometers, Special Use Vehicle if applicable and License Location (State).
2. Click the “Create” button to continue entering the claim.
3. The information will populate into the “Repair Order Creation” screen in the top section.
4. Enter the additional information in the Repair Information section including the Repair Line Number, Claim
Type (61-FLEET), Sub-Code (QFC for Ford/Lincoln/Mercury vehicles with parts and labor), Repair Line
Completion Date, Odometer Reading at Repair Completion with M or KM selected from the drop down,
Customer Concern Code (A99), Condition Code (82), License Number, Driver Name, Driver ID, Fleet Company
Name, and Fleet Approval Amount are mandatory fields and the rest are if applicable to the claim.
Service Advisor ID has 9 digits. Add zeros before the number to make it 9 digits long.
$700.00 962110
Note: Enter Fleet Approval Amount and a P.O. Number from the Fleet if repair exceeds pre-authorization value.

Submitting a Claim for a Customer Paid Body Shop Repair for a Ford, Lincoln and Mercury Vehicle (cont.)
5. Scroll down to the Comments section of the claim. Enter the Customer Comments and detailed Technicians
Comments.
6. Add the parts used in the Parts Information section. Note: For each line/part, enter the quantity used and
total amount including mark up. The system will calculate the Unit Price automatically.
7. Enter the total labor of the claim in the Labor Information section by using the L001 labor code.
8.
If also using OSP, OSL, Misc. or Other an explanation is required in the Technicians Comments to assist in claim approval. Note: The Technicians Comments are printed on the customers invoice.
See Pages 15-16 for details on OSP, OSL, Misc. or Other
Include the markup in the total amount. The system will not automatically add the markup.
Causal PartNum
Use L001 as the Labor Operation – Labor code L001 is the letter L with 2 zeros and then the number 1.
Enter the Labor Hours being charged for the repair.

Submitting a Claim for a Customer Paid Body Shop Repair for a Ford, Lincoln and Mercury Vehicle (cont.)
9. Scroll down the webpage to the Miscellaneous Information section, add any Misc, Other and Tax into this
section. A tax line is required for every claim. If the customer is tax exempt, or if tax is not applicable, enter
amount as $0.00.
10. The Parts, Labor and Miscellaneous will total up in the Repair Line Sub Total automatically.
11. Click the PreValidate button to verify if additional information is needed or if there are any common errors
that require correction prior to submitting.
12. Click the submit button when the claim is ready to be submitted.
Table of Contents

Submitting a Claim for a Ford Protect Deductible for a Ford, Lincoln and Mercury Vehicle In this example, a customer has a repair with the Ford Protect Deductible. Note that this example is to show what
information is needed to complete the claim for a Ford Protect Deductible.
1. After clicking the “Enter a Claim” button on the Home Page, enter the VIN, Vehicle, Service Advisor
ID, Repair Order Number, Repair Order Open Date, Odometer at Repair Order Open, select “M” for
miles or “KM” for kilometers, Special Use Vehicle if applicable and License Location (State).
2. Click the “Create” button to continue entering the claim.
3. The information will populate into the “Repair Order Creation” screen in the top section.
4. Enter the additional information in the Repair Information section including the Repair Line Number, Claim
Type (61-FLEET), Sub-Code (QFC for Ford/Lincoln/Mercury vehicles with parts and labor), Repair Line
Completion Date, Odometer Reading at Repair Completion with M or KM selected from the drop down,
Customer Concern Code (A99), Condition Code (82), License Number, Driver Name, Driver ID, Fleet Company
Name, and Fleet Approval Amount are mandatory fields and the rest are if applicable to the claim.
Service Advisor ID has 9 digits. Add zeros before the number to make it 9 digits long.
Note: Enter Fleet Approval Amount and a P.O. Number from the Fleet if repair exceeds pre-authorization value.

Submitting a Claim for a Ford Protect Deductible for a Ford, Lincoln and Mercury Vehicle (cont.)
5. Scroll down to the Comments section of the claim. Enter the Customer Comments and detailed Technicians
Comments.
6. Add the parts used in the Parts Information section. Note: For each line/part, enter the quantity used and
total amount including mark up. The system will calculate the Unit Price automatically.
7. The Labor line is left blank due to no labor charge on this claim.
If also using OSP, OSL, Misc. or Other an explanation is required in the Technicians Comments to assist in claim approval. Note: The Technicians Comments are printed on the customers invoice.
See Pages 15-16 for details on OSP, OSL, Misc. or Other
Causal PartNum

Submitting a Claim for a Ford Protect Deductible for a Ford, Lincoln and Mercury Vehicle (cont.)
8. Scroll down the webpage to the Miscellaneous Information section, add any Misc, Other and Tax into this
section. A tax line is required for every claim. If the customer is tax exempt, or if tax is not applicable, enter
amount as $0.00.
9. The Parts, Labor and Miscellaneous will total up in the Repair Line Sub Total automatically.
10. Click the PreValidate button to verify if additional information is needed or if there are any common errors
that require correction prior to submitting.
11. Click the submit button when the claim is ready to be submitted.
Table of Contents

Submitting a Claim for a Courtesy Inspection on Ford Motor Company Vehicle
In this example, an employee will be getting a new vehicle. Note that this example is to show what information is
needed to complete the claim for a courtesy delivery.
1. After clicking the “Enter a Claim” button on the Home Page, enter the VIN, Vehicle, Service Advisor
ID, Repair Order Number, Repair Order Open Date, Odometer at Repair Order Open, select “M” for
miles or “KM” for kilometers, Special Use Vehicle if applicable and License Location (State).
2. Click the “Create” button to continue entering the claim.
3. The information will populate into the “Repair Order Creation” screen in the top section.
4. Enter the additional information in the Repair Information section including the Repair Line Number, Claim
Type (61-FLEET), Sub-Code (QFC for Ford/Lincoln/Mercury vehicles with parts and labor), Repair Line
Completion Date, Odometer Reading at Repair Completion with M or KM selected from the drop down,
Customer Concern Code (A99), Condition Code (82), License Number, Driver Name, Driver ID, Fleet Company
Name, and Fleet Approval Amount are mandatory fields and the rest are if applicable to the claim.
Service Advisor ID has 9 digits. Add zeros before the number to make it 9 digits long.
Company Name in OASIS
$300.00 013552
Note: Enter Fleet Approval Amount and a P.O. Number from the Fleet if repair exceeds pre-authorization value.

Submitting a Claim for a Courtesy Inspection on Ford Motor Company Vehicle (cont.)
5. Scroll down to the Comments section of the claim. Enter the Customer Comments and detailed Technicians
Comments.
6. In the Parts Information section, click the magnifying glass to scroll and select Courtesy for the Casual Part
Number. Note: Only used as the Causal Part, enter “0” in the Quantity and Amount fields.
7. Enter the total of the claim amount in the Labor Information section by using the L001 labor code.
Use L001 as the Labor Operation – Labor code L001 is the letter L with 2 zeros and then the number 1.
Add the title, tax, license & PDI fees in the Amount field.
Note: The Technicians Comments are printed on the customers invoice.
Causal PartNum

Submitting a Claim for a Courtesy Inspection on Ford Motor Company Vehicle (cont.)
8. Scroll down the webpage to the Miscellaneous Information section, add any Misc, Other and Tax into this
section. A tax line is required for every claim. If the customer is tax exempt, or if tax is not applicable, enter
amount as $0.00.
9. The Parts, Labor and Miscellaneous will total up in the Repair Line Sub Total automatically.
10. Click the PreValidate button to verify if additional information is needed or if there are any common errors
that require correction prior to submitting.
11. Click the submit button when the claim is ready to be submitted.
Table of Contents

Submitting a Claim for a Maintenance Service for a Non-Ford Vehicle
In this example, the customer needs an oil change on a Chevy Express. Note that this example is to show what information is needed to complete the claim for a maintenance services on a Non-Ford vehicle.
1. After clicking the “Enter a Claim” button on the Home Page, enter the VIN, Vehicle, Service Advisor
ID, Repair Order Number, Repair Order Open Date, Odometer at Repair Order Open, select “M” for
miles or “KM” for kilometers, Special Use Vehicle if applicable and License Location (State).
2. Click the “Create” button to continue entering the claim.
3. The information will populate into the “Repair Order Creation” screen in the top section.
4. Enter the additional information in the Repair Information section including the Repair Line Number, Claim
Type (61-FLEET), Sub-Code (QFCC for non-Ford vehicle), Repair Line Completion Date, Odometer Reading at
Repair Completion with M or KM selected from the drop down, Customer Concern Code (A99), Condition
Code (82), License Number, Driver Name, Driver ID, Fleet Company Name, and Fleet Approval Amount are
mandatory fields and the rest are if applicable to the claim.
Service Advisor ID has 9 digits. Add zeros before the number to make it 9 digits long.
QFCC is used with non-Ford vehicles
Note: Enter Fleet Approval Amount and a P.O. Number from the Fleet if repair exceeds pre-authorization value.

Submitting a Claim for a Maintenance Service for a Non-Ford Vehicle (cont.)
5. Scroll down to the Comments section of the claim. Enter the Customer Comments and detailed Technicians
Comments.
6. Add the parts used in the Parts Information section. Note: Causal Part must be COMPMAKE with the total
quantity and total amount of all parts used including mark up. Add another part line using the Ford base part
number with zero quantity and zero in the amount for each additional part used.
7. Enter the total labor of the claim in the Labor Information section by using the L001 labor code.
COMPMAKE has the total cost of all
the parts used. Use the closest Ford Base Part Number
with NO quantity and NO cost.
If also using OSP, OSL, Misc. or Other an explanation is required in the Technicians Comments to assist in claim approval. Note: The Technicians Comments are printed on the customers invoice.
See Pages 15-16 for details on OSP, OSL, Misc. or Other
Include the markup in the total amount. The system will not automatically add the markup.
COMPMAKE
Causal PartNum
Use L001 as the Labor Operation – Labor code L001 is the letter L with 2 zeros and then the number 1.
Enter the Labor Hours being charged for the repair.
0.2
COMPMAKE $21.55 FOR GM OIL FILTER

Submitting a Claim for a Maintenance Service for a Non-Ford Vehicle (cont.)
8. Scroll down the webpage to the Miscellaneous Information section, add any Misc, Other and Tax into this
section. A tax line is required for every claim. If the customer is tax exempt, or if tax is not applicable, enter
amount as $0.00.
9. The Parts, Labor and Miscellaneous will total up in the Repair Line Sub Total automatically.
10. Click the PreValidate button to verify if additional information is needed or if there are any common errors
that require correction prior to submitting.
11. Click the submit button when the claim is ready to be submitted.
Table of Contents

Submitting a Claim for a Diagnostics Test without Repair for a Non-Ford Vehicle
In this example, the customer states that the brakes are squeaking. Note that this example is to show what information is needed to complete the claim for a diagnostics test only of a Non-Ford vehicle. Additionally, this claim will also be used for state or vehicle pre-delivery, DOT and safety inspections.
1. After clicking the “Enter a Claim” button on the Home Page, enter the VIN, Vehicle, Service Advisor
ID, Repair Order Number, Repair Order Open Date, Odometer at Repair Order Open, select “M” for
miles or “KM” for kilometers, Special Use Vehicle if applicable and License Location (State).
2. Click the “Create” button to continue entering the claim.
3. The information will populate into the “Repair Order Creation” screen in the top section.
4. Enter the additional information in the Repair Information section including the Repair Line Number, Claim
Type (61-FLEET), Sub-Code (QFCC for non-Ford vehicle), Repair Line Completion Date, Odometer Reading at
Repair Completion with M or KM selected from the drop down, Customer Concern Code (A99), Condition
Code (82), License Number, Driver Name, Driver ID, Fleet Company Name, and Fleet Approval Amount are
mandatory fields and the rest are if applicable to the claim.
Service Advisor ID has 9 digits. Add zeros before the number to make it 9 digits long.
QFCC is used with non-Ford vehicles
Note: Enter Fleet Approval Amount and a P.O. Number from the Fleet if repair exceeds pre-authorization value.

Submitting a Claim for a Diagnostics Test without Repair for a Non-Ford Vehicle (cont.)
5. Scroll down to the Comments section of the claim. Enter the Customer Comments and detailed Technicians
Comments.
6. Add the parts used in the Parts Information section. Causal part must be COMPMAKE and include the total
of all the parts. Note: Causal Part must be COMPMAKE, enter “0” in the Quantity and Amount fields.
7. Enter the total labor of the claim in the Labor Information section by using the L001 labor code.
If also using OSP, OSL, Misc. or Other an explanation is required in the Technicians Comments to assist in claim approval. Note: The Technicians Comments are printed on the customers invoice.
See Pages 15-16 for details on OSP, OSL, Misc. or Other
COMPMAKE
Causal PartNum
Use L001 as the Labor Operation – Labor code L001 is the letter L with 2 zeros and then the number 1.
Enter the Labor Hours being charged for the repair.

Submitting a Claim for a Diagnostics Test without Repair for a Non-Ford Vehicle (cont.)
8. Scroll down the webpage to the Miscellaneous Information section, add any Misc, Other and Tax into this
section. A tax line is required for every claim. If the customer is tax exempt, or if tax is not applicable, enter
amount as $0.00.
9. The Parts, Labor and Miscellaneous will total up in the Repair Line Sub Total automatically.
10. Click the PreValidate button to verify if additional information is needed or if there are any common errors
that require correction prior to submitting.
11. Click the submit button when the claim is ready to be submitted.
Table of Contents

Submitting a Claim for a Customer Paid Repair for a Non-Ford Vehicle
In this example, the customer states that the brake pedal feels low. Note that this example is to show what information is needed to complete the claim for a customer paid repair.
1. After clicking the “Enter a Claim” button on the Home Page, enter the VIN, Service Advisor ID, Repair
Order Number, Repair Order Open Date, Odometer at Repair Order Open, select “M” for miles or
“KM” for kilometers, Special Use Vehicle if applicable and License Location (State).
2. Click the “Create” button to continue entering the claim.
3. The information will populate into the “Repair Order Creation” screen in the top section.
4. Enter the additional information in the Repair Information section including the Repair Line Number, Claim
Type (61-FLEET), Sub-Code (QFCC for non-Ford vehicle), Repair Line Completion Date, Odometer Reading at
Repair Completion with M or KM selected from the drop down, Customer Concern Code (A99), Condition
Code (82), License Number, Driver Name, Driver ID, Fleet Company Name, and Fleet Approval Amount are
mandatory fields and the rest are if applicable to the claim.
Service Advisor ID has 9 digits. Add zeros before the number to make it 9 digits long.
$500.00
QFCC is used with non-Ford vehicles
6541102
Note: Enter Fleet Approval Amount and a P.O. Number from the Fleet if repair exceeds pre-authorization value.

Submitting a Claim for a Customer Paid Repair for a Non-Ford Vehicle (cont.)
5. Scroll down to the Comments section of the claim. Enter the Customer Comments and detailed Technicians
Comments.
6. Add the parts used in the Parts Information section. Note: Causal Part must be COMPMAKE with the total
quantity and total amount of all parts used including mark up. Add another part line using the Ford base part
number with zero quantity and zero in the amount for each additional part used.
7. Enter the total labor of the claim in the Labor Information section by using the L001 labor code.
COMPMAKE has the total cost of all
the parts used.
Use the closest Ford Base Part Number with NO quantity and NO cost.
If also using OSP, OSL, Misc. or Other an explanation is required in the Technicians Comments to assist in claim approval. Note: The Technicians Comments are printed on the customers invoice.
See Pages 15-16 for details on OSP, OSL, Misc. or Other
Include the markup in the total amount. The system will not automatically add the markup.
COMPMAKE
Causal PartNum
Use L001 as the Labor Operation – Labor code L001 is the letter L with 2 zeros and then the number 1.
Enter the Labor Hours being charged for the repair.

Submitting a Claim for a Customer Paid Repair for a Non-Ford Vehicle (cont.)
8. Scroll down the webpage to the Miscellaneous Information section, add any Misc, Other and Tax into this
section. A tax line is required for every claim. If the customer is tax exempt, or if tax is not applicable, enter
amount as $0.00.
9. The Parts, Labor and Miscellaneous will total up in the Repair Line Sub Total automatically.
10. Click the PreValidate button to verify if additional information is needed or if there are any common errors
that require correction prior to submitting.
11. Click the submit button when the claim is ready to be submitted.
Table of Contents

Submitting a Claim for a Customer Paid Repair for Tires for a Non-Ford Vehicle
In this example, the customer states that the 2 tires need to be replaced. Note that this example is to show what information is needed to complete the claim for a customer paid repair for tires for a Non-Ford vehicle.
1. After clicking the “Enter a Claim” button on the Home Page, enter the VIN, Service Advisor ID, Repair
Order Number, Repair Order Open Date, Odometer at Repair Order Open, select “M” for miles or
“KM” for kilometers, Special Use Vehicle if applicable and License Location (State).
2. Click the “Create” button to continue entering the claim.
3. The information will populate into the “Repair Order Creation” screen in the top section.
4. Enter the additional information in the Repair Information section including the Repair Line Number, Claim
Type (61-FLEET), Sub-Code (QFCC for Non-Ford vehicle), Repair Line Completion Date, Odometer Reading at
Repair Completion with M or KM selected from the drop down, Customer Concern Code (A99), Condition
Code (82), License Number, Driver Name, Driver ID, Fleet Company Name, and Fleet Approval Amount are
mandatory fields and the rest are if applicable to the claim.
Service Advisor ID has 9 digits. Add zeros before the number to make it 9 digits long.
$400.00
QFCC is used with non-Ford vehicles
0012300
Note: Enter Fleet Approval Amount and a P.O. Number from the Fleet if repair exceeds pre-authorization value.

Submitting a Claim for a Customer Paid Repair for Tires for a Non-Ford Vehicle (cont.)
5. Scroll down to the Comments section of the claim. Enter the Customer Comments and detailed Technicians
Comments.
6. Add the parts used in the Parts Information section. COMPMAKE part must be used as the Causal Part and
include all parts total including mark up. Note: Causal Part must be COMPMAKE with the total quantity and
total amount of all parts used including mark up. Add another part line using the Ford base part number with
zero quantity and zero in the amount for each additional part used.
7. Enter the total labor of the claim in the Labor Information section by using the L001 labor code.
COMPMAKE has the total cost of
all the parts used.
Use the closest Ford Base Part Number with NO quantity and NO cost.
If also using OSP, OSL, Misc. or Other an explanation is required in the Technicians Comments to assist in claim approval. Note: The Technicians Comments are printed on the customers invoice.
See Pages 15-16 for details on OSP, OSL, Misc. or Other
Include the markup in the total amount. The system will not automatically add the markup.
COMPMAKE
Causal PartNum
Use L001 as the Labor Operation – Labor code L001 is the letter L with 2 zeros and then the number 1.
Enter the Labor Hours being charged for the repair.

Submitting a Claim for a Customer Paid Repair for Tires for a Non-Ford Vehicle (cont.)
8. Scroll down the webpage to the Miscellaneous Information section, add any Misc, Other and Tax into this
section. A tax line is required for every claim. If the customer is tax exempt, or if tax is not applicable, enter
amount as $0.00.
9. Scroll to Test Results and click the down arrow to the left of the words.
10. Select from the drop down list “REPLACED TIRE DOT CODE” for the tires being replaced and enter all the
code from the tire to the fields under the Code section.
11. Select from the drop down list “REPLACMENT TIRE DOT CODE” for the new tires and enter all the code from
the tire to the fields under the Code section.
12. The Parts, Labor and Miscellaneous will total up in the Repair Line Sub Total automatically.
13. Click the PreValidate button to verify if additional information is needed or if there are any common
errors that require correction prior to submitting.
14. Click the submit button when the claim is ready to be submitted.
Table of Contents
ACX844P4309
ACX844P4304 ACX844P4305
ACX844P4310

Submitting a Claim for a State Emissions Test for a Non-Ford Vehicle
In this example, the customer request for a state emissions test to be completed on the vehicle. Note that this
example is to show what information is needed to complete the claim for a state emissions test for a Non-Ford
vehicle.
1. After clicking the “Enter a Claim” button on the Home Page, enter the VIN, Vehicle, Service Advisor
ID, Repair Order Number, Repair Order Open Date, Odometer at Repair Order Open, select “M” for
miles or “KM” for kilometers, Special Use Vehicle if applicable and License Location (State).
2. Click the “Create” button to continue entering the claim.
3. The information will populate into the “Repair Order Creation” screen in the top section.
4. Enter the additional information in the Repair Information section including the Repair Line Number, Claim
Type (61-FLEET), Sub-Code (QFCC for non-Ford vehicle), Repair Line Completion Date, Odometer Reading at
Repair Completion with M or KM selected from the drop down, Customer Concern Code (A99), Condition
Code (82), License Number, Driver Name, Driver ID, Fleet Company Name, and Fleet Approval Amount are
mandatory fields and the rest are if applicable to the claim.
Service Advisor ID has 9 digits. Add zeros before the number to make it 9 digits long.
QFCC is used with non-Ford vehicles
Note: Enter Fleet Approval Amount and a P.O. Number from the Fleet if repair exceeds pre-authorization value.

Submitting a Claim for a State Emissions Test for a Non-Ford Vehicle (cont.)
5. Scroll down to the Comments section of the claim. Enter the Customer Comments and detailed Technicians
Comments.
6. Add the parts used in the Parts Information section. Note: Causal Part must be COMPMAKE with the total
quantity and total amount of all parts used including mark up. Add another part line using the Ford base part
number with zero quantity and zero in the amount for each additional part used.
7. Enter the total labor of the claim in the Labor Information section by using the L001 labor code.
COMPMAKE has the total cost of all the parts used.
Note: The Technicians Comments are printed on the customers invoice.
Include the markup in the total amount. The system will not automatically add the markup.
COMPMAKE
Causal PartNum
Use L001 as the Labor Operation – Labor code L001 is the letter L with 2 zeros and then the number 1.
Enter the Labor Hours being charged for the repair.
0.1

Submitting a Claim for a State Emissions Test for a Non-Ford Vehicle (cont.)
8. Scroll down the webpage to the Miscellaneous Information section, add any Misc, Other and Tax into this
section.
9. The Parts, Labor and Miscellaneous will total up in the Repair Line Sub Total automatically.
10. Click the PreValidate button to verify if additional information is needed or if there are any common errors
that require correction prior to submitting.
11. Click the submit button when the claim is ready to be submitted.
Table of Contents

Submitting a Claim for a Parts Purchase
In this example, the customer needs to purchase brake lining and hub assembly from the dealership. Note that
this example is to show what information is needed to complete the claim for the part purchase claim.
1. After clicking the “Enter a Claim” button on the Home Page, enter the billing account number in the
VIN, no vehicle, Service Advisor ID, Repair Order Number, Repair Order Open Date, for the Repair
Order Open enter “20”, select “M” for miles or “KM” for kilometers, Special Use Vehicle if applicable
and License Location (State).
2. Click the “Create” button to continue entering the claim.
3. The information will populate into the “Repair Order Creation” screen in the top section.
4. Enter the additional information in the Repair Information section including the Repair Line Number, Claim
Type (61-FLEET), Sub-Code (QFCP for over the counter parts purchase), Repair Line Completion Date, for the
Repair Completion enter “20” for QFCP claims with M or KM selected from the drop down, Customer
Concern Code (A99), Condition Code (82), License Number, Driver Name, Driver ID, Fleet Company Name,
and Fleet Approval Amount are mandatory fields and the rest are if applicable to the claim.
Service Advisor ID has 9 digits. Add zeros before the number to make it 9 digits long.
The billing account format is “Q###FC#####” for example “Q000FC99999”. Use zero, not the letter O.
“20” and “M” are entered in the Odometer fields for Parts Purchase Claims only. QFCP is used with a Parts Purchase only.
Marks
$400.00 8520032
Note: Enter Fleet Approval Amount and a P.O. Number from the Fleet if repair exceeds pre-authorization value.

Submitting a Claim for a Parts Purchase (cont.)
5. Scroll down to the Comments section of the claim. Enter the Customer Comments and detailed Technicians
Comments.
6. Technicians Comments must include the parts counter ticket number even if it the same at the RO number
and the name of the PERSON who made the request and authorized the request or picked up the parts.
Note: The Fleet Name is not required in the comments.
7. Add the parts used in the Parts Information section. Note: Causal Part must be PART SALE with the total
quantity and total amount of all parts used including mark up. Add another part line using the Ford base part
number with zero quantity and zero in the amount for each additional part used.
8. Do not enter a labor code or labor amount for a Parts purchase claim.
If also using OSP, OSL, Misc. or Other an explanation is required in the Technicians Comments to assist in claim approval. Note: The Technicians Comments are printed on the customers invoice.
See Pages 15-16 for details on OSP, OSL, Misc. or Other
Include the markup in the total amount. The system will not automatically add the markup.
PART SALE
Causal PartNum
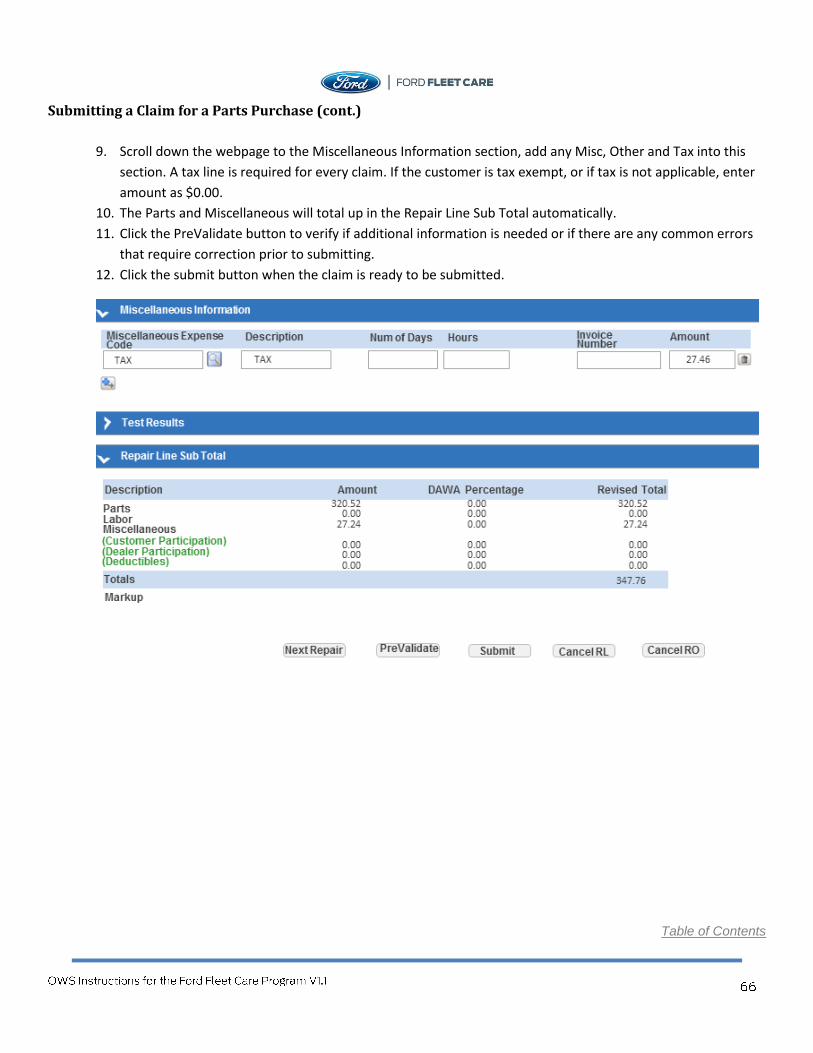
Submitting a Claim for a Parts Purchase (cont.)
9. Scroll down the webpage to the Miscellaneous Information section, add any Misc, Other and Tax into this
section. A tax line is required for every claim. If the customer is tax exempt, or if tax is not applicable, enter
amount as $0.00.
10. The Parts and Miscellaneous will total up in the Repair Line Sub Total automatically.
11. Click the PreValidate button to verify if additional information is needed or if there are any common errors
that require correction prior to submitting.
12. Click the submit button when the claim is ready to be submitted.
Table of Contents

Appeal a Claim – Change of Price on Part and/or Labor and/or Misc
In this example, the claim was entered and paid; however, the prices were entered incorrectly on the part and
labor. Note that this example is to show what information is needed to complete the appeal (chargeback) of a
claim.
1. On the Home page of the OWS website, click the “View Claim Status Report” button to start the
appeal process.
2. The Claim Status Report screen will appear.
3. Enter Repair Order Number or VIN, From Date AND to Date, or Repair Order Open Date and then click
the Inquire button to submit the search parameters.
0123456
07/10/2016 07/16/2016

Appeal a Claim – Change of Price on Part and/or Labor and/or Misc (cont.)
4. The Claim Status Report will show the Work in Progress Claims (not paid) and the Dispositioned
Claims (paid). Double click the Repair Order that you need to make the price adjustments to.
5. The claim will open to view it, note in the upper right section of the screen above the Print icon, there is an
“Appeal” button. Click the Appeal button to begin the appeal process.
012345 012345
Driver Num
42.72

Appeal a Claim – Change of Price on Part and/or Labor and/or Misc (cont.)
6. The claim will open on the screen.
7. Under the Repair Information Section of the claim, the Appeal Reason has a drop down list to select the type
of Appeal and in this case it is an Adjustment.
• Adjustment – change the number or price to a new number or price
• Full Chargeback – completely zeroing out the entire claim
• Full Reversal – reversal of a full chargeback
There are 3 Appeal Reasons that can be used for an appeal:
1. Adjustment – change the existing info in the quantity, amount or
misc. to the correct amount
2. Full Chargeback – completely zeroing out the entire claim
3. Full Reversal – reversal of a full chargeback – can only be used
when the entire claim was charged back

Appeal a Claim – Change of Price on Part and/or Labor and/or Misc (cont.)
8. Scroll down the claim to change the Parts and Labor prices.
• Under the Parts Information section, select the Action code from the drop down list. In this case, we
selected “C” for change.
• Enter the New amount for the Parts section and the system will calculate the adjustment
automatically.
• Under the Labor Information section, select “C” from the Action code drop down list to change the
price. Enter the Present (new) price for the labor and the system will calculate the adjustment
automatically.
a. C is for change part, labor and or miscellaneous
b. B is for zeroing out a part and/or labor to a cost of $0.00
c. R is for reverse chargeback of the previous appeal d. A is for adding a part, labor or miscellaneous to the claim
• Under the Miscellaneous Information section, select the Action code “C” to change the tax amount.
Enter the Present (new) tax amount and the system will calculate the adjustment automatically.
There are 4 Action codes that can be used for an adjustment: 1. C is for change part, labor and or miscellaneous
2. B is for zeroing out a part and/or labor to a cost of $0.00
3. R is for reverse chargeback of the previous appeal 4. A is for adding a part, labor or miscellaneous to the claim
Causal PartNum Causal PartNum

Appeal a Claim – Change of Price on Part and/or Labor and/or Misc (cont.)
9. Scroll down the page to the Repair Line Sub Total section. The changes are present in this area with the Prior
Paid, Present, Adjustment and Revised Total amounts.
10. Click the “PreValidate” button to verify information.
11. Finally, click the “Submit” button to save and submit the claim information into the OWS.
Table of Contents
The Adjustment column shows the difference in price
and the Revised Total column shows the new total.

Appeal a Claim – Add Part and/or Labor and/or Misc.
In this example, the claim was entered and paid; however, a part was entered on this claim. Note that this
example is to show what information is needed to complete the appeal process for adding a part to a paid claim.
1. On the Home page of the OWS website, click the “View Claim Status Report” button to start the
appeal process.
2. The Claim Status Report screen will appear.
3. Enter Repair Order Number or VIN, From Date AND to Date, or Repair Order Open Date and then click
the Inquire button to submit the search parameters.
123456
07/14/2016 07/16/2016

Appeal a Claim – Add Part and/or Labor and/or Misc. (cont.)
4. The Claim Status Report will show the Dispositioned Claims (paid). Double click the Repair Order that
you need to make the price adjustments to.
5. The claim will open to view it, note in the upper right section of the screen above the Print icon, there is an
“Appeal” button. Click the Appeal button to begin the appeal process.
012345
19.32

Appeal a Claim – Add Part and/or Labor and/or Misc. (cont.)
6. The claim will open on the screen.
7. Under the Repair Information Section of the claim, the Appeal Reason has a drop down list to select the type
of Appeal and in this case it is an Adjustment.
• Adjustment – change the number or price to a new number or price
• Full Chargeback – completely zeroing out the entire claim
• Full Reversal – reversal of a full chargeback
There are 3 Appeal Reasons that can be used for an appeal:
1. Adjustment – change the existing info in the quantity, amount or
misc. to the correct amount
2. Full Chargeback – completely zeroing out the entire claim
3. Full Reversal – reversal of a full chargeback – can only be used
when the entire claim was charged back

Appeal a Claim – Add Part and/or Labor and/or Misc. (cont.)
8. Scroll down the claim to change the Parts and Labor prices.
• Under the Parts Information section, select the Action code from the drop down list. In this case, we
selected “A” to add the missing part to the claim.
• Under the Miscellaneous Information section, select the Action code “C” to change the tax amount.
Enter the Present (new) tax amount and the system will calculate the adjustment automatically.
There are 4 Action codes that can be used for an adjustment: 1. C is for change part, labor and or miscellaneous
2. B is for zeroing out a part and/or labor to a cost of $0.00
3. R is for reverse chargeback of the previous appeal 4. A is for adding a part, labor or miscellaneous to the claim
Causal PartNum

Appeal a Claim – Add Part and/or Labor and/or Misc. (cont.)
9. Scroll down the page to the Repair Line Sub Total section. The changes are present in this area with the Prior
Paid, Present, Adjustment and Revised Total amounts.
10. Click the “PreValidate” button to verify information.
11. Finally, click the “Submit” button to save and submit the claim information into the OWS.
Table of Contents
The Adjustment column shows the difference in price
and the Revised Total column shows the new total.

Appeal a Claim – Parts Return
In this example, the claim was entered and paid; however, the customer is returning one of the parts purchased
on this claim. Note that this example is to show what information is needed to complete the appeal (chargeback)
of a parts purchase claim.
1. On the Home page of the OWS website, click the “View Claim Status Report” button to start the
appeal process.
2. The Claim Status Report screen will appear.
3. Enter Repair Order Number or VIN, From Date AND to Date, or Repair Order Open Date and then click
the Inquire button to submit the search parameters.
685108
08/29/2016 09/02/2016
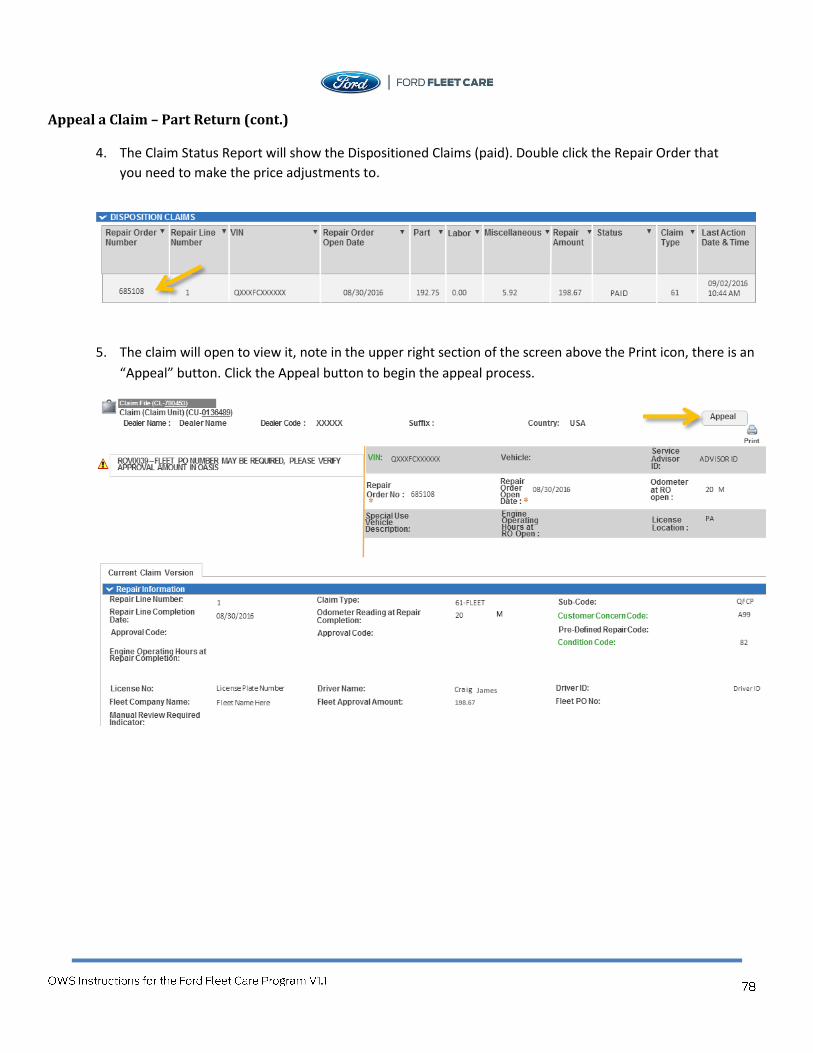
Appeal a Claim – Part Return (cont.)
4. The Claim Status Report will show the Dispositioned Claims (paid). Double click the Repair Order that
you need to make the price adjustments to.
5. The claim will open to view it, note in the upper right section of the screen above the Print icon, there is an
“Appeal” button. Click the Appeal button to begin the appeal process.
James
198.67

Appeal a Claim – Part Return (cont.)
6. The claim will open on the screen.
7. Under the Repair Information Section of the claim, the Appeal Reason has a drop down list to select the type
of Appeal and in this case it is an Adjustment.
• Adjustment – change the number or price to a new number or price
• Full Chargeback – completely zeroing out the entire claim
• Full Reversal – reversal of a full chargeback
There are 3 Appeal Reasons that can be used for an appeal:
1. Adjustment – change the existing info in the quantity, amount or
misc. to the correct amount
2. Full Chargeback – completely zeroing out the entire claim
3. Full Reversal – reversal of a full chargeback – can only be used
when the entire claim was charged back

Appeal a Claim – Part Return (cont.)
8. Scroll down the claim to change the Parts and Labor prices.
• Under the Parts Information section, select the Action code from the drop down list. In this case, we
selected “B” to zero out the returned part line.
• Under the Miscellaneous Information section, select the Action code “C” to change the tax amount.
Enter the Present (new) tax amount and the system will calculate the adjustment automatically.
There are 4 Action codes that can be used for an adjustment: 1. C is for change part, labor and or miscellaneous
2. B is for zeroing out a part and/or labor to a cost of $0.00
3. R is for reverse chargeback of the previous appeal 4. A is for adding a part, labor or miscellaneous to the claim
5A772
6890
REAR STABILIZER BAR
PCV ELBOW ASY
B
B
B
Causal PartNum

Appeal a Claim – Part Return (cont.)
9. Scroll down the page to the Repair Line Sub Total section. The changes are present in this area with the Prior
Paid, Present, Adjustment and Revised Total amounts.
10. Click the “PreValidate” button to verify information.
11. Finally, click the “Submit” button to save and submit the claim information into the OWS.
Table of Contents
The Adjustment column shows the difference in price
and the Revised Total column shows the new total.
-10.31

Appeal a Claim – Core Return In this example, the claim was entered and paid; however, the customer is returning the core on this claim and is
refunded the core cost. Note that this example is to show what information is needed to complete the appeal
(chargeback) of a claim with core cost.
1. On the Home page of the OWS website, click the “View Claim Status Report” button to start the
appeal process.
2. The Claim Status Report screen will appear.
3. Enter Repair Order Number, VIN, From Date AND to Date, or Repair Order Open Date and then click
the Inquire button to submit the search parameters.
105412
08/29/2016 08/30/2016

Appeal a Claim – Core Return (cont.)
4. The Claim Status Report will show the Dispositioned Claims (paid). Double click the Repair Order that
you need to make the price adjustments to.
5. The claim will open to view it, note in the upper right section of the screen above the Print icon, there is an
“Appeal” button. Click the Appeal button to begin the appeal process.
307.40 9513325

Appeal a Claim – Core Return (cont.)
6. The claim will open on the screen.
7. Under the Repair Information Section of the claim, the Appeal Reason has a drop down list to select the type
of Appeal and in this case it is an Adjustment.
• Adjustment – change the number or price to a new number or price
• Full Chargeback – completely zeroing out the entire claim
• Full Reversal – reversal of a full chargeback
There are 3 Appeal Reasons that can be used for an appeal:
1. Adjustment – change the existing info in the quantity, amount or
misc. to the correct amount
2. Full Chargeback – completely zeroing out the entire claim
3. Full Reversal – reversal of a full chargeback – can only be used
when the entire claim was charged back

Appeal a Claim – Core Return (cont.)
8. Scroll down the claim to change the Parts and Labor prices.
• Under the Parts Information section, select the Action code from the drop down list. In this case, we
selected “B” to zero out the line if all cores were returned or “C” for change if the quantity changed.
• Under the Miscellaneous Information section, select the Action code “C” to change the tax amount.
Enter the Present (new) tax amount and the system will calculate the adjustment automatically.
There are 4 Action codes that can be used for an adjustment: 1. C is for change part, labor and or miscellaneous
2. B is for zeroing out a part and/or labor to a cost of $0.00
3. R is for reverse chargeback of the previous appeal 4. A is for adding a part, labor or miscellaneous to the claim
CORE
Causal PartNum

Appeal a Claim – Core Return (cont.)
9. Scroll down the page to the Repair Line Sub Total section. The changes are present in this area with the Prior
Paid, Present, Adjustment and Revised Total amounts.
10. Click the “PreValidate” button to verify information.
11. Finally, click the “Submit” button to save and submit the claim information into the OWS.
Table of Contents
The Adjustment column shows the difference in price
and the Revised Total column shows the new total.
-37.10

Index
Service Advisor Guide - Penske Vehicles enrolled in Ford Fleet Care 88 Parts Department Guide - National Fleet Parts Pricing Program 90 HERZOG DOT Inspection Process 94 Frequently Asked Questions 95 Claim Entry Tips and Reminders 96 Helpful Hints for Ford Fleet Care Claim Entry 97
Table of Contents

Service Advisor Guide - Penske Vehicles enrolled in Ford Fleet Care Program
To identify a Penske Vehicle enrolled in Ford Fleet Care use OASIS
Verify active enrollment in the Ford Fleet Care Program by entering the VIN in OASIS; if the system is unavailable contact Ford Fleet Program Headquarters at 800-367-3221.
NOTE: Penske participates in the National Fleet Parts Pricing Program and as such should receive parts pricing not to exceed Ford Suggested Fleet Pricing for both Service and Wholesale Parts Department transactions through participating Ford and Lincoln dealerships.
Prepare Estimate and Obtain Approval
Contact the Penske Fleet Administrator for approval PRIOR to performing the repair when the estimated Total Customer Paid Repair amount (including applicable CORE charges) exceeds the Penske Prior Approval Limit.
A Penske authorization for service will consist of the district / location number in the first 6 positions followed by numbers, up to 6 numbers Example: 067310789789
If the estimate changes, contact the Penske Fleet Administrator for approval for the added costs. Repairs performed without authorization or that exceed the authorized amount will be charged back.
NOTE: Ford Protect Extended Service Plan deductibles do not require an authorization code.
Submit for Payment
Submit a Ford Fleet Care claim in OWS using either Program Code below depending on vehicle make:
QFC (Ford, Lincoln, and Mercury Vehicles) QFCC (Competitive Make Vehicles)
Claiming instructions are available in the Dealer Program Manual located at www.fleetcare.ford.com.
For claim questions contact Ford Fleet Program Headquarters @ 1-800-367-3221.
TAX NOTE: A Tax entry is required. Enter Tax as $0 for tax exempt status
IMPORTANT: Core Information
If CORE was included in the Purchase Order Estimate it must be included in
the claimed amount.
IMPORTANT:
Retail Repair Order Information
Drivers must sign and be provided with a copy of the Retail Repair Order indicating
the amount Penske will be billed. DO NOT provide a No Charge Warranty Repair
Order claim copy – this will result in a chargeback of the claim.

Service Advisor Guide - Penske Vehicles enrolled in Ford Fleet Care Program (cont.)
Table of Contents
IMPORTANT FLEET PRUCHASE ORDER NOTE:
Ensure your DSP Software version accommodates 13 character PO #’s

Parts Department Guide for Penske - National Fleet Parts Pricing Program
Penske Truck Leasing is a participant of the Ford National Fleet Parts Pricing (NFPP) program and as such should receive
parts pricing “not to exceed” Ford Suggested National Fleet Pricing for both Service and Wholesale Parts Department
transactions.
In combination with the NFPP program, Penske Truck Leasing has elected to use the Ford Fleet Care Program as their
billing and payment option to your dealership.
This replaces payment made by “P – card” commonly referred to as PEMS and/or FORD X.
The following provides the required information your dealership will need to obtain from the Penske Truck Leasing
location and the steps to submit for payment.
Step 1: Obtain an Account Billing Code
Obtain the Ford Fleet Care Account Billing Code from the Penske Truck Leasing location
• The Account Billing code will be 11 characters in length
• Position 1: A capital ‘Q’
• Positions 2-4: A series of numbers
• Positions 5-6: A capital ‘FC’
• Positions 7-11: A series of numbers
Step 2: Obtain a Purchase Order
Obtain a Purchase Order for the full amount of the transaction including any applicable CORE or freight charges. All part
purchases require approval
1. A Penske Truck Leasing Purchase Order for Wholesale Parts will consist of:
• Positions 1-6: Penske Truck Leasing district / location number
• Positions 7-8: A capital ‘PN’
• Positions 9-13: A series of computer assigned numbers
(There may be a range of 1 to 5 numbers after the ‘PN’)
2. Be sure to include (zero) 0’s when provided at the beginning or end of a PO
IMPORTANT:
Purchase Order
Information
A Penske representative must sign and be provided with a copy of the Purchase Order
indicating the amount Penske will be billed. DO NOT provide a No Charge Purchase
Order copy – this will result in a chargeback of the claim.
IMPORTANT:
DSP Software Information
Ford Fleet Care Account Billing Code Example: Q999FC99999
PO Example: 067310PN2536
Ensure your DSP Software version accommodates 13 character PO #’s
Parts Department Guide

Parts Department Guide for Penske - National Fleet Parts Pricing Program (cont.)
Step 3: Submit for Payment
1. After clicking the “Enter a Claim” button on the Home Page, enter the VIN, Vehicle, Service Advisor
ID, Repair Order Number, Repair Order Open Date, Odometer at Repair Order Open, select “M” for
miles or “KM” for kilometers, Special Use Vehicle if applicable and License Location (State).
2. Click the “Create” button to continue entering the claim.
3. The information will populate into the “Repair Order Creation” screen in the top section.
4. Enter the additional information in the Repair Information section including the Repair Line Number, Claim
Type (61-FLEET), Sub-Code (QFCP for Ford/Lincoln/Mercury vehicles with parts and labor OR QFCP for Part
purchase ONLY), Repair Line Completion Date, Odometer Reading at Repair Completion with M or KM
selected from the drop down, Customer Concern Code (A99), Condition Code (82), License Number, Driver
Name, Driver ID, Fleet Company Name, and Fleet Approval Amount are mandatory fields and the rest are if
applicable to the claim. If the total repair amount exceeds the approval amount in OASIS, contact the
number provided in OASIS to obtain a P.O. number from the Fleet which should be entered in the Fleet
Purchase Order Num field.
Service Advisor ID has 9 digits. Add zeros before the number to make it 9 digits long.
P P

Parts Department Guide for Penske - National Fleet Parts Pricing Program (cont.)
5. Scroll down to the Comments section of the claim. Enter the Customer Comments and detailed Technicians
Comments.
6. If using OSP, OSL, Misc. or Other an explanation is needed in the Technicians Comments section to assist the
claim getting approved the first submission.
7. Add the parts used in the Parts Information section. Note: For each line/part, enter the quantity used and
total amount including mark up. The system will calculate the Unit Price automatically.
8. No labor cost is added to the Part Sale.
Enter Causal Code as PARTSALE
Enter CORE (If cost was included in PO)
PARTS TICKET #123123 SOLD STEERING GEER TO APRIL SAMPLE
F75Z 3540CRM STEERING GEAR
Causal PartNum

Parts Department Guide for Penske - National Fleet Parts Pricing Program (cont.)
9. Scroll down the webpage to the Miscellaneous Information section, add any Misc, Other and Tax into this
section. A tax line is required for every claim. If the customer is tax exempt, or if tax is not applicable, enter
amount as $0.00.
10. The Parts and Miscellaneous will total up in the Repair Line Sub Total automatically.
11. Click the PreValidate button to verify if additional information is needed or if there are any common errors
that require correction prior to submitting.
12. Click the submit button when the claim is ready to be submitted.
Questions: Contact Ford Fleet Program Headquarters at 1-800-367-3221 or by email at: [email protected]
Table of Contents
Enter FRGHT for Freight (If cost was included in PO)

HERZOG DOT Inspection Process This document is intended to provide information to assist with Department of Transportation (DOT) inspections using the Herzog Annual Vehicle Inspection Report. Questions regarding the adequacy of the inspection should be directed to Herzog directly. Ford Motor Company makes no representations regarding the sufficiency or compliance of the Herzog inspection process with DOT inspection requirements.
When a Herzog vehicle is presented for DOT inspection service, please follow the direction included below. Before proceeding with the inspection, the driver must present you with a DOT Safety Inspection Sticker. Please be sure to review the instructions on the reverse side of the sticker to ensure the inspection is completed appropriately.
To begin the Herzog DOT inspection process, you can download and print the Herzog Annual Vehicle Inspection Report from the Ford Fleet Care website (www.fleetcare.ford.com) or the Quick Lane Tire and Auto Center website (www.quicklane.dealerconnection.com). After reviewing the form and instructions provided, perform the inspection as indicated.
Herzog has preapproved up to 0.7 hours to perform a vehicle inspection
Herzog must be contacted for approval of additional time required to complete the
inspection (including completion of the form and sticker application)
If the total inspection and associated repairs exceed $250, approval (PO) must be obtained from the driver or by
calling Ford Fleet Program Headquarters (800-367-3221) for the appropriate approving Herzog location.
Job Code and Cost Code must be obtained from the driver before contacting Herzog
Upon completion of the annual vehicle inspection, complete the DOT Safety Inspection Sticker and affix to the vehicle as shown in the illustration below.
When completing the form, vehicle inspector (technician) should note the following:
The Annual Vehicle Inspection – Inspector Certification form may need to be completed (if one has not been
completed previously). The form can be found on the Ford Fleet Care website.
Document the vehicle road flare kit and secured fire extinguishing device presence as applicable on the inspection
report form. If the devices are not present for inspection, note “Needs Repair” and inform driver of his
responsibility to acquire for DOT & Herzog policy compliance.
For any items that are not applicable, please indicate "NA" as appropriate on the inspection report form.
A Herzog vehicle may also have a trailer that requires inspection. A separate Annual Vehicle Inspection Report
should be completed for the trailer. For areas that are not applicable to a trailer, please indicate "NA" as
appropriate on the inspection report form. For all other items, a reasonable visual inspection should be performed.
Herzog has preapproved up to 0.7 hours to perform a trailer inspection.
After the Annual Vehicle Inspection Report form(s) have been completed, the original form and RO must be provided to the driver for retention in the vehicle. A copy should be faxed to Ford Fleet Program Headquarters at the following number: (313) 390-3555. An additional copy should also be kept for the service file.
Table of Contents
DOT Safety Inspection
Sticker Placement

Dealer Frequently Asked Questions
Fleet Customer How can a customer update Ford Fleet Care account information or add/delete vehicles? Customers and Dealers may contact Ford Fleet Care Headquarters for any account or vehicle questions or requests. How does a customer resolve questions about a Ford Fleet Care monthly bill? Contact Ford Fleet Care Headquarters for assistance.
Dealership How do I get help entering a Ford Fleet Care Claim or ask questions regarding a chargeback? Download the Dealer Program Manual from www.fleetcare.ford.com, under the “My Ford Fleet Care” tab, select “Manuals/Guides” or contact Ford Fleet Program Headquarters for assistance. Who can I contact with National Fleet Parts Program Billing through Ford Fleet Care Questions? Contact your FCSD Region Representative. General Program questions can be directed to Ford Fleet Program Headquarters at (800) 367-3221. Are Ford Fleet Care billed parts purchases eligible for wholesale incentives (WINS)? Yes. Parts billed through Ford Fleet Care and purchased using the Ford Fleet Care Parts program are eligible - provided they meet the requirements outlined in the Ford Parts Policy and Procedure Manual. It can be located on FMCDealer.com: Select: Parts and Service Tab Select: Parts Department Tools Link Select: Procedures and Manuals Link Select: Dealer Parts Policy and Procedure Manual Select: 2200 Incentives & Allowances
Additional information is also available on Wins-on-the-web; simply access the site by selecting the WINS link or contact
WINS Program Headquarters at (734) 713-3437.
Ford Fleet Care Program Headquarters Contact Information
Website: www.fleetcare.ford.com
Email: [email protected] Phone: 800-367-3221 Fax: 313-390-3555
Mail: Ford Fleet Care Program Headquarters, 19855 W. Outer Drive #500E, Dearborn, MI 48124
Table of Contents

Claim Entry Tips and Reminders
Ford Fleet Care Claims
Verify the fleet customer pre-set authorization limit on OASIS before performing any repair work. If the repair exceeds the authorization amount, contact the customer using the information located in OASIS. A Purchase Order Number or Approval Code should be obtained. This number must be entered when submitting the claim for payment.
Be aware of state tax laws regarding customer paid repairs. Ford Fleet Care repairs should be treated like retail
repairs. If your dealership taxes retail repairs, most likely, fleet repairs should also be taxed. Ensure that tax is entered on the OWS claim when submitting for payment.
If the fleet is tax exempt, remember to note the tax exemption number on the repair write-up. Enter the tax on the claim at zero dollars.
Before submitting a repair for payment, confirm Ford warranty or Ford Protect Extended Service Plan coverage. OASIS will display any Ford Protect Extended Service Plan coverage registered to the vehicle.
Due to variations in DSP software, Ford Fleet Program Administration recommends that all Ford Fleet Care claims be submitted directly in One Warranty Solution (OWS). By submitting claims directly, dealers have the ability to manually mark up for parts, resulting in a reduction of Ford Fleet Care claims that require an appeal.
All customer and technician comments entered with Ford Fleet Care claims are passed to the customer as part of their Ford Fleet Care billing documentation. Please ensure that comments entered are descriptive and appropriate in documenting the customer concern and technician activity on a repair.
OWS will not mark-up parts on Ford Fleet Care claims, this is a manual process.
Remember to clear error messages for all claims (see the Error Code Guide in the OWS User Manual).
Parts Billing Claims
ALL parts purchases require authorization from the fleet customer.
Customer Loyalty Program (CLP) Claims
Directions for submitting CLP claims are located in the OWS Manual. Chapter 3 – Special Claim Preparation provides specific entry assistance for CLP claims for fleet customers. The most current version of the OWS Manual can be viewed and downloaded online from FMCDealer.com at the link below:
https://team.extsp.ford.com/sites/OneWarrantySolution/EXTDOCS/Dealer%20Launch%20Documents/Forms/AllItems.aspx
Ford Fleet Care Program Headquarters Contact Information
Website: www.fleetcare.ford.com
Email: [email protected] Phone: 800-367-3221 Fax: 313-390-3555
Mail: Ford Fleet Care Program Headquarters, 19855 W. Outer Drive #500E, Dearborn, MI 48124
Table of Contents

Helpful Hints for Ford Fleet Care Claim Entry
Review OASIS for coverage and Fleet Account Pre-Set Authorization Limits prior to performing the repair.
Contact the Fleet Administrator if the cost exceeded the Fleet Pre-Set Authorization Limit.
Submitting a Claim for Customer Paid Repairs
• Claims require the complete Ford or Motorcraft Part Number(s) being serviced or replaced. • Labor code L001 is the letter L with 2 zeros and then the number 1. The letter “O” is not accepted.
Submitting a Claim for Customer Paid Repairs with OSP, OSL, Misc. and Other
• A description of the codes are required in the Technician comments. The comments are to include the code, the amount and the description of each part or labor billed.
Example: “OSP for $10.50 = competitive make air filter”
Submitting a Claim for Customer Paid Maintenance Services
• Enter the full Ford or Motorcraft Part Number being serviced or replaced as the causal part for maintenance services. Do not use MAINT as the causal part.
Submitting a Claim for Non-Ford Vehicles
• Submit claims using program code QFCC with causal part COMPMAKE and labor operation L001. • Ford or Motorcraft base part number of all parts repaired or replaced must be included in the claim.
Submitting a Claim for Over the Counter Parts Purchases
• Enter the 11-character billing account number provided by the Fleet customer. • The billing account number format is “Q###FC#####” for example “Q000FC12345”. Use zero, not the
letter “O” for any numbers.
Submitting an Appeal
• Part numbers entered incorrectly cannot be changed. Debit the existing part line and add a new part line with the correct part number.
• Cores must be billed against the original sale invoice. Cores cannot be billed on a separate R.O.
Note: DO NOT…
• Include Ford Warranty repairs, Ford Protect repairs or Ford Protect deductibles in the repair cost estimate.
• Use the same P.O. for second repair or repairs for which the claim value has changed without reconfirming with the Fleet Administrator.
Table of Contents