Embed Size (px)
Citation preview

Concert Performer Series Digital Piano
Owner’s Manual
Model: CP205/CP185

II
All descriptions and specifications in this manual are subject to change without notice.

III
Important Safety Instructions
WARNING - When using electric products, basic precautions should always be followed, including the following.
CAUTIONRISK OF ELECTRIC SHOCK
DO NOT OPEN
AVIS : RISQUE DE CHOC ELECTRIQUE - NE PAS OUVRIR.
TO REDUCE THE RISK OF ELECTRIC SHOCK, DO NOT REMOVE COVER (OR BACK).NO USER-SERVICEABLE PARTS INSIDE. REFER SERVICING TO QUALIFIED SERVICE PERSONNEL.
The lighting flash with arrowhead symbol, within an equilateral triangle, is intended to alert the user to the presence of uninsulated "dangerous voltage" within the product's enclosure that may be of sufficient magnitude to constitute a risk of electric shock to persons.
The exclamation point within an equilateral triangle is intended to alert the user to the presence of important operating and maintenance (servicing) instructions in the leterature accompanying the product.
WARNINGTO REDUCE THE RISK OF FIRE OR ELECTRIC SHOCK, DO NOT EXPOSE THIS PRODUCT TO RAIN OR MOISTURE.
SAVE THESE INSTRUCTIONS
Read all the instructions before using the product.
denotes that care should be taken.The example instructs the user to take care not to allow fingers to be trapped.
denotes a prohibited operation.The example instructs that disassembly of the product is prohibited.
denotes an operation that should be carried out.The example instructs the user to remove the power cord plug from the AC outlet.
Examples of Picture Symbols
WARNING Indicates a potential hazard that could result in death or serious injury if the product is handled incorrectly.
120V 240V230V
Do not use this product near water - for example, near a bathtub, washbowl, kitchen sink, in a wet basement, or near a swimming pool, or the like.
Do not attempt to service the product beyond that described in the user-maintenance instructions. All other servicing should be reffered to qualified service personnel.
Do not touch the power plug with wet hands. There is a risk of electrical shock.Treat the power cord with care as well. Stepping on or tripping over it can break or short-circuit the wire inside.
The product should be connected to a power supply only of the type described in the operatiing instructions or as marked on the product.
Pulling the AC power cord itself may damage the cord, causing a fire, electric shock or short-circuit.
When disconnecting the AC power cord's plug, always hold the plug and pull it to remove it.
INSTRUCTIONS PERTAINING TO A RISK OF FIRE, ELECTRIC SHOCK, OR INJURY TO PERSONS

IV
CAUTION Indicates a potential hazard that could result in injury or damage to the product or other property if the product is handled incorrectly.
Do not use the product in the following areas.
● Areas, such as those near windows, where the product is exposed to direct sunlight
● Extremely hot areas, or close to heat sources such as radiators, heat registers, or other products that produce heat.
● Extremely cold areas, such as outside● Extremely humid areas● Areas where a large amount of sand or dust is present● Areas where the product is exposed to excessive vibrations
Using the product in such areas may result in product breakdown.
This product in combination with an amplifier and headphones or speakers, may be capable or producing sound level that could cause permanent hearing loss. Do not operate for a long period of time at a high volume level or at a level that is uncomfortable. If you experience any hearing loss or ringing in the ear, you should consult an audiologist.
This product may be equipped with a polarized line plug (one blade wider than the other). This is a safety feature. If you are unable to insert the plug into the outlet, contact an electrician to replace your obsolete outlet.Do not defeat the safety purpose of the plug.
Before connecting cords, make sure that the power to this product and other devices is turned OFF.Failure to do so may cause breakdown of this product and other devices.
When connecting the AC power cord and other cords, take care not to get them tangled.Failure to do so may damage them, resulting in fire, electric shock or short-circuit.
Do not stand on the product or exert excessive force.Doing so may cause the product to become deformed or fall over, resulting in breakdown or injury.
The product should be located so that its location or position does not interfere with its proper ventilation.
Keep the instrument away from electrical motors, neon signs, fluorescent light fixture, and other sources of electrical noises.
OFF
Do not lean against the product.Doing so may cause the product to move unexpectedly, resulting in injury.
Take care not to drop the product.Please note that the product is heavy and must be handled by more than one person.Dropping the product may result in breakdown.
Always turn the power off when the instrument is not in use. The product is not completely disconnected from the power supply even when the power switch is turned off. The power supply cord of the product should be unplugged from the outlet when left unused for a long period of time.
OFF
Care should be taken so that objects do not fall and liquids are not spilled into the enclosure through openings. The product shall not be exposed to dripping or splashing. No objects filled with liquids, such as vases, shall be placed on the product.

V
The product should be serviced by qualified service personnel when:
● The power supply cord or the plug has been damaged.● Objects have fallen, or liquid has been spilled into the product.● The product has been exposed to rain.● The product does not appear to operate normally or exhibits a
marked change in performance.● The product has been dropped, or the enclosure damaged.
Do not wipe the product with benzene or thinner.Doing so may result in discoloration or deformation of the product.When cleaning the product, put a soft cloth in lukewarm water, squeeze it well, then wipe the product.
To reduce the risk of injury, close supervision is necessary when a product is used near children.
Close the topboard when the instrument is not in use. Should an abnormality occur in the product, immediately turn the power OFF, disconnect the power cord plug, and then contact the shop from which the product was purchased.
CAUTION:To prevent electric shock, match wide blade of plug to wide slot, fully insert.
ATTENTION:Pour viter les chocs lectriques, introduire la lame la plus large de la fiche dans la borne correspondante de la prise et pousser jusqu’au fond.
Instruction for AC power cord (U.K.)Do not plug either terminal of the power cord to the ground of the AC outlet on the wall.
FCC Information
This equipment has been tested and found to comply with the limits for a Class B digital device, pursuant to Part 15 of the FCC Rules. These limits are designed to provide reasonable protection against harmful interference in a residential installation. This equipment generates, uses and can radiate radio frequency energy and, if not installed and used in accordance with the instructions, may cause harmful interference to radio communications. If this equipment does cause harmful interference to radio or television reception, which can be determined by turning the equipment off and on, the user is encouraged to try to correct the interference by one or more of the following measures:
¥ Reorient or relocate the receiving antenna.¥ Increase the separation between the equipment and receiver.¥ Connect the equipment into an outlet on a different electrical circuit from the
receiver.¥ Consult the dealer or an experienced radio/TV technician for help.
Canadian Radio Interference Regulations
This instrument complies with the limits for a class B digital apparatus, pursuant to the Radio Interference Regulations, C.R.C., c. 1374.

Kawai Concert Performer Series Digital PianoVI
Table of Contents
Parts and Names . . . . . . . . . . . . . . . . . . . . . . . . . . . . . 2
Overview
LCD Screen . . . . . . . . . . . . . . . . . . . . . . . . . . . . . . . 6
Select Buttons . . . . . . . . . . . . . . . . . . . . . . . . . . . . . . 6
Dial . . . . . . . . . . . . . . . . . . . . . . . . . . . . . . . . . . . . . . 8
Basic Controls
Selecting a Part to Play . . . . . . . . . . . . . . . . . . . . . 9
Splitting the keyboard. . . . . . . . . . . . . . . . . . . . . . 10
Selecting Sounds . . . . . . . . . . . . . . . . . . . . . . . . . 11
Mixer . . . . . . . . . . . . . . . . . . . . . . . . . . . . . . . . . . 13
Effects . . . . . . . . . . . . . . . . . . . . . . . . . . . . . . . . . . 15
Effect Types . . . . . . . . . . . . . . . . . . . . . . . . . . . . . . 19
Effect Priority Guidelines . . . . . . . . . . . . . . . . . . . 20
Transpose and Octave Shift . . . . . . . . . . . . . . . . 22
Metronome . . . . . . . . . . . . . . . . . . . . . . . . . . . . . . 24
Piano Only . . . . . . . . . . . . . . . . . . . . . . . . . . . . . . 25
Using a Style
Selecting and Playing a Style . . . . . . . . . . . . . . . 26
Fill-In and Variation . . . . . . . . . . . . . . . . . . . . . . . 28
Auto Accompaniment System . . . . . . . . . . . . . . . 28
Bass Inversion . . . . . . . . . . . . . . . . . . . . . . . . . . . . 29
1-2 Play . . . . . . . . . . . . . . . . . . . . . . . . . . . . . . . . 30
Registration . . . . . . . . . . . . . . . . . . . . . . . . . . . . . 31
Registration Groups . . . . . . . . . . . . . . . . . . . . . . . 31
Style Lock . . . . . . . . . . . . . . . . . . . . . . . . . . . . . . . . 35
Song Stylist . . . . . . . . . . . . . . . . . . . . . . . . . . . . . 36
Harmony . . . . . . . . . . . . . . . . . . . . . . . . . . . . . . . 40
Recording a Song
Easy Recording . . . . . . . . . . . . . . . . . . . . . . . . . . 42
Part Status . . . . . . . . . . . . . . . . . . . . . . . . . . . . . . . 44
Saving the song . . . . . . . . . . . . . . . . . . . . . . . . . . . 45
Erasing the song . . . . . . . . . . . . . . . . . . . . . . . . . . 45
Advanced Recording . . . . . . . . . . . . . . . . . . . . . . 47
Real-time Recording . . . . . . . . . . . . . . . . . . . . . . . 48
Mixer . . . . . . . . . . . . . . . . . . . . . . . . . . . . . . . . . . . 49
Track Settings . . . . . . . . . . . . . . . . . . . . . . . . . . . . 51
Introduction
Thank you for purchasing the Kawai Concert Performer(CP) Series Ensemble Digital Piano.
The CP Series piano has been designed to provide you withthe ultimate musical experience, no matter your skill level.Featuring superbly realistic instrument tones and the most finelycrafted keyboard in its class, the CP is a unique musical instrumentresulting from the combination of Kawai’s seventy-plus yearsexperience in making acoustic pianos along with cutting-edgedigital music technologies.
With over 900 different instrument and drum sounds at yourdisposal, you will have the flexibility to perform any kind of musicranging from traditional to contemporary. The Auto-Accompaniment Styles provides the enjoyment of playing rich,fully orchestrated music in hundreds of musical genres. Thanksto the Song Stylist feature, you will never have to worry aboutfinding the best sounds and style to perform a particular song.
The Concert Performer incorporates many professionalfeatures, such as a 16-track Recorder, Microphone Input, and a3.5-inch Floppy Disk Drive. For the non-player, Kawai’s uniqueConcert Magic feature creates the thrill of being a performingmusician simply by tapping any key on the keyboard.
Finally, the CP205 is the world’s first ensemble piano witha CD-R drive, allowing anyone to make their own audio CDrecordings right on the instrument. The Concert Performer offerstremendous opportunities for anyone who is interested in learning,playing, and listening to music. Please read this manualthoroughly and keep it handy as a reference so that you can getthe most out of this incredible instrument.
We hope you enjoy every moment that you spend with yourConcert Performer.

Introduction VII
Loop Settings . . . . . . . . . . . . . . . . . . . . . . . . . . . . . 52
Style Paste . . . . . . . . . . . . . . . . . . . . . . . . . . . . . . . 53
Punch-In Recording . . . . . . . . . . . . . . . . . . . . . . . 54
Step Recording . . . . . . . . . . . . . . . . . . . . . . . . . . . . 57
Song Edit . . . . . . . . . . . . . . . . . . . . . . . . . . . . . . . . 60
Bar Editing . . . . . . . . . . . . . . . . . . . . . . . . . . . . . . 61
Event Edit . . . . . . . . . . . . . . . . . . . . . . . . . . . . . . . 74
Creating Your Own Styles
Conductor . . . . . . . . . . . . . . . . . . . . . . . . . . . . . . 76
Making a New Style . . . . . . . . . . . . . . . . . . . . . . . 82
Auto-accompaniment System . . . . . . . . . . . . . . . . 86
Making a Style with Phrase Combination . . . . . 89
Style Convert . . . . . . . . . . . . . . . . . . . . . . . . . . . . 92
Editing Sounds
Editing the Preset Effect Settings . . . . . . . . . . . . 96
Making a User Sound . . . . . . . . . . . . . . . . . . . . . 98
Playing Songs from a Floppy Disk
About songs on Floppy Disk . . . . . . . . . . . . . . . 102
Selecting a Song from Disk . . . . . . . . . . . . . . . . 103
Controlling Playback of a Song . . . . . . . . . . . . . 105
Playing with Concert Magic
Selecting a Concert Magic Song . . . . . . . . . . . . 108
Performing a Concert Magic Song . . . . . . . . . . 109
Concert Magic Song Arrangements . . . . . . . . . . 113
Creating a Concert Magic Song . . . . . . . . . . . . 114
System Menu . . . . . . . . . . . . . . . . . . . . . . . . . . . . . . 116
Tuning . . . . . . . . . . . . . . . . . . . . . . . . . . . . . . . . . 118
Touch Curve . . . . . . . . . . . . . . . . . . . . . . . . . . . . . 119
System EQ . . . . . . . . . . . . . . . . . . . . . . . . . . . . . . 122
Virtual Voicing . . . . . . . . . . . . . . . . . . . . . . . . . . 124
Resonance . . . . . . . . . . . . . . . . . . . . . . . . . . . . . . 125
Concert Magic Sound . . . . . . . . . . . . . . . . . . . . . 126
Pedal Assign . . . . . . . . . . . . . . . . . . . . . . . . . . . . . 127
Fill-in Mode . . . . . . . . . . . . . . . . . . . . . . . . . . . . . 130
Solo Settings . . . . . . . . . . . . . . . . . . . . . . . . . . . . . 131
Video Out . . . . . . . . . . . . . . . . . . . . . . . . . . . . . . . 132
Effect for Sound . . . . . . . . . . . . . . . . . . . . . . . . . . 133
Temperament . . . . . . . . . . . . . . . . . . . . . . . . . . . . 134
MIDI Menu . . . . . . . . . . . . . . . . . . . . . . . . . . . . . . 138
Power Up Settings . . . . . . . . . . . . . . . . . . . . . . . . 143
Soft Reset . . . . . . . . . . . . . . . . . . . . . . . . . . . . . . . 144
Software Version . . . . . . . . . . . . . . . . . . . . . . . . . 145
Display Control . . . . . . . . . . . . . . . . . . . . . . . . . 146
Mic Harmony and Effect
Mic Harmony . . . . . . . . . . . . . . . . . . . . . . . . . . . 148
About Mic Harmonis . . . . . . . . . . . . . . . . . . . . . . 150
Mic Effect . . . . . . . . . . . . . . . . . . . . . . . . . . . . . . 152
Floppy Disk Operations
Disk Menu . . . . . . . . . . . . . . . . . . . . . . . . . . . . . 156
Saving Data to a Floppy Disk . . . . . . . . . . . . . . 157
Loading Data from a Floppy Disk . . . . . . . . . . 160
Erasing Data from a Floppy Disk . . . . . . . . . . . 163
Formatting a Floppy Disk . . . . . . . . . . . . . . . . . 164
CD-R Operations (CP205 only) . . . . . . . . . . . . . . . . 166
Playing an audio CD . . . . . . . . . . . . . . . . . . . . . 167
Recording onto a CD . . . . . . . . . . . . . . . . . . . . . 169
Closin (Finalizing) Your CD . . . . . . . . . . . . . . 171
Getting Assistance: Using Help and Demo
Using the Help . . . . . . . . . . . . . . . . . . . . . . . . . . 172
Using the Demonstrations . . . . . . . . . . . . . . . . . 174
Playing Piano Music . . . . . . . . . . . . . . . . . . . . . . . . 177
Appendices
List of Preset Sound . . . . . . . . . . . . . . . . . . . . . . 180
List of Style . . . . . . . . . . . . . . . . . . . . . . . . . . . . . 185
List of Song Stylist . . . . . . . . . . . . . . . . . . . . . . . 187
Concert Magic Songs . . . . . . . . . . . . . . . . . . . . . 192
Table of Chord Form . . . . . . . . . . . . . . . . . . . . . 196
Example of Connection . . . . . . . . . . . . . . . . . . . 198
USB . . . . . . . . . . . . . . . . . . . . . . . . . . . . . . . . . . . 200
MIDI Data Format . . . . . . . . . . . . . . . . . . . . . . . 201
MIDI Implementation Chart . . . . . . . . . . . . . . . 206
Specifications . . . . . . . . . . . . . . . . . . . . . . . . . . 207

Kawai Concert Performer Series Digital PianoP. 2
9. Style (page 26)These buttons are used to select an Accompaniment Style to play along with.
10. Accompaniment (page 28)These buttons are used to turn the Auto-Accompaniment function on/off, and selectthe Auto-Accompaniment mode.
11. 1-2 Play (page 30)This button is used to automatically choose an appropriate sound and setup for theselected style.
12. Metronome (page 24)This button is used to turn the Metronome on/off.
13. Tap (page 24, 26)This button is used to tap in the desired tempo for a song or Style.
14. Sync/Fade out (page 27)When active, the accompaniment style will start as soon as you play a note or chordon the keyboard. Press this button while a Style is playing to fade in or out of theStyle.
15. Start/Stop (page 27)This button is used to start and stop the accompaniment style.
1. PowerTurns the piano on/off.
2. Master Volume SliderThis slider is used to adjust the overall volume level of the instrument.
3. Accomp/Song Volume SliderThis slider is used to adjust the volume level of the Auto Accompaniment Styles.Also used to adjust the volume level of a song played from the CP Recorder or directlyfrom a floppy disk. This slider does not affect the Master Volume Slider setting.
4. Demo (page 174)This button is used to select the built-in demo songs and function demos whichexplain important features of the CP piano.
5. Concert Magic (page 108)This button is used to select the built-in Concert Magic songs.
6. Song Stylist (page 36)This button is used to select the Song Stylist Registrations.
7. Piano Music (page 177)This button is used to select the built-in piano music.
8. Style Conductor (page 76)These buttons are used to modify or create your own Accompaniment Styles.
SPECIAL
METRONOME
DEMO
CONCERTMAGIC
SONGSTYLIST
VOLUMEMASTER ACCOMP/SONG
CONDUCTOR50’S &60’S
CLASSICPIANO
TRADI-TIONAL
KIDS &HOLIDAY
TAP TEMPO
ACC ON/OFFBASSINVER
SYNC /FADE OUT
START/STOP
EDIT
RESET
USER
WALTZ
BALLAD COUNTRY
FULLKBD FINGERED
ONEFINGER
BLUES &GOSPEL
USER
BEAT
ACCOMPANIMENT
1 2 3
1 2 3
4
4
1-2PLAY
EXIT
HELP
STYLE
FILL IN
VARIATIONPIANOMUSIC
INTRO/ENDING1 2
SWING &BIG BAND
POP &ROCK
JAZZ &CONTEMP
LATIN &ISLAND
BROADWAYSOLOPIANO
INTIMATEPIANO
Parts and Names
1
2 3
4
5
6
7
8
12
13
14 15
9
16
1017
1819
20
22
11
Basic Controls P. 3
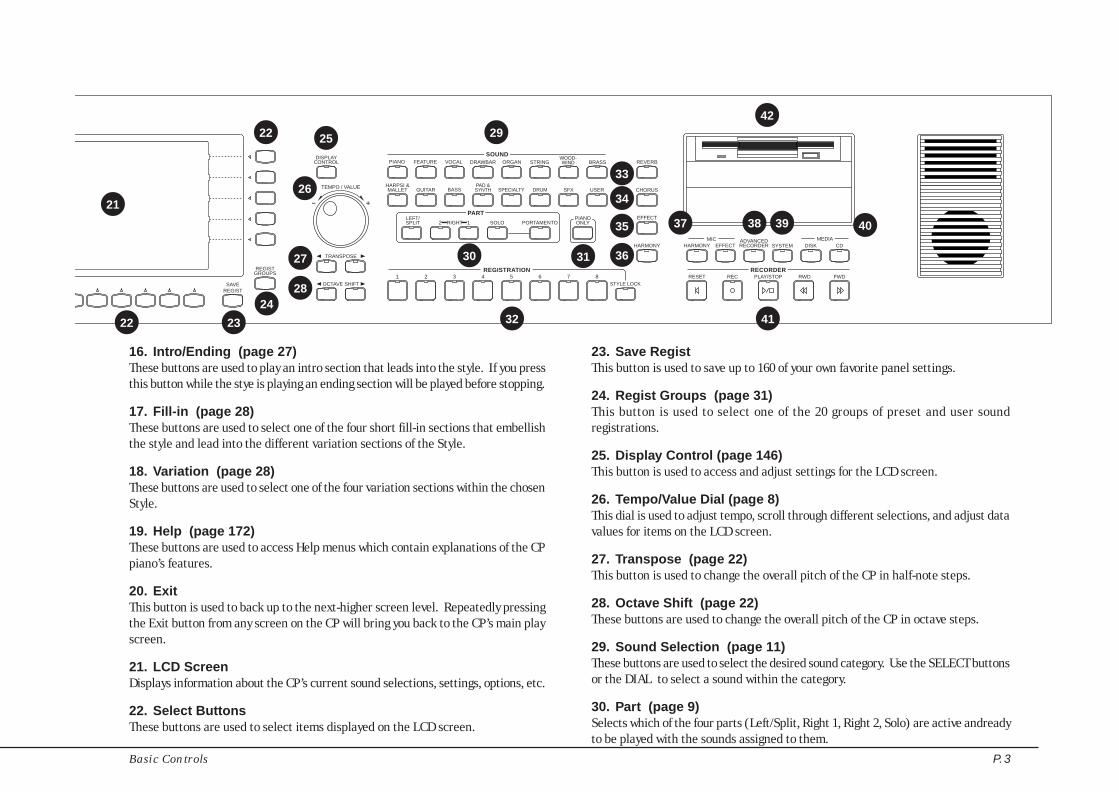
16. Intro/Ending (page 27)These buttons are used to play an intro section that leads into the style. If you pressthis button while the stye is playing an ending section will be played before stopping.
17. Fill-in (page 28)These buttons are used to select one of the four short fill-in sections that embellishthe style and lead into the different variation sections of the Style.
18. Variation (page 28)These buttons are used to select one of the four variation sections within the chosenStyle.
19. Help (page 172)These buttons are used to access Help menus which contain explanations of the CPpiano’s features.
20. ExitThis button is used to back up to the next-higher screen level. Repeatedly pressingthe Exit button from any screen on the CP will bring you back to the CP’s main playscreen.
21. LCD ScreenDisplays information about the CP’s current sound selections, settings, options, etc.
22. Select ButtonsThese buttons are used to select items displayed on the LCD screen.
23. Save RegistThis button is used to save up to 160 of your own favorite panel settings.
24. Regist Groups (page 31)This button is used to select one of the 20 groups of preset and user soundregistrations.
25. Display Control (page 146)This button is used to access and adjust settings for the LCD screen.
26. Tempo/Value Dial (page 8)This dial is used to adjust tempo, scroll through different selections, and adjust datavalues for items on the LCD screen.
27. Transpose (page 22)This button is used to change the overall pitch of the CP in half-note steps.
28. Octave Shift (page 22)These buttons are used to change the overall pitch of the CP in octave steps.
29. Sound Selection (page 11)These buttons are used to select the desired sound category. Use the SELECT buttonsor the DIAL to select a sound within the category.
30. Part (page 9)Selects which of the four parts (Left/Split, Right 1, Right 2, Solo) are active andreadyto be played with the sounds assigned to them.
SAVEREGIST
REGISTGROUPS
DISPLAYCONTROL
TEMPO / VALUE
TRANSPOSE
OCTAVE SHIFT4 5 6REGISTRATION
PIANOONLY
PART
SOUND PIANO DRAWBAR STRING
LEFT/SPLIT SOLO PORTAMENTO
ORGAN
BASS
BRASS
GUITARHARPSI &MALLET
WOOD-WIND
12 RIGHT
PAD &SYNTH SFXSPECIALTY USER
1 2 3 7 8STYLE LOCK
REVERB
CHORUS
EFFECT
HARMONY
RECORDER
EFFECT SYSTEMADVANCEDRECORDERHARMONY
RESET REC RWD FWDPLAY/STOP
CDDISK
FEATURE VOCAL
DRUM
MIC MEDIA
21
22
22
23
24
25
26
27
28
29
30
32
31
35
34
33
36
37 38 39 40
41
42

Kawai Concert Performer Series Digital PianoP. 4
Front TerminalsPedals
31. Piano Only (page 25)This button is used to automatically assign the Concert Grand sound to the Right 1part.
32. Registrations (page 31)These buttons are used to recall one of the eight panel settings available in thecurrently selected Registration group.
33. Reverb (page 15)This button turns on/off the Reverb. Press and hold the button to select the Reverbsettings menu.
34. Chorus (page 16)This button turns on/off the Chorus. Press and hold the button to select the Chorussettings menu.
35. Effects (page 18)This button turns on/off the Effects. Press and hold the button to select the Effectsettings menu.
36. Harmony (page 40)This button turns on/off the Harmony for the instrument sounds. Press and hold thebutton to select the Harmony settings menu.
37. MIC Harmony/Effect (page 148)This button turns on/off the MIC Harmony/Effect for the Microphone jack. Pressand hold the button to select the MIC Harmony/Effect settings menu.
38. Advanced Recorder (page 47)This button is used to access the Advanced Recorder functions.
39. System (page 116)This button is used to access the system settings menu.
40. Media Disk/CD (page 102, 156, 166)These buttons are used to access the Floppy Disk functions and CD-R Drive functions(CP205 only).
41. Recorder (page 42)Used to record and play back a song.
42. Disk DriveReads and writes data to a standard 3.5” floppy disk..
43. Soft PedalDepressing this pedal softens the sound and reduces its volume. This pedal canalso be assigned to control other functions. (See page 127)
43 44 45
46 47 48

Basic Controls P. 5
44. Sostenuto PedalDepressing this pedal after playing the keyboard and before releasing the keyssustains the sound of only the keys just played. This pedal can also be assigned tocontrol other functions. (See page 128)
45. Sustain PedalSustains the sound after lifting your hands from the keyboard. The sustain pedal iscapable of responding to half pedaling.
46. Headphone JacksThese jacks are used to connect up to two headphones to the CP piano.
47. Mic In VolumeThis knob adjusts volume level of the microphone input.
48. Microphone JackThis jack is used to connect a microphone or other comparable mic-level soundsource.
49. EXP PedalThis jack is used to connect an optional expression pedal.
50. Video OutThis jack is used to connect the CP to a TV set or external monitor display.
51. Line Out JacksThese jacks are used to provide stereo output of the CP’s sound to amplifiers, taperecorders or similar equipment. The audio signal coming through the LINE IN jacksis also routed to these jacks.
52. Line In JacksThese jacks are used to connect stereo outputs from other audio equipment orelectronic instruments to the CP’s speakers. The audio signal coming through thesejacks bypasses the CP’s volume control.
53. MIDI-USB SwitchSwitches between the MIDI jacks and USB jack.
54. MIDI JacksThese jacks are used to connect external MIDI devices to the CP. Enabled onlywhen the MIDI-USB switch is set to MIDI.
55. USB JacksThis jack is used to connect a personal computer to the CP. Enabled only when theMIDI-USB switch is set to USB.
56. Receptacle for Pedal CableThis jack is used to connect the cable from the pedal unit.
Rear Terminals
49 50 51 52 53 54 55 56

Kawai Concert Performer Series Digital PianoP. 6
OverviewThis manual provides you with all the information you will need inorder to take full advantage of the Concert Performer’s potential.Before you begin learning how to use the specific features, it isimportant to understand some of the basic ideas behind theinstrument’s design.
The Concert Performer has been designed to have an easy andintuitive user interface. However, the instrument has so many
features that it is simply impractical to have a dedicated button forevery single one. As a result, many features and functions areselected by choosing them from lists, or “menus”, that are presentedto you on the CP’s large display screen. Often times selecting anitem from a menu may access another “sub-menu” of optionsspecific to that item. This system of menus and sub-menus keepseverything logical and straightforward and becoming familiar withhow to make your way through them is very easy.
LCD ScreenThe LCD Screen is the window through which the Concert Performer communicates with you. Thelarge display size allows many items to be clearly displayed at the same time, allowing for not onlywords but graphics to be shown as well.
Select ButtonsMost of the buttons on the front panel are used to directly select a function on the CP that youwould like to work with. In most cases, the specific function name is printed on the front paneldirectly above the button. For example, there are buttons labeled 1-2 PLAY, FILL-IN, and so on. Inthis manual, references to these buttons are always printed in capital letters for clarity. Most ofthese buttons have an LED Indicator (small light) on them. This Indicator will be turned ON whena function is in use so that you can quickly see if that function is active.
There are 17 SELECT buttons surrounding the LCD screen that do not have labels printed next tothem because they do not have predetermined functions. Instead, they are used to select whateveritems are currently displayed next to them on the LCD screen. For example, a SELECT buttonmight be used to select an instrument sound on one screen, while on another screen the sameSELECT button might serve to activate a feature related to Floppy Disk or CD-R Drive operation.

Basic Controls P. 7
To keep things simple, this manual will refer to the five SELECT buttons along the left side of theLCD screen as L1-L5. Likewise, the five SELECT buttons along the right side of the screen will bereferred to as R1-R5. The seven SELECT buttons along the bottom of the screen, which are alsoknown as function buttons, will be referred to as F1-F7.
In some cases when you see an item displayed on the screen and press the L or R button next to it,that item on the screen will become highlighted (shown in reverse color) to indicate you haveselected that item. Sometimes a submenu screen relating to that item will be displayed and presentyou with further options.
When you press one of the F buttons, the corrosponding function on the LCD screen will behighlighted to indicate that it has been selected.
R1 Selects the SOLO Part. Use the F6, F7buttons, Sound buttons, or the Dial tochange the Sound.
R2 Selects the RIGHT1 Part. Use the F6, F7buttons, Sound buttons, or the Dial tochange the Sound.
R3 Selects the RIGHT2 Part. Use the F6,F7buttons, Sound buttons, or the Dial tochange the Sound.
No functions are assigned to the R4 and R5buttons on this screen.
"RIGHT1" is highlighted to indicate that this Partis now selected.
L1 Selects Style. Use the F2,F3buttons, Style buttons, or the Dialto change the active Style.
L2 Selects Tempo. Use the Dial or theTAP TEMPO button to change theTempo
L3 Selects the LEFT Part. Use the F6,F7buttons, Sound buttons, or theDial to change the Sound.
No functions are assigned to the L4 and L5buttons on this screen.
F1 Takes you to the MIXER settings screen.F2, F3 Selects a Style.F4, F5 Adjusts the volume level for the Part currently selected.F6, F7 Selects a sound for the selected Part. "Sound" is highlighted
to indicate this graphic button is active.
EXIT
HELP
SAVEREGIST
REGISTGROUPS

Kawai Concert Performer Series Digital PianoP. 8
DialThe Dial is used to change data values and scroll through options that are displayed on the LCDscreen.When you turn the Dial, you will notice that whatever item on the LCD screen is currently selected(highlighted) will be affected. Or in some cases when the screen presents you with a list of choices,turning the Dial will allow you to quickly scroll through the list until you arrive at your choice. Itcan also be used instead of the L, R, and F buttons as another way of selecting or changing an itemor value on the LCD screen.
TEMPO / VALUE

Basic Controls P. 9
Basic ControlsThis chapter discusses the basic operations that are used to playthe Concert Performer, such as sound selection, Part configurationand effect settings.
Selecting a Part to PlayWhen the CP’s main play screen is displayed (For example, when the CP is first turned on), you arepresented with four sound Parts that can be played from the keyboard. These four Parts are namedLEFT/SPLIT, RIGHT 1, RIGHT 2, and SOLO, and each one has an instrument sound assigned to it.You can selectively turn on/off any combination of these four Parts, allowing you to have up to fourdifferent sounds at the same time across the keyboard.Sounds assigned to Parts RIGHT 1, RIGHT 2 and SOLO will be layered on top of each other when allthree Parts are active at the same time. Activating the LEFT/SPLIT Part automatically splits thekeyboard so that only the sound that is assigned to the LEFT/SPLIT Part is heard when you play inthe lower octave keys. Each Part has a dedicated button on the front panel that selects and turnson/off that Part. You can Also select a Part by pressing the appropriate L or R button.
Selecting a Part is easy:
1) Press the PART button for the Part you wish to activate. The PART button LED will light.2) Press the PART button again to turn that Part off.
• If the LCD screen is currently showing the main play screen, you can tell which Parts are activeby looking at the name of the sound assigned to it. If the name of a sound is in large typeface,then the Part it is assigned to is active. If the sound name is displayed in small typeface, then thePart is not active.
L 1
L 2
L 3
L 4
R 1
R 2
R 3
R 4
This example indicates:
RIGHT1 is currently active
SOLO, RIGHT2, LEFT are inactive.

Kawai Concert Performer Series Digital PianoP. 10
Splitting the keyboard.When the LEFT/SPLIT Part is activated, the CP automatically splits the keyboard and only thesound assigned to the LEFT/SPLIT Part will be heard when you play below a specified key (splitpoint) on the keyboard. The default split point is between F2 and F#2 but you can freely change thesplit point to any key on the keyboard.
To change the split point:
1) Press the LEFT/SPLIT button to activate the LEFT/SPLIT Part. The LEFT/SPLIT button LED will lightand the LCD screen will display a diagram of the CP’s 88 note keyboard.
2) Press the LEFT/SPLIT button again, and while holding it down, press the desired key on the keyboardthat you want to serve as the split point. The key you press will become the lowest note the Righthand Parts will play (RIGHT1, RIGHT2, and SOLO). The LEFT/SPLIT sound will be heard when keysbelow the split point are played.You may also use the L4 and R4 buttons to move the split point. On the LCD screen the split pointmarker will move across the 88 note keyboard diagram as you press these buttons.
• Moving the split point completely to the LEFT end of the keyboard will allow the LEFT/SPLITPart to function as a layer with the three right hand Parts. In this manner you can create fourpart layered across the entire keyboard.
L 1
L 2
L 3
L 4
L 5
F 1 F 2 F 3 F 4 F 5 F 6 F 7
R 1
R 2
R 3
R 4
R 5
L4 Lowers the split point. R4 Raises the split point.

Basic Controls P. 11
Portamento for the Solo PartThe Solo Part is monophonic (only plays one note at a time) regardless of which sound is assignedto it. You can use Portamento on this Part. Portamento is a gradual slide in pitch from one note tothe next, and is useful for adding very expressive qualities to many instruments.
To use Portamento:
1) Press the PORTAMENTO button. The PORTAMENTO button LED will light.2) Press the button again to turn Portamento off.
You can adjust the Portamento Time, which determines how quickly the pitch will slide from onenote to the next. You can also set the note priority for Portamento. (See “Solo Settings” on page131).
Selecting SoundsThe Concert Performer has over 900 instrument and drum sounds available from the front panel.You can freely assign any of these sounds to the four Parts. Remember that there is always a soundassigned to each of the Parts, even if some of the Parts are not currently active.
The sounds span a tremendous variety of instruments, ranging from traditional acoustic sounds tomodern electronic tones. To help you quickly find the sound that you want, the sounds have beenorganized into 15 categories. Each category has a dedicated Sound Selection button on the frontpanel.
To select a Sound:
1) In the main play screen, select the Part to which you wish to assign a new sound using the L3, or R1-R3 buttons. The selected Part will become highlighted.
SOUND PIANO DRAWBAR STRINGORGAN
BASS
BRASS
GUITARHARPSI &MALLET
WOOD-WIND
PAD &SYNTH SFXSPECIALTY USER
FEATURE VOCAL
DRUM
The USER button lets you select any soundsthat may be stored in the User Sound category.

Kawai Concert Performer Series Digital PianoP. 12
2) Press the SOUND button for the sound category that your are interested in. The first page of sounds inthat category will be displayed. There are at least three pages of sounds in each category (exceptUser). Use the F1-6 buttons to view the other pages in a category.
3) Select a sound by pressing the L or R button that is next to the displayed name.4) Press the F1-F6 buttons to show the Sounds on the other pages for the same category.5) You can also use the Dial to scroll through all of the categories and sounds one by one.
Use the L or R buttons to select your desired Sound.
F1-F6 Selects the different pages of Sounds within a category.
F7 Takes you to the Sound Edit menu. (See "Editing Sounds"on page 96.)
L 1
L 2
L 3
L 4
L 5
F 1 F 2 F 3 F 4 F 5 F 6 F 7
R 1
R 2
R 3
R 4
R 5
Basic Controls P. 13
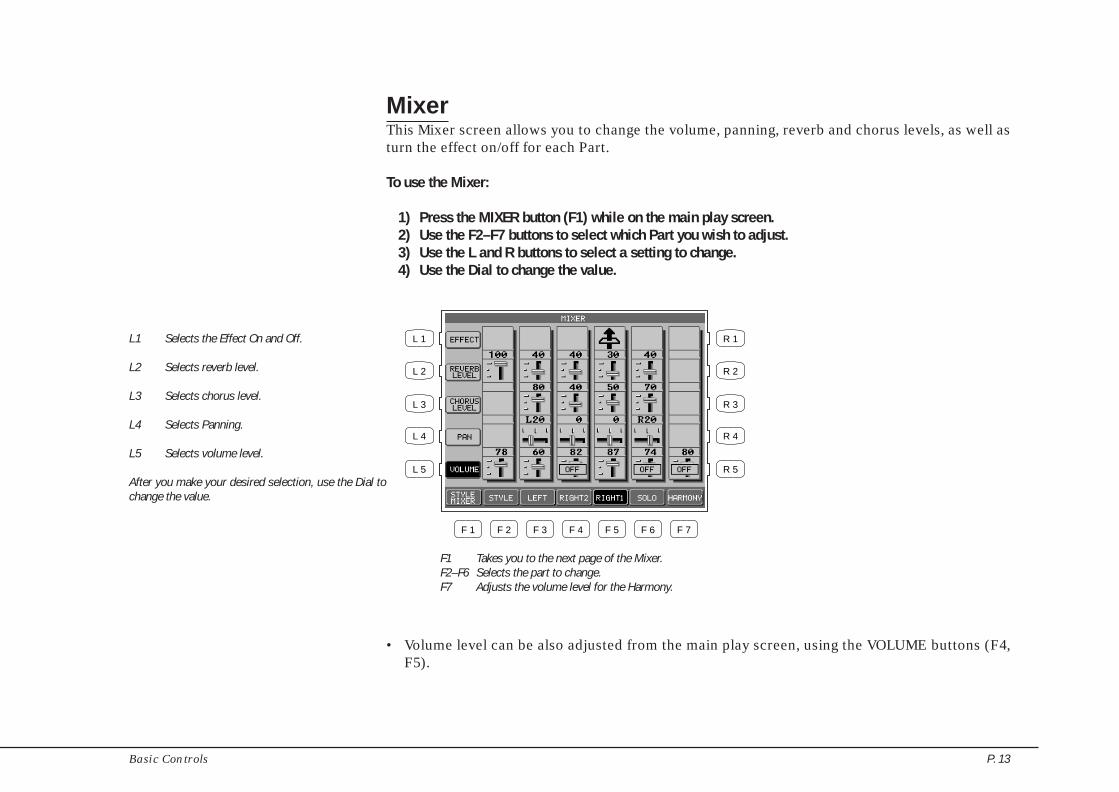
MixerThis Mixer screen allows you to change the volume, panning, reverb and chorus levels, as well asturn the effect on/off for each Part.
To use the Mixer:
1) Press the MIXER button (F1) while on the main play screen.2) Use the F2–F7 buttons to select which Part you wish to adjust.3) Use the L and R buttons to select a setting to change.4) Use the Dial to change the value.
• Volume level can be also adjusted from the main play screen, using the VOLUME buttons (F4,F5).
L 1
L 2
L 3
L 4
L 5
F 1 F 2 F 3 F 4 F 5 F 6 F 7
R 1
R 2
R 3
R 4
R 5
L1 Selects the Effect On and Off.
L2 Selects reverb level.
L3 Selects chorus level.
L4 Selects Panning.
L5 Selects volume level.
After you make your desired selection, use the Dial tochange the value.
F1 Takes you to the next page of the Mixer.F2–F6 Selects the part to change.F7 Adjusts the volume level for the Harmony.

Kawai Concert Performer Series Digital PianoP. 14
The Mixer not only lets you set the overall volume level for the Style, but set individual volumelevels for the 6 Sections within a Style.
To adjust the individual Section level:
1) On the Mixer screen, press the STYLE MIXER button (F1). The Style Mixer screen will be selected.2) Use the F2–F7 buttons to choose a Section, then use the Dial to change the volume.3) Press the BACK button (F1) to go back the previous Mixer screen, or press the EXIT button to go back
to the main play screen.
L 1
L 2
L 3
L 4
L 5
F 1 F 2 F 3 F 4 F 5 F 6 F 7
R 1
R 2
R 3
R 4
R 5
F1 Takes you to the previous Mixer screen.F2–F7 Selects the Section that you wish to change.

Basic Controls P. 15
EffectsYou might have noticed that when you select some of the sounds, the LED indicator for the REVERB,CHORUS, or EFFECTS button is turned on. The reason for this is some of the sounds are set upwith one or more of these effects on as part of their initial setting.
Adding an effect to the sound enhances tonal quality and improves acoustical realism. The CPpiano is provided with three separate groups of effects. The first is REVERB, the second is CHORUS,and third group EFFECTS contains other useful effects such as Delay, Phaser, Rotary Speaker etc.There is a dedicated button on the front panel for each Effects group and each of the three Effectgroups can be turned on/off separately or used in combination for each part. The Concert Performerhas a selection of 27 different Reverb, Chorus, and Effect types that can be used to enhance or evendramatically alter the instrument sounds. Each of the over 900 instrument and drum sounds hasalready been assigned a REVERB and CHORUS setting and an additional EFFECT that suits thatparticular type of instrument. For example, a moderate Delay effect is used on the Church Organ torecreate the sense of being in a large church, and a Rotary speaker effect is used on the Drawbarorgan to give it an authentic, vintage feel.
If you wish, you can change any of these effect settings to suit your tastes separately for each soundsave them as the new Preset effect settings for that Sound (See Sound Edit on page 96). In addtion,by setting the Effect For Sound function in the System to “Panel” the CP will ignore the preseteffects settings for each Sound (see Effect For Sound on page 133).(The CP piano can also remember your Effect settings as part of a Registration. See Registration onpage 31.)
To add Reverb :
1) Press the REVERB button. The REVERB button LED will light.2) If you wish to edit the settings, hold down the REVERB button for a moment until the Reverb Settings
screen is displayed.3) Use the F3-F7 buttons to select the Part you want to edit.4) Use the L2-L4 buttons to select the specific setting that you wish to change.5) Use the Dial to change the value.6) Press the EXIT button to leave the Reverb Settings menu.7) If you wish to turn the reverb effect off, press the REVERB button again.
REVERB
CHORUS
EFFECT

Kawai Concert Performer Series Digital PianoP. 16
Type of Reverb
Hall 1, Hall 2 Simulates the ambiance of a concert hall or theater.Stage 1, Stage 2 Simulates the ambiance of a small hall or live house.Room 1, Room 2 Simulates the ambiance of a living room or small rehearsal room.Plate Simulates the sound of a metallic plate reverb.
• The LED Indicator on the REVERB button will be lit whenever Reverb is turned on for the anyPart except ACC (regardless of each part’s Effect Priority). See “Effect Priority Guidelines”later in this chapter for an explanation of Effect Priority.
To add Chorus:
1) Press the CHORUS button. The CHORUS button LED will light.2) If you wish to edit the settings, hold down the CHORUS button for a moment until the Chorus Settings
screen is displayed.3) Use the F3–F6 buttons to select the Part you want to edit4) Use the L2–L4 buttons to select the specific setting that you wish to change.
L 1
L 2
L 3
L 4
L 5
F 1 F 2 F 3 F 4 F 5 F 6 F 7
R 1
R 2
R 3
R 4
R 5
L2 Selects the Reverb type. Use the Dial to chooseone of the 7 Reverb types.
L3 Selects Reverb on/off. Use the Dial to turn theReverb on/off for the selected Part.
L4 Selects Reverb depth. Use the Dial to changethe Reverb depth for the selected Part.
F3–F6 Selects the Part you want to change. Repeatedly pressingthe appropriate button also turns the Reverb on/off forthat Part.

Basic Controls P. 17
• The Indicator light on the CHORUS button will be lit only when Chorus is turned on for theactive “Priority Part”. See “Effect Priority Guidelines” later in this chapter for an explanation ofthis.
• You can select from four chorus types when in the Chorus Settings menu. There is a fifth chorustype which is assigned as an Effect from the Effect Settings menu. In this way, you can actuallyhave two chorus effects active if so desired.
5) Turn the Dial to change the value.6) Press the EXIT button to leave the Chorus Settings menu.7) If you wish to turn the chorus off, press the CHORUS button again.
L2 Selects the Chorus type. Use the Dial to chooseone of the 4 Chorus types.
L3 Selects Chorus on/off. Use the Dial to turn theChorus on/off for the selected Part.
L4 Selects Chorus depth. Use the Dial to changethe Chorus depth for the selected Part.
F3–F6 Selects the Part you want to change. Repeatedly pressing theappropriate button also turns the Chorus on/off for that Part.
L 1
L 2
L 3
L 4
L 5
F 1 F 2 F 3 F 4 F 5 F 6 F 7
R 1
R 2
R 3
R 4
R 5

Kawai Concert Performer Series Digital PianoP. 18
To add an Effect:
1) Press the EFFECT button. The EFFECT button LED will light.2) If you wish to edit the settings, hold down the button for a moment until the Effect Settings screen is
displayed.3) Use the F3–F6 button to turn ON/OFF the Effect for each part.4) Use the L2–L5, R3 buttons to select the specific setting that you wish to change.5) Turn the Dial to change the value.6) Press the EXIT button to leave the Effect Settings screen.7) If you wish to turn the Effect off, push the EFFECTS button again.
L2 Selects Effect type. Use the Dial to choose oneof the 16 Effect types.
L3 Selects Wet Balance. Use the Dial to change thevalue.
L4 Selects a different editable setting for each Effecttype. Use the Dial to change the value.
R3 Selects a different editable setting foreach Effect type. Use the Dial tochange the value.
F3–F6 Turns the Effect on/off for each Part.
L 1
L 2
L 3
L 4
L 5
F 1 F 2 F 3 F 4 F 5 F 6 F 7
R 1
R 2
R 3
R 4
R 5

Basic Controls P. 19
Effect Types
Chorus Simulates the rich character of a vocal choir or string ensemble, by layering aslightly detuned version of the sound over the original to enrich it.
Flanger Creates a shifting comb-filter, which adds motion and a “hollow” tone to thesound.
Celeste A three-phase chorus without modulation.
Ensemble A three-phase chorus with a slight modulation to each phase.
Delay 1-3 Adds echoes to the sound. The three types differ in the length of time betweenthe echoes.
Auto Pan Moves the sound left and right across the stereo field at a variable rate.
Tremolo Modulates the volume of the sound. This is a vibrato type effect.
Tremulant A combination of Tremolo and Vibrato. It simulates the tremulant pipes of achurch organ.
Phaser Creates a phase change, adding motion to the sound.
Rotary 1-2 This effect simulates the sound of the Rotary Speaker cabinet commonly usedwith electric organs. Rotary 2 adds distortion. The soft pedal is used to changethe speed of the rotor between SLOW and FAST.
Auto Wah Sweeps a tone filter up and down at the beginning of a note, recreating the popularvintage wah wah pedal sound.
Enhancer Emphasizes high frequencies to make a sound more easily discernible in a mix.
Distortion Adds frequencies that were not present in the original sound, resulting in a “fuzzy”or warmer tone.

Kawai Concert Performer Series Digital PianoP. 20
Effect Priority GuidelinesReverb and Chorus are global effects. In other words, all of the Parts and the Accompaniment Stylemust share the same Reverb and Chorus type. However each of these Parts can have a differentamount of Reverb and Chorus applied to them. In addition Reverb and Chorus can be independentlyturned on/off for each part. However, since the CP’s EFFECT section can only have one Effectturned on at a time (in addition to the REVERB and CHORUS), what happens if you have two (ormore) Parts active, with entirely different sounds, each with a different Effect setting?In these cases, the CP’s Effects section can only use the Effect settings for one of the Parts. TheEFFECT section chooses which Effect settings to use based upon a predetermined priority orderfor each of the Parts. The Priority order is SOLO > RIGHT 1> RIGHT 2 > LEFT/SPLIT. The preseteffect settings for the Priority Part will be used and the other Parts will either share these settingsor may have their Effects automatically turned off.
This “Priority Part” depends on the current situation. If you only have one Part active, regardlessof which Part it is, the preset effect settings for that sound will be used. If you have two or moreParts active, then the CP will treat one of them as the Priority Part, and ignore the settings of theother(s).If the the Effect For Sound is set to “Panel” in the System then the Preset effect settings for eachSound will be ignored and the Part Priority will be ignored. (See Effect For Sound on page 131).
Here are some guidelines for Effect Priority:
• Priority is given to the Parts in the following order: SOLO>RIGHT1>RIGHT2>LEFT. This meansthat anytime the SOLO Part is active, its Effect settings will be used, not only for its sound butfor any sound in any other Part, that you want to add effects to. Likewise, the only time anactive LEFT Part’s settings will be applied is if the other 3 Parts are inactive.
• Unlees you change them, the Effect settings will only change in response to a change in thePriority Part being activated/deactivated, or a new sound is assigned to an active Priority Part.In the latter case, the new Effect settings will reflect the Preset effect settings for the newsound.
• When the Effect settings change for the Piority Part, the Effects will be automatically turned offfor the other Parts. (This is so that your Flute sound on RIGHT2 doesn’t suddenly get effectedby the Distortion settings of the Electric Guitar that you’ve just assigned to the SOLO Part!)
• You can, however, turn the effect on for any Part by adjusting the Effect On/Off option in thedisplay for that Part.

Basic Controls P. 21
• The LED Indicator on the EFFECT and CHORUS buttons will be on only when the active PriorityPart has these effects turned on.
ExampleAssume that your CP is set up according to the following chart:
SOLO RIGHT1 RIGHT 2 LEFT INDICATORPart Inactive Active Inactive Active
Effect On On Off On On
If you then select a different sound for RIGHT1, the Effect setting for the SOLO, RIGHT2, LEFT willbe turned off automatically. This is because RIGHT1 is the Priority Part (note that the SOLO Part isNOT the Priority Part because it was inactive).The chart would now look like this:
SOLO RIGHT1 RIGHT 2 LEFT INDICATORPart Inactive Active Inactive Active
Effect Off On Off Off On
Even if you now assign a new sound to the SOLO Part, the Effect settings for the other Parts won’tchange, because SOLO is still inactive, so therefore would not have priority.Once you make the SOLO Part active, however, it would now be considered the Priority Part. TheEffect settings for the other Parts will again be turned off. The Indicator light on the EFFECTbutton will now reflect the Effect status for the sound assigned to SOLO.
SOLO RIGHT1 RIGHT 2 LEFT INDICATORPart Active Active Inactive Active
Effect Off Off Off Off Off
At this point, if the Effect that has been called up along with the SOLO sound is one that you’d liketo use for the other Parts, simply select Effect On in the LCD display for those Parts.

Kawai Concert Performer Series Digital PianoP. 22
Transpose and Octave ShiftTranspose raises or lowers the CP’s pitch in half- step increments. Octave Shift does the same butin octave increments.
Transpose can be especially useful when you have learned a song in one key and have to play it inanother key. The transpose feature allows you to play the song in the original key, but hear it inanother key. You can transpose the Concert Magic songs, the Accompaniment Styles, any songsplayed back by the Easy/Advanced Recorder and any of the over 900 instrument and drum soundsavailable in the CP. Songs recorded on the CD-R Drive cannot be transposed once they have beenrecorded.
Octave shift can be very useful when you are playing multiple sounds across the keyboard. Youmay want to use the octave shift to adjust a bass sound assigned to the LEFT/SPLIT Part to play inthe proper pitch range, or to set one sound in a layer to play in a different octave so that it mixeswell with other sounds in the layer. Octave shift is only available for the four Parts: LEFT/SPLIT,RIGHT1, RIGHT 2, and SOLO.
To Transpose:
1) Press either the ß or † TRANSPOSE buttons. The LCD screen shows you a number telling you howmany half steps up or down you have transposed the piano. -5, for example, represents a transpositionthat is 5 half steps lower.
2) To cancel the Transpose setting, press both the ß and † buttons at the same time. The transposeamount will disappear from the LCD screen, indicating that the CP is now back to its original setting.
To use the Octave Shift:
1) Select the Part that you would like to apply the shift to.2) Press either the ß or † OCTAVE SHIFT buttons. The number of shifted octaves (up or down) will be
displayed with an “ß” in the LCD screen.3) To cancel the octave shift, press both the ß and † buttons at the same time. The symbols will
disappear from the screen, indicating that the selected Part is back to its normal octave range.
TRANSPOSE
OCTAVE SHIFT

Basic Controls P. 23
L 1
L 2
L 3
L 4
L 5
F 1 F 2 F 3 F 4 F 5 F 6 F 7
R 1
R 2
R 3
R 4
R 5
L3 Selects the LEFT Part to be Transposed or OctaveShifted.
R1 Selects the SOLO Part to be Transposed orOctave Shifted.
R2 Selects the RIGHT1 Part to be Transposedor Octave Shifted.
R3 Selects the RIGHT2 Part to be Transposedor Octave Shifted.
The number of octaves shifted is represented bythe number of triangles shown above the soundname for each Part.
Transpose amount is shown at the bottom of thescreen.
• The Octave Shift has a range of four octaves in each direction. However, some on board soundsmay have a limited range in which they play properly. If you shift too far out of this range, theinstrument may sound strange or may not play at all. This has no affect on the CP’s properfunction though, and you should feel encouraged to use this feature as a means of gettinginteresting tonal variations out of the preset Sounds.

Kawai Concert Performer Series Digital PianoP. 24
MetronomeRhythm is one of the most important elements when learning music. It is important to practiceplaying the piano at the correct tempo and with a steady rhythm. The CP piano’s metronome is atool that helps you to achieve this by providing a steady beat for you play along with.
To use the Metronome:
1) Press the METRONOME button. The CP piano will start counting with an audible steady beat. Youwill see Volume level, Beat (time signature), as well as the Metronome icon appear in the LCDscreen next to the Tempo value.
2) Use the BEAT, VOLUME, or TEMPO buttons (F2–F7) to select the setting you wish to change.3) Use the F buttons (F2-F7) or the Dial to change the values.
You can also adjust the tempo by tapping on the TAP TEMPO button. Simply tap on the button withyour finger three or more times at the desired tempo, and the CP will automatically translate thatinto a tempo value on the screen!
4) To stop the metronome, press the METRONOME button again.
METRONOME
TAP TEMPO
L 1
L 2
L 3
L 4
L 5
F 1 F 2 F 3 F 4 F 5 F 6 F 7
R 1
R 2
R 3
R 4
R 5
F1 Takes you to the Mixer menu.F2, F3 Changes the Beat. Choose from 1/4, 2/4, 3/4, 4/4, 5/4,
6/8, 7/8, 9/8 and 12/8 time signatures.F4, F5 Adjusts the volume level.F6, F7 Adjusts the tempo.

Basic Controls P. 25
Piano OnlyThe Piano Only button provides a way to quickly set the Concert Performer up to play the ConcertGrand piano sound. Pressing the Piano Only button immediately turns off all Parts except the Right1 part and sets the Right 1 sound to Concert Grand.
The Piano Only button also turns off all auto-accompaniment functions and stops the Easy/AdvancedRecorder. Additionally, pressing the Piano Only button will cause the CP to exit any function orediting screen (except for Concert Magic) and immediately return to the Main Screen.
We you are using Concert Magic, pressing the Piano Only button will change the Concert Magicsong’s preset sounds to Concert Grand piano.
• You can also use the Piano Only button as a “panic button” to immediately stop any unintendedaccompaniment style or recording, or to quickly exit any confusing situation and return to afamiliar piano sound.
To use Piano Only:
Press the PIANO ONLY button. The Main Screen is displayed and the Concert Grand sound is assignedto RIGHT1.
PIANOONLY

Using a StyleThe Concert Performer contains 220 built-in Styles for you to playalong with covering a wide variety of musical genres. You canchoose from a simple drum or percussion accompaniment or addin a fully orchestrated arrangement. In addition to the Full Styleswhich provide a full musical arrangement including Drums, Bass,and other accompanying instruments there are Intimate Styles withsimpler more “Intimate” arrangements. There is also a selection of
Solo Piano Styles if you just want to play along with a pianoaccompaniment. If the on board variety of styles is not enough, orif you have creative ideas of your own, the CP contains otherfeatures such as Style Maker and Conductor to help you edit orcreate your own custom Styles. These features are explained inthe section of this manual “Creating Your Own Styles”, page 76.
Selecting and Playing a StyleJust like the Sounds the Styles are organized into 15 categories, each with a dedicated STYLE SELECTbutton on the front panel.
To select a Style:
1) Press the STYLE button for the category of your choice. The LCD screen will display the the first StyleSelection page for that category.
2) Press the L or R button next to the on-screen name of the Style you wish to select.3) Each Style category has two pages of styles. If you don't see your desired Style on the currently
displayed page, you can use the F1- F2 buttons to select the other page. Press another STYLE buttonto jump to another category, or turn the Dial to scroll through all the Styles one by one.
4) If you wish play the selected Style, press eitherthe START/STOP button to start the Style playing immediately,or the INTRO/ENDING button to start the Style with an Intro pattern.You can also press the SYNC/FADE OUT button before starting a Style or pressing the INTRO/ENDbuttons. When the SYNCFADE OUT button is pressed, the Style will not start until you play a note orchord on the keyboard.
5) To adjust the tempo of the Style, select Tempo on the main play screen and use the Dial to change theTempo.You can also use the TAP TEMPO button. Tap the button three or more times at the desired tempo,and the CP will automatically translate your taps into an on-screen Tempo value.
6) To stop the Style, press either,the START/STOP button to stop the Style immediately,or the INTRO/ENDING button to stop with an ending pattern,You can also press the SYNC/FADE OUT button and have the Style fade out gradually.

• When you are in the main play screen, you can select a Style by just using the Dial. Press the L1button or F2–F3 (STYLE) and “Style” will become highlighted. Use the Dial or press the F2–F3button to select another Style.
Use the L or R buttons to select your desired Style.
F1, F2 Select the different pages within a Style category.
L 1
L 2
L 3
L 4
L 5
F 1 F 2 F 3 F 4 F 5 F 6 F 7
R 1
R 2
R 3
R 4
R 5
SYNC /FADE OUT
When this button is pressed before starting a Style or before pressing theINTRO/ENDING button, the Style will not start until you play a note or chordon the keyboard. When this button is pressed while the Style is running theStyle will gradually fade out. When this button is pressed during a fade outthe Style will gradually fade back in and you may resume playing the Style.You can press the SYNC/FADE OUT button at any time while any of thepatterns (Intro, Variation, Ending) in the Style are running to fade in or outof the Style.
Starts or stops the Style immediately.
When one of these buttons is pressed to start a Style the selected Intropattern will be played before the selected Variation pattern plays. There areboth major and minor versions for each Intro. The Auto-accompanimentSystem will decide which Intro to use based upon the first Chord you play(major or minor). The LCD screen will display a countdown in bars to showhow many bars you have until the the variation begins playing. When oneof these buttons is pressed while the Style is running the selected Endingpattern will be played before the Style stops. There are major and minorversions for each Ending.
START/STOP
INTRO/ENDING1 2

• The CP remembers the last Style selection that you made within each category while the poweris on. When you press a STYLE button, the CP will automatically select the Style previouslychosen in the same category.
• When you switch from one Style to another while it is running, the new Style will wait until thebeginning of the next measure before it begins to play.
Fill-In and VariationEach Style is made of four Variation patterns and four Fill-in patterns.
Fill-ins are short patterns that temporarily embellish the Style. Fill-ins can add excitement andrhythmic change to the Style and be used as a musical lead in between the Variations. To use a Fill-in, just press one of the FILL IN buttons. You will hear the fill-in begin playing immediately from amusically appropriate spot.
Fill-ins can also be used as a short intro. First press the SYNC/FADE OUT button then press one ofthe FILL-IN buttons to select a desired Fill-in. Press any key on the keyboard to start the style. Afterthe Fill-in plays, the selected Variation will play.
To select a Variation, press one of the four VARIATION buttons to select the desired Variation. TheSelected VARIATION button LED will light.
• You can set the CP to automatically play a Fill-in anytime you press a VARIATION button as youswitch from one Variation to another. Select your preferred option in the Fill-in mode. (See page130)
Auto Accompaniment SystemThe Auto-accompaniment System (ACC) is a powerful feature that determines how the Styles willinteract with you as you play. The ACC System analyzes your playing and adjusts the notes theStyle plays to follow the Chords that you play on the keyboard. The ACC System is capable ofrecognizing single finger as well as more complex chord voicings. The CP recognizes 61 chordtypes as well as most of their inversions. (See page 196 for a chord table.) There are three modes ofkey recognition—One Finger, Fingered, and Full Keyboard. Your choice of which mode to usedepends on your skill level and the selected musical style.
1 2 3
1 2 3
4
4FILL IN
VARIATION
ACC ON/OFFBASSINVER
FULLKBD FINGERED
ONEFINGER
ACCOMPANIMENT

Fingered The player must play at least three notes of a chord below the split point (LEFT/SPLIT Part) before the ACC System will recognize the chord type. (See page 196for chord table.)
One Finger Uses a simplified chord method that allows beginners to specify a chord type byplaying only one or two notes below the split point. The types of chords that canbe recognized in this manner are limited to Major, Minor, 7th and Major 7th.While the player can trigger basic chords with as little as one finger, the ACCSystem will recognize more complex chord types if you play them, even you arein the One Finger mode.
Full Keyboard The player must play at least three notes of a chord anywhere across the 88 keysbefore the ACC System will recognize the chord type. This mode is similar toFingered however, Full Keyboard recognizes chord types from three or morenotes played anywhere across the 88 keys not just below the split point.
Bass InversionWhen Bass Inversion is on, the Bass Section of the Style will follow the lowest note of the chordvoicing played on the keyboard. With Bass Inversion on it is possible to specify a chord over acertain bass note by the chord voicing you play. For example, a C chord over a G bass, or a Bb7chord over a C Bass. Bass Inversion will work with all three key recognition modes but when inOne Finger mode, you play at least two notes of a chord for Bass Inversion to function.
To turn Auto-accompaniment (ACC) on:
1) Select a Style that you would like to play.2) Press one of the ACCOMPANIMENT buttons to select the Key Recognition mode. The selected Key
recognition mode will be displayed at the bottom of the LCD screen if you're on the main play screen.3) Press the BASS INVERSION button if you would like to turn it on.4) Press the ACC ON/OFF button to activate the Auto-accompaniment System (ACC).5) Press the START/STOP button to start the Style, and play some chords in the LEFT/SPLIT Part. You
will hear the Style start and also change keys and chord types as you play different chords.6) If you want to cancel or stop the Auto-accompaniment, press the ACC ON/OFF button again. If you
turn the ACC off without stopping the Style the drum rhythms will continue to play.

• When you play along with the Auto-accompaniment using the Fingered or Full Keyboard modes,you may hear two sounds playing the chords: one is selected by the front panel and the other ispre programmed for the Style. This is because the sounds used by the Auto-accompanimentStyle are independent of the Left and Right Part sound settings. Therefore you will hear theinstrument sounds played by your hand as well as those generated by the accompaniment.
In most cases, these are just duplicate notes being played using different sounds. In some caseshowever, you may hear different notes or an unexpected chord inversion. If the overall musicaleffect is undesirable, try turning the LEFT/SPLIT Part off and let the accompaniment play alone.
• You can use the Auto-accompaniment (ACC) System without the Style running. In this way youcan make use of the chord recognition without having the pre programmed rhythms or patternsplaying. Just turn the ACC on and play without starting the Style. You will hear the bass andchord parts only. This may be useful when you play a musical piece that is not played withdrums. The accompaniment sounds are pre programmed to best suit the different Styles, andyou cannot alter them. When playing in One Finger mode, however, you can replace the chordsound with the sound chosen for the LEFT/SPLIT Part. Assign your preferred sound and makethe LEFT/SPLIT Part active.
You can also start a Style without the ACC on. In this way you can have just drums and percussionaccompany you.
1-2 PlayIf you want to play using an Accompaniment Style, but have no idea as to what sounds you shoulduse for the right and left-hand parts, try using the 1-2 Play feature. This feature gives you apreprogrammed panel setup with appropriate sounds and settings for the Style you have chosen.
To use 1-2 Play:
1) Select the Style you would like to play.2) Press the 1-2 PLAY button. The 1-2 Play indicator will become lit, and the words “1-2 Play” are
displayed in the Main Screen. The SYNC button is activated as well.3) Activate one of the INTO/ENDING buttons if you want the Style to begin with an introduction. Start the
Style by playing a key on the left side of the keyboard, or by pressing the START/STOP button.4) Press the 1-2 PLAY button again to turn it off.
1-2PLAY

• Among the settings contained in the 1-2 Play setting are the Sounds assigned to the keyboardParts (Solo, Right 1/2, Left), Tempo, and Mixer settings.
RegistrationA Registration is a setup that remembers the panel settings along with many other performancefunctions so that you can recall them at the touch of a button. This lets you begin to play quicklyinstead of spending a lot of time programming all the settings and values manually.
There are 8 Registration buttons on the panel of the Concert Performer. Each button contains adifferent registration. Pressing any of the Registration buttons activates the setup stored there.Pressing another Registration button changes to the registration stored in that button. Pressing theactive Registration button again deactivates the registration and returns you to the original panelsetup.
Registration GroupsThere are 20 Registration Groups in the Concert Performer. Each group contains settings for the 8Registration buttons on the panel. Each group represents a “family” of settings for the CP. Thesound and performance capability of the Concert Performer is remarkable, and each registrationgroup is designed to take full advantage of certain types of sounds available in the instrument.Switching from one Registration Group to another instantly changes the Registration buttons fromPipe Organ settings to Orchestra settings, for example.
• The default Registration Group is “American Pop”, a family of registrations designed to playpopular music from the 1940’s through today.
With 8 Registration buttons and 20 Registration Groups, you have a total of 160 preprogrammedRegistrations available. Plus, you can overwrite any registration with your own unique setups.
To use a Registration:
1) Press the REGIST GROUP button. Ten Registration Groups will be displayed.2) Press the F1 and F2 buttons to view the Registration Groups on the other page.3) Highlight any Group from the list by using the L and R buttons.4) Press one of the eight REGISTRATION buttons to activate a Registration from your selected Registration
Group.5) To return to the Main Screen, press the EXIT button.
REGISTGROUPS

• The CP remembers how the front panel was setup before you chose a Registration so that afterexiting the Registration, the prior settings will be restored.
• It is not necessary to always begin with the REGIST GROUP button when selecting a Registration.If the group you want to use is already selected, pressing one of the REGISTRATION buttons willactivate a setup from that group. The CP will remember the Registration Group last chosen aslong as the power remains on.
• You cannot use the 1-2 Play function and Registrations at the same time. Choosing one alwayscancels the other.
Use the L and R buttons to select the Group. Thenpress one of eight REGISTRATION buttons to callthe desired setup.
L 1
L 2
L 3
L 4
L 5
F 1 F 2 F 3 F 4 F 5 F 6 F 7
R 1
R 2
R 3
R 4
R 5
F1, F2 Searches for the Registration Groups on the other pages.F6, F7 Takes you to the Registration Group Name screen.

• The following settings can be stored in a Registration:Sounds (Solo, Right1, Right2, Left), Split Point, Style and Variation, Fill-in mode, Tempo,Accompaniment settings, Mixer settings, Chorus settings, Effect settings, Harmony settings,Voicing, Detune, Resonance, Left Pedal functions, Mic Harmony, and Mic Effect
• You can save your Registrations on a floppy disk and load them into the CP later. (See page 156.)
To create your own Registration:
1) Set up the panel and functions in the way that you’d like to save them.2) Press the SAVE REGIST button. Use the R1 – R4 buttons to select the Registration Group in which to
save your setup. Use the F1 – F4 buttons to view the 20 Registration Groups in sets of five.3) Press one of the 8 REGISTRATION buttons to specify which location you’d like to save your Registration
to.
R1–R5 Selects the Registration Group to save in.L 1
L 2
L 3
L 4
L 5
F 1 F 2 F 3 F 4 F 5 F 6 F 7
R 1
R 2
R 3
R 4
R 5
Press the F1-F4 buttons to display the RegistrationGroups on the other pages.
Press the specific REGISTRATION button whereyou’d like to save to.
4 5 6REGISTRATION
1 2 3 7 8S

To rename the Registration Group:
1) Press the REGIST GROUPS button.2) Use the F1, F2, L and R buttons to select the Group to rename.3) Press the NAME (F6, F7) button.
L 1
L 2
L 3
L 4
L 5
F 1 F 2 F 3 F 4 F 5 F 6 F 7
R 1
R 2
R 3
R 4
R 5
Use the F1, F2, L and R buttons to select the Group to rename.
4) In the Registration Group Name screen, use the CURSOR (F2, F3) buttons and the CHARACTER (F4,F5) buttons to change the name. You can also use the Dial to change the characters.
5) Press the SAVE (F6, F7) button to confirm the name.

L 1
L 2
L 3
L 4
L 5
F 1 F 2 F 3 F 4 F 5 F 6 F 7
R 1
R 2
R 3
R 4
R 5
F1 Takes you to the previous menu.F2, F3 Moves the cursor over the characters in the name.F4, F5 Selects a character.F6, F7 Saves the name.
Style LockPressing the STYLE LOCK button keeps the current Style, even if another Registration is selected.This allows you to change Sounds and settings by the Registration button while keeping the Styleas-is. As long as the STYLE LOCK button is on, changing registrations will not change the style.However, you can always manually change the style, even if the Style Lock is on.
Press the STYLE LOCK button again to turn it off.
STYLE LOCK

Song StylistWith over 900 Sounds and 220 Styles, it can sometimes be difficult to decide the best settings withwhich to play a song. Even if you are very familiar with the Concert Performer, you may want aquick way to change the CP’s setup to play another song. The Song Stylist feature was created tohandle this situation for you. You simply pick the name of the song you want to play and theConcert Performer sets up everything for you.
The Song Stylist contains a list of 700 popular song titles. In the Song Stylist, there is an appropriatesetup for each of those songs. You may search for your favorite title either alphabetically by songname, or by category of musical genre. Once you’ve found the song you want to play, simply pressone button and the CP is immediately setup for that song and ready for you to begin.
• The Song Stylist contains no prerecorded music, only the setup to play the chosen song. Youmust play the actual music yourself.
To use the Song Stylist:
1) Press the SONG STYLIST button. The Category list appears, showing the different musical genres forthe SONG STYLIST.
2) Use the SEARCH BY CATEGORY buttons (F1, F2) to display the Category choices on the other page.When you have found the category you want, use the L and R buttons to select it. A list of songswithin that musical category appears.
SONGSTYLIST
L 1
L 2
L 3
L 4
L 5
F 1 F 2 F 3 F 4 F 5 F 6 F 7
R 1
R 2
R 3
R 4
R 5
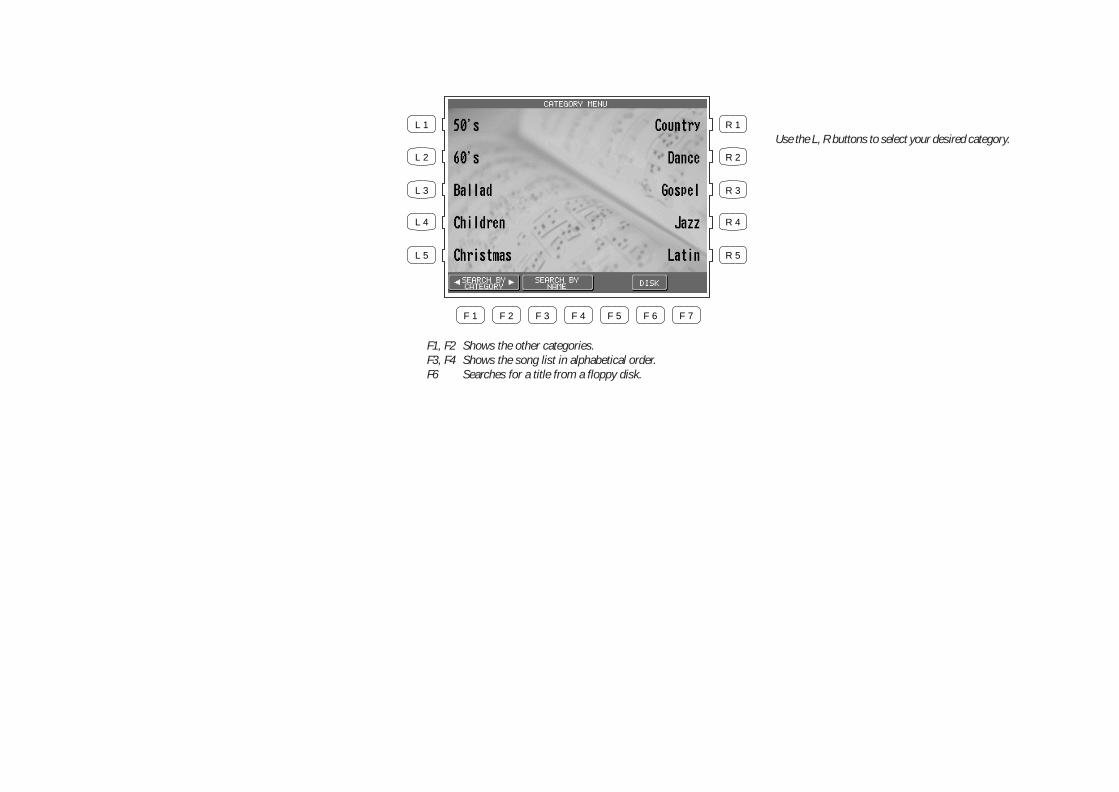
F1, F2 Shows the other categories.F3, F4 Shows the song list in alphabetical order.F6 Searches for a title from a floppy disk.
Use the L, R buttons to select your desired category.

3) Use the PAGE buttons (F1, F2) to display the Song Titles on the other pages in the same category.4) Use the L and R buttons to select one of the ten songs displayed in the screen. The CP automatically
returns to the Main Screen ready with all of the settings for that song.5) You may start and play the song in your usual manner. You can operate the CP normally and make
any changes to the Song Stylist setup that you wish.6) To play another song, press the Songlist (F7) button. To exit, press the SONG STYLIST button again
or press the EXIT button.
Use the L or R buttons to select your desired song.
L 1
L 2
L 3
L 4
L 5
F 1 F 2 F 3 F 4 F 5 F 6 F 7
R 1
R 2
R 3
R 4
R 5
F1, F2 Searches for a title on the other page.F4 Starts the Chain Play.F6 Searches for a title from the internal presets.F7 Selects the song.
Selecting a song from a floppy disk.
F1, F2 Searches for a title on the other pages.F3 Jumps to the Song Stylist Category menu.F4 Searches for a title listed in alphabetical order.F6 Searches for a title from a floppy disk.F7 Selects the song.
L 5
F 1 F 2 F 3 F 4 F 5 F 6 F 7
R 5

• You may use different Sounds, Styles, Tempo and other settings to customize to your taste.
• When choosing a Song Stylist created by you (or someone else) and saved to floppy disk, theremay be a recorded melody and chord track available. The chord track, called the Auto ChordProgression, will provide you with the chord changes to the song.
You may also find a song title by searching the list alphabetically.
To search the Song Stylist by Song Title:
1) Press the SONG STYLIST button. The Category list appears, showing the different musical genres forthe SONG STYLIST.
2) Press the SEARCH BY NAME (F3, F4) buttons. In the Name Menu, press the L or R buttons to take youto the first letter of the name of the song. For example, if your song title starts with “G”, press the L4button.
3) Use the PAGE (F1, F2) to search for the name of your song. When you find the song, press thecorresponding L or R button. The CP automatically returns to the Main Screen ready with all of thesettings for that song.
L1 Highlights the Style.
L2 Adjusts the Tempo.
L3 Highlights the LEFT Part.
L4 Changes the split point.
L 1
L 2
L 3
L 4
L 5
F 1 F 2 F 3 F 4 F 5 F 6 F 7
R 1
R 2
R 3
R 4
R 5
F1, F2 Turns on the Auto Chord Progression (if available).F3, F4 Turns on the Melody part (if available).F5, F6 Adjusts the volume level for the sound.F7 Takes you back to the Song Stylist menu.
R1 Highlights the SOLO Part.
R2 Highlights the RIGHT 1 Part.
R3 Highlights the RIGHT 2 Part.
R4 Changes the split point.

HarmonyWhen the Auto-Accompaniment is on, you can use Harmony function. The Harmony functionautomatically adds notes to your right hand (melody) part to help you sound more professional.This function analyzes the notes you play and automatically adds notes from the Accompanimentchord (shown in the Main Screen when the Accompaniment is on), creating a “harmony” part (evenif you are only playing single notes in the left and right hands).
There are 10 types of Harmony.
Block Adds three or four notes based on the chord.
Open Adds three or four notes based on the chord. Harmony notes may extend overone octave below the lowest right-hand note.
Jazz Adds three or four notes based on the chord.
Rockn’ Adds a note at a fifth (or fourth) interval to the lowest note played in the RIGHTPart.
Dynamic Adds three or four notes based on the chord. Harmony notes are played withinone octave below the lowest note played in the right hand.
Duet Adds a note according to the lowest note played in the right hand and based onthe chord.
Octave Takes the highest note played in the right hand and doubles it an octave down.
Octave Duet Adds an Octave note and a Duet note.
Vocal 1 Adds a single note above the top note of the right hand based on the chord.
Vocal 2 Adds three notes based on the chord. The lowest note will always be the root ofthe chord.
HARMONY

To use Harmony:
1) Press the HARMONY button. The button will be lit to show that it is active. The Harmony symbol willalso appear in the Main Screen.
2) To change the Harmony type, hold down the Harmony button for a moment until the Harmony Selectmenu is displayed.
3) Choose the Harmony type using the L and R buttons.4) Press the EXIT button to leave the Harmony Select menu.5) To turn off the Harmony, press the HARMONY button again.
• The additional notes created by Harmony are added to the RIGHT 1 Part, if that part is on. If theRIGHT 1 Part is off, the additional notes are added to the RIGHT 2 Part. If both parts are off,there will be no Harmony even though the HARMONY button is lit. The Harmony notes areplayed with the same sound as the part they are added to.
• You can volume mix the Harmony separately in the MIXER screen.• If the Accompaniment in not on, you will not be able to activate Harmony
L 1
L 2
L 3
L 4
L 5
F 1 F 2 F 3 F 4 F 5 F 6 F 7
R 1
R 2
R 3
R 4
R 5
Use the L or R buttons to select your desiredHarmony type.

Kawai Concert Performer Series Digital PianoP. 42
Recording a Songup to 16 independent tracks separately. In addition, with AdvancedRecorder you can edit your recorded data one measure or evenone note at a time. There is also a step recording mode in whichyou can enter notes or other MIDI data events one step at a timefor even more accurate control.
Song data created on other instruments in the Standard MIDI Fileformat (SMF) can also be loaded into the CP’s recorder to be playedor edited. The CP’s recorder can read both Type 1 and 0 SMF files.
Please read the following sections carefully to learn more aboutthe capabilities of the Easy and Advanced recorder.
The CP has built-in recording capabilities that allow you to recordand play back your performances. Since the CP records yourperformances as digital data not audio data you can easily edit yourperformances after recording them. There are two ways to use theCP’s recording feature:
Easy Recorder records your playing much like a tape recorder andis just as easy to use. The CP will record all of your playing as wellas any changes you make to the front panel settings during therecording.
Advanced Recorder is useful for creating more complexrecordings. Advanced Recorder gives you the ability to record on
Easy RecordingThe Easy Recorder will record all of your playing as well as any settings you have made on the frontpanel or in the mixer screen at the touch of a button. Simply press the REC button and the CP willbegin recording with the first note you play. You can also record a Style along with your playing ifyou like. Before you begin recording its a good idea to select your desired sound(s) and make anypanel settings you would like to record.
To record:
1) Press the REC button. The REC button LED will blink and the LCD screen will show Rec Ready. If youwant to, you can still change sounds or panel settings before proceeding.
2) Start recording in one of the following ways:A. Play the keys and the CP will automatically start recording with the first note you play.B. If you are recording with a Style, press the START/STOP button to start the recorder with the Style.Pressing the INTRO/ENDING button will include an Intro phrase at the beginning of the recording.C. You can also press the SYNC button to begin recording the Style and your own playing together.D. Press the PLAY/STOP button to start with a 2-bar countdown to help you get ready.
3) When you are finished recording, press the PLAY/STOP button.You may resume recording from the point where you stopped by repeating these steps from step 2.
RECORDERRESET REC RWD FWDPLAY/STOP

Recording a Song P. 43
• You may resume recording from the bar where you stopped by repeating these steps. You canalso change sounds, tempo, and make other changes to the panel settings before you continuerecording.
• To Re-record or make other changes to a previously recorded section of a song, please read thesection titled “Re-recording or adding another Part” on page 44.
To play back the recorded song:
1) Press the RESET button in the RECORDER section of the front panel to return to the first bar of thesong.
2) Press the PLAY/STOP button to play back the song.3) Press the PLAY/STOP button again to stop at any time.4) Pressing the PLAY/STOP button again resumes the playback from the bar where you stopped.5) Use the RWD or FWD buttons to rewind or fast-forward through the recording.
L 1
L 2
L 3
L 4
L 5
F 1 F 2 F 3 F 4 F 5 F 6 F 7
R 1
R 2
R 3
R 4
R 5
The current bar number is displayed.You can make changes to the panel settings beforeand during recording using the L and R buttons.
F1 Takes you to the Mixer menu.F2 Deletes the recorded song dataF3-F7 Changes the part status.
RECORDERRESET REC RWD FWDPLAY/STOP

Kawai Concert Performer Series Digital PianoP. 44
Part StatusThe playback and record status for the RIGHT/ LEFT Parts and the Style are displayed at the bottomof the LCD screen. Whether you are in the process of recording or playing back your song it ishelpful to know the status for each of these Parts.The LCD screen will show the following Part status messages at the bottom of the screen:
REC This Part is ready to be recorded. This message is only displayed after the REC button hasbeen pressed.
PLAY This Part has been recorded and will be heard both on playback and while recording.MUTE This Part has been recorded but will be silent both on playback and while recording.– – – This part has not been recorded.
After you have recorded a song you can change the status for a Part by pressing the appropriatebutton, F3-7 below the LCD screen. Pressing the F buttons during playback will select PLAY orMUTE. REC can only be selected after you press the REC button but before you begin recording.During recording you can however set any Part to PLAY or MUTE by pressing the appropriate Fbutton.
You can record all RIGHT/LEFT Parts as well as the Style simultaneously or only certain Parts asyou choose. When you first record a song all Parts and the Style will be automatically set to RECbut only the active Parts and the Style will be recorded. When you are finished recording the statusfor any active Parts and the Style will automatically change from REC to PLAY. After recording, thestatus for any RIGHT/LEFT Parts that were not active during recording will be automatically changedto - - - to show they have not been recorded yet.
When you press the PLAY/STOP button to listen to your song any Parts set to PLAY status will beheard.
Re-recording or adding another PartAfter you have recorded a song you can Re-record a Part or add (overdub) other Parts if you likewith the following procedure. Re-recording a Part completely erases the previous performance forthat Part automatically.
To Re-record or add a Part:
1) Make sure the Part(s) you wish to Re-record are active, then select any sounds or change panelsettings as desired.

Recording a Song P. 45
2) Press the REC button.3) Press the appropriate F button(s) below the LCD screen to set the desired Part(s) to REC.4) Begin recording by following step 2 in the “To Record” section on page 42.
Remember Re-Recording a Part completely erases the previously recorded performance for thatPart. You can Re-record or add any of the RIGHT/LEFT Parts as many times as you like but you canonly have one performance/sound for each RIGHT/LEFT Part.
Saving the songOnce you finish recording a song you should save it to disk before you turn the power OFF. Oncethe power is turned OFF your song data will be lost.
See the section titled “Saving Data to a Floppy Disk” on page 157.
• If you press the EXIT button to get out of the Easy Recorder, the CP will automatically promptyou to save your work.
Erasing the songWhenever a Part is selected for recording, the new performance is written right over any existingone that may be there for that Part. In this sense, the Easy Recorder is just like a tape machine. Anew song will simply erase the old song during the recording process.
However, if you wish to simply erase all the Parts and the Style in a song at once you can use theDelete function.
To delete a song:
1) Press the DELETE button (F2) while the Recorder is not recording or currently ready to record. TheCP will ask if you are sure.
2) Use either the YES (F7) button to proceed or NO (F1) to cancel.

Kawai Concert Performer Series Digital PianoP. 46
• DELETE erases all of the performance data for all Parts and the Style in the song. The panelsetup, such as Style, Tempo, and Sound settings are not erased by the DELETE function.
L 1
L 2
L 3
L 4
L 5
F 1 F 2 F 3 F 4 F 5 F 6 F 7
R 1
R 2
R 3
R 4
R 5
F1 Cancels erasing the song.F7 Proceeds with erasing the song.

Recording a Song P. 47
ADVANCEDRECORDER
Advanced RecordingThe Advanced Recorder is a full featured sixteen track MIDI recorder that includes many of thesame professional features found on dedicated MIDI sequencing (recording) devices. In additionto sixteen MIDI tracks the CP Advanced recorder provides a separate Style, chord, and tempo trackfor even more flexibility.Even though you can create recordings of great musical complexity using the Advanced recorderyou will find that it is still very straightforward and easy to use.Using the Advanced Recorder allows you much greater control over the recording and compositionalprocess than that offered by the Easy Recorder. However, songs created using the Easy Recordercan also be edited using the Advanced Recorder by simply pressing the ADVANCED RECORDERbutton.
To go to the Advanced Recorder Menu:
Press the ADVANCED RECORDER button. The recording options will be displayed on the screen.
R1 Edit loop settings for the song.
R2 Edit the general settings for the song.
R3 Edit the song by bars.
R4 Edit the song by MIDI events.
R5 Create your own new user Style.
F1 Converts recorded Style data into MIDI note data that can thenbe edited in the Advanced Recorder. Style Paste will only bedisplayed if the current song was recorded using a Style.
L 1
L 2
L 3
L 4
L 5
F 1 F 2 F 3 F 4 F 5 F 6 F 7
R 1
R 2
R 3
R 4
R 5
L1 Change the Reverb, Effect, Panning, Volume leveland Chorus for each of the 16 tracks.
L2 Prepares the track for real-time recording.
L3 Re-record specific measures within your song.
L4 Record by entering data note by note.
L5 Select the sound to be assigned to each of the16 tracks, and change the track's recording andplay back status.

Kawai Concert Performer Series Digital PianoP. 48
Real-time RecordingWith Real-time record, the CP records your performance as you are playing it, in real-time. You canselect any of the sixteen instrument tracks or the Style and tempo tracks to record, but you canonly record on one track at a time. Since the Advanced Recorder only records on one track at atime, only the RIGHT 1 Part is active in the Advanced Recorder. Any other active Parts areautomatically turned OFF when the ADVANCED RECORDER button is pressed. In addition toselecting the desired track to record, the Real-time recording screen provides many other usefulReal-time recording functions.
To use Real-time recording:
1) From the Advanced Recorder menu, press the L2 button to select “Real Time REC”, or simply pressthe REC button. The REC button LED will blink and the LCD screen will display the “Real Time REC”screen.
2) Use the F, L and R buttons to select a function to edit. Use the Dial to change the values.3) If necessary, you can go to the Mixer and Track Settings screens by pressing the appropriate F
buttons.
F1 Cancels the real-time recording setup and returns you to the AdvancedRecorder menu.
F2 Takes you to the Mixer menu.F4, F5 Takes you to the Track Settings menu.F6 Turns the Loop feature on/off
L 1
L 2
L 3
L 4
L 5
F 1 F 2 F 3 F 4 F 5 F 6 F 7
R 1
R 2
R 3
R 4
R 5
R1 Changes the time signature.
R2 Changes the tempo.
R3 Selects the recording mode. REPLACEerases the previous data and records thenew data in its place. OVERDUB mixes thenew data with the previous data so that bothare heard together. Repeatedly pressing theR3 button switches between the REPLACEand OVERDUB.
R4 Selects the ending bar for the Loop feature.This function is available only when Loopis turned on.
L1 Selects the track on which you want to record.There are 16 Instrument tracks, 1 Tempo track,and 1 Style track.
L2 Selects the sound or Style that you want torecord with.
L3 Shows the current bar and beat number.
L4 Selects the starting bar for the Loop feature. Thisfunction is a available only when Loop is turnedON.

Recording a Song P. 49
4) Start recording by pressing the PLAY/STOP button while the REC button LED is blinking. There is anautomatic two bar count in before the CP begins recording. If you are recording on the Style track youmust press the START/STOP or INTRO buttons instead of the PLAY/STOP button. When recording aStyle there is no two bar count in, recording begins immediately.You can cancel recording at anytime by pressing the REC button again or by pressing the F1 button toreturn to the Advanced Recorder menu.
• When you select a Style to record the default tempo for that Style is ignored. The Style will usethe current tempo setting for the song instead. You can set the desired tempo on the Real-timerecord screen before recording or change the tempo after you have recorded in Song Edit or onthe tempo track in Event Edit.
• When you are recording on the Style track only the Style will be recorded. The style track willrecord any chords (to the chord track) you play but the actual notes you are playing will not berecorded.
• When the recording is done, the Mixer screen will automatically be displayed.
To play back the recorded song:
1) Press the RESET button in the RECORDER section of the front panel to return to the first bar of thesong.
2) Press the PLAY/STOP button to play back the song.3) Press the PLAY/STOP button again to stop at any time.4) Pressing the PLAY/STOP button again resumes the playback from the bar where you stopped.5) Use the RWD or FWD buttons to rewind or fast-forward through the recording.
MixerOn the Mixer screen, you can change the following settings for each of the 16 tracks: Reverb level,Chorus level, Effect on/off, Panning, Track mute, Volume level.
To use the Mixer:
1) Use the TRACK buttons (F2, F3) to select which of the 16 tracks you wish to make changes to.2) Use the L1 and L5 buttons to choose the track setting that you want to change.3) Use the Dial to change the value.

Kawai Concert Performer Series Digital PianoP. 50
4) At this point, you can start recording or go to another menu to continue setting up.
• You can make changes on the Mixer screen at any time except while the CP is busy recording.The Mixer screen is accessible from the Advanced Recorder menu, Track Settings screen andReal-time Rec screen.
• You can save any changes you have made to the settings on the Mixer screen at any bar or beatin your song. Simply play back the song or press the FWD/RWD buttons until you reach theexact bar and beat where you want to make changes to the Mixer settings and stop the song.Make any changes on the Mixer screen, then press the SAVE button (F7). You can do this asmany times and in as many places within your song as you wish.
Note“Saving” here only means any changes you made on the Mixer screen were saved as part of thesong. Once you finish recording a song or after you make any important changes you should saveit to disk before you turn the power OFF. Once the power is turned OFF your song data and anychanges you have made will be lost.See the section titled “Saving Data to a Floppy Disk” on page 157.
L 1
L 2
L 3
L 4
L 5
F 1 F 2 F 3 F 4 F 5 F 6 F 7
R 1
R 2
R 3
R 4
R 5
L1, L5 Used to select the track setting you want tochange. Use the Dial to change the value.
F1 Returns you to the Advanced Recorder menu.F2, F3 Selects the track that you wish to edit.F4, F5 Takes you to the Track Settings menu.F6 Turns Loop ON/OFF.F7 Saves the Mixer settings as part of the song.

Recording a Song P. 51
Track SettingsThe Track Settings screen shows you the Play, Record, and Mute status for each track. In additionit shows you what sound is assigned for the sixteen instrument tracks. You can change the trackstatus or select a different sound for each track.
The Track Status screen will show the following Status messages.
Rec This track is ready to be recorded.Play This track has been recorded and will be heard both on playback and while recording.MIDI Rec MIDI Rec enables the CP to record incoming MIDI data from an external MIDI
instrument connected to the MIDI jacks. You can set more than one track to MIDIRec, enabling the CP to record on several tracks simultaneously over MIDI.
Mute This track has been recorded but will be silent both on playback and while recording.Empty This track has not been recorded.
After you have recorded a song you can change the status for a track by pressing the STATUSbutton (F3) below the LCD screen. Pressing the STATUS button during playback will select Play orMute. Pressing the STATUS button after entering Real-time record but before recording begins, willselect Play, MIDI Rec, or Mute. Rec can only be selected from the Real-time Record screen. TheTrack settings screen cannot be accessed during recording.
To use the Track Settings screen:
1) Press the TRACK SETTINGS button (L5) on the Advanced Recorder menu.2) Press the L3 and L4 buttons to select the track that you wish to edit. If you wish to select tracks 10-
16, the Style, or Tempo tracks, press the L5 button to jump to these tracks. Press the L2 button toreturn to tracks 1-9.
3) Press the STATUS button (F3) to change the status to PLAY, MUTE or MIDI REC.4) If you wish to change the sound assigned to the track, press the SOUND buttons (F5, F6). You can
also select sounds by pressing any of the SOUND buttons.5) When you are finished, press the MENU button (F1) to return to the Advanced Recorder menu or
press the MIXER button (F2) to go to the Mixer menu.

Kawai Concert Performer Series Digital PianoP. 52
• As discussed in the above section, MIDI Rec enables the CP to record incoming MIDI data froman external MIDI instrument connected to the MIDI jacks. You can set more than one track toMIDI REC, enabling the CP to record on several tracks simultaneously over MIDI. Each MIDIRec track will record on the incoming MIDI channel that corresponds to its track number. Track1 records MIDI channel 1 and so on.
Loop SettingsThe Loop function lets you specify certain bars or your entire song to repeat over and over. Loop isa global function and all tracks will be looped equally. You cannot have different loop settings foreach track.
To set the Loop:
1) Go to the Loop Settings screen by pressing the R1 button in the Advanced Recorder menu.2) Use the L2–L4 buttons to select the different settings, then use the Dial to change the values.3) Press the L2 button to turn the Loop ON/OFF.4) Press the L3 button to specify the bar where you want the Loop to start.
L 1
L 2
L 3
L 4
L 5
F 1 F 2 F 3 F 4 F 5 F 6 F 7
R 1
R 2
R 3
R 4
R 5
L2 Jumps to tracks 1-9.
L3, L4 Selects the tracks one at a time.
L5 Jumps to tracks 10-16, Tempo, and Style.
R1 Changes the tempo. Use the Dial to changethe value.
F1 Returns you to the Advanced Recorder menu.F2 Takes you to the Mixer.F3 Changes the track’s status.F5, F6 Selects a different sound for the track.F7 Saves the Track settings as part of the song.

Recording a Song P. 53
5) Press the L4 button to specify the bar where you want the Loop to end.6) Press the MENU button (F1) to return to the Advanced Recorder menu when you are finished.
• You can turn looping on and off in the Mixer menu. However, you still have to set the Start andEnd Bar from the Loop Settings menu.
• You can set up looping for recording in the Real-time REC menu as well. In the Real-time RECmenu, when you turn on the looping, the Start Bar and End Bar information will be automaticallycopied from the Loop Settings menu.
Style PasteWhen you record a Style as part of your song, the Style data is automatically recorded on the Styletrack. This data is unique to the CP, and cannot be used with any other musical instruments.Additionally the instrument tracks that are part of the Style cannot be edited individually.Style Paste converts any Style data recorded on the Style track into MIDI note and event data andplaces it on separate tracks (Trks 9-16). Once the Style data is converted into actual note data, youcan view and edit the individual Style tracks as if you had recorded the data yourself. Also yoursong including the Style can now be played back by any other MIDI instrument that reads StandardMIDI File (SMF) format song data.
L2 Turns the Loop ON/OFF.
L3 Specifies the starting bar.
L4 Specifies the ending bar.
L 1
L 2
L 3
L 4
L 5
F 1 F 2 F 3 F 4 F 5 F 6 F 7
R 1
R 2
R 3
R 4
R 5
F1 Takes you back to the Advanced Recorder menu.

Kawai Concert Performer Series Digital PianoP. 54
• Before you use Style Paste, you need to make sure Tracks 9-16 are empty or don’t contain importantdata. When the Style is pasted, the data from the Style track will be pasted into these tracks andwill replace any existing data.
To use Style Paste:
1) Press the STYLE PASTE button (F1) while you are in the Advanced Recorder menu. The LCD screenwill prompt you for confirmation.
2) If you would like to proceed, press the YES button (F7), or press the NO button (F1) to cancel.
Punch-In RecordingPunching In means being able to automatically start recording right in the middle of a track that isplaying back, continue recording new data on that track for a specified number of measures, andthen automatically stop recording at a specific measure and hear the rest of the track play to theend. This tool is very valuable if you wish to record over some misplayed notes in the middle of atrack, but would like to preserve the music in the measures leading up to, and following, the troublespot.
F1 Cancels the Style Paste.F7 Proceeds with Style Paste.
L 1
L 2
L 3
L 4
L 5
F 1 F 2 F 3 F 4 F 5 F 6 F 7
R 1
R 2
R 3
R 4
R 5

Recording a Song P. 55
To use Punch-in recording:
1) Select Punch In/Out in the Advanced Recorder menu.2) Use the L and R buttons to select the options and change their values using the Dial. Select AUTO
with the R5 button to have the CP automatically handle the punching in/out while you play.3) Press the REHEARSAL button (F4, F5) to listen to the song for rehearsal. If you need to adjust mixing
or if you would like to loop the song, use the MIXER (F2) or LOOP ON/OFF (F6) button.4) When you are ready to record, press the REC button and then the PLAY button. The music will start
immediately from the Start Bar that you have chosen. Once the song reaches the Punch In Bar, anynotes that you play on the keyboard will be recorded.Recording will stop when the song reaches the Punch-Out Bar, but the CP will keep playing back thesong to the end unless you press the STOP button.You can repeat the punch-in/out section by turning the looping on with the F6 button.
5) Listen to what you have recorded and re-record if necessary.
F1 Takes you to the Advanced Recorder menu.F2 Takes you to the Mixer Settings menu.F4, F5 Plays the song for rehearsal.F6 Turns Loop on/off.
L 1
L 2
L 3
L 4
L 5
F 1 F 2 F 3 F 4 F 5 F 6 F 7
R 1
R 2
R 3
R 4
R 5
R1 Changes the time signature.
R2 Changes the tempo.
R3 Selects the recording mode. REPLACEerases the previous data and records thenew data in its place. OVERDUB mixes thenew data with the previous data so that bothare heard together. Repeatedly pressing theR3 button switches between the REPLACEand OVERDUB.
R5 Selects the Punch-in method, Auto or Pedal.Repeatedly pressing the R5 button switchesbetween the Auto and Pedal.
L1 Selects the track to Punch in on.
L3 Selects the measure in the song from where youwant the CP to start playing.
L4 Selects the measure where the CP will punch-inand start recording.
L5 Selects the measure where the CP will punch-out and stop recording.

Kawai Concert Performer Series Digital PianoP. 56
• If you set the CP to Punch-In at the very first measure of the song, the metronome willautomatically play a two-measure intro to assist you with the timing. These “ticks” will not berecorded as part of the track.
Punch-In recording using the pedalInstead of specifically setting an automatic Punch-In and Punch-Out Bar, you can use the centerpedal to manually Punch In and Out.
• You can punch in and out with pedal one time for each pass over the track that you make.
To use the pedal to Punch-In/Out:
1) Use the R5 button to select Pedal in the Punch In/Out menu.2) Use the L and R buttons to set up other recording options.3) Press the REC button to start. The song will start playing.4) When the song reaches the bar where you wish to punch in, press the center pedal and play the
keyboard.5) When you reach the bar where you wish to punch out, press the pedal again to stop recording. Notice
that the song keeps playing to the end (it’s just no longer recording) or until you press STOP.
F1 Takes you to the Advanced Recorder menu.F2 Takes you to the Mixer Settings menu.F4, F5 Plays the song for reharsal.F6 Turns Loop on/off.
L 1
L 2
L 3
L 4
L 5
F 1 F 2 F 3 F 4 F 5 F 6 F 7
R 1
R 2
R 3
R 4
R 5
R1 Changes the time signature.
R2 Changes the tempo.
R3 Selects the recording mode. REPLACEerases the previous data and records the newdata in its place. OVERDUB mixes the newdata with the previous data so that both areheard together. Repeatedly pressing the R3button switches between the REPLACE andOVERDUB.
R5 Selects Auto or Pedal as the Punch-Inmethod. Repeatedly pressing the R5 buttonswitches between the Auto and Pedal.
L1 Selects the track to Punch in.
L3 Selects the measure in the song from where youwant the CP to start playing.

Recording a Song P. 57
Step RecordingStep Recording is a method of recording a song by manually entering notes one after another asdata, instead of playing the keyboard in real-time. This method may be useful when trying to createa phrase with a precise rhythm, or when recording a phrase that is beyond your playing skill level.
To set up Step recording:
1) In the Advanced Recorder menu select Step Rec (L4). The Step Record menu will be displayed.2) Use the L and R buttons and the Dial to set up recording options.3) Press the START button (F7). You will be presented with the data entry screen.
To use the Step Recorder:
1) Use the F1–F3 buttons to select a setting (Note value, Note length, Velocity) and use the Dial tochange its value. The value will be displayed above the buttons at the bottom of the screen.Velocity value can be entered by actually hitting a key on the keyboard. To enable this, select “Key”for the Velocity value instead of a number.
F1 Cancels Step recording and takes you to the Advanced Recorder menu.F7 Proceeds to the data entry screen of the Step Record menu.
L 1
L 2
L 3
L 4
L 5
F 1 F 2 F 3 F 4 F 5 F 6 F 7
R 1
R 2
R 3
R 4
R 5
R1 Changes the time signature.
R3 Selects recording mode. REPLACE erasesthe previous data and records the new datain its place. OVERDUB mixes the new datawith the previous data so that both areheard together. Repeatedly pressing the R3button switches between the REPLACE andOVERDUB.
L1 Selects the recording track.
L2 Selects which sound is assigned to the track.
L3 Selects which measure you’d like to startrecording at.

Kawai Concert Performer Series Digital PianoP. 58
2) To enter a note event, play the note using the keyboard. The note data will be displayed on thescreen. Continue entering as many notes as you wish; notice how previously entered notes continueto be displayed as a list, screen room permitting. The graphic navigator near the bottom of thescreen gives you feedback as to what bar you are in.
3) If you enter a wrong note and wish to delete it, press the L2 button. When you are using the REPLACEmode for recording, every time you press L2 the list of your entered notes on the screen scrolls backone event, and that event is erased immediately. Therefore, if you scroll back to the first beat of bar5 of a 10-bar list of notes, everything from bar 5 on will be erased. In OVERDUB mode, however, youcan delete only the most recently added note, and scrolling back over the list using L2 will notautomatically erase events. When using OVERDUB, you need to press the Delete button (R1) toerase the event.
L 1
L 2
L 3
L 4
L 5
F 1 F 2 F 3 F 4 F 5 F 6 F 7
R 1
R 2
R 3
R 4
R 5
R1 Deletes the last note entered in OVERDUBmode.
F1 Selects the note value.F2 Adjusts the note length.F3 Selects the velocity value. Values are from 1–127 or Key.F4 Enters Tied note values.F5 Enters a rest.F6 Takes you to the beginning of the next measure.F7 Stops recording.
L2, L3 Moves the cursor up and down the list of enterednotes in OVERDUB mode.
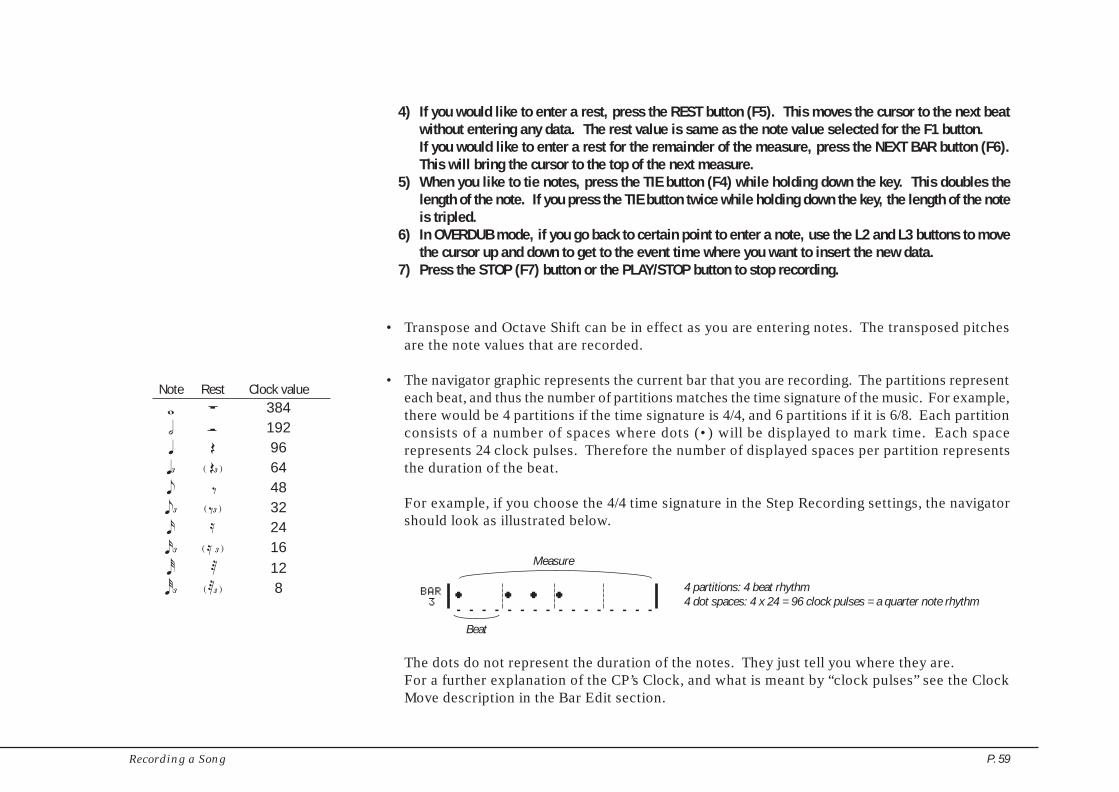
Recording a Song P. 59
• Transpose and Octave Shift can be in effect as you are entering notes. The transposed pitchesare the note values that are recorded.
• The navigator graphic represents the current bar that you are recording. The partitions representeach beat, and thus the number of partitions matches the time signature of the music. For example,there would be 4 partitions if the time signature is 4/4, and 6 partitions if it is 6/8. Each partitionconsists of a number of spaces where dots (•) will be displayed to mark time. Each spacerepresents 24 clock pulses. Therefore the number of displayed spaces per partition representsthe duration of the beat.
For example, if you choose the 4/4 time signature in the Step Recording settings, the navigatorshould look as illustrated below.
4) If you would like to enter a rest, press the REST button (F5). This moves the cursor to the next beatwithout entering any data. The rest value is same as the note value selected for the F1 button.If you would like to enter a rest for the remainder of the measure, press the NEXT BAR button (F6).This will bring the cursor to the top of the next measure.
5) When you like to tie notes, press the TIE button (F4) while holding down the key. This doubles thelength of the note. If you press the TIE button twice while holding down the key, the length of the noteis tripled.
6) In OVERDUB mode, if you go back to certain point to enter a note, use the L2 and L3 buttons to movethe cursor up and down to get to the event time where you want to insert the new data.
7) Press the STOP (F7) button or the PLAY/STOP button to stop recording.
4 partitions: 4 beat rhythm4 dot spaces: 4 x 24 = 96 clock pulses = a quarter note rhythm
The dots do not represent the duration of the notes. They just tell you where they are.For a further explanation of the CP’s Clock, and what is meant by “clock pulses” see the ClockMove description in the Bar Edit section.
Note Rest Clock valuew î 384h î 192q Î 96q£ ( Σ ) 64e ä 48e£ ( ä £ ) 32x 24x£ ( £ ) 16r ¨ 12r£ ( ¨ £ ) 8 BAR
3
Beat
Measure
• • • •––––––––––––––––

Kawai Concert Performer Series Digital PianoP. 60
Song EditSong Edit lets you name, transpose, and change initial tempo settings for your song.
To edit the song:
1) Select Song Edit from the Advanced Recorder menu. The Song Edit screen is displayed.2) Use the L and R buttons to select the setting that you wish to change, then use the Dial to change the
value.3) To name to the song, use the F2 and F3 buttons to move the cursor over the characters in the name,
then use the Dial to select characters.4) Press the L3 button to set the transpose amount. You can transpose your song +/- 24 in half step
increments.5) Press L4 to change the initial tempo setting of the song.6) When you are finished, press the MENU button (F1) to return to the Advanced Recorder menu.
F1 Takes you to the Advanced Recorder menu.F2, F3 Moves the cursor over the characters when naming the song.
L 1
L 2
L 3
L 4
L 5
F 1 F 2 F 3 F 4 F 5 F 6 F 7
R 1
R 2
R 3
R 4
R 5
L2 Names the song.
L3 Adjusts transposition.
L4 Sets the initial tempo of the song.

Recording a Song P. 61
Bar EditingBar Edit contains many useful editing functions. You can edit your song one bar or any number ofbars at a time.
To use Bar Edit:
1) In the Advanced Recorder menu select Bar Edit (R3). The Bar Edit screen will be displayed.2) Use the L and R buttons to select the desired editing function. The editing screen for that function
will be displayed.
Use the L and R buttons to select the desired editfunction.
F1 Takes you to the Advanced Recorder menu.
L 1
L 2
L 3
L 4
L 5
F 1 F 2 F 3 F 4 F 5 F 6 F 7
R 1
R 2
R 3
R 4
R 5

Kawai Concert Performer Series Digital PianoP. 62
• Resolution determines the timing value the quantize function will use to shift the notes you wantto quantize. For example, setting a quarter note resolution will shift all of the quantized notes tothe nearest quarter beat. Setting an eighth note resolution will shift all of the quantized notes tothe nearest eighth beat and so on. In the Advanced Recorder, quantize values are expressed innote values and as a number that indicates how many clock beats each note value contains. TheAdvanced Recorder divides each beat in a bar into 96 smaller clock beats. A Quarter note is 96clock beats, an eighth note is 48 clock beats, and a sixteenth note is 24 clock beats and so on.The quantize resolution range is from quarter notes (96 clocks), to 64th note triplets (4 clocks).
QuantizeQuantize automatically shifts the timing of a note. This can be used to correct imperfect timing in aperformance by shifting notes that were played either too early or too late so they will fall exactlyon the correct beat. For example, you can accurately align any out of time notes to the nearest 8th-or 16th-note beat depending on the type of song you are quantizing. Sometimes quantizing all ofyour notes to exactly the same beat can make your playing sound too stiff. The Advanced Recorderquantize function allows you to set a quantize “Range” so only the notes that were very early or lateare quantized. Notes that were almost perfect are not quantized thus keeping more of the originalfeeling in your music.
R2 Selects the note Resolution for quantization.Use the Dial to change the value.
R3, R4 Sets the Low and High Range forquantization. Use the Dial to change thevalue.
F1 Returns you to the Advanced Recorder menu.F2 Undoes the quantization which was just applied. This option
is not always available.F7 Applies the quantization to your recording.
L 1
L 2
L 3
L 4
L 5
F 1 F 2 F 3 F 4 F 5 F 6 F 7
R 1
R 2
R 3
R 4
R 5
L1 Selects the track that you wish to quantize.
L2, L3 Selects the bar range that you want to quantize.Use the Dial to set the bar numbers.
L4 Selects the lowest note that you want to quantize.Use the Dial to change the note value.
L5 Selects the highest note that you want toquantize. Use the Dial to change the note value.

Recording a Song P. 63
• Range sets up timing “borders” around the Resolution value you specify. Notes within theseborders will not be quantized and notes outside the borders will be moved to the nearest beatspecified by the resolution value (Quarter note, Eighth note, etc.). The negative value representsthe placement of the “border” before the beat, and the positive value represents the placementthe “border” after the beat. Together, these two “borders” form a timing “range” around thespecified beat.
The notes that fall inside the Rangeare not shifted at all.
The notes that fall beyond theRange are moved to the closest“border” of the Range.
Selecting zero Range results in no“range”, and all notes are shiftedto the precise beat.
Resolution24 Beat 12 Beat 12
Range0, 0 Ï « Ï Ï » Ï Ï «Ï » Ï Ï « Ï Ï«
○○
○○
○○
○○
○
○○
○○
○○
○○
○
○○
○○
○○
○○
○
Resolution24 Beat 12 Beat 12
Range-3, 3 Ï « Ï ÏÏ Ï » Ï
○○
○○
○○
○○
○
○○
○○
○○
○○
○
○○
○○
○○
○○
○
Resolution48 Beat 24 Beat 24
Range2, 10 Ï « Ï ÏÏ Ï» Ï
○○
○○
○○
○○
○
○○
○○
○○
○○
○
○○
○○
○○
○○
○
By experimenting with Resolution and Range settings, you can correct the timing of the notes in yourrecording while still allowing for a natural, human feel.

Kawai Concert Performer Series Digital PianoP. 64
CopyThe Copy function allows you to copy a section or all of the data on a track to another location.The destination may be on the same track, or it can be on another track.
• The destination of the copied data must either be:1) A location that already has data in it.2) The first blank bar after the end of a track (Bar 1 if the destination track is empty).
For example, if a track only has 10 bars in it, you cannot copy data onto bar 20. You can, however,copy data to bars 1 through 11.
• Copied data replaces any current data that may be at the destination.
R2 Selects the destination track. Use the Dialto select the track number 1-16, Tempo, orChord.
R3 Selects the bar in the destination track wherethe copied data will be placed.
F1 Returns you to the Advanced Recorder menu.F2 Undoes the copying. This option is not always available.F7 Proceed with copying.
L 1
L 2
L 3
L 4
L 5
F 1 F 2 F 3 F 4 F 5 F 6 F 7
R 1
R 2
R 3
R 4
R 5
L2 Selects the track to be copied. Use the Dial toselect the track numbers 1-16, Tempo, or Chord.
L3 Selects the bar where the data that you arecopying starts. Use the Dial to change the barnumber.
L4 Selects the bar where the data that you arecopying ends. Use the Dial to change the barnumber.

Recording a Song P. 65
DeleteDelete completely erases and removes the bars that you specify.
F1 Returns you to the Advanced Recorder menu.F2 Undoes the deletion. This option is not always available.F7 Proceed with the deletion.
L 1
L 2
L 3
L 4
L 5
F 1 F 2 F 3 F 4 F 5 F 6 F 7
R 1
R 2
R 3
R 4
R 5
L2 Selects the track to be deleted. Use the Dial tochoose 1-16, Tempo, Chord or All.
L3 Selects the first bar that has the data you wantto delete. Use the Dial to change bars.
L4 Selects the last bar that contains the data thatyou want to delete. Use the Dial to change bars.

Kawai Concert Performer Series Digital PianoP. 66
InsertThe Insert function duplicates data from specified bars and copies it to a certain location. However,the current data at the destination is not erased, but instead is pushed back to make room for thecopied data.
• If you just wish to insert empty bars into a track, select INSERT BAR (F3 or F4), and a sub-menuwill be displayed. You can insert empty bars into a track between bars that have data, or at thefirst blank bar at the end of the track.
R2 Selects the destination track where you wantthis data inserted. Choose from 1-16,Tempo, Chord or All.
R3 Selects the bar in the destination track whereyou want this data inserted.
F1 Takes you to the Advanced Recorder menu.F2 Undoes the Insert. This option is not always available.F3, F4 Takes you to the Insert Bar menu.F7 Proceeds with the Insert.
L 1
L 2
L 3
L 4
L 5
F 1 F 2 F 3 F 4 F 5 F 6 F 7
R 1
R 2
R 3
R 4
R 5
L2 Selects the track that contains the data you wishto duplicate. Choose from 1-16, Tempo, Chordor All.
L3 Selects the first bar that has the data you wantto duplicate.
L4 Selects the last bar that has the data you want toduplicate.

Recording a Song P. 67
R2 Selects the track where the empty bars aregoing to be inserted. Choose 1-16, Tempo,Chord or All.
R3 Selects the location in the destination trackwhere you want the empty bars inserted.Use the Dial to choose the location.
F1 Takes you to the previous menu.F2 Undoes the Insert. This option is not always available.F7 Proceeds with the Insert.
L 1
L 2
L 3
L 4
L 5
F 1 F 2 F 3 F 4 F 5 F 6 F 7
R 1
R 2
R 3
R 4
R 5
L2 Selects the number of empty bars you wish toinsert. Use the Dial to change the value.
L3 Selects the time signature for the bars that aregoing to be inserted. Use the Dial to change thevalue.
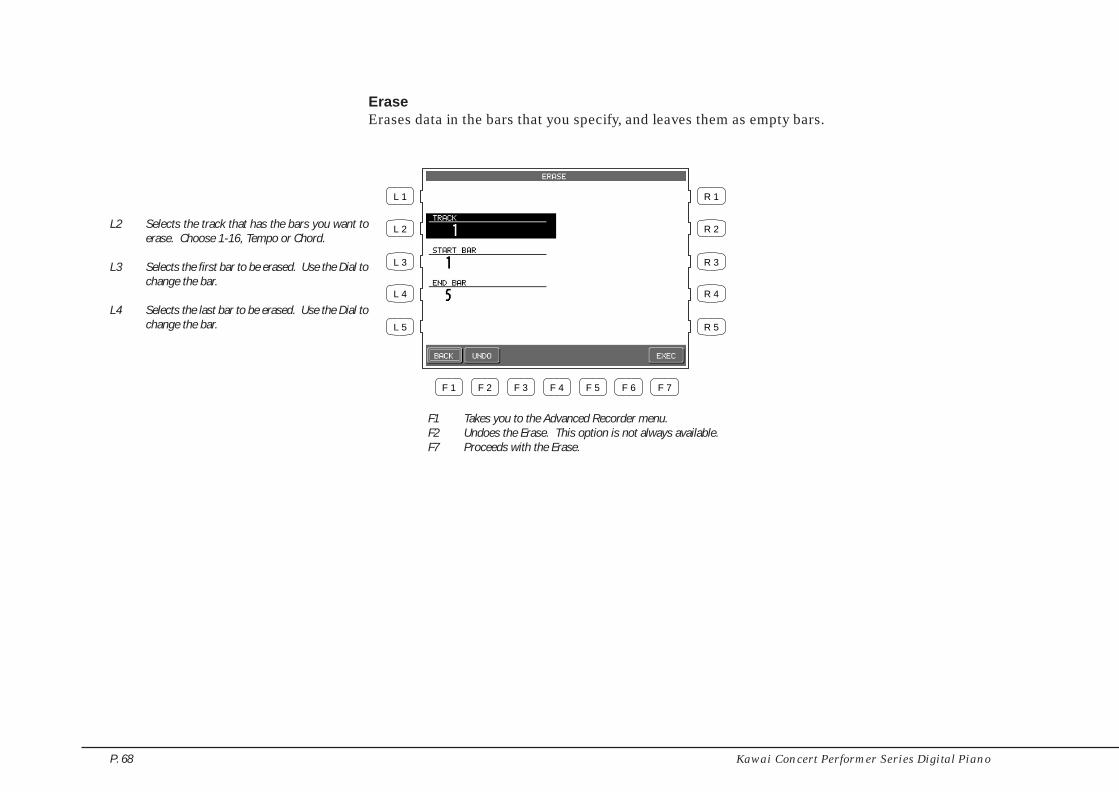
Kawai Concert Performer Series Digital PianoP. 68
EraseErases data in the bars that you specify, and leaves them as empty bars.
F1 Takes you to the Advanced Recorder menu.F2 Undoes the Erase. This option is not always available.F7 Proceeds with the Erase.
L 1
L 2
L 3
L 4
L 5
F 1 F 2 F 3 F 4 F 5 F 6 F 7
R 1
R 2
R 3
R 4
R 5
L2 Selects the track that has the bars you want toerase. Choose 1-16, Tempo or Chord.
L3 Selects the first bar to be erased. Use the Dial tochange the bar.
L4 Selects the last bar to be erased. Use the Dial tochange the bar.

Recording a Song P. 69
MergeMerge combines data from two tracks. You can make complex musical phrases using several tracks,then combine them together on one track. Remember that there can only be one instrument soundassigned to each track, so the resulting merged track will play all the combined data using oneinstrument sound. Merge can be useful for making rhythm patterns by first recording differentdrum/ percussion parts using the same drum kit on several tracks for easy editing of each instrument,or recording the right and left hand parts of a piano piece and combining them later on one track tofree up extra tracks for more recording.
• Merge does not automatically erase the track from where you copied the data.
R2 Select the track where you want this datamerged to. Choose 1-16.
F1 Takes you to the Advanced Recorder menu.F2 Undoes the Merge. This option is not always available.F7 Proceed with the Merge.
L 1
L 2
L 3
L 4
L 5
F 1 F 2 F 3 F 4 F 5 F 6 F 7
R 1
R 2
R 3
R 4
R 5
L2 Selects the track from where you want to copydata. Choose 1-16.

Kawai Concert Performer Series Digital PianoP. 70
Gate Time ModifyGate time refers to the length of a note as a percentage. Whatever the length of a note is when it isfirst recorded, this value is considered as its Gate time of 100%. By editing the length of the note,you can shorten it to 10% or lengthen it to 300% of the original value.
R2 Adjusts the Gate time in 10% increments.Use the Dial to select a value from 10%-300%.
F1 Takes you to the Advanced Recorder menu.F2 Undoes the Gate time adjustment. This option is not always
available.F7 Proceeds with applying the Gate time adjustment.
L 1
L 2
L 3
L 4
L 5
F 1 F 2 F 3 F 4 F 5 F 6 F 7
R 1
R 2
R 3
R 4
R 5
L2 Selects the track in which you want to modifyGate times. Use the Dial to choose the track.
L3 Selects the first bar of the data that you want tomodify Gate times for. Use the Dial to changebars.
L4 Selects the last bar of the data that you want tomodify Gate times for. Use the Dial to changebars.

Recording a Song P. 71
Velocity ModifyVelocity refers to how hard a key is struck, which translates into the dynamics of how loud theproduced sound is.
A note’s Velocity is a numerical value from 1-127. When editing the note Velocities in your recording,you can change them within a +/-100 range of their original values.
R2 Adjusts Velocity from -100 to +100 of theircurrent values.
F1 Takes you to the Advanced Recorder menu.F2 Undoes the Velocity adjustment. This option is not always
available.F7 Proceeds with adjusting the Velocity values.
L 1
L 2
L 3
L 4
L 5
F 1 F 2 F 3 F 4 F 5 F 6 F 7
R 1
R 2
R 3
R 4
R 5
L2 Selects the track in which you want to adjustVelocity.
L3 Selects the bar where the data you want to adjuststarts.
L4 Selects the bar where the data you want to adjustends.

Kawai Concert Performer Series Digital PianoP. 72
Clock MoveIn the Resolution section of this manual we learned that the CP Advanced recorder divides eachbeat in a bar into 96 clock beats, also expressed as a quarter note. Therefore there are 48 clocks pereighth note, and 24 clocks per sixteenth note and so on. This relationship holds true regardless ofthe song’s tempo.
On the CP, you can shift the timing of all notes in a track by shifting the entire track ahead (negativevalues) or behind (positive values) the beat by a certain clock value. Clock move is useful foradjusting the overall timing of a track. For example, if a certain sound you recorded respondsslowly and sounds behind the beat, you could shift the timing of the notes ahead of the beat tocompensate for the sounds slow response and make its timing feel more natural.
R2 Sets how many clocks you wish to move thetrack. Choose from –999 to +999.
F1 Takes you to the Advanced Recorder menu.F2 Undoes the clock move. This option is not always available.F7 Proceeds with applying the clock move.
L 1
L 2
L 3
L 4
L 5
F 1 F 2 F 3 F 4 F 5 F 6 F 7
R 1
R 2
R 3
R 4
R 5
L2 Selects the track that you wish to move. Choosefrom 1-16.
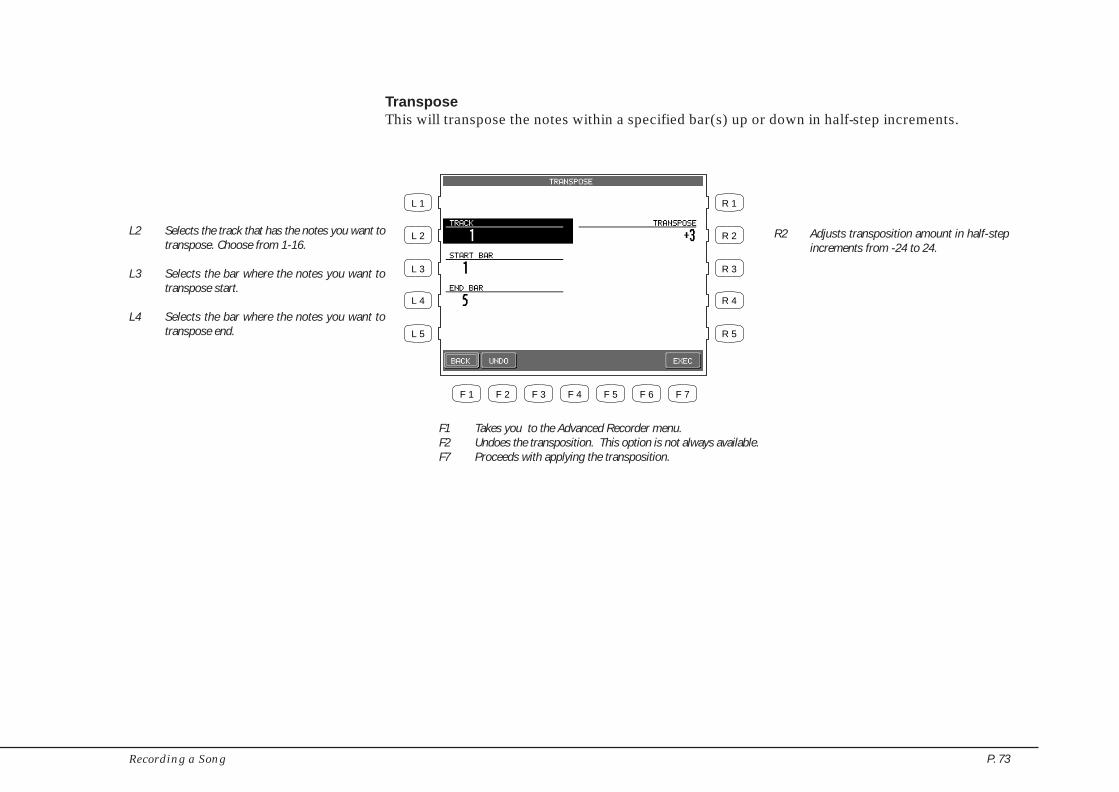
Recording a Song P. 73
TransposeThis will transpose the notes within a specified bar(s) up or down in half-step increments.
R2 Adjusts transposition amount in half-stepincrements from -24 to 24.
F1 Takes you to the Advanced Recorder menu.F2 Undoes the transposition. This option is not always available.F7 Proceeds with applying the transposition.
L 1
L 2
L 3
L 4
L 5
F 1 F 2 F 3 F 4 F 5 F 6 F 7
R 1
R 2
R 3
R 4
R 5
L2 Selects the track that has the notes you want totranspose. Choose from 1-16.
L3 Selects the bar where the notes you want totranspose start.
L4 Selects the bar where the notes you want totranspose end.

Kawai Concert Performer Series Digital PianoP. 74
Event EditEvent Edit enables you to examine and edit your performance note by note.
To use Event Edit:
1) Select Event Edit in the Advanced Recorder menu. The Event Edit screen will be displayed.2) Choose the track that you want to edit using the TRACK buttons (F3, F4). Note that Style, Chord, and
Tempo track can be edited as well.3) Use the L buttons to scroll up or down the event list until you find the specific event that you want to
edit. You can also use the Dial to scroll through the event list. You will hear the individual eventsbeing played as you scroll over them.
4) Use the CURSOR buttons (F5, F6) buttons to determine how you want to scroll through the event list.Selecting Bar scrolls through the event list bar by bar, selecting Beat scrolls through the event listbeat by beat and so on. The selection will become highlighted.
L 1
L 2
L 3
L 4
L 5
F 1 F 2 F 3 F 4 F 5 F 6 F 7
R 1
R 2
R 3
R 4
R 5
L2 Moves the cursor to the previous bar.
L3 Moves the cursor up the event list.
L4 Moves the cursor down the event list.
L5 Moves the cursor to the next bar.
R1 Removes the selected event.
R2 Creates a new event.
R3 Modifies the existing event.
F1 Takes you to the Advanced Recorder menu.F3, F4 Selects the track to work with.F5, F6 Moves the cursor across the columns in the event list.F7 Starts playing the Track.

Recording a Song P. 75
5) Select the function that you would like to apply to this event. You can select DELETE (R1) to removethe event, INSERT (R2) to create a new event at any specified location, or REPLACE (R3) to changethe existing event. Enter new values in the pop up Entry Box when you select INSERT or REPLACE.When Inserting or Replacing an event, use the CURSOR buttons to select the specific part of theevent you want to edit. Use the Dial to change the value.
6) Press the EXEC (F7) button to proceed, or press CANCEL (F2). The CP will prompt you for confirmation.7) Use the MENU button (F1) to return to the Advanced Recorder menu when you are done editing.
L 1
L 2
L 3
L 4
L 5
F 1 F 2 F 3 F 4 F 5 F 6 F 7
R 1
R 2
R 3
R 4
R 5
FI Takes you to the Advanced Recorder Menu.F2 Cancel the edit.F5, F6 Moves the cursor across the columns in the event list.

Kawai Concert Performer Series Digital PianoP. 76
Creating Your Own StylesThe CP can store up to 20 User Styles on board at one time.However since you can also save your original Styles onto a floppydisk, your library of Styles is virtually unlimited.
Thanks to the Style Convert Software developed by EMC Software,you can also convert style data from many other manufacturersfor use on the CP. That way you can take advantage of the hundredsof Style disks that are available on the market!
The Concert Performer contains 220 built-in Styles covering a widevariety of musical genres. There are two powerful features thatallow you to edit any of these Styles to better suit your musicaltastes, or even create your own Style entirely from scratch! Theseare the Conductor and the Style Maker.
The Conductor allows you to edit the Style data and personalize itto your taste. The Conductor offers two ways to edit: Easy Editand Advanced Edit.
The Style Maker allows you to create Styles of your own.There are three ways of using this feature: Make a New Style, Editan Existing Style, and Phrase Combination.
ConductorThe Conductor is used to edit Preset or User Style data.There are two editing methods offered by the Conductor.
Easy Style Edit This is an easy way to edit the Style data. The CP built-in styles are comprisedthree different types, Full, Intimate, and Solo Piano Styles. A Full Styleconsists of six instrument tracks called Sections. These are the Drums,Bass, and four Accompaniment tracks. The Intimate Styles have fourSections, Drum, Bass, And Two Accompaniment tracks. The Solo pianoStyles have two Accompaniment Tracks (Right and Left hand) and no Drumor Bass tracks.When you play a Style, each of these sections plays a musical Phrasecomposed for that type of instrument. Each section can play one of fourdifferent musical phrases, one for each of the four variations within a Style.Easy Edit lets you assign which of these four Phrases will be played by eachsection for each of the four variations within the style. This means you canmix and match the different phrases for each section to create your ownunique arrangements. Once you are satisfied with your edits, you can saveyour Easy Style edits to the PRESET STYLE.
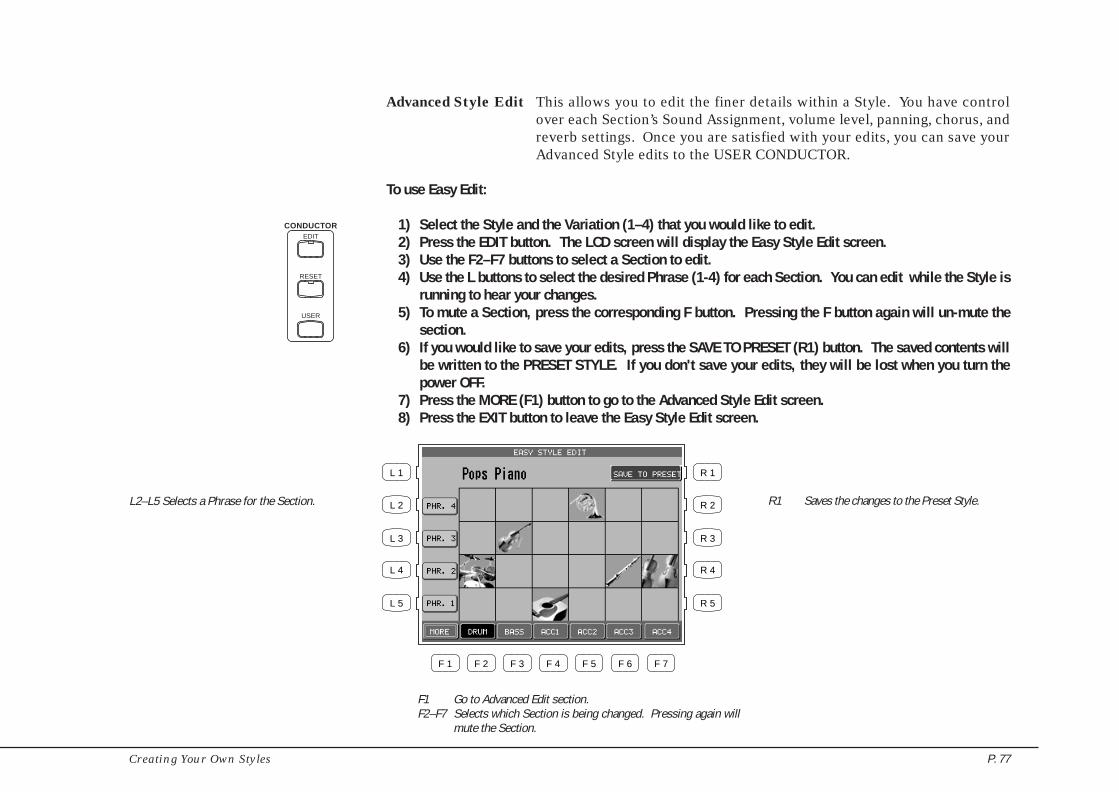
Creating Your Own Styles P. 77
Advanced Style Edit This allows you to edit the finer details within a Style. You have controlover each Section’s Sound Assignment, volume level, panning, chorus, andreverb settings. Once you are satisfied with your edits, you can save yourAdvanced Style edits to the USER CONDUCTOR.
To use Easy Edit:
1) Select the Style and the Variation (1–4) that you would like to edit.2) Press the EDIT button. The LCD screen will display the Easy Style Edit screen.3) Use the F2–F7 buttons to select a Section to edit.4) Use the L buttons to select the desired Phrase (1-4) for each Section. You can edit while the Style is
running to hear your changes.5) To mute a Section, press the corresponding F button. Pressing the F button again will un-mute the
section.6) If you would like to save your edits, press the SAVE TO PRESET (R1) button. The saved contents will
be written to the PRESET STYLE. If you don't save your edits, they will be lost when you turn thepower OFF.
7) Press the MORE (F1) button to go to the Advanced Style Edit screen.8) Press the EXIT button to leave the Easy Style Edit screen.
L2–L5 Selects a Phrase for the Section.
F1 Go to Advanced Edit section.F2–F7 Selects which Section is being changed. Pressing again will
mute the Section.
L 1
L 2
L 3
L 4
L 5
F 1 F 2 F 3 F 4 F 5 F 6 F 7
R 1
R 2
R 3
R 4
R 5
CONDUCTOREDIT
RESET
USER
R1 Saves the changes to the Preset Style.

Kawai Concert Performer Series Digital PianoP. 78
Resetting the StyleThe CP always remembers the original Preset Style settings. If you wish to restore those factorysettings before saving your edits, simply press the RESET button in the Conductor.
• If you would like to revert all Styles back to their original factory settings, after you have pressedthe SAVE button, use reset Conductor on the Soft Reset screen. See the section titled “SoftReset” on page 144.
Note:Easy Edit doesn’t allow you to edit the Intro, Ending and Fill-ins. However, muting a Section in theStyle will result in automatic muting of the same Section in the Intro, Ending and Fill-ins. If youmute a certain Section, you need to consider what effect it will have on the overall Style.
• Pressing the SAVE button will save all Styles at one time. You cannot save individually.
• For Intimate Styles the ACC 3/4 Sections are not used and cannot be edited.
• For Solo Piano Styles the Drum, Bass, and ACC 3/4 Sections are not used and cannot be edited.

Creating Your Own Styles P. 79
To use Advanced Edit:
1) Select the Style and the Variation (1–4) that you would like to edit.2) In the EASY STYLE EDIT screen, press the MORE button (F1). The Advanced Style Edit screen will be
displayed.3) Use the F2–F7 buttons to select a Section to edit.
4) Use the L buttons to select a setting and use the Dial to change its value. You can make your editswhile the Style is playing to hear your changes.
5) Press the BACK (F1 button) to return to the Easy Style Edit screen.
L 1
L 2
L 3
L 4
L 5
F 1 F 2 F 3 F 4 F 5 F 6 F 7
R 1
R 2
R 3
R 4
R 5
L1 Selects a sound for the Section.
L2 Adjiusts the Reverb level.
L3 Adjiusts the Chorus level.
L4 Adjusts panning.
L5 Adjusts the volume level.
F1 Back to the EVENT STYLE EDIT settings.
F2–F7 Selects the Section to change. Pressing again will mute theSection.
R1 Saves the changes to the User Conductor.

Kawai Concert Performer Series Digital PianoP. 80
Important Note:If you are using a User Style as the Source Style of your User Conductor, that User Style mustalways be kept at the same location in the CP, or else the User Conductor will not be able to locateit.
6) If you would like to save your edits, press the SAVE TO USER (R1) button. Your edits will be writtento the USER CONDUCTOR. If you don't save your edits, they will be lost as soon as you exit theAdvanced Style Edit screen.
7) Press the EXIT button to exit the Advanced Style Edit screen.
L 1
L 2
L 3
L 4
L 5
F 1 F 2 F 3 F 4 F 5 F 6 F 7
R 1
R 2
R 3
R 4
R 5
L3 Selects the memory location (1 through 40)where you wish to save your User ConductorStyle.
L4 Names your Style.
F1 Back to the Advanced Style EditF2, F3 Moves the cursor over the characters in the Style name.F4, F5 Selects a character to enter as part of the name.F7 Proceeds with saving the Style.

Creating Your Own Styles P. 81
Resetting the StyleYou can restore the original Style settings by pressing the RESET button. This will completely clearthe changes made to the Styles except any data already saved as a User Conductor Style. You canalso instantly discard the current changes by pressing the EXIT button to leave the Advanced Editscreen.
To use a saved User Conductor Style:
1) Press the USER CONDUCTOR button. If there are any User Conductor Styles available, they will bedisplayed.
2) Use the F1–F4 buttons to select the page that contains your desired User Conductor Style.3) Use the L or R button to select the desired User Conductor Style.
Use the L or R buttons to select your desired UserConductor Style.
F1-F4 Search for User Conductor Styles on the other pages.F7 Deletes the selected User Conductor Style.
L 1
L 2
L 3
L 4
L 5
F 1 F 2 F 3 F 4 F 5 F 6 F 7
R 1
R 2
R 3
R 4
R 5
RESET

Kawai Concert Performer Series Digital PianoP. 82
Making a New StyleThis is the most flexible way to create a new Style.You can make a completely new style from scratch or edit an existing style. First, read the explanationbelow about the configuration of a style and understand how a style is made.
Configuration of a StyleA complete Style consists of the following patterns:
Basic pattern 4 patterns (Variation 1–4) Max 16 measuresFill-in 4 patterns (Fill-In 1–4) 1 or 2 measuresIntro Major 2 patterns Max 16 measuresIntro Minor 2 patterns Max 16 measuresEnding Major 2 patterns Max 16 measuresEnding Minor 2 patterns Max 16 measures
• Each of these patterns in a Full Style is made up of six Sections—Drum, Bass, ACC1, ACC2,ACC3 and ACC4. In an Intimate Style there are four Sections—Drum, Bass, ACC1, ACC2. In aSolo Piano Style there are two Sections— ACC1, ACC2. You can use up to six sections in a UserStyle but you don’t necessarily have to use all of the sections to create a Style. For example, justlike the Intimate and Solo Piano Styles you may not need to use some Variations or Sections toaccomplish your musical idea. These unused sections or variations may be left blank.
• The different Sections can be of varying bar lengths as long as they stay within the limit. Havingthem all the same length may make the Style easier to use in a song, but you may find that havinguneven bar lengths among the Sections can create interesting musical results.
• For simplicity’s sake it is advisable to record your new style in the key of C.
To create a Style:
1) Press the ADVANCED RECORDER button. The LCD screen will display the Advanced Recorder menu.2) In the Advanced Recorder menu, press the Style Maker button (R5). The LCD screen will display the
first Style Maker screen.3) To make a completely new Style, press the Make New Style button (L1) and use the Dial to select the
time signature for the style you are going to make. To edit an existing style, press the Edit ExistingStyle button (L3) and use the Dial to select the style you want to edit.

Creating Your Own Styles P. 83
5) Use the L and R buttons to select which pattern to record.6) Press the Bar Length button (R1) and use the Dial to change the bar length of the pattern.7) Press the REC button (F7). The Style Maker Record screen will be displayed.
4) Press the ENTER button (F7). The Style Maker Record screen will be displayed.
L 1
L 2
L 3
L 4
L 5
F 1 F 2 F 3 F 4 F 5 F 6 F 7
R 1
R 2
R 3
R 4
R 5
L1 Selects Make New Style.
L3 Selects Edit Existing Style.
L5 Selects Phrase Combination.
F1 Go to the Advanced Recorder menu.F7 Enters the selected Style Maker menu.
L 1
L 2
L 3
L 4
L 5
F 1 F 2 F 3 F 4 F 5 F 6 F 7
R 1
R 2
R 3
R 4
R 5
R1 Changes the Time Signature.
R3 Selects the Style you want to edit.
R5 Selects the Initial Style.
L3 Selects an Intro and Ending to record.
L4 Selects a Variation and Fill-in to record
L5 Copies a phrase from another pattern.
R1 Changes the bar length.
R3 Selects an Intro and Ending to record.
R4 Selects a Variation and Fill-in to record.
R5 Saves the new Style to User Style.
F1 Takes you to the Style Maker menu.F7 Takes you to Style Maker Record screen.

Kawai Concert Performer Series Digital PianoP. 84
8) Use the L, R and F buttons to select the different record functions. Use the Dial to change the values.9) Press the REC START button (R4) to start recording. There will be an automatic 2-bar count in.
10) Start playing on the keyboard. The recording is looping, which means when it comes to the end ofthe last bar, it automatically goes back to the beginning of the first bar. In the Edit Existing Style, theexisting style will play.
L 1
L 2
L 3
L 4
L 5
F 1 F 2 F 3 F 4 F 5 F 6 F 7
R 1
R 2
R 3
R 4
R 5
L1 Selects the Part to be recorded.
L2 Sets the recording tempo.
L5 Takes you to the Detail Setting menu.
R1 Selects the Sound for the selected Part.
R2 Selects the Quantize resolution. This is inputQuantize and your playing will automatically beQuantized as you play.
R4 Starts the recording.
R5 Saves the Style to User Style.
F1 Takes you to the Style Maker menu.F2-F7 Switches between Play and Mute for the recorded Part.
Note:Press the Detail Setting button (L5) to edit the detail settings for the Auto-accompaniment system.See page 87 for an explanation of the Detail Settings.

Creating Your Own Styles P. 85
11) To erase any unnecessary or incorrect notes, use the ERASE (F1) button. While the pattern is stillrecording the notes will be erased as long as you press and hold the button.
12) When finished recording, press the REC STOP button (R4).13) Follow the above procedure to record any other desired patterns as needed.14) To save the recorded Style, press the SAVE button (R5). The Style Save screen will be displayed.
L 1
L 2
L 3
L 4
L 5
F 1 F 2 F 3 F 4 F 5 F 6 F 7
R 1
R 2
R 3
R 4
R 5
F1 Erases the recorded notes.
R4 Stops the recording.
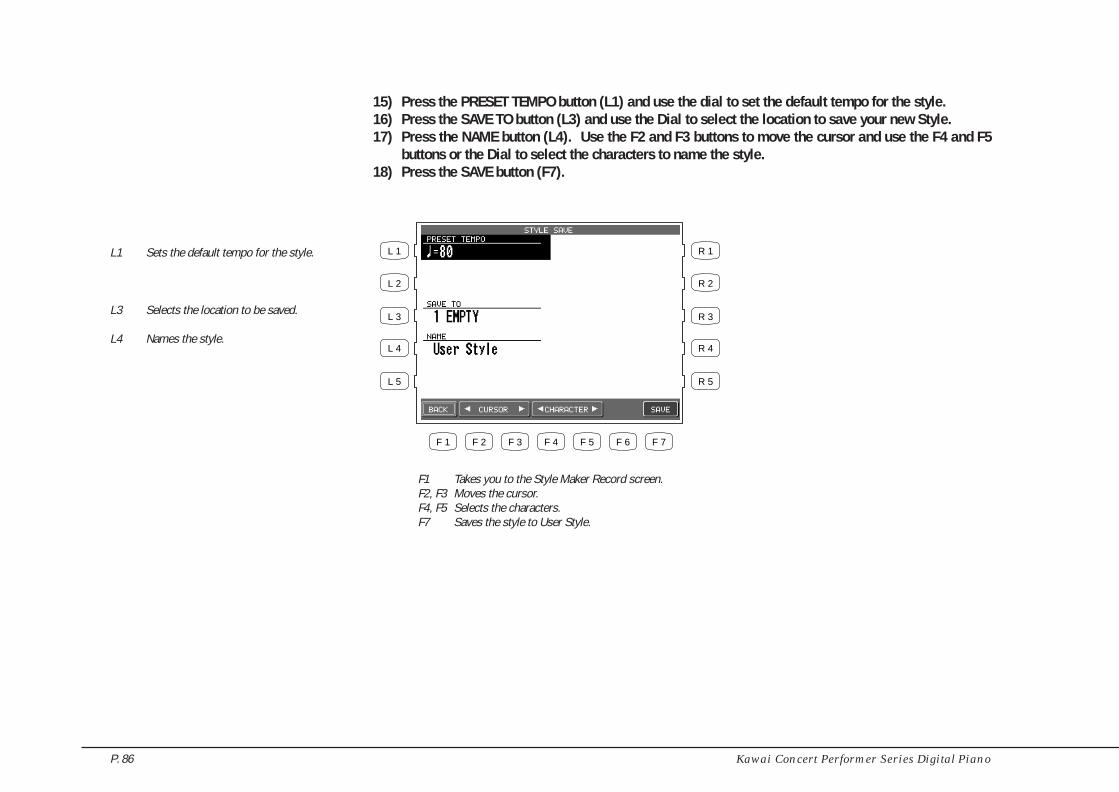
Kawai Concert Performer Series Digital PianoP. 86
15) Press the PRESET TEMPO button (L1) and use the dial to set the default tempo for the style.16) Press the SAVE TO button (L3) and use the Dial to select the location to save your new Style.17) Press the NAME button (L4). Use the F2 and F3 buttons to move the cursor and use the F4 and F5
buttons or the Dial to select the characters to name the style.18) Press the SAVE button (F7).
F1 Takes you to the Style Maker Record screen.F2, F3 Moves the cursor.F4, F5 Selects the characters.F7 Saves the style to User Style.
L 1
L 2
L 3
L 4
L 5
F 1 F 2 F 3 F 4 F 5 F 6 F 7
R 1
R 2
R 3
R 4
R 5
L1 Sets the default tempo for the style.
L3 Selects the location to be saved.
L4 Names the style.

Creating Your Own Styles P. 87
Auto-accompaniment SystemThe Concert Performer Auto-Accompaniment System (ACC) analyzes your playing and adjusts thenote data recorded in the different Phrases in a pattern to match the root key and chord type youare playing. The ACC System also shifts the octave for each phrase to keep each section playingwithin its musically useful range. To get the most out of this System, any new Style you create canbenefit from some fine tuning of these settings.
When you press the DETAIL SETTINGS button (L5) on the Style Maker Record screen, the StyleMaker Detail Settings screen will be displayed.
Accompaniment Type (ACC Type)This setting determines how Phrases being played by a particular section in a pattern will be analyzedby the Auto-accompaniment (ACC) System. There are Two Accompaniment Types: Chordal andScalic (melodic). Chordal Phrases usually consist of block chords or arppegiated chords. Youshould set this kind Phrase to Chordal. Scalic Phrases usually play melodic phrases that serve toadd interest to the style as well as provide counter melodies and riffs. Melodic Phrases or Phrasesthat contain chromatic passages should be set to Scalic. Scalic Phrases can also contain chords butthey will be analyzed differently than chords in a Chordal Phrase. The Bass section is automaticallyset to Scalic since it will rarely if ever play chords.
The terms Open and Close apply to Chordal Phrases, and refer to how the CP will regulate thevoicing of a Chordal Phrase. Setting a Section to Open will allow for open-voiced chords, whichmight be good for guitar and string sounds. Setting a Section to Close maintains closed voicedchords, which are better suited to piano parts and other chording or comping instruments.
RangeThis determines the chord inversions that a Chordal Phrase will play.The term “range” here has nothing to do with the span of actual chord notes. It selects which notein the chord will serve as the basis of the chord inversion.HI is the initial setting and is recommended as a starting point. MID plays an inversion based on thenext lower note in relation to HI, while LO plays an inversion based two-notes lower.
CrossoverThis determines the point where a Scalic Phrase will be transposed to keep the notes in a musicallyuseful range. When notes in a Scalic Phrase fall below the Crossover point you select they will betransposed up one octave by the Accompaniment System. For example if you set the Crossover

Kawai Concert Performer Series Digital PianoP. 88
point to E, the Phrase would begin to be transposed up one octave whenever you play a chord withan E as the root.
Experiment with the different Chordal and Scalic settings to find the one that works best with eachPhrase.
Bass LimitThis is an option for the Bass section and sets the limit for the lowest note the Bass will play. If anote in a Bass Phrase falls below the limit, it will automatically be transposed up an octave.
To adjust the auto-accompaniment system:
1) Use the L2-L4 buttons to select the setting you wish to change.2) Use the F3-F7 buttons to select the Section.3) Use the Dial to select or change a value.4) When done, press the BACK button (F1) to go back the previous menu. Then save the Style if necessary.
L 1
L 2
L 3
L 4
L 5
F 1 F 2 F 3 F 4 F 5 F 6 F 7
R 1
R 2
R 3
R 4
R 5
L2 Changes ACC Type.
L3 Changes RANGE.
L4 Changes CROSS OVER.
L5 Changes BASS LIMIT.
F1 Takes you to the previous menu.F2 Plays the style.F3-F7 Selects the Section.

Creating Your Own Styles P. 89
Making a Style with Phrase CombinationPhrase Combination is similar to Easy Style Edit in the Conductor. Phrase Combination however,lets you not only combine Phrases from within the selected Style but you can also combine Phrasesfrom any of the Styles in the CP to create a new Style. Additionally you can edit Fill-ins and basicpatterns (Variations).
• You cannot change the Intro and Ending Phrases. These will remain the same as in your selectedStyle.
To use Phrase Combination:
1) In the Advanced Recorder menu, press the Style Maker button (R5). The LCD screen will display thefirst Style Maker screen.
2) Press the Phrase Combination button (L5) and use the dial to select the initial style.3) Press the ENTER button (F7) to proceed to the next screen.4) Use the L2 and L3 buttons to select which of the four Fill-ins and Variations you would like to change.5) Use the L3 and L5 buttons to select the Section to change.6) Use the F4 and F5 buttons to move the cursor between the Style and Phrase column.7) Use the Dial to change the current Style or Phrase. You can jump to the desired Style category by
pressing the Style select buttons directly.8) Press the PLAY button (F2) to listen to the new Style.9) Press the SAVE button (F7) to save the new Style.
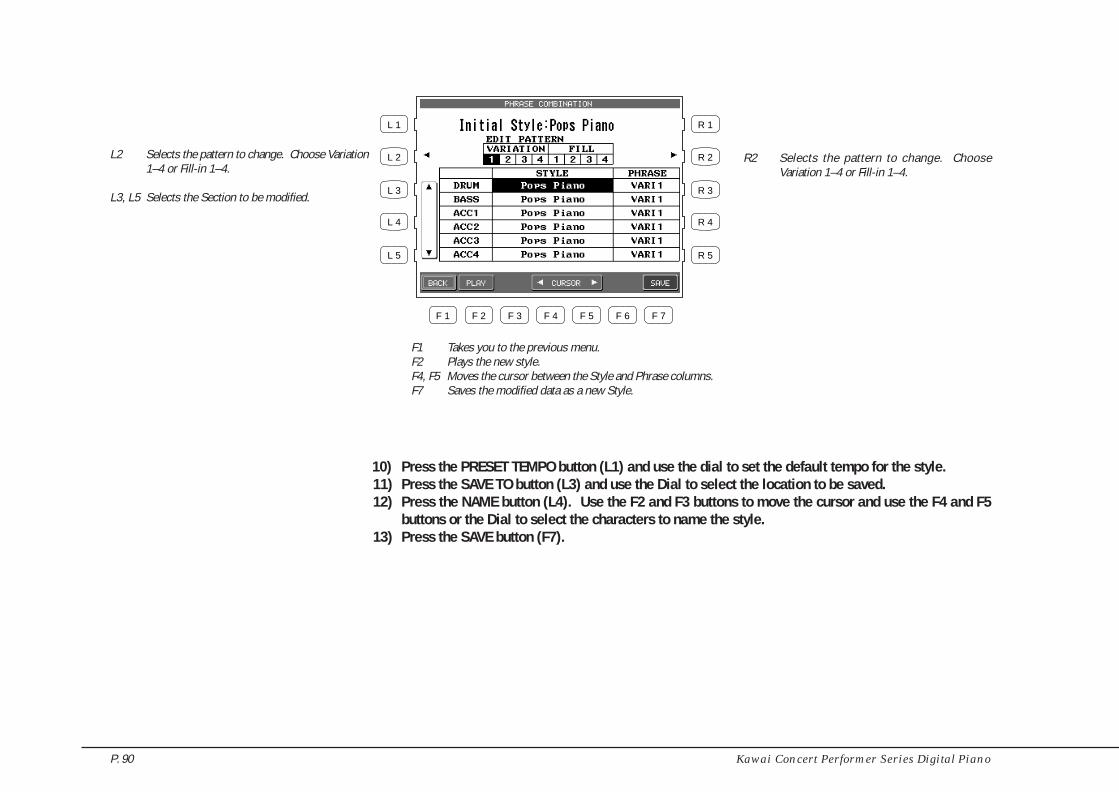
Kawai Concert Performer Series Digital PianoP. 90
10) Press the PRESET TEMPO button (L1) and use the dial to set the default tempo for the style.11) Press the SAVE TO button (L3) and use the Dial to select the location to be saved.12) Press the NAME button (L4). Use the F2 and F3 buttons to move the cursor and use the F4 and F5
buttons or the Dial to select the characters to name the style.13) Press the SAVE button (F7).
L 1
L 2
L 3
L 4
L 5
F 1 F 2 F 3 F 4 F 5 F 6 F 7
R 1
R 2
R 3
R 4
R 5
R2 Selects the pattern to change. ChooseVariation 1–4 or Fill-in 1–4.
L2 Selects the pattern to change. Choose Variation1–4 or Fill-in 1–4.
L3, L5 Selects the Section to be modified.
F1 Takes you to the previous menu.F2 Plays the new style.F4, F5 Moves the cursor between the Style and Phrase columns.F7 Saves the modified data as a new Style.

Creating Your Own Styles P. 91
L 1
L 2
L 3
L 4
L 5
F 1 F 2 F 3 F 4 F 5 F 6 F 7
R 1
R 2
R 3
R 4
R 5
L1 Sets the default tempo for the style.
L3 Selects the location to be saved.
L4 Names the style.
F1 Takes you to the Style Maker Record screen.F2, F3 Moves the cursor.F4, F5 Selects the characters.F7 Saves the style to User Style.

Kawai Concert Performer Series Digital PianoP. 92
Style ConvertStyle Convert is a technology originally developed for personal computers by EMC Software. Kawaiis proud to have licensed it for use in our musical instruments. This software reads many of thecommercially available Style data disks made by several popular keyboard manufacturers andconverts them for use with the Concert Performer. This conversion process is extremely easy, andonce converted the Style can be re saved in The CP’s own Style format.
To use the Style Convert Program:
1) Make sure that there is an empty location in the User Style area to hold the converted Style. TheStyle Convert program will automatically save the converted Style there.
2) Press the DISK button. The LCD screen will display the Disk Menu.3) Press the STYLE CONVERT button (R4) on the DISK menu. The Style Convert screen will be displayed
and prompt you to insert the Style Convert program disk in the floppy drive.4) Insert the program disk in the drive and then press the F7 button to continue. Press the F1 button to
cancel the Style Convert process.
L 1
L 2
L 3
L 4
L 5
F 1 F 2 F 3 F 4 F 5 F 6 F 7
R 1
R 2
R 3
R 4
R 5
F1 Cancels conversion process and goes back to the DISKmenu.
F7 Proceeds with the conversion.

Creating Your Own Styles P. 93
5) After the CP reads the program, it will display a list of the manufacturers Style formats that can beconverted. Use the L2 and L4 buttons to select the format you would like to convert. Press the F7button to continue.
L 1
L 2
L 3
L 4
L 5
F 1 F 2 F 3 F 4 F 5 F 6 F 7
R 1
R 2
R 3
R 4
R 5
L2, L4 Selects a Style format.
F1 Takes you to the previous screen.F7 Proceeds with the conversion.

Kawai Concert Performer Series Digital PianoP. 94
6) Insert the appropriate manufacturers Style disk when you are asked to do so. Press the EXEC buttonto proceed.
7) Select the desired Style to convert and press EXEC button. The CP will begin converting that Style.
8) When the conversion is complete, the SAVE USER STYLE screen will be displayed. Save the newconverted Style using the same procedure as saving a new User Style.
• You have just learned the basic procedure to convert other manufacturers Style formats. Fordetailed information on the Style Convert program, read the instruction sheet that comes withthe software. There you will find a list of which manufacturers formats are supported. Fortechnical information contact EMC Software directly at the location listed on the instructionsheet.
• An optional style conversion software package for use with a personal computer is also availablefrom EMC software. It is called “Style Works 2000 Kawai”. It offers more features than theinternal conversion program. To inquire about obtaining it, contact your local Kawai dealer ordistributor.
L 1
L 2
L 3
L 4
L 5
F 1 F 2 F 3 F 4 F 5 F 6 F 7
R 1
R 2
R 3
R 4
R 5
L2, L4 Selects the desired Style from the disk.
F1 Takes you to the previous menu.F7 Proceeds with the conversion.

Creating Your Own Styles P. 95

Kawai Concert Performer Series Digital PianoP. 96
Editing SoundsEven though the Concert Performer has over 900 high qualityinstrument and drum sounds built-in, there may be times when youwould like to change some of the qualities of a sound to really getthe tonal character that you have in mind. The CP allows you editcertain settings for individual sounds. You can choose to changesubtle nuances of the sound or even drastically change the sound’s
character to the point where you can no longer recognize what itwas originally! Once you have made these changes, you can saveup to 20 User Sounds in the User Sound Category, or a virtuallyunlimited number onto floppy disks.
Editing the Preset Effect SettingsEach of the CP instrument Sounds has preset Chorus and Effect settings that are appliedautomatically whenever that sound is selected.You can change these settings to suit your tastes and save them so they become the preset settingsfor that Sound.
To adjust the settings:
1) Select the sound you want to edit and press the SOUND EDIT button (F7). The LCD screen willdisplay the Sound Edit Menu.
2) Press the L2 button to select Edit Preset Sound Settings. The Preset Sound Settings screen will bedisplayed.
L 1
L 2
L 3
L 4
L 5
F 1 F 2 F 3 F 4 F 5 F 6 F 7
R 1
R 2
R 3
R 4
R 5
L2 Selects Edit Preset Effect Settings
L3 Selects Make User Sound.

Editing Sounds P. 97
3) Press the L1 button and then turn the Dial to select which preset sound you wish to modify.4) Use the L and R buttons to select the different effect settings and use the Dial to change their value.5) When you are finished, press the SAVE button (F7) to save your settings.
L 1
L 2
L 3
L 4
L 5
F 1 F 2 F 3 F 4 F 5 F 6 F 7
R 1
R 2
R 3
R 4
R 5
L1 Selects the preset sound to edit.
L2 Turns the Chorus on/off.
L3 Turns the Effect on/off.
L4 Selects an effect type.
L5 Adjusts the effect setting.
R2 Adjusts the chorus level.
R4, R5 Adjusts the effect setting.
F1 Takes you to the previous menu.F7 Saves the settings.
• Pressing the SAVE (F7) button will save all changes made in the Preset Effect Settings menu. Ifyou exit the Preset Effect Settings menu without saving your changes, the settings will remainunchanged.

Kawai Concert Performer Series Digital PianoP. 98
Making a User SoundThere are two steps to making a User Sound: Editing the effect settings—same as described in theprevious section—and editing the sound’s character.
You can adjust six parameters of the sound character: Vibrato Depth, Brightness, Attack, Decay,Sustain, and Release.
Brightness controls the Strength of the high frequencies. Higher values produce a brighter sound,lower values produce a darker sound.
Vibrato Depth controls the depth of the Vibrato effect. Positive values produce a deeper Vibrato.Negative values produce a shallower Vibrato. The actual speed of the vibrato is preset for eachsound.
Attack determines how quickly a sound reaches its maximum volume after you press a key. Positivevalues produce a slower attack that is more gradual and smooth, while negative values produce afaster attack that is more percussive in nature.
Decay determines how quickly the volume of the sound decreases after it reaches it maximumvolume while the key is still held down. Positive values produce a slower decay, while negativevalues produce a faster decay.
Sustain determines the volume level of the sound after the decay portion of the sound is complete.Positive values produce a louder volume, while negative values produce a softer volume.
Release determines how long it takes for the sound to fade away to silence after you release thekey. Positive values produce a slower fade, while negative values produce a faster fade.
Note:For some sounds, changing the values for these parameters may have no effect. Each sound has apre-programmed setting for each of these parameters. When you change the values you are increasingor decreasing the value from the pre-programmed setting. If the setting for a certain sound parameteris 0 for example, then changing the value will have no effect.

Editing Sounds P. 99
To make a User Sound:
1) Select the sound you want to edit and press the SOUND EDIT button (F7). The LCD screen will displaythe Sound Edit Menu.
2) In the Sound Edit menu, select Make User Sound (L3). The User Sound Settings screen will bedisplayed.
3) You can edit the settings for Vibrato, Brightness, Attack, Decay, Sustain and Release.4) Use the F3 and F4 buttons to select a setting and use the Dial to change its value. You can always
play the keys as you edit the sound, enabling you to hear what changes are being made.5) Press the MORE button (F2) to edit the Effect Settings for your new sound, which is the same screen
as described in the previous section.6) If you would like to save the changes you have made, press SAVE (F7). Otherwise press BACK (F1) to
return to the previous menu or use the EXIT button to go back to the main Sound Edit menu.
7) If you press SAVE (F7), the Save To User Sound screen will be displayed. Use the L3 button to selectSave to User Sound on the screen. Use the Dial to select the User Sound location number where youwant to save your new Sound. You can name the sound by using the F2-F5 buttons. Pressing theSAVE button (F7) one more time will save the sound.
F1 Takes you to the previous menu.F2 Takes you to the Preset Effect Settings menu.F3, F4 Move the cursor.F7 Proceeds with saving the sound.
L 1
L 2
L 3
L 4
L 5
F 1 F 2 F 3 F 4 F 5 F 6 F 7
R 1
R 2
R 3
R 4
R 5

Kawai Concert Performer Series Digital PianoP. 100
• To select and play your new User Sound, press the USER SOUND button located in the SOUNDsection of the front panel, then select the desired User Sound.
L 1
L 2
L 3
L 4
L 5
F 1 F 2 F 3 F 4 F 5 F 6 F 7
R 1
R 2
R 3
R 4
R 5
L3 Selects the location where the sound will besaved.
L4 Names the Sound
F1 Takes you to the previous menu.F2, F3 Moves the cursor.F4, F5 Selects the character.F7 Saves the editted sound to User Sound.

Editing Sounds P. 101

Kawai Concert Performer Series Digital PianoP. 102
If you wish to play a song without any intentions to make permanentchanges or additional recordings, you can use the CP’s Disk SongPlay function to load the song very quickly for playback. Using thedisk drive in this way makes the Concert Performer an enjoyablesource of entertainment for parties and other social events, as wellas a great tool for the professional musician or music educator.
The Concert Performer’s floppy disk drive provides a convenientway to playback songs recorded in the CP’s Internal Format orStandard MIDI File (SMF) format. Songs in the CP’s internal formattypically are ones that you have recorded on your own instrument.There are many sources of SMF songs, including disks for sale fromprofessional musicians and publishers, songs shared amongmusicians and hobbyists, and Internet sites that feature SMF songsavailable for download.
About songs on Floppy DiskIf you will use a blank disk to store and play your own compositions made on the Concert Performer,there isn’t much to worry about. The CP can format the disk (if it isn’t already formatted), and theCP’s internal song format remembers everything about your song, including which sounds to usewith the recorded tracks. However, if you wish to purchase a disk of songs from your music storeor publisher, play a disk given to you by someone else, or play songs downloaded from the Internet,you will need to remember a few simple points:
• The CP reads only DOS formatted disks, either double-sided double-density (720KB) or highdensity (1.4MB). These are the most commonly used disk formats in both computers and musicalinstruments.
• The CP recognizes song files written in the Standard MIDI File format as long as they have DOSfile names ending with “.MID”. There are two types of Standard MIDI File formats, Format 0 and1. The CP can read the song data of both formats, however it will only display the lyrics of a songwritten as format 0.
• Songs that have been composed with the General MIDI (GM) standard will sound fine withoutany additional work, because data in the files will inform the CP as to what sounds to use whenplaying the song. If the song was not composed to the GM standard, you may find it necessary toedit the song to assign the correct sounds to the various tracks. Fortunately, almost allcommercially available MIDI files adhere to the General MIDI standard.
Playing Songs from a Floppy Disk

Playing Songs From a Floppy Disk P. 103
• The CP can also recognize most songs formatted for the PianoDisc player piano system andsongs formatted for Yamaha’s Disk Orchestra Collection. (Please check with your Kawai dealeror distributor for further information).
Selecting a Song from DiskA single floppy disk can store dozens of song files at one time, depending on the length of the songs.
To select a song:
1) Put the disk in the Floppy Disk Drive and press the DISK button. In the Disk menu, select Song Play(R3). After the CP searches the disk it will display the first ten available songs. If there are morethan ten songs on the disk, use the SEARCH buttons (F2, F3) to list the additional songs.
2) Use the L and R buttons to select the song you want to hear. You can also select a song by using theDial.
3) Once your desired song is highlighted, press PLAY/STOP to have the CP load the song and automaticallystart playing. You may also press SELECT (F7) to have the CP load the data and wait for you to startit manually.
4) Press the SONG CHAIN (F4, F5) buttons to have the CP automatically play all songs, one after another.5) When your selected song is ready to play, the Disk Song Play screen is displayed. Use the Recorder
control buttons on the left side of the panel to control the playback of the song.
CDDISKMEDIA

Kawai Concert Performer Series Digital PianoP. 104
The L and R buttons select the song you want tohear.
F1 Takes you to the Disk menu.F2, F3 Lists the next or previous ten titles.F4, F5 Starts the Chain Play.F7 Selects the song and takes you to the Disk Song Play screen.
L 1
L 2
L 3
L 4
L 5
F 1 F 2 F 3 F 4 F 5 F 6 F 7
R 1
R 2
R 3
R 4
R 5

Playing Songs From a Floppy Disk P. 105
Controlling Playback of a SongAs the song plays, you can adjust the tempo, play or sing along with on the keyboard, and even turnon/off the different instrument parts (tracks) in the song.The status of the song parts is displayed at the bottom of the LCD screen. You will see the partsreferred to as the CP’s four Parts + Style if the song was created on the CP, or as Channels (ch 1-16)if the song is a MIDI file. Displayed above each part is its current status:
PLAY The part will be heard when you play the song.MUTE The part has data, but it won’t be heard when you play the song.– – – – The part has no data to play.
• Transpose and Octave Shift are available when a song is playing. Octave Shift affects only thenotes you play “live” on the keyboard, not the music playing from the song file. Transpose canbe applied separately to the keyboard sound and the song sounds. This lets you play the keyboardin your preferred key along with a song recorded in a different (or more difficult) key.Use the front panel’s dedicated TRANSPOSE buttons to affect the keyboard sound. Use theSong Transpose option (R4 and R5) in the Disk Song Play menu to affect the song data.
• The Song Transpose option is available only for the song data in Standard MIDI file.
To make adjustments to the song:
1) In the Disk Song Play screen, use the R1, R2, R3, and L3 buttons to highlight and assign sounds tothe CP’s four keyboard Parts. These will be the sounds that you can play live from the keyboard asthe song is playing. Once a Part is highlighted, press any of the Sound category buttons to select anew sound.
2) Use the F buttons to play and mute any of the song’s instrument parts.3) Press the L4 button to use the Mixer to make adjustments to the song’s instrument parts. (See page
49 for the Mixer function.)4) Use the R4 and R5 buttons to transpose the song data.5) Use the panel TRANSPOSE and OCTAVE SHIFT buttons to adjust the CP’s keyboard Parts.6) Press the PLAY/STOP button to start the song.7) To adjust the tempo, press the L2 button and use the Dial to change values.8) Press the PLAY/STOP button again to stop the song.

Kawai Concert Performer Series Digital PianoP. 106
L2 Adjusts the song’s tempo.
L3 Highlights the LEFT Part.
L4 Takes you to the Mixer screen.
L5 Displays the song’s lyrics (if available in the data).
R1 Highlights the SOLO Part.
R2 Highlights the RIGHT1 Part.
R3 Highlights the RIGHT2 Part.
R4, R5 Transposes the song (but not the keyboard).
F1 Takes you to the Disk Song Select menu.F2-F5 Turns the song part on/off.F6, F7 Displays the status of the next set of 4 song parts. (Ch 5–8,
Ch9–12, Ch 13–16).
L 1
L 2
L 3
L 4
L 5
F 1 F 2 F 3 F 4 F 5 F 6 F 7
R 1
R 2
R 3
R 4
R 5
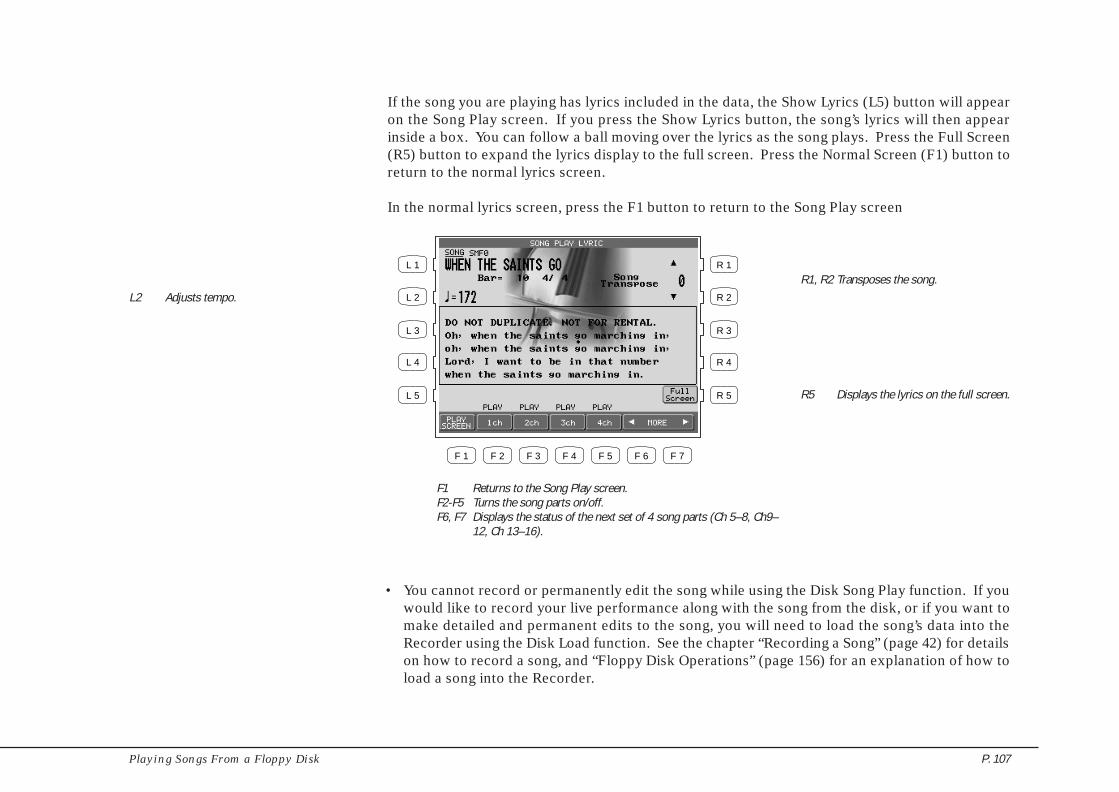
Playing Songs From a Floppy Disk P. 107
• You cannot record or permanently edit the song while using the Disk Song Play function. If youwould like to record your live performance along with the song from the disk, or if you want tomake detailed and permanent edits to the song, you will need to load the song’s data into theRecorder using the Disk Load function. See the chapter “Recording a Song” (page 42) for detailson how to record a song, and “Floppy Disk Operations” (page 156) for an explanation of how toload a song into the Recorder.
If the song you are playing has lyrics included in the data, the Show Lyrics (L5) button will appearon the Song Play screen. If you press the Show Lyrics button, the song’s lyrics will then appearinside a box. You can follow a ball moving over the lyrics as the song plays. Press the Full Screen(R5) button to expand the lyrics display to the full screen. Press the Normal Screen (F1) button toreturn to the normal lyrics screen.
In the normal lyrics screen, press the F1 button to return to the Song Play screen
L2 Adjusts tempo.R1, R2 Transposes the song.
R5 Displays the lyrics on the full screen.
F1 Returns to the Song Play screen.F2-F5 Turns the song parts on/off.F6, F7 Displays the status of the next set of 4 song parts (Ch 5–8, Ch9–
12, Ch 13–16).
L 1
L 2
L 3
L 4
L 5
F 1 F 2 F 3 F 4 F 5 F 6 F 7
R 1
R 2
R 3
R 4
R 5

Kawai Concert Performer Series Digital PianoP. 108
As you play a CM song, a handy Note Navigator display helps youkeep track of where you are in the music, as well as suggestinghow the rhythm of the song should be tapped out on the keys.
Many of the CM songs have lyrics that can be displayed as the songis being performed. As the song is played, a Bouncing Ball makesits way over the lyrics, following the player’s performance andencouraging everyone around the instrument to sing along.
The Concert Performer can also automatically play any of theConcert Magic songs. Listening to the song first can make it easierto play. There is also a Chain Play mode, giving you options tolisten to groups of CM songs.
Playing with Concert MagicThanks to Kawai’s innovative CONCERT MAGIC (CM) feature,absolutely anyone can sit at the Concert Performer and experiencethe joy of being a real performing musician… even if they havenever touched a musical instrument in their life!
Concert Magic allows you to play a song by simply tapping any keyon the keyboard. Regardless of what keys you play, the notes thatare heard will be the correct ones for the song. However, whatmakes this really exciting is that you control the timing of the notes,as well as their dynamics. This lets you add a level of expressivenessand individuality to the song that makes it real musical performance.
Selecting a Concert Magic SongThe 176 on-board Concert Magic songs are divided into eight groups by song category: Children’sSongs, American Classics, Patriotic Songs, Christmas Songs, Hymns, Classics, Special Occasions,and International songs.
• In addition, you can create and play your own Concert Magic songs using the floppy disk drive.
To select a song:
1) Press the CONCERT MAGIC button. The song selection menu will be displayed.2) Ten song titles from the Children’s Songs category will be displayed. The category name is displayed
at the very top of the screen. If you want to go to another song category, press SEARCH BY CATEGORY(F1, F2). You can also search for a specific title by using SEARCH BY NAME (F3, F4), which will listall 176 song titles in alphabetical order. You may also use the Dial to scroll through all the titles oneafter another.
• If you wish to play a CM song from floppy disk, press the DISK button (F6) to see the list of songson disk.
3) When you have found the song that you want to play, use the L or R buttons to move the box over thetitle. Press the SELECT button (F7) to choose it. The Note Navigator screen will be displayed, andyou are ready to perform!
CONCERTMAGIC

Playing with the Concert Magic P. 109
Performing a Concert Magic SongPlaying the Concert Magic song you’ve selected is very easy. Just begin tapping any key on thekeyboard and the song will play. Concert Magic plays the correct notes of the song, but you mustprovide the rhythm. Being familiar with how a particular song sounds does make it easier, butwatching the Note Navigator screen can help you play a song that you’ve never heard before.
The Note Navigator provides an outline of the song’s rhythm that looks a lot like the real music. Thedots (•) in the display are the notes that you play. The spacing of the notes gives a clue to the timing(rhythm) of the notes. Notes that are closer together are played faster; notes that are farther apartare played longer. Notes that are evenly spaced are played evenly, and so on.
Up to four lines of music are displayed. After you’ve played past a note in the song, the dot becomesa cross (+) to help you keep track of where you now are. When you get to the bottom of the screen,the top lines change to show the next lines of music, as if you had turned the page. When you get tothe end of the song you will see a double line, and then the song will reset to the beginning.
The L and R buttons select the desired song.
F1, F2 Searches by song category.F3, F4 Searches by song name.F5 Enters the Chain Play mode of the Concert Magic.F6 Searches for a song on floppy disk.F7 Can also select the song.
L 1
L 2
L 3
L 4
L 5
F 1 F 2 F 3 F 4 F 5 F 6 F 7
R 1
R 2
R 3
R 4
R 5

Kawai Concert Performer Series Digital PianoP. 110
To play a selected CM song:
1) In the Note Navigator screen press START (F4) if you want to first listen to the song. The CP will playthe song. Press the STOP (F4) button to stop. Notice how the Note Navigator displays the rhythm asthe song is playing.
2) If you wish to play the CM song yourself, start tapping any of 88 keys while the song is stopped, andthe song will play.
3) Press the RESET (F4) button at any time to start at the beginning of the song again.4) To play another song, press the SONG LIST buttons (F6, F7) to display the list.5) If you have selected a song that has lyrics, you may view them by pressing the LYRICS button (F1,F2)6) If you would like to play any song by steady tapping (instead of following the original rhythm), press
the STEADY BEAT button (F3).7) To exit Concert Magic, simply press the CONCERT MAGIC button again.
F1, F2 Displays the selected song’s lyrics, if available.F3 Allows you to play any song by steady tapping.F4 Starts and stops the song. Also used to reset the song when
performing.F5 Saves the changed Sounds.F6, F7 Selects another song.
L 1
L 2
L 3
L 4
L 5
F 1 F 2 F 3 F 4 F 5 F 6 F 7
R 1
R 2
R 3
R 4
R 5

Playing with the Concert Magic P. 111
• When you reach the end of the song, press any key one more time. This will not produce sound,but instead resets the song to the beginning for another performance.
• The Bouncing Ball only works with song files that are specifically designed for Concert Magic totake advantage of this feature.
• A Concert Magic song is made of two parts - a melody part and accompaniment part. Many of thesongs have different instrument sounds assigned each part to make the music more interesting.You can select different sounds for each part separately. The RIGHT1 Part plays the melody. Tochange its sound, press any Sound category button and select a new sound. The LEFT Parthandles the accompaniment. To change its sound, first turn off the RIGHT1 Part and then pressany Sound category button to select a new sound. Don’t forget to turn the RIGHT1 Part back onbefore you begin to play.
• You can use the PIANO ONLY button to quickly change the sound for both parts to the ConcertGrand piano.
F1, F2 Returns to the Note Navigator screen.F3 Allows you to play any song by steady beat tapping.F4 Starts and stops the song. Also used to reset the song when
performing.F5 Saves the changed Sounds.F6, F7 Selects another song.
L 1
L 2
L 3
L 4
L 5
F 1 F 2 F 3 F 4 F 5 F 6 F 7
R 1
R 2
R 3
R 4
R 5

Kawai Concert Performer Series Digital PianoP. 112
• You can also activate the RIGHT2 Part to use as a layer (additional sound) for the melody. Inaddition, if you know the melody to a Concert Magic song you can play along by activating theSOLO Part. Remember, you must play the notes of the melody when the SOLO sound is active.You can also select any new sound for the RIGHT2 and SOLO parts. Turn off all Parts except theone you wish to change, and then select the new sound. Don’t forget to turn all necessary Partsback on before you begin to play.
• You can save your new sound settings by pressing the SAVE button (F4). The Soft Reset functionwill be required to return the sounds to their original settings (see page 144).
• You can transpose the song by pressing the TRANSPOSE buttons.
To enter the Chain Play mode of the Concert Magic:
1) Press the CONCERT MAGIC button. The song selection menu will be displayed.2) Press the CHAIN PLAY button (F4). The Chain Play menu will be displayed.3) Use the L and R buttons to highlight a setting, then turn the Dial to change that setting. You can
choose to play songs from any one category, or to play all 176 CM songs. You can also choose to useeach song’s preset sounds, or to play the songs using the Concert Grand piano sound only.
4) Press the PLAY button (F4) to start playing the songs.5) To exit Concert Magic, press the CONCERT MAGIC button again.
TRANSPOSE
L 1
L 2
L 3
L 4
L 5
F 1 F 2 F 3 F 4 F 5 F 6 F 7
R 1
R 2
R 3
R 4
R 5
R2 Selects the song category.
F4 Starts the chain play.F6, F7 Returns to the song list.
L2 Selects Play mode.
L4 Selects Sound mode.

Playing with the Concert Magic P. 113
Concert Magic Song ArrangementsConcert Magic songs are specially arranged so that they will work well with your key tapping. Eachof the 176 CM songs falls into one of three categories of musical arrangements of varying difficulty.
EASY BEATThese are the easiest songs to play. To perform them, simply tap any key with a constant beat. Youcan easily see which songs are Easy Beat songs when you look at the Note Navigator. The dots willline up at a constant interval in the screen, indicating a constant beat.
MELODY PLAYThese songs are also quite easy to play, especially if you are familiar with them. To perform them,tap the keys to the rhythm of the melody (as if you were singing).
SKILLFULThese songs are more challenging. To perform them, carefully follow the rhythm as shown in theNote Navigator. It may require some practice to successfully play these songs. Even skilled playerswill enjoy the challenge that these songs offer.
Steady Beat PlayAfter you choose a song, you can press the STEADY BEAT button (F3) to play the song by steadytapping instead of the original rhythm. You can play any song from any arrangement category bytapping steady beats.

Kawai Concert Performer Series Digital PianoP. 114
Creating a Concert Magic SongYou can also use Concert Magic to play a song that isn’t one of the 176 built-in titles. You can recorda new song using the Concert Performer’s Recorder and then save on a floppy disk as a StandardMIDI File (SMF). The song can now be selected by pressing the DISK button when you are in theConcert Magic song selection screen.
• You can also record a song for Concert Magic by using an external sequencer. Remember to saveit to a floppy disk as a Standard MIDI File.
As you might imagine, getting your song to sound exactly the way you want it to in Concert Magicmay require a few adjustments to the original arrangement. The most important consideration is tokeep the musical arrangement as simple as possible. Concert Magic “pauses” the song after everynote as it waits for you to tap the next key. If there are complex rhythm patterns that have manynotes per beat, the song may become overly difficult to play. Here are some suggestions for creatinga Concert Magic song:
1) Record the melody first using the RIGHT 1 Part in the Easy Recorder (or Track 2 in the AdvancedRecorder).
2) Then record the accompaniment using the LEFT Part in the Easy Recorder (or Track 4 in the AdvancedRecorder).
3) Arrange the accompaniment so that its notes fall on the same beats as the melody. (This creates aMelody Play arrangement.)
4) If you want to be a little more adventurous, insert a few carefully placed accompaniment notes inbetween melody notes. (This creates a Skillful arrangement.)
5) If you are recording your song using an external sequencer, record the melody on channel 2 and theaccompaniment on channel 4.
6) For best results, you should quantize your parts.
• Of course, these are merely suggestions. There are no steadfast rules for how to compose yourCM song. In fact, very rewarding musical experiences may come out of simple trial and error.

Playing with the Concert Magic P. 115

Kawai Concert Performer Series Digital PianoP. 116
System MenuThe System Menu contains all of the functions that affect the overallperformance of the CP piano. This includes functions such as theSystem settings, tuning, and MIDI Setup. By adjusting these settingsyou can tailor the CP’s performance to your taste.
To use the System menu:
1) Press the SYSTEM button. The SYSTEM button LED will light and the System menu is displayed.2) Use the F1 and F2 buttons to access the System Menu pages.3) Use the L, R and F buttons to select the function you wish to change. A sub-menu with further options
for that function will be displayed.4) Use the L, R and F buttons to choose a setting from the sub-menu and use the Dial to change its
value.
• If you would like to have the CP remember your settings and have them immediately appliedevery time you turn the instrument on, select Power Up Setting (Page 2-R1) from the Systemmenu, and choose “Save Current Settings” (L2).
• For further details on resetting data, see page 144.
SYSTEM

System Menu P. 117
R1 Selects the Concert Magic Sound mode.
R2 Selects the Pedal functions.
R3 S e l e c t s t h e F i l l - i n m o d e f o r t h eAccompaniment Styles.
R4 Selects the SOLO part settings.
R5 Selects Video Out settings
F1, F2 Selects the different System Menu pages.
L1 Selects the overall tuning of the CP.
L2 Selects the Touch Curve (Key velocity sensitivity).
L3 Selects the Equalizer settings for the CP.
L4 Selects the Voicing settings.
L5 Selects the Resonance effect for the sustainpedal.
L 1
L 2
L 3
L 4
L 5
F 1 F 2 F 3 F 4 F 5 F 6 F 7
R 1
R 2
R 3
R 4
R 5
L 1
L 2
L 3
L 4
L 5
F 1 F 2 F 3 F 4 F 5 F 6 F 7
R 1
R 2
R 3
R 4
R 5
L1 Selects the Effect priority settings.
L2 Selects the Temperament settings.
L3 Selects the MIDI settings.
R1 Selects the Power up mode settings
R2 Restores the initial factory settings.
R3 Displays the software version.
F1, F2 Selects the different System Menu pages.

Kawai Concert Performer Series Digital PianoP. 118
TuningTuning allows you to adjust the CP’s pitch. You may need to adjust the tuning when you play withother instruments.
The master pitch is displayed in Hertz. The range of adjustment is from 427.0 to 453.0 Hz. Thefactory preset value is set to the modern standard A = 440.0 Hz.
• You can also adjust the tuning for each Part separately. This can be used to simulate a chorus-like effect by layering the same sound in RIGHT1 and RIGHT2 and slightly detuning them. EachPart can be raised or lowered by up to 50 cents. (50 cents = 1/4 tone).
L2 Selects the master pitch.
L3 Selects the pitch for the LEFT Part.
L4 Selects the pitch for the SOLO Part.
R3 Selects the pitch for the RIGHT1 Part.
R4 Selects the pitch for the RIGHT2 Part.
F1 Takes you to the System menu.
L 1
L 2
L 3
L 4
L 5
F 1 F 2 F 3 F 4 F 5 F 6 F 7
R 1
R 2
R 3
R 4
R 5

System Menu P. 119
Touch CurveWhen playing a piano, the volume of the sound produced increases in direct relation to how hard akey is struck. The CP’s Normal Touch curve offers the standard feel of an acoustic piano for practicingmusic. The CP offers six other touch curves ranging from light to heavy. You can also create yourown touch curves tailored to your personal playing style.
Normal This is the standard touch of an acoustic piano.Light 1, 2 For those still developing finger strength, such as a child, a louder sound is
produced even when the piano is played with a soft touch. Light 2 is lighter thanLight 1.
Heavy 1, 2 Perfect for those with strong fingers. Requires a heavier touch to produce a loudvolume. Heavy 2 is heavier than Heavy 1.
Off A constant volume is produced regardless of how hard the keys are struck. Thissetting is suitable for sounds that have a fixed dynamic range such as Organ orHarpsichord.
User 1, 2 You can create two of your own custom touch curves.
• LIGHT and HEAVY do not represent the physical weight of the keys. These are settings thataffect the sensitivity of the keys, which determines the volume level in response to the keymovement.
L1 Selects the normal setting.
L2 Selects a moderately light touch.
L3 Selects a light touch.
L4 Selects a moderately heavy touch.
L5 Selects a heavy touch.
R2 Selects the User 1 touch.
R3 Selects the User 2 touch.
R4 Turns off the Touch sensitivity entirely.
F1 Takes you to the System menu.F7 Takes you to the User Touch Curve screen.
L 1
L 2
L 3
L 4
L 5
F 1 F 2 F 3 F 4 F 5 F 6 F 7
R 1
R 2
R 3
R 4
R 5

Kawai Concert Performer Series Digital PianoP. 120
User Touch CurveYou can create your own custom touch curve to fit your playing style. Two User Touch curves canbe saved.
To create a User Touch Curve:
1) Press the EDIT button (F7) in the Touch Curve screen. The LCD screen will display the User Touchscreen.
2) Now start playing dynamically from soft to loud in order to let the CP analyze your playing style.While you are playing, a musical note e will blink in the right corner of the LCD display.
3) Press the CREATE button (F7) when you finish playing. The CP will analyze your playing and createa custom touch curve for you based upon your playing style. The User Touch Exec screen will bedisplayed.
L 1
L 2
L 3
L 4
L 5
F 1 F 2 F 3 F 4 F 5 F 6 F 7
R 1
R 2
R 3
R 4
R 5
F1 Takes you to the previous menu.F7 Creates a user touch curve.

System Menu P. 121
4) Use the Dial to select either User 1 or User 2 as the location for your new touch curve.5) Press the EXEC button (F7) to save your new touch curve.6) The CP will ask for your confirmation. Press YES (F7) to confirm.
• The user touch curve data is saved automatically even after the power is turned off. However,You must re select the user touch curve each time the power is turned on unless you make yourUser touch curve the default by selecting “Save Current Settings” from the Power Up Settingsscreen (See Power Up settings on page 143).
L 1
L 2
L 3
L 4
L 5
F 1 F 2 F 3 F 4 F 5 F 6 F 7
R 1
R 2
R 3
R 4
R 5
Use the Dial to select either User 1 or User 2 as thelocation for your new touch curve.
F1 Cancels the saving procedure.F7 Proceeds with saving procedure.

Kawai Concert Performer Series Digital PianoP. 122
System EQThe System EQ allows you to adjust the tone character of the CP piano to your taste. In addition toa Flat EQ setting (no EQ), there are four special EQ settings optimized for each of the CP modelsand four general purpose EQ settings. There is also a User EQ, that allows you to edit the existingEQ settings or create your own EQ settings.
• The System EQ affects the overall tone character of the CP speakers and the Line Out Jacks(The CD-R Drive is not affected by the System EQ). The special CP EQ’s are optimized for thespeaker systems on different CP models. When connecting the Line Out Jacks to an externalsource the Flat EQ setting is recommended.
• The Flat EQ setting is the default. If you want to save a different EQ setting as the default youmust select the “Save Current Settings” on the Power Up Settings screen (See Power Up Settings,page 143).
Use the L and R buttons to select your desired EQ setting.
F1 Takes you to the previous menu.F7 Takes you to the User System EQ screen.
L 1
L 2
L 3
L 4
L 5
F 1 F 2 F 3 F 4 F 5 F 6 F 7
R 1
R 2
R 3
R 4
R 5

System Menu P. 123
To create a User EQ:
1) Select one the ten EQ settings to edit and press the EDIT button (F7). The LCD screen will display theUser System EQ screen.
2) Use the F2, F3 buttons to move the cursor and use the Dial to change the value.3) Press the SAVE button (F7) to save the edited EQ settings to the User EQ.
L 1
L 2
L 3
L 4
L 5
F 1 F 2 F 3 F 4 F 5 F 6 F 7
R 1
R 2
R 3
R 4
R 5
F1 Takes you to the System EQ menu.F2, F3 Moves the cursor.F7 Saves the edited EQ settings to User EQ.

Kawai Concert Performer Series Digital PianoP. 124
Virtual VoicingVoicing is a technique used by piano technicians to mold the character of a piano’s sound. TheVoicing function lets you change the CP piano’s tone quality by choosing one of four types of voicings.
Normal Produces the normal timbre of an acoustic piano throughout the entire dynamicrange. This is the default setting.
Bright Produces a brighter tone throughout the entire dynamic range.Mellow Produces a mellower tone throughout the entire dynamic range.Dynamic The tone will change dramatically from mellow to bright according to your
playing.
• The current voicing selection is global for all the instrument Sounds. You can not have anindividual setting for each Sound.
• While voicing is a technique used for optimizing the tone of an acoustic piano, this function canbe used on all the Sounds on the CP piano.
L2 Selects Normal.
L3 Selects Mellow.
R2 Selects Dynamic.
R3 Selects Bright.
L 1
L 2
L 3
L 4
L 5
F 1 F 2 F 3 F 4 F 5 F 6 F 7
R 1
R 2
R 3
R 4
R 5
F1 Takes you to the System menu.

System Menu P. 125
ResonanceWhen the sustain pedal is depressed on an acoustic piano, all the dampers are lifted up allowing thestrings to vibrate freely. In this condition, when you play a note not only will the strings for the noteyou played vibrate but other strings will vibrate due to sympathetic resonance. The Resonancefunction simulates this phenomenon. You can select from three levels of Resonance.
Off No resonance.Normal Simulates the natural resonance characteristics of an acoustic piano.Deep Produces a more intense resonance.
L2 Selects normal resonance.
L3 Selects deep resonance.
R2 Turns off the resonance.
L 1
L 2
L 3
L 4
L 5
F 1 F 2 F 3 F 4 F 5 F 6 F 7
R 1
R 2
R 3
R 4
R 5
F1 Takes you to the System menu.

Kawai Concert Performer Series Digital PianoP. 126
Concert Magic SoundThis function determines which sounds the Concert Magic songs will be played with.
Preset Plays all the Concert Magic songs with the Preset Sounds assigned to each song.Piano Plays all the Concert Magic songs with the Concert Grand piano.
F1 Takes you to the System menu.
L 1
L 2
L 3
L 4
L 5
F 1 F 2 F 3 F 4 F 5 F 6 F 7
R 1
R 2
R 3
R 4
R 5
L2 Selects Preset sounds.
L3 Selects Piano sound.

System Menu P. 127
Pedal AssignThe Soft and Sostenuto pedals on the Concert Performer function as much more than just traditionalpiano pedals. These pedals can be assigned to control various other functions on the CP piano.With an optional expression pedal connected to the EXP pedal jack, you can also control the volumefor each Part.
Damper Pedal (Right)Sustain only Can be activated or deactivated separately for each Part.
Pedal assignment options for Soft Pedal (Left) and Sostenuto Pedal (Center)Soft Softens the sound and reduces its volume.Sostenuto Sustains only notes that were held when pedal was depressed.Start/Stop Controls start/stop for Styles and Songs.Harmony on/off Turns the instrument Harmony function on/off.Registration Switches from one Registration to another. You may choose the order,
1 to 8 or 8 to 1.Style Variation Switches from one Style Variation to another. You may choose the
order, 1 to 4 or 4 to 1.Intro/Ending Plays the Intro or Ending.Fill In Plays the Fill-in currently selected.Break Interrupts the whole Style.Drums Only Interrupts the Style except Drum part.Sync/Fade Out Controls the SYNC/FADE OUT button.Glide Bends the pitch up and down as programmed by you.Modulation Applies programmable vibrato to the sound.Rotary Fast/Slow Controls the speed of rotary speaker effect. This function will be
automatically assigned to the Soft Pedal (Left) when a sound that hasthe rotary effect turned on is selected as the Priority Part.
Left Hand Hold Holds the notes played in the LEFT/SPLIT Part as long as the pedal isdepressed.
Panel Lock Locks all buttons on the panel to prevent them from being tamperedwith or pressed accidently while you are playing. Press the assignedpedal once to lock the panel buttons. Press the assigned pedal again tounlock the panel buttons.

Kawai Concert Performer Series Digital PianoP. 128
EXP Pedal (Optional)Expression The Expression pedal controls the volume of Parts. Expression can be
activated or deactivated separately for each Part.
• The pedal assignments made to the Left pedal will be saved as part of a Registration. The pedalassignments made to the Center pedal are global and are not saved as part of a Registration.
1) Select the Pedal Assign (R2) option in the System menu (page 1). The LCD screen will display thePedal Assign screen. Use the L buttons to select which pedal you want to make assignments for.
F1 Takes you to the System menu.
L 1
L 2
L 3
L 4
L 5
F 1 F 2 F 3 F 4 F 5 F 6 F 7
R 1
R 2
R 3
R 4
R 5
L1 Selects the Right pedal (Damper).
L2 Selects the Center pedal (Sostenuto).
L3 Selects the Left pedal (Soft).
L4 Selects the Expression pedal.

System Menu P. 129
2) Use the L and R buttons to select the setting and use the Dial to change its value.
L2 Selects a function to assign to the pedal. Use the other L and R buttons to adjust parameters.
L 1
L 2
L 3
L 4
L 5
F 1 F 2 F 3 F 4 F 5 F 6 F 7
R 1
R 2
R 3
R 4
R 5
F1 Back to the pedal Assign menu.F3-F6 Selects the different pedals.

Kawai Concert Performer Series Digital PianoP. 130
Fill-in ModeThis determines whether or not a Fill-in will be automatically played each time a VARIATION buttonis pressed.There are two options.
Normal A Fill-in will not be automatically played each time a VARIATION button ispressed. Fill ins will only be played if a FILL button is pressed.
Auto A Fill-in will be played each time a VARIATION button is pressed. The Fill-inthat is played will be the one that accompanies the Variation that you are leaving.For example, if Variation 1 is currently active, and you select Variation 2, theFill-in for Variation 1 will be played.
L2 Selects Normal mode.
L3 Selects Auto mode.
F1 Takes you to the System menu.
L 1
L 2
L 3
L 4
L 5
F 1 F 2 F 3 F 4 F 5 F 6 F 7
R 1
R 2
R 3
R 4
R 5

System Menu P. 131
• You can access this screen by holding down the PORTAMENTO button for a few seconds.
Solo SettingsThis configures the special settings for the Solo part.
Since the Solo part allows you to play only one note at a time (monophonic), it is important to selectwhich note will be played by the SOLO Part when more than one key is played at a time.There are three options.
Top Note The SOLO Part plays only the highest note among the notes played at one time.Last Note The SOLO Part plays only the last key played among the notes played at one
time. When the last key is released, the SOLO Part will play the last previous keyplayed and so on.
No Retrigger The SOLO Part plays only the last key played among the notes played at onetime, but when that key is released the SOLO Part will stop playing.
When using Portamento, you can adjust Portamento Time which determines how long it takes forthe pitch to slide up or down from one note to the next.
L2 Selects the note priority.
L3 Adjusts Portamento time.
F1 Takes you to the previous menu.
L 1
L 2
L 3
L 4
L 5
F 1 F 2 F 3 F 4 F 5 F 6 F 7
R 1
R 2
R 3
R 4
R 5

Kawai Concert Performer Series Digital PianoP. 132
Video OutThis function is used select the type of video signal that will be output by the Video Out Jack.
NTSC The TV video signal system mainly used in North American countries and Japan.PAL The TV video signal system mainly used in the European countries.OFF The video signals are not output.
L2 Selects NTSC.
L3 Selects PAL.
L4 Selects OFF.
F1 Takes you to the System menu.
L 1
L 2
L 3
L 4
L 5
F 1 F 2 F 3 F 4 F 5 F 6 F 7
R 1
R 2
R 3
R 4
R 5

System Menu P. 133
Effect for SoundThis function determines whether or not the Preset Effects settings assigned to each Sound will beused or not.
Preset The Preset Effect settings for each Sound will be used. This is the default setting.Panel The Preset Effect settings for each Sound will not be used. In other words, changing
the Sounds will not change the Effect types and other settings for the Effects. Thisallows you to set each Effect section (REVERB, CHORUS, and EFFECTS) to your owntaste and use your Effect settings for all sounds. The Panel setting is very useful if youonly want to use certain Effects at all times or if you want to prevent the Effects fromconstantly changing each time you select a new Sound.
F1 Takes you to the System menu.
L2 Selects Preset.
L3 Selects Panel.
L 1
L 2
L 3
L 4
L 5
F 1 F 2 F 3 F 4 F 5 F 6 F 7
R 1
R 2
R 3
R 4
R 5

Kawai Concert Performer Series Digital PianoP. 134
TemperamentThe CP offers not only equal temperament (the modern standard) but also immediate access totemperaments popular during the Renaissance and Baroque periods.You can also create your own User tuning Temperament as well.
1) Select Temperament form the System Menu. The LCD screen will display the Temperament screen.2) Select your desired Temperament with the L and R buttons.3) Set the Temperament Key with the F2 and F3 buttons.4) If you select Equal temperament, use the F5 and F6 buttons to set Stretch Tuning to On, Off, or Piano
Only. (For an explanation of Equal and Equal Stretched tuning see page 135).Stretch=On: Applies the Stretched Tuning to all instrument Sounds.Stretch=Off: Stretched Tuning is turned Off for all the instrument Sounds Off.Stretch=Piano (only): Applies the Stretched Tuning only to the Piano Sound. The tuning for any otheractive sounds layered with a piano sound will be stretched to match the piano. If no piano sound isactive the tuning for any active sounds will not be stretched.
L 1
L 2
L 3
L 4
L 5
F 1 F 2 F 3 F 4 F 5 F 6 F 7
R 1
R 2
R 3
R 4
R 5
L1 Selects Equal.
L2 Selects Meantone.
L3 Selects Pure Major.
L4 Selects Pure minor.
L5 Selects Pythagorean.
R1 Selects Werckmeister.
R2 Selects Kirnberger.
R3 Selects Arabic 1.
R4 Selects Arabic 2.
R5 Selects User.
F1 Takes you to the System menu.F2, F3 Selects the Temperament Key.F5 Selects the Stretch tuning type On/Off/Piano.F7 Takes you to the User Temperament screen.

System Menu P. 135
Brief explanation of temperaments
Temperament Keys
Limitless modulation of the key became available only after the invention of Equal temperament.When you use a temperament other than Equal temperament, you must carefully choose the key toplay in. For example, if the song you are going to play is written in D major, choose “D” to set thetemperament key.
Equal Temperament (Flat)
This is an “unstretched” equal temperament that divides the scale into twelve equal semitones. Thisproduces the same chordal intervals in all twelve keys, and has the advantage of limitless modulationof the key. However the tonality of each key becomes less characteristic and no chord is in pureconsonance.
Equal Temperament (Stretched)
This is the most popular piano temperament and is the initial setting. The hearing ability of ahuman is uneven and is not as accurate with high frequency and low frequency as it is with themiddle range. This temperament’s tuning is stretched to compensate for this so the sound will beheard naturally to the ears. This “Stretched” equal temperament is a practical variation of the“unstretched” equal temperament which was invented on a mathematical basis.
Pure Temperament
This temperament, which eliminates dissonances for thirds and fifths is still popular for choralmusic because of its perfect harmony.You need to be aware what key you are playing in with this temperament. Any key modulation willresult in dissonances. When you play music in a particular key, you need to match the key of thetemperament as well.
Pythagorean Temperament
This temperament, which uses mathematical ratios to eliminate dissonance for fifths, is very limitedfor use with chords, but it produces very characteristic melodic lines.
Meantone Temperament
This temperament, which uses a mean between a major and minor whole tone to eliminate dissonancefor thirds, was devised to eliminate the lack of consonance’s experienced with certain fifths for thePure temperament. It produces chords that are more beautiful than those with the equal temperament.

Kawai Concert Performer Series Digital PianoP. 136
Werckmeister III, Kirnberger III Temperament
These two temperaments are placed in between Meantone and Pythagorean. For music with fewaccidentals, this temperament produces the beautiful chords of the mean tone, but as accidentalsincrease, the temperament produces the characteristic melodies of the Pythagorean temperament.It is used primarily for classical music written in the Baroque era to revive the original characteristics.
Arabic
Some oriental scales, including the Arabic, are characterized for “quarter-tone” which is half of ahalf-tone (50 cents). This makes the music sound very different from traditional western music.The CP Piano provides two of the most popular Arabic scales, although you can create morevariations with the User Temperament function. With Arabic 1, the notes B and E are a quartertonelower than the Occidental Scale, while the notes A and E are lower with Arabic 2.
To create a User Temperament:
1) On the Temperament screen, press the EDIT button (F7). The User Temperament screen will bedisplayed.
2) Use the KEY buttons (F3, F4) to select the note to edit.3) Use the Dial or TUNE buttons (F5, F6) to change the value. The value is represented in cents above
or below Equal temperament and ranges from –50 to +50.4) Press the SAVE button (F7) to save the User Temperament.

System Menu P. 137
• The User Temperament alters the tuning for each octave equally. In other words, you cannotalter the tuning of different sections of the CP’s keyboard range separately.
F1 Takes you to the Temperament menu.F3, F4 Selects the note to edit.F7 Saves the User Temperament.
L 1
L 2
L 3
L 4
L 5
F 1 F 2 F 3 F 4 F 5 F 6 F 7
R 1
R 2
R 3
R 4
R 5

Kawai Concert Performer Series Digital PianoP. 138
MIDI MenuThe letters MIDI stand for Musical Instrument Digital Interface, an international standard forconnecting MIDI equipped synthesizers, drum machines, and other electronic instruments so thatthey can exchange data. Personal computers can also be equipped for MIDI communication.Electronic instruments equipped with MIDI can transmit and receive performance data such as,notes, what sound to play, pedal information, volume, etc. through the MIDI In/Out/Thru Jacks.This data can be recorded with a device like a sequencer or a computer.
• In this manual we will only discuss the basic MIDI functions that pertain directly to the CP. Fordetailed literature on MIDI, please visit the music department of your local bookstore.
On page one of the MIDI Settings menu you can configure the following settings.
Right Transmit Channel
Sets the MIDI Transmit Channel for the RIGHT hand Parts. You can select MIDI Channels 1-16.
Left Transmit Channel
Sets the MIDI Transmit Channel for the LEFT/SPLIT Part. You can select MIDI Channels 1-16.
Chord Transmit Channel
Sets the MIDI Transmit channel the Chord data created by the Accompaniment System when itanalyzes the notes you play in the lower section of the keyboard. You can select MIDI Channels 1-16 and OFF. OFF disables MIDI transmission of the chord data.
Chord Detect Channel
Sets the MIDI receive channel for chord data being sent to the CP. The Accompaniment System canbe controlled remotely on this MIDI channel by an external MIDI controller. You can select MIDIchannels 1-16, OFF, All, or MIDI Accordion. When set to ALL the Accompaniment System willrespond to any chord data it receives on ANY MIDI channel.
Local Control ON/OFF
This determines whether the CP’s sound will be played from the piano’s keyboard (“ON”) or onlyfrom an external MIDI instrument (“OFF”). Even with local control “off” the CP’s keyboard willstill transmit to an external MIDI instrument or personal computer.

System Menu P. 139
Clock
Clock is a data code that a MIDI instrument uses as the reference for its Tempo settings as well asStyle Start/Stop commands. When it is set to INTERNAL, the CP uses its own built-in clock tocontrol tempo settings. When set to EXTERNAL, the CP reads the clock data that it receives viaMIDI and uses this data to control the Tempo.
To configure the MIDI Settings:
1) On page 2 in the System menu, press the MIDI (L3) button. The LCD screen will display the first MIDIpage.
2) Use the L and R buttons to select the setting and use the Dial to change the values.
F1-F4 Selects the other MIDI Settings pages.
L2 Selects Transmit channel for the RIGHT Part.Choose 1–16.
L3 Selects Transmit channel for the LEFT Part.Choose 1–16.
L4 Selects Transmit channel for the chord data.Choose 1-16 or OFF.
L5 Selects the chord detect Receive channel.Choose 1–16, OFF, All, or MIDI Accordion.
L 1
L 2
L 3
L 4
L 5
F 1 F 2 F 3 F 4 F 5 F 6 F 7
R 1
R 2
R 3
R 4
R 5
R2 Turns Local Control on/off.
R3 Selects the Clock source.

Kawai Concert Performer Series Digital PianoP. 140
Transmit MIDI Data
On page two of the MIDI Setting menu you can determine what MIDI data will be transmitted fromthe CP.“Keyboard = On/Off” Determines whether or not note data that is generated by the keys beingplayed will be transmitted.“Program = On/Off” Determines whether or not the CA piano will transmit program changeinformation when a Sound is selected on the CP.“Control = On/Off” Determines whether or not changes in controllers (such as the pedals beingdepressed) will be transmitted.“Expression = Key/Acc/Both” Determines whether or not the Expression data (CC# 11) for notesplayed on the keyboard, by the Auto Accompaniment System, or both should be transmitted.“System Exclusive = On/Off” Determines whether or not all of the CP’s settings will be transmittedin a special format that is understood by another CP.“Clock = On/Off” Determines whether or not the CP’s Clock data will be transmitted.“ACC = On/Off” Determines whether or not the data from the Auto Accompaniment System will betransmitted.
F1-F4 Selects the other MIDI Settings pages.
L2 Selects whether note data is transmitted.
L3 Selects whether Bank and Program Change datais transmitted.
L4 Selects whether Controller data is transmitted.
L5 Selects whether Expression data is transmitted
R2 Selects whether System Exclusive data istransmitted.
R3 Selects whether Clock data is transmitted.
R4 Selects whether Auto-accompaniment data istransmitted.
L 1
L 2
L 3
L 4
L 5
F 1 F 2 F 3 F 4 F 5 F 6 F 7
R 1
R 2
R 3
R 4
R 5

System Menu P. 141
On page three of the MIDI Settings menu, you can determine which MIDI channels the CP willreceive MIDI data on. The CP can receive MIDI data on all 16 MIDI channels at once or only certainMIDI channels.
Channel Receive On/Off
Each of the 16 MIDI channels can be set separately to On or Off.
Use the L2, R2, L4 and R4 buttons to select the channeland use the Dial to change the setting, On and Off.
F1-F4 Selects the other MIDI Settings pages.
L 1
L 2
L 3
L 4
L 5
F 1 F 2 F 3 F 4 F 5 F 6 F 7
R 1
R 2
R 3
R 4
R 5

Kawai Concert Performer Series Digital PianoP. 142
MIDI Accordion
On page four of the MIDI Settings Menu you can configure the CP to be played from a MIDI Accordion.
L2 Selects receive channel for the Solo (Solo) part.Choose 1-16.
L3 Selects receive channel for the Melody (Right1)part. Choose 1-16.
R2 Selects receive channel for the Bass (Right2)part. Choose 1-16.
R3 Selects receive channel for the Chord (Left)part. Choose 1-16.
F1-F4 Selects the other MIDI Settings pages.
L 1
L 2
L 3
L 4
L 5
F 1 F 2 F 3 F 4 F 5 F 6 F 7
R 1
R 2
R 3
R 4
R 5

System Menu P. 143
Power Up SettingsThis determines whether the CP stores your preferred panel and system settings as the defaultsettings and applies them automatically when the instrument is turned on.
Select Save Current Settings (L2) in the Power Up Setting menu to save the current panel settingsautomatically as the default settings when the CP is turned on.
Select Restore Factory Settings (L3) to return the CP to the factory default settings. The originalfactory settings will now be used by the CP when it is turned on.
• The CP never automatically stores Panel and System settings. If you make any new changes thatyou want to save, you must use the Save Current Settings (L2) command.
L2 Saves the current settings.
L3 Restores the initial factory settings.
F1 Takes you to the System menu.F7 Applies the selected settings.
L 1
L 2
L 3
L 4
L 5
F 1 F 2 F 3 F 4 F 5 F 6 F 7
R 1
R 2
R 3
R 4
R 5

Kawai Concert Performer Series Digital PianoP. 144
Soft ResetThe Soft Reset function allows you to return all of the User Settings back to the original FactorySettings. You can instantly reset all of the user settings or only the ones you want to Reset at thetouch of a button.
To perform a Soft Reset:
1) Press SOFT RESET button (R2) on Page two in the System menu. The Soft Reset screen will bedisplayed.
2) Use the L and R buttons to choose type of data you want to reset.3) Press EXEC button (F7).4) Press YES (F7) to proceed, or NO (F1) to back out.
F1 Takes you to the System menu without resetting data.F7 Proceeds with the Reset.
L1 Selects Regist Groups.
L2 Selects Conductor.
L3 Selects Sound Settings.
L4 Selects Concert Magic.
L5 Selects System Settings.
R1 Selects User Sounds.
R2 Selects User Styles.
R3 Selects User Conductor.
R5 Selects ALL.
L 1
L 2
L 3
L 4
L 5
F 1 F 2 F 3 F 4 F 5 F 6 F 7
R 1
R 2
R 3
R 4
R 5

System Menu P. 145
Software VersionThis function is used to show what system software version is currently installed in the CP.
To show the software version:
1) Press the Software Version button (R3) on page two in the System menu.2) The software version will appear in the LCD screen.
F1 Takes you to the System menu.
L 1
L 2
L 3
L 4
L 5
F 1 F 2 F 3 F 4 F 5 F 6 F 7
R 1
R 2
R 3
R 4
R 5
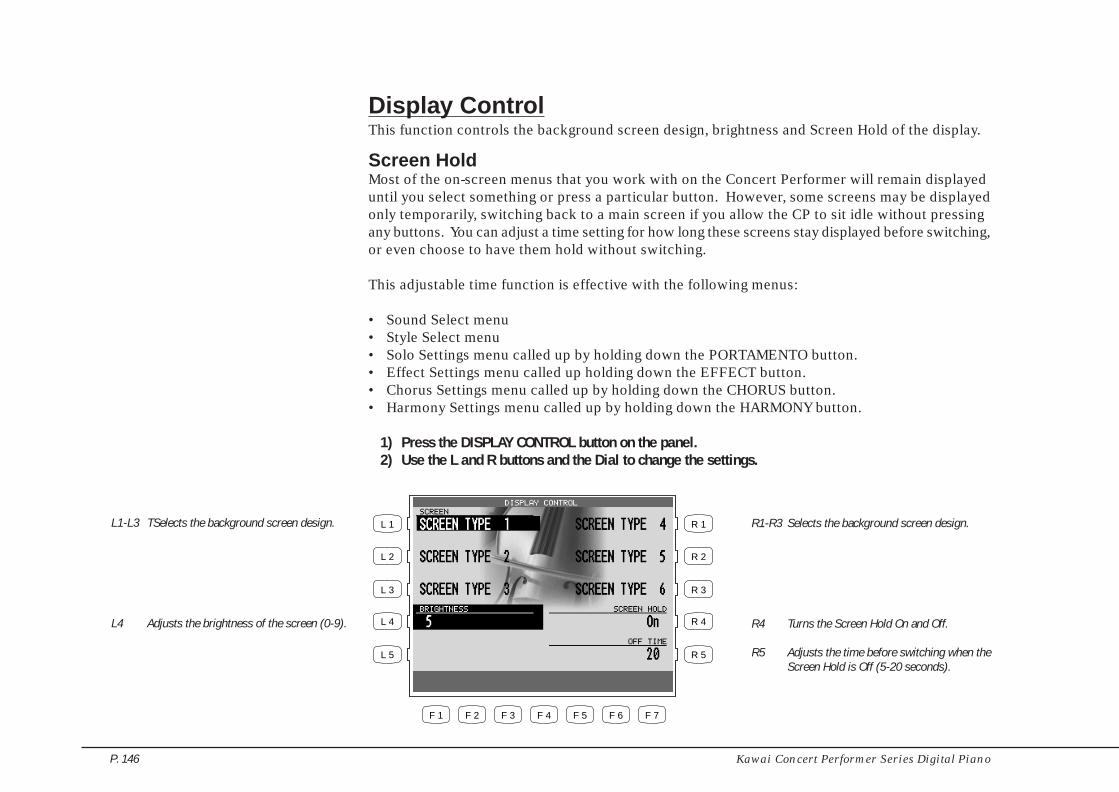
Kawai Concert Performer Series Digital PianoP. 146
Display ControlThis function controls the background screen design, brightness and Screen Hold of the display.
Screen HoldMost of the on-screen menus that you work with on the Concert Performer will remain displayeduntil you select something or press a particular button. However, some screens may be displayedonly temporarily, switching back to a main screen if you allow the CP to sit idle without pressingany buttons. You can adjust a time setting for how long these screens stay displayed before switching,or even choose to have them hold without switching.
This adjustable time function is effective with the following menus:
• Sound Select menu• Style Select menu• Solo Settings menu called up by holding down the PORTAMENTO button.• Effect Settings menu called up holding down the EFFECT button.• Chorus Settings menu called up by holding down the CHORUS button.• Harmony Settings menu called up by holding down the HARMONY button.
1) Press the DISPLAY CONTROL button on the panel.2) Use the L and R buttons and the Dial to change the settings.
L1-L3 TSelects the background screen design.
L4 Adjusts the brightness of the screen (0-9).
R1-R3 Selects the background screen design.
R4 Turns the Screen Hold On and Off.
R5 Adjusts the time before switching when theScreen Hold is Off (5-20 seconds).
L 1
L 2
L 3
L 4
L 5
F 1 F 2 F 3 F 4 F 5 F 6 F 7
R 1
R 2
R 3
R 4
R 5

Display Control P. 147

Kawai Concert Performer Series Digital PianoP. 148
Mic Harmony and Effect
Mic HarmonyThis function adds many types of harmony to your mic input coming into the microphone input ofthe CP.
Type of Harmony
Vocorder Trio (Sub) Octave Duet (Sub)Gender Male to Female Trio Mix (Sub) Octave Duet Up (Sub)Gender Female to Male Duet Octave UpQuartet Duet Spread Octave DownQuartet Mix Duet Close Octave Up (Sub)Quartet with Bass Duet Up Octave Down (Sub)Jazzy Quartet Duet (Sub) 2 Octaves DownJazzy Qurtet Mix Duet Spread (Sub) 2 Octaves Down (Sub)Chorale Duet Close (Sub) DoubleTrio Duet Up (Sub) Stereo DoubleTrio Mix Octave Duet Double (Sub)Trio Up Octave Duet Up Lead Substitution
To add Mic Harmony:1) Press the MIC HARMONY button. The button’s indicator light will show that it has been activated.2) If you wish to change the Harmony type, hold down the MIC HARMONY button for a moment until the
Mic Harmony types are listed in the LCD display.3) Use the L and R buttons to choose Harmony type. If you want to edit the settings, press EDIT (F7)
button. Use the L buttons and the Dial to change the settings.4) Use the F1-F4 buttons to list more Harmony types on the other pages.
The Concert Performer has a microphone input jack. You can plugin a microphone and sing while playing on the CP. You can also“mic” other instruments or plug other electric instruments into themicrophone input. The Mic Harmony and Effect buttons addvarious harmonies and effects to your mic input.
EFFECTHARMONYMIC
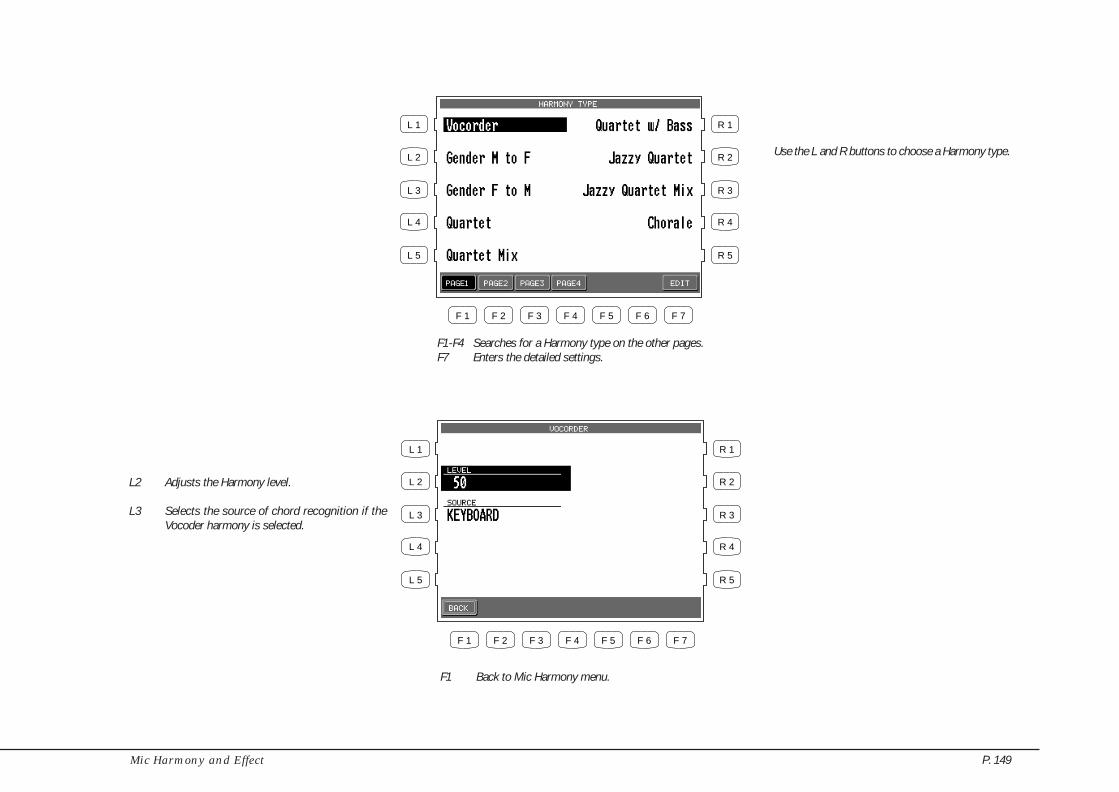
Mic Harmony and Effect P. 149
F1-F4 Searches for a Harmony type on the other pages.F7 Enters the detailed settings.
L 1
L 2
L 3
L 4
L 5
F 1 F 2 F 3 F 4 F 5 F 6 F 7
R 1
R 2
R 3
R 4
R 5
F1 Back to Mic Harmony menu.
Use the L and R buttons to choose a Harmony type.
L2 Adjusts the Harmony level.
L3 Selects the source of chord recognition if theVocoder harmony is selected.
L 1
L 2
L 3
L 4
L 5
F 1 F 2 F 3 F 4 F 5 F 6 F 7
R 1
R 2
R 3
R 4
R 5

Kawai Concert Performer Series Digital PianoP. 150
About Mic HarmoniesMany of the microphone harmonies rely upon chord information generated by the Auto-Accompaniment style system. For these harmonies to operate, the ACC button music be ON. Otherharmonies do not rely on the Auto-Accompaniment stystem for chordal information. Theseharmonies will operate whether or not the ACC is ON.
Non-Chordal Harmonies
These harmonies do not rely on chordal information from the ACC system. They include the Vocodor,Gender, Octave, Double, and Lead Substitution harmonies. In the case of the Vocodor, the harmoniescreated are taken from the notes actually played on the keyboard, or the notes actually found in achosen sequencer track.Use the EDIT button to choose the KEYBOARD or SEQUENCER TRACK to use as the harmonysource.
The Gender Male to Female and Gender Female to Male harmonies actually change the pitch andquality of your voice as indicated by the harmony names. The various Octave harmonies add avoice up or down as indicated by the harmony names.
The Double harmonies add a recording studio quality effect to your voice to make it thicker andsmoother sounding. The effect is similar to the “double-tracking” vocal technique performed inprofessional recordings. The Lead Substitution harmony replaces your voice with one that hasbeen pitch-corrected.
Chordal Harmonies
All other harmonies rely on chordal information from the Auto-Accompaniment system to operate.If the ACC button is ON, then you will hear harmony based upon the note that you are singing,chord you are playing and the harmony that is chosen. The active chord will be indicated in theupper left-hand portion of the display. You can play chords in the Single Finger, Fingered, or WholeKybd Modes of the ACCOMPANIMENT system.

Mic Harmony and Effect P. 151
Duet Harmonies create one harmony note in addition to the lead note. Trio harmonies create twoharmony notes in addition to the lead note. Quartet harmonies create three harmony notes inaddition to the lead note. Octave Duet harmonies create one harmony note and one octave note inaddition to the lead note.
The lead note will be your own voice, unless the harmony name contains the word (Sub). In thiscase, your voice will be substituted with one that is pitch-corrected.
Note:If you have chosen a chordal harmony but do not turn on the ACC ON/OFF button, the instrumentwill substitute the Vocoder harmony. Once you turn on the ACC ON/OFF button, the harmony willswitch to the one you have actually chosen.
Tips and SuggestionsDon’t be afraid to experiment with different harmony types. After a little trial and error, you willbegin to learn which harmony type will be most appropriate for a particular musical setting. TheHarmony names will help you find the appropriate harmony type. For a fuller harmony effect,choose one of the Quartet harmonies.For lighter harmonies, choose a Trio or Duet harmony. Words such as “Mix”, “Up”, and “Spread”will give you further clues to the function and sound of the harmony.
Make sure to adjust both your mic input volume (found beside the Mic Input Jack) and the MicLevel parameter in the Mic Effects menu. Also, adjust the Harmony Level (found by pressing theEDIT button in the Harmony Type screen) for the best results.
All Mic Harmony and Effects settings are saved in a Registration. This makes recalling any MicHarmony and Effects quick and easy.

Kawai Concert Performer Series Digital PianoP. 152
Mic EffectThere are six different Mic Effects available to enhance the audio signal (Voice or instrument sound)coming from the microphone jack. All effects, except the Echo/Vibrato, operate independently ofone another. The Mic Effect function is separate from the Effects assigned to the keyboard Parts.Therefore, you can use different effects on the keyboard sounds and on Vocal/instrument soundsfrom the microphone.
Type of Effect
Equalizer
The equalizer allows you to adjust the tonal Character of the Mic input (voice, instrument, etc) byraising or lowering the volume level of the High, Mid and Low frequencies separately. Raising theValues increases the level of the frequency. Lowering the values reduces the level of the frequency.
Gate
This effect mutes the signal from the Mic input (Voice, Instrument, etc) when the input level (volume)falls below a specified setting. This is useful for cutting out softer, extraneous background noise(cars, air conditioners, etc) while still allowing the desired, louder signal (Vocal, instrument etc.) tobe heard. This can be very useful for recording to the CD-R in a noisy room.Higher Gate settings cut out more background noise. 0 - All sounds are heard. 100 - Almost nosound is heard.
Compressor
This effect reduces the volume of very loud input levels above the specified threshold. Reducing theloud input levels can enhance soft signal levels that are weak and helps to smooth out the overallvolume level of a performance.
Threshold - Determines how loud the input must be before it is compressed. Higher settings provideless compression. 0 - All input levels are compressed. 100 - No input level is compressed. SettingThreshold to 50 will compress only the louder input levels for more natural compression.
Ratio - Determines how much the input level will be compressed (reduced). Higher values producemore compression. Compression ratios between 1.6 and 5 are best for Vocals.

Mic Harmony and Effect P. 153
Note:The suggestions given for the Gate and Compressor should be considered starting points. Byexperimenting you will find the settings that work best for you. Remember often times it is notnecessary to use any Gating or Compression at all.
Echo
Adds delay or echoes to the sound.
Time - Determines the delay time between each echo. Higher values add longer delays.
Level - Determines the volume of the first echo. Each echo will become softer after that. Highervalues create louder echoes.
Feedback - Determines how many echoes will be heard after the first echo. Higher settings producemore echoes.
Vibrato
Adds a controlled vibrato to the sound.
Rate - Determines how fast the vibrato will be. Higher values produce faster vibrato.
Depth - Determines how strong the vibrato effect will be. Higher values produce deeper vibrato.
Note:Echo and Vibrato cannot be used together.
Reverb
Adds reverberation to the sound simulating the ambience of a stage or concert hall. Reverb can beused along with the above effects. Higher settings add more Reverb.

Kawai Concert Performer Series Digital PianoP. 154
R2 Turns the Compressor On and Off.
R3 Turns the Echo/Vibrato On and Off.
R4 Adjusts the Reverb level.
F7 Edits the chosen Effect.
L 1
L 2
L 3
L 4
L 5
F 1 F 2 F 3 F 4 F 5 F 6 F 7
R 1
R 2
R 3
R 4
R 5
L2 Adjusts the Mic level.
L3 Turns the EQ On and Off.
L4 Adjusts the Gate time.
EFFECTHARMONYMIC
Mic Effect Parameters
EQMIC LEVEL COMPRESSORGATE ECHO/VIBRATO REVERB
LowMidHigh
ECHO
VIBRATO
TIMELEVELFEED BACK
RATEDEPTH
THRESHOLDRATIO
To add Mic Effect:
1) Press the MIC EFFECT button. The button’s indicator light will show that it has been activated. Anyeffect that is active in the Mic Effect menu will be turned on.
2) If you wish to change or edit the effect types, hold down the MIC EFFECT button for a moment untilthe Mic Effect menu is displayed.
3) Use the L and R buttons to highlight the Effect types. Use the DIAL to adjust the value of the highlightedeffect.
4) If you want to edit the settings of a highlighted effect, press EDIT (F7) button. Use the L buttons andthe Dial to change the settings.

Mic Harmony and Effect P. 155
F1 Back to Mic Effect menu.F2, F3 Selects Low Range.F4, F5 Selects Mid Range.F6, F7 Selects High Range
L 1
L 2
L 3
L 4
L 5
F 1 F 2 F 3 F 4 F 5 F 6 F 7
R 1
R 2
R 3
R 4
R 5

Kawai Concert Performer Series Digital PianoP. 156
CDDISKMEDIA
disk so the student may play along. This can greatly assist thelearning process. Finally, there are numerous sites on theWorldWide Web dedicated to the sharing and selling of MIDI music thatcan be downloaded and played on your Concert Performerinstrument. For instructions on how to use one of these Song Diskson your CP, see “Playing Songs from a Floppy Disk” on page 102.
The CP comes with a special program called Style Converter on afloppy disk. This allows you to convert Styles that were made fora number of other manufacturers’ machines, and use them as ifthey were designed for the CP. See the separate instructions thatcame with the Style Converter disk for additional information.
Floppy Disk OperationsThe Concert Performer has a built-in 3.5” floppy disk drive thatcan read and write to double-density (720KB) or high-density(1.4MB) disks. These are the exact same disks that are used withyour personal computer. You can use floppy disks to quickly andeasily build up an extensive library of Concert Performer data thatcan be shared with other CP owners.
There are many companies who specialize in just making MIDI songfiles of popular and traditional tunes that can be purchase on floppydisk. In fact, these days almost any popular song that you can thinkof has probably been turned into a MIDI file by someone! Manypublishers of piano lesson books now provide the music on floppy
Disk MenuThe Disk menu is where you can work with various disk operations. There are six functions thatyou can choose from, including access to the Style Converter feature.
To work with a disk:
1) Press the DISK button. The Disk menu will be displayed.2) Use the L and R buttons to select the preferred function.

Floppy Disk Operations P. 157
L 1
L 2
L 3
L 4
L 5
F 1 F 2 F 3 F 4 F 5 F 6 F 7
R 1
R 2
R 3
R 4
R 5
L2 Loads data from a floppy disk.
L3 Saves data onto a floppy disk.
L4 Erases data from a floppy disk.
R2 Formats a floppy disk.
R3 Plays the song data from a floppy disk.(See page 106.)
R4 Converts other manufacturers’ Style datafor use in the CP. (See page 89.)
Saving Data to a Floppy DiskThis important function stores your custom data to disk so that you can retrieve it at a later time.You can save the following data:
Song Song data currently in the Recorder. You can save it as the CP’sown unique format (Internal) or as Standard MIDI File format(SMF) or Stylist format (Internal format plus Registration setting).
User Style Each User Style or all 20 User Styles at once.User Conductor Each User Conductor setting or all 40 User Conductor settings at
once.User Sound Each User Sound or all 20 User Sounds at once.Regist Group Each Registration Group, containing 8 Registrations, or all 20
Registration Groups at once.User Touch Two User Touch Curve settings.User System EQ One User System EQ setting.Temperament One User Temperament setting.All Settings This allows you to save the current settings of all 8 of the above
data types at once, as a single file.

Kawai Concert Performer Series Digital PianoP. 158
Use the L and R buttons to select the type of datato save.
L 1
L 2
L 3
L 4
L 5
F 1 F 2 F 3 F 4 F 5 F 6 F 7
R 1
R 2
R 3
R 4
R 5
F1 Takes you to the Disk menu.
To save your data:
1) In the Disk menu, select SAVE (L3). The Disk Save menu will be displayed.2) Use the L and R buttons to select the type of data to save. Then the particular sub-menu for that data
type will be displayed.
3) Use the appropriate L button, CURSOR buttons (F2, F3) and CHARACTER buttons (F4, F5) to give thedata file a name.When saving a Song, use the L3 button and the Dial to select whether the song data file will be in theINTERNAL (CP’s unique) format, or SMF (Standard MIDI File) format or Stylist format.
• The data saved in Stylist format can be called up only in Song Stylist mode.
• When you select SMF format, data in the style track will be automatically pasted to tracks 9-16.This will erase any existing data on tracks 9-16.
4) Make sure that a formatted floppy disk is in the drive. Then press the SAVE button (F6, F7) to savethe selected data to the disk.

Floppy Disk Operations P. 159
L 1
L 2
L 3
L 4
R 1
R 2
R 3
R 4
L 1
L 2
L 3
L 4
L 5
F 1 F 2 F 3 F 4 F 5 F 6 F 7
R 1
R 2
R 3
R 4
R 5
F1 Takes you to the previous menu.F2, F3 Moves the cursor over the characters in the name.F4, F5 Selects a character to use in the name.F7 Saves the data file to floppy disk.
Example: Saving a Style
L3 Selects which file you would like to save, or if allfiles are to be save as a single “all” file.
L4 Names the data file.
Example: Saving a Song
L2 Names the data file.
L3 Selects which format the data should be savedas.

Kawai Concert Performer Series Digital PianoP. 160
L 1
L 2
L 3
L 4
L 5
F 1 F 2 F 3 F 4 F 5 F 6 F 7
R 1
R 2
R 3
R 4
R 5
Use the L and R buttons to select the type of datato load.
F1 Takes you to the disk menu.
Loading Data from a Floppy DiskThis function allows you to retrieve the stored data from disk.
Song One Song can be loaded into the Recorder from disk.User Style Up to 20 Styles can be loaded from disk. This number varies depending on the
size of the data contained in the Styles.User Conductor Up to 40 User Conductor setups can be loaded from disk.User Sound Up to 20 User Sounds can be loaded from disk.Regist Group Up to 20 Groups, containing 8 Registrations each, can be loaded from disk.User Touch Two User Touch Curves can be loaded from disk.User System EQ One User System EQ can be loaded from disk.Temperament One User Temperament can be loaded from disk.All Settings Loads the “All Settings” file on disk.
To load the data from a disk:
1) In the Disk menu, press LOAD (L2). The Disk Load menu will be displayed.2) Insert your floppy disk into the drive.3) Use the L and R buttons to select the type of data to load. Then a sub-menu will be displayed that
lists all available files of that type.

Floppy Disk Operations P. 161
L 1
L 2
L 3
L 4
L 5
F 1 F 2 F 3 F 4 F 5 F 6 F 7
R 1
R 2
R 3
R 4
R 5
Use the L and R buttons to select the data to load.
F1 Takes you to the previous menu.F2, F3 Displays more selections.F4 Selects the “All” file type if that is how the files were
saved.F5 Displays data files that were saved individually.F7 Proceeds to the next screen.
4) When loading User Style, User Conductor, User Sound or Registration data, you can choose whetherto load data that was stored individually or to load all the data that was saved as an “All” file. PressALL (F4) to load data that was saved as an “All” file. Press EACH (F5) if data files were savedindividually.
5) Use the L and R buttons to select the data to load. Use the PAGE (F1, F2) buttons to display moredata, if available.
6) Press the EXEC (F7) button to proceed. The screen will display the destination where the data will beloaded.

Kawai Concert Performer Series Digital PianoP. 162
L 1
L 2
L 3
L 4
L 5
F 1 F 2 F 3 F 4 F 5 F 6 F 7
R 1
R 2
R 3
R 4
R 5
L3 Selects the destination to load individually a Style,Conductor, Sound or Registration.
F1 Takes you to the previous menu.F7 Loads the data.
7) When loading an individual data file, use the L3 button and the Dial to select the preferred destination.8) Then press the EXEC button to load the selected data into the CP. Press BACK (F1) to cancel loading.
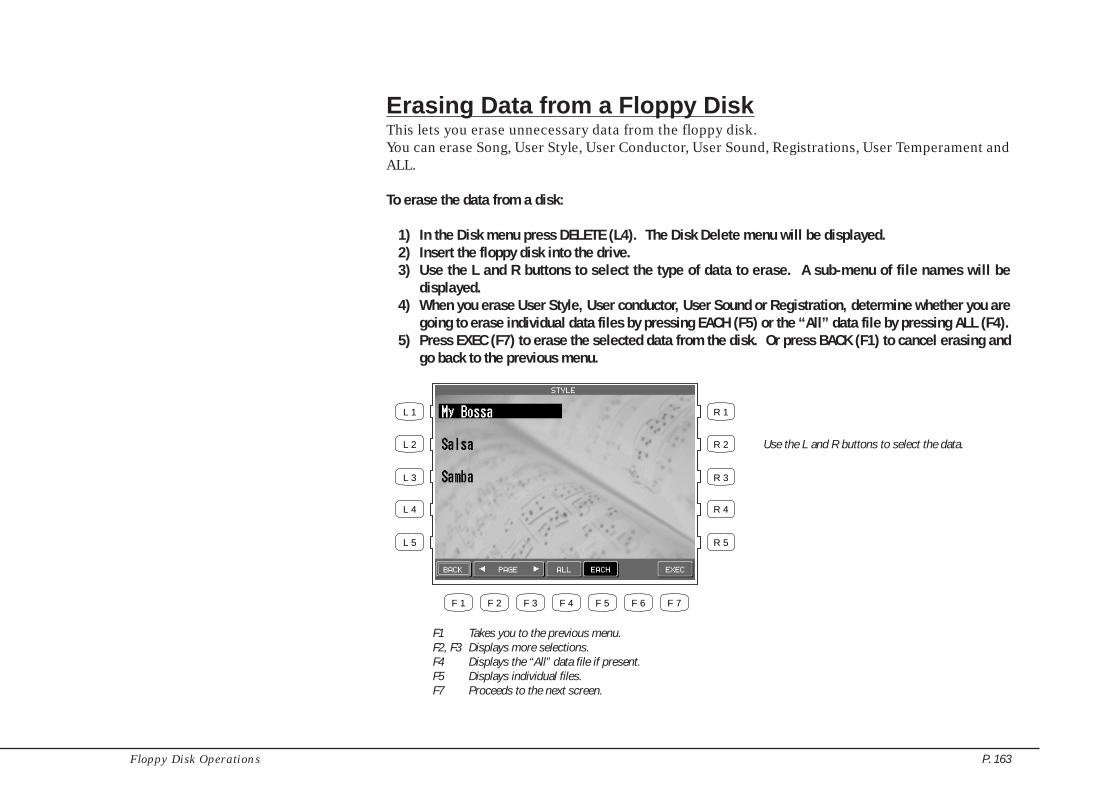
Floppy Disk Operations P. 163
L 1
L 2
L 3
L 4
L 5
F 1 F 2 F 3 F 4 F 5 F 6 F 7
R 1
R 2
R 3
R 4
R 5
Use the L and R buttons to select the data.
F1 Takes you to the previous menu.F2, F3 Displays more selections.F4 Displays the “All” data file if present.F5 Displays individual files.F7 Proceeds to the next screen.
Erasing Data from a Floppy DiskThis lets you erase unnecessary data from the floppy disk.You can erase Song, User Style, User Conductor, User Sound, Registrations, User Temperament andALL.
To erase the data from a disk:
1) In the Disk menu press DELETE (L4). The Disk Delete menu will be displayed.2) Insert the floppy disk into the drive.3) Use the L and R buttons to select the type of data to erase. A sub-menu of file names will be
displayed.4) When you erase User Style, User conductor, User Sound or Registration, determine whether you are
going to erase individual data files by pressing EACH (F5) or the “All” data file by pressing ALL (F4).5) Press EXEC (F7) to erase the selected data from the disk. Or press BACK (F1) to cancel erasing and
go back to the previous menu.

Kawai Concert Performer Series Digital PianoP. 164
Formatting a Floppy DiskBefore a floppy disk can be used to save data for the first time, it will need to be formatted. Thissimply means that the disk must be “prepared” to hold data.
The Concert Performer can read and write to MS-DOS formatted disks. You can purchase pre-formatted floppy disks from any computer or office supply store. Floppy disks may also be formattedon a PC computer, or the CP can format them itself. There are two types of 3.5” floppy disk in themarket, 2DD (which can hold 720KB of data) or 2HD (which can hold 1,440KB or 1.44MB of data).Both can be used in the exact same fashion with the Concert Performer.
• You can always re-format a disk at any time. Keep in mind, though, that every time you format adisk, all data that is currently on it will be erased. Re-formatting is a good way to completelyerase a disk that might have been used previously on a computer, since there may be all sorts ofirrelevant data files left on it otherwise.
To format a disk:
1) In the Disk menu, press FORMAT (R2). The Disk Format menu will be displayed.2) Insert the floppy disk into the drive.3) Use the L2 or L3 buttons to select the size of disk you are using, 2HD or 2DD.4) Press EXEC (F7) to proceed. The screen prompts you for confirmation.5) Press YES (F7) again to start formatting. Or press NO (F1) to cancel formatting and go back to the
previous menu.
• It takes about a minute to format a floppy disk. Once the formatting is complete, the LCD screenreturns to the Disk menu automatically.

Floppy Disk Operations P. 165
L 1
L 2
L 3
L 4
L 5
F 1 F 2 F 3 F 4 F 5 F 6 F 7
R 1
R 2
R 3
R 4
R 5
L2 Formats a 2HD disk.
L3 Formats a 2DD disk.
F1 Cancels formatting and takes you to the Disk menu.F7 Starts formatting the disk.

Kawai Concert Performer Series Digital PianoP. 166
The Concert Performer can also playback CD-R and CD-RW discs,along with any regular audio CD, including commercial CD’s.
CD-R Operations (CP205 only)
1) Insert a blank CD-R or CD-RW into the CD-R drive and press the CD button on the panel.2) The LCD screen shows the CD menu.3) Use the L and R buttons to select your desired function.
• When you insert a blank CD into the drive, only the Record option will be available in the menu.Unavailable options will be shown in gray. After your first recording, all options will be available.
• When a Closed (finalized) audio CD is in the CD drive, pressing the CD button will automaticallyjump to the CD Play menu in the LCD screen. You can return to the CD menu by pressing theMENU button.
With the Concert Performer’s built-in CD-R drive, you can recordyour performances to CD-R and CD-RW discs. You can record a“live” keyboard performance, a pre-recorded song from theRecorder, or both. Even your live vocal performance can berecorded to CD. Your finished CD can be played in any audio CDplayer.
L 1
L 2
L 3
L 4
L 5
F 1 F 2 F 3 F 4 F 5 F 6 F 7
R 1
R 2
R 3
R 4
R 5
L2 Shows CD Play screen.
L3 Shows CD Record screen.
R2 Shows Close CD screen.
R3 Plays the CD only from the headphone jackon the CD drive unit.

CD-R Operations P. 167
Playing an audio CDThe operation of the Concert Performer’s CD is similar to a regular CD player.
1) Insert an audio CD in the CD drive and press the CD button on the panel. If the CD is closed (finalized),then the LCD screen will jump to the CD Play screen. If the CD is open (not finalized), then press thePlay (L2) button in the menu to go to the Play screen.
2) Press the F3 button to start the CD.3) Use the L, R and F buttons to select the various CD songs and functions. Use the Dial to change the
value.
• Some of the copy protected CD’s may not play in the CD drive of the Concert Performer.
L 1
L 2
L 3
L 4
L 5
F 1 F 2 F 3 F 4 F 5 F 6 F 7
R 1
R 2
R 3
R 4
R 5
L1 Turns the Repeat mode On and Off.
L2 Selects the track number.
L3 Adjusts the CD volume.
R1 Selects the Play mode. All = Plays all tracks.Select = Plays the selected track only. Random= Plays all tracks at random. Program = Playsthe tracks in programmed order.
R3 Shows the Play Time.
F1 Returns to the CD menu.F2 Stops the CD.F3 Plays the CD.F4 Returns to the beginning of the playing track or goes back
to the previous track.F5 Rewinds the CD.F6 Forwards the CD.F7 Skips to the next track.

Kawai Concert Performer Series Digital PianoP. 168
To program the playing order:
1) Press the R1 button in the menu and use the Dial to change the play mode to Program.2) Press the L2 button and use the Dial to select the first playing track.3) Press the F7 button to move the cursor to the next position and use the Dial to select the second
track.4) Repeat step #3 to program up to ten tracks.
L 1
L 2
L 3
L 4
L 5
F 1 F 2 F 3 F 4 F 5 F 6 F 7
R 1
R 2
R 3
R 4
R 5
Use the F7 button and the Dial to program.
Select “Program” with the Dial.

CD-R Operations P. 169
Recording onto a CDYou can record any performance on the Concert Performer directly onto a CD-R or CD-RW disc.Your performance can be “live” playing with or without auto-accompaniment styles. It can also bea previously recorded song playing from the Easy or Advanced Recorder, and even a voice orinstrument from the Mic input. Any, and all, of these performances can be recorded onto the CD.You must record vocals, or any instrument using the Mic Input, directly to the CD. (The Easy/Advanced Recorder cannot record from the Mic Input)
Multiple songs (tracks) can be recorded onto CD, up to the full time capacity of the disc. Once asong is recorded to CD, the Concert Performer cannot erase it.
1) Insert a blank or open CD in the CD drive and press the Record button (R3) in the CD menu. The CDRecord screen will be displayed in the LCD screen.
2) The Concert Performer will check the CD and automatically set the recording track number.3) Press the REC button (F3). The CD is ready to start recording.4) If you start an Accompaniment Style, or start the Recorder, the CD recording will automatically start.5) You can manually start the recording by pressing the PLAY button (F5) in the screen.
L 1
L 2
L 3
L 4
L 5
F 1 F 2 F 3 F 4 F 5 F 6 F 7
R 1
R 2
R 3
R 4
R 5
L1 Shows the recording track number.
L2 Adjusts the volume for the Style.
L3 Adjusts the Tempo.
L4 Adjusts the volume for the LEFT Part.
R1 Shows the remaining time available forrecording.
R2 Adjusts the volume for the SOLO Part.
R3 Adjusts the volume for the RIGHT 1 Part.
R4 Adjusts the volume for the RIGHT 2 Part.
F1 Takes you to the CD menu.F2 CD Record button (Record Ready)F4 Stops the recording.F5 Starts the CD recording.

Kawai Concert Performer Series Digital PianoP. 170
Recording Tips and Suggestions
• Anyone can have fun making CD recordings and sharing them with family and friends. You do nothave to be a professional musician to record your own CD. If you are not a great player, you can firstrecord your song using the Concert Performer’s Easy Recorder. You can record the song slowly andspeed it up later. You can even re-record it if you make a mistake. Advanced users can edit mistakesand add extra tracks in the Advanced Recorder. When your song is perfect, set the CD to Recordand press Play on the Recorder. Your perfected performance will be recorded to the CD.
• If you want to begin your CD recording with live playing or vocals, you will need to press the PLAYbutton (F5) to manually start the recording. (See steps #4 and #5 above). If you want to begin witha Style or Recording, press the Play or Start button in the corresponding areas of the panel.
• Vocals can be sung along with the Easy/Advanced Recorded songs and/or live keyboard performanceswhile recording onto the CD. In other words, you can play up to a 16-part sequence (from the Easy/Advanced Recorder), play along with the sequence on the keyboard, and sing into the microphoneat the same time. All of this will be recorded to the CD.
• The Style Start/Stop and Recorder Play/Stop functions are independent from the CD Record Start/Stop functions. You can start and stop Styles and Recordings while continuing to record to CD.
• While recording to CD, the panel of the Concert Performers operates normally. You can add andchange sounds, balance the volumes, and change accompaniment styles during your CD recording.Highlight a Part or Style field with the L and R buttons, then turn the Dial to change the volume.Press any SOUND category button to change the sound for a highlighted part. Press any STYLEcategory button to change the Style.
• You can also change Registrations while recording to CD. This is a quick and easy way to make lotsof changes to sounds and styles while recording to CD.
• Advanced Users with computer sequencers can even record an external sequence into the CD usingthe Concert Performer’s internal sounds.
• It may take a few experimental recordings to get volumes mixes and settings perfected for a goodresult. This is especially true if you plan to sing and play or play “live” along with the Easy/AdvancedRecorder.

CD-R Operations P. 171
Closing (Finalizing) Your CDTo listen to your recorded CD in a regular (audio) CD player, you must first Close (finalize) the CD.Until you close the CD, you can listen to it only with the CD drive on the Concert Performer. Onceyou close the CD, you cannot record on it any more.
1) Press the Close CD button (R2) in the CD menu.2) Press the EXEC button (F7) to close the CD. Press the MENU button (F1) to cancel and go back to the
CD menu.
Tips and Suggestions
• A Closed CD can be played on any audio CD player, including car stereo and personal computers.You can give your CD to friends, family, or anyone.
• If you have a personal computer with the appropriate CD drive and software, you can save yourCD recordings to computer. You can then make duplicate CD copies to send to others, deletingany bad tracks (songs), or mixing and matching songs from other CD’s that you’ve recorded.
• The Concert Performer’s CD drive records and plays audio CD’s only. You cannot play or recordother forms of CD’s, including CD-ROM’s and data CD’s.
• A song recorded on a CD-RW disc can be erased by a personal computer with the appropriate CDdrive and software, or by a stand-alone CD-RW recorder/player.
L 1
L 2
L 3
L 4
L 5
F 1 F 2 F 3 F 4 F 5 F 6 F 7
R 1
R 2
R 3
R 4
R 5
F1 Cancels and goes back to the CD menu.F7 Closes the CD-R

Kawai Concert Performer Series Digital PianoP. 172
There are times when you might not have the Owner’s Manual atyour side, and you need an explanation of a button or feature.Fortunately, there are built-in Help guides to give you a hand. TheHelp function provides a basic introduction and overview of mostof the features found in the CP.
There are also many built-in Demostration songs that really showof the musical potential of the Concert Performer. These songswere composed by some of the top musicians in the music industry,and will undoubtedly impress and inspire you.
Getting Assistance: Using Help and Demo
Using the HelpTo get Help, simply press the HELP button to the left of the display. The display will show anexplanation on the function or feature that you are presently working on. Help is available at anytime, except when the CP is busy recording your performance or accessing a floppy disk.
To use the Help:
1) Press the HELP button. The Help text will be displayd in the LCD screen.2) If the text is not what you are looking for, press the INDEX (F1) button to list the HELP topics. Use the
F1 and F2 buttons to list more topics on the other pages.3) Use the appropriate L or R button to select the topic, and the text will be displayed.4) Use the F3 or F4 button to change the language. English, German, French, and Spanish are available.5) To leave Help, press the EXIT button.
HELP
The first time you sit at the Concert Performer, you may feeloverwhelmed by the wealth of features and options that it offers.You will find, though, that if you keep this Owner’s Manual handyyou can learn to use the different functions as you need them, atyour own pace. And, there is certainly nothing wrong with onlyusing a few basic features, and thoroughly enjoying them. Afterall, the Concert Performer is first and foremost a musicalinstrument, and its whole purpose is to provide you with the toolsfor musical expression and fun no matter your skill level.

Getting Assisted—Help and Demo P. 173
Use the L and R buttons to selct a Help topic.
F1, F2 Searches for more Help topics on the otherpages.
F1 Takes you to the Help menu.F3, F4 Selects the language.
L 1
L 2
L 3
L 4
L 5
F 1 F 2 F 3 F 4 F 5 F 6 F 7
R 1
R 2
R 3
R 4
R 5
L 1
L 2
L 3
L 4
L 5
F 1 F 2 F 3 F 4 F 5 F 6 F 7
R 1
R 2
R 3
R 4
R 5

Kawai Concert Performer Series Digital PianoP. 174
Using the DemonstrationsThere are five types of Demonstrations programmed in the CP piano.
Main Demo
An exciting and entertaining long song that shows off the CP’s musical potential as a whole.
Function Demos
Songs, Text, and Graphics that help explain the most important features and functions of the ConcertPerformer.
Sound Category Demos
Each Sound category has a song, or songs, that demonstrate the sound choices and capabilitiesfound in the category.
Style Category Demos
Each Style category has a song, or songs, that demonstrate how the Auto-Accompaniment Stylescan be used.
Piano Music
The initial DEMO menu screen will play Classical and Contemporary piano music as long as youremain in that screen. The songs are randomly selected from the Piano Music feature.
To listen to a Main/Sound/Style Demo:
1) Press the DEMO button. The Demonstration menu will be displayed.2) Select your preferred Demo piece by either,
pressing the Main Demo Song button (F2,F3) to select the Main Demo,or pressing any of the SOUND category buttons to select a Sound Demo,or pressing any of the STYLE category buttons to select a Style Demo.Sound or Style categories may have more than one demo songs played in sequence. Press theSound or Style button repeatedly to skip to the next demo song.
3) To exit, press the EXIT, PLAY/STOP or the DEMO button.
DEMO

Getting Assisted—Help and Demo P. 175
• When a selected Demo song ends, another song of the same type will be randomly chosen fromanother category and played. You can select another demo song at any time by pressing theappropriate button.
The SOUND category buttons are used to select the demo for thatsound category.
L 1
L 2
L 3
L 4
L 5
F 1 F 2 F 3 F 4 F 5 F 6 F 7
R 1
R 2
R 3
R 4
R 5
SOUND PIANO DRAWBAR STRINGORGAN
BASS
BRASS
GUITARHARPSI &MALLET
WOOD-WIND
PAD &SYNTH SFXSPECIALTY USER
FEATURE VOCAL
DRUM
F2, F3 Plays the Main Demo.F5, F6 Enters the Function Demo menu.
50’S &60’S
CLASSICPIANO
TRADI-TIONAL
KIDS &HOLIDAY WALTZ
BALLAD COUNTRYBLUES &GOSPEL
USER
STYLE SWING &BIG BAND
POP &ROCK
JAZZ &CONTEMP
LATIN &ISLAND
BROADWAYSOLOPIANO
INTIMATEPIANO
The STYLE category buttons are used to select the demo for thatStyle category.
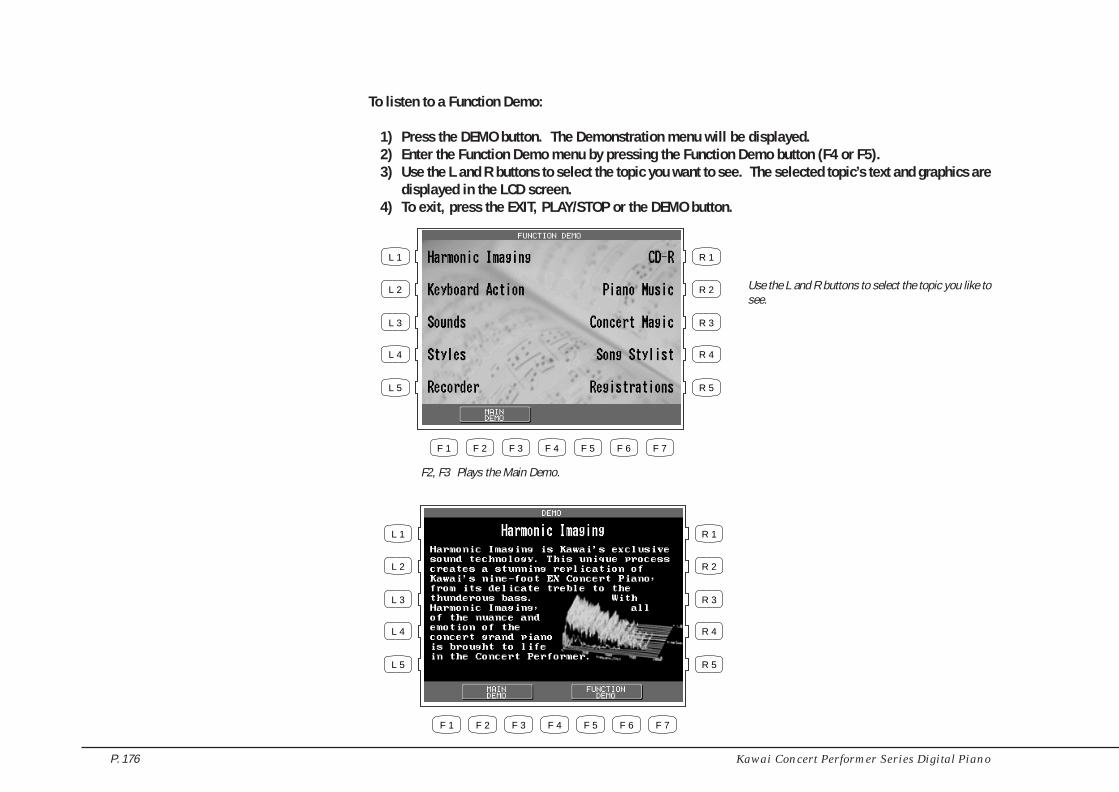
Kawai Concert Performer Series Digital PianoP. 176
To listen to a Function Demo:
1) Press the DEMO button. The Demonstration menu will be displayed.2) Enter the Function Demo menu by pressing the Function Demo button (F4 or F5).3) Use the L and R buttons to select the topic you want to see. The selected topic’s text and graphics are
displayed in the LCD screen.4) To exit, press the EXIT, PLAY/STOP or the DEMO button.
L 1
L 2
L 3
L 4
L 5
F 1 F 2 F 3 F 4 F 5 F 6 F 7
R 1
R 2
R 3
R 4
R 5
Use the L and R buttons to select the topic you like tosee.
F2, F3 Plays the Main Demo.
L 1
L 2
L 3
L 4
L 5
F 1 F 2 F 3 F 4 F 5 F 6 F 7
R 1
R 2
R 3
R 4
R 5

Getting Assisted—Help and Demo P. 177
Playing Piano MusicThe Concert Performer has over five hours of prerecorded PianoMusic available for your listening pleasure. The Piano Music isdivided into three sections: Classical, Contemporary, and Holiday
music. You can listen to all selections in a category, or you canprogram a list of your favorite ten selections from each category.
To listen to the Piano Music:
1) Press the PIANO MUSIC button. The Piano Music menu will be displayed.2) Select your preferred category, CLASSICAL (F1, F2), CONTEMPORARY (F3, F4) or HOLIDAY (F5, F6).
3) Use the L and R buttons to select the song you like to listen.4) Use the F1 and F2 buttons to search more songs on the other pages.5) Press the PLAY button (F7) to start the song. When the song is finished, another song from that will
be played at random. Songs from the category will continue to play randomly until you exit thescreen.
6) Press the F7 button to pause the song. Press the F5 and F6 buttons to return to category’s song list.7) To exit, press the EXIT, PLAY/STOP, or PIANO MUSIC button.
L 1
L 2
L 3
L 4
L 5
F 1 F 2 F 3 F 4 F 5 F 6 F 7
R 1
R 2
R 3
R 4
R 5
F1, F2 Selects the Classical category.F3, F4 Selects the Contemporary categoryF5, F6 Selects the Holiday category.

Kawai Concert Performer Series Digital PianoP. 178
L 1
L 2
L 3
L 4
L 5
F 1 F 2 F 3 F 4 F 5 F 6 F 7
R 1
R 2
R 3
R 4
R 5
Use the L and R buttons to select the song you like tolisten.
F1, F2 Searches more songs on the other pages.F3, F4 Takes you to the category selection menu.F5, F6 Enters the Favorites menu.F7 Plays the selected song.
L 1
L 2
L 3
L 4
L 5
F 1 F 2 F 3 F 4 F 5 F 6 F 7
R 1
R 2
R 3
R 4
R 5
F5,F6 Displays the song list.F7 Pauses the playback.

Getting Assisted—Help and Demo P. 179
Making your Favorites listYou can make your Favorites list for each Piano Music category. Ten songs can be programmed inthe order of playback.
NOTE:You cannot select between songs in different categories.
To make your Favorites list:
1) Select one of the three Piano Music categories. Press the FAVORITES button (F5 or F6) in the Categorysong screen. A default list is displayed in the LCD screen.
2) Use the L and R buttons to highlight one of the ten locations. Use the Dial or the SELECT SONGbuttons (F2, F3) to select a new song for that location.
3) Repeat step #2 to program your ten favorite songs in any order you wish.4) Press the SAVE button (F1) to save the edited list.
L 1
L 2
L 3
L 4
L 5
F 1 F 2 F 3 F 4 F 5 F 6 F 7
R 1
R 2
R 3
R 4
R 5
Use the L and R buttons to select a location to edit.
F1 Saves the edited list.F2, F3 Selects a song.F5, F6 Goes back to the song list in the selected category.F7 Plays the song.

Kawai Concert Performer Series Digital PianoP. 180
Preset SoundsAppendicesAppendices
PIANOPAGE 1 PAGE 2 PAGE 3 PAGE 4 PAGE 5Concert Grand Mellow Grand Jazz Grand New Age Piano Piano & VibesStudio Grand Rock Grand Crystal EP New Age Piano 2 Piano & Guitar 2Modern Piano Hony Tonk Piano & Guitar New Age Piano 3 Piano & Organ 3Electric Grand Electric Grand 2 Mono Grand New Age EP EP DolcePiano Octaves Piano Octaves 2 Wide Honky Tonk New Age EP 2 Toy PianoClassic EP Classic EP 2 Piano & EP New Age EP 3Modern EP Classic EP 3 Piano & EP 2Modern EP 2 Modern EP 3 Piano & EP 360’s EP EP Legend Piano & OrganTremolo EP EP Phase Piano & Organ 2
FEATUREPAGE 1 PAGE 2 PAGE 3 PAGE 4 PAGE 5 PAGE 6Plunger Trumpet Lead Trumpet Lead Flugel Horn Exp Guitar 2 Flugel & Tenor Cello Up BowTrumpet Shake Harmon Mute Tpt Exp Trumpet Ballad Guitar Mute Tpt & Bone Cello Down BowLead Trombone Ballad Trumpet Closed Mute Tpt Pick Nylon Gtr Flugel & Mute Tpt Violin UpbowExp Guitar Exp Trombone Plunger Trombone Finger Nylon Gtr Soft Tpt & Bone Violin DownbowExp Nylon Guitar Ballad Trombone Closed Mute Bone Ac Gtr Harmonics Medium Tpt & Alto Exp BrassExp Flute Lead Soprano Ballad Flute Classical Violin Soft Tenor & Alto Exp SaxesSoft Alto Exp Alto Flute Overblow Dolce Violin Med Tenor & AltoBallad Tenor Exp Tenor Flute Flutter Classical Cello Lead Tenor & AltoPassionate Violin Breathy Tenor Lead Alto Dolce Cello Lead Bone & TenorPassionate Cello Growl Tenor Quartet Tpt & Bone & Tenor
VOCALPAGE1 PAGE 2 PAGE 3 PAGE 4 PAGE 5 PAGE 6Jazz Ensemble 40’s Auto 40’s Dah Bah Male Aah 50’s Shoo 40’s DooFemale Scat 50’s Auto 40’s Doo Dah Male Ooh 50’s Bee 40’s Dah50’s Ensemble Jazz Doo Dao Slow Choir Male/Female Aah 50’s Doo 40’s Bee50’s Females Jazz Doo Bop Choir & String Male/Female Ooh 50’s Hey 40’s BahJazz Auto Jazz Bah Bop Ooh 60’s Ooh 50’s La 40’s Shoo60’s Ensemble Contemp Males Bass Vocal Pop Ooh 50’s Ooh Choir Aahs 260’s Ensemble 2 60’s Ooh Wah Choir Aahs Pop Aah 50’s Aah Choir Aahs 3Pop Ensemble 50’s Doo Wop Breathy Choir Pop Wah Female Doo Choir Aahs SfzPop Ensemble 2 50’s Ooh Aah Voice Oohs 60’s Wah Female Dao VoiceContemp Ensemble 40’s Doo Bee Humming 60’s Bop Female Duya Choir

Appendice P. 181
DRAWBARPAGE 1 PAGE 2 PAGE 3 PAGE 4Be 3 Be More Drawbar Bass Jazz OrganJazzer Be Nice 16’ Drawbar Jazz Organ 2Hi-Lo Odd Man 8’ Drawbar Rock OrganFull Organ Screamin’ 5 1/3’ Drawbar Pedal PercussionMellow Hollow 4’ Drawbar Pedal Percussion 2Drawbar Drawbar 2 2 2/3’ DrawbarPercussive Organ Percussive Organ 3 2’ DrawbarPercussive Organ 2 Drawbar 3 1 3/5’ Drawbar4’ percussion Soft Solo 1 1/3’ Drawbar2 2/3’ percussion Key Click 1’ Drawbar
ORGANPAGE 1 PAGE 2 PAGE 3 PAGE 4 PAGE 5 PAGE 6Full Pipes Baroque Mix 8’ Reed Stopped Pipe Pipe Ensemble Pedal MixerSmall Ensemble 8’ Diapason 8’ Flute Celeste Principal Pipe Resultant Pedal8’ Celeste Church Organ 3 8’ Flute Chiff Princial Choir Contra Gambe Pedal 2Church Organ Puff Organ 2 2/3’ Flute Chiff 8’ & 4’ Diapason Kinura Pedal 3Church Organ 2 Electronic Organ 2 8’ Flute Small Ensemble 2 Post Horn Pedal 4Electronic Organ 60’s Organ 8’ & 2’ Flute Reed Pipes Vox Celeste 8 Theater Organ 5Mixer Reed Organ 4’ & 2’ Flute Posaune Chiffy Tibia Theatre FullTheater Organ Theater Organ 3 2 2/3’ Flute Bass Pipe Full Pipes 2 Theatre TibiaTheater Organ 2 Theater Organ 4 1 3/5’ Flute Bass Pipe 2 Baroque Theatre VoxReeds 8’ Diapason 2 8’ Diapason 3 Cornopean Pump Organ
STRINGPAGE 1 PAGE 2 PAGE 3 PAGE 4 PAGE 5Beautiful Strings String Quartet Violin Ensemble Harp Sweep Up Warm Strings 2String Ensemble Strings & Brass Cello Ensemble Harp Sweep Down Warm Strings 3String Ensemble 2 Warm Strings String Bass Ens Harp Cascade Up Strings SustainingSynth Strings Synth Strings 3 Mono Strings Harp Cascade Down Strings SforzandoSynth Strings 2 60’s Strings Octave Strings String & HarpPassionate Violin Violin Strings & Bell Slow ViolinPassionate Cello Viola Strings & Piano Tremolo StringsFull Orchestra Cello Strings & Piano 2 String Quartet 2Small String Ens Contrabass Slow Cello Orchestra HitHarp Pizzicato Synth String Orch

Kawai Concert Performer Series Digital PianoP. 182
WOODWINDPAGE 1 PAGE 2 PAGE 3 PAGE 4 PAGE 5 PAGE 6Ballad Tenor Alto Sax Flute & Mute Tpt Classic Alto Sax Recorder 2 Pan FluteExp Alto Tenor Sax Flute & Strings Alto Sax 2 Oboe & Bassoon Slow Pan FluteBaritone Sax Soft Alto Sax Octave Saxes Alto Sax Bend Bassoon & Euphonium Pan Flute 2Soprano Sax Soft Tenor sax Big Band Winds 2 Tenor Sax 2 Clarinet & Bassoon Recorder 3Big Band Winds Breathy Tenor Sax Orchestral Flute Tenor Sax 3 Jazz Clarinet 2 Piccolo 2Exp Flute Jazz Flute Orch Clarinet Piccolo Flute & Clarinet Clarinet 3Flute Jazz Clarinet Orchestral Winds 2 Clarinet 2 Oboe & Clarinet Flute Key ClickClarinet Recorder Reeds Ensemble Bass ClarinetOboe English Horn Reeds Ensemble 2 Oboe 2Orchestral Winds Bassoon Sax Section Bassoon 2
BRASSPAGE 1 PAGE 2 PAGE 3 PAGE 4 PAGE 5Trumpet Shake Flugel Horn Bright Solo Tpt Cornet Brass Section 3Lead Trombone Muted Trumpet 2 Trumpet Ensemble Classic Trumpet Brass Section 4Solo Trumpet Cup Mute Trombone Trumpet & Alto Dixieland Trumpet Synth Brass 3Muted Trumpet Bright Trombone Trombone & Tenor Trumpet 2 Synth Brass 4Cup Mute Trumpet Trombone 2 Brass & Sax Sentimental Bone Trombone & TptFrench Horns Warm French Horn Brass Pad Euphonium Trombone & Tpt 2Tuba Jump Brass Mute Brass Ens Sousaphone Wide Horn SectionTrumpet Brass Section 2 Brass & Synth Tuba 2Trombone Synth Brass Brass & Synth 2Brass Section Synth Brass 2 French Horn & Strg
HARPSI & MALLETPAGE 1 PAGE 2 PAGE 3 PAGE 4Harpsichord Harpsichord Octave Soft Marimba Harpsi & StringsClavi Synth Clavi Wide Marimba Harpsi & Strings 2Celeste Glockenspiel Wide Vibraphone Harpsi & PipesHand Bells Carillon Harpsichord 2 Harpsi & Pipes 2Church Bells Tubular Bells Wide Harpsichord BellsSteel Drums Rolling Steel Drum Muted Handbells Bell LyraVibraphone Rolling Vibes Vibes & Guitar Hand Bells 2Marimba Rolling Marimba Octave Vibes Music Box 2Xylophone Synth Mallet Steel Drums 2Music Box Hard Marimba

Appendice P. 183
GUITARPAGE 1 PAGE 2 PAGE 3 PAGE 4 PAGE 5Exp Guitar Nylon Acoustic 3 Mellow Steel Strg Spanish Guitar Electric Guitar 4Exp Nylon Guitar Steel String 2 Lazz Guitar 2 Folk Guitar Electric Guitar 5Nylon Acoustic 12 String Nylon Electric Folk Guitar 2 Delayed Elec GtrNylon Acoustic 2 Electric Guitar 2 Guitar & Strings Delayed Folk Gtr OverdriveSteel Guitar Electric Guitar 3 Guitar Pad Pedal Steel 2 DistortionPedal Steel Hawaiian Guitar Guitar Feedback Delay Pedal Steel Gtr Cutting NoiseCountry Lead Rhythm Guitar Dynamic Overdrive Jazz Guitar 3Jazz Guitar Ukulele Dist Feedback Muted Guitar 2Electric Guitar Cutting Guitar Dist RhythmMuted Electric Elec Gtr Harmonics Gtr Fret Noise
BASSPAGE 1 PAGE 2 PAGE 3Acoustic Bass Acoustic Bass 2 Octave FretlessElectric Bass Finger Slap Bass Poly Synth BassFinger Bass Warm Synth Bass Clavi Bass 2Pick Bass Clavi Bass Electric Bass 2Fretless Bass Hammer Bass Finger Bass 2Ac Bass & Ride Elec Bass & Ride Ac Bass & PianoSlap Bass Slap Bass 2 Elec Bass & PianoSynth Bass Synth Bass 3 Acoustic Bass 3Synth Bass 2 Synth Bass 4 Acoustic Bass 4Attack Bass Rubber Bass Ac Bass Slap
PAD & SYNTHPAGE 1 PAGE 2 PAGE 3 PAGE 4 PAGE 5 PAGE 6Itopia Bowed Classic Synth Classic Synth 3 Multi Sweep EchoesWarm Pad Metallic Classic Synth 2 Fifth Warm Sweep Sci-FiBrightness Soundtrack Square Square 2 Bowed 2 GoblinAtmosphere Analog Voice Sine Sequenced Analog Saw Pad Echo PanNew Age Halo 2 Chiff Charang Analog Brass 3 New Age 3Sweep Bright Warm Pad Bass & Lead Lead Big Saw New Age 4Polysynth Metallic Pad 2 Wire Lead Soft Wire Lead Octave Saw Saw CompSine Pad Polysynth 2 Crystal Echo Bell Clean Square Square CompHalo New Age 2 Rain Pad Caliope Square Lead Saw Comp 2Synth Vocal Brightness 2 Analog Brass Analog Brass 2 Square Pad Chiff Comp

Kawai Concert Performer Series Digital PianoP. 184
SPECIALTYPAGE 1 PAGE 2 PAGE 3 PAGE 4 PAGE 5 PAGE 6Strumming Ac Gtr Picking Elec Gtr Accordion Shakuhachi Bag Pipe KokyuStrumming Ac Gtr 2 Pick/Strum Gtr French Accordion Sitar Balalaika ShoPicking Ac Gtr Pick/Strum Gtr 2 Tango Accordion Blown Bottle Ryuteki HichirikiPicking Ac Gtr 2 Strumming Mandolin French Accordion 2 Koto Nokan AtariganeMandolin Strumming Banjo Accordion 2 Kalimba Biwa MokugyoBanjo Blues Harmonica Celtic Harp Ocarina Kenban Harmonica TsuzumiPicking Banjo Wah Harmonica Mellow Mandolin Shamisen Mandolin 2 AinoteHarmonica Wah Harmonica 2 Hammer Dulcimer Sitar 2 Celtic Harp 2 Euro HitFiddle Dulcimer Banjo 2 Shanai Cordovox 6th HitStrumming Elec Gtr Slow Fiddle Whistle Taisho Koto Whistlers Bass Hit Plus
DRUMPAGE 1 PAGE 2 PAGE 3 PAGE 4 PAGE 5Standard Kit Marching Set Sleigh Bells Timpani Bass DrumJazz Kit Nogaku Set Triangle Rolling Timpani Talking DrumBrush kit Taiko Drums Repeating Castanet Soft Timpani Slit DrumRoom Kit Melodic Toms Cym & Bass Drum Soft Timpani Roll Room TomPower Kit Concert Bass Drum Snare Roll Orch Cymbal & BD Brush TomAnalog Kit Woodblock Melodic Tom 2 Finger Snap Cymbal RollDance Kit Agogo Synth Drum Hand Clap Ride CymbalElectric Kit Tinkle Bell Rhythm Box Tom Metronome Crash CymbalOrchestra Kit Castanet Electric Drum Conga Splash CymbalStandard Kit 2 Reverse Cymbal Snare Roll 2 Tambourine Crash Cymbal Mute
SFXPAGE 1 PAGE 2 PAGE 3 PAGE 4 PAGE 5 PAGE 6SFX Kit Applause Helicopter Car Passing Train Latin “Huh”SFX Kit 2 Seashore Gunshot Car Stopping Jet plane ScratchNature Stream Explosion Breath Noise Crickets RoosterTransportation Rain Machine Gun Cat Crickets 2 Trolley BellWar Games Thunder Siren Horse Gallop Cu-Coo TypewriterAnimal Farm Wind Foot Step Crow Starship Whistle DownMystery Theatre Bird Tweet Door Slam Plane Punch Whistle UpGame Show Laughing Dog Barking Door Creak Heartbeat Organ BellCounting Screaming Telephone 2 Car Engine Laser Gun CowTrip to Japan Telephone Wind Chime Car Crash Kiss Bubble

Appendice P. 185
List of Styles
SWING & BIG BAND 50’S & 60’S POP & ROCKPAGE 1 PAGE 2 PAGE 1 PAGE 2 PAGE 1 PAGE 2Fast Big Band Night Club 50’s Rock 50’s Rock 3 Philly Soul DiscoFast Big Band 2 Jitterbug 50’s Rock 2 60’s Rock 70’s R&B Disco 2Medium Big Band Big Band Samba 50’s Rockabilly 60’s Rock 2 70’s R&B 2 Disco 3Sing It Big Band Cha Cha 50’s Folk 60’s Folk Rock Cont Pop 80’s DanceJump Swing Big Band Foxtrot Rock Rhumba 60’s Pop 2 Pop / Funk 80’s Dance 2Medium Swing Slow Big Band 60’s Beach 60’s R&B Latin Rock Classic RockNice and Easy Medium Swing 2 Surf Rock 60’s R&B 2 80’s Rock 70’s Country RockSlow Swing Slow Swing 2 60’s Pop Pop / Rock Rock Shuffle
Motown Folk Rock Pop ShuffleMotown 2 Slow Rock 70’s Pop
BALLAD COUNTRY BLUES & GOSPELPAGE 1 PAGE 2 PAGE 1 PAGE 2 PAGE 1Cont R&B Ballad Modern Ballad 2 Country Shuffle Bluegrass KC BluesModern Ballad Modern Ballad 3 Country Stomp Texas Swing Slow R&BPop Ballad Pop Ballad 2 Boot Scootin Country Pop Fast R&BR&B Ballad R&B Ballad 2 Train Beat Country Two Beat Blues / Rock70’s Pop Ballad 70’s Rock Ballad Mod Country Shuffle Country Rock 2 Slow BluesMod Country Ballad Country Ballad Redneck Rock Gospel ShuffleCountry Pop Ballad Rock Ballad Country Rock Southern Gospel6/8 Ballad Folk Rock Ballad Modern Train Beat Fast Gospel50’s Ballad 50’s Ballad 2 Slow Gospel50’s Orch Ballad 6/8 Gospel
JAZZ & CONTEMP LATIN & ISLAND CLASSIC PIANOPAGE 1 PAGE 2 PAGE 1 PAGE 2 PAGE 1Smooth Jazz Smooth Jazz 3 Bossa Nova Modern Bossa ShowmanSmooth Jazz 2 Jazz R&B Bossa Nova 2 Bolero Pops PianoJazz / Pop Latin Jazz 2 Salsa Salsa 2 Table for TwoLatin Jazz Cont 16 Beat 2 Samba Salsa 3 RagtimeCont 16th Shuffle Cont 8 Beat Beguine Balenato Country PianoCont 16 Beat Cont 8 Beat 2 Hawaiian Bachata Rock LegendJammin Organ Reggae Reggae 2 Toons5/4 Jazz Calypso Gypsi Boogie
MamboRhumba
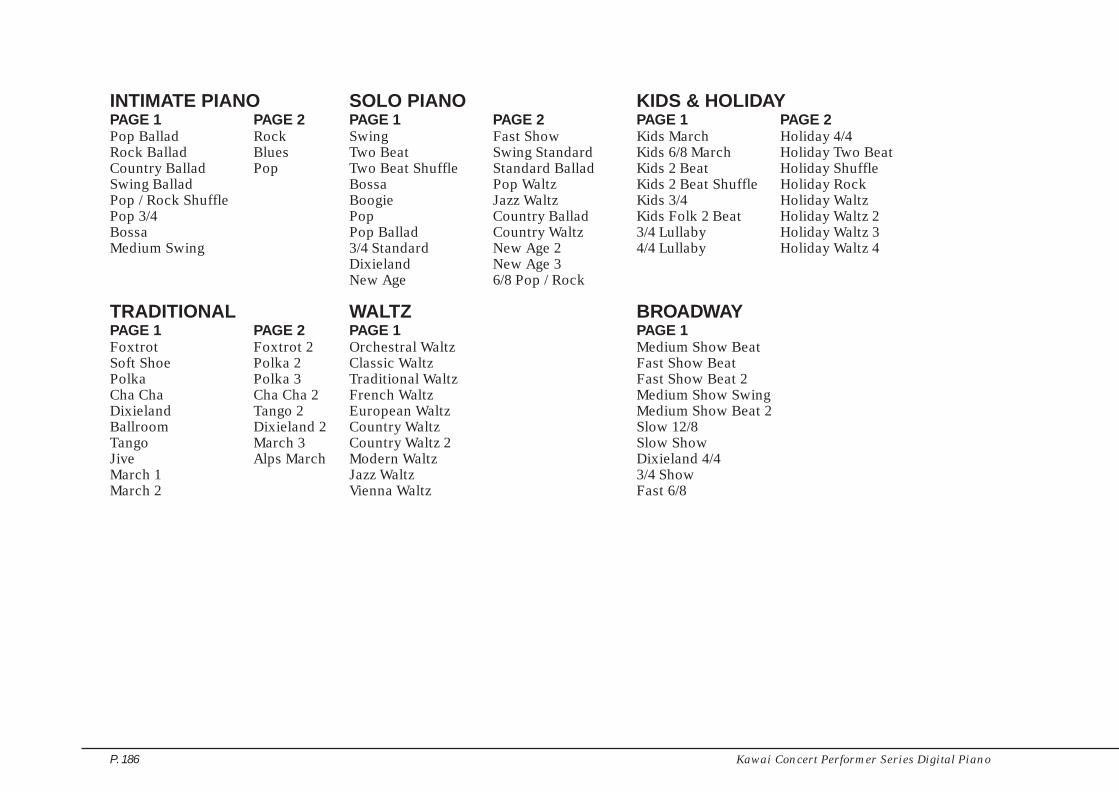
Kawai Concert Performer Series Digital PianoP. 186
INTIMATE PIANO SOLO PIANO KIDS & HOLIDAYPAGE 1 PAGE 2 PAGE 1 PAGE 2 PAGE 1 PAGE 2Pop Ballad Rock Swing Fast Show Kids March Holiday 4/4Rock Ballad Blues Two Beat Swing Standard Kids 6/8 March Holiday Two BeatCountry Ballad Pop Two Beat Shuffle Standard Ballad Kids 2 Beat Holiday ShuffleSwing Ballad Bossa Pop Waltz Kids 2 Beat Shuffle Holiday RockPop / Rock Shuffle Boogie Jazz Waltz Kids 3/4 Holiday WaltzPop 3/4 Pop Country Ballad Kids Folk 2 Beat Holiday Waltz 2Bossa Pop Ballad Country Waltz 3/4 Lullaby Holiday Waltz 3Medium Swing 3/4 Standard New Age 2 4/4 Lullaby Holiday Waltz 4
Dixieland New Age 3New Age 6/8 Pop / Rock
TRADITIONAL WALTZ BROADWAYPAGE 1 PAGE 2 PAGE 1 PAGE 1Foxtrot Foxtrot 2 Orchestral Waltz Medium Show BeatSoft Shoe Polka 2 Classic Waltz Fast Show BeatPolka Polka 3 Traditional Waltz Fast Show Beat 2Cha Cha Cha Cha 2 French Waltz Medium Show SwingDixieland Tango 2 European Waltz Medium Show Beat 2Ballroom Dixieland 2 Country Waltz Slow 12/8Tango March 3 Country Waltz 2 Slow ShowJive Alps March Modern Waltz Dixieland 4/4March 1 Jazz Waltz 3/4 ShowMarch 2 Vienna Waltz Fast 6/8

Appendice P. 187
16 Tons3 Coins In A Fount76 Trombones
AA Summer PlaceA Whole New WorldAchy Breaky HeartAcross the AlleyAfter The Love HasAin’t Misbehavin’Ain’t No WomanAin’t Too ProudAll I Have To DoAll I Wanna DoAll Of MeAll Shook UpAlley CatAloha OeAlways A WomanAlways On My MindAmapolaAmazing GraceAmerican PieAnnie’s SongAnniversary WaltzAnything GoesApril ShowersAround The WorldArrivederci RomaArthur’s ThemeAs Long As He NeedAs Tears Go ByAs Time Goes ByAt The HopAuld Lang SyneAutumn LeavesAway In A Manger
BBaby FaceBad Leroy BrownBallad Davy CrocktBeautiful MorningBeauty & The BeastBeer Barrel PolkaBegin The BeguineBehind Closed DoorBenny And The JetsBest Of My LoveBewitchedBill BaileyBillie JeanBingoBlue BayouBlue BossaBlue MoonBlue Suede ShoesBlue VelvetBlueberry HillBody And SoulBoogie Bugle BoyBoot Scootin’Boy From NY CityBreeze & IBrick HouseBridge Over WaterBrown Eyed GirlBrown Eyes BlueBut BeautifulButton Up OvercoatBy The Time I GetBye Bye Love
CCabaretCalifornia DreaminCalifornia Girls
Can You Feel LoveCanadian SunsetCandle In The WindCandyCan’t Get EnoughCan’t Get StartedCan’t Help FallingCan’t Hurry LoveCan’t SmileCan’t Stop LovingCara MiaCareless WhisperCelebrationC’est Si BonChain Of FoolsChances AreChange The WorldChantilly LaceChapel of LoveChatahoocheeChatt. Choo ChooCherishCherry Pink&AppleChicagoChristmas SongClementineClimb Ev’ry MtnClose To YouColors Of The WindCome In From RainCome Rain Or ShineComin Up RosesConsider YourselfCopacabanaCorcovadoCould I Have DanceCould It Be I’mCould’ve BeenCountry RoadsCoward Of County
Cracklin RoseCrazyCrazy Little ThingCruisin Down RiverCrusin’CryCry Me A RiverCrying In Chapel
DDaddyDance To The MusicDancin’ In StreetDanielDaydreamDays Of Wine RosesDeck The HallsDeep PurpleDeja VuDesafinadoDesparadoDidn’t We AlmostDo Re MiDo Your Ears HangDock Of The BayDomoniqueDon’t Be CruelDon’t Cry For MeDon’t Fall In LoveDon’t Fence Me InDon’t Get AroundDon’t Let The SunDon’t Worry B HapyDowntownDreamDueling BanjosDust In THe Wind
List of Song Stylists

Kawai Concert Performer Series Digital PianoP. 188
Friends Are ForFriends Low PlacesFriends See Me NowFrom A DistanceFrosty The SnowmanFun, Fun, Fun
GGambler, TheG’bye Yellow BrickGeorgia On My MindGeorgy GirlGet Down TonightGetting To Know UGimme Some Lovin’Girl From IpanemaGive My Regards ToGlory Of Love, TheGlow WormGod Bless ChildGoin Out Of My HedGood Golly MsMollyGood MorningGood ThingGot My Mind SetGranpa’s FarmGreat Balls O FireGreen Door, TheGreatest Love
☞ The Greatest LoveGreen Green GrassGreen OnionsGroovinGuitars, Cadillacs
HHandy ManHang On SloopyHappy BirthdayHappy Together
Happy TrailsHarbor LightsHard Days NightHard HabitHarlem NocturneHave I Told YouHawaiian WeddingHeard It GrapevineHeart Will Go OnHeartbreak HotelHeat Is OnHeatwaveHeavenHello DollyHello Mary LouHelpHelp Me Make ItHere Comes SantaHere’s Rainy DayHey JudeHold Your HandHolly Jolly XmasHome For HolidaysHonestyHoneyHoneysuckle RoseHonky Tonk ManHonky Tonk WomanHound DogHow Am I SupposedHow Are Thing InHow Can You MendHow Deep Is LoveHow Great Thou ArtHow High The MoonHow InsensitiveHow Sweet It IsHurts So GoodHustle
☞ The Hustle
II BelieveI Could Have DanceI Could Write BookI Don’t Know HowI Don’t Want 2 SetI Fall To PiecesI Get AroundI Got A NameI Got RhythmI Just Called ToI Love ParisI Love Rock n RollI Love YouI Need Your LovinI Only Have EyesI Saw Mommy KissI Shot The SheriffI Talk To TreesI Walk The LineI Want To KnowI Will Always LoveI Will SurviveI Write The SongsIf I Had A HammerIf I Were CarpentrIf You Don’t KnowI’ll Be AroundI’ll Be Home XmasI’ll Be Loving YouI’ll Be ThereI’ll Fly AwayI’ll Remember AprilI’m A BelieverI’m A Country BoyI’m A Little TeaptI’m Beginning 2SeeImaginationImagineIn The Mood
EEarth AngelEbony & IvoryEdelweissElviraEnd Of The RoadEndless LoveEvergreenEvery Breath YouEvery Rose Has ItsEverybody PlaysEverything I DoEverything Is BeauEvil WaysExodus Song, TheEyes Of Love
FFalling In LoveFarmer In The DellFascinating RhythmFascinationFast CarFeelingsFeels So GoodFeels So RightFerry Cross MerseyFeverFields Of GoldFire & RainFirst Time Ever IFlashdanceFly Me To The MoonFoggy Day, AFolsom PrisonFor All We KnowForever And EverFree BirdFree RideFreeway Of Love

Appendice P. 189
Islands In StreamIsn’t It RomanticIsn’t She LovelyIt Had To Be YouIt’s A Grand NightIt’s A Small WorldIt’s All In GameIt’s Beginning ToIts Matter Of TimeIt’s My PartyIt’s Not For MeIt’s Not UnusualIt’s Now Or NeverIt’s Too LateIt’s Unusual DayItsy Bitsy SpiderI’ve Been Working
JJailhouse RockJambalayaJingle Bell RockJingle BellsJive TalkinJohn Jacob JingleJohnny B. GoodeJoy To The WorldJuke Box Sat. NiteJumpJune Is Bustin’Just a Closer WalkJust a GigoloJust As I AmJust In TimeJust My Imagine…Just OnceJust The Two Of UsJust Way You Are
K
Kansas CityKing Of The RoadKnock 3 TimesKokomo
LLa BambaLadyLady Is A TrampLast DanceLast DateLast Time Saw PariLaughter In RainLay Down SallyLaylaLeaving Jet PlaneLet It BeLet It Snow!Lets Get It OnLet’s Stay TogethrLight My FireLilli MarleneLittle Dog GoneLittle Green ApplesLocomotionLollipopLondon BridgeLong Winding RoadLook Of LoveLose My FaithLost In Your EyesLove Boat
☞ The Love BoatLove First DegreeLove Is A ManyLove In BlueLove Me TenderLove Will Keep UsLoves Me… RockLove’s Theme
Lovin’ FeelingLuchenbach TexasLucilleLyin Eyes
MMacho ManMack The KnifeMaizry DoatsMammas Don’t LetMan In The MirrorManagua NicaraguaMandyManiacMargaritavilleMary Little LambMe And Bobby McGeeMe And My ShadowMeditationMemoryMercy Mercy MeMerry Little XmasMiami ViceMidnight HourMidnight Train-GAMistyMonday MondayMoon RiverMoolight In VTMoreMorning DanceMost Wondrful TimeMr. BojanglesMr. WonderfulMrs. RobinsonMuffin ManMusic Box DancerMusic Music MusicMusic Of The NightMy Cherie Amore
My Coloring BookMy Cup Runneth OvrMy Favorite ThingsMy Funny ValentineMy GirlMy LifeMy LoveMy Wild Irish Rose
NNa Na Hey Hey GbyeNadia’s ThemeNew Kid In TownNew York, New YorkNight And DayNight FeverNightingale SangNights In White Satin
OOh My Pa-PaOklahomaOld Cape CodOld Devil MoonOld LamplighterOld MacDonaldOld Rugged CrossOld Soft ShoeOld Time R & ROld Time ReligionOn Street Where UOn The Road AgainOn Top Ole SmokyOne (Chorus Line)One More TryOne Tin SoldierOnly YouOoh Baby BabyOpen ArmsOpus OneOrange Blossom

Kawai Concert Performer Series Digital PianoP. 190
Our Day Will ComeOver The Rainbow
PPaper RosesParty’s Over, ThePeace in ValleyPeaceful Easy FeelPeanuts’ ThemePegPenn. 6-5000PeoplePeople Will SayPhysicalPiano ManPink Panther
☞ The Pink PantherPlease Mr. PostmanPlease Please MePoincianaPolka Dots MoonbmsPop Goes WeaselPrecious MemoriesPretty WomanProud MaryPuff Magic Dragon
QQuando, QuandoQue Sera, Sera
RRag MopRainbow ConnectionRed Red WineRed RosesRed Sails SunsetRelease MeRescue MeRespect
ReunitedRhinestone CowboyRock A Bye BabyRock Around ClockRock This TownRocket ManRockin’ Xmas TreeRocky Mtn HighRocky TopRose
☞ The RoseRose GardenRow Your BoatRudolf
SSailingSaints Go MarchingSan FranciscoSaraSara SmileSat Nile Is LoneliSatin DollSatisfactionSave Best For LastSeasons In The SunSeems Like Old TmsSentimental ReasonSeptemberSF Flowers In HairShadow Your SmileShake Your BootyShake, Rattle, RollSh-BoomShe Believes in MeShe Loves YouShe’ll Be ComingShe’s In LoveShe’s Like WindShoo Fly Pie
Shop AroundShow BusinessSigned Sealed Del.Silent NightSilly Love SongsSilver BellsSinging In RainSleigh RideSmileSmoke Gets In EyesSmooth OperatorSnow BirdSo In LoveSoldier Of LoveSome Day My PrinceSome Enchanted EveSomethingSomething To TalkSometimes When WeSomewhereSomewhere Out TherSong Sung BlueSoul ManSound Of MusicSpanish EyesSpanish HarlemSpeak LowSt. Elmo’s FireSt. ThomasStand By MeStand By Your ManStangers In NightStardustStarting OverStayin AliveStompin’ SavoyStormy WeatherStreet Where U LivString Of PearlsSummer Breeze
Summer SambaSummertimeSummertime BluesSunday Kind LoveSunnySunny Gets BlueSunny Side StreetSunrise, SunsetSurfin USASurrey With FringeSweet CarolineSweet Home AlabamaSwingin On A Star
TTake FiveTake It EasyTake Me OutTake The A TrainTake This Job AndTakin’ Care OfTammyTea For TwoTears In HeavenTell Her About ItTemptedTennessee WaltzTequilaTequila SunriseThanks For MemoryThat Kind Of GirlThat’ll Be The DayThat’s AmoreThat’s LifeThat’s The WayThe Christmas SongThe Greatest LoveThe HustleThe Love BoatThe Pink Panther

Appendice P. 191
The RoseThe Way We WereThe Way You DoThen Came YouThere Must Be WayThere’ll Be SadThese DreamsThey Call The WindThingsThings We Did LastThinkThird Man ThemeThis MasqueradeThis Ole ManThose Were The DaysThree Times A LadyThrough The YearsTico TicoTime After TimeTime In A BottleTiny BubblesTo All The GirlsTom DooleyTomorrowTonightTop Of The WorldTotal EclipseTroubleTrue LoveTry To RememberTurn Turn TurnTutti FruttiTuxedo JunctionTwinkle TwinkleTwist & ShoutTwist, The
UUnchained MelodyUnder Boardwalk
UnforgettableUp On HousetopUp Up & AwayUp Where We Belong
VVaya Con DiosVentura Highway
WWake Little SusieWake Me UpWalk On ByWalkin’ MidnightWasted Days andWatch What HappensWaveWay We Were
☞ The Way We WereWay You Do
☞ The Way You DoWayward Wind, TheWe Are FamilyWe Are The WorldWe Built This CityWe Didn’t StartWe Wish YouWe’re In This LoveWe’ve Got Tonight (Rock Ballad)We’ve Got Tonight (Modern Country)We’ve Only BegunWhat A FriendWhat Child Is ThisWhat I Did 4 LoveWhat Kind Of FoolWhat Would U ThinkWheel Of FortuneWheels On The BusWhen A Man Loves AWhen Can I See You
When I Fall n LoveWhen I’m 64When Irish EyesWhen You’re SmilingWhere Did Love GoWhere Flowers GoneWhite ChristmasWhiter Shade PaleWho Can I Turn ToWhole New WorldWhy Do Fools FallWide Open SpacesWind Beneath WingsWinter WonderlandWipe OutWish Upon A StarWith A Little HelpWith Or Without UWomanWonderful WondrfulWonderful WorldWooden HeartWorld On A StringWunderbar
YYakety SaxYesterdayYesterday When IYMCAYou Can’t be TrueYou Don’t Bring MeYou Light Up LifeYou Make Me YoungYou Needed MeYou Send MeYou’d Be So NiceYou’ll Never WalkYoung At HeartYour Cheatin Heart
Your SongYou’re 16You’re So VainYou’ve Got Friend

Kawai Concert Performer Series Digital PianoP. 192
Children’s Songs
Twinkle, Twinkle, Little Star . . . . . . . . . . . . . . . . . . . . . . . . . . MP ✔
I’m A Little Teapot . . . . . . . . . . . . . . . . . . . . . . . . . . . . . . . . . MP ✔
This Old Man . . . . . . . . . . . . . . . . . . . . . . . . . . . . . . . . . . . . . MP ✔
Mary Had A Little Lamb . . . . . . . . . . . . . . . . . . . . . . . . . . . . . MP ✔
London Bridge . . . . . . . . . . . . . . . . . . . . . . . . . . . . . . . . . . . . MP ✔
Row, Row, Row Your Boat . . . . . . . . . . . . . . . . . . . . . . . . . . . MP ✔
Hickory Dickory Dock . . . . . . . . . . . . . . . . . . . . . . . . . . . . . . MP ✔
Pop Goes The Weasel . . . . . . . . . . . . . . . . . . . . . . . . . . . . . . MP
Good Morning To You . . . . . . . . . . . . . . . . . . . . . . . . . . . . . . MP ✔
Frère Jacques . . . . . . . . . . . . . . . . . . . . . . . . . . . . . . . . . . . . MP ✔
The Farmer In The Dell . . . . . . . . . . . . . . . . . . . . . . . . . . . . . MP ✔
Bingo . . . . . . . . . . . . . . . . . . . . . . . . . . . . . . . . . . . . . . . . . . . MP ✔
Itsy, Bitsy Spider . . . . . . . . . . . . . . . . . . . . . . . . . . . . . . . . . . MP ✔
Where, O Where Has My Little Dog Gone? . . . . . . . . . . . . . . EB ✔
The Muffin Man . . . . . . . . . . . . . . . . . . . . . . . . . . . . . . . . . . . MP ✔
Three Blind Mice . . . . . . . . . . . . . . . . . . . . . . . . . . . . . . . . . . MP ✔
Old MacDonald Had A Farm . . . . . . . . . . . . . . . . . . . . . . . . . MP ✔
Did You Ever See A Lassie? . . . . . . . . . . . . . . . . . . . . . . . . . . MP ✔
Ten Little Indians . . . . . . . . . . . . . . . . . . . . . . . . . . . . . . . . . . MP
Brahm’s Lullaby . . . . . . . . . . . . . . . . . . . . . . . . . . . . . . . . . . . SK ✔
Rock A Bye Baby . . . . . . . . . . . . . . . . . . . . . . . . . . . . . . . . . . MP ✔
Here We Go Round The Mulberry Bush . . . . . . . . . . . . . . . . . MP ✔
Little Brown Jug . . . . . . . . . . . . . . . . . . . . . . . . . . . . . . . . . . MP ✔
She’ll Be Comin’ Around The Mountain . . . . . . . . . . . . . . . . EB ✔
Whistler And His Dog . . . . . . . . . . . . . . . . . . . . . . . . . . . . . . SK
Polly Wolly Doodle . . . . . . . . . . . . . . . . . . . . . . . . . . . . . . . . MP ✔
Christmas Songs
Hark The Herald Angels Sing . . . . . . . . . . . . . . . . . . . . . . . . MP ✔
Jingle Bells . . . . . . . . . . . . . . . . . . . . . . . . . . . . . . . . . . . . . . MP ✔
Deck The Halls . . . . . . . . . . . . . . . . . . . . . . . . . . . . . . . . . . . MP ✔
O Come All Ye Faithful . . . . . . . . . . . . . . . . . . . . . . . . . . . . . MP ✔
Joy To The World . . . . . . . . . . . . . . . . . . . . . . . . . . . . . . . . . . MP ✔
The First Noel . . . . . . . . . . . . . . . . . . . . . . . . . . . . . . . . . . . . MP ✔
Silent Night . . . . . . . . . . . . . . . . . . . . . . . . . . . . . . . . . . . . . . MP ✔
We Wish You A Merry Christmas . . . . . . . . . . . . . . . . . . . . . . MP ✔
What Child Is This? . . . . . . . . . . . . . . . . . . . . . . . . . . . . . . . . MP ✔
Angels We Have Heard On High . . . . . . . . . . . . . . . . . . . . . . . MP ✔
It Came Upon A Midnight Clear . . . . . . . . . . . . . . . . . . . . . . . MP ✔
Away In A Manger . . . . . . . . . . . . . . . . . . . . . . . . . . . . . . . . . MP ✔
O Holy Night . . . . . . . . . . . . . . . . . . . . . . . . . . . . . . . . . . . . . EB ✔
O Tannenbaum (O Christmas Tree) . . . . . . . . . . . . . . . . . . . . MP ✔
The Twelve Days Of Christmas (12 Days of Christmas) . . . . . MP ✔
We Three Kings Of Orient Are . . . . . . . . . . . . . . . . . . . . . . . . MP ✔
O Little Town Of Bethlehem . . . . . . . . . . . . . . . . . . . . . . . . . . MP ✔
Ave Maria . . . . . . . . . . . . . . . . . . . . . . . . . . . . . . . . . . . . . . . SK
Patriotic Songs
My Country ’Tis Of Thee . . . . . . . . . . . . . . . . . . . . . . . . . . . . MP ✔
Battle Hymn Of The Republic . . . . . . . . . . . . . . . . . . . . . . . . . MP ✔
America The Beautiful . . . . . . . . . . . . . . . . . . . . . . . . . . . . . . MP ✔
Yankee Doodle . . . . . . . . . . . . . . . . . . . . . . . . . . . . . . . . . . . . MP ✔
Hail To The Chief . . . . . . . . . . . . . . . . . . . . . . . . . . . . . . . . . . MP ✔
Washington Post March . . . . . . . . . . . . . . . . . . . . . . . . . . . . . SK
Song Title Type Lyrics
Concert Magic Songs
The words in bold type are the title displayed in the LCD screen.
Song Title Type Lyrics

Appendice P. 193
You’re A Grand Old Flag . . . . . . . . . . . . . . . . . . . . . . . . . . . . EB ✔
Stars And Stripes Forever . . . . . . . . . . . . . . . . . . . . . . . . . . . SK
Anchors Aweigh . . . . . . . . . . . . . . . . . . . . . . . . . . . . . . . . . . . SK ✔
Under The Double Eagle . . . . . . . . . . . . . . . . . . . . . . . . . . . . SK
American Classics
Danny Boy . . . . . . . . . . . . . . . . . . . . . . . . . . . . . . . . . . . . . . . EB ✔
Down In The Valley . . . . . . . . . . . . . . . . . . . . . . . . . . . . . . . . EB ✔
Let Me Call You Sweetheart . . . . . . . . . . . . . . . . . . . . . . . . . EB ✔
Home Sweet Home . . . . . . . . . . . . . . . . . . . . . . . . . . . . . . . . EB ✔
My Bonnie Lies Over The Ocean . . . . . . . . . . . . . . . . . . . . . . MP ✔
In The Good Old Summertime . . . . . . . . . . . . . . . . . . . . . . . . EB ✔
For He’s A Jolly Good Fellow . . . . . . . . . . . . . . . . . . . . . . . . . MP ✔
Bill Bailey Won’t You Please Come Home . . . . . . . . . . . . . . . EB ✔
Give My Regards To Broadway . . . . . . . . . . . . . . . . . . . . . . . SK ✔
Clementine . . . . . . . . . . . . . . . . . . . . . . . . . . . . . . . . . . . . . . MP ✔
Fascination . . . . . . . . . . . . . . . . . . . . . . . . . . . . . . . . . . . . . . SK
Home On The Range . . . . . . . . . . . . . . . . . . . . . . . . . . . . . . . MP ✔
Take Me Out To The Ballgame . . . . . . . . . . . . . . . . . . . . . . . . EB ✔
Auld Lang Syne . . . . . . . . . . . . . . . . . . . . . . . . . . . . . . . . . . . MP ✔
Michael Row The Boat Ashore . . . . . . . . . . . . . . . . . . . . . . . . MP ✔
Oh, Susanna . . . . . . . . . . . . . . . . . . . . . . . . . . . . . . . . . . . . . SK ✔
On Top Of Old Smokey . . . . . . . . . . . . . . . . . . . . . . . . . . . . . . EB ✔
Bicycle Built For Two . . . . . . . . . . . . . . . . . . . . . . . . . . . . . . . EB ✔
The Camptown Races . . . . . . . . . . . . . . . . . . . . . . . . . . . . . . MP ✔
The Band Played On . . . . . . . . . . . . . . . . . . . . . . . . . . . . . . . EB ✔
When Johnny Comes Marching Home . . . . . . . . . . . . . . . . . . MP ✔
When The Saints Go Marching In . . . . . . . . . . . . . . . . . . . . . EB ✔
Beautiful Dreamer . . . . . . . . . . . . . . . . . . . . . . . . . . . . . . . . . EB ✔
Ta Ra Ra Boom De Ay . . . . . . . . . . . . . . . . . . . . . . . . . . . . . . MP ✔
Turkey In The Straw . . . . . . . . . . . . . . . . . . . . . . . . . . . . . . . . SK
Blue Bells Of Scotland . . . . . . . . . . . . . . . . . . . . . . . . . . . . . . MP ✔
Down By The Riverside . . . . . . . . . . . . . . . . . . . . . . . . . . . . . SK ✔
By The Light Of The Silvery Moon . . . . . . . . . . . . . . . . . . . . . SK ✔
Shine On Harvest Moon . . . . . . . . . . . . . . . . . . . . . . . . . . . . . SK ✔
American Patrol March . . . . . . . . . . . . . . . . . . . . . . . . . . . . . MP
Dixie . . . . . . . . . . . . . . . . . . . . . . . . . . . . . . . . . . . . . . . . . . . SK ✔
Yellow Rose Of Texas . . . . . . . . . . . . . . . . . . . . . . . . . . . . . . SK ✔
I Love Coffee, I Love Tea (Java Jive) . . . . . . . . . . . . . . . . . . . MP ✔
Arkansas Traveler . . . . . . . . . . . . . . . . . . . . . . . . . . . . . . . . . MP ✔
Old Kentucky Home . . . . . . . . . . . . . . . . . . . . . . . . . . . . . . . . SK ✔
Red River Valley . . . . . . . . . . . . . . . . . . . . . . . . . . . . . . . . . . EB ✔
The Entertainer . . . . . . . . . . . . . . . . . . . . . . . . . . . . . . . . . . . SK
Old Folks At Home . . . . . . . . . . . . . . . . . . . . . . . . . . . . . . . . . SK ✔
Maple Leaf Rag . . . . . . . . . . . . . . . . . . . . . . . . . . . . . . . . . . . SK
After The Ball Is Over . . . . . . . . . . . . . . . . . . . . . . . . . . . . . . SK ✔
After You’ve Gone . . . . . . . . . . . . . . . . . . . . . . . . . . . . . . . . . EB ✔
Thunder And Blazes . . . . . . . . . . . . . . . . . . . . . . . . . . . . . . . . SK
Annie Laurie . . . . . . . . . . . . . . . . . . . . . . . . . . . . . . . . . . . . . MP ✔
Wabash Cannonball . . . . . . . . . . . . . . . . . . . . . . . . . . . . . . . SK ✔
I’ve Been Working On The Railroad . . . . . . . . . . . . . . . . . . . . EB ✔
Grandfather’s Clock . . . . . . . . . . . . . . . . . . . . . . . . . . . . . . . . EB ✔
(continue)
Song Title Type Lyrics Song Title Type Lyrics
EB: Easy Beat, MP: Melody Play, SK: Skilfull
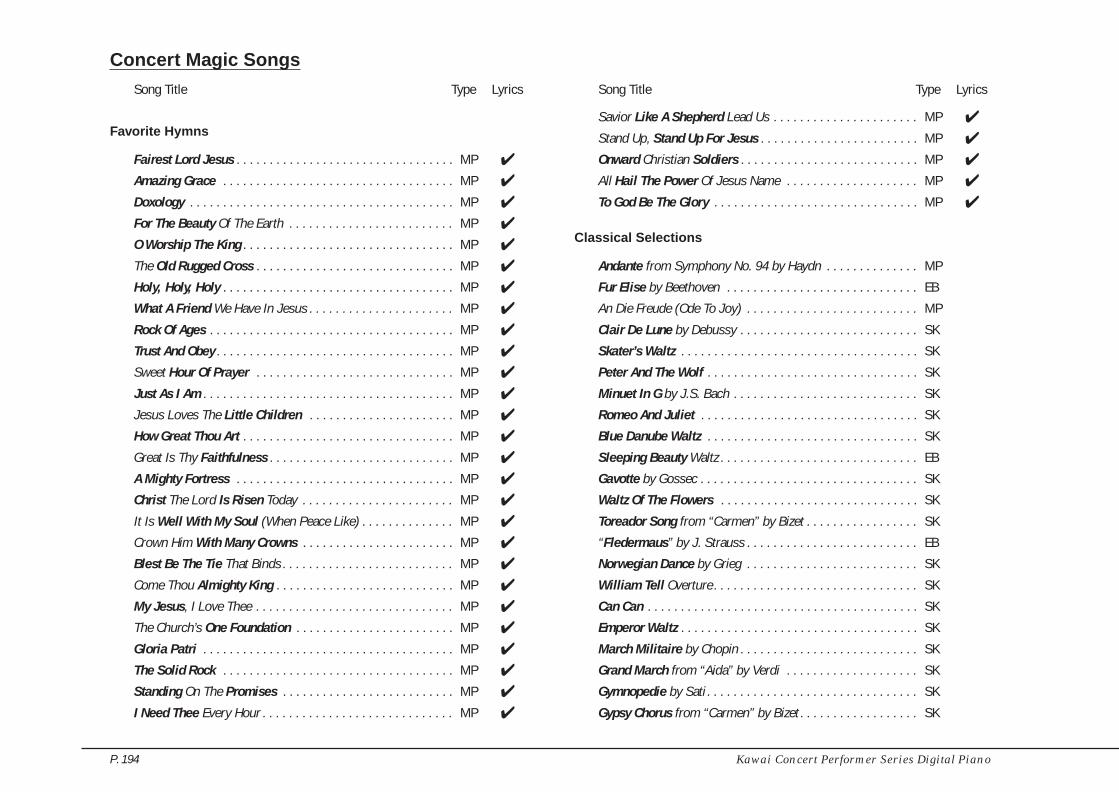
Kawai Concert Performer Series Digital PianoP. 194
Favorite Hymns
Fairest Lord Jesus . . . . . . . . . . . . . . . . . . . . . . . . . . . . . . . . . MP ✔
Amazing Grace . . . . . . . . . . . . . . . . . . . . . . . . . . . . . . . . . . . MP ✔
Doxology . . . . . . . . . . . . . . . . . . . . . . . . . . . . . . . . . . . . . . . . MP ✔
For The Beauty Of The Earth . . . . . . . . . . . . . . . . . . . . . . . . . MP ✔
O Worship The King . . . . . . . . . . . . . . . . . . . . . . . . . . . . . . . . MP ✔
The Old Rugged Cross . . . . . . . . . . . . . . . . . . . . . . . . . . . . . . MP ✔
Holy, Holy, Holy . . . . . . . . . . . . . . . . . . . . . . . . . . . . . . . . . . . MP ✔
What A Friend We Have In Jesus . . . . . . . . . . . . . . . . . . . . . . MP ✔
Rock Of Ages . . . . . . . . . . . . . . . . . . . . . . . . . . . . . . . . . . . . . MP ✔
Trust And Obey . . . . . . . . . . . . . . . . . . . . . . . . . . . . . . . . . . . . MP ✔
Sweet Hour Of Prayer . . . . . . . . . . . . . . . . . . . . . . . . . . . . . . MP ✔
Just As I Am . . . . . . . . . . . . . . . . . . . . . . . . . . . . . . . . . . . . . . MP ✔
Jesus Loves The Little Children . . . . . . . . . . . . . . . . . . . . . . MP ✔
How Great Thou Art . . . . . . . . . . . . . . . . . . . . . . . . . . . . . . . . MP ✔
Great Is Thy Faithfulness . . . . . . . . . . . . . . . . . . . . . . . . . . . . MP ✔
A Mighty Fortress . . . . . . . . . . . . . . . . . . . . . . . . . . . . . . . . . MP ✔
Christ The Lord Is Risen Today . . . . . . . . . . . . . . . . . . . . . . . MP ✔
It Is Well With My Soul (When Peace Like) . . . . . . . . . . . . . . MP ✔
Crown Him With Many Crowns . . . . . . . . . . . . . . . . . . . . . . . MP ✔
Blest Be The Tie That Binds . . . . . . . . . . . . . . . . . . . . . . . . . . MP ✔
Come Thou Almighty King . . . . . . . . . . . . . . . . . . . . . . . . . . . MP ✔
My Jesus, I Love Thee . . . . . . . . . . . . . . . . . . . . . . . . . . . . . . MP ✔
The Church’s One Foundation . . . . . . . . . . . . . . . . . . . . . . . . MP ✔
Gloria Patri . . . . . . . . . . . . . . . . . . . . . . . . . . . . . . . . . . . . . . MP ✔
The Solid Rock . . . . . . . . . . . . . . . . . . . . . . . . . . . . . . . . . . . MP ✔
Standing On The Promises . . . . . . . . . . . . . . . . . . . . . . . . . . MP ✔
I Need Thee Every Hour . . . . . . . . . . . . . . . . . . . . . . . . . . . . . MP ✔
Savior Like A Shepherd Lead Us . . . . . . . . . . . . . . . . . . . . . . MP ✔
Stand Up, Stand Up For Jesus . . . . . . . . . . . . . . . . . . . . . . . . MP ✔
Onward Christian Soldiers . . . . . . . . . . . . . . . . . . . . . . . . . . . MP ✔
All Hail The Power Of Jesus Name . . . . . . . . . . . . . . . . . . . . MP ✔
To God Be The Glory . . . . . . . . . . . . . . . . . . . . . . . . . . . . . . . MP ✔
Classical Selections
Andante from Symphony No. 94 by Haydn . . . . . . . . . . . . . . MP
Fur Elise by Beethoven . . . . . . . . . . . . . . . . . . . . . . . . . . . . . EB
An Die Freude (Ode To Joy) . . . . . . . . . . . . . . . . . . . . . . . . . . MP
Clair De Lune by Debussy . . . . . . . . . . . . . . . . . . . . . . . . . . . SK
Skater’s Waltz . . . . . . . . . . . . . . . . . . . . . . . . . . . . . . . . . . . . SK
Peter And The Wolf . . . . . . . . . . . . . . . . . . . . . . . . . . . . . . . . SK
Minuet In G by J.S. Bach . . . . . . . . . . . . . . . . . . . . . . . . . . . . SK
Romeo And Juliet . . . . . . . . . . . . . . . . . . . . . . . . . . . . . . . . . SK
Blue Danube Waltz . . . . . . . . . . . . . . . . . . . . . . . . . . . . . . . . SK
Sleeping Beauty Waltz . . . . . . . . . . . . . . . . . . . . . . . . . . . . . . EB
Gavotte by Gossec . . . . . . . . . . . . . . . . . . . . . . . . . . . . . . . . . SK
Waltz Of The Flowers . . . . . . . . . . . . . . . . . . . . . . . . . . . . . . SK
Toreador Song from “Carmen” by Bizet . . . . . . . . . . . . . . . . . SK
“Fledermaus” by J. Strauss . . . . . . . . . . . . . . . . . . . . . . . . . . EB
Norwegian Dance by Grieg . . . . . . . . . . . . . . . . . . . . . . . . . . SK
William Tell Overture . . . . . . . . . . . . . . . . . . . . . . . . . . . . . . . SK
Can Can . . . . . . . . . . . . . . . . . . . . . . . . . . . . . . . . . . . . . . . . . SK
Emperor Waltz . . . . . . . . . . . . . . . . . . . . . . . . . . . . . . . . . . . . SK
March Militaire by Chopin . . . . . . . . . . . . . . . . . . . . . . . . . . . SK
Grand March from “Aida” by Verdi . . . . . . . . . . . . . . . . . . . . SK
Gymnopedie by Sati . . . . . . . . . . . . . . . . . . . . . . . . . . . . . . . . SK
Gypsy Chorus from “Carmen” by Bizet . . . . . . . . . . . . . . . . . . SK
Concert Magic Songs
Song Title Type Lyrics Song Title Type Lyrics

Appendice P. 195
Largo from Symphony No. 9 by Dvorák . . . . . . . . . . . . . . . . . SK
Prelude In A by Chopin . . . . . . . . . . . . . . . . . . . . . . . . . . . . . MP
Pizzicato Polka . . . . . . . . . . . . . . . . . . . . . . . . . . . . . . . . . . . SK
Rondeau by Mouret . . . . . . . . . . . . . . . . . . . . . . . . . . . . . . . . SK
Voice Of Spring . . . . . . . . . . . . . . . . . . . . . . . . . . . . . . . . . . . EB
Allegro Moderato from Symphony Nr. 8 by Schubert . . . . . . SK
Special Occasions
Bridal Chorus from “Lohengrin” by Wagner . . . . . . . . . . . . . MP ✔
Wedding March from “Midsummer Night’s Dream” . . . . . . .
by Mendelssoh . . . . . . . . . . . . . . . . . . . . . . . . . . . . . . . . . . . . SK
Pomp And Circumstance . . . . . . . . . . . . . . . . . . . . . . . . . . . . SK
Mazel Tov . . . . . . . . . . . . . . . . . . . . . . . . . . . . . . . . . . . . . . . . EB
International Songs
When Irish Eyes Are Smiling . . . . . . . . . . . . . . . . . . . . . . . . . EB ✔
Hatikvah . . . . . . . . . . . . . . . . . . . . . . . . . . . . . . . . . . . . . . . . . MP ✔
My Wild Irish Rose . . . . . . . . . . . . . . . . . . . . . . . . . . . . . . . . MP ✔
Hava Nagilah . . . . . . . . . . . . . . . . . . . . . . . . . . . . . . . . . . . . . EB ✔
Ich Bin Ein Musikant . . . . . . . . . . . . . . . . . . . . . . . . . . . . . . . SK
Chiapenacas . . . . . . . . . . . . . . . . . . . . . . . . . . . . . . . . . . . . . SK
Funiculi Funicula . . . . . . . . . . . . . . . . . . . . . . . . . . . . . . . . . . SK ✔
La Marseillaise . . . . . . . . . . . . . . . . . . . . . . . . . . . . . . . . . . . MP ✔
La Paloma . . . . . . . . . . . . . . . . . . . . . . . . . . . . . . . . . . . . . . . SK ✔
Santa Lucia . . . . . . . . . . . . . . . . . . . . . . . . . . . . . . . . . . . . . . SK ✔
Habanera . . . . . . . . . . . . . . . . . . . . . . . . . . . . . . . . . . . . . . . . SK
La Bamba . . . . . . . . . . . . . . . . . . . . . . . . . . . . . . . . . . . . . . . . SK
EB: Easy Beat, MP: Melody Play, SK: Skilfull
Song Title Type Lyrics

Kawai Concert Performer Series Digital PianoP. 196
C Maj
C7
C ∆7
C6 C sus4 C b5C aug
C6 9 C add9
C9
C11 C13
C7 b5
C7 #5C7 sus4
C7 b9
* *
*
*
*
Cm
Cm7
Cm6 Cm6 9Cm#5
*
Table of Chord Types
This table describes the fingering of 61 types of chords, including inversions, that the CP pianorecognizes. All these are represented here in the key of C, but of course any transposition of thesechords to other keys apply.Entries on the chart with an asterisk (*) are easy fingerings that can be recognized in the One-Finger mode.

Appendice P. 197
Cm7 b13 Cm7 11 b13
Cm7 b5 Cm7 b5 b9
Cm7 b5 11
Cm7 b5 9
C ∆7 #5
C ∆7 b5
C ∆9 13
C ∆9 #11
C ∆9
C ∆7 13 C∆7 #11 13 C∆9 #11 13 C∆ 9 #11 13
Cm9
C dim C dim∆7 C dim b13
C dim 9 C dim 11
C7 #9
C7 #11C7 b9 11 C7 b9 #11 C7 #9 #11
C9 13 C9 11 13
Cm add9
Cm9
Cm7 11 Cm9 11
C7 #9 13
C9 #11 13
C7 b13
C7 b9 b13C7 #9 b13
C7 b9 13
C9 b13C7 b9 11 13

Kawai Concert Performer Series Digital PianoP. 198
A
BC
A. Using External Speakers
The Concert Performer has an amplifier and built-in speakers and together,they produce a powerful sound. However, for larger venues or outdoorperformances, you may need to use additional amplification and speakersystems.Standard 1/4-inch audio cables can be plugged into the CP’s stereo Line Outjacks for this purpose. The CP’s Master Volume will affect the signals levelsoutput from the Line Out Jacks.
Connection Examples
Amplifier
B. Using the Concert Performer with Your Home Audio System
You can connect audio cables from your stereo system or another source tothe CP’s Line In jacks. The sound of your stereo playing a tape, CD, or evenradio will be heard through the CP’s speaker system and mixed in with anysounds from the CP itself, enabling you to play along with your favorite songs!Connect the CP with your CD player or other device as illustrated.
Tape Recorder CD Player
C. Recording Your Performance with Your Tape Recorder
Even though the CP185 do not have a CD-R Drive you can still make a recordingfrom your CP using the Line out Jacks. Simply connect an external CD-Rrecorder or other recording device (Cassette, Audio software from a personalcomputer etc.) to the CP’s Line Out Jacks. Everything that you hear comingout of the CP’s built-in speaker system is also sent out through the Line OutJacks and can be recorded. You can also record anything that is connected tothe Line In Jacks along with anything being played by the CP.

Appendice P. 199
D E
D. Using the Concert Performer with an External MIDIInstrument
MIDI lets you expand the creative possibilities of the CP byconnecting it to an external MIDI device or personal computer.
Use a MIDI cable to connect the CP’s MIDI Out jack to the otherdevice’s MIDI In. Likewise, connect the MIDI Out jack of the otherdevice to the CP’s MIDI In.
E. Using The Concert Performer with Your PersonalComputer
Your personal computer can be used as a MIDI device as well. Inorder to connect your computer to the CP you will need a MIDIinterface. Check with your local music store or computer dealerfor more information about particular models of these interfacedevices. Once you have your computer connected to your ConcertPerformer, you can think of it as a powerful extension of the CP’sown music processing abilities. There are hundreds of softwareprograms available that you can use to do everything from learnthe basics of piano playing, to creating film scores for your homemovies, to composing the next great digital symphony.
If you don’t wish to purchase a MIDI interface device for yourcomputer, the Concert Performer has a special type of interfacebuilt in to it that may make the connection easier. The CP can beconnected directly to the back of your computer via a USB cable.
In order for the CP and your computer to properly communicateover this USB cable, you first need to set the MIDI-USB switchlocated next to the MIDI jacks to USB. Also your computer musthave a USB driver installed. Please read the instruction on thenext page for the details about the USB driver.
Sound Module
PersonalComputer

Kawai Concert Performer Series Digital PianoP. 200
USB
The Concert Performer can be connected with a personal computer with a USB cable for exchanging MIDI data. You need a USB driverinstalled in your computer.
[For Windows XP/Me users]A standard USB driver is already installed in your computer. You don’t need to install a new driver.
[For Windows 2000/98SE users]You need to install the designated driver in your computer. Visit the KAWAI web site at http://www.kawai.co.jp/english/Download1.html anddownload the program.
[For Macintosh users]Currently we don’t have a USB driver available for Macintosh computers. Please use an appropriate MIDI interface and MIDI cables whenconnecting the Concert Performer to a Macintosh computer.
NOTE:When both MIDI jacks and USB jack are connected, USB has priority.When connecting USB cable to the Concert Performer, first connect the USB cable and then turn the power of the Concert Performer on.It may take some time to startcommunication when the Concert Performer is connected to the computer via USB.When USB communication is unstable with connection via hub, connect the USB cable directly to the USB port of the computer.Turning the power of the Concert Performer on/off or disconnecting the USB cable while the following actions may cause unstablecommunication.
while installing USB driverwhile booting up the computerwhile MIDI application is workingwhile communicating with the computerwhile the computer is in energy saver mode
* If you have any problem with USB communication, consult the instruction manual of your computer and check your computer set up.
* Windows is registerd trademark of Microsoft Corporation.
* Macintosh is registerd trademark of Apple Computer, Inc.

Appendice P. 201
MIDI Data Format
3. Exclusive data
3.1 UNIVERSAL REALTIME SYSTEM EXCLUSIVE MESSAGE
3.1.1 Master VolumeFormat: F0 7f 7f 04 01 <ll> <mm> F7<ll>: VALUE LSB (*round up numbers of five and above and drop anything under five)<mm>: VALUE MSB
00 00 - 7f 7f (- ∞ ~ 0dB) Default = 7fH/7fH
3.1.2 Master Fine TuneFormat: F0 7f 7f 04 03 <ll> <mm> F7<ll>: VALUE LSB<mm>: VALUE MSB
00 00 - 40 00 - 7f 7f (-100cent ~ 0 ~ +100cent) Default = 40H/00H*transmitting by Tuning setting: 1e/62 - 40/00 - 60/21 (427.0Hz - 440.0Hz - 453.0Hz )
3.1.3 Master Coarse TuneFormat: F0 7f 7f 04 04 00 <mm> F7<mm>: VALUE
28H - 40H - 58H (-24semitone ~ 0 ~ +24semitone) Default = 40H*transmitting by Transpose setting: 34H - 40H - 4CH (-12 ~ 0 ~+12)
3.1.4 Grobal Parameter Contorl3.1.4.1: Reverb
Format: F0 7f 7f 04 05 01 01 01 01 01 [pp vv] ••• F7[pp vv]: pp vva: Reverb Type Default = 4
00H 0 = Small Room,1 = Medium Room, 2 = Large Room, 3 = Medium Hall,4 = Large Hall, 5 or 8 = Plate*transmitting by Reverb Type Select
b: Reverb Time01H 0 - 64 - 127 (0.36 ~ 1.8 ~ 9 sec) Default = (Preset value)
3.1.4.2: ChorusFormat: F0 7f 7f 04 05 01 01 01 01 02 [pp vv] ••• F7[pp vv]: pp vva: Chorus Type Default = 2
00H 0 = Chorus1, 1 = Chorus2, 2 = Chorus3, 3 = Chorus4, 4 = FB chorus, 5 = Flanger*transmitting by Chorus Type Select
b: Chorus Rate01H 0 - 127 (0 ~ 15.5Hz) Default = (Preset value)
c: Chorus depth02H 0 - 127 (0.31 ~ 40 msec p-p) Default = (Preset value)
d: Feedback03H 0 - 127 (0 ~ 97%) Default = (Preset value)
e: Chorus Send to Reverb04H 0 - 127 (0 ~ 100%) Default = (Preset value)

Kawai Concert Performer Series Digital PianoP. 202
3.1.5 Controller Destination Setting
3.1.5.1: Channel Pressure (After Touch)
Format: F0 7f 7f 09 01 <ch> [pp vv] ••• F7
<ch>: 0H-fH (ch.1 - ch.16)
[pp vv]: pp vv
a: Pitch
00H 28H - 40H - 4CH (-24 semitone ~ 0 ~ +12 semitone) Default = 40H
b: Cutoff
01H 0 - 64 - 127 (-9600 cent ~ 0 ~ +9450 cent) Default = 40H
c: Level
02H 0 - 64 - 127 (-100% ~ 0 ~ +100%) Default = 40H
d: Viblato Depth
03H 0 - 127 (0 cent ~ 600 cent) Default = 00H
e:Growl Depth
04H 0 - 127 (0 cent ~ 1200 cent) Default = 00H
f: Tremolo Depth
05H 0 - 127 (0% ~ 100%) Default = 00H
3.1.5.2: Controller (Control Change)
Format: F0 7f 7f 09 03 <ch> <cc> [pp vv] ••• F7
<ch>: 0H-fH (ch.1 - ch.16)
<cc>: controller number (0-5fH) Default = 10H
[pp vv]: pp vv
a: Pitch
00H 28H - 40H - 4CH (-24 semitone ~ 0 ~ +12 semitone) Default = 40H
b: Cutoff
01H 0 - 64 - 127 (-9600 cent ~ 0 ~ +9450 cent) Default = 40H
c: Level
02H 0 - 64 - 127 (-100% ~ 0 ~ +100%) Default = 40H
d: Vibrato Depth
03H 0 - 127 (0 cent ~ 600 cent) Default = 00H
e:Growl Depth
04H 0 - 127 (0 cent ~ 1200 cent) Default = 00H
f: Tremolo Depth
05H 0 - 127 (0% ~ 100%) Default = 00H

Appendice P. 203
3.1.6 Key-Based Instrument Controllers
Format: F0 7f 7f 0a 01 <ch> <kk> [nn vv] ••• F7
<ch>: 0H-fH (ch.1 - ch.16)
<kk>: key number (00H - 7fH)
[nn vv]: nn vv
a:Volume
07H 0 - 64 - 127 (-100% ~ 0 ~ +100%) Default = 40H
b:Panpot *absolute
0aH 0 - 64 - 127 (left - Center - right) Default = (Preset value)
c:Reverb Send level *absolute
5bH 0 - 127 (0 ~ Max) Default = (Preset value)
d:Chorus Send level *absolute
5dH 0 - 127 (0 ~ Max) Default = (Preset value)
3.2 UNIVERSAL NON-REALTIME SYSTEM EXCLUSIVE MESSAGE
3.2.1 Scale/Octave Tuning Adjust(non-realtime/1byte format)
Format: F0 7e 7f 08 08 <ff> <gg> <hh> <s1><s2><s3><s4><s5><s6><s7><s8><s9><sa><sb><sc> F7
<ff>: bits 0 to 1 = channel 15 to 16, bit 2 to 6 = reserved for future expansion
<gg>: bits 0 to 6 = channel 8 to 14
<hh>: bits 0 to 6 = channel 1 to 7
<s1>: value of key ”C” 0 - 64 - 127 (-64 cent ~ 0 ~ +63 cent) Default = 40H
<s2>: value of key ”C#” 0 - 64 - 127 (-64 cent ~ 0 ~ +63 cent) Default = 40H
<s3>: value of key ”D” 0 - 64 - 127 (-64 cent ~ 0 ~ +63 cent) Default = 40H
<s4>: value of key ”D#” 0 - 64 - 127 (-64 cent ~ 0 ~ +63 cent) Default = 40H
<s5>: value of key ”E” 0 - 64 - 127 (-64 cent ~ 0 ~ +63 cent) Default = 40H
<s6>: value of key ”F” 0 - 64 - 127 (-64 cent ~ 0 ~ +63 cent) Default = 40H
<s7>: value of key ”F#” 0 - 64 - 127 (-64 cent ~ 0 ~ +63 cent) Default = 40H
<s8>: value of key ”G” 0 - 64 - 127 (-64 cent ~ 0 ~ +63 cent) Default = 40H
<s9>: value of key ”G#” 0 - 64 - 127 (-64 cent ~ 0 ~ +63 cent) Default = 40H
<sa>: value of key ”A” 0 - 64 - 127 (-64 cent ~ 0 ~ +63 cent) Default = 40H
<sb>: value of key ”A#” 0 - 64 - 127 (-64 cent ~ 0 ~ +63 cent) Default = 40H
<sc>: value of key ”B” 0 - 64 - 127 (-64 cent ~ 0 ~ +63 cent) Default = 40H
3.2.2 GM System Messages
3.2.2.1: GM2 System On
Format: F0 7e 7f 09 03 F7
3.2.2.2: GM1 System On
Format: F0 7e 7f 09 01 F7
*transmitting when POWER ON

Kawai Concert Performer Series Digital PianoP. 204
3.3 CP155/175/185/205 EXCLUSIVE MESSAGE
F0H Sys-Ex40H kawai - ID7FH channel (7f: Global)33H function (33: Common Parameter)
ggH group-ID (04: Electronic Piano , 7f: Global) *ignore
mmH machine-ID (06: CPxx5 , 7f: Global) *ignore
llH sub-command<data> data~ <data> ~dataF7h Eox
function sub-command33H 01H Common Function mode133H 03H Common Function mode233H 10H Drum KIT Select for Rhythm Channel
33H 20H Effect Settings33H 21H Tuning33H 30H Sound Control33H 40H Accompaniment Control33H 41H Chord Change33H 42H Acc. Mixer Volume33H 43H Acc. Mixer Reverb Depth
3.3.1.Common Function mode1
Format: F0 40 7F 33 gg mm 03 F7
3.3.2.Drum KIT Select for Rhythm Channel
Format: F0 40 7F 33 gg mm 10 ch tp kk F7
<ch>: 0H-fH (ch.1 - ch.16)<tp>: MACHINE TYPE No, 7F = ignore (not use)
<kk>: Drum KIT No.
3.3.3.Effect Settings3.3.3.1.Panel Effects Settings
Format: F0 40 7F 33 gg mm 20 05 pp vv F7[pp vv]: pp vva: Type
00H Effect Type No.b: Wet-Balance
01H 0 - 7FHc: Parameter1
02H 0 - 7FHd: Parameter2
03H 0 - 7FHe: Send To Reverb
04H 0 - 7FHf: Send To Chorus
05H 0 - 7FHg: MIDI Ch ON/OFF
06H 1xH = ON / 0xH = OFF, x = 0-f (1-16ch)
3.3.4.Stretch Tuning Curve On Off3.3.4.1.Stretch tuning On Off
Format: F0 40 7F 33 gg mm 21 00 ff gg hh nn F7<ff>: channel/options byte 1
bits 0 to 1 = channel 15 to 16bits 2 to 6 = reserved for future expantion
<gg>: channel byte 2 - bits 0 to 6 = channel 8 to 14<hh>: channel byte 3 - bits 0 to 6 = channel 1 to 7<nn>: 0: off 1:on
3.3.4.2.Stretch tuning Part On OffFormat: F0 40 7F 33 gg mm 21 01 ch nn F7<ch>: MIDI ch 0-f (7f = grobal)<nn> 0: off 1: on

Appendice P. 205
3.3.5.Accompaniment Control *SMF save onlyFormat: F0 40 7F 33 gg mm 40 bb cc vv F7<bb>: Beat Bank No. 0-7FH<cc>: Music Style No. 0-7FH<vv>: MSB4bit: VariationNo. / LSB 4bit: PatternNo.PatternNo.0 Intro Start1 Ending Start2 Basic Start3 Fill Start4 Stop / Parameter Off5 Parameter OnVariationNo.PatternNo.0-30-7 Variation 1-8On/Off Parameter0 Stop1 Long Bass2 Fade (ON = FadeIn / OFF = FadeOut)3 Acc. SW4 DrumOnly SW5 Break SW6-7 Undefine
3.3.6.Chord Change Control *SMF save onlyFormat: F0 40 7F 33 gg mm 41 rt tp bs F7<rt>: Chord Root 0-11 (C~B), bit6:Off Detect Flag (1 = Off Detect, 0 = On Detect)<tp>: Chord Type No. 0-63<bs>: Bass Root 0-11 (C~B), 7FH = Bass Off
* ... minorChord Type No. Chord Type No.0 Major 32 71 sus4 33 7 (b5)2 add9 34 7 (#5)3 b5 35 7sus44 aug 36 95 M omit3rd 37 116 *minor 38 137 *madd9 39 9 (13)8 *m (#5) 40 9 (11,13)9 *m omit3rd 41 7 (b9)10 M7 42 7 (#9)11 M7 (#5) 43 7 (#11)12 M7 (b5) 44 7 (b13)13 M9 45 7 (b9,b13)14 M7 (13) 46 7 (#9,b13)15 M9 (13) 47 7 (b9,13)16 M9 (#11) 48 9 (b13)17 M7 (#11,13) 49 7 (#9,13)18 M9 (#11,13) 50 7 (b9,11)19 M (9,#11,13) 51 7 (b9,#11)20 6 52 7 (#9,#11)21 6 (9) 53 9 (#11,13)22 *m7 54 *m7 (b5)23 *m9 55 *m7 (b5,b9)24 *m7 (11) 56 *m7 (b5,11)25 *m9 (11) 57 dim26 *m7 (b13) 58 *dimM727 *m7 (11,b13) 59 *dim (b13)28 *mM7 60 *dim929 *mM9 61 *dim1130 *m6 62 7 (b9,11,13)31 *m6 (9) 63 m7 (b5,9)
3.3.7.ACC Mixer VolumeFormat: F0 40 7F 33 gg mm 42 pt vv F7<pt>: 7FH = master, 0 = drum,1 = bass, 2~5 = chord1~4
<vv>: volume 0-7FH (0-100%)
3.3.8.ACC Mixer Reverb DepthFormat: F0 40 7F 33 gg mm 43 pt vv F7<pt>: 7FH = master<vv>: volume 0-7FH (0-100%)

Appendice P. 206
MIDI Implementation ChartMODEL: Kawai Digital Piano CP205/CP185
DATE: APRIL 2003VERSION 1.0
Function Transmitted*1 Recognized RemarksBasic Default 1 1-16Channel Changed 1-16 1-16Mode Default Mode 3 Mode 3
Messagees X Mode 3, 4Altered *****
Note 36-96 0-127Number True voice ***** 0-127Velocity Note ON O O
Note OFF X XAfter Key's X XTouch Ch's X OPitch Bend O*2 O
0, 32 O O Bank Select1 O*3 O Modulation5 O O Portamento Time
Control 6, 38 O O Data EntryChange 7 O O Volume
10 O O Panpot11 O O Expression64 O O Damper (Hold 1)65 O O Portament On/Off66 O O Sostenuto67 O O Soft69 O*4 O Hold 270 O O Sustain Level71 X O Resonance72 O O Release Time73 O O Attack Time74 O O Cutoff75 O O Decay Time76 X O Vibrato Speed77 O O Vibrato Depth78 X O Vibrato Delay84 O O Portamento Control91 O O Reverb Send Level93 O O Chorus Send Level
0-95*5 X O General Controller98, 99 X O NRPN LSB, MSB
100, 101 O O RPN LSB, MSBProgram O O *6 Program NumberChange True # 0-127*6 1-128System Exclusive O O
: Song pos X XCommon : Song sel X X
: Tune X XSystem : Clock O OReal Time : Commands O O
: All Sound OFF X O (120): Reset All Controller X O (121)
Aux : Local ON/OFF X XMessages : All Note OFF X O (123)
: Active Sense O O: Reset X X
Notes *1 NOT sequencer mode*2 Glide Pedal*3 Modulation Pedal*4 Left Hand Hold Pedal*5 Possible to Select (default = 16)
Mode 1: OMNI ON, POLY Mode 2: OMNI ON, MONO O: YesMode 3: OMNI OFF, POLY Mode 4: OMNI OFF, MONO X: No
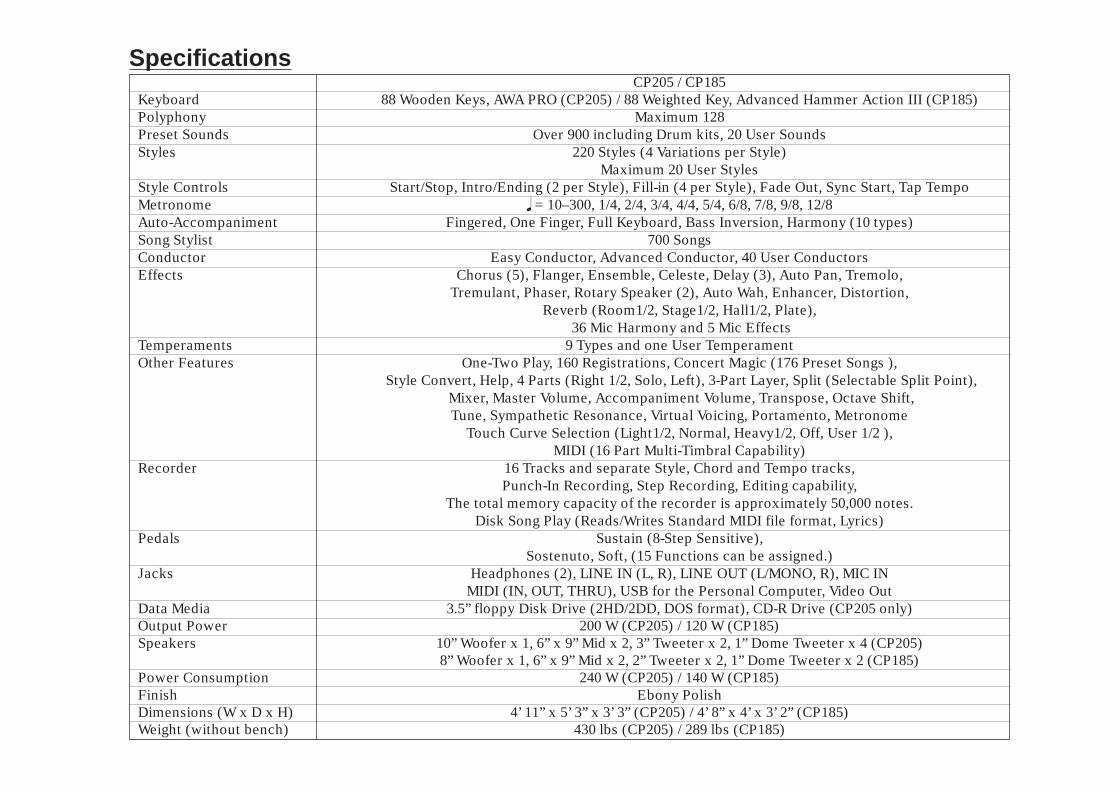
SpecificationsCP205 / CP185
Keyboard 88 Wooden Keys, AWA PRO (CP205) / 88 Weighted Key, Advanced Hammer Action III (CP185)Polyphony Maximum 128Preset Sounds Over 900 including Drum kits, 20 User SoundsStyles 220 Styles (4 Variations per Style)
Maximum 20 User StylesStyle Controls Start/Stop, Intro/Ending (2 per Style), Fill-in (4 per Style), Fade Out, Sync Start, Tap TempoMetronome q = 10–300, 1/4, 2/4, 3/4, 4/4, 5/4, 6/8, 7/8, 9/8, 12/8Auto-Accompaniment Fingered, One Finger, Full Keyboard, Bass Inversion, Harmony (10 types)Song Stylist 700 SongsConductor Easy Conductor, Advanced Conductor, 40 User ConductorsEffects Chorus (5), Flanger, Ensemble, Celeste, Delay (3), Auto Pan, Tremolo,
Tremulant, Phaser, Rotary Speaker (2), Auto Wah, Enhancer, Distortion,Reverb (Room1/2, Stage1/2, Hall1/2, Plate),
36 Mic Harmony and 5 Mic EffectsTemperaments 9 Types and one User TemperamentOther Features One-Two Play, 160 Registrations, Concert Magic (176 Preset Songs ),
Style Convert, Help, 4 Parts (Right 1/2, Solo, Left), 3-Part Layer, Split (Selectable Split Point), Mixer, Master Volume, Accompaniment Volume, Transpose, Octave Shift,Tune, Sympathetic Resonance, Virtual Voicing, Portamento, Metronome
Touch Curve Selection (Light1/2, Normal, Heavy1/2, Off, User 1/2 ),MIDI (16 Part Multi-Timbral Capability)
Recorder 16 Tracks and separate Style, Chord and Tempo tracks,Punch-In Recording, Step Recording, Editing capability,
The total memory capacity of the recorder is approximately 50,000 notes.Disk Song Play (Reads/Writes Standard MIDI file format, Lyrics)
Pedals Sustain (8-Step Sensitive),Sostenuto, Soft, (15 Functions can be assigned.)
Jacks Headphones (2), LINE IN (L, R), LINE OUT (L/MONO, R), MIC INMIDI (IN, OUT, THRU), USB for the Personal Computer, Video Out
Data Media 3.5” floppy Disk Drive (2HD/2DD, DOS format), CD-R Drive (CP205 only)Output Power 200 W (CP205) / 120 W (CP185)Speakers 10” Woofer x 1, 6” x 9” Mid x 2, 3” Tweeter x 2, 1” Dome Tweeter x 4 (CP205)
8” Woofer x 1, 6” x 9” Mid x 2, 2” Tweeter x 2, 1” Dome Tweeter x 2 (CP185)Power Consumption 240 W (CP205) / 140 W (CP185)Finish Ebony PolishDimensions (W x D x H) 4’ 11” x 5’ 3” x 3’ 3” (CP205) / 4’ 8” x 4’ x 3’ 2” (CP185)Weight (without bench) 430 lbs (CP205) / 289 lbs (CP185)

Concert Performer Series Digital PianoOW969E-T 0305Printed in Japan