Embed Size (px)
Citation preview

P/NO : MFL67204967
HT806PH (HT806PH, SH86TH-S/ C, SH86SH-S, SH95TA-W)
Please read this manual carefully before operating your set and retain it for future reference.
OWNER’S MANUAL
DVD Home Theater System
ENG
LISHPORTUGUÊS
FRANÇAISالعربية
HT806PH-A0_BNGAFLK_ENG_4967.indd 1 2011-06-03 �� 10:36:10

1 GettingStarted
Getting Started2
Getting S
tarted
1
Safety Information
CAUTIONRISK OF ELECTRIC SHOCK
DO NOT OPEN
CAUTION:TOREDUCETHERISKOFELECTRICSHOCKDONOTREMOVECOVER(ORBACK)NO
USER-SERVICEABLEPARTSINSIDEREFERSERVICINGTOQUALIFIEDSERVICEPERSONNEL.
Thislightningflashwitharrowheadsymbolwithinanequilateraltriangleisintendedtoalerttheusertothepresenceofuninsulateddangerousvoltagewithintheproduct’senclosurethatmaybeofsufficientmagnitudetoconstituteariskofelectricshocktopersons.
Theexclamationpointwithinanequilateraltriangleisintendedtoalerttheusertothepresenceofimportantoperatingandmaintenance(servicing)instructionsintheliteratureaccompanyingtheproduct.
WARNING:TOPREVENTFIREORELECTRICSHOCKHAZARD,DONOTEXPOSETHISPRODUCTTORAINORMOISTURE.
WARNING:Donotinstallthisequipmentinaconfinedspacesuchasabookcaseorsimilarunit.
CAUTION:Donotblockanyventilationopenings.Installinaccordancewiththemanufacturer’sinstructions.Slotsandopeningsinthecabinetareprovidedforventilationandtoensurereliableoperationoftheproductandtoprotectitfromoverheating.Theopeningsshallbeneverbeblockedbyplacingtheproductonabed,sofa,rugorothersimilarsurface.Thisproductshallnotbeplacedinabuilt-ininstallationsuchasabookcaseorrackunlessproperventilationisprovidedorthemanufacturer’sinstructionhasbeenadheredto.
CAUTION:ThisproductemploysaLaserSystem.Toensureproperuseofthisproduct,pleasereadthisowner’smanualcarefullyandretainitforfuturereference.Shalltheunitrequiremaintenance,contactanauthorizedservicecenter.Useofcontrols,adjustmentsortheperformanceofproceduresotherthanthosespecifiedhereinmayresultinhazardousradiationexposure.Topreventdirectexposuretolaserbeam,donottrytoopentheenclosure.Visiblelaserradiationwhenopen.DONOTSTAREINTOBEAM.
CAUTION concerning the Power Cord
Mostappliancesrecommendtheybeplaceduponadedicatedcircuit;
Thatis,asingleoutletcircuitwhichpowersonlythatapplianceandhasnoadditionaloutletsorbranchcircuits.Checkthespecificationpageofthisowner’smanualtobecertain.Donotoverloadwalloutlets.Overloadedwalloutlets,looseordamagedwalloutlets,extensioncords,frayedpowercords,ordamagedorcrackedwireinsulationaredangerous.Anyoftheseconditionscouldresultinelectricshockorfire.Periodicallyexaminethecordofyourappliance,andifitsappearanceindicatesdamageordeterioration,unplugit,discontinueuseoftheappliance,andhavethecordreplacedwithanexactreplacementpartbyanauthorizedservicecenter.Protectthepowercordfromphysicalormechanicalabuse,suchasbeingtwisted,kinked,pinched,closedinadoor,orwalkedupon.Payparticularattentiontoplugs,walloutlets,andthepointwherethecordexitstheappliance.Todisconnectpowerfromthemains,pulloutthemainscordplug.Wheninstallingtheproduct,ensurethattheplugiseasilyaccessible.
HT806PH-A0_BNGAFLK_ENG_4967.indd 2 2011-06-03 �� 10:36:10
Getting Started 3G
etting Started
1
Thisdeviceisequippedwithaportablebatteryoraccumulator.
Safety way to remove the battery or the battery from the equipment: Removetheoldbatteryorbatterypack,followthestepsinreverseorderthantheassembly.Topreventcontaminationoftheenvironmentandbringonpossiblethreattohumanandanimalhealth,theoldbatteryorthebatteryputitintheappropriatecontaineratdesignatedcollectionpoints.Donotdisposeofbatteriesorbatterytogetherwithotherwaste.Itisrecommendedthatyouuselocal,freereimbursementsystemsbatteriesandaccumulators.Thebatteryshallnotbeexposedtoexcessiveheatsuchassunshine,fireorthelike.
CAUTION:Theapparatusshallnotbeexposedtowater(drippingorsplashing)andnoobjectsfilledwithliquids,suchasvases,shallbeplacedontheapparatus.
CopyrightsItisforbiddenbylawtocopy,broadcast,show,broadcastviacable,playinpublic,orrentcopyrightedmaterialwithoutpermission.ThisproductfeaturesthecopyprotectionfunctiondevelopedbyMacrovision.Copyprotectionsignalsarerecordedonsomediscs.Whenrecordingandplayingthepicturesofthesediscspicturenoisewillappear.ThisproductincorporatescopyrightprotectiontechnologythatisprotectedbyU.S.patentsandotherintellectualpropertyrights.UseofthiscopyrightprotectiontechnologymustbeauthorizedbyMacrovision,andisintendedforhomeandotherlimitedviewingusesonlyunlessotherwiseauthorizedbyMacrovision.Reverseengineeringordisassemblyisprohibited.
CONSUMERSSHOULDNOTETHATNOTALLHIGHDEFINITIONTELEVISIONSETSAREFULLYCOMPATIBLEWITHTHISPRODUCTANDMAYCAUSEARTIFACTSTOBEDISPLAYEDINTHEPICTURE.INCASEOF525OR625PROGRESSIVESCANPICTUREPROBLEMS,ITISRECOMMENDEDTHATTHEUSERSWITCHTHECONNECTIONTOTHE‘STANDARDDEFINITION’OUTPUT.IFTHEREAREQUESTIONSREGARDINGOURTVSETCOMPATIBILITYWITHTHISMODEL525pAND625pUNIT,PLEASECONTACTOURCUSTOMERSERVICECENTER.
Youhavetosetthediscformatoptionto[Mastered]inordertomakethediscscompatiblewiththeLGplayerswhenformattingrewritablediscs.WhensettingtheoptiontoLiveFileSystem,youcannotuseitonLGplayers.
(Mastered/LiveFileSystem:DiscformatsystemforWindowsVista)
POWER:Thisunitoperatesonamainssupplyof200-240V~,50/60Hz.WIRING:ThisunitissuppliedwithaBSI1363ap-proved13ampmainsplug,fusedat5amp.Whenreplacingthefusealwaysusea5ampBS1362,BSIorASTAapprovedtype.Neverusethisplugwiththefusecoveromitted.Toobtainareplacementfusecovercontactyourdealer.Ifthetypeofplugsuppliedisnotsuitableforthemainssocketsinyourhome,thentheplugshouldberemovedandasuitabletypefitted.Pleaserefertothewiringinstructionsbelow:WIRING:Amainsplugremovedfromthemainsleadofthisunitmustbedestroyed.Amainsplugwithbaredwiresishazardousifinsertedinamainssocket.Donotconnecteitherwiretotheearthpin,markedwiththeletterEorwiththeearthsymbol orcolouredgreenorgreenandyellow.Ifanyotherplugisfitted,usea5ampfuse,eitherintheplug,oratthedistributionboard.IMPORTANT:Thewiresinthismainsleadarecolouredinaccordancewiththefollowingcodes:- BLUE: NEUTRAL, BROWN: LIVE -Asthecoloursofthewiresinthemainsleadofthisunitmaynotcorrespondwiththecolouredmarkingidentifyingtheterminalsinyourplug,proceedasfollows:ThewirewhichiscolouredbluemustbeconnectedtotheterminalwhichismarkedwiththeletterNorcolouredblack.Thewirewhichiscolouredbrownmustbecon-nectedtotheterminalwhichismarkedwiththeletterLorcolouredred.
In NIGERIA
HT806PH-A0_BNGAFLK_ENG_4967.indd 3 2011-06-03 �� 10:36:10

Table of Contents4
Table of Contents
1 Getting Started2 Safety Information6 Unique Features6 – Portable In6 – USB Direct Recording6 – Full HD up-scaling6 – Home Theater Speaker ez Setup6 Accessories7 Introduction7 – Playable Discs7 – About the “&” Symbol Display7 – Symbols Used in this Manual7 – Regional Codes8 Playable file Requirement9 Remote control10 Front panel11 Rear panel
2 Connecting12 Assembling the speaker stand to the
speaker13 Attaching the speakers to the unit14 Positioning the system15 Connections to Your TV15 – Component Video Connection16 – HDMI Out Connection17 – Video Connection18 – Resolution Setting18 Video Output Resolution19 Optional Equipment Connection19 – AUX In Connection19 – AUDIO (PORT. IN) In Connection19 – Listening to music from your portable
player or external device20 – USB Connection21 – OPTICAL In connection21 – Home theater speaker ez setup21 Antenna Connection
3 System Setting22 Adjust the setup settings22 – OSD Initial language settings -
Optional22 – To display and exit the Setup menu23 – Language23 – Display24 – Audio25 – Lock (Parental Control)26 – Others
4 Operating27 Using the Home Menu27 Basic Operations28 Other Operations28 – Displaying Disc Information on-screen29 – To display the DVD Menu29 – To display the DVD title29 – 1.5 times speed playback29 – Screen Saver29 – Starting play from selected time29 – Resume playback29 – Changing subtitle code page30 – Marked Playback31 – Viewing a PHOTO file32 – Sleep Timer Setting32 – Dimmer32 – Turn off the sound temporarily32 – Last Scene Memory32 – System Select - Optional32 – Adjust the speaker level settings33 Radio Operations33 – Listening to the radio33 – Presetting the Radio Stations33 – Deleting all the saved stations33 – Deleting a saved station33 – Improving poor FM reception34 Sound adjustment34 – Setting the surround mode35 Advanced Operations35 – Recording to USB
5 Troubleshooting36 Troubleshooting
HT806PH-A0_BNGAFLK_ENG_4967.indd 4 2011-06-03 �� 10:36:10
Table of Contents 5
1
2
3
4
5
6
6 Appendix37 Maintenance37 – Handling the Unit37 – Notes on Discs38 Area Code List39 Language code List40 Trademarks and Licenses41 Specifications
HT806PH-A0_BNGAFLK_ENG_4967.indd 5 2011-06-03 �� 10:36:10
Getting Started6
Getting S
tarted
1
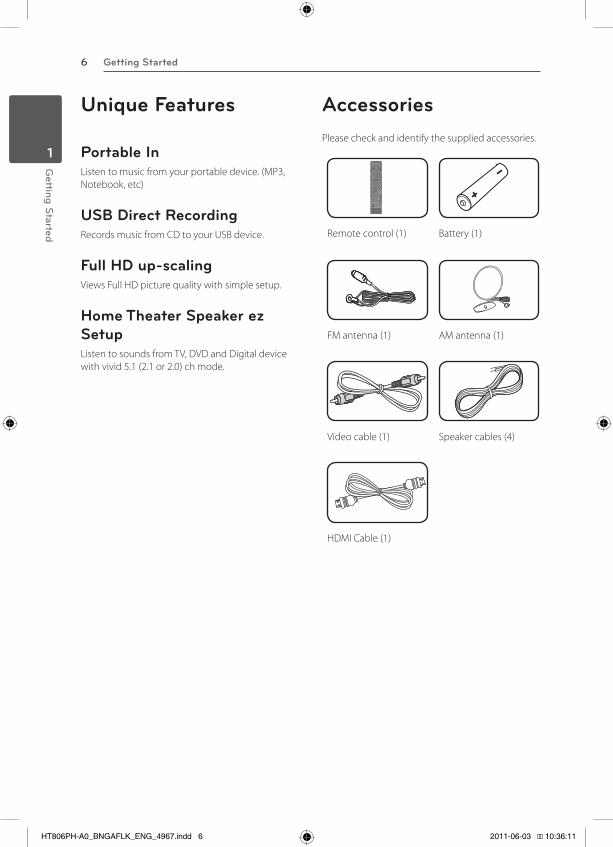
Unique Features
Portable InListentomusicfromyourportabledevice.(MP3,Notebook,etc)
USB Direct RecordingRecordsmusicfromCDtoyourUSBdevice.
Full HD up-scalingViewsFullHDpicturequalitywithsimplesetup.
Home Theater Speaker ez SetupListentosoundsfromTV,DVDandDigitaldevicewithvivid5.1(2.1or2.0)chmode.
AccessoriesPleasecheckandidentifythesuppliedaccessories.
Remotecontrol(1) Battery(1)
FMantenna(1) AMantenna(1)
Videocable(1) Speakercables(4)
HDMICable(1)
HT806PH-A0_BNGAFLK_ENG_4967.indd 6 2011-06-03 �� 10:36:11
Getting Started 7G
etting Started
1
Introduction
Playable DiscsThisunitplaysDVD±R/RWandCD-R/RWthatcontainsaudiotitles,DivX,MP3,WMAand/orJPEGfiles.SomeDVD±RW/DVD±RorCD-RW/CD-Rcannotbeplayedonthisunitduetotherecordingqualityorphysicalconditionofthedisc,orthecharacteristicsoftherecordingdeviceandauthoringsoftware.
DVD-VIDEO(8cm/12cmdisc)
Discssuchasmoviesthatcanbepurchasedorrented.
DVD±R(8cm/12cmdisc)
Videomodeandfinalizedonly.
DVD-RW(8cm/12cmdisc)
Videomodeandfinalizedonly.
DVD+R:Videomodeonly
Supportsthedoublelayerdiscalso.
DVD+RW(8cm/12cmdisc)
Videomodeandfinalizedonly.
AudioCD:MusicCDsorCD-R/CD-RWinmusicCDformatthatcanbepurchased.
About the “&” Symbol Display“&”mayappearonyourTVdisplayduringoperationandindicatesthatthefunctionexplainedinthisowner’smanualisnotavailableonthatspecificmedia.
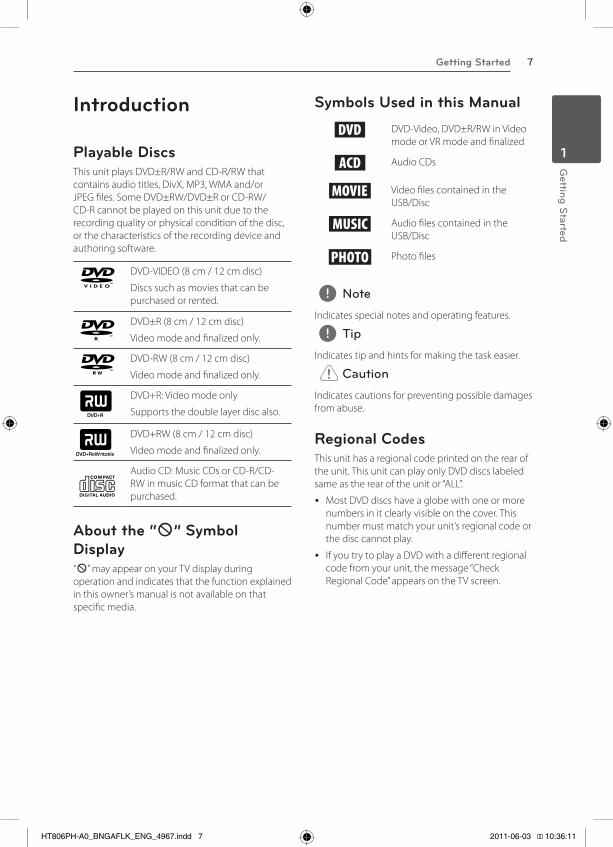
Symbols Used in this Manual
r DVD-Video,DVD±R/RWinVideomodeorVRmodeandfinalized
t AudioCDs
y VideofilescontainedintheUSB/Disc
u AudiofilescontainedintheUSB/Disc
i Photofiles
,, Note
Indicatesspecialnotesandoperatingfeatures.
,, Tip
Indicatestipandhintsformakingthetaskeasier.
,>Caution
Indicatescautionsforpreventingpossibledamagesfromabuse.
Regional CodesThisunithasaregionalcodeprintedontherearoftheunit.ThisunitcanplayonlyDVDdiscslabeledsameastherearoftheunitor“ALL”.
y MostDVDdiscshaveaglobewithoneormorenumbersinitclearlyvisibleonthecover.Thisnumbermustmatchyourunit’sregionalcodeorthedisccannotplay.
y IfyoutrytoplayaDVDwithadifferentregionalcodefromyourunit,themessage“CheckRegionalCode”appearsontheTVscreen.
HT806PH-A0_BNGAFLK_ENG_4967.indd 7 2011-06-03 �� 10:36:11
Getting Started8
Getting S
tarted
1
Playable file Requirement
MP3/ WMA music file requirementMP3/WMAfilecompatibilitywiththisunitislimitedasfollows:
y Samplingfrequency:within32to48kHz(MP3),within32to48kHz(WMA)
y Bitrate:within32to320kbps(MP3),40to192kbps(WMA)
y SupportVersion:v2,v7,v8,v9
y Maximumfiles:Under999
y Fileextensions:“.mp3”/“.wma”
y CD-ROMfileformat:ISO9660/JOLIET
y WerecommendthatyouuseEasy-CDCreator,whichcreatesanISO9660filesystem.
Photo file requirementPhotofilecompatibilitywiththisunitislimitedasfollows:
y Maxpixelinwidth:2760x2048pixel
y Maximumfiles:Under999
y Somediscsmaynotoperateduetoadifferentrecordingformatortheconditionofdisc.
y Fileextensions:“.jpg”
y CD-ROMfileformat:ISO9660/JOLIET
DivX file requirementDivXfilecompatibilitywiththisunitislimitedasfollows:
y Availableresolution:within720x576(WxH)pixels.
y ThefilenameoftheDivXsubtitleshouldbeenteredwithin45characters.
y IfthereisimpossiblecodetoexpressintheDivXfile,itmaybedisplayedas“_“markonthedisplay.
y Framerate:lessthan30fps.
y Ifthevideoandaudiostructureofrecordedfilesisnotinterleaved,eithervideooraudioisoutputted.
y PlayableDivXfile:“.avi”,“.mpg”,“.mpeg”,“.divx”
y PlayableSubtitleformat:SubRip(*.srt/*.txt),SAMI(*.smi),SubStationAlpha(*.ssa/*.txt),MicroDVD(*.sub/*.txt),SubViewer2.0(*.sub/*.txt),Vobsub(*.sub)
y PlayableCodecformat:“DIVX3.xx”,“DIVX4.xx”,“DIVX5.xx”,“MP4V3”,“3IVX”.
y PlayableAudioformat:“AC3”,“PCM”,“MP3”,“WMA”.
y Samplingfrequency:within32to48kHz(MP3),within32to48kHz(WMA)
y Bitrate:within32to320kbps(MP3),40to192kbps(WMA)
y ForDiscsformattedinLivefilesystem,youcannotitonthisunit.
y Ifthenameofmoviefileisdifferentfromthatofthesubtitlefile,duringplaybackofaDivXfile,subtitlemaynotbedisplay.
y IfyouplayaDivXfiledifferfromDivXspec,itmaynotoperatenormally.
HT806PH-A0_BNGAFLK_ENG_4967.indd 8 2011-06-03 �� 10:36:11
Getting Started 9G
etting Started
1
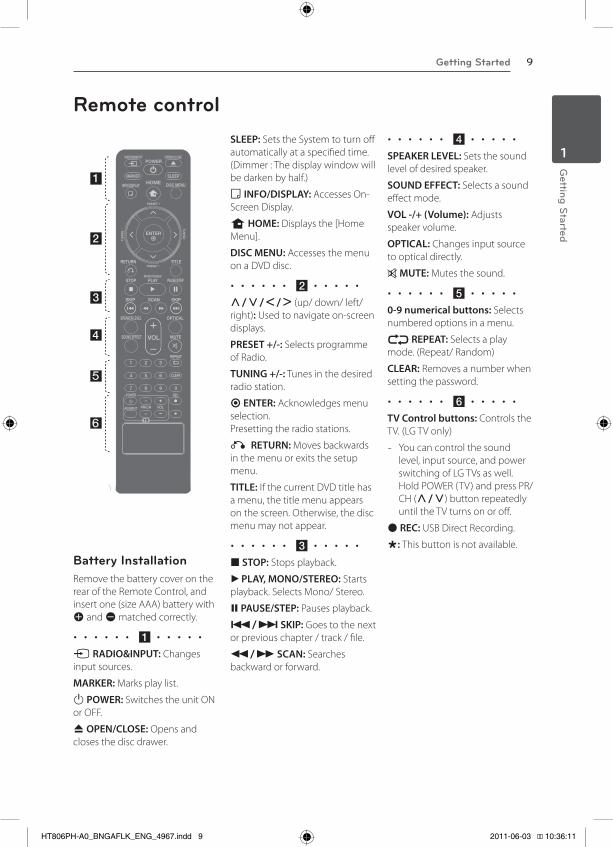
Battery InstallationRemovethebatterycoverontherearoftheRemoteControl,andinsertone(sizeAAA)batterywith4and5matchedcorrectly.
• • • • • • a • • • • •
PRADIO&INPUT:Changesinputsources.
MARKER:Marksplaylist.
1 POWER: SwitchestheunitONorOFF.
B OPEN/CLOSE:Opensandclosesthediscdrawer.
SLEEP:SetstheSystemtoturnoffautomaticallyataspecifiedtime.(Dimmer:Thedisplaywindowwillbedarkenbyhalf.)
m INFO/DISPLAY: AccessesOn-ScreenDisplay.
n HOME:Displaysthe[HomeMenu].
DISC MENU:AccessesthemenuonaDVDdisc.
• • • • • • b • • • • •
W/S/A/D (up/down/left/right):Usedtonavigateon-screendisplays.
PRESET +/-:SelectsprogrammeofRadio.
TUNING +/-:Tunesinthedesiredradiostation.
b ENTER:Acknowledgesmenuselection.Presettingtheradiostations.
x,RETURN: Movesbackwardsinthemenuorexitsthesetupmenu.
TITLE:IfthecurrentDVDtitlehasamenu,thetitlemenuappearsonthescreen.Otherwise,thediscmenumaynotappear.
• • • • • • c • • • • •
Z STOP:Stopsplayback.
d PLAY, MONO/STEREO:Startsplayback.SelectsMono/Stereo.
M PAUSE/STEP:Pausesplayback.
C/V SKIP:Goestothenextorpreviouschapter/track/file.
c/v SCAN:Searchesbackwardorforward.
• • • • • • d • • • • •
SPEAKER LEVEL: Setsthesoundlevelofdesiredspeaker.
SOUND EFFECT:Selectsasoundeffectmode.
VOL -/+ (Volume):Adjustsspeakervolume.
OPTICAL:Changesinputsourcetoopticaldirectly.
MUTE:Mutesthesound.
• • • • • • e • • • • •
0-9 numerical buttons:Selectsnumberedoptionsinamenu.
h REPEAT:Selectsaplaymode.(Repeat/Random)
CLEAR:Removesanumberwhensettingthepassword.
• • • • • • f • • • • •
TV Control buttons: ControlstheTV.(LGTVonly)
- Youcancontrolthesoundlevel,inputsource,andpowerswitchingofLGTVsaswell.HoldPOWER(TV)andpressPR/CH(W/S)buttonrepeatedlyuntiltheTVturnsonoroff.
X REC:USBDirectRecording.
?: Thisbuttonisnotavailable.
Remote control
HT806PH-A0_BNGAFLK_ENG_4967.indd 9 2011-06-03 �� 10:36:11
Getting Started10
Getting S
tarted
1
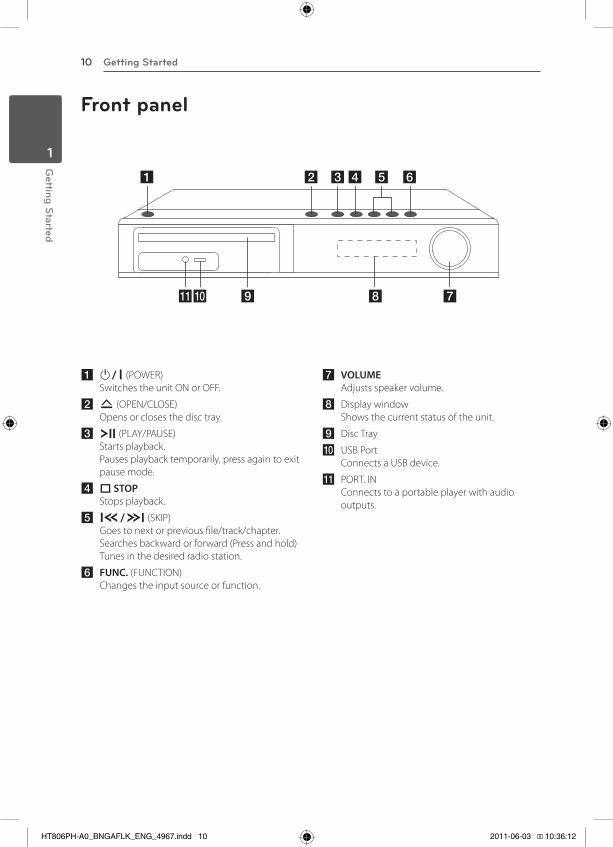
Front panel
a b cd e f
kj i h g
a 1/! (POWER)SwitchestheunitONorOFF.
b R(OPEN/CLOSE)Opensorclosesthedisctray.
c T (PLAY/PAUSE)Startsplayback.Pausesplaybacktemporarily,pressagaintoexitpausemode.
d I STOPStopsplayback.
e Y/U(SKIP)Goestonextorpreviousfile/track/chapter.Searchesbackwardorforward(Pressandhold)Tunesinthedesiredradiostation.
f FUNC.(FUNCTION)Changestheinputsourceorfunction.
g VOLUMEAdjustsspeakervolume.
h DisplaywindowShowsthecurrentstatusoftheunit.
i DiscTray
j USBPortConnectsaUSBdevice.
k PORT.INConnectstoaportableplayerwithaudiooutputs.
HT806PH-A0_BNGAFLK_ENG_4967.indd 10 2011-06-03 �� 10:36:12

Getting Started 11G
etting Started
1
a Powercord
b SpeakersconnectorsConnectsthespeakercables.
c CoolingFan
d AntennaConnectorFM-ConnectstheFMwiredantennaAM-ConnectstheAMloopantenna
e VIDEOOUTConnectstoaTVwithvideoinputs.
f HDMIOUTConnectstoTVwithHDMIinputs.(Interfacefordigitalaudioandvideo)
g OPTICALINConnectstoopticalaudioequipment.
h COMPONENTVIDEO(YPBPR)OUTPUT(PROGRESSIVESCAN)ConnectstoaTVwithYPBPRinputs.
i AUX(L/R)INPUTConnectstoanexternalsourcewith2channelaudiooutputs.
Rear panel
a b c d e
ihg f
HT806PH-A0_BNGAFLK_ENG_4967.indd 11 2011-06-03 �� 10:36:12

2 Connecting
12
Connecting
2
Connecting
Assembling the speaker stand to the speaker
Beforeconnectingthespeakers,assemblethespeakers.Pleasechecktheitemsforassemblingthespeakers.
Preparation
Speaker
Stand
Attachthespeakerstothespeakerstandsbyrotatingthescrews.
HT806PH-A0_BNGAFLK_ENG_4967.indd 12 2011-06-03 �� 10:36:12
Connecting 13C
onnecting
2
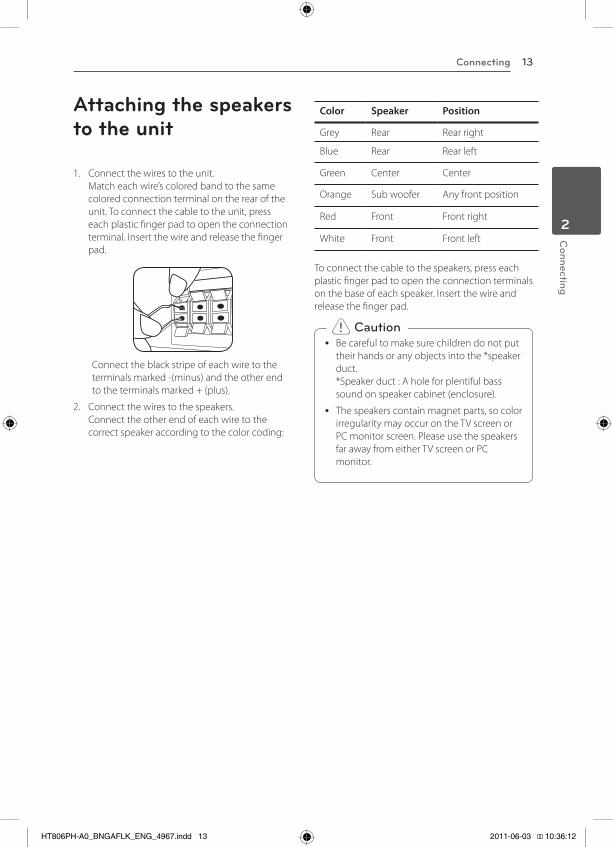
Attaching the speakers to the unit
1. Connectthewirestotheunit.Matcheachwire’scoloredbandtothesamecoloredconnectionterminalontherearoftheunit.Toconnectthecabletotheunit,presseachplasticfingerpadtoopentheconnectionterminal.Insertthewireandreleasethefingerpad.
Connecttheblackstripeofeachwiretotheterminalsmarked-(minus)andtheotherendtotheterminalsmarked+(plus).
2. Connectthewirestothespeakers.Connecttheotherendofeachwiretothecorrectspeakeraccordingtothecolorcoding:
Color Speaker Position
Grey Rear Rearright
Blue Rear Rearleft
Green Center Center
Orange Subwoofer Anyfrontposition
Red Front Frontright
White Front Frontleft
Toconnectthecabletothespeakers,presseachplasticfingerpadtoopentheconnectionterminalsonthebaseofeachspeaker.Insertthewireandreleasethefingerpad.
y Becarefultomakesurechildrendonotputtheirhandsoranyobjectsintothe*speakerduct.*Speakerduct:Aholeforplentifulbasssoundonspeakercabinet(enclosure).
y Thespeakerscontainmagnetparts,socolorirregularitymayoccurontheTVscreenorPCmonitorscreen.PleaseusethespeakersfarawayfromeitherTVscreenorPCmonitor.
,>Caution
HT806PH-A0_BNGAFLK_ENG_4967.indd 13 2011-06-03 �� 10:36:12

Connecting14
Connecting
2
Positioning the systemThefollowingillustrationshowsanexampleofpositioningthesystem.Notethattheillustrationsintheseinstructionsdifferfromtheactualunitforexplanationpurposes.
Forthebestpossiblesurroundsound,allthespeakersotherthanthesubwoofershouldbeplacedatthesamedistancefromthelistening
position( ).
A
B
D
D
E
E
F
F
AA A
A
A
G
G
C
CA BA
Frontleftspeaker(L)/ Frontrightspeaker(R):Placethefrontspeakerstothesidesofthemonitororscreenandasflushwiththescreensurfaceaspossible.
Centerspeaker:Placethecenterspeakeraboveorbelowthemonitororscreen.
Surroundleftspeaker(L)/ Surroundrightspeaker(R):Placethesespeakersbehindyourlisteningposition,facingslightlyinwards.
Subwoofer:Thepositionofthesubwooferisnotsocritical,becauselowbasssoundsarenothighlydirectional.Butitisbettertoplacethesubwoofernearthefrontspeakers.Turnitslightlytowardthecenteroftheroomtoreducethewallreflections.
Unit
HT806PH-A0_BNGAFLK_ENG_4967.indd 14 2011-06-03 �� 10:36:13
Connecting 15C
onnecting
2
Connections to Your TVMakeoneofthefollowingconnections,dependingonthecapabilitiesofyourexistingequipment.
y DependingonyourTVandotherequipmentyouwishtoconnect,therearevariouswaysyoucouldconnecttheplayer.Useonlyoneoftheconnectionsdescribedinthismanual.
y PleaserefertothemanualsofyourTV,StereoSystemorotherdevicesasnecessarytomakethebestconnections.
,, Note
y MakesuretheunitisconnecteddirectlytotheTV.TunetheTVtothecorrectvideoinputchannel.
y DonotconnectyourplayerviayourVCR.Theimagecouldbedistortedbythecopyprotectionsystem.
,>Caution
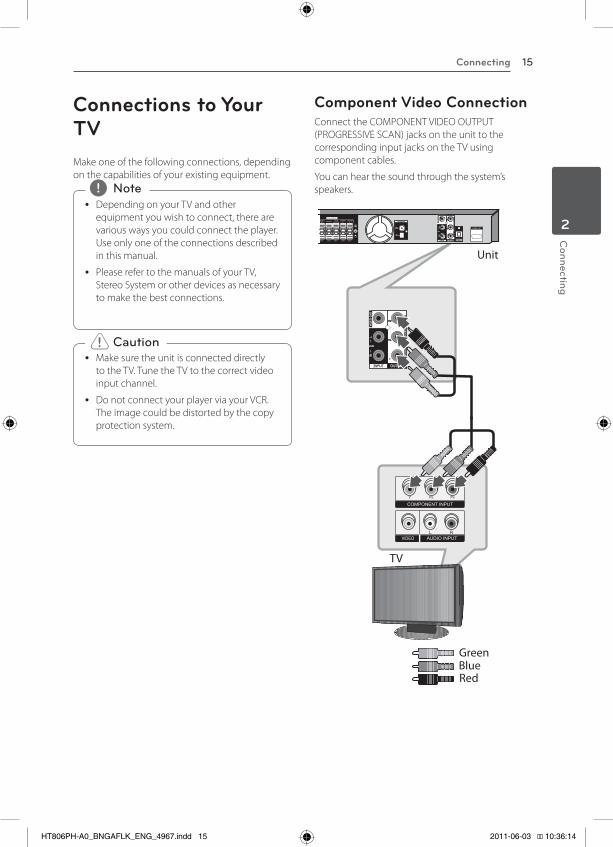
Component Video ConnectionConnecttheCOMPONENTVIDEOOUTPUT(PROGRESSIVESCAN)jacksontheunittothecorrespondinginputjacksontheTVusingcomponentcables.
Youcanhearthesoundthroughthesystem’sspeakers.
Unit
TV
GreenBlueRed
HT806PH-A0_BNGAFLK_ENG_4967.indd 15 2011-06-03 �� 10:36:14

Connecting16
Connecting
2
HDMI Out ConnectionIfyouhaveaHDMITVormonitor,youcanconnectittothisunitusingaHDMIcable(TypeA,HighSpeedHDMI™Cable).ConnecttheHDMIOUTjackontheunittotheHDMIINjackonaHDMIcompatibleTVormonitor.SettheTV’ssourcetoHDMI(refertoTV’sOwner’smanual).
Unit
TV
y YoucanfullyenjoydigitalaudioandvideosignalstogetherwiththisHDMIconnection.
y WhenyouuseHDMIconnection,youcanchangetheresolutionfortheHDMIoutput.(Referto“ResolutionSetting”onpage18.)
,, Tip
y IfaconnectedHDMIdevicedoesnotaccepttheaudiooutputoftheunit,theHDMIdevice’saudiosoundmaybedistortedormaynotoutput.
y WhenyouconnectaHDMIorDVIcompatibledevicemakesureofthefollowing:
-TryswitchingofftheHDMI/DVIdeviceandthisunit.Next,switchontheHDMI/DVIdeviceandleaveitforaround30seconds,thenswitchonthisunit.
-Theconnecteddevice’svideoinputissetcorrectlyforthisunit.
-Theconnecteddeviceiscompatiblewith720x480i(or576i),720x480p(or576p),1280x720p,1920x1080ior1920x1080pvideoinput.
y NotallHDCP-compatibleHDMIorDVIdeviceswillworkwiththisunit.
-Thepicturewillnotbedisplayedproperlywithnon-HDCPdevice.
-ThisunitdoesnotplaybackandTVscreenischangedtoblackorgreenscreenorthesnownoisemayoccuronthescreen.
y Ifthereisnoiseorlinesonthescreen,pleasechecktheHDMIcableanduseahigherversioncablethanHighSpeedHDMI™Cable.
,, Note
y Changingtheresolutionwhentheconnectionhasalreadybeenestablishedmayresultinmalfunctions.Tosolvetheproblem,turnofftheunitandthenturnitonagain.
y WhentheHDMIconnectionwithHDCPisnotverified,TVscreenischangedtoblackorgreenscreenorthesnownoisemayoccuronthescreen.Inthiscase,checkthetheHDMIconnection,ordisconnecttheHDMIcable.
,>Caution
HT806PH-A0_BNGAFLK_ENG_4967.indd 16 2011-06-03 �� 10:36:14
Connecting 17C
onnecting
2
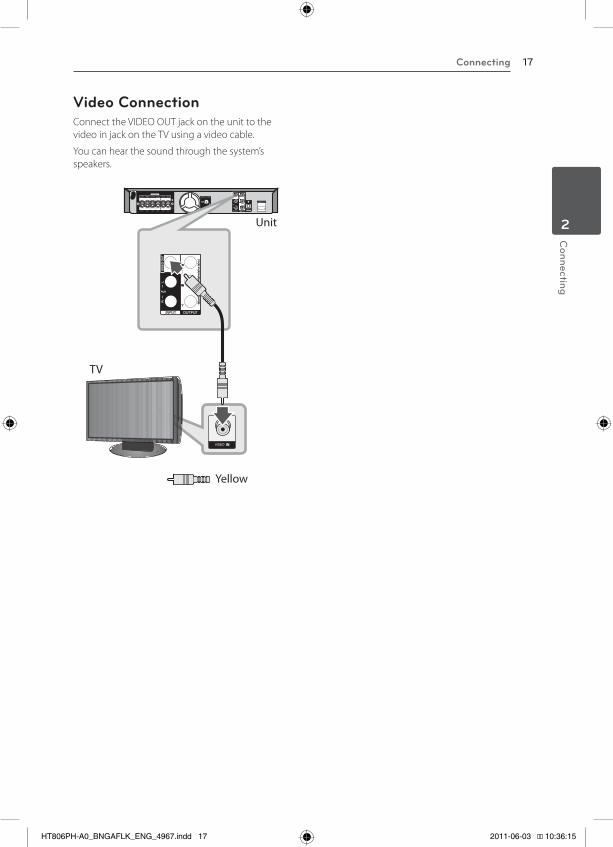
Video ConnectionConnecttheVIDEOOUTjackontheunittothevideoinjackontheTVusingavideocable.
Youcanhearthesoundthroughthesystem’sspeakers.
Unit
TV
Yellow
HT806PH-A0_BNGAFLK_ENG_4967.indd 17 2011-06-03 �� 10:36:15

Connecting18
Connecting
2
Resolution SettingTheunitprovidesseveraloutputresolutionsforHDMIOUTandCOMPONENTVIDEOOUTjacks.Youcanchangetheresolutionusing[Setup]menu.
1. PressnHOME.
2. UseA/Dtoselectthe[Setup]andpressbENTER.The[Setup]menuappears.
3. UseW/Stoselect[Display]optionthenpressDtomovetothesecondlevel.
4. UseW/Stoselectthe[Resolution]optionthenpressDtomovetothethirdlevel.
5. UseW/StoselectthedesiredresolutionthenpressbENTERtoconfirmyourselection.
IfyourTVdoesnotaccepttheresolutionyouhavesetontheplayer,youcansetresolutionto480p(or576p)asfollows:
PressZSTOPformorethan5seconds.
,, Note
Video Output ResolutionDisplayedresolutionindisplaywindowandoutputtedresolutionmaydifferentaccordingtoconnectiontype.
[HDMIOUT]:1080p,1080i,720pand480p(or576p)and480i(or576i)
[COMPONENTVIDEOOUT]:480p(or576p)and480i(or576i)
[VIDEOOUT]:480i(or576i)
HT806PH-A0_BNGAFLK_ENG_4967.indd 18 2011-06-03 �� 10:36:15
Connecting 19C
onnecting
2
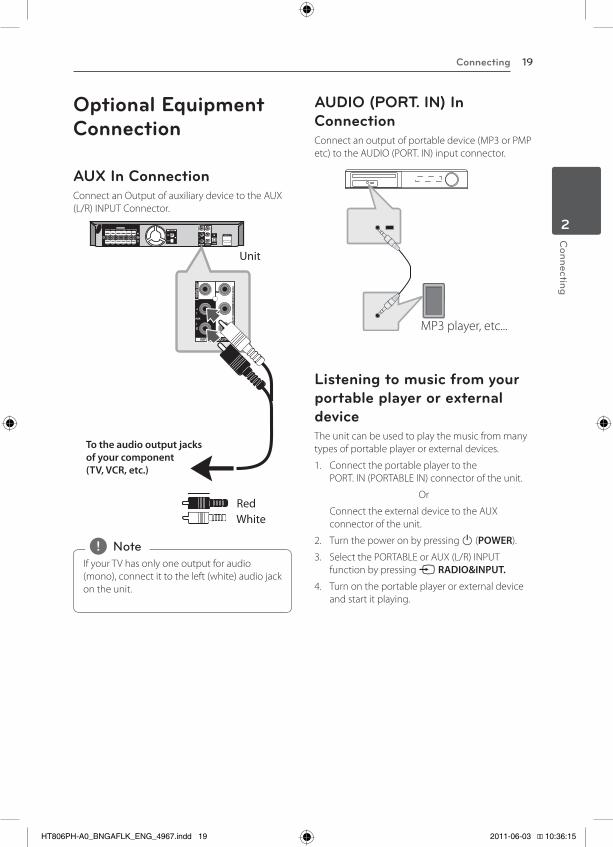
Optional Equipment Connection
AUX In ConnectionConnectanOutputofauxiliarydevicetotheAUX(L/R)INPUTConnector.
Unit
RedWhite
To the audio output jacks of your component (TV, VCR, etc.)
IfyourTVhasonlyoneoutputforaudio(mono),connectittotheleft(white)audiojackontheunit.
,, Note
AUDIO (PORT. IN) In ConnectionConnectanoutputofportabledevice(MP3orPMPetc)totheAUDIO(PORT.IN)inputconnector.
MP3player,etc...
Listening to music from your portable player or external deviceTheunitcanbeusedtoplaythemusicfrommanytypesofportableplayerorexternaldevices.
1. ConnecttheportableplayertothePORT.IN(PORTABLEIN)connectoroftheunit.
Or
ConnecttheexternaldevicetotheAUXconnectoroftheunit.
2. Turnthepoweronbypressing1(POWER).
3. SelectthePORTABLEorAUX(L/R)INPUTfunctionbypressingPRADIO&INPUT.
4. Turnontheportableplayerorexternaldeviceandstartitplaying.
HT806PH-A0_BNGAFLK_ENG_4967.indd 19 2011-06-03 �� 10:36:15

Connecting20
Connecting
2
USB ConnectionConnecttheUSBportofUSBMemory(orMP3player,etc.)totheUSBportonthefrontoftheunit.
RemovingtheUSBDevicefromtheunit1. ChooseadifferentfunctionmodeorpressZ
STOPtwiceinarow.2.RemovetheUSBdevicefromtheunit.
Compatible USB Devicesy MP3Player:FlashtypeMP3player.
y USBFlashDrive: DevicesthatsupportUSB2.0orUSB1.1.
y TheUSBfunctionofthisunitdoesnotsupportsomeUSBdevices.
USB device requirementy Deviceswhichrequireadditionalprogram
installationconnectedtoacomputer,arenotsupported.
y DonotextracttheUSBdevicewhileinoperation.
y ForalargecapacityUSB,itmaytakelongerthanafewminutetobesearched.
y Topreventdataloss,backupalldata.
y IfyouuseaUSBextensioncableorUSBhub,theUSBdeviceisnotrecognized.
y UsingNTFSfilesystemisnotsupported.(OnlyFAT(16/32)filesystemissupported.)
y Thisunitisnotsupportedwhenthetotalnumberoffilesis1000ormore.
y ExternalHDD,Cardreaders,Lockeddevices,orhardtypeusbdevicesarenotsupported.
y USBportoftheunitcannotbeconnectedtoPC.Theunitcannotbeusedasastoragedevice.
HT806PH-A0_BNGAFLK_ENG_4967.indd 20 2011-06-03 �� 10:36:15

System Setting 21S
ystem S
etting
3
OPTICAL In connectionConnectanopticaloutputofUnit(orDigitalDeviceetc)totheOPTICALINconnector.
To the digital optical output jack of your component
Home theater speaker ez setupListentosoundfromTV,DVDandDigitalDevicewith5.1(2.1or2)chmode.Eveninpoweroffmode,ifyoupressOPTICAL,thenpowerisonandautomaticallychangedtoAUXOPTmode.
1. Connecttheunit’sOPTICALINjacktojackonopticaloutofyourTV(orDigitalDeviceetc.).
2. SelecttheAUXOPTbyusingtheOPTICAL.ToselecttheAUXOPTdirectly.
3. Listensoundwith5.1(2.1or2)chspeaker.
4. ToescapefromAUXOPTbyusingtheOPTICAL.Functionisretunedtopreviousone.
Antenna ConnectionConnectthesuppliedFM/AMantennaforlisteningtotheradio.
ConnecttheAMLoopantennatotheAMantennaconnector.
ConnecttheFMWireantennatotheFMantennaconnector.
y Topreventnoisepickup,keeptheAMLoopantennaawayfromtheunitandothercomponents.
y BesuretofullyextendtheFMwireantenna.AfterconnectingtheFMwireantenna,keepitashorizontalaspossible.
,, Note
HT806PH-A0_BNGAFLK_ENG_4967.indd 21 2011-06-03 �� 10:36:16
3 SystemSetting
System Setting22
System
Setting
3
Adjust the setup settingsByusingtheSetupmenu,youcanmakevariousadjustmentstoitemssuchaspictureandsound.
YoucanalsosetalanguageforthesubtitlesandtheSetupmenu,amongotherthings.FordetailsoneachSetupmenuitem,seepages22to26.
OSD Initial language settings - OptionalDuringthefirstuseofthisunit,theinitiallanguagesetupmenuappearsonyourTVscreen.Youmustcompleteinitiallanguageselectionbeforeusingtheunit.Englishwillbeselectedastheinitiallanguage.
1. Press1(POWER)toturntheuniton.Thelanguagesetupmenuwillappearonthescreen.
2. UseWSADtoselectalanguagethenpressbENTER.Theconfirmmenuwillappear.
3. UseADtoselectthe[Enter]thenpressbENTERtofinishthelanguagesetup.
To display and exit the Setup menu1. PressnHOME.
Displaysthe[HomeMenu].
2. Selectan[Setup]byusingAD.
3. PressbENTER.Displaysthe[Setup].
4. PressnHOMEorxRETURNtoexitinthe[Setup]Menu.
About help menu for Setup
Menu Buttons Operation
ws
MoveWS Movingtoanother
menu.
aMove A Movingtoprevious
level.
dMove
DMovingtonextlevelorselectingmenu.
xClose
x RETURNToexitthe[Setup]menuor[5.1SpeakerSetup].
b Select
bENTER Toconfirmmenu.
HT806PH-A0_BNGAFLK_ENG_4967.indd 22 2011-06-03 �� 10:36:16

23S
ystem S
etting
3
Language
Menu LanguageSelectalanguagefortheSetupmenuandthenonscreendisplay.
Disc Audio / Disc Subtitle / Disc MenuSelectthelanguageyoupreferfortheaudiotrack(discaudio),subtitles,andthediscmenu.
[Original]
Referstotheoriginallanguageinwhichthediscwasrecorded.
[Other]
Toselectanotherlanguage,pressnumericbuttonsandthenbENTERtoenterthecorresponding4-digitnumberaccordingtothelanguagecodelistonthepage39.Ifyouenterthewronglanguagecode,pressCLEAR.
[Off (for Disc Subtitle)]
TurnoffSubtitle.
Display
TV AspectSelectwhichscreenaspecttousebasedontheshapeofyourTVscreen.
[4:3]
Selectwhenastandard4:3TVisconnected.
[16:9]
Selectwhena16:9wideTVisconnected.
Display ModeTheDisplayModesettingworksonlywhentheTVAspectmodeissetto4:3.
[Letterbox]
Displaysawidepicturewithbandsontheupperandlowerportionsofthescreen.
[Panscan]
Automaticallydisplaysthewidepictureontheentirescreenandcutsofftheportionsthatdonotfit.(Ifthedisc/fileisnotcompatiblewithPanScan,thepictureisdisplayedatLetterboxratio.)
ResolutionSetstheoutputresolutionoftheComponentandHDMIvideosignal.Referto“ResolutionSetting”fordetailsabouttheresolution(page18).
[Auto]
IftheHDMIOUTjackisconnectedtoTVsprovidingdisplayinformation(EDID),automaticallyselectstheresolutionbestsuitedtotheconnectedTV.IftheCOMPONENTVIDEOOUTisonlyconnected,thischangestheresolutionto480i(or576i)asdefaultresolution.
[1080p]
Outputs1080linesofprogressivevideo.
[1080i]
Outputs1080linesofinterlacedvideo.
[720p]
Outputs720linesofprogressivevideo.
[480p (or 576p)]
Outputs480(or576)linesofprogressivevideo.
[480i (or 576i)]
Outputs480(or(576)linesofinterlacedvideo.
System Setting
HT806PH-A0_BNGAFLK_ENG_4967.indd 23 2011-06-03 �� 10:36:16

System Setting24
System
Setting
3
Audio
5.1 Speaker SetupMakethefollowingsettingsforthebuilt-in5.1channelsurrounddecoder.
1. Select[5.1SpeakerSetup]onthe[Audio]menu.
2. PressbENTER.The[5.1SPEAKER]appears.
3. UseADtoselectthedesiredspeaker.
4. AdjustoptionsusingWSADbuttons.
5. ReturnstothepreviousmenubypressingxRETURN.
[Speaker]
Selectaspeakerthatyouwanttoadjust.
CertainspeakersettingsareprohibitedbytheDolbyDigitallicensingagreement.
,, Note
[Size]
Sincethespeakersettingsarefixed,youcannotchangethesettings.
[Volume]
PressADtoadjusttheoutputleveloftheselectedspeaker.
FrontL/R:0--5SubWoofer,RearL/R,Center:5--5
[Distance]
Afteryouconnectedspeakerstoyourunit,settheDistancebetweenthespeakersandyourlisteningpointifthedistanceofCenterorRearspeakersisbiggerthanthedistanceofFrontspeakers.Thisallowsthesoundfromeachspeakertoreachthelisteneratthesametime.PressADtoadjusttheDistanceoftheselectedspeaker.ThisdistanceisequivalenttoadifferenceofthedistancebetweenCenterorRearspeakerandFrontspeakers.
[Test]
Select[SpeakerTestStart]byusingtheWSandpressbENTER.PressbENTERagaintostop.Adjustthevolumetomatchthevolumeoftestsignalsmemorizedinthesystem.
HT806PH-A0_BNGAFLK_ENG_4967.indd 24 2011-06-03 �� 10:36:16

System Setting 25S
ystem S
etting
3
DRC (Dynamic Range Control) Makethesoundclearwhenthevolumeisturneddown(DolbyDigitalonly).Setto[On]forthiseffect.
VocalSelect[On]tomixkaraokechannelsintonormalstereo.
Thisfunctioniseffectiveformulti-channelkaraokeDVDsonly.
HD AV SyncSometimesDigitalTVencountersadelaybetweenpictureandsound.Ifthishappensyoucancompensatebysettingadelayonthesoundsothatiteffectively‘waits’forthepicturetoarrive:thisiscalledHDAVSync.UseWS(ontheremotecontrol)toscrollupanddownthroughthedelayamount,whichyoucansetatanythingbetween0and300msec.
Lock (Parental Control)
Initial Setting the Area Code:Whenyouusethisunitforthefirsttime,youhavetosettheAreaCode.
1. Selectthe[Lock]menuandthenpressD.
2. PressD.Toaccessthe[Lock]options,youmustinputthepasswordyouhavecreated.InputapasswordandpressbENTER.EnteritagainandpressbENTERtoverify.IfyoumakeamistakebeforepressingbENTER,pressCLEAR.
3. SelectthefirstcharacterusingWSbuttons.
4. PressbENTERandselectthesecondcharacterusingWSbuttons.
5. PressbENTERtoconfirmyourAreacodeselection.
RatingBlocksplaybackofratedDVDsbasedontheircontents.Notalldiscsarerated.
1. Select[Rating]onthe[Lock]menuthenpressD.
2. InputapasswordandpressbENTER.
3. Selectaratingfrom1to8usingtheWSbuttons.
[Rating 1-8]
Ratingone(1)hasthemostrestrictionsandratingeight(8)istheleastrestrictive.
[Unlock]
Ifyouselectunlock,parentalcontrolisnotactiveandthediscplaysinfull.
4. PressbENTERtoconfirmyourratingselection.
HT806PH-A0_BNGAFLK_ENG_4967.indd 25 2011-06-03 �� 10:36:16
4 Operating
System Setting26
System
Setting
3
PasswordYoucanenterorchangepassword.
1. Select[Password]onthe[Lock]menuandthenpressD.
2. PressbENTER.
3. InputapasswordandpressbENTER.
Tochangethepassword,pressbENTERwhenthe[Change]optionishighlighted.InputapasswordandpressbENTER.EnteritagainandpressbENTERtoverify.
4. PressnHOMEtoexitthemenu.
Ifyouforgetyourpassword,youcanclearitusingthefollowingsteps:
1. Selectthe[Setup]menuonthe[HomeMenu].
2. Inputthe6-digitnumber“210499”andpressbENTER.Thepasswordiscleared.
,, Note
Area CodeEnterthecodeoftheareawhosestandardswereusedtoratetheDVDvideodisc,basedonthelistonpage38.
1. Select[AreaCode]onthe[Lock]menuthenpressD.
2. InputapasswordandpressbENTER.
3. SelectthefirstcharacterusingWSbuttons.
4. PressbENTERandselectthesecondcharacterusingWSbuttons.
5. PressbENTERtoconfirmyourAreacodeselection.
Others
DivX VODWeprovideyouwiththeDivX®VOD(VideoOnDemand)registrationcodethatallowsyoutorentandpurchasevideosusingtheDivX®VODservice.
Formoreinformation,visitwww.divx.com/vod.
[Register]
Displaystheregistrationcodeofyourplayer.
[Deregister]
Deactivateyourplayeranddisplaythedeactivationcode.
AllthedownloadedvideosfromDivXVODcanonlybeplayedbackonthisunit.
,, Note
HT806PH-A0_BNGAFLK_ENG_4967.indd 26 2011-06-03 �� 10:36:16
4 Operating
Operating 27O
perating
4
Using the Home Menu1. PressnHOME.
Displaysthe[HomeMenu].
2. SelectanoptionbyusingAD.
3. PressbENTERthenselectedoptionmenu.
[Music]–Displays[MUSIC]menu.
[Movie]–Startvideomedia’splaybackordisplaysthe[MOVIE]menu.
[Photo]–Displays[PHOTO]menu.
[Setup]–Displaysthe[Setup]menu.
Youcannotselectthe[Music],[Movie]or[Photo]optionwhentheUSBdeviceisnotconnectedoradiscisnotinserted.
,, Note
Basic Operations1. InsertthediscbyusingtheBOPEN/CLOSEor
ConnecttheUSBdevicetotheUSBport.
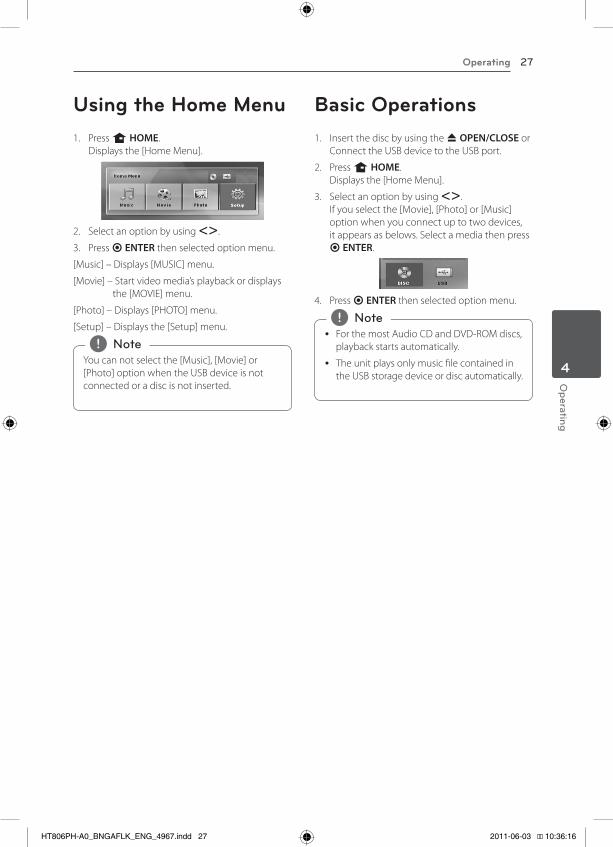
2. PressnHOME.Displaysthe[HomeMenu].
3. SelectanoptionbyusingAD.Ifyouselectthe[Movie],[Photo]or[Music]optionwhenyouconnectuptotwodevices,itappearsasbelows.SelectamediathenpressbENTER.
4. PressbENTERthenselectedoptionmenu.
y ForthemostAudioCDandDVD-ROMdiscs,playbackstartsautomatically.
y TheunitplaysonlymusicfilecontainedintheUSBstoragedeviceordiscautomatically.
,, Note
HT806PH-A0_BNGAFLK_ENG_4967.indd 27 2011-06-03 �� 10:36:16

Operating28
Operating
4
To Do this
Stop PressZ STOP.
PlaybackPress d PLAY, MONO/STEREO.
Pause PressM PAUSE/STEP.
Frame-by-Frameplayback
PressM PAUSE/STEPrepeatedlytoplaytitleFrame-by-Frame.(DVD,DivXonly)
Skippingtothenext/previouschapter/track/
file
Duringplayback,press C/,V SKIPtogotothenextchapter/track/fileortoreturntothebeginningofthecurrentchapter/track/file.
PressC,SKIP twicebrieflytostepbacktothepreviouschapter/track/file.
Locatingapointquicklybyplayingafileinfastforwardor
fastreverse
Duringplayback,pressc/v SCANrepeatedlytoselecttherequiredscanspeed.
Toreturntonormalspeed,pressd PLAY, MONO/STEREO.
Playingrepeatedlyor
randomly
Pressh REPEAT repeatedly,andthecurrenttitle,chapterortrackwillbeplayedbackrepeatedlyorrandomly.
-DVD:Chapter/Title/Off
-DivX:Title/All/Off
-AudioCD/MP3/WMA:Track/All/Random/Off
Slowingdowntheplaying
speed
Inthepausemode,pressSLOW(corv)toselecttherequiredspeed.(DVD,DivXonly)TheDivXfilecannotbeslowdownreverseplayback.
Other Operations
Displaying Disc Information on-screenYoucandisplayvariousinformationaboutthediscloadedon-screen.
1. PressmINFO/DISPLAYtoshowvariousplaybackinformation.Thedisplayeditemsdifferdependingonthedisctypeorplayingstatus.
2. YoucanselectanitembypressingWS,andchangeorselectthesettingbypressingAD.
Title–Currenttitlenumber/totalnumberoftitles.
Chapter–Currentchapternumber/totalnumberofchapters.
Time–Elapsedplayingtime.
Audio–Selectedaudiolanguageorchannel.
Subtitle–Selectedsubtitle.
Angle–Selectedangle/totalnumberofangles.
Ifanybuttonisnotpressedforafewseconds,theon-screendisplaydisappears.
,, Note
HT806PH-A0_BNGAFLK_ENG_4967.indd 28 2011-06-03 �� 10:36:17

Operating 29O
perating
4
To display the DVD Menur
WhenyouplayaDVDwhichcontainsseveralmenu,youcanselectthemenuyouwantusingtheMenu.
1. PressDISC MENU.Thedisc’smenuappears.
2. SelectthemenubyusingWSAD.
3. PressdPLAY, MONO/STEREOtoconfirm.
To display the DVD titler
WhenyouplayaDVDwhichcontainsseveraltitle,youcanselectthetitleyouwantusingtheMenu.
1. PressTITLE.Thedisc’stitleappears.
2. SelectthemenubypressingWSAD.
3. PressdPLAY, MONO/STEREOtoconfirm.
1.5 times speed playbackr
The1.5speedallowsyoutowatchthepicturesandlistentothesoundquickerthanplayingatanormalspeed.
1. Duringplayback,pressdPLAY, MONO/STEREOtoplayat1.5timesspeed.“dX1.5”appearsonthescreen.
2. Pressd PLAY, MONO/STEREOagaintoexit.
Screen SaverThescreensaverappearswhenyouleavetheunitinStopmodeforaboutfiveminutes.
Starting play from selected timery
Tostartplayingatanychosentimeonthefileortitle.
1. PressmINFO/DISPLAYduringplayback.
2. PressWStoselectthetimeclockiconand“--:--:--”appears.
3. Inputtherequiredstarttimeinhours,minutes,andsecondsfromlefttoright.Ifyouenterthewrongnumbers,pressCLEARtoremovethenumbersyouentered.Theninputthecorrectnumbers.Forexample,tofindasceneat1hour,10minutes,and20seconds,enter“11020”byusingnumericalbuttons.
4. PressbENTERtoconfirm.Playbackstartsfromtheselectedtime.
Resume playbackryut
TheunitrecordsthepointwhereyoupressedtheZSTOPdependingonthedisc.If“MZ(ResumeStop)”appearsonthescreenbriefly,pressdPLAY, MONO/STEREOtoresumeplayback(fromthescenepoint).
IfyoupressZSTOPtwiceorunloadthedisc,“Z”(CompleteStop)appearsonthescreen.Theunitwillclearthestoppedpoint.
Theresumepointmaybeclearedwhenabuttonispressed(forexample;1(POWER),BOPEN/CLOSE,etc).
,, Note
Changing subtitle code pageyIfthesubtitleisnotdisplayedproperly,youcanchangethesubtitlecodepagetoviewthesubtitlefileproperly.
1. Duringplayback,pressmINFO/DISPLAYtodisplaytheOn-Screendisplay.
2. UseWStoselectthe[CodePage]option.
3. UseADtoselectdesiredcodeoption.
4. PressxRETURNtoexittheOn-Screendisplay.
HT806PH-A0_BNGAFLK_ENG_4967.indd 29 2011-06-03 �� 10:36:17
30
Operating
4
Operating
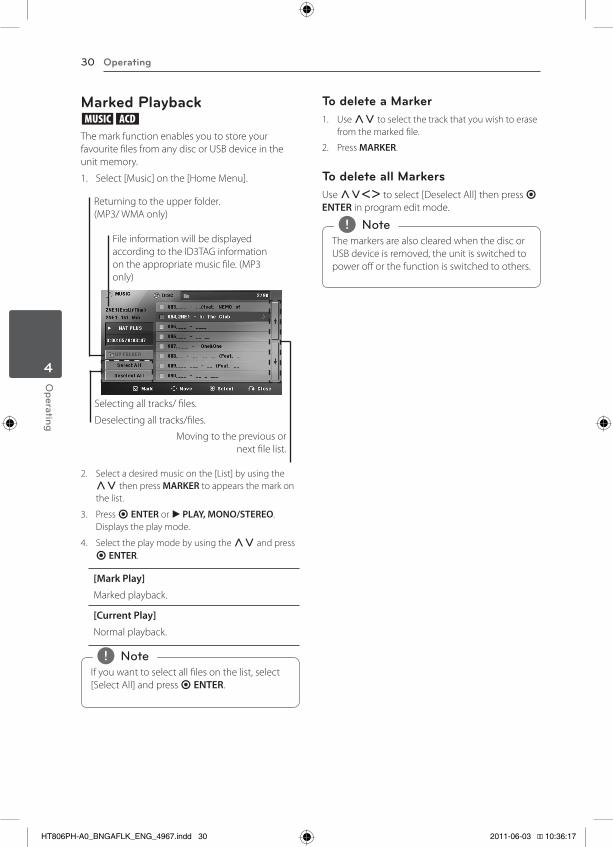
Marked PlaybackutThemarkfunctionenablesyoutostoreyourfavouritefilesfromanydiscorUSBdeviceintheunitmemory.
1. Select[Music]onthe[HomeMenu].
Returningtotheupperfolder.(MP3/WMAonly)
Movingtothepreviousornextfilelist.
Selectingalltracks/files.
Deselectingalltracks/files.
FileinformationwillbedisplayedaccordingtotheID3TAGinformationontheappropriatemusicfile.(MP3only)
2. Selectadesiredmusiconthe[List]byusingtheWSthenpressMARKERtoappearsthemarkonthelist.
3. PressbENTERordPLAY, MONO/STEREO.Displaystheplaymode.
4. SelecttheplaymodebyusingtheWSandpressbENTER.
[Mark Play]
Markedplayback.
[Current Play]
Normalplayback.
Ifyouwanttoselectallfilesonthelist,select[SelectAll]andpressbENTER.
,, Note
To delete a Marker1. UseWStoselectthetrackthatyouwishtoerase
fromthemarkedfile.
2. PressMARKER.
To delete all MarkersUseWSADtoselect[DeselectAll]thenpressbENTERinprogrameditmode.
ThemarkersarealsoclearedwhenthediscorUSBdeviceisremoved,theunitisswitchedtopowerofforthefunctionisswitchedtoothers.
,, Note
HT806PH-A0_BNGAFLK_ENG_4967.indd 30 2011-06-03 �� 10:36:17

Operating 31O
perating
4
Viewing a PHOTO filei
Thisunitcanplaydiscswithphotofiles.
1. Select[Photo]onthe[HomeMenu]andpressbENTER.
Movingtothepreviousornextfilelist.
Returningtotheupperfolder.
2. PressWStoselectafolder,andthenpressbENTER.
3. Ifyouwanttoviewaslideshow,pressWStohighlightafileandpressdPLAY, MONO/STEREO.
About help menu in the [Photo] menu
Menu Buttons Operation
d,Slide Show
d,PLAY, MONO/
STEREO
Viewingaslideshow.
wsadMove WSAD Movingtoanother
fileorcontent.
bSelect bENTER Viewingaparticular
file.
x Close x RETURN Returningtothe
[HomeMenu].
About help menu in the full screen
Menu Buttons Operation
Menum
INFO/DISPLAY
DisplayingtheOptionmenu.
a/dPrev./ Next A/D Movingtoanotherfile.
x,Close
x RETURN
Returningtothe[Photo]menu.
Options while viewing a photoYoucanusevariousoptionsduringviewingaphotoinfullscreen.
1. Whileviewingaphotoinfullscreen,pressmINFO/DISPLAYtodisplaytheoptionmenu.
2. SelectanoptionusingWSAD.
a
b c d e
a Current photo/ Total number of photos–UseADtoviewprevious/nextphoto.
b Slide Show z/M–PressENTERtostartorpauseslideshow.
c Speed x3/ x2/ x1–UseENTERtoselectadelayingspeedbetweenphotosinaslideshow.
d Rotate–PressENTERtorotatethephoto.
e Go to list–PressENTERtoreturn[Photo]menu.
HT806PH-A0_BNGAFLK_ENG_4967.indd 31 2011-06-03 �� 10:36:17

Operating32
Operating
4
Sleep Timer SettingPressSLEEPoneormoretimestoselectdelaytimebetween10and180minutes,aftertheunitwillturnoff.
Tochecktheremainingtime,pressSLEEP.
Tocancelthesleepfunction,pressSLEEPrepeatedlyuntil“SLEEP10”appears,andthenpressSLEEPonceagainwhile“SLEEP10”isdisplayed.
YoucanchecktheremainingtimebeforetheUnitturnsoff.
PressSLEEPTheremainingtimeappearsinthedisplaywindow.
,, Note
DimmerPressSLEEPonce.Thedisplaywindowwillbedarkenbyhalf.Tocancelit,pressSLEEPrepeatedlyuntildimoff.
Turn off the sound temporarilyPress MUTEtomuteyourunit.
Youcanmuteyourunitinorder,forexample,toanswerthetelephone,appearstheMUTEinthedisplaywindow.
Last Scene Memoryr
Thisunitmemorizeslastscenefromthelastdiscthatisviewed.Thelastsceneremainsinmemoryevenifyouremovethediscfromtheunitorswitchofftheunit.Ifyouloadadiscthathasthescenememorized,thesceneisautomaticallyrecalled.
System Select - OptionalYoumustselecttheappropriatesystemmodeforyourTVsystem.PressandholdMPAUSE/STEPformorethanfivesecondstobeabletoselectasysteminthe[HomeMenu].
IftheUSBdeviceisconnectedoradiscisinserted,thisfunctionisnotoperated.
,, Note
Adjust the speaker level settingsYoucanadjustthesoundlevelofeachspeaker.
1. PressSPEAKER LEVELrepeatedlytoselectadesiredspeakertoset.
2. PressVOL -/+toadjustthesoundleveloftheselectedspeakerwhilethelevelsettingmemuisdisplayedonthedisplaywindow.
3. Repeatandadjustthesoundleveloftheotherspeakers.
HT806PH-A0_BNGAFLK_ENG_4967.indd 32 2011-06-03 �� 10:36:17

Operating 33O
perating
4
Radio OperationsBesurethatbothFM/AMaerialsareconnected.(Refertothepage21.)
Listening to the radio1. PressPRADIO&INPUT untilFM/AMappears
inthedisplaywindow.Thelastreceivedstationistunedin.
2. PressandholdTUNING (-/+)forabouttwosecondsuntilthefrequencyindicationstartstochange,thenrelease.Scanningstopswhentheunittunesinastation.
or
PressTUNING (-/+)repeatedly.
3. AdjustthevolumebyrotatingVOLUMEonthefrontpanelorbypressingVOL (+/-)ontheremotecontrolrepeatedly.
Presetting the Radio StationsYoucanpreset50stationsforFM/AM.
Beforetuning,makesurethatyouhaveturneddownthevolume.
1. PressPRADIO&INPUTuntilFM/AMappearsinthedisplaywindow.
2. SelectthedesiredfrequencybyusingTUNING (-/+).
3. PressbENTERapresetnumberwillflashinthedisplaywindow.
4. PressPRESET (-/+)toselectthepresetnumberyouwant.
5. PressbENTER.Thestationisstored.
6. Repeatthesteps2to5tostoreotherstations.
Deleting all the saved stations1. PressandholdCLEARfortwoseconds.
“ERASEALL”willflashupontheunitdisplay.
2. PressCLEARtoeraseallsavedoftheradiostations.
Deleting a saved station1. PressPRESET - / +toSelectapresetnumber
youwanttodelete.
2. PressCLEAR,thepresetnumberwillblinkinthedisplaywindow.
3. PressCLEARagain,todeletetheselectdpresetnumber.
Improving poor FM receptionPressd PLAY, MONO/STEREOontheremotecontrol.Thiswillchangethetunerfromstereotomonoandusuallyimprovethereception.
HT806PH-A0_BNGAFLK_ENG_4967.indd 33 2011-06-03 �� 10:36:17

Operating34
Operating
4
Sound adjustment
Setting the surround modeThissystemhasanumberofpre-setsurroundsoundfields.YoucanselectadesiredsoundmodebyusingSOUND EFFECT.
YoucanchangetheSOUND EFFECTusingADarrowkeywhilethesoundeffectinformationisdisplayedon.
Thedisplayeditemsfortheequalizermaybedifferentdependingonsoundsourcesandeffects.
On Display Description
NATPLUS
TheNATPLUSisNaturalPlussoundeffect.Youcanenjoythenaturalsoundeffectsameasa5.1-channel.
NATURALYoucanenjoycomfortableandnaturalsound.
Localspecialization
equalizer
Regionallyoptimizedsoundeffect.(DANGDUT/ARABIC/PERSIAN/INDIA/REGUETON/MERENGUE/SAMBA/SALSA/CUMBIA/AFRO)
AUTOEQ
RealizesthesoundequalizerthatisthemostsimilartothegenreofwhichisincludedintheMP3ID3tagofsongfiles.
POP
CLASSIC
JAZZ
ROCK
Thisprogramlendsanenthusiasticatmospheretothesound,givingyouthefeelingyouareatanactualrockpop,jazzorclassicconcert.
MP3OPTThisfunctionisoptimizedforcompressibleMP3,WMAfile.Itimprovesthetreblesound.
BASS
TheBASSisBassBlast.Duringplayback,reinforcethetreble,bassandsurroundsoundeffect.
LOUDNESSImprovesthebassandtreblesound.
On Display Description
VIRTUALTheVIRTUALisVSMPlus.Youcanenjoymorevirtualsurroundsound.
BYPASSYoucanenjoythesoundwithoutequalizereffect.
y Insomeofsurroundmodes,somespeakers,there’snosoundorlowsound.Itdependsonthemodeofsurroundandthesourceofaudio,itisnotdefective.
y Youmayneedtoresetthesurroundmode,afterswitchingtheinput,sometimesevenafterthesoundtrackchanged.
,, Note
HT806PH-A0_BNGAFLK_ENG_4967.indd 34 2011-06-03 �� 10:36:17

Operating 35O
perating
4
Advanced Operations
Recording to USBYoucanrecordmusicorsoundsoucetoUSBdevicebyconnectingintotheportontheunit.
1. ConnecttheUSBdevicetotheunit.
2. Selectamodeinwhichyouwanttorecord.Playbackasoundsourcefirst.
3. StarttherecordingbypressingXREC.
4. Tostoprecording,pressZSTOP.
[All tracks/ files recording]
RecordtoUSBinstoporplaymode.
[Program list recording]
Aftermarkingdesiredfile(s)andyoucanrecordittoUSB(Refertothepage30).
It’ll be stored as follows.
Audio CD
MP3/ WMA
The other sources (Tuner, AUX, Portable)
y YoucanchecktherecordingpercentageratefortheUSBrecordonthescreenduringtherecording.(AudioCDorMP3/WMACDonly)
y DuringrecordingMP3/WMA,thereisnosound.
y Whenyoustoprecordingduringplayback,thefilethathasbeenrecordedatthattimewillbestored.(AudioCDonly)
y DonotremovetheUSBdeviceorturnofftheunitduringUSBrecording.Ifnot,anincompletefilemaybemadeandnotdeletedonPC.
y IfUSBrecordingdoesnotwork,themessagelike“NOUSB”,“ERROR”,“USBFULL”or“NOREC”isdisplayedonthedisplaywindow.
y MulticardreaderdeviceorexternalHDDcannotbeusedforUSBrecording.
y Afileisrecordedby128Mbyte(about2hours)whenyourecordforalongterm.Therearerecordedlessthan4files.
y Whenyoustoprecordingduringplayback,thefilewillnotbestored.
y InthestateCD-G,DTSdiscUSBrecordisnotoperated.
y Thefilesinthesub-foldersarenotrecordedduringalltrackrecording.
y Youmaynotrecordmorethan999files.
y Thenumberingoftherecordingfileisenteredfromthelowestnumber.Soifyoudeletesomeoftherecordingfiles,thenextrecordingfilecouldbethelowestnumberamongthem.
,, Note
Themakingofunauthorizedcopiesofcopy-protectedmaterial,includingcomputerprograms,
files,broadcastsandsoundrecordings,maybeaninfringementofcopyrightsandconstituteacriminaloffense.Thisequipmentshouldnotbe
usedforsuchpurposes.Be responsible
Respect copyrights.
HT806PH-A0_BNGAFLK_ENG_4967.indd 35 2011-06-03 �� 10:36:17
6 Appendix5 Troubleshooting
Troubleshooting36
Troubleshooting
5
Troubleshooting
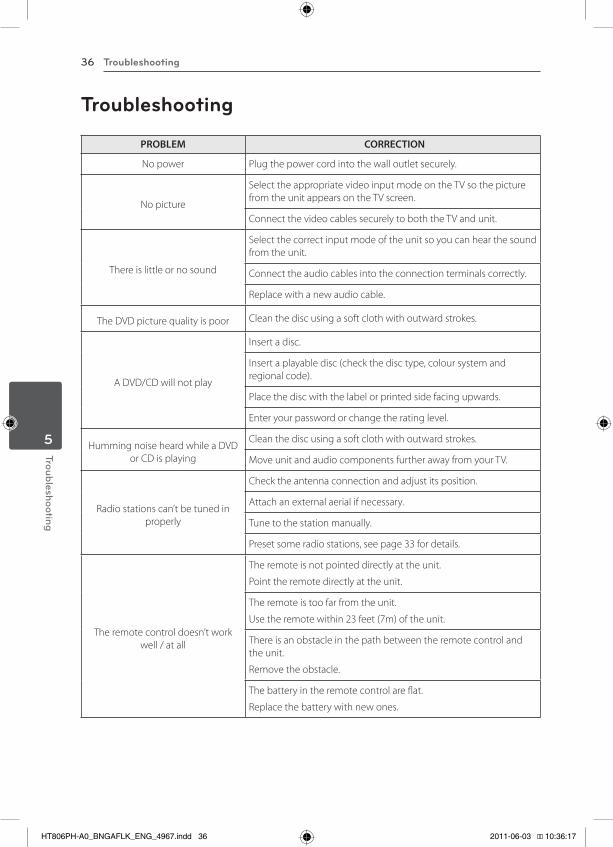
PROBLEM CORRECTION
Nopower Plugthepowercordintothewalloutletsecurely.
Nopicture
SelecttheappropriatevideoinputmodeontheTVsothepicturefromtheunitappearsontheTVscreen.
ConnectthevideocablessecurelytoboththeTVandunit.
Thereislittleornosound
Selectthecorrectinputmodeoftheunitsoyoucanhearthesoundfromtheunit.
Connecttheaudiocablesintotheconnectionterminalscorrectly.
Replacewithanewaudiocable.
TheDVDpicturequalityispoor Cleanthediscusingasoftclothwithoutwardstrokes.
ADVD/CDwillnotplay
Insertadisc.
Insertaplayabledisc(checkthedisctype,coloursystemandregionalcode).
Placethediscwiththelabelorprintedsidefacingupwards.
Enteryourpasswordorchangetheratinglevel.
HummingnoiseheardwhileaDVDorCDisplaying
Cleanthediscusingasoftclothwithoutwardstrokes.
MoveunitandaudiocomponentsfurtherawayfromyourTV.
Radiostationscan’tbetunedinproperly
Checktheantennaconnectionandadjustitsposition.
Attachanexternalaerialifnecessary.
Tunetothestationmanually.
Presetsomeradiostations,seepage33fordetails.
Theremotecontroldoesn’tworkwell/atall
Theremoteisnotpointeddirectlyattheunit.
Pointtheremotedirectlyattheunit.
Theremoteistoofarfromtheunit.
Usetheremotewithin23feet(7m)oftheunit.
Thereisanobstacleinthepathbetweentheremotecontrolandtheunit.
Removetheobstacle.
Thebatteryintheremotecontrolareflat.
Replacethebatterywithnewones.
HT806PH-A0_BNGAFLK_ENG_4967.indd 36 2011-06-03 �� 10:36:17

6 Appendix
Appendix 37A
ppendix
6
Maintenance
Handling the Unit
When shipping the unitPleasesavetheoriginalshippingcartonandpackingmaterials.Ifyouneedtoshiptheunit,formaximumprotection,re-packtheunitasitwasoriginallypackedatthefactory.
Keepingtheexteriorsurfacesclean
y Donotusevolatileliquidssuchasinsecticidesprayneartheunit.
y Wipingwithstrongpressuremaydamagethesurface.
y Donotleaverubberorplasticproductsincontactwiththeunitforalongperiodoftime.
Cleaning the unitTocleantheplayer,useasoft,drycloth.Ifthesurfacesareextremelydirty,useasoftclothlightlymoistenedwithamilddetergentsolution.Donotusestrongsolventssuchasalcohol,benzine,orthinner,asthesemightdamagethesurfaceoftheunit.
Maintaining the UnitTheunitisahigh-tech,precisiondevice.Iftheopticalpick-uplensanddiscdrivepartsaredirtyorworn,thepicturequalitycouldbediminished.Fordetails,pleasecontactyournearestauthorizedservicecenter.
Notes on Discs
Handling DiscsDonottouchtheplaybacksideofthedisc.Holdthediscbytheedgessothatfingerprintsdonotgetonthesurface.Neverstickpaperortapeonthedisc.
Storing DiscsAfterplaying,storethediscinitscase.Donotexposethedisctodirectsunlightorsourcesofheatandneverleaveitinaparkedcarexposedtodirectsunlight.
Cleaning DiscsFingerprintsanddustonthedisccancausepoorpicturequalityandsounddistortion.Beforeplaying,cleanthediscwithacleancloth.Wipethediscfromthecentertoout.
Donotusestrongsolventssuchasalcohol,benzine,thinner,commerciallyavailablecleaners,oranti-staticsprayintendedforoldervinylrecords.
HT806PH-A0_BNGAFLK_ENG_4967.indd 37 2011-06-03 �� 10:36:17
Appendix38
Appendix
6
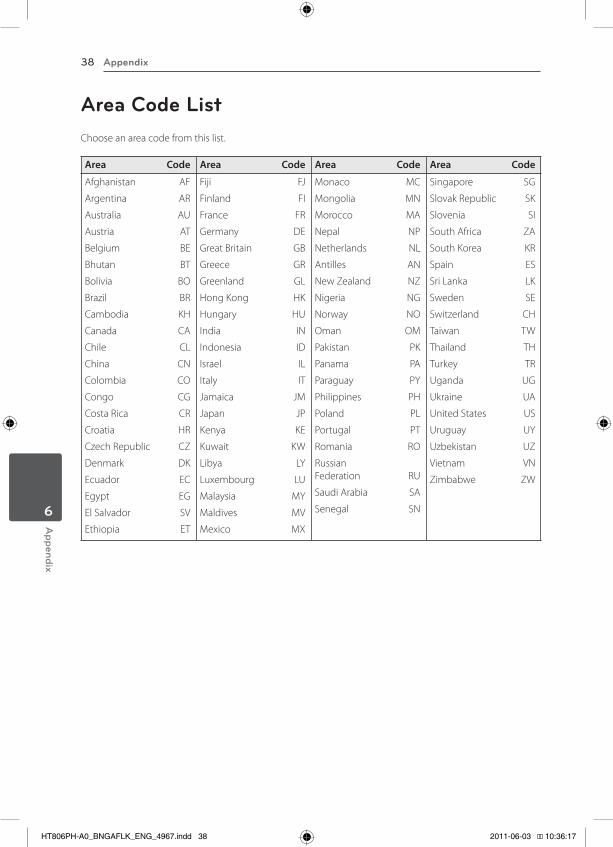
Area Code ListChooseanareacodefromthislist.
Area Code Area Code Area Code Area Code
Afghanistan AF
Argentina AR
Australia AU
Austria AT
Belgium BE
Bhutan BT
Bolivia BO
Brazil BR
Cambodia KH
Canada CA
Chile CL
China CN
Colombia CO
Congo CG
CostaRica CR
Croatia HR
CzechRepublic CZ
Denmark DK
Ecuador EC
Egypt EG
ElSalvador SV
Ethiopia ET
Fiji FJ
Finland FI
France FR
Germany DE
GreatBritain GB
Greece GR
Greenland GL
HongKong HK
Hungary HU
India IN
Indonesia ID
Israel IL
Italy IT
Jamaica JM
Japan JP
Kenya KE
Kuwait KW
Libya LY
Luxembourg LU
Malaysia MY
Maldives MV
Mexico MX
Monaco MC
Mongolia MN
Morocco MA
Nepal NP
Netherlands NL
Antilles AN
NewZealand NZ
Nigeria NG
Norway NO
Oman OM
Pakistan PK
Panama PA
Paraguay PY
Philippines PH
Poland PL
Portugal PT
Romania RO
RussianFederation RU
SaudiArabia SA
Senegal SN
Singapore SG
SlovakRepublic SK
Slovenia SI
SouthAfrica ZA
SouthKorea KR
Spain ES
SriLanka LK
Sweden SE
Switzerland CH
Taiwan TW
Thailand TH
Turkey TR
Uganda UG
Ukraine UA
UnitedStates US
Uruguay UY
Uzbekistan UZ
Vietnam VN
Zimbabwe ZW
HT806PH-A0_BNGAFLK_ENG_4967.indd 38 2011-06-03 �� 10:36:17

Appendix 39A
ppendix
6
Language code ListUsethislisttoinputyourdesiredlanguageforthefollowinginitialsettings:[DiscAudio],[DiscSubtitle]and[DiscMenu].
Language Code Language Code Language Code Language Code
Afar 6565
Afrikaans 6570
Albanian 8381
Ameharic 6577
Arabic 6582
Armenian 7289
Assamese 6583
Aymara 6588
Azerbaijani 6590
Bashkir 6665
Basque 6985
Bengali;Bangla 6678
Bhutani 6890
Bihari 6672
Breton 6682
Bulgarian 6671
Burmese 7789
Byelorussian 6669
Chinese 9072
Croatian 7282
Czech 6783
Danish 6865
Dutch 7876
English 6978
Esperanto 6979
Estonian 6984
Faroese 7079
Fiji 7074
Finnish 7073
French 7082
Frisian 7089
Galician 7176
Georgian 7565
German 6869
Greek 6976
Greenlandic 7576
Guarani 7178
Gujarati 7185
Hausa 7265
Hebrew 7387
Hindi 7273
Hungarian 7285
Icelandic 7383
Indonesian 7378
Interlingua 7365
Irish 7165
Italian 7384
Japanese 7465
Kannada 7578
Kashmiri 7583
Kazakh 7575
Kirghiz 7589
Korean 7579
Kurdish 7585
Laothian 7679
Latin 7665
Latvian,Lettish 7686
Lingala 7678
Lithuanian 7684
Macedonian 7775
Malagasy 7771
Malay 7783
Malayalam 7776
Maori 7773
Marathi 7782
Moldavian 7779
Mongolian 7778
Nauru 7865
Nepali 7869
Norwegian 7879
Oriya 7982
Panjabi 8065
Pashto,Pushto 8083
Persian 7065
Polish 8076
Portuguese 8084
Quechua 8185
Rhaeto-Romance 8277
Rumanian 8279
Russian 8285
Samoan 8377
Sanskrit 8365
ScotsGaelic 7168
Serbian 8382
Serbo-Croatian 8372
Shona 8378
Sindhi 8368
Singhalese 8373
Slovak 8375
Slovenian 8376
Spanish 6983
Sudanese 8385
Swahili 8387
Swedish 8386
Tagalog 8476
Tajik 8471
Tamil 8465
Telugu 8469
Thai 8472
Tonga 8479
Turkish 8482
Turkmen 8475
Twi 8487
Ukrainian 8575
Urdu 8582
Uzbek 8590
Vietnamese 8673
Volapük 8679
Welsh 6789
Wolof 8779
Xhosa 8872
Yiddish 7473
Yoruba 8979
Zulu 9085
HT806PH-A0_BNGAFLK_ENG_4967.indd 39 2011-06-03 �� 10:36:17
Appendix40
Appendix
6
Trademarks and Licenses
ManufacturedunderlicensefromDolbyLaboratories.Dolbyandthedouble-DsymbolaretrademarksofDolbyLaboratories.
HDMI,theHDMIlogoandHigh-DefinitionMultimediaInterfacearetrademarksorregisteredtrademarksofHDMIlicensingLLC.
“DVDLogo”isatrademarkofDVDFormat/LogoLicensingCorporation.
DivX®,DivXCertified®andassociatedlogosaretrademarksofDivX,Inc.andareusedunderlicense.
ABOUTDIVXVIDEO:DivX®isadigitalvideoformatcreatedbyDivX,Inc.ThisisanofficialDivXCertified®devicethatplaysDivXvideo.Visitwww.divx.comformoreinformationandsoftwaretoolstoconvertyourfilesintoDivXvideo.
ABOUTDIVXVIDEO-ON-DEMAND:ThisDivXCertified®devicemustberegisteredinordertoplaypurchasedDivXVideo-on-Demand(VOD)movies.Toobtainyourregistrationcode,locatetheDivXVODsectioninyourdevicesetupmenu.Gotovod.divx.comformoreinformationonhowtocompleteyourregistration.
What is SIMPLINK?
SomefunctionsofthisunitarecontrolledbyTV’sremotecontrolwhenthisunitandLGTVwithSIMPLINKareconnectedthroughHDMIconnection.ControllablefunctionsbyLGTV’sremotecontrol;Play,Pause,Scan,Skip,Stop,PowerOff,etc.
y RefertotheTVowner’smanualforthedetailsofSIMPLINKfunction.
y LGTVwithSIMPLINKfunctionhasthelogoasshownabove.
y UseahigherversioncablethanHighSpeedHDMI™Cable.
HT806PH-A0_BNGAFLK_ENG_4967.indd 40 2011-06-03 �� 10:36:18
Appendix 41A
ppendix
6
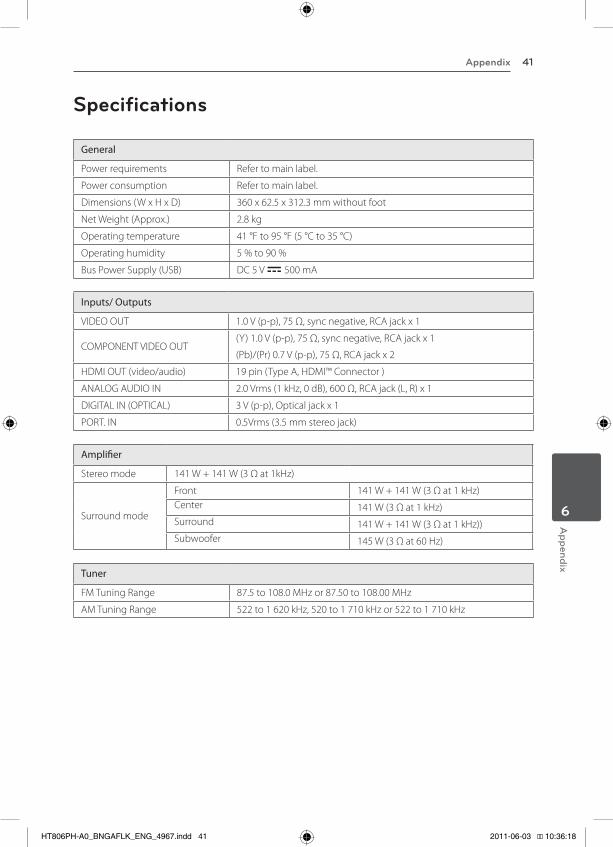
Specifications
General
Powerrequirements Refertomainlabel.
Powerconsumption Refertomainlabel.
Dimensions(WxHxD) 360x62.5x312.3mmwithoutfoot
NetWeight(Approx.) 2.8kg
Operatingtemperature 41°Fto95°F(5°Cto35°C)
Operatinghumidity 5%to90%
BusPowerSupply(USB) DC5V0500mA
Inputs/ Outputs
VIDEOOUT 1.0V(p-p),75Ω,syncnegative,RCAjackx1
COMPONENTVIDEOOUT(Y)1.0V(p-p),75Ω,syncnegative,RCAjackx1
(Pb)/(Pr)0.7V(p-p),75Ω,RCAjackx2
HDMIOUT(video/audio) 19pin(TypeA,HDMI™Connector)
ANALOGAUDIOIN 2.0Vrms(1kHz,0dB),600Ω,RCAjack(L,R)x1
DIGITALIN(OPTICAL) 3V(p-p),Opticaljackx1
PORT.IN 0.5Vrms(3.5mmstereojack)
Amplifier
Stereomode 141W+141W(3Ωat1kHz)
Surroundmode
Front 141W+141W(3Ωat1kHz)Center 141W(3Ωat1kHz)Surround 141W+141W(3Ωat1kHz))Subwoofer 145W(3Ωat60Hz)
Tuner
FMTuningRange 87.5to108.0MHzor87.50to108.00MHz
AMTuningRange 522to1620kHz,520to1710kHzor522to1710kHz
HT806PH-A0_BNGAFLK_ENG_4967.indd 41 2011-06-03 �� 10:36:18

Appendix42
Appendix
6
Front Speaker
Type 2Way2speaker
ImpedanceRated 3Ω
InputPower 141W
Max.InputPower 282W
NetDimensions(WxHxD) 260x1102x200mm
NetWeight 2.68kg
Rear Speaker
Type 1Way1Speaker
ImpedanceRated 3Ω
InputPower 141W
Max.InputPower 282W
NetDimensions(WxHxD) 102x193x81mm
NetWeight 0.5kg
Centre Speaker
Type 2Way2speaker
ImpedanceRated 3Ω
InputPower 141W
Max.InputPower 282W
NetDimensions(WxHxD) 250x100x88mm
NetWeight 0.6kg
Passive Subwoofer
Type 1Way1Speaker
ImpedanceRated 3Ω
InputPower 145W
Max.InputPower 290W
NetDimensions(WxHxD) 190x385x318mm
NetWeight 5.0kg
Designandspecificationsaresubjecttochangewithoutnotice.
HT806PH-A0_BNGAFLK_ENG_4967.indd 42 2011-06-03 �� 10:36:18

HT806PH-A0_BNGAFLK_ENG_4967.indd 43 2011-06-03 �� 10:36:18