Embed Size (px)
Citation preview

RD9000E
OWNER’S MANUAL
®
Read all safety precautions and instructions carefully before operating equipment.Ensure engine is stopped and level before performing any maintenance or service.
IMPORTANT:
Record product information to reference when ordering parts or obtaining warranty coverage.
Specification:Serial Number:Purchase Date:
www.firmangenerators.com
DUAL FUEL GENERATOR
9375 Starting Watts/7500 Rated Watts (GAS)
8400 Starting Watts/6700 Rated Watts (LPG)

NOTE:
[CAUTION]
WARNING
Do not operate the generator before you have read and understood the instructions.
Failure to do so could result in personal injury or equipment damage.
The generator is designed to give safe and dependable service if operated according
to instructions.
Indicates a strong possibility of severe personal injury, loss of life and equipment damage if
instructions are not followed.
Indicates a possibility of personal injury, or equipment damage if instructions are not followed.
Gives helpful information.
If a problem should arise, or if you have any questions about the generator, consult a dealer
selling FIRMAN generators.
Thank you for purchasing a FIRMAN generator.
This manual covers operation and maintenance of the FIRMAN generators. All information in this
publication is based on the latest production information available at the time of approval for
printing.
Pay special attention to statements preceded by the following words:
WARNING
Page 01

Safe Operation ChecklistSafe operation of the portable generator requires the completion of the following tasks:
Carbon Monoxide (CO) Alarm
Carbon monoxide (CO) alarm(s) in working order.
Smoke Alarm
Smoke alarm (s) in working order.
Generator Location
Generator placed in a Carbon Monoxide (CO) safe zone. See Generator Location to
reduce the Risk of Carbon Monoxide Poisoning.
Generator placed in a fire safe zone. See Generator Location to reduce the Risk of
Generator located on flat and level surface.
Oil and Fuel
Engine filled to proper oil level. See Add Engine Oil.
Fuel tank filled at or below baffle. See Add Fuel .
Inspect fuel lines, tank, cap and fittings each time before using generator. DO NOT
use if fuel leak or damage is found.
Electrical
When connecting to a buildings electrical system, install listed transfer equipment.
See Connecting to a Building Electrical System.
Electrical cords are rated for intended loads. See Cord Sets and Receptacles.
Electrical cords do not run through doorways, windows, holes in ceilings, walls or
Inspect electrical cords thoroughly before each use. DO NOT use if damaged.
All labeled electrical cord safeties are understood and being followed.
Operation
Start engine. See Starting the Engine.
Fire.
floors.
Page 02

1. SAFETY PRECAUTIONS .................................................................................04
2. SPECIFICATIONS..........................................................................................09
3. COMPONENTS............................................................................................10
4. PRE-OPERATION CHECKS............................................................................11
5. OPERATING PROCEDURES...........................................................................16
6. SERVICING THE GENERATOR.......................................................................22
7. “HOW-TO” MAINTENANCE...........................................................................23
8. PREPARATION FOR STORAGE.......................................................................26
9. TROUBLE SHOOTING...................................................................................27
10. WARRANTY..................................................................................................28
Table of Contents
Page 03

1. SAFETY PRECAUTIONS
Page 04
WARNING
POISONOUS GAS HAZARD.
Engine exhaust contains carbon monoxide, a poisonous gas that could
kill you in minutes. You CANNOT smell it, see it, or taste it. Even if you do
not smell exhaust fumes, you could still be exposed to carbon monoxide
gas.
Operate this product ONLY outside far away from windows, doors and vents to reduce
the risk of carbon monoxide gas from accumulating and potentially being drawn
towards occupied spaces.
•
•Install battery-operated carbon monoxide alarms or plug-in carbon monoxide alarms
with battery back-up according to the manufacturer’s instructions. Smoke alarms
cannot detect carbon monoxide gas.
•DO NOT run this product inside homes, garages, basements, crawlspaces, sheds, or
other partially-enclosed spaces even if using fans or opening doors and windows for
ventilation. Carbon monoxide can quickly build up in these spaces and can linger for
hours, even after this product has shut off.
•ALWAYS place this product downwind and point the engine exhaust away from
occupied spaces. If you start to feel sick, dizzy, or weak while using this product, shut
it off and get to fresh air RIGHT AWAY. See a doctor. You may have carbon monoxide
poisoning.

WARNING
Page 05
Starter cord kickback (rapid retraction) will pull hand and arm toward
engine faster than you can let go which could cause broken bones,
fractures, bruises, or sprains resulting in serious injury.
When starting engine, pull cord slowly until resistance is felt and then pull rapidly to
avoid kickback.••NEVER start or stop engine with electrical devices plugged in and turned on.
WARNING
Fuel and its vapors are extremely flammable and explosive
which could cause burns, fire, or explosion resulting in death
or serious injury.
WHEN ADDING OR DRAINING FUEL
Turn generator engine OFF and let it cool at least 2 minutes before removing fuel cap.
Loosen cap slowly to relieve pressure in tank.• Fill or drain fuel tank outdoors.••DO NOT overfill tank. Allow space for fuel expansion
If fuel spills, wait until it evaporates before starting engine.•Keep fuel away from sparks, open flames, pilot lights, heat, and other ignition sources.
Check fuel lines, tank, cap, and fittings frequently for cracks or leaks. Replace if
necessary.
DO NOT light a cigarette or smoke.
•••WHEN STARTING EQUIPMENT
Ensure spark plug, muffler, fuel cap, and air cleaner are in place.•DO NOT crank engine with spark plug removed.•
WHEN OPERATING EQUIPMENT
DO NOT operate this product inside any building, carport, porch, mobile equipment,
marine applications, or enclosure.•DO NOT tip engine or equipment at angle which causes fuel to spill.
DO NOT stop engine by moving choke control to “Choke” position ( )••WHEN TRANSPORTING, MOVING OR REPAIRING EQUIPMENT
Transport/move/repair with fuel tank EMPTY or with fuel shutoff valve OFF.••DO NOT tip engine or equipment at angle which causes fuel to spill.
Disconnect spark plug wire.•WHEN STORING FUEL OR EQUIPMENT WITH FUEL IN TANK
• Store away from furnaces, stoves, water heaters, clothes dryers, or other appliances
that have pilot light or other ignition source because they could ignite fuel vapors.
Page 06
WARNING
This generator does not meet U. S. Coast Guard Regulation 33CFR-183 and should not
be used on marine applications.••Failure to use the appropriate U. S. Coast Guard approved generator could result in
death or serious injury.
WARNING
Generator voltage could cause electrical shock or burn resulting in death
or serious injury.
Use listed transfer equipment, suitable for the intended use, to prevent backfeed by
isolating generator from electric utility workers.
When using generator for backup power, notify utility company.
Use a ground fault circuit interrupter (GFCI) in any damp or highly conductive area,
such as metal decking or steel work
DO NOT touch bare wires or receptacles.
DO NOT use generator with electrical cords which are worn, frayed, bare or otherwise
damaged.
DO NOT operate generator in the rain or wet weather.
DO NOT handle generator or electrical cords while standing in water, while barefoot,
or while hands or feet are wet.
DO NOT allow unqualified persons or children to operate or service generator.
••
•••••
WARNINGExhaust heat/gases could ignite combustibles, structures or
damage fuel tank causing a fire, resulting in death or serious
injury.
Contact with muffler area could cause burns resulting in
serious injury.
DO NOT touch hot parts and AVOID hot exhaust gases.
Allow equipment to cool before touching.
Keep at least 5 feet (1.5 m) of clearance on all sides of generator including overhead.
It is a violation of California Public Resource Code, Section 4442, to use or operate the
engine on any forest-covered, brush-covered, or grass-covered land unless the exhaust
system is equipped with a spark arrester, as defined in Section 4442, maintained in
effective working order. Other states or federal jurisdictions may have similar laws.
Contact the original equipment manufacturer, retailer, or dealer to obtain a spark
arrester designed for the exhaust system installed on this engine.
Replacement parts must be the same and installed in the same position as the original
parts.
••••
•

WARNING
Unintentional sparking could cause fire or electric shock resulting in death
or serious injury.
WHEN ADJUSTING OR MAKING REPAIRS TO YOUR GENERATOR
Disconnect the spark plug wire from the spark plug and place the wire where it cannot
contact spark plug.•WHEN TESTING FOR ENGINE SPARK
Use approved spark plug tester.•DO NOT check for spark with spark plug removed.•
WARNING
Starter and other rotating parts could entangle hands, hair, clothing, or
accessories resulting in serious injury.
NEVER operate generator without protective housing or covers.
DO NOT wear loose clothing, jewelry or anything that could be caught in the starter
or other rotating parts.
Tie up long hair and remove jewelry.
•••[CAUTION]Excessively high operating speeds could result in minor injury.
Excessively low operating speeds impose a heavy load.
DO NOT tamper with governor spring, links or other parts to increase engine speed.
Generator supplies correct rated frequency and voltage when running at governed speed.
DO NOT modify generator in any way.
••NOTE:
DO NOT exceed the generator’s wattage/amperage capacity.
Start generator and let engine stabilize before connecting electrical loads.
Connect electrical loads in OFF position, then turn ON for operation.
Turn electrical loads OFF and disconnect from generator before stopping generator.
Use generator only for intended uses.
If you have questions about intended use, ask dealer or contact local service center.
Operate generator only on level surfaces.
DO NOT expose generator to excessive moisture, dust, dirt, or corrosive vapors.
DO NOT insert any objects through cooling slots.
If connected devices overheat, turn them off and disconnect them from generator.
Shut off generator if:
-electrical output is lost;
-equipment sparks, smokes, or emits flames;
-unit vibrates excessively.
•••••••••••
Page 07
Page 08
DANGER
Liquid Petroleum Gas (LPG) is highly flammable and explosive.
Fire or explosion can cause severe burns or death. Unintentional startup can
result in entanglement, traumatic amputation or laceration.
•••••
•••
Keep any and all LPG away from skin at all times.
LPG is highly flammable and explosive .
Flammable gas under pressure can cause a fire or explosion if ignited.
LPG is heavier than air and can settle in low places while dissipating.
LPG has a distinctive odor added to help detect potential leaks quickly.
In any petroleum gas fire, flames should not be extinguished unless by doing
so the fuel supply valve can be turned OFF. This is because if a fire is
extinguished and a supply of fuel is not turned OFF, then an explosion hazard
could be created.
When exchanging LPG cylinders, be sure the cylinder valve is of the same type.
Always keep the LPG cylinder in an upright position.
LPG will burn skin if it comes in contact with it.
•

120/240V
ST190FDE-2-A9
211 lbs
29.8 X 21.1 X 21.7 in.
Rated AC Voltage
Phase
Power Factor
Engine Model
Engine Type
Voltage regulator
Gen
era
tor
Model RD9000E
AVR
Single Phase
1
Single Cylinder, 4-Stroke OHV Air Cooled
Displacement
Maximum output
Ignition System
Starting System
Fuel
Capacity Fuel Tank
439cc
Breakless Ignition Type, Flywheel Magneto
GAS/LPG(PROPANE)
6 Gallon
38 ozLubricating Oil Capacity
Counter Clockwise (Facing P.T.O.)
Float
Brush
Polyurethane Type
Carburetor Type
Air Cleaner
Alternator Type
P.T.O. shaft rotation
Dim
e-
nsi
on L X W X H
Dry Weight
En
gin
e
Page 09
15HP
2 . SPECIFICATIONS
Recoil/Electric
Running Watts
Starting Watts 9375Watts@60Hz(Gas) 8400Watts@60Hz(LPG)
7500Watts@60Hz(Gas) 6700Watts@60Hz(LPG)

3. COMPONENTS
Page 10
1
2
14
45
6
789
10
11
12
15
16
18
1. FUEL SELECTOR SWITCH
2. DIGITAL DISPLAY
3. GROUND TERMINAL
4. CIRCUIT BREAKER
5. SOCKET
6. IGNITION SWITCH
7. BATTERY SWITCH
8. FUEL GAUGE
9. FUEL TANK
13
3
17
10. FUEL TANK CAP
11. AIR CLEANER
12. RECOIL STARTER
13. LPG HOSE CONNECTOR
14. OIL FILLER CAP
15. MUFFLER
16. SUPPORTING LEGS
17. CHOKE LEVER
18. WHEELS

Page 11
Remove the Generator from the Shipping Carton
1. Set the shipping carton on a solid, flat surface.
2. Remove everything from the carton except the generator.
3. Carefully cut each corner of the box from top to bottom. Fold each side flat on
the ground to provide a surface area to install the wheel kit and support leg.
Install the Wheel Kit
[CAUTION]The wheel kit is not intended for over-the-road use.
1. Attach the support leg to the generator frame with cap screws and nuts.
2. Tip the generator slowly so that it rests on the wheels and support leg.
Install the Support Leg
4. PRE-OPERATION CHECKS
1.Before adding fuel and oil, tip the generator on it’s side.
2. Slide the M10x125 wheel bolt through the washer, bushing and wheel.
3. Slide the bolt through the mount point on the frame.
4. Fasten securely with the M10 lock nut.
5. Repeat steps 2-4 to attach the second wheel.

CHECK ENGINE OIL
Remove oil filter cap and check the engine
oil level.
Oil capacity:
Model................Upper level
RD9000E.............38 oz
Change oil if contaminated. (See “HOW-TO”
MAINTENANCE)
If oil level is below the lower level line, refill
with suitable oil (see table below) to upper
level line. Do not screw in the oil filler cap
when checking oil level.
Multigrade
Ambient -20 -10 0 10 20 30 40
-4 14 32 50 68 86 104
5W
10W
20W
#20
#30
#40
10W-30
10W-40
Single grade
CF
Page 12
Before checking or refilling oil, be sure the
generator is put on a stable and level surface
with engine stopped.
temperature

Check fuel level at fuel gauge.
CHECKING COMPONENTS
Do not refuel while smoking or near open flame or other such potential fire hazards.
Otherwise a fire accident could occur.
If fuel level is low, refill with unleaded automotive gasoline.
Fuel tank capacity:
RD9000E.............6 Gallon
Make sure you review each warning in order to prevent fire hazard.
Fuel leakage from fuel hose etc. ,
Tighten any loose bolts or nuts.
Check components for damage or breakage.
Check following items before starting engine:
Do not refill tank while engine is running or hot.
Close fuel valve before refueling with fuel.
Be careful not to admit dust, dirt, water or other foreign objects into fuel
Wipe off spilt fuel thoroughly before starting engine.
Keep away from open flames.
Be sure to use the fuel filter screen on the fuel filter neck.
CHECK ENGINE FUEL
WARNING
WARNING
Fuel must meet these requirements:
•Clean, fresh, unleaded gasoline.Octane rating of 86(R+M)/2 or higher.Research Octane Number(RON)91octane minimum.Gasoline up to 10% ethyl alcohol,90%unleaded is acceptable.Methyl Tertiary Butyl Ether(MTBE) andunleaded gasoline blend(max 15%MTBE by volume)are approved.Do not add oil to gasoline.Do not overfill fuel tank.Do not use gasoline older than 30 days.
••••
•••
NOTE: E15,E20 and E85 art NOT approved and should NOT be used, effects of old, stale or contaminated fuel are not warrantable.
Page 13

Page 14
1. Make sure the selector switch on the generator is in the off position.
2. Attach the LPG hose (included) to the LPG hose connector on the side of the
generator and tighten with a 19 mm or adjustable wrench.
Important: DO NOT use tape or any other type of sealant to seal LPG hose
connection.
3. Remove the safety plug or cap from the cylinder valve.
4. Attach the other end of the hose to the LPG connector on the cylinder and
hand tighten.
5. Check all connections for leaks by wetting the fittings with a solution of soap
and water. Bubbles which appear or bubbles which grow indicate that a leak
exists. If a leak exists at a fitting then turn off the gas valve at the tank and
tighten the fitting. Turn the gas back on and recheck the fitting with the soap
and water solution. If the leak continues or if the leak is not at a fitting then do
not use the generator and contact customer service.
NOTE:
[CAUTION]
Connecting Liquid Petroleum Gas (LPG) Cylinder
Use only standard 20 or 30 pound capacity LP tanks with Type 1, right hand
Acme threads.
Verify the requalification date on the tank has not expired.
All new cylinders must be purged of air and moisture prior to filling. Used
cylinders that have not been plugged or kept closed must also be purged.
The purging process should be done by a LPG supplier. (Cylinders from an
exchange supplier should have been purged and filled properly already).
Always position the cylinder so the connection between the valve and the
gas inlet won’t cause sharp bends or kinks in the hose.
If there is a strong smell of gas: Close off the gas supply at the cylinder. Use soapy
water, which will produce a large bubble at the point of any leak, to check the
hose, and connections on the cylinder valve and the generator. Do not smoke or
light a cigarette, or check for leaks using a match, open flame source or lighter.
Contact a qualified technician to inspect and repair the LPG system if a leak is
found, before using the generator.
Do not allow children to tamper or play with the cylinder or hose connections.
Use approved LPG cylinders equipped with an OPD (overfilling prevention
device) valve. Always keep the cylinder in a vertical position with the valve on
top and installed at ground level on a flat surface Cylinders must not be
installed near any heat source and should not be exposed to sun, rain, and dust.
When transporting and storing, turn off the cylinder valve and fuel valve, and
disconnect the cylinder. Plug the outlet, usually by a plastic protective cap, if
one is available. Keep cylinders away from heat and ventilated when in a vehicle.

CHECKING GENERATOR SURROUNDINGS
Make sure you review each warning in order to prevent fire hazard.
Keep area clear of inflammables or other hazardous materials.
Keep generator at least 3 feet (1 meter) away from buildings or other structures.
Only operate generator in a dry, well ventilated area.
Keep exhaust pipe clear of foreign objects.
Keep generator away from open flame.
Keep generator on a stable and level surface.
Do not block generator air vents with paper or other material.
Page 15
WARNING
Move the generator to the desired location.The generator is very easy to move.
CHECKING GROUND TERMINAL
The ground terminal is used to assist in properly grounding the generator to help protect
against electrical shock. Consult with a local electrician for grounding requirements in
your area.
THERE IS A PERMANENT CONDUCTOR BETWEEN THE GENERATOR (STATOR WINDING)
AND THE FRAME.

Page 16
5. OPERATING PROCEDURES
The LPG fuel valve (A) is to the LPG position .
The gas fuel valve (B) is to the Gas position.
Fuel Selector Switch
The fuel selector switch on the front panel of the generator is designed specifically to
choose between the fuel source desired, Gas or LPG.
A
BB
A

STARTING THE ENGINE
(a) Make sure the AC circuit breaker is in the OFF position. The generator may
be difficult to start if a load is connected.
Page 17
GAS
(b)Turn the fuel selector switch to the “GAS(A)” position.
(c)Move the choke lever to the “CHOKE” position.
(d)Flip the IGNITION SWITCH to the “ON” position.
(e)Turn the BATTERY SWITCH to the “ON” position.
(f)ELECTRIC START:
Press and hold the ignition switch to the “START” position. Release as the
engine begins to roll over. If the engine fails to start within five seconds,
release the switch and wait at least ten seconds before attempting to start the
engine again.
RECOIL START:
Pull the starter cord slowly until resistance is felt and then pull rapidly.
(g) After the engine started, return the choke lever gradually to "RUN” position.
(h) Warm up the engine without load for a few minutes.

Page 18
LPG
(a) Make sure the AC circuit breaker is in the OFF position. The generator may be difficult
to start if a load is connected.
(b)Fully open the LPG cylinder fuel knob. Turn the fuel selector switch to the
“LPG(A)” position.
(c)Move the choke lever to the “CHOKE” position.
(d)Flip the IGNITION SWITCH to the “ON” position.
(e)Turn the BATTERY SWITCH to the “ON” position.
(f)ELECTRIC START:
Press and hold the ignition switch to the “START” position. Release as the
engine begins to roll over. If the engine fails to start within five seconds,
release the switch and wait at least ten seconds before attempting to start the
engine again.
RECOIL START:
Pull the starter cord slowly until resistance is felt and then pull rapidly.
(g) After the engine started, return the choke lever gradually to "RUN” position.
(h) Warm up the engine without load for a few minutes.

USING ELECTRIC POWER
Be sure to ground the generator if the connected electrical equipment is grounded.NOTE:
(a) Check the digital display for proper voltage.
(b) Turn off the switch(es) of the electrical appliance(s) before connecting to the generator.
(c)Insert the plug(s) of the electrical appliance(s) into the receptacle.
(d) Check the amperage of the socket, and be sure not to take a current exceed the exceed the
specified amperage.
This generator is thoroughly tested and adjusted in the factory.
If the generator does not produce the specified voltage, consult your nearest FIRMAN
Generator dealer.
Be sure that the total wattage of all appliances does not exceed the rated output of the
generator.
When the circuit breaker or no-fuse breaker turns off during operation, the generator is
overloaded or the appliance is defective.
Stop the generator immediately, check the appliance and /or generator for overloading
or defect and repair as necessary.
(e) Make sure the AC CIRCUIT BREAKER is "ON". If the breaker is "OFF", set the breaker “ON”.
Page 19

Page 20
OPEN
Operation at High AltitudeThe density of air at high altitude is lower than at sea level. Engine power is
reduced as the air mass and air-fuel ratio decrease. Engine power and generator
output will be reduced approximately 3% for every 1000 feet of elevation above sea
level. This is a natural trend and cannot be changed by adjusting the engine. At
high altitudes increased exhaust emissions can also result due to the increased
enrichment of the air fuel ratio.
Other high altitude issues can include hard starting, increased fuel consumption
and spark plug fouling. To alleviate high altitude issues other than the natural
power loss, FIRMAN can provide a high altitude carburetor main jet.The alternative
main jet and installation instructions can be obtained by contacting Customer
Support. Installation instructions are also available in the Technical Bulletin area of
the FIRMAN internet site.
The part number and recommended minimum altitude for the application of the
high altitude carburetor main jet is listed in the table below.
In order to select the correct high altitude main jet it is necessary to identify the
carburetor model. For this purpose, a code is stamped on the side of the
carburetor. Select the correct main jet part number corresponding to the carburetor
code found on your particular carburetor.
Operation using the alternative main jet at elevations lower than the recommended
minimum altitude can damage the engine. For operation at lower elevations, the
standard main jet must be used. Operating the engine with the wrong engine
configuration at a given altitude may increase its emissions and decrease fuel
efficiency and performance.
WARNING
Standard main jet
Altitude main jet 1
Altitude main jet 2
439cc
490.131017.11
490.131017.12
490.131017.13
Altitude
3000-6000Feet
6000-8000Feet
0-3000Feet
STOPPING THE GENERATOR
(a) Turn off the power switch of the electric equipment or unplug the cord from receptacle of the
generator.
(b) Allow the engine about 3 minutes to cool down at no-load before stopping.
(d) Press the IGNITION SWITCH to "OFF" position.
( c)Turn the selector switch to the “OFF” position.
Page 21
(e) Turn the BATTERY SWITCH to the “OFF” position.
[CAUTION]
NOTE:
Always ensure that the Selector Switch and the Ignition Switch are in the “OFF” position
when the engine is not in use.
Always ensure that the Battery switch are in the “OFF” position when the engine
is not in use.
When turning off the generator after LPG operation, turn the fuel knob on LPG
cylinder off too. Make sure it is in the fully closed position.
If the engine will not be used for a period of two weeks or longer, please see the
Storage section for proper engine and fuel storage.

6. SERVICING THE GENERATOR
MAINTENANCE SCHEDULE
The electrical safety may only be checked by personnel authorized for this task.
SERVICING WORK
CHECKING ELECTRICAL SAFETY
3 years
● Check the air cleaner● Check oil level and refill to the upper level before starting the engine.● Check all the points indicated in "PRE-OPERATION CHECKS".
● Clean and wash air-cleaner element. More often if used in dirty or dusty environments.● Change engine oil.(The initial oil change must be conducted after the 25 hours operation.)● Check spark plug, and clean and adjust if necessary.● Check and clean the fuel shut-off valve.
● Replace air-cleaner element.○ Decarbonize cylinder head, valves and piston.○ Check and replace carbon brushes.
● Replace spark plug.○ Inspect control panel components.○ Check rotor and stator.
○ Replace engine mount rubber.○ Overhaul engine.● Change fuel lines.
300 hours orevery year
100 hours
50 hours(Weekly)
Daily
Servicing work should only be carried out by personnel qualified for this purpose.
All the works listed in the service plan are to be carried out in accordance with the
operating and service instructions for the motor.
We recommend that these works be carried out by an authorized service station.
NOTE:Initial oil change should performed after first 5 hours of use. Thereafter change oil every 50
hours. Before changing oil, check for a suitable way to dispose of the old oil. Do not pour it
down into sewage drains, onto garden soil or into open streams. Your local zoning
environmental regulations will give you more detailed instructions on proper disposal.
Items marked with a “O” required advanced skill and tools, so they should be done by the
distributor.
Page 22

7. "HOW-TO" MAINTENANCE
ENGINE OIL CHANGE
SERVICING THE AIR CLEANER
UP
Change engine oil every 50 hours.
(for a new engine, change oil after 5 hours.)
(a) Drain oil by removing the drain plug and
the oil filler cap while the engine is warm.
Please use a container to dump the
used oil for protecting the environment.
(b) Reinstall the drain plug and fill the engine
with oil until it reaches the upper level on the
oil filler cap.
Use fresh and high quality lubricating oil to the specified quantity.
If contaminated or deteriorated oil is used or the quantity of the engine oil is not
sufficient, the engine damage will result and its life will be greatly shortened.
Always keep the element clean.
(a) Take out the air cleaner, clean it well
in kerosene and dry it.
(b) After wetting the element by clean
engine oil squeeze it tight by hand.
(c) Lastly, put the element in the case
and install it securely.
Maintaining an air cleaner in proper
condition is very important. Dirt induced
through improperly installed, improperly
serviced, or inadequate elements
damages and wears out engines.
Page 23
NOTE:
ARRIBA

CLEANING AND ADJUSTING THE SPARK PLUG
CLEANING FUEL STRAINER
(a) If the plug is contaminated with carbon,
using a plug cleaner and wire brush.
(b) Adjust the electrode gap to 0.7 to
0.8 mm (0.028” to 0.031”).
SPARK PLUG: TORCH F6RTC equivalent.
Dirt and water in the fuel are removed
by the fuel strainer.
(a) Remove the strainer cup and throw
away water and dirt.
(b) Clean the screens and strainer cup
with gasoline.
(c) Tightly fasten the cup to main body,
making sure to avoid fuel leak.
Page 24

Page 25
Inspect Muffler and Spark Arrester
Inspect the muffler for cracks, corrosion, or other damage. Remove the spark arrester, if
equipped, and inspect for damage or carbon blockage. If replacement parts are required,
make sure to use only original equipment replacement parts.
• DO NOT touch hot parts and AVOID hot exhaust gases.
• Allow equipment to cool before touching.
• Replacement parts must be the same and installed in the same position as the original parts.
Exhaust heat/gases could ignite combustibles, structures or damage
fuel tank causing a fire, resulting in death or serious injury.
Contact with muffler area could cause burns resulting in serious injury.
• Keep at least 5 feet (1.5 m) of clearance on all sides of generator including overhead.
• Contact the original equipment manufacturer, retailer, or dealer to obtain a spark arrester
designed for the exhaust system installed on this engine.
Clean or replace spark arrester as follows:
1. Allow the engine to cool completely before servicing the spark arrester.
2. Remove the screw(A) holding the spark arrester(B) to the muffler(C).
3. Remove the spark arrester screen.
4. Carefully remove the carbon deposits from the spark arrester screen with a wire brush.
5. Replace the spark arrester if it is damaged.
6. Position the spark arrester in the muffler and attach with the screws..
WARNING
NOTE:
[CAUTION]
Failure to clean the spark arrester will result in degraded engine performance.
Federal and local laws and administrative requirements indicate when and where spark
arresters are required. When ordered, spark arresters are required for operation of this
generator in National Forest lands. In California, this generator must not be used on any
forest- covered land, brush-covered land, or grass- covered land unless the engine is
equipped with a spark arrester.
8. STORAGE
DRAINSCREW
The following procedures should be followed prior to storage of your generator for
periods of 3 months or longer.
Drain fuel from fuel tank carefully. Gasoline left in the fuel tank will eventually
deteriorate making engine-starting difficult.
Loosen the drain screw on the bottom of the carburetor float chamber, and drain the
fuel completely.
Change engine oil.
Check for loose bolts and screws, tighten them if necessary.
Clean generator thoroughly with oiled cloth. Spray with preservative if available.
NEVER USE WATER TO CLEAN GENERATOR.
Pull starter handle until resistance is felt, leaving handle in that position.
Store generator in a well ventilated, low humidity area.
Page 26
Generator Battery
This product is equipped with an automatic battery charging circuit. The battery
will receive charging voltage when the engine is running. The battery will maintain
a proper charge if the unit is used on a regular basis (about once every two weeks).
If it is used less frequently, the battery should be connected to a trickle charger or
battery maintainer to keep the battery properly charged. If the battery is not able
to start the engine, it can be started by manually pulling the engine recoil cord. If
the battery voltage is extremely low, the charging circuit may not be able to
re-charge the battery. In this case, the battery must be connected to a standard
automotive style battery charger for re-charging before it can be used.
Disconnect the Battery
1. Remove the protective cover from the black/negative battery lead.
2. Disconnect the black/negative lead from the black/negative terminal on the battery
and store the cap screw and nut.
3. Repeat steps 1-2 for the red/positive battery lead.
4. Store the battery in a cool, dry place.
Generator Storage

9. TROUBLE SHOOTING
Page 27
Problem Cause Solution
Generator will not start No fuel Add fuel
Faulty spark plug Replace spark plug
Unit loaded during start up Remove load from unit
Generator will not start;
Generator starts but runs roughly
Low oil level Fill crankcase to the proper level
Place generator on a �at, level surface
Choke in the wrong position Adjust choke
Spark plug wire loose Attach wire to spark plug
Generator will not start electrically Generator battery is dead Recharge generator battery
Battery switch is in the “OFF” position Turn battery switch to “ON” position
Generator shuts down during operation Out of fuel Fill the gasoline tank or fill LPG cylinder
Low oil level Fill crankcase to the proper level. Place
generator on a flat, level surface
Generator cannot supply enough power
or overheating
Generator is overloaded Review load and adjust. See “Power
Management”
Insufficient ventilation Check for air restriction. Move to a well
ventilated area
No AC output Cable not properly connected Check all connections
Connected device is defective Replace defective device
Circuit breaker is open Reset circuit breaker
Faulty brush assembly Replace brush assembly (Service Center)
Faulty AVR (auto voltage regulator) Replace AVR (Service Center)
Loose wiring Inspect and tighten wiring connections
Other Contact the help line
Repeated circuit breaker tripping Overload Review load and adjust. See “Power
Management”
Faulty cords or device Check for damaged, bare or frayed wires.
Replace defective device

Page 28
Warranty QualificationsFirman generator will register the warranty upon receipt of your Warranty Registration Card and a copy of your sales receipt from one of FIRMAN’s retail locations as proof of purchase. Please submit your warranty registration and your proof of purchase within ten (10) days of the date of purchase.
Repair/Replacement WarrantyFirman warrants to the original purchaser that the mechanical and electrical components will be free of defects in material and workmanship for a period of one (1) year (parts and labor) and two (2) years (parts) from the original date of purchase (90 days [parts and labor] and 180 days [parts] for commercial & industrial use. Transportationcharges on product submitted for repair or replacement under this warranty are the sole responsibility of the purchaser. This warranty only applies to the original purchaser and is not transferable.
Do Not Return the Unit to the Place of PurchaseContact FIRMAN Service Center and FIRMAN will troubleshoot any issue via phone or e-mail. If the problem is not corrected by this method, FIRMAN will, at its option, authorize evaluation, repair or replacement of the defective part or component at a FIRMAN Service Center. FIRMAN will provide you with a case number for warranty service. Please keep itfor future reference. Repairs or replacements without prior authorization, or at an unauthorized repair facility, will not be covered by this warranty.
Warranty ExclusionsThis warranty does not cover the following repairs and equipment:
Normal WearYour product needs periodic parts and service to perform well. This warranty does not cover repair when normal use has exhausted the life of a part or the equipment as a whole.
Installation, Use and MaintenanceThis warranty will not apply to parts and/or labor if your product is deemed to have been misused, neglected, involved in an accident, abused, loaded beyond the generator’s limits, modified, installed improperly or connected incorrectly to any electrical component. Normal maintenance is not covered by this warranty.
Other ExclusionsThis warranty excludes:– cosmetic defects such as paint, decals, etc.,– wear items,– accessory parts,– failures to due acts of God and other force majeure events beyond the manufacturer’s control,–problems caused by parts that are not original FIRMAN parts.
10.FIRMAN Two (2) Year Limited Warranty

Page 29
Limits of Implied Warranty and Consequential DamageFIRMAN disclaims any obligation to cover any loss of time, use of this product, freight, or any incidental or consequential claim by anyone from using this product. THIS WARRANTY IS IN LIEU OF ALL OTHER WARRANTIES, EXPRESS OR IMPLIED, INCLUDING WARRANTIES OF MERCHANTABILITY OR FITNESS FOR A PARTICULAR PURPOSE.A unit provided as an exchange will be subject to the warranty of the original unit. The length of the warranty governing the exchanged unit will remain calculated by reference to the purchase date of the original unit.This warranty gives you certain legal rights which may change from state to state. Your state may also have other rights you may be entitled to that are not listed within this warranty.
Contact InformationYou may contact FIRMAN at:
AddressSUMEC North AmericaAttn: Customer Service
2090 Baker Road Suite 304 Box 105Kennesaw Ga. 30144
www.firmangenerators.com
Customer ServiceMon-Fri 8:30 AM- 5:30 PM (EST)Toll Free:1-844-FIRMAN1(1-844-347-6261)
WWW.FIRMANGENERATORS.COMToll Free:1-844-347-6261
P/N:375741001 Rev 01
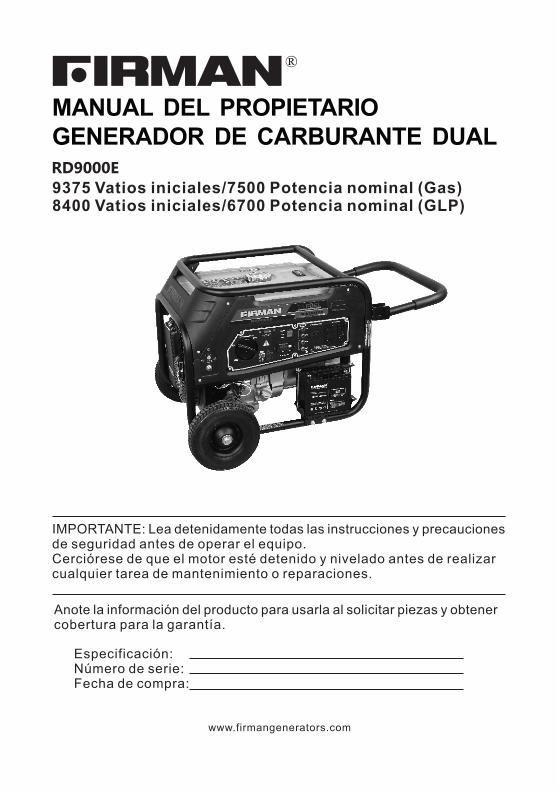
RD9000E
MANUAL DEL PROPIETARIO
®
IMPORTANTE: Lea detenidamente todas las instrucciones y precauciones de seguridad antes de operar el equipo.Cerciórese de que el motor esté detenido y nivelado antes de realizar cualquier tarea de mantenimiento o reparaciones.
Anote la información del producto para usarla al solicitar piezas y obtener cobertura para la garantía.
Especificación:Número de serie:Fecha de compra:
www.firmangenerators.com
GENERADOR DE CARBURANTE DUAL
9375 Vatios iniciales/7500 Potencia nominal (Gas) 8400 Vatios iniciales/6700 Potencia nominal (GLP)

NOTA:
[PRECAUCIÓN]
ADVERTENCIA
Sólo opere el generador tras haber leído y comprendido las instrucciones, ya que de lo
contrario podrían producirse lesiones personales o daños al equipo.
El generador se ha diseñado para proporcionar un servicio seguro y fiable si se opera conforme
a las instrucciones.
Indica una gran posibilidad de lesiones personales graves, peligro de muerte y daños al equipo
si no se acatan las instrucciones.
Indica una posibilidad de lesiones personales o daños al equipo si no se acatan las instrucciones.
Proporciona información útil.
Si surgiera un problema o si tuviera alguna pregunta sobre el generador, consulte a un
distribuidor de generadores FIRMAN.
Gracias por comprar un generador FIRMAN.
Este manual cubre la operación y mantenimiento de los generadores FIRMAN. Toda la
información en esta publicación se basa en los datos de producción más recientes disponibles
al momento de aprobarse la impresión.
Preste especial atención a las declaraciones que comienzan con las siguientes palabras:
Page 01
ADVERTENCIA

Lista de verificación para la operación segura
Para brindar una operación segura del generador portátil se deben realizar las siguientes
tareas:
Alarma de monóxido de carbono (CO)
Alarma(s) de monóxido de carbono (CO) en funcionamiento.
Detector de humo
Detector(es) de humo en funcionamiento.
Ubicación del generador
El generador se encuentra en una superficie plana y nivelada.
Aceite y combustible
El motor tiene el nivel adecuado de aceite. Vea la sección sobre cómo añadir aceite al motor.
El tanque de combustible se ha llenado a nivel o debajo del deflector. Vea la sección sobre
cómo añadir combustible.
.
Consideraciones eléctricas
Operación
Poner en marcha el motor. Vea la sección sobre cómo arrancar el motor.
Page 02
El generador se encuentra en una zona segura contra monóxido de carbono
(CO). Vea la sección sobre la ubicación del generador para reducir el riesgo
de envenenamiento por monóxido de carbono.
El generador se encuentra en una zona segura contra incendios. Vea la sección
sobre la ubicación del generador para reducir el riesgo de incendios.
Siempre revise las tuberías, tanque, tapa y acoples del sistema de combustible
antes de utilizar el generador. NO o utilice si hay una fuga de combustible o
detecta daños.
Cuando conecte la unidad al sistema eléctrico de un inmueble, instale el equipo
de transferencia indicado. Vea la sección sobre conexión al sistema eléctrico de
un inmueble.
Los cables eléctricos están diseñados para las cargas previstas. Vea la sección de
conjuntos de cables y tomacorrientes.
Los cables eléctricos no deben tenderse a través de puertas de entradas,
ventanas, agujeros en cielos rasos, paredes ni pisos.
Revise completamente los cables eléctricos antes de cada uso. NO los utilice
si están dañados.
Ha comprendido y acatado todos los rótulos de seguridad sobre cables eléctricos.
1. PRECAUCIONES DE SEGURIDAD .................................................................................04
2. ESPECIFICACIONES..........................................................................................08
3. COMPONENTES........ . . . . . . . . . . . . . . . . . . . . . . . . . . . . . . . . . . . . . . . . . . . . . . . . . . . . . . . . . . . . . . . . . . . . . . . . . . . . . . . . . . .11
4. REVISIONES PREVIAS A LA OPERACIÓN...........................................................................12
5. PROCEDIMIENTOS DE OPERACIÓN........................................................................16
6. REPARAR EL GENERADOR...... . . . . . . . . . . . . . . . . . . . . . . . . . . . . . . . . . . . . . . . . . . . . . . . . . . . . . . . . . . . . . . . . .20
7. PROCEDIMIENTOS DE MANTENIMIENTO....................................................................21
8. PREPARACIÓN PARA EL ALMACENAMIENTO...........................................................24
9. RESOLUCIÓN DE PROBLEMAS...................................................................................25
10.GARANTÍA... . . . . . . . . . . . . . . . . . . . . . . . . . . . . . . . . . . . . . . . . . . . . . . . . . . . . . . . . . . . . . . . . . . . . . . . . . . . . . . . . . . . . . . . . . . . . .26
Contenido
Page 03

1. PRECAUCIONES DE SEGURIDAD
Page 04
PELIGRO DE GAS VENENOSO.
El escape del motor contiene monóxido de carbono, un gas venenoso que
podría provocar la muerte en cuestión de minutos. NO TIENE olor, sabor
y es invisible. Incluso si usted no huele los humos de escape, de todas
maneras podría exponerse al gas del monóxido de carbono.
SÓLO opere este producto en exteriores lejos de ventanas, puertas y conductos para
reducir el riesgo de acumulación de monóxido de carbono y la potencial propagación
de este gas hacia espacios habitados.
•
•Instale alarmas de monóxido de carbono que operen o se respalden con pilas conforme
a las instrucciones del fabricante. Los detectores de humo no pueden identificar el gas
del monóxido de carbono.
•NO haga funcionar este producto dentro de la casa, garajes, sótanos, entresuelos,
entretechos, galpones ni en otros espacios parcialmente cerrados, incluso si hay
ventiladores o las puertas y ventanas están abiertas para su ventilación. El monóxido
de carbono puede acumularse rápidamente en tales lugares y puede permanecer
por horas, incluso tras haber apagado este producto.
•SIEMPRE coloque este producto a favor del viento y apunte el escape del motor en
dirección opuesta a los espacios habitados. Si comienza a sentirse mal, mareado o
débil mientras usa este producto, apáguelo y procure respirar aire fresco INMEDIATAMENTE.
Vea a un doctor. Puede estar sufriendo envenenamiento por monóxido de carbono.
PELIGRO
Utilizar un generador en interiores PUEDE PROVOCAR LA MUERTE EN CUESTIÓN DE MINUTOS.
Los gases del generador contienen monóxido de carbono, el cual es una sustancia venenosa que no puede verse ni olerse.
NUNCA lo utilice dentro de la casa o garaje, INCLUSO SI están abiertas las puertas y ventanas.
Sólo úselo EN EXTERIORES bien alejado de ventanas, puertas y conductos.
ADVERTENCIA

Page 05
El retroceso del cable del arrancador (retracción rápida) puede jalar hacia
el motor las manos y brazos atrapándolos rápidamente, lo cual podría causar
lesiones graves debido a fracturas, hematomas o esguinces.
Al poner en marcha el motor, jale el cable lentamente hasta que sienta cierta resistencia
y luego jálelo rápidamente para evitar que se retraiga de un golpe.••NUNCA arranque o detenga el motor si están enchufados y encendidos aparatos eléctricos.
El combustible y sus vapores son sumamente inflamables y
explosivos, lo cual podría provocar lesiones graves o la muerte
debido a quemaduras, incendios o explosiones.
AL AÑADIR O DRENAR COMBUSTIBLE
Apague el motor del generador y déjelo enfriar al menos 2 minutos antes de retirar la
tapa de combustible. Afloje la tapa lentamente para liberar la presión en el tanque.
Llene o drene el tanque de combustible en exteriores.
•
•NO llene el tanque excesivamente. Deje espacio para que se expanda el combustible.
Si se derrama combustible, espere hasta que se evapore antes de poner en marcha el motor.•Mantenga el combustible lejos de chispas, llamas expuestas, llamas piloto, calor y otras
fuentes de ignición.
Revise frecuentemente las tuberías, tanque, tapa y acoples del sistema de combustible
para constatar si presentan grietas o fugas. Reemplace todo componente que lo amerite.
NO encienda cigarrillos ni fume.
•••AL PONER EL EQUIPO EN MARCHA
Cerciórese de que estén instalados correctamente la bujía, silenciador, tapa de combustible
y depuradores de aire.•NO haga partir el motor si no está instalada la bujía.•
AL OPERAR EL EQUIPO
NO opere este producto dentro de ningún inmueble, cobertizo para automóviles, porche,
equipamiento móvil, aplicaciones marítimas o recintos cerrados.•NO incline el motor o equipamiento con un ángulo que podría derramar el combustible.
NO detenga el motor moviendo el control del cebador a la posición de obstrucción “Choke” ( ) ••AL TRANSPORTAR, MOVER O REPARAR EL EQUIPO
Transporte/mueva/repare el equipo con el tanque de combustible VACÍO o con la válvula de
corte APAGADA.••NO incline el motor o equipamiento con un ángulo que podría derramar el combustible.
Desconecte el cable de la bujía.•AL ALMACENAR COMBUSTIBLE O EQUIPAMIENTO CON GASOLINA EN EL TANQUE
•Almacénelo lejos de calderas, estufas, calentadores de agua, secadoras de ropa u otros
artefactos que tengan llama piloto u otras fuentes de ignición ya que estos podrían inflamar
los vapores del combustible.
ADVERTENCIA
ADVERTENCIA

Page 06
Este generador no cumple la normativa 33CFR-183 de la Guardia Costera de EE. UU. y
no debe utilizarse en aplicaciones marítimas.••Si no utiliza un generador aprobado por la Guardia Costera de EE. UU. podrían producirse
lesiones graves o la muerte.
El voltaje del generador podría provocar lesiones graves o la muerte debido
a descargas eléctricas o quemaduras.
Utilice el equipo de transferencia indicado, apto para el uso previsto, a fin de prevenir
el retorno de energía al aislar el generador de los trabajadores de la empresa eléctrica.
Notifique a la empresa de electricidad cuando utilice el generador como fuente de
respaldo de energía.Utilice un interruptor de circuito de fallos con conexión a tierra
(GFCI) en toda área húmeda o altamente conductiva, como plataformas metálicas o
estructuras de acero.
NO toque tomacorrientes o cables expuestos
NO utilice el generador con cables eléctricos que estén deteriorados, deshilachados,
al descubierto o dañados de alguna forma.
NO opere el generador en condiciones de lluvia o humedad.
NO manipule el generador ni cables eléctricos si está parado sobre agua, si está descalzo
o si sus manos o pies están mojados.
NO permita que niños o personas no calificadas operen o den mantenimiento al generador.
••
•••••
Los gases/calor del escape podrían inflamar materiales
combustibles, quemar estructuras o dañar el tanque de
combustible produciendo incendios que pueden causar la
muerte o lesiones graves.
El contacto con el área del silenciador puede provocar graves
lesiones debido a quemaduras.
NO toque las partes calientes y EVITE la exposición a gases calientes del escape.
Deje enfriar el equipo antes de tocarlo.
Mantenga un espacio de al menos 1,5 metros (5 pies) en todos los lados del generador,
incluso por encima.
Constituye una infracción al Código de recursos públicos de California, Sección 4442,
utilizar u operar el motor en cualquier terreno cubierto de árboles, arbustos o césped,
a menos que el sistema de escape esté equipado con un parachispas (según lo establecido
en la Sección 4442) que se encuentre en perfecto estado de funcionamiento. Puede que
otras jurisdicciones estatales o federales mantengan una legislación similar al respecto.
Comuníquese con el fabricante de equipo original, tienda minorista o distribuidor para
obtener un parachispas apto para el sistema de escape instalado en este motor.
Se deben utilizar piezas de recambio idénticas e instalarse en la misma posición de las
originales.
••••
•
ADVERTENCIA
ADVERTENCIA
ADVERTENCIA

Page 07
Las chispas accidentales podrían provocar lesiones graves o la muerte
debido a incendios o descargas eléctricas.
AL REALIZAR AJUSTES O REPARACIONES AL GENERADOR
Desconecte el cable de la bujía y colóquelo en un lugar que no entre en contacto con la bujía.•AL PROBAR EL ENCENDIDO DEL MOTOR
Utilice un probador de bujías autorizado.•NO verifique el encendido si no está instalada la bujía.•
El arrancador y otras piezas giratorias podrían atrapar las manos, cabello,
ropa o accesorios personales provocando graves lesiones.
NUNCA opere el generador si no están instaladas las cubiertas o carcasa protectora.
NO use ropa holgada, joyas ni otras prendas que podrían quedar atrapadas en el
arrancador u otras piezas giratorias.
Ate el cabello largo y quítese las joyas.
•••[PRECAUCIÓN]Las velocidades de funcionamiento excesivamente altas podrían provocar lesiones leves.
Las velocidades de funcionamiento excesivamente bajas hacen trabajar demasiado al generador.
NO altere la unidad con resortes reguladores, empalmes ni otras piezas para aumentar la
velocidad del motor. El generador suministra la frecuencia nominal y voltaje correctos
cuando funciona a la velocidad establecida.
NO modifique el generador de manera alguna.
•
•NOTA:
NO exceda la capacidad de amperaje/vatiaje del generador.
Ponga en marcha el generador y deje que el motor se estabilice antes de conectar las
cargas eléctricas.
Conecte las cargas eléctricas en la posición OFF (apagado), y luego enciéndalas.
Apague las cargas eléctricas y desconéctelas del generador antes de detenerlo.
Sólo utilice el generador para los usos previstos.
Si tiene alguna pregunta sobre el uso previsto, consulte al distribuidor o comuníquese
con el centro de servicio de su localidad.
Sólo opere el generador en superficies niveladas.
NO exponga el generador a humedad excesiva, polvo, suciedad o vapores corrosivos.
NO introduzca ningún tipo de objeto en las ranuras de enfriamiento.
Si se sobrecalientan los dispositivos conectados, apáguelos y desconéctelos del generador.
Apague el generador si:
-se corta la generación eléctrica;
-el equipo emite chispas, humos o llamas;
-la unidad vibra excesivamente.
•••••••••••
ADVERTENCIA
ADVERTENCIA

Page 08
PELIGRO
Gas Licuado de Petróleo (GLP) es altamente inflamable y explosivo.
El fuego o una explosión pueden causar quemaduras graves o la muerte. La puesta en
marcha no intencionada puede resultar en enredo, amputación traumática o laceración.
l GLP es altamente inflamable y explosivo.
l Gas inflamable bajo presión puede provocar fuego o explosión si se enciende.
l GLP es más pesado que el aire y se puede poner en lugares bajos mientras se disipa.
l GLP desprende un olor distintivo para ayudar a detectar rápidamente posibles
escapes.
l En caso de fuego por gas petróleo, no se deben apagar las llamas a menos que
hacerlo permita CERRAR la válvula de suministro de carburante. Esto se debe a que
si se apaga el fuego pero no se CIERRA el suministro de carburante se podría crear
riesgo de explosión.
l Al cambiar los cilindros de GLP, asegúrese que la válvula del cilindro sea del mismo
tipo.
l Mantenga el cilindro GLP siempre en posición vertical hacia arriba.
l GLP quema la piel si entra en contacto con ella.
l Mantenga siempre todo GLP alejado de la piel.
••••••
••••

120/240V
95 kg (211 lbs)
75.8 X 53.6 X 55.2 cm. (29.8 X 21.1 X 21.7 pulg)
Tensión nominal de CA
Fase
Factor de potencia
Modelo de motor
Tipo de motor
Regulador de voltajeGen
era
do
r
Modelo RD9000E
8400 vatios a 60 Hz(Gas)
Regulador automático de voltaje (AVR)
Monofásico
1
Monocilíndrico, 4 tiempos, OHV (válvulas en la culata), enfriado por aire
Cilindrada
Potencia máxima
Sistema de encendido
Sistema de arranque
Combustible
Capacidad del tanque
de combustible
439cc
Encendido electrónico, volante magnético
Gas/GLP
22 L (6 gal)
38 ozCapacidad del aceitelubricante
Antihorario (apuntando hacia la toma de fuerza)
Flotador
Escobilla
Tipo de poliuretano
Tipo de carburador
Depurador de aire
Tipo de alternador
Rotación del eje de la toma de fuerza
Dim
ensi
ón
Lar X Anc X Alt
Peso en seco
Mo
tor
Page 09
15HP
2 . ESPECIFICACIONES
Retroceso/eléctrico
Vatios de funcionamiento
Vatios de arranque9375 vatios a 60 Hz(Gas)
ST190FDE-2-A9
8400 vatios a 60 Hz(GLP)
6700 vatios a 60 Hz(GLP)
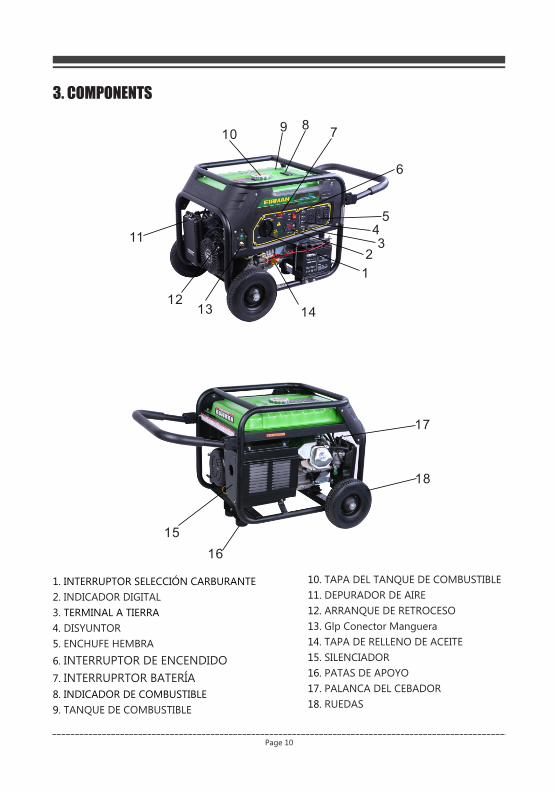
3. COMPONENTS
Page 10
1
2
14
45
6
789
10
11
12
15
16
18
13
3
17
1. INTERRUPTOR SELECCIÓN CARBURANTE
2. INDICADOR DIGITAL
3. TERMINAL A TIERRA
4. DISYUNTOR
5. ENCHUFE HEMBRA
6. INTERRUPTOR DE ENCENDIDO
7. INTERRUPRTOR BATERÍA
8. INDICADOR DE COMBUSTIBLE
9. TANQUE DE COMBUSTIBLE
10. TAPA DEL TANQUE DE COMBUSTIBLE
11. DEPURADOR DE AIRE
12. ARRANQUE DE RETROCESO
13. Glp Conector Manguera
14. TAPA DE RELLENO DE ACEITE
15. SILENCIADOR
16. PATAS DE APOYO
17. PALANCA DEL CEBADOR
18. RUEDAS

Page 11
Retirar el generador de la caja de embalaje
Instalar el kit de ruedas
[PRECAUCIÓN]El kit de ruedas no está diseñado para uso vial.
1. Coloque la pata de apoyo en el armazón del generador con tornillos de casquete y tuercas.
2. Incline lentamente el generador de manera que descanse en las ruedas y patas de apoyo.
Instalar la pata de apoyo
4. REVISIONES PREVIAS A LA OPERACIÓN
1. Coloque la caja en una superficie firme y plana.
2. Retire todos los componentes de la caja, excepto el generador.
3. Corte cuidadosamente cada esquina de la caja de cartón de arriba hacia abajo.
Extienda cada lado de la caja en el piso para proporcionar un área en la cual instalar el kit
de ruedas y patas de apoyo.
1. Antes de añadir el combustible y aceite, ponga el generador de costado.
2. Deslice el perno a través de la rueda(M10X125), del punto de montaje en el armazón y
de la arandela (si se incluye).
3. Inserte el pasador en el perno.
4. Sujételo firmemente con la tuerca.
5. Repita los pasos 2 al 4 para instalar la otra rueda.

REVISAR EL ACEITE DEL MOTOR
TAPA DE RELLENO DE ACEITE(INDICADOR DE ACEITE)
NIVEL SUPERIOR
NIVEL INFERIOR
Retire la tapa de relleno de aceite y revise el
nivel de aceite del motor.
Capacidad del aceite:
Modelo................Nivel superior
RD9000E.............1100 ml (38 oz líq)
Cambie el aceite si está contaminado. (Vea los
PROCEDIMIENTOS DE MANTENIMIENTO)
Si el nivel de aceite se encuentra debajo de la
línea inferior, llene con aceite adecuado
(vea la tabla abajo) hasta la línea superior.
No atornille la tapa de relleno de aceite cuando
esté revisando el nivel.
Multigrado
-20 -10 0 10 20 30 40
-4 14 32 50 68 86 104
5W
10W
20W
Nº20
Nº30
Nº40
10W-30
10W-40
Monogrado
CF
Page 12
Antes de revisar o llenar el aceite, cerciórese de
colocar el generador en una superficie estable y
nivelada con el motor detenido.
Temperatura ambiente

Revise el nivel de gasolina en el indicador de combustible.
REVISAR COMPONENTES
No llene combustible mientras esté fumando o se encuentre cerca de una llama abierta u otro
potencial peligro de inflamación, ya que podría producirse un incendio accidental.
Si el nivel está bajo, llene con gasolina
automotriz sin plomo.
Capacidad del tanque de combustible:
RD9000E.............21 L (5.5 gal)
Cerciórese de revisar cada una de las advertencias a fin de prevenir peligros de incendio.
Derrames de gasolina en la manguera del sistema de combustible, etc.
Apriete todos los pernos o tuercas que estén aflojados.
Revise si hay componentes dañados o quebrados.
Revise lo siguiente antes de poner en marcha el motor:
No llene el tanque mientras el motor esté en marcha o caliente.
Cierre la palanca de combustible antes de recargar gasolina.
Cerciórese de que no entre polvo, suciedad, agua ni otros objetos extraños en la gasolina
Limpie la gasolina derramada completamente antes de poner en marcha el motor.
Mantenga el generador lejos de llamas abiertas.
Cerciórese de usar la rejilla del filtro de
combustible en el cuello del filtro.
REVISAR EL COMBUSTIBLE DEL MOTOR
Page 13
El combustible debe cumplir los
siguientes requisitos:
•Gasolina limpia, reciente, sin plomo.Octanaje de 86(R+M)/2 o superior.91 octanos RON como mínimo.Gasolina hasta con un 10% de alcohol etílico, 90% sin plomo es aceptable.Se acepta mezcla de éter metil tert-butílico (MTBE) y gasolina sin plomo (máx 15% de MTBE por volumen).No añada aceite a la gasolina.No llene el tanque excesivamente.No utilice gasolina almacenada por más de 30 días.
•••••••
NOTA: NO se aprueban ni deben usarse mezclas E15, E20 ni E85; no se garantizan resultados óptimos con combustible antiguo, rancio o contaminado.
ADVERTENCIA
ADVERTENCIA

Page 14
Conectar el cilindro de Gas Licuado de Petróleo (GLP)
1. Asegúrese que la del generador esté cerrada interruptor selección carburante (posición OFF)2. Enganche la manguera GLP (incluida) al conector de la manguera GLP a un lado del generador y ajústela con una llave de ajuste de 19mm.
Importante: NO utilice cinta adhesiva o cualquier otro tipo de sellador para sellar
conexión de la manguera GLP.
3. Quite el tapón de seguridad de la válvula del cilindro.
4. Enganche el otro extremo de la manguera del conector GLP en el cilindro y asegúrelo
manualmente.
5. Asegúrese de que no haya escapes en las conexiones mojando las terminales con una
solución de jabón y agua. La aparición de burbujas o burbujas que crecen indican de la
existencia de un escape. Si existe un escape en una de las terminales cierre la válvula de
gas en el depósito y ajuste la terminal. Vuelva a encender el gas y vuelva a comprobar la
terminal con la solución de agua y jabón. Si el escape persiste o si el escape no se
encuentra en la terminal, no utilice el generador y contacte con Servicio al Cliente.
NOTA:Utilice solo depósitos LP estándar de 9 o 13 quilos de capacidad con Tipo 1, roscas
Acme mano derecha.
Verifique que la fecha de recalificación en el depósito no haya vencido.
Se deben purgar de aire y humedad todos los cilindros nuevos antes de llenar. Los
cilindros ya usados que han sido conectados o permanecido cerrados también deben
ser purgados.
El proceso de purgado debería llevarlo a cabo un proveedor de GLP.
(Los cilindros de un proveedor de cambio ya deberían haber sido purgados y llenados).
Posicione siempre el cilindro de manera que la conexión entre la válvula y la entrada de
gas no causen curvas cerradas o torceduras en la manguera.
No permitan a niños jugar o manipular los cilindros o conexiones de la manguera.
Utilice cilindros de GLP aprobados equipados con una válvula OPD (Dispositivo de
Prevención de Sobrellenado). Guarde siempre el cilindro en posición vertical con la
válvula en la parte de arriba e instalada a nivel del suelo en una superficie plana. Los
cilindros no deben ser instalados cerca de fuentes da calor y no deben ser expuestos al
sol, lluvia y polvo. Al transportar o guardar, apague la válvula del cilindro y la válvula del
carburante, y desconecte el cilindro. Tape la toma de corriente, habitualmente con un
tapón de plástico de protección, si se encuentra disponible. Mantenga los cilindros
alejados del calor y ventilados cuando se encuentren en un vehículo.
En caso de fuerte olor a gas: cierre el suministro de gas del cilindro. Utilice agua con jabón,
que producirá una gran burbuja donde exista un escape, para supervisar la manguera, la
conexiones en la válvula del cilindro y el generador. No fume ni encienda un cigarrillo, o
compruebe si hay escapes utilizando una cerilla, fuente de llama abierta o un encendedor.
Contacte con una técnico cualificado para que inspeccione y repare el sistema GLP en caso
de escape antes de usar el generador.
[PRECAUCIÓN]

REVISAR LAS INMEDIACIONES DEL GENERADOR
Cerciórese de revisar cada una de las advertencias a fin de prevenir peligros de incendio.
Mantenga el área libre de materiales peligrosos o inflamables.
Mantenga el generador a una distancia mínima de 1 metro (3 pies) de inmuebles u
otras estructuras.
Sólo opere el generador en áreas secas y bien ventiladas
Mantenga el tubo de escape libre de objetos extraños.
Mantenga el generador lejos de llamas abiertas.
Mantenga el generador en una superficie estable y nivelada.
No obstruya los conductos de ventilación del generador con papel ni otro tipo de materiales.
Page 15
Mueva el generador a la ubicación deseada. Es muy sencillo trasladar el generador.
REVISAR EL TERMINAL A TIERRA
El terminal a tierra se utiliza para conectar debidamente a tierra el generador a fin de
protegerlo contra descargas eléctricas. Consulte a un electricista de su localidad para
informase sobre los requisitos de conexión a tierra de su área.
EXISTE UN CONDUCTOR PERMANENTE ENTRE EL GENERADOR (BOBINADO DEL INDUCTOR)
Y EL ARMAZÓN.
ADVERTENCIA
Page 16
5. PROCEDIMIENTOS DE OPERACIÓN
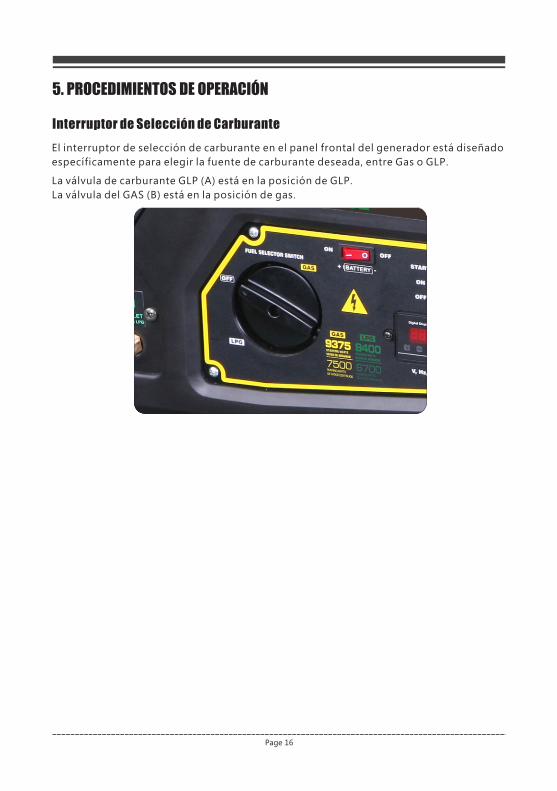
Interruptor de Selección de Carburante
El interruptor de selección de carburante en el panel frontal del generador está diseñado
específicamente para elegir la fuente de carburante deseada, entre Gas o GLP.
La válvula de carburante GLP (A) está en la posición de GLP.
La válvula del GAS (B) está en la posición de gas.

ARRANCAR EL MOTOR
Page 17
GAS
(a) Asegúrese que el disruptor de circuito AC esté en la posición OFF. Puede que sea
difícil arrancar el motor si una carga está conectada.
(b) Gire la la posición “Gas(A)”.interruptor selección carburante
(c) Mueva la palanca del estrangulador hacia la posición de “CHOKE” (estrangular)
(d) Gire el INTERRUPTOR DE ENCENDIDO a la posición “ON”.
(e) Gire el INTERRUPTOR DE LA BATERÍA HACIA la posición “ON”.
(f) ARRANQUE ELÉCTRICO:
Pulse y aguante el botón de encendido en la posición “START”. Suéltelo cuando el motor
empiece a rodar. Si el motor no arranca al cabo de 5 segundos, suelte el interruptor y
espere al menos diez segundos antes de volver a intentar arrancarlo.
ARRANQUE DE RETROCESO:
Tire de la cuerda de arranque lentamente hasta que note Resistencia y luego tire
rápidamente.
(g) Una vez el motor haya arrancado, vuela a poner la palanca del estrangulador en
posición de “RUN”(En funcionamiento)
(h) Caliente el motor sin carga durante unos minutos.

GLP
Page 18
(a) Asegúrese de que el disruptor del circuito AC esté en posición OFF (Apagado). Puede
resultar difícil arrancar el generador si una carga está conectada.
(b) Abra completamente la perilla de combustible del cilindro GLP. Gire la interruptor
selección carburante la posición “LPG(A)” (Encendido).
(c) Mueva la palanca del estrangulador hacia la posición “CHOKE” (Estrangular)
(d) Ponga el INTERRUPTOR DE ENCENDIDO en posición “ON”.
(e) Gire el INTERRUPTOR DE LA BATERÍA en posición “ON”.
(f) ARRANQUE ELÉCTRICO:
Pulse y aguante el botón de encendido en la posición “START” (Arrancar). Suéltelo cuando
el motor empiece a rodar. Si el motor no arranca al cabo de cinco segundos, suelte el
interruptor y espere al menos diez segundos antes de volver a intentar arrancarlo.
ARRANQUE DE RETROCESO:
Tire de la cuerda de arranque lentamente hasta que note Resistencia y luego tire de ella
rápidamente.
(g) Una vez el motor haya arrancado, vuelva a poner la palanca del estrangulador en
posición de “RUN”(En funcionamiento).
(h) Caliente el motor sin carga durante unos minutos.

UTILIZAR LA ENERGÍA ELÉCTRICA
Cerciórese de conectar a tierra el generador si el equipo eléctrico posee puesta a tierra.NOTA:
(a) Revise que el voltaje sea adecuado en la pantalla digital.
(b) Apague el o los interruptores de los artefactos eléctricos antes de conectar el generador.
(c)Introduzca la o las clavijas de los artefactos eléctricos en el tomacorriente.
(d) Revise el amperaje del enchufe hembra y cerciórese de que la corriente no exceda el amperaje
especificado.
Este generador se ha probado y ajustado completamente en la fábrica.
Si no produce el voltaje especificado, consulte al distribuidor FIRMAN más cercano.
Compruebe que el vatiaje total de todos los artefactos no exceda la potencia nominal del
generador.
Cuando se apague el disyuntor o cortacircuito sin fusible durante el funcionamiento, significa
que el generador está sobrecargado o que el artefacto tiene algún desperfecto.
Detenga inmediatamente el generador, revise si el artefacto y/o el generador están sobrecargados
o presentan desperfectos y repárelos según sea necesario.
(e) Cerciórese de que el DISYUNTOR DE CA (Circuit Breaker) esté en la posición "ON".
Si se encuentra en "OFF", colóquelo en “ON”.
Page 19
ADVERTENCIA

Page 20
OPEN
Operación a gran altitudLa densidad del aire a grandes alturas es inferior que a nivel del mar. La potencia del
motor se reduce a medida que disminuye el índice de aire-combustible y masa de aire.
La potencia del motor y del generador se reducirán aproximadamente un 3% por cada
305 metros (1000 pies) de elevación sobre el nivel del mar. Ello es una tendencia natural
y no puede modificarse ajustando el motor. También es posible que se produzcan mayores
emisiones a altas altitudes debido al mayor enriquecimiento del índice de aire-combustible.
Otros problemas derivados de una alta altitud pueden incluir dificultades para arrancar
el motor, mayor consumo de combustible y residuos en la bujía. Para atenuar problemas
diferentes a la pérdida de potencia natural que se producen a altas altitudes, FIRMAN puede
proporcionar un surtidor principal de carburador de alta altitud. Es posible obtener el
surtidor principal opcional e instrucciones de instalación comunicándose con el Servicio
al cliente. También encontrará instrucciones de instalación en la sección de boletín técnico
del sitio de FIRMAN en Internet.
El número de pieza y la altitud mínima recomendada para el surtidor principal de carburador
de alta altitud aparecen en la siguiente tabla.
A fin de seleccionar el surtidor principal de alta altitud es necesario identificar el modelo
de carburador. Para este propósito, aparece impreso un código en el costado del carburador.
Seleccione el número de pieza correcto del surtidor principal correspondiente al código
que se encuentra en su carburador en particular.
La operación utilizando el surtidor principal opcional a elevaciones inferiores a la altitud
mínima recomendada puede dañar el motor. Para operaciones a elevaciones inferiores,
debe utilizarse el surtidor principal estándar. Operar el motor con la configuración de
motor incorrecta a una altitud dada puede aumentar sus emisiones y disminuir la eficacia
y rendimiento del consumo de combustible.
Surtidor principal estándar
Surtidor principal de altitud 1
Surtidor principal de altitud 2
Altitud
3000-6000pies
6000-8000pies
0-3000pies
ADVERTENCIA
490.131017.11
490.131017.12
490.131017.13
439cc

DETENER EL GENERADOR
Page 21
a) Cierre el interruptor de corriente del equipo eléctrico o desconecte el cable del
receptor del generador.
b) Dele unos 3 minutos al motor para que se enfríe hasta sin-carga antes de apagarlo.
c) Gire la la posición “OFF” (Apagado).interruptor selección carburante
d) Pulse el interruptor del motor a la posición “OFF”.
e) Gire el interruptor de la bateria hacia la posición “OFF”.
[PRECAUCIÓN]
Asegúrese siempre que la i el Interruptor del Motor están interruptor selección carburante
en posición “OFF” cuando el motor no se esté usando.
Asegúrese siempre que el interruptor de la Batería está en posición “OFF” cuando el
motor no se esté usando.
NOTA:Cuando se apague el generador después del manejo GLP, cierre también la perilla de
carburante del cilindro GLP. Asegúrese que está completamente en la posición de cerrado.
Si no se utiliza el motor durante un periodo de dos semanas o más, por favor vea la sección
de almacenamiento para el buen almacenaje del motor y carburante.

6. REPARAR EL GENERADOR
CALENDARIO DE MANTENIMIENTO
Los aspectos de seguridad eléctrica sólo deben estar a cargo de personal autorizado para dicha tarea.
FAENAS DE REPARACIÓN
REVISAR LA SEGURIDAD ELÉCTRICA
3 años
● Revise el depurador de aire.● Revise el nivel de aceite y llénelo hasta el nivel superior antes de poner en marcha el motor.● Revise todos los puntos indicados en "REVISIONES PREVIAS A LA OPERACIÓN"
● Limpie y lave el elemento del depurador de aire. Con mayor frecuencia si la unidad se utiliza en entornos sucios o polvorientos.● Cambie el aceite del motor. (El recambio inicial debe efectuarse después de 25 horas de funcionamiento).● Revise la bujía, y límpiela y ajústela si fuera necesario.● Revise y limpie la válvula de corte de combustible.
● Reemplace el elemento del depurador.○ Descarbure las válvulas, pistón y culata del cilindro.○ Revise y reemplace las escobillas de carbón.
● Reemplace la bujía.○ Inspeccione los componentes del panel de control.○ Revise el rotor y el inductor.
○ Reemplace la goma de montaje del motor.○ Ponga a punto el motor.● Cambie las tuberías del sistema de combustible.
300 horas o anualmente
100 horas
50 horas (semanalmente)
Periódicamente
Las faenas de reparación sólo deben efectuarse por personal calificado para tales tareas. Todas
las faenas indicadas en el plan de reparación deben realizarse en conformidad con las instrucciones
de funcionamiento y mantenimiento del motor.
Recomendamos efectuar tales tareas en un centro de servicio autorizado.
NOTA:El recambio de aceite inicial debe efectuarse después de las primeras 5 horas de uso.
Posteriormente, cambie el aceite cada 50 horas. Antes de cambiar el aceite, busque una manera
adecuada de desechar el aceite antiguo. No lo vierta en los sistemas de alcantarillado, en tierra
de jardín ni en arroyos. Consulte las normas medioambientales de su localidad para obtener
mayor información sobre cómo desechar debidamente el aceite. Los puntos identificados con
un símbolo “O” requieren herramientas y conocimientos avanzados, por lo cual deben ser
efectuados por el distribuidor.
Page 22
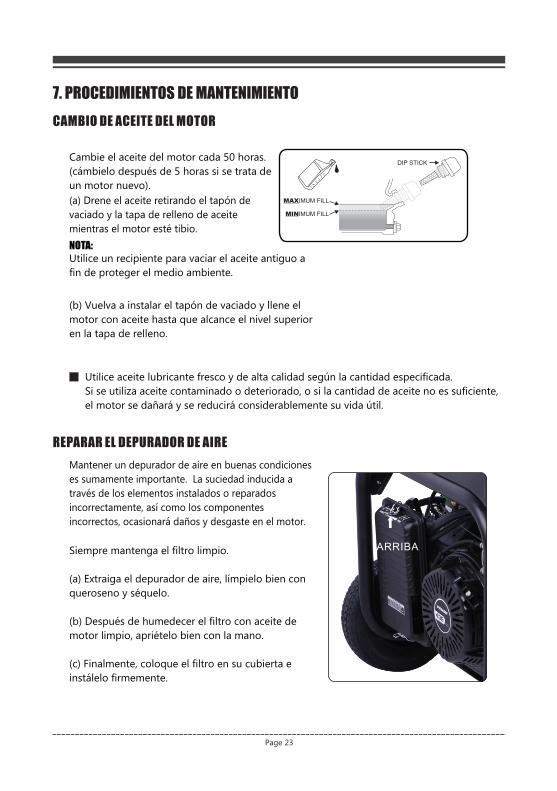
7. PROCEDIMIENTOS DE MANTENIMIENTO
CAMBIO DE ACEITE DEL MOTOR
REPARAR EL DEPURADOR DE AIRE
ARRIBA
Cambie el aceite del motor cada 50 horas.
(cámbielo después de 5 horas si se trata de
un motor nuevo).
(a) Drene el aceite retirando el tapón de
vaciado y la tapa de relleno de aceite
mientras el motor esté tibio.
Utilice un recipiente para vaciar el aceite antiguo a
fin de proteger el medio ambiente.
(b) Vuelva a instalar el tapón de vaciado y llene el
motor con aceite hasta que alcance el nivel superior
en la tapa de relleno.
Utilice aceite lubricante fresco y de alta calidad según la cantidad especificada.
Si se utiliza aceite contaminado o deteriorado, o si la cantidad de aceite no es suficiente,
el motor se dañará y se reducirá considerablemente su vida útil.
Siempre mantenga el filtro limpio.
(a) Extraiga el depurador de aire, límpielo bien con
queroseno y séquelo.
(b) Después de humedecer el filtro con aceite de
motor limpio, apriételo bien con la mano.
(c) Finalmente, coloque el filtro en su cubierta e
instálelo firmemente.
Mantener un depurador de aire en buenas condiciones
es sumamente importante. La suciedad inducida a
través de los elementos instalados o reparados
incorrectamente, así como los componentes
incorrectos, ocasionará daños y desgaste en el motor.
Page 23
NOTA:

LIMPIAR Y AJUSTAR LA BUJÍA
LIMPIAR EL COLADOR
(a) Si la bujía está contaminada con carbón,
utilice un limpiador de bujías o un cepillo de
alambre.
(b) Ajuste la separación de electrodos en 0,7
a 0,8 mm (0,028” a 0,031”).
BUJÍA: Equivalente a TORCH F6RTC.
El colador de combustible permite eliminar la
suciedad y agua.
(a) Retire la copa del colador y elimine el agua y
suciedad.
(b) Limpie con gasolina las rejillas y la copa del
colador.
(c) Apriete firmemente la copa al cuerpo principal,
cerciorándose de no derramar combustible.
Page 24

Page 25
Inspeccione el silenciador y el supresor de chispas
Inspeccione el silenciador en busca de grietas, corrosión u otros daños. Quite el supresor
de chispas, si está instalado, y compruebe que no haya daños u obstrucción de carbono.
Si hacen falta repuestos, asegúrese que solo utiliza piezas de repuesto originales.
ADVERTENCIA
El calor o gas de escape puede encender combustibles, estructuras o
dañar el depósito de carburante originando fuego, causando la muerte
o lesiones graves.
El contacto con la zona del silenciador podría provocar quemaduras y
en consecuencia lesiones graves.
NO toque la parte caliente y EVITE los gases de escape.
Permita que el equipo se enfríe antes de tocarlo.
Deje 1.5m de espacio libre en todos los costados del generador incluso por arriba.
Contacte con el fabricante, minorista o comerciante del equipo original para obtener
un supresor de chispas diseñado para el sistema de escape instalado en el motor.
Las piezas de repuesto tienen que ser las mismas y ser instaladas en la misma posición
que las partes originales.
Limpie o reponga el supresor de chispas de la siguiente forma:
1. Permita que el motor se enfríe completamente antes de tratar el supresor de chispas.
2. Quite el tornillo (A) que sujeta el supresor de chispas (B) con el silenciador (C).
3. Quite la pantalla del supresor de chispas.
4. Quite con cuidado los depósitos de carbono de la pantalla del supresor de chispas con
un cepillo de alambre.
5. Reponga el supresor de chispas si está dañado.
6.Posicione el supresor de chispas en el silenciador y ajuste con tornillos.
[PRECAUCIÓN]
Si no se limpia el supresor de chispas el rendimiento del motor se degradará.
Las leyes locales y federales y los requisitos administrativos indican cuándo y dónde se
requieren supresores de chispas. Cuando se pidan, los supresores de chispas deben ser
operativos para utilizar el generador en tierras de Parques Nacionales. En California, el
generador no debe utilizarse en tierras cubiertas por bosque, maleza o hierba, a menos
que el motor esté equipado con supresor de chispas.
NOTA:

8. ALMACENAMIENTO
NUNCA USE AGUA PARA LIMPIAR EL GENERADOR.
Page 26
Almacenamiento del generador
Los siguientes procedimientos deberían llevarse a cabo antes de almacenar el generador
por un periodo de tres meses o más.
Drene el depósito de carburante con cuidado. En caso de quedar gasolina en el
depósito se deteriorará dificultando el arrancado del motor.
Afloje el tornillo del fondo de la cámara flotante del carburador, y drene completamente
el carburante. Cambie el aceite del motor. Compruebe si hay pernos y tornillos sueltos,
y ajústelos si es necesario.
Limpie el generador a fondo con un trapo con aceite. Pulverice con producto de
preservación si está disponible.
Tire de la palanca de arranque hasta que note resistencia, y deje la resistencia en esa
posición.
Almacene el generador en una zona bien ventilada y poca húmeda.
Batería del Generador
El producto está equipado con un circuito de carga de batería automático. La batería
recibirá el voltaje de carga cuando el motor esté en funcionamiento. La batería mantendrá
una carga adecuada si la unidad se utiliza de forma regular (al menos una vez cada dos
semanas). Si se usa con menos frecuencia, la batería debería estar conectada a un cargador
de mantenimiento o a un sustentador de batería para mantener la batería debidamente
cargada. Si la batería no es capaz de arrancar el motor, se puede arrancar manualmente
tirando de la cuerda de retroceso del motor. Si el voltaje de la batería es extremadamente
bajo, puede que el circuito de carga no sea capaz de recargar la batería. En ese caso, la
batería debe estar conectada a un cargador de batería de tipo automotivo estándar para
recargar antes de que se pueda usar.
Desconecte la Batería
1. Quite la cubierta protectora de la regleta negra/negativa de la batería.
2. Desconecte la regleta negra/negativa de la terminal negra/negativa en la batería y
almacene el tornillo y la tuerca.
3. Repita los pasos 1-2 para la regleta roja/negativa de la batería.
4. Almacene la batería en un sitio fresco y seco.

9. RESOLUCIÓN DE PROBLEMAS
Page 27
Problema Causa Solución
Falta carburante Añadir carburante
Bujía defectuosa Cambiar la bujía
El generador no arranca
Unidad cargada durante el
arranque
Quitar la carga de la unidad
Llenar el cárter hasta el nivel
adecuado
Bajo nivel de aceite
Colocar el generador en una
superficie llana y nivelada.
Estrangulador en la posición
incorrecta
Ajustar el estrangulador
El generador no
arranca; el generador
arranca pero no
funciona bien.
Cable de la bujía suelta Engancha el cable de la bujía
La batería del generador está
agotada
Recargar la batería del generador El generador no arranca
eléctricamente
El interruptor de la batería está en
posición “OFF”
Poner el interruptor en posición
“ON”
Falta carburante Llenar el depósito de gasolina del
cilindro GLP
El generador se apaga
durante el
funcionamiento Bajo nivel de aceite Llenar el cárter hasta el nivel
adecuado. Colocar el generador en
una superficie llana y nivelada.
El generador está sobrecargado Revisar la carga y ajústarla. Ver
“Gestión de Potencia”
El generador no puede
suministrar energía
suficiente o se
sobrecalienta
Ventilación insuficiente Comprobar si hay restricción de
aire. Trasladar a un sitio bien
ventilado.
El cable no está bien conectado Comprobar todas la conexiones
El dispositivo conectado es
defectuoso
Sustituir el dispositivo defectuoso
El corta circuitos está abierto Reajustar el corta circuitos.
Montaje de cepillo defectuoso Sustituir el montaje de cepillo
(centro de asistencia)
AVR defectuoso (Regulador de
voltaje automático)
Sustituir el AVR (Centro de
asistencia)
Cables sueltos Comprobar y ajustar los cables
sueltos
Sin potencia de salida
AC
Otros Contactar la línea de asistencia
Desconexión repetida
del disyuntor
Sobrecarga Revisar la carga y ajustar. Ver
“Gestión de Potencia”

Page 28
Requisitos de la garantíaFirman generator registrará la garantía del generador tras recibir la Tarjeta de inscripción de garantía y una copia del recibo de venta de uno de los puntos de venta minorista de FIRMAN como comprobante de compra. Envié la inscripción de su garantía y comprobante de compra dentro de diez (10) días a partir de la fecha de compra.
Garantía de reparaciones/reemplazosFirman warrants to the original purchaser that the mechanical and electrical components will be free of defects in material and workmanship for a period of one (1) year (parts and labor) and two (2) years (parts) from the original date of purchase (90 days [parts and labor] and 180 days [parts] for commercial & industrial use. Transportationcharges on product submitted for repair or replacement under this warranty are the sole responsibility of the purchaser. This warranty only applies to the original purchaser and is not transferable.
No devuelva la unidad al lugar de compraComuníquese con el Centro de servicio de FIRMAN para abordar cualquier duda/problema por teléfono o correo electrónico. Si el problema no puede resolverse mediante este método, FIRMAN, a su elección, autorizará la evaluación, reparación o reemplazo de la pieza o componente defectuoso en un Centro de servicio de FIRMAN. FIRMAN le proporcionará un número de caso de servicio de garantía. Consérvelo para referencia futura. Esta garantía no cubrirá las reparaciones o reemplazos efectuados sin previa autorización o en un centro de servicio no autorizado.
Exclusiones de la garantíaEsta garantía no cubre las siguientes reparaciones ni equipos:
Desgaste normalSu producto requiere piezas y mantenimiento regulares para funcionar debidamente. Esta garantía no cubre reparaciones cuando el uso normal ha agotado la vida útil de una pieza o equipo en general.
Instalación, uso y mantenimientoEsta garantía no es válida para las piezas y/o mano de obra si se estima que el producto se ha utilizado indebidamente, se ha descuidado, ha formado parte de un accidente, se han contravenido sus instrucciones, se le han conectado cargas que superan el límite del generador, se ha modificado, se ha instalado indebidamente o se ha conectado incorrectamente a cualquier componente eléctrico. Esta garantía no cubre el mantenimiento normal del producto.
Otras exclusionesEsta garantía excluye: – defectos cosméticos tales como pintura, calcomanías, etc., – desgaste normal de artículos, – accesorios, – fallas debido a desastres naturales o catástrofes y otras circunstancias de fuerza mayor que estén fuera del control del fabricante, –problemas originados por piezas que no sean las originales de FIRMAN.
10.Garantía limitada de dos (2) años de FIRMAN

Page 29
Límites de garantía implícita y daños resultantes FIRMAN rechaza toda obligación de cubrir cualquier pérdida de tiempo, incapacidad de usar este producto, transporte o cualquier daño resultante o fortuito exigido por alguien que utilice este producto ESTA GARANTÍA INVALIDA A TODAS LAS DEMÁS GARANTÍAS, EXPRESAS O IMPLÍCITAS, INCLUYENDO GARANTÍAS DE COMERCIABILIDAD O IDONEIDAD PARA UN FIN EN PARTICULAR.En una unidad que se proporcione como intercambio regirá la garantía de la unidad original. La duración de la garantía correspondiente a la unidad intercambiada se calculará considerando la fecha de compra de la unidad original.Esta garantía le otorga ciertos derechos legales que pueden variar entre un estado y otro. Además, puede que su estado le confiera otros derechos que no están incluidos en esta garantía.
Información de contacto Puede contactarse con FIRMAN en:
DirecciónSUMEC North AmericaAttn: Customer Service
2090 Baker Road Suite 304 Box 105Kennesaw Ga. 30144www.firmangenerators.com
Servicio al clienteLun-Vier 8:30 AM - 5:30 PM (Hora estándar del este - EE. UU.)Sin costo:1-844-FIRMAN1 (1-844-347-6261)
WWW.FIRMANGENERATORS.COMToll Free:1-844-347-6261
Reservados todos los derechos. Se prohíbe expresamente toda reimpresión o uso no autorizado sin permiso por escrito.N/P:375741001 Rev 01