Embed Size (px)
Citation preview

OWNER'S MANUAL
The New Generation Sauna In The World!

Dear Customer, Congratulations on your purchase of the sauna, the new generation Sauna in the world. We are confident that you will enjoy many benefits of using the sauna for years to come. Carefully and thoroughly read this manual in its entirety before using the sauna for the first time. We recommend keeping this manual for regular review and future reference. I attribute this growth and success entirely to our customer satisfaction, the rec- ognized health benefits, and the quality of our workmanship. We use only the best materials coupled with state-of-the-art construction and the highest safety standard in the industry. You will be surprised at the noticeable effects on pain relief, weight control, skin stimulation, and stress reduction due to an increased blood circulation when using the sauna. Whatever your needs, we invite you to experience the difference with the sau- na: A difference in health benefit, a difference in quality, and a difference in at- titude of our team service and support. The whole team is looking forward to serving your needs.
TABLE OF CONTENTS
Conditions of use
PAGE
(1) Packaging and Individual Panel Information (1) Installation Information (4) Assembly Instructions (4) Digital Controller Operating Instructions (15) Oxygen Ionizer Application Guide (17) Enjoying Your Sauna (18) Tips for Use (19) Warnings Safety Instructions (20) Limited Warranty (22) Frequently Asked Questions (23) Maintenance (27) 4 Person Model Only (28) Corner Model Only (29)

1 2
a
r
Conditions of use 1. Temperature from +5℃~+40℃ (+41℉ ~ +104℉) 2. Relative humidity≤85% 3. Depression: 700~1060 hpa 4. Main supply: AC □110V □ 120V □230V □240V
Frequency □60Hz±1 □50Hz±1 General technical characteristics 1. Functions processed by microprocessors 2. Temperature adjustable from 18℃to 60℃ 3. Adjustable dwell time from 0 to 60 minutes 4. Digital temperature sensor 5. Soft touch key 6. Long-live ceramic infrared heater
NOTE: PLS DO NOT MIX PACKAGE (MEANS PARTS FROM DIFFERENT BOXES CAN NOT BE INSTALLED TOGETHER, OR EXCHANGED).
Parts list of a sauna room
Bottom Panel Top Panel Bench Panel Bench Heater Panel Front Panel Left Side Panel Right Side Panel Back Panel Accessories
Below are pictures of individual panels for the 2-person model. Othe models vary.
Packaging and Individual Panel Information The sauna is packed in 2 boxes:
Front Panel Bottom Panel
PLEASE FIND OUT THE SAME NUMBER OF THE CARTON BOX. FOR EXAMPLE: "NO.001 1 OF 2" FIT "NO.001 2 OF 2" on carton package. THEN YOU CAN ASSEMBLE OUR SETS EASILY.
NO.001 1 OF 2
NO.001 1 OF 2
NO.001 2 OF 2
NO.005 2 OF 2
Top Panel Back Panel

3 4
Side Panel
Left Right
Bench Panel Bench Heater Panel WARNING!!! The receptacle provided by the manufacturer must be
Installation Information a. Do not plug any other appliances into the power socket with your sauna. b. the sauna should always be placed on a level surface.
d. Do not spray the exterior with water. If the floor is damp, install a floor separator to keep the sauna high & dry. e. Do not store flammable objects or chemical substances near the sauna. Assembly Instructions Assembly of the sauna requires at least 2 adults to complete. Please read the instructions thoroughly before and during assembly to ensure proper installation of the unit. If you encounter any problems or have questions during assembly, please feel free to call our Customer Service or local dealers.
installed by a qualified electrician only WARNING!!! We have two installation methods 9
8
11
10
7
12 1
12
13 6 2
3 5 4
we'll introduce you to two parts The frist method: How to install the buckles sauna. (1) LOCATION OF SAUNA When determining a location for your sauna, please keep in mind the following: 1. The Main Power Cord on the sauna must be easily accessible. 2. The location must be dry and leveled. (2) PLACING BOTTOM PANEL Place the Bottom Panel on the ground and make sure that the "FRONT" sticker is facing the direction where the front of the sauna would be.
1. Left Side Panel 2. Digital controll panel 3. Front Panel 4. Bottom Panel 5. Bench Heater Panel 6. Bench Panel 7. Right Side Panel 8. Back Panel 9. Top Panel 10. Oxygen Ionizer 11. Light 12. Cup holder 13.CD Player
FRONT
5 6
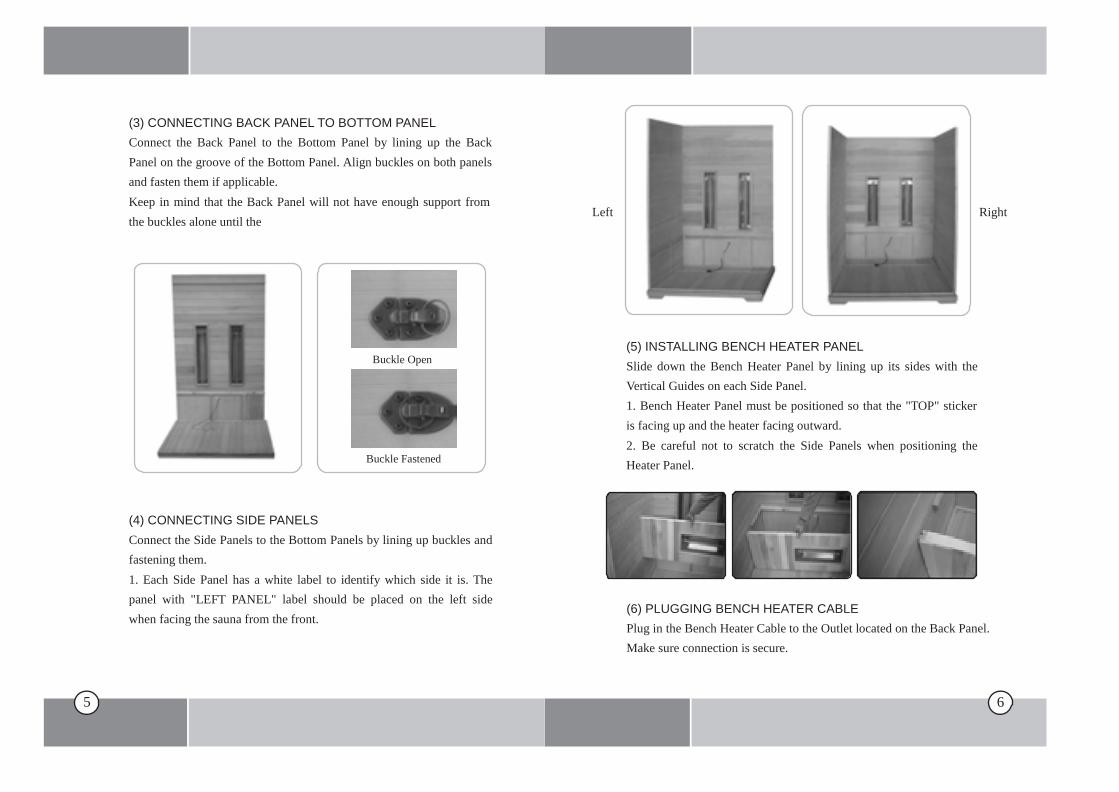
(3) CONNECTING BACK PANEL TO BOTTOM PANEL Connect the Back Panel to the Bottom Panel by lining up the Back Panel on the groove of the Bottom Panel. Align buckles on both panels and fasten them if applicable. Keep in mind that the Back Panel will not have enough support from the buckles alone until the
Left Right
Buckle Open
Buckle Fastened
(5) INSTALLING BENCH HEATER PANEL Slide down the Bench Heater Panel by lining up its sides with the Vertical Guides on each Side Panel. 1. Bench Heater Panel must be positioned so that the "TOP" sticker is facing up and the heater facing outward. 2. Be careful not to scratch the Side Panels when positioning the Heater Panel.
(4) CONNECTING SIDE PANELS Connect the Side Panels to the Bottom Panels by lining up buckles and fastening them. 1. Each Side Panel has a white label to identify which side it is. The panel with "LEFT PANEL" label should be placed on the left side when facing the sauna from the front.
(6) PLUGGING BENCH HEATER CABLE Plug in the Bench Heater Cable to the Outlet located on the Back Panel. Make sure connection is secure.
7 8
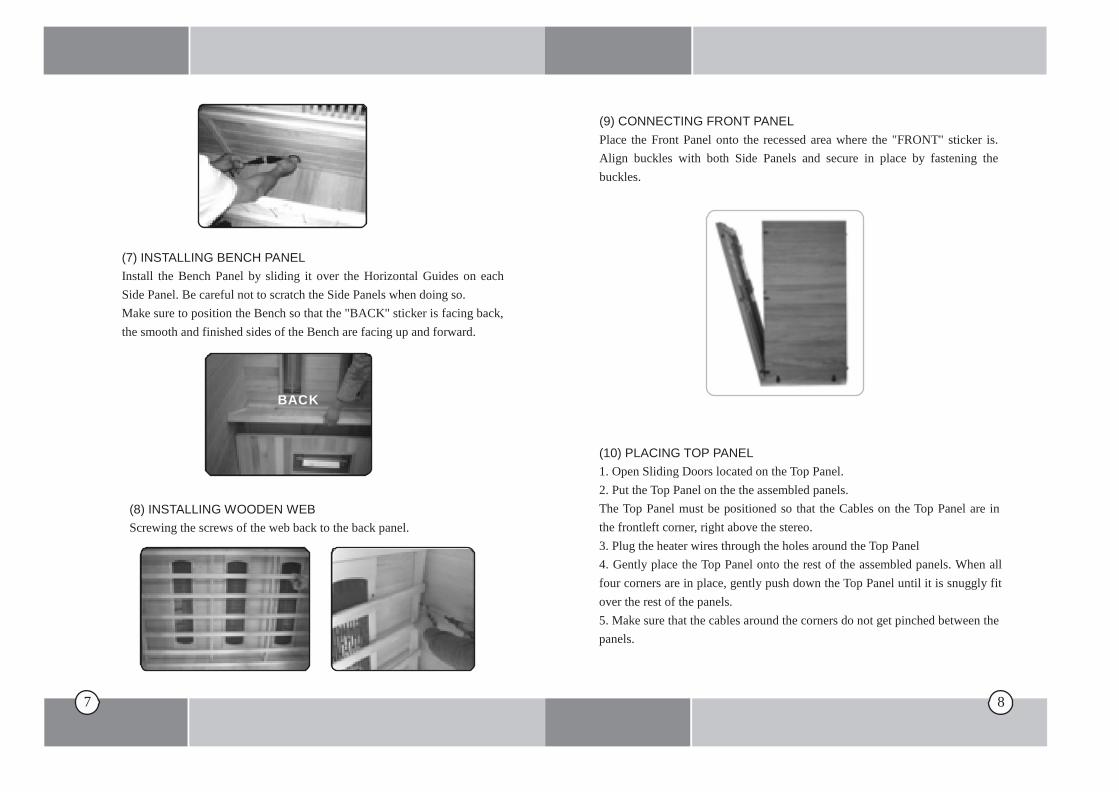
(9) CONNECTING FRONT PANEL Place the Front Panel onto the recessed area where the "FRONT" sticker is. Align buckles with both Side Panels and secure in place by fastening the buckles.
(7) INSTALLING BENCH PANEL Install the Bench Panel by sliding it over the Horizontal Guides on each Side Panel. Be careful not to scratch the Side Panels when doing so. Make sure to position the Bench so that the "BACK" sticker is facing back, the smooth and finished sides of the Bench are facing up and forward.
BACK
(8) INSTALLING WOODEN WEB Screwing the screws of the web back to the back panel.
(10) PLACING TOP PANEL 1. Open Sliding Doors located on the Top Panel. 2. Put the Top Panel on the the assembled panels. The Top Panel must be positioned so that the Cables on the Top Panel are in the frontleft corner, right above the stereo. 3. Plug the heater wires through the holes around the Top Panel 4. Gently place the Top Panel onto the rest of the assembled panels. When all four corners are in place, gently push down the Top Panel until it is snuggly fit over the rest of the panels. 5. Make sure that the cables around the corners do not get pinched between the panels.

9 10
(11) POWER SUPPLY CONNECTIONS The new power supply connector is like this:
All wiring from the ceiling's Power Board should be draped inside the Top Panel. Firstly plug the Connector pin to the socket on the back of the CD(You can pull out by pressing the top of the connector pin) and then the plug of the antenna.
1.Open the Sliding Door located on the top panel where you can find wire terminals. 2.Please connect the power supply code as follow pictures:
(12) STEREO AND CONTROL PANEL CONNECTIONS WARNING!!! We have two installation methods, we'll introduce you to two parts. The frist method: If you CD-PLAYER is in the outside, please install it like flowing pictures: Install CD:
Plug the 6 pin's plug onto the 6 pin's socket of the control panel. Plug the 4 pin's plug onto the 4pin's socket of the control panel to connect the temperature sensor. Plug the connector pin of the inside control panel in the connector socket, make sure the bulge of the plug fit directly to its hollow of the socket. Then attach the inside control panel by screws.

11 12
(14) INSTALLING CUP HOLDER
Attach cup holders in the fore left corner and the fore right corner (when sitting in the sauna).
The second method: If you CD-PLAYER is in the inside, please install it like flowing pictures:
(15) DOORKNOB INSTALLATION WARNING!!! We have two types of Doorknob, we'll introduce you to two parts. The first method: 1. Align the Outside Doorknob against 2 holes on the outside of the door , hold it at an angle against the door. 2. Insert the Screw into the hole located on the inside of the door.Screw until it is tightly fit.
(13) INSTALLING OXYGEN IONIZER
The second method: Install the doorknob like the flowing pictures:
1.plug the power. 2.Hang up ionizer on a screw hook at the designation of oxygen ionizer.

13 14
The second method: How to install the inner buckles sauna. If you buy the inner buckles sauna ,please install it like this: The inner buckles like following pictures.
1. Placing bottom panel 2 .Placing the back panel
5. Placing the front panel on the right place , connect it with the left panel. then the right panel , last the top panel.
3.Placing the left panel and connect it with back panel.
4.Install the bench panel, then make sure the connectors is on way. Put the bottom heater on the bottom panel.
6. The others install way are the same to the buckles sauna. (16) PLUG YOUR SAUNA INTO THE WALL OUTLET AND IT'S READY TO BE ENJOYED BY YOU AND YOUR FAMILY!

15 16
Main control panel Sub control panel
Digital Keypad Instructions
Plug in the power cord to the electrical outlet. A) START-UP 1. Press POWER button to turn the power on, POWER INDICATOR turns on. 2. Press SET button to start. If no button is pressed within 10 seconds, the sauna will automatically start with preset settings of 38 minutes and 104°F(40℃)(factory default). B) SET THE TEMPERATURE AND TIME 1. Press SET button again, SET INDICATOR turns on,
2. Press the TEMPERATURE+/TEMPERATURE- buttons to adjust the temperature. Temperature value will increase or decrease by 1 degree at a time. By holding down the +/- keys, you can speed us the rate of change. Repress SET key again and now the temperature window displays the present temperature. 3. Press TIME key + or - to adjust the time. Temperature value will in- crease or decrease by 1 minute at a time. By holding down the +/- keys, you can speed up the rate of change. The time window displays the count down time until-when heating stops. C) TURN OFF THE SAUNA Press POWER button again to turn off the sauna. D) SWITHCING BETWEEN °F AND °C When in the state of non-setting mode, press °F / °C button, you can alter- nate between double-digit Centigrade and three-figure Fahrenheit. The °F / °C indicators will be lit accordingly. E) READING LIGHT Press LIGHT button to turn on or off interior light. F) INSIDE CONTROLLER If you can choose the inside controller, the operation method is just the same as the outside control panel. Note: if do not use the sauna for a long time, please take off the plug. Instruction for Digital Light Therapy(OPTIONAL PARTS)
1. Power on Press "power",dispalying(-)(-)while digital therapy lights start working and rotate 7 colors. 2. Color selection and time set When Digital Light Therapy turns to required color,press to keep col- or.Thus it will display(-)(-).Then, press "set"button,displaying window become flick,go on setting required maintain time of this color by press(+)(-). Time can be set between 1 to 60 minutes.After setting,display

17 18
figures start counting down till (-)(-).then new rotation start. 3. Color sequence Rotating sequence: Red, Green, Red-green,Blue-green,Red-blue and Red-green-blue. 4. Power off Press "power" again to close digital therapy light.
OXYGEN IONIZER APPLICATION GUIDE (Only suitable for the models that chosen Oxygen Ionizers)
Ionizer releases negative ion to purify the air, dispense natural flo- ral fragrances to enhance people's mood and help stimulate relaxa- tion.
The type of oxygen ionizer:
1. Turn to ION , Prevent air conditioner disease. 2. Turn to O3, Ozone disin- fection.
Replacing the fragrance piec
1. Take off the oxygen ionizer 2. Open the back piece of it 3. Take out the floral fragrance piece inside of it.
Enjoying your Sauna INSTRUCTIONS FOR USE Review all health and safety instructions. If in doubt as to the advisabil- ity of using your infrared sauna, consult with your physician. If you feel light -headed or heat-exhausted during a session, exit the sauna im- mediately. 1. Set the temperature to a comfortable level, normally, 40-50??. 2. Allow approximately 8-15 minutes for the sauna to warm up before beginning a session. 3. Perspiration will begin within 6 to 15 minutes after stepping into the unit. We recommend that a sauna session does not exceed 30 minutes. 4. When the temperature reaches the level set on the thermostat, the heaters will turn off and on periodically to maintain the desired temper- ature level inside of the sauna. 5. The front door/window and/or ceiling vent can be opened at any time to introduce fresh air into the sauna. 6. Infrared's unique property of direct penetration into the body without heating the intervening air in-between allows sauna users to enjoy all of its benefits while the door or window of a sauna is open for ventilation. 7. Always drink plenty of water before, during, and after a sauna ses- sion. Doing so will replenish lost fluids from the body through perspi- ration. 8. Choosing to take a hot shower or bath prior to the sauna session will further promote perspiration. However, dry off thoroughly before going into the sauna because excessive water will stain or warp the wood. A shower after the session is refreshing and rinses perspiration from the body. 9. To absorb perspiration and keep the sauna tidy during the session, place a towel on the bench and floor of the sauna. Keep one towel han- dy to wipe excessive sweat from your body.

19 20
Tips for Use 1) To regulate the temperature inside the sauna during your session, use the roof vent or the door window (by setting it at an angle). 2) If you feel the need for more cooling, simply leave the door open until the air around you feels comfortable enough. 3) Drink plenty of fluids prior to, during, and after your session. 4) If you take a hot/warm shower or bath before your sauna session, you may perspire more. Try it with and without bathing or showering first to determine which way you prefer. 5) To utilize the sauna's heat therapy effect, give your hair a hot oil treat- ment while in the sauna. Put oil or treatment into your hair and wrap it with towel. After the session is over, rinse your hair thoroughly. 6) Use at least 2-3 towels. Sit on one towel folded over several times for added cushioning. Put another towel on the floor to absorb extra sweat. A third towel draped over the knees may aid you in comfort and is useful to towel off sweat. 7) Be sure to towel off excess sweat during your session to help the body perspire more freely. 8) To help relieve sore and tense muscles, massage the affected areas while in sauna to help heal faster. 9) Shaving your face or legs with a razor while profusely sweating in a sauna yields an incredibly smooth result without the use of gels or foams. 10) Do not eat anything at least an hour before your sauna session. It is better to go in the sauna on an empty stomach. You are more likely to feel uncomfortable sitting in a sauna with a full stomach. 11) To make the most out of your sauna session, work your muscles while in the sauna. Stretch your arms and legs, massage your neck, mas- sage your feet, etc.
12) You can benefit from the relaxing and soothing effects of a regular sauna session by going to sleep afterwards. The peaceful and relaxed state rendered by a sauna session will help you sleep easier and better. 13) At the first sign of cold or flu, increasing your sauna sessions may be beneficial in boosting your immune system and decreasing the reproduc- tive rate of the viruses. 14) Consult your physician for the proper treatment for this or any other conditions. 15) To treat your ankles and feet more effectively, you must elevate them while inside the sauna. Any area that you wish to achieve a specific deep heating effect in should be moved as close to one of the heaters as feels comfortable. 16) After the session is over, do not immediately jump into the shower. Since your body was heated up during the session, it will continue to sweat even after the heaters are off. Sit in the sauna with the door open and let the body sweat a little more while it cools off. After you feel comfortable enough, take a warm shower and finish it off with a cold shower to cool off completely. Warnings This appliance is not intended for use by persons ( including children ) with reduced physical, sensory or mental capabilities, or lack of experi- ence and knowledge, unless they have been given supervision or instruc- tion concerning use of the appliance by a person responsible for their safety. Children should be supervised to ensure that they do not play with the appliance !

21 22
Safety Instructions 1. Read and follow all instructions carefully. 2. When installing and using this electrical equipment, basic safety pre- cautions should always be followed. 3. Do not use the sauna immediately following strenuous exercise. Wait at least 30 minutes to allow the body to cool down completely. Safety precautions a. To avoid fire, do not dry clothes or leave any towels in the sauna. b. To prevent burns or electric shocks, do not touch or use metal tools on the net cover of the far infrared heater elements.c. While in the sauna, do not touch the light bulb. If the bulb needs to be changed, switch it off and wait until the sauna is shut off and the bulb is cool d. Do not spray water on the far-infrared tube. This activity may result in electric shock or damage to the heater elements. e. Do not use the sauna if you have any of the following conditions: 1) Open wounds 2) Eye diseases 3) Severity sunburns 4) Elderly & weak people, especially those suffering from a disease, pregnant women and infants are prohibited. Children over the age of 6 years of age may use the sauna under the supervision of adults. 5) If suffering from a disease directly related to temperature, seek the ad- vice of a doctor before use. 6) Persons suffering from obesity or with a medical history of heart dis- ease, low or high blood pressure, circulatory system problems, or diabe- tes should consult a physician prior to using the sauna. 7) Persons using medications should consult a physician before using the sauna since some medications may induce drowsiness while others may affect heart rate, blood pressure, and circulation.
8) Do not place pets in the sauna. 9) Do not use the sauna if you are under the effects of alcohol. The use of alcohol, drugs, or medications prior to or during the sauna session may lead to unconsciousness. Limited Warranty We warrants the sauna to be free of defects in material and workman- ship. 1) Heaters 18 months 2) Workmanship 18 months 3) Electrical Components 18 months 4) Radio/CD player 12 months This warranty extends only to the original retail purchaser of the sauna and terminates upon transfer of ownership. Freight charges to and from the customer are the responsibility of the customer. This includes freight charges for parts shipped to enable the services of your sauna. This warranty is void if the sauna has been altered, misused, or abused. Such instances shall include operation or maintenance of the sauna in de- viation to the published instructions. The warranty extends only to the manufacturing defects and does not cover any damages resulting from mishandling of the product by the owner. We shall not be liable for the loss of use of the sauna or other incidental or consequential damages. Under no circumstances shall we or any of its representatives be held liable for injury to any persons or damages to any properties. Some states do not allow exclusion or limitation of incidental or consequential damages, so the above limitations or exclusions may not apply to you. This warranty gives you specific legal rights, and you may also have other rights that vary from state to state. Specifications are subject to change without notice.

23 24
For your record, please complete the following information. Date of Purchase Date of delivery Model Number Serial number Dealer Information (Name & Phone)
Problem Explanation Solution
1 The power indicator
is not on. The fuse is broken or the sauna is not plugged in.
Change the fuse or plug in the sauna.
2 The soft keys do not
work. Unplug sauna,wait a minute, and plug back into power source.
Frequently Asked Questions
PS: MAKING SURE SHUT OFF ELECTRICITY BEFORE YOU DOING IT. If the supply cord is damaged, it must be replaced by the manufactur- er, its service agent or similarly qualified persons in order to avoid a hazard .
1.open the cover of the top and then open the control box. 2.take out the damaged fuse as the following pictures. 3.change the fuse in the spare parts. 4.put the changede fuse back, finally close the cover of the control box and the cover of the top.
2. Reading light does not work
1. The control panel does not work
Change the bulb Push down the bulb together with the cover from the top panel, then pull down the plug. Take off the metal pin around the bulb while also take down the broken bulb, next , put a new bulb into the original place , put on pin and install onto the top.
Change the fuse Replace the old fuse with a new one.(fuse on the top panel)

25 26
Problem
Explanation
Solution
1
Part of the heater does warm up.
The heater is defective Replace with a new heater A portion of the heater is not connected well or is burned out.
Connect them tightly.
2
The entire room does not heat up.
The relay is damaged. Replace the relay The control panel is dam- aged
Replace the control panel.
The plug is not plugged in correctly.
Re-plug in the machine.
3
Bench heater does not heat
The bench heater cable is not plugged tightly into the outlet on the Back Panel
Plugged tightly
3. The heater does not heat up
Change the ceramic infrared heater. Firstly take away the metal cover on the heater. 1. Screwing the screws of the out cover and displace it. 2. Screwing the ceramic hat of the tube, take away ceramic protect, screwing the metal screw inter of it, moving lines away. 3. Doing the same process as 2, and than, dismantling the bottom fixing tube steel wire away. When you assembling it, please doing the process from 3 to 1 Finally close the web cover .

27 28
Maintenance 1. Cleaning a. Clean the faceplate with a wet towel, or clean with a small amount of hand-soap missed with warm water if necessary. Clean the sauna room with a wet cotton towel, dry with a clean dry towel. Do no use benzene, alcohol, or strong cleaning chemicals on sauna.
NOTE: Any chemical that can damage wood material will dam- age the sauna and the protection layer that is on the wood.
4 Person Model only:
1
2
Transportation and storage 1. Avoid exposure to rain, snow or strong collisions during transport. 2. Do not store in damp environments.
3 4
There are 2 benches for 4 person models. Horizontal bench guides are locater on the front and back panel. Slide the bench all way in until it touches the side panel and
5 is securely in place. Front panel must be installed prior to installing bench heater panels and benches for 4 Person models.

29 30
Corner Model only:
1.Place the bottom panel on the ground.
2.Connect the left back panel to the bottom panel by lining up the back panel on the groove of the bottom panel. Align buckles on both panels and fasten them, if applicable.
3.Connect two back panels by lining up buckles and fasten them se- curely in place.
4. Connect the side panels (Left & Right) to the back panel using sliding hinges. Each side panel has a white label to identify which side it is. The panel with "LEFT" label should be placed on the left side when fac- ing the sauna from the front. The panel with "RIGHT" label should be placed on the right side when facing the sauna from the front. 5. Install the right heater bench firstly by sliding it over the horizon- tal bench guides. And then install the left heater bench .Continue to install right and left benches. Be careful not to scratch the adjacent panels when sliding in the bench. Push the benches all the way in un- til they touch the back panel and are securely in place.

31
6. Place the whole front panel onto the recessed area on the bottom panel. Align buckles both side panels and secure in place by fastening them. 7. Put the top panel onto the assembled panels。 (1). Please remove the screws from the corners of the top roof cover and remove the cover. (2). Gently places the Top Panel onto the top of the assembled panels (walls). When all four corners are in place, gently push down the Top Panel until it snug- gly fits over the rest of the panels. Make sure that the cables around the corners do not get pinched between the panels. (3). Access and securely connect the black cables that are located on the top of the Top Panel. (4). Once done, place the top roof cover back on top and screw it back in place.
EXTERIOR LAMP SWITCH To enjoy the deluxe exterior lamp, turn on the switch on the top left hand corner.