Embed Size (px)
Citation preview

O w n e r’sG u i d e
T9250, T9350 AND T9450HRTFOLDING TREADMILLS

ongratulations on choosing a VISION FITNESS Treadmill. You’ve takenan important step in developing and sustaining an exercise program! YourTreadmill is a tremendously effective tool for achieving your personal fitness goals. Regular use of your Treadmill can improve the quality of yourlife in so many ways…
Here are just a few of the health benefits of aerobic exercise:
• Weight Loss • A Healthier Heart• Improved Muscle Tone• Increased Daily Energy Levels• Reduced Stress• Help In Countering Anxiety and Depression• An Improved Self Image
The key to reaping these benefits is to develop the exercise habit. Yournew Treadmill will help you eliminate the obstacles that prevent you fromgetting in your exercise time. Snow and rain and darkness won't interfere with your workout when you have your Treadmill in the comfort ofyour home. This Owner’s Guide provides you with basic information onstarting an exercise program. A more complete knowledge of your newTreadmill will assist you in realizing your goal of a healthy lifestyle.
Some kinds of service to your Treadmill should only be performed by yourVISION FITNESS retailer. Please contact your authorized VISION FITNESSretailer should service be required. If a question or problem arises whichcannot be handled by your VISION FITNESS retailer, please contact us:
VISION FITNESSP.O. Box 280500 South C.P. AvenueLake Mills, WI 53551Ph: 1.800.335.4348Fax: 1.920.648.3373www.visionfitness.com
C

Table of Contents
SAFETY INSTRUCTIONS . . . . . . . . . . 4ASSEMBLY & FOLDING . . . . . . . . . . 7MOVING & LEVELING . . . . . . . . . . . 8POWER & SAFETY KEY . . . . . . . . . . 9
TROUBLESHOOTING:TREADMILL . . . . . . . . . . . . . . . . . 41HEART RATE MONITOR . . . . . . . . . 42COMMON QUESTIONS . . . . . . . . . 43TENSIONING THE BELT . . . . . . . . . 44HOME WARRANTY . . . . . . . . . . . . 45FITNESS GUIDELINES . . . . . . . . . . 47WEEKLY WORKOUT LOGS . . . . . . . 54MONTHLY WORKOUT LOGS . . . . . . 56
A L L M O D E L S
INTRODUCTION . . . . . . . . . . . . . . 11FEEDBACK DISPLAY . . . . . . . . . . . 12
CONSOLE
PROGRAM DETAILS . . . . . . . . . . . . 23EASY START . . . . . . . . . . . . . . . . 25FEEDBACK DISPLAY . . . . . . . . . . . 26CHOOSING PROGRAM . . . . . . . . . 27TARGET HEART RATE TRAINING . . . . 30CHEST TRANSMITTER . . . . . . . . . . 31HEART RATE TRAINING PROGRAM . . 33ENTERING WEIGHT, STARTING . . . . 34WARM UP MODE . . . . . . . . . . . . . 35COOL DOWN MODE . . . . . . . . . . . 36FITstrategy™ USER PROFILES . . 38
CONSOLET 9 4 5 0 H R T
G E N E R A L
T 9 2 5 0
PROGRAM DETAILS . . . . . . . . . . . . 14EASY START, PAUSE . . . . . . . . . . . 15FEEDBACK DISPLAY . . . . . . . . . . . 16CHOOSING A PROGRAM . . . . . . . . 18FITstrategy™ USER PROFILES . . 20
CONSOLET 9 3 5 0

3
T9250T9350
T9450HRT
LEVELERS
COMPACT FOLDING DESIGN
CONSOLE
T 9 2 5 0 T 9 3 5 0 T 9 4 5 0 H R T
F O L D I N G T R E A D M I L L S
MOTORCOVER
POWERSWITCH TRANSPORT
WHEELS
SIDERAILS
HANDLEBARS
RUNNINGBELT

4
ALL
MOD
ELS IMPORTANT SAFETY INSTRUCTIONS
SAVE THESE INSTRUCTIONSWhen using an electrical product, basic precautions should always be followed, including the following:Read all instructions before using this exercise product.
To reduce the risk of burns, fire, electrical shock or injuryto persons:• Use this exercise product for its intended use as described in this Owner’s
Guide. Do not use attachments not recommended by the manufacturer.• Never drop or insert any object into any opening.• Do not remove the Treadmill motor covers or roller covers. Service should
be performed only by an authorized VISION FITNESS retailer.• Never operate this Treadmill if it has a damaged cord or plug, if it is not
working properly, if it has been damaged, or immersed in water. Returnthe Treadmill to a retailer for examination and repair.
• Keep the cord away from heated surfaces.• Do not use outdoors.• To disconnect, turn the switch to the OFF position, then remove plug from
outlet.• Never place the power cord under carpeting or place any object on
top of the power cord, which may pinch and damage it.• Unplug your VISION FITNESS Treadmill before moving it.
CHILDREN• Keep children off your VISION FITNESS Treadmill at all times. • When the VISION FITNESS Treadmill is in use, young children and pets
should be kept at least 10 feet away.
WARNING!

5
ALL MODELS
OTHER SAFETY TIPS FOR YOUR VISION FITNESS TREADMILL
CAUTION!: If you experience chest pains, nausea, dizziness or shortness ofbreath, stop exercising immediately and consult your physician before continuing.• Do not wear clothing that might catch on any part of the Treadmill.• Read this Owner’s Guide before operating this Treadmill.
CLEANING• Clean with soap and slightly damp cloth only; never use solvents.

6
ALL
MOD
ELS WALL POWER TO TREADMILL
This product is for use on a nominal 120-volt circuit, and has a groundingplug that looks like the plug illustrated below. A temporary adapter suchas the one illustrated below may be used to connect this plug to a 2-polereceptacle as shown, if a properly grounded outlet is not available. Thetemporary adapter should be used only until a properly grounded outletcan be installed by a qualified electrician. The green colored rigid ear,lug, or the like extending from the adapter must be connected to a permanent ground such as a properly grounded outlet box cover.Whenever the adapter is used, it must be held in place by a metal screw.surge protectors or extension cords should not be used. They do not supply enough electricity to the treadmill and can damage it.

7
ALL MODELS
ASSEMBLYVISION FITNESS recommends this treadmill be assembled and deliveredby qualified personnel. If you have elected to assemble this product yourself, for your safety please read and follow each of the steps in theenclosed Assembly Guide. It is recommended, when possible, that assembly be performed by an authorized VISION FITNESS Retailer. If youhave any questions regarding any part or function of your Treadmill, contact your Retailer.
FOLDINGTo fold your Treadmill in the uprightposition first make sure theElevation is set to 0; if it is not,lower the Elevation (if you do notset the Elevation to 0 the Treadmillwill not fold and lock). Then simplylift the back end of the Treadmillwith both hands and push it up.The Treadmill has a built-in lockingmechanism that will automaticallyengage and click into placewhen you reach a vertical point.
UNFOLDINGTo un-fold your Treadmill from theupright position simply lift the leveron the left side vertical rail. Guidethe deck down with both handsuntil the Treadmill reaches the floor.Do not let go before the deck isresting on the floor.
CAUTION: Our Treadmills are well-built and heavy, weighing up to 325 lbs.! Use care and additionalhelp if necessary.

8
ALL
MOD
ELS
PLACEMENT IN YOUR HOMEIt is important that you place your Treadmill in a comfortable and invitingroom. Your Treadmill is designed to use minimal floor space. Many people will place their Treadmills facing the TV or a picture window. If atall possible, avoid putting your Treadmill in an unfinished basement. Tomake exercise a desirable daily activity for you, the Treadmill should be inan attractive setting.NOTE: If you place your treadmill facing out from a wall, you should leavethree to five feet between the wall and the treadmill to ensure safe operation.
LEVELINGThe Treadmill should be level for optimum use. Once you have placed theTreadmill where you intend to use it, raise or lower one or both of theadjustable levelers located on the front frame of the Treadmill. A carpenter’slevel is recommended. If your Treadmill is not level, the running belt maynot track properly. Once you have leveled the Treadmill, lock the levelersin place by tightening the nuts against the frame.
MOVING YOUR VISION FITNESS TREADMILLYour VISION FITNESS Treadmill has a pair of transport wheels built into the rear frame. To move, fold the Treadmill into the upright position,firmly grasp the frame by the handlebars, then carefully tilt and roll.
CAUTION: Our Treadmills are well-built and heavy, weighing up to 325 lbs.! Use care and additional help if necessary.

9
ALL MODELS
POWEREnsure that your Treadmill is properly connected to a poweroutlet, then turn on the Powerswitch, located at the front of themain frame.
SAFETY KEY CLIP & TETHERYour VISION FITNESS Treadmillwill not start unless the Safety Keyis inserted into the keyhole in thecenter of the console case. Youshould attach the clip end to yourclothing. If at any time you need tostop the Treadmill quickly simplypull the Safety Key off the console.This will cut all power to theTreadmill and it will come to acomplete stop. To resume yourworkout, place the Safety Keyback in place. This will send youback to the start-up mode.

11
T9250
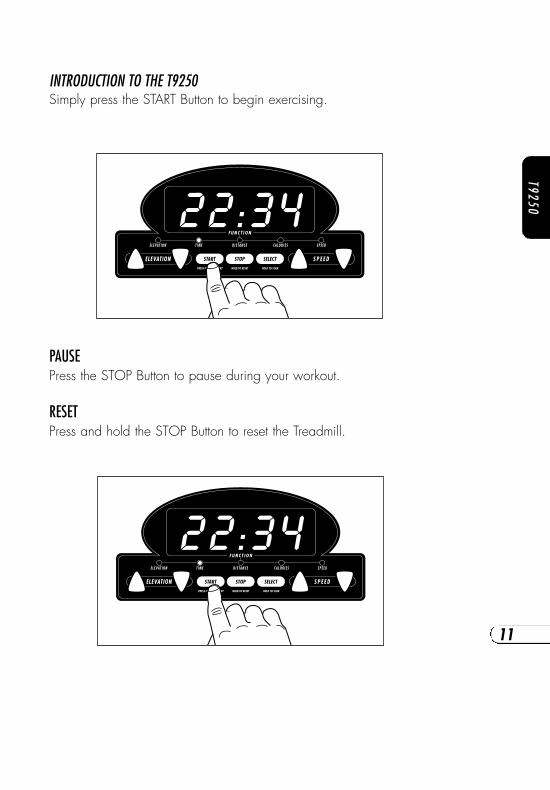
INTRODUCTION TO THE T9250Simply press the START Button to begin exercising.
PAUSEPress the STOP Button to pause during your workout.
RESETPress and hold the STOP Button to reset the Treadmill.

12
T925
0
T9250 FEEDBACK DISPLAY
SCAN FUNCTIONTo scan through the functions during your workout, press the SELECT button. To continuously Scan, press and hold until the console double-beeps (about 2 seconds). The selected function is displayed when theFunction light is on above the word itself
ELEVATIONShown as a percentage of incline. This Indicates how steeply inclined therunning surface is, to simulate running on a hill.
TIMEShown as (Minutes:Seconds). View the Time elapsed in your workout.
DISTANCEShown as miles or kilometers. View Distance traveled during workout.
CALORIESShown as estimated accumulated Calories burned during workout.
SPEEDShown as Miles/Hour or Kilometers/Hour. This Indicates how fast the running surface is moving, to simulate outdoor running.


14
T935
0
T9350 PROGRAM DETAILS
P1 - MANUALCustomized workouts; with no default Time.
P2 - INTERVALS • SPEED CHANGESImproves your strength, speed, and endurance by raising andlowering the Speed throughout your workout to involve bothyour heart and muscles; Time defaults to 24 minutes.
P3 - WEIGHT LOSS • SPEED CHANGESPromotes weight loss by raising and lowering your speed levelwhile still keeping you within your fat burning zone; Timedefaults to 48 minutes.
P4 - SPEED WALK • ELEVATION & SPEED CHANGEPromotes weight loss by raising and lowering your elevationlevel while still keeping you within your fat-burning zone; Timedefaults to 32 minutes.
P5 - 5K BACKTRAIL RUNImproves your cardiovascular training by simulating a 5K runwith hills; no preset time with elevation changes.
P6 - 10K LAKESIDE RUNImproves your endurance training by simulating a 10K run withhills; no preset time with elevation changes.
Programs P2 - P6 have 9 Levels. By having 9 Levels to choose from, you canchange the intensity of your workout as your fitness level improves. In general thebeginner levels have lower Level numbers and the most advanced levels havehigher Level numbers. For example, L9 will be the most advanced workout and L1will be the beginner Level. If you are not sure what fitness level you are at, youshould start out at a lower Level and work up to a comfortable Level.
NOTE: All the programs can provide an aerobic and cardiovascular benefit inaddition to the specific benefits listed.

15
T9350
T9350 EASY STARTSimply press the START Button to begin exercising in the MANUALProgram.
PAUSEPress the STOP button to pause during your workout.
RESETPress and hold the STOP button to reset the Treadmill.

16
T935
0
T9350 FEEDBACK DISPLAY
SCAN FUNCTIONTo scan through the functions during your workout, press theSELECT button. To continuouslyScan, press and hold until the console double-beeps (about 2seconds). The selected function isdisplayed when the Function lightis on above the word itself
TIMEShown as (Minutes:Seconds). View the Time elapsed in your workout.
DISTANCEShown as miles or kilometers. View Distance traveled during workout.
CALORIESShown as estimated accumulated Calories burned during workout.
PACEShown as Time (Minutes:Seconds) required to travel 1 mile at currentSpeed.
AVERAGE PACEShown as Time (Minutes:Seconds) required to travel 1 mile at AverageSpeed.
AVERAGE SPEEDShown as Miles/Hour or Kilometers/Hour. Equals accumulated Distanceplus elapsed Time. Corresponds to simulated outdoor walking or runningSpeed.

17
T9350
T9350 FEEDBACK DISPLAY
ELEVATIONShown as percentage of incline,Elevation is visible in the left-hand LED window. Indicates howsteeply inclined the running surface is, to simulate running on ahill.
SPEEDShown as Miles/Hour, Speed isvisible in the right-hand LED window. Indicates how fast therunning surface is moving, to simulate outdoor running.
PROFILEShown as a graphical representationof the Program you have chosen(Intervals, Weight Loss, etc.). Theleft-most column of orange LEDs indicates Elevation and corresponds to the main Elevationwindow. The right-most column ofgreen LEDs indicates Speed and corresponds to the main Speedwindow.

18
T935
0
CHOOSING A PROGRAMUse the Arrow buttons to chooseone of the 7 Programs: P1 - MANUAL, P2 - INTERVALS,etc.). Press the SELECT button. See Page 20 for FITstrategy™
Custom User Profiles.
CHOOSING A LEVELUse the Arrow buttons to chooseone of the 9 Levels; L1 providesthe least resistance, L9 the most.Press the SELECT button.
CHOOSING A TIMEAfter you have chosen a Level, theTime will default, depending onwhich Program you have chosen,and then flash. You may use thisdefault Time or choose another byusing either set of Arrow buttons.
If you are ready to begin exercising press START. Optionally,if you wish to enter your weight,proceed first to the next step.

19
T9350
ENTERING YOUR WEIGHTAfter you have chosen your workout time you may now enteryour Weight. By entering yourWeight, the totals for Calories willbe adjusted according to yourentered Weight.
FINISHINGWhen your work-out is completethe Speed window will beep and flash three times letting youknow that your Program is complete. The Treadmill will returnto its starting position and you willbe able to use the SELECT buttonto scan through and check your DISTANCE, CALORIES, AVERAGESPEED and PACE.
When you are ready to begin exercising press START.

20
T935
0
ENTER PROGRAM TIMEEnter Time using Arrows, thenpress the SELECT button to savetotal workout time.
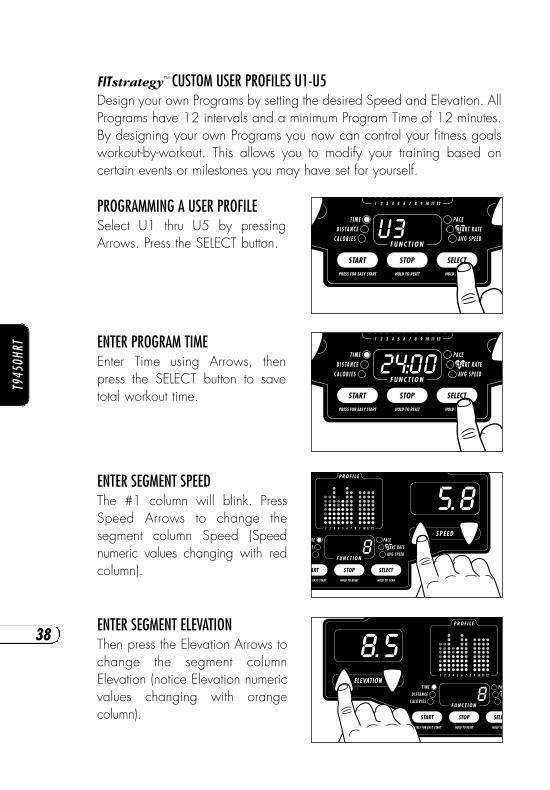
FITstrategy™ CUSTOM USER PROFILES U1-U5Design your own Programs by setting the desired Speed and Elevation. AllPrograms have 12 intervals and a minimum Program Time of 12 minutes.By designing your own Programs you now can control your fitness goalsworkout-by-workout. This allows you to modify your training based on certain events or milestones you may have set for yourself.
ENTER SEGMENT SPEEDThe #1 column will blink. PressSpeed Arrows to change the segment column Speed (Speed numeric values changing with redcolumn).
ENTER SEGMENT ELEVATIONThen press the Elevation Arrows tochange the segment columnElevation (notice Elevation numericvalues changing with orange column).
PROGRAMMING A USER PROFILESelect U1 thru U5 by pressingArrows. Press the SELECT button.

21
T9350
SAVING SEGMENT DATAPress the SELECT button to storeSpeed and Elevation, then proceedto the next column.NOTE: Repeat entering segmentSpeed and segment Elevation untilall 12 segments are completed.
ENTERING YOUR WEIGHTAfter you have chosen your workout time you may now enteryour Weight. By entering yourWeight, the totals for Calories willbe adjusted according to yourentered Weight.
BEGINNING WORKOUTBegin your exercising in your new FITstrategy™ Custom UserProfile by pressing the START button. NOTE: This Profile will be saved per-manentally and may be changedby repeating the steps above.


23
T9450HRT
T9450HRT PROGRAM DETAILS
P1 - MANUALCustomized workouts; with no default Time.
P2 - INTERVALS • SPEED CHANGESImproves your strength, speed, and endurance by raising andlowering the Speed throughout your workout to involve bothyour heart and muscles; Time defaults to 24 minutes.
P3 - WEIGHT LOSS • SPEED CHANGESPromotes weight loss by raising and lowering your Speed Levelwhile still keeping you within your fat-burning zone; Timedefaults to 48 minutes.
P4 - SPEED WALK • ELEVATION & SPEED CHANGEPromotes weight loss by raising and lowering your Elevationlevel while still keeping you within your fat-burning zone; Timedefaults to 32 minutes.
P5 - 5K BACKTRAIL RUNImproves your cardiovascular training by simulating a 5K runwith hills; no preset time with Elevation changes.
P6 - 10K LAKESIDE RUNImproves your endurance training by simulating a 10K run withhills; no preset time with Elevation changes.
P7 - HEART RATE CONTROLSaves time by making the most of your limited workout time;motivates and encourages you to achieve your fitness goals.Benefits weight loss by maintaining an optimum exercise levelto burn fat; Time defaults to 34 minutes.
(continued on next page)

24
T945
0HRT
T9450HRT PROGRAM DETAILS
Programs P2-P6 have 9 Levels. By having 9 Levels to choose from, you canchange the intensity of your workout as your fitness level improves. In general thebeginner levels have lower Levels numbers and the most advanced levels havehigher Levels numbers. For example, L9 will be the most advanced workout andL1 will be the beginner Level. If you are not sure what fitness level you are at, youshould start out at a lower Level and work up to a comfortable Level.
NOTE: All the programs can provide an aerobic and cardiovascular benefit inaddition to the specific benefits listed.

25
T9450HRT
T9450 EASY STARTSimply press the START Button to begin exercising in the MANUALProgram.
PAUSEPress the STOP button to pause during your workout.
RESETPress and hold the STOP button to reset the Treadmill.

26
T945
0HRT
T9450HRT FEEDBACK DISPLAY
SCAN FUNCTIONTo scan through the functions duringyour workout, press the SELECT button. To continuously scan, pressand hold until the console double-beeps (about 2 seconds). The selected function is displayed whenthe Function light is on above theword itself.
TIMEShown as (Minutes:Seconds). View the Time remaining or the Timeelapsed in your workout.
DISTANCEShown as Miles or Kilometers. View Distance traveled during workout.
CALORIESShown as estimated accumulated Calories burned during workout.
HEART RATEShown as Beats-per-Minute. You can monitor your Heart Rate at any timeduring a workout.
AVERAGE SPEEDShown as Miles/Hour or Kilometers/Hour. Equals accumulated Distanceplus elapsed Time. Corresponds to simulated outdoor walking or runningSpeed.
PACEShown as Time (Minutes:Seconds) required to travel 1 mile at currentSpeed.

27
T9450HRT
T9450HRT FEEDBACK DISPLAY
ELEVATIONShown as percentage of incline,Elevation is visible in the left-handLED window. Indicates howsteeply inclined the running surface is, to simulate running on ahill.
SPEEDShown as Miles/Hour, Speed isvisible in the right-hand LED window. Indicates how fast therunning surface is moving, to simulate outdoor running.
PROFILEShown as a graphical representationof the Program you have chosen(Intervals, Weight Loss, etc.). Theleft-most column of orange LEDs indicates Elevation and corresponds to the main Elevationwindow. The right-most column ofgreen LEDs indicates Speed and corresponds to the main Speedwindow.

28
T945
0HRT
CHOOSING A PROGRAMUse the Arrow buttons to chooseone of the 7 Programs:(P1 - MANUAL, P2 - INTERVALS,etc.). Press SELECT.See Page 38 for FITstrategy™
Custom User Profiles.
CHOOSING A LEVELUse the Arrow buttons to chooseone of the 9 Levels; L1 providesthe least resistance, L9 the most.Press SELECT.
CHOOSING A TIMEAfter you have chosen a Level, theTime will default, depending onwhich Program you have chosen,and then flash. You may use thisdefault Time or choose another byusing either set of Arrow buttons.
If you are ready to begin exercisingpress START. Optionally, if youwish to enter your weight, proceedfirst to the next step.

29
T9450HRT
ENTERING YOUR WEIGHTAfter you have chosen your workout time you may now enteryour Weight. By entering yourWeight, the totals for Calories willbe adjusted according to yourentered Weight.
FINISHINGWhen your work-out is completethe Speed window will beep and flash three times letting youknow that your Program is complete. The Treadmill will returnto its starting position and you willbe able to use the SELECT buttonto scan through and check your DISTANCE, CALORIES, AVERAGESPEED and PACE.
STARTINGWhen you are ready to begin exercising press START.

30
T945
0HRT
GENERAL HEART RATE TRAINING RECOMMENDATIONSTo use the Heart Rate Training Program, it is important to determine yourTarget Heart Rate Zone, using the chart below. After determining yourTarget Zone, you should use the treadmill in MANUAL mode to see if theTarget Zone you have selected is correct. This will give you a good baseto start your Heart Rate Training. If you feel your Target Zone is too low ortoo high, keep using the treadmill in the MANUAL mode until you feelcomfortable during your workout; then you can begin using the Heart RateTraining Program.
EXERCISE INTENSITYTo reap the most cardiovascular benefits from your workout, it is necessaryto exercise within a recommended intensity. The three ways to monitorexercise intensity are Target Heart Rate, Perceived Exertion, and the Talk Test.
TARGET HEART RATETarget Heart Rate is a percentage of your maximum heart rate. Target Ratewill very for each individual, depending on age, current level of conditioning, and personal fitness goals. Exercise heart rate should rangefrom 50 - 90% of the predicted maximum heart rate for most healthyadults. A guideline for Target Heart Rate follows:
50 - 60% Beginning Exercisers or Health Concerns60 - 75% General Fitness or Weight Loss75 - 90% Improve Aerobic Capacity or Athletic Performance

31
T9450HRT
WIRELESS CHEST TRANSMITTERPrior to wearing the Strap on your chest, moisten the two rubber contact pads with several drops of water and spread about with your fingers.
TRANSMITTER STRAP PLACEMENTCenter the Transmitter Strap justbelow the breast or pectoral muscles, directly over your sternumwith the VISION FITNESS logofacing out.Adjust the elastic strap length toavoid bouncing or sliding.
32
T945
0HRT
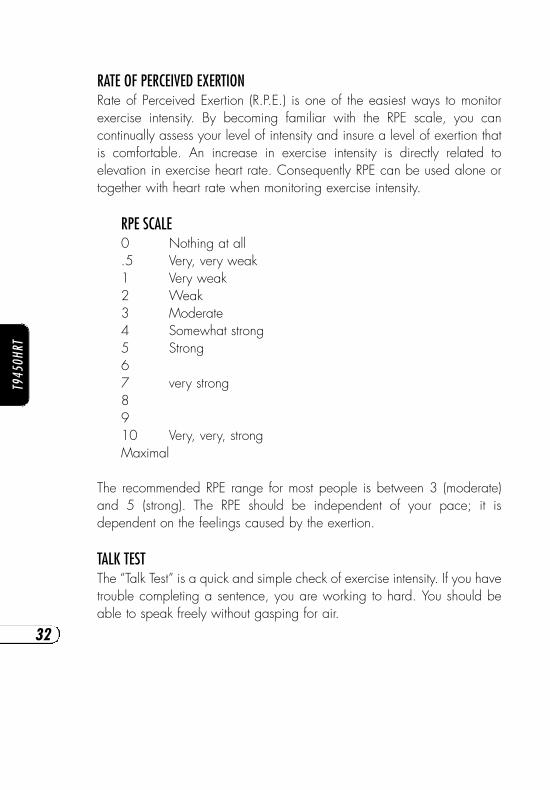
RATE OF PERCEIVED EXERTIONRate of Perceived Exertion (R.P.E.) is one of the easiest ways to monitorexercise intensity. By becoming familiar with the RPE scale, you can continually assess your level of intensity and insure a level of exertion thatis comfortable. An increase in exercise intensity is directly related to elevation in exercise heart rate. Consequently RPE can be used alone ortogether with heart rate when monitoring exercise intensity.
RPE SCALE0 Nothing at all.5 Very, very weak1 Very weak2 Weak3 Moderate4 Somewhat strong5 Strong67 very strong8910 Very, very, strongMaximal
The recommended RPE range for most people is between 3 (moderate)and 5 (strong). The RPE should be independent of your pace; it is dependent on the feelings caused by the exertion.
TALK TESTThe “Talk Test” is a quick and simple check of exercise intensity. If you havetrouble completing a sentence, you are working to hard. You should beable to speak freely without gasping for air.

33
T9450HRT
CHOOSE THE HRT PROGRAMUsing either set of Arrow buttonsselect “P7” Heart Rate Programand press the SELECT button.
ENTER TARGET HEART RATE ZONEUsing either set of Arrow buttons,enter your Target Heart Rate andpress the SELECT button.NOTE: The Function Window willblink and the heart rate LED will belit to let the user know what theirTarget Zone is.
T9450HRT HEART RATE TRAINING
HEART RATE CONTROL ELEVATION & SPEEDProgram default is 34:00 minutesEnter Target Heart Rate, Time & Weight.The Treadmill has a manual mode warm up until you reach your TargetHeart Rate. During the warm up mode, you control both speed and elevation. This does not count for the program time. Once you reach yourTarget Heart Rate, the Treadmill controls Heart Rate by Speed andElevation. The speed will be automatically adjusted; first up to 1 MPHgreater than the current Target Heart Rate Speed. After the console automatically adjusts your speed up to 1 MPH more than the Target HeartRate Speed, the elevation will take over and adjust your elevation to keepyou in your Target Zone. This will repeat throughout the program.

34
T945
0HRT
CHOOSE TIMEAfter you have chosen your TargetHeart Rate, the Time wil show theprogram default time of 34:00.You may change the Time, usingeither set of Arrow buttons. Pressthe SELECT button to enter yourTime.NOTE: The Minimum Time is 5 minutes. If you are ready tobegin exercising, press the STARTbutton. Optionally, if you wish toenter your weight, proceed to thenext step.
ENTER WEIGHTUsing either set of Arrow buttons,enter your Weight. Press theSELECT button.
BEGIN THE PROGRAMPress the START button. The consolewill begin three beep countdown.The belt will begin to move once thiscountdown is complete.

35
T9450HRT
WARM-UP MODENow the Treadmill is in the MANUAL warm-up mode.The user controls both the speed and elevation to reach their Target HeartRate plus or minus 5 Beats-per-Minute (BPM). Once a steady Heart Rateis found, the console will beep 3 times and then enter the Heart RateTraining mode.
After the user has reached their target zone, the speed will be adjusted first upto 1 MPH greater than the current target Heart Rate Speed in the program. Thespeed can always decrease greater than the current speed. After you speed upto 1 MPH more, the elevation will take over and control elevation to keep inzone. This would repeat throughout the program.

36
T945
0HRT
COOL DOWN MODEAfter you have completed your timed workout, the console will display“COOL DOWN”. This is to let you know that the program has ended.Now the user is in a manual mode cool down and has control of theSpeed and Elevation buttons. This lets the user cool down at their own pace.
COMPLETING YOUR WORKOUTOnce you feel your cool down time is enough, press STOP and theTreadmill will stop.

37
T9450HRT
NOTES FOR YOUR HEART RATE TRAINING PROGRAM
• If there is no Heart Rate detected, the Treadmill will not speed up ordown.
• If the Heart Rate detected is higher than the Target Zone by 10 BPM theconsole will “beep” 4 times to warn the user.
• If the Heart Rate detected is higher than the Target Zone by 15 BPM,the console will “beep” 4 times, stop, and then continue beeping 4 timesagain and the same process will repeat 5 times.
• If the user’s Heart Rate is 20 beats over their Target Zone, the Treadmillwill “beep” 5 times then Shut Down.
• Once the user is in their Target Zone +/- 5 BPM, the speed will adjustto stay at the current Heart Rate until the last 5 minutes of the program.
NOTE: At all times the speed and elevation keys are operative for the user.
38
T945
0HRT
PROGRAMMING A USER PROFILESelect U1 thru U5 by pressingArrows. Press the SELECT button.
ENTER PROGRAM TIMEEnter Time using Arrows, thenpress the SELECT button to savetotal workout time.
ENTER SEGMENT SPEEDThe #1 column will blink. PressSpeed Arrows to change the segment column Speed (Speed numeric values changing with redcolumn).
ENTER SEGMENT ELEVATIONThen press the Elevation Arrows tochange the segment columnElevation (notice Elevation numericvalues changing with orange column).
FITstrategy™ CUSTOM USER PROFILES U1-U5Design your own Programs by setting the desired Speed and Elevation. AllPrograms have 12 intervals and a minimum Program Time of 12 minutes.By designing your own Programs you now can control your fitness goalsworkout-by-workout. This allows you to modify your training based on certain events or milestones you may have set for yourself.

39
T9450HRT
SAVING SEGMENT DATAPress the SELECT button to storeSpeed and Elevation, then pro-ceed to the next column.NOTE: Repeat entering segmentspeed and segment elevation untilall 12 segments are completed.
ENTERING YOUR WEIGHTAfter you have chosen your workout time you may now enteryour Weight. By entering yourWeight, the totals for Calories willbe adjusted according to yourentered Weight.
BEGINING WORKOUTBegin your exercising in your newFITstrategy™ Custom User Profileby pressing the START button. NOTE: This program will be savedpermanentally and may bechanged by repeating the stepsabove


41
GENERAL
TROUBLESHOOTING YOUR TREADMILL
Our Treadmills are designed to be reliable and easy to use. If, however,you have a problem, these troubleshooting steps may indicate the cause.
PROBLEM: The Console does not light up.SOLUTION: Check to make sure the Treadmill is connected to a functioning outlet, and that the Treadmill is turned on.
PROBLEM: The Treadmill’s built-in circuit breaker trips repeatedly, shutting-off for no apparent reason.SOLUTION: The lubricating wax coating on the deck is wearing downand needs to be replenished; contact your VISION FITNESS retailer.
PROBLEM: The Treadmill shuts off when elevated.SOLUTION: Check to make sure that the power cord is not stretched sotight that when the Treadmill is elevated the cord is pulled out of the walloutlet.
PROBLEM: The running belt does not stay in the center of the Treadmillwhen you are running on it.SOLUTION: 1) Check to make sure the Treadmill is level. 2) The runningbelt is loose and needs to be properly tensioned (see Page 44 for properprocedure).
PROBLEM: The belt moves within 1/4” of -- but does not touch -- the side rail.SOLUTION: There is nothing wrong, this is normal and will not cause anydamage.
NOTE: If the above steps do not remedy the problem, discontinue use, turnthe power off and contact your VISION FITNESS retailer.

42
GEN
ERAL
TROUBLESHOOTING YOUR HEART RATE MONITOR CHEST STRAP
PROBLEM: No pulse reading appearsSOLUTION: There may be a poor connection between the contactpads and skin. Remoisten electrodes.SOLUTION: Transmitter is not properly positioned. Reposition the chest strap.SOLUTION: Verify that the distance between transmitter and receiver is notbeyond the recommended range of 36 inches.
PROBLEM: There is an erratic pulse rate.SOLUTION: Chest strap is too loose; readjust according to directions.
NOTE: It is possible that heart rate monitors will not function properly onsome people due to a variety of reasons. It may be necessary to experiment with the fit and position of the chest strap. Outside interference sources such as computers, motors, etc. are also a majorsource of problems for heart rate monitors.

43
GENERAL
COMMON TREADMILL QUESTIONS
Q: Are the sounds my Treadmill makes normal?A: All Treadmills make a certain type of thumping noise due to the belt riding over the rollers. This noise will diminish over time, although it mightnot totally go away. With use, the belt will stretch, causing the belt to ridemore smoothly over the rollers. It might appear that one Treadmill is louder another. There are many reasons for this and may not be due to adefect.
Q: Why is the Treadmill I had delivered louder than the one at the store?A: All fitness products seem quieter in a large store showroom becausethere is generally more background noise than in your home. This is dueto many acoustic differences. A number of precautions can be take toreduce noise. For instance, a heavy rubber mat can help reduce reverberation through the floor. And finally, if a fitness product is placedclose to a wall, there will more reflected noise.
Q: When should I be worried about a noise?A: As long as the sounds your Treadmill makes are no louder than a normal conversational tone of voice, it is considered normal noise. If yourTreadmill is louder than this, you may want to call your service technician.Sometimes an initial diagnosis can be made over the phone.

44
GEN
ERAL
TENSIONING THE BELTIf the running belt slips when used, use the supplied 8MM Allen wrench toturn the left and right tension bolts clockwise 1/4-turn at a time until the beltno longer slips.
CENTERING THE BELTIf the running belt is too far to the right side, use the supplied 8MM Allenwrench to turn the right tension bolt clockwise 1/4-turn at a time until thebelt remains centered during use.If the running belt is too far to the left side, turn the left tension bolt clockwise 1/4-turn at a time until the belt remains centered during use.

45
GENERAL
LIMITED HOME USE WARRANTY
VISION FITNESS extends the following exclusive, limited warranty, which shallapply only to the use of the device in the home, for residential, non-commercialpurposes only. Any other use of the device shall void this warranty.
VISION FITNESS hereby extends the following limited warranties for the followingcomponents of the device, for the time period indicated:
FRAME - LIFETIME VISION FITNESS warrants the Frame against defects in workmanship and materials for the life of the product, so long as it remains in thepossession of the original owner.
MOTOR - TEN YEARS VISION FITNESS warrants the Motor against defects inworkmanship and materials for a period of ten years from the date of original purchase, so long as the device remains in the possession of the original owner.
ELECTRONICS & PARTS - TWO YEARS VISION FITNESS warrants the Electroniccomponents and all original Parts (other than the Motor) against defects in workmanship and materials for a period of two years from the date of original purchase, so long as the device remains in the possession of the original owner.
LABOR - ONE YEAR VISION FITNESS shall cover the Labor cost for the repair ofthe device for a period of one year from the date of original purchase, so long asthe device remains in the possession of the original owner.

46
GEN
ERAL
LIMITED HOME USE WARRANTY (continued)
EXCLUSIVE REMEDYThe exclusive remedy for any of the above warranties shall be repair or replacement of defective Parts, or the supply of Labor to cure any defect, provided that Labor shall be limited to one year. All Labor shall be supplied by thelocal Retailer who sold the Product and the Product must be located within thatRetailer’s service area. Products located outside the Retailer’s service area will notbe covered by the Labor warranty.
EXCLUSIONS AND LIMITATIONSThis warranty applies only to the original owner and is not transferable. This warranty is expressly limited to the repair or replacement of a defective Frame,Electronic component, or defective Part and is the sole remedy of the warranty. Thewarranty does not cover normal wear and tear, improper assembly or maintenance, or installation of parts or accessories not originally intended or compatible with the Fitness Product as sold. The warranty does not apply to damage or failure due to accident, abuse, corrosion, discoloration of paint or plastic, or neglect. VISION FITNESS shall not be responsible for incidental or consequential damages. Parts and Electronic components reconditioned to AsNew Condition by VISION FITNESS or its vendors may sometimes be supplied aswarranty replacement parts and constitute fulfillment of warranty terms. Any warranty replacement parts shall be warranted for the remainder of the originalwarranty term.
VISION FITNESS expressly disclaims all other warranties, express or implied,including but not limited to all warranties of fitness for a particular purpose or ofmerchantability. This warranty gives you specific legal rights and your rights mayvary from state to state.
WARRANTY REGISTRATIONYour warranty card must be completed and sent to VISION FITNESS before a warranty claim can be processed. You may also register via our website atwww.visionfitness.com. Inside the enclosed warranty card you will find a customer survey. Your care in completing the survey will be of value to us in serving you in the future. Comments and suggestions are always welcome. Weare certain you will enjoy your new Treadmill. Thank you for selecting a VISIONFITNESS product.

47
GENERAL
DEVELOPING A FITNESS PROGRAM
WARM UPWhen you exercise you need more oxygen to fuel your muscles. This oxygen is carried to the muscles through blood. The increasing demandsof exercise will cause increased breathing rate, heart rate, blood flow andblood temperature. As your blood temperature rises and more oxygen isreleased, the temperature of your muscles will increase. This allows themuscles to burn calories and create energy for exercise.
A warm-up activity should be a progressive aerobic activity that utilizes themuscles you will be using during your workout. There is no set intensity towarm-up with. A typical warm-up will produce a small amount of perspiration, but not leave you feeling fatigued. Intensity and fitness levelwill affect the duration of your warm-up, but 5 to 10 minutes is usually recommended.
A gradual warm-up will do the following:• Produce faster more forceful muscle contractions• Increase your metabolic rate so oxygen is delivered to the working
muscles more quickly• Leads to efficient calorie burning by increasing your core body
temperature• Prevent injuries by improving the elasticity of your muscles• Allow you to work out comfortably longer because your energy
systems are able to exercise, preventing the buildup of lactic acidin the blood.
• Improves joint range of motion • Psychologically prepares you for higher intensities by increasing
your arousal and focus on exercise

48
GEN
ERAL
FLEXIBILITYBefore stretching, take a few minutes to warm-up as stretching a cold muscle can cause injury. When stretching you should start slowly, exhaling as you gently stretch the muscle. Try to hold each stretch for atleast 15 to 30 seconds. Don’t bounce when you stretch. Holding a stretchis more effective and less of a risk for injury. Don’t strain or push a muscletoo far. If a stretch hurts, ease up.
SEATED TOE TOUCHSit on the floor with your legstogether and straight out in front ofyou. Do not lock your knees.Extend your fingers toward yourtoes exhaling as you go. Hold thestretch for 15 to 30 seconds.Return to the start position andrepeat the stretch as necessary.
STANDING QUADRICEPS STRETCHUsing a wall or your Bike to provide balance, grasp your leftankle with your left hand and holdto stretch. Your knee should bepointing to the floor. Hold thestretch for 15 to 30 seconds.Repeat with your right leg andcontinue to alternate for amount ofdesired repetitions.
49
GENERAL
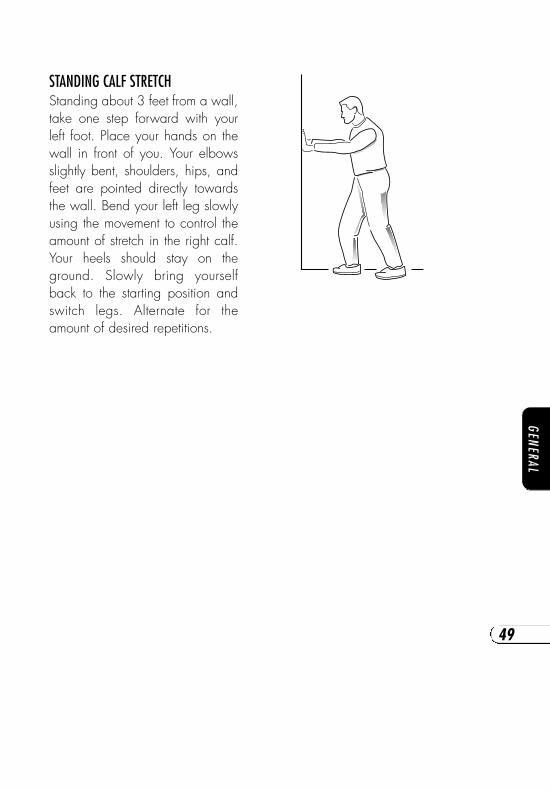
STANDING CALF STRETCHStanding about 3 feet from a wall,take one step forward with yourleft foot. Place your hands on thewall in front of you. Your elbowsslightly bent, shoulders, hips, andfeet are pointed directly towardsthe wall. Bend your left leg slowlyusing the movement to control theamount of stretch in the right calf.Your heels should stay on theground. Slowly bring yourselfback to the starting position andswitch legs. Alternate for theamount of desired repetitions.
50
GEN
ERAL
EXERCISE GUIDELINES The American Council of Sports Medicine (A.C.S.M.) recommends the following exercise guidelines, for healthy aerobic activity:
Frequency: Exercise 3 to 5 days each week.
Warm-up: Warm-up 5 to 10 minutes before aerobic activity.
Duration: Maintain your exercise intensity for 20 to 60 minutes.
Cool Down: Gradually decrease the intensity of your workout, thenstretch to cool down during the last 5 to 10 minutes.
NOTE: If weight loss is major goal, participate in your aerobic activity atleast 30 minutes for five or more days each week.

51
GENERAL
ACHIEVING YOUR FITNESS GOALSAn important step in developing a long term fitness program is to determine your goals. Is your primary goal for exercising on your VISIONFITNESS Product to lose weight? Improve muscle tone? Relieve stress?Prepare for the spring racing schedule? Knowing what your goals are willhelp you develop a more successful exercise program. Below are somecommon exercise goals:
•Weight Loss & Maintenance•Improve Body Shape & Tone•Increase Energy Level •Improve Cycling/Cross Sports Performance •Improve Cardiovascular Endurance •Stress Reduction•Improve Sleep Patterns•Improve muscular strength
If possible try to define your personal goals in precise, measurable terms,and then put your goals in writing. The more specific you can be, the easier it will be to track your progress. If your goals are long term, dividethem up into monthly and weekly segments. Longer term goals can losesome of the immediate motivation benefits. Short term goals are easier toachieve. Your VISION FITNESS Product console provides you with several readouts that can be used to record your progress. You can trackDistance, Calories or Time. Time is the most important and useful of testfunctions.

52
GEN
ERAL
SAMPLE GOALS:Goal-setting is a popular motivational technique. It’s important to set goalsand reward yourself when initiating a new exercise program becauseyou’re attempting to break current patterns and form a new habit. Whetheryou use this technique or another, make fitness a priority in your life. Youcan achieve the ultimate reward to yourself: you can establish the exercisehabit! Some sample goals may be:
•To strengthen my heart by exercising 24 minutes three days a week.(Goal Measurement: Exercise Time=72 minutes a week).•To improve my body’s ability to burn fat by exercising at a lowintensity for 48 minutes per day, 5 days a week.(Goal Measurement: Exercise Time=240 minutes per week).•To burn off work related stress by exercising for 20 minutes a day on work days.(Goal Measurement: Exercise Time=100 minutes per week).
KEEPING AN EXERCISE DAIRYPhotocopy the weekly and annual log sheets on the following pages tomake your personal exercise log book. As time goes by you’ll be able tolook back with pride at the work you’ve done. As your fitness improves,you can look back and see how far you’ve come.


54
GEN
ERAL

55
GENERAL

56
GEN
ERAL

57
GENERAL


500 South C.P. Avenue • P.O. Box 280
Lake Mil ls, WI 53551
tol l f ree 1.800.335.4348 • phone 1.920.648.4090
fax 1.920.648.3373
www.visionfitness.com
2002 Vision Fitness. Al l Rights Reserved. 12.02 Part #Z84TM41-OM1804PRDOM18.04PRDREV3
s t a r t s
v i s i o nw i t h a
i t a l l


