Embed Size (px)
Citation preview

O W N E R ’ S / A S S E M B LY M A N UA LO W N E R ’ S / A S S E M B LY M A N UA L
Manual en Español Latino Americano: www.support.nautilus.com

Owner’s Manual
2
Important Safety Instructions ................................. 3Safety Warning Labels and Serial Number............. 5FCC Compliance .................................................... 5
........................... 6Parts ...................................................................... 7
.................................................... 9 ............................................................. 10
Storing Your Machine ........................................... 32Leveling Your Machine ......................................... 32Features ............................................................... 33
................... 37Operations ............................................................ 39Getting Started ..................................................... 40
Power Up Mode ................................................... 41 ................................................ 41
Workout Programs ............................................... 41 .................................................... 44
............................................................. 44 .................................. 45
................................................ 45Machine Settings Mode ....................................... 46Maintenance ......................................................... 47
.................................................... 50 ............................................ 54
Warranty ............................................................... 55
You’re about to experience an incredible workout that can help you lose weight and reshape your entire body so you’ll look and feel better than ever
® workouts and for tips to keep your machine well maintained.
Yours in Health,
Table of Contents
To validate warranty support, keep the original proof of purchase and record the following information:
Serial Number __________________________ Date of Purchase ____________________
Or call 1 (800) 605–3369.
If you have questions or problems with your product, please call 1 (800) 605–3369.
trademarks owned by or licensed to Nautilus, Inc. MyFitnessPal® , Polar®, OwnCode® ®
®
is under license.
Welcome to the Bowflex® HVT
™ machine!

Owner’s Manual
3
Important Safety Instructions
When using an electrical appliance, basic precautions should always be followed, including the following:
This icon means a potentially hazardous situation which, if not avoided, could result in death or serious injury.
Obey the following warnings:
Read and understand all Warnings on this machine.
for future reference.
To reduce the risk of electrical shock or unsupervised usage of the equipment, always unplug this machine from the electrical outlet immediately after using and before cleaning.
• Keep bystanders and children away from the product you are assembling at all times.• Do not connect power supply to the machine until instructed to do so.• •
Nautilus Customer Service for repair information. • Do not drop or put objects into any opening of the machine.• Do not assemble this machine outdoors or in a wet or moist location.• Make sure assembly is done in an appropriate work space away from foot traffic and exposure to bystanders.• Some components of the machine can be heavy or awkward. Use a second person when doing the assembly steps involving these parts. Do not
do steps that involve heavy lifting or awkward movements on your own.• Set up this machine on a solid, level, horizontal surface.• • If replacement parts are necessary, use only genuine Nautilus replacement parts and hardware. Failure to use genuine replacement parts can
cause a risk to users, keep the machine from operating correctly and void the warranty.• Do not use until the machine has been fully assembled and inspected for correct performance in accordance with the Manual.• Use this machine only for its intended use as described in this manual. Do not use attachments not recommended by the manufacturer.• Do all assembly steps in the sequence given. Incorrect assembly can lead to injury or incorrect function.• Do not move the machine without aid. Injury to you or damage to the machine can occur.• Connect this machine to a properly grounded outlet only (see Grounding Instructions).• Keep the power cord away from heat sources and hot surfaces.• Do no operate where aerosol products are being used. •

Owner’s Manual
4
Before using this equipment, obey the following warnings:
Read and understand all Warnings on this machine. If at any time the Warning stickers become loose, unreadable or dislodged, contact Nautilus Customer Service for replacement stickers.
To reduce the risk of unsupervised use of the equipment, remove the AC Adapter from the wall outlet and the machine. Place the AC Adapter in a secure location
• Children must not be let on or near to this machine. Moving parts and other features of the machine can be dangerous to children.• Not intended for use by anyone under 14 years of age.• Consult a physician before you start an exercise program. Stop exercising if you feel pain or tightness in your chest, become short of breath, or
feel faint. Contact your doctor before you use the machine again. Use the values calculated or measured by the machine’s computer for reference purposes only.
• Front Platform Frame by 12” ( 30.5cm). Never operate the machine when standing to the sides or behind the machine. Doing so could lead to equipment instability and harm to the user. If required to perform an exercise, the user can step off the platform with one foot but must stay within
• their connections, making sure they are properly secured and attached, and show no signs of visible wear or damage. Do not use if found in this condition. Contact Nautilus Customer Service for repair information.
• Do not let liquids touch the electronic controller. If it does, the controller must be inspected and tested for safety by an approved technician before it can be used again.
• • • •
exercise equipment.• • Set up and operate this machine on a solid, level, horizontal surface.• Use caution when you step on and off the platform. Keep the Platform clean and dry.• Do not operate this machine outdoors or in moist or wet locations.•
around the machine, emergency dismounts, and the workout training area. Keep third parties out of this space when machine is in use.• Do not over exert yourself during exercise. Operate the machine in the manner described in this manual.• Never attempt to exercise with more resistance than you can safely and comfortably handle.• • Keep clear of cable movement path during operation. Keep any bystanders clear of machine and out of exercise area during operation.• Perform all regular and periodic maintenance procedures recommended in the Owner’s Manual.• Do not drop or put objects into any opening of the machine.• Exercise on this machine requires coordination and balance.
level can occur during workouts, and be attentive in order to avoid loss of balance and possible injury.• Use this machine only for its intended use as described in this manual. Do not use attachments not recommended by the manufacturer. •
been given supervision or instruction concerning use of the appliance by a person responsible for their safety. Keep children under the age of 14 away from this machine.

Owner’s Manual
5
FCC Compliance
authority to operate the equipment.
cause harmful interference, and (2) this device must accept any interference received, including interference that may cause undesired operation.
equipment generates, uses and can radiate radio frequency energy and, if not installed and used in accordance with the instructions, may cause harmful interference to radio communications.
However, there is no guarantee that interference will not occur in a particular installation. If this equipment does cause harmful interference to radio or television reception, which can be determined by turning the equipment off and on, the user is encouraged to try to correct the interference by one
• Increase the separation between the equipment and receiver. • Connect the equipment into an outlet on a circuit different from that to which the receiver is connected.
Serial Number
Product Specification
Power Inlet
Safety Warning Labels and Serial Number
WARNING!- Injury or death is possible if caution is not used while using this machine.
- Read and follow all warnings on this machine.
additional warnings and safety infor-mation.- The heart rate displayed is an
for reference only.- Not intended for use by anyone under 14 years of age.
machine is 300 lbs (136 kg).- This machine is for home use only.- Consult a physician prior to using
CAUTION / ATTENTION

Owner’s Manual
6
Before Assembly
be done in the intended workout location.
Basic Assembly Tips
• • Collect all the pieces necessary for each assembly step.• Using the recommended wrenches, turn the bolts and nuts to the right (clockwise) to tighten, and the left (counterclockwise) to loosen, unless
instructed otherwise.• When attaching 2 pieces, lightly lift and look through the bolt holes to help insert the bolt through the holes.•
Machine Mat®
rubber machine mat provides a non-slip, rubber surface which limits static discharge and reduces the possibility of display or running errors. If pos-® Machine Mat in your selected workout area before you begin assembly.
300 lbs. (136 kg)
Assembled Weight: approx. 182 lbs (82.5kg)
Power Requirements:
Complies with the following:
Specifications / Before Assembly
83.0”(210.9 cm)
65.3”(165.8 cm)
45.2”(114.7 cm)

Owner’s Manual
7
Parts
( 2 BOXES )BOX 1
11
9109
1
23
4
5
6
7
8
27
12
14
15
16
17
25
14
23
22
26
21
20 19
13
24
3029
18
28
Item Qty Description Item Qty Description1 - 8 1 each Platform Decking 20 1
9 2 Platform Corner Shroud 21 110 1 Platform Frame, Front 22 111 1 23 1 Middle Shroud, Left Front12 1 24 1 Hardware Card13 1 25 114 2 Handlebar 26 1 Left Platform Frame15 1 27 1 Document Kit16 1 28 1 Quick Start Guide17 1 29 118 1 30 119 1
Owner’s Manual
8
BOX 2
40
39
38
42
34
35
33
32
3641
31
37
Item Qty Description Item Qty Description31 2 Lower Grip Holder 37 6 Snap Hooks32 1 Upper Pulley Shroud, Left 38 133 1 Upper Front Shroud 39 434 1 Lower Pulley Shroud, Left 40 235 1 41 136 1 42 1

Owner’s Manual
9
Item Qty Description Item Qty Description32 D 632 E 24
C 14 F 6
Note:after the proper assembly of your machine.
6mm #2 (recommended)
ToolsIncluded Not Included
Hardware / Tools / Assembly
A B C D EE F

Owner’s Manual
10
1. Safely Remove the Frame Assembly from the Shipping Box and Stand Upright in the Intended Workout Area. Remove the Upper Shroud from Frame Assembly.
Note:assembly.
involving these parts. Do not do steps that involve heavy lifting or awkward movements on your own.
36
33
Assembly

Owner’s Manual
11
A
B
X3
11
6mm
2. Safely Remove the Right Shipping Support and Attach the Right Platform Frame to the Frame Assembly
Note:

Owner’s Manual
12
A B
X3
26
6mm
3. Safely Remove the Left Shipping Support and Attach the Left Platform Frame to the Frame Assembly
Note:

Owner’s Manual
13
4. Flip the Front Platform Frame and Attach the Platform Corner Shrouds
C
X2
9
10
9
#2

Owner’s Manual
14
5. Attach Front Platform Frame Assembly to Platform Frames
Note:
AB
X46mm

Owner’s Manual
15
6. Release the Lower Ropes from the Snap Hooks and Route through the Platform Frames

Owner’s Manual
16
7. Pivot, Connect, and Place the Platform Decking into the Platform Frame Assembly
Note:
a ‘v’ in the Platform Frame. With your foot centered on the piece marked ‘2’, push downward to set into place.
1
3
2
4
5
6
7
8
X2
Owner’s Manual
17
*
*
*
*
A
B
AB
D
X6
X2
12
25
F
X4
6mm
6mm
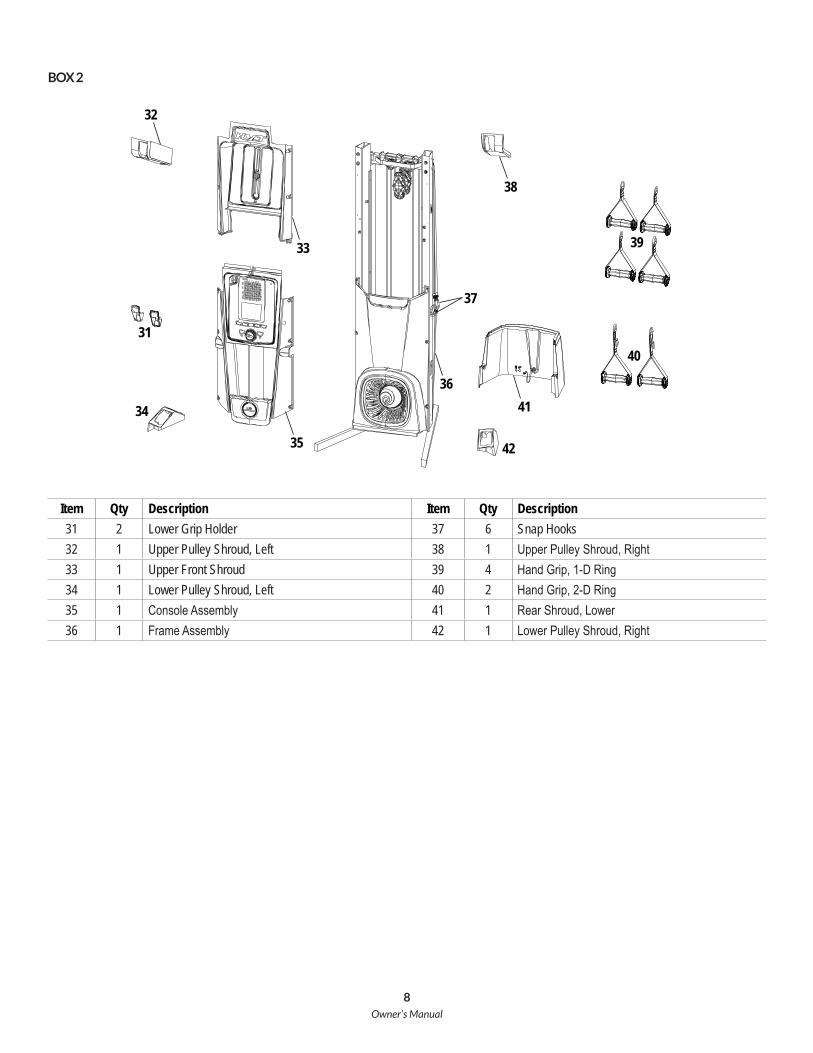
8. Route the Lower Rope and Attach the Support Arms and Securing Ball
Note:
pull out of the round opening.
Owner’s Manual
18
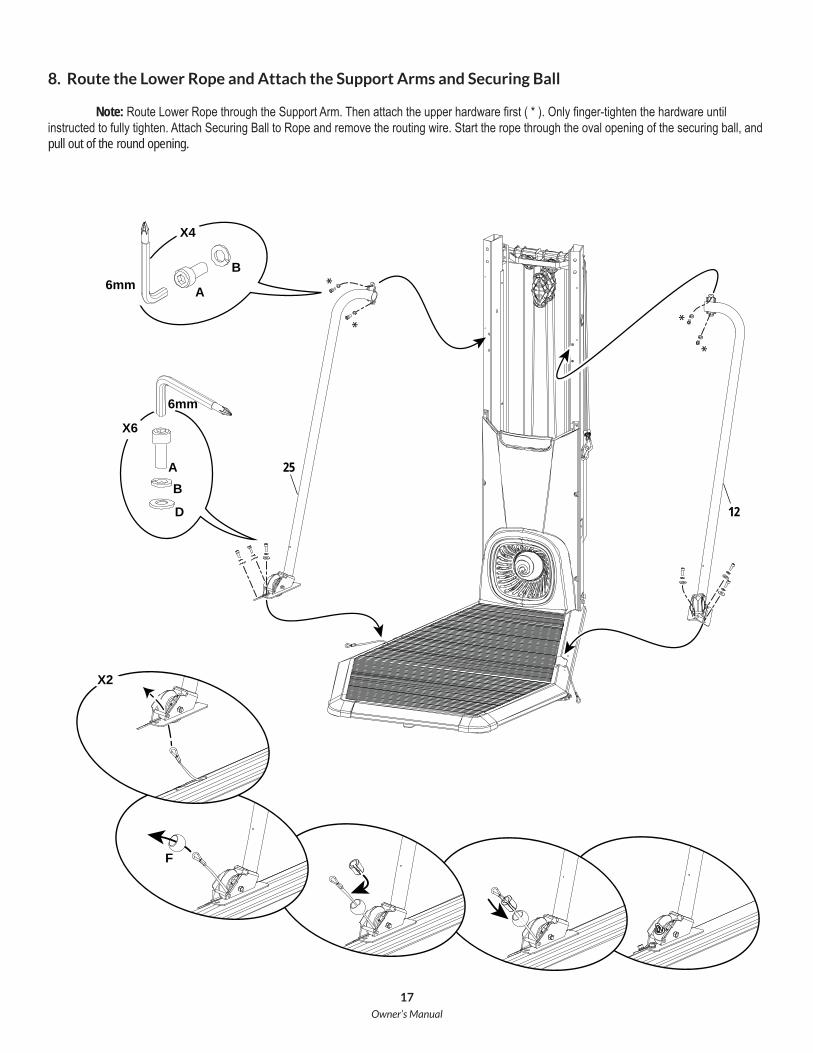
9. Tighten All Hardware from Previous Steps
10. Disconnect the Ropes and Route the Front Rope (*) through Upper Pulley Arms and Insert to Frame Assembly
Note:the round opening.
*
19
20
F
X2

Owner’s Manual
19
11. Attach the Middle Pulley Arms and Route the Middle Ropes
Note:
the end of the rope after routing. Start the rope through the oval opening of the securing ball, and pull out of the round opening.
*
AB
X8
X2
*
**
17
21
F
6mm
Owner’s Manual
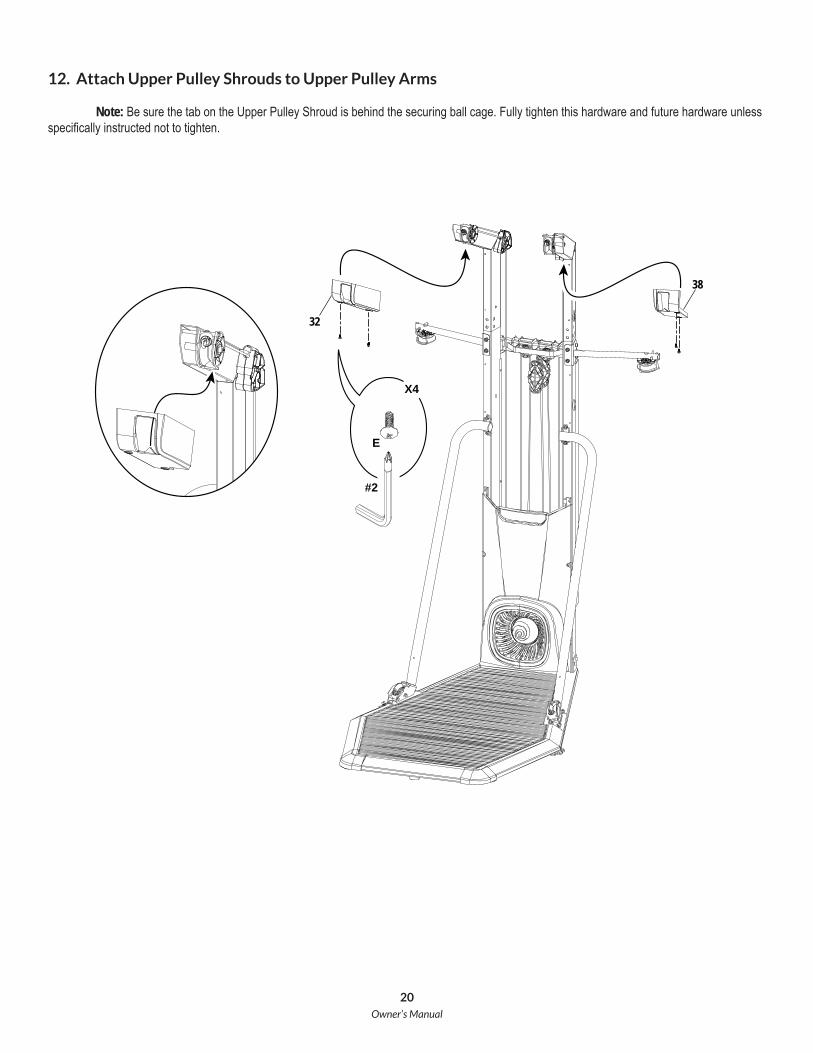
20
E
X4
32
38
#2
12. Attach Upper Pulley Shrouds to Upper Pulley Arms
Note:

Owner’s Manual
21
13. Attach the Handlebars to the Frame Assembly
AB
X4
1414
6mm

Owner’s Manual
22
C
X2
18
#2
14. Attach Upper Rear Shroud to Frame Assembly

Owner’s Manual
23
15. Attach the Middle Pulley Shrouds to the Frame Assembly
Note:*).
C
X10
*
*
15
23
16
22
#2
Owner’s Manual
24
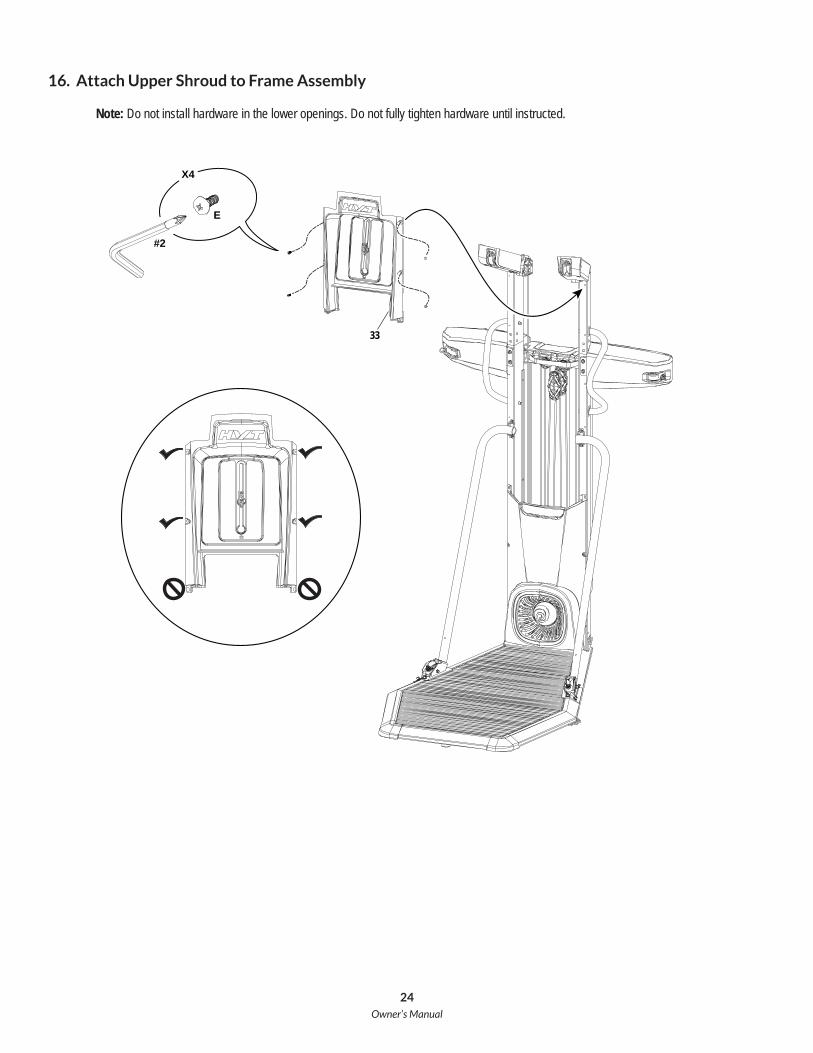
E
X4
33
#2
16. Attach Upper Shroud to Frame Assembly
Note: Do not install hardware in the lower openings. Do not fully tighten hardware until instructed.

Owner’s Manual
25
17. Connect the Cables and Attach the Console Assembly to Frame Assembly
Note:
E
X6
35
#2

Owner’s Manual
26
18. Attach Lower Pulley Shrouds to Frame Assembly
E
X4
4234
#2

Owner’s Manual
27
19. Attach Lower Grip Holders to Frame Assembly
E
X2
31
#2
31

Owner’s Manual
28
20. Connect the Power Input Cables and Attach the Lower Rear Shroud to Frame Assembly
Note:
E
X4
41
#2

Owner’s Manual
29
21. Carefully Attach Hand Grips to Ropes
Note:
40
39
39
40
39
39
37
37
37
37
37
37

Owner’s Manual
30
22. Secure the Training Guide to the Media Tray on the Upper Shroud
Note:
29

Owner’s Manual
31
23. Attach Power Adapter to Frame Assembly
Note: Do not crimp the Cables.
24. Using the Hand Grips, Fully Extend each of the Ropes and Remove any Twists from Them
Note: ®
gradually allowing them to retract.
ropes are fully retracted. The rope will be under tension and will retract itself into the
damage to the machine or injury to the user or bystanders.
13

Owner’s Manual
32
Moving and Storing the Machine
Do not move the machine without aid. Injury to you or damage to the machine can occur.
Leveling the Machine
1. Place the machine in your workout area.
Do not adjust the levelers to such a height that they detach or unscrew from the machine. Injury to you or damage to the machine can occur.
25. Final Inspection
excess hardware according to your local regulations.

Owner’s Manual
33
Platform
Leveler
Lower Pulley
Power Inlet
Upper Pulley
Middle Pulley
Static Handlebars
Console
Hand Grip
Features
Hand Grip Holder

Owner’s Manual
34
Pulleys®
Platform
Note: If necessary, grab onto the Static Handlebars for stability.
Console Features
Bluetooth® icon® ® enabled device is connected to the Console.
Round display
Note:
® icon
Exercise segment

Owner’s Manual
35
Exercise segment
that Workout Program.
Total Time display
Total Calories display
Active Exercise Segment Timers:
Work display
Rest display
Break display
Total Power display
Resistance display
Heart Rate (if supplied)
of breath, or feel faint. Contact your doctor before you use the machine again. The heart rate displayed on the console is an

Owner’s Manual
36
Keypad Functions
User button
Active User display
Note: For a more accurate calorie count, be sure to edit your
Workout Program buttons
START button
Resistance Level dial
increase a value, counter-clockwise will decrease a value.
PAUSE/STOP buttonPauses an active workout, ends a paused workout, or goes back to the previous screen.
Add Time button-
Note:
Volume button and indicator lights
LEDs), or off (no LEDs).
Training Guide ®
machine. Each of the Workout Programs have been designed to take full advantage of the ® machine. -
-
Note: If desired, a smart device with the ® ®
during workouts, and be attentive in order to avoid loss of balance and possible injury. Grab onto the Static Handlebars to stabilize yourself at any moment.

Owner’s Manual
37
Accessory Storage Area behind Media Shelf®
Media Shelf, lift and pull outward the Media Shelf backing.
to the height of the device you have on the Media Shelf.
Connectivity on your fitness machine® ®
® icon will activate. If
The “Bowflex® HVT™” Software App® -
score, resistance, and heart rate (if supplied). Plus, it automatically posts your workout data to MyFitnessPal®®
® ®.
USB Charging
operate the Device and charge it at the same time.
Remote Heart Rate Monitor
Note: ® compatible model. (Coded ® ® OwnCode® chest straps will not work with this equipment.)
If you have a pacemaker or other implanted electronic device, consult your doctor before using a wireless chest strap or other telemetric heart rate monitor.
Heart Rate Calculations
using an age related formula.

Owner’s Manual
38
-
you maintain your target heart rate, the more fat your body will burn.
Fat-Burning Target Heart Rate
higher or lower. Consult your physician for your individual target heart rate zone.
Note:

Owner’s Manual
39
How Often Should You Exercise
for reference only.
• 3 times a week for about 20 minutes each day.• Schedule workouts in advance and try to follow the schedule. Note: If you are new to exercise (or returning to a regular exercise program), and you are unable to comfortably complete 20 minutes of con-
tinuous exercise at one time, select a few workouts and do them for 5 – 10 minutes. Gradually increase your workout time until you can comfortably complete the total time for one of the Workout Programs.
Apparel ®
• • Exercise clothing that allows you to move freely, and keep comfortably cool.•
Do not wear loose clothing or jewelry. This machine contains moving parts. Do not put fingers, feet, or other objects into moving
Always wear rubber soled athletic shoes when you use this machine. Do not use the machine with bare feet or only wearing socks.
Intensity of Workout
• • Increase the resistance level while keeping the number of repetitions constant. Note:
was done.• Push yourself to increase the number of repetitions during the Work segment of each exercise.
®
Operations
Owner’s Manual
40
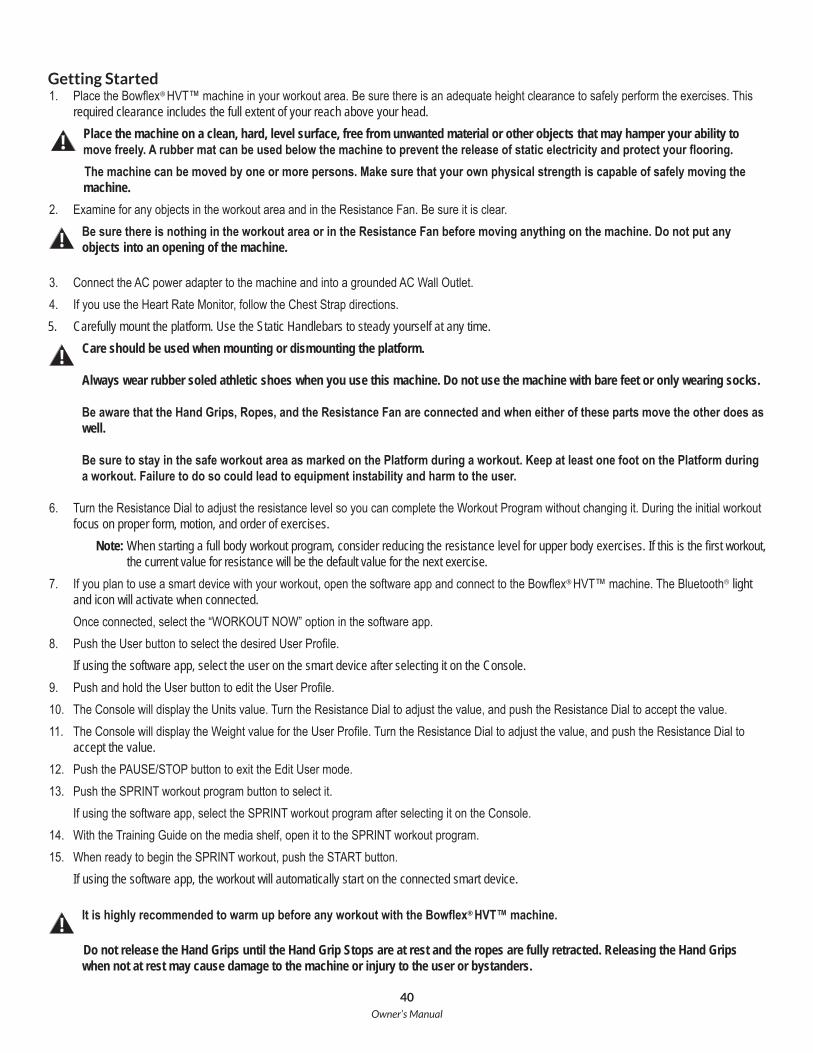
Getting Started®
required clearance includes the full extent of your reach above your head.Place the machine on a clean, hard, level surface, free from unwanted material or other objects that may hamper your ability to
machine.
objects into an opening of the machine.
5. Carefully mount the platform. Use the Static Handlebars to steady yourself at any time.Care should be used when mounting or dismounting the platform.
Always wear rubber soled athletic shoes when you use this machine. Do not use the machine with bare feet or only wearing socks.
well.
focus on proper form, motion, and order of exercises. Note: When starting a full body workout program, consider reducing the resistance level for upper body exercises. If this is the first workout,
the current value for resistance will be the default value for the next exercise.® ® light
and icon will activate when connected.
If using the software app, select the user on the smart device after selecting it on the Console.
accept the value.
If using the software app, the workout will automatically start on the connected smart device.
®
Do not release the Hand Grips until the Hand Grip Stops are at rest and the ropes are fully retracted. Releasing the Hand Grips when not at rest may cause damage to the machine or injury to the user or bystanders.

Owner’s Manual
41
Note:fully retract into the machine.
Power-Up Mode ( Start-Up screen )
Auto Shut-Off (Sleep Mode)
display is off while in Sleep Mode. Note:
2. Push and hold the User button for 3 seconds to begin the Edit User mode. Note:
adjust the resistance to the ending resistance level the last time that exercise was done. Note: If this is the first workout, the current value for resistance will be the default value for the next exercise.
been erased.
Workout Programs®
workout.

Owner’s Manual
42
program.
SPRINT program
Each exercise is performed for 20 seconds (Work) followed by 10
CIRCUIT program
again.
Each exercise is performed for 25 seconds (Work) followed by 15
ROUND
1
2
3
4
1 2 3 4 5 6 7 8
1. Speed squat2. Chest press3. Squat jump
6. Split leg alternating bicep curl
8. Squat with overhead press
ROUND
1
2
3
4
1 2 3 4 5 6 7 8
1
2
3
4
1 2 3 4 5 6 7 8
4. Split jump5. Lunge bicep curl6. Lateral lunge high to low chop7. Deadlift

Owner’s Manual
43
BUILDER program
an additional exercise.
Each exercise is performed for 30 seconds (Work).
MANUAL program
total time that the fan is moving. When the resistance fan stops, the time count pauses, while the total time of the workout continues.
Note:
resistance and capacity levels of this machine. Only
for operation with this machine.
ROUND
1
2
3
4
1 2 3 4 5 6 7 8
ROUND
1
2
3
4
1 2 3 4 5 6 7 8
1. Speed squat
7. Combo tricep extension bicep curl8. Forward lunge chest press

Owner’s Manual
44
1. Carefully step up onto the platform.-
5. Grasp the appropriate Handle (Upper, Middle, or Lower Handles) and begin the first exercise of the Workout Program after the 3-2-1 countdown.
requires it. 6.
segment or another Work segment.
Do not release the Hand Grips until the Hand Grip Stops are at rest and the ropes are fully retracted. Releasing the Hand Grips when not at rest may cause damage to the machine or injury to the user or bystanders.
Note:
Note: For every 100 calories burned during a workout, the Console will congratulate with an audible sound and a notification. When 30 seconds
Paused / Results Mode
completed exercise segments are displayed on the Console.
Note: Console does not receive any further input, it will automatically shut off in approximately 5 minutes.
Add Time to a Workout Program
-

Owner’s Manual
45
Note:
Changing Resistance Levels
-
that exercise segment.
Note:
contact our Customer Service department for assistance.
Total Power score ®
®
Note:your previous scores and not to other User Profiles.

Owner’s Manual
46
Machine Settings Mode
Mode. Note:
8.
10. Note: ®
Note:

Owner’s Manual
47
Maintenance
done. Worn or damaged components must be repaired or replaced immediately. Only manufacturer supplied components can be used to maintain and repair the equipment.
If at any time the Warning labels become loose, unreadable or dislodged, contact Nautilus Customer Service for re-placement labels.
To reduce the risk of unsupervised use of the equipment, remove the AC Adapter from the wall outlet and the machine. Place the AC Adapter in a secure location.
Daily:
a damp cloth to wipe your machine and Console free of sweat.Note:
Weekly: Inspect all pulleys and their connections making sure they are properly secured and attached, and show no
from the ropes. Wipe the machine to remove dust, dirt, or grime. Clean the platform and front of machine with a damp cloth.Note: Do not use petroleum based products.
Monthly or after 20 hours:
Yearly:
NOTICE:

Owner’s Manual
48
Maintenance Parts
V
X
BBBB
AA
S
PY
ZO
N
G
F
R
HH
GG
Z
C
EE
FF
DD
A
BD E
U
H
M
T
Q
Q
K
L
J
I
CCW
II
KK
JJ
LLMM

Owner’s Manual
49
N Platform DeckingUpper Pulley Shroud, Left O Platform Corner Shrouds
C Upper Front Shroud P CC Front Platform FrameD Q lower Grip Holder DD Left Platform FrameE EE Middle Shroud, Left FrontF S FFG GGH U HH Lower Pulley Shroud, LeftI IIJ W Snap Clip JJ Servo MotorK X KKL Fan Shroud Y LL Elastic CordM Handlebar MM

Owner’s Manual
50
Troubleshooting
Things to Check SolutionOutlet
Power cord not plugged in
Check console display for damage
Check for visual sign that console display is cracked or otherwise damaged.
Console displayConsole.
If problem persists Contact Customer Service.
not displayedChest Strap (optional) ®” compatible and uncoded. Make sure strap is
directly against skin and contact area is wet.Interference
displayed incorrectlyInterference
device in the left side of the media tray.
when rope is pulledInspect ropes to see if they are intact, and inspect all connections to be sure they are connected.
If problem persists Contact Customer Care for further assistance.Fan will not turn Check for blockage of fan Safely remove material from fan. Do not pull on ropes when removing mate-
rial because the fan will turn.
will turn.If necessary, detach the Shrouds to help with removal. Do not operate ma-chine until Shrouds have been replaced.
Check leveler adjustmentCheck surface under unit
Move machine to level area.Squeaking noise that appears a few minutes into a workout and normally will get progressively worse as the workout continues
releasedInspect all ropes for a twist
Workout results will not sync with ® enabled device
Current console mode the Power-Up Mode screen is displayed.
Console.Fitness machine
® enabled device ® wireless feature has been enabled on it.

Owner’s Manual
51

Owner’s Manual
52

Owner’s Manual
53

Owner’s Manual
54
Buy Back Guarantee
®
®
price, less shipping and handling.
®
apply to sales made by dealers or distributors.
®
®
Your Name
Your Phone Number
in each box of merchandise.®
recommends that you obtain tracking numbers and insure your shipment.
-

Warranty
Who Is CoveredThis warranty is valid only to the original purchaser and is not transferable or applicable to any other person(s).
What Is CoveredNautilus, Inc. warrants that this product is free from defects in materials and workmanship, when used for the purpose intended, under normal conditions, and provided it receives proper care and maintenance as described in the Product’s Assembly and Owner’s manual. This warranty is good only for authentic, original, legitimate machines manufactured by Nautilus, Inc. and sold through an authorized agent and used in the United States or Canada.
TermsWarranty terms for products purchased in US/Canada are as stated below.• Frame 2 years • Mechanical parts 2 years• Electronics 2 years• Labor 90 days (Labor support does not include the installation of replacement parts involved in the initial product assembly and preventative maintenance services. All repairs covered under the labor portion of the warranty must be preauthorized by Nautilus.)
For warranty & service of products purchased outside US/Canada, please contact your local distributor. To find your local international distributor, go to: www.nautilusinternational.com
How Nautilus Will Support the WarrantyThroughout the terms of the warranty coverage, Nautilus, Inc. will repair any machine that proves to be defective in materials or workmanship. Nautilus reserves the right to replace the product in the event a repair is not possible. When Nautilus determines replacement is the correct remedy, Nautilus may apply a limited credit reimbursement toward another Nautilus, Inc. brand Product, at our discretion. This reimbursement may be prorated based on length of ownership. Nautilus, Inc. provides repair service within major metropolitan areas. Nautilus, Inc. reserves the right to charge the consumer for travel outside these areas. Nautilus, Inc. is not responsible for dealer labor or maintenance charges beyond the applicable warranty period(s) stated herein. Nautilus, Inc. reserves the right to substitute material, parts or products of equal or better quality if identical materials or products are not available at the time of service under this warranty. Any replacement of the product under the terms of the Warranty in no way extends the original Warranty period. Any limited credit reimbursement may be prorated based on length of ownership. THESE REMEDIES ARE THE EXCLUSIVE AND SOLE REMEDIES FOR ANY BREACH OF WARRANTY.
What You Must Do• Retain appropriate and acceptable Proof of Purchase.• Operate, maintain, and inspect the Product as specified in the Product Documentation (Assembly, Owner’s Manuals, etc.).• Product must be used exclusively for the purpose intended.• Notify Nautilus within 30 days after detecting an issue with the Product.• Install replacement parts or components in accordance with any Nautilus instructions.• Perform diagnostic procedures with a trained Nautilus, Inc representative if requested.
What Is Not Covered• Damage due to abuse, tampering or modification of the Product, failure to properly follow assembly instructions, maintenance instructions, or safety warnings as stated in the
Product Documentation (Assembly, Owner’s Manuals, etc), damage due to improper storage or the effect of environmental conditions such as moisture or weather, misuse, mishandling, accident, natural disasters, power surges.
• A machine placed or used in a commercial or institutional setting. This includes gyms, corporations, work places, clubs, fitness centers and any public or private entity that has a machine for use by its members, customers, employees or affiliates.
• Damage caused by exceeding maximum user weights as defined in the Product’s Owner’s manual or warning label.• Damage due to normal usage and wear and tear.• This warranty does not extend to any territories or countries outside the United States and Canada.
How to Obtain ServiceFor Products purchased directly from Nautilus, Inc. contact the Nautilus office listed on the Contacts page of the products Owner’s manual. You may be required to return the defective component to a specified address for repair or inspection, at your expense. Standard ground shipping of any warranty replacement parts will be paid by Nautilus, Inc. For products purchased from a retailer, you may be asked to contact your retailer for warranty support.
ExclusionsThe preceding warranties are the sole and exclusive express warranties made by Nautilus, Inc. They supersede any prior, contrary or additional representations, whether oral or written. No agent, representative, dealer, person or employee has the authority to alter or increase the obligations or limitations of this warranty. Any implied warranties, including the WARRANTY OF MERCHANTABILITY and any WARRANTY OF FITNESS FOR A PARTICULAR PURPOSE, are limited in duration to the term of the applicable express warranty provided above, whichever is longer. Some states do not allow limitations on how long an implied warranty lasts, so the above limitation may not apply to you.
Limitation of RemediesEXCEPT AS OTHERWISE REQUIRED BY APPLICABLE LAW, THE PURCHASER’S EXCLUSIVE REMEDY IS LIMITED TO REPAIR OR REPLACEMENT OF ANY COMPONENT DEEMED BY NAUTILUS, INC. TO BE DEFECTIVE UNDER THE TERMS AND CONDITIONS STATED HEREIN. IN NO EVENT WILL NAUTILUS, INC. BE LIABLE FOR ANY SPECIAL, CONSEQUENTIAL, INCIDENTAL, INDIRECT OR ECONOMIC DAMAGES, REGARDLESS OF THE THEORY OF LIABILITY (INCLUDING, WITHOUT LIMITATION, PRODUCT LIABILITY, NEGLIGENCE OR OTHER TORT) OR FOR ANY LOST REVENUE, PROFIT, DATA, PRIVACY OR FOR ANY PUNITIVE DAMAGES ARISING OUT OF OR RELATED TO THE USE OF THE FITNESS MACHINE EVEN IF NAUTILUS, INC. HAS BEEN ADVISED OF THE POSSIBILITY OF SUCH DAMAGES. THIS EXCLUSION AND LIMITATION SHALL APPLY EVEN IF ANY REMEDY FAILS OF ITS ESSENTIAL PURPOSE. SOME STATES DO NOT ALLOW THE EXCLUSION OR LIMITATION OF CONSEQUENTIAL OR INCIDENTAL TYPE DAMAGES SO THE ABOVE LIMITATION MAY NOT APPLY TO YOU.
State LawsThis warranty gives you specific legal rights. You may also have other rights, which vary from state to state.
ExpirationsIf the warranty has expired, Nautilus, Inc. may assist with replacements or repairs to parts and labor, but there will be a charge for these services. Contact a Nautilus office for information on post-warranty parts and services. Nautilus does not guarantee availability of spare parts after expiration of warranty period.
International PurchasesIf you purchased your machine outside of the United States consult your local distributor or dealer for warranty coverage.
8016644.061518.C
EN