Embed Size (px)
DESCRIPTION
User Manual
Citation preview

6.0™
USER MANUAL
User Manual

No part of this documentation may be reproduced in any form whatsoever or be stored in any data retrieval system without prior written permission of the copyright owners.
This documentation is supplied on an as-is basis. Information contained within this documenta-tion is subject to change at any time without notice and must not be relied upon.
All company and product names are ™ or Registered Trademarks ® of their respective owners. Windows Vista, Windows XP and Windows 2000 are trademarks of Microsoft Corporation.
Merging Technologies makes no warranties express or implied regarding this software, its qual-ity, performance, merchantability or fitness for a particular purpose. The software is supplied “as is” you, the purchaser, are assuming the entire risk of the results of using this Merging Technolo-gies software.
In no circumstances will Merging Technologies, its owners, directors, officers, employees or agents be liable to you for any consequential, incidental or indirect loss or damages including loss of time, loss of business, loss of profits, loss of data or similar resulting from the use of or inability to use the Merging Technologies hardware and or software or for any defect in the hardware software or documentation.
© Copyright Merging Technologies Inc. 2013. All rights reserved
Merging TechnologiesLe Verney 1070 Puidoux Switzerland
Tel: +41 21 946 04 44 • Fax: +41 21 946 04 45www.merging.com

Contents : Page 3
Welcome to Merging Technologies Ovation! 10Introduction 10
Overview 11Scope 11
Evaluation Mode 11
Latency 11
Audio Formats Supported 11
Ovation Documentation and Help 12Conventions 12
QUICKSTART 13A First Simple Show 13
New Show 14
Configure the Mixer 16
Building the Show 18
First Run 19Hot Keys Mode 22
Timed Cue List 24
Conclusion 27Ovation Concepts 28
Launching Ovation 28
Ovation Media and Commands 28
Media Management 29
Remote Control 29Remote Control OF Ovation 29
Remote Control BY Ovation 29
Remote Control of Ovation Mixer 29
Multi-Sequencer Synchronization 29
Ovation Modes 30Compose Mode 30
Show Mode 30
Show 31
Cue Lists 31Multiple Cue Lists 31
Audition 31
Cue List Pane 32
Contents

Contents : Page 4
Cues in Cue Lists 33
Cue Fire Buttons 34
Fire Toolbar 35
Cue List Types 35Cue List Detail 36
Standard Cue List 36
Timed Cue List 37
Hot Keys Cue List 37
Custom Keys Cue List 39
Cue Browser Cue List 41
Hot Browser Cue List 42
Cues 42Cue Icons 43
Selecting Cues 43
Cue / Cue List Context Menu 43
CD Tracks Import 46
Cue Capabilities 49Empty Cues 50
Compound Cues 50
Scenes 51Mixer 51
Sync Source Considerations 51
I/O Status Window 51
Snapshot Automation 51
Show Logging 54
Other Modules 54
Editing with Pyramix 55Recording 57
Record 57Record Mixer 59
Ovation User Interface 60User Interface Options 60
Fire Command 60
Context Menus 60
Keyboard Shortcuts 60
Hardware Control Surfaces 60
Mouse Modifier Keys 60
Main Window 61Main Window, Panes and Toolbars 62
Toolbars 65Toolbar Context Menu 65
Audition Toolbar 66Audition Jump 66

Contents : Page 5
Audition Drop-down 67
Show Controls 68
Other Toolbars 69Show 70
Cue List 71
Create Cue List 72
Cue 72
Fire 73
Settings 74
Show Menus and Toolbars in Emergency 74Active Cue Window 75
Features & Functions 75Cue List and Cue 75
Lock and Pin 75
Cue Trimmer 78
Audition Toolbar 79
Show Mode 80
Active Cue Window Edit Toolbar 82
Markers 84Markers in Cue Properties 85
Markers Interaction Rules 86Properties Panes 88
Types 88
Show Properties 89
Cue List Properties 93
Cue Properties 97
Interaction Rules 110Adding Rules 110
Show ValidationTool 114Show Validator 114
Show Consolidation and Packaging 115The Consolidation Process 115
The Packaging Process 116Audio Control 119
Audio Control Pane 119
Cue Gain 120Cue Gain Control 120
TimeCode 121TimeCode Reader Panes 121
Audio Output Slots 123What is an Audio Output Slot? 123
Audio Gain Matrix 124Ovation Files 128

Contents : Page 6
File Types 128Ovation Menus 129
Show 129
Cue List 130
Cue 132
Fire 134
View 135
Settings 136
Help 136Settings 137
Settings Buttons 138
Show Settings 139General 139
I/O Interfaces 141
Routing 142
TimeCode 142
Mixing Console 142
Application Settings 152General 152
Player Units 157
MIDI 158
IP 159
Com 160
Ethernet 161
GPO 163
Controller 165
Controller Units 165
Proprietary 166
MIDI 170
COM 172
IP 175
GPI 176Ovation Webserver 179
Using Ovation Webserver 179Tips and Tricks 183
Rules 183Fade Modifier 183
<Default> 183
Drag & Drop 183
Changing Properties for Multiple Cues 184
Starting a Show With Sysex 184System Requirements For Ovation 185
Computer 185

Contents : Page 7
Hard Disk Space Requirements 185
Installing Hardware 186Mykerinos Board Installation 186
Multi-board installation 186
Mykerinos Board I/O 186
Time Code and Video Sync Option 187
Cabling Ovation in your System Environment 187
Digital Audio Synchronization and TimeCode 188Installing Ovation Software 189
Installation Overview: 189
Driver Signing 189
Running the Installer 189Enabling Ovation with your Software Key 190
First launch 192Before Launch 192
Starting Ovation 193Audio File Support 194
Quicktime Support 194
Compressed Audio File Formats 194Codecs 194
How Compressed Audio Support Works 194Keyboard Shortcuts 196
Default Keyboard Shortcuts 196
Custom Keyboard Shortcuts 200Advanced Features 202
Multiple Ovation Sequencers for Redundancy 202
Remote Players and Controllers 202OV Player 202
OV Controller 205Appendix I 209
OVController Commands 209Media Sequencer Mode available Commands: 210
Media Server Mode available Commands: 212Appendix II 214
The Ovation Keyboard Controller Commands Map 214Keyboard Layout 214
Changing Keyboard Mapping 215
Ovation Keyboard Commands mapping 216Appendix III 217
MIDI and Midi Show Control 217Appendix IV 225
DMX Commands 225Appendix V 226
GPI Commands 226

Contents : Page 8
Appendix VI 228 Mouse Modifier Keys 228
Show Control 228
Hot Key Mode 228Appendix VII 229
I/O Daughter-card Options 229Appendix IIX 231
Web Server Commands 231Index 237

:
: Page 9
Document revision-57
Date: 26th-September-2013

Welcome to Merging Technologies Ovation! : Introduction Page 10
Welcome to Merging Technologies Ovation!
Introduction
Thank you!Congratulations on your purchase of the Ovation Media Server & Sequencer.
Ovation is a ground-breaking Media Server and Sequencer with the tools you need to produce and run shows in many spheres of activity. For example:
Theatres
Theme Parks
Museums
TV Game Shows
Trade Shows
AV Presentations
Radio stations
Retail Outlets
are just a few of the possible applications for Ovation.
Note: IMPORTANT! - The first thing you need to do is register your software to acquire your security key(s) and to be included in our user support list.
Please also subscribe to the User Forum at:
http://www.merging.com/forum/
PLEASE DO NOT PRINT THIS DOCUMENT UNLESS ABSOLUTELY NECESSARY SAVE TREES AND INK BY USING THE HYPERLINKS

Welcome to Merging Technologies Ovation! : Overview Page 11
Overview
Ovation enables the user to run Cues of many Media and Command types, either manually like a spot player / car-tridge machine or automatically against Run-time, Time-of-day or external LTC or MIDI TimeCode. The Ovation Sequencer can be controlled from a hardware controller, touch screens, GPIs, Sony 9-pin (P2) Protocol commands and MIDI.
Audio recording is also possible.
ScopeToday, Ovation can control Audio, GPOs, MIDI Files, MIDI Commands, Sony 9-pin (P2 protocol commands over RS422 or ethernet (IP), IP commands, MMC, MTC TimeCode and Shell Commands/Scripts/batch Files. DMX will be supported in the future.The Ovation Mixer can be automated under Ovation control.
Ovation can be controlled via a dedicated Hardware Controller, Touch Screens, MIDI and GPIs. The Ovation Mixer can be remote controlled via EMC or Eucon. The Merging Technologies ISIS remote controller is not supported.
Evaluation ModeIf you have not entered a valid key Ovation will run in Evaluation Mode.
Everything works in the same way as the full version but only one Cue List can be saved or loaded with a Show.
LatencyMinimum latency will only be achieved in systems running in Native or MassCore™ modes. Under MassCore™ the fire latency will be between 45ms and 66ms, plus the time required by the triggering device (USB, GPI/O, etc…). The dedicated Ovation hardware controller typically gives rise to an additional 10ms latency.
Note: All automatically triggered events are sample accurate. For example when a rule fires a Cue.
Audio Formats SupportedFor the full list of supported audio formats please see the Pyramix User Manual.

Welcome to Merging Technologies Ovation! : Ovation Documentation and Help Page 12
Ovation Documentation and Help
ToolTipsOvation Software is equipped with ‘ToolTips’. Hovering the mouse cursor over a tool icon pops-up a box with the name of the function.
DocumentationAll the documentation is in the Adobe Acrobat pdf format. (.pdf file extension)
In order to read the documentation you will need to have Adobe Acrobat Reader V6 or later installed on your computer.
Note: All Contents entries, Index entries and Cross-references are hyperlinks for rapid navigation.
This Ovation User Guide and the Pyramix User Manual may be opened from the Help menu. Other documenta-tion can be found in the Windows Start menu in All Programs > Pyramix > Docs. Please check for the most recent versions at:
http://www.merging.com
SupportIf you cannot find an answer to a query in the documentation, please consult the on-line support at:
http://www.merging.com
where you will find answers to F.A.Q.s (Frequently Asked Questions) and further support.
AssumptionsThis Ovation User Guide and other documentation assume you are thoroughly familiar with PCs and Windows terms and concepts. If self installing to a new PC, please ensure the machine is working correctly before attempt-ing to install Ovation.
ConventionsConventions used in Merging Technologies Documents:Names found on screens and in menus are shown in bold. E.g. Information & Settings
Menu and sub-menu selections are shown like this:
Show > Recent Shows : Quickstart
Which means:
Go to the Show pull-down menu, mouse down to the Recent Shows sub-menu and choose Quickstart.
The Settings dialog Has its own hierarchical tree structure in the left hand pane with folders leading to pages.

QUICKSTART : A First Simple Show Page 13
QUICKSTART
OverviewThis section provides a step-by-step guide to creating a simple new Show and configuring the mixer. It includes: adding Cues to Cue Lists, several different types of Cue List, Running the Show and Firing Cues and Cue Lists.
Note: This section is not intended as a substitute for the more detailed information to be found elsewhere in this guide.
A First Simple Show
The following prior steps are assumed:
• Ovation hardware and software installation has been completed.
• A means of monitoring has been connected to the physical I/O.
• The software has been registered, the registration key(s) entered and the initial settings entered in the VS3 Control Panel.
Launch OvationDouble-click the Ovation icon:
Alternatively, click on Start > All Programs > Merging Technologies > Ovation : Ovation
Ovation will open with an empty main window and the New Show dialog opens.

QUICKSTART : A First Simple Show Page 14
New Show
Start with a template show When selected you can choose a preexisting template from the list in the right-hand pane.
Start with a single Cue List When selected the Show will open with a single Cue List ready created. The combo box shows the type of Cue List which will be created. The arrow drops down the list of types available.
Standard Cue List
Timed Cue List
Hot Keys
Custom Keys
Cue Browser
Hot Browser
Set up a new Show Workspace : When ticked a new Show Workspace will be created for the new Show.
Show Name Type a suitable name for the new Show in this field.
Show & Media Location The field shows the path to where the Show and associated files will be stored.
New Show dialog

QUICKSTART : A First Simple Show Page 15
... Clicking on the ... button opens a Browse For Folder dialog :
The Browse For Folder dialog functions the same way as other Windows browsers. navigate to the location you wish to store the new project and select the desired folder or use the Make New Folder button to create and name a new one. Click on OK to create the new folder and close the dialog. The Cancel button closes the dialog without selecting a new location.
For the purposes of this first simple Show select:
Start with a single Cue List: Standard Cue List
Tick Setup a new Show Workspace (If not already ticked (default).
Type a suitable name for the Show
Navigate to a suitable location to store the Show (Create a new folder if necessary.)
Click on OK to create the Show
The Show opens in Compose Mode. I.e. the mode for adding Cues and designing your Show and a new Standard Cue List will appear in the otherwise empty main window.
Browse For Folder dialog

QUICKSTART : A First Simple Show Page 16
Configure the MixerThe default mixer will be displayed. If this does not happen check that View > View Mixer is highlighted (enabled).
On first launch the default 8 into 2 mixer will be loaded with NO output routing selected.
Default Mixer with Output Routing Circled

QUICKSTART : A First Simple Show Page 17
Output RoutingClick on the L: XLR icon near the bottom of the ST1 output Bus Mixer Strip to pop-up the Connect Output menu.
Click on the appropriate daughter board output for your hardware (In this case an ADAT daughter board is fitted so there are two entries, one for each physical connector.) Click on the desired output to route it for the Left side of the stereo output.
Repeat for the R: XLR icon choosing a second output channel for the Right side of the stereo output.
Set PanningFor this exercise stereo material is assumed and the panning needs to be set to suit:
Click on Strip One’s pan slider and drag to the left until Left is shown in the alphanumeric panel above the fader.
Now click and drag Strip Two’s pan slider to the right until Right shows in the display. (The display reverts to peak level a second or two after the mouse pointer moves away.) Repeat for the remaining six strips in Left Right pairs.
Note: For detailed information about the mixer please see the Pyramix User Manual.
Saving Mixer ConfigurationsThe mixer configuration is saved with the Show. Mixer configurations can also be saved and loaded independently via the mixer Organize tab. (Please see the Pyramix User Manual for full details.)
Default Mixer Output Routing
Default Mixer Stereo Panning

QUICKSTART : A First Simple Show Page 18
Building the Show
Add CuesSelect Add > Load Audio File from the right-click context menu or select from the Cue menu Add > Load Audio File to open the Open Audio Files Browser.
Select, say, five Audio Media Files and click on Open to load them as Cues into the Cue List created with the Show.
Notice that the Cue names in the Browser include the UIDs (Unique IDentifiers(
Cue List Pane - Compose Mode
Open Audio Files Browser

QUICKSTART : First Run Page 19
You should now have a Cue List that looks something like this:
Notice that Ovation has abbreviated the Media File names intelligently to generate Cue Names. The Cue Name can be changed in the Cue Properties pane and the Media File(s) can be changed without changing the Cue Name by using the Replace Audio Media function.
Experiment with the Move Up and Move Down buttons (in the right-click context menu), but for the present leave everything else as it is.
First Run
Initialize ShowIn the main window Click on the Init Show button:
Cue List Pane - Compose Mode
Main Window

QUICKSTART : First Run Page 20
(Or select Show > Init) to Initialize the Show. Note that the Main Window may well contain the Cue List(s) you’ve created. Notice also that the Cue List pane changes to Normal Show Mode with the first Cue selected :
The Green bar highlighting 1 - Cue List 1 shows that this Cue List is selected and will be affected by the Show Control buttons. Notice that the Cue status labels all read Asleep.
Play
Click on the Start Show button to begin.
The selected Cue is highlighted in Purple indicating that it is selected and Ready is shown in below the Cue Name. I.e. prepared for Firing. (buffer loaded)
Notice also that a red border has appeared around the Cue. This flashes slowly and indicates that this is the Cue which will be affected by the next initiation of any of the Fire, Pause and Stop Buttons, Keyboard Shortcuts and remote control.
Cue List Pane - Show Mode
Cue List Pane with Cue Ready - Show Mode

QUICKSTART : First Run Page 21
Click on the Fire Selected Cue button. The selected Cue plays and it’s colour changes to Green with an elapsed time bar running across the Cue and two counters showing time elapsed and time remaining.
Notice that the same Cue remains selected in the Cue List. Notice also that when the Cue has finished Playing, it stops and is highlighted in grey to show that it is selected.
Stop the Show and re-initialize. (Show > Stop and click OK in the Are you sure you really want to Stop the Show? dialog.
Start the Show. As before, the selected Cue is readied for playout.
Click on the Fire Sequence button. The selected Cue plays. Notice that this time, the next Cue in the list is now highlighted and Ready for Firing.
Cue List Pane with Cue Playing - Show Mode
Cue List Pane with Cue Playing & Next Cue Ready - Show Mode

QUICKSTART : First Run Page 22
Notice also that the red border has moved to Cue 2. This is because it is now the Cue which will be affected by the next initiation of any of the Fire, Pause and Stop Buttons, Keyboard Shortcuts and remote control.
Click on the Fire Sequence button again. The next Cue Plays. Notice that the original Cue (if it hasn’t ended) is still playing and the next Cue is now highlighted and Ready for Firing.
Notice also that the red border has now moved to Cue 3.Play with the Show Control “Transport” buttons until you are familiar with their operation.Click on Show > Stop and OK in the Stop Show dialog to return to Compose Mode.
Hot Keys ModeCreate a second Cue List, this time choosing CueList > New > Hot Keys, and add some Cues.
Cue List Pane with Two Cues Playing & Next Cue Ready - Show Mode
Hot Keys Cue List Pane - Compose Mode - normal

QUICKSTART : First Run Page 23
Note: In normal Compose mode, apart from the orange header and the (Hot Keys) label in the title bar there is no difference between the standard Cue List and the Hot Keys Cue list until the Show is initialized.
Click on the Init Show button to Initialize the Show:
The original Cue List will appear as before and the new, Hot Keys, Cue List will appear thus:
If the new Cue List is not selected (no Orange bar) either click on the title bar to select it or click on the
Show Controls Toggle Cue Lists button until it is selected.
Start the Show and experiment with the on screen Hot Keys in the 2-Cue List 2 Pane and the Show Control Fire and Fire Sequence buttons.
Experiment with the Hot Keys. (Number keys on the PC Keyboard, NOT the Numeric keypad) and notice that they toggle Fire and Stop. (This behavior can be changed later if you wish.)
Select the first Cue List, 1-Cue List 1, either by clicking on its Title Bar or clicking on theShow Control Toggle Cue Lists button until the list is selected (Green Title bar).
Select a Cue in the first Cue List and Fire it using the Show Control Fire Selected Cue or Fire Sequence buttons. Now use the keyboard Hotkeys to Fire and Stop Cues in the second list.
Click on Stop Show and OK in the Stop Show dialog to return to Compose Mode.
Hot Keys Cue List Pane - Show Mode

QUICKSTART : First Run Page 24
Timed Cue ListCreate a third Cue List, this time using Cue List > New > Timed Cue List and add three Cues.
Timed Cue List Pane - Compose Mode

QUICKSTART : First Run Page 25
Select the first Cue in the list right-click and select Cue Properties button to open the Cue Properties Pane for the selected Cue. Float the Pane and resize to convenient dimensions:
Click in the Go Time field:
A Time entry box appears. This takes the form of Hours Minutes Seconds and Milliseconds.
Click to position the entry cursor in the seconds section and type 10. Click elsewhere in the Cue Properties pane to enter the value. Notice that the Go Time field value changes to 00:00:10:000
In the third Cue List Pane select the next Cue and enter a Go Time of 00:00:20:000
Repeat for the third Cue, entering a Go Time of 00:00:30:000.
Cue Properties Pane
Time Entry Box - Cue Properties Pane

QUICKSTART : First Run Page 26
Notice that the Cue List 3 pane has changed to include the Go: times.
Select Show > View Show Properties and click in the Show Time Mode field and choose Duration. (If not already showing.)
Initialize the Show
Notice that Cue list 3 now has a Time Toolbar:
Chase Timed List
Click on the Chase Timed List button to instruct the list to follow the Show Time.
Note: The Chase Timed List button is Latching. I.e. its state is remembered when the show is stopped and re-started.
Timed Cue List Pane with Cue Start Times - Compose Mode
Timed Cue List Pane -Show Mode

QUICKSTART : First Run Page 27
In Show mode the Chase Timed List button is lit green when engaged.
Note: Once selected this function persists when the show is stopped and re-started until manually cancelled by clicking on the button again.
Click on Start Show. Cue List 3’s Time Counter follows the Show Time Counter. The Timed Cues in List 3 fire as the Show Time reaches their Go Times. (If the Cues you chose are longer than 10 seconds each then the next Cue will be Fired while the earlier one continues to play.)
Notice that the Hot Keys are still active for List 2 Cues and that List 1 Cues can still be controlled by the Show Con-trols once List 1 has been selected. Now Stop the Show.
Start Timed ListInitialize the Show and click on the Chase Timed List button in Cue List 3 to cancel the function. Start the Show and allow it to run beyond 10 seconds.
Click on the Start Timed List button. The first Timed Cue Fires when the Timed List Counter reaches its Go Time i.e. 10 seconds.
Start Timed List introduces an Offset between Show Time and Timed List Time. The entire list is played from the beginning including the time before the first Cue. Stop the Show
Fire/Start Timed ListInitialize and Start the Show.
Click on the Fire/Start Timed List button. The first Timed Cue Fires Immediately and the others follow in their proper timed sequence.
Fire/Start Timed List introduces an offset between Show Time and Timed List Time. The entire list is played from the beginning of the first Cue disregarding any List time before the first Cue.
Note: If the Showtime is past the start time of the first Cue then the Cue fires immedi-ately the button is pressed.
Pause Timed ListOnly available when list has been initiated with Fire/Start Timed List.
Click to Pause the Timed List. A second click resumes.
Stop Timed ListOnly available when list has been initiated with Fire/Start Timed List.
Click to Stop the Timed List. Resets list to the start.
ConclusionCongratulations! You have just designed and run your first Show using examples of each of three main types of Cue List.
Ovation has many, many more possibilities including Fades and Interaction Rules. Detailed information on using these are to be found elsewhere in this Guide.

Ovation Concepts : Launching Ovation Page 28
Ovation Concepts
Launching Ovation
Launch OvationDouble-click the Ovation shortcut icon:
Alternatively, click on Start > All Programs > Merging Technologies > Ovation : Ovation
Application Delay LaunchThis function enables Ovation to be launched automatically at machine startup with a delay to ensure all drivers and services etc. required are available.
To enable automatic launch simply drag the Ovation icon into the Startup folder and set the required delay value (in seconds) in the Show Properties pane, Show section in the Application Delay Launch field.
Ovation Media and Commands
AudioOvation reproduces Audio Cues via a configurable Mixer through a Horus, a Mykerinos board or a sound card if using Native
MIDIOvation outputs MIDI (MMC, MIDI Files and MIDI Commands to other applications on the same machine or to external devices.
IP CommandsOvation outputs IP Commands per Cue.
Sony P2 / RS422Ovation outputs Sony P2 protocol, RS422 commands. (or over ethernet)
GPOOvation outputs GPO commands to COM ports.
Shell Commands/Scripts/Batch filesOvation output Shell Commands/Scripts/Batch files
AutomationOvation Mixer Snapshots can be triggered.
DMX 512 / CMX Lighting ControlPlease see: DMX Commands on page 225
Ovation Concepts : Media Management Page 29
Media Management
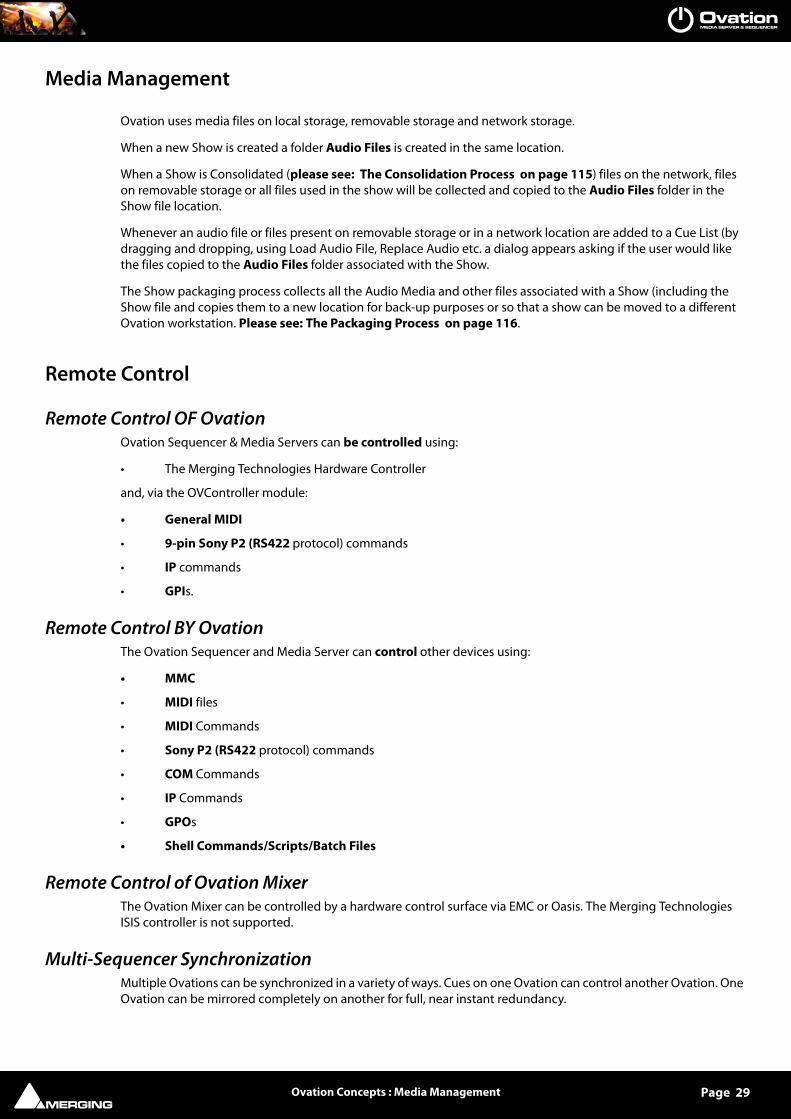
Ovation uses media files on local storage, removable storage and network storage.
When a new Show is created a folder Audio Files is created in the same location.
When a Show is Consolidated (please see: The Consolidation Process on page 115) files on the network, files on removable storage or all files used in the show will be collected and copied to the Audio Files folder in the Show file location.
Whenever an audio file or files present on removable storage or in a network location are added to a Cue List (by dragging and dropping, using Load Audio File, Replace Audio etc. a dialog appears asking if the user would like the files copied to the Audio Files folder associated with the Show.
The Show packaging process collects all the Audio Media and other files associated with a Show (including the Show file and copies them to a new location for back-up purposes or so that a show can be moved to a different Ovation workstation. Please see: The Packaging Process on page 116.
Remote Control
Remote Control OF OvationOvation Sequencer & Media Servers can be controlled using:
• The Merging Technologies Hardware Controller
and, via the OVController module:
• General MIDI
• 9-pin Sony P2 (RS422 protocol) commands
• IP commands
• GPIs.
Remote Control BY OvationThe Ovation Sequencer and Media Server can control other devices using:
• MMC
• MIDI files
• MIDI Commands
• Sony P2 (RS422 protocol) commands
• COM Commands
• IP Commands
• GPOs
• Shell Commands/Scripts/Batch Files
Remote Control of Ovation MixerThe Ovation Mixer can be controlled by a hardware control surface via EMC or Oasis. The Merging Technologies ISIS controller is not supported.
Multi-Sequencer SynchronizationMultiple Ovations can be synchronized in a variety of ways. Cues on one Ovation can control another Ovation. One Ovation can be mirrored completely on another for full, near instant redundancy.

Ovation Concepts : Ovation Modes Page 30
Creative PossibilitiesIf, for example an installation requires multiple Ovation sequencers to be set up, typically one for each of various zones where the audience may be moving freely between the zones then it may be desirable to have all the sequencers playing certain Cues in perfect sync. E.g. background music. To achieve the Cue(s) on one Ovation are set as the Master and the identical Cue(s) on all others as Slaves. A common source of time base must be provided to each Ovation, e.g. from GPS TimeCode generators. Any Cue that must be in sync on all machines is set as Master in the Master system and as Slave with the same token in the Slaves. All other Cues can be triggered indepen-dently in each system providing different event in each zones, but the baseline audio will be in sync across all sys-tems.
Redundancy for BackupTo achieve redundancy with a backup Ovation running an identical show in mission critical situations, it is possible to use the Controller > Mirror all Commands to Remote Ovation Sequencers feature. However, this does not ensure sample accurate sync. If sample accurate backup is required some key Cues in both systems can be set as Master/Slave. Typically identical Shows will be running in the Main and Backup machine and any Cues which are to be manually triggered during the show are set as Master in the Main Ovation and as Slave in the Backup. All other Cues which are triggered via rules or timed events do not required to be Master/Slaved, they will be trig-gered automatically in both systems at the same time by the sequencer engines. However, you can ensure that Cues triggered manually will be synced in the Backup machine by this using the Multi-Sequencer Synchronization feature. If there is a problem with the Main machine and it is necessary to switch to the Backup machine, the audio outputs are simply switched manually to the Backup machine. Subsequent manual control of Cues is done on this machine. It will be in the exact same state as the Master.
Note: The Master Show should be stopped after changeover to the Backup in order to avoid contradictory commands.
Using Multi-Sequencer SynchronizationBefore Multi-Sequencer Synchronization can be used IP communication must be configured in both the Master and Slave sequencers.Please see: TCP/IP Connections on page 156
Multi-Sequencer Synchronization is switched on and global parameters set in Show Properties. Please see: Multi-Sequencer Synchronization Section on page 92.
Parameters for individual Cues are set in Cue Properties for each Cue you wish to synchronize.Please see: REMOTE CONTROL: Multi-Sequencer Synchronization on page 108
Ovation Modes
Compose ModeShows are designed and assembled in Ovation’s Compose Mode.
Show ModeShows are run in Ovation’s Show Mode. Clicking on the Initialize Show button puts Ovation into Show Mode.
Start ShowClicking on Start Show or pressing the Start Show button on the Ovation Keyboard does a number of things:
• Hot Cues and Custom Cues are now available for firing
• Timed lists set to Show Time will fire their Cues at the times specified.
• Standard Cue Lists are available for firing.

Ovation Concepts : Show Page 31
Show
A Show is the top level of organization. Shows are saved with the file extension .ovs. A Show controls and keeps track of all the various elements you are assembling at a given time. A viable Show always contains one or more Cue Lists which contain one or more Cues pointing to Media Files or containing MIDI, GPO, DMX or IP etc. Com-mands.
Cue Lists
Cue List displays are Modal. I.e. when the Show is not Initialized they are in Compose Mode. Once the Show has been Initialized Cue List displays switch to Show Mode.
When Ovation is in Compose Mode the main area of a Cue List displays a tree structure of all Cues and Child-Cues added to the list. In Show Mode the display will depend on the type of Cue List and on choices made in Compose Mode.
Note: If a Cue List is Closed without saving it separately it will be lost. If you try to close a Cue List the following dialog will appear:
Multiple Cue ListsOvation handles multiple Cue Lists in Shows. The Main window Show Control operates on the currently selected list of whatever type. When the Main window Show Control is controlling a selected Cue list of any type a second Hot Key Cue List can be controlled simultaneously via keyboard shortcuts or an external hardware controller. Timed Cue Lists will follow the Interaction Rules set-up in Compose Mode unless otherwise affected by the Main window Show Control when a particular Timed List is selected.
Audition
Audio auditions are played via the Output Slot(s) chosen in Settings > Application > General > Audition.
Selected CueThe currently selected Cue can be auditioned by clicking on the Cue List Audition button or Cue > Audition/PFL. Clicking on the small down arrow adjacent to the Audition button gives access to the full range of Audition trans-port controls which are the same as those available in the Audition Toolbar. Please see Audition Toolbar on page 66
Any Cue can be also Auditioned by double-clicking it. A second double-click stops the Audition.
Close Cue List Dialog

Ovation Concepts : Cue List Pane Page 32
Audition JumpThere are six Audition Jump commands. These commands are available only when Auditioning a Cue and via Key-board Shortcuts or with a modifier key when clicking on the Rewind and Fast Forward buttons in any Audition Toolbar or on the Ovation Keyboard:
• Audition Jump Forward 1: Jump 1 Second later in time (Ctrl + -> Key or Fast Forward Button)
• Audition Jump Forward 2: Jump 5 Seconds later in time (Ctrl + Shift + -> Key or Fast Forward Button)
• Audition Jump Forward 3: Jump 15 Seconds later in time (Ctrl + Shift + Alt + -> Key or Fast Forward But-ton)
• Audition Jump Back 1: Jump 1 Second earlier in time (Ctrl + <- Key or Rewind Button)
• Audition Jump Back 2: Jump 5 Seconds earlier in time (Ctrl + Shift + <- Key or Rewind Button)
• Audition Jump Back 3: Jump 15 Seconds earlier in time (Ctrl + Shift + Alt + <- Key or Rewind Button)
Cue List Pane
To open a new, empty Cue List pane select Cue List > New > (required type) from the menu in the main Ovation window.
The Title bar is highlighted in pale green when the Cue List is selected. The Top Hat Pin Icon toggles Auto Hide mode when the pane is docked.
Edit ToolbarFor people who prefer working with Toolbars an Edit Toolbar is provided. By default it is only visible in Compose Mode and only when the Cue List > View Edit Toolbar entry is toggled to show the Toolbar.
Note: The >> button to the right of the Toolbar accesses further Toolbar buttons. If the pane is re-sized to a sufficient width, all the Toolbar buttons will be visible thus:
Cue Properties Opens the Cue Properties pane with details of the currently selected Cue
Empty Cue List Pane - Compose Mode
Empty Cue List Pane. Full width Toolbar - Compose Mode

Ovation Concepts : Cue List Pane Page 33
Cue Rules Opens the Cue Rules pane
Cue Gain Opens the Cue Gain dialog. Enables the overall Cue Gain to be set
Add Adds a new Empty Cue to the list. Clicking on the adjacent Down Arrow offers a choice of:
Add Short Empty Cue Adds a 1S long empty Cue. Used for triggering.
Add Long Empty Cue Adds a 24H long empty Cue. Used for implementing conditional rules.
Load MTInterChange XML
Load Audio File
Import CD Tracks
Load MIDI File
Add Long Empty Cue Adds a 24H long empty Cue. Used for implementing conditional rules.
Remove Deletes the selected Cue for the Cue List
Edit in Pyramix Opens the selected audio Cue in Pyramix.
Replace Audio Media Opens a browser window. Choose the Audio Media file you wish to use in place of the current one and click on Open.
Snapshot Automation Opens the Filter Mixer Controls to Snapshot dialog for the selected Cue.
Paste Automation Pastes the Automation Snapshot from the last Cue Copied to the selected Cue.
Audition Plays the selected Cue via the Output Slot chosen in Settings > Application Set-tings > Audition. The drop down gives the standard audition options.
Move Down Moves the selected Cue Down one position in the Cue List
Move Up Moves the selected Cue Up one position in the Cue List
Nest Makes the selected Cue a Child-Cue of the one above it in the list. Cues can be nested as deep as you might reasonably wish. I.e Child-Child Cues etc.
Un-Nest Moves the selected Cue up a nesting level. If it is a simple Child-Cue then restores this to the top, Cue level.
Cues in Cue Lists
Cue StatusWhen in Show Mode a Cue in a Standard Cue List can be in one of four states.
Asleep
Cue Colours - Show Mode

Ovation Concepts : Cue List Pane Page 34
Ready
Playing
Paused
Cue Status is indicated by a label and the highlight color.
Asleep Asleep No highlight
Ready Ready Purple highlight
Playing Playing Green highlight
Paused Paused Yellow highlight
Red BorderThe Cue which has the focus has a flashing red border. I.e. this is the Cue which will be affected by the next initia-tion of any of the Fire, Pause and Stop Buttons, Keyboard Shortcuts and remote control.
Cue ProgressWhen a Cue is Fired its list entry or (Hot Key Button) displays its progress in three ways.
The left-hand counter shows elapsed time from the start of the Cue.
The right-hand counter shows time remaining to the end of the Cue.
A black progress bar moves from left to right as the Cue plays.
When a Cue has been paused and then resumed the progress bar shows progress since the last pause. (As shown above)
Cue Fire ButtonsCues can each display Fire/Pause and Stop buttons when in Show Mode:
Cue Fire Buttons are shown in Show Mode when the Cue Fire Buttons field is set to Yes in the Show Time Options section of Show Properties.
Cue List with Fire Buttons - Show Mode

Ovation Concepts : Cue List Types Page 35
Fire ToolbarIf the Fire Toolbar is selected for a Standard Cue List (View > View Fire Toolbar) the Cue List Pane will appear like this in Show Mode when the Show is Ready and Started:
Select Previous Child-Cue in Cue List
Select Next Child-Cue in Cue List
Fire Selected Cue in currently selected Cue List and select next Cue and make Ready to Fire
Select Previous Cue in Cue List
Select Next Cue in Cue List
Fire Selected Cue in Cue List. Cue remains Ready to be Fired Again
Pause Selected Cue in Cue List
Stop Selected Cue in Cue List
Cue List Types
Standard Cue Lists:
Cue List with Fire Toolbar - Show Mode

Ovation Concepts : Cue List Types Page 36
Lists with sequential events manually triggered
Timed Cue Lists:
Lists with Cues that can be automatically triggered at a given time or manually.
Hot Keys Cue Lists:
Lists with Cues that can be triggered anytime with a given Hot Key mode.
Custom Keys Cue Lists:
Lists acting like Hot Keys Lists but where Cues buttons can be customized.
Cue Browser Lists:
Lists showing only Cues reflecting the content of a folder in the file system or network.
Hot Browser Cue Lists:
Lists acting like Browser Lists but Cues are fired with a single click and Cues cannot be dragged out to other Cue Lists. Typically to be used as an Audio file player.
Cue List Detail
Selecting Cue ListsCue Lists can be selected by:
• Clicking on them
• Using the Tab key to cycle through all available Cue Lists (Or the Select Cue List button on the Ovation keyboard.
• In Show Mode by holding down a Ctrl key and pressing a Hot Key trigger button. (1-48 on the Ovation Keyboard, 1-0 on the PC Keyboard with standard mapping.)
Standard Cue List
This can be thought of as the “basic” mode. Cues can be Fired and Paused or Stopped from the main panel Show Control buttons when the Cue List is selected, from the Active Cue panel buttons and from the Toolbar buttons in the Cue List pane itself.
Cue List Pane with Show Control - Show Mode

Ovation Concepts : Cue List Types Page 37
Timed Cue List
Once started, Cues with Go Times defined will follow a pre-determined time sequence. Cues can still be manually Fired or started from the Show Controls.
Hot Keys Cue List
This Cue List presents each Cue as a Fire button when in Show Mode. Used for spot effects this mode is commonly used with keyboard short-cuts or an external hardware controller. Cues in a Hot Key Cue List can also be fired from the Show Controls.
Stopping Hot CuesTo Stop a Hot Cue while playing Alt + Click it. Double-Click would be too dangerous!
Hot Keys Cue List Design ModeHot Keys Cue Lists have a Hot/Custom Keys Design Mode to enable Cues to be arranged in the Hot Keys View (see details below). To enter this mode either right-click on the Cue List to open the context menu and choose Hot/Custom Keys > Hot/Custom Keys Design Mode or, if you prefer, select it on the Cue List menu.
Timed Cue List - Show Mode
Hot Keys Cue List Pane - Show Mode

Ovation Concepts : Cue List Types Page 38
The Hot Keys slots are always displayed on a grid whether they contain a Cue or not:
Note: Slots are kept square automatically whenever possible.
• Hot Keys Numbers follow the Hot/Custom Keys Design Mode setting:
• If the Cue List is in Automatic Cue Numbering Mode then all Cues are displayed in the Hot Key view one after another reflecting their standard Cue List ordering. In this mode the Cues arrangement is automati-cally computed and cannot be manually changed in Hot/Custom Keys Design Mode.
• If the Cue List is NOT in Automatic Cue Numbering mode then the Cues are displayed in the Hot Key slot corresponding to their Cue Number. The Cue Number can be changed in the Cue Properties pane or by drag and dropping Cues directly in the Hot Keys view when in Hot/Custom Keys Design Mode.
Hot Keys ColumnsThe Number of Columns displayed in the Hot Key View can be set manually:
This setting is available in the Cue List Properties pane in the Hot Keys section.
When the Number of Columns is set to Auto then the system automatically adjusts the number of columns depending on the size of the Cue List pane, but still follows the Automatic Cues Numbering setting and leaves empty slots if necessary.
Hot Keys Column to Audio Slot MappingHot Keys Columns can be Mapped to Audio Slots Mapping in the Cue List Properties Hot keys section:
• If set to No all Cues are played back in the Audio Output Slot defined in their Cue Properties.
• If set to a number (1, 2 or 6) then the Cues are played back in an Audio Slot corresponding to the Hot Keys Column. In this way Hot Keys Cues can be assigned to Audio Output by the Column in which they are placed.
Note: In this mode the actual Audio Output Slot(s) is computed as Cue Column Number multiplied by the number selected in the Hot Keys Column to Audio Slot Mapping field. This enables Mono (1), Stereo (2), Surround (6) Cues to be handled.
Hot Keys Cue List Pane - Design Mode

Ovation Concepts : Cue List Types Page 39
Triggering Hot KeysThe Hot Keys that can be triggered either by the Ovation dedicated Keyboard, any installed Controllers or the Key-board ShortCuts (Hot Key 01 to 48)
Note: If the Ctrl key is pressed with the trigger button then the Cue is selected rather than fired. If Ctrl + Shift is pressed with the trigger button then the Cue List with this number is selected.
Only Selects the given Cue (no Fire) if Ctrl is pressed
Selects the Cue List having this number if the Ctrl + SHIFT key is pressed when called.
Custom Keys Cue List
Functionally identical to the Hot Keys Cue List but you can custom design the fire buttons in terms of shape, color, text color, font and font size as well as position. Like Hot Keys Cue Lists when in Show Edit Mode the Custom Keys Cue Lists are still displayed as standard Cue lists for simple Cue management. However, there is the further option of Custom Keys Design Mode:
Custom Keys Design ModeTo enter this mode either right-click on the Cue List to open the context menu and choose Hot/Custom Keys > Hot/Custom Keys Design Mode or, if you prefer, select it on the Cue List menu.
Click on a button to modify it. Click and drag the black boxes to re-size the button and click and drag anywhere on the button to move it to a new location. The dots on the background represent a grid and all re-sizes an moves snap to the grid. On the Custom Keys sub-menu you will find commands to Snap all Keys on Grid, Reset all Keys Position and Reset all Keys Size and Position. (Snap all Keys on Grid is provided for quick alignment if the grid size is changed.)
Note: Cues in standard Cue Lists can have the font and label background customized.
Grid SizeTo adjust the grid size open the Cue List Properties pane and change the value in the Custom Keys Grid Size field in the Custom Keys section.
Color and FontTo change colors or the font for the selected button open the Cue Properties pane. Locate the Custom Key sec-tion. In the Custom Color field Colors can be changed directly by entering RGB color values numerically. Or click on the ... button on the right of the field to open a color picker. Standard and custom colors are provided. Similarly,
Custom Keys Cue List Pane - Design Mode

Ovation Concepts : Cue List Types Page 40
to change the font color use the Custom Font Color field. Click in the Custom Font field to change the font attri-butes. Clicking on the ... button opens a standard font dialog where any font installed on the system can be selected, the font style, Regular, Italic, Bold or Bold Italic can be set and the font size selected.
JustificationWhen no Custom Font is defined the button text is Left justified as with all other Cues. When a Custom Font is set, then there is a high probability that the button will have a “graphical meaning”. Therefore the text is automatically centered and multiple lines are allowed to attempt to fit as much text as possible in a large button.
Typically this is used for Cues such as:
Note: If the Cue List is set to non-Automatic Cue Numbering Mode (Cue List Proper-ties : Automatic Cue Numbering field set to No) then the Numbers of all Cues in the Custom Keys Cue List can be set to nothing if irrelevant as in the example above. This is the default condition for Custom Cue Lists.
Custom Keys Cue List - Show Mode Custom text

Ovation Concepts : Cue List Types Page 41
Cue Browser Cue List
This special type of Cue List enables Media Files to be browsed, auditioned, copied and pasted as Cues into other Cue Lists from within the main Ovation interface. The chunky scroll bars are to facilitate touch-screen use.
Parent moves up one level in the folder hierarchy.
Refresh refreshes the list as with a normal Windows Browser.
Double-clicking a Media File in the list plays the file.
Cues are always played in Audition mode regardless of whether the Show is running. All other Toolbars are dis-abled for this type of Cue List.
The Cue Browser is very useful for searching Cues then copying/pasting them into other (standard) Cue Lists. The right-click context menu enables copy and paste.
Search Cues FunctionThe Browser and Hot Browser Cue Lists have a <Search> text box on the right side of the path name to
search/filter files. This operates in the same fashion as search in Vista Explorer:
• If nothing is typed in, the content of the current folder is displayed, including sub-folder names.
• If something is typed in, all files containing this text in their names are displayed, INCLUDING those in sub-folders recursively, but the sub-folder names are not displayed.
• When searching for files, the Comment field is automatically populated with the Path Name where the files have been found.
Cue Browser Cue List

Ovation Concepts : Cues Page 42
Hot Browser Cue List
The Hot Browser Cue List is very similar to the Browser Cue List with these important differences:
• A SINGLE click fires the Cue.
• A single click on a Playing Cue Pauses the Cue
• A single click on a Paused Cue Restarts the Cue from the point at which it was paused
• Double-clicking a Playing Cue Stops the Cue
• Cues cannot be dragged to other lists or be copied and pasted.
• The Parent and Refresh buttons are bigger to facilitate touch screen operation.
Parent moves up one level in the folder hierarchy.
Refresh refreshes the list as with a normal Windows Browser.
Note: The Hot Browser Cue List type will typically be used as an Audio file player.
Cues
A Cue is a set of instructions to perform actions. These actions can be on a Media file (or files if multi-channel/multi-media, Pyramix Compositions etc.) or can send instructions to external or internal devices. For example to turn mic inputs on and off or to change a Mixer Snapshot. A Cue does not have to play an entire Media File. Via the Cue Properties Pane the Length can be set to anything up to the entire Cue and the starting point can be Offset to any point within the Media File.
The Cue Trimmer option in the Active Cue window provides a quick and easy method of adjusting In point, Out point and In and Out fades. Please see: Cue Trimmer on page 78
Hot Browser Cue List

Ovation Concepts : Cue / Cue List Context Menu Page 43
Cue Icons
Cues have dedicated icons when each of the Audio, Microphone Input, TimeCode Generator, MMC, MIDI File, MIDI Command, Sony P2/RS422, GPO, Shell Command and Mixer Snapshot options are enabled for the Cue.
Selecting CuesCues are selected by clicking on them. Multiple Cues are selecting in the usual Windows fashion. Ctrl + Click tog-gles selection of individual Cues while retaining previous selections. To select a contiguous range Click on the first Cue then Shift + Click on the last to select a contiguous block.
Cues can also be selected by holding down the Ctrl key and pressing one of the Hot Key buttons on the Ovation Keyboard or the PC keyboard.
Moving and Copying CuesOnce selected Cues can be moved or copied using the standard Windows shortcuts. e.g. Ctrl + C copies, Ctrl + V pastes etc. Cues can also be moved between Cue Lists by simple ‘drag and drop’. Drag and drop with Ctrl copies. Drag and drop with Alt replaces the audio in the target Cue with the audio in the source Cue. Audio files can be dragged and dropped from Windows Explorer for easy Cue insertion.
Cue / Cue List Context Menu
Right-clicking on a Cue or blank area in a Cue List opens a context menu with the following options:
Undo (last undoable action)
Cut
Copy
Paste
Cue Properties Toggles the Cue Properties pane open or closed
Cue Rules Opens the Interaction Rules dialog
Cue Audio Gain Opens a window with an Audio fader. This adjusts the gain for the entire Cue. Click OK to accept the change or Cancel to reject.
Add Cue>
Add Short Empty Cue
Add Long Empty Cue
Load MTInterChange XML
Load Audio File
Import CD Tracks Opens the Import CD dialog. Please see: CD Tracks Import on page 46
Record Audio as New Cue Opens the Record Audio dialog. Please see: Recording on page 57
Load MIDI File
Remove
Edit in Pyramix Opens the Cue in Pyramix ready for editing.
Record Audio Opens the Record Audio dialog. Please see: Recording on page 57
Replace Audio Media (Only present for a Cue containing Audio.) Opens a Browser window to select an alternative Audio Media file to replace the current one for the selected Cue.
Cue Type Icons

Ovation Concepts : Cue / Cue List Context Menu Page 44
Snapshot Automation Takes a snapshot of the mixer state. This will be recalled by the Cue.
Paste Automation Applies the automation snapshot on the Clipboard to the selected Cue.
Change Audio Gain Opens the Cue Gain fader window
Edit Rules Opens the Cue Interaction Rules dialog
Add Rule > Drops down a list of Rules which can be applied to the Cue directly
Fire Next Cue when Ending
Fire Next Cue when Stopping
Fire All Child Cues when Starting
Stop Previous Cue when Starting
Loop (Fire Itself when Ending
Loop between Markers (Fire Itself between Markers
Dim All Cues when Starting
Select Next Cue when Starting
Audition/PFL Plays Cue through selected Audition output(s) For non media Cues behavior var-ies.
Audition >
Start
Rewind
Stop
Play/Pause
Fast-Forward
End
Jump Forward 1
Jump Forward 2
Jump Forward 3
Jump Back 1
Jump Back 2
Jump Back 3
Pin/Unpin to Active Cue Window Sets the Cue Pinned or Unpinned. With Pin active in the Active Cue Window-when Pinned the Cue will appear in the Active Cue Window when selected. When unpinned it won’t.
Lock in Active Cue Window When Lock is active in the Active Cue Window selecting this will substitute the selected Cue for the locked Cue in the Active Cue Window. (Alt + Click on a Cue has the same effect.)
Move Down
Move Up
Nest
Unnest
Hot/Custom Keys
Hot/Custom Keys Design Mode
Snap all Keys on Grid

Ovation Concepts : Cue / Cue List Context Menu Page 45
Reset all Keys Position
Reset all Keys Size and Position
Fire
Pause
Stop
Cue Properties

Ovation Concepts : CD Tracks Import Page 46
CD Tracks Import
Ovation has comprehensive CD import functions.
Selecting Cue > Add > Import CD Tracks from the Cue Menu or the Cue / Cue List context menu opens the Import CD dialog.
Device SettingsThe combo box drop-down list shows all suitable drives on the machine.
CD Import dialog

Ovation Concepts : CD Tracks Import Page 47
SettingsThe Settings button opens a dialog box with specific drive settings. These settings may be altered if required by clicking on an entry and typing a new value in the box.
StatusThe field to the right of the Settings button shows pertinent information about the CD import process.
Disc ContentRead TOC... Click the Read TOC to read the Table Of Contents on the CD. The tracks are listed in
the pane below.
Read ISRC, UPCEAN & CDtext When checked this information will also be read, if present.
CD Import Settings dialog

Ovation Concepts : CD Tracks Import Page 48
Query Database Click to use an online database to obtain track names and other data about com-mercial CDs. Results are shown in a dialog :
If multiple disc titles are shown, click on the appropriate one to select it then click on OK to import the data. The disc name is automatically entered in the Clip Prefix: field.
Database Settings Click to access a dialog where the database address and other settings can be changed:
Default settings are shown above. To change a setting, click on the entry and type. Click OK to save the edited set-tings. Defaults restores the default settings and Cancel closes the dialog without making changes..
Import All Tracks When active all tracks on the CD will be imported regardless of individual selec-tions in the track list check boxes.
Import Selected Track(s) When active only the tracks selected (ticked in the track list) will be imported.
Select All Click the button to select all tracks in the list.
Deselect All Click the button to deselect all tracks in the list.
Target FileDestination Drive: Information only. Shows the folder where the resulting files will be placed.
Format: Shows the format selected and offers the choice of :
CD Import Query Database results dialog
CD Import Database Settings dialog

Ovation Concepts : Cue Capabilities Page 49
PMF, SD2, AIFF, FLAC, Ogg Vorbis, MP3/MPEG-1/2 Audio, MP4/AAC, DSDIFF, DSDIFF Edited Master, Virtual Tape, Wave, BWF, CD Image, MTFF, Digital Release, OMF.
Waveform: Offers the choice of Generate WHILE recording, Generate AFTER recording or None.
Sampling Rate Offers an extensive choice of sampling rates for the imported tracks. CD tracks are saple rate converted automatically on import if anything other than 44.1kHz is selected.
Prefix When checked a prefix will be added to each imported track. This defaults to the CD title but any desired prefix may be typed in the field when the box is checked.
Track Bar illustrates progress bar for each imported track
Disc Bar illustrates import progress of all selected tracks or the entire disc.
Import Tracks Click to initiate the import process.
Cancel Click to abort an import in progress or to close the dialog without importing.
Keep window open after Import When checked the CD Import window remains open, e.g. for further imports, after the import is completed. The Prefix label field will be grayed out when this option is selected.
Keep open keeps the CD Import window open after the import is completed and grays out the Prefix field.
Cue Capabilities
A Cue is a container object for commands to initiate or respond to actions, e.g. Play a Media file or run a Batch File etc. Cues can have single or multiple functions. There is only one Cue type covering all capabilities.
Audio A Cue can trigger playback of mono, stereo or multi-channel audio media files. It can also trigger playback of Pyra-mix Compositions which may contain many elements.
TimeCode GeneratorA Cue can output LTC to any suitably equipped device.
Choose a suitable Serial Port in the TimeCode generator section of the Properties panes.
MTC A Cue can send MTC (MIDI TimeCode) to any suitably equipped hardware or software device.
Choose a suitable MIDI Port in the TimeCode generator section of the Properties panes. (Remember, the Cue set-ting overrides the Cuelist setting which, in turn, overrides the Show setting.)
MMC A Cue can send MMC (MIDI Machine Control) commands to any suitably equipped hardware or software device.
Choose a suitable MIDI Port in the MMC section of the Cue Properties pane and enter the start time.
Fire sends an MMC Play command, Pause an MMC Pause command and Stop an MMC Stop command.
MIDI FileA Cue can transmit a MIDI file to any suitably equipped hardware or software device.
Choose a suitable MIDI Port in the MIDI File section of the Cue Properties pane and enter a path to the MIDI file you wish to transmit.
When the Cue is made Ready the MIDI file is loaded. Fire Plays the MIDI file, Pause will Pause the MIDI file and Stop will Stop playing the MIDI file.

Ovation Concepts : Cue Capabilities Page 50
MIDI Command A Cue can send General MIDI Commands to any suitably equipped hardware or software device.
Sony P2 / RS422A Cue can send Sony P2 / RS422 commands to any suitably equipped hardware device. This includes a VCube either running in the same machine as Ovation or on a remote machine. Please see: Sony P2 over IP 0 on page 161
Fire sends a Sony P2 Play command, Pause sends a Sony P2 Jog(0) command and Stop sends a Sony P2 Stop command.
IP CommandData to be output can be added in the filled in the Cue Properties pane (unique to every Cue). IP command for-mat can be ASCII or HEXA (Hexadecimal). The IP Output port can be selected.
GPO A Cue can send GPO commands via a serial port and adaptor to any suitably equipped hardware device.
Please see: GPO on page 163 and GPO Section on page 104
Shell Commands/Scripts/Batch filesPlease see: Shell Command / Script / Batch Section on page 105
Microphone Switch A Cue can switch mixer inputs from replay to mic for the duration of the Cue. This operates within a 24 hour win-dow. Please see: Microphone Switch Section on page 101
Mixer AutomationA Cue can trigger an automation snapshot which is applied to the Ovation mixer. Please see: Snapshot Automation on page 51
REMOTE CONTROL: General MIDI CommandIndividual Cues can be remote controlled from General MIDI Commands. Please see: REMOTE CONTROL: Gen-eral MIDI Command on page 106.
REMOTE CONTROL: IP CommandIndividual Cues can be remote controlled from IP Commands
REMOTE CONTROL: Multi-Sequencer SynchronizationIndividual Cues can be synchronized on secondary Slave or Master machines. Please see: Multi-Sequencer Synchronization on page 29
REMOTE CONTROL: Dataton SynchronizationIndividual Cues can be synchronized with Dataton video player timelines.
Empty CuesEmpty Cues can be created by clicking on the Add button or from the menu Cue > Add > Add or from the right-click Cue context menu. Empty Cues can have Media or Commands added subsequently so that Cue Lists can be constructed before the media is available. Empty Cues can also be used in conjunction with Cue Rules to construct complex interactions.
Compound CuesA single Cue can contain instructions to do many things at once. For example, play an Audio Media file and dim the lights. To add functions to a Cue simply set the required options in the various sections of the Cue Properties pane.

Ovation Concepts : Scenes Page 51
Scenes
Cues can be nested, many layers deep if required. For operational convenience the top level is referred to as a Scene. In, for example, theatre work, if all the Cues and Child-Cues associated with scenes are nested under single top-level Cues then the Scene buttons enable quick changes between these Scenes whereas the Cue navigation buttons will step through each Child-Cue.
MixerEach Show on each Ovation has an Audio Mixer associated with it. This is configurable to suit local requirements.
Cue based Snapshot Automation is available. Please see: Snapshot Automation on page 51
Please see the Mixer Chapter in the Pyramix User Manual for details of all the manifold configuration options.
Note: For the present, before you can add Strips and effects etc. you may have to Initial-ize the current Show, Start it and Stop it before the mixer can be rebuilt to reflect the required configuration.
Sync Source ConsiderationsUnder construction
I/O Status Window
This window shows useful information about input and synchronization status.
Input sourcesAll the possible input sources are shown, each with an associated red and a green light. The green lights show the presence of a valid digital signal (This does not necessarily mean that the sampling rate of this input matches the current Ovation clock source). When the red light is on and steady, Ovation is using this input as it’s clock reference and is successfully locked up.
Default Clock SourceIf Ovation is set up to lock to an external clock source but cannot get a valid signal from this source, it will switch to Internal clock. In this case the red light associated with Internal will be on, and the red light associated with the intended clock source will be blinking.
Sampling Rate MismatchIf Ovation is set up to lock to an external clock source and the sampling rate set in the Ovation Mixer does not match the sampling rate of the clock source, the green light associated with the clock source will be on, but the red light will be blinking showing the sampling rate mismatch.
Snapshot Automation
Any Cue can store a Mixer Snapshot and recall it when the Cue is fired. The snapshot changes to the mixer can be implemented when the Cue is fired instantly, over the entire length of the Cue linearly or over a user-defined time period linearly.
OV Player I/O Status Window

Ovation Concepts : Snapshot Automation Page 52
Store a Snapshot• Select the Cue to which you wish to add a Snapshot.
• Set the mixer control(s) to be affected by the Snapshot to the required values.
• Open the Cue Properties pane (if not already visible)
• In the Mixer Automation > Type field click in the ComboBox and select Snapshot, or
• Cue > Snapshot Automation, or
• In the right mouse button Cue context menu choose Snapshot Automation.
Any of these actions will open the Filter Mixer Controls to Snapshot dialog:
This dialog is similar to the Pyramix dialog. The By Strips and By Types buttons switch between the two views.
Note: Switching between views restores selections to the default. I.e. All selected.
Filter Mixer Controls to Snapshot dialog

Ovation Concepts : Snapshot Automation Page 53
By StripsIn this view every automatable control in the current mixer is displayed in a tree structure. Ticked boxes include the control or group of controls in the snapshot.
The All button ticks every box.
The Nothing button unticks every box.
• Select the mixer controls to be included in the snapshot.
• Click on OK to record the snapshot and close the dialog.
Erase a Snapshot• Select the Cue from which you wish to remove a Snapshot.
• Open the Cue Properties pane (if not already visible)
• In the Snapshot field click in the Type ComboBox and select None
GlideWhen a Cue containing a Snapshot is Fired any changes are applied instantaneously by default. This behaviour can be modified. Options are: over a user-defined time period linearly or over the entire length of the Cue linearly.
To modify the default behaviour:
• Open the Cue Properties pane.
• In the Mixer Automation Section
• Click in the Glide field.
• For a user defined glide time type a suitable value in the _:_:_:_ time entry area or:
• For a glide over the entire length of the Cue choose Cue Length from the drop-down list.
Note: If a value longer than the Cue length is entered the Glide will occur over the Cue length.
Apply SnapshotTo apply a Mixer Automation Snapshot simply Fire the Cue
Note: Two snapshots controlling the same Mixing Console controls at the same time will “conflict”. Please avoid this situation.Snapshots can be Auditioned, however FF/REW and Scrubbing is not possible.
Copy and Paste SnapshotTo Copy a snapshot simply Copy the Cue containing the snapshot.
To Paste a snapshot select the target Cue and choose Paste Automation from the Cue right-click context menu.
Alternatively, select Cue > Paste Automation. The automation snapshot is added to the target Cue without affecting the Media file or any other parameters.

Ovation Concepts : Show Logging Page 54
Show Logging
Show Logging creates Log Files listing every Audio file played. This is useful for broadcasters.Logging is enabled and set up in the Show Properties pane. Please see: Show Logging Section on page 91
New Log Files are created Every Show, Every Week or Every Month and may be saved in any Folder accessible to Ovation. Log Files are never deleted, new files are created with the date and time in the filename.
The filename can include:
• Station Name
• Station Name + Date
• Station Name + Show Name
• Station Name + Show Name + Date
Log Files are created in any of the following formats:
• ASCII Text (.log)
• XML (.xml)
• Enco DAD log file (.exp)
ExamplesASCII Text (.log)
2013-04-03 16:07:40 00:00:02 I Love Rock N Roll.wav
XML (.xml)
<Cue>
<Name>I Love Rock N Roll</Name>
<Date>2013-04-03</Date>
<PlayedAt>16:32:21</PlayedAt>
<Duration>00:00:07</Duration>
<FileName>I Love Rock N Roll.wav</FileName>
<PathName>E:\Media\Music\I Love Rock N Roll.wav</PathName>
</Cue>
Enco DAD log file (.exp)
16:09:0100:00:0104/03/1300000I Love Rock N Roll Love Rock N Roll.wav
Other Modules
It is possible to call other applications such as audio editors from within Ovation and exchange data with them. For example, the Merging Technologies Pyramix audio editor. Third-party applications will also be supported.

Ovation Concepts : Editing with Pyramix Page 55
Editing with Pyramix
In a MassCore™ system an audio Cue, Mono, Stereo, multi-channel or a multi track composition may be opened for comprehensive editing by invoking Edit from either the right-click context menu while hovering over a Cue or for the selected Cue from Cue > Edit. However, before Pyramix editing can be used, Pyramix must be open and both applications set up in a specific way.
For example, to set up for editing stereo Cues :
1. Close Ovation if open.
2. Open the VS3 Control Panel.
3. Check that the Application drop-down list is displaying Ovation and, if it isn’t, choose it from the list.
4. Check that the Platform drop-down list is displaying MassCore™ and, if it isn’t, choose it from the list.
5. Click on the MT ASIO Bridge Enable button so that it is ticked.
6. Set the Number of channels (I/O) drop-down list to 8
7. Now select Pyramix Virtual Studio from the Application drop-down list
8. Also select Native - ASIO from the Platform list.
9. Select MT ASIO Bridge Driver from the I/O Selection Driver name: drop-down list if not already selected.
10. Start Ovation go to Settings > Show Settings > Mixing Console > Slots Allocation.
11. In the Slots Allocation drop-down list set the value to 6
VS3 Control Panel

Ovation Concepts : Editing with Pyramix Page 56
12. Now open the Ovation Mixing Console (View > View Mixer) and for Strips 7 and 8, set the Live INPUTS to MT ASIO Bridge 1 and 2 respectively.
13. Start Pyramix
14. Create a new Pyramix Project and name it “Ovation Edit” or similar. A simple 8:2 mixer will do nicely.
15. Open the Mixer Monitoring Section, select the Configure Tab and create a new Speaker Set. Name this as something you will remember such as “Ovation Edit” and patch the L and R Speaker OUTPUTS to MT ASIO Bridge 1 and 2. Now activate the Speaker Set. (Alternatively you can simply patch the Pyramix Mixer Stereo output strip outputs to MT ASIO Bridge 1 & 2)
16. Now save the Pyramix Project with a memorable name such as “Ovation Editor”.
Now you can right-click on a stereo Cue in Ovation and choose Edit.
17. The selected Cue will open in Pyramix.
18. Edit in Pyramix until you are happy with the results.
19. In Pyramix select Project > Ovation > Publish to Ovation and the edited Cue will appear in the same place in Ovation.(Alternatively, choose Project > Ovation > Publish to Ovation as a New Cue. The edited Cue will then appear in the Ovation Cue List directly below the original with the same name and the suffix (New) E.g. if the original Cue is named steampass2 then the new one will be named steampass2 (New).)
Note: Pyramix must be opened AFTER Ovation and with an empty project loaded before invoking Edit
Note: If you wish to edit Multi-channel Cues then simply follow the above set-up proce-dure increasing the number of slots and changing speaker/output mappings as appro-priate.
Note: When Edit is invoked from an Ovation Cue the existing Pyramix Project will be overwritten with the new Cue. I.e. all existing tracks will be deleted and new tracks cre-ated to accommodate the new Cue for editing.
Note: Clip Gain and Envelope ARE supported and published to Ovation.
• When a Cue edited in Pyramix contains Envelope information this is published to Ovation.
• Clip Gain set in a Cue edited in Pyramix is published to Ovation. (Gain value applied is not visible in Ova-tion)
Recording : Record Page 57
Recording
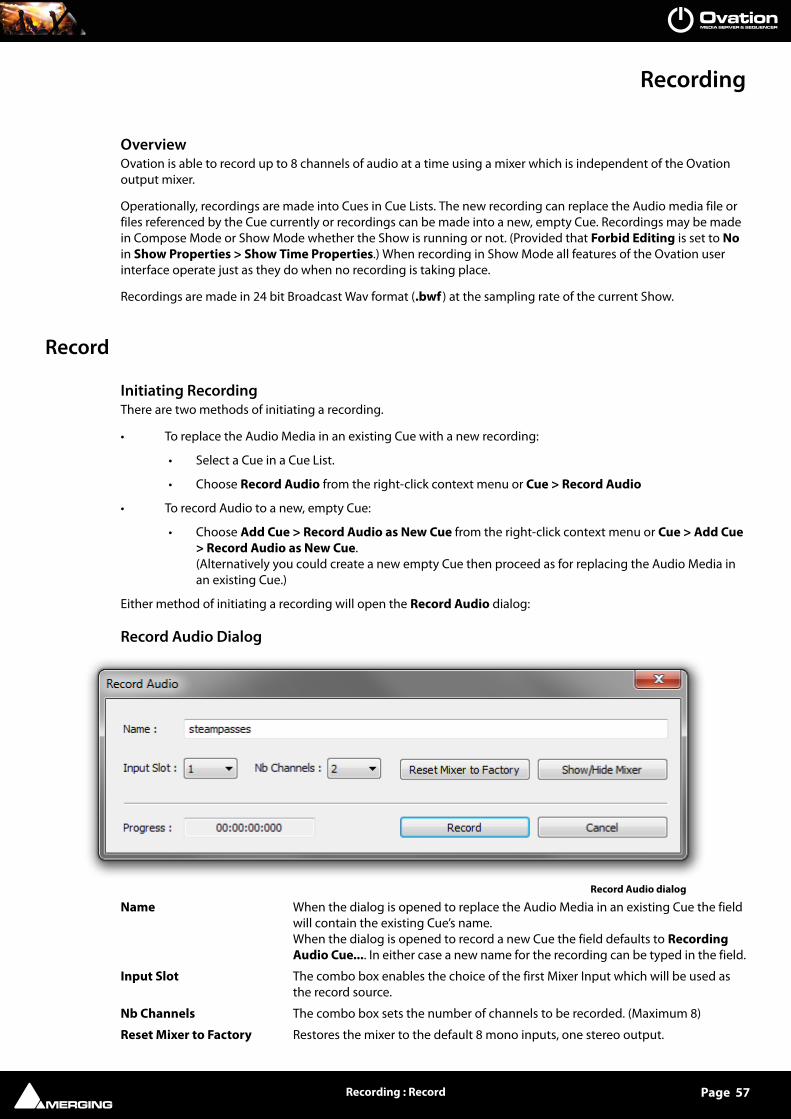
OverviewOvation is able to record up to 8 channels of audio at a time using a mixer which is independent of the Ovation output mixer.
Operationally, recordings are made into Cues in Cue Lists. The new recording can replace the Audio media file or files referenced by the Cue currently or recordings can be made into a new, empty Cue. Recordings may be made in Compose Mode or Show Mode whether the Show is running or not. (Provided that Forbid Editing is set to No in Show Properties > Show Time Properties.) When recording in Show Mode all features of the Ovation user interface operate just as they do when no recording is taking place.
Recordings are made in 24 bit Broadcast Wav format (.bwf ) at the sampling rate of the current Show.
Record
Initiating RecordingThere are two methods of initiating a recording.
• To replace the Audio Media in an existing Cue with a new recording:
• Select a Cue in a Cue List.
• Choose Record Audio from the right-click context menu or Cue > Record Audio
• To record Audio to a new, empty Cue:
• Choose Add Cue > Record Audio as New Cue from the right-click context menu or Cue > Add Cue > Record Audio as New Cue. (Alternatively you could create a new empty Cue then proceed as for replacing the Audio Media in an existing Cue.)
Either method of initiating a recording will open the Record Audio dialog:
Record Audio Dialog
Name When the dialog is opened to replace the Audio Media in an existing Cue the field will contain the existing Cue’s name.When the dialog is opened to record a new Cue the field defaults to Recording Audio Cue.... In either case a new name for the recording can be typed in the field.
Input Slot The combo box enables the choice of the first Mixer Input which will be used as the record source.
Nb Channels The combo box sets the number of channels to be recorded. (Maximum 8)
Reset Mixer to Factory Restores the mixer to the default 8 mono inputs, one stereo output.
Record Audio dialog

Recording : Record Page 58
Show/Hide Mixer Toggles the Record Mixer visible/hidden. (Default is hidden.)
Progress The counter shows elapsed time from the beginning of recording.
Record Click the button to start recording.
Cancel Click the button to cancel recording and close the dialog.
Note: The Record and Cancel buttons are modal. When recording they offer the follow-ing options:
Stop & Accept Click the button to stop the recording, close the dialog and link the recording to the selected Cue.
Abort & Try Again Click the button to cancel the recording, delete the file and leave the dialog open for another recording.
Note: If the Cue being recorded is deleted or the list containing the Cue is closed the recording will be terminated correctly and the file will be created properly but no Cue will be created or changed to point to the recording.If a Record Audio operation is Undone then the Cue returns to its previous state or is removed but the Audio Media file is retained.
Recording File locationFiles created by recording will be located in the Audio Files sub-folder of the folder containing the Show file.
Record Audio dialog - recording

Recording : Record Page 59
Record MixerA dedicated Record Mixer is created when the Record Audio Audio dialog is opened:
The Mixer can be displayed using the Show/Hide button in the Record Audio dialog.
By default, the Record Mixer is created with 8 mono inputs strips and one stereo output bus.
Inputs are connected to Channels 1 to 8.
The mixer is configurable as desired and will be recalled in the same state when the Record Audio dialog is opened subsequently.
Note: VERY IMPORTANT If you wish to use Record Mixer outputs for monitoring etc. then please ensure the phys-ical outputs selected are NOT already assigned to the Ovation output Mixer. If outputs already in use in the OV output Mixer are assigned to the Record Mixer they will be reas-signed and the relevant outputs from the OV output Mixer will be disconnected.
Note: For detailed information about mixer configuration please see the Pyramix User Manual.
Default Record Mixer

Ovation User Interface : User Interface Options Page 60
Ovation User Interface
OverviewThe Ovation user interface has been designed from the ground up for composing and running shows. A show can contain Media and Trigger Cues of many types and these can be fired manually or automatically to suit the appli-cation.
Commands and functions can be accessed from buttons, pull-down menus, contextual pop-up menus and key-board shortcuts.
There are generally several ways of accessing any given function in Ovation. Sub-sections of the interface are sep-arate, dockable, nestable panes that can be shown or hidden and arranged automatically or by the user. This is intended to enable users to work in the manner they find most comfortable for the type of task they are undertak-ing. It also means ‘Power Users’ can develop highly efficient operating procedures.
It is perfectly possible to use Ovation casually, or as an operator, without discovering all of the many available pos-sibilities. However, for Show designers, a far more rewarding experience awaits.
User Interface Options
Apart from conventional menus Ovation offers many other UI options:
Fire CommandThe Fire Command acts like Double-Click when in Show Compose Mode and is mapped by default to the Space key. So:
• In Edit Mode, Space Bar toggles Audition / Stop.
• In Show Mode, Space always Fires the Cue.
In Show Mode, Enter initiates Fire Sequenced Cue ! (Fire and Select Next Cue).
Context MenusRight-clicking pop-ups menus with commands and options relevant to the current cursor location.
Keyboard ShortcutsIn particular we would encourage users to use keyboard shortcuts and preferably the standard Ovation mapping. Keyboard shortcuts can be fully customized.
Hardware Control SurfacesFor many applications a hardware control surface and or touch-screen will be desirable if not essential. Merging Technologies offer a versatile, dedicated controller for Ovation and our Sales Partners can help with bespoke solu-tions.
Mouse Modifier KeysThe range of possible actions resulting from a mouse click are extended by the use of Keyboard Modifiers. These aid productivity and are well worth learning. Please see: Appendix VI on page 228

Ovation User Interface : Main Window Page 61
Main Window
If Ovation is launched without any Cue Lists present it opens as a blank canvas with no panes present. You will see the main Ovation window with its Menus at the top and the Show Controls with Time Display at the bottom.:
Fixed Buttons
At top right the standard buttons are standard Windows items.
Minimize Minimizes the Main Ovation Window to the Taskbar.
Maximize / Restore Toggles between Maximizing the Main Ovation Window and Restoring it to the size and position it occupied prior to being minimized / maximized
Close Opens the Exit Ovation dialog
Main Ovation Window
Exit Ovation dialog

Ovation User Interface : Main Window Page 62
Click on OK to close Ovation or Cancel to exit the dialog without closing Ovation.
Main Window, Panes and ToolbarsThe Ovation user Interface is based around a Main Window with sub-windows or Panes. These Panes (and Tool-bars) can be positioned anywhere on the Windows Desktop, they do not have to remain inside the Main Ovation Window. Panes and Toolbars are ‘magnetized’ to each other and to the edges of the Main window when in close proximity. Panes and Toolbars will also resize automatically when close to the Main window edges. The new size is shown as a semi-transparent grey box. Resizing only takes place when the mouse button is released. Blue “Land-ing Lights” show where a Pane will dock.
Double-clicking in the Pane title bar toggles its size and position between current and last or docks the Pane in the Main window.
Nested and Combined PanesNested PanesPanes, e.g. Cue lists or Properties can be nested by simply dragging, say Cue List 2 over Cue List 1 Until the blue “ghost” pane covers most of the existing pane.and the centre blue landing light is lit.
Cue List Pane with Cue List ready to dock - Compose Mode

Ovation User Interface : Main Window Page 63
Here is the result:
The large buttons at the top enable the focus to be switched between the nested Panes, in this case:
1 - Cue List 1, 2 - Cue List 2.
Panes can be Un-Nested by clicking and dragging on the large Cue List label buttons.
Cue List Pane with Nested Cue Lists - Compose Mode

Ovation User Interface : Main Window Page 64
Combined PanesIf a Pane is dragged over another near the edges a Combined Window can be formed. This can be Closed or Auto-hidden as a single entity. Depending on where the Pane is dragged Panes can be combined vertically or horizon-tally. In the following image you can see a pair of Properties Panes Combined with two nested Cue List Panes.
Here you can see that Cue List 1 has the focus. Properties are displayed for the selected Cue, highlighted in dark gray, in the selected Cue List, highlighted in pale green.
Cue List Properties are pale green, Show Properties are blue and Cue Properties are gray.
Combined and Nested Panes - Compose Mode

Toolbars : Toolbar Context Menu Page 65
Toolbars
Ovation is equipped with a number of standard Toolbars. These can be shown in the user interface or hidden as required. It is also possible to show Toolbars in Compose Mode and hide them in Show mode by setting the Hide Toolbars field in Show Properties to Yes.
All Main Window toolbars including the Menu toolbar can be made floating by clicking to the left of the first entry until the cursor changes to Move and dragging to a new location. If a floating Toolbar is dragged close to the edge of the Main Window it will snap to a docked configuration.
Toolbar Context Menu
Right-clicking on a blank part of the Main window header or footer opens the Toolbars menu :
Checked entries in the list will be present in the Main Ovation window.
Toolbars context menu

Toolbars : Audition Toolbar Page 66
Audition Toolbar
Selecting Show > View Audition Toolbar adds the Audition Toolbar to the bottom of the main Show Window.
The buttons should be self-explanatory but, just in case, from left to right we have:
Start of Cue or Previous Cue if cursor is at Start of Cue - Rewind - Stop - Start / Pause - Fast Forward - Next Cue
These controls act on the currently selected Cue.
Audition JumpThere are six Audition Jump commands. These commands are available only when Auditioning a Cue and via Keyboard Shortcuts or with a modifier key when clicking on the Rewind and Fast Forward buttons in any Audition Toolbar or on the Ovation Keyboard:
• Audition Jump Forward 1: Jump 1 Second later in time (Ctrl + -> Key or Fast Forward Button)
• Audition Jump Forward 2: Jump 5 Seconds later in time (Ctrl + Shift + -> Key or Fast Forward Button)
• Audition Jump Forward 3: Jump 15 Seconds later in time (Ctrl + Shift + Alt + -> Key or Fast Forward But-ton)
• Audition Jump Back 1: Jump 1 Second earlier in time (Ctrl + <- Key or Rewind Button)
• Audition Jump Back 2: Jump 5 Seconds earlier in time (Ctrl + Shift + <- Key or Rewind Button)
• Audition Jump Back 3: Jump 15 Seconds earlier in time (Ctrl + Shift + Alt + <- Key or Rewind Button)
Audition Toolbar

Toolbars : Audition Toolbar Page 67
Audition Drop-downIn a Cue List pane, clicking on the down arrow immediately to the right of the Audition button drops down the Audition transport controls. These are identical in function to the Audition Toolbar.
Standard Cue List Pane with Audition Drop-down - Compose Mode

Toolbars : Show Controls Page 68
Show Controls
The Show Control bar at the bottom of the main screen can be made floating in the same manner as the Menus. I.e. click and drag at the left-hand edge when the cursor changes to a cross.
If the Show Control bar is dragged near to an edge of the Main Screen it will re-dock, horizontally or vertically. Otherwise it can be placed anywhere on the Desktop.
Select Previous Child-Cue in currently selected Cue List
Select Next Child-Cue in currently selected Cue List
Fire Selected Cue in currently selected Cue List and select next Cue and make Ready to Fire
Select Previous Cue in currently selected Cue List
Select Next Cue in currently selected Cue List
Toggle through Cue Lists in ascending order (with Shift in descending order)
Fire Selected Cue in currently selected Cue List. Cue remains Ready to be Fired Again
Pause Selected Cue in currently selected Cue List
Stop Selected Cue in currently selected Cue List
Show Time Counter Displays selected Time format when Show is running
Initialize Show Prepares Show for Running. Cue Lists displays change to Show Mode
Ovation Main Window Show Control Bar

Toolbars : Other Toolbars Page 69
Start Show Timed Cues fire at appropriate times. Hot Key Cues can be Fired at will.
Pause Show Opens the Pause Show dialog:
OK Pauses the Show, Cancel closes the dialog without affecting the Show.
Pause Show button with Show Paused.
Clicking on Pause Show when the Show is Paused, Re-starts the Show from the point at which it was Paused.
Stop Show Opens the Stop Show dialog
OK Stops the Show. Cue List displays return to Compose Mode and the Time is reset if Time Mode is Duration. Cancel closes the dialog without affecting the Show.
Note: The Pause Show and Stop Show dialogs can be suppressed in the Show Proper-ties pane. Useful for rehearsals and when constructing a Show.
Other Toolbars
The other Toolbars are accessed by right-clicking on a blank area of the main Ovation Window header or footer and selecting them from the context menu. All the extra Toolbars are user configurable. The down arrow next to the far right icon gives access to the current Toolbar’s buttons plus Customize... Buttons visible currently in the Toolbar are highlighted in blue. Clicking on an entry in the list toggles it shown/hidden. The last entry in the list is Reset Toolbar this does what it says and resets the Toolbar to the default condition. I.e. all buttons present.
Pause Show Dialog
Stop Show Dialog

Toolbars : Other Toolbars Page 70
Show
New Show
Open Show
Save Show
Initialize Show
Start the Show
Pause the Show
Stop the Show
Consolidate the Show
Package the Show
Toggle Show Properties pane show/hide
Toggle Show Validator pane show/hide
Toggle Show Log pane show/hide
Toggle Show Control Toolbar show/hide
Toggle Audition Toolbar show/hide
Toggle Active Cue Window show/hide
Toggle Audio Gain Matrix show/hide

Toolbars : Other Toolbars Page 71
Toggle Audio Control Fader show/hide
Open User Manual
About Ovation
Cue List
New - drops down the list of possible Cue List types. Selection opens new list.
Open Cue List
Save Cue List
Toggle Cue List Properties pane show/hide
Fire /Start Timed List
Start Timed List
Pause Timed List
Stop Timed List
Chase Timed List
Fire Toolbar - Toggles Fire Toolbar show/hide in selected Cue List in Show Mode for selected window
Edit Toolbar - Toggles Edit Toolbar show/hide in selected Cue List in Compose Mode for selected window
Toggle/Select Cue List - Cycles the selection through open Cue Lists
Toggle/Select Hot Key List

Toolbars : Other Toolbars Page 72
Create Cue List
New Standard Cue List
New Timed Cue List
New Hot Keys Cue List
New Custom Keys Cue List
New Cue Browser
New Hot Browser
Cue
Undo
Cut
Copy
Paste
Toggle Cue Properties pane show/hide
Open Cue Rules window
Open Cue gain fader dialog
Add - drops down the list of Cue add options
Remove - selected Cue

Toolbars : Other Toolbars Page 73
Edit - Cue in Pyramix (if already open)
Replace Audio Media - Opens a browser to select an alternative Audio Media file/Compo-sition.
Snapshot Automation
Paste Automation
Audition - Click on the button to Audition the selected Cue or the down arrow to drop-down the Audition transport controls.
Pin/Unpin Cue to the Active Cue Window
Places and Locks selected Cue in the Active Cue Window (Only available when Lock is active in the Active Cue Window)
Move Down
Move Up
Nest
Un-nest
Link Offsets / Start Times
Fire
Fire Selected Cue
Select Previous Scene
Select Next Scene
Select Previous Cue

Toolbars : Show Menus and Toolbars in Emergency Page 74
Select Next Cue
Fire Selected Cue
Pause selected Cue
Stop Selected Cue
Stop All Cues
Settings
Open Settings Window
Open Keyboard Shortcuts Window
Show Menus and Toolbars in Emergency
The Hotkey combination Ctrl + Alt + Home brings back the menus and all selected Toolbars when in Show Mode to give access to all commands in case of emergency.

Active Cue Window : Features & Functions Page 75
Active Cue Window
Features & Functions
The Active Cue Window displays information about, and enables various operations to be performed on, the Cue selected currently in both Compose and Show modes.
Cursor Position, Position in Audio File and Zoom Level is remembered when switching between Cues.
Compose Mode
Cue List and Cue
Below the Upper Toolbar the first bar shows the Cue List where the Active Cue is located. The second bar shows the Active Cue. The two buttons to the right activate Pinned mode or Locked mode.
Lock and Pin
Pinned ModePinned Mode enables only Cues with “interesting” content to be displayed in the Active Cue Window.
When the Pinned button is inactive all types of Cue are shown in the Active Cue Window as they are fired.
Active Cue Window - Compose Mode
Active Cue Window - Cue List and Cue

Active Cue Window : Features & Functions Page 76
When the Pinned button is active only Cues with the Pinned to the Active Cue Window parameter set to Yes in Cue Properties will be shown as they are selected. Audio Cues are Pinned by default. Other types of Control Cue are unpinned by default.
OverrideAlt + Click on an Unpinned Cue overrides the Pin function temporarily and substitutes this Cue for the current Cue.
Note: The Pinned icon is only shown in Cues in Cue Lists when Pinned is active in the Active Cue Window.
Cue List with Pinned Cues in Show Mode

Active Cue Window : Features & Functions Page 77
Locked ModeLocked Mode when active locks the Cue displayed currently to the Active Cue Window. No other Cues will be dis-played until Lock is deactivated.
OverrideAlt + Click on another Cue overrides the Lock temporarily and substitutes this Cue for the current Cue.
Unlocked. Cues are displayed as they are selected or fired.
Locked. The Cue currently displayed is locked to the Active Cue Window.
In a Cue List the Cue locked to the active Cue Window is shown with a Lock symbol to the left of the name.
Cue List with Locked Cue

Active Cue Window : Features & Functions Page 78
Cue Trimmer
Navigation
Marker Button
The Marker button gives access to the Marker management functions. Please see: Markers on page 84.
Scroll BarThe Scroll bar and Nudge buttons, Zoom In / Zoom Out / Zoom-To-Fit buttons control the view of the Cue in the Trimmer.
The size of the Scroller handle changes according to how much of the Cue is visible in the Timeline.
The Nudge buttons scroll the view of the Cue left or right in one second increments.
Zoom In
Zoom Out
Zoom-to-fit
Timescale RulerThe Cue selected currently is shown in the Active Cue Timeline starting at 00:00:00:000.
Double-clicking in the Ruler auditions the Cue from the mouse cursor position within the active area.
Clicking and dragging in the Ruler moves the Timeline.
Audition Cursor• In Stop mode, with the Alt key pressed and held, placing the mouse cursor on the Audition Cursor in the
Timeline Ruler and clicking auditions the Cue while the left mouse button is held down. (Mouse Cursor changes to I-beam) Audition Cursor flies back to Mouse Cursor position when button released.
• In Stop mode the I-beam mouse Cursor moves the Audition Cursor without playing.
• When Stopped or Paused and calling Audition or Fire from the Active Cue Window playback starts from the current Audition Cursor position, i.e. from where previous playback stopped. This allows for, when for example rehearsing a show, the rehearsal to be resumed from the middle of a Cue and not from its begin-ning.
Active Cue Window - Trimmer

Active Cue Window : Features & Functions Page 79
• After pressing the Audition Stop button twice the next Audition or Fire will start from the beginning of the Cue.
When calling Fire or Audition from outside the Active Cue Window (Menu, Keyboard, Show Control Toolbar, etc…) the Active Cue is Fired from its current IN point.
Trimmer Waveform DisplayThe visible portion of the selected Cue is displayed and the active portion of it is highlighted in lighter gray. The four boxes at the corners of the shaded area are handles. These handles can be dragged to adjust the Start, End, Fade In and Fade Out points graphically. The bottom handles set the In and Out points and the top handles adjust the Fade In and Fade Out. Double-clicking a handle restores the default value. I.e. the Cue boundary for the In and Out handles and No Fade for the Fade Handles.
Note: The Start and End points can be dragged out beyond the boundaries of the Media to provide a Start Offset / Preroll and or an End Offset / Postroll.
Zoom and Move
Clicking and dragging horizontally anywhere in the Timeline and Ruler while the cursor is a cross moves the entire Timeline. Clicking and dragging vertically anywhere in the Timeline and Ruler while the cursor is a cross zooms into or out of the Timeline
Trim with the MouseThe Cue can also be modified with the mouse.
• SHIFT+Click moves the Cue IN to the current mouse position.
• Ctrl+Click moves the Cue OUT to the current mouse position.
Review while trimming:• To review the Cue while trimming the in point, simply audition it (either by using Audition Play/Pause or
Review Start): Each time the Cue IN is modified with one of the above methods, the Cue is restarted from its new IN point.
• To review the Cue while trimming the OUT point, simply press Ctrl + Review End: When the audition gets to the current Cue OUT point, it loops the last second of the Cue.
Note: The Preroll and Cue Out Loop durations are set in Settings > Application Set-tings > General > Audition. While the Cue loops, you can trim the Cue out precisely with quick and interactive feedback of the current result. Once the Loop Out mode is enabled by Ctrl + Clicking the Review End icon button all the subsequent keyboard-shortcut calls to Audition Review End (Ctrl + Alt + Space) will play in Loop out mode, until the “Review end” icon button gets mouse-clicked without the Ctrl key. When working with the mouse, you can choose to press Ctrl or not, each time you review the end of the Cue.
Audition Toolbar
From left to right the buttons are:
Start of Cue or Previous Cue if Playhead Cursor is at Start of Cue - Rewind - Stop - Start / Pause - Fast Forward - Next Cue
The Audition Toolbar is visible in Compose Mode and will be merged with the Fire Toolbar in Show Mode if the Forbid Editing field in Show Properties is set to No.
Active Cue Window - Audition

Active Cue Window : Features & Functions Page 80
Show Mode Note: The Active Cue Window displays the Cue selected currently in the Cue List selected currently. I.e. NOT the Cue playing unless this is also selected.
In Show Mode the Active Cue Window is simplified by the removal of the top Toolbar and Audition toolbar (If present). Fire, Pause and Stop appear at bottom left. If the Forbid Editing field in Show Properties is set to No the Fire and Audition Toolbars are merged in Show Mode. See below:
Active Cue Window - Show Mode

Active Cue Window : Features & Functions Page 81
Show Mode With Merged Toolbars
Auditioning a Cue
If the Forbid Editing field in Show Properties is set to No then the Fire and Audition/PFL Toolbars are merged and if Hide Toolbars is set to No then the top toolbar is retained in Show Mode.
Cues can therefore be auditioned while the show is running by selecting them and using the Audition buttons.
Cue Fired
When the selected Cue is Playing in Show Mode the Rewind, Stop, Play/Pause and Fast Forward buttons are unavailable. (Grayed out.)
Active Cue Window - Show Mode with Merged Toolbars
Active Cue Window - Show Running - Selected Cue Fired

Active Cue Window : Features & Functions Page 82
Active Cue Window Edit ToolbarHidden by default, the Edit Toolbar can be shown by selecting View > View Active Cue Window Edit Toolbar.
Cue Properties Opens the Cue Properties pane with details of the Active Cue
Cue Rules Opens the Cue Rules window
Cue Gain Opens the Cue Gain Window
Edit Opens the Active Cue ready for editing in Pyramix (Pyramix editing must be set up and Pyramix launched before Ovation if this function is required.)
Replace Audio Media
Snapshot Automation
Snapshot Automation Paste
Audition clicking on Audition auditions the Cue. Clicking on the small arrow gives access to the Audition transport controls. (Same as those at the bottom of the Window plus the Jump options. Please see: Audition Toolbar on page 66)
Link Offsets/Start Times Links all Audio, TCGen, MMC and 9-pin (Sony P2) Offsets and Start Times in a Cue with these properties. The button toggles on/off and it’s state is not saved when a different Cue is Active. When enabled all related field names in the Cue Properties pane turn red for clarity.
NudgeThe Nudge button functions affect the Cue in the increments set in the drop-down list. Increments range from 1 sample to 100 seconds.
Nudge Cue In Less (earlier)
Nudge Cue In More (later)
Nudge Cue Out Less (earlier)
Nudge Cue Out More (later)
Nudge Fade In Less (earlier)
Nudge Fade In More (later)
p

Active Cue Window : Features & Functions Page 83
Nudge Fade Out Less (earlier)
Nudge Fade Out More (later)
Nudge Cursor Less (earlier)
Nudge Cursor More (later)
Snap Cue In to Cursor
Snap Cue Out to Cursor
Nudge Value
Review Start
Review End

Active Cue Window : Markers Page 84
Markers
Markers, in combination with Interaction Rules are a very powerful Ovation tool.
Clicking on the Markers button drops down the Markers Menu. When a Cue has no Markers only the Add Marker entry is active.
Markers MenuAdd Marker Adds a new Marker at the current Audition Cursor position. Note: existing Markers subse-
quent to the new Marker are renumbered.
Edit Selected Marker Interaction Rules Opens the Interaction Rules dialog.
Remove Selected Marker Deletes the Marker selected currently. Note: existing markers subsequent to the deleted Marker are renumbered.
Goto Marker 1 Locates the Audition Cursor to Marker 1.
Goto Marker 2 Every Marker added will show up here as a Goto Marker x entry.
Markers in the Timeline Ruler• Clicking on a Marker in the Ruler selects it. Selected Markers are highlighted.
• Click and drag a Marker in the Ruker to move it.
• Double-clicking on a Marker in the Ruler opens the Interaction Rules dialog.
Note: Markers are always numbered in the chronological order they appear in the Time-line. So, if Marker 4 is moved before Marker 1 it is renumbered as Marker 1 and all subse-quent markers are renumbered accordingly. The same applies when Markers are added or deleted. The left-most Marker will always be 1 and Markers are always numbered sequentially. Note also that Markers with Interaction Rules have an exclamation point. !
Active Cue Window Markers Drop-down Menu
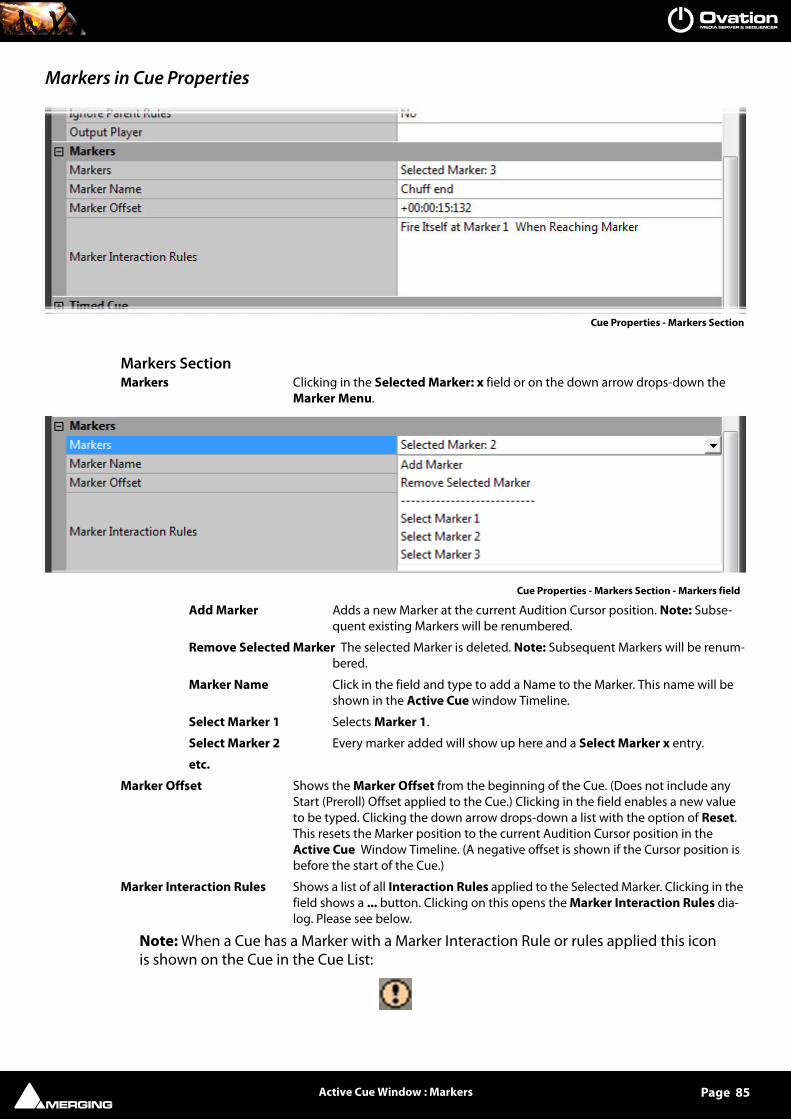
Active Cue Window : Markers Page 85
Markers in Cue Properties
Markers SectionMarkers Clicking in the Selected Marker: x field or on the down arrow drops-down the
Marker Menu.
Add Marker Adds a new Marker at the current Audition Cursor position. Note: Subse-quent existing Markers will be renumbered.
Remove Selected Marker The selected Marker is deleted. Note: Subsequent Markers will be renum-bered.
Marker Name Click in the field and type to add a Name to the Marker. This name will be shown in the Active Cue window Timeline.
Select Marker 1 Selects Marker 1.
Select Marker 2 Every marker added will show up here and a Select Marker x entry.
etc.
Marker Offset Shows the Marker Offset from the beginning of the Cue. (Does not include any Start (Preroll) Offset applied to the Cue.) Clicking in the field enables a new value to be typed. Clicking the down arrow drops-down a list with the option of Reset. This resets the Marker position to the current Audition Cursor position in the Active Cue Window Timeline. (A negative offset is shown if the Cursor position is before the start of the Cue.)
Marker Interaction Rules Shows a list of all Interaction Rules applied to the Selected Marker. Clicking in the field shows a ... button. Clicking on this opens the Marker Interaction Rules dia-log. Please see below.
Note: When a Cue has a Marker with a Marker Interaction Rule or rules applied this icon is shown on the Cue in the Cue List:
Cue Properties - Markers Section
Cue Properties - Markers Section - Markers field
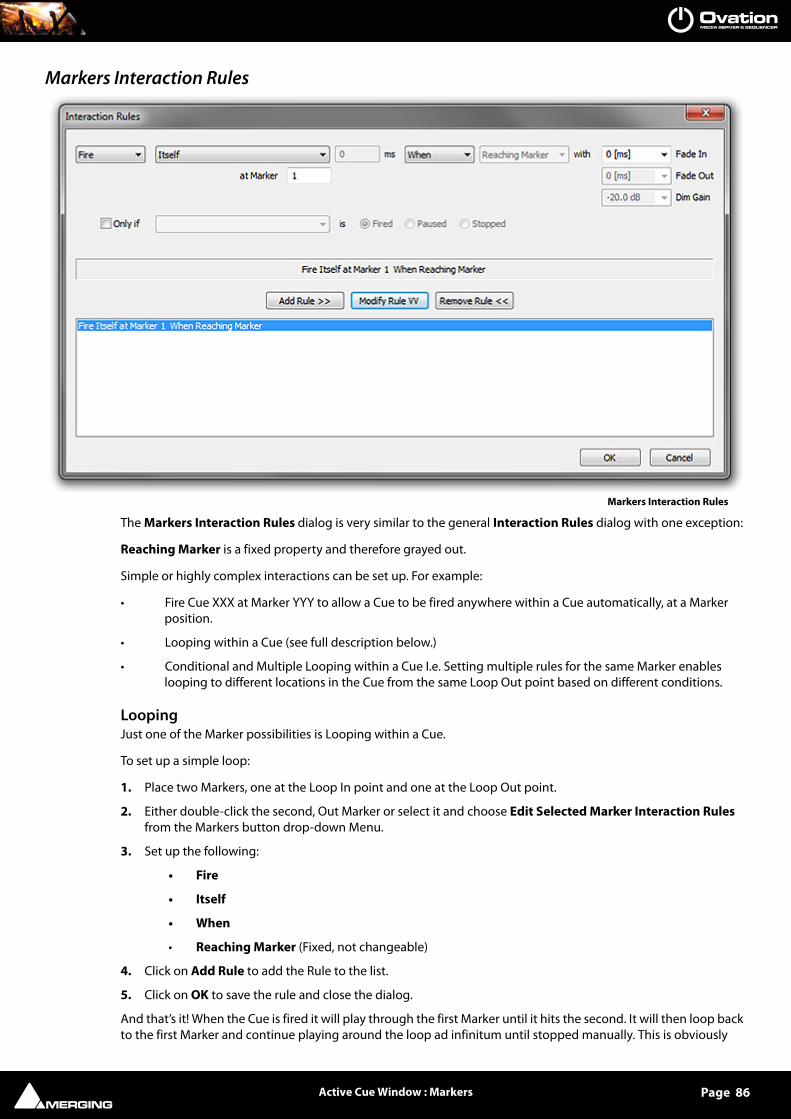
Active Cue Window : Markers Page 86
Markers Interaction Rules
The Markers Interaction Rules dialog is very similar to the general Interaction Rules dialog with one exception:
Reaching Marker is a fixed property and therefore grayed out.
Simple or highly complex interactions can be set up. For example:
• Fire Cue XXX at Marker YYY to allow a Cue to be fired anywhere within a Cue automatically, at a Marker position.
• Looping within a Cue (see full description below.)
• Conditional and Multiple Looping within a Cue I.e. Setting multiple rules for the same Marker enables looping to different locations in the Cue from the same Loop Out point based on different conditions.
LoopingJust one of the Marker possibilities is Looping within a Cue.
To set up a simple loop:
1. Place two Markers, one at the Loop In point and one at the Loop Out point.
2. Either double-click the second, Out Marker or select it and choose Edit Selected Marker Interaction Rules from the Markers button drop-down Menu.
3. Set up the following:
• Fire
• Itself
• When
• Reaching Marker (Fixed, not changeable)
4. Click on Add Rule to add the Rule to the list.
5. Click on OK to save the rule and close the dialog.
And that’s it! When the Cue is fired it will play through the first Marker until it hits the second. It will then loop back to the first Marker and continue playing around the loop ad infinitum until stopped manually. This is obviously
Markers Interaction Rules

Active Cue Window : Markers Page 87
only a very simple example and careful use of multiple Interaction Rules enable many other possibilities. For example stopping the Looped Cue when another Cue is fired.
For full details of the Interaction Rules Please see: Interaction Rules on page 110
Note: For a rule to be functional the system requires a period of 1 second before its trig-gering time to prepare for triggering the rule. Therefore Markers set before 1 second after the beginning of a Cue or 1 second before the Fade Out of a Cue will not trigger their Rules. They will be colored Red in the Active Cue Window !

Properties Panes : Types Page 88
Properties Panes
Types
Ovation has three types of Properties Pane, Show, Cue List and Cue.
These Panes present information about the currently loaded Show, selected Cue List and selected Cue.
The small Minus and Plus buttons on the left Collapse each main section of the Pane to a sin-gle line and Expand it back to full respectively:
AppearanceThe text in Properties Panes is displayed in the font size set in View > Properties Font Size.
Properties FieldsSome fields are for ‘information only’ many others can accept text, numeric values or provide a choice of options.
Clicking in fields other than ‘free text’ or ‘information only’ pops up a down arrow. This gives access to the options for the field.
Numeric FieldsMany numeric fields offer a choice of likely values in a drop-down list. If you wish to enter your own value simply click in the number field to produce a cursor and edit the value directly.
PrecedenceIn general settings made in Show Properties, Cue List Properties and Cue Properties have the following prece-dence:
Cue Properties settings override Cue List Properties settings and Show Properties settings.
Cue List Properties override Show Properties settings.
Show Properties settings apply when not overridden by either Cue List Properties Settings or Cue Properties set-tings.
Where exceptions exist to these rules they are noted.
Properties Windows drop-down list

Properties Panes : Show Properties Page 89
Show Properties
Show Properties Pane
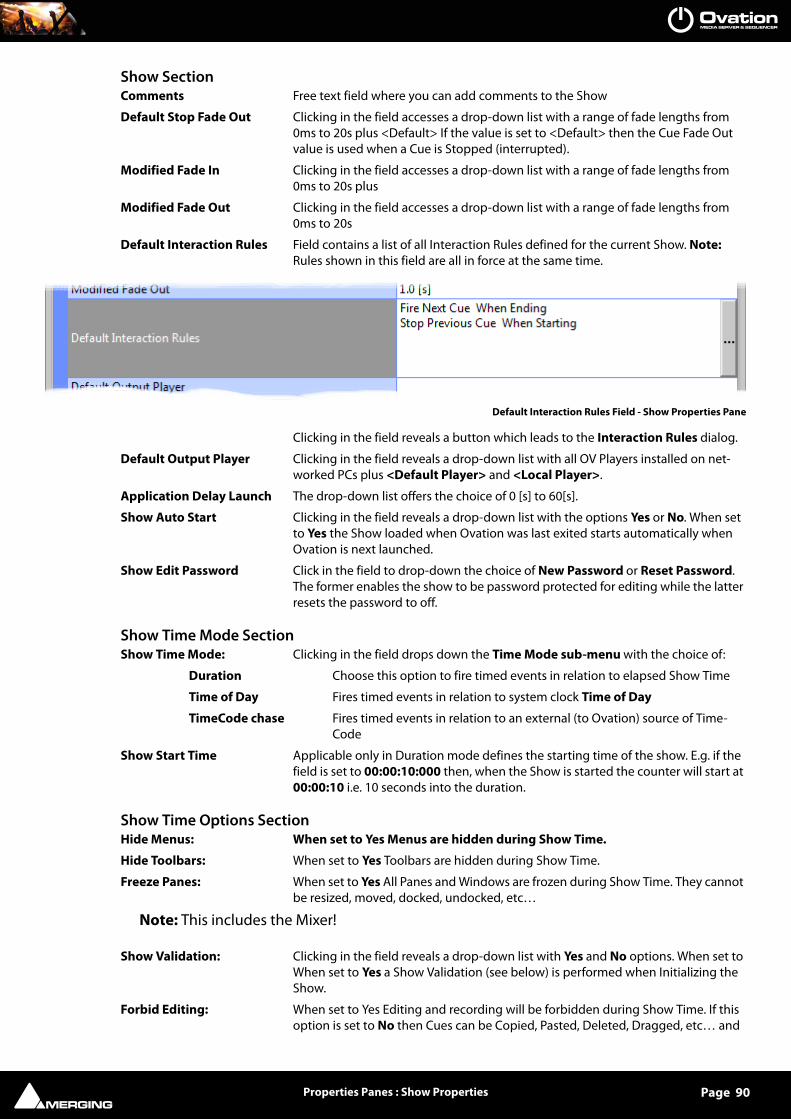
Properties Panes : Show Properties Page 90
Show SectionComments Free text field where you can add comments to the Show
Default Stop Fade Out Clicking in the field accesses a drop-down list with a range of fade lengths from 0ms to 20s plus <Default> If the value is set to <Default> then the Cue Fade Out value is used when a Cue is Stopped (interrupted).
Modified Fade In Clicking in the field accesses a drop-down list with a range of fade lengths from 0ms to 20s plus
Modified Fade Out Clicking in the field accesses a drop-down list with a range of fade lengths from 0ms to 20s
Default Interaction Rules Field contains a list of all Interaction Rules defined for the current Show. Note: Rules shown in this field are all in force at the same time.
Clicking in the field reveals a button which leads to the Interaction Rules dialog.
Default Output Player Clicking in the field reveals a drop-down list with all OV Players installed on net-worked PCs plus <Default Player> and <Local Player>.
Application Delay Launch The drop-down list offers the choice of 0 [s] to 60[s].
Show Auto Start Clicking in the field reveals a drop-down list with the options Yes or No. When set to Yes the Show loaded when Ovation was last exited starts automatically when Ovation is next launched.
Show Edit Password Click in the field to drop-down the choice of New Password or Reset Password. The former enables the show to be password protected for editing while the latter resets the password to off.
Show Time Mode SectionShow Time Mode: Clicking in the field drops down the Time Mode sub-menu with the choice of:
Duration Choose this option to fire timed events in relation to elapsed Show Time
Time of Day Fires timed events in relation to system clock Time of Day
TimeCode chase Fires timed events in relation to an external (to Ovation) source of Time-Code
Show Start Time Applicable only in Duration mode defines the starting time of the show. E.g. if the field is set to 00:00:10:000 then, when the Show is started the counter will start at 00:00:10 i.e. 10 seconds into the duration.
Show Time Options SectionHide Menus: When set to Yes Menus are hidden during Show Time.
Hide Toolbars: When set to Yes Toolbars are hidden during Show Time.
Freeze Panes: When set to Yes All Panes and Windows are frozen during Show Time. They cannot be resized, moved, docked, undocked, etc…
Note: This includes the Mixer!
Show Validation: Clicking in the field reveals a drop-down list with Yes and No options. When set to When set to Yes a Show Validation (see below) is performed when Initializing the Show.
Forbid Editing: When set to Yes Editing and recording will be forbidden during Show Time. If this option is set to No then Cues can be Copied, Pasted, Deleted, Dragged, etc… and
Default Interaction Rules Field - Show Properties Pane

Properties Panes : Show Properties Page 91
Audio recordings made during Show Time, allowing for more interactive perfor-mances to be achieved. Cues being modified during Show Time are immediately updated. If they are currently playing at that time then the changes will be avail-able for the next playback only. Cues being deleted while playing will continue playing until they end or are manually stopped.
Hide Properties: Clicking in the field reveals a drop-down list with Yes and No options. When set to Yes Show Properties, Cue List Properties and Cue Properties will be hidden during Show Time. This option is typically used with the previous one.
Cue Fire Buttons Clicking in the field reveals a drop-down list with Yes and No options. Default is No When set to Yes, in Show Mode all Cues have Play/Pause and Stop buttons on the left-hand side.
Focused Cue Flashing Mode For clarity, especially in Shows with many Cue Lists, the Cue with the focus is given a flashing red border in Show Mode. This setting determines which Cue List types flashing mode is applied to. Clicking in the field accesses a drop-down list with the following options:
None
All Cue Lists
All Cue Lists except Hot Keys and Custom Keys
Show Mode Confirmations Clicking in the field reveals a drop-down list with Yes and No options. When set to No all “Show stopping” and “Show Pausing” dialogs will be disabled during Show Time. Typically disabled for Remote Controlled Shows and during rehearsals. When set to Yes cautionary dialogs will be displayed when performing actions which would Stop, Pause, End or Change the Show.
Saving Confirmations Clicking in the field reveals a drop-down list with Yes and No options. When set to No, no “Do you want to save...” confirmations will be shown when exiting Ovation.
Popups Confirmations Clicking in the field reveals a drop-down list with Yes and No options. When set to No, no confirmation pop-ups for actions such as closing Cue Lists will be shown.
Show Logging SectionEnable Logging Clicking in the field reveals a drop-down list with Yes and No options. When Log-
ging is enabled by setting to Yes the following settings will apply:
New Log File Clicking in the field reveals a drop-down list with Every Show, Every Day, Every Week and Every Month options. Choose the option appropriate to your needs.
Log File Name Structure Clicking in the field reveals a drop-down list with Station Name, Station Name / Show Name, Station Name / Date and Station Name / Show Name / Date options. This option determines how the generated Log File will be labelled.
Log File Format Clicking in the field reveals a drop-down list with ASCII Text (.log), XML (.xml) and Enco DAD log file (.exp) options.
Log File Folder Clicking in the field reveals a drop-down list with a Browse option. Clicking on Browse opens a File Browser to navigate to the required Log output Folder.
TimeCode Generator SectionThe Show TimeCode can be output to any available TimeCode Output Port. This can be LTC, if Ovation is running with a Mykerinos card, or a MIDI MTC port enabled in Settings >Application Settings >Player Units > MIDI.
TC Gen Output Port Currently selected Output Port is shown. The drop-down list shows all available TC outputs. This can be LTC, if Ovation is running with a Mykerinos card, or a MIDI MTC port.
TC Gen Pause Mode The drop-down list offers a choice of:
Off TC output ceases when the Show is paused
Freeze TC freezes at current value when Show is paused
Free Roll TC continues to run when Show is paused
TC Gen Stop Mode The drop-down list offers a choice of:
Off TC output ceases when the Show is paused

Properties Panes : Show Properties Page 92
Freeze TC continues to generate current value when Show is paused
Free Roll TC continues to generate and increment value when Show is paused
TC Gen Goto on Ready Clicking in the field reveals a drop-down list with Yes and No options. If Yes (enabled) the Start Time is generated continuously on the output port when the Cue is made Ready, to allow a Slave device to commence locating to the Start Time in advance of the Cue being fired.
Multi-Sequencer Synchronization SectionSynchronization Mode The drop-down list offers the choice of Master, Slave or Off.
Resynchronize Drifts/Jumps Determines whether or not re-synchronization will take place when a sync drift or jump is detected. The drop-down list offer the choice of Yes or No.
Resynchronize Difference threshold Determines how far out of sync a sequencer must be before re-synchroni-zation takes place. Type the desired threshold in the field. Default is 1.0[s].
Note: Synchronization is sample accurate provided Master and Slave TIME is in sync. I.e. TimeCode Chase. A pre-roll of up to two seconds is required before output begins from a slave Ovation.If this is critical in your application add two seconds of silence to Cues which start at the very beginning of the Show. Or use a TC/IP Command.One method of achieving Time synchronization across several Ovations is to use a GPS source.
Note: Before Multi-Sequencer Synchronization can be used an IP connection must be established between the Master and Slave machines in Settings > Application Settings > General > IP. Cues are configured for synchronization in Cue Properties. Please see: TCP/IP Connections on page 156

Properties Panes : Cue List Properties Page 93
Cue List Properties
Note: Some fields will be grayed out and sections collapsed depending on the Cue List selected currently.
Cue List SectionNumber Position in the list of Cue Lists of the currently selected Cue List. The Drop-down
list enables the position to be changed. The rest of the list is re-ordered to suit. I.e. the other Cue Lists are automatically re-numbered as necessary. For example, if the selected Cue List is currently no.2 of five then changing its Number to 1 places it at the beginning of the list. The previous no.1 becomes 2 and everything else stays put. If Cue List 2 is reNumbered 4, then 1 stays where it is, 3 moves up to the empty 2 slot, 4 moves up to 3 and 5 stays where it is.
Name Name (can be changed here)
Comments Free text field where you can add comments to the Cue List
Cue List Properties Pane

Properties Panes : Cue List Properties Page 94
Automatic Cue Numbering Default is On for Standard and Timed CueLists. Default is Off for Hot Key and Cus-tom Key CueLists. Click in the field to toggle On/Off. When Off new Cues added will still be numbered consecutively but these numbers can be removed in the Cue Properties pane. Cue number is then determined by position in the Cue List.
Hidden When checked the Cue List will not be visible in Show Mode. This is useful for man-agement Cuelists which contain logical instructions which are not relevant to the operator running the show.
Default Stop Fade Out Clicking in the field accesses a drop-down list with fade times from 0ms to 20s plus <default>. If the value is set to <Default> then the Cue Fade Out value is used when a Cue is Stopped (interrupted).
Default Interaction Rules Field contains a list of all Interaction Rules defined for the current Cue List. Note: Rules shown in this field are all in force at the same time.
Clicking in the field reveals a button which leads to the Interaction Rules dialog
Default Output Player Clicking in the field reveals a drop-down list with all OV Players installed on net-worked PCs plus the currently defined Show <Default Player> and <Local Player>. When <Default Player> is selected nothing is shown in the box and the player used will depend on the parent choices. I.e. in the Show.
Timed Cue List SectionTimed Mode Chasing Yes or No When Yes (enabled) the Cue List is fired in relation to the TimeCode
source values. When No (disabled) events are fired in relation to Show elapsed time. Timed Mode Start Time introduces an offset.
Timed Mode TC Chase Source When Timed Mode Chase is enabled sets the TC source to be chased. Options in the drop-down list are Show Time or any available TC input.
Timed Mode Start Time Offsets the Cue List start time values. Only available when Timed Mode Chasing is not enabled.
Timed Mode Pauses Cues
Timed Mode Stops Cues
TimeCode Generator SectionThe Cue List TimeCode can be output to any available TimeCode Output Port. This can be LTC, if Ovation is running with a Mykerinos card, or a MIDI MTC port enabled in Settings > Application Settings > Player Units > MIDI.
TC Gen Output Port Currently selected Output Port is shown. The drop-down list shows all available TC outputs. This can be LTC, if Ovation is running with a Mykerinos card, or a MIDI MTC port.
TC Gen Pause Mode The drop-down list offers a choice of:
Off TC output ceases when the Cue List is paused
Freeze TC freezes at current value when Cue List is paused
Free Roll TC continues to run when Cue List is paused
TC Gen Stop Mode The drop-down list offers a choice of:
Off TC output ceases when the Cue List is paused
Freeze TC continues to generate current value when Cue List is paused
Free Roll TC continues to generate and increment value when Cue List is paused
TC Gen Goto on Ready Yes or No. If Yes (enabled) the Start Time is generated continuously on the output port when the Cue is made Ready, to allow a Slave device to commence locating to the Start Time in advance of the Cue being fired.
Hot Keys SectionHot Keys number of Columns Clicking in the field drops down a list with the choices of Auto (default) or 1 - 8.
Note: When the Number of Columns is set to Auto then the system automatically adjusts the number of columns, but still follows the Automatic Cues Numbering setting and leaves empty slots if necessary.

Properties Panes : Cue List Properties Page 95
Hot Keys Column to Audio Slot Mapping
• If set to No all Cues are played back in the Audio Output Slot defined in their Cue Properties.
• If set to a number (1, 2, etc…) then the Cues are played back in an Audio Slot corresponding to the Hot Keys Column. In this way Hot Keys Cues can be assigned to Audio Output by the Column in which they are placed.
Note: In this mode the actual Audio Output Slot(s) is computed as Cue Column Number multiplied by the Hot Keys Column to Audio Slot Mapping. This allows handling Mono (1), Stereo (2), Surround (6), etc… Cues.
The order of precedence is:
• The Cue List Audio Output Slot is used first if not set to <Use Cue Slot>
• The Hot Keys Column to Audio Slot Mapping is then used if not set to “No”
• The Cue individual Audio Output Slot is then used if none of the above applies.
Custom Keys Section
Custom Keys Grid Size Click in the field to reveal the down arrow. You can either pick a value from the drop-down menu or type directly in the left-hand side of the field.
Note: The Timed Cue List and TimeCode Generator sections are collapsed and fields are greyed out for non Timed Cue Lists and the Custom Keys section is collapsed and fields grayed out for non Custom Keys Cue Lists.
Cue List Properties Pane - Custom Keys Section

Properties Panes : Cue List Properties Page 96
Audio Section
Audio Output Slot Click in the field to reveal the down arrow. You can either pick a value from the drop-down menu or type directly in the left-hand side of the field.
Note: This setting applies to every Cue in the list. This value takes precedence over the individual Cue Output Slot, if set, for the Cue list. The default value is <use Cue Slot>.
Cue List Properties Pane - Audio Section

Properties Panes : Cue Properties Page 97
Cue Properties
Cue Properties Pane

Properties Panes : Cue Properties Page 98
Cue SectionNumber Number of the currently selected Cue. (Information only)
Name Name (can be changed here)
Comments Free text field where you can add comments to the Cue List
Pinned to Active Cue Window When set to Yes (default) the Cue will be displayed in the Active Cue Window when playing in Show Mode with the Pinned button active.
Length Length of Cue is shown and can be defined here
Fade In Clicking in the field accesses a drop-down list with fade times from 0ms to 20s
Fade in Curve Clicking in the field accesses a drop-down list with a choice of fade characteristics.
Power
Linear
dB
Cosine
Root-Cosine
Fade Out Clicking in the field accesses a drop-down list with fade times from 0ms to 20s
Fade Out Curve Clicking in the field accesses a drop-down list with a choice of fade characteristics.
Power
Linear
dB
Cosine
Root-Cosine
Interaction Rules Field contains a list of all Interaction Rules defined for the current Cue List. Note: Rules shown in this field are all in force at the same time.
Clicking in the field reveals a button which leads to the Interaction Rules dialog.
Ignore Parent Rules Determines whether child (nested) Cues follow the rules defined for the parent. Clicking in the field reveals a Drop-down list with a choice of Yes or No.
Output Player Shows the currently defined OV Player for this Cue. Clicking in the field reveals a drop-down list with all OV Players installed on networked PCs plus the currently defined Show <Default Player> and <Local Player> When <Default Player> is selected nothing is shown in the box and the player used will depend on the par-ent choices. I.e. in the Cue List or Show.
Markers Section .
Markers Clicking in the Selected Marker: x field or on the down arrow drops-down the Marker Menu
Cue Properties - Markers Section - Markers field

Properties Panes : Cue Properties Page 99
Add Marker Adds a new Marker at the current Audition Cursor position. Note: Subse-quent existing Markers will be renumbered.
Remove Selected Marker The selected Marker is deleted. Note: Subsequent Markers will be renum-bered.
Marker Name Click in the field and type to add a Name to the Marker. This name will be shown in the Active Cue window Timeline.
Select Marker 1 Selects Marker 1.
Select Marker 2 Every marker added will show up here and a Select Marker x entry.
Marker Offset Shows the Marker Offset from the beginning of the Cue. (Does not include any Start (Preroll) Offset applied to the Cue.) Clicking in the field enables a new value to be typed. Clicking the down arrow drops-down a list with the option of Reset. This resets the Marker position to the current Audition Cursor position in the Active Cue Window Timeline. (A negative offset is shown if the Cursor position is before the start of the Cue.)
Marker Interaction Rules Shows a list of all Interaction Rules applied to the Selected Marker. Clicking in the field shows a ... button. Clicking on this opens the Marker Interaction Rules dia-log. Please see below.
Timed Cue Section
Go Time Cue Fire Time shown and can be defined here or set to Manual. Only applies to Cues in Timed Cue Lists
Note: The Timed Cue section is collapsed and Go Time field is greyed out in non Timed Lists
Hot Key Section
Only applicable to Hot Key and Custom Key Cue Lists. Shows current Hot key Mode for the selected Cue. Clicking in the field reveals a Drop-down list with a choice of Hot Key behaviors
Hotkey Mode
Play from Start
Timed Cue section - Cue Properties Pane
Hot Key Mode Drop-down List - Cue Properties Pane

Properties Panes : Cue Properties Page 100
Toggle Play / Stop
Toggle Play / Pause
Press Play / Pause
Press Play / Release Stop
Press Play / Release Pause
Custom Key Section
Note: The Custom Color field in the Custom Key Section is also available for Hotkeys, however the Custom Font and Custom Font Color fields are not.In a Standard or Timed Cuelist Custom Color affects the label background only and Custom Font is also available.
Custom Color Click in the field to reveal the ... and drop-down arrow buttons. Clicking on ... opens a standard Color Picker. The drop-down accesses the default.
Custom Font Click in the field to reveal the ... button. Clicking on this opens a standard Font dia-log with a list of all installed fonts. You can also choose the font style and size. The drop-down accesses the default.
Custom Font Color Click in the field to reveal the ... button. Clicking on this opens a standard Color Picker.The drop-down accesses the default.
Custom Key section - Cue Properties Pane

Properties Panes : Cue Properties Page 101
Audio Section
Offset Determines the starting point of the Cue within the Media File. Offsets must be positive only.
Gain Clicking in the field enables values to be typed directly. The value entered here determines the gain offset the Cue will be played with. Negative values attenuate, positive amplify. Clicking on the down arrow accesses a drop-down list of Gain val-ues. Clicking on the ... button opens the Cue Gain fader dialog. Please see: Cue Gain on page 120
Audio Output Slot Shows the Output Slot number. Clicking in the field enables a new number to be typed. Please see: Audio Output Slots on page 123
Audio Media Shows the full path to the Audio Media of the Cue whether single file or Multiple Files. When the right-hand down arrow is clicked a drop-down list appears with the choice of Replace and Remove the current Audio Media Files.
Sampling Rate Information only - shows the Cue sampling rate.
Note: The Length and Audio Offset fields in the Cue Properties have a Reset option accessed by clicking on the button on the right side of the field. The Go Time field in Cue Properties has a Manual option accessed by clicking on the button on the right side of the field to reset it to Manual Fire.
Note: Cue > Link Offsets/StartTimes and the Link Offsets/StartTimes icon in the Active Cue pane Links all Audio, TCGen, MMC and 9-pin (Sony P2) Offsets and Start Times in a Cue with these properties. The button toggles on/off and it’s state is not saved when a different Cue is Active. When enabled all related fields in the Cue Properties pane turn red for clarity.
Microphone Switch SectionThis section allows a range of Mixing Console Inputs to be defined. All Inputs in the range will be switched to Input when the Cue is Fired and returned to Repro when the Cue ends.
First Mic / Input Slot Click in the field and type the number of the first Mic Input Slot to be switched automatically.
Last Mic / Input Slot Click in the field and type in the number of the last Mic Input to be switched auto-matically.
Audio section - Cue Properties Pane

Properties Panes : Cue Properties Page 102
TimeCode Generator SectionThe Cue TimeCode can be output to any available TimeCode Output Port. This can be LTC, if Ovation is running with a Mykerinos card, or a MIDI MTC port enabled in Settings > Application Settings > Player Units > MIDI.
TC Gen Output Port Currently selected Output Port is shown. The drop-down list shows all available TC outputs. This can be LTC, if Ovation is running with a Mykerinos card, or a MIDI MTC port.
TC Gen Start Time The First TimeCode value that will be output when the Cue is Fired.
TC Gen Pause Mode The drop-down list offers a choice of:
Off TC output ceases when the Cue is paused
Freeze TC freezes at current value when Cue is paused
Free Roll TC continues to run when Cue is paused
TC Gen Stop Mode The drop-down list offers a choice of:
Off TC output ceases when the Cue is paused
Freeze TC continues to generate current value when Cue is paused
Free Roll TC continues to generate and increment value when Cue is paused
TC Gen Goto on Ready Yes or No. If Yes (enabled) the Start Time is generated continuously on the output port when the Cue is made Ready, to allow a Slave device to commence locating to the Start Time in advance of the Cue being fired.
Note: The TimeCode Generator section is collapsed and fields are greyed out for non timed Cues.
MMC SectionMMC Output Port Clicking in the field reveals a down arrow to access a drop-down list of all available
MIDI ports
MMC Start Time When a valid output port is selected in the previous field a start time may be entered here.
Note: When the Cue is fired, an MMC Play command is sent; when the Cue is paused, a MMC Pause command is sent; when the Cue is stopped a MMC Stop command is sent.
MIDI File SectionMIDI Output Port Clicking in the field reveals a down arrow to access a drop-down list of all available
MIDI ports
MIDI File Path Name When a valid output port is selected in the previous field clicking in the field reveals a down arrow with the choice of Replace or Remove. Clicking on Remove removes the current path (if any) Clicking on Replace opens the Open MIDI Files browser window. Navigate to the required file and click on Open.
Note: The drop down menu (MIDI 1, GPO, etc.) lists all the devices installed on the machine but does indicate which devices are available/enabled in the system. (to be improved in a next release).
MIDI Command SectionMID Command Output Port Clicking in the field reveals a down arrow to access a drop-down list of all available
MIDI ports
MIDI Fire Command Click in the field to reveal the ... box. Click on this to open the Edit MIDI Command dialog.
MIDI Pause Command Click in the field to reveal the ... box. Click on this to open the Edit MIDI Command dialog.
MIDI Stop Command Click in the field to reveal the ... box. Click on this to open the Edit MIDI Command dialog.

Properties Panes : Cue Properties Page 103
Examples of the Edit MIDI Command Dialog
Available predefined General Midi Commands drop-down list
An example of a MSC Sysex (Go command of the Cue 235.6, Cue list 36.6, path 59)
An example of a General Midi command

Properties Panes : Cue Properties Page 104
Note: when you use the Custom Midi Message edit line, the drop-down menus above are updated if the message is recognized
Sony P2 / RS422 SectionSony P2 / RS422 COM Port Shows the current Com Port or None. The drop down shows a list of all Com ports.
Sony P2 / RS422 Start Time
Note: When the Cue is fired, a P2 Play command is sent; when the Cue is paused, a P2 Jog [0] command is sent; when the Cue is stopped a P2 Stop command is sent.
Please see also: Sony P2 over IP 0 on page 161
COM Command SectionCOM Command Output Port Shows the current Com Port or None. The drop down shows a list of all Com ports.
Command Format Click in the field to drop-down the choice of Hexadecimal or ASCII.
COM Fire Command Click in the field to type a command.
COM Pause Command Click in the field to type a command.
COM Stop Command Click in the field to type a command.
Note: COM Commands can be used to control suitably equipped external devices via serial control. For example you could send a POWER ON command to fire up a projector, or you could send a command line like Command=Cue_Fire &CueList=2 &Cue=1.Each device manufacturer should provide a list of available commands.
IP Command Section
IP Command Output Port Shows the current IP Port or None. The drop down shows a list of all available IP ports
Command Format Click in the field to drop-down the choice of Hexadecimal or ASCII.
IP Fire Command Click in the field to type a command.
IP Pause Command Click in the field to type a command.
IP Stop Command Click in the field to type a command.
Note: IP Commands can be used to control suitably equipped external devices via ether-net. For example you could send a POWER ON command to fire up a projector.Each device manufacturer should provide a list of available commands.
GPO Section
GPO Output Port A physical GPO device assigned to that port.
GPO Output Pin The output pin of the GPO device to trigger.
GPO Ready State The state of the output pin when the Cue enters the Ready condition.
GPO Fire State The state of the output pin when the Cue is Fired.
GPO Pause State The state of the output pin when the Cue is Paused.
Audio section - Cue Properties Pane

Properties Panes : Cue Properties Page 105
GPO Stop State The state of the output pin when the Cue is Stopped.
GPO Duration The time in milliseconds during which the state is maintained. (Pulse length)
Note: Up and Down means:
Up the circuit between Common and the Pin# is closed
Down the circuit between Common and the Pin# is open
Shell Command / Script / Batch Section
Fire Command
Fire Command Parameters
Fire Command Default Directory
Pause Command
Pause Command Parameters
Pause Command Default Directory
Stop Command
Stop Command Parameters
Stop Command Default Directory
A Shell Command requires three parameters:
• The Application name or command (acrobat.exe, myscript.bat, etc…)
• The Parameters modifying this command (optional) (- filename, - load, - verbose, etc… or whatever required by the command itself )
• The Default Directory (optional) (some commands or applications need to run from a given folder where required files are present)
Note: There is a separate set of parameters for each Fire, Pause and Stop event.
Shell Command/Script/Batch section - Cue Properties Pane

Properties Panes : Cue Properties Page 106
Mixer Automation
Type Please see: Snapshot Automation on page 51 for details.
Glide
REMOTE CONTROL: General MIDI Command
MIDI Command Input Port Click in the field to drop-down a list of available ports.
Fire Command Click in the field to reveal the ... button and down arrow.
Pause Command Click in the field to reveal the ... button and down arrow.
Stop Command Click in the field to reveal the ... button and down arrow.
For each of the commands clicking on the ... button opens the MIDI Command Learn dialog. Clicking on the down arrow offers the choice of <None> or <Learn>. None removes the existing mapping whilst Learn also opens the MIDI Command Learn dialog.
Note: Before attempting remote control of Cues in this way check the Controller Set-tings in Settings > Application Settings > Controller Units > MIDI.
In order for direct MIDI Command mapping to work for the given physical or logical MIDI port the option Enable direct Cue mapping of MIDI messages from the selected Virtual MIDI Port in the General Midi (GM) section must be checked. Commands coming from the given physical or logical MIDI Port will be seen in the MIDI Com-mand Learn dialog as coming from the selected Virtual MIDI Port at the top of the MIDI settings page. This enables the physical MIDI port to be changed easily without having to redo the entire mapping).
Note: A useful possibility is to be able to map Note On to the Fire Command and Note Off to the Stop Command to emulate the Hot Keys Press Play/Release Stop mode.
Mixer Automation section - Cue Properties Pane
REMOTE CONTROL: General MIDI Command section - Cue Properties Pane

Properties Panes : Cue Properties Page 107
MIDI Command Learn
The main field displays incoming MIDI Commands. After opening the dialog from one of the Fire, Pause or Stop Command fields, send the MIDI command you wish to map to Ovation and, when you see it in the field, click on OK to complete the mapping and close the dialog.
Clear clears the field if the command is incorrect and
Cancel closes the dialog without completeing the mapping.
REMOTE CONTROL : IP Command
IP Command Input Port Click in the field to drop-down a list of available ports.
Command Format Click in the field to drop-down the choice of Hexadecimal or ASCII.
Fire Command Click in the field to reveal the ... button and down arrow.
Pause Command Click in the field to reveal the ... button and down arrow.
Stop Command Click in the field to reveal the ... button and down arrow.
For each of the commands clicking on the ... button opens the IP Control Fire/Pause/Stop Learn dialog. Clicking on the down arrow offers the choice of <None> or <Learn>. None removes the existing mapping whilst Learn also opens the IP Command Learn dialog.
Note: Before attempting remote control of Cues in this way check the Controller Set-tings in Settings > Application Settings > Controller Units > IP.
MIDI Command Learn dialog
REMOTE CONTROL: IP Command section - Cue Properties Pane

Properties Panes : Cue Properties Page 108
REMOTE CONTROL: Multi-Sequencer Synchronization
Synchronization Mode Click in the field for the choice of Master, Slave or Off.
Synchronization Token Ovation generates the Synchronization Token automatically from the Cue Name and CueList Nam,e, Master and Slave Tokens MUST match. (case sensitive).
Note: If for some reason automatic Token generation is unsuitable. E.g. because the Cue on the Master Ovation is named Bach and the Cue on the Slave is named Bach back then a Token value may be typed in the field. (The same Token Value MUST be used on Master and Slave Ovations.
Resynchronize Drifts/Jumps Determines whether or not re-synchronization will take place when a sync drift or jump is detected. The drop-down list offer the choice of Yes or No.
Synchronize Pause Click in the field for the choice of Yes or No. When set to Yes if the Master Cue is Paused the Slave Cue also Pauses.
Synchronize Stop Click in the field for the choice of Yes or No. When set to Yes if the Master Cue is Stopped the Slave Cue also Stops.
Note: Before attempting to synchronize Cues in this way an IP connection must be established between the Master and Slave machines in Settings > Application Settings > General > TCP/IP Connections and Multi-Sequencer Synchronization must be switched on and configured as Master or Slave in Show Properties.
Please see: TCP/IP Connections on page 156
REMOTE CONTROL: Multi-Sequencer Synchronization section - Cue Properties Pane

Properties Panes : Cue Properties Page 109
REMOTE CONTROL: Dataton Synchronization
Synchronization IP Port Click in the field to drop-down a list of available ports. The Port selected MUST be the port associated with the target machine running the Dataton video player.
Synchronization Token The name typed here determines which Dataton Timeline. is linked to the Cue.
Note: If for some reason automatic Token generation is unsuitable. E.g. because the Cue on the Master Ovation is named Score and the Timeline on the remote Dataton is named Movie then a Token value may be typed in the field. (The Token Value MUST match the name of the Dataton Timeline you wish to synchronize.)
Resynchronize Drifts/Jumps Determines whether or not re-synchronization will take place when a sync drift or jump is detected. The drop-down list offer the choice of Yes or No.
Synchronize Pause Click in the field for the choice of Yes or No. When set to Yes if the Master Cue is Paused the Slave Dataton Timeline also Pauses.
Synchronize Stop Click in the field for the choice of Yes or No. When set to Yes if the Master Cue is Stopped the Slave Dataton also Stops.
Note: Before attempting to synchronize Cues in this way an IP connection must be established between the Master Ovation and Slave Dataton machines in Settings > Application Settings > General > TCP/IP Connections.
Please see: TCP/IP Connections on page 156
REMOTE CONTROL: Dataton Synchronization section - Cue Properties Pane

Properties Panes : Interaction Rules Page 110
Interaction Rules
OverviewInteraction Rules are one of the most powerful features of Ovation.
Interaction rules affect what happens to other Cues and Cue Lists when a Cue is Fired or Stopped. All selected Rules apply together so it is possible to arrive at a situation where nothing will play at all!
Rules set in Show Properties are global. I.e. they apply to every Cue List and Every Cue unless overridden by Rules set in Cue List Properties or Cue Properties.
Rules set in Cue List Properties apply to all Cues in the Cue List unless they are overridden by Rules set in Cue Properties.
Rules include an optional offset
Rules can be conditional. A rule can be triggered based on the state of another Cue (Fired, Paused or
Stopped).
A Cue can fire itself through a Rule. This is how to make a Cue Loop.
When an Interaction Rule points to a Cue List as Target, then:
• If the Cue List is a Timed Cue List, then the Cue List Time is Started, Paused or Stopped (equivalent to the Cue List Start, Pause or Stop buttons).
• If the Cue List is NOT a Timed Cue List then the FIRST Cue in the list is Fired, or ALL Cues are Paused, Stopped or Dimmed.
Adding RulesThere are several ways of adding rules. You can use Cue > Add rule or the right-click context menu to add simple rules to a Cue directly. For more complex compound interactive rules the Interaction Rules dialog is used.
Adding Simple RulesSelect a Cue and either go to Cue > Add Rule or right-click on a Cue and go to Add > Rule in the context menu.
The list of available Rules is the same whichever method you choose:
Fire Next Cue when Ending
Fire Next Cue when Stopping
Fire All Child Cues when Stopping
Stop Previous Cue when Starting
Stop All Cues in Cue List when Starting
Loop (Fires Itself when Ending)
Loop between Markers (Fire Itself between Markers)
Dim All Cues when Starting
Select Next Cue when Starting
Note: Choosing Loop between Markers creates two new Markers one at the beginning and end of the Cue. The Markers can be moved subsequently.

Properties Panes : Interaction Rules Page 111
Opening the Interaction Rules Dialog Clicking in an Interaction Rules field in a Properties pane and clicking on the ... button opens the Interaction Rules dialog. When rules are already set double-clicking on the icon(s) in the Cue in the Cue List also opens the dialog.
The dialog enables Interaction Rules to be Added, Modified or Removed from the active list.
Interaction Rules applied at the Show level affect all Cue Lists and Cues. These are overridden by Rules applied to a List and these in turn are overridden by Rules applied to individual Cues. However, some rules will affect Cues regardless. E.g. If an individual Cue is set to Stop All Cues at Start then all Cues in all Cue Lists playing when it is Fired will Stop. Subsequent Cues in Timed Lists will Fire as expected.
The options available under each of the drop-down lists will vary depending on the choices already made and other rules in force.
Adding a RuleMake choices using the drop-down lists and click on Add Rule >>
Removing a RuleClick on the Rule you wish to remove in the list to highlight it and click on Remove Rule <<
Update a RuleClick on the Rule you wish to update in the list to highlight it. Its parameters will be reflected in the controls. Change parameters as required and click on Update Rule VV to accept the changes.
Change Order of RulesClick on the Rule you wish to re-order and click on the Move Rule Up or Move Rule Down buttons to change the Rule order.
Rules FormInteraction Rules take the form:
Stop / Pause / Dim / Fire/ Select the:
Interaction Rules Dialog

Properties Panes : Interaction Rules Page 112
Next Cue
Next Sibling Cue
Previous Cue
Previous Sibling Cue
a Specific Cue or Group of Cues
Cue List or
Itself
When or After the selected Cue(s)
Starting
Ending or
Stopping
with a
Fade In
Fade Out and/or
Dim Gain applied if required and as determined by the other choices.
If After is selected then the ms box becomes active. Enter a value here to delay the rule’s action after the trigger-ing event has occurred.
For Stop the dialog presents Starting as the default choice.
For Fire the dialog presents Ending as the default choice.
For Pause and Dim the Start / Stop choice is grayed out since the only logical use is to Pause or Dim another Cue or Cues whilst the current one is playing.
Sibling means a Cue on the same level. Thus using e.g. Next Sibling bypasses any Child Cues.
Note: Rules which act when a Cue is started occur at the Start time. Rules which act when a Cue Ends or Stops occur at he START of the Fade out. This produces a cross-fade. If you require a fade out but do not want the next action to occur until the End of the Cue then simply use the After rule with an delay equivalent to the fade out length.
at MarkerOnly valid when first action is set to Fire. If the Cue has a Marker or Markers set then the Cue will be be Fired at the Marker number in the at Marker field.
LoopsTo produce a loop simply use the form, Fire : Itself : When : Ending. More complex loops within a Cue can be achieved using Markers. Please see: Markers Interaction Rules on page 86
Cue List TargetWhen an Interaction Rules points to a Cue List as Target, then:
• If the Cue List is a Timed Cue List, then the Cue List Time is Started, Paused or Stopped (equivalent to the Cue List Start, Pause or Stop buttons).
• If the Cue List is NOT a Timed Cue List then the FIRST Cue in the list is Fired, or ALL Cues are Paused, Stopped or Dimmed.
Conditional RulesIf the Only if box is checked then a further layer of control comes into play. A rule set up using the controls described above will only apply when the conditions are met. I.e when the item chosen in the drop down list from a choice of Next Cue, Previous Cue a Specific Cue or Group of Cues or a Timed Cue List - is either Fired, Paused or Stopped as selected via the radio buttons.
Interaction Rules is an extremely powerful tool and experimentation is strongly encouraged!

Properties Panes : Interaction Rules Page 113
Rules IconsWhen Interaction Rules are applied an Icon or Icons is/are shown in the Cue in the Cue List.
When present there is a Rule or Rules applied in Cue Properties.
When present there is a Rule or Rules applied in Cue List Properties
When present there is a Rule or Rules applied in Show Properties
When present there is a Rule or Rules applied to a Marker in the Cue
Double clicking the Cue Properties, Cue List or Show Icons opens the Interaction Rules dialog.

Show ValidationTool : Show Validator Page 114
Show ValidationTool
Show Validator
The Show Validation Tool is available via Show > Show Validator.
It enables the following aspects of the Show to be validated:
• Interaction Rules validity. For instance, Rules pointing to a non existing Cue or Cue List.
• Offline Clips Players
• Invalid Audio Output Slots
More checks will be added in subsequent versions.
Note: Double-clicking on reported errors in the Validation Tool pane selects the incrimi-nated Cue or Cue List.
Show Validator pane

Show Consolidation and Packaging : The Consolidation Process Page 115
Show Consolidation and Packaging
Show Consolidation collects all Audio, MIDI and other files associated with and referenced by a Show and copies them to the Audio Files folder in the same location as the Show file. The Show file is modified to point to the new file locations of the copied files. The Show remains active in the Ovation Sequencer for further editing.
Show Packaging collects all Audio, MIDI and other files associated with and referenced by a Show and copies them to a new Audio Files folder created automatically in the packing location selected along with copy of the Show file. At the end of the process the option of Show Validation is offered to verify that all is well with the pack-aged version. The resultant packaged Show file is modified to point to the new file locations of the copied files.
The original Show is not affected by the process and, when Consolidation is complete the original Show remains active in the Ovation Sequencer.
The Consolidation Process
To initiate the Packaging Process choose Show > Consolidate Show to open the Consolidate Show dialog :
The options are self explanatory.
If you are happy to continue click on Yes to initiate the process.
Consolidate Show Dialog
Consolidating Cues Dialog

Show Consolidation and Packaging : The Packaging Process Page 116
The process begins and the Consolidating Cues... dialog appears. Click on Cancel to abort the process otherwise an info box appears when the process is complete.
The Packaging Process
To initiate the Packaging Process choose Show > Package Show to open the Package Show dialog :
The options are self explanatory.
Consolidate Cues Info Box
Package Show Dialog

Show Consolidation and Packaging : The Packaging Process Page 117
If you are happy to continue click on Yes to continue the process by opening the Package Show Browse For Folder dialog.
Navigate to a suitable existing folder or to a suitable location to create a new one. When you have opened the des-tination folder (or created it) click on OK to initiate the process.
A dialog will show details of progress:
Package Show Browser
Package Show Progress Dialog

Show Consolidation and Packaging : The Packaging Process Page 118
And a further dialog will show progress of copying individual files.
When the process completes you will be invited to validate the new Show :
We suggest you accept the option. The result will be displayed at the end of the process.
Recursive PackagingThe Packaging process can be incremental. I.e. the process can be called many times one after another and only newly referenced files will be copied to the Packaged location.
Backup/ArchiveThe Package Show function offers a simple method of backing-up/archiving a Show to a different location.
Copying Files Dialog
Package Show Validation Dialog

Audio Control : Audio Control Pane Page 119
Audio Control
Audio Control Pane
The Audio Control pane is accessed from the Show Toolbar, the Show menu or the View menu. It controls atten-uation of the right-most Bus fader from the 0dB position on the Ovation Mixer. It is only active when it is open and a Show is running or a Cue is being Auditioned.
Controls are chunky to facilitate Touch Screen operation.
The top Slider button increases level in 2dB per click increments from -146dB to -40dB and 1dB increments from -40dB to a maximum of 0dB.
The slider can be clicked and dragged. The degree of attenuation is shown numerically on the Slider knob. Double-clicking the knob restores the default, 0dB value.
The bottom Slider button decreases level in 1dB per click increments down to -40dB and 2dB per click increments down to -146dB
The bottom button MUTEs the Ovation mixer Main Output.
The Audio Control pane retains its current settings when closed and opened (and from load / unload of the application) however, the output is only updated with its values when the
Audio Control pane is open.

Audio Control : Cue Gain Page 120
Cue Gain
Cue Gain ControlCue Gain sets the overall Cue Level in real time.
The Cue Gain dialog is accessed from the Cue List Edit Toolbar, Change Cue Gain in the Cue menu and in the right-click Cue context menu.
The box shows the amount of boost or cut applied in dB. You can click in the box and type a numeric value.
The Slider can be clicked and dragged to set the Cue Gain
Click OK to accept changes and exit the dialog
Click Cancel to reject changes and exit the dialog
Changes made in the Cue Gain dialog are reflected in the Cue Properties pane.
Note: When a Clip is published to Ovation from Pyramix any Gain adjustments made with the Cue Gain Control are applied in addition to gain adjustments applied to the Clip in Pyramix.
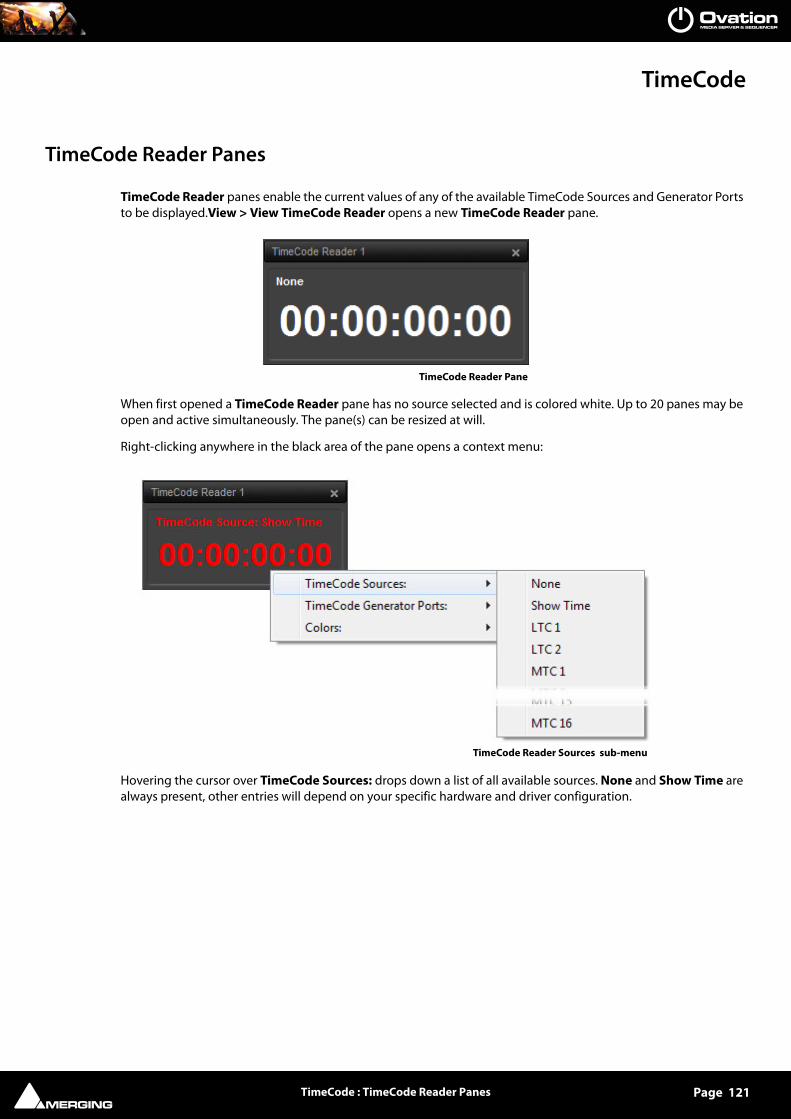
TimeCode : TimeCode Reader Panes Page 121
TimeCode
TimeCode Reader Panes
TimeCode Reader panes enable the current values of any of the available TimeCode Sources and Generator Ports to be displayed.View > View TimeCode Reader opens a new TimeCode Reader pane.
When first opened a TimeCode Reader pane has no source selected and is colored white. Up to 20 panes may be open and active simultaneously. The pane(s) can be resized at will.
Right-clicking anywhere in the black area of the pane opens a context menu:
Hovering the cursor over TimeCode Sources: drops down a list of all available sources. None and Show Time are always present, other entries will depend on your specific hardware and driver configuration.
TimeCode Reader Pane
TimeCode Reader Sources sub-menu

TimeCode : TimeCode Reader Panes Page 122
Hovering the cursor over TimeCode Generator Ports: drops down a list of all available outputs:
None is always present other entries will depend on your specific hardware and driver configuration.
Hoevering over the third entry Colors: drops down a color picker:
TimeCode Reader Generator Ports sub-menu
TimeCode Reader Colors sub-menu

Audio Output Slots : What is an Audio Output Slot? Page 123
Audio Output Slots
What is an Audio Output Slot?
Audio Output Slots are set in Cue Properties for individual Cues. An Audio Output Slot is nothing more than the audio channel count across the mixer from left to right. So, Strip one, Channel one is also Slot one. But Strip four Channel one could be one of several things depending on what type of Strips the mixer uses. In a mixer using all Mono Strips, Strip four Channel One is Slot four but in a mixer with all Stereo Strips it will be Slot eight. In a mixer using 5.1 GPS Strips Strip four Channel one will be Slot 19 and so on.
Multi-channel CuesMulti-channel Cues are handled transparently with the channels present in the Cue mapped in ascending order from the Audio Slot Output specified in Cue Properties.
Audio Output Slots and Cue ListsThe Audio Output Slot can be set for an entire Cue list in the Audio Output Slot field in the Audio section of the Cue List Properties pane. The default is <Use Cue Slot> and in this case Cues will be played via the Audio Output Slots set in the Cue Properties pane.
Note: If a setting other than <Use Cue Slot> is used then this takes precedence over the Audio Output Settings in the Cue Properties pane.

Audio Output Slots : Audio Gain Matrix Page 124
Audio Gain Matrix
By default the Audio Gain Matrix for each Cue is Off. Under these conditions an Audio Cue will be played via the Mixer strip(s) determined by the Audio Output Slot settings. However, the Audio Gain Matrix is a very powerful tool when dealing with Cues. For example, it can correct incorrect channel order, imbalances or level discrepencies or, for example, downmix a 5.1 Cue for stereo playout.
The Audio Gain Matrix pane can be accessed by clicking in the Audio Gain Matrix field in the Audio section of the Cue Properties pane or by selecting Show > View Audio Gain Matrix.
The Audio Gain Matrix pane shows the selected Cue List and selected Cue it will affect.
Output SlotThe Output Slot drop-down list functions in exactly the same way as the field in the Cue Properties pane and any changes made here will be reflected in Cue Properties.
Cue GainThe Cue Gain pot determines the overall gain of the Cue across all channels whether the Matrix is active or not. Any change to the value made with this control is reflected in the Audio Gain field in the Cue Properties pane.
As with the other rotary controls here and in the mixer a value can also be entered by clicking in the numeric box and typing.
Matrix SizeThis value determines the number of Outputs from the Matrix and the number of vertical Output columns in the dialog. Matrix Size can be set to Off (as in the above screenshot) or to any sensible value. When the Matrix is Off the number of outputs is determined by the number of channels in the Cue. Off and 1-16 are available in the drop-down list. Type larger values manually, followed by Enter. These outputs are patched to the Ovation mixer slots in ascending order from the Slot Number set as the Output Slot.
Audio Gain Matrix pane - Matrix Off

Audio Output Slots : Audio Gain Matrix Page 125
InputsThe number of Matrix Inputs and therefore the number of horizontal Input rows in the dialog is determined by the number of channels in the Cue.
Using both the Output Slot and the Matrix Size number enables you to focus first on an area of the mixer (Output Slot) and then determine how many strips in that area you wish to distribute the audio channels present in the Cue to.
For example, if you wish to mix a Cue into Strips 30,31,32,33,34 and 35 you would select Output Slot 30 and set the Matrix Size to 6:
By default only the same number of Output channels will be active as the number of input channels. The rotary controls set the overall Cue Gain and the individual gains for each of the channels present in the Cue.
The Output rotary controls set the overall level for each Output channel and the contribution per Output from each Input channel. Double-clicking a rotary control Mutes / deMutes.
Audio Gain Matrix pane - 2 In 6 out

Audio Output Slots : Audio Gain Matrix Page 126
DownmixingEqually, the Audio Gain Matrix can be used to mix down a multi-channel Cue to Stereo or Mono:
Linking Parameters in the Audio Gain Matrix:To make relative moves of several gains simultaneously, groups can be created.
Create a Gain Control GroupPress and hold SHIFT
• Click on individual gain controls to add them to a group.
• Click on members of a group to remove them from it.
• Click on an Output Gain knob to add the whole Matrix column to the group.
• Click on RESET to reset all the links (remove all from the group)
Audio Gain Matrix pane - 6 In 2 out

Audio Output Slots : Audio Gain Matrix Page 127
Independent Control of a Group Member• Press and hold CTRL
• Manipulate a gain knob which is assigned to a group, without moving the rest of the group.
Note: Links are preserved when you click away from the Cue. Links are saved with the show, thus links are retained when you close and open the show.
Set Audio Gain Matrix For Multiple CuesAudio Gain Matrix parameters can be set for multiple Cues or an entire Cue List in one operation. It only makes sense to do this if the Cues are in the same format.
• Select all the Cues in the Cue List
• Open the Audio Gain Matrix pane with Show > View Audio Gain Matrix.
• Make the settings required.
The new settings will be applied to all the selected Cues.

Ovation Files : File Types Page 128
Ovation Files
File Types
Ovation files store Shows including Cue Lists and have an .ovs file extension.
Cue Lists can also be saved and loaded independently and have an .ovl file extension.
Settings are stored with a .pms file extension.
OVPlayer Sessions are stored with an .ovp file extension.
OVController Sessions are stored with an .ovc file extension

Ovation Menus : Show Page 129
Ovation Menus
Show
New Show Opens a new, Untitled Ovation Show
Open Show Opens the Open Windows File Browser to enable an existing Show to be loaded
Save Show Saves the current Show. If this is Untitled, opens the Save As file browser
Save Show As... Opens the Save As file browser
Save Show As Template Saves the current Show as a Template fro future shows
Save Special Enables Show to be saved in Ovation 3.x format for mixer compatibility
Close Show Closes all open Cue Lists and the Show
Recent Shows > Drops down a list of recently opened Shows
Init Show Initialize Show
Start Show Start Show
Pause Show Pause Show
Stop Show Stop Show
Ovation Show Menu

Ovation Menus : Cue List Page 130
Consolidate Show Opens the Consolidate Show dialog. Please see: Show Consolidation and Packaging on page 115
Package Show
View Show Properties... Opens the Show Properties Tab Pane
View Show Validator... Opens the Show Validator Tab Pane
View Show Log Opens the Log Tab Pane
View Show Control Toolbar Toggles the Main Window Show Control Toolbar
View Audition Toolbar Toggles the Main Window Audition Toolbar
View Active Cue Window Toggles the Active Cue Window
View Audio Gain Matrix Toggles the Audio Gain Matrix Window
View Audio Control Window Toggles the Audio Control Window
Exit Quits the Ovation application
Cue List
New Cue List Drops Down the List of Cue Lists
Standard Cue List Opens a new, Untitled, Standard Cue List
Timed Cue List Opens a new, Untitled, Timed Cue List
Hot Keys Opens a new, Untitled, Hot Keys Cue List
Custom Keys List Opens a new, Untitled, Custom Keys Cue List
Cue Browser Opens a new, Untitled, Cue Browser Cue List
Hot Browser Opens a new, Untitled, Hot Browser Cue List
Open Cue List Opens the Open Windows File Browser to enable an existing Cue List to be loaded
Ovation Cue List Menu

Ovation Menus : Cue List Page 131
Save Cue List As Saves the currently selected Cue List. If this is Untitled, opens the Save As file browser
Close... Opens the Close Cue List dialog
Note: If a Cue List is Closed without saving it separately it will be lost.
Fire & Start Acts on Timed Lists when selected. Fires the Selected Cue and starts the Cue List Counter running from the Go Time of the Cue. Selects and Readies next Cue for Fir-ing.
Start Acts on Timed Lists when selected. Starts the Timed List from zero.
Pause Pauses the Timed List. List will restart from the point at which it was Paused.
Stop/Reset Stops the Timed List. List is reset to the beginning and made ready for Firing.
Chase When a Timed List is Selected engages/disengages Chase Mode
Toggle/Select
Cue List (Tab) Steps the selection through all open Cue Lists in ascending numerical order.
Toggle Select
Hot Key list (Ctrl+Tab)Toggles the selected Cue List between the available Hot Key lists. (Note: Hot Key Display is only visible when the Show is Initialized)
View Cue List Properties... Opens or selects the Cue List Properties pane for the currently selected Cue List
View Fire Toolbar Toggles the Fire Toolbar Shown / Hidden
View Edit Toolbar Toggles the Edit Toolbar Shown / Hidden
Hot/Custom Keys Only available when a Custom Keys list is selected
Hot/Custom Keys Design Mode When ticked the selected Hot/Custom Keys pane is shown in Design Mode
Snap all Keys on Grid Snaps all the Keys into alignment with the current Grid
Reset all Keys Position Resets all Keys to their original positions
Reset all Keys Size and Position As it says.
Cue List Menu > Custom Keys sub-menu

Ovation Menus : Cue Page 132
Cue
Undo (last undoable action)
Cut Ctrl+X
Copy Ctrl+C
Paste Ctrl+V
Add Cue Opens the Add sub-menu
Add Short Empty Cue Adds a 1 second duration new empty Cue below the Cue currently high-lighted. If none, then adds a new empty Cue at the bottom of the list.
Add Short Empty Cue Adds a 24 hour new empty Cue below the Cue currently highlighted. If none, then adds a new empty Cue at the bottom of the list.
Note: Empty Cues are typically used to trigger something immediately or in conditional rules. If intermediate lengths are required this is easily accomplished by modifying the Cue Length in Cue Properties.
Load MTInterchange XML
Load Audio File Opens a Browser to search for and Add Cues
Ovation Cue Menu

Ovation Menus : Cue Page 133
Import CD Tracks Opens the Import CD dialog. Please see: CD Tracks Import on page 46
Record Audio as New Cue Opens the Record Audio dialog. Please see: Recording on page 57
Load MIDI File Opens a Browser to search for and Add a MIDI File Cue
Remove Removes the selected Cue from the Cue List
Edit in Pyramix Opens the Pyramix editor for editing the selected Cue
Record Audio Opens the Record Audio dialog to record audio into a new Cue. Please see: Recording on page 57
Replace Audio Media Opens a Browser to search for and replace a Cue’s existing Audio Media File.
Snapshot Automation Opens the Filter Mixer Controls to Snapshot dialog.
Paste Automation Pastes the Automation Snapshot from the Cue copied last to the Cue selected cur-rently. Please see: Snapshot Automation on page 51
Change Audio Gain Opens the Cue Gain fader window
Edit Rules Opens the Cue Interaction Rules dialog
Add Rule > Drops down a list of Rules which can be applied to the Cue directly
Fire Next Cue when Ending
Fire Next Cue when Stopping
Fire All Child Cues when Starting
Stop Previous Cue when Starting
Loop (Fire Itself when Ending
Loop between Markers (Fire Itself between Markers
Dim All Cues when Starting
Select Next Cue when Starting
Audition/PFL Plays the selected Cue through the selected Output Slot
Audition > Drops down a list of available Audition commands:
Start
Rewind
Stop
Play/Pause
Fast-Forward
End
Jump Forward 1
Jump Forward 2
Jump Forward 3
Jump Back 1
Jump Back 2
Jump Back 3
Pin/Unpin to Active Cue Window Toggles the Cue selected currently Pinned or Unpinned to the Active Cue Win-dow
Lock in Active Cue Window Puts the selected Cue into the Active Cue Window when Lock mode is active. Grayed out when Lock mode is not active in Active Cue Window

Ovation Menus : Fire Page 134
Move Down Down Moves the selected Cue Down one position in the Cue List
Move Up Up Moves the selected Cue Up one position in the Cue List
Nest Right Makes the Selected Cue a Child-Cue of the one above.
Unnest Left Brings a Child-Cue Up one level (becomes a Cue if only one level deep)
Edit Cue Rules Opens the Cue Interaction Rules dialog
Edit Audio Gain Opens the Cue Gain fader window
Link Offsets/StartTimes Links all Audio, TCGen, MMC and 9-pin (Sony P2) Offsets and Start Times in a Cue with these properties. The button toggles on/off and it’s state is not saved when a different Cue is Active. When enabled all related fields in the Cue Properties pane turn red for clarity.
View Cue Properties Toggles the Cue Properties Pane Open/Closed
Fire
Fire Sequenced Cue !
Enter With the Show running Fires the currently selected Cue in the currently selected Cue List and moves the Selection to the next Cue
Previous Scene LEFT Moves the selection to the Previous Scene (Child-Cue or Cue) in the cur-rently selected Cue List
Next Scene RIGHT Moves the selection to the Next Scene (Child-Cue or Cue) in the currently selected Cue List
Previous Cue UP Moves the selection to the Previous Cue in the currently selected Cue List
Next Cue DOWNMoves the selection to the Next Cue in the currently selected Cue List
Fire Cue Plays selected Cue
Pause Cue Pauses selected Cue
Stop Cue Stops selected Cue
Stop All Cues Stops all Playing Cues. (Typically used as Emergency Stop)
Ovation Fire Menu

Ovation Menus : View Page 135
View
View Show Properties Toggle Show Properties show/hide
View Show Validator Toggle Show Validator show/hide
View Show Log Toggle Show Log show/hide
View Show Control Toolbar Toggle Show Control Toolbar show/hide
View Cue List Properties Toggle Cue List Properties show/hide
View Fire Toolbar Toggle Cue List Fire Toolbar show/hide (Show Mode)
View Edit Toolbar Toggle Cue List Edit Toolbar show/hide (Compose Mode)
View Cue Properties Toggle Cue Properties show/hide
Properties Font Size The sub-menu offers the choice of:
Small
Medium
Large
Font sizes for the Properties panes.
View TimeCode Reader Opens a TimeCode Reader window. Up to 20 may be opened
View Audition Toolbar Toggle Audition Toolbar show/hide (in main Ovation Window)
View Active Cue Window Toggle Active Cue window show/hide
View Audio Gain Matrix Toggle Audio Gain Matrix window show/hide
View Audio Control Toggle Audio Control window show/hide
Ovation View Menu

Ovation Menus : Settings Page 136
View Mixer Toggle Mixer show/hide
View I/O Status Toggle I/O Status window show/hide
View Input Check
View Touch Controller Toggle Touch Controller show/hide
Settings
Settings Opens the Main Ovation application Settings window.
Keyboard Shortcuts Opens the Keyboard Shortcuts dialog.
Help
User Manual Opens this User Guide.
About Ovation Opens the About Ovation window.
Ovation Settings Menu
Ovation Help Menu

Settings : Help Page 137
Settings
Note: When the Show is running or a Cue is Auditioning if the Settings Window is opened many Settings pages will not be shown.
OverviewMany settings are made in the Cue Properties, Cue List Properties and Show Properties panes from within the active Show. However, there are many other settings which are kept separate and are accessed from the Settings menu.
The Keyboard Shortcut Editor, is accessed directly from the Settings menu.
The main Settings dialog window is also accessed directly from the Settings menu. Folders and sub-folders are used to group settings logically. The left-hand side of the window shows all available settings. Folders can be col-lapsed or expanded by clicking on the folder icons. By default, all folders are open, displaying the Settings Pages they contain by name. Clicking on a Settings Page in the left-hand pane opens it in the right-hand side of the win-dow for viewing and editing. Information about pages not described here can be found in the Pyramix User Manual.
There are two main groups of settings.
Shown here with all sub-folders collapsed.
• Show Settings are specific to and saved with each Show.
• Application Settings are global and apply to all Shows.
Note: There is one exception to this rule.In the Application Settings > General > Audition page all the settings are global EXCEPT the Audition Cues Output Slot. This is saved with the Show so that Templates can have a PFL bus.
Ovation Settings dialog

Settings : Settings Buttons Page 138
Settings Buttons
Apply changes to ...Below the Settings folders tree view the first large button’s function and label changes to reflect the currently open settings page (if any). Apply changes to ... does as it says without saving the changes to a Settings file. Set-tings can be saved selectively or in their entirety for future use.
Load Load opens a Browser window to enable settings Profile (*.pms) files to be located. When the required file has been located clicking on the Open button loads the file.
SaveTo save all settings, Click on the: Save button to open a Save As browser window. If necessary, navigate to a suit-able location for the file. Type a suitable name in the File name: box and click the Save button to save the file and close the browser window.
OKSaves any changes made to settings and exits the Settings window.
CancelCancels any changes made to settings and exits the Settings window.

Settings : Show Settings Page 139
Show Settings
General
Formats & Sync
Show Settings > General > Formats & Sync

Settings : Show Settings Page 140
PresetThis section allows the user to Save and ReLoad or Delete Presets of all the parameters in this page. A variety of common scenarios are covered in the supplied Presets:
InformationEffective Sampling Rate Displays the sampling rate including the effect of any pull-up or down or Varisp-
eed settings.
Effective TC Frame Rate Displays the TC Frame Rate including the effect of any pull-up or down or Varisp-eed settings.
Effective Video Frame Rate Displays the Video Frame including the effect of any pull-up or down or Varispeed settings.
Sampling Rate Displays the rate set when the project was created or the default Mixer preset loaded. This can be changed from the Sampling Rate drop-down list.
Note: Sampling rate can only be set when a Show is NOT running. If you have been auditioning Cues the same applies. Please Init and Stop the Show to access.
WarningsDisplays any caveats about the selected rates.
FrequenciesSampling Rate The drop-down list presents a choice of all available nominal sampling rates.
TC Frame Rate The drop-down list presents a choice of all available TC Frame Rates
Drop Only available for NTSC Frame Rates I.e. 29.97fps and 30fps. When checked drop frame counting is applied.
Audio SynchronizationMaster Sync In a Multi-board system choose the board which will be the sync master from the
drop-down list.
Source This determines the sample clock source for the whole Pyramix system. If an exter-nal source is selected and no valid signal is detected, the system reverts to Internal until the external signal is restored. The following choices are available:
Internal Selects the board’s internal oscillator as Clock Master.
Show Settings Hardware Formats & Sync Preset List

Settings : Show Settings Page 141
Video Selects an external video input as the reference. The card derives word clock from the video sync rate. A valid video signal must be connected to the Mykerinos board chosen as the Video / TC master in the VS3 control panel.
Word Clock Selects an external word clock source as the reference. The word clock must be connected to the Mykerinos board chosen as video / TC master in the VS3 control panel. This option is grayed out if there is no valid source con-nected.
Audio Input Select this option if you want Pyramix to derive it’s clock from an external audio source connected to any of the daughtercard(s) present. The correct audio input must also be selected. LTC
Note: In special situations this option enables word clock to be derived from Linear TimeCode
WordClock is Output at XXk*2 For sample rates above 48kHz WordClock is normally output at the standard fundamental rate. E.g. if 128KHz is selected then WordClock is out-put at 32kHz unless the box is ticked, in which case the WordClock output rate is doubled to 64kHz.
Video/TimeCode Synchronization Video Format The drop-down list presents all available Video Formats.
TC Reference The drop-down list presents all valid TimeCode reference sources.
VarispeedAllows either choice of either a pull-up / pull-down sampling rate or of running Pyramix in Varispeed mode by adapting the sampling rate.
Important! Typical digital to analog or analog to digital converters (such as Merging Technologies Sphynx or DUAII do not operate beyond +/- 0.15 ‰ (150 ppm) and therefore will mute in any Varispeed mode. It is suggested that the Mykerinos digital I/O’s are routed through external real-time sampling rate conversion circuitry or to that adequate external converters with built-in pull-up or pull-down support are used.
Note: Note: Locking to external NTSC video reference is limited to nominal and pull-down sampling rates.
Nominal ‘Normal’ mode. Uses the nominal sampling rate as set in the Sampling Rate pull-down menu.
Pull-Down Decreases the sampling rate by 0.1%. Most often used in audio post production for compatibility reasons between NTSC frame rates of 30 fps and 29.97 fps.
Pull-Up Increases the sampling rate by 0.1%. Most often used in audio post production for compatibility reasons between NTSC frame rates of 30 fps and 29.97 fps.
Varispeed The speed of audio playback can be varied within the range of -12.5% to +12.5%. Select this option, then enter the required speed change in tenths of percents into the adjacent entry field. Values entered outside of the allowed range will be lim-ited to the extent of the allowed range. E.g. if 1500 is entered, the value will be set to 1125.
MassCore™ [dedicated mode]Please see the Pyramix User Manual for details.
I/O InterfacesThe page(s) shown here depend on the options included with your individual system. Please see the Pyramix User Manual for details.
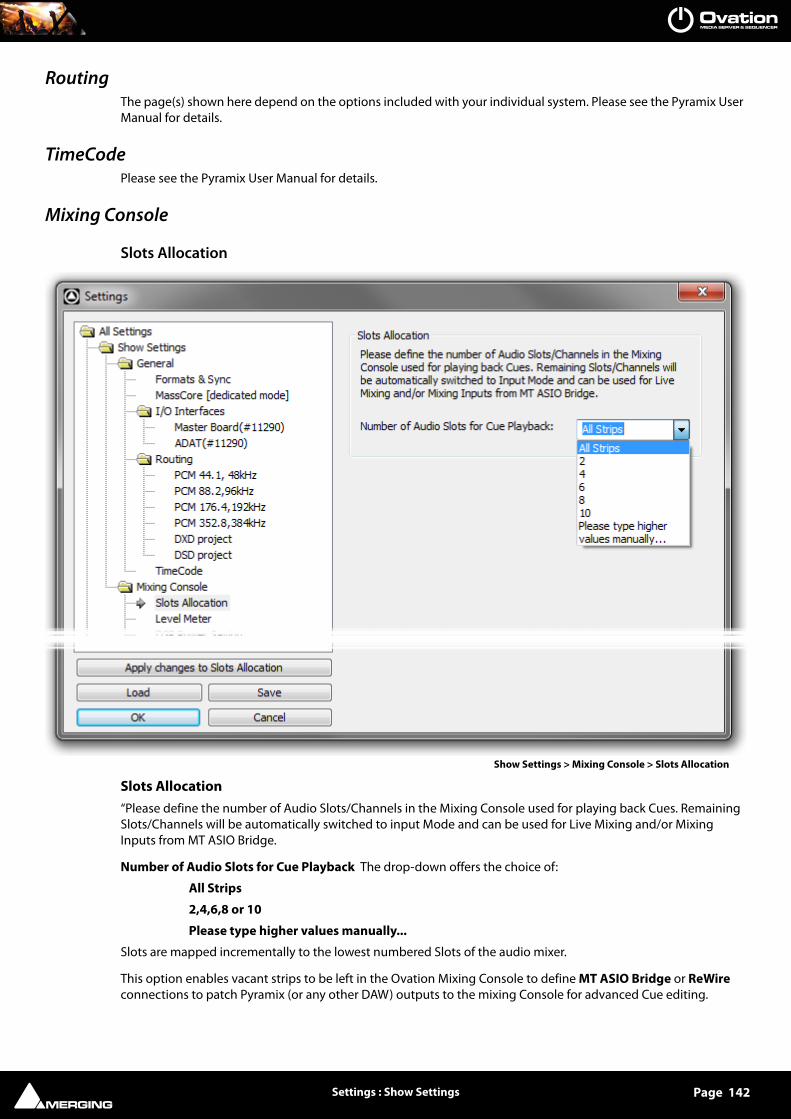
Settings : Show Settings Page 142
RoutingThe page(s) shown here depend on the options included with your individual system. Please see the Pyramix User Manual for details.
TimeCodePlease see the Pyramix User Manual for details.
Mixing Console
Slots Allocation
Slots Allocation“Please define the number of Audio Slots/Channels in the Mixing Console used for playing back Cues. Remaining Slots/Channels will be automatically switched to input Mode and can be used for Live Mixing and/or Mixing Inputs from MT ASIO Bridge.
Number of Audio Slots for Cue Playback The drop-down offers the choice of:
All Strips
2,4,6,8 or 10
Please type higher values manually...
Slots are mapped incrementally to the lowest numbered Slots of the audio mixer.
This option enables vacant strips to be left in the Ovation Mixing Console to define MT ASIO Bridge or ReWire connections to patch Pyramix (or any other DAW) outputs to the mixing Console for advanced Cue editing.
Show Settings > Mixing Console > Slots Allocation
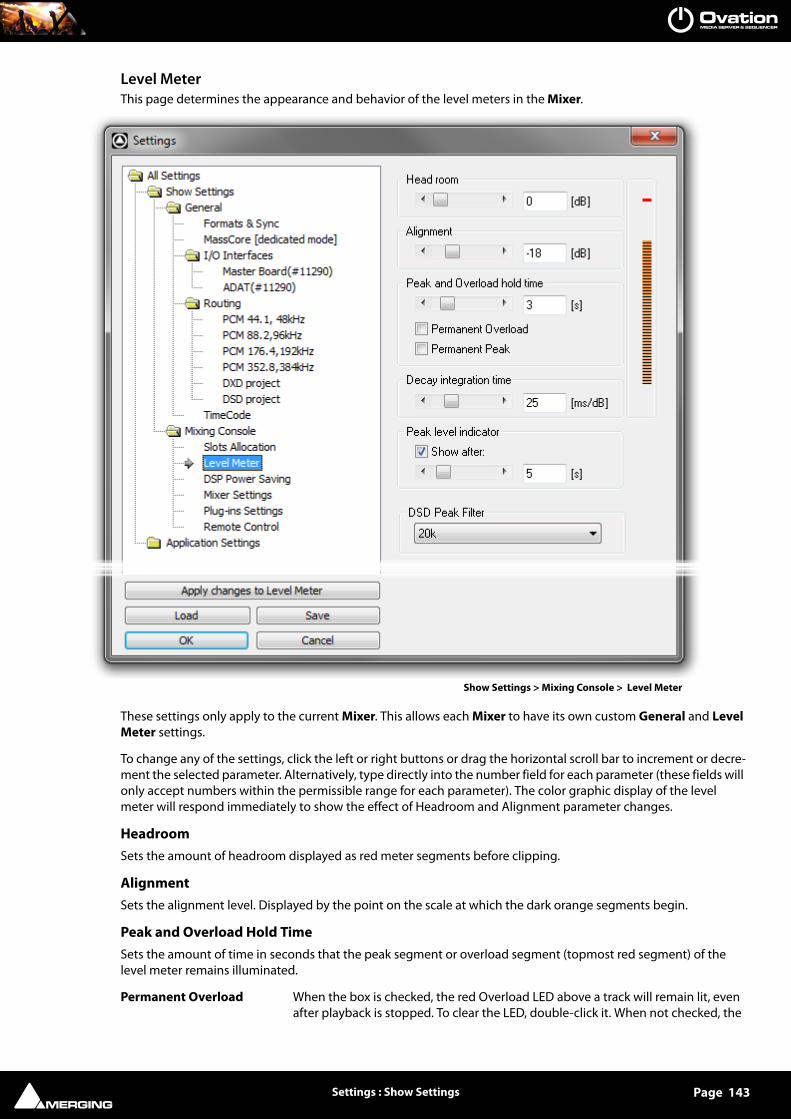
Settings : Show Settings Page 143
Level MeterThis page determines the appearance and behavior of the level meters in the Mixer.
These settings only apply to the current Mixer. This allows each Mixer to have its own custom General and Level Meter settings.
To change any of the settings, click the left or right buttons or drag the horizontal scroll bar to increment or decre-ment the selected parameter. Alternatively, type directly into the number field for each parameter (these fields will only accept numbers within the permissible range for each parameter). The color graphic display of the level meter will respond immediately to show the effect of Headroom and Alignment parameter changes.
HeadroomSets the amount of headroom displayed as red meter segments before clipping.
AlignmentSets the alignment level. Displayed by the point on the scale at which the dark orange segments begin.
Peak and Overload Hold TimeSets the amount of time in seconds that the peak segment or overload segment (topmost red segment) of the level meter remains illuminated.
Permanent Overload When the box is checked, the red Overload LED above a track will remain lit, even after playback is stopped. To clear the LED, double-click it. When not checked, the
Show Settings > Mixing Console > Level Meter

Settings : Show Settings Page 144
Overload LED will automatically clear itself after a few seconds and remain off until the next overload occurrence.
Note: The overload LED will go on after one sample with the maximum level.
Permanent Peak This parameter works in conjunction with the Peak Level Display. When this is on (checked), the Peak Level pop-up display will show the value and location of the highest level reached on a track up to the time when the mouse was clicked on the meter. The level display will not be updated until the next time playback is stopped and re-started. If it is not on (unchecked), the Peak Level Popup Display will show the highest level reached in that track from the last time the Popup Dis-play is activated (while playback continues). For example, clicking a channel’s meter while playing back will display the Peak Level Popup, which will show the peak level (and its location) reached so far. Click away from the Popup, and it will disappear. Click on that meter again, and the Popup will appear again, this time showing the peak level/location reached since the last time the Popup was dis-played.
Decay integration timeThis parameter sets the rate at which the level meter display decays after the level falls below the most recent peak. The slope of the decay is given in terms of milliseconds per decibel (ms/dB).
Peak level indicatorShow After When the box is checked, the Fader/Input Level displays located above the faders
on each mixer strip display the peak level of the signal running through the corre-sponding mixer strip. The values are updated at the interval set by the slider below the check box. If the check box Show After is off, the Fader/Input Level displays always show the setting of their corresponding fader.
DSD Peak FilterFor DSD projects this drop-down list offers the choice between two filtering options which will be applied to the DSD signal before it is measured by the level meter.
This will help enable you to ensure that the DSD signal is compatible with the AES recommendations concerning the high frequency dither noise content.
20k
Applies a 20 kHz low pass filter to the signal, thus only the audible audio content is measured.
40k-100k
Applies a band pass filter with a frequency range of 40 kHz to 100kHz to the signal. According to the AES recom-mendation the signal level in this frequency range should not exceed -20 dB.

Settings : Show Settings Page 145
DSP Power Saving
Special ModesPlayer/Recorder Mode This mode allows big configurations (such as 48 x 48 channels) to run on a single
board. Player/Recorder Mode is intended for use with an external hardware con-sole. When this mode is activated, the mixer is relegated to the role of signal router, there is no level control, no panning, no plug-ins and no inserts. This option is only available in configurations with multiple mono mix busses.
The Direct Out functionality provides an alternative, more user configurable method of achieving similar DSP sav-ings.
DSP Time SavingDisable Punch In / Punch out When the box is checked, Punch-in and out recording capabilities are disabled.
Important! The software still will allow you to arm tracks and to start the recording process, but the resulting media file will contain digital nulls.
Disable Mix Down When the box is checked, the digital mixdown function activated with the menu command: Project->Mix Down is disabled.
Important! The software still will allow you to start the mixdown process, but the resulting media file will contain digital nulls.
Show Settings > Mixing Console > DSP Power Saving

Settings : Show Settings Page 146
Mixer Settings
Stereo Pan LawThe drop-down menu offers a choice between the default Sin/Cos law, Constant Power, -3dB center and Square Root law, Constant Power, -3dB center.
Note: Existing projects will use the previous default Square Root law unless this setting is changed.
Internal BusesMax Number of Internal Buses available : Select the number of Buses required from the drop-down. (32 - 384)
Show Settings > Mixing Console > Mixer Settings

Settings : Show Settings Page 147
Delay Compensation PolicyMode
The drop-down menu offers a choice between:
Full Delay Compensation
Off
Note: Automatic Delay Compensation does not support more than 5 nested I/O loops.
Automatic Delay Compensation When ticked, turns Automatic Delay Compensation On
Note: Any changes to the delay required that occur during playback or recording will only be computed and applied when the Transport is next in Stop.
Max Mixer Delay Compensation
When required by the Mixer error: Delay compensation dialog the slider should be set to a value just above the delay latency value requested.
Reset to Factory Click the button to restore the factory computed maximum delay value.

Settings : Show Settings Page 148
Plug-ins Settings
VST Plug-insThe buttons offer a choice of how the VST Plug-ins are ordered and grouped in the Plug-ins List Menu.
Company Name and I/O Configuration Sorts the list will be ordered by Company Name and the plug-in’s grouped according to their I/O configuration. I.e. 1 in - 1 out, 1 in - 2 out, 2 in - 2 out and so on.
I/O Configuration Groups the Plug-ins by I/O Configuration and within each group lists them alpha-betically by name.
Show Settings > Mixing Console > Plug-ins Settings

Settings : Show Settings Page 149
Remote Control
Mixing Console Remote ControlEnable When ticked enables the mixer remote protocol(s) selected from the drop-down
list and set up in their respective configuration dialogs.
Properties Opens the configuration dialog for the mixer remote protocol selected in the drop-down list.
OASIS
EMC
RAP
Show Settings > Mixing Console > Remote Control

Settings : Show Settings Page 150
OASIS
Console IP addressSet the Console IP address and Port.
Timeout OptionsShow reconnection message When ticked a message box will be displayed if connection to the console is
lost and re-established.
Timeout [ms] Set the maximum time for connection to be re-established.
Click on OK to save the configuration and close the dialog or Cancel to close the dialog without saving.
EMC
Click on OK to save the configuration and close the dialog or Cancel to close the dialog without saving.
OASIS Transport Configuration dialog
EMC MIDI I/O Configuration dialog

Settings : Show Settings Page 151
RAP (Ross Audio Protocol)
Ovation can be controlled by the Ross Overdrive and Vision products.
Set the Server IP address and Server port in this dialog.
Click on OK to save the configuration and close the dialog or Cancel to close the dialog without saving.
Note: RAP support requires the optional OASIS first class security key. (Included with Ovation Platinum)
RAP - Ross Audio Protocol configuration dialog

Settings : Application Settings Page 152
Application Settings
General
Media Manager
Application Settings > General > Media Manager

Settings : Application Settings Page 153
Preferred Media FoldersClick here to add a path
Click on the ... field to open the Browse For Folder dialog:
This enables new Media Paths to be added to search for Media required to Run by an Ovation Show. For example, it may be desirable to use locally stored Cues rather than run them across a network connection.
Real-time Sampling Rate ConversionToggles between three options:
Disabled No Real-time SRC will take place. Clips will be played back at the original sampling rate. I.e. if sampling rate does not match Project sampling rate then the Clips will be played back at incorrect speed.
Medium Quality Clips will be played back at the correct speed. Conversion, if necessary, will be car-ried out at a compromise quality between speed and quality.
High Quality Clips will be played back at the correct speed. Conversion, if necessary, will be car-ried out at a the highest quality. This obviously requires more resources.
Very High Quality Clips will be played back at the correct speed. Conversion, if necessary, will be car-ried out by the Merging Technologies HeptaCon Sample Rate Converter at a the very highest quality.
Preferred Media Folders Browser

Settings : Application Settings Page 154
Other SettingsCompressed Media SettingsHere you specify where the media should be decompressed to :
Locally (by the original). When active, File(s) will be created in the same location as the original file.
Sub-locally (by the original, in a \MTDXCache sub folder). When active, File(s) will be created in a sub-folder created by Pyramix in the same location as the original file.
Custom (files are generated to the specified location). File(s) will be created in a user specified location. When this option is selected the Browse... button is available to open a file browser win-dow to set the user defined path.
Decompress files... dialog

Settings : Application Settings Page 155
Audition
Cue AuditionThe radio buttons offer a choice of which Player and Audio Output Slot will be used to audition Audio Cues. Default is the machine Ovation is running on. Alternative Player choices are only valid in very advanced configura-tions with Players on networked machines.
Note: For multi-channel Cues, the number set in the Audition Cues on : Audio Output Slot box defines the FIRST slot to be used for audition monitoring. So, if the Cue is six channel surround and the number in the box is 9 then the signals will be routed to Out-put Slots 9 though 14
Audition Cues through their default Player
Audition Cues through : Any Player, on the network can be selected from the Player drop-down list.
Audition Cues on their default Audio Output Slot
Audition Cues on :
Audio Output Slot Any available Audio Output Slot can be typed in the field.
Note: This setting is saved in the Show, as opposed to all other settings in this page that are saved globally.
Application Settings > General > Audition

Settings : Application Settings Page 156
Active Cue Window Trim In/Out Audition TimingsCue Out preroll (in s.) Click in the field to enter an alternative to the default value (5 secs)
Cue Out Looping (in s.) Click in the field to enter an alternative to the default value (1 sec)
TCP/IP Connections
The TC/IP Connections page enables Ovation TCP/IP connections to be set with the following options:
Type Server or Client
IP address / Server name Enter the target Server IP address or name here. (Not relevant if Type is set to Server)
Port number / name Enter the target Port number or name here.
Transport Default is TCP.
Status This field shows the current status of the connection.
Note:
• Once an IP Client or Server is created, the IP object appears in both the Player Units and Controller Units sections.
• Player Units deal with Control Protocol Outputs
• Controller Units deal with Control Protocol Inputs
• Both Servers and Clients can send AND receive data. The only practical distinction between them is that a Server can be connected to multiple clients whereas a Client can only be connected to one Server.
• Servers accept multiple Clients’ connections.
• When data is sent through a Server, it is sent to all connected Clients.
• When a Server is no longer available, Clients attempt to reconnect to the Server automatically.
Application Settings > General > TC/IP Connections

Settings : Application Settings Page 157
• When a new connection is created/destroyed, the Apply changes to IP connection button adds/removes the corresponding Player/Controller units.
IP Address / Server Name ConsiderationsIn general, it is usually preferable to use fixed IP addresses to avoid surprises. A DHCP server should assign the same address to a given device every time until the device is offline for the amount of time set in the DHCP servers “lease time”. If you use machine names instead of IP addresses then there is no real disadvantage with a DHCP server on the network. However, some devices cannot be resolved as a name and an IP address is the only way to connect them. So, unless there is a very good reason not to use them, fixed IP addresses are the preferred option.
Note: It is best to avoid using the most common port numbers (under 1024 ). For maxi-mum safety we would recommend the use of ports in the range 49152–65535.
Player UnitsPlayer Units are the virtual devices which enable Ovation to control other targets .
Lists available MIDI interface IP ports and COM ports for playing MIDI, IP Commands and Sony P2 / RS422 Cues
Note: If you attempt to assign an output to a Virtual Com Port that is already in use this dialog appears:
Virtual COM Port selection conflict

Settings : Application Settings Page 158
MIDI
Clicking on an entry in the MIDI list under Player Units brings up the associated options in the right-hand pane.
MidiEnable Click to enable
Virtual MIDI Port When enabled the drop-down list becomes active to enable a Virtual Midi Port to be selected from the list.
Application Settings > Player Units > MIDI

Settings : Application Settings Page 159
IP
IPEnable When checked the Player will output IP commands as defined in Cue Properties.
Escape character When checked an Escape character is used to define the end of a command string. Choose a suitable Escape character from the drop-down list.
Application Settings > Player Units > IP

Settings : Application Settings Page 160
Com
COMEnable Click to enable the COM Player
Virtual COM Port When enabled the drop-down list becomes active to enable a Virtual COM Port to be selected from the list.
Protocol The drop-down offers the choice of Generic or Sony P2
COM Settings
Note: COM Settings and Protocol below are only available when Generic is selected in Protocol above.
When Generic is active the following serial port options are available. Use the drop-down lists to select the appro-priate settings for your application:
Baud rate
Data bits
Parity
Stop bits
Application Settings > Player Units > COM

Settings : Application Settings Page 161
Flow Control
ProtocolStart of message The drop-down list offers a choice of hex character strings which will be added to
the start of each outgoing message.
End of message The drop-down list offers a choice of hex character strings which will be added to the end of each outgoing message.
Ethernet
Sony P2 over IP 0
Pre-requisites1. Check that File and Printer Sharing is activated:
WIn XP Windows Control Panel > Network Connections ~select your LAN card/adap-tor~ Right-click and choose Properties
Win 7 Windows Control Panel > Network and Sharing Center > Change advanced sharing settings
2. a) Computers on a domainIf your Computers are connected under the same domain jump directly to section 3, since the security access is managed by your domain server. Please talk to your IT Manager for further details.b) Computers in a WorkGroupWorking under workgroups requires some extra steps:
• Make sure each machine is a member of the same workgroup.
• You can change your workgroup in Windows Control Panel > System >
• [XP]Computer Name tab > Change [Win7]Change Settings
• You must restart the computer for changes to take effect !
• On each machine, make sure that you can access the other machine(s):
• My computer > Network > Workgroup
• Remember that you have to enter a user name and its password for a user account on the machine that you require access to.
Local Area Connection Properties Network and Sharing Center > Advanced Sharing Settings

Settings : Application Settings Page 162
• Check the box Remember my credentials [Win7] Remember my password [XP] Otherwise you will have to enter the user name and password each time you restart the computers.
• You do not need to share any folders.
Sony over IP
Sony P2 over IP enables Ovation to control a remote VCube or Pyramix workstation by using the Sony P2 protocol over an Ethernet connection. Enable COM port.
Choose a Virtual COM Port (COM1 to COM 16). This behaves in the same way as a real COM port. Virtual COM ports are used in the Cue Properties pane under Sony P2 / RS422 and COM Command sections.
Remote Computer Name Insert an IP address or a computer name or leave blank when the target local is local. (E.g. VCube running on the same machine as the Ovation Sequencer.
Port Name Use if the target machine has multiples ports set. This could be the case for a Pyramix but not for a VCube.
In the rare case that the remote machine is a Pyramix, you must add a controller in Pyramix with the Sony over IP settings.
If the remote machine is a VCube, there is nothing to configure on the VCube side. But only one connection is per-mitted.
ComEnable When the box is ticked Sony P2 over IP is active.
Application Settings > Player Units > SONY P2 > Device\Serial
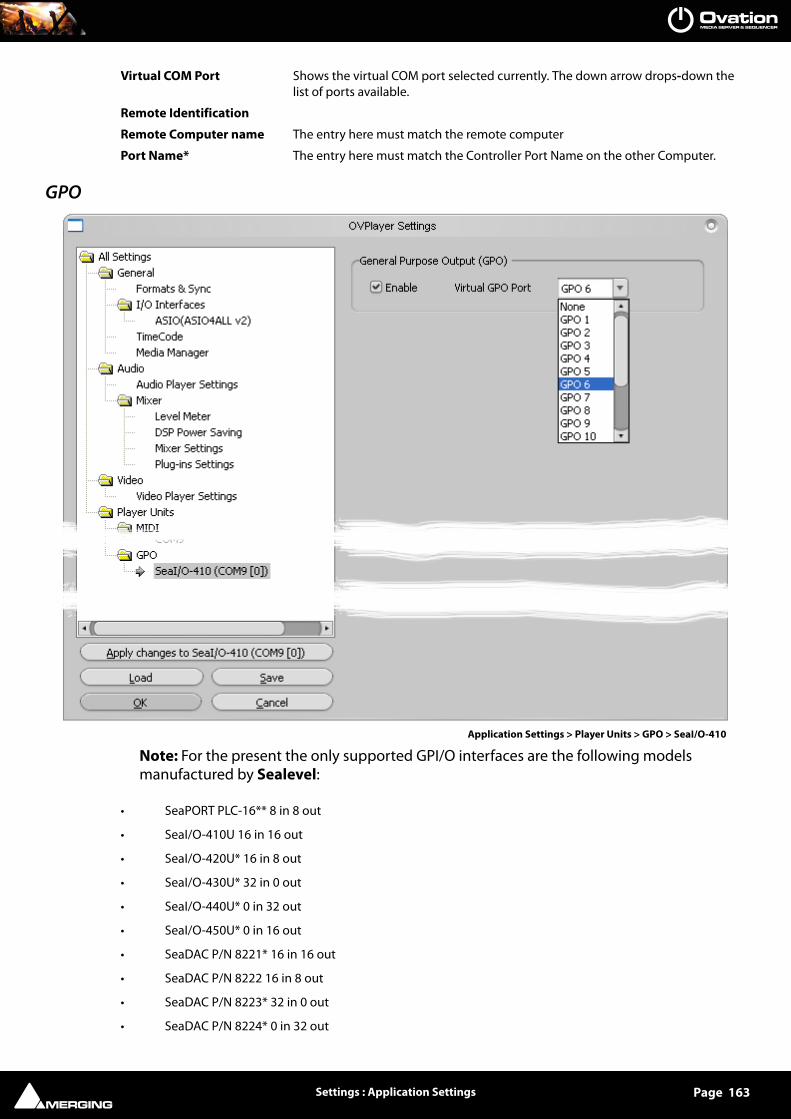
Settings : Application Settings Page 163
Virtual COM Port Shows the virtual COM port selected currently. The down arrow drops-down the list of ports available.
Remote Identification
Remote Computer name The entry here must match the remote computer
Port Name* The entry here must match the Controller Port Name on the other Computer.
GPO
Note: For the present the only supported GPI/O interfaces are the following models manufactured by Sealevel:
• SeaPORT PLC-16** 8 in 8 out
• SeaI/O-410U 16 in 16 out
• SeaI/O-420U* 16 in 8 out
• SeaI/O-430U* 32 in 0 out
• SeaI/O-440U* 0 in 32 out
• SeaI/O-450U* 0 in 16 out
• SeaDAC P/N 8221* 16 in 16 out
• SeaDAC P/N 8222 16 in 8 out
• SeaDAC P/N 8223* 32 in 0 out
• SeaDAC P/N 8224* 0 in 32 out
Application Settings > Player Units > GPO > SeaI/O-410

Settings : Application Settings Page 164
• SeaDAC P/N 8225* 0 in 16 out
* Obtainable on special order.
** No longer available.
Note: Note: USB drivers are included in the Pyramix Installer. There is no need to download the driver from the supplier’s website. For more information about the specification of the GPIO hardware device please see:
http://www.sealevel.com
A maximum of 32 units may be connected. Physically installed GPO devices will appear here. capabilities will depend on the model.
General Purpose OutputEnable
When ticked General Purpose Outputs are enabled
Virtual GPO Port
The drop down list offers a choice of all available Virtual GPO Ports or None.
Note: When the Show is running or a Cue is Auditioning if the Settings Window is opened the Player pages will not be present.
Note: Whether the Player is the default local machine or stand alone on a Networked machine, when the Show is running or a Cue is Auditioning all Player related pages are absent from the Settings window.

Settings : Application Settings Page 165
Controller
Remote Controlled Ovations This page enables you to define which Stations I.e. PCs running Ovation, will be controlled by an OV Controller Session.
Controlled StationsLocal Ovation Sequencer
When checked the Ovation Sequencer running in the same machine (Embedded or Local) receives the commands from this Controller.
Remote Ovation Sequencers
This table enables a list of remote machines to be added on which a running Ovation Sequencer will receive com-mands from the selected Controller. This allows for remote control via the network and/or controlling multiple Ovation Sequencers at the same time for redundancy.
New Remote Ovation Sequencers are added by clicking on Click here to add a Remote Ovation Sequencer and typing the PC’s network name.
In the above screenshot two Remote Ovation Sequencers, Parade and Lake have been added.
Backup SequencerMirror All Commands to Remote Ovation Sequencers listed above
When checked all commands on the local Ovation are mirrored to the selected remote sequencer(s) for redun-dancy.
Controller Units Controller Units enable the Ovation Sequencer/Show controller to be remote controlled.
Application Settings > Controller > Remote Controlled Ovation Stations

Settings : Application Settings Page 166
In this folder all supported Remote Control Units available in the system are listed in sub-folders. They can be:
• The Proprietary Ovation Keyboard
• The Proprietary Ovation Webserver
• IP Controller
• MIDI ports - Midi Show Control (MCS), Midi TimeCode (MTC), Midi Machine Control (MMC) and General Midi (GM).
• DMX ports (Art Net protocol available in later beta)
• GPI ports
• Sony 9-pin (P2 Protocol) remote control
Note: Appendix I and following details how the various Controller Units protocols are implemented and how they map the available Ovation Media Sequencer and Media Server Commands.
When a Controller Unit is clicked to select it in the list, a related page displays appropriate options.Please see sub-sequent pages in this document.
Proprietary
OVKeyboard
Ovation KeyboardEnable
Application Settings > OV Controller Units > Proprietary > OVKeyboard

Settings : Application Settings Page 167
When checked the Ovation Keyboard is active
Keyboard MappingMulti-purpose (Standard Mapping)
Hot Keys Only
The radio buttons are mutually exclusive. Select the Mapping corresponding to your physical keyboard layout.
Note: For those people using Pyramix and Ovation at the same time and who have the ADR authorization key and an Ovation Keyboard then Pyramix may conflict with the Keyboard. In this case you should add a DWORD Registry Key in: HKEY_CURRENT_USER\Software\Merging Technologies\Pyramix\ADR,name it "Disable ADR Keyboard" and set it to 1.If you are not confident with Registry editing then please ask your Merging Sales Partner to make this change for you.

Settings : Application Settings Page 168
Web Server
Web ServerEnable When ticked, Web Server control is active.
HTTP Port: The default value is 888. Type in the field to change this if necessary.
Pages Root Folder The default path to the Pages Root Folder is shown in the field. Clicking on the ... button opens a browser where an alternative path can be set.
Password (optional) : Type a Password in the field to password protect the pages.
TutorialIn any browser simply type the IP address of the machine running Ovation followed by the port number as defined above, like :
http://128.0.0.1:888
Application Settings > OV Controller Units > Proprietary > Web Server

Settings : Application Settings Page 169
The displayed Cue Lists can be limited by adding the following filter (the Cue List Index in the filter is defined as the Cue List number minus 1) :
http://128.0.0.1:888/Filter?Cuelist=0
The Show Control Bar on the bottom of the page can be hidden to avoid unexpected interaction by adding the following filter :
http://128.0.0.1:888/Filter?ShowControlBar=Hidden
Or both together, separated by an & :
http://128.0.0.1:888/Filter?Cuelist=0&ShowControlBar=Hidden

Settings : Application Settings Page 170
MIDI
E.g. Ethernet MIDI
MIDI INPUTsNote: Red flashing ‘LEDs’ to the right of each MIDI section indicate that MIDI data is being received.
Midi PortEnable
Check the button to enable MIDI remote control
Note: The rest of the options on this page will be grayed out (unavailable) until this option is selected.
Application Settings > Controller Units > MIDI > Ethernet MIDI

Settings : Application Settings Page 171
Virtual MIDI Port
The drop down list offers the choice of any of the first 16 MIDI ports available on the machine.
Midi Show Control (MSC)Enable
Check the button to enable MIDI Show Control (MSC)
Device Id
The drop-down list offers the choice of Any or Device Ids from 0 to 7E
Command Format
The drop-down list offers many MSC choices for filtering Command Format types.
Midi TimeCode (MTC)Enable
Check the button to enable MIDI TimeCode
The Midi Port used is the one set in the first section above: Midi Port.
Midi Machine Control (MMC)Enable
Check the button to enable MIDI Machine Control.
General Midi (GM)Enable direct Cue mapping of MIDI messages from the selected Virtual MIDI Port
Check the button to enable General MIDI (GM) control of individual Cues.
Note: Direct MIDI messages Cue mapping is available in the Cue Properties ‘REMOTE CONTROL: General MIDI Command section
Please see REMOTE CONTROL: General MIDI Command on page 106
Enable Mapping based on command:Enables MIDI commands to be mapped to events not related to Cue events, such as Show Start, Select Next Cue List, etc… or contextually related Cue commands such as Select Next Cue, etc…
The drop-down list offers a choice of which type of Midi command is to be mapped from:
Note off
Note on
Polyphonic key pressure
Control change
Program change
Overall keypressure aftertouch
Pitch bender change
Control Change commands are General Midi commands such as Note On.
Clicking on Add in the Midi Channel column adds an entry to the list.
Clicking on the 0 entry in the Midi Channel column drops down the list of available Midi Channels (1-16)
Clicking on the entry in the Data 1 column drops down a list with the choice of 0 to 127.
Clicking in the Media Sequencer column drops down the list of mappable Ovation commands.

Settings : Application Settings Page 172
Delete on the PC keyboard removes a mapping entry.
Enable Legacy GM (Note On/Off and Program Change old auto mapping)Reactivates the old ‘fixed’ style GM mapping.
Please see also: General Midi (GM) on page 171 for a complete list of mappable commands.
COM Ovation Cues can be Started - Stopped or Paused from any Sony P2 Protocol controller. An Ovation station can also control another Ovation linked via a serial connection using the native Ovation protocol.
Sony P2
Com PortEnable When ticked the Com Port and associated remote controller are able to control
Ovation.
Application Settings > Controller Units > COM > COM1: P2 mode)

Settings : Application Settings Page 173
Protocol The drop-down offers the choice of Sony P2 and Ovation. The settings page is modal and this setting determines what other appropriate settings are shown.Choose Sony P2 for control by a machine using this protocol.
Com Settings
ProtocolSony Device IdThe drop-down list offers the choice of Ovation and all P2 device emulations supported by Ovation
Targeted Cue ListThe drop-down list enables any Cue List in the current Ovation Show to be selected as the target.
Track Arming Cues Selection
Note: Only Digital presets (Track Arming) from 1-32 are allowed.
The drop down list offers the following choices:
No selection track arming has no effect.
1-8 Selects Cue lists, 9-32 selects Cues
Targeted Cue List is used, 1-32 selects Cuestargeted Cue list is determined by the choice made in the Targeted Cue List drop-down list.
Targeted Cue List is used, hours selects Cues targeted Cue list is determined by the choice made in the Targeted Cue List drop-down list.
Goto Cues selectionThe drop-down list offers the following choices:
No Selection goto TimeCode has no effect
Hours selects Cue Lists, minutes select Cues
Targeted Cue list is used, hours select Cues targeted Cue list is determined by the choice made in the Targeted Cue List drop-down list.
Notes:Valid Cue and Cue List NumbersSince 00 is not allowed as either a Cue number or Cue List number the maximum number of Cues and Cue Lists that can be adressed is limited to 23 i.e. 1-23 or 59 i.e. 1-59 in Hours and Minutes respectively.
Limitations• Goto a specific timecode inside a Cue (not implemented)
• Analog A1, A2, V and TC edit preset bit (track arming) are not used. Only Digital edit preset from 1 up to 32 are used. Above Preset 32 (not implemented)
• Rew, F.Fwd, Jog, Shuttle not possible.
Track arming Cues selection options:• A) "No selection" track arming has no effect.
• B) "1-8 selects Cue lists, 9-32 selects Cues"
• C) "Targeted Cue list is used, 1-32 selects Cues" : targeted Cue list is chosen by the drop down menu.
Goto Cues selection options :• 1) "No selection" goto timecode has no effect
• 2) "Hours select Cue lists, minutes select Cues"
• 3) "Targeted Cue list is used, hours select Cues" targeted Cue list is chosen by the drop down menu.
Ovation to Controller ReportingOvation reports the following information back to the Controller:

Settings : Application Settings Page 174
• The current timecode of the selected Cue.
• Full timecode for option 1 above;
• Seconds and Frames for option 2 above, Hours and Minutes indicating respectively the Cue list # and Cue # .
• Minutes, Seconds and Frames for option 3 above, Hours indicating the Cue #.
• Play, Stop, Pause (Still) tally, Cue Up (when Cue is ready).
• Track arming status (Edit preset sense) indicating the selected Cue. Inactive for option A.
• Default Device Id is Ovation which reports: Sony device ID : 0xF0B1 (NTSC), 0xF1B1 (PAL), 0xF2B1 (Film). Any other available device Id can be selected from the Sony Device Id drop-down list.
Ovation mode
Com PortEnable When ticked the Com Port and associated remote controller are able to control
Ovation.
Protocol The drop-down offers the choice of Sony P2 and Ovation. The settings page is modal and this setting determines what other appropriate settings are shown.Choose Ovation for control by another Ovation station.
Application Settings > Controller Units > COM > COM1: Ovation mode)

Settings : Application Settings Page 175
COM SettingsThe following parameters should be set to match the controlling Ovation.
Baud rate
Data bits
Parity
Stop bits
Flow Control
ProtocolPlease see: Appendix IIX on page 231 of this document for the commands detail.
IP
Note: An IP entry and IP1 etc. controllers will only be visible if they have been defined in Settings > Application > General > IP Connection. Please see: TCP/IP Connections on page 156
An IP Controller Unit is used to receive data.
Two data formats are accepted:
1. Ovation Native (http protocol format)
2. Mapping. Mapping data messages are defined either by
a. Message length
b. By a special end of message character (Escape character)
Internet Protocol Options
Application Settings > Controller Units > IP > IP3
Settings : Application Settings Page 176
Enable When checked, the Controller is active and the rest of the settings on this page become available.
Ovation Native Mutually exclusive with Mapping and Dataton Synchronization. When checked, the native HTML format command strings as used by the Ovation Web Server are accepted. Please see: Web Server Commands on page 231
Mapping (Cue direct mapping) Mutually exclusive with Native and Dataton Synchronization.
Escape Character When checked an Escape character is used to define the end of a command string. Choose a suitable Escape character from the drop-down list.
Message Length of When checked the Message length (in bytes) is used to define the break points between command strings.
Dataton Synchronization Check this when using a remote Dataton player. Mutually exclusive with Native and Mapping.
Send status feedback via Player section of this connection (Player section will be unavailable for other pur-pose)
GPI
All Available GPI Units ListedClick on each entry in the list to configure the GPI Device
Note: For the present the only supported GPI/O interfaces are the following models manufactured by Sealevel:
• SeaPORT PLC-16** 8 in 8 out
• • SeaI/O-410U 16 in 16 out
• • SeaI/O-420U* 16 in 8 out
• • SeaI/O-430U* 32 in 0 out
• • SeaI/O-440U* 0 in 32 out
• • SeaI/O-450U* 0 in 16 out
• • SeaDAC P/N 8221* 16 in 16 out
• • SeaDAC P/N 8222 16 in 8 out
• • SeaDAC P/N 8223* 32 in 0 out
• • SeaDAC P/N 8224* 0 in 32 out
• • SeaDAC P/N 8225* 0 in 16 out
*Obtainable on special order.
**No longer available.
Note: A maximum of 32 units may be connected.

Settings : Application Settings Page 177
General Purpose Input (GPI)Enable
Check the button to enable General Purpose Input (GPI) control.
Cue # corresponds to the Cue ID
When the button is checked the The Cue is identified with up to 3 nested levels using Cue#, Child#1, Child#2 and Child#3. This is the greyed number present in the Cue property page or the Number next to the Cue name in a Cue button. The number represents the separation between the Cue# of Child#1 etc.
This mode is useful when a Cue needs to be added anywhere in the Cue List using the nesting mechanism without changing the # of the Cue below the inserted Cue.
Cue # corresponds to the Cue Index
The Cue # is the Cue index in its Cue List. This is the greyed number present in the Cue Properties page or the Number next to the Cue name in a Cue button IF any of the Cues are nested. Useful when the nested mechanism is not useful for the mapping.
OV Controller Settings > Controller Units > GPI > SeaI/O-410 (COM9 [0])
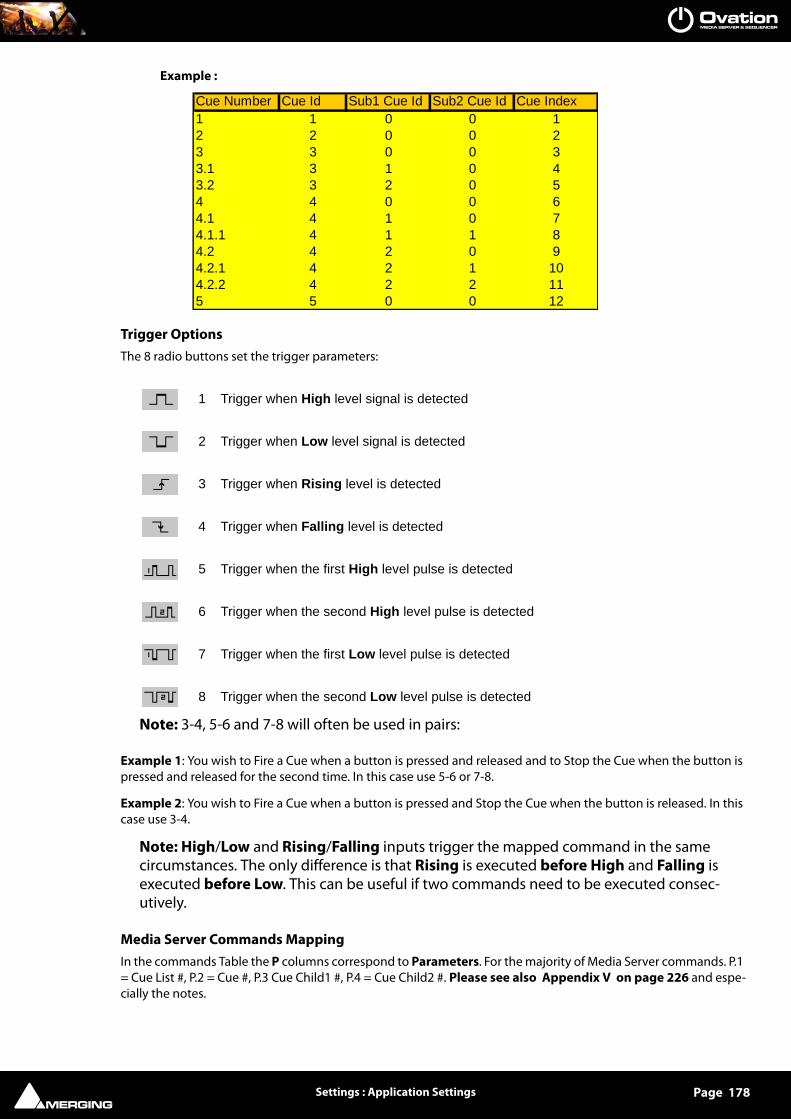
Settings : Application Settings Page 178
Example :
Trigger OptionsThe 8 radio buttons set the trigger parameters:
1 Trigger when High level signal is detected
2 Trigger when Low level signal is detected
3 Trigger when Rising level is detected
4 Trigger when Falling level is detected
5 Trigger when the first High level pulse is detected
6 Trigger when the second High level pulse is detected
7 Trigger when the first Low level pulse is detected
8 Trigger when the second Low level pulse is detected
Note: 3-4, 5-6 and 7-8 will often be used in pairs:
Example 1: You wish to Fire a Cue when a button is pressed and released and to Stop the Cue when the button is pressed and released for the second time. In this case use 5-6 or 7-8.
Example 2: You wish to Fire a Cue when a button is pressed and Stop the Cue when the button is released. In this case use 3-4.
Note: High/Low and Rising/Falling inputs trigger the mapped command in the same circumstances. The only difference is that Rising is executed before High and Falling is executed before Low. This can be useful if two commands need to be executed consec-utively.
Media Server Commands MappingIn the commands Table the P columns correspond to Parameters. For the majority of Media Server commands. P.1 = Cue List #, P.2 = Cue #, P.3 Cue Child1 #, P.4 = Cue Child2 #. Please see also Appendix V on page 226 and espe-cially the notes.
Cue Number Cue Id Sub1 Cue Id Sub2 Cue Id Cue Index1 1 0 0 12 2 0 0 23 3 0 0 33.1 3 1 0 43.2 3 2 0 54 4 0 0 64.1 4 1 0 74.1.1 4 1 1 84.2 4 2 0 94.2.1 4 2 1 104.2.2 4 2 2 115 5 0 0 12

Ovation Webserver : Using Ovation Webserver Page 179
Ovation Webserver
OverviewOvation delivers an amazing amount of control over any system. However, until now, accessing that control has been, like most other sequencer and control software, limited to proprietary interfaces on local machines.
Now, with the WebServer option for Ovation, the entire picture has changed. Through standard HTTP interfaces on any web enabled platform (desktops, laptops, Smart Phones, iPad etc) it is now possible to have complete con-trol over your Ovation show from multiple locations.
Use Merging's own interface design, or, if you know basic web page design, you can do it yourself and create bespoke custom interfaces. Whatever your choice, and whatever the project, using WebServer for your next Ova-tion show or installation will unlock unprecedented control possibilities.
Applications• Multiple zone access for non-technical users (Museum exhibits with multiple rooms etc.)
• Stage side access for firing manual Cues and sequences
• Multiple control stations, for example, for game shows. The gallery, the sound supervisor and presenter can all have appropriate controls for theor needs.
• Show information and timing views for Conductors in "the Pit"
• Bespoke, branded interfaces for hotel lobbies and bar installs
• And many, many more……
Using Ovation Webserver
ActivatingTo enable the Ovation WebServer go to Settings >Application > Controller Units > Proprietary > Web Server and check the Enable button.
If necessary, the HTTP Port number can be changed in this page. The default Port is 888.
The Pages Root Folder can be changed to provide custom pages different to those provided by Merging as stan-dard. The default implements an interface similar to the Ovation User Interface.
Note: The files OvationShow.html and js/OvationProcess.js are the property of Merg-ing Technologies, but can be used freely as a reference to aid in the creation of custom pages.

Ovation Webserver : Using Ovation Webserver Page 180
QuickstartIn any browser simply type the IP address of the machine running Ovation followed by the port number, for exam-ple :
http://192.168.2.13:888
The Cue Lists displayed can be limited by adding the following filter (the Cue List Index in the filter is defined as the Cue List number minus 1) :
http://192.168.2.13:888/Filter?Cuelist=0
The Show Control Bar on the bottom of the page can be hidden to avoid unexpected interaction by adding the following filter :
http://192.168.2.13:888/Filter?ShowControlBar=Hidden

Ovation Webserver : Using Ovation Webserver Page 181
Or both together, separated by an & :
http://192.168.2.13:888/Filter?Cuelist=0&ShowControlBar=Hidden
Which looks like this :
SettingsClicking on the Ovation logo on the top right-hand corner of the page displays a menu with a choice of viewing style, Tabbed or All-In-One-View and the page Refresh Interval :
In All-in-One View Cue Lists are shown one after another down the page. In Tabbed View a single Cue List is shown with the rest available on tabs at the top of the page.

Ovation Webserver : Using Ovation Webserver Page 182
If the network is slow or artefacts are noticed the refresh rate can be reduced to advantage.
HTTP ControlHTTP Commands can be sent directly to the Ovation WebServer by any client application (or simply by typing commands in a web browser URL field).
These commands are described in the Ovation Controller Commands documents which can be found here: Appendix IIX on page 231 Web Server Commands.
Typically, commands such as these will be sent:
• 192.168.1.33:888/Action?Command=Show_Init
• 192.168.1.33:888/Action?Command=Show_Start
• 192.168.1.33:888/Action?Command=Cue_Fire&CueList=0&Cue=4.-2
• 192.168.1.33:888/Action?Command=CueList_Select&CueList=0
• 192.168.1.33:888/Action?Command=Cue_Select&CueList=-1&Cue=1.-2
• 192.168.1.33:888/Action?Command=Cue_Fire&CueList=-1&Cue=-1
• 192.168.1.33:888/Action?Command=Cue_Pause&CueList=-1&Cue=-1
• 192.168.1.33:888/Action?Command=Cue_Fire
• 192.168.1.33:888/Action?Command=Cue_Stop
• 192.168.1.33:888/Request?Show
• 192.168.1.33:888/Request?Cues_Status
Connection FeedbackIf the client network connection is lost (wifi) or if for whatever reason the Ovation server goes offline, the Time-Code counter background turns red. The Web UI reconnects automatically when the connection is restored.

Tips and Tricks : Rules Page 183
Tips and Tricks
Rules
It is important to appreciate the differences between specifying Ending and Stopping.
Ending is when a Cue finishes playing normally.
Stopping is when a Cue is terminated prematurely either manually or by a rule.
It is equally important to appreciate the difference between When and After. This setting affects the point at which the rule is applied. If When is selected then the rule is applied at the point the fade out or the fade in begins. If After is selected then the rule’s action is applied after the Cue Starts or after the Cue Ends or Stops with a delay set in the ms box.
Note: A rule’s action always occurs at either the start of a Cue or at the beginning of the Fade Out unless a delay is applied using After.
If When is chosen this is an easy method of producing cross-fades.
If a crossfade is NOT required then you can use the Offset parameter to compensate.
Fade ModifierPressing the Shift key invokes the User defined fade duration. (Fade Modifier key on the dedicated keyboard or the Shift key of the standard keyboard.)
<Default>Where <default> is an option in Ovation the hierarchy works like this:
Cue settings override Cue List settings override Show settings.
PlayerIf no specific network OVPlayer is assigned in Cue Properties I.e. the field is set to blank or <default> then Ova-tion looks at the assignment in the Cue List Properties Default Output Player field. If this is also set to blank or <Default> then Ovation looks at the Default Output Player field in Show Properties. If this too is set to blank or <Default> then the local Ovation player is used.
Stop Fade OutSimilarly if Stop Fade Out is set to <Default> in Cue Properties then Ovation looks at the setting in the Cue List Properties Default Stop Fade Out field. If this is also set to <Default> then Ovation looks at the Default Stop Fade Out field in Show Properties. If this too is set to <Default> then the value in the Fade Out field in Cue Properties is used.
Drag & Drop
Media Files can be “Dragged & Dropped” into Cue Lists from outside Ovation. E.g. Explorer browser or iTunes. A new Cue is created automatically when Media Files are added in this way unless the Alt key is held down while Drag & Dropping onto an existing Cue, in which case, for Audio only Cues, the underlying Media File is replaced.
Cues can be dragged and dropped between Cue Lists using the Shift modifier. If the Alt modifier is used the underlying audio Media File is replaced with the source. Simple drag and drop is used to reorder Cue Lists.

Tips and Tricks : Changing Properties for Multiple Cues Page 184
Changing Properties for Multiple Cues
When multiple Cues are selected, parameters changed in Cue Properties are updated for all selected Cues. The only exception being Cue Number. This applies even when the Cues are selected in several different lists.
(Selecting Multiple Cues follows the Windows browser conventions. I.e. With one Cue selected, Shift + Click selects a contiguous range of Cues to the second Cue clicked and Ctrl+Click toggles Cues selected/unselected.)
Starting a Show With Sysex
In Ovation 2.x, MIDI SysEx inputs are not mappable to a specific Ovation command. The only MIDI inputs mappa-ble are : General Midi (GM) - Control Change commands (2-3 byte length message). I.e. hexa = B0 00 00 or B1 10 00 or ...
However, if the controlling device is capable of sending any SysEx message, the two Midi Show Control specific SysEx messages below can be used.
Show Init:
Hexa = F0 7F <Device id> 02 <Sound (General) = 10> 07 01 F7 Show Start:
Hexa = F0 7F <Device id> 02 <Sound (General) = 10> 07 02 F7
<Device id> : specified in Settings > Controller Units > MIDI > Midi port (Midi Show Control section).
<Sound (General)> : as well.
For details of Midi Show Control macro commands available in Ovation Please see MIDI and Midi Show Control on page 217 onwards.

System Requirements For Ovation : Computer Page 185
System Requirements For Ovation
Computer
• Pentium 4, Pentium D or Core 2 Duo
• "1024 MB RAM (2048 MB or more recommended for large projects)
• "IDE, SATA System Hard Disk
• "AGP/PCIe graphic card with resolution of 1280x1024 or better (ideally Dual-Head for twin screen operations)
• "SATA/RAID HD for Audio Storage
• "SVGA 17" monitor (19" or better recommended)
• "3 button mouse
• "USB or Firewire/IEEE1394a (better) for ASIO Audio
Note: Please note that Ovation requires a 32 bit Windows 7 or Windows XP Pro worksta-tion with a minimum display resolution of 1280x1024 256 colors (in small fonts mode). (64 bit Windows 7 is also certified for Native Oavtion systems ONLY.
Hard Disk Space RequirementsA complete software installation will require around 100MB of disk space for the Ovation software itself and approximately 10MB of disk space for Virtual Transport.
In addition, you will need hard disk storage for media files. For audio media as a rule of thumb, one Gigabyte of disk storage equals:
• 185 track minutes at 44.1 kHz 16 bits
• 125 track minutes at 44.1 kHz 24 bits
• 170 track minutes at 48 kHz 16 bits
• 115 track minutes at 48 kHz 24 bits
• 55 track minutes at 96 kHz 24 bits
For multi-track applications, divide total available mono track time by the number of tracks you will be using.
Please note that these are very rough estimates, and should be used only as a general indication of storage requirements.
Operating SystemFor systems including Mykerinos cards and or MassCore 32 bit Windows 7 or 32 bit Windows XP Pro, installed with Administrator privileges (never attempt to install Ovation on NT Server). For Ovation Native systems ONLY 64 bit Windows 7 is also certified.
Power ManagementN.B. As with all real-time applications, we recommend setting the PC to an Always On Power management scheme. (Start > Control Panel double-click Power Options. Choose Always On from the Power Schemes combo box.) This allows the monitor to be turned off by the system but disables hard-disk turn off and Standby.
Note: The Mykerinos card is not designed to support Standby modes.
Other ApplicationsLike all real-time applications, Ovation works best when there are no other unnecessary applications or services running.

System Requirements For Ovation : Installing Hardware Page 186
Installing Hardware
Mykerinos Board InstallationThe Merging Technologies Mykerinos board can be installed in any free PCI slot in your PC. In general, it is best NOT to install the board in the PCI slot adjacent to an AGP graphics adapter; and in a PCI slot which may be physi-cally shared with an ISA slot.Please consult the:
www.merging.com
website for current compatibility information.
Make absolutely certain the PC power is OFF before installing the board!
With most of the current generation motherboards this means either the mains switch on the power supply or the power outlet switch. Where no switch is provided, either on the PC or the supply socket, then the PC should be unplugged.
Always observe proper static precautions when handling any PC boards! Use a static strap, and/or be sure to firmly ground yourself to the computer power supply, chassis or if the PC is unplugged, to a known good earth before handling and installing the Mykerinos board.
Some PCs have batteries, cables, jumpers, etc. which could prevent proper board seating in one or more slots. Make certain the board is firmly and fully seated before switching on.
Multi-board installationMultiple boards must be installed in adjacent slots. To enable multi-board operation, all Mykerinos cards in the PC have to be connected together using a special HDTDM ribbon cable. This cable has to be plugged into the multi-pin connectors located on the top edge of the I/O daughter cards. Please contact your Merging Technologies dealer for information on how to order this HDTDM ribbon cable.
HDTDM/XDTDMThe HDTDM board linking cable has the following functions in a multiple Mykerinos board installation:
a) synchronization (to 1/512th of an audio sample accuracy) This enables Pyramix to "see" a single system com-prised of a large pool of DSP power and I/O resources spread over separate cards.
b) transfers all audio signals (Live Inputs, Internal Send/Return Busses, Mix busses, Aux busses, Live Outputs, etc. between all the Mykerinos I/O daughter-cards which comprise the multi-board system.
Mykerinos Board I/O
Audio I/O OptionsMykerinos is a modular board which can have any one of several optional audio I/O daughter cards attached. When ordering Ovation from Merging Technologies or one of its distributors, be sure to specify the daughter card appropriate to your specific needs.
On-board Analog Audio I/ORegardless of which I/O daughter card is chosen, you can simultaneously use the 3.5mm stereo mini-phone jack on the Mykerinos board as an unbalanced, analog stereo audio monitor output for all projects up to 384 kHz, with levels programmable from within the software. Sources at sample rates higher than 96 kHz are automatically Sam-ple Rate Converted to 96 kHz, 24 bit. This stereo mini-jack connection may be connected to headphones or to a line level audio monitor input.
External Audio D/A-A/D Converter BoxesMost of the I/O options for the Mykerinos board are digital. Pyramix will often be used with external audio D/A (for playback) and A/D (for recording) converters. Many such converters are available from Merging Technologies as options: for example, the Merging Technologies Dua II and Sphynx 2. Contact your local Merging Technologies Sales representative for more information.

System Requirements For Ovation : Cabling Ovation in your System Environment Page 187
Capabilities of third party A/D - D/A converter boxes are widely variable. Please check with the manufacturer to ascertain which sample rates, word lengths and number of I/O channels are supported. You will need this informa-tion later to appropriately configure the software.
Time Code and Video Sync OptionThe Synchronization option provides SMPTE / EBU LTC and VITC time code in/out, video sync in/out and word clock sync. A multi-pin circular mini-DIN connector, on the back plate of the Mykerinos board carries all the system synchronization, time code and video sync signals. An optional break-out cable is provided for connections to time code, sync and video I/O. The Synchronization option allows Ovation to be configured as a master or slave lock to external time code, video or word clock. It also enables VITC and/or a visible time code burn-in window (BITC) to be added to video output/throughput.
Cabling Ovation in your System Environment
Please read this in conjunction with the guide or guides for your specific interface daughter-cards and external interfaces/converters.
Due to the number of possible I/O options and the variety of user environments it is impossible to cover all the variations of cable connections to and from an Ovation workstation. However, here are some general rules and examples:
Mykerinos Back-plate
Audio ConnectionsMany users will have A/D Converters for feeding analog audio sources into Pyramix, and D/A Converters for play-ing analog audio out of Pyramix. In this case, connect your analog audio sources to the A/D Converter analog audio inputs, and the A/D digital audio output(s) to the Mykerinos digital audio input(s). Similarly, connect the
3.5mm Mini-Phone Jack for analog monitor output
8-pin Mini-DIN for sync breakout cable
Area where I/O Daughter Card output connectors appear
Mykerinos Backplate

System Requirements For Ovation : Digital Audio Synchronization and TimeCode Page 188
Mykerinos digital audio output(s) to your D/A Converter digital audio input(s), and the D/A Converter analog audio outputs to your studio monitors or recorders. It may be also be useful to connect the stereo mini-phone out-put on the Mykerinos card to either stereo headphones or a stereo monitor console input. The source for this jack can be configured inside the Pyramix software.
Digital Audio Synchronization and TimeCode
THERE MUST BE ONLY ONE SOURCE OF SYNC FOR AUDIO AND TIMECODE
Digital audio relies on extremely accurate timing. In any digital audio system there can only be one source of sync at one time. This is particularly important when planning multi-machine systems. If TimeCode is not locked to the same sync source as the digital audio then either the audio will work properly, or the Time-Code. But NOT BOTH AT THE SAME TIME.
Ideally, in any system with more than one device, there will also be an independent source of sync. E.g. a word-clock generator with multiple outputs. Each device is fed by a single output and configured to use this source as its sync reference.
Sync, Video and Time Code ConnectionsIn any digital audio system, it is VERY IMPORTANT all interconnected units are locked to the same sync reference. A digital audio signal itself can sometimes be used as the master sync source, but a high stability video or word-clock signal is usually preferable.
The Mykerinos board can be configured inside the Ovation software to act as either a sync master, or to slave to a variety of incoming signals.
Decide which device in your system will provide the master sync reference, then ensure that all other digital audio devices in your system take their synchronization from it. This will require routing appropriate cables --whether digital audio, video or wordclock cables-- to the various other devices and may also involve a separate sync refer-ence generator and or distribution amplifiers.
If Pyramix is configured as the master (Internal sync), other digital audio devices will probably be able to lock to the digital audio output from Ovation. However, Ovation can also be configured to output a wordclock signal at the Video output BNC connector (Synchronization option required).
If Ovation is configured as a slave to an external device, Various synchronization signals can be accepted.
• To lock to incoming digital audio, connect an appropriate digital audio signal to an Ovation digital audio input.
• To lock to incoming video, connect an appropriate video signal to the Video Reference input (Synchroni-zation option required).
• To lock to incoming wordclock, connect an appropriate master wordclock signal to the Video 2 Input (Syn-chronization option required).
• To set the termination jumpers provided on the Mykerinos board, please see the Mykerinos User Guide.
• Ovation can either output or lock to incoming SMPTE / EBU TimeCode.
• If a master LTC Time Code output from Ovation is required, cable the LTC time code out RCA jack or XLR to any other devices slaving to this output (Synchronization option required). Ovation always generates time code when playing.
• To lock Ovation to an incoming LTC time code signal, cable the LTC TimeCode output from the TimeCode source to the LTC input RCA jack or XLR (Synchronization option required).
• Ovation can accept and generate VITC in standard PAL/NTSC formats. It can also provide BITC (Burnt In TimeCode) on its video outputs.
MIDI ConnectionsTo use Ovation MIDI functionality with external equipment, you will require a MIDI interface. Many current moth-erboards include an on-board MIDI interface. If yours does not, it is a simple matter to add one. This can be either an internal PCI card or an external unit connected via a USB port or an RS232 serial COM port.

Installing Ovation Software : Installation Overview: Page 189
Installing Ovation Software
Installation Overview:
Note: Note: If you have purchased hardware options such as Mykerinos cards or the Sync Board, please install these first following the instructions in the accompanying docu-mentation.
The Ovation software uses an automated installer wizard which will install all necessary prerequisites. We use a unified installer package containing the current versions of Pyramix, VCube and Ovation. The initial installer screen offers the choice of Pyramix, VCube and Ovation. Choosing Ovation will also install Pyramix.
You may exclude the installation of any of the individual components in the wizard, if the device in question is not present on your machine or if you do not intend to use an item, by un-ticking the tick boxes next to the items listed in the wizard.
Note: The security dongle (or Mykerinos card) must be in place and the security keys entered before attempting to launch Ovation
Driver Signing
Important! Before attempting to install the Ovation software please check the following setting:
Start > Administrative Tools > Local Security Policy the Local Security Settings dialog will open. Find Devices: unsigned driver behavior in the list and either double-click the entry or right-click and select Properties from the context menu to open the Devices: unsigned driver behavior Properties dialog:
Select the Warn but allow installation option from the drop-down list and click on OK to close the dialog.
Running the Installer
Note: Note: You must have full Administrator Access to install Ovation.
Devices: Unsigned driver installation behavior Properties dialog

Installing Ovation Software : Running the Installer Page 190
1. Insert the Merging Technologies USB memory stick or installation CD/DVD, as applicable, into a suitable socket or drive.
2. Unless you have disabled the function the installer will run automatically.
3. If necessary locate and run the installer manually.
4. Choose Ovation when prompted
5. At the next screen, de-select any items you do not require.
6. Override any warnings about uncertified drivers during the installation process.
7. Plug in the security USB dongle.
8. Enter the optional keys in MT Security Settings, if necessary.
9. Restart the PC.
10. If you have purchased the Platinum version run the installer again and choose VCube.
11. Before attempting to launch Ovation, please read First launch on page 192
Note: If the installation appears to freeze for a long period please check that the Driver Signing warning dialog is not hidden behind another Window. Installation will not con-tinue until you click OK in this dialog.
WARNING: Certain computers do not properly shut down despite the reboot command issued by the installer but only perform a log off.
In this case, please activate a full shut down manually.
Enabling Ovation with your Software KeyThe Ovation software and its various software options are protected by an authorization key mechanism which uses a unique registration key number generated by Merging Technologies. Based on purchased software compo-nents, this key is unique to your Sentinel or HASP USB dongle serial number or Mykerinos board serial number, your Company Name and your User name. Once you have registered your software you will be provided with this Key or Keys (depending on the options chosen).
When you receive your Ovation Package you should also receive either an email from your Merging technologies Sales Partner or a printed copy of the email containing your security setting details. If you did not receive this key, have lost it or would like to change the user and/or company name, please contact your Merging Sales Partner with your Mykerinos serial #, your User Name, your Company Name and the list of purchased software compo-nents. Usually, a key can be issued within one business day, after the verification of your personal data has been completed.
Entering your Key(s)After the installation process you will be prompted to enter your Authorization Key. If you click Yes the MT Secu-rity Settings dialog will be launched automatically, allowing the Key or Keys to be entered immediately. If you choose not to enter your Key at this point you can do so later by choosing one of the following procedures:
1. Double-click the file YourPersonalKeyXXXXX.mtk. This is attached to the email containing your Key(s).
2. Open the MT Security Settings Control Panel (Windows Task Bar Start > Control Panel > MT Security Settings), click the Import Key button and browse for your Key file called
YourPersonalKeyXXXXX.mtk
3. Open the MT Security Settings Control Panel (as above), in the Registration section select the board num-ber corresponding to the serial number for your Keys or HASP Key for a dongle, click the Enter Key button and type your User Name, Company Name and Key then click OK. Repeat this step for each Keys listed in the email.
Changing or re-entering a KeyShould you need to subsequently change or re-enter a Key, follow the appropriate option above.

Installing Ovation Software : Running the Installer Page 191
The key system is "smart". Only one key or set of keys is required regardless of the number of boards in a system. Any card can hold this key set as the authorization is processed based on a "Logical OR" of all keys present on any and all Mykerinos boards. Of course this Logical OR will only process keys with identical User Name and Company Name to the one entered in the key enabling window.

First launch : Before Launch Page 192
First launch
Before Launch
Important! After installation has been completed, please reboot the PC before attempting to launch Ovation. Then open the VS3 control panel application.
Start > All Programs > Ovation > VS3 control panel.
ApplicationChoose Ovation from the drop down list.
For Pyramix systems with a single Mykerinos board:Leave all default selections as they are, making sure the On Bus checkbox for your Mykerinos card is indeed checked then click on OK. The MT Control Panel exit dialog will open:
Click on Yes to save changes and exit the Merging Technologies Virtual Studio control panel application.
For Pyramix systems with a multiboard configuration: • Make sure there is a check mark in the On Bus boxes for the board(s) you wish to use with Ovation.
VS3 Control Panel Configuration page
MT Control Panel Exit dialog

First launch : Starting Ovation Page 193
• Select which board is to provide an external Video/TC reference with the radio buttons next to the board icons.
• For now, leave the default DSP Allocation settings as they are.
• When the VS3 Control Panel Do you want to save xxxx selection? dialog box appears, click on OK
• the VS3 Control Panel will close
Starting Ovation
By default the Installer will put Ovation into the Programs folder. It also places a shortcut icon on the Windows desktop.
Double-click on the Ovation desktop icon to launch Ovation.
Alternately, choose Start > All Programs > Ovation > Ovation.
This Ovation Guide is available from within Ovation and may be accessed via the Help menu or by pressing F1, or online at merging.com
Security KeysThe first time Ovation is launched, you will need to enter in your special Key to enable the program properly (Please see: Enabling Ovation with your Software Key on page 190).
The Pyramix Settings dialog window brings together all Pyramix settings. You will find detailed information about individual pages in the Pyramix User Manual.
The left-hand side of the window shows all available settings grouped in folders. Folders can be collapsed or expanded by clicking on the folder icons. By default, all folders are open, displaying the Settings pages they con-tain by name. Clicking on a settings page opens it in the right-hand side of the window for viewing and editing.

Audio File Support : Quicktime Support Page 194
Audio File Support
Quicktime Support
In order to enable the Quicktime handler you will need to purchase and install Quicktime Pro from Apple.
http://www.apple.com/quicktime/pro/
Compressed Audio File Formats
Ovation supports many compressed file formats, including MP3 and AAC, directly. Other compressed formats are supported via Windows DirectShow technology.
Codecs
MP3 and AACOvation supports MP3 and AAC directly. (Requires the optional Advanced Audio Codec Support key.) No sepa-rate codec installation is required and no decompressed file is generated.
FLACFLAC encoding and decoding is supported directly. No separate codec installation or key is required and no decompressed file is generated.
Ogg-VorbisOgg-Vorbis encoding and decoding is supported natively. No separate codec installation or key is required and no decompressed file is generated.
How Compressed Audio Support Works
TechnologyThe decompression is handled via Microsoft DirectShow technology. So the formats supported will depend on which DirectShow codecs are installed. Default Windows installation should handle most of the common com-pressed file formats (wma, mp3 and more), but a wide variety of codecs exist to support all the major compressed formats (such as ogg-vorbis, flac, etc.).
If you experience problems with the default Widows Installation or if you are in need of specific Codec, Merging has a list of recommended third-party codecs available.
For more details please refer to the Merging Forum Pyramix Troubleshooting & Tips section
http://forum.merging.com/viewforum.php?f=16
To enable sample accurate editing, the compressed files are first decompressed into a cache file. The file is format-ted as follows:
originalFileName__DXC(tag)DCX_.wav
This file is a plain wav file.
Ovation SetupFirst, set up the Default decompression cache options in :
Settings > Application > General > Media Manager > Other settings and click on Decompression Settings to open the Decompress files... dialog.

Audio File Support : Compressed Audio File Formats Page 195
Here you specify where the media should be decompressed to when no Mounting Rules are specified :
Locally (by the original) File(s) will be created in the same location as the original file.
Sub-locally (by the original, in a \MTDXCache sub folder). File(s) will be created in a sub folder created by Pyra-mix in the same location as the original file.
Custom (files are generated to the specified location). File(s) will be created in a user specified location. When this option is selected the Browse... button is available to open a file browser window to set the user defined path.
Mounting RulesIn addition to the general settings, Mounting Rules can be created to override the Default decompression cache settings for a specific Mounting location:
Special rules for cache file decompressionLocally (by the original) File(s) will be created in the same location as the original file.
Sub-locally (by the original, in a \MTDXCache sub folder). File(s) will be created in a sub folder created by Pyra-mix in the same location as the original file.
Custom (files are generated to the specified location). File(s) will be created in a user specified location. When this option is selected the Browse... button is available to open a file browser window to set the user defined path.
Enable enables the rule.
Allow cache files mounting when ticked cache files can be mounted directly, otherwise they remain invisible.
Decompress files... dialog
Mounting Rules dialog decompression rules section

Keyboard Shortcuts : Default Keyboard Shortcuts Page 196
Keyboard Shortcuts
Note: The Fire Command now acts like Double-Click when in Show Edit Mode and is mapped by default to the Space key. So:
• § In Edit Mode, Space toggles Audition / Stop.
• § In Show Mode, Space always Fires the Cue.
• § In Show Mode, Enter calls Fire Sequenced Cue ! (Fire and select Next).
Default Keyboard Shortcuts
ShowNew Show CTRL + N
Open Show CTRL + O
Save Show CTRL + S
Save Show As CTRL + A
Init Show F1
Start Show F2
Pause Show F3
Stop Show F4
Consolidate Show
View Show Properties SHIFT + P
View Show Validator
View Show Log
View Show Control Toolbar
View Audition Toolbar
View Active Cue Window
View Audio Control
Exit CTRL + Q
Cue ListNew Standard Cue List CTRL + SHIFT + N
New Timed Cue List
New Hot Keys
New Custom Keys
New Browser CTRL + SHIFT + B
New Hot Browser
Open Cue List CTRL + SHIFT + O
Save Cue List As CTRL + SHIFT + A

Keyboard Shortcuts : Default Keyboard Shortcuts Page 197
Close Cue List CTRL + SHIFT + C
Fire & Start F5
Start F6
Pause Shift + F7, F7
Stop Shift + F8, F8
Chase
Toggle/Select Cue List TAB
Toggle/Select Hot Key list
Select Specific Cue List CTRL + Corresponding Hot Key (01 - 48) (Either on PC keyboard or Hardware Remote)
View Cue List Properties CTRL + SHIFT + P
View Fire Toolbar
View Edit Toolbar
Custom Keys Design Mode Ctrl + Shift + E
Snap all Keys on Grid
Reset all Keys Position
Reset all Keys Size and Position
CueUndo Ctrl + Z
Cut CTRL + X
Copy CTRL + C
Paste CTRL + V
Add Empty Cue Insert
Load MTInterChange XML
Load Audio File
Load MIDI File
Remove Delete
Edit Ctrl + E
Replace Audio Media
Audition Ctrl + Space, Ctrl + D
Audition Start
Audition Rewind
Audition Stop Ctrl + Shift + F11, Ctrl + F11
Audition Play/Pause Ctrl + F9, Ctrl + Shift + F9
Audition Fast-Forward
Audition End

Keyboard Shortcuts : Default Keyboard Shortcuts Page 198
Audition Review Start
Audition Review End
Audition Jump Forward 1 Ctrl + Right
Audition Jump Forward 2 Ctrl + Shift + Right
Audition Jump Forward 3 Ctrl + Shift + Alt + Right
Audition Jump Back 1 Ctrl + Left
Audition Jump Back 2 Ctrl + Shift + Left
Audition Jump Back 3 Ctrl + Shift + Alt + Left
Move Down Ctrl + Down
Move Up Ctrl + Up
Nest Ctrl + Alt + Right
Unnest Ctrl + Alt + Left
Edit Cue Rules Ctrl + R
Edit Audio Gain Ctrl + G
View Cue Properties Ctrl + P
FireFire Sequenced Cue ! Enter
Previous Scene Left
Next Scene Right
Previous Cue Up
Next Cue Down
Fire Cue Space, Shift + F9, F9
Pause Cue Shift + F10, F10
Stop Cue Shift + F11, F11
Stop All Cues
Hot Key 01 (Down) 1
Hot Key 02 (Down) 2
Hot Key 03 (Down) 3
Hot Key 04 (Down) 4
Hot Key 05 (Down) 5
Hot Key 06 (Down) 6
Hot Key 07 (Down) 7
Hot Key 08 (Down) 8
Hot Key 09 (Down) 9
Hot Key 10 (Down) 0
Hot Key 11 (Down)
Continues to:-
Hot Key 48 (Down)

Keyboard Shortcuts : Default Keyboard Shortcuts Page 199
Hot Key 01 (Up) 1
Hot Key 02 (Up) 2
Hot Key 03 (Up) 3
Hot Key 04 (Up) 4
Hot Key 05 (Up) 5
Hot Key 06 (Up) 6
Hot Key 07 (Up) 7
Hot Key 08 (Up) 8
Hot Key 09 (Up) 9
Hot Key 10 (Up) 0
Hot Key 11 (Up)
Continues to:
Hot Key 48 (Up)
TrimmerNudge Cue In Less
Nudge Cue In More
Nudge Cue Out Less
Nudge Cue Out More
Nudge Fade In Less
Nudge Fade In More
Nudge Fade Out Less
Nudge Fade Out More
Nudge Cursor Less
Nudge Cursor More
Snap In To Cursor
Nudge Out To Cursor
Audition Review Start
Audition Review End
ViewView Show Properties Shift + P
View Show Validator
View Show Log
View Show Control Toolbar
View Cue List Properties Ctrl + Shift + P
View Cue List Fire Toolbar
View Cue List Edit Toolbar

Keyboard Shortcuts : Custom Keyboard Shortcuts Page 200
View Cue Properties Ctrl + P
View Audition Toolbar
View Active Cue Window
View Mixer Alt + M
View Touch Controller Alt + C
SettingsSettings Alt + G
Keyboard Shortcuts Ctrl + K
HelpUser Manual Ctrl + H
Custom Keyboard Shortcuts
We strongly encourage you to learn the default Ovation keyboard shortcuts. However, if you wish to create your own Keyboard Shortcuts for Ovation functions this is how to do it.
To define your own Keyboard Shortcuts:

Keyboard Shortcuts : Custom Keyboard Shortcuts Page 201
1. Choose Settings > Keyboard Shortcuts. This opens the Keyboard Shortcuts window.
2. All menu Commands are grouped together into Tabs within this window. Select the Tab with whichever group of Command Functions you wish to add or change key assignments for.
3. Click on the appropriate Command so that it is highlighted.
4. Click in the Press new shortcut key box. The cursor will become a blinking bar.
5. Now press the desired Key or combination of Key and modifier (e.g. the Ctrl, Shift, Alt, etc.). These will appear in the Press new shortcut key box. Note that Pyramix will warn you if the chosen Key or combination is already assigned to another function.
6. Click the Assign button.
7. Continue assigning Keys to Commands until you are satisfied.
8. Any set of user defined Keyboard Shortcuts can be saved as a Preset. To do so, click the Save Preset button, then name the Preset. Similarly, to recall a previously saved Preset, click in the Presets box and select it from the pop-up list. Note that several common Presets are shipped with Ovation.The Table will be saved in the system for the user currently logged in and will not affect any other user.
9. A table can be Saved or Loaded to a file so it can be taken to an other system. Just Click on the Save Table or Load Table button.
10. A table can be exported as a Text File along with some comments about commands. This is very useful since it enables you to print it as a command reference guide with your own keyboard shortcuts.
Ovation Keyboard Shortcuts dialog

Advanced Features : Multiple Ovation Sequencers for Redundancy Page 202
Advanced Features
Multiple Ovation Sequencers for Redundancy
Mirror All Commands to Remote Ovation Sequencershe Mirror All Commands to Remote Ovation Sequencers setting can be found in Settings > Application Set-tings > Controller > Remote Controlled Ovations. When enabled (ticked) this option ensures that all commands issued by the local Ovation Sequencer with the mouse, keyboard shortcuts or touch screen (I.e. NOT with a hard-ware controller) are also sent to all the Remote Ovation Sequencers defined in the Controller Settings. This enables total redundancy to be achieved with another Ovation Sequencer running the same show on another machine on the network. If two machines on the network enable this option and both define the other one in their own Con-troller Settings > Remote Ovation Sequencers list, then either or both user interfaces can be operated during the Show and each Sequencer will be a mirror of the other. Multiple mirrors can be defined.
Remote Players and Controllers
Ovation PlayersApart from the main Ovation application a smaller application, the OVPlayer is also included in the package.
In most circumstances Ovation will either operate stand-alone or networked with other machines running further full iterations of Ovation. However, it is possible to have one master Ovation sequencer with one or more Ovation Players running on remote, networked machines. In this case one Ovation sequencer is the master and controls the others.
Ovation ControllersSimilar to the OVPlayer, OV Controllers can be run on remote machines. OV Controllers enable Ovation to be con-trolled by commands from external devices.
OV PlayerThe OV Player module is the mechanism for interpreting Ovation Sequencer instructions and playing back the correct Media files and outputting control protocols at the right time from local or network storage.
In Show Mode an OV Player on a networked PC or indeed several PCs running OV Player can be controlled by a single Ovation module. This powerful feature enables highly complex scenarios to be developed.
Each Cue List and indeed each individual Cue can have different Default Output Players defined which then override the Show defaults.
Only one OV Player can be running on any one machine at one time. The OV Player on the machine running the Ovation Show is part of the Ovation Sequencer. The separate OV Player application is provided for use on slave Player Machines.
OV Player FilesOV Player files store player set-ups including audio mixer settings and have a .ovp file extension.

Advanced Features : Remote Players and Controllers Page 203
OV Player User InterfaceMain ScreenWhen an OV Player is launched its Main window opens together with the audio Mixer window used most recently.
Note: The OV Player can be set to start minimized in the View menu.
OV Player Buttons and Toolbars
OV Logo button. Clicking on this drops down the Main window control menu:
Controls are standard Windows items. At top right the three circular buttons are, from Left to Right:
Minimize Minimizes Main OV Player Window and the Mixer window (If open) to the Taskbar.
Maximize / Restore Toggles between Maximizing the Main OV Player Window and Restoring it to the size and position it occupied prior to being minimized / maximized
OV Player main Window
OV Player Window Control Menu

Advanced Features : Remote Players and Controllers Page 204
Close Opens the Exit OV Player dialog
Click on OK to close the OV Player or Cancel to exit the dialog without closing OV Player.
ToolbarsAll toolbars including the Menu toolbar can be made floating by clicking to the left of the first entry until the cur-sor changes to Move and dragging to a new location. If a floating Toolbar is dragged close to the edge of the Main Window it will snap to a docked configuration.
Opens a new, Untitled OV Player Session
Opens the Open Windows File Browser to enable an existing Session to be loaded
Saves the current Session. If this is Untitled, opens the Save As file browser
Toggles the Mixer window open / closed
Opens the OV Player Settings Window
Opens the About OV Player window (Will later also open this Guide)
OV Player Menus
Clicking on Session, View or Help drops down the respective menu
Session
New Ctrl+NOpens a new, Untitled OV Player Session
Exit OV Player dialog
OV Player Toolbar
OV Player Menus
OV Player Session Menu

Advanced Features : Remote Players and Controllers Page 205
Open Ctrl+OOpens the Open Windows File Browser to enable an existing Session to be loaded
Save Ctrl+S Saves the current Session. If this is Untitled, opens the Save As file browser
Save As... Opens the Save As file browser
Recent Sessions Drops down a list of recently opened Sessions
Exit Quits the OV Player application
View
Run Minimized When ticked OV Player will subsequently open minimized in the Task Bar
Mixer Toggles the Mixer window open / closed
View Player I/O Status Toggle OV Player I/O Status window show/hide
Settings Opens the OV Player Settings Window
Note: This is a restricted version of the Settings window accessible from the Ovation Sequencer Settings menu.
Help
Opens the About OV Player window
OV ControllerThis application module handles Ovation MIDI and GPI remote control inputs. I.e. control OF the Ovation sequencer(s) by external devices.
Exactly like the OVPlayer application it can be run on a remote computer.
Only one OV Controller can be running on an any one machine at one time.
Note: OVControllers control Ovation Sequencers which in turn can control remote OVPlayers.
OV Controller FilesOV Controller files store controller set-ups and have a .ovc file extension.
OV Player View Menu
OV Player Help Menu

Advanced Features : Remote Players and Controllers Page 206
OV Controller User InterfaceMain ScreenWhen an OV Controller is launched its Main window opens: .
Note: The OV Controller can be set to start minimized in the Controller View menu.
OV Controller Buttons and Toolbars
OV Logo button. Clicking on this drops down the Main window control menu:
Controls are standard Windows items. At top right the three circular buttons are, from Left to Right:
Minimize Minimizes Main OV Controller Window to the Taskbar.
Maximize / Restore Toggles between Maximizing the Main OV Controller Window and Restoring it to the size and position it occupied prior to being minimized / maximized
OV Controller main Window
OV Controller Window Control Menu

Advanced Features : Remote Players and Controllers Page 207
Close Opens the Exit OV Controller dialog
Click on OK to close the OV Controller or Cancel to exit the dialog without closing OV Controller.
ToolbarsAll toolbars including the Menu toolbar can be made floating by clicking to the left of the first entry until the cur-sor changes to Move and dragging to a new location. If a floating Toolbar is dragged close to the edge of the Main Window it will snap to a docked configuration.
Opens a new, Untitled OV Controller Session
Opens the Open Windows File Browser to enable an existing Session to be loaded
Saves the current Session. If this is Untitled, opens the Save As file browser
Opens the Touch Controller window
Opens the OV Controller Settings Window
Opens the About OV Controller window
OV Controller Menus
Clicking on Session, View or Help drops down the respective menu
Session
New Ctrl+NOpens a new, Untitled OV Controller Session
Exit OV Controller dialog
OV Controller Toolbar
OV Controller Menus
OV Controller Session Menu

Advanced Features : Remote Players and Controllers Page 208
Open Ctrl+OOpens the Open Windows File Browser to enable an existing Session to be loaded
Save Ctrl+S Saves the current Session. If this is Untitled, opens the Save As file browser
Save As... Opens the Save As file browser
Recent Sessions Drops down a list of recently opened Sessions
Exit Quits the OV Player application
View
Run Minimized When ticked OV Controller will subsequently open minimized in the Task Bar
Touch Controller Toggles the Touch Controller window open / closed
Settings Opens the OV Controller Settings Window
Note: This is a restricted version of the Settings window accessible from the Ovation Sequencer Settings menu.
Help
Opens the About OV Controller window
OV Controller View Menu
OV Controller Help Menu

Appendix I : OVController Commands Page 209
Appendix I
OVController Commands
• Ovation can be remote controlled in two ways:
• As a Media Sequencer: All features available in the user interface are remote controllable the same manner they are operated manually with the mouse from within the application. It’s equivalent as remote controlling each buttons of the user interface.
• As a Media Server: All Cues and Cue Lists can be remote controlled independently given their Cue List Number and/or Cue Number or Index. It’s equivalent as remote controlling a pool of media inde-pendently of the Ovation user interface.
• - Both modes can be used at the same time. A remote controller can send some Media Sequencer com-mands and some Media Server commands anytime and transparently.
• - The charts in following pages show all available commands in both modes.
• Appendix II on page 214 gives details on the Ovation Keyboard Commands mapping
• Appendix III on page 217 gives details on MIDI / Midi Show Control Commands mapping
• Appendix IV on page 225 gives details on DMX Commands mapping
• Appendix V on page 226 gives details on GPI Commands mapping

Appendix I : OVController Commands Page 210
Media Sequencer Mode available Commands: Note: If the tables are difficult to read please zoom in.
Ovation Media SequencerCommands Parameter 1 Parameter 2 Parameter 3 Parameter 4
CueFireCueFireSequencedCuePauseCueStopCueStopAll
CueHotPress Down = 1 / Up = 0
CueAuditionCueAuditionStartCueAuditionRewindCueAuditionStopCueAuditionPlayPauseCueAuditionFastForwardCueAuditionEndCueAuditionReviewStartCueAuditionReviewEndCueBrowse
CueSelect Cue # ** Cue Sub#1 ** Cue Sub#2 ** Cue Sub#3 **CueSelectNextCueSelectPrevCueSelectNextSceneCueSelectPrevScene
CueListSelect Cue List # *CueListSelectNextCueListSelectPrevCueListSelectToggle
HotCueListSelect Cue List # *HotCueListSelectNextHotCueListSelectPrevHotCueListSelectToggle
CueListFireStartCueListStartCueListPauseCueListStopCueListChase On =1 / Off = 0CueListChaseToggle
ShowInitShowStartShowPauseShowStopShowReset
OKCancel
SendModifierKey Modifier Key Code *** Down = 1 / Up = 0SendVirtualKey Virtual Key Code **** Down = 1 / Up = 0
UndoCutCopyPasteSave
SetMasterOutputGain GainMuteMasterOutput Mute = 1 / Unmute = 0

Appendix I : OVController Commands Page 211
Parameters details:
* CueList # Cue List Number as displayed in the Ovation Sequencer
** Cue # If Cue Sub#1 equals OVCUEINDEX (-2) then Cue # is the Cue index in its Cue ListOtherwise the Cue is identified with up to 3 nested levels using :Cue#, Sub#1, Sub#2 and Sub#3.Example: 1.1.2 or 3.4.2.5Note: 1.2.0.0 = 1.2.-1.-1 = 1.2
*** Modifier Key: OVCCMK_CONTROL 1OVCCMK_SHIFT 2OVCCMK_ALT 3
OVCCMK_FADE 2 (= OVCCMK_SHIFT)OVCCMK_RESET_PL4OVCCMK_PLAY_STO5OVCCMK_PLAY_PAU6OVCCMK_PLAY_DEP7OVCCMK_PLAY_DEP8
**** Virtual Keys: Any valid Windows Virtual Key Code

Appendix I : OVController Commands Page 212
Media Server Mode available Commands:
Ovation Media Server
Commands
CueList#
Cue#
CueSub#1
CueSub#2
CueSub#3 Time TimeOffset Fade
ProgressOffset Boolean Integer Floating Point String
CueAddAudio X X X X X Audio Output Slot Audio Gain PathName URL
CueAddVideo X X X X X PathName URL
CueLoad X X X X XCueUnload X X X X XCueMakeReady X X X X XCueFire X X X X X X X Fade In XCueFireSequenced X X X X XCuePause X X X X X X X Fade Out
CueStop X X X X X X X Fade Out
CueStopAll
CueDim X X X X X X X Fade Out
CueUnDim X X X X X X X Fade In
CueHotPress X X X X X Pressed=1/Released=0
CueAudition X X X X XCueAuditionStart X X X X XCueAuditionRewind X X X X XCueAuditionStop X X X X XCueAuditionPlayPause X X X X XCueAuditionFastForward X X X X XCueAuditionEnd X X X X XCueAuditionReviewStart X X X X XCueAuditionReviewEnd X X X X XCueBrowse X X X X X
CueSelect X X X X XCueSelectNext XCueSelectPrev XCueSelectNextScene XCueSelectPrevScene X
CueListSelect XCueListSelectNext
CueListSelectPrev
CueListSelectToggle
HotCueListSelect XHotCueListSelectNext
HotCueListSelectPrev
HotCueListSelectToggle
CueListFireStart X X X X XCueListStart XCueListPause XCueListStop XCueListSetTime X X XCueListChase X Chase Enabled = 1
CueListChaseToggle X
ShowInit
ShowStart
ShowPause
ShowStop
ShowReset
OK
Cancel
SendModifierKey Pressed=1/Released=0 Modifier Key Code
SendVirtualKey Pressed=1/Released=0 Virtual Key Code
Undo
Cut
Copy
Paste
Save
SetMasterOutputGain Gain
MuteMasterOutput Mute = 1 / Unmute = 0
CueList / Cue Identification Parameters Command Timing Parameters Generic Parameters

Appendix I : OVController Commands Page 213
Parameters Explanation:
CueList # If CueList # equals OVSELECTED (-1) then the currently selected
CueList in the Sequencer is used for the command
Otherwise the Cue List Number as displayed in the Ovation Sequencer
Cue # If Cue # equals OVSELECTED (-1) then the currently selected Cue in the Sequencer is used for the command
If Cue Sub#1 equals OVCUEINDEX (-2) then Cue # is the Cue index in its Cue List
Otherwise the Cue is identified with up to 3 nested levels using Cue#, Sub#1, Sub#2 and Sub#3.
Example: 1.1.2 or 3.4.2.5
Note: 1.2.0.0 = 1.2.-1.-1 = 1.2
Time Absolute Time when the Command will be executed.
This Time relates to the Show Time. (OV_INVALID_TIME means as soon as possible)
TimeOffset Relative Time when the Command will be executed counting from when the command is issued
(OV_INVALID_TIME means no offset)
Fade Fade Time (OV_INVALID_TIME means the Fade Time defined in the Sequencer is used)
ProgressOffset Time from the beginning of the Cue to start playing the Cue when Fired
(OV_INVALID_TIME means the Cue starts from its beginning)
Modifier Key Code: OVCCMK_CONTROL 1
OVCCMK_SHIFT 2
OVCCMK_ALT 3
OVCCMK_FADE 2 (= OVCCMK_SHIFT)
OVCCMK_RESET_PLAY 4
OVCCMK_PLAY_STOP 5
OVCCMK_PLAY_PAUSE 6
OVCCMK_PLAY_DEPRESS_ST 7
OVCCMK_PLAY_DEPRESS_PA 8
Virtual Key Code: Any valid Windows Virtual Key Code

Appendix II : The Ovation Keyboard Controller Commands Map Page 214
Appendix II
The Ovation Keyboard Controller Commands Map
Keyboard Layout
Standard - General Purpose Mapping

Appendix II : The Ovation Keyboard Controller Commands Map Page 215
Hot Keys Only Mapping
Note: The Ovation Keyboard does not map any Media Server Mode specific Commands.
Note: The keyboard keys can be changed easily with the key caps removal tool provided with the keyboard. All the key caps required for both keyboard layouts are supplied with the keyboard.
Changing Keyboard MappingTo change the keyboard mapping between General Purpose and Hotkeys go to:
Settings > Application > Controller Units > Proprietary > OVKeyboard
Make sure that the Enable checkbox is ticked and choose the appropriate mapping with the radio buttons.

Appendix II : The Ovation Keyboard Controller Commands Map Page 216
Ovation Keyboard Commands mapping

Appendix III : MIDI and Midi Show Control Page 217
Appendix III
MIDI and Midi Show Control
Midi Show Control Media Sequencer Mode Commands Mapping
Ovation Media Sequencer Commands MCS Command Cmd Param (Dec) Cmd Param (Hex) Comments
CueFire Fire 8 8CueFireSequenced Fire 9 9CuePause Fire 10 ACueStop Fire 11 BCueStopAll Fire 12 C
CueHotPress Fire 48-95 30-5F Even : Down - Odd : Up
CueAudition Fire 32 20CueAuditionStart Fire 33 21CueAuditionRewind Fire 34 22CueAuditionStop Fire 35 23CueAuditionPlayPause Fire 36 24CueAuditionFastForward Fire 37 25CueAuditionEnd Fire 38 26CueAuditionReviewStart Fire 39 27CueAuditionReviewEnd Fire 40 28CueBrowse Fire 41 29
CueSelectCueSelectNext Fire 42 2ACueSelectPrev Fire 43 2BCueSelectNextScene Fire 44 2CCueSelectPrevScene Fire 45 2E
CueListSelect FireCueListSelectNext Fire 17 11CueListSelectPrev Fire 18 12CueListSelectToggle Fire 19 13
HotCueListSelect FireHotCueListSelectNext Fire 22 16HotCueListSelectPrev Fire 23 17HotCueListSelectToggle Fire 24 18
CueListFireStart Fire 26 1ACueListStart Fire 27 1BCueListPause Fire 28 1CCueListStop Fire 29 1DCueListChaseCueListChaseToggle Fire 30 1E
ShowInit Fire 1 1ShowStart Fire 2 2ShowPause Fire 3 3ShowStop Fire 4 4ShowReset Fire 5 5
OK Fire 112 70Cancel Fire 113 71
SendModifierKey Fire 96-111 60-6F Even : Down - Odd : UpSendVirtualKey
Undo Fire 114 72Cut Fire 115 73Copy Fire 116 74Paste Fire 117 75Save Fire 118 76
SetMasterOutputGainMuteMasterOutput Fire 119-120 7A-7B Mute - Unmute

Appendix III : MIDI and Midi Show Control Page 218
Midi Show Control Media Server Mode Commands mapping:
Continued on next page
Ovation Media Server Commands MSC Command
CueAddAudioCueAddVideo
CueLoadCueUnloadCueMakeReady LoadCueFire Go / Timed Go / ResumeCueFireSequencedCuePause StopCueStop Go OffCueStopAllCueDimCueUnDim
CueHotPress
CueAuditionCueAuditionStartCueAuditionRewindCueAuditionStopCueAuditionPlayPauseCueAuditionFastForwardCueAuditionEndCueAuditionReviewStartCueAuditionReviewEndCueBrowse
CueSelectCueSelectNext Standby +CueSelectPrev Standby -CueSelectNextScene Sequence +CueSelectPrevScene Sequence -
CueListSelect Open Cue ListCueListSelectNextCueListSelectPrevCueListSelectToggle
HotCueListSelectHotCueListSelectNextHotCueListSelectPrevHotCueListSelectToggle
CueListFireStart Go / Jam ClockCueListStart Start ClockCueListPauseCueListStop Stop ClockCueListSetTime Zero Clock / Set ClockCueListChase MTC Chase On / OffCueListChaseToggle
ShowInitShowStartShowPauseShowStopShowReset Reset

Appendix III : MIDI and Midi Show Control Page 219
Note: Ovation is compatible with the MSC data specification with the following limita-tion:
Sub-Cue (Child-Cue) level id is limited to 4I.e. if 10.4.1.2.8.14 cue data is sent, Ovation will use the 10.4.1.2 cue identifier and Sub Cue id 8.14 will be ignored
Sub-Cue list level id is limited to 1 all Sub-Cue list id will be ignoredI.e. If 1.2 cue list data is sent, Ovation will use the first cue list identifier. In that case 1
Cue list 0 is not supported
Cue path data is ignored
Ovation Media Server Commands MSC Command
Cancel
SendModifierKeySendVirtualKey
UndoCutCopyPasteSave
SetMasterOutputGainMuteMasterOutput All Off / Restore

Appendix III : MIDI and Midi Show Control Page 220
General MIDI Media Sequencer Mode Commands Mapping Note: If the tables are difficult to read please zoom in.
Note: Data 1 is a range of values from 0 to 63
Ovation Media Sequencer Commands Command Data 1 Data 2 Comments
CueFire Control Change mappableCueFireSequenced Control Change mappableCuePause Control Change mappableCueStop Control Change mappableCueStopAll Control Change mappable
CueHotPress Control Change mappable 0 = down otherwise up
CueAudition Control Change mappableCueAuditionStart Control Change mappableCueAuditionRewind Control Change mappableCueAuditionStop Control Change mappableCueAuditionPlayPause Control Change mappableCueAuditionFastForward Control Change mappableCueAuditionEnd Control Change mappableCueAuditionReviewStart Control Change mappableCueAuditionReviewEnd Control Change mappableCueBrowse Control Change mappable
CueSelect Control Change mappable the Cue #CueSelectNext Control Change mappableCueSelectPrev Control Change mappableCueSelectNextScene Control Change mappableCueSelectPrevScene Control Change mappable
CueListSelect Control Change mappable the Cue List #CueListSelectNext Control Change mappableCueListSelectPrev Control Change mappableCueListSelectToggle Control Change mappable
HotCueListSelect Control Change mappable the Cue List #HotCueListSelectNext Control Change mappableHotCueListSelectPrev Control Change mappableHotCueListSelectToggle Control Change mappable
CueListFireStart Control Change mappableCueListStart Control Change mappableCueListPause Control Change mappableCueListStop Control Change mappableCueListChase Control Change mappable 0 = Chase On otherwise Chase OffCueListChaseToggle Control Change mappable
ShowInit Control Change mappableShowStart Control Change mappableShowPause Control Change mappableShowStop Control Change mappableShowReset Control Change mappable
OK Control Change mappableCancel Control Change mappable
SendModifierKey Control Change mappableSendVirtualKey Control Change mappable
Undo Control Change mappableCut Control Change mappableCopy Control Change mappablePaste Control Change mappableSave Control Change mappable
SetMasterOutputGain Control Change mappable The master gain fader position 0 = MuteMuteMasterOutput Control Change mappable 0 = Unmute otherwise Mute

Appendix III : MIDI and Midi Show Control Page 221
General MIDI Media Server Mode Commands Mapping
The MIDI channel is the Cue list Id or is ignored and the Selected Cue List is targeted. An option is available.
Ovation Media Server Commands GM Command Data 1 Comments
CueAddAudioCueAddVideo
CueLoadCueUnloadCueMakeReadyCueFire Note On the Cue # depends on the Note On optionCueFireSequencedCuePause Note Off the Cue # depends on the Note Off and Note On optionCueStop Note Off the Cue # depends on the Note Off and Note On optionCueStopAllCueDimCueUnDim
CueHotPress Note On / Note Off the Cue # depends on the Note On option
CueAuditionCueAuditionStartCueAuditionRewindCueAuditionStopCueAuditionPlayPauseCueAuditionFastForwardCueAuditionEndCueAuditionReviewStartCueAuditionReviewEndCueBrowse
CueSelectCueSelectNextCueSelectPrevCueSelectNextSceneCueSelectPrevScene
CueListSelect Program Change the CueList #CueListSelectNextCueListSelectPrevCueListSelectToggle
HotCueListSelectHotCueListSelectNextHotCueListSelectPrevHotCueListSelectToggle
CueListFireStartCueListStartCueListPauseCueListStopCueListSetTimeCueListChaseCueListChaseToggle
ShowInitShowStartShowPauseShowStopShowReset
OKCancel
SendModifierKeySendVirtualKey
UndoCutCopyPasteSave
SetMasterOutputGainMuteMasterOutput

Appendix III : MIDI and Midi Show Control Page 222
MMC Media Sequencer Commands Mapping
Ovation Media Sequencer Commands MMC Command Cmd (Dec) Cmd (Hex) Comments
CueFire Play / Deferred Play 2, 3 2, 3CueFireSequencedCuePause Pause 9 9CueStop Stop 1 1CueStopAll
CueHotPress
CueAuditionCueAuditionStartCueAuditionRewindCueAuditionStopCueAuditionPlayPauseCueAuditionFastForwardCueAuditionEndCueAuditionReviewStartCueAuditionReviewEndCueBrowse
CueSelectCueSelectNext Fast Forward 4 4CueSelectPrev Rewind 5 5CueSelectNextSceneCueSelectPrevScene
CueListSelectCueListSelectNext Variable Play 69 45 positive valueCueListSelectPrev Variable Play 69 45 negative valueCueListSelectToggle Eject 10 A
HotCueListSelectHotCueListSelectNextHotCueListSelectPrevHotCueListSelectToggle
CueListFireStartCueListStartCueListPauseCueListStopCueListChaseCueListChaseToggle
ShowInitShowStartShowPauseShowStopShowReset
OKCancel
SendModifierKeySendVirtualKey
UndoCutCopyPasteSave
SetMasterOutputGainMuteMasterOutput

Appendix III : MIDI and Midi Show Control Page 223
GM Media Sequencer Commands Mapping
Note: Data 1 is a range of values from 0 to 63
Ovation Media Sequencer Commands Command Data 1 Data 2 Comments
CueFire Control Change mappableCueFireSequenced Control Change mappableCuePause Control Change mappableCueStop Control Change mappableCueStopAll Control Change mappable
CueHotPress Control Change mappable 0 = down otherwise up
CueAudition Control Change mappableCueAuditionStart Control Change mappableCueAuditionRewind Control Change mappableCueAuditionStop Control Change mappableCueAuditionPlayPause Control Change mappableCueAuditionFastForward Control Change mappableCueAuditionEnd Control Change mappableCueAuditionReviewStart Control Change mappableCueAuditionReviewEnd Control Change mappableCueBrowse Control Change mappable
CueSelect Control Change mappable the Cue #CueSelectNext Control Change mappableCueSelectPrev Control Change mappableCueSelectNextScene Control Change mappableCueSelectPrevScene Control Change mappable
CueListSelect Control Change mappable the Cue List #CueListSelectNext Control Change mappableCueListSelectPrev Control Change mappableCueListSelectToggle Control Change mappable
HotCueListSelect Control Change mappable the Cue List #HotCueListSelectNext Control Change mappableHotCueListSelectPrev Control Change mappableHotCueListSelectToggle Control Change mappable
CueListFireStart Control Change mappableCueListStart Control Change mappableCueListPause Control Change mappableCueListStop Control Change mappableCueListChase Control Change mappable 0 = Chase On otherwise Chase OffCueListChaseToggle Control Change mappable
ShowInit Control Change mappableShowStart Control Change mappableShowPause Control Change mappableShowStop Control Change mappableShowReset Control Change mappable
OK Control Change mappableCancel Control Change mappable
SendModifierKey Control Change mappableSendVirtualKey Control Change mappable
Undo Control Change mappableCut Control Change mappableCopy Control Change mappablePaste Control Change mappableSave Control Change mappable
SetMasterOutputGain Control Change mappable The master gain fader position 0 = MuteMuteMasterOutput Control Change mappable 0 = Unmute otherwise Mute

Appendix III : MIDI and Midi Show Control Page 224
GM Media Server Commands Mapping
Note: The MIDI channel is the Cue list Id or is ignored and the Selected Cue List is tar-geted. An option is available.
Ovation Media Server Commands GM Command Data 1 Comments
CueAddAudioCueAddVideo
CueLoadCueUnloadCueMakeReadyCueFire Note On the Cue # depends on the Note On optionCueFireSequencedCuePause Note Off the Cue # depends on the Note Off and Note On optionCueStop Note Off the Cue # depends on the Note Off and Note On optionCueStopAllCueDimCueUnDim
CueHotPress Note On / Note Off the Cue # depends on the Note On option
CueAuditionCueAuditionStartCueAuditionRewindCueAuditionStopCueAuditionPlayPauseCueAuditionFastForwardCueAuditionEndCueAuditionReviewStartCueAuditionReviewEndCueBrowse
CueSelectCueSelectNextCueSelectPrevCueSelectNextSceneCueSelectPrevScene
CueListSelect Program Change the CueList #CueListSelectNextCueListSelectPrevCueListSelectToggle
HotCueListSelectHotCueListSelectNextHotCueListSelectPrevHotCueListSelectToggle
CueListFireStartCueListStartCueListPauseCueListStopCueListSetTimeCueListChaseCueListChaseToggle
ShowInitShowStartShowPauseShowStopShowReset
OKCancel
SendModifierKeySendVirtualKey
UndoCutCopyPasteSave
SetMasterOutputGainMuteMasterOutput

Appendix IV : DMX Commands Page 225
Appendix IV
DMX Commands
Under Construction

Appendix V : GPI Commands Page 226
Appendix V
GPI CommandsOvation
Media Server Commands
Param 1 Param 2 Param 3 Param 4 Comments
CueAddAudio CueList # Cue # Cue Sub#1 Cue Sub#2CueAddVideo CueList # Cue # Cue Sub#1 Cue Sub#2
CueLoad CueList # Cue # Cue Sub#1 Cue Sub#2CueUnload CueList # Cue # Cue Sub#1 Cue Sub#2CueMakeReady CueList # Cue # Cue Sub#1 Cue Sub#2CueFire CueList # Cue # Cue Sub#1 Cue Sub#2CueFireSequenced CueList # Cue # Cue Sub#1 Cue Sub#2CuePause CueList # Cue # Cue Sub#1 Cue Sub#2CueStop CueList # Cue # Cue Sub#1 Cue Sub#2CueStopAllCueDim CueList # Cue # Cue Sub#1 Cue Sub#2CueUnDim CueList # Cue # Cue Sub#1 Cue Sub#2
CueHotPress CueList # Cue # Cue Sub#1 0 = Down otherwise Up
CueAudition CueList # Cue # Cue Sub#1 Cue Sub#2CueAuditionStart CueList # Cue # Cue Sub#1 Cue Sub#2CueAuditionRewind CueList # Cue # Cue Sub#1 Cue Sub#2CueAuditionStop CueList # Cue # Cue Sub#1 Cue Sub#2CueAuditionPlayPause CueList # Cue # Cue Sub#1 Cue Sub#2CueAuditionFastForward CueList # Cue # Cue Sub#1 Cue Sub#2CueAuditionEnd CueList # Cue # Cue Sub#1 Cue Sub#2CueAuditionReviewStart CueList # Cue # Cue Sub#1 Cue Sub#2CueAuditionReviewEnd CueList # Cue # Cue Sub#1 Cue Sub#2CueBrowse CueList # Cue # Cue Sub#1 Cue Sub#2
CueSelect CueList # Cue # Cue Sub#1 Cue Sub#2CueSelectNext CueList #CueSelectPrev CueList #CueSelectNextScene CueList #CueSelectPrevScene CueList #
CueListSelect CueList #CueListSelectNextCueListSelectPrevCueListSelectToggle
HotCueListSelect CueList #HotCueListSelectNextHotCueListSelectPrevHotCueListSelectToggle
CueListFireStart CueList # Cue # Cue Sub#1 Cue Sub#2CueListStart CueList #CueListPause CueList #CueListStop CueList #CueListSetTime CueList #CueListChase CueList # Chase Off = 0 otherwise Chase On
CueListChaseToggle CueList #
ShowInitShowStartShowPauseShowStopShowReset
OKCancel
SendModifierKey Modifier Key Code Release=0 otherwise Pressed
SendVirtualKey Virtual Key Code Release=0 otherwise Pressed
UndoCut CueList #Copy CueList #Paste CueList #Save
SetMasterOutputGain Gain [dB]MuteMasterOutput Unmute = 0 otherwise Mute
GPI Media Server Mapping

Appendix V : GPI Commands Page 227
Parameters Explanation:
CueList # If CueList # equals OVSELECTED (-1) then the currently selected CueList in the Sequencer is used for the command
Otherwise the Cue List Number as displayed in the Ovation Sequencer
Cue # If Cue # equals OVSELECTED (-1) then the currently selected Cue in the Sequencer is used for the command
Modifier Key Code: OVCCMK_CONTROL 1
OVCCMK_SHIFT 2
OVCCMK_ALT 3
OVCCMK_FADE 2 (= OVCCMK_SHIFT)
OVCCMK_RESET_PLAY 4
OVCCMK_PLAY_STOP 5
OVCCMK_PLAY_PAUSE 6
OVCCMK_PLAY_DEPRESS_STOP 7
OVCCMK_PLAY_DEPRESS_PAUSE 8
Virtual Key Code: Any valid Windows Virtual Key Code
Appendix VI : Mouse Modifier Keys Page 228
Appendix VI
Mouse Modifier Keys
This table shows the valid modifier keys which can be used in conjunction with some mouse operations
Show ControlUnder construction
Hot Key Mode
Click on a Cue Fire ButtonFire Cue following Cue Properties Hot Key Mode None
Fire Cue following inverse of Cue Properties Hot Key Mode Ctrl
(for example Toggle Play / Stop becomes
Press Play / Release Stop)
Force Stop Alt
Add default Fade In and Out Shift

Appendix VII : I/O Daughter-card Options Page 229
Appendix VII
I/O Daughter-card Options
ADAT Optical I/OThe ADAT Optical daughter card offers 16 channels of audio input and 16 channels of audio output, 8 channels per optical connection. From top to bottom of the card, it has two digital optical input connectors (Inputs A and B) and two digital optical output connectors (Outputs A and B).
The signal format of optical connectors Input A and Output A can be set inside the Pyramix software to operate in either ADAT or S/PDIF mode. When in ADAT mode, there are 8 discrete audio channels carried per each optical connector. S/PDIF mode has 2 channels per optical connector.
Note: in SPDIF mode the maximum sampling rate is limited to 48 kHz. Please also note that whilst the ADAT daughterboard continues to function normally in HDTDM (64 bus) mode it cannot be used for input when in XDTDM (128 bus) mode and is then only capa-ble of 8 outputs via Optical Output A with the same 8 duplicated on Optical Output B.
WARNING! The ADAT Daughterboard requires modification before use with XDTDM mode. Failure to do this may result in data loss. Please contact your Merging Technologies Sales Partner to arrange a mod.
AES/EBU I/OThe AES/EBU daughter card offers 24 channels of I/O over 12 AES/EBU input and output pairs. Connection is via three DB-25 connectors, One on the main card attached to the Mykerinos and two more on a separate bracket connected via internal ribbon cable to the main card. An optional break-out cable can be ordered separately which connects to the DB-25 connector and terminates in 8 XLR connectors which may be used to connect to standard AES/EBU stereo inputs and outputs. AES daughter cards are available with or without 8 channels of SRC (sample rate conversion)
Dual DC I/OThe Dual DC offers up to 12 inputs and outputs at 32kHz, 44.1kHz or 48kHz sampling rates on a single board. All converters are 24 bit. Connection is via 2 DB-25 connectors. One, on the main card attached to the Mykerinos, car-ries the analog I/O and the second, on a separate bracket, carries four AES/EBU Input and Output stereo pairs. There are four analogue Line outputs and four analogue Line Inputs, two of which may be switched to accept Mic or Line level inputs. These have Mic pre-amps and 48V phantom powering. The analogue Line level I/O is adjust-able over a 24dB range to accommodate all standard studio levels. Optional break-out cables can be ordered sep-arately which connect to the DB-25 connectors and terminate in 8 XLR connectors.
The Dual DC is the most cost-effective I/O daughter card for Pyramix users. It is an ideal I/O solution for mixed ana-log/digital requirements, as encountered in Broadcast production, and Video post-production environments. It allows direct connection of up to two dynamic or condenser microphones, typically for quick and easy voice-over recording.
Note: the Dual DC I/O daughterboard is not HDTDM bus compatible and can not be used in a multiboard setup.
MADI I/OThe MADI daughter card offers 56 channels of 24 bit bi-directional I/O, and up to 64 channels in MADI-X (MADI Extended) format. It can be ordered either in a BNC coaxial version or an optical duplex SC version. Both versions are fitted with a standard Wordclock BNC I/O connector, which can be programmed in the Pyramix software as a Wordclock In or Out signal.
SDIF I/OThe Mykerinos SDIF daughter board is specially designed for multi-track DSD recording. It offers 8 channels of DSD digital input over 8 unbalanced, 75 Ohm terminated BNC connectors and 8 channels of DSD digital output over 8 unbalanced, 75 Ohm BNC connectors.One channel of DSD signal is transported at the bit-rate of 2.82 MHz through

Appendix VII : I/O Daughter-card Options Page 230
each BNC connector. SDIF-2 and SDIF-3 format are fully supported for DSD transport (selected under software control)
With one Mykerinos board, it is only possible to use one DSD Input and Output channel. To have the full range of 8 I/O channels, a second Mykerinos board is required to provide sufficient DSP power.
TASCAM TDIFThe TASCAM TDIF daughter card offers 24 channels of I/O over 3 Tascam TDIF connections. Connection is via three DB-25 connectors, One on the main card attached to the Mykerinos and two more on a separate bracket con-nected via internal ribbon cable to the main card.
TASCAM TDIF I/O OptionA TASCAM TDIF format option bracket may be added to the ADAT I/O daughtercard and provides is available for 8 channels of TDIF I/O. The TDIF bracket connects to a socket on the ADAT card only. This daughter card cannot be used in multi-board systems (since it utilizes the HTDM connector).

Appendix IIX : Web Server Commands Page 231
Appendix IIX
Web Server Commands
Please zoom in to view comfortably.
HTTP Media Sequencer Map
O v a tio n M e d ia S e q u e n c e rC o m m an d s C o m m a n d P a ra m e te r 2 P a ra m e te r 3 P a ra m e te r 4 P a ra m e ter 5
C u eF ire < IP > :<P o rt> /A c tio n? C o m m an d = C ue _ F ire & C u e L is t= < C u eL is t> (*) & C u e= < C u e > (*) & T im e = < n [m s ]> (*) & T im e O ffse t= <n [m s ]> (*)C u eF ire S e q u e n c e d < IP > :<P o rt> /A c tio n? C o m m an d = C ue _ F ireS eq u e nc e d & C u e L is t= < C u eL is t> (*) & C u e= < C u e > (*)C u eP a u s e < IP > :<P o rt> /A c tio n? C o m m an d = C ue _ P a us e & C u e L is t= < C u eL is t> (*) & C u e= < C u e > (*) & T im e = < n [m s ]> (*) & T im e O ffse t= <n [m s ]> (*)C u eS to p < IP > :<P o rt> /A c tio n? C o m m an d = C ue _ S to p & C u e L is t= < C u eL is t> (*) & C u e= < C u e > (*) & T im e = < n [m s ]> (*) & T im e O ffse t= <n [m s ]> (*)C u eS to p All < IP > :<P o rt> /A c tio n? C o m m an d = C ue _ S to pA ll
C u eH o tP re s s < IP > :<P o rt> /A c tio n? C o m m an d = C ue _ H o tP re s s & C u e L is t= < C u eL is t> (*) & C u e= < C u e > (*) & P res s e d= 1 o r 0
C u eA u d itio n < IP > :<P o rt> /A c tio n? C o m m an d = C ue _ A u d ition & C u e L is t= < C u eL is t> (*) & C u e= < C u e > (*)C u eA u d itio n S ta rtC u eA u d itio n R e w in dC u eA u d itio n S to pC u eA u d itio n P la yP a u s eC u eA u d itio n F a s tF o rw a rdC u eA u d itio n E n dC u eA u d itio n R e v ie w S ta rtC u eA u d itio n R e v ie w E n dC u eB ro w s e
C u eS e le c t < IP > :<P o rt> /A c tio n? C o m m an d = C ue _ S e le c t & C u e L is t= < C u eL is t> (*) & C u e= < C u e > (*)C u eS e le c tN e x t < IP > :<P o rt> /A c tio n? C o m m an d = C ue _ S e le c t_ N e x t & C u e L is t= < C u eL is t> (*)C u eS e le c tP re v < IP > :<P o rt> /A c tio n? C o m m an d = C ue _ S e le c t_ P re v & C u e L is t= < C u eL is t> (*)C u eS e le c tN e x tS c en e < IP > :<P o rt> /A c tio n? C o m m an d = C ue _ S e le c t_ N e x tS ce n e & C u e L is t= < C u eL is t> (*)C u eS e le c tP re v S c en e < IP > :<P o rt> /A c tio n? C o m m an d = C ue _ S e le c t_ P re vS ce ne & C u e L is t= < C u eL is t> (*)
C u eL is tS e le c t < IP > :<P o rt> /A c tio n? C o m m an d = C ue L is t_ S e le c t & C u e L is t= < C u eL is t> (*)C u eL is tS e le c tN e x t < IP > :<P o rt> /A c tio n? C o m m an d = C ue L is t_ S e le c t_ N e x tC u eL is tS e le c tP re v < IP > :<P o rt> /A c tio n? C o m m an d = C ue L is t_ S e le c t_ P re vC u eL is tS e le c tT o g g le < IP > :<P o rt> /A c tio n? C o m m an d = C ue L is t_ S e le c t_ T o gg le
H o tC u e L is tS e lec t < IP > :<P o rt> /A c tio n? C o m m an d = H otC ue L is t_ S e le c t & C u e L is t= < C u eL is t> (*)H o tC u e L is tS e lec tN ex t < IP > :<P o rt> /A c tio n? C o m m an d = H otC ue L is t_ S e le c t_ N e x tH o tC u e L is tS e lec tP re v < IP > :<P o rt> /A c tio n? C o m m an d = H otC ue L is t_ S e le c t_ P re vH o tC u e L is tS e lec tT o g g le < IP > :<P o rt> /A c tio n? C o m m an d = H otC ue L is t_ S e le c t_ T o gg le
C u eL is tF ire S ta rt < IP > :<P o rt> /A c tio n? C o m m an d = C ue L is t_ F ireS ta rt & C u e L is t= < C u eL is t> (*) & C u e= < C u e > (*)C u eL is tS ta rt < IP > :<P o rt> /A c tio n? C o m m an d = C ue L is t_ S ta rt & C u e L is t= < C u eL is t> (*)C u eL is tP a u s e < IP > :<P o rt> /A c tio n? C o m m an d = C ue L is t_ P a u se & C u e L is t= < C u eL is t> (*)C u eL is tS to p < IP > :<P o rt> /A c tio n? C o m m an d = C ue L is t_ S to p & C u e L is t= < C u eL is t> (*)C u eL is tC h as e < IP > :<P o rt> /A c tio n? C o m m an d = C ue L is t_ C h a s e & C u e L is t= < C u eL is t> (*) & C h a s eO n = 1 o r 0C u eL is tC h as e T o g g le < IP > :<P o rt> /A c tio n? C o m m an d = C ue L is t_ C h a s eT og g le & C u e L is t= < C u eL is t> (*)C u eL is tS e tT im e < IP > :<P o rt> /A c tio n? C o m m an d = C ue L is t_ S e tT im e & C u e L is t= < C u eL is t> (*) & T im e= <n [m s ]>
S h o w In it < IP > :<P o rt> /A c tio n? C o m m an d = S h o w _ In itS h o w S ta rt < IP > :<P o rt> /A c tio n? C o m m an d = S h o w _ S ta rtS h o w P a u s e < IP > :<P o rt> /A c tio n? C o m m an d = S h o w _ P a us eS h o w S to p < IP > :<P o rt> /A c tio n? C o m m an d = S h o w _ S topS h o w R es e t
O KC an c e l
S e n d M o d ifie rK eyS e n d V irtu a lK e y
U n d oC u tC o p yP a s teS a v e
S e tM a s te rO u tp u tG a in < IP > :<P o rt> /A c tio n? C o m m an d = M a ste r_ O utp u tG a in & G a in = < n [d B ]>M u teM a s te rO u tp u t < IP > :<P o rt> /A c tio n? C o m m an d = M a ste r_ M ute & M ute = 1 o r 0
D e fin itio n o f C o m m a n d s a n d P a ra m e te rs fo r c o n tro llin g O va tio n a s a M e d ia S e q u e n c e r th ro u g h H T T P C o m m a n d s
P a ra m e te r d e ta ils :
(*) O p tion a l p a ra m ete r
< IP > IP A dd re s s o f th e m a c h in e run n in g th e O va tio n S e q u en c e r<P o rt> P o rt nu m be r a s se t in th e O va tio n A ll S e ttin g s > C o n tro lle r U n its > P ro p r ie ta ry > W e b S erve r P a g e > H T T P P o rt
<C u e L is t> T h e C ue L is t In de x (0 ba s e d , i.e . C ue L is t N u m be r - 1 )-1 in d ic a tes th e c u rre n tly s e le c te d C u e L is t (D e fa u lt if th e < C u e L is t> p a ra m e te r is no t s e t)
<C u e > T h e C ue N u m b er, fo r e xa m p le C u e = 1 .1 .2 o r C u e = 3 .4 .2 .5-1 in d ic a tes th e c u rre n tly s e le c te d C u e , fo r e x a m p le C ue = -1 (D e fa u lt if the < C u e> p a ra m ete r is n o t se t)-2 in the s e co n d su b d ig it in d ic a te s th a t th e firs t d ig it is th e C u e In d e x in th e C u e L is t in s tea d o f th e C u e N u m b e r, fo r e x a m p le C u e= 5 .-2
T im e A b so lu te T im e in [m s ] w he n th e C om m an d w ill b e e xe cu te d . T h is T im e re la tes to th e S h o w T im e .
T im e O ffs e t R e la tive T im e in [m s ] w h en th e C om m a nd w ill b e e x e cu te d co u n tin g from w h e n th e c om m an d is iss u e d
F a d e F a de T im e in [m s ]
P ro g res s O ffs e tT im e T im e in [m s ] fro m th e be g inn in g o f the C u e to s ta rt p la y in g the C u e w h e n F ire d

Appendix IIX : Web Server Commands Page 232
HTTP Media Server Map
O v a tio n M e d ia S e q u e n c e rC o m m a n d s C o m m a n d P aram e ter 2 P a ra m e te r 3 P a ra m e te r 4 P a ra m e te r 5
C u e Ad d Au d io < IP > :< P o rt> /A c tion ? C om m a n d= C u e _ F ire & C ue L is t= <C ue L is t> (*) & C u e = < C u e > (*) & T im e = < n [m s ]> (*) & T im e O ffse t= < n [m s ]> (*)C u e Ad d V id e o
C u e L o a dC u e U n lo a dC u e F ire < IP > :< P o rt> /A c tion ? C om m a n d= C u e _ F ire & C ue L is t= <C ue L is t> (*) & C u e = < C u e > (*) & T im e = < n [m s ]> (*) & T im e O ffse t= < n [m s ]> (*)C u e F ire S e q u e n c e d < IP > :< P o rt> /A c tion ? C om m a n d= C u e _ F ire S e qu e n c e d & C ue L is t= <C ue L is t> (*) & C u e = < C u e > (*)C u e P a u s e < IP > :< P o rt> /A c tion ? C om m a n d= C u e _ P a u se & C ue L is t= <C ue L is t> (*) & C u e = < C u e > (*) & T im e = < n [m s ]> (*) & T im e O ffse t= < n [m s ]> (*)C u e S to p < IP > :< P o rt> /A c tion ? C om m a n d= C u e _ S to p & C ue L is t= <C ue L is t> (*) & C u e = < C u e > (*) & T im e = < n [m s ]> (*) & T im e O ffse t= < n [m s ]> (*)C u e S to p A ll < IP > :< P o rt> /A c tion ? C om m a n d= C u e _ S to p A llC u e D im < IP > :< P o rt> /A c tion ? C om m a n d= C u e _ D im & C ue L is t= <C ue L is t> (*) & C u e = < C u e > (*) & T im e = < n [m s ]> (*) & T im e O ffse t= < n [m s ]> (*)C u e U n D im < IP > :< P o rt> /A c tion ? C om m a n d= C u e _ U n D im & C ue L is t= <C ue L is t> (*) & C u e = < C u e > (*) & T im e = < n [m s ]> (*) & T im e O ffse t= < n [m s ]> (*)
C u e H o tP re ss < IP > :< P o rt> /A c tion ? C om m a n d= C u e _ H o tP re s s & C ue L is t= <C ue L is t> (*) & C u e = < C u e > (*) & P re s s e d = 1 o r 0
C u e Au d it io n < IP > :< P o rt> /A c tion ? C om m a n d= C u e _ A u d itio n & C ue L is t= <C ue L is t> (*) & C u e = < C u e > (*)C u e Au d it io n S ta rtC u e Au d it io n R e w in dC u e Au d it io n S to pC u e Au d it io n P la yP a u s eC u e Au d it io n F a s tF o rw a rdC u e Au d it io n E n dC u e Au d it io n R e v ie w S ta rtC u e Au d it io n R e v ie w E n dC u e B ro w s e
C u e S e le c t < IP > :< P o rt> /A c tion ? C om m a n d= C u e _ S e le c t & C ue L is t= <C ue L is t> (*) & C u e = < C u e > (*)C u e S e le c tN e x t < IP > :< P o rt> /A c tion ? C om m a n d= C u e _ S e le c t_ N e x t & C ue L is t= <C ue L is t> (*)C u e S e le c tP re v < IP > :< P o rt> /A c tion ? C om m a n d= C u e _ S e le c t_ P re v & C ue L is t= <C ue L is t> (*)C u e S e le c tN e x tS c e n e < IP > :< P o rt> /A c tion ? C om m a n d= C u e _ S e le c t_ N e x tS ce n e & C ue L is t= <C ue L is t> (*)C u e S e le c tP re v S c e n e < IP > :< P o rt> /A c tion ? C om m a n d= C u e _ S e le c t_ P re vS cen e & C ue L is t= <C ue L is t> (*)
C u e L is tS e lec t < IP > :< P o rt> /A c tion ? C om m a n d= C u e L is t_ S e lec t & C ue L is t= <C ue L is t> (*)C u e L is tS e lec tN e x t < IP > :< P o rt> /A c tion ? C om m a n d= C u e L is t_ S e lec t_ N e x tC u e L is tS e lec tP re v < IP > :< P o rt> /A c tion ? C om m a n d= C u e L is t_ S e lec t_ P re vC u e L is tS e lec tT o g g le < IP > :< P o rt> /A c tion ? C om m a n d= C u e L is t_ S e lec t_ T o g g le
H o tC u eL is tS e le c t < IP > :< P o rt> /A c tion ? C om m a n d= H o tC u e L is t_ S e le c t & C ue L is t= <C ue L is t> (*)H o tC u eL is tS e le c tN e xt < IP > :< P o rt> /A c tion ? C om m a n d= H o tC u e L is t_ S e le c t_ N e x tH o tC u eL is tS e le c tP re v < IP > :< P o rt> /A c tion ? C om m a n d= H o tC u e L is t_ S e le c t_ P revH o tC u eL is tS e le c tT o g g le < IP > :< P o rt> /A c tion ? C om m a n d= H o tC u e L is t_ S e le c t_ T og g le
C u e L is tF ire S ta rt < IP > :< P o rt> /A c tion ? C om m a n d= C u e L is t_ F ire S ta rt & C ue L is t= <C ue L is t> (*) & C u e = < C u e > (*)C u e L is tS ta rt < IP > :< P o rt> /A c tion ? C om m a n d= C u e L is t_ S ta rt & C ue L is t= <C ue L is t> (*)C u e L is tP a u s e < IP > :< P o rt> /A c tion ? C om m a n d= C u e L is t_ P a u s e & C ue L is t= <C ue L is t> (*)C u e L is tS to p < IP > :< P o rt> /A c tion ? C om m a n d= C u e L is t_ S to p & C ue L is t= <C ue L is t> (*)C u e L is tC h a s e < IP > :< P o rt> /A c tion ? C om m a n d= C u e L is t_ C h a s e & C ue L is t= <C ue L is t> (*) & C h a s e O n = 1 o r 0C u e L is tC h a s e T o g g le < IP > :< P o rt> /A c tion ? C om m a n d= C u e L is t_ C h a s e T o g g le & C ue L is t= <C ue L is t> (*)C u e L is tS e tT im e < IP > :< P o rt> /A c tion ? C om m a n d= C u e L is t_ S e tT im e & C ue L is t= <C ue L is t> (*) & T im e = < n [m s ]>
S h o w In it < IP > :< P o rt> /A c tion ? C om m a n d= S h o w _ In itS h o w S ta rt < IP > :< P o rt> /A c tion ? C om m a n d= S h o w _ S ta rtS h o w P a u s e < IP > :< P o rt> /A c tion ? C om m a n d= S h o w _ P a u seS h o w S to p < IP > :< P o rt> /A c tion ? C om m a n d= S h o w _ S to pS h o w R e s e t
O KC an ce l
S e n d M o d ifie rK eyS e n d V irtu a lK e y
U n d oC u tC o p yP a s teS a v e
D e fin itio n o f C o m m a n d s a n d P a ra m e te rs fo r c o n tro llin g O va tio n a s a M e d ia S e rve r th ro u g h H T T P C o m m a n d s
Parameters details:
(*) Optional parameter
<IP> IP Address of the machine running the Ovation Sequencer<Port> Port number as set in the Ovation All Settings > Controller Units > Proprietary > Web Server Page > HTTP Port
<CueList> The Cue List Index (0 based, i.e. Cue List Number - 1)-1 indicates the currently selected Cue List (Default if the <CueList> parameter is not set)
<Cue> The Cue Number, for example Cue=1.1.2 or Cue=3.4.2.5-1 indicates the currently selected Cue, for example Cue=-1 (Default if the <Cue> parameter is not set)-2 in the second sub digit indicates that the first digit is the Cue Index in the Cue List instead of the Cue Number, for example Cue=5.-2
Time Absolute Time in [ms] when the Command will be executed. This Time relates to the Show Time.
TimeOffset Relative Time in [ms] when the Command will be executed counting from when the command is issued
Fade, FadeIn, FadeOut Fade Time in [ms]
ProgressOffsetTime Time in [ms] from the beginning of the Cue to start playing the Cue when Fired
PathName URLs or PathNames can optionally be converted with escaped characters (for example White Spaces = %20)

Appendix IIX : Web Server Commands Page 233
HTTP Request Response
Continued on next page:
Show Request Command:
<IP>:<Port>/Request?Show
JSON Response: Comments
{Host : "192.168.1.34:888",Show :
{Title : "Test.ovs",PathName : "D:\Projects\Ovation\Test.ovs",ShowTimeCueFireButtons : 0,State : "Running",ShowTime : "00:00:02",TimeCodes :
[{
Name : "LTC 1",Type : "Generator",TimeCode : "00:01:09:00"
},
{Name : "MTC 1",Type : "Source",TimeCode : "00:00:00:00"
}
],CueLists :
[{
Index : 0,Name : "Standard Cue List",Number : "1",Mode : 0, Standard Cue ListHotKeysColumns : -1,Selected : 1,HotSelected : 0,TitleColor : "60e6b4",Cues :
[{
Index : 0,Name : "11 Don't Kill It Carol",Number : "1",GoTime : "Invalid",Selected : 1,Length : "00:06:14",State : "Ready",StateBackgroundColor : "a495b2",StateBorderColor : "a495b2",Progress : 0, PercentProgressCounters : ""
}
]
},
{Index : 1,Name : "Timed Cue List",Number : "2",Mode : 1, Timed Cue ListHotKeysColumns : -1,Selected : 0,HotSelected : 0,CueListTime : "00:00:00",Chasing : 0,Running : 0,Paused : 0,TitleColor : "000000",Cues :
[{
Index : 0,Name : "Million Miles From Home",Number : "1",GoTime : 00:01:00:000,Selected : 1,Length : "00:03:58",State : "Asleep",StateBackgroundColor : "9f9b93",StateBorderColor : "9f9b93",Progress : 0, PercentProgressCounters : ""
}
]
},
{

Appendix IIX : Web Server Commands Page 234
Index : 2,Nam e : "Hot Keys",Num ber : "3",Mode : 2, Hot Keys Cue ListHotKeysColum ns : -1,Selected : 0,HotSelected : 1,TitleColor : "000000",Cues :
[{
Index : 0,Nam e : "Trust_Antisocial",Num ber : "1",GoTim e : "Invalid",HotKeyNum ber : 1,HotRectLeft : 8,HotRectR ight : 207,HotRectTop : 8,HotRectBottom : 207,Selected : 1,Length : "00:04:32",S tate : "Ready",S tateBackgroundColor : "b26f43",S tateBorderColor : "b26f43",Progress : 0, PercentProgressCounters : ""
}
]
},
{Index : 3,Nam e : "Custom Cue List",Num ber : "4",Mode : 3, Custom Keys Cue ListHotKeysColum ns : -1,Selected : 0,HotSelected : 0,TitleColor : "000000",Cues :
[{
Index : 0,Nam e : "19 Banquet",Num ber : "3.2",GoTim e : "Invalid",Custom RectLeft : 60,Custom RectR ight : 360,Custom RectTop : 40,Custom RectBottom : 140,Custom Color : "00cc99",Custom Font : "",Custom FontColor : "000000",Selected : 1,Length : "00:05:15",S tate : "Ready",S tateBackgroundColor : "008e6b",S tateBorderColor : "008e6b",Progress : 0, PercentProgressCounters : ""
}
]
}
],ShowDirty : 1 Show has changed
} meaning that a Show Requestis required w hen received in a
} Cues_Status response

Appendix IIX : Web Server Commands Page 235
Cues Status Request Command:
<IP>:<Port>/Request?Cues_Status
JS O N R esponse: C om m ents
{H ost : "192.168.1.34:888",S how :
{S tate : "R unning",S howTim e : "00:01:44",T im eCodes :
[{
Nam e : "LTC 1",Type : "G enerator",T im eCode : "00:01:09:00"
},
{Nam e : "M TC 1",Type : "S ource",T im eCode : "00:00:00:00"
}
],C ueLis ts :
[{
Index : 0 ,Nam e : "S tandard Cue L is t",Num ber : "1",M ode : 0 ,S elected : 1 ,HotS elected : 0 ,T itleC olor : "60e6b4",Cues :
[{
Index : 0 ,Selected : 1 ,Length : "00:06:14",S tate : "P laying",S tateBackgroundC olor : "45b259",S tateBorderC olor : "45b259",P rogress : 6, P ercentProgressC ounters : "00:00:23 - 00:05:50"
}
]
},
{Index : 1 ,Nam e : "T im ed C ue L is t",Num ber : "2",M ode : 1 ,S elected : 0 ,HotS elected : 0 ,CueLis tT im e : "00:00:00",Chasing : 0 ,Running : 0 ,P aused : 0 ,T itleC olor : "000000",Cues :
[]
},
{Index : 2 ,Nam e : "Hot Keys",Num ber : "3",M ode : 2 ,S elected : 0 ,HotS elected : 1 ,T itleC olor : "000000",Cues :
[]
},
{Index : 3 ,Nam e : "Custom Cue L is t",Num ber : "4",M ode : 3 ,S elected : 0 ,HotS elected : 0 ,T itleC olor : "000000",Cues :
[]
}
],S ho w D irty : 0
}
}

Appendix IIX : Web Server Commands Page 236

Page 237
Index

Page 238
A
AAC 194Active Cue
Show Mode 80Show Mode With Merged Toolbars 81
Active Cue Window 75 82Compose Mode 75Cue Trimmer 78Locked Mode 77Pinned Mode 75Review while trimming 79Show Mode 80Trim In/Out Audition Timings 156Trim with the Mouse 79
Advanced Features 202Appendix 1 209Appendix I
OVController Commands 209Appendix II
Keyboard Controller Commands Map 214Appendix II The Ovation Keyboard OVController Com-mands Map 214Appendix III
MIDI and Midi Show Control Commands Mapping 217Appendix III MIDI and Midi Show Control OVControllerCommands Map 217Appendix IV
DMX Commands 225Appendix IV DMX Commands 225Appendix V
GPI Commands 226Appendix V GPI Commands 226Appendix VI
Mouse Modifier Key 228Appendix VII
I/O Daughter-card Options 229Application Delay Launch 90Application Settings 152
General 152Archive 118ASIO Bridge 55Audio 28Audio Connections 187Audio Control 119Audio Control Pane 119Audio File Support 194Audio Formats Supported 11Audio Gain Matrix 124Audio Output Slots 123Audio Syncronization 140Audition 31
Player Settings 155
Selected Cue 31Audition Drop-down 67Audition Jump 32, 66Audition Toolbar 66, 79Auto Start Show 90Automatic Cue Numbering 94Automation 28, 51
Apply Snapshot 53Copy and Paste Snapshot 53Erase a Snapshot 53Glide 53Store a Snapshot 52
B
Backup/Archive 118
C
CD ImportOnline database of track names 48
CD TracksImport 43
CD Tracks Import 46Changing Keyboard Mapping 215Changing or re-entering a Key 190Chase Timed List 26Codecs 194Column to Audio Slot Mapping 95Combined Panes 64Commands 28Compose Mode 30Compound Cues 50Compressed Audio File Formats 194Compressed Audio Formats Mounting Rules 195Compressed Audio Support 194Compressed Media 154Computer 185Conditional Rules 112Consolidation
Recursive 118Show 115
Consolidation Process 115Context Menu
Cue / Cue List 43Context Menus 60Control Surfaces 60Controlled Stations Settings 165Controller 205
Buttons and Toolbars 206Menus 207
Controller Settings 165Controller Units
GPI 176Proprietary 166

Page 239
Settings 165Conventions 12Create Cue List Toolbar 72cross-fade 112Cue
Audio Gain Matrix 124Red Border 34
Cue / Cue List Context Menu 43Cue # corresponds to the Cue I 177Cue # corresponds to the Cue Inde 177Cue Audition Settings 155Cue Browser Cue List 41Cue Capabilities 49Cue Fire Buttons 34, 91Cue Gain 120Cue List
Detail 36Pane 32Properties 93Selecting 36Types 35
Cue List Menu 130Cue List Properties 93
Audio Section 96Cue List Section 93Custom Keys Section 95Hot Keys Section 94TimeCode Generator Section 94Timed Cue List Section 94
Cue List Toolbar 71Cue Lists 31
Hidden 94Multiple 31
Cue Menu 132Cue Properties 97
Audio Section 101COM Command Section 104Cue Section 98Custom Key Section 100GPO Section 104Hot Key Section 99IP Command Section 104Markers Section 98Microphone Switch Section 101MIDI Command Section 102MIDI File Section 102Mixer Automation Section 106MMC Section 102Shell Command / Script / Batch Section 105Sony P2 / RS422 Section 104TimeCode Generator Section 102Timed Cue Section 99
Cue Toolbar 72Cue Trimmer 78Cuelist
Fire Toolbar 35Cues 42
Changing Properties for Multiple Cues 184
Compound 50Copying 43Empty 50GPI 50Microphone Switch 50MIDI 50Mixer Automation 50Multiple, Changing Properties 184Selecting 43
Custom Keyboard Shortcuts 200Custom Keys
Color and Font 39Design Mode 39Grid Size 39
Custom Keys Cue List 39
D
Dataton Synchronization 50, 109, 176Default 183
Stop Fade Out 183Default Clock Source 51Default Keyboard Shortcuts 196Default Player 183Delay Compensation Policy 147Delay Launch 28, 90Digital Audio Synchronization and TimeCode 188Disable Mix Down 145Disable Punch in/out 145DMX 512 / CMX Lighting Control 28DMX Commands 225Do you want to save routing? 193Documentation 12Drag & Drop 183drag and drop 43Driver Signing 189DSD Peak Filter 144DSP Power Saving 145DSP Time Saving 145
E
Edit Toolbar 32Editing with Pyramix 55Effective Sampling Rate 140Effective TC Frame Rate 140Effective Video Frame Rate 140EMC Mixer remote control configuration 150Emergency - Show Menus and Toolbars 74Empty Cue
Long 33Short 33
Empty Cues 50Enabling Ovation 190Entering Keys 190Ethernet 161Evaluation Mode 11

Page 240
External Applications 54External Audio D/A-A/D Converter Boxes 186
F
Fade Modifier 183Files
Ovation 128Fire 134Fire Buttons, Cue 34Fire Command 60Fire Toolbar 73Fire/Start Timed List 27First launch
Multi-board system 192flac 194FLAC Decoding 194Flashing Mode 91Focused Cue Flashing Mode 91Formats & Sync 139
Presets 140Frequencies 140
G
Gain Matrix 124General MIDI Command 50, 106General MIDI Media Sequencer Mode Commands Map-ping 220General MIDI Media Server Mode Commands Mapping221General Settings 139GM Media Sequencer Commands Mapping 223GM Media Server Commands Mapping 224GPI Commands 226GPI Trigger Options 178GPI/O Interfaces 163GPO Cue Properties 104GPO output 28
H
Hard Disk Space Requirements 185HDTDM 186Help 12, 136HeptaCon Sample Rate Converter. 153Hot Browser Cue List 42Hot Cues - Stopping 37Hot Keys
Column to Audio Slot Mapping 38Hot Keys Column to Audio Slot Mapping 95Hot Keys Cue List 37
Columns 38Design Mode 37
Hot Keys Mode 22HTTP Media Sequencer Map 231HTTP Media Server Map 232
HTTP Request Response 233
I
I/O Interfaces 141I/O Status Window 51Icons
Rules 113Import CD Tracks 43Import Key 190Installer 189Installing Ovation 189Interaction Rules 110Internal Buses 146Internet Protocol Options 175Introduction 10IP
Controller Unit Settings 175Player Unit settings 159port numbers 157TC/IP Connection Settings 156
IP Address / Server Name Considerations 157IP Command 50, 107iTunes 183
K
Keyboard Shortcuts 60, 196Custom 200Default 196
L
Latency 11Launching Ovation 28Level Meter 143Link Offsets/Start Times 82Link Offsets/StartTimes 134Lock in Active Cue Window 77Lock Mixer 90Logging 91Long Empty Cue 33Looping 86Loops 112
M
Main Window 61, 62Marker Button 78Markers 84
in Cue Properties 85Interaction Rules 86Menu 84
Master Sync 140Media 28Media Management 29Media Manager Settings 152Media Sequencer Mode available Commands 210

Page 241
Media Server Mode available Commands 212Menu
Cue 132Cue List 130Fire 134Help 136View 135
Menus 129Meter Alignment level 143Meter Decay integration time 144Meter Headroom setting 143Meter Permanent Overload 143Meter Permanent Peak 144Microphone Switch Cues 50MIDI and Midi Show Control OVController CommandsMap 217MIDI Command 106MIDI Command Learn 107MIDI Connections 188MIDI output 28Midi Player Settings 158MIDI Settings Player Units 158Midi Show Control Media Sequencer Mode CommandsMapping 217Midi Show Control Media Server Mode Commands map-ping 218Minimize Player 205, 208Mirror all Commands to Remote Ovation Sequencers 202Mixer 51
Configuration 16Frozen 90Lock 90Record 59Snapshot Automation 51
Mixer Automation 106Mixer Automation Cues 50Mixer Settings 146Mixing Console
Remote Control 149Settings 142
MMC Media Sequencer Commands Mapping 222Modes 30Mouse Modifier Keys 60, 228Moving and Copying Cues 43MP3 194MT ASIO Bridge 55MT Security Settings 190Multi-board installation 186Multiple Cue Lists 31Multi-Sequencer Synchronization 29, 50, 92, 108Mykerinos 186
Back-plate 187Board I/O 186Board Installation 186
N
Nested and Combined Panes 62Nested Panes 62New Show 14New Users 13Numeric Fields 88
O
OASIS Mixer remote configuration 150Ogg Vorbis 194On-board Analog Audio I/O 186Operating System 185Other Applications 185Output Routing 17Output Slots 123OV Controller 205
Files 205User Interface 206
OV PlayerButtons and Toolbars 203Files 202Main Screen 203Media Paths 153Menus 204Session menu 204Toolbars 204User Interface 203
OV Players 202Ovation
Files 128Menus 129
Ovation KeyboardSettings 166
Ovation Keyboard Media Sequencer Mode Commandsmapping 216Ovation Keyboard OVController Commands Map 214Ovation Webserver 179OVController
Buttons and Toolbars 206Files 205Help menu 208Main Screen 206Menus 207User Interface 206View menu 208
OVController Commands 209Overview 11OVKeyboard Settings 166OVPlayer
Help menu 205Session menu 207View menu 205
P
Packaging

Page 242
Show 115Packaging Process 116Panes 62Panning 17Parent Button 42Parent button 41Password 90Pause Timed List 27Peak and Overload Hold Time 143Peak level indicator 144Pin in Active Cue Window 75Player
Buttons and Toolbars 203Default 183Files 202Menus 204User Interface 203
Player Units 157COM 160GPO 163Settings 157
Player/Recorder Mode 145Plug-ins Settings 148Power Management 185Precedence 88Properties Fields 88Properties Panes 88Pull-Down 141Pull-Up 141Pyramix
Clip Gain 56Editing Cues in 55Envelope 56
Q
Query Database 48QUICKSTART 13
R
RAP (Ross Audio Protocol) 151Real-time Sampling Rate Conversion 153Record Audio 57Record Mixer 59Recording 57Recursive Consolidation 118Redundant Control 202Refresh buton 41Refresh Button 42REMOTE CONTROL
Dataton Synchronization 50, 109General MIDI Command 50, 106IP Command 50, 107Multi-Sequencer Synchronization 50, 108
Remote Control 29Mixing Console 149
Remote Controlled Ovations 165replace audio 183Review while trimming 79Ross Audio Protocol 151Routing Settings 142Rule
Adding 111Change Order 111Removing 111Updating 111
Rules 183at Marker 112Conditional 112Form 111Loops 112Shorthand 113
S
Sample and TC Rate Warnings 140Sample Rate Converter 153Sampling Rate 140Sampling Rate Conversion 153Sampling Rate Mismatch 51Save Show As Template 129Save Special 129Scenes 51Scope 11Search Cues Function 41Security Keys 193Selecting Cues 43Settings 136, 137
Application 152Compressed Media 154Controller 165
Remote Controlled Ovations 165Controller Units 165
COM 172COM (RS422) 172GPI 176IP 175MIDI 170OVKeyboard 166Proprietary 166Web Server 168
Controller unitsProprietary 166
General 152Audition 155TC/IP Connections 156
Media Manager 152Player Units 157
Ethernet 161

Page 243
GPO 163IP 159MIDI 158
Player unitsCOM 160Ethernet
Sony P2 over IP 162Buttons 138Overview 137Show 139
General 139Formats & Sync 139I/O Interfaces 141Routing 142
MixerPlug-ins Settings 148
Mixing Console 142Allocation 142DSP Power Saving 145Level Meter 143Mixer Settings 146Remote Control 149
TimeCode 142Toolbar 74
Settings hierarchy 183Shell Commands/Scripts/Batch files output 28Short Empty Cue 33Show 31
Auto Start 90Consolidate 115Consolidation 115Controls 68Package 116Validation Tool 114
Show Logging 91Show Menu 129Show Menus and Toolbars in Emergency 74Show Mode 30Show Password 90Show Properties 89
Multi-Sequencer Synchronization Section 92Show Section 90Show Start Time 90Show Time Mode Section 90Show Time Options 90TimeCode Generator Section 91
Show Toolbar 70Sibling 112Simple Rules 110Simple Show 13Slots Allocation 142Snapshot Automation 51
Software Key 190Sony P2 / RS422 output 28Sony P2 over IP
Prerequisites 161Settings 162
Sony P2 Protocol controller 172Special Modes 145Standard Cue List 36Start Show 30Start Timed List 27Starting a Show With Sysex 184Starting Pyramix 193Stereo Pan Law 146Stop Timed List 27Stopping Hot Cues 37Strip Meters
Characteristics 143Support 12Suppress
Popups Confirmations 91Saving Confirmations 91Show Mode Confirmations 91
Sync Input sources 51Sync Source Considerations 51Sync, Video and Time Code Connections 188System Requirements 185
T
TASCAM TDIF I/O Option 230Time Code and Video Sync Option 187TimeCode Reader 121TimeCode Settings 142Timed Cue List 24, 37Timed List
Chase 26Fire/Start 27Pause 27Start 27Stop 27
Tips and Tricks 183Toolbar
Create Cue List 72Cue 72Fire 73Settings 74
Toolbar Context Menu 65Toolbars 65ToolTips 12Triggering Hot Keys 39Trim with the Mouse 79
U
User Interface 60User Interface Options 60

Page 244
V
Varispeed 141Video/TimeCode Synchronization 141View Menu 135Virtual COM Port selection conflict 157VS3 Control Panel 55VS3 control panel 193
W
Web ServerSettings 168
Web Server Commands 231Webserver 179
Y
YourPersonalKey 190