Embed Size (px)
Citation preview

Outbound Option Guide for Cisco Unified Contact Center Enterpriseand Hosted Release 9.0(1)First Published: June 15, 2012
Last Modified: May 03, 2013
Americas HeadquartersCisco Systems, Inc.170 West Tasman DriveSan Jose, CA 95134-1706USAhttp://www.cisco.comTel: 408 526-4000 800 553-NETS (6387)Fax: 408 527-0883

THE SPECIFICATIONS AND INFORMATION REGARDING THE PRODUCTS IN THIS MANUAL ARE SUBJECT TO CHANGE WITHOUT NOTICE. ALL STATEMENTS,INFORMATION, AND RECOMMENDATIONS IN THIS MANUAL ARE BELIEVED TO BE ACCURATE BUT ARE PRESENTED WITHOUT WARRANTY OF ANY KIND,EXPRESS OR IMPLIED. USERS MUST TAKE FULL RESPONSIBILITY FOR THEIR APPLICATION OF ANY PRODUCTS.
THE SOFTWARE LICENSE AND LIMITEDWARRANTY FOR THE ACCOMPANYING PRODUCT ARE SET FORTH IN THE INFORMATION PACKET THAT SHIPPED WITHTHE PRODUCT AND ARE INCORPORATED HEREIN BY THIS REFERENCE. IF YOU ARE UNABLE TO LOCATE THE SOFTWARE LICENSE OR LIMITED WARRANTY,CONTACT YOUR CISCO REPRESENTATIVE FOR A COPY.
The Cisco implementation of TCP header compression is an adaptation of a program developed by the University of California, Berkeley (UCB) as part of UCB's public domain versionof the UNIX operating system. All rights reserved. Copyright © 1981, Regents of the University of California.
NOTWITHSTANDINGANYOTHERWARRANTYHEREIN, ALL DOCUMENT FILES AND SOFTWARE OF THESE SUPPLIERS ARE PROVIDED “AS IS"WITH ALL FAULTS.CISCO AND THE ABOVE-NAMED SUPPLIERS DISCLAIM ALL WARRANTIES, EXPRESSED OR IMPLIED, INCLUDING, WITHOUT LIMITATION, THOSE OFMERCHANTABILITY, FITNESS FORA PARTICULAR PURPOSEANDNONINFRINGEMENTORARISING FROMACOURSEOFDEALING, USAGE, OR TRADE PRACTICE.
IN NO EVENT SHALL CISCO OR ITS SUPPLIERS BE LIABLE FOR ANY INDIRECT, SPECIAL, CONSEQUENTIAL, OR INCIDENTAL DAMAGES, INCLUDING, WITHOUTLIMITATION, LOST PROFITS OR LOSS OR DAMAGE TO DATA ARISING OUT OF THE USE OR INABILITY TO USE THIS MANUAL, EVEN IF CISCO OR ITS SUPPLIERSHAVE BEEN ADVISED OF THE POSSIBILITY OF SUCH DAMAGES.
Any Internet Protocol (IP) addresses and phone numbers used in this document are not intended to be actual addresses and phone numbers. Any examples, command display output, networktopology diagrams, and other figures included in the document are shown for illustrative purposes only. Any use of actual IP addresses or phone numbers in illustrative content is unintentionaland coincidental.
Cisco and the Cisco logo are trademarks or registered trademarks of Cisco and/or its affiliates in the U.S. and other countries. To view a list of Cisco trademarks, go to this URL: http://www.cisco.com/go/trademarks. Third-party trademarks mentioned are the property of their respective owners. The use of the word partner does not imply a partnershiprelationship between Cisco and any other company. (1110R)
© 2012-2013 Cisco Systems, Inc. All rights reserved.
C O N T E N T S
P r e f a c e Preface xiii
Purpose xiii
Audience xiii
Organization xiv
Related Documentation xv
Product Naming Conventions xvi
Conventions xvi
Documentation and Support xvii
Documentation Feedback xviii
C H A P T E R 1 Outbound Business Concepts 1
Overview 1
Automatic Dialers 1
Cisco Outbound Solution 1
High-Level Overview of Cisco Outbound Option 2
Outbound Option Features 2
Unified CCE Compatible Dialer 2
Campaign Management 3
Unified Contact Center Software Management of Skill Groups 3
Dedicated and Blended Dialing Modes 3
Outbound Option Dialing Modes 3
Outbound Option activity reports 4
Callbacks 4
Call Progress Analysis (CPA) 4
Transfer to IVR 4
Sequential Dialing 4
Cisco IP Contact Center Agent Re-skilling 5
Outbound Option Guide for Cisco Unified Contact Center Enterprise and Hosted Release 9.0(1) iii

Abandoned and Retry Call Settings 5
Campaign Prefix Digits for Dialed Numbers 5
Outbound Option Support on Cisco Unified Contact Center Hosted 5
Outbound ECC Variables Support in Siebel 7.5.3 and Later 5
Relationships Between Outbound Option Components 6
Imports 8
Do Not Call List Imports 8
Contact List Imports 9
Import Rule Reports 9
Query Rules 10
Campaigns 10
Dialing Modes 10
Caller ID Masking by Campaign 12
Agent Campaigns 13
Callbacks 13
About Regular Callbacks 14
About Personal Callbacks 14
Transfer to IVR Campaigns 15
Dialing Order 15
Sequential Dialing 16
Contact Priority Among Callbacks, Retries, and Pending Contacts 16
Campaign Reports 16
Campaign Query Rule Reports 17
Transfer to IVR Reports 17
Call Type Reports 17
Campaign Skill Groups 17
Smaller Skill Groups 18
Blended Campaigns/Skill Groups 18
Agents Skilled for Multiple Active Campaigns 18
Campaign Skill Group Reports 18
Blended Campaign Skill Group Reports 19
Customer Time Versus System Time 19
Customer Time 19
System Time 20
Call Progress Analysis (Answering Machine Detection) 20
Outbound Option Guide for Cisco Unified Contact Center Enterprise and Hosted Release 9.0(1)iv
Contents

C H A P T E R 2 Architectural Overview 21
Unified CCE Software Overview 21
Outbound Option Software Components 22
Outbound Option Component Relationships 23
Outbound Option Campaign Manager Component 24
Outbound Option Import Component 25
Outbound Option Dialer Component 25
SIP Dialer 25
Dialer Port Allocation 26
Port Allocations for Campaign Modes 27
Outbound Option Dialer Process Flow 28
Transfer to IVR Call Flow 29
Transfer to Agent Call Flow: SIP Dialer with SIP Proxy 30
Transfer to IVR Call Flow: SIP Dialer with SIP Proxy 31
Transfer to Agent - SIP Dialer with No SIP Proxy 32
Peripheral Gateway (PG) 33
Agent PG 33
Media Routing PG 33
IVR 33
Administration and Data Server: Configuration 34
Cisco Unified Intelligence Center 34
Dialer Reports 34
Outbound Option Agent Desktops 34
Cisco CTI Object Server (CTI OS) 34
Cisco Agent Desktop (CAD) 35
Cisco Agent Desktop 35
Cisco Supervisor Desktop 35
Cisco Desktop Administrator 36
Cisco Finesse 36
Outbound Option Extended Call Context Variables 36
Desktop Button Behavior 39
Outbound Option Scripting 40
Outbound Option administrative scripts 41
Outbound Option agent reservation scripts 41
Outbound Option Guide for Cisco Unified Contact Center Enterprise and Hosted Release 9.0(1) v
Contents

Fault Recovery 42
Campaign Manager Fault Recovery 42
Dialer Fault Recovery 42
C H A P T E R 3 Outbound Option Installation: Preliminary Steps 45
Before You Begin 45
Dialer Component Performance Optimization 45
Auto-answer Settings 45
Outbound Option Database Size 45
IVR Integration 46
System Requirements 46
Installation Procedure Locations 46
C H A P T E R 4 Outbound Option Installation: SIP Dialer 47
Installation task maps 47
System Configuration for Outbound Option 47
Software Installation and Database Creation 48
Unified CCE configuration for Outbound Option 49
Configure the PG 49
Configure Dialer Component 50
Configure Port Map 51
Create a Network VRU 52
Configure Media Routing PG (MR PG) 52
Send to VRU 53
Configure Skill Group 54
Create Dialed Number 55
Configure System Options 56
Enable Expanded Call Variables 56
(Optional) Configure Personal Callbacks 56
Create an Enterprise Skill Group 60
Create an Enterprise Route 61
Configure Queue to Agent Node 62
Packet Capture 63
Unified Communications Manager and Gateway Configuration 64
Disable Ringback During Transfer to Agent for SCCP 64
Outbound Option Guide for Cisco Unified Contact Center Enterprise and Hosted Release 9.0(1)vi
Contents

Disable Ringback During Transfer to Agent for SIP 65
Configuration of Voice Gateways, SIP Proxy, or Cisco Unified Border Element 68
Configure SIP Trunks 70
Outbound Option Software Installation Steps 71
Software Installation and Database Creation 71
Create Outbound Option Private Database 71
Configure Logger 73
Upgrade of an Outbound Option Database from a Previous Release 73
Install Dialer Component on the PG Platform 73
Modification of Local Static Route File 75
Edit Dialer-Related Registry Values 75
Install MR PG 75
Installation of Cisco CTI Controls 76
Integrate Outbound Option with CTI OS 76
Configure CTI OS Server for Outbound Option 77
Install CTI Toolkit Outbound Desktop (Win32) 78
Integrate Outbound Option with Standard CTI Toolkit Agent Desktop 78
Set Outbound Option Expanded Call Variables 78
Setup of Outbound Option in Cisco Desktop Administrator 79
Outbound Option Enterprise Data 79
Add Enterprise Data Fields to Layout List 79
Verification 80
Dialer Component Status 81
Verify Critical Configuration Steps 83
Verify Database Configuration 83
Verify Router Registry Key 83
C H A P T E R 5 Outbound Option Installation: SCCP Dialer 85
Installation task maps 86
Unified CCE Outbound Configuration 86
Cisco Unified CM and Gateway Configuration 86
Software Installation and Database Creation 87
Unified CCE Outbound Option Configuration 88
Configure IPCC PG 88
Configure Dialer Component 89
Outbound Option Guide for Cisco Unified Contact Center Enterprise and Hosted Release 9.0(1) vii
Contents

Configure Port Map 90
Create a Network VRU 91
Configure Media Routing PG (MR PG) 91
Configure Skill Group 92
Create Dialed Number 93
Configure System Options 93
Enable ECC Variables 94
Configuration and scheduling of personal callback feature 94
Configure Personal Callbacks 94
Create Enterprise Skill Group 97
Create Enterprise Route 98
Configure Queue to Agent Node 98
Unified CMr and Gateway Configuration 99
Import and Assign Dialer Ports 100
Disable Ringback During Transfer to Agent for SIP 101
Auto Answer Configuration on Agent Phones 102
Outbound Option Software Installation Steps 102
Create Outbound Option Private Database 102
Upgrade of Outbound Option from Previous Release 103
Install Dialer Component 103
Configure Dialer After Installation 105
Modify JTAPI for Calls to Invalid Numbers 105
Install MR PG 105
Installation of Cisco CTI Controls 106
Integrate Outbound Option with CTI OS 106
Install CTI Toolkit Outbound Desktop (Win32) 107
Setup of Outbound Option in Cisco Desktop Administrator 108
Outbound Option Enterprise Data 108
Add Enterprise Data Fields to Layout List 108
Verification 109
Troubleshoot Connections 110
Verify Critical Configuration Steps 112
Verify Connectivity 112
Verify Dialer Port Map Configuration 115
Verify Database Configuration 116
Outbound Option Guide for Cisco Unified Contact Center Enterprise and Hosted Release 9.0(1)viii
Contents

Verify Router Registry Key 117
C H A P T E R 6 Configuration of Campaigns and Imports 119
Outbound Option Configuration Process Overview 120
Dialing Modes 121
Predictive Dialing 122
Predictive Dialing Description 122
Preview Dialing 122
Direct Preview Dialing 122
Progressive Dialing 123
Configuration Process Task Maps 123
Campaign Task List 123
Transfer to IVR Campaign Tasks 124
Configure Skill Group 125
Create Dialed Numbers 125
Configure Dialed Numbers 126
Create Import Rule 127
Import Rule General Tab Page 128
Import Rule Definition Tab Page 129
Imports 130
Import Procedure 130
Create Do Not Call List 131
Create Contact Import File 132
Import Rule Schedule tab page 132
Create a Query Rule 133
Create a Campaign 135
Campaign General Tab Page 135
Modification of Maximum Number of Attempts in a Campaign 138
Parameter Tuning 139
Campaign Purpose Tab Page 139
Query Rule Selection Tab Page 142
Skill Group Selection Tab Page 142
Call Target Tab 144
Notes on Editing a Campaign in Progress 145
Create an Enterprise Skill Group 145
Outbound Option Guide for Cisco Unified Contact Center Enterprise and Hosted Release 9.0(1) ix
Contents

Create an Enterprise Route 146
Create a Call Type 146
Outbound Option Scripting 147
Outbound Option administrative scripts 147
Outbound Option agent reservation scripts 147
Set Up Reservation Script 148
Script for Agent Campaign 148
Configure a Transfer to IVR Script 149
Set Up Administrative Script 151
Sample Administrative Scripts 153
Administrative Script: TimeBasedControl 154
Map Scripts, Call Types, and Dialed Numbers 154
Configure Translation Route for Use with SIP Dialer 155
Multi-Tenant Customer Instances Configuration 155
SIP Dialer Recording Parameters Configuration 155
Verification of Dialed NumberDN/Script Selector Configuration 156
Verify DN/Script Selector Configuration 156
Verify Campaign Configuration 156
C H A P T E R 7 Administrative and Supervisory Tasks 157
Reports 157
Outbound Option Reports 157
Campaign reports 158
Skill Group Reports 159
Agent Reports 159
Import Rule Reports 160
Dialer Reports 161
Agent Management 161
Agent Addition 162
Dedicate an Agent to Only Perform Outbound Activity 162
Agent Re-skilling 162
Imports 162
Import Procedure 163
Create Do Not Call List 163
Add Attributes to a Contact List 164
Outbound Option Guide for Cisco Unified Contact Center Enterprise and Hosted Release 9.0(1)x
Contents

Campaign Management 164
Single Campaign Versus Multiple Campaigns 165
Results from Individual Customers 165
Interpret Information from Dialer_Detail Table 165
Dialing List 165
Management of Predictive Campaigns 165
Initial Values for Lines per Agent 166
End-of-Day Calculation for Abandon Rate 166
Transfer of Answering Machine Detection Calls to Agents 166
Parameter Tuning 166
Limitations of Smaller Agent Groups 167
Management of Agent Idle Time 167
Sources of Higher Idle Times in Reports 168
Dialer Saturation 168
Few Available Records 168
Retry Records in Append Campaigns 168
SIP Dialer Voice Gateway Over-capacity Errors 169
Update the North American Numbering Plan Data 169
A P P E N D I X A Registry Settings 171
Campaign Manager Registry Settings 171
Dialer Registry Settings 175
A P P E N D I X B Long Distance Digit Prefix Logic 183
Transformation of Imported Numbers 183
Dialer Configuration Fields and Registry Settings 184
A P P E N D I X C Dialer_Detail Table 187
About the Dialer_Detail Table 187
Advantages 187
Data Flow 187
Fault Tolerance 188
Dialer_Detail Table Database Fields and Descriptions 188
CallResult Codes and Values 188
CallStatusZone Values 189
Outbound Option Guide for Cisco Unified Contact Center Enterprise and Hosted Release 9.0(1) xi
Contents

DialingMode Values 191
CallResults Table 191
Outbound dialer call result for combinations of PSTN and status code 194
A P P E N D I X D Termination_Call_Detail Table 197
Peripheral call types 197
Map Release 8.x to Release 6.0(0) and Earlier Peripheral Call Types 197
Call Disposition Values Used in Termination_Call_Detail Table 198
CED Column Values 198
TCD Column Descriptions 199
Reservation Calls 199
IPCC Reservation Call 199
MR PIM Reservation Entry Not a Real Call (TCD) 199
MR PIM Route Request (RCD - route_call_detail) 200
Customer Calls 200
Transfer to IVR TCD Records 202
Initial Customer Call on PIM Transferred to Route Point 202
Transferred Customer Call on Unified CM PIM Redirected to IVR 203
IVR Plays a Message on VRU PIM to a Customer 203
A P P E N D I X E Dialing_List Table 205
Dialing_List Table Columns 205
A P P E N D I X F Schedule of Contacts Between Customers and Agents 209
Personal_Callback_List Table 209
A P P E N D I X G CTI OS Outbound Option ECC Variable Settings 213
ECC Variables for Outbound Call Centers Example 213
ECC Variables in Mixed Inbound and Outbound Call Centers Example 214
Outbound Option Guide for Cisco Unified Contact Center Enterprise and Hosted Release 9.0(1)xii
Contents

Preface
• Purpose, page xiii
• Audience, page xiii
• Organization, page xiv
• Related Documentation, page xv
• Product Naming Conventions, page xvi
• Conventions, page xvi
• Documentation and Support, page xvii
• Documentation Feedback, page xviii
PurposeThis manual provides conceptual, installation, and configuration information about the Cisco Unified ContactCenter Enterprise (Unified CCE) Outbound Option application (formerly called “Blended Agent”). It alsoprovides verification checklists and troubleshooting information to ensure the Outbound Option installationand configuration setup is successful.
For detailed Outbound Option Components field descriptions, see the online help.
You must have a copy of the Staging Guide Cisco Unified ICM/Contact Center Enterprise & Hosted,available in addition to this manual to successfully complete the Outbound Option installation. See http://www.cisco.com/web/psa/products/index.html for the complete set of Cisco Unified ICM/Contact CenterEnterprise and Hosted software manuals.
Note
AudienceThis document is intended for contact center supervisors and contact center technology experts who performthe following functions using Outbound Option:
Outbound Option Guide for Cisco Unified Contact Center Enterprise and Hosted Release 9.0(1) xiii

• System Administrators – The installer/partner, who needs to know how to install and configure theDialer and hook it up to Cisco Unified Communications Manager (abbreviated as Unified CM andformerly known as “CallManager”).
• Administrator – The administrator responsible for configuration tasks, such as adding agents, skillgroups, campaigns, and scripts necessary for ongoing activity.
• Supervisors/Business users – These users might need to perform such tasks as modifying a query rule,adjusting the lines per agent, or enabling or disabling a campaign. This group of users needs to knowhow to read and interpret reports to help them run their business.
• Sales – A secondary audience, interested primarily in conceptual information.
OrganizationThe following table describes the information contained in each chapter of this guide.
DescriptionChapter
Provides a high-level overview of Outbound Option and itscomponents.
Chapter 1, “Outbound Business Concepts”Intended Audience: all audiences
Provides a high-level overview of Unified CCE software,Outbound Option component relationships, scripting, andfault recovery.
Chapter 2, “Architectural Overview”Intended Audience: SystemAdministrators/Administrators
Provides prerequisite information users need to know beforeinstalling Outbound Option.
Chapter 3, “Outbound Option Installation:Preliminary Steps”Intended Audience: System Administrators
Provides all the information users need to install OutboundOption with a Session Initiation Protocol (SIP) Dialer.
Chapter 4, “Outbound Option Installation:Preliminary Steps”Intended Audience: System Administrators
Provides all the information users need to install OutboundOption with a Skinny Call Control Protocol (SCCP) Dialer.
Chapter 5, “Outbound Option Installation:SCCP Dialer”Intended Audience: System Administrators
Provides all the information users need to configure OutboundOption.
Chapter 6, “Configuration of Campaigns andImports”Intended Audience: Administrators
Provides information about reading reports, agent desktops,adding and reskilling agents, running imports, and runningand managing effective campaigns,
Chapter 7, “Administrative and SupervisoryTasks”Intended Audience:Administrators/Supervisors who may ormay not have administrative permission
Outbound Option Guide for Cisco Unified Contact Center Enterprise and Hosted Release 9.0(1)xiv
PrefaceOrganization

DescriptionChapter
Contains information about registry settings for OutboundOption server processes.
Appendix A, “Registry Settings”
Provides information about outbound call routing.Appendix B, “Long Distance Digit PrefixLogic”
Provides information about the Dialer_Detail table, ahistorical table that was incorporated into the IP ContactCenter (IPCC) database in Release 7.2(1). It allows detaileddialer records to be written to the Logger databases andreplicated to each Historical Data Server (HDS) database.
Appendix C, “Dialer_Detail Table”
Describes the PeripheralCallType andCallDisposition columnvalues used in the Termination_Call_Detail table. It alsoprovides the CED column values for Outbound Optionreservation or personal callback calls.
Appendix D, “Termination_Call_Detail Table”
Provides information about the Dialing List table. Only theOutbound Option application uses the Dialing List table.Other applications are not allowed to access it for reading,writing, or using triggers.
Appendix E, “Dialing_List Table”
Documents all the columns in the personal callback table.Appendix F, “Schedule of Contacts BetweenCustomers and Agents”
Contains a sample .REG file, which creates the applicableOutbound Option expanded call context (ECC) registryentries for CTI OS.
AppendixG, “CTIOSOutboundOption ECCVariable Settings”
Related DocumentationDocumentation for Cisco Unified ICM/Contact Center Enterprise &Hosted, as well as related documentation,is accessible from Cisco.com at: http://www.cisco.com/cisco/web/psa/default.html.
Related documentation includes the documentation sets for Cisco CTI Object Server (CTI OS), Cisco AgentDesktop (CAD), CiscoAgent Desktop - Browser Edition (CAD-BE), CiscoUnified Contact CenterManagementPortal, Cisco Unified Customer Voice Portal (CVP), Cisco Unified IP IVR, Cisco Unified Intelligence Center,and Cisco Support Tools.
• For documentation for these Cisco Unified Contact Center Products, go to http://www.cisco.com/cisco/web/psa/default.html, selectVoice and Unified Communications > Customer Collaboration > CiscoUnified Contact Center Products or Cisco Unified Voice Self-Service Products, and select theproduct/option you are interested in.
• For troubleshooting tips for these Cisco Unified Contact Center Products, go to http://docwiki.cisco.com/wiki/Category:Troubleshooting, and then click the product/option you are interested in.
• Documentation for Unified CM is accessible from: http://www.cisco.com/cisco/web/psa/default.html.
Outbound Option Guide for Cisco Unified Contact Center Enterprise and Hosted Release 9.0(1) xv
PrefaceRelated Documentation
• Technical Support documentation and tools are accessible from: http://www.cisco.com/en/US/support/index.html.
• The Product Alert tool is accessible from (login required): http://www.cisco.com/cgi-bin/Support/FieldNoticeTool/field-notice.
• For information on the Cisco software support methodology, see the Software Release and SupportMethodology: ICM/IPCC available at (login required): http://www.cisco.com/en/US/partner/products/sw/custcosw/ps1844/prod_bulletins_list.html.
• For a detailed list of language localizations, see the Cisco Unified ICM/Contact Center Product andSystem Localization Matrix available at the bottom of the following page: http://www.cisco.com/en/US/products/sw/custcosw/ps1001/prod_technical_reference_list.html.
Product Naming ConventionsIn this release, the product names defined in the table below have changed. The New Name (long version) isreserved for the first instance of that product name and in all headings. The New Name (short version) is usedfor subsequent instances of the product name.
This document uses the naming conventions provided in each GUI, which means that in some cases theold product name is in use.
Note
New Name (short version)New Name (long version)Old Product Name
Unified CCECisco Unified Contact CenterEnterprise
Cisco IPCC Enterprise Edition
Unified CCHCisco Unified Contact CenterHosted
Cisco IPCC Hosted Edition
Unified ICMECisco Unified Intelligent ContactManagement Enterprise
Cisco Intelligent ContactManagement (ICM) EnterpriseEdition
Unified ICMHCisco Unified Intelligent ContactManagement Hosted
Cisco Intelligent ContactManagement (ICM)Hosted Edition
Unified CMCisco Unified CommunicationsManager
Cisco CallManager/Cisco UnifiedCallManager
ConventionsThis manual uses the following conventions:
Outbound Option Guide for Cisco Unified Contact Center Enterprise and Hosted Release 9.0(1)xvi
PrefaceProduct Naming Conventions

DescriptionConvention
Boldface font is used to indicate commands, such as user entries, keys,buttons, and folder and submenu names. For example:
• Choose Edit > Find.
• Click Finish.
boldface font
Italic font is used to indicate the following:
• To introduce a new term; for example: A skill group is a collectionof agents who share similar skills.
• For emphasis; for example: Do not use the numerical namingconvention.
• A syntax value that the user must replace; for example: IF(condition, true-value, false-value)
• A book title; for example: See the Cisco CRS Installation Guide.
italic font
Window font, such as Courier, is used for the following:
• Text as it appears in code or that the window displays; for example:<html><title>Cisco Systems,Inc. </title></html>
• Navigational text when selecting menu options; for example: ICMConfiguration Manager > Tools> Explorer Tools > Agent
Explorer
window font
Angle brackets are used to indicate the following:
• For arguments where the context does not allow italic, such asASCII output.
• A character string that the user enters but that does not appear onthe window such as a password.
< >
Documentation and SupportFor information on obtaining documentation, submitting a service request, and gathering additional information,see the monthlyWhat's New in Cisco Product Documentation, which also lists all new and revised Ciscotechnical documentation, at:
http://www.cisco.com/en/US/docs/general/whatsnew/whatsnew.html
Subscribe to theWhat's New in Cisco Product Documentation as a Really Simple Syndication (RSS) feedand set content to be delivered directly to your desktop using a reader application. The RSS feeds are a freeservice and Cisco currently supports RSS Version 2.0.
Outbound Option Guide for Cisco Unified Contact Center Enterprise and Hosted Release 9.0(1) xvii
PrefaceDocumentation and Support
Documentation FeedbackYou can provide comments about this document by sending e-mail to the following address:
mailto:[email protected]
We appreciate your comments.
Outbound Option Guide for Cisco Unified Contact Center Enterprise and Hosted Release 9.0(1)xviii
PrefaceDocumentation Feedback

C H A P T E R 1Outbound Business Concepts
This chapter, intended for all audiences, discusses the outbound business concepts you need to know beforeplanning and configuring your outbound system. Review this chapter in its entirety before moving on toinstalling and configuring your outbound system.
• Overview, page 1
• Imports, page 8
• Query Rules, page 10
• Campaigns, page 10
• Campaign Skill Groups, page 17
• Customer Time Versus System Time, page 19
• Call Progress Analysis (Answering Machine Detection), page 20
OverviewThis section provides a high-level overview of automatic dialers and the Cisco Outbound Option solution,which includes a description of what it does and why you would want to use it.
Automatic DialersAutomatic dialers increase contact center efficiency because they eliminate the possibility of reaching a wrongnumber, save time, and make contact center agents more productive. By automatically dialing and screeningfor busy signals, no answer, and answering machines, dialers ensure that agents do not waste time onnon-value-added mechanical and routine tasks. Only when the dialer reaches a live contact will the solutiontransfer the call to the next available agent.
Cisco Outbound SolutionCisco Unified Intelligent Contact Management Enterprise and Cisco Unified Contact Center Enterprise helpcompanies distribute inbound calls to a variety of termination points, including automatic call distributors
Outbound Option Guide for Cisco Unified Contact Center Enterprise and Hosted Release 9.0(1) 1

(ACDs), interactive voice response (IVR) systems, home agents, and network terminations. TheCiscoOutboundOption application, with its combination of outbound dialing modes, enables call centers to manage outboundcalls. The ability for agents to handle both inbound and outbound contacts offers a way to optimize contactcenter resources.
High-Level Overview of Cisco Outbound OptionThe Cisco Outbound Option application provides outbound dialing functionality along with the existinginbound capabilities of Cisco Unified Contact Center Enterprise (Unified CCE, formerly known as “IPCCEnterprise”). This application enables the contact center to dial customer contacts and direct contacted customersto agents or IVRs.
With the Cisco Outbound Option, you can configure a contact center for automated outbound activities.
Outbound Option FeaturesOutbound Option features include:
• Unified CCE Compatible Dialer
• Campaign Management
• Unified Contact Center Software Management of Skill Groups
• Outbound Option Dialing Modes
• Outbound Option activity reports
• Callbacks
• Call Progress Analysis (CPA)
• Transfer to IVR
• Sequential Dialing
• Cisco IP Contact Center Agent Re-skilling
• Abandoned and Retry Call Settings
• Campaign Prefix Digits for Dialed Numbers
• Outbound Option Support on Cisco Unified Contact Center Hosted
• Outbound ECC Variables Support in Siebel 7.5.3 and Later
Unified CCE Compatible DialerCisco IP Contact Center can be implemented in a single-site environment or integrated into a multi-site contactcenter enterprise. Some capabilities of Unified CCE include intelligent call routing, ACD functionality,network-to-desktop computer telephony integration (CTI), IVR integration, call queuing, and consolidatedreporting.
With Unified CCE integration, customer calls are placed using the Cisco Voice Gateway, using the UnifiedCM for call control.
Outbound Option Guide for Cisco Unified Contact Center Enterprise and Hosted Release 9.0(1)2
Outbound Business ConceptsHigh-Level Overview of Cisco Outbound Option

Outbound Option on Unified CCE provides a native multi-site outbound dialing solution.
Campaign ManagementOutbound Option supports advanced list management, which provides for the following features:
• Customer records can be assigned to multiple lists, which can be merged into a single campaign.
• Pre-configured rules decide when the various lists are called.
• Agents are assigned to campaigns using skill groups.
Unified Contact Center Software Management of Skill GroupsThe Script Editor application controls the outbound mode of every skill group.
Dedicated and Blended Dialing Modes• Dedicated mode: Designed for agents who will only make outbound calls.
• Blended mode: Allows agents to receive inbound calls and make outbound calls without switchingbetween Inbound/Outbound skill groups. (In Blended mode, inbound calls receive precedence overoutbound calls.)
Outbound Option maximizes performance in both pure outbound and blended modes.
The skill group mode variable is only a setting and has no impact on how the Router routes calls. If a skillgroup is set to Dedicated mode, you must also create a corresponding routing script that uses the IF nodeto enforce the Dedicated mode. In other words, the IF node must state that if the Outbound Control skillgroup setting is set to Dedicated, inbound calls must not be routed to that skill group.
Note
Outbound Option Dialing ModesOutbound Option supports the following dialing modes:
• Preview
• Direct Preview
• Progressive
• Predictive
Related Topics
Dialing Modes, on page 10
Outbound Option Guide for Cisco Unified Contact Center Enterprise and Hosted Release 9.0(1) 3
Outbound Business ConceptsOutbound Option Features
Outbound Option activity reportsOutbound Option uses Unified CCE software reporting features provided by the Cisco Unified IntelligenceCenter (Unified Intelligence Center) application, including agent, campaign, dialer, and skill groups reporttemplates created especially for Outbound Option customers.
Related Topics
Administrative and Supervisory Tasks, on page 157
CallbacksDepending on the Outbound Option campaign settings, a callback can be scheduled as a personal callbackor a regular callback.
Related Topics
Callbacks, on page 13
Call Progress Analysis (CPA)Call Progress Analysis (CPA) uses a combination of call signaling and media stream analysis to differentiatevarious types of calls.
You enable recording of CPA on a per campaign basis on the Dialer itself by setting the Call Progress Analysisoption on the Campaign Purpose Tab Page of the Outbound Option Campaign tool.
The Dialer will only record up to 100 simultaneous CPA streams. The streams are stored in CPM format. Bydefault, the system will automatically purge old recording files when it reaches 500 meg. For details aboutconfiguring CPA recording, see information on SIP Dialer Recording Parameters Configuration.
Related Topics
Call Progress Analysis (Answering Machine Detection), on page 20Create a Campaign, on page 135SIP Dialer Recording Parameters Configuration, on page 155
Transfer to IVRThe transfer to IVR feature provides Outbound Option with another outbound mode. This mode causes theDialer to transfer every customer call associated with a specific skill group to a service control-based IVRinstead of an agent. This feature allows a contact center to run unassisted outbound campaigns usingpre-recorded messages in the Cisco Unified IP-IVR and Cisco Unified Customer Voice Portal products.
Related Topics
Transfer to IVR Campaigns, on page 15
Sequential DialingThe sequential dialing feature, accessed through the Campaign Call Target tab, allows you to associate up toten phone numbers per customer record.
Outbound Option Guide for Cisco Unified Contact Center Enterprise and Hosted Release 9.0(1)4
Outbound Business ConceptsOutbound Option Features

Related Topics
Sequential Dialing, on page 16
Cisco IP Contact Center Agent Re-skillingCisco IP Contact Center agent re-skilling is an optional feature that allows IPCC call center supervisors tosign-in and change the skill groups for agents they manage. You can access this feature using the UnifiedCCE Agent Re-skilling Tool. It lets you change the skill group designations of agents on your team, andquickly view skill group members and details about individual agents. Changes you make to an agent’s skillgroup membership take place immediately without need for the agent to exit and re-enter the system.
Related Topics
Agent Re-skilling, on page 162
Abandoned and Retry Call SettingsThe Campaign component contains fields to support abandoned and retry calls.
For detailed instructions on how to configure abandoned and retry call settings, see the Outbound Optiononline help.
Campaign Prefix Digits for Dialed NumbersTheCampaign prefix digits field, which is available on the CampaignGeneral tab in the Campaign component,allows you to configure prefix digits for dialed numbers in campaigns. If you configure a prefix, it will beinserted before the Dial prefix for all numbers dialed in a campaign. This prefix allows an administrator tocreate campaign-specific Unified CM translation patterns, which you can use to tailor the Automatic NumberIdentification (ANI) seen by a customer. For example, all customers dialed from Campaign A will see a callerID of “1-800-333-4444,”while all customers dialed fromCampaign Bwill see a caller ID of “1-800-555-1212.”
Related Topics
Create a Campaign, on page 135
Outbound Option Support on Cisco Unified Contact Center HostedOutbound Option support on Cisco Unified Contact Center Hosted (Unified CCH) Edition is available, butthis release still requires Outbound Option to be deployed on a distinct CICM instance platform (meaningthat OutboundOption will not be shared among customers—each needs to have their own dialer, and so forth).
See the Unified CCH documentation set for more details.
Outbound ECC Variables Support in Siebel 7.5.3 and LaterReleases 7.5(3) and later of the Cisco Unified CRM Connector for Siebel (formerly called the CTI Driver forSiebel) provide support for Outbound Option.
See the Cisco Unified CRM Connector for Siebel guide for detailed information about the ECC variablessupport for Outbound Option.
Outbound Option Guide for Cisco Unified Contact Center Enterprise and Hosted Release 9.0(1) 5
Outbound Business ConceptsOutbound Option Features

Relationships Between Outbound Option ComponentsThe following figure shows the component relationships within Outbound Option.
The following figure and table only describe Outbound Option Components and concepts; they do notdescribe the Outbound Option process.
Note
Figure 1: Outbound Option Component Relationships
Items outlined in blue in Figure 1 indicate that they are configured by the user.Note
Table 1: Relationships Between Outbound Option Component Concepts
DescriptionConcept
Defines when and how Outbound Option reads in a user-generated list ofcustomers to call and customers who should not be called.
See the “Imports” section for moredetails.
Note
Import
Set of criteria for selecting customer contacts from a customer list.
See the “Query Rules” section for moredetails.
Note
Query Rule
Outbound Option Guide for Cisco Unified Contact Center Enterprise and Hosted Release 9.0(1)6
Outbound Business ConceptsRelationships Between Outbound Option Components

DescriptionConcept
Defines the collection of query rule-generated dialing lists associated with agentskill groups, and maps the contacts to a call with the agent skill groups.
Users create the agent skill groups and associate them with one or more dialinglists by assigning them to a campaign.
With Outbound Option, you can configure an agent-based campaign or a transferto IVR campaign:
• Agent-based campaign: This type of campaign uses an outbound modethat causes the Dialer to transfer every customer call associated with aspecific skill group to an agent.
• Transfer to IVR campaign: This type of campaign uses an outbound modethat causes the Dialer to transfer every customer call associated with aTransfer to IVR Campaign specific skill group to a service control-basedIVR instead of an agent. This feature allows a contact center to rununassisted outbound campaigns using pre-recorded messages in the IVR.
See the “Campaigns” section for moredetails.
Note
Campaign
Defines a selection of agents to be used in a campaign. Each skill group can onlyhave one campaign assignment, but a campaign can service multiple skill groups.
Outbound agents are tied to the campaign by their skill group association. Agentsmight belong to multiple skill groups and thus be part of multiple campaigns.
The campaign associates dialing lists with specific skill groups, but the campaigncannot associate a specific dialing list to a specific skill group unless there isonly one dialing list and one skill group in the campaign.
See the “Campaign Skill Groups” section for moredetails.
Note
Skill Group
A collection of agents and skill groups that are bound to a specific Unified CM.The Dialer is bound to serve the group of agents in a specific call center site.(For experiencedUnified CCE users, this document uses the term agent controlleras another way to convey agent peripheral.)
See the “Agent PG” section in Chapter 2, Architectural Overview, formore details.
Note
Agent Peripheral Gateway(PG)
An Outbound Option component that places Outbound Option calls. The Dialeris associated with the agent peripheral at a call center site. Outbound Optionsends calls to a Dialer based on the campaign skill group relationship for theagent controller at that site. The Dialer monitors campaign skill groups and ismapped to an agent peripheral.
See the “Outbound Option Dialer Component” section in Chapter 2,Architectural Overview, for more details.
Note
Dialer
List of contact information that you provide during import.Customer List
Outbound Option Guide for Cisco Unified Contact Center Enterprise and Hosted Release 9.0(1) 7
Outbound Business ConceptsRelationships Between Outbound Option Components

DescriptionConcept
An internal table, to which an import applies a query rule to determine whichrecords to insert in the dialing list. There is one Contact List for each import.
See the “Contact List Imports” section for moredetails.
Note
Contact List
The list of customer contacts that Outbound Option dials to make outbound calls.There is one dialing list for each campaign query rule.
Each campaign query rule combination results in a unique dialing list.
Only one dialing list is active at a time for a particular campaign. Whenever adialing list is active, it is distributed to all skill groups in the campaign. A specificdialing list cannot be mapped to a specific skill group in a campaign.
See the “Dialing List” section in Chapter 7, Administrative/SupervisoryTasks, for more details.
Note
Dialing List
Using some of the preceding terms, the following example demonstrates what happens during an OutboundOption import:
1 Outbound Option imports the user's customer list into an internal table of customer contacts.
2 While the import process continues, a query rule filter selects and inserts data from the customer contactsinto a dialing list.
3 Outbound Option reads in records from the dialing list for the campaign, and sends the records to be dialedto dialers co-located on peripherals where associated skill groups are configured.
See the “Create a Campaign” section in Chapter 6, “Configuring Campaigns and Imports,” for details aboutthe sequence of events that occur during a campaign creation.
Note
ImportsYou can import a list of customer contact information and a list of customers who should not be called. Youcan configure Outbound Option to import both types of lists either by continuously polling or at scheduledintervals. You can also specify that imported lists should replace existing lists or be appended to them.
Do Not Call List ImportsUnited States federal law requires telephone solicitors to maintain do not call lists. A Do Not Call (DNC) listensures that those customers who request not to be contacted will not be contacted regardless of the callinglist imported into the system.
The Do Not Call list is a list of numbers that are identified as off-limits for outbound calling. This list mayinclude numbers from the federal DNC list, as well as numbers from customers who have specifically requestedthat they not be contacted. Entries in the Do Not Call list will not be dialed even though they are included ina contact list. The DNC list is shared across all campaigns, and only contains phone numbers. The campaignvalidates that a number in the dialing list is not in the Do Not Call list before sending it to a Dialer, which the
Outbound Option Guide for Cisco Unified Contact Center Enterprise and Hosted Release 9.0(1)8
Outbound Business ConceptsImports

solution checks at the last minute before actually placing the call. You can update a Do Not Call list while acampaign is running, and the update will immediately affect records that have not been sent to a Dialer.Records already sent from the Campaign Manager to the Dialer will not be affected, because those recordsare beyond the control of the Campaign Manager.
Do Not Call imports are validated for improper formatting and field lengths during the import process. Invalidrecords are flagged and written to an error file.
Related Topics
Create Do Not Call List, on page 131
Contact List ImportsThe contact list import reads in a user-generated text file of customer contacts and associated phone numbersand places it in an internal contact table. Like Do Not Call imports, there is a validation step where improperlyformatted records are flagged and written to an error file. The error files are written to the\icm\<instance>\la\logfiles directory on LoggerA. The name of the files are based on the name of the TargetTable Name and the date and time the import occurred. Phone numbers without prefix matches are not placedin a file.
You can add additional business-specific attributes to the contact list import file before the import occurs.This allows for segmentation of the campaign using a query rule. In this way, a single import can containrecords for multiple dialing lists for the same campaign; however, do not include the campaign customercontacts in multiple dialing lists because this might result in the same customer being dialed twice.
See the “Add Attributes to a Contact List” section in Chapter 7, “Administrative/Supervisory Tasks,” formore details.
Note
The U.S. area code mappings are provided along with the product. International customers must provide theirown data and add it to the database.
During the contact list import process, time zone and daylight saving time information is assigned to eachcontact by matching phone numbers to region prefix strings. If any of the phone numbers for a contact do notmatch a configured region prefix, the contact list import will use the default time zone data configured for thecampaign.
Import Rule ReportsThe same import rule reports are used for Do Not Call and Contact List imports. The reports display a historicalview of when imports occurred, the number of records imported, and the number of records that were consideredinvalid due to length constraints or improper formatting.
For contact list imports, the reports also provide insight into the number of contacts that were assigned withthe default time zone information for the campaign, as well as the number of contacts that were actuallyimported into the dialing list after the query rule and format validation was performed.
Related Topics
Administrative and Supervisory Tasks, on page 157
Outbound Option Guide for Cisco Unified Contact Center Enterprise and Hosted Release 9.0(1) 9
Outbound Business ConceptsContact List Imports

Query RulesThe query rule determines which customer contacts to use from the import for a campaign. You can associatemultiple query rules with a campaign; therefore, you can use them to segment a campaign by query rule forprioritization or other logical groupings. For example, if your campaign requires dialing customers betweenthe hours of 9:00AM and 11:00AM, you could set up a query rule to only dial during those times, then configurethe campaign to switch to another query rule after that time when the sequence has ended.
When dialing, only one query rule is active at any time for each campaign.
You can change query rules based on different conditions, including configured time limit, or a number ofrecords attempted (referred to as penetration), time of day, or current hit rate across the query rule. The queryrule will also automatically switch to another available query rule if it runs out of numbers that are ready tobe dialed now.
CampaignsA campaign is made up of one or more query rule-generated dialing lists and one or more campaign skillgroups. Outbound Option reads in contacts from the dialing list associated with the active query rule for thecampaign, and directs Dialers to place calls to customers. The Dialer then directs contacted customers toagents (Agent Campaigns) or IVRs (Transfer to IVR Campaigns) in the campaign skill group for applicablecustomer treatment.
You can create or modify campaigns using the Outbound Option Campaign component, where you define ormodify the settings that apply to a campaign. You can also add or delete a campaign using the Campaigncomponent.
You can define two types of campaigns, agent-based and transfer to IVR; however, only one campaign typecan be configured per campaign.
See the “Create a Campaign” section in Chapter 6, “Configuring Campaigns and Imports,” for more details.Note
Dialing ModesOutbound Option supports the following dialing modes:
• Preview: The agent previews the contact information on the desktop before deciding whether this contactshould be dialed or not, so the agent can decide to skip to the next contact. After the agent accepts acontact, the Dialer places the call so that the agent gets the benefit of Call Progress Analysis (CPA), butthe agent does not hear the ringing.
Agents cannot place calls from their desktop (phone); only the Dialer can place calls.During a personal callback, the Dialer places the call and the assigned agent receives ascreen pop on their desktop before the number is dialed, so the agent can decide if thecall can be placed at that time.
Note
Outbound Option Guide for Cisco Unified Contact Center Enterprise and Hosted Release 9.0(1)10
Outbound Business ConceptsQuery Rules
In Preview mode, if the agent skips or rejects the call, the record is marked “R” for retry and is sent toanother agent based on the No answer setting in the Campaign configuration. For example, if the Noanswer parameter is two hours, then the skipped or rejected record is presented to another agent aftertwo hours.
The Preview and Direct Preview dialing modes only apply to agent campaigns becausethey require agent interaction, and only dial one line per agent.
Note
• Direct Preview: Direct Preview is similar to the Preview mode, except that the call is placed from theagent’s phone after the agent accepts. This dialing mode also avoids the possibility of abandoning callsand answering machine detection false positives. After initiating the call, the agent hears the ringing sothat there is no delay when the customer answers, but the agent has to deal with answering machinesand other results that the dialer’s CPA would normally handle while in other dialing modes.
• Progressive: The campaign is configured to dial a specific number of lines per agent (not based onexpected hit rate, which is the percentage of customers that have been successfully contacted); therefore,if you configure the campaign to dial two lines per agent, when an agent is available the Dialer will dialtwo contacts at the same time expecting only one of them to answer.
The Progressive and Predictive dialing modes apply to agent campaigns as well asunattended transfer to IVR campaigns. Progressive and Predictive dialing modes arefocused on keeping the agent/IVR resources busy. Also, agents cannot preview thecontact information on their desktops while using these dialing modes.
Note
• Predictive: The Dialer adjusts the number of customers to dial per available agent (or IVR port for atransfer to IVR campaign).
As in Progressive mode, when multiple customers answer the calls placed for a single agent, secondaryanswers can be transferred to another associated agent in the campaign, or sent to the configured IVRfor abandon treatment and possible queuing if no agents are available. If no agents or IVR is available,the call will be dropped without treatment.
A Predictive Dialer is designed to increase agent utilization in a call center. To increase the chances ofreaching a customer, a Predictive Dialer dials several phone lines per available agent. The goal is to dialenough lines to keep the agents busy while not exceeding the configured maximum abandoned call rate.An abandoned call occurs when a customer answers the phone, but no agent is available to talk to them.In some cases, the abandoned call rate is limited by government regulations (typically, less than 3% fortelemarketing calls). In Predictive mode, the Dialer increases the number of lines used per agent untilthe Abandon Rate is close to the preconfigured maximum Abandon Rate. At this point, the Dialerstabilizes the Lines Per Agent to keep the Abandon Rate below the preconfigured maximum. If theAbandon Rate goes above the maximum, the Dialer lowers the Lines Per Agent.
If the hit rate spikes upward very sharply during the campaign, it can cause the Abandon Rate to exceedthe daily Abandon Rate target; for example, the hit rate changes from 10% to 30% in a few minutes. Itis very difficult for the Predictive Dialer to cope with hit rate changes of this magnitude and still keepthe Abandon Rate under the daily Abandon Rate target.
Outbound Option Guide for Cisco Unified Contact Center Enterprise and Hosted Release 9.0(1) 11
Outbound Business ConceptsDialing Modes

Because there is a wide variation in how long each phone call lasts, Predictive modedetermines the proper number of customers to call for each agent given the current hitrate and configured abandon limit.
Note
In Predictive and Progressive mode, agents that are reserved remain reserved until there is a successful livecall. They are not immediately released if a live call is not available. On campaign completion (when thedialing list for the campaign runs out of records), agents who remain reserved are released. The same actionoccurs if the skill group mode is switched to “Inbound.”In Predictive or Progressive mode, agents are released under the following conditions:
• A successful live call was transferred to the agent (the reservation call will be dropped).
• There are no more records in the Contact List for the campaign that the agent is working on.
• The agent’s skill group mode changes from Predictive/Progressive mode to Inbound mode.
After the reservation call is dropped, the agent goes into wrap-up or available mode depending on the UnifiedCCE Agent Desk Setting configuration.
In Preview mode, each preview call is associated with the agent who accepted the call. In this mode, agentsare released when the following conditions occur:
• The agent rejected the preview call (if the agent decides to skip the call, that agent remains reserved).
• A successful live call was transferred to the agent (the reservation call will be dropped).
• The contact number was busy, was not answered, or an answering machine was detected and answeringmachine detection was enabled.
• The outbound call could not be successfully transferred to the agent (this might be due to any failure onthe switch or to a Unified CCE software problem).
After the reservation call is dropped, the agent might go into wrap-up mode (after call work), if the agent isa manualIN agent. (The Outbound Option Dialer does not automatically set the agent to ready mode.)
As soon as an agent goes into the Ready state, that agent might receive another call if there are more records.
Caller ID Masking by CampaignOutbound Option allows you to configure up to 15 prefix digits for dialed numbers in a campaign. If youconfigure a prefix, it will be inserted before the Dial prefix for all numbers dialed in a campaign.
In Outbound Option deployments that use the SCCP Dialer, this prefix allows an administrator to createcampaign-specific Unified CM translation patterns, which you can use to tailor the ANI seen by a customerby campaign. For example, all customers dialed from Campaign A will see a caller ID of “1-800-333-4444,”while all customers dialed from Campaign B will see a caller ID of “1-800-555-1212.” The prefix digits arealways prepended to the beginning of the number, so that they can easily be stripped using translation patterns.
Outbound Option Guide for Cisco Unified Contact Center Enterprise and Hosted Release 9.0(1)12
Outbound Business ConceptsCaller ID Masking by Campaign

This translation pattern function is not applicable for the SIP Dialer. In a SIP Dialer deployment, the SIPDialer uses the SIP message to make outbound calls directly to the gateway. The SIP interface allows theSIP Dialer to set the ANI directly.
Note
Agent CampaignsIn an agent campaign, Outbound Option dials customers and transfers them to agents in targeted skill groups.The Dialer monitors for available agents. When the Dialer determines that an agent is available, the peripheralgateway (PG) places a virtual reservation call to the agent so that the contact center knows that this agent isreserved. The physical phone does not actually ring, but the agent desktop is updated with the data so that thedesktop believes that there is a call in progress. After the agent is reserved, the Dialer places outbound callsto customer contacts using the dialing mode that was set for the campaign skill group. After the Dialer identifiesa customer, the call is transferred to the agent. The agent is expected to stay on the reservation call until acustomer call is reached to avoid the possibility of abandoned calls. Once a customer call is reached, the agentmust disconnect the reservation call from the agent desktop.
The agent still has the opportunity to mark the call as a wrong number, wrong party, or to schedule a callbackfor later which would not close the record out. If more than one line was dialed for the agent, and more thanone of those calls are answered by customers, the first call will be assigned to the agent. At this point theDialer determines what to do with the second answered call. If another agent is reserved in the campaign, thecall will be transferred there. Otherwise, the call will be transferred to the IVR or IVRs that are configured inthe Abandon to IVR setting for the campaign skill group. If no IVR is configured, then the call is droppedwith no treatment. It is strongly recommended that the Abandon to IVR setting be set up to avoid Dialerabandons. Once calls are sent to the IVR, prompts can be played, data collected, and the customer can beredirected to a properly skilled agent anywhere in the enterprise contact center.
CallbacksWhen the system contacts a customer and transfers the call to an agent, the customer has the option to requestbeing called back at a later date and time. The agent enters the date and time the customer would like to becalled into the agent application, and the call is scheduled for callback.
The callback number can be different from the number originally dialed.Note
If an agent is skilled for a predictive campaign and schedules a callback for that campaign, the callback forthat campaign will be handled in Predictive mode as well (callbacks are handled in the same mode as thecampaign type).
Depending on the Outbound Option campaign settings, a callback can be scheduled as a regular callback ora personal callback.
• Regular callbacks can be handled by any agent assigned to the campaign, where the customer is calledback using the configured campaign mode.
• Personal callbacks allow the customer to receive a callback from the agent they spoke to when they werefirst contacted. The customer is called back using a similar mode to the Preview dialing mode.
Callbacks on personal callbacks are handled in the associated campaign mode.
Outbound Option Guide for Cisco Unified Contact Center Enterprise and Hosted Release 9.0(1) 13
Outbound Business ConceptsAgent Campaigns

Related Topics
About Regular Callbacks, on page 14About Personal Callbacks, on page 14
About Regular CallbacksRegular callbacks can be handled by any agent assigned to the campaign.
The callback time is not constrained by the campaign dialing times. CallbackTimeLimit (15 minutes by defaultand configurable in the registry) determines the time range when the callback can occur.
The callback time will be rescheduled for a later time if the Dialer is unable to reach the customer, becauseof a busy signal or ring no answer, for example.
The CallbackTime limit might be exceeded if no agents are available. If the elapsed time exceeds theCallbackTimeLimit, and RescheduleCallback (1 by default and configurable in the registry) is enabled, therecord returns to the Pending state at TimeToResetDailyStats (00:30 by default and configurable in the registry).
About Personal CallbacksThe Outbound Option personal callback feature allows scheduling customer callbacks for specific agents, sothat customers receive callbacks from the same agent who spoke with them initially.
This feature is very similar to Preview mode in that an agent reservation occurs first. When the agent isreserved, they can either accept the customer call or reject it. (The Skip option is not available.) ClickingClose sets the BAResponse variable to indicate a close operation, which closes out the record so that it is notdialed again.
Personal callbacks are not dependent on a particular campaign, and do not require a campaign to be runningwhen the call is placed. This feature allows personal callbacks to work together with active campaignscontaining either predictive or preview skill groups. Agents scheduled for a personal callback can belogged in to any inbound, outbound, or blended skill group at the time of the callback. The callback agentmust be logged in with the same agent ID that was used to schedule the callback. Be aware that only oneDialer on a particular peripheral is assigned personal callback records.
Note
The personal callback feature supports three callback modes:
• Use the alternate VDN (the call will be routed to the skill group DN for the campaign associated withthe callback, if the DN is available).
If this option is selected and the specified agent is not available at the designated callback time, the callis routed to another agent right away.
• Reschedule the personal callback to the same time the next business day.
• Abandon the personal callback.
The following actions can take place during a personal callback:
• If the customer cannot be reached during the specified callback time, the call is rescheduled or abandonedbased on the configuration setup or until the specified maximum number of attempts has been exhausted.
Outbound Option Guide for Cisco Unified Contact Center Enterprise and Hosted Release 9.0(1)14
Outbound Business ConceptsCallbacks

• If the Outbound Option Dialer detects an answering machine response during a personal callback, thecall is still transferred to the scheduled agent. This allows the agent to leave a message and/or reschedulethe callback for another convenient time.
•When the callback mode is set to Reschedule or Abandon:
◦If the specified agent is not logged in at the designated callback time, but then logs in within thecallback time period, Outbound Option reserves the agent and places the callback.
◦If the specified agent is on an existing call and is unavailable during the entire callback time period,the personal callback fails and the call is rescheduled or abandoned based on the configurationsetup.
•When the callback mode is set to Alternate VDN:
◦If the specified agent is not available or not logged in, another agent is reserved for the callbackusing the dialed number of the associated campaign skill group.
Customer records can be inserted directly into the Personal Callback List to support scheduling callsbetween agents and customers for a specific date and time, but this requires special integration withthird-party applications to import these records. See Appendix F, “Schedule of Contacts Between Customersand Agents”, for detailed information.
Note
Transfer to IVR CampaignsA transfer to IVR campaign, also known as an unattended or unassisted campaign, can send both live customerand answering machine calls to IVRs for customer treatment. This customer treatment includes playingprompts, collecting data from the customer, and redirecting the call to applicable agents anywhere in thecontact center enterprise.
The configuration allocates the maximum number of IVR ports used for transfer to IVR campaigns, and itattempts to keep them all busy within the dialing constraints.
Either Progressive or Predictive modes can be used to dial an unattended campaign. You can play a differentprompt for a live customer or for an answering machine.
You cannot use the transfer to IVR feature in the Direct Preview mode or the regular Preview modes.Note
Dialing OrderOutbound Option initiates contacts for a campaign based on the ordering in the imported contact list. Thisorder is not changed during the import.
Each number for the contact is dialed once, in the order it is configured (on the Call Target tab in the Campaignconfiguration) and imported in the contact list, and before any of the numbers for that contact are retried.
See Chapter 6, “Configuration of Campaigns and Imports”for more information.
Outbound Option Guide for Cisco Unified Contact Center Enterprise and Hosted Release 9.0(1) 15
Outbound Business ConceptsTransfer to IVR Campaigns

Sequential DialingThe sequential dialing feature, accessed through the Campaign Call Target tab in the Outbound OptionCampaign component, allows you to associate up to ten phone numbers per customer record. Two time periodsfor calling the customers, called “zones,” can be configured for each campaign. Each time period (zone) listswhich of the ten phone numbers will be called during that time. A phone number can be configured for eitherzone or for both zones.
Customers are dialed based on the time zone of the first phone that is configured on this tab. The timezone is based on the prefix of the phone number and the region prefix configuration. If two phone numbersimported for the same customer have different time zones, both phones will be called during times thatare valid for the first phone.
Note
Contact Priority Among Callbacks, Retries, and Pending ContactsThe contact priority order is as follows:
• Top priority is given to customers who have requested callbacks. This ensures that the customers arecalled at the time that they requested.
• Retries get second priority. A contact is marked for retry after all the numbers associated with the contacthave been tried once, and one or more of those numbers had a call result configured for retry.
• Pending contacts get third priority. A customer record is considered to be pending until all of its eligiblephone numbers have been tried once.
The default priority order can be changed by setting the PendingOverRetryEnabled registry setting to 1in the Campaign Manager. This setting ensures that all numbers and records are tried once before retriesare attempted. See Appendix A, “Registry Settings”, for detailed information.
Note
Campaign ReportsThe query rule call activity and pending record reports are available as campaign roll-ups for multiple queryrules within a campaign.
There are also consolidated reports available, which attempt to blend campaign call activity reportinginformation with skill group performance reports to give a better overall view of the business activity. Becausethe consolidated reports mix data from different reporting engines in a single report, there are a few caveatsthat are described in the reports themselves. These reports provide a rough overview of agent activity, averagetime between calls, abandon rate, and so on.
Related Topics
Administrative and Supervisory Tasks, on page 157
Outbound Option Guide for Cisco Unified Contact Center Enterprise and Hosted Release 9.0(1)16
Outbound Business ConceptsCampaign Reports

Campaign Query Rule ReportsThere are two general categories of campaign query rule reports:
• One category of reports indicates the number of records closed, in Pending state, and total records inthe query rule’s dialing list.
• A second category of reports provides different views into the call result activity. It breaks down callresults into approximately a dozen categories.
Transfer to IVR ReportsThe campaign and query rule call activity reports display accurate call activity for calls that are not transferredto IVR. Calls transferred to IVR are counted as being transferred to an IVR, but the campaign and query ruleactivity reports do not display what occurred after the call was sent to the IVR. If calls are queued and transferredback to an agent, they are treated as new inbound calls in the reports.
Call Type ReportsThe call type is a Unified CCE concept that maps a route point dialed number to a routing script. It is also auseful reporting object for the enterprise to describe all calls that traversed a specific routing script. The calltype applies primarily to inbound traffic in the call center because the Dialer does not use the routing scriptwhen placing outbound calls. However, the Outbound Option does use routing scripts to reserve agents andto transfer calls to the IVR, so that it can provide some insight into how calls are being routed.
Campaign Skill GroupsA campaign skill group describes the resource pool for a campaign and provides the necessary informationfor managing the campaign. For larger enterprise deployments with multiple contact center sites, skill groupsare associated with a specific contact center site, which might have different hours of operation and differentIVR equipment. Dialing Mode is a skill group attribute, so that contact center skill groups can be opened andclosed at different times for shared campaigns using Unified CCE administrative scripts.
The Dialer uses campaign skill groups to monitor resource availability. With agent campaigns, the Dialerlooks at the number of available agents. With Transfer to IVR campaigns, the Dialer looks at the number ofcalls in queue for the associated campaign skill group to make sure it has not reached its quota of configuredIVR ports.
Each Dialer is associated with a peripheral (PG). The Dialer monitors skill groups associated with its ownperipheral for resource availability and requests records for campaigns associated with those skill groups.
The Dialer only places calls on behalf of agents located on its PG.
One campaign could be served by multiple Dialers if one or more skill groups from each peripheral isassigned to the campaign. This assignment allows campaigns to be site-specific or shared across theenterprise depending on the configuration.
Note
Outbound Option Guide for Cisco Unified Contact Center Enterprise and Hosted Release 9.0(1) 17
Outbound Business ConceptsCampaign Skill Groups

Smaller Skill GroupsPredictive mode campaigns are more efficient when there are more resources (more agents for an agentcampaign; more IVR ports for a transfer to IVR campaign) in a campaign skill group. The Dialer adjusts itsdialing rate based on the number of abandons in a set number of calls. The more frequently calls are placed,the more often it can adjust the dialing rate. It is difficult for the Dialer to make accurate adjustments frequentlyenough when there are less than 10 agents in the campaign.
Blended Campaigns/Skill GroupsBlended campaigns are campaigns in which agents take inbound calls and outbound calls at the same time.The inbound program can use the same or different skill group as the outbound campaign skill group. Theinbound calls generally receive priority in two ways. First, the campaign skill group can be configured to usea percentage of active agents, reserving the rest for inbound calls; and second, if an inbound customer is inqueue, blended agents are not reserved for the blended campaign.
An agent on an outbound reservation call will not be interrupted with a routed inbound call. The agentreservation call is not terminated until the agent does so or the campaign is closed out for that skill group, oruntil the Dialer times out the reservation. An agent on a reservation call may be interrupted by an internalcall. This interruption normally results in a dropped reservation call, and because the Dialer is dialing customersfor that agent, it may also result in abandoned calls if no agents are available.
Agents Skilled for Multiple Active CampaignsAgents can be skilled for multiple active campaigns. Because of the way the Dialer reserves agents, one ofthe campaigns wins the race to find an available agent when agents become available.
For example, assume that you have an agent in three active campaign skill groups. That agent becomesavailable in all three skill groups at the same time. The Dialer monitoring at the skill group level for the numberof available agents sends up three reservation requests, one for each associated campaign skill group. In sucha case, the request by the first campaign skill group in the Dialer memory gets priority over the other requests.Over time, this situation results in an imbalance of agents between skill groups
To work around this issue, queue reservation calls in a similar way to what is often done for personal callbacks.This workaround ensures that reservation requests in the second and third campaign skill groups are servicedfirst the next time an agent in that skill group becomes available. Now, calls can be evenly distributed acrosseach of the active campaigns when agents are skilled for more than one of them.
Related Topics
Configuration of Campaigns and Imports, on page 119
Campaign Skill Group ReportsSkill Group reports provide information about agent activity for outbound and inbound agents.
Outbound Option Guide for Cisco Unified Contact Center Enterprise and Hosted Release 9.0(1)18
Outbound Business ConceptsSmaller Skill Groups
Blended Campaign Skill Group ReportsIf the same skill group is used for both inbound and outbound, then the campaign consolidated reports canprovide a consolidated overview of business activity for both inbound and outbound calls.
Related Topics
Administrative and Supervisory Tasks, on page 157
Customer Time Versus System TimeThis section helps identify when the customer time zone is used in Outbound Option activities versus whenthe system time is used.
Customer Time
Since the Outbound Option uses area code prefixes to determine the time zone, this option might dialcustomers using wireless phones or VoIP phones in a different time zone according to the configured areacode or time zone mapping.
Note
Customers in a specific campaign can be distributed across multiple time zones, as long as they follow thesame rules for when daylight saving time changes.
To determine the time zone offset of each contact, the Unified CCE system has a configurable region prefixdatabase with phone number prefixes, assigned time zone offsets, and indications as to whether or not theyobserve daylight saving time. The import uses this database to associate time zone offsets with customers, sothat when the campaign searches for records in the active query rule’s dialing list, it considers time zone offsetwhen determining which contacts are appropriate to dial now. However, this approach does not account fordaylight saving time changes from time zone to time zone. These daylight saving time changes are managedat the campaign level so that campaigns cannot attempt to contact customers in time zones that observe daylightsaving time, but switch over on different calendar dates.
For example, the United States is comprised of time zone regions that do not observe daylight saving time,or switch over on the same day. But a campaign that is dialing Houston, Texas and Mexico City, Mexicomight have a problem because these locations change over to daylight saving time on different days.
If a contact’s number does not match any of the configured region prefixes, then the campaign’s default timezone offset is assigned. If all of the customers are in one time zone, then configuring the region prefixinformation is not necessary.
Outbound Option receives its list of daylight saving zones from the Microsoft Operating System. Make surethat all Outbound Option components have the same version of the MS OS installed for proper handling ofany new time zones. Also, make sure that the Logger and AW machines have the latest time zone update forMicrosoft Windows operating systems, or have the same time zone patches from Microsoft.
Related Topics
Architectural Overview, on page 21
Outbound Option Guide for Cisco Unified Contact Center Enterprise and Hosted Release 9.0(1) 19
Outbound Business ConceptsCustomer Time Versus System Time

System TimeThe system time refers to the time used in scheduled imports. It also refers to the query rule time of dayswitching of contact lists, which is based on the time at the Central Controller.
Call Progress Analysis (Answering Machine Detection)Call Progress Analysis (CPA) uses a combination of call signaling and media stream analysis to differentiatetypes of calls.
• Fax/modem detection looks for specific tones in the media stream.
• Voice detection looks in the media stream for alternate voice and silence patterns after the call has beenconnected.
• AnsweringMachine Detection (AMD) uses media stream analysis to look for a longer voice streamwithminimal silence periods. (An option is available that searches for terminating tone detection.)
• Operator Intercept relies on call signaling network identification. It does not analyze the media streamlooking for specific tri-tones.
Enable Answering Machine Detection in the Outbound Option Campaign component on acampaign-by-campaign basis, depending upon the requirements of the campaign or the purpose of the call.
Special Information Tones (SIT) and busy tones are detected by the gateway and not by the dialer. The dialerreceives skinny messages from Unified CM and handles call classification based on them.
The gateway supports SIT detection only on T1 CAS (FXO loopstart signaling) and FXO ports for callsoriginated from an SCCP based Unified CM dialer.
Answering machine detection takes into account speech patterns and silence between identified voice patterns,to differentiate live voice from answering machine recording and background noise. There are a fewconfiguration parameters to modify in the Outbound Option Campaign Configuration component to changethe amount of silence or the expected time of greeting depending on the business need. Accuracy levels dependon various factors, such as campaign list quality and phone number types called.
SIP Dialer
If you have a SIP dialer, you must enable IP AMD for CPA to properly function. If you do not enable IPAMD, the SIP dialer instructs the gateway to transfer the call to an agent without waiting for detection.
Related Topics
Create a Campaign, on page 135SIP Dialer Recording Parameters Configuration, on page 155
Outbound Option Guide for Cisco Unified Contact Center Enterprise and Hosted Release 9.0(1)20
Outbound Business ConceptsSystem Time

C H A P T E R 2Architectural Overview
This chapter, intended for system administrators and administrators, provides an overview of the OutboundOption architecture.
The Outbound Option Dialer component is designed to maximize resources in a contact center by dialingseveral customers per agent. After reaching a live contact, the Outbound Option Dialer component transfersthe customer to an agent along with a screen pop to the agent’s desktop. To optimize use of available agents,the Outbound Option Dialer component calculates the average amount of time an agent waits to receive acall and the average call handle time per agent.With this information, the Outbound Option Dialer componentcalculates the number of lines to dial so that agent wait time is kept to a minimum.
• Unified CCE Software Overview, page 21
• Outbound Option Software Components, page 22
• Outbound Option Scripting, page 40
• Fault Recovery, page 42
Unified CCE Software OverviewThis section provides a high-level overview of Unified CCE software, which must be installed and configuredbefore installing Outbound Option.
See Chapters 3-5 for detailed information about installing Unified CCE and Outbound Option software.Note
Before installing Unified CCE software, the computers must have the Microsoft Windows operating systemand, for some components, Microsoft SQL Server database management software installed. Also, ensure thatthere is enough disk space available on each computer to install the Unified CCE component.
See theHardware & System Software Specification (Bill of Materials) for Cisco Unified ICM/Contact CenterEnterprise & Hosted, Release 9.0(1) (located on the Cisco web site) for details about operating system andsoftware requirements.
Unified CCE software contains the following components:
• CallRouter: The component of the Central Controller that makes routing decisions. It gathers anddistributes data to and from remote sites.
Outbound Option Guide for Cisco Unified Contact Center Enterprise and Hosted Release 9.0(1) 21

• Logger: The component of the Central Controller that controls the central database.
• Administration & Data Server: Known as the Admin Workstation in previous releases, theAdministration & Data Server is the user interface for Unified CCE software. The Administration &Data Server can be located at any central or remote site. It allows users to monitor call handling withinthe system and make changes to configuration data or routing scripts.
• Peripheral Gateway: The interface between the Unified CCE platform and third-party hardware ineach call center, such as an ACD. A Peripheral Gateway (PG) is typically located at the call center.
Install the Peripheral Gateway from the PG Setup program; install the other components from the Web Setupprogram.
Together, the CallRouter and Logger compose the Central Controller and are installed at a central site. APeripheral Gateway is typically installed in each call center. Administration & Data Servers can be installedat a central site, a call center, or at a separate admin site.
Outbound Option Software ComponentsThis section provides details about the server processes of the Outbound Option application:
• Campaign Manager: Manages lists.
• Outbound Option Import: Reads customer import files and generates database lists.
• Outbound Option Dialer: Maximizes the resources in a contact center by dialing several customersper agent. This component resides on the PG server, where it performs the following actions:
◦Dials customers
◦Reserves agents
◦Performs call classification
◦Calculates agent availability
◦Keeps outbound dialing at a level where the abandon rate is below the maximum allowed abandonrate
The Outbound Option components comprise the user interface where configuration data can be entered. Thisconfiguration data is used by the Outbound Option server processes to configure campaigns.
Outbound Option Guide for Cisco Unified Contact Center Enterprise and Hosted Release 9.0(1)22
Architectural OverviewOutbound Option Software Components

Outbound Option Component RelationshipsThe following figure shows the component relationships within an Outbound Option deployment that usesthe SIP Dialer. These relationships include the Unified CCE software components that Outbound Option uses.
Figure 2: Outbound Option Network Component Relationship (SIP Dialer)
The following figure shows the component relationships within an Outbound Option deployment that usesthe SCCP Dialer.
Figure 3: Diagram of Outbound Option Network Component Relationship (SCCP Dialer)
Outbound Option Guide for Cisco Unified Contact Center Enterprise and Hosted Release 9.0(1) 23
Architectural OverviewOutbound Option Component Relationships

Outbound Option Campaign Manager ComponentThe Campaign Manager component, which resides on the Logger, is responsible for:
• Managing when a campaign runs.
• Maintaining system and dialer configurations.
• Making decisions about which contact records to retrieve from a campaign based upon configurablequery rules and delivering contact records to dialers.
Records for callbacks are sent to the Dialer only when agents are logged in, and are controlled by registryvalues as described in Chapter 6, “Configuration of Campaigns and Imports”.
• Distributing configuration data to the import process and all available dialers in the system.
• Collecting real-time and historical data and sending it to the CallRouter.
• Managing the Do Not Call list to ensure that no records on it are sent to the Dialers.
• Performing record queries based on the following order:
◦Callback
◦Retry Zone1
◦Retry Zone2
◦Pending Zone1
◦Pending Zone1 DST
◦Pending Zone2
◦Pending Zone2 DST
Based on this order, the priority for the Retry record is higher than for the Pending record. However,the Pending record priority can be set above the Retry record by setting the “PendingOverRetryEnabled”registry key to 1 (default is 0). If the value is set to 1, the record query order would be:
◦Callback
◦Pending Zone1
◦Pending Zone1 DST
◦Pending Zone2
◦Pending Zone2 DST
◦Retry Zone1
◦Retry Zone2
Related Topics
Registry Settings, on page 171
Outbound Option Guide for Cisco Unified Contact Center Enterprise and Hosted Release 9.0(1)24
Architectural OverviewOutbound Option Campaign Manager Component

Outbound Option Import ComponentThe Outbound Option Import component, which resides on the ICM Logger, imports the customer's contactlist that the Outbound Option dialer uses to contact customers. In addition, the Import component uses thescheduling configured in the OutboundOption components to process imports that are scheduled for a particulardate and time.
The Import component imports a Contact list, which contains the phone numbers that Outbound Option dials.
When the Import component processes an import, the following steps occur:
1 Import a Contact list into a table.
2 Build a dialing list for a campaign.
3 Perform region prefix matching.
Outbound Option can continue to run a campaign while an import is in progress; however, some of thecampaign’s query rules might be disabled.
Note
Outbound Option Dialer ComponentThe Outbound Option Dialer component, which resides on the PG server, performs the following actions:
• Dials customers. In a deployment with the SIP Dialer, the Dialer component dials customers using thevoice gateways. In a deployment with the SCCP Dialer, the Dialer component dials customers usingUnified CM.
• Reserves agents through the Media Routing (MR) interface.
• Performs call classification.
• Calculates agent availability by monitoring campaign skill groups via the CTI Server interface to theagent PG.
• Transfers answered customers calls to reserved agents.
SIP DialerUnified CCE Release 8.5(1) offers the Session Initiation Protocol (SIP) Dialer alongside the Skinny CallControl Protocol (SCCP) Dialer that has been the sole Dialer offered in previous releases of Outbound Option.In an Outbound Option deployment that uses the SIP Dialer, functions such as dialing, call control, and CallProgress Analysis for Outbound campaigns are handled by the Voice Gateway rather than by Unified CM.This process increases the number of Outbound agents that a deployment can service on a PG, and reducesthe number of PGs and Dialers customers need to deploy for larger enterprise systems.
The following table summarizes feature differences between the SIP Dialer and the SCCP Dialer.
Outbound Option Guide for Cisco Unified Contact Center Enterprise and Hosted Release 9.0(1) 25
Architectural OverviewOutbound Option Import Component

SCCP DialerSIP Dialer
Use the Unified CM routing and dial plans foroutbound call routing
Use the voice gateway or CUBE dial peers andUnified SIP Proxy routing policies for outbound callrouting
Need to configure Unified CM translation pattern tosupport Campaign ANI
No need to configure Unified CM translation patternto support Campaign Automatic NumberIdentification (ANI)
Perform CPA at Unified CM dialer portPerform CPA at gateway DSP resource
CPA supports only G.711 codecCPA supports both G.711 and G.729 codecs
Need to configure dialer port on Unified CMNo need to configure dialer port on Unified CM
Call Throttling supports 5 CPS per dialerCall Throttling supports 60 CPS per dialer
Dialer needs to be in proximity of voice gatewayDialer need NOT be in proximity of voice gateway
Supports 120 dialer portsSupports 1500 dialer ports
Does not support warm standby architectureSupports warm standby architecture
Requires two MR PIMs for duplex SCCP Dialers,and one MR PIM for simplex SCCP Dialer
Requires one MR PIM for MR PG
All the outbound calls go through Agent PG andUnified CM
Only connected outbound calls, which are transferredto agents or IVR, go through Agent PG and UnifiedCM
Dialer Port AllocationThe Dialer component reserves agents when it sees agents have become available. The Dialer requests skillgroup statistics from the agent PG every two seconds, and it attempts to reserve agents based on the numberof available agents and the number of dialers active for this PG. If there are two dialers, each dialer attemptsto reserve no more than half of the available agents. If there is only one agent left, then both dialers will attemptto reserve the agent, but because the dialers are not synchronized, the first dialer to see the available agentreserves it. It is not uncommon for under-used dialers to end up with one dialer getting more use than theothers only because one dialer is more likely to see an agent become available.
For example, one dialer reserves more agents than the other dialer because both dialers ask every two seconds.If Dialer 2 always asks about agent availability right after Dialer 1, then Dialer 1 is always ahead on requestingagents and reserves more agents. Unless the agent becomes available after Dialer 1 asks, Dialer 2 receivesless reservations.
Load balancing between Dialers increases as they get busier service for larger or multiple campaigns.Note
Outbound Option Guide for Cisco Unified Contact Center Enterprise and Hosted Release 9.0(1)26
Architectural OverviewOutbound Option Dialer Component
TheDialer component allocates available dialer ports based on need. Campaign skill groups withmore availableagents or that are dialing more lines per available agent receive a greater percentage of the available ports.
For example, in a two-dialer system, when one campaign dials three lines per agent with six available agents,the Dialer reserves nine ports for dialing, plus three ports to reserve agents because it is sharing agent resourceswith its dialer peer. If multiple campaigns are active and the number of ports that are needed is greater thanthe number of ports that are available, then ports are distributed in proportion to the lines per agent multipliedby the available agents for each campaign.
Each dialer checks agent availability to make reservation requests based on the skill group statistic refreshesthat occur every two seconds. When skill groups for multiple campaigns are active for one or more of thesame agents, then one campaign will always reserve that agent or agents. You can avoid this situation byscripting the reservation scripts to queue reservation calls using the same mechanism that is described forqueuing personal callback reservation requests. This resolution ensures a more even distribution of calls foractive campaigns that share a common agent pool.
For example, in the following scenario where two campaigns are in progress:
• Campaign 1 has four available agents and is dialing two lines per agent, which has a relative weight ofeight (two lines each for four agents).
• Campaign 2 has one available agent, but is dialing at four lines per agent, which has a relative weightof four (four lines for one agent).
To satisfy dialing customers for all available agents they would need 12 ports, but in this condition only nineports are left.
The results:
• Campaign 1 gets 2/3 of the remaining ports, or six of the remaining ports.
• Campaign 2 gets 1/3 of the remaining ports, or three of the remaining ports.
• The Dialer begins dialing with the ports it has, and assigns newly available ports to the campaigns whennew ports become available.
Port Allocations for Campaign ModesPreview, Predictive, and Progressive campaigns require at least two ports to place calls because they requireat least one port to reserve the agent and one port to dial the customer. Because campaigns are shared acrossactive dialers that service a PG, this maximum number of active campaigns applies to the PG.
Transfer to IVR and Direct Preview calls only require one port. Transfer to IVR calls do not reserve the IVRport before dialing, and Direct Preview calls use the agent's phone to place the call.
Outbound Option Guide for Cisco Unified Contact Center Enterprise and Hosted Release 9.0(1) 27
Architectural OverviewOutbound Option Dialer Component
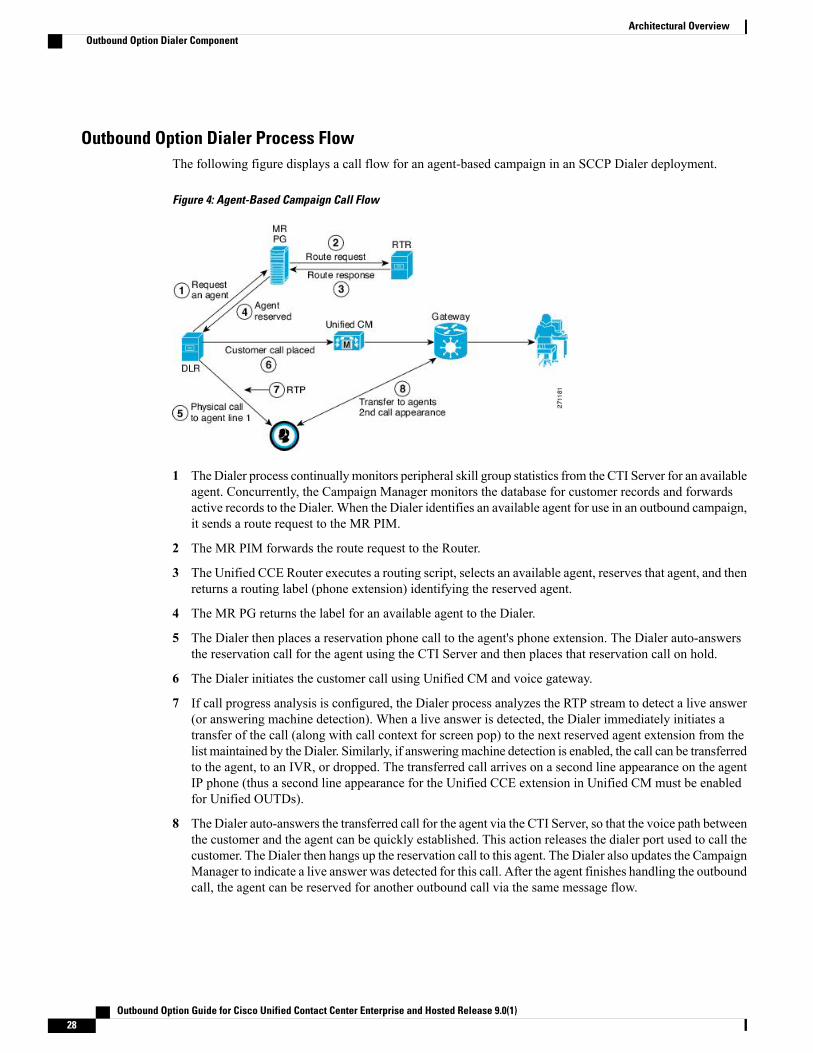
Outbound Option Dialer Process FlowThe following figure displays a call flow for an agent-based campaign in an SCCP Dialer deployment.
Figure 4: Agent-Based Campaign Call Flow
1 TheDialer process continually monitors peripheral skill group statistics from the CTI Server for an availableagent. Concurrently, the Campaign Manager monitors the database for customer records and forwardsactive records to the Dialer. When the Dialer identifies an available agent for use in an outbound campaign,it sends a route request to the MR PIM.
2 The MR PIM forwards the route request to the Router.
3 The Unified CCE Router executes a routing script, selects an available agent, reserves that agent, and thenreturns a routing label (phone extension) identifying the reserved agent.
4 The MR PG returns the label for an available agent to the Dialer.
5 The Dialer then places a reservation phone call to the agent's phone extension. The Dialer auto-answersthe reservation call for the agent using the CTI Server and then places that reservation call on hold.
6 The Dialer initiates the customer call using Unified CM and voice gateway.
7 If call progress analysis is configured, the Dialer process analyzes the RTP stream to detect a live answer(or answering machine detection). When a live answer is detected, the Dialer immediately initiates atransfer of the call (along with call context for screen pop) to the next reserved agent extension from thelist maintained by the Dialer. Similarly, if answeringmachine detection is enabled, the call can be transferredto the agent, to an IVR, or dropped. The transferred call arrives on a second line appearance on the agentIP phone (thus a second line appearance for the Unified CCE extension in Unified CM must be enabledfor Unified OUTDs).
8 The Dialer auto-answers the transferred call for the agent via the CTI Server, so that the voice path betweenthe customer and the agent can be quickly established. This action releases the dialer port used to call thecustomer. The Dialer then hangs up the reservation call to this agent. The Dialer also updates the CampaignManager to indicate a live answer was detected for this call. After the agent finishes handling the outboundcall, the agent can be reserved for another outbound call via the same message flow.
Outbound Option Guide for Cisco Unified Contact Center Enterprise and Hosted Release 9.0(1)28
Architectural OverviewOutbound Option Dialer Component

Transfer to IVR Call FlowThe following figure displays a call flow for an IVR-based campaign in an SCCP Dialer deployment.
Figure 5: IVR-Based Campaign Call Flow
1 The Dialer initiates a call to the customer.
2 The RTP stream is analyzed and voice is detected.
3 The Dialer requests an in-line transfer to a pre-configured route point.
4 The Unified CM PG requests translation route for the Router.
5 The Router responds.
6 The response is translated and sent to Unified CM.
7 Unified CM transfers the call to the IVR.
Outbound Option Guide for Cisco Unified Contact Center Enterprise and Hosted Release 9.0(1) 29
Architectural OverviewOutbound Option Dialer Component

Transfer to Agent Call Flow: SIP Dialer with SIP ProxyThe following figure illustrates a Transfer to Agent Call Flow in a deployment with a SIP Dialer that isconnected to a SIP Proxy.
Figure 6: Transfer to Agent Call Flow - SIP Dialer with SIP Proxy
In the above example:
1. An agent campaign starts. Customer records are delivered to the Dialer.
2 to 5. An Agent is reserved with a virtual placeholder call.
6 to 7.The dialer asks the gateway (via proxy) to place a call, and it does.
8. The Voice Gateway performs Call Progress Analysis and detects live voice. Media is terminated at theVGW until the CPA completes.
9. The dialer is notified and asks the voice gateway (via proxy) to transfer the call to the agent.
10. The Voice gateway sets up the customer call with the voice agent (via proxy) and the UC Manager.
Outbound Option Guide for Cisco Unified Contact Center Enterprise and Hosted Release 9.0(1)30
Architectural OverviewOutbound Option Dialer Component

Transfer to IVR Call Flow: SIP Dialer with SIP ProxyThe following figure illustrates a Transfer to IVR Call Flow in an Outbound Option deployment with a SIPDialer connected to a SIP Proxy.
Figure 7: Transfer to IVR Call Flow - SIP Dialer with SIP Proxy
In the above example:
1 An unattended IVR campaign starts. Customer records are delivered to the Dialer.
2 The Dialer asks the SIP Proxy to forward an invite to an available gateway to start a call.
3 The Gateway places the call.
4 Voice Gateway does Call Progress Analysis and detects an answering machine. The Dialer is notified.
5 The Dialer asks the MR PG where the IVR is.
6 MR PG forwards the request to the Router.
7 Routing Script identifies the IVR and notifies the MR PG.
8 The MR PG forwards the route response to the Dialer.
9 The Dialer notifies the voice gateway to transfer the call to the IVR.
10 The Gateway initiates the transfer to the SIP Proxy, and the SIP Proxy forwards the invitation onto UnifiedCM. Unified CM forwards the call invitation to the IP IVR, and media is set up between the Gateway andthe IP IVR.
Outbound Option Guide for Cisco Unified Contact Center Enterprise and Hosted Release 9.0(1) 31
Architectural OverviewOutbound Option Dialer Component

Transfer to Agent - SIP Dialer with No SIP ProxyThe following figure illustrates a transfer to agent call flow in an Outbound Option deployment with a SIPDialer with no SIP Proxy.
Figure 8: Transfer to Agent - SIP Dialer with No SIP Proxy
In the above example:
1 Import is scheduled and campaign starts. Records are delivered to Dialer.
2 Agent looks for an available agent via the Media Routing Interface.
3 MR PG forwards the request to the Router.
4 The Routing Script identifies an agent and responds to the MR PG.
5 Media Routing PIM notifies the Dialer that the agent is available.
6 Dialer signals the gateway to place a call to the customer.
7 The Gateway places a call to the customer, and the Dialer is notified it is trying.
8 Call Progress Analysis is performed at the gateway. Voice is detected, and Dialer is notified.
9 The Dialer asks the voice gateway to transfer the call to the reserved agent by its agent extension.
10 The Gateway directs the call to the agent via Unified CM using dial peer configuration to locate the UnifiedCM. Media is set up between the Gateway and the agent’s phone.
Outbound Option Guide for Cisco Unified Contact Center Enterprise and Hosted Release 9.0(1)32
Architectural OverviewOutbound Option Dialer Component

Peripheral Gateway (PG)The peripheral gateways (PGs) are redundant in a SideA - SideB configuration with one side active and theother side running in a standby while waiting to be activated. As mentioned earlier, the dialers are typicallyco-located with the agent PGs with the dialers running in a peer model.
Agent PGThe agent PG is a primary data collection point for agent and skill group statistics. The Dialer connects to theagent PG through the CTI Server interface where it monitors skill groups associated with campaigns duringcampaign configuration. It uses the number of working agents and available agents to determine when toreserve agents and when to dial for agent campaigns. For transfer to IVR campaigns, the Dialer monitors thenumber of calls queued as provided in the campaign skill group to determine when the Dialer component hasreached its configured limit of IVR ports for this campaign.
The agent PG also monitors all calls that the Dialer ports place. The Dialer uses the PG representation of thecall to push customer call context to the agent. It also provides dialer information about call results so thatthe PG can report the outbound statistics properly for the campaign skill group.
Campaign statistics and skill group statistics overlap in describing the number of outbound calls that reachagents. The Campaign Manager collects and reports campaign statistics. The PG collects and reports skillgroup statistics. It is not uncommon for the two reports to be off by a call or two for a given half hour, but itwill corroborate at the end of the campaign.
Media Routing PGTheMedia Routing PG (MRPG) is the interface the Dialer uses to make route requests to the Central Controllerto find and reserve available agents. Each Dialer uses its own MR controller (MR PIM), and a separate dialednumber is configured to differentiate requests for different campaign skill groups for agent campaigns.
In a Dialer deployment, the IVR and agent controllers (PIMs) are included in the agent PG using the GenericPG or System PG deployment to allow the MR PG to be co-located. (See the Hardware & System SoftwareSpecification (Bill of Materials) for Cisco Unified ICM/Contact Center Enterprise & Hosted for more detailsabout agent PG deployments.)
IVRThe Dialer uses the IVR for unassisted treatment of customer calls depending on campaign configuration forabandoned calls, answering machine treatment in an agent campaign, or for unassisted transfer to IVRcampaigns.
IVR scripting is flexible in playing prompts to the user and collecting additional data. It can also be a queuepoint to wait for the next available agent.
Partition the ports accordingly when using the same IVR for inbound and outbound campaigns. For inboundcalls, do not use ports allocated for the transfer to IVR feature. For IVR ports shared between inbound andoutbound applications, the Dialer might transfer customers to an IVR which does not have any available portsleft. In this case, the called party may hear a fast busy signal or hear a ring no answer message. To avoid thissituation, purchase enough ports for the IVR.
Outbound Option Guide for Cisco Unified Contact Center Enterprise and Hosted Release 9.0(1) 33
Architectural OverviewPeripheral Gateway (PG)

The transfer speed is usually under two seconds, but is dependent on network design and configuration.Note
Administration and Data Server: ConfigurationThe Administration & Data Server is an application where you can configure the Unified CCE system. (Inreleases prior to Release 8.0(1), this functionality was provided by an application called the AdminWorkstation.)Enable the tools for configuring Outbound Option by editing the Administration & Data Server setup.
Cisco Unified Intelligence CenterCisco Unified Intelligence Center (Unified Intelligence Center) is the standard Unified CCE reporting interface.
For details about Unified Intelligence Center, see the Cisco Unified Intelligence Center Documentation.
Dialer ReportsThe Outbound Option Dialer reports provide information about the dialer platform. These predefined templatesinclude information about performance and resource usage. The templates also enable you to determinewhether you need more dialer ports to support more outbound calls.
Related Topics
Administrative and Supervisory Tasks, on page 157
Outbound Option Agent DesktopsThree desktops are available for the Outbound Option: CTI Object Server (CTI OS), the Cisco Agent Desktop(CAD), and Cisco Finesse.
Related Topics
Outbound Option Installation: Preliminary Steps, on page 45
Cisco CTI Object Server (CTI OS)The CTI OS component provides an object-based interface to the CTI Server using the COM, C++, Java, and.NET interfaces. These interfaces permit development of agent desktop applications that interface with UnifiedCCE software.
Outbound Option includes a sample agent desktop, the Cisco CTI Toolkit Outbound Desktop (Win32), withVisual Basic source code, using CTI OS.
See theCTI OSDeveloper's Guide for Cisco Unified ICM/Contact Center Enterprise &Hosted for informationabout the CTI OS Architecture and the CTI OS Client Interface.
Outbound Option Guide for Cisco Unified Contact Center Enterprise and Hosted Release 9.0(1)34
Architectural OverviewAdministration and Data Server: Configuration

Cisco Agent Desktop (CAD)Cisco Agent Desktop (CAD) is a computer telephony integration solution for contact centers that is easy todeploy, configure, and manage. The desktop provides contact center agents and supervisors with powerfultools to increase agent productivity, improve customer satisfaction, and reduce contact center costs.
CAD includes the following major components:
• Cisco Desktop Administrator
• Cisco Agent Desktop
• Cisco Supervisor Desktop
• Cisco Agent Desktop Services
This section discusses the Cisco Agent Desktop, Cisco Supervisor Desktop, and Cisco Desktop Administrator.See the CAD documentation for detailed information about other components.
Cisco Agent DesktopCisco Agent Desktop displays windows on the agent PC when the call arrives, increasing the speed of callprocessing. Cisco Agent Desktop populates any sort of third-party application (databases, help desk packages,personal information managers, and so on) based on the calling number, called number, or information thata VRU collects. The screen pop can use a combination of elements.
The Cisco Agent Desktop softphone allows agents to control calls from the PC. It minimizes keystrokes andsaves time for agents who are working simultaneouslywith the phone, CTI desktop, and third-party applications.The softphone toolbar automates common telephony functions, including answer, drop, and speed dial. Thetoolbar also includes a taskbar, which launches applications based on telephony or data events. Agents selectfrom up to ten predefined task buttons to update CRM data and other applications, as well as initiate automatedafter-call tasks, such as sending an e-mail or fax, or initiating call-handling scripts, or starting otherWindows-based tools.
The Chat feature allows agents to communicate with their supervisors and other agents via text messages forassistance at any time without leaving their desks or putting a call on hold.
The integrated browser allows agents to view intranet and internet web pages fromwithin Cisco Agent Desktop.
Cisco Supervisor DesktopCisco Supervisor Desktop allows contact center supervisors to view and direct agent activity in real time.Without leaving their desks, supervisors can observe, coach, and communicate with agents using instantmessaging, view agent status details, as well as view conference information. Without the caller’s knowledge,supervisors can initiate “chat” sessions to coach agents on how to handle customer issues. Supervisors cansend scrolling marquee messages to all agents or to teams of agents to broadcast important information.
Supervisors can also use the real-time audio monitoring capabilities to listen to agent conversations withcustomers. If necessary, they can barge-in to calls—conference themselves into the conversation—or intercepta call—transfer a call to themselves. Supervisors can also record agent conversations and save those recordingsfor up to 30 days for later review.
Outbound Option Guide for Cisco Unified Contact Center Enterprise and Hosted Release 9.0(1) 35
Architectural OverviewOutbound Option Agent Desktops

Cisco Desktop AdministratorCisco Desktop Administrator allows a contact center administrator to configure how Cisco Agent Desktoplooks and behaves. Using Cisco Desktop Administrator, an administrator can create work flows, configurehow enterprise data is displayed, customize task buttons, and perform many more tasks to customize CiscoAgent Desktop for that contact center’s particular needs.
Related Topics
Outbound Option Installation: Preliminary Steps, on page 45
Cisco FinesseCisco Finesse provides the following applications and tools:
• Aweb-based desktop application for agents and supervisors. Agents and supervisors access their desktopsby entering the following URL in their browsers: http://hostname, where hostname is the hostname orIP address of the Finesse server.
• A web service that provides contact center agent desktop functionality through a REST-like interface.
• An administration console for configuring system settings, desktop layout, wrap-up reasons, and reasoncodes. Administrators access this console by entering the following URL in their browsers:http://hostname/cfadmin, where hostname is the hostname or IP address of the primary Finesse server.
Cisco Finesse supports Outbound Option as follows:Note
• You must use Progressive mode, Predictive mode, or Preview mode only. Direct Preview mode isnot supported.
• You must use the SIP Dialer only. SCCP Dialer is not supported.
The following Outbound Option features are not supported by the out-of-the-box Finesse Agent Desktop:
• scheduling a callback (regular or personal)
• adding a contact to the Do Not Call List
Agents who are on Progressive or Predictive OutboundOption calls do not appear in the Talking - Outboundcolumn of the Queue Statistics gadget on the supervisor desktop. This number only includes agents whoare talking on outbound calls placed by those agents.
Note
Outbound Option Extended Call Context VariablesThe Outbound Option Dialer uses CTI Extended Call Context (ECC) variables to exchange information withthe CTI Toolkit Agent Desktop (Win32) for Unified CCE. The following table lists the ECC variables OutboundOption uses.
Outbound Option Guide for Cisco Unified Contact Center Enterprise and Hosted Release 9.0(1)36
Architectural OverviewOutbound Option Extended Call Context Variables
Dialer ECC variables can be passed to an IVR.Note
See the Installation Guide for Cisco Unified ICM/Contact Center Enterprise & Hosted for instructions onadding the Outbound Option ECC variables to CTI OS.
Table 2: ECC Variables for Outbound Option
DescriptionECC Variable
Indicates the name of the OutboundOption campaign to which the call belongs.BACampaign
Identifies a customer account number and can be used by the desktopapplication to perform a database lookup to obtain additional customer data.This ECC variable is displayed only if the data was available in the customerimport file.
30 characters is the maximum character length of this ECCvariable.
Note
BAAccountNumber
Multi-purpose placeholder that sends data from the CTI Desktop to theOutbound Option Dialer. This variable responds to the reservation call toschedule and cancel callbacks, and to changes to the callback phone number.See the following rows for more information about BAResponse.
BAResponse
When an agent uses the Accept, Reject, Reject-Close, Skip, Skip-Next, andSkip-Close buttons in Preview mode, BAResponse is set to one of thefollowing values:
• Accept: Accepts the current preview call.
• Reject: Rejects the current preview call. Sets record to “R” for retry.
• Reject-Close: Rejects the current preview call and closes the record soit will not be called again.
• Skip: Skips the current preview call. Sets record to “R” for retry.
• Skip-Close: Skips the current preview call and closes the record so itwill not be called again.
The Reject-Close and Skip-Close buttons are only available on theCTI OS desktop.
Note
BAResponse for Previewmode
Outbound Option Guide for Cisco Unified Contact Center Enterprise and Hosted Release 9.0(1) 37
Architectural OverviewOutbound Option Extended Call Context Variables

DescriptionECC Variable
When an agent uses the Callback button, BAResponse is set to one of thefollowing values:
Spaces are relevant andmust be included in the commands below.Note
• Callbackmmddyyyy hh:mm: Schedules a callback for the indicated dateand time
• Callback Cancel: Cancels a previously scheduled callback for this call
• P#xxxxxxxxxxxxxxxxxxxx: Changes the callback phone number to thenumber specified by xxxx
For Preview modes, cancel the reservation call by clicking Reject.
For Predictive mode, cancel the reservation call by clicking Not Ready andthen hang up the reservation call.
BAResponse for theCallback button
For Direct Preview calls, any connected customer call is classified as VOICEby the Dialer (default). To reclassify the call result, the agent has the optionto click the following buttons:
• Voice: To reclassify a call as a voice call, set the BAResponse variableto REX_VOICE. Enable the Voice button only after pressing one of theother buttons first. Pressing one of the other buttons first enables an agentto reclassify the call if needed.
• Answering Machine: To reclassify the call as an answering machinecall, set the BAResponse variable to REX_ANS_MACHINE.
• Fax/Modem: To reclassify the call as a fax/modem call, set theBAResponse variable to REX_FAX.
• Invalid: To reclassify the call as an invalid call, set the BAResponsevariable to REX_INVALID.
BAResponse for DirectPreview calls
For answering machine detection on a transfer to IVR campaign, theBAResponse variable is evaluated to carry the CPA result of the customercall. Two new IF node configurations are supported:
• Call.BAResponse=“CPA_AnswerMachine”
• Call.BAResponse=“CPA_Voice”
These IF nodes route to separate External Scripts to allow for differenttreatment depending onwhether a voice or an answeringmachine was detected.
BAResponse for answeringmachine detection in atransfer to IVR campaign
Outbound Option Guide for Cisco Unified Contact Center Enterprise and Hosted Release 9.0(1)38
Architectural OverviewOutbound Option Extended Call Context Variables

DescriptionECC Variable
Contains two characters indicating the mode and direction of the OutboundOption Dialer initiated call. The first character identifies the call mode:
• R: Reservation call, Predictive mode
• G: Reservation call, Progressive mode
• P: Reservation call, Preview mode
• D: Direct Preview reservation call
• C: Customer call
• A: Reservation call, personal callback
During a reservation call, the first character is P, R, G, or A.
When a customer call is transferred to an agent, the first character is C.
The second character of BAStatus indicates the call direction:
• O: Outbound
BAStatus
Unique key identifying a specific customer record within the Dialing List tablein the Outbound Option private database.
BADialedListID
Indicates the GMT offset, in minutes, for the customer’s time zone and obtainsthe customer’s local time. The format of this ECC variable is +/-#####.
This field’s first character is either a positive or negative sign, followed by 5digits. For example:
• This example indicates that the customer is one hour behind GMT:
BATimeZone = -00060
• This example indicates that the customer is two hours ahead of GMT:
BATimeZone = +00120
BATimeZone
Contains the customer’s last and first name separated by a comma, which iscompiled using the imported LastName, FirstName that was configured onthe Import Rule Definition tab page.
BABuddyName
Desktop Button BehaviorThe following table explains the desktop button behavior when a call is placed using Outbound Option.
For more information about dialing modes, refer to Dialing Modes, on page 10.
Outbound Option Guide for Cisco Unified Contact Center Enterprise and Hosted Release 9.0(1) 39
Architectural OverviewDesktop Button Behavior

Buttons EnabledCall DescriptionDialing Mode /Other Conditions
Accept, Skip, Reject, Skip-Close, andReject-Close buttons are enabled if the reservationcall has not been accepted yet
Reservation calls: Dialer makes thecall and agent is available
Preview
No buttons are enabled if the customer does notanswer the call
Initial customer calls: Agent acceptsthe call and Dialer makes the callto a customer
Callback button is enabledTransferred customer calls: Agentis talking to a customer
No buttons are enabledReservation calls: Dialer makes thecall and agent is available
Predictive andProgressive
No buttons are enabled if the customer does notanswer the call
Initial customer calls: Dialer makesthe call to a customer
Callback button is enabledTransferred customer calls: Agentis talking to a customer
Accept, Skip, Reject, Skip-Close, andReject-Close buttons are enabled if the reservationcall has not been accepted yet
Reservation calls: Dialer makes thecall and agent is available
Direct Preview
No buttons are enabled if the customer does notanswer the call
Initial customer calls: Agent acceptsthe call and calls a customer
Callback, AnsMach, Fax, and Invalid buttonsare enabled
You can revert back to voice if you makea mistake.
Note
Transferred customer calls: Agentis talking to a customer
Accept and Reject buttons are enabled, if thereservation call has not been accepted yet
BAStatus is set to A and O or A andB for a reservation call
Personal_Callback_ListTable
No buttons are enabled if the customer does notanswer the call
Initial customer calls: Agent acceptsthe call and calls a customer
Callback button is enabledTransferred customer calls: Agentis talking to a customer
Outbound Option ScriptingOutbound Option uses Unified ICM Enterprise scripting configured on the Administrative Workstation tomanage campaigns.
Outbound Option Guide for Cisco Unified Contact Center Enterprise and Hosted Release 9.0(1)40
Architectural OverviewOutbound Option Scripting

There are two types of scripts:
• Outbound Option administrative scripts, on page 41
• Outbound Option agent reservation scripts, on page 41
Outbound Option administrative scriptsOutbound Option administrative scripts enable, disable, or throttle campaign skill groups for outboundcampaigns. The scripts can also automatically close out a skill group for a specific campaign based on timeor any other conditional factor that the admin script can access. This scripting is performed at the skill grouplevel to provide more flexibility when managing larger campaigns that are distributed across multiple skillgroups.
Enable a campaign skill group by setting the campaign mode to one of the available modes: Preview, DirectPreview, Progressive or Predictive. (For more information about these modes, see Dialing Modes, on page121.) Schedule an administrative script to run at regular intervals. Disable the campaign skill group by theadministrative script, using a script node to change the campaign mode to inbound for that skill group.
This script also provides the ability to control the percentage of agents to be used in a campaign skill groupand whether this skill group is used for other campaigns or inbound calls.
An administrative script controls a campaign skill group. A campaign skill group can be mapped only toone campaign at a time. A skill group can be reused if new campaigns are added. If a campaign skill groupis recycled, its administrative scripting should be reused as well. However, note that although it is possibleto have two administrative scripts controlling the same skill group, conflicting campaign mode requestsfor Outbound Option can result.
Note
Outbound Option agent reservation scriptsTwo types of routing scripts are described later in this document. One is for Agent Campaign and one is forIVR Campaign.
Reservation scripts are used by the Dialer to reserve agents for specific outbound campaigns and personalcallbacks. With this kind of script, the Dialer makes a route request via its Media Routing Client using thedialed number that is configured for the campaign skill group. Each campaign has its own dialed number andreservation scripting. If an agent is not available, the default behavior is for the script to end the call and theDialer receives an error. The Dialer retries the reservation request when it sees available agents in the skillgroup statistics as described in the Dialer description earlier in this chapter. You can queue reservation callswhich have scripts that distribute agents across campaigns when those agents are skilled for multiple, activecampaigns.
A call can be transferred to an IVR as part of a transfer to IVR campaign, or transferred to non-IVR campaignsfor answering machine or abandons. A transfer to IVR campaign places a route request call to a CTI RoutePoint dialed number on the Agent PG, which enables the call context of the customer call to be transferred tothe IVR. A new call context can be added to the call while the call is being treated at the IVR.
Outbound Option Guide for Cisco Unified Contact Center Enterprise and Hosted Release 9.0(1) 41
Architectural OverviewOutbound Option administrative scripts
Fault RecoveryThis section describes Outbound Option behavior when specific components fail and recover.
Campaign Manager Fault RecoveryThe Campaign Manager resides on Logger Side A. Logger Side B has no Campaign Manager, so only oneCampaign Manager runs in the environment.
After the Dialer processes all of its cached records, it will not make calls until the CampaignManager processrecovers and further records can be sent to the Dialer again.
When the Campaign Manager process shuts down, the Dialer continues to dial contacts and saves the resultsuntil it processes all of the cached calls in memory, assuming that the Dialer is still able to reserve outboundagents for an agent campaign (that is, the ICM Router and MR PG need to be accessible).
After the Campaign Manager is back online, it updates call results based on the information it receives fromthe Dialer. (A few records may be lost due to race conditions when the Campaign Manager is not available.)
Dialer Fault RecoverySIP Dialer
The SIP Dialer architecture supports a single active dialer per peripheral. Only one SIP Dialer needs to beconfigured. Two Dialers are installed on separate PG platforms, but each is installed using the same DialerName.
When the Dialer state changes from ready to not ready, it updates the status to the Campaign Manager. TheCampaign Manager activates the standby Dialer if there is a standby Dialer in ready state. The same processapplies if the Campaign Manager detects that the connection from the active Dialer is lost.
The Dialer returns all active and pending records to the Campaign Manager (dialer flush), or closes theminternally if the link to the Campaign Manager is not available. Active calls are canceled if the call is notconnected, abandoned if the call is connected but not transferred to agent/IVR, or continued if the call isalready transferred and the PG/CG does not fail during that time. If the Dialer goes down or is disconnectedfrom the Campaign Manager and the Campaign Manager detects the disconnection, the Campaign Managermarks all outstanding records with an Unknown status and returns them to Pending status if the Dialer doesnot respond within a certain time period.
SCCP Dialer
The Dialers run in a peer mode for a given Peripheral Gateway and Agent Controller. The Dialer asks theCampaignManager for records for a given active campaign skill group, and the CampaignManager distributesrecords to each Dialer equally as the Dialers request them.
When a Dialer shuts down, the Campaign Manager marks its records with a “U” to indicate that the Dialerhas an unknown state. After an hour, the Campaign Manager sets the records back to a pending state (“P”),so that the records can be retried. The active agent PG continues to track and report on existing OutboundOption agent calls in the campaign’s skill group. Tracking and reporting is reflected in the CampaignConsolidated reports.
For example, assume that two dialers are running for an agent skill group. When one Dialer shuts down, theother Dialer continues to dial records for the active campaigns. Dialing capacity is reduced.
Outbound Option Guide for Cisco Unified Contact Center Enterprise and Hosted Release 9.0(1)42
Architectural OverviewFault Recovery

If the Agent PG becomes unavailable, or is reported as out of service, the Dialer's memory flushes calls thathave not been dialed and cancels calls in progress.
If Unified CM fails, the Dialer ports unregister and calls in progress end. The Dialer component stays offlineuntil the Unified CM subscriber recovers. To avoid overloading any subscriber with traffic from multipleDialers, Cisco recommends that no Dialer port has backup Unified CM subscribers.
Outbound Option implements a load balancing paradigm at the Outbound Option Dialer component level. Ifa dialer process terminates for any reason, other dialers at the same location become aware of this informationand attempt to take over the failed dialer’s load, resources permitting. The Outbound Option Campaigncomponent marks records contained in the failed dialer with a status of “U” for unknown. These records arereset every hour to a Pending (“P”) state. If the disconnected dialer is offline due to a network outage, thedisconnected dialer caches call results and updates its records to the correct call result.
Outbound Option Guide for Cisco Unified Contact Center Enterprise and Hosted Release 9.0(1) 43
Architectural OverviewDialer Fault Recovery

Outbound Option Guide for Cisco Unified Contact Center Enterprise and Hosted Release 9.0(1)44
Architectural OverviewDialer Fault Recovery

C H A P T E R 3Outbound Option Installation: Preliminary Steps
This chapter, intended for system administrators who will perform the initial installation of Outbound Option,describes what you need to do before starting to install Outbound Option.
• Before You Begin, page 45
• Installation Procedure Locations, page 46
Before You BeginThe following sections identify considerations that you must make when you install Outbound Option.
Dialer Component Performance OptimizationThe Outbound Option Dialer component dials at a rate that can overload a Unified CM subscriber. As a result,you must limit traffic for each Dialer to one Unified CM subscriber. In most cases the system cannot handletwo Dialers that have overlapping subscribers, even as a backup.
Auto-answer SettingsOutbound Option is flexible when configuring auto-answer, depending on the system requirements. The maindetermining factor is whether or not the business requires the Outbound Option agent to hear a zip tone. Usingan agent zip tone increases the transfer time line by almost one second.
Outbound Option Database SizeOutbound Option uses its own private SQL database on the Logger. Part of the installation includes creatingthis database, which is discussed later in this chapter. The SQL database creation on the Logger requires thatthe installer collect some business-related data and perform some calculations.
Outbound Option Guide for Cisco Unified Contact Center Enterprise and Hosted Release 9.0(1) 45

IVR IntegrationThe IVR deployment determines whether you require Unified CMMTP resources, or whether you can transfercustomer call context to the IVR.
For this deployment, to support account number and name transfer to the IVR from the Dialer component,you need an IVR deployment that supports transfer to IVR.
If you are deploying Cisco Unified Customer Voice Portal (Unified CVP), you may need to allocate MTPresources for calls transferred to the IVR from the Dialer.
System RequirementsSystem requirements for Outbound Option include the following:
• A working Unified CCE system that has a Router, Logger, Administration & Data Server, Agent PG,IPCC Generic PG or System PG, CTI Server, and Unified CM connectivity with agents and CTI RoutePoints. See your IPCC Enterprise documentation for instructions.
• If you plan to use the transfer to IVR feature, configure an IVR deployment that supports transfer toIVR. See your Unified CVP, Cisco Unified Contact Center Express, or third party IVR documentationfor instructions.
• Your system must meet the hardware and software requirements as listed in the following documents:
◦Hardware & System Software Specification (Bill of Materials) for Cisco Unified ICM/ContactCenter Enterprise & Hosted
◦Cisco Unified Contact Center Enterprise (Unified CCE) Software Compatibility Guide
• Important: If any service releases for the currently installed version of ICM/CCE are installed, youmust uninstall those service releases before proceeding. See the release notes for your ICM/CCE servicerelease for uninstall instructions.
• Only T1 PRI and E1 PRI interfaces to the PSTN are supported for Outbound SIP dialers.
Installation Procedure LocationsOnce the requirements stated in this chapter are satisfied, go to one of the following chapters for proceduresfor installing Outbound Option:
• For installation procedures for a SIP Dialer deployment, go to Outbound Option Installation: PreliminarySteps
• For installation procedures for a SCCP Dialer deployment, go to Outbound Option Installation: SCCPDialer
Outbound Option Guide for Cisco Unified Contact Center Enterprise and Hosted Release 9.0(1)46
Outbound Option Installation: Preliminary StepsIVR Integration
C H A P T E R 4Outbound Option Installation: SIP Dialer
This chapter, intended for system administrators who perform the first installation of Outbound Option,describes what you need to set up and install the Outbound Option platform.
This chapter groups installation activities to minimize switching between configuration and actual softwareinstallation. The general flow lists Unified CCE configuration first, then the Unified CommunicationsManager, and then the Outbound Option component software installation and associated database creation.
• Installation task maps, page 47
• Unified CCE configuration for Outbound Option, page 49
• Unified Communications Manager and Gateway Configuration, page 64
• Outbound Option Software Installation Steps, page 71
• Setup of Outbound Option in Cisco Desktop Administrator, page 79
• Verification, page 80
Installation task maps
System Configuration for Outbound OptionThe first phase is to configure Outbound Option to handle the optional Outbound Option components. Thefollowing table lists the required steps and provides pointers to where the tasks are discussed.
Table 3: Configure Unified CCE for Outbound Option
System PG ProcedureUnified CCE ProcedureTaskStep Number
Configure the PG, onpage 49
Configure the PG, onpage 49
Configure the Unified CCE PG1
Configure DialerComponent, on page 50
Configure DialerComponent, on page 50
Configure the Dialer component2
Outbound Option Guide for Cisco Unified Contact Center Enterprise and Hosted Release 9.0(1) 47
System PG ProcedureUnified CCE ProcedureTaskStep Number
Configure Port Map, onpage 51
Configure Port Map, onpage 51
Configure the port map3
Create a Network VRU,on page 52
Create a Network VRU,on page 52
Create a Network VRU4
Configure MediaRouting PG (MR PG),on page 52
ConfigureMedia RoutingPG (MR PG), on page52
Configure the Media RoutingPG
5
Configure Skill Group,on page 54
Configure Skill Group,on page 54
Configure a Skill Group6
Create Dialed Number,on page 55
Create Dialed Number,on page 55
Create a Dialed Number7
Unified CCEDocumentation
Unified CCEDocumentation
Create Translation Route ToIVR
8
Configure SystemOptions, on page 56
Configure SystemOptions, on page 56
Configure System Options9
Enable Expanded CallVariables, on page 56
Enable Expanded CallVariables, on page 56
Enable ECC Variables10
Configure PersonalCallbacks, on page 94
Configure PersonalCallbacks, on page 94
Configure and schedule personalcallbacks (optional)
11
Packet Capture, on page63
Packet Capture, on page63
Enable packet capture12
Software Installation and Database CreationThe next phase in installing Outbound Option is Outbound Option component software installation andassociated database creation. The following table lists the steps that comprise software installation and databasecreation and provides pointers to where the tasks are discussed.
Table 4: Software Installation and Database Creation Steps
System PGProcedure
Unified CCEProcedure
TaskStep Number
Create OutboundOption PrivateDatabase, on page71
Create OutboundOption PrivateDatabase, on page71
Install the Outbound Option privatedatabase on the Logger Side A platform
1
Outbound Option Guide for Cisco Unified Contact Center Enterprise and Hosted Release 9.0(1)48
Outbound Option Installation: SIP DialerSoftware Installation and Database Creation

System PGProcedure
Unified CCEProcedure
TaskStep Number
Install DialerComponent on thePG Platform, onpage 73
Install DialerComponent on thePG Platform, onpage 73
Install the Dialer component on the PGplatform
2
Edit Dialer-RelatedRegistry Values, onpage 75
Edit Dialer-RelatedRegistry Values, onpage 75
Edit Dialer-related Registry values3
Install MR PG, onpage 75
Install MR PG, onpage 75
Install the MR PG on the PG platform4
Unified CCE configuration for Outbound OptionThis section provides procedures for the tasks that are associated with configuring the Unified CCE forOutbound Option.
Configure the PGPerform the following steps to configure the PG (PG1).
Procedure
Step 1 In ICM Configuration Manager, open the PG Explorer tool.Step 2 Click Retrieve, and then click Add.
Add a Unified CCE PG.
Step 3 Enter the name (for example, PG1).Step 4 Select the CallManager or PG Generic PG Type.Step 5 Add a peripheral.Step 6 Enter the name (for example, PG1_PIM1).Step 7 On the Peripheral tab, select the Enable post routing check box.Step 8 Select the Default Desk Setting from the drop-down list box.Step 9 On the Routing Client tab, enter the routing clientname (for example, PIM1_Voice).Step 10 Select the Cisco_Voice option from the Default media routing domain drop-down list box.Step 11 Click Save.Step 12 Record the assigned Logical Controller ID for later use: ____________________.Step 13 Record the assigned Peripheral ID for later use: ____________________.
Outbound Option Guide for Cisco Unified Contact Center Enterprise and Hosted Release 9.0(1) 49
Outbound Option Installation: SIP DialerUnified CCE configuration for Outbound Option

Configure Dialer ComponentPerform the following steps to configure the dialer component.
Procedure
Step 1 Make sure that all CCE services are running.Step 2 Open the Unified CCE Configuration Manager.Step 3 Expand Outbound Option, and double-click Dialer to display the Outbound Option Dialer configuration
window.Step 4 Click Retrieve.Step 5 Click Add to add a new dialer.Step 6 Enter the following information in the Dialer General Tab fields.
Table 5: Dialer General Tab Fields
DescriptionField
The name of the system where the dialer is located. Maximum 32-characterstring, including alphanumeric characters, periods (.), and underscores (_).Alphabetic characters can be uppercase or lowercase. The name must beginwith an alphanumeric character, and must not contain spaces.
When you install the dialer component (see Install DialerComponent on the PG Platform, on page 73), you must enter theDialer Name in Peripheral Gateway Setup exactly as you enter iton the Dialer General Tab. Otherwise, the dialer cannot registerwith Campaign Manager.
Note
Dialer Name (required)
Check this check box to enable this dialer for all campaigns.Enable
Select a preconfigured MR PG peripheral name. This field is a drop-downlist and is not editable.
ICM Peripheral Name(required)
Select SIP (Session Initiation Protocol)Dialer Type
Maximum 255 characters. This description appears only on this tab page.Description
General Telephony Section
When this option is enabled, the dialer uses the area code to reach localtelephone numbers. The default is Disabled.
Include Area Code whenDialing
Enter any dialing prefix required by your location or by your campaigns.For example, some locations require the prefix 9 to reach an outside telephoneline.
Dial prefix
Outbound Option Guide for Cisco Unified Contact Center Enterprise and Hosted Release 9.0(1)50
Outbound Option Installation: SIP DialerConfigure Dialer Component

DescriptionField
Enter the long distance area code for all long distance calls. The dialer checksthe local area codes against the contact number. If the configured local areacode does not match the area code in the contact number, the dialerdetermines that this number is a long distance call. The default is 1.
If the dialer is installed in a location outside the United States, eitherenter the locally specific long distance prefix in the Long distanceprefix field or leave the field blank.
Note
Long distance prefix
Enter the area/city code that is used at your location. Enter multiple localarea codes separated by commas; for example, “508,978,617” representsthree local area codes.
Local area code (commadelimited) (required)
Enter the number of seconds the dialer waits before reusing a port after ahangup event. The default is 1 second.
Hangup Delay (1-10)
Themaximum calls-per-second rate at which the dialer dials outbound calls.Default is 10 to 15 calls per second for SIP dialer.
Port Throttle
Step 7 Click Save.
Configure Port MapPerform the following steps to configure the port map for each dialer. The port map specifies the number ofports that are available on the dialer and the extension numbers that Unified CommunicationsManager assignsto those ports. Each configured port represents a dialer phone device on Unified Communications Manager.
Note • For the SIP Dialer, you do not need to configure port extensions on the Unified CommunicationsManager. (Configuration of matching port extensions is required for the SCCP Dialer.)
• Extension numbers must be unique across the full enterprise. If there are multiple UnifiedCommunications Manager clusters, the extensions (Unified Communications Manager directorynumber) must still be unique. Extension numbers can be up to ten digits in length.
•When selecting extension numbers for Dialer ports, check the phone numbers in UnifiedCommunications Manager and the dial numbers in Device Target Explorer tool in Unified CCEAdministration to make sure existing numbers are not being used.
Procedure
Step 1 In the Unified CCE Configuration Manager Outbound Option Dialer configuration window, click the PortMap Selection tab to display the port map configuration.
Outbound Option Guide for Cisco Unified Contact Center Enterprise and Hosted Release 9.0(1) 51
Outbound Option Installation: SIP DialerConfigure Port Map
Make sure all agents and skill groups used by Outbound Option are associated with the UnifiedCommunications Manager PG, not the MR PG.
Note
Step 2 To begin adding ports to this dialer, click Add.Step 3 Configure a set of ports and their associated extensions.
Note:Make sure you provide the same number of ports for all the Dialers configured on the same peripheral.
Step 4 Click OK. The port mappings appear on the Port Map Selection tab.Step 5 Click Save to save all the configuration information.
Create a Network VRUPerform the following steps to create a Network VRU using the Network VRU Explorer tool.
Procedure
Step 1 Open the ICM Configuration Manager application.Step 2 Open the Explorer tools.Step 3 Open the Network VRU Explorer tool.Step 4 Create a type 2 VRU to be used during Media Routing (MR) PIM setup. Record the \ VRU name:
______________.Step 5 Click Save.
See the ICM Configuration Guide for Cisco Unified ICM Enterprise for detailed information about theICM Configuration Manager tools.
Note
Configure Media Routing PG (MR PG)Perform the following steps to configure the MR PG (PG2).
Outbound Option Guide for Cisco Unified Contact Center Enterprise and Hosted Release 9.0(1)52
Outbound Option Installation: SIP DialerCreate a Network VRU

Procedure
Step 1 In ICM Configuration Manager, open the PG Explorer tool.Step 2 Click Retrieve, then click Add. Add an MR PG.Step 3 Enter the name (for example, PG2_MR).Step 4 Select theMR PG type.Step 5 Add a peripheral.Step 6 Enter the name (for example, PG2_MR_PIM1).Step 7 On the Peripheral tab, check the Enable post routing check box.Step 8 On the Routing Client tab, enter the routing client name (for example, MR_PIM1_Voice).Step 9 Select the Cisco_Voice option from the Default media routing domain drop-down list box.Step 10 On the Advanced tab, select theNetwork VRU that you created during IPCC installation from the drop-down
list box.Step 11 Click Save.Step 12 Record the assigned Logical Controller ID for later use: ____________________.Step 13 Record the assigned Peripheral ID for later use: ____________________.
Send to VRUThe Send to VRU node can be used in a routing script for an IVR campaign. The following steps andaccompanying diagram provide an example of how to create a script for an IVR campaign.
Procedure
Step 1 Using the Dialed Number tool, associate the MR dialed numbers with the configured call type.
Step 2 Using the Script Editor Call Type Manager, associate the call type with the newly created reservation script.
Outbound Option Guide for Cisco Unified Contact Center Enterprise and Hosted Release 9.0(1) 53
Outbound Option Installation: SIP DialerSend to VRU
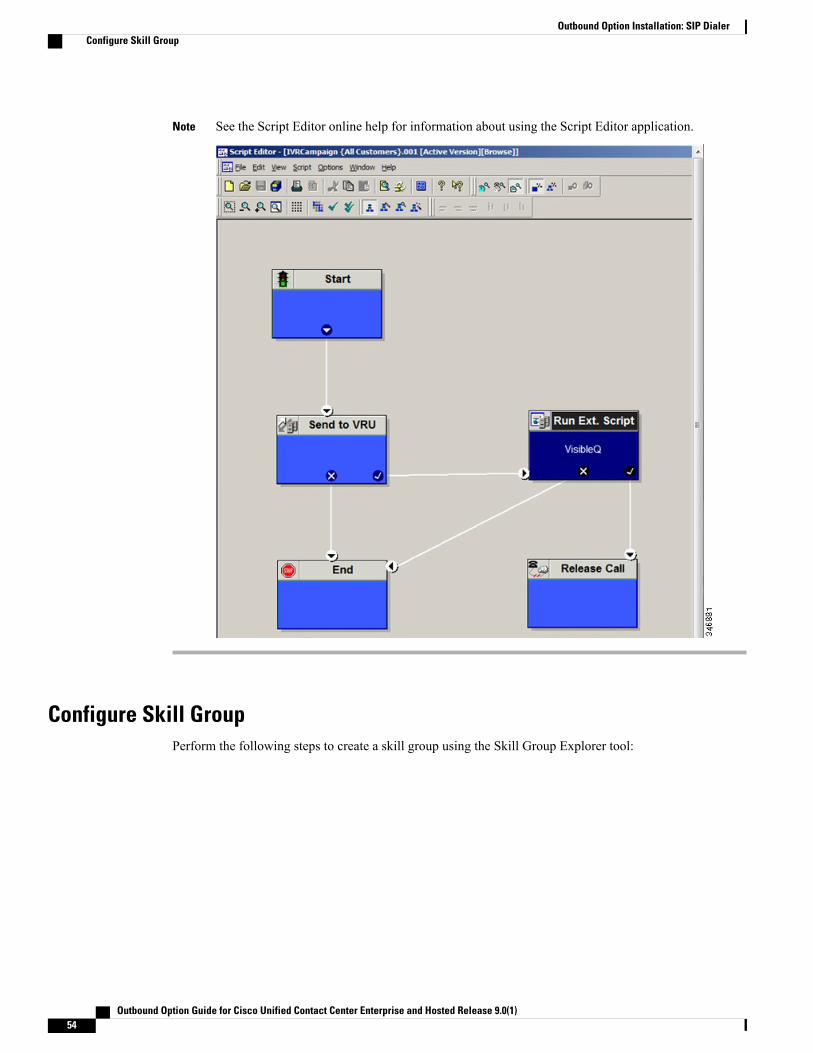
See the Script Editor online help for information about using the Script Editor application.Note
Configure Skill GroupPerform the following steps to create a skill group using the Skill Group Explorer tool:
Outbound Option Guide for Cisco Unified Contact Center Enterprise and Hosted Release 9.0(1)54
Outbound Option Installation: SIP DialerConfigure Skill Group

Procedure
Step 1 In ICM Configuration Manager, open the Skill Group Explorer tool.Step 2 Make sure the PIM is displayed in the Select filter data section (for information on creating the PIM, see
Configure the PG, on page 49).Step 3 Click Retrieve.Step 4 Click Add Skill Group.Step 5 Set theMedia Routing Domain to Cisco_Voice.Step 6 Enter a peripheral name and number (record them):____________________. (You can either enter a name
or allow the system to generate the name.)Step 7 Check the ICM picks the agent check box.Step 8 Click Add Route.Step 9 Enter a name for the new route (any name is allowed).Step 10 Click Save.
Create Dialed NumberPerform the following steps to create a dialed number for the MR PG.
Procedure
Step 1 In ICM Configuration Manager, open the Dialed Number/Script Selector List tool.Step 2 Click Add, and then enter a dialed number for the MR PG.Step 3 Select the MR routing client from the drop-down list box.Step 4 Select Cisco_Voice from theMedia Routing Domain drop-down list box.Step 5 Enter the dialed number.Step 6 On the Dialed Number Mapping tab, click Add.Step 7 In the Calling Line ID group box, click the All radio button.Step 8 In the Caller-entered digits group box, click the All radio button.Step 9 In the Call type drop-down list box, select the MR call type.Step 10 Click OK on the Dialed Number Map Entry dialog box, and then click Save.
To use the Personal Callback feature, a second dialed number is required. This dialed number must havethe PersonalCallback dialed number string. As with the previous dialed number, map all Calling LineIDs and all Caller-entered digits to the call type previously created for the MR routing client. Multipledialers require multiple dialed numbers—one for each routing client per skill group.
Note
Outbound Option Guide for Cisco Unified Contact Center Enterprise and Hosted Release 9.0(1) 55
Outbound Option Installation: SIP DialerCreate Dialed Number

Configure System OptionsUse the Outbound Option System Options component in the Unified CCE Configuration Manager to definecontact dialing time ranges to apply to all of your Outbound Option campaigns.
Be sure to select AM or PM for your start and end times.
Procedure
Step 1 In Unified CCE Configuration Manager, expand Outbound Option, and then select System Options.Step 2 Click the General Options tab to define the dialing time range for all your Outbound Option campaigns to
use, and then click OK.Step 3 Click the Bulk Update tab page to define specific dialing time ranges for telephone numbers, and then click
Update All Campaigns.
Enable Expanded Call VariablesPerform the following steps to enable the expanded call variables.
Procedure
Step 1 Open the System Information tool in the Tools/Miscellaneous folder in the ICM Configuration Managerapplication.
Step 2 In Unified CCE Administration, clickManage > Expanded Call Variables.Step 3 Check the Expanded call context enabled check box.Step 4 Click Save.Step 5 Open the List tools.Step 6 Open the Expanded Call Variable List tool.Step 7 Click all BAxxxx variables (BAAccountNumber, BABuddyName, BACampaign, BADialedListID,
BAResponse, BAStatus, and BATimezone).Step 8 In the Attributes tab, check the Enabled check box for each variable.Step 9 Click Save.
(Optional) Configure Personal CallbacksPersonal Callback is an optional feature in Outbound Option. Personal Callback allows an agent to schedulea callback to a customer for a specific date and time. A personal callback connects the agent who originallyspoke to the customer back to the customer at the customer-requested time.
Outbound Option Guide for Cisco Unified Contact Center Enterprise and Hosted Release 9.0(1)56
Outbound Option Installation: SIP DialerConfigure System Options

This section describes how to configure your system to handle personal callbacks. Then, when your contactcenter users create campaigns, they enable the callback feature on a per campaign basis. The following tableoutlines the steps involved and lists which steps are described in detail below.
All personal callbacks occur in Preview mode. Be aware that only one Dialer on a particular peripheralis assigned personal callback records.
Note
Some personal callback options must be configured through the registry. Furthermore, if a personal callbackrecord is not associated with a campaign, it follows the rules configured within the registry.
Procedure
Step 1 To enable Personal Callback, open the Unified CCE Configuration Manager.Step 2 Select Outbound Option.Step 3 Load the Campaign tool.Step 4 Select the Campaign General tab.Step 5 Open a predefined campaign.Step 6 Check the personal callback check box.
Personal callback is now enabled. To configure the personal callback registry entries, continue with Step 7of this procedure.
Step 7 Configure a call type for personal callback. For information about creating call types, see “Call Types” in thePackaged CCE Administration Guide.
Step 8 Create a dialed number with the name PersonalCallback on the outbound routing client. Refer to "DialedNumbers" in the Packaged CCE Administration Guide for Release 9.0(x) for information about configuringdialed numbers.
Step 9 In Script Editor, create a routing script that sets up the Personal Callback reservation.Include the following nodes:
• Add a queue-to-agent node.
• Add a Wait node after the Queue to Agent node. Use a value that is less than theTimeToWaitForMRIResponse Dialer registry setting. The default value is 600 seconds (10 minutes).
• The script should end in a Release Node instead of an End Node to avoid filling the Router Log Viewerwith “No Default Label” errors.
Outbound Option Guide for Cisco Unified Contact Center Enterprise and Hosted Release 9.0(1) 57
Outbound Option Installation: SIP Dialer(Optional) Configure Personal Callbacks

For example, the following Personal Callback reservation script uses nodes described in following sections:
Figure 9: Personal Callback Reservation Script
For details of routing scripts, refer to Set Up Routing Scripts.
Step 10 Open regedit on the data server (DS).Step 11 Open HKEY_LOCAL_MACHINE\SOFTWARE\Cisco Systems, Inc.\ICM\<instance
name>\LoggerA\BlendedAgent\CurrentVersion in the Outbound Option registry.Step 12 Configure the personal callback registry entries listed in the following table. (Enter the values in decimal
format.)The minimum and maximum values in the table are enforced by Outbound Option at runtime. Theregistry does not validate the values. Also, the default values are sufficient for most users.
Note
DescriptionDefaultValue(integers)
Name
Calculates the callback time range for each personalcallback in minutes. Outbound Option queries thePersonal Callback List for callback records, where theCallbackDateTime value is between the current timeand the sum of the current time minus theCallbackTimeLimit.
15CallbackTimeLimit
Sets the amount of time, in minutes, that the OutboundOption Dialer waits before retrying a personal callbackwhen the customer’s phone is busy (minimum value is1; maximum value is 10).
1PersonalCallbackTimeToRetryBusy
Outbound Option Guide for Cisco Unified Contact Center Enterprise and Hosted Release 9.0(1)58
Outbound Option Installation: SIP Dialer(Optional) Configure Personal Callbacks

DescriptionDefaultValue(integers)
Name
Sets the amount of time, in minutes, that the OutboundOption Dialer waits before retrying a personal callbackwhen the customer does not answer the phone(minimum value is 5; maximum value is 60).
20PersonalCallbackTimeToRetryNoAnswer
Sets the amount of time, in minutes, that the OutboundOption Dialer waits before retrying to reserve an agentif the agent is not available (minimum value is 1;maximum value is 10).
5PersonalCallbackTimeToRetryReservation
Sets the maximum number of times a personal callbackis attempted (minimum value is 1; maximum value is20). When the number of maximum attempts reaches0, the record is not tried again and the status is set to“M” (max-ed out).
5PersonalCallbackMaxAttemptsDefault
The interval time, in minutes, at which the OutboundOption Dialer checks the Campaign Manager forpersonal callback records (minimum value is 1;maximum value is 30).
5PersonalCallbackTimeToCheckForRecords
The number of days after the personal callback has beenscheduled to keep the record before it is purged(minimum value is 1; maximum value is 30).
5PersonalCallbackDaysToPurgeOldRecords
The number of personal callback records to send to theOutbound Option Dialer at one time (minimum valueis 5; maximum value is 100).
20PersonalCallbackRecordsToCache
Indicates whether personal callbacks are allowed onSaturdays:
• 0: Personal callbacks are not allowed on Saturdaysand will be scheduled for the next allowable day.For example, a personal callback which fails toreach the customer on a Friday will berescheduled for the following Sunday orMonday.
• 1: Personal callbacks are allowed on Saturdays.
0PersonalCallbackSaturdayAllowed
Outbound Option Guide for Cisco Unified Contact Center Enterprise and Hosted Release 9.0(1) 59
Outbound Option Installation: SIP Dialer(Optional) Configure Personal Callbacks

DescriptionDefaultValue(integers)
Name
Indicates whether personal callbacks are allowed onSundays:
• 0: Personal callbacks are not allowed on Sundaysand will be scheduled for the next allowable day.For example, a personal callback which fails toreach the customer on a Friday will berescheduled for the following Saturday orMonday.
• 1: Personal callbacks are allowed on Sundays.
0PersonalCallbackSundayAllowed
If needed, this registry entry must be created.
String containing the call status types to consider whenpurging old personal callback records. For example, ifthe string contains “C,M,F,L,I,” all calls with these callstatuses are purged from the database. (If the registryentry is missing, the default is assumed.)
The call status values can optionally bedelimited using a comma, a hyphen, asemicolon, or a colon. For more informationabout call status values, see the DatabaseSchema Guide for Cisco Unified ContactCenter Enterprisehttp://www.cisco.com/en/US/products/sw/custcosw/ps1844/prod_technical_reference_list.html.
Note
C, MPersonalCallbackCallStatusToPurge
If needed, this registry entry must be created.
The number of times a customer phone rings before thecall is classified as an unanswered call (minimum valueis 2; maximum value is 10).
4PersonalCallbackNoAnswerRingLimit
Step 13 Create an enterprise skill group and an enterprise route. Then configure the Queue to Agent node.
Create an Enterprise Skill GroupTo use the Personal Callback feature, you need to create the enterprise skill group associated with the agentusing the Enterprise Skill Group List tool.
Outbound Option Guide for Cisco Unified Contact Center Enterprise and Hosted Release 9.0(1)60
Outbound Option Installation: SIP Dialer(Optional) Configure Personal Callbacks

Procedure
Step 1 Open the List tools.Step 2 Open the Enterprise Skill Group List tool.Step 3 Create an enterprise skill group. In the Add Name field, type the enterprise name, then click Add. Select the
skill group, and then click Save.Step 4 In the Attributes tab, click Add to add the skill group or groups.Step 5 Click Save.
Create an Enterprise RouteAfter you create the enterprise skill group associated with the agent, you need to create an enterprise routeusing the Enterprise Route List tool. This route should target the enterprise skill group created in the previousstep.
Procedure
Step 1 Open the List tools.Step 2 Open the Enterprise Route List tool.Step 3 Create an enterprise route. In the Name field, type the enterprise route, and then click Add. Select the route,
then click Save.Step 4 On the Attributes tab, add the route.Step 5 Click Save.
Outbound Option Guide for Cisco Unified Contact Center Enterprise and Hosted Release 9.0(1) 61
Outbound Option Installation: SIP Dialer(Optional) Configure Personal Callbacks

Configure Queue to Agent Node
Procedure
Step 1 In Script Editor, double-click the Queue to Agent node.Step 2 Press Change in the Queue to agent type section.Step 3 Click Lookup agent reference by expression, then click OK.Step 4 In the agent expression column, enter Call.PreferredAgentID.Step 5 Select the enterprise skill group you created in the Enterprise Skill Group section (see Create an Enterprise
Skill Group, on page 60). If you are configuring for Unified SCCE, select the Route you configured in thatsection.
Step 6 Select the enterprise route you created in the Enterprise Route section (see Create an Enterprise Route, onpage 61).
Step 7 Confirm that the Peripheral column is left blank.Step 8 Click OK to save the Queue to Agent node.Step 9 Save and then schedule the script. When scheduling the script, use the call type that is configured for personal
callback.
Figure 10: Scheduling Script
Outbound Option Guide for Cisco Unified Contact Center Enterprise and Hosted Release 9.0(1)62
Outbound Option Installation: SIP Dialer(Optional) Configure Personal Callbacks
Packet CaptureIn order for SIP Dialer to properly capture data, you must ensure that the SIP Dialer on the call server machineis using the active interface from the Ethernet Interface list. You can find out which interface is the activeinterface by using a network protocol analyzer tool such as Wireshark, which you can download fromwww.wireshark.org. (From Wireshark, click Capture to open a Capture Interfaces dialog box; the listedinterface with network packets is the active interface.)
You can change the SIP Dialer packet capture parameters to use the active interface from theWindows RegistryEditor. Change the value of the interface name option (-i) in the CaptureOptions key to the number of theactive interface. For example, to use the third interface, edit the value for -i to read -i 3.
Capture files are in the HKEY_LOCAL_MACHINE\SOFTWARE\Cisco Systems, Inc.\ICM\<customerinstance>\Dialer registry key location.
• From a command prompt window, enter a procmon ba_capture command to specify that SIP Dialeruse the active interface. In this command, specify the number of the active interface to use in the /options-i parameter.
The syntax of the procmon ba_capture command is as follows:ba_capture [/on] [/off] [/options] [/type]where
/on turns packet capture on, /off turns packet capture off. The default is off; you should turnit on.
/on, /off
/options• -i <ifname>: Specifies interface name to capture on.
• -w <filename>: Captures directly to file in pcap format, file can be openedwithWiresharkor with other tools.
• -C <file_size>: Specifies the maximum size of a capture file. The units of file_size aremillions of bytes (1,000,000 bytes, not 1,048,576 bytes).
• -W <filecount>: Specifies the number of files created. The capture files are overwrittenfrom the beginning, thus creating a rotating buffer. Capture files after the first capturefile have the name specified with the -w flag, with a number after it, starting at 1 andcontinuing upward.
• -tt : Prints an unformatted timestamp on each dump line.
• -s : Snarfssnaplen bytes of data from each packet rather than the default of 68 . Settingsnaplen to 0 means use the required length to catch whole packets.
/type 1 captures SIP packets only or /type 2 captures the entire data payload on the Dialerhost machine.
/type
For example, the commandcapture /on /options -i 2 -tt -C 20 –s 0 -W 20 -w DialerCapture
Outbound Option Guide for Cisco Unified Contact Center Enterprise and Hosted Release 9.0(1) 63
Outbound Option Installation: SIP DialerPacket Capture

captures the network packets on interface 3 with capture files: capture1 – capture20. The maximum numberof capture files stored is 20. After 20 files are created, the oldest capture file is overwritten with the new data.Maximum file size is 20 MB.
Unified Communications Manager and Gateway ConfigurationThe next phase of installing Outbound Option is configuring Unified CommunicationsManager and its relatedgateway.
The following table lists the steps that comprise Unified CommunicationsManager configuration and providespointers to where the tasks are discussed.
Table 6: Unified CM Configuration Steps for Deployments with SIP Dialer
System PG ProcedureIPCC Enterprise ProcedureTaskStepNumber
Disable RingbackDuring Transfer toAgent for SCCP, onpage 64
Disable Ringback DuringTransfer to Agent forSCCP, on page 64
Disable Ring Tone for Dialer Transfer1
Configure SIP Trunks,on page 70
Configure SIP Trunks, onpage 70
Configure SIP Trunks2
Disable Ringback During Transfer to Agent for SCCPPerform the following configuration so that customers do not hear a ringback tone while a call is beingtransferred to an agent.
The following configuration is applicable to H323 only. You cannot disable Ringback for the MediaGateway Control Protocol (MGCP).
Note
Outbound Option Guide for Cisco Unified Contact Center Enterprise and Hosted Release 9.0(1)64
Outbound Option Installation: SIP DialerUnified Communications Manager and Gateway Configuration

Procedure
Step 1 Log into the Unified CM Administration window.Step 2 Select System > Service Parameters. The Service Parameter Configuration screen appears.Step 3 On the Server and Service drop-down menus, select the Server and Service. For Service, specify Cisco
CallManager.Step 4 Navigate to the Send H225 User Info Message drop-down menu. Select the Use ANN for Ringback option.Step 5 Click Save.Step 6 Repeat Steps 1 and 2.Step 7 On the Server and Service drop-down menus, select the Server and Service. For Service, specify Cisco IP
Voice Media Streaming App.Step 8 Navigate to the Annunciator (ANN) parameters section of the screen.Step 9 On the Run Flag drop-down menu, select False.Step 10 Click Update.
Disable Ringback During Transfer to Agent for SIPThe configuration for the SCCP Dialer does not work for the SIP Dialer. When the SIP Dialer is handing offthe call to an agent, it sends REFER to the voice gateway. The voice gateway initiates a new SIP call (newINVITE) to CUCM, and then receives a 180 RINGING response. As a result, the gateway generates a ringbacktone to the customer. With CUCM 8.5 and later, you can disable the ringback by applying a SIP normalizationscript to the CUCM SIP trunk. This script manipulates the 180 RINGING to a 183 SESSION PROGRESSmessage to prevent the gateway from generating a ringback.
Note • Apply this SIP normalization script only to the SIP trunk that is handling the inbound call from voicegateway for agent transfer. If you use the same gateway for both PSTN calls and the SIP Dialer, youmust configure separate trunks in Unified Communications Manager and apply this normalizationscript only to the Dialer SIP trunk. The trunk for PSTN calls still needs a 180 ringing SIP messagefor inbound calls to trigger the gateway to play ringback to the PSTN.
• Skip Step 3 if a dedicated SIP trunk already exists for handling agent transfer dialer. Perform Step1 if the same SIP trunk is used for normal inbound PSTN calls and dialer agent transfer calls.
Procedure
Step 1 Navigate to https://<IP_address>:8443 where <IP_address> identifies the UnifiedCommunications Manager server.
Step 2 Log in to Unified Communications ManagerStep 3 To create a SIP trunk in Unified Communications Manager with a SIP security profile for the dialer agent
transfer calls, select Communications Manager GUI > System > Security > SIP Trunk Security Profile> [Add New].
Outbound Option Guide for Cisco Unified Contact Center Enterprise and Hosted Release 9.0(1) 65
Outbound Option Installation: SIP DialerDisable Ringback During Transfer to Agent for SIP

The default port is 5060.
Figure 11: SIP Security Profile
Step 4 Click Save.Step 5 Create a New SIP trunk and associate the created SIP trunk Security Profile.
Figure 12: Create a new SIP trunk
Step 6 Click Save.Step 7 Click Reset.Step 8 In Communications Manager GUI > Devices > Device Settings > SIP Normalization Scripts > [Create
New], enter the following SIP normalization script into the content field. All other values remain set to default.M = {}function M.outbound_180_INVITE(msg)msg:setResponseCode(183, "Session in Progress")endreturn M
Outbound Option Guide for Cisco Unified Contact Center Enterprise and Hosted Release 9.0(1)66
Outbound Option Installation: SIP DialerDisable Ringback During Transfer to Agent for SIP
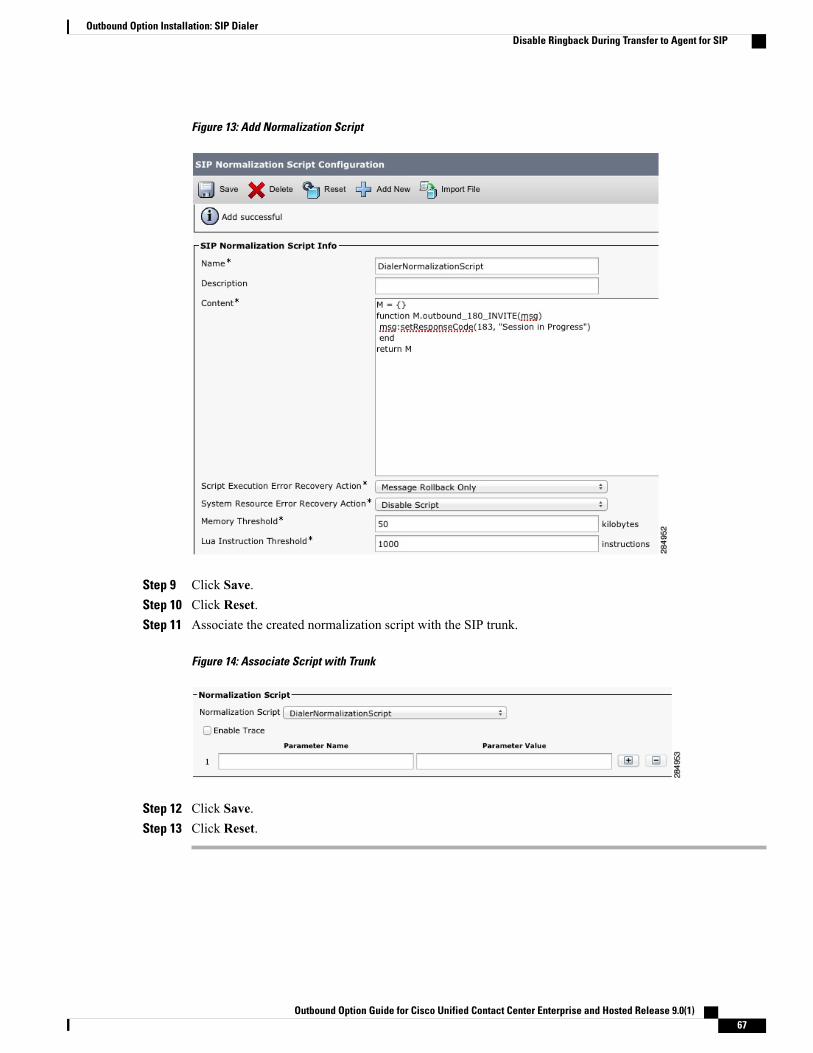
Figure 13: Add Normalization Script
Step 9 Click Save.Step 10 Click Reset.Step 11 Associate the created normalization script with the SIP trunk.
Figure 14: Associate Script with Trunk
Step 12 Click Save.Step 13 Click Reset.
Outbound Option Guide for Cisco Unified Contact Center Enterprise and Hosted Release 9.0(1) 67
Outbound Option Installation: SIP DialerDisable Ringback During Transfer to Agent for SIP
Configuration of Voice Gateways, SIP Proxy, or Cisco Unified Border ElementIn an Outbound Option deployment that uses the SIP Dialer, there are three possible types of configurations:
• The SIP Dialer is connected to a SIP Proxy such as Cisco Unified SIP Proxy. The SIP Proxy, in turn, isconnected to voice gateway. It is possible for the SIP Proxy to be connected to more than one voicegateway; a configuration with multiple voice gateways is known as a server group.
• The SIP Dialer is connected directly to a voice gateway; no SIP Proxy is present. The voice gateway isconfigured with standard dial peer configuration so that the gateway knows how to direct traffic to agentextensions or to the IVR. This configuration is already commonly used for inbound calls.
Specify which configuration you are using when you install the Dialer component.
When you configure a voice gateway for use with Outbound Option, most of the default configuration valuesare sufficient. However, the following values must be specifically set. If you do not know these values, requestthe information from your voice network administrator.
• Youmust ensure 100rel is enabled for Outbound Option. Otherwise, Outbound calls from the SIP Dialerfail. 100rel is enabled globally on the gateway by default. However, 100rel cannot be enabled globallyif Unified CVP calls are also routed with this gateway. When using Outbound Option on the samegateway as Unified CVP, disable 100rel globally with the command rel1xx disable and enable 100relon the Outbound dial peer with the example dial-peer command: voice-class sip rel1xx supported"100rel".
•When configuring a voice gateway for use with the SIP Dialer, do not specify signaling forwardunconditional under voice service voip. The SIP Dialer does not support this configuration. Instead,specify signaling forward none.
• Telecom carriers sometimes send ISDN alerting message without a progress indicator, which causes thevoice gateway to send a SIP 180 Ringing message instead of a SIP 183 Session In Progress message tothe SIP dialer. The SIP dialer has the capability to process provisional messages such as 180, 181, 182,and 183 with or without Session Description Protocol (SDP). When the SIP dialer receives theseprovisional messages without SDP, it does not perform Call Progress Analysis (CPA), and the RecordCPA feature is disabled.
To enable the SIP dialer to perform CPA, add the following configuration to the POTS dial-peer of thevoice gateway so that a SIP 183 message is sent to the SIP dialer:"progress_ind alert enable 8".
• In some situations, the carrier may send an ISDN Connect message without an alerting message. In thiscase, the SIP Dialer disconnects the call because it receives 200 OK before a SIP 183 Session In Progressmessage.
To correct this situation, add the configuration " progress_ind connect enable 8" to the POTS dial-peerof the voice gateway. This configuration causes the gateway to send the SIP 183 Session In Progressmessage before 200K.
You must ensure the 100rel SIP capability is enabled for Outbound Option. Otherwise, outbound calls fromthe SIP Dialer fail. The following two sections provide examples of voice gateway configuration from thecommand line.
Outbound Option Guide for Cisco Unified Contact Center Enterprise and Hosted Release 9.0(1)68
Outbound Option Installation: SIP DialerConfiguration of Voice Gateways, SIP Proxy, or Cisco Unified Border Element

In an Outbound SIP dialer with Unified CVP IVR deployment, a call-survivability script enabled on anincoming POTS dial-peer in the Ingress gateway is not invoked during dialer-related call flows. Enablinga call-survivability script on an Inbound POTS dial-peer, however, does not negatively affect dialer-relatedcall flows.
Note
If you are using a SIP Proxy, perform the following configuration on the SIP Proxy:
• Enable the SIP Dialer to reach the correct voice gateway for outbound calls.
• Enable the voice gateway to reach all of the applicable Unified CM/CVP nodes for calls transferred toan agent, an IVR, or to CVP.
• If your SIP proxy is connected to more than one voice gateway, you can optionally load balance betweenthe voice gateways.
For detailed instructions on how to perform SIP Proxy configuration, see the Cisco Unified SIP Proxydocumentation website at http://www.cisco.com/en/US/partner/products/ps10475/products_installation_and_configuration_guides_list.html.
Configure CUBE
CUBE is only supported with SIP dialer when CPA is disabled.Note
While configuring Cisco Unified Border Element, ensure that you:
• Disable the CPA on the terminating network or voice gateway when the Cisco Unified Border Elementis connected to the voice gateway or any other terminating network.
• Configure the three dial-peers in the Cisco Unified Border Element. The dial-peers are used for:
• incoming calls from the dialer.
• outgoing calls to the terminating network from the Cisco Unified Border Element.
• calls to be routed to the Cisco Unified Communications Manager.
• Issue the following commands globally to configure the Cisco Unified Border Element:
◦no supplementary-service sip refer
◦supplementary-service media-renegotiate
• Disable the Call Progress Analysis (CPA) for the SIP dialer to process these provisional messages: 180,181, and 183 - with and without SDP.
To disable the CPA, go to Configuration Manager > launch Outbound Option Campaign > CampaignPurpose tab > uncheck the Call Progress Analysis (CPA) checkbox.
Outbound Option Guide for Cisco Unified Contact Center Enterprise and Hosted Release 9.0(1) 69
Outbound Option Installation: SIP DialerConfiguration of Voice Gateways, SIP Proxy, or Cisco Unified Border Element

Configure SIP TrunksUnified CM is connected to the voice gateway or the SIP Proxy by SIP Trunks, which you configure onUnified CM.
Configure a SIP trunk on Unified CM from Unified CM to the voice gateway. Specify the IP address of thevoice gateway in the Destination field. See also steps in this topic: Disable Ringback During Transfer to Agentfor SIP, on page 65.
Procedure
Step 1 Configure these trunks as follows:DescriptionOption
Configure two SIP trunks on Unified CM for making the transfer to agents.Configure one trunk between Unified CM and the SIP Proxy (specify the IPaddress of the SIP Proxy in the Destination field), and configure a secondtrunk from Unified CM to the voice gateways (specify the IP address of thevoice gateways in the Destination field).
If you are using a SIP Proxy
Configure a SIP trunk on Unified CM from Unified CM to the voice gateway(specify the IP address of the voice gateway in the Destination field).
If you are not using a SIPProxy
Configure a SIP trunk between the Unified CM and CUBE. (specify the IPaddress of the CUBE in the Destination field).
If you are using CUBE
See the Cisco Unified Communications Manager System Guide for instructions on how to configure SIPtrunks.
Step 2 If your Unified CM cluster has more than two nodes, and you want to reach each node from both the voicegateway and Cisco Unified SIP Proxy, configure the trunk to belong to a device pool that points to theCommunicationsManager Publisher. This configuration ensures that calls go to the agent if a Subscriber nodefails over. See the following configuration example:For information about logging into Ingress or VXML gateways, refer to the "Courtesy Callback" chapter.
Example:dial-peer voice 617 voipdescription catch all for referdestination-pattern 617Tsession protocol sipv2session target ipv4:10.86.227.107 (CUCM Publisher)codec g711ulaw!
dial-peer voice 508 voipdescription catch all for referdestination-pattern 508Tsession protocol sipv2session target ipv4:10.86.227.107 (CUCM Publisher)codec g711ulaw!
Outbound Option Guide for Cisco Unified Contact Center Enterprise and Hosted Release 9.0(1)70
Outbound Option Installation: SIP DialerConfigure SIP Trunks

Outbound Option Software Installation StepsThis section discusses the tasks that are associated with installing Outbound Option and related components.Before proceeding, navigate to the side A data server and stop all ICM services there. Then perform the stepsin the following sections.
Software Installation and Database CreationThe next phase in installing Outbound Option is Outbound Option component software installation andassociated database creation. The following table lists the steps that comprise software installation and databasecreation and provides pointers to where the tasks are discussed.
Table 7: Software Installation and Database Creation Steps
System PGProcedure
Unified CCEProcedure
TaskStep Number
Create OutboundOption PrivateDatabase, on page71
Create OutboundOption PrivateDatabase, on page71
Install the Outbound Option privatedatabase on the Logger Side A platform
1
Install DialerComponent on thePG Platform, onpage 73
Install DialerComponent on thePG Platform, onpage 73
Install the Dialer component on the PGplatform
2
Edit Dialer-RelatedRegistry Values, onpage 75
Edit Dialer-RelatedRegistry Values, onpage 75
Edit Dialer-related Registry values3
Install MR PG, onpage 75
Install MR PG, onpage 75
Install the MR PG on the PG platform4
Create Outbound Option Private DatabaseBefore you use Outbound Option on Unified CCE, estimate the size of the Outbound Option private databaseand then create it on the Logger Side A platform using the ICM ICMDBA utility.
It is important that you create the Outbound Option private database on side A only.Note
Outbound Option Guide for Cisco Unified Contact Center Enterprise and Hosted Release 9.0(1) 71
Outbound Option Installation: SIP DialerOutbound Option Software Installation Steps

Procedure
Step 1 Collect the following information:
•What is the size, in bytes, of each customer record in the import file? If the size is less than 128 bytes,use 128. (RecordSize)
• How many records will be imported? (RecordCount)
•Will new imports replace or append records that are already imported?
Step 2 Estimate the contact table size using one of the following formulas:
• If imports overwrite imports: Do not change record count
• If imports append imports: RecordCount = total number of rows kept in a customer table at any one time
• contact-table-size = RecordSize * RecordCount * 1.18
Step 3 Estimate the dialing list table size using one of the following formulas:
• If imports overwrite imports: RecordCount = number of rows imported * 1.5 (50%more rows are insertedinto the dialing list than imported)
• If imports append imports: RecordCount = total number of rows kept in customer table at any one time* 1.5
• dialing-list-table-size = rows in dialing list * 128 bytes * 4.63
Step 4 Calculate the database size using this formula:
(Number of rows in all DL tables * (size of one row + size of index) ) +(Number of rows in personal call back table * (size of one row + size of index) ) +Sum of (Number of rows in Contact List table * (size of one row + size of index))
Step 5 Start ICMDBA by entering ICMDBA in the Microsoft Windows Run dialog box or command window.Step 6 Select the Logger and select Database > Create.Step 7 In the Create Database window, specify the Outbound Option database type.
Be sure to enable autogrow on the database.Step 8 Click Add. The Add Device window appears.
Use this window to create a new data device and log device for the Outbound Option database. Specify thedisk drive letter and size in megabytes for each new device. Click OK to create the device, and then clickCreate. Click Start.
At a later time, if necessary, you can edit the device to change storage size, or remove a device, using theDatabase > Expand option.
Step 9 Click Close.
Outbound Option Guide for Cisco Unified Contact Center Enterprise and Hosted Release 9.0(1)72
Outbound Option Installation: SIP DialerCreate Outbound Option Private Database

No manual changes to the contents of the outbound database are allowed. Do not use triggers in theoutbound database. Triggers for the dialing lists or personal callback list should not be added or modified.The Dialer_Detail table in the HDS contains the information required by custom applications. Extract thatinformation from the historical database server (HDS) to a separate server where the custom applicationcan process the data without impacting the HDS.
Caution
Configure LoggerPerform the following steps to configure the logger.
Procedure
Step 1 ClickWeb Setup.Step 2 Load the Logger and click Edit Logger.Step 3 Check the enable Outbound Option check box.Step 4 Click Save.
Upgrade of an Outbound Option Database from a Previous ReleaseIf you are upgrading from a previous CCE/CCH release, you must run the Enhanced DatabaseMigration Tool(EDMT) to upgrade your Outbound Option database. Otherwise, Campaign Manager will not start, and analarm is triggered to indicate an incorrect private database version. See the Upgrade Guide for Cisco UnifiedICM/Contact Center Enterprise & Hosted at http://www.cisco.com/en/US/products/sw/custcosw/ps1844/prod_installation_guides_list.html for instructions on running EDMT.
Install Dialer Component on the PG PlatformPerform the following steps to install the dialer component on the Side A PG platform.
Procedure
Step 1 Make sure all ICM Services are stopped.Step 2 On both the call server side A and side B run Peripheral Gateway Setup. Type Start >All Programs >Cisco
Unified CCE Tools > Peripheral Gateway Setup.Step 3 In the Cisco Unified ICM/Contact Center Enterprise & Hosted Setup dialog box, in the left column under
Instances, select an instance.Step 4 Click Add in the Instance Components section.
The ICM Component Selection dialog box opens.
Step 5 Click Outbound Option Dialer.
Outbound Option Guide for Cisco Unified Contact Center Enterprise and Hosted Release 9.0(1) 73
Outbound Option Installation: SIP DialerConfigure Logger
The Outbound Option Dialer Properties dialog box opens.
Step 6 In the initial Dialer Properties dialog box, check Production mode and Auto start at system startup unlessyou are specifically told otherwise by your Unified ICM support provider. These options set the Dialer Servicestartup type to Automatic, so the dialer starts automatically when the machine starts up.
Step 7 For Dialer Type, select the radio button for SIP (Session Initiation Protocol).Step 8 Click Next.
After you create a dialer, you cannot change the Dialer Type. To switch dialer types, delete theexisting dialer and create a new dialer.
Note
Step 9 AnOutbound Option SIP Dialer Properties dialog box appears if you selected SIP as your Dialer Type. Supplythe following information on this page:
• In the SIP Dialer Name field, enter the name of the SIP dialer. There is a 32-character limit. Example:Dialer_for_Premium_Calling_List. The name entered here must match the name configured inConfiguration Manager.
• For SIP Server Type, select either Cisco voice gateway or Cisco Unified SIP Proxy (CUSP).
• In the SIP Server field, enter the hostname or IP address of the Cisco voice gateway.
• In the SIP Server Port field, enter the port number of the SIP Server port. Default is 5060.
Click Next.
Step 10 On the last Outbound Option Dialer Properties dialog box, specify the following information:
• OutboundOption server: The host name or IP address of the Outbound Option server. This is typicallythe same machine where the Outbound Option Campaign Manager (Dataserver Side A) is located.
• CTI server A: The hostname or IP address of the machine that has side A of CTI server installed. Thisis typically the same machine where the PG is located (Call Server Side A).
• CTI server port A: The port number the dialer uses to create an interface with CTI server side A. Thedefault is 42027. Make sure CTI server port matches with CG configuration. Locate the CTI OS Serverport number by running the Diagnostic Framework Portico page from the call server machine, andselecting ListProcesses.
• CTI server B: For duplexed installations, the hostname or IP address of the machine that has side B ofCTI server installed.
• CTI server port B: For duplexed installations, the port number the dialer uses to create an interfacewith CTI server side B. The default is 43027.
• Heart beat: How often the dialer checks its connection to the CTI server, in milliseconds. The defaultvalue is 500.
•Media routing port: The port number the dialer uses to create an interface with the Media Routing PIMon the Media Routing PG. The default is 3800 to 3801. Make sure the Media routing port matches thatof the MR PG configuration. Access this registry key:Computer\HKEY_LOCAL_MACHINE\SOFTWARE\Cisco Systems,Inc.\ICM\mango\PG2A\PG\CurrentVersion\PIMS\pim1\MRData\Config\ApplicationTcpServiceName1.
• Call Manager TFTP server: The host name or IP address of the CallManager TFTP server. This serveris the same machine used for the CallManager publisher.
Outbound Option Guide for Cisco Unified Contact Center Enterprise and Hosted Release 9.0(1)74
Outbound Option Installation: SIP DialerInstall Dialer Component on the PG Platform

Step 11 Click Next. A Summary screen appears.Step 12 Verify that you have specified the correct information. Click Back to make corrections if needed; otherwise,
click Next to begin dialer installation.
Modification of Local Static Route FileThe SIP Dialer installation process installs an empty template file named DNPHost in the\icm\customerInstanceName\Dialer directory. This file defines the static route mappings of a dialed numberwildcard pattern to the IP address or host name with which an agent phone or CTI Route point is registered.For each static route you wish to define, enter a row in this file in the following format:wildcard pattern, IP address or host name, descriptionExamples:7?????, 10.86.227.144, transferring outbound calls to agent extensions
86! , 10.86.227.186, for CTI Route Points on CUCM node1
4?????, gambino.cisco.com, transfer to IVR campaignFor single gateway deployments, the SIP Dialer reads the static routing info from DNPHost and uses theinformation from the file to construct the SIP REFER message. If the SIP Dialer is setup to support a voicegateway, the SIP Dialer loads DNPHost, ensures that it has valid routing entries, and sends an alarm if thefile does not exist or is invalid.
See the installed DNPHost file template for additional information about its use.
Edit Dialer-Related Registry ValuesAfter you finish installing the dialer component, perform the following dialer-related configuration:
• Configure the Dialer throttling on each Dialer in the system. Open ICM Configuration Manager, selectOutbound Option > Dialer, and then enter a value in the Port Throttle field. This field indicates thenumber of ports to throttle, which helps determine the calls per second rate at which the Dialer dialsoutbound calls. For example, a port throttle count=5 indicates that no more than 5 calls can be startedduring a one second period. If 5 calls are ready to be dialed, they are spaced evenly over that one secondperiod. The total call capacity of Unified CM is dependent on several different factors, including theUnified CM version, inbound call rate, and outbound call rate.
For more details, see the SNMP Guide for Cisco Unified ICM/Contact Center Enterprise & Hosted.
• After the dialer process runs for the first time, change the value of the AutoAnswerCall entry to 0 todisable the auto answer setting in the Dialer registry.
See Auto Answer Configuration on Agent Phones, on page 102 for details about other options for autoanswer that support agent notification of an incoming call.
Install MR PGPerform the following steps to install the MR PG on the Side A platform.
Outbound Option Guide for Cisco Unified Contact Center Enterprise and Hosted Release 9.0(1) 75
Outbound Option Installation: SIP DialerModification of Local Static Route File

Procedure
Step 1 Run ICM Setup to install a PG that corresponds with PG2, which was configured earlier.Step 2 In the Peripheral Gateway Properties window, select the PG2 PG Node ID and theMediaRouting Client
Type.Step 3 Click Next.Step 4 Add a PIM, PIM1.Step 5 In the MediaRouting Configuration window, enable the PIM.Step 6 Enter the peripheral name and the peripheral ID (recorded at the end of the procedure described in Configure
Media Routing PG (MR PG), on page 52) of the MR_PIM.Step 7 Set the Application Hostname fields:
• For simplex deployments, set both of the Application Hostname fields to the computer name of theOutbound Option Dialer.
• For duplex Sip Dialers with duplex MR PG deployments,
◦Specify the local Dialer HostName in ApplicationHostName1.
◦Specify the remote, duplex Dialer HostName in ApplicationHostName2.
Step 8 Set the Application Connection Port to the port number used by the Outbound Option Dialer (usually 38001).Step 9 Click Next until Setup finishes. When Setup finishes, click Finish.Step 10 Repeat the preceding steps to install the MR PG on the Side B PG platform.
Installation of Cisco CTI ControlsThis section describes the installation process for the Cisco CTI controls. It also describes how to install theCisco CTI Toolkit Outbound Desktop (Win32) for Unified CCE.
Perform the following procedures to install CTI controls to support Outbound Option on the desktop.
See the CTI documentation available online at http://www.cisco.com.
Integrate Outbound Option with CTI OSOutbound Option works with CTI OS, which provides an object-based interface to the CTI Server using theCOM and C++ interfaces. These interfaces permit development of agent desktop applications that interfacewith Unified ICM software.Outbound Option is fully compatible with the CTI OS CIL library and the CTI Toolkit Agent Desktop (Win32).While there are no Outbound Option-specific controls available for the CTI Toolkit Agent Desktop (Win32),a sample CTI OS Desktop (known as the “Cisco CTI Toolkit Outbound Desktop (Win32)”), which supportsOutbound Option, is shipped with the product (located in <Drive Letter>:\Program Files\CiscoSystems\CTIOS Client\CTIOS Toolkit\Win32 CIL\Samples\CTI Toolkit OutboundDesktop). In addition, the standard CTI Toolkit Agent Desktop (Win32) can be modified to display allOutbound Option ECC variables in the call variable grid.
Outbound Option Guide for Cisco Unified Contact Center Enterprise and Hosted Release 9.0(1)76
Outbound Option Installation: SIP DialerInstallation of Cisco CTI Controls
Be aware that CTI OS Release 7.0(0) and greater uses CTI Protocol 11. As a result, there are more CTIfields available in CTI OS (for example, call type, CampaignID, and QueryRuleID).
Note
When installing, install the CTI OS Client, select theCTI Toolkit SDK and theWin32 check boxes to accessthe CTI Toolkit Outbound Desktop (Win32) sample. (See the “Install CTI Toolkit Outbound Desktop (Win32),on page 78” section for more details.)If you are running Outbound Option with CTI OS, perform the following procedure to add Outbound OptionECC variables to CTI OS Server:
Procedure
Step 1 Log in to the CTI OS server.Step 2 Rename the <Drive Letter>:\ICM\CTIOS_bin\blendedagent_addecc.reg.txt file to
blendedagent_addecc.reg.Step 3 Save the blendedagent_addecc.reg read-only file. Right-click the file, select Properties, and then uncheck
the Read Only check box.Step 4 Edit the blendedagent_addecc.reg file and globally change “InstanceName” to the real system instance name
and save it.Step 5 Double-click on theblendedagent_addecc.reg file to add the Outbound Option ECC variables to CTI OS.Step 6 In the Node Manager, restart the CTI OS service on the call server.Step 7 Restart all CTI OS Desktop clients to download the new ECC variables.
What to Do Next
See the CTI OS System Manager's Guide for Cisco Unified ICM/Contact Center Enterprise & Hosted formore information. See CTI OS Outbound Option ECC Variable Settings, on page 213 for a sample .REG filewhich creates the applicable Outbound Option ECC registry entries. (This registry file must be edited and runon the CTI OS server.)
After the Outbound Option ECC variables have been added to the standard CTI Toolkit Agent Desktop(Win32), the values can be set through the grid. (See the “Outbound Option Extended Call Context Variables,on page 36” section for a description of each ECC variable.)
Configure CTI OS Server for Outbound OptionIf you are running Outbound Option with CTI OS, perform the following procedure to add Outbound Optionexpanded call variables to CTI OS Server:
Outbound Option Guide for Cisco Unified Contact Center Enterprise and Hosted Release 9.0(1) 77
Outbound Option Installation: SIP DialerInstallation of Cisco CTI Controls

Procedure
Step 1 Log in to the CTI OS server.Step 2 Rename the <Drive Letter>:\ICM\CTIOS_bin\blendedagent_addecc.reg.txt file to
blendedagent_addecc.reg.Step 3 Right-click the file, select Properties, and then uncheck the read-only check box.Step 4 Edit the blendedagent_addecc.reg file and globally change “InstanceName” to the system instance
name from your Unified ICM setup.Step 5 Save the file.Step 6 Double-click the blendedagent_addecc.reg file to add the Outbound Option expanded call variables
to CTI OS.Step 7 In the Node Manager, restart the CTI OS service on the call server.Step 8 Restart all CTI OS Desktop clients to automatically download the new expanded call variables.
Install CTI Toolkit Outbound Desktop (Win32)A sample CTI OS Desktop (known as the “Cisco CTI Toolkit Outbound Desktop (Win32)”), which supportsOutbound Option, is shipped with the product. It is located in <Drive Letter>:\Program Files\CiscoSystems\CTIOS Client\CTIOS Toolkit\Win32 CIL\Samples\CTI Toolkit Outbound Desktop.
Procedure
Step 1 Install CTI OS Client and confirm that the CTI Toolkit SDK andWin32 check boxes are checked.See theCTIOS SystemManager's Guide for CiscoUnified ICM/Contact Center Enterprise&Hostedfor detailed information about installing the CTI Toolkit SDK.
Note
Step 2 Access the CTI Toolkit Outbound Desktop (Win32) from the following location:<Drive Letter>:\Program Files\Cisco Systems\CTIOS Client\CTIOS Toolkit\Win32CIL\Samples\CTI Toolkit Outbound Desktop
Step 3 Double-click theCTIOSOutOptSSoftphone.exe file. The CTI Toolkit Outbound Desktop (Win32) displays.
Integrate Outbound Option with Standard CTI Toolkit Agent DesktopOutbound Option is fully compatible with the CTI OS CIL library and the CTI Toolkit Agent Desktop (Win32).While there are no Outbound Option-specific controls available for the CTI Toolkit Agent Desktop (Win32),the standard CTI Toolkit Agent Desktop (Win32) can be modified to display all Outbound Option expandedcall variables in the call variable grid.
Set Outbound Option Expanded Call VariablesAfter you add the Outbound Option expanded call variables to the standard CTI Toolkit Agent Desktop(Win32), you can set the values through the grid on the Agent Desktop with Outbound Option. When the
Outbound Option Guide for Cisco Unified Contact Center Enterprise and Hosted Release 9.0(1)78
Outbound Option Installation: SIP DialerInstallation of Cisco CTI Controls

agent logs in, the Outbound Option-related expanded call variables are visible. The agent can then changevalues for those variables.
Setup of Outbound Option in Cisco Desktop AdministratorThis section provides information about setting up Outbound Option with Cisco Desktop Administrator. Whenusing Outbound Option with Cisco Agent Desktop, outbound calls appear as inbound calls to the agent, andinformation about the call appears in the Enterprise Data pane.
See the CAD documentation available online at http://www.cisco.com for more information.
Outbound Option Enterprise DataTo enable Outbound Option enterprise data to appear in the Cisco Agent Desktop Enterprise Data window,the administrator must edit the Default layout to include some or all OutboundOption variables. These variablesare prefixed with “BA.” (Edit the default enterprise data layout in the Cisco Desktop Administrator.)
• BAAccountNumber [200]
• BABuddyName [201]
• BACampaign [202]
• BADialedListID [203]
• BAResponse [204]
• BAStatus [205]
• BATimeZone [206]
Note • The BAStatus field is required. All other BA fields are optional for Progressive and Predictive modes.In Preview mode, the Skip button will not work if BADialedListID is not enabled.
• The BABuddyName field is required, to see the customer’s name being called.
• If a call is part of a Preview dialing mode campaign, the first letter in the BAStatus field entry is P.If a call is part of a Direct Preview dialing mode campaign, the first letter in the BAStatus field entryis D.
Add Enterprise Data Fields to Layout ListUse the following procedure to add the Outbound Option variables.
Outbound Option Guide for Cisco Unified Contact Center Enterprise and Hosted Release 9.0(1) 79
Outbound Option Installation: SIP DialerSetup of Outbound Option in Cisco Desktop Administrator
Procedure
Step 1 Start Cisco Desktop Administrator.Step 2 In the navigation tree, navigate to the Layout Editor in the Enterprise Data window: Location > (logical
contact center name) > Enterprise Data Configuration > Enterprise Data. Click Edit.Step 3 Add the following fields to the Layout List by selecting the field from the Available Fields List, and then
clicking the left arrow button:
• BAAccountNumber
• BABuddyName
• BACampaign
• BADialedListID
• BAResponse
• BAStatus
• BATimeZone
Step 4 Click OK.Step 5 Click Apply to save your changes.
VerificationThis section provides a series of verification steps to determine if the system has been installed properly.These steps are designed to pinpoint problems that might exist in the setup before actually attempting to deploythe Dialer. If problems occur while using this product, please see this section before contacting Cisco TechnicalSupport (TAC).
This section assumes that the Outbound Option application is installed and at least one Dialer has beenconfigured along with its associated port map. This section also assumes that the Dialer port map has beenexported and configured on Unified CM using the BAT tool.
Note
Outbound Option Guide for Cisco Unified Contact Center Enterprise and Hosted Release 9.0(1)80
Outbound Option Installation: SIP DialerVerification

Dialer Component StatusThe Dialer component process status provides details about the health of the installation even before anycampaign configuration is initiated or before any call is placed. You can view the Dialer component status inthe Diagnostic Framework Portico.
Figure 15: SIP Dialer Component Status
Customer Instance Name
The customer instance name shows the dialer’s customer instance, node name, and process name. This canbe used if TAC asks you to interrogate the system while debugging a problem for a case.
Campaign Manager
The Campaign Manager shows the Campaign Manager connectivity status. This status is either A for activeor X for disconnected. If the Campaign Manager connectivity status is X, the dialer is not connected to theCampaign Manager.
Try pinging from the dialer to the Campaign Manager machine by hostname and by IP Address.
• If the ping fails for the IP address, recheck that the IP address is correct and troubleshoot networkconnectivity.
◦Check to see whether the Logger Side A node is running.
◦Check to verify whether Outbound Option has been enabled in the Logger Side A setup, and thatthe Campaign Manager process is running.
Outbound Option Guide for Cisco Unified Contact Center Enterprise and Hosted Release 9.0(1) 81
Outbound Option Installation: SIP DialerDialer Component Status

• If the ping is successful for the IP address but not for the DNS hostname, check that the DNS hostnameis correct and that it is properly configured in the system’s DNS server.
• If the ping is successful, then recheck the dialer component setup to see if the dialer component setupcontains the wrong address or port number for the side A Logger.
• Check to see if the name of the Dialer configured in Configuration Manager matches the name enteredduring PG setup.
CTI Server
The third block shows CTI Server connectivity status. This status is eitherA for active or X for disconnected.If the status is X, then the dialer cannot connect to either CTI Server on side A or side B.
Try pinging from the dialer to the CTI Server/PG machines by hostname and by IP address.
• If the ping fails for the IP address:
◦Recheck that the IP address is correct, and troubleshoot network connectivity.
◦Check to see whether the CTI Server processes are running.
• If the ping is successful for the IP address but not for the DNS hostname, check that the DNS hostnameis correct and whether it is properly configured in the system’s DNS server.
• If the ping is successful, then recheck the dialer component set up to see if the dialer component set upcontains the wrong address or port number for the CTI Server.
• Check that the PG is online. Check that the PG has been enabled properly in the ICM Router setup.
Ports
The fourth block shows the state of all dialer ports. The first value, C, shows the total number of configuredports. The second value, R, shows the total number of ready ports. Finally, the third value, B, reports thenumber of dialer ports that are blocked. (This is runtime activity; it is unusual for ports to be blocked.)
If the number of ports Configured is zero, then the dialer is not receiving port configuration from the CampaignManager component. Check to verify that ports are configured properly.
If the number of Ready ports is zero, confirm that the PG has been started.
MR PIM
The next block shows connectivity status with the MR PIM. This status is either A for active, X fordisconnected, orNRwhich means connected but not yet able to route. (TheU status is rarely seen and indicatesthat a particular connectivity object within the dialer has not been created yet.)
- If the MR Status is X, check the connectivity by verifying the MR PG address and port configured in thedialer component setup.
If the MR PG status is NR, then the Media Routing connection is established. Check to see if the MR PG isonline by looking at its status window.
SIP Dialer
The final block shows connectivity status with the SIP Proxy or Voice Gateway that is connected to the SIPdialer. This status is either A for active, X for disconnected, or D for heartbeat disabled.
Outbound Option Guide for Cisco Unified Contact Center Enterprise and Hosted Release 9.0(1)82
Outbound Option Installation: SIP DialerDialer Component Status

Verify Critical Configuration StepsIn the Dialer Configuration Component, click the Port Map Selection tab and ensure the Dialer is assigned toa Unified CM PG.
Verify Database ConfigurationThe procedure for verifying that the database configuration is properly set up for SQL Server varies, dependingon the installed version of SQL Server.
For SQL Server 2008 R2, perform the following steps:
Procedure
Step 1 Open the SQL Server Management Studio.Step 2 Expand the databases.Step 3 Select the <cust instance_baA> Outbound Option database. Right click and select Properties.Step 4 Select the Files page.Step 5 In the database file row, click the button in theAutogrowth column. A Change Autogrowth dialog box appear.Step 6 Ensure that the Enable Autogrowth box is checked. Click OK.Step 7 In the log file row, click the button in the Autogrowth column. A Change Autogrowth dialog box appears.Step 8 Ensure that the Enable Autogrowth box is checked. Click OK.Step 9 Select the Options page.Step 10 On the Recovery Model drop-down menu, select Simple.Step 11 Click OK.
Verify Router Registry KeyIf you are using the Transfer to IVR feature, verify that the following router registry key on Side A and SideB of the Router has a value of 2.HKEY_LOCAL_MACHINE\SOFTWARE\Cisco Systems, Inc.\ICM\<customer
instance>\RouterA/B\Router\CurrentVersion\Configuration\Global\SkillGroupCallsInQTimerInterval = 2
Outbound Option Guide for Cisco Unified Contact Center Enterprise and Hosted Release 9.0(1) 83
Outbound Option Installation: SIP DialerVerify Critical Configuration Steps

Outbound Option Guide for Cisco Unified Contact Center Enterprise and Hosted Release 9.0(1)84
Outbound Option Installation: SIP DialerVerify Router Registry Key

C H A P T E R 5Outbound Option Installation: SCCP Dialer
The SCCP Dialer is deprecated for release 10.0 and will reach end-of-sale in an upcoming release.Note
This chapter, intended for system administrators performing the initial installation of Outbound Option,describes how to set up and install the Outbound Option platform in an SCCP Dialer deployment.
This chapter groups installation activities to minimize switching between configuration and actual softwareinstallation. The general flow lists Unified CCE configuration first, then the Unified CM configuration, andthen the Outbound Option component software installation and associated database creation.
Cisco Finesse is not supported with the SCCP dialer.Note
• Installation task maps, page 86
• Unified CCE Outbound Option Configuration, page 88
• Configuration and scheduling of personal callback feature, page 94
• Unified CMr and Gateway Configuration, page 99
• Outbound Option Software Installation Steps, page 102
• Installation of Cisco CTI Controls, page 106
• Setup of Outbound Option in Cisco Desktop Administrator, page 108
• Verification, page 109
Outbound Option Guide for Cisco Unified Contact Center Enterprise and Hosted Release 9.0(1) 85
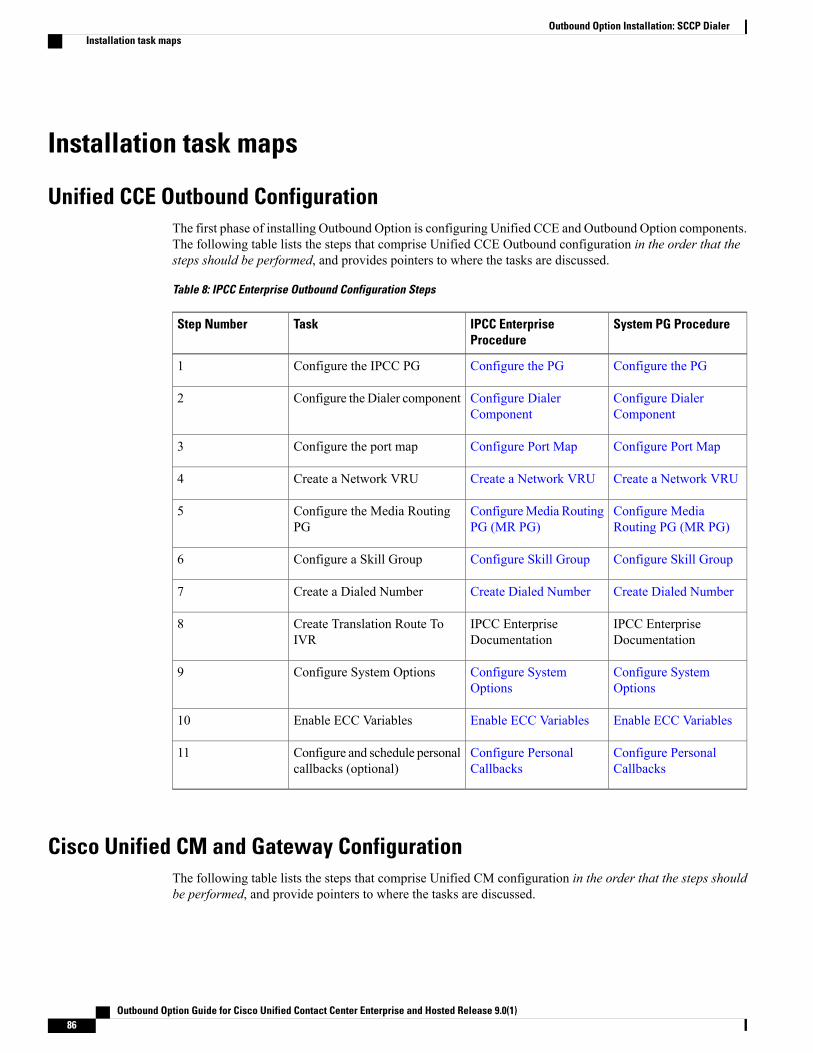
Installation task maps
Unified CCE Outbound ConfigurationThe first phase of installing Outbound Option is configuring Unified CCE and Outbound Option components.The following table lists the steps that comprise Unified CCE Outbound configuration in the order that thesteps should be performed, and provides pointers to where the tasks are discussed.
Table 8: IPCC Enterprise Outbound Configuration Steps
System PG ProcedureIPCC EnterpriseProcedure
TaskStep Number
Configure the PGConfigure the PGConfigure the IPCC PG1
Configure DialerComponent
Configure DialerComponent
Configure the Dialer component2
Configure Port MapConfigure Port MapConfigure the port map3
Create a Network VRUCreate a Network VRUCreate a Network VRU4
Configure MediaRouting PG (MR PG)
ConfigureMedia RoutingPG (MR PG)
Configure the Media RoutingPG
5
Configure Skill GroupConfigure Skill GroupConfigure a Skill Group6
Create Dialed NumberCreate Dialed NumberCreate a Dialed Number7
IPCC EnterpriseDocumentation
IPCC EnterpriseDocumentation
Create Translation Route ToIVR
8
Configure SystemOptions
Configure SystemOptions
Configure System Options9
Enable ECC VariablesEnable ECC VariablesEnable ECC Variables10
Configure PersonalCallbacks
Configure PersonalCallbacks
Configure and schedule personalcallbacks (optional)
11
Cisco Unified CM and Gateway ConfigurationThe following table lists the steps that comprise Unified CM configuration in the order that the steps shouldbe performed, and provide pointers to where the tasks are discussed.
Outbound Option Guide for Cisco Unified Contact Center Enterprise and Hosted Release 9.0(1)86
Outbound Option Installation: SCCP DialerInstallation task maps

Table 9: Cisco Unified Communications CM Steps for Deployments with SCCP Dialer
System PGProcedure
IPCC EnterpriseProcedure
TaskStep Number
Cisco UnifiedCommunicationsManagerAdministrationGuide
Cisco UnifiedCommunicationsManagerAdministrationGuide
Configure a separate Device Pool for each Dialer1
Cisco UnifiedCommunicationsManagerAdministrationGuide
Cisco UnifiedCommunicationsManagerAdministrationGuide
Configure a separate Unified CM ManagerGroup for each Dialer’s Unified CM subscriber
2
Import and AssignDialer Ports
Import and AssignDialer Ports
Import Dialer Ports and assign to the PG’s CTIApplication User, assigning Dialer ports for eachDialer component to a distinct device pool
3
Cisco UnifiedCommunicationsManager Featuresand Services Guide
Cisco UnifiedCommunicationsManager Featuresand Services Guide
Disable tone on hold/ music on hold for theDialer
4
Disable RingbackDuring Transfer toAgent for SIP
Disable RingbackDuring Transfer toAgent for SIP
Disable ring tone for dialer transfer5
Auto AnswerConfiguration onAgent Phones
Auto AnswerConfiguration onAgent Phones
Set Up Auto Answer on agent phone if zip tonerequired
6
Software Installation and Database CreationThe third phase of installing Outbound Option is installing the component software and creating the associateddatabase. The following table lists the steps that comprise software installation and database creation in theorder that the steps should be performed and provides pointers to where the tasks are discussed.
Table 10: Software Installation and Database Creation Steps
System PGProcedure
IPCC EnterpriseProcedure
TaskStep Number
Create OutboundOption PrivateDatabase
Create OutboundOption PrivateDatabase
Install the Outbound Option privatedatabase on the Logger Side A platform
1
Outbound Option Guide for Cisco Unified Contact Center Enterprise and Hosted Release 9.0(1) 87
Outbound Option Installation: SCCP DialerSoftware Installation and Database Creation

System PGProcedure
IPCC EnterpriseProcedure
TaskStep Number
Install DialerComponent
Install DialerComponent
Install the Dialer component on the PGplatform
2
Configure DialerAfter Installation
Configure DialerAfter Installation
Edit Dialer-related Registry values3
Modify JTAPI forCalls to InvalidNumbers
Modify JTAPI forCalls to InvalidNumbers
Modify JTAPI for calls to invalidnumbers
4
Install MR PGInstall MR PGInstall the MR PG on the PG platform5
Unified CCE Outbound Option ConfigurationThis section provides procedures for the tasks associated with Unified CCE Outbound Option configuration.
Configure IPCC PGPerform the following steps to configure the IPCC PG (PG1).
Procedure
Step 1 In ICM Configuration Manager, open the PG Explorer tool.Step 2 Click Retrieve, and then click Add. Add an IPCC PG.Step 3 Enter the name (for example, PG1_IPCC).Step 4 Select the CallManager or PG Generic PG Type.Step 5 Add a peripheral.Step 6 Enter the name (for example, PG1_IPCC_PIM1).Step 7 On the Peripheral tab, click the Enable post routing check box.Step 8 Select the Default Desk Setting from the drop-down list.Step 9 On the Routing Client tab, enter the routing client name (for example, IPCC_PIM1_Voice).Step 10 Select the Cisco_Voice option from the Default media routing domain drop-down list.Step 11 Click Save.Step 12 Record the assigned Logical Controller ID for later use: ____________________.Step 13 Record the assigned Peripheral ID for later use: ____________________.
Outbound Option Guide for Cisco Unified Contact Center Enterprise and Hosted Release 9.0(1)88
Outbound Option Installation: SCCP DialerUnified CCE Outbound Option Configuration

Configure Dialer ComponentPerform the following steps to configure the Dialer component.
Procedure
Step 1 Confirm that all ICM services are running.Step 2 Open the ICM Configuration Manager.Step 3 Double-click the Outbound Option - Dialer option to open the Outbound Option Dialer configuration
window.Step 4 Click Retrieve.Step 5 Click Add to add a new Dialer.Step 6 Enter the following information in the Dialer General Tab fields.
DescriptionField
The name of the system where the Dialer is located.Maximum 32-character string, includingalpha-numeric characters, periods (.), and underscores(_). Alphabetic characters can be upper- orlower-case. The name must begin with analpha-numeric character, andmust not contain spaces.
Dialer Name (required)
Maximum 32-character string, includingalpha-numeric characters, periods (.), underscores(_), and hyphens (-). Alphabetic characters can beupper- or lower-case. The name must begin with analpha-numeric character and must not contain spaces.
Computer Name (required)
Click the check box to enable or disable this Dialerfor all campaigns.
Enable
Select a preconfigured peripheral name. This field isa drop-down list and is not editable.
ICM Peripheral Name (required)
Select SCCP (Skinny Call Control Protocol).Dialer Type
Maximum 255 characters. This description appearsonly on this tab page.
Description
General Telephony
When this option is enabled, the Dialer uses all digitsto reach local telephone numbers rather than not usingthe area code. The default is Disabled.
Include Area Code when Dialing
Outbound Option Guide for Cisco Unified Contact Center Enterprise and Hosted Release 9.0(1) 89
Outbound Option Installation: SCCP DialerConfigure Dialer Component

DescriptionField
Enter any dialing prefix required by your location orby your campaigns. For example, some locationsmight require the prefix 9 to reach an outsidetelephone line.
Dial prefix
Enter the pre-pended value for all long distance calls.The Dialer checks the local area codes against thecontact number. If the configured local area code doesnot match the area code in the contact number, theDialer determines this number is a long distance call.The default is 1.
Long distance prefix
Enter the area/city code used at your location. Entermultiple local area codes separated by commas; forexample, “508,978,617” represents three local areacodes.
Local area code (comma delimited) (required)
Enter the number of seconds for the Dialer to waitbefore reusing a port after a hangup event. The defaultis one second.
Hangup Delay (1-10)
The maximum calls per second rate at which theDialer dials outbound calls. Default is 5 calls persecond for SCCP Dialer.
Port Throttle
If the Dialer is installed in a location outside the U.S., either enter the locally-specific long distanceprefix in the Long distance prefix field or leave the field blank.
Note
Step 7 Click Save.
Configure Port MapPerform the following steps to configure the port map for each Dialer. This specifies the number of portsavailable on the Dialer and the extension numbers, which Unified CM assigns to those ports. The maximumnumber of ports per SCCP Dialer is 120. Each configured port represents a Dialer phone device (Cisco 30VIP) on Unified CM.
• Extension numbers must be unique across the full enterprise. If there are multiple Unified CM clusters,the extensions (Unified CM directory number) must still be unique. Extension numbers can be up to tendigits in length.
•When selecting extension numbers for Dialer ports, confirm that existing phone numbers in Unified CMand dial numbers in the Device Target Explorer tool are not already done.
Outbound Option Guide for Cisco Unified Contact Center Enterprise and Hosted Release 9.0(1)90
Outbound Option Installation: SCCP DialerConfigure Port Map

Procedure
Step 1 In the ICM Configuration Manager Outbound Option Dialer configuration window, click the Port MapSelection tab to display the port map configuration.
Confirm that all agents and skill groups used by Outbound Option are associated with the UnifiedCM PG, and not the MR PG.
Note
Step 2 To begin adding ports to this Dialer, click Add.Step 3 Configure a set of ports and their associated extensions.
Make sure you provide the same number of ports for all the Dialers configured on the same peripheral.Note
Step 4 Click OK. The port mappings appear on the Port Map Selection tab.Step 5 Click Save to save all the configuration information.Step 6 Click Export. The Select CM Version dialog appears.Step 7 Click the Unified CM option. (Select the latest Unified CM option if you are using a later version of Unified
CM.)Step 8 Click OK and specify the path for the port mapping file.Step 9 Click Save to save the file. You will import this file, during Unified CM configuration.
Create a Network VRUPerform the following steps to create a Network VRU using the Network VRU Explorer tool.
Procedure
Step 1 Open the ICM Configuration Manager application.Step 2 Open the Explorer tools.Step 3 Open the Network VRU Explorer tool.Step 4 Create a type 2 VRU to be used during Media Routing (MR) PIM setup. Record the \ VRU name:
______________.Step 5 Click Save.
See the ICM Configuration Guide for Cisco Unified ICM Enterprise for detailed information about theICM Configuration Manager tools.
Note
Configure Media Routing PG (MR PG)Perform the following steps to configure the MR PG (PG2).
Outbound Option Guide for Cisco Unified Contact Center Enterprise and Hosted Release 9.0(1) 91
Outbound Option Installation: SCCP DialerCreate a Network VRU
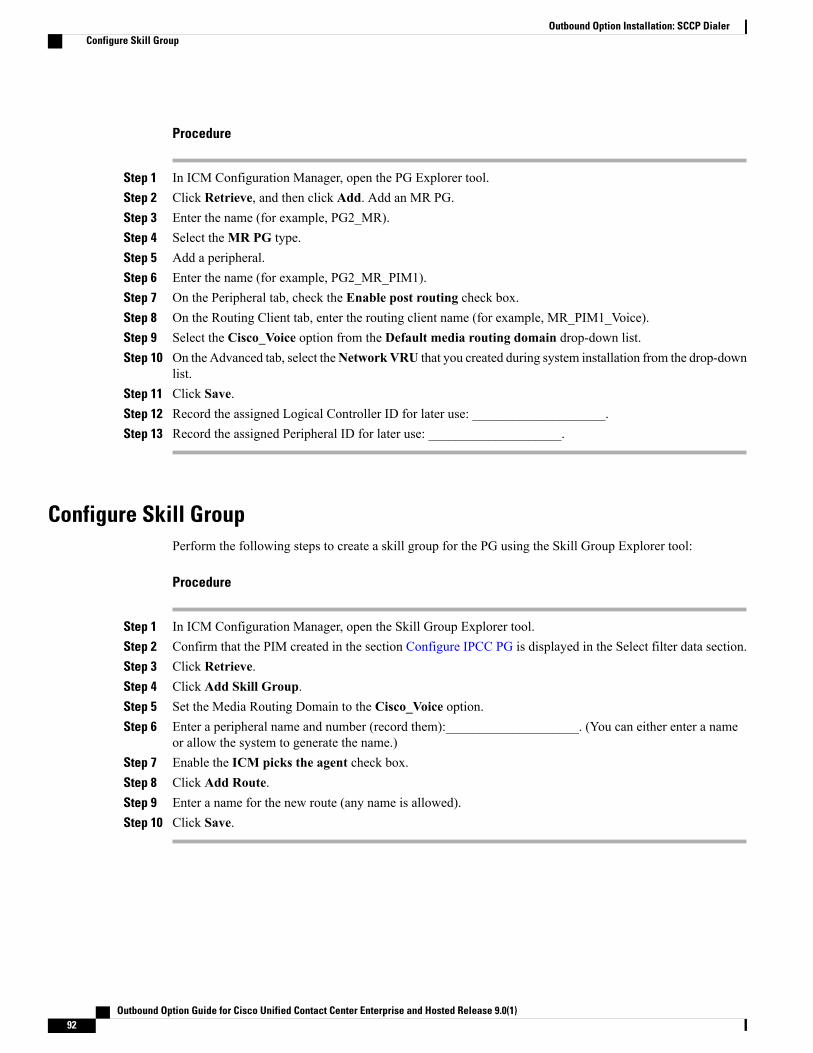
Procedure
Step 1 In ICM Configuration Manager, open the PG Explorer tool.Step 2 Click Retrieve, and then click Add. Add an MR PG.Step 3 Enter the name (for example, PG2_MR).Step 4 Select theMR PG type.Step 5 Add a peripheral.Step 6 Enter the name (for example, PG2_MR_PIM1).Step 7 On the Peripheral tab, check the Enable post routing check box.Step 8 On the Routing Client tab, enter the routing client name (for example, MR_PIM1_Voice).Step 9 Select the Cisco_Voice option from the Default media routing domain drop-down list.Step 10 On the Advanced tab, select theNetworkVRU that you created during system installation from the drop-down
list.Step 11 Click Save.Step 12 Record the assigned Logical Controller ID for later use: ____________________.Step 13 Record the assigned Peripheral ID for later use: ____________________.
Configure Skill GroupPerform the following steps to create a skill group for the PG using the Skill Group Explorer tool:
Procedure
Step 1 In ICM Configuration Manager, open the Skill Group Explorer tool.Step 2 Confirm that the PIM created in the section Configure IPCC PG is displayed in the Select filter data section.Step 3 Click Retrieve.Step 4 Click Add Skill Group.Step 5 Set the Media Routing Domain to the Cisco_Voice option.Step 6 Enter a peripheral name and number (record them):____________________. (You can either enter a name
or allow the system to generate the name.)Step 7 Enable the ICM picks the agent check box.Step 8 Click Add Route.Step 9 Enter a name for the new route (any name is allowed).Step 10 Click Save.
Outbound Option Guide for Cisco Unified Contact Center Enterprise and Hosted Release 9.0(1)92
Outbound Option Installation: SCCP DialerConfigure Skill Group

Create Dialed NumberPerform the following steps to create a dialed number for the MR PG.
Procedure
Step 1 In ICM Configuration Manager, open the Dialed Number/Script Selector List tool.Step 2 Click Add, then enter a dialed number for the MR PG.Step 3 Select the MR routing client from the drop-down list.Step 4 Select Cisco_Voice from theMedia Routing Domain drop-down list.Step 5 Enter the dialed number.Step 6 On the Dialed Number Mapping tab, click Add.Step 7 In the Calling Line ID group box, click the All radio button.Step 8 In the Caller-entered digits group box, click the All radio button.Step 9 In the Call type drop-down list, select the MR call type.Step 10 Click OK on the Dialed Number Map Entry dialog box, and then click Save.
To use the Personal Callback feature, a second dialed number is required. This dialed number must havethe PersonalCallback dialed number string. As with the previous dialed number, map all Calling LineIDs and all Caller-entered digits to the call type previously created for the MR routing client. Multipledialers require multiple dialed numbers—one for each routing client per skill group.
Note
Configure System OptionsUse the Outbound Option System Options component in the ICM Configuration Manager to define contactdialing time ranges that apply to all of your Outbound Option campaigns.
Because this component uses 12-hour time notation, be sure to select AM or PM for your start and end times.
Procedure
Step 1 In ICM Configuration Manager, open the Outbound Option System Options component.Step 2 Select the General Options tab page to define the total dialing time range for all your Outbound Option
campaigns to use, and then click OK.Step 3 Select the Bulk Update tab page to define specific dialing time ranges for telephone numbers, and then click
Update All Campaigns.
Outbound Option Guide for Cisco Unified Contact Center Enterprise and Hosted Release 9.0(1) 93
Outbound Option Installation: SCCP DialerCreate Dialed Number

Enable ECC VariablesPerform the following steps to enable the Expanded Call Context (ECC) variables using the System Informationtool and the Expanded Call Variable List tool.
Procedure
Step 1 Open the System Information tool in the Tools/Miscellaneous folder in the ICM Configuration Managerapplication.
Step 2 Enable the Expanded call context enabled check box.Step 3 Click Save.Step 4 Open the List tools.Step 5 Open the Expanded Call Variable List tool.Step 6 Click all BAxxxx variables (BAAccountNumber, BABuddyName, BACampaign, BADialedListID,
BAResponse, BAStatus, and BATimezone).Step 7 In the Attributes tab, click the Enabled check box for each variable.Step 8 Click Save.
Configuration and scheduling of personal callback feature
Configure Personal Callbacks
All personal callbacks occur in Preview mode. Be aware that only one Dialer on a particular peripheralis assigned personal callback records.
Note
Some personal callback options must be configured through the registry. Furthermore, if a personal callbackrecord is not associated with a campaign, it follows the rules configured within the registry.
Procedure
Step 1 Configure the reschedule callback mode in the Outbound Option Campaign Configuration Component byselecting one of the following options on the Campaign General tab:
• Use the alternate VDN—the call is routed to the skill group DN for the campaign associated with thecallback, if the DN is available
• Reschedule the personal callback to the same time the next business day
• Abandon the personal callback
Outbound Option Guide for Cisco Unified Contact Center Enterprise and Hosted Release 9.0(1)94
Outbound Option Installation: SCCP DialerEnable ECC Variables

Step 2 Open the HKEY_LOCAL_MACHINE\SOFTWARE\Cisco Systems, Inc.\ICM\<instancename>\LoggerA\BlendedAgent\CurrentVersion folder in the Outbound Option registry.
Step 3 Configure the personal callback registry entries listed in the following table.DescriptionDefault
ValueName
Calculates the callback time range for eachpersonal callback in minutes. The CampaignManager queries the Personal Callback List forcallback records where the CallbackDateTimevalue is between the current time and the sumof the current time minus theCallbackTimeLimit.
15CallbackTimeLimit
Sets the amount of time, in minutes, that theOutbound Option Dialer waits before retrying apersonal callback when the customer’s phone isbusy (minimum value is 1; maximum value is10).
1PersonalCallbackTimeToRetryBusy
Sets the amount of time, in minutes, that theOutbound Option Dialer waits before retrying apersonal callback when the customer does notanswer the phone (minimum value is 5;maximum value is 60).
20PersonalCallbackTimeToRetryNoAnswer
Sets the amount of time, in minutes, that theOutbound Option Dialer waits before retryingto reserve an agent if the agent is not available(minimum value is 1; maximum value is 10).
5PersonalCallbackTimeToRetryReservation
Sets the maximum number of times a personalcallback will be attempted (minimum value is 1;maximum value is 20). When the number ofmaximum attempts reaches 0, the record is nottried again and the status is set to “M” (max-edout).
5PersonalCallbackMaxAttemptsDefault
The interval time, in minutes, at which theOutbound Option Dialer checks the CampaignManager for personal callback records (minimumvalue is 1; maximum value is 30).
5PersonalCallbackTimeToCheckForRecords
The number of days after the personal callbackhas been scheduled to keep the record before itis purged (minimum value is 1; maximum valueis 30).
5PersonalCallbackDaysToPurgeOldRecords
Outbound Option Guide for Cisco Unified Contact Center Enterprise and Hosted Release 9.0(1) 95
Outbound Option Installation: SCCP DialerConfigure Personal Callbacks
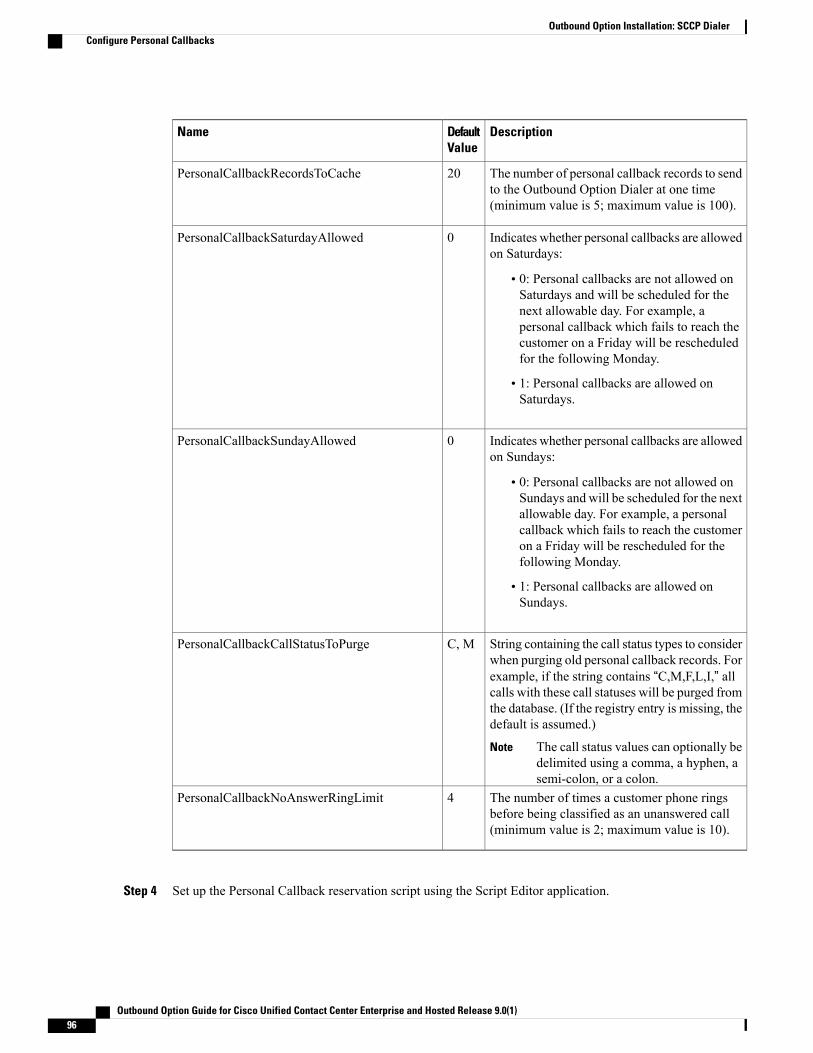
DescriptionDefaultValue
Name
The number of personal callback records to sendto the Outbound Option Dialer at one time(minimum value is 5; maximum value is 100).
20PersonalCallbackRecordsToCache
Indicates whether personal callbacks are allowedon Saturdays:
• 0: Personal callbacks are not allowed onSaturdays and will be scheduled for thenext allowable day. For example, apersonal callback which fails to reach thecustomer on a Friday will be rescheduledfor the following Monday.
• 1: Personal callbacks are allowed onSaturdays.
0PersonalCallbackSaturdayAllowed
Indicates whether personal callbacks are allowedon Sundays:
• 0: Personal callbacks are not allowed onSundays and will be scheduled for the nextallowable day. For example, a personalcallback which fails to reach the customeron a Friday will be rescheduled for thefollowing Monday.
• 1: Personal callbacks are allowed onSundays.
0PersonalCallbackSundayAllowed
String containing the call status types to considerwhen purging old personal callback records. Forexample, if the string contains “C,M,F,L,I,” allcalls with these call statuses will be purged fromthe database. (If the registry entry is missing, thedefault is assumed.)
The call status values can optionally bedelimited using a comma, a hyphen, asemi-colon, or a colon.
Note
C, MPersonalCallbackCallStatusToPurge
The number of times a customer phone ringsbefore being classified as an unanswered call(minimum value is 2; maximum value is 10).
4PersonalCallbackNoAnswerRingLimit
Step 4 Set up the Personal Callback reservation script using the Script Editor application.
Outbound Option Guide for Cisco Unified Contact Center Enterprise and Hosted Release 9.0(1)96
Outbound Option Installation: SCCP DialerConfigure Personal Callbacks

• Add a Wait node after the Queue to Agent node using a value that is less than theTimeToWaitForMRIResponse Dialer registry setting (default value of 600 seconds equals 10 minutes).
• Like all reservations scripts, the script should end in a Release Node instead of an End Node to avoidcluttering up the Router Log Viewer with “No Default Label” errors.
For example, the following Personal Callback reservation script uses the nodes described above:
Figure 16: Personal Callback Reservation Script
Create Enterprise Skill GroupTo use the Personal Callback feature, you need to create the enterprise skill group associated with the agentusing the Enterprise Skill Group List tool.
Procedure
Step 1 Open the List tools.Step 2 Open the Enterprise Skill Group List tool.Step 3 Create an enterprise skill group. In the Add Name field, type the enterprise name, then click Add. Select the
skill group, and then click Save.Step 4 In the Attributes tab, click Add to add the skill group or groups.Step 5 Click Save.
Outbound Option Guide for Cisco Unified Contact Center Enterprise and Hosted Release 9.0(1) 97
Outbound Option Installation: SCCP DialerCreate Enterprise Skill Group

Create Enterprise RouteAfter you create the enterprise skill group associated with the agent, you need to create an enterprise routeusing the Enterprise Route List tool. This route should target the enterprise skill group created in the previousstep.
Procedure
Step 1 Open the List tools.Step 2 Open the Enterprise Route List tool.Step 3 Create an enterprise route. In the Name field, type the enterprise route, and then click Add. Select the route,
and then click Save.Step 4 In the Attributes tab, add the route.Step 5 Click Save.
Configure Queue to Agent NodeIf you use personal callbacks, complete the following steps to configure the Queue to Agent Node in yourreservation script.
Outbound Option Guide for Cisco Unified Contact Center Enterprise and Hosted Release 9.0(1)98
Outbound Option Installation: SCCP DialerCreate Enterprise Route

Procedure
Step 1 Right-click the Queue to Agent node and select Properties.Step 2 Click Change in the “Queue to agent type” section.Step 3 Select Lookup agent reference by expression, and then click OK.Step 4 Enter the agent expression Call.PreferredAgentID.Step 5 Select the enterprise skill group you created in the Create an Enterprise Skill Group section.Step 6 Select the enterprise route you created in the Create an Enterprise Route section.Step 7 Confirm that the Peripheral column is left blank.Step 8 Click OK to save the Queue to Agent node.Step 9 Save and then schedule the script.
Figure 17: Scheduling Script
Unified CMr and Gateway ConfigurationThis section provides procedures for the tasks associated with the Unified CM and gateway configuration.
Outbound Option Guide for Cisco Unified Contact Center Enterprise and Hosted Release 9.0(1) 99
Outbound Option Installation: SCCP DialerUnified CMr and Gateway Configuration

Ensure that each dialer’s ports are contained on their own UCManager subscriber, and the UCManagersubscriber is not shared with any other Dialer. Because a Dialer port makes shorter calls at sustained highercall rates, it takes a larger portion of UCManager resources than a normal agent phone. The sizing calculatorshould have already been used to properly size when designing the solution. The port throttle configurationreferenced in Dialer configuration prevents the Dialer from over-using its subscriber. If more than one Dialerpoints to the same subscriber, then this Dialer throttling mechanism is not effective because it only applies toeach Dialer.
Import and Assign Dialer PortsPerform the following procedure to import Dialer Ports and assign them to the PG’s CTI Application User.
Procedure
Step 1 After configuring the Dialer PortMap, click Select All, and then clickExport to save the port map configurationto a CSV-formatted text file. Select the Unified CM version.
Be sure to select the Unified CM release that is compatible with the product release.Note
Step 2 Use the Cisco Unified CM BAT tool to create a new phone template.
1 Select the Cisco 30 VIP phone choice.
2 Enter the template name.
3 Set the device pool.
4 Choose the Standard 30 VIP phone button template and the device security profile.
5 Save the phone template.
6 Click the line1 template and insert a single line with no speed dials.
7 Click Save.
When creating a dialer port template using the BAT tool, be careful when selecting the Device pool.Make sure the correct region is set so it works across different audio codecs.
Note
Step 3 Select Bulk Administration > Upload Download. Click Add New. Browse to the CSV file, select Phones,select Insert Phones > Specific Details, and then click Save.
Step 4 Select Bulk Administration > Phones > Insert Phones. Select the file name and the phone template name,click Run Immediately, and then click Submit.To see the status of this job, select Bulk Administration > Job Scheduler, and then click the Find button.
Step 5 Associate the newly created devices with a PG user. In the Unified CM Administration window, select UserManagement > Application User, and then click Find.
Step 6 Select theDevice Association link. In the Device List Filter, select theDirectory Number and then enter thefirst few digits of the newly created Dialer ports.
Step 7 Click Select Devices. Make sure the check box next to each Dialer port is checked.Step 8 Click Save.
Outbound Option Guide for Cisco Unified Contact Center Enterprise and Hosted Release 9.0(1)100
Outbound Option Installation: SCCP DialerImport and Assign Dialer Ports
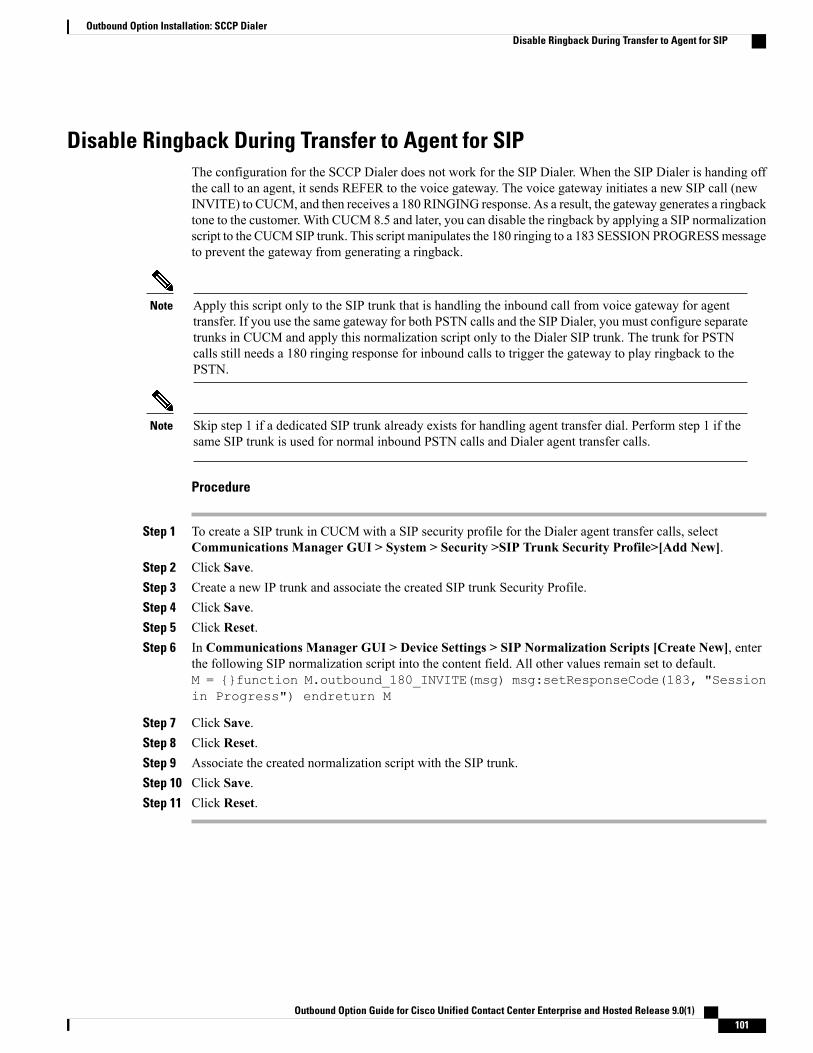
Disable Ringback During Transfer to Agent for SIPThe configuration for the SCCP Dialer does not work for the SIP Dialer. When the SIP Dialer is handing offthe call to an agent, it sends REFER to the voice gateway. The voice gateway initiates a new SIP call (newINVITE) to CUCM, and then receives a 180 RINGING response. As a result, the gateway generates a ringbacktone to the customer. With CUCM 8.5 and later, you can disable the ringback by applying a SIP normalizationscript to the CUCMSIP trunk. This script manipulates the 180 ringing to a 183 SESSIONPROGRESSmessageto prevent the gateway from generating a ringback.
Apply this script only to the SIP trunk that is handling the inbound call from voice gateway for agenttransfer. If you use the same gateway for both PSTN calls and the SIP Dialer, you must configure separatetrunks in CUCM and apply this normalization script only to the Dialer SIP trunk. The trunk for PSTNcalls still needs a 180 ringing response for inbound calls to trigger the gateway to play ringback to thePSTN.
Note
Skip step 1 if a dedicated SIP trunk already exists for handling agent transfer dial. Perform step 1 if thesame SIP trunk is used for normal inbound PSTN calls and Dialer agent transfer calls.
Note
Procedure
Step 1 To create a SIP trunk in CUCM with a SIP security profile for the Dialer agent transfer calls, selectCommunications Manager GUI > System > Security >SIP Trunk Security Profile>[Add New].
Step 2 Click Save.Step 3 Create a new IP trunk and associate the created SIP trunk Security Profile.Step 4 Click Save.Step 5 Click Reset.Step 6 In Communications Manager GUI > Device Settings > SIP Normalization Scripts [Create New], enter
the following SIP normalization script into the content field. All other values remain set to default.M = {}function M.outbound_180_INVITE(msg) msg:setResponseCode(183, "Sessionin Progress") endreturn M
Step 7 Click Save.Step 8 Click Reset.Step 9 Associate the created normalization script with the SIP trunk.Step 10 Click Save.Step 11 Click Reset.
Outbound Option Guide for Cisco Unified Contact Center Enterprise and Hosted Release 9.0(1) 101
Outbound Option Installation: SCCP DialerDisable Ringback During Transfer to Agent for SIP

Auto Answer Configuration on Agent PhonesThe dialer component is preconfigured during installation to auto answer Outbound Option related calls tothe Outbound Option agent. However, this default configuration does not provide a zip tone to the agent(which notifies of incoming calls), so agents must monitor the agent application for incoming customer calls.
To enable zip tone, enable auto-answer on the agent’s phone configuration in Unified CM. This solution addsabout a second onto the transfer time. This solution is identical to the solution that is used for Unified CCE.
For Mobile Agents using the nailed connection, the Unified CM auto answer setting does not provide a ziptone, but Unified CCE does provide an option for playing a notification tone to the agent using the agent desksettings.
Enabling auto answer in the agent desk settings or in the dialer component in conjunction with the UnifiedCM can be problematic. Therefore, Cisco recommends that you disable the auto answer option in the dialercomponent, and enable it either in the agent desk settings or in Unified CM.
Outbound Option Software Installation StepsThis section describes how to install Outbound Option and related components.
Important: Before you perform the installation procedures in this section, you must stop the Router, theLogger, the AW, and the Agent PGs in ICM Service Control. You must also enable Outbound Option inthe Logger setup before creating the Outbound Option database. ICMDBA cannot create the OutboundOption database without enabling it in the Logger.
Note
Create Outbound Option Private DatabaseBefore you use Outbound Option on Unified CCE, estimate the size of the Outbound Option private databaseand then create it on the Logger Side A platform using ICM’s ICMDBA utility.
Unified SCCE automatically creates and sizes the Outbound Option database. Skip this step if you aredeploying Outbound Option with Unified SCCE.
Note
Procedure
Step 1 Collect the following information:
•What is the size, in bytes, of each customer record in the import file? If the size is less than 128 bytes,use 128. (The size of a record cannot be less than 128 bytes.) (RecordSize)
• How many records will be imported? (RecordCount)
•Will new imports replace or append records already imported?
Step 2 Estimate the contact table size using one of the following formulas:
Outbound Option Guide for Cisco Unified Contact Center Enterprise and Hosted Release 9.0(1)102
Outbound Option Installation: SCCP DialerAuto Answer Configuration on Agent Phones

If imports overwrite imports: Do not change record count•
• If imports append imports: RecordCount = total number of rows kept in a customer table at any one time
• contact-table-size = RecordSize * RecordCount * 1.18
Step 3 Estimate the dialing list table size using one of the following formulas:
• If imports overwrite imports: RecordCount = number of rows imported * 1.5 (50% more rows will beinserted into the dialing list than imported)
• If imports append imports: RecordCount = total number of rows kept in all customer table at any onetime * 1.5
• dialing-list-table-size = rows in dialing list * 128 bytes * 4.63
Step 4 Calculate the database size using this formula: contact-table-size + dialing-list-table-size.Step 5 Start ICMDBA by entering ICMdba in Microsoft Windows’ Run dialog box or command window.Step 6 Select the Logger and select Database > Create (or click the right mouse button and select Create).Step 7 In the Create Database window, specify the Outbound Option database type.Step 8 Click Add. The Add Device window opens.
Use this window to create a new data device and log device for the Outbound Option database. Specify thedisk drive letter and size in megabytes for each new device. Click OK to create the device, and then clickCreate. Click Start.
At a later time, if necessary, you can edit the device to change storage size, or remove a device, using theDatabase > Expand option.
Step 9 Click Close.
No manual changes to the contents of the outbound database are allowed. Do not use triggers in theoutbound database. Triggers for the dialing lists or personal callback list should not be added or modified.The Dialer_Detail table in the HDS contains the information required by custom applications. Extract theinformation from the HDS to a separate server where the custom application can process the data withoutimpacting the HDS.
Caution
Upgrade of Outbound Option from Previous ReleaseIf you are upgrading from a previous CCE/CCH release, you must run the Enhanced DatabaseMigration Tool(EDMT) to upgrade your Outbound Option database. Otherwise, Campaign Manger will not start, and analarm is triggered to indicate an incorrect private database version. See the Upgrade Guide for Cisco UnifiedICM/Contact Center Enterprise & Hosted at http://www.cisco.com/en/US/products/sw/custcosw/ps1844/prod_installation_guides_list.html for instructions on running EDMT.
Install Dialer ComponentPerform the following steps to install the Dialer component on the Side A PG platform.
Outbound Option Guide for Cisco Unified Contact Center Enterprise and Hosted Release 9.0(1) 103
Outbound Option Installation: SCCP DialerUpgrade of Outbound Option from Previous Release

Procedure
Step 1 Make sure all ICM Services are stopped.Step 2 Run Peripheral Gateway Setup.Step 3 In the Cisco Unified ICM/Contact Center Enterprise & Hosted Setup dialog box, in the left column under
Instances, select an instance.Step 4 Click Add in the Instance Components section.
The ICM Component Selection dialog box opens.
Step 5 Click Outbound Option Dialer.The Outbound Option Dialer Properties dialog box opens.
Step 6 In the initial Dialer Properties dialog box, check Production mode and Auto start at system startup unlessyou are specifically told otherwise by your Unified ICM support provider. These options set the Dialer Servicestartup type to Automatic, so the Dialer starts automatically when the machine starts up.
Step 7 For Dialer Type, select SCCP (Skinny Call Control Protocol).Step 8 Click Next.
After you create a Dialer, you cannot change the Dialer Type. To switch Dialer types, delete theexisting Dialer and create a new Dialer.
Note
Step 9 On the last Outbound Option Dialer Properties dialog box, specify the following information:
• Outbound Option server: The host name or IP address of the Outbound Option server. This server istypically the same machine where the Outbound Option Campaign Manager is located.
• CTI server A: The host name or IP Address of the machine that has side A of CTI server installed.
• CTI server port A: The port number the Dialer uses to interface with CTI server side A. The defaultis 42027.
• CTI server B: For duplexed installations, the host name or IP Address of the machine that has side Aof CTI server installed.
• CTI server port B: For duplexed installations, the port number the Dialer uses to interface with CTIserver side B. The default is 43027.
• Heart beat: How often the dialer checks its connection to the CTI server, in milliseconds. The defaultvalue of 500 is acceptable.
•Media routing port: The port number the Dialer uses to interface with the Media Routing PIM on theMedia Routing PG. The default is 3800 ot 3801.
• Call Manager TFTP server: The host name or IP address of the CallManager TFTP server. This serveris the same machine used for the CallManager publisher.
Step 10 Click Next. A Summary screen appears.Step 11 Verify that you have specified the correct information. Click Back to make corrections if needed; otherwise,
click Next to begin Dialer installation.
Outbound Option Guide for Cisco Unified Contact Center Enterprise and Hosted Release 9.0(1)104
Outbound Option Installation: SCCP DialerInstall Dialer Component
Configure Dialer After InstallationAfter you finish installing the Dialer component, edit the following Dialer-related Registry values:
• Configure the Dialer throttling on each Dialer in the system. Open ICM Configuration Manager, selectOutbound Option > Dialer, and then enter a value in the Port Throttle field. This field indicates thenumber of ports to throttle, which helps determine the calls per second rate at which the Dialer dialsoutbound calls. For example, a port throttle count=10 and a time=2 indicates that no more than 5 callscan be started during a one second period. If 5 calls are ready to be dialed, they will be spaced evenlyover that one second period. The total call capacity of Unified CM is dependent on several differentfactors, including the Unified CM version, inbound call rate, and outbound call rate.For more details, see the SNMP Guide for Cisco Unified ICM/Contact Center Enterprise & Hosted.
• After the Dialer process runs for the first time, you also need to change the value of the AutoAnswerCallentry to 0, disabling the auto answer setting in the Dialer registry.See the Auto Answer Configuration on Agent Phones section in this chapter for details about otheroptions for auto answer that support agent notification of an incoming call.
Modify JTAPI for Calls to Invalid NumbersYou must change the jtapi.ini file on the peripheral gateway so that dialed calls are recorded with progresscodes, and not as No_Answer. Progress codes 1, 4, 22, and 28 represent Unallocated_Number, Send specialinformation tone, Number changed, and Invalid Number Format, respectively. To make this change, performthe following steps.
Procedure
Step 1 From the IPCC PG, access a command prompt and set the path to C:\winnt\java\lib. Enter the commandjava CiscoJtapiVersion -parms> Jtapi.ini.
Step 2 Go to c:\winnt\java\lib.Step 3 Open the jtapi.ini file in a text editor.Step 4 Add the following line, if not already present: UseProgressAsDisconnectedDuringErrorEnabled=1,4,22,28.Step 5 Save and close the file.Step 6 Reboot the PG machine.
Install MR PGPerform the following steps to install the MR PG on the Side A platform.
Outbound Option Guide for Cisco Unified Contact Center Enterprise and Hosted Release 9.0(1) 105
Outbound Option Installation: SCCP DialerConfigure Dialer After Installation

Procedure
Step 1 Run ICM Setup to install a PG that corresponds with PG2, which was configured earlier.Step 2 In the Peripheral Gateway Properties window, select the PG2 PG Node ID and theMediaRouting Client
Type.Step 3 Click Next.Step 4 Add a PIM, PIM1.Step 5 In the MediaRouting Configuration window, enable the PIM.Step 6 Enter the peripheral name and the peripheral ID (that you recorded at the end of the Configure Media Routing
PG (MR PG) procedure ) of the MR_PIM.Step 7 Set both Application Hostname fields to the computer name of the Outbound Option Dialer.Step 8 Set the Application Connection Port to the port number used by the Outbound Option IPCC Dialer (usually
38001).Step 9 Click Next until Setup finishes. When Setup finishes, click Finish.Step 10 Repeat the preceding steps to install the MR PG on the Side B PG platform.
Installation of Cisco CTI ControlsThis section describes the installation process for the Cisco CTI controls. It also describes the Cisco CTIToolkit Outbound Desktop (Win32) for Unified CCE.
Perform the following procedures to install CTI controls to support Outbound Option on the desktop.
See the CTI documentation available online at http://www.cisco.com.
Integrate Outbound Option with CTI OSOutbound Option works with CTI OS, which provides an object-based interface to the CTI Server using theCOM and C++ interfaces. These interfaces permit development of agent desktop applications that interfacewith Unified ICM software.Outbound Option is fully compatible with the CTI OS CIL library and the CTI Toolkit Agent Desktop (Win32).While there are no Outbound Option-specific controls available for the CTI Toolkit Agent Desktop (Win32),a sample CTI OS Desktop (known as the “Cisco CTI Toolkit Outbound Desktop (Win32)”), which supportsOutboundOption, is shipped with the product (located in <Drive Letter>:\Program Files\Cisco Systems\CTIOSClient\CTIOS Toolkit\Win32 CIL\Samples\CTI Toolkit Outbound Desktop). In addition, the standard CTIToolkit Agent Desktop (Win32) can be modified to display all Outbound Option ECC variables in the callvariable grid.
Be aware that CTI OS Release 7.0(0) and greater uses CTI Protocol 11. As a result, there are more CTIfields available in CTI OS (for example, call type, CampaignID, and QueryRuleID).
Note
Outbound Option Guide for Cisco Unified Contact Center Enterprise and Hosted Release 9.0(1)106
Outbound Option Installation: SCCP DialerInstallation of Cisco CTI Controls

When installing the CTI OS Client, select the CTI Toolkit SDK and theWin32 check boxes to access theCTI Toolkit Outbound Desktop (Win32) sample. (See the “Install CTI Toolkit Outbound Desktop (Win32)”section for more details.)
If you are running Outbound Option with CTI OS, perform the following procedure to add Outbound OptionECC variables to the CTI OS Server.
Procedure
Step 1 Rename the C:\ICM\CTIOS_bin\blendedagent_addecc.reg.txt file to blendedagent_addecc.reg.Step 2 Save the blendedagent_addecc.reg read-only file. Right-click the file, select Properties, and then uncheck
the Read Only check box.Step 3 Edit the blendedagent_addecc.reg file and globally change “InstanceName” to the real system instance name
and save it.Step 4 Double-click on the blendedagent_addecc.reg file to add the Outbound Option ECC variables to CTI OS.Step 5 In the Node Manager, restart the CTI OS service.Step 6 Restart all CTI OS Desktop clients to download the new ECC variables.
What to Do Next
See the CTI OS System Manager's Guide for Cisco Unified ICM/Contact Center Enterprise & Hosted formore information. See CTI OS Outbound Option ECC Variable Settings for a sample .REG file which createsthe applicable Outbound Option ECC registry entries. (This registry file must be edited and run on the CTIOS server.)
After the Outbound Option ECC variables have been added to the standard CTI Toolkit Agent Desktop(Win32), the values can be set through the grid. (See the “Outbound Option Extended Call Context Variables”section in Chapter 2 for a description of each ECC variable.)
Install CTI Toolkit Outbound Desktop (Win32)
Procedure
Step 1 Install CTI OS Client and confirm that the CTI Toolkit SDK and theWin32 check boxes are selected.See theCTIOS SystemManager's Guide for CiscoUnified ICM/Contact Center Enterprise&Hostedfor detailed information about installing the CTI Toolkit SDK.
Note
Step 2 Access the CTI Toolkit Outbound Desktop (Win32) from the following location:<Drive Letter>:\Program Files\Cisco Systems\CTIOSClient\CTIOS Toolkit\Win32 CIL\Samples\CTI ToolkitOutbound Desktop
Step 3 Double-click theCTIOSOutOptSSoftphone.exe file to display the CTI Toolkit Outbound Desktop (Win32).
Outbound Option Guide for Cisco Unified Contact Center Enterprise and Hosted Release 9.0(1) 107
Outbound Option Installation: SCCP DialerIntegrate Outbound Option with CTI OS

Setup of Outbound Option in Cisco Desktop AdministratorThis section provides information about setting up Outbound Option with Cisco Desktop Administrator. Whenusing Outbound Option with Cisco Agent Desktop, outbound calls appear as inbound calls to the agent, andinformation about the call appears in the Enterprise Data pane.
See the CAD documentation available online at http://www.cisco.com for more information.
Outbound Option Enterprise DataTo enable Outbound Option enterprise data to appear in the Cisco Agent Desktop Enterprise Data window,the administrator must edit the Default layout to include some or all OutboundOption variables. These variablesare prefixed with “BA.” (Edit the default enterprise data layout in the Cisco Desktop Administrator.)
• BAAccountNumber [200]
• BABuddyName [201]
• BACampaign [202]
• BADialedListID [203]
• BAResponse [204]
• BAStatus [205]
• BATimeZone [206]
Note • The BAStatus field is required. All other BA fields are optional for Progressive and Predictive modes.In Preview mode, the Skip button will not work if BADialedListID is not enabled.
• The BABuddyName field is required, if you want to see the customer’s name being called.
• If a call is part of a Preview dialing mode campaign, the first letter in the BAStatus field entry is P.If a call is part of a Direct Preview dialing mode campaign, the first letter in the BAStatus field entryis D.
Add Enterprise Data Fields to Layout ListUse the following procedure to add the Outbound Option variables.
Procedure
Step 1 Start Cisco Desktop Administrator.Step 2 In the navigation tree, navigate to the Layout Editor in the Enterprise Data window: Location > (logical
contact center name) > Enterprise Data Configuration > Enterprise Data. Click Edit.Step 3 Add the following fields to the Layout List by selecting the field from the Available Fields List, and then
clicking the left arrow button.
Outbound Option Guide for Cisco Unified Contact Center Enterprise and Hosted Release 9.0(1)108
Outbound Option Installation: SCCP DialerSetup of Outbound Option in Cisco Desktop Administrator

BAAccountNumber•
• BABuddyName
• BACampaign
• BADialedListID
• BAResponse
• BAStatus
• BATimeZone
Step 4 Click OK.Step 5 Click Apply to save your changes.
VerificationThis section provides a series of verification steps to determine if the system has been installed properly.These steps are designed to pinpoint problems that might exist in the setup before actually attempting to deploythe Dialer. If problems occur while using this product, please see this section before contacting Cisco TechnicalSupport (TAC).
This section assumes that the Outbound Option application is installed and at least one Dialer has beenconfigured along with its associated port map. This section also assumes that the Dialer port map has beenexported and configured on Unified CM using the BAT tool.
Note
Outbound Option Guide for Cisco Unified Contact Center Enterprise and Hosted Release 9.0(1) 109
Outbound Option Installation: SCCP DialerVerification

Troubleshoot Connections
Dialer Component Status
The Dialer component process status provides a lot of details about the health of the installation even beforeany campaign configuration is initiated or before any call is placed. You can view the Dialer component statusin the Diagnostic Framework Portico.
Figure 18: SCCP Dialer Component Status
Troubleshoot Dialer Connections
Dialer customer instance, node name, and process name
This information is useful if TAC asks you to interrogate the system while debugging a problem for acase.
Outbound Option Guide for Cisco Unified Contact Center Enterprise and Hosted Release 9.0(1)110
Outbound Option Installation: SCCP DialerTroubleshoot Connections

Campaign Manager connectivity status
This status is either A for active or X for disconnected. If the Campaign Manager connectivity statusis X, the Dialer is not connected to the Campaign Manager.Try pinging from the Dialer to the Campaign Manager machine by hostname and by IP Address.
• If the ping fails for the IP address, recheck that the IP address is correct, and then troubleshootnetwork connectivity.
◦Check to see whether the Logger Side A node is running.
◦Check to verify whether Outbound Option has been enabled in the Logger Side A setup,and that the Campaign Manager process is running.
• If the ping is successful for the IP address but not for the DNS hostname, check that the DNShostname is correct and that it is properly configured in the system’s DNS server.
• If the ping is successful, recheck the Dialer component setup to see if the Dialer component setupcontains the wrong address or port number for the side A Logger.
CTI Server connectivity status
This status is eitherA for active orX for disconnected. If the status isX, then the Dialer cannot connectto either CTI Server on side A or side B.
Try pinging from the Dialer to the CTI Server/PG machines by hostname and by IP address.
• If the ping fails for the IP address:
◦Recheck that the IP address is correct, and then troubleshoot network connectivity.
◦Check to see if the CTI Server processes are running.
• If the ping is successful for the IP address but not for the DNS hostname, check that the DNShostname is correct and that it is properly configured in the system’s DNS server.
• If the ping is successful, then recheck the Dialer component set up to see if the Dialer componentset up contains the wrong address or port number for the CTI Server.
• Confirm that the PG is online. Check that the PG has been enabled properly in the ICM Routersetup.
Outbound Option Guide for Cisco Unified Contact Center Enterprise and Hosted Release 9.0(1) 111
Outbound Option Installation: SCCP DialerTroubleshoot Connections
Dialer ports states
The first value, C, shows the total configured ports derived from the port map configuration. The secondvalue, R, shows the total number of ports registered with Unified CM. Finally, the third value, B,indicates the number of Dialer ports that failed to register with Unified CM. The third value also reportsthe number of Dialer ports that are blocked. (This is a runtime activity; it is unusual for ports to beblocked.)
If the number of ports Configured is zero, then the Dialer is not receiving port configuration from theCampaign Manager component. Check to verify that ports are configured properly.
If the number of ports Registered is zero, then the Dialer component is having trouble registering withUnified CM.
• Check the TFTP server address in the Dialer component setup configuration.
• Confirm that the Unified CM is configured correctly. In particular, check if the port map has beenimported and the ports have been registered to the JTAPI user for the IPCC PG.
• Confirm that the IPCC PG has been started.
• Confirm that the JTAPI Gateway has finished configuring. If it has not, wait for it to finish.
• Verify that Unified CM and CTI Manager are running.
• Check to see if DNS name (of your PG) is resolving the CUCM IP address
MR PIM connectivity status
This status is either A for active, X for disconnected, or NR, which means connected but not yet ableto route. (TheU status is rarely seen and indicates that a particular connectivity object within the Dialerhas not been created yet.)
- If the MR Status is X, check the connectivity by performing the following steps:
• Ping the MR PG address by hostname or IP address.
• Double check the MR PG address and port configured in the Dialer component setup.
If the MR PG status is NR, then the Media Routing connection is established. Check to see if the MRPG is online by looking at its status window.
Verify Critical Configuration StepsIn the Dialer Configuration Component, click the Port Map Selection tab and ensure the Dialer is assigned toa Unified CM PG.
Verify ConnectivityFirst, verify that each Dialer can place calls on Unified CM. A diagnostic utility, DialogicTest, is installed onthe Dialer machine in the \icm\bin directory. From the \icm\bin directory, execute DialogicTest to verifyconnectivity on Unified CCE installation.
Outbound Option Guide for Cisco Unified Contact Center Enterprise and Hosted Release 9.0(1)112
Outbound Option Installation: SCCP DialerVerify Critical Configuration Steps

Procedure
Step 1 For an Unified CCE installation, determine the Dialer’s peripheral ID before executing the DialogicTest utility.This value can be obtained from the Dialer table stored in the Side A database of the ICM Logger. Using theSQL query analyzer, run the following query on the Side A database:Select * from Dialer
Match the DialerName column with the Dialer that is being configured and note the peripheral ID (stored inthe DialerID column). This ID is used when launching DialogicTest.
TheOutboundOption IPDialermust be shut down before runningDialogicTest.Note
Step 2 From the \icm\bin directory on the Dialer, type the following to run the DialogicTest utility, typeDialogictest softphone <number of ports in the Dialer port map> <CallManager name or IP
address> <dialer ID> <starting channelID> <custname>
where:
a) The CallManager name or IP address indicates the Unified CM TFTP server machine.b) The dialer ID is the numeric identifier obtained above from the Dialer table.c) The starting channel ID indicates the first port ID in the Dialer (usually 0). This creates simulated Dialer
ports based on the port map configuration.d) The custname is the ICM customer name.
Example:The following example displays the command syntax and the output log messages.
Outbound Option Guide for Cisco Unified Contact Center Enterprise and Hosted Release 9.0(1) 113
Outbound Option Installation: SCCP DialerVerify Connectivity

Step 3 Choose a phone station on the ACD that has a “caller ID” display and note its phone number. This phonestation is called to validate connectivity between the Dialer and the station. Using DialogicTest, dial thisstation using the following syntax:>d 0 <station #> 30
where d is the abbreviation for “Dial,” 0 is the first channel in the port map, station # is the actual number toreach the phone station, and 30 represents the amount of time DialogicTest attempts to ring the phone station.For example, to dial station 51001, the command is >d 0 51001 30.
Example:The following example displays the command syntax and the output log messages.
Outbound Option Guide for Cisco Unified Contact Center Enterprise and Hosted Release 9.0(1)114
Outbound Option Installation: SCCP DialerVerify Connectivity

This syntax causes the phone station to ring and display the calling number, which is the station identifier ofthe first port in the Dialer port map. Answer the phone station and speak into the receiver. The DialogicTestutility notes that voice was detected. If the phone does not ring, the Dialer does not have basic connectivitywith the switch and will not work properly. See the Cisco Docwiki for troubleshooting assistance.
Verify Dialer Port Map ConfigurationNow that basic connectivity has been verified, it is important to verify that the port map which was configuredin the Unified ICM configuration matches the configuration of the switch (or Unified CM for Unified CCE).The DialogicTest utility is also used for this process.
Outbound Option Guide for Cisco Unified Contact Center Enterprise and Hosted Release 9.0(1) 115
Outbound Option Installation: SCCP DialerVerify Dialer Port Map Configuration

The Outbound Option IP Dialer must be shut down before running DialogicTest.Note
How to Verify the Dialer Port Map Configuration
Procedure
Step 1 Beginning with the first port of the port map (channel 0 in DialogicTest), dial the phone station used for testingabove and verify that the calling number displayed on the station matches the first port configured in the Dialerport map in Unified ICM software.
Example:For example, to dial station number 1234, use the following command:>d 0 1234 30
Step 2 Hang up this channel by typing >h 0 and move to the next channel (channel 1). Dial the phone station again,using a command similar to the following example:
Example:>h 0 >d 0 1234 30
Verify that the calling number shown on the station matches the station number configured in the ICM Dialerport map.
Step 3 Hang up this channel by typing >h 1 and move to channel 2. Continue this procedure for the entire port mapto verify that the station numbers configured in Unified ICM software match the actual numbers on the switch.If there is a mismatch in this configuration, the Dialer will not work properly.If the configuration is a Unified CCE configuration and the BAT tool was used to configure the devices onUnified CM, it is satisfactory to test only a few ports in the range. If the Dialer is connected to a switch usingan Analog link, each port must be tested because it is possible to wire this connection incorrectly for a smallnumber of ports. Incorrect wiring creates problems in the Dialer that are difficult to find.
Verify Database ConfigurationThe procedure varies for verifying that the database configuration is properly set up for SQL Server, dependingon the installed version of SQL Server.
Procedure
For SQL Server 2008 R2 64bit, perform the following steps:a) Open the SQL Server Management Studio.b) Expand the databases.c) Select the <cust instance_baA> Outbound Option database. Right click and select Properties.d) Select the Files page.e) In the database file row, click the button in the Autogrowth column. A Change Autogrowth dialog box
appears.f) Ensure that the Enable Autogrowth box is checked. Click OK.
Outbound Option Guide for Cisco Unified Contact Center Enterprise and Hosted Release 9.0(1)116
Outbound Option Installation: SCCP DialerVerify Database Configuration

g) In the log file row, click the button in the Autogrowth column. A Change Autogrowth dialog box appears.h) Ensure that the Enable Autogrowth box is checked. Click OK.i) Click the Options page.j) On the Recovery Model drop-down menu, select Simple.k) Click OK.
Verify Router Registry KeyIf you are using the Transfer to IVR feature, verify that the following router registry key on Side A and SideB of the Router has a value of 2:HKEY_LOCAL_MACHINE\SOFTWARE\Cisco Systems, Inc.\ICM\<customer
instance>\RouterA/B\Router\CurrentVersion\Configuration\Global\SkillGroupCallsInQTimerInterval = 2
Outbound Option Guide for Cisco Unified Contact Center Enterprise and Hosted Release 9.0(1) 117
Outbound Option Installation: SCCP DialerVerify Router Registry Key

Outbound Option Guide for Cisco Unified Contact Center Enterprise and Hosted Release 9.0(1)118
Outbound Option Installation: SCCP DialerVerify Router Registry Key

C H A P T E R 6Configuration of Campaigns and Imports
This chapter, intended for administrators, provides an overview of the Outbound Option components andinformation that:
• Provides a high-level overview of creating an Outbound Option campaign
• Describes the tasks to perform to create an agent campaign and a transfer to IVR campaign
• Provides procedures for configuring and scheduling personal callbacks
• Gives instructions to verify that your Outbound Option system has been configured correctly
• Outbound Option Configuration Process Overview, page 120
• Dialing Modes, page 121
• Configuration Process Task Maps, page 123
• Configure Skill Group, page 125
• Create Dialed Numbers, page 125
• Configure Dialed Numbers, page 126
• Create Import Rule, page 127
• Create a Query Rule, page 133
• Create a Campaign, page 135
• Notes on Editing a Campaign in Progress, page 145
• Create an Enterprise Skill Group, page 145
• Create an Enterprise Route, page 146
• Create a Call Type, page 146
• Outbound Option Scripting, page 147
• Set Up Reservation Script, page 148
• Configure a Transfer to IVR Script, page 149
• Set Up Administrative Script, page 151
Outbound Option Guide for Cisco Unified Contact Center Enterprise and Hosted Release 9.0(1) 119
• Sample Administrative Scripts, page 153
• Map Scripts, Call Types, and Dialed Numbers, page 154
• Configure Translation Route for Use with SIP Dialer, page 155
• Multi-Tenant Customer Instances Configuration, page 155
• SIP Dialer Recording Parameters Configuration, page 155
• Verification of Dialed NumberDN/Script Selector Configuration, page 156
• Verify Campaign Configuration, page 156
Outbound Option Configuration Process OverviewThe process of configuring Outbound Option involves the following procedures:
• Configuring dialed numbers (DNs) for agent reservation and transferring to IVR
• Creating a skill group and a route for the campaign
• Creating an import rule to schedule contact and do-not-call imports
• Creating a query rule to filter contact records based on SQL queries and associate those records with animport
• Create a campaign to define campaign settings, such as the campaign name, description, answeringmachine detection, personal callback settings, dial settings, query rule selections, and skill group selections
• Create call types to map the DNs to a reservation or transfer to IVR routing script
• Create reservation, transfer to IVR, and administrative scripts
The following figure provides a high-level overview of this process.
Outbound Option Guide for Cisco Unified Contact Center Enterprise and Hosted Release 9.0(1)120
Configuration of Campaigns and ImportsOutbound Option Configuration Process Overview

Campaign Task List, on page 123 and Transfer to IVR Campaign Tasks, on page 124 provide a complete listof tasks associated with creating those campaigns.
Dialing ModesOutbound Option supports three different types of outbound dialing modes:
• Predictive Dialing, on page 122: The Dialer component determines the number of customers to dial peragent, based on the abandoned rate. The agent must take the call if logged into a campaign skill group.
• Preview Dialing, on page 122: The agent previews customer information on their desktop, and choosesto contact the customer, skip to another customer, or reject the call.
• Progressive Dialing, on page 123: The administrator specifies a fixed number of lines to dial per agentinstead of the Dialer component determining the number of lines. The agent must take the call if loggedinto a campaign skill group.
For agent campaigns, all three modes reserve an agent at the beginning of every outbound call cycle bysending a reservation call to the agent.
Note
Outbound Option Guide for Cisco Unified Contact Center Enterprise and Hosted Release 9.0(1) 121
Configuration of Campaigns and ImportsDialing Modes

Predictive DialingIn predictive dialing, the dialer determines the number of customers to dial per agent based on the abandonrate. The agent must take the call if that agent is logged into a campaign skill group.
A Predictive Dialer is designed to increase the resource utilization in a call center. It is designed to dial severalcustomers per agent. After reaching a live contact, the Predictive Dialer transfers the customer to a live agentalong with a screen pop to the agent’s desktop. The Predictive Dialer determines the number of lines to dialper available agent based on the target abandoned percentage.
Predictive Dialing DescriptionOutbound Option predictive dialing works by keeping outbound dialing at a level where the abandon rate isbelow the maximum allowed abandon rate. For example, each campaign is configured with a maximumallowed abandon rate. In Predictive mode, the Dialer continuously increments the number of lines being dialedper agent until the abandon rate rises to the preconfigured maximum abandon rate. At this point, the Dialerbegins lowering the lines per agent until the abandon rate goes below the preconfigured maximum. In thisway, the Dialer stays just below the preconfigured maximum abandon rate. Under ideal circumstances, theDialer internally targets an abandon rate of 85% of the preconfigured maximum abandon rate. Due to therandom nature of outbound dialing, the actual attainable abandon rate at any point in time may vary for theDialer.
Preview DialingPreview dialing reserves an agent prior to initiating an outbound call and presents the agent with a popupwindow. The agent may then Accept, Skip, or Reject the call with the following results:
• Accept: The customer is dialed and transferred to the agent.
• Skip: The agent is presented with another customer call.
• Skips-Close: The customer will not be called again, and the agent is presented with another customercall.
• Reject: The agent is released. At this point, the system delivers another call to the agent, either anotherPreview outbound call, or a new inbound call.
• Rejects-Close: The agent is released and the record is closed so it is not called again. At this point, thesystem delivers another call to the agent, either another Preview outbound call or a new inbound call.
Direct Preview DialingThe Direct Preview mode is similar to the Preview mode, except that the call is automatically placed by thedialer from the agent's phone after the agent accepts. Because the call is initiated from the agent's phone, theagent hears the ringing, and there is no delay when the customer answers. However, in this mode, the agentmust deal with answering machines and other results that the Dialer Call Progress Analysis (CPA) normallyhandles for other campaign dialing modes.
Outbound Option Guide for Cisco Unified Contact Center Enterprise and Hosted Release 9.0(1)122
Configuration of Campaigns and ImportsPredictive Dialing

Note • The CPA and the transfer to IVR features are not available while using Direct PreviewDialingmode.
• A zip tone is a tone that announces incoming calls. There is no zip tone in Direct Preview mode.
Progressive DialingProgressive Dialing is similar to predictive dialing (see Predictive Dialing, on page 122). The only differenceis that in Progressive Dialing mode, Outbound Option does not calculate the number of lines to dial per agent,but allows users to configure a fixed number of lines that will always be dialed per available agent.
Configuration Process Task MapsThis section contains configuration process task map tables that list the steps for creating an agent campaignand a transfer to IVR campaign.
Campaign Task ListThe following table lists the steps required to create an agent campaign, in the order that you need to performthese steps, and the location (in this document or in another Cisco document) of the instructions for the task.The primary difference in configuration steps between an agent campaign and a transfer to IVR campaign isthat the agent campaign requires an agent reservation script, while the transfer to IVR campaign does not.
Table 11: Steps for Creating an Agent Campaign
Where DiscussedTaskStep Number
Create Dialed Numbers,on page 125
Create DN on MR client using IPCC DN tool.1
Create Dialed Numbers,on page 125
Create DN for Abandon to IVR on the CM PC for the SCCPDialer, and on the MR PG for the SIP Dialer.
2
Create Dialed Numbers,on page 125
Create DN for AMD to IVR. For the SCCP dialer you createthis on the CM PG; for the SIP dialer you create this on theMR PG.
3
Create Import Rule, onpage 127
Configure an Import Rule using the Outbound Option ImportRule tool.
4
Create a Query Rule, onpage 133
Configure Query Rules using the Outbound Option QueryRule tool.
5
Create a Campaign, onpage 135
Configure a Campaign using the OutboundOption Campaigntool.
6
Outbound Option Guide for Cisco Unified Contact Center Enterprise and Hosted Release 9.0(1) 123
Configuration of Campaigns and ImportsProgressive Dialing

Where DiscussedTaskStep Number
Create a Call Type, onpage 146
Configure Call Type using IPCC Call Type tool.7
Set Up Reservation ScriptConfigure Reservation Script using Script Editor.8
Configure a Transfer toIVR Script, on page 149
Configure transfer to IVR scripts for AMD and Abandon toIVR using Script Editor.
9
Map Scripts, Call Types,and Dialed Numbers, onpage 154
Map Scripts to Call Types and DNs using AW Script Editor.10
Set Up AdministrativeScript, on page 151
Configure Administrative Script using Script Editor.11
Cisco UnifiedCommunicationsManagerAdministration Guide
Configure CTI Route Points for Abandon and AMD to IVR.12 (SCCP Dialeronly)
Transfer to IVR Campaign TasksThe following table lists the steps required to create a transfer to IVR campaign, in the order that you needto perform these steps, and the location (in this document or in another Cisco document) of the instructionsfor the task.
Where DiscussedTaskStep Number
Create Dialed Numbers, on page 125Create DN for Abandon to IVR. For the SCCPdialer you create this on the CM PG; for theSIP dialer you create this on the MR PG.
1
Create Dialed Numbers, on page 125Create DN for AMD to IVR. For the SCCPdialer you create this on the CM PG; for theSIP dialer you create this on the MR PG.
2
Create Import Rule, on page 127Configure an Import Rule using the OutboundOption Import Rule tool.
3
Create a Query Rule, on page 133Configure Query Rules using the OutboundOption Query Rule tool.
4
Create a Campaign, on page 135Configure a Campaign using the OutboundOption Campaign tool.
5
Create a Call Type, on page 146Configure Call Type using IPCC Call Typetool.
6
Outbound Option Guide for Cisco Unified Contact Center Enterprise and Hosted Release 9.0(1)124
Configuration of Campaigns and ImportsTransfer to IVR Campaign Tasks

Where DiscussedTaskStep Number
Configure a Transfer to IVR Script, onpage 149
Configure transfer to IVR script using ScriptEditor.
7
Map Scripts, Call Types, and DialedNumbers, on page 154
Map Scripts to Call Types and DNs using AWScript Editor.
8
Set Up Administrative Script, on page151
Configure Administrative Script using ScriptEditor.
9
Cisco Unified CommunicationsManager Administration Guide
Configure CTI Route Points for Abandon andAMD to IVR.
10 (SCCP Dialeronly)
Configure Skill GroupPerform the following steps to create a skill group using the Skill Group Explorer tool:
Procedure
Step 1 In ICM Configuration Manager, open the Skill Group Explorer tool.Step 2 Make sure the PIM is displayed in the Select filter data section (for information on creating the PIM, see
Configure the PG, on page 49).Step 3 Click Retrieve.Step 4 Click Add Skill Group.Step 5 Set theMedia Routing Domain to Cisco_Voice.Step 6 Enter a peripheral name and number (record them):____________________. (You can either enter a name
or allow the system to generate the name.)Step 7 Check the ICM picks the agent check box.Step 8 Click Add Route.Step 9 Enter a name for the new route (any name is allowed).Step 10 Click Save.
Create Dialed NumbersBefore you configure an Outbound Option campaign, you need to create the dialed numbers to specify forcertain fields on the Campaign Skill Group tab page. The following table lists these fields, the purpose forthe dialed number to be created, and the routing client associated with that dialed number.
Outbound Option Guide for Cisco Unified Contact Center Enterprise and Hosted Release 9.0(1) 125
Configuration of Campaigns and ImportsConfigure Skill Group

Associated Routing ClientPurposeCampaign Skill Group Tab FieldName
Configure on the MR routingclients for each Dialer.
Dialed Number to reserve agents.Not applicable for Transfer to IVRcampaigns.
Dialed Number
For SIP Dialer, configure on theMR Peripheral PG. For SCCPDialer, configure on the agentcontroller / PG.
Dialed Number for Transfer toIVR.
After AMD and for transfer toIVR
For SIP Dialer, configure on theMR Peripheral PG. For SCCPDialer, configure on the agentcontroller / PG.
Dialed Number for Transfer toIVR.
When no agents are available
For agent campaigns, create all three dialed numbers. For transfer to IVR campaigns, create the dialed numbersfor the After AMD and for transfer to IVR field.
Perform the following steps to create these dialed numbers.
Procedure
Step 1 In ICM Configuration Manager, double-click the Dialed Number/Script Selector List tool.Step 2 In the Routing Client drop-down menu on the left portion of the screen, select the routing client listed in the
preceding table.Step 3 Click Retrieve.Step 4 Click Add.Step 5 On the Attributes tab:
a) For Routing Client, select the routing client listed in the preceding table.b) For Media Routing Domain, select Cisco_Voice.c) Enter values in the Dialed Number String/Script Selector and Name fields.
Step 6 Click Save.Step 7 For Unified CCE configurations that have more than one Dialer component, repeat these steps to create the
dialed number for each media routing client.
Configure Dialed NumbersYou must configure at least two dialed numbers on the outbound routing client: one for the agent campaignand one for the IVR campaign. See the Cisco Packaged Contact Center Enterprise Administration andConfigurationGuide at http://www.cisco.com/en/US/products/ps12586/tsd_products_support_series_home.htmlfor information about configuring dialed numbers.
Outbound Option Guide for Cisco Unified Contact Center Enterprise and Hosted Release 9.0(1)126
Configuration of Campaigns and ImportsConfigure Dialed Numbers

Create Import RuleThe Import Rule defines how Outbound Option:
• Locates the imported file and defines the name of the contact table into which the import process placesthe contact information.
• Recognizes and defines the contact list data in the imported file. The Import Rule defines the importformat of the user contact list (fixed length, comma-delimited), and the information to be found in thefields of the file, such as the first and last names of contacts.
• Schedules updates for your calling lists imports.
There are two types of import rules in Outbound Option:
• Contact - An import rule that you create for a specific campaign. Note that it is possible to have a singleimport rule with many contacts, and use query rules to separate those contacts into different campaigns.
• Do Not Call - An import rule, created once and applicable to all campaigns, that provides do-not-callinformation to all campaigns
Before you create an import rule, you need to decide where you want Outbound Option to look for the importlist.
When you edit an existing import rule, changing the target table name creates a new table, but does notremove the old table. The old table remains in the database, but will not be used by the system.
Note
When you import records, take note of the following:
• The dialing rate/CPS is affected.
• The “record fetch query performance” is also affected if you are importing huge number of records. Theperformance of the query impacts the call rate. Purge the dialing list manually to maintain and ensureeffective query performance.
Perform the following steps to create an import rule.
Procedure
Step 1 In ICM Configuration Manager, expand the Outbound Option menu, then double-click the Outbound OptionImport Rule component.
Step 2 Click Retrieve.Step 3 Click Add at the bottom of the list box area of the window. Then fill out the information that is required on
the following tab pages:a) Import Rule General Tab Page, on page 128.b) Import Rule Definition Tab Page, on page 129.c) Import Rule Schedule tab page, on page 132.
Step 4 Click Save.
Outbound Option Guide for Cisco Unified Contact Center Enterprise and Hosted Release 9.0(1) 127
Configuration of Campaigns and ImportsCreate Import Rule

If you edit an import rule, the changes that you make to that import rule take effect on the next import.Note
Import Rule General Tab PageSpecify the following information on the Import Rule General tab page.
DescriptionField
There is a 32-character limit.Import name (required)
This option enables or disables importing for the import rule.Enable option
Select either Contact or Do_Not_Call from the drop-down list.
If you are creating a Do_Not_Call import, be sure to alsoproperly format the Do Not Call list file as described inCreate Do Not Call List, on page 131. If you are creatinga contact import, format the contact import file asdescribed in Create Contact Import File, on page 132.
Note
Import type
If you selected Do_Not_Call as the import type, the Import Rulecomponent automatically assigns it to the DoNotCall table.
If you selected Contact as the import type, you can enter any namefor the target table within the following restrictions:
The name must be a maximum 32-character string, includingalphanumeric characters, periods (.), underscores (_), and hyphens(-). Alphabetic characters can be upper- or lowercase. The namemust begin with an alphanumeric character and must not containspaces.
When editing an existing import rule, changing the targettable name creates a new table but does not remove theold table. The old table remains in the database, but willnot be used by the system.
Note
Target table name (required)
Enter the directory path name for the import file. The maximumnumber of characters allowed is 255. Click Browse to the right ofthe Edit field to browse for the location.
Import file path (required)
Select the Comma delimited, or the Fixed length setting, toindicate if the file is comma-delimited or if it uses fixed-lengthcolumns to separate fields.
Import data type
Outbound Option Guide for Cisco Unified Contact Center Enterprise and Hosted Release 9.0(1)128
Configuration of Campaigns and ImportsImport Rule General Tab Page
DescriptionField
When this option is enabled, you can overwrite the current importwith a new import.
When this option is disabled, new import data is appended to theexisting data. Note that you cannot append a new field to existingimport data. Also, you cannot modify or remove existing fields.
Do not perform a file import with the Overwrite tableoption while a campaign is in progress. If you do, the dialerbecomes unable to access records, because a databaseoperation is in progress on the dialing List table.
Note
Overwrite table
Import Rule Definition Tab PageSpecify the following information on the Import Rule Definition tab page.
DescriptionField
Choose a column type to use for this data field in the import rule.The following column types are allowed:
• AccountNumber
• Custom
• FirstName
• LastName
• Phone01 through Phone10 (allowed data: digits 0-9, poundsign (#), and asterisk (*))
• PhoneExt01 through PhoneExt10. This column is for futureuse. Do not use it.
Outbound Option removes single quotation marks present in theImport file.
Outbound Option does not send data from Custom columns to theagent desktop. They are available for use only in the query ruleselect clause for business-specific filtering into different dialinglists.
Standard column type
The name that you assign to this field, disabled unless you selectCustom for the Standard column type. The maximum length is 32characters.
Field name
Outbound Option Guide for Cisco Unified Contact Center Enterprise and Hosted Release 9.0(1) 129
Configuration of Campaigns and ImportsImport Rule Definition Tab Page

DescriptionField
The field name and its drop-down list are disabled unless you selectCustom for the Standard column type. For a Custom type, selectthe data type that this field uses. The following Custom columntypes are allowed:
• Custom CHAR (up to 255 characters)
• Custom VARCHAR (up to 255 characters)
• Custom DATETIME (date followed by time: MM/dd/yyHH:mm:ss)
• Custom REAL (up to 4 characters, including the decimalpoint)
• Custom INT (up to 255 characters; decimal point counts asone character)
The default is the VARCHAR data type.
Note that Outbound Option allows only one column of each ofthese types per import rule.
Type
The number of characters that this field uses to store data. Thedefault is 1.
Field length (1-255)
For numeric data fields, enter the number of decimal places youwant the import rule to use.
Decimal places (1-10)
If you enable this option, you can have empty data in the importfile for this column.
If you disable this option, you must have data.
The default is Disabled.
Allow nulls to be entered for this fieldoption
ImportsThis section provides procedures for creating an import rule file, creating a Do Not Call list, and addingattributes for a contact list.
Import ProcedureBefore you run an import, you must first create an import rule file that contains the data to be imported. Thisimport rule can have a maximum of 10240 characters per row, and can be in one of two formats:
• Comma-delimited format - Each column data is separated by a comma.
• Fixed format - Each column data is separated by spaces.
Then, to run the import, specify information about that import in the Import Rule component:
Outbound Option Guide for Cisco Unified Contact Center Enterprise and Hosted Release 9.0(1)130
Configuration of Campaigns and ImportsImports

• On the General tab, specify attributes such as the Import Type (contact list or Do Not Call list), thedirectory path of the import file, and the format of the import file.
• On the Definition tab, specify the import file fields that are to appear as columns in the import list. Youcan specify these fields only if you are creating a contact list. the Do Not Call list import type has fixedfields.
• On the Schedule tab, specify the time that you want the import to start and how often you want theimport to run.
When the import runs, the data is read and the import file is renamed so that it is not re-imported. This allowsyou to read and review the import file (if necessary) to troubleshoot problems.
Create Do Not Call ListWhen creating a Do_Not_Call list file, format it correctly using the following instructions.
Procedure
Step 1 Using a text editor, create a text file that contains all the do-not-call phone numbers.Step 2 Enter a phone number and an extension (if applicable) for each Do Not Call entry on a new line.Step 3 Observe the following characteristics for each Do Not Call entry:
a) Each phone number can be a maximum of 20 characters long.b) Each extension can be a maximum of eight characters long.c) Phone numbers with associated extensions must be separated with a comma between the phone number
and the extension.d) The Do Not Call table can support up to 60 million entries, but note that the information is stored in
memory in the Campaign Manager process.e) Each Do Not Call entry uses 16 bytes of memory, so 60 million entries would require approximately one
gigabyte of memory (960 million bytes) on the Logger Side A platform.
Step 4 Save the text file to the local server.
The following is an example of a Do_Not_Call list:
2225554444
2225556666
2225559999
2225552000,4321
To add a customer to this list, import a Do Not Call list.
Do Not Call import files are read by the Campaign Manager. Dialing List entries are marked as Do Not Callentries only when the Campaign Manager fetches the Dialing List entry and only when there is an exact,digit-for-digit match. This allows Do Not Call imports to happen while a Campaign is running withoutrebuilding the Dialing List.
Outbound Option Guide for Cisco Unified Contact Center Enterprise and Hosted Release 9.0(1) 131
Configuration of Campaigns and ImportsImports

If the Dialing List includes a base number plus extension, this entry must match a Do Not Call entry forthat same base number and same extension. The dialer will not dial the extension.
Note
When the Campaign Manager starts it automatically imports from the DoNotCall.restore file that is stored inthe<drive>\icm\<instance>\la\bin directory.When reading DoNot Call import files, the CampaignManagerappends the data to the DoNotCall.restore file. This restore file allows recovery of Do Not Call records afterthe CampaignManager stops unexpectedly or for plannedmaintenance, such as a Service Release installation.
The restore file can grow to approximately 1 GB if 60 million DNC records are imported, each having ten-digitnumbers plus five-digit extensions. Sufficient disk space must be available on LoggerA to store theDoNotCall.restore file.
To clear the Do Not Call list, import a blank file with the Overwrite table option enabled.Note
Create Contact Import FileWhen creating a contact import file, you must observe the format you designed according to the databaserules set up in Import Rule Definition Tab Page, on page 129.
The following example assumes that you have contact informationwithAccountNumber, FirstName, LastName,and Phone column types.
Procedure
Step 1 Using a text editor, create a text file that contains the information for these fields.Step 2 Enter an account number, first name, last name, and phone number for each entry on a new line.
Use either comma delimited or fixed length, as described on the Import Rule General Tab Page.
Step 3 Save the text file to the local server.The following is an example of a contact import file:
6782,Henry,Martin,2225554444
3456,Michele,Smith,2225559999
4569,Walker,Evans,2225552000
Import Rule Schedule tab pageSpecify the following information on the Import Rule Schedule tab page.
Outbound Option Guide for Cisco Unified Contact Center Enterprise and Hosted Release 9.0(1)132
Configuration of Campaigns and ImportsImport Rule Schedule tab page
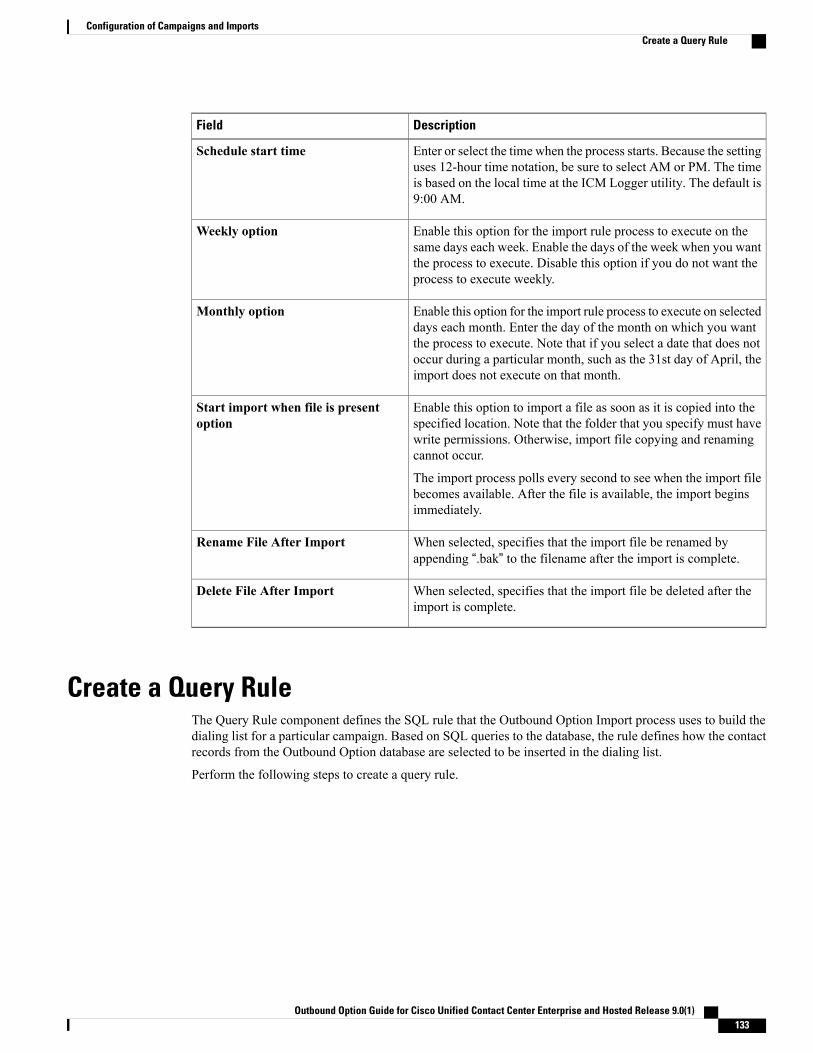
DescriptionField
Enter or select the time when the process starts. Because the settinguses 12-hour time notation, be sure to select AM or PM. The timeis based on the local time at the ICM Logger utility. The default is9:00 AM.
Schedule start time
Enable this option for the import rule process to execute on thesame days each week. Enable the days of the week when you wantthe process to execute. Disable this option if you do not want theprocess to execute weekly.
Weekly option
Enable this option for the import rule process to execute on selecteddays each month. Enter the day of the month on which you wantthe process to execute. Note that if you select a date that does notoccur during a particular month, such as the 31st day of April, theimport does not execute on that month.
Monthly option
Enable this option to import a file as soon as it is copied into thespecified location. Note that the folder that you specify must havewrite permissions. Otherwise, import file copying and renamingcannot occur.
The import process polls every second to see when the import filebecomes available. After the file is available, the import beginsimmediately.
Start import when file is presentoption
When selected, specifies that the import file be renamed byappending “.bak” to the filename after the import is complete.
Rename File After Import
When selected, specifies that the import file be deleted after theimport is complete.
Delete File After Import
Create a Query RuleThe Query Rule component defines the SQL rule that the Outbound Option Import process uses to build thedialing list for a particular campaign. Based on SQL queries to the database, the rule defines how the contactrecords from the Outbound Option database are selected to be inserted in the dialing list.
Perform the following steps to create a query rule.
Outbound Option Guide for Cisco Unified Contact Center Enterprise and Hosted Release 9.0(1) 133
Configuration of Campaigns and ImportsCreate a Query Rule

Procedure
Step 1 In ICM Configuration Manager, expand the Outbound Options menu, then open the Outbound Option QueryRule component.
Step 2 Click Retrieve.Step 3 Click Add at the bottom of the list box area of the window.Step 4 Specify the following information on the Query Rule General tab page.
Table 12: Query Rule General Tab Page
DescriptionField
Maximum 32-character string, including alpha-numeric characters,periods (.), and underscores (_). Alphabetic characters can beuppercase or lowercase. The namemust begin with an alphanumericcharacter, and must not contain spaces.
Query rule name (required)
Specifies that the rule is available for all campaigns. The defaultis Enabled.
Enable option
Select the name of the import rule to use as part of this query rule.The drop-down list displays all of the import rules that you createdwith the Outbound Option Import Rule component.
Import
(Optional) Enter a description of this query rule.Description
To create a rule clause for selecting records, select items from theColumn Name, Operators, and SQL Functions columns on this tabpage, and then click Paste to enter them in the Rule Clause areaof the tab page. After you have created the rule clause, clickValidate Rule Clause to perform SQL syntax checks on everythingin the Rule Clause area. If SQL returns any syntax warning or errormessages, correct any problems before clicking Save at the bottomof the tab page.
If you want a rule clause to select all records in the input, specifya rule clause of 1=1.
Rule Clause (required)
If you make changes to this query rule, clicking this button causesthe changes to be updated in the dialing list for all the campaignsthat use this particular query rule (dynamic update). If you do notclick this button, the changes occur during the next import.
Update Dialing List
Step 5 Click Save.
Outbound Option Guide for Cisco Unified Contact Center Enterprise and Hosted Release 9.0(1)134
Configuration of Campaigns and ImportsCreate a Query Rule

Create a CampaignUse the Outbound Option Campaign tool to define or modify the settings that apply to a campaign. You canalso add or delete a campaign through this tool.You can define two types of campaigns: agent-based, and transfer to IVR. However, only one campaign typecan be configured per campaign.
Before you create a campaign, you must first configure the following information:
• A dialed number for accessing the agent reservation script
• A dialed number for transferring the call to the IVR for AMD
• A dialed number for transferring the call to the IVR for abandon treatment when no agents are available.
Perform the following steps to create a campaign.
Procedure
Step 1 In ICMConfigurationManager, expand the OutboundOptionmenu, then open the OutboundOption Campaigncomponent.
Step 2 Click Retrieve.Step 3 Click Add at the bottom of the list box area of the window.Step 4 Fill in the fields described on the following pages:
a) Campaign General Tab Page, on page 135.b) Campaign Purpose Tab Page, on page 139.c) Query Rule Selection Tab Page, on page 142.d) Skill Group Selection Tab Page, on page 142.e) Call Target Tab , on page 144.
Step 5 Click Save.
Campaign General Tab PageSpecify the following information on the Campaign General tab page.
DescriptionField
Maximum 32-character string, including alphanumeric characters,periods (.), and underscores (_). Alphabetic characters can be upper-or lowercase. The name must begin with an alphanumeric character.
Campaign Name (required)
Optional description for the campaign; maximum 255 characters.Description
This option enables or disables the campaign.Enable option
Power Dialing Section
Outbound Option Guide for Cisco Unified Contact Center Enterprise and Hosted Release 9.0(1) 135
Configuration of Campaigns and ImportsCreate a Campaign

DescriptionField
The number of lines dedicated to each agent in this campaign. Notethat if this value and the Maximum lines per agent value are both setto 1, the mode defaults to Progressive.
Default = 1.5 (Three lines for every two agents.)
Allowable Range = 1 - 100
This value performs as follows in the Outbound Option dialingmodes:
• Preview mode: Ignored (always 1).
• Progressive mode: Used as defined.
• Predictive mode: Used as an initial value.
Lines per agent (required)
Dialing Options Section
The upper bound for the number of customers the dialer will dial fora reserved agent at a time when the campaign is running in predictivemode.
Default = 2
Range = 1 - 100
Maximum lines per agent(required)
This option only applies to Predictive campaigns.
Enable this option to set an Abandon calls limit (1-100) for thepercentage of abandoned calls in this campaign. The granularity is toone-tenth of a percent. Default = 3.0.
If the option is disabled, the campaign dials without regard to theabandon limit.
A call is considered abandoned if a person answers it and thecontact center does not connect the call to a salesrepresentative within two seconds of the person's completedgreeting.
Note
Abandon calls limit (1-100)
Clicking the Advanced button opens a Predictive Dialing Settingsdialog box. On this dialog box, you can change the followingparameters that control how adjustments are made to the lines peragent in this campaign. Accept the default in most cases.
• Voice Calls Per Adjustment: A count of the number of livevoice connects that must occur before the Dialer makes anadjustment. Increasing this number results in less frequentadjustments based on larger sample size. Decreasing this numberresults in more frequent adjustments using a smaller sample size.Default = 70 .
• Gain: The size of the adjustment to lines per agent each time anadjustment is made. Increasing the Gain results in larger linesper agent adjustments; decreasing the Gain results in smallerlines per agent adjustments. Default = 1 .
Advanced
Outbound Option Guide for Cisco Unified Contact Center Enterprise and Hosted Release 9.0(1)136
Configuration of Campaigns and ImportsCampaign General Tab Page

DescriptionField
Dial Settings Section
Defines the number of times the software allows a dialed telephonenumber to ring. Enter the maximum number of rings allowed. Thelength of one ring is specified at the dialer level in theTimeToRingCustomer registry entry. Default = 4.
The default behavior is to allow calls to ring for 32 seconds(No answer ring limit - 4, TimeToRingCustomer key - 8seconds). Assuming the default 8 secondTimeToRingCustomer key is used, setting the "No answerring limit" to the minimum 2 rings meets 15-second ring-timerequirements.
Note
No answer ring limit (2 - 10)
Defines the maximum number of attempts, including callbacks andretries. Enter the maximum number of attempts to be made in zone 1and zone 2. Default = 3. Note that increasing the number of attemptscauses closed records to be reopened, which can result in slowerperformance.
Modifying this parameter while the campaign is in progress can resultin longer agent idle times and delays to retrieve records from thedialing list.
Maximum attempts (1 - 100)
Minimum duration (in seconds) of an outbound call. If the durationof an outbound call is less than this specified value, Outbound Optionconsiders the call as customer abandoned, and the customer recordthat is associated with that call is scheduled for a retry. To disable thisfeature, set this value to 0. Enter the number of seconds. Default = 1.Note that if this feature is disabled, then Outbound Option does notconsider this call as customer abandoned. It affects the reporting ofthis call in the Outbound Option dialer_detail table.
Abandoned call wait time (0 - 10)(required)
Digits to be prefixed to each customer number dialed from thiscampaign. For the SIP Dialer, this field represents the phone numberthat is advertised as the calling number for the campaign. Enter amaximum of 15 digits in this field.
Campaign Prefix Digits
Retries Section
Defines (in minutes) how often the software waits before calling backa no-answer call. Enter the number of minutes. Default = 60.
No answer delay
Defines (in minutes) how long the software waits before calling backa busy telephone number. Enter the number of minutes. Default = 60.
Busy signal delay
If a customer abandons a call, the time (delay in minutes) when thedialer should call the customer back. Default = 30.
Customer abandoned delay
If the dialer abandons a call, the time (delay in minutes) when thedialer should call the customer back. Default = 60.
Dialer abandoned delay
Outbound Option Guide for Cisco Unified Contact Center Enterprise and Hosted Release 9.0(1) 137
Configuration of Campaigns and ImportsCampaign General Tab Page

DescriptionField
If the call was answered by an answering machine, how long thesoftware waits (in minutes) before calling back. Default = 60.
Answering machine delay
If the customer was not at home and should be called back, the time(in minutes) when the dialer should call the customer back. Default= 60.
Customer not home delay
Callback Settings Section
Enables the personal callback option. This option allows an agent toschedule a callback to a customer for a particular date and time, whichconnects the customer to the agent they originally spoke to (at thetime the customer requested).
Personalized callback
Determines howOutboundOption should handle the personal callbackif the agent is not available:
• Use Campaign DN.
• Reschedule the personal callback to the same time the nextbusiness day.
• Abandon the personal callback.
Reschedule callback mode(required)
Digits to be prefixed to each customer number dialed from thiscampaign.
For the SCCP Dialer, this field creates a unique prefix that can beused by the Unified CM Translation Pattern function to change theANI that customers see.
For the SIP Dialer, this field represents the phone number that isadvertised as the calling number for the campaign.
Enter a maximum of 15 digits in this field.
Campaign Prefix Digits
Modification of Maximum Number of Attempts in a CampaignAdjusting the maximum number of attempts amount (Maximum attempts field on the Campaign General tabpage) in a campaign configuration can be useful for calling customers who were not previously reachedwithout having to import their phone numbers again. This option is particularly useful if the campaign importis an append instead of an overwrite type. Be aware that modifying this option in the campaign configurationresults in an update of all customer records that were not successfully contacted. The Campaign Manager canupdate only about 20 records per second, and no new customer records will be delivered to the dialer for thiscampaign while this update is in progress; therefore, only update theMaximum attempts field when thecampaign is not in progress.
You can view how many records have been closed and how many were successfully reached by using theCall Summary Count per Campaign Real Time report. See Reports, on page 157 for more information.
Outbound Option Guide for Cisco Unified Contact Center Enterprise and Hosted Release 9.0(1)138
Configuration of Campaigns and ImportsCampaign General Tab Page

Parameter TuningThe Voice Calls Per Adjustment and Gain parameters are settings in the Advanced Users configuration tabused to control the way the predictive dialing behaves. Do not modify the default values unless you understandthe parameters and the possible risks incurred when changing the pacing.
• The Voice Calls Per Adjustment parameter is a count of the number of live voice connections that arerequired to trigger a correction. (The default value is 70 voice calls.) If the abandon rate exceeds thetarget by a significant margin, the dialer can make corrections before collecting 70 calls.
• The Gain parameter controls the size of the Lines per agent corrections.
Setting the Voice Calls Per Adjustment parameter to a smaller setting leads to larger fluctuations in themeasured Abandon Rate because the sample size is less significant. This results in less change in the Linesper agent value over time.
Be careful when modifying both parameters (Gain and Voice Calls Per Adjustment) at the same time. Forexample, increasing the Gain while decreasing the Voice Calls Per Adjustment results in larger changesin the “Lines per agent correction rate,” which might overcorrect changes in measured values.Decreasing the Gain while increasing the Voice Calls Per Adjustment can similarly cause too slow of achange to underlying changes in the hit-and-abandon-rates. A campaign that is reaching more than 20 livevoice customers every minute (600 per half hour) might benefit from reducing the Gain, but a lower Gainbecomes less effective as the number of agents in the campaign dwindles or the hit rate changes rapidly.
Caution
Campaign Purpose Tab PageSpecify the following information on the Campaign Purpose tab page.
You cannot configure both Agent Based campaigns and Transfer to IVR campaigns at the same time.Note
DescriptionField
Agent Based Campaign
This type of campaign uses an outbound mode that causes the dialerto transfer every customer call that is associated with a specific skillgroup to an agent.
Agent Based Campaign
Outbound Option Guide for Cisco Unified Contact Center Enterprise and Hosted Release 9.0(1) 139
Configuration of Campaigns and ImportsCampaign Purpose Tab Page
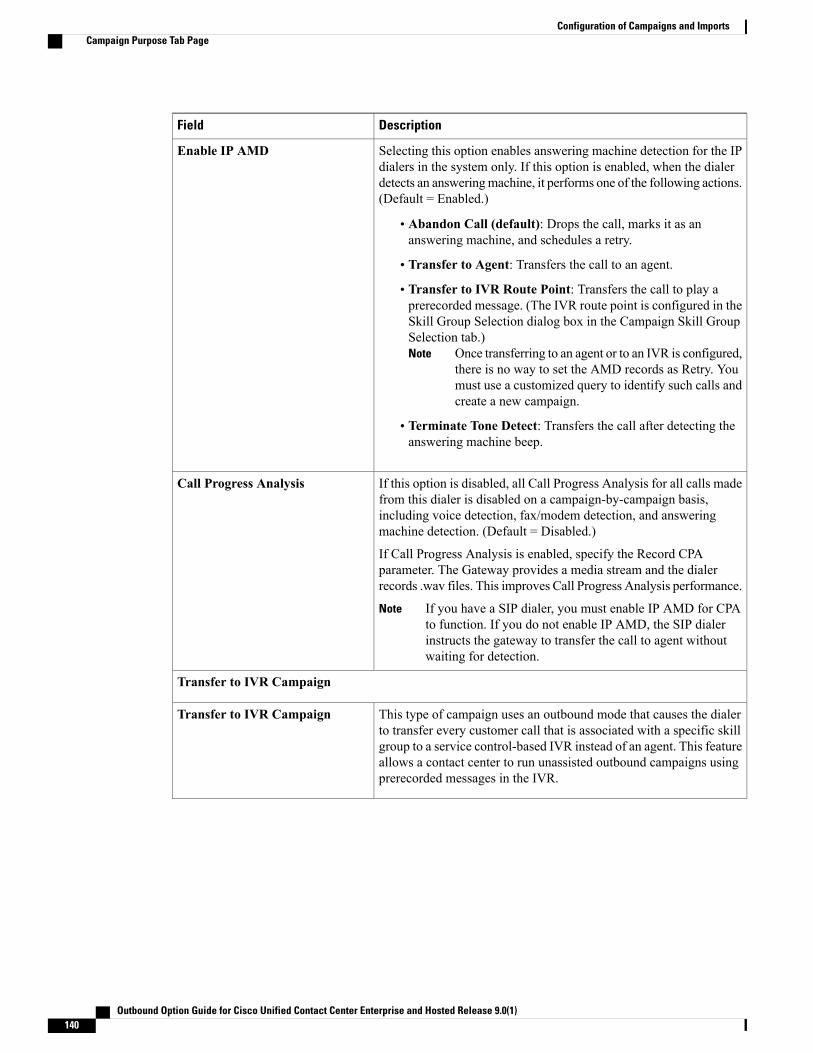
DescriptionField
Selecting this option enables answering machine detection for the IPdialers in the system only. If this option is enabled, when the dialerdetects an answeringmachine, it performs one of the following actions.(Default = Enabled.)
• Abandon Call (default): Drops the call, marks it as ananswering machine, and schedules a retry.
• Transfer to Agent: Transfers the call to an agent.
• Transfer to IVR Route Point: Transfers the call to play aprerecorded message. (The IVR route point is configured in theSkill Group Selection dialog box in the Campaign Skill GroupSelection tab.)
Once transferring to an agent or to an IVR is configured,there is no way to set the AMD records as Retry. Youmust use a customized query to identify such calls andcreate a new campaign.
Note
• Terminate Tone Detect: Transfers the call after detecting theanswering machine beep.
Enable IP AMD
If this option is disabled, all Call Progress Analysis for all calls madefrom this dialer is disabled on a campaign-by-campaign basis,including voice detection, fax/modem detection, and answeringmachine detection. (Default = Disabled.)
If Call Progress Analysis is enabled, specify the Record CPAparameter. The Gateway provides a media stream and the dialerrecords .wav files. This improves Call Progress Analysis performance.
If you have a SIP dialer, you must enable IP AMD for CPAto function. If you do not enable IP AMD, the SIP dialerinstructs the gateway to transfer the call to agent withoutwaiting for detection.
Note
Call Progress Analysis
Transfer to IVR Campaign
This type of campaign uses an outbound mode that causes the dialerto transfer every customer call that is associated with a specific skillgroup to a service control-based IVR instead of an agent. This featureallows a contact center to run unassisted outbound campaigns usingprerecorded messages in the IVR.
Transfer to IVR Campaign
Outbound Option Guide for Cisco Unified Contact Center Enterprise and Hosted Release 9.0(1)140
Configuration of Campaigns and ImportsCampaign Purpose Tab Page

DescriptionField
Selecting this option enables answering machine detection for the IPdialers in the system only. If this option is enabled, when the dialerdetects an answering machine, it does one of the following actions.(Default = Enabled.)
• Abandon Call (default): Drops the call, marks it as ananswering machine, and schedules a retry.
• Transfer to IVR Route Point: Transfers the call to play aprerecorded message. (The IVR route point is configured in theSkill Group Selection dialog box in the Campaign Skill GroupSelection tab.)
Once transferring to an agent or to an IVR is configured,there is no way to set the AMD records as Retry. Youmust use a customized query to identify such calls andcreate a new campaign.
Note
• Terminate Tone Detect: Transfers the call after detecting theanswering machine beep.
Enable IP AMD
Call Progress Analysis Parameters
Minimum silence period required to classify a call as voice detected.If many answering machine calls are being passed through to agentsas voice, then increasing this value accounts for longer pauses inanswering machine greetings. Default is 608.
Minimum Silence Period(100-1000)
Number of milliseconds spent analyzing this call. If there is a shortagent greeting on an answering machine, then a longer value herecategorizes that answering machine call as voice. If the call is to abusiness where the operator has a longer scripted greeting, a shortervalue here categorizes the long, live greeting as answering machine.Default is 2500.
Analysis Period (1000-10000)
Minimum number of milliseconds of voice required to qualify a callas voice detected. Default is 112.
Minimum Valid Speech (50-500)
Max number of milliseconds allowed for analysis before identifyinga problem analysis as dead air/low volume. Default is 3000.
Maximum Analysis Time(1000-10000)
Maximum milliseconds the dialer analyzes an answering machinevoice message looking for a termination tone. If the message has anodd tone and the analysis does not recognize it, the call is nottransferred or dropped until this timeout occurs. Default is 30000.
Maximum Termination ToneAnalysis (1000-60000)
Resets all items in the Call Progress Analysis (CPA) Parameterssection to the system defaults.
Reset to System Default
Outbound Option Guide for Cisco Unified Contact Center Enterprise and Hosted Release 9.0(1) 141
Configuration of Campaigns and ImportsCampaign Purpose Tab Page

Query Rule Selection Tab PagePress the Add button on the Query Rule Selection tab page and specify the following information.
DescriptionField
The name of the query rule.Query rule name
Enables the query rule for this campaign. Default = Enabled.Enable
The local time at the ICM Central Controller when a query rule canbegin to execute.
Start time
The local time at the ICM Central Controller when a query rule muststop executing.
End time
Themaximum number of calls that this campaign tries during a queryrule execution; for example, 400 contact attempts. When a query rulereaches the penetration number, it stops executing and the next queryrule in the list begins to execute. Default = 100. If this option isenabled, Duration and Hit Rate are disabled.
Penetration (0-400):
The total amount of time that this query rule can run; for example, 30minutes.When the query rule reaches the time limit, it stops executingand the next query rule in the list can begin to execute. Default = 30.If this option is enabled, Penetration and Hit Rate are disabled.
Duration (0-120):
The minimum percentage of calls that can be answered (excludinganswers by answering machines) during this query rule execution;for example, 30 percent. If the hit rate drops below this value, thenext query rule begins to execute. Default = 30. If this option that isenabled, Duration and Penetration are disabled.
Hit Rate (0-100):
Skill Group Selection Tab PageFrom the Skill Group Selection tab page, press Add to display the fields available to fill out.
DescriptionField
The name of the skill group assigned to this campaign.Skill Group Name
Outbound Option Guide for Cisco Unified Contact Center Enterprise and Hosted Release 9.0(1)142
Configuration of Campaigns and ImportsQuery Rule Selection Tab Page

DescriptionField
This setting can be useful for Progressive campaigns to reduce theabandon rate at the cost of increasing agent idle times. This settingensures that there is always at least one extra agent reserved beforeit begins dialing.When this setting is set to 1, at least two agents needto be reserved before the dialer begins dialing. The intention is toincrease the odds that an agent is available when two or morecustomers answer, which increases agent idle times while decreasingthe abandon rate.
OverflowAgents per Dialer (0-100)
The digits that are dialed to reserve an agent in the configured skillgroup. The Dialed Number allows only alphanumeric and (.)and (_)asvalid characters; there is a ten-character limitation. It does not allowspecial characters like *,@, # ... etc., which are unacceptable for thisdialed number. A matching dialed number also needs to be created.
Dialed number
The minimum number of dialing numbers that each dialer caches foreach of the Outbound Option skill groups. Default = 1.
Note that this value should not exceed 400 records.
Records to cache (1-400)
The total number of IVR ports allocated for the specific skill group.This value indicates how many ports are available for the dialer totransfer customer calls. Since this value indicates the total number ofports supported by the IVR for the current skill group, multiple skillgroups can make transfer to IVR calls. They also use one IVR to playdifferent messages based on the route point where the contact istransferred. If there are multiple dialers associated with this skillgroup, each dialer dials a fraction of the total number of ports.
Number of IVR Ports
Route Points for Transferring to an IVR
If the campaign is a Transfer to IVR campaign or is configured totransfer AMD calls to an IVR, this number indicates the route pointrequired to execute the transfer to IVR routing script. This numbershould coincide with a route point configured on Unified CM and beassigned to the PGUser. Contacts are transferred to this route point,which points to a routing script. This script transfers the call to anIVR. The maximum length is 32 characters.
After AMDand for transfer to IVRcampaigns
If the campaign is a Transfer to IVR campaign or is configured totransfer AMD calls to an IVR, this number enables the Dialer to playa message to any calls about to be disconnected due to lack ofavailable agents. This number should coincide with a route pointconfigured on Unified CM and be assigned to the agent PG's CTIapplication (for example, PGUser). Contacts are transferred to thisroute point, which points to a routing script. This script transfers thecall to an IVR. The maximum length is 10 characters.
When no agents are available
Filter
Outbound Option Guide for Cisco Unified Contact Center Enterprise and Hosted Release 9.0(1) 143
Configuration of Campaigns and ImportsSkill Group Selection Tab Page
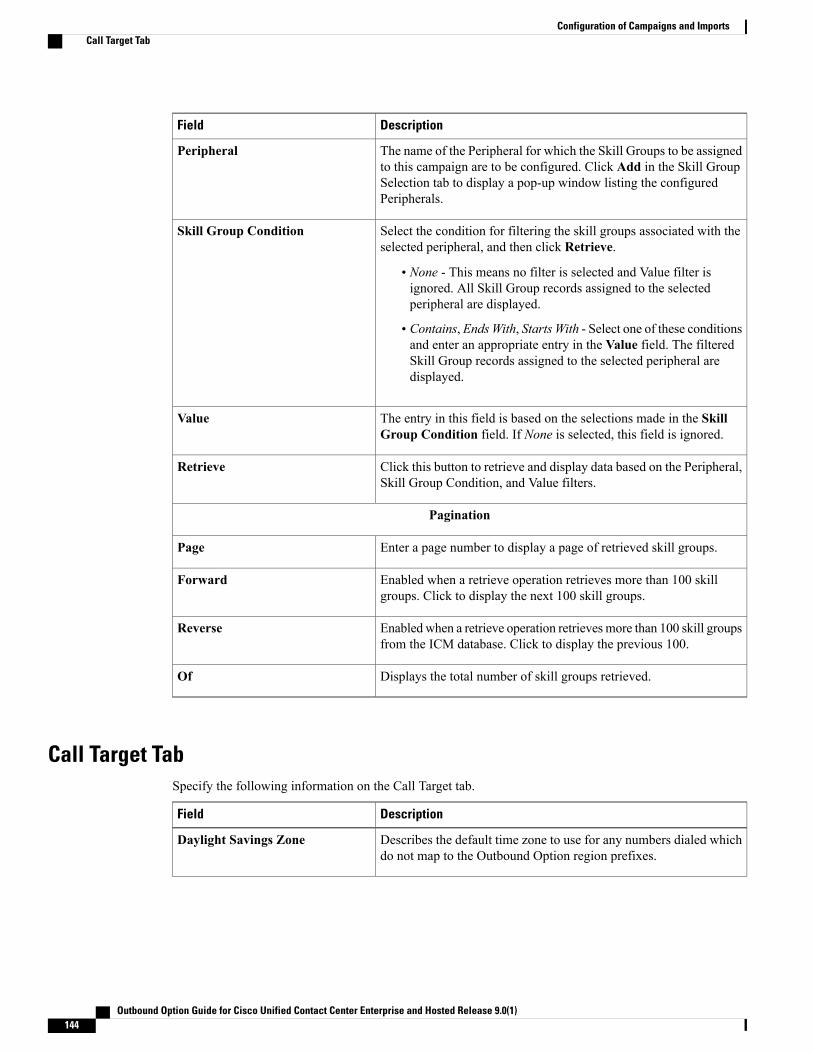
DescriptionField
The name of the Peripheral for which the Skill Groups to be assignedto this campaign are to be configured. Click Add in the Skill GroupSelection tab to display a pop-up window listing the configuredPeripherals.
Peripheral
Select the condition for filtering the skill groups associated with theselected peripheral, and then click Retrieve.
• None - This means no filter is selected and Value filter isignored. All Skill Group records assigned to the selectedperipheral are displayed.
• Contains, EndsWith, Starts With - Select one of these conditionsand enter an appropriate entry in the Value field. The filteredSkill Group records assigned to the selected peripheral aredisplayed.
Skill Group Condition
The entry in this field is based on the selections made in the SkillGroup Condition field. If None is selected, this field is ignored.
Value
Click this button to retrieve and display data based on the Peripheral,Skill Group Condition, and Value filters.
Retrieve
Pagination
Enter a page number to display a page of retrieved skill groups.Page
Enabled when a retrieve operation retrieves more than 100 skillgroups. Click to display the next 100 skill groups.
Forward
Enabled when a retrieve operation retrievesmore than 100 skill groupsfrom the ICM database. Click to display the previous 100.
Reverse
Displays the total number of skill groups retrieved.Of
Call Target TabSpecify the following information on the Call Target tab.
DescriptionField
Describes the default time zone to use for any numbers dialed whichdo not map to the Outbound Option region prefixes.
Daylight Savings Zone
Outbound Option Guide for Cisco Unified Contact Center Enterprise and Hosted Release 9.0(1)144
Configuration of Campaigns and ImportsCall Target Tab

DescriptionField
Enable this option, and then enter the start and end times for reachingyour calling targets. Zones are useful for distinguishing phonelocations. For example, Zone 1 can be designated as work, and Zone2 can be home.
The start and end times are local to your contacts (CustomerTime). The same number can be assigned to one or bothzones at the same time. However, Zone 1 time and Zone 2time cannot overlap.
Note
Zone 1 and Zone 2 options
Lists the phone numbers in dialing order for the Zone 1 or Zone 2.
• To move a phone number into the Numbers to dial list, click anumber in the Available numbers list and then click the leftarrow to add it to the Numbers to dial list. Do not move phonenumbers after the campaign has started because the phonenumbers might not be dialed.
• To remove a phone number in the Numbers to dial list, clickthe number and then click the right arrow to add it to theAvailable numbers list.
• To control the dialing order, use the up and down arrows tomove the phone numbers within the Numbers to dial list.
Customers are dialed based on the time zone of the firstphone that is configured on this tab. The time zone is basedon the prefix of the phone number and the region prefixconfiguration. If two phone numbers that are imported forthe same customer have different time zones, both phonesare called during times that are valid for the first phone.
Note
Numbers to dial
Contains the available phone numbers that can be added to theNumbers to dial list for Zone 1 or Zone 2.
Available numbers
Notes on Editing a Campaign in ProgressYou can edit most campaign configuration settings while a campaign is running. The changes take effect withnew calls after the setting has been changed. However, avoid the following edits to a campaign in progress:
• Do not modify the Max Attempts value. Modifying this value while a campaign is in progress can causea long delay in record retrieval and longer agent idle times.
• Do not delete a skill group while a campaign is in progress.
Create an Enterprise Skill GroupTo use the Personal Callback feature, you need to create the enterprise skill group associated with the agentusing the Enterprise Skill Group List tool.
Outbound Option Guide for Cisco Unified Contact Center Enterprise and Hosted Release 9.0(1) 145
Configuration of Campaigns and ImportsNotes on Editing a Campaign in Progress

Procedure
Step 1 Open the List tools.Step 2 Open the Enterprise Skill Group List tool.Step 3 Create an enterprise skill group. In the Add Name field, type the enterprise name, then click Add. Select the
skill group, and then click Save.Step 4 In the Attributes tab, click Add to add the skill group or groups.Step 5 Click Save.
Create an Enterprise RouteAfter you create the enterprise skill group associated with the agent, you need to create an enterprise routeusing the Enterprise Route List tool. This route should target the enterprise skill group created in the previousstep.
Procedure
Step 1 Open the List tools.Step 2 Open the Enterprise Route List tool.Step 3 Create an enterprise route. In the Name field, type the enterprise route, and then click Add. Select the route,
then click Save.Step 4 On the Attributes tab, add the route.Step 5 Click Save.
Create a Call TypePerform the following steps to create the call type that the scripts you create later will reference.
Procedure
Step 1 In ICM Configuration Manager, double-click the Call Type List tool.Step 2 Click Retrieve.Step 3 Click Add.Step 4 Enter the Name for the call type.Step 5 Accept the defaults for all other fields.Step 6 Click Save.
Outbound Option Guide for Cisco Unified Contact Center Enterprise and Hosted Release 9.0(1)146
Configuration of Campaigns and ImportsCreate an Enterprise Route

Outbound Option ScriptingOutbound Option uses Unified ICM Enterprise scripting configured on the Administrative Workstation tomanage campaigns.
There are two types of scripts:
• Outbound Option administrative scripts, on page 41
• Outbound Option agent reservation scripts, on page 41
Outbound Option administrative scriptsOutbound Option administrative scripts enable, disable, or throttle campaign skill groups for outboundcampaigns. The scripts can also automatically close out a skill group for a specific campaign based on timeor any other conditional factor that the admin script can access. This scripting is performed at the skill grouplevel to provide more flexibility when managing larger campaigns that are distributed across multiple skillgroups.
Enable a campaign skill group by setting the campaign mode to one of the available modes: Preview, DirectPreview, Progressive or Predictive. (For more information about these modes, see Dialing Modes, on page121.) Schedule an administrative script to run at regular intervals. Disable the campaign skill group by theadministrative script, using a script node to change the campaign mode to inbound for that skill group.
This script also provides the ability to control the percentage of agents to be used in a campaign skill groupand whether this skill group is used for other campaigns or inbound calls.
An administrative script controls a campaign skill group. A campaign skill group can be mapped only toone campaign at a time. A skill group can be reused if new campaigns are added. If a campaign skill groupis recycled, its administrative scripting should be reused as well. However, note that although it is possibleto have two administrative scripts controlling the same skill group, conflicting campaign mode requestsfor Outbound Option can result.
Note
Outbound Option agent reservation scriptsTwo types of routing scripts are described later in this document. One is for Agent Campaign and one is forIVR Campaign.
Reservation scripts are used by the Dialer to reserve agents for specific outbound campaigns and personalcallbacks. With this kind of script, the Dialer makes a route request via its Media Routing Client using thedialed number that is configured for the campaign skill group. Each campaign has its own dialed number andreservation scripting. If an agent is not available, the default behavior is for the script to end the call and theDialer receives an error. The Dialer retries the reservation request when it sees available agents in the skillgroup statistics as described in the Dialer description earlier in this chapter. You can queue reservation callswhich have scripts that distribute agents across campaigns when those agents are skilled for multiple, activecampaigns.
A call can be transferred to an IVR as part of a transfer to IVR campaign, or transferred to non-IVR campaignsfor answering machine or abandons. A transfer to IVR campaign places a route request call to a CTI Route
Outbound Option Guide for Cisco Unified Contact Center Enterprise and Hosted Release 9.0(1) 147
Configuration of Campaigns and ImportsOutbound Option Scripting

Point dialed number on the Agent PG, which enables the call context of the customer call to be transferred tothe IVR. A new call context can be added to the call while the call is being treated at the IVR.
Set Up Reservation ScriptUse the Script Editor application to create a reservation script that uses the dialed number for the OutboundRouting Type and routes through a Select node to the previously configured skill group.
Script for Agent CampaignThe following steps and accompanying diagram provide an example of how to create a script for an agentcampaign.
Procedure
Using the Script Editor Call TypeManager, associate the MR (and Personal Callback, if used) dialed numberswith the configured call type and newly created reservation script.
Figure 19: Sample Script for Agent Campaign Without Personal Callback
For information on configuring a personal callback, see (Optional) Configure Personal Callbacks, on page56
Outbound Option Guide for Cisco Unified Contact Center Enterprise and Hosted Release 9.0(1)148
Configuration of Campaigns and ImportsSet Up Reservation Script
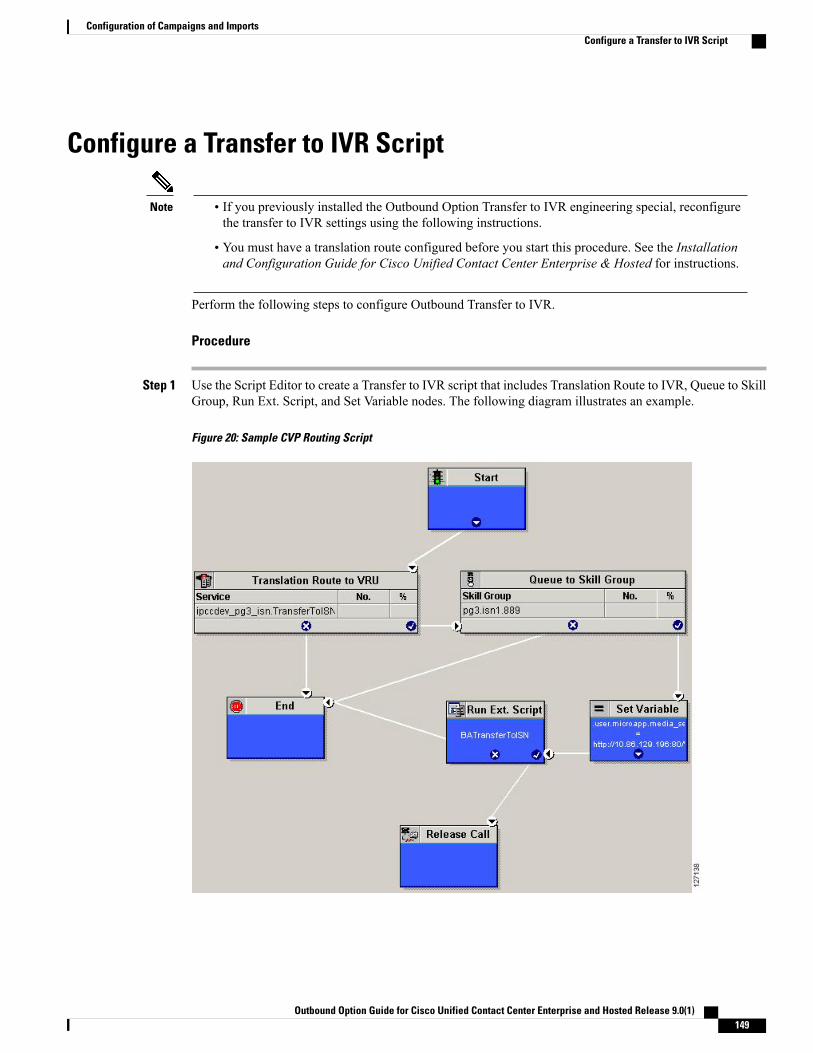
Configure a Transfer to IVR Script
Note • If you previously installed the Outbound Option Transfer to IVR engineering special, reconfigurethe transfer to IVR settings using the following instructions.
• You must have a translation route configured before you start this procedure. See the Installationand Configuration Guide for Cisco Unified Contact Center Enterprise & Hosted for instructions.
Perform the following steps to configure Outbound Transfer to IVR.
Procedure
Step 1 Use the Script Editor to create a Transfer to IVR script that includes Translation Route to IVR, Queue to SkillGroup, Run Ext. Script, and Set Variable nodes. The following diagram illustrates an example.
Figure 20: Sample CVP Routing Script
Outbound Option Guide for Cisco Unified Contact Center Enterprise and Hosted Release 9.0(1) 149
Configuration of Campaigns and ImportsConfigure a Transfer to IVR Script

Note • The Transfer to IVR feature requires that a translation route to a skill group must be specifiedin a Transfer to IVR script. It also requires that the translation route must point at a Queue toSkill node.
• See the Scripting and Media Routing Guide for Cisco Unified ICM/Contact Center Enterprise& Hosted for task-based information about using Script Editor. See the Script Editor onlinehelp for detailed information about the Script Editor options.
Step 2 To implement answering machine detection as part of this transfer to IVR script, include an If node thatevaluates the value of the BAResponse variable and prescribes a call treatment depending on the CPA resultof the call (whether the call detected voice or an answering machine).The following is an example of such an If node.
Figure 21: Exanoke BAResponse If Node
Step 3 Create an IVR or VRU script. (Be aware that this script is different from a reservation script.) The IVR scriptcontains a list of commands that tell the IVR what kind of information to play to the customer, such as apre-recorded message using a .wav file. The IVR script can also collect survey information by requesting the
Outbound Option Guide for Cisco Unified Contact Center Enterprise and Hosted Release 9.0(1)150
Configuration of Campaigns and ImportsConfigure a Transfer to IVR Script

customer press specific numbers. Consult your Unified CVP, IP/IVR, or documentation for your otherthird-party IVR for more information.
Step 4 Schedule the script by following the procedure in Map Scripts, Call Types, and Dialed Numbers, on page154.
Set Up Administrative ScriptUse the Script Editor application to create an administrative script for each skill group to set theOutboundControl variable and the skill group reservation percentage. The Outbound Option Dialer uses thevalue of this variable to determine which mode each skill group uses.
Note • If the OutboundControl variable is not set, the skill group defaults to inbound. See Outbound BusinessConcepts, on page 1 for detailed information about Outbound Option outbound dialing modes.
• Make sure the routing client for the translation route labels is Unified CM, which makes the outgoingcall.
Perform the following steps to create the administrative script:
Procedure
Step 1 Open the Script Editor application.Step 2 Select File > New > Administrative Script.Step 3 Create an administrative script.
One script can be used to control all Outbound Option skill groups or multiple scripts can control multipleOutbound Option skill groups. For example, if you want to control skill groups at different times of the day,you might need multiple administrative scripts; however, if you are going to initialize the groups all in thesame way, you may need only one script (with additional Set nodes).
Step 4 Set up the script with the following nodes (required): Start, Set Variable, End, and If.
Outbound Option Guide for Cisco Unified Contact Center Enterprise and Hosted Release 9.0(1) 151
Configuration of Campaigns and ImportsSet Up Administrative Script

The following diagram displays a very simple administrative script where both the OutboundControl variableand the outbound percentage are set for a skill group. A script in a production call center would typically bemore complex, perhaps changing these variables due to time of day or service level.
Figure 22: Sample Administrative Script
The transfer to IVR feature requires an IF node in the administrative script to disable it if the IVR isnot available. Also, to ensure timely responses to IVR outages, set the administrative script to runevery minute. When using the System PG, use this node to ensure that the trunks are not set to idle;for example, “NetworkTrunkGroup.IPCC_Component_Interface_PG_NTG.TrunksIdle>0.”
Note
Step 5 Set the OutboundControl variable. Setting this variable enables contact center managers to control the agentmode. Set this variable to one of the values listed in the following table.
Table 13: OutboundControl Variable Values
DescriptionValue String
Agents take inbound calls only. Outbound dialing is disabled for theskill group.
INBOUND
Agents in the skill group are dedicated for outbound Predictive callsonly.
PREDICTIVE_ONLY
Outbound Option Guide for Cisco Unified Contact Center Enterprise and Hosted Release 9.0(1)152
Configuration of Campaigns and ImportsSet Up Administrative Script

DescriptionValue String
Agents in the skill group are dedicated for outbound Preview callsonly.
PREVIEW_ONLY
Agents in the skill group are dedicated for outbound Progressive callsonly.
PROGRESSIVE_ONLY
Agents only place outbound calls and hear ring tones, such as phoneringing or busy signal.
PREVIEW_DIRECT_ONLY
If the administrative script is changed and the SET node is removed, the value of the OutboundControlvariable is the same as it was the last time the script was executed. However, if the Central Controlleris restarted, the value resets to INBOUND.
Note
Step 6 Set the OutboundPercent variable in the same administrative script; for example, select the OutboundPercentvariable in the Set Properties window and enter the agent percentage in the Value field. This variable controlsthe percentage of agents, which are logged into a particular skill group, used for outbound dialing. For example,if there are 100 agents logged into a skill group, and the OutboundPercent variable is set to 50%, 50 agentswould be allocated for outbound dialing for this campaign skill group. This set up allows the rest of the agentsto be used for inbound or other active campaigns. The default is 100%.Note • The OutboundPercent variable also applies to Transfer To IVR campaigns, by controlling the
percentage of IVR Ports that are considered for the campaign skill group.
• This variable does not allocate specific agents for outbound dialing, just a total percentage. Thedefault is 100%.
Step 7 Schedule the script.a) Select Script > Administrative Manager. An Administrative Manager dialog box appears.b) Click Add.c) On the Script tab, select the administrative script.d) On the Period tab, specify the run frequency of the script. (Recommended frequency is every minute of
every day.)e) Optionally, enter a description on the Description tab.f) Click OK to close the Add Administrative Schedule dialog box.g) Click OK to close the Administrative Manager.
Sample Administrative ScriptsThe following section describes a sample administrative script.
Outbound Option Guide for Cisco Unified Contact Center Enterprise and Hosted Release 9.0(1) 153
Configuration of Campaigns and ImportsSample Administrative Scripts

Administrative Script: TimeBasedControlThe following figure is a simple example of setting skill group modes for maximizing the resource utilizationin a call center based upon time of day.
Figure 23: TimeBasedControl Script
This script divides the day into three parts:
• Peak Inbound Traffic Period (8:00 AM to 12:00 PM): During this time, the skill group variable isset to INBOUND only, because more agents are required to handle inbound calls.
• Off-Peak Traffic Period (2:00PM to 4:00PM): During this time, the skill group variable is set toPREVIEW_BLENDED, so that when an agent is not on an inbound call, Outbound Option presents theagent with Preview calls. Once the agent is on a Preview outbound call or is busy making a decision toaccept or reject the call, Unified ICM software does not route an inbound call to that agent. As soon asthe agent is finished with the Preview call, Unified ICM software routes an inbound call to the agent. Ifthere are no inbound calls, Outbound Option reserves the agent for another outbound call.
• All Other Periods: For the rest of the day, the skill group variable is set to PREDICTIVE_ONLY sothat if any agents are logged-in, Outbound Option immediately reserves the agents for outbound calls.
Map Scripts, Call Types, and Dialed NumbersAfter you create a reservation script, you must associate that script with the call type and dialed numberconfigured for the campaign. To make the association, perform the following steps.
Outbound Option Guide for Cisco Unified Contact Center Enterprise and Hosted Release 9.0(1)154
Configuration of Campaigns and ImportsAdministrative Script: TimeBasedControl

Procedure
Step 1 In Script Editor, open the script.Step 2 Select Script > Call Type Manager. A Call Type Manager dialog opens.Step 3 Select the call type from the Call Type drop-down list.Step 4 Click OK.Step 5 On the Schedules tab, click Add. A Call Type Schedule dialog opens.Step 6 Select the script. Click OK.
Configure Translation Route for Use with SIP DialerConfigure the translation route for the transfer-to-IVR campaign or the agent campaign to transfer a connectedoutbound call with ECC call variables from the SIP Dialer to a VRU Peripheral.
You need configure the network VRU as Type 2 for IP IVR, or as Type 8 for CVP.
For more information about configuring the translation routes, see Configuration Guide for Cisco UnifiedIntelligent Contact Management/Contact Center Enterprise & Hosted (available at http://www.cisco.com/en/US/products/sw/custcosw/ps1844/products_installation_and_configuration_guides_list.html) and the CampaignManager online help.
Multi-Tenant Customer Instances ConfigurationOutbound Option Multi-Tenant is no longer supported beginning with Release 9.0(1).
SIP Dialer Recording Parameters ConfigurationWhen recording is enabled in a campaign on the SIP dialer, the number of recording files that result can belarge. The following table lists registry settings that you can adjust to regulate the number of recording sessionsand the maximum recording file size.
DescriptionDefault SettingRegistry Setting
The maximum recording file size (in bytes) of allrecording files. per SIP Dialer.
500,000,000MaxAllRecordFiles
The maximum number of media termination sessionsper SIP Dialer if recording is enabled in the Campaignconfiguration.
200MaxMediaTerminationSessions
The maximum recording file size (in bytes) that theSIP Dialer deletes when the total recording file size,MaxAllRecordFiles, is reached.
100,000,000MaxPurgeRecordFiles
Outbound Option Guide for Cisco Unified Contact Center Enterprise and Hosted Release 9.0(1) 155
Configuration of Campaigns and ImportsConfigure Translation Route for Use with SIP Dialer

DescriptionDefault SettingRegistry Setting
The maximum number of recording sessions per SIPDialer if recording is enabled in the Campaignconfiguration.
100MaxRecordingSessions
Recording files are in the HKEY_LOCAL_MACHINE\SOFTWARE\Cisco Systems,Inc.\ICM\<customer instance>\Dialer directory.
Only the G.711 codec is supported for recording. To record outbound calls, configure the G.711 on thevoice gateway.
Note
Verification of Dialed NumberDN/Script Selector ConfigurationOutbound Option places agents in the Reserved state prior to using them for an outbound call. The dialerperforms this action by using the dialed number to route to an agent. The following procedure describes howto verify that this mechanism works properly.
Verify DN/Script Selector ConfigurationWhen anOutboundOption Dialer is installed in a Unified CCE environment, the dialer uses the dialed numberto make routing requests through the Media Routing (MR) Peripheral Gateway. The following verificationsteps assume that all the applicable configuration and reservation script generation has already been performed.
Procedure
Step 1 Log an agent in to a skill group participating in an outbound campaign, and make the agent available. (Notethe dialed number, which was configured in the Skill Group Selection tab in the Campaign component.) If adifferent dialed number is used for predictive and preview calls, make sure to verify both dialed numbers.
Step 2 Run the Script Editor application and select the Call Tracer utility from the Script > Call Tracer menu.Select the routing client that is associated with the MR PG and select the Dialed Number.
Step 3 Press Send Call to simulate a route request and note the results. If a label was returned for the agent who waslogged in above, the reservation script is working properly and the dialer can reserve agents through this script.If a label is not returned while running this script, see the Troubleshooting Unified CCE Docwiki at http://docwiki-dev.cisco.com/wiki/Troubleshooting_Unified_CCE for troubleshooting assistance.
Verify Campaign ConfigurationAs a final step to verify that you configured your Outbound Option campaign correctly, create a small campaignof one or two entries that dial work phones or your mobile phone.
Outbound Option Guide for Cisco Unified Contact Center Enterprise and Hosted Release 9.0(1)156
Configuration of Campaigns and ImportsVerification of Dialed NumberDN/Script Selector Configuration

C H A P T E R 7Administrative and Supervisory Tasks
This chapter, intended for administrators and supervisors (who may or may not have administrativepermission), provides an overview of the Outbound Option administrative and supervisory tasks.
• Reports, page 157
• Agent Management, page 161
• Imports, page 162
• Campaign Management, page 164
• SIP Dialer Voice Gateway Over-capacity Errors, page 169
• Update the North American Numbering Plan Data , page 169
ReportsThis section provides an overview of the Outbound Option reports available in the Cisco Unified IntelligenceCenter (CUIC).
Outbound Option ReportsThis section describes the Outbound Option reports, created using the Unified Intelligence Center.
• Outbound Historical Reports Bundle
• Outbound Realtime Reports Bundle
• Agent Reports, on page 159
• Campaign reports, on page 158
• Skill Group Reports, on page 159
• Import Rule Reports, on page 160
• Dialer Reports, on page 161
Outbound Option Guide for Cisco Unified Contact Center Enterprise and Hosted Release 9.0(1) 157

All Outbound Option reports are voice-only reports and can be used in Unified CCE environments.Note
The Outbound Option reports are distributed in two report bundles: Realtime Outbound and HistoricalOutbound. The report bundles are available as downloads fromCisco.com (http://software.cisco.com/download/release.html?mdfid=282163829&softwareid=284697222&release=10.0.1&relind=AVAILABLE&rellifecycle=&reltype=latest.)Depending on how it was deployed, your installation of Unified Intelligence Center may include all or a subsetof these reports.
For information on importing report bundles or custom reports, see the Cisco Unified Intelligence CenterReport Customization Guide at http://www.cisco.com/en/US/products/ps9755/tsd_products_support_series_home.html.
Call Type reporting can be used on Outbound Option reservation calls and transfer to IVR calls. Call Typereporting is not applicable for outbound customer calls because a routing script is not used.
Note
Campaign reportsOutbound Option provides a campaign report template that describes the effectiveness of a campaign. Thislist can be used for Agent and IVR campaigns.
Observe the following guidelines when using the campaign reports:
• Campaign Real Time reports describe how many records are left in the campaign dialing list.
• Both Campaign and Dialer Half Hour reports provide the call result counts since the last CampaignManager restart in the half hour that it restarts.
• Dialer utilization fields in the Dialer Half Hour report are unaffected, although the Half Hour recordmight be missing if the CampaignManager was inactive during the half-hour boundary.When the Dialerrestarts, only the Dialer Utilization fields are affected; therefore, the Dialer Utilization only capturesport status since the Dialer restarted during that half hour. Some records might be left in an active statefor a short period of time after the Dialer or Campaign Manager restarts, but the Campaign Managerhas a mechanism to reclaim those records.
Campaign Real Time reports capture call results since the last Campaign Manager restart only. If theCampaign Manager restarts, data prior to the restart is lost.
Note
The following list describes the data that is presented in the campaign reports.
• A summary of call results for query rules within a campaign since the beginning of the day.
• A summary of call results for a campaign since the beginning of the day. It includes a summary of allquery rules within the campaign.
• Aview of what is configured for valid campaign calling times for zone1 and zone2 for selected campaigns.The times are relative to the customer’s time zone.
• A view of what is configured for valid campaign calling times for zone1 and zone2 for selected campaignquery rules. The zone times are relative to the customer’s time zone. The query rule start and stop timesare relative to the Central Controller time.
Outbound Option Guide for Cisco Unified Contact Center Enterprise and Hosted Release 9.0(1)158
Administrative and Supervisory TasksOutbound Option Reports

• How many records for selected query rules have been dialed to completion, and how many recordsremain.
• How many records for selected campaigns have been dialed to completion, and how many recordsremain.
• A summary of call results for selected campaign query rules for selected half-hour intervals.
• A summary of call results for all query rules for selected campaigns for selected half-hour intervals.
• A historical table by half-hour/daily report that shows the status (summary and percentage) of eachcampaign for the selected time period.
• A historical table by breakdown of attempts (in percentage) of each campaign for the selected timeperiod.
• A historical table by half-hour/daily report that shows the status (summary and percentage) per queryrule of each campaign for the selected time period.
• A historical table by breakdown of attempts (in percentage) per query rule of each campaign for theselected time period.
• A summary half-hour/daily report that shows activity and performance of the selected campaigns andtheir skill group for the selected time period, including abandon rate, hit rate, and agent idle times.
• A historical table by breakdown of actual customer calls (outbound calls which reached live voice,inbound calls, or calls transferred to the campaign skill group) for the selected campaigns and their skillgroups for the selected time period.
Skill Group ReportsFor skill group reporting per campaign, Outbound Option provides reports that represent the skill group activityfor a contact center.
The following list describes the data presented in the skill group reports:
• A real-time table that shows all skill groups and their associated Outbound Option status.
• A historical table by half-hour intervals that shows Outbound Option counts for agents signed on, handle,talk, and hold states.
Agent ReportsIn addition to the reports contained in the Outbound Reports bundles, other Agent reports also provideinformation about Outbound activities:
Outbound Option FieldsReport
The Direction field indicates he direction of the callthat the agent is currently working on including OtherOut/Outbound Direct Preview, Outbound Reserve,Outbound Preview, or OutboundPredictive/Progressive.
TheDestination field indicates the type of outboundtask on which the agent is currently working.
Agent Queue Real Time
Agent Real Time
Agent Skill Group Real Time
Agent Team Real Time
Outbound Option Guide for Cisco Unified Contact Center Enterprise and Hosted Release 9.0(1) 159
Administrative and Supervisory TasksOutbound Option Reports
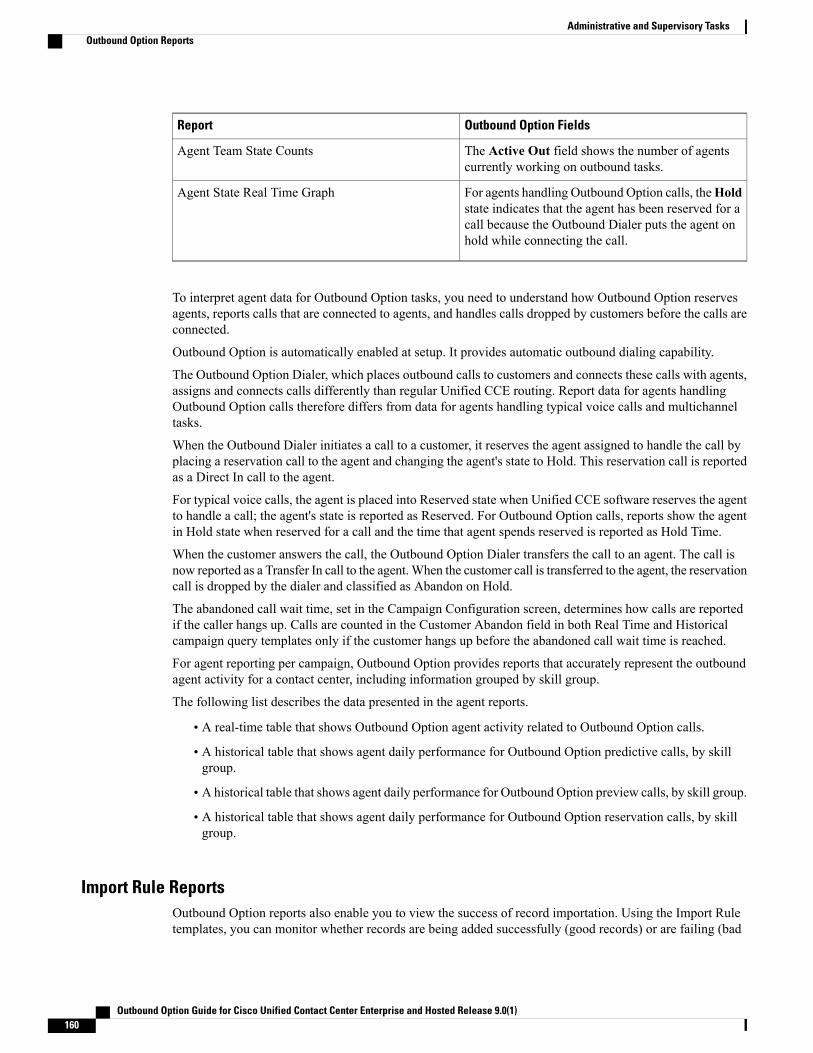
Outbound Option FieldsReport
The Active Out field shows the number of agentscurrently working on outbound tasks.
Agent Team State Counts
For agents handling Outbound Option calls, theHoldstate indicates that the agent has been reserved for acall because the Outbound Dialer puts the agent onhold while connecting the call.
Agent State Real Time Graph
To interpret agent data for Outbound Option tasks, you need to understand how Outbound Option reservesagents, reports calls that are connected to agents, and handles calls dropped by customers before the calls areconnected.
Outbound Option is automatically enabled at setup. It provides automatic outbound dialing capability.
The Outbound Option Dialer, which places outbound calls to customers and connects these calls with agents,assigns and connects calls differently than regular Unified CCE routing. Report data for agents handlingOutbound Option calls therefore differs from data for agents handling typical voice calls and multichanneltasks.
When the Outbound Dialer initiates a call to a customer, it reserves the agent assigned to handle the call byplacing a reservation call to the agent and changing the agent's state to Hold. This reservation call is reportedas a Direct In call to the agent.
For typical voice calls, the agent is placed into Reserved state when Unified CCE software reserves the agentto handle a call; the agent's state is reported as Reserved. For Outbound Option calls, reports show the agentin Hold state when reserved for a call and the time that agent spends reserved is reported as Hold Time.
When the customer answers the call, the Outbound Option Dialer transfers the call to an agent. The call isnow reported as a Transfer In call to the agent.When the customer call is transferred to the agent, the reservationcall is dropped by the dialer and classified as Abandon on Hold.
The abandoned call wait time, set in the Campaign Configuration screen, determines how calls are reportedif the caller hangs up. Calls are counted in the Customer Abandon field in both Real Time and Historicalcampaign query templates only if the customer hangs up before the abandoned call wait time is reached.
For agent reporting per campaign, Outbound Option provides reports that accurately represent the outboundagent activity for a contact center, including information grouped by skill group.
The following list describes the data presented in the agent reports.
• A real-time table that shows Outbound Option agent activity related to Outbound Option calls.
• A historical table that shows agent daily performance for Outbound Option predictive calls, by skillgroup.
• A historical table that shows agent daily performance for Outbound Option preview calls, by skill group.
• A historical table that shows agent daily performance for Outbound Option reservation calls, by skillgroup.
Import Rule ReportsOutbound Option reports also enable you to view the success of record importation. Using the Import Ruletemplates, you can monitor whether records are being added successfully (good records) or are failing (bad
Outbound Option Guide for Cisco Unified Contact Center Enterprise and Hosted Release 9.0(1)160
Administrative and Supervisory TasksOutbound Option Reports

records). Also, you can monitor how long it takes to import the records so that you can plan for future recordimportation.
The same import rule reports are used for Do Not Call and Contact List imports. The reports display a historicalview of when imports were done, the number of records imported, and the number of records that wereconsidered invalid because of length constraints or improper formatting.
For contact list imports, the reports also provide insight into the number of contacts that were assigned withthe default time zone information for the campaign, as well as the number of contacts that were actuallyimported into the dialing list after the query rule and format validation was performed.
The following information is available in the Import Rule reports:
• Number of successful, unsuccessful, and total records imported by time range
• Current import status
• A real-time table that shows the number of successful, unsuccessful, and total records imported or to beimported.
• A historical table that shows the number of successful, unsuccessful, and total records imported by timerange. The Total Records column indicates the total number of records available in the import file.
Dialer ReportsThe Outbound Option Dialer reports provide information about the dialer. These reports include informationabout performance and resource usage. The templates also enable you to determine whether you need moredialer ports to support more outbound calls.
The following list describes the data presented in the Outbound Option Dialer reports:
• A real-time table that shows contact, busy, voice, answering machine, and SIT detection for each dialer.A special information tone (SIT) consists of three rising tones indicating a call has failed.
• An historical table by half-hour intervals that shows contact, busy, voice, answering machine, and SITTone detection for each dialer.
• Displays information about the amount of time the dialer was idle or had all ports busy.
• Displays Dialer status on a port-by-port basis used for troubleshooting. If this report does not displayany records, then the data feed is disabled by default. It would be enabled only for troubleshootingpurposes.
Agent ManagementIn addition to reviewing the following sections, note that the following table lists agent tasks and theirdocumentation references.
Where Discussed/NotesTask
Installation and Configuration Guide for Cisco Unified Contact CenterEnterprise & Hosted
Adding Agents
Installation and Configuration Guide for Cisco Unified Contact CenterEnterprise & Hosted; assign the agent only to campaign skill groups
Dedicating Agent to OutboundActivity Only
Outbound Option Guide for Cisco Unified Contact Center Enterprise and Hosted Release 9.0(1) 161
Administrative and Supervisory TasksAgent Management

Where Discussed/NotesTask
Agent Re-skilling Tool Online HelpRe-skilling Agents
Agent AdditionYou assign agents to skill groups to map them to campaigns and to skill the agents for multiple activecampaigns.
An agent can be assigned to multiple campaigns.Note
Related Topics
Agents Skilled for Multiple Active Campaigns, on page 18
Dedicate an Agent to Only Perform Outbound ActivityTo perform this activity, associate the agent only with campaign skill groups.
Agent Re-skillingThe agent re-skilling feature allows supervisors to sign-in and change the skill groups for agents they manage.Access this feature using the Unified CCE Agent Re-skilling Tool. This tool is an optional, browser-basedapplication designed for use by call-center supervisors. It lets you change the skill group designations ofagents on your team and quickly view skill group members and details about individual agents. Changes youmake to an agent’s skill group membership take place immediately without the need for the agent to exit andre-enter the system.
If your company decides to install this tool, you can perform the functions listed above. The AgentRe-skilling Tool is an optional tool, so this tool might not be available on your system.
Note
See the Agent Re-skilling Tool online help for information about using the agent re-skilling feature.
See the Administration Guide for Cisco Unified Contact Center Enterprise & Hosted for detailed instructionson how to re-skill agents.
ImportsThis section provides procedures for creating an import rule file, creating a Do Not Call list, and addingattributes for a contact list.
Outbound Option Guide for Cisco Unified Contact Center Enterprise and Hosted Release 9.0(1)162
Administrative and Supervisory TasksAgent Addition

Import ProcedureBefore you run an import, you must first create an import rule file that contains the data to be imported. Thisimport rule can have a maximum of 10240 characters per row, and can be in one of two formats:
• Comma-delimited format - Each column data is separated by a comma.
• Fixed format - Each column data is separated by spaces.
Then, to run the import, specify information about that import in the Import Rule component:
• On the General tab, specify attributes such as the Import Type (contact list or Do Not Call list), thedirectory path of the import file, and the format of the import file.
• On the Definition tab, specify the import file fields that are to appear as columns in the import list. Youcan specify these fields only if you are creating a contact list. the Do Not Call list import type has fixedfields.
• On the Schedule tab, specify the time that you want the import to start and how often you want theimport to run.
When the import runs, the data is read and the import file is renamed so that it is not re-imported. This allowsyou to read and review the import file (if necessary) to troubleshoot problems.
Create Do Not Call ListWhen creating a Do_Not_Call list file, format it correctly using the following instructions.
Procedure
Step 1 Using a text editor, create a text file that contains all the do-not-call phone numbers.Step 2 Enter a phone number and an extension (if applicable) for each Do Not Call entry on a new line.Step 3 Observe the following characteristics for each Do Not Call entry:
a) Each phone number can be a maximum of 20 characters long.b) Each extension can be a maximum of eight characters long.c) Phone numbers with associated extensions must be separated with a comma between the phone number
and the extension.d) The Do Not Call table can support up to 60 million entries, but note that the information is stored in
memory in the Campaign Manager process.e) Each Do Not Call entry uses 16 bytes of memory, so 60 million entries would require approximately one
gigabyte of memory (960 million bytes) on the Logger Side A platform.
Step 4 Save the text file to the local server.
The following is an example of a Do_Not_Call list:
2225554444
2225556666
Outbound Option Guide for Cisco Unified Contact Center Enterprise and Hosted Release 9.0(1) 163
Administrative and Supervisory TasksImport Procedure

2225559999
2225552000,4321
To add a customer to this list, import a Do Not Call list.
Do Not Call import files are read by the Campaign Manager. Dialing List entries are marked as Do Not Callentries only when the Campaign Manager fetches the Dialing List entry and only when there is an exact,digit-for-digit match. This allows Do Not Call imports to happen while a Campaign is running withoutrebuilding the Dialing List.
If the Dialing List includes a base number plus extension, this entry must match a Do Not Call entry forthat same base number and same extension. The dialer will not dial the extension.
Note
When the Campaign Manager starts it automatically imports from the DoNotCall.restore file that is stored inthe<drive>\icm\<instance>\la\bin directory.When reading DoNot Call import files, the CampaignManagerappends the data to the DoNotCall.restore file. This restore file allows recovery of Do Not Call records afterthe CampaignManager stops unexpectedly or for plannedmaintenance, such as a Service Release installation.
The restore file can grow to approximately 1 GB if 60 million DNC records are imported, each having ten-digitnumbers plus five-digit extensions. Sufficient disk space must be available on LoggerA to store theDoNotCall.restore file.
To clear the Do Not Call list, import a blank file with the Overwrite table option enabled.Note
Add Attributes to a Contact ListTo add additional attributes to the import, perform the following steps.
Procedure
Step 1 In ICM Configuration Manager, double-click the Outbound Option Import Rule component.Step 2 Enter the attributes in the fields on the Import Rule Definition tab page.Step 3 Add custom attributes using the custom selections.
These custom attributes are only useful for filtering out customer contacts into different dialing lists based onyour business needs; for example, you could define a custom entry called “Amount Owed” and add the customercontacts that owe more into a different dialing list that can be dialed at a higher priority.
These custom attributes are not forwarded to the agentdesktop.
Note
Step 4 Click Save.
Campaign ManagementTo manage your campaigns most efficiently, use multiple query rules instead of using multiple campaigns.
Outbound Option Guide for Cisco Unified Contact Center Enterprise and Hosted Release 9.0(1)164
Administrative and Supervisory TasksAdd Attributes to a Contact List

Single Campaign Versus Multiple CampaignsYou might choose to run multiple campaigns because of different calling policies (for example, time rules)or to run different outbound modes simultaneously.
From the perspective of dialer port allocation, running fewer campaigns with a larger agent pool is moreefficient. Dialer ports are allocated based on the number of agents assigned and the current number of linesper agent to dial. The more campaigns you have that are active, the more the ports are distributed across thecampaigns, which affects overall efficiency.
Use query rules to break down a campaign into smaller requirements. These rules can be enabled based onpenetration or scheduled times. Campaign reports are available on a query rule level.
In multiple campaigns, the skill groups of agents handling the calls must be the same as those of a singlecampaign.
Note
Results from Individual CustomersAfter running a campaign, you can generate a list of customers who were reached, not reached, or have invalidphone numbers. The following are options for how to receive this information from the Outbound Optionsolution.
Interpret Information from Dialer_Detail TableThe Dialer_Detail table is a single table that contains the customer call results for all campaigns. When youview the Dialer_Detail table, note that each attempted Outbound Option call is recorded as an entry in thetable. Each entry lists the number called and which numbers are invalid.
Related Topics
Dialer_Detail Table, on page 187
Dialing ListThe Dialing List is a good source of information, but it has several drawbacks when compared to theDialer_Detail table. The Dialing List is only in the Campaign Manager’s private database on the Logger SideA, so excessive activity on that table will have a negative performance impact on the real-time processesrunning on that platform, particularly the Campaign Manager. This can lead to interruptions in dialing andlong idle times for agents, so avoid querying this table while campaigns are in progress.
Another drawback to using the Dialing List is that there is a different dialing list table for every campaignquery rule, so you must look in multiple locations as opposed to looking in the one Dialer_Detail table.
Management of Predictive CampaignsThe following sections provide guidelines to follow when working with predictive campaigns.
Outbound Option Guide for Cisco Unified Contact Center Enterprise and Hosted Release 9.0(1) 165
Administrative and Supervisory TasksSingle Campaign Versus Multiple Campaigns

Initial Values for Lines per AgentDetermining the initial value for the number of lines per agent is not as simple as inverting the hit rate. If acampaign has a 20% hit rate, you cannot assume that five lines per agent is the applicable initial value for thecampaign if you are targeting a 3% abandon rate. The opportunity for abandoned calls increases geometricallyas the lines per agent increases; therefore, set the initial value conservatively in the campaign configuration.
If the reports show that the abandon rate is below target and does not come back in line very quickly, modifythe initial value in the campaign configuration to immediately correct the lines per agent being dialed.
End-of-Day Calculation for Abandon RateIt is not unusual for a campaign to be over the abandon rate target for any given 30 minute period. The dialerexamines the end-of-day rate when managing the abandon rate. If the overall abandon rate is over target forthe day, the system targets a lower abandon rate for remaining calls until the average abandon rate falls intoline. This end-of-day calculation cannot work until after the campaign has been running for one hour. Smallsample sizes due to short campaigns or campaigns with fewer agents might not give the dialer enough timeto recover from an initial value that is too high.
Similarly, if the campaign is significantly under the target abandon rate, it might begin dialingmore frequentlywith an abandon rate over target for a while to compensate in the abandon rate.
Transfer of Answering Machine Detection Calls to AgentsWhen enabling the Transfer AMD (Answering Machine Detection) to agent option for an agent campaign orenabling the Transfer AMD to IVR option for an IVR campaign, consider the increase in calls to the targetresources (agents or IVR) when determining the initial value. If the expectation is that the AMD rate and thelive voice rate are over 50%, perhaps start out with an initial value of 1.1 or even one line per agent to stayunder a 3% abandon rate.
Parameter TuningThe Voice Calls Per Adjustment and Gain parameters are settings in the Advanced Users configuration tabused to control the way the predictive dialing behaves. Do not modify the default values unless you understandthe parameters and the possible risks incurred when changing the pacing.
• The Voice Calls Per Adjustment parameter is a count of the number of live voice connections that arerequired to trigger a correction. (The default value is 70 voice calls.) If the abandon rate exceeds thetarget by a significant margin, the dialer can make corrections before collecting 70 calls.
• The Gain parameter controls the size of the Lines per agent corrections.
Setting the Voice Calls Per Adjustment parameter to a smaller setting leads to larger fluctuations in themeasured Abandon Rate because the sample size is less significant. This results in less change in the Linesper agent value over time.
Outbound Option Guide for Cisco Unified Contact Center Enterprise and Hosted Release 9.0(1)166
Administrative and Supervisory TasksManagement of Predictive Campaigns

Be careful when modifying both parameters (Gain and Voice Calls Per Adjustment) at the same time. Forexample, increasing the Gain while decreasing the Voice Calls Per Adjustment results in larger changesin the “Lines per agent correction rate,” which might overcorrect changes in measured values.Decreasing the Gain while increasing the Voice Calls Per Adjustment can similarly cause too slow of achange to underlying changes in the hit-and-abandon-rates. A campaign that is reaching more than 20 livevoice customers every minute (600 per half hour) might benefit from reducing the Gain, but a lower Gainbecomes less effective as the number of agents in the campaign dwindles or the hit rate changes rapidly.
Caution
Limitations of Smaller Agent GroupsThe dialer runs for each dialer skill group, so if you have 20 agents in a campaign skill group on two dialers,then on average each dialer is allocated 10 agents. Below 20 agents, the dialer’s ability to stay near the abandonrate target degrades. With small sample sizes, the measured abandon rate has larger fluctuations, makingadjustments based on abandon rate measurements difficult. Parameters have been set to adjust to most situationswhen 70 live connects are made per dialer skill group within approximately 10 minutes or less, allowing sixcorrections per hour. 70 live connects would roughly occur with 10 active agents per dialer skill group andan Average Handle Time (AHT) equal to 50 seconds. As the call rate decreases below this number, theperformance degrades.
In addition, in a small agent group where the Lines Per Agent being dialed are low, it may take longer to geta live connect. While most agents are connected within the Average Handle Time, statistical fluctuations maymean occasional long waits for a live connect.
For smaller agent groups that are held to a small abandon rate limitation, consider running that campaign ona single dialer using one of the options described in Single Dialer Options (SCCP Dialer Only). Otherwise,explore running the campaign in a Progressive mode with a conservative lines per agent value.
Management of Agent Idle TimeOne of the key reporting metrics for administrators managing campaigns is the amount of time agents spendidle between calls.
There are many possible reasons for longer idle times, such as a combination of one or more of the following:
• A dialing list with a low hit rate. The solution is to create a better list.
• A small agent pool results in fewer calls, resulting in slower adjustments. One solution is to add moreagents to the pool.
• Shorter average handle times means agents become available more frequently. A shorter handle timemeans that the agent idle time percentage will climb.
• Not enough dialer ports deployed or too many agents. Deploy more ports or use fewer agents.
• A large number of retry attempts at the beginning of a day when running with append imports resultingin lower hit rates. Prioritize pending over retries.
• Modifying the maximum number of attempts up or down in an active campaign. This activity caninterrupt the Campaign Manager’s processing of dialer requests for records, as mentioned earlier in thischapter. One solution is to perform the activity during off hours.
• Running out of records to dial. Import new records.
Outbound Option Guide for Cisco Unified Contact Center Enterprise and Hosted Release 9.0(1) 167
Administrative and Supervisory TasksManagement of Agent Idle Time
Sources of Higher Idle Times in ReportsThe following Outbound Option reports provide information regarding sources of higher idle times:
• Campaign Consolidated Reports: These reports provide a very useful overview of a campaign bycombining campaign and agent skill group statistics into a single report. They provide average idle time,campaign hit rate, the number of agents working on the campaign, as well as their Average Handle Timeper call. Low hit rates and low average handle times result in more work for the dialer to keep thoseagents busy.
• Dialer Capacity Reports: These reports show how busy the dialers are and how much time was spent atfull capacity when the dialer was out of ports. They also provide the average reservation call time aswell as the average time each dialer port spent contacting customers.
Dialer SaturationIf both Dialers have relatively low idle times and high all ports busy times, then it is likely the Dialers havebeen oversubscribed. The combination of number of agents, Dialing List hit rate, and average handle time arelikely more than the deployed number of ports the Dialer can handle.
To solve this problem, perform one of the following actions:
• Reduce the number of agents working on the campaign.
• Move a campaign to a skill group on another agent PG.
• Add more Dialer ports to the solution, possibly on another agent PG.
Few Available RecordsCall Summary Count reports show howmany records in the aggregate campaign dialing lists have been closedand how many are still available to dial.
Retry Records in Append CampaignsRunning campaigns with an append import and maximum number of attempts greater than one can result ina large number of retries at the beginning of the next day. As a general rule, retries usually have a lower hitrate than pending records. Longer idle times for agents might result until the first group of retries are calledbecause retry records normally have priority over pending records by default. The number of records increaseas you increase the retry time.
There are a few ways to manage this situation:
• Shorten the retry times to reduce the number of retries that are scheduled at the end of the day.
• Change the Campaign Manager priority scheme so all numbers and records are tried once before anyretries are attempted. Set the PendingOverRetryEnabled registry key to 1 in the Campaign Manager.
See Registry Settings, on page 171, for detailed information about thePendingOverRetryEnabled registry setting.
Note
Outbound Option Guide for Cisco Unified Contact Center Enterprise and Hosted Release 9.0(1)168
Administrative and Supervisory TasksManagement of Agent Idle Time

• Modify the campaign import to use theOverwrite option instead of theAppend option and import newrecords daily.
SIP Dialer Voice Gateway Over-capacity ErrorsYour network monitoring tool might receive an alarm from the SIP dialer about being over capacity. You canignore the alarm unless it becomes an ongoing issue. This section describes the source of the alarm andremedial actions.
If the Voice Gateway in a SIP dialer implementation is over dialed or over capacity, the SIP Dialer receivesone of the following messages: .
• SIP 503 messages if the SIP Dialer is deployed with Voice Gateway only
• SIP 502 messages if the SIP Dialer is deployed with SIP Proxy
The SIP dialer raises an alarmwhen the percentage of SIP 502 or SIP 503messages reaches 1% of all messages.
If the percentage of SIP 502 or SIP 503 messages reaches 2% of all messages, the SIP dialer performs anautomatic throttle down. This throttle down means that the SIP dialer decreases the configured value of PortThrottle (the calls-per-second rate at which the dialer dials outbound calls, set on the Dialer General tab inICM Configuration Manager) by approximately 10%.
If one throttle down does not correct the problem, the SIP dialer performs additional throttle downs until eitherthe problem is corrected or the value of Port Throttle is throttled down to 50% of the originally configuredvalue.
For each automatic throttle down, alarm and trace messages clearly provide detailed information about theadjusted port throttle value, the configured port throttle value, and time duration.
If Voice Gateway capacity becomes an ongoing issue, use one of the following measures to attempt to remedythe problem:
• Check the Voice Gateway configuration. If there are errors, fix them and reset Port Throttle to its originalvalue.
• Check the sizing information. Adjust the value of Port Throttle according to the documented guidelines.
Update the North American Numbering Plan DataThe Regional Prefix Update Tool (RPUT) is used to update the Unified CCE ICM database to the latest NorthAmerican Local Exchange NPA NXX Database (NALENND).
• If Unified CCE ICM is using the North American Numbering Plan.
• On an Administration & Data Server that includes Real-time Data Server as part of its role.
The RPUT is composed of the following two files (installed in the ICM\bin directory on the data server):
• region_prefix_data.txt (or the <DatafileName>)Contains the data this tool uses to update the region prefix table in the Unified CCE ICM database. Notethat you should change paths to the ICM\bin directory.
• regionfix.exe
Outbound Option Guide for Cisco Unified Contact Center Enterprise and Hosted Release 9.0(1) 169
Administrative and Supervisory TasksSIP Dialer Voice Gateway Over-capacity Errors

This executable reads the region_prefix_data.txt data file and updates the region prefix table.
The RPUT is run from the command line as described in the following procedure.
Procedure
Step 1 Open a command prompt (Select Start > Run, and enter cmd, then click OK).Step 2 Change the path to ICM\bin.Step 3 Enter the following at the prompt: regionfix.exe <DatafileName> (where <DatafileName> is the name of
the data file).If the <DatafileName> is left blank, the RPUT uses the region_prefix_data.txt file as the input datafile.
Note
The Regional Prefix Update Tool then shows the version of the input data file and asks if you want to proceed.If you proceed, the tool connects to the Unified CCE ICM database. The number of records that are to beupdated, deleted, and inserted appear. These records are put into two different files:
• region_prefix_update.txt (which includes deleted entries)
• region_prefix_new.txt
Step 4 Check the contents of the two files before proceeding.Step 5 Answer Yes to proceed with the update.
When the update is complete, the tool displays the following message:
Your region prefix table has been successfully updated.
Outbound Option Guide for Cisco Unified Contact Center Enterprise and Hosted Release 9.0(1)170
Administrative and Supervisory TasksUpdate the North American Numbering Plan Data

A P P E N D I X ARegistry Settings
This appendix contains information about registry settings for Outbound Option server processes.
Registry settings are located in /Cisco Systems, Inc./ICM/<instancename>/LoggerA(B)/BlendedAgent/CurrentVersion.
Note
• Campaign Manager Registry Settings, page 171
• Dialer Registry Settings, page 175
Campaign Manager Registry SettingsThe following registry settings modify the behavior of the Campaign Manager:
DescriptionDefault SettingRegistry Setting
Calculates the callback time range for each personal callback inminutes. The Campaign Manager queries the Personal CallbackList for callback records, where the CallbackDateTime databasecolumn value is between the current time and current time minusthe CallbackTimeLimit. For example, if the current time is 3:00PM and the CallbackTimeLimit is 15 minutes, the query toretrieve Personal Callback records is “where CallbackDateTime>= 2:45 PM and CallbackDateTime <= 3:00 PM.” This columnis also used to control how long a Personal Callback is retriedafter it is sent to a dialer. If the CallbackTimeLimit is set to 15minutes, the Dialer keeps reserving the agent and calling thecustomer for 15 minutes before giving up for that day. The Dialerre-reserves the agent based on thePersonalCallbackTimeToRetryReservation registry entry.
15 minutesCallbackTimeLimit (CampaignManager only)
Describes how many dialer detail records should be bufferedbefore sending to the Central Controller database.
20DialerDetailBufferSize
Outbound Option Guide for Cisco Unified Contact Center Enterprise and Hosted Release 9.0(1) 171

DescriptionDefault SettingRegistry Setting
Describes how long to wait before sending dialer detail recordsto the Central Controller database when theDialerDetailBufferSize is not reached.
5DialerDetailBufferTimeout
When set to 0, dialer detail records are not sent from campaignmanager. All Dialer Detail records are disabled.
TRUEDialerDetailEnabled
OutboundOption Import sends a heartbeat message to CampaignManager every n milliseconds to indicate that it is still alive.
500 millisecondsEMTHeartBeat (Outbound OptionImport only)
When set to 0, this setting performs standard region_prefixmatching. When set to 1, the GMT time zones are always set tothe local time zone of the ICM Logger.
If there is a prefix match, the GMT time zones for each customerrecord are retrieved from the Region_Prefix table.
Time zones are selected based on the data in theRegion_Prefix database. When contacts are imported,the phone number is assigned a time zone based on theinformation in the region prefix table. Each prefix hassettings for the time zone and daylight savingsobservation. If the prefix of the contact number does notmatch any of the prefixes listed in the region prefix table,then the contact number is assigned the time zone listedin the campaign configuration tool Call Target Tab.
Note
If this registry setting changes, the ICM Logger must berestarted before the new values take affect. Alternatively,restart the Outbound Option Import process by closingits console window.
Note
0, enabledImportAreaCodeProcDisable(Outbound Option Import only)
The number of digits in a phone number must be greater than thisregistry entry to perform a search of the region_prefix table.
If this registry setting changes, the ICM Logger must berestarted before the new values take affect. Alternatively,restart the Outbound Option Import process by closingits console window.
Note
7 digitsImportRegLocalNumberSize(Outbound Option Import only)
Specifies the minimum number of calls that have to be attemptedbefore the hit-rate percentage calculation begins for a campaignquery rule.
30 callsMinimumCallsForHitRate (CampaignManager only)
When set to 1, pending records get priority over retry records forall campaigns.
0PendingOverRetryEnabled
The number of times a customer phone rings before beingclassified as an unanswered call.
Minimum value is 2;maximum value is 10;default is 4 rings
PersonalCallbackNoAnswerRingLimit(Campaign Manager only)
Outbound Option Guide for Cisco Unified Contact Center Enterprise and Hosted Release 9.0(1)172
Registry SettingsCampaign Manager Registry Settings

DescriptionDefault SettingRegistry Setting
String containing the call status types to consider when purgingold personal callback records. For example, if the string contains“C,M,F,L,I,” all calls with these call statuses are purged from thedatabase.
This registry setting is not added by default; it must beadded manually.
Note
The call status values can optionally be delimited usinga comma, a hyphen, a semi-colon, or a colon.
Note
If the registry entry ismissing, the defaultvalues are C,M
PersonalCallbackCallStatusToPurge(Campaign Manager only)
The number of days after the personal callback has been scheduledto keep the record before it is purged.
Minimum value is 1;maximum value is 30;default is 5 days
PersonalCallbackDaysToPurgeOldRecords(Campaign Manager only)
This registry key determines if the Callback has to be enabled ifthe query rule is disabled.
0PersonalCallbackDisableViaQueryRule(Campaign Manager only)
Sets the maximum number of times a personal callback isattempted (minimum value is 1; maximum value is 20). Whenthe number of maximum attempts reaches 0, the record is nottried again and the status is set to M (max-ed out).
5PersonalCallbackMaxAttemptsDefault(Campaign Manager only)
Not used.1PersonalCallbackMode
The number of personal callback records to send to the OutboundOption Dialer at one time.
Minimum value is 5;maximum value is 100;default is 20
PersonalCallbackRecordsToCache(Campaign Manager only)
Indicates whether personal callbacks are allowed on Saturdays.
• 0: Personal callbacks are not allowed on Saturdays and willbe scheduled for the next allowable day. For example, apersonal callback which fails to reach the customer on aFriday will be rescheduled for the following Monday.
• 1: Personal callbacks are allowed on Saturdays.
0PersonalCallbackSaturdayAllowed(Campaign Manager only)
Indicates whether personal callbacks are allowed on Sundays.
• 0: Personal callbacks are not allowed on Sundays and willbe scheduled for the next allowable day. For example, apersonal callback which fails to reach the customer on aFriday or Saturday will be rescheduled for the followingMonday.
• 1: Personal callbacks are allowed on Sundays.
0PersonalCallbackSundayAllowed(Campaign Manager only)
The interval time, in minutes, at which the Outbound OptionDialer checks the Campaign Manager for personal callbackrecords.
Minimum value is 1;maximum value is 30;default is 1 minute
PersonalCallbackTimeToCheckForRecords(Campaign Manager only)
Outbound Option Guide for Cisco Unified Contact Center Enterprise and Hosted Release 9.0(1) 173
Registry SettingsCampaign Manager Registry Settings

DescriptionDefault SettingRegistry Setting
Sets the amount of time, in minutes, that the Outbound OptionDialer waits before retrying a personal callback when thecustomer’s phone is busy.
Minimum value is 1;maximum value is 10;default is 1 minute
PersonalCallbackTimeToRetryBusy(Campaign Manager only)
Sets the amount of time, in minutes, that the Outbound OptionDialer waits before retrying a personal callbackwhen the customerdoes not answer the phone.
Minimum value is 5;maximum value is 60;default is 20 minutes
PersonalCallbackTimeToRetryNoAnswer(Campaign Manager only)
Sets the amount of time, in minutes, that the Outbound OptionDialer waits before retrying to reserve an agent if the agent is notavailable.
Minimum value is 1;maximum value is 10;default is 1 minute
PersonalCallbackTimeToRetryReservation(Campaign Manager only)
Boolean value. Controls how to handle contacts that wererequested to be called back at a particular time, but wereunreachable at that time for whatever reason.
• 0: Unreachable records are not rescheduled or purged.
• 1: Unreachable records will be scheduled for retry at thenext valid time.
1RescheduleCallbacks (CampaignManager only)
Not used.nullSQLServer (Campaign Manager andOutbound Option Import)
Not used.""TCD_DBComputerName_A
Not used.""TCD_DBComputerName_B
Not used.""TCD_DBDatabaseName_A
Not used.""TCD_DBDatabaseName_B
Not used.0TCDCopyPendingEnabled
Not used.0TCDEnabled
Not used.30TCDKeepDays
Specifies the time of day (in 24-hour format: hh:mm) when thereal-time statistics for DialerRealTime and DialerPortRealTimeare reset.
30 minutes aftermidnight (“00:30”)
TimeToResetDailyStats (CampaignManager only)
Outbound Option Guide for Cisco Unified Contact Center Enterprise and Hosted Release 9.0(1)174
Registry SettingsCampaign Manager Registry Settings

DescriptionDefault SettingRegistry Setting
The interval time, in minutes, at which the Campaign Managerresets the contact records in Unknown status to Pending status(available for re-use).
Contact records are marked Unknown if they are in theActive state when the Campaign Manager is initializedor if the Outbound Option Dialer dialing those (Active)records disconnects from the CampaignManager due tonetwork or Outbound Option Dialer failure.
Note
60 minutesUnknownCallStatusResetTime(Campaign Manager only)
Dialer Registry SettingsThe following registry settings modify the behavior of the Outbound Option Dialer. To specify the exact path,modify the registry path for the dialer to HKEY_LOCAL_MACHINE\SOFTWARE\Cisco Systems,Inc.\ICM\<instance name>\Dialer instead ofHKEY_LOCAL_MACHINE\SOFTWARE\Cisco Systems,Inc.\\Dialer.
DescriptionDefault SettingRegistry Setting
When enabled (1), dialer automatically answers customer callstransferred to agent phones.
1AnswerTransferUsingAgentPhone
This registry key is not created until the process starts up. Itcontrols whether the Dialer auto-answers the call or not. Therecommendation is to disable this and use the auto-answer inUnified CM if you want zip tone.
1AutoAnswerCall
Amount of silence before no ringback is returned, in seconds. Ifringback is not detected within this time limit, the call is dropped.
Changes made to this setting take effect after theOutbound Option Dialer is cycled.
Note
20 secondsCa_cnosig
Controls behavior when started call attempts can be cancelledonce all agents are occupied and abandon to IVR is notconfigured. Setting to 0 never cancels calls after they have beenstarted. Setting to 1 always cancels calls after they have beenstarted once no agents are available. A value of 100 cancels allringing calls that are less than 100 milliseconds after the dialingwas started (that is, line went off hook).
0CancelDialingCalls
When set to 0, packet capturing is disabled; when set to 1, packetcapturing is enabled.
0CaptureEnabled
Outbound Option Guide for Cisco Unified Contact Center Enterprise and Hosted Release 9.0(1) 175
Registry SettingsDialer Registry Settings

DescriptionDefault SettingRegistry Setting
Options associated with packet capture:
• -i <ifname>: Interface name to capture on
• -tt : Print an unformatted timestamp on each dump line.
• -w <filename>: Capture directly to file in pcap format, filecan be opened with Wireshark.
• -C <file_size>: The maximum size of a capture file. Theunits of file_size are millions of bytes (1,000,000 bytes, not1,048,576 bytes).
• -W <filecount>: The number of files created. The capturefiles are overwritten from the beginning, thus creating arotating buffer. Capture files after the first capture file havethe name specified with the -w flag, with a number after it,starting at 1 and continuing upward.
• -s : Snarf snaplen bytes of data from each packet ratherthan the default of 68 . Setting snaplen to 0 means use therequired length to catch whole packets.
-i 2 -tt -C 20 -s 0 -W 20-w DialerCapture
CaptureOptions
When set to 1, capture SIP packets only. When set to 2, capturethe entire data payload on the Dialer host machine.
1CaptureType
Not used.0CCMTransferDelay
Not used.3ConsecutiveNoDialToneEvents
Signal must exceed CPAActiveThreshold*noiseThreshold to beconsidered active. For example, 32 is 10 * log(32) = 15 dB.
32CPAActiveThreshold
Maximum amount of time (from the moment the system firstdetects speech) that analysis is performed on the input audio.
2500CPAAnalysisPeriod
The jitter buffer delay (in mS).150CPAJitterBufferDelay
Amount of time that the signal must be silent after speechdetection to declare a live voice (in mS).
375CPAMinSilencePeriod
Maximum Noise floor possible. Used to restrict noise floormeasurement.
10000CPAMaxNoiseFloor
Minimum Noise floor possible. Used to restrict noise floormeasurement.
1000CPAMinNoiseFloor
The amount of time to wait for the beep of an answering machinebefore the dialer connects the agent with the machine to leave amessage.
15000CPAMaxTermToneAnalysis
Outbound Option Guide for Cisco Unified Contact Center Enterprise and Hosted Release 9.0(1)176
Registry SettingsDialer Registry Settings
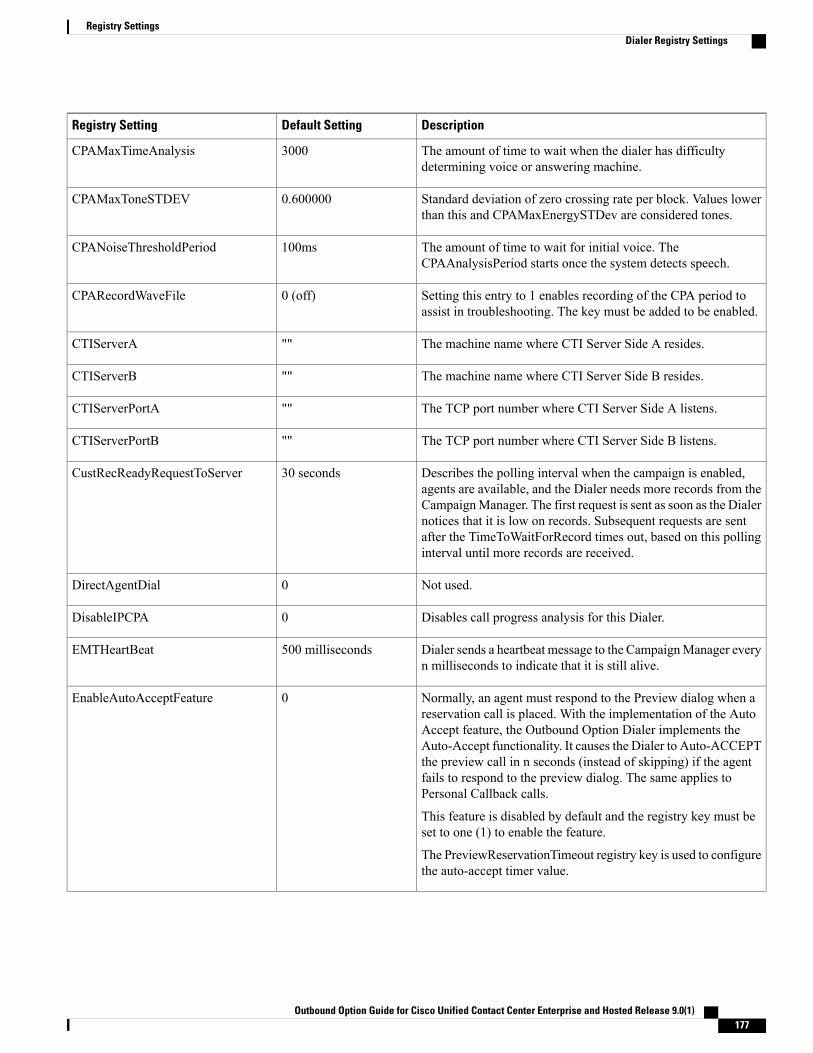
DescriptionDefault SettingRegistry Setting
The amount of time to wait when the dialer has difficultydetermining voice or answering machine.
3000CPAMaxTimeAnalysis
Standard deviation of zero crossing rate per block. Values lowerthan this and CPAMaxEnergySTDev are considered tones.
0.600000CPAMaxToneSTDEV
The amount of time to wait for initial voice. TheCPAAnalysisPeriod starts once the system detects speech.
100msCPANoiseThresholdPeriod
Setting this entry to 1 enables recording of the CPA period toassist in troubleshooting. The key must be added to be enabled.
0 (off)CPARecordWaveFile
The machine name where CTI Server Side A resides.""CTIServerA
The machine name where CTI Server Side B resides.""CTIServerB
The TCP port number where CTI Server Side A listens.""CTIServerPortA
The TCP port number where CTI Server Side B listens.""CTIServerPortB
Describes the polling interval when the campaign is enabled,agents are available, and the Dialer needs more records from theCampaignManager. The first request is sent as soon as the Dialernotices that it is low on records. Subsequent requests are sentafter the TimeToWaitForRecord times out, based on this pollinginterval until more records are received.
30 secondsCustRecReadyRequestToServer
Not used.0DirectAgentDial
Disables call progress analysis for this Dialer.0DisableIPCPA
Dialer sends a heartbeat message to the CampaignManager everyn milliseconds to indicate that it is still alive.
500 millisecondsEMTHeartBeat
Normally, an agent must respond to the Preview dialog when areservation call is placed. With the implementation of the AutoAccept feature, the Outbound Option Dialer implements theAuto-Accept functionality. It causes the Dialer to Auto-ACCEPTthe preview call in n seconds (instead of skipping) if the agentfails to respond to the preview dialog. The same applies toPersonal Callback calls.
This feature is disabled by default and the registry key must beset to one (1) to enable the feature.
The PreviewReservationTimeout registry key is used to configurethe auto-accept timer value.
0EnableAutoAcceptFeature
Outbound Option Guide for Cisco Unified Contact Center Enterprise and Hosted Release 9.0(1) 177
Registry SettingsDialer Registry Settings

DescriptionDefault SettingRegistry Setting
EnableHeartbeat registry is used to enable heartbeats on the dialer.When this flag is enabled, the dialer will send heartbeats (SIPOPTIONS request message) to the SIP server - Proxy or Gateway.
If there is no response from the SIP server, the dialer will markitself as not ready and inform the same to the campaign manager.
If this registry is disabled, there will be no indication if the SIPserver goes down.
1 (enabled)EnableHeartbeat
The time between heartbeats.5 secondsHBInterval
The number of times a timeout occurs before the SIP Dialeridentifies the SIP Gateway or SIP Proxy as down.
1HBNumTries
Not used.“1”LongDistancePrefix
The maximum recording file size (in bytes) per SIP Dialer.500,000,000MaxAllRecordFiles
The maximum number of media termination sessions per SIPDialer if recording is enabled in the Campaign configuration.
200MaxMediaTerminationSessions
The maximum recording file size (in bytes) that the SIP Dialerdeletes when the total recording file size, MaxAllRecordFiles, isreached.
100,000,000MaxPurgeRecordFiles
The maximum number of recording sessions per SIP Dialer ifrecording is enabled in the Campaign configuration.
100MaxRecordingSessions
The connection port for the MR PIM.38001MRPort
This registry entry is reserved for future use. Leave the value ofthis parameter at 0.
0OptimizeAgentAvailability
Not used.0OverrideNetworkTones
Contains a script name that the MR PIM receives as a dialednumber when personal callback calls need to reserve agents.
“PersonalCallback”PersonalCallbackDN
Number of seconds to wait before canceling a preview agent’sreservation call. This key is automatically created when the Dialerstarts. If a preview agent does not accept/reject/skip a call withinthis time period, the agent’s reservation call is dropped and therecord is marked as rejected.
This registry setting also works with Direct Previewmode, and applies to the regular callback calls in bothPreview mode and Direct Preview mode.
Note
600PreviewReservationTimeout
Not used.0ReclassifyTransferFailures
Outbound Option Guide for Cisco Unified Contact Center Enterprise and Hosted Release 9.0(1)178
Registry SettingsDialer Registry Settings
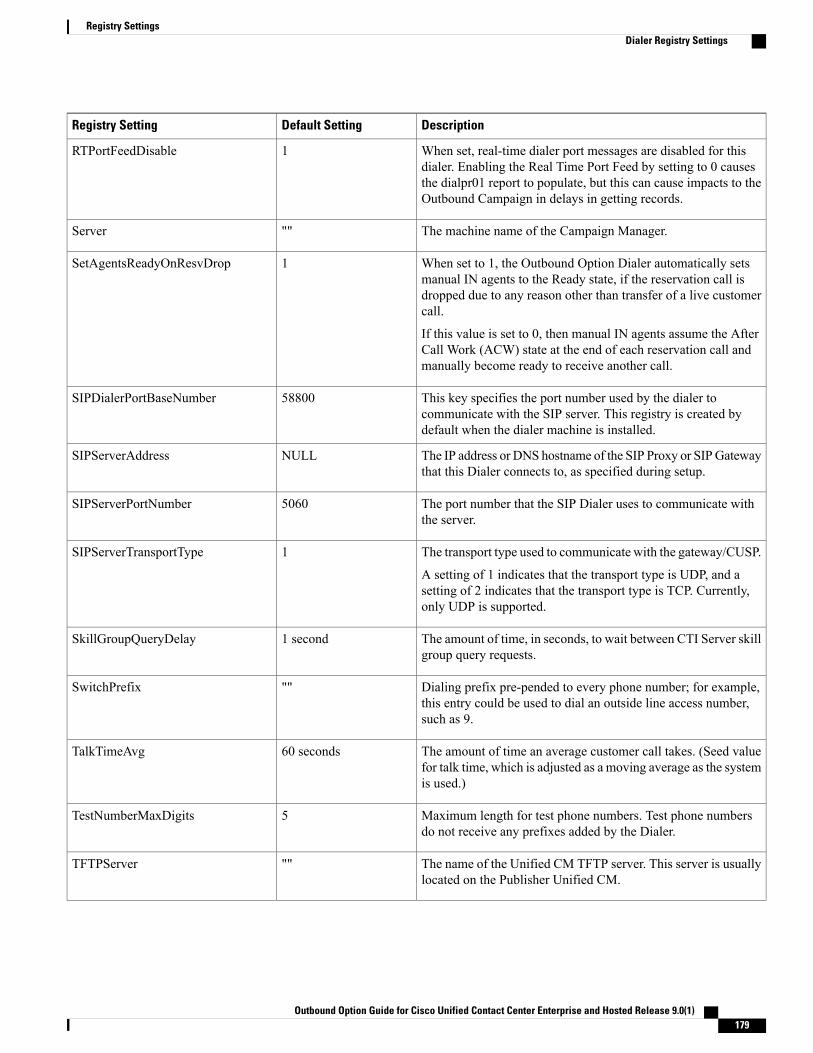
DescriptionDefault SettingRegistry Setting
When set, real-time dialer port messages are disabled for thisdialer. Enabling the Real Time Port Feed by setting to 0 causesthe dialpr01 report to populate, but this can cause impacts to theOutbound Campaign in delays in getting records.
1RTPortFeedDisable
The machine name of the Campaign Manager.""Server
When set to 1, the Outbound Option Dialer automatically setsmanual IN agents to the Ready state, if the reservation call isdropped due to any reason other than transfer of a live customercall.
If this value is set to 0, then manual IN agents assume the AfterCall Work (ACW) state at the end of each reservation call andmanually become ready to receive another call.
1SetAgentsReadyOnResvDrop
This key specifies the port number used by the dialer tocommunicate with the SIP server. This registry is created bydefault when the dialer machine is installed.
58800SIPDialerPortBaseNumber
The IP address or DNS hostname of the SIP Proxy or SIPGatewaythat this Dialer connects to, as specified during setup.
NULLSIPServerAddress
The port number that the SIP Dialer uses to communicate withthe server.
5060SIPServerPortNumber
The transport type used to communicate with the gateway/CUSP.
A setting of 1 indicates that the transport type is UDP, and asetting of 2 indicates that the transport type is TCP. Currently,only UDP is supported.
1SIPServerTransportType
The amount of time, in seconds, to wait between CTI Server skillgroup query requests.
1 secondSkillGroupQueryDelay
Dialing prefix pre-pended to every phone number; for example,this entry could be used to dial an outside line access number,such as 9.
""SwitchPrefix
The amount of time an average customer call takes. (Seed valuefor talk time, which is adjusted as a moving average as the systemis used.)
60 secondsTalkTimeAvg
Maximum length for test phone numbers. Test phone numbersdo not receive any prefixes added by the Dialer.
5TestNumberMaxDigits
The name of the Unified CM TFTP server. This server is usuallylocated on the Publisher Unified CM.
""TFTPServer
Outbound Option Guide for Cisco Unified Contact Center Enterprise and Hosted Release 9.0(1) 179
Registry SettingsDialer Registry Settings

DescriptionDefault SettingRegistry Setting
The amount of time, in seconds, to wait for the CTI begin callevent before canceling call.
7 secondsTimeToCTIBeginCall
The amount of time, in seconds, before a customer call is declaredstuck and dropped.
7200 seconds, which is 2hours
TimeToFreeStuckCall
The amount of time, in seconds, to wait before releasing a stuckport.
7200 seconds, which is 2hours
TimeToFreeStuckPort
The amount of time, in seconds, to wait before abandoning acustomer call due to lack of agents. If abandon to IVR is enabledfor campaigns, this value should be set to 0 to reduce transferdelays.
1 secondTimeToHoldCustomer
The amount of time, in seconds, to wait before dropping areservation call.
10 secondsTimeToReserve
The amount of time, in seconds, to wait before retrying a closecustomer record request to the Campaign Manager.
When the Outbound Option Dialer finishes with a customerrecord, it sends a close customer record request message to theCampaign Manager. If this message is not sent, the OutboundOption Dialer retries the call based on the configured timeout.
30 secondsTimeToRetryCustomerRequest
The amount of time, in seconds, each customer ring takes. Forexample, if this entry is set to 8 and the no-answer configurationin the campaign is set to 3 rings, then the Dialer classifies the callas no-answer within 3*8 (24) seconds.
8 secondsTimeToRingCustomer
The amount of time, in seconds, to wait before dropping a callbeing transferred.
7 secondsTimeToTransfer
The amount of time, in seconds, to wait for the CTI Server torespond to a request before dropping the call.
3 secondsTimeToWaitForCTIResp
The amount of time, in seconds, to wait for the Unified CM dialtone.
4 secondsTimeToWaitForIPDialTone
The amount of time, in seconds, to wait for the MR PIM torespond to a new task request before cancelling the request.
600 seconds (10minutes)TimeToWaitForMRIResponse
The amount of time, in seconds, to wait for customer recordsfrom the Campaign Manager before declaring the skill groupdisabled.
Once a skill group has been disabled, the Dialer begins pollingthe CampaignManager every <CustRecReadyRequestToServer>seconds for additional records.
5 secondsTimeToWaitForRecord
Outbound Option Guide for Cisco Unified Contact Center Enterprise and Hosted Release 9.0(1)180
Registry SettingsDialer Registry Settings

DescriptionDefault SettingRegistry Setting
Sets the type of Service field in the IP Header on SCCP packetsfrom the Dialer to the Campaign Manager for Quality of Service(QoS).
This setting does not control the TOS settings on SCCPpackets from the CampaignManager to the Dialer. Thesesettings are controlled by the DSCP parameters. See theCiscoUnified CommunicationsManager AdministrationGuide for detailed information about how to set theDSCP Unified CM service parameters.
Note
For Release 7.0(0) of Outbound Option, the Dialer was enhancedto support the marking of SCCP (“Skinny”) packets with “Typeof Service” (TOS). This support allows for preferential treatment(for example, class AF31 for assured forwarding) of call signalingtraffic, if the network is configured to support this QoS scheme.
By default, the Dialer does not mark packets, which means trafficis sent “best effort” (TOS = 0).The Dialer sets TOS markings for outgoing packets only. SettingTOS on signaling packets fromUnified CM to the Dialer requiresconfiguring Unified CM properly using the DSCP parameters(see theCisco Unified CommunicationsManager AdministrationGuide). If only the Dialer side is configured, then TOS will beuni-directional and will not behave correctly.
Configuring Bi-directional Communications:
To turn on TOS with AF31 for bi-directional communications,configure the following registry keys for the Dialer:
HKEY_LOCAL_MACHINE\SOFTWARE\Cisco Systems,Inc.\ICM\<customer>\Dialer\ "TOS"=dword:00000068
Note that the dword value listed above is in hex format(decimal 104).
Note
0 (off)TOS
Outbound Option Guide for Cisco Unified Contact Center Enterprise and Hosted Release 9.0(1) 181
Registry SettingsDialer Registry Settings

DescriptionDefault SettingRegistry Setting
Important additional configuration instructions:
This type of TOSmarking requires the setting of a special systemregistry key in Windows 2000 and Windows 2003 as follows:
HKEY_LOCAL_MACHINE\SYSTEM\CurrentControlSet\Services\TcpIp\Parameters"DisableUserTOSSetting"=dword:00000000
DisableUserTOSSetting defaults to 1 (and is not present bydefault); therefore, TOS markings are disabled without settingthis key. After this registry key is set, restart the system for thischange to become effective. Because this key is a system registrykey, then setting it has an impact on all the applications runningon the system. Hence, if the Dialer is co-resident with otherapplications (that is, CTI Server, router, and so on), then settingit changes the behavior of other applications.
For additional information, see:
• http://support.microsoft.com/default.aspx?scid=kb;en-us;258978
• http://technet.microsoft.com/en-us/library/cc706993%28WS.10%29.aspx
• http://www.microsoft.com/technet/prodtechnol/windowsserver2003/technologies/networking/tcpip03.mspx
Important! In order for TOS to become effective, thenetwork (specifically the routers) needs to be configuredto treat packets with TOS markings preferential.
Note
Outbound Option Guide for Cisco Unified Contact Center Enterprise and Hosted Release 9.0(1)182
Registry SettingsDialer Registry Settings

A P P E N D I X BLong Distance Digit Prefix Logic
• Transformation of Imported Numbers, page 183
• Dialer Configuration Fields and Registry Settings, page 184
Transformation of Imported NumbersThe following example displays an outbound call route that provides information about how imported numbersare transformed for the outbound call.
Figure 24: How Imported Numbers Are Transformed
Outbound Option Guide for Cisco Unified Contact Center Enterprise and Hosted Release 9.0(1) 183

DescriptionOutbound OptionConfiguration Field
Call Item
Final dialing number transferred to either theACD or Unified CM (used for debugging/labpurposes only)
ImportedNumber <=TestNumberMaxDigits Registrysetting
Area/city code used at your location, which isconfigured in the Dialer ConfigurationComponent
Local area codeArea Code match beginning ofImportedNumber
Includes the area code for a long distance call orremoves the area code for a local call
Local area codeIncludeAreaCodeWhenDialing
Includes the pre-pended value for a long distancecall, which is configured in the DialerConfiguration Component
Long distance prefixPrePend “LongDistancePrefix”
Include the dialing prefix required by yourlocation or by your campaign, which is configuredin the Dialer Configuration Component
Dial prefixPrePend “Dial Prefix” Digits
Dialer Configuration Fields and Registry SettingsThe following example displays the Dialer configuration fields and Registry settings from the DumpconfProcmon command that are used in an outbound call.C:\>procmon ipccd dialer badialer >>>>dumpconf Dialer Config
------------- DialerID : [5006] PeripheralID : [5000] ActiveDialers : [1] LocalAreaCode: [978]
<--- area code DialToneDetectEnabled : [0] HangupTime : [1] TenDigitDialEnabled : [0]<--- Include area code when dialing PrefixDigits : [] <--- Dial prefix digitsLongDistancePrefix : [1] <---- "Long distance prefix" Callback config has not been
receivedyet ----------------------------------------- Configured Skill Groups
-------------------------------- SkillGroupID : [11988] VDN : [11988] PeripheralNumber : [890]
SkillGroupEnableStatus:[0] CampaignName : [DialAgents] ModeName : [N] TypeName : [I] Customer Count : [0]
CustomerCount (idle) : [0] RecordsToCache : [20] PredictiveExt : [890] PreviewExt : [890]*PortsPerAgent : [1.500000] AgentPercentage : [100] AgentsLoggedIn : [0] AgentsAvailable
: [0]AgentsTalking : [0] *PortsAllocated : [0] AgentsReadyIn8Secs : [0] TalkTimeAverage :
[60]*AgentsToReserveDelta : [0] *PortsUsedToDialDelta : [0] OverflowAgents : [0]AutoAnswerReservation : [0] AbandonRate : [2] MaximumLinesPerAgent : [2.000000]NoAnswerRingLimit : [4] MinimumCallDuration : [1] PreReservedRecordCount: [0]
IVRPortCount :[0] TransferToIVREnabled : [N] TransferAnsMachine : [Y] IVRExt : [] ---------
SkillGroupID :[-1] VDN : [-1] PeripheralNumber : [0] SkillGroupEnableStatus: [0] CampaignName :
[Callback]ModeName : [A] TypeName : [O] Customer Count : [0] Customer Count (idle) : [0]
RecordsToCache :[0] PredictiveExt : [] PreviewExt : [] *PortsPerAgent : [1.500000] AgentPercentage :
[100]AgentsLoggedIn : [0] AgentsAvailable : [0] AgentsTalking : [0] *PortsAllocated : [0]
Outbound Option Guide for Cisco Unified Contact Center Enterprise and Hosted Release 9.0(1)184
Long Distance Digit Prefix LogicDialer Configuration Fields and Registry Settings
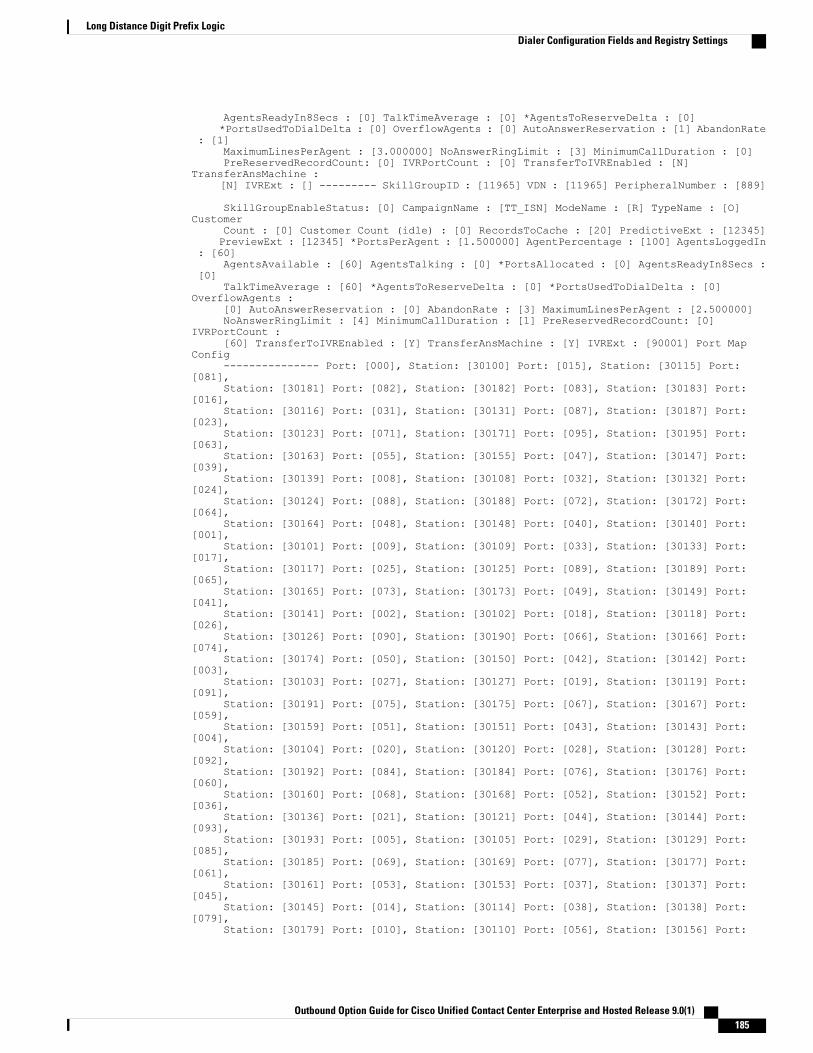
AgentsReadyIn8Secs : [0] TalkTimeAverage : [0] *AgentsToReserveDelta : [0]*PortsUsedToDialDelta : [0] OverflowAgents : [0] AutoAnswerReservation : [1] AbandonRate
: [1]MaximumLinesPerAgent : [3.000000] NoAnswerRingLimit : [3] MinimumCallDuration : [0]PreReservedRecordCount: [0] IVRPortCount : [0] TransferToIVREnabled : [N]
TransferAnsMachine :[N] IVRExt : [] --------- SkillGroupID : [11965] VDN : [11965] PeripheralNumber : [889]
SkillGroupEnableStatus: [0] CampaignName : [TT_ISN] ModeName : [R] TypeName : [O]Customer
Count : [0] Customer Count (idle) : [0] RecordsToCache : [20] PredictiveExt : [12345]PreviewExt : [12345] *PortsPerAgent : [1.500000] AgentPercentage : [100] AgentsLoggedIn
: [60]AgentsAvailable : [60] AgentsTalking : [0] *PortsAllocated : [0] AgentsReadyIn8Secs :
[0]TalkTimeAverage : [60] *AgentsToReserveDelta : [0] *PortsUsedToDialDelta : [0]
OverflowAgents :[0] AutoAnswerReservation : [0] AbandonRate : [3] MaximumLinesPerAgent : [2.500000]NoAnswerRingLimit : [4] MinimumCallDuration : [1] PreReservedRecordCount: [0]
IVRPortCount :[60] TransferToIVREnabled : [Y] TransferAnsMachine : [Y] IVRExt : [90001] Port Map
Config--------------- Port: [000], Station: [30100] Port: [015], Station: [30115] Port:
[081],Station: [30181] Port: [082], Station: [30182] Port: [083], Station: [30183] Port:
[016],Station: [30116] Port: [031], Station: [30131] Port: [087], Station: [30187] Port:
[023],Station: [30123] Port: [071], Station: [30171] Port: [095], Station: [30195] Port:
[063],Station: [30163] Port: [055], Station: [30155] Port: [047], Station: [30147] Port:
[039],Station: [30139] Port: [008], Station: [30108] Port: [032], Station: [30132] Port:
[024],Station: [30124] Port: [088], Station: [30188] Port: [072], Station: [30172] Port:
[064],Station: [30164] Port: [048], Station: [30148] Port: [040], Station: [30140] Port:
[001],Station: [30101] Port: [009], Station: [30109] Port: [033], Station: [30133] Port:
[017],Station: [30117] Port: [025], Station: [30125] Port: [089], Station: [30189] Port:
[065],Station: [30165] Port: [073], Station: [30173] Port: [049], Station: [30149] Port:
[041],Station: [30141] Port: [002], Station: [30102] Port: [018], Station: [30118] Port:
[026],Station: [30126] Port: [090], Station: [30190] Port: [066], Station: [30166] Port:
[074],Station: [30174] Port: [050], Station: [30150] Port: [042], Station: [30142] Port:
[003],Station: [30103] Port: [027], Station: [30127] Port: [019], Station: [30119] Port:
[091],Station: [30191] Port: [075], Station: [30175] Port: [067], Station: [30167] Port:
[059],Station: [30159] Port: [051], Station: [30151] Port: [043], Station: [30143] Port:
[004],Station: [30104] Port: [020], Station: [30120] Port: [028], Station: [30128] Port:
[092],Station: [30192] Port: [084], Station: [30184] Port: [076], Station: [30176] Port:
[060],Station: [30160] Port: [068], Station: [30168] Port: [052], Station: [30152] Port:
[036],Station: [30136] Port: [021], Station: [30121] Port: [044], Station: [30144] Port:
[093],Station: [30193] Port: [005], Station: [30105] Port: [029], Station: [30129] Port:
[085],Station: [30185] Port: [069], Station: [30169] Port: [077], Station: [30177] Port:
[061],Station: [30161] Port: [053], Station: [30153] Port: [037], Station: [30137] Port:
[045],Station: [30145] Port: [014], Station: [30114] Port: [038], Station: [30138] Port:
[079],Station: [30179] Port: [010], Station: [30110] Port: [056], Station: [30156] Port:
Outbound Option Guide for Cisco Unified Contact Center Enterprise and Hosted Release 9.0(1) 185
Long Distance Digit Prefix LogicDialer Configuration Fields and Registry Settings

[034],Station: [30134] Port: [080], Station: [30180] Port: [057], Station: [30157] Port:
[058],Station: [30158] Port: [022], Station: [30122] Port: [006], Station: [30106] Port:
[030],Station: [30130] Port: [011], Station: [30111] Port: [035], Station: [30135] Port:
[012],Station: [30112] Port: [013], Station: [30113] Port: [086], Station: [30186] Port:
[070],Station: [30170] Port: [094], Station: [30194] Port: [078], Station: [30178] Port:
[062],Station: [30162] Port: [046], Station: [30146] Port: [054], Station: [30154] Port:
[007],Station: [30107] Registry Config Values ---------------------- TimeToCTIBeginCall :
[7]TimeToRingCustomer : [8] TimeToHoldCustomer : [1] TimeToReserve : [10] TimeToTransfer
: [7]TimeToFreeStuckPort : [7200] TimeToFreeStuckCall : [7200] SwitchPrefix : []TimeToRetryCustomerRequest : [30] TimeToWaitForRecord : [5] TimeToWaitForCTIResp : [3]
TalkTimeAvg : [60] CustRecReadyRequestToServer: [30] TestNumberMaxDigits : [5] <-----"Test
Number Max digits" ca_cnosig : [20] PortThrottleTime : [2] PortThrottleCount : [20]OptimizeAgentAvailability : [0] RTPortFeedDisable : [1] SkillGroupQueryDelay : [1]ReclassifyTransferFailures : [0] SetAgentsReadyOnResvDrop : [1] DirectAgentDial : [0]OverrideNetworkTones : [0] AnswrTrnsfrUsingAgentPhone : [1] </end>>>>>
Outbound Option Guide for Cisco Unified Contact Center Enterprise and Hosted Release 9.0(1)186
Long Distance Digit Prefix LogicDialer Configuration Fields and Registry Settings
A P P E N D I X CDialer_Detail Table
• About the Dialer_Detail Table, page 187
• Dialer_Detail Table Database Fields and Descriptions, page 188
About the Dialer_Detail TableThe Dialer_Detail table is a historical table that is present in the Unified CCE/CCH database in Releases7.2(2) and later. Its purpose is to allow detailed dialer records to be written to the Logger databases andreplicated to each HDS database.
This table can become very large. Running custom reporting queries against it while it is on the HDS candegrade performance. To optimize performance, extract the data from the HDS into your own custom databaseon a separate server (one that is not used for other Unified CCE/CCH components). Use only DBDateTime(date and time of the record that was written to the HDSdatabase) to perform the extraction. The table on thecustom database can be indexed according to the custom reporting needs.
AdvantagesData stored in this table allows for better management of the system and generation of custom reports.
For example, the table stores the following information:
• The Account Number for the contact and the Call Result, so that the last termination code can be obtainedfor each contact.
• An identifier for the Agent so that skipped records and callbacks scheduled by each agent can bedetermined.
• Additional data for better troubleshooting of Outbound Dialer attempts such as the CallID that was usedto place the call.
Data Flow1 After making an attempt to contact a customer, the Dialer sends the results to the Campaign Manager in
a CloseCustomerRecord message.
Outbound Option Guide for Cisco Unified Contact Center Enterprise and Hosted Release 9.0(1) 187

The CloseCustomerRecord message is also sent if the Agent chooses to skip a call in preview mode.Results for Personal Callback attempts are sent to the Campaign Manager using aClosePersonalCallbackRecord message.
2 Campaign Manager then sends a Dialer Detail record to the Router.
At this point, the message flow is identical to all other historical data in the system.
3 The Router passes the historical data information to the Historical Logger process.
4 The Historical Logger process commits the data to the Logger database.
5 The Replication process on the Logger passes the historical data to the Replication process on the HistoricalData Server (HDS).
6 The Replication process on the HDS commits the data to the HDS database.
Fault ToleranceWhen the Router is down or the CampaignManager loses the connection to the Router, the CampaignManagerstores Dialer_Detail records in a file on the server where CampaignManager is running. All the Dialer_Detailrecords in the cached file are sent to the Router when the connection is restored.
Dialer_Detail Table Database Fields and DescriptionsFor a full description of the database fields for the Dialer_Detail table, see the Database Schema Handbookfor Cisco Unified ICM/Contact Center Enterprise & Hosted.
CallResult Codes and ValuesThe CallResult field can be populated with the following values:
Table 14: CallResult Codes and Values
DescriptionValue
Dialer has not yet attempted to contact that customer record0
Error condition while dialing2
Number reported not in service by network3
No ringback from network when dial attempted4
Operator intercept returned from network when dial attempted5
No dial tone when dialer port went off hook6
Number reported as invalid by the network7
Outbound Option Guide for Cisco Unified Contact Center Enterprise and Hosted Release 9.0(1)188
Dialer_Detail TableFault Tolerance

DescriptionValue
Customer phone did not answer8
Customer phone was busy9
Customer answered and was connected to agent10
Fax machine detected11
Answering machine detected12
Dialer stopped dialing customer due to lack of agents or network stopped dialingbefore it was complete
13
Customer requested callback14
Call was abandoned by the dialer due to lack of agents16
Failed to reserve agent for personal callback.17
Agent has skipped or rejected a preview call or personal callback call.18
Agent has skipped or rejected a preview call with the close option19
Customer has been abandoned to an IVR20
Customer dropped call within configured abandoned time21
Mostly used with TDM switches - network answering machine, such as a networkvoicemail
22
Number successfully contacted but wrong number23
Number successfully contacted but reached the wrong person24
Dialer has flushed this record due to a change in the skillgroup or the campaign25
The number was on the do not call list26
Call disconnected by the carrier or the network while ringing27
Dead air or low voice volume call28
CallStatusZone ValuesThe CallStatusZone1 and CallStatusZone2 fields can be populated with the following values that show thecurrent status of the customer record for the zone.
Outbound Option Guide for Cisco Unified Contact Center Enterprise and Hosted Release 9.0(1) 189
Dialer_Detail TableCallStatusZone Values

The values are:
Table 15: CallStatusZone Values
DescriptionValue
Active: Stored in CallStatusZoneX (1 or 2). A zone is set to active when it has beensent to a dialer for dialing.
A
A callback was requested. Stored in CallStatusZone1 and CallStatusZone2 field whena regular callback (non personal callback) has been scheduled. The Callback timeitself is stored in both the CallbackDateTimeZone1 and CallbackDateTimeZone2columns since the callback overrides the individual zones.
B
Closed: Record has been closed for that particular zone, so the record will not beretried again for that zone (zone1 or zone2).
C
Agent rejected (closed out the record)J
The maximum number of attempts has been reached. Stored in both CallStatusZone1and CallStatusZone2. A record is set to “M” when it has dialed the maximum timesas specified in the campaign and will not be retried again. Both zones are set to “M”to indicate no further calling in either zone.
M
Pending. Stored in CallStatusZoneX (1 or 2). This is the initial state of a record beforeany dialing has taken place. The record remains in the pending state for a particularzone until all of the numbers specified for that zone are dialed. A pending contactwhich has already dialed at least one dialer from its sequence will have at least oneCallBackDateTimeXX column filled in with a retry time.
P
Retry. Stored in CallStatusZoneX (1 or 2) for the zone where the Retry is scheduled.The retry time itself is stored in the CallbackDateTimeZoneX (1 or 2) as well as inthe individual number column CallbackDateTimeXX, where XX is the number tobe retried (01 - 10). Call can be retried for a variety of reasons, including receivinga busy or no answer result.
R
A personal callback was requested. Stored in both CallStatusZone1 andCallStatusZone2. A record is set to “S” when it has been scheduled for a personalcallback. Both zones are set to “S” to indicate that the record has been moved to thepersonal callback list.
S
Unknown: Stored in CallStatusZone1 and CallStatusZone2. A record is set toUnknown if its status was Active when the Campaign Manager started or the Dialerre-started. The record will stay in the Unknown state until it gets an update. If theCampaignManager fails to get an update within sixty minutes, it will return the recordto Pending.
U
For a personal callback, the agent is not available, and the reschedule mode isAbandon. (This value is used for CallStatusZone1 only.)
X
Outbound Option Guide for Cisco Unified Contact Center Enterprise and Hosted Release 9.0(1)190
Dialer_Detail TableCallStatusZone Values

DialingMode ValuesThe DialingMode field can be populated with the following values that show the campaign mode for the call.This field is NULL for Do Not Call entries.
Values are shown in the following table.
Table 16: DialingMode Values
DescriptionValue
Predictive only1
Predictive blended2
Preview only3
Preview blended4
Progressive only5
Progressive blended6
Direct preview only7
Direct preview blended8
CallResults TableThe following CallResults table maps the call result to the campaign call report.
Table 17: CallResults Table
Retry ActionDetectedLive Voice?
Counted asAttempt?
Reporting ColumnDescriptionCall Result
None, but returned to thepending state
NoNoNoneError conditionwhile dialing
2
NoneNoYesNoneNumber reportednot in service bynetwork
3
No answerNoYesNoRingBackNo ringback fromnetwork when dialattempted
4
Outbound Option Guide for Cisco Unified Contact Center Enterprise and Hosted Release 9.0(1) 191
Dialer_Detail TableDialingMode Values

Retry ActionDetectedLive Voice?
Counted asAttempt?
Reporting ColumnDescriptionCall Result
NoneNoYesSITToneOperator interceptreturned fromnetwork when dialattempted
5
No answerNoYesNoDialToneNo dial tone whendialer port went offhook
6
NoneNoYesSITToneNumber reported asinvalid by thenetwork
7
No answerNoYesNoAnswerCustomer phone didnot answer
8
BusyNoYesBusyCustomer phonewas busy
9
NoneYesYesVoiceCustomer answeredand was connectedto agent
10
NoneNoYesFaxFax machinedetected
11
Answering Machine, ifneeded
No, buttransfer toagentpossible
YesAnsweringMachineAnsweringmachinedetected
12
Dialer AbandonedNoYesCancelledDialer stoppeddialing customerdue to lack ofagents
13
NoneYesYesCallback &PersonalCallback
Customer requestedcallback
14
NoneNoYesCallback &PersonalCallback
Callback Machine15
Dialer AbandonedYesYesAbandonCall was abandonedby the dialer due tolack of agents
16
Outbound Option Guide for Cisco Unified Contact Center Enterprise and Hosted Release 9.0(1)192
Dialer_Detail TableCallResults Table
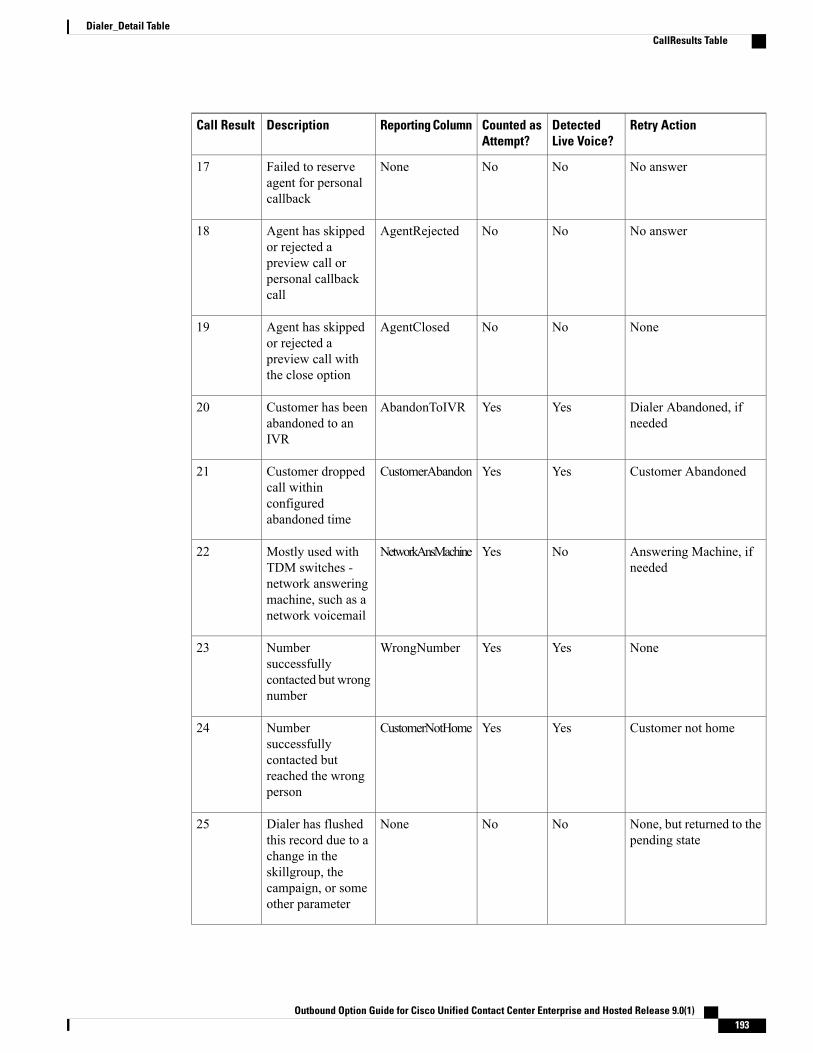
Retry ActionDetectedLive Voice?
Counted asAttempt?
Reporting ColumnDescriptionCall Result
No answerNoNoNoneFailed to reserveagent for personalcallback
17
No answerNoNoAgentRejectedAgent has skippedor rejected apreview call orpersonal callbackcall
18
NoneNoNoAgentClosedAgent has skippedor rejected apreview call withthe close option
19
Dialer Abandoned, ifneeded
YesYesAbandonToIVRCustomer has beenabandoned to anIVR
20
Customer AbandonedYesYesCustomerAbandonCustomer droppedcall withinconfiguredabandoned time
21
Answering Machine, ifneeded
NoYesNetworkAnsMachineMostly used withTDM switches -network answeringmachine, such as anetwork voicemail
22
NoneYesYesWrongNumberNumbersuccessfullycontacted but wrongnumber
23
Customer not homeYesYesCustomerNotHomeNumbersuccessfullycontacted butreached the wrongperson
24
None, but returned to thepending state
NoNoNoneDialer has flushedthis record due to achange in theskillgroup, thecampaign, or someother parameter
25
Outbound Option Guide for Cisco Unified Contact Center Enterprise and Hosted Release 9.0(1) 193
Dialer_Detail TableCallResults Table

Retry ActionDetectedLive Voice?
Counted asAttempt?
Reporting ColumnDescriptionCall Result
NoneNoNoNoneThe number was onthe do not call list
26
No answerNoYesNoRingbackNetworkdisconnected whilealerting
27
No answerNoYesNoRingbackLow Energy orDead Air calldetected by CPA
28
Outbound dialer call result for combinations of PSTN and status codeThe following dialer call results corresponds to the combinations of PSTN cause code and Status code specifiedin the Dialer_ Detail table.
Status code: Status code is a 3-digit integer result code that indicates the outcome of an attempt to understandand satisfy a SIP request.
PSTN cause code: In signaling context, PSTN cause codes are used to indicate certain events or conditionsin the network.
CheckCallState: Indicates whether the call is active or not . TRUE value implies that the call is active.
CallState: Indicates the intermediate call state. When a call is active, it can have any one of the followingvalues - CS_INITIATED, CS_ALERTED, and CS_CONNECTED.
DialerCallResult: Indicates the SIP Dialer call result for the respective SIP status code and PSTN cause code.
Table 18: Outbound Dialer Call Result for PSTN and status code combinations
SystemTypeValues(from Dialerdetail:CallResult)
DialerCallResultCallStateCheckCallStatePSTNCauseCodeStatusCode
7NUMBER_NOT_ALLOCATEDCS_NONEFALSE0404
7NUMBER_NOT_ALLOCATEDCS_NONEFALSE1404
7NUMBER_NOT_ALLOCATEDCS_NONEFALSE31404
3NOT_IN_SERVICECS_NONEFALSE20404
6NO_DIALTONECS_NONEFALSE120408
7NUMBER_NOT_ALLOCATEDCS_NONEFALSE22410
4NO_RINGBACKCS_INITIATEDTRUE18480
Outbound Option Guide for Cisco Unified Contact Center Enterprise and Hosted Release 9.0(1)194
Dialer_Detail TableOutbound dialer call result for combinations of PSTN and status code
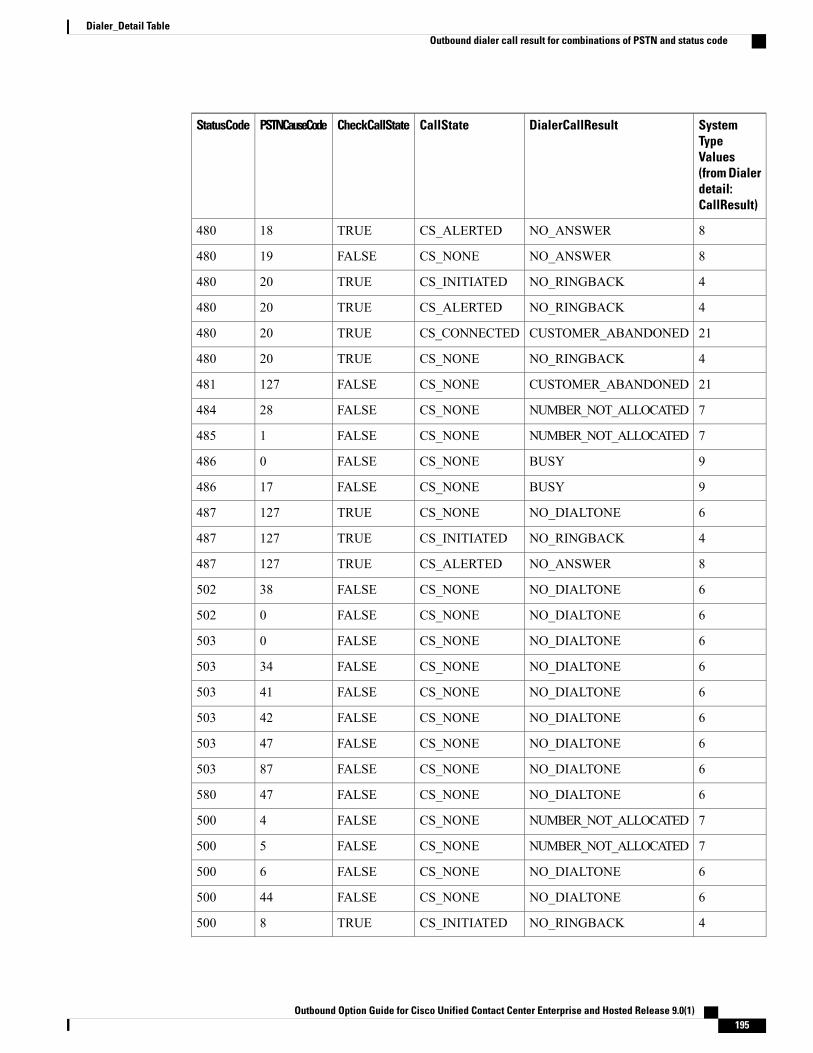
SystemTypeValues(from Dialerdetail:CallResult)
DialerCallResultCallStateCheckCallStatePSTNCauseCodeStatusCode
8NO_ANSWERCS_ALERTEDTRUE18480
8NO_ANSWERCS_NONEFALSE19480
4NO_RINGBACKCS_INITIATEDTRUE20480
4NO_RINGBACKCS_ALERTEDTRUE20480
21CUSTOMER_ABANDONEDCS_CONNECTEDTRUE20480
4NO_RINGBACKCS_NONETRUE20480
21CUSTOMER_ABANDONEDCS_NONEFALSE127481
7NUMBER_NOT_ALLOCATEDCS_NONEFALSE28484
7NUMBER_NOT_ALLOCATEDCS_NONEFALSE1485
9BUSYCS_NONEFALSE0486
9BUSYCS_NONEFALSE17486
6NO_DIALTONECS_NONETRUE127487
4NO_RINGBACKCS_INITIATEDTRUE127487
8NO_ANSWERCS_ALERTEDTRUE127487
6NO_DIALTONECS_NONEFALSE38502
6NO_DIALTONECS_NONEFALSE0502
6NO_DIALTONECS_NONEFALSE0503
6NO_DIALTONECS_NONEFALSE34503
6NO_DIALTONECS_NONEFALSE41503
6NO_DIALTONECS_NONEFALSE42503
6NO_DIALTONECS_NONEFALSE47503
6NO_DIALTONECS_NONEFALSE87503
6NO_DIALTONECS_NONEFALSE47580
7NUMBER_NOT_ALLOCATEDCS_NONEFALSE4500
7NUMBER_NOT_ALLOCATEDCS_NONEFALSE5500
6NO_DIALTONECS_NONEFALSE6500
6NO_DIALTONECS_NONEFALSE44500
4NO_RINGBACKCS_INITIATEDTRUE8500
Outbound Option Guide for Cisco Unified Contact Center Enterprise and Hosted Release 9.0(1) 195
Dialer_Detail TableOutbound dialer call result for combinations of PSTN and status code

SystemTypeValues(from Dialerdetail:CallResult)
DialerCallResultCallStateCheckCallStatePSTNCauseCodeStatusCode
4NO_RINGBACKCS_INITIATEDTRUE9500
4NO_RINGBACKCS_INITIATEDTRUE39500
4NO_RINGBACKCS_INITIATEDTRUE16500
8NO_ANSWERCS_ALERTEDTRUE16500
21CUSTOMER_ABANDONEDCS_CONNECTEDTRUE16500
6NO_DIALTONECS_NONEFALSE44500
9BUSYCS_NONEFALSE46500
7NUMBER_NOT_ALLOCATEDCS_NONEFALSE63500
21CUSTOMER_ABANDONEDCS_NONEFALSE86500
7NUMBER_NOT_ALLOCATEDCS_NONEFALSE1604
9BUSYCS_NONEFALSE17600
Outbound Option Guide for Cisco Unified Contact Center Enterprise and Hosted Release 9.0(1)196
Dialer_Detail TableOutbound dialer call result for combinations of PSTN and status code

A P P E N D I X DTermination_Call_Detail Table
This appendix provides a summary of new peripheral call types that identify the dialing mode of reservationand customer calls, and describes the PeripheralCallType and CallDisposition column values used in theTermination_Call_Detail table. It also provides the CED column values for Outbound Option reservationor personal callback calls.
• Peripheral call types, page 197
• TCD Column Descriptions, page 199
• Transfer to IVR TCD Records, page 202
Peripheral call types
Map Release 8.x to Release 6.0(0) and Earlier Peripheral Call TypesThis section maps the Release 8.x peripheral call types to Release 6.0(0) and earlier peripheral call types.
Table 19: Mapping of Release 8.x Peripheral Call Types to Release 6.0(0) and Earlier Peripheral Call Types
DescriptionPeripheral Call Type
CALLTYPE_OO_RESERVATION_PREVIEW = 27
CALLTYPE_OO_RESERVATION_PREVIEWDIRECT = 28
CALLTYPE_OO_RESERVATION_PREDICTIVE = 29
CALLTYPE_OO_RESERVATION_CALLBACK = 30
CALLTYPE_OO_RESERVATION_PERSONALCALLBACK =31
CALLTYPE_RESERVATION
CALLTYPE_OO_CUSTOMER_PREDICTIVE = 34
CALLTYPE_OO_CUSTOMER_IVR = 37
CALLTYPE_AUTO_OUT
Outbound Option Guide for Cisco Unified Contact Center Enterprise and Hosted Release 9.0(1) 197

DescriptionPeripheral Call Type
CALLTYPE_OO_CUSTOMER_PREVIEW = 32
CALLTYPE_OO_CUSTOMER_CALLBACK = 35
CALLTYPE_OO_CUSTOMER_PREVIEWDIRECT = 33
CALLTYPE_OO_CUSTOMER_PERSONALCALLBACK = 36
CALLTYPE_OO_CUSTOMER_PREDICTIVE = 34
CALLTYPE_OO_CUSTOMER_IVR = 37
CALLTYPE_PREVIEW
Call Disposition Values Used in Termination_Call_Detail TableThe following CallDisposition values can be interpreted as Outbound Option Result Codes:
• 01. ABAND_NETWORK - Customer phone number not in service
• 02. ABAND_LOCAL_QUEUE - An outbound call was abandoned either by the customer or dialer 08.BUSY - Outbound call resulted in a busy signal
• 19. RING_NO_ANSWER - Outbound call was not answered in the allotted time
• 20. INTERCEPT_REORDER - Dialer did not receive a ring back from the ACD on network
• 21. INTERCEPT_DENIAL - Customer call was intercepted by the operator
• 22. TIME_OUT - Dialer unable to detect dial tone
• 23. VOICE_ENERGY - Outbound call was answered by a person
On Unified CCE, this result might also represent a call answered by an answeringmachine.
Note
• 24. NONCLASSIFIED_ENERGY_DETECT - Outbound call reached a FAX machine
• 26. UABORT - Outbound call was disconnected before customer answered
• 33. ANSWERING_MACHINE - Outbound call was answered by answering machine
CED Column ValuesThe CED column values for Outbound Option reservation or personal callback calls are as follows:
“Callback” = Personal callback customer call“ICM_BA_Reservation_Call” = Reservation call
Outbound Option Guide for Cisco Unified Contact Center Enterprise and Hosted Release 9.0(1)198
Termination_Call_Detail TableCall Disposition Values Used in Termination_Call_Detail Table

TCD Column DescriptionsThe following types of records are generated when the Outbound Option Dialer makes agent reservation callsand customer calls.
Reservation CallsReservation calls generate two TCD records and one RCD record:
• IPCC reservation call (TCD) as described below.
• MR PIM reservation entry “not a real call” (TCD) as described below.
• MR PIM route request (RCD) as described on the next page.
This record is a route request sent from the Dialer via the MR PIM.Note
IPCC Reservation CallPeripheralCallType = 18 (Reserve)
CallDisposition = 6 (agent abandon)
DialedNumber =Number dialed to run routing script
CED = ICM_BA_Reservation_Call
DNIS = Agent phone number (also InstrumentPortNumber)
HoldTime =Most of reserve time is kept under this bucket
TalkTime = Prior to reservation call being placed on hold the talking bucket is incremented
Duration = Total reservation time
AgentPeripheralNumber = Agent Sign-in ID
PeripheralCallKey = Unique peripheral call ID
ANI = Customer phone number (only available for Preview reservation calls)
RouterCallKeyDay/RouterCallKey = Maps reservation call to MR reservation request and associates it withroute_call_detail record
MR PIM Reservation Entry Not a Real Call (TCD)PeripheralID = MR PIM Peripheral ID (not Unified CM Peripheral ID)
PeripheralCallType = 1 (ACD IN; all MR calls are this type)
CallDisposition = 14 (call handled by Dialer)
RouterCallKeyDay/RouterCallKey = Maps MR reservation request to actual reservation call and associatesit with MR reservation route_call_detail record
Outbound Option Guide for Cisco Unified Contact Center Enterprise and Hosted Release 9.0(1) 199
Termination_Call_Detail TableTCD Column Descriptions
MR PIM Route Request (RCD - route_call_detail)RouterCallKeyDay/RouterCallKey = Maps MR reservation route to actual reservation call and associates itwith MR reservation route_call_detail record
RequestType = 6 (Post-Routing)
RoutingClientID = MR PIM used by Dialer
ScriptID = Script used to service agent reservation request
RouterErrorCode = 0 (no error)
Label = Agent phone extension
DialedNumberString = Dialed number used to choose script
Customer CallsCustomer calls generate up to two TCD records:
• Initial customer call transferred to agent (TCD) as described in Table D-2.
• Customer speaking with agent (TCD) as described in Table D-3.
Table 20: Initial Customer Call Transferred to Agent (TCD)
DescriptionColumn Name
One of the following:
• 32 (preview)
• 33 (preview direct)
• 34 (predictive)
• 35 (callback)
• 36 (personal callback)
• 37 (IVR)
PeripheralCallType
Customer phone numberDigitsDialed
29 (announced transfer, call was transferred to agent)CallDisposition
Number of seconds agent was reserved for anoutbound call including amount of time it took toreserve the agent
Duration
Number of seconds agent was reservedHoldTime
Unique key for TCD recordICRCallKey
Outbound Option Guide for Cisco Unified Contact Center Enterprise and Hosted Release 9.0(1)200
Termination_Call_Detail TableCustomer Calls

DescriptionColumn Name
Call key identifying the transferred customer callICRCallKeyChild
Unique peripheral call ID (same as transferred call)PeripheralCallKey
Customer phone numberANI
Table 21: Customer Speaking with Agent (TCD)
DescriptionColumn Name
ICM agent IDAgentSkillTargetID
ICM skill group IDSkillGroupSkillTargetID
One of the following:
• 32 (preview)
• 33 (preview direct)
• 34 (predictive)
• 35 (callback)
• 36 (personal callback)
• 37 (IVR)
PeripheralCallType
Agent phone extensionDigitsDialed
13 (disconnect/drop handled, call was handled byagent)
CallDisposition
Total customer handle time (including talk andwrap-up)
Duration
Agent talk timeTalkTime
Unique key for TCD recordICRCallKey
Call key identifying the original customer call priorto the transfer
ICRCallKeyChild
Unique peripheral call ID (same as original customercall prior to transfer)
PeripheralCallKey
Customer phone numberANI
Outbound Option Guide for Cisco Unified Contact Center Enterprise and Hosted Release 9.0(1) 201
Termination_Call_Detail TableCustomer Calls
Transfer to IVR TCD RecordsSIP Dialer
With SIP dialer, the Transferred Customer Calls have a PeripheralCallType of 1.
No TCD records are cut for the outbound calls that do not hit the Unified CCE peripheral for either CVP(IVR)or Agent-based campaigns.
SCCP Dialer
For SCCP dialer, the peripheral call type varies.
Transfer to IVR calls generate up to three TCD records:
• Initial Customer Call on Unified CM PIM Transferred to Route Point
• Transferred Customer Call on Unified CM PIM Redirected to IVR
• IVR Playing a Message on VRU Pim to a Customer
Note • If the call is not answered, only one TCD record is generated.
• If the Dialer transfers a customer to an IVR while the IVR is experiencing technical difficulties, therecord closes in the Dialing List table with a CallResult of 10 (Voice) or 16 (Abandon). However,in the t_Termination_Call_Detail table, the CallDisposition is 7 (Short) or 10 (Disconnect/drop noanswer) for the second CM PIM TCD record. The first Unified CM PIM TCD record has a value of23 (Voice Energy). The CallDisposition for the VRU PIM TCD record is 27 (Failed Software).
For calls transferred to an IVR, depending on the sequence of events occurring from Unified CM to UnifiedCCE, an extra TCD might be generated.
• Scenario one: If the call arrived at the IVR before it cleared from the Agent PG side, no extra TCD isgenerated.
• Scenario two: If the call cleared from the Agent PG side first, an extra TCD is generated.
There is no guarantee of the event order for events coming from Unified CM; therefore, Unified CCE mightgenerate inconsistent reports based on inconsistent events.
Initial Customer Call on PIM Transferred to Route Point• PeripheralCallType - one of the following:
◦32 (preview)
◦33 (preview direct)
◦34 (predictive)
◦35 (callback)
Outbound Option Guide for Cisco Unified Contact Center Enterprise and Hosted Release 9.0(1)202
Termination_Call_Detail TableTransfer to IVR TCD Records

◦36 (personal callback)
◦37 (IVR)
• DigitsDialed - Customer phone number
• CallDisposition - 29 (announced transfer, call was transferred to route point)
• Duration - Number of seconds it took the Dialer to dial the customer phone number and have thecustomer pick up the phone
• ICRCallKey - Unique key for TCD record
• ICRCallKeyChild - Call key identifying the transferred customer call
• PeripheralCallKey- Unique peripheral call ID (same as transferred call)
• ANI - Customer phone number
Transferred Customer Call on Unified CM PIM Redirected to IVR• PeripheralCallType - one of the following:
◦32 (preview)
◦33 (preview direct)
◦34 (predictive)
◦35 (callback)
◦36 (personal callback)
◦37 (IVR)
• DigitsDialed - Customer phone number
• CallDisposition - 15 (redirect)
• Duration - Number of seconds it took the Dialer to redirect the call
• ICRCallKey - Unique key for TCD record
• ICRCallKeyParent - Call key identifying the initial customer call
• PeripheralCallKey - Unique peripheral call ID (same as transferred call)
• ANI - Customer phone number
IVR Plays a Message on VRU PIM to a Customer• PeripheralCallType - 1 (ACD in, call comes into IVR)
• DigitsDialed - Digits dialed to reach the route point, which executes the translation route
• CallDisposition - 13 (disconnect/drop handled, call was handled by IVR) or 6 (abandon; customer hangsup the phone before the IVR message ends)
Outbound Option Guide for Cisco Unified Contact Center Enterprise and Hosted Release 9.0(1) 203
Termination_Call_Detail TableTransferred Customer Call on Unified CM PIM Redirected to IVR

• LocalQTime - Total customer handle time at the IVR
• ICRCallKey - Unique key for TCD record
• PeripheralCallKey - Unique peripheral call ID (same as original customer call prior to transfer)
• ANI - Customer phone number
Outbound Option Guide for Cisco Unified Contact Center Enterprise and Hosted Release 9.0(1)204
Termination_Call_Detail TableIVR Plays a Message on VRU PIM to a Customer

A P P E N D I X EDialing_List Table
This appendix provides information about the Dialing List table. (This table is used for troubleshootingpurposes.)
Other applications are not allowed to access it for reading, writing, or using triggers.
• Dialing_List Table Columns, page 205
Dialing_List Table ColumnsThere is a separate Dialing_List table for every Campaign andQuery Rule combination. The naming conventionfor each table is “DL_CCCC_QQQQ,” where “CCCC” is the database ID of the campaign and “QQQQ” is thedatabase ID for the query rule. The following table displays the Dialing_List table column names and theirdescription.
Table 22: Dialing_List Table Columns for Release 7.0(0)
Autoincrement value - unique for eachCampaign Query Rule table
TypeDialing List ID
Phone number imported into Phone01through Phone 10 standard column
VARCHAR20Phone01 through Phone10
Phone number extension imported intoPhoneExt01 through PhoneExt10 standardcolumn. This column is for future use; it isnot currently being used.
VARCHAR8PhoneExt01 through PhoneExt10
Phone number to be used for a regularcallback it can be supplied by the agent
VARCHAR20CallbackNumber
The call result from the last call placed forthis record (see Call Result definitions).
SMALLINTCallResult
Outbound Option Guide for Cisco Unified Contact Center Enterprise and Hosted Release 9.0(1) 205

Autoincrement value - unique for eachCampaign Query Rule table
TypeDialing List ID
The call result from the last timePhone01through Phone10 was called (seeCall Result definitions). CallResult01captures the results of all requested regularcallback calls for Phone01 to Phone10
SMALLINTCallResult01 through CallResult10
The last zone that was dialed (0 indicateszone1, 1 indicates zone2)
SMALLINTLastZoneDialed
The last number dialed in zone1 (1 forphone01, 2 for phone02, and so on)
SMALLINTLastNumberDialedZone1
The last number dialed in zone2 (1 forphone01, 2 for phone02, and so on)
SMALLINTLastNumberDialedZone2
The number of calls made to numbers inzone 1
For a call which an OutboundAgent has scheduled a callback,the CallResult resets to 0
Note
SMALLINTCallsMadeToZone1
The number of calls made to numbers inzone 2
For a call which an OutboundAgent has scheduled a callback,the CallResult resets to 0
Note
SMALLINTCallsMadeToZone2
The date/time when the next call to thiszone will occur
DATETIMECallbackDateTimeZone1
The number of calls made to numbers inzone 2
DATETIMECallbackDateTimeZone2
The date/time when the next call to thisphone number will occur
DATETIMECallbackDateTime01 throughCallbackDateTime010
The time zone where this phone number islocated
SMALLINTGMTPhone01 throughGMTPhone10
Is DST observed at this phone number(boolean).
SMALLINTDSTPhone01 throughDSTPhone10
The call status (pending, retry, callback,and so forth) for this zone
CHAR(1)CallStatusZone1 andCallStatusZone2
Customer’s account numberVARCHAR25AccountNumber
Customer’s last nameVARCHAR50LastName
Outbound Option Guide for Cisco Unified Contact Center Enterprise and Hosted Release 9.0(1)206
Dialing_List TableDialing_List Table Columns

Autoincrement value - unique for eachCampaign Query Rule table
TypeDialing List ID
Customer’s first name.VARCHAR50FirstName
The date/time when the record wasimported.
DATETIMEImportRuleDate
Outbound Option Guide for Cisco Unified Contact Center Enterprise and Hosted Release 9.0(1) 207
Dialing_List TableDialing_List Table Columns

Outbound Option Guide for Cisco Unified Contact Center Enterprise and Hosted Release 9.0(1)208
Dialing_List TableDialing_List Table Columns

A P P E N D I X FSchedule of Contacts Between Customers andAgents
This appendix describes the Personal Callback List and documents all the columns in the personal callbacktable.
This table is insert only, and can be used to perform queries.Note
• Personal_Callback_List Table, page 209
Personal_Callback_List TableThe Personal Callback List maintains a list of customer records scheduled to be called back by a specificagent. The Personal_Callback_List is managed by the Campaign Manager.
When an agent (working in an outbound campaign) schedules a personal callback with the personal callbackmode enabled, the scheduled callback is treated as a personal callback (for the agent who scheduled thecallback). The original record in the contact_list is updated with CallStatus=S (“S” indicates the customerrecord has a personal callback scheduled) and a new record is inserted into the Personal_Callback_List.
The following table documents all the columns in the personal callback table.
Table 23: Personal Callback Table Columns
DescriptionTypeColumn Name
Unique identifier for each record in this table.AUTO-INTPersonalCallbackListID
Cross-references a record that has beenmoved fromthe contact_list to this table.
INTDialingListID
Campaign ID (if the record was originally dialedas part of a campaign).
INTCampaignID
Outbound Option Guide for Cisco Unified Contact Center Enterprise and Hosted Release 9.0(1) 209

DescriptionTypeColumn Name
Peripheral ID for the peripheral where the agentwould be available.
INTPeripheralID
Agent to which the call has to be connected.INTAgentID
VDN to use (if original agent is unavailable).VARCHARAlternateVDN
GMT of the customer number (if NULL, the localGMT zone is assumed). If this value is provided,it must always be a positive value from 0 to 23.Convert all negative GMT values using thefollowing formula: 24 + (negative GMT value). Forexample, the US eastern time zone is -5, so thevalue stored in this column is 24 + (-5) = 19.
SMALLINTGMTZone
Phone number to call back.VARCHARPhone
Customer account number.VARCHARAccountNumber
Maximum number of times a call will be attempted(decrements at each attempt). An “attempt” isdefined as the Outbound Option Dialer’s attemptto reserve the agent and make the customer call.Since the Outbound Option Dialer is responsiblefor placing multiple customer call attempts (busy,no answer), the actual individual call attempts arenot tracked here; only the end result at the end ofthe callback time range.
Once this column is set to 0, no moreattempts will be made.
Note
INTMaxAttempts
Time to attempt customer callback is normalizedto the logger GMT zone; for example, if theCampaign Manager is in Boston and the customeris in California and wished to be contacted at 3:00PM, the time in this column would be 6:00 PM.
DATETIMECallbackDateTime
Current status of the callback record, such as 'P' forpending or 'C' for closed.
New records must be set to'P.'
Note
CHARCallStatus
Telephony call result (busy, no answer, and so on)or agent reservation attempt result (Agent RejectedCall, Unable to reserve and so on.)
SMALLINTCallResult
Last name of the customer.VARCHARLastName
First name of the customer.VARCHARFirstName
Outbound Option Guide for Cisco Unified Contact Center Enterprise and Hosted Release 9.0(1)210
Schedule of Contacts Between Customers and AgentsPersonal_Callback_List Table

Outbound Option Guide for Cisco Unified Contact Center Enterprise and Hosted Release 9.0(1) 211
Schedule of Contacts Between Customers and AgentsPersonal_Callback_List Table

Outbound Option Guide for Cisco Unified Contact Center Enterprise and Hosted Release 9.0(1)212
Schedule of Contacts Between Customers and AgentsPersonal_Callback_List Table

A P P E N D I X GCTI OS Outbound Option ECC Variable Settings
This appendix contains a sample .REG file, which creates the applicable Outbound Option ECC registryentries for CTI OS.
If your call center has both inbound and outbound call traffic, also see the “ECC Variables in Mixed Inboundand Outbound Call Centers Example” section.
• ECC Variables for Outbound Call Centers Example, page 213
• ECC Variables in Mixed Inbound and Outbound Call Centers Example, page 214
ECC Variables for Outbound Call Centers Example
This sample registry file (.REG) must be run on the CTI OS server.Note
REGEDIT4 [HKEY_LOCAL_MACHINE\SOFTWARE\Cisco Systems,Inc.\CTIOS\InstanceName\ctios1\EnterpriseDesktopSettings\All
Desktops\Grid\CallAppearance][HKEY_LOCAL_MACHINE\SOFTWARE\Cisco Systems,Inc.\CTIOS\InstanceName\ctios1\EnterpriseDesktopSettings\AllDesktops\Grid\CallAppearance\Columns] [HKEY_LOCAL_MACHINE\SOFTWARE\Cisco Systems,Inc.\CTIOS\InstanceName\ctios1\EnterpriseDesktopSettings\AllDesktops\Grid\CallAppearance\Columns\Number] [HKEY_LOCAL_MACHINE\SOFTWARE\Cisco Systems,
Inc.\CTIOS\InstanceName\ctios1\EnterpriseDesktopSettings\AllDesktops\Grid\CallAppearance\Columns\Number\1] "Type"="CallID"[HKEY_LOCAL_MACHINE\SOFTWARE\Cisco Systems,Inc.\CTIOS\InstanceName\ctios1\EnterpriseDesktopSettings\AllDesktops\Grid\CallAppearance\Columns\Number\2] "Type"="CallStatus"[HKEY_LOCAL_MACHINE\SOFTWARE\Cisco Systems,Inc.\CTIOS\InstanceName\ctios1\EnterpriseDesktopSettings\AllDesktops\Grid\CallAppearance\Columns\Number\3] "Type"="DNIS"
[HKEY_LOCAL_MACHINE\SOFTWARE\CiscoSystems, Inc.\CTIOS\InstanceName\ctios1\EnterpriseDesktopSettings\AllDesktops\Grid\CallAppearance\Columns\Number\4] "Type"="ANI"
[HKEY_LOCAL_MACHINE\SOFTWARE\CiscoSystems, Inc.\CTIOS\InstanceName\ctios1\EnterpriseDesktopSettings\AllDesktops\Grid\CallAppearance\Columns\Number\5] "Type"="CED"
[HKEY_LOCAL_MACHINE\SOFTWARE\CiscoSystems, Inc.\CTIOS\InstanceName\ctios1\EnterpriseDesktopSettings\AllDesktops\Grid\CallAppearance\Columns\Number\6] "Type"="DialedNumber"[HKEY_LOCAL_MACHINE\SOFTWARE\Cisco Systems,Inc.\CTIOS\InstanceName\ctios1\EnterpriseDesktopSettings\AllDesktops\Grid\CallAppearance\Columns\Number\7] "Type"="CallType"
Outbound Option Guide for Cisco Unified Contact Center Enterprise and Hosted Release 9.0(1) 213
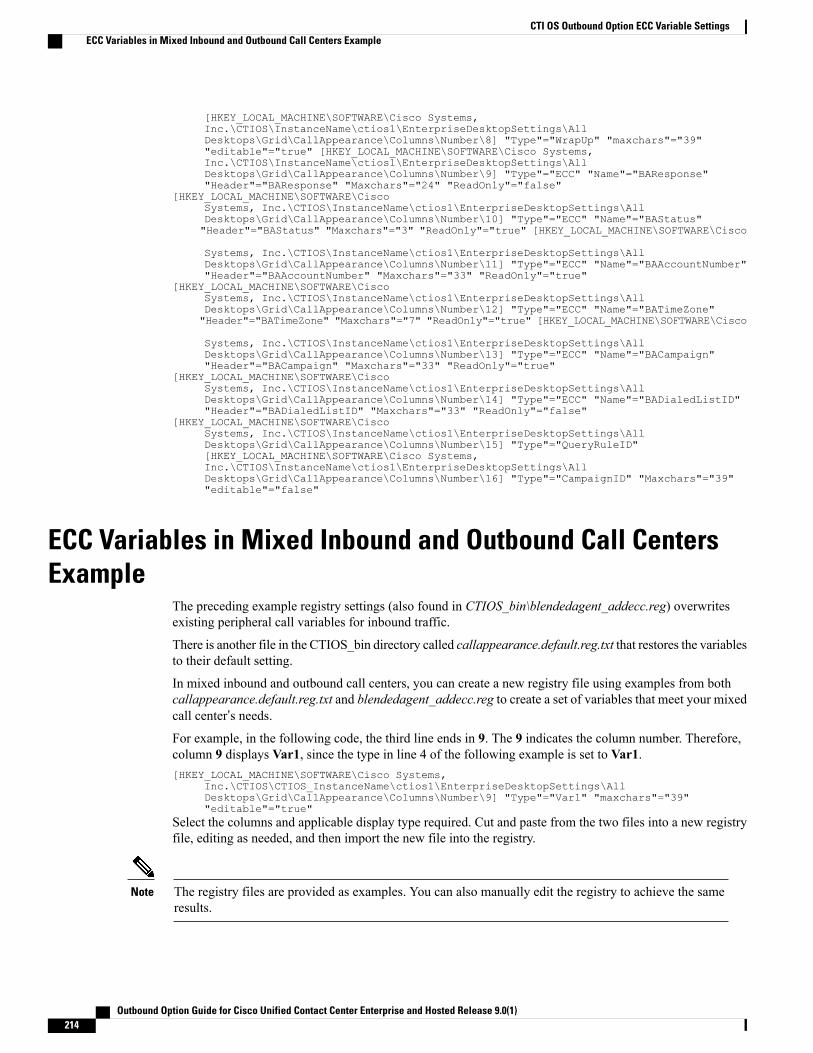
[HKEY_LOCAL_MACHINE\SOFTWARE\Cisco Systems,Inc.\CTIOS\InstanceName\ctios1\EnterpriseDesktopSettings\AllDesktops\Grid\CallAppearance\Columns\Number\8] "Type"="WrapUp" "maxchars"="39""editable"="true" [HKEY_LOCAL_MACHINE\SOFTWARE\Cisco Systems,Inc.\CTIOS\InstanceName\ctios1\EnterpriseDesktopSettings\AllDesktops\Grid\CallAppearance\Columns\Number\9] "Type"="ECC" "Name"="BAResponse""Header"="BAResponse" "Maxchars"="24" "ReadOnly"="false"
[HKEY_LOCAL_MACHINE\SOFTWARE\CiscoSystems, Inc.\CTIOS\InstanceName\ctios1\EnterpriseDesktopSettings\AllDesktops\Grid\CallAppearance\Columns\Number\10] "Type"="ECC" "Name"="BAStatus""Header"="BAStatus" "Maxchars"="3" "ReadOnly"="true" [HKEY_LOCAL_MACHINE\SOFTWARE\Cisco
Systems, Inc.\CTIOS\InstanceName\ctios1\EnterpriseDesktopSettings\AllDesktops\Grid\CallAppearance\Columns\Number\11] "Type"="ECC" "Name"="BAAccountNumber""Header"="BAAccountNumber" "Maxchars"="33" "ReadOnly"="true"
[HKEY_LOCAL_MACHINE\SOFTWARE\CiscoSystems, Inc.\CTIOS\InstanceName\ctios1\EnterpriseDesktopSettings\AllDesktops\Grid\CallAppearance\Columns\Number\12] "Type"="ECC" "Name"="BATimeZone""Header"="BATimeZone" "Maxchars"="7" "ReadOnly"="true" [HKEY_LOCAL_MACHINE\SOFTWARE\Cisco
Systems, Inc.\CTIOS\InstanceName\ctios1\EnterpriseDesktopSettings\AllDesktops\Grid\CallAppearance\Columns\Number\13] "Type"="ECC" "Name"="BACampaign""Header"="BACampaign" "Maxchars"="33" "ReadOnly"="true"
[HKEY_LOCAL_MACHINE\SOFTWARE\CiscoSystems, Inc.\CTIOS\InstanceName\ctios1\EnterpriseDesktopSettings\AllDesktops\Grid\CallAppearance\Columns\Number\14] "Type"="ECC" "Name"="BADialedListID""Header"="BADialedListID" "Maxchars"="33" "ReadOnly"="false"
[HKEY_LOCAL_MACHINE\SOFTWARE\CiscoSystems, Inc.\CTIOS\InstanceName\ctios1\EnterpriseDesktopSettings\AllDesktops\Grid\CallAppearance\Columns\Number\15] "Type"="QueryRuleID"[HKEY_LOCAL_MACHINE\SOFTWARE\Cisco Systems,Inc.\CTIOS\InstanceName\ctios1\EnterpriseDesktopSettings\AllDesktops\Grid\CallAppearance\Columns\Number\16] "Type"="CampaignID" "Maxchars"="39""editable"="false"
ECC Variables in Mixed Inbound and Outbound Call CentersExample
The preceding example registry settings (also found in CTIOS_bin\blendedagent_addecc.reg) overwritesexisting peripheral call variables for inbound traffic.
There is another file in the CTIOS_bin directory called callappearance.default.reg.txt that restores the variablesto their default setting.
In mixed inbound and outbound call centers, you can create a new registry file using examples from bothcallappearance.default.reg.txt and blendedagent_addecc.reg to create a set of variables that meet your mixedcall center’s needs.For example, in the following code, the third line ends in 9. The 9 indicates the column number. Therefore,column 9 displays Var1, since the type in line 4 of the following example is set to Var1.[HKEY_LOCAL_MACHINE\SOFTWARE\Cisco Systems,
Inc.\CTIOS\CTIOS_InstanceName\ctios1\EnterpriseDesktopSettings\AllDesktops\Grid\CallAppearance\Columns\Number\9] "Type"="Var1" "maxchars"="39""editable"="true"
Select the columns and applicable display type required. Cut and paste from the two files into a new registryfile, editing as needed, and then import the new file into the registry.
The registry files are provided as examples. You can also manually edit the registry to achieve the sameresults.
Note
Outbound Option Guide for Cisco Unified Contact Center Enterprise and Hosted Release 9.0(1)214
CTI OS Outbound Option ECC Variable SettingsECC Variables in Mixed Inbound and Outbound Call Centers Example

I N D E X
A
abandon rates, end-of-day calculations 166adding 79, 108, 162
agents 162Enterprise Data fields to the Layout list 79, 108
admin scripts 41, 147Admin Workstation 34
Cisco Unified Intelligence Center 34configuration 34
administrative scripts 154TimeBasedControl 154
agent PG 33about 33deployments 33
agents 13, 18, 159, 162, 167adding 162blended 18campaign 13dedicating particular agent to only perform outboundactivity 162managing idle time 167re-skilling 162reporting templates 159skilled for multiple active campaigns 18working with smaller skill groups 18
Agtskg06 report 159Agtskg10 report 159Agtskg11 report 159Agtskg12 report 159answering machine detection 20
with call progress analysis 20answering machine terminating beep detection 20
with call progress analaysis 20attributes, adding to a contact list 164
B
blended 18, 19agent 18campaign skill group reporting 19
blended (continued)campaigns 18skill groups 18
C
call progress analysis 20overview 20
call types 17reporting 17
callbacks 13, 14, 16calling order priority 16overview 13personal 14regular 14
Campaign Manager 24, 42, 171component, about 24fault recovery 42registry settings 171
campaign query rule reporting 17campaigns 10, 12, 13, 15, 16, 17, 18, 19, 27, 139, 158, 164, 165, 166, 167,
168agent 13agents skilled for mutiple active 18blended 18callbacks 13customer time versus system time 19dialing modes 10dialing order 15dialing time 19end-of-day calculations for abandon rate 166initial values for lines per agent 166limitations of smaller agent groups 167managing predictive 165masking caller ID 12overview 10port requirements, modes 27reporting 16reporting templates 158retry records in append 168running effective 164
Outbound Option Guide for Cisco Unified Contact Center Enterprise and Hosted Release 9.0(1) IN-1

campaigns (continued)running single versus multiple 165skill group reporting 18skill group reporting for blended 19skill groups 17transfer to IVR 15transferring AMD calls to agents 166tuning the parameters 139, 166working with smaller skill groups 18
Camqry01 report 158Camqry02 report 158Camqry03 report 158Camqry04 report 158Camqry05 report 158Camqry06 report 158Camqry10 report 158Camqry11 report 158Camqry12 report 158Camqry13 report 158Camqry14 report 158Camqry15 report 158Camqry16 report 158Camqry17 report 158Camqry18 report 158Camqry19 report 158Camqry20 report 158Camqry21 report 158Camqry22 report 158Camqry23 report 158CCE software overview 21CED column values 198changing 138
max attempts 138Cisco Agent Desktop (CAD) 35, 36
overview of components 35using Cisco Agent Desktop soft phone 35using Cisco Desktop Administrator 36using Cisco Supervisor Desktop 35
Cisco Desktop Adminstrator 79, 108adding the Enterprise Data fields to the Layout list 79, 108Outbound Option enterprise data 79, 108setting up Outbound Option 79, 108
component relationships, Outbound Option 23concepts, Outbound Option 6Configuration Components 120configuring 50, 51, 52, 56, 62, 89, 90, 91, 93, 98, 102, 119, 155
auto answer on agent phones 102campaigns and imports 119Dialer component 50, 89MR PG 52, 91Outbound Option Multi-Tenant customer instances 155port map 51, 90queue to agent node 62, 98system options 56, 93
contact information, previewing 10Contact list 9, 164
adding attributes 164creating 60, 61, 97, 98, 125, 127, 131, 133, 135, 145, 146, 163
call type 146campaign 135dialed numbers 125Do Not Call list 131, 163enterprise route 61, 98, 146enterprise skill group 60, 97, 145import rule 127query rule 133
CTI controls, installing 76, 106CTI ECC variables, using 36CTI OS 34, 76, 106, 213
about 34integrating Outbound Option 76, 106Outbound Option ECC variable settings 213
CTI Server 73, 103Properties 73, 103
CTI Toolkit Outbound Desktop (Win32), installing 78, 107customer time, campaign 19
D
Daylight savings 171desktops 34, 39
button performance 39Outbound Option 34
Dialer 21, 25, 26, 28, 42, 73, 81, 103, 110, 161, 168component status bar, checking 81, 110component, about 25example of process flow in Predictive mode 28fault recovery 42installation instructions 73, 103overview 21port allocation 26reporting templates 161saturation 168
Dialer_Detail table 165, 187, 188, 189, 191about 187advantages 187CallResult codes and values 188CallResults table 191CallStatusZone values 189data flow 187database fields and descriptions 188DialingMode values 191fault tolerance 188getting results for individual customers 165
Dialer01 report 161Dialer10 report 161
Outbound Option Guide for Cisco Unified Contact Center Enterprise and Hosted Release 9.0(1)IN-2
Index

Dialer11 report 161Dialer12 report 161Dialers 1
definition 1dialing 10, 16
modes, Direct Preview 10modes, Predictive 10modes, Preview 10modes, Progressive 10sequential 16
Dialing List 165getting results for individual customers 165
dialing modes 121, 122, 123direct preview 122Predictive 122Preview 122Progressive 123understanding 121
Dialpr01 report 161Direct Preview dialing mode 10Direct Preview mode 122
enabling 122disabling 64, 101
ringback during transfer to agent 64, 101Do Not Call list 8, 131, 163
creating 131, 163
E
ECC variables 36, 56, 94, 213, 214CTI OS Outbound Option 213enabling 56, 94for outbound call centers 213in mixed inbound and outbound call centers 214
F
fault recovery 42Campaign Manager 42Dialer 42
fax/modem detection 20with call progress analysis 20
features 2, 3, 4, 5abandoned and retry call settings 5activity reports 4agent re-skilling 5Call Progress Analysis (CPA) 4callbacks 4campaign management 3campaign prefix digits for dialed numbers 5Dialer 2
features (continued)dialing modes 3list of Outbound Option 2managing skill groups 3Outbound ECC variables support in Siebel 7.5.3 and later 5Outbound Option support on IPCC Hosted 5sequential dialing 4transfer to IVR 4
G
getting results for individual customers 165
I
ICMDBA utility 71Import component 25Import Rule 160
reporting templates 160imports 8, 9, 130, 163
Contact list 9Do Not Call list 8reporting 9running 130, 163types 8
Imprule01 report 160Imprule10 report 160installing 73, 75, 76, 78, 103, 105, 106, 107
Cisco CTI controls 76, 106CTI Toolkit Outbound Desktop (Win32) 78, 107Dialer component 73, 103MR PG 75, 105
integrating Outbound Option with CTI OS 76, 106
J
JTAPI, modifying for calls to invalid numbers 105
L
lists 8, 9, 209Contact 9Do Not Call 8Personal Callback 209
Outbound Option Guide for Cisco Unified Contact Center Enterprise and Hosted Release 9.0(1) IN-3
Index

M
managing 164, 167agent idle time 167effective campaigns 164
masking caller ID 12max attempts, changing 138modifying JTAPI for calls to invalid numbers 105
N
navigating Outbound Option Configuration Components 120overview 120
Network VRU 52, 91creating 52, 91
North American Local Exchange NPA NXX (NALENND) 169North AmericanNumbering PlanData, SeeNorth American LocalExchange NPA NXX Database
O
outbound dialing modes 121Outbound Option 1, 2, 6, 21, 22, 40, 45, 46, 71, 79, 102, 108, 120, 147,
157architectural overview 21concepts, how they relate to each other 6configuration tools overview 120Dialer component, overview 21enterprise data 79, 108features 2high-level overview 2installation overview 45installation prerequisites 46private database, creating 71, 102reports 157scripting 40, 147software components 22solution 1
Outbound Option Dialer 73, 103, 175adding a component 73, 103installation instructions 73, 103registry settings 175
P
pending contracts, calling order priority 16peripheral gateway 33
about 33agent 33media routing 33
Perskg11 report 159Perskg12 report 159Personal Callback list 209port throttle 169
SIP dialer 169ports 27
requirements for campaign modes 27predictive algorithm 122, 139, 165, 166
example 122managing 165tuning the parameters 139, 166
Predictive dialing mode 10, 122prerequisites 46
Outbound Option installation 46Preview dialing mode 10, 122Progressive dialing mode 10, 123
Q
query rules 10overview 10
R
re-skilling 162agent 162
registry settings 171reporting 9, 16, 17, 18, 19, 34, 157, 158, 159, 160, 161, 167, 168
agent 159blended campaign skill group 19call type 17campaign 16Campaign 158campaign query rule 17campaign skill group 18Dialer 34, 161Dialer saturation 168half-hour 157import 9Import Rule 160managing agent idle time 167real-time 157retry records in append campaigns 168running out of available records 168skill group 159sources of higher idle times 168transfer to IVR 17understanding 157
reservation scripts 41, 147retries, calling order priority 16ringback, disabling during transfer to agent 64, 101
Outbound Option Guide for Cisco Unified Contact Center Enterprise and Hosted Release 9.0(1)IN-4
Index

running 130, 163, 164, 168effective campaigns 164imports 130, 163out of available records 168
S
scheduling contacts using Personal Callback List 209script selector configuration 156
on IPCC installation 156scripting 40, 41, 147
Outbound Option 40, 147Outbound Option admin scripts 41, 147Outbound Option reservation scripts 41, 147
scripts 154administrative, example of TimeBasedControl 154
SIP dialer 169throttle down 169voice gateway 169
skill groups 17, 18, 159agents skilled for multiple active campaigns 18blended 18campaign 17reporting for campaign 18reporting temmplates 159working with smaller 18
system time, campaign 20
T
tasks 47, 48, 50, 51, 52, 56, 60, 61, 62, 64, 71, 73, 75, 76, 78, 79, 86, 87, 89, 90, 91, 93, 94, 97, 98, 99, 100, 101, 102, 103, 105, 106, 107, 108, 125, 127, 133, 135, 145, 146, 149, 151, 154, 156, 157
adding enterprise data fields to the layout list 79, 108administrative/supervisory 157configuring auto answer on agent phones 102configuring Dialer component 50, 89configuring MR PG 52, 91configuring personal callbacks 56, 94configuring port map 51, 90configuring queue to agent node 62, 98configuring transfer to IVR script 149creating call type 146creating campaign 135creating dialed numbers 125creating enterprise route 61, 98, 146creating enterprise skill group 60, 97, 145creating import rule 127creating Network VRU 52, 91creating query rule 133creating the Outbound Option private database 71, 102
tasks (continued)disabling ringback during transfer to agent 64, 101enabling ECC variables 56, 94importing and assigning Dialer ports 100installing CTI controls 76, 106installing CTI Toolkit Outbound Desktop 78, 107installing MR PG 75, 105installing the Dialer component 73, 103IPCC Enterprise outbound configuration 47, 86mapping scripts and call types and dialed numbers 154setting up administrative script 151setting up Outbound Option in Cisco DesktopAdministrator 79, 108software installation and database creation 48, 71, 87system options 56, 93Unified CM configuration 64, 86, 99verifying DN/script selector configuration 156
TCD column descriptions 199TCD records, transfer to IVR 202templates 158, 159, 160, 161
agent activity 159campaign consolidated detailed records status byhalf-hour/daily for selected time period 158campaign consolidated records status by half-hour/daily forselected time period 158campaign dialing times 158campaign query rules by half-hour 158campaign records breakdown of attempts for selected timeperiod 158campaign records breakdown per query rule of attempts forselected time period 158campaign records status 158campaign records status by half-hour 158campaign records status by half-hour/daily for selected timeperiod 158campaign records status per query rule by half-hour/daily forselected time period 158current status of all campaign records 158dialer activity by port 161dialer capacity by half-hour/daily 161dialer detection by half-hour 161dialer detection status 161Outbound Option counts 159predictive calls by skill group 159preview calls by skill group 159query rule dialing times 158query rules within a campaign 158real-time table of query rules within a campaign 158records imported 160records imported by time range 160reservation calls by skill group 159skill groups and associated Outbound Option status 159
throttle down (SIP dialer) 169
Outbound Option Guide for Cisco Unified Contact Center Enterprise and Hosted Release 9.0(1) IN-5
Index

transfer to IVR 15, 17, 29, 202campaigns 15example of process flow 29reporting 17TCD records 202
transferring 166AMD calls to agents 166
U
Unified CCE software overview 21using 33, 35, 36
Cisco Agent Desktop soft phone 35Cisco Desktop Administrator 36Cisco Supervisor Desktop 35CTI ECC variables 36
using (continued)IVR 33
V
values, initial for lines per agent 166verifying 80, 83, 109, 112, 115, 116, 156
campaign configuration 156critical configuration steps 83, 112database configuration 83, 116Dialer port map configuration 115DN/script selector configuration 156DN/Script Selector configuration 156system installation 80, 109Unified CM connectivity 112
Outbound Option Guide for Cisco Unified Contact Center Enterprise and Hosted Release 9.0(1)IN-6
Index