Embed Size (px)
Citation preview

Oregon Employer Services Portal Registration and Account Activation User Guide – Page 1
Oregon Employer Services Portal Registration Guide
Table of Contents
Overview Page 2
Information Required for Registration Page 3
Role of the Security Contact Page 3
Helpful Hints Page 4
Registering Your Company for an Account Page 5
Registering for an Employer Account Page 6
Registering for a Third Party Account Page 13
Activating Your Oregon Employer Services Portal Account Page 18
Employer adding a Third Party Company to their OregonEmployer Services Portal account
Page 20
Third Party accepts request to work on behalf of anEmployer
Page 24
Reference Sheet for User Roles in an Employer Account Page 27
Reference Sheet for User Roles in a Third Party Account Page 28
Note: Click any of the links shown above in the Table of Contents to view the separate sections of this
document. To return to the Table of Contents, click the link on the right hand side of the section
heading.
Note: Entry fields in the Portal registration screens that require special attention, codes, or buttons that
are needed to advance are highlighted with a red box:

Oregon Employer Services Portal Registration and Account Activation User Guide – Page 2
Overview - Registration Guide for New Users of the Oregon Employer Service Portal (Back to Table of
Contents)
The Oregon Employer Services Portal (OESP) is a convenient, secure and easy way for Employers andtheir Third Party Companies to fulfill their legal requirements online. Upon successful registration,authorized Users will be able to:
Update company/employee information
Report new hires/terminations
Receive and Respond to Income Withholding Orders
Receive and Respond to National Medical Support Notices
Submit Child Support Payments
Respond to Verification of Employment Notices (coming soon)
Initiate, accept and manage Employer-to-Third Party business relationships
Oregon Employer Services Portal Users can utilize the features that meet the needs of their business.This Guide is designed to assist you with the registration process and describes the following:
Information needed for registering your company
Roles of Security Contact and Users
Registering your company for an Employer Account
Registering your company for a Third Party Account

Oregon Employer Services Portal Registration and Account Activation User Guide – Page 3
Information Required For Registration (Back to Table of Contents)
The first step in using this site is to register your company. You will need to provide the following:
The Federal Employer Identification Number (FEIN) of the company that you are registering.
For additional information regarding a Federal Employer Identification Number (FEIN) go to theFederal IRS web site at the following address:
http://www.irs.gov/Businesses/Small-Businesses-&-Self-Employed/Employer-ID-Numbers-(EINs)
The registered legal name of the company
Name of the Security Contact to represent your company when registering and maintainingother Users. (See “Role of the Security Contact” below.)
Contact information such as the main business address and phone number. When registeringan Employer Account, you will also be asked to provide Income Withholding and Medical contactinformation.
Role of the Security Contact (Back to Table of Contents)
The first person to register on behalf of a company will be assigned the role of Security Contact. ASecurity Contact is the person to represent your company when registering and maintaining other Users.There must be a minimum of one Security Contact for every OESP account. After initial registration, anunlimited number of Security Contacts may be added as necessary.
The Security Contact has the authorization to:
Request additional Users to have access to online functions (including additional SecurityContacts)
Manage additional Users for the registered company
Maintain all contact information for the registered company
Perform all online functions (Payroll and Medical)
Approve or Deny requests for a Third Party Company to work on behalf of an Employer
After the Security Contact receives notification that the account has been approved, they can request anunlimited amount of other Users to fulfill the following User roles:

Oregon Employer Services Portal Registration and Account Activation User Guide – Page 4
Payroll: The company representative assigned as a Payroll User is authorized to reportemployee new hires, terminations, Verification of Employment responses, view/respond toIncome Withholding Orders and manage EFT (Electronic Funds Transfer) Payments*.
Medical: The company representative assigned as a Medical User is authorized to reportemployee terminations and view/respond to National Medical Support Notices.
Payroll and Medical: The company representative assigned as a Payroll and Medical User isauthorized to report employee new hires, terminations, Verifications of Employment responses,view/respond to Income Withholding Orders and National Medical Support Notices and manageEFT Payments*.
*Any User of an Employer account who is authorized to manage EFT payments will have the ability toadd or delete company bank accounts as well as submit EFT payments for child support. Users of a ThirdParty account will not have the ability to add or delete company bank accounts. Third Party Users thatare authorized by an Employer to work in a Payroll role will be able to submit payments for child supporton their behalf.
Helpful Hints (Back to Table of Contents)
If you need help while using the Oregon Employer Services Portal, instructions may be displayed byclicking the Help link located in various sections of each page. Clicking the Help link will displayadditional information about an individual section of the page you are viewing.
Data entry fields have a limited number of characters that can be entered. Formatting information suchas allowable field length and acceptable characters for a data entry field can be seen by clicking the
Help link for the section of the page you are viewing.
You are required to enter data in fields marked with a red asterisk.*
If you log into the Oregon Employer Services Portal and are not actively working on the site, you areautomatically logged out after 15 minutes. This is necessary for security purposes.
Frequently Asked Questions (FAQs) are located under the Employer Resources section and may beaccessed by clicking the FAQ link which displays on the upper right corner of every Oregon EmployerServices Portal page.

Oregon Employer Services Portal Registration and Account Activation User Guide – Page 5
Registering Your Company for an Account (Back to Table of Contents)
Once you are ready to register your company, click the New Users Register button.
After you have clicked the New Users Register button, you will be prompted to choose an Employer orThird Party account type.
**Only one Account Type may be selected at the time of registration.
The option to register for an Employer Account means you are accessing the Oregon Employer ServicesPortal to obtain or provide information regarding your company and its employees. Please be aware ifyou are a Third Party Company or person such as a bookkeeper or payroll company registering anaccount on behalf of an Employer, the account will be denied. In order to do business in the Portal, anEmployer must complete their own registration and accept their own Terms of Agreement.
The option to register for a Third Party Account means you are not the Employer, rather a company orperson (s) such as a bookkeeper, payroll company, or health care provider, given authority by anEmployer to handle a specific responsibility on their behalf.
Please Note - It may be appropriate for a Third Party Company to register for both Account Types. Seebelow for additional information on when this may apply:
Registering an Employer account would allow the Third Party Company to manage child supportobligations for employees working for their company.

Oregon Employer Services Portal Registration and Account Activation User Guide – Page 6
Registering a Third Party account would allow the Third Party Company to receive a requestfrom another Employer to work on their behalf.
Registering for an Employer Account (Back to Table of Contents)
Step 1 Choose the Employer Account Type
Step 2 Read the Terms and Conditions. Accept the Terms and Conditions by clicking the checkbox.Click the “Next” button shown below. Click “Next” to continue.
Oregon Employer Services Portal Registration and Account Activation User Guide – Page 7
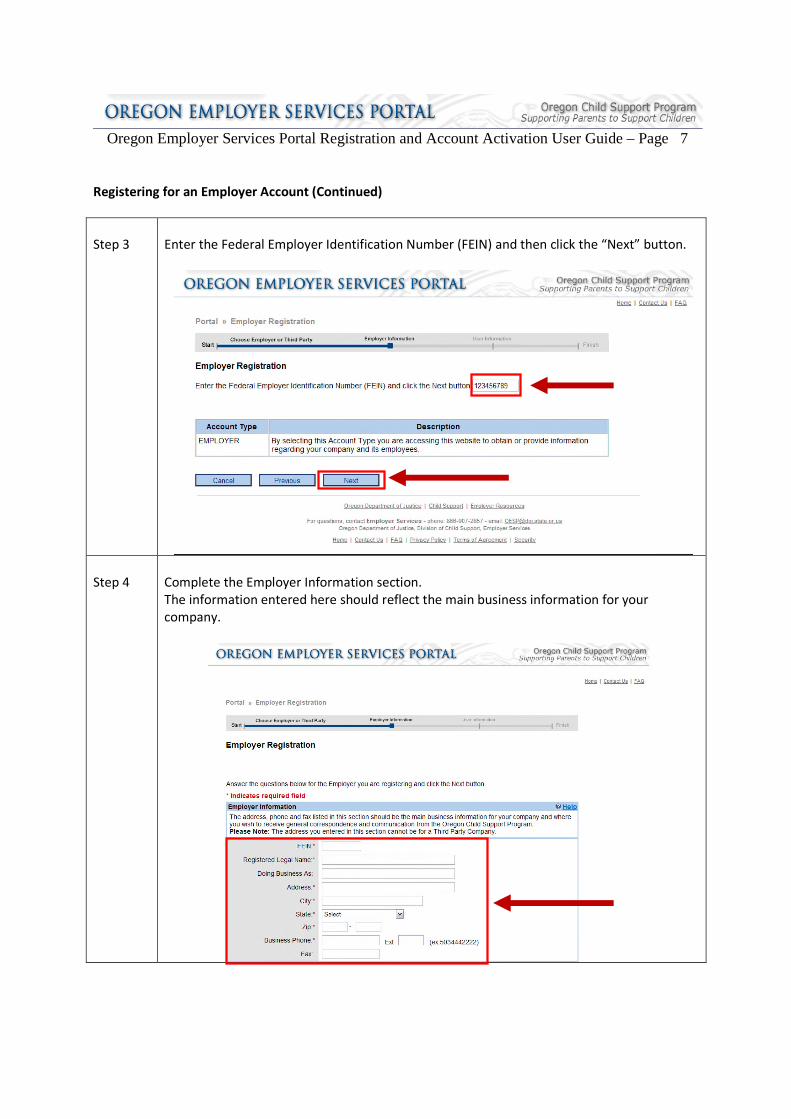
Registering for an Employer Account (Continued)
Step 3 Enter the Federal Employer Identification Number (FEIN) and then click the “Next” button.
Step 4 Complete the Employer Information section.The information entered here should reflect the main business information for yourcompany.

Oregon Employer Services Portal Registration and Account Activation User Guide – Page 8
Registering for an Employer Account (Continued)
Step 5 Indicate whether you offer health care coverage through your company, state yourpreference for a Notice Delivery Method, the number of employees in your company, andwhether your business is part of a Federally Recognized Tribe.
Step 6 Complete the Income Withholding Contact Information. (Note – if the address, phone and faxare the same as the main business information you have previously entered, click the “copyprevious business information” checkbox to populate these fields.)

Oregon Employer Services Portal Registration and Account Activation User Guide – Page 9
Registering for an Employer Account (Continued)
Step 7 Complete the Medical Contact Information. (Note – if the address, phone and fax are thesame as the main business information you entered, click the “copy previous businessinformation” checkbox to populate these fields.) After all required items have beenentered, click the “Next” button.
Step 8(optional)
Clicking the “Add Another Employer” button allows a Security Contact to register more thanone Employer. A maximum of five Employers can be added during the registration process.After the account is approved, an unlimited number of Employers can then be added. Thisfunction may be useful if you are the owner of multiple businesses and you wish to managemultiple Employer accounts while maintaining only one User ID and Password.

Oregon Employer Services Portal Registration and Account Activation User Guide – Page 10
Registering for an Employer Account (Continued)
Step 9 Review the Employer Registration Information.Click the “Next” button to continue.
Step 10 Security Contact Information – First Name, Last Name, Email Address. For securitypurposes, only one unique email address will be allowed for each account type (i.e.Employer and Third Party).

Oregon Employer Services Portal Registration and Account Activation User Guide – Page 11
Registering for an Employer Account (Continued)
Step 11 Choose your User ID and password.Pick a User ID that you can remember. Choose a password that no one else will be able toguess. Keep this password in a safe place and do not share it with anyone.
Step 12 Select Security Questions 1-3 and provide unique answers for each question.
Step 13 Choose a SiteKey image and enter a name for the image you selected. Click the “Next”button to continue.

Oregon Employer Services Portal Registration and Account Activation User Guide – Page 12
Registering for an Employer Account (Continued)
Step 14 Review Registration Information. Click the “Edit” button to make any Employer or Useredits. Click the “Submit” button if information is correct.
Step 15 Your Employer Registration is complete. An Activation Code will be sent to your emailaddress in 2-5 business days.
Oregon Employer Services Portal Registration and Account Activation User Guide – Page 13
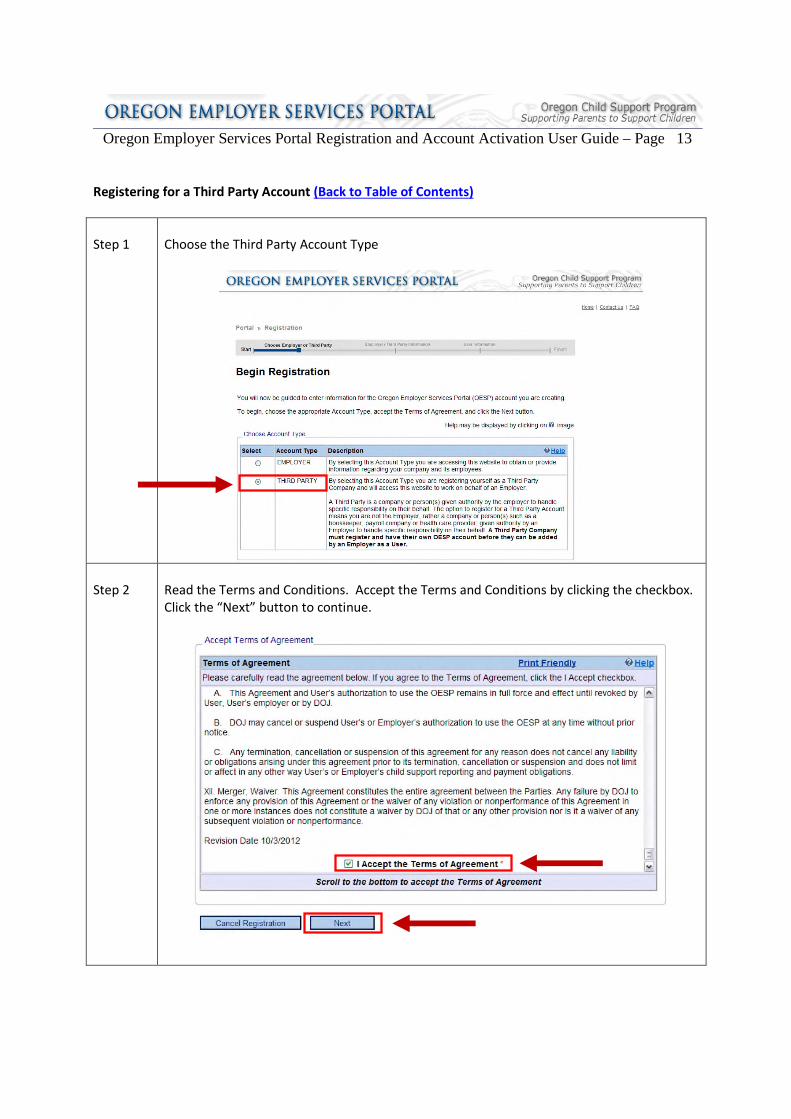
Registering for a Third Party Account (Back to Table of Contents)
Step 1 Choose the Third Party Account Type
Step 2 Read the Terms and Conditions. Accept the Terms and Conditions by clicking the checkbox.Click the “Next” button to continue.

Oregon Employer Services Portal Registration and Account Activation User Guide – Page 14
Registering for a Third Party Account (Continued)
Step 3 Enter your Federal Employer Identification Number (FEIN) and then click the “Next” button.
Step 4 Complete the Third Party Company Information section. The information entered hereshould reflect the main business information for your company.

Oregon Employer Services Portal Registration and Account Activation User Guide – Page 15
Registering for a Third Party Account (Continued)
Step 5 Security Contact Information – First Name, Last Name, Email Address. For security purposes,only one unique email address will be allowed for each account type (i.e. Employer and ThirdParty).
Step 6 Choose your User ID and password. Pick a User ID that you can remember. Choose apassword that no one else will be able to guess. Keep this password in a safe place and donot share it with anyone.

Oregon Employer Services Portal Registration and Account Activation User Guide – Page 16
Registering for a Third Party Account (Continued)
Step 7 Select Security Questions 1-3 and provide unique answers for each question.
Step 8 Choose a SiteKey image and enter a name for the image you selected. Click the “Next”button to continue.
Step 9 Review Registration Information. Click the “Edit” button to make any Third Party or Useredits. Click the “Submit” button if the information entered is correct.

Oregon Employer Services Portal Registration and Account Activation User Guide – Page 17
Registering for a Third Party Account (Continued)
Step 10 Your Third Party Registration is complete. An Activation Code will be sent to your emailaddress in 2-5 business days.
Oregon Employer Services Portal Registration and Account Activation User Guide – Page 18
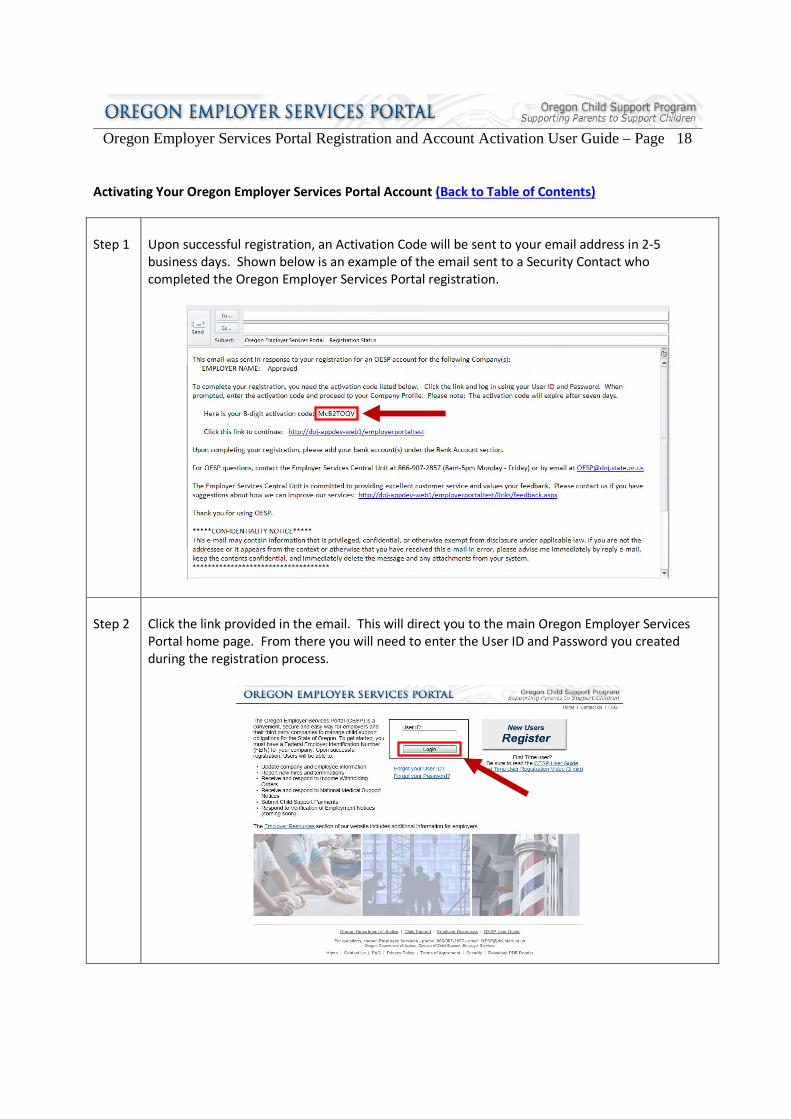
Activating Your Oregon Employer Services Portal Account (Back to Table of Contents)
Step 1 Upon successful registration, an Activation Code will be sent to your email address in 2-5business days. Shown below is an example of the email sent to a Security Contact whocompleted the Oregon Employer Services Portal registration.
Step 2 Click the link provided in the email. This will direct you to the main Oregon Employer ServicesPortal home page. From there you will need to enter the User ID and Password you createdduring the registration process.

Oregon Employer Services Portal Registration and Account Activation User Guide – Page 19
Activating Your Oregon Employer Services Portal Account (Continued)
Step 3 After successfully entering your User ID and Password, you will be prompted to enter theActivation Code provided to you via email.
Step 4 After entering the Activation Code and clicking the Submit Button, you will proceed to theOregon Employer Services Portal home page as shown below. Your Oregon EmployerServices Portal account is now up and running!
Oregon Employer Services Portal Registration and Account Activation User Guide – Page 20
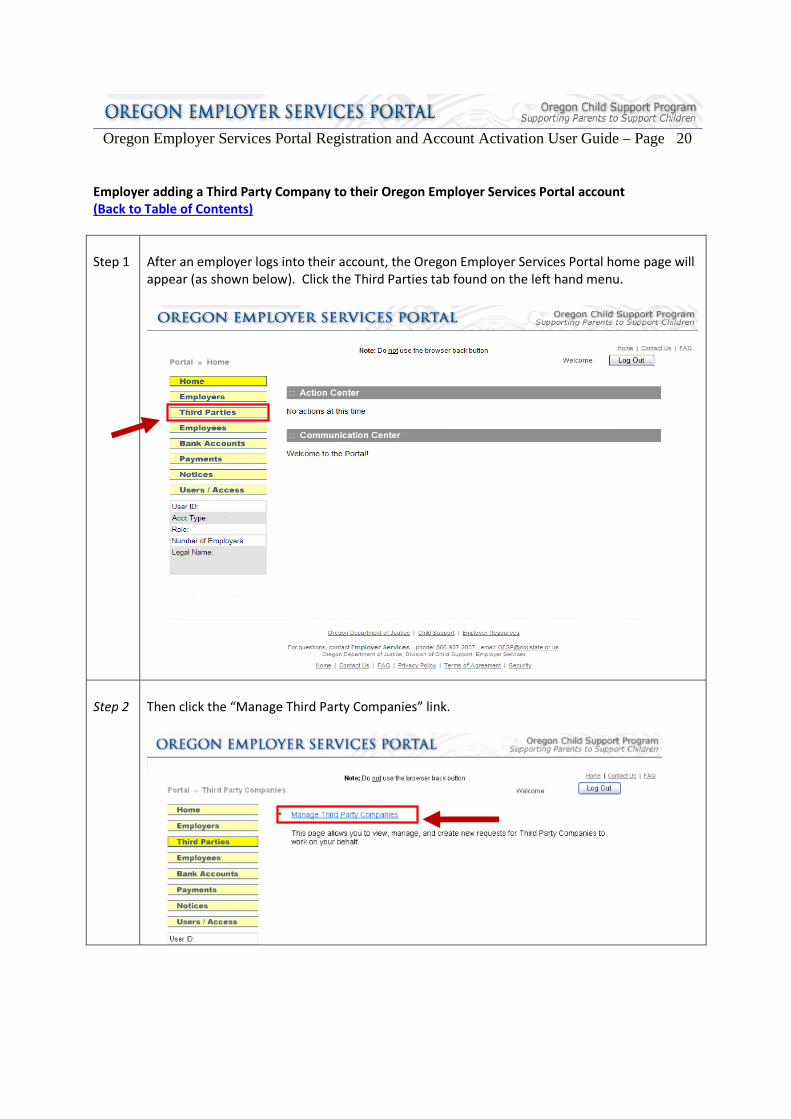
Employer adding a Third Party Company to their Oregon Employer Services Portal account(Back to Table of Contents)
Step 1 After an employer logs into their account, the Oregon Employer Services Portal home page willappear (as shown below). Click the Third Parties tab found on the left hand menu.
Step 2 Then click the “Manage Third Party Companies” link.

Oregon Employer Services Portal Registration and Account Activation User Guide – Page 21
Employer adding a Third Party Company to their Oregon Employer Services Portal account (Continued)
Step 3 Click the “Request New Third Party” button.
Step 4 Enter the Federal Employer Identification Number (FEIN) for the Third Party Company you arerequesting to work on your behalf. Then, click the Submit button.
Note: if you receive an error message after submitting the FEIN, it may be the FEIN wasentered incorrectly, or the Third Party Company has not registered their Oregon EmployerServices Portal account. If the Third Party Company has not registered, contact them andrequest they do so. You will not be able to send them a request until they have completedtheir Third Party Company registration and the account is approved.

Oregon Employer Services Portal Registration and Account Activation User Guide – Page 22
Employer adding a Third Party Company to their Oregon Employer Services Portal account (Continued)
Step 5 A summary of the Third Party Company information will display. Review the information toverify it is the correct Third Party Company you wish to request to work on your behalf. If theinformation is correct, click the “Select this Third Party Company” button.
Step 6 Select the role you want to assign to the Third Party Company. The available roles are Payroll,Medical or Payroll and Medical. For definitions on each role and their level of access, click the
Help icon in the upper right hand corner of the role section.

Oregon Employer Services Portal Registration and Account Activation User Guide – Page 23
Employer adding a Third Party Company to their Oregon Employer Services Portal account (Continued)
Step 7 Select the employer you want to assign to the Third Party Company, and then click the “SubmitThird Party Request” button.Note: if your portal account has more than one employer, separate requests must be sent foreach employer to the Third Party Company for them to work on your behalf.
Step 8 An email for each employer will be sent to the Third Party Company showing your request tohave them work on your behalf. After the Third Party Company accepts the request, you willreceive an email and the status on the grid view will show as “Approved”.

Oregon Employer Services Portal Registration and Account Activation User Guide – Page 24
Third Party Company accepts request to work on behalf of an Employer (Back to Table of Contents)
Step 1 After a third party logs into their account, the Oregon Employer Services Portal home page willappear (as shown below). A message will show in the Action Center that you have a pendingrequest from an employer. To respond to the request, you can either click the “act now”button in the action center, or the Employers tab found on the left hand menu.
Step 2 Then click the “Manage Requests from Employer” link.

Oregon Employer Services Portal Registration and Account Activation User Guide – Page 25
Third Party Company accepts request to work on behalf of an Employer (Continued)
Step 3 Click the “View/Edit” link to view and accept the request from an Employer.
Step 4 To accept the request from the employer, click the “Accept” button.

Oregon Employer Services Portal Registration and Account Activation User Guide – Page 26
Third Party Company accepts request to work on behalf of an Employer (Continued)
Step 5 You can now perform work on the employers behalf based on your assigned role. Theemployer will be notified by email that you have accepted their request.

Oregon Employer Services Portal Registration and Account Activation User Guide – Page 27
Reference Sheet for User Roles in an Employer Account (Back to Table of Contents)
Specific User Roles will have their access restricted access to previously designated functions throughoutthe portal. Shown below is a breakdown of the different User Roles and the functions they are allowedto access for an EMPLOYER account type.

Oregon Employer Services Portal Registration and Account Activation User Guide – Page 28
Reference Sheet for User Roles in a Third Party Account (Back to Table of Contents)
Specific User Roles will have their access restricted access to previously designated functions throughoutthe portal. Shown below is a breakdown of the different User Roles and the functions they are allowedto access for a THIRD PARTY account type.
**Be aware that Users within a Third Party Company have a two part assignment. First, they are
assigned to either a Security Contact or a Non-Security Contact role for the Third Party Company. The
main difference between those two User Types is:
A Third Party Security Contact can manage the Third Party Company information and managerequests from Employers.
A Third Party Non-Security Contact cannot manage the Third Party Company information ormanage requests from Employers.
The second role for Third Party Users is assigned by the Employer. When an Employer requests a Third
Party Company to work on their behalf, they allow them access as a Payroll and Medical, Payroll, or
Medical user.

Oregon Employer Services Portal Registration and Account Activation User Guide – Page 29
Reference Sheet for User Roles in a Third Party Account (continued)
Thank you for taking the time to review the Oregon Employer Services Portal Registration and AccountActivation User Guide.
Should you have any additional questions feel free to contact the Employer Services Central Unit viaemail at [email protected] or by phone at 866-907-2857.