Embed Size (px)
Citation preview

Oracle® iPlanet Web Proxy Server 4.0.14Administration Guide
Part No: 821–1882June 2010

Copyright © 2010, Oracle and/or its affiliates. All rights reserved.
This software and related documentation are provided under a license agreement containing restrictions on use and disclosure and are protected by intellectualproperty laws. Except as expressly permitted in your license agreement or allowed by law, you may not use, copy, reproduce, translate, broadcast, modify, license,transmit, distribute, exhibit, perform, publish, or display any part, in any form, or by any means. Reverse engineering, disassembly, or decompilation of this software,unless required by law for interoperability, is prohibited.
The information contained herein is subject to change without notice and is not warranted to be error-free. If you find any errors, please report them to us in writing.
If this is software or related software documentation that is delivered to the U.S. Government or anyone licensing it on behalf of the U.S. Government, the followingnotice is applicable:
U.S. GOVERNMENT RIGHTS Programs, software, databases, and related documentation and technical data delivered to U.S. Government customers are“commercial computer software” or “commercial technical data” pursuant to the applicable Federal Acquisition Regulation and agency-specific supplementalregulations. As such, the use, duplication, disclosure, modification, and adaptation shall be subject to the restrictions and license terms set forth in the applicableGovernment contract, and, to the extent applicable by the terms of the Government contract, the additional rights set forth in FAR 52.227-19, CommercialComputer Software License (December 2007). Oracle America, Inc., 500 Oracle Parkway, Redwood City, CA 94065.
This software or hardware is developed for general use in a variety of information management applications. It is not developed or intended for use in any inherentlydangerous applications, including applications which may create a risk of personal injury. If you use this software or hardware in dangerous applications, then youshall be responsible to take all appropriate fail-safe, backup, redundancy, and other measures to ensure its safe use. Oracle Corporation and its affiliates disclaim anyliability for any damages caused by use of this software or hardware in dangerous applications.
Oracle and Java are registered trademarks of Oracle and/or its affiliates. Other names may be trademarks of their respective owners.
AMD, Opteron, the AMD logo, and the AMD Opteron logo are trademarks or registered trademarks of Advanced Micro Devices. Intel and Intel Xeon aretrademarks or registered trademarks of Intel Corporation. All SPARC trademarks are used under license and are trademarks or registered trademarks of SPARCInternational, Inc. UNIX is a registered trademark licensed through X/Open Company, Ltd.
This software or hardware and documentation may provide access to or information on content, products, and services from third parties. Oracle Corporation andits affiliates are not responsible for and expressly disclaim all warranties of any kind with respect to third-party content, products, and services. Oracle Corporationand its affiliates will not be responsible for any loss, costs, or damages incurred due to your access to or use of third-party content, products, or services.
100624@24378
Contents
Preface ...................................................................................................................................................19
1 Introducing iPlanet Web Proxy Server ............................................................................................. 25About Proxy Server ............................................................................................................................. 25New in This Release ............................................................................................................................. 25Getting Started ..................................................................................................................................... 26
Administration Server Overview ............................................................................................... 26Server Manager Overview ........................................................................................................... 27Configuration Files ...................................................................................................................... 29Regular Expressions ..................................................................................................................... 29
2 Administering Proxy Server ..............................................................................................................31Starting the Administration Server ................................................................................................... 31
To Start the Administration Server on UNIX or Linux ........................................................... 31To Start the Administration Server on Windows .................................................................... 32
Stopping the Administration Server ................................................................................................. 32To Stop the Administration Server on UNIX or Linux ........................................................... 32To Stop the Administration Server on Windows ..................................................................... 32
Running Multiple Proxy Servers ........................................................................................................ 33▼ To Install multiple server instances ........................................................................................... 33
Removing a Server Instance ............................................................................................................... 33▼ To Remove a Server Instance ...................................................................................................... 33
Migrating From Proxy Server 3.6 ...................................................................................................... 34
3 Setting Administration Preferences .................................................................................................35Creating and Managing Listen Sockets ............................................................................................. 35
▼ To Add Listen Sockets ................................................................................................................. 36
3

▼ To Edit Listen Sockets ................................................................................................................. 36▼ To Delete Listen Sockets ............................................................................................................. 36
Changing Superuser Settings ............................................................................................................. 37▼ To Change Superuser Settings for the Administration Server ............................................... 37▼ To Change the Superuser Password .......................................................................................... 37
Allowing Multiple Administrators .................................................................................................... 38▼ To Enable Distributed Administration ..................................................................................... 38
Specifying Log File Options ............................................................................................................... 39Viewing Log Files ......................................................................................................................... 39
Using Directory Services .................................................................................................................... 40Restricting Server Access .................................................................................................................... 40SNMP Master Agent Settings ............................................................................................................. 41
4 Managing Users and Groups .............................................................................................................43Accessing Information About Users and Groups ............................................................................ 43About Directory Services .................................................................................................................... 44
LDAP Directory Services ............................................................................................................ 44Key File Directory Services ......................................................................................................... 44Digest File Directory Services ..................................................................................................... 45
Configuring Directory Services ......................................................................................................... 45▼ To Create Directory Services ...................................................................................................... 45▼ To Edit Directory Services .......................................................................................................... 46
Understanding Distinguished Names (DNs) ................................................................................... 46Using LDIF ........................................................................................................................................... 47Creating Users ..................................................................................................................................... 47
Creating Users in LDAP-based Authentication Databases ..................................................... 47Creating Users in Key File Authentication Databases ............................................................. 49
▼ To Create Users in Key File Authentication Databases ........................................................... 50Creating Users in Digest File Authentication Databases ........................................................ 50
▼ To Create Users in Digest File Authentication Databases ...................................................... 50Managing Users ................................................................................................................................... 51
Finding User Information ........................................................................................................... 51Editing User Information ........................................................................................................... 53Managing User Passwords .......................................................................................................... 54Renaming Users ........................................................................................................................... 54
Contents
Oracle iPlanet Web Proxy Server 4.0.14 Administration Guide • June 20104

Removing Users ........................................................................................................................... 55Creating Groups .................................................................................................................................. 55
About Static Groups .................................................................................................................... 56About Dynamic Groups .............................................................................................................. 57
Managing Groups ................................................................................................................................ 60Finding Group Entries ................................................................................................................. 60Editing Group Entries ................................................................................................................. 62Adding Group Members ............................................................................................................. 62Adding Groups to the Group Members List ............................................................................. 63Removing Entries From the Group Members List ................................................................... 63Managing Owners ........................................................................................................................ 64Managing See Alsos ..................................................................................................................... 64Renaming Groups ........................................................................................................................ 65Removing Groups ........................................................................................................................ 65
Creating Organizational Units .......................................................................................................... 66▼ To Create Organizational Units ................................................................................................. 66
Managing Organizational Units ........................................................................................................ 66Finding Organizational Units .................................................................................................... 67Editing Organizational Unit Attributes .................................................................................... 68Renaming Organizational Units ................................................................................................ 69Removing Organizational Units ................................................................................................ 69
5 Using Certificates and Keys ................................................................................................................71Securing Administration Server Access ............................................................................................ 72Certificate-based Authentication ...................................................................................................... 72Creating a Trust Database .................................................................................................................. 73
▼ To Create a Trust Database ......................................................................................................... 73Using password.conf ................................................................................................................... 74Starting an SSL-Enabled Server Automatically ........................................................................ 74
Using Sun Crypto Accelerator Keystore ........................................................................................... 75▼ To Configure Proxy Server to Use Sun Crypto Accelerator .................................................... 75▼ To Enable the Sun Crypto Accelerator 4000 Board for Proxy Server .................................... 75
Requesting and Installing a VeriSign Certificate ............................................................................. 76▼ To Request a VeriSign Certificate .............................................................................................. 76▼ To Iinstall a VeriSign Certificate ................................................................................................ 76
Contents
5
Requesting and Installing Other Server Certificates ....................................................................... 77Required CA Information ........................................................................................................... 77Requesting Other Server Certificates ......................................................................................... 78Installing Other Server Certificates ............................................................................................ 79
Migrating Certificates From Previous Versions .............................................................................. 81▼ To Migrate a Certificate ............................................................................................................... 82
Using the Built-in Root Certificate Module .............................................................................. 82Managing Certificates ......................................................................................................................... 83
▼ To Manage Certificates ................................................................................................................ 83Installing and Managing CRLs and CKLs ........................................................................................ 83
▼ To Install CRLs or CKLs .............................................................................................................. 84▼ To Manage CRLs and CKLs ........................................................................................................ 84
Setting Security Preferences ............................................................................................................... 84SSL and TLS Protocols ................................................................................................................. 86Using SSL to Communicate With LDAP .................................................................................. 86Tunneling SSL Through the Proxy Server ................................................................................ 87Configuring SSL Tunneling ........................................................................................................ 88Enabling Security for Listen Sockets .......................................................................................... 89Configuring Security Globally .................................................................................................... 91
Using External Encryption Modules ................................................................................................. 92Installing the PKCS #11 Module ................................................................................................. 93FIPS-140 Standard ....................................................................................................................... 96
Setting Client Security Requirements ............................................................................................... 97Requiring Client Authentication ............................................................................................... 97Client Authentication in a Reverse Proxy ................................................................................. 98Setting Up Client Authentication in a Reverse Proxy .............................................................. 99Mapping Client Certificates to LDAP ...................................................................................... 101Using the certmap.conf File .................................................................................................... 102
Setting Stronger Ciphers ................................................................................................................... 106▼ To Set Stronger Ciphers ............................................................................................................ 107
Other Security Considerations ........................................................................................................ 107Limiting Physical Access ........................................................................................................... 108Limiting Administration Access .............................................................................................. 108Choosing Strong Passwords ..................................................................................................... 108Changing Passwords or PINs ................................................................................................... 109Limiting Other Applications on the Server ............................................................................. 110
Contents
Oracle iPlanet Web Proxy Server 4.0.14 Administration Guide • June 20106
Preventing Clients From Caching SSL Files ........................................................................... 110Limiting Ports ............................................................................................................................. 110Knowing Your Server’s Limits .................................................................................................. 111
6 Managing Server Clusters ................................................................................................................113About Server Clusters ....................................................................................................................... 113Guidelines for Using Clusters .......................................................................................................... 114Setting Up Clusters ............................................................................................................................ 114Adding Servers to a Cluster .............................................................................................................. 115
▼ To Add Remote Servers to a Cluster ........................................................................................ 115Modifying Server Information ......................................................................................................... 116
▼ To Modify Information About Servers in a Cluster ............................................................... 116Removing Servers from a Cluster .................................................................................................... 116
▼ To remove servers from a cluster ............................................................................................. 116Controlling Server Clusters .............................................................................................................. 116
▼ To Control Servers in a Cluster ................................................................................................ 117
7 Configuring Server Preferences ......................................................................................................119Starting the Proxy Server .................................................................................................................. 119
▼ To Start the Proxy Server From the Administration Interface ............................................. 120To Start the Proxy Server on UNIX or Linux .......................................................................... 120To Start the Proxy Server on Windows ................................................................................... 120Starting SSL-Enabled Servers ................................................................................................... 120
Stopping the Proxy Server ................................................................................................................ 121▼ To Stop the Proxy Server From the Administration Interface .............................................. 121
To Stop the Proxy Server on UNIX or Linux .......................................................................... 121To Stop the Proxy Server on Windows .................................................................................... 122
Restarting the Proxy Server .............................................................................................................. 122Restarting the Server UNIX or Linux ...................................................................................... 122Restarting the Server Windows ................................................................................................ 123Setting the Termination Timeout ............................................................................................ 123
Viewing Server Settings .................................................................................................................... 124▼ To View the Settings for the Proxy Server ............................................................................... 124
Viewing and Restoring Backups of Configuration Files ............................................................... 124▼ To View a Previous Configuration .......................................................................................... 125
Contents
7

▼ To Restore a Backup Copy of Your Configuration Files ....................................................... 125▼ To Set the Number of Backups Displayed ............................................................................... 125
Configuring System Preferences ..................................................................................................... 126▼ To Modify the System Preferences ........................................................................................... 127
Tuning the Proxy Server ................................................................................................................... 127▼ To Change the Default Tuning Parameters ............................................................................ 127
Adding and Editing Listen Sockets .................................................................................................. 128▼ To Add Listen Sockets ............................................................................................................... 129▼ To Edit Listen Sockets ............................................................................................................... 130▼ To Delete Listen Sockets ........................................................................................................... 131
Selecting Directory Services ............................................................................................................. 131▼ To Select a Directory Service .................................................................................................... 131
MIME Types ...................................................................................................................................... 132Creating a MIME Type .............................................................................................................. 132
▼ To Edit a MIME Type ................................................................................................................ 132▼ To Remove a MIME Type ......................................................................................................... 133
Administering Access Control ......................................................................................................... 133▼ To Manage Access Control Lists .............................................................................................. 133
Configuring the ACL Cache ............................................................................................................. 134▼ To Configure the ACL Cache ................................................................................................... 134
Understanding DNS Caching .......................................................................................................... 135Configuring the DNS Cache ..................................................................................................... 135
Configuring DNS Subdomains ........................................................................................................ 136▼ To Set the Levels of Subdomains For Proxy Lookup ............................................................. 136
Configuring HTTP Keep-Alive ....................................................................................................... 137▼ To Configure HTTP Keep-Alive .............................................................................................. 137
8 Controlling Access to Your Server ................................................................................................... 139What Is Access Control? ................................................................................................................... 139
Access Control for User-Group ............................................................................................... 140Access Control for Host-IP ....................................................................................................... 147Using Access Control Files ....................................................................................................... 147Configuring the ACL User Cache ............................................................................................ 148Controlling Access With Client Certificates ........................................................................... 148
How Access Control Works ............................................................................................................. 149
Contents
Oracle iPlanet Web Proxy Server 4.0.14 Administration Guide • June 20108

Setting Access Control ...................................................................................................................... 151Setting Access Control Globally ............................................................................................... 151Setting Access Control for a Server Instance .......................................................................... 153
Selecting Access Control Options ................................................................................................... 155Setting the Action ....................................................................................................................... 155Specifying Users and Groups .................................................................................................... 155Specifying the From Host .......................................................................................................... 157Restricting Access to Programs ................................................................................................ 158Setting Access Rights ................................................................................................................. 158Writing Customized Expressions ............................................................................................ 159Turning Access Control Off ...................................................................................................... 160Responding When Access Is Denied ....................................................................................... 160
Limiting Access to Areas of Your Server ........................................................................................ 160Restricting Access to the Entire Server .................................................................................... 161Restricting Access to a Directory ............................................................................................. 161Restricting Access to a File Type .............................................................................................. 162Restricting Access Based on Time of Day ............................................................................... 163Restricting Access Based on Security ....................................................................................... 163
Securing Access to Resources ........................................................................................................... 164Securing Access to Server Instances ......................................................................................... 164Enabling IP-Based Access Control ........................................................................................... 164
Creating ACLs for File-Based Authentication ............................................................................... 165Creating ACLs for Directory Services Based on File Authentication .................................. 166Creating ACLs for Directory Services Based on Digest Authentication ............................. 167
9 Using Log Files ...................................................................................................................................169About Log Files .................................................................................................................................. 169Logging on UNIX and Windows Platforms ................................................................................... 170
Default Error Logging ............................................................................................................... 170Logging Using syslog ............................................................................................................... 170
Log Levels ........................................................................................................................................... 171Archiving Log Files ........................................................................................................................... 172
Internal-Daemon Log Rotation ............................................................................................... 172Scheduler-based Log Rotation ................................................................................................. 173
Setting Access Log Preferences ........................................................................................................ 173
Contents
9

▼ To Set the Access Log Preferences for the Administration Server ....................................... 175Setting Access Log Preferences for the Server Instance ......................................................... 176Easy Cookie Logging ................................................................................................................. 180
Setting Error Logging Options ........................................................................................................ 180▼ To Set the Error Logging Options ............................................................................................ 180
Configuring the LOG Element ........................................................................................................ 181Viewing Access Log Files .................................................................................................................. 181Viewing Error Log Files .................................................................................................................... 182Working With the Log Analyzer ..................................................................................................... 183
Transfer Time Distribution Report ......................................................................................... 184Data Flow Report ....................................................................................................................... 184Status Code Report .................................................................................................................... 185Requests and Connections Report ........................................................................................... 185Cache Performance Report ....................................................................................................... 186Transfer Time Report ................................................................................................................ 188Hourly Activity Report .............................................................................................................. 188
▼ To Run the Log Analyzer From the Server Manager ............................................................. 189To Run the Log Analyzer From the Command Line ............................................................. 191
Viewing Events (Windows) ............................................................................................................. 192▼ To Use the Event Viewer ........................................................................................................... 192
10 Monitoring Servers ...........................................................................................................................193Monitoring the Server Using Statistics ........................................................................................... 194
Processing Proxy Server Statistics ............................................................................................ 194Enabling Statistics ...................................................................................................................... 195Using Statistics ........................................................................................................................... 196Monitoring Current Activity Using the perfdump Utility .................................................... 198Using Performance Buckets ...................................................................................................... 201
SNMP Basics ...................................................................................................................................... 204Management Information Base ....................................................................................................... 204Setting Up SNMP .............................................................................................................................. 205Using a Proxy SNMP Agent (UNIX) .............................................................................................. 206
Installing the Proxy SNMP Agent ............................................................................................ 207Starting the Proxy SNMP Agent ............................................................................................... 207Restarting the Native SNMP Daemon ..................................................................................... 208
Contents
Oracle iPlanet Web Proxy Server 4.0.14 Administration Guide • June 201010

Reconfiguring the SNMP Native Agent .......................................................................................... 208Installing the SNMP Master Agent .................................................................................................. 208
▼ To Install the Master SNMP Agent .......................................................................................... 209Enabling and Starting the SNMP Master Agent ............................................................................ 209
Starting the Master Agent on Another Port ............................................................................ 210Manually Configuring the SNMP Master Agent .................................................................... 210Editing the Master Agent CONFIG File .................................................................................. 211Defining sysContact and sysLocation Variables ................................................................ 211Configuring the SNMP Subagent ............................................................................................. 212Starting the SNMP Master Agent ............................................................................................. 212
Configuring the SNMP Master Agent ............................................................................................. 214Configuring the Community String ........................................................................................ 214Configuring Trap Destinations ................................................................................................ 214
Enabling the Subagent ...................................................................................................................... 214Understanding SNMP Messages ..................................................................................................... 215
11 Proxying and Routing URLs .............................................................................................................217Enabling/Disabling Proxying for a Resource ................................................................................. 217
▼ To Enable Proxying for a Resource .......................................................................................... 218Routing Through Another Proxy .................................................................................................... 218
Configuring Routing for a Resource ........................................................................................ 219Chaining Proxy Servers ............................................................................................................. 220Routing Through a SOCKS Server ........................................................................................... 220
Forwarding the Client IP Address to the Server ............................................................................ 221▼ To Configure the Proxy to Send Client IP Addresses ............................................................ 222
Allowing Clients to Check IP Address ............................................................................................ 225▼ To Check the Java IP Address ................................................................................................... 225
Client Autoconfiguration ................................................................................................................. 226Setting the Network Connectivity Mode ........................................................................................ 226
▼ To Change the Running Mode for the Proxy Server .............................................................. 227Changing the Default FTP Transfer Mode ..................................................................................... 227
▼ To Set the FTP Mode ................................................................................................................. 228Specifying the SOCKS Name Server IP Address ............................................................................ 228
▼ To Specify the SOCKS Name Server IP Address .................................................................... 229Configuring HTTP Request Load Balancing ................................................................................. 229
Contents
11

▼ To Configure HTTP Request Load Balancing ........................................................................ 229Managing URLs and URL Mappings .............................................................................................. 230
Creating and Modifying URL Mappings ................................................................................ 231▼ To Change Your Existing Mappings ....................................................................................... 233▼ To Remove a Mapping .............................................................................................................. 233
Redirecting URLs ....................................................................................................................... 234
12 Caching ............................................................................................................................................... 235How Caching Works ......................................................................................................................... 235Understanding the Cache Structure ................................................................................................ 236Distributing Files in the Cache ......................................................................................................... 237Setting Cache Specifics ...................................................................................................................... 237
▼ To Set Cache Specifics ............................................................................................................... 238Creating a Cache Working Directory ...................................................................................... 239Setting Cache Size ...................................................................................................................... 240Caching HTTP Documents ...................................................................................................... 240Caching FTP and Gopher Documents .................................................................................... 242
Creating and Modifying a Cache ..................................................................................................... 243▼ To Add Cache Partitions ........................................................................................................... 243▼ To Modify Cache Partitions ...................................................................................................... 243
Setting Cache Capacity ..................................................................................................................... 244▼ To set the cache capacity ........................................................................................................... 244
Managing Cache Sections ................................................................................................................. 245▼ To Manage Cache Sections ....................................................................................................... 245
Setting the Garbage Collection Preferences ................................................................................... 245Scheduling Garbage Collection ....................................................................................................... 246
▼ To Set Garbage Collection ........................................................................................................ 246Configuring the Cache ...................................................................................................................... 246
▼ To Configure the Cache ............................................................................................................ 247Caching Configuration Elements ............................................................................................ 247
Caching Local Hosts .......................................................................................................................... 249▼ To Enable the Caching of Local Hosts ..................................................................................... 249
Configuring the File Cache ............................................................................................................... 250▼ To Configure the File Cache ..................................................................................................... 250
Viewing the URL Database .............................................................................................................. 252
Contents
Oracle iPlanet Web Proxy Server 4.0.14 Administration Guide • June 201012

▼ To View the URLs in the Database .......................................................................................... 252▼ To Cause Cached URLs to Expire or Remove the Cached URLs ......................................... 252
Using Cache Batch Updates ............................................................................................................. 253Creating Batch Updates ............................................................................................................ 253Editing or Deleting Batch Update Configurations ................................................................ 255
▼ To edit or delete a batch update configuration ....................................................................... 255▼ To Delete a Batch Update Configuration ................................................................................ 255
Using the Cache Command-Line Interface ................................................................................... 256▼ To Run the Command-Line Utilities ...................................................................................... 256
Building the Cache Directory Structure .................................................................................. 256Managing the Cache URL List .................................................................................................. 258Managing Cache Garbage Collection ...................................................................................... 261Managing Batch Updates .......................................................................................................... 262
Using the Internet Cache Protocol (ICP) ....................................................................................... 262Routing Through ICP Neighborhoods ................................................................................... 263Setting Up ICP ............................................................................................................................ 264
▼ To Add Parent or Sibling Proxies to an ICP Neighborhood ................................................. 265▼ To Edit a Configuration in an ICP Neighborhood ................................................................. 266▼ To Remove Proxies from an ICP Neighborhood ................................................................... 267▼ To Configure the Local Proxy Server in Your ICP Neighborhood ...................................... 267▼ To Enable ICP ............................................................................................................................. 268▼ To Enable Routing Through an ICP Neighborhood ............................................................. 269
Using Proxy Arrays ........................................................................................................................... 270Routing Through Proxy Arrays ................................................................................................ 270Creating a Proxy Array Member List ....................................................................................... 274Editing Proxy Array Member List Information ..................................................................... 276
▼ To Edit Member List Information ........................................................................................... 276Deleting Proxy Array Members ............................................................................................... 277Configuring Proxy Array Members ......................................................................................... 277Enabling Routing Through a Proxy Array .............................................................................. 278Enabling or Disabling a Proxy Array ....................................................................................... 279Redirecting Requests in a Proxy Array .................................................................................... 280Generating a PAC File From a PAT File ................................................................................... 280Routing Through Parent Arrays .............................................................................................. 282
Contents
13

13 Filtering Content Through the Proxy ............................................................................................. 285Filtering URLs .................................................................................................................................... 286
Creating a Filter File of URLs .................................................................................................... 286Setting Default Access for a Filter File ..................................................................................... 287
Content URL Rewriting .................................................................................................................... 288▼ To Create a URL Rewriting Pattern ......................................................................................... 288▼ To Edit a URL Rewriting Pattern ............................................................................................. 289▼ To Delete a URL Rewriting Pattern ......................................................................................... 289
Restricting Access to Specific Web Browsers ................................................................................. 289▼ To Restrict Access to the Proxy Based on the Client’s Web Browser ................................... 290
Blocking Requests .............................................................................................................................. 290▼ To block requests based on MIME type .................................................................................. 290
Suppressing Outgoing Headers ....................................................................................................... 291▼ To Suppress Outgoing Headers ................................................................................................ 292
Filtering by MIME Type ................................................................................................................... 292▼ To Filter by MIME Type ............................................................................................................ 292
Filtering by HTML Tags ................................................................................................................... 293▼ To Filter out HTML Tags .......................................................................................................... 293
Configuring the Server for Content Compression ........................................................................ 294Configuring the Server to Compress Content on Demand .................................................. 294
14 Using a Reverse Proxy .......................................................................................................................297How Reverse Proxying Works ......................................................................................................... 297
Proxy as a Stand-in for a Server ................................................................................................ 297Proxying for Load Balancing .................................................................................................... 301
Setting up a Reverse Proxy ................................................................................................................ 303▼ To Create Regular or Reverse Mapping .................................................................................. 303
Setting Up a Secure Reverse Proxy ........................................................................................... 304Virtual Multihosting in Reverse Proxy .................................................................................... 307
15 Using SOCKS .......................................................................................................................................311About SOCKS .................................................................................................................................... 311Using the Bundled SOCKS v5 Server .............................................................................................. 312
▼ To use the SOCKS ...................................................................................................................... 312About socks5.conf ...................................................................................................................... 313
Contents
Oracle iPlanet Web Proxy Server 4.0.14 Administration Guide • June 201014

Starting and Stopping the SOCKS v5 Server .................................................................................. 314▼ To Start and Stop the SOCKS Server From the Server Manager .......................................... 314
To Start and Stop the SOCKS Server From the Command Line .......................................... 314Configuring the SOCKS v5 Server ................................................................................................... 314
▼ To Configure the SOCKS Server .............................................................................................. 314Configuring SOCKS v5 Authentication Entries ............................................................................ 316
▼ To Create SOCKS Authentication Entries .............................................................................. 316▼ To Edit Authentication Entries ................................................................................................ 317▼ To Delete Authentication Entries ............................................................................................ 318▼ To Move Authentication Entries .............................................................................................. 318
Configuring SOCKS v5 Connection Entries .................................................................................. 318▼ To Create Connection Entries .................................................................................................. 318▼ To Edit Connection Entries ...................................................................................................... 320▼ To Delete Connection Entries .................................................................................................. 321▼ To Move Connection Entries ................................................................................................... 321
Configuring SOCKS v5 Server Chaining ........................................................................................ 321▼ To Configure SOCKS Server Chaining ................................................................................... 321
Configuring Routing Entries ........................................................................................................... 322▼ To Create Routing Entries ........................................................................................................ 322▼ To Create Proxy Routing Entries ............................................................................................. 323▼ To Edit Routing Entries ............................................................................................................. 324▼ To Delete Routing Entries ......................................................................................................... 324▼ To Move Routing Entries .......................................................................................................... 325
16 Managing Templates and Resources ..............................................................................................327About Templates ............................................................................................................................... 327
Understanding Regular Expressions ....................................................................................... 328Understanding Wildcard Patterns ........................................................................................... 329
Working With Templates ................................................................................................................. 330▼ To Create a Template ................................................................................................................ 330▼ To Apply a Template ................................................................................................................. 330▼ To Remove a Template .............................................................................................................. 331▼ To Edit a Template ..................................................................................................................... 331
Removing Resources ......................................................................................................................... 332▼ To Remove a Resource .............................................................................................................. 332
Contents
15
17 Using the Client Autoconfiguration File ........................................................................................ 333Understanding Autoconfiguration Files ......................................................................................... 334
What the Autoconfiguration File Does ................................................................................... 334Accessing the Proxy as a Web Server ....................................................................................... 334
Using Server Manager Pages to Create Autoconfiguration Files ................................................. 336▼ To Create an Autoconfiguration File using The Server Manager ......................................... 336
Creating Autoconfiguration Files Manually .................................................................................. 338FindProxyForURL() Function ................................................................................................. 338JavaScript Functions and Environment .................................................................................. 340
18 ACL File Syntax ...................................................................................................................................353About ACL Files and ACL File Syntax ............................................................................................ 353
Authentication Statements ....................................................................................................... 354Authorization Statements ......................................................................................................... 355Default ACL File ......................................................................................................................... 357
Referencing ACL Files in the obj.conf File ..................................................................................... 358
19 Tuning Server Performance .............................................................................................................359General Performance Considerations ............................................................................................ 359
Access Logging ........................................................................................................................... 360ACL Cache Tuning .................................................................................................................... 360Buffer Size ................................................................................................................................... 361Connection Timeout ................................................................................................................. 361Errors Log Level ......................................................................................................................... 361Security Requirements .............................................................................................................. 361Solaris File System Caching ...................................................................................................... 361
Timeout Values ................................................................................................................................. 362init-proxy() SAF (obj.conf File) ......................................................................................... 362http-client-config() SAF (obj.conf File) ........................................................................ 363KeepAliveTimeout() SAF (magnus.conf File) ...................................................................... 363
Up-to-Date Checks ........................................................................................................................... 364Last-Modified Factor ................................................................................................................. 364
DNS Settings ...................................................................................................................................... 365Number of Threads ........................................................................................................................... 365Inbound Connection Pool ................................................................................................................ 366
Contents
Oracle iPlanet Web Proxy Server 4.0.14 Administration Guide • June 201016

FTP Listing Width ............................................................................................................................. 367Cache Architecture ........................................................................................................................... 367Cache Batch Update .......................................................................................................................... 367Garbage Collection ............................................................................................................................ 368
gc hi margin percent Variable ..............................................................................................368gc lo margin percent Variable ..............................................................................................368gc extra margin percentVariable ........................................................................................368gc leave fs full percent Variable ......................................................................................369
Solaris Performance Tuning ............................................................................................................ 369
Index ................................................................................................................................................... 371
Contents
17

18

Preface
This Administration Guide describes how to configure and administer Oracle iPlanet WebProxy Server (Proxy Server).
This preface consists of the following sections:
■ “Who Should Use This Book” on page 19■ “How This Book Is Organized” on page 19■ “The Proxy Server Documentation Set” on page 20■ “Documentation Conventions” on page 21■ “Default Paths and File Names” on page 23■ “Documentation, Support, and Training” on page 23■ “Searching Oracle Product Documentation” on page 24■ “Third-Party Web Site References” on page 24
Who Should Use This BookThis book is intended for information technology administrators in production environments.The guide assumes familiarity with the following areas:
■ Performing basic system administration tasks■ Installing software■ Using web browsers■ Issuing commands in a terminal window
How This Book Is OrganizedThe guide is divided into parts, each of which addresses specific areas and tasks. The followingtable lists the parts of the guide and their contents.
TABLE P–1 Guide Organization
Part Description
19

TABLE P–1 Guide Organization (Continued)Part 1 Server Basics Provides an overview of the Proxy Server and its administration:
■ Chapter 1, “Introducing iPlanet Web Proxy Server”■ Chapter 2, “Administering Proxy Server”
Part 2 Using the Administration Server Provides details about configuring Administration Serverpreferences, managing users and groups, securing the Proxy Server,and using clusters to share configurations among servers:■ Chapter 3, “Setting Administration Preferences”■ Chapter 4, “Managing Users and Groups”■ Chapter 5, “Using Certificates and Keys”■ Chapter 6, “Managing Server Clusters”
Part 3 Configuring and MonitoringProxy Server
Provides details about configuring server preferences, setting accesscontrol, and monitoring server activity:■ Chapter 7, “Configuring Server Preferences”■ Chapter 8, “Controlling Access to Your Server”■ Chapter 9, “Using Log Files”■ Chapter 10, “Monitoring Servers”
Part 4 Managing Proxy Server Provides details about concepts and tasks related to how the ProxyServer handles requests:■ Chapter 11, “Proxying and Routing URLs”■ Chapter 12, “Caching”■ Chapter 13, “Filtering Content Through the Proxy”■ Chapter 14, “Using a Reverse Proxy”■ Chapter 15, “Using SOCKS”■ Chapter 16, “Managing Templates and Resources”■ Chapter 17, “Using the Client Autoconfiguration File”
Part 5 Appendixes Describes access control list (ACL) file syntax and tuning serverperformance:■ Chapter 18, “ACL File Syntax”■ Chapter 19, “Tuning Server Performance”
The Proxy Server Documentation SetThe documentation set lists the Oracle documents that are related to Proxy Server. The URL forProxy Server 4.0.14 documentation is http://docs.sun.com/coll/1311.14. For anintroduction to Proxy Server, refer to the books in the order in which they are listed in thefollowing table.
Preface
Oracle iPlanet Web Proxy Server 4.0.14 Administration Guide • June 201020
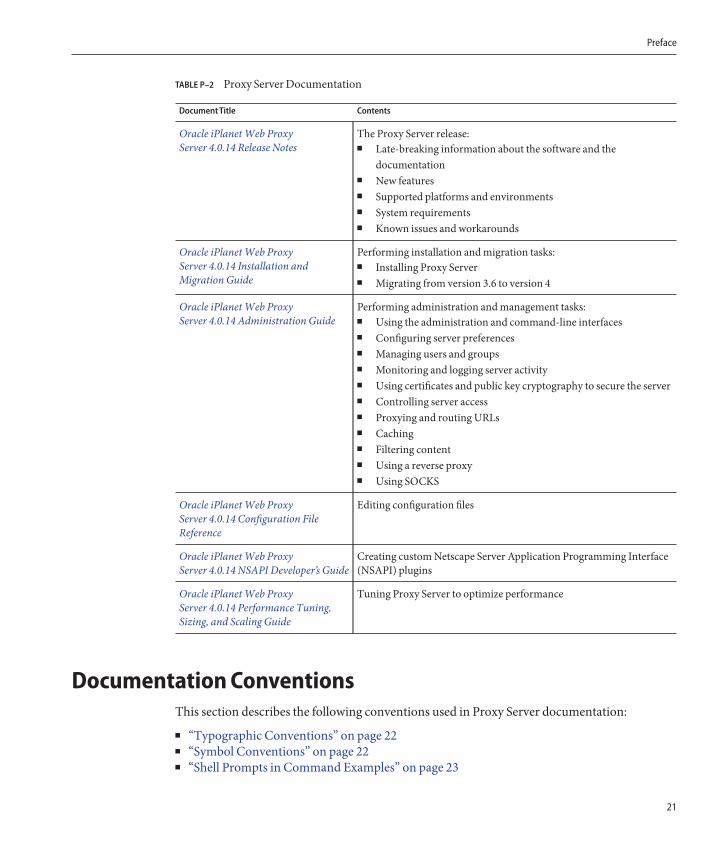
TABLE P–2 Proxy Server Documentation
Document Title Contents
Oracle iPlanet Web ProxyServer 4.0.14 Release Notes
The Proxy Server release:■ Late-breaking information about the software and the
documentation■ New features■ Supported platforms and environments■ System requirements■ Known issues and workarounds
Oracle iPlanet Web ProxyServer 4.0.14 Installation andMigration Guide
Performing installation and migration tasks:■ Installing Proxy Server■ Migrating from version 3.6 to version 4
Oracle iPlanet Web ProxyServer 4.0.14 Administration Guide
Performing administration and management tasks:■ Using the administration and command-line interfaces■ Configuring server preferences■ Managing users and groups■ Monitoring and logging server activity■ Using certificates and public key cryptography to secure the server■ Controlling server access■ Proxying and routing URLs■ Caching■ Filtering content■ Using a reverse proxy■ Using SOCKS
Oracle iPlanet Web ProxyServer 4.0.14 Configuration FileReference
Editing configuration files
Oracle iPlanet Web ProxyServer 4.0.14 NSAPI Developer’s Guide
Creating custom Netscape Server Application Programming Interface(NSAPI) plugins
Oracle iPlanet Web ProxyServer 4.0.14 Performance Tuning,Sizing, and Scaling Guide
Tuning Proxy Server to optimize performance
Documentation ConventionsThis section describes the following conventions used in Proxy Server documentation:
■ “Typographic Conventions” on page 22■ “Symbol Conventions” on page 22■ “Shell Prompts in Command Examples” on page 23
Preface
21

Typographic ConventionsThe following table describes the typographic changes that are used in this book.
TABLE P–3 Typographic Conventions
Typeface Meaning Example
AaBbCc123 The names of commands, files, anddirectories, and onscreen computeroutput
Edit your .login file.
Use ls -a to list all files.
machine_name% you have mail.
AaBbCc123 What you type, contrasted with onscreencomputer output
machine_name% su
Password:
AaBbCc123 A placeholder to be replaced with a realname or value
The command to remove a file is rm filename.
AaBbCc123 Book titles, new terms, and terms to beemphasized (note that some emphasizeditems appear bold online)
Read Chapter 6 in the User's Guide.
A cache is a copy that is stored locally.
Do not save the file.
Symbol ConventionsThe following table explains symbols that might be used in this book.
TABLE P–4 Symbol Conventions
Symbol Description Example Meaning
[ ] Contains optional argumentsand command options.
ls [-l] The -l option is not required.
{ | } Contains a set of choices for arequired command option.
-d {y|n} The -d option requires that you useeither the y argument or the nargument.
${ } Indicates a variablereference.
${com.sun.javaRoot} References the value of thecom.sun.javaRoot variable.
- Joins simultaneous multiplekeystrokes.
Control-A Press the Control key while you pressthe A key.
+ Joins consecutive multiplekeystrokes.
Ctrl+A+N Press the Control key, release it, andthen press the subsequent keys.
Preface
Oracle iPlanet Web Proxy Server 4.0.14 Administration Guide • June 201022

TABLE P–4 Symbol Conventions (Continued)Symbol Description Example Meaning
→ Indicates menu itemselection in a graphical userinterface.
File → New → Templates From the File menu, choose New.From the New submenu, chooseTemplates.
Shell Prompts in Command ExamplesThe following table shows default system prompts and superuser prompts.
TABLE P–5 Shell Prompts
Shell Prompt
C shell on UNIX and Linux systems machine_name%
C shell superuser on UNIX and Linux systems machine_name#
Bourne shell and Korn shell on UNIX and Linux systems $
Bourne shell and Korn shell superuser on UNIX and Linux systems #
Default Paths and File NamesThe following table describes the default paths and file names used in Proxy Serverdocumentation.
TABLE P–6 Default Paths and File Names
Placeholder Description Default Value
install-dir Represents the base installationdirectory for iPlanet Web ProxyServer.
Solaris and Linux installations:$HOME/Oracle/Middleware/ProxyServer4
Windows installations:C:\Oracle\Middleware\ProxyServer4
Documentation, Support, and TrainingThe Oracle web site provides information about the following additional resources:
■ Documentation (http://docs.sun.com/)■ Support (http://www.sun.com/support/)■ Training (http://education.oracle.com/pls/web_prod-plq-dad/
db_pages.getpage?page_id=315)
Preface
23
Searching Oracle Product DocumentationBesides searching Oracle product documentation from the docs.sun.com web site, you can usea search engine by typing the following syntax in the search field:
search-term site:docs.sun.com
For example, to search for “proxy,” type the following:
proxy site:docs.sun.com
To include other Oracle web sites in your search (for example, java.sun.com, www.sun.com,and developers.sun.com), use sun.com in place of docs.sun.com in the search field.
Third-Party Web Site ReferencesThird-party URLs are referenced in this document and provide additional, related information.
Note – Oracle is not responsible for the availability of third-party web sites mentioned in thisdocument. Oracle does not endorse and is not responsible or liable for any content, advertising,products, or other materials that are available on or through such sites or resources. Oracle willnot be responsible or liable for any actual or alleged damage or loss caused or alleged to becaused by or in connection with use of or reliance on any such content, goods, or services thatare available on or through such sites or resources.
Preface
Oracle iPlanet Web Proxy Server 4.0.14 Administration Guide • June 201024

Introducing iPlanet Web Proxy Server
This chapter provides a general overview of iPlanet Web Proxy Server, including a briefdescription of what’s new in this release and an overview of the web-based user interfaces usedto administer, configure, and manage the Proxy Server.
This chapter contains the following sections:
■ “About Proxy Server” on page 25■ “New in This Release” on page 25■ “Getting Started” on page 26
About Proxy ServerProxy Server represents the HTTP caching and acceleration foundation for high performanceInternet and Intranet environments. The Proxy Server is a system for caching and filtering webcontent and boosting network performance, offering integration with the entire networkinfrastructure, cross-platform support, and centralized management capabilities. Acting as anetwork traffic manager, distributes and manages information efficiently so network traffic anduser wait times are reduced. The Proxy Server also helps ensure that users can access networkresources safely and productively, providing a secure gateway for content distribution andserving as a control point for Internet traffic.
New in This ReleaseiPlanet Web Proxy Server 4 includes the following enhancements:
■ Modern HTTP core■ Support for Linux and the Solaris x86 platform■ Modern SSL (Secure Sockets Layer) support on all platforms■ Multi-threaded architecture on all platforms■ Improved administration, graphical user interface, and ease of management
1C H A P T E R 1
25

■ New NSAPI (Netscape Server Application Programming Interface) filters■ Increased LDAP (Lightweight Directory Access Protocol) performance■ Improved scalability and performance■ Improved content filtering■ Implementation of the server.xml configuration file
For information about new features and enhancements, see the Proxy Server Release Notes,available at: http://docs.sun.com/coll/1311.14.
Getting StartedProxy Server is administered and configured with the Administration Server and the ServerManager web-based user interfaces. The Administration Server is used to manage configurationthat is common to all Proxy Server instances installed on your system, while the Server Manageris used to configure settings for individual server instances.
This section contains the following topics:■ “Administration Server Overview” on page 26■ “Server Manager Overview” on page 27■ “Configuration Files” on page 29■ “Regular Expressions” on page 29
Note – Cookies must be enabled in your browser to run the CGI programs necessary forconfiguring your server.
Administration Server OverviewThe Administration Server is a web-based user interface used to manage configuration that iscommon to all Proxy Server instances installed on your system.
After the Administration Server has been started, the Administration Server is accessed bylaunching a browser and entering a URL. The URL is determined by the host name and portnumber specified during installation, for example, http://myserver.mycorp.com:1234.
More than one administrator can be granted access to the Administration Server. For moreinformation about distributed administration, see “Allowing Multiple Administrators” onpage 38.
Administration Server settings are organized by tabs that correspond to specific tasks. Thefollowing table lists the Administration Server tabs, followed by a brief description of the tasksthat the tabs provide.■ Servers - Manage, add, remove, migrate Proxy Servers
Getting Started
Oracle iPlanet Web Proxy Server 4.0.14 Administration Guide • June 201026
■ Preferences - Shutdown the Administration Server, edit listen sockets, configure superuseraccess, configure distributed administration allowing multiple administrators, customizeand view access and error logs
■ Global Settings - Configure directory services, specify access control, configure SNMPmaster agent settings
■ Users and Groups - Add and manage users, groups, and organizational units■ Security - Create new trust databases, request and install VeriSign and other certificates,
change the key-pair file password, view and manage installed certificates, add or replaceCertificate Revocation Lists and Compromised Key Lists (CRLs and CKLs), manage CRLsand CKLs, migrate 3.x certificates
■ Cluster - Control remote servers in a cluster, add and remove remote servers, modify serverinformation
Regardless of the tab or page you are on, the following buttons also display:■ Version - Displays version information about Proxy Server■ Refresh - Refreshes the current page■ Help - Displays online Help for the current page
▼ To Access the Administration Server
Launch a browser and go to the URL that reflects the host name and port number specified forthe Administration Server during installation, for example,http://myserver.mycorp.com:1234
When prompted, type the user name and password specified during installation.The Administration Server’s user interface displays.
For more information about using the Administration Server, see Chapter 2, “AdministeringProxy Server.” Also see the online help for Administration Server tabs and pages.
Server Manager OverviewThe Server Manager is the web-based user interface used to start, stop, and configure individualinstances of Proxy Server.
Server Manager settings are organized by tabs that correspond to specific tasks. The following isa list of the Server Manager tabs, with a brief description of the tasks that the tabs provide.■ Preferences - Start and stop the server, view server settings, restore configuration
information, configure system preferences, tune Proxy Server performance, add and editlisten sockets, manage MIME types, administer access control, configure ACL and DNScaches, configure DNS local subdomains, configure HTTP keep-alive settings, set ciphersize
1
2
Getting Started
Chapter 1 • Introducing iPlanet Web Proxy Server 27

■ Routing - Enable and disable proxying, set routing preferences, forward client credentials,enable Java IP address checking, create and edit autoconfiguration files, set the connectivitymode, change the default FTP transfer mode, set the SOCKS name server IP address,configure HTTP request load balancing
■ SOCKS - Start and stop the SOCKS server, and create and manage SOCKS authentication,connection, and routing entries
■ URLs - View, create, and manage URL mappings and redirections■ Caching - Set cache specifics, add and modify cache partitions, move sections among
existing partitions, set the cache capacity, set the garbage collection mode, tune the cache,schedule garbage collection, tune garbage collection settings, configure caching for specificresources, enable the caching of local hosts, change the file cache settings, set cache batchupdates, view information about recorded cached URLs, configure proxies in an ICPneighborhood, create and update the proxy array member list, configure proxy arraymembers, view information in the PAT file
■ Filters - Create filter files, set content URL rewriting, set user-agent restriction and requestblocking, suppress outgoing headers, set MIME filters and HTML tag filters, compresscontent on demand
■ Server Status - View log files, archive logs, set log preferences, generate reports, monitorcurrent activity, configure and control the SNMP subagent
■ Security - Create new trust databases, request and install VeriSign and other certificates,change the key-pair file password, view and manage installed certificates, add or replaceCertificate Revocation Lists and Compromised Key Lists (CRLs and CKLs), manage CRLsand CKLs, migrate 3.x certificates
■ Templates - Create, remove, apply, and view templates, and remove resources
Regardless of the tab or page you are on, the following buttons also display:
■ Version - Displays version information about Proxy Server■ Refresh - Refreshes the current page■ Help - Displays online Help for the current page
At times, you might also see a Restart Required link below the Refresh button. This linkindicates that changes have been made for which a server restart is required. To apply thechanges, click the link and specify the desired action.For more information about using the Server Manager, see related tasks in this guide. Alsosee the online Help for Server Manager tabs and pages.
▼ To Access the Server Manager
Access the Administration Server as described in “Administration Server Overview”on page 26.The Administration Server appears on the Servers tab.
1
Getting Started
Oracle iPlanet Web Proxy Server 4.0.14 Administration Guide • June 201028

On the Manage Servers page, click the link for the server instance you want to manage.The Server Manager user interface appears.
Configuration FilesThe configuration and behavior of Proxy Server is determined by a set of configuration files.Settings configured in the administration interface are reflected in the configuration files. Thefiles can also be edited manually.
The configuration files reside in the directory instance-dir/config, where instance-dir is theserver instance. The config directory contains various configuration files that control differentcomponents. The number and names of the configuration files depend on which componentshave been enabled or loaded. This directory always contains four configuration files that areessential to server operation. The following table lists the four essential configuration files andtheir contents.
TABLE 1–1 Essential Configuration Files
File Contains
server.xml Most of the server configuration (new in this Proxy Server release)
magnus.conf Global server initialization information
obj.conf Instructions for handling requests from clients
mime.types Information for determining the content type of requested resources
For detailed information about these files and other configuration files, see Oracle iPlanet WebProxy Server 4.0.14 Configuration File Reference.
Regular ExpressionsYou can use regular expressions to identify resources and configure the Proxy Server to handlerequests from different URLs differently. You can specify regular expressions as you perform avariety of tasks using the Administration Server and Server Manager user interfaces. Fordetailed information about the use of regular expressions, see Chapter 16, “ManagingTemplates and Resources.”
2
Getting Started
Chapter 1 • Introducing iPlanet Web Proxy Server 29

30

Administering Proxy Server
This chapter introduces the basics of administering iPlanet Web Proxy Server using theAdministration Server. The Administration Server is a web-based user interface used tomanage, add, remove, and migrate servers.
This chapter contains the following sections:
■ “Starting the Administration Server” on page 31■ “Stopping the Administration Server” on page 32■ “Running Multiple Proxy Servers” on page 33■ “Removing a Server Instance” on page 33■ “Migrating From Proxy Server 3.6” on page 34
For details about configuring Administration Server preferences, see Chapter 3, “SettingAdministration Preferences.” For details about administering multiple Proxy Servers usingserver clusters, see Chapter 6, “Managing Server Clusters.”
Starting the Administration ServerThis section describes how to start the Administration Server on different platforms. Forinformation about stopping the Administration Server, see “Stopping the AdministrationServer” on page 32.
To Start the Administration Server on UNIX or Linux1. From the command line, go to server-root/proxy-admserv and2. Type ./start to start the Administration Server (or ./restart to restart the
Administration Server).
2C H A P T E R 2
31

To Start the Administration Server on WindowsYou can start the Administration Server on Windows in any of the following ways:
■ On the Start menu, select Programs ⇒ Oracle Corporation ⇒ Oracle iPlanet Proxy Server4⇒ Start Admin
■ Use Control Panel ⇒ Administrative Tools ⇒ Services ⇒ Oracle iPlanet Proxy Server4Administration Server ⇒ Start
■ From a command prompt, go to server-root\proxy-admserv and type startsvr.bat to startthe Administration Server (or ./restart to restart the Administration Server).
After the Administration Server has been started, you can access it by launching a browser andprovding a URL that reflects the host name and port number specified for the AdministrationServer during installation, for example, http://myserver.mycorp.com:1234. You will beprompted for a user name and password, both of which were also specified during installation.
More than one administrator can be granted access to the Administration Server. For moreinformation about distributed administration, see “Allowing Multiple Administrators” onpage 38.
Stopping the Administration ServerThis section describes how to stop the Administration Server on different platforms. Forinformation about starting the Administration Server, see “Starting the Administration Server”on page 31.
To Stop the Administration Server on UNIX or LinuxYou can stop the Administration Server on UNIX or Linux in either of the following ways:
■ Using the administration interface:1. Access the Administration Server.2. Select the Preferences tab.3. Click the Shutdown Server link.4. Click OK.
■ From the command line, go to server-root/proxy-admserv/ and type ./stop.
To Stop the Administration Server on WindowsYou can stop the Administration Server on Windows in either of the following ways:
Stopping the Administration Server
Oracle iPlanet Web Proxy Server 4.0.14 Administration Guide • June 201032

■ Use the iPlanet Web Proxy Server 4.0 Administration Server service in the Services window:Control Panel->Administrative Tools->Services->iPlanet Web Proxy Server 4.0Administration Server> Stop
■ From the command prompt, go to server-root\proxy-admserv and type stopsvr.bat.
Running Multiple Proxy ServersTo run multiple Proxy Servers on your system multiple server instances must be installed andconfigured. The following procedure describes how to add server instances.
▼ To Install multiple server instancesAccess the Administration Server.
On the Servers tab, click Add Server.
Provide the requested information and click OK.For more information about specific fields, see the online Help.
If desired, click the Configure Your New Server link on the Success page that displays aftersuccessfully adding a new server instance.The Server Manager interface appears. You can use it to configure server instances.
Removing a Server InstanceThe Administration Server can be used to remove Proxy Server instances. This process cannotbe undone, so be sure you want to remove the server instance before performing the followingprocedure.
▼ To Remove a Server InstanceAccess the Administration Server.
On the Servers tab, click Remove Server.
From the drop-down list, select the server instance you want to remove.
Select the Confirming Server Removal checkbox and click OK.
1
2
3
4
1
2
3
4
Removing a Server Instance
Chapter 2 • Administering Proxy Server 33
Migrating From Proxy Server 3.6Sun ONE Web Proxy Server 3.6 (also known as Sun iPlanet Web Proxy Server) can be migratedto iPlanet Web Proxy Server 4. The 3.6 server is preserved, and a new version 4 server with thesame settings is created. For more information about migrating a server from version 3.6 toversion 4, see Oracle iPlanet Web Proxy Server 4.0.14 Installation and Migration Guide. Also seethe online help for migration-related pages in the Proxy Server user interface. For informationabout migrating certificates, see “Migrating Certificates From Previous Versions” on page 81 inthis guide.
Migrating From Proxy Server 3.6
Oracle iPlanet Web Proxy Server 4.0.14 Administration Guide • June 201034

Setting Administration Preferences
This chapter describes how to configure administration preferences using the AdministrationServer. Cookies must be enabled in your browser to run the CGI programs necessary forconfiguring your server.
This chapter contains the following sections:
■ “Creating and Managing Listen Sockets” on page 35■ “Changing Superuser Settings” on page 37■ “Allowing Multiple Administrators” on page 38■ “Specifying Log File Options” on page 39■ “Using Directory Services” on page 40■ “Restricting Server Access” on page 40■ “SNMP Master Agent Settings” on page 41
Creating and Managing Listen SocketsBefore the server can process a request, the request must be accepted by a listen socket and thendirected to the correct server. When the Proxy Server is installed, one listen socket (ls1) iscreated automatically. This listen socket uses the IP address 0.0.0.0 and the port numberspecified as the Administration Server port number during installation.
Listen sockets are added, edited, and deleted using the Administration Server’s Edit ListenSockets page. You must have at least one listen socket with which to access the server. Youcannot delete a listen socket if it is the only one listed.
This section describes how to add, edit, and delete listen sockets.
3C H A P T E R 3
35

▼ To Add Listen SocketsAccess the Administration Server and select the Preferences tab.
Click the Edit Listen Sockets link.
Click the New button.
Specify the settings and click OK.For more information about specific fields, see the online Help.
▼ To Edit Listen SocketsAccess the Administration Server and select the Preferences tab.
Click the Edit Listen Sockets link.
Click the link for the listen socket you want to edit.
Make the desired changes, and then click OK.
▼ To Delete Listen SocketsAccess the Administration Server and select the Preferences tab.
Click the Edit Listen Sockets link.
Select the checkbox next to the listen socket you want to delete and click OK.
When prompted to confirm deletion, click OK.You must have at least one listen socket with which to access the server. You cannot delete thelisten socket if it is the only one listed.
1
2
3
4
1
2
3
4
1
2
3
4
Creating and Managing Listen Sockets
Oracle iPlanet Web Proxy Server 4.0.14 Administration Guide • June 201036

Changing Superuser SettingsSuperuser access can be configured for the Administration Server. These settings affect only thesuperuser account. If the Administration Server uses distributed administration, additionalaccess controls must be configured for the permitted administrators.
Caution – If Oracle Directory Server Enterprise Edition is used to manage users and groups, thesuperuser entry must be updated in the directory before changing the superuser user name orpassword. If you do not update the directory first, you will not be able to access the Users andGroups interface in the Administration Server. You then must either access the AdministrationServer with an administrator account that does have access to the directory, or update thedirectory using the Directory Server console or configuration files.
▼ To Change Superuser Settings for the AdministrationServer
Access the Administration Server and select the Preferences tab.
Click the Control Superuser Access link.
Make the desired changes and click OK.For more information about specific fields, see the online Help.
The superuser’s user name and password are kept in a file called admpw, located inserver-root/proxy-admserv/config. The file has the format username:password. You can viewthis file to obtain the user name, but the password is encrypted and unreadable. If you forget thepassword, you can change to a new password.
▼ To Change the Superuser PasswordEdit the admpwfile and delete the encrypted password.
Access the Administration Server with the user name and no password.
Click the Preferences tab.
Click the Control Superuser Access link.
Provide a new password and click OK.
1
2
3
1
2
3
4
5
Changing Superuser Settings
Chapter 3 • Setting Administration Preferences 37

Caution – Because the admpw file can be edited, the server computer must be kept in a secure placeand access to its file system must be restricted.
On UNIX and Linux systems, consider changing file ownership so that the file is writable onlyby root or whatever system user runs the Administration Server daemon. On Windows systems,restrict file ownership to the user account used by the Administration Server.
Allowing Multiple AdministratorsMultiple administrators can change specific parts of the server through distributedadministration. A directory server must be installed before distributed administration can beenabled. The default directory service must be LDAP-based.
The two levels of users for distributed administration are superuser and administrator.
■ Superuser is the user listed in server-root/proxy-admserv/config/admpw. This is the username and password specified during installation. This user has full access to all forms in theAdministration Server except the Users and Groups forms, the access for which depends onthe superuser having a valid account in an LDAP server.
■ Administrators go directly to the Server Manager forms for a specific server, including theAdministration Server. The forms they see depend on the access control rules configured forthem, usually by the superuser. Administrators can perform limited administrative tasksand also make changes that affect other users, such as adding users or changing accesscontrol.
For more information about access control, see Chapter 8, “Controlling Access to Your Server.”
▼ To Enable Distributed AdministrationVerify that a directory server is installed.
Access the Administration Server.
(Optional) After a directory server has been installed, you might also need to create anadministration group if you have not already done so. To create a group:
a. Click the Users and Groups tab.
b. Click the Create Group link.
1
2
3
Allowing Multiple Administrators
Oracle iPlanet Web Proxy Server 4.0.14 Administration Guide • June 201038

c. Create an administrators group in the LDAP directory, and add the names of the users towhom you are granting permission to configure the Administration Server or any of theservers installed in its server root.For more information about specific fields, see the online Help.
All users in the administrators group have full access to the Administration Server, butaccess control can be used to limit the servers and forms they are allowed to configure.
Once an access control list is created, the distributed administration group is added to thatlist. If the name of the administrators group is changed, you must manually edit the accesscontrol list to change the group it references.
Click the Preferences tab.
Click the Configure Distributed Administration link.
Select Yes, specify the administrator group, and then click OK.
Specifying Log File OptionsThe Administration Server log files record data about the Administration Server, including thetypes of errors encountered and information about server access. The log information enablesyou to monitor server activity and troubleshoot problems. You can specify the type and formatof the data recorded in the Administration Server logs using the many options on the LogPreferences pages. You can choose the Common Logfile Format, which provides a fixedamount of information about the server, or you can create a custom log file format that bettersuits your requirements.
To access the Administration Server Log Preferences pages, click the Preferences tab, then clickthe Set Access Log Preferences or Set Error Log Preferences link. For detailed information aboutthe log files and setting log file options, see Chapter 9, “Using Log Files.” Also see the onlineHelp.
Viewing Log FilesAdministration Server log files are located in server-root/proxy-admserv/logs. You can viewboth the error and access log through the Proxy Server administration console, or with a texteditor.
Access Log FileThe access log file records information about requests to and responses from the server.
4
5
6
Specifying Log File Options
Chapter 3 • Setting Administration Preferences 39

▼ To View the Access Log File
Access the Administration Server and click the Preferences tab.
Click the View Access Log link.For more information about specific fields, see the online Help. Also see Chapter 9, “Using LogFiles.”
Error Log FileThe error log lists all errors the server has encountered since the log file was created. It alsocontains informational messages about the server, such as when the server was started, and whotried to log in but failed.
▼ To View the Error Log File
Access the Administration Server and click the Preferences tab.
Click the View Error Log link.For more information about specific fields, see the online Help. Also see Chapter 9, “Using LogFiles.”
Using Directory ServicesYou can store and manage information such as user names and passwords in a single directoryserver using LDAP. You can also configure the server to allow users to retrieve directoryinformation from multiple, easily accessible network locations. For more information aboutusing directory services, see Chapter 4, “Managing Users and Groups.”
Restricting Server AccessWhen the Proxy Server evaluates an incoming request, access is determined based on ahierarchy of rules called access control entries (ACEs), and then matching entries are used todetermine if the request should be allowed or denied. Each ACE specifies whether the servershould continue to the next ACE in the hierarchy. The collection of ACEs is called an accesscontrol list (ACL).
Access control can be configured for access to the Administration Server and to specificresources within a server instance, such as files, directories, and file types. Access control to theAdministration Server is configured from the Global Settings tab in the Administration Server.
1
2
1
2
Using Directory Services
Oracle iPlanet Web Proxy Server 4.0.14 Administration Guide • June 201040
Access control for resources within a server instance is configured from the Preferences tab inthe Server Manager. For more information about setting access control, see Chapter 8,“Controlling Access to Your Server.”
Note – Distributed administration must be enabled before you can restrict server access. Formore information, see “Allowing Multiple Administrators” on page 38.
SNMP Master Agent SettingsSimple Network Management Protocol (SNMP) is a protocol used to exchange data aboutnetwork activity. This information is transferred between a network management station andthe server through the use of subagents and master agents.
SNMP master agent settings are configured using the Global Settings tab in the AdministrationServer. The master agent is installed with the Administration Server. For detailed informationabout SNMP and agent settings, see Chapter 10, “Monitoring Servers.” Also see the online Helpfor master agent pages on the Global Settings tab in the Administration Server, and for thesubagent pages on the Server Status tab in the Server Manager.
SNMP Master Agent Settings
Chapter 3 • Setting Administration Preferences 41

42

Managing Users and Groups
This chapter describes how to add, delete, modify, and manage the users and groups that canaccess the Proxy Server.
This chapter contains the following sections:
■ “Accessing Information About Users and Groups” on page 43■ “About Directory Services” on page 44■ “Configuring Directory Services” on page 45■ “Creating Users” on page 47■ “Managing Users” on page 51■ “Creating Groups” on page 55■ “Managing Groups” on page 60■ “Creating Organizational Units” on page 66■ “Managing Organizational Units” on page 66
Accessing Information About Users and GroupsThe Administration Server provides access to application data about user accounts, group lists,access privileges, organizational units, and other user- and group-specific information.
User and group information is stored either in flat files in text format, or in a directory serversuch as Oracle Directory Server Enterprise Edition, which supports LDAP (LightweightDirectory Access Protocol). LDAP is an open directory access protocol that runs over TCP/IP(Transmission Control Protocol/Internet Protocol) and is scalable to a global size and millionsof entries.
4C H A P T E R 4
43

About Directory ServicesA directory service enables all user information to be managed from a single source. With ProxyServer, three different types of directory services can be configured: LDAP, key file, and digestfile.
If no other directory service has been configured, the first new directory service created is set tothe value default, irrespective of its type. When a directory service is created, theserver-root/userdb/dbswitch.conf file is updated with directory service details.
This section describes directory services for LDAP, key files, and digest files.
LDAP Directory ServicesWith an LDAP directory service, user and group information is stored in an LDAP-baseddirectory server.
If the LDAP service is the default service, the dbswitch.conf file is updated as shown in theexample below:
directory default ldap://test22.india.sun.com:589/dc%3Dindia%2Cdc%3Dsun%2Cdc%
3Dcomdefault:binddn cn=Directory Managerdefault:encoded bindpw YWRtaW5hZG1pbg==
If the LDAP service is a non-default service, the dbswitch.conf file is updated as shown in theexample below:
directory ldap ldap://test22.india.sun.com:589/dc%3Dindia%2Cdc%
3Dsun%2Cdc%3Dcomldap:binddn cn=Directory Managerldap:encoded bindpw
YWRtaW5hZG1pbg==
Key File Directory ServicesA key file is a text file that contains the user’s password in a hashed format and the list of groupsto which the user belongs. The key file format can only be used when the intent is to use HTTPBasic authentication. For more information about this authentication method, see “SpecifyingUsers and Groups” on page 155.
When a key file-based database is created, the dbswitch.conf file is updated as shown in theexample below:
directory keyfile filekeyfile:syntax keyfilekeyfile:keyfile
D:\\test22\\keyfile\\keyfiledb
About Directory Services
Oracle iPlanet Web Proxy Server 4.0.14 Administration Guide • June 201044

Digest File Directory ServicesA digest file stores user and group information based on encrypted user name and password.
The digest file format is meant to support the use of HTTP Digest authentication but alsosupports Basic authentication, so it can be used for both authentication methods. For moreinformation about these methods, see “Specifying Users and Groups” on page 155.
When a digest-based database is created, the dbswitch.conf file is updated as shown in theexample below:
directory digest filedigest:syntax digestdigest:digestfile
D:\\test22\\digest\\digestdb
Note – To configure distributed administration, the default directory service must be anLDAP-based directory service.
Configuring Directory ServicesA directory service is created and configured on the Global Settings tab in the AdministrationServer. Users, groups, and organizational units are then created and managed on the Users andGroups tab in the Administration Server.
This section describes how to create and edit directory services.
▼ To Create Directory ServicesAccess the Administration Server and click the Global Settings tab.
Click the Configure Directory Service link.
From the Create New Service of Type drop-down list, select the type of directory service youwant to create and click New.
The configuration page for that directory service appears.
Provide configuration information, and then click Save Changes.
For more information about specific fields, see the online Help.
1
2
3
4
Configuring Directory Services
Chapter 4 • Managing Users and Groups 45
Note – If no other directory service has been configured, the first new directory service created isset to the value default, irrespective of its type.
▼ To Edit Directory ServicesAccess the Administration Server and click the Global Settings tab.
Click the Configure Directory Service link.
Click the link for the directory service you want to edit.
Make the desired changes, and then click Save Changes.For more information about specific fields, see the online help.
Understanding Distinguished Names (DNs)The Users and Groups tab in the Administration Server is used to create or modify users,groups, and organizational units. A user is an individual in the LDAP database, such as anemployee of your company. A group is two or more users who share a common attribute. Anorganizational unit is a subdivision within your organization that uses theorganizationalUnit object class. Users, groups, and organizational units are described ingreater detail later in this chapter.
Each user and group in your enterprise is represented by a distinguished name (DN) attribute.A DN attribute is a text string that contains identifying information for an associated user,group, or object. You use DNs whenever user or group directory entries are changed. Forexample, DN information must be provided each time you create or modify directory entries,configure access controls, and configure user accounts for applications such as mail orpublishing. The Users and Groups interface of the Proxy Server is used to create or modify DNs.
The following example represents a typical DN for an employee of Sun Microsystems:
uid=doe,[email protected],cn=John Doe,o=Sun Microsystems Inc.,c=US
The abbreviations in this example mean the following:
■ uid is the user ID■ e is the email address■ cn is the user’s common name■ o is the organization■ c is the country
1
2
3
4
Understanding Distinguished Names (DNs)
Oracle iPlanet Web Proxy Server 4.0.14 Administration Guide • June 201046

DNs may include a variety of name-value pairs, and are used to identify both certificate subjectsand entries in directories that support LDAP.
Using LDIFIf you do not currently have a directory, or you want to add a new subtree to an existingdirectory, you can use the directory server’s LDIF (Lightweight Directory Interchange Format)import function. This function accepts a file containing LDIF and attempts to build a directoryor a new subtree from the LDIF entries. You can also export your current directory to LDIFusing the directory server’s LDIF export function. This function creates an LDIF-formatted filethat represents your directory. You can add or edit entries using the ldapmodify command-lineutility, if available, along with the appropriate LDIF update statements.
To add entries to the database using LDIF, first define the entries in an LDIF file, then importthe LDIF file from the directory server.
Creating UsersThe Users and Groups tab in the Administration Server is used to create and modify userentries. A user entry contains information about an individual person or object in the database.
Note – Be sure to protect server security by ensuring that users do not have unauthorized accessto resources. Proxy Server uses an ACL-based authorization and authentication model. Formore information about ACL-based security, see Chapter 8, “Controlling Access to YourServer.” For additional security information, also see Chapter 5, “Using Certificates and Keys.”
This section describes how to create users in LDAP-based authentication databases, key fileauthentication databases, and digest file authentication databases.
Creating Users in LDAP-based AuthenticationDatabasesWhen user entries are added to an LDAP-based directory service, the services of an underlyingLDAP-based directory server are used to authenticate and authorize users. This section listsguidelines to consider when using an LDAP-based authentication database, and describes howto add users through the Proxy Server Administration Server.
Guidelines for Creating LDAP-based User EntriesConsider the following guidelines when using the Proxy Server administration console to createnew user entries in an LDAP-based directory service:
Creating Users
Chapter 4 • Managing Users and Groups 47

■ If you provide a given name (or first name) and a surname, the user’s full name and user IDare automatically completed. The user ID is generated as the first initial of the user’s firstname followed by the user’s last name. For example, if the user’s name is Billie Holiday, theuser ID is automatically set to bholiday. You can replace this user ID with an ID of yourown choosing if you wish.
■ The user ID must be unique. The Administration Server ensures that the user ID is uniqueby searching the entire directory from the search base (base DN) down to see if the user ID isin use. Be aware, however, that if you use the directory server ldapmodify command-lineutility, if available, to create a user, unique user IDs are not ensured. If duplicate user IDsexist in your directory, the affected users will not be able to authenticate to the directory.
■ The base DN specifies the distinguished name where directory lookups occur by default,and where all Proxy Server Administration Server entries are placed in your directory tree. Adistinguished name (DN) is the string representation for the name of an entry in a directoryserver.
■ At a minimum, you must specify the following user information when creating a new userentry:■ Surname or last name■ Full name■ User ID
If any organizational units are defined for your directory, you can specify where you wantthe new user to be placed using the Add New User To list on the Create User page in theAdministration Server. The default location is your directory’s base DN, or root point.
Directory Server User EntriesNote the following information about directory server user entries:
■ User entries use the inetOrgPerson, organizationalPerson, and person object classes.■ By default, the distinguished name for users is of the form:
cn=full name,ou=organization,...,o=base organization,c=country
For example, if a user entry for Billie Holiday is created within the organizational unitMarketing, and the directory’s base DN is o=Ace Industry, c=US, then the DN is:
cn=Billie Holiday,ou=Marketing,o=Ace Industry,c=US
This format can be changed to a user ID (uid)-based distinguished name.■ The values on the user form fields are stored as LDAP attributes.
The following table lists the fields and corresponding LDAP attributes that are displayedwhen creating or editing a new user in the Proxy Server interface.
Creating Users
Oracle iPlanet Web Proxy Server 4.0.14 Administration Guide • June 201048

TABLE 4–1 LDAP Attributes - Creating or Editing User Entries
User Field LDAP Attribute
Given Name givenName
Surname sn
Full Name cn
User ID uid
Password userPassword
E-mail Address mail
Title title
Phone Number telephoneNumber
Creating LDAP-Based User EntriesTo create a user entry, read the guidelines outlined in “Guidelines for Creating LDAP-basedUser Entries” on page 47, then perform the following procedure.
▼ To Create Users in LDAP-based Authentication Databases
Access the Administration Server and click the Users and Groups tab.
Click the Create User link.
Select the LDAP directory service from the drop-down list and click Select.
Provide the information on the page that displays.
For more information about specific fields, see the online Help.
Also see “Directory Server User Entries” on page 48.
Click Create to create the user entry, or Create and Edit to create the user entry and proceed tothe edit page for the entry just created.
Creating Users in Key File Authentication DatabasesA key file is a text file that contains the user’s password in a hashed format and the list of groupsto which the user belongs.
1
2
3
4
5
Creating Users
Chapter 4 • Managing Users and Groups 49

▼ To Create Users in Key File Authentication DatabasesAccess the Administration Server and click the Users and Groups tab.
Click the Create User link.
Select the key file-based directory service from the drop-down list and click Select.
Type the information on the page that displays, and then click Create User.For more information about specific fields, see the online Help.
Creating Users in Digest File AuthenticationDatabasesA digest file authentication database stores user and group information in an encrypted form.
▼ To Create Users in Digest File AuthenticationDatabases
Access the Administration Server and click the Users and Groups tab.
Click the Create User link.
Select the digest file-based directory service from the drop-down list and click Select.
Type the information on the page that displays, and then click Create User.For more information about specific fields, see the online Help.
Note – The same realm string must be specified when creating an ACL that uses Digestauthentication using the Proxy Server ACL user interface. For more information, see “SettingAccess Control” on page 151.
1
2
3
4
1
2
3
4
Creating Users
Oracle iPlanet Web Proxy Server 4.0.14 Administration Guide • June 201050

Managing UsersYou can edit user attributes on the Manage Users page of the Administration Server Users andGroups tab. On this page you can find, change, rename, and delete user entries.
This section describes the following topics:
■ “Finding User Information” on page 51■ “Editing User Information” on page 53■ “Managing User Passwords” on page 54■ “Renaming Users” on page 54■ “Removing Users” on page 55
Finding User InformationBefore you can edit a user entry you must first find and display the entry. For LDAP-baseddirectory services, you can provide descriptive values for the entry you want to edit.
You can provide any of the following information.:
■ A name. Enter a full or partial name. All entries that equally match the search string arereturned. If no such entries are found, all entries that contain the search string are found. Ifno such entries are found, any entries that sound like the search string are found.
■ A user ID. If you enter only a partial user ID, any entries that contain the string are returned.■ A telephone number. If you enter only a partial number, any entries that have telephone
numbers ending in the search number are returned.■ An email address. Any search string containing an at symbol (@) is assumed to be an email
address. If an exact match cannot be found, a search is performed to find all email addressesthat begin with the search string.
■ Any LDAP search filter. Any string that contains an equal sign (=) is considered a searchfilter.
■ An asterisk (*) to see all entries currently in your directory. You can achieve the same resultby leaving the field blank.
Building Custom Search QueriesFor LDAP services, the Find All Users Whose section enables you to build a custom search filter.Use the fields to narrow search results returned by a Find User search.
The left drop-down list specifies the attribute on which the search will be based. The followingtables lists the available search attribute options.
Managing Users
Chapter 4 • Managing Users and Groups 51

TABLE 4–2 Search Attribute Options
Option Searches for a Match
Full name Each entry’s full name
Last name Each entry’s last name, or surname
User ID Each entry’s user ID
Phone number Each entry’s phone number
E-mail address Each entry’s e-mail address
The center drop-down list specifies the type of search to perform. The following tables lists theavailable search type options.
TABLE 4–3 Search Type Options
Option Description
Contains Causes a substring search to be performed. Entries with attribute values containingthe specified search string are returned. For example, if you know a user’s nameprobably contains the word "Dylan," use this option with the search string "Dylan" tofind the user’s entry.
Is Causes an exact match to be found (specifies an equality search). Use this option whenyou know the exact value of a user’s attribute. For example, you know the exactspelling of the user’s name.
Isn’t Returns all entries whose attribute value does not exactly match the search string. Usethis option to find all users in the directory whose name is not "John Smith." Note thatuse of this option can cause an extremely large number of entries to be returned.
Sounds like Causes an approximate, or phonetic, search to be performed. Use this option if youknow an attribute’s value but do not know the spelling. For example, you do not knowif a user’s name is spelled "Sarret," "Sarette," or "Sarett."
Starts with Causes a substring search to be performed. Returns all entries whose attribute valuestarts with the specified search string. For example, you know a user’s name starts with"Miles," but do not know the rest of the name.
Ends with Causes a substring search to be performed. Returns all entries whose attribute valueends with the specified search string. For example, you know a user’s name ends with"Dimaggio," but do not know the rest of the name.
The right text field is used to enter a search string. To display all user entries contained in thedirectory specified in the Look Within field, type an asterisk (*) or leave this field blank.
Managing Users
Oracle iPlanet Web Proxy Server 4.0.14 Administration Guide • June 201052

▼ To find user information
Access the Administration Server and click the Users and Groups tab.
Click the Manage Users link.
Select a directory service from the drop-down list and click Select.For key file or digest file directory services, a list of users displays. For LDAP-based directoryservices, search fields display.
Find user information:For key file or digest file directory services, click the link for the user to display the edit page andmake changes. For more information about specific fields, see the online Help.
For LDAP-based directory services, do the following:
a. In the Find User field, enter a descriptive value for the entry you want to edit.As an alternative, use the drop-down menus in the Find All Users Whose section to narrowthe results of your search. For more information, see “Building Custom Search Queries” onpage 51.
b. In the Look Within field, select the organizational unit under which you want to search forentries.The default is the directory’s root point, the topmost entry.
c. In the Format field, specify whether the output should be formatted for display on screen orfor printing to a printer.
d. At any stage in this process, click the Find button.All users matching your search criteria will be displayed.
e. Click the link for the entry you want to display.
Editing User Information
▼ To Edit User Entries
Access the Administration Server and click the Users and Groups tab.
Click the Manage Users link.
1
2
3
4
1
2
Managing Users
Chapter 4 • Managing Users and Groups 53

Display the user entry as described in “Finding User Information”on page 51.
Make the desired changes.For more information about specific fields, see the online Help.
Note – To change an attribute value that is not displayed by the edit user page, use the directoryserver ldapmodify command-line utility, if available.
For information about changing a user’s user ID, see “Renaming Users” on page 54.
Managing User PasswordsThe following procedure describes how to change or create user passwords.
▼ To Change or Create User Passwords
Access the Administration Server and click the Users and Groups tab.
Click the Manage Users link.
Display the user entry as described in “Finding User Information”on page 51.
Make the desired changes.For more information about specific fields, see the online Help.
For LDAP databases, you can also disable the user’s password by clicking the Disable Passwordbutton on the page used to edit user password information, accessed from the Manage Userspage. This action prevents the user from logging into a server without your having to delete theuser’s directory entry. You can allow access for the user again by providing a new password.
Renaming UsersFor LDAP databases, the rename feature changes only the user ID. All other fields are left intact.You cannot use the rename feature to move the entry from one organizational unit to another.
▼ To Rename User Entries
Access the Administration Server and click the Users and Groups tab.
Click the Manage Users link.
Display the user entry as described in “Finding User Information”on page 51.
3
4
1
2
3
4
1
2
3
Managing Users
Oracle iPlanet Web Proxy Server 4.0.14 Administration Guide • June 201054

Click the Rename User button on the edit user page.
Type the user ID on the page that is displayed, and click Save Changes.
Note – You can specify that the Administration Server no longer retains the old values when anentry is renamed by setting the keepOldValueWhenRenaming parameter to false (the default).This parameter is found in the following file:
server-root/proxy-admserv/config/dsgw-orgperson.conf
Removing Users
▼ To Remove User Entries
Access the Administration Server and click the Users and Groups tab.
Click the Manage Users link.
Display the user entry as described in “Finding User Information”on page 51.
Click the appropriate button.
■ For LDAP servers, click Delete User.■ For key file and digest file databases, click Remove User.
Creating GroupsA group is an object that describes a set of objects in an LDAP database. An iPlanet server groupconsists of users who share a common attribute. For instance, the set of objects might be anumber of employees who work in the Marketing division of your company. These employeesmight belong to a group called Marketing.
For LDAP services, the two ways to define the membership of a group are statically anddynamically. Static groups enumerate their member objects explicitly. A static group is acommon name (CN) and contains uniqueMembers or memberURLs ormemberCertDescriptions. For static groups, the members do not share a common attributeexcept for the cn=groupname attribute.
Dynamic groups enable you to use an LDAP URL to define a set of rules that match only forgroup members. For dynamic groups, the members do share a common attribute or set ofattributes that are defined in the memberURL filter. For example, if you need a group thatcontains all employees in Sales, and those employees are already in the LDAP database underou=Sales,o=Airius.com, you would define a dynamic group with the following member URL:
4
5
1
2
3
4
Creating Groups
Chapter 4 • Managing Users and Groups 55

ldap:///ou=Sales,o=sun??sub?(uid=*)
This group would subsequently contain all objects that have a uid attribute in the tree below theou=Sales,o=sun point.
For static and dynamic groups, members can share a common attribute from a certificate if thememberCertDescription is used. This sharing of common attribute only applies if the ACL usesthe SSL method.
Once a new group has been created, you can add users (members) to it.
This section contains the following topics:■ “About Static Groups” on page 56■ “About Dynamic Groups” on page 57
About Static GroupsFor LDAP services, the Administration Server enables you to create a static group by specifyingthe same group attribute in the DNs of any number of users. A static group does not changeunless a user is added to or deleted from the group.
Guidelines for Creating Static GroupsConsider the following guidelines when using the Administration Server interface to create newstatic groups:■ Static groups can contain other static or dynamic groups.■ If organizational units are defined for your directory, specify where you want the new group
to be placed using the Add New Group To list on the Create Group page in theAdministration Server interface. The default location is your directory’s root point, thetopmost entry.
■ For more information about editing groups, see “Editing Group Entries” on page 62.
▼ To Create Static Groups
Access the Administration Server and click the Users and Groups tab.
Click the Create Group link.
Select New Group from the Type of Group drop-down list, and then click Go.
Type the information on the Create Group page.For more information about specific fields, see the online Help.
1
2
3
4
Creating Groups
Oracle iPlanet Web Proxy Server 4.0.14 Administration Guide • June 201056
Click Create to create the group, or Create and Edit to create the group and display the edit pagefor the group just created.
About Dynamic GroupsFor LDAP services, Proxy Server enables you to create a dynamic group when you want togroup users automatically based on any attribute, or when you want to apply ACLs to specificgroups that contain matching DNs. For example, you can create a group that automaticallyincludes any DN that contains the attribute department=marketing. If you apply a search filterfor department=marketing, the search returns a group including all DNs containing theattribute department=marketing. You can then define a dynamic group from the search resultsbased on this filter. Subsequently, you can define an ACL for the resulting dynamic group.
How Dynamic Groups Are ImplementedProxy Server implements dynamic groups in the LDAP server schema asobjectclass=groupOfURLs. A groupOfURLs class can have zero or more memberURL attributes,each of which is an LDAP URL that describes a set of objects in the directory. The members ofthe group would be the union of these sets. For example, the following group contains just onemember URL:
ldap:///o=mcom.com??sub?(department=marketing)
This example describes a set that consists of all objects below o=mcom.com whose department ismarketing. The LDAP URL can contain a search base DN, a scope, and a filter, but not a hostname and port. Therefore you can only refer to objects on the same LDAP server. All scopes aresupported. For more information about LDAP URLs, see “Guidelines for Creating DynamicGroups” on page 58.
The DNs are included automatically without having to add each individual to the group. Thegroup changes dynamically because Proxy Server performs an LDAP server search each time agroup lookup is needed for ACL verification. The user and group names used in the ACL filecorrespond to the cn attribute of the objects in the LDAP database.
Note – Proxy Server uses the cn attribute as the group name for ACLs.
The mapping from an ACL to an LDAP database is defined both in the dbswitch.conf file(which associates the ACL database names with actual LDAP database URLs) and the ACL file(which defines which databases are to be used for which ACL). For example, if you want baseaccess rights on membership in a group named staff, the ACL code looks up an object with anobject class of groupOfanything and a CN set to staff. The object defines the members of thegroup, either by explicitly enumerating the member DNs (as is done for groupOfUniqueNamesfor static groups), or by specifying LDAP URLs (for example, groupOfURLs).
5
Creating Groups
Chapter 4 • Managing Users and Groups 57

Note – Groups can be both static and dynamic. A group object can have bothobjectclass=groupOfUniqueMembers and objectclass=groupOfURLs. Therefore, bothuniqueMember and memberURL attributes are valid. The group’s membership is the union of itsstatic and dynamic members.
Dynamic Group Impact on Server PerformanceUsing dynamic groups affects server performance. If you are testing group membership and theDN is not a member of a static group, Proxy Server checks all dynamic groups in the database’sbase DN. Proxy Server determines whether each memberURL matches by checking its base DNand scope against the DN of the user. Proxy Server then performs a base search using the userDN as the base DN and the filter of the memberURL. This procedure can involve a large numberof individual searches.
Guidelines for Creating Dynamic GroupsConsider the following guidelines when using the Administration Server interface to create newdynamic groups:
■ Dynamic groups cannot contain other groups.■ LDAP URLs use the following format without host and port info, as these parameters are
ignored:ldap:///base-dn?attributes?scope?(filter)
The attributes, scope, and (filter) parameters are identified by their positions in the URL.If you do not want to specify any attributes, you must still include the question marks (?)delimiting that field.
■ If organizational units are defined for your directory, specify where you want the new groupto be placed using the Add New Group To list on the Create Group page in theAdministration Server interface. The default location is your directory’s root point, thetopmost entry.
For more information about editing groups, see “Editing Group Entries” on page 62.
The following table lists the required parameters for the LDAP URL.
TABLE 4–4 Required Parameters for the LDAP URL
Parameter Name Description
base_dn The DN of the search base, or point from which all searches are performedin the LDAP directory. This parameter is often set to the suffix or root of thedirectory, such as o=mcom.com.
Creating Groups
Oracle iPlanet Web Proxy Server 4.0.14 Administration Guide • June 201058

TABLE 4–4 Required Parameters for the LDAP URL (Continued)Parameter Name Description
attributes A list of attributes to be returned by the search. To specify more than one,use commas to delimit the attributes (for example,cn,mail,telephoneNumber). If no attributes are specified, all attributes arereturned. This parameter is ignored for dynamic group membershipchecks.
scope This parameter is required.
The scope of the search, which can be one of these values:■ base retrieves information only about the distinguished name
(base_dn) specified in the URL.
■ one retrieves information about entries one level below thedistinguished name (base_dn) specified in the URL. The base entry isnot included in this scope.
■ sub retrieves information about entries at all levels below thedistinguished name (base_dn) specified in the URL. The base entry isincluded in this scope.
(filter) This parameter is required.
The Search filter to apply to entries within the specified scope of the search.If you are using the Administration Server interface, you must specify thisattribute. The parentheses are required.
Creating Dynamic Groups
▼ To Create Dynamic Groups
Access the Administration Server and click the Users and Groups tab.
Click the Create Group link.
Select Dynamic Group from the Type of Group drop-down list and click Go.
Provide the information on the Create Group page.
For more information about specific fields, see the online Help.
Click Create to create the group, or Create and Edit to create the group and display the edit pagefor the group just created.
1
2
3
4
5
Creating Groups
Chapter 4 • Managing Users and Groups 59

Managing GroupsFor LDAP services, the Administration Server enables you to edit groups and manage groupmemberships on the Manage Groups page on the Administration Server Users and Groups tab.
This section describes the following tasks:
■ “Finding Group Entries” on page 60■ “Editing Group Entries” on page 62■ “Adding Group Members” on page 62■ “Adding Groups to the Group Members List” on page 63■ “Removing Entries From the Group Members List” on page 63■ “Managing Owners” on page 64■ “Managing See Alsos” on page 64■ “Renaming Groups” on page 65■ “Removing Groups” on page 65
Finding Group EntriesBefore you can edit a group entry, you must first find and display the entry, as described in thefollowing procedure.
▼ To Find Group Entries
Access the Administration Server and click the Users and Groups tab.
Click the Manage Groups link.
Type the name of the group you want to find in the Find Group field.You can provide any of the following:
■ An asterisk (*) to see all groups currently residing in your directory. You can achieve thesame result by leaving the field blank.
■ Any LDAP search filter. Any string that contains an equal sign (=) is considered to be asearch filter.As an alternative, use the Find All Groups Whose section to build a custom search filter andnarrow the results of your search. For more information, see “Find All Groups Whose” onpage 61.
■ A name. Provide a full or partial name. All entries that equally match the search string arereturned. If no such entries are found, all entries that contain the search string are found. Ifno such entries are found, any entries that sound like the search string are found.
1
2
3
Managing Groups
Oracle iPlanet Web Proxy Server 4.0.14 Administration Guide • June 201060
In the Look Within field, select the organizational unit under which you want to search forentries.The default is the directory’s root point, the topmost entry.
In the Format field, specify whether the output should be formatted for display on screen or forprinting to a printer.
To display all groups meeting your criteria at any stage in this process, click the Find button.
Click the link for the entry you want to display.
Find All Groups WhoseFor LDAP services, the Find All Groups Whose section enables you to build a custom searchfilter. Use the fields in this section to narrow the search results that are otherwise returned byFind Group.
The left drop-down list specifies the attribute on which the search is based. The followingoptions are available:■ Name. Searches each entry’s full name for a match.■ Description. Searches each group entry’s description for a match.
The center drop-down list specifies the type of search to perform. The following options areavailable:■ Contains. Causes a sub-string search to be performed. Entries with attribute values
containing the specified search string are returned. For example, if you know a group’s nameprobably contains the word “Administrator”, use this option with the search string“Administrator” to find the group entry.
■ Is. Causes an exact match to be found. Use this option when you know the exact value of agroup’s attribute. For example, you know the exact spelling of the group’s name.
■ Isn’t. Returns all entries whose attribute value does not exactly match the search string. Usethis option if you want to find all groups in the directory whose name does not contain“administrator.” Be aware, however, that using this option can cause an extremely largenumber of entries to be returned.
■ Sounds like. Causes an approximate, or phonetic, search to be performed. Use this option ifyou know an attribute’s value, but are unsure of the spelling. For example, you do not knowif a group’s name is spelled “Sarret’s list,” “Sarette’s list,” or “Sarett’s list.”
■ Starts with. Causes a sub-string search to be performed. Returns all entries whose attributevalue starts with the specified search string. For example, you know a group’s name startswith “Product,” but do not know the rest of the name.
■ Ends with. Causes a sub-string search to be performed. Returns all entries whose attributevalue ends with the specified search string. For example, you know a group’s name ends with“development,” but do not know the rest of the name.
4
5
6
7
Managing Groups
Chapter 4 • Managing Users and Groups 61

In the right text field, enter a search string. To display all group entries contained in the LookWithin directory, enter an asterisk (*) or leave this field blank.
Editing Group Entries
▼ To Edit Group EntriesThe following procedure applies to LDAP services only.
Access the Administration Server and click the Users and Groups tab.
Click the Manage Groups link.
Locate the group you want to edit as described in “Finding Group Entries”on page 60.
Make the desired changes.For more information about specific fields and buttons, see the online Help.
Note – You may want to change an attribute value that is not displayed by the group edit page. Inthis situation, use the directory server ldapmodify command line utility, if available.
Adding Group Members
▼ To Add Members to a GroupThe following procedure applies to LDAP services only.
Access the Administration Server and click the Users and Groups tab.
Click the Manage Groups link.
Locate and display the group you want to manage as described in “Finding Group Entries”onpage 60, and click the Edit button next to Group Members.Any existing group members are listed on the page that displays. Search fields also display.
■ To add user entries to the list of members, Users must be selected in the Find drop-downlist.
■ To add group entries to the group, Groups must be selected.
In the Matching text field, enter a search string. Provide information for any of the followingoptions:
1
2
3
4
1
2
3
4
Managing Groups
Oracle iPlanet Web Proxy Server 4.0.14 Administration Guide • June 201062

■ A name. Enter a full or partial name. All entries whose name matches the search string arereturned. If no such entries are found, all entries that contain the search string are found. Ifno such entries are found, any entries that sound like the search string are found.
■ A user ID. If you enter only a partial user ID, any entries that contain the string are returned.■ A telephone number. If you enter only a partial number, any entries that have telephone
numbers ending in the search number are returned.■ An e-mail address. Any search string containing an at symbol (@) is assumed to be an e-mail
address. If an exact match cannot be found, a search is performed to find all e-mail addressesthat begin with the search string.
■ Enter an asterisk (*) or leave this field blank to see all entries or groups currently residing inyour directory.
■ Any LDAP search filter. Any string that contains an equal sign (=) is considered to be asearch filter.
Click Add to find all matching entries in the LDAP database and add them to the group.
(Optional) If the search returns any entries you do not want added to the group, click thecorresponding checkbox in the Remove From List column. You can also construct a search filterto match the entries you want removed from the group, and then click Remove. For moreinformation, see “Removing Entries From the Group Members List”on page 63.
When the list of group members is complete, click Save Changes. The entries are added to thegroup member list.
Adding Groups to the Group Members ListFor LDAP services, you can add groups instead of individual members to the group’s memberslist. Any users belonging to the included group will then become a member of the receivinggroup. For example, if Neil Armstrong is a member of the Engineering Managers group and youmake the Engineering Managers group a member of the Engineering Personnel group, thenNeil Armstrong is also a member of the Engineering Personnel group.
To add a group to the members list of another group, add the group as if it were a user entry. Formore information, see “Adding Group Members” on page 62.
Removing Entries From the Group Members ListThis procedure applies to LDAP services only.
5
6
7
Managing Groups
Chapter 4 • Managing Users and Groups 63

▼ To Remove Entries From the Group Members List
Access the Administration Server and click the Users and Groups tab.
Click the Manage Groups link.
Locate the group you want to manage.For more information, see “Finding Group Entries” on page 60. and click the Edit button nextto Group Members.
Indicate the members that you want to remove.
■ To remove only a few members, click the corresponding checkbox in the Remove From Listcolumn.
■ To remove members based on common criteria, construct a search filter to match theentries you want removed from the group, and then click Remove.
For more information about creating a search filter, see “Adding Group Members” on page 62.
Click Save Changes.The entries are deleted from the group members list.
Managing OwnersFor LDAP services, a group owners list is managed in the same way as a group members list.
The following table lists the topics in this guide that provide more information.
TABLE 4–5 Managing Owners
To See
Add owners to the group “Adding Group Members” on page 62
Add groups to the owners list “Adding Groups to the Group Members List” on page 63
Remove entries from the owners list “Removing Entries From the Group Members List” on page 63
Managing See AlsosSee Alsos are references to other directory entries that might be relevant to the current group.These references enable users to easily find entries for people and other groups that are relatedto the current group. You manage See Alsos the same way you manage the group members list.
The following table lists the topics in this guide that provide more information.
1
2
3
4
5
Managing Groups
Oracle iPlanet Web Proxy Server 4.0.14 Administration Guide • June 201064

TABLE 4–6 Managing See Alsos
To See
Add users to See Alsos “Adding Group Members” on page 62
Add groups to See Alsos “Adding Groups to the Group Members List” on page 63
Remove entries from See Alsos “Removing Entries From the Group Members List” on page 63
Renaming GroupsThis procedure applies to LDAP services only. When you rename a group entry, only thegroup’s name is changed. You cannot use the Rename Group feature to move the entry fromone organizational unit to another. For example, a business might have the followingorganizations:
■ Organizational units for Marketing and Product Management■ A group named Online Sales under the Marketing organizational unit
In this example, you can rename the group from Online Sales to Internet Investments, but youcannot rename the entry such that Online Sales under the Marketing organizational unitbecomes Online Sales under the Product Management organizational unit.
▼ To Rename Groups
Access the Administration Server and click the Users and Groups tab.
Click the Manage Groups link and locate the group you want to manage as described in “FindingGroup Entries”on page 60.
Click the Rename Group button.
Specify a new group name on the page that displayed, and click Save Changes.
Removing GroupsThis procedure applies to LDAP services only.
▼ To Remove Groups
Access the Administration Server and click the Users and Groups tab.
Click the Manage Groups link.
1
2
3
4
1
2
Managing Groups
Chapter 4 • Managing Users and Groups 65

Locate the group you want to manage as described in “Finding Group Entries”on page 60 andclick Delete Group.
Note – Individual members of the group are not removed. Only the group entry is removed.
Creating Organizational UnitsFor LDAP services, an organizational unit can include a number of groups and usuallyrepresents a division, department, or other discrete entity. A DN can exist in more than oneorganizational unit.
■ New organizational units are created using the organizationalUnit object class.■ The distinguished name for new organizational units is of the form:
ou=new organization,ou=parent organization,...,o=base organization,c=country
▼ To Create Organizational UnitsAccess the Administration Server and click the Users and Groups tab.
Click the Create Organizational Unit link.
Enter the information and click Create.For more information about specific fields, see the online help.
For example, if you create a new organization called Accounting within the organizational unitWest Coast, and your base DN is o=Ace Industry,c=US, then the new organization unit’s DN is:
ou=Accounting,ou=West Coast,o=Ace Industry,c=US
Managing Organizational UnitsFor LDAP services, organizational units are edited and managed from the ManageOrganizational Units page on the Administration Server Users and Groups tab.
This section contains the following topics:
■ “Finding Organizational Units” on page 67■ “Editing Organizational Unit Attributes” on page 68■ “Renaming Organizational Units” on page 69■ “Removing Organizational Units” on page 69
3
1
2
3
Creating Organizational Units
Oracle iPlanet Web Proxy Server 4.0.14 Administration Guide • June 201066

Finding Organizational UnitsThis procedure applies to LDAP services only.
▼ To find organizational units
Access the Administration Server and click the Users and Groups tab.
Click the Manage Organizational Units link.
Enter the name of the unit you want to find in the Find Organizational Unit field.You can enter any of the following:■ A name. Enter a full or partial name. All entries that equally match the search string are
returned. If no such entries are found, all entries that contain the search string are found. Ifno such entries are found, any entries that sound like the search string are found.
■ An asterisk (*) to see all groups currently residing in your directory. You can achieve thesame result by leaving the field blank.
■ Any LDAP search filter. Any string that contains an equal sign (=) is considered to be asearch filter.As an alternative, use the drop-down menus in the Find All Units Whose section to narrowthe results of your search. For more information, see “Find All Units Whose ” on page 67.
In the Look Within field, select the organizational unit under which you want to search forentries.The default is the root point of the directory (topmost entry).
In the Format field, specify whether the output should be formatted for display on screen or forprinting to a printer.
At any stage in this process, click the Find button.All organizational units matching your search criteria will be displayed.
Click the link for the entry you want to display.
Find All Units WhoseFor LDAP services, the Find All Units Whose section enables you to build a custom search filter.Use the fields in this section to narrow the search results that are otherwise returned by FindOrganizational Unit.
The left drop-down list specifies the attribute on which the search is based. The followingoptions are available:
1
2
3
4
5
6
7
Managing Organizational Units
Chapter 4 • Managing Users and Groups 67

■ Unit name. Searches each entry’s full name for a match.■ Description. Searches each organizational unit entry’s description for a match.
The center drop-down list specifies the type of search to perform. The following options areavailable:■ Contains. Causes a sub-string search to be performed. Entries with attribute values
containing the specified search string are returned. For example, if you know anorganizational unit’s name probably contains the word “Administrator,” use this option withthe search string “Administrator” to find the organizational unit entry.
■ Is. Causes an exact match to be found. Use this option when you know the exact value of anorganizational unit’s attribute. For example, you know the exact spelling of theorganizational unit’s name.
■ Isn’t. Returns all entries whose attribute value does not exactly match the search string. Thatis, use this option if you want to find all organizational units in the directory whose namedoes not contain “administrator.” Be aware, however, that use of this option can cause anextremely large number of entries to be returned.
■ Sounds like. Causes an approximate, or phonetic, search to be performed. Use this option ifyou know an attribute’s value, but are unsure of the spelling. For example, you do not knowif an organizational unit’s name is spelled “Sarret’s list,” “Sarette’s list,” or “Sarett’s list.”
■ Starts with. Causes a sub-string search to be performed. Returns all entries whose attributevalue starts with the specified search string. For example, you know an organizational unit’sname starts with “Product,” but do not know the rest of the name.
■ Ends with. Causes a sub-string search to be performed. Returns all entries whose attributevalue ends with the specified search string. For example, you know an organizational unit’sname ends with “development,” but do not know the rest of the name.
In the right text field, enter a search string. To display all organizational unit entries containedin the Look Within directory, enter an asterisk (*) or leave this field blank.
Editing Organizational Unit AttributesThis procedure applies to LDAP services only.
▼ To Edit Organizational Unit Entries
Access the Administration Server and click the Users and Groups tab.
Click the Manage Organizational Units link.
Locate the organizational unit you want to edit as described in “Finding Organizational Units”on page 67.
1
2
3
Managing Organizational Units
Oracle iPlanet Web Proxy Server 4.0.14 Administration Guide • June 201068

Make the desired changes.For more information about specific fields, see the online Help.
Note – To change an attribute value that is not displayed by the organizational unit edit page, usethe directory server ldapmodify command-line utility, if available.
Renaming Organizational UnitsThis procedure applies to LDAP services only. When you rename an organizational unit entry,only the organizational unit’s name is changed. You cannot use the rename feature to move theentry from one organizational unit to another.
▼ To Rename Organizational Units
Access the Administration Server and click the Users and Groups tab.
Click the Manage Organizational Units link.
Locate the organizational unit you want to edit as described in “Finding Organizational Units”on page 67.
Click the Rename button.
Type the new organizational unit name on the page that displays, and click Save Changes.
Removing Organizational UnitsThis procedure applies to LDAP services only.
▼ To Delete Organizational Units
Access the Administration Server and click the Users and Groups tab.
Click the Manage Organizational Units link.
Locate the organizational unit you want to delete as described in “Finding Organizational Units”on page 67.
Click the Delete button and then click OK in the resulting confirmation box.
4
1
2
3
4
5
1
2
3
4
Managing Organizational Units
Chapter 4 • Managing Users and Groups 69

70
Using Certificates and Keys
This chapter describes the use of certificates and keys authentication to secure Proxy Server.Proxy Server incorporates the security architecture of all iPlanet servers, and is built on industrystandards and public protocols for maximum interoperability and consistency.
This chapter assumes familiarity with the basic concepts of public-key cryptography, includingencryption and decryption, public and private keys, digital certificates, and encryptionprotocols.
This chapter contains the following sections:
■ “Securing Administration Server Access” on page 72■ “Certificate-based Authentication” on page 72■ “Creating a Trust Database” on page 73■ “Using Sun Crypto Accelerator Keystore” on page 75■ “Requesting and Installing a VeriSign Certificate” on page 76■ “Requesting and Installing Other Server Certificates” on page 77■ “Migrating Certificates From Previous Versions” on page 81■ “Managing Certificates” on page 83■ “Installing and Managing CRLs and CKLs” on page 83■ “Setting Security Preferences” on page 84■ “Using External Encryption Modules” on page 92■ “Setting Client Security Requirements” on page 97■ “Setting Stronger Ciphers” on page 106■ “Other Security Considerations” on page 107
5C H A P T E R 5
71

Securing Administration Server AccessThe Administration Server which is a web-based user interface used to manage, add, remove,and migrate servers, needs to be secured.
The default Administration Server page starts in HTTP mode. The available Proxy Serverinstances are displayed as a list under the heading of Manage Servers. To administer any ProxyServer instance, click on the name from the list. When you click the name of a Proxy Serverinstance, the Server Manager page for that instance is displayed.
From the Server Manager page you can go back to the Administration Server page by clickingon the Manage Servers link at the top left corner in the Server Manager page.
The security features like certificate based authentication, creating a trust database, configuringSSL, requesting and installing certificates, setting security preferences, and so on, apply both toAdministration Server and the individual Proxy Server instances. For security relatedconfigurations of Administration Server, use the Preferences tab, and the Security tab thatappear on the Administration Server page. For security configurations related to Proxy Serverinstances, use the Preferences tab, and the Security tab that appear on the Server Manager pagefor that Proxy instance.
To start the Administration Server in secure mode, you need to access it using HTTPS insteadof the default HTTP.
The security features are described in detail in the following sections.
Certificate-based AuthenticationAuthentication is the process of confirming identity. In the context of network interactions,authentication is the confident identification of one party by another. Certificates are one wayof supporting authentication.
A certificate consists of digital data that specifies the name of an individual, company, or otherentity, and certifies that the public key included in the certificate belongs to that entity.
Both clients and servers can have certificates. Server authentication refers to the confidentidentification of a server by a client. Identification of the organization assumed to be responsiblefor the server at a particular network address. Client authentication refers to the confidentidentification of a client by a server, or identification of the person assumed to be using theclient software. Clients can have multiple certificates, much like a person might have severaldifferent pieces of identification.
A certificate is issued and digitally signed by a Certificate Authority, or CA. The CA can be acompany that sells certificates, or a department responsible for issuing certificates for yourcompany’s intranet or extranet. You decide which CAs you trust enough to serve as verifiers ofother people’s identities.
Securing Administration Server Access
Oracle iPlanet Web Proxy Server 4.0.14 Administration Guide • June 201072
A certificate includes the following information.
■ a public key■ the name of the entity identified by the certificate■ an expiration date■ the name of the CA that issued the certificate■ the digital signature of the issuing CA
Note – A server certificate must be installed before encryption can be activated.
Creating a Trust DatabaseBefore requesting a server certificate you must create a trust database. In Proxy Server, theAdministration Server and each server instance can have its own trust database. The trustdatabase should only be created on your local computer.
When you create the trust database, you specify a password to be used for a key-pair file. Youalso need this password to start a server using encrypted communications. For a list ofguidelines to consider when choosing a password, see “Choosing Strong Passwords” onpage 108.
In the trust database you create and store the public and private keys, referred to as yourkey-pair file. The key-pair file is used for SSL encryption. You use the key-pair file when yourequest and install your server certificate. The certificate is stored in the trust database afterinstallation.
The key-pair file is stored encrypted in the following directory.
server-root/alias/proxy-serverid-key3.db
The Administration Server can have only one trust database. Each server instance can have itsown trust database.
▼ To Create a Trust DatabaseAccess either the Administration Server or the Server Manager and click the Security tab.
Click the Create Database link.
Type a password for the trust database.
Type the password again and click OK.
1
2
3
4
Creating a Trust Database
Chapter 5 • Using Certificates and Keys 73

Using password.confBy default, the Proxy Server prompts the administrator for the key database password beforestarting up. To restart an unattended Proxy Server, you must save the password in apassword.conf file. Do this only if your system is adequately protected, so that this file and thekey databases are not compromised.
Typically, you cannot start a UNIX SSL-enabled server with the /etc/rc.local or the/etc/inittab files because the server requires a password before starting. Although you canstart an SSL-enabled server automatically if you keep the password in plain text in a file, doingso is unsafe. The server’s password.conf file should be owned by root or the user who installedthe server, with only the owner having read and write access to the file.
On UNIX, leaving the SSL-enabled server’s password in the password.conf file is a largesecurity risk. Anyone who can access the file has access to the SSL-enabled server’s password.Consider the security risks before keeping the SSL-enabled server’s password in thepassword.conf file.
On Windows, if you have an NTFS file system, you should protect the directory that containsthe password.conf file by restricting access, even if you do not use the file. The directory shouldhave read and write permissions for the Administration Server user and the Proxy Server user.Protecting the directory prevents others from creating a false password.conf file. You cannotprotect directories or files on FAT file systems by restricting access to them.
Starting an SSL-Enabled Server Automatically
▼ To start an SSL-Enabled Server Automatically
Make sure SSL is enabled.
Create a new password.conf file in the config subdirectory of the Proxy Server instance.
■ If you are using the internal PKCS #11 software encryption module included with the ProxyServer, type the following information:internal:your-password■ If you are using a different PKCS #11 module for hardware encryption or hardware
accelerators, specify the name of the PKCS #11 module, followed by the password, forexample:nFast:your-password
You will always be prompted to supply a password when starting the Proxy Server, evenafter the password.conf file has been created.
1
2
Creating a Trust Database
Oracle iPlanet Web Proxy Server 4.0.14 Administration Guide • June 201074
Using Sun Crypto Accelerator KeystoreThe Sun Crypto Accelerator 4000 card provides optimized, scalable SSL operations at speedsmuch greater than a system CPU can achieve.
▼ To Configure Proxy Server to Use Sun CryptoAccelerator
Install the Sun Crypto Accelerator 4000 board.
Initialize the Sun Crypto Accelerator 4000 board.
Install Proxy Server 4.0.10 (preferably as root).
Create a trust database in the proxy instance.For more information about creating a trust database, see “Creating a Trust Database” onpage 73.
Enable the Sun Crypto Accelerator 4000 board.
▼ To Enable the Sun Crypto Accelerator 4000 Board forProxy Server
Set the user and realm using the command secadm.
Copy the directory“server-root/bin/proxy”to the directory “server-root/bin/https”.This step is required to enable the script ipsslcfg to locate the command modutil.
Edit the script /opt/SUNWconn/bin/iplsslcfg and provide the path to modutil.
Execute /opt/SUNWconn/bin/iplsslcfg.
Select option 1. Configure Sun ONE Web Server for SSL.
Note – The option 1 denotes configuration of Web Server for SSL. Select the same option 1 forProxy Server configuration also.
Specify the Proxy Server 4.0.10 installation directory and select y to proceed.Module Sun Crypto Accelerator gets added to the database.
1
2
3
4
5
1
2
3
4
5
6
Using Sun Crypto Accelerator Keystore
Chapter 5 • Using Certificates and Keys 75

Restart the administration server.
After the restart, select Security->Request Certificate->Cryptographic Module.The list displays the following: SUNW acceleration only, Internal, and keystore_name. Eachkeystore has its own entry in the list.
Select the keystore.Do not select the option SUNW acceleration only, while creating server certificates.
Requesting and Installing a VeriSign CertificateVeriSign is Proxy Server’s preferred Certificate Authority. The company’s technology simplifiesthe certificate request process. VeriSign has the advantage of being able to return its certificatedirectly to your server.
After creating a certificate trust database for your server, you can request a certificate andsubmit it to a CA (Certificate Authority). If your company has its own internal CA, request yourcertificate from that department. If you plan to purchase your certificate from a commercialCA, choose a CA and ask for the specific format of the information they require.
The Administration Server can have only one server certificate. Each server instance can haveits own server certificate.
▼ To Request a VeriSign CertificateAccess either the Administration Server or the Server Manager and click the Security tab.
Click the Request VeriSign Certificate link.
Review the steps listed on the page that displays and click OK.The VeriSign Enrollment Wizard walks you through the process.
▼ To Iinstall a VeriSign CertificateAccess either the Administration Server or the Server Manager and click the Security tab.
Click the Install VeriSign Certificate link.
Unless you plan to use an external encryption module, select Internal from the CryptographicModule drop-down list.
7
8
9
1
2
3
1
2
3
Requesting and Installing a VeriSign Certificate
Oracle iPlanet Web Proxy Server 4.0.14 Administration Guide • June 201076
Type your key-pair file password or PIN.
Select the Transaction ID to retrieve from the drop-down list and click OK.
Requesting and Installing Other Server CertificatesIn addition to VeriSign, you can also request and install certificates from other CertificateAuthorities. Your company or organization might provide its own internal certificates. Thissection describes how to request and install other types of server certificates.
This section contains the following topics:
■ “Required CA Information” on page 77■ “Requesting Other Server Certificates” on page 78■ “Installing Other Server Certificates” on page 79
Required CA InformationBefore you start the request process, make sure you know what information your CA requires.The format of the requested information varies by CA, but you might typically be asked toprovide the information listed below. Most of this information is usually not required forcertificate renewals.
■ Requestor name. The name under which the certificate will be issued.■ Telephone number. The telephone number of the requestor.■ Common name. The fully qualified host name used in DNS lookups, for example,
www.example.com.■ Email address. The business email address used for correspondence between you and the
CA.■ Organization. The official, legal name of your company, educational institution,
organization, and so on. Most CAs require that this information be verified with legaldocuments, such as a copy of a business license.
■ Organizational unit. A description of an organizational unit within your company.■ Locality. A description of the city, principality, or country where the organization is located.■ State or Province. The state or province in which the business is located.■ Country. The two-character abbreviation of your country name in ISO format. For
example, the country code for the United States is US.
All information is combined as a series of attribute-value pairs called the distinguished name(DN), which uniquely identifies the subject of the certificate.
4
5
Requesting and Installing Other Server Certificates
Chapter 5 • Using Certificates and Keys 77

If you are purchasing your certificate from a commercial CA, you must contact the CA to findout what additional information they require before they issue a certificate. Most CAs requirethat you prove your identity. For example, they want to verify your company name and who isauthorized by the company to administer the server, they also might ask whether you have thelegal right to use the information you provide.
Some commercial CAs offer certificates with greater detail and veracity to organizations orindividuals who provide more thorough identification. For example, you might be able topurchase a certificate stating that the CA has verified that you are the rightful administrator ofthe www.example.com computer, and also that you are a company that has been in business forthree years, and have no outstanding customer litigation.
Requesting Other Server Certificates
▼ To Request Other Server Certificates
Access either the Administration Server or the Server Manager and click the Security tab.
Click the Request Certificate link.
Specify whether this is a new certificate or a certificate renewal.
Many certificates expire after a set period of time, such as six months or a year. Some CAs willautomatically send you a renewal.
Specify how you want to submit the request for the certificate:
■ To submit the request using email, select CA Email Address and enter the appropriate emailaddress for such requests.■ To submit the request using the CA’s web site, select CA URL and type the appropriate
URL for such requests.
From the Cryptographic Module drop-down list, select the cryptographic module to be used forthe key-pair file when requesting the certificate.
Type the password for your key-pair file.
This password is specified when you created the trust database, unless a cryptographic moduleother than Internal is selected. The server uses the password to obtain your private key andencrypt a message to the CA. The server then sends both your public key and the encryptedmessage to the CA. The CA uses the public key to decrypt your message.
1
2
3
4
5
6
Requesting and Installing Other Server Certificates
Oracle iPlanet Web Proxy Server 4.0.14 Administration Guide • June 201078

Provide your identification information, such as name and phone number.
The format of this information varies by CA. Most of this information is usually not requiredfor certificate renewals.
Double-check your work to ensure accuracy, and then click OK.
The more accurate the information, the faster your certificate is likely to be approved. If yourrequest is going to a certificate server, you will be prompted to verify the form informationbefore the request is submitted.
The server generates a certificate request that contains your information. The request has adigital signature created with your private key. The CA uses a digital signature to verify that therequest was not tampered with during routing from your server computer to the CA. In the rareevent that the request is tampered with, the CA usually contacts you by phone.
If you chose to email the request, the server sends an email message containing the request tothe CA. Typically, the certificate is then emailed to you. If you specified a URL to a certificateserver, your server uses the URL to submit the request to the certificate server. You might get anemail response or a response by some other means, depending on the CA.
The CA notifies you if it agrees to issue you a certificate. In most cases, the CA sends yourcertificate using e-mail. If your organization is using a certificate server, you may be able tosearch for the certificate using the certificate server’s forms.
Note – Not everyone who requests a certificate from a commercial CA is given one. Many CAsrequire you to prove your identity before issuing a certificate. Also, approval often can takeanywhere from one day to several weeks. You are responsible for promptly providing allnecessary information to the CA.
Install the certificate once you receive it. In the meantime, you can still use your Proxy Serverwithout SSL.
Installing Other Server CertificatesYour certificate from the CA is encrypted with your public key so that only you can decrypt it.Only by entering the correct password for your trust database can you decrypt and install yourcertificate.
The three types of certificates are:
■ Your own server’s certificate to present to clients■ A CA’s own certificate for use in a certificate chain■ A trusted CA’s certificate
7
8
Requesting and Installing Other Server Certificates
Chapter 5 • Using Certificates and Keys 79

A certificate chain is a hierarchical series of certificates signed by successive CertificateAuthorities. A CA certificate identifies a Certificate Authority and is used to sign certificatesissued by that authority. A CA certificate can in turn be signed by the CA certificate of a parentCA, and so on, up to a root CA.
Note – If your CA does not automatically send you its certificate, request it. Many CAs includetheir certificate in the email with your certificate, and both certificates are installed by yourserver at the same time.
Your certificate from the CA is encrypted with your public key so that only you can decrypt it.The Proxy Server uses the key-pair file password you specify to decrypt the certificate when it isinstalled. You can either save the email somewhere accessible to the server, or copy the text ofthe email and be ready to paste the text into the Install Certificate form, as described in thefollowing procedure.
▼ To Install Other Server Certificates
Access either the Administration Server or the Server Manager and click the Security tab.
Click the Install Certificate link.
Next to Certificate For, select the type of certificate to install:
■ This Server■ Server Certificate Chain■ Certification Authority
For more information about specific settings, see the online Help.
Select the cryptographic module from the drop-down list.
Type the key-pair file password.
Type a certificate name only if you selected Server Certificate Chain or Certification Authority inStep 3.
Provide certificate information by doing one of the following:
■ Select Message Is In This File and then type the full path name to the file that contains theCA certificate.■ Select Message Text (with headers) and then copy and paste the content of the CA
certificate. Be sure to include the Begin Certificate and End Certificate headers,including the beginning and ending hyphens.
1
2
3
4
5
6
7
Requesting and Installing Other Server Certificates
Oracle iPlanet Web Proxy Server 4.0.14 Administration Guide • June 201080

Click OK.
Indicate whether you are adding a new certificate or renewing an existing certificate.
■ Add Certificate if you are installing a new certificate.■ Replace Certificate if you are installing a certificate renewal.
The certificate is stored in the server’s certificate database. For example:server-root/alias/proxy-serverid-cert8.db
Migrating Certificates From Previous VersionsWhen migrating from Sun ONE Web Proxy Server 3.6 (also known as Sun iPlanet Web ProxyServer) to iPlanet Web Proxy Server 4, your files, including your trust and certificate databases,are updated automatically.
Make sure that the Proxy Server 4 Administration Server has read permissions on the old 3.xdatabase files. The files are alias-cert.db and alias-key.db, located in the3.x-server-root/alias directory.
Key-pair files and certificates are migrated only if security is enabled for your server. You canalso migrate keys and certificates by themselves using the Migrate 3.x Certificates option underthe Security tab in the Administration Server and the Server Manager. For information aboutspecific settings, see the online Help.
In previous versions, a certificate and key-pair file were referred to by an alias that could be usedby multiple server instances. The Administration Server managed all of the aliases and theirconstituent certificates. In Proxy Server 4, the Administration Server and each server instancehave their own certificate and key-pair file, referred to as a trust database instead of an alias.
The trust database and its constituent certificates are managed from the Administration Serverfor the Administration Server itself, and from the Server Manager for server instances. Thecertificate and key-pair database files are named after the server instance that uses them. If, inthe previous version, multiple server instances shared the same alias, when migrated thecertificate and key-pair file are renamed for the new server instance.
The entire trust database associated with the server instance is migrated. All CAs listed in yourprevious database are migrated to the Proxy Server 4 database. If duplicate CAs occur, use theprevious CA until it expires. Do not attempt to delete duplicate CAs.
Proxy Server 3.x certificates are migrated to the supported Network Security Services (NSS)format. The certificate is named according to the Proxy Server page from which it was accessed,that is, from the Administration Server Security tab or the Server Manager Security tab.
8
9
Migrating Certificates From Previous Versions
Chapter 5 • Using Certificates and Keys 81

▼ To Migrate a CertificateFrom your local computer, access either the Administration Server or the Server Manager andselect the Security tab.
Click the Migrate 3.x Certificates link.
Specify the root directory where the 3.6 server is installed.
Specify the alias for this computer.
Type the administrator’s password and click OK.
Using the Built-in Root Certificate ModuleThe dynamically loadable root certificate module included with Proxy Server contains the rootcertificates for many CAs, including VeriSign. The root certificate module enables you toupgrade your root certificates to newer versions in a much easier way. In the past, you wererequired to delete the old root certificates one at a time and then install the new ones one at atime. To install well-known CA certificates, you can now simply update the root certificatemodule file to a newer version as it becomes available through future versions of the ProxyServer.
Because the root certificate is implemented as a PKCS #11 cryptographic module, you can neverdelete the root certificates it contains. The option to delete will not be offered when managingthese certificates. To remove the root certificates from your server instances, disable the rootcertificate module by deleting the following entry in the server’s aliasdirectory:
■ libnssckbi.so (on most UNIX platforms)■ nssckbi.dll (on Windows)
If you want to restore the root certificate module, you can copy the extension fromserver-root/bin/proxy/lib (UNIX) or server-root\\bin\\proxy\\bin (Windows) into thealias subdirectory.
You can modify the trust information of the root certificates. The trust information is written tothe certificate database for the server instance being edited, not back to the root certificatemodule itself.
1
2
3
4
5
Migrating Certificates From Previous Versions
Oracle iPlanet Web Proxy Server 4.0.14 Administration Guide • June 201082

Managing CertificatesYou can view, delete, or edit the trust settings of your own certificate and certificates from CAsinstalled on your server.
▼ To Manage CertificatesAccess either the Administration Server or the Server Manager and click the Security tab.
Click the Manage Certificates link.
■ If you are managing a certificate for a default configuration using the internal cryptographicmodule, a list of all installed certificates with their type and expiration date is displayed. Allcertificates are stored in the directory server-root/alias.■ If you are using an external cryptographic module, such as a hardware accelerator, you
must first type your password for each specific module and click OK. The certificate listwill update to include certificates in the module.
Click the name of the certificate you want to manage.A page appears with management options for that type of certificate. Only CA certificates allowyou to set or unset client trust. Some external cryptographic modules will not allow certificatesto be deleted.
Specify the desired action.The following options are available:■ Delete certificate or Quit for certificates obtained internally
■ Set client trust, Unset server trust, or Quit for CA certificatesCertificate information includes the owner and who issued it. Trust settings allow you toset client trust or unset server trust. For LDAP server certificates, the server must betrusted.
Installing and Managing CRLs and CKLsCertificate revocation lists (CRLs) and compromised key lists (CKLs) make known anycertificates and keys that either client or server users should no longer trust. If data in acertificate changes, such as when a user changes offices or leaves the organization before thecertificate expires, the certificate is revoked, and its data appears in a CRL. If a key is tamperedwith or otherwise compromised, the key and its data appear in a CKL. Both CRLs and CKLs areproduced and periodically updated by a CA. Contact your specific CA to obtain these lists.
This section describes how to install and manage CRLs and CKLs.
1
2
3
4
Installing and Managing CRLs and CKLs
Chapter 5 • Using Certificates and Keys 83

▼ To Install CRLs or CKLsObtain a CRL or CKL from your CA and download it to a local directory.
Access either the Administration Server or the Server Manager and click the Security tab.
Click the Install CRL/CKL link.
Select either:
■ Certificate Revocation List■ Compromised Key List
Type the full path name to the associated file and click OK.
The Add Certificate Revocation List or Add Compromised Key List page appears, listing CRL orCKL information. If a CRL or CKL already exists in the database, a Replace CertificateRevocation List or Replace Compromised Key List page appears.
Add or replace the CRL or CKL.
▼ To Manage CRLs and CKLsAccess either the Administration Server or the Server Manager and click the Security tab.
Click the Manage CRL/CKL link.
The Manage Certificate Revocation Lists /Compromised Key Lists page appears, listing allinstalled CRLs and CKLs and their expiration dates.
Select a certificate from either the Server CRLs or Server CKLs list.
Select Delete CRL or Delete CKL to delete the CRL or CKL. .
Quit to return to the management page
Setting Security PreferencesOnce you have a certificate, you can begin securing your server. Proxy Server provides manysecurity elements, which are discussed in this section.
1
2
3
4
5
6
1
2
3
4
5
Setting Security Preferences
Oracle iPlanet Web Proxy Server 4.0.14 Administration Guide • June 201084

Encryption is the process of transforming information so it is unintelligible to anyone but theintended recipient. Decryption is the process of transforming encrypted information so that itis intelligible again. Proxy Server supports the Secure Sockets Layer (SSL) and Transport LayerSecurity (TLS) encryption protocols.
A cipher is a cryptographic algorithm (a mathematical function) used for encryption ordecryption. SSL and TLS protocols contain numerous cipher suites. Some ciphers are strongerand more secure than others. Generally speaking, the more bits a cipher uses, the harderdecrypting the data will be.
In any two-way encryption process, both parties must use the same ciphers. Because a numberof ciphers are available, you must enable your server for those most commonly used.
During a secure connection, the client and the server agree to use the strongest cipher they canboth have for communication. You can choose ciphers from the SSL 2.0, SSL 3.0, and TLSprotocols.
Note – Improvements to security and performance were made after SSL 2.0. Do not use SSL 2.0unless you have clients that are incapable of using SSL 3.0. Client certificates are not guaranteedto work with SSL 2.0 ciphers.
The encryption process alone is not enough to secure your server’s confidential information. Akey must be used with the encrypting cipher to produce the actual encrypted result, or todecrypt previously encrypted information. The encryption process uses two keys to achieve thisresult: a public key and a private key. Information encrypted with a public key can be decryptedonly with the associated private key. The public key is published as part of a certificate. Only theassociated private key is safeguarded.
For a description of the various cipher suites and more information about keys and certificates,see Introduction to SSL.
You can specify which ciphers your server can use. Unless you have a compelling reason not touse a specific cipher, you should select them all. You might not wish to enable ciphers with lessthan optimal encryption.
Caution – Do not select Enable No Encryption, Only MD5 Authentication. If no other ciphers areavailable on the client side, the server defaults to this setting and no encryption occurs.
This section contains the following topics:
■ “SSL and TLS Protocols” on page 86■ “Using SSL to Communicate With LDAP” on page 86■ “Tunneling SSL Through the Proxy Server” on page 87■ “Configuring SSL Tunneling” on page 88
Setting Security Preferences
Chapter 5 • Using Certificates and Keys 85
■ “Enabling Security for Listen Sockets” on page 89■ “Configuring Security Globally” on page 91
SSL and TLS ProtocolsProxy Server supports the SSL and TLS protocols for encrypted communication. SSL and TLSare application independent, and higher-level protocols can be layered transparently on them.
SSL and TLS protocols support a variety of ciphers used to authenticate the server and client toeach other, transmit certificates, and establish session keys. Clients and servers may supportdifferent cipher suites, or sets of ciphers, depending on factors such as which protocol theysupport, company policies on encryption strength, and government restrictions on export ofencrypted software. Among other functions, the SSL and TLS handshake protocols determinehow the server and client negotiate which cipher suites they will use to communicate.
Using SSL to Communicate With LDAPYou should require your Administration Server to communicate with LDAP using SSL.
Note – In this scenario Proxy Server acts as SSL client and must have imported the root CAcertificate which signs SSL server LDAP certificate. In case the SSL certificate for LDAP was notissued by a well known CA, the CA root key used must be imported to Proxy Server key store.
▼ To enable LDAP with SSL connection on your Administration Server
Access the Administration Server and click the Global Settings tab.
Click the Configure Directory Service link.
In the table that displays, click the link for the directory service.
The Configure Directory Service page displays. If the LDAP-based directory service has not yetbeen created, select LDAP Server from the Create New Service of Type drop-down list, and thenclick New to configure the directory service. For more information about the specific fields thatdisplay for an LDAP-based directory service, see the online Help.
Select Yes to use SSL for connections, and then click Save Changes.
1
2
3
4
Setting Security Preferences
Oracle iPlanet Web Proxy Server 4.0.14 Administration Guide • June 201086
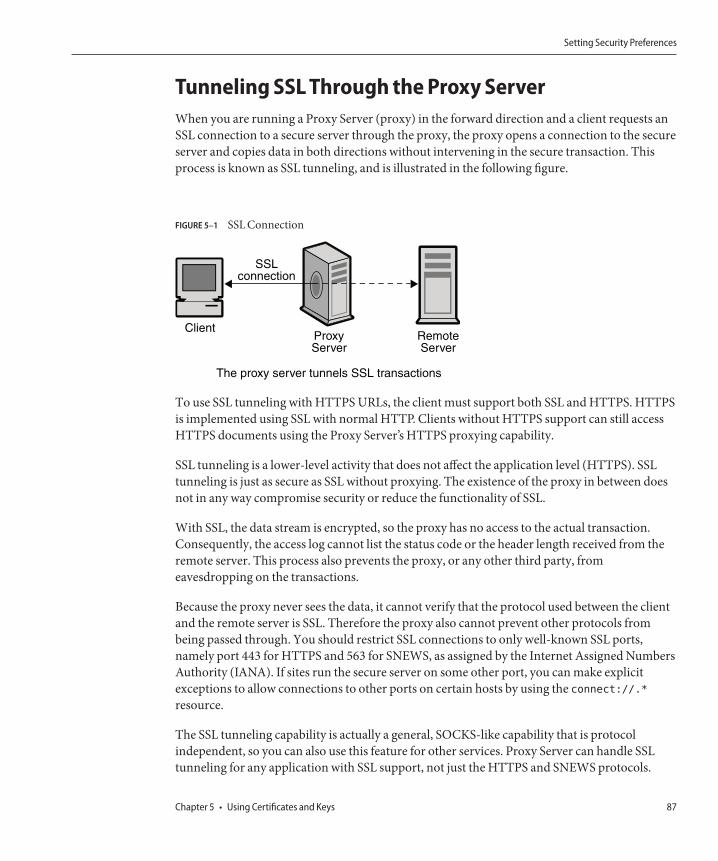
Tunneling SSL Through the Proxy ServerWhen you are running a Proxy Server (proxy) in the forward direction and a client requests anSSL connection to a secure server through the proxy, the proxy opens a connection to the secureserver and copies data in both directions without intervening in the secure transaction. Thisprocess is known as SSL tunneling, and is illustrated in the following figure.
To use SSL tunneling with HTTPS URLs, the client must support both SSL and HTTPS. HTTPSis implemented using SSL with normal HTTP. Clients without HTTPS support can still accessHTTPS documents using the Proxy Server’s HTTPS proxying capability.
SSL tunneling is a lower-level activity that does not affect the application level (HTTPS). SSLtunneling is just as secure as SSL without proxying. The existence of the proxy in between doesnot in any way compromise security or reduce the functionality of SSL.
With SSL, the data stream is encrypted, so the proxy has no access to the actual transaction.Consequently, the access log cannot list the status code or the header length received from theremote server. This process also prevents the proxy, or any other third party, fromeavesdropping on the transactions.
Because the proxy never sees the data, it cannot verify that the protocol used between the clientand the remote server is SSL. Therefore the proxy also cannot prevent other protocols frombeing passed through. You should restrict SSL connections to only well-known SSL ports,namely port 443 for HTTPS and 563 for SNEWS, as assigned by the Internet Assigned NumbersAuthority (IANA). If sites run the secure server on some other port, you can make explicitexceptions to allow connections to other ports on certain hosts by using the connect://.*resource.
The SSL tunneling capability is actually a general, SOCKS-like capability that is protocolindependent, so you can also use this feature for other services. Proxy Server can handle SSLtunneling for any application with SSL support, not just the HTTPS and SNEWS protocols.
FIGURE 5–1 SSL Connection
ClientRemoteServer
ProxyServer
SSLconnection
The proxy server tunnels SSL transactions
Setting Security Preferences
Chapter 5 • Using Certificates and Keys 87

Configuring SSL TunnelingThe following procedure describes how to configure your Proxy Server to tunnel SSL.
▼ To configure SSL tunneling
Access the Server Manager for a server instance and click the Routing tab.
Click the Enable/Disable Proxying link.
Select the connect://.*.443 resource from the drop-down list.The connect:// method is an internal proxy notation that does not exist outside of the proxy.See “Technical Details for SSL Tunneling” on page 88 for more information about connect.
To allow connections to other ports, you can use similar URL patterns in a template. For moreinformation about templates, see Chapter 16, “Managing Templates and Resources.”
Select Enable Proxying Of This Resource and click OK.
Caution – If the proxy is misconfigured, someone can use the proxy to make it appear that atelnet connection is coming from the proxy host rather than the actual connecting host.Therefore do not allow any more ports than absolutely necessary, and use access control onyour proxy to restrict the client hosts.
Technical Details for SSL TunnelingInternally, SSL tunneling uses the CONNECT method with the destination host name and portnumber as a parameter followed by an empty line:
CONNECT energy.example.com:443 HTTP/1.0
The following example shows a successful response from the Proxy Server, followed by anempty line:
HTTP/1.0 200 Connection establishedProxy-agent: Oracle-iPlanet-Proxy-Server/4.0
The connection is then set up between the client and the remote server. Data can be transferredin both directions until either closes the connection.
Internally, to benefit from the typical configuration mechanism based on URL patterns, the hostname and port number are automatically mapped into a URL such as this:
connect://energy.example.com:443
1
2
3
4
Setting Security Preferences
Oracle iPlanet Web Proxy Server 4.0.14 Administration Guide • June 201088

connect:// is an internal notation used by Proxy Server to make configuration easier and moreuniform with other URL patterns. Outside of the Proxy Server, connect URLs do not exist. Ifthe Proxy Server receives such a URL from the network, it marks the URL as invalid and refusesto service the request.
Enabling Security for Listen SocketsYou can secure your server’s listen sockets by doing the following:
■ Turning the security on■ Selecting a server certificate for the listen socket■ Selecting ciphers
Note – You can enable security only in reverse proxy mode and not in forward proxy mode.
Turning Security OnYou must turn security on before you can configure the other security settings for your listensocket. You can turn security on when you create a new listen socket or edit an existing one.
▼ To Turn Security on When Creating Listen Sockets
Access either the Administration Server or the Server Manager and click the Preferences tab.
Click the Add Listen Socket link.
Provide the required information.
Note – Use the Edit Listen Sockets link to configure the security settings after a listen socket hasbeen created.
To turn security on, select Enabled from the Security drop-down list, and then click OK.If a server certificate has not been installed, your only choice will be Disabled. For moreinformation about specific settings, see the online Help.
▼ To Turn Security on When Editing Listen Sockets
Access either the Administration Server or the Server Manager and click the Preferences tab.
Click the Edit Listen Sockets link.
Click the link for the listen socket you want to edit.
1
2
3
4
1
2
3
Setting Security Preferences
Chapter 5 • Using Certificates and Keys 89
Select Enabled from the Security drop-down list, and click OK.If a server certificate has not been installed, your only choice will be Disabled.
Selecting Server Certificates for Listen SocketsYou can configure listen sockets in either the Administration Server or the Server Manager touse server certificates you have requested and installed.
Note – At least one certificate must be installed.
▼ To Select a Server Certificate for a Listen Socket
Access either the Administration Server or the Server Manager and click the Preferences tab.
Click the Edit Listen Sockets link.
Click the link for the listen socket you want to edit.
Select Enabled from the Security drop-down list, and click OK.If a server certificate has not been installed, your only choice will be Disabled.
Select a server certificate from the drop-down Server Certificate Name list for the listen socket,and then click OK.
Selecting CiphersTo protect the security of the Proxy Server, you should enable SSL. You can enable the SSL 2.0,SSL 3.0, and TLS encryption protocols and select the various cipher suites. The SSL and TLSprotocols can be enabled on the listen socket for the Administration Server. Enabling SSL andTLS on a listen socket for the Server Manager sets those security preferences for specific serverinstances. At least one certificate must be installed.
Note – Enabling SSL on a listen socket applies only when the Proxy Server is configured toperform reverse proxying.
The default settings allow the most commonly used ciphers. Unless you have a compellingreason for not using a specific cipher suite, you should select them all.
The default and recommended setting for TLS Rollback is Enabled. This setting configures theserver to detect “man-in-the-middle version rollback” attack attempts. Setting TLS Rollback toDisabled might be required for interoperability with some clients that incorrectly implementthe TLS specification.
4
1
2
3
4
5
Setting Security Preferences
Oracle iPlanet Web Proxy Server 4.0.14 Administration Guide • June 201090

Disabling TLS Rollback leaves connections vulnerable to version rollback attacks. Versionrollback attacks are a mechanism by which a third party can force a client and server tocommunicate using an older, less secure protocol such as SSL 2.0. Because SSL 2.0 protocol hasknown deficiencies, failing to detect “version rollback” attack attempts makes intercepting anddecrypting encrypted connections easier for a third party.
▼ To Enable SSL and TLS
Access either the Administration Server or the Server Manager and click the Preferences tab.
Click the Edit Listen Sockets link, and then click the link for the listen socket you want to edit.For a secure listen socket, the available cipher settings are displayed.
If security is not enabled on the listen socket, no SSL and TLS information is listed. To workwith ciphers, ensure that security is enabled on the selected listen socket. For more information,see “Enabling Security for Listen Sockets” on page 89.
Select the checkboxes corresponding to the required encryption settings and click OK.
Select both TLS and SSL 3.0 for Netscape Navigator 6.0. For TLS Rollback also select TLS, andmake sure both SSL 3.0 and SSL 2.0 are disabled.Once SSL has been enabled on a server, its URLs use https instead of http. URLs that point todocuments on an SSL-enabled server are formatted as :https://servername.domain.dom:port, for example, https://admin.example.com:443
If you use the default secure HTTP port (443), you do not need to enter the port number in theURL.
Configuring Security GloballyInstalling an SSL-enabled server creates directive entries in the magnus.conf file, the server’smain configuration file for global security parameters.
SSLSessionTimeoutThe SSLSessionTimeout directive controls SSL 2.0 session caching. The syntax is:
SSLSessionTimeout seconds
where seconds is the number of seconds until a cached SSL session becomes invalid. The defaultvalue is 100. If the SSLSessionTimeout directive is specified, the value of seconds is silentlyconstrained to be between 5 and 100 seconds.
1
2
3
4
Setting Security Preferences
Chapter 5 • Using Certificates and Keys 91

SSLCacheEntriesSpecifies the number of SSL sessions that can be cached.
SSL3SessionTimeoutThe SSL3SessionTimeout directive controls SSL 3.0 and TLS session caching. The Syntax is:
SSL3SessionTimeout seconds
where seconds is the number of seconds until a cached SSL 3.0 session becomes invalid. Thedefault value is 86400 (24 hours). If the SSL3SessionTimeout directive is specified, the value ofseconds is silently constrained to be between 5 and 86400 seconds.
▼ To Set Values for SSL Configuration File Directives
Access the Server Manager for a server instance.
Ensure that security is enabled for the listen socket you want to configure.For more information, see “Enabling Security for Listen Sockets” on page 89.
Manually edit the magnus.conf file and provide values for the following settings:
■ SSLSessionTimeout
■ SSLCacheEntries
■ SSL3SessionTimeout
For more information about magnus.conf, see Oracle iPlanet Web Proxy Server 4.0.14Configuration File Reference.
Using External Encryption ModulesProxy Server supports the following methods of using external cryptographic modules such assmart cards or token rings:
■ PKCS #11■ FIPS-140
You must add the PKCS #11 module before activating the FIPS-140 encryption standard.
This section contains the following topics:
■ “Installing the PKCS #11 Module” on page 93■ “FIPS-140 Standard” on page 96
1
2
3
Using External Encryption Modules
Oracle iPlanet Web Proxy Server 4.0.14 Administration Guide • June 201092
Installing the PKCS #11 ModuleProxy Server supports Public Key Cryptography Standard (PKCS) #11, which defines theinterface used for communication between SSL and PKCS #11 modules. PKCS #11 modules areused for standards-based connectivity to SSL hardware accelerators. Imported certificates andkeys for external hardware accelerators are stored in the secmod.db file, which is generatedwhen the PKCS #11 module is installed. The file is located in the server-root/alias directory.
Using the Tool modutil to Install PKCS #11 ModulesYou can install PKCS #11 modules in the form of .jar files or object files using the modutiltool.
▼ To Install PKCS #11 modules using the Tool modutil
Make sure that all servers, including the Administration Server, have been stopped.
Go to the server-root/aliasdirectory containing the databases.
Add server-root/bin/proxy/admin/bin to your PATH.
Locate modutil in server-root/bin/proxy/admin/bin.
Set the environment.
■ On UNIX: setenv
LD_LIBRARY_PATH server-root/bin/proxy/lib:${LD_LIBRARY_PATH}
■ On Windows, add it to the PATH
LD_LIBRARY_PATH server-root/bin/proxy/bin
You can find the PATH for your computer listed underserver-root/proxy-admserv/start.
In a terminal window, type modutil.
The options will be listed.
Perform the actions required.
For example, to add the PKCS #11 module in UNIX, enter:
modutil -add (name of PKCS#11 file) -libfile (your libfile for PKCS #11) -nocertdb -dbdir .(your db directory)
1
2
3
4
5
6
7
Using External Encryption Modules
Chapter 5 • Using Certificates and Keys 93

Exporting with the tool pk12utilUsing pk12util enabless you to export certificates and keys from your internal database andimport them into an internal or external PKCS #11 module. You can always export certificatesand keys to your internal database, but most external tokens will not allow you to exportcertificates and keys. By default, pk12util uses certificate and key databases named cert8.db
and key3.db.
▼ To Export a Certificate and Key From an Internal Database
Go to the server-root/aliasdirectory containing the databases.
Add server-root/bin/proxy/admin/bin to your PATH.
Locate pk12util in server-root/bin/proxy/admin/bin.
Set the environment.
■ On UNIX:setenv LD_LIBRARY_PATH/server-root/bin/proxy/lib:${LD_LIBRARY_PATH}
■ On Windows, add it to the PATHLD_LIBRARY_PATH server-root/bin/proxy/binYou can find the PATH for your computer listed under: server-root/proxy-admserv/start.
In a terminal window, type pk12util.The options will be listed.
Perform the actions required.For example, in UNIX type
pk12util -o certpk12 -n Server-Cert [-d /server/alias] [-P https-test-host]
Type the database password.
Type the pkcs12password.
▼ To Import a Certificate and Key Into an Internal or External PKCS #11Module
Go to the server-root/aliasdirectory containing the databases.
Add server-root/bin/proxy/admin/bin to your PATH.
1
2
3
4
5
6
7
8
1
2
Using External Encryption Modules
Oracle iPlanet Web Proxy Server 4.0.14 Administration Guide • June 201094
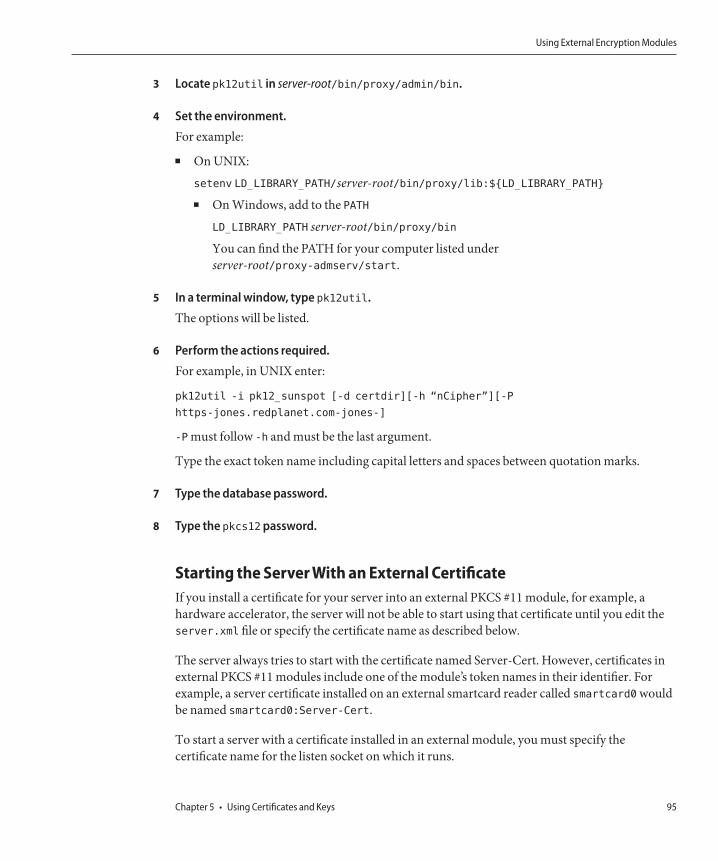
Locate pk12util in server-root/bin/proxy/admin/bin.
Set the environment.
For example:
■ On UNIX:
setenv LD_LIBRARY_PATH/server-root/bin/proxy/lib:${LD_LIBRARY_PATH}■ On Windows, add to the PATH
LD_LIBRARY_PATH server-root/bin/proxy/bin
You can find the PATH for your computer listed underserver-root/proxy-admserv/start.
In a terminal window, type pk12util.
The options will be listed.
Perform the actions required.
For example, in UNIX enter:
pk12util -i pk12_sunspot [-d certdir][-h “nCipher”][-P
https-jones.redplanet.com-jones-]
-P must follow -h and must be the last argument.
Type the exact token name including capital letters and spaces between quotation marks.
Type the database password.
Type the pkcs12password.
Starting the Server With an External CertificateIf you install a certificate for your server into an external PKCS #11 module, for example, ahardware accelerator, the server will not be able to start using that certificate until you edit theserver.xml file or specify the certificate name as described below.
The server always tries to start with the certificate named Server-Cert. However, certificates inexternal PKCS #11 modules include one of the module’s token names in their identifier. Forexample, a server certificate installed on an external smartcard reader called smartcard0 wouldbe named smartcard0:Server-Cert.
To start a server with a certificate installed in an external module, you must specify thecertificate name for the listen socket on which it runs.
3
4
5
6
7
8
Using External Encryption Modules
Chapter 5 • Using Certificates and Keys 95

▼ To Select the Certificate Name for a Listen SocketIf security is not enabled on the listen socket, certificate information will not be listed. To selecta certificate name for a listen socket, you must first ensure that security is enabled on the listensocket. For more information, see “Enabling Security for Listen Sockets” on page 89.
Access either the Administration Server or the Server Manager and click the Preferences tab.
Click the Edit Listen Sockets link.
Click the link for the listen socket that you want to associate with a certificate.
Select a server certificate from the Server Certificate Name drop-down list for the listen socketand click OK.The list contains all internal and external certificates installed.
You could also require the server to start with that server certificate instead, by manually editingthe server.xml file. Change the servercertnickname attribute in the SSLPARAMS to:
$TOKENNAME:Server-Cert
To find what value to use for $TOKENNAME, go to the server’s Security tab and select the ManageCertificates link. When you log in to the external module where Server-Cert is stored, itscertificates are displayed in the list in the $TOKENNAME:$NICKNAME form.
If you did not create a trust database, one will be created for you when you request or install acertificate for an external PKCS #11 module. The default database created has no password andcannot be accessed. Your external module will work, but you will not be able to request andinstall server certificates. If a default database has been created without a password, use theCreate Database page on the Security tab to set the password.
FIPS-140 StandardThe PKCS #11 APIs enable communication with software or hardware modules that performcryptographic operations. Once PKCS #11 is installed on your Proxy Server, you can configurethe server to be FIPS-140 compliant. FIPS stands for Federal Information Processing Standards.These libraries are included only in SSL 3.0.
▼ To Enable FIPS-140
Install the plug-in following the FIPS-140 instructions.
Access either the Administration Server or the Server Manager and click the Preferences tab.
1
2
3
4
1
2
Using External Encryption Modules
Oracle iPlanet Web Proxy Server 4.0.14 Administration Guide • June 201096

Click the Edit Listen Sockets link.For a secure listen socket, the Edit Listen Sockets page displays the available security settings.
To work with FIPS-140, ensure that security is enabled on the selected listen socket. For moreinformation, see “Enabling Security for Listen Sockets” on page 89.
Select Enabled from the SSL Version 3 drop-down list, if not already selected.
Select the appropriate FIPS-140 cipher suite and click OK:
■ Enable Triple DES with 168–bit encryption and SHA authentication (FIPS)■ Enable DES with 56–bit encryption and SHA authentication (FIPS)
Setting Client Security RequirementsAfter you have performed all of the steps to secure your servers, additional securityrequirements can be set for your clients.
Client authentication is not essential to an SSL connection, but it does give extra assurance thatencrypted information is being sent to the correct parties. You can use client authentication in areverse proxy to make sure that your content server does not share information withunauthorized proxies or clients.
This section contains the following topics:
■ “Requiring Client Authentication” on page 97■ “Client Authentication in a Reverse Proxy” on page 98■ “Setting Up Client Authentication in a Reverse Proxy” on page 99■ “Mapping Client Certificates to LDAP” on page 101■ “Using the certmap.conf File” on page 102
Requiring Client AuthenticationYou can enable the listen sockets for your Administration Server and each server instance torequire client authentication. When client authentication is enabled, the client’s certificate isrequired before the server sends a response to a query.
Proxy Server supports authenticating client certificates by matching the CA in the clientcertificate with a CA trusted for signing client certificates. You can view a list of CAs trusted forsigning client certificates on the Manage Certificates page through the Security tabs.
You can configure the Proxy Server to refuse any client that does not have a client certificatefrom a trusted CA. To accept or reject trusted CAs, client trust must be set for the CA. For moreinformation, see “Managing Certificates” on page 83.
3
4
5
Setting Client Security Requirements
Chapter 5 • Using Certificates and Keys 97

Proxy Server logs an error, rejects the certificate, and returns a message to the client if thecertificate has expired. You can also view which certificates have expired on the ManageCertificates page.
You can configure your server to gather information from the client certificate and match itwith a user entry in an LDAP directory. This process ensures that the client has a validcertificate and an entry in the LDAP directory. It can also ensure that the client certificatematches the one in the LDAP directory. To learn how to do this, “Mapping Client Certificates toLDAP” on page 101.
You can combine client certificates with access control, so that in addition to being from atrusted CA, the user associated with the certificate must match the access control rules (ACLs).For more information, see “Using Access Control Files” on page 147.
▼ To Require Client Authentication
Access either the Administration Server or the Server Manager and click the Preferences tab.
Click the Edit Listen Sockets link.
Click the link for the listen socket for which you are requiring client authentication.
Use the Client Authentication drop-down list to require client authentication for the listensocket, and click OK.
Client Authentication in a Reverse ProxyIn a reverse proxy, you can configure client authentication according to any of the followingscenarios:
■ Proxy-Authenticates-Client. This scenario enables you to allow access to all clients withacceptable certificates, or to allow access to only those clients that have acceptablecertificates and are recognized users on the access control list for your Proxy Server.
Note – Proxy must have the user root keys of the CA or the self-signing application whichsigned the user certificate. User must have loaded Proxy Server root keys of either the CA orthe self-signing application which signed the Proxy Server certificate.
■ Content-Server-Authenticates-Proxy. This scenario enables you to make sure that yourcontent server is actually connecting with your Proxy Server and not some other server.
1
2
3
4
Setting Client Security Requirements
Oracle iPlanet Web Proxy Server 4.0.14 Administration Guide • June 201098

Note – Proxy must have the content server root keys of either the CA or the self-signingapplication which signed the Content Server certificate. Content Server must have the ProxyServer root keys of either the CA or the self-signing application which signed the ProxyServer certificate.
■ Proxy-Authenticates-Client and Content-Server-Authenticates-Proxy. This scenarioprovides the maximum security and authentication for your reverse proxy.
For information about how to configure these scenarios, see “Setting Up Client Authenticationin a Reverse Proxy” on page 99.
Setting Up Client Authentication in a Reverse ProxyClient authentication in a secure reverse proxy provides further insurance that yourconnections are secure. The following instructions explain how to configure clientauthentication according to the scenario you choose.
Note – Each scenario assumes that you have both a secure Client-to-Proxy connection and asecure Proxy-to-Content-Server connection.
▼ To Configure the Proxy-Authenticates-Client Scenario
Follow the directions for configuring the secure Client-to-Proxy and secure Proxy-to-ContentServer scenario in“Setting up a Reverse Proxy”in Chapter 14,“Using a Reverse Proxy.”
Access the Server Manager for a server instance and click the Preferences tab.
Click the Edit Listen Sockets link, and then click the link for the desired listen socket in the tablethat displays.
(Use the Add Listen Socket link to configure and add listen sockets.)
Specify client authentication requirements:
a. To permit access to all users with valid certificates:
In the Security section, use the Client Authentication setting to require client authenticationon this listen socket. If a server certificate has not been installed, this setting will not bevisible.
1
2
3
4
Setting Client Security Requirements
Chapter 5 • Using Certificates and Keys 99
b. To permit access to only those users who have both valid certificates and are specified asacceptable users in access control:
i. In the Security section, leave the Client Authentication setting set to off. If a servercertificate has not been installed, this setting will not be visible.
ii. On the Server Manager Preferences tab for this server instance, click the AdministerAccess Control link.
iii. Select an ACL, and then click the Edit button.
The Access Control Rules For page displays (authenticate first, if prompted).
iv. Turn access control on (select the Access control Is On checkbox if not already selected).
v. Set your Proxy Server to authenticate as a reverse proxy.
For more information, see “Setting up a Reverse Proxy” on page 303.
vi. Click the Rights link for the desired access control rule, specify access rights in the lowerframe, and then click Update to update this entry.
vii. Click the Users/Groups link. In the lower frame. Specify users and groups, select SSL asthe authentication method, and click Update to update this entry.
viii.Click Submit in the upper frame to save your entries.
For more information about setting access control, see Chapter 8, “Controlling Access toYour Server.”
▼ To Configure the Content Server-Authenticates-Proxy Scenario
Follow the directions for configuring the secure Client-to-Proxy and secureProxy-to-Content-Server scenario in “Setting up a Reverse Proxy”on page 303.
On your content server, turn client authentication on.
You can modify this scenario so that you have an unsecure client connection to the ProxyServer, a secure connection to the content server, and the content server authenticates the ProxyServer. To do so, you must turn encryption off and require the proxy to initialize certificatesonly as described in the following procedure.
1
2
Setting Client Security Requirements
Oracle iPlanet Web Proxy Server 4.0.14 Administration Guide • June 2010100

▼ To Configure the Proxy-Authenticates-Client and ContentServer-Authenticates-Proxy scenario
Follow the directions for configuring the Proxy-Authenticates-Client scenario in “To Configurethe Proxy-Authenticates-Client Scenario”on page 99.
On your content server, turn client authentication on.
Mapping Client Certificates to LDAPThis section describes the process that the Proxy Server uses to map a client certificate to anentry in an LDAP directory. Before mapping client certificates to LDAP, you must alsoconfigure the required ACLs. For more information, see Chapter 8, “Controlling Access to YourServer.”
When the server receives a request from a client, the server asks for the client’s certificate beforeproceeding. Some clients send the client certificate to the server along with the request.
The server tries to match the CA to the list of trusted CAs in the Administration Server. If amatch does not exist, Proxy Server ends the connection. If a match exists, the server continuesprocessing the request.
After verifying that the certificate is from a trusted CA, the server maps the certificate to anLDAP entry by doing the following:
■ Mapping the issuer and subject DN from the client certificate to a branch point in the LDAPdirectory
■ Searching the LDAP directory for an entry that matches the information about the subject(end user) of the client certificate
■ (Optional) Verifying the client certificate with one in the LDAP entry that corresponds tothe DN
The server uses a certificate mapping file called certmap.conf to determine how the LDAPsearch is performed. The mapping file tells the server what values to take from the clientcertificate such as the end user’s name, email address, and so on. The server uses these values tosearch for a user entry in the LDAP directory, but first the server must determine where in theLDAP directory to start the search. The certificate mapping file also tells the server where tostart.
Once the server knows where to start the search and what to search for, it performs the search inthe LDAP directory (second point). If it finds no matching entry or more than one matchingentry, and the mapping is not set to verify the certificate, the search fails.
1
2
Setting Client Security Requirements
Chapter 5 • Using Certificates and Keys 101

The following table lists the expected search result behavior. You can specify the expectedbehavior in the ACL. For example, you can specify that the Proxy Server accepts only you if thecertificate match fails. For more information about how to set the ACL preferences, see “UsingAccess Control Files” on page 147.
TABLE 5–1 LDAP Search Results
LDAP Search Result Certificate Verification ON Certificate Verification OFF
No entry found Authentication fails Authentication fails
Exactly one entry found Authentication fails Authentication succeeds
More than one entry found Authentication fails Authorization fails
After the server finds a matching entry and certificate in the LDAP directory, the server can usethat information to process the transaction. For example, some servers use certificate-to-LDAPmapping to determine access to a server.
Using the certmap.conf FileCertificate mapping determines how a server looks up a user entry in the LDAP directory. Youcan use the certmap.conf file to configure how a certificate, designated by name, is mapped toan LDAP entry. You edit this file and add entries to match the organization of your LDAPdirectory, and to list the certificates you want your users to have. Users can be authenticatedbased on user ID, email address, or any other value used in the subjectDN. Specifically, themapping file defines the following information:
■ Where in the LDAP tree the server should begin the search■ What certificate attributes the server should use as search criteria when searching for the
entry in the LDAP directory■ Whether the server goes through an additional verification process
The certificate mapping file is found in the following location:
server-root/userdb/certmap.conf
The file contains one or more named mappings, each applying to a different CA. A mapping hasthe following syntax:
certmap name issuerDNname:property [value]
The first line specifies a name for the entry and the attributes that form the distinguished namefound in the CA certificate. The name is arbitrary and can be defined to whatever you prefer.However, issuerDN must exactly match the issuer DN of the CA that issued the client certificate.For example, the following two issuer DN lines differ only in the spaces separating theattributes, but the server treats these two entries as different:
Setting Client Security Requirements
Oracle iPlanet Web Proxy Server 4.0.14 Administration Guide • June 2010102

certmap sun1 ou=Sun Certificate Authority,o=Sun,c=UScertmap sun2 ou=Sun
Certificate Authority, o=Sun, c=US
Note – If you are using Oracle Directory Server Enterprise Edition and experiencing problems inmatching the issuer DN, check the Directory Server error logs for useful information.
The second and subsequent lines in the named mapping match properties with values. Thecertmap.conf file has six default properties. You can also use the certificate API to customizeyour own properties. The default properties are:
■ DNComps is a list of comma-separated attributes used to determine where in the LDAPdirectory the server should start searching for entries that match the user’s information, thatis, the owner of the client certificate. The server gathers values for these attributes from theclient certificate and uses the values to form an LDAP DN, which then determines where theserver starts its search in the LDAP directory. For example, if DNComps is set to use the o andc attributes of the DN, the server starts the search from the o=org, c= country entry in theLDAP directory, where org and country are replaced with values from the DN in thecertificate.Note the following situations:■ If there is no DNComps entry in the mapping, the server uses either the CmapLdapAttr
setting or the entire subject DN in the client certificate, that is, the end user’sinformation.
■ If the DNComps entry is present but has no value, the server searches the entire LDAP treefor entries matching the filter.
FilterComps is a list of comma-separated attributes used to create a filter by gatheringinformation from the user’s DN in the client certificate. The server uses the values for theseattributes to form the search criteria used to match entries in the LDAP directory. If theserver finds one or more entries in the LDAP directory that match the user’s informationgathered from the certificate, the search is successful and the server optionally performs averification.
For example, if FilterComps is set to use the email address and user ID attributes(FilterComps=e,uid), the server searches the directory for an entry whose values for emailand user ID match the end user’s information gathered from the client certificate. Emailaddresses and user IDs are good filters because they are usually unique entries in thedirectory. The filter must be specific enough to match one and only one entry in the LDAPdatabase.
The attribute names for the filters need to be attribute names from the certificate, not fromthe LDAP directory. For example, some certificates have an e attribute for the user’s emailaddress, whereas LDAP calls that attribute mail.
The following table lists the attributes for x509v3 certificates.
Setting Client Security Requirements
Chapter 5 • Using Certificates and Keys 103

TABLE 5–2 Attributes for x509v3 Certificates
Attribute Description
c Country
o Organization
cn Common name
l Location
st State
ou Organizational unit
uid UNIX/Linux userid
email Email address
■ verifycert tells the server whether the client’s certificate should be compared with thecertificate found in the LDAP directory. Property takes two values: on and off. Use thisproperty only if your LDAP directory contains certificates. This feature is useful to ensurethat end users have a valid, unrevoked certificate.
■ CmapLdapAttr is a name for the attribute in the LDAP directory that contains subject DNsfrom all certificates belonging to the user. The default for this property is certSubjectDN.This attribute is not a standard LDAP attribute, so to use this property, you must extend theLDAP schema. For more information, see Introduction to SSL.If this property exists in the certmap.conf file, the server searches the entire LDAPdirectory for an entry whose attribute named with this property matches the subject’s fullDN taken from the certificate. If no entries are found, the server retries the search using theDNComps and FilterComps mappings.This approach to matching a certificate to an LDAP entry is useful when matching entriesusing DNComps and FilterComps is difficult.
■ Library is the path name to a shared library or DLL. Use this property only if you createyour own properties using the certificate API.
■ InitFn is the name of an init function from a custom library. Use this property only if youcreate your own properties using the certificate API.
For more information about these properties, refer to the examples described in “SampleMappings” on page 105.
Creating Custom PropertiesThe client certificate API can be used to create your own properties. Once you have a custommapping, you reference the mapping as follows:
name:library path_to_shared_libraryname:InitFN name_of_init_function
Setting Client Security Requirements
Oracle iPlanet Web Proxy Server 4.0.14 Administration Guide • June 2010104

For example:
certmap default1 o=Sun Microsystems, c=US default1:library
/usr/sun/userdb/plugin.so default1:InitFn plugin_init_fn default1:DNComps ou o
c default1:FilterComps l default1:verifycert on
Sample MappingsThe certmap.conf file should have at least one entry. The following examples illustrate thedifferent ways certmap.conf can be used.
Example #1 certmap.conf File With Only One Default Mapping
certmap default defaultdefault:DNComps ou, o, cdefault:FilterComps e,
uiddefault:verifycert on
Using this example, the server starts its search at the LDAP branch point containing the entryou=orgunit, o=org, c=country, where the italicized text is replaced with the values from thesubject’s DN in the client certificate.
The server then uses the values for e-mail address and user ID from the certificate to search for amatch in the LDAP directory. When an entry is found, the server verifies the certificate bycomparing the one sent by the client to the one stored in the directory.
Example #2 certmap.conf File With Two Mappings
The following example file has two mappings: one for default and another for the US PostalService.
certmap default defaultdefault:DNCompsdefault:FilterComps e, uid
certmap usps ou=United States Postal Service, o=usps, c=USusps:DNComps
ou,o,cusps:FilterComps eusps:verifycert on
When the server receives a certificate from anyone other than the US Postal Service, it uses thedefault mapping, which starts at the top of the LDAP tree and searches for an entry matchingthe client’s email address and user ID. If the certificate is from the US Postal Service, the serverstarts its search at the LDAP branch containing the organizational unit and searches formatching email addresses. Also the server verifies the certificate. Other certificates are notverified.
Setting Client Security Requirements
Chapter 5 • Using Certificates and Keys 105

Caution – The issuer DN (that is, the CA’s information) in the certificate must be identical to theissuer DN listed in the first line of the mapping. In the previous example, a certificate from anissuer DN that is o=United States Postal Service,c=US will not match because the DN hasno space between the o and the c attributes.
Example #3 Searching the LDAP Database
The following example uses the CmapLdapAttr property to search the LDAP database for anattribute called certSubjectDN, whose value exactly matches the entire subject DN taken fromthe client certificate. This example assumes that the LDAP directory contains entries with theattribute certSubjectDN
certmap myco ou=My Company Inc, o=myco, c=USmyco:CmapLdapAttr
certSubjectDNmyco:DNComps o, c myco:FilterComps mail, uid myco:verifycert on
If the client certificate subject is:
uid=Walt Whitman, o=LeavesOfGrass Inc, c=US
the server first searches for entries that contain the following information:
certSubjectDN=uid=Walt Whitman, o=LeavesOfGrass Inc, c=US
If one or more matching entries are found, the server proceeds to verify the entries. If nomatching entries are found, the server uses DNComps and FilterComps to search for matchingentries. In this example, the server searches for uid=Walt Whitman in all entries undero=LeavesOfGrass Inc, c=US.
Setting Stronger CiphersThe Set Cipher Size option on the Server Manager Preferences tab presents a choice of 168-bit,128-bit, or 56-bit secret key size for access or no restriction. You can specify a file to be servedwhen the restriction is not met. If no file is specified, Proxy Server returns a Forbidden status.
If you select a key size for access that is not consistent with the current cipher settings underSecurity Preferences, Proxy Server displays a warning that you need to enable ciphers withlarger secret key sizes.
The implementation of the key size restriction is based on an NSAPI PathCheck directive inobj.conf, rather than Service fn=key-toosmall. This directive is:
PathCheck fn="ssl-check" [secret-keysize=nbits] [bong-file=filename]
where nbits is the minimum number of bits required in the secret key, and filename is the nameof a file to be served if the restriction is not met.
Setting Stronger Ciphers
Oracle iPlanet Web Proxy Server 4.0.14 Administration Guide • June 2010106

PathCheck returns REQ_NOACTION if SSL is not enabled, or if the secret-keysize parameter isnot specified. If the secret key size for the current session is less than the specifiedsecret-keysize, the function returns REQ_ABORTED with a status of PROTOCOL_FORBIDDEN ifbong-file is not specified. If , bong-file is specified, the function returns REQ_PROCEED, andthe path variable is set to the bong-file filename. Also, when a key size restriction is not met,the SSL session cache entry for the current session is invalidated, so that a full SSL handshakeoccurs the next time the same client connects to the server.
Note – The Set Cipher Size form removes any Service fn=key-toosmall directives found in anobject when it adds a PathCheck fn=ssl-check.
▼ To Set Stronger CiphersAccess the Server Manager for a server instance and click the Preferences tab.
Click the Set Cipher Size link.
From the drop-down list, select the resource to which to apply stronger ciphers, and then clickSelect. You can also specify a regular expression.For more information, see Chapter 16, “Managing Templates and Resources.”
Select the secret key size restriction:
■ 168 bits or larger■ 128 bits or larger■ 56 bits or larger■ No restrictions
Specify the file location of the message to reject access, and click OK.For more information about ciphers, see Introduction to SSL.
Other Security ConsiderationsOther security risks exist beyond someone trying to break your encryption. Networks face risksfrom external and internal hackers, using a variety of tactics to gain access to your server andthe information on it. In addition to enabling encryption on your server, you should take extrasecurity precautions. For example, put the server computer in a secure room, and do not allowindividuals you do not trust to upload programs to your server. This section describes some ofthe key things you can do to make your server more secure.
This section contains the following topics:
1
2
3
4
5
Other Security Considerations
Chapter 5 • Using Certificates and Keys 107

■ “Limiting Physical Access” on page 108■ “Limiting Administration Access” on page 108■ “Choosing Strong Passwords” on page 108■ “Changing Passwords or PINs” on page 109■ “Limiting Other Applications on the Server” on page 110■ “Preventing Clients From Caching SSL Files” on page 110■ “Limiting Ports” on page 110■ “Knowing Your Server’s Limits” on page 111
Limiting Physical AccessThis simple security measure is often forgotten. Keep the server computer in a locked room thatonly authorized people can enter. This policy prevents anyone from hacking the servercomputer itself. Also, protect your computer’s administrative (root) password, if you have one.
Limiting Administration AccessIf you use remote configuration, be sure to set access control to allow administration from onlya few users and computers. If you want your Administration Server to provide end-user accessto the LDAP server or local directory information, consider maintaining two AdministrationServers and using cluster management. The SSL-enabled Administration Server then acts as themaster server, and the other Administration Server is available for end-users’ access. For moreinformation about clusters, see Chapter 6, “Managing Server Clusters.”
You should also turn encryption on for the Administration Server. If you do not use an SSLconnection for administration, be cautious when performing remote server administrationover an unsecure network. Anyone could intercept your administrative password andreconfigure your servers.
Choosing Strong PasswordsYou use a number of passwords with your server: the administrative password, the private keypassword, database passwords, and so on. Your administrative password is the most importantpassword, because anyone with that password can configure any and all servers on yourcomputer. Your private key password is the next most important. Anyone who has your privatekey and your private key password, can create a fake server that appears to be yours, or interceptand change communications to and from your server.
A good password is one you will remember but others will not guess. For example, you couldremember MCi12!mo as “My Child is 12 months old!” An example of a bad password is yourchild’s name or birthday.
Other Security Considerations
Oracle iPlanet Web Proxy Server 4.0.14 Administration Guide • June 2010108

Creating Hard-to-Crack PasswordsUse these guidelines to create a stronger password. You do not have to incorporate all of thefollowing rules in one password, but the more rules you use, the better your chances of makingyour password hard to guess. Some tips:
■ Passwords should be 6-14 characters long■ Do not use illegal characters: *, “, or spaces■ Do not use dictionary words (any language)■ Do not make common letter substitutions, such as replacing E with 3, or L with 1■ Include characters from as many of these classes as possible:
■ Uppercase letters■ Lowercase letters■ Numbers■ Symbols
Changing Passwords or PINsChange your trust database/key-pair file password or PIN periodically. If your AdministrationServer is SSL-enabled, this password is required when starting the server. Changing yourpassword periodically adds an extra level of server protection.
You should only change this password on your local computer. For a list of guidelines toconsider when changing a password, see “Creating Hard-to-Crack Passwords” on page 109.
▼ To Change the Trust Database/Key-Pair File Password
Access either the Administration Server or the Server Manager and click the Security tab.
Click the Change Key Pair File Password link.
From the Cryptographic Module drop-down list, select the security token on which you want tochange the password.
By default, this token is Internal for the internal key database. If PKCS #11 modules areinstalled, all of the security tokens will be listed.
Type your current password.
Type your new password.
1
2
3
4
5
Other Security Considerations
Chapter 5 • Using Certificates and Keys 109

Type the new password again and click OK.Make sure your key-pair file is protected. The Administration Server stores key-pair files in thedirectory server-root/alias.
Know whether the file is stored on backup tapes or otherwise available for someone to intercept.If so, you must protect your backups as completely as your server.
Limiting Other Applications on the ServerCarefully consider all applications that run on the same computer as the server. Someone couldcircumvent your server’s security by exploiting holes in other programs running on your server.Disable all unnecessary programs and services. For example, the UNIX sendmail daemon isdifficult to configure securely and can be programmed to run other, possibly detrimental,programs on the server computer.
UNIX and LinuxCarefully choose the processes started from inittab and rc scripts. Do not run telnet orrlogin from the server computer. You also should not have rdist on the server computer. Thiscan distribute files but can also be used to update files on the server computer.
WindowsCarefully consider which drives and directories you share with other computers. Also, considerwhich users have accounts or guest privileges. Be careful about what programs you put on yourserver, or allow others to install. Other people’s programs might have security holes. Evenworse, someone might upload a malicious program designed specifically to subvert yoursecurity. Always examine programs carefully before you allow them on your server.
Preventing Clients From Caching SSL FilesYou can prevent pre-encrypted files from being cached by a client by adding the following lineinside the <HEAD> section of an HTML file:
<meta http-equiv="pragma" content="no-cache">
Limiting PortsDisable any ports not used on the computer. Use routers or firewall configurations to preventincoming connections to anything other than the absolute minimum set of ports. Thisprotection means that the only way to get a shell on the computer is to physically use the server’scomputer, which should already be in a restricted area.
6
Other Security Considerations
Oracle iPlanet Web Proxy Server 4.0.14 Administration Guide • June 2010110

Knowing Your Server’s LimitsThe server offers secure connections between the server and the client. It cannot control thesecurity of information once the client has it, nor can it control access to the server computeritself and its directories and files.
Being aware of these limitations helps you understand what situations to avoid. For example,you might acquire credit card numbers over an SSL connection, but are those numbers storedin a secure file on the server computer? What happens to those numbers after the SSLconnection is terminated? Be sure to secure any information clients send to you through SSL.
Other Security Considerations
Chapter 5 • Using Certificates and Keys 111

112

Managing Server Clusters
This chapter describes the concept of clustering Proxy Servers, and describes how clusters canbe used to share configurations among servers.
This chapter contains the following sections:
■ “About Server Clusters” on page 113■ “Guidelines for Using Clusters” on page 114■ “Setting Up Clusters” on page 114■ “Adding Servers to a Cluster” on page 115■ “Modifying Server Information” on page 116■ “Removing Servers from a Cluster” on page 116■ “Controlling Server Clusters” on page 116
About Server ClustersA cluster is a group of Proxy Servers that can be administered from a single AdministrationServer. Each cluster must include one server designated as the master Administration Server.
By organizing servers into clusters you can do the following:
■ Create a central place for administering all Proxy Servers■ Share one or more configuration files between servers■ Start and stop all servers from one master Administration Server■ View the access and error logs for specific servers
6C H A P T E R 6
113

Guidelines for Using ClustersFollowing these guidelines for configuring groups of Proxy Servers into clusters:
■ All servers to be included in a particular cluster must be installed prior to creating anyclusters.
■ All servers in a cluster must be the same type (UNIX or Windows). Clusters must behomogenous.
■ All servers in a cluster must be Proxy Server version 4. Only Proxy Server version 4 serversare supported for addition to clusters.
■ All Administration Servers must use the same protocol, HTTP or HTTPS. If you change theprotocol of one Administration Server in a cluster, you must change the protocols for allAdministration Servers. For more information, see “Modifying Server Information” onpage 116.
■ All cluster-specific Administration Servers must have the same user name and password asthe master Administration Server. Distributed administration can be used to configuremultiple administrators on each Administration Server.
■ One cluster-specific Administration Server must be designated as the masterAdministration Server, which server you choose does not matter.
■ The master Administration Server must have access to each cluster-specific AdministrationServer. The master Administration Server retrieves information about all installed ProxyServers.
Setting Up ClustersFollowing are the general steps to set up Proxy Server clusters.
1. Install the Proxy Servers you want included in the cluster.
Make sure the Administration Server for the cluster has a user name and password that themaster Administration Server can use for authentication. You can do this by using thedefault user name and password, or by configuring distributed administration.
2. Install the Proxy Server that will contain the master Administration Server, making sure theuser name and password matches the one you set in Step 1.
3. Add a server to the cluster list.
For more information, see “Adding Servers to a Cluster” on page 115.
4. Administer a remote server by accessing its Server Manager interface from the ControlCluster page, or by copying a configuration file from one server in the cluster to another.
Guidelines for Using Clusters
Oracle iPlanet Web Proxy Server 4.0.14 Administration Guide • June 2010114

Adding Servers to a ClusterWhen a Proxy Server is added to a cluster, its Administration Server and port number arespecified. If that Administration Server contains information about more than one server, all ofits servers are added to the cluster. Individual servers can be removed at a later time.
If a remote Administration Server contains information about a cluster, the servers in theremote cluster are not added. The master Administration Server adds only those servers that arephysically installed on the remote computer.
▼ To Add Remote Servers to a ClusterMake sure that the master Administration Server is turned on.
Access the master Administration Server and click the Cluster tab.
Click the Add Server link.
Choose the protocol used by the remote Administration Server:
■ HTTP for a typical Administration Server■ HTTPS for a secure Administration Server
Type the fully qualified host name of the remote Administration Server as it appears in themagnus.conf file, for example, plaza.example.com.
Type the port number for the remote Administration Server.
Type the administrator user name and password for the remote Administration Server and clickOK.The master Administration Server attempts to contact the remote server. If successful, you areprompted to confirm the addition of the server to the cluster.
Note – When cluster control is enabled, the master of the cluster creates a number of files in theproxy-serverid/config/cluster/server-name/proxy-serverid directory for each slave in thecluster. These files are not configurable.
1
2
3
4
5
6
7
Adding Servers to a Cluster
Chapter 6 • Managing Server Clusters 115

Modifying Server InformationUse the Modify Server option on the Cluster tab of the Administration Server only to updateslave administration port information after it has been changed on the slave server. If youchange the port number of a remote Administration Server in your cluster, you must alsomodify the information about that Administration Server stored in the cluster. Any otherchanges to the slave Administration Server require you to remove the server, and then add itback into the cluster after the changes have been made.
▼ To Modify Information About Servers in a ClusterAccess the master Administration Server and click the Cluster tab.
Click the Modify Server link. Servers display, listed by unique server identifiers.
Select the server to be modified, make the desired changes, and then click OK.
Removing Servers from a Cluster
▼ To remove servers from a clusterAccess the master Administration Server and click the Cluster tab.
Click the Remove Server link.
Select the remote server(s) to remove from the cluster and click OK.The removed server can no longer be accessed through the cluster. It can only be accessedthrough its own Administration Server.
Controlling Server ClustersProxy Server enables you to control the remote servers in your cluster through the followingactions:■ Starting and stopping the servers■ Viewing their access and error logs■ Transferring configuration files. If the master Administration Server has more then one
instance of the Proxy Server, files can be transferred from any of these servers to any slaveadded to the cluster. Clusters must be homogeneous. All servers in a cluster must be of the
1
2
3
1
2
3
Modifying Server Information
Oracle iPlanet Web Proxy Server 4.0.14 Administration Guide • June 2010116

same type, either UNIX or Windows. Transferring configuration files from a differentplatform may cause the server to hang or crash. The configuration files are:■ server.xml
■ magnus.conf
■ obj.conf
■ mime.types
■ socks5.conf
■ bu.conf
■ icp.conf
■ parray.pat
■ parent.pat
▼ To Control Servers in a ClusterAccess the master Administration Server and click the Cluster tab.
Click the Control Cluster link.
Select the servers to control and make your desired selections.Click the Reset button at any time to reset elements to the values they contained before anychanges were made.
■ Select Start, Stop, or Restart from the drop-down list and click Go. You will be prompted toconfirm the action.
■ Select View Access or View Error from the drop-down list and enter the last number of linesyou want to view in the log file. Click Go to display the information. Click the View buttonin the Cluster Execution Report that displays.
■ Transfer configuration files:■ Select the configuration file you want to transfer■ Select the server on which the file resides■ Click Go to transfer the information
1
2
3
Controlling Server Clusters
Chapter 6 • Managing Server Clusters 117

118

Configuring Server Preferences
This chapter describes the Proxy Server’s system settings and tells you how to configure them.System settings affect the entire Proxy Server. The settings include options such as the useraccount the proxy server uses and the port to which it listens.
This chapter contains the following sections:
■ “Starting the Proxy Server” on page 119■ “Stopping the Proxy Server” on page 121■ “Restarting the Proxy Server” on page 122■ “Viewing Server Settings” on page 124■ “Viewing and Restoring Backups of Configuration Files” on page 124■ “Configuring System Preferences” on page 126■ “Tuning the Proxy Server” on page 127■ “Adding and Editing Listen Sockets” on page 128■ “Selecting Directory Services” on page 131■ “MIME Types” on page 132■ “Administering Access Control” on page 133■ “Configuring the ACL Cache” on page 134■ “Understanding DNS Caching” on page 135■ “Configuring DNS Subdomains” on page 136■ “Configuring HTTP Keep-Alive” on page 137
Starting the Proxy ServerThis section describes how to start the Proxy Server on different platforms. Once the server isinstalled, it listens for and accepts requests.
7C H A P T E R 7
119
▼ To Start the Proxy Server From the AdministrationInterfaceAccess the Server Manager and click the Preferences tab.
Click the Start/Stop Server link.The Start/Stop Server page is displayed.
Click the On button.The status of the server appears in the Start/Stop Server page.
To Start the Proxy Server on UNIX or LinuxYou can start the Proxy Server on UNIX or Linux in either of the following ways:■ From the command line, go to server-root/proxy-serverid and type ./start to start the
Proxy Server.■ Use start. If you want to use this script with init, you must include the start command
prxy:2:respawn:server-root/proxy-serverid/start -start -i in /etc/inittab.
To Start the Proxy Server on WindowsYou can start the Proxy Server on Windows in any of the following ways■ On the Start menu, select Programs ⇒ Oracle Corporation ⇒ Oracle iPlanet Proxy Server4
⇒ Start Proxy Server■ Use Control Panel ⇒ Administrative Tools ⇒ Services ⇒ Oracle iPlanet Proxy Server 4
(proxy-serverid) ⇒ Start■ From a command prompt, go to server-root\proxy-serverid and type startsvr.bat to
start the Proxy Server.
Starting SSL-Enabled ServersTo start an SSL-enabled server, a password is required. Although you can start an SSL-enabledserver automatically if you keep the password in plain text in a file, doing so is a large securityrisk. Anyone who can access the file has access to the SSL-enabled server’s password. Considerthe security risks before keeping the SSL-enabled server’s password in plain text
The server’s start script, key pair file, and the key password should be owned by root or, if anon-root user installed the server, that user account, with only the owner having read and writeaccess to them.
1
2
3
Starting the Proxy Server
Oracle iPlanet Web Proxy Server 4.0.14 Administration Guide • June 2010120

Stopping the Proxy ServerThis section describes the various methods to stop the Proxy Server on different platforms.
▼ To Stop the Proxy Server From the AdministrationInterface
Access the Server Manager and click the Preferences tab.
Click the Start/Stop Server link.The Start/Stop Server page is displayed.
Click the Off button.The status of the server appears in the Start/Stop Server page.
To Stop the Proxy Server on UNIX or LinuxYou can stop the Proxy Server on UNIX or Linux in either of the following ways:
■ From the command line, go to server-root/proxy-serverid and type ./stop.
Note – If you used the etc/inittab file to restart the server you must remove the line startingthe server from /etc/inittab and type kill -1 1 before you try to stop the server. Otherwise,the server restarts automatically after it is stopped.
■ Use stop, which shuts down the server completely, interrupting service until it is restarted.If you set the etc/inittab file to automatically restart using respawn, you must remove theline pertaining to the proxy server in etc/inittab before shutting down the server;otherwise, the server automatically restarts.
After you shut down the server, a few seconds might lapse before the server completes itsshut-down process and its status changes to Off.
If your system crashes or is taken offline, the server stops and any requests it was servicingmight be lost.
Note – If you have a security module installed with your server, you will be required to providethe appropriate passwords before starting or stopping the server.
1
2
3
Stopping the Proxy Server
Chapter 7 • Configuring Server Preferences 121

To Stop the Proxy Server on WindowsYou can stop the Proxy Server on Windows in any of the following ways:■ On the Start menu, select Programs ⇒ Oracle Corporation ⇒ Oracle iPlanet Proxy Server4
⇒ Stop Proxy Server■ From a command prompt, go to server-root\proxy-serverid and type stopsvr.bat to stop
the Proxy Server.■ Use the Oracle iPlanet Proxy Server4 (proxy-serverid) service in the Services window:
Control Panel ⇒ Administrative Tools ⇒ Services
Restarting the Proxy ServerThis section describes the various methods to restart the Proxy Server on different platforms.
Restarting the Server UNIX or LinuxYou can restart the server using one of the following methods:■ Restarting the servers manually.■ Automatically restart the server from the inittab file
If you are using a version of UNIX or Linux not derived from System V (such as SunOS4.1.3), you will not be able to use the inittab file.
■ Automatically restart the server with daemons in /etc/rc2.d when the system reboots.
Because the installation scripts cannot edit the /etc/rc.local or /etc/inittab files, you mustedit those files with a text editor. If you do not know how to edit these files, consult your systemadministrator or system documentation.
▼ To Restart the Proxy Server From the Command Line
Log in as root if the server runs on ports with numbers lower than 1024; otherwise, log in as rootor with the servers user account.
At the command-line prompt, type the following line and press Enter:server-root/proxy-serverid/restart
where server-root is the directory where you installed the server.■ You can use the optional parameter -i at the end of the line. The -i option runs the server in
inittab mode if the server process is ever killed or crashed, inittab will restart the serverfor you. This option also prevents the server from putting itself in a background process.
1
2
Restarting the Proxy Server
Oracle iPlanet Web Proxy Server 4.0.14 Administration Guide • June 2010122

To Restart the Server Using inittabAdd the following text on one line in the /etc/inittab file:
prxy:23:respawn:server-root/proxy-serverid/start -start -i
where server-root is the directory where you installed the server, and proxy-serverid is theserver’s directory.
The -i option prevents the server from putting itself in a background process.
You must remove this line before you stop the server.
To Restart the Server Using System RC ScriptsIf you use /etc/rc.local, or your system’s equivalent, place the following line in/etc/rc.local:
server-root/proxy-serverid/start
Replace server-root with the directory where you installed the server.
Restarting the Server WindowsYou can restart the server by using the Services Control Panel or by completing the followingtask.
▼ To Restart the Server on Windows
Use Control Panel > Administrative Tools > Services >
Select iPlanet Web Proxy Server 4.0 (proxy-serverid) from the list of services.
Change the Startup type to Automatic in the Properties window. Your system will start theserver each time the computer starts or reboots.
Click OK.
Setting the Termination TimeoutWhen the server is off, it stops accepting new connections. Then the server waits for alloutstanding connections to complete. The time the server waits before timing out isconfigurable in the magnus.conf file. By default, this value is set to 30 seconds. To change thevalue, add the following line to magnus.conf file:
1
2
3
4
Restarting the Proxy Server
Chapter 7 • Configuring Server Preferences 123

TerminateTimeout seconds
where seconds represents the number of seconds the server will wait before timing out.
The advantages to configuring this value is that the server will wait longer for connections tocomplete. However, because servers often have connections open from nonresponsive clients,increasing the termination timeout might increase the time necessary for the server to shutdown.
Viewing Server SettingsDuring installation, you configure some settings for your Proxy Server. You can view these andother system settings from the Server Manager. The View Server Settings page lists all of thesettings for your Proxy Server. This page also tells you whether you have unsaved and unappliedchanges. If you have unsaved changes, save the changes and restart the Proxy Server so it canbegin using the new configurations.
The two types of server settings are technical and content. The server’s content settings dependon how you have configured your server. Typically, the proxy lists all templates, URL mappings,and access control. For individual templates, the View Server Settings page lists the templatename, its regular expression, and the settings for the template such as cache settings.
The proxy server’s technical settings come from the magnus.conf file and the server.xml file,and the content settings come from the obj.conf file. These files are located in the server rootdirectory in the proxy-id/config subdirectory.
▼ To View the Settings for the Proxy ServerAccess the Server Manager and click the Preferences tab.
Click the View Server Settings link.The View Server Settings page is displayed.
Viewing and Restoring Backups of Configuration FilesYou can view or restore a backup copy of your configuration files:server.xml, magnus.conf,obj.conf, mime types, server.xml.clfilter, magnus.conf.clfilter,
obj.conf.clfilter, socks5.conf, bu.conf, icp.conf, parray.pat, parent.pat,
proxy-id.acl. This feature enables you to go to a previous configuration if you are havingtrouble with your current configuration. For example, if you made several changes to theproxy’s configuration and then the proxy does not work the way you thought it should (forexample, you denied access to a URL but the proxy will service the request), you can revert to aprevious configuration and then redo your configuration changes.
1
2
Viewing Server Settings
Oracle iPlanet Web Proxy Server 4.0.14 Administration Guide • June 2010124
▼ To View a Previous ConfigurationAccess the Server Manager and click the Preferences tab.
Click the Restore Configuration link.The Restore Configuration page is displayed. The page lists all the previous configurationsordered by date and time.
Click the View link to display a listing of the technical and content settings of a particularversion.
▼ To Restore a Backup Copy of Your Configuration FilesAccess the Server Manager and click the Preferences tab.
Click the Restore Configuration link.The Restore Configuration page is displayed. The page lists all the previous configurationsordered by date and time.
Click the Restore link for the version you want to restore.If you want to restore all files to their state at a particular time, click the Restore to time link inthe left column of the table. time is the date and time to which you want to restore.
▼ To Set the Number of Backups DisplayedAccess the Server Manager and click the Preferences tab.
Click the Restore Configuration link.The Restore Configuration page is displayed.
In the Set Number Of Sets Of Backups field, type the number of backups you want to display.
Click the Change button.
1
2
3
1
2
3
1
2
3
4
Viewing and Restoring Backups of Configuration Files
Chapter 7 • Configuring Server Preferences 125

Configuring System PreferencesThe Configure System Preferences page enables you to set up or change the basic aspects ofyour server. The page allows you to do the following:
■ Change the server user, the number of processes, listen queue size, proxy timeout, andtimeout after interrupt for your proxy server
■ Enable DNS, ICP, proxy arrays, and parent arrays
The preference options are:
■ Server User. The Server User is the user account that the proxy uses. The user name youenter as the proxy server user should already exist as a normal user account. When theserver starts, it runs as if it were started by this user.
If you want to avoid creating a new user account, you can choose an account used byanother server running on the same host, or if you are running a UNIX proxy, you canchoose the user nobody. However, on some systems the user nobody can own files but cannotrun programs, which would make it unsuitable as the proxy user name.
On a UNIX system, all the processes that the proxy spawns are assigned to the server useraccount.
■ Processes. The Processes field shows how many processes are available to service requests.By default, the value is 1. Do not modify this setting unless required.
■ Listen Queue Size. The Listen Queue Size field specifies the maximum number of pendingconnections on a listen socket.
■ DNS. A Domain Name Service (DNS) restores IP addresses into host names. When a webbrowser connects to your server, the server gets only the client’s IP address, for example,198.18.251.30. The server does not have the host name information, such aswww.example.com. For access logging and access control, the server can resolve the IPaddress into a host name. On the Configure System Preferences page, you can tell the serverwhether or not to resolve IP addresses into host names.
■ ICP. The Internet Cache Protocol (ICP) is a message-passing protocol that enables caches tocommunicate with one another. Caches can use ICP to send queries and replies about theexistence of cached URLs and about the best locations from which to retrieve those URLs.You can enable ICP on the Configure System Preferences page. For more information onICP, see “Routing Through ICP Neighborhoods” on page 263.
■ Proxy Array. A proxy array is an array of proxies serving as one cache for the purposes ofdistributed caching. If you enable the proxy array option on the Configure SystemPreferences page, that means that the proxy server you are configuring is a member of aproxy array, and that all other members in the array are its siblings. For more informationon using proxy arrays, see “Routing Through Proxy Arrays” on page 270.
Configuring System Preferences
Oracle iPlanet Web Proxy Server 4.0.14 Administration Guide • June 2010126

■ Parent Array. A parent array is a proxy array that a proxy or proxy array member routesthrough. So, if a proxy routes through an upstream proxy array before accessing a remoteserver, the upstream proxy array is considered the parent array. For more information onusing parent arrays with your proxy server, see “Routing Through Parent Arrays” onpage 282.
■ Proxy Timeout. The proxy timeout is the maximum time between successive network datapackets from the remote server before the proxy server times out the request. The defaultvalue for proxy timeout is 5 minutes.
Note – When the remote server uses server-push and the delay between pages is longer thanthe proxy timeout, the connection could be terminated before the transmission is done.Instead, use client-pull, which sends multiple requests to the proxy.
▼ To Modify the System PreferencesAccess the Server Manager and click the Preferences tab.
Click the Configure System Preferences link.The Configure System Preferences page is displayed.
Change the options, and then click OK.
Click Restart Required.The Apply Changes page is displayed.
Click the Restart Proxy Server button to apply the changes.
Tuning the Proxy ServerThe Tune Proxy page enables you to change the default parameters to tune your proxy server’sperformance.
▼ To Change the Default Tuning ParametersAccess the Server Manager and click the Preferences tab.
Click the Tune Proxy link.The Tune Proxy page is displayed.
1
2
3
4
5
1
2
Tuning the Proxy Server
Chapter 7 • Configuring Server Preferences 127

(Optional) Modify the width of FTP listings to allow longer file names and thus reduce file nametruncation.The default width is 80 characters.
Click OK.
Click Restart Required.The Apply Changes page id displayed.
Click the Restart Proxy Server button to apply the changes.
Adding and Editing Listen SocketsBefore the server can process a request, it must accept the request via a listen socket, then directthe request to the correct server. When you install the Proxy Server one listen socket, ls1, iscreated automatically. This listen socket uses the IP address 0.0.0.0 and the port number youspecified as your proxy server port number during installation. You cannot delete the defaultlisten socket.■ General
■ Listen Socket ID. The internal name for the listen socket. You cannot change this nameafter a listen socket has been created.
■ IP Address. The IP address of the listen socket. This address can be in dotted-pair orIPv6 notation. It can also be 0.0.0.0, any, or ANY or INADDR_ANY (all IP addresses).
■ Port. The port number on which to create the listen socket. The values allowed are1-65535. On UNIX, creating sockets that listen on ports 1-1024 requires superuserprivileges. Configure an SSL listen socket to listen on port 443.
■ Server Name. The default server for this listen socket.
Security
If security is disabled, only the following parameter is displayed:■ Security. Enables or disables security for the listen socket selected.
If security is enabled, the following parameters are displayed:■ Security. Enables or disables security for the listen socket selected.
■ Server Certificate Name. Select an installed certificate from the drop-down list to usefor this listen socket.
■ Client Authentication. Specifies whether client authentication is required on this listensocket. This setting is Optional by default.
■ SSL Version 2. Enables or disables SSL Version 2. This setting is disabled by default.
3
4
5
6
Adding and Editing Listen Sockets
Oracle iPlanet Web Proxy Server 4.0.14 Administration Guide • June 2010128

■ SSL Version 2 Ciphers. Lists all ciphers within this suite. Select the ciphers that youwant to enable for the listen socket you are editing by selecting or deselecting the boxes.The default versions are deselected.
■ SSL Version 3. Enables or disables SSL Version 3. This setting is enabled by default.■ TLS. Enables or disables TLS, the Transport Layer Security protocol for encrypted
communication. This is enabled by default.■ TLS Rollback. Enables or disables TLS Rollback. Note that disabling TLS Rollback leaves
connections vulnerable to version rollback attacks. This is enabled by default.■ SSL Version 3 and TLS Ciphers. Lists all ciphers within this suite. Select the ciphers you
want to enable for the listen socket you are editing by selecting or deselecting the boxes.The default versions are selected.
Advanced■ Number Of Acceptor Threads. The number of acceptor threads for the listen socket.
The recommended value is the number of processors in the machine. The default is 1.The values are 1-1024.Protocol Family. The socket family type. The values allowed are inet, inet6, and nca.Use the value inet6 for IPv6 listen sockets. Specify nca to make use of the SolarisNetwork Cache and Accelerator.
Listen sockets are added, edited, and deleted using the Server Manager’s Add Listen Socket andEdit Listen Sockets pages.
Security for a listen socket has Enabled as an option only after the required certificates havebeen installed and until then only Disabled shows up in the drop-down box.
This section contains the following topics:■ “To Configure the Proxy-Authenticates-Client Scenario” on page 99■ “To Configure the Content Server-Authenticates-Proxy Scenario” on page 100■ “To Configure the Proxy-Authenticates-Client and Content Server-Authenticates-Proxy
scenario” on page 101
▼ To Add Listen SocketsAccess the Server Manager and click the Preferences tab.
Click the Add Listen Socket link.The Add Listen Socket page is displayed.
Specify the internal name for the listen socket.You cannot change this name after the listen socket has been created.
1
2
3
Adding and Editing Listen Sockets
Chapter 7 • Configuring Server Preferences 129
Specify the IP address of the listen socket.The IP address can be in dotted-pair or IPv6 notation. It can also be 0.0.0.0, any, ANY orINADDR_ANY (all IP addresses).
Specify the port number to create the listen socket on. The values allowed are 1 - 65535.On UNIX, creating sockets that listen on ports 1 - 1024 requires superuser privileges. Configurean SSL listen socket to listen on port 443.
Specify the server name to be used in the host name section of any URLs the server sends to theclient.This setting affects URLs that the server automatically generates but does not affect the URLsfor directories and files stored in the server. This name should be the alias name if your serveruses an alias.
From the drop-down list, specify whether security should be enabled or disabled for the listensocket.
Click OK.
Click Restart Required.The Apply Changes page is displayed.
Click the Restart Proxy Server button to apply the changes.
▼ To Edit Listen SocketsAccess the Server Manager and click the Preferences tab.
Click the Edit Listen Sockets link.The Edit Listen Sockets page is displayed.
In the Configured Sockets table, click the link for the listen socket you want to edit.The Edit Listen Sockets page is displayed.
Make the desired changes to the options.For a description of the options, see the beginning of this section.
Click OK.
Click Restart Required.The Apply Changes page is displayed.
4
5
6
7
8
9
10
1
2
3
4
5
6
Adding and Editing Listen Sockets
Oracle iPlanet Web Proxy Server 4.0.14 Administration Guide • June 2010130

Click the Restart Proxy Server button to apply the changes.
▼ To Delete Listen SocketsAccess the Server Manager and click the Preferences tab.
Click the Edit Listen Sockets link.
Select the check box next to the listen socket you want to delete and click OK.You will be prompted to confirm deletion. It is possible to delete any listen socket, provided it isnot the only listen socket for that instance.
Click Restart Required.The Apply Changes page is displayed.
Click the Restart Proxy Server button to apply the changes.
Selecting Directory ServicesThe Select Directory Services page lists all directory services for the specified proxy serverinstance. The page allows you to select the directory services to use with a specific proxy serverinstance. For more information, see “Configuring Directory Services” on page 45.
▼ To Select a Directory ServiceAccess the Server Manager, and click the Preferences tab.
Click the Select Directory Services link.The Select Directory Services page is displayed showing all the directory services for thespecified proxy server instance.
Select a directory service from the list.
Click OK.
Click Restart Required.The Apply Changes page is displayed.
7
1
2
3
4
5
1
2
3
4
5
Selecting Directory Services
Chapter 7 • Configuring Server Preferences 131

MIME TypesA Multi-purpose Internet Mail Extension (MIME) type is a standard for multimedia e-mail andmessaging. So that you can filter files depending on their MIME type, the proxy server providesa page that lets you create new MIME types for use with your server. The proxy adds the newtypes to the mime.types file. For more information on blocking files based on MIME types, see“Filtering by MIME Type” on page 292.
This section describes how to create, edit, or remove a MIME type.
Creating a MIME Type
▼ To Create a MIME Type
Access the Server Manager, and click the Preferences tab.
Click the Create/Edit MIME Types link.The Create/Edit MIME Types page is displayed showing all the MIME types listed in the proxy’smime.types file.
Specify the category of the MIME type from the drop-down list. This can be type, enc, or lang.type is the file or application type, enc is the encoding used for compression, and lang is thelanguage encoding.For more information on the category, see the online Help.
Specify the content type that will appear in the HTTP header.
Specify the file suffix.File Suffix refers to the file extensions that map to the MIME type. To specify more than oneextension, separate the entries with a comma. The file extensions should be unique, that is, youshould not map one file extension to two MIME types.
Click the New button to add the MIME type.
▼ To Edit a MIME TypeAccess the Server Manager, and click the Preferences tab.
Click the Create/Edit MIME Types link.The Create/Edit MIME Types page that appears shows all the MIME types listed in the proxy’smime.types file.
1
2
3
4
5
6
1
2
MIME Types
Oracle iPlanet Web Proxy Server 4.0.14 Administration Guide • June 2010132

Click the Edit link for the MIME type you want to edit.
Make the desired changes. Click the Change MIME Type button.
▼ To Remove a MIME TypeAccess the Server Manager, and click the Preferences tab.
Click the Create/Edit MIME Types link.
The Create/Edit MIME Types page that appears shows all the MIME types listed in the proxy’smime.types file.
Click the Remove link for the MIME type you want to remove.
Administering Access ControlThe Administer Access Control page enables you to manage access control lists (ACLs). ACLsenable you to control which clients can access your server. ACLs can screen out certain users,groups, or hosts to either allow or deny access to part of your server. ACLs can also set upauthentication so that only valid users and groups can access part of the server. For moreinformation about access control, see Chapter 8, “Controlling Access to Your Server.”
▼ To Manage Access Control ListsAccess the Server Manager, and click the Preferences tab.
Click the Administer Access Control link.
The Administer Access Control page is displayed.
Select a resource, or an existing ACL, or type the ACL name and click the Edit button.
The Access Control Rules for page is displayed.
Make the desired changes and click Submit.
For more information about access control see “Setting Access Control for a Server Instance” inChapter 8, “Controlling Access to Your Server.”
3
4
1
2
3
1
2
3
4
Administering Access Control
Chapter 7 • Configuring Server Preferences 133

Configuring the ACL CacheThe Configure ACL Cache page is used to enable or disable the proxy authentication cache, setthe proxy authentication cache directory, configure the cache table size, and set the entryexpiration time.
▼ To Configure the ACL CacheAccess the Server Manager and click the Preferences tab.
Click the Configure ACL Cache link.
The Configure ACL Cache page is displayed.
Enable or disable the proxy authentication cache.
Select the number of users in the user cache from the Proxy Auth User Cache Size drop-downlist.
The default size is 200.
Select the number of group IDs that can be cached for a single UID/cache entry from the ProxyAuth Group Cache Size drop-down list.
The default size is 4.
Select the number of seconds before cache entries expire.
Each time an entry in the cache is referenced, its age is calculated and checked against this value.The entry is not used if its age is greater than or equal to the Proxy Auth Cache Expiration value.If this value is set to 0, the cache is turned off.
If you use a large number for this value, you may need to restart the Proxy Server when youmake changes to the LDAP entries. For example, if this value is set to 120 seconds, the ProxyServer might be out of sync with the LDAP server for as long as 2 minutes. If your LDAP entriesare not likely to change often, use a large number. The default expiration value is 2 minutes.
Click OK.
Click Restart Required.
The Apply Changes page is displayed.
Click the Restart Proxy Server button to apply the changes.
1
2
3
4
5
6
7
8
9
Configuring the ACL Cache
Oracle iPlanet Web Proxy Server 4.0.14 Administration Guide • June 2010134

Understanding DNS CachingProxy Server supports DNS caching to reduce the number of DNS lookups performed by theproxy while it resolves DNS host names into IP addresses.
There are two types of proxy DNS cache:■ host-dns-cache-init: Enables caching of the remote hosts' host-to-ip lookups.■ ip-dns-cache-init: Enables caching of the clients' ip-to-host lookups.
From Proxy Server 4.0.10, you can configure statistics and profiling to view statistics of eitherthe clients' ip-to-host cache or the remote servers' host-to-ip cache.
Configuring the DNS CacheThe Configure DNS Cache page is used to enable or disable DNS caching, set the size of theDNS cache, set the expiration of DNS cache entries, and enable or disable negative DNScaching.
The proxy server optionally maintains a "Client DNS cache" and a "Host DNS cache" to storethe results of ipaddress to hostname lookups done on clients and hostname to ipaddress
lookups done on remote hosts, respectively. The "Configure DNS Cache" page is used toconfigure both types of caches.
▼ To Configure the DNS Cache
Access the Server Manager and click the Preferences tab.
Click the Configure DNS Cache link.The Configure DNS Cache page is displayed.
Enable or disable Host/Client DNS caching.
Select the number of entries from the Host/Client DNS Cache Size drop-down list that can bestored in the Host/Client DNS cache.The default size is 1024.
Set the Host/Client DNS cache expiration time.The Proxy Server purges Host/Client DNS cache entries from the cache when it reaches apre-set expiration time. The default DNS expiration time for both Host and Client DNS cachesis 20 minutes.
Enable or disable caching of errors when the host name is not found.
1
2
3
4
5
6
Understanding DNS Caching
Chapter 7 • Configuring Server Preferences 135

Click OK.
Click Restart Required.
The Apply Changes page is displayed.
Click the Restart Proxy Server button to apply the changes.
Configuring DNS SubdomainsSome URLs contain host names with many levels of subdomains. The proxy server might take along time to do DNS checks if the first DNS server cannot resolve the host name. You can set thenumber of levels that the Proxy Server will check before returning a “host not found” messageto the client.
For example, if the client requests http://www.sj.ca.example.com/index.html, the proxycould take a long time to resolve that host into an IP address because it might have to gothrough four DNS servers to get the IP address for the host computer. Because these lookupscan take a lot of time, you can configure the proxy server to quit looking up an IP address if theproxy has to use more than a certain number of DNS servers.
▼ To Set the Levels of Subdomains For Proxy LookupAccess the Server Manager and click the Preferences tab.
Click the Configure DNS Subdomains link.
The Configure DNS Subdomains page is displayed.
Select a resource from the drop-down list or specify a regular expression.
Select the number of levels from the Local Subdomain Depth drop-down list.
Click OK.
Click Restart Required.
The Apply Changes page is displayed.
Click the Restart Proxy Server button to apply the changes.
7
8
9
1
2
3
4
5
6
7
Configuring DNS Subdomains
Oracle iPlanet Web Proxy Server 4.0.14 Administration Guide • June 2010136

Configuring HTTP Keep-AliveThe Configure HTTP Client page is used to enable keep-alives on your proxy server.
Keep-alives are a TCP/IP feature that keeps a connection open after the request is complete, sothat the client can quickly reuse the open connection. The proxy, by default, does not usekeep-alive connections, but for some systems, using the keep-alive feature can improve theproxy’s performance.
In normal client-server transactions on the web, the client can make several connections to theserver that requests multiple documents. For example, if the client requests a web page that hasseveral graphic images, the client needs to make separate requests for each graphic file.Re-establishing connections is time consuming. Therefore, keep-alive packets can be useful.
▼ To Configure HTTP Keep-AliveAccess the Server Manager and click the Preferences tab.
Click the Configure HTTP Client link.The Configure HTTP Client page is displayed.
Select a resource from the drop-down list.Select a HTTP or HTTPS resource to configure keep-alives on your Proxy Server or specify aregular expression.
Specify whether the HTTP client should use persistent connections by selecting the appropriateKeep Alive option.
Specify the maximum number of seconds in the Keep Alive Timeout field to keep a persistentconnection open.The default value is 29.
Specify whether the HTTP client can reuse existing persistent connections for all types ofrequests by selecting the appropriate Persistent Connection Reuse option.The default value is off, which does not allow persistent connections to be reused for non-GETrequests nor for requests with a body.
Specify the HTTP protocol version string in the HTTP Version String field.Do not specify this parameter unless you encounter specific protocol interoperability problems.
Specify the Proxy Server product name and version in the Proxy Agent Header field.
1
2
3
4
5
6
7
8
Configuring HTTP Keep-Alive
Chapter 7 • Configuring Server Preferences 137
Specify the nickname of the client certificate in the SSL Client Certificate Nickname field topresent to the remote server.
Select the appropriate SSL Server Certificate Validation option to indicate whether the ProxyServer must validate the certificate presented by the remote server.
Click OK.
Click Restart Required.The Apply Changes page is displayed.
Click the Restart Proxy Server button to apply the changes.
9
10
11
12
13
Configuring HTTP Keep-Alive
Oracle iPlanet Web Proxy Server 4.0.14 Administration Guide • June 2010138

Controlling Access to Your Server
This chapter describes how to control access to the Administration Server and the data servedby the Proxy Server. Access can be restricted to all data served by the server, or to specific URLsit serves. For example, you can specify that only certain people access specific URLs, or thateveryone except those people can see the files. You might allow all clients to access URLs forHTTP, but allow only restricted access to FTP. You could also restrict URLs based on hostnames or domain names, such as when you have a Proxy Server serving many internal webservers, but want only specific people to access a confidential research project stored on one ofthose servers.
Before access control can be used on the Administration Server, you must enable distributedadministration and configure an administration group in your LDAP database. Theinformation in this chapter is based on the assumption that those tasks have been performed.
This chapter contains the following sections:
■ “What Is Access Control?” on page 139■ “Setting Access Control” on page 151■ “Selecting Access Control Options” on page 155■ “Limiting Access to Areas of Your Server” on page 160■ “Securing Access to Resources” on page 164■ “Creating ACLs for File-Based Authentication” on page 165
What Is Access Control?Access control enables you to determine who can access the Proxy Server, and what parts of theserver they can access. You can control access to the entire server or just to parts of the server,such as directories, files, file types, and so on. When an incoming request is evaluated, access isdetermined based on a hierarchy of rules called access control entries (ACEs). Proxy Serverlooks for matching entries to determine whether access should be granted or denied. Each ACEspecifies whether the server should continue to the next entry in the hierarchy. The collection of
8C H A P T E R 8
139

ACEs is called an access control list (ACL). When a request is received, the obj.conf file ischecked for a reference to an ACL, which is then used to determine access. By default, the serverhas one ACL file that contains multiple ACLs.
Access is allowed or denied based on the following items:■ Who is making the request (User-Group)■ Where the request is coming from (Host-IP)■ When the request is happening (such as time of day)■ What type of connection is being used (SSL)
This section contains the following topics:■ “Access Control for User-Group” on page 140■ “Access Control for Host-IP” on page 147■ “Using Access Control Files” on page 147■ “Configuring the ACL User Cache” on page 148■ “Controlling Access With Client Certificates” on page 148
Access Control for User-GroupYou can limit access to your server to certain users or groups. User-Group access controlrequires users to provide a user name and password before gaining access to the server. Theserver compares the information in a client certificate, or the client certificate itself, with adirectory server entry.
The Administration Server uses only Basic authentication. To require client authentication onthe Administration Server, you must manually edit the ACL files in obj.conf, changing themethod to SSL.
User-Group authentication is performed by the directory service configured for a server. Formore information, see “Configuring Directory Services” on page 45.
The information a directory service uses to implement access control can come from either ofthe following sources:■ An internal flat file-type database■ An external LDAP database
When the server uses an external LDAP-based directory service, the following types ofUser-Group authentication methods are supported for server instances:■ Default■ Basic■ SSL■ Digest■ Other
What Is Access Control?
Oracle iPlanet Web Proxy Server 4.0.14 Administration Guide • June 2010140

When the server uses an internal file-based directory service, the User-Group authenticationmethods supported for server instances include the following:
■ Default■ Basic■ Digest
User-Group authentication requires users to authenticate themselves before gaining access.With authentication, users verify their identity by providing a user name and password, byusing a client certificate, or with the Digest authentication plug-in. Using client certificatesrequires encryption.
Default AuthenticationDefault authentication is the preferred method. The Default setting uses the default method inthe obj.conf file, or Basic if no setting in exists in obj.conf. If Default is selected, the ACL ruledoes not specify a method in the ACL file. Choosing Default enables you to easily change themethods for all ACLs by editing one line in the obj.conf file.
Basic AuthenticationBasic authentication requires users to provide a user name and password to access the server.Basic authentication is the default setting. You must create and store a list of users and groups inan LDAP database, such as the Oracle Directory Server Enterprise Edition, or in a file. You mustuse a directory server installed on a different server root than your Proxy Server, or a directoryserver installed on a remote computer.
When users attempt to access a resource that has User-Group authentication, users areprompted to provide a user name and password. The server receives this information encryptedor unencrypted, depending on whether encryption is turned on for your server (SSL is enabled).
Note – Using Basic authentication without SSL encryption sends the user name and password inunencrypted text across the network. The network packets could be intercepted, and the username and password could be pirated. Basic authentication is most effective when combinedwith SSL encryption, Host-IP authentication, or both. Using Digest authentication eliminatesthis problem.
If the authentication is successful, the user sees the requested resource. If the user name orpassword is invalid, the system issues a message denying access.
You can customize the message received by unauthorized users. For more information, see“Responding When Access Is Denied” on page 160.
What Is Access Control?
Chapter 8 • Controlling Access to Your Server 141
SSL AuthenticationThe server can confirm users’ identities with security certificates in two ways:■ Using the information in the client certificate as proof of identity■ Verifying a client certificate published in an LDAP directory (additional)
When the server is configured to use certificate information for authenticating the client, theserver performs the following actions:■ Checks to determine whether the certificate is from a trusted CA (Certificate Authority). If
not, the authentication fails and the transaction ends. To learn how to enable clientauthentication, see “Setting Security Preferences” on page 84.
■ Maps the certificate to a user’s entry using the certmap.conf file, if the certificate is from atrusted CA. To learn how to configure the certificate mapping file, see “Using thecertmap.conf File” on page 102.
■ Checks the ACL rules specified for that user if the certificate maps correctly. Even if thecertificate maps correctly, ACL rules can deny access to the user.
Requiring client authentication for controlling access to specific resources differs fromrequiring client authentication for all connections to the server. If the server is configured torequire client authentication for all connections, the client must only present a valid certificateissued by a trusted CA. If the server is configured to use the SSL method for authentication ofusers and groups, the following actions must happen:■ The client must present a valid certificate issued by a trusted CA■ The certificate must be mapped to a valid user in LDAP■ The access control list must evaluate properly
When you require client authentication with access control, SSL ciphers must be enabled foryour Proxy Server. See Chapter 5, “Using Certificates and Keys,” for more information aboutenabling SSL.
To successfully gain access to an SSL-authenticated resource, the client certificate must be froma CA trusted by the Proxy Server. The client certificate must be published in a directory server ifthe Proxy Server’s certmap.conf file is configured to compare the client’s certificate in thebrowser with the client certificate in the directory server. However, the certmap.conf file can beconfigured to compare only selected information from the certificate to the directory serverentry. For example, you could configure certmap.conf to compare only the user ID and emailaddress in the browser certificate with the directory server entry. For more information aboutcertmap.conf and certificate mapping, see Chapter 5, “Using Certificates and Keys.” Also seeOracle iPlanet Web Proxy Server 4.0.14 Configuration File Reference.
Digest AuthenticationProxy Server can be configured to perform Digest authentication using either an LDAP-basedor a file-based directory service.
What Is Access Control?
Oracle iPlanet Web Proxy Server 4.0.14 Administration Guide • June 2010142
Digest authentication allows users to authenticate based on user name and password withoutsending the user name and password as clear text. The browser uses the MD5 algorithm tocreate a digest value using the users password and some information provided by the ProxyServer.
When the server uses an LDAP-based directory service to perform Digest authentication, thisdigest value is also computed on the server side using the Digest authentication plug-in, andcompared against the digest value provided by the client. If the digest values match, the user isauthenticated. For this to work, your directory server must have access to the user’s password inclear text. Oracle Directory Server Enterprise Edition includes a reversible password plug-inusing a symmetric encryption algorithm to store data in an encrypted form that can later bedecrypted to its original form. Only Directory Server holds the key to the data.
For LDAP-based Digest authentication, you must enable the reversible password plug-in andthe Digest authentication-specific plug-in included with Proxy Server. To configure your ProxyServer to process Digest authentication, set the digestauth property of the database definitionin the dbswitch.conf file, found in server-root/userdb/.
Here is a sample dbswitch.conf file.
directory default ldap://<host_name>:<port>
default:binddn cn=Directory Manager
default:encoded bindpw ***********
default:digestauth on
or
directory default ldap://<host_name>:<port>/
default:binddn cn=Directory Manager
default:encoded bindpw ***********
default:digestauthstate on
The server tries to authenticate against the LDAP database based upon the ACL methodspecified, as shown in “Digest Authentication” on page 142. If you do not specify an ACLmethod, the server uses either Digest or Basic when authentication is required, or Basic ifauthentication is not required.
The following table lists Digest authentication that is and is not supported by the authenticationdatabase.
TABLE 8–1 Digest Authentication Challenge Generation
ACL Method Supported by Authentication Database Not Supported by Authentication Database
Default
None specified
Digest and Basic Basic
Basic Basic Basic
What Is Access Control?
Chapter 8 • Controlling Access to Your Server 143

TABLE 8–1 Digest Authentication Challenge Generation (Continued)ACL Method Supported by Authentication Database Not Supported by Authentication Database
Digest Digest ERROR
When processing an ACL with method=digest, the server attempts to authenticate byperforming the following actions:■ Checking for the Authorization request header. If the header is not found, a 401 response is
generated with a Digest challenge, and the process stops.■ Checking for the Authorization type. If the Authentication type is Digest, the server then
performs the following actions:■ Checks nonce. If the nonce is not a valid, fresh nonce generated by this server, a 401
response is generated, and the process stops. If the nonce is stale, a 401 response isgenerated with stale=true, and the process stops.The time the nonce remains fresh can be configured by changing the value of theparameter DigestStaleTimeout in the magnus.conf file, located inserver-root/proxy-server_name/config/. To set the value, add the following line tomagnus.conf:DigestStaleTimeout secondswhere seconds represents the number of seconds the nonce remains fresh. After thespecified seconds elapse, the nonce expires and new authentication is required from theuser.
■ Checks the realm. If the realm does not match, a 401 response is generated, and theprocess stops.
■ Checks the existence of the user in the LDAP directory if the authentication directory isLDAP-based, or checks existence of the user in the file database if the authenticationdirectory is file-based. If the user is not found, a 401 response is generated, and theprocess stops.
■ Gets the request-digest value from the directory server or file database and checks fora match to the client’s request-digest. If no match is found, a 401 response isgenerated, and the process stops.
■ Constructs the Authorization-Info header and inserts this header into server headers.
Installing the Digest Authentication Plug-inFor Digest authentication using an LDAP-based directory service, you must install the Digestauthentication plug-in. This plug-in computes a digest value on the server side, and comparesthis value against the digest value provided by the client. If the digest values match, the user isauthenticated.
If you are using a file-based authentication database, you do not need to install the Digestauthentication plug-in.
What Is Access Control?
Oracle iPlanet Web Proxy Server 4.0.14 Administration Guide • June 2010144

Installing the Digest Authentication Plug-in on UNIX
The Digest authentication plug-in consists of a shared library and a ldif file:
■ libdigest-plugin.lib
■ libdigest-plugin.ldif
▼ To Install the Digest Authentication Plug-in on UNIX■ Make sure this shared library resides on the same server computer on which the Oracle
Directory Server Enterprise Edition is installed.■ Make sure you know the Directory Manager password.■ Modify the libdigest-plugin.ldif file changing all references to /path/to to the location
where you installed the digest plug-in shared library.
To install the plug-in, type the command:
% ldapmodify -D "cn=Directory Manager" -w password -a < libdigest-plugin.ldif
Installing the Digest Authentication Plug-in on Windows
You must copy several .dll files from the Proxy Server installation to your Oracle DirectoryServer Enterprise Edition server computer for the Directory Server to start properly with theDigest plug-in.
▼ To Install the Digest Authentication Plug-in on Windows
Access the shared libraries in Proxy Server in server-root\bin\proxy\bin.
Copy the files nsldap32v50.dll, libspnr4.dll, and libplds4.dll onto the appropriatedirectory:
Paste them into either:
■ \Winnt\system32
■ The Oracle Directory Server Enterprise Edition install directory:server-root\bin\sldap\server
Setting Oracle Directory Server Enterprise Edition to Use the DES Algorithm
The DES algorithm is needed to encrypt the attribute where the digest password is stored.
Before You Begin
●
1
2
3
What Is Access Control?
Chapter 8 • Controlling Access to Your Server 145

▼ To Set Directory Server to Use the DES algorithm
Launch the Directory Server Console.
Open your Directory Server instance.
Select the Configuration tab.
Click the + sign next to plug-ins.
Select the DES plug-in.
Choose Add to add a new attribute.
Type iplanetReversiblePassword.
Click Save.
Set a Digest authentication password.
Note – The server uses the iplanetReversiblePassword attribute which is in the object classiplanetReversiblePassword. To use a Digest authentication password in theiplanetReversiblePassword attribute for a user, your entry must include theiplanetReversiblePasswordobject object.
This can be done using ldapmodify or using the Directory Server administration interface.
Using ldapmodify —
Create a file digest.ldif to store the LDAP commands. Adding the password is a two-stepprocess.
a. Add the object class to the digest.ldif.The file looks similar to the following (you can have more ldif files based on the DirectoryServer users and the ACL):dn:uid=user1,dc=india,dc=sun,dc=com
changetype:modify
add:objectclass
objectclass:iplanetReversiblePasswordobject
dn:uid=user1,dc=india,dc=india,dc=sun,dc=com
changetype:modify
add:iplanetReversiblePassword
iplanetReversiblePassword:user1
1
2
3
4
5
6
7
8
9
What Is Access Control?
Oracle iPlanet Web Proxy Server 4.0.14 Administration Guide • June 2010146

b. # ldapmodify -D “cn={CN_Value}” -w <password> -a <ldif_file_name>
Restart your Oracle Directory Server Enterprise Edition instance and verify that the userattributes are added to the Directory Server database.
Other AuthenticationYou can create a custom authentication method using the access control API.
Access Control for Host-IPYou can limit access to the Administration Server and its files and directories by making themavailable only to clients using specific computers. You specify host names or IP addresses forthe computers you want to allow or deny. Access to a file or directory using Host-IPauthentication appears seamless to the user. Users can access the files and directoriesimmediately, without entering a user name or password.
Because more than one person might use a particular computer, Host-IP authentication is moreeffective when combined with User-Group authentication. If both methods of authenticationare used, a user name and password will be required for access.
Host-IP authentication does not require DNS (Domain Name Service) to be configured on yourserver. If you choose to use Host-IP authentication, you must have DNS running in yournetwork, and your server must be configured to use it. To enable DNS, access the ServerManager for your server, click the Preferences tab, and then click Configure SystemPreferences. You will see the DNS settings.
Enabling DNS degrades the performance of Proxy Server because the server is forced toperform DNS lookups. To reduce the effects of DNS lookups on your server’s performance,resolve IP addresses only for access control and CGI instead of resolving the IP address forevery request. To set this limitation, specify the following in obj.conf:
AddLog fn="flex-log" name="access" iponly=1
Using Access Control FilesWhen you use access control on the Administration Server or the files or directories on theserver, the settings are stored in a file with the extension .acl. Access control files are stored inthe directory server-root/httpacl, with server-root being the location where the server isinstalled. For example, if you installed the server in /usr/Sun/Servers, the ACL files for boththe Administration Server and each server instance configured on your server would be locatedin /usr/Sun/Servers/httpacl/.
10
What Is Access Control?
Chapter 8 • Controlling Access to Your Server 147
The main ACL file is generated-proxy-serverid.acl. The temporary working file isgenwork-proxy-serverid.acl. If you use the Administration Server to configure access, you willhave these two files. However, if you want more complex restrictions, you can create multiplefiles and reference them from the server.xml file. A few features are also available only byediting the files, such as restricting access to the server based on the time of day or day of theweek.
For more information about access control files and their syntax, see Chapter 18, “ACL FileSyntax.” For more information about server.xml, see the Oracle iPlanet Web ProxyServer 4.0.14 Configuration File Reference.
Configuring the ACL User CacheBy default, Proxy Server caches user and group authentication results in the ACL user cache.You can control the amount of time the ACL user cache is valid through using theACLCacheLifetime directive in the magnus.conf file. Each time an entry in the cache isreferenced, its age is calculated and checked against ACLCacheLifetime. The entry is not used ifits age is greater than or equal to the ACLCacheLifetime. The default value is 120 seconds.Setting the value to 0 (zero) turns the cache off. If you use a large number for this value, youmight need to restart Proxy Server every time you make changes to the LDAP entries. Forexample, if this value is set to 120 seconds, Proxy Server might be out of sync with the LDAPdirectory for as long as two minutes. Only set a large value if your LDAP directory is not likelyto change often.
Using the magnus.conf parameter of ACLUserCacheSize, you can configure the maximumnumber of entries that can be held in the cache. The default value for this parameter is 200. Newentries are added to the head of the list, and entries at the end of this list are recycled to makenew entries when the cache reaches its maximum size.
You can also set the maximum number of group memberships that can be cached per user entryusing the magnus.conf parameter ACLGroupCacheSize. The default value for this parameter is4. Non-membership of a user in a group is not cached, which results in several LDAP directoryaccesses on every request.
Controlling Access With Client CertificatesIf SSL is enabled on your server, client certificates can be used in conjunction with accesscontrol. You must specify that a client certificate is required to access a specific resource. Whenthis feature is enabled on your server, users with a certificate enter their name and passwordonly the first time they attempt to access a restricted resource. Once their identity is established,the server maps their login name and password to that specific certificate. From then on, usersno longer need to enter their login name or password when accessing resources for which clientauthentication is required.
What Is Access Control?
Oracle iPlanet Web Proxy Server 4.0.14 Administration Guide • June 2010148

When users attempt to access a restricted resource, their client sends the server the clientcertificate, which the server checks against its list of mappings. If the certificate belongs to a userto whom you have granted access, the resource is served.
Requiring client authentication for controlling access to specific resources is different thanrequiring client authentication for all connections to the server. Also, be aware that requiringclient certificates for all SSL connections does not automatically map the certificates to users inyour databases. To set this mapping, you must specify that a client certificate is required toaccess a specified resource.
How Access Control WorksWhen the server receives a request for a page, it uses the rules in the ACL file to determinewhether access should be granted. The rules can reference the host name or IP address of thecomputer sending the request. The rules can also reference users and groups stored in theLDAP directory.
The following example shows the possible contents of an ACL file, and provides examples ofaccess control rules.
version 3.0;
# The following "es-internal" rules protect files such
# as icons and images related to iPlanet Web Proxy Server.
# These "es-internal" rules should not be modified.
acl "es-internal";allow (read, list, execute,info) user = "anyone";deny (write, delete) user = "anyone";
# The following rules deny access to the directory "web"# to everyone not in the directory server and deny everyone
# in the directory server who is not in GroupB.
# Only the users in GroupB are allowed read, execute, list,
# and info permissions. GroupA cannot gain access to the
# directory "web" even though (in the ACL rule below) they
# can access the directory “my_stuff”. Furthermore, members
# of GroupB cannot write or delete files.
acl "path=/export/user/990628.1/docs/my_stuff/web/";authenticate (user,group) {
database = "default";method = "basic";
};
deny (all)
(user = "anyone");
allow (read,execute,list,info)
(group = "GroupB");
How Access Control Works
Chapter 8 • Controlling Access to Your Server 149

# The following rule denies everyone not in the directory
# server and denies everyone in the directory server except
# users with the ID of "SpecificMemberOfGroupB". The ACL rule
# in this setting also has a requirement that the user
# connect from a specific IP address. The IP address setting
# in the rule is optional, and has been added for extra
# security. Also, this ACL rule has a Customized prompt
# of "Presentation Owner". This Customized prompt appears
# in the username and password dialog box in the client’s# browser.
acl "path=/export/user/990628.1/docs/my_stuff/web/presentation.html";authenticate (user,group) {
database = "default";method = "basic";prompt = "Presentation Owner";
};
deny (all)
(user = "anyone" or group = "my_group");allow (all)
(user = "SpecificMemberOfGroupB") and
(ip = "208.12.54.76");
# The following ACL rule denies everyone not in the directory
# server and everyone in the directory server except for
# GroupA and GroupB access to the directory “my_stuff”
acl "path=/export/user/990628.1/docs/my_stuff/";authenticate (user,group) {
database = "default";method = "basic";
};
deny (all)
(user = "anyone");allow (read,execute,list,info)
(group = "GroupA,GroupB");
For example, if a user requests the URLhttp://server_name/my_stuff/web/presentation.html, the Proxy Server first checks accesscontrol for the entire server. If the ACL for the entire server is set to continue, the server checksfor an ACL for the directory my_stuff. If an ACL exists, the server checks the ACEs within theACL, and then moves on to the next directory. This process continues until an ACL is foundthat denies access, or until the final ACL for the requested URL, in this case, the filepresentation.html is reached.
How Access Control Works
Oracle iPlanet Web Proxy Server 4.0.14 Administration Guide • June 2010150
To set up access control for this example using the Server Manager, you could create an ACL forthe file only, or create an ACL for each resource leading to the file, that is, one for the entireserver, one for the my_stuff directory, one for the my_stuff/web directory, and one for the file.
If more than one ACL matches, the server uses the last ACL statement that has a match.
Setting Access ControlThis section describes the process of restricting access. You can set global access control rulesfor all servers, and also individually for specific servers. For instance, a human resourcesdepartment might create ACLs allowing all authenticated users to view their own payroll data,but restrict access for the purpose of updating data to human resources personnel responsiblefor payroll.
This section contains the following topics:■ “Setting Access Control Globally” on page 151■ “Setting Access Control for a Server Instance” on page 153
Note – Distributed administration must be configured and activated before global access controlcan be set.
Setting Access Control Globally
▼ To Set Access Control for All Servers
Access the Administration Server and click the Global Settings tab.
Click the Administer Access Control link.
Select the administration server (proxy-admserv) from the drop-down list, click Go to load data,and then click New ACL (or Edit ACL).
Authenticate if prompted.The Access Control Rules For page is displayed. The Administration Server has two lines ofdefault access control rules, which cannot be edited.
Select Access Control Is On if not already selected.
To add a default ACL rule to the bottom row of the table, click the New Line button.To change the position of an access control restriction, click the up or down arrow.
1
2
3
4
5
6
Setting Access Control
Chapter 8 • Controlling Access to Your Server 151

Click Anyone in the Users/Groups column.The User/Group page is displayed in the lower frame.
Select the users and groups to which you will allow access, and click Update.Clicking the List button for Group or User provides lists from which to choose. For moreinformation about the settings, see the online Help. Also see “Specifying Users and Groups” onpage 155.
Click Anyplace in the From Host column.The From Host page is displayed in the lower frame.
Specify the host names and IP addresses allowed access, and click Update.For more information about the settings, see the online Help. Also see “Specifying the FromHost” on page 157.
Click All in the Programs column.The Programs page is displayed in the lower frame.
Select the Program Groups or type the specific file name in the Program Items field to which youwill allow access, and click Update.For more information about the settings, see the online Help. Also see “Restricting Access toPrograms” on page 158.
(Optional) Click the X in the Extra column to add a customized ACL expression.The Customized Expressions page is displayed in the lower frame. For more information, see“Writing Customized Expressions” on page 159.
Select the checkbox in the Continue column, if not already selected.The server evaluates the next line before determining whether the user is allowed access. Whencreating multiple lines, work from the most general restrictions to the most specific.
(Optional) Click the trash can icon to delete the corresponding line from the access control rules.
(Optional) Click the Response When Denied link to specify the response a user receives whendenied access.The Access Deny Response page is displayed in the lower frame.
a. Select the desired response.
b. Specify additional information if appropriate.
c. Click Update
7
8
9
10
11
12
13
14
15
16
Setting Access Control
Oracle iPlanet Web Proxy Server 4.0.14 Administration Guide • June 2010152
For more information about the settings, see “Responding When Access Is Denied” on page 160.
Click Submit to store the new access control rules in the ACL file, or Revert to reset elements inthe page to the values they contained before changes were made.
Setting Access Control for a Server InstanceYou can create, edit, or delete access control for a specific server instance using the ServerManager. If deleting, do not delete all ACL rules from the ACL files. At least one ACL filecontaining a minimum of one ACL rule is required to start the server. Deleting all ACL rulesand restarting the server will result in a syntax error.
▼ To Set Access Control for a Server Instance
Access the Server Manager for the server instance and click the Preferences tab.
Click the Administer Access Control link.
Select an ACL using one of the following methods:
■ Select a resource that uses ACLs to restrict access from the Select A Resource drop-down list,or click Regular Expression to specify a regular expression. For more information, seeChapter 16, “Managing Templates and Resources,” in the Proxy Server AdministrationGuide.
■ Select An Existing ACL lists all ACLs that are enabled.Existing ACLs that are not enabled do not display in this list. Select an ACL from thedrop-down list.
■ Type In The ACL Name . This option enables you to create named ACLs. Use the optiononly if you are familiar with ACL files. You must manually edit obj.conf if you want toapply named ACLs to resources. For more information, see Chapter 18, “ACL File Syntax.”
Click the corresponding Edit button.The Access Control Rules For page is displayed.
Select Access Control Is On if not already selected.
To add a default ACL rule to the bottom row of the table, click the New Line button.To change the position of an access control restriction, click the up or down arrow.
To edit the ACL for this server instance, click the action in the Action column.The Allow/Deny page is displayed in the lower frame.
17
1
2
3
4
5
6
7
Setting Access Control
Chapter 8 • Controlling Access to Your Server 153

Select Allow if not already selected as the default, and click Update.For more information about Allow or Deny, see “Setting the Action” on page 155.
Click Anyone in the Users/Groups column. The User/Group page is displayed in the lower frame.
Select the users and groups to which you will allow access, specify authentication information,and then click Update.Clicking the List button for Group or User to display lists from which to choose. For moreinformation about the settings, see the online Help. Also see “Specifying Users and Groups” onpage 155.
Click Anyplace in the From Host column.The From Host page is displayed in the lower frame.
Specify the host names and IP addresses allowed access, and click Update.For more information about the settings, see the online Help. Also see “Specifying the FromHost” on page 157.
Click All in the Rights column.The Access Rights page is displayed in the lower frame.
Specify access rights for this user, and click Update.For more information, see “Restricting Access to Programs” on page 158.
(Optional) Click the X under the Extra column to add a customized ACL expression.The Customized Expressions page is displayed in the lower frame. For more information, see“Writing Customized Expressions” on page 159.
Select the checkbox in the Continue column, if not already selected.The server evaluates the next line before determining if the user is allowed access. Whencreating multiple lines, work from the most general restrictions to the most specific.
(Optional) Click the trash can icon to delete the corresponding line from the access control rules.Do not delete all ACL rules from the ACL files. At least one ACL file containing at least one ACLrule is required to start the server. If you delete all ACL rules in the ACL files and try to restartthe server, you will receive a syntax error.
(Optional) Click the Response When Denied link to specify the response a user receives whendenied access.The Access Deny Response page is displayed in the lower frame. Select the desired response,specify additional information if appropriate, and then click Update. For more informationabout the settings, see “Responding When Access Is Denied” on page 160.
8
9
10
11
12
13
14
15
16
17
18
Setting Access Control
Oracle iPlanet Web Proxy Server 4.0.14 Administration Guide • June 2010154

Click Submit to store the new access control rules in the ACL file, or Revert to reset elements inthe page to the values they contained before changes were made.
Selecting Access Control OptionsThe following topics describe the various options you can select when setting access control.For the Administration Server, the first two lines are set as defaults and cannot be edited.
This section contains the following topics:
■ “Setting the Action” on page 155■ “Specifying Users and Groups” on page 155■ “Specifying the From Host” on page 157■ “Restricting Access to Programs” on page 158■ “Setting Access Rights” on page 158■ “Writing Customized Expressions” on page 159■ “Turning Access Control Off” on page 160■ “Responding When Access Is Denied” on page 160
Setting the ActionYou can specify the action the server takes when a request matches the access control rule.
■ Allow means users or systems can access the requested resource■ Deny means users or systems cannot access the resource
The server goes through the list of access control entries (ACEs) to determine the accesspermissions. For example, the first ACE is usually to deny everyone. If the first ACE is set tocontinue, the server checks the second ACE in the list. If that ACE matches, the next ACE isused. If Continue is not selected, everyone is denied access to the resource. The server continuesdown the list until it reaches either an ACE that does not match or an ACE that matches butdoes not continue. The last matching ACE determines if access is allowed or denied.
Specifying Users and GroupsWith user and group authentication, users are prompted to provide a user name and passwordbefore they can access the resource specified in the access control rule.
The Proxy Server checks lists of users and groups stored either in an LDAP server, such asOracle Directory Server Enterprise Edition, or in an internal file-based authentication database.
You can allow or deny access to everyone in the database, allow or deny specific people by usingwildcard patterns, or select who to allow or deny from lists of users and groups.
19
Selecting Access Control Options
Chapter 8 • Controlling Access to Your Server 155

The following elements are displayed for Users/Groups on the Access Control Rules For page inthe user interface.
■ Anyone (No Authentication) is the default and means anyone can access the resourcewithout providing a user name or password. However, the user might be denied accessbased on other settings, such as host name or IP address. For the Administration Server, thissetting means that anyone in the administrators group that you specified for distributedadministration can access the pages.
■ Authenticated People Only■ All In The Authentication Database matches any user who has an entry in the database.■ Only The following People specifies which users and groups to match. You can list users
or groups of users individually by separating the entries with commas, or with a wildcardpattern, or you can select from the lists of users and groups stored in the database.Group matches all users in the groups you specify. User matches the individual usersyou specify. For the Administration Server, the users must also be in the administratorsgroup you specified for distributed administration.
Prompt For Authentication specifies the message text that is displayed in theauthentication dialog box. You can use this text to describe what the user needs to type.Depending on the operating system, users see approximately the first 40 characters of theprompt. Most browsers cache the user name and password and associate them with theprompt text. If the user accesses areas of the server files and directories that have the sameprompt, the user does not need to retype user names and passwords. Conversely, if you wantto force users to reauthenticate for various areas, you must change the prompt for the ACLon that resource.
■ Authentication Methods specifies the method the server uses for getting authenticationinformation from the client. The Administration Server offers only the Basic method ofauthentication. The Server Manager offers the following methods:■ Default uses the default method specified in the obj.conf file, or Basic if there is no
setting exists in obj.conf. If you select Default, the ACL rule does not specify a methodin the ACL file. Choosing Default enables you to easily change the methods for all ACLsby editing one line in the obj.conf file.
■ Basic uses the HTTP method to get authentication information from the client. The username and password are only encrypted if encryption is turned on for the server (SSL isenabled). Otherwise, names and passwords are sent in clear text, and can be read ifintercepted.
■ SSL uses the client certificate to authenticate the user. To use this method, SSL must beturned on for the server. When encryption is on, Basic and SSL methods can becombined.
Selecting Access Control Options
Oracle iPlanet Web Proxy Server 4.0.14 Administration Guide • June 2010156

Note – You can enable security only in reverse proxy mode and not in forward proxymode.
■ Digest uses an authentication mechanism that enables browsers to authenticate usersbased on user name and password without sending the user name and password as cleartext. The browser uses the MD5 algorithm to create a digest value using the user’spassword and some information provided by the Proxy Server. This digest value is alsocomputed on the server side using the Digest authentication plug-in and comparedagainst the digest value provided by the client.
Note – Prompt For Authentication is a required parameter in Digest Authentication.Change the value to match the realm (required for digest file). For example, if in thedigest file, you have configured all users to be in the realm test, then the Prompt ForAuthentication field should contain the text test.
■ Other uses a custom method that you create using the access control API.
Authentication Database specifies the database that the server will use to authenticate users.This option is only available through the Server Manager. If you choose Default, the serverlooks for users and groups in a directory service configured as default. If you want toconfigure individual ACLs to use different databases, select Other, and specify the database.Non-default databases and LDAP directories must be specified inserver-root/userdb/dbswitch.conf. If you use the access control API for a customdatabase, select Other, and type the database name.
Specifying the From HostYou can restrict access to the Administration Server based on which computer the requestcomes from.
The following elements are displayed for From Host on the Access Control Rules For page inthe user interface:
■ Anyplace allows access to all users and systems■ Only From enables you to restrict access to specific host names or IP addresses
If the Only From option is selected, type a wildcard pattern or a comma-separated list in theHost Names or IP Addresses fields. Restricting by host name is more flexible than by restrictingby IP address. If a user’s IP address changes, you do not need to update this list. Restricting by IPaddress, however, is more reliable. If a DNS lookup fails for a connected client, host namerestriction cannot be used.
Selecting Access Control Options
Chapter 8 • Controlling Access to Your Server 157

You can only use the * wildcard notation for wildcard patterns that match the computers’ hostnames or IP addresses. For example, to allow or deny all computers in a specific domain, youwould enter a wildcard pattern that matches all hosts from that domain, such as*.example.com. You can set different host names and IP addresses for superusers accessing theAdministration Server.
For host names, the * must replace an entire component of the name, that is, *.example.com isacceptable, but *users.example.com is not. When the * appears in a host name, it must be theleftmost character. For example, *.example.com is acceptable, but users.*.com is not.
For the IP address, the * must replace an entire byte in the address, for example, 198.95.251.*is acceptable, but 198.95.251.3* is not. When the * appears in an IP address, it must be therightmost character. For example, 198.* is acceptable, but 198.*.251.30. is not.
Restricting Access to ProgramsAccess to programs can only be restricted by the Administration Server. Restricting access toprograms allows only specified users to view the Server Manager pages, and determines whetherthose users can configure that server. For example, you might allow some administrators toconfigure the Users and Groups section of the Administration Server but deny access to theGlobal Settings section.
You can configure different users to access different functional domains. Once a user is givenaccess to a few selected functional domains, after the user logs in, Administration Server pagesfrom only those functional domains are available to that user.
The following elements are displayed for Programs on the Access Control Rules For page in theuser interface:■ All Programs allows or denies access to all programs. By default, administrators have access
to all programs for a server.■ Only The Following enables you to specify the programs to which users have access.
■ Program Groups reflect the tabs of the Administration Server, for example, Preferencesand Global Settings, and represent access to those pages. When an administratoraccesses the Administration Server, the server uses their user name, host, and IP addressto determine the pages they can view.
■ Program Items enables you to control access to specific pages within a program bytyping a page name in the field.
Setting Access RightsAccess rights can only be set by the Server Manager for a server instance. Access rights restrictaccess to files and directories on your server. In addition to allowing or denying all access rights,
Selecting Access Control Options
Oracle iPlanet Web Proxy Server 4.0.14 Administration Guide • June 2010158

you can specify a rule that allows or denies partial access rights. For example, you could allowusers read-only access rights to your files so they can view the information but not change thefiles.
The following elements are displayed for Rights on the Access Control Rules For page in theuser interface.
■ All Access Rights is the default and allows or denies all rights.■ Only The following Rights enables you to select a combination of rights to be allowed or
denied:■ Read permits users to view files, including the HTTP methods GET, HEAD, POST, and
INDEX.■ Write permits users to change or delete files, including the HTTP methods PUT,
DELETE, MKDIR, RMDIR, and MOVE. To delete a file, a user must have both write anddelete rights.
■ Execute permits users to execute server-side applications, such as CGI programs, Javaapplets, and agents.
■ Delete permits users who also have write privileges to delete files or directories.■ List permits users to access lists of the files in directories that do not contain an
index.html file.■ Info permits users to receive information about the URI, for example http_head.
Writing Customized ExpressionsYou can enter custom expressions for an ACL. Select this option only if you are familiar withthe syntax and structure of ACL files. A few features are available only by editing the ACL file orcreating custom expressions. For example, you can restrict access to your server depending onthe time of day, day of the week, or both.
The following customized expression shows how you could restrict access by time of day andday of the week. This example assumes you have two groups in your LDAP directory. TheRegular group gets access Monday through Friday, 8:00 am to 5:00 pm. The Critical group getsaccess all the time.
allow (read){(group=regular and dayofweek=”mon,tue,wed,thu,fri”);
(group=regular and (timeofday>=0800 and timeofday<=1700));(group=critical)}
For more information about valid syntax and ACL files, see Chapter 18, “ACL File Syntax.”
Selecting Access Control Options
Chapter 8 • Controlling Access to Your Server 159

Turning Access Control OffWhen you deselect the option labeled Access Control Is On on the Access Control Rules Forpage, you receive a prompt asking whether you want to erase records in the ACL. When youclick OK, the ACL entry for that resource is deleted from the ACL file.
If you want to deactivate an ACL, comment out the ACL lines in the filegenerated-proxy-serverid.acl by using # signs at the start of each line.
From the Administration Server, you could create and turn on access control for a specificserver instance and leave it off (the default) for other servers. For example, you could deny allaccess to the Server Manager pages from the Administration Server. With distributedadministration on and access control off by default for any other servers, administrators couldstill access and configure the other servers, but could not configure the Administration Server.
Responding When Access Is DeniedThe Proxy Server provides a default message when access is denied, and you can customize theresponse if desired. You can also create a different message for each access control object.
By default, for the Administration Server, users receive the Permission Denied message inserver-root/httpacl/admin-denymsg.html.
▼ To Change the Access Denied Message
Click the Response When Denied link on the Access Control Rules For page.
Select the desired response, provide additional information if appropriate and then clickUpdate. Make sure users have access to the response to which they are redirected.
Click Submit to save your changes, or Revert to reset the elements in the page to the values theycontained before your changes.
Limiting Access to Areas of Your ServerThis section describes some commonly used restrictions to a server and its contents. The stepsfor each procedure detail the specific actions you must take. However, you still must completethe steps described in “Setting Access Control for a Server Instance” on page 153.
This section contains the following topics:
■ “Restricting Access to the Entire Server” on page 161■ “Restricting Access to a Directory” on page 161
1
2
3
Limiting Access to Areas of Your Server
Oracle iPlanet Web Proxy Server 4.0.14 Administration Guide • June 2010160

■ “Restricting Access to a File Type” on page 162■ “Restricting Access Based on Time of Day” on page 163■ “Restricting Access Based on Security” on page 163■ “Securing Access to Resources” on page 164■ “Securing Access to Server Instances” on page 164■ “Enabling IP-Based Access Control” on page 164
Restricting Access to the Entire ServerYou might want to allow access to users in a group who access the server from computers in asubdomain. For instance, you might have a server for a company department that you onlywant users to access from computers in a specific subdomain of your network.
▼ To Restrict Access to the Entire Server
Access the Server Manager for the server instance.
On the Preferences tab, click the Administer Access Control link.
Select the entire server from the drop-down list, click Select, and then click the correspondingEdit button.The Access Control Rules For page is displayed.
Add a rule to deny access to all.
Add another rule to allow access to a specific group.
Use From Host to specify the host names and IP addresses you want to restrict.
Click Submit to save your changes.
Restricting Access to a DirectoryYou can allow users in a group to read or run applications in directories, and the subdirectoriesand files, that are controlled by an owner of the group. For example, a project manager mightupdate status information for a project team to review.
▼ To Restrict Access to DirectoriesUsing the steps described for setting access control for a server instance (see “Setting AccessControl for a Server Instance” on page 153), do the following:
Access the Server Manager for the server instance.
1
2
3
4
5
6
7
1
Limiting Access to Areas of Your Server
Chapter 8 • Controlling Access to Your Server 161
On the Preferences tab, click the Administer Access Control link.
Select the desired resource from the drop-down list and click Edit.
Create a rule with the default values that deny access to everyone from everywhere.
Create another rule allowing users in a specific group to have read and execute rights only.
Create a third rule to allow a specific user to have all rights.
Deselect Continue for the last two rules.
Click Submit to save your changes.
Restricting Access to a File TypeYou can limit access to file types. For example, you might want to allow only specific users tocreate programs that run on your server. Anyone would be able to run the programs but onlyspecified users in the group would be able create or delete them.
▼ To Restrict Access to File Types
Access the Server Manager for the server instance.
On the Preferences tab, click the Administer Access Control link.
Click Regular Expression in the Select A Resource section, and specify the regular expression, forexample, *.cgi.
Click Edit.
Create a rule to allow read access to all users.
Create another rule that allows write and delete access only to a specified group.
Click Submit to save your changes.
For file type restriction, you would leave both Continue boxes selected. If a request for a filecomes in, the server then checks the ACL for the file type first.
A Pathcheck function is created in the obj.conf file that might include wildcard patterns forfiles or directories. The entry in the ACL file would appear as follows: acl"*.cgi";
2
3
4
5
6
7
8
1
2
3
4
5
6
7
Limiting Access to Areas of Your Server
Oracle iPlanet Web Proxy Server 4.0.14 Administration Guide • June 2010162

Restricting Access Based on Time of DayYou can restrict write and delete access to the server during specified hours or on specified days.
▼ To Restrict Access Based on Time of Day
Access the Server Manager for the server instance.
On the Preferences tab, click the Administer Access Control link.
Select the entire server from the drop-down list in the Select A Resource section, and click Edit.
Create a rule allowing read and execute rights to all.If a user wants to add, update, or delete a file or directory, this rule does not apply and the serversearches for another rule that matches.
Create another rule denying write and delete rights to all.
Click the X link to create a customized expression.
Type the days of the week and the times of day to be allowed, for example:user = "anyone" anddayofweek = "sat,sun" or(timeofday >= 1800
andtimeofday <= 600)
Click Submit to save your changes.Any errors in the custom expression produce an error message. Make corrections and submitagain.
Restricting Access Based on SecurityYou can configure SSL and non-SSL listen sockets for the same server instance. Restrictingaccess based on security enables you to create protection for resources that should only betransmitted over a secure channel.
▼ To Restrict Access Based on Security
Access the Server Manager for the server instance.
On the Preferences tab, click the Administer Access Control link.
Select the entire server from the drop-down list in the Select A Resource section, and click Edit.
1
2
3
4
5
6
7
8
1
2
3
Limiting Access to Areas of Your Server
Chapter 8 • Controlling Access to Your Server 163

Create a rule allowing read and execute rights to all.
If a user wants to add, update, or delete a file or directory, this rule does not apply and the serversearches for another rule that matches.
Create another rule denying write and delete rights to all.
Click the X link to create a customized expression.
Type ssl="on". For example:user = "anyone" and ssl="on"
Click Submit to save your changes.
Any errors in the custom expression produce an error message. Make corrections and submitagain.
Securing Access to ResourcesThis section describes the additional tasks you must perform to secure access control with theProxy Server, after enabling distributed administration.
Securing Access to Server InstancesTo configure the Proxy Server to control access to server instances, edit theserver-root/httpacl/*.proxy-admserv.acl files to specify the user to whom you want to grantaccess control privileges. For example:
acl "proxy-server_instance"; authenticate (user,group) { database = "default";method = "basic"; }; deny absolute (all) user != "UserA";
Enabling IP-Based Access ControlIf the access control entry that refers to the ip attribute is located in the ACL files related to theAdministration Server (gen*.proxy-admserv.acl), complete Steps 1 and 2 below.
If the access control entry that refers to the ip attribute is located in the ACL files related to aserver instance, complete only Step 1 below for that particular ACL.
4
5
6
7
8
Securing Access to Resources
Oracle iPlanet Web Proxy Server 4.0.14 Administration Guide • June 2010164
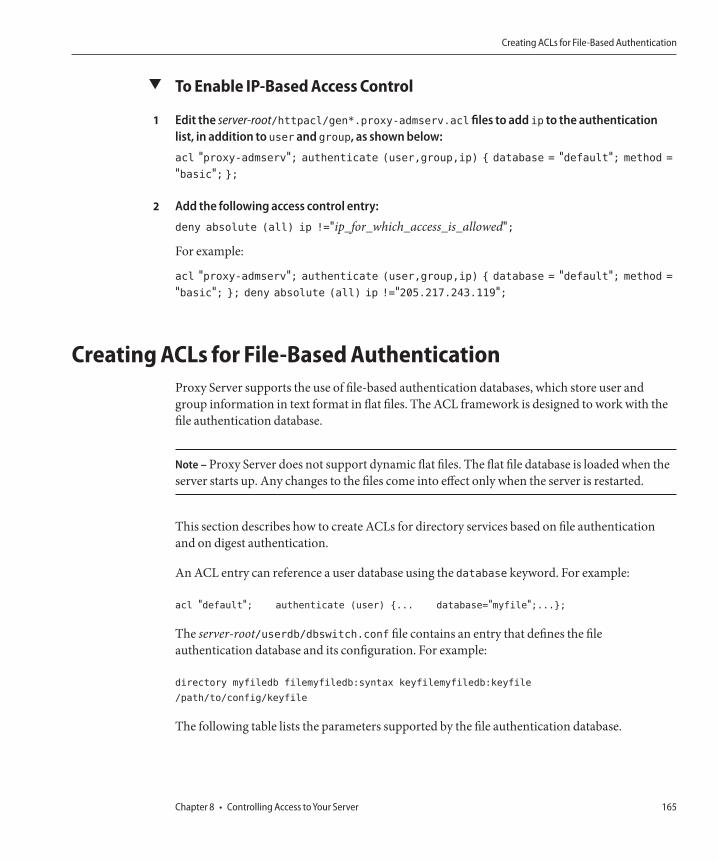
▼ To Enable IP-Based Access Control
Edit the server-root/httpacl/gen*.proxy-admserv.acl files to add ip to the authenticationlist, in addition to user and group, as shown below:
acl "proxy-admserv"; authenticate (user,group,ip) { database = "default"; method =
"basic"; };
Add the following access control entry:
deny absolute (all) ip !="ip_for_which_access_is_allowed";
For example:
acl "proxy-admserv"; authenticate (user,group,ip) { database = "default"; method =
"basic"; }; deny absolute (all) ip !="205.217.243.119";
Creating ACLs for File-Based AuthenticationProxy Server supports the use of file-based authentication databases, which store user andgroup information in text format in flat files. The ACL framework is designed to work with thefile authentication database.
Note – Proxy Server does not support dynamic flat files. The flat file database is loaded when theserver starts up. Any changes to the files come into effect only when the server is restarted.
This section describes how to create ACLs for directory services based on file authenticationand on digest authentication.
An ACL entry can reference a user database using the database keyword. For example:
acl "default"; authenticate (user) {... database="myfile";...};
The server-root/userdb/dbswitch.conf file contains an entry that defines the fileauthentication database and its configuration. For example:
directory myfiledb filemyfiledb:syntax keyfilemyfiledb:keyfile
/path/to/config/keyfile
The following table lists the parameters supported by the file authentication database.
1
2
Creating ACLs for File-Based Authentication
Chapter 8 • Controlling Access to Your Server 165
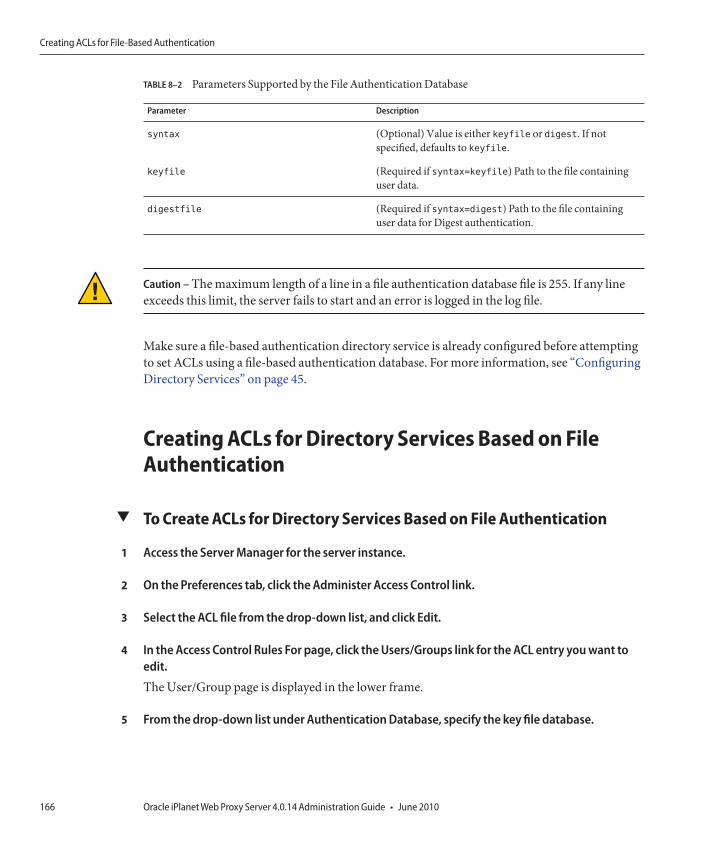
TABLE 8–2 Parameters Supported by the File Authentication Database
Parameter Description
syntax (Optional) Value is either keyfile or digest. If notspecified, defaults to keyfile.
keyfile (Required if syntax=keyfile) Path to the file containinguser data.
digestfile (Required if syntax=digest) Path to the file containinguser data for Digest authentication.
Caution – The maximum length of a line in a file authentication database file is 255. If any lineexceeds this limit, the server fails to start and an error is logged in the log file.
Make sure a file-based authentication directory service is already configured before attemptingto set ACLs using a file-based authentication database. For more information, see “ConfiguringDirectory Services” on page 45.
Creating ACLs for Directory Services Based on FileAuthentication
▼ To Create ACLs for Directory Services Based on File Authentication
Access the Server Manager for the server instance.
On the Preferences tab, click the Administer Access Control link.
Select the ACL file from the drop-down list, and click Edit.
In the Access Control Rules For page, click the Users/Groups link for the ACL entry you want toedit.
The User/Group page is displayed in the lower frame.
From the drop-down list under Authentication Database, specify the key file database.
1
2
3
4
5
Creating ACLs for File-Based Authentication
Oracle iPlanet Web Proxy Server 4.0.14 Administration Guide • June 2010166

Click Update, and then click Submit to save your changes.When you set an ACL against a key file-based file authentication database, the dbswitch.conffile is updated with an ACL entry, such as the sample entry given below:version 3.0;acl "default";authenticate (user) {prompt =
"iPlanet Web Proxy Server 4.0";database = "mykeyfile";method = "basic";};deny (all) user = "anyone";allow (all) user = "all";
Creating ACLs for Directory Services Based on DigestAuthenticationThe file authentication database also supports a file format suitable for use with Digestauthentication, per RFC 2617. A hash based on the password and realm is stored. Clear textpasswords are not maintained.
▼ To Create ACLs for Directory Services Based on Digest Authentication
Access the Server Manager for the server instance.
On the Preferences tab, click the Administer Access Control link.
Select the ACL file from the drop-down list, and click Edit.
In the Access Control Rules For page, click the Users/Groups link for the ACL you want to edit.The User/Group page is displayed in the lower frame.
From the drop-down list under Authentication Database, specify the digest database.
Click Update, and then click Submit to save your changes.When you set an ACL against a Digest authentication-based file authentication database, thedbswitch.conf file is updated with an ACL entry, such as the sample entry below.version 3.0;acl "default";authenticate (user) {prompt = "filerealm";database = "mydigestfile";method = "digest";}; deny (all) user = "anyone";allow (all) user = "all";
6
1
2
3
4
5
6
Creating ACLs for File-Based Authentication
Chapter 8 • Controlling Access to Your Server 167

168

Using Log Files
You can monitor your server’s activity using several different methods. This chapter discusseshow to monitor your server by recording and viewing log files. For information on using thebuilt-performance monitoring services, or SNMP, see Chapter 10, “Monitoring Servers.”
This chapter contains the following sections:
■ “About Log Files” on page 169■ “Logging on UNIX and Windows Platforms” on page 170■ “Log Levels” on page 171■ “Archiving Log Files” on page 172■ “Setting Access Log Preferences” on page 173■ “Setting Error Logging Options” on page 180■ “Configuring the LOG Element” on page 181■ “Viewing Access Log Files” on page 181■ “Viewing Error Log Files” on page 182■ “Working With the Log Analyzer” on page 183■ “Viewing Events (Windows)” on page 192
About Log FilesServer log files record your server’s activity. You can use these logs to monitor your server andto help you when troubleshooting. The error log file, located inproxy-server_name/logs/errors in the server root directory, lists all the errors the server hasencountered. The access log, located in proxy-server_name/logs/access in the server rootdirectory, records information about requests to the server and the responses from the server.You can configure the information recorded in the Proxy Server access log file. You use the loganalyzer to generate server statistics. You can back up server error and access log files byarchiving them.
9C H A P T E R 9
169

Note – Due to limitations in the operating system, the Proxy Server cannot work with log fileslarger than 2 Gbytes on Linux. As soon as the maximum file size is reached, logging will cease.
Logging on UNIX and Windows PlatformsThis section discusses how log files are created. In addition, this section includes the followingtopics:
■ “Default Error Logging” on page 170■ “Logging Using syslog” on page 170
Note – For more information on the event log mechanism used in the Windows operatingenvironment, refer to the Windows help system index for the keywords Event Logging.
Default Error LoggingOn both the UNIX and Windows platforms, logs from the administration server are collected inthe administration proxy-admserv/logs/ directory. Logs from the server instances arecollected in the proxy-server_name/logs/ directory.
The default log level for the entire server can be set. You can redirect stdout and stderr to theserver’s event log and direct the log output to the operating system’s system log. Additionally,you can direct stdout and stderr content to the server’s event log. Log messages by default aresent to stderr in addition to the specified server log file.
Logging Using syslog
For stable operational environments where centralized logging is required, syslog isappropriate. For environments where log output is frequently required for diagnostics anddebugging, individual server instance logs might be more manageable.
Because storing logged data for the server instance and administration server in one file mightprove difficult to read and debug, use the syslog master log file only for deployed applicationsthat are running smoothly.
Logged message are intermixed with all other logs from the Solaris daemon applications.
By using the syslog log file in conjunction with syslogd and the system log daemon, you canconfigure the syslog.conf file to perform the following actions:
■ Log messages to the appropriate system log
Logging on UNIX and Windows Platforms
Oracle iPlanet Web Proxy Server 4.0.14 Administration Guide • June 2010170

■ Write messages to the system console■ Forward logged messages to a list of users, or forward logged messages to another syslogd
on another host over the network
Because logging to syslog implies that logs from Proxy Server and other daemon applicationsare collected in the same file, logged messages are enhanced with the following information toidentify Proxy Server-specific messages from the particular server instance:
■ Unique message ID■ Timestamp■ Instance name■ Program name (proxyd or proxyd-wdog)■ Process ID (PID of the proxyd process)■ Thread ID (optional)■ Server ID
The LOG element can be configured for both the administration server and the server instancein the server.xml file.
For more information on the syslog logging mechanism used in the UNIX operatingenvironment, use the following man commands at a terminal prompt:
man syslog
man syslogd
man syslog.conf
Log LevelsThe following table defines the log levels and messages in Proxy Server, in increasing order ofseverity.
TABLE 9–1 Log Levels
Log level Description
finest
finer
fine
Messages indicate extent of verbosity of debug messages. finest gives themaximum verbosity.
info Messages are informative in nature, usually related to server configurationor server status. These messages do not indicate errors that need immediateaction.
warning Messages indicate a warning. The message would probably be accompaniedby an exception.
Log Levels
Chapter 9 • Using Log Files 171

TABLE 9–1 Log Levels (Continued)Log level Description
failure Messages indicate a failure of considerable importance that can preventnormal application execution.
config Messages relate to a variety of static configuration information, to assist indebugging problems that may be associated with particular configurations.
security Messages indicate a security issue.
catastrophe Messages indicate a fatal error.
Archiving Log FilesYou can set up your access and error log files to be automatically archived. At a certain time, orafter a specified interval, your logs will be rotated. Proxy Server saves the old log files and stampsthe saved file with a name that includes the date and time they were saved.
For example, you can set up your access log files to rotate every hour. The Proxy Server savesand names the file “access.200505160000,” where the name of the log file, year, month, day,and 24-hour time is concatenated together into a single character string. The format of the logarchive file varies depending upon which type of log rotation you set up.
The Proxy Server offers the two types of log rotation for archiving files: internal-daemon logrotation and cron-based log rotation.
Internal-Daemon Log RotationInternal-daemon log rotation happens within the HTTP daemon, and can only be configured atstartup time. The server rotates logs internally without requiring a server restart. Logs rotatedusing this method are saved in the following format:
access.<YYYY><MM><DD><HHMM>
errors.<YYYY><MM><DD><HHMM>
You can specify the time used as a basis to rotate log files and start a new log file. For example, ifthe rotation start time is 12:00 a.m. and the rotation interval is 1440 minutes (one day), a newlog file will be created immediately when you save and apply changes regardless of the presenttime. The log file will rotate every day at 12:00 a.m., and the access log will be stamped at 12:00a.m. and saved as access.200505172400. Likewise, if you set the interval at 240 minutes (4hours), the four-hour intervals begin at 12:00 a.m. such that the access log files will containinformation gathered from 12:00 a.m. to 4:00 a.m., from 4:00 a.m. to 8:00 a.m., and so forth.
Archiving Log Files
Oracle iPlanet Web Proxy Server 4.0.14 Administration Guide • June 2010172

If log rotation is enabled, log file rotation starts at server startup. The first log file to be rotatedgathers information from the current time until the next rotation time. Using the previousexample, if you set your start time at 12:00 a.m. and your rotation interval at 240 minutes, andthe current time is 6:00 a.m., the first log file to be rotated will contain the information gatheredfrom 6:00 a.m. to 8:00 a.m, and the next log file will contain information from 8:00 a.m. to 12:00p.m. (noon), and so forth.
Scheduler-based Log RotationScheduler-based log rotation is based on the time and day stored in the server.xml file in theserver-root/proxy-server_name/config/ directory. This method allows you to archive log filesimmediately or have the server archive log files at a specific time on specific days. The server’sscheduler configuration options are stored in server.xml in theserver-root/proxy-server_name/config/ directory. Logs rotated using the scheduler-basedmethod are saved in the following format:
<original_filename>.<YYYY><MM><DD><HHMM>
For example, access might become access.200505171630 when it is rotated at 4:30 p.m.
Log rotation is initialized at server startup. If rotation is turned on, the Proxy Server creates atime-stamped access log file and rotation starts at server startup.
Once the rotation starts, the Proxy Server creates a new time stamped log file when a request orerror occurs after the prior-scheduled “next rotate time” that needs to be logged to the access orerror log file.
Note – Archive the server logs before running the log analyzer.
To archive log files and to specify whether to use the Internal daemon method or thescheduler-based method, use the Archive Log page in the Server Manager.
Setting Access Log PreferencesDuring installation, an access log file named access is created for the server. You can customizeaccess logging for any resource by specifying whether to log accesses, what format to use forlogging, and whether the server should spend time looking up the domain names of clientswhen they access a resource.
You can specify logging preferences using the Set Access Log Preferences page in the ServerManager, or you can manually configure directives in the obj.conf file. In obj.conf, the servercalls the function flex-init to initialize the flexible logging system and the function flex-log
Setting Access Log Preferences
Chapter 9 • Using Log Files 173

to record request-specific data in a flexible log format. To log requests using the common logfile format, the server calls init-clf to initialize the Common Log subsystem which is used inobj.conf, and common-log to record request-specific data in the common log format used bymost HTTP servers.
Once an access log for a resource has been created, you cannot change its format unless youarchive it or create a new access log file for the resource.
TABLE 9–2 Log File Formats for the Administration Server
Log Format Item Description
Client Hostname The hostname (or IP address if DNS is disabled) of theclient requesting access.
Authenticate User Name If authentication is necessary, you can list theauthenticated user name in the access log.
System Date The date and time of the client request.
Full Request The exact request the client made.
Status The status code the server returned to the client.
Content Length The content length, in bytes, of the document sent tothe client.
HTTP Header, “referer” The referer specifies the page from which the clientaccessed the current page. For example, if a user islooking at the results from a text search query, thereferer would be the page from which the useraccessed the text search engine. Referers enable theserver to create a list of backtracked links.
HTTP Header, “user-agent” The user-agent information, which includes the typeof browser the client is using, its version, and theoperating system on which it is running. Thisinformation comes from the User-agent field in theHTTP header information that the client sends to theserver.
Method The HTTP request method used, such as GET, PUT,or POST.
URI Universal Resource Identifier. The location of aresource on the server. For example, forhttp://www.a.com:8080/special/docs, the URI isspecial/docs.
Setting Access Log Preferences
Oracle iPlanet Web Proxy Server 4.0.14 Administration Guide • June 2010174

TABLE 9–2 Log File Formats for the Administration Server (Continued)Log Format Item Description
Query String Of The URI Any text after the question mark in a URI. Forexample, forhttp://www.a.com:8080/special/docs?find_this,the query string of the URI is find_this.
Protocol The transport protocol and version used.
When changing the format of an existing log file, you should first delete/rename the existing logfile OR use a different file name.
▼ To Set the Access Log Preferences for theAdministration ServerAccess the Administration Server and click the Preferences tab.
Click the Set Access Log Preferences link.The Set Access Log Preferences page is displayed.
Select the resource from the drop-down list or click the Regular Expression button, type aregular expression, and click OK.
Specify whether to log client accesses.This setting requires Domain Name Service (DNS) to be enabled.
Specify the absolute path for the access log file.As a default, the log files are kept in the logs directory in the server root. If you specify a partialpath, the server assumes the path is relative to the logs directory in the server root.
If you are editing the entire server, the default value for this field is $accesslog, the variable thatdenotes the access log file for the server in the configuration file.
Choose whether record domain names or IP addresses of the systems accessing the server in theaccess log.
Choose the type of log file format to use in the access log.The following options are available:■ Use Common LogFile Format. Includes client’s host name, authenticated user name, date
and time of request, HTTP header, status code returned to the client, and content length ofthe document sent to the client.
1
2
3
4
5
6
7
Setting Access Log Preferences
Chapter 9 • Using Log Files 175

■ Only Log. Enables you to determine which information will be logged. You can choosefrom the flexible log format items listed in Table 9–2.
■ If you choose a custom format, type it in the Custom Format field.
Click OK.
Click Restart Required.The Apply Changes page is displayed.
Click the Restart Proxy Server button to apply the changes.
Setting Access Log Preferences for the Server InstanceThe flexible log formats that you can use to set the access log preferences for the server instanceare listed in the following table.
TABLE 9–3 Log File Formats for the Server Instance
Log Format Item Description
Client Hostname The hostname (or IP address if DNS is disabled) of theclient requesting access.
Authenticate User Name If authentication was necessary, you can have theauthenticated user name listed in the access log.
System Date The date and time of the client request.
Full Request The exact request the client made.
Status The status code the server returned to the client.
Content Length The content length, in bytes, of the document sent tothe client.
HTTP Header, “referer” The referer specifies the page from which the clientaccessed the current page. For example, if a user islooking at the results from a text search query, thereferer would be the page from which the useraccessed the text search engine. Referers enable theserver to create a list of backtracked links.
HTTP Header, “user-agent” The user-agent information, which includes the typeof browser the client is using, its version, and theoperating system on which it is running. Thisinformation comes from the User-agent field in theHTTP header information that the client sends to theserver.
8
9
10
Setting Access Log Preferences
Oracle iPlanet Web Proxy Server 4.0.14 Administration Guide • June 2010176
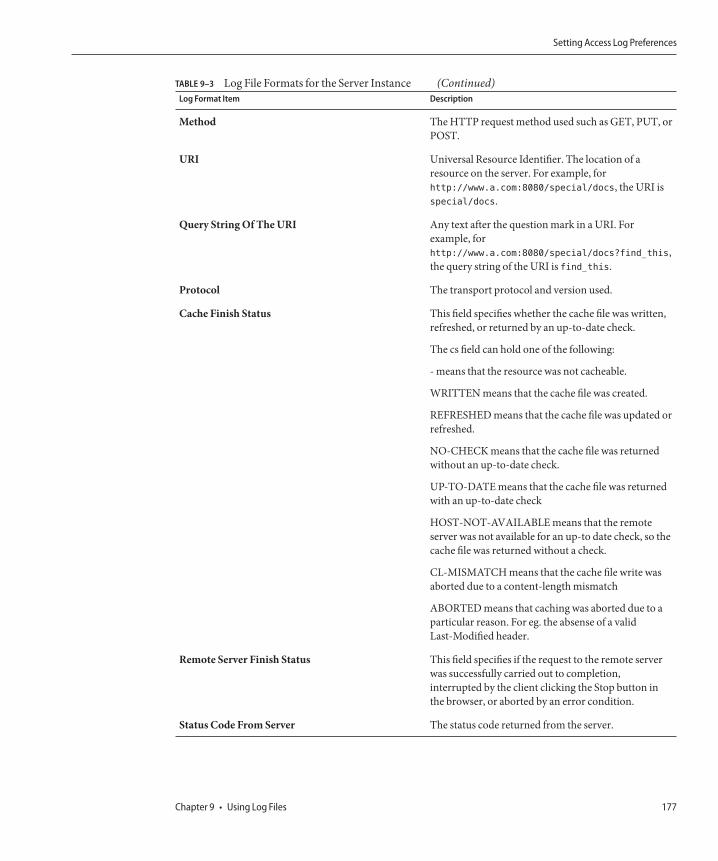
TABLE 9–3 Log File Formats for the Server Instance (Continued)Log Format Item Description
Method The HTTP request method used such as GET, PUT, orPOST.
URI Universal Resource Identifier. The location of aresource on the server. For example, forhttp://www.a.com:8080/special/docs, the URI isspecial/docs.
Query String Of The URI Any text after the question mark in a URI. Forexample, forhttp://www.a.com:8080/special/docs?find_this,the query string of the URI is find_this.
Protocol The transport protocol and version used.
Cache Finish Status This field specifies whether the cache file was written,refreshed, or returned by an up-to-date check.
The cs field can hold one of the following:
- means that the resource was not cacheable.
WRITTEN means that the cache file was created.
REFRESHED means that the cache file was updated orrefreshed.
NO-CHECK means that the cache file was returnedwithout an up-to-date check.
UP-TO-DATE means that the cache file was returnedwith an up-to-date check
HOST-NOT-AVAILABLE means that the remoteserver was not available for an up-to date check, so thecache file was returned without a check.
CL-MISMATCH means that the cache file write wasaborted due to a content-length mismatch
ABORTED means that caching was aborted due to aparticular reason. For eg. the absense of a validLast-Modified header.
Remote Server Finish Status This field specifies if the request to the remote serverwas successfully carried out to completion,interrupted by the client clicking the Stop button inthe browser, or aborted by an error condition.
Status Code From Server The status code returned from the server.
Setting Access Log Preferences
Chapter 9 • Using Log Files 177

TABLE 9–3 Log File Formats for the Server Instance (Continued)Log Format Item Description
Route To Proxy (PROXY, SOCKS, DIRECT) The route used to retrieve the resource. The documentcan be retrieved directly, through a proxy, or througha SOCKS server.
Transfer Time The length of time of the transfer, in seconds ormilliseconds.
Header-length From Server Response The length of the header from the server response.
Request Header Size From Proxy To Server The size of the request header from the proxy to theserver.
Response Header Size Sent To Client. The size of the response header sent to the client.
Request Header Size Received From Client The size of the request header received from the client.
Content-length From Proxy To Server Request. The length, in bytes, of the document sent from theproxy to the server.
Content-length Received From Client The length, in bytes, of the document from the client.
Content-length From Server Response The length, in bytes, of the document from the server.
Unverified User From Client The user name given to the remote server duringauthentication.
▼ To Set the Access Log Preferences for the Server Instance
Access the Server Manager and click the Server Status tab.
Click the Set Access Log Preferences link.
The Set Access Log Preferences page is displayed.
Select the resource from the drop-down list or click the Regular Expression button, type aregular expression, and click OK.
Specify whether to log client accesses.
This setting requires Domain Name Service (DNS) to be enabled.
Specify the absolute path for the access log file.
The log files by default are kept in the logs directory in the server root. If you specify a partialpath, the server assumes the path is relative to the logs directory in the server root.
If you are editing the entire server, the default value for this field is $accesslog, the variable thatdenotes the access log file for the server in the configuration file.
1
2
3
4
5
Setting Access Log Preferences
Oracle iPlanet Web Proxy Server 4.0.14 Administration Guide • June 2010178

Choose whether to record domain names or IP addresses of the systems accessing the server inthe access log.
Choose the format the log file should be: common, extended, extended-2, only specifiedinformation (“Only log”radio button), or custom.
If you click Only log, the following flexible log format items are available:
Choose the type of log file format to use in the access log.
Server access logs can be in Common Logfile Format, Extended Logfile Format, Extended2Logfile format, flexible log format, or your own customizable format. The Common LogfileFormat is a commonly supported format that provides a fixed amount of information about theserver. The flexible log format enables you to choose (from Proxy Server) what to log. Acustomizable format uses parameter blocks that you specify to control what gets logged.
■ Use Common LogFile Format. Includes client’s host name, authenticated user name, dateand time of request, HTTP header, status code returned to the client, and content length ofthe document sent to the client.
■ Use Extended LogFile Format. Includes all of the fields of the common log file format as wellas some additional fields such as remote status, proxy to client content length, remote toproxy content length, proxy to remote content length, client to proxy header length, proxyto client header length, proxy to remote header length, remote to proxy header length andtransfer time.
■ Use Extended2 LogFile Format. Includes all of the fields of the extended logfile format aswell as some additional fields such as client status, server status, remote status, cache finishstatus, and actual route.
■ Only Log. Allows you to choose which information will be logged. You can choose from theflexible log format items listed in Table 9–3.
■ If you choose a custom format, type it in the Custom Format field.
If you do not want to log client access from certain host names or IP addresses, type them in thehost names and IP Addresses fields.
Type a wildcard pattern of hosts from which the server should not record accesses. For example,*.example.com does not log accesses from people whose domain is example.com. You can typewildcard patterns for host names, IP addresses, or both.
Choose whether to include the format string in the log file.
If you are using the Proxy Server’s log analyzer, you should include a format string. If you areusing a third-party analyzer, you may not want to include a format string in your log file.
Click OK.
6
7
8
9
10
11
Setting Access Log Preferences
Chapter 9 • Using Log Files 179
Click Restart Required.The Apply Changes page appears.
Click the Restart Proxy Server button to apply the changes.
Easy Cookie LoggingProxy Server has an easy way to log a specific cookie using the flexlog facility. AddReq->headers.cookie.cookie_name to the line that initializes the flex-log subsystem in theconfiguration file obj.conf. This instruction logs the value of the cookie variable cookie_nameif the cookie variable is present in the request’s headers, and logs - if it is not present.
Setting Error Logging OptionsYou can configure the information to be logged in the server’s errors logs.
▼ To Set the Error Logging OptionsTo set the error logging options from the Administration Server, choose the Preferences tab, andthen click the Set Error Log Preferences link.To set the error logging options for the server instance from the Server Manager, choose theServer Status tab, and then click the Set Error Log Preferences link.
Specify the file that stores messages from the server in the Error Log File Name field.
From the Log Level drop-down list, specify the amount of information that should be logged inthe errors log. The following options are available:
To redirect stdout ouput to the errors log, select Log Stdout.
To redirect stderr output to the errors log, select Log Stderr.
To redirect log messages to the console, select Log To Console.
To use the UNIX syslog service or Windows Event Logging to produce and manage logs, selectUse System Logging.
Click OK.
Click Restart Required.The Apply Changes page appears.
12
13
1
2
3
4
5
6
7
8
9
Setting Error Logging Options
Oracle iPlanet Web Proxy Server 4.0.14 Administration Guide • June 2010180
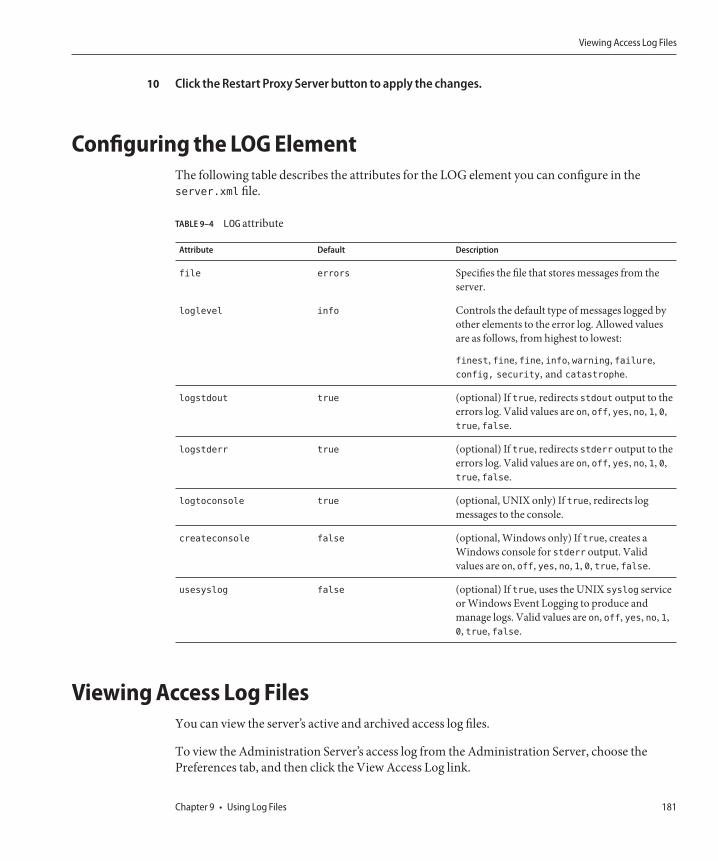
Click the Restart Proxy Server button to apply the changes.
Configuring the LOG ElementThe following table describes the attributes for the LOG element you can configure in theserver.xml file.
TABLE 9–4 LOG attribute
Attribute Default Description
file errors Specifies the file that stores messages from theserver.
loglevel info Controls the default type of messages logged byother elements to the error log. Allowed valuesare as follows, from highest to lowest:
finest, fine, fine, info, warning, failure,config, security, and catastrophe.
logstdout true (optional) If true, redirects stdout output to theerrors log. Valid values are on, off, yes, no, 1, 0,true, false.
logstderr true (optional) If true, redirects stderr output to theerrors log. Valid values are on, off, yes, no, 1, 0,true, false.
logtoconsole true (optional, UNIX only) If true, redirects logmessages to the console.
createconsole false (optional, Windows only) If true, creates aWindows console for stderr output. Validvalues are on, off, yes, no, 1, 0, true, false.
usesyslog false (optional) If true, uses the UNIX syslog serviceor Windows Event Logging to produce andmanage logs. Valid values are on, off, yes, no, 1,0, true, false.
Viewing Access Log FilesYou can view the server’s active and archived access log files.
To view the Administration Server’s access log from the Administration Server, choose thePreferences tab, and then click the View Access Log link.
10
Viewing Access Log Files
Chapter 9 • Using Log Files 181

To view an access log for the server instance from the Server Manager, choose the Server Statustab, and then click the View Access Log link.
The following example shows an access log in the Common Logfile Format.
198.18.17.222 - - [20/May/2005:14:15:49 +0530]
"GET http://www.example.com/ HTTP/1.1" 504 622 198.18.17.222 - abc
[20/May/2005:14:16:09 +0530] "GET http://www.test.com/report.zip HTTP/1.1"504 630
The following table describes the last line of this sample access log.
Access Log Field Example
Hostname or IP address of client 198.18.17.222 (In this case, the client’s IP address is shown because theproxy server’s setting for DNS lookups is disabled;if DNS lookups wereenabled, the client’s hostname would appear.
RFC 931 information - (RFC 931 identity not implemented)
Username abc (username entered by the client for authentication)
Date/time of request 20/May/2005:14:16:09 +0530
Request GET
Protocol HTTP/1.1
Status code 504
Bytes transferred 630
Viewing Error Log FilesThe error log file contains errors the server has encountered since the log file was created. Thefile also contains informational messages about the server, such as when the server was started.Unsuccessful user authentication is also recorded in the error log. Use the error log to findbroken URL paths or missing files.
To view the Administration Server’s error log file, from the Administration Server, choose thePreferences tab, and click the View Error Log link.
To view a server instance’s error log file, from the Server Manager, choose the Server Status tab,and click the View Error Log link.
The following error log example contains three entries..
Viewing Error Log Files
Oracle iPlanet Web Proxy Server 4.0.14 Administration Guide • June 2010182
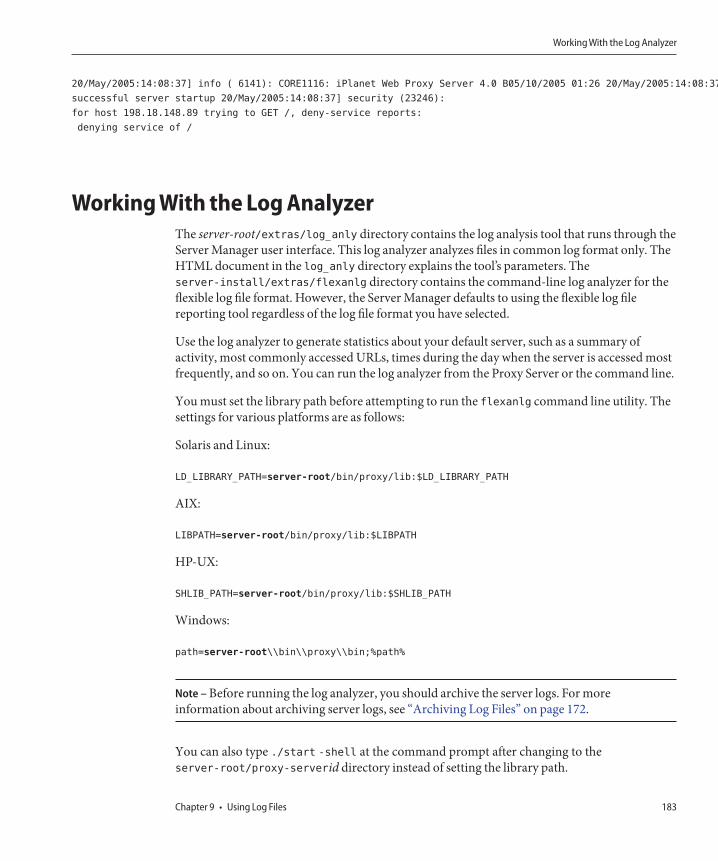
20/May/2005:14:08:37] info ( 6141): CORE1116: iPlanet Web Proxy Server 4.0 B05/10/2005 01:26 20/May/2005:14:08:37] info ( 6142):
successful server startup 20/May/2005:14:08:37] security (23246):
for host 198.18.148.89 trying to GET /, deny-service reports:
denying service of /
Working With the Log AnalyzerThe server-root/extras/log_anly directory contains the log analysis tool that runs through theServer Manager user interface. This log analyzer analyzes files in common log format only. TheHTML document in the log_anly directory explains the tool’s parameters. Theserver-install/extras/flexanlg directory contains the command-line log analyzer for theflexible log file format. However, the Server Manager defaults to using the flexible log filereporting tool regardless of the log file format you have selected.
Use the log analyzer to generate statistics about your default server, such as a summary ofactivity, most commonly accessed URLs, times during the day when the server is accessed mostfrequently, and so on. You can run the log analyzer from the Proxy Server or the command line.
You must set the library path before attempting to run the flexanlg command line utility. Thesettings for various platforms are as follows:
Solaris and Linux:
LD_LIBRARY_PATH=server-root/bin/proxy/lib:$LD_LIBRARY_PATH
AIX:
LIBPATH=server-root/bin/proxy/lib:$LIBPATH
HP-UX:
SHLIB_PATH=server-root/bin/proxy/lib:$SHLIB_PATH
Windows:
path=server-root\\bin\\proxy\\bin;%path%
Note – Before running the log analyzer, you should archive the server logs. For moreinformation about archiving server logs, see “Archiving Log Files” on page 172.
You can also type ./start -shell at the command prompt after changing to theserver-root/proxy-serverid directory instead of setting the library path.
Working With the Log Analyzer
Chapter 9 • Using Log Files 183
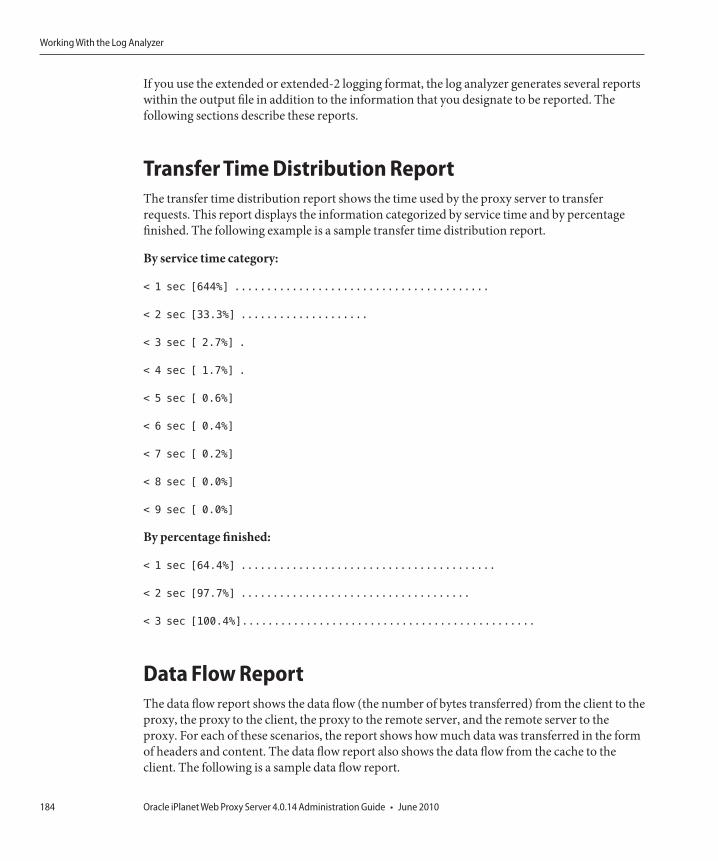
If you use the extended or extended-2 logging format, the log analyzer generates several reportswithin the output file in addition to the information that you designate to be reported. Thefollowing sections describe these reports.
Transfer Time Distribution ReportThe transfer time distribution report shows the time used by the proxy server to transferrequests. This report displays the information categorized by service time and by percentagefinished. The following example is a sample transfer time distribution report.
By service time category:
< 1 sec [644%] ........................................
< 2 sec [33.3%] ....................
< 3 sec [ 2.7%] .
< 4 sec [ 1.7%] .
< 5 sec [ 0.6%]
< 6 sec [ 0.4%]
< 7 sec [ 0.2%]
< 8 sec [ 0.0%]
< 9 sec [ 0.0%]
By percentage finished:
< 1 sec [64.4%] ........................................
< 2 sec [97.7%] ....................................
< 3 sec [100.4%]..............................................
Data Flow ReportThe data flow report shows the data flow (the number of bytes transferred) from the client to theproxy, the proxy to the client, the proxy to the remote server, and the remote server to theproxy. For each of these scenarios, the report shows how much data was transferred in the formof headers and content. The data flow report also shows the data flow from the cache to theclient. The following is a sample data flow report.
Working With the Log Analyzer
Oracle iPlanet Web Proxy Server 4.0.14 Administration Guide • June 2010184
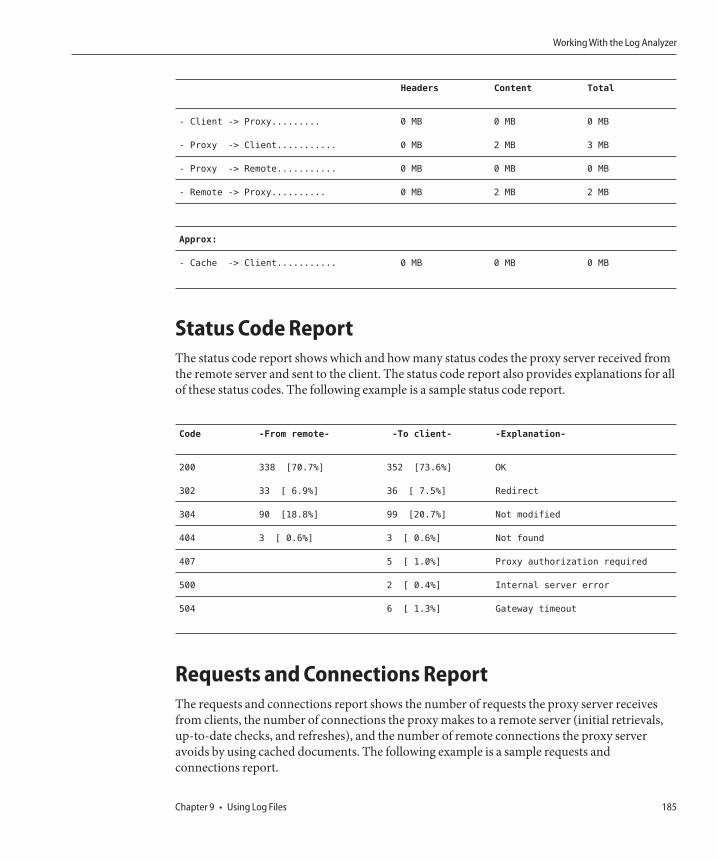
Headers Content Total
- Client -> Proxy......... 0 MB 0 MB 0 MB
- Proxy -> Client........... 0 MB 2 MB 3 MB
- Proxy -> Remote........... 0 MB 0 MB 0 MB
- Remote -> Proxy.......... 0 MB 2 MB 2 MB
Approx:
- Cache -> Client........... 0 MB 0 MB 0 MB
Status Code ReportThe status code report shows which and how many status codes the proxy server received fromthe remote server and sent to the client. The status code report also provides explanations for allof these status codes. The following example is a sample status code report.
Code -From remote- -To client- -Explanation-
200 338 [70.7%] 352 [73.6%] OK
302 33 [ 6.9%] 36 [ 7.5%] Redirect
304 90 [18.8%] 99 [20.7%] Not modified
404 3 [ 0.6%] 3 [ 0.6%] Not found
407 5 [ 1.0%] Proxy authorization required
500 2 [ 0.4%] Internal server error
504 6 [ 1.3%] Gateway timeout
Requests and Connections ReportThe requests and connections report shows the number of requests the proxy server receivesfrom clients, the number of connections the proxy makes to a remote server (initial retrievals,up-to-date checks, and refreshes), and the number of remote connections the proxy serveravoids by using cached documents. The following example is a sample requests andconnections report.
Working With the Log Analyzer
Chapter 9 • Using Log Files 185

- Total requests............. 478
- Remote connections......... 439
- Avoided remote connects.... 39 [ 8.2%]
Cache Performance ReportThe cache performance report shows the performance of the clients’ caches, the proxy server’scache, and the direct connections.
Client CacheA client cache hit occurs when a client performs an up-to-date check on a document and theremote server returns a 304 message telling the client that the document was not modified. Anup-to-date check initiated by a client indicates that the client has its own copy of the documentin the cache.
For the client’s cache, the report shows:
■ Client and proxy cache hits: A client cache hit in which the proxy server and the client bothhave a copy of the requested document and the remote server is queried for an up-to-datecheck with respect to the proxy’s copy and the client’s request is then evaluated with respectto the proxy’s copy. The cache performance report shows the number of requests of this typethat the proxy serviced and the average amount of time it took to service these requests.
■ Proxy shortcut no-check: A client cache hit in which the proxy server and the client bothhave a copy of the requested document and the proxy server tells the client without checkingwith the remote server that the document in the client’s cache is up-to-date. The cacheperformance report shows the number of requests of this type that the proxy serviced andthe average time used to service these requests.
■ Client cache hits only: A client cache hit in which only the client has a cached copy of therequested document. In this type of request, the proxy server directly tunnels the client’sIf-modified-since GET header. The cache performance report shows the number of requestsof this type that the proxy serviced and the average time used to service these requests.
■ Total client cache hits: the total number of client cache hits and the average amount of timeused to service these requests.
Proxy CacheA proxy cache hit occurs when a client requests a document from a proxy server and the proxyserver already has the document in its cache. For the proxy server’s cache hits, the report shows:
■ Proxy cache hits with check: A proxy cache hit in which the proxy server queries the remoteserver for an up-to-date check on the document. The cache performance report shows thenumber of requests of this type that the proxy serviced and the average time used to servicethese requests.
Working With the Log Analyzer
Oracle iPlanet Web Proxy Server 4.0.14 Administration Guide • June 2010186

■ Proxy cache hits without check: A proxy cache hit in which the proxy server does not querythe remote server for an up-to-date check on the document. The cache performance reportshows the number of requests of this type that the proxy serviced and the average time usedto service these requests.
■ pure proxy cache hits: A proxy cache hit in which the client does not have a cached copy ofthe requested document. The cache performance report shows the number of requests ofthis type that the proxy serviced and the average time used to service these requests.
Proxy Cache Hits CombinedFor the proxy cache hits combined, the report shows the total number of hits to the proxyserver’s cache and the average amount of time it took to service these requests.
Direct TransactionsDirect transactions are those that go directly from the remote server to the proxy server to theclient without any cache hits. For the direct transactions, the report shows:■ Retrieved documents: Documents retrieved directly from the remote server. The cache
performance report shows the number of requests of this type that the proxy serviced, theaverage time it took to service these requests, and the percentage of total transactions.
■ Other transactions:Transactions that are returned with a status code other than 200 or 304.The cache performance report shows the number of requests of this type that the proxyserviced and the average time it took to service these requests.
■ Total direct traffic: Requests, both failed requests and successfully retrieved documents thatwent directly from the client to the remote server. The cache performance report shows thenumber of requests of this type that the proxy serviced, the average time used to servicethese requests, and the percentage of total transactions.
The following example is a sample cache performance report.
CLIENT CACHE:
- Client & proxy cache hits... 86 reqs [18.0%] 0.21 sec/req- Proxy shortcut
no-check........ 13 reqs [ 2.7%] 0.00 sec/req- Client cache hits only.....
- TOTAL client cache hits.......... 99 reqs [20.7%] 0.18 sec/req
PROXY CACHE:
- Proxy cache hits w/check........ 4 reqs [ 0.8%] 0.50 sec/req- Proxy cache
hits w/o check.. 10 reqs [ 2.1%] 0.00 sec/req- Pure proxy cache hits......
14 reqs [ 2.9%] 0.14 sec/req
PROXY CACHE HITS COMBINED:
- TOTAL proxy cache hits....... 113 reqs [23.6%] 0.18 sec/req
DIRECT TRANSACTIONS:
- Retrieved documents..313 reqs [65.5%] 0.90 sec/req 2 MB- Other
Working With the Log Analyzer
Chapter 9 • Using Log Files 187

transactions.. 52 reqs [10.9%] 7.79 sec/req- TOTAL direct traffic..
365 reqs [76.4%] 1.88 sec/req 2 MB
Transfer Time ReportThe transfer time report shows the information about the time used by the proxy server toprocess a transaction. This report shows values for the following categories:
Average transaction time: The average of all transfer times logged.
Average transfer time without caching: the average of transfer times for transactions that arenot returned from the cache, that is those transaction that result in a 200 response from remoteserver.
Average with caching, without errors: The average of transfer times for all non-errortransactions, that is those transaction, 2xx and 3xx status codes.
Average transfer time improvement: The average transaction time minus the average transfertime with caching, without errors.
The following example is a sample transfer time report.
- Average transaction time... 1.48 sec/req- Ave xfer time w/o caching..
0.90 sec/req- Ave w/caching, w/o errors.. 0.71 sec/req - Ave xfer
time improvement.. 0.19 sec/req
Hourly Activity ReportFor each analyzed hour, the hourly activity report shows:
■ The load average■ The number of cache hits with no up-to-date check to the remote server■ The number of hits to the proxy server’s cache with an up-to-date check to the remote server
that proves that the document is up-to-date and the document is in the client cache■ The number of hits to the proxy server’s cache with an up-to-date check to the remote server
that proves that the document is up-to-date and the document is not in the client cache■ The number of hits to the proxy server’s cache with an up-to-date check to the remote server
that caused part of the document to be updated■ The number of hits to the proxy server’s cache with an up-to-date check to the remote server
that returned a new copy of the requested document with a 200 status code■ The number of requests for which documents are directly retrieved from the remote server
without any hits to the proxy server’s cache
Working With the Log Analyzer
Oracle iPlanet Web Proxy Server 4.0.14 Administration Guide • June 2010188

▼ To Run the Log Analyzer From the Server ManagerAccess the Server Manager, and click the Server Status tab.
Click the Generate Report link.The Generate Report page is displayed.
Type the name of your server. This name appears in the generated report.
Choose whether the report will appear in HTML or ASCII format.
Select the log file you want to analyze.
If you want to save the results in a file, type an output filename in the Output File field.If you leave the field blank, the report results print to the screen. For large log files, you shouldsave the results to a file because printing the output to the screen might take a long time.
Select whether to generate totals for certain server statistics.The following totals can be generated:
■ Total Hits- The total number of hits the server received since access logging was enabled.■ 304 (Not Modified) Status Codes- The number of times a local copy of the requested
document was used, rather than the server returning the page.■ 302 (Redirects) Status Codes- The number of times the server redirected to a new URL
because the original URL moved.■ 404 (Not Found) Status Codes- The number of times the server could not find the
requested document or the server did not serve the document because the client was not anauthorized user.
■ 500 (Server Error) Status Codes- The number of times a server-related error occurred.■ Total Unique URLs- The number of unique URLs accessed since access logging was
enabled.■ Total Unique Hosts- The number of unique hosts who have accessed the server since access
logging was enabled.■ Total Kilobytes Transferred- The number of kilobytes the server transferred since access
logging was enabled.
Select whether to generate general statistics. If you choose to generate statistics, choose fromthe following:
■ Find Top Number Seconds Of Log- Generates statistics based on information from themost recent number of seconds.
1
2
3
4
5
6
7
8
Working With the Log Analyzer
Chapter 9 • Using Log Files 189

■ Find Top Number Minutes Of Log-■ Generates statistics based on information from the most recent number of minutes.■ Find Top Number Hours Of Log- Generates statistics based on information from the most
recent number of hours.■ Find Number Users (If Logged)- Generates statistics based on information from the
number of users.■ Find Top Number Referers (If Logged)- Generates statistics based on information from the
number of referers.■ Find Top Number User Agents (If Logged)- Generates statistics based on information on
the user agents, for example, the browser type, its version, and the operating system.■ Find Top Number Miscellaneous Logged Items (If Logged)- Generates statistics based on
information from the number of user.
Select whether to generate lists.
If you choose to generate lists, specify the items for which you would like to generate lists:
■ URLs Accessed- Displays the URLs that were accessed■ Number Most Commonly Accessed URL- Displays the most commonly accessed URLs or
URLs that were accessed more than a specified number of times■ URLs That Were Accessed More Than Number Times- Displays the URL that were
accessed more times than the number specified■ Hosts Accessing Your Server- Displays the hosts that accessed the Proxy Server■ Number Hosts Most Often Accessing Your Server- Displays the hosts most often accessing
your server or hosts that have accessed your server more than a specified number of times■ Hosts That Accessed Your Server More Than Number Times- Displays the hosts that
accessed your server more times than the number specified
Specify the order in which you want to see the results
Prioritize the order from 1 to 3 that you would like each section to appear in the report. If youchose not to generate any of them, the section will automatically be left out. The sections are:
■ Find Totals■ General Statistics■ Make Lists
Click OK.
The report appears in a new window.
9
10
11
Working With the Log Analyzer
Oracle iPlanet Web Proxy Server 4.0.14 Administration Guide • June 2010190

To Run the Log Analyzer From the Command LineTo analyze access log files from the command line, run theflexanlg tool , which is in thedirectory server-install/extras/flexanlg.
To run flexanlg, type the following command and options at the command prompt:
./flexanlg [-n name] [-x] [-r] [-p order] [-i file]* [ -m metafile ]* [-o
file][-c opts] [-t opts] [-l opts]
Options marked * can be repeated.
You can display this information online by
typing ./flexanlg -h.
-P: proxy log format Default: no
-n servername: The name of the server
-x : Output in HTML Default: no
-r : Resolve IP addresses to hostnames Default: no
-p [c,t,l]: Output order (counts, time stats, lists) Default: ctl
-i filename: Input log file Default: none
-o filename: Output log file Default: stdout
-m filename: Meta file Default: none
-c [h,n,r,f,e,u,o,k,c,z]: Count these item(s) - Default: hnreuokc
h: total hits
n: 304 Not Modified status codes (Use Local Copy)
r: 302 Found status codes (Redirects)
f: 404 Not Found status codes (Document Not Found)
e: 500 Server Error status codes (Misconfiguration)
u: total unique URL’so: total unique hosts
k: total kilobytes transferred
c: total kilobytes saved by caches
z: Do not count any items.
-t [sx,mx,hx, xx,z]: Find time stats - Default:s5m5h10u10a10r10x10
s(number): Find top (number) seconds of log
m(number): Find top (number) minutes of log
h(number): Find top (number) hours of log
u(number): Find top (number) users of log
a(number): Find top (number) user agents of log
r(number): Find top (number) referers of log
x(number): Find top (number) for miscellaneous keywords
z: Do not find any time stats.
-l [cx,hx]: Make a list of - Default: c+3h5
c(x,+x): Most commonly accessed URL’s(x: Only list x entries)
(+x: Only list if accessed more than x times)
h(x,+x): Hosts (or IP addresses) most often accessing your server
Working With the Log Analyzer
Chapter 9 • Using Log Files 191

(x: Only list x entries)
(+x: Only list if accessed more than x times)
z: Do not make any lists.
Viewing Events (Windows)In addition to logging errors to the server error log, Proxy Server logs severe system errors to theEvent Viewer. The Event Viewer enables you to monitor events on your system. Use the EventViewer to see errors resulting from fundamental configuration problems, which can occurbefore the error log can be opened.
▼ To Use the Event ViewerFrom the Start menu, select Programs and then Administrative Tools.Choose Event Viewer in the Administrative Tools program group.
Choose Application from the Log menu.The Application log appears in the Event Viewer. Errors from Proxy Server have a source labelof proxy-serverid.
Choose Find from the View menu to search for one of these labels in the log.Choose Refresh from the View menu to see updated log entries.
For more information about the Event Viewer, consult your system documentation.
1
2
3
Viewing Events (Windows)
Oracle iPlanet Web Proxy Server 4.0.14 Administration Guide • June 2010192

Monitoring Servers
This chapter contains information about ways to monitor your server, including the built-inmonitoring tool, and Simple Network Management Protocol (SNMP).
You can use SNMP together with iPlanet management information bases (MIB) and networkmanagement software such as HP OpenView to monitor your servers in real-time just as youmonitor other devices in your network.
Note – On Windows, before installing Proxy Server 4 ensure that Windows SNMP componentsare already installed on your system.
You can view the server’s status in real time by using the statistics feature or the SNMP. If youare using UNIX or Linux, you must configure your Proxy Server for SNMP if you plan to use it.
This chapter contains the following sections:
■ “Monitoring the Server Using Statistics” on page 194■ “SNMP Basics” on page 204■ “Setting Up SNMP” on page 205■ “Using a Proxy SNMP Agent (UNIX)” on page 206■ “Reconfiguring the SNMP Native Agent” on page 208■ “Installing the SNMP Master Agent” on page 208■ “Enabling and Starting the SNMP Master Agent” on page 209■ “Configuring the SNMP Master Agent” on page 214■ “Enabling the Subagent” on page 214■ “Understanding SNMP Messages” on page 215
10C H A P T E R 1 0
193

Monitoring the Server Using StatisticsYou can use the statistics feature to monitor your server’s current activity. The statistics showyou how many requests your server is handling and how well it is handling these requests. If theinteractive server monitor reports that the server is handling a large number of requests, youmay need to adjust the server configuration or the system’s network kernel to accommodate therequests. Statistics are disabled by default because gathering statistics adds overhead to theProxy Server. Enabling statistics causes the server to begin gathering and saving statisticsinformation.
Once you enable statistics, you can view statistics in the following areas:
■ Connections■ DNS■ KeepAlive■ Cache■ Server requests
For a description of the various server statistics for which the interactive server monitor reportsthe totals, see the Monitor Current Activity page in the online help.
Processing Proxy Server StatisticsA built-in function called stats-xml is used to collect Proxy Server statistics. This functionmust be enabled to view statistics from the Server Manager or to generate a report using theperfdump function. The stats-xml function is also used to enable profiling, which is arequirement for monitoring statistics through the use of a custom NSAPI function. Enablingstatistics and profiling on the server initializes a server function called stats-init in theobj.conf file to begin statistics gathering.
Init profiling="on" fn="stats-init"
This instruction also creates a NameTrans directive that allows you to access statistics from abrowser window.
NameTrans fn="assign-name" name="stats-xml" from="(/stats-xml|/stats-xml/.*)
Finally, enabling statistics adds a Service directive to process the stats-xml function when theNameTrans directive is selected
<Object name="stats-xml">
Service fn="stats-xml"
</Object>
Statistics gathering updates an Init function in the obj.conf. Therefore, you must stop and startyour server for these changes to take effect.
Monitoring the Server Using Statistics
Oracle iPlanet Web Proxy Server 4.0.14 Administration Guide • June 2010194
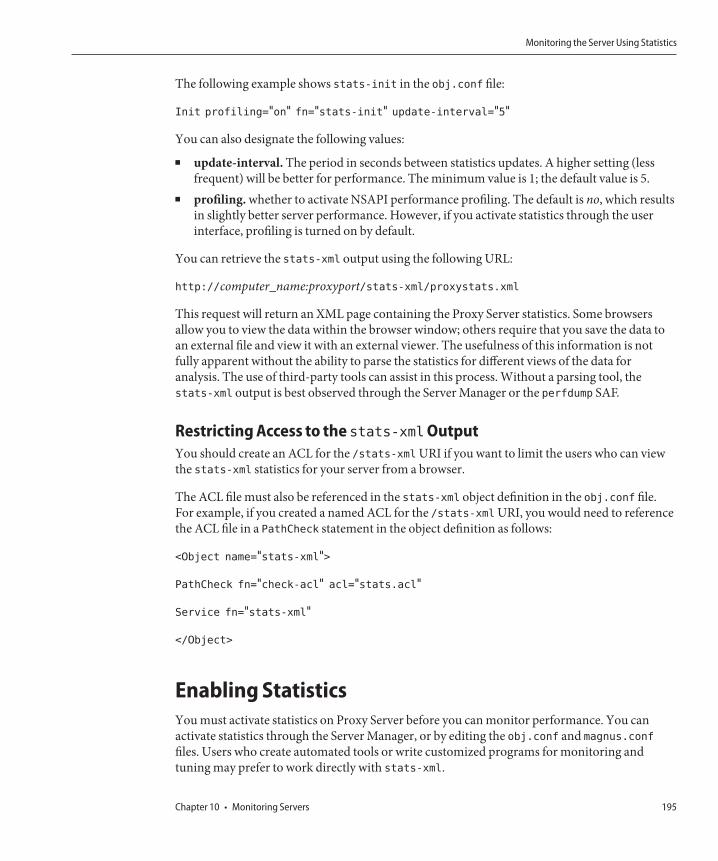
The following example shows stats-init in the obj.conf file:
Init profiling="on" fn="stats-init" update-interval="5"
You can also designate the following values:■ update-interval. The period in seconds between statistics updates. A higher setting (less
frequent) will be better for performance. The minimum value is 1; the default value is 5.■ profiling. whether to activate NSAPI performance profiling. The default is no, which results
in slightly better server performance. However, if you activate statistics through the userinterface, profiling is turned on by default.
You can retrieve the stats-xml output using the following URL:
http://computer_name:proxyport/stats-xml/proxystats.xml
This request will return an XML page containing the Proxy Server statistics. Some browsersallow you to view the data within the browser window; others require that you save the data toan external file and view it with an external viewer. The usefulness of this information is notfully apparent without the ability to parse the statistics for different views of the data foranalysis. The use of third-party tools can assist in this process. Without a parsing tool, thestats-xml output is best observed through the Server Manager or the perfdump SAF.
Restricting Access to the stats-xmlOutputYou should create an ACL for the /stats-xml URI if you want to limit the users who can viewthe stats-xml statistics for your server from a browser.
The ACL file must also be referenced in the stats-xml object definition in the obj.conf file.For example, if you created a named ACL for the /stats-xml URI, you would need to referencethe ACL file in a PathCheck statement in the object definition as follows:
<Object name="stats-xml">
PathCheck fn="check-acl" acl="stats.acl"
Service fn="stats-xml"
</Object>
Enabling StatisticsYou must activate statistics on Proxy Server before you can monitor performance. You canactivate statistics through the Server Manager, or by editing the obj.conf and magnus.conf
files. Users who create automated tools or write customized programs for monitoring andtuning may prefer to work directly with stats-xml.
Monitoring the Server Using Statistics
Chapter 10 • Monitoring Servers 195

Caution – When you enable statistics/profiling, statistics information is made available to anyuser of your server.
▼ To Enable Statistics From the Server Manager
Access the Server Manager, and click the Server Status tab.
Click the Monitor Current Activity link.
The Monitor Current Activity page is displayed.
Select the Yes option for Activate Statistics/Profiling to enable statistics.
Click OK.
Click Restart Required.
The Apply Changes page appears.
Click the Restart Proxy Server button to apply the changes.
▼ To Enable Statistics Using stats-xml
Under the default object in the obj.conffile, add the following line:NameTrans fn="assign-name" name="stats-xml" from="(/stats-xml|/stats-xml/.*)"
Add the following Service function to obj.conf:
<Object name="stats-xml">
Service fn="stats-xml"
</Object>
Add the stats-init SAF to the obj.conf.
Using StatisticsOnce you have enabled statistics, you can get a variety of information on how your serverinstance is running. The statistics are broken up into functional areas.
1
2
3
4
5
6
1
2
3
Monitoring the Server Using Statistics
Oracle iPlanet Web Proxy Server 4.0.14 Administration Guide • June 2010196

Displaying Statistics in the Server ManagerThis section describes how a subset of the proxystats.xml data can be viewed in the ServerManager.
You can view totals, maximum values, peak numbers, and bar graphs of information pertainingto connections to the Proxy Server, DNS processing, keep-alive values, cache, and serverrequests.
The following section describe the types of information that may be obtained for each of theseareas.
Connection Statistics
The following connection statistics are available from the Server Manager:■ Total number of connections■ Maximum number of queued connections■ Peak number of queued connections■ Current number of queued connections■ Number of processes
DNS Statistics
The following DNS statistics are available from the Server Manager:■ Maximum DNS cache entries■ Number of processes■ Number of DNS cache hits (also shown as a bar graph)■ Number of DNS cache misses (also shown as a bar graph)
Keep-Alive Statistics
The following keep-alive statistics are available from the Server Manager:■ Maximum keep-alive connections■ Keep-alive timeout■ Number of processes■ Number of keep-alive hits (also shown as a bar graph)■ Number of keep-alive flushes (also shown as a bar graph)■ Number of keep-alive refusals (also shown as a bar graph)■ Number of keep alive time-outs (also shown as a bar graph)
Server Request Statistics
The following server statistics are available from the Server Manager.
■ Total number of requests.■ Number of bytes received.
Monitoring the Server Using Statistics
Chapter 10 • Monitoring Servers 197
■ Number of bytes sent.■ Number of processes.■ A breakdown of the requests per HTTP server code (also shown as bar graphs). For
example, the HTTP server code 200 indicates a fulfilled request.
▼ To Access statistics
Access the Server Manager, and click the Server Status tab.
Click the Monitor Current Activity link.
Choose the refresh interval from the Select Refresh Interval drop-down list.The refresh interval is the number of seconds between updates of the statistics informationdisplayed.
Choose the kind of statistics you want displayed from the Select Statistics To Be Displayeddrop-down list.For more information about the types of statistics, see “Displaying Statistics in the ServerManager” on page 197.
Click Submit.If your server instance is running, and you have enabled Statistics/Profiling, you see a pagedisplaying the kind of statistics you selected. The page is updated every 5-15 seconds, dependingupon the value of the refresh interval.
Select the process ID from the drop-down list.You can view current activity through the Server Manager, but these categories are not fullyrelevant for tuning your server. The perfdump statistics are recommended for tuning yourserver. For more information, see the next section.
Monitoring Current Activity Using the perfdumpUtilityThe perfdump utility is a Server Application Function (SAF) built into Proxy Server that collectsvarious pieces of performance data from the Proxy Server internal statistics and displays themin ASCII text. The perfdump utility enables you to monitor a greater variety of statistics thanthose available through the Server Manager.
With perfdump, the statistics are unified. Rather than monitoring a single process, statistics aremultiplied by the number of processes, which gives you a more accurate view of the server as awhole.
1
2
3
4
5
6
Monitoring the Server Using Statistics
Oracle iPlanet Web Proxy Server 4.0.14 Administration Guide • June 2010198

Enabling the perfdumpUtilityYou can enable the perfdump SAF only after you have enabled the stats-xml function.
▼ To Enable the perfdump SAF
Add the following object to your obj.conffile after the default object:<Object name="perf">
Service fn="service-dump"
</Object>
Add the following line to the default object:NameTrans fn=assign-name from="/.perf" name="perf"
Restart your server software.
Access perfdumpby going to http://computer_name:proxyport/.perf.You can request the perfdump statistics and specify how frequently (in seconds) the browsershould automatically refresh. The following example sets the refresh to every 5 seconds:
http://computer_name:proxyport/.perf?refresh=5
Sample perfdumpOutputThe following example shows sample perfdump output
proxyd pid: 6751
iPlanet Web Proxy Server 4.0 B05/02/2005 15:32 (SunOS DOMESTIC)
Server started Thu May 19 13:15:14 2005
Process 6751 started Thu May 19 13:15:14 2005
ConnectionQueue:
-----------------------------------------
Current/Peak/Limit Queue Length 0/1/4096
Total Connections Queued 1
Average Queue Length (1, 5, 15 minutes) 0.00, 0.00, 0.00
Average Queueing Delay 0.09 milliseconds
ListenSocket ls1:
------------------------
Address http://0.0.0.0:8081
Acceptor Threads 1
1
2
3
4
Monitoring the Server Using Statistics
Chapter 10 • Monitoring Servers 199
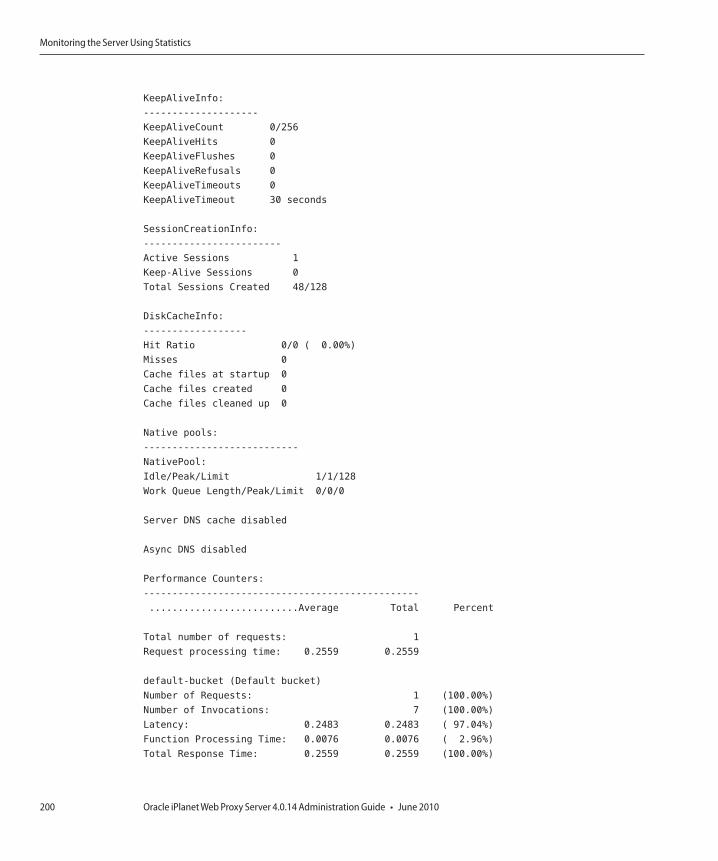
KeepAliveInfo:
--------------------
KeepAliveCount 0/256
KeepAliveHits 0
KeepAliveFlushes 0
KeepAliveRefusals 0
KeepAliveTimeouts 0
KeepAliveTimeout 30 seconds
SessionCreationInfo:
------------------------
Active Sessions 1
Keep-Alive Sessions 0
Total Sessions Created 48/128
DiskCacheInfo:
------------------
Hit Ratio 0/0 ( 0.00%)
Misses 0
Cache files at startup 0
Cache files created 0
Cache files cleaned up 0
Native pools:
---------------------------
NativePool:
Idle/Peak/Limit 1/1/128
Work Queue Length/Peak/Limit 0/0/0
Server DNS cache disabled
Async DNS disabled
Performance Counters:
------------------------------------------------
..........................Average Total Percent
Total number of requests: 1
Request processing time: 0.2559 0.2559
default-bucket (Default bucket)
Number of Requests: 1 (100.00%)
Number of Invocations: 7 (100.00%)
Latency: 0.2483 0.2483 ( 97.04%)
Function Processing Time: 0.0076 0.0076 ( 2.96%)
Total Response Time: 0.2559 0.2559 (100.00%)
Monitoring the Server Using Statistics
Oracle iPlanet Web Proxy Server 4.0.14 Administration Guide • June 2010200
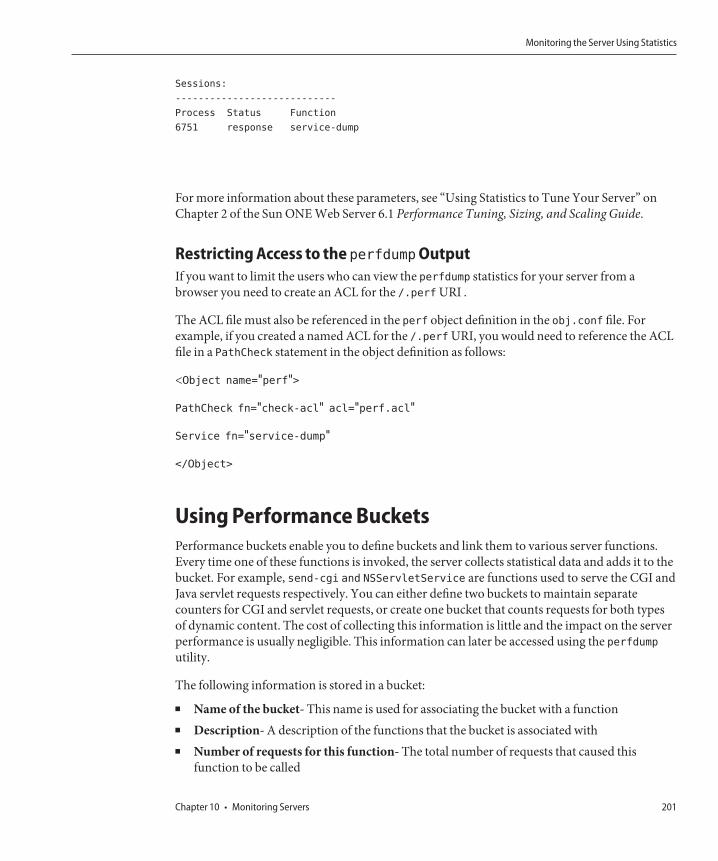
Sessions:
----------------------------
Process Status Function
6751 response service-dump
For more information about these parameters, see “Using Statistics to Tune Your Server” onChapter 2 of the Sun ONE Web Server 6.1 Performance Tuning, Sizing, and Scaling Guide.
Restricting Access to the perfdumpOutputIf you want to limit the users who can view the perfdump statistics for your server from abrowser you need to create an ACL for the /.perf URI .
The ACL file must also be referenced in the perf object definition in the obj.conf file. Forexample, if you created a named ACL for the /.perf URI, you would need to reference the ACLfile in a PathCheck statement in the object definition as follows:
<Object name="perf">
PathCheck fn="check-acl" acl="perf.acl"
Service fn="service-dump"
</Object>
Using Performance BucketsPerformance buckets enable you to define buckets and link them to various server functions.Every time one of these functions is invoked, the server collects statistical data and adds it to thebucket. For example, send-cgi and NSServletService are functions used to serve the CGI andJava servlet requests respectively. You can either define two buckets to maintain separatecounters for CGI and servlet requests, or create one bucket that counts requests for both typesof dynamic content. The cost of collecting this information is little and the impact on the serverperformance is usually negligible. This information can later be accessed using the perfdumputility.
The following information is stored in a bucket:
■ Name of the bucket- This name is used for associating the bucket with a function■ Description- A description of the functions that the bucket is associated with■ Number of requests for this function- The total number of requests that caused this
function to be called
Monitoring the Server Using Statistics
Chapter 10 • Monitoring Servers 201
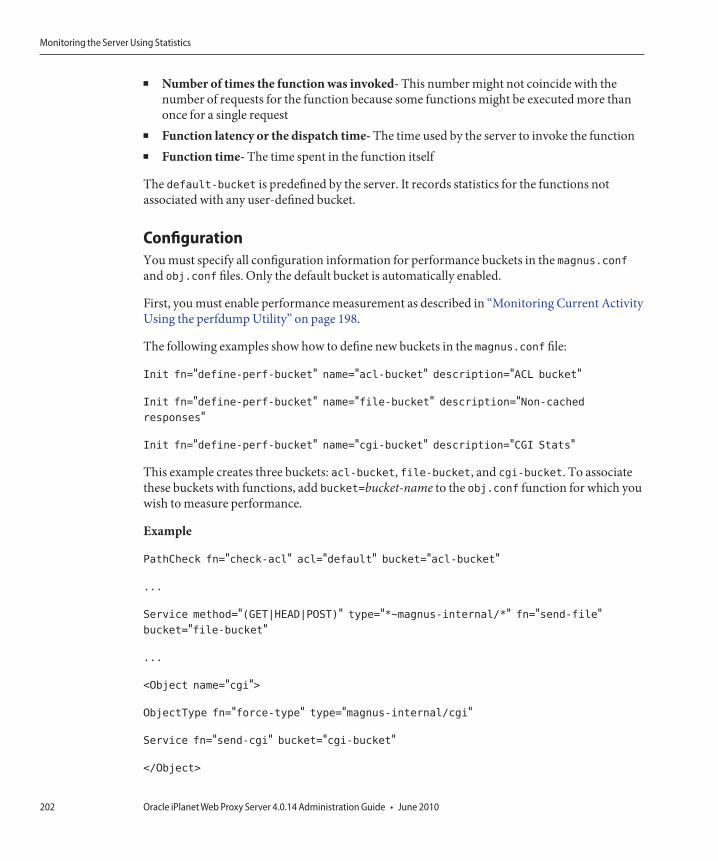
■ Number of times the function was invoked- This number might not coincide with thenumber of requests for the function because some functions might be executed more thanonce for a single request
■ Function latency or the dispatch time- The time used by the server to invoke the function■ Function time- The time spent in the function itself
The default-bucket is predefined by the server. It records statistics for the functions notassociated with any user-defined bucket.
ConfigurationYou must specify all configuration information for performance buckets in the magnus.confand obj.conf files. Only the default bucket is automatically enabled.
First, you must enable performance measurement as described in “Monitoring Current ActivityUsing the perfdump Utility” on page 198.
The following examples show how to define new buckets in the magnus.conf file:
Init fn="define-perf-bucket" name="acl-bucket" description="ACL bucket"
Init fn="define-perf-bucket" name="file-bucket" description="Non-cachedresponses"
Init fn="define-perf-bucket" name="cgi-bucket" description="CGI Stats"
This example creates three buckets: acl-bucket, file-bucket, and cgi-bucket. To associatethese buckets with functions, add bucket=bucket-name to the obj.conf function for which youwish to measure performance.
Example
PathCheck fn="check-acl" acl="default" bucket="acl-bucket"
...
Service method="(GET|HEAD|POST)" type="*~magnus-internal/*" fn="send-file"bucket="file-bucket"
...
<Object name="cgi">
ObjectType fn="force-type" type="magnus-internal/cgi"
Service fn="send-cgi" bucket="cgi-bucket"
</Object>
Monitoring the Server Using Statistics
Oracle iPlanet Web Proxy Server 4.0.14 Administration Guide • June 2010202

Performance ReportThe server statistics in buckets can be accessed using the perfdump utility. The performancebuckets information is located in the last section of the report returned by perfdump.
The report contains the following information:
■ Average, Total, and Percent columns give data for each requested statistic.■ Request Processing Time is the total time required by the server to process all requests it has
received so far.■ Number of Requests is the total number of requests for the function.■ Number of Invocations is the total number of times that the function was invoked. This
value differs from the number of requests in that a function could be called multiple timeswhile processing one request. The percentage column for this row is calculated in referenceto the total number of invocations for all of the buckets.
■ Latency is the time in seconds the Proxy Server uses to prepare for calling the function.■ Function Processing Time is the time in seconds Proxy Server spent inside the function. The
percentage of Function Processing Time and Total Response Time is calculated withreference to the total Request Processing Time.
■ Total Response Time is the sum in seconds of Function Processing Time and Latency.
The following example shows sample performance bucket information available throughperfdump:
Performance Counters:
------------------------------------------------
Average Total Percent
Total number of requests: 1
Request processing time: 0.2559 0.2559
default-bucket (Default bucket)
Number of Requests: 1 (100.00%)
Number of Invocations: 7 (100.00%)
Latency: 0.2483 0.2483 ( 97.04%)
Function Processing Time: 0.0076 0.0076 ( 2.96%)
Total Response Time: 0.2559 0.2559 (100.00%)
Monitoring the Server Using Statistics
Chapter 10 • Monitoring Servers 203
SNMP BasicsSNMP is a protocol used to exchange data about network activity. With SNMP, data travelsbetween a managed device and a network management station (NMS). A managed device isanything that runs SNMP: hosts, routers, your proxy server, and other servers on your network.The NMS is a system used to remotely manage that network. Usually, the NMS software willprovide a graph to display collected data or use that data to make sure the server is operatingwithin a particular tolerance.
The NMS is usually a powerful workstation with one or more network managementapplications installed. A network management application such as HP OpenView graphicallyshows information about managed devices, such as your web servers. This information mightinclude which servers in your enterprise are up or down, or the number and type of errormessages received. When you use SNMP with a proxy server, this information is transferredbetween the NMS and the server through the use of two types of agents, the subagent and themaster agent.
The subagent gathers information about the server and passes the information to the server’smaster agent. Every server, except for the Administration Server, has a subagent.
Note – After making any SNMP configuration changes, you must click Apply Required, thenrestart SNMP subagent.
The master agent communicates with the NMS. The master agent is installed with theAdministration Server.
You can have multiple subagents installed on a host computer, but only one master agent. Forexample, if you had Proxy Server, Oracle Directory Server Enterprise Edition, and OracleCommunications Messaging Exchange Server installed on the same host, the subagents for eachof the servers would communicate with the same master agent.
Management Information BaseThe Proxy Server stores variables pertaining to network management. Variables that the masteragent can access are called managed objects. These objects are defined in a tree-like structurecalled the management information base (MIB). The MIB provides access to the Proxy Serversnetwork configuration, status, and statistics. Using SNMP, you can view this information fromthe NMS.
The top level of the MIB tree shows that the internet object identifier has four sub-trees:directory, mgmt, experimental , and private . The private subtree contains the enterprises node.Each subtree in the enterprises node is assigned to an individual enterprise, which is anorganization that has registered its own specific MIB extensions. An enterprise can then create
SNMP Basics
Oracle iPlanet Web Proxy Server 4.0.14 Administration Guide • June 2010204

product-specific subtrees under its subtree. MIBs created by companies are located under theenterprises node. The iPlanet server MIBs are also located under the enterprises node. EachiPlanet server subagent provides an MIB for use in SNMP communication. The server reportssignificant events to the NMS by sending messages or traps containing these variables. TheNMS can also query the servers MIB for data, or can remotely change variables in the MIB. EachiPlanet server has its own MIB. All iPlanet server MIBs are located at
server-root/plugins/snmp
The Proxy Servers MIB is a file called proxyserv40.mib. This MIB contains the definitions forvarious variables pertaining to network management for the Proxy Server. You can seeadministrative information about your Proxy Server and monitor the server in real time usingthe Proxy Server MIB.
Setting Up SNMPTo use SNMP you must have a master agent and at least one subagent installed and running onyour system. You need to install the master agent before you can enable a subagent.
The procedures for setting up SNMP are different depending upon your system.
Before you begin, you should verify two things:
■ Whether your system already running an SNMP agent (an agent native to your operatingsystem)
■ If so, whether your native SNMP agent support SMUX communication? (If you are usingthe AIX platform, your system supports SMUX.)
See your system documentation for information about how to verify this information.
Note – After changing SNMP settings in the Administration Server, installing a new server, ordeleting an existing server, you must perform the following steps:
■ (Windows) Restart the Windows SNMP service or reboot the system.■ (UNIX) Restart the SNMP master agent using the Administration Server.
TABLE 10–1 Overview of procedures for enabling SNMP master agents and subagents
If your server meets these conditions.......follow these procedures. These are discussed in detail in thefollowing sections.
■ No native agent is currently running 1. Start the master agent.2. Enable the subagent for each server installed on
the system.
Setting Up SNMP
Chapter 10 • Monitoring Servers 205
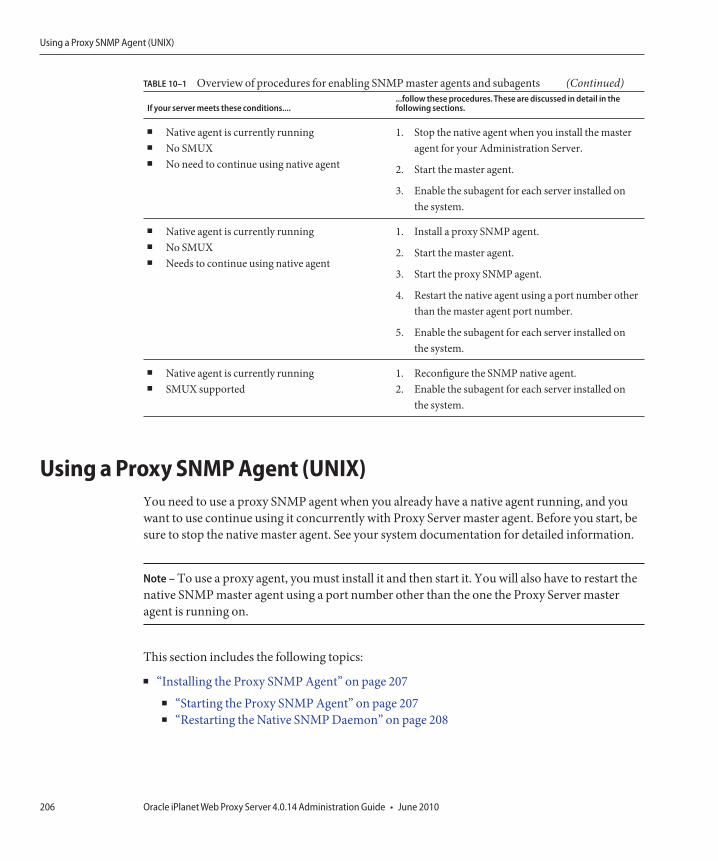
TABLE 10–1 Overview of procedures for enabling SNMP master agents and subagents (Continued)
If your server meets these conditions.......follow these procedures. These are discussed in detail in thefollowing sections.
■ Native agent is currently running■ No SMUX■ No need to continue using native agent
1. Stop the native agent when you install the masteragent for your Administration Server.
2. Start the master agent.
3. Enable the subagent for each server installed onthe system.
■ Native agent is currently running■ No SMUX■ Needs to continue using native agent
1. Install a proxy SNMP agent.
2. Start the master agent.
3. Start the proxy SNMP agent.
4. Restart the native agent using a port number otherthan the master agent port number.
5. Enable the subagent for each server installed onthe system.
■ Native agent is currently running■ SMUX supported
1. Reconfigure the SNMP native agent.2. Enable the subagent for each server installed on
the system.
Using a Proxy SNMP Agent (UNIX)You need to use a proxy SNMP agent when you already have a native agent running, and youwant to use continue using it concurrently with Proxy Server master agent. Before you start, besure to stop the native master agent. See your system documentation for detailed information.
Note – To use a proxy agent, you must install it and then start it. You will also have to restart thenative SNMP master agent using a port number other than the one the Proxy Server masteragent is running on.
This section includes the following topics:
■ “Installing the Proxy SNMP Agent” on page 207■ “Starting the Proxy SNMP Agent” on page 207■ “Restarting the Native SNMP Daemon” on page 208
Using a Proxy SNMP Agent (UNIX)
Oracle iPlanet Web Proxy Server 4.0.14 Administration Guide • June 2010206

Installing the Proxy SNMP AgentIf an SNMP agent is running on your system and you want to continue using the native SNMPdaemon, follow the steps in these sections:
▼ To install the Proxy SNMP Agent
Install the SNMP master agent.
See “Installing the SNMP Master Agent” on page 208.
Install and start the proxy SNMP agent and restart the native SNMP daemon.
See “Using a Proxy SNMP Agent (UNIX)” on page 206.
Start the SNMP master agent.
See “Enabling and Starting the SNMP Master Agent” on page 209.
Enable the subagent.
See “Enabling the Subagent” on page 214.
To install the SNMP proxy agent, edit the CONFIG file, located in plugins/snmp/sagt in theserver root directory. Add the port that the SNMP daemon will listen to. This file should alsoinclude the MIB trees and traps that the proxy SNMP agent will forward.
The following example shows a CONFIG file.AGENT AT PORT 1161 WITH COMMUNITY public
SUBTREES 1.3.6.1.2.1.1,
3.6.1.2.1.2,
1.3.6.1.2.1.3,
1.3.6.1.2.1.4,
1.3.6.1.2.1.5,
1.3.6.1.2.1.6,
1.3.6.1.2.1.7,
1.3.6.1.2.1.8
FORWARD ALL TRAPS;
Starting the Proxy SNMP AgentTo start the proxy SNMP agent, at the command prompt, type:
# sagt -c CONFIG&
1
2
3
4
Using a Proxy SNMP Agent (UNIX)
Chapter 10 • Monitoring Servers 207
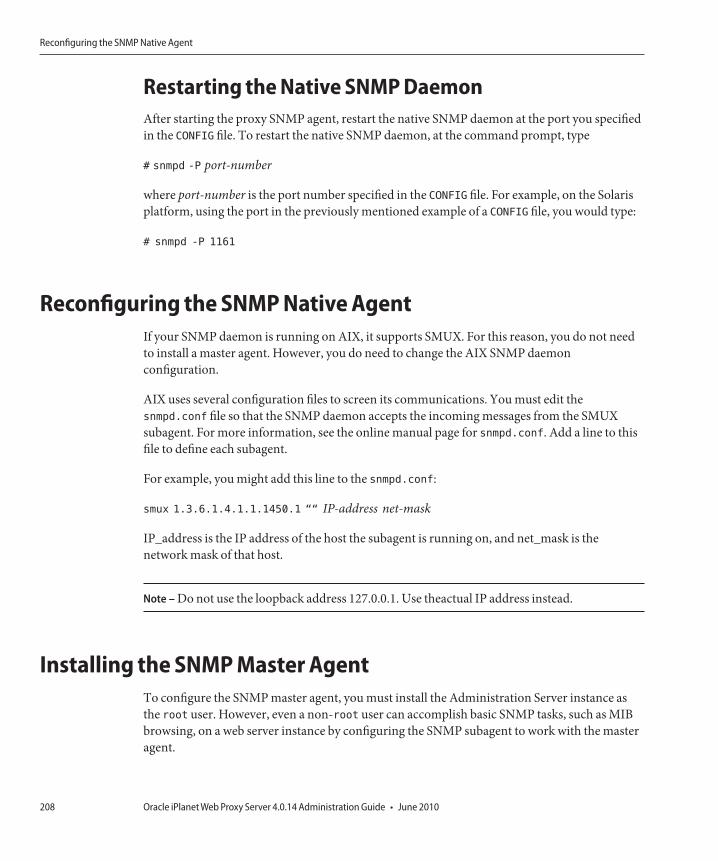
Restarting the Native SNMP DaemonAfter starting the proxy SNMP agent, restart the native SNMP daemon at the port you specifiedin the CONFIG file. To restart the native SNMP daemon, at the command prompt, type
# snmpd -P port-number
where port-number is the port number specified in the CONFIG file. For example, on the Solarisplatform, using the port in the previously mentioned example of a CONFIG file, you would type:
# snmpd -P 1161
Reconfiguring the SNMP Native AgentIf your SNMP daemon is running on AIX, it supports SMUX. For this reason, you do not needto install a master agent. However, you do need to change the AIX SNMP daemonconfiguration.
AIX uses several configuration files to screen its communications. You must edit thesnmpd.conf file so that the SNMP daemon accepts the incoming messages from the SMUXsubagent. For more information, see the online manual page for snmpd.conf. Add a line to thisfile to define each subagent.
For example, you might add this line to the snmpd.conf:
smux 1.3.6.1.4.1.1.1450.1 ““ IP-address net-mask
IP_address is the IP address of the host the subagent is running on, and net_mask is thenetwork mask of that host.
Note – Do not use the loopback address 127.0.0.1. Use theactual IP address instead.
Installing the SNMP Master AgentTo configure the SNMP master agent, you must install the Administration Server instance asthe root user. However, even a non-root user can accomplish basic SNMP tasks, such as MIBbrowsing, on a web server instance by configuring the SNMP subagent to work with the masteragent.
Reconfiguring the SNMP Native Agent
Oracle iPlanet Web Proxy Server 4.0.14 Administration Guide • June 2010208

▼ To Install the Master SNMP AgentLog in as root.
Check whether an SNMP daemon (snmpd) is running on port 161.
■ If no SNMP daemon is running, go to “Installing the SNMP Master Agent”on page 208.
■ If an SNMP daemon is running, make sure you know how to restart it and which MIB trees itsupports. Then, kill its process.
In the Administration Server, click the Set SNMP Master Agent Trap link in the Global Settingstab.
Type the name of the system that is running your network management software.
Type the port number at which your network management system listens for traps. (Thewell-known port is 162.)
For more information on traps, see “Configuring Trap Destinations” on page 214.
Type the community string you want to use in the trap.
For more information on community strings, see “Configuring the Community String” onpage 214.
Click OK.
In the Administration Server, click the Set SNMP Master Agent Community link in the GlobalSettings tab.
Type the community string for the master agent.
Choose an operation for the community.
Click New.
Enabling and Starting the SNMP Master AgentThe operation of the master agent is defined in an agent configuration file named CONFIG. Youcan edit the CONFIG file using the Server Manager, or you can edit the file manually. You mustinstall the master SNMP agent before you can enable the SNMP subagent.
1
2
3
4
5
6
7
8
9
10
11
Enabling and Starting the SNMP Master Agent
Chapter 10 • Monitoring Servers 209

If a bind error message appears similar to System Error: Could not bind to port, whenrestarting the master agent, use ps -ef | grep snmp to check if magt is running. If it is running,use the command kill -9 pid to end the process. The CGIs for SNMP will then start workingagain.
This section includes the following topics:
■ “Starting the Master Agent on Another Port” on page 210■ “Manually Configuring the SNMP Master Agent” on page 210■ “Editing the Master Agent CONFIG File” on page 211■ “Defining sysContact and sysLocation Variables” on page 211■ “Configuring the SNMP Subagent” on page 212■ “Starting the SNMP Master Agent” on page 212
Starting the Master Agent on Another PortThe Administration Interface will not start the SNMP master agent on ports other than 161.
▼ To Manually Start the Master Agent on Another Port
Specify the desired port in the /server-root/plugins/snmp/magt/CONFIG file .
Run the start script as follows:cd /server-root/proxy-admserv
./start -shell /server-root/plugins/snmp/magt/magt
/server-root/plugins/snmp/magt/CONFIG
/server-root/plugins/snmp/magt/INIT
The master agent will then start on the desired port. The user interface will be able to detect thatthe master agent is running.
Manually Configuring the SNMP Master Agent
▼ To Configure the Master SNMP Agent Manually
Log in as superuser.
Check whether an SNMP daemon (snmpd) is running on port 161.If an SNMP daemon is running, make sure you know how to restart it and which MIB trees itsupports. Then kill its process.
1
2
1
2
Enabling and Starting the SNMP Master Agent
Oracle iPlanet Web Proxy Server 4.0.14 Administration Guide • June 2010210

Edit the CONFIGfile located in plugins/snmp/magt in the server root directory.
(Optional) Define sysContact and sysLocation variables in the CONFIGfile.
Editing the Master Agent CONFIG File
▼ To configure the master SNMP agent manually
Log in as superuser.
Check to see if there is an SNMP daemon (snmpd) running on port 161.If an SNMP daemon is running, make sure you know how to restart it and which MIB trees itsupports. Then kill its process.
Edit the CONFIGfile located in plugins/snmp/magt in the server root directory.
(Optional) Define sysContact and sysLocation variables in the CONFIGfile.
Defining sysContact and sysLocationVariablesThe sysContact and sysLocation entries in the CONFIG file specify the sysContact andsysLocation MIB-II variables. The strings for sysContact and sysLocation in this exampleare enclosed in quotes. Any string that contains spaces, line breaks, tabs, and so on must be inquotes. You can also specify the value in hexadecimal notation.
The following example shows a CONFIG file with sysContract and sysLocation variablesdefined:
COMMUNITY public
ALLOW ALL OPERATIONS
MANAGER nms2
SEND ALL TRAPS TO PORT 162
WITH COMMUNITY public
INITIAL sysLocation "Server room
987 East Cannon Road
Mountain View, CA 94043 USA"INITIAL sysContact "Jill Dawson
email: [email protected]"
3
4
1
2
3
4
Enabling and Starting the SNMP Master Agent
Chapter 10 • Monitoring Servers 211

Configuring the SNMP SubagentYou can configure the SNMP subagent to monitor your server.
▼ To Configure the SNMP Subagent
Access the Server Manager, and click the Server Status tab.
Click the Configure SNMP Subagent link.The Configure SNMP Subagent page is displayed.
Type the name and domain of the server in the Master Host field.
Type the Description of the server, including operating system information.
Type the Organization responsible for the server.
Type the absolute path for the server in the Location field.
Type the name of the person responsible for the server and the person’s contact information inthe Contact field.
Select On to Enable the SNMP Statistics Collection.
Click OK.
Click Restart Required.The Apply Changes page appears.
Click the Restart Proxy Server button to apply the changes.
Starting the SNMP Master AgentOnce you have installed the SNMP master agent, you can start it manually or by using theAdministration Server.
To Start the SNMP Master Agent ManuallyTo start the master agent manually, type the following command at the command prompt:
# magt CONFIG INIT&
1
2
3
4
5
6
7
8
9
10
11
Enabling and Starting the SNMP Master Agent
Oracle iPlanet Web Proxy Server 4.0.14 Administration Guide • June 2010212

The INIT file is a nonvolatile file that contains information from the MIB-II system group,including system location and contact information. If INIT does not already exist, starting themaster agent for the first time will create it. An invalid manager name in the CONFIG file willcause the master agent start-up process to fail.
To start a master agent on a nonstandard port, use one of two methods:
Method one: In the CONFIG file, specify a transport mapping for each interface over which themaster agent listens for SNMP requests from managers. Transport mappings allow the masteragent to accept connections at the standard port and at a nonstandard port. The master agentcan also accept SNMP traffic at a nonstandard port. The maximum number of concurrentSNMP is limited by your target system’s limits on the number of open sockets or file descriptorsper process. The following example shows a transport mapping entry:
TRANSPORT extraordinary SNMP
OVER UDP SOCKET
AT PORT 11161
After editing the CONFIG file manually, you should start the master agent manually by typing thefollowing command at the command prompt:
# magt CONFIG INIT&
Method two: Edit the /etc/services file to allow the master agent to accept connections at thestandard port as well as a nonstandard port.
▼ To start the SNMP Master Agent Using the Administration Server
Log in to the Administration Server.
From the Administration Server, click the Control SNMP Master Agent link on the GlobalSettings tab.
Click Start.You can also stop and restart the SNMP master agent from the Control SNMP Master Agentpage.
1
2
3
Enabling and Starting the SNMP Master Agent
Chapter 10 • Monitoring Servers 213

Configuring the SNMP Master AgentOnce you have enabled the master agent and enabled a subagent on a host computer, you needto configure the host’s Administration Server. In this configuration, you specify communitystrings and trap destinations.
Configuring the Community StringA community string is a text string that an SNMP agent uses for authorization. A networkmanagement station sends a community string with each message it sends to the agent. Theagent can then verify whether the network management station is authorized to getinformation. Community strings are not concealed when sent in SNMP packets. Strings aresent in ASCII text.
You can configure the community string for the SNMP master agent from the Set SNMPMaster Agent Community page in the Administration Server. You also define whichSNMP-related operations a particular community can perform. From the AdministrationServer, you can also view, edit, and remove the communities you have already configured.
Configuring Trap DestinationsAn SNMP trap is a message the SNMP agent sends to a network management station. Forexample, an SNMP agent sends a trap when an interface’s status has changed from up to down.The SNMP agent must know the address of the network management station so it knows whereto send traps. You can configure this trap destination for the SNMP master agent from ProxyServer. You can also view, edit, and remove the trap destinations you have already configured.When you configure trap destinations using Proxy Server, you are actually editing the CONFIGfile.
Enabling the SubagentAfter you have installed the master agent that comes with the Administration Server, you mustenable the subagent for your server instance before you attempt to start it. For moreinformation, see “Installing the SNMP Master Agent” on page 208. You can use the ServerManager to enable the subagent.
To stop the SNMP function on UNIX or Linux platforms, you must stop the subagent first, thenthe master agent. If you stop the master agent first, you might not be able to stop the subagent. Ifthat happens, restart the master agent, stop the subagent, then stop the master agent.
To enable the SNMP subagent, use the Configure SNMP Subagent page in the Server Manager,and start the subagent from the Control SNMP Subagent page. For more information, see thecorresponding sections in the online help.
Configuring the SNMP Master Agent
Oracle iPlanet Web Proxy Server 4.0.14 Administration Guide • June 2010214

Once you have enabled the subagent, you can start, stop or restart it from the Control SNMPSubagent page or the Services Control Panel for Windows.
Note – After making any SNMP configuration changes, you must click Apply Required, thenrestart SNMP subagent.
Understanding SNMP MessagesGET and SET are two types of messages defined by SNMP. GET and SET messages are sent by anetwork management station (NMS) to a master agent. You can use these messages with theAdministration Server.
SNMP exchanges network information in the form of protocol data units (PDUs). These unitscontain information about variables stored on the managed device, such as the web server.These variables, also known as managed objects, have values and titles that are reported to theNMS as necessary. Protocol data units sent by the server to the NMS are known as traps. Thefollowing examples show the use of GET, SET, and trap messages in communication initiatedby the NMS or by the server.
NMS-initiated Communication. The NMS either requests information from the server orchanges the value of a variable store in the server’s MIB. For example:
1. The NMS sends a message to the Administration Server master agent. The message might bea request for data (a GET message), or an instruction to set a variable in the MIB (a SETmessage).
2. The master agent forwards the message to the appropriate subagent.3. The subagent retrieves the data or changes the variable in the MIB.4. The subagent reports data or status to the master agent, and then the master agent forwards
the GET message back to the NMS.5. The NMS displays the data textually or graphically through its network management
application.Server-initiated Communication. The server subagent sends a message or trap to the NMSwhen a significant event has occurred. For example:
6. The subagent informs the master agent that the server has stopped.7. The master agent sends a message or trap reporting the event to the NMS.8. The NMS displays the information textually or graphically through its network
management application.
Understanding SNMP Messages
Chapter 10 • Monitoring Servers 215

216

Proxying and Routing URLs
This chapter describes how requests are handled by the proxy server. It also explains how toenable proxying for specific resources. The chapter also covers how to configure the proxyserver to route URLs to different URLs or servers.
This chapter contains the following sections:
■ “Enabling/Disabling Proxying for a Resource” on page 217■ “Routing Through Another Proxy” on page 218■ “Forwarding the Client IP Address to the Server” on page 221■ “Allowing Clients to Check IP Address” on page 225■ “Client Autoconfiguration” on page 226■ “Setting the Network Connectivity Mode” on page 226■ “Changing the Default FTP Transfer Mode” on page 227■ “Specifying the SOCKS Name Server IP Address” on page 228■ “Configuring HTTP Request Load Balancing” on page 229■ “Managing URLs and URL Mappings” on page 230
Enabling/Disabling Proxying for a ResourceYou can turn proxying on or off for resources. Resources can be individual URLs, groups ofURLs with something in common, or an entire protocol. You can control whether proxying ison for the entire server, for various resources, or for resources as specified in a template file. Youcan deny access to one or more URLs by turning off proxying for that resource. This setting canbe a global way to deny or allow all access to a resource. You can also allow or deny access toresources by using URL filters. For more information about URL filters, see “Filtering URLs” onpage 286.
11C H A P T E R 1 1
217

▼ To Enable Proxying for a ResourceAccess the Server Manager and click the Routing tab.
Click the Enable/Disable Proxying link.
The Enable/Disable Proxying page is displayed.
Select the resource from the drop-down list or click the Regular Expression button, type aregular expression and click OK.
You can choose a default setting for the resource you specified.
■ Use Default Setting Derived From A More General Resource. The settings for a moregeneral resource that includes this one will be used for this resource.
■ Do Not Proxy This Resource. This resource cannot be reached through the proxy.■ Enable Proxying Of This Resource. The proxy allows clients to access this resource
(provided they pass the other security and authorization checks). When you enableproxying for a resource, all methods are enabled. The read methods, including GET, HEAD,INDEX, POST, and CONNECT for SSL tunneling, and the write methods, including PUT,MKDIR, RMDIR, MOVE, and DELETE, are all enabled for that resource. Barring any othersecurity checks, clients all have read and write access.
Click OK.
Click Restart Required.
The Apply Changes page is displayed.
Click the Restart Proxy Server button to apply the changes.
Routing Through Another ProxyThe Set Routing Preferences page is used to configure your proxy server to route certainresources using the derived default configuration or direct connections; or using proxy arrays,ICP neighborhood, another proxy server, or a SOCKS server.
1
2
3
4
5
6
7
Routing Through Another Proxy
Oracle iPlanet Web Proxy Server 4.0.14 Administration Guide • June 2010218

Configuring Routing for a Resource
▼ To Configure Routing for a Resource
Access the Server Manager and click the Routing tab.
Click the Set Routing Preferences link.
The Set Routing Preferences page is displayed.
Select the resource from the drop-down list or click the Regular Expression button, type aregular expression, and clicking OK.
Select the the type of routing you would like for the resource you are configuring.
The available options are::
■ Derived Default Configuration. The proxy server uses a more general template, that is, onewith a shorter, matching regular expression, to determine whether it should use the remoteserver or another proxy. For example, if the proxy routes all http://.* requests to anotherproxy server and all http://www.* requests to the remote server, you could create a deriveddefault configuration routing for http://www.example.* requests, that would go directly tothe remote server because of the setting for the http://www.* template.
■ Direct Connections. The request will always go directly to the remote server instead ofthrough the proxy.
■ Route Through A SOCKS Server. The requests for the specified resource will be routedthrough a SOCKS server. If you choose this option, specify the name or IP address and theport number of the SOCKS server that the proxy server will route through.
■ Route Through. Enables you to specify whether you would like to route through a proxyarray, ICP neighborhood, parent array, or proxy server. If you choose multiple routingmethods, the proxy will follow the hierarchy shown on the form: proxy array, redirect, ICP,parent array, or another proxy. For more information on routing through a proxy server, see“Chaining Proxy Servers” on page 220.
For information on routing through a SOCKS server, see “Routing Through a SOCKSServer” on page 220. For information on routing through proxy arrays, parent arrays, or ICPneighborhoods, see Chapter 12, “Caching.”
Note – To enable routing of connect requests on ports other than 443, change the ppathparameter to connect://.* in the obj.conf file.
Click OK.
1
2
3
4
5
Routing Through Another Proxy
Chapter 11 • Proxying and Routing URLs 219

Click Restart Required.The Apply Changes page is displayed.
Click the Restart Proxy Server button to apply the changes.
Chaining Proxy ServersYou can have the proxy access another proxy for some resources instead of accessing the remoteserver. Chaining is a good way to organize several proxies behind a firewall. Chaining alsoenables you to build hierarchical caching.
▼ To Route Through Another Proxy Server
Access the Server Manager and click the Routing tab.
Click the Set Routing Preferences link.The Set Routing Preferences page is displayed.
Select the resource from the drop-down list or click the Regular Expression button, type aregular expression and click OK.
Select the Route Through option in the Routing Through Another Proxy section of the page.
Select the Another Proxy checkbox.
In the Another Proxy field, you can type the server name and the port number of the proxy severthat you want to route through.Type the server name and port number as servername:port
Click OK.
Click Restart Required.The Apply Changes page is displayed.
Click the Restart Proxy Server button to apply the changes.
Routing Through a SOCKS ServerIf you already have a remote SOCKS server running on your network, you can configure theproxy to connect to the SOCKS server for specific resources.
6
7
1
2
3
4
5
6
7
8
9
Routing Through Another Proxy
Oracle iPlanet Web Proxy Server 4.0.14 Administration Guide • June 2010220

▼ To Route Through a SOCKS server
Access the Server Manager and click the Routing tab.
Click the Set Routing Preferences link.
The Set Routing Preferences page is displayed.
Select the resource from the drop-down list or click the Regular Expression button, type aregular expression and click OK.
Select the Route Through option in the Routing Through Another Proxy section of the page.
Select the Route Through SOCKS Server option.
Specify the name or IP address and the port number of the SOCKS server that the proxy serverwill route through.
Click OK.
Click Restart Required.
The Apply Changes page is displayed.
Click the Restart Proxy Server button to apply the changes.
Next StepsOnce you have enabled routing through a SOCKS server, you should create proxy routes usingthe SOCKS v5 Routing page. Proxy routes identify the IP addresses that are accessible throughthe SOCKS server your proxy routes through. Proxy routes also specify whether that SOCKSserver connects directly to the host.
Forwarding the Client IP Address to the ServerThe Forward Client Credentials page is used to configure the proxy to send client credentials tothe remote server.
1
2
3
4
5
6
7
8
9
Forwarding the Client IP Address to the Server
Chapter 11 • Proxying and Routing URLs 221
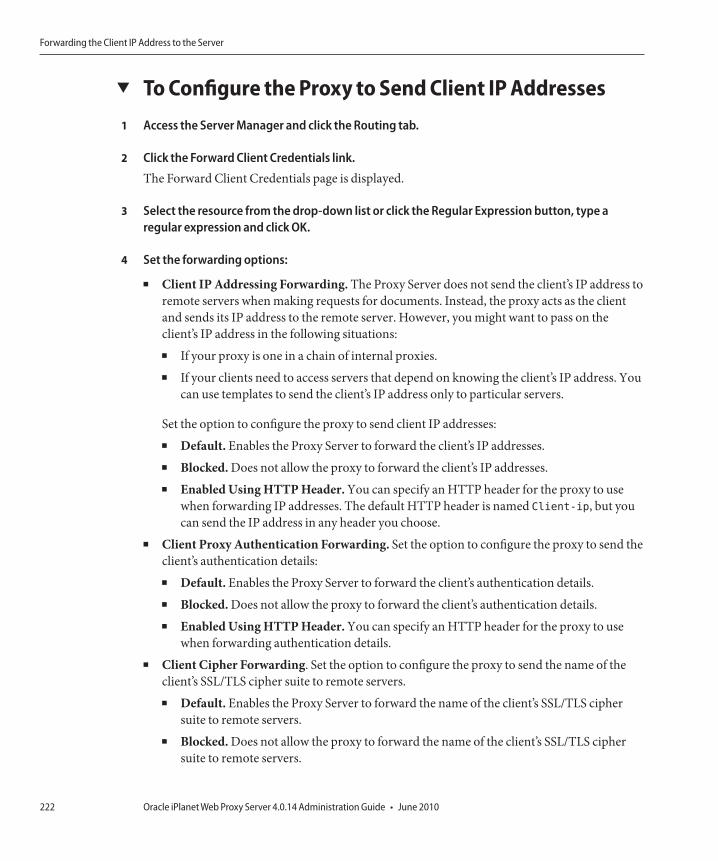
▼ To Configure the Proxy to Send Client IP AddressesAccess the Server Manager and click the Routing tab.
Click the Forward Client Credentials link.
The Forward Client Credentials page is displayed.
Select the resource from the drop-down list or click the Regular Expression button, type aregular expression and click OK.
Set the forwarding options:
■ Client IP Addressing Forwarding. The Proxy Server does not send the client’s IP address toremote servers when making requests for documents. Instead, the proxy acts as the clientand sends its IP address to the remote server. However, you might want to pass on theclient’s IP address in the following situations:■ If your proxy is one in a chain of internal proxies.■ If your clients need to access servers that depend on knowing the client’s IP address. You
can use templates to send the client’s IP address only to particular servers.
Set the option to configure the proxy to send client IP addresses:■ Default. Enables the Proxy Server to forward the client’s IP addresses.■ Blocked. Does not allow the proxy to forward the client’s IP addresses.■ Enabled Using HTTP Header. You can specify an HTTP header for the proxy to use
when forwarding IP addresses. The default HTTP header is named Client-ip, but youcan send the IP address in any header you choose.
■ Client Proxy Authentication Forwarding. Set the option to configure the proxy to send theclient’s authentication details:■ Default. Enables the Proxy Server to forward the client’s authentication details.■ Blocked. Does not allow the proxy to forward the client’s authentication details.■ Enabled Using HTTP Header. You can specify an HTTP header for the proxy to use
when forwarding authentication details.■ Client Cipher Forwarding. Set the option to configure the proxy to send the name of the
client’s SSL/TLS cipher suite to remote servers.■ Default. Enables the Proxy Server to forward the name of the client’s SSL/TLS cipher
suite to remote servers.■ Blocked. Does not allow the proxy to forward the name of the client’s SSL/TLS cipher
suite to remote servers.
1
2
3
4
Forwarding the Client IP Address to the Server
Oracle iPlanet Web Proxy Server 4.0.14 Administration Guide • June 2010222

■ Enabled Using HTTP Header. You can specify an HTTP header for the proxy to usewhen forwarding the name of the client’s SSL/TLS cipher suite to remote servers. Thedefault HTTP header is named Proxy-cipher, but you can send the name of the client’sSSL/TLS cipher suite in any header you choose.
■ Client Keysize Forwarding. Set the option to configure the proxy to send the size of theclient’s SSL/TLS key to remote servers.■ Default. Enables the Proxy Server to forward the size of the client’s SSL/TLS key to
remote servers.■ Blocked. Does not allow the proxy to forward the size of the client’s SSL/TLS key to
remote servers.■ Enabled Using HTTP Header. You can specify an HTTP header for the proxy to use
when forwarding the size of the client’s SSL/TLS key to remote servers. The defaultHTTP header is named Proxy-keysize, but you can send the size of the client’s SSL/TLSkey in any header you choose.
■ Client Secret Keysize Forwarding. Set the option to configure the proxy to send the size ofthe client’s SSL/TLS secret key to remote servers:■ Default. Enables the Proxy Server to forward the size of the client’s SSL/TLS secret key to
remote servers.■ Blocked. Does not allow the proxy to forward the size of the client’s SSL/TLS secret key
to remote servers.■ Enabled Using HTTP Header. You can specify an HTTP header for the proxy to use
when forwarding the size of the client’s SSL/TLS secret key to remote servers. The defaultHTTP header is named Proxy-secret-keysize, but you can send the size of the client’sSSL/TLS secret key in any header you choose.
■ Client SSL Session ID Forwarding. Set the option to configure the proxy to send the client’sSSL/TLS session ID to remote servers.■ Default. Enables the Proxy Server to forward the client’s SSL/TLS session ID to remote
servers.■ Blocked. Does not allow the proxy to forward the client’s SSL/TLS session ID to remote
servers.■ Enabled Using HTTP Header. You can specify an HTTP header for the proxy to use
when forwarding the client’s SSL/TLS session ID to remote servers. The default HTTPheader is named Proxy-ssl-id, but you can send the client’s SSL/TLS session ID in anyheader you choose.
■ Client Issuer DN Forwarding. Set the option to configure the proxy to send thedistinguished name of the issuer of the client’s SSL/TLS certificate to remote servers.■ Default. Enables the Proxy Server to forward the distinguished name of the issuer of the
client’s SSL/TLS certificate to remote servers.■ Blocked. Does not allow the proxy to forward the distinguished name of the issuer of the
client’s SSL/TLS certificate to remote servers.
Forwarding the Client IP Address to the Server
Chapter 11 • Proxying and Routing URLs 223
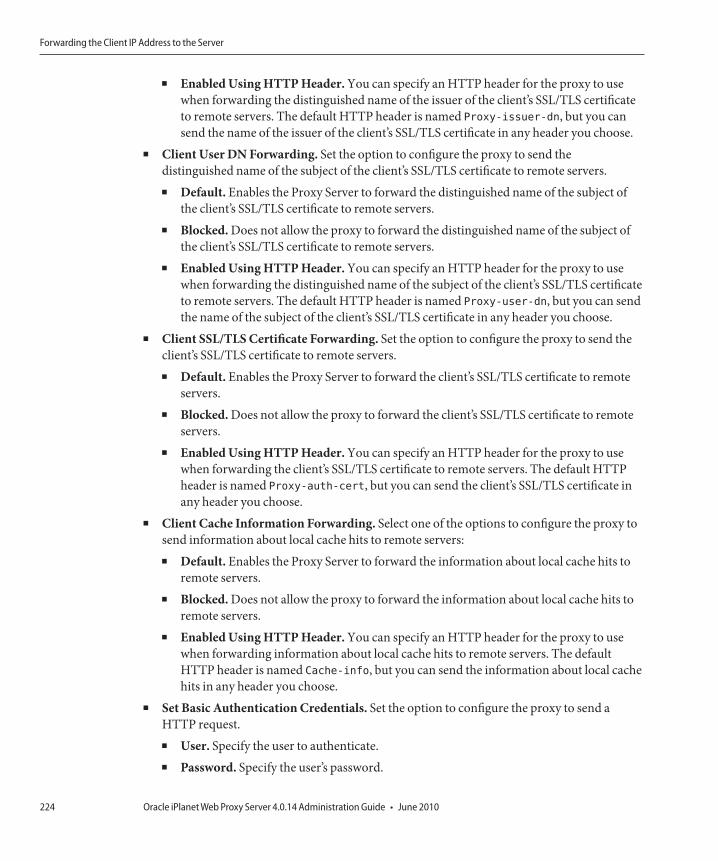
■ Enabled Using HTTP Header. You can specify an HTTP header for the proxy to usewhen forwarding the distinguished name of the issuer of the client’s SSL/TLS certificateto remote servers. The default HTTP header is named Proxy-issuer-dn, but you cansend the name of the issuer of the client’s SSL/TLS certificate in any header you choose.
■ Client User DN Forwarding. Set the option to configure the proxy to send thedistinguished name of the subject of the client’s SSL/TLS certificate to remote servers.■ Default. Enables the Proxy Server to forward the distinguished name of the subject of
the client’s SSL/TLS certificate to remote servers.■ Blocked. Does not allow the proxy to forward the distinguished name of the subject of
the client’s SSL/TLS certificate to remote servers.■ Enabled Using HTTP Header. You can specify an HTTP header for the proxy to use
when forwarding the distinguished name of the subject of the client’s SSL/TLS certificateto remote servers. The default HTTP header is named Proxy-user-dn, but you can sendthe name of the subject of the client’s SSL/TLS certificate in any header you choose.
■ Client SSL/TLS Certificate Forwarding. Set the option to configure the proxy to send theclient’s SSL/TLS certificate to remote servers.■ Default. Enables the Proxy Server to forward the client’s SSL/TLS certificate to remote
servers.■ Blocked. Does not allow the proxy to forward the client’s SSL/TLS certificate to remote
servers.■ Enabled Using HTTP Header. You can specify an HTTP header for the proxy to use
when forwarding the client’s SSL/TLS certificate to remote servers. The default HTTPheader is named Proxy-auth-cert, but you can send the client’s SSL/TLS certificate inany header you choose.
■ Client Cache Information Forwarding. Select one of the options to configure the proxy tosend information about local cache hits to remote servers:■ Default. Enables the Proxy Server to forward the information about local cache hits to
remote servers.■ Blocked. Does not allow the proxy to forward the information about local cache hits to
remote servers.■ Enabled Using HTTP Header. You can specify an HTTP header for the proxy to use
when forwarding information about local cache hits to remote servers. The defaultHTTP header is named Cache-info, but you can send the information about local cachehits in any header you choose.
■ Set Basic Authentication Credentials. Set the option to configure the proxy to send aHTTP request.■ User. Specify the user to authenticate.■ Password. Specify the user’s password.
Forwarding the Client IP Address to the Server
Oracle iPlanet Web Proxy Server 4.0.14 Administration Guide • June 2010224
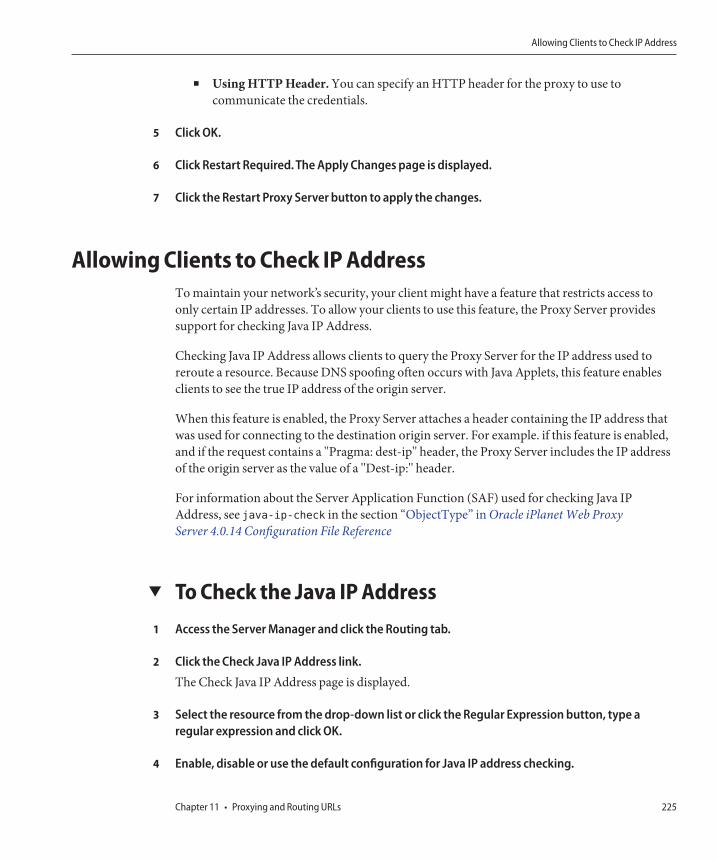
■ Using HTTP Header. You can specify an HTTP header for the proxy to use tocommunicate the credentials.
Click OK.
Click Restart Required. The Apply Changes page is displayed.
Click the Restart Proxy Server button to apply the changes.
Allowing Clients to Check IP AddressTo maintain your network’s security, your client might have a feature that restricts access toonly certain IP addresses. To allow your clients to use this feature, the Proxy Server providessupport for checking Java IP Address.
Checking Java IP Address allows clients to query the Proxy Server for the IP address used toreroute a resource. Because DNS spoofing often occurs with Java Applets, this feature enablesclients to see the true IP address of the origin server.
When this feature is enabled, the Proxy Server attaches a header containing the IP address thatwas used for connecting to the destination origin server. For example. if this feature is enabled,and if the request contains a "Pragma: dest-ip" header, the Proxy Server includes the IP addressof the origin server as the value of a "Dest-ip:" header.
For information about the Server Application Function (SAF) used for checking Java IPAddress, see java-ip-check in the section “ObjectType” in Oracle iPlanet Web ProxyServer 4.0.14 Configuration File Reference
▼ To Check the Java IP AddressAccess the Server Manager and click the Routing tab.
Click the Check Java IP Address link.
The Check Java IP Address page is displayed.
Select the resource from the drop-down list or click the Regular Expression button, type aregular expression and click OK.
Enable, disable or use the default configuration for Java IP address checking.
5
6
7
1
2
3
4
Allowing Clients to Check IP Address
Chapter 11 • Proxying and Routing URLs 225
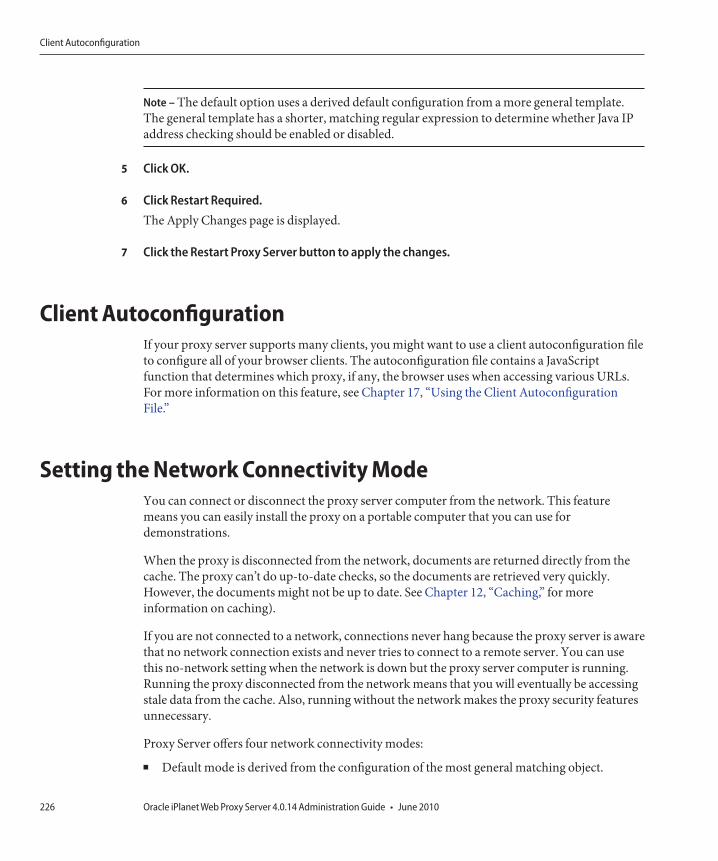
Note – The default option uses a derived default configuration from a more general template.The general template has a shorter, matching regular expression to determine whether Java IPaddress checking should be enabled or disabled.
Click OK.
Click Restart Required.The Apply Changes page is displayed.
Click the Restart Proxy Server button to apply the changes.
Client AutoconfigurationIf your proxy server supports many clients, you might want to use a client autoconfiguration fileto configure all of your browser clients. The autoconfiguration file contains a JavaScriptfunction that determines which proxy, if any, the browser uses when accessing various URLs.For more information on this feature, see Chapter 17, “Using the Client AutoconfigurationFile.”
Setting the Network Connectivity ModeYou can connect or disconnect the proxy server computer from the network. This featuremeans you can easily install the proxy on a portable computer that you can use fordemonstrations.
When the proxy is disconnected from the network, documents are returned directly from thecache. The proxy can’t do up-to-date checks, so the documents are retrieved very quickly.However, the documents might not be up to date. See Chapter 12, “Caching,” for moreinformation on caching).
If you are not connected to a network, connections never hang because the proxy server is awarethat no network connection exists and never tries to connect to a remote server. You can usethis no-network setting when the network is down but the proxy server computer is running.Running the proxy disconnected from the network means that you will eventually be accessingstale data from the cache. Also, running without the network makes the proxy security featuresunnecessary.
Proxy Server offers four network connectivity modes:
■ Default mode is derived from the configuration of the most general matching object.
5
6
7
Client Autoconfiguration
Oracle iPlanet Web Proxy Server 4.0.14 Administration Guide • June 2010226
■ Normal mode is the normal operating mode for the proxy. The proxy retrieves documentsfrom the content server if they are not already in the cache. If they are in the cache, they maybe checked against the content server to determine if they are up to date. If a cached file haschanged, it is replaced with the current copy.
■ Fast-demo mode enables you to present smooth demonstrations when the network isavailable. If a document is found in the cache, the content server is not contacted, not evento find out if the document has changed. This mode prevents any latency created by waitingfor the content server to respond. If a document is not in the cache, it is retrieved from thecontent server and cached. The fast-demo mode has less latency than the normal mode, butcan occasionally return stale data because once the server has a copy of a document, it doesnot do up-to-date checks on the document.
■ No-network mode is designed for portable computers during the time they are notconnected to the network. The proxy returns the document if it is in the cache or returns anerror if it is not. The proxy never tries to contact the content server, which prevents theproxy from timing out while trying to get a connection that doesn’t exist.
▼ To Change the Running Mode for the Proxy ServerAccess the Server Manager and click the Routing tab.
Click the Set Connectivity Mode link. The Set Connectivity Mode page is displayed.
Select the resource from the drop-down list or click the Regular Expression button, type aregular expression and click OK.
Select the mode you want.
Click OK.
Click Restart Required. The Apply Changes page is displayed.
Click the Restart Proxy Server button to apply the changes.
Changing the Default FTP Transfer ModeFTP has two different ways to establish a data connection between the FTP server and the client,the proxy acting as a client. The two modes are referred to as PASV and PORT mode FTP.
■ Passive Mode (PASV). The data connection is initiated from the proxy server, and the FTPserver accepts the connection. This is safer for the site running the proxy server because theserver does not have to accept inbound connections.
1
2
3
4
5
6
7
Changing the Default FTP Transfer Mode
Chapter 11 • Proxying and Routing URLs 227

■ Active Mode (PORT). The data connection is initiated by the remote FTP server, and theproxy accepts the incoming connection. If the proxy server is within a firewall, the firewallmight block the incoming FTP data connection from the FTP server, which means thePORT mode might not work.
Some FTP sites run a firewall, which makes PASV mode non-functional for proxy servers.Therefore, the proxy server can be configured to use the PORT mode FTP. You can turn onPORT mode for the entire server, or you can turn it on only for specific FTP servers.
Even when PASV mode is on, the proxy server will use PORT mode if the remote FTP serverdoes not support PASV mode.
If the proxy server is behind a firewall that makes the PORT mode FTP non-functional, youcannot enable PORT mode. If default is selected for the resource, the proxy server uses themode from a more general resource. If none is specified, PASV mode will be used.
▼ To Set the FTP ModeAccess the Server Manager and click the Routing tab.
Click the Set FTP Mode link. The Set FTP Mode page is displayed.
Select the resource from the drop-down list or click the Regular Expression button, type aregular expression and click OK.
Select the FTP transfer mode
Click OK.
Click Restart Required. The Apply Changes page is displayed.
Click the Restart Proxy Server button to apply the changes.
Specifying the SOCKS Name Server IP AddressIf your proxy is configured to make its outbound connections through a SOCKS server, youmight need to explicitly specify the IP address for the name server to be used with SOCKS.
You should specify the name server IP address if you are resolving outside host names with aDNS server other than an internal DNS service that is inside the firewall.
1
2
3
4
5
6
7
Specifying the SOCKS Name Server IP Address
Oracle iPlanet Web Proxy Server 4.0.14 Administration Guide • June 2010228

▼ To Specify the SOCKS Name Server IP AddressAccess the Server Manager and click the Routing tab.
Click the Set SOCKS Name Server link.The Set SOCKS Name Server page is displayed.
Type the IP address of the DNS name server in the field.
Click OK.
Note – The feature that enables you to specify the SOCKS name server IP address at one time wasonly accessible through the SOCKS_NS environment variable. If you set the environmentvariable and use the SOCKS Name Server Setting form to specify the name server IP address,the proxy will use the IP address specified on the form instead of the environment variable.
Click Restart Required.The Apply Changes page is displayed.
Click the Restart Proxy Server button to apply the changes.
Configuring HTTP Request Load BalancingThe Configure HTTP Request Load Balancing page is used to distribute the load among thespecified origin server.
▼ To Configure HTTP Request Load BalancingAccess the Server Manager and click the Routing tab.
Click the Configure HTTP Request Load Balancing link.The Configure HTTP Request Load Balancing page is displayed.
Select the resource from the drop-down list or click the Regular Expression button, type aregular expression and click OK.
Specify the URL of an origin server in the Server field. If multiple server parameters are given,the Proxy Server will distribute the load among the specified origin server.
1
2
3
4
5
6
1
2
3
4
Configuring HTTP Request Load Balancing
Chapter 11 • Proxying and Routing URLs 229

In the Sticky Cookie field, specify the name of the cookie that when present in a response willcause subsequent requests to stick to that origin server. The default value is JSESSIONID.
In the Sticky Parameter field, specify the name of a URI parameter to inspect for routeinformation. When the URI parameter is present in a request URI and its value contains a colon,followed by a route ID, the request will“stick”to the origin server identified by that route ID. Thedefault value is jsessionid.
In the Route Header field, specify the name of the HTTP request header that is used tocommunicate route IDs to origin servers. The default value is proxy-jroute.
In the Route Cookie field, specify the name of the cookie that is generated by the Proxy Serverwhen it encounters a sticky cookie in a response.
The default value is JROUTE.
Set the Rewrite Host option to indicate whether the Host HTTP request header is rewritten tomatch the host specified by the server parameter.
Set the Rewrite Location option to indicate whether Location HTTP response headers thatmatch the server parameter should be rewritten.
Set the Rewrite Content Location option to indicate whether Content-location HTTP responseheaders that match the server parameter should be rewritten.
Indicate whether the headername HTTP response headers that match the server parametershould be rewritten, where headername is a user-defined header name. Specify theheadername in the Headername field.
Click OK.
Click Restart Required.
The Apply Changes page is displayed.
Click the Restart Proxy Server button to apply the changes.
Managing URLs and URL MappingsUse the Server Manager to map URLs to another server, sometimes called a mirror server.When a client accesses the proxy with a mirrored URL, the proxy retrieves the requesteddocument from the mirrored server and not from the server specified in the URL. The client isnever aware that the request is going to a different server. You can also redirect URLs. In this
5
6
7
8
9
10
11
12
13
14
15
Managing URLs and URL Mappings
Oracle iPlanet Web Proxy Server 4.0.14 Administration Guide • June 2010230

case, the proxy returns only the redirected URL to the client and not the document, so the clientcan then request the new document. Mapping also enables you to map URLs to a file, as in PACand PAT mappings.
Creating and Modifying URL MappingsTo map a URL, you specify a URL prefix and where to map it. The following sections describethe various types of URL mappings. You can create the following types of URL mappings:■ Regular mappings map a URL prefix to another URL prefix. For example, you can configure
the proxy to go to a specific URL any time it gets a request that beginshttp://www.example.com.
■ Reverse mappings map a redirected URL prefix to another URL prefix. These are used withreverse proxies when the internal server sends a redirected response instead of thedocument to the proxy. See Chapter 14, “Using a Reverse Proxy,” for more information.
■ Regular expressions map all URLs matching the expression to a single URL. For example,you can map all URLs matching .*job.* to a specific URL, perhaps one that explains why theproxy server won’t let a user go to a particular URL.
■ Client autoconfiguration maps URLs to a specific .pac file stored on the proxy server. Formore information on autoconfiguration files, see Chapter 17, “Using the ClientAutoconfiguration File.”
■ Proxy array table (PAT) maps URLs to a specific .pat file stored on the proxy server. Youshould only create this type of mapping from a master proxy. For more information on PATfiles and proxy arrays, see “Routing Through Proxy Arrays” on page 270.
Clients accessing a URL are sent to a different location on the same server or on a differentserver. This feature is useful when a resource has moved or when you need to maintain theintegrity of relative links when directories are accessed without a trailing slash.
For example, suppose you have a heavily loaded web server called hi.load.com that you wantmirrored to another server called mirror.load.com. For URLs that go to the hi.load.comcomputer, you can configure the proxy server to use the mirror.load.com computer.
The source URL prefix must be unescaped, but in the destination (mirror) URL, only charactersthat are illegal in HTTP requests need to be escaped.
Do not use trailing slashes in the prefixes!
▼ To create a URL mapping
Access the Server Manager and click the URLs tab.
Click the Create Mapping link.The Create Mapping page is displayed.
1
2
Managing URLs and URL Mappings
Chapter 11 • Proxying and Routing URLs 231

Choose the type of mapping you want to create.
■ Regular Mappings. If you select this option, the following option is displayed in the lowersection of the page:■ Rewrite Host. Indicate whether the Host HTTP header is rewritten to match the host
specified by the to parameter.■ Reverse Mappings. Maps a redirected URL prefix to another URL prefix. If you select
this option, the following option is displayed in the lower section of the page:■ Rewrite Location. Indicate whether the Location HTTP response header should be
rewritten.■ Rewrite Content Location. Indicate whether the Content-location HTTP response
header should be rewritten.■ Rewrite Headername. Select the check box to indicate whether the headername
HTTP response header should be rewritten, where headername is a user-definedheader name.
Regular Expressions. Map all URLs matching the expression to a single URL. For moreinformation on regular expressions, see Chapter 16, “Managing Templates andResources.”
■ Client Autoconfiguration. Maps URLs to a specific .pac file stored on the Proxy Server.For more information on autoconfiguration files, see Chapter 17, “Using the ClientAutoconfiguration File.”
■ Proxy Array Table (PAT). Maps URLs to a specific .pat file stored on the Proxy Server.You should only create this type of mapping from a master proxy. For more informationon PAT files and proxy arrays, see “Routing through Proxy Arrays” in Chapter 12,“Caching”
Type the map source prefix.For regular and reverse mappings, this prefix should be the part of the URL you want tosubstitute.
For regular expression mappings, the URL prefix should be a regular expression for all the URLsyou want to match. If you also choose a template for the mapping, the regular expression willwork only for the URLs within the template’s regular expression.
For client autoconfiguration mappings and proxy array table mappings, the URL prefix shouldbe the full URL that the client accesses.
Type a map destination.For all mapping types except client autoconfiguration and proxy array table, this declarationshould be the full URL to which to map. For client autoconfiguration mappings, this valueshould be the absolute path to the .pac file on the proxy server’s hard disk. For proxy array tablemappings, this value should be the absolute path to the .pat file on the master proxy’s local disk.
3
4
5
Managing URLs and URL Mappings
Oracle iPlanet Web Proxy Server 4.0.14 Administration Guide • June 2010232

Select the template name from the drop-down list, or leave the value at NONE if you do not wantto apply a template.
Click OK to create the mapping.
Click Restart Required.
The Apply Changes page is displayed.
Click the Restart Proxy Server button to apply the changes.
▼ To Change Your Existing MappingsAccess the Server Manager and click the URLs tab.
Click the View/Edit Mappings link.
The View/Edit Mappings page is displayed.
Click the Edit link next to the mapping to be modified. You can edit the prefix, the mapped URL,and template that are affected by the mapping. Click OK to confirm your changes.
Click Restart Required. The Apply Changes page is displayed.
Click the Restart Proxy Server button to apply the changes.
▼ To Remove a MappingAccess the Server Manager and click the URLs tab.
Click the View/Edit Mappings link.
The View/Edit Mappings page is displayed.
Select the mapping to be removed, then click the Remove link next to it.
Click Restart Required. The Apply Changes page is displayed.
Click the Restart Proxy Server button to apply the changes.
6
7
8
9
1
2
3
4
5
1
2
3
4
5
Managing URLs and URL Mappings
Chapter 11 • Proxying and Routing URLs 233
Redirecting URLsYou can configure the proxy server to return a redirected URL to the client instead of gettingand returning the document. With redirection, the client is aware that the URL originallyrequested has been redirected to a different URL. The client usually requests the redirected URLimmediately. Netscape Navigator automatically requests the redirected URL. The user does nothave to explicitly request the document a second time.
URL redirection is useful when you want to deny access to an area because you can redirect theuser to a URL that explains why access was denied.
▼ To Redirect One or More URLs
Access the Server Manager and click the URLs tab.
Click the Redirect URLs link. The Redirect URLs page is displayed.
Type a source URL that is a URL prefix.
Type a URL to redirect to. This URL can either be a URL prefix or a fixed URL.
■ If you choose to use a URL prefix as the URL to redirect to, select the radio button next to theURL prefix field and type a URL prefix.
■ If you choose to use a fixed URL, select the radio button next to the Fixed URL field and typea fixed URL.
Click OK.
Click Restart Required.The Apply Changes page is displayed.
Click the Restart Proxy Server button to apply the changes.
1
2
3
4
5
6
7
Managing URLs and URL Mappings
Oracle iPlanet Web Proxy Server 4.0.14 Administration Guide • June 2010234

Caching
This chapter describes how Proxy Server caches documents. It also describes how you canconfigure the cache by using the online pages.
This chapter contains the following sections:■ “How Caching Works” on page 235■ “Understanding the Cache Structure” on page 236■ “Distributing Files in the Cache” on page 237■ “Setting Cache Specifics” on page 237■ “Creating and Modifying a Cache” on page 243■ “Setting Cache Capacity” on page 244■ “Managing Cache Sections” on page 245■ “Setting the Garbage Collection Preferences” on page 245■ “Scheduling Garbage Collection” on page 246■ “Configuring the Cache” on page 246■ “Caching Local Hosts” on page 249■ “Configuring the File Cache” on page 250■ “Viewing the URL Database” on page 252■ “Using Cache Batch Updates” on page 253■ “Using the Cache Command-Line Interface” on page 256■ “Using the Internet Cache Protocol (ICP)” on page 262■ “Using Proxy Arrays” on page 270
How Caching WorksCaching reduces network traffic and offers faster response time for clients that are using theproxy server instead of going directly to remote servers.
When a client requests a web page or document from the proxy server, the proxy server copiesthe document from the remote server to its local cache directory structure while sending thedocument to the client.
12C H A P T E R 1 2
235

When a client requests a document that was previously requested and copied into the proxycache, the proxy returns the document from the cache instead of retrieving the document fromthe remote server again as shown in the following figure. If the proxy determines that the file isnot up to date, the proxy refreshes the document from the remote server and updates its cachebefore sending the document to the client.
Files in the cache are automatically maintained by the Proxy Server garbage collection utility(CacheGC). The CacheGC automatically cleans the cache on a regular basis to ensure that thecache does not get cluttered with out-of-date documents.
Understanding the Cache StructureA cache consists of one or more partitions. Conceptually, a partition is a storage area on a diskthat you set aside for caching. If you want to have your cache span several disks, configure atleast one cache partition for each disk. Each partition can be independently administered. Inother words, you can enable, disable, and configure a partition independently of all otherpartitions.
Storing a large number of cached files in a single location can slow performance; therefore,create several directories, or sections, in each partition. Sections are the next level underpartitions in the cache structure. You can have up to 256 sections in your cache across allpartitions. The number of cache sections must be a power of 2 (for example, 1, 2, 4, 8, 16, ...,256).
The final level in the cache structure hierarchy is the subsection. Subsections are directorieswithin sections. Each section has 64 subsections. Cached files are stored in the subsectionswhich is the lowest level in your cache.
FIGURE 12–1 Proxy Document Retrieval
Up-to-datecheck
Proxy server
CacheClient Remoteserver
Documentsent from
cache
Documentrequest
Understanding the Cache Structure
Oracle iPlanet Web Proxy Server 4.0.14 Administration Guide • June 2010236
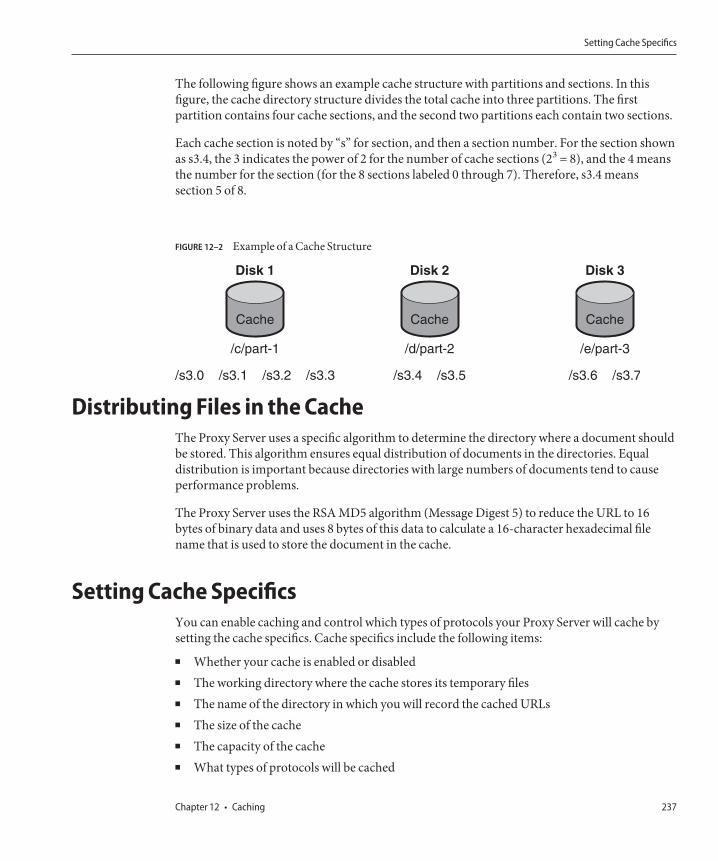
The following figure shows an example cache structure with partitions and sections. In thisfigure, the cache directory structure divides the total cache into three partitions. The firstpartition contains four cache sections, and the second two partitions each contain two sections.
Each cache section is noted by “s” for section, and then a section number. For the section shownas s3.4, the 3 indicates the power of 2 for the number of cache sections (23 = 8), and the 4 meansthe number for the section (for the 8 sections labeled 0 through 7). Therefore, s3.4 meanssection 5 of 8.
Distributing Files in the CacheThe Proxy Server uses a specific algorithm to determine the directory where a document shouldbe stored. This algorithm ensures equal distribution of documents in the directories. Equaldistribution is important because directories with large numbers of documents tend to causeperformance problems.
The Proxy Server uses the RSA MD5 algorithm (Message Digest 5) to reduce the URL to 16bytes of binary data and uses 8 bytes of this data to calculate a 16-character hexadecimal filename that is used to store the document in the cache.
Setting Cache SpecificsYou can enable caching and control which types of protocols your Proxy Server will cache bysetting the cache specifics. Cache specifics include the following items:
■ Whether your cache is enabled or disabled■ The working directory where the cache stores its temporary files■ The name of the directory in which you will record the cached URLs■ The size of the cache■ The capacity of the cache■ What types of protocols will be cached
FIGURE 12–2 Example of a Cache Structure
Cache
/c/part-1
/s3.0 /s3.1 /s3.2 /s3.3
Disk 1
Cache
/d/part-2
/s3.4 /s3.5
Disk 2
Cache
/e/part-3
/s3.6 /s3.7
Disk 3
Setting Cache Specifics
Chapter 12 • Caching 237

■ When to refresh a cached document■ Whether the proxy should track the number of times a document is accessed and report that
value back to the remote server
Note – Setting the specifics for a large cache is time-consuming and may cause theadministration interface to time-out. Therefore, if you are creating a large cache, use thecommand line utilities to set cache specifics. For more information on the cache command lineutilities, see “Using the Cache Command-Line Interface” on page 256.
▼ To Set Cache SpecificsAccess the Server Manager, and click the Caching tab.
Click the Set Cache Specifics link.The Set Cache Specifics page is displayed.
You can enable or disable the cache by selecting the appropriate option.The cache is enabled by default.
Provide the working directory.By default the working directory is present under the proxy instance. This location can bechanged. For more information, see “Creating a Cache Working Directory” on page 239.
Click the partition configuration link.The Add/Edit Cache Partitions page is displayed. You can add a new cache partition or editexisting cache paritions. Cache size is the maximum size the cache is allowed to grow. Themaximum cache size is 32Gbytes. For more information, see “Setting Cache Size” on page 240.
Click the cache capacity configuration link.The Set Cache Capacity page is displayed. You can set the cache capacity on the Set CacheCapacity page.
Select the Cache HTTP to enable caching of HTTP documents.If you decide that you want your proxy server to cache HTTP documents, determine whether itshould always do an up -to-date check for the documents in the cache or whether it shouldcheck based on an interval. You can also enable or disable the Proxy Server from reportingcache hits to the remote server. For more information, see “Caching HTTP Documents” onpage 240. The available options are:
■ Select the Always Check That The Document Is Up To Date option to ensure that the HTTPdocument is always up-to- date.
1
2
3
4
5
6
7
Setting Cache Specifics
Oracle iPlanet Web Proxy Server 4.0.14 Administration Guide • June 2010238

■ Select the number of hours from the Check Only If Last Check More Than drop-downlist to specify the refresh interval for the proxy server. The up-to-date check is performedusing any one of the following options:■ Use Last-modified Factor. The last modified header that is sent by the origin server
along with the document.■ Use Only Explicit Expiration Information. The proxy server uses the Expires
header to decide if the cache entry is fresh or stale.
Select the Never Report Accesses To Remote Server option to prevent the proxy serverfrom reporting the number of accesses to the remote server.
■ Select the Report Cache Hits To Remote Server option to track the number of times adocument was accessed and report it back to the remote server.
Set the refresh interval for cached FTP documents by selecting the Yes; Reload If Older Thancheckbox and also set the time interval by selecting the value from the drop-down list. For moreinformation, see “Caching FTP and Gopher Documents”on page 242.
You can set the refresh interval for cached Gopher documents. Select the Yes; Reload If OlderThan checkbox and also set the time interval by selecting the value from the drop-down list. Formore information, see “Caching FTP and Gopher Documents”on page 242.
Click OK.
Click Restart required. The Apply Changes page is displayed.
Click the Restart Proxy Server button to apply the changes.
Creating a Cache Working DirectoryThe cache files are under cache partitions. The working directory you specify on the Set CacheSpecifics page is often the parent directory for the cache. All cached files appear in an organizeddirectory structure under the caching directory. If you change the cache directory name ormove it to another location, you have to provide the proxy with the new location.
You can extend the cache directory structure to multiple file systems so that you can have alarge cache structure divided on multiple smaller disks instead of keeping it all on one largedisk. Each proxy server must have its own cache directory structure, that is, cache directoriescannot be concurrently shared by multiple proxy servers.
8
9
10
11
12
Setting Cache Specifics
Chapter 12 • Caching 239
Setting Cache SizeThe cache size indicates the partition size. Cache size should always be less than the cachecapacity as it is the maximum size to which the cache can grow. The sum of all the partition sizesmust be less than or equal to the cache size.
The amount of disk space available for the proxy cache has a considerable effect on cacheperformance. If the cache is too small, the Cache GC must remove cached documents to makeroom on the disk more often, and documents must be retrieved from content servers moreoften. These activities slow performance.
Large cache sizes are more efficient because the more cached documents, the less the networktraffic load and the faster the response time the proxy provides. Also, the GC removes cacheddocuments if users no longer need them. Barring any file system limitations, cache size cannever be too large. The excess space simply remains unused.
You can also have the cache split on multiple disk partitions.
Caching HTTP DocumentsHTTP documents offer caching features that documents of the other protocols do not.However, by setting up and configuring the cache properly, you can ensure that your ProxyServer will cache HTTP, FTP, and Gopher documents effectively.
Note – Proxy Server 4 does not support caching HTTPS documents.
All HTTP documents have a descriptive header section that the Proxy Server uses to compareand evaluate the document in the proxy cache and the document on the remote server. Whenthe proxy does an up-to-date check on an HTTP document, the proxy sends one request to theserver that tells the server to return the document if the version in the cache is out of date.Often, the document has not changed since the last request and therefore is not transferred.This method of checking to see if an HTTP document is up-to-date saves bandwidth anddecreases latency.
To reduce transactions with remote servers, the Proxy Server enables you to set a CacheExpiration setting for HTTP documents. The Cache Expiration setting provides information tothe proxy to estimate whether the HTTP document needs an up-to-date check before sendingthe request to the server. The proxy makes this estimate based on the HTTP document’sLast-Modified date found in the header.
With HTTP documents, you can also use a Cache Refresh setting. This option specifies whetherthe proxy always does an up-to-date check, which would override an Expiration setting orwhether the proxy waits a specific period of time before doing a check. The following tableshows what the proxy does if both an Expiration setting and a Refresh setting are specified.Using the Refresh setting decreases latency and saves bandwidth considerably.
Setting Cache Specifics
Oracle iPlanet Web Proxy Server 4.0.14 Administration Guide • June 2010240

TABLE 12–1 Using the Cache Expiration and Cache Refresh settings With HTTP
Refresh setting Expiration setting Results
Always do an up-to-datecheck
(Not applicable) Always do an up-to-date check
User-specified interval Use document’s “expires” header Do an up-to-date check if intervalexpired
Estimate with document’sLast-Modified header
Smaller value* of the estimate andexpires header
Note – * Using the smaller value guards against getting stale data from the cache for documentsthat change frequently.
Setting the HTTP Cache Refresh IntervalIf you decide that you want your Proxy Server to cache HTTP documents, determine whether itshould always do an up-to-date check for documents in the cache or whether it should checkbased on a Cache Refresh setting (up-to-date check interval). For HTTP documents, areasonable refresh interval would be four to eight hours, for example. The longer the refreshinterval, the fewer the number of times the proxy connects with remote servers. Even thoughthe proxy does not do up-to-date checking during the refresh interval, users can force a refreshby clicking the Reload button in the client. This action makes the proxy force an up-to-datecheck with the remote server.
You can set the refresh interval for HTTP documents on either the Set Cache Specifics page orthe Set Caching Configuration page. The Set Cache Specifics page enables you to configureglobal caching procedures, and the Set Caching Configuration page enables you to controlcaching procedures for specific URLs and resources.
Setting the HTTP Cache Expiration PolicyYou can also set up your server to check if the cached document is up-to-date by using alast-modified factor or explicit expiration information only.
Explicit expiration information is a header found in some HTTP documents that specifies thedate and time when that file will become outdated. Not many HTTP documents use explicitExpires headers, so you should estimate based on the Last-modified header.
If you decide to have your HTTP documents cached based upon the Last-modified header, youneed to select a fraction to use in the expiration estimation. This fraction, known as the LMfactor, is multiplied by the interval between the last modification and the time that the lastup-to-date check was performed on the document. The resulting number is compared with thetime since the last up-to-date check. If the number is smaller than the time interval, thedocument is not expired. Smaller fractions make the proxy check documents more often.
Setting Cache Specifics
Chapter 12 • Caching 241
For example, suppose you have a document that was last changed ten days ago. If you set thelast-modified factor to 0.1, the proxy interprets the factor to mean that the document isprobably going to remain unchanged for one day (10 * 0.1 = 1). The proxy would, in that case,return the document from the cache if the document was checked less than a day ago.
In this same example, if the cache refresh setting for HTTP documents is set to less than oneday, the proxy does the up-to-date check more than once a day. The proxy always uses thevalue, cache refresh or cache expiration, that requires the more frequent update.
You can set the expiration setting for HTTP documents on either the Set Cache Specifics pageor the Set Caching Configuration page. The Set Cache Specifics page enables you to configureglobal caching procedures and the Set Caching Configuration page enables you to controlcaching procedures, for specific URLs and resources.
Reporting HTTP Accesses to the Remote ServerWhen a document is cached by Proxy Server, it can be accessed many times before it isrefreshed again. For the remote server, sending one copy to the proxy that will cache itrepresents only one access, or “hit.” The Proxy Server can count how many times a givendocument is accessed from the proxy cache between up-to-date checks and then send that hitcount back to the remote server in an additional HTTP request header (Cache-Info) the nexttime the document is refreshed. This way, if the remote server is configured to recognize thistype of header, it receives a more accurate account of how many times a document is accessed.
Caching FTP and Gopher DocumentsFTP and Gopher do not include a method for checking to see whether a document isup-to-date. Therefore, the only way to optimize caching for FTP and Gopher documents is toset a Cache Refresh interval. The Cache Refresh interval is the amount of time the Proxy Serverwaits before retrieving the latest version of the document from the remote server. If you do notset a Cache Refresh interval, the proxy will retrieve these documents even if the versions in thecache are up to date.
If you are setting a cache refresh interval for FTP and Gopher, choose one that you consider safefor the documents the proxy gets. For example, if you store information that rarely changes, usea high number for several days. If the data changes constantly, you will want the files to beretrieved at least every few hours. During the refresh time, you risk sending an out-of-date fileto the client. If the interval is short enough, for example, a few hours, you eliminate most of thisrisk while getting noticeably faster response time.
You can set the cache refresh interval for FTP and Gopher documents on either the Set CacheSpecifics page or the Set Caching Configuration page. The Set Cache Specifics page enables youto configure global caching procedures, and the Set Caching Configuration page enables you tocontrol caching procedures for specific URLs and resources. For more information about usingthe Set Cache Specifics page, see “Setting Cache Specifics” on page 237. For more informationabout using the Set Caching Configuration page, see “Configuring the Cache” on page 246.
Setting Cache Specifics
Oracle iPlanet Web Proxy Server 4.0.14 Administration Guide • June 2010242

Note – If your FTP and Gopher documents vary widely (some change often, others rarely), usethe Set Caching Configuration page to create a separate template for each kind of document (forexample, create a template with resources ftp://.*.gif) and then set a refresh interval that isappropriate for that resource.
Creating and Modifying a CacheCache partitions are reserved parts of disks or memory that are set aside for caching purposes. Ifyour caching capacity changes, you may want to change or add partitions.
▼ To Add Cache PartitionsAccess the Server Manager, and click the Caching tab.
Click the Add/Edit Cache Partitions link.The Add/Edit Cache Partitions page is displayed.
Click the Add Cache Partition button.The Cache Partition Configuration page is displayed.
Provide the appropriate values for the new partition.
Click OK.
Click Restart Required.The Apply changes page is displayed.
Click Restart Proxy Server button to apply the changes
▼ To Modify Cache PartitionsAccess the Server Manager, and click the Caching tab.
Click the Add/Edit Cache Partitions link.The Add/Edit Cache Partitions page is displayed.
Click on the name of the partition that you would like to change.
1
2
3
4
5
6
7
1
2
3
Creating and Modifying a Cache
Chapter 12 • Caching 243

Edit the information.
Click OK.
Click Restart Required.The Apply Changes page is displayed.
Click the Restart Proxy Server button to apply the changes.
Setting Cache CapacityCache capacity value is used to derive the cache directory structure. The number of sections thatcan be in the cache directory is derived from the cache capacity. Cache capacity is directlyrelated to the cache hierarchy in the cache directories. The bigger the capacity, the larger thehierarchy. The cache capacity should be equal to or greater than the cache size. Setting thecapacity larger than the cache size can be helpful if you know that you plan to increase the cachesize later (such as by adding an external disk). The cache capacity can be of maximum 128 GBwhich will create 256 sections.
▼ To set the cache capacityAccess the Server Manager, and click the Caching tab.
Click the Set Cache Capacity link.The Set Cache Capacity page is displayed.
Choose a capacity from the New Capacity Range drop-down list.
Click OK.
Click Restart Required.The Apply Changes page is displayed.
Click the Restart Proxy Server button to apply the changes.
4
5
6
7
1
2
3
4
5
6
Setting Cache Capacity
Oracle iPlanet Web Proxy Server 4.0.14 Administration Guide • June 2010244
Managing Cache SectionsThe proxy cache is separated into one or more cache sections. You can have up to 256 sections.The number of cache sections must be a power of two (for example, 1, 2, 4, 8, 16, ..., 256). Thelargest capacity is 32 Gbytes (optimum) with 256 cache sections.
If you pick a cache capacity of 500 Mbytes, the installer will create 4 cache sections (500 d6 125 =4); if you choose a cache capacity of 2GB, the installer creates 16 sections (2000 d6 125 = 16).The optimum value for each section to get the number of sections is 125 Mbytes. More thenumber of sections larger the number of URLs stored and distributed across.
▼ To Manage Cache SectionsAccess the Server Manager, and click the Caching tab.
Click the Manage Sections link.The Manage Sections page is displayed.
Change the information in the table.The sections can be moved among existing partitions.
Click OK.
Click Restart Required.The Apply Changes page is displayed.
Click the Restart Proxy Server button to apply the changes.
Setting the Garbage Collection PreferencesYou can use the cache garbage collector to delete files from the cache. Garbage collection can bedone in either the automatic mode or the explicit mode. The explicit mode is externallyscheduled by the administrator. Select one of the modes and click OK. Click Restart Required.The Apply Changes page is displayed. Click the Restart Proxy Server button to apply thechanges.
1
2
3
4
5
6
Setting the Garbage Collection Preferences
Chapter 12 • Caching 245

Scheduling Garbage CollectionThe Schedule Garbage Collection page enables you to specify the days and time when garbagecollection will take place.
▼ To Set Garbage CollectionAccess the Server Manager, and click the Caching tab.
Click the Schedule Garbage Collection link.
The Schedule Garbage Collection is displayed.
Select the time at which garbage collection will occur from the Schedule Garbage Collection Atlist.
Specify the day of the week on which garbage collection will occur.
Click OK.
Click Restart Required.
The Apply Changes page is displayed.
Click the Restart Proxy Server button to apply the changes.
Configuring the CacheYou can specify several configuration parameter values for URLs matching a regular expressionpattern that you specify. This feature gives you fine control of the proxy cache based on the typeof document cached. Configuring the cache can include identifying the following items:
■ The cache default■ How to cache pages that require authentication■ How to cache queries■ The minimum and maximum cache file sizes■ When to refresh a cached document■ The cache expiration policy■ The caching behavior for client interruptions■ The caching behavior for failed connections to origin servers
1
2
3
4
5
6
7
Scheduling Garbage Collection
Oracle iPlanet Web Proxy Server 4.0.14 Administration Guide • June 2010246

Note – If you set the cache default for a particular resource to either Derived configuration orDon’t cache, the cache configuration options will not appear on the Set Caching Configurationpage. However, if you choose a cache default of Cache for a resource, you can specify severalother configuration items.
▼ To Configure the CacheAccess the Server Manager, and click the Caching tab.
Click the Set Caching Configuration page.The Set Caching Configuration page is displayed.
Select the resource from the drop-down list or click the Regular Expression button, type aregular expression, and click OK.
Change the configuration information.
Click OK.
Click Restart Required.The Apply Changes page is displayed.
Click the Restart Proxy Server button to apply the changes.
Caching Configuration ElementsThe following sections include information that will help you to determine which configurationwill best suit your needs.
Setting the Cache DefaultThe proxy server enables you to identify a cache default for specific resources. A resource is atype of file that matches certain criteria that you specify. For instance, to have your serverautomatically cache all documents from the domain company.com, you could create thefollowing regular expression
[a-z] *://[^/:]\\.company\\.com.*.
By default, the Cache option is selected. Your server automatically caches all cacheabledocuments from that domain.
1
2
3
4
5
6
7
Configuring the Cache
Chapter 12 • Caching 247

Note – If you set the cache default for a particular resource to either Derived configuration orDon’t cache, it is not necessary to configure the cache for that resource. However, if you choosea cache default of Cache for a resource, you can specify several other configuration items. For alist of these items, see “Configuring the Cache” on page 246.
The cache default for HTTP, FTP, and Gopher can also be set.
Caching Pages That Require AuthenticationYou can have your server cache files that require user authentication. The Proxy Server tags thefiles in the cache so that it can require authentication from the remote server if a user asks forthem.
Because the Proxy Server cannot determine how remote servers authenticate and it does nothave a list of users’ IDs or passwords, it will simply force an up-to-date check with the remoteserver each time a request is made for a document that requires authentication. The usertherefore must type an ID and password to gain access to the file. If the user has already accessedthat server earlier in the browser session, the browser automatically sends the authenticationinformation without prompting the user.
If you do not enable the caching of pages that require authentication, the proxy does not cachethem, which is the default behavior.
Caching QueriesCached queries only work with HTTP documents. You can limit the length of queries that arecached, or you can completely inhibit caching of queries. The longer the query, the less likely itis to be repeated, and the less useful it is to cache.
The following caching restrictions apply for queries:■ The access method has to be GET, the document must not be protected (unless caching of
authenticated pages is enabled), and the response must have at least a Last-modified header.This requires the query engine to indicate that the query result document can be cached.
■ If the Last-modified header is present, the query engine should support a conditional GETmethod (with an If-modified-since header) in order to make caching effective; otherwise thequery engine should return an Expires header.
Setting Minimum and Maximum Cache File SizesYou can set the minimum and maximum sizes for files cached by your Proxy Server. You maywant to set a minimum size if you have a fast network connection. If your connection is fast,small files may be retrieved so quickly that having the server to cache them is unnecessary. Inthis instance, you would want to cache only larger files. You may want to set a maximum filesize to make sure that large files do not occupy too much of your proxy’s disk space.
Configuring the Cache
Oracle iPlanet Web Proxy Server 4.0.14 Administration Guide • June 2010248

Setting the Up-to-date Checking PolicyThe up-to-date checking policy ensures that the HTTP document is always up-to- date. Youcan also specify the refresh interval for the Proxy Server.
Setting Expiration PolicyYou can set the Expiration Policy using the last modified factor or the explicit expirationinformation.
Setting Cache Behavior for Client InterruptionsIf a document is only partially retrieved and the client interrupts the data transfer, the proxy canfinish retrieving the document for the purpose of caching it. The proxy’s default is to finishretrieving a document for caching if at least 25 percent of the document has already beenretrieved. Otherwise, the proxy terminates the remote server connection and removes thepartial file. You can raise or lower the client interruption percentage.
Behavior on Failure to Connect to ServerIf an up-to-date check on a stale document fails because the origin server is unreachable, youcan specify whether the proxy sends the stale document from the cache.
Caching Local HostsIf a URL requested from a local host lacks a domain name, the Proxy Server will not cache it.This behavior avoids duplicate caching. For example, if a user requestshttp://machine/filename.html and http://machine.example.com/filename.html from alocal server, both URLs might appear in the cache. Because these files are from a local server,they may be retrieved so quickly caching them is not necessary.
However, if your company has servers in many remote locations, you might want to cachedocuments from all hosts to reduce network traffic and decrease the time needed to access thefiles.
▼ To Enable the Caching of Local HostsAccess the Server Manager, and click the Caching tab.
Click the Cache Local Hosts link.The Cache Local Hosts page is displayed.
1
2
Caching Local Hosts
Chapter 12 • Caching 249

Select the resource from the drop-down list or click the Regular Expression button, type aregular expression, and click OK.For more information on regular expressions, see Chapter 16, “Managing Templates andResources.”
Click the enabled button.
Click OK.
Click Restart Required.The Apply Changes page is displayed.
Click the Restart Proxy Server button to apply the changes.
Configuring the File CacheThe file cache is turned on by default. The file cache settings are contained in the server.xmlfile. You can use the Server Manager to change the file cache settings.
▼ To Configure the File CacheFrom the Server Manager, click the Caching tab.
Click the Configure File Cache link.The Configure File Cache page is displayed.
Select Enable File Cache, if not already selected.
Choose whether to transmit files.When you enable Transmit File, the server caches open file descriptors for files in the file cacherather than the file contents. PR_TransmitFile is used to send the file contents to a client. WhenTransmit File is enabled, the distinction normally made by the file cache between small,medium, and large files no longer applies, because only the open file descriptor is being cached.By default, Transmit File is enabled on Windows and disabled on UNIX. On UNIX, you shouldonly enable Transmit File for platforms that have native OS support for PR_TransmitFile,which currently includes HP-UX. Use on UNIX/Linux platforms is not recommended.
Type a size for the hash table.The default size is twice the maximum number of files plus 1. For example, if your maximumnumber of files is set to 1024, the default hash table size is 2049.
3
4
5
6
7
1
2
3
4
5
Configuring the File Cache
Oracle iPlanet Web Proxy Server 4.0.14 Administration Guide • June 2010250
Type a maximum age in seconds for a valid cache entry.The default setting is 30. This setting controls how long cached information will continue to beused once a file has been cached. An entry older than MaxAge is replaced by a new entry for thesame file, if the same file is referenced through the cache. Set the maximum age based onwhether the content is updated on a regular schedule. For example, if content is updated fourtimes a day at regular intervals, you could set the maximum age to 21600 seconds (6 hours).Otherwise, consider setting the maximum age to the longest time you are willing to serve theprevious version of a content file after the file has been modified.
Type the Maximum Number of Files to be cached.The default setting is 1024.
Type medium and small file size limits in bytes.The Medium File Size Limit is set by default to 537600. The Small File Size Limit is set by defaultto 2048.
The cache treats small, medium, and large files differently. The contents of medium files arecached by mapping the file into virtual memory only on UNIX/Linux platforms. The contentsof small files are cached by allocating heap space and reading the file into it. Information aboutlarge files is cached but the file contents are not cached. The advantage of distinguishingbetween small files and medium files is to avoid wasting part of many pages of virtual memorywhen there are lots of small files. So the Small File Size Limit is typically a slightly lower valuethan the VM page size.
Set the medium and small file space.The medium file space is the size in bytes of the virtual memory used to map all medium sizedfiles. The size is set by default to 10485760. The small file space is the size of heap space in bytesused for the cache, including heap space used to cache small files. The size is set by default to1048576 for UNIX/Linux.
Click OK.
Click Restart Required.The Apply Changes page is displayed.
Click the Restart Proxy Server button to apply the changes.
6
7
8
9
10
11
12
Configuring the File Cache
Chapter 12 • Caching 251

Viewing the URL DatabaseYou can view the names and attributes of all recorded cached URLs grouped by access protocoland site name. By accessing this information, you can perform various cache managementfunctions such as expiring and removing documents from the cache.
▼ To View the URLs in the DatabaseAccess the Server Manager, and click the Caching tab.
Click the View URL Database link.The View URL Database page is displayed.
Click the Regenerate button to generate a current list of cached URLs.
(Optional) To view the information for a specific URL, type a URL or regular expression in theSearch field and click the Search button.
To view cache database information grouped by domain name and host:
a. Select a domain name from the list.A list of hosts in that domain appears. Click the name of a host and a list of URLs appears.
b. Click on the name of a URL.Detailed information about that URL appears.
c. Click the name of a URL to see detailed information about that URL.
▼ To Cause Cached URLs to Expire or Remove the CachedURLs
Access the Server Manager, and click the Caching tab.
Click the View URL Database link.The View URL Database page is displayed.
Click the Regenerate button to generate a snapshot of the cache database.This snapshot forms the basis for the remaining steps.
1
2
3
4
5
1
2
3
Viewing the URL Database
Oracle iPlanet Web Proxy Server 4.0.14 Administration Guide • June 2010252
If you know of a specific URL that you would like to cause the expiry of or remove, type that URLor a regular expression that matches that URL in the Search field and click the Search button.
If you would like to work with URLs grouped by domain name and host:
a. select a domain name from the list.A list of hosts in that domain appears.
b. Click the name of a host and a list of URLs appears.
To cause the expiry of individual files:
a. Select the Ex option next to the URLs for those files.
b. Click the Exp/Rem Marked button.
To expire all of the files in the list, click the Exp All button on the bottom of the form.
To remove individual files from the cache:
a. Select the Rm option next to the URLs for these files you want to remove.
b. Click the Exp/Rem Marked button.
To remove all of the files in the list, click the Rem All button.
Click the Regenerate button to regenerate the snapshot.
Note – When you use the Ex or Rm option, the associated file is processed but the changes arenot reflected in the snapshot. The snapshot needs to be regenerated for the changes to be visible.
Using Cache Batch UpdatesYou can pre-load files in a specified web site or do an up-to-date check on documents already inthe cache whenever the proxy server is not busy. You can create, edit, and delete batches ofURLs and enable and disable batch updating.
Creating Batch UpdatesYou can actively cache files by specifying files to be updated in a batch. You can perform anup-to-date check on several files currently in the cache or pre-load multiple files in a particularweb site.
4
5
6
7
8
9
10
Using Cache Batch Updates
Chapter 12 • Caching 253

▼ To Create a Batch Update
Access the Server Manager, and click the Caching tab.
Click the Set Cache Batch Updates link.The Set Cache Batch Updates page is displayed.
Select New and Create from the drop-down lists next to Create/Select a Batch UpdateConfiguration.
Click OK. The Set Cache Batch Updates page is displayed.
In the Name section, type a name for the new batch update entry.
In the Source section of the page, select the type of batch update that you want to create.Click the first radio button if you want to perform an up-to-date check on all documents in thecache. Click the second radio button if you want to cache URLs recursively starting from thegiven source URL.
In the Source section fields, identify the documents that you want to use in the batch update.
In the Exceptions section, identify any files that you would like to exclude from the batchupdate.
In the Resources section, type the maximum number of simultaneous connections and themaximum number of documents to traverse.
Click OK.Select the newly added batch name and Schedule from the drop-down lists next to Create/Selecta Batch Update Configuration.
Click OK.
Note – You can create, edit, and delete batch update configurations without having batchupdates turned on. However, if you want your batch updates to be updated according to thetimes you set on the Set Cache Batch Updates page, you must turn updates on.
The Schedule Batch Updates page is displayed.
Select either Update On or Update Off option.
Select a time in the drop-down list and select the days on which you want the update to be run.
1
2
3
4
5
6
7
8
9
10
11
12
13
14
Using Cache Batch Updates
Oracle iPlanet Web Proxy Server 4.0.14 Administration Guide • June 2010254
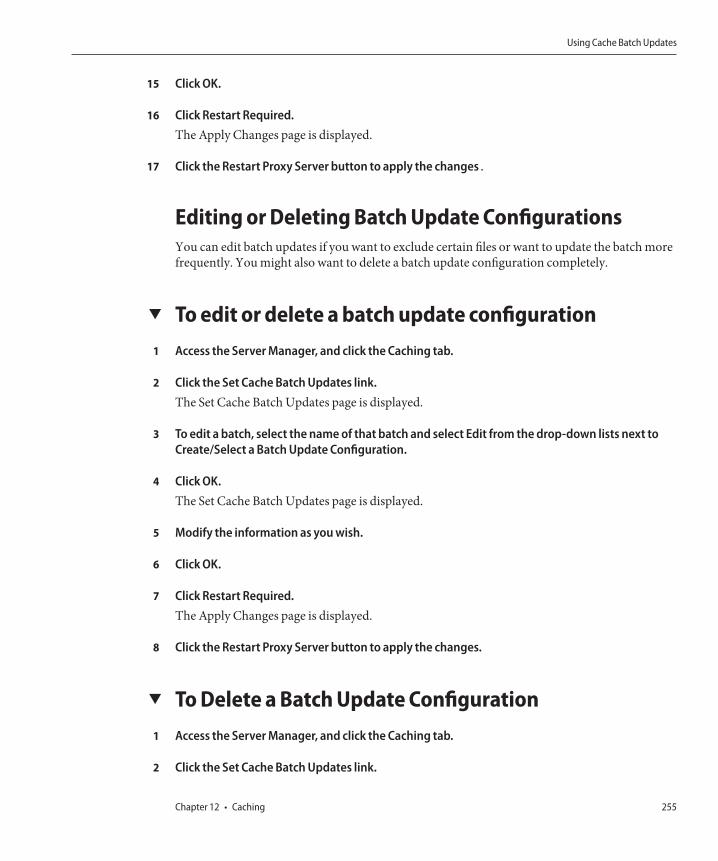
Click OK.
Click Restart Required.The Apply Changes page is displayed.
Click the Restart Proxy Server button to apply the changes.
Editing or Deleting Batch Update ConfigurationsYou can edit batch updates if you want to exclude certain files or want to update the batch morefrequently. You might also want to delete a batch update configuration completely.
▼ To edit or delete a batch update configurationAccess the Server Manager, and click the Caching tab.
Click the Set Cache Batch Updates link.The Set Cache Batch Updates page is displayed.
To edit a batch, select the name of that batch and select Edit from the drop-down lists next toCreate/Select a Batch Update Configuration.
Click OK.The Set Cache Batch Updates page is displayed.
Modify the information as you wish.
Click OK.
Click Restart Required.The Apply Changes page is displayed.
Click the Restart Proxy Server button to apply the changes.
▼ To Delete a Batch Update ConfigurationAccess the Server Manager, and click the Caching tab.
Click the Set Cache Batch Updates link.
15
16
17
1
2
3
4
5
6
7
8
1
2
Using Cache Batch Updates
Chapter 12 • Caching 255

To delete a batch, select the name of that batch and select Delete from the drop-down lists nextto Create/Select a Batch Update Configuration.
Click OK.
Click Restart Required.
The Apply Changes page is displayed.
Click the Restart Proxy Server button to apply the changes.
Using the Cache Command-Line InterfaceThe proxy server comes with several command-line utilities that enable you to configure,change, generate, and repair your cache directory structure. Most of these utilities duplicate thefunctionality of the Server Manager pages. You might want to use the utilities if you need toschedule maintenance, for example, as a cron job. All of the utilities are located in the extrasdirectory.
▼ To Run the Command-Line UtilitiesFrom the command-line prompt, go to the server_root/proxy-serverid directory.
Type ./start -shell
The following sections describe the various utilities.
Building the Cache Directory StructureThe proxy utility called cbuild is an offline cache database manager. This utility enables you tocreate a new cache structure or modify an existing cache structure using the command-lineinterface. You can use the Server Manager pages to enable the proxy to use the newly createdcache.
3
4
5
6
1
2
Using the Cache Command-Line Interface
Oracle iPlanet Web Proxy Server 4.0.14 Administration Guide • June 2010256

Note – The utility does not update the server.xml file. cbuild cannot resize a cache that hasmultiple partitions. When the cache is created or modified by cbuild, the cachecapacityparameter should be manually updated in the server.xml file.
<PARTITION partitionname="part1" partitiondir="/home/build/install9/proxy-server1/cache" maxsize="1600" minspace="5" enabled="true"/><CACHE enabled="true" cachecapacity="2000" cachedir="/tmp/cache">
You can invoke the cbuild utility in two modes. The first mode is:
cbuild -d conf-dir -c cache-dir -s cache sizecbuild -d conf-dir -c cache-dir -s cache size -r
For example:
cbuild -d server_root/proxy-serverid/config-c server_root/proxy-serverid/cache -s 512
cbuild -d server_root/proxy-serverid/config-c server_root/proxy-serverid/cache -s 512 -r
where
■ conf-dir is the configuration directory of the proxy instance located in theserver_root/proxy-serverid/config directory.
■ cache-dir is the directory for your cache structure.■ cache size is the maximum size to which the cache can grow. This option cannot be used
with the cache-dim parameter. The maximum size is 65135 Mbytes.■ -r resizes an existing cache structure provided it has a single partition. This is not required
for creating a new cache.
The second mode is:
cbuild -d conf-dir -c cache-dir -n cache-dimcbuild -d conf-dir -c cache-dir -n cache-dim -r
For example:
cbuild -d server_root/proxy-serverid/config-c server_root/proxy-serverid/cache -n 3
cbuild -d server_root/proxy-serverid/config-c server_root/proxy-serverid/cache -n 3 -r
where
■ conf-dir is the configuration directory of the proxy instance located in theserver_root/proxy-serverid/config directory.
Using the Cache Command-Line Interface
Chapter 12 • Caching 257

■ cache-dir is the directory for your cache structure.■ cache-dim determines the the number of sections. For example, in Figure 12–2 the section
shown as s3.4, the 3 indicates the dimension. The default value of cache-dim is 0 and themaximum value is 8.
■ -r resizes an existing cache structure provided it has a single partition. This option is notrequired for creating a new cache.
Additionally, cbuild accepts a -R argument which specifies that the .size files of a specifiedpartition must be updated to full accuracy. For example:
cbuild -d conf-dir -c cache-dir -R
Managing the Cache URL ListThe proxy utility urldb manages the URL list in the cache. You can use this utility to list theURLs that are cached. You can also selectively expire and remove cached objects from the cachedatabase.
The urldb commands can be categorised into three groups based on the -o option:
■ domains■ sites■ URLs
■ To list domains, type the following command at the command line:
urldb -o matching_domains -e reg-exp -d conf-dir
For example:
urldb -o matching_domains -e “.*phoenix.*” -d server-root/proxy-serverid/config
where■ matching_domains lists domains that match regular expression■ reg-exp is the regular expression used■ conf-dir is the configuration directory of the proxy instance located in the
server-root/proxy-serverid/config directory.■ To list all the matching sites in a domain, type the following command at the command line:
urldb -o matching_sites_in_domain -e reg-exp -m domain_name -d conf-dir
For example:
urldb -o matching_sites_in_domain -e “.*atlas” -m phoenix.com
-d server-root/proxy-serverid/config
where
Using the Cache Command-Line Interface
Oracle iPlanet Web Proxy Server 4.0.14 Administration Guide • June 2010258

■ matching_sites_in_domain lists all the sites in a domain that match the regularexpression
■ reg-exp is the regular expression used■ domain_name is the name of the domain■ conf-dir is the configuration directory of the proxy instance located in the
server-root/proxy-serverid/config directory.■ To list all the matching sites, type the following command at the command line:
urldb -o all_matching_sites -e reg-exp -d conf-dir
For example:
urldb -o all_matching_sites -e “.*atlas.*” -d server-root/proxy-serverid/config
where■ all_matching_sites lists all the sites that match the regular expression■ reg-exp is the regular expression used■ conf-dir is the configuration directory of the proxy instance located in the
server-root/proxy-serverid/config directory.■ To list matching URLs in a site, type the following command at the command line:
urldb -o matching_urls_from_site -e reg-exp -s site_name -d conf-dir
For example:
urldb -o matching_urls_from_site -e “http://.*atlas.*” -s atlas.phoenix.com
-d server-root/proxy-serverid/config
where■ matching_urls_from_site lists all URLs from site that match the regular expression■ reg-exp is the regular expression used■ site_name is the name of the site■ conf-dir is the configuration directory of the proxy instance located in the
server-root/proxy-serverid/config directory.■ To expire or remove matching URLs in a site, type the following command at the command
line:
urldb -o matching_urls_from_site -e reg-exp -s site_name -x e -d conf-dirurldb -o matching_urls_from_site -e reg-exp -s site_name -x r -d conf-dir
For example:
urldb -o matching_urls_from_site -e “http://.*atlas.*” -s atlas.phoenix.com
-x e -d server-root/proxy-serverid/config
where
Using the Cache Command-Line Interface
Chapter 12 • Caching 259

■ matching_urls_from_site lists all URLs from site that match the regular expression■ reg-exp is the regular expression used■ site_name is the name of the site■ -x e is the option to expire the matching URLs from the c ache database. This option
can not be used with the domain and site modes■ -x r is the option to remove the matching URLs from the cache database■ conf-dir is the configuration directory of the proxy instance. It is located in the
server-root/proxy-serverid/config directory.■ To list all matching URLs , type the following at the command line:
urldb -o all_matching_urls -e reg-exp -d conf-dir
For example:
urldb -o all_matching_urls -e “.*cgi-bin.*” -d
server-root/proxy-serverid/config
where■ all_matching_urls lists all the URLs that match the regular expression■ reg-exp is the regular expression used■ conf-dir is the configuration directory of the proxy instance located in the
server-root/proxy-serverid/config directory.■ To cause the expiry of all matching URLs, or to remove all matching URLs, type the
following command at the command line:
urldb -o all_matching_urls -e reg-exp -x e -d conf-dirurldb -o all_matching_urls -e reg-exp -x r -d conf-dir
For example:
urldb -o all_matching_urls -e “.*cgi-bin.*” -x e -d server-root/proxy-serverid/config
where■ all_matching_urls lists all the URLs that match the regular expression■ reg-exp is the regular expression used■ -x e is the option to cause the expiry of the matching URLs from the cache database■ -x r is the option to remove the matching URLs from the cache database■ conf-dir is the configuration directory of the proxy instance located in the
server-root/proxy-serverid/config directory.■ To cause the expiry of a list of URLs, or to remove a list of URLs , type the following
command at the command line:
urldb -l url-list -x e -e reg-exp -d conf-dirurldb -l url-list -x r -e reg-exp -d conf-dir
Using the Cache Command-Line Interface
Oracle iPlanet Web Proxy Server 4.0.14 Administration Guide • June 2010260

For example:
urldb -l url.lst -x e -e “.*cgi-bin.*” -d server-root/proxy-serverid/config
where■ url-list is the list of URLs that need to be expired. This option can be used for
providing the URL list.■ -x e is the option to cause the expiry of the matching URLs from the cache database.■ -x r is the option to remove the matching URLs from the cache database.■ reg-exp is the regular expression used■ conf-dir is the configuration directory of the proxy instance located in the
server-root/proxy-serverid/config directory.
Managing Cache Garbage CollectionThe cachegc utility enables you to remove objects from the cache database that might haveexpired or are too old to be cached due to cache size constraints.
Note – Ensure that the CacheGC is not running in the proxy instance when the cachegc utility isused.
The cachegc utility can be used in the following way:
cachegc -f leave-fs-full-percent -u gc-high-margin-percent -l gc-low-margin-percent -e
extra-margin-percent -d conf-dir
For example:
cachegc -f 50 -u 80 -l 60 -e 5 -d server-root/proxy-serverid/config
where
■ leave-fs-full-percent determines the percentage of the cache partition size below whichgarbage collection will not go
■ gc-high-margin-percent controls the percentage of the maximum cache size that, whenreached, triggers garbage collection
■ gc-low-margin-percent controls the percentage of the maximum cache size that the garbagecollector targets
■ extra-margin-percent is used by the garbage collector to determine the fraction of the cacheto remove.
■ conf-dir is the configuration directory of the proxy instance located in theserver-root/proxy-serverid/config directory.
Using the Cache Command-Line Interface
Chapter 12 • Caching 261

Managing Batch UpdatesThe bu utility updates the cache and works in two modes. In the first mode, it iterates throughthe cache database and updates all the URLs that are present in the cache by sending HTTPrequests for each. In the second mode, it starts with a given URL and does a breadth firstiteration of all the links from that URL to the depth that you specify and fetches pages to thecache. bu is a RFC compliant robot.
bu -n hostname -p port -t time-lmt -f contact-address -s sleep-time -o object -r n -d conf-dir
For example:
bu -n phoenix -p 80 -t 3600 -f [email protected] -s 60 -o nova -r n
-d server-root/proxy-serverid/config
where
■ hostname is the host name of the machine on which proxy is running. The default value isthe localhost.
■ port is the port on which proxy server is running. The default port is 8080.■ time-lmt is the time limit to which the utility will run■ contact-address determines the contact address that would be sent in the HTTP requests
that are sent from bu. The default value is worm@proxy-name.■ sleep-time is the sleep time between two consecutive requests. The default value is 5 seconds.■ object is the object specified in bu.conf that is currently being executed.■ -r n option determines whether the robot.txt policy is followed. The default value is y.■ conf-dir is the configuration directory of the proxy instance located in the
server-root/proxy-serverid/config directory.
Using the Internet Cache Protocol (ICP)The Internet Cache Protocol (ICP) is an object location protocol that enables caches tocommunicate with one another. Caches can use ICP to send queries and replies about theexistence of cached URLs and about the best locations from which to retrieve those URLs. In atypical ICP exchange, one cache will send an ICP query about a particular URL to allneighboring caches. Those caches will then send back ICP replies that indicate whether theycontain that URL. If the caches do not contain the URL, they send back miss. If they do containthe URL, they send back hit.
Using the Internet Cache Protocol (ICP)
Oracle iPlanet Web Proxy Server 4.0.14 Administration Guide • June 2010262

Routing Through ICP NeighborhoodsICP can be used for communication among proxies located in different administrativedomains. It enables a proxy cache in one administrative domain to communicate with a proxycache in another administrative domain. It is effective for situations in which several proxyservers want to communicate, but cannot all be configured from one master proxy as they are ina proxy array. Figure 12–3 shows an ICP exchange between proxies in different administrativedomains.
The proxies that communicate with each other through ICP are called neighbors. You cannothave more than 64 neighbors in an ICP neighborhood. The two types of neighbors in an ICPneighborhood are parents and siblings. Only parents can access the remote server if no otherneighbors have the requested URL. Your ICP neighborhood can have no parents or it can havemore than one parent. Any neighbor in an ICP neighborhood that is not a parent is considered asibling. Siblings cannot retrieve documents from remote servers unless the sibling is marked asthe default route for ICP, and ICP uses the default.
You can use polling rounds to determine the order in which neighbors receive queries. A pollinground is an ICP query cycle. For each neighbor, you must assign a polling round. If youconfigure all neighbors to be in polling round one, then all neighbors will be queried in onecycle at the same time. If you configure some of the neighbors to be in polling round 2, then allof the neighbors in polling round one are queried first and if none of them return a Hit, allround two proxies will be queried. The maximum number of polling rounds is two.
Since ICP parents are likely to be network bottlenecks, you can use polling rounds to lightentheir load. A common setup is to configure all siblings to be in polling round one and all parentsto be in polling round two. That way, when the local proxy requests a URL, the request goes toall of the siblings in the neighborhood first. If none of the siblings have the requested URL, therequest goes to the parent. If the parent does not have the URL, the URL will retrieve it from aremote server.
Each neighbor in an ICP neighborhood must have at least one ICP server running. If a neighbordoes not have an ICP server running, it cannot answer the ICP requests from their neighbors.Enabling ICP on your proxy server starts the ICP server if it is not already running.
Using the Internet Cache Protocol (ICP)
Chapter 12 • Caching 263

Setting Up ICPThis section provides details about setting up ICP. The general steps required to set up ICP are:
1. (Optional) Add parents to your ICP neighborhood.
For more information, see “To Add Parent or Sibling Proxies to an ICP Neighborhood” onpage 265.
2. Add siblings to your ICP neighborhood.
FIGURE 12–3 ICP Exchange
Cache
Proxy E
Cache
Proxy A
Engineeringdomain
Salesdomain
Cache
Proxy B
Marketingdomain
Firewall
Using the Internet Cache Protocol (ICP)
Oracle iPlanet Web Proxy Server 4.0.14 Administration Guide • June 2010264
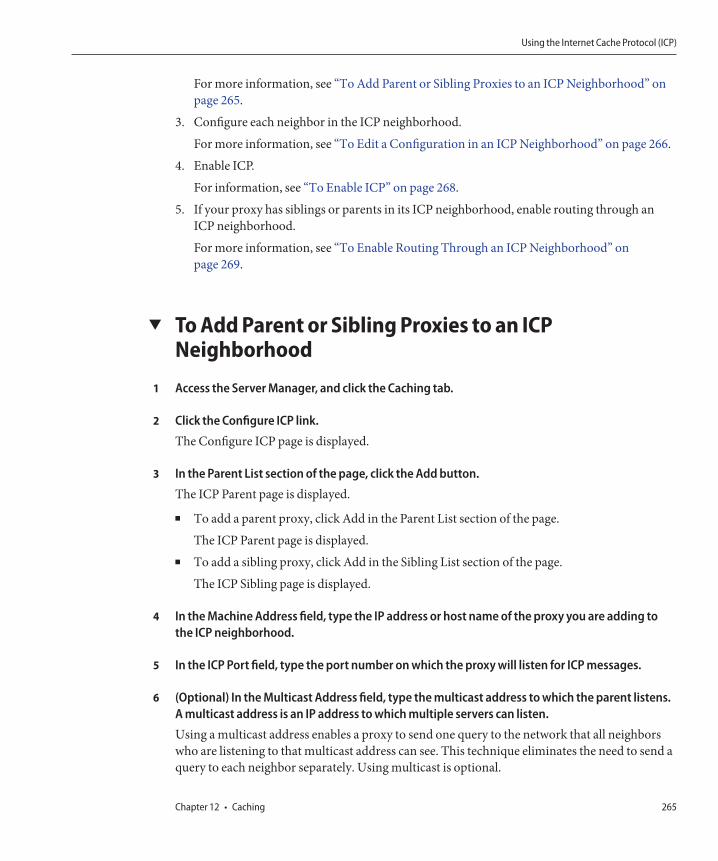
For more information, see “To Add Parent or Sibling Proxies to an ICP Neighborhood” onpage 265.
3. Configure each neighbor in the ICP neighborhood.
For more information, see “To Edit a Configuration in an ICP Neighborhood” on page 266.
4. Enable ICP.
For information, see “To Enable ICP” on page 268.
5. If your proxy has siblings or parents in its ICP neighborhood, enable routing through anICP neighborhood.
For more information, see “To Enable Routing Through an ICP Neighborhood” onpage 269.
▼ To Add Parent or Sibling Proxies to an ICPNeighborhood
Access the Server Manager, and click the Caching tab.
Click the Configure ICP link.
The Configure ICP page is displayed.
In the Parent List section of the page, click the Add button.
The ICP Parent page is displayed.
■ To add a parent proxy, click Add in the Parent List section of the page.
The ICP Parent page is displayed.■ To add a sibling proxy, click Add in the Sibling List section of the page.
The ICP Sibling page is displayed.
In the Machine Address field, type the IP address or host name of the proxy you are adding tothe ICP neighborhood.
In the ICP Port field, type the port number on which the proxy will listen for ICP messages.
(Optional) In the Multicast Address field, type the multicast address to which the parent listens.A multicast address is an IP address to which multiple servers can listen.
Using a multicast address enables a proxy to send one query to the network that all neighborswho are listening to that multicast address can see. This technique eliminates the need to send aquery to each neighbor separately. Using multicast is optional.
1
2
3
4
5
6
Using the Internet Cache Protocol (ICP)
Chapter 12 • Caching 265
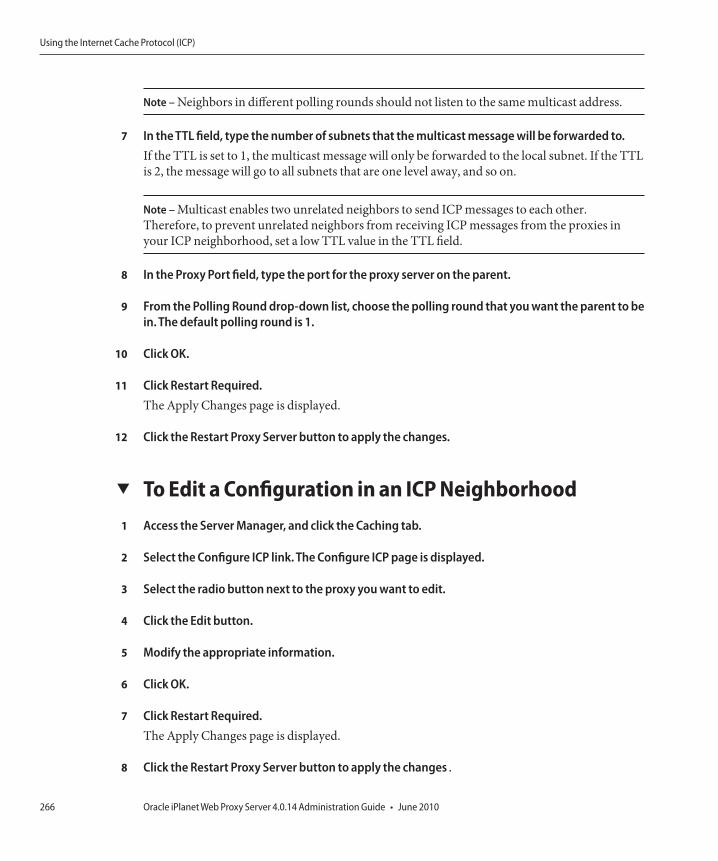
Note – Neighbors in different polling rounds should not listen to the same multicast address.
In the TTL field, type the number of subnets that the multicast message will be forwarded to.If the TTL is set to 1, the multicast message will only be forwarded to the local subnet. If the TTLis 2, the message will go to all subnets that are one level away, and so on.
Note – Multicast enables two unrelated neighbors to send ICP messages to each other.Therefore, to prevent unrelated neighbors from receiving ICP messages from the proxies inyour ICP neighborhood, set a low TTL value in the TTL field.
In the Proxy Port field, type the port for the proxy server on the parent.
From the Polling Round drop-down list, choose the polling round that you want the parent to bein. The default polling round is 1.
Click OK.
Click Restart Required.The Apply Changes page is displayed.
Click the Restart Proxy Server button to apply the changes.
▼ To Edit a Configuration in an ICP NeighborhoodAccess the Server Manager, and click the Caching tab.
Select the Configure ICP link. The Configure ICP page is displayed.
Select the radio button next to the proxy you want to edit.
Click the Edit button.
Modify the appropriate information.
Click OK.
Click Restart Required.The Apply Changes page is displayed.
Click the Restart Proxy Server button to apply the changes.
7
8
9
10
11
12
1
2
3
4
5
6
7
8
Using the Internet Cache Protocol (ICP)
Oracle iPlanet Web Proxy Server 4.0.14 Administration Guide • June 2010266

▼ To Remove Proxies from an ICP NeighborhoodAccess the Server Manager, and click the Caching tab.
Select the Configure ICP link. The Configure ICP page is displayed.
Select the radio button next to the proxy you want to remove.
Click the Delete button.
Click Restart Required.
The Apply Changes page is displayed.
Click the Restart Proxy Server button to apply the changes.
▼ To Configure the Local Proxy Server in Your ICPNeighborhoodYou need to configure each neighbor, or local proxy, in your ICP neighborhood.
Access the Server Manager, and click the Caching tab.
Select the Configure ICP link.
The Configure ICP page is displayed.
In the Binding Address field, type the IP address to which the neighbor server will bind.
In the Port field, type the port number to which the neighbor server will listen for ICP.
In the Multicast Address field, type the multicast address to which the neighbor listens.
A multicast address is an IP address to which multiple servers can listen. Using a multicastaddress enables a proxy to send one query to the network that all neighbors who are listening tothat multicast address can see. This technique eliminates the need to send a query to eachneighbor separately.
If both a multicast address and bind address are specified for the neighbor, the neighbor usesthe bind address to send replies and uses multicast to listen. If neither a bind address or amulticast address is specified, the operating system will decide which address to use to send thedata.
1
2
3
4
5
6
1
2
3
4
5
Using the Internet Cache Protocol (ICP)
Chapter 12 • Caching 267

In the Default Route field, type the name or IP address of the proxy to which the neighborshould route a request when none of the neighboring proxies respond with a hit.
If you type the word “origin” into this field, or if you leave the field blank, the default route willbe to the origin server.
If you choose “first responding parent” from the No Hit Behavior drop-down list , the route youtype in the Default Route field will have no effect. The proxy only uses this route if you choosethe default “no hit” behavior.
In the second Port field, type the port number of the default route machine that you typed intothe Default Route field.
From the On No Hits, Route Through drop-down list, select the neighbor’s behavior when noneof the siblings in the ICP neighborhood have the requested URL in their caches.
The available options are:
■ first responding parent. The neighbor will retrieve the requested URL through the parentthat first responds with a miss
■ default route. The neighbor will retrieve the requested URL through the machine specifiedin the Default Route field
In the Server Count field, type the number of processes that will service ICP requests.
In the Timeout field, type the maximum amount of time the neighbor will wait for an ICPresponse in each round.
Click OK.
Click Restart Required.
The Apply Changes page is displayed.
Click the Restart Proxy Server button to apply the changes.
▼ To Enable ICPAccess the Server Manager, and click the Preferences tab.
Click the Configure System Preferences link.
The Configure System Preferences page is displayed.
Select the Yes radio button for ICP and Click OK.
6
7
8
9
10
11
12
13
1
2
3
Using the Internet Cache Protocol (ICP)
Oracle iPlanet Web Proxy Server 4.0.14 Administration Guide • June 2010268

Click Restart Required.The Apply Changes page is displayed.
Click the Restart Proxy Server button to apply the changes.
▼ To Enable Routing Through an ICP NeighborhoodYou need to enable routing through an ICP neighborhood only if your proxy has other siblingsor parents in the ICP neighborhood. If your proxy is a parent to another proxy and does nothave any siblings or parents of its own, then you need to enable ICP only for that proxy. You donot need to enable routing through an ICP neighborhood.
Access the Server Manager, and click the Routing tab.
Click the Set Routing Preferences link.The Set Routing Preferences page is displayed.
Select the resource from the drop-down list or click the Regular Expression button, type aregular expression, and click OK.
Select the radio button next to the Route Through option.
Select the checkbox next to ICP.
(Optional) To enable the client to retrieve a document directly from the ICP neighbor that hasthe document instead of going through another neighbor to get it, select the checkbox next tothe Text Redirect option.
Click OK.
Caution – Redirect is not currently supported by any clients, so don’t use the feature at this time.
Click Restart Required.The Apply Changes page is displayed.
Click the Restart Proxy Server button to apply the changes.
4
5
1
2
3
4
5
6
7
8
9
Using the Internet Cache Protocol (ICP)
Chapter 12 • Caching 269
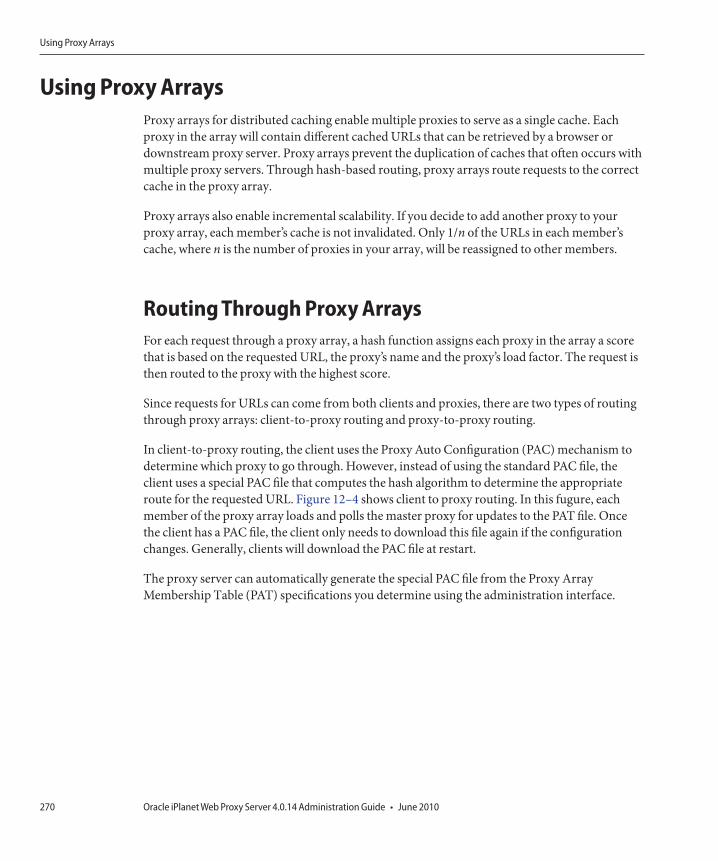
Using Proxy ArraysProxy arrays for distributed caching enable multiple proxies to serve as a single cache. Eachproxy in the array will contain different cached URLs that can be retrieved by a browser ordownstream proxy server. Proxy arrays prevent the duplication of caches that often occurs withmultiple proxy servers. Through hash-based routing, proxy arrays route requests to the correctcache in the proxy array.
Proxy arrays also enable incremental scalability. If you decide to add another proxy to yourproxy array, each member’s cache is not invalidated. Only 1/n of the URLs in each member’scache, where n is the number of proxies in your array, will be reassigned to other members.
Routing Through Proxy ArraysFor each request through a proxy array, a hash function assigns each proxy in the array a scorethat is based on the requested URL, the proxy’s name and the proxy’s load factor. The request isthen routed to the proxy with the highest score.
Since requests for URLs can come from both clients and proxies, there are two types of routingthrough proxy arrays: client-to-proxy routing and proxy-to-proxy routing.
In client-to-proxy routing, the client uses the Proxy Auto Configuration (PAC) mechanism todetermine which proxy to go through. However, instead of using the standard PAC file, theclient uses a special PAC file that computes the hash algorithm to determine the appropriateroute for the requested URL. Figure 12–4 shows client to proxy routing. In this fugure, eachmember of the proxy array loads and polls the master proxy for updates to the PAT file. Oncethe client has a PAC file, the client only needs to download this file again if the configurationchanges. Generally, clients will download the PAC file at restart.
The proxy server can automatically generate the special PAC file from the Proxy ArrayMembership Table (PAT) specifications you determine using the administration interface.
Using Proxy Arrays
Oracle iPlanet Web Proxy Server 4.0.14 Administration Guide • June 2010270

In proxy-to-proxy routing, proxies use a PAT (Proxy Array Table) file to compute the hashalgorithm instead of the PAC file used by clients. The PAT file is an ASCII file that containsinformation about a proxy array, including the proxies’ machine names, IP addresses, ports,load factors, cache sizes, and so on. For computing the hash algorithm at the server, using a PATfile is much more efficient than using a PAC file (which is a JavaScript file that has to beinterpreted at run-time). However, most clients do not recognize the PAT file format, andtherefore, must use a PAC file. Figure 12–5 shows proxy-to-proxy routing.
FIGURE 12–4 Client to Proxy Routing
Cache
Client
Proxy A
Cache
Proxy B
Proxy array 1
Cache
Master Proxy
PAC
PAT
Firewall
Using Proxy Arrays
Chapter 12 • Caching 271

The PAT file is be created on the master proxy in the proxy array. The proxy administrator mustdetermine which proxy will be the master proxy. The administrator can change the PAT filefrom this master proxy server. All other members of the proxy array can then manually orautomatically poll the master proxy for these changes. You can configure each member toautomatically generate a PAC file from these changes.
You can also chain proxy arrays together for hierarchical routing. If a proxy server routes anincoming request through an upstream proxy array, the upstream proxy array is then known asa parent array. In other words, if a client requests a document from Proxy X, and Proxy X doesnot have the document, it sends the request to Proxy Array Y instead of sending it directly to theremote server. So, Proxy Array Y is a parent array.
In Figure 12–5, Proxy Array 1 is a parent array to Proxy Array 2. A member of Proxy Array 2loads and polls for updates to the parent array’s PAT file. Usually, the member polls the masterproxy in the parent array. The hash algorithm for the requested URL is computed using thedownloaded PAT file. The member in the Proxy Array 2 then retrieves the requested URL fromwhichever proxy in Proxy Array 1 has the highest score. In the figure, Proxy B has the highestscore for the URL requested by the client.
Using Proxy Arrays
Oracle iPlanet Web Proxy Server 4.0.14 Administration Guide • June 2010272

FIGURE 12–5 Proxy-to-Proxy Routing
Cache
Proxy A
Cache
Proxy B
Proxy array 1(parent)
Cache
Master Proxy 1
Headquarters
Cache
Proxy C
Proxy array 2
Cache
Master Proxy 2
Branch Office
PAT
Firewall
Cache
Proxy D
Using Proxy Arrays
Chapter 12 • Caching 273
The general steps to set up a proxy array are as follows.
From the master proxy, do the following steps:
1. Create the proxy array.
For more information on creating the member list, see “Creating a Proxy Array MemberList” on page 274.
2. Generate a PAC file from your PAT file.
You only need to generate a PAC file if you are using client to proxy routing. For moreinformation, see “Generating a PAC File From a PAT File” on page 280.
3. Configure the master member of the array. For more information, see “Configuring ProxyArray Members” on page 277.
4. Enable routing through a proxy array. For more information, see “Enabling RoutingThrough a Proxy Array” on page 278.
5. Create a PAT mapping to map the URL /pat to the PAT file.
6. Enable your proxy array.
For more information, see “Enabling or Disabling a Proxy Array” on page 279.
From each of the non-master proxies, do the following steps:
1. Configure the non-master member of the array.
For more information, see “Configuring Proxy Array Members” on page 277
2. Enable routing through a proxy array.
For more information, see “Enabling Routing Through a Proxy Array” on page 278.
3. Enable your proxy array.
For more information, see “Enabling or Disabling a Proxy Array” on page 279.
Note – If your proxy array is going to route through a parent array, you also need to enablethe parent array and configure each member to route through a parent array for desiredURLs. For more information, see “Routing Through Parent Arrays” on page 282.
Creating a Proxy Array Member ListYou should create and update the proxy array member list from the master proxy of the arrayonly. You only need to create the proxy array member list once, but you can modify it at anytime. By creating the proxy array member list, you are generating the PAT file to be distributedto all of the proxies in the array and to any downstream proxies.
Using Proxy Arrays
Oracle iPlanet Web Proxy Server 4.0.14 Administration Guide • June 2010274

Note – You should only make changes or additions to the proxy array member list through themaster proxy in the array. All other members of the array can only read the member list.
▼ To Create a Proxy Array Member List
Access the Server Manager, and click the Caching tab
Click the Configure Proxy Array link.
The Configure Proxy Array page is displayed.
In the Array name field, type the name of the array.
In the Reload Configuration Every field, type the number of minutes between each polling forthe PAT file.
Click the Array Enabled checkbox.
Click the Create button.
The Create button changes to an OK button after the proxy array has been created.
Note – Be sure to click OK before you begin to add members to the member list.
Click OK.
Click Restart Required.
The Apply Changes page is displayed.
For each member in the proxy array, provide the following and then click OK.
The master member should be added first before adding the other members.
■ Name. The name of the proxy server you are adding to the member list■ IP Address. The IP address of the proxy server you are adding to the member list■ Port. This is the port on which the member polls for the PAT file.■ Load Factor. An integer that reflects the relative load that should be routed through the
member.■ Status. The status of the member. This value can be either on or off. If you disable a proxy
array member, the member’s requests will be re-routed through another member
1
2
3
4
5
6
7
8
9
Using Proxy Arrays
Chapter 12 • Caching 275

Note – Be sure to click OK after you type the information for each proxy array member you areadding.
Click Restart Required.The Apply Changes page is displayed.
Click the Restart Proxy Server button to apply the changes.
Editing Proxy Array Member List InformationAt any time, you can change the information for the members in the proxy array member list.You can only edit the proxy array member list from the master proxy.
Note – You should only make changes or additions to the proxy array member list through themaster proxy in the array. If you modify this list from any other member of the array, allchanges will be lost.
▼ To Edit Member List InformationAccess the Server Manager, and click the Caching tab.
Click the Configure Proxy Array link.The Configure Proxy Array page is displayed.
In the Member List, select the radio button next to the member that you want to edit.
Click the Edit button.The Configure Proxy Array Member page is displayed.
Edit the appropriate information.
Click OK.
Click Restart Required.The Apply Changes page is displayed.
Click the Restart Proxy Server button to apply the changes.
10
11
1
2
3
4
5
6
7
8
Using Proxy Arrays
Oracle iPlanet Web Proxy Server 4.0.14 Administration Guide • June 2010276

Note – If you want your changes to take effect and to be distributed to the members of the proxyarray, update the Configuration ID on the Configure Proxy Array page and click OK. To updatethe configuration ID, you can simply increase it by one.
Deleting Proxy Array MembersDeleting proxy array members removes them from the proxy array. You can only delete proxyarray members from the master proxy.
▼ To Delete Members of a Proxy Array
Access the Server Manager, and click the Caching tab.
Click the Configure Proxy Array link.
The Configure Proxy Array page is displayed.
In the Member List, select the radio button next to the member that you want to delete.
Click the Delete button.
Note – If you want your changes to take effect and to be distributed to the members of the proxyarray, update the Configuration ID on the Configure Proxy Array page and click OK. To updatethe configuration ID, you can simply increase it by one.
Click Restart Required.
The Apply Changes page is displayed.
Click the Restart Proxy Server button to apply the changes.
Configuring Proxy Array MembersYou must configure each member in the proxy array once from the member itself. You cannotconfigure a member of the array from another member. You also need to configure the masterproxy.
1
2
3
4
5
6
Using Proxy Arrays
Chapter 12 • Caching 277

▼ To Configure Each Member of the Proxy Array
Access the Server Manager, and click the Caching tab.
Click the Configure Proxy Array Member link.The Configure Proxy Array Member page is displayed.
In the Proxy Array section, indicate whether the member needs to poll for the PAT file byselecting the appropriate radio button.
■ Non-Master Member. Select this option if the member you are configuring is not the masterproxy. Any proxy array member that is not a master proxy must poll for the PAT file in orderto retrieve it from the master proxy.
■ Master Member.Select this option if you are configuring the master proxy. If you areconfiguring the master proxy, the PAT file is local and does not need to be polled.
In the Poll Host field, type the name of the master proxy to be polled for the PAT file.
In the Port field, type the port at which the master proxy accepts HTTP requests.
In the URL field, type the URL of the PAT file on the master proxy. If you have created a PATmapping on the master proxy, to map the PAT file to the URL /pat, you should type /pat in theURL field.
(Optional) In the Headers File field, type the full path name for a file with any special headersthat must be sent with the HTTP request for the PAT file, such as authentication information.
Click OK.
Click Restart Required.The Apply Changes page is displayed.
Click the Restart Proxy Server button to apply the changes.
Enabling Routing Through a Proxy Array
▼ To Enable Routing Through a Proxy Array
Access the Server Manager, and click the Routing tab.
Click the Set Routing Preferences link.The Set Routing Preferences page is displayed.
1
2
3
4
5
6
7
8
9
10
1
2
Using Proxy Arrays
Oracle iPlanet Web Proxy Server 4.0.14 Administration Guide • June 2010278
Select the resource from the drop-down list or click the Regular Expression button, type aregular expression, and click OK.
Select the Route Through option.
Select the checkboxes for proxy array or parent array.You can only enable proxy array routing if the proxy server you are configuring is a member ofa proxy array. You can only enable parent routing if a parent array exists. Both routing optionsare independent of each other.
If you choose to route through a proxy array and you want to redirect requests to another URL,select the redirect checkbox.Redirecting means that if a member of a proxy array receives a request that it should not service,it tells the client which proxy to contact for that request.
Click OK.
Click Restart Required.The Apply Changes page is displayed.
Click the Restart Proxy Server button to apply the changes.
Enabling or Disabling a Proxy ArrayIf you are not routing through a proxy array, you should make sure that all clients use a specialPAC file to route correctly before you disable the proxy array option. If you disable the parentarray option, you should have valid alternative routing options set in the Set RoutingPreferences page, such as explicit proxy or a direct connection.
▼ To Enable or Disable a Proxy Array
Access the Server Manager, and clcik the Preferences tab.
Click the Configure System Preferences link.The Configure System Preferences page is displayed.
Enable or Disable the proxy array.
■ To enable the proxy array, click the Yes option for the type of array or arrays you want toenable: a normal proxy array or a parent array.
■ To disable the proxy array, click No.
3
4
5
6
7
8
9
1
2
3
Using Proxy Arrays
Chapter 12 • Caching 279

Click OK.
Click Restart Required.The Apply Changes page is displayed.
Click the Restart Proxy Server button to apply the changes.
Redirecting Requests in a Proxy ArrayIf you choose to route through a proxy array, you need to designate whether you want toredirect requests to another URL. Redirecting means that if a member of a proxy array receivesa request that it should not service, it tells the client which proxy to contact for that request.
Generating a PAC File From a PAT FileBecause most clients do not recognize the PAT file format, the clients in client-to-proxy routinguse the Proxy Auto Configuration (PAC) mechanism to receive information about which proxyto go through. However, instead of using the standard PAC file, the client uses a special PAC filederived from the PAT file. This special PAC file computes the hash algorithm to determine theappropriate route for the requested URL.
You can generate a PAC file from the PAT file manually or automatically . If you manuallygenerate the PAC file from a specific member of the proxy array, that member will immediatelyregenerate the PAC file based on the information currently in the PAT file. If you configure aproxy array member to automatically generate a PAC file, the member will automaticallyregenerate the file after each time it detects a modified version of the PAT file.
Note – If you are not using the proxy array feature for your proxy server, use the Create/EditAutoconfiguration File page to generate your PAC file. For more information see Chapter 17,“Using the Client Autoconfiguration File.”
▼ To manually generate a PAC file from a PAT fileThe PAC file can be generated only from the master proxy.
Access the Server Manager of the master proxy, and click the Caching tab.
Click the Configure Proxy Array link.The Configure Proxy Array page is displayed.
Click the Generate PAC button.The PAC Generation page is displayed.
4
5
6
1
2
3
Using Proxy Arrays
Oracle iPlanet Web Proxy Server 4.0.14 Administration Guide • June 2010280
If you want to use custom logic in your PAC file, type the name of the file containing thecustomized logic you would like to include in the generation of your PAC file in the Custom logicfile field.This logic is inserted before the proxy array selection logic in the FindProxyForURL function.This function is typically used for local requests which need not go through the proxy array.
If you have already provided the custom logic file when configuring the proxy array member,this field will be populated with that information. You may edit the custom logic file name here.
In the Default Route field, type the route a client should take if the proxies in the array are notavailable.If you have already provided the default route when configuring a proxy array member, thisfield will be populated with that information. You may edit the default route here.
Click OK.
Click Restart Required.The Apply Changes page is displayed.
Click the Restart Proxy Server button to apply the changes.
▼ To Automatically Generate a PAC File
Access the Server Manager, and click the Caching tab.
Click the Configure Proxy Array Member link.The Configure Proxy Array Member page is displayed.
Select the Auto-generate PAC File checkbox.
If you want to use custom logic in your PAC file, type the name of the file containing thecustomized logic you would like to include in the generation of your PAC file in the Custom LogicFile fieldThis logic is inserted before the proxy array selection logic in the FindProxyFor URL function.
If you have already provided and saved the custom logic file when configuring the proxy array,this field will be populated with that information. You may edit the custom logic file name here.
In the Default Route field, type the route a client should take if the proxies in the array are notavailable.If you have already provided the default route when configuring the proxy array, this field willbe populated with that information. You may edit the default route.
4
5
6
7
8
1
2
3
4
5
Using Proxy Arrays
Chapter 12 • Caching 281
Click OK.
Click Restart Required.The Apply Changes page is displayed.
Click the Restart Proxy Server button to apply the changes.
Routing Through Parent ArraysYou can configure your proxy or proxy array member to route through an upstream parentarray instead of going directly to a remote server.
▼ To Route Through a Parent Array
Enable the parent array.For more information, see “Enabling or Disabling a Proxy Array” on page 279.
Enable routing through the parent array.For more information, see “Enabling Routing Through a Proxy Array” on page 278.
Access the Server Manager, and click the Caching tab.
Click the Configure Proxy Array Member link.The Configure Proxy Array Member page is displayed.
In the Poll Host field in the Parent Array section of the page, type the host name of the proxy inthe parent array to be polled for the PAT file.This proxy is usually the master proxy of the parent array.
In the Port field in the Parent Array section of the page, type the port number of the proxy in theparent array that you will poll for the PAT file.
In the URL field, type the URL of the PAT file on the master proxy.If you have created a PAT mapping on your master proxy, type the mapping into this URL field.
(Optional) In the Headers File field in the Parent Array section of the form, type the full pathname for a file with any special headers that must be sent with the HTTP request for the PAT file,such as authentication information.This field is optional.
Click OK.
6
7
8
1
2
3
4
5
6
7
8
9
Using Proxy Arrays
Oracle iPlanet Web Proxy Server 4.0.14 Administration Guide • June 2010282
Click Restart Required.The Apply Changes page is displayed.
Click the Restart Proxy Server button to apply the changes.
Viewing Parent Array InformationIf your proxy array is routing through a parent array, you need information about the membersof the parent array. This information is sent from the parent array in the form of a PAT file.
▼ To View Parent Array Information
Access the Server Manager, and click the Caching tab.
Click the View Parent Array Configuration link.The View Parent Array Configuration page is displayed.
View the information.
10
11
1
2
3
Using Proxy Arrays
Chapter 12 • Caching 283

284

Filtering Content Through the Proxy
This chapter describes how to filter URLs so that your proxy server either does not allow accessto the URL or modifies the HTML and JavaScript content it returns to the client. This chapteralso describes how you can restrict access through the proxy based on the web browser (useragent) that the client is using.
You can use a URL filter file to determine which URLs the server supports. For example, insteadof manually typing in wildcard patterns of URLs to support, you can create or purchase one textfile that contains URLs you want to restrict. This feature enables you to create one file of URLsthat you can use on many different proxy servers.
You can also filter URLs based on their MIME type. For example, you might allow the proxy tocache and send HTML and GIF files but not allow it to get binary or executable files because ofthe risk of computer viruses.
This chapter contains the following sections:
■ “Filtering URLs” on page 286■ “Content URL Rewriting” on page 288■ “Restricting Access to Specific Web Browsers” on page 289■ “Blocking Requests” on page 290■ “Suppressing Outgoing Headers” on page 291■ “Filtering by MIME Type” on page 292■ “Filtering by HTML Tags” on page 293■ “Configuring the Server for Content Compression” on page 294
13C H A P T E R 1 3
285

Filtering URLsYou can use a file of URLs to configure what content the proxy server retrieves. You can set up alist of URLs the proxy always supports and a list of URLs the proxy never supports.
For example, if you are an Internet service provider who runs a proxy server with contentappropriate for children, you might set up a list of URLs that are approved for viewing bychildren. You can then have the proxy server retrieve only the approved URLs. If a client tries togo to an unsupported URL, either you can have the proxy return the default “Forbidden”message or you can create a custom message explaining why the client could not access thatURL.
To restrict access based on URLs, create a file of URLs through the Server Manager to allow orrestrict. You can do this through the Server Manager. Once you have created the file, you can setup the restrictions. These processes are discussed in the following sections.
Creating a Filter File of URLsA filter file is a file that contains a list of URLs. The filter files that the proxy server uses are plaintext files with lines of URLs in the following pattern:
protocol://host:port/path/filename
You can use regular expressions in each of the three sections: protocol, host:port, andpath/filename. For example, if you want to create a URL pattern for all protocols going to thenetscape.com domain, you’d have the following line in your file:
.*://.*\\.example\\.com/.*
This line works only if you do not specify a port number. For more information about regularexpressions, see “Understanding Regular Expressions” in Chapter 16, “Managing Templatesand Resources.”
If you want to create your own file without using the Server Manager, use the Server Managerpages to create an empty file, and then add your text in that file or replace the file with onecontaining the regular expressions.
▼ To Create a Filter File
Access the Server Manager, and click the Filters tab.
Click the Restrict URL Filter Access link.The Restrict URL Filter Access page is displayed.
Choose New Filter from the drop-down list next to the Create/Edit button.
1
2
3
Filtering URLs
Oracle iPlanet Web Proxy Server 4.0.14 Administration Guide • June 2010286

Type a name for the filter file in the text box to the right of the drop-down list and then click theCreate/Edit button.The Filter Editor page is displayed.
Use the Filter Content scrollable text box to type URLs and regular expressions of URLs.The Reset button clears all the text in this field.
For more information on regular expressions, see “Understanding Regular Expressions” inChapter 16, “Managing Templates and Resources.”
Click OK.The proxy server creates the file and returns you to the Restrict URL Filter Access page. Thefilter file is created in the proxy-serverid/conf_bk directory.
Setting Default Access for a Filter FileOnce you have a filter file that contains the URLs you want to use, you can set the default accessfor those URLs.
▼ To Set Default Access for a Filter File
Access the Server Manager, and click the Filters tab.
Click the Restrict URL Filter Access link.The Restrict URL Filter Access page is displayed.
Choose the template you want to use with the filters.Typically, you will want to create filter files for the entire proxy server, but you might want oneset of filter files for HTTP and another for FTP.
Use the URL Filter To Allow list to choose a filter file that contains the URLs you want the proxyserver to support.
Use the URL Filter To Deny list to choose a filter file that contains the URLs to which you want theproxy server to deny access.
Choose the text you want the proxy server to return to clients who request a denied URL.
■ Send the default “Forbidden” response that the proxy generates.■ Send a text or HTML file with customized text. Type the absolute path to this file in the
text box.
Click OK.
4
5
6
1
2
3
4
5
6
7
Filtering URLs
Chapter 13 • Filtering Content Through the Proxy 287

Click Restart Required. The Apply Changes page is displayed.
Click the Restart Proxy Server button to apply the changes.
Content URL RewritingProxy Server can inspect the content being returned to the client and replace patterns such asURLs with other strings. Two parameters can be configured: a source string and a destinationstring. The Proxy Server looks for text matching the source string and substitutes text in thedestination string. This feature works only in the reverse proxy mode.
▼ To Create a URL Rewriting PatternAccess the Server Manager, and click the Filters tab.
Click the Set Content URL Rewriting link.
The Set Content URL Rewriting page is displayed.
Select a resource from the drop-down list or specify a regular expression.
For more information about regular expressions, see “Understanding Regular Expressions” inChapter 16, “Managing Templates and Resources.”
Specify the source string in the Source Pattern text box.
Specify the destination string in the Destination Pattern text box.
Specify the content type in the MIME Pattern text box.
Click OK.
Click Restart Required.
The Apply Changes page is displayed.
Click the Restart Proxy Server button to apply the changes.
8
9
1
2
3
4
5
6
7
8
9
Content URL Rewriting
Oracle iPlanet Web Proxy Server 4.0.14 Administration Guide • June 2010288

▼ To Edit a URL Rewriting PatternAccess the Server Manager, and click the Filters tab.
Click the Set Content URL Rewriting link.
The Set Content URL Rewriting page is displayed.
Click the Edit link next to the URL rewriting pattern you want to edit.
Click OK
Click Restart Required.
The Apply Changes page is displayed.
Click the Restart Proxy Server button to apply the changes.
▼ To Delete a URL Rewriting PatternAccess the Server Manager, and click the Filters tab.
Click the Set Content URL Rewriting link.
The Set Content URL Rewriting page is displayed.
Click the Remove link next to the URL rewriting pattern you want to delete.
Click OK to confirm deletion.
Click Restart Required.
The Apply Changes page is displayed.
Click the Restart Proxy Server button to apply the changes.
Restricting Access to Specific Web BrowsersYou can restrict access to the proxy server based on the type and version of the client’s webbrowser. Restriction occurs based on the user-agent header that all web browsers send to serverswhen making requests.
1
2
3
4
5
6
1
2
3
4
5
Restricting Access to Specific Web Browsers
Chapter 13 • Filtering Content Through the Proxy 289

▼ To Restrict Access to the Proxy Based on the Client’sWeb Browser
Access the Server Manager, and click the Filters tab.
Click the Set User-Agent Restriction link.The Set User-Agent Restriction page is displayed.
Select the resource from the drop-down list or type a regular expression that matches theuser-agent string for the browsers you want the Proxy Server to support.If you want to specify more than one client, enclose the regular expression in parentheses anduse the | character to separate the multiple entries. For more information on regularexpressions, see “Understanding Regular Expressions” in Chapter 16, “Managing Templatesand Resources.”
Check the Allow Only User-Agents Matching option.
Click OK.
Click Restart Required.The Apply Changes page is displayed.
Click the Restart Proxy Server button to apply the changes.
Blocking RequestsYou may want to block file uploads and other requests based on the upload content type.
▼ To block requests based on MIME typeAccess the Server Manager, and click the Filters tab.
Click the Set Request Blocking link.The Set Request Blocking page is displayed.
Select the resource from the drop-down list or click the Regular Expression button, type aregular expression and click OK.
Select the type of request blocking you want.
1
2
3
4
5
6
7
1
2
3
4
Blocking Requests
Oracle iPlanet Web Proxy Server 4.0.14 Administration Guide • June 2010290

■ Disabled — Disables request blocking■ Multipart MIME (File Upload) — Blocks all file uploads■ MIME Types Matching Regular Expression — Blocks requests for MIME types that match
the regular expression you type. For more information about regular expressions, see“Understanding Regular Expressions” in Chapter 16, “Managing Templates and Resources.”
Choose whether you want to block requests for all clients or for user-agents that match a regularexpression you enter.
Select the methods for which you want to block requests.The options are:
■ Any Method With Request Body — Blocks all requests with a request body, regardless of themethod
■ only for:■ POST — blocks file upload requests using the POST method■ PUT — blocks file upload requests using the PUT method
■ Methods Matching Regular Expression — blocks all file upload requests using the methodyou enter
Click OK.
Click Restart Required.The Apply Changes page is displayed.
Click the Restart Proxy Server button to apply the changes.
Suppressing Outgoing HeadersYou can configure the proxy server to remove outgoing headers from the request, usually forsecurity reasons. For example, you might want to prevent the From header from going outbecause it reveals the user’s email address. Or, you might want to filter out the user-agent headerso external servers cannot determine what web browsers your organization uses. You may alsowant to remove logging or client-related headers that are to be used only in your intranet beforea request is forwarded to the Internet.
This feature does not affect headers that are specially handled or generated by the proxy itself orthat are necessary to make the protocol work properly, such as If-Modified-Since andForwarded.
The forwarded header originating from a proxy is not a security problem. The remote servercan detect the connecting proxy host from the connection. In a proxy chain, a forwarded header
5
6
7
8
9
Suppressing Outgoing Headers
Chapter 13 • Filtering Content Through the Proxy 291
coming from an inner proxy can be suppressed by an outer proxy. Setting your servers up thisway is recommended when you do not want to have the inner proxy or client host namerevealed to the remote server.
▼ To Suppress Outgoing HeadersAccess the Server Manager, and click the Filters tab.
Click the Suppress Outgoing Headers link.The Suppress Outgoing Headers page is displayed.
Type a comma-separated list of request headers to be suppressed in the Suppress Headers textbox.
Click Restart Required.The Apply Changes page is displayed.
Click the Restart Proxy Server button to apply the changes.
Filtering by MIME TypeYou can configure the proxy server to block certain files that match a MIME type. For example,you could set up your proxy server to block any executable or binary files so that any clientsusing your proxy server can’t download a possible computer virus.
If you want the proxy server to support a new MIME type, in the Server Manager, choosePreferences > Create/Edit MIME Types and add the type. For more information on creating aMIME type, see “Creating a MIME Type” on page 132.
You can combine filtering MIME types with templates, so that only certain MIME types areblocked for specific URLs. For example, you could block executables coming from anycomputer in the .edu domain.
▼ To Filter by MIME TypeAccess the Server Manager, and click the Filters tab.
Click the Set MIME Filters link.The Set MIME Filters page is displayed.
1
2
3
4
5
1
2
Filtering by MIME Type
Oracle iPlanet Web Proxy Server 4.0.14 Administration Guide • June 2010292

Choose the template you want to use for filtering MIME types, or make sure you are editing theentire server.
In the Current filter text box, you can type a regular expression that matches the MIME types youwant to block.For example, to filter out all applications, you could type application/.* for the regularexpression. This method is faster than checking each MIME type for every application type. Theregular expression is not case-sensitive. For more information on regular expressions, see“Understanding Regular Expressions” in Chapter 16, “Managing Templates and Resources.”
Check the MIME types you want to filter.When a client attempts to access a file that is blocked, the proxy server returns a “403Forbidden” message.
Click OK.
Click Restart Required.The Apply Changes page is displayed.
Click the Restart Proxy Server button to apply the changes.
Filtering by HTML TagsYou can specify HTML tags you want to filter out before passing the file to the client. Thismethod lets you filter out objects such as Java applets and JavaScript embedded in the HTMLfile. To filter HTML tags, you specify the beginning and ending HTML tags. The proxy thensubstitutes blanks for all text and objects in those tags before sending the file to the client.
The proxy stores the original (unedited) file in the cache, if the proxy is configured to cache thatresource.
▼ To Filter out HTML TagsAccess the Server Manager, and click the Filters tab.
Click the Set HTML Tag Filters link.The Set HTML Tag Filters page is displayed.
Choose the template you want to modify.You might choose HTTP, or you might choose a template that specifies only certain URLs suchas those from hosts in the .edu domain.
3
4
5
6
7
8
1
2
3
Filtering by HTML Tags
Chapter 13 • Filtering Content Through the Proxy 293

Select the default HTML tags you want to filter.
■ APPLET usually surrounds Java applets.■ SCRIPT indicates the start of JavaScript code.■ IMG specifies an inline image file.
You can type any HTML tags you want to filter.
Type the beginning and ending HTML tags.
For example, to filter out forms, you could type FORM in the Start Tag box and /FORM in the EndTag box. The HTML tags are not case-sensitive. If the tag you want to filter does not have an endtag, such as OBJECT and IMG, you can leave the End Tag box empty.
Click OK.
Click Restart Required.
The Apply Changes page is displayed.
Click the Restart Proxy Server button to apply the changes.
Configuring the Server for Content CompressionProxy Server supports HTTP content compression. Content compression enables you toincrease delivery speed to clients and serve higher content volumes without increasing yourhardware expenses. Content compression reduces content download time, a benefit mostapparent to users of dial-up and high-traffic connections.
With content compression, your Proxy Server sends out compressed data and instructs thebrowser to decompress the data on the fly. This compression reduces the amount of data sentand increasing page display speed.
Configuring the Server to Compress Content onDemandYou can configure the Proxy Server to compresses transmission data on the fly. A dynamicallygenerated HTML page does not exist until a user asks for it.
4
5
6
7
8
Configuring the Server for Content Compression
Oracle iPlanet Web Proxy Server 4.0.14 Administration Guide • June 2010294

▼ To Configure Your Server to Compress Content on Demand
Access the Server Manager, and click the Filters tab.
Click the Compress Content on Demand link.The Compress Content on Demand page is displayed.
Select the resource from the drop-down list or type a regular expression.For more information on regular expressions, see “Understanding Regular Expressions” inChapter 16, “Managing Templates and Resources.”
Specify the following information:
■ Activate Compress Content on Demand? Choose whether the server should serveprecompressed content for the selected resource.
■ Vary Header. Specify whether to insert a Vary: Accept-encoding header. Select either yes orno. If set to yes, then a Vary: Accept-encoding header is always inserted when a compressedversion of a file is selected.If set to no, then a Vary: Accept-encoding header is never inserted.By default, the value is set to yes.
■ Fragment Size. Specifies the memory fragment size in bytes to be used by the compressionlibrary (zlib) to control how much to compress at a time. The default value is 8096.
■ Compression Level. Specifies the level of compression. Choose a value between 1 and 9.The value 1 yields the best speed; the value 9 the best compression. The default value is 6, acompromise between speed and compression.
Click OK.
Click Restart Required.The Apply Changes page is displayed.
Click the Restart Proxy Server button to apply the changes.
1
2
3
4
5
6
7
Configuring the Server for Content Compression
Chapter 13 • Filtering Content Through the Proxy 295

296

Using a Reverse Proxy
This chapter describes how to use Proxy Server as a reverse proxy. A reverse proxy can be usedoutside the firewall to represent a secure content server to outside clients, preventing direct,unmonitored access to your server’s data from outside your company. It can also be used forreplication; that is, multiple proxies can be attached in front of a heavily used server for loadbalancing. This chapter describes the alternate ways that Proxy Server can be used inside oroutside a firewall.
This chapter contains the following sections:
■ “How Reverse Proxying Works” on page 297■ “Setting up a Reverse Proxy” on page 303
How Reverse Proxying WorksYou can use two different methods for reverse proxying. One method takes advantage of ProxyServer’s security features to handle transactions. The other method uses caching to provide loadbalancing on a heavily used server. Both of these mehtods differ from the conventional proxyusage because they do not operate strictly on a firewall.
Proxy as a Stand-in for a ServerIf you have a content server that has sensitive information that must remain secure, such as adatabase of credit card numbers, you can set up a proxy outside the firewall as a stand–in foryour content server. When outside clients try to access the content server, they are sent to theproxy server instead. The real content resides on your content server, safely inside the firewall.The proxy server resides outside the firewall, and appears to the client to be the content server.
When a client makes a request to your site, the request goes to the proxy server. The proxyserver then sends the client’s request through a specific passage in the firewall to the contentserver. The content server passes the result through the passage back to the proxy. The proxy
14C H A P T E R 1 4
297

sends the retrieved information to the client, as if the proxy were the actual content server, asshown in Figure 14–1. If the content server returns an error message, the proxy server canintercept the message and change any URLs listed in the headers before sending the message tothe client. This behavior prevents external clients from getting redirection URLs to the internalcontent server.
In this way, the proxy provides an additional barrier between the secure database and thepossibility of malicious attack. In the unlikely event of a successful attack, the perpetrator ismore likely to be restricted only to the information involved in a single transaction, as opposedto having access to the entire database. The unauthorized user can not get to the real contentserver because the firewall passage allows only the proxy server to have access.
You can configure the firewall router to allow a specific server on a specific port (in this case, theproxy on its assigned port) to have access through the firewall without allowing any othermachines in or out.
Secure Reverse ProxyingSecure reverse proxying occurs when one or more of the connections between the proxy serverand another machine use the Secure Sockets Layer (SSL) protocol to encrypt data.
Secure reverse proxying has many uses:■ Provides an encrypted connection from a proxy server outside a firewall to a secure content
server inside the firewall
FIGURE 14–1 Reverse Proxy Process
Server withina firewall
The proxy server uses a regular mapping to forward client requests to internal content servers
The proxy server appears to be the content server
A client sends a request to the proxy server
Fir
ew
all
How Reverse Proxying Works
Oracle iPlanet Web Proxy Server 4.0.14 Administration Guide • June 2010298
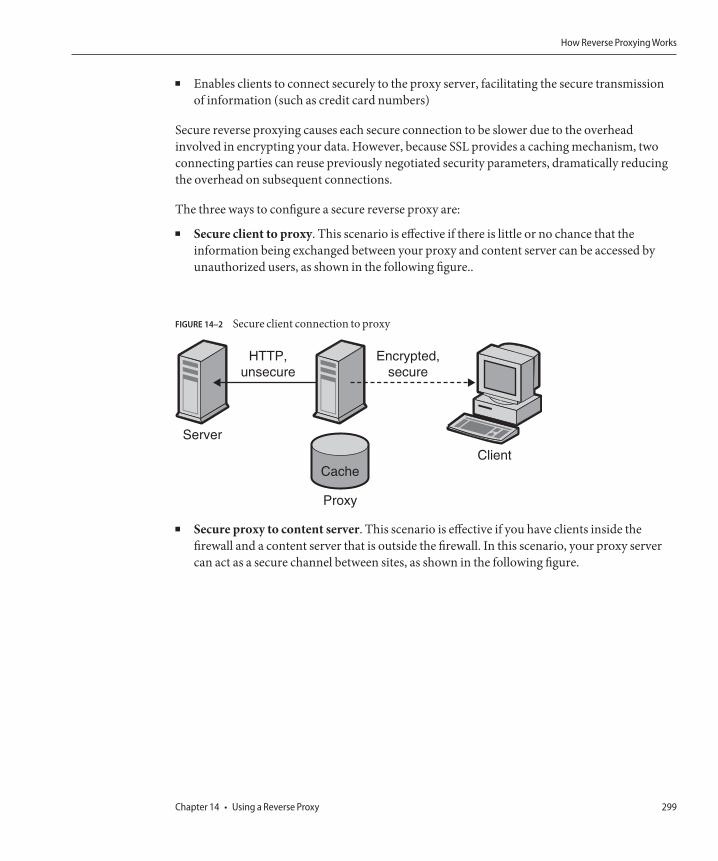
■ Enables clients to connect securely to the proxy server, facilitating the secure transmissionof information (such as credit card numbers)
Secure reverse proxying causes each secure connection to be slower due to the overheadinvolved in encrypting your data. However, because SSL provides a caching mechanism, twoconnecting parties can reuse previously negotiated security parameters, dramatically reducingthe overhead on subsequent connections.
The three ways to configure a secure reverse proxy are:
■ Secure client to proxy. This scenario is effective if there is little or no chance that theinformation being exchanged between your proxy and content server can be accessed byunauthorized users, as shown in the following figure..
■ Secure proxy to content server. This scenario is effective if you have clients inside thefirewall and a content server that is outside the firewall. In this scenario, your proxy servercan act as a secure channel between sites, as shown in the following figure.
FIGURE 14–2 Secure client connection to proxy
Client
Server
HTTP,unsecure
Encrypted,secure
Cache
Proxy
How Reverse Proxying Works
Chapter 14 • Using a Reverse Proxy 299

■ Secure client to proxy and secure proxy to content server. This scenario is effective if theinformation exchanged between the server, proxy and client needs to be secure. In thisscenario, your proxy server can act like a secure channel between sites with the additionalsecurity of client authentication, as shown in the following figure.
FIGURE 14–3 Secure Proxy Connection to Content Server
Client
Server outsidefirewall
Encrypted,secure
HTTP,unsecure
Cache
Proxy
Fir
ew
all
How Reverse Proxying Works
Oracle iPlanet Web Proxy Server 4.0.14 Administration Guide • June 2010300

For information about how to set up each of these configurations, see “Setting up a ReverseProxy” on page 303.
In addition to SSL, the proxy can use client authentication, which requires that a computermaking a request to the proxy provides a certificate or other form of identification to verify itsidentity.
Proxying for Load BalancingYou can use multiple proxy servers within an organization to balance the network load amongweb servers. This model takes advantage of the caching features of the proxy server to create aserver pool for load balancing. In this case, the proxy servers can be on either side of the firewall.If you have a web server that receives a high number of requests per day, you could use proxyservers to take the load off the web server and make the network access more efficient.
The proxy servers act as go-betweens for client requests to the real server. The proxy serverscache the requested documents. If you have more than one proxy server, DNS can route therequests randomly using a “round-robin” selection of their IP addresses. The client uses thesame URL each time, but the route the request takes might go through a different proxy eachtime.
FIGURE 14–4 Secure Client Connection to Proxy and Secure Proxy Connection to Content Server
Client
Server outsidefirewall
Cache
Proxy
Internet
Encrypted,secure
Encrypted,secure
Fir
ew
all
Fir
ew
all
How Reverse Proxying Works
Chapter 14 • Using a Reverse Proxy 301
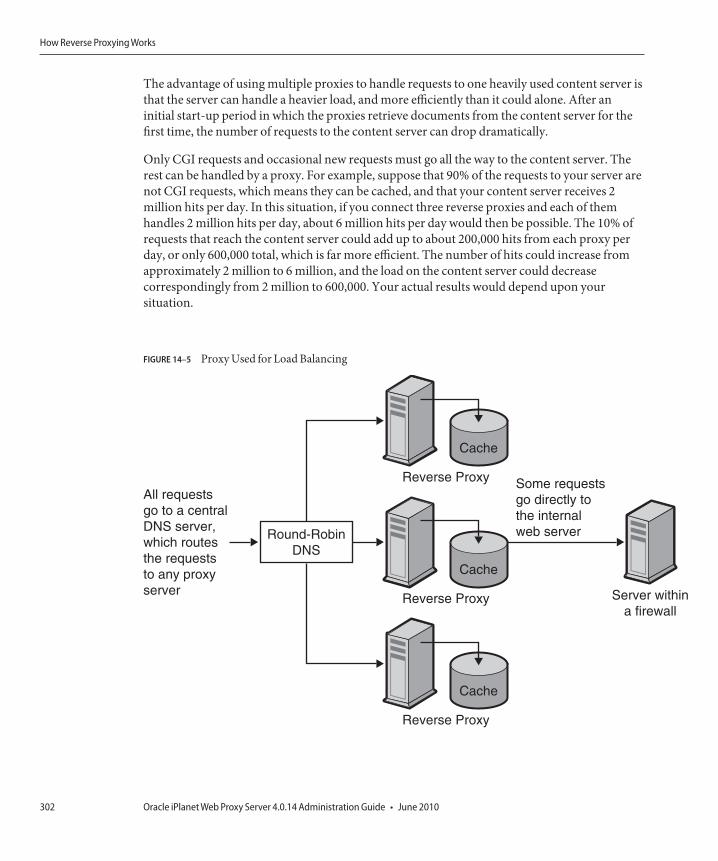
The advantage of using multiple proxies to handle requests to one heavily used content server isthat the server can handle a heavier load, and more efficiently than it could alone. After aninitial start-up period in which the proxies retrieve documents from the content server for thefirst time, the number of requests to the content server can drop dramatically.
Only CGI requests and occasional new requests must go all the way to the content server. Therest can be handled by a proxy. For example, suppose that 90% of the requests to your server arenot CGI requests, which means they can be cached, and that your content server receives 2million hits per day. In this situation, if you connect three reverse proxies and each of themhandles 2 million hits per day, about 6 million hits per day would then be possible. The 10% ofrequests that reach the content server could add up to about 200,000 hits from each proxy perday, or only 600,000 total, which is far more efficient. The number of hits could increase fromapproximately 2 million to 6 million, and the load on the content server could decreasecorrespondingly from 2 million to 600,000. Your actual results would depend upon yoursituation.
FIGURE 14–5 Proxy Used for Load Balancing
Server withina firewall
Cache
Reverse Proxy
Cache
Reverse Proxy
Cache
Reverse Proxy
All requests go to a central DNS server, which routes the requests to any proxy server
Some requests go directly to the internal web serverRound-Robin
DNS
How Reverse Proxying Works
Oracle iPlanet Web Proxy Server 4.0.14 Administration Guide • June 2010302

Setting up a Reverse ProxyTo set up a reverse proxy, you need two mappings: a regular and a reverse mapping.■ The regular mapping redirects requests to the content server. When a client requests a
document from the proxy server, the proxy server needs a regular mapping to tell it where toget the actual document.
Caution – Do not use a reverse proxy with a proxy that serves autoconfiguration files, because theproxy could return the wrong result.
■ The reverse mapping instructs the proxy server to trap for redirects from the content server.The proxy intercepts the redirect and then changes the redirected URL to map to the proxyserver. For example, if the client requests a document that was moved or not found, thecontent server will return a message to the client explaining that it cannot find the documentat the requested URL. In that returned message, the content server adds an HTTP headerthat lists a URL to use to get the moved file. In order to maintain the privacy of the internalcontent server, the proxy can redirect the URL using a reverse mapping.
Suppose you have a web server called http://http.site.com/ and you want to set up a reverseproxy server for it. You could call the reverse proxy http://proxy.site.com/.
▼ To Create Regular or Reverse MappingAccess the Server Manager, and click the URLs tab.
Click the Create Mapping link.The Create Mapping page is displayed.
In the page that appears, provide the source prefix and source destination for the regularmapping,for example,
Source prefix: http://proxy.site.com
Source destination: http://http.site.com/
Click OK.Return to the page and create the reverse mapping, for example,
Reverse mapping:
Source prefix: http://http.site.com/
Source destination: http://proxy.site.com/
1
2
3
4
Setting up a Reverse Proxy
Chapter 14 • Using a Reverse Proxy 303

To make the change, click OK.
Once you click the OK button, the proxy server adds one or more additional mappings. To seethe mappings, click the lView/Edit Mappings link. Additional mappings would be in thefollowing format:
from: /
to: http://http.site.com/
These additional automatic mappings are for users who connect to the reverse proxy as anormal server. The first mapping is to catch users connecting to the reverse proxy as a regularproxy. The “/” mapping is added only if the user doesn't change the contents of the Map SourcePrefix text box provided automatically by the Administration GUI. Depending on the setup,usually the second mapping is the only one required, but the extra mapping does not causeproblems in the proxy.
Note – If the web server has several DNS aliases, each alias should have a corresponding regularmapping. If the web server generates redirects with several DNS aliases to itself, each of thosealiases should have a corresponding reverse mapping.
CGI applications still run on the origin server. The proxy server never runs CGI applications onits own. However, if the CGI script indicates that the result can be cached by implying anon-zero time-to-live by issuing a Last-modified or Expires header, the proxy will cache theresult.
When authoring content for the web server, keep in mind that the content will be served by thereverse proxy, too, so all links to files on the web server should be relative links. Do not refer tothe host name in the HTML files. All links must consist only of the page:
/abc/def
as opposed to a fully qualified host name, such as:
http://http.site.com/abc/def
Note – You can provide custom error pages for the errors that occur in reverse proxy mode.These error pages override the errors generated by the proxy. This enables you to prevent theclient from knowing that a proxy server is configured.
Setting Up a Secure Reverse ProxyBefore setting up secure reverse proxying, you should be familiar with digital certificates,Certificate Authorities, and authentication.
5
Setting up a Reverse Proxy
Oracle iPlanet Web Proxy Server 4.0.14 Administration Guide • June 2010304
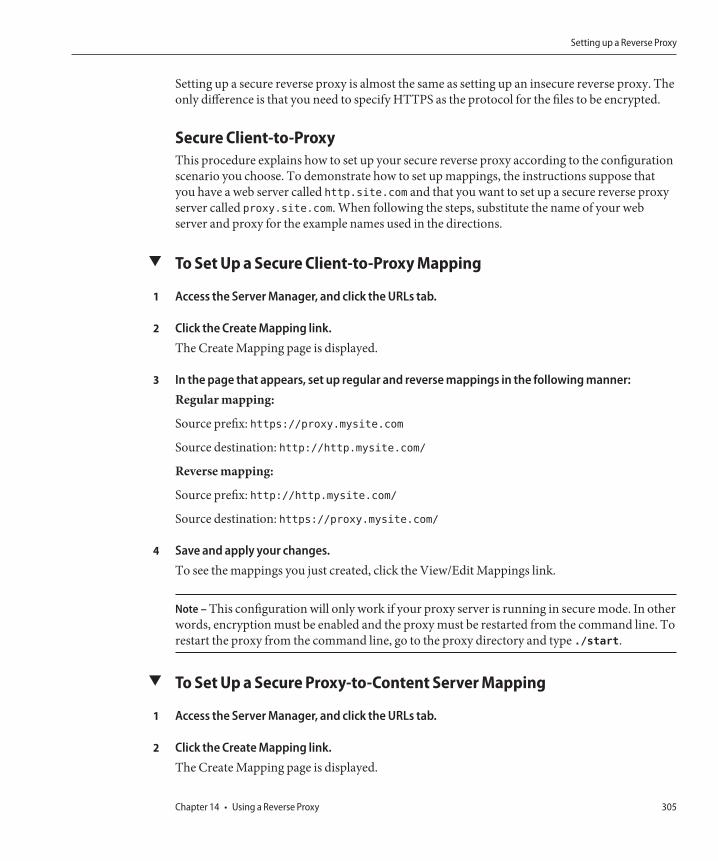
Setting up a secure reverse proxy is almost the same as setting up an insecure reverse proxy. Theonly difference is that you need to specify HTTPS as the protocol for the files to be encrypted.
Secure Client-to-ProxyThis procedure explains how to set up your secure reverse proxy according to the configurationscenario you choose. To demonstrate how to set up mappings, the instructions suppose thatyou have a web server called http.site.com and that you want to set up a secure reverse proxyserver called proxy.site.com. When following the steps, substitute the name of your webserver and proxy for the example names used in the directions.
▼ To Set Up a Secure Client-to-Proxy Mapping
Access the Server Manager, and click the URLs tab.
Click the Create Mapping link.The Create Mapping page is displayed.
In the page that appears, set up regular and reverse mappings in the following manner:Regular mapping:
Source prefix: https://proxy.mysite.com
Source destination: http://http.mysite.com/
Reverse mapping:
Source prefix: http://http.mysite.com/
Source destination: https://proxy.mysite.com/
Save and apply your changes.To see the mappings you just created, click the View/Edit Mappings link.
Note – This configuration will only work if your proxy server is running in secure mode. In otherwords, encryption must be enabled and the proxy must be restarted from the command line. Torestart the proxy from the command line, go to the proxy directory and type ./start.
▼ To Set Up a Secure Proxy-to-Content Server Mapping
Access the Server Manager, and click the URLs tab.
Click the Create Mapping link.The Create Mapping page is displayed.
1
2
3
4
1
2
Setting up a Reverse Proxy
Chapter 14 • Using a Reverse Proxy 305

In the page that appears, set up regular and reverse mappings in the following manner:Regular mapping:
Source prefix: http://proxy.mysite.com
Source destination: https://http.mysite.com/
Reverse mapping:
Source prefix: https://http.mysite.com/
Source destination: http://proxy.mysite.com/
Save and Apply your changes.To see the mappings you just created, click the link called View/Edit Mappings.
Note – This configuration will only work if your content server is running in secure mode.
▼ To Set up Secure Client-to-Proxy and Secure Proxy-to-Content Server
Access the Server Manager, and click the URLs tab.
Click the Create Mapping link.The Create Mapping page is displayed.
In the page that appears, set up regular and reverse mappings in the following manner:Regular mapping:
Source prefix: https://proxy.mysite.com
Source destination: https://http.mysite.com/
Reverse mapping:
Source prefix: https://http.mysite.com/
Source destination: https://proxy.mysite.com/
Save and Apply your changes.To see the mappings you just created, click the link called View/Edit Mappings.
Note – This configuration will only work if your proxy server and content server are running insecure mode. In other words, for the proxy, encryption must be enabled and the proxy must berestarted from the command line. To restart the proxy from the command line, go to the proxydirectory and type ./restart.
3
4
1
2
3
4
Setting up a Reverse Proxy
Oracle iPlanet Web Proxy Server 4.0.14 Administration Guide • June 2010306

Disabling the Forward Proxying Feature in a Reverse Proxy SetupA proxy server instance, when configured as a reverse proxy server, by default does not stopfunctioning as a forward proxy server. Such a server instance accepts and serves reverse proxyrequests as well as forward proxy requests. Further configuration is required to disable theforward proxying feature. You can set up an ACL configuration that denies requests whose URImatches forward proxy format. You can use a Client directive for this purpose:
<Client uri="http://.*">PathCheck fn="check-acl" acl="http://.*"<Client>
.
.
.
The "http://.*" ACL can be a deny all ACL as follows:
.
.
acl "http://.*";deny (all) user="anyone";
Virtual Multihosting in Reverse ProxyVirtual multihosting is a feature which enables an origin server, such as a reverse proxy server,to respond to multiple DNS aliases as if a different server was installed in each of thoseaddresses. As an example, suppose you have the DNS host names:■ www
■ specs
■ phones
Each of these host names could be mapped to the same IP address, the IP address of the reverseproxy. the reverse proxy could then act differently based on which DNS name was used toaccess it.
Virtual Multihosting enables you to host multiple different *domains* in a single reverse proxyserver as well. For example:■ www.domain-1.com
■ www.domain-2.com
■ www.domain-3.com
You can have a combination of multiple local host names as well as multiple domains, all in asingle proxy server:■ www
■ specs
■ phones
Setting up a Reverse Proxy
Chapter 14 • Using a Reverse Proxy 307

■ www.domain-1.com
■ www.domain-2.com
■ www.domain-3.com
Functional Details of Virtual MultihostingThe virtual multihosting feature works by specifying the DNS host and domain names oraliases, and then a target URL prefix where requests sent to that host name should be directed.As an example, suppose you have two mappings:
■ engr.domain.com -> http://int-engr.domain.com
■ mktg.domain.com -> http://int-mktg.domain.com
Mappings do not have to go root-to-root. You may specify an additional URL path prefix in thetarget URL:
■ engr.domain.com -> http://internal.domain.com/engr
■ mktg.domain.com -> http://internal.domain.com/mktg
The same technique applies to virtual domain mappings. For example, you could use:
■ www.domain-1.com -> http://int-engr.domain.com
■ www.domain-2.com -> http://int-mktg.domain.com
The system will look at the HTTP “Host:” header. Based on that header, the system will choosethe matching Virtual Multihosting mapping. If none of the multihosting mappings match, theserver will continue looking at other mappings in the order that they appear in theconfiguration file, or perform no mappings if no matches are found. If no matches are found,the proxy will typically issue the “Proxy denies fulfilling the request” response.
▼ To Configure Virtual Multihosting
Access the Server Manager and click the URLs tab.
Click the Configure Virtual Multihosting link.The Configure Virtual Multihosting page is displayed.
In the Source Hostname (alias) field, specify the local host name (or DNS alias) that this mappingshould apply to.
In the Source Domain Name field, type the local domain name that this mapping should applyto.Typically, this name is your own network’s domain name, unless you want to multi hostmultiple different DNS domains.
1
2
3
4
Setting up a Reverse Proxy
Oracle iPlanet Web Proxy Server 4.0.14 Administration Guide • June 2010308

In the Destination URL Prefix field, type the target URL prefix where the request will be directedif the host and domain names match the above specifications.
If you are using templates, choose the template name from the Use This Template drop-downlist, or leave the value at NONE if you do not want to apply a template.
Click OK.
Click Restart Required.
The Apply Changes page is displayed.
Click the Restart Proxy Server button to apply the changes.
Repeat the above steps for each virtual multihosting mapping you want to establish.
All virtual multihosting mappings appear on the bottom of the Configure Virtual Multihostingpage. The Source Hostname (alias) and Source Domain Name fields are merged, together withthe proxy’s port number, into a single regular expression that is used to match the “Host:”header.
For example, if you have host name www, domain example.com, and port number 8080, thefollowing regular expression will appear:
www(|.example.com)(|:8080)
This regular expression guarantees a match with all of the following possible combinations thatthe user might have typed, or the client might have sent. The port number might be omitted bysome client software even when it is non-80, as the server was listening on that port.
■ www
■ www:8080
■ www.example.com
■ www.example.com:8080
Notes about Virtual Multihosting■ You will need to disable the Client autoconfiguration feature before you can configure
reverse proxy mappings. The Client autoconfiguration feature is for the forward proxyoperation, not reverse proxy.
■ The Virtual Multihosting feature establishes automatic reverse mappings. Do not createreverse mappings for mappings that you provide using the Virtual Multihosting page.
■ Virtual mappings are specified with virt-map function in the obj.conf file.
5
6
7
8
9
Setting up a Reverse Proxy
Chapter 14 • Using a Reverse Proxy 309

■ Virtual mappings are matched in the order specified in the obj.conf configuration file. Ifregular, reverse, regular expression, or client autoconfiguration mappings appear before thevirtual mappings, they will be applied first. Similarly, if no matches are found in virtualmappings, translation will continue to the next mapping after the virtual mapping section inobj.conf.
Note – In the order of specification, reverse mapping should appear before other mappings.
■ If the port number of the proxy server is changed, you will need to recreate the VirtualMultihosting mappings, to reflect the new port number.
Setting up a Reverse Proxy
Oracle iPlanet Web Proxy Server 4.0.14 Administration Guide • June 2010310
Using SOCKS
This chapter describes how to configure and use the SOCKS server included with Proxy Server.Proxy Server supports SOCKS versions 4 and 5.
This chapter contains the following sections:■ “About SOCKS” on page 311■ “Using the Bundled SOCKS v5 Server” on page 312■ “About socks5.conf” on page 313■ “Starting and Stopping the SOCKS v5 Server” on page 314■ “Configuring the SOCKS v5 Server” on page 314■ “Configuring SOCKS v5 Authentication Entries” on page 316■ “Configuring SOCKS v5 Connection Entries” on page 318■ “Configuring SOCKS v5 Server Chaining” on page 321■ “Configuring Routing Entries” on page 322
About SOCKSSOCKS is a networking proxy protocol that redirects connection requests from hosts onopposite sides of a SOCKS server, enabling hosts on one side to gain full access to hosts on theother without requiring direct IP reachability. SOCKS is commonly used as a network firewallthat enables hosts behind a SOCKS server to gain full access to the Internet while preventingunauthorized access from the Internet to the internal hosts.
A SOCKS server is a generic firewall daemon that controls access through the firewall on apoint-to-point basis. The SOCKS server authenticates and authorizes requests, establishes aproxy connection, and relays data. The SOCKS server works at the network level instead of theapplication level, and therefore has no knowledge of protocols or methods used for transferringrequests. Because the SOCKS server has no knowledge of protocols, it can be used to pass thoseprotocols that are not supported by the Proxy Server, such as Telnet.
15C H A P T E R 1 5
311

Using the Bundled SOCKS v5 ServerProxy Server includes its own SOCKS daemon that understands the standard socks5.conf fileformat used by other SOCKS daemons. This daemon can be used by the Proxy Server to routerequests, or it can be run from the Proxy Server to provide additional capabilities for thenetwork. For more information about configuring the Proxy Server to route requests through aSOCKS server, see “Configuring Routing Entries” on page 322.
The SOCKS daemon included with Proxy Server is disabled by default. You can enable thedaemon from the SOCKS tab in the Server Manager interface, or from the command line. Formore information, see “Starting and Stopping the SOCKS v5 Server” on page 314.
Note – In Proxy Server 4 the name of the SOCKS daemon has been changed from ns-sockd tosockd.
The overall steps that must be taken to use the SOCKS server included with the Proxy Serverare:
▼ To use the SOCKSConfigure the SOCKS server. See “Configuring the SOCKS v5 Server”on page 314.
If the SOCKS server will be running on a computer with multiple interfaces, create SOCKSrouting entries. See “Configuring Routing Entries”on page 322.
Create authentication entries. See “Configuring SOCKS v5 Authentication Entries”on page 316.
Create connection entries. See “Configuring SOCKS v5 Connection Entries”on page 318.
Enable the SOCKS server. See “Starting and Stopping the SOCKS v5 Server”on page 314.
FIGURE 15–1 Position of a SOCKS Server in a Network
Internet
Fire
wal
l
Fire
wal
l
Web Proxy
Client
Router Router
SOCKS v5
Proxy Server
1
2
3
4
5
Using the Bundled SOCKS v5 Server
Oracle iPlanet Web Proxy Server 4.0.14 Administration Guide • June 2010312

About socks5.confProxy Server uses the socks5.conf file to control access to the SOCKS server and its services.Each entry defines what the Proxy Server does when a request is received that matches the entry.Choices made in the Server Manager are written to socks5.conf. The file can also be editedmanually. The socks5.conf file is located in the installation root directory server-rootasfollows:
server-root/proxy-serverid/config directory
This section provides general information about socks5.conf. For detailed information aboutthe file and its directives and syntax, see the Proxy Server Configuration File Reference.
AuthenticationThe SOCKS daemon can be configured to require authentication to use its services.Authentication is based on the host name and port of the connecting client. If you choose torequire a user name and password, the information is authenticated against a user name andpassword file referenced by the socks5.conf file. If the provided user name and password donot match a listing in the password file, access is denied. The format for user names andpasswords in the password file is username password, where the user name and password areseparated by a space. .
You can also ban users. To require user name and password authentication, theSOCKS5_PWDFILE directive must be added to socks5.conf. For more information about thedirective and its syntax, see the socks5.conf section in the Proxy Server Configuration FileReference
User name and password authentication can also be performed against a configured LDAPserver, and not just a file.
Access ControlAccess control is performed using a set of ordered lines in the socks5.conf file. Each linecontains a single directive that permits or denies access to a resource. Directives are processedin the order in which they appear in the configuration file. A request that does not match any ofthe permit directives is denied access.
LoggingThe SOCKS daemon logs both error and access messages in the SOCKS log file. The log filelocation and type of logging can be specified in socks5.conf.
The SOCKS daemon also generates a stat entry each hour, which gives statistics for the daemon.
Using the Bundled SOCKS v5 Server
Chapter 15 • Using SOCKS 313
TuningYou can use the socks5.conf file to determine the number of worker and accept threads usedby the SOCKS server. These numbers influence the performance of the SOCKS server.
For more information about worker and accept thread settings and their impact onperformance, see the relevant section in “Configuring the SOCKS v5 Server” on page 314.
Starting and Stopping the SOCKS v5 ServerThe SOCKS server can be started and stopped from the Server Manager or from the commandline.
▼ To Start and Stop the SOCKS Server From the ServerManagerAccess the Server Manager for a server instance and click the SOCKS tab.
Click the Start/Stop SOCKS Server link.
Start or stop the SOCKS server.
To Start and Stop the SOCKS Server From theCommand LineRun the scripts found in the server-root/proxy-serverid directory, where server-root is theinstallation root:■ start-sockd starts the SOCKS daemon■ stop-sockd stops the SOCKS daemon■ restart-sockd restarts the SOCKS daemon
Configuring the SOCKS v5 Server
▼ To Configure the SOCKS ServerAccess the Server Manager for a server instance and click the SOCKS tab.
Click the Configure SOCKS v5 link.
1
2
3
1
2
Starting and Stopping the SOCKS v5 Server
Oracle iPlanet Web Proxy Server 4.0.14 Administration Guide • June 2010314

In the SOCKS Port field, type the port number on which the SOCKS server will listen. The defaultis 1080.
Select the SOCKS options you want to use.The following options are available:
■ Disable Reverse DNS Lookup. Disables reverse DNS lookup for the SOCKS server. ReverseDNS translates IP addresses into host names. Disabling reverse DNS lookup can conservenetwork resources. DNS Lookup is disabled by default. If reverse DNS lookup is disabledand a URL is requested with a host name, the server will not map the host name to the IPaddress. If reverse DNS lookup is enabled, the server performs the mapping, and an entry isadded to the SOCKS log file, listing the DNS translation.■ Use Client-specific Bind Port. Allows the client to specify the port in a BIND request.
With this option disabled, SOCKS ignores the client’s requested port and assigns arandom port. This option is disabled by default.
■ Allow Wildcard As Bind IP Address. Allows the client to specify an IP address of all zeros(0.0.0.0) in a BIND request, which means that any IP address can connect. With thisoption disabled, the client must specify the IP address that will be connecting to the bindport, and the SOCKS server rejects requests to bind to 0.0.0.0. This option is disabled bydefault.
■ Quench Updates. Disables the automatic stat file writing once an hour. If disabled, thewriting takes place with every request. For more information, see “Logging” on page 313.
The Quench Updates element displays in the user interface but is not implemented in thisrelease of Proxy Server 4.
In the Log File field, type the full path name of the SOCKS log file.The default is server-root/proxy-serverid/logs/socks5.log.
From the Log Level drop-down list, select whether the log file should contain warnings anderrors only, all requests, or debugging messages.
Select an RFC 1413 ident response.Ident allows the SOCKS server to determine the user name for a client. Generally, this featureonly works when the client is running some version of UNIX. The following options areavailable
■ Don’t Ask. Never use ident to determine the user name for a client. This setting is therecommended and default setting.■ Ask But Don’t Require. Ask for the user name of all clients but do not require it. This
option uses ident for logging purposes only.■ Require. Ask for the user name of all clients and only permit access to those with valid
responses.
3
4
5
6
7
Configuring the SOCKS v5 Server
Chapter 15 • Using SOCKS 315

In the SOCKS Tuning section, specify the number of worker and accept threads the SOCKS servershould use. These numbers influence performance of the SOCKS server. Click OK.
■ Number Of Worker Threads. The default is 40. If the SOCKS server is too slow, increasethe number of worker threads. If the server is unstable, decrease the number. Whenchanging this number, start with the default and increase or decrease as necessary. Thetypical number of worker threads is between 10 and 150. The absolute maximum is 512, butmore than 150 tends to be wasteful and unstable.■ Number Of Posted Accepts. The default is 1. If the SOCKS server is dropping
connections, increase the number of accept threads. If the server is unstable, decrease thesever number. When changing this number, start with the default and increase ordecrease as necessary. The typical number of accept threads is between 1 and 10. Theabsolute maximum is 512, but than 60 tends to be wasteful and unstable. Tune thissetting if requests are failing when the SOCKS server is put under load and connectionsare being dropped.
Configuring SOCKS v5 Authentication EntriesSOCKS authentication entries identify the hosts from which the SOCKS daemon should acceptconnections, and which types of authentication the SOCKS daemon should use to authenticatethose hosts.
▼ To Create SOCKS Authentication EntriesAccess the Server Manager for a server instance and click the SOCKS tab.
Click the Set SOCKS v5 Authentication link.
Click the Add button.
In the Host Mask field, type the IP addresses or host names of the hosts that the SOCKS serverwill authenticate.If you type an IP address, follow the address with a forward slash and the mask to be applied tothe incoming IP address. The SOCKS server applies this mask to the IP address to determine ifit is a valid host. Do not use spaces in the host mask entry. If you do not type a host mask, theauthentication entry applies to all hosts.
For example, you can type 155.25.0.0/255.255.0.0 in the host mask field. If the host’s IP addressis 155.25.3.5, the SOCKS server applies the mask to the IP address and determines that the host’sIP address matches the IP address for which the authentication record applies (155.25.0.0).
8
1
2
3
4
Configuring SOCKS v5 Authentication Entries
Oracle iPlanet Web Proxy Server 4.0.14 Administration Guide • June 2010316

In the Port Range field, type the ports on the host computers that the SOCKS server willauthenticate.
Do not use spaces in the port range entry. If you do not provide a port range, the authenticationentry applies to all ports.
You can use brackets [ ] to include the ports at each end of the range or parentheses ( ) toexclude them. For example, [1000-1010] means all port numbers between and including 1000and 1010, while (1000-1010) means all port numbers between, but not including, 1000 and1010. You can also mix brackets and parentheses. For instance, (1000-1010] means all numbersbetween 1000 and 1010, excluding 1000 but including 1010.
From the Authentication Type drop-down list, select the authentication type.
The following options are available:
■ Require user-password. User name and password are required to access the SOCKS server.■ User-password, if available. If a user name and password are available, they should be used
to access the SOCKS server but they are not required for access.■ Ban. Banned from the SOCKS server.■ None. No authentication is required to access the SOCKS server.
From the Insert drop-down list, select the position for this entry in the socks5.conf file andclick OK.
Because you can have multiple authentication methods, you must specify the order in whichthey are evaluated. Therefore, if the client does not support the first authentication methodlisted, the second method is used instead. If the client does not support any of theauthentication methods listed, the SOCKS server disconnects without accepting a request.
▼ To Edit Authentication EntriesAccess the Server Manager for a server instance and click the SOCKS tab.
Click the Set SOCKS v5 Authentication link.
Select the authentication entry you want to edit and click the Edit button.
Make changes as desired.
Click OK.
5
6
7
1
2
3
4
5
Configuring SOCKS v5 Authentication Entries
Chapter 15 • Using SOCKS 317

▼ To Delete Authentication EntriesAccess the Server Manager for a server instance and click the SOCKS tab.
Click the Set SOCKS v5 Authentication link.
Select the authentication entry you want to delete.
Click the Delete button.
▼ To Move Authentication EntriesEntries are evaluated in the order in which they appear in the socks5.conf file. You can changethe order by moving them.
Access the Server Manager for a server instance and click the SOCKS tab.
Click the Set SOCKS v5 Authentication link.
Select the authentication entry you want to move and click the Move button.
From the Move drop-down list, select the position for this entry in the socks5.conf file.
Click OK.
Configuring SOCKS v5 Connection EntriesSOCKS connection entries specify whether the SOCKS daemon should permit or deny arequest.
▼ To Create Connection EntriesAccess the Server Manager for a server instance and click the SOCKS tab.
Click the Set SOCKS v5 Connections link.
Click the Add button.
From the Authentication Type drop-down list, select the authentication method for which thisaccess control line applies.
1
2
3
4
1
2
3
4
5
1
2
3
4
Configuring SOCKS v5 Connection Entries
Oracle iPlanet Web Proxy Server 4.0.14 Administration Guide • June 2010318

From the Connection Type drop-down list, select the type of command the line matches.Possible command types are:
■ Connect■ Bind■ UDP■ All
In the Source Host Mask field, type the IP address or host names of the hosts for which theconnection control entry applies.
If you type an IP address, follow it with a forward slash and the mask to be applied to thesource’s IP address. The SOCKS server applies this mask to the source’s IP address to determineif it is a valid host. Do not use spaces in the host mask entry. If you do not type a host mask, theconnection entry applies to all hosts.
For example, you can type 155.25.0.0/255.255.0.0 in the host mask field. If the host’s IP addressis 155.25.3.5, the SOCKS server applies the mask to the IP address and determines that the host’sIP address matches the IP address for which the connection control entry applies (155.25.0.0).
In the Port Range field, type the ports on the source computers for which the connection controlentry applies.
Do not use spaces in the port range entry. If you do not specify a port range, the connectionentry applies to all ports.
You can use brackets [ ] to include the ports at each end of the range or parentheses ( ) toexclude them. For example, [1000-1010] means all port numbers between and including 1000and 1010, while (1000-1010) means all port numbers between, but not including, 1000 and1010. You can also mix brackets and parentheses. For instance, (1000-1010] means all numbersbetween 1000 and 1010, excluding 1000, but including 1010.
In the Destination Host Mask field, type the IP address or host name for which the connectionentry applies.
If you type an IP address, follow it with a forward slash and the mask to be applied to theincoming IP address. The SOCKS server applies this mask to the IP address of the destinationcomputer to determine if it is a valid destination host. Do not use spaces in the host mask entry.If you do not type a destination host mask, the connection entry applies to all hosts.
For example, you can type 155.25.0.0/255.255.0.0 into the destination host mask field. If thedestination host’s IP address is 155.25.3.5, the SOCKS server applies the mask to the IP addressand determines that the destination host’s IP address matches the IP address for which theproxy entry applies (155.25.0.0).
5
6
7
8
Configuring SOCKS v5 Connection Entries
Chapter 15 • Using SOCKS 319

In the Port Range field, type the ports on the destination host computers for which theconnection control entry applies.
Do not use spaces in the port range entry. If you do not type a port range, the connection entryapplies to all ports.
Note – Most SOCKS applications request port 0 for bind requests, meaning they have no portpreference. Therefore, the destination port range for bind should always include port 0.
You can use brackets [ ] to include the ports at each end of the range or parentheses ( ) toexclude them. For example, [1000-1010] means all port numbers between and including 1000and 1010, while (1000-1010) means all port numbers between, but not including, 1000 and1010. You can also mix brackets and parentheses. For instance, (1000-1010] means all numbersbetween 1000 and 1010, excluding 1000, but including 1010.
In the User Group field, type the group to which you want to permit or deny access.
If a group is not specified, the connection entry applies to all users.
From the Action drop-down list, choose to permit or deny access for the connection you arecreating.
From the Insert drop-down list, select the position for this entry in the socks5.conf file andclick OK.
Because you can have multiple connection directives, you must specify the order in which theyare evaluated.
▼ To Edit Connection EntriesAccess the Server Manager for a server instance and click the SOCKS tab.
Click the Set SOCKS v5 Connections link.
Select the connection entry you want to edit and click the Edit button.
Make changes as desired.
Click OK.
9
10
11
12
1
2
3
4
5
Configuring SOCKS v5 Connection Entries
Oracle iPlanet Web Proxy Server 4.0.14 Administration Guide • June 2010320
▼ To Delete Connection EntriesAccess the Server Manager for a server instance and click the SOCKS tab.
Click the Set SOCKS v5 Connections link.
Select the connection entry you want to delete.
Click the Delete button.
▼ To Move Connection EntriesEntries are evaluated in the order in which they appear in the socks5.conf file. You can changethe order by moving them.
Access the Server Manager for a server instance and click the SOCKS tab.
Click the Set SOCKS v5 Connections link.
Select the connection entry you want to move.
Click the Move button.
From the Move drop-down list, select the position for this entry in the socks5.conf file and clickOK.
Configuring SOCKS v5 Server ChainingSOCKS servers can be chained together in the same manner as Proxy Servers, meaning that aSOCKS server can route through another SOCKS server.
▼ To Configure SOCKS Server ChainingAccess the Server Manager for a server instance and click the SOCKS tab.
Click the Set SOCKS v5 Routing link.
If the downstream proxy in the proxy chain requires authentication to serve any requests, in theServer Chaining section, type the user name and password for authenticating to chained ProxyServers. Click OK.
1
2
3
4
1
2
3
4
5
1
2
3
Configuring SOCKS v5 Server Chaining
Chapter 15 • Using SOCKS 321
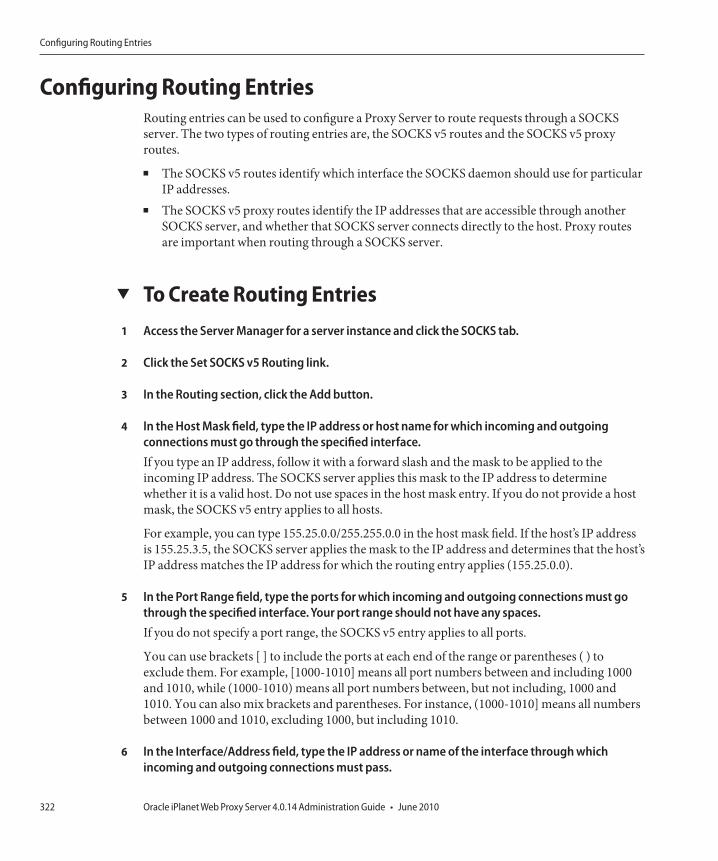
Configuring Routing EntriesRouting entries can be used to configure a Proxy Server to route requests through a SOCKSserver. The two types of routing entries are, the SOCKS v5 routes and the SOCKS v5 proxyroutes.
■ The SOCKS v5 routes identify which interface the SOCKS daemon should use for particularIP addresses.
■ The SOCKS v5 proxy routes identify the IP addresses that are accessible through anotherSOCKS server, and whether that SOCKS server connects directly to the host. Proxy routesare important when routing through a SOCKS server.
▼ To Create Routing EntriesAccess the Server Manager for a server instance and click the SOCKS tab.
Click the Set SOCKS v5 Routing link.
In the Routing section, click the Add button.
In the Host Mask field, type the IP address or host name for which incoming and outgoingconnections must go through the specified interface.If you type an IP address, follow it with a forward slash and the mask to be applied to theincoming IP address. The SOCKS server applies this mask to the IP address to determinewhether it is a valid host. Do not use spaces in the host mask entry. If you do not provide a hostmask, the SOCKS v5 entry applies to all hosts.
For example, you can type 155.25.0.0/255.255.0.0 in the host mask field. If the host’s IP addressis 155.25.3.5, the SOCKS server applies the mask to the IP address and determines that the host’sIP address matches the IP address for which the routing entry applies (155.25.0.0).
In the Port Range field, type the ports for which incoming and outgoing connections must gothrough the specified interface. Your port range should not have any spaces.If you do not specify a port range, the SOCKS v5 entry applies to all ports.
You can use brackets [ ] to include the ports at each end of the range or parentheses ( ) toexclude them. For example, [1000-1010] means all port numbers between and including 1000and 1010, while (1000-1010) means all port numbers between, but not including, 1000 and1010. You can also mix brackets and parentheses. For instance, (1000-1010] means all numbersbetween 1000 and 1010, excluding 1000, but including 1010.
In the Interface/Address field, type the IP address or name of the interface through whichincoming and outgoing connections must pass.
1
2
3
4
5
6
Configuring Routing Entries
Oracle iPlanet Web Proxy Server 4.0.14 Administration Guide • June 2010322

From the Insert drop-down list, select the position for this entry in the socks5.conf file andclick OK.Because you can have multiple routing methods, you must specify the order in which they areevaluated.
Note – The interface specified should be used for both incoming and outgoing connections,otherwise the incoming route will be different from the configured interface and an errormessage will be received.
▼ To Create Proxy Routing EntriesAccess the Server Manager for a server instance and click the SOCKS tab.
Click the Set SOCKS v5 Routing link.
In the Proxy Routing section, click the Add button.
From the Proxy Type drop-down list, select the type of Proxy Server through which you arerouting. The following options are available
■ SOCKS v5■ SOCKS v4■ Direct connection
In the Destination Host Mask field, type the IP address or host name for which the connectionentry applies.If you type an IP address, follow it with a forward slash and the mask to be applied to theincoming IP address. The SOCKS server applies this mask to the IP address of the destinationcomputer to determine whether it is a valid destination host. Do not use spaces in the host maskentry. If you do not provide a destination host mask, the connection entry applies to all hosts.
For example, you can type 155.25.0.0/255.255.0.0 in the destination host mask field. If thedestination host’s IP address is 155.25.3.5, the SOCKS server applies the mask to the IP addressand determines that the destination host’s IP address matches the IP address for which theproxy entry applies (155.25.0.0).
In the Destination Port Range field, type the ports on the destination host for which the proxyentry applies.Do not use spaces in the port range entry. If you do not specify a port range, the proxy entryapplies to all ports.
You can use brackets [ ] to include the ports at each end of the range or parentheses ( ) toexclude them. For example, [1000-1010] means all port numbers between and including 1000
7
1
2
3
4
5
6
Configuring Routing Entries
Chapter 15 • Using SOCKS 323

and 1010, while (1000-1010) means all port numbers between, but not including, 1000 and1010. You can also mix brackets and parentheses. For instance, (1000-1010] means all numbersbetween 1000 and 1010, excluding 1000, but including 1010.
In the Destination Proxy Address field, type the host name or IP address of the Proxy Server touse.
In the Destination Proxy Port field, type the port number on which the Proxy Server will listenfor SOCKS requests.
From the Insert drop-down list, select the position for this entry in the socks5.conf file andclick OK.
Because you can have multiple routing methods, you must specify the order in which they areevaluated.
▼ To Edit Routing EntriesAccess the Server Manager for a server instance and click the SOCKS tab.
Click the Set SOCKS v5 Routing link.
Select the entry you want to edit.
Click the Edit button.
Make changes as desired.
Click OK.
▼ To Delete Routing EntriesAccess the Server Manager for a server instance and click the SOCKS tab.
Click the Set SOCKS v5 Routing link.
Select the entry you want to delete.
Click the Delete button.
7
8
9
1
2
3
4
5
6
1
2
3
4
Configuring Routing Entries
Oracle iPlanet Web Proxy Server 4.0.14 Administration Guide • June 2010324
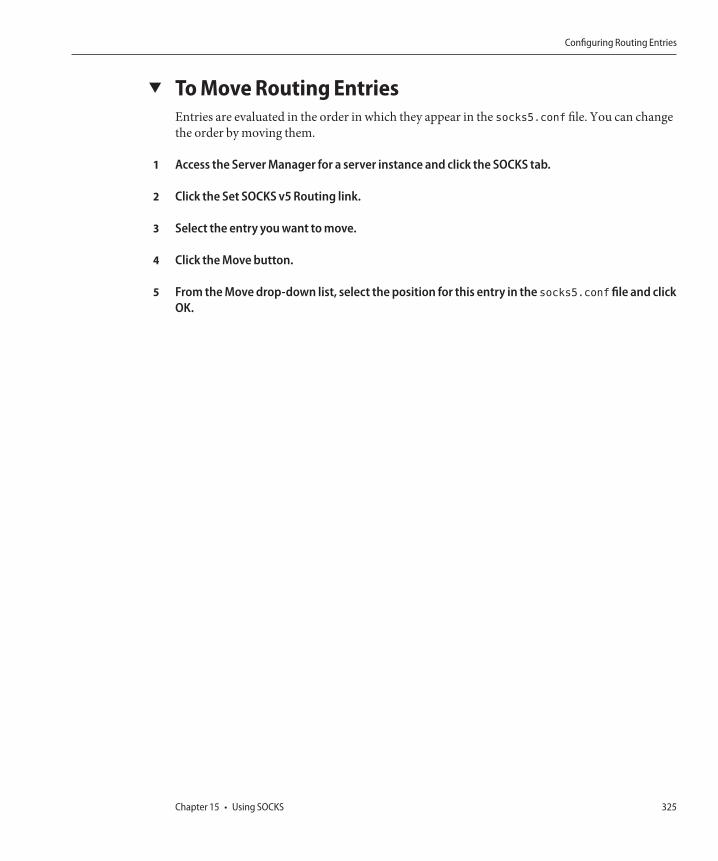
▼ To Move Routing EntriesEntries are evaluated in the order in which they appear in the socks5.conf file. You can changethe order by moving them.
Access the Server Manager for a server instance and click the SOCKS tab.
Click the Set SOCKS v5 Routing link.
Select the entry you want to move.
Click the Move button.
From the Move drop-down list, select the position for this entry in the socks5.conf file and clickOK.
1
2
3
4
5
Configuring Routing Entries
Chapter 15 • Using SOCKS 325

326

Managing Templates and Resources
You can use templates to group URLs together so that you can configure how the proxy handlesthem. You can make the proxy behave differently depending on the URL the client tries toretrieve. For example, you might require the client to authenticate by typing a user name andpassword when accessing URLs from a specific domain. Or, you might deny access to URLs thatpoint to image files. You can configure different cache refresh settings based on the file type.
This chapter contains the following sections:
■ “About Templates” on page 327■ “Working With Templates” on page 330■ “Removing Resources” on page 332
About TemplatesA template is a collection of URLs, called resources. A resource might be a single URL, a groupof URLs that have something in common, or an entire protocol. You name and create atemplate and then you assign URLs to that template by using regular expressions. In this way,you can configure the proxy server to handle requests for various URLs differently. Any URLpattern you can create with regular expressions can be included in a template. The followingtable lists the default resources and provides some ideas for other templates.
TABLE 16–1 Resource regular expression wildcard patterns
Regular expression pattern What it configures
ftp://.* All FTP requests
http://.* All HTTP requests
https://.* All secure HTTP requests
gopher://.* All Gopher requests
16C H A P T E R 1 6
327

TABLE 16–1 Resource regular expression wildcard patterns (Continued)Regular expression pattern What it configures
connect://.*:443 All SSL (secure) transactions to HTTPS port.
http://home\.example\.com.* All documents on the home.example.com web site.
.*\.gif.* Any URL that includes the string .gif
.*\.edu.* Any URL that includes the string .edu
http://.*\.edu.* Any URL going to a computer in the .edu domain
Understanding Regular ExpressionsProxy Server allows you to use regular expressions to identify resources. Regular expressionsspecify a pattern of character strings. In the proxy server, regular expressions are used to findmatching patterns in URLs.
The following example shows a regular expression:
[a-z]*://[^:/]*\.abc\.com.*
This regular expression would match any documents from the .abc.com domain. Thedocuments could be of any protocol and could have any file extension.
The following table lists the regular expressions and their corresponding meanings.
TABLE 16–2 Regular expressions and their meanings
Expression Meaning
. Matches any single character except a newline.
x? Matches zero or one occurrences of regular expression x.
x* Matches zero or more occurrences of regular expression x.
x+ Matches one or more occurrences of regular expression x.
x{n,m} Matches the character x where x occurs at least n times but no more than mtimes.
x{n,} Matches the character x where x occurs at least n times.
x{n} Matches the character x where x occurs exactly n times.
[abc] Matches any of the characters enclosed in the brackets.
[^abc] Matches any character not enclosed in the brackets.
[a-z] Matches any characters within the range in the brackets.
About Templates
Oracle iPlanet Web Proxy Server 4.0.14 Administration Guide • June 2010328
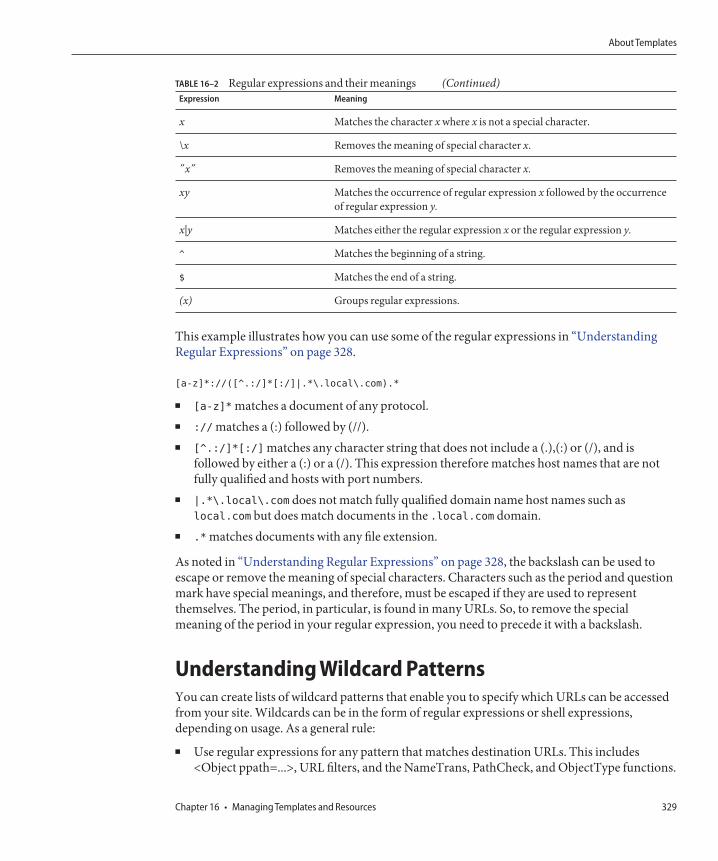
TABLE 16–2 Regular expressions and their meanings (Continued)Expression Meaning
x Matches the character x where x is not a special character.
\x Removes the meaning of special character x.
"x" Removes the meaning of special character x.
xy Matches the occurrence of regular expression x followed by the occurrenceof regular expression y.
x|y Matches either the regular expression x or the regular expression y.
^ Matches the beginning of a string.
$ Matches the end of a string.
(x) Groups regular expressions.
This example illustrates how you can use some of the regular expressions in “UnderstandingRegular Expressions” on page 328.
[a-z]*://([^.:/]*[:/]|.*\.local\.com).*
■ [a-z]* matches a document of any protocol.■ :// matches a (:) followed by (//).■ [^.:/]*[:/] matches any character string that does not include a (.),(:) or (/), and is
followed by either a (:) or a (/). This expression therefore matches host names that are notfully qualified and hosts with port numbers.
■ |.*\.local\.com does not match fully qualified domain name host names such aslocal.com but does match documents in the .local.com domain.
■ .* matches documents with any file extension.
As noted in “Understanding Regular Expressions” on page 328, the backslash can be used toescape or remove the meaning of special characters. Characters such as the period and questionmark have special meanings, and therefore, must be escaped if they are used to representthemselves. The period, in particular, is found in many URLs. So, to remove the specialmeaning of the period in your regular expression, you need to precede it with a backslash.
Understanding Wildcard PatternsYou can create lists of wildcard patterns that enable you to specify which URLs can be accessedfrom your site. Wildcards can be in the form of regular expressions or shell expressions,depending on usage. As a general rule:■ Use regular expressions for any pattern that matches destination URLs. This includes
<Object ppath=...>, URL filters, and the NameTrans, PathCheck, and ObjectType functions.
About Templates
Chapter 16 • Managing Templates and Resources 329

■ Use shell expressions for any pattern that matches incoming client or user IDs, includinguser names and groups for access control and the IP addresses or DNS names of incomingusers, for example, <Client dns=...>.
You can specify several URLs by using regular expression wildcard patterns. Wildcards enableyou to filter by domain name or by any URL with a given word in the URL. For example, youmight want to block access to URLs that contain the string “careers.” To do this, you couldspecify http://.*careers.* as the regular expression for the template.
Working With Templates
▼ To Create a TemplateYou can create a template using a regular expression wildcard pattern. You can then configureaspects that affect only the URLs specified in that template. For example, you might use one typeof caching configuration for .GIF images and another for plain .html files.
Access the Server Manager, and click the Templates tab.Click the Create Template link. The Create Template page is displayed.
In the Template Name field, type a name for the template you are creating, and click OK.The name should be something you can easily remember. The Server Manager prompts you tosave and apply your changes. You can save the changes after you create a regular expression forthe template, as described in the remaining steps.
▼ To Apply a TemplateAccess the Server Manager, and click the Templates tab.
Click the Apply Template link.The Apply Template page is displayed.
Type a regular expression wildcard pattern that includes all of the URLs you want to include inyour template in the URL Prefix Wildcard field.
From the Template list, select the name of the new template you just added.
Click OK.
1
2
1
2
3
4
5
Working With Templates
Oracle iPlanet Web Proxy Server 4.0.14 Administration Guide • June 2010330

Click Restart Required.
The Apply Changes page is displayed.
Click the Restart Proxy Server button to apply the changes.
▼ To Remove a TemplateYou can remove existing templates. Removing a template deletes all of the associatedconfigurations for the template. For example, if you have access control set up for all URLs inthe template TEST, removing the TEST template also removes the access control to the URLscontained in then template.
Access the Server Manager, and click the Templates tab.
Click the Remove Template link.
The Remove Template page is displayed.
Choose the template from the Remove list.
Click OK.
Click Restart Required.
The Apply Changes page is displayed.
Click the Restart Proxy Server button to apply the changes.
▼ To Edit a TemplateYou can view and edit the templates created in the Server Manager.
Access the Server Manager, and click the Templates tab.
Click the View Template link.
The View Template page is displayed. The templates are shown in a table that lists the regularexpression for the template and the template name.
To edit an existing template, click the Edit Template Assignment link. The Apply Template pageis displayed.
6
7
1
2
3
4
5
6
1
2
3
Working With Templates
Chapter 16 • Managing Templates and Resources 331

Removing ResourcesYou can delete an entire regular expression object and its corresponding configurations withthe Remove Resource page. For instance, you can remove the gopher resource so that allsettings associated with that resource will be removed from the proxy server’s configurationfiles.
▼ To Remove a ResourceAccess the Server Manager, and click the Templates tab.
Click the Remove Resource link.The Remove Resource page is displayed.
Select the resource that you want to remove by choosing it from the Remove drop-down list.
Click OK.
Click Restart Required.The Apply Changes page is displayed.
Click the Restart Proxy Server button to apply the changes.
1
2
3
4
5
6
Removing Resources
Oracle iPlanet Web Proxy Server 4.0.14 Administration Guide • June 2010332

Using the Client Autoconfiguration File
If you have multiple proxy servers that support many clients, you can use a clientautoconfiguration file to configure all of your browser clients. The autoconfiguration filecontains a JavaScript function that determines which proxy, if any, the browser uses whenaccessing various URLs.
When the browser starts, it loads the autoconfiguration file. Each time the user clicks a link ortypes in a URL, the browser uses the configuration file to determine if it should use a proxy and,if so, which proxy it should use. This feature lets you provide an easy way to configure allinstances of the browser in your organization. There are several ways you can get theautoconfiguration file to your clients.■ You can use the proxy server as a web server that returns the autoconfiguration file. You
point the browser to the proxy’s URL. Having the proxy act as a web server enables you tokeep the autoconfiguration file in one place so that when you need to make updates, youneed to change only one file.
■ You can store the file on a web server, an FTP server, or any network directory to which thebrowser has access. You configure the browser to find the file by providing the URL to thefile, so any general URL is acceptable. If you need to do complex calculations, for example, ifyou have large proxy chains in your organization, you might write a web server CGIprogram that outputs a different file depending on who accesses the file.
■ You can store the autoconfiguration file locally with each copy of the browser. However, ifyou need to update the file, you have to distribute copies of the file to each client.
You can create the autoconfiguration file in either of two ways: you can use a page in the ServerManager or you can create the file manually. Directions for creating the files appear later in thischapter.
This chapter contains the following sections:■ “Understanding Autoconfiguration Files” on page 334■ “Using Server Manager Pages to Create Autoconfiguration Files” on page 336■ “Creating Autoconfiguration Files Manually” on page 338
17C H A P T E R 1 7
333

Understanding Autoconfiguration FilesAs the person administering the Proxy Server, you will also create and distribute the clientautoconfiguration files.
What the Autoconfiguration File DoesThe autoconfiguration file is written in JavaScript, a compact, object-based scripting languagefor developing client and server Internet applications. The browser interprets the JavaScript file.
When the browser is first loaded, it downloads the autoconfiguration file. The file can be keptanywhere that the browser can get to it by using a URL. For example, the file can be kept on aweb server. The file could even be kept on a network file system, provided the browser can get toit using a file:// URL.
The proxy configuration file is written in JavaScript. The JavaScript file defines a single function(called FindProxyForURL) that determines which proxy server, if any, the browser should usefor each URL. The browser sends the JavaScript function two parameters: the host name of thesystem from which the browser is running and the URL it is trying to obtain. The JavaScriptfunction returns a value to the browser that tells it how to proceed.
By using an autoconfiguration file, you can specify different proxies (or no proxy at all) forvarious types of URLs, various servers, or even various times of the day. In other words, you canhave multiple specialized proxies so that, for example, one serves the .com domain, another the.edu domain, and yet another serves everything else. This method enables you to divide theload and use your proxies’ disks more effieciently because only a single copy of any file is storedin the cache instead of multiple proxies all storing the same documents.
Autoconfiguration files also support proxy failover, so if a proxy server is unavailable, thebrowser will transparently switch to another proxy server.
Accessing the Proxy as a Web ServerYou can store one or more autoconfiguration files on the proxy server and have the proxy serveract as a web server whose only documents are autoconfiguration files. This lets you, the proxyadministrator, maintain the proxy autoconfiguration files needed by the clients in yourorganization. It also lets you keep the files in a central location, so if you have to update the files,you do it once and all browser clients automatically get the updates.
You keep the proxy autoconfiguration files in the server- root/proxy-serverid/pac/ directory. Inthe browser, you enter the URL to the proxy autoconfiguration file typing the URL to the file inthe Proxies tab. The URL for the proxy has this format:
http://proxy.domain:port/URI
Understanding Autoconfiguration Files
Oracle iPlanet Web Proxy Server 4.0.14 Administration Guide • June 2010334
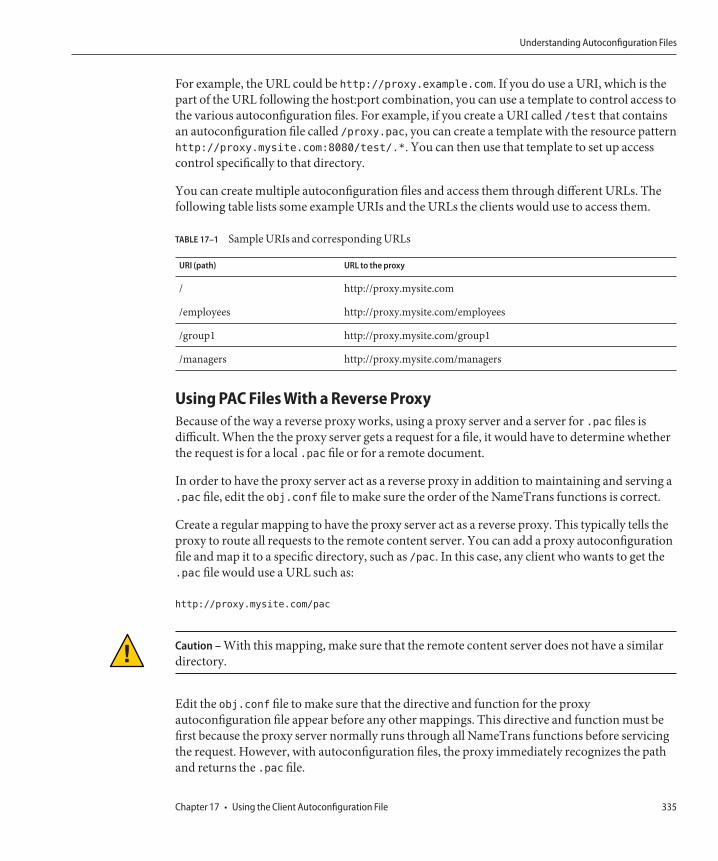
For example, the URL could be http://proxy.example.com. If you do use a URI, which is thepart of the URL following the host:port combination, you can use a template to control access tothe various autoconfiguration files. For example, if you create a URI called /test that containsan autoconfiguration file called /proxy.pac, you can create a template with the resource patternhttp://proxy.mysite.com:8080/test/.*. You can then use that template to set up accesscontrol specifically to that directory.
You can create multiple autoconfiguration files and access them through different URLs. Thefollowing table lists some example URIs and the URLs the clients would use to access them.
TABLE 17–1 Sample URIs and corresponding URLs
URI (path) URL to the proxy
/ http://proxy.mysite.com
/employees http://proxy.mysite.com/employees
/group1 http://proxy.mysite.com/group1
/managers http://proxy.mysite.com/managers
Using PAC Files With a Reverse ProxyBecause of the way a reverse proxy works, using a proxy server and a server for .pac files isdifficult. When the the proxy server gets a request for a file, it would have to determine whetherthe request is for a local .pac file or for a remote document.
In order to have the proxy server act as a reverse proxy in addition to maintaining and serving a.pac file, edit the obj.conf file to make sure the order of the NameTrans functions is correct.
Create a regular mapping to have the proxy server act as a reverse proxy. This typically tells theproxy to route all requests to the remote content server. You can add a proxy autoconfigurationfile and map it to a specific directory, such as /pac. In this case, any client who wants to get the.pac file would use a URL such as:
http://proxy.mysite.com/pac
Caution – With this mapping, make sure that the remote content server does not have a similardirectory.
Edit the obj.conf file to make sure that the directive and function for the proxyautoconfiguration file appear before any other mappings. This directive and function must befirst because the proxy server normally runs through all NameTrans functions before servicingthe request. However, with autoconfiguration files, the proxy immediately recognizes the pathand returns the .pac file.
Understanding Autoconfiguration Files
Chapter 17 • Using the Client Autoconfiguration File 335

The following example is from an obj.conf file that uses a reverse proxy and maintains anautoconfiguration file.
<Object name="default">NameTrans from="file:" fn="map" to="ftp:"NameTrans from="/pac" fn="pac-map" name="file"
to="/ns-home/proxy/pac/proxy.pac"NameTrans fn="redirect" from="http://foo.*" url="http://www.acme.com"NameTrans from="/ns-icons" fn="pfx2dir" dir="/ns-home/ns-icons" name="file"NameTrans fn="reverse-map" from="http://web.acme.com"
to="http://proxy.acme.com:8080"NameTrans fn="map" from="http://proxy.acme.com:8080"
to="http://web.acme.com"NameTrans fn="map" from="/" to="http://web.acme.com"PathCheck fn="url-check"Service fn="deny-service"AddLog fn="flex-log" name="access"AddLog fn="urldb-record"</Object>
Using Server Manager Pages to Create AutoconfigurationFiles
▼ To Create an Autoconfiguration File using The ServerManager
Access the Server Manager, and select the Routing tab.
Click the Create/Edit Autoconfiguration File link.The page that appears lists any autoconfiguration files you have on your proxy’s system. Youcan click the autoconfiguration file to edit it. The remaining steps tell you how to create a newfile.
Type an optional URI which is the path portion of a URL, that clients will use when getting theautoconfiguration file from the proxy.For example, type / to let clients access the file as the proxy’s main document (similar to anindex.html file for a web server); clients would then use only the domain name when accessingthe proxy for the autoconfiguration file. You can use multiple URIs and create separateautoconfiguration files for each URI.
1
2
3
Using Server Manager Pages to Create Autoconfiguration Files
Oracle iPlanet Web Proxy Server 4.0.14 Administration Guide • June 2010336

Type a name for the autoconfiguration file using the .pac extension.
If you have one file, you might call it simply proxy.pac (pac is short for proxyautoconfiguration). All autoconfiguration files are ASCII text files with a single JavaScriptfunction.
Click OK. Another page appears.
Use this page to create an autoconfiguration file. The items on the page are followed in order bythe client. These are the items on the page:
■ Never Go Direct To Remote Server tells the browser to always use your proxy. You canspecify a second proxy server to use in case your proxy server is not running.
■ Go Direct To Remote Server When determines when to bypass the proxy server. Thebrowser determines those occasions in the order the options are listed on the page:
■ Connecting To Non-fully Qualified Host Names sends the browser directly to a serverwhen the user specifies only the computer name. For example, if an internal web server iscalled winternal.mysite.com, the user might type only http://winternal instead of thefully qualified domain name. In this case, the browser goes directly to the web server insteadof to the proxy.
■ Connecting To A Host In Domainenables you to specify up to three domain names that thebrowser can access directly. When specifying the domains, begin with the dot character. Forexample, you could type .example.com.
■ Connecting To A Resolvable Host sends the browser directly to the server when the clientcan resolve the host. This option is typically used when DNS is set to resolve only local(internal) hosts. The clients would use a proxy server when connecting to servers outside ofthe local network.
Caution – This option negatively affects the performance witnessed by the client because theclient must consult DNS for every request.
■ Connecting To A Host In Subnet sends the browser directly to the server when the clientaccesses a server in a particular subnet. This option is useful when an organization has manysubnets in a geographical area. For example, some companies might have one domain namethat applies to subnets around the world, but each subnet is specific to a particular region.
Caution – This option negatively affects the performance witnessed by the client because theclient must consult DNS for every request.
4
5
Using Server Manager Pages to Create Autoconfiguration Files
Chapter 17 • Using the Client Autoconfiguration File 337

■ Except When Connecting To Hostsenables you to specify exceptions to the rule of goingdirectly to a server. For example, if you type.example.com as a domain to which to godirectly, you could make an exception for going to home.example.com. The browser wouldthen use your proxy when going to home.example.com but go directly to any other server inthe example.com domain.
■ Secondary Failover Proxy specifies a second proxy to use if your proxy server is notrunning.
■ Failover Direct sends the browser directly to the servers if your proxy server isn’t running.If you specify a secondary failover proxy, Navigator tries the second proxy server beforegoing directly to the server.
Click OK to create the autoconfiguration file.The file is stored in the directory server-root/proxy-serverid/pac.
A confirmation message appears saying that the file was created correctly. Repeat the precedingsteps to create as many autoconfiguration files as you need.
Once you create your autoconfiguration file, make sure you either tell all the people using yourproxy server to point to the correct autoconfiguration file or configure the copies of the browseryourself.
Creating Autoconfiguration Files ManuallyThis section describes how to manually create autoconfiguration files.
The proxy autoconfiguration file is written using client-side JavaScript. Each file contains asingle JavaScript function called FindProxyForURL() that determines which proxy server, ifany, the browser should use for each URL. The browser sends the JavaScript function twoparameters: the host name of the destination origin server and the URL it is trying to obtain.The JavaScript function returns a value to Navigator that tells it how to proceed. The followingsection describes the function syntax and the possible return values.
FindProxyForURL() FunctionThe syntax of the FindProxyFor() URL function is:
function FindProxyForURL(url, host){ ...}
For every URL the browser accesses, it sends the url and host parameters and calls the functionin the following way:
ret = FindProxyForURL(url, host);
url is the full URL being accessed in the browser.
6
Creating Autoconfiguration Files Manually
Oracle iPlanet Web Proxy Server 4.0.14 Administration Guide • June 2010338

host is the host name extracted from the URL that is being accessed. This is only forconvenience; it is the same string as between :// and the first : or / after that. The port number isnot included in this parameter. It can be extracted from the URL when necessary.
ret (the return value) is a string describing the configuration.
Function Return Values
The autoconfiguration file contains the function FindProxyForURL(). This function uses theclient host name and the URL it is accessing as parameters, . The function returns a single stringthat tells the browser how to proceed. If the string is null, no proxies should be used. The stringcan contain any number of the building blocks shown in the following table, separated bysemicolons.
TABLE 17–2 FindProxyForURL()Return Values
Return Values Resulting Action of the Browser
DIRECT Make connections directly to the server without going through anyproxies.
PROXY host:port Use the specified proxy and port number. If multiple values are separatedby semicolons, the first proxy is used. If that proxy fails, then the nextproxy is used, and so on.
SOCKS host:port Use the specified SOCKS server. If multiple values are separated bysemicolons, the first proxy is used. If that proxy fails, then the next proxy isused, and so on.
If the browser encounters an unavailable proxy server, the browser will automatically retry thepreviously unresponsive proxy after 30 minutes, then after one hour, and so on, at 30-minuteintervals. So, if you temporarily shut down a proxy server, your clients will resume using theproxy no later than 30 minutes after it was restarted.
If all of the proxies are down and the DIRECT return value is not specified, the browser will askthe user whether the browser should temporarily ignore proxies and attempt direct connectionsinstead. The browser will ask if proxies should be retried after 20 minutes, then again in another20 minutes, and so on at 20-minute intervals.
In the following example, the return value tells the browser to use the proxy calledw3proxy.example.com on port 8080. If that proxy is unavailable, the browser uses the proxycalled proxy1.example.com on port 8080:
PROXY w3proxy.example.com:8080; PROXY proxy1.example.com:8080
In the next example, the primary proxy is w3proxy.example.com:8080. If that proxy isunavailable, the browser uses proxy1.example.com:8080. If both proxies are unavailable, thenthe browser goes directly to the server. After 20 minutes, the browser asks the user whether itshould retry the first proxy.
Creating Autoconfiguration Files Manually
Chapter 17 • Using the Client Autoconfiguration File 339

PROXY w3proxy.example.com:8080; PROXY proxy1.example.com:8080; DIRECT
JavaScript Functions and EnvironmentThe JavaScript language has several predefined functions and environmental conditions thatare useful with proxying. Each of these functions checks whether a certain condition is met andthen returns a value of true or false. The related utility functions are an exception because theyreturn a DNS host name or IP address. You can use these functions in the mainFindProxyForURL() function to determine what return value to send to the browser. Theexamples later in this chapter provide ideas on using these functions.
Each of the functions or environmental conditions is described in this section. The functionsand environmental conditions that apply to the browser integration with the proxy are:
■ The host name functions are:■ dnsDomainIs()()
■ isInNet()()
■ isPlainhost name()()
■ isResolvable()()
■ localHostOrDomainIs()()
■ Utility functions:■ dnsDomainLevels()■ dnsResolve()■ myIpAddress()
■ URL/host name-based condition:■ shExpMatch()
■ Time-based conditions:■ dateRange()■ timeRange()■ weekdayRange()
Hostname-Based FunctionsThe hostname-based functions let you use the host name or IP address to determine whichproxy, if any, to use.
dnsDomainIs()(host, domain)The dnsDomainIs()() function detects whether the URL host name belongs to a given DNSdomain. This function is useful when you are configuring the browser not to use proxies for thelocal domain, as illustrated in “Example 1: Proxy All Servers Except Local Hosts” on page 348and “Example 2: Proxy Local Servers Outside the Firewall” on page 349.
Creating Autoconfiguration Files Manually
Oracle iPlanet Web Proxy Server 4.0.14 Administration Guide • June 2010340

This function is also useful when you are using multiple proxies for load balancing in situationswhere the proxy that receives the request is selected from a group of proxies based on whichDNS domain the URL belongs to. For example, if you are load balancing by directing URLscontaining .edu to one proxy and those containing .com to another proxy, you can check theURL host name using dnsDomainIs()().
Parameters
host is the host name from the URL.
domain is the domain name to test the host name against.
Return Values
true or false
Examples
The following statement would be true:
dnsDomainIs("www.example.com", ".example.com")
The following statements would be false:
dnsDomainIs("www", ".example.com") dnsDomainIs("www.mcom.com",".example.com")
isInNet()(host, pattern, mask)The isInNet()() function enables you to resolve a URL host name to an IP address and testwhether it belongs to the subnet specified by the mask. This is the same type of IP addresspattern matching that SOCKS uses. See “Example 4: Connect Directly to a Subnet” on page 350.
Parameters:
host is a DNS host name or IP address. If a host name is passed, this function will resolve it intoan IP address.
pattern is an IP address pattern in the dot-separated format
mask is the IP address pattern mask that determines which parts of the IP address should bematched against. A value of 0 means ignore; 255 means match. This function is true if the IPaddress of the host matches the specified IP address pattern.
Return Values
true or false
Creating Autoconfiguration Files Manually
Chapter 17 • Using the Client Autoconfiguration File 341

Examples
This statement is true only if the IP address of the host matches exactly 198.95.249.79 exactly:
isInNet(host, "198.95.249.79", "255.255.255.255")
This statement is true only if the IP address of the host matches 198.95.*.*: isInNet(host,"198.95.0.0", "255.255.0.0")
isPlainhost name()(host)The isPlainhost name()() function detects whether the host name in the requested URL is aplain host name or a fully qualified domain name. This function is useful if you want thebrowser to connect directly to local servers, as illustrated in “Example 1: Proxy All ServersExcept Local Hosts” on page 348 and “Example 2: Proxy Local Servers Outside the Firewall” onpage 349.
Parameters
host is the host name from the URL, excluding the port number only if the host name has nodomain name (no dotted segments).
Return Values
true if host is local; false if host is remote
ExampleisPlainhost name("host")
If host is a string like www, then the function returns true. If host is a string likewww.example.com, the function returns false.
isResolvable()(host)If the DNS inside the firewall recognizes only internal hosts, you can use the isResolvable()()function to test whether a host name is internal or external to the network. Using this function,you can configure the browser to use direct connections to internal servers and to use the proxyonly for external servers. This function is useful at sites where the internal hosts inside thefirewall are able to resolve the DNS domain name of other internal hosts, but all external hostsare unresolvable. The isResolvable()() function consults DNS, attempting to resolve the hostname into an IP address. See “Example 3: Proxy Only Unresolved Hosts” on page 349
Parameters
host() is the host name from the URL.
Creating Autoconfiguration Files Manually
Oracle iPlanet Web Proxy Server 4.0.14 Administration Guide • June 2010342

Return Values
true if the function can resolve the host name, false if it cannot
ExampleisResolvable("host")
If host() is a string like www and can be resolved through DNS, then this function returns true.
localHostOrDomainIs()(host, hostdom)ThelocalHostOrDomainIs()() function specifies local hosts that might be accessed by eitherthe fully qualified domain name or the plain host name. See “Example 2: Proxy Local ServersOutside the Firewall” on page 349.
The localHostOrDomainIs()() function returns true if the host name matches the specifiedhost name exactly or if there is no domain name part in the host name that the unqualified hostname matches.
Parameters
host is the host name from the URL.
hostdom is the fully qualified host name to match.
Return Values
true or false
Examples
The following statement is true (exact match):
localHostOrDomainIs("www.example.com", "www.example.com")
The following statement is true (host name match, domain name not specified):
localHostOrDomainIs("www", "www.example.com")
The following statement is false (domain name mismatch):
localHostOrDomainIs("www.mcom.com", "www.example.com")
The following statement is false (host name mismatch):
localHostOrDomainIs("home.example.com", "www.example.com")
Creating Autoconfiguration Files Manually
Chapter 17 • Using the Client Autoconfiguration File 343

Utility FunctionsThe utility functions enable you to find out domain levels, the host on which the browser isrunning, or the IP address of a host.
dnsDomainLevels()(host)The dnsDomainLevels()() function finds the number of DNS levels (number of dots) in theURL host name.
Parameters
host is the host name from the URL.
Return Value
number (integer) of DNS domain levels.
Examples
dnsDomainLevels("www") returns 0.
dnsDomainLevels("www.example.com") returns 2.
dnsResolve()(host)The dnsResolve()() function resolves the IP address of the given host, typically from the URL.This function is useful if the JavaScript function has to do more advanced pattern matchingthan can be done with the existing functions.
Parameters
host is the host name to resolve. Resolves the given DNS host name into an IP address, andreturns it in the dot-separated format as a string.
Return Value
dotted quad IP address as a string value
Example
The following example would return the string 198.95.249.79.
dnsResolve("home.example.com")
Creating Autoconfiguration Files Manually
Oracle iPlanet Web Proxy Server 4.0.14 Administration Guide • June 2010344
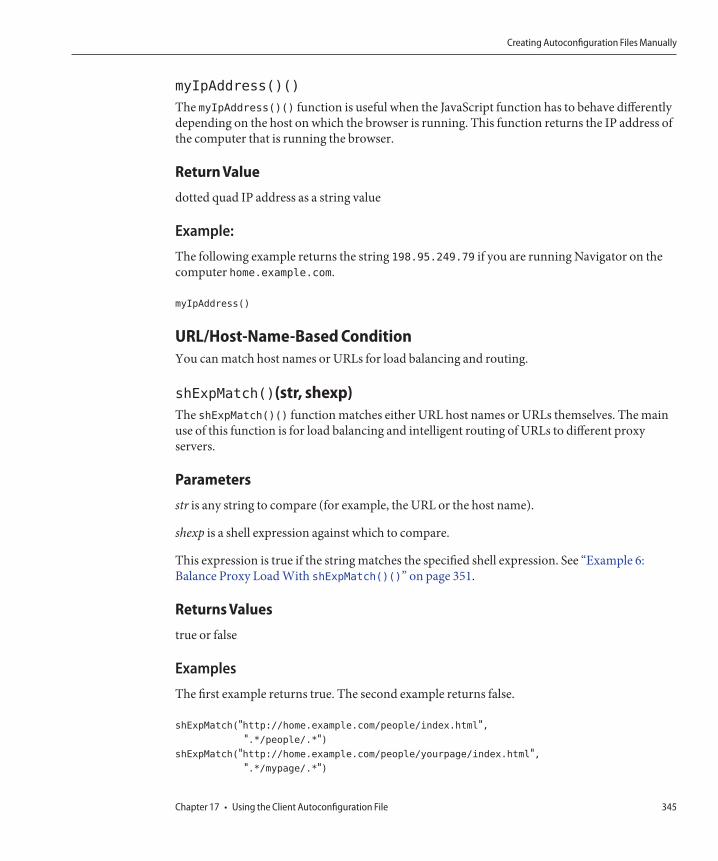
myIpAddress()()
The myIpAddress()() function is useful when the JavaScript function has to behave differentlydepending on the host on which the browser is running. This function returns the IP address ofthe computer that is running the browser.
Return Value
dotted quad IP address as a string value
Example:
The following example returns the string 198.95.249.79 if you are running Navigator on thecomputer home.example.com.
myIpAddress()
URL/Host-Name-Based ConditionYou can match host names or URLs for load balancing and routing.
shExpMatch()(str, shexp)The shExpMatch()() function matches either URL host names or URLs themselves. The mainuse of this function is for load balancing and intelligent routing of URLs to different proxyservers.
Parameters
str is any string to compare (for example, the URL or the host name).
shexp is a shell expression against which to compare.
This expression is true if the string matches the specified shell expression. See “Example 6:Balance Proxy Load With shExpMatch()()” on page 351.
Returns Values
true or false
Examples
The first example returns true. The second example returns false.
shExpMatch("http://home.example.com/people/index.html",".*/people/.*")
shExpMatch("http://home.example.com/people/yourpage/index.html",".*/mypage/.*")
Creating Autoconfiguration Files Manually
Chapter 17 • Using the Client Autoconfiguration File 345

Time-Based ConditionsYou can make the FindProxyForURL function behave differently depending on the date, time,or day of the week.
dateRange() (day, month, year...)The dateRange()() function detects a particular date or a range of dates, such as April 19th,1996 through May 3rd, 1996. This function is useful if you want the FindProxyForURL()function to act differently depending on the day week, for example, if maintenance down time isregularly scheduled for one of the proxies.
The date range can be specified several ways:
dateRange(day)dateRange(day1, day2)dateRange(mon)dateRange(month1,
month2)dateRange(year)dateRange(year1, year2)dateRange(day1, month1, day2,
month2)dateRange(month1, year1, month2, year2)dateRange(day1, month1, year1,
day2, month2, year2)dateRange(day1, month1, year1, day2, month2, year2, gmt)
Parameters
day is an integer between 1 and 31 for the day of month.
month is one of the month strings: JAN FEB MAR APR MAY JUN JUL AUG SEP OCT NOV DEC
year is a four-digit integer for the year number (for example, 1996).
gmt is either the string “GMT”, which indicates that time comparisons should occur inGreenwich Mean Time, or is left blank so that times are assumed to be in the local time zone.The GMT parameter can be specified in any of the call profiles, always as the last parameter. Ifonly a single value is specified from each category (day, month, year), the function returns a truevalue only on days that match that specification. If two values are specified, the result is truefrom the first time specified through the second time specified.
Examples
This statement is true on the first day of each month, local time zone: dateRange(1)
This statement is true on the first day of each month, Greenwich Mean Time: dateRange(1,"GMT")
This statement is true for the first half of each month: dateRange(1, 15)
This statement is true on the 24th of December each year: dateRange(24, "DEC")
This statement is true on the 24th of December, 1995: dateRange(24, "DEC", 1995)
This statement is true during the first quarter of the year: dateRange("JAN", "MAR")
Creating Autoconfiguration Files Manually
Oracle iPlanet Web Proxy Server 4.0.14 Administration Guide • June 2010346

This statement is true from June 1st through August 15th, each year: dateRange(1, "JUN", 15,"AUG")
This statement is true from June 1st, 1995, until August 15th, 1995: dateRange(1, "JUN", 15,1995, "AUG", 1995)
This statement is true from October 1995 through March 1996: dateRange("OCT", 1995,"MAR", 1996)
This statement is true during the entire year of 1995: dateRange(1995)
This statement is true from the beginning of 1995 until the end of 1997: dateRange(1995,1997)
timeRange (hour, minute, second...)The timeRange() function detects a particular time of day or a range of time, such as 9 p.m.through 12 a.m. This function is useful if you want the FindProxyForURL() function to actdifferently depending on what time it is.
timeRange(hour)timeRange(hour1, hour2)timeRange(hour1, min1, hour2,
min2)timeRange(hour1, min1, sec1, hour2, min2, sec2)
Parameters:
hour is the hour from 0 to 23. 0 is midnight, 23 is 11:00 p.m.
min is the number of minutes from 0 to 59.
sec is the number of seconds from 0 to 59.
gmt is either the string GMT for GMT time zone, or not specified for the local time zone. Thisparameter can be used with each of the parameter profiles and is always the last parameter.
Returns Values
true or false
Examples:
This statement is true from noon to 1:00 p.m: timerange(12, 13)
This statement is true noon to 12:59 p.m. GMT: timerange(12, "GMT")
This statement is true from 9:00 a.m. to 5:00 p.m: timerange(9, 17)
This statement is true between midnight and 30 seconds past midnight: timerange(0, 0, 0,0, 0, 30)
Creating Autoconfiguration Files Manually
Chapter 17 • Using the Client Autoconfiguration File 347

weekdayRange()(wd1, wd2, gmt)The weekdayRange() function detects a particular weekday or a range of weekdays, such asMonday through Friday. This is useful if you want the FindProxyForURL function to actdifferently depending on the day of the week.
Parameters
wd1and wd2are any one of these weekday strings: SUN MON TUE WED THU FRI SAT
gmt is either GMT for Greenwich Mean Time, or is left out for local time.
Only the first parameter, wd1, is mandatory. Either wd2, gmt, or both can be left out.
If only one parameter is present, the function returns a true value on the weekday that theparameter represents. If the string GMT is specified as a second parameter, times are given inGMT. Otherwise, the times are given in your local time zone.
If both wd1 and wd2 are defined, the condition is true if the current weekday is between thosetwo weekdays. Bounds are inclusive. The order of parameters is important; “MON,” “WED” isMonday through Wednesday, but “WED,” “MON” is from Wednesday to the Monday of thenext week.
Examples
This statement is true Monday through Friday (local time zone). weekdayRange("MON", "FRI")
This statement is true Monday through Friday, in Greenwich Mean Time.weekdayRange("MON", "FRI", "GMT")
This statement is true on Saturdays, local time.weekdayRange("SAT")
This statement is true on Saturdays, in Greenwich Mean Time.weekdayRange("SAT", "GMT")
This statement is true Friday through Monday (the order is important)weekdayRange("FRI","MON")
Function ExamplesThis section provides detailed examples of the JavaScript functions.
Example 1: Proxy All Servers Except Local Hosts
In this example, the browser connects directly to all hosts that are not fully qualified and theones that are in the local domain. All other hosts go through the proxy calledw3proxy.example.com:8080.
Creating Autoconfiguration Files Manually
Oracle iPlanet Web Proxy Server 4.0.14 Administration Guide • June 2010348

Note – If the proxy goes down, connections become direct automatically.
function FindProxyForURL(url, host)
{
if (isPlainhost name(host) ||
dnsDomainIs(host, ".example.com") ||
dnsDomainIs(host, ".mcom.com"))return "DIRECT";
else
return "PROXY w3proxy.example.com:8080; DIRECT";}
Example 2: Proxy Local Servers Outside the Firewall
This example resembles “Example 1: Proxy All Servers Except Local Hosts” on page 348, but ituses the proxy for local servers that are outside the firewall. If hosts such as the main web serverbelong to the local domain but are outside the firewall and are only reachable through the proxyserver, those exceptions are handled using the localHostOrDomainIs()() function:
function FindProxyForURL(url, host)
{
if ((isPlainhost name(host) ||
dnsDomainIs(host, ".example.com")) &&
!localHostOrDomainIs(host, "www.example.com") &&
!localHostOrDoaminIs(host, "merchant.example.com"))return "DIRECT";
else
return "PROXY w3proxy.example.com:8080; DIRECT";}
This example uses the proxy for all hosts except local hosts in the example.com domain. Thehosts www.example.com and merchant.example.com also go through the proxy.
The order of the exceptions increases efficiency: localHostOrDomainIs()() functions getexecuted only for URLs that are in the local domain, not for every URL. In particular, notice theparentheses around the or expression before the and expression.
Example 3: Proxy Only Unresolved Hosts
This example works in an environment where internal DNS resolves only internal host names.The goal is to use a proxy only for hosts that aren’t resolvable.
function FindProxyForURL(url, host)
{
if (isResolvable(host))
Creating Autoconfiguration Files Manually
Chapter 17 • Using the Client Autoconfiguration File 349
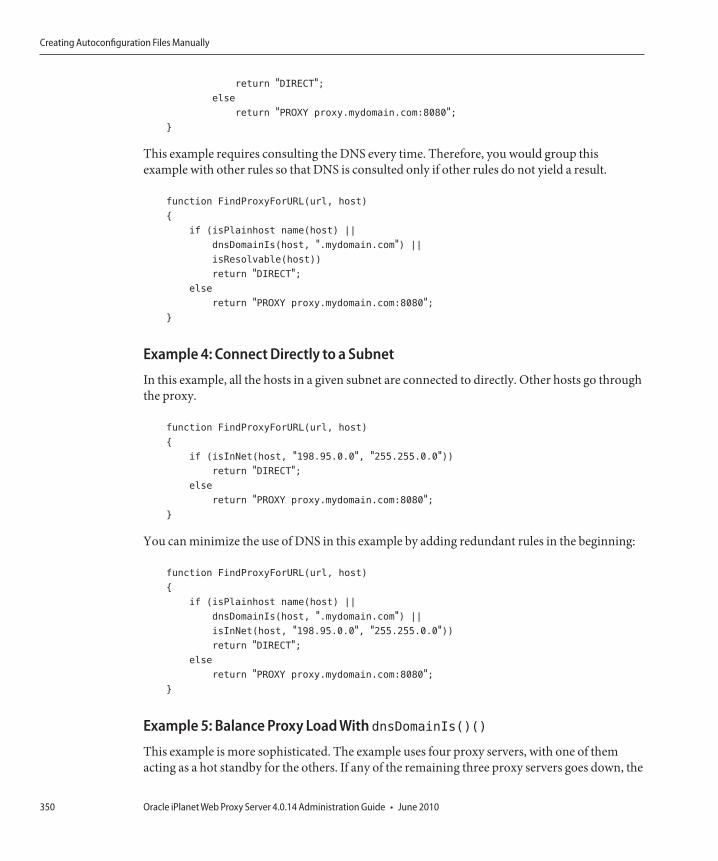
return "DIRECT";else
return "PROXY proxy.mydomain.com:8080";}
This example requires consulting the DNS every time. Therefore, you would group thisexample with other rules so that DNS is consulted only if other rules do not yield a result.
function FindProxyForURL(url, host)
{
if (isPlainhost name(host) ||
dnsDomainIs(host, ".mydomain.com") ||
isResolvable(host))
return "DIRECT";else
return "PROXY proxy.mydomain.com:8080";}
Example 4: Connect Directly to a Subnet
In this example, all the hosts in a given subnet are connected to directly. Other hosts go throughthe proxy.
function FindProxyForURL(url, host)
{
if (isInNet(host, "198.95.0.0", "255.255.0.0"))return "DIRECT";
else
return "PROXY proxy.mydomain.com:8080";}
You can minimize the use of DNS in this example by adding redundant rules in the beginning:
function FindProxyForURL(url, host)
{
if (isPlainhost name(host) ||
dnsDomainIs(host, ".mydomain.com") ||
isInNet(host, "198.95.0.0", "255.255.0.0"))return "DIRECT";
else
return "PROXY proxy.mydomain.com:8080";}
Example 5: Balance Proxy Load With dnsDomainIs()()
This example is more sophisticated. The example uses four proxy servers, with one of themacting as a hot standby for the others. If any of the remaining three proxy servers goes down, the
Creating Autoconfiguration Files Manually
Oracle iPlanet Web Proxy Server 4.0.14 Administration Guide • June 2010350

fourth one takes over. The three remaining proxy servers share the load based on URL patterns,which makes their caching more effective. Only one copy of any document exists on the threeservers, as opposed to one copy on each of them. The load is distributed as shown in thefollowing table.
TABLE 17–3 Balance Proxy Load
Proxy Purpose
#1 .com domain
#2 .edu domain
#3 all other domains
#4 hot standby
All local accesses should be direct. All proxy servers run on port 8080. You can concatenatestrings by using the + operator.
function FindProxyForURL(url, host)
{
if (isPlainhost name(host) || dnsDomainIs(host, ".mydomain.com"))return "DIRECT";
else if (dnsDomainIs(host, ".com"))return "PROXY proxy1.mydomain.com:8080; " +
"PROXY proxy4.mydomain.com:8080";
else if (dnsDomainIs(host, ".edu"))return "PROXY proxy2.mydomain.com:8080; " +
"PROXY proxy4.mydomain.com:8080";
else
return "PROXY proxy3.mydomain.com:8080; " +
"PROXY proxy4.mydomain.com:8080";}
Example 6: Balance Proxy Load With shExpMatch()()
This example is essentially the same as “Example 5: Balance Proxy Load WithdnsDomainIs()()” on page 350, but instead of using dnsDomainIs()(), this example usesshExpMatch()().
function FindProxyForURL(url, host)
{
if (isPlainhost name(host) || dnsDomainIs(host, ".mydomain.com"))return "DIRECT";
Creating Autoconfiguration Files Manually
Chapter 17 • Using the Client Autoconfiguration File 351

else if (shExpMatch(host, "*.com"))return "PROXY proxy1.mydomain.com:8080; " +
"PROXY proxy4.mydomain.com:8080";else if (shExpMatch(host, "*.edu"))
return "PROXY proxy2.mydomain.com:8080; " +
"PROXY proxy4.mydomain.com:8080";else
return "PROXY proxy3.mydomain.com:8080; " +
"PROXY proxy4.mydomain.com:8080";}
Example 7: Proxying a Specific Protocol
You can set a proxy for a specific protocol. Most of the standard JavaScript functionality isavailable for use in the FindProxyForURL()() function. For example, to set different proxiesbased on the protocol, you can use the substring()() function.
function FindProxyForURL(url, host)
{
if (url.substring(0, 5) == "http:") {
return "PROXY http-proxy.mydomain.com:8080";}
else if (url.substring(0, 4) == "ftp:") {
return "PROXY ftp-proxy.mydomain.com:8080";}
else if (url.substring(0, 7) == "gopher:") {
return "PROXY gopher-proxy.mydomain.com:8080";}
else if (url.substring(0, 6) == "https:" ||
url.substring(0, 6) == "snews:") {
return "PROXY security-proxy.mydomain.com:8080";}
else {
return "DIRECT";}
}
You can also accomplish this configuration by using the shExpMatch()() function; forexample:
...
if (shExpMatch(url, "http:*")) {
return "PROXY http-proxy.mydomain.com:8080;
}
...
Creating Autoconfiguration Files Manually
Oracle iPlanet Web Proxy Server 4.0.14 Administration Guide • June 2010352

ACL File Syntax
Access control list (ACL) files are text files containing lists that define who can access ProxyServer resources. By default, the Proxy Server uses one ACL file that contains all of the lists foraccess to your server. Multiple ACL files can also be created and referenced in the obj.conf file.
Proxy Server 4 uses a different ACL file syntax than was used in Proxy Server 3.x. This appendixdescribes ACL files and their syntax. For detailed information about controlling access to yourProxy Server and its resources, see Chapter 8, “Controlling Access to Your Server.” Resourcetemplates are supported in the Proxy Server 4 release, as described in Chapter 16, “ManagingTemplates and Resources.”
This appendix contains the following sections:
■ “About ACL Files and ACL File Syntax” on page 353■ “Referencing ACL Files in the obj.conf File” on page 358
About ACL Files and ACL File SyntaxAll ACL files must follow a specific format and syntax. An ACL file is a text file containing oneor more ACLs. All ACL files must begin with a single syntax version number. For example:
version 3.0;
There version line can appear after any comment lines. Proxy Server uses syntax version 3.0.Comments can be included in the file by using the # symbol at the start of the comment line.
Each ACL in the file begins with a statement that defines its type: path, resource, or named.
■ Path ACLs specify an absolute path to the resource they affect.■ Resource ACLs specify the template they affect, such as http://, https://, ftp://, and so
on. For more information about templates, see Chapter 16, “Managing Templates andResources.”
18C H A P T E R 1 8
353

■ Named ACLs specify a name that is referenced in resources in the obj.conf file. The servercomes with a default named resource that allows read access to anyone, and write access tousers in the LDAP directory. Even though a named ACL can be created from the ProxyServer user interface, you must manually reference the named ACLs with resources in theobj.conf file.
Path and resource ACLs can include wildcards. For more information about wildcards, seeChapter 16, “Managing Templates and Resources.”
The type line begins with the letters acl and then includes the type information in doublequotation marks, followed by a semicolon. For example:
acl "default";acl "http://*.*";
Each type information for all ACLs must be a unique name, even among different ACL files.After you define the type of ACL, you can have one or more authentication statements thatdefine the method used with the ACL. You also can include authorization statements to definethe people and computers who are allowed or denied access. The following sections describe thesyntax for these statements.
Authentication StatementsACLs can optionally specify the authentication method the server must use when processingthe ACL. The three general methods are:
■ Basic (default)■ Digest■ SSL
The Basic and Digest methods require the user to provide a user name and password beforeaccessing a resource.
The SSL method requires the user to have a client certificate. To be authenticated, encryptionmust be turned on for the Proxy Server, and the user’s certificate issuer must be in the list oftrusted CAs.
By default, the server uses the Basic method for any ACL that does not specify a method. Yourserver’s authentication database must support Digest authentication sent by a user.
Each authenticate line must specify what attribute the server authenticates: users, groups, orboth users and groups. The following authentication statement, which would appear after theACL type line, specifies Basic authentication with users matched to individual users in thedatabase or directory:
authenticate(user) { method = "basic";};
The following example uses SSL as the authentication method for users and groups:
About ACL Files and ACL File Syntax
Oracle iPlanet Web Proxy Server 4.0.14 Administration Guide • June 2010354

authenticate(user, group) { method = "ssl";};
The following example allows any user whose user name begins with the word sales:
allow (all) user = "sales*";
If the last line is changed to group = sales, then the ACL would fail because the group attributeis not authenticated.
Authorization StatementsEach ACL entry can include one or more authorization statements. Authorization statementsspecify who is allowed or denied access to a server resource.
Writing Authorization StatementsUse the following syntax when writing authorization statements:
allow|deny [absolute] (right[,right...]) attribute expression;
Start each line with either allow or deny. Because of the hierarchy of rules, deny access toeveryone in the first rule and then specifically allow access for users, groups, or computers insubsequent rules. For example, if you allow anyone access to a directory called /my_files, andallow a few users access to the subdirectory /my_files/personal, the access control on thesubdirectory will not work because anyone allowed access to the /my_files directory will alsobe allowed access to the /my_files/personal directory. To prevent this, create a rule for thesubdirectory that first denies access to anyone, and then allows access for the few users whoneed it.
In some cases, however, if you set the default ACL to deny access to everyone, your other ACLrules do not need a “deny all” rule.
The following line denies access to everyone:
deny (all) user = "anyone";
Hierarchy of Authorization StatementsThe hierarchy in ACLs depends on the resource. When the server receives a request for aspecific resource, it builds a list of ACLs that apply for that resource. The server first adds namedACLs listed in check-acl statements of its obj.conf file. It then appends matching path andresource ACLs. This list is processed in the same order. Unless “absolute” ACL statements arepresent, all statements are evaluated in order. If an “absolute allow” or “absolute deny”statement evaluates to “true,” the server stops processing and accepts this result.
About ACL Files and ACL File Syntax
Chapter 18 • ACL File Syntax 355
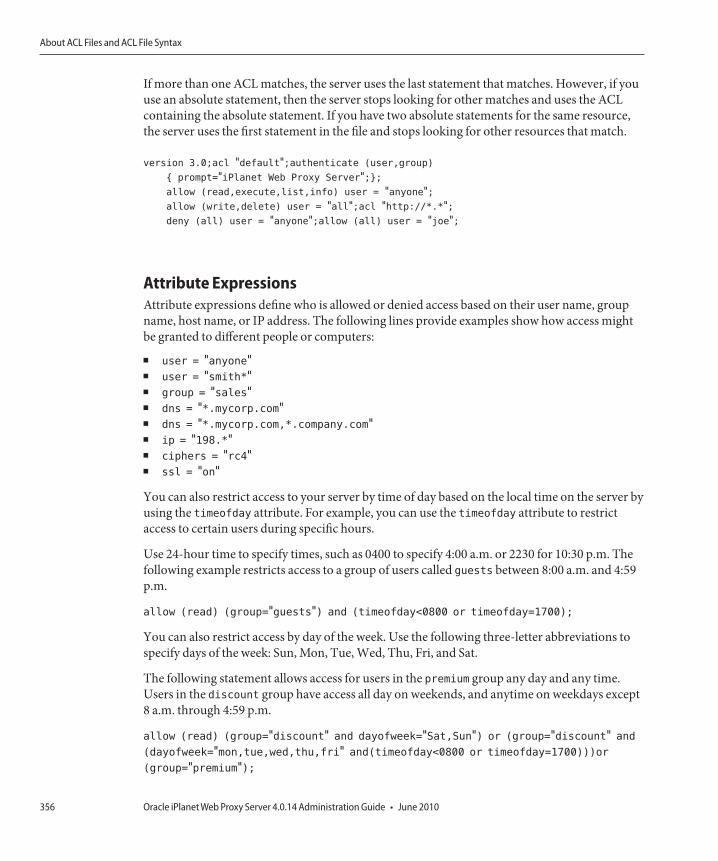
If more than one ACL matches, the server uses the last statement that matches. However, if youuse an absolute statement, then the server stops looking for other matches and uses the ACLcontaining the absolute statement. If you have two absolute statements for the same resource,the server uses the first statement in the file and stops looking for other resources that match.
version 3.0;acl "default";authenticate (user,group)
{ prompt="iPlanet Web Proxy Server";};allow (read,execute,list,info) user = "anyone";allow (write,delete) user = "all";acl "http://*.*";deny (all) user = "anyone";allow (all) user = "joe";
Attribute ExpressionsAttribute expressions define who is allowed or denied access based on their user name, groupname, host name, or IP address. The following lines provide examples show how access mightbe granted to different people or computers:
■ user = "anyone"■ user = "smith*"■ group = "sales"■ dns = "*.mycorp.com"■ dns = "*.mycorp.com,*.company.com"■ ip = "198.*"■ ciphers = "rc4"■ ssl = "on"
You can also restrict access to your server by time of day based on the local time on the server byusing the timeofday attribute. For example, you can use the timeofday attribute to restrictaccess to certain users during specific hours.
Use 24-hour time to specify times, such as 0400 to specify 4:00 a.m. or 2230 for 10:30 p.m. Thefollowing example restricts access to a group of users called guests between 8:00 a.m. and 4:59p.m.
allow (read) (group="guests") and (timeofday<0800 or timeofday=1700);
You can also restrict access by day of the week. Use the following three-letter abbreviations tospecify days of the week: Sun, Mon, Tue, Wed, Thu, Fri, and Sat.
The following statement allows access for users in the premium group any day and any time.Users in the discount group have access all day on weekends, and anytime on weekdays except8 a.m. through 4:59 p.m.
allow (read) (group="discount" and dayofweek="Sat,Sun") or (group="discount" and
(dayofweek="mon,tue,wed,thu,fri" and(timeofday<0800 or timeofday=1700)))or
(group="premium");
About ACL Files and ACL File Syntax
Oracle iPlanet Web Proxy Server 4.0.14 Administration Guide • June 2010356
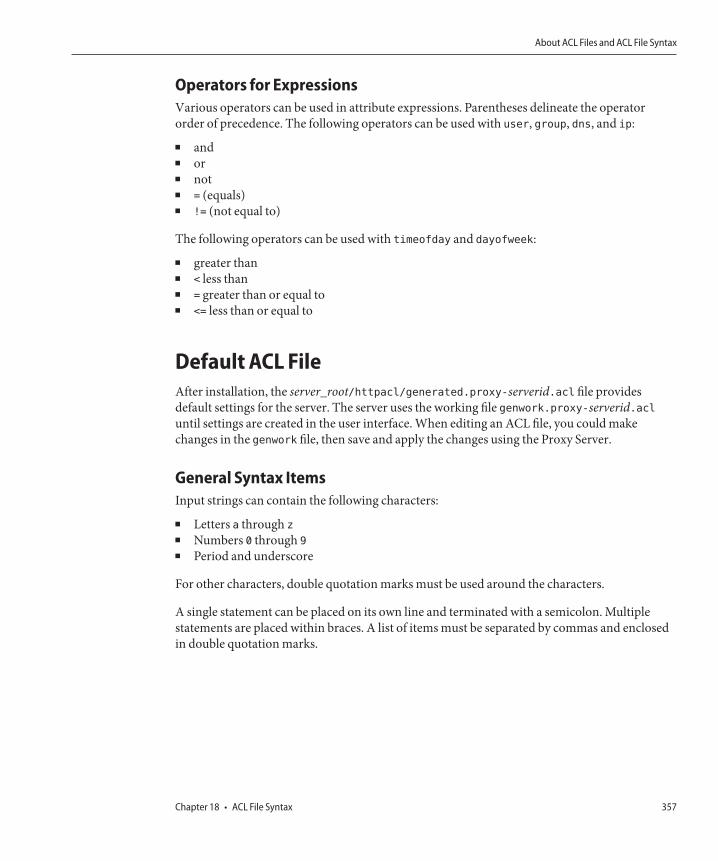
Operators for ExpressionsVarious operators can be used in attribute expressions. Parentheses delineate the operatororder of precedence. The following operators can be used with user, group, dns, and ip:
■ and■ or■ not■ = (equals)■ != (not equal to)
The following operators can be used with timeofday and dayofweek:
■ greater than■ < less than■ = greater than or equal to■ <= less than or equal to
Default ACL FileAfter installation, the server_root/httpacl/generated.proxy-serverid.acl file providesdefault settings for the server. The server uses the working file genwork.proxy-serverid.acluntil settings are created in the user interface. When editing an ACL file, you could makechanges in the genwork file, then save and apply the changes using the Proxy Server.
General Syntax ItemsInput strings can contain the following characters:
■ Letters a through z
■ Numbers 0 through 9
■ Period and underscore
For other characters, double quotation marks must be used around the characters.
A single statement can be placed on its own line and terminated with a semicolon. Multiplestatements are placed within braces. A list of items must be separated by commas and enclosedin double quotation marks.
About ACL Files and ACL File Syntax
Chapter 18 • ACL File Syntax 357
Referencing ACL Files in the obj.conf FileNamed ACLs or separate ACL files can be referenced in the obj.conf file in the PathCheckdirective using the check-acl function. The line has the following syntax:
PathCheck fn="check-acl" acl="aclname"
where aclname is the unique name of an ACL as it appears in any ACL file.
For example, you might add the following lines to the obj.conf file to restrict access to adirectory using the ACL named testacl:
<Object ppath="https://"PathCheck fn="check-acl" acl="testacl"</Object>
In this example, the first line is the object that states the server resource to which you want torestrict access. The second line is the PathCheck directive that uses the check-acl function tobind the named ACL (testacl) to the object in which the directive appears. The testacl ACLcan appear in any ACL file referenced in server.xml.
Referencing ACL Files in the obj.conf File
Oracle iPlanet Web Proxy Server 4.0.14 Administration Guide • June 2010358

Tuning Server Performance
Many elements impact performance in your Proxy Server environment, including the proxyclient, the Proxy Server, the origin server, and the network. This appendix describesadjustments you can make that might improve Proxy Server performance.
This appendix is for advanced administrators ONLY. Be very careful when tuning your server,and always back up configuration files before making any changes.
This appendix contains the following sections:
■ “General Performance Considerations” on page 359■ “Timeout Values” on page 362■ “Up-to-Date Checks” on page 364■ “DNS Settings” on page 365■ “Number of Threads” on page 365■ “Inbound Connection Pool” on page 366■ “FTP Listing Width” on page 367■ “Cache Architecture” on page 367■ “Cache Batch Update” on page 367■ “Garbage Collection” on page 368■ “Solaris Performance Tuning” on page 369
General Performance ConsiderationsThis section describes general areas to consider when analyzing Proxy Server performance.
This section contains the following topics:
■ “Access Logging” on page 360■ “ACL Cache Tuning” on page 360■ “Buffer Size” on page 361■ “Connection Timeout” on page 361
19C H A P T E R 1 9
359

■ “Errors Log Level” on page 361■ “Security Requirements” on page 361■ “Solaris File System Caching” on page 361
Access LoggingDisabling access logging can increase the performance of your Proxy Server. However, you losevisibility as to who is accessing the Proxy Server and what pages they are requesting.
You can disable Proxy Server access logging by commenting out the following directives in theobj.conf file:
Init fn=“flex-init” access=“$accesslog” format.access=“%Ses->client.ip% -
%Req->vars.auth-user% [%SYSDATE%] \\”%Req->reqpb.clf-request%\\“
%Req->srvhdrs.clf-status% %Req->srvhdrs.content-length%”...AddLog fn=“flex-log”
name=“access”
ACL Cache TuningBy default, the Proxy Server caches user and group authentication results in the ACL user cache.You can control the amount of time the ACL user cache is valid with the ACLCacheLifetimedirective in the magnus.conf file. Each time an entry in the cache is referenced, its age iscalculated and checked against ACLCacheLifetime. The entry is not used if its age is greaterthan or equal to the ACLCacheLifetime.
The default value for the ACLCacheLifetime is 120 seconds, which means that the Proxy Servermay be out of sync with the LDAP server for as long as two minutes. Setting the value to 0 (zero)turns the cache off and forces the Proxy Server to query the LDAP server each time a userauthenticates. This setting will have a negative impact on the performance of your Proxy Serverwhen implementing access control. If you set a large ACLCacheLifetime value, you might needto restart Proxy Server every time you make changes to the LDAP entries because this settingwill force the Proxy Server to query the LDAP server. Set a large value only if your LDAPdirectory is not likely to change often.
The ACLUserCacheSize is a magnus.conf parameter that configures the maximum number ofentries that can be held in the cache. The default value is 200. New entries are added to thebeginning of the list, and entries at the end of this list are recycled to permit new entries whenthe cache reaches its maximum size.
You can also set the maximum number of group memberships that can be cached per user entrywith the ACLGroupCacheSize parameter. The default value is 4. Because non-membership of auser in a group is not cached, several LDAP directory accesses will occur on every request.
General Performance Considerations
Oracle iPlanet Web Proxy Server 4.0.14 Administration Guide • June 2010360

Buffer SizeYou can specify the size of the send buffer (SndBufSize) and the receiving buffer (RcvBufSize) atthe server’s sockets. These parameters are configurable in the magnus.conf file. Therecommended values vary between various UNIX and Linux operating systems. Refer to theoperating system’s documentation to properly set these parameters.
Connection TimeoutYou can specify the number of seconds the server waits for data to arrive from the client beforeclosing the connection by using the AcceptTimeout parameter in the magnus.conf file. If datadoes not arrive before the timeout expires, the connection is closed. This parameter is set to 30seconds by default. Under most circumstances, you do not need to change this setting. You canfree up threads by setting this parameter to less than the default, but you might also disconnectusers with slower connections.
Errors Log LevelIncreasing the loglevel attribute in the LOG tag of the server.xml() file causes the server togenerate and store more information in the errors log. However, writing entries to that fileaffects performance. Increase logging only while debugging a problem, and minimize loggingwhen not in a troubleshooting mode.
Security RequirementsEnabling SSL increases the privacy and security of your Proxy Server, but also affectsperformance because encryption and decryption of the packets causes overhead. You mightwant to consider offloading encryption and decryption processing to a hardware acceleratorcard.
Solaris File System CachingThe Proxy Server cache is not stored in random access memory. Accesses to files are made to thefile system each time a document is extracted from cache. You might want to consider usingSolaris file system caching to pre-load the Proxy Server cache into memory. References tocached files are then extracted from memory rather than from the file system.
General Performance Considerations
Chapter 19 • Tuning Server Performance 361
Timeout ValuesTimeouts have a significant impact on server performance. Setting the optimal timeout for theProxy Server helps to conserve network resources.
Two instance-specific SAFs (server application functions) and one global parameter can beused to configure timeout values within the Proxy Server:■ “init-proxy() SAF (obj.conf File)” on page 362■ “http-client-config() SAF (obj.conf File)” on page 363■ “KeepAliveTimeout() SAF (magnus.conf File)” on page 363
init-proxy() SAF (obj.conf File)The init-proxy() function initializes the Proxy Server’s internal settings. This function iscalled during the initialization of the Proxy Server, but should also be specified in the obj.conffile to ensure that the values are initialized properly.
The syntax of this function is as follows:
Init fn=init-proxy timeout=seconds timeout-2=seconds
In the previous example, the following parameters have direct applicability to Proxy Servertimeout settings for the init-proxy SAF:■ timeout (proxy timeout)– The proxy timeout parameter tells the server how long to wait
before quitting an idle connection. A high proxy timeout value commits a valuable proxythread to a potentially down client for a long time. A low timeout value quits CGI scriptsthat take a long time to produce results, such as a database query gateway.To determine the best proxy timeout for the server, consider these issues:■ Will the Proxy Server be handling many database queries or CGI scripts?■ Will the Proxy Server be handling a small enough number of requests that a process can
be spared at any given time?If you answered yes to either of these questions, you might decide to set a high proxytimeout value. The highest proxy timeout value recommended is 1 hour. The defaultvalue is 300 seconds (5 minutes).You can view or modify the proxy timeout value by accessing the Configure SystemPreferences page under the Preferences tab in the Server Manager. This parameter isreferenced as Proxy Timeout.
timeout-2 (timeout after interrupt)– The timeout after interrupt value tells the Proxy Serverhow much time to continue writing a cache file after a client has quit the transaction. Inother words, if the Proxy Server has almost finished caching a document and the client quitsthe connection, the server can continue caching the document until it reaches the timeoutafter interrupt value.
Timeout Values
Oracle iPlanet Web Proxy Server 4.0.14 Administration Guide • June 2010362
The highest recommended timeout after interrupt value is 5 minutes. The default value is 15seconds.
http-client-config() SAF (obj.conf File)The http-client-config function configures the Proxy Server’s HTTP client.
The syntax of this function is as follows:
Init fn=http-client-config
keep-alive=(true|false)
keep-alive-timeout=seconds
always-use-keep-alive=(true|false)
protocol=HTTP Protocol
proxy-agent="Proxy-agent HTTP request header"
The settings are:
■ keep-alive– (Optional) Boolean that indicates whether the HTTP client should attempt touse persistent connections. The default is true.
■ keep-alive-timeout– (Optional) The maximum number of seconds to keep a persistentconnection open. The default is 29.
■ always-use-keep-alive– (Optional) Boolean that indicates whether the HTTP client canreuse existing persistent connections for all types of requests. The default is false, meaningpersistent connections will not be reused for non-GET requests or for requests with a body.
■ protocol– (Optional) HTTP protocol version string. By default, the HTTP client uses eitherHTTP/1.0 or HTTP/1.1, based on the contents of the HTTP request. Do not use theprotocol parameter unless you encounter specific protocol interoperability problems.
■ proxy-agent– (Optional) Value of the Proxy-agent HTTP request header. The default is astring that contains the Proxy Server product name and version.
KeepAliveTimeout() SAF (magnus.conf File)KeepAliveTimeout() parameter determines the maximum time (in seconds) that the serverholds open HTTP keep-alive connections or persistent connections between the client and theProxy Server. The default is 30 seconds. The connection times out if idle for more than 30seconds. The maximum is 300 seconds (5 minutes).
Timeout Values
Chapter 19 • Tuning Server Performance 363

Caution – Timeout settings in the magnus.conf file apply to connections between the client andthe Proxy Server. Timeout settings in the http-client-config SAF in the obj.conf file applyto connections between the Proxy Server and an origin server.
Up-to-Date ChecksProxy Servers increase performance by serving documents out of a local cache rather thanobtaining them from the origin server. One drawback to this methodology is the potential toprovide documents that are out of date.
The Proxy Server can perform a check to determine whether a document is up to date, and thenrefresh the cached version if the document is old. This up-to-date check should be performedonly as necessary, because frequently checking documents can decrease the overallperformance of the Proxy Server.
Up-to-date checking is configured on the Set Cache Specifics page of the Caching tab. Thedefault is to check for a new document every two hours. This information is configured in theObjectType directive with the max-uncheck parameter.
To improve the server’s performance while ensuring that a document is up-to-date, customizeup to date checking by determining a reasonable document lifetime in conjunction with thelast-modified factor.
Last-Modified FactorThe last-modified factor helps determine the likelihood that a document will change based onthe previous changes that have been noted.
The last-modified factor is a fraction between .02 and 1.0. It is multiplied by the intervalbetween a document’s actual last modification and the time the last up-to-date check wasperformed on the document. The resulting number is compared with the time since the lastup-to-date check. If the number is smaller than the time interval, the document has not expired.If, however, the number is larger than the time interval, then the document has expired and anew version is obtained from the origin server.
The last-modified factor enables you to ensure that recently changed documents are checkedmore often than old documents.
You should set a last-modified factor between 0.1 and 0.2.
Up-to-Date Checks
Oracle iPlanet Web Proxy Server 4.0.14 Administration Guide • June 2010364

DNS SettingsDNS is the system used to associate standard IP addresses with host names. DNS lookupinvolves computational and network costs as it requires talking to a DNS server to resolve a hostname to it's IP address. To optimize performance, consider the following options:■ Enable DNS caching.
DNS Caching is enabled by choosing the Configure DNS Cache link under the Preferencestab of the Server Manager. Select the Enabled radio button for DNS caching.
■ Log only client IP addresses rather than client DNS names.Client DNS name logging is disabled by choosing the Set Access Log Preferences link underthe Server Status tab of the Server Manager. Select the IP Addresses radio button to log IPaddresses rather than client host names.
■ Disable reverse DNS.Reverse DNS translates IP addresses into host names. Reverse DNS is disabled by choosingthe Configure System Preferences link under the Preferences tab of the Server Manager.Select the No radio button to disable reverse DNS.
■ Avoid access control based on client host namesWhen possible, use clients’ IP addresses instead of host names in access control statements.
Number of ThreadsThe RqThrottle parameter in the magnus.conf file specifies the maximum number ofsimultaneous transactions the Proxy Server can handle. The default value is 128. Change thisvalue to throttle the server, minimizing latencies for transactions that are performed.
To compute the number of simultaneous requests, the server counts the number of activerequests. The server adds one to the number when a new request arrives, and subtracts onewhen it finishes the request. When a new request arrives, the server checks whether themaximum number of requests is already being processed. If the limit has been reached, theprocessing of new requests is deferred until the number of active requests drops below themaximum amount.
You can monitor the number of simultaneous requests by viewing the SessionCreationInfoportion of data generated by perfdump, or proxystats.xml data. From this information, youcan determine the maximum number of simultaneous peak requests as compared to the totalnumber (limit) of threads. The following information came from a perfdump output:
SessionCreationInfo:
------------------------
Active Sessions 1
Keep-Alive Sessions 0
Total Sessions Created 48/128
Number of Threads
Chapter 19 • Tuning Server Performance 365
Active Sessions shows the number of sessions (request processing threads) currently servicingrequests. Keep-Alive Sessions is similar to Active Sessions, but is specific to a keep-aliveconnection. Total Sessions Created shows both the number of sessions created and themaximum number of sessions allowed. These values are the minimum and maximum valuesfor the RqThrottle value.
Caution – RqThrottleMin is the minimum number of threads that the server initiates uponstartup. The default value is 48. This parameter can also be set in the magnus.conf file, but doesnot appear by default.
Reaching the maximum number of configured threads is not necessarily undesirable. You donot need to automatically increase the RqThrottle value. Reaching this limit means that theserver needed this many threads at peak load. As long as the server was able to serve requests ina timely manner, the server is adequately tuned. However, at this point, connections will queueup in the connection queue, potentially overflowing it. If your perfdump output regularly showsthat the total sessions created value is often near the RqThrottle maximum, consider increasingyour thread limits.
Suitable RqThrottle values range from 100 to 500, depending on the load.
Inbound Connection PoolThe inbound connection pool can be tuned using the KeepAlive* settings and related settings inmagnus.conf, including the following:
■ MaxKeepAliveConnections■ KeepAliveThreads■ KeepAliveTimeout■ KeepAliveQueryMaxSleepTime■ KeepAliveQueryMeanTime■ ConnQueueSize■ RqThrottle■ acceptorthreads
For more information about these parameters, see Chapter 2 of the Sun ONE Web Server 6.1SP6 Performance Tuning, Sizing, and Scaling Guide at:
http://docs.sun.com/app/docs/doc/819-6516/
Outbound connection pool settings cannot be configured in this release of the Proxy Server.
Inbound Connection Pool
Oracle iPlanet Web Proxy Server 4.0.14 Administration Guide • June 2010366

FTP Listing WidthIncreasing FTP listing width allows longer file names and thus reduces file name truncation.The default width is 80 characters.
The FTP listing width can be modified by choosing the Tune Proxy link under the Preferencestab of the Server Manager.
Cache ArchitecturePerformance of your server can be improved by configuring your cache wisely. Suggestions tokeep in mind when architecting your cache:
■ Distribute the load.■ Use multiple proxy cache partitions.■ Use multiple disk drives.■ Use multiple disk controllers.
Proper cache setup is critical to the performance of your Proxy Server. The most important ruleto remember when laying out your proxy cache is to distribute the load. Caches should be set upwith approximately 1 Gbyte per partition and should be spread across multiple disks andmultiple disk controllers. This type of arrangement provides faster file creation and retrievalthan is possible with a single, larger cache.
Cache Batch UpdateThe cache batch update feature enables you to pre-load files from a specified web site orperform an up-to-date check on documents already in the cache. This is typically initiated whenthe load on the Proxy Server is at its lowest. You can create, edit, and delete batches of URLs andenable and disable batch updating on the Cache Batch Updates page.
You can actively cache content as opposed to on-demand caching, by specifying files to beupdated in batch. The Proxy Server enables you to perform an up-to-date check on several filescurrently in the cache, or pre-load multiple files in a particular web site.
At larger sites with a network of servers and proxies, you might want to use batch updating topre-load a given area of the web. The batch process performs a recursive descent across links inthe document and caches the content locally. This function can be a burden on remote servers,so be careful. The parameters in the bu.conf configuration file help to keep the process fromperforming recursion indefinitely and provide some control of this process.
Use the Proxy Server access logs to determine which sites are the most commonly active andperform a batch update on those sites to increase performance.
Cache Batch Update
Chapter 19 • Tuning Server Performance 367

Garbage CollectionGarbage collection is the process of reviewing the Proxy Server cache and removing old stalefiles. Garbage collection is a resource-intensive process. Therefore, you might want to tunesome garbage collection settings to improve its performance.
The following parameters provide the ability to fine-tune the garbage collection process. Youcan view or modify these parameters on the Tune Garbage Collection form, which is located bychoosing Tune GC under the Caching tab of the Server Manager. The parameters are:■ gc hi margin percent■ gc lo margin percent■ gc extra margin percent■ gc leave fs full percent
gc hi margin percent VariableThe gc hi margin percent variable controls the percentage of the maximum cache size that,when reached, triggers garbage collection.
This value must be higher than the value for gc lo margin percent.
The valid range for gc hi margin percent is 10 to 100 percent. The default value is 80 percentwhich trigger garbage collection when the cache is 80 percent full.
gc lo margin percent VariableThe gc lo margin percent variable controls the percentage of the maximum cache size that thegarbage collector targets.
This value must be lower than the value for gc hi margin percent.
The valid range for gc lo margin percent is 5 to 100 percent. The default value is 70 percent,which targets at 70 percent full cache after garbage collection.
gc extra margin percentVariableIf garbage collection is triggered by a reason other than the partition’s size approaching themaximum allowed size (gc hi margin percent), the garbage collector will use the percentage setby the gc extra margin percent variable to determine the fraction of the cache to remove.
The valid range for gc extra margin percent is 0 to 100 percent. The default value is 30 percent,which removes 30 percent of existing cache files.
Garbage Collection
Oracle iPlanet Web Proxy Server 4.0.14 Administration Guide • June 2010368
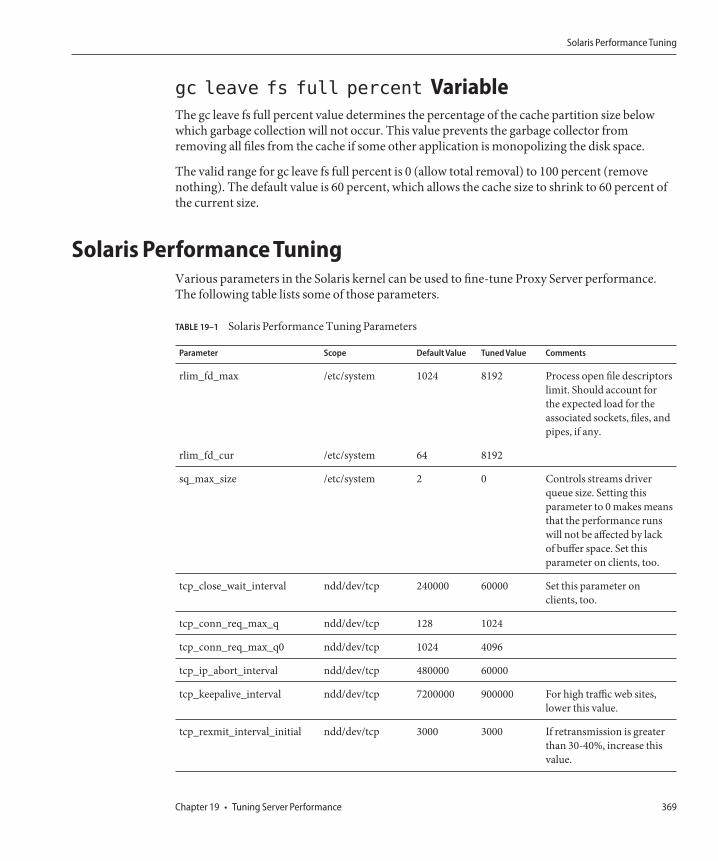
gc leave fs full percent VariableThe gc leave fs full percent value determines the percentage of the cache partition size belowwhich garbage collection will not occur. This value prevents the garbage collector fromremoving all files from the cache if some other application is monopolizing the disk space.
The valid range for gc leave fs full percent is 0 (allow total removal) to 100 percent (removenothing). The default value is 60 percent, which allows the cache size to shrink to 60 percent ofthe current size.
Solaris Performance TuningVarious parameters in the Solaris kernel can be used to fine-tune Proxy Server performance.The following table lists some of those parameters.
TABLE 19–1 Solaris Performance Tuning Parameters
Parameter Scope Default Value Tuned Value Comments
rlim_fd_max /etc/system 1024 8192 Process open file descriptorslimit. Should account forthe expected load for theassociated sockets, files, andpipes, if any.
rlim_fd_cur /etc/system 64 8192
sq_max_size /etc/system 2 0 Controls streams driverqueue size. Setting thisparameter to 0 makes meansthat the performance runswill not be affected by lackof buffer space. Set thisparameter on clients, too.
tcp_close_wait_interval ndd/dev/tcp 240000 60000 Set this parameter onclients, too.
tcp_conn_req_max_q ndd/dev/tcp 128 1024
tcp_conn_req_max_q0 ndd/dev/tcp 1024 4096
tcp_ip_abort_interval ndd/dev/tcp 480000 60000
tcp_keepalive_interval ndd/dev/tcp 7200000 900000 For high traffic web sites,lower this value.
tcp_rexmit_interval_initial ndd/dev/tcp 3000 3000 If retransmission is greaterthan 30-40%, increase thisvalue.
Solaris Performance Tuning
Chapter 19 • Tuning Server Performance 369

TABLE 19–1 Solaris Performance Tuning Parameters (Continued)Parameter Scope Default Value Tuned Value Comments
tcp_rexmit_interval_max ndd/dev/tcp 240000 10000
tcp_rexmit_interval_min ndd/dev/tcp 200 3000
tcp_smallest_anon_port ndd/dev/tcp 32768 1024 Set this parameter onclients, too.
tcp_slow_start_initial ndd/dev/tcp 1 2 Slightly faster transmissionof small amounts of data.
tcp_xmit_hiwat ndd/dev/tcp 8129 32768 Use this parameter toincrease the transmit buffer.
tcp_recv_hiwat ndd/dev/tcp 8129 32768 Use this parameter toincrease the receive buffer.
For more information about these parameters, see Chapter 5 of the Sun ONE Web Server 6.1SP6 Performance Tuning, Sizing, and Scaling Guide at:
http://docs.sun.com/app/docs/doc/819-6516/
Solaris Performance Tuning
Oracle iPlanet Web Proxy Server 4.0.14 Administration Guide • June 2010370

Index
Aabout
access control, 139-167Certificate Authorities (CAs), 72certmap.conf, 102-106ciphers, 85client authentication, 72clusters, 113configuration files, 29dbswitch.conf, 44decryption, 85directory services, 44-45Distinguished Names (DNs), 46-47dynamic groups, 57-59encryption, 85groups, 55key-pair file, 73listen sockets, 35-36managing servers, 26-29proxy arrays, 270-283Proxy Server, 25-29public and private keys, 85restricting server access, 40-41server authentication, 72server configuration, 29SOCKS, 311SOCKS server, 311socks5.conf, 313-314SSL, 86static groups, 56-57TLS, 86
accelerators, hardware, 93, 95
acceptorthreads directive, 366AcceptTimeout directive, 361access
controlling with client certificates, 148-149delete rights, 159execute rights, 159info rights, 159list rights, 159read rights, 159restricting, 40-41, 139-167restricting, based on security, 163-164restricting, directories, 161-162restricting, entire server, 161restricting, file types, 162superuser, 37-38write rights, 159
access controlabout, 139-149and server.xml, 148, 358API, 147, 157client certificates, 148-149customized expressions, 159databases and, 157date restrictions, 159, 163default rules, 155entries (ACEs), 40-41, 139file, default, 357file, example of, 149file, syntax of, 353-358files, location of, 147files, names of, 148for programs, 158
371

access control (Continued)Host-IP, 147, 157-158IP-based, 164-165LDAP directories and, 157lists (ACLs), 40-41manage, 133methods, 141prerequisites, 139rules, default, 155rules, global, 151-155rules, server instances, 151-155setting, 151-155, 155-160time restrictions, 159, 163turning off and on, 160User-Group, 140-147, 155-157
Access Control Rules For page, options on, 155-160access log, 173
location, 169access log file, viewing, 39access log files, configuring, 173access logging, performance impact, 360access rights, 158-159accessing
Administration Server, 26-27Server Manager, 27-29
ACEs, 40-41ACL
attribute expressions, 356authentication statements, 354authorization statements, 354, 355-357deactivating, 160default file, 357Digest authentication procedure, 144mapping to LDAP databases, 57named, 354obj.conf, referencing, 358path, 353resource, 353types, 353user cache, 148
ACL filesdefault, 357example of, 149location of, 147
ACL files (Continued)names of, 148syntax of, 353-358
ACL user cache tuning, 360ACLCacheLifetime directive, 148, 360ACLGroupCacheSize parameter, 148, 360aclname, in PathCheck directive, 358ACLUserCacheSize parameter, 148, 360adding
groups to group members lists, 63listen sockets, 36, 128-131members to groups, 62-63Proxy Servers, 33servers to clusters, 115
administeringProxy Server, 26-29, 31-34server clusters, 113-117SOCKS server, 311-325
administration preferences, 35-41Administration Server
accessing, 26-27log files, 39-40overview, 26-27removing old values when renaming users, 55starting, 31-32starting the SNMP master agent, 213stopping, 32-33, 121-122superuser access, 37-38URL for, 26-27user interface, 26-27
Administration Server tabsCluster, 27Global Settings, 27Preferences, 27Security, 27Servers, 26Users and Groups, 27
administrators, multiple, 38-39admpw file, 37, 38agents, SNMP, 41alias directory, 81, 82alias file, 82aliases, and 3.x certificates, 81all servers, managing, 26-27
Index
Oracle iPlanet Web Proxy Server 4.0.14 Administration Guide • June 2010372

Allow or Deny, access control, 155always-use-keep-alive parameter, 363and operator, 357APPLET, 294archiving, log files, 172attribute expressions
operators, 357using for access control, 356
attributesLDAP, 48-49LDAP URL, 59search options, 51x509v3 certificates, 104
authenticationBasic, 44, 141, 156client, requiring, 97-98client, server, 72database, 157, 165-167Default, 141Digest, 142-144entries, SOCKS, 316-318for SOCKS server, 317Host-IP, 147methods, access control, 156statements, ACL syntax, 354User-Group, 155-157
authoring content, host names for, 304authorization statements, ACL, 354, 355-357autoconfiguration file, generating from PAT file
automatically, 281-282manually, 280-281
autoconfiguration files, 333creating, 336-338return values, 339
Bbandwidth, saving, 240base DN, 48base_dn (LDAP URL parameter), 58Basic authentication, 44, 141, 156, 354Basic authentication and SSL, 141batch updates, performance impact, 367block requests, 290
bong-file, 107bu, 262bu.conf, 124buffer size, performance impact, 361
Cc attribute, 104cache
adding, modifying sections, 245batch updates, 253changing size, 240command line interface, 256-262command-line utilities, 256-258directories
structure, 256-258example, 237expiration policy, 241file dispersion, 237garbage collector, 245partitions, 236refresh interval, 241refresh setting, 240sections, 236size, 240specifics, 237subsections, 236
cache architecture, performance impact, 367cache batch updates, performance impact, 367cache files, dispersion of, 237Cache-info, 224cache tuning, 360cached documents, lifetime of, 364cached results, user and group authentication, 148cached URLs, 252cachegc, 261caching, queries, 248caching files, 110caching process, 235Caching tab, 28cbuild, 256certificate API, 104Certificate Authority
about, 72
Index
373

Certificate Authority (Continued)approval process, 79VeriSign, 76
certificate chain, 80certificate mapping file (certmap.conf)
about, 102-106location of, 102syntax for, 102
certificate request, information required, 77certificate revocation lists (CRLs), 83certificates
attributes, 104client, 97-98exporting with pk12util, 94importing with pk12util, 94-95introduction, 72migrating from Proxy Server 3.6, 81removing and restoring root certificates, 82requesting other, 78-79types of, 79
certmap.confabout, 102-106client certificates, 142default properties, 103LDAP searches, 101location of, 102sample mappings, 105syntax for, 102
certSubjectDN, 106CGI programs, 35, 147, 159, 362chaining
Proxy Servers, 220SOCKS servers, 321
changingaccess denied message, 160default FTP transfer mode, 227-228key-pair file password, 109position of SOCKS entries, 318superuser settings, 37-38trust database password, 109-110user entries, 53-54
check-acl function, 358checking document lifetimes, 364
ciphersabout, 85setting options, 106TLS and SSL 3.0 for Netscape Navigator 6.0, 91
CKLs, installing and managing, 83cleartext
passwords and Digest authentication, 167user name and password, 143, 156
client authenticationabout, 72in a reverse proxy, 98-99, 99-101requiring, 97-98, 142scenarios, 98-99
client autoconfiguration, 226client certificates, 97
API, 104controlling access with, 148-149mapping to LDAP entries, 101-102
Client-ip, 222client IP address, 221-225client-pull, 127client security requirements, setting, 97-106client to proxy routing, 270clients, lists of accesses, 173Cluster tab, 27clusters
about, 113adding servers to, 115guidelines for, 114managing, 117modifying servers in, 116removing servers from, 116
CmapLdapAttr, 104, 106cn attribute, 49, 57, 104command line, using flexanlg to analyze access log
files, 191common-log, 174Common Logfile Format, 39-40common logfile format, example, 182community string, a text string that an SNMP agent
uses for authorization, 214compromised key lists (CKLs), 83CONFIG, 207, 209config directory, 29
Index
Oracle iPlanet Web Proxy Server 4.0.14 Administration Guide • June 2010374

configurationProxy Server, 29sharing, 113SOCKS server, 313-314, 314-316
configuration filesabout, 29essential, 29location of, 29magnus.conf, 29mime.types, 29more information about, 29obj.conf, 29server.xml, 29socks5.conf, 313-314
configuringACL Cache, 134ACL user cache, 148cache, 246client authentication in reverse proxy, 99-101directory services, 45-46DNS cache, 135DNS subdomains, 136HTTP keep-alive, 137-138LOG element, 181Proxy Server, 26-29routing, 219-220secure reverse proxy, 299SOCKS server, 314-316SSL tunneling, 88-89Sun Crypto Accelerator, 75virtual multihosting, 308-309
CONNECT method, proxying, 218connection entries, SOCKS, 318-321connection pool
inbound, 366outbound, 366
connection timeout, 361connectivity mode, 226-227ConnQueueSize directive, 366contains, search type option, 52content compression, 294controlling
server access, 139-167superuser access, 37-38
cookies and CGI programs, 35creating
custom NSAPI plugins, 21directory services, 45-46dynamic groups, 59groups, 55-59organizational units, 66SOCKS entries, 316-317, 318-320, 322-323, 323-324static groups, 56-57trust database, 73-74
creating user entriesdigest file, 50key file, 49LDAP-based, 47, 49
CRLs, installing and managing, 83cron-based log rotation, 173cryptographic modules, external, 92custom
authentication method, 157expressions, access control, 159log file format, 39-40NSAPI plugins, 21search queries, LDAP, 51-52, 61, 67
Custom Logic File, 281customized expressions, access control, 159
Ddata stream, SSL and, 87database, authentication, 157, 165-167database, trust
creating, 73password, 109
database entries, adding using LDIF, 47date restrictions, access control, 159, 163dayofweek, 357dbswitch.conf, 44-45, 157dbswitch.conf changes
digest file, 45key file, 44LDAP, 44
decryption, about, 85default
access control rules, 155
Index
375

default (Continued)directory service, 44-45mode, 226
Default authentication, 141, 156DELETE method, 159delete rights, 159deleting
listen sockets, 36, 128-131SOCKS entries, 318, 321, 324users, 55
Deny or Allow, access control, 155DES algorithm, Directory Server settings, 145Digest authentication
access control option, 157authentication statements, 354plug-in, installing, 144-147using, 142-144
digest filecreating user entries, 50finding users, 51-53
digestauth property, 143DigestStaleTimeout parameter, 144directories, restricting access to, 161-162directory server
DES algorithm, 145distributed administration, 38-39ldapmodify command line utility, 48user entries, 48
Directory Server Enterprise Edition, Oracle, 37directory services
about, 44-45configuring, 45-46creating, 45-46digest file, 45editing, 46key file, 44LDAP, 44types of, 44-45
dispersion of cache files, 237Distinguished Name (DN)
about, 46-47, 48example of, 46format of, 48
distributed administrationdefault directory service, 45levels of users, 38multiple administrators, 38-39superuser access, 37
DNComps, 103DNS, 126
and Host-IP authentication, 147enabling, 147lookups and server performance, 147reverse DNS lookups, SOCKS server, 315settings and performance, 365
DNS Caching, 135-136document lifetimes, checking, 364dynamic groups
about, 55, 57-59creating, 59guidelines for, 58-59impact on server performance, 58implementation of, 57-58
Ee attribute, 104editing
directory services, 46group entries, 62listen sockets, 36, 128-131SOCKS entries, 317, 320, 324user entries, 53-54
enablingDNS, 147FIPS-140, 96-97ICP, 268-269IP-based access control, 164-165security for listen sockets, 89-91SSL, 89-91Sun Crypto Accelerator, 75-76the SOCKS server, 314
encryptionabout, 85two-way, 85
encryption modules, external, 92-97ends with, search type option, 52
Index
Oracle iPlanet Web Proxy Server 4.0.14 Administration Guide • June 2010376

entire server, restricting access to, 161entries
LDAP, 46-47, 47-48, 48-49SOCKS, 316-318, 318-320, 322-325
error log file, location, 169error log file, viewing, 40error log level, performance impact, 361error logs, 182event viewer, 192execute rights, 159expiration policy, 241Expires header, needed to cache query results, 248expiring cached files, 252-253exporting certificates and keys, 94expressions
attribute, 356customized, ACL, 159regular, 29
externalencryption modules, 92-97hardware accelerators, 93, 95
external certificate, starting the server with, 95
Ffast-demo mode, 227FAT file systems, security for, 74features, Proxy Server, 21, 25-26file syntax, ACL, 353-358file types, restricting access to, 162files, dispersion in cache, 237filter, LDAP URL parameter, 59filter HTML tags, 293FilterComps, 103Filters tab, 28finding
groups, 60-62user entries, 51
FindProxyForURL, 334FIPS-140, 96flex-init, 173flex-log, 173flexanlg, 183
use and syntax, 191
forgotten superuser password, 37From Host, access control option, 157-158FTP, listing width, 367FTP mode
Active Mode (PORT), 228Passive Mode (PASV ), 227
Ggarbage collection, tuning, 368-369gc extra margin percent variable, 368gc hi margin percent variable, 368gc leave fs full percent variable, 369gc lo margin percent variable, 368generate report, 189generated-proxy-(serverid).acl, 148genwork-proxy-(serverid).acl, 148GET method, 159
needed to cache query results, 248proxying, 218
getting started, 26-29givenName attribute, 49global
access control rules, 151security parameters, 91
Global Settings tab, 27group, See Alsos, managinggroup membership
defining, 55static and dynamic, 58
group owners, managing, 64groupOfURLs, 57groups, 61-62
about, 55adding groups to members list, 63adding members to, 62-63creating, 55-59defining membership in, 55dynamic, 57-59editing entries, 62finding, 60-62guidelines for creating, dynamic, 58-59guidelines for creating, static, 56managing, 60
Index
377

groups (Continued)narrowing search results for, 61-62searching for, 60-62static, 56-57
groups and usersauthenticating, 155-157managing, 43-69
groups of Proxy Servers, administering, 113GUI overview, 26-29guidelines for
creating dynamic groups, 58-59creating LDAP-based user entries, 47-48creating static groups, 56creating strong passwords, 109using server clusters, 114
Hhandling requests from URLs, 29hardware accelerators, 93HEAD method, 159
proxying, 218Help button, 27hierarchy, ACL authorization statements, 355-356Host-IP, access control, 147, 157-158HP OpenView network management software, use with
SNMP, 193http-client-config SAF, 363http_head, 159HTTP request load balancing, 229-230httpacl directory, 147HTTPS, SSL and, 87
IICP, 126
adding parent proxies, 265-266neighbors, 263parents, 263polling rounds, 263siblings, 263
icp.conf, 124ident, 315
identifying resources, 29IMG, 294improving server performance
Proxy Server, 359-370SOCKS server, 314
inbound connection pool, 366INDEX method, 159inetOrgPerson, object class, 48info rights, 159INIT, 213init-clf, 174init-proxy SAF, 362-363InitFn, 104inittab, 74installing
Digest authentication plug-in, 144-147multiple Proxy Servers, 33
instancesmanaging, 27-29starting and stopping, 27-29
internal daemon log rotation, 172Internet Cache Protocol (ICP), 262IP-based access control, 164-165iplanetReversiblePassword, 146iplanetReversiblePasswordobject, 146is, search type option, 52isn’t, search type option, 52issuerDN, 102
JJava IP Address Checking, 225JavaScript
proxy autoconfiguration files and, 334return values and, 339
JROUTE, 230JSESSIONID, 230jsessionid, 230
Kkeep-alive parameter, 363Keep-Alive Statistics, 197
Index
Oracle iPlanet Web Proxy Server 4.0.14 Administration Guide • June 2010378

keep-alive-timeout parameter, 363KeepAliveQueryMaxSleepTime directive, 366KeepAliveQueryMeanTime directive, 366KeepAliveThreads directive, 366KeepAliveTimeout directive, 363-364, 366keepOldValueWhenRenaming parameter, 55key database password, 74key file directory service
about, 44finding users, 51-53user entries, 49
key-pair fileabout, 73changing password for, 109securing, 110
key size restriction, PathCheck, 106keys
about, 85exporting with pk12util, 94importing with pk12util, 94-95
known issues, more information about, 21
Ll attribute, 104last-modified factor, 364Last-Modified header, needed to cache query
results, 248LDAP
and Digest authentication, 142-144attributes, user entries, 48, 49custom search filter, 51-52directories, access control for, 157directory service, about, 44distributed administration, enabling, 38entries, 46-47, 47-48, 48-49groups, creating, 55groups, finding, 60-62managing users and groups, 43-69mapping client certificates to, 101-102organizational units, creating, 66organizational units, finding, 67-68search filter, 51, 60search results, 102
LDAP (Continued)searches and certmap.conf, 101user name and password authentication, 141users, creating, 48-49, 49users, finding, 51-53
LDAP URLsdynamic groups, 55, 57-58format of, 58required parameters for, 58
ldapmodify, caution about unique uids, 48LDIF
adding database entries, 47import and export functions, 47
libdigest-plugin.ldif, 145libdigest-plugin.lib, 145libnssckbi.so, 82libplds4.dll, 145Library property, 104libspnr4.dll, 145list rights, 159listen queue size, 126listen sockets
about, 35-36adding, 36, 128-131associating external certificates with, 96deleting, 36, 128-131editing, 36, 128-131ls1, 35requiring client authentication, 97-98
load balancing, 301log, access, location, 169log, error, location, 169log analyzer, flexanlg, use and syntax, 191log_anly, 183LOG element, 171log files
2 GB size limitation with Linux OS, 170access log, 39Administration Server, 39-40archiving, 172configuring, 173error log, 40flexible format, 179location of, 39-40
Index
379

log files (Continued)preferences, 39-40SOCKS server, 313viewing, 39-40
log levels, 171log rotation
cron-based, 173internal daemon, 172
logfile formatcommon, 175, 179extended, 179extended2, 179
logs, access, 173logs, error, viewing, 182ls1 listen socket, 35
Mmagnus.conf, 124, 202
contents of, 29performance-related settings, 359-370security entries in, 91termination timeout, 144
magnus.conf.clfilter, 124mail attribute, 49, 104managed objects, 215management information base, 204managing
certificates, 83clusters, 113-117CRLs and CKLs, 83-84group owners, 64groups, 60listen sockets, 35-36organizational units, 66-69See Alsos, 64servers, 26-29user passwords, 54users, 51users and groups, 43-69
mappingACLs to an LDAP database, 57client certificates to LDAP entries, 101-102URLs to mirror servers, 230
master agentSNMP, 204SNMP, installing, 206-208starting on a nonstandard port, 213
master agents, 41max-uncheck parameter, 364MaxKeepAliveConnections directive, 366MD5 algorithm, 143member URL, example of, 57memberCertDescriptions, 55members
adding, 62-63adding groups to, 63defining for groups, 55
memberURL, 55migrating 3.6 servers, 34MIME filters, 292MIME type category
enc, 132lang, 132type, 132
mime types, 124mime.types, contents of, 29mirror sites, mapping URLs to, 230MKDIR method, 159modules, PKCS#11, 74, 93modutil, using to install PKCS#11, 93MOVE method, 159moving SOCKS entries, 318, 321multiple
administrators, 38-39Proxy Servers, 33
Nnamed ACLs, 354NameTrans directive, 194Netscape Navigator, SSL and, 87network connectivity modes
default, 226fast-demo, 227no-network, 227normal, 227
network management station (NMS), 204
Index
Oracle iPlanet Web Proxy Server 4.0.14 Administration Guide • June 2010380
new features, Proxy Server, 21, 25-26new user entries, required information, 48NMS-initiated communication, 215no-network mode, 227nobody user account, as server user, 126nonce, 144normal mode, 227not operator, 357NSAPI plugins, custom, 21nsldap32v50.dll, 145NSS, and migrated certificates, 81nssckbi.dll, 82NSServletService, 201NTFS file system, password protection, 74number of threads, performance
Proxy Server, 365-366SOCKS server, 314
Oo attribute, 104obj.conf, 124, 173, 194, 202
and named ACLs, 354contents of, 29default authentication, 141performance-related settings, 359-370referencing ACL files, 358
obj.conf.clfilter, 124old values, removing when renaming users, 55online Help, 27operators for attribute expressions, 357or operator, 357Oracle Directory Server Enterprise Edition, 37organizational units
about, 46, 66creating, 66managing, 66-69
organizationalPerson, object class, 48organizationalUnit, object class, 46Other, authentication option, 157ou attribute, 104outbound connection pool, 366overview
Administration Server, 26-27
overview (Continued)GUI, 26-29Proxy Server, 25-29Server Manager, 27-29SOCKS server, 312-314
owners, managing, 64
PPAC file, 280
generating from PAT fileautomatically, 281-282manually, 280-281
pac filescreating, 336-338defined, 337serving from the proxy, 333
pages, restricting access to, 158parent array, 127
routing, 282-283view information, 283
parent arrays, 283parent.pat, 124parray.pat, 124parts of the server, restricting access to, 158password.conf, 74password file, 313password protection, NTFS file system, 74passwords
guidelines for creating, 109superuser, 37
PAT file, 271, 280path ACLs, 353PathCheck, key size restriction, 106PathCheck directive, 358perfdump, 365perfdump output, 199-201perfdump utility
about, 198enabling, 199performance report, 203
performanceand DNS lookups, 147, 365impact of dynamic groups, 58
Index
381

performance (Continued)Proxy Server, 359-370SOCKS server, 314, 316tuning, sizing, and scaling guide, 366
performance buckets, 201configuration, 202examples, 202
person, object class, 48pk12util
about, 94exporting certificates and keys, 94importing certificates and keys, 94-95
PKCS#11exporting certificates and keys with pk12util, 94importing certificates and keys with pk12util, 94-95installing using modutil, 93modules, 74
platforms, supported, 21polling rounds, 263ports, security, risks, 88POST method, 159
proxying, 218pragma no-cache, 110Preferences tab
Administration Server, 27Server Manager, 27
private key, 85programs, access to, 158protocol data units (PDUs), 215PROTOCOL_FORBIDDEN, 107protocol parameter, 363proxy-agent parameter, 363proxy array, 126
creating member list, 274-276enable, 279-280enabling routing, 278-279
Proxy array table, 231proxy arrays
generating a PAC fileautomatically, 281-282manually, 280-281
parent arrays, 283Proxy-auth-cert, 224Proxy Auto Configuration, 280
Proxy-cipher, 223proxy-id.acl, 124Proxy-issuer-dn, 224proxy-jroute, 230Proxy-keysize, 223proxy routing entries, SOCKS, 322-325Proxy-secret-keysize, 223Proxy Server
about, 25administering, 31-34
proxy serveras a web server, 333
Proxy Serverchaining, 220configuring, 26-29controlling access to, 139-167features, 21, 25-26migrating, 34overview, 25-29
proxy servertuning, 127-128
proxy SNMP agent, 206Proxy-ssl-id, 223proxy timeout, 127proxy timeout parameter, 362proxy to proxy routing, 270, 271Proxy-user-dn, 224proxystats.xml, 197, 365public key, 73, 78, 85PUT method, 159
Qquench updates, 315queries, caching of, 248
Rrc.local, 74RcvBufSize, 361read rights, 159Refresh button, 27refresh interval, 241
Index
Oracle iPlanet Web Proxy Server 4.0.14 Administration Guide • June 2010382

regular expressions, 29, 328meanings, 328
Release Notes, 21remote servers, adding to clusters, 115removing
old values when renaming users, 55server instances, 33servers from clusters, 116users, 55
removing cached files, 252-253renaming, removing old values, 55reports
cache performance report, 186-188data flow report, 184-185hourly activity report, 188requests and connections report, 185-186status code report, 185transfer time distribution report, 184transfer time report, 188
REQ_ABORTED, 107REQ_NOACTION, 107REQ_PROCEED, 107request-digest, 144requests from URLs, 29required information
certificate requests, 77user entries, 48
required parameters, LDAP URL, 58requiring client authentication, 97-98, 142resource ACLs, 353resources, 327resources, identifying, 29respawn, 120response when access denied, 160restart proxy server, using inittab, 123Restart Required, 28restarting the Administration Server, 31-32restrict access, browsers, 289restricting access, 151-155
perfdump output, 201stats-xml output, 195
restricting server access, 40-41, 139-167based on security, 163-164directories, 161-162
restricting server access (Continued)entire server, 161file types, 162
restsrt proxy server, using system RC scripts, 123return values, autoconfiguration files and, 339reverse DNS lookups, SOCKS server, 315reverse proxy, authoring content, 304reverse proxy, client authentication in, 98-99, 99-101rewrite content location, 232rewrite headername, 232rewrite host, 232rewrite location, 232RFC 1413 ident response, 315rights, access, 158-159rlim_fd_cur parameter, 369rlim_fd_max parameter, 369RMDIR method, 159root certificates, removing and restoring, 82routing, configuring, 219-220routing entries, SOCKS, 322-325Routing tab, 28RqThrottle parameter, 365, 366RqThrottleMin parameter, 366RSA MD5 algorithm, 237running multiple Proxy Servers, 33
Ssagt, 207sagt, command for starting Proxy SNMP agent, 207scope, LDAP URL parameter, 59SCRIPT, 294search attributes, 51search base (base DN), 48search field, valid entries, 51search filter, LDAP, 51, 60search options, list of, 52search queries, LDAP, 51-52search results
groups, 61-62organizational units, 67-68users, 51-52
search results, LDAP, 102
Index
383

searching forgroups, 60-62organizational units, 67-68users, 51
secret-keysize, 107securing access to server instances, 164security
global parameters in magnus.conf, 91increasing, 107performance impact, 361proxy and SSL, 87risks, 88
security, restricting access based on, 163-164security preferences, setting, 84-92Security tab
Administration Server, 27Server Manager, 28
See Alsos, managing, 64send-cgi, 201server, logs (archive prior to running the log
analyzer), 183server, configuration of, 29server, mirror, 230server authentication, about, 72server chaining
Proxy Servers, 220SOCKS servers, 321
server clusters, 113server configurations, sharing, 113Server-initiated communication, 215server instances
access control rules for, 151, 153-155adding, 33managing, 26-29migrating, 34multiple, 33removing, 33securing access to, 164starting and stopping, 27
Server Manageraccessing, 27-29overview, 27-29running the log analyzer, 189user interface, 27-29
Server Manager tabsCaching, 28Filters, 28Preferences, 27Routing, 28Security, 28Server Status, 28SOCKS, 28Templates, 28URLs, 28
server-push, 127server settings
migrating, 34restricting access to, 158sharing, 113viewing, 124
Server Status tab, 28server.xml, 124, 171
and access control, 148, 358and external certificates, 95, 96contents of, 29more information about, 148
server.xml.clfilter, 124servercertnickname, 96servers
adding to clusters, 115chaining, 220, 321checking status in real time via SNMP, 193managing all, 26-27managing individual, 27-29removing from clusters, 116types of statistics for monitoring, 194
Servers tab, 26SessionCreationInfo, 365SET, SNMP message, 215setting
access control, 151-155, 155-160access rights, 158-159administration preferences, 35-41client authentication in reverse proxy, 99-101client security requirements, 97-106security preferences, 84-92
sharing server configurations, 113SMUX, 205
Index
Oracle iPlanet Web Proxy Server 4.0.14 Administration Guide • June 2010384

sn attribute, 49SndBufSize, 361SNMP
basics, 204checking server’s status in real time, 193community string, 214GET and Set messages, 215master agent, 204
installing, 206-208proxy agent, 206setting up on a server, 205subagent, 204trap, 214
SNMP master agents and subagents, 41snmpd, command for restarting native SNMP
daemon, 208snmpd.conf, 208SOCKS, about, 311SOCKS server
about, 311access control, 313authentication entries, 316-318authentication for, 317chaining, 321configuring, 314-316connection entries, 318-321ident, 315included with Proxy Server, 312-314options, 315performance, 314, 316reverse DNS lookups, 315routing entries, 322-325socks5.conf file, 312, 313-314tuning, 314, 316worker and accept threads, 314, 316
SOCKS tab, 28socks5.conf, 124, 312
about, 313-314location of, 313-314more information about, 313-314
SOCKS5_PWDFILE directive, 313Solaris
file system caching, 361performance tuning parameters, 369-370
sounds like, search type option, 52sq_max_size parameter, 369SSL
2.0 protocol, 903.0 protocol, 85, 90about, 86and Basic authentication, 141authentication method, 142, 156, 354data flow, 87enabling, 89-91hardware accelerators, 93HTTPS and, 87information needed to enable, 77Netscape Navigator and, 87performance impact, 361proxying with, 87telnet hopping, 88tunneling, 87, 88-89
SSL/TLS cipher, 222SSLPARAMS, 96st attribute, 104start proxy server
on UNIX or Linux, 120on Windows, 120
startingAdministration Server, 31-32Proxy Server instances, 27SOCKS server, 314
starting the server with external certificate, 95starts with, search type option, 52startsvr.bat, 120static groups
about, 56-57creating, 56-57
statisticsconnection statistics, 197displaying, 197-198DNS statistics, 197enabling, 195server request statistics, 197types available for monitoring server, 194
stats-init, 194stats-xml, 194
Index
385
stop proxy serveron UNIX or Linux, 121-122on Windows, 122
stoppingAdministration Server, 32-33, 121-122Proxy Server instances, 27SOCKS server, 314
stopsvr.bat, 122subagent, SNMP, 204subagents, 41Sun Crypto Accelerator 4000, enabling for Proxy
Server, 75-76Sun Crypto Accelerator Keystore, 75-76superuser
Administration Server access, 37-38determining password, 37distributed administration, 38Oracle Directory Server Enterprise Edition, 37settings, 37-38user name and password, 37
supported platforms, 21syntax, ACL files, 353-358sysContact, 211sysContract, 211sysLocation, 211system requirements, 21
Ttcp_close_wait_interval parameter, 369tcp_conn_req_max_q parameter, 369tcp_conn_req_max_q0 parameter, 369tcp_ip_abort_interval parameter, 369tcp_recv_hiwat parameter, 370tcp_rexmit_interval_initial parameter, 369tcp_rexmit_interval_max parameter, 370tcp_rexmit_interval_min parameter, 370tcp_slow_start_initial parameter, 370tcp_smallest_anon_port parameter, 370tcp_xmit_hiwat parameter, 370telephoneNumber attribute, 49telnet hopping, security risk, 88template, 327Templates tab, 28
termination timeout, magnus.conf, 144threads
Proxy Server performance, 365-366SOCKS server performance, 314
time restrictions, access control, 159, 163timeofday, 357timeout, connection, 361timeout-2 parameter, 362timeout after interrupt parameter, 362timeout parameter, 362timeout values, performance impact, 362-364title attribute, 49TLS, about, 86, 90TLS and SSL 3.0 ciphers, Netscape Navigator 6.0, 91tlsrollback, 90transport layer security, 86trap, SNMP, 214triple DES cipher, 97trust database
auto creation, external PKCS#11 module, 96creating, 73password for, 109
tuningACL user cache, 360garbage collection, 368-369Proxy Server, 359-370SOCKS server, 314, 316Solaris parameters, 369-370
tunneling, SSL, 87, 88-89two-way encryption, ciphers, 85types of
ACLs, 353directory services, 44-45search options, 52
Uuid attribute, 49, 104understanding DNs, 46-47uniqueMembers, 55units, organizational, creating, 66up-to-date checking, 364URL
for Administration Server, 26-27
Index
Oracle iPlanet Web Proxy Server 4.0.14 Administration Guide • June 2010386

URL (Continued)LDAP, 55, 57-58, 58remove mapping, 233
urldb, 258URLs
handling requests from, 29mapping to mirror servers, 230SSL-enabled servers and, 91
URLs tab, 28user accounts, 126user and group authentication, cached results, 148user cache
ACL, 148tuning, 360
user entriesattributes, 49changing, 53-54creating new, digest file, 50creating new, key file, 49creating new, LDAP, 47-49deleting, 55directory server, 48finding, 51notes about, 48-49removing old values when renaming, 55required information, 48
User-Groupaccess control, 140-147authentication, 140, 147, 148, 155-157
user name and password authentication, 141user name and password file, 313user search fields, valid entries, 51userPassword attribute, 49users
creating, 47-50deleting, 55DN format, 48editing, 53-54managing, 43-69narrowing search results, 51-52removing, 55renaming, 54-55searching for, 51
users and groupsauthenticating, 155-157managing, 43-69
Users and Groups tab, 27, 46Users/Groups, access control option, 155-157
Vverifycert, 104VeriSign certificate
installing, 76-77requesting, 76
VeriSign Certificate Authority, 76Version button, 27viewing, 182viewing log files, 39-40
Wweb servers, proxy running as, 333width, FTP listings, 367wildcard patterns, 329wildcards
and access control, 155, 157-158and ACLs, 354and the SOCKS server, 315
workarounds, more information about, 21worker and accept threads, SOCKS server, 314, 316write rights, 159
Xx509v3 certificates, attributes, 104
Index
387

388

![[1]Oracle® iPlanet Web Proxy Server Release Notes Release … · [1]Oracle® iPlanet Web Proxy Server Release Notes Release 4.0.28 E18782-14 October 2016](https://img.dokumen.tips/doc/110x75/5ba0668709d3f2fb538c898d/1oracle-iplanet-web-proxy-server-release-notes-release-1oracle-iplanet.jpg)