Embed Size (px)
Citation preview
Oracle FLEXCUBE Direct Banking
Installation Manual On
Weblogic Application Server
Release 12.0.2.0.0
Part No. E50108-01
September 2013

Installation Manual On Weblogic Application Server September 2013
Oracle Financial Services Software Limited
Oracle Park
Off Western Express Highway
Goregaon (East)
Mumbai, Maharashtra 400 063
India
Worldwide Inquiries:
Phone: +91 22 6718 3000
Fax:+91 22 6718 3001
www.oracle.com/financialservices/
Copyright © 2008, 2013, Oracle and/or its affiliates. All rights reserved.
Oracle and Java are registered trademarks of Oracle and/or its affiliates. Other names may be trademarks of their respective owners.
U.S. GOVERNMENT END USERS: Oracle programs, including any operating system, integrated software, any programs installed on the hardware, and/or documentation, delivered to U.S. Government end users are “commercial computer software” pursuant to the applicable Federal Acquisition Regulation and agency-specific supplemental regulations. As such, use, duplication, disclosure, modification, and adaptation of the programs, including any operating system, integrated software, any programs installed on the hardware, and/or documentation, shall be subject to license terms and license restrictions applicable to the programs. No other rights are granted to the U.S. Government.
This software or hardware is developed for general use in a variety of information management applications. It is not developed or intended for use in any inherently dangerous applications, including applications that may create a risk of personal injury. If you use this software or hardware in dangerous applications, then you shall be responsible to take all appropriate failsafe, backup, redundancy, and other measures to ensure its safe use. Oracle Corporation and its affiliates disclaim any liability for any damages caused by use of this software or hardware in dangerous applications.
This software and related documentation are provided under a license agreement containing restrictions on use and disclosure and are protected by intellectual property laws. Except as expressly permitted in your license agreement or allowed by law, you may not use, copy, reproduce, translate, broadcast, modify, license, transmit, distribute, exhibit, perform, publish or display any part, in any form, or by any means. Reverse engineering, disassembly, or decompilation of this software, unless required by law for interoperability, is prohibited.
The information contained herein is subject to change without notice and is not warranted to be error-free. If you find any errors, please report them to us in writing.
This software or hardware and documentation may provide access to or information on content, products and services from third parties. Oracle Corporation and its affiliates are not responsible for and expressly disclaim all warranties of any kind with respect to third-party content, products, and services. Oracle Corporation and its affiliates will not be responsible for any loss, costs, or damages incurred due to your access to or use of third-party content, products, or services.
Contents
1. PREFACE
1.1. INTENDED AUDIENCE ............................................................................................................................ 5
1.2. DOCUMENTATION ACCESSIBILITY ........................................................................................................... 5
1.3. ACCESS TO OFSS SUPPORT ................................................................................................................ 5
1.4. STRUCTURE ......................................................................................................................................... 5 1.5.RelatedInformationSources………………………………………………………………………………….5
2. ABBREVIATIONS ........................................................................................................................................... 6
3. PRE- REQUISITES ......................................................................................................................................... 7
4. APPLICATION SERVER CONFIGURATION ............................................................................................... 8
4.1. CREATING AND MANAGING A SERVER INSTANCE ............................................................................................. 8
4.1.1. Creating a WebLogic domain ................................................................................................................ 8
4.1.2. SSL Configuration ................................................................................................................................. 19
4.1.3. Create Cluster ........................................................................................................................................ 19
4.1.4. ORACLE WebLogic server administrative console. ......................................................................... 20
4.1.5. Enable Archived Real Path .................................................................................................................. 21
4.1.6. Creating a Managed Server ................................................................................................................ 23
4.1.7. Configurations to Start/Stop managed server from Administrative Console ................................ 26
4.2. DEPLOYING APPLICATIONS ............................................................................................................................. 41
4.2.1. Starting Application ............................................................................................................................... 49
5. SETUP JDBC DATA SOURCE AND CONNECTION POOLING ............................................................. 52
6. JMS QUEUE CREATION ON WEBLOGIC SERVER ................................................................................ 70
6.1. CREATE JMS MODULE .................................................................................................................................... 71
6.2. CREATE JMS FOREIGN SERVER..................................................................................................................... 76
6.3. CREATING DESTINATIONS ............................................................................................................................... 83
7. MODULE INSTALLATION ........................................................................................................................... 87
7.1. BULK MODULE SETUP ..................................................................................................................................... 87
7.2. ALERTS NOTIFICATION AND CHASE CYCLE SETUP ........................................................................................ 88
7.3. J2ME BASED ORACLE FLEXCUBE DIRECT BANKING APPLICATION............................................................ 89
7.4. SMS BASED ORACLE FLEXCUBE DIRECT BANKING APPLICATION ............................................................. 89
8. DB CREATION .............................................................................................................................................. 90
9. ENCRYPTION AND DECRYPTION OF PROPERTY FILES .................................................................... 91

10. SERVICE TIER SECURITY ....................................................................................................................... 92
10.1. WEBSERVICE MODE ...................................................................................................................................... 92
10.2. EJB MODE..................................................................................................................................................... 97
11. APPENDIX ................................................................................................................................................. 101
12. TOOLS ....................................................................................................................................................... 104

1.Preface
1.1. Intended Audience
This document is primarily targeted at
• Oracle FLEXCUBE Direct Banking Development Teams
• Oracle FLEXCUBE Direct Banking Implementation Teams
• Oracle FLEXCUBE Direct Banking Implementation Partners
1.2. Documentation Accessibility For information about Oracle's commitment to accessibility, visit the Oracle Accessibility Program website at http://www.oracle.com/pls/topic/lookup?ctx=acc&id=docacc.
1.3. Access to OFSS Support
https://flexsupp.oracle.com/
1.4. Structure This manual is organized into the following categories:
Preface gives information on the intended audience. It also describes the overall structure of the User
Manual
Application Server Configuration provides information on Creating and Managing a JMS Servers etc.
Chapters post Application server configuration are dedicated to Setup JDBC data source and Connection
Pooling and JMS queue creation on Weblogic server, Module Installation and Encryption and Decryption
of property files.
1.5. Related Information Sources
For more information on Oracle FLEXCUBE Direct Banking Release 12.0.2.0.0, refer to the following
documents:
Oracle FLEXCUBE Direct Banking Licensing Guide

6 Oracle FLEXCUBE Direct Banking12.0.2.0.0 Installation On Weblogic
2.Abbreviations
FCDB Oracle FLEXCUBE Direct Banking
Java EE / JEE Java Enterprise Edition
Java SE / JSE Java 2 Standard Edition
DBA Database Administrator
JDK Java Development Kit

7 Oracle FLEXCUBE Direct Banking12.0.2.0.0 Installation On Weblogic
3.Pre- requisites
All the software requirements mentioned in the sheet
“Oracle_FLEXCUBE_Direct_Banking_Software_Stack” must be installed.
Oracle FLEXCUBE Direct Banking application is installed successfully using Oracle FCDB Installer.

8 Oracle FLEXCUBE Direct Banking12.0.2.0.0 Installation On Weblogic
4.Application Server Configuration
4.1.Creating and Managing a Server Instance
4.1.1.Creating a WebLogic domain
A domain consists of one or more server instances that can be managed with a single administration server. When the administration server is used to perform a configuration task, the changes made apply only to the domain managed by that administration server. To manage another domain, the administration server for that domain must be used.
Through Wizard:
1. Go to Start Menu Oracle WebLogic WebLogic Server 11g R1 Tools Configuration
Wizard in Windows.
Select “Create a new WebLogic Domain” and click “Next”.

9 Oracle FLEXCUBE Direct Banking12.0.2.0.0 Installation On Weblogic

10 Oracle FLEXCUBE Direct Banking12.0.2.0.0 Installation On Weblogic
Select “Generate a domain configured automatically to support the following Products” and click
“Next”

11 Oracle FLEXCUBE Direct Banking12.0.2.0.0 Installation On Weblogic
Specify Domain Name and Location
Enter the following values and click “Next”
Field Value
User Name <Enter username>
User password <Enter password>
Confirm user password <Repeat same password>

12 Oracle FLEXCUBE Direct Banking12.0.2.0.0 Installation On Weblogic

13 Oracle FLEXCUBE Direct Banking12.0.2.0.0 Installation On Weblogic
Select “Development Mode” under “Web Logic Domain Startup Mode”,
Select “Available JDKs” in JDK selection and select “Sun SDK 1.6.0_11” and click “Next”
14 Oracle FLEXCUBE Direct Banking12.0.2.0.0 Installation On Weblogic
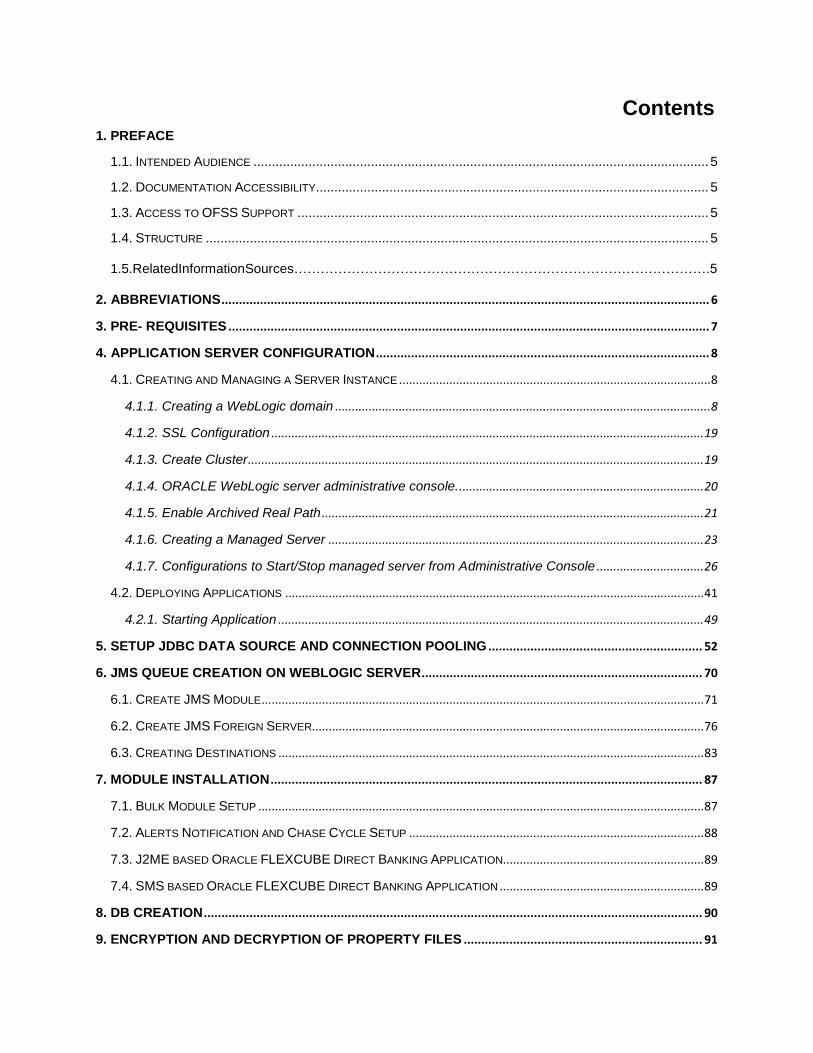
Do not select any of the check boxes and click “Next”

15 Oracle FLEXCUBE Direct Banking12.0.2.0.0 Installation On Weblogic
Click on “Create”

16 Oracle FLEXCUBE Direct Banking12.0.2.0.0 Installation On Weblogic
The screen displayed below show the progress

17 Oracle FLEXCUBE Direct Banking12.0.2.0.0 Installation On Weblogic
Click “Done”

18 Oracle FLEXCUBE Direct Banking12.0.2.0.0 Installation On Weblogic
Using commands.
a) Through the command prompt go to the <Oracle Base Folder>/<WLS home directory>/common/bin
e.g If the base folder is oracle , the path will be D:\oracle\wlserver_10.0\common\bin
b) Execute the batch file inside it wlst.bat (on Windows) or wlst.sh(on Unix)
c) The environment will be set and the prompt changes to wls:/offline>
d) Give the following command to create the domain.
createDomain(domainTemplate, domainDir, user, password)
Argument Definition
domainTemplate Name and location of the domain template from which you want to create a domain.
domainDir Name of the directory to which you want to write the domain configuration information.
user Name of the default user.
password Password of the default user.
For e.g.:
createDomain('D:/oracle/wlserver_10.0/common/templates/domains/wls.jar','D:/o
racle/user_projects/domains/trial', ‘<user_name>’,’<password>’)
This will create a domain under the location D:/oracle/user_projects/domains.
19 Oracle FLEXCUBE Direct Banking12.0.2.0.0 Installation On Weblogic
4.1.2.SSL Configuration
For the SSL configurations kindly refer to the doc “Oracle_FLEXCUBE_Direct_Banking_Configure_Apache_HTTP_and_Weblogic“
4.1.3.Create Cluster
For configuration of clusters kindly refer to the doc “Oracle_FLEXCUBE_Direct_Banking_Clustering_on_Weblogic“

20 Oracle FLEXCUBE Direct Banking12.0.2.0.0 Installation On Weblogic
4.1.4.ORACLE WebLogic server administrative console.
The Administration Console facilitates in creating, starting, suspending, resuming and stopping servers; deploying applications and other administration facilities.
1. To start the ORACLE WebLogic Server Administration Console in Windows ,click ORACLE
Products User Projects <domain_name>
To open Administration Console, type http://<hostname OR IP>:<port>/console in browser window.
Enter User Id and Password set during domain creation and click Log In.
21 Oracle FLEXCUBE Direct Banking12.0.2.0.0 Installation On Weblogic
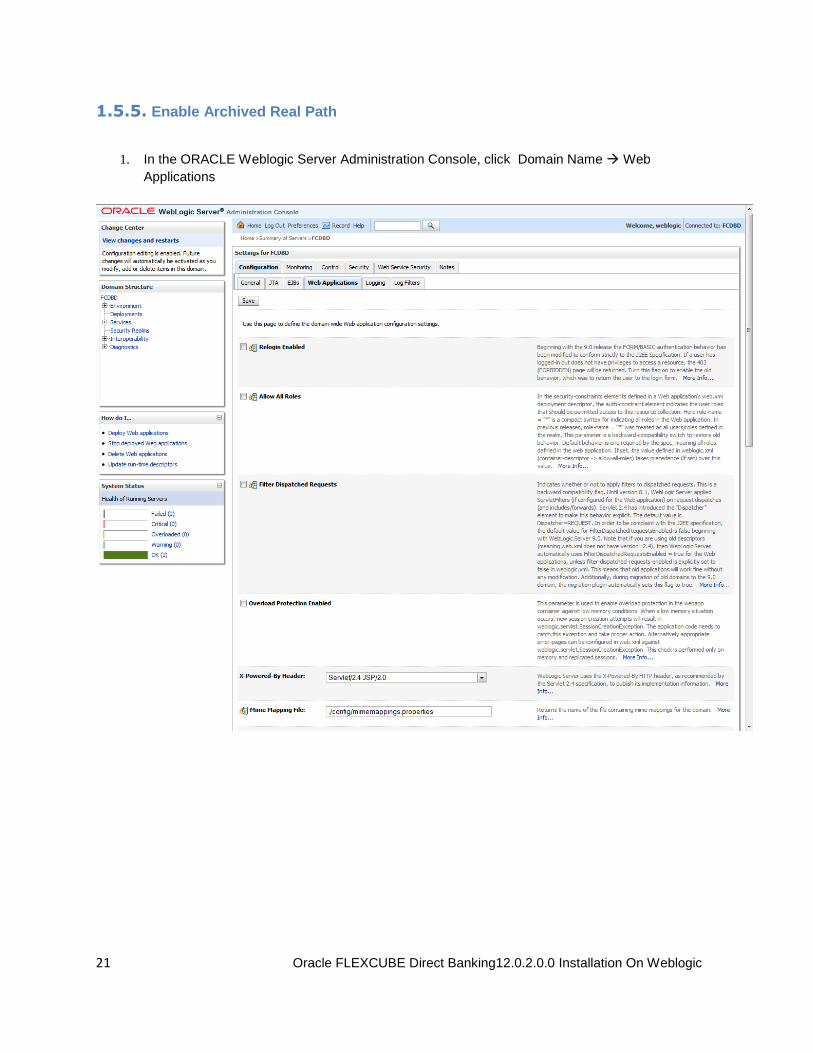
1.5.5. Enable Archived Real Path
1. In the ORACLE Weblogic Server Administration Console, click Domain Name Web
Applications

22 Oracle FLEXCUBE Direct Banking12.0.2.0.0 Installation On Weblogic
2. Scroll down and Check Archived Real Path Enabled and click Save

23 Oracle FLEXCUBE Direct Banking12.0.2.0.0 Installation On Weblogic
4.1.6.Creating a Managed Server
1. In the ORACLE Weblogic Server Administration Console, click Environment Servers
Click “New”

24 Oracle FLEXCUBE Direct Banking12.0.2.0.0 Installation On Weblogic
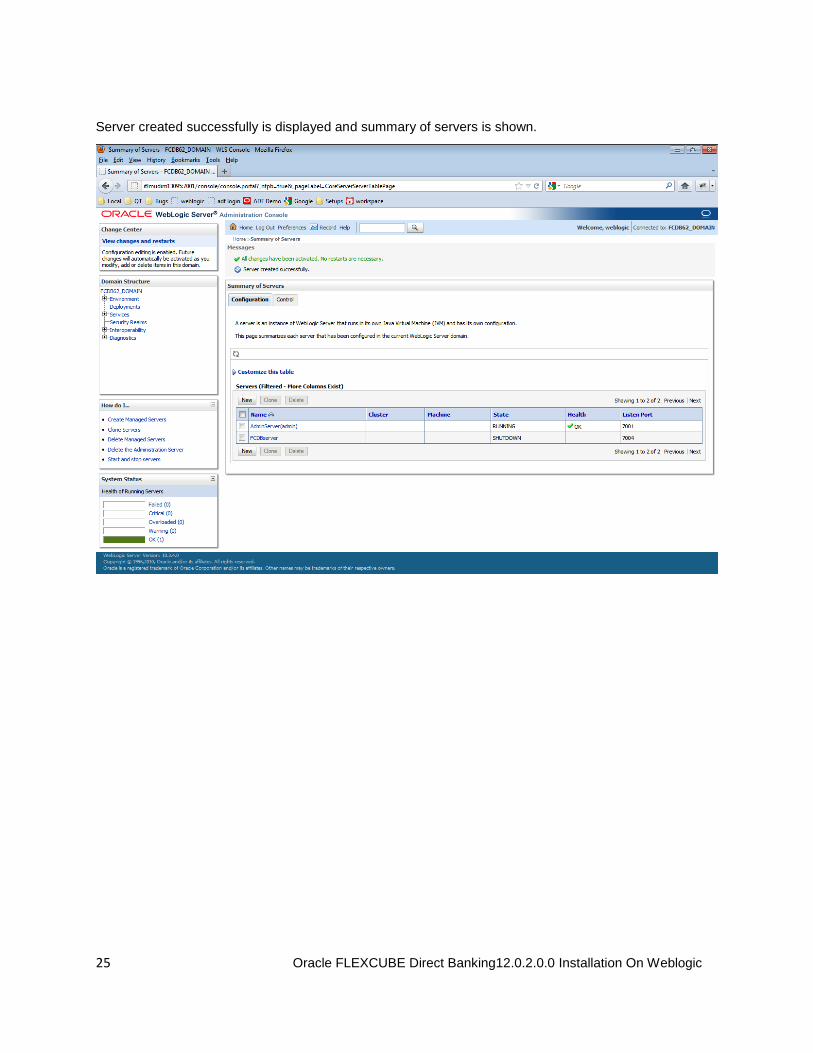
Enter the “Server Name” as “FCDBServer”, set the Server listen Port to “7002” or any free port that is not
in use.
Select the radio button against No, this is a stand-alone server and click “Finish”
25 Oracle FLEXCUBE Direct Banking12.0.2.0.0 Installation On Weblogic
Server created successfully is displayed and summary of servers is shown.

26 Oracle FLEXCUBE Direct Banking12.0.2.0.0 Installation On Weblogic
4.1.7.Configurations to Start/Stop managed server from Administrative Console
Creating Machine
It is required to create a machine in order to Start/Suspend/Resume/Stop the Managed Servers in Weblogic using Administration Console.
1. Click Environment Machines
Click “New” button

27 Oracle FLEXCUBE Direct Banking12.0.2.0.0 Installation On Weblogic
Enter the Name as “FCDBMachine” and click “Next”

28 Oracle FLEXCUBE Direct Banking12.0.2.0.0 Installation On Weblogic
Select “Type” as “Plain” from the drop down list and click Finish.

29 Oracle FLEXCUBE Direct Banking12.0.2.0.0 Installation On Weblogic
Machine created successfully message is displayed.

30 Oracle FLEXCUBE Direct Banking12.0.2.0.0 Installation On Weblogic
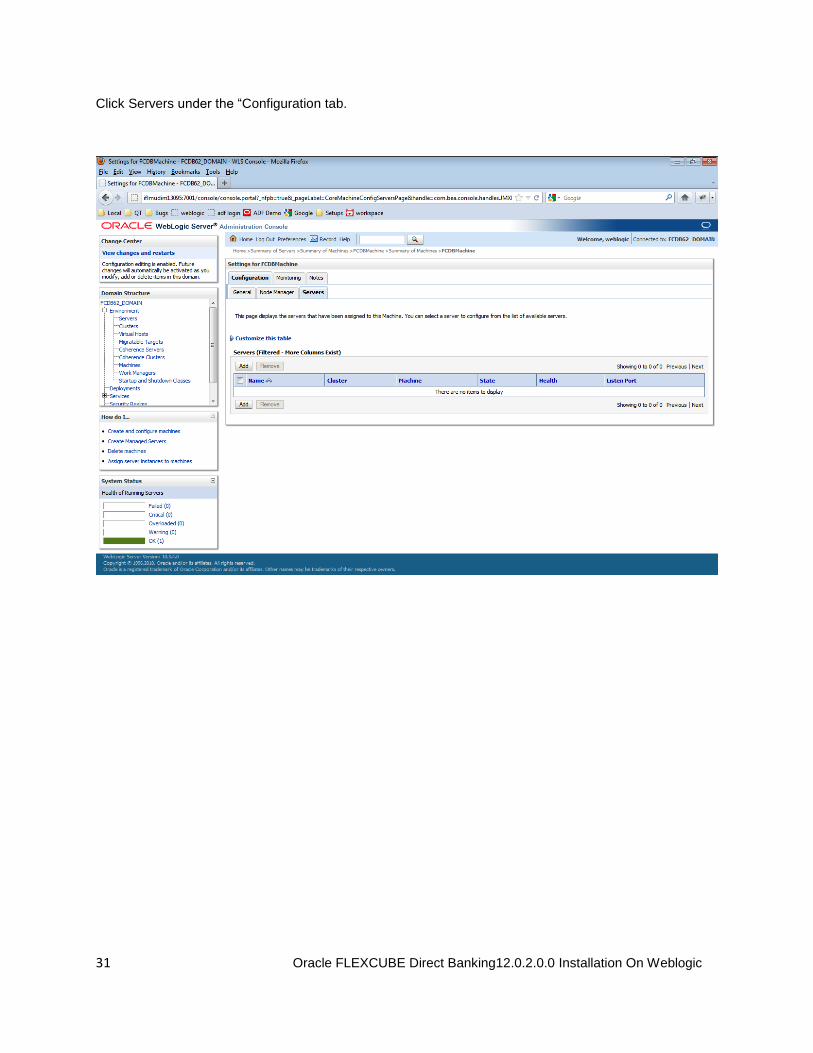
Click on Newly created FCDBMachine.
31 Oracle FLEXCUBE Direct Banking12.0.2.0.0 Installation On Weblogic
Click Servers under the “Configuration tab.

32 Oracle FLEXCUBE Direct Banking12.0.2.0.0 Installation On Weblogic
Click Add button to add a server to machine

33 Oracle FLEXCUBE Direct Banking12.0.2.0.0 Installation On Weblogic
Check the radio button against “Select an existing server, and associate it with this machine”.
Select FCDBServer from the “Select a Server” drop down and click on “Finish”. Server created
successfully message is displayed

34 Oracle FLEXCUBE Direct Banking12.0.2.0.0 Installation On Weblogic
Configuring Managed Server
1. Click on EnvironmentServer in the left menu.

35 Oracle FLEXCUBE Direct Banking12.0.2.0.0 Installation On Weblogic
Click on server name with FCDBServer”
On General tab, please ensure that the ‘SSL Listen Port Enabled’ feature is enabled (as it is mandatory).
And the Listen Address should be “App Server IP”
Note: If you are using APACHE HTTP server then kindly refer
Oracle_FLEXCUBE_Direct_Banking_Configure_Apache_HTTP_and_Weblogic manual for more
details.
36 Oracle FLEXCUBE Direct Banking12.0.2.0.0 Installation On Weblogic
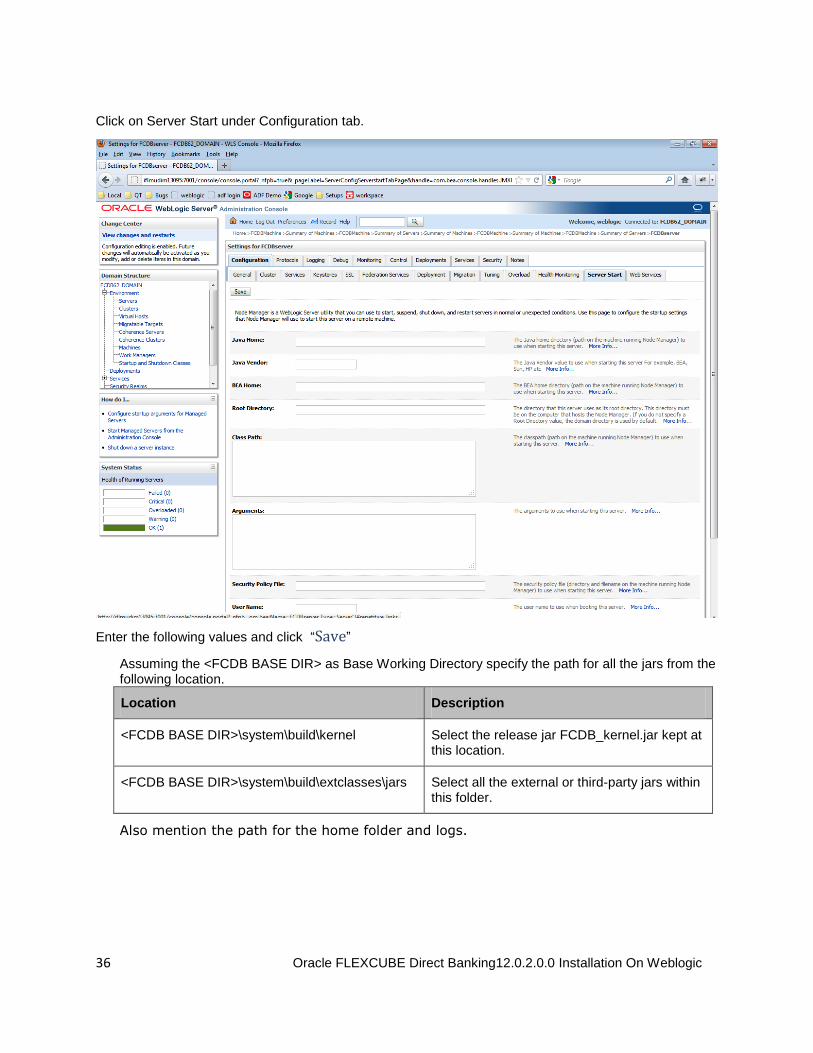
Click on Server Start under Configuration tab.
Enter the following values and click “Save”
Assuming the <FCDB BASE DIR> as Base Working Directory specify the path for all the jars from the following location.
Location Description
<FCDB BASE DIR>\system\build\kernel Select the release jar FCDB_kernel.jar kept at this location.
<FCDB BASE DIR>\system\build\extclasses\jars Select all the external or third-party jars within this folder.
Also mention the path for the home folder and logs.
37 Oracle FLEXCUBE Direct Banking12.0.2.0.0 Installation On Weblogic
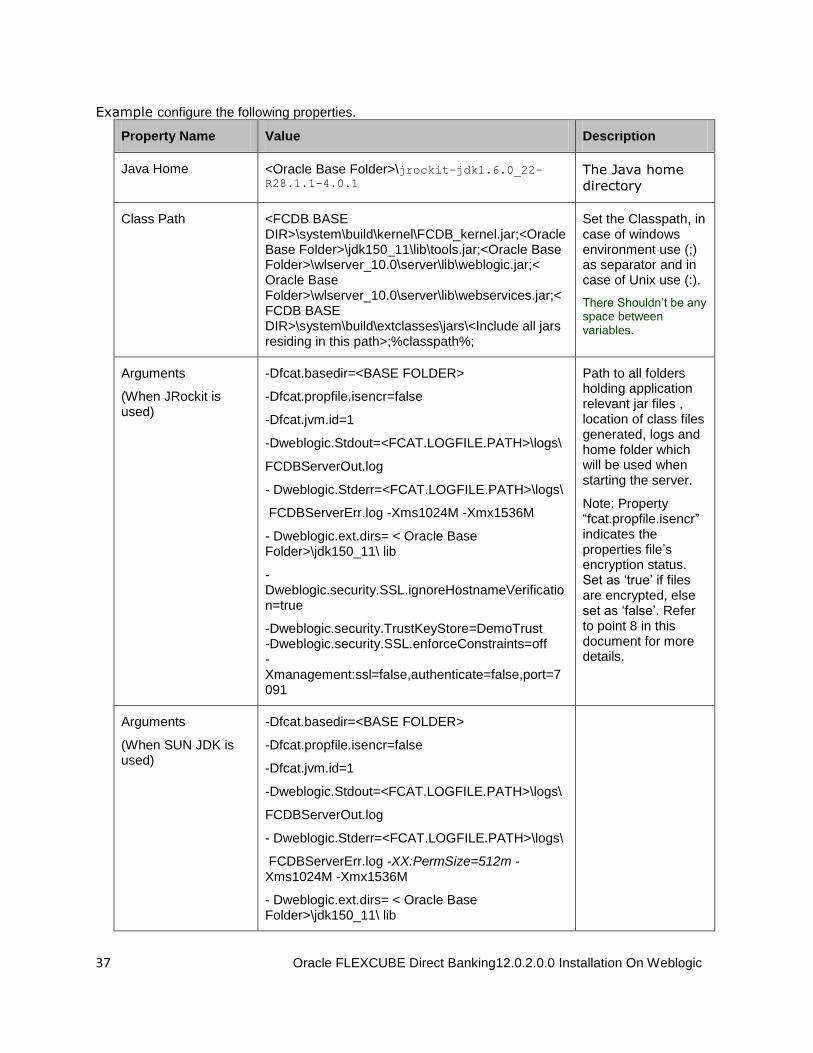
Example configure the following properties.
Property Name Value Description
Java Home <Oracle Base Folder>\jrockit-jdk1.6.0_22-R28.1.1-4.0.1
The Java home
directory
Class Path <FCDB BASE DIR>\system\build\kernel\FCDB_kernel.jar;<Oracle Base Folder>\jdk150_11\lib\tools.jar;<Oracle Base Folder>\wlserver_10.0\server\lib\weblogic.jar;< Oracle Base Folder>\wlserver_10.0\server\lib\webservices.jar;<FCDB BASE DIR>\system\build\extclasses\jars\<Include all jars residing in this path>;%classpath%;
Set the Classpath, in case of windows environment use (;) as separator and in case of Unix use (:).
There Shouldn’t be any space between variables.
Arguments
(When JRockit is used)
-Dfcat.basedir=<BASE FOLDER>
-Dfcat.propfile.isencr=false
-Dfcat.jvm.id=1
-Dweblogic.Stdout=<FCAT.LOGFILE.PATH>\logs\
FCDBServerOut.log
- Dweblogic.Stderr=<FCAT.LOGFILE.PATH>\logs\
FCDBServerErr.log -Xms1024M -Xmx1536M
- Dweblogic.ext.dirs= < Oracle Base Folder>\jdk150_11\ lib
-Dweblogic.security.SSL.ignoreHostnameVerification=true
-Dweblogic.security.TrustKeyStore=DemoTrust -Dweblogic.security.SSL.enforceConstraints=off -Xmanagement:ssl=false,authenticate=false,port=7091
Path to all folders holding application relevant jar files , location of class files generated, logs and home folder which will be used when starting the server.
Note: Property “fcat.propfile.isencr” indicates the properties file’s encryption status. Set as ‘true’ if files are encrypted, else set as ‘false’. Refer to point 8 in this document for more details.
Arguments
(When SUN JDK is used)
-Dfcat.basedir=<BASE FOLDER>
-Dfcat.propfile.isencr=false
-Dfcat.jvm.id=1
-Dweblogic.Stdout=<FCAT.LOGFILE.PATH>\logs\
FCDBServerOut.log
- Dweblogic.Stderr=<FCAT.LOGFILE.PATH>\logs\
FCDBServerErr.log -XX:PermSize=512m -Xms1024M -Xmx1536M
- Dweblogic.ext.dirs= < Oracle Base Folder>\jdk150_11\ lib
38 Oracle FLEXCUBE Direct Banking12.0.2.0.0 Installation On Weblogic
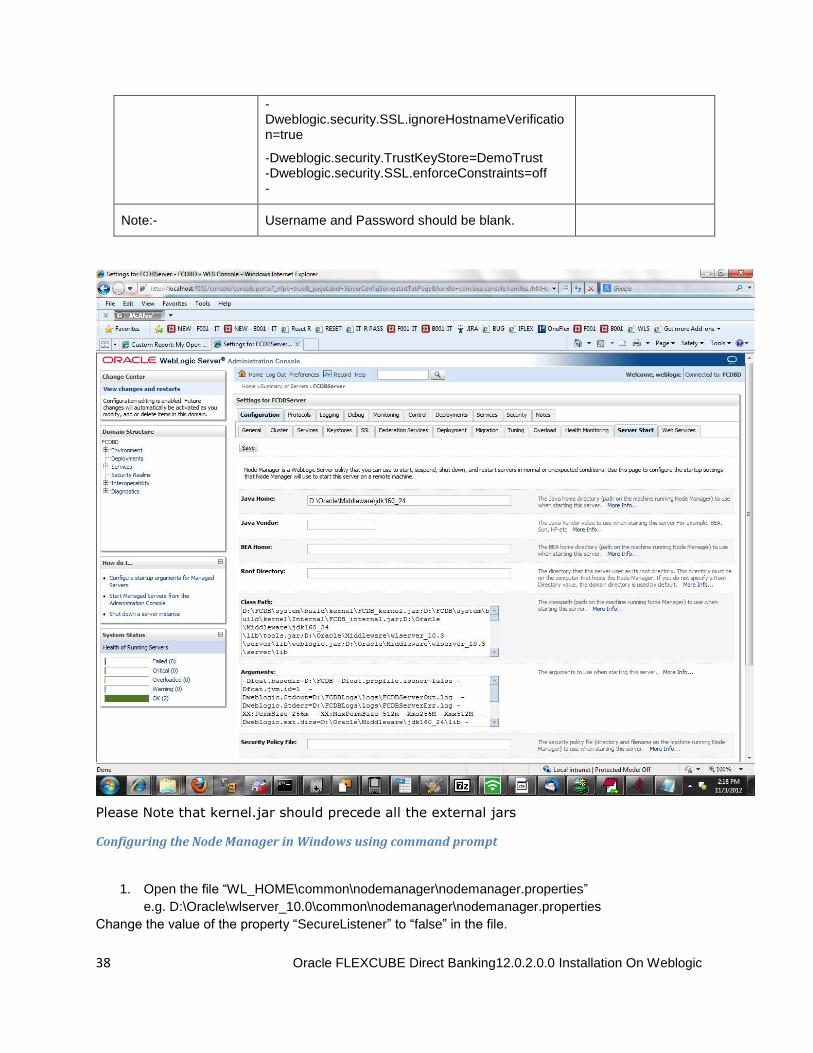
-Dweblogic.security.SSL.ignoreHostnameVerification=true
-Dweblogic.security.TrustKeyStore=DemoTrust -Dweblogic.security.SSL.enforceConstraints=off -
Note:- Username and Password should be blank.
Please Note that kernel.jar should precede all the external jars
Configuring the Node Manager in Windows using command prompt
1. Open the file “WL_HOME\common\nodemanager\nodemanager.properties”
e.g. D:\Oracle\wlserver_10.0\common\nodemanager\nodemanager.properties
Change the value of the property “SecureListener” to “false” in the file.
39 Oracle FLEXCUBE Direct Banking12.0.2.0.0 Installation On Weblogic
Execute the file installNodeMgrSvc in WL_Home\server\bin
Verify the configuration by following these steps
a. Find the service with the name “Oracle Products NodeManager through services.msc.
b. Make sure that the “Startup Type” is “Automatic”
c. Click on the Start link to start the service.
Configuration to Start/Stop Servers as a windows Service.
Admin Server
1. Copy the installAdminServerSvc.cmd file from the list of files provided in the following location.
< Oracle Base Folder>\user_projects\domains\DOMAIN_NAME
Execute the following command at the command prompt under the directory where the
installAdminServerSvc.cmd file has been copied to.
installAdminServerSvc <username> <password>
FCDBServer
Copy the installFCDBServerSvc.cmd to the following location.
< Oracle Base Folder>\user_projects\domains\DOMAIN_NAME
Execute the following command at the command prompt under the directory where the
installFCDBServerSvc.cmd file has been copied to.
installFCDBServerSvc <username> <password>
Property Description
DOMAIN_NAME Name of the domain as specified in domain creation.
username The user name specified at domain creation.
password The password specified at domain creation.
Check the path in My ComputerEnvironment VariablesPath (Variable). It must not contain any
spaces. This can be verified by giving the command at the command prompt
echo %PATH%
Starting Admin Server and Managed Server using command prompt
1. In a command prompt, set up the required environment variables by running the following script:
WL_HOME\server\bin\setWLSEnv.cmd (on Windows)
WL_HOME/server/bin/setWLSEnv.sh (on UNIX)
where WL_HOME is the home directory for WebLogic.
In the command prompt, change to the root of the domain directory, usually
<ORACLE_HOME>\user_projects\domains\<DOMAIN_NAME>
To start an Administration Server, enter the following command:
java weblogic.Server
You can start a Managed Server as follows:

40 Oracle FLEXCUBE Direct Banking12.0.2.0.0 Installation On Weblogic
java -Dweblogic.Name=<managed-server-name>
Dweblogic.management.server=<url-for-Administration-Server> weblogic.Server
For example, if you create a Managed Server named FCDBSerevr in the fcdb_domain, you can enter the
following command:
java -Dweblogic.Name= FCDBServer
Dweblogic.management.server=localhost:7001 weblogic.Server

41 Oracle FLEXCUBE Direct Banking12.0.2.0.0 Installation On Weblogic
Starting the Node Manager through Windows
Start the Node Manager from the Program Files< ORACLE Folder>ToolsNode Manager.
Starting Managed Server using Administrative Console
1. Click on “Environment Servers.”
Click on the server that is to be started.
Note: Only those servers which have been assigned a machine can be controlled through Administration
console
Click on “Control” tab.
Select the checkbox against the server name and click on the “Start” button.
Click “Yes” in the confirmation screen.
4.2. Deploying Applications
Web Application Deployment
Following section explains deploying Web application on Weblogic. For details and different options of deployment refer to documentations provided by ORACLE Weblogic .
These steps should be carried out for each FCDB web application mentioned below.
Deployable Suggested Context Path Location Description
F001.war F001 <FCDB BASE DIR>\deploy
Application for Super entity F001
B001.war B001 < FCDB BASE DIR>\deploy
Application for Bank entity B001. This is available only for Base release.
T001.war T001 < FCDB BASE DIR>\deploy
Application for Model Third Party Bank entity T001. This is applicable only for Third party Accelerator Pack release.
V001.war V001 < FCDB BASE DIR>\deploy
Application for Model Virtual Bank entity V001. This is applicable only for Virtual Bank Accelerator Pack release.
SMS.war SMS < FCDB BASE DIR>\deploy
Required for SMS Banking.
help.war B001 < FCDB BASE DIR>\deploy
Required for help
42 Oracle FLEXCUBE Direct Banking12.0.2.0.0 Installation On Weblogic
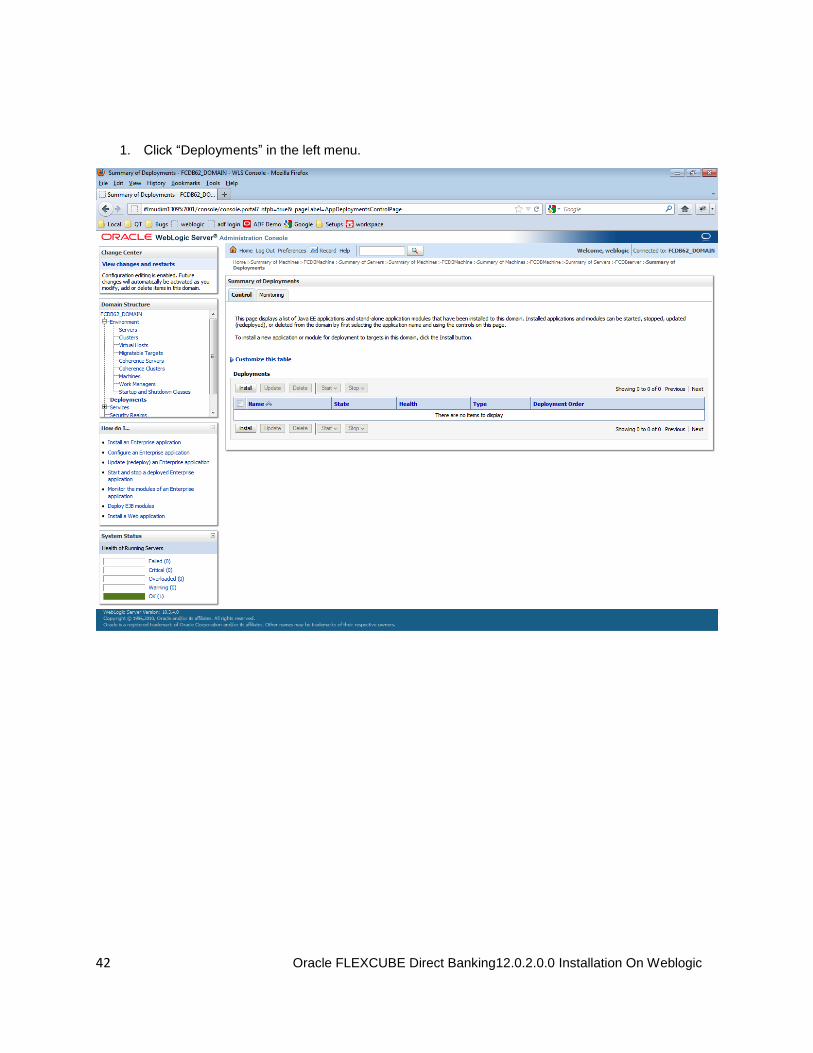
1. Click “Deployments” in the left menu.
43 Oracle FLEXCUBE Direct Banking12.0.2.0.0 Installation On Weblogic
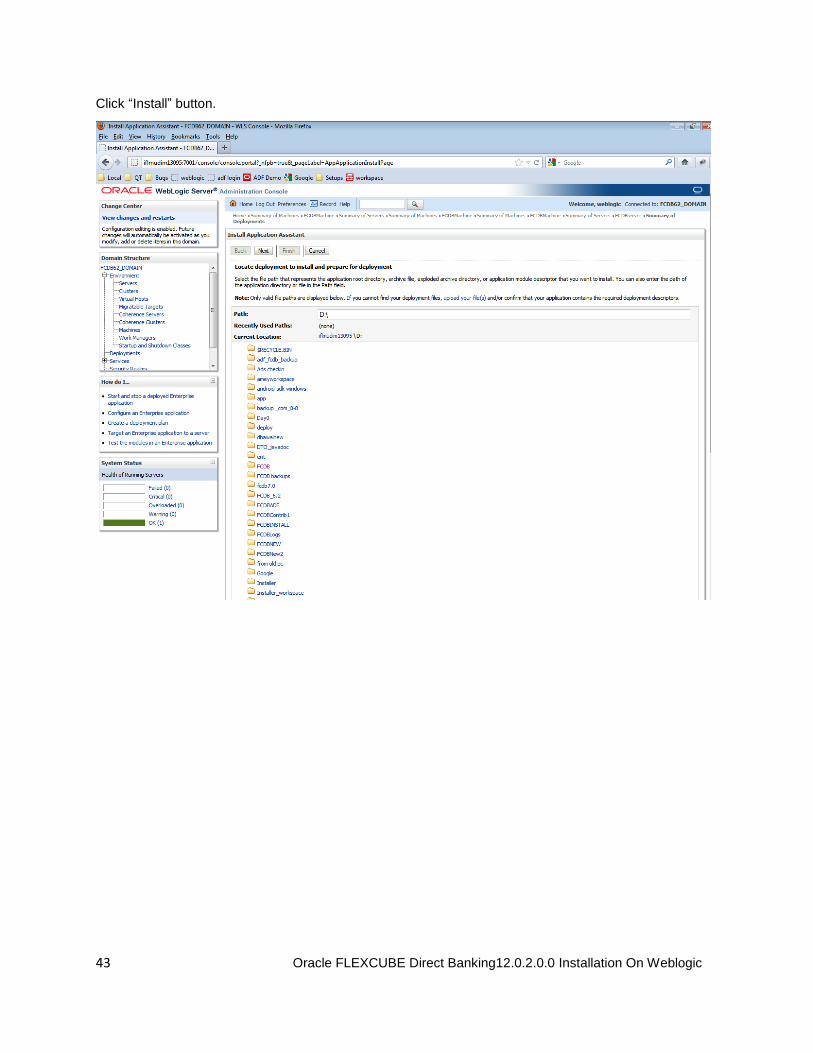
Click “Install” button.

44 Oracle FLEXCUBE Direct Banking12.0.2.0.0 Installation On Weblogic
Navigate to the location where the war is stored on the machine and select the radio button against the
deployable .war file. Click “Next”

45 Oracle FLEXCUBE Direct Banking12.0.2.0.0 Installation On Weblogic
Check the radio button against “Install this deployment as an application” and click Next.

46 Oracle FLEXCUBE Direct Banking12.0.2.0.0 Installation On Weblogic
Select the server FCDBserver to be mapped and click on
Next
47 Oracle FLEXCUBE Direct Banking12.0.2.0.0 Installation On Weblogic
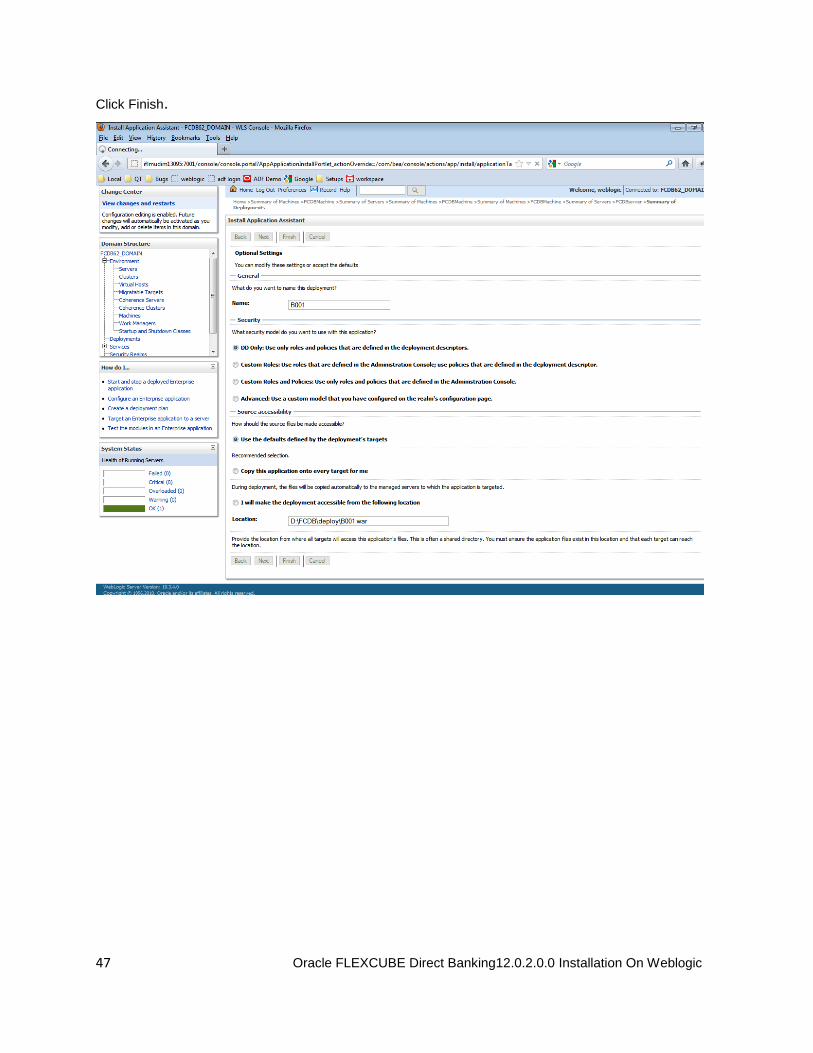
Click Finish.

48 Oracle FLEXCUBE Direct Banking12.0.2.0.0 Installation On Weblogic
Confirmation Page is displayed
Deploy all the deployable mentioned in the Appendix depending upon the invocation mode set.
49 Oracle FLEXCUBE Direct Banking12.0.2.0.0 Installation On Weblogic
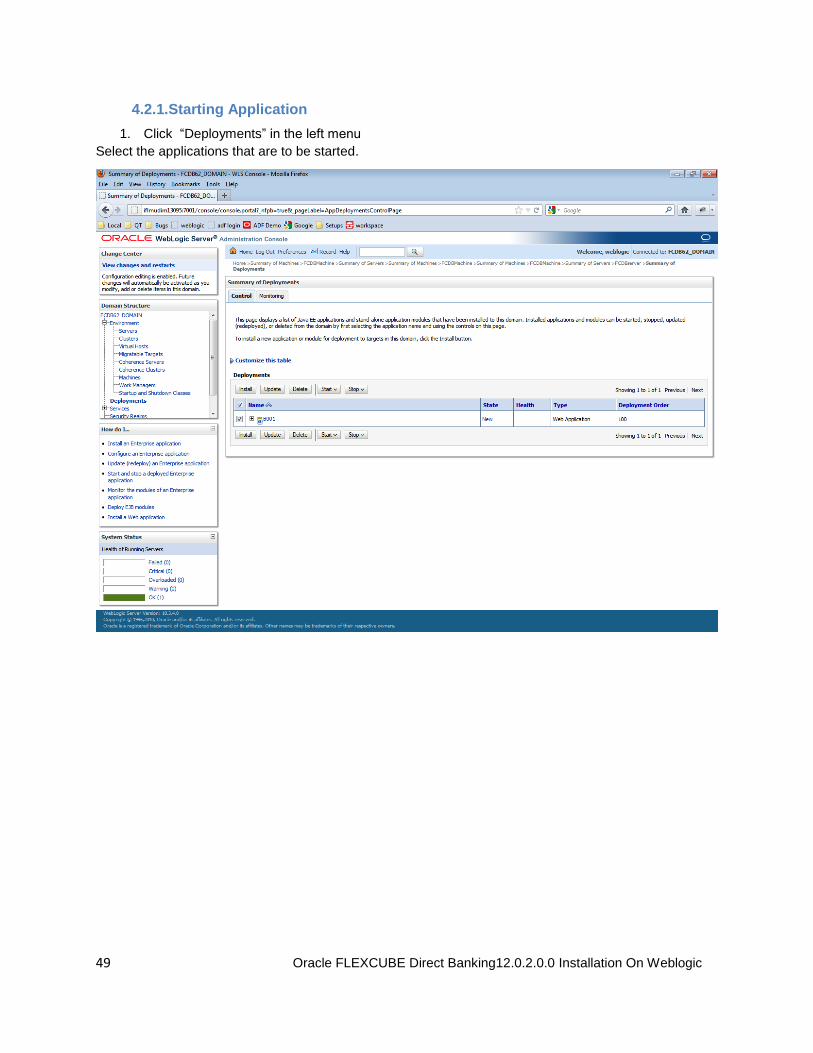
4.2.1.Starting Application
1. Click “Deployments” in the left menu
Select the applications that are to be started.

50 Oracle FLEXCUBE Direct Banking12.0.2.0.0 Installation On Weblogic
Click “Servicing all requests” in the drop down list under “Start” tab

51 Oracle FLEXCUBE Direct Banking12.0.2.0.0 Installation On Weblogic
Confirmation screen displayed
52 Oracle FLEXCUBE Direct Banking12.0.2.0.0 Installation On Weblogic
5.Setup JDBC data source and Connection Pooling
XA Enabled Data Source:
The XA-aware data source implementation allows connections to participate in distributed
transactions. If an application needs to participate in a two-phase commit like in case of Bulk which
will interact across the MQ and the DB for example, this type of data source must be used.

53 Oracle FLEXCUBE Direct Banking12.0.2.0.0 Installation On Weblogic
Following are the steps to configure the XA data source.
1. Go to the “ServicesData Sources”.
2. Click New to create a new JDBC Data Source

54 Oracle FLEXCUBE Direct Banking12.0.2.0.0 Installation On Weblogic
3. Select the option “Generic Data Source”.
55 Oracle FLEXCUBE Direct Banking12.0.2.0.0 Installation On Weblogic
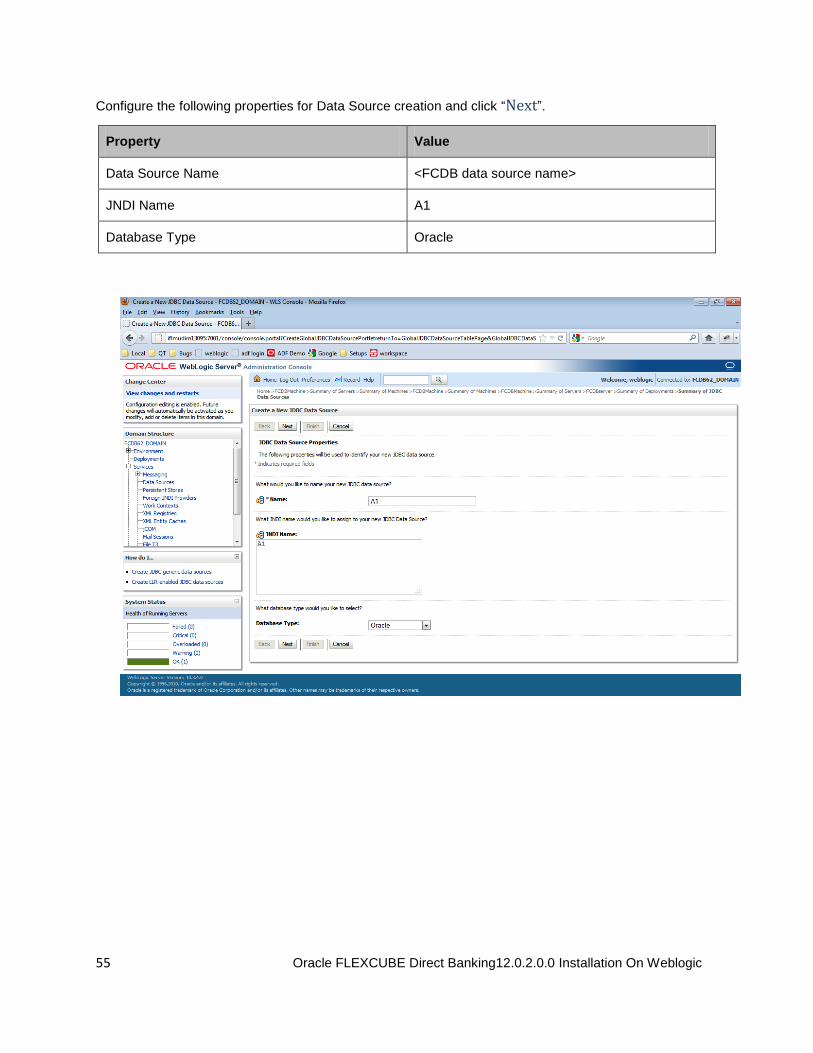
Configure the following properties for Data Source creation and click “Next”.
Property Value
Data Source Name <FCDB data source name>
JNDI Name A1
Database Type Oracle

56 Oracle FLEXCUBE Direct Banking12.0.2.0.0 Installation On Weblogic
Select Database Driver as Oracle’s Driver (Thin XA) Versions: 9.0.1 and later and click Next.

57 Oracle FLEXCUBE Direct Banking12.0.2.0.0 Installation On Weblogic
Click Next.

58 Oracle FLEXCUBE Direct Banking12.0.2.0.0 Installation On Weblogic
Click “Next” button.
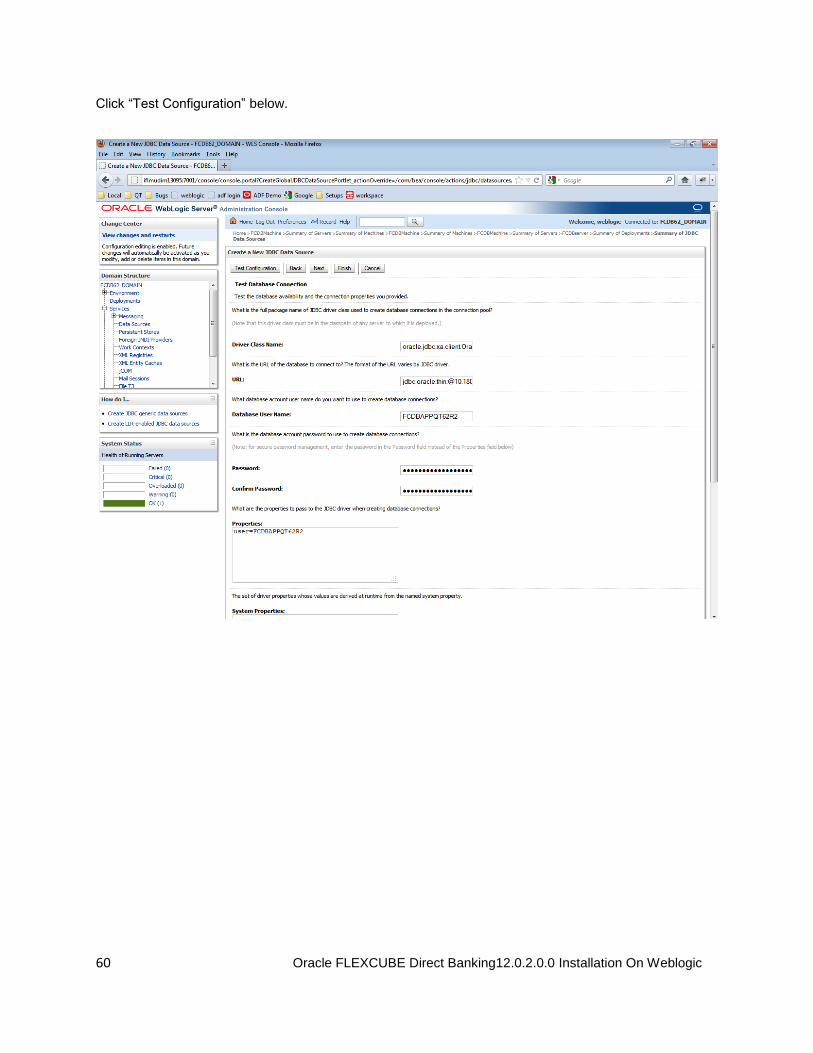
Give the following database details to which you need to connect. For e.g :
Property Description
Database Name Name of the database to be connected to
Host Name ip address or hostname
Port Port number of the database
Database User Name Username used to connect to the database.
Password Password used to connect to the database.
Confirm Password Same password used to connect to the database.

59 Oracle FLEXCUBE Direct Banking12.0.2.0.0 Installation On Weblogic
Click “Next” button.
60 Oracle FLEXCUBE Direct Banking12.0.2.0.0 Installation On Weblogic
Click “Test Configuration” below.

61 Oracle FLEXCUBE Direct Banking12.0.2.0.0 Installation On Weblogic
A success message must appear with “Connection test succeeded”.
62 Oracle FLEXCUBE Direct Banking12.0.2.0.0 Installation On Weblogic
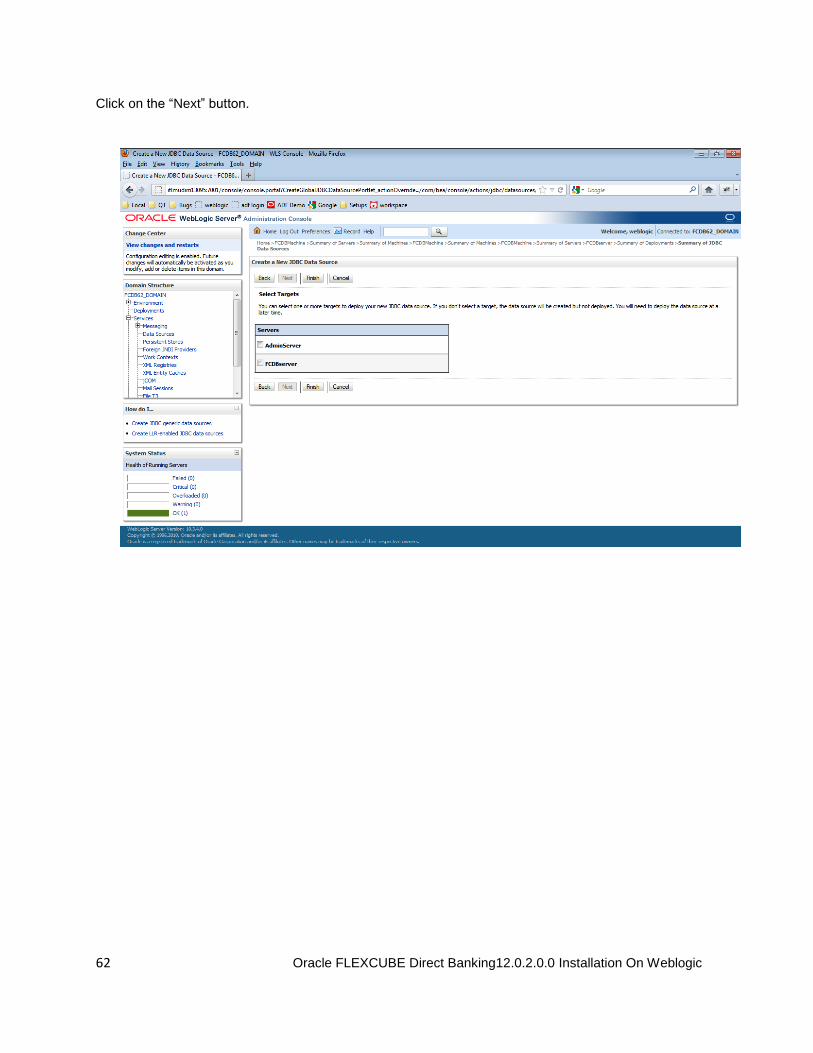
Click on the “Next” button.

63 Oracle FLEXCUBE Direct Banking12.0.2.0.0 Installation On Weblogic
Select the server as ‘FCDBServer’ and click on Finish.

64 Oracle FLEXCUBE Direct Banking12.0.2.0.0 Installation On Weblogic
The data source is created successfully. Click on the newly created data source under Data Sources
menu option.
65 Oracle FLEXCUBE Direct Banking12.0.2.0.0 Installation On Weblogic
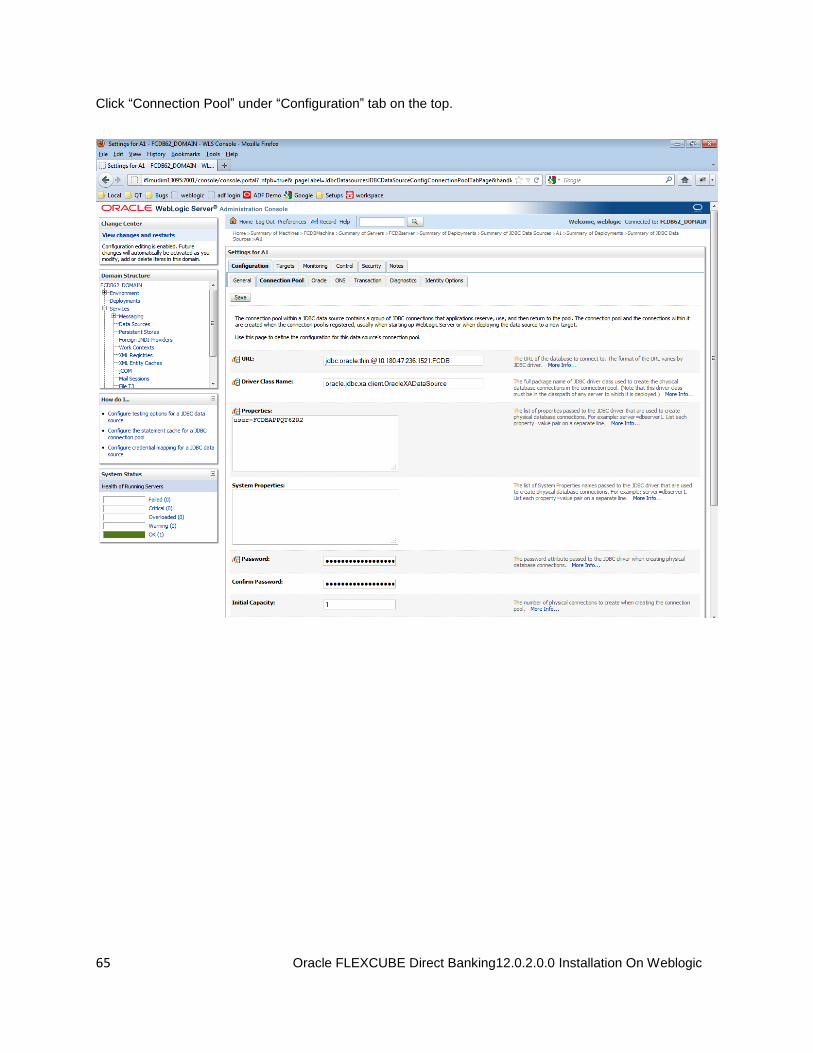
Click “Connection Pool” under “Configuration” tab on the top.

66 Oracle FLEXCUBE Direct Banking12.0.2.0.0 Installation On Weblogic
Click on the “Advanced” link below.

67 Oracle FLEXCUBE Direct Banking12.0.2.0.0 Installation On Weblogic
You can specify the required parameters for connection pooling. In the second section check the option
against “Test Connections On Reserve” and click Save.
68 Oracle FLEXCUBE Direct Banking12.0.2.0.0 Installation On Weblogic
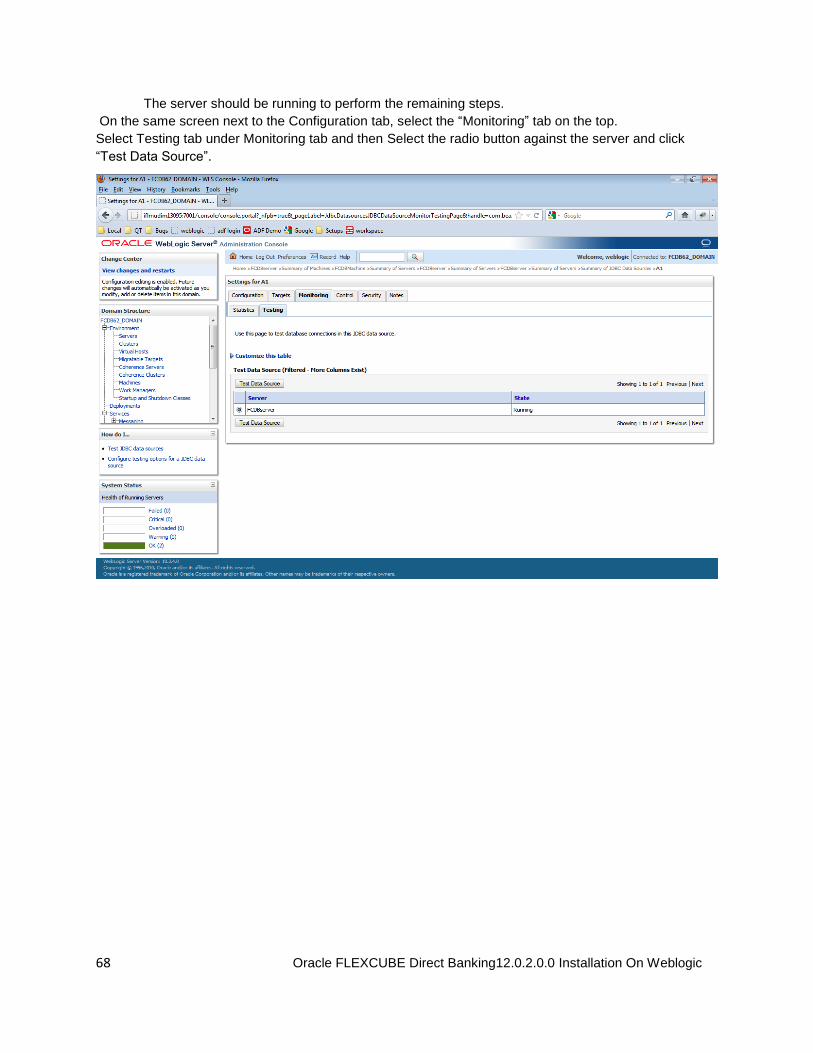
The server should be running to perform the remaining steps.
On the same screen next to the Configuration tab, select the “Monitoring” tab on the top.
Select Testing tab under Monitoring tab and then Select the radio button against the server and click
“Test Data Source”.

69 Oracle FLEXCUBE Direct Banking12.0.2.0.0 Installation On Weblogic
A success message with the connection tested successfully must appear.
The property files mentioned in the Appendix will need to be updated with the data source and connection pool details as per the “Oracle_FLEXCUBE_Direct_Banking_Parameter_Sheet” under the Module Name “Core” and for Property location “fcat.properties” and “fcat-config.xml” where the
Parameter Name includes application id “A1 and AP”. Different data sources can be created w.r.t Application Id, Application type etc.

70 Oracle FLEXCUBE Direct Banking12.0.2.0.0 Installation On Weblogic
6.JMS queue creation on Weblogic server
This section assumes that Weblogic JMS is to be used as the queuing system. For a detailed explanation on creation of queues on Weblogic JMS, please refer to the document
Oracle_FLEXCUBE_Direct_Banking_JMS_Queue_Creation_On_Weblogic.doc.
After completing the steps mentioned in above document, follow steps below

71 Oracle FLEXCUBE Direct Banking12.0.2.0.0 Installation On Weblogic
6.1.Create JMS Module
Click on “ServicesMessagingJMS Modules” on the left menu. Click on “New” button on RHS
screen.

72 Oracle FLEXCUBE Direct Banking12.0.2.0.0 Installation On Weblogic
1. Type in a name “MQIntegrationTest” in the Name text box and click “Next”.
73 Oracle FLEXCUBE Direct Banking12.0.2.0.0 Installation On Weblogic
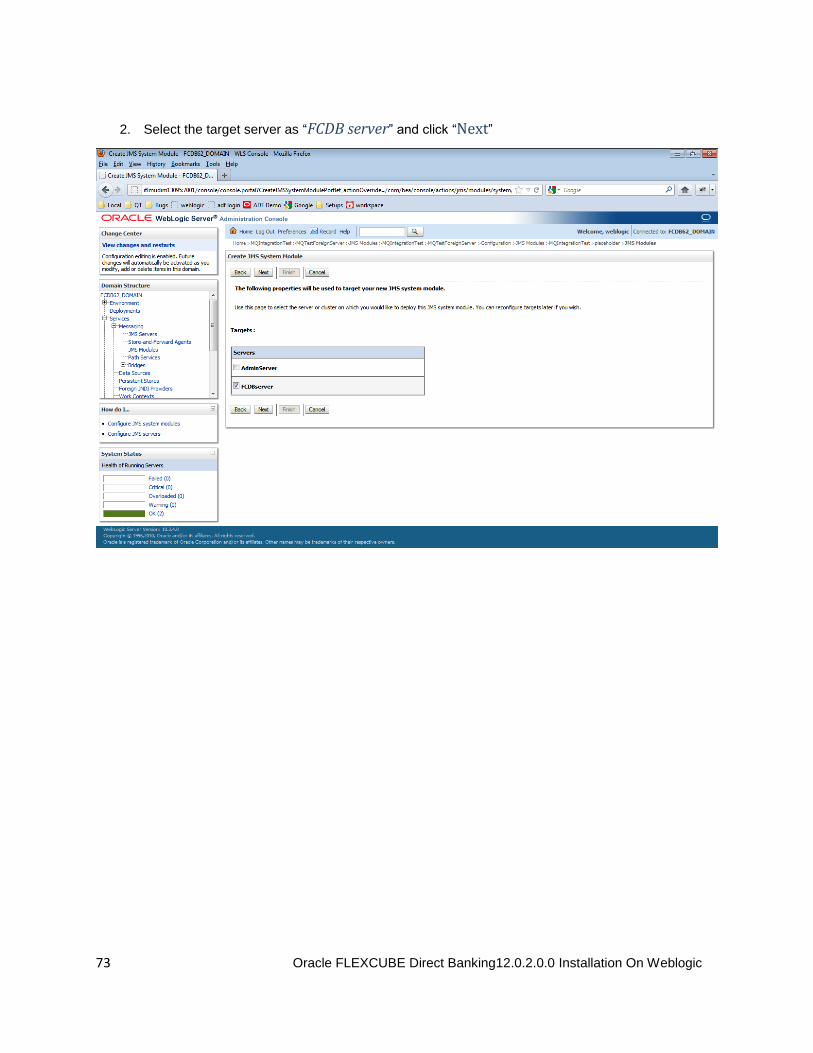
2. Select the target server as “FCDB server” and click “Next”
74 Oracle FLEXCUBE Direct Banking12.0.2.0.0 Installation On Weblogic
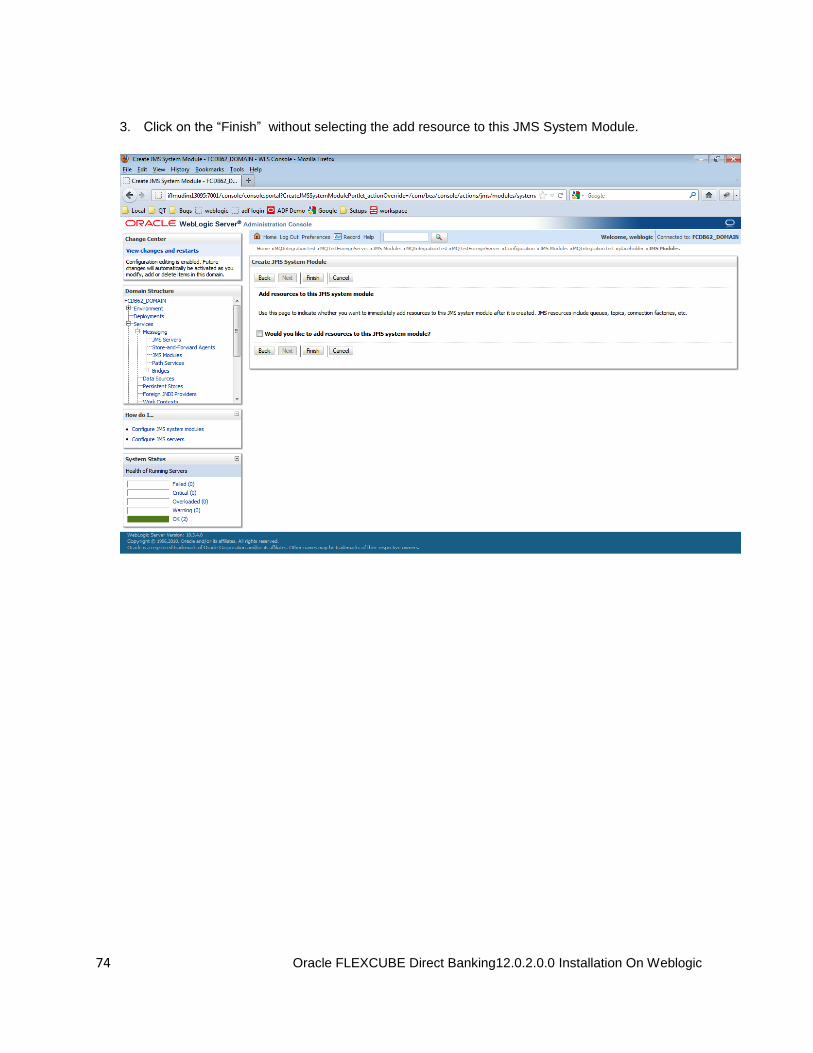
3. Click on the “Finish” without selecting the add resource to this JMS System Module.

75 Oracle FLEXCUBE Direct Banking12.0.2.0.0 Installation On Weblogic
4. Following screen will appear.
76 Oracle FLEXCUBE Direct Banking12.0.2.0.0 Installation On Weblogic
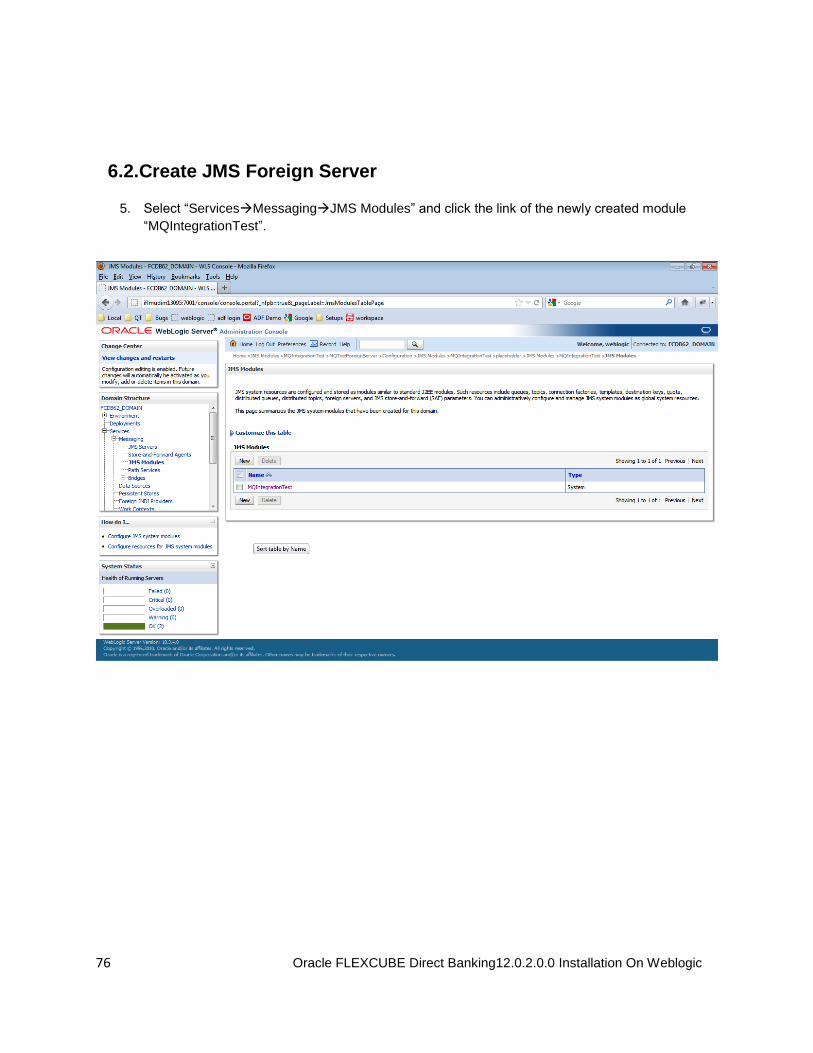
6.2.Create JMS Foreign Server
5. Select “ServicesMessagingJMS Modules” and click the link of the newly created module
“MQIntegrationTest”.

77 Oracle FLEXCUBE Direct Banking12.0.2.0.0 Installation On Weblogic
6. Click the “New” button.
78 Oracle FLEXCUBE Direct Banking12.0.2.0.0 Installation On Weblogic
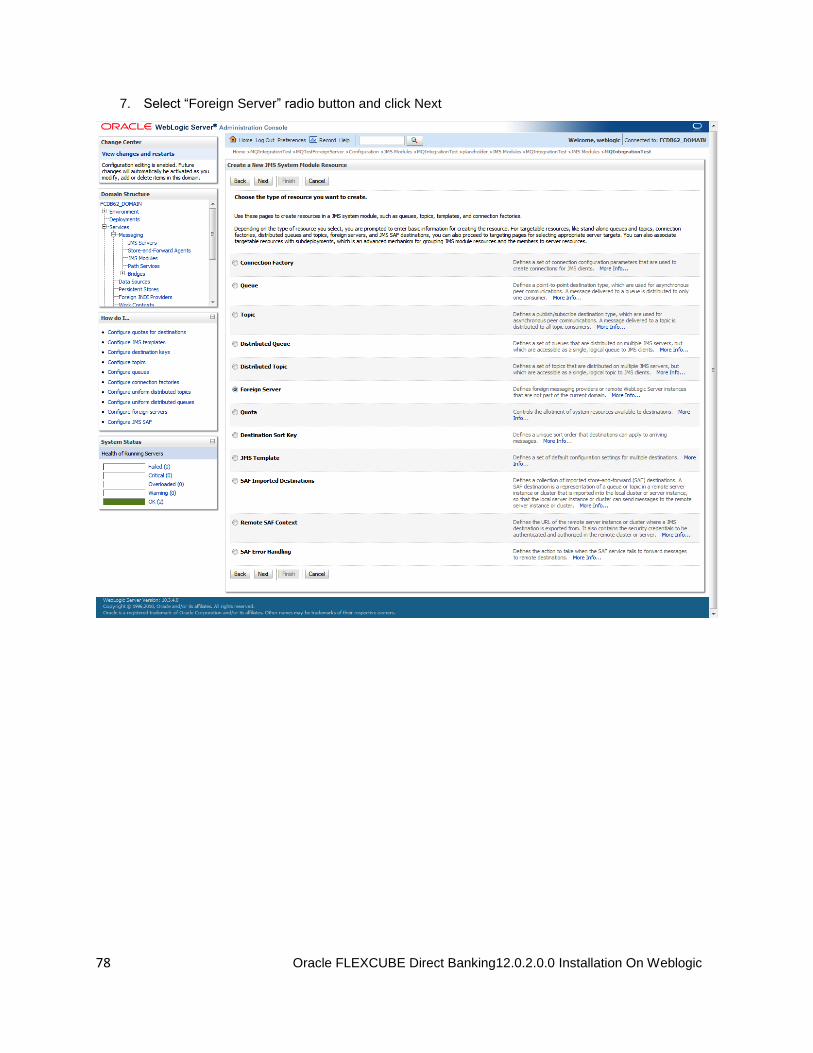
7. Select “Foreign Server” radio button and click Next
79 Oracle FLEXCUBE Direct Banking12.0.2.0.0 Installation On Weblogic
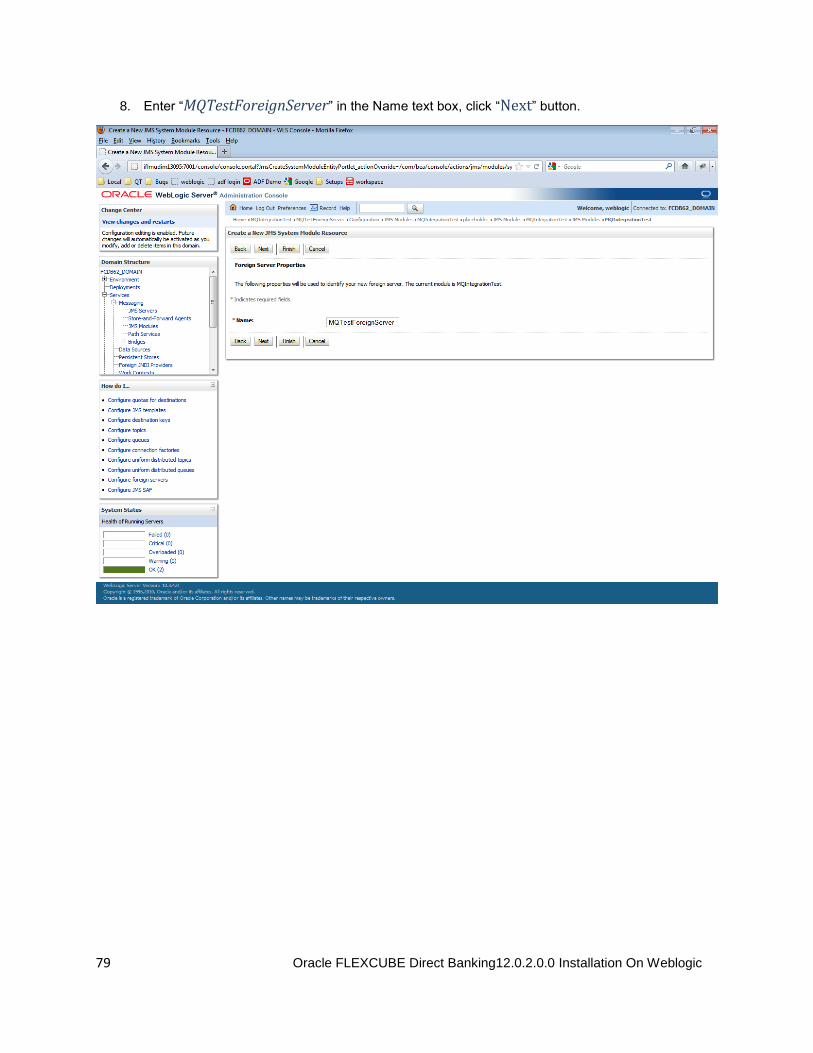
8. Enter “MQTestForeignServer” in the Name text box, click “Next” button.

80 Oracle FLEXCUBE Direct Banking12.0.2.0.0 Installation On Weblogic
9. The ensuing page shows that the target server is already selected. Click “Finish”

81 Oracle FLEXCUBE Direct Banking12.0.2.0.0 Installation On Weblogic
10. ‘The foreign server was created successfully’ message will appear.
11. Click on the newly created foreign server (“MQTestForeignServer”.)

82 Oracle FLEXCUBE Direct Banking12.0.2.0.0 Installation On Weblogic
12. Under the tab “ConfigurationGeneral” type in following details
Property Value
JNDI Initial Context Factory weblogic.jndi.WLInitialContextFactory
JNDI Connection URL t3://localhost:7003 (The server IP of the weblogic server where queues are created should be mentioned here. If the queues are on the same server as FCDB, then localhost can be mentioned. The port should be queuing server’s bookstrap port). If https is to be used then t3s should be used.
13. Click “Save”.

83 Oracle FLEXCUBE Direct Banking12.0.2.0.0 Installation On Weblogic
6.3.Creating Destinations
14. Click button “New” under “ConfigurationDestinations” the tab at the top

84 Oracle FLEXCUBE Direct Banking12.0.2.0.0 Installation On Weblogic
15. Click “New” and enter following details.
16. Click “OK”.
85 Oracle FLEXCUBE Direct Banking12.0.2.0.0 Installation On Weblogic
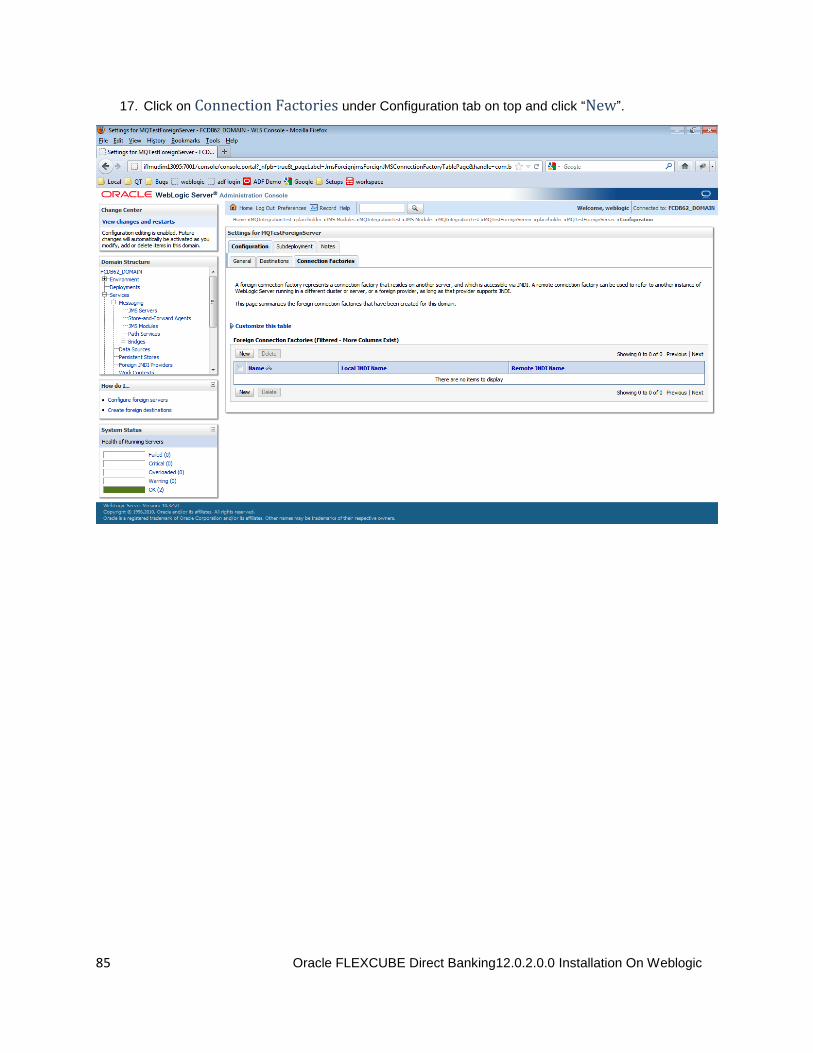
17. Click on Connection Factories under Configuration tab on top and click “New”.

86 Oracle FLEXCUBE Direct Banking12.0.2.0.0 Installation On Weblogic
18. Enter following details in “Create a New Foreign JMS Connection Factory”.
Property Value
Name FCDBQCF
Local JNDI Name jms/ FCDBQCF (Name of the Queue Connection Factory)
Remote JNDI Name FCDBQCF (Name of the Queue Connection Factory)
Click “OK”. With that you are done with creating and configuring Foreign JMS Server.

87 Oracle FLEXCUBE Direct Banking12.0.2.0.0 Installation On Weblogic
7.Module Installation
7.1. Bulk Module Setup
To deploy the bulk module on Weblogic JMS follow the steps explained in the doc “Oracle_FLEXCUBE_Direct_Banking_JMS_Queue_Creation_On_Weblogic” along with the deployment
of MDBs as explained in section “Deploying Applications”. The MDBs will be deployed as a normal
war/ear deployment. Alongwith the MDBs Refer to the Appendix for the ears required to be deployed for Bulk.
A queue connection factory with the JNDI name “jms/FCDBQCF” is required to be created.
List of queues required for Bulk module are:-
1. jms/UPLOAD
2. jms/DECRYPT
3. jms/PREPROCESS
4. jms/PROCESS
5. jms/AUTH
6. jms/AUTHREJECT
7. jms/RESPONSE
8. jms/COMPLETE
The list of MDBs required for deployment on the queues is as follows:
1. UPLOAD_MDB
2. DECRYPT_MDB
3. PREPROCESS_MDB
4. PROCESS_MDB
88 Oracle FLEXCUBE Direct Banking12.0.2.0.0 Installation On Weblogic
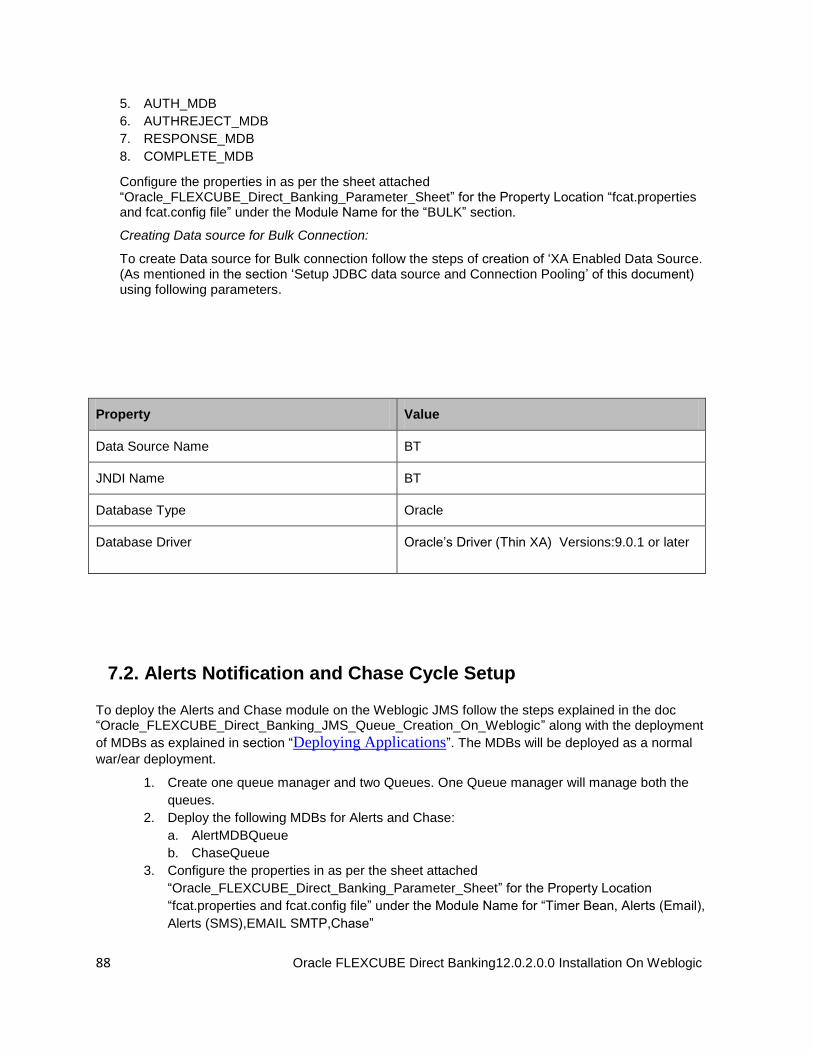
5. AUTH_MDB
6. AUTHREJECT_MDB
7. RESPONSE_MDB
8. COMPLETE_MDB
Configure the properties in as per the sheet attached “Oracle_FLEXCUBE_Direct_Banking_Parameter_Sheet” for the Property Location “fcat.properties and fcat.config file” under the Module Name for the “BULK” section.
Creating Data source for Bulk Connection:
To create Data source for Bulk connection follow the steps of creation of ‘XA Enabled Data Source. (As mentioned in the section ‘Setup JDBC data source and Connection Pooling’ of this document) using following parameters.
Property Value
Data Source Name BT
JNDI Name BT
Database Type Oracle
Database Driver Oracle’s Driver (Thin XA) Versions:9.0.1 or later
7.2. Alerts Notification and Chase Cycle Setup
To deploy the Alerts and Chase module on the Weblogic JMS follow the steps explained in the doc “Oracle_FLEXCUBE_Direct_Banking_JMS_Queue_Creation_On_Weblogic” along with the deployment
of MDBs as explained in section “Deploying Applications”. The MDBs will be deployed as a normal
war/ear deployment.
1. Create one queue manager and two Queues. One Queue manager will manage both the
queues.
2. Deploy the following MDBs for Alerts and Chase:
a. AlertMDBQueue
b. ChaseQueue
3. Configure the properties in as per the sheet attached
“Oracle_FLEXCUBE_Direct_Banking_Parameter_Sheet” for the Property Location
“fcat.properties and fcat.config file” under the Module Name for “Timer Bean, Alerts (Email),
Alerts (SMS),EMAIL SMTP,Chase”
89 Oracle FLEXCUBE Direct Banking12.0.2.0.0 Installation On Weblogic
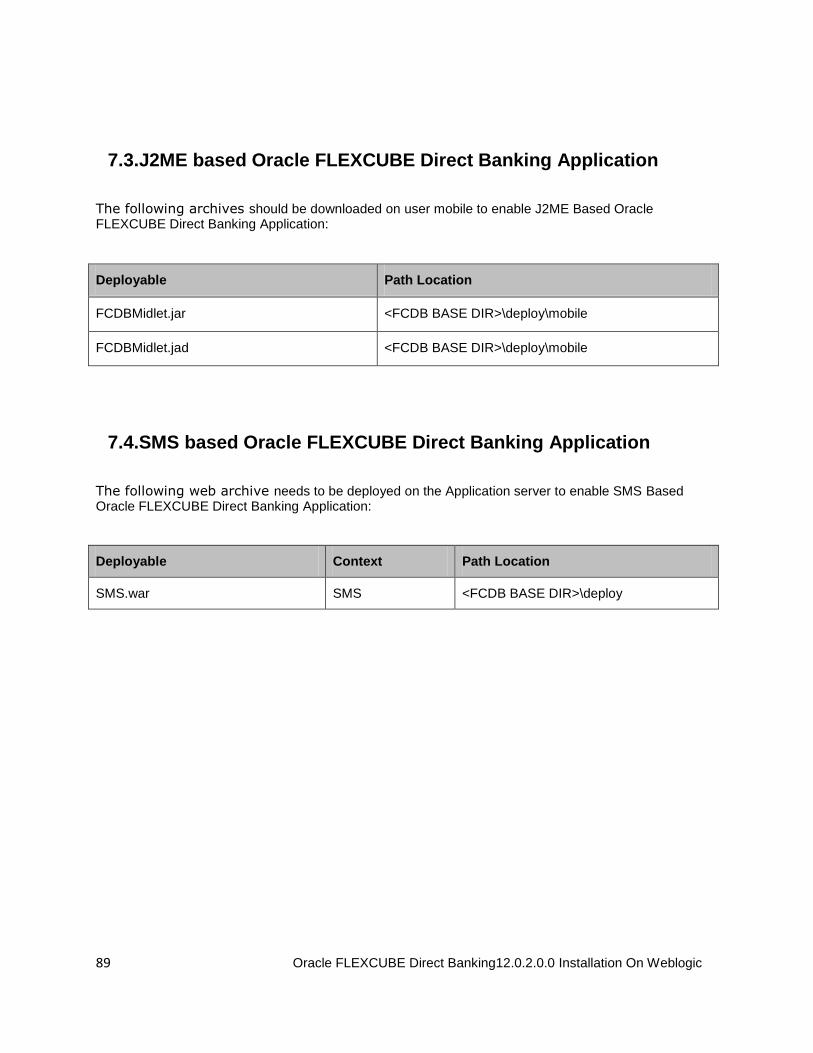
7.3.J2ME based Oracle FLEXCUBE Direct Banking Application
The following archives should be downloaded on user mobile to enable J2ME Based Oracle FLEXCUBE Direct Banking Application:
Deployable Path Location
FCDBMidlet.jar <FCDB BASE DIR>\deploy\mobile
FCDBMidlet.jad <FCDB BASE DIR>\deploy\mobile
7.4.SMS based Oracle FLEXCUBE Direct Banking Application
The following web archive needs to be deployed on the Application server to enable SMS Based Oracle FLEXCUBE Direct Banking Application:
Deployable Context Path Location
SMS.war SMS <FCDB BASE DIR>\deploy

90 Oracle FLEXCUBE Direct Banking12.0.2.0.0 Installation On Weblogic
8.DB Creation
For completing the DB setup kindly refer to the doc “Oracle_FLEXCUBE_Direct_Banking_Database_Setup“
Once the database scripts are successfully executed the SUPERADMIN user created must be unlocked by executing the files in the Tools Section.
91 Oracle FLEXCUBE Direct Banking12.0.2.0.0 Installation On Weblogic
9.Encryption and Decryption of property files
The property files <Identity>.xml , fcat-config.xml and fcat.properties mentioned in the Appendix will be stored in the encrypted format and decrypted later for reading them.
The system property “fcat.propfile.isencr” is set as “true”; if the property files are encrypted. It is set as “false”; if property files are in plain text format. If this property is not set at all as system property then all the property files are assumed to be in plain text format.
The usage of the tools are mentioned in the Tools section.
92 Oracle FLEXCUBE Direct Banking12.0.2.0.0 Installation On Weblogic
10.Service Tier Security
10.1.Webservice Mode
For enabling webservice mode, the invocation mode in fcat-config.xml should be set as ‘W’.
Deployment of application through Webservice mode requires following ear:
Application Name Deployable Context Path Location
service service.ear service <FCDB BASE DIR>\deploy\weblogic
After deploying services.ear, please follow the below steps to authenticate webservice –
1. Create a user under the current security realm.

93 Oracle FLEXCUBE Direct Banking12.0.2.0.0 Installation On Weblogic
Click on the name of security realm.
Under ‘User & Groups’ tab, click on “New”
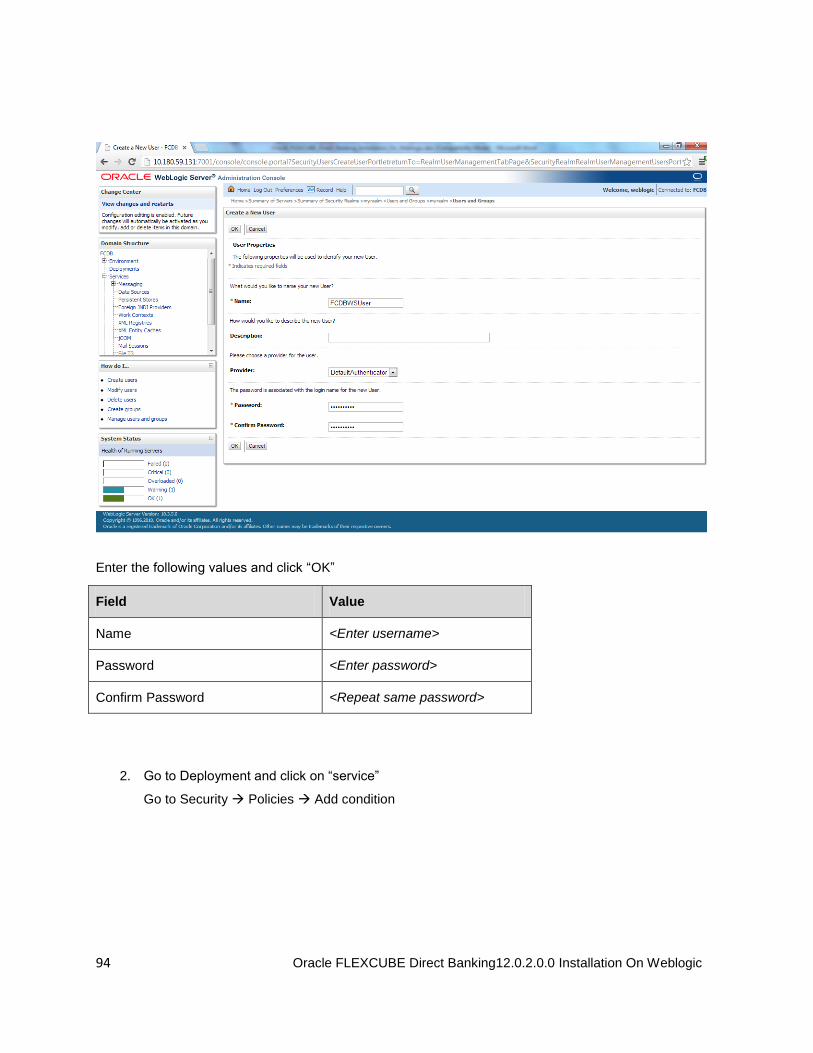
94 Oracle FLEXCUBE Direct Banking12.0.2.0.0 Installation On Weblogic
Enter the following values and click “OK”
Field Value
Name <Enter username>
Password <Enter password>
Confirm Password <Repeat same password>
2. Go to Deployment and click on “service”
Go to Security Policies Add condition
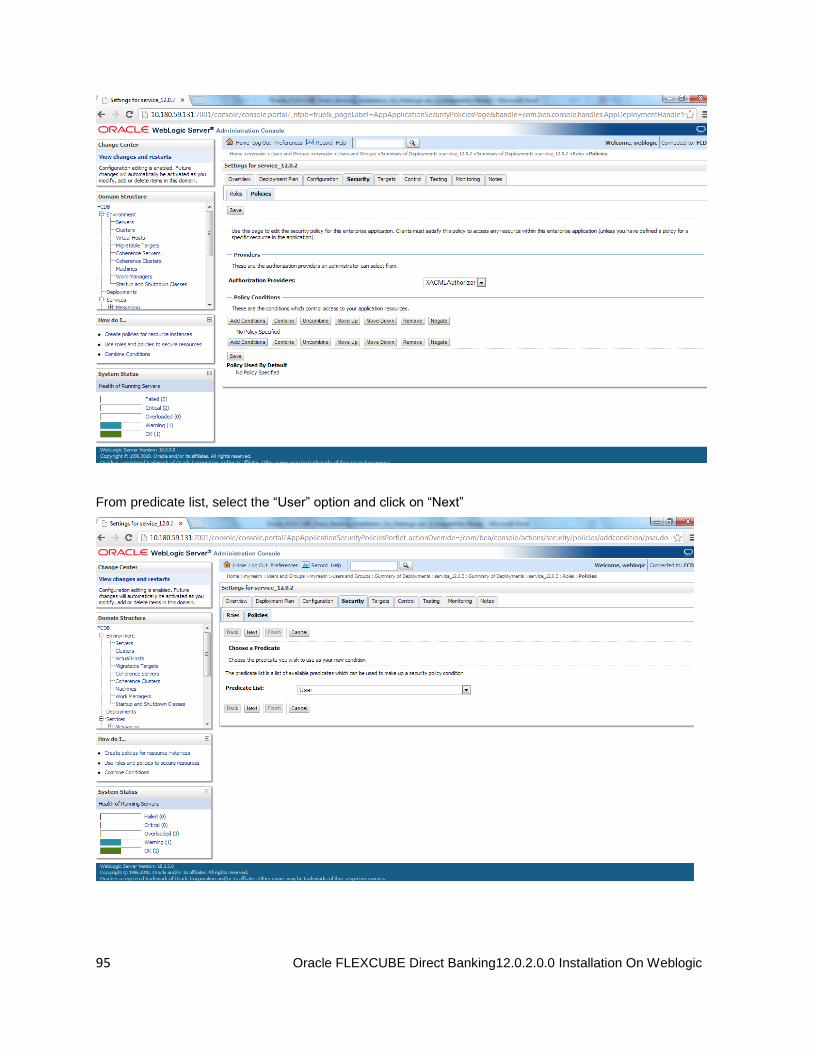
95 Oracle FLEXCUBE Direct Banking12.0.2.0.0 Installation On Weblogic
From predicate list, select the “User” option and click on “Next”
96 Oracle FLEXCUBE Direct Banking12.0.2.0.0 Installation On Weblogic
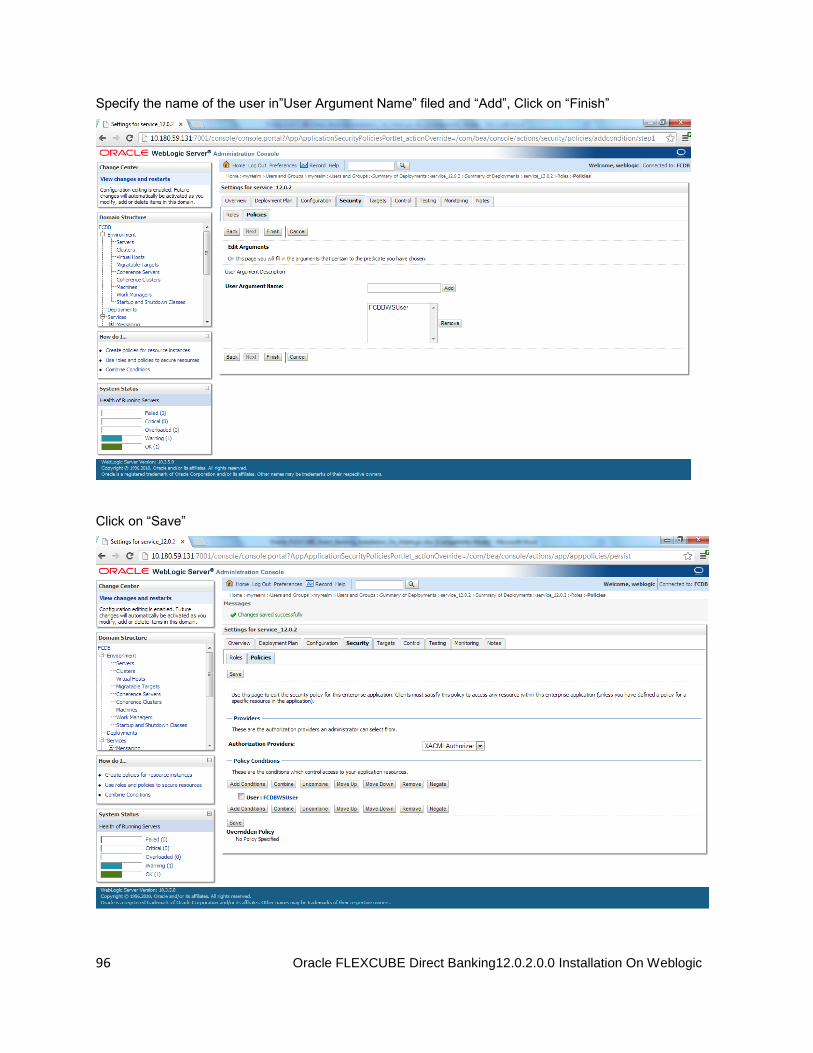
Specify the name of the user in”User Argument Name” filed and “Add”, Click on “Finish”
Click on “Save”

97 Oracle FLEXCUBE Direct Banking12.0.2.0.0 Installation On Weblogic
3. In fcat-config.xml set the following properties with username and password of the user created in above steps.
Field Value
FCAT.CONNECT.SVC.USERNAME <Enter username>
FCAT.CONNECT.SVC.PASSWORD <Enter password>
10.2.EJB Mode
For enabling EJB mode, the invocation mode in fcat-config.xml should be set as ‘E’.
Deployment of application through EJB mode requires following jar:
Application Name Deployable Context Path Location
ServiceEndPointRI ServiceEndPointRI.jar ServiceEndPointEJB <FCDB BASE DIR>\deploy
After deploying ServiceEndPointRI.jar, please follow the below steps to authenticate EJB mode –
1. Create a user under the current security realm.
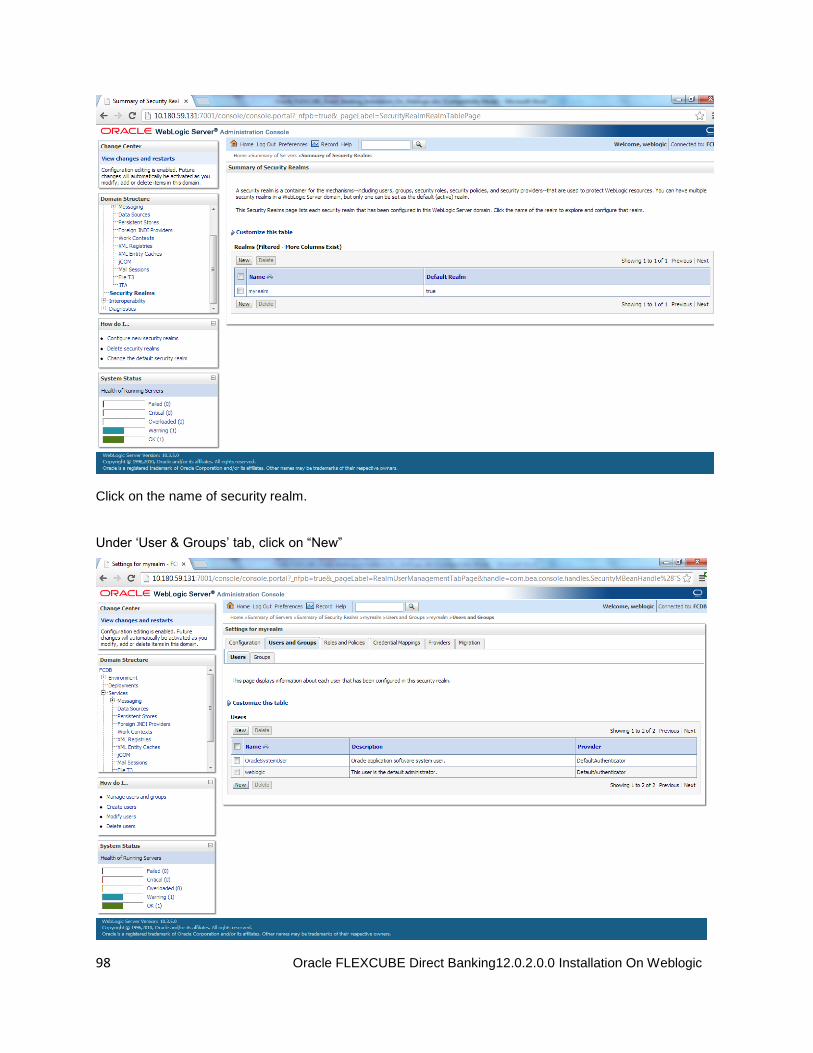
98 Oracle FLEXCUBE Direct Banking12.0.2.0.0 Installation On Weblogic
Click on the name of security realm.
Under ‘User & Groups’ tab, click on “New”

99 Oracle FLEXCUBE Direct Banking12.0.2.0.0 Installation On Weblogic
Enter the following values and click “OK”
Field Value
Name <Enter username>
Password <Enter password>
Confirm Password <Repeat same password>
2. In fcat-config.xml set the following properties with username and password of the user created in above steps.
Field Value
FCAT.CONNECT.SVC.USERNAME <Enter username>
FCAT.CONNECT.SVC.PASSWORD <Enter password>

100 Oracle FLEXCUBE Direct Banking12.0.2.0.0 Installation On Weblogic
3. A role named FCDBEJBRole is defined as follows, in ejb-jar.xml inside ServiceEndPointRI.jar. The user which was created in the above steps is to be assigned this role which is done in step 4.s
<assembly-descriptor>
<security-role>
<role-name>FCDBEJBRole</role-name>
</security-role>
<method-permission>
<role-name>FCDBEJBRole</role-name>
<method>
<ejb-name>ServiceEndPointEJB</ejb-name>
<method-name>processRequestWithXML</method-name>
</method>
</method-permission>
</assembly-descriptor>
4. Update the above created username in weblogic-ejb-jar.xml inside ServiceEndPointRI.jar in
<principal-name/> tag.
<security-role-assignment>
<role-name>FCDBEJBRole</role-name>
<principal-name>%%username%%</principal-name>
</security-role-assignment>
**By default, the username set in <principal-name/> is weblogic.

101 Oracle FLEXCUBE Direct Banking12.0.2.0.0 Installation On Weblogic
12.Appendix
After the successful installation of FCDB with the help of FCDB Installer, following folder structure will be
created:
Folder Name Comments
<FCDB BASE DIR>\documents Folder containing all FCDB documents
<FCDB BASE DIR>\dbsetup Folder containing scripts for FCDB Database setup
<FCDB BASE DIR>\system Folder containing FCDB application & properties files
<FCDB BASE DIR>\system\build\kernel Folder containing the application codebase in form of a jar called FCDB_kernel.jar.
<FCDB BASE DIR>\system\build\extclasses\jars Folder containing all requisite third-party jars. Seperate folders will be created for all the third party jars. e.g. <FCDB BASE DIR>\system\build\extclasses\jars\fcr
<FCDB BASE DIR>\system\home Folder containing all the configuration/properties files of the application.

102 Oracle FLEXCUBE Direct Banking12.0.2.0.0 Installation On Weblogic
<FCDB BASE DIR>\system\build\tools Folder containing all the tools required to generate the GUI xsls, to encrypt/decrypt the property files and generation of password for db user.
<FCAT.LOGFILE.PATH>\logs Property FCAT.LOGFILE.PATH is configured to locate the folder for storing the log files of the server. e.g. D:\FCDBLogs.
If this property is not set then logs are created at default location at <FCDB BASE DIR>\logs.
Deployment of application through EJB mode requires following jars:
Application Name Deployable JNDI Path Location
EJBChannleController EJBChannleController.jar EJBChannelController <FCDB BASE DIR>\deploy
ServiceEndPointRI ServiceEndPointRI.jar ServiceEndPointEJB <FCDB BASE DIR>\deploy
TransactionBean TransactionBean.jar TransactionBean <FCDB BASE DIR>\deploy
TimerBean TimerBean.jar TimerBean <FCDB BASE DIR>\deploy
Deployment of the war file is mandatory for both modes (EJB\Webservice).
Deployable Context Path Location
F001.war F001 <FCDB BASE DIR>\deploy
B001.war B001 <FCDB BASE DIR>\deploy
SMS.war [SMS Banking] SMS <FCDB BASE DIR>\deploy
T001.war T001 < FCDB BASE DIR>\deploy
V001.war V001 < FCDB BASE DIR>\deploy
SMS.war SMS < FCDB BASE DIR>\deploy
Additional deployments when interaction with host is Message driven requires the following MDBs:
Deployable Context Comment Path Location

103 Oracle FLEXCUBE Direct Banking12.0.2.0.0 Installation On Weblogic
CloneQueueReceiverMDB.jar CloneQueueReceiverMDB Mandatory <FCDB BASE DIR>\deploy
ClonedQueuResourceAdapter.rar ClonedQueuResourceAdapter Mandatory <FCDB BASE DIR>\deploy
The following ears will be required for Bulk module setup.
Deployable Context Path Location
BULKEVENTHANDLEREJB.ear BULKEVENTHANDLEREJB <FCDB BASE DIR>\deploy\weblogic\bulk
The following archives should be downloaded on user mobile to enable J2ME Based Oracle FLEXCUBE Direct Banking Application.
Deployable Context Path Location
FCDBMidlet.jar <FCDB BASE DIR>\deploy\mobile
FCDBMidlet.jad <FCDB BASE DIR>\deploy\mobile
Configuration/Property Files
The layers presentation, channel & service in the system use the following property files:
Property File Purpose
<Identity>.xml Each web application deployed has its own property file named as <daemonName>.xml. The daemon name can be configured by property 'FCAT.INTERNETSERVLET.DAEMON.NAME' in web.xml. If no daemon name is specified, default name 'INTERNETSERVLET' is used. (internetservlet.xml). The daemon name can be B001 hence B001.xml.
fcat-config.xml
Configuration property used at the channel layer containing the db properties, invocation mode.This will be updated mainly when the invocation mode is Webservice (W).
fcat.properties
Configuration property used at the service layer containing the db properties, connection pool settings, path for logs and properties configured specific to any module installed.
Kindly refer to the sheet “Oracle_FLEXCUBE_Direct_Banking_Parameter_Sheet” under Module Name “Core” and Property Location for all the above files.

104 Oracle FLEXCUBE Direct Banking12.0.2.0.0 Installation On Weblogic
13.Tools
Before using the tools ensure that the Java home path is set.
Encryption and Decryption of property files in home folder.
Change the working folder to <FCDB BASE DIR>\system\build\tools. Pick up the following files
for the respective platform and execute them at the command prompt:
File Name OS
securepropertiesfiles.bat Windows
securepropertiesfiles.sh Linux
The tool operates in the interactive mode. The arguments will be provided on execution of the files.
To encrypt or decrypt a file the arguments prompted are :
<Encryption or Decryption mode(E/D)> <Path of the input property file> <Path of the output property file>
e.g. E D:\FCDB\system\home\fcat-config.xml D:\config
Once the file is encrypted set the system property “fcat.propfile.isencr” to “true”.
105 Oracle FLEXCUBE Direct Banking12.0.2.0.0 Installation On Weblogic
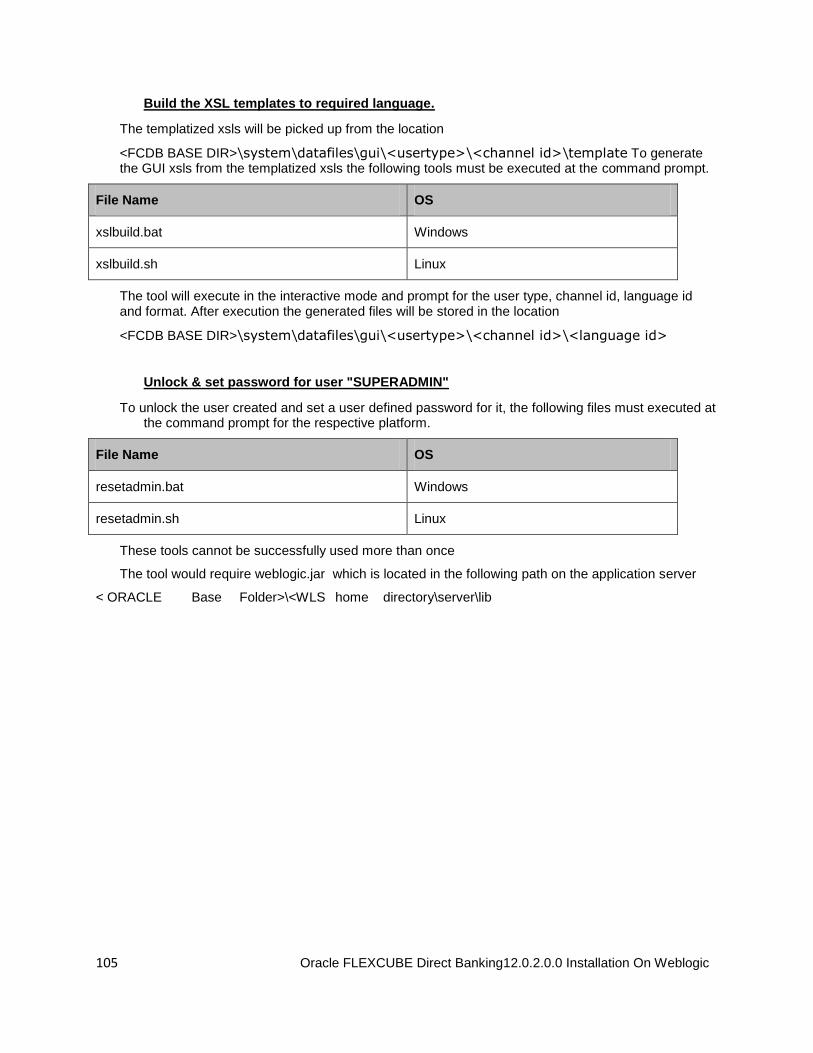
Build the XSL templates to required language.
The templatized xsls will be picked up from the location
<FCDB BASE DIR>\system\datafiles\gui\<usertype>\<channel id>\template To generate the GUI xsls from the templatized xsls the following tools must be executed at the command prompt.
File Name OS
xslbuild.bat Windows
xslbuild.sh Linux
The tool will execute in the interactive mode and prompt for the user type, channel id, language id and format. After execution the generated files will be stored in the location
<FCDB BASE DIR>\system\datafiles\gui\<usertype>\<channel id>\<language id>
Unlock & set password for user "SUPERADMIN"
To unlock the user created and set a user defined password for it, the following files must executed at the command prompt for the respective platform.
File Name OS
resetadmin.bat Windows
resetadmin.sh Linux
These tools cannot be successfully used more than once
The tool would require weblogic.jar which is located in the following path on the application server
< ORACLE Base Folder>\<WLS home directory\server\lib


![UCM Server Setup Oracle FLEXCUBE Universal Banking …...UCM Server Setup Oracle FLEXCUBE Universal Banking Release 12.2.0.0.0 [May] [2016]](https://img.dokumen.tips/doc/110x75/5f5188e390d52d0087493ac2/ucm-server-setup-oracle-flexcube-universal-banking-ucm-server-setup-oracle-flexcube.jpg)


![Nostro Reconciliation Oracle FLEXCUBE Universal Banking ... · Oracle FLEXCUBE Universal Banking Release 11.5.0.0.0 [July] [2014] Nostro Reconciliation . Table of Contents 1.](https://img.dokumen.tips/doc/110x75/5ac8cffd7f8b9a40728d134b/nostro-reconciliation-oracle-flexcube-universal-banking-flexcube-universal-banking.jpg)

![Millionaire Certificate Oracle FLEXCUBE Universal Banking ... · Millionaire Certificate . Oracle FLEXCUBE Universal Banking . Release 11.3.83.02.0 [April] [2014] Oracle Part Number](https://img.dokumen.tips/doc/110x75/5b93734609d3f2d9098d521d/millionaire-certificate-oracle-flexcube-universal-banking-millionaire-certificate.jpg)