Embed Size (px)
Citation preview

Oracle® Communications Performance Intelligence Center
G5 to Gen8 Migration Guide
Release 10.1
E57376 Revision 1
October 2014

Page 2 of 27
Oracle Communications Performance Intelligence Center Installation Guide, Release 10.1
Copyright © 2003, 2014, Oracle and/or its affiliates. All rights reserved.
This software and related documentation are provided under a license agreement containing restrictions on use and disclosure and are protected by intellectual property laws. Except as expressly permitted in your license agreement or allowed by law, you may not use, copy, reproduce, translate, broadcast, modify, license, transmit, distribute, exhibit, perform, publish, or display any part, in any form, or by any means. Reverse engineering, disassembly, or decompilation of this software, unless required by law for interoperability, is prohibited.
The information contained herein is subject to change without notice and is not warranted to be error-free. If you find any errors, please report them to us in writing.
If this is software or related documentation that is delivered to the U.S. Government or anyone licensing it on behalf of the U.S. Government, the following notice is applicable:
U.S. GOVERNMENT RIGHTS Programs, software, databases, and related documentation and technical data delivered to U.S. Government customers are "commercial computer software" or "commercial technical data" pursuant to the applicable Federal Acquisition Regulation and agency-specific supplemental regulations. As such, the use, duplication, disclosure, modification, and adaptation shall be subject to the restrictions and license terms set forth in the applicable Government contract, and, to the extent applicable by the terms of the Government contract, the additional rights set forth in FAR 52.227-19, Commercial Computer Software License (December 2007). Oracle America, Inc., 500 Oracle Parkway, Redwood City, CA 94065.
This software or hardware is developed for general use in a variety of information management applications. It is not developed or intended for use in any inherently dangerous applications, including applications that may create a risk of personal injury. If you use this software or hardware in dangerous applications, then you shall be responsible to take all appropriate fail-safe, backup, redundancy, and other measures to ensure its safe use. Oracle Corporation and its affiliates disclaim any liability for any damages caused by use of this software or hardware in dangerous applications.
Oracle and Java are registered trademarks of Oracle and/or its affiliates. Other names may be trademarks of their respective owners.
Intel and Intel Xeon are trademarks or registered trademarks of Intel Corporation. All SPARC trademarks are used under license and are trademarks or registered trademarks of SPARC International, Inc. AMD, Opteron, the AMD logo, and the AMD Opteron logo are trademarks or registered trademarks of Advanced Micro Devices. UNIX is a registered trademark of The Open Group.
This software or hardware and documentation may provide access to or information on content, products, and services from third parties. Oracle Corporation and its affiliates are not responsible for and expressly disclaim all warranties of any kind with respect to third-party content, products, and services. Oracle Corporation and its affiliates will not be responsible for any loss, costs, or damages incurred due to your access to or use of third-party content, products, or services.
My Oracle Support (MOS) (https://support.oracle.com) is your initial point of contact for all product support and training needs. A representative at Customer Access Support (CAS) can assist you with MOS registration.
Call the CAS main number at 1-800-223-1711 (toll-free in the US), or call the Oracle Support hotline for your local country from the list at http://www.oracle.com/us/support/contact/index.html.
See more information on MOS in the Appendix section.

Page 3 of 27
TABLE OF CONTENTS
1.0 INTRODUCTION ............................................................................................................... 4 1.1 Purpose and Scope ..................................................................................................... 4 1.2 References .................................................................................................................. 4 1.3 Requirements and PrerequisItes ................................................................................. 4
2.0 PRE-MIGRATION CHECKLIST ........................................................................................ 4
3.0 MIGRATION STRATEGY .................................................................................................. 6 3.1 DWS Migration ............................................................................................................ 7 3.2 NSP Migration ............................................................................................................. 7 3.3 xMF Migration ............................................................................................................. 8 3.4 IXP Migration .............................................................................................................. 8
4.0 PIC HEALTHCHECK ........................................................................................................ 8
5.0 G5 TO GEN 8 MIGRATION ............................................................................................. 10 5.1 NSP G5 to GEN 8 Migration ...................................................................................... 10 5.2 XMF Migration ........................................................................................................... 12 5.3 DWS G5 to Gen8 Migration ....................................................................................... 17 5.4 IXP G5 to Gen8 Migration ......................................................................................... 21
APPENDIX A: POTENTIAL ISSUES .................................................................................. 24
APPENDIX B: TERMINATE OLD HARDWARE ALARMS ................................................. 25
APPENDIX C: MY ORACLE SUPPORT (MOS) .................................................................. 26
APPENDIX D: LOCATE PRODUCT DOCUMENTATION ON THE ORACLE TECHNOLOGY NETWORK SITE ................................................................................................................... 27

Page 4 of 27
1.0 INTRODUCTION
1.1 PURPOSE AND SCOPE
This Technical Reference document provides an overview of the migration procedures for the PIC 10.1. The
migration shall involve the following:
NSP scale down from G5 4 box to Gen8 1 Box.
Replacement of G5 servers to Gen8 servers for all PIC components.
Replacement of Tek2/Tek3 IMF with E-5APPB or Gen8 servers.
Replacement of DWS server from G5 to Gen8.
This is mainly a guideline document and depending on the site to be upgraded, a method of procedure document
should be prepared keeping in mind the guidelines suggested in this document.
Based on this document:
Any Customer Service or PV person should be able to write its own MOP document and perform the
migration of PIC setup to Release 10.1.
Note: It is strongly recommended that prior to performing the migration of the PIC setup, on a rack mount or c-
class blades system, the user read through this document.
1.2 REFERENCES
[1] PIC 10.0 Major Upgrade Document,E53509-01.docx
[2] PIC 10.0 Installation Document,E53508-01.docx
[3] PIC 10.0 Upgrade FRS Document, FE007393.docx
[4] PIC Planning Guide, FeaturePlanningGuides.aspx
[5] HP Gen8 RMS Support For PIC, FE007119.docx
[6] HP Gen8 Blade Support For PIC, FE007228.docx
[7] Tekelec Default Passwords,TR006061.doc
1.3 REQUIREMENTS AND PREREQUISITES
Please refer section 1.5 Requirements & Prerequisites in "PIC 10.0 Major Upgrade" and section 1.6
Requirements & Prerequisites in "PIC 10.0 Installation"
The ILO configuration for the Gen8 servers should be done before the installation on the Gen8
servers should be started. Refer Appendix D in "PIC 10.0 Installation" for ILO configuration. It is
recommended to use the same ILO IP address as used in the G5 server.
2.0 PRE-MIGRATION CHECKLIST
Page 5 of 27
The purpose of the pre-migration checklist is to collect information related to site as a part of site preparation. This
checklist will help in getting the smoother migration, as it will help in removing the delays that may be associated
with procurement of additional IP addresses , switch ports e.t.c
The installation team should customize this list based on the actual site requirements.
Item Compliance
1. Check for additional footprint (space) availability with customer for site preparation. This may be beneficial for reducing the migration downtime, by pre-installing the Gen8 boxes with release 10.1.
2. Obtain additional IP address for the servers, in case additional space is available. The IP addresses for the server & ILO connection should be arranged for.
3. Procure external server or USB drive for storing the NSP backup externally.
4. Obtain two additional IP addresses (one for the ILO & other for server) for the new Gen 8 DWS pool, in case of additional footprint for DWS is available.
5. Collect the information about the IXP sub-system on how many G5 Servers can be replaced by lesser number of Gen8 servers. This should help in the migration of the DFPs before the IXP sub-system migration.
6. Collect the information about the site before the migration the information can be following a) number of IXP sub-systems b) number of IMF sub-system c) number of PMF servers d) number of DWS, e) If an IXP sub-system is a collection of G5 and G6 servers, in this case only G5 will be migrated and G6 will be upgraded. f) If the customer wants G5 DWS to be used for historical data or willing to replace the
G5 DWS with Gen8 DWS pool or does not want to migrate the DWS.
7. Availability of additional switch ports in case of additional footprint availability for carrying out the pre-installation of the Gen8 servers.
8. Availability of the power sources to power on the Gen8 servers in case additional footprint is available.
9. Laptop to configure the switches and install xMF ISO.

Page 6 of 27
3.0 MIGRATION STRATEGY The migration of the PIC system from release 9.0.3/9.0.4 to 10.1 is based on the PIC 10.0 major upgrade strategy. In
this document the general guidelines about the migration are provided and the procedures inside "PIC 10.0 Major
Upgrade" and "PIC 10.0 Installation" documents have been referred. The deviations from the standard procedures
have been detailed in the corresponding sections in this document.
It has been assumed that footprint is only available for the DWS and not for any other PIC component. The
migration for the export & report server is not supported.
Points to remember
1. In case additional footprint is available for DWS, then new Gen8 DWS must be added as a new storage
pool and the configuration should be modified to use the new storage pool. The storage DFPs, ProTraq
configuration & Monitoring sessions must be updated to use the new storage pool. The existing storage
G5 DWS pool must be moved to read-only mode, after the new Gen8 pool has been added and
configuration modified. It is also advisable to reduce the session lifetime before the migration.
2. In case of additional footprint for DWS, the new DWS must not be added in the existing storage pool, as
when the existing G5 DWS will be moved to query-only mode then newly created sessions will report an
error on ProTrace because of limitation on ProTrace.
3. The migration must only be done for the G5 servers and G6 servers must be upgraded to release 10.1
using the major upgrade procedures "PIC 10.0 Major Upgrade"
4. The DWS migration must be done before the NSP migration. The care must be taken to take the PIC
Global backup only after the DWS has been migrated using chapter 4.0 PIC healthcheck.
5. After the migration of complete PIC system, it is advisable to remove the old hardware alarms
corresponding to old G5 servers that have been migrated. Please refer Appendix B:Terminate Old
Hardware Alarms
As a part of migration strategy it has been proposed to proceed for the migration as per following flow diagram.
Note: In case the DWS migration is not required by the customer, the migration must be started by NSP migration in
the given flow.
5.3 DWS G5 to Gen8 Migration
5.2.2 PMF Migration 5.2.3 IMF Migration
5.4 IXP G5 to Gen8 Migration
2.0 Pre-Migration Checklist
5.1 NSP G5 to GEN 8 Migration
4.0 PIC Healthcheck
Figure 1: Generic Flow for migration to Gen8 from G5
Page 7 of 27
The following sections provides an overview on the migration of various components.
3.1 DWS MIGRATION
The DWS migration shall involve following scenarios:
1. No Available footprint: G5 DWS replacement with Gen8 DWS
If no available footprint, G5 server shall be replaced by Gen8 server, with data loss, by replacing old
server and storage module, using same IP address and hostname , by the new one inside the same storage
pool. (can exceed a maintenance windows due to possible physical hardware replacement constraints).
The migration must be done by stopping all the DFPs on the IXP sub-system. This should be done to
prevent IxpStore process from attempting to connect to Oracle database when it is being installed on new
Gen8 Server.
Note: same procedure can be used to convert a G6 or Gen8 DWS from 32 bits to 64 bits, with data loss.
Refer section 5.3.1 G5 DWS Replacement with Gen8 DWS for detailed steps
2. Footprint available: New Gen8 DWS added in the new storage pool
In this case additional IP address(es) is(are) needed. A new Gen8 DWS server shall be installed with PIC
10.0 and a new storage pool shall be added in the IXP sub-system before the NSP migration. All the
storage DFPs/monitoring sessions/session associated with ProTraq configurations need to be modified, so
that the sessions are moved to the new Gen8 DWS (a new storage pool). The G5 DWS will be moved to
the read-only mode. If the customer still wants to view the old xDR (in the sessions on the G5 DWS), it
can query the old sessions.
Refer section 5.3.2 New Gen8 DWS added in the new storage pool for detailed steps
Note: After the period of historical data is over, the old G5 DWS pool must be removed from the NSP.
3. No DWS replacement: If the old DWS is G5 server then it is mandatory to replace the G5 server with
Gen8 server. For this migration strategies defined in point 1 & 2 in this section can be used for migration
of G5 server. However if the old DWS is G6 server then it is not mandatory to replace the server with
Gen8 server and in this case no migration steps are required.
3.2 NSP MIGRATION
The NSP migration shall involve mainly two scenarios:
1. Downscale of NSP 4Box (G5 servers) to 1Box (Gen8 Server)
In the downscale from 4Box to 1Box NSP, a down scale script (downscale.sql) shall be provided and this
script shall perform the required changes in NSP database to downscale NSP from 4 box to one box. The IP
addresses of the Apache box shall be retained as an IP address of the NSP 1Box. In this migration it is
important to update the NSP IP address on IXP & xMF sub-system after the NSP migration, so as to enable
the IXP & xMF sub-system to keep sending the alarms to NSP.
Refer section 5.1.1 Downscale of NSP G5 4 Box to Gen8 1 Box for detailed steps
2. NSP 1 Box G5 server to 1 Box Gen8 server migration
In the migration from 1Box G5 server to Gen8 server, there will not be any down scale involved and the G5
server shall be simply replaced with Gen8 server. The same IP address shall be used post migration. The
G5 server should be powered off and replaced with the Gen8 server along with the new storage array and
execute the major upgrade procedure. The procedure is similar to single box NSP upgrade in 10.0.
Refer section 5.1.2 NSP 1 Box migration from G5 to GEN8 for detailed steps

Page 8 of 27
3.3 XMF MIGRATION
The xMF migration shall involve following scenarios:
1. PMF migration
In PMF migration, only the IP PMF migration is supported in this document, the TDM PMF migration is
not considered. The same IP address & hostname shall be used, however the care should be taken in
deciding the slots for the monitoring cards in Gen8 and should be kept same as in G5 PMF, if possible.
Refer section 5.2.2 PMF Migration for detailed steps
2. IMF Tek2/3 to Gen8 or E-5APP-B migration
Switch Configuation:
For IMF switch configuration following options are available :
o Update the switch configuration to layer 3, refer section 15.4.4 to 15.4.9 for Gen8 in "PIC 10.0
Installation" o If single switch then, update the switch configuration to layer2, refer section 15.4.10 for Gen8 in "PIC
10.0 Installation"
o Update the switch configuration to layer 3, refer section 15.4.12.2 and 15.4.12.3 for E5-APP-B in "PIC 10.0 Installation"
o If single switch then, update the switch configuration to layer2, refer section 15.4.12.4 for E5-APP-B
in "PIC 10.0 Installation"
The replacement of Tek2/Tek3 server with Gen8 server shall be per server basis and will not result in the
reduction of the servers in the sub-system for example each Tek3/Tek2 IMF server shall be replaced with
either E-5APP-B or Gen8 server, but the IMF sub-system shall contain all the servers of same type.
Refer section 5.2.3 IMF Migration for detailed steps
3.4 IXP MIGRATION
The IXP migration shall involve the following scenarios:
1. Number of servers remains same in the IXP sub-system post migration.
The migration in this case is similar to 10.0 major upgrade. Each of the G5 server should be replaced with
the Gen8 server. The bulkconfig file for the Gen8 servers must be modified to update the NSP G5 apache
IP address in case of NSP downscale.
Refer section 5.4.1 Number of servers remains same in the IXP sub-system for detailed steps
2. Number of servers reduced in the IXP sub-system post migration.
In this migration, the number of Gen8 servers will be less than the number of G5 servers. The bulkconfig
file must be modified with the NSP G5 apache IP address (only in case there is a downscale of NSP) and
the entries corresponding servers which are removed from IXP sub-system must be deleted. The DFPs must
be distributed from the removed servers to the other servers after NSP box migration and the servers also
need to be deleted from CCM.
Refer section 5.4.2 Number of servers reduced in the IXP sub-system for detailed steps
4.0 PIC HEALTHCHECK

Page 9 of 27
The healthcheck of the complete PIC system should be done prior to the execution of the migration procedures.
To perform the health check execute the chapter 4.0 PIC Healthcheck in "PIC 10.0 Major Upgrade"
The healthcheckup steps should be completed on the 9.0.3/9.0.4 release
Note 1: When PIC system is at 9.0.3 or 9.0.4 release, The NSP backup folder does not contain bulkconfig and global_version.properties files, hence few checks may fail. In this case user needs to create bulkconfig file manually by copying /root/bulkconfig to NSP backup directory. global_version.properties file also needs to be copied from /opt/nsp/nsp-package/framework directory to NSP backup directory. Note 2: The NSP backup should be moved to the external server or in the USB drive from the backup partition on the G5 oracle box in case of 4box or from the G5 NSP 1box. This should be done because the G5 servers would be powered off and remove from the frame, so the backup should be moved to external servers or in the USB drive.
Page 10 of 27
5.0 G5 TO GEN 8 MIGRATION
The following sections shall describe the steps needed for the PIC system migration from G5 hardware to Gen8
hardware.
5.1 NSP G5 TO GEN 8 MIGRATION
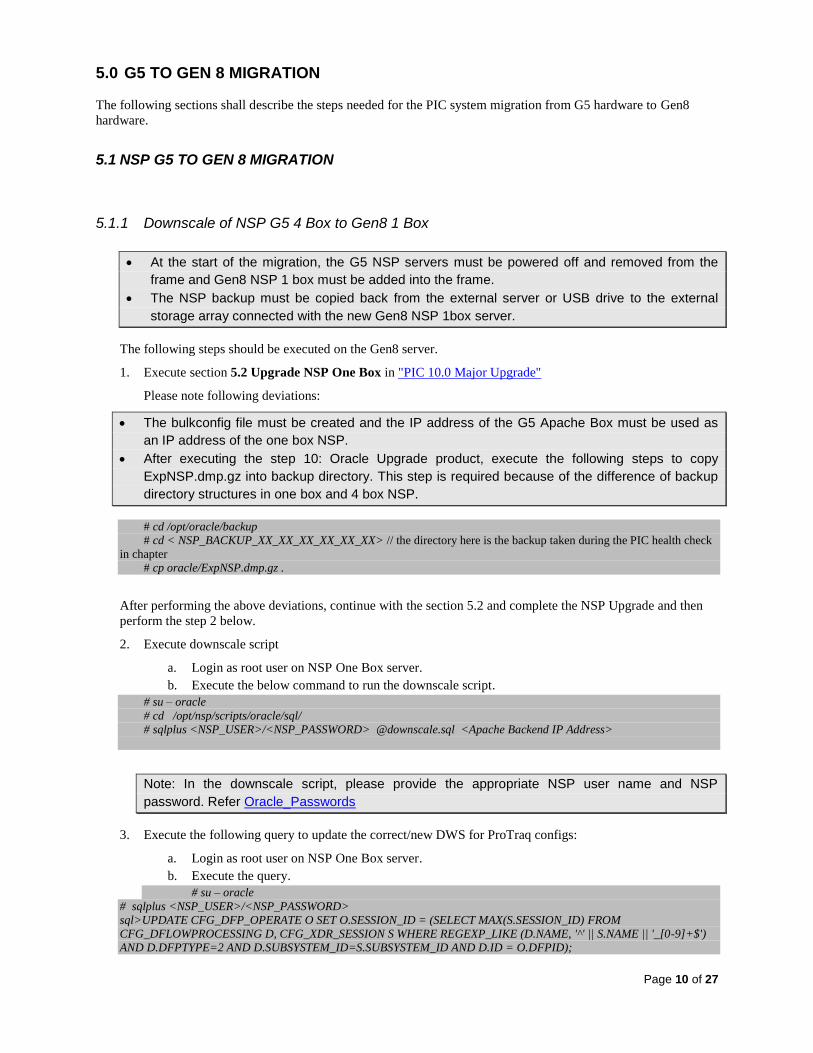
5.1.1 Downscale of NSP G5 4 Box to Gen8 1 Box
At the start of the migration, the G5 NSP servers must be powered off and removed from the
frame and Gen8 NSP 1 box must be added into the frame.
The NSP backup must be copied back from the external server or USB drive to the external
storage array connected with the new Gen8 NSP 1box server.
The following steps should be executed on the Gen8 server.
1. Execute section 5.2 Upgrade NSP One Box in "PIC 10.0 Major Upgrade"
Please note following deviations:
The bulkconfig file must be created and the IP address of the G5 Apache Box must be used as
an IP address of the one box NSP.
After executing the step 10: Oracle Upgrade product, execute the following steps to copy
ExpNSP.dmp.gz into backup directory. This step is required because of the difference of backup
directory structures in one box and 4 box NSP.
# cd /opt/oracle/backup
# cd < NSP_BACKUP_XX_XX_XX_XX_XX_XX> // the directory here is the backup taken during the PIC health check
in chapter
# cp oracle/ExpNSP.dmp.gz .
After performing the above deviations, continue with the section 5.2 and complete the NSP Upgrade and then
perform the step 2 below.
2. Execute downscale script
a. Login as root user on NSP One Box server.
b. Execute the below command to run the downscale script.
# su – oracle
# cd /opt/nsp/scripts/oracle/sql/
# sqlplus <NSP_USER>/<NSP_PASSWORD> @downscale.sql <Apache Backend IP Address>
Note: In the downscale script, please provide the appropriate NSP user name and NSP
password. Refer Oracle_Passwords
3. Execute the following query to update the correct/new DWS for ProTraq configs:
a. Login as root user on NSP One Box server.
b. Execute the query.
# su – oracle
# sqlplus <NSP_USER>/<NSP_PASSWORD>
sql>UPDATE CFG_DFP_OPERATE O SET O.SESSION_ID = (SELECT MAX(S.SESSION_ID) FROM
CFG_DFLOWPROCESSING D, CFG_XDR_SESSION S WHERE REGEXP_LIKE (D.NAME, '^' || S.NAME || '_[0-9]+$')
AND D.DFPTYPE=2 AND D.SUBSYSTEM_ID=S.SUBSYSTEM_ID AND D.ID = O.DFPID);

Page 11 of 27
sql> commit ;
4. Execute section 5.3 Upgrade A-Node in "PIC 10.0 Major Upgrade"
5. Execute section 5.4 Post Upgrade Settings in "PIC 10.0 Major Upgrade"
6. Execute section 5.5 Post Upgrade Check in "PIC 10.0 Major Upgrade"
7. Execute section 5.6 NSP Backup in "PIC 10.0 Major Upgrade"
8. Execute section 5.7 Upload xDR Builder ISO to NSP in "PIC 10.0 Major Upgrade"
Note: The NSP migration may be done in a separate maintenance window than IXP & xMF, so in
case of downscale the appropriate NSP IP address must be updated on IXP & xMF so that
alarms are propagated from xMF & IXP to NSP. It is advisable that post NSP downscale to 1 box,
the NSP one Box IP address is updated in the bulkconfig files on xMF & IXP servers and the
corresponding procedures to update the NSP IP address must be executed on IXP & xMF
servers.
Warning: After the NSP migration, the “Apply Change” must not be done on the IXP and xMF
sub-systems before their migration.
5.1.2 NSP 1 Box migration from G5 to GEN8
At the start of the migration, the G5 NSP 1 box must be powered off and removed from the
frame and Gen8 NSP 1 box must be added into the frame.
The NSP backup must be copied back from the external server or the USB drive to the external
storage array connected with the new Gen8 NSP 1box server.
The following steps should be executed on the Gen8 servers
1. Execute section 5.2 Upgrade NSP One Box in "PIC 10.0 Major Upgrade"
2. Execute the following query to update the correct/new DWS for ProTraq configs:
a. Login as root user on NSP One Box server.
b. Execute the query.
# su – oracle
# sqlplus <NSP_USER>/<NSP_PASSWORD>
sql>UPDATE CFG_DFP_OPERATE O SET O.SESSION_ID = (SELECT MAX(S.SESSION_ID) FROM
CFG_DFLOWPROCESSING D, CFG_XDR_SESSION S WHERE REGEXP_LIKE (D.NAME, '^' || S.NAME ||
'_[0-9]+$') AND D.DFPTYPE=2 AND D.SUBSYSTEM_ID=S.SUBSYSTEM_ID AND D.ID = O.DFPID);
sql> commit ;
3. Execute section 5.3 Upgrade A-Node in "PIC 10.0 Major Upgrade"
4. Execute section 5.4 Post Upgrade Settings in "PIC 10.0 Major Upgrade"
5. Execute section 5.5 Post Upgrade Check in "PIC 10.0 Major Upgrade"
6. Execute section 5.6 NSP Backup in "PIC 10.0 Major Upgrade"
7. Execute section 5.7 Upload xDR Builder ISO to NSP in "PIC 10.0 Major Upgrade"

Page 12 of 27
5.2 XMF MIGRATION
5.2.1 xMF Pre-requisites
The bulkconfig file must be created with the same information as present in the “platform.csv” file in
9.0.3/9.0.4. The entry for NSP IP address in bulkconfig file must be updated with the backend IP address of
the G5 Apache box in case of NSP downscale.
The same IP address & hostname shall be used for the servers in the xMF sub-system.
5.2.2 PMF Migration
5.2.2.1 PMF Migration Pre-requisites
Migration for PMF is supported from G5 to Gen8.
The migration of PMF covers only the IP PMF migration and it does not cover the TDM PMF.
Verify that the number of acquisition interfaces used on the existing G5 PMF server are not higher than the
number of acquisition interfaces available on the new Gen8 PMF server.
5.2.2.2 PMF Migration:No space available to add mechanically new server
At the start of the migration, the G5 PMF should be powered off and removed from the frame
and Gen8 PMF must be added into the frame.
The following steps should be executed on the Gen8 server
1. Execute section 6.1 xMF Pre-Install Configuration in "PIC 10.0 Major Upgrade"
2. Execute section 6.2 xMF Pre-Install Healthcheck in "PIC 10.0 Major Upgrade"
3. Execute section 6.3 Install xMF in "PIC 10.0 Major Upgrade"
Bulkconfig Update: The procedure in sec 6.3 would have restored the PMF bulkconfig file from the
last PIC backup used in the migration. The bulkconfig file would contain the entries for NSP IP
addresses corresponding to the 4-box in case of downscale. Following steps must be performed to
update the NSP IP address information in bulkconfig file in case of NSP downscale:
a) The entry for NSP IP address in bulkconfig file must be updated with the backend IP address of
the G5 Apache box. Take care to remove the entry for the NSP secondary IP address from the
bulkconfig file and also verify that no appserver2 or nsp-secondary entry is present in the
/etc/hosts file, if present then remove the entry by modifying the host file from platcfg menu.
b) Execute the script /opt/TKLCmf/bin/bulkConf.pl from root user.
c) Don’t reboot the server, but restart the jmxAgent from cfguser.
4. Execute section 6.4 Sync NSP with xMF in "PIC 10.0 Major Upgrade"
5. Execute section 6.5 xMF Post-Sync Healthcheck in "PIC 10.0 Major Upgrade"
Please note that in case of migration to Gen8 PMF, the cards may not be present on the same
slot as were in the G5 server. In this case after the “apply changes” is done, the sync of the PMF
server should be done to discover the new cards and the existing traffic classifications should be
modified to include the new monitoring interfaces.
The entries of the old obsolete cards interfaces must be removed from CCM application.
Apply the changed configuration.

Page 13 of 27
5.2.2.3 PMF Migration:Space available to add mechanically new server
Prepare the new PMF server outside the customer network using the console connection.
The following steps must be executed on the Gen8 PMF server:
1. Execute section 6.1 xMF Pre-Install Configuration in "PIC 10.0 Major Upgrade"
2. Execute section 6.2 xMF Pre-Install Healthcheck in "PIC 10.0 Major Upgrade"
3. Execute section 6.3 Install xMF in "PIC 10.0 Major Upgrade"
Bulkconfig Update: The procedure in sec 6.3 would have restored the PMF bulkconfig file from the
last PIC backup used in the migration. The bulkconfig file would contain the entries for NSP IP
addresses corresponding to the 4-box in case of downscale. Following steps must be performed to
update the NSP IP address information in bulkconfig file in case of NSP downscale:
a) The entry for NSP IP address in bulkconfig file must be updated with the backend IP address of
the G5 Apache box
b) Execute the script /opt/TKLCmf/bin/bulkConf.pl from root user.
c) Don’t reboot the server, but restart the jmxAgent from cfguser.
Start Service Interruption:
a) Disconnect existing G5 PMF from the customer network (including ILO interface) and disconnect
also the acquisition interfaces
b) Connect new Gen8 PMF to the customer network (including ILO interface) and connect also the
acquisition interfaces
c) Continue with the existing migration procedures.
4. Execute section 6.4 Sync NSP with xMF in "PIC 10.0 Major Upgrade"
Stop Service Interruption:
5. Execute section 6.5 xMF Post-Sync Healthcheck in "PIC 10.0 Major Upgrade"
Please note that in case of migration to Gen8 PMF, the cards may not be present on the same
slot as were in the G5 server. In this case after the “apply changes” is done, the sync of the PMF
server should be done to discover the new cards and the existing traffic classifications should be
modified to include the new monitoring interfaces.
The entries of the old obsolete cards interfaces must be removed from CCM application.
Apply the changed configuration.

Page 14 of 27
5.2.3 IMF Migration
5.2.3.1 IMF Migration Pre-requisities
The migration is supported from Tek2/Tek3 to Gen8 or Tek2/Tek3 to E-5APP-B.
In case of Cisco switch layer 3 configuration, don’t forget to ask for customer switches modification before
starting the migration.
Cabling modification will generate alarms on Eagle side too, don’t forget to inform all implied customer
teams.
5.2.3.2 IMF Migration:reuse existing cisco switches
1) Power down and disconnect the Blue switch from existing Tek2/Tek3 setup frame.
2) Put the Blue switch in the new Gen8 or E-5APP-B setup frame. However don’t connect the Blue
switch to the customer network to avoid conflict of address during the installation phase but
use a laptop in order to install the XMF ISO (refer to section 15.4.3 “switch port allocation” in
the "PIC 10.0 Installation" because port value may be different – port 46 for Gen8, port 48 for
E5-APP-B).
3) Configure the Blue switch by following the procedures already described in section 15.1.11 in
"PIC 10.0 Installation".
a. For Gen8 refer sections 15.4.4 to 15.4.9 for Gen8 in "PIC 10.0 Installation"
b. For E-5APP-B refer sections 15.4.12.2 and 15.4.12.3 in "PIC 10.0 Installation".
4) Run the following procedure for all new IMF servers:
1. Execute section 6.1 xMF Pre-Install Configuration in "PIC 10.0 Major Upgrade"
2. Execute section 6.2 xMF Pre-Install Healthcheck in "PIC 10.0 Major Upgrade"
Warning: the step “Restore XMF configuration” must be adapted because of unavailability of access
from NSP to XMF (manual copy of the archive from the laptop).
3. Execute section 6.3 Install xMF in "PIC 10.0 Major Upgrade"
Bulkconfig Update: The procedure in sec 6.3 would have restored the PMF bulkconfig file
from the last PIC backup used in the migration. The bulkconfig file would contain the entries
for NSP IP addresses corresponding to the 4-box in case of downscale. Following steps must
be performed to update the NSP IP address information in bulkconfig file in case of NSP
downscale:
a) The entry for NSP IP address in bulkconfig file must be updated with the backend IP
address of the G5 Apache box. Take care to remove the entry for the NSP secondary IP
address from the bulkconfig file and also verify that no appserver2 or nsp-secondary
entry is present in the /etc/hosts file, if present then remove the entry by modifying the
host file from platcfg menu.
b) Execute the script /opt/TKLCmf/bin/bulkConf.pl from root user.
c) Don’t reboot the server, but restart the jmxAgent from cfguser.
5) Connect the Blue switch to Eagle cards.
Start service interruption
6) Disconnect the Yellow switch from the customer network (including ILO interface).
7) Connect the Blue switch to the customer network (including ILO interface).
8) Continue with the existing migration procedure.
4. Execute section 6.4 Sync NSP with xMF in "PIC 10.0 Major Upgrade"

Page 15 of 27
Stop service interruption
5. Execute section 6.5 xMF Post-Sync Healthcheck in "PIC 10.0 Major Upgrade"
9) Power down and disconnect the Yellow switch from existing Tek2/Tek3 setup frame.
10) Put the Yellow switch in the new Gen8 or E-5APP-B setup frame.
11) Configure the Yellow switch by following the procedure already described in section 15.1.11 in
"PIC 10.0 Installation".
a. For Gen8 refer sections 15.4.4 to 15.4.9 for Gen8 in "PIC 10.0 Installation".
b. For E-5APP-B refer sections 15.4.12.2 and 15.4.12.3 in "PIC 10.0 Installation".
12) Connect the Yellow switch to Eagle cards and customer network (including ILO interface).
5.2.3.3 IMF Migration:new cisco switches
1) Prepare the new IMF setup outside of the customer network: don’t connect the Yellow/Blue
switch to the customer network to avoid conflict of address during the installation phase but
use a laptop in order to install the XMF ISO (refer to section 15.4.3 “switch port allocation” in
the "PIC 10.0 Installation” because port value may be different – port 46 for Gen8, port 48
for E5-APP-B)
2) Configure the Yellow and Blue switches by following the procedure already described in the "PIC
10.0 Installation”
a. For Gen8 refer sections 15.4.4 to 15.4.9 for Gen8 in "PIC 10.0 Installation"
b. For E-5APP-B refer sections 15.4.12.2 and 15.4.12.3 in "PIC 10.0 Installation".
3) Run the following procedure for all new IMF servers:
1. Execute section 6.1 xMF Pre-Install Configuration in "PIC 10.0 Major Upgrade"
2. Execute section 6.2 xMF Pre-Install Healthcheck in "PIC 10.0 Major Upgrade"
3. Execute section 6.3 Install xMF in "PIC 10.0 Major Upgrade"
Bulkconfig Update: The procedure in sec 6.3 would have restored the PMF bulkconfig file from
the last PIC backup used in the migration. The bulkconfig file would contain the entries for NSP IP
addresses corresponding to the 4-box in case of downscale. Following steps must be performed
to update the NSP IP address information in bulkconfig file in case of NSP downscale:
a) The entry for NSP IP address in bulkconfig file must be updated with the backend IP address
of the G5 Apache box. Take care to remove the entry for the NSP secondary IP address from
the bulkconfig file and also verify that no appserver2 or nsp-secondary entry is present in the
/etc/hosts file, if present then remove the entry by modifying the host file from platcfg menu.
b) Execute the script /opt/TKLCmf/bin/bulkConf.pl from root user.
c) Don’t reboot the server, but restart the jmxAgent from cfguser.
4) Power down existing Tek2/Tek3 setup frame Blue switch.
5) Connect the new Gen8 or E-5APP-B setup frame Blue switch to Eagle cards.
Start service interruption:
6) Disconnect the Yellow switch from the customer network (including ILO interface).
7) Connect the Blue switch to the customer network (including ILO interface).
8) Continue with the existing migration procedure.
4. Execute section 6.4 Sync NSP with xMF in "PIC 10.0 Major Upgrade"
Stop service interruption:

Page 16 of 27
5. Execute section 6.5 xMF Post-Sync Healthcheck in "PIC 10.0 Major Upgrade"
9) Power down existing Tek2/Tek3 setup frame Yellow switch
10) Connect the new Gen8 or E-5APP-B setup frame Yellow switch to Eagle cards and customer
network (including ILO interface)
Page 17 of 27
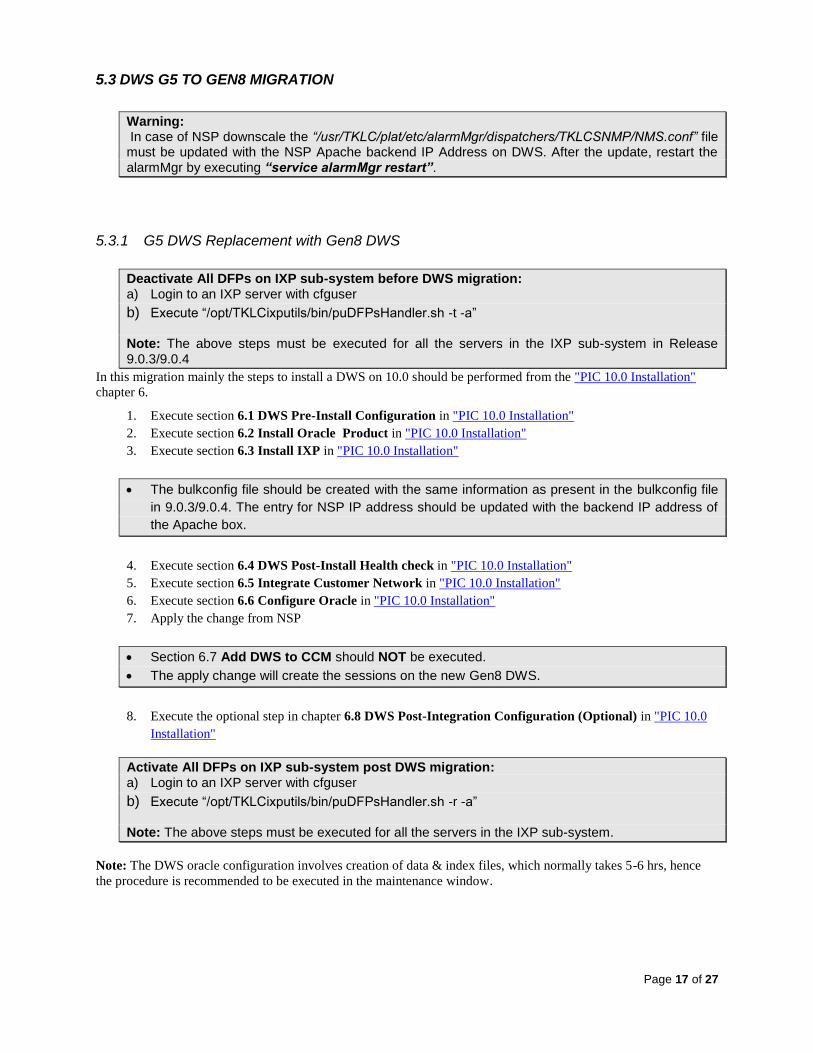
5.3 DWS G5 TO GEN8 MIGRATION
Warning: In case of NSP downscale the “/usr/TKLC/plat/etc/alarmMgr/dispatchers/TKLCSNMP/NMS.conf” file must be updated with the NSP Apache backend IP Address on DWS. After the update, restart the alarmMgr by executing “service alarmMgr restart”.
5.3.1 G5 DWS Replacement with Gen8 DWS
Deactivate All DFPs on IXP sub-system before DWS migration: a) Login to an IXP server with cfguser
b) Execute “/opt/TKLCixputils/bin/puDFPsHandler.sh -t -a”
Note: The above steps must be executed for all the servers in the IXP sub-system in Release 9.0.3/9.0.4
In this migration mainly the steps to install a DWS on 10.0 should be performed from the "PIC 10.0 Installation"
chapter 6.
1. Execute section 6.1 DWS Pre-Install Configuration in "PIC 10.0 Installation"
2. Execute section 6.2 Install Oracle Product in "PIC 10.0 Installation"
3. Execute section 6.3 Install IXP in "PIC 10.0 Installation"
The bulkconfig file should be created with the same information as present in the bulkconfig file
in 9.0.3/9.0.4. The entry for NSP IP address should be updated with the backend IP address of
the Apache box.
4. Execute section 6.4 DWS Post-Install Health check in "PIC 10.0 Installation"
5. Execute section 6.5 Integrate Customer Network in "PIC 10.0 Installation"
6. Execute section 6.6 Configure Oracle in "PIC 10.0 Installation"
7. Apply the change from NSP
Section 6.7 Add DWS to CCM should NOT be executed.
The apply change will create the sessions on the new Gen8 DWS.
8. Execute the optional step in chapter 6.8 DWS Post-Integration Configuration (Optional) in "PIC 10.0
Installation"
Activate All DFPs on IXP sub-system post DWS migration: a) Login to an IXP server with cfguser
b) Execute “/opt/TKLCixputils/bin/puDFPsHandler.sh -r -a”
Note: The above steps must be executed for all the servers in the IXP sub-system.
Note: The DWS oracle configuration involves creation of data & index files, which normally takes 5-6 hrs, hence
the procedure is recommended to be executed in the maintenance window.
Page 18 of 27
5.3.2 New Gen8 DWS added in the new storage pool
The following steps should be executed on the Gen8 server.
1. Execute section 6.1 DWS Pre-Install Configuration in "PIC 10.0 Installation"
2. Execute section 6.2 Install Oracle Product in "PIC 10.0 Installation"
3. Execute section 6.3 Install IXP in "PIC 10.0 Installation"
The bulkconfig file should be created with the same information as present in the bulkconfig file
in 9.0.3/9.0.4. The entry for NSP IP address should be updated with the backend IP address of
the Apache box.
4. Execute section 6.4 DWS Post-Install Health check in "PIC 10.0 Installation"
5. Execute section 6.5 Integrate Customer Network in "PIC 10.0 Installation"
6. Execute section 6.6 Configure Oracle in "PIC 10.0 Installation"
7. Execute section 6.7 Add DWS to CCM in "PIC 10.0 Installation"
8. Apply Changes from NSP.
9. Execute the optional step in chapter 6.9 DWS Post-Integration Configuration (Optional) in "PIC 10.0
Installation"
Note: The DWS oracle configuration involves creation of data & index files, which normally takes 5-6 hrs,
hence the procedure is recommended to be executed in the maintenance window
10. After the new DWS has been added in CCM, perform the following procedure to move the existing
sessions on the new DWS pool
Procedure: Move Sessions To New DWS
1. Modify the store DFPs to move the session on the new DWS pool. Execute this for all storage
DFPs in the IXP sub-system.
a. Go to CCM, select the DFP and click on the icon to modify the DFP.
b. Create the session with the same session name on the new DWS pool.
c. Click on the Modify button to complete.
d. Verify that new sessions are getting data.
Note 1: The system created DFPs cannot be modified from the GUI, this should be done in
step 4.
2. If the two store DFPs, one corresponding to an oracle session and another corresponding to
CSV streaming are sharing the same input stream then the storage DFP for the oracle session
cannot be modified to move the session to new DWS unless the store DFP for CSV streaming
is modified to use different input stream. Following steps must be performed to migrate all such
sessions on new DWS:
a. Go to CCM, Create a new dummy xDR stream( the dictionary must be same as that of
the original input stream) from the stream creation screen.
b. Select the store DFP corresponding to the CSV streaming and click on the icon to
modify the DFP.
c. Modify the input source by selecting the dummy xDR stream created in step a
d. Click on the Modify button to complete.

Page 19 of 27
e. Modify the store DFP (that corresponds to oracle session and not to CSV stream) to
move the session on new DWS pool, execute Step1 of this procedure.
f. Modify the storage DFP corresponding to CSV streaming again to point to the original
input stream as before.
g. Verify that new session is getting data.
Note: At the end remove the dummy xDR stream from CCM.
3. The ProTraq configurations must be modified to enable the sessions corresponding to ProTraq
configurations to be moved to new Gen8 DWS pool. Execute this for all ProTraq configurations.
a. Go to the ProTraq configuration application.
b. Select the configuration and de-activate the configuration.
c. Disassociate the session from the ProTraq configuration.
d. Modify the session to move to the new DWS pool, execute Step1 of this procedure
e. Associate the session to the ProTraq configuration.
f. Re-activate the ProTraq configuration.
g. Verify the configurations.
4. Modify the system created DFPs e.g. PoolMonitor, BuildMonitor, StoreMonitor,
AggSessionMonitor e.t.c to move their corresponding sessions to the new DWS. The system
created DFPs are not modifiable from the GUI, in this scenario some NSP database changes
must be done.
a. Execute the query on NSP to make the monitoring DFP modifiable from CCM. Connect
to NSP oracle DB using sqlplus client and execute: update cfg_dflowprocessing set
admintype = 7 where name like '%Monitor%' and admintype = 1 and dfptype =3 and
subsystem_id = (select subsystem_id from cfg_subsystem where subsystem_name='<ixp sub-
system name>');
b. Commit;
c. Modify the monitoring DFPs by executing the Step 1 of this procedure.
d. The PoolMonitor DFP should give an error during the modification, execute following
queries
A) update cfg_feed_params set param_value=(select session_id from
cfg_xdr_session where name like '%PoolMonitor' and storage_id = (select
subsystem_id from cfg_subsystem where subsystem_name='<new
pool_name>')) where dfpid = (select dfpid from cfg_dfp_store_dwh where
xdrsessionid = (select session_id from cfg_xdr_session where name like
'%PoolMonitor' and storage_id = (select subsystem_id from cfg_subsystem
where subsystem_name='<old pool_name>')));
B) update cfg_dfp_store_dwh set xdrsessionid = (select session_id from
cfg_xdr_session where name like '%PoolMonitor' and storage_id = (select
subsystem_id from cfg_subsystem where subsystem_name='<new
pool_name>')) where xdrsessionid = (select session_id from cfg_xdr_session
where name like '%PoolMonitor' and storage_id = (select subsystem_id from
cfg_subsystem where subsystem_name='<old pool_name>'));
C) update cfg_dfp_operate set session_id = (select session_id from
cfg_xdr_session where name like '%PoolMonitor' and storage_id = (select
subsystem_id from cfg_subsystem where subsystem_name='<new
pool_name>')) where session_id = (select session_id from cfg_xdr_session
where name like '%PoolMonitor' and storage_id = (select subsystem_id from
cfg_subsystem where subsystem_name='<old pool_name>'));
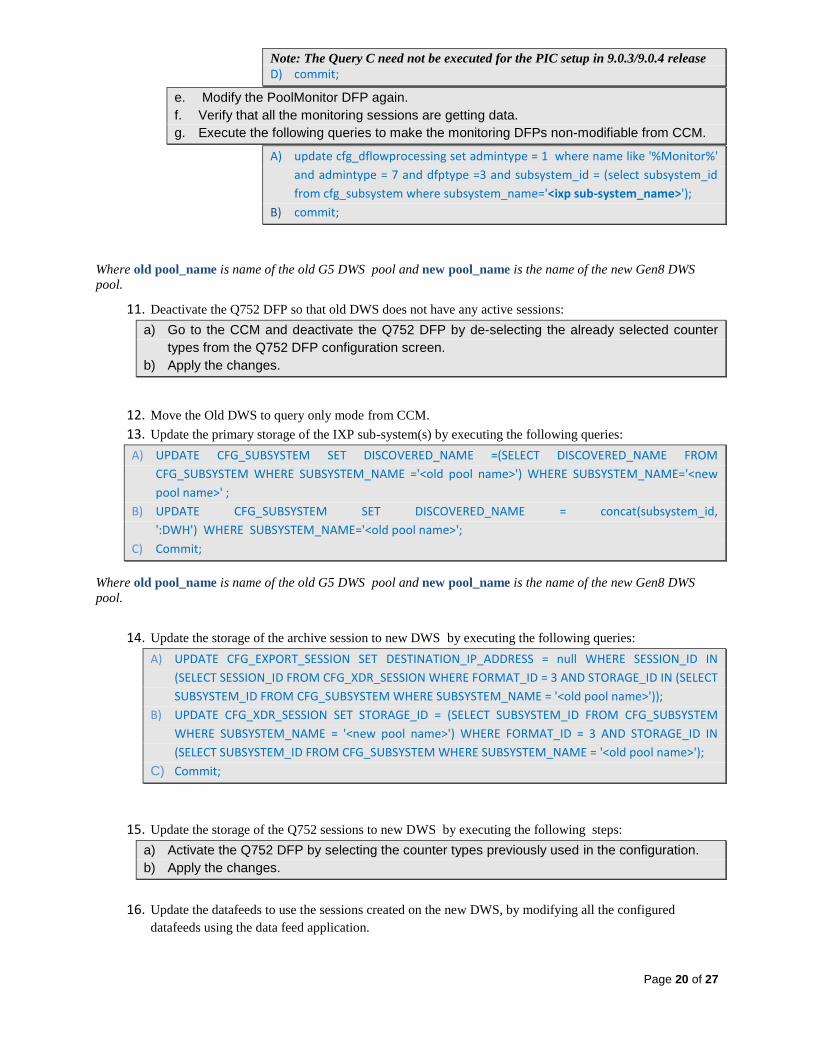
Page 20 of 27
Note: The Query C need not be executed for the PIC setup in 9.0.3/9.0.4 release
D) commit;
e. Modify the PoolMonitor DFP again.
f. Verify that all the monitoring sessions are getting data.
g. Execute the following queries to make the monitoring DFPs non-modifiable from CCM.
A) update cfg_dflowprocessing set admintype = 1 where name like '%Monitor%'
and admintype = 7 and dfptype =3 and subsystem_id = (select subsystem_id
from cfg_subsystem where subsystem_name='<ixp sub-system_name>');
B) commit;
Where old pool_name is name of the old G5 DWS pool and new pool_name is the name of the new Gen8 DWS
pool.
11. Deactivate the Q752 DFP so that old DWS does not have any active sessions:
a) Go to the CCM and deactivate the Q752 DFP by de-selecting the already selected counter
types from the Q752 DFP configuration screen.
b) Apply the changes.
12. Move the Old DWS to query only mode from CCM.
13. Update the primary storage of the IXP sub-system(s) by executing the following queries:
A) UPDATE CFG_SUBSYSTEM SET DISCOVERED_NAME =(SELECT DISCOVERED_NAME FROM
CFG_SUBSYSTEM WHERE SUBSYSTEM_NAME ='<old pool name>') WHERE SUBSYSTEM_NAME='<new
pool name>' ;
B) UPDATE CFG_SUBSYSTEM SET DISCOVERED_NAME = concat(subsystem_id,
':DWH') WHERE SUBSYSTEM_NAME='<old pool name>';
C) Commit;
Where old pool_name is name of the old G5 DWS pool and new pool_name is the name of the new Gen8 DWS
pool.
14. Update the storage of the archive session to new DWS by executing the following queries:
A) UPDATE CFG_EXPORT_SESSION SET DESTINATION_IP_ADDRESS = null WHERE SESSION_ID IN
(SELECT SESSION_ID FROM CFG_XDR_SESSION WHERE FORMAT_ID = 3 AND STORAGE_ID IN (SELECT
SUBSYSTEM_ID FROM CFG_SUBSYSTEM WHERE SUBSYSTEM_NAME = '<old pool name>'));
B) UPDATE CFG_XDR_SESSION SET STORAGE_ID = (SELECT SUBSYSTEM_ID FROM CFG_SUBSYSTEM
WHERE SUBSYSTEM_NAME = '<new pool name>') WHERE FORMAT_ID = 3 AND STORAGE_ID IN
(SELECT SUBSYSTEM_ID FROM CFG_SUBSYSTEM WHERE SUBSYSTEM_NAME = '<old pool name>');
C) Commit;
15. Update the storage of the Q752 sessions to new DWS by executing the following steps:
a) Activate the Q752 DFP by selecting the counter types previously used in the configuration.
b) Apply the changes.
16. Update the datafeeds to use the sessions created on the new DWS, by modifying all the configured
datafeeds using the data feed application.

Page 21 of 27
Note: The step 17 or procedure to delete the old DWS must not be executed till the time historical data is needed
17. The old G5 DWS pool must be deleted after it is no more required for historical data. Following
procedure should be executed to remove the old DWS pool.
Procedure: Delete Old DWS
1. Execute the query on NSP to make the monitoring DFP modifiable from CCM. Connect to NSP
oracle DB using sqlplus client and execute update cfg_xdr_session set admintype = 7 where
storage_id = (select subsystem_id from cfg_subsystem where subsystem_name='<old pool_name>') and
name like '%Monitor%';
2. Commit;
3. Delete all the sessions on the Old DWS in IXP sub-system.
a. Go the sessions under the IXP subs-system
b. Select all the sessions on the old DWS and click on delete icon.
4. Delete the old DWS pool from CCM
a. Go to the old DWS under the IXP sub-system.
b. Select the DWS and click on the delete icon.
Where old pool_name is name of the old G5 DWS pool.
5.4 IXP G5 TO GEN8 MIGRATION
5.4.1 Number of servers remains same in the IXP sub-system
The G5 servers must be powered off and removed from the frame and Gen8 should be added
into the frame.
The bulkconfig file must be created on all the Gen8 servers. The information from the bulkconfig
file used in 9.0.3/9.0.4 must be used. The entry for NSP IP address in bulkconfig file must be
updated with the backend IP address of the G5 Apache box in case of NSP downscale.
The following steps should be executed on the Gen8 server: 1. Execute section 7.1 Install Operating System in "PIC 10.0 Major Upgrade"
2. Execute section 7.2 IXP Pre-Install Configuration in "PIC 10.0 Major Upgrade"
3. Execute section 7.3 Install IXP in "PIC 10.0 Major Upgrade"
Bulkconfig Update: The procedure in sec 7.3 would have restored the IXP bulkconfig file from the
last PIC backup used in the migration. The restored bulkconfig file would contain the entries for NSP
IP addresses corresponding to the 4-box in case of downscale. The entry for NSP IP address in
bulkconfig file must be updated with the backend IP address of the G5 Apache box in case of NSP
downscale.
4. Execute section 7.4 IXP Post-Install Healthcheck in "PIC 10.0 Major Upgrade"
5. Execute section 7.5 Integrate Customer Network in "PIC 10.0 Major Upgrade"
After the bc_customer_integration.sh –post execution, the VIP should be assigned to any of the servers,
preferably 1A.

Page 22 of 27
Re-discover the IXP application on the NSP for each of the Gen8 server.
“Apply Changes” to the IXP-subsystem.
6. Execute section 7.6 Install xDR Builders in "PIC 10.0 Major Upgrade"
7. Execute section 7.7 IXP Subsystem Healthcheck in "PIC 10.0 Major Upgrade"
8. Execute section 7.8 Upgrade DTO Package in "PIC 10.0 Major Upgrade"
9. Execute section 7.9 Capacity Management KPIs installation in "PIC 10.0 Major Upgrade"
10. Execute section 7.10 IXP Post-Integration Configuration (Optional) in "PIC 10.0 Major Upgrade"
11. Execute section 7.11 NSP Backup in "PIC 10.0 Major Upgrade"
12. Execute section 7.12 Unset Configuration on NSP in "PIC 10.0 Major Upgrade"
Note: In case of migration from G5 server to Gen8 server, the PDUs stored on the IXP PDU storage servers shall be lost.

Page 23 of 27
5.4.2 Number of servers reduced in the IXP sub-system
Distribute the DFPs to other servers on NSP using the DFP distribution screen from CCM.
Distribute the datafeeds configured on the servers which are going to be removed from the IXP
sub-system. This can be done by going to data feed application and modifying the
corresponding datafeed and selecting the different host for the datafeed. It must be kept in mind
that datafeed first needs to be deactivated before modification and activated again after
modification.
The G5 servers must be powered off and removed from the frame and Gen8 must be added into
the frame.
The bulkconfig file must be created on all the Gen8 servers. The information from the bulkconfig
file used previously must be used. The entry for NSP IP address in bulkconfig file must be
updated with the backend IP address of the G5 Apache box in case of NSP downscale. The
entries for the removed G5 servers must be removed from the bulkconfig file.
The following steps should be executed on the Gen8 server:
1. Execute section 7.1 Install Operating System in "PIC 10.0 Major Upgrade"
2. Execute section 7.2 IXP Pre-Install Configuration in "PIC 10.0 Major Upgrade"
3. Execute section 7.3 Install IXP in "PIC 10.0 Major Upgrade"
Bulkconfig Update: The procedure in sec 7.3 would have restored the IXP bulkconfig file from the last PIC backup used in the migration. The restored bulkconfig file would contain the entries for NSP IP addresses corresponding to the 4-box in case of downscale. The entry for NSP IP address in bulkconfig file must be updated with the backend IP address of the G5 Apache box in case of NSP downscale. In the restored bulkconfig file the entries for the removed G-5 servers must be deleted from the bulkconfig file.
4. Execute section 7.4 IXP Post-Install Healthcheck in "PIC 10.0 Major Upgrade"
5. Execute section 7.5 Integrate Customer Network in "PIC 10.0 Major Upgrade"
After the bc_customer_integration.sh –post execution, the VIP should be assigned to any of the
servers, preferably 1A.
Discover the IXP application on the NSP for each of the Gen8 server.
Apply the change to the IXP-subsystem.
Delete the removed IXP G5 servers from the site in NSP.
6. Execute section 7.6 Install xDR Builders in "PIC 10.0 Major Upgrade"
7. Execute section 7.7 IXP Subsystem Healthcheck in "PIC 10.0 Major Upgrade"
8. Execute section 7.8 Upgrade DTO Package in "PIC 10.0 Major Upgrade"
9. Execute section 7.9 Capacity Management KPIs installation in "PIC 10.0 Major Upgrade"
10. Execute section 7.10 IXP Post-Integration Configuration (Optional) in "PIC 10.0 Major Upgrade"
11. Execute section 7.11 NSP Backup in "PIC 10.0 Major Upgrade"
12. Execute section 7.12 Unset Configuration on NSP in "PIC 10.0 Major Upgrade"
Note: In case of migration from G5 server to Gen8 server, the PDUs stored on the IXP PDU storage servers shall be lost.

Page 24 of 27
APPENDIX A: POTENTIAL ISSUES
After the migration the xMF servers may not ping. The ARP table of the Cisco switch, which
maintains relation between Ethernet MAC and IP addresses, may not be properly updated. This
kind of issue happens only in case of disconnection and reconnection of two different servers
(different Ethernet MAC Address) with the same IP Address and this issue will not occur during
simple upgrade procedure, where no migration of hardware is done. The workaround is to
reboot the cisco switches.

Page 25 of 27
APPENDIX B: TERMINATE OLD HARDWARE ALARMS
After the migration of the complete PIC system, the system may contain the open hardware alarms corresponding to
the old G5 servers. It is advisable to terminate the open hardware alarms that corresponds to old G5 hardware. After
the old hardware alarms have been terminated the alarms would be purged automatically from the NSP. Following
steps must be performed to terminate the alarms corresponding to the old hardware:
1. Login to NSP ProAlarm Viewer application
2. Click on the “All Alarms” in Application Menu to view all the alarms.
3. Select the filter as "Host" for “Managed Object Class”. All the alarms for all the hosts in the system shall
be displayed.
4. Select all the old hardware alarms e.g. “TKSPLATMA2: Server Internal Disk Error …“ for all hosts
and click on the “Terminate Selected Alarms” icon on the toolbar. In the pop-up reason for terminating
the alarms can be given.
5. Click on Apply in the pop-up window to complete the termination of the alarms.
6. Selected alarms would be moved to the Terminated Alarms Tab.
Note: Only the hardware alarms for the old hardware should be terminated and the above steps must be
performed for every PIC component (NSP, IXP & xMF). After the migration the host name shall remain same,
so the alarm raised time and alarm changed time can be used as reference to identify the pre-migration alarms
(corresponding to old hardware).

Page 26 of 27
APPENDIX C: MY ORACLE SUPPORT (MOS)
MOS (https://support.oracle.com) is your initial point of contact for all product support and training needs. A
representative at Customer Access Support (CAS) can assist you with MOS registration.
Call the CAS main number at 1-800-223-1711 (toll-free in the US), or call the Oracle Support hotline for your local
country from the list at http://www.oracle.com/us/support/contact/index.html. When calling, make the selections in
the sequence shown below on the Support telephone menu:
1. Select 2 for New Service Request
2. Select 3 for Hardware, Networking and Solaris Operating System Support
3. Select 2 for Non-technical issue
You will be connected to a live agent who can assist you with MOS registration and provide Support Identifiers.
Simply mention you are a Tekelec Customer new to MOS.
MOS is available 24 hours a day, 7 days a week, 365 days a year.

Page 27 of 27
APPENDIX D: LOCATE PRODUCT DOCUMENTATION ON THE ORACLE TECHNOLOGY NETWORK SITE
Oracle customer documentation is available on the web at the Oracle Technology Network (OTN) site,
http://docs.oracle.com. You do not have to register to access these documents. Viewing these files requires Adobe
Acrobat Reader, which can be downloaded at www.adobe.com.
1. Log into the Oracle Technology Network site at http://docs.oracle.com.
2. Under Applications, click the link for Communications.
The Oracle Communications Documentation window opens with Tekelec shown near the top.
3. Click Oracle Communications Documentation for Tekelec Products.
4. Navigate to your Product and then the Release Number, and click the View link (the Download link will retrieve
the entire documentation set).
5. To download a file to your location, right-click the PDF link and select Save Target As.