Embed Size (px)
Citation preview

Oracle Business Intelligence 11g
Peak ETA – Developers’ Guide Antony Heljula / Paul Oprea
January 2013

© Peak Indicators Limited 2
Agenda Peak ETA – Developers’ Guide
• About the Peak ETA Console • About the Peak ETA Server • Development Approach • How It Works • Loading a new Aggregate • Error Handling

© Peak Indicators Limited 3
Peak ETA – Developers’ Guide About the Peak ETA Console

© Peak Indicators Limited 4
About the Peak ETA Console Logging In
• You can log onto the Peak ETA Console by using the following URL:
• http://[server]:7001/PeakETA
• To log on, you must use a user account which is granted the “Peak ETA Admin” role in the LDAP identity provider(s) used by WebLogic

© Peak Indicators Limited 5
About the Peak ETA Console “Current Load Overview”
• This first screen provides an overview of the current (or latest) ETA load process:
Process flow of the Aggregate Groups
(you can see how the Aggregate Groups are
processed in sequence)
Status overview, showing details such as the current load status
of each Aggregate
A process flow for the Aggregates. You can see
that the Aggregates within each group are processed
in parallel
Button to start a new
load process
Graph to show the current load status of all
the Aggregates within each Aggregate Group

© Peak Indicators Limited 6
About the Peak ETA Console “Current Load Details”
• Provides detailed information about the current (or latest) load of each Aggregate
Table listing various attributes/metrics about
the current status of each Aggregate
Loading an Aggregate requires up to 6
individual “steps”, you can cycle through these steps to see full details
such as timings, SQL and row counts . You also view error messages
If an Aggregate failed to load, the “Errors” tab will list any
error messages captured whilst loading the aggregate
© Peak Indicators Limited 7
About the Peak ETA Console “Aggregate Groups”
• This is a simple screen enabling you to administer your Aggregate Groups:
You need to specify a sequence number to
determine the order in which the Aggregate
Groups are processed The number of parallel
threads for each Aggregate Group. In
this example, the Aggregate Groups are
configured to load up to 5 tables simultaneously
Create, Delete, Save and Undo options for Aggregate Groups

© Peak Indicators Limited 8
About the Peak ETA Console “Aggregates”
• This screen allows you to administer your Aggregates and specify how they should be incrementally loaded:
Choose an Aggregate Group
Option buttons to assist with the administration of
Aggregates
“Full Reload” or “Incremental Update”
WHERE condition to define the
“incremental subset”
“Business Model” SQL used to populate the
Aggregate (this is auto generated)
Options to run custom Logical SQL statements before/after
Aggregate is loaded

© Peak Indicators Limited 9
About the Peak ETA Console “Configuration”
• Configuration parameters set during the installation process (see “Peak ETA – Installation Guide”):
Enabling this option will force a “full reload” when the next load process is initiated. A full reload will force Aggregate tables to
be truncated and fully reloaded with all records (the WHERE filters defined on the “Aggregates” screen are ignored)

© Peak Indicators Limited 10
About the Peak ETA Console “Server Log Files”
• View OBI “nqquery.log” and “Peak ETA Server” log files (the log files must reside on the same server running the Peak ETA Console):
Click the relevant button to view the log file
© Peak Indicators Limited 11
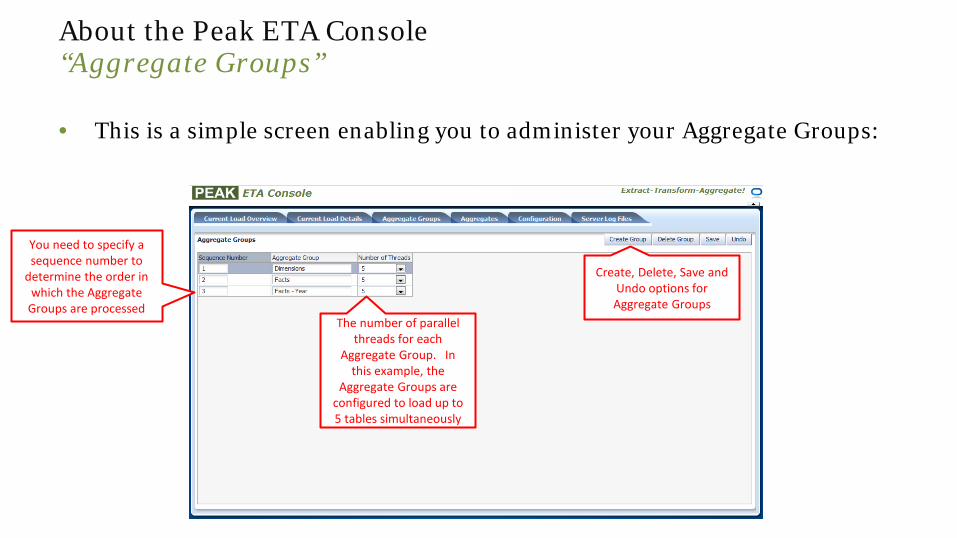
About the Peak ETA Console Refreshing the Screen
• To refresh any screen, you simply click on the corresponding “Tab” • Using the browser refresh button or pressing the F5 key does not refresh the screen
with any new data, so you must use the Tabs to do a full screen refresh:

© Peak Indicators Limited 12
Peak ETA – Developers’ Guide Using the Peak ETA Server

© Peak Indicators Limited 13
Using the Peak ETA Server Overview
• The Peak ETA Server is a java parallel execution engine which can run on any platform. Scripts are provided for Windows and Linux
• The scripts can be invoked from the command-line or from within the Peak ETA Console (“Load Overview” and “Server Log Files” screens)
• NOTE: To start the Peak ETA Server from the Peak ETA Console, the server scripts and console must be installed on the same server machine
• When the script is invoked, the output should be redirected to a “peaketa.log” file so
that any error messages are captured for further analysis
• In order to run the Peak ETA Server process, you must have first configured the “client.properties” file (see Peak ETA – Installation Guide)

© Peak Indicators Limited 14
Using the Peak ETA Server Initiating from the Command Line
• Here is a sample command line to initiate the Peak ETA Server on a Windows machine and output the results to “peaketa.log”:
• C:\PeakETA\peaketa.bat > C:\PeakETA\peaketa.log 2>&1 NOTE: The “2>&1” syntax is required at the end to capture all debugging info
• And here is a similar command line for Linux:
• . /home/oracle/PeakETA/peaketa.sh > /home/oracle/PeakETA/peaketa.log
© Peak Indicators Limited 15
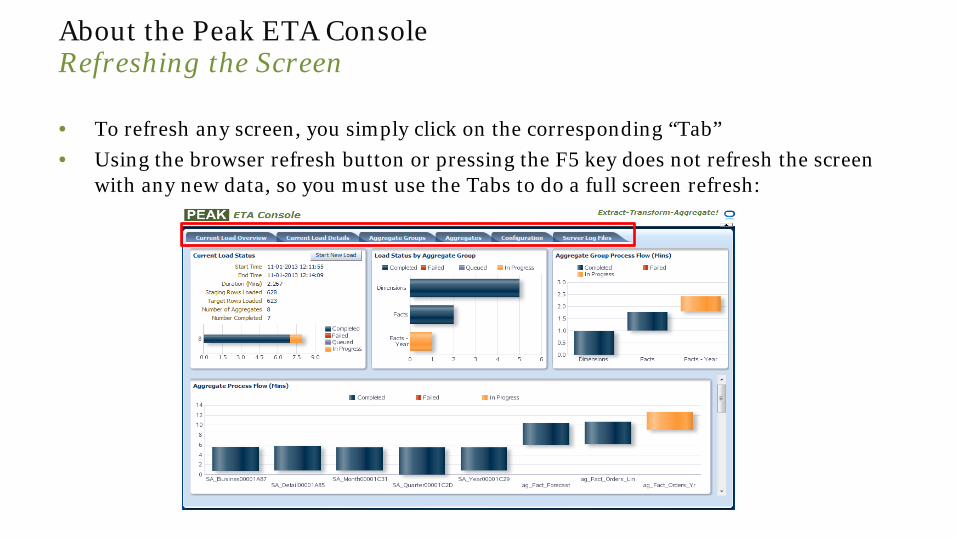
Using the Peak ETA Server Protection from Multiple runs
• If you accidentally try to invoke the Peak ETA Server process whilst it is already running, you will see the following error message:
• The reason is that a “peaketa.lock” file is created when a new load process is started. It is then deleted once the process has completed
• The script starts by detecting if this “peaketa.lock” file exists, and will abort with the above error if it is detected
• If you do actually need to restart the process after a previous failure, then you can manually delete the “peaketa.lock” file in order to start the process again

© Peak Indicators Limited 16
Peak ETA – Developers’ Guide Development Approach
© Peak Indicators Limited 17
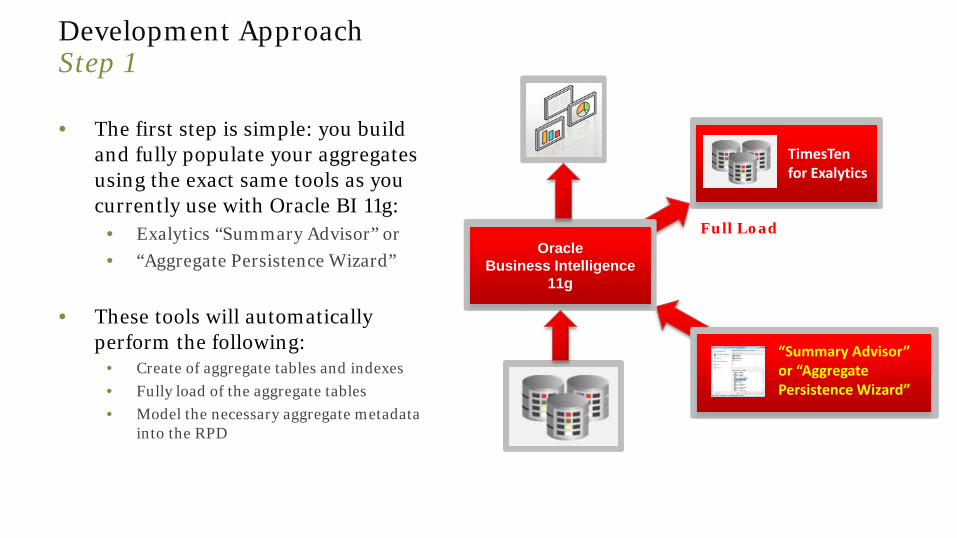
Development Approach Step 1
• The first step is simple: you build and fully populate your aggregates using the exact same tools as you currently use with Oracle BI 11g:
• Exalytics “Summary Advisor” or • “Aggregate Persistence Wizard”
• These tools will automatically perform the following:
• Create of aggregate tables and indexes • Fully load of the aggregate tables • Model the necessary aggregate metadata
into the RPD
Oracle Business Intelligence
11g
TimesTen for Exalytics
“Summary Advisor” or “Aggregate Persistence Wizard”
Full Load

© Peak Indicators Limited 18
Development Approach Step 2
• Step 2 is even simpler! You just need to do the following:
1. Register the name of each aggregate in the Peak ETA Console
2. Define how each aggregate should be incrementally updated
• All other code is automatically
generated
• That’s it! You now have parallel incremental loading capability for your in-memory aggregates
Oracle Business Intelligence
11g
TimesTen for Exalytics
Peak ETA
Incremental Load (in parallel)
© Peak Indicators Limited 19
Peak ETA – Developers’ Guide How It Works
© Peak Indicators Limited 20
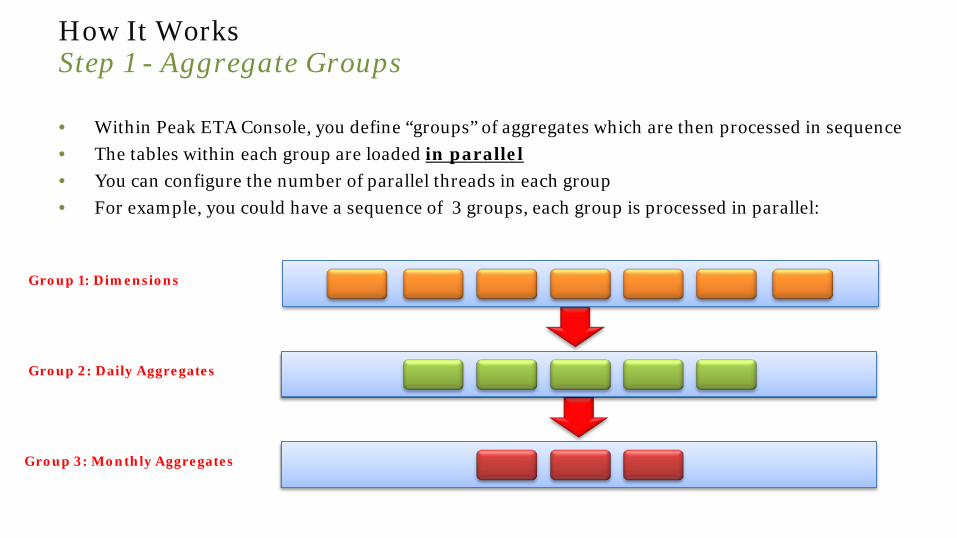
How It Works Step 1 - Aggregate Groups
• Within Peak ETA Console, you define “groups” of aggregates which are then processed in sequence • The tables within each group are loaded in parallel • You can configure the number of parallel threads in each group • For example, you could have a sequence of 3 groups, each group is processed in parallel:
Group 1: Dimensions
Group 2: Daily Aggregates
Group 3: Monthly Aggregates

© Peak Indicators Limited 21
How It Works Step 2 - Aggregates
• Staying within the Peak ETA Console, you simply need to register each aggregate table
• The following details are required: 1. Aggregate table name 2. Key columns used for incremental update 3. “Business Model” SQL used to populate aggregate via the BI Server 4. “WHERE” clause filter to define incremental extract
• NOTE: The “Business Model” SQL is auto-generated

© Peak Indicators Limited 22
How It Works Process Flow - START
• As the starting point, you have some TimesTen In-Memory Aggregates which have already been built and populated using the Exalytics Summary Advisor (or Aggregate Persistence Wizard)
Oracle Business Intelligence
11g
Target Aggregates
© Peak Indicators Limited 23
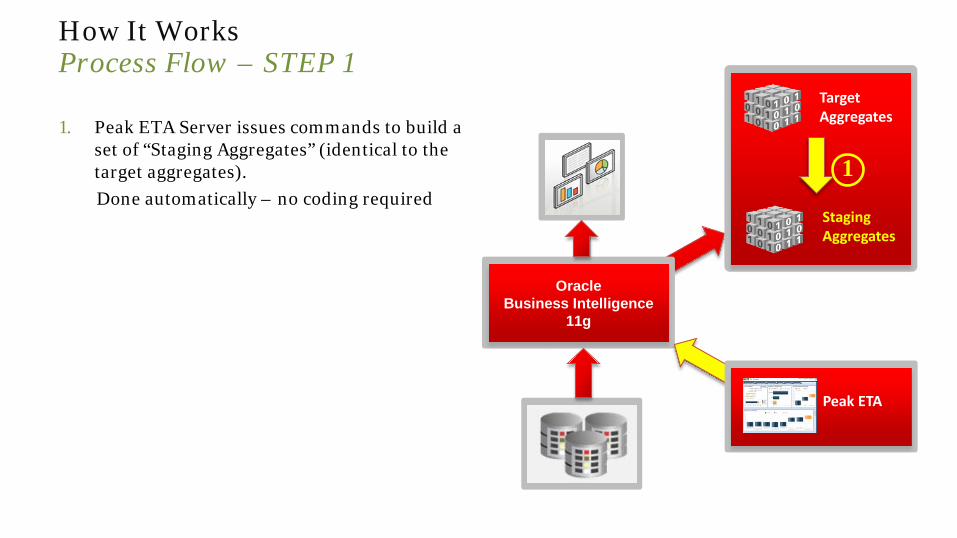
How It Works Process Flow – STEP 1
1. Peak ETA Server issues commands to build a set of “Staging Aggregates” (identical to the target aggregates).
Done automatically – no coding required
Oracle Business Intelligence
11g
Target Aggregates
Staging Aggregates
1
Peak ETA

© Peak Indicators Limited 24
How It Works Process Flow – STEP 2
1. Peak ETA Server issues commands to build a set of “Staging Aggregates” (identical to the target aggregates).
Done automatically – no coding required 2. Peak ETA Server instructs Oracle BI Server to
populate the Staging Aggregates using an incremental extract and load
Oracle Business Intelligence
11g
Target Aggregates
Staging Aggregates
Peak ETA
2
© Peak Indicators Limited 25
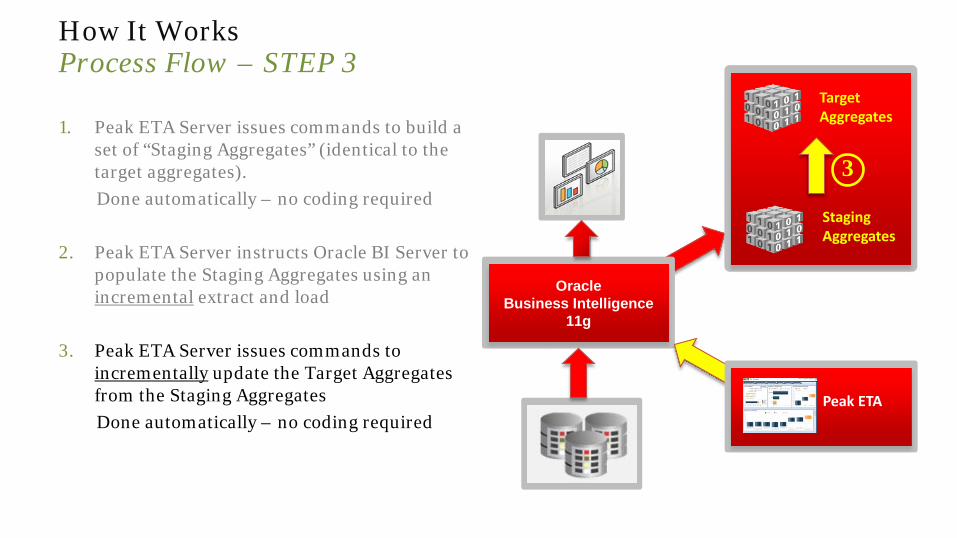
How It Works Process Flow – STEP 3
1. Peak ETA Server issues commands to build a set of “Staging Aggregates” (identical to the target aggregates).
Done automatically – no coding required 2. Peak ETA Server instructs Oracle BI Server to
populate the Staging Aggregates using an incremental extract and load
3. Peak ETA Server issues commands to incrementally update the Target Aggregates from the Staging Aggregates
Done automatically – no coding required
Oracle Business Intelligence
11g
Target Aggregates
Staging Aggregates
Peak ETA
3

© Peak Indicators Limited 26
How It Works All Steps Performed in Parallel
• For maximum efficiency, all parts of the process can be done in parallel
Oracle Business Intelligence
11g
Target Aggregates
Staging Aggregates

© Peak Indicators Limited 27
Peak ETA – Developers’ Guide Loading a new Aggregate

© Peak Indicators Limited 28
Loading a New Aggregate Example
• In this example, we are going to create a new aggregate table called “ag_Fact_Orders_Yr” to optimise the Analysis below which reports on the following data:
1. “Business Group” from the Organization dimension 2. “Year” from the Time dimension 3. “Total Revenue (Millions)” from the Order Lines fact
• The new Aggregate will be configured for incremental loading – each load process will only extract data for the “current year” (rather than the whole history)
1
2
3

© Peak Indicators Limited 29
Loading a New Aggregate Before you begin!
• So that Peak ETA Console can obtain the relevant Business Model SQL commands, you need to increase your session log level to 5
• You can do this in two ways: 1. Set Log Level for an individual user (must be the user account which
loads the data e.g. weblogic): • Open up your BI Repository (RPD) and go to “Manage > Identity” • Open up the properties for the relevant user and set “Logging Level” to 5
2. Set LOGLEVEL Session Variable:
• Create a Session Variable initialization block to set the LOGLEVEL system session variable to 5:
© Peak Indicators Limited 30
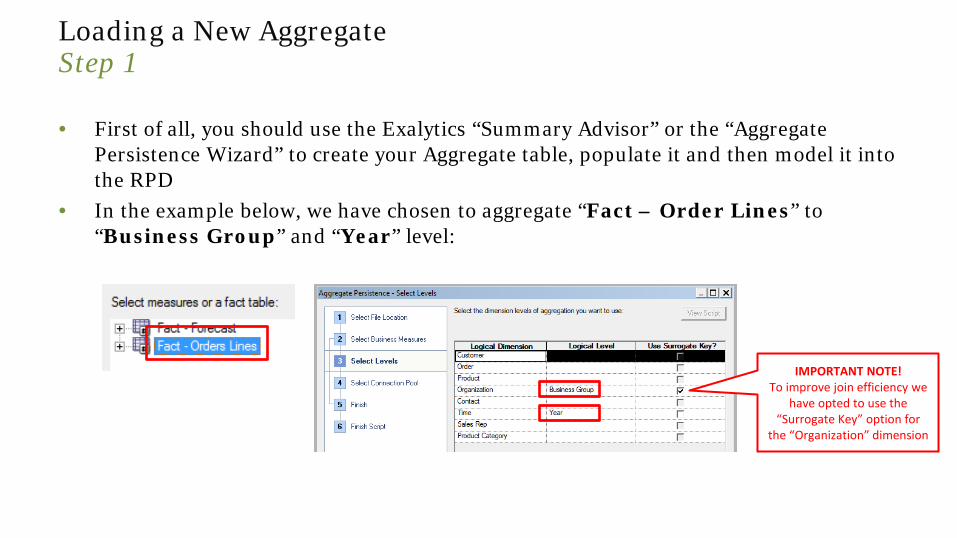
Loading a New Aggregate Step 1
• First of all, you should use the Exalytics “Summary Advisor” or the “Aggregate Persistence Wizard” to create your Aggregate table, populate it and then model it into the RPD
• In the example below, we have chosen to aggregate “Fact – Order Lines” to “Business Group” and “Year” level:
IMPORTANT NOTE! To improve join efficiency we
have opted to use the “Surrogate Key” option for
the “Organization” dimension
© Peak Indicators Limited 31
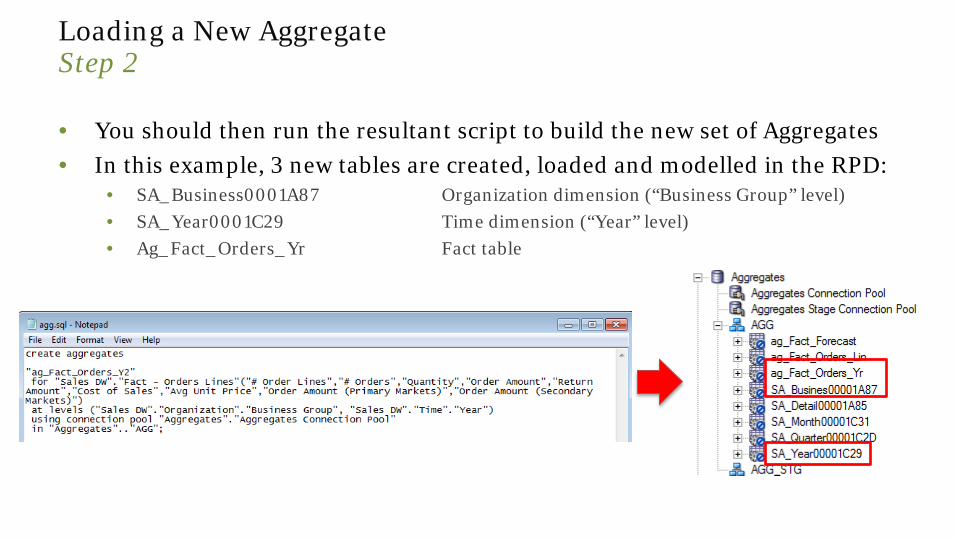
Loading a New Aggregate Step 2
• You should then run the resultant script to build the new set of Aggregates • In this example, 3 new tables are created, loaded and modelled in the RPD:
• SA_Business0001A87 Organization dimension (“Business Group” level) • SA_Year0001C29 Time dimension (“Year” level) • Ag_Fact_Orders_Yr Fact table

© Peak Indicators Limited 32
Loading a New Aggregate Step 3
• If required, go to the “Aggregate Groups” screen of the Peak ETA Console and set up any new Aggregate Groups that may be needed:
Our “Time” and “Business Group” dimension Aggregate tables will be
added to the “Dimensions” Aggregate Group
We’ve created a new Aggregate Group “Facts - Year” for the
Aggregate fact table

© Peak Indicators Limited 33
Loading a New Aggregate Step 4
• On the “Aggregates” screen, use the “Create Aggregate” button to create a new record • Specify the name of the first Aggregate table (e.g. SA_Busines00001A87) and configure the
following options: • Update Strategy: “Incremental Update” (Delete/Insert) or “Full Reload” (Truncate/Insert) • Disable Cache Hit: Do not query any data from the BI Server cache (default “Yes”) • Disable Cache Seed: Do not load the BI Server cache with the data extracted (default “Yes”) • Disable Summary Stats Logging: The queries generated will not be considered by the “Summary Advisor”
(default “Yes”)

© Peak Indicators Limited 34
Loading a New Aggregate Step 4 (Continued)
• Inactivate Target Schema: Specifies list of physical schemas which cannot be used as a source source for loading the aggregate. Click on the button to auto-populate this! Set to “” if you want it to be empty
• Update Columns: A comma-separated list of columns on which an incremental update will be based. During an incremental load, records in the target “Aggregate” will be deleted and replaced if the values in these columns exist in the “staging” Aggregate. For a dimension Aggregate, the “Update Columns” will typically be set to the dimension’s unique key
© Peak Indicators Limited 35
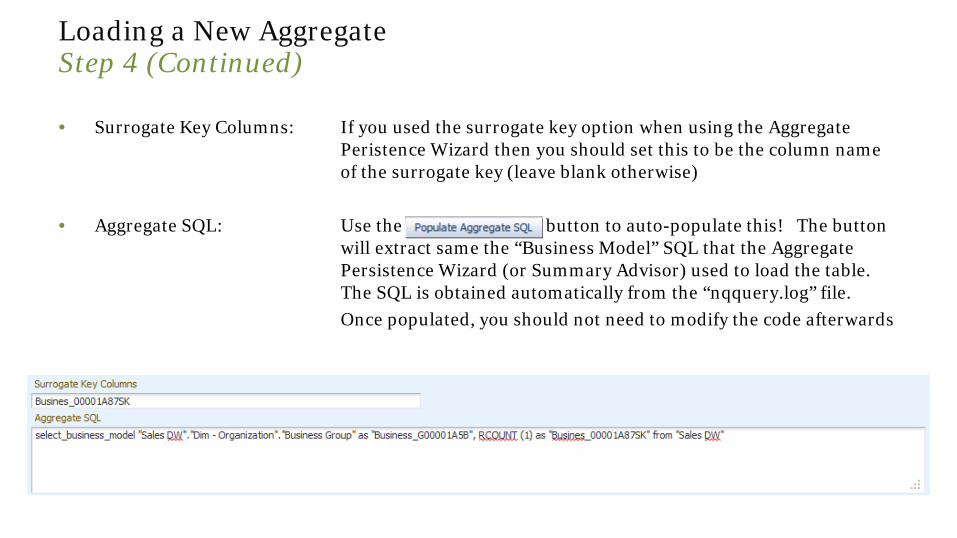
Loading a New Aggregate Step 4 (Continued)
• Surrogate Key Columns: If you used the surrogate key option when using the Aggregate Peristence Wizard then you should set this to be the column name of the surrogate key (leave blank otherwise)
• Aggregate SQL: Use the button to auto-populate this! The button
will extract same the “Business Model” SQL that the Aggregate Persistence Wizard (or Summary Advisor) used to load the table. The SQL is obtained automatically from the “nqquery.log” file.
Once populated, you should not need to modify the code afterwards

© Peak Indicators Limited 36
Loading a New Aggregate Step 4 (Continued) • WHERE Clause: Specify a WHERE clause filter to define the subset of records which
should be extracted from the source database. Leave blank to extract all records. You can apply as many WHERE/AND filters
as you like.
In the example below, we are choosing to extract all records which have been updated since the last ETL Load Date (defined by a repository variable).

© Peak Indicators Limited 37
Loading a New Aggregate
Step 5
• If you used the “surrogate key” option for the aggregate when using the Aggregate Persistence Wizard (or Summary Advisor), then you need to go to the “Pre/Post SQL” tab and click the button “Generate Surrogate Key Lookup SQL”
• This will auto-populate the “Pre-SQL” field with the SQL code to look up the existing surrogate key values in the target Aggregate and update them in the staging Aggregate. In addition, any new dimension records will have new surrogate key values generated automatically
You can use these Pre/Post SQL fields to define Logical SQL
commands that should be run against the BI Server before or after
the target Aggregate is loaded
You can use these Pre/Post SQL fields to define Logical SQL
commands that should be run against the BI Server before or after
the target Aggregate is loaded

© Peak Indicators Limited 38
Loading a New Aggregate
Repeat
• You now just have to repeat Steps 4 and 5 for all your other Aggregate tables The Aggregate “ag_Fact_Orders_Yr”
has been placed in the “Facts - Year” Aggregate Group
In this case, only data for the current year will be extracted during an Incremental load and inserted into
the target Aggregate (after all records for the same year have been deleted from the target Aggregate)
Remember to click the “Save” button after configuration
each Aggregate!
In this case, the incremental load will compare the “Year” values in the target and staging Aggregates. Records in the target Aggregate will be deleted if the “Year” value exists in the staging Aggregate. An INSERT
command will then insert all records from the staging Aggregate, effectively replacing the deleted records. The DELETE/INSERT commands
operate within a single database transaction
© Peak Indicators Limited 39
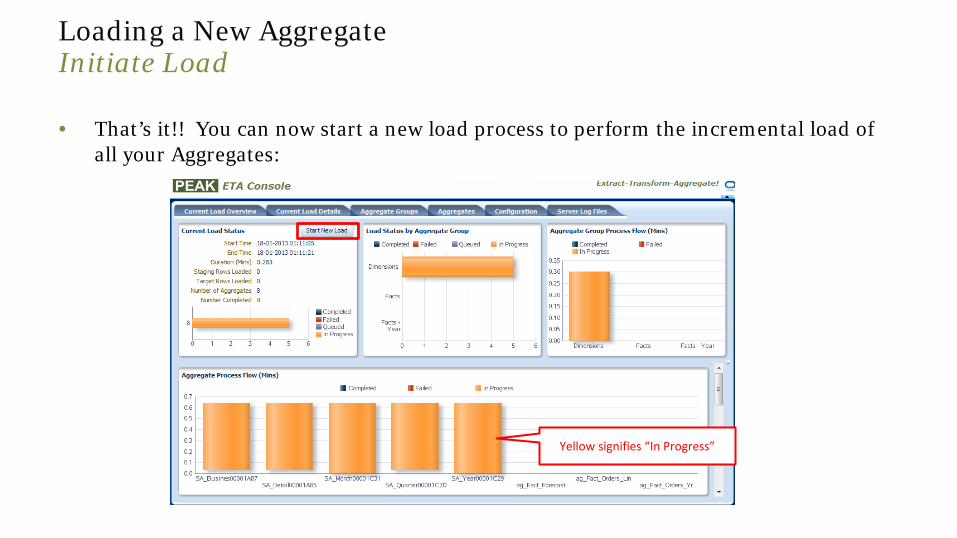
Loading a New Aggregate
Initiate Load
• That’s it!! You can now start a new load process to perform the incremental load of all your Aggregates:
Yellow signifies “In Progress”

© Peak Indicators Limited 40
Peak ETA – Developers’ Guide Error Handling

© Peak Indicators Limited 41
Error Handling Overview
• If an error occurs whilst loading an Aggregate, you will be alerted to this on the “Current Load Overview” screen
• In the example shown, all the Aggregates in the first Aggregate Group failed (because the database was unavailable)
• Whenever an error occurs, the load process will be aborted once the current Aggregate Group has completed (so no further Aggregate Groups will be processed)
Red signifies a failure!

© Peak Indicators Limited 42
Error Handling Details
• The “Current Load Details” screen will provide more detailed information about any errors which have occurred:
The error message shows clearly that the issue was
down to the database being unavailable

© Peak Indicators Limited 43
Error Handling Server Logs
• Error messages will also be captured in the Peak ETA Server log file:
The error message also shows clearly that the issue was down to the database
being unavailable

© Peak Indicators Limited 44
Error Handling Further Notes
• If a load process did not complete successfully, you can simply restart it again
• Upon restarting, the load process will start again from the beginning (a future enhancement will see the ability to restart the load from the point of failure!)
• There is no risk of data corruption, since each step of the load process is completely “atomic” (so it all succeeds or it all fails)
© Peak Indicators Limited 45
Questions?

Helping Your Business Intelligence Journey


![Oracle Database 11g The Top New Features for DBAs and … · 2009-11-25 · Oracle Database 11g: The Top New Features for DBAs and Developers Database Replay [3] 1. The workload captured](https://img.dokumen.tips/doc/110x75/5e960db3246e3f24fc6b4ca2/oracle-database-11g-the-top-new-features-for-dbas-and-2009-11-25-oracle-database.jpg)