Embed Size (px)
Citation preview

R
Barcode 2000™
Installation and Setup Manual
For Use with Oracle Applications
Document Revision 2.0 – 4/17/07

TABLE OF CONTENTS
PURPOSE: ................................................................................................................................................ 3
OPERATING SYSTEM INSTALLATION ............................................................................................... 4
CONFIRM PROPER EXECUTION FROM THE COMMAND LINE ....................................................... 4
ORACLE APPLICATIONS SETUP ........................................................................................................ 5
PRINT DRIVER CREATION................................................................................................................... 6
PRINTER TYPE ASSIGNMENT............................................................................................................. 9
REGISTER NEW TYPE........................................................................................................................ 10
CREATE A REPORT TO QUERY DATA............................................................................................. 11
SETUP THE REPORT IN CONCURRENT MANAGER....................................................................... 12
BOUNCE CONCURRENT MANAGER ................................................................................................ 14
APPENDIX A ADD A QUEUE WITH CUPS........................................................................................ 19
APPENDIX B DEMO FILES................................................................................................................. 24

BARCODE 2000 Oracle Applications Demo Page 3
Purpose:
This document is a demonstration of a method for installing Unibar’s BARCODE 2000 for use through Oracle Applications. It includes an example of installing and setting up a print driver within Oracle Applications and the Concurrent Manager. It also provides information on creating a report designed to pull label data from the database. The Oracle instructions were written for Oracle Applications 11i with the Vision demo installed. Prerequisite information on the use of BARCODE 2000 can be found in the user manual that is included with the BARCODE 2000 software package.

BARCODE 2000 Oracle Applications Demo Page 4
Operating System Installation
• Install BARCODE 2000 software. For this demo, we assume installation begins in the home directory of the applmgr user which is /oracle/home/applmgr on our system. To ensure that the concurrent manager can properly execute BARCODE 2000, the following lines were added to the end of $APPL_TOP/VIS_linux1.env:
UNIBAR=”/oracle/home/applmgr/unibar” export UNIBAR PATH=$UNIBAR:${PATH} export PATH
• Permissions must be set to allow read and execute on the directory and files for
the development group and Oracle applications (if they are distinct). Write permission must be given to whoever will run BARCODE 2000 directly from the command line.
Note: See BARCODE 2000 documentation for configuration details.
Confirm Proper Execution From The Command Line
After installation and setup of BARCODE 2000, it is very important to verify proper operation of the software on the target machine - sending output to the desired printer - before proceeding to Oracle Applications configuration. We will use the piped form of the command for our demonstration purposes. Confirm that the following entered on the command line produces a document with a barcode on the desired printer: cat inputFile | ubfmt /L=demo2.lbl /C=numCopies /P=LogicalPrinterName
The inputFile contains the data necessary to print the label. For our demo, this file will look like..
/DRTxData.demo 140009~Goodway~6001~Home Style Root Beer
… for one label. If you do not have the demo2.lbl or demo.ldd files, their contents are listed in Appendix B Demo Files. The above is the same form of the command that Oracle Applications concurrent manager will issue. Once this is working correctly, then it is proper to proceed to configuring Oracle Applications.
BARCODE 2000 Oracle Applications Demo Page 5
Oracle Applications Setup
• Create a print driver that will call ubfmt, which is the formatter executable of
BARCODE 2000. • Refer to Print Driver Creation for more details. * Requires System Administration
Responsibility • Choose an existing print style. That is, portrait, landscape, landscape wide, etc.
that meets the requirements of the data file. For our demo, we will use LANDWIDE.
• Assign the selected print style and new driver to a new printer type. Refer to Printer Type Assignment for more details. * Requires System Administration Responsibility
• Create a new queue for the label printer. • Register the new queue with the new printer type. • Create a new report to query the label data.
• Setup the new report through the concurrent manager.
• The Concurrent manager must be “bounced” after the driver, type, and registration have been completed for them to take effect. Contact your sysadmin if you are not logging in as applmgr.
• Run the report, and the labels print.

BARCODE 2000 Oracle Applications Demo Page 6
Print Driver Creation
Login as System Administrator. Navigate to Install/Printer/Driver
Figure A
Create a new driver that will pass the output of the report, which is delimited label data (See Create a Label Data Query Report), to the formatter along with BARCODE 2000 parameters. Create a new driver and insert in the following fields as appropriate and click on the save icon.
*The following is an example of setting up a driver that calls BARCODE 2000’s formatter process. Refer to Figure B

BARCODE 2000 Oracle Applications Demo Page 7
Field Name Value to Enter Description of value
Driver Name UNIBARLABELDRIVER User Driver Name
Description Unibar Label Driver routes report output through BARCODE 2000
Description of the driver
SRW Driver W Printer control file that Oracle Reports uses
Platform
Null Platform on which Oracle resides.
Driver Method (radio buttons)
Command Specifies execution method
Driver Method Parameters
Spool File
Standard Input
Program Name
Null
Null
Null
Specifies details of how the program will be executed. None of these are used in our method and should remain clear/blank
Arguments(important) ** See explanation below Tell Oracle how to send the output file to BARCODE 2000
Initialization Null String that Oracle send to printer to format page
Reset Null String that Oracle send to printer to reset format
Please note that the SRW Driver (SQL Report Writer) is used to determine the dimensions of the output. In our demo, this has nothing to do with what is printed on the label, instead it is used to set the maximum data record length. Also note that the formatter produces a complete set of printer language instructions and if either Initialization or Reset are not blank, they may “confuse” the printer so that no label is printed. Once these values are entered, press the save icon. ** The arguments field contains the following values:
1. Input data file 2. BARCODE 2000 executable with path. 3. Printer configuration file and path 4. Print command and parameters: cat $PROFILES$.FILENAME | ubfmt /L=demo2.lbl /C=$PROFILES$.CONC_COPIES /P=ZEBRA

BARCODE 2000 Oracle Applications Demo Page 8
Figure B
You can see from the Arguments that this is essentially the same as the command line used in testing the software in the section Confirm Proper Execution from the Command Line except that Oracle Applications environment variables are used to pass the parameters. It is very important that the UNIBAR environment variable be set and included in the path as detailed in the section Operating System Installation. For this demonstration, we do not create any new Styles. A new style may be a better alternative to control whether the report goes through BARCODE 2000, but Styles cannot be removed once created. We opted not to add any new styles at this time. What we did instead, is to create a new queue for the label printer with a unique name that users can recognize. If you do not know how to add a queue in the OS, please see your sysadmin, or see how we did it in Appendix A Add A Queue With CUPS. For this demo we selected the LANDWIDE style as it provides 180 columns for each data record. If a data record exceeds 180 columns, then it will wrap in the report and the remainder will incorrectly appear as a new data record. If you proceed to a permanent installation, you can add Styles for the user to select at request submission that will make it easy for the user to know that barcodes will be printed.

BARCODE 2000 Oracle Applications Demo Page 9
Printer Type Assignment
Login as System Administrator. Navigate to Install/Printer/Type • Create a new printer type (UnibarLabelPrinter) to which you will assign the
desired printer style and new driver and provide a description. • Go to the ‘Style’ field and quick-pick the desired style (LANDWIDE for this demo) • Go to the ‘Driver’ field and quick-pick the label driver (e.g. UnibarLabelDriver) Once these values are entered, press the save icon. * Refer to figure C This will enable developers to attach this printer type style to a specific printer at registration time.
Figure C

BARCODE 2000 Oracle Applications Demo Page 10
Register New Type
Login as System Administrator. Navigate to Install/Printer/Register
Register the new printer type (UnibarLabelPrinter) with the new Printer Queue (ZEBRA) established for the same printer used in the original test of the software in the section Confirm Proper Execution from the Command Line. Once these values are entered, press the save icon.
Figure D

BARCODE 2000 Oracle Applications Demo Page 11
Create a Report to Query Data
For our demo we only need to specify the data mapping and query the four variable data fields; OrderNumber, CustomerName, ItemNumber, and ItemDescription, on our demo2 label format. Please refer to Appendix B Demo Files. The following SQL extracts the data: select '/DRTxData.demo' from dual;
select ltrim(rtrim(ORDER_NO))||'~'||ltrim(rtrim(CUST_NAME))||'~'||ltrim(rtrim(ITEM_NO))||'~'||ltrim(rtrim(ITEM_DESC1)) from OPM_SHIPPING where ORDER_NO between 140009 and 140011 order by ORDER_NO, ITEM_NO;
When this SQL is run against our Oracle Applications Vision Demo produces the following output: /DRTxData.demo 140009~Goodway~6001~Home Style Root Beer 140010~Bigmart~8002~HYDROCHLORIC ACID, 33-40% 140011~Goodway~9010~Cheryl's Ice Cream Sandwich
A simple report, reportLabelDemo2.rdf, was created with Oracle Reports Builder 6i (rwbld60) that just encapsulates this SQL.
Figure E

BARCODE 2000 Oracle Applications Demo Page 12
Setup the Report in Concurrent Manager
Making a request to run our new report available in Oracle Applications requires that that a concurrent executable and a concurrent program be defined. Login as System Administrator. Navigate to Concurrent/Program/Executable
Figure F
Once these values are entered, press the save icon. We put this under the Payables responsibility because our BARZ_OUT Pro Oracle Applications demo also runs a report under this responsibility. Next we define the concurrent program that will employ this executable.

BARCODE 2000 Oracle Applications Demo Page 13
Login as System Administrator. Navigate to Concurrent/Program/Define
Figure G
ZEBRA is specified as the printer here so that users will be prevented from trying to send the output to any other (non-ZPL) printer. Once these values are entered, press the save icon. Next, we must stop and re-start (bounce) the concurrent manager so that all of our changes will take effect.

BARCODE 2000 Oracle Applications Demo Page 14
Bounce Concurrent Manager
Once all of the Oracle Applications printer configuration tasks have been completed, the concurrent manager must be “bounced” for all of the changes to take effect on the server. Login to the server OS as applmgr and start and stop the concurrent manager. This requires the Oracle user apps login/password. Be advised, it can take some time for all of the concurrent processes to go down. $APPLCSF/scripts/VIS_linux1/adcmctl.sh stop apps/<appsPWD>
Navigate to Concurrent/Manager/Administer Here you can monitor the processes as they die. Keep pressing the Refresh button until there are all zeroes in the Actual column.
Figure H
Then you can re-start them all by running the Concurrent Manager control script again with the start parameter this time. $APPLCSF/scripts/VIS_linux1/adcmctl.sh start apps/<appsPWD>

BARCODE 2000 Oracle Applications Demo Page 15
Print Labels If all of the previous steps have been completed successfully, we can now request the report and have the labels printed. Login as Operations Select Payables Responsibility
Figure J
Of course, your user may be different for the Payables responsibility. In which case, just login as the appropriate user.

BARCODE 2000 Oracle Applications Demo Page 16
Then scroll down to and click on Other/Requests/Run at the bottom.

BARCODE 2000 Oracle Applications Demo Page 17
Make sure you change Copies to 1 then submit…
You can then track your requests to see when the labels should print…

BARCODE 2000 Oracle Applications Demo Page 18

BARCODE 2000 Oracle Applications Demo Page 19
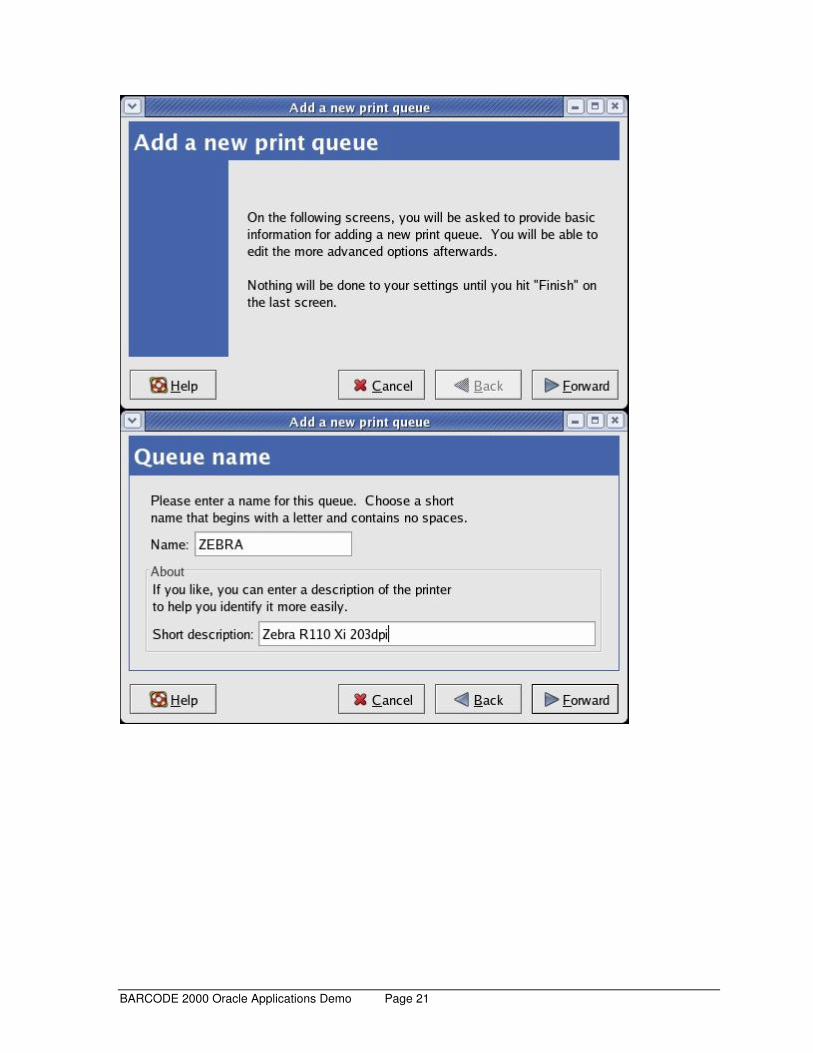
Appendix A Add A Queue With CUPS
This short demonstration shows two ways a new Printer queue was added to a Red Hat Linux system. Root privileges are required. Our aim here is to create a new queue for an existing printer. Our first example is through the command line:
You must be logged in as root to add the queue. First we use the `lpstat –s` command to see the installed printers. The printer we want to create a new queue for is named “first_printer”. The command `lpadmin –p UB_BARZ_OUT –D “Unibar BARZ_OUT for HPLJ4” –E –v socket://10.10.10.22:9100
–m laserjet.ppd.gz` creates the queue. The –p specifies the name of the queue. The –D specifies an optional description for the queue. The –E enables the queue. The –v specifies the device for the queue. This is a JetDirect queue so the device URI is the IP Address:Port Number. The –m specifies an installed Postscript Printer Description (PPD) file. CUPS uses PPD files for both Postscript and non-Postscript printers. You can use the `lpinfo –m` command to get a list of all of the PPD files.

BARCODE 2000 Oracle Applications Demo Page 20
The `lpoptions –p UB_BARZ_OUT –o raw` command sets this to be a raw queue, meaning that there is no filtering of the input, it is sent directly to the printer as is. This queue can be removed with the `lpadmin –x UB_BARZ_OUT` command. Our second example is through the graphical user interface and begins on the desktop with clicking through Applications->System Settings->Printing. The following screenshots show the flow of creating the new queue after entering the root password at the prompt.
Once again we are trying to create a new queue for the Zebra Label printer with the same specifications that were used in the first example.
BARCODE 2000 Oracle Applications Demo Page 21

BARCODE 2000 Oracle Applications Demo Page 22

BARCODE 2000 Oracle Applications Demo Page 23
This queue can be removed with the Delete button on the Printer configuration panel.

BARCODE 2000 Oracle Applications Demo Page 24
Appendix B Demo Files
demo2.lbl VERSION 6.0 ATTRIBUTES 0, "demo.ldd", 0 NAME "demo2.lbl" SPEED 0 PRINTER "Sato CL412e", "SATO_CL412" SIZE 400.0, 600.0 UNIT "1/100 inch", "1/100 inch" TEXT "TEXT11", 2, 100, 0, "Item Description:", 14, 13, 0, N, N, N, N, N, N, 0, "", 10 TEXT "TEXT10", 2, 80, 0, "Item Number:", 14, 13, 0, N, N, N, N, N, N, 0, "", 10 TEXT "TEXT9", 2, 60, 0, "Customer Name:", 14, 13, 0, N, N, N, N, N, N, 0, "", 10 TEXT "TEXT8", 2, 40, 0, "Order Number:", 14, 13, 0, N, N, N, N, N, N, 0, "", 10 TEXT "TEXT7", 2, 20, 0, "Company Name:", 14, 13, 0, N, N, N, N, N, N, 0, "", 10 BARCODE "BARCODE1", 13, 173, -1, "<allFields>", "", 18, N, 6, 100, 0, N, 0, "", 10, 8, 0, 3, 10, 0 DATA "TEXT5", 150, 100, -1, "<ItemDescription>", "", 15, 12, 0, N, N, N, N, N, N, 0, "", 9 DATA "TEXT4", 150, 80, -1, "<ItemNumber>", "", 15, 12, 0, N, N, N, N, N, N, 0, "", 9 DATA "TEXT3", 150, 60, -1, "<CustomerName>", "", 15, 12, 0, N, N, N, N, N, N, 0, "", 9 DATA "TEXT2", 150, 40, -1, "<OrderNumber>", "", 15, 12, 0, N, N, N, N, N, N, 0, "", 9 TEXT "TEXT1", 150, 20, 12, "My Company", 15, 12, 0, N, N, N, N, N, N, 0, "", 9
demo.ldd CONSTANT~CompanyName~ ~My Company VARIABLE~OrderNumber~ ~8~Numeric~140000 VARIABLE~CustomerName~ ~15~Alphanumeric~cust_name VARIABLE~ItemNumber~ ~6~Alphanumeric~1111 VARIABLE~ItemDescription~ ~30~Alphanumeric~item_desc CONCATENATED~allFields~ ~"Order Number: "+OrderNumber+" Item Number: "+ItemNumber+" Item Description: "+ItemDescription+"\x0d"~ TXDATA~TxData.demo~ ~OrderNumber+CustomerName+ItemNumber+ItemDescription~D FILE~defaultPCX~Default graphic file~CONSTANT~0~ ~ ~C:\unibar\images\ub_pcx.pcx