Embed Size (px)
Citation preview
DMID Workflow Process Guide for Sponsors: Viewing the Case Narrative and Routing the Case – Page 1 February 2016
Oracle Argus Safety Workflow Process Guide for DMID Sponsors: Viewing the Case Narrative and Routing the Case
This workflow process guide will show DMID Sponsors how to view the case narrative and then route the case to the appropriate PVG specialist in the Oracle Argus Safety System. Please note that as the DMID Sponsor you have Read Only access to the case and case narrative. This workflow process guide will explain how to perform the following tasks: Logging in to the Oracle Argus Safety System Opening a Case Checking all cases for the same Subject ID Viewing the Case Narrative and Case Causality Routing the Case and Adding Comments Logging in to the Oracle Argus Safety System 1. Enter your Username and Password. 2. Click Login.
DMID Workflow Process Guide for Sponsors: Viewing the Case Narrative and Routing the Case – Page 2 February 2016
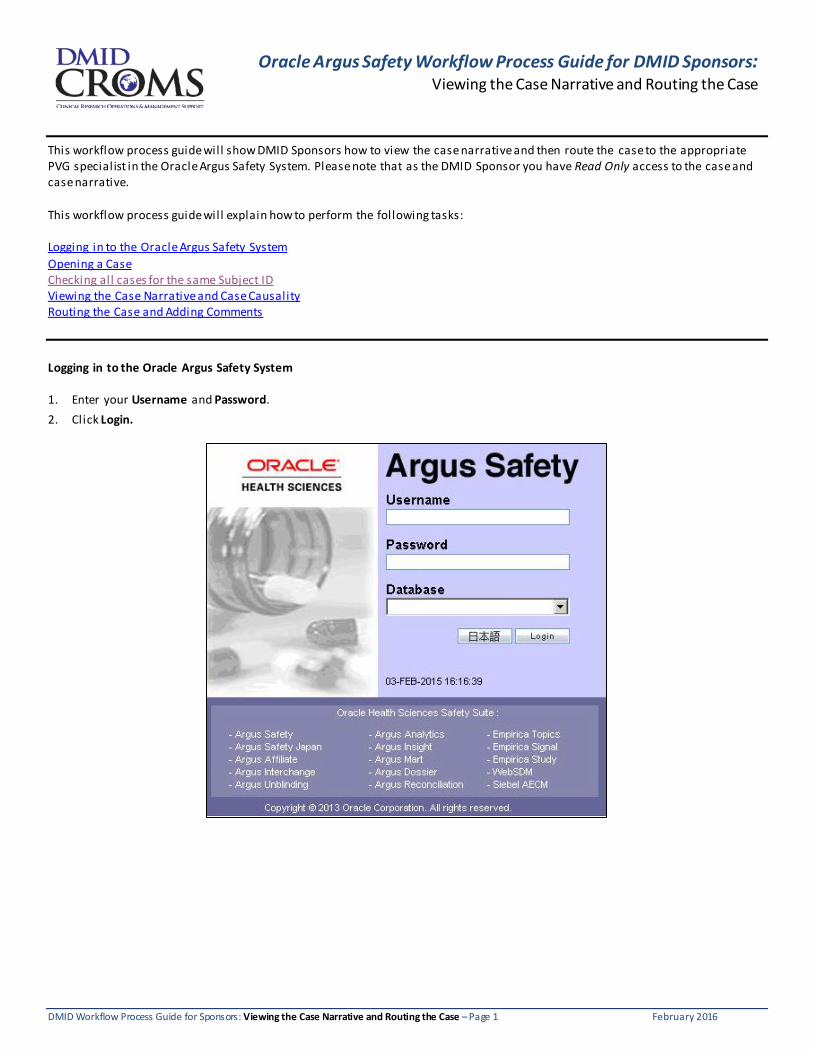
Opening a Case
1. After logging in, the first page Argus displays is your Personal Dashboard. Your Personal Dashboard wil l show all of the cases assigned to you.
2. To open a case, cl ick the case number link (for example, 10-0065-00052).

DMID Workflow Process Guide for Sponsors: Viewing the Case Narrative and Routing the Case – Page 3 February 2016
3. The General tab appears after opening a case. All the fields will be grayed out and you will have Read Only access. You can
view additional case information by selecting individual tabs.
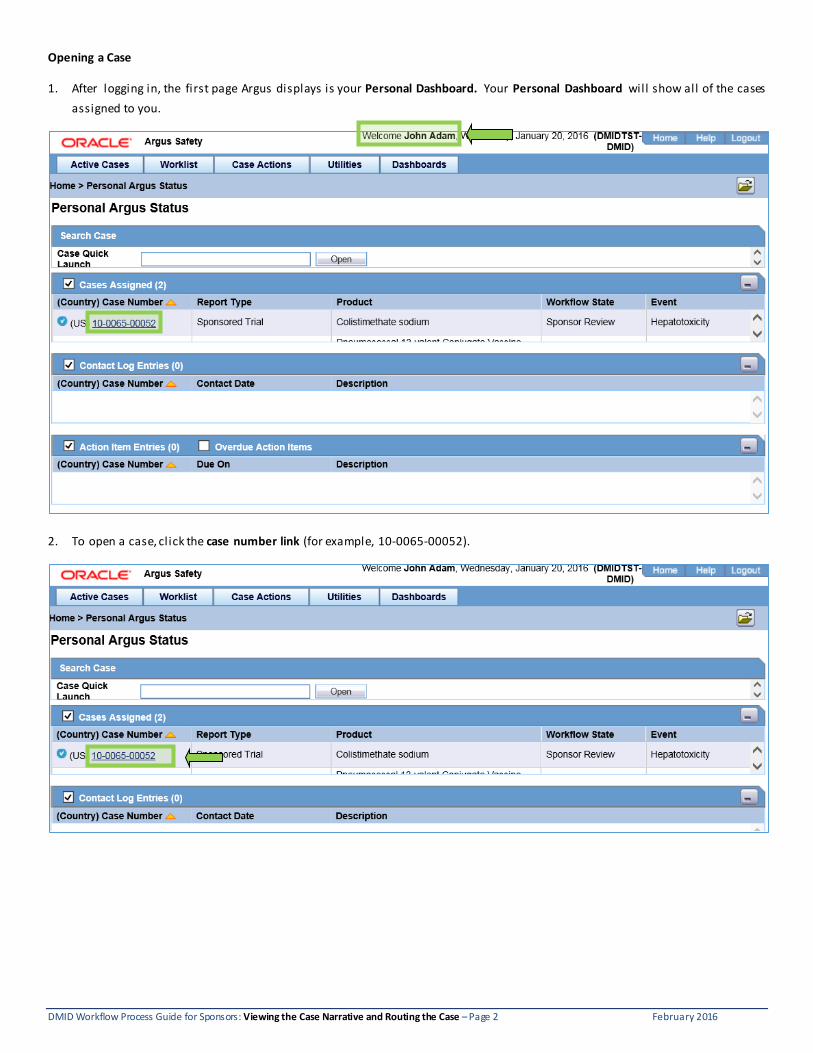
Checking all cases for the same Subject ID 1. Under the Case Actions tab, cl ick Open to display the case open page.
2. Under the Search For tab, select Patient ID.
DMID Workflow Process Guide for Sponsors: Viewing the Case Narrative and Routing the Case – Page 4 February 2016
3. Enter the Patient ID and click Search to display the l ist of cases for the subject.
4. Right click on the Case number to open the Case Summary window. Then click on Case Summary, this will provide more information about the case.
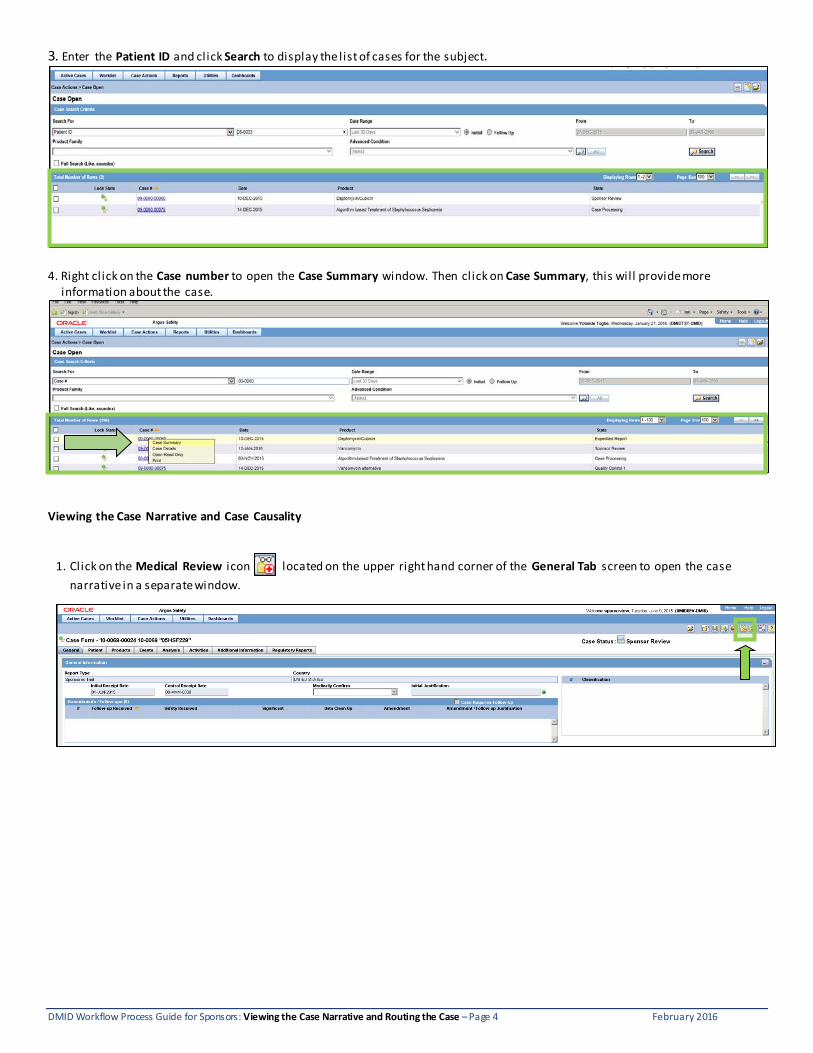
Viewing the Case Narrative and Case Causality
1. Click on the Medical Review icon located on the upper right hand corner of the General Tab screen to open the case narrative in a separate window.
DMID Workflow Process Guide for Sponsors: Viewing the Case Narrative and Routing the Case – Page 5 February 2016
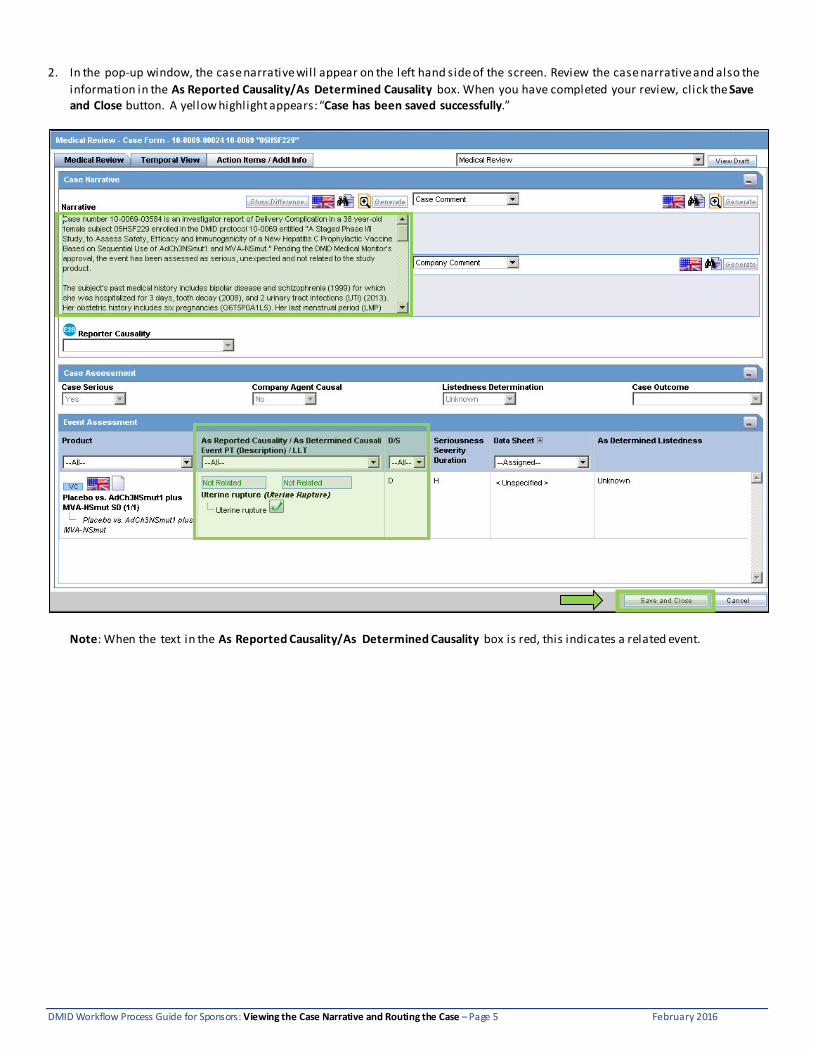
2. In the pop-up window, the case narrative will appear on the left hand side of the screen. Review the case narrative and also the information in the As Reported Causality/As Determined Causality box. When you have completed your review, click the Saveand Close button. A yellow highlight appears: “Case has been saved successfully.”
Note: When the text in the As Reported Causality/As Determined Causality box is red, this indicates a related event.
DMID Workflow Process Guide for Sponsors: Viewing the Case Narrative and Routing the Case – Page 6 February 2016
Routing the Case and Adding Comments
Routing the case to the next state is determined by your assessment of the case. You will approve, disapprove or expedite the case and add your comments at this step in the process. Below is a brief description of each routing state:
Approved: You are satisfied with the case narrative. You approve the case for queries or for closure.
Disapproved: You disapprove the case narrative and will need to provide comments explaining why you selected this option. You will reroute the case back to PVG. PVG will need to submit a new revised case narrative for your review.
Expedited Report: You are satisfied with the case narrative. You approve the case for queries. You have determined that a case is a serious, unexpected and suspected adverse reaction (SUSAR), and must provide comments to justify why you selected this option. The case will be routed back to PVG. PVG will draft an Expedited Safety Report and provide you with a timeline.
To route the case to the next state, do the following steps. Note: These steps are applicable to all three routing state options.
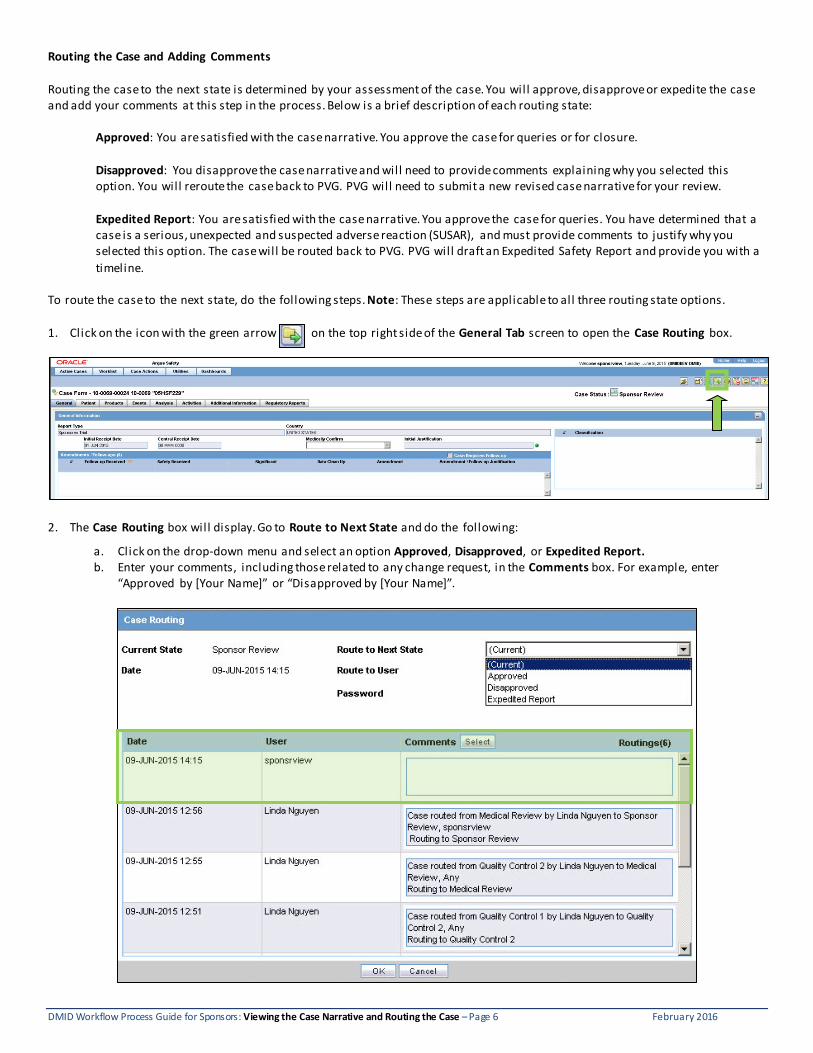
1. Click on the icon with the green arrow on the top right side of the General Tab screen to open the Case Routing box.
2. The Case Routing box will display. Go to Route to Next State and do the following:
a. Click on the drop-down menu and select an option Approved, Disapproved, or Expedited Report. b. Enter your comments, including those related to any change request, in the Comments box. For example, enter
“Approved by [Your Name]” or “Disapproved by [Your Name]”.
DMID Workflow Process Guide for Sponsors: Viewing the Case Narrative and Routing the Case – Page 7 February 2016
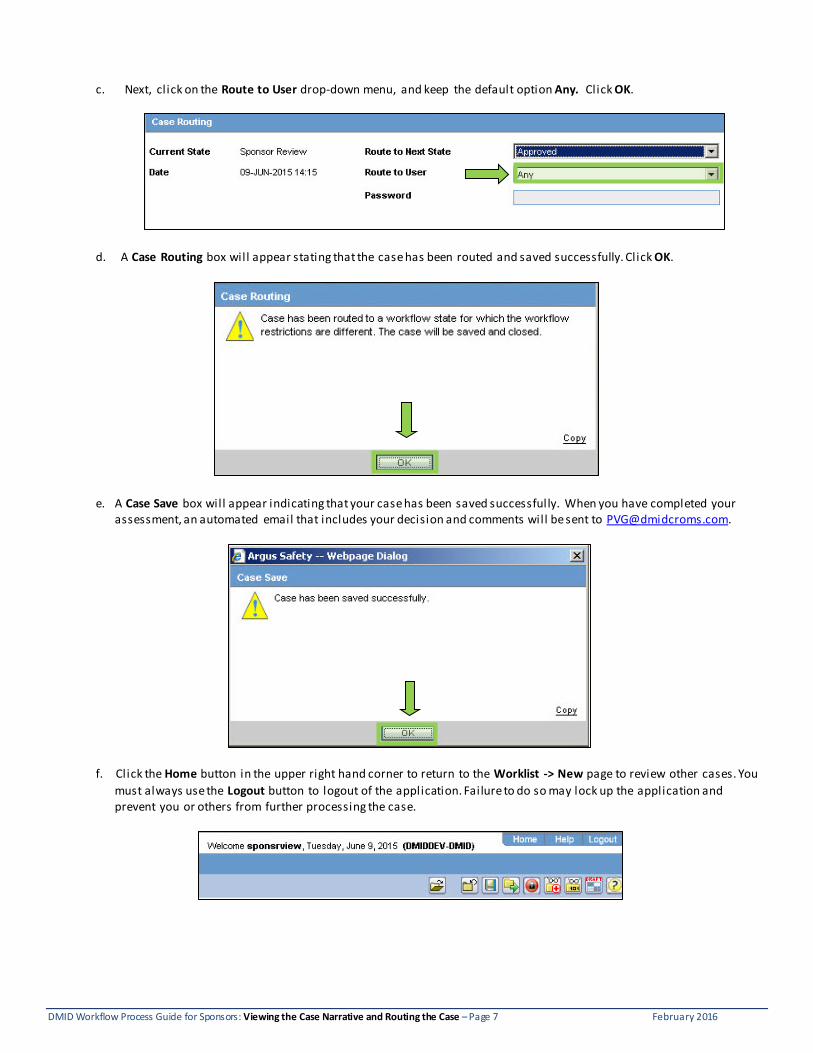
c. Next, cl ick on the Route to User drop-down menu, and keep the default option Any. Click OK.
d. A Case Routing box will appear stating that the case has been routed and saved successfully. Click OK.
e. A Case Save box will appear indicating that your case has been saved successfully. When you have completed yourassessment, an automated email that includes your decision and comments will be sent to [email protected].
f. Click the Home button in the upper right hand corner to return to the Worklist -> New page to review other cases. Youmust always use the Logout button to logout of the application. Failure to do so may lock up the application and prevent you or others from further processing the case.
DMID Workflow Process Guide for Sponsors: Viewing the Case Narrative and Routing the Case – Page 8 February 2016
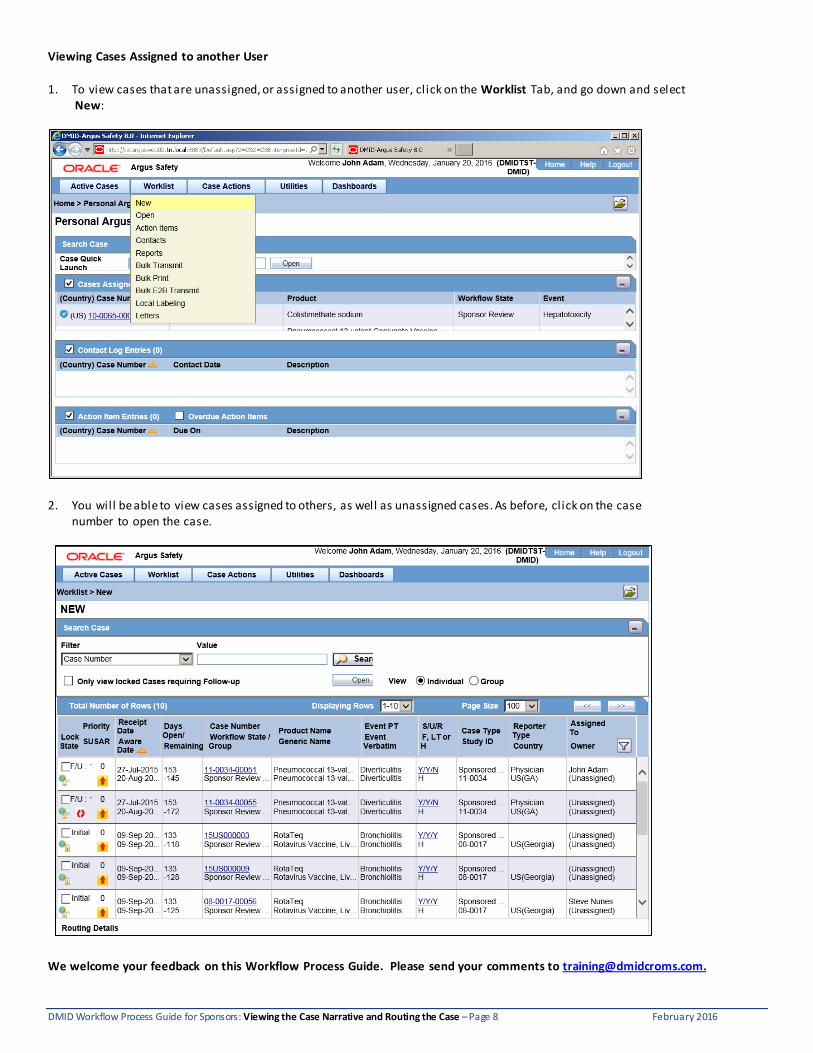
Viewing Cases Assigned to another User 1. To view cases that are unassigned, or assigned to another user, cl ick on the Worklist Tab, and go down and select New:
2. You will be able to view cases assigned to others, as well as unassigned cases. As before, cl ick on the case number to open the case.
We welcome your feedback on this Workflow Process Guide. Please send your comments to [email protected].