Embed Size (px)
Citation preview

Oracle Activity-Based Management
User Guide
Release 11i
August 2001
Part No. A85332-02

Oracle Activity-Based Management User Guide, Release 11i
Part No. A85332-02
Copyright © 1996, 2001, Oracle Corporation. All rights reserved.
Primary Authors: Steve Gordon, Melanie Heisler
Contributing Authors: Mike Casey, Scott Date, Dan Sinnreich
Contributors: Rajesh Dharamshi, Jaya Govindan, Steve Gumerman, Scott Landsman, Nico Martinez de Hoz, Amit Mittal, Jay Patel, Penny Randall, Satish Sista, Lauren Sternberg, Bart Stoehr, Raghu Tirnellai,
The Programs (which include both the software and documentation) contain proprietary information of Oracle Corporation; they are provided under a license agreement containing restrictions on use and disclosure and are also protected by copyright, patent, and other intellectual and industrial property laws. Reverse engineering, disassembly, or decompilation of the Programs is prohibited.
The information contained in this document is subject to change without notice. If you find any problems in the documentation, please report them to us in writing. Oracle Corporation does not warrant that this document is error free. Except as may be expressly permitted in your license agreement for these Programs, no part of these Programs may be reproduced or transmitted in any form or by any means, electronic or mechanical, for any purpose, without the express written permission of Oracle Corporation.
If the Programs are delivered to the U.S. Government or anyone licensing or using the programs on behalf of the U.S. Government, the following notice is applicable:
Restricted Rights Notice Programs delivered subject to the DOD FAR Supplement are "commercial computer software" and use, duplication, and disclosure of the Programs, including documentation, shall be subject to the licensing restrictions set forth in the applicable Oracle license agreement. Otherwise, Programs delivered subject to the Federal Acquisition Regulations are "restricted computer software" and use, duplication, and disclosure of the Programs shall be subject to the restrictions in FAR 52.227-19, Commercial Computer Software - Restricted Rights (June, 1987). Oracle Corporation, 500 Oracle Parkway, Redwood City, CA 94065.
The Programs are not intended for use in any nuclear, aviation, mass transit, medical, or other inherently dangerous applications. It shall be the licensee's responsibility to take all appropriate fail-safe, backup, redundancy, and other measures to ensure the safe use of such applications if the Programs are used for such purposes, and Oracle Corporation disclaims liability for any damages caused by such use of the Programs.
Oracle is a registered trademark, and Oracle Discoverer and Activa are trademarks or registered trademarks of Oracle Corporation. Other names may be trademarks of their respective owners.

Contents
Send Us Your Comments .................................................................................................................. xv
Preface......................................................................................................................................................... xvii
Overview.............................................................................................................................................. xviiIntended Audience ............................................................................................................................. xviiiStructure............................................................................................................................................... xviiiRelated Documents............................................................................................................................... xxTraining and Support.......................................................................................................................... xxiSafeguarding Your Data .................................................................................................................... xxiiTypographical Conventions.............................................................................................................. xxiiAbout Oracle Corporation................................................................................................................. xxiii
1 Overview
Introduction ......................................................................................................................................... 1-1Activity-Based Management Concepts........................................................................................... 1-2Building a Model ................................................................................................................................ 1-2Integrating Oracle ABM with Oracle Performance Analyzer .................................................... 1-5
2 User Interface
Overview .............................................................................................................................................. 2-1Control Panel ....................................................................................................................................... 2-2
Launchpad..................................................................................................................................... 2-3Navigator ....................................................................................................................................... 2-3Hierarchy Navigator .................................................................................................................... 2-4
iii

Inspector Panels .................................................................................................................................. 2-5Inspector Panel Features and Options....................................................................................... 2-6Inspector Grid................................................................................................................................ 2-7Details Window ............................................................................................................................ 2-8
Tab Order and Text Boxes ................................................................................................... 2-8ID and Name Fields in Wizards and Details Windows ................................................ 2-9
Toolbar .................................................................................................................................................. 2-9Status Bar ............................................................................................................................................ 2-10Wizards................................................................................................................................................ 2-11
Wizard Features .......................................................................................................................... 2-12Using Wizards............................................................................................................................. 2-14
Wizard Welcome Screen..................................................................................................... 2-14Single Step Wizard Title Pages .......................................................................................... 2-14Wizard Step Screens............................................................................................................ 2-15Wizard Summary Screen.................................................................................................... 2-16
Navigation Procedures ..................................................................................................................... 2-16Creating and Running Calculations.............................................................................................. 2-18
Creating a Calculation Instance................................................................................................ 2-20Specifying Calculation Parameters .......................................................................................... 2-21Using Offsets to Define Calculation Data Set Parameters .................................................... 2-23Running a Calculation ............................................................................................................... 2-24Viewing Calculation Results ..................................................................................................... 2-25
3 Getting Started
Overview .............................................................................................................................................. 3-2Master Lists .......................................................................................................................................... 3-3Currencies............................................................................................................................................. 3-5Models................................................................................................................................................... 3-6Data Sets ............................................................................................................................................... 3-8
Period Types.................................................................................................................................. 3-8Periods.......................................................................................................................................... 3-10Data Set Types and Data Set Classes ....................................................................................... 3-11Creating a Data Set ..................................................................................................................... 3-12Closing and Opening Data Sets ................................................................................................ 3-14
Units of Measure ............................................................................................................................... 3-15
iv

Department Types............................................................................................................................. 3-16Exchange Rates .................................................................................................................................. 3-17Attributes and Attribute Values..................................................................................................... 3-19
Attribute Entities ........................................................................................................................ 3-19Object-Specific Attribute Entities ...................................................................................... 3-20Shared Attribute Entities.................................................................................................... 3-20
Locking Attributes...................................................................................................................... 3-24Mapping Rule Sets ........................................................................................................................... 3-25Activity Rate Sets .............................................................................................................................. 3-27Bill Types ............................................................................................................................................ 3-28Activity Hierarchy ............................................................................................................................ 3-29Department Hierarchy ..................................................................................................................... 3-31User Preferences Window ............................................................................................................... 3-32
General Tab ................................................................................................................................. 3-33Attributes Tab ............................................................................................................................. 3-34Specifying User Preferences...................................................................................................... 3-35
4 Defining Master List Objects
Overview .............................................................................................................................................. 4-1Master List Object Definitions ........................................................................................................ 4-2
Departments .................................................................................................................................. 4-2Accounts ........................................................................................................................................ 4-2Statistics.......................................................................................................................................... 4-2Activities ........................................................................................................................................ 4-2Activity Drivers ............................................................................................................................ 4-3Materials ........................................................................................................................................ 4-3Cost Objects ................................................................................................................................... 4-3
Defining Master List Objects ........................................................................................................... 4-3Object-Specific Setup Requirements .......................................................................................... 4-8
Departments........................................................................................................................... 4-8Accounts ................................................................................................................................. 4-8Materials and Cost Objects .................................................................................................. 4-8
Attributes ....................................................................................................................................... 4-9
v

5 Relating Objects and Entering Model Data
Overview .............................................................................................................................................. 5-1Relating Master List Objects to Master List Departments.......................................................... 5-2
Department Accounts .................................................................................................................. 5-2Department Statistics, Activities, and Activity Drivers .......................................................... 5-2Attributes ....................................................................................................................................... 5-7
Relating Master List Objects to a Model ........................................................................................ 5-8Model Departments...................................................................................................................... 5-8Model Department Accounts.................................................................................................... 5-11Selecting an Account Cost Type and Inventoriable Classification...................................... 5-13Model Department Statistics..................................................................................................... 5-16Model Department Activities.................................................................................................... 5-19Model Department Activity Drivers........................................................................................ 5-23Model Materials .......................................................................................................................... 5-26Model Cost Objects..................................................................................................................... 5-29
Relating Model Accounts and Statistics....................................................................................... 5-32Model Department Activity Department Accounts .............................................................. 5-32Model Department Activity Statistics...................................................................................... 5-36Model Material Department Accounts .................................................................................... 5-39Model Material Department Statistics ..................................................................................... 5-43Model Cost Object Department Accounts............................................................................... 5-46Model Cost Object Department Statistics................................................................................ 5-50
Entering Model Data ........................................................................................................................ 5-53Origin Codes................................................................................................................................ 5-54Using Model Account Inspector Panels .................................................................................. 5-55
Account Inspector Panel..................................................................................................... 5-56Account Item Details Window .......................................................................................... 5-57Account Transaction Details Window.............................................................................. 5-58
Entering Model Account Data .................................................................................................. 5-59Using Model Statistic Inspector Panels ................................................................................... 5-60
Statistic Inspector Panel ...................................................................................................... 5-61Statistic Item Details Window ........................................................................................... 5-62Statistic Transaction Details Window............................................................................... 5-63
Entering Model Statistic Data ................................................................................................... 5-63Using the Model Department Activity Drivers Inspector Panel ......................................... 5-64
vi

Entering Model Department Activity Driver Data................................................................ 5-66Using the Material Unit Costs Inspector Panel ...................................................................... 5-66Entering Material Unit Costs Data........................................................................................... 5-69Viewing and Updating Model Data ........................................................................................ 5-69
6 Mapping Costs
Overview .............................................................................................................................................. 6-1Mapping Terms ................................................................................................................................... 6-3Types of Mapping ............................................................................................................................... 6-5
Department Account-to-Department Account ........................................................................ 6-5Department Account-to-Department Activity ......................................................................... 6-5Department Activity-to-Department Activity.......................................................................... 6-5Department-Activity-to-Department Account......................................................................... 6-6
Using the Mapping Inspector Panel ............................................................................................... 6-6List Tab........................................................................................................................................... 6-7
Details: Mapping Calculation Window ............................................................................. 6-8Details: Mapping Rules Window........................................................................................ 6-9
Rules Tab...................................................................................................................................... 6-11Details: Mapping Rules Window...................................................................................... 6-13Details: Mapping Targets Window................................................................................... 6-14
Results Tab................................................................................................................................... 6-15Creating a Mapping Rule Set ......................................................................................................... 6-16Creating a Mapping Calculation.................................................................................................... 6-16
Mapping Calculation Parameters ............................................................................................ 6-17Mapping Calculation Effective Dates............................................................................... 6-17Mapping Calculation Data Sets......................................................................................... 6-17
Specifying Mapping Calculation Parameters......................................................................... 6-19Creating Mapping Rules ................................................................................................................. 6-20
Using the Mapping Wizard to Create Mapping Rules ......................................................... 6-20Create New Mapping Targets ........................................................................................... 6-20Use Existing Mapping Targets .......................................................................................... 6-21
Mapping Rule Parameters......................................................................................................... 6-31Using Details Windows to Update Mapping Rule Parameters ........................................... 6-35Using the List Tab Fill Button to Update Mapping Rule Parameters ................................. 6-37Adding New Targets to an Existing Mapping Rule .............................................................. 6-39
vii

Running Mapping Calculations .................................................................................................... 6-41Viewing Mapping Results ......................................................................................................... 6-41Transactional Mapping .............................................................................................................. 6-41
7 Calculating Activity Rates
Overview .............................................................................................................................................. 7-1Defining Activity Rates ..................................................................................................................... 7-3Creating an Activity Rate Set............................................................................................................ 7-7Relating Activity Rates to an Activity Rate Set............................................................................. 7-7
Specifying Activity Rate Set Rate Effective Dates.................................................................. 7-11Updating Activity Rate Set Rate Parameters .......................................................................... 7-13
Creating an Activity Rate Calculation .......................................................................................... 7-14Specifying Activity Rate Calculation Parameters .................................................................. 7-15Running Activity Rate Calculations......................................................................................... 7-17Viewing Activity Rate Calculation Results............................................................................. 7-18
Calculating Activity Driver Volumes............................................................................................ 7-18Defining Activity Driver Sources ............................................................................................. 7-20
Updating Activity Driver Sources Data ........................................................................... 7-25Updating Activity Driver Sources Effective Dates ......................................................... 7-25
Creating a Driver Volume Calculation.................................................................................... 7-27Running Driver Volume Calculations ..................................................................................... 7-29
Using Local and Rolled-Up Activity Rates .................................................................................. 7-30
8 Calculating Cost Object Unit Costs
Overview .............................................................................................................................................. 8-1Bill Terms and Components ............................................................................................................. 8-2
Bill Header ..................................................................................................................................... 8-2Bill Items......................................................................................................................................... 8-3
Using the Bill Inspector Panel .......................................................................................................... 8-4Bill Search Window ...................................................................................................................... 8-5Bill Inspector Panel ....................................................................................................................... 8-7Rules Tab........................................................................................................................................ 8-7Quantities Tab ............................................................................................................................. 8-10Results Tab................................................................................................................................... 8-13
Defining a Cost Object .................................................................................................................... 8-15
viii

Creating a Bill .................................................................................................................................... 8-15Updating Bill Header Parameters ............................................................................................ 8-20
Bill Header Parameters....................................................................................................... 8-21Updating Bill Item Parameters ................................................................................................. 8-22
Bill Rules Parameters .......................................................................................................... 8-23Bill Quantities Parameters.................................................................................................. 8-24
Specifying Bill Item Effective Dates ......................................................................................... 8-25Creating a Cost Object Unit Costs Calculation ........................................................................... 8-28Specifying Cost Object Unit Costs Calculation Parameters..................................................... 8-29Running Cost Object Unit Costs Calculations............................................................................ 8-31Using Dynamic Consumption Quantities ................................................................................... 8-32
9 Activity-Based Budgeting
Overview .............................................................................................................................................. 9-1Deriving Bill Quantities .................................................................................................................... 9-2
Creating and Running a Derive Bill Quantities Calculation.................................................. 9-2Derive Bill Quantities Calculation Parameters......................................................................... 9-2Derive Bill Quantities Calculation Example ............................................................................. 9-4
Updating Flex Percentages ................................................................................................................ 9-6Flex Percentage Inspector Panel ................................................................................................. 9-6Updating a Flex Percentage Factor ............................................................................................ 9-7
Deriving Activity Cost Elements ..................................................................................................... 9-9Creating and Running a Derive Activity Cost Elements Calculation................................. 9-10Derive Activity Cost Elements Calculation Parameters ....................................................... 9-11Derive Activity Cost Elements Calculation Example............................................................ 9-11
Deriving Department Accounts ..................................................................................................... 9-14Creating and Running a Derive Department Accounts Calculation .................................. 9-14Derive Department Accounts Calculation Parameters ......................................................... 9-14Derive Department Accounts Calculation Example ............................................................. 9-15
10 Importing
Overview ............................................................................................................................................ 10-1Using Spreadsheet Import .............................................................................................................. 10-2
Spreadsheet Import Choices ..................................................................................................... 10-2Creating Master List and Model Structures ........................................................................... 10-3
ix

Spreadsheet Features.................................................................................................................. 10-4Entering Spreadsheet Information ........................................................................................... 10-5Executing a Spreadsheet Import............................................................................................... 10-7Spreadsheet Import Errors ........................................................................................................ 10-9
Using Staging Area Import ........................................................................................................... 10-10Staging Area Import Choices .................................................................................................. 10-10Staging Area Features .............................................................................................................. 10-10Defining Staging Area Import Options ................................................................................. 10-11
Defining Import Sources................................................................................................... 10-12Defining Import Currencies ............................................................................................. 10-15Defining Import Units of Measure.................................................................................. 10-17Defining Import Units of Measure Conversion Rules ................................................. 10-18
Using Staging Area Inspector Panels..................................................................................... 10-21Department Account, Statistic, and Activity Statistic Data......................................... 10-21Material and Cost Object Quantity Data........................................................................ 10-22
Updating Staging Area Transactions..................................................................................... 10-25Manually Creating Staging Area Transactions .................................................................... 10-25Manually Creating Material and Cost Object Quantity Account Transactions............... 10-27Executing a Staging Area Import ........................................................................................... 10-28Staging Area Import Errors ..................................................................................................... 10-30
11 Reporting
Overview ............................................................................................................................................ 11-1Report Definitions ............................................................................................................................ 11-2
Activity Cost Report ................................................................................................................... 11-2Activity Cost Report—Graph by Activity Tag ....................................................................... 11-2Activity Cost Report—Graph by Driver Tag.......................................................................... 11-3Account Mapping Summary Report........................................................................................ 11-3Cost Object Comparison Report ............................................................................................... 11-3Cost Object Detail Report .......................................................................................................... 11-4Extended Cost Object Report .................................................................................................... 11-4Extended Cost Object Comparison Report ............................................................................. 11-5Extended Material Cost Report ................................................................................................ 11-5Mapping Redistribution and Reconciliation Report ............................................................. 11-5Department Comparison Report—Accounts ......................................................................... 11-6
x

Department Comparison Report Statistics ............................................................................. 11-6Creating Reports ............................................................................................................................... 11-6
Restrictions for Characters in Report Names ......................................................................... 11-7Creating a Report Instance ........................................................................................................ 11-7Specifying Report Parameters .................................................................................................. 11-9
Running Reports ............................................................................................................................. 11-10Executing a Report ................................................................................................................... 11-10Viewing Reports ....................................................................................................................... 11-10
Printing Reports................................................................................................................. 11-11Report Links ....................................................................................................................... 11-11Report Errors...................................................................................................................... 11-11
12 Visual Tracing and Searching Data
Overview ............................................................................................................................................ 12-1Visual Tracing .................................................................................................................................... 12-1
General Concepts........................................................................................................................ 12-1Trace Cost .................................................................................................................................... 12-2Trace Total ................................................................................................................................... 12-2Traceable Objects ........................................................................................................................ 12-3Limitations................................................................................................................................... 12-3
Search Data ........................................................................................................................................ 12-3Searching For Data ..................................................................................................................... 12-4Using the Find Control in ABM ............................................................................................... 12-5Mapping Inspector ..................................................................................................................... 12-7Mapping Wizard......................................................................................................................... 12-9Find Control ................................................................................................................................ 12-9Hints and Tips........................................................................................................................... 12-10
13 Advanced Modeling and Calculations
Overview ............................................................................................................................................ 13-2Building a Department Hierarchy ................................................................................................. 13-2Building an Activity Hierarchy...................................................................................................... 13-6Calculations and Computations................................................................................................... 13-10Activity Cost Rollup Calculation................................................................................................. 13-11Activity Statistic Rollup Calculation .......................................................................................... 13-12
xi

All Material Unit Costs Calculation ............................................................................................ 13-12All Extended Cost Object Costs Calculation ............................................................................. 13-13All Extended Material Costs Calculation ................................................................................... 13-14Compute Bill Items......................................................................................................................... 13-15
Specific Department ................................................................................................................. 13-15Summarize Departments ......................................................................................................... 13-17All Departments........................................................................................................................ 13-18
Compute Department Account or Statistic Values ................................................................... 13-19Specific Department ................................................................................................................. 13-19All Departments........................................................................................................................ 13-20
Cross Data Set Operations ............................................................................................................ 13-21Data Set Consolidation............................................................................................................. 13-21Bill Item Accounts..................................................................................................................... 13-22Bill Item Statistics...................................................................................................................... 13-22
Delete Data Processes .................................................................................................................... 13-23Deleting Data Sets..................................................................................................................... 13-24Deleting Mapping Rule Sets.................................................................................................... 13-26Deleting Activity Rate Sets ...................................................................................................... 13-26
14 System Administration
Overview ............................................................................................................................................ 14-1Setting Up Users................................................................................................................................ 14-2
Obtaining Access from Oracle Applications........................................................................... 14-2Creating Responsibilities in Oracle ABM................................................................................ 14-2
Sysmgr Responsibility ........................................................................................................ 14-3System Administrator Privileges ...................................................................................... 14-3
Relating Oracle Applications User Names to Oracle ABM Responsibilities ..................... 14-6Setting Up Security........................................................................................................................... 14-8
Creating Security Profiles ......................................................................................................... 14-8Security Profile Types ......................................................................................................... 14-9Security Rules....................................................................................................................... 14-9Assigning Security Profiles .............................................................................................. 14-10Using the Security Profiles Inspector Panel................................................................... 14-11Using the Fill Button to Update Security Codes ........................................................... 14-14Using the Clear Access Button to Clear Security Codes .............................................. 14-14
xii

Creating Master List Profiles .................................................................................................. 14-15Using the Master List Profiles Inspector Panel ............................................................. 14-15Removing Master List Profile Security Profile Assignments...................................... 14-17
Creating Model Profiles........................................................................................................... 14-18Using the Model Profiles Inspector Panel ..................................................................... 14-18Using the Clear Button to Remove Model Profile Security Profile Assignments.... 14-20
Running Concurrent Programs and Reports ............................................................................. 14-21Installation-Specific Date and Number Formats...................................................................... 14-22
Special Considerations for European and Similar Locales................................................. 14-23Profile Options for Numeric, Currency, and Date Formats in Web Reports................... 14-23
Numeric and Date Formats.............................................................................................. 14-24Currency Formats.............................................................................................................. 14-24
Customizing UI Labels .................................................................................................................. 14-25
A Import Specifications
Format Definitions ............................................................................................................................. A-1Spreadsheet Layouts .......................................................................................................................... A-2
Master List Templates.................................................................................................................. A-2Master List Departments ...................................................................................................... A-2Master List Department Accounts ...................................................................................... A-3Master List Department Statistics ....................................................................................... A-3Master List Department Activities...................................................................................... A-4Master List Department Activity Drivers .......................................................................... A-4Master List Accounts ............................................................................................................ A-5Master List Statistics ............................................................................................................. A-5Master List Activities ............................................................................................................ A-5Master List Activity Drivers ................................................................................................ A-6Master List Materials ............................................................................................................ A-6Master List Cost Objects ....................................................................................................... A-6
Model Templates .......................................................................................................................... A-7Model Department Account Data....................................................................................... A-7Model Department Statistic Data........................................................................................ A-8Model Department Activities .............................................................................................. A-8Model Department Activity Department Account Data ................................................. A-9Model Department Activity Statistic Data ...................................................................... A-10
xiii

Model Department Activity Drivers................................................................................. A-11Model Department Activity Hierarchy ............................................................................ A-12Model Department Activity Driver Data......................................................................... A-12Model Department Hierarchy ........................................................................................... A-12Model Cost Object Account Data ...................................................................................... A-13Model Cost Object Statistic Data ....................................................................................... A-14Model Bill Header ............................................................................................................... A-15Model Bill Items................................................................................................................... A-15Model Material Account Data ........................................................................................... A-17Model Material Statistic Data ............................................................................................ A-18Model Material Unit Cost................................................................................................... A-19
Mapping Rule Templates .......................................................................................................... A-20Department Redistribution by Department Statistic...................................................... A-20Department to Activity Mapping by Activity Statistic .................................................. A-21
Staging Area Tables .......................................................................................................................... A-26
B Oracle Applications ABM Responsibilities
ABM Manager ..................................................................................................................................... B-1ABM Supervisor.................................................................................................................................. B-2ABM Web Reports .............................................................................................................................. B-3
C Concurrent Programs
D Securable Objects List
Index
xiv

Send Us Your Comments
Oracle Activity-Based Management User Guide, Release 11i
Part No. A85332-02
Oracle Corporation welcomes your comments and suggestions on the quality and usefulness of this document. Your input is an important part of the information used for revision.
■ Did you find any errors?■ Is the information clearly presented?■ Do you need more information? If so, where?■ Are the examples correct? Do you need more examples?■ What features did you like most?
If you find any errors or have any other suggestions for improvement, please indicate the document title and part number, and the chapter, section, and page number (if available). You can send com-ments to us at:
■ Telephone: (650) 506-7000■ Postal service:
Oracle Corporation Oracle ABM Documentation Manager500 Oracle ParkwayRedwood Shores, CA 94065U.S.A.
If you would like a reply, please give your name, address, telephone number, and (optionally) elec-tronic mail address.
If you have problems with the software, please contact your local Oracle Support Services.
xv

xvi

Preface
Welcome to Release 11i of the Oracle Activity-Based Management User Guide.
This user guide includes all the information you need to work with Oracle Activity-Based Management (ABM) effectively. It contains detailed information, including:
■ Setting up a model
■ Mapping costs
■ Calculating cost object unit costs
■ Importing
■ Activity-based budgeting
■ Reporting
■ Security
This preface explains how this user guide is organized and introduces other sources of information that can help you.
OverviewOracle ABM is an activity-based management system that allows companies to make informed business decisions based on relevant, accurate cost information. Businesses implementing activity-based management use Oracle ABM to track the activities that drive cost and profit performance, to gain insights into cost behavior and the effect of volume and other metrics on activity cost. These insights can be used to make such critical business decisions as whether to make, buy, or outsource;
xvii

where to set optimal pricing levels; or whether to add or drop product lines, all with a full understanding of the financial impact of the decision.
Oracle ABM is a component of the E-Business Intelligence Suite, and provides key data in relation to the determination of enterprise wide profitability for an organization.
Intended AudienceThis guide is intended for both administrators and end-users of Oracle ABM. Target audiences include:
■ End Users
■ System Administrators
■ Database Managers
■ Consultants
StructureThis guide is the primary source of information about Oracle ABM. It discusses the following topics:
Chapter 1: Overview Provides a brief overview of Oracle ABM, activity-based management concepts, and the steps required to build an activity-based costing model.
Chapter 2: User InterfaceDiscusses the graphical user interface used in Oracle ABM.
Chapter 3: Getting StartedAddresses the setup steps for the objects and parameters that are used to group and categorize model information in Oracle ABM.
Chapter 4: Defining Master List ObjectsDescribes master list objects and the steps required to define them.
Chapter 5: Relating Objects and Entering Model DataDescribes the processes of relating objects and entering model data.
xviii

Chapter 6: Mapping CostsAddresses the process used to map costs in Oracle ABM.
Chapter 7: Calculating Activity RatesDescribes the processes associated with calculating activity rates.
Chapter 8: Calculating Cost Object Unit CostsDiscusses the elements involved with creating bills and calculating cost object unit costs.
Chapter 9: Activity-Based BudgetingDescribes how to set up and use Oracle ABM to perform activity-based budgeting to derive bill quantities, activity cost elements and accounts.
Chapter 10: ImportingDescribes how to use spreadsheets and staging areas to import objects and data into Oracle ABM.
Chapter 11: ReportingDiscusses Oracle ABM reporting functionality used to define, create and run reports.
Chapter 12: Visual Tracing and Searching DataAddresses the data search tools available in Oracle ABM.
Chapter 13: Advanced Modeling and CalculationsDiscusses how to set up and use the advanced modeling features and functions in Oracle ABM.
Chapter 14: System AdministrationAddresses Oracle ABM system administration functions including setting up security, and running concurrent programs and reports
Appendix A: Import SpecificationsDescribes the formats and layouts for Oracle ABM import spreadsheets and staging areas.
xix

Appendix B: Oracle Applications ABM ResponsibilitiesDescribes the three responsibilities you can use to access Oracle ABM from the Oracle Applications Self Service environment.
Appendix C: Concurrent ProgramsLists the Oracle ABM concurrent programs that you can run from the Oracle Applications Self Service environment using the ABM Supervisor responsibility
Appendix D: Securable Objects ListLists the Oracle ABM objects associated with the Oracle ABM security profile types.
Related DocumentsThere are many sources of information, including documentation, training, and support services, to increase your knowledge and understanding of Oracle ABM and related SEM applications. Related documents include the following:
Oracle Activity-Based Management Installation Guide, Release 11iThis guide, written for a technical audience, explains how to install Release 11i of Oracle ABM, ABM Analyzer, and SEM Exchange.
Oracle ABM Technical Reference Manual, Release 11iThis manual includes a description of the database schema related to Oracle ABM 11i.
Oracle ABM Analyzer User Guide, Release 11iThis manual is the primary source of information about Oracle ABM Analyzer, which enables users throughout an organization the ability to generate multidimensional custom reports for Oracle ABM without writing any code.
Oracle SEM Exchange User Guide, Release 11iThis manual is the primary source of information about SEM Exchange, which enables users to transfer date from an Oracle Applications General Ledger directly into Oracle ABM.
xx

Oracle Discoverer User Guide, Release 11iThis guide explains how to use the User Edition portion of Discoverer. It describe how to work with Discoverer to access, view, and analyze data in your database, and how to produce reports.
Oracle Applications User Guide, Release 11iThis guide explains how to use the graphical user interface in this release to enter data, query information, and navigate.
This guide also includes information about setting user profiles, as well as running and reviewing reports and concurrent requests.
Oracle Applications Flexfields Guide, Release 11iThis guide provides flexfields planning, setup, and reference information for those implementing Oracle General Ledger, as well as for users responsible for the ongoing maintenance of Oracle Applications product data. This manual also provides information on creating custom reports of flexfields data.
Training and Support
TrainingOracle offers a complete set of training courses in its product family to help you and your staff master each application product. Oracle provides training courses for Oracle General Ledger, Oracle ABM, and SEM Exchange. We can help you develop a training program plan that provides thorough training for both your project team and your end users. We will work with you to organize courses appropriate to your job or area of responsibility.
You have a choice of educational environments. You can attend Oracle applications courses at any Oracle Education Center, or you can arrange for Oracle trainers to teach at your facility. In addition, Oracle training professionals can tailor standard courses or develop custom courses to meet your needs.
SupportFrom on-site support to central support, Oracle’s experienced professionals provide the help and information you need to keep Oracle ABM working for you. This team includes your technical representative, account manager, and Oracle’s large staff of consultants and support specialists with expertise in your business area, in managing an Oracle server, and in your hardware and software environments.
xxi

Safeguarding Your Data
Oracle Applications tables are interrelated, so any change you make using Oracle Applications can update many tables at once. Also, the system automatically reviews changes for validity and keeps track of who made them. If you use any other tool, you lose these safeguards and could obtain unsatisfactory results.
Typographical ConventionsThe following typographical conventions are used in this manual:
Caution: Do not use SQL*Plus or any other tool to modify Oracle Applications data unless you are instructed to by Oracle.
Convention Meaning
. . .
Vertical ellipsis points in an example mean that information not directly related to the example has been omitted.
. . . Horizontal ellipsis points in statements or commands mean that parts of the statement or command not directly related to the example have been omitted
boldface text Boldface type in text indicates a term defined in the text, the glossary, or in both locations.
< > Angle brackets enclose user-supplied names.
[ ] Brackets enclose optional clauses from which you can choose one or none.
xxii

About Oracle CorporationOracle Corporation develops and markets an integrated line of software products for database management, applications development, decision support, and office automation, as well as Oracle Applications, an integrated suite of more than 45 software modules for financial management, supply chain management, manufacturing, project systems, human resources, and sales and service management.
Oracle products are available for mainframes, minicomputers, personal computers, network computers, and personal digital assistants, enabling organizations to integrate different computers, different operating systems, different networks, and even different database management systems, into a single, unified computing and information resource.
Oracle is the world’s leading supplier of software for information management, and the world’s second largest software company. Oracle offers its database, tools, and applications products, along with related consulting, education, and support services, in over 140 countries.
xxiii

xxiv

Ove
1
OverviewThis chapter provides an introduction to Oracle Activity-Based Management, Release 11i (Oracle ABM), and a brief overview of activity-based management concepts. This chapter also provides a list of the steps required to set up a basic working model in order to calculate cost consumption in Oracle ABM.
This chapter includes the following major topics:
■ Introduction
■ Activity-Based Management Concepts
■ Building a Model
IntroductionOracle ABM is an enterprise-wide, activity-based costing (ABC) and management application that supports any ABC methodology in any industry. Oracle ABM provides flexible modeling to enable profit and loss analysis at any level of the organization. Activity-based analysis of profitability provides a new decision- making foundation for customer profitability, accurate product and service profitability, and volume-based forecasting of expenses and resources.
The functionality and architecture of Oracle ABM reflects the three components of activity-based management:
■ Cost accounting
■ Cost management
■ Performance measurement
rview 1-1

Activity-Based Management Concepts
Oracle ABM provides you with the ability to create an activity-based costing model, with the output from the model supporting the needs of an activity-based management methodology.
Activity-Based Management ConceptsThe basis for activity-based management is the development of an activity-based costing model. At certain steps in the process, you will generate interim data points that can be used to investigate areas for process improvement and performance analysis. As the model is further developed, you will have access to cost improvement information as well as life cycle costs. Profound analysis may be performed using output from the model at various stages in the process.
Once you have your model’s building blocks in place, you can use the defined structures to perform decision support and “what if” analysis based on different projected levels of production, service offerings or product mixes. Decisions can be made concerning which products to make and at what price to sell them. This type of profound analysis is critical for companies to remain competitive in today’s business environment.
Building a ModelMuch of the information needed to create a model can be captured using Oracle ABM import processes. Importing allows you to capture both the information needed to create a model structure, and the numerical data that is required to run calculations. Refer to Chapter 10for more information.
Oracle ABM uses the values you specify in the User Preferences window to group and categorize model information. At certain points during the process of creating a model, you must update the User Preferences window with an object or parameter value in order to proceed to the next model building step. Items that you must specify in User Preferences in order to advance to the next step include Master List ID, Model ID, and Data Set ID. See "Specifying User Preferences" in Chapter 3 for information.
Model-Building StepsTable 1–1 lists the steps of creating a basic working model for assigning costs to activities and calculating a cost object unit cost in Oracle ABM. Use the list to guide you through the process of building a model.
The steps listed in Table 1–1 do not address all of the calculation and process options that are available in Oracle ABM. See Chapter 9, "Activity-Based Budgeting"
1-2 Oracle Activity-Based Management User Guide

Building a Model
and Chapter 13, "Advanced Modeling and Calculations" for information on additional calculation and processes that you can use once you create a working model. Also, certain steps listed in the table are optional. Refer to the chapters referenced in the table for information.
You must have an Oracle Applications user name and appropriate security defined in order to access Oracle ABM features and functions. See Chapter 14, "System Administration" for information on setting up users and establishing application security.
Table 1–1 Model-Building Steps
Step Description of StepChapter Reference
1 Define a Master List 3
2 Define a Currency 3
3 Define a Model 3
4 Define a Period Type 3
5 Define a Period 3
6 Define a Data Set Type 3
7 Define a Data Set Class 3
8 Create a Data Set 3
9 Define a Unit of Measure 3
10 Define a Department Type 3
11 Define Exchange Rates 3
12 Define Attributes and Attribute Values 3
13 Define a Mapping Rule Set 3
14 Define an Activity Rate Set 3
15 Define a Bill Type 3
16 Define an Activity Hierarchy 3
17 Define a Department Hierarchy 3
18 Define Master List Objects (Departments, Accounts, Statistics, Activities, Activity Drivers, Materials, and Cost Objects)
4
19 Relate Master List Departments to Master List Accounts 5
Overview 1-3

Building a Model
20 Relate Master List Departments to Master List Statistics, Activities, and Activity Drivers
5
21 Relate Master List Departments to a Model 5
22 Relate Master List Department Accounts to a Model 5
23 Relate Master List Statistics, Activities, and Activity Drivers to Model Departments
5
24 Relate Master List Materials to a Model 5
25 Relate Master List Cost Objects to a Model 5
26 Enter Model Department Account Data 5
27 Enter Model Department Statistics Data 5
28 Enter Model Department Activity Department Account Data 5
29 Enter Model Department Activity Department Statistics Data 5
30 Enter Model Material Department Account Data 5
31 Enter Model Material Department Statistics Data 5
32 Enter, or Calculate Model Material Unit Costs 5, 13
33 Create a Mapping Calculation and Mapping Rules 6
34 Run a Mapping Calculation 6
35 Relate Activity Drivers to Activities (define activity rates) 7
36 Enter, or Calculate Activity Driver Volumes 5, 7
37 Relate Activity Rates to an Activity Rate Set 7
38 Run the Activity Rates Calculation 7
39 Create a Bill by Relating Activities and Materials to Cost Objects and Updating Bill Item (Consumption) Quantities
8
40 Run the Cost Object Unit Costs Calculation 8
Step Description of StepChapter Reference
1-4 Oracle Activity-Based Management User Guide

Integrating Oracle ABM with Oracle Performance Analyzer
Integrating Oracle ABM with Oracle Performance AnalyzerThe major objective of the Oracle Activity-Based Management (ABM) and Oracle Performance Analyzer integration is to transfer unit cost data from ABM to Performance Analyzer. ABM transfers unit costs into Performance Analyzer for use in cost allocations. ABM unit costs are primarily used in Performance Analyzer for pricing transaction table data but could prove useful elsewhere as well. Integration of ABM unit costs with Performance Analyzer requires sharing dimensions between the two products.
The ABM/Performance Analyzer Integration Process requires OFSA release 4.5.1 with patch 4511 or higher. Earlier versions of OFSA do not support this process.
Complete details in relation to the ABM/PA integration process are included in the Oracle Activity-Based Management and Oracle Performance Analyzer Integration Guide. This guide may be found on Metalink as follows:
1. Log on to Metalink and navigate to Technical Libraries > Industry Solutions > Financial Services Applications.
2. Select the Documentation link, and then scroll down to the section labeled Other Product Reference Guides. The first link in this section opens the integration guide.
Overview 1-5

Integrating Oracle ABM with Oracle Performance Analyzer
1-6 Oracle Activity-Based Management User Guide

User Inte
2
User InterfaceThis chapter provides an introduction to the graphical user interface of Oracle ABM. It discusses the following interface topics:
■ Control Panel
■ Inspector Panels
■ Toolbar
■ Status Bar
■ Wizards
■ Navigation Procedures
■ Creating and Running Calculations
OverviewOracle ABM uses a highly responsive graphical user interface (GUI) with full point-and-click capability. You can use your mouse to operate graphical controls such as navigation menus, tabs, buttons, poplists, and check boxes.
The basic screen in Oracle ABM consists of a control panel for navigation and an inspector panel that displays information in a grid format. Above the inspector panel is a toolbar with buttons for commonly performed functions, such as creating new objects, deleting records, and saving changes. A status bar at the bottom of the inspector panel displays the parameters for the current user session.
Wizards are used to create new objects, relationships and calculations. Each wizard is a series of windows that systematically guide you through a setup procedure.
Navigation procedures are used to tailor Oracle ABM operations to your organization and workflow.
rface 2-1

Control Panel
Oracle ABM contains numerous pre-defined calculations that are used to perform arithmetical operations using the account, statistic and volume data captured in the application. Each calculation follows a common set of steps that you use to define a calculation instance, specify calculation parameters, and run a calculation.
Control PanelThe Oracle ABM Control Panel appears on the left-hand side of your screen and is always visible. It displays the navigation options in a tree format and shows your location in the application. You use the control panel to open navigation menus and navigate to inspector panels. It is divided into three parts:
■ Launchpad. Displays the list of navigation menus.
■ Navigator. Displays a menu tree of inspector panels based on a launchpad selection. You open an inspector panel by selecting a menu node in the navigator.
■ Hierarchy Navigator. Displays existing hierarchies and their components. You open inspector panels for department, activity, and bill hierarchies from the Hierarchy Navigator.
Hierarchy Navigator
Navigator
Launchpad
2-2 Oracle Activity-Based Management User Guide

Control Panel
You can decrease or expand the width of the control panel to customize your Oracle ABM desktop. Using your mouse, drag the right edge of the control panel until the control panel is the size you wish. You can decrease the width of the control panel to increase the area that displays the inspector panel. You can also expand the control panel to display the full text of a menu.
LaunchpadThe launchpad is the top part of the control panel. It is a list of six inspector panel menus that can be displayed in the navigator. These menus group the inspector panels into six areas based on functionality. The menu groups are:
■ Calculations. A list of the calculations available in Oracle ABM. Use this menu when you want to create and execute calculations, or view calculation results.
■ Objects. A list of master list and model inspector panels. Select this menu path when you want to create, view or update a costing model.
■ Import. A list of import spreadsheet templates and import staging areas. This path opens the inspector panels used to import objects, data and structures into Oracle ABM.
■ Reports. A list of the reports that you can create, run and view in Oracle ABM.
■ ABM Analyzer. Launches Oracle ABM Analyzer from within Oracle ABM.
■ Setup. The path used to set up basic structural parameters required in Oracle ABM before you can build a model. These include currencies, data sets, master list names, model names, import and versioning options, and attributes.
When you launch the application, Oracle ABM opens at the calculations menu. To change menus, simply select a different menu item in the launchpad.
NavigatorThe navigator is the middle section of the control panel. It displays a list of inspector panels available for the menu selected in the launchpad. The navigator has two functions. First, it enables you to navigate to an inspector panel. When you select an item from the menu, the corresponding inspector panel opens on the right side of the screen. Secondly, the navigator shows your location in the application by highlighting the current menu mode.
You can customize the navigator area by changing the size of the area that displays a menu. Drag the horizontal bar that separates the navigator and the hierarchy navigator to change the height of the navigator panel.
User Interface 2-3

Control Panel
You can also expand a menu by clicking on the plus sign next to a menu mode. To collapse a menu, click on the minus sign next to a menu node.
Hierarchy NavigatorThe hierarchy navigator is a specialized navigator that enables you to open the inspector panels for existing hierarchies in Oracle ABM. The hierarchy navigator displays the parent and child components for existing hierarchies. This navigator is available from the Objects launchpad when you select the corresponding node for the three types of hierarchies:
■ Department Hierarchy
The menu path is Objects > Models > Departments > Hierarchy.
■ Activity Hierarchy
Select Objects > Models > Departments > Activities > Hierarchy.
■ Bill
Select Objects > Models > Cost Objects > Bill.
It is also available for the following calculations:
■ Cost Object Unit Costs
■ Activity Cost Rollup
■ Activity Statistic Rollup
While all other menus are determined by Oracle ABM and cannot be modified, the hierarchy menu trees are user-defined. The content of the hierarchy navigator is dynamically linked to the hierarchies you create for departments, activities, or bills. After you have created any of the three types of hierarchies, Oracle ABM can display the parent and child nodes in the hierarchy navigator. To display and open these hiearchies, you must specify an activity hierarchy, department hierarchy, or bill type in user preferences. If no values are specified, or if no hierarchies exist, this area of the control panel will be blank.
2-4 Oracle Activity-Based Management User Guide

Inspector Panels
Inspector PanelsInspector panels are the main information and working windows in Oracle ABM. All information about an object or calculation is created, viewed, stored, modified, or deleted from an inspector panel. Inspector panels are also the location from which you execute calculations and run reports.
To open an inspector panel, select a menu node from the navigator or hierarchy navigator. Oracle ABM will display the corresponding inspector panel for the selected node.
User Interface 2-5

Inspector Panels
Inspector Panel Features and OptionsThe layout of an inspector panel varies depending on whether the inspector panel is linked to an object, calculation, hierarchy or report. There are three features common to all inspector panels:
■ Inspector Grid. Displays a list of records and information about the individual records in a grid format for a selected object, calculation, hierarchy or report.
■ Details Button. Used to access the Details window for a specific record. Details windows are used in Oracle ABM to provide access to information about individual records displayed in an inspector grid. You use details windows to enter, view, and update information and numerical data for a single record. You open details windows by selecting a record on an inspector grid and choosing the Details button.
■ Wizards. A series of screens to guide you through the procedure to set up a new object, relationship, hierarchy, or calculation. A wizard is available when the New button on the toolbar is enabled. See "Wizards" on page 2-11 for more information.
Calculation inspector panels and some object inspector panels have multiple tabbed regions that group information:
■ List. Displays the available calculations with their associated rules.
■ Rules. Displays the details for a calculation rule. However, not all calculations have a rules tab.
■ Results. Opens the object inspector panel where Oracle ABM has posted the results of a calculation.
■ Quantities. Displays consumption quantity information on the Bill inspector panel. See "Quantities Tab" in Chapter 8 for more information.
Common buttons and options that can be available depending on the inspector panel include:
■ Attributes. Opens the attributes window (or windows) pertaining to a master list object in order to select attributes and attributes values. See "Attributes and Attribute Values" in Chapter 3 for more information.
■ Execute. Initiates the Concurrent Manager to run a calculation
■ View Log. Opens a window that displays information about the status of an executed calculation.
■ Fill. Used to fill a set of one or more records with a selected value.
2-6 Oracle Activity-Based Management User Guide

Inspector Panels
■ Clear or Clear Value. Clears a parameter setting or value displayed in one or more inspector panel rows.
■ Viewing Option. Allows you to select a parameter that limits the records displayed on an inspector panel.
Inspector GridInspector panels display information in a grid format of rows and columns. This information is created by using wizards, the import process, running a calculation, or by entering information and data on a details window. You cannot enter text or numerical data directly into an inspector panel grid.
Records are added by using a wizard, through the import process, or through running calculations.
The inspector grid can be customized to suit your working preferences by:
■ Selecting columns. The number of columns of information available varies depending on the type of record being displayed. You can choose to display all columns for a record or only selected columns. To customize the columns shown in an inspector panel, right-click over a line item inside the inspector grid. A pop-up list of all available columns appears. This is a list of all information fields presented in the Details window for the current inspector panel. Select the columns you want to be displayed by selecting the appropriate check boxes.
■ Sorting records. The records displayed in an inspector grid can be sorted, alphabetically or numerically, by any column to make it easier to locate an individual record or a group of records. You can also sort records to organize the information in a more meaningful way. To sort records, click on a column label. If you select a column header more than once, the sort order will switch between ascending and descending order.
■ Rearranging columns. You can change the order in which columns appear in the inspector grid. To move a column, click on a column label and while holding down the left mouse button, drag the column to the desired position.
User Interface 2-7
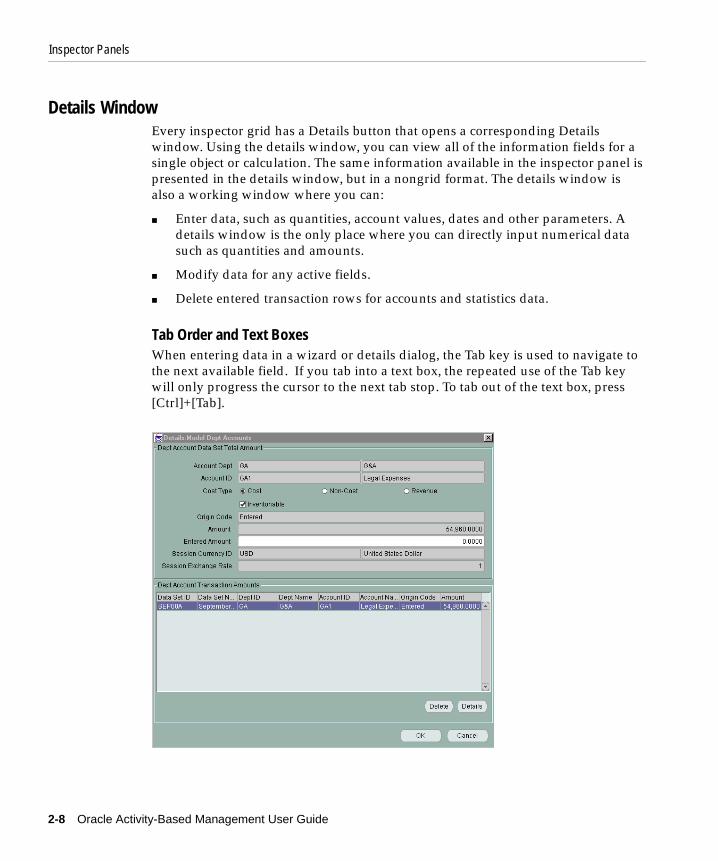
Inspector Panels
Details Window Every inspector grid has a Details button that opens a corresponding Details window. Using the details window, you can view all of the information fields for a single object or calculation. The same information available in the inspector panel is presented in the details window, but in a nongrid format. The details window is also a working window where you can:
■ Enter data, such as quantities, account values, dates and other parameters. A details window is the only place where you can directly input numerical data such as quantities and amounts.
■ Modify data for any active fields.
■ Delete entered transaction rows for accounts and statistics data.
Tab Order and Text BoxesWhen entering data in a wizard or details dialog, the Tab key is used to navigate to the next available field. If you tab into a text box, the repeated use of the Tab key will only progress the cursor to the next tab stop. To tab out of the text box, press [Ctrl]+[Tab].
2-8 Oracle Activity-Based Management User Guide

Toolbar
ID and Name Fields in Wizards and Details Windows Across the application, a single field label is provided for ID and Name field combinations on details windows and data entry wizards. Any place you see two adjacent fields, with a label of ID, represents a field for the Object ID and the Object NAME. (A field label for Name is not explicitly displayed.)
Toolbar The Oracle ABM toolbar has the following buttons:
New. Launches a wizard associated with the current inspector panel to create a new object, calculation, import or report.
Delete. Deletes highlighted records in the active inspector panel.
Save. Commits all deletions to the database. If no records have been deleted, this button will be disabled.
Refresh. Refreshes the information displayed on an inspector panel.
Select All. Selects all items in an inspector grid.
User Interface 2-9
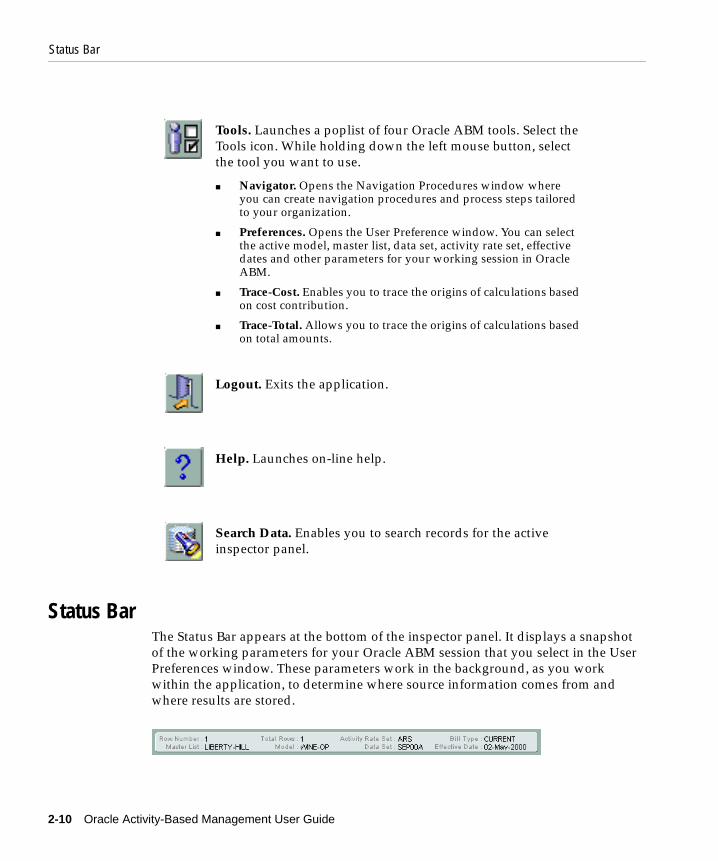
Status Bar
Status BarThe Status Bar appears at the bottom of the inspector panel. It displays a snapshot of the working parameters for your Oracle ABM session that you select in the User Preferences window. These parameters work in the background, as you work within the application, to determine where source information comes from and where results are stored.
Tools. Launches a poplist of four Oracle ABM tools. Select the Tools icon. While holding down the left mouse button, select the tool you want to use.
■ Navigator. Opens the Navigation Procedures window where you can create navigation procedures and process steps tailored to your organization.
■ Preferences. Opens the User Preference window. You can select the active model, master list, data set, activity rate set, effective dates and other parameters for your working session in Oracle ABM.
■ Trace-Cost. Enables you to trace the origins of calculations based on cost contribution.
■ Trace-Total. Allows you to trace the origins of calculations based on total amounts.
Logout. Exits the application.
Help. Launches on-line help.
Search Data. Enables you to search records for the active inspector panel.
2-10 Oracle Activity-Based Management User Guide

Wizards
The status bar displays:
■ Row Number. The row number of the record highlighted in the inspector panel.
■ Total Rows. Total number of rows in the inspector panel.
■ Activity Rate Set. The active activity rate set.
■ Bill Type. The active bill type.
■ Master List. The active master list.
■ Model. The active model.
■ Data Set. The active data set where Oracle ABM will retrieve, display, and store all numerical data.
■ Effective Date. The date specified in user preferences.
See "User Preferences Window" in Chapter 3 for more information on the status bar fields.
WizardsOracle ABM uses wizards to guide you through the process of creating new objects, defining relationships, creating calculations, and grouping data together into hierarchies. A wizard is a series of screens with simple instructions in an easy to use interface. From within an inspector panel, you launch the associated wizard by selecting the New button on the toolbar. If a wizard is not available, the New button will be disabled.
User Interface 2-11

Wizards
Wizard FeaturesAlthough all wizards share the same basic structure, the specific content of a wizard and the features available in that wizard are determined by the launchpad node you select.
Wizards have the following features:
■ Title Bar. Each wizard screen has a title bar that identifies the name of the wizard. The title bar tells you the number of steps in the wizard and the step name and number for the current screen.
■ Interactive Area. This is the main part of the wizard screen where you input text and select records from inspector grids or drop down boxes by following the wizards instructions.
■ Interactive Area Column Headers. Provide the ability to sort records and rearrange columns in inspector grids. See "Inspector Grid" on page 2-7 for more information.
■ Wizard Buttons. At the bottom of each screen are the navigation buttons available for the wizard. These buttons include:
■ Cancel. Closes the wizard without saving any entries.
■ Help. Opens on-line Help to assist you in using the current wizard.
■ New. The New button operates in two ways depending on the type of wizard you are using.
2-12 Oracle Activity-Based Management User Guide

Wizards
– If you are using a wizard that sets up new objects, selecting the New button enables you to add multiple new objects before exiting the wizard.
– The New button can also open another wizard that will enable you to create a new object or object relationship that, once created, you can then use in the current wizard. Being able to launch a wizard from within a wizard means that you do not have to close a wizard and navigate to another inspector panel in order to launch the wizard that will create the new object or relationship. You have the flexibility to create the required object or relationship directly from within the current wizard.
■ Delete. Deletes unwanted records from the summary wizard screen.
■ Search. Opens the Search window where you can filter the data visible on the wizard screen to locate a record.
■ Back. Moves to the previous screen in the wizard.
■ Next. Moves ahead one screen in the wizard.
■ Finish. Completes the wizard setup process and commits the information to the database.
User Interface 2-13

Wizards
Using WizardsEach wizard has a welcome screen, intermediary step screens, and a final summary screen.
Wizard Welcome Screen
The first screen that appears when you open a wizard is the Welcome screen. This screen identifies what the wizard will set up and lists the steps required. Select the Next button to continue.
Single Step Wizard Title PagesThe welcome page for simple single step data entry wizards is no longer present. For these wizards, the first navigation step is the data entry step for these wizards. For example, all of the wizards to create master list objects are now just a single step.
2-14 Oracle Activity-Based Management User Guide

Wizards
Wizard Step Screens
The wizard then opens the interactive screens for the sequence of steps. Each step screen will have instructions at the top that tell you what to do. Depending on the wizard, you may be required to enter text or values, select an item from a drop down box of existing list of values, or highlight rows in an inspector grid. Use the Next button to move forward one screen or the Back button to return to the previous screen.
User Interface 2-15

Navigation Procedures
Wizard Summary Screen
The last screen in a wizard recaps, in a grid format, all entries and selections you have made, for your review. If the information is correct, select the Finish button to close the wizard and save your entries in the database. If you need to make changes, select the Back button to return to a previous screen.
Navigation ProceduresNavigation Procedures are user-defined lists of operations tailored to your organization and workflow. Oracle ABM is a large and complex application. Many steps are required before you can produce costing information. By setting up navigation procedures, you can create a reference to guide new and experienced users how to perform tasks properly and efficiently.
You can use Navigation Procedures to:
■ Document procedures on-line to specify all required steps and guide the user to the appropriate inspector panel for a particular process or operation.
■ Overlay Oracle ABM with processes or terminologies specific to your organization or industry.
■ Train new users.
■ Document complex or infrequently used processes.
2-16 Oracle Activity-Based Management User Guide

Navigation Procedures
■ Navigate directly to the inspector panels, web pages, or calculations that you need to use.
A navigation procedure is a list of steps or other information that tell the user how to accomplish a particular outcome within Oracle ABM. The procedure can be the list of the steps required to map all financial account information to activities in a department. It can be the steps required to produce quarterly reports for a line of business within your organization. It can be the process required to import data to update your model and then run calculations. When building a navigation procedure, you can include steps, text information, links to on-line information, procedures, and calculations.
◗◗To access a navigation procedure: 1. From the toolbar, select the Tools button.
2. While holding down the left mouse button, use your cursor to select Navigation from the poplist.
The Navigation Procedures window opens and displays all existing procedure lists in Oracle ABM. When you select a node within a procedure, Oracle ABM opens the corresponding inspector panel, web link, or calculation.
The Navigation Procedures window has these features:
■ Edit. Opens the Navigation Procedures wizard where you can make changes to an existing procedure. The existing steps for the procedure will appear in the Selected Navigation Steps region where you can make changes.
■ New. Opens the Navigation Procedures wizard where you can create a new procedure.
■ Delete. Deletes a navigation procedure or one of its steps.
■ Close. Exits the Navigation Procedures window.
Note: When you create a URL link, you must prefix it with http:// (as in this example: http://www.oracle.com). Oracle ABM will not edit for the presence of this prefix at the beginning of a link.
User Interface 2-17

Creating and Running Calculations
◗◗To create a navigation procedure: From the toolbar, select Navigator from the Tools poplist to open the Navigation Procedures window.
Choose the New button to open the Navigation Wizard. Choose the Next button on the wizard welcome screen to begin the setup process.
Step 1 Enter the required dataEnter a unique name and an optional description for the Navigation Procedure. Choose Next to continue to the Step 2 screen.
Step 2 Select your steps to be used for the navigation procedureThe available procedures are grouped into five tabbed regions: Step, Text, URL, Proc and Calc. If the procedure you want to add does not exist, select the New button in this region to add a new procedure. Procedures can also be edited or deleted.
Highlight a procedure in the Available Procedures region and use the arrows to move it to the Selected Navigation Steps region. Use the Up and Down arrows to arrange the procedures in the correct order.
If necessary, choose the Back button to return to the previous screen in order to make changes. Choose Next to continue to the Step 3 screen.
Step 3 Review the steps of the navigation procedureReview your Navigation Procedure. If necessary, choose the Back button to return to the previous screens in order to make changes. If satisfied, choose Finish to save the procedure and close the wizard.
Creating and Running CalculationsOracle ABM contains numerous pre-defined calculations that are used to perform arithmetical operations using the account, statistic and volume data captured in the application. Oracle ABM calculation functionality is based on a flexible calculation set up mechanism that enables you to create and maintain multiple versions, or instances, of a calculation.
You use a calculation instance to define a unique calculation. A calculation instance consists of a calculation ID, name, and calculation parameters. Calculation parameters specify the objects, data sets, effective dates, and other information that is used to run a calculation. Each calculation has a pre-defined list of required and optional parameters to which you assign parameter values. You can create multiple
2-18 Oracle Activity-Based Management User Guide

Creating and Running Calculations
versions of a calculation by defining multiple calculation instances and by using different combinations of parameter values. A calculation instance can be used more than once and can be modified at any time by updating the calculation parameters.
To create and run Oracle ABM calculations, you must follow these steps:
1. Create a calculation instance.
2. Specify calculation parameters.
3. Execute the calculation.
The steps and processes involved with creating and running Oracle ABM calculations are the same. However, there may be variations in calculation screens depending on the requirements of a calculation. Refer to the information pertaining to each Oracle ABM calculation for specific requirements. Screens for an Activity Rate calculation are being used in this procedure for an example.
User Interface 2-19

Creating and Running Calculations
Creating a Calculation InstanceYou use a calculation wizard to create a calculation instance. You access a calculation wizard from a calculation inspector panel.
◗◗To create a calculation instance:
Navigate to a calculation inspector panel. Choose the New icon on the toolbar to open a calculation wizard. Choose the Next button on the wizard welcome screen to begin the setup process.
2-20 Oracle Activity-Based Management User Guide

Creating and Running Calculations
Step 1 Enter the required data
Enter a unique calculation name. Entering a description is optional. Choose the New button if you want to add more than one calculation in the same update. When finished, choose Next to continue to the Step 2 screen.
Step 2 Press Finish to create new calculationsReview the displayed results. If necessary, choose the Back button to return to the previous screen in order to make changes. Choose Finish to save the update when you are satisfied with the results. The saved calculation will appear on the calculation inspector panel.
Specifying Calculation ParametersYou use a calculation Details window to specify calculation parameters. You access a calculation Details window from a calculation inspector panel.
◗◗To specify calculation parameters: 1. Navigate to a calculation inspector panel.
Note: Once you create a calculation instance, you must specify calculation parameters in order to run the calculation.
User Interface 2-21

Creating and Running Calculations
2. Select a calculation by clicking anywhere on a calculation row in order to highlight it and choose the Details button.
3. Select an item you want to update by clicking anywhere on a parameter row in order to highlight it. Choose the Value button to begin the update process.
4. Specify parameter values. Depending on the individual parameter, Oracle ABM uses different methods for specifying parameter values. For example:
– Effective date fields are typically an input field where you enter a date using the following format: ’dd-mmm-yyyy’.
– Items such as data sets and attributes use lists of values to display parameter value options. For these items, you select a value by clicking anywhere on a value or a value row in order to highlight it.
– Certain field values are presented in the form of a checkbox, or option button, which you click on in order to make a selection.
5. After specifying a parameter value, if available, you must choose the OK button on the parameter value screen in order to confirm the selection and return to the Details window.
6. Repeat Steps 3 through 5 as necessary for each calculation parameter.
7. Choose OK on the calculation Details window in order to save the parameter update once you have finished specifying values. All required parameters must be specified before the Details windows will close.
2-22 Oracle Activity-Based Management User Guide

Creating and Running Calculations
Using Offsets to Define Calculation Data Set ParametersInstead of manually selecting data set values for your calculation parameters each period, you can use the Offset feature to automatically select the data sets used in a calculation. Using offsets, you specify a whole number, such as 0, -1, or 2, as the value for a data set parameter. Oracle ABM uses this value to select a data set that contains a period that is the same (0), before (-), or after (no sign) the period of the data set you specify in the User Preferences window for the current session. The offset feature uses a combination of the period, period type, period beginning and ending dates, data set type, and data set class to select the correct offset data set.
◗◗To define an offset for a calculation data set value: Before you can define a data set offset value, you must first update the parameter with a data set value that contains a data set type and data set class that you want to use in your offset criteria, and save the selection. This will cause the data set type and data set class fields to be populated with these values when you choose the Offset button. You can then use the following procedure to define an offset value.
1. Navigate to a calculation inspector panel.
2. Select a calculation by clicking anywhere on a calculation row in order to highlight it and choose the Details button.
3. Select a data set parameter you want to update by clicking anywhere on a parameter row in order to highlight it and choose the Offset button.
4. Enter an offset value.
Note: Oracle ABM will not automatically create data sets that match your offset criteria. You must create the data sets that you want Oracle ABM to select using the offset feature.
User Interface 2-23

Creating and Running Calculations
You must precede a value with a minus sign (-) to indicate you want to select data set periods before (-) the date specified in user preferences. Do not precede positive values with a plus sign (+). This will cause the offset to revert to a “0” value.
5. After entering a value, choose the Test button to display a confirmation message indicating the data set that would be selected using the offset value and the data set specified in user preferences.
6. Choose the OK button to return to the Details window after making a selection.
7. Repeat Steps 3 through 6 for each data set parameter you want to update.
8. Choose OK on the Details window in order to save your selections once you have finished selecting values.
Running a CalculationCalculations are run from a calculation inspector panel.
◗◗To run a calculation: 1. Navigate to a calculation inspector panel.
2. Highlight a calculation you want to run by clicking on a calculation row in order to highlight it and choose the Execute button.
3. Choose the View Log button to monitor the status of an executed calculation. Oracle ABM will display the following status codes to advise you of the status of a calculation:
– S = Submitted
– R = Running
– C = Completed
– E = Error
To refresh the status displayed on the View Log window, choose the Close button to exit the window, then choose View Log again to requery the job status.
2-24 Oracle Activity-Based Management User Guide

Creating and Running Calculations
Viewing Calculation ResultsOnce a calculation has run successfully, you can immediately view the results by accessing a calculation inspector panel Results tab, or by navigating to other inspector panels that include the type of data included in the calculation results.
User Interface 2-25

Creating and Running Calculations
2-26 Oracle Activity-Based Management User Guide

Getting S
3
Getting StartedThis chapter addresses setup steps for the objects and parameters that are used to group and categorize model information in Oracle ABM including:
■ Master Lists
■ Currencies
■ Models
■ Data Sets (including Period Types, Periods, Data Set Types and Data Set Classes)
■ Units of Measure
■ Department Types
■ Exchange Rates
■ Attributes and Attribute Values
■ Mapping Rule Sets
■ Activity Rate Sets
■ Bill Types
■ Activity Hierarchy
■ Department Hierarchy
This chapter also discusses the use of the User Preferences Window to select session parameters when working in Oracle ABM.
tarted 3-1

Overview
OverviewBefore you can create a model and capture quantitative data, you must define the objects and parameters that enable you to group and categorize your model information. For example:
■ Before you define the master list objects that you use to create a model, you must define a master list ID and name.
■ Before you assign a unit of measure basis to a master list material or master list cost object, you must define the unit of measure basis.
■ Before you associate master list objects to a model, you must define a model ID and name.
■ Before you define a model, you must define the currency you will designate as the model currency.
All model objects and parameters are defined by opening the appropriate inspector panel from the Setup menu and using the associated wizard.
3-2 Oracle Activity-Based Management User Guide

Master Lists
Once you create objects and parameters, you will use the User Preferences window to select the default object and parameter values that will control the information and data that you can view and update during your Oracle ABM session.
Master ListsMaster lists are groupings of master list objects. Master list objects are the data entities that you use to build a model in Oracle ABM. The master list ID is the highest level identifier for master list objects, model objects, and model data. You must define a master list ID and name before you can define master list objects.
Master lists objects which you set up under a master list ID include:
■ Departments
■ Accounts
■ Statistics
■ Activities
■ Activity Drivers
■ Materials
■ Cost Objects
Each of the master list objects listed above, and their associated setup steps, are described in Chapter 4.
Typically, one master list grouping should be sufficient for an organization. However, you can create as many as you require to meet your needs. Multiple master lists can be used when multiple organizations are running on the same database instance, and there is no need to compare information across the organizations. Data cannot be merged across multiple master lists.
◗◗To define a master list: Navigate to the Master List inspector panel. Choose the New icon on the toolbar to open the Master List Wizard. Choose the Next button on the wizard welcome screen to begin the setup process.
Getting Started 3-3
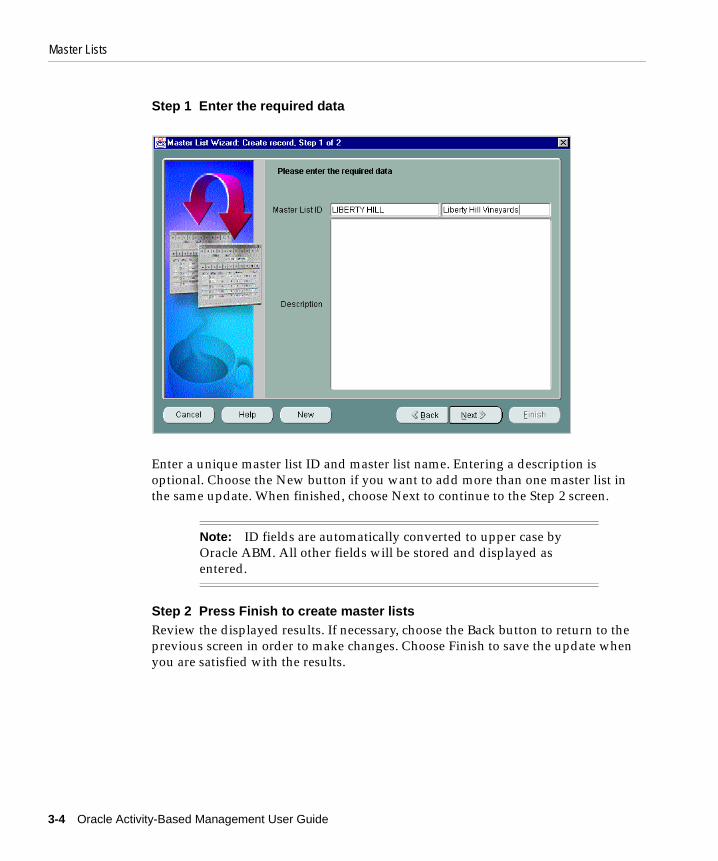
Master Lists
Step 1 Enter the required data
Enter a unique master list ID and master list name. Entering a description is optional. Choose the New button if you want to add more than one master list in the same update. When finished, choose Next to continue to the Step 2 screen.
Step 2 Press Finish to create master listsReview the displayed results. If necessary, choose the Back button to return to the previous screen in order to make changes. Choose Finish to save the update when you are satisfied with the results.
Note: ID fields are automatically converted to upper case by Oracle ABM. All other fields will be stored and displayed as entered.
3-4 Oracle Activity-Based Management User Guide

Currencies
CurrenciesOracle ABM allows you to use multiple currencies. You can capture, store, and view model data using different currencies and exchange rates.
When you define a model, you will be required to specify a model currency. The model currency designation determines the currency basis used by Oracle ABM to store model data, and provides the reference point for currency conversions. This means you can input and view monetary data in a currency basis other than the model currency. Oracle ABM will convert amounts to the model currency and store the data in the model currency, provided you have defined the appropriate exchange rates. For example, if you specify a model currency of U.S. dollars, you can capture and view account data denominated in other currencies, such as Canadian dollars or Japanese yen, and the data will be stored in the database in U.S. dollars. See "Exchange Rates" on page 3-17 for more information.
◗◗To define a currency: Navigate to the Model Currencies inspector panel. Choose the New icon on the toolbar to open the Model Currencies Wizard. Choose the Next button on the wizard welcome screen to begin the setup process.
Note: After you have defined a master list, you can navigate to the User Preferences window and specify the master list as the one you want to work with in your current session. You must specify a master list ID in the User Preferences window in order to set up master list objects and to define a model. See "User Preferences Window" on page 3-32 for more information.
Getting Started 3-5
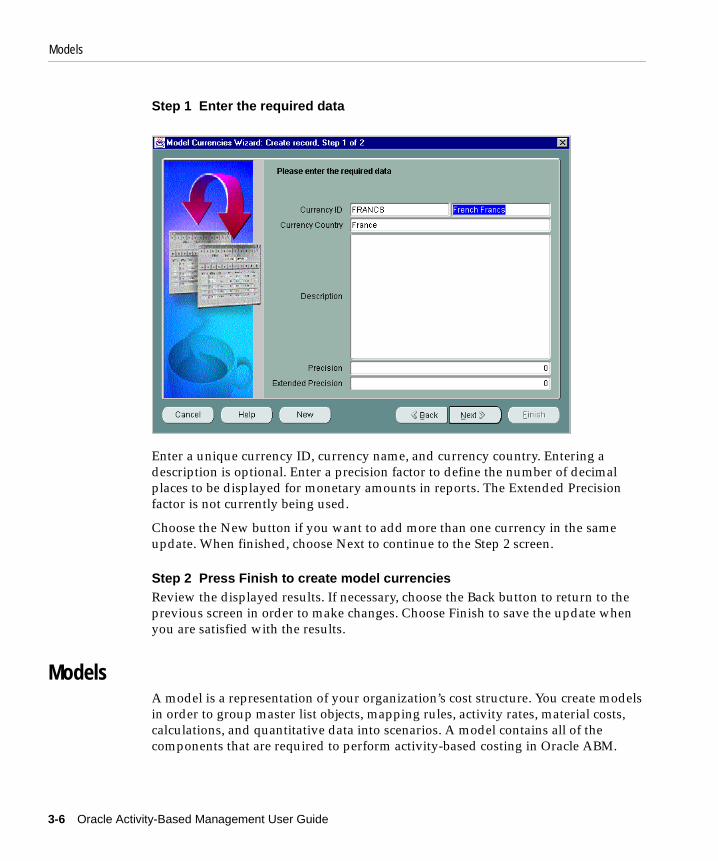
Models
Step 1 Enter the required data
Enter a unique currency ID, currency name, and currency country. Entering a description is optional. Enter a precision factor to define the number of decimal places to be displayed for monetary amounts in reports. The Extended Precision factor is not currently being used.
Choose the New button if you want to add more than one currency in the same update. When finished, choose Next to continue to the Step 2 screen.
Step 2 Press Finish to create model currenciesReview the displayed results. If necessary, choose the Back button to return to the previous screen in order to make changes. Choose Finish to save the update when you are satisfied with the results.
ModelsA model is a representation of your organization’s cost structure. You create models in order to group master list objects, mapping rules, activity rates, material costs, calculations, and quantitative data into scenarios. A model contains all of the components that are required to perform activity-based costing in Oracle ABM.
3-6 Oracle Activity-Based Management User Guide

Models
You must associate master list departments, accounts, statistics, activities, activity drivers, materials, and cost objects with a model ID in order to be able to capture financial and other quantitative data.
You can set up more than one model to distinguish different aspects of your organization.
◗◗To define a model:
Navigate to the Models inspector panel. Choose the New icon on the toolbar to open the Models Wizard. Choose the Next button on the wizard welcome screen to begin the setup process.
Step 1 Enter the required data
Enter a unique model ID and model name. You must select a model currency from the drop down box in the Currency ID field. The model currency designation determines the currency basis in which model data is stored and provides the reference point for currency conversions.
Getting Started 3-7

Data Sets
Entering a description is optional. Choose the New button if you want to add more than one model in the same update. When finished, choose Next to continue to the Step 2 screen.
Step 2 Press Finish to create modelsReview the displayed results. If necessary, choose the Back button to return to the previous screen in order to make changes. Choose Finish to save the update when you are satisfied with the results.
After you have defined a model, you can navigate to the User Preferences window and specify the model as the one you want to work with in your current session. You must specify a model ID in the User Preferences window in order to set up a data set. See "User Preferences Window" on page 3-32 for more information.
Data SetsData sets group model data into time frames and categories. You use data sets to separate and store your model data by period (such as months or quarters) and by classification (such as actual, budget, forecast).
In order to create a data set, you must first define the following four components.
■ Period Types
■ Periods
■ Data Set Types
■ Data Set Classes
Period TypesPeriod types define the unit of time for a period. Typically, period types correspond to calendar time divisions (such as month, quarter, or year). However, you can define period types to correspond to any period of time for which you want to capture data. You must set up period types before you can define a period.
Note: The model currency cannot be changed once the model is saved.
3-8 Oracle Activity-Based Management User Guide
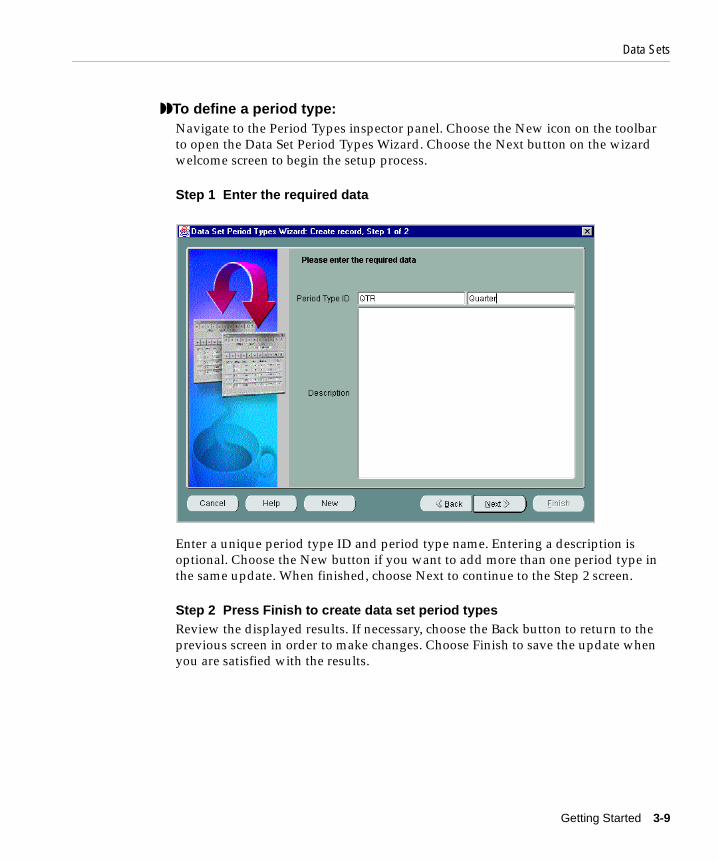
Data Sets
◗◗To define a period type: Navigate to the Period Types inspector panel. Choose the New icon on the toolbar to open the Data Set Period Types Wizard. Choose the Next button on the wizard welcome screen to begin the setup process.
Step 1 Enter the required data
Enter a unique period type ID and period type name. Entering a description is optional. Choose the New button if you want to add more than one period type in the same update. When finished, choose Next to continue to the Step 2 screen.
Step 2 Press Finish to create data set period typesReview the displayed results. If necessary, choose the Back button to return to the previous screen in order to make changes. Choose Finish to save the update when you are satisfied with the results.
Getting Started 3-9

Data Sets
PeriodsPeriods define a specific range of time (such as May 2000, First Quarter). You must select a period type, and specify a begin date and an end date (such as 01-May-2000, 31-May-2000) when you define a period.
◗◗To define a period:
Navigate to the Periods inspector panel. Choose the New icon on the toolbar to open the Data Set Periods Wizard. Choose the Next button on the wizard welcome screen to begin the setup process.
Step 1 Enter the required data
Select a period type for the period from the drop down box. Enter a unique period ID and period name. Enter a begin date and an end date for the period (dd-mmm-yyyy). Entering a description is optional. Choose the New button if you want to add more than one period in the same update. When finished, choose Next to continue to the Step 2 screen.
3-10 Oracle Activity-Based Management User Guide

Data Sets
Step 2 Press Finish to create data set periodsReview the displayed results. If necessary, choose the Back button to return to the previous screen in order to make changes. Choose Finish to save the update when you are satisfied with the results.
Data Set Types and Data Set ClassesData set types and data set classes are user-defined elements that categorize the information contained in a data set. There are no system prescribed meanings attached to either of these elements. However, use of both elements is required. These elements allow you to create more than data set category for a period. When you create a data set, you will be prompted to choose both a data set type and a data set class.
Data set types and data set classes can be treated as independent classifications, or they can be defined in a way where the values created for each compliment each other. For example, you can use data set types to indicate that a data set contains actual, budget, or forecast data, and use data set classes to indicate the source of the data as being the general ledger or estimates.
Oracle ABM uses data set types and data set classes to select a data set when using the Offset feature in calculations.
◗◗To define a data set type or a data set class:
Navigate to the Data Set Types or Data Set Classes inspector panel. Choose the New icon on the toolbar to open the Data Set Types or Data Set Classes Wizard. Choose the Next button on the wizard welcome screen to begin the setup process.
Note: You cannot assign a date to more than one period with the same period type (i.e. period dates may not overlap between periods). For example, you cannot include the date of 01-May-2000 in more than one period with a period type of month.
Note: The setup steps for data set types and data set classes are the same. Data set type screens are being shown in this procedure as an example.
Getting Started 3-11

Data Sets
Step 1 Enter the required data
Enter a unique data set type or data set class ID, and a data set type or data set class name. Entering a description is optional. Choose the New button if you want to add more than one data set type or data set class in the same update. When finished, choose Next to continue to the Step 2 screen.
Step 2 Press Finish to create data set types or data set classesReview the displayed results. If necessary, choose the Back button to return to the previous screen in order to make changes. Choose Finish to save the update when you are satisfied with the results.
Creating a Data SetOnce you have defined a period type, period, data set type, and data set class, you can create a data set. Note that data sets are specific to a model. You must specify a master list and a model in the User Preferences window before you can create a data set.
3-12 Oracle Activity-Based Management User Guide

Data Sets
◗◗To create a data set: Navigate to the Data Sets inspector panel. Choose the New icon on the toolbar to open the Data Sets Wizard. Choose the Next button on the wizard welcome screen to begin the setup process.
Step 1 Enter the required data
Enter a unique data set ID and a data set name. Entering a description is optional. When creating a new data set, you can set the Lock Status indicator to either closed or open.
You must select a data set class ID, a data set type ID, and a period ID from the drop down boxes. Choose the New button if you want to add more than one data set in the same update. When finished, choose Next to continue to the Step 2 screen.
Note: The Lock Status indicator is used to control access to the data in a data set. See the following caption "Closing and Opening Data Sets" for additional information.
Getting Started 3-13

Data Sets
Step 2 Press Finish to create data setsReview the displayed results. If necessary, choose the Back button to return to the previous screen in order to make changes. Choose Finish to save the update when you are satisfied with the results.
Closing and Opening Data SetsA data set can have a lock status of either closed or open. When a data set is open, you can update and view the values in a data set. When a data set is closed, you cannot update or delete data, but you can still view it. You must have system administrator privileges in order to change the lock status for an existing data set. See "System Administrator Privileges" in Chapter 14 for more information. To update the lock status after a data set is created, you must access the details window for a data set item.
◗◗To close or open a data set: 1. Navigate to the Data Sets inspector panel.
2. Highlight a data set you want to update by clicking anywhere on a data set row, then choose the Details button.
3. To change the lock status to closed or open, click the button next to the new value you want to select.
4. Choose OK to save the update.
3-14 Oracle Activity-Based Management User Guide

Units of Measure
Units of MeasureOracle ABM uses units of measure to define the measurement basis for materials and cost objects. When you define materials and cost objects you will be required to specify the measurement basis you want to use. You can define measures based on volumes, weights, unit definitions, etc.
◗◗To define a unit of measure:
Navigate to the Units of Measure inspector panel. Choose the New icon on the toolbar to open the Units of Measure Wizard. Choose the Next button on the wizard welcome screen to begin the setup process.
Step 1 Enter the required data
Enter a unique unit of measure ID and a unit of measure name. Entering a description is optional. Choose the New button if you want to add more than one unit of measure in the same update. When finished, choose Next to continue to the Step 2 screen.
Getting Started 3-15

Department Types
Step 2 Press Finish To create units of measureReview the displayed results. If necessary, choose the Back button to return to the previous screen in order to make changes. Choose Finish to save the update when you are satisfied with the results.
Department TypesDepartment Types are used to classify and sort departments for viewing or reporting purposes. For example, you can create department types that indicate geographical regions (such as North America, Central America), or that reflect functional groupings (such as Production, Packaging).
Use of department types to classify departments is optional. If used, you will have an opportunity to select a department type classification when you define master list departments.
◗◗To define a department type: Navigate to the Department Types inspector panel. Choose the New icon on the toolbar to open the Department Types Wizard. Choose the Next button on the wizard welcome screen to begin the setup process.
3-16 Oracle Activity-Based Management User Guide

Exchange Rates
Step 1 Enter the required data.
Enter a unique department type ID and a department type name. Entering a description is optional. Choose the New button if you want to add more than one department type in the same update. When finished, choose Next to continue to the Step 2 screen.
Step 2 Press Finish to create department types.Review the displayed results. If necessary, choose the Back button to return to the previous screen in order to make changes. Choose Finish to save the update when you are satisfied with the results.
Exchange RatesOracle ABM allows you to define currency exchange rates at the model and data set levels.
You define exchange rates in terms of the relationship of the currency you want to use to view or capture data, to the model currency. For example, if you want to capture expenses in Canadian Dollars for a model with a model currency of U.S. Dollars, and reflect an exchange rate of 1.50 Canadian dollars per U.S. Dollar, you
Getting Started 3-17
Exchange Rates
would specify a Canadian Dollar exchange rate of 1.50. Assuming that you record a transaction for 300 Canadian dollars, Oracle ABM will use the exchange rate of 1.50 to convert the 300 Canadian dollars into 200 U.S. dollars (300/1.50), and will store the U. S. Dollar denominated amount in the database.
If you have more than one model and you want to utilize the same exchange rates in each model, you must enter the exchange rates separately for each model. Additionally, since exchange rates are maintained at the data set level, you must enter exchange rates each time you create a new data set.
Exchange Rates Inspector PanelExchange rate values are input on the Exchange Rates details window which is accessed from the Exchange Rates inspector panel.
The list of currencies displayed in the Exchange Rates inspector panel is dynamic and varies depending on the model you have chosen for the current Oracle ABM session. The displayed list will include all currencies that have been defined in Oracle ABM, with the exception of the model currency for the model you are working with. The exchange rate values displayed in the inspector panel will be the values that have been specifically defined for the selected model and data set.
◗◗To define an exchange rate: Exchange rates are defined at a model and data set level based on the values you specify in the user preferences window. You should verify that the correct model and data set values are specified in the User Preferences window before you can define exchange rates.
1. Navigate to the Exchange Rates inspector panel.
2. Highlight a currency you want to define an exchange rate for by clicking anywhere on a currency row, then choose the Details button.
Note: You cannot change a currency exchange rate for a data set once you have recorded amounts in that currency. However, Oracle ABM will allow you to override exchange rates at the transaction level when entering data. See "Entering Model Data" in Chapter 5 for more information.
3-18 Oracle Activity-Based Management User Guide

Attributes and Attribute Values
3. Enter an exchange rate and choose the OK button to save the update and return to the Exchange Rates inspector panel.
Attributes and Attribute ValuesAttributes are user-defined characteristics used to categorize master list objects. Attributes allow you to sort lists on Oracle ABM screens and in reports.
Attributes are global in nature. They are not specific to a particular master list or to a model. This allows you to create common attributes that you can use to categorize information across different models within a master list, or across different master lists. For example, you can create attributes to categorize departments by geographical area (such as Western Division, Southeast Texas Region), and to classify accounts according to cost type (such as operations, maintenance, administrative). You can then apply these attributes to any and all master lists and models in the application.
Use of attributes in Oracle ABM is optional. You can choose whether or not to assign attributes when you define and relate master list objects. See "Defining Master List Objects" in Chapter 4, and "Relating Master List Objects to Master List Departments" in Chapter 5 for more information on assigning attributes.
Attribute EntitiesAttributes are grouped by an element called the attribute entity. Attribute entities group individual attributes with particular master list objects to filter limit the list of attributes that are available for selection when you define or relate master list objects.
You will be required to select an attribute entity classification when you create an attribute.There are essentially two types of attribute entity classifications, object-specific attribute entities and shared attribute entities.
Getting Started 3-19

Attributes and Attribute Values
Object-Specific Attribute EntitiesObject-specific attribute entities are associated with only one type of master list object. The names for the object-specific attribute entities coincide with master list object names and include:
■ Department
■ Department Account
■ Department Statistic
■ Department Activity
■ Department Activity Driver
■ Account
■ Statistic
■ Activity
■ Activity Driver
■ Material
■ Cost Object
Shared Attribute EntitiesShared attribute entities are associated with more than one type of master list object. There are two shared attribute entities:
■ Data Source. Data source attributes can be assigned to accounts, statistics, and activity drivers. These are the three master list objects you can use to capture numerical data. You can use data source attributes to define characteristics that describe or categorize something about the nature of the data you are capturing. For example, you can create a data source attribute called Frequency of Update to depict how often numerical data is refreshed in your model, and define attribute values depicting different periods of time (such as monthly or quarterly). You can then assign this attribute and the appropriate time period value to your accounts, statistics, and activity drivers.
■ Item. Item attributes can be assigned to department activities, materials and cost objects. These are the three objects that are the components of a bill, which is used to determine a cost object unit cost. You can create item attributes that define characteristics or features that are common to all three components. For example, you can create item attributes and attribute values that identify the
3-20 Oracle Activity-Based Management User Guide

Attributes and Attribute Values
source of components, the method used to ship components, or the batch or lot size of components.
See the following Table 3–1 which summarizes attribute entity classifications and the attributes that can be used with the various master list objects:
Table 3–1
Master List Object Object-specific Attribute Entity Shared Attribute Entity
Departments Department None
Department Accounts Department Account None
Department Statistics Department Statistic None
Department Activities Department Activity Item
Department Activity Drivers
Department Activity Driver None
Accounts Account Data Source
Statistics Statistic Data Source
Activities Activity None
Activity Drivers Activity Driver Data Source
Materials Material Item
Cost Objects Cost Object Item
Getting Started 3-21

Attributes and Attribute Values
◗◗To define an attribute: Navigate to the Attributes inspector panel. The Attributes inspector panel consists of two grids. The upper grid displays the complete list of attributes that have been defined in Oracle ABM. The lower grid displays lists of values that have been defined for an attribute highlighted in the upper grid. As you scroll down the list of attributes in the upper grid, the corresponding list of values in the lower grid will change to reflect the values for the highlighted attribute.
Choose the New icon on the toolbar to open the Attributes Wizard. Choose the Next button on the wizard welcome screen to begin the setup process.
Step 1 Enter the required data.
Enter a unique attribute ID and an attribute name. You must select an attribute entity from the drop down box. Entering a description is optional. Choose the New button if you want to add more than one attribute in the same update.
When specifying attributes, only alpha and numeric characters may be used for attribute IDs. Additionally, attribute IDs must be in English with no embedded special characters.
When finished, choose Next to continue to the Step 2 screen.
3-22 Oracle Activity-Based Management User Guide

Attributes and Attribute Values
Step 2 Press Finish to create attributes.Review the displayed results. If necessary, choose the Back button to return to the previous screen in order to make changes. Choose Finish to save the update when you are satisfied with the results.
◗◗To define an attribute value:
Navigate to the Attributes inspector panel. Choose the New button below the Attribute Values grid to open the Attribute Values Wizard. Choose the Next button on the wizard welcome screen to begin the setup process.
Step 1 Select attributes to relate.
Select an attribute by clicking anywhere on an attribute row. If necessary, you can set up new attributes during this step. Clicking the New button opens the Attributes Wizard that guides you through the process of creating attributes. Once you have finished creating attributes, you will be returned to the Attribute Values Wizard so that you can continue the relating process. When finished, choose Next to continue to the Step 2 screen.
Getting Started 3-23

Attributes and Attribute Values
Step 2 Enter the required data.
Enter a unique attribute value and an attribute value name. Entering a description is optional. Choose the New button if you want to add more than one attribute value in the same update. If necessary, choose the Back button to return to the previous screen in order to make changes. When finished, choose Next to continue to the Step 3 screen.
Step 3 Press Finish to create attribute values.Review the displayed results. If necessary, choose the Back button to return to the previous screens in order to make changes. Choose Finish to save the update when you are satisfied with the results.
Locking AttributesAttribute and attribute values can be used to create subtotals on many reports. If you want to ensure that attribute assignments do not change (thus changing your subtotaling formulae), you can lock an attribute to prevent the attribute from being assigned to any additional objects, or from being disassociated with an object. You must have system administrator privileges in order to change the lock status.
3-24 Oracle Activity-Based Management User Guide

Mapping Rule Sets
See "System Administrator Privileges" in Chapter 14 for more information. To update the lock status you must access the details window for an attribute item.
◗◗To lock or unlock an attribute: 1. Navigate to the Attributes inspector panel.
2. Highlight an attribute you want to update by clicking anywhere on an attribute row, then choose the Details button.
3. To change the lock status, click the checkbox to lock (checked) or unlock (unchecked) the attribute.
4. Choose OK to save the update.
Mapping Rule SetsA mapping rule set is a collection of mapping rules within a model. Mapping is the process of assigning costs to and among accounts and activities. You must define a mapping rule set ID and name, and specify it in the User Preferences window, before you can create mapping calculations and mapping rules for a model. See Chapter 6 for more information on mapping.
Note: Mapping rule sets are specific to a model. You must specify a master list and a model in the User Preferences window before you can create a mapping rule set.
Getting Started 3-25

Mapping Rule Sets
◗◗To define a mapping rule set: Navigate to the Mapping Rule Sets inspector panel. Choose the New icon on the toolbar to open the Mapping Rule Sets Wizard. Choose the Next button on the wizard welcome screen to begin the setup process.
Step 1 Enter the required data.
Enter a unique mapping rule set ID and a mapping rule set name. Entering a description is optional. Choose the New button if you want to add more than one mapping rule set in the same update. When finished, choose Next to continue to the Step 2 screen.
Step 2 Press Finish to create mapping rule sets.Review the displayed results. If necessary, choose the Back button to return to the previous screen in order to make changes. Choose Finish to save the update when you are satisfied with the results.
3-26 Oracle Activity-Based Management User Guide

Activity Rate Sets
Activity Rate SetsActivity rate sets are used to group activity rates into categories. You use activity rate sets to combine your activity rates into common groupings based on activity driver definitions. You must assign activity rates to an activity rate set in order to use them in a bill. See Chapter 7 for more information on activity rates.
◗◗To define an activity rate set:
Navigate to the Activity Rate Sets inspector panel. Choose the New icon on the toolbar to open the Activity Rate Sets Wizard. Choose the Next button on the wizard welcome screen to begin the setup process.
Step 1 Enter the required data.
Enter a unique activity rate set ID and an activity rate set name. Entering a description is optional. Choose the New button if you want to add more than one activity rate set in the same update. When finished, choose Next to continue to the Step 2 screen.
Getting Started 3-27

Bill Types
Step 2 Press Finish to create activity rate sets.Review the displayed results. If necessary, choose the Back button to return to the previous screen in order to make changes. Choose Finish to save the update when you are satisfied with the results.
Bill TypesA bill type is a label used to categorize bills. In Oracle ABM, a bill is used to combine activities, materials, and cost objects from other bills (e.g. representing components or subassemblies), into a structure that is used to calculate a cost object unit cost. Using bill types, you can create multiple versions of a bill for a single cost object. For example, you can define bill types to distinguish between actual, estimate, or other types of bills. You must define a bill type and specify it in the User Preferences window in order to create a bill. See Chapter 8 for more information on creating a bill.
Mixed Bill TypeWhen you define a bill type, you can indicate whether or not the bill type should be classified as a mixed bill type. A mixed bill type signifies that a bill can include costs from bills with different bill types. For example, if you want to create a bill with a bill type of Estimate, but also be able to include the cost of a component that has a bill type of Actual, designate the Estimate bill type as being a mixed bill type. If you do not make this indication, you can only select components from other bills that have the same Estimate bill type.
◗◗To define a bill type: Navigate to the Bill Types inspector panel. Choose the New icon on the toolbar to open the Bill Types wizard. Choose the Next button on the wizard welcome screen to begin the setup process.
3-28 Oracle Activity-Based Management User Guide

Activity Hierarchy
Step 1 Enter the required information.
Enter a unique bill type ID and a bill type name. Select the Mixed Bill Type check box if this bill type will be designated as mixed. Entering a description is optional. Choose the New button if you want to add more than one bill type in the same update. When finished, choose Next to continue to the Step 2 screen.
Step 2 Press Finish to create bill types.Review the displayed results. If necessary, choose the Back button to return to the previous screen in order to make changes. Choose Finish to save the update when you are satisfied with the results.
Activity HierarchyAn activity hierarchy is a structure made up of a list of activities. Activity hierarchies are used to roll up several activities into a summary entity for reporting purposes. Activity hierarchies allow you to define your activities at a more detail level for analysis purposes, and then summarize them for cost object costing. You must define an activity hierarchy ID and name, and specify it in the User Preferences window before you can create an activity hierarchy.
Getting Started 3-29

Activity Hierarchy
◗◗To define an activity hierarchy: Navigate to the Activity Hierarchy inspector panel. Choose the New icon on the toolbar to open the Activity Hierarchy Wizard. Choose the Next button on the wizard welcome screen to begin the setup process.
Step 1 Enter the required data.
Enter a unique activity hierarchy ID and an activity hierarchy name. Entering a description is optional. Choose the New button if you want to add more than one activity hierarchy in the same update. When finished, choose Next to continue to the Step 2 screen.
Step 2 Press Finish to create activity hierarchies.Review the displayed results. If necessary, choose the Back button to return to the previous screen in order to make changes. Choose Finish to save the update when you are satisfied with the results.
3-30 Oracle Activity-Based Management User Guide

Department Hierarchy
Department HierarchyA department hierarchy is a structure made up of a list of model departments. Department hierarchies are used to roll up several model departments into a summary entity. You must define a department hierarchy ID and name, and specify it in the User Preferences window before you can create a department hierarchy.
◗◗To define a department hierarchy: Navigate to the Department Hierarchy inspector panel. Choose the New icon on the toolbar to open the Department Hierarchy Wizard. Choose the Next button on the wizard welcome screen to begin the setup process.
Step 1 Enter the required data.
Enter a unique department hierarchy ID and a department hierarchy name. Entering a description is optional. Choose the New button if you want to add more than one department hierarchy in the same update. When finished, choose Next to continue to the Step 2 screen.
Getting Started 3-31

User Preferences Window
Step 2 Press Finish to create department hierarchies.Review the displayed results. If necessary, choose the Back button to return to the previous screen in order to make changes. Choose Finish to save the update when you are satisfied with the results.
User Preferences WindowThe User Preferences window is used to specify the default object and parameter values that are applicable to an Oracle ABM session.
Oracle ABM uses the values you specify in the User Preferences window to control which information is displayed in Oracle ABM inspector panels, and to control the information you can view and edit during an Oracle ABM session. User preferences values also control how information is organized when you create objects and capture numerical data. For example, before you define master list objects, you must specify a master list ID value in the User Preferences window. All master list objects that you create while a particular master list ID value is displayed in the User Preferences window will be set up under that particular master list.
The user preferences window has two tabbed regions:
■ General. Is used to specify values for all of the major objects and parameters used to organize and categorize Oracle ABM information, with the exception of Attributes.
■ Attributes. Is used to specify default attribute values. You can specify attribute values in the User Preferences window in order to filter or limit the information you can view and access throughout the application.
Note: If you attempt to update or access a field in Oracle ABM that requires a value in the User Preferences window and the required value is blank, the application will display an error message. However, you will not be prompted to specify a user preference value if the field already contains a valid value. Therefore, you should always verify that the correct user preferences values are specified before you view or update objects and data.
3-32 Oracle Activity-Based Management User Guide

User Preferences Window
General Tab
The General tab is used to specify the following session values:
■ Database Name
■ Responsibility ID
■ Master List ID
■ Model ID
■ Data Set ID
■ Currency ID
■ Department Hierarchy ID
■ Activity Hierarchy ID
■ Bill Type ID
■ Activity Rate Set ID
■ Mapping Rule Set ID
■ Effective Date
Getting Started 3-33

User Preferences Window
The displayed values for Database Name and Responsibility ID are automatically populated by Oracle ABM and are for information only. You cannot modify these values.
Attributes Tab
The Attributes tab is used to specify the following session attribute values:
■ Department Attribute ID
■ Account Attribute ID
■ Statistic Attribute ID
■ Activity Driver Attribute ID
■ Activity Attribute ID
■ Material Attribute ID
■ Cost Object Attribute ID
3-34 Oracle Activity-Based Management User Guide

User Preferences Window
Specifying User PreferencesThe first time you log in to Oracle ABM, all fields in the User Preferences window will be blank. You will select the initial values for these fields as you define Oracle ABM objects (master list IDs, model IDs, data sets, etc.). When you specify values in the User Preferences window, the values will remain active and continue to appear each time you log into Oracle ABM until you select different values. You can change user preference values at any time as long as all other Oracle ABM windows are closed.
The current settings for certain User Preferences information (including the Master List, Model, Data Set, Activity Rate Set, Bill Type, and Effective Date) are displayed in the Status Bar located at the bottom of an inspector panel.
The Database Name field and your responsibility ID are automatically populated by Oracle ABM and cannot be modified. You can specify values for all other fields. Selection of values for all fields except Effective Date is controlled by drop down lists.
◗◗To specify user preferences: 1. Navigate to the User Preferences window by choosing the Tools icon on the
toolbar, and selecting Preferences on the resulting poplist.
The General Tab will be the default tab displayed when you open the User Preferences window. Select the Attributes Tab to access the list of attribute values.
2. For all fields except Effective Date, click on the button to the right of each field to display the list of available values. Click on a value in the drop down list to make a selection.
Note: The security, master list, and model profiles associated with your responsibility ID determine the objects and lists of values that are displayed and available for selection when you are specifying user preferences values. Oracle ABM will only display values for the objects to which you have access. At a minimum, a responsibility must allow view access to the objects, master lists, and models in user preferences that you must access in order to use the application. See Chapter 14, "System Administration" for information on setting up users and establishing application security.
Getting Started 3-35

User Preferences Window
3. For the Effective Date field, enter an appropriate (beginning) effective date (dd-mmm-yyyy) in order to control the selection of objects and data for viewing and updating purposes, and to control the use of objects and data in calculations.
4. Choose OK on either tab to save the selections once you have finished selecting values.
3-36 Oracle Activity-Based Management User Guide

Defining Master List O
4
Defining Master List ObjectsThis chapter describes master list objects and the steps required to define them in Oracle ABM. It includes the following topics:
■ Master List Object Definitions
■ Defining Master List Objects
OverviewMaster list objects are the building blocks used to create a model in Oracle ABM.
By themselves, master list objects cannot be used to capture and store numerical data. Master list objects must be associated with a model in order to create the structures that are used to capture and store numerical data. Associating objects in Oracle ABM is referred to as relating. See Chapter 5 for information on relating master list objects.
There are seven master list objects in Oracle ABM including:
■ Departments
■ Accounts
■ Statistics
■ Activities
■ Activity Drivers
■ Materials
■ Cost Objects
bjects 4-1

Master List Object Definitions
Master List Object Definitions
DepartmentsDepartments represent the operating units or other reporting structures within an organization. A department can be a cost center, department, geographic region, division, or any other type of organizational grouping or entity. A department can also be used to represent a product line, process, or function.
AccountsOracle ABM uses accounts to classify and hold financial accounting data. Accounts can be used to capture cost, non-cost and revenue data. Typically, an organization’s general ledger is the source for account information. However, you can use accounts to capture information that does not reside in a general ledger account. For example, you can create a non-cost account to store quantity information such as inventory volumes.
StatisticsStatistics are factors used to map costs to and between department accounts and activities. Statistic are also used in calculations to compute rolled-up, or summarized results. Statistics are numerical measures of inputs, outputs, and / or physical attributes. Examples of statistics are: number of employees, quantities used, time measures (such as hours or days), and area measures (e.g. square footage).
ActivitiesActivities represent what an organization does to produce products and /or services. Activities define the action steps and processes that either utilize resources in the creation of products and / or services, or that convert resources into a product or service. Examples of activities are: process an order, operate equipment, build a component, and generate a billing.
Note: Oracle ABM uses a combination of departments and accounts to identify unique accounts. You must relate departments and accounts before you can enter amounts. See Chapter 5 for more information.
4-2 Oracle Activity-Based Management User Guide

Defining Master List Objects
Activity DriversActivity Drivers represent the number of times activities occur, or are performed in an organization. For example, the activity driver for an activity called write orders could be total number of orders. The activity driver for an activity called assemble component could be number of components assembled. Activity Drivers are used in the activity rate calculation to determine the unit cost for an activity.
MaterialsMaterials are physical items that are used or consumed during the creation of products. This includes both direct materials used in product manufacture, and any other materials used in the course of operations. Materials represent purchased items or raw materials. Materials do not represent finished items that an organization produces for use in the organization’s own products and services (such as components and subassemblies). Items produced and used by an organization are classified as cost objects.
Cost ObjectsCost objects represent products and services produced, created, or generated by an organization. Cost objects can represent any item for which you want to find a total cost. They represent the final recipients of cost in an Oracle ABM model. Cost objects are composed of activities, materials and other cost objects (such as components and subassemblies). A cost object can be a product, a customer, a process, or a service. A cost object can also be a grouping of products, customers, processes or services.
Defining Master List Objects.
Master list objects are identified by a unique object ID and an object name. An optional description can also be entered for each object.
Four master list objects—Departments, Accounts, Materials, and Cost Objects have an additional data field that is specific to each object. These are listed and described in Table 4–1 on page 4-8.
Note: Before you can define master list objects, you must define a master list ID and name, and specify it in the User Preferences window. See "Master Lists" in Chapter 3 for more information.
Defining Master List Objects 4-3

Defining Master List Objects
You can also assign attributes to your master list objects during the setup process. The types of attributes that can be assigned to master list objects are listed in Table 4–2 on page 4-9.
◗◗ To define a master list object:
The setup steps for all seven master list objects are the same. Master list department screens are being shown in this procedure as an example.
Navigate to the inspector panel for the type of master list object you want to define.
Choose the New icon on the toolbar to open a master list setup wizard.
In addition to wizards, you can also use the Import process to define master list objects. Importing is especially useful when you need to define a large number of master list objects. See Chapter 10 for a description of importing processes.
Choose the Next button on the wizard welcome screen to begin the setup process.
4-4 Oracle Activity-Based Management User Guide

Defining Master List Objects
Step 1 Enter the required data
Enter a unique object ID and object name. Entering a description is optional. For departments, accounts, materials, and cost objects, select or specify the additional object-specific data element as listed in Table 4–1 on page 4-8. Choose the New button if you want to add more than one master list object in the same update. When finished, choose Next to continue to the Step 2 screen.
Note: You cannot change a master list object ID after you save an update. You must delete and reenter a master list object in order to assign a new ID. Additionally, a master list object can be deleted only if the object has no data with it and all relationships referencing the object have been removed.
Defining Master List Objects 4-5

Defining Master List Objects
Step 2 Select attribute values for these objectsSelection of attributes is not required. Choose Next to continue to the Step 3 screen if you do not want to select attributes.
Depending on the master list object, you will be able to select attributes from either one or two grids. The types of attributes that can be assigned to master list objects are listed in Table 4–2 on page 4-9.
4-6 Oracle Activity-Based Management User Guide

Defining Master List Objects
Navigate to the upper or lower grid on the attribute panel, as appropriate. Highlight an attribute you want to select by clicking anywhere on an attribute row, then choose the Value button.
In the Attribute Values panel, select a value by clicking anywhere on a value row, then choose OK to save the selection and return to the main Step 2 attribute screen.
If you define multiple master list objects in an update, the attributes selected in Step 2 will be assigned to all objects.
If necessary, choose the Back button to return to the previous screen in order to make changes. Choose Next to continue to the Step 3 screen.
Step 3 Press Finish to create master list objectsReview the displayed results. If necessary, choose the Back button to return to the previous screens in order to make changes. Choose Finish to save the update when you are satisfied with the results.
Note: You can select multiple attributes from either, or both grids on the attribute panel. However, each attribute you select can reference only one value. Repeat the selection step as many times as you want in order to add additional attributes.
Defining Master List Objects 4-7

Defining Master List Objects
Object-Specific Setup RequirementsTable 4–1 lists the additional data field requirements that are specific to departments, accounts, materials and cost objects. Each item is described in the paragraphs that follow.
DepartmentsWhen defining departments, select a department type from the drop-down list in the Department Type ID field. The Department Type ID is an optional, user-defined attribute that provides a means to classify and sort departments for viewing or reporting purposes. For example, you can leave department types blank, or select a predefined department type that identifies a department to a geographical region or function (such as production, packaging). See "Department Types" in Chapter 3 for more information.
AccountsFor accounts, select the Reconciling Code check box if you want to indicate the account should reconcile to a general ledger account. The Reconciling Code is an optional, information-only indicator that can be used in reports. There are no calculation consequences to selecting or not selecting this check box.
Materials and Cost ObjectsWhen defining materials and cost objects, select a unit of measure basis from the drop-down list in the UOM ID field. The UOM ID is a required field that is used to specify the measurement basis (such as unit, each, page, item, piece) applicable to a material or cost object item. See "Units of Measure" in Chapter 3 for more information.
Table 4–1
Object Name Field Name Required
Departments Department Type ID Optional
Accounts Reconciling Code Optional
Materials UOM ID (unit of measure basis) Required
Cost Objects UOM ID (unit of measure basis) Required
4-8 Oracle Activity-Based Management User Guide

Defining Master List Objects
AttributesDepending on the particular object you are working with, you will be able to select attributes from either an object-specific attribute entity list, or both an object-specific attribute entity list and a shared attribute entity list. The attribute entities available to each master list object are listed in the following Table 4–2. See "Attributes and Attribute Values" in Chapter 3 for more information.
Table 4–2
Master List Object Object-specific Attribute Entity Shared Attribute Entity
Departments Department None
Accounts Account Data Source
Statistics Statistic Data Source
Activities Activity None
Activity Drivers Activity Driver Data Source
Materials Material Item
Cost Objects Cost Object Item
Defining Master List Objects 4-9

Defining Master List Objects
4-10 Oracle Activity-Based Management User Guide

Relating Objects and Entering Mode
5
Relating Objects and Entering Model DataThis chapter describes the processes of relating objects and entering model data. It includes the following topics:
■ Relating Master List Objects to Master List Departments
■ Relating Master List Objects to a Model
■ Relating Model Accounts and Statistics
■ Entering Model Data
OverviewOnce you have defined master list objects, the next steps in the model building process are to create associations between master list objects, create associations between master list objects and a model, and capture numerical data.
Associating objects in Oracle ABM is referred to as relating. Relating objects is a key aspect of building a model in Oracle ABM. In Chapter 3, "Getting Started" and Chapter 4, "Defining Master List Objects", the focus was on creating the identifiers, groupings, and objects that are used to create the components of a model. Relating is the step that combines all of these components into the structures that define a unique model.
Relating objects also creates the structures that are used to capture and store the numerical data that is needed to map costs to activities, calculate a cost object unit cost, and run other Oracle ABM calculations. You cannot use master list objects alone to capture and store numerical data. All numerical data is captured at the model level. Therefore, you must first relate master list objects to a model. Additionally, master list objects such as accounts, statistics, activities, and activity drivers must be associated with a department in order to create a unique data identifier. For example, Oracle ABM uses the combination of master list department
l Data 5-1

Relating Master List Objects to Master List Departments
and master list account to identify a unique account. In order to create an account that you can reference in a model, you must relate a department and an account to create a department account. Then, in order to capture account data, you must relate the combined department account entity to a model to create a model department account.
Relating Master List Objects to Master List DepartmentsIn Oracle ABM, departments are used as part of the unique identifier for accounts, statistics, activities, and activity drivers. The first step of the relating process involves creating relationships between master list departments and master list accounts, statistics, activities, and activity drivers.
Materials and cost objects are not associated with departments at either the master list or the model level.
Department AccountsYou must relate a master list account to a master list department before you can create an account relationship with a model. This relationship is created at the master list level in order to ensure consistency of department account definitions across models. This is necessary because Oracle ABM uses the combination of departments and accounts to define unique accounts. By creating the department account relationship at the master list level, you are assured that department account definitions will have the same meaning across multiple models.
Department Statistics, Activities, and Activity DriversRelating master list statistics, activities and activity drivers to master list departments is optional. Even if you create relationships at the master list level, you will still be required to specify department relationships when you create model level relationships. However, creating the master list department relationships gives you the option of assigning attributes to the related objects. You cannot assign attributes at a model level. Attributes allow you to sort objects for viewing and reporting.
5-2 Oracle Activity-Based Management User Guide

Relating Master List Objects to Master List Departments
◗◗To relate departments at the master list level:
Navigate to the inspector panel for the department relationship you want to create.
Choose the New icon on the toolbar to open a setup wizard. Choose the Next button on the wizard welcome screen to begin the relating process.
Note: The steps for relating master list accounts, statistics, activities, and activity drivers to master list departments are the same. Department account screens are being shown in this procedure as an example.
Relating Objects and Entering Model Data 5-3

Relating Master List Objects to Master List Departments
Step 1 Select master list departments
Highlight a department you want to relate by clicking anywhere on a department row. You can select more than one department to relate during this step. Use your [Ctrl] and [Shift] keys, as appropriate, to select more than one department row.
If necessary, you can set up new master list departments during this step. Select the New button to open the setup wizard that guides you through the process of creating master list departments. See Chapter 4 for information on creating master list objects. Once you have finished setting up new department objects, you will be returned to the master list department wizard so that you can continue the relating process.
When finished, choose Next to continue to the Step 2 screen.
5-4 Oracle Activity-Based Management User Guide

Relating Master List Objects to Master List Departments
Step 2 Select a master list object
A master list object can be an account, statistic, activity, or activity driver.
Highlight an object you want to relate by clicking anywhere on an object row. You can select more than one object to relate during this step. Use your [Ctrl] and [Shift] keys, as appropriate, to select more than one object row.
If necessary, you can set up new master list objects during this step. Choose the New button to open the setup wizard that guides you through the process of creating master list objects. See Chapter 4 for information on creating master list objects. Once you have finished setting up new master list objects, you will be returned to the master list department wizard so that you can continue the relating process.
If necessary, choose the Back button to return to the previous screen in order to make changes. Choose Next to continue to the Step 3 screen.
Note: By selecting multiple departments and/or objects in Step 1 and 2, you will create relationships for all possible combinations of the selected departments and objects.
Relating Objects and Entering Model Data 5-5

Relating Master List Objects to Master List Departments
Step 3 Select attribute values for these objects
Selection of attributes is not required. Choose Next to continue to the Step 4 screen if you do not want to select attributes.
Depending on the master list relationship, you will be able to select attributes from either one or two grids. The types of attributes that can be assigned to master list object relationships are listed in Table 5–1 on page 5-7.
Navigate to the upper or lower grid on the attribute panel, as appropriate. Highlight an attribute you want to select by clicking anywhere on an attribute row, then choose the Value button.
5-6 Oracle Activity-Based Management User Guide

Relating Master List Objects to Master List Departments
In the Attribute Values panel, select a value for the attribute by clicking anywhere on a value row, then choose OK to save the selection and return to the Step 3 wizard screen.
If necessary, choose the Back button to return to the previous screens in order to make changes. Choose Next to continue to the Step 4 screen.
Step 4 Press Finish to create related master list department objectsReview the displayed results. If necessary, choose the Back button to return to the previous screens in order to make changes. Choose Finish to save the update when you are satisfied with the results.
AttributesDepending on the master list object relationship you are creating, you can select attributes from either an object-specific attribute entity list only, or both an object-specific attribute entity list and a shared attribute entity list. The attribute entities available to each master list object are listed in the following Table 5–1. See "Attributes and Attribute Values" in Chapter 3 for more information.
Note: You can select multiple attributes from either or both grids on the attribute panel. However, each attribute you select can reference only one value. Repeat the selection step as many times as you want in order to add additional attributes.
Note: If you define multiple master list objects in an update, each one will have the attributes selected in Step 3.
Table 5–1
Master List Object Object-specific Attribute Entity Shared Attribute Entity
Department Accounts Department Account None
Department Statistics Department Statistic None
Department Activities Department Activity Item
Department Activity Drivers
Department Activity Driver None
Relating Objects and Entering Model Data 5-7

Relating Master List Objects to a Model
Relating Master List Objects to a ModelOnce you create master list department relationships, the next step in the model building process is to define a unique model structure by relating master list objects to a model ID. Relating master list objects to a model ID also creates structures that you can use to capture numerical data. This section describes master list/model relationships and the steps required to create them. See "Entering Model Data" on page 5-53 for information on capturing numerical data.
Model DepartmentsThe first model relationship that you must create is the model department. The combination of model and department creates a unique model identifier to which you will relate the following master list objects:
■ Department Accounts
■ Statistics
■ Activities
■ Activity Drivers
Each of these objects must be related to a model department relationship. They cannot be related directly to a model ID. Master list materials and cost objects are the only objects that can be related directly to a model ID.
Note: Master list objects will be related to the model ID you specify in the User Preferences window for the current session. You should check the status bar to make sure you have specified the correct model in the User Preferences window before you begin a relating process. See "User Preferences Window" in Chapter 3 for more information.
5-8 Oracle Activity-Based Management User Guide

Relating Master List Objects to a Model
◗◗To create a model department: Navigate to the Model Departments inspector panel.
Choose the New icon on the toolbar to open the Model Departments Wizard. Choose the Next button on the wizard welcome screen to begin the relating process.
Relating Objects and Entering Model Data 5-9

Relating Master List Objects to a Model
Step 1 Select master list departments
Highlight a master list department you want to relate by clicking anywhere on a department row. You can select more than one department to relate during this step. Use your [Ctrl] and [Shift] keys, as appropriate, to select more than one department row.
If necessary, you can set up new master list departments during this step. Choose the New button to open the setup wizard that guides you through the process of creating master list departments. See Chapter 4 for information on creating master list objects. Once you have finished setting up new master list departments, you will be returned to the Model Departments Wizard so that you can continue the relating process.
When finished, choose Next to continue to the Step 2 screen.
Step 2 Press Finish to create model departmentsReview the displayed results. If necessary, choose the Back button to return to the previous screen in order to make changes. Choose Finish to save the update when you are satisfied with the results.
5-10 Oracle Activity-Based Management User Guide

Relating Master List Objects to a Model
Model Department AccountsModel department accounts represent the valid list of department accounts for a model. Typically, model department accounts are used to capture the resource costs, non-cost amounts, and revenue account values that are obtained from external sources and are used in cost mapping and calculations. Model department accounts can also be populated with amounts generated from calculations within Oracle ABM (such as as in department account-to-department account cost mapping).
You also use the list of model department accounts as a source when you are selecting accounts to relate to model department activities, materials, and cost objects. See "Relating Model Accounts and Statistics" on page 5-32 for more information.
Although you relate departments and accounts at the master list level in order to define valid department account combinations, you must relate master list department accounts to a model in order to capture account values, and to relate department accounts to a model department activity, material, or cost object.
◗◗To create a model department account:
Navigate to the Model Department Accounts inspector panel.
Relating Objects and Entering Model Data 5-11

Relating Master List Objects to a Model
Choose the New icon on the toolbar to open the Model Department Accounts Wizard. Choose the Next button on the wizard welcome screen to begin the relating process.
Step 1 Select master list department accounts to relate
Highlight a master list department account you want to relate by clicking anywhere on a department account row. You can select more than one department account to relate during this step. Use your [Ctrl] and [Shift] keys, as appropriate, to select more than one department account row.
If necessary, you can set up new master list department accounts during this step. Choose the New button to open the setup wizard that guides you through the process of creating master list department accounts. See "Relating Master List Objects to Master List Departments" on page 5-2 for more information.
Note: When creating model department accounts, you can only select the master list department accounts you want to relate. Oracle ABM will obtain the model ID from the value specified in the User Preferences window, and the department ID from the selected master list department account. If it does not already exist, Oracle ABM will also create a model department relationship based on the selected values.
5-12 Oracle Activity-Based Management User Guide

Relating Master List Objects to a Model
Once you have finished setting up new master list department accounts, you will be returned to the Model Department Accounts Wizard so that you can continue the relating process.
When finished, choose Next to continue to the Step 2 screen.
Step 2 Press Finish to create model department accountsReview the displayed results. If necessary, choose the Back button to return to the previous screen in order to make changes. Choose Finish to save the update when you are satisfied with the results.
Selecting an Account Cost Type and Inventoriable ClassificationOracle ABM uses two indicators to classify model department account data. These indicators are the Cost Type, and the Inventoriable classification.
The application automatically assigns default values to each of these indicators when a model department account is created. However, you can change the default values immediately after the model department account is created.
■ Cost Type. Is used to specify if a model department account contains cost, non-cost, or revenue amounts. Oracle ABM defaults this value to Cost when you create a new model department account.
■ Cost. Is used to indicate an account that contains expense items. This typically indicates an account that contains cost amounts that will be mapped to activities and become part of a cost object unit cost. The Cost classification is also used to characterize accounts that contain material unit cost data.
■ Non-Cost. Is used to indicate an account that contains other financial account information, such as beginning inventory or scrap account values.
Note: In addition to providing information about the nature of the data in an account, Oracle ABM uses the cost type to control the type of account data that can be associated with a model account object. For example, you cannot relate a model department account with a cost type value of Revenue to a model material. You cannot relate a model department account with a cost type of Cost to a model cost object. See "Relating Model Accounts and Statistics" on page 5-32 for more information on use of cost types with specific model account objects.
Relating Objects and Entering Model Data 5-13

Relating Master List Objects to a Model
Non-cost accounts are not used in mapping, or in the calculations for material unit cost or cost object unit cost. However, they can be included in the determination of a total material cost or a total cost object cost.
■ Revenue. Is used to indicate an account that contains revenue or other credit amounts. Revenue accounts are not used in mapping or unit cost calculations. Revenue accounts are typically used in the determination of product profitability.
■ Inventoriable. This indicator is used to specify an account that represents an inventoriable product cost or credit amount. Oracle ABM provides this flag so that all accounts can be attached to products for activity-based costing purposes, but split into inventoriable and non-inventoriable components for inventory valuation purposes. A value of Inventoriable is valid for both the Cost and Revenue cost types. It is not valid for Non-Cost. Oracle ABM defaults this value as Inventoriable (checked) when a new model department account is created.
The Cost Type and Inventoriable indicators are updated on the Model Department Accounts Details window, which is accessed from the Model Department Accounts inspector panel.
Note: You can update the cost type and inventoriable indicators at any time after a model department account is created. However, you cannot change the values once you use the model department account to capture numerical data, or once it is related to a model department activity, model material, or model cost object. You should verify the indicator values for a model department account before you use the account to capture data, or before you create a relationship using the model department account.
5-14 Oracle Activity-Based Management User Guide

Relating Master List Objects to a Model
◗◗To update the cost type and inventoriable indicators: 1. Navigate to the Model Department Accounts inspector panel.
2. Highlight a model department account you want to update by clicking anywhere on an account row, then choose the Details button.
3. To change the cost type, click the button next to the new value you want to select.
4. To change the inventoriable classification, click the check box in order to remove the check (non-inventoriable status), or to display it (inventoriable status).
5. Choose OK to save the new selections.
Relating Objects and Entering Model Data 5-15

Relating Master List Objects to a Model
Model Department StatisticsModel department statistics represent the valid list of statistics for a model. You use the list of model department statistics as a source when you are selecting statistics to relate to model department activities, materials, and cost objects. See "Relating Model Accounts and Statistics" on page 5-32 for more information.
You can also use model department statistics to capture values for use in calculations (such as mapping). It is not necessary to record values for model department statistics if you do not need them for calculations.
You must relate master list statistics to a model department in order to capture statistics values, and before you can relate statistics to a model department activity, material, or cost object.
◗◗To create a model department statistic: Navigate to the Model Department Statistics inspector panel.
Choose the New icon on the toolbar to open the Model Department Statistics Wizard. Choose the Next button on the wizard welcome screen to begin the relating process.
5-16 Oracle Activity-Based Management User Guide

Relating Master List Objects to a Model
Step 1 Select model departments to relate
Highlight a model department you want to relate by clicking anywhere on a department row. You can select more than one model department to relate during this step. Use your [Ctrl] and [Shift] keys, as appropriate, to select more than one model department row.
If necessary, you can set up new model departments during this step. Choose the New button to open the setup wizard that guides you through the process of creating model departments. See "Model Departments" on page 5-8 for more information. Once you have finished setting up new model departments, you will be returned to the Model Department Statistics Wizard so that you can continue the relating process.
When finished, choose Next to continue to the Step 2 screen.
Relating Objects and Entering Model Data 5-17

Relating Master List Objects to a Model
Step 2 Select master list statistics to relate
Highlight a master list statistic you want to relate by clicking anywhere on a statistic row. You can select more than one master list statistic to relate during this step. Use your [Ctrl] and [Shift] keys, as appropriate, to select more than one statistic row.
If necessary, you can set up new master list statistics during this step. Choose the New button to open the setup wizard that guides you through the process of creating master list statistics. See Chapter 4 for information on creating master list objects. Once you have finished setting up new master list statistics, you will be returned to the Model Department Statistics Wizard so that you can continue the relating process.
If necessary, choose the Back button to return to the previous screen in order to make changes. When finished, choose Next to continue to the Step 3 screen.
Step 3 Press Finish to create model department statisticsReview the displayed results. If necessary, choose the Back button to return to the previous screens in order to make changes. Choose Finish to save the update when you are satisfied with the results.
5-18 Oracle Activity-Based Management User Guide

Relating Master List Objects to a Model
Model Department ActivitiesModel department activities represent the valid list of activities for a model. Typically, model department activities are the final recipients of costs (i.e. the targets) in a mapping calculation. Model department activities can also be an original or intermediate source of costs in a mapping calculation. For example, in addition to department account-to-activity mapping, Oracle ABM allows you to map costs from one activity to another, and from an activity to a department account. This provides you with the flexibility to map costs for different levels of activity and account detail. See Chapter 6 for more information on mapping.
You also use the list of model department activities as a source when you are creating relationships with model department accounts and statistics. See "Relating Model Accounts and Statistics" on page 5-32 for more information.
In instances where model department activities represent the final targets in a mapping calculation, Oracle ABM assigns activity costs to a model department activity department account relationship. Oracle ABM divides the total cost in a model department activity department account by a model department activity driver volume to calculate an activity rate. Activity rates are attached to a cost object and become a component of the cost object unit cost. See Chapter 7 for more information on activity rates, and Chapter 8 for information on calculating cost object unit costs.
You must relate master list activities to a model department in order to reference them in a mapping calculation, create activity rates, and before you can create model department activity account and statistic relationships.
Relating Objects and Entering Model Data 5-19

Relating Master List Objects to a Model
◗◗To create a model department activity: Navigate to the Model Department Activities inspector panel.
Choose the New icon on the toolbar to open the Model Department Activities Wizard. Choose the Next button on the wizard welcome screen to begin the relating process.
5-20 Oracle Activity-Based Management User Guide

Relating Master List Objects to a Model
Step 1 Select model departments to relate
Highlight a model department you want to relate by clicking anywhere on a department row. You can select more than one model department to relate during this step. Use your [Ctrl] and [Shift] keys, as appropriate, to select more than one model department row.
If necessary, you can set up new model departments during this step. Choose the New button to open the setup wizard that guides you through the process of creating model departments. See "Model Departments" on page 5-8 for more information. Once you have finished setting up new model departments, you will be returned to the Model Department Activities Wizard so that you can continue the relating process.
When finished, choose Next to continue to the Step 2 screen.
Relating Objects and Entering Model Data 5-21

Relating Master List Objects to a Model
Step 2 Select master list activities to relate
Highlight a master list activity you want to relate by clicking anywhere on an activity row. You can select more than one master list activity to relate during this step. Use your [Ctrl] and [Shift] keys, as appropriate, to select more than one activity row.
If necessary, you can set up new master list activities during this step. Choose the New button to open the setup wizard that guides you through the process of creating master list activities. See Chapter 4 for information on creating master list objects. Once you have finished setting up new master list activities, you will be returned to the Model Department Activities Wizard so that you can continue the relating process.
If necessary, choose the Back button to return to the previous screen in order to make changes. When finished, choose Next to continue to the Step 3 screen.
Step 3 Press Finish to create model department activitiesReview the displayed results. If necessary, choose the Back button to return to the previous screens in order to make changes. Choose Finish to save the update when you are satisfied with the results.
5-22 Oracle Activity-Based Management User Guide

Relating Master List Objects to a Model
Model Department Activity DriversModel department activity drivers represent the valid list of activity drivers for a model. Model department activity drivers define the number of times a model department activity occurs, or is performed. Oracle ABM divides the total cost in a model department activity account by a model department activity driver volume in order to calculate an activity rate. Activity rates are attached to a cost object and become a component of the cost object unit cost. See Chapter 7 for information on activity rates, and Chapter 8 for information on calculating cost object unit costs.
Activity driver volumes can either be input manually, or calculated by Oracle ABM. Refer to Chapter 7 for information on defining activity driver sources and calculating activity driver volumes.
You must relate master list activity drivers to a model department in order to capture activity driver volume data and to use them to create activity rates.
◗◗To create a model department activity driver: Navigate to the Model Department Activity Drivers inspector panel.
Relating Objects and Entering Model Data 5-23

Relating Master List Objects to a Model
Choose the New icon on the toolbar to open the Model Department Activity Drivers Wizard. Choose the Next button on the wizard welcome screen to begin the relating process.
Step 1 Select model departments to relate
Highlight a model department you want to relate by clicking anywhere on a department row. You can select more than one model department to relate during this step. Use your [Ctrl] and [Shift] keys, as appropriate, to select more than one model department row.
If necessary, you can set up new model departments during this step. Choose the New button to open the setup wizard that guides you through the process of creating model departments. See "Model Departments" on page 5-8 for more information. Once you have finished setting up new model departments, you will be returned to the Model Department Activity Drivers Wizard so that you can continue the relating process.
When finished, choose Next to continue to the Step 2 screen.
5-24 Oracle Activity-Based Management User Guide

Relating Master List Objects to a Model
Step 2 Select master list activity drivers to relate
Highlight a master list activity driver you want to relate by clicking anywhere on an activity driver row. You can select more than one master list activity driver to relate during this step. Use your [Ctrl] and [Shift] keys, as appropriate, to select more than one activity driver row.
If necessary, you can set up new master list activity drivers during this step. Choose the New button to open the setup wizard that guides you through the process of creating master list activity drivers. See Chapter 4 for information on creating master list objects. Once you have finished setting up new master list activity drivers, you will be returned to the Model Department Activity Drivers Wizard so that you can continue the relating process.
If necessary, choose the Back button to return to the previous screen in order to make changes. When finished, choose Next to continue to the Step 3 screen.
Step 3 Press Finish to create model department activity driversReview the displayed results. If necessary, choose the Back button to return to the previous screens in order to make changes. Choose Finish to save the update when you are satisfied with the results.
Relating Objects and Entering Model Data 5-25

Relating Master List Objects to a Model
Model MaterialsModel materials represent the valid list of materials for a model. Unlike department accounts, statistics, activities, and activity drivers, which are all related to a model department, materials and cost objects (see "Model Cost Objects" on page 5-29) are related directly to a model ID.
Typically, model materials are used to capture material unit costs. Material unit costs are attached to a cost object and become a component of the cost object unit cost. Material unit costs can either be input manually, or calculated by Oracle ABM. See "All Material Unit Costs Calculation" in Chapter 13 for information on calculating material unit costs, and Chapter 8 for information on calculating cost object unit costs.
You also use the list of model materials as a source when you are creating relationships with model department accounts and statistics. See "Relating Model Accounts and Statistics" on page 5-32 for more information.
You must relate master list materials to a model in order to capture unit cost amounts, and before you can create model material account and statistic relationships.
5-26 Oracle Activity-Based Management User Guide

Relating Master List Objects to a Model
◗◗To create a model material: Navigate to the Model Materials inspector panel.
Choose the New icon on the toolbar to open the Model Materials Wizard. Choose the Next button on the wizard welcome screen to begin the relating process.
Relating Objects and Entering Model Data 5-27

Relating Master List Objects to a Model
Step 1 Select master list materials to relate
Highlight a master list material you want to relate by clicking anywhere on a material row. You can select more than one material to relate during this step. Use your [Ctrl] and [Shift] keys, as appropriate, to select more than one material row.
If necessary, you can set up new master list material objects during this step. Choose the New button to open the setup wizard that guides you through the process of creating master list materials. See Chapter 4 for information on creating master list objects. Once you have finished setting up new master list materials, you will be returned to the Model Materials Wizard so that you can continue the relating process.
When finished, choose Next to continue to the Step 2 screen.
Step 2 Press Finish to create model materialsReview the displayed results. If necessary, choose the Back button to return to the previous screen in order to make changes. Choose Finish to save the update when you are satisfied with the results.
5-28 Oracle Activity-Based Management User Guide

Relating Master List Objects to a Model
Model Cost ObjectsModel cost objects represent the valid list of cost objects for a model. Unlike department accounts, statistics, activities, and activity drivers, which are all related to a model department, cost objects and materials (see "Model Materials" on page 5-26) are related directly to a model ID.
Model cost objects are the final recipients of costs in an Oracle ABM model. Oracle ABM uses the model cost object ID to identify a bill. Using a bill, you associate activity rates, material unit costs, and other cost object unit costs (such as subassemblies and components) with a model cost object in order to determine the cost object unit cost. See Chapter 8 for information on creating a bill and calculating cost object unit costs.
You also use the list of model cost objects as a source when you are creating relationships with model department accounts and statistics. See "Relating Model Accounts and Statistics" on page 5-32 for more information.
You must relate master list cost objects to a model in order to reference them in a bill to calculate cost object unit costs, and before you can create model cost object account and statistic relationships.
Relating Objects and Entering Model Data 5-29

Relating Master List Objects to a Model
◗◗To create a model cost object: Navigate to the Model Cost Objects inspector panel.
Choose the New icon on the toolbar to open the Model Cost Objects Wizard. Choose the Next button on the wizard welcome screen to begin the relating process.
5-30 Oracle Activity-Based Management User Guide

Relating Master List Objects to a Model
Step 1 Select master list cost objects to relate
Highlight a master list cost object you want to relate by clicking anywhere on a cost object row. You can select more than one cost object to relate during this step. Use your [Ctrl] and [Shift] keys, as appropriate, to select more than one cost object row.
If necessary, you can set up new master list cost objects during this step. Choose the New button to open the setup wizard that guides you through the process of creating master list cost objects. See Chapter 4 for information on creating master list objects. Once you have finished setting up new master list materials, you will be returned to the Model Cost Objects Wizard so that you can continue the relating process.
When finished, choose Next to continue to the Step 2 screen.
Step 2 Press Finish to create model cost objectsReview the displayed results. If necessary, choose the Back button to return to the previous screen in order to make changes. Choose Finish to save the update when you are satisfied with the results.
Relating Objects and Entering Model Data 5-31

Relating Model Accounts and Statistics
Relating Model Accounts and StatisticsThere are several relationships that you must create between objects within a model in order to capture the account and statistics data needed to run calculations, and to store calculation results. Within a model, you can relate model department accounts and statistics to model department activities, model materials, and model cost objects. This section describes each of these relationships and the steps required to create them. See "Entering Model Data" on page 5-53 for information on capturing numerical data.
Model Department Activity Department AccountsModel department activity department accounts are created by relating model department accounts to model department activities. They are used primarily to capture the cost amounts that are assigned to a model department activity. See "Model Department Activities" on page 5-19 for more information.
You can create relationships with model department accounts that have a cost type value of either Cost or Non-Cost. You cannot create relationships with model department accounts that have a cost type value of Revenue.
Typically, amounts for these accounts are generated by Oracle ABM in a mapping calculation. When you run mapping, Oracle ABM calculates the amounts to be assigned to a model department activity and will automatically create any required model department activity department account relationships, if they do not already exist. Therefore, you normally do not need to create these relationships.
Oracle ABM also allows you the flexibility to manually input amounts for these accounts. In these situations, you must create the relationships before you can input account values.
5-32 Oracle Activity-Based Management User Guide

Relating Model Accounts and Statistics
◗◗To create a model department activity department account: Navigate to the Model Department Activity Department Accounts inspector panel.
Choose the New icon on the toolbar to open the Model Department Activity Department Accounts Wizard. Choose the Next button on the wizard welcome screen to begin the relating process.
Relating Objects and Entering Model Data 5-33

Relating Model Accounts and Statistics
Step 1 Select model department activities to relate
Highlight a model department activity you want to relate by clicking anywhere on an activity row. You can select more than one model department activity to relate during this step. Use your [Ctrl] and [Shift] keys, as appropriate, to select more than one activity row.
If necessary, you can set up new model department activities during this step. Choose the New button to open the setup wizard that guides you through the process of creating model department activities. See "Model Department Activities" on page 5-19 for more information. Once you have finished setting up new model department activities, you will be returned to the Model Department Activity Department Accounts Wizard so that you can continue the relating process.
When finished, choose Next to continue to the Step 2 screen.
5-34 Oracle Activity-Based Management User Guide

Relating Model Accounts and Statistics
Step 2 Select model department accounts to relate
Highlight a model department account you want to relate by clicking anywhere on an account row. You can select more than one model department account to relate during this step. Use your [Ctrl] and [Shift] keys, as appropriate, to select more than one account row.
If necessary, you can set up new model department accounts during this step. Choose the New button to open the setup wizard that guides you through the process of creating model department accounts. See "Model Department Accounts" on page 5-11 for more information. Once you have finished setting up new model department accounts, you will be returned to the Model Department Activity Department Accounts Wizard so that you can continue the relating process.
If necessary, choose the Back button to return to the previous screen in order to make changes. When finished, choose Next to continue to the Step 3 screen.
Step 3 Press Finish to create model department activity department accountsReview the displayed results. If necessary, choose the Back button to return to the previous screens in order to make changes. Choose Finish to save the update when you are satisfied with the results.
Relating Objects and Entering Model Data 5-35

Relating Model Accounts and Statistics
Model Department Activity StatisticsModel department activity statistics are created by relating model department statistics to model department activities. Typically, they are used to capture activity statistics values for use in mapping calculations. You must create model department activity statistics and capture values if you are using activity statistics to map costs.
◗◗To create a model department activity statistic:
Navigate to the Model Department Activity Statistics inspector panel.
Choose the New icon on the toolbar to open the Model Department Activity Statistics Wizard. Choose the Next button on the wizard welcome screen to begin the relating process.
5-36 Oracle Activity-Based Management User Guide

Relating Model Accounts and Statistics
Step 1 Select model department activities to relate
Highlight a model department activity you want to relate by clicking anywhere on an activity row. You can select more than one model department activity to relate during this step. Use your [Ctrl] and [Shift] keys, as appropriate, to select more than one activity row.
If necessary, you can set up new model department activities during this step. Choose the New button to open the setup wizard that guides you through the process of creating model department activities. See "Model Department Activities" on page 5-19 for more information. Once you have finished setting up new model department activities, you will be returned to the Model Department Activity Statistics Wizard so that you can continue the relating process.
When finished, choose Next to continue to the Step 2 screen.
Relating Objects and Entering Model Data 5-37

Relating Model Accounts and Statistics
Step 2 Select model department statistics to relate
Highlight a model department statistic you want to relate by clicking anywhere on a statistic row. You can select more than one model department statistic to relate during this step. Use your [Ctrl] and [Shift] keys, as appropriate, to select more than one statistic row.
If necessary, you can set up new model department statistics during this step. Choose the New button to open the setup wizard that guides you through the process of creating model department statistics. See "Model Department Statistics" on page 5-16 for more information. Once you have finished setting up new model department statistics, you will be returned to the Model Department Activity Statistics Wizard so that you can continue the relating process.
If necessary, choose the Back button to return to the previous screen in order to make changes. When finished, choose Next to continue to the Step 3 screen.
Step 3 Press finish to create model department activity statisticsReview the displayed results. If necessary, choose the Back button to return to the previous screens in order to make changes. Choose Finish to save the update when you are satisfied with the results.
5-38 Oracle Activity-Based Management User Guide

Relating Model Accounts and Statistics
Model Material Department AccountsModel material department accounts are created by relating model department accounts to model materials. Typically, they are used to capture the amounts that are used to calculate material unit costs. However, you can input model material unit costs directly into Oracle ABM without creating model material department account relationships.
You can create relationships with model department accounts that have a cost type value of either Cost or Non-Cost. You cannot create relationships with model department accounts that have a cost type value of Revenue. The material unit cost calculation uses only model material department accounts that have a cost type value of Cost. You can capture non-cost amounts (such as beginning balances and scrap account values) for use in calculating a total material cost.
You must create model material department accounts and capture values if you want Oracle ABM to calculate material unit costs. See "All Material Unit Costs Calculation" in Chapter 13 for more information. Otherwise, creation of these accounts relationships and capturing values for use in calculations is optional. You do not need to create model material accounts in order to input model material unit costs directly into Oracle ABM.
Relating Objects and Entering Model Data 5-39

Relating Model Accounts and Statistics
◗◗To create a model material department account:
Navigate to the Model Material Department Accounts inspector panel.
Choose the New icon on the toolbar to open the Model Material Department Accounts Wizard. Choose the Next button on the wizard welcome screen to begin the relating process.
5-40 Oracle Activity-Based Management User Guide

Relating Model Accounts and Statistics
Step 1 Select model materials to relate
Highlight a model material you want to relate by clicking anywhere on a material row. You can select more than one model material to relate during this step. Use your [Ctrl] and [Shift] keys, as appropriate, to select more than one material row.
If necessary, you can set up new model materials during this step. Choose the New button to open the setup wizard that guides you through the process of creating model materials. See "Model Materials" on page 5-26 for more information. Once you have finished setting up new model materials, you will be returned to the Model Material Department Accounts Wizard so that you can continue the relating process.
When finished, choose Next to continue to the Step 2 screen.
Relating Objects and Entering Model Data 5-41

Relating Model Accounts and Statistics
Step 2 Select model department accounts to relate
Highlight a model department account you want to relate by clicking anywhere on an account row. You can select more than one model department account to relate during this step. Use your [Ctrl] and [Shift] keys, as appropriate, to select more than one account row.
If necessary, you can set up new model department accounts during this step. Choose the New button to open the setup wizard that guides you through the process of creating model department accounts. See "Model Department Accounts" on page 5-11 for more information. Once you have finished setting up new model department accounts, you will be returned to the Model Material Department Accounts Wizard so that you can continue the relating process.
If necessary, choose the Back button to return to the previous screen in order to make changes. When finished, choose Next to continue to the Step 3 screen.
Step 3 Press finish to create model material department accountsReview the displayed results. If necessary, choose the Back button to return to the previous screens in order to make changes. Choose Finish to save the update when you are satisfied with the results.
5-42 Oracle Activity-Based Management User Guide

Relating Model Accounts and Statistics
Model Material Department StatisticsModel material department statistics are created by relating model department statistics to model materials. Typically, they are used in conjunction with model material department accounts to calculate material unit costs. However, you can input model material unit costs directly into Oracle ABM without creating model material department statistics relationships.
You must create model material department statistics and capture values if you want Oracle ABM to calculate material unit costs. See "All Material Unit Costs Calculation" in Chapter 13 for more information. Otherwise, creation of these relationships and capturing values for use in calculations is optional.
◗◗To create a model material department statistic:
Navigate to the Model Material Department Statistics inspector panel.
Choose the New icon on the toolbar to open the Model Material Department Statistics Wizard. Choose the Next button on the wizard welcome screen to begin the relating process.
Relating Objects and Entering Model Data 5-43

Relating Model Accounts and Statistics
Step 1 Select model materials to relate
Highlight a model material you want to relate by clicking anywhere on a material row. You can select more than one model material to relate during this step. Use your [Ctrl] and [Shift] keys, as appropriate, to select more than one material row.
If necessary, you can set up new model materials during this step. Choose the New button to open the setup wizard that guides you through the process of creating model materials. See "Model Materials" on page 5-26 for more information. Once you have finished setting up new model materials, you will be returned to the Model Material Department Statistics Wizard so that you can continue the relating process.
When finished, choose Next to continue to the Step 2 screen.
5-44 Oracle Activity-Based Management User Guide

Relating Model Accounts and Statistics
Step 2 Select model department statistics to relate
Highlight a model department statistic you want to relate by clicking anywhere on a statistic row. You can select more than one model department statistic to relate during this step. Use your [Ctrl] and [Shift] keys, as appropriate, to select more than one statistic row.
If necessary, you can set up new model department statistics during this step. Choose the New button to open the setup wizard that guides you through the process of creating model department statistics. See "Model Department Statistics" on page 5-16 for more information. Once you have finished setting up new model department statistics, you will be returned to the Model Material Department Statistics Wizard so that you can continue the relating process.
If necessary, choose the Back button to return to the previous screen in order to make changes. When finished, choose Next to continue to the Step 3 screen.
Step 3 Press finish to create model material department statisticsReview the displayed results. If necessary, choose the Back button to return to the previous screens in order to make changes. Choose Finish to save the update when you are satisfied with the results.
Relating Objects and Entering Model Data 5-45

Relating Model Accounts and Statistics
Model Cost Object Department AccountsModel cost object department accounts are created by relating model department accounts to model cost objects. You can create relationships for model department accounts that have a cost type value of either Non-Cost or Revenue. You cannot create relationships for model department accounts that have a cost type value of Cost. This is because Oracle ABM does not allow you to manually input any cost account elements for a cost object. Costs for a cost object can be determined only by running the calculate cost object unit costs calculation, or when computing a total cost object cost. When running calculations, Oracle ABM will automatically create any required relationships for Cost accounts, if they do not already exist.
You can use non-cost and revenue accounts to capture amounts for accounts such as beginning inventory, scrap, or product revenue. This allows you to calculate a total cost object cost and generate product profitability information.
You do not need to create model cost object department accounts in order to calculate cost object unit costs. Creation of model cost object department account relationships and capturing values for use in other calculations is optional.
5-46 Oracle Activity-Based Management User Guide

Relating Model Accounts and Statistics
◗◗To create a model cost object department account:
Navigate to the Model Cost Object Department Accounts inspector panel.
Choose the New icon on the toolbar to open the Model Cost Object Department Accounts Wizard. Choose the Next button on the wizard welcome screen to begin the relating process.
Relating Objects and Entering Model Data 5-47

Relating Model Accounts and Statistics
Step 1 Select model cost objects to relate
Highlight a model cost object you want to relate by clicking anywhere on a cost object row. You can select more than one model cost object to relate during this step. Use your [Ctrl] and [Shift] keys, as appropriate, to select more than one cost object row.
If necessary, you can set up new model cost objects during this step. Choose the New button to open the setup wizard that guides you through the process of creating model cost objects. See "Model Cost Objects" on page 5-29 for more information. Once you have finished setting up new model cost objects, you will be returned to the Model Cost Object Department Accounts Wizard so that you can continue the relating process.
When finished, choose Next to continue to the Step 2 screen.
5-48 Oracle Activity-Based Management User Guide

Relating Model Accounts and Statistics
Step 2 Select model department accounts to relate
Highlight a model department account you want to relate by clicking anywhere on an account row. You can select more than one model department account to relate during this step. Use your [Ctrl] and [Shift] keys, as appropriate, to select more than one account row.
If necessary, you can set up new model department accounts during this step. Choose the New button to open the setup wizard that guides you through the process of creating model department accounts. See "Model Department Accounts" on page 5-11 for more information. Once you have finished setting up new model department accounts, you will be returned to the Model Cost Object Department Accounts Wizard so that you can continue the relating process.
If necessary, choose the Back button to return to the previous screen in order to make changes. When finished, choose Next to continue to the Step 3 screen.
Step 3 Press finish to create model cost object department accountsReview the displayed results. If necessary, choose the Back button to return to the previous screens in order to make changes. Choose Finish to save the update when you are satisfied with the results.
Relating Objects and Entering Model Data 5-49

Relating Model Accounts and Statistics
Model Cost Object Department StatisticsModel cost object department statistics are created by relating model department statistics to model cost objects. You do not need to create model cost object department statistics in order to calculate cost object unit costs. Typically, these relationships are used to capture cost object quantity information for use in calculations such as the All Extended Cost Object Costs calculation, and in activity-based budgeting. See Chapter 9, "Activity-Based Budgeting" and Chapter 13, "Advanced Modeling and Calculations" for more information.
You do not need to create model cost object department statistics in order to calculate cost object unit costs. Creation of these relationships and capturing values for use in other calculations is optional.
◗◗To create a model cost object department statistic:
Navigate to the Model Cost Object Department Statistics inspector panel.
Choose the New icon on the toolbar to open the Model Cost Object Department Statistics Wizard. Choose the Next button on the wizard welcome screen to begin the relating process.
5-50 Oracle Activity-Based Management User Guide

Relating Model Accounts and Statistics
Step 1 Select model cost objects to relate
Highlight a model cost object you want to relate by clicking anywhere on a cost object row. You can select more than one model cost object to relate during this step. Use your [Ctrl] and [Shift] keys, as appropriate, to select more than one cost object row.
If necessary, you can set up new model cost objects during this step. Choose the New button to open the setup wizard that guides you through the process of creating model cost objects. See "Model Cost Objects" on page 5-29 for more information. Once you have finished setting up new model cost objects, you will be returned to the Model Cost Object Department Statistics Wizard so that you can continue the relating process.
When finished, choose Next to continue to the Step 2 screen.
Relating Objects and Entering Model Data 5-51

Relating Model Accounts and Statistics
Step 2 Select model department statistics to relate
Highlight a model department statistic you want to relate by clicking anywhere on a statistic row. You can select more than one model department statistic to relate during this step. Use your [Ctrl] and [Shift] keys, as appropriate, to select more than one statistic row.
If necessary, you can set up new model department statistics during this step. Choose the New button to open the setup wizard that guides you through the process of creating model department statistics. See "Model Department Statistics" on page 5-16 for more information. Once you have finished setting up new model department statistics, you will be returned to the Model Cost Object Department Statistics Wizard so that you can continue the relating process.
If necessary, choose the Back button to return to the previous screen in order to make changes. When finished, choose Next to continue to the Step 3 screen.
Step 3 Press finish to create model cost object department statisticsReview the displayed results. If necessary, choose the Back button to return to the previous screens in order to make changes. Choose Finish to save the update when you are satisfied with the results.
5-52 Oracle Activity-Based Management User Guide

Entering Model Data
Entering Model DataNumerical data for a model can either be entered in details windows one transaction at a time, or captured via the import process. This section describes the inspector panels and details windows that are used to access and enter model data, and the procedures for entering data in details windows.
You can enter numerical data for the following model objects:
■ Account Data:
– Model Department Accounts
– Model Department Activity Department Accounts
– Model Material Department Accounts
– Model Cost Object Department Accounts
■ Statistics Data:
– Model Department Statistics
– Model Department Activity Statistics
– Model Material Department Statistics
– Model Cost Object Department Statistics
■ Model Department Activity Drivers
See "Relating Master List Objects to a Model" on page 5-8 and "Relating Model Accounts and Statistics" on page 5-32 for descriptions of each of these relationships and the procedures that are required to create them.
This section also addresses the procedures for entering model material unit costs.
Note: Oracle ABM has a flexible data import process that allows you to capture many transactions in a single update using spreadsheets, or Oracle ABM staging areas. Additionally, importing allows you to automatically create master list objects and model relationships at the same time you are capturing data. It is highly recommended that you use Oracle ABM importing functionality when you have a large number of transactions to input, particularly when you also need to create new master list objects and relationships. See Chapter 10 for information on Oracle ABM importing functionality.
Relating Objects and Entering Model Data 5-53

Entering Model Data
Origin CodesOrigin codes are automatically assigned by Oracle ABM to all entered transactions. These codes are used are used to identify the source of numerical data. When you view numerical data in an inspector panel or on a details screen, Oracle ABM will display one of the following origin codes to identify the source of the data:
■ Entered. is used to identify data that is entered directly or captured from a spreadsheet import. It can also be used to identify data captured from a staging area import when you want to allow users the ability to update imported transactions.
■ Interfaced. signifies data that was capturing using Oracle ABM staging area import functionality.
■ In. represents an amount allocated in to an account or activity by running a mapping calculation. You cannot manually override or change an amount generated by mapping. You can do this only by rerunning the calculation.
■ Out. represents an amount allocated out from an account or activity by running a mapping calculation. You cannot manually override or change an amount generated by mapping. You can do this only by rerunning the calculation.
■ Calculated. denotes an amount that was generated by an Oracle ABM calculation, other than mapping. With exception of material unit costs, you cannot override or change a calculated value.
■ Derived. reflects amounts that are generated using Oracle ABM activity-based budgeting functionality.
■ Mixed. means that an amount consists of transaction data of more than one origin code (such as an out transaction and an entered transaction).
5-54 Oracle Activity-Based Management User Guide
Entering Model Data
Using Model Account Inspector PanelsInformation and numerical data for model account relationships is displayed in a model account inspector panel. The navigation paths to the various inspector panels are:
■ Model Department Accounts
Objects > Models > Departments > Account Data
■ Model Department Activity Department Accounts
Objects > Models > Departments > Activities > Account Data
■ Model Material Department Accounts
Objects > Models > Materials > Account Data
■ Model Cost Object Department Accounts
Objects > Models > Cost Objects > Account Data
Note: While there are slight differences in screen layouts and captions, the features of all model account inspector panels and details windows are the same. Model department account screens are being used in this discussion as an example. Also see "Inspector Panels" in Chapter 2 for more information on inspector panel and details window features.
Relating Objects and Entering Model Data 5-55

Entering Model Data
Account Inspector Panel
When you open a model account inspector panel, it will display all records for the data set specified for the current session. You can limit the list of account records displayed by selecting a cost type in the Viewing Option region. From a model account inspector panel you can view and update information for a specific account item, and access wizards to create new model account relationships.
To enter data, as well as view details for an existing model account item, you must navigate to the Details window for the item. To access the Details window, highlight an account item by clicking anywhere on an account row, then choose the Details button.
5-56 Oracle Activity-Based Management User Guide

Entering Model Data
Account Item Details Window
The upper region of the account item Details window displays information about the selected account item including the account ID, department ID, origin code, session currency, session exchange rate, the cost type and inventoriable classifications, and the total amount for all underlying transactions.
The upper region also contains an input field where you can enter an amount in order to create a new transaction. An entered amount is all that is required to create a transaction.
Relating Objects and Entering Model Data 5-57

Entering Model Data
The total amount displayed for an account item can be comprised of multiple transactions. The lower region of the Details window will display all of the transactions for an account item. To update transaction information, as well as view transaction details, you must navigate to the Details window for a transaction item. To access a transaction Details window, highlight a transaction by clicking anywhere on a transaction row, then choose the Details button.
Account Transaction Details Window
The transaction level Details window displays information about a specific transaction including the account ID, department ID, origin code, session currency, session exchange rate, and the entered amount for a transaction.
Note: The Model Department Accounts details window is the only place you can update the cost type and inventoriable classification for a model account. You cannot change the values for these indicators once you capture numerical data, or after you relate a model department account to a model department activity, model material, or model cost object.
Verify that you are using the correct values before you enter data or creating model department activity, material or cost object department account relationships.
See "Selecting an Account Cost Type and Inventoriable Classification" on page 5-13 for more information.
5-58 Oracle Activity-Based Management User Guide

Entering Model Data
The transaction level Details window can also contain two optional input fields:
■ Entered Exchange Rate. You can enter an exchange rate at the transaction level in order to override the session exchange rate. The displayed session exchange rate, which is specific to the data set you are using, is the rate specified in the Exchange Rates inspector panel for the session currency. Oracle ABM will not allow you to change a currency exchange rate for a data set once you have entered data for that currency. However, the Entered Exchange Rate field allows you to override the rate on a transaction-by-transaction basis. See "Exchange Rates" in Chapter 3 for more information.
■ Reference Code. This field is available only for Model Material Department Accounts and Model Cost Object Department Accounts. You can use this field to capture user-defined reference or description information for a transaction. For example, you can use this field to capture a purchase order number for a material item, or to reference a sales invoice for a cost object account.
Entering Model Account DataModel account data will be captured in the currency and data set you specify in the User Preferences window for the current session. You should verify that you have specified the correct session values for these items before you enter data. See "User Preferences Window" in Chapter 3 for more information.
◗◗To enter a transaction for an account: 1. Navigate to a model account inspector panel.
2. Highlight an account item by clicking anywhere on an account row. You can enter amounts for one account item at a time. Choose the Details button to navigate to the Details window for the account item.
3. Enter an amount in the Entered Amount field.
4. Choose the OK button to save the transaction.
Note: You cannot override the session currency at the transaction level.
Relating Objects and Entering Model Data 5-59
Entering Model Data
◗◗To enter details for an account transaction:
1. Navigate to a model account inspector panel.
2. Highlight an account item by clicking anywhere on an account row. Choose the Details button to navigate to the Details window for the account item.
3. Highlight a transaction item in the lower region by clicking anywhere on a transaction row. Choose the Details button to navigate to the Details window for the transaction item.
4. If desired, enter an exchange rate in the Entered Exchange Rate field, and / or other transaction information in the Reference Code field.
5. Choose the OK button to return to the account item Details window.
6. Choose the OK button on the account item Details window to save the updated transaction.
Using Model Statistic Inspector PanelsInformation and numerical data for model statistic relationships is displayed in a model statistic inspector panel. The navigation paths to the various inspector panels are:
■ Model Department Statistics
Objects > Models > Departments > Statistic Data
■ Model Department Activity Statistics
Objects > Models > Departments > Activities > Statistic Data
■ Model Material Department Statistics
Objects > Models > Materials > Statistic Data
■ Model Cost Object Department Statistics
Objects > Models > Cost Objects > Statistic Data
While there are slight differences in screen layouts and captions, the features of all model statistic inspector panels and details windows are the same. Model department statistic screens are being used in this discussion as an example. Also see "Inspector Panels" in Chapter 2 for more information on inspector panel and details window features.
5-60 Oracle Activity-Based Management User Guide

Entering Model Data
Statistic Inspector Panel
When you open a model statistic inspector panel, it will display all records for the data set specified for the current session. From a model statistic inspector panel you can view and update information for a specific statistic item, and access wizards to create new model statistic relationships.
To enter data, as well as view details for an existing model statistic item, you must navigate to the Details window for the item. To access the Details window, highlight a statistic item by clicking anywhere on a statistic row, then choose the Details button.
Relating Objects and Entering Model Data 5-61

Entering Model Data
Statistic Item Details Window
The upper region of the statistic item Details window displays information about the selected statistic item including the statistic ID, department ID, origin code, and the total quantity for all underlying transactions.
The upper region also contains an input field where you can enter a quantity in order to create a new transaction. An entered quantity is all that is required to create a transaction.
The total quantity displayed for a statistic item can be comprised of multiple transactions. The lower region of the Details window will display all of the transactions for a statistic item. To view transaction details, you must navigate to the Details window for a transaction item. To access a transaction Details window, highlight a transaction by clicking anywhere on a transaction row, then choose the Details button.
5-62 Oracle Activity-Based Management User Guide

Entering Model Data
Statistic Transaction Details Window
The transaction level Details window displays information about a specific transaction including the statistic ID, department ID, origin code, and the entered quantity for a transaction. You cannot update any information on this window.
Entering Model Statistic DataModel statistic data will be captured in the data set you specify in the User Preferences window for the current session. You should verify that you have specified the correct session value before you enter data. See "User Preferences Window" in Chapter 3 for more information.
◗◗To enter a transaction for a statistic: 1. Navigate to a model statistic inspector panel.
2. Highlight a statistic item by clicking anywhere on a statistic row. You can enter a quantity for one statistic item at a time. Choose the Details button to navigate to the Details window for the statistic item.
3. Enter a quantity in the Entered Quantity field.
4. Choose the OK button to save the transaction.
Relating Objects and Entering Model Data 5-63

Entering Model Data
Using the Model Department Activity Drivers Inspector PanelInformation and numerical data for model department activity drivers is displayed in the Model Department Activity Drivers inspector panel.
When you open the Model Department Activity Drivers inspector panel, it will display all records for the data set specified for the current session. From the inspector panel you can view and update information for a specific activity driver item, and access wizards to create new model department activity driver relationships.
The Model Department Activity Drivers inspector panel consists of two grids. The upper grid displays the list of model department activity drivers. The lower grid displays driver sources for an activity driver that is highlighted in the upper grid if the activity driver volume data is determined by using the Driver Volume calculation.
5-64 Oracle Activity-Based Management User Guide

Entering Model Data
You can use the Driver Volume calculation to automatically calculate activity driver volume data based on account or statistic values that exist in Oracle ABM. Driver sources information references the account or statistic items that are used in the calculation. See "Calculating Activity Driver Volumes" in Chapter 7 for more information.
The Driver Sources grid will be blank when you highlight an activity driver item that uses entered data.
To enter volume data, as well as view details for an existing model department activity driver item, you must navigate to the Details:Model Department Activity Drivers window. Highlight an activity driver item by clicking anywhere on an activity driver row, then choose the Details button.
Details: Model Department Activity Driver Window
The Details window displays information about the selected activity driver item including the activity driver ID, department ID, and origin code. The window also contains an input field where you can enter, or update an activity driver volume data.
Relating Objects and Entering Model Data 5-65

Entering Model Data
Entering Model Department Activity Driver DataModel department activity driver volume data will be captured in the data set you specify in the User Preferences window for the current session. You should verify that you have specified the correct session value before you enter data. See "User Preferences Window" in Chapter 3 for more information.
◗◗To enter model department activity driver data: 1. Navigate to the upper grid of the model department activity driver inspector
panel.
2. Highlight an activity driver item by clicking anywhere on an activity driver row. You can enter data for one activity driver item at a time. Choose the Details button to navigate to the Details screen for the activity driver item.
3. Enter a volume in the Total field.
4. Choose the OK button to save the update.
Using the Material Unit Costs Inspector PanelMaterial unit costs data is displayed in the Material Unit Costs inspector panel.
In Oracle ABM, you have the option of directly entering, or calculating material unit costs. The All Material Unit Costs calculation calculates an average unit cost for materials using model material department account and model material department statistic data. See Chapter 13 for more information. The Material Unit Costs inspector panel displays entered and calculated amounts.
Oracle ABM enables you to override a calculated material unit cost with an entered value. This is the only place in Oracle ABM where you can type over or change a value with an origin code of Calculated. If you want to prevent this override capability, create and assign a security profile that does not allow update access to Material Unit Costs.
5-66 Oracle Activity-Based Management User Guide

Entering Model Data
Material Unit Costs Inspector Panel
When you open the Material Unit Costs inspector panel, it will display all records for the data set specified for the current session. From the inspector panel you can view and update cost information for a specific material item, and access wizards to create new model material relationships.
To enter data, as well as view details for an existing material items, you must navigate to the Details:Material Unit Costs window. Highlight a material item by clicking anywhere on a material row, then choose the Details button.
Relating Objects and Entering Model Data 5-67

Entering Model Data
Details: Material Unit Costs Window
The Details window displays information about the selected material item including the material ID, UOM ID (unit of measure), origin code, session currency, session exchange rate and an entered amount. The Entered Amount field will reflect the sum of the inventoriable and non-inventoriable amounts.
This window allow you to enter inventoriable and non-inventoriable unit cost components, and an exchange rate.
You can use the Entered Exchange Rate field to override the session exchange rate. The displayed session exchange rate, which is specific to the data set you are using, is the rate specified in the Exchange Rates inspector panel for the session currency. Oracle ABM will not allow you to change a currency exchange rate for a data set once you have entered data for that currency. However, the Entered Exchange Rate field allows you to override the rate on a transaction-by-transaction basis. See "Exchange Rates" in Chapter 3 for more information.
5-68 Oracle Activity-Based Management User Guide

Entering Model Data
Entering Material Unit Costs DataMaterial unit cost data will be captured in the data set you specify in the User Preferences window for the current session. You should verify that you have specified the correct session value before you enter data. See "User Preferences Window" in Chapter 3 for more information.
◗◗To enter a material unit cost: 1. Navigate to the material unit cost inspector panel.
2. Highlight a material item by clicking anywhere on a material row. You can enter an amount one material item at a time. Choose the Details button to navigate to the Details screen for the material item.
3. Enter an inventoriable and / or a non-inventoriable unit cost amount.
4. If desired, enter a exchange rate in the Entered Exchange Rate field.
5. Choose the OK button to save the update.
Viewing and Updating Model DataThe inspector panels and details windows that are used to directly enter model data can also be used to view and update model data, regardless of the method that was originally used to capture the data. You can use the same inspector panels and details windows to access data that was originally captured via the import process, or generated as a result of Oracle ABM calculations (such as mapping).
Relating Objects and Entering Model Data 5-69

Entering Model Data
5-70 Oracle Activity-Based Management User Guide
Mapping
6
Mapping CostsThis chapter addresses mapping. It includes the following topics:
■ Mapping Terms
■ Types of Mapping
■ Using the Mapping Inspector Panel
■ Creating a Mapping Rule Set
■ Creating a Mapping Calculation
■ Creating Mapping Rules
■ Running Mapping Calculations
OverviewMapping is the process of assigning costs to and among resources and activities within a model. In the mapping process, you relate a source entity to one or more target entities so that the costs associated with the source can be distributed to the target, or targets. The mapping calculation is the engine that calculates the amounts to be reassigned, and distributes them from their original source to the designated target, or targets.
Mapping of costs from resources to activities is not always accomplished in a single step. As represented in Figure 6–1, you must frequently assign costs to and between one or more resources and activities before you can fully drive all resource costs to an activity, and ultimately, to a cost object.
Costs 6-1

Overview
Figure 6–1 Mapping and Cost Consumption
Mapping calculations target a single data set. When a mapping calculation executes, all prior mapping results in the target data set are deleted, even if they were created by a different mapping calculation. If you want to store the results of different mapping calculations for the same period, you must create and specify a different data set (such as January Actual or January Budget).
The mapping calculation runs for both department accounts and department activities at the same time, in the order of sequence numbers which you assign to each of the rules in the calculation.
The process of mapping costs has four major processes:
1. Create a mapping rule set
2. Create a mapping calculation
3. Create mapping rules
4. Run the Mapping calculation
Create a Mapping Rule Set. A mapping rule set is a collection of mapping calculations and mapping rules within a model. In order to create mapping calculations and mapping rules, you must first set up a mapping rule set ID and specify it in the User Preferences window.
Create a Mapping Calculation. A mapping calculation is created within a mapping rule set and consists of calculation parameters, and associated mapping rules. In order to perform mapping, you must create at least one mapping calculation instance and create mapping rules which are associated with the calculation.
Create Mapping Rules. Mapping rules define how costs are assigned to and between sources and targets. A mapping rule can occur only once in a mapping rule
6-2 Oracle Activity-Based Management User Guide

Mapping Terms
set. However, a mapping rule can be associated with more than one mapping calculation.
Run the Mapping Calculation. Once you create a mapping calculation instance and mapping rules that are associated with a calculation instance, you can run the mapping calculation. The mapping calculation is the engine that drives costs to and between sources and targets.
Mapping TermsMapping Rule Set. A mapping rule set is a collection of mapping calculations and mapping rules within a model. A mapping rule set can contain one or more mapping calculations and one or more mapping rules. You can create multiple mapping rule sets in a model to accommodate different combinations of mapping calculations and mapping rules.
Mapping Calculation. A mapping calculation defines a calculation instance. A mapping calculation is associated with a mapping rule set and is identified by a calculation name. A mapping calculation is a grouping of calculation parameters and mapping rules. You must create at least one mapping calculation in a mapping rule set in order to create and use mapping rules to assign costs. You can set up multiple mapping calculations in a mapping rule set in order to create different mapping scenarios (such as mapping of actual, forecast, or budget amounts) using the same set of mapping rules.
When executed, a mapping calculation is the engine that generates the numerical results for the mapping targets.
Mapping Rule. A mapping rule associates one or more mapping sources with one or more mapping targets, and identifies the method used to assign values from a source to a target. A rule is the combination of a source, a target, and a method.
Source. A source is the origin of the cost to be assigned by a mapping rule. Model department accounts and model department activities can be used as sources. A single mapping rule can specify one or more sources to map to one or more targets. A source can be referenced only once in a mapping rule set for a given date.
Target. A target represents the end point for costs being assigned by a mapping rule. A single mapping rule can specify one or more targets, and a target can be referenced in more than one mapping rule. You select targets by specifying a destination type of either Department or Department Activity. Costs for department destinations are assigned to model department accounts. Costs for department activity destinations are assigned to model department activity department accounts.
Mapping Costs 6-3
Mapping Terms
Method. A method defines the components of the distribution ratio. A method specifies how amounts will be assigned from a source to a target by a mapping rule. When you create a mapping rule, you first select a method type of either department account or department statistics to identify the basis for assigning costs, then you identify the specific department account, department statistics, department activity department accounts, or department activity statistics values that are used. A method and a target are always related. That is, the department or department activity associated with an account or statistic in the method, will always be the same as the department or department activity associated with a target.
There are four possible method types:
■ Department Accounts. Determine distribution ratios based on department account amounts. For example, you can map an account for total benefit costs to individual department accounts by the ratio created by a department salary expense divided by total salary expense.
■ Department Statistics. Determine distribution ratios based on a department statistic, such as the number of products tested in the Quality Assurance Department, or the square feet of floor space in the Production Department.
■ Department Activity Department Accounts. Determine distribution ratios based on amounts assigned to an activity. They are created by relating a department account to a department activity because a department activity alone cannot hold a numerical value. For example, a department activity department account could be the salary cost for assembling components in the Assembly Department.
■ Department Activity Department Statistics. Determine distribution ratios based an activity statistic. They are created by relating a department statistic to a department activity because a department activity alone cannot hold a numerical value. For example, a department activity department statistic could be the percent of time spent boxing product orders in the Shipping Department.
Distribution Ratio. A distribution ratio determines the cost amounts that each target will receive when the Mapping calculation executes. The numerator of the distribution ratio is the value of an individual method item (such as the amount for a specific department salary account). The denominator is the sum of all method values (such as the total amount for all department salary expense accounts).
6-4 Oracle Activity-Based Management User Guide

Types of Mapping
Types of MappingThere are four types of mapping. They are described based on the combinations of sources and targets involved in the mapping process. Each type of mapping can be performed using either account-based or statistic-based methods.
Department Account-to-Department AccountThis type of mapping, sometimes referred to as account redistribution, is used to reorganize financial data in order to reflect true resource use by activities. Account redistribution can be performed to assign expenses from departments where no activity is taking place, to the departments where activities occur. For example, you can use mapping to perform a redistribution of costs from a high-level department account that is used to accumulate total telephone expenses, to lower-level department accounts that pertain to each of the consuming departments. The expenses could be assigned based on the number of telephones or the headcount in those departments.
Department Account-to-Department Activity The mapping of costs from accounts to activities is the main thrust of activity-based costing, and is the foundation on which activity costs are based. In Department Account-to-Department Activity mapping, costs are assigned from the accounts that are used to classify and categorize cost data, to the underlying activities that are responsible for the incurrence of the costs. For example, in this type of mapping, you can assign building rent expense to manufacturing and selling activities based on the square footage of building space used to conduct those activities, or you can assign total manufacturing salaries expense to setup, production, and maintenance activities based on the amount of time employees spend on each of those activities.
Department Activity-to-Department Activity Mapping of costs between activities can be used to support the breakdown of activity costs into lower-level activities, or to reassign the cost of support activities. For example, you can map the costs associated with supervising all production line activities to detailed activities representing the supervision of each product line. Conversely, you can assign costs for several different maintenance activities to a total maintenance activity in order to summarize all maintenance activities.
Mapping Costs 6-5

Using the Mapping Inspector Panel
Department-Activity-to-Department AccountThis type of mapping is used to assign costs from activities to departments. You can use activity-to-account mapping to assign the costs of support activities to a specific cost category in order to consolidate those costs before you map them to other activities. For example, you can assign the costs of an activity called Maintain Telephone Switching Equipment to the department account used to capture total telephone expenses. You can assign activity costs to departments that represent any type of organizational entity, such as business processes, product lines, and geographical regions. For example, you can assign the costs associated with an activity called Create Special Marketing Brochures to a department entity established to capture the results for a specific sales campaign.
Using the Mapping Inspector PanelYou use the Mapping inspector panel to handle all aspects of mapping, such as creating and updating calculations and mapping rules, relating mapping rules to calculations, and running and viewing the results of calculations.
The Mapping inspector panel has three tabbed regions including:
■ List Tab
■ Rules Tab
■ Results Tab
6-6 Oracle Activity-Based Management User Guide

Using the Mapping Inspector Panel
List Tab
The List tab is the default tab that opens when you navigate to the Mapping inspector panel. This tab is used to view and update information pertaining to mapping calculations. From the List tab, you can perform tasks such as:
■ Create new mapping calculations.
■ Define and update mapping calculation parameters.
■ Execute mapping calculations and monitor status.
■ Associate mapping rules with calculations and assign sequence numbers.
■ Update mapping rule parameters that override calculation parameters.
Mapping Rule Set This region displays the Mapping Rule Set specified in the User Preferences window for the current session. You must specify a mapping rule set ID in the User Preferences window before you can create, update, or view mapping calculations and mapping rules. See "Creating a Mapping Rule Set" on page 6-16 for more information.
Mapping Costs 6-7

Using the Mapping Inspector Panel
Mapping Calculations The Mapping Calculations region displays a list of calculation instances that have been created for a mapping rule set. Mapping calculations are created by opening the Mapping Calculation Wizard. See "Creating a Mapping Calculation" on page 6-16 for information. From this region you can also view and update mapping calculation parameters, and execute and monitor calculations. To access parameters for an individual calculation, you must navigate to the details window for that calculation. To access a calculation details window, highlight a mapping calculation by clicking anywhere on a calculation item row, then choose the Details button.
Details: Mapping Calculation WindowThe mapping calculation details window displays parameters for a selected mapping calculation and indicates whether a parameter value is required (Y) or optional (N).
In addition to the Calculation Name and Description, you can enter or update information for the following fields:
■ Rule Effective Date
■ Target Effective Date
■ Target Data Set
■ Source Data Set
6-8 Oracle Activity-Based Management User Guide
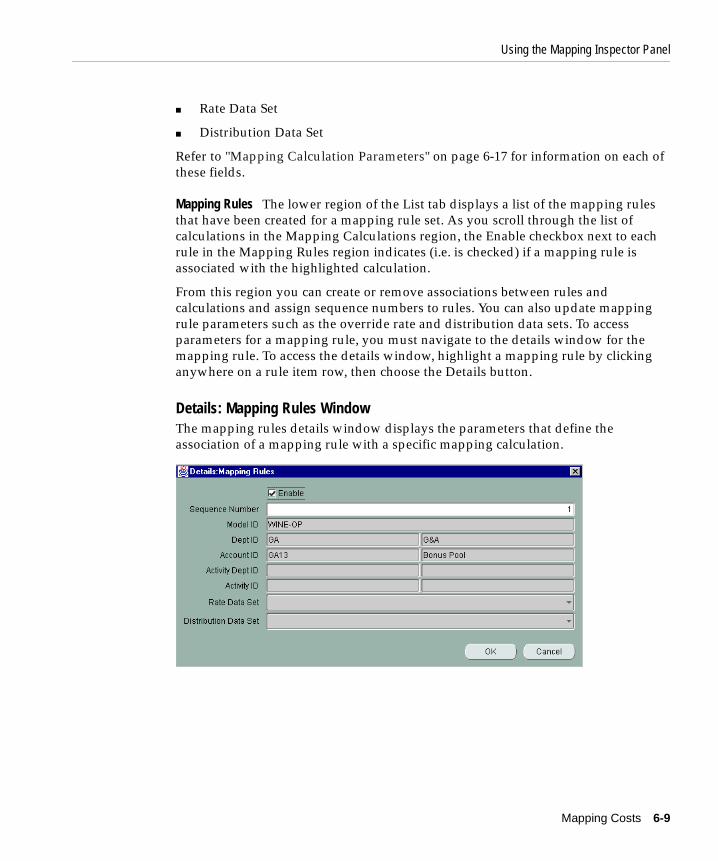
Using the Mapping Inspector Panel
■ Rate Data Set
■ Distribution Data Set
Refer to "Mapping Calculation Parameters" on page 6-17 for information on each of these fields.
Mapping Rules The lower region of the List tab displays a list of the mapping rules that have been created for a mapping rule set. As you scroll through the list of calculations in the Mapping Calculations region, the Enable checkbox next to each rule in the Mapping Rules region indicates (i.e. is checked) if a mapping rule is associated with the highlighted calculation.
From this region you can create or remove associations between rules and calculations and assign sequence numbers to rules. You can also update mapping rule parameters such as the override rate and distribution data sets. To access parameters for a mapping rule, you must navigate to the details window for the mapping rule. To access the details window, highlight a mapping rule by clicking anywhere on a rule item row, then choose the Details button.
Details: Mapping Rules WindowThe mapping rules details window displays the parameters that define the association of a mapping rule with a specific mapping calculation.
Mapping Costs 6-9

Using the Mapping Inspector Panel
You can enter or update information for the following fields:
■ Enable Checkbox
■ Sequence Number
■ (Override) Rate Data Set
■ (Override) Distribution Data Set
Refer to "Mapping Rule Parameters" on page 6-31 for information for each of these fields.
Note: In addition to the Enable checkbox, sequence numbers, and data set overrides, there are other mapping rule parameters that affect how costs are mapped from sources to targets. These parameters are accessed from the Mapping Sources and Mapping Targets regions in the Rules tab. See the following section "Rules Tab" for more information.
In addition to using the Details: Mapping Rules Window to update the Enable checkbox, sequence numbers and data set overrides for a mapping rule, you can use the Fill Button option to update several mapping rules with the same parameter values in a single update. See "Using the List Tab Fill Button to Update Mapping Rule Parameters" on page 6-37.
6-10 Oracle Activity-Based Management User Guide

Using the Mapping Inspector Panel
Rules Tab
The Rules tab is used to view and update information pertaining to mapping rules. From the Rules tab, you can perform tasks such as:
■ Create new mapping rules.
■ Define and update mapping rule effective date and target account parameters.
■ View mapping rules from either a source or a targets perspective.
■ Add new targets to existing mapping rules.
Mapping Rule Set This region displays the Mapping Rule Set specified in the User Preferences window for the current session. You must specify a mapping rule set ID in the User Preferences window before you can create, update, or view mapping calculations and mapping rules. See "Creating a Mapping Rule Set" on page 6-16 for more information.
Mapping Costs 6-11

Using the Mapping Inspector Panel
Viewing Mode Mapping rule information can be viewed from either a mapping sources or a mapping targets perspective. You can choose either the Source Mode or Target Mode button to determine how Oracle ABM will display mapping rule information in the Mapping Sources and the Mapping Targets regions.
Source Mode. Source Mode is the default viewing mode when you open the Rules tab. In Source Mode, the Mapping Sources grid displays a list of all mapped sources in the specified mapping rule set. When you highlight a mapping source by clicking on a row, the Mapping Targets grid will display the corresponding targets for that source.
Target Mode. When you select Target Mode, the Mapping Targets grid displays a list of all mapped targets in the specified mapping rule set. When you highlight a mapping target by clicking on a row, the Mapping Sources grid will display the corresponding sources for that target.
Mapping Sources The upper region of the Results tab displays information about mapping rule sources.
From the Mapping Sources region, you can update mapping rule parameters such as the mapping rule ending effective date and the Target Account ID, and delete mapping rules. To delete a mapping rule, select the rule by clicking anywhere on a mapping sources row in order to highlight it, and choose the Delete and Save icons on the toolbar.
Although Oracle ABM allows you to delete a mapping rule entirely, use of an appropriate ending effective date is the preferred method of inactivating a mapping rule once it has been used in a mapping calculation. When effective dates are used, Oracle ABM will display the mapping rule as long as the Deleting a mapping rule will eliminate that portion of the audit trail for any calculations which have been performed using the rule. See "Mapping Rule Parameters" on page 6-31 for more information on mapping rule effective dates.
To access mapping rule parameters, you must navigate to the details window for the mapping rule. To access the details window, highlight a mapping rule by clicking anywhere on a rule item row, then choose the Details button.
6-12 Oracle Activity-Based Management User Guide

Using the Mapping Inspector Panel
Details: Mapping Rules WindowThe mapping rules details window displays effective dates and target account parameters for a mapping rule.
You can enter or update information for the following fields:
■ (Mapping Rule) Ending Effective Date
■ Target Account ID
Refer to "Mapping Rule Parameters" on page 6-31 for information on these fields.
Mapping Targets The lower region of the Results tab displays information about mapping rule targets.
From this region, you can update the ending effective date for a mapping target and delete mapping targets. To delete a mapping target, select the rule by clicking anywhere on a mapping target row in order to highlight it, and choose the Delete and Save icons on the toolbar. .
Note: Although Oracle ABM allows you to delete a mapping target from a mapping rule, use of an appropriate ending effective date is the preferred method of inactivating a target once it has been used in a mapping calculation. Deleting a mapping target will eliminate that portion of the audit trail for any calculations which have been performed using the rule. See "Mapping Rule Parameters" on page 6-31 for more information on target effective dates.
Mapping Costs 6-13

Using the Mapping Inspector Panel
From the Mapping Targets region, you can also access a wizard that allows you to add new mapping targets to an existing mapping rule. See "Adding New Targets to an Existing Mapping Rule" on page 6-39 for more information.
To access a mapping target ending effective date, you must navigate to the details window for the mapping target. To access the details window, highlight a mapping target by clicking anywhere on a target item row, then choose the Details button.
Details: Mapping Targets WindowThe mapping targets details window displays effective dates, target account/or activity parameters, and target method percentages, target method quantities/or amounts, for a mapping target.
You can enter or update information for only the target ending effective date. Refer to "Mapping Rule Parameters" on page 6-31 for information on this field.
6-14 Oracle Activity-Based Management User Guide

Using the Mapping Inspector Panel
Results Tab
The Results tab displays model department account and model department activity department account data in separate grids, for the data set you specified in the User Preferences window for the current session. You can navigate to the Results tab after running a mapping calculation in order to view your results.
Additionally, from this window you can also access details windows to view and update information for individual model department account and model department activity department account items. To access the details window for an account item, highlight an item by clicking anywhere on an item row, then choose the Details button in the appropriate grid.
Hint: If you specify a target data set in your calculation parameters that is different from the data set you specified in user preferences for the current session, you must change the user preferences value to match the target data set value of your calculation in order to view calculation results.
Mapping Costs 6-15

Creating a Mapping Rule Set
The account information displayed in the Results tab grids can also be accessed from the Model Department Accounts and Model Department Activity Department Accounts inspector panels. Additionally, the Details buttons on the Results tab provide access to the same details windows as the account inspector panels. See "Using Model Account Inspector Panels" and "Entering Model Account Data" in Chapter 5 for information on viewing and updating account data.
Creating a Mapping Rule SetIn order to create mapping calculations and mapping rules, you must first create a mapping rule set ID and specify it in the User Preferences window for the current session. See "Mapping Rule Sets" and "User Preferences Window" in Chapter 3 for information on creating and specifying a mapping rule set.
In many modeling situations, a mapping rule set is created that is used as a basis for scenario creation within the same model. To easily provide this ability, the copy mapping rule set feature is now available.
To copy a mapping rule set, navigate to the Setup > Versioning Options > Mapping Rule Sets inspector. From this inspector, click on a row to select the mapping rule set to be copied. Once a row is selected, click on the Copy Mapping Rule Set button to open the copy dialog. On the copy dialog, select the target rule set from target combo dropdown. Once a selection has been made, select the Copy button to begin the copy process. All mapping rules, calculations, enabled flags and sequence numbers will be copied to the selected target mapping rule set. Please note that the source and target mapping rule set selections cannot be the same, and the target mapping rule set must be completely empty for a successful copy operation.
Creating a Mapping CalculationYou must create at least one mapping calculation for a mapping rule set in order to create mapping rules. When you create a mapping calculation, it is automatically associated with the mapping rule set specified in user preferences. You can create a calculation from the Mapping Calculation inspector panel List tab.
Note: You cannot manually update a calculated amount. You can only enter new transaction items. To change the results of a mapping calculation, you must change calculation and/or mapping rule parameters, and rerun the calculation.
6-16 Oracle Activity-Based Management User Guide

Creating a Mapping Calculation
Refer to "Creating and Running Calculations"in Chapter 2 for information on creating a calculation instance, specifying calculation parameters, and executing a calculation.
Once you create a mapping calculation, you must define calculation parameters, which includes effective dates and data set information. See the following section "Mapping Calculation Parameters" for more information.
Mapping Calculation ParametersMapping calculation parameters include effective dates and data sets. These parameters tell a calculation which mapping rules are active and where the calculation data resides.
Mapping Calculation Effective DatesThere are two effective date parameters you must specify for a mapping calculation:
■ Rule Effective Date. You must enter a rule effective date in order to select active mapping rules for a calculation. All mapping rules have a beginning and an ending effective date. A calculation will execute all associated mapping rules where the rule effective date falls between the beginning and ending effective date of a mapping rule. See "Mapping Rule Parameters" on page 6-31 for more information on mapping rule effective dates.
■ Target Effective Date. You must include a target effective date in order to select active mapping targets for the mapping rules used in a calculation. All mapping targets have a beginning and an ending effective date. A calculation will map costs to all targets where the target effective date falls between the beginning and ending effective date of a mapping target. See "Mapping Rule Parameters" on page 6-31 for more information on mapping rule effective dates.
Mapping Calculation Data SetsWhen you run a mapping calculation, the calculation executes the following formula for each mapping rule:
■ Source Amount x Distribution Ratio = Target Amount (or Mapped Cost)
where:
■ Distribution Ratio = Individual Method Value / Sum of All Method Values
Mapping Costs 6-17

Creating a Mapping Calculation
– An Individual Method Value is the amount or quantity associated with a single account or statistic item being used to assign costs to a target department or activity.
– The Sum of All Method Values is the sum of all amounts or quantities associated with the account or statistic being used to assign costs to target department or activities.
The data for each of these formula components can be associated with a different data set. Oracle ABM uses the data sets you specify in calculation parameters to determine where to find the data values used for the source and method components, and where to post the target amounts resulting from a mapping calculation.
You must specify the following data set parameters in order to execute a mapping calculation:
■ Target Data Set. The target data set is used to capture the results (target amounts) of a mapping calculation.
■ Source Data Set. The source data set contains the cost amounts that you want to assign.
■ Rate Data Set. The rate data set contains the sum of the account or statistic values that are used as the denominator in the distribution ratio for the method.
■ Distribution Data Set. The distribution data set contains the individual account or statistic values that are associated with each mapping target item, and are used as the numerator in the distribution ratio for the method.
You can specify different data sets for each of the components of a mapping calculation. For example, if you want to create a forecast for August 2000 based on July 2000 actual expenses, and assign the expenses using August budgeted total usage quantities and July actual usage for the individual items, you would specify the following data set values:
– Target Data Set = August 2000 Forecast
Note: When a mapping calculation executes, all prior mapping results in the target data set are deleted, even if they were created by a different mapping calculation. If you want to store the results of different mapping calculations for the same period, you must create and specify a different target data set (such as January Actual or January Budget) for each calculation.
6-18 Oracle Activity-Based Management User Guide

Creating a Mapping Calculation
– Source Data Set = July 2000 Actual
– Rate Data Set = August 2000 Budget
– Distribution Data Set = July 2000 Actual
Specifying Mapping Calculation ParametersMapping calculation parameters are captured on the Mapping Calculation Details window which can be accessed from the Mapping Calculation inspector panel List tab.
Refer to "Creating and Running Calculations"in Chapter 2 for information on creating a calculation instance, specifying calculation parameters, and executing a calculation.
Note: The parameter values you enter in the mapping calculation Details window will apply to all of the mapping rules that are associated with the selected mapping calculation. However, you can override the rate and distribution data set parameters at the mapping rule level. See "Mapping Rule Parameters" on page 6-31 for more information.
Mapping Costs 6-19

Creating Mapping Rules
Creating Mapping RulesIn order to create mapping rules, you must create a mapping rule set and specify it in the User Preferences window for the current session, and create a mapping calculation ID. When you create a mapping rule, it is automatically associated with the mapping rule set specified in user preferences, and with a calculation you select when you create the rule. Although you can later change or remove an association between a mapping rule and a mapping calculation, you must specify a calculation at the time you create the rule.
Using the Mapping Wizard to Create Mapping RulesMapping rules are created using the Mapping Wizard. When you open the wizard, you are prompted to select a mapping calculation and the source accounts or activities that hold the costs you want to assign. You can select one of three options for selecting a method and targets for your mapping rule. The three options are grouped under two captions in the Mapping Wizard.
Create New Mapping Targets
By Target Method With the Target Method option, you first select a method (i.e., department accounts or department statistics), then you select the departments or department activities you want to target in your mapping. This option allows you to identify targets and create mapping rules based on your cost assignment criteria. For example, using the Target Method and selecting a specific department account (such as Salaries) as the method value, you would be able to easily identify and target all departments that use that account.
By Target Destination This option is the opposite of the Target Method option. With this option, you first select a target destination type of department or department activity, then you select a method to use to assign the costs. This option lets you identify targets (i.e., departments and department activities) and create mapping rules based on assignment criteria (department accounts or department statistics) that is common to all target departments or department activities.
6-20 Oracle Activity-Based Management User Guide

Creating Mapping Rules
Use Existing Mapping Targets
By Mapped Source The Mapped Source method lets you copy the targets and method for an existing mapped source. You simply identify a previously mapped source, and Oracle ABM will create mapping rules that mirror that of the existing source.
These three options are depicted in Figure 6–2:
Figure 6–2 Mapping Wizard
Mapping Costs 6-21
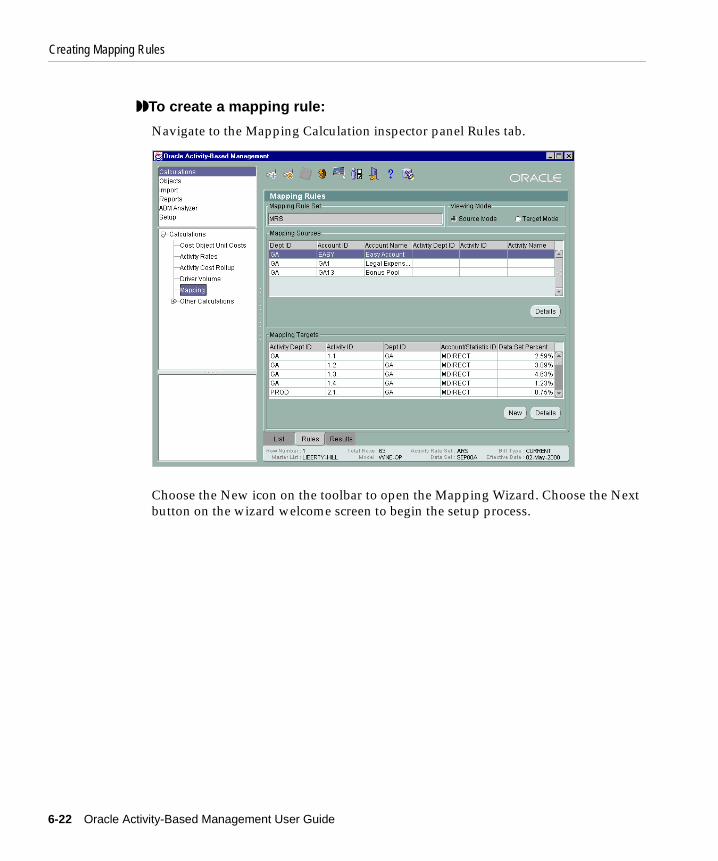
Creating Mapping Rules
◗◗To create a mapping rule:
Navigate to the Mapping Calculation inspector panel Rules tab.
Choose the New icon on the toolbar to open the Mapping Wizard. Choose the Next button on the wizard welcome screen to begin the setup process.
6-22 Oracle Activity-Based Management User Guide

Creating Mapping Rules
Step 1 Select mapping calculations
Highlight a calculation you want to use by clicking on a calculation row. You can select more than one calculation during this step. Use your [Ctrl] and [Shift] keys, as appropriate, to select more than one calculation row.
If necessary, you can set up new calculations during this step. Choose the New button to open the setup wizard that guides you through the process of creating a mapping calculation. See "Creating a Mapping Calculation" on page 6-16 for information. Once you have finished setting up new calculations, you will be returned to the Mapping Wizard so that you can continue the selection process.
When finished, choose Next to continue to the Step 2 screen.
Mapping Costs 6-23

Creating Mapping Rules
Step 2 Select mapping sources
You have the option of selecting either model department accounts or model department activities for your mapping sources. In the Source Type Region, select the Department Account or Department Activity button to determine whether a list of model department accounts or model department activities is displayed. Highlight an account or activity to use as a source by clicking anywhere on an account or activity row. You can select more than one account or activity item during this step. Use your [Ctrl] and [Shift] keys, as appropriate, to select more than one row.
If necessary, you can create new model department accounts or model department activities during this step to use in your mapping. Choose the New button to open the setup wizard that guides you through the process of creating new model department accounts or model department activities. See "Model Department Accounts"and "Model Department Activities" in Chapter 5 for information. Once you have finished creating new model objects, you will be returned to the Mapping Wizard so that you can continue the selection process.
If necessary, choose the Back button to return to the previous screen in order to make changes. Choose Next to continue to the Step 3 screen.
6-24 Oracle Activity-Based Management User Guide

Creating Mapping Rules
Step 3 Set mapping target option
In this step, you choose the option that you will use to select targets for your mapping rules. Select one of the following options by clicking on a button next to one of the items:
■ Create New Mapping Targets:
– By Target Method
– By Target Destination
■ Use Existing Mapping Targets:
– By Mapped Source
If necessary, choose the Back button to return to the previous screen in order to make changes. Choose Next to continue to the Step 4 screen.
Mapping Costs 6-25

Creating Mapping Rules
Step 4 Select mapping targetsDepending on the target option you select in Step 3, you will select your mapping targets using one of the following three screen flows:
Using Target Option: Create New Mapping Targets by Target Method
Step 4a Select target methods
You have the option of selecting either model department accounts or model department statistics for your method. In the Method Type region, select the Department Account or Department Statistic button to determine whether a list of model department accounts or model department statistics is displayed. Highlight one or more accounts or statistics to use as a method by clicking anywhere on an account or statistic row. Use your [Ctrl] and [Shift] keys, as appropriate, to select more than one row.
If necessary, you can create new model department accounts or model department statistics during this step. Choose the New button to open the setup wizard that guides you through the process of creating new model department accounts or model department statistics. See "Model Department Accounts"and "Model Department Statistics" in Chapter 5 for information. Once you have finished creating new model objects, you will be returned to the Mapping Wizard so that you can continue the selection process.
6-26 Oracle Activity-Based Management User Guide

Creating Mapping Rules
If necessary, choose the Back button to return to the previous screen in order to make changes. Choose Next to continue to the Step 4b screen.
Step 4b Select target destinations
You can select either model departments or model department activities for your target destinations.
In the Destination Type region, select the Department or Department Activity button. The selection of a destination type, combined with the method type you selected in the previous screen will determine the list of objects that will be displayed for selection as target destinations.
Depending on the criteria used, the displayed objects may be model department accounts, model department statistics, model department activity department accounts, or model department activity statistics. By selecting objects on this screen, you are identifying your target departments or target activities, and the accounts or statistics that will be used to assign costs. Highlight one or more objects by clicking anywhere on an account or statistic item row. Use the [Ctrl] and [Shift] keys, as appropriate, to select more than one row.
If necessary, you can create new model objects during this step. Choose the New button to open the setup wizard that guides you through the process of creating either new model department accounts, model department statistics, model department activity department accounts, or model department activity statistics.
Mapping Costs 6-27

Creating Mapping Rules
See "Relating Master List Objects to a Model" and "Relating Model Accounts and Statistics"in Chapter 5 for information. Once you have finished creating new model objects, you will be returned to the Mapping Wizard so that you can continue the selection process.
If necessary, choose the Back button to return to the previous screen in order to make changes. Choose Next to continue to the Step 5 screen.
Using Target Option: Create New Mapping Targets by Target Destination
Step 4a Select target destinations
You can select either model departments or model department activities for your target destinations. In the Destination Type region, select the Department or Department Activity button to determine whether a list of model departments or model department activities is displayed. Highlight one or more objects to use as a destination by clicking anywhere on a department or activity item row. Use your [Ctrl] and [Shift] keys, as appropriate, to select more than one row.
If necessary, you can create new model departments or model department activities during this step. Choose the New button to open the setup wizard that guides you through the process of creating new model departments or model department activities. See "Model Departments"and "Model Department Activities" in Chapter 5 for information.
6-28 Oracle Activity-Based Management User Guide

Creating Mapping Rules
Once you have finished creating new model objects, you will be returned to the Mapping Wizard so that you can continue the selection process.
If necessary, choose the Back button to return to the previous screen in order to make changes. Choose Next to continue to the Step 4b screen.
Step 4b Select target methods
You can select either model department accounts or model department statistics for your target methods.
In the Method Type region, select the Department Account or Department Statistic button. The selection of a method type, combined with the destination type you selected in the previous screen, determines the list of objects that are displayed for selection as target methods. Depending on the criteria used, the displayed objects may be model department accounts, model department statistics, model department activity department accounts, or model department activity statistics. By selecting objects on this screen, you are identifying your target departments or target activities, and the accounts or statistics that will be used to assign costs. Highlight one or more objects by clicking anywhere on an account or statistic item row. Use the [Ctrl] and [Shift] keys, as appropriate, to select more than one row.
Mapping Costs 6-29

Creating Mapping Rules
If necessary, you can create new model objects during this step. Choose the New button to open the setup wizard that guides you through the process of creating either new model department accounts, model department statistics, model department activity department accounts, or model department activity statistics. See "Relating Master List Objects to a Model" and "Relating Model Accounts and Statistics"in Chapter 5 for information. Once you have finished creating new model objects, you will be returned to the Mapping Wizard so that you can continue the selection process.
If necessary, choose the Back button to return to the previous screen in order to make changes. Choose Next to continue to the Step 5 screen.
Using Target Option: Use Existing Mapping Targets by Mapped Source
Step 4 Select mapped source targets for your mapping
You can select either model department account or model department activity items for your mapped sources. In the Source Type Region, select the Department Account or Department Activity button to determine whether a list of model department account or model department activity sources is displayed. Highlight an account or activity to use as a mapped source by clicking anywhere on an account or activity row. You can select more than one account or activity item during this step. Use the [Ctrl] and [Shift] keys as appropriate to select more than one row.
6-30 Oracle Activity-Based Management User Guide

Creating Mapping Rules
If necessary, choose the Back button to return to the previous screen in order to make changes. Choose Next to continue to the Step 5 screen.
Step 5 Create mapping rulesReview the displayed results. If necessary, choose the Back button to return to the previous screens in order to make changes. Choose Finish to save the update when you are satisfied with the results.
Once you create a mapping rule, you can update mapping rule parameters, which includes the Enable checkbox, sequence numbers, effective dates, override data set information, and the target account ID. See the following section "Mapping Rule Parameters" for more information.
Mapping Rule ParametersIn addition to the parameters that you define for a mapping calculation, there are several parameters that are defined at the mapping rule level that affect how costs are mapped from sources to targets. Certain fields are populated automatically when you create a mapping rule while others are left blank. For example, when you create a new mapping rule, it is automatically associated with a calculation (i.e. Enable checkbox is checked), and it is assigned a sequence value of one (1), a beginning effective date based on the value in the user preferences window, and an ending effective date of 12/31/9999. Additionally, the Override Rate Data Set, Override Distribution Data Set, and the Target Account fields, which are optional fields, are left blank. Oracle ABM allows you to update each of these parameters on a rule by rule basis, once a mapping rule is created.
Parameters which you can update for a mapping rule include:
■ Enable Checkbox. Oracle ABM uses the Enable checkbox to designate whether a mapping rule is associated with a particular mapping calculation. When you execute a calculation, it will execute only those mapping rules that are associated with the calculation (i.e. Enable checkbox is checked).
When you create a mapping rule using the Mapping Wizard, you are required to select a single calculation to which the rule will be associated. However, once a rule is created, you can also associate it with other calculations, and you can remove an association between a rule and a calculation (i.e. Enable checkbox is unchecked).
■ Sequence Number. When a mapping calculation is run, mapping rules are executed in the order of the sequence numbers you specify for each rule.
Mapping Costs 6-31

Creating Mapping Rules
When you create a mapping rule using the Mapping Wizard, Oracle ABM assigns the rule a default sequence number of one (1).
Because costs can be assigned using any of the four types of mapping, some mapping rules may depend on other rules to provide the source cost amounts required for mapping. If rules are not triggered in the correct order, you may encounter a situation where there are no costs to assign from a particular source account or activity. Therefore, you must determine if your rules need to be executed in an order, and update each rule to reflect an appropriate sequence number. However, if your calculation is designed such that there are no dependencies between mapping rules, assigning of sequence numbers is not required.
■ (Override) Rate Data Set. When you create a mapping calculation, you specify a rate data set parameter in order to identify the data set that contains the sum of the account or statistic values that are used as the denominator in the distribution ratio for a method for each mapping rule. Oracle ABM allows you to override the calculation parameter by providing an input field at the mapping rule level.
When you create a mapping rule, this field is left blank, meaning that the mapping rule will default to the calculation level parameter. However, once a rule is created, you can enter a data set value in this field in order to override the calculation level value.
■ (Override) Distribution Data Set. When you create a mapping calculation, you specify a distribution data set parameter in order to identify the data set that contains the individual account or statistic values that are used as the numerator in the distribution ratio for a method for each mapping rule. Oracle ABM allows you to override the calculation parameter by providing an input field at the mapping rule level.
When you create a mapping rule, this field is left blank, meaning that the mapping rule will default to the calculation level parameter. However, once a rule is created, you can enter a data set value in this field in order to override the calculation level value.
Note: If you use two-digit sequence numbers and leave gaps in your initial sequence number assignments (e.g, assigning sequence numbers of 10, 20, 30, 40, and so on), you will be able to insert new mapping rules later without having to change other sequence numbers.
6-32 Oracle Activity-Based Management User Guide

Creating Mapping Rules
■ (Mapping Rule) Ending Effective Date. Oracle ABM allows you to activate and inactivate mapping rules, and create new versions of a mapping rule through the use of beginning and ending effective dates. Reasons for inactivating or revising a mapping rule can include events such as a change in your resource cost and activity relationships, or a change in the method used to assign costs.
Although Oracle ABM allows you to delete a mapping rule entirely, use of an appropriate ending effective date is the preferred method of inactivating a mapping rule once it has been used in a mapping calculation. Deleting a mapping rule will eliminate that portion of the audit trail for any calculations which have been performed using the rule.
When you create a mapping rule, it is automatically assigned a beginning effective date based on the effective date specified in the User Preferences window at the time the rule is created, and an ending effective date value of 31-Dec-9999. A beginning effective date cannot be changed. If you are creating a mapping rule that requires a different begin date, you must change the Effective Date in the User Preferences window before creating the rule. Once the rule is created, you can update the ending effective date to specify a different date.
The beginning and ending effective dates specified in a mapping rule control whether or not a mapping rule is used in a particular mapping calculation, and whether the rule is displayed when you view mapping rules for a calculation. When you define mapping calculation parameters, you will specify a rule effective date. When you run the mapping calculation, it will only execute mapping rules where the rule effective date falls within the beginning and ending effective date range specified in a mapping rule. Additionally, Oracle ABM will only display mapping rules where the effective date specified in the User Preferences window for the current session falls within the beginning and ending effective date range for a mapping rule.
Using end dates to inactivate mapping rules allows you to reuse mapping sources in new mapping rule specifications, as long as the new beginning effective date falls after the latest ending effective date of previous versions of the rule
■ Target Account ID. When you create a mapping rule using the Mapping Wizard, this field is left blank. By default, when you run a mapping calculation, Oracle ABM will assign costs to a target department or department activity using the same account ID as the source department or department activity. However, by specifying a target account ID in a mapping rule, you cause all target cost amounts to be recorded in the designated account, regardless of their source.
Mapping Costs 6-33

Creating Mapping Rules
■ (Mapping Target) Ending Effective Date. Oracle ABM allows you to activate and inactivate targets, and specify new targets for a mapping rule through the use of target beginning and ending effective dates. Reasons for inactivating a mapping target can include events such as a change in your resource cost and activity relationships, or a change in the method used to assign costs to target departments or target activities.
Although Oracle ABM allows you to delete a mapping target from a mapping rule, use of an appropriate ending effective date is the preferred method of inactivating a target once it has been used in a mapping calculation. Deleting a mapping target will eliminate that portion of the audit trail for any calculations which have been performed using the rule.
When you create a mapping target for a mapping rule, it is automatically assigned a beginning effective date based on the effective date specified in the User Preferences window at the time the target is created, and an ending effective date value of 31-Dec-9999. A beginning effective date cannot be changed. If you are creating a mapping target that requires a different begin date, you must change the Effective Date in the User Preferences window before creating the target. Once the target is created, you can update the ending effective date to specify a different date.
The beginning and ending effective dates specified in a mapping target control whether or not a target is used in a mapping rule when a calculation using the mapping rule is run, and whether the target is displayed when you view mapping rules for a calculation. When you define mapping calculation parameters, you will specify a target effective date. When you run the mapping calculation, it will only use mapping targets for active mapping rules where the target effective date falls within the beginning and ending effective date range specified in a mapping target. Additionally, Oracle ABM will only display mapping targets where the effective date specified in the User Preferences window for the current session falls within the beginning and ending effective date range for a target.
6-34 Oracle Activity-Based Management User Guide

Creating Mapping Rules
Using Details Windows to Update Mapping Rule ParametersMapping rule parameters are updated on the three details windows which can be accessed from the List tab and the Rules tab.
Navigate to the List tab Mapping Rules region to access the details window that allows you to update the enable indicator, sequence number and data set overrides.
Additionally, you can use the Fill button option on the List tab to change these parameters when you want to update more than one mapping rule at a time with the same values. See the following section "Using the List Tab Fill Button to Update Mapping Rule Parameters" for information.
Mapping Costs 6-35

Creating Mapping Rules
To update the effective dates for rules and targets, and define target account overrides, navigate to the Rules tab to access the details windows for sources (rules) or targets.
Additionally, you can use the New button on the Rules tab Mapping Targets region to access the wizard that allows you to add new mapping targets to an existing mapping rule. See "Adding New Targets to an Existing Mapping Rule" on page 6-39 for information.
6-36 Oracle Activity-Based Management User Guide

Creating Mapping Rules
◗◗ To update mapping rule parameters from a Details window: 1. Navigate to the region in the Mapping Calculation inspector panel List or Rules
tab that is used to access the Details window containing the fields you want to update.
2. Select a mapping rule or mapping target item by clicking anywhere on a row in order to highlight it and choose the Details button.
3. Use the following steps to update the designated field type in a Details window:
– Enable Checkbox: Click on the checkbox to change from an enabled (checked) or disabled (unchecked) status.
– Sequence Number: Enter a value.
– Data Sets: Click on the arrow in the data set field to display a list of data set values, then click on a value in order to select it.
– Ending Effective Dates: Enter a date (dd-mmm-yyyy).
– Target Account ID: Click on the arrow in the target account field to display a list of account values, then click on a value in order to select it.
4. Choose OK on the Details window to save the mapping rule parameter updates once you have finished specifying values.
Using the List Tab Fill Button to Update Mapping Rule ParametersUse the Fill button option on the List tab when you want to change the enable checkbox, sequence numbers, override rate data set, and override distribution data set and apply the same parameter values to more than one mapping rule at a time.
◗◗To update mapping rule information using the Fill button:
1. Navigate to the Mapping Rules region in the Mapping Calculation inspector panel List tab.
2. Highlight the rules you want to update by using your [Ctrl] and [Shift] keys, as appropriate, and choose the Fill button.
Mapping Costs 6-37

Creating Mapping Rules
3. Use the following steps to populate the designated field type:
– Enable Checkbox: Click on the checkbox to change from an enabled (checked) or disabled (unchecked) status.
– Sequence Number: Enter a value.
– Data Sets: Click on the arrow in the data set field to display a list of data set values, then click on a value in order to select it.
4. Choose the Fill button on the Fill window in order to update the rules you selected in Step 2 with the parameter values selected in Step 3.
5. Choose OK on the Fill window to save the mapping rule parameter updates.
6-38 Oracle Activity-Based Management User Guide

Creating Mapping Rules
Adding New Targets to an Existing Mapping RuleOracle ABM allows you to add new targets to an existing mapping rule using the Mapping Update Wizard.
◗◗To add new targets to an existing mapping rule: Navigate to the Mapping Calculation inspector panel Rules tab.
Select a mapping rule in the Mapping Sources region by clicking anywhere on a rule in order to highlight it. Choose the New button in the Mapping Targets region to open the Mapping Update Wizard. Choose the Next button on the wizard welcome screen to begin the setup process.
Mapping Costs 6-39

Creating Mapping Rules
Step 1 Select mapping targets
Depending on the criteria used when you originally created the mapping rule, the displayed objects will be model department accounts, model department statistics, model department activity department accounts, or model department activity statistics. Highlight one or more objects that you want to add as targets by clicking anywhere on an account or statistic item row. Use your [Ctrl] and [Shift] keys, as appropriate, to select more than one row.
If necessary, you can create new model objects during this step. Choose the New button to open the setup wizard that guides you through the process of creating either new model department accounts, model department statistics, model department activity department accounts, or model department activity statistics. See "Relating Master List Objects to a Model" and "Relating Model Accounts and Statistics"in Chapter 5 for information. Once you have finished creating new model objects, you will be returned to the Mapping Wizard so that you can continue the selection process.
When finished, choose Next to continue to the Step 2 screen.
Step 2 Update mapping rulesReview the displayed results. If necessary, choose the Back button to return to the previous screens in order to make changes. Choose Finish to save the update when you are satisfied with the results.
6-40 Oracle Activity-Based Management User Guide

Running Mapping Calculations
Running Mapping CalculationsWhen a mapping calculation is executed, it will reference the effective dates and data sets you specify in calculation parameters. Although you can define overrides for the rate and distribution date sets at the individual mapping rule level, the entire results of a mapping calculation will populate the target data set specified in calculation parameters.
When the mapping calculation is run, it deletes all prior mappings in the target data set, even if they were created by a different mapping calculation. The calculation runs for accounts, activities, and statistics all at the same time. If you assign sequence numbers to your mapping rules, the mapping rules will be executed in sequence number order.
Mapping calculations are run from the Mapping Calculations region of the Mapping Calculation inspector panel List tab.
Refer to "Creating and Running Calculations"in Chapter 2 for information on creating a calculation instance, specifying calculation parameters, and executing a calculation.
Viewing Mapping ResultsYou can view the results of a mapping calculation in three windows:
■ Mapping Calculation Results tab
■ Model Department Accounts inspector panel
■ Model Department Activity Department Accounts inspector panel
If you specify a target data set in your calculation parameters that is different from the data set you specified in user preferences for the current session, you must change the user preferences value to match the target data set value of your calculation in order to view calculation results.
Transactional Mapping The results of mapping in Oracle ABM are recorded on a transactional basis. Transactional mapping treats each assignment of cost from one entity to another as a transaction and does not change the amount of the original entity. By leaving the original amount unchanged and keeping track of all the costs that go in and out of an entity, model results can be traced back to their source with greater clarity. This greatly increases cost tracing capabilities and flexibility in Oracle ABM.
Mapping Costs 6-41

Running Mapping Calculations
When a cost is driven from a source to a target, the source of the cost is recorded in the target entity, along with the mapped amount, in a line-item transaction that is permanently recorded. These transactions are similar to debit and credit transactions in accounting, and they indicate cost inflows and outflows. They are classified as in and out transactions depending on whether they transfer cost into a target or out of a source. No special pooling or redistribution accounts need to be set up. The “in” transactions are assigned to the same account name as the source. If the account does not exist in the list of targets, it is automatically created by Oracle ABM.
Depending on the type of mapping you are using, Oracle ABM handles the creation of in and out transactions differently.
■ When you are assigning resource costs between like entities (such as in Department Account-to-Department Account or Department Activity-to-Department Activity mapping), Oracle ABM treats this type of cost assignment as a redistribution and will create both an out transaction to reflect the assignment of cost from the department account or department activity source, and an in transaction to reflect the assignment to another department account or department activity target. This is based on the premise that a redistribution does not change the total resource cost in a model.
■ When you assign costs from a department account to a department activity, Oracle ABM creates only an in transaction for the department activity target. It does not create an out transaction for the department account source. This is based on the premise that the assignment of costs from a department account to a department activity is not a true redistribution of cost. Rather, you are simply creating a different view of your cost structure. Creating an out transaction for a department account without a corresponding in department account transaction would result in a change in the total resource cost in a model.
■ The assignment of costs from a department activity to a department account is considered to be a re-assigning of an earlier department account-to-department activity mapping. Oracle ABM treats this type of mapping like a department account-to-department account redistribution that is performed in two stages.
Note: Oracle ABM gives you the option of specifying a target account in a mapping rule so that you can designate an account other than that of the source to use for your target transactions. See "Mapping Rule Parameters" on page 6-31 for information.
6-42 Oracle Activity-Based Management User Guide

Running Mapping Calculations
First, Oracle ABM creates an out transaction for the department activity source and an in transaction for the department account target. But, because costs are being added to a department account, Oracle ABM will use the account associated with the department activity, and create a corresponding out transaction at the department account level in order to keep total resource costs at the department account level in balance.
The transactions created by the four different types of mapping are summarized in Table 6–1 below:
Table 6–1
Type of Mapping
Mapping Source Entity
Transaction Created
Mapping Target Entity
Transaction Created
Department Account to Department Account
Department Account
Out Department Account
In
Department Account to Department Activity
Department Account
None Department Activity
In
Department Activity to Department Activity
Department Activity
Out Department Activity
In
Department Activity to Department Account
Department Activity
Out Department Account
Department Account
Out
In
Mapping Costs 6-43

Running Mapping Calculations
6-44 Oracle Activity-Based Management User Guide

Calculating Activity
7
Calculating Activity RatesThis chapter describes the processes associated with calculating activity rates. It includes the following topics:
■ Defining Activity Rates
■ Creating an Activity Rate Set
■ Relating Activity Rates to an Activity Rate Set
■ Creating an Activity Rate Calculation
■ Running Activity Rate Calculations
■ Calculating Activity Driver Volumes
■ Using Local and Rolled-Up Activity Rates
OverviewOracle ABM uses an activity rate to represent the unit cost of an activity. An activity rate answers the question "How much does it cost the organization every time an activity is performed?" An activity rate is used with a consumption quantity to create a bill line for a cost object.
To calculate activity rates, Oracle ABM uses the total cost for an activity (i.e. the total cost assigned to all model department activity department accounts for an activity) and divides it by the number of times the activity occurs during the model data set period. A model department activity driver volume (or quantity) is used to capture the measure of an activity occurrence.
In the example of an activity rate calculation below, activity rates are calculated for two activities, Write Orders and Ship Orders.
Rates 7-1

Overview
Figure 7–1 Activity Rate Calculation
You can relate an activity to more than one activity driver in order to create multiple activity rates for the same activity. This allows you to create rates for different reporting and analysis scenarios within the same model.
You group activity rates by relating them to an activity rate set. Activity rate sets allow you to combine activity rates into your different reporting and analysis scenarios.
Activities can also be grouped into hierarchies that allow you to view activity rates at an individual activity (or local) level, and at a summarized (rolled-up) level.
There are five major processes involved in creating activity rates.
1. Define activity rates.
2. Create an activity rate set.
3. Relate activity rates to an activity rate set.
4. Create an activity rate calculation.
5. Run the Activity Rates calculation.
Define Activity Rates. You define an activity rate by relating a model department activity to a model department activity driver. You can relate more than one activity driver to an activity in order to create multiple activity rate definitions for an activity.
Create an Activity Rate Set. You create activity rate sets in order to define groupings for your activity rates. This allows you to group activity rates for different reporting and analysis scenarios (such as actual or budget). You must define at least one activity rate set and relate activity rates to it in order to reference your activity rates in a bill.
7-2 Oracle Activity-Based Management User Guide

Defining Activity Rates
Relate Activity Rates to an Activity Rate Set. You relate activity rates to an activity rate set in order to combine your activity rates into common groupings. You must relate activity rates to an activity rate set in order to reference them in a bill. However, you do not need to create relationships in order to run the Activity Rates calculation.
Create an Activity Rate Calculation. An activity rate calculation defines a calculation instance. Calculation parameters specify the data sets to be used as sources for the activity costs and activity driver volumes, and where to post the calculated rates.
Run the Activity Rates Calculation. Once you define activity rates and create a calculation instance, you can run the Activity Rates calculation. The calculation will create rates for all related activity / activity driver combinations, regardless of whether they have been related to an activity rate set.
Defining Activity RatesYou define activity rates by relating a model department activity and a model department activity driver. When the Activity Rates calculation is run, Oracle ABM divides the total cost associated with a model department activity (the total of all model department activity department account amounts) by the total volume (or quantity) associated with a model department activity driver. The resulting rate represents the cost of performing a single unit of an activity.
You can relate an activity with more than one activity driver in order to create multiple rates for the same activity. This allows you to create different reporting and analysis scenarios within your model. For example, you can define different rates in order to create product costing, performance measurement, activity-based budgeting, budgeting and planning, root cause analysis, unit costing, period costing or multi-level cost attachment modeling scenarios.
An activity rate can be classified as being inventoriable or non-inventoriable to designate whether the activity is related to the production of inventory. This determination is based on the classification of the department account that is related to the activity.
Once you have defined your department activity rates and captured model department activity department account and model department activity driver data, you can run the Activity Rates calculation.
Calculating Activity Rates 7-3

Defining Activity Rates
◗◗To define a department activity rate:
Navigate to the Department Activity Rates inspector panel.
Choose the New icon on the toolbar to open the Department Activity Rates Wizard. Choose the Next button on the wizard welcome screen to begin the relating process.
7-4 Oracle Activity-Based Management User Guide

Defining Activity Rates
Step 1 Select model department activities to relate
Highlight a model department activity you want to relate by clicking anywhere on an activity row. You can select more than one model department activity to relate during this step. Use your [Ctrl] and [Shift] keys, as appropriate, to select more than one model department activity row.
If necessary, you can set up new model department activities during this step. Choose the New button to open the setup wizard that guides you through the process of creating model department activities. See "Model Department Activities" in Chapter 5 for information. Once you have finished setting up new model department activities, you will be returned to the Department Activity Rates Wizard so that you can continue the relating process.
When finished, choose Next to continue to the Step 2 screen.
Calculating Activity Rates 7-5

Defining Activity Rates
Step 2 Select model department activity drivers to relate
Highlight a model department activity driver you want to relate by clicking anywhere on an activity driver row. You can select more than one model department activity driver to relate during this step. Use your [Ctrl] and [Shift] keys, as appropriate, to select more than one activity driver row.
If necessary, you can set up new model department activity drivers during this step. Choose the New button to open the setup wizard that guides you through the process of creating model department activity drivers. See "Model Department Activity Drivers" in Chapter 5 for information. Once you have finished setting up new model department activity drivers, you will be returned to the Department Activity Rates Wizard so that you can continue the relating process.
If necessary, choose the Back button to return to the previous screen in order to make changes. When finished, choose Next to continue to the Step 3 screen.
Step 3 Press finish to create department activity ratesReview the displayed results. If necessary, choose the Back button to return to the previous screens in order to make changes. Choose Finish to save the update when you are satisfied with the results.
7-6 Oracle Activity-Based Management User Guide
Relating Activity Rates to an Activity Rate Set
Creating an Activity Rate SetAn activity rate set is used to group activity rates into categories. For example, if you create activity rates for different reporting and analysis scenarios, you can relate each rate to separate activity rate sets containing only the rates for a specific scenario. Each rate set does not have to account for all of the activities in your model. For example, in addition to organizing your rates into different reporting scenarios such as actual or budget, you can further organize your rates into subsets representing groupings such as manufacturing processes or products.
You must create an activity rate set ID and specify it in the User Preferences window for the current session if you want to access the Department Activity Rate Set Rates inspector panel. From this inspector panel you can access the Department Activity Rate Set Rates wizard which you use to assign activity rates to an activity rate set. You can also view and update existing activity rate set relationships from this inspector panel. See "Activity Rate Sets" and "User Preferences Window" in Chapter 3 for information on creating and specifying an activity rate set.
Relating Activity Rates to an Activity Rate SetYou must relate activity rates to an activity rate set if you want to reference them in a bill in order to calculate a cost object unit cost. However, you do not have to relate rates to an activity rate set in order to run the Activity Rates calculation.
An activity can only be referenced once in an activity rate set. Oracle ABM prevents you from adding an activity rate if a rate for that activity already exists in a rate set. Additionally, if you are using an activity hierarchy to create rolled-up activity rates:
■ A child activity cannot be added to a rate set if any of its parents are already in the rate set and are defined as rolled-up.
■ A parent activity cannot be added to a rate set with rolled-up status if any of its children are in the rate set with local or rolled-up status.
See "Using Local and Rolled-Up Activity Rates" on page 7-30 for more information.
Calculating Activity Rates 7-7

Relating Activity Rates to an Activity Rate Set
◗◗To relate department activity rates to an activity rate set: Navigate to the Department Activity Rate Set Rates inspector panel.
Choose the New icon on the toolbar to open the Department Activity Rate Set Rates Wizard. Choose the Next button on the wizard welcome screen to begin the relating process.
7-8 Oracle Activity-Based Management User Guide

Relating Activity Rates to an Activity Rate Set
Step 1 Select activity rate sets to relate
Highlight an activity rate set you want to relate by clicking anywhere on an activity rate set row. You can select only one activity rate set to relate during this step.
If necessary, you can set up new activity rate sets during this step. Choose the New button to open the setup wizard that guides you through the process of creating activity rate sets. See "Activity Rate Sets" in Chapter 3 for information. Once you have finished setting up activity rate sets, you will be returned to the Department Activity Rate Set Rates Wizard so that you can continue the relating process.
When finished, choose Next to continue to the Step 2 screen.
Calculating Activity Rates 7-9

Relating Activity Rates to an Activity Rate Set
Step 2 Select available department activity rates to relate
Highlight a department activity rate you want to relate by clicking anywhere on an activity rate row. You can select more than one activity rate to relate during this step. Use your [Ctrl] and [Shift] keys, as appropriate, to select more than one activity rate row.
If necessary, you can create new department activity rates during this step. Choose the New button to open the setup wizard that guides you through the process of creating department activity rates. See "Defining Activity Rates" on page 7-3 for information. Once you have finished setting up new department activity rates, you will be returned to the Department Activity Rate Set Rates Wizard so that you can continue the relating process.
If necessary, choose the Back button to return to the previous screen in order to make changes. When finished, choose Next to continue to the Step 3 screen.
7-10 Oracle Activity-Based Management User Guide

Relating Activity Rates to an Activity Rate Set
Step 3 Press finish to create department activity rate set ratesReview the displayed results. If necessary, choose the Back button to return to the previous screens in order to make changes.
Before saving your update, you can navigate to the Details: Department Activity Rate Set Rates window for each department activity rate set rate item in order to update effective date information, select a dynamic consumption quantity calculation option, or specify the use of a rolled-up activity rate. See "Updating Activity Rate Set Rate Parameters" on page 7-13 for more information. Choose Finish to save the update when you are satisfied with the results.
Specifying Activity Rate Set Rate Effective DatesOracle ABM allows you to activate and inactivate activity rates within an activity rate set. Because Oracle ABM prevents you from referencing an activity more than once within an activity rate set, you must inactivate an existing activity rate for an activity before you can reference a new one.
Although you can delete an activity rate from the Department Activity Rate Set Rates and the Department Activity Rates inspector panels, use of an appropriate ending effective date for an activity rate set rate is the preferred method of inactivating a rate. Deleting an activity rate will eliminate that portion of the audit trail for any calculations which have been performed using the activity rate.
When you relate an activity rate to an activity rate set, it is automatically assigned a beginning effective date based on the effective date specified in the User Preferences window at the time the relationship is created, and an ending effective date value of 31-Dec-9999. A beginning effective date cannot be changed. If you are relating an activity rate that requires a different begin date, you must change the Effective Date in the User Preferences window before adding the activity rate to the rate set. Once the relationship is created, you can update the ending effective date to specify a different date.
When you change your User Preferences date to a date that is earlier or later than that of the effective begin dates of existing rates in the rate set and relate a new rate to the rate set, ABM may perform a smooth update. A smooth update is when a user attempts to relate new rates to a rate set with an earlier or later effective begin date than that of corresponding existing rates. In the case of a new rate occurring before an existing rate, the system will implicitly end date the new rate to one day before the existing rate’s effective begin date. In the case of a new rate being created after the existing rate’s begin date, the system will end date the existing rate to one day before the effective begin date of the new rate.
Calculating Activity Rates 7-11

Relating Activity Rates to an Activity Rate Set
For example, you have an existing Activity Rate:
Change User Preferences date to 01-Apr-2000 and add the same Activity with a different Activity Driver to reflect a change in the company’s tracking policy. ABM smooth updates the Effective End Date of the new rate to one day before the Effective Begin Date of the existing rate.
Change User Preferences date to 01-Jun-2000 and add the same Activity with a different Activity Driver to reflect another change in the company’s tracking policy. ABM smooth updates the existing rate to an Effective End Date of one day before the Effective Begin Date of the new rate.
Note: Because smooth updates are automatic, caution should be exercised when changing User Preference dates and adding rates to rate sets.
Activity Rate Set ID Activity Rate (Activity/Driver) Effective Begin Date Effective End Date
ARS Hire/Discharge Employees/ #TOTAL HEADCOUNT
02-May-2000 31-Dec-9999
Activity Rate Set ID Activity Rate (Activity/Driver) Effective Begin Date Effective End Date
ARS Hire/Discharge Employees/ #HOURS
01-Apr-2000 01-May-2000
Activity Rate Set ID Activity Rate (Activity/Driver) Effective Begin Date Effective End Date
ARS Hire/Discharge Employees/ #CLERICAL
01-Jun-2000 31-Dec-9999
7-12 Oracle Activity-Based Management User Guide

Relating Activity Rates to an Activity Rate Set
The history of this Activity Rate is now:
The beginning and ending effective dates specified for a department activity rate set rate control whether an activity rate is available when selecting activities to create bill items (lines), and whether an activity rate is displayed when you view the Department Activity Rate Set Rates inspector panel. Oracle ABM will only display activity rates where the effective date specified in user preferences for the current session falls within the beginning and ending effective date range for an activity rate set rate.
Updating Activity Rate Set Rate ParametersParameters you can update for an activity rate set rate include the ending effective date, the Local/Rolled up Code, and the Auto Calc Tag ID field. The Auto Calc Tag ID field is used to specify a dynamic consumption quantity calculation option. See the preceding caption "Specifying Activity Rate Set Rate Effective Dates" for information on specifying effective dates. See "Using Local and Rolled-Up Activity Rates" on page 7-30 for more information on this topic. See "Using Dynamic Consumption Quantities" in Chapter 8 for information on using and defining a dynamic consumption quantities calculation option.
You can update these parameters while you are creating an activity rate set rate using the Department Activity Rate Set Rates Wizard, or at anytime after a rate is created using the Details: Department Activity Rate Set Rates window.
◗◗To update activity rate set rate parameters: 1. Navigate to the to the Details: Department Activity Rate Set Rates window. You
can access this window from the Step 3 screen of the Department Activity Rate Set Rates Wizard when you are relating department activity rates to an activity rate set,
Activity Rate Set ID Activity Rate (Activity/Driver) Effective Begin Date Effective End Date
ARS Hire/Discharge Employees/ #TOTAL HEADCOUNT
01-Apr-2000 01-May-2000
ARS Hire/Discharge Employees/ #HOURS
02-May-2000 31-May-2000
ARS Hire/Discharge Employees/ #CLERICAL
01-Jun-2000 31-Dec-9999
Calculating Activity Rates 7-13
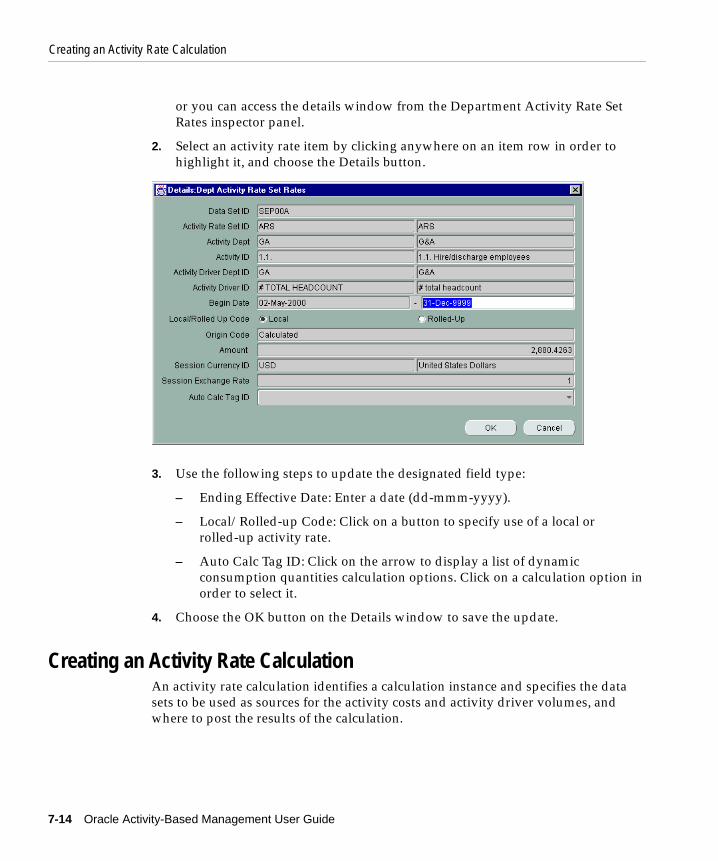
Creating an Activity Rate Calculation
or you can access the details window from the Department Activity Rate Set Rates inspector panel.
2. Select an activity rate item by clicking anywhere on an item row in order to highlight it, and choose the Details button.
3. Use the following steps to update the designated field type:
– Ending Effective Date: Enter a date (dd-mmm-yyyy).
– Local/Rolled-up Code: Click on a button to specify use of a local or rolled-up activity rate.
– Auto Calc Tag ID: Click on the arrow to display a list of dynamic consumption quantities calculation options. Click on a calculation option in order to select it.
4. Choose the OK button on the Details window to save the update.
Creating an Activity Rate CalculationAn activity rate calculation identifies a calculation instance and specifies the data sets to be used as sources for the activity costs and activity driver volumes, and where to post the results of the calculation.
7-14 Oracle Activity-Based Management User Guide

Creating an Activity Rate Calculation
An activity rate calculation is not specific to an activity rate set. When you execute a calculation, it will calculate activity rates for all existing activity/activity driver combinations in your model, regardless of rate set designations.
You can create a calculation from the Activity Rates calculation inspector panel List tab.
Refer to "Creating and Running Calculations"in Chapter 2 for information on creating a calculation instance, specifying calculation parameters, and executing a calculation.
Specifying Activity Rate Calculation ParametersWhen you run an activity rate calculation, the calculation executes the following formula for each activity rate:
Note: Once you create an activity rate calculation, you must define data set parameters for the calculation. See the following section "Specifying Activity Rate Calculation Parameters" for more information.
Calculating Activity Rates 7-15

Creating an Activity Rate Calculation
Activity Cost Amount / Activity Driver Volume = Activity Rate
where:
– An Activity Cost Amount is the total amount of all model department activity department accounts associated with a model department activity.
– The Activity Driver Volume is the total volume (or quantity) associated with a model department activity driver.
The data for each of these formula components can be associated with a different data set. Oracle ABM uses the data sets you specify in calculation parameters to determine where to find the data values used for each component and where to post the target amounts resulting from an activity rate calculation.
You must specify the following data set parameters in order to execute an activity rate calculation:
■ Activity Cost Data Set. This data set that contains the total costs for your activities.
■ Driver Data Set. This data set that contains the activity drivers you want to divide into total activity costs in order to determine an activity rate.
■ Target Data Set. The target data set is used to capture the results of an activity rate calculation.
Activity rate calculation parameters are captured on the Activity Rates calculation Details window which can be accessed from the Activity Rates calculation inspector panel List tab.
Note: When an activity rate calculation executes, all prior calculation results in the target data set are deleted, even if they were created by a different activity rate calculation. If you want to store the results of different activity rate calculations for the same period, you must create and specify a different target data set (such as January Actual or January Budget) for each calculation.
7-16 Oracle Activity-Based Management User Guide

Creating an Activity Rate Calculation
Refer to "Creating and Running Calculations"in Chapter 2 for information on creating a calculation instance, specifying calculation parameters, and executing a calculation.
Running Activity Rate CalculationsWhen an activity rate calculation is run, it will reference the data sets you specify in calculation parameters.
The activity rate calculation divides total activity costs by activity driver volumes to calculate a rate. When you run the Activity Rates calculation, the calculation:
■ Calculates a rate for all defined activity rates (activity/activity driver combinations) even if they belong to different activity rate sets.
■ Creates both local and rolled-up rates with a break-out for inventoriable and non-inventoriable costs.
Hint: If you run the Activity Cost Rollup before running the Activity Rate Calculation, Oracle ABM will calculate the rolled-up rates as well as the local rates for each activity. See "Using Local and Rolled-Up Activity Rates" on page 7-30 for more information.
Calculating Activity Rates 7-17

Calculating Activity Driver Volumes
The formula for rolled-up rates is:
Activity Rate = Rolled-up activity cost/activity driver volume for activity
Activity rate calculations are run from the Activity Rates calculation inspector panel List tab.
Refer to "Creating and Running Calculations"in Chapter 2 for information on creating a calculation instance, specifying calculation parameters, and executing a calculation.
Viewing Activity Rate Calculation ResultsYou can view the results of an activity rate calculation in three windows:
■ Activity Rates Calculation Results tab
■ Model Department Activity Rates inspector panel
■ Model Department Activity Rate Set Rates inspector panel
Calculating Activity Driver VolumesActivity driver volumes are the numerical data values that represent activity driver quantities. Like other model data items, activity driver volumes can be entered manually or imported. See "Using the Model Department Activity Drivers Inspector Panel" and "Entering Model Department Activity Driver Data" in Chapter 5, and Chapter 10, "Importing" for more information. You also have the option of calculating activity driver volumes in Oracle ABM by using the Driver Volume calculation.
The Driver Volume calculation creates activity driver volumes by summing existing data values for account or statistic items that you relate to an activity driver. This calculation is useful when you want to automatically update activity driver volumes each period and the source data resides in Oracle ABM.
There are four sources you can use to calculate activity driver volumes:
■ Department Accounts
Hint: If you specify a target data set in your calculation parameters that is different from the data set you specified in user preferences for the current session, you must change the user preferences value to match the target data set value of your calculation in order to view calculation results.
7-18 Oracle Activity-Based Management User Guide

Calculating Activity Driver Volumes
■ Department Statistics
■ Department Activity Department Accounts
■ Department Activity Department Statistics
There are three major processes involved in calculating activity driver volumes:
1. Define activity driver sources.
2. Create a driver volume calculation.
3. Run the Driver Volume calculation.
Define Activity Driver Sources. You define activity driver data sources by relating a model department activity driver to specific model department accounts, model department statistics, model department activity department accounts, or model department activity statistic items containing the data values that you want to use to calculate a driver volume.
Create a Driver Volume Calculation. A driver volume calculation defines a calculation instance. Calculation parameters specify an effective date, and the data sets to be used for the driver sources data and for posting the calculated activity driver volumes.
Run the Driver Volume Calculation. Once you define activity driver sources and create a calculation instance, you can run the Driver Volume calculation. The calculation will sum the individual account or statistic driver data values in order to create a total volume for each activity driver.
Calculating Activity Rates 7-19

Calculating Activity Driver Volumes
Defining Activity Driver SourcesActivity driver sources can be defined from either the Model Department Activity Drivers inspector panel or the Driver Volume Calculation inspector panel Rules tab.
◗◗To create an activity driver source: Navigate to the Drivers Sources grid of either the Model Department Activity Drivers inspector panel or the Driver Volume calculation inspector panel Rules tab.
7-20 Oracle Activity-Based Management User Guide

Calculating Activity Driver Volumes
Driver Volume Calculation Inspector Panel Rules Tab
Choose the New button in the Driver Sources grid to open the Activity Driver Sources Wizard. Choose the Next button on the wizard welcome screen to begin the relating process.
Calculating Activity Rates 7-21

Calculating Activity Driver Volumes
Step 1 Select model department activity drivers to relate
Highlight a model department activity driver you want to relate by clicking anywhere on an activity driver row. You can select only one model department activity driver to relate during this step.
If necessary, you can set up new model department activity drivers during this step. Choose the New button to open the setup wizard that guides you through the process of creating model department activity drivers. See "Model Department Activity Drivers" in Chapter 5 for information. Once you have finished setting up new model department activity drivers, you will be returned to the Activity Driver Sources Wizard so that you can continue the relating process.
When finished, choose Next to continue to the Step 2 screen.
7-22 Oracle Activity-Based Management User Guide

Calculating Activity Driver Volumes
Step 2 Select source type to relate to the activity driver
In this step, you choose the source type of the items you will relate to the activity driver selected in Step 1. Select one of the following options by clicking on a button next to one of the items:
■ Department Account
■ Department Activity Department Account
■ Department Activity Department Statistic
■ Department Statistic
If necessary, choose the Back button to return to the previous screen in order to make changes. Choose Next to continue to the Step 3 screen.
Calculating Activity Rates 7-23

Calculating Activity Driver Volumes
Step 3 Select the account or statistics items to relate
Depending on the source type you selected in Step2, Oracle ABM will display a list of model department accounts, model department activity department accounts, model department activity statistics, or model department statistics.
Highlight an account or statistic item you want to relate by clicking anywhere on an account or statistic row. You can select more than one item to relate during this step. Use your [Ctrl] and [Shift] keys, as appropriate, to select more than one row.
If necessary, you can set up new model department account or statistic objects during this step. Choose the New button to open the setup wizard that guides you through the process of creating a model department account or statistic object. See Chapter 5 for information on creating model department account and statistic objects. Once you have finished setting up new objects, you will be returned to the Activity Driver Sources Wizard so that you can continue the relating process.
If necessary, choose the Back button to return to the previous screens in order to make changes. Choose Next to continue to the Step 4 screen.
7-24 Oracle Activity-Based Management User Guide

Calculating Activity Driver Volumes
Step 4 Press finish to create activity driver sourcesReview the displayed results. If necessary, choose the Back button to return to the previous screens in order to make changes. Choose Finish to save the update when you are satisfied with the results.
Updating Activity Driver Sources DataYou can update activity driver sources account and statistics data from the Activity Drivers and Driver Volume calculation inspector panels. Driver sources data can be accessed by clicking on a driver source row in order to highlight it and choosing the Details button to open the details window for the item. The procedures for updating driver sources account and statistics data are the same as the procedures for entering model account and statistic data. See "Entering Model Data" in Chapter 5 for information.
Updating Activity Driver Sources Effective DatesYou can activate and inactivate activity driver sources through the use of beginning and ending effective dates. Although you can delete an individual driver source item, use of an appropriate ending effective date is the preferred method of inactivating a driver source.
Note: Once you define driver sources for an activity driver, the Driver Sources grids in the Activity Drivers and Driver Volume calculation inspector panels will display the driver sources and associated volume data based on the effective date and data set parameters you specify in the User Preferences window for the current session. The Model Department Activity Drivers grid will display the source type for your driver sources in the Activity Driver Source Type column. The Total volume column will be blank. In order to generate the total volume for your activity driver you must run the Driver Volume calculation.
Note: Updating accounts and statistics data from a drivers sources details window affects all Oracle ABM calculations that use this data (such as mapping).
You must rerun the Driver Volume calculation anytime you update driver sources information.
Calculating Activity Rates 7-25

Calculating Activity Driver Volumes
Deleting a driver source will eliminate that portion of the audit trail for any calculations which have been performed using the driver source.
When you create a driver source, it is automatically assigned a beginning effective date based on the effective date specified in the User Preferences window at the time the driver source is created, and an ending effective date value of 31-Dec-9999. A beginning effective date cannot be changed. If you are creating a driver source that requires a different begin date, you must change the Effective Date in the User Preferences window before creating the item. Once the driver source is created, you can update the ending effective date to specify a different date.
The beginning and ending effective dates specified for a driver source determine whether or not it is available when you run the Driver Volume calculation and whether the rule is displayed when you view driver sources information. Oracle ABM will only use driver sources in the Driver Volume calculation where the effective date specified in driver calculation parameters falls within the beginning and ending effective date range for a driver source. Additionally, Oracle ABM will only display driver sources where the effective date specified in the User Preferences window for the current session falls within the beginning and ending effective date range for a driver source.
You update driver sources effective dates from the Activity Drivers and Driver Volume calculation inspector panels. Driver sources effective dates can be accessed by clicking on a driver source row in order to highlight it and choosing the Details button to open the details window for the item. The procedures for updating driver sources effective dates is the same as the procedures for updating effective dates for a department activity rate set rate. Enter a different date (dd-mmm-yyyy) in the ending effective date field of the Details window and choose OK to save the update. See "Specifying Activity Rate Set Rate Effective Dates" on page 7-11 for more information.
Note: You must rerun the Driver Volume calculation anytime you update driver sources information.
7-26 Oracle Activity-Based Management User Guide

Calculating Activity Driver Volumes
Creating a Driver Volume CalculationA driver volume calculation identifies a calculation instance and specifies the calculation parameters. These parameters identify the data sets to be used as the source for the driver sources data and where to post the results of the calculation. the parameters also specify an effective date which is used to select active driver sources. You can create a calculation from the Driver Volume calculation inspector panel List tab.
Refer to "Creating and Running Calculations" in Chapter 2 for information on creating a calculation instance, specifying calculation parameters, and executing a calculation.
Note: Once you create an activity rate calculation, you must define effective date and data set parameters for the calculation. See the following section "Specifying Driver Volume Calculation Parameters" for more information.
Calculating Activity Rates 7-27

Calculating Activity Driver Volumes
Specifying Driver Volume Calculation ParametersWhen you run a driver volume calculation, the calculation sums the data values for all driver sources and displays the total as the activity driver volume.
You must specify the following calculation parameters in order to execute a driver volume calculation:
■ Source Data Set. This is the data set that contains the data for the driver sources.
■ Target Data Set. The target data set is used to capture the results of the calculation.
■ Effective Date. You must enter an effective date in order to select active driver sources for a calculation. All driver sources have a beginning and an ending effective date. A calculation will use all driver sources where the calculation effective date falls between the beginning and ending effective date of a driver source.
Driver volume calculation parameters are captured on the Driver Volume calculation Details window, which can be accessed from the Driver Volume calculation inspector panel List tab.
Note: When a driver volume calculation executes, all prior calculation results in the target data set are deleted, even if they were created by a different calculation. If you want to store the results of different driver volume calculations for the same period, you must create and specify a different target data set (such as January Actual or January Budget) for each calculation.
7-28 Oracle Activity-Based Management User Guide
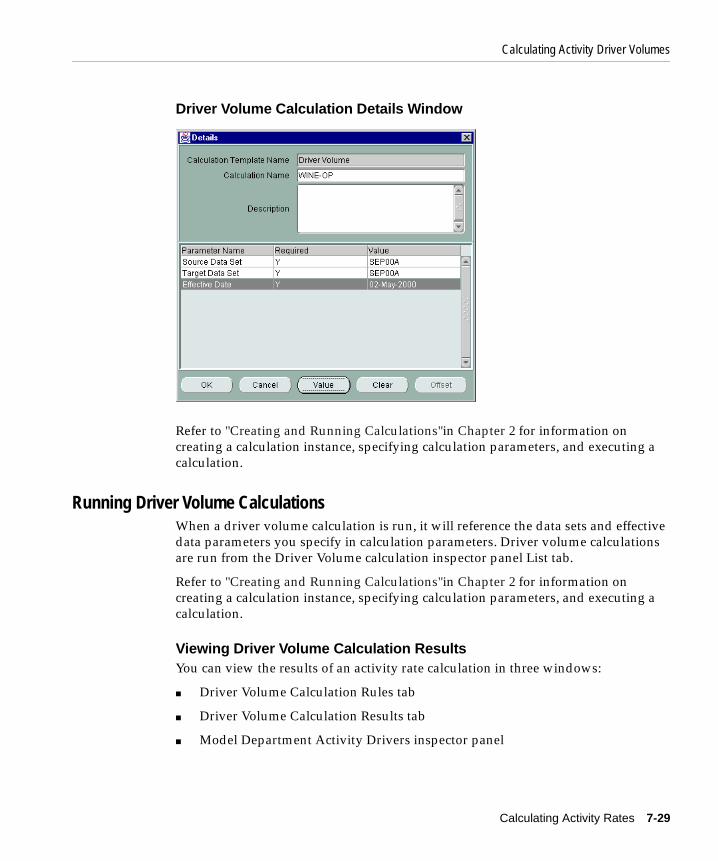
Calculating Activity Driver Volumes
Driver Volume Calculation Details Window
Refer to "Creating and Running Calculations"in Chapter 2 for information on creating a calculation instance, specifying calculation parameters, and executing a calculation.
Running Driver Volume CalculationsWhen a driver volume calculation is run, it will reference the data sets and effective data parameters you specify in calculation parameters. Driver volume calculations are run from the Driver Volume calculation inspector panel List tab.
Refer to "Creating and Running Calculations"in Chapter 2 for information on creating a calculation instance, specifying calculation parameters, and executing a calculation.
Viewing Driver Volume Calculation ResultsYou can view the results of an activity rate calculation in three windows:
■ Driver Volume Calculation Rules tab
■ Driver Volume Calculation Results tab
■ Model Department Activity Drivers inspector panel
Calculating Activity Rates 7-29

Using Local and Rolled-Up Activity Rates
If you specify a target data set in your calculation parameters that is different from the data set you specified in user preferences for the current session, you must change the user preferences value to match the target data set value of your calculation in order to view calculation results.
Using Local and Rolled-Up Activity RatesOracle ABM allows you to summarize, or roll-up, the costs of several child activities into a parent activity in order to determine a rolled-up activity rate. Rolled-up rates are useful when you do not need to use a lower level of detail for costing and analysis purposes.
A parent activity can be an existing activity, or a summary activity that is created specifically to represent a roll-up. As with any activity rate you use to calculate a cost object unit cost, you must define an activity rate for a summary activity by relating it to an activity driver, then relate the activity rate to an activity rate set.
In order to generate rolled-up activity rates, you must create an activity hierarchy that includes the child and parent activities you want to include in a roll-up. You can then run an Activity Cost Rollup calculation referencing the activity hierarchy. After running an Activity Cost Rollup calculation, you can run the Activity Rates calculation. The Activity Rates calculation will determine an individual activity rate (a local rate) and a summarized activity rate (a rolled-up rate) for each activity, based on the results of the Activity Cost Rollup calculation. If an activity is not included in an activity hierarchy, the rolled-up rate will equal the local rate. See Chapter 13, "Advanced Modeling and Calculations" for information on creating an activity hierarchy and running the Activity Cost Rollup calculation.
In order to use rolled-up activity rates in a cost object unit costs calculation, you must choose the Rolled-up rates button on the details window for an activity rate set rate. You can do this at the time you are relating activity rates to a rate set, or at any time afterwards. See "Relating Activity Rates to an Activity Rate Set" on page 7-7 for more information.
7-30 Oracle Activity-Based Management User Guide

Calculating Cost Object Unit
8
Calculating Cost Object Unit CostsThis chapter discusses the elements involved with creating bills and calculating cost object unit costs. It includes the following topics:
■ Bill Terms and Components
■ Using the Bill Inspector Panel
■ Defining a Cost Object
■ Creating a Bill
■ Creating a Cost Object Unit Costs Calculation
■ Running Cost Object Unit Costs Calculations
■ Using Dynamic Consumption Quantities
OverviewOracle ABM uses a bill to calculate cost object unit costs. A bill is a user-defined structure that details the activities, materials, and other cost objects (such as components and subassemblies referenced from other bills) that comprise an organization’s products and services. A cost object unit cost cannot be entered directly or imported into Oracle ABM, it can only be calculated.
Depending on the particular cost object, a bill can consist of many activities, materials, and other cost objects. Activities and materials used in a bill must come from the same model as the bill cost object. However, other cost objects can be referenced from other model bills.
Costs 8-1

Bill Terms and Components
The process of developing a cost object unit cost has four major components:
1. Define a cost object
2. Create a bill
3. Create a cost object unit costs calculation
4. Run the Calculate Cost Object Unit Costs calculation
Define a Cost Object. A cost object ID is used to identify a bill. You will select a cost object for a bill from the list of model cost objects that you create by relating master list cost objects to a model.
Create a Bill. You create a bill by relating a parent cost object to all of the child activities, materials, and other cost objects that are utilized to create the product or service that is represented by the parent cost object.
Create a Cost Object Unit Costs Calculation. A cost object unit costs calculation defines a calculation instance and defines calculation parameters. Calculation parameters specify the source activity rate set, bill type, and effective dates. Additionally, the parameters specify the data sets to be used as sources for the activity rates, material unit costs, and bill item quantities, as well as where to post the calculation results.
Run the Cost Object Unit Costs Calculation. The Cost Object Unit Costs calculation multiplies the activity rate, material unit cost, or other cost object unit costs for each bill item by the bill item quantity. The result is the total unit cost of a cost object.
Bill Terms and ComponentsA bill is composed of a bill header and bill items.
Bill HeaderThe bill header identifies the parent cost object for which you want to calculate a cost object unit cost. It also specifies the bill type, unit of measure, and header quantity for a bill.
■ Bill Type: Is a label used to categorize bills. By creating different bill types, you can create multiple versions of a bill for a cost object. For example, you can define bill types to distinguish between actual, estimate, or simulation bills. A cost object can have only one bill of a given bill type. See "Bill Types" in Chapter 3 for information on creating bill types.
8-2 Oracle Activity-Based Management User Guide

Bill Terms and Components
■ Unit of Measure: Is the unit of measure basis of the parent cost object. This value defaults from the model cost object. You can change the value when you create the bill header.
■ Header Quantity: Is used to represent the lot size of a parent cost object (i.e., the number of units that make up a cost object). Oracle ABM defaults this value as one. However, you can change the header quantity value to reflect the actual number of units that make up a cost object.
The bill header quantity is used in conjunction with individual bill line item quantity values to compute the unit quantity of each bill item that is required to produce a single unit of a cost object. This prevents you from having to calculate decimal equivalents when a bill item quantity required to produce a parent cost object unit is not one-to-one. By using an appropriate header quantity, you can input your bill item quantities in whole numbers. For example, if a parent cost object consisting of four units requires one material unit and one activity unit, you can specify the actual whole number quantities for each bill measure. Oracle ABM will use these values to calculate corresponding material and activity unit quantity values of .25.
The value you specify in the header quantity value will be the default header quantity value for all bill items. However, you can override the bill header quantity value at the bill item level. See "Updating Bill Item Parameters" on page 8-22 for more information.
Bill ItemsBill items are the child line items that reference the activity rates, material unit costs, cost objects, and item quantities that are used to calculate the cost of the product or service that is represented by the parent cost object.
■ Activity Rates. Are the result of the activity rate calculation which divides total activity costs by activity driver volumes, and stores the calculated rates in an activity rate set. Activity rates represent the activity unit cost for a cost object. See Chapter 7 for more information.
■ Material Unit Costs. Are the costs of raw material or purchased items. Material unit costs can either be input directly, imported, or calculated by Oracle ABM. See "Entering Material Unit Costs Data"in Chapter 5, "All Material Unit Costs Calculation" in Chapter 13, and "Importing" for more information.
■ Other Cost Objects. Are components or subassemblies that are referenced from other cost object bills. Other cost objects referenced in a bill can be from the same model, or from other models.
Calculating Cost Object Unit Costs 8-3

Using the Bill Inspector Panel
When referencing other cost objects, only the total cost object unit cost is used in the bill, not the individual activity, material, and cost object costs.
■ Item Quantities. Represent the consumption quantities of each activity, material, and other cost object item that is used to produce the parent cost object. Quantities can either be input directly, imported, or calculated using the dynamic consumption quantity calculation feature. See "Using Dynamic Consumption Quantities" on page 8-32 for more information.
See the following caption "Using the Bill Inspector Panel" for a discussion of bill components.
Using the Bill Inspector PanelInformation about bill components for a single bill is displayed in the Bill inspector panel. From the Bill inspector panel you can view and update information for existing bills, and access the Bill Wizard to create new bills and bill lines.
You can access a bill inspector panel using the following navigation paths:
■ Objects > Models > Cost Objects > Bill
■ Calculations > Cost Object Unit Costs
When you first navigate to a bill inspector panel, you will be prompted to enter cost object or bill item selection criteria in the Bill Search window.
Note: You can only access bill information for the model and bill type you selected in the User Preferences window for the current session. You must navigate to the User Preferences window and change these settings if you want to access other bill information. See Chapter 3, "Getting Started" for information on specifying user preferences.
8-4 Oracle Activity-Based Management User Guide

Using the Bill Inspector Panel
Bill Search Window
The Bill Search window is used to filter and generate a list of model cost objects from which you can select a parent cost object, or bill, to view or update. A search can result in a single bill or multiple bills depending on your search criteria. The Search Criteria region of the window is used to specify search parameters. The Results region will display the list of cost objects that meets the search criteria.
You can do a bill search by specifying a specific cost object or bill item, performing a find-all search, or by using wild card selection criteria.
■ Specific Cost Object. If you know the bill you want to access, enter the cost object ID or name, and choose the Find button. The matching cost object information will be displayed in the Results region.
Note: It is not necessary to access an existing bill in order to create a new bill. Choose Cancel if you want to proceed directly to the Bill inspector panel to initiate the Bill Wizard.
Calculating Cost Object Unit Costs 8-5

Using the Bill Inspector Panel
■ Specific Bill Item. If you want to generate a list of bills that reference a specific bill item, enter the bill item ID or name, and choose the Find button. A list of cost objects will be displayed in the Results region.
■ Find-All Search. If you want to generate a complete list of bills for a model and bill type combination, leave the cost object and bill item fields in the Search Criteria area blank, and choose Find. A list of all bill cost objects will be displayed in the Results region.
■ Wild Card Search. The search criteria ID and name fields will accept wild card characters in order to filter a display list. For example, the percent sign (%) can be used to indicate any and all occurrences. The underscore character (_) can be used as a placeholder for an individual character. You can use any combination of wildcards in your search criteria. Examples of search criteria and results using % and _ are:
– Merlot% - would return all bills beginning with Merlot, regardless of the make-up of the ending characters.
– %Merlot - would return all bills ending with Merlot, regardless of the make-up of the beginning characters.
– %Merlot% - would return all bills with Merlot anywhere in the ID.
– _erlot - would return all bills beginning with any character followed by erlot, and no other trailing characters.
– _erlot% - would return all bills beginning with any character followed by erlot, and any other trailing characters.
The Activities, Materials, and Cost Objects check boxes can be selected, or de-selected, as appropriate, to further qualify your search criteria.
Once a list is generated in the Results region, select a bill for display in the Bill inspector panel by clicking anywhere on a bill row in order to highlight it, then choose the Show button. The information for the selected bill will be displayed in the Bill inspector panel.
8-6 Oracle Activity-Based Management User Guide

Using the Bill Inspector Panel
Bill Inspector PanelThe Rules tab is the default region displayed when you navigate to the Bill inspector panel.
Rules Tab
Bill Hierarchy Navigator When the Bill inspector panel opens, the Bill Hierarchy navigator is displayed in the lower region of the control panel on the left side of the screen. The Bill Hierarchy displays nodes for the bill (parent) cost object and any other (child) cost objects that are included in a bill. When you select a parent or child bill node, the parent and child information displayed in the inspector panel will change to correspond to the particular bill node. This allows you to view all child bill items relating to both the parent cost object and any child cost objects. The Bill Hierarchy does not display activity and material bill items, as neither activities or materials have child bill items associated with them.
Parent Information The parent region in the inspector panel will display bill header information including the model, bill type, and cost object. The Mixed Bill Type indicator will be checked if the specified bill type allows costs from other bill types.
Calculating Cost Object Unit Costs 8-7

Using the Bill Inspector Panel
Child Information The child region displays bill items for a selected parent or child cost object. The displayed columns will vary depending on the Bill inspector panel tab you are viewing. A bill inspector panel uses three tabbed regions to display information about a bill including:
■ Rules
■ Quantities
■ Results
From the Rules tab, you can create new bills and bill items, view parent and child information for the resources used in existing bills, and perform maintenance activities such as deleting bill items or updating bill item details. To view and update details for a specific bill item, you must navigate to the Details: Bill Rules window. To access the details window, highlight a bill item by clicking anywhere on a child bill item row, then choose the Details button.
Note: Choose the Bill Search button on the inspector panel at any time in order to return to the Bill Search window to select another listed item, or to initiate a new bill search.
8-8 Oracle Activity-Based Management User Guide

Using the Bill Inspector Panel
Details: Bill Rules Window
The details window displays parent and child rules information for a specific bill item.
Parent Information The parent region of the window is for informational purposes only. It displays bill header information about the parent cost object including the model, bill type, and cost object. You cannot update any fields in this region.
Child Information The child region displays information about the selected bill item, such as the model, item ID, and item type. Cost object bill items will reflect a bill type. You can enter or update information for the following fields:
■ Sequence Number
■ Ending Effective Date
■ ECO Number
■ BOM Line
Calculating Cost Object Unit Costs 8-9

Using the Bill Inspector Panel
Refer to "Updating Bill Item Parameters" on page 8-22 for information for each of these fields.
Quantities Tab
From the Quantities tab, you can enter, view, or update consumption quantities information for bill items. To view and update details for a specific bill item, you must navigate to the Details: Bill Quantities window. To access the details window, highlight a bill item by clicking anywhere on a child bill item row, then choose the Details button.
8-10 Oracle Activity-Based Management User Guide

Using the Bill Inspector Panel
Details: Bill Quantities Window
The details window displays parent and child quantities information for a specific bill item.
Parent Information The parent region of the window is for informational purposes only. It displays bill header information about the parent cost object including the model, bill type and cost object. You cannot update any fields in this region. This is the same parent information displayed in the Details: Bill Rules window.
Child Information The child region is for informational purposes only. It displays information about the selected bill item, such as the sequence number, model, bill type, item ID, and item type. You cannot update any fields in this region. This is the same information displayed in the Details: Bill Rules window.
Bill Quantities The lower region of the Details: Bill Quantities window displays the information relating to bill item consumption quantities. The Data Set ID references the data set where the quantities information is captured.
Calculating Cost Object Unit Costs 8-11

Using the Bill Inspector Panel
If you are using the dynamic consumption quantities feature to determine bill item consumption quantities, the Auto Calc Tag ID will display a dynamic consumption quantity calculation option. See "Using Dynamic Consumption Quantities" on page 8-32 for more information. The Origin Code identifies the source of the quantities values (such as entered, calculated). The Override check box is used to indicate if a bill header quantity has been overridden at the bill item level. This field is automatically checked by Oracle ABM if a bill item value differs from the bill header value. The Unit Quantity is the calculated quantity of a bill item that is used to create one unit of the product or service that is represented by the parent cost object. It is determined as follows:
(Item Quantity / Header Quantity) / Yield Factor = Unit Quantity
You can enter or update information for the following fields:
■ Yield
■ Item Quantity
■ Header Quantity
Refer to "Updating Bill Item Parameters" on page 8-22 for information for each of these fields.
8-12 Oracle Activity-Based Management User Guide

Using the Bill Inspector Panel
Results Tab
From the Results tab, you can view the results of a Cost Object Unit Costs calculation for a bill. To view details for an individual bill item you must navigate to the Details: Bill Item Unit Costs window. To access the details window, highlight a bill item by clicking anywhere on a child bill item row, then choose the Details button.
Calculating Cost Object Unit Costs 8-13

Using the Bill Inspector Panel
Details: Bill Item Unit Cost Window
The details window displays parent and child unit cost information for a specific bill item.
Parent Information The parent region of the window is for informational purposes only. It displays bill header information about the parent cost object including the model, bill type and cost object. You cannot update any fields in this region. This is the same parent information displayed in the Details: Bill Rules window.
Child Information The child region is for informational purposes only. It displays information about the selected bill item, such as the sequence number, model, bill type, item ID, and item type. You cannot update any fields in this region. This is the same information displayed in the Details: Bill Rules window.
Activity/Material/Cost Object Unit Costs This region is for informational purposes only. It displays the information relating to bill item unit costs, such as the origin code, session currency, exchange rate, unit cost and the data set ID. You cannot update any fields in this region.
8-14 Oracle Activity-Based Management User Guide

Creating a Bill
Defining a Cost ObjectCost objects represent the products and services produced or created by an organization. Cost objects are also used to identify a bill. When you create a bill, you will select a model cost object to which you will relate the associated activities, materials, and other cost objects that are required to calculate a cost object unit cost. See Chapter 4 for information on creating master list cost objects, and Chapter 5 for information on relating master list cost objects to a model.
Creating a BillUse this process to create new bills, and to add new bill item lines to existing bills.
To create a bill, you must specify the model, bill type, activity rate set, data set, and effective date you want to use to create your bill in the User Preferences window. See Chapter 3, "Getting Started" for information on creating each of these items, and for information on specifying user preferences.
When you first navigate to a bill inspector panel, you will be prompted to enter cost object or bill item selection criteria in the Bill Search window in order to access an existing bill. It is not necessary to access an existing bill in order to create a new bill. Choose Cancel if you want to proceed directly to the Bill inspector panel to initiate the Bill Wizard. See "Bill Search Window" on page 8-5 for more information.
◗◗To create a bill or new bill lines Navigate to the Bill inspector panel Rules tab. Choose the new icon on the toolbar to open the Bill Wizard.
Choose the next button on the wizard welcome screen to begin the setup process.
Note: In addition to the Bill Wizard, you can also use the Import process to create a bill header and bill lines. See Chapter 10, "Importing" for a description of importing processes.
Calculating Cost Object Unit Costs 8-15

Creating a Bill
Step 1 Select parent bills to relate
In this step, you select a parent cost object for a new bill, or an existing bill cost object to which you want to add new bill items.
Select a cost object by clicking anywhere on a model cost object row in order to highlight it. The list of available model cost objects, bill type, and the data set referenced will be based on the values you specify in the User Preferences window for the current session.
If necessary, you can create new model cost objects during this step. Choose the New button to open the setup wizard that guides you through the process of creating a master list cost object. See Chapter 4, "Defining Master List Objects" for information on creating a master list cost object. The master list cost objects you create will be automatically related to the bill model. Once you have finished setting up additional cost objects, you will be returned to the Bill Wizard so you can continue setting up your bill.
After selecting a cost object, you can choose the Details button to navigate to the Details: Bill Header window. You can use this window to update the unit of measure and bill header quantity for the parent cost object.
8-16 Oracle Activity-Based Management User Guide

Creating a Bill
Details: Bill Header Window
Click on the drop-down list for the unit of measure to select a new value. Update the header quantity by entering a new value. Choose OK to save your bill header updates and to return to the Step 1 wizard screen.
When you are finished selecting a cost object, choose Next to continue to the Step 2 screen.
Calculating Cost Object Unit Costs 8-17

Creating a Bill
Step 2 Select child resources to relate
In this step, you create new bill items by selecting the child activities, materials, and other cost objects that are used to create the product or service that is represented by the parent cost object.
Click on the Bill Items node to display the Activities, Materials, and Cost Objects nodes. The Cost Objects node may also reflect two child nodes, The Cross Model node, and the Cross Bill Type node. Click on a node to display a list of available activities, materials, or cost objects. The list of available activities, materials and cost objects is determined by the values you specify in the User Preferences window for the current session. The list of activities is based on the specified activity rate set. The list of materials is based on the list of valid materials for the specified model. The list of cost objects is based on the list of valid master list models, model cost objects, and the specified bill type.
Choosing the cost objects node displays a list of other cost objects within the same model having the same bill type as the parent cost object. If available, choose the Cross Model node to display a list of cost objects from other models within the same master list having the same bill type as the parent cost object. If available, choose the Cross Bill Type node to display a list of cost objects within the same model having a bill type that is different from the parent cost object.
8-18 Oracle Activity-Based Management User Guide

Creating a Bill
Select an item to add to your bill by clicking anywhere on an item row in order to highlight it. After highlighting a bill item, you can choose the Details button to navigate to the details screen to view detail information for the item. You can select one or several activity, material or cost object items during this step. Use your [Ctrl] and [Shift] keys, as appropriate, to select more than one item.
If necessary, choose the Back button to return to the previous screen in order to make changes. You can also add new activity rates to an activity rate set, and create new materials and cost objects during this step. Choose the New button while selecting activity, material, and cost object items in order to open the appropriate setup wizard. See Chapter 4, "Defining Master List Objects", and Chapter 7, "Calculating Activity Rates" for more information. The materials and cost objects you create will be automatically related to the bill model. Once you have finished setting up new activity rates, materials, or cost objects, you will be returned to the Bill Wizard so that you can continue setting up your bill.
When you are finished selecting bill items, choose Next to continue to the Step 3 screen.
Step 3 Press finish to create bill lines
Calculating Cost Object Unit Costs 8-19

Creating a Bill
Review the displayed results. Before saving your update, you can navigate to the Details: Bill Rules window for each item in order to update bill item parameters. To access bill item parameters, select an item by clicking anywhere on an item row, and choose the Details button. See the following caption "Updating Bill Item Parameters" for more information.
Choose Finish on the Step 3 screen to save the bill update when you are satisfied with the results.
Updating Bill Header ParametersEach bill header parameter consists of a unit of measure and a header quantity. You can update the header quantity from two details windows:
■ Both the bill header unit of measure and quantity can be updated or cleared from the Details window through the Model Cost Objects screen. The Details screen will only display bill headers with quantities that have been imported through the Imports feature (either spreadsheet or staging area) or from a bill that has lines associated with it. See Chapter 10, "Importing" for additional information.
8-20 Oracle Activity-Based Management User Guide
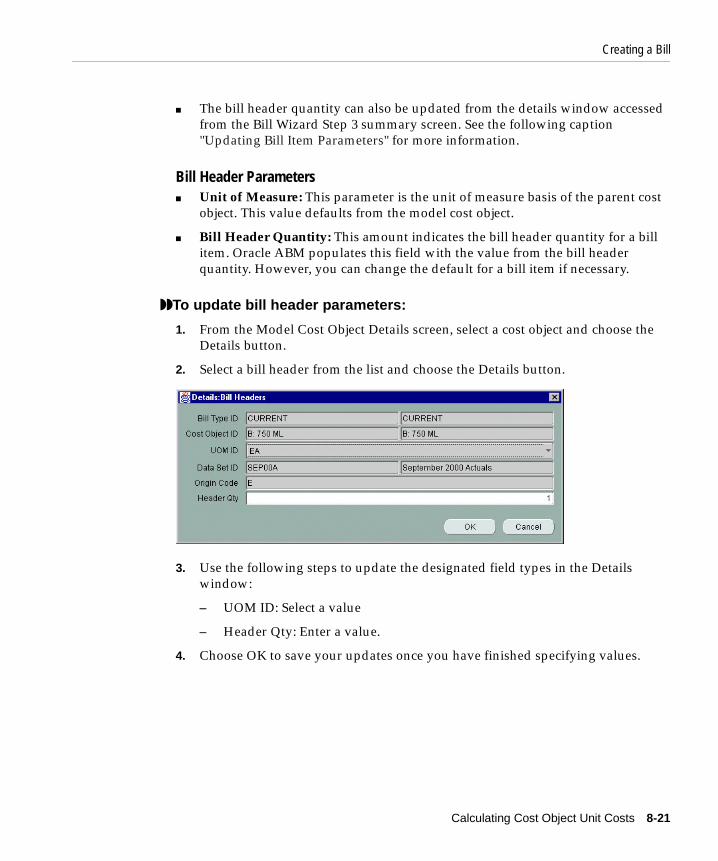
Creating a Bill
■ The bill header quantity can also be updated from the details window accessed from the Bill Wizard Step 3 summary screen. See the following caption "Updating Bill Item Parameters" for more information.
Bill Header Parameters■ Unit of Measure: This parameter is the unit of measure basis of the parent cost
object. This value defaults from the model cost object.
■ Bill Header Quantity: This amount indicates the bill header quantity for a bill item. Oracle ABM populates this field with the value from the bill header quantity. However, you can change the default for a bill item if necessary.
◗◗To update bill header parameters:
1. From the Model Cost Object Details screen, select a cost object and choose the Details button.
2. Select a bill header from the list and choose the Details button.
3. Use the following steps to update the designated field types in the Details window:
– UOM ID: Select a value
– Header Qty: Enter a value.
4. Choose OK to save your updates once you have finished specifying values.
Calculating Cost Object Unit Costs 8-21

Creating a Bill
◗◗To delete bill header parameters:
1. From the Model Cost Object Details screen, select a cost object and choose the Details button.
2. Select a bill header from the list and choose the Delete button.
Updating Bill Item ParametersBill item parameters consist of bill rules parameters and bill quantities parameters.
You can update bill item parameters from three details windows:
■ Both bill rules and bill quantities parameters can be updated from the details window you can access from the Bill Wizard Step 3 summary screen.
Note: Only a bill header that does not have lines associated to it can be deleted. To delete a bill header that contains associated lines, you must first delete the bill line items from the bill header. See "Creating a Bill" for more information.
8-22 Oracle Activity-Based Management User Guide

Creating a Bill
■ Bill rules (only) parameters can be updated from the details window you can access from the Bill inspector panel Rules tab. See "Rules Tab" on page 8-7 for more information.
■ Bill quantities (only) parameters can be updated from the details window you can access from the Bill inspector panel Quantities tab. See "Quantities Tab" on page 8-10 for more information.
Oracle ABM allows you to define the following bill item parameter values:
Bill Rules Parameters■ Sequence Number. Is used to differentiate between multiple occurrences of the
same resource item in a bill. For example, if you want to reference an activity or material item more than once in a bill, you need to assign a different sequence number to each occurrence of the same activity or material item in order to create a unique identifier for the bill item.
Calculating Cost Object Unit Costs 8-23

Creating a Bill
■ Ending Effective Date. Is used to define an ending effective date for a bill item. See the following caption "Specifying Bill Item Effective Dates" for information on defining effective dates for bill items.
■ ECO Number. Is an optional field which can be used to reference an engineering change order.
■ BOM Line. Is an optional field that can be used to reference a bill of material.
Bill Quantities Parameters■ Yield. This field is used to specify a yield percent for the bill item. Oracle ABM
uses this factor to gross up the bill item quantity, if applicable. For example, if a bill item yields less than a whole unit of a parent cost object (such as 80%), you can input a yield percent and Oracle ABM will gross up the bill item quantity to account for the additional quantity required to produce a single cost object unit. Oracle ABM defaults this value to 100%.
■ Cost Object Quantity. This value specifies the consumption quantities of a bill item that are used to create the parent cost object. Oracle ABM defaults this value as one. However, you can change the default value to correspond to the actual quantities used.
■ Bill Header Quantity. This amount indicates the bill header quantity for a bill item. Oracle ABM populates this field with the value from the bill header quantity. However, you can change the default value for a bill item if necessary. For example, if a parent cost object with a header quantity value of four, requires only one unit of a bill material for every two units of the parent cost object, you can change the bill header quantity for that material item to two. The override value would then be used to calculate the bill item unit quantity for the material item. In this case, the bill item quantity of one, and the override bill header quantity of two, would result in a corresponding unit quantity of .50 for the material item.
Note: If you are using a dynamic consumption quantity calculation for an activity rate set rate, you cannot enter a bill item quantity. See "Using Dynamic Consumption Quantities" on page 8-32 for more information.
8-24 Oracle Activity-Based Management User Guide

Creating a Bill
◗◗ To update bill item parameters: 1. From the Bill Wizard Step 3 summary screen, or the Bill inspector panel Rules
and Quantities tabs, select a bill item by clicking anywhere on a row in order to highlight it and choose the Details button.
2. Use the following steps to update the designated field type in a Details window:
– Sequence Number: Enter a value.
– Ending Effective Dates: Enter a date (dd-mmm-yyyy).
– ECO Number: Enter a numerical or descriptive reference.
– BOM Line: Enter a numerical or descriptive reference.
– Yield: Enter a whole number to use as a percentage.
– Item Quantity: Enter a value.
– Header Quantity: Enter a value.
3. Choose OK on the Details window to save your updates once you have finished specifying values.
Specifying Bill Item Effective DatesOracle ABM allows you to activate and inactivate bill items within a bill. Although you can delete a bill item, use of an appropriate ending effective date is the preferred method of inactivating an item. Deleting a bill item will eliminate that portion of the audit trail for any calculations which have been performed using the bill item.
When you create a bill item by relating an activity rate, material, or cost object to a bill, it is automatically assigned a beginning effective date based on the effective date specified in the User Preferences window at the time the relationship is created, and an ending effective date value of 31-Dec-9999. A beginning effective date cannot be changed. If you are creating a bill item that requires a different begin date, you must change the effective date in the User Preferences window before creating the bill item. Once the item is created, you can update the ending effective date to specify a different date.
When you change your User Preferences date to a date that is earlier or later than that of the effective begin dates of existing bill items in the bill and relate a new bill item to the bill, ABM may perform a smooth update. A smooth update is when a user attempts to relate new bill items to a bill with an earlier or later effective begin
Calculating Cost Object Unit Costs 8-25

Creating a Bill
date than that of corresponding existing bill items. In the case of a new bill item being added before an existing bill item, the system will implicitly end date the new bill item to one day before the existing bill item’s effective begin date. In the case of a new bill item being created after the existing bill item’s begin date, the system will end date the existing bill item to a day before the effective begin date of the new bill item.
For example, you have an existing Bill:
Change User Preferences date to 01-Apr-2000 and add the same Bill Item (with the same sequence number). ABM smooth updates the Effective End Date of the new bill item to one day before the Effective Begin Date of the existing bill item.
Change User Preferences date to 01-June-2000 and add the same Bill Item (with the same sequence number). ABM smooth updates the existing bill item to an Effective End Date of one day before the Effective Begin Date of the new bill item.
Note: Because smooth updates are automatic, caution should be exercised when changing User Preference dates and adding bill items to a bill.
Bill ID Bill Item Effective Begin Date Effective End Date
B: 750 ML Hire/Discharge Employees/ #TOTAL HEADCOUNT
02-May-2000 31-Dec-9999
Bill ID Bill Item Effective Begin Date Effective End Date
B: 750 ML Hire/Discharge Employees/ #TOTAL HEADCOUNT
01-Apr-2000 01-May-2000
Bill ID Bill Item Effective Begin Date Effective End Date
B: 750 ML Hire/Discharge Employees/ #TOTAL HEADCOUNT
01-Jun-2000 31-Dec-9999
8-26 Oracle Activity-Based Management User Guide

Creating a Bill
The history of this Bill is now:
The beginning and ending effective dates for a bill item control whether a bill item is available when running the Cost Object Unit Costs calculation. The effective dates also control whether a bill item is displayed when you view bill inspector panels. When you run a calculation, Oracle ABM will only use bill items where the Bill (BOR) Effective Date specified in calculation parameters falls within the beginning and ending effective date range for a bill item. Oracle ABM will only display bill items where the effective date specified in the User Preferences window for the current session falls within the beginning and ending effective date range for a bill item.
Bill ID Bill Item Effective Begin Date Effective End Date
B: 750 ML Hire/Discharge Employees/ #TOTAL HEADCOUNT
01-Apr-2000 01-May-2000
B: 750 ML Hire/Discharge Employees/ #TOTAL HEADCOUNT
02-May-2000 31-May-2000
B: 750 ML Hire/Discharge Employees/ #TOTAL HEADCOUNTS
01-Jun-2000 31-Dec-9999
Calculating Cost Object Unit Costs 8-27

Creating a Cost Object Unit Costs Calculation
Creating a Cost Object Unit Costs CalculationA cost object unit costs calculation identifies a calculation instance and specifies the calculation parameters. These parameters identify the data sets to be used as the sources for the bill item data and where to post the results of the calculation. The parameters also specify the effective dates and other parameters that are used to select bill components. You can create a calculation from the Cost Object Unit Costs calculation inspector panel List tab.
Refer to "Creating and Running Calculations"in Chapter 2 for information on creating a calculation instance, specifying calculation parameters, and executing a calculation.
Note: Once you create a cost object unit cost calculation, you must define a bill type, effective dates, data sets, and other parameters for the calculation. See the following section "Specifying Cost Object Unit Costs Calculation Parameters" for more information.
8-28 Oracle Activity-Based Management User Guide

Specifying Cost Object Unit Costs Calculation Parameters
Specifying Cost Object Unit Costs Calculation ParametersYou must specify the following calculation parameters in order to execute a cost object unit costs calculation:
■ Activity Rate Set. You must specify an activity rate set to use as the source for the activity rates referenced in your bills.
■ Activity Rate Set Effective Date. Is used to control the selection of activity rates from a rate set when a calculation is run. You must enter an effective date in order to define the active activity rates for a calculation. All activity rate set rates have a beginning and an ending effective date. A calculation will reference activity rate set rates where the calculation activity rate set effective date falls between the beginning and ending effective date of an activity rate item.
■ Bill Type. You must specify a bill type in order to select the bills that will be included in a cost object unit cost calculation. Unless you use the option of running a calculation for a single cost object, Oracle ABM will run the calculation for all cost objects having the specified bill type. You must select a valid bill type even if you are running the calculation for a single cost object.
■ Bill Effective Date. Is used to control the selection of bill items when the calculation is run. You must enter an effective date in order to define the active bill items for a calculation. All bill items have a beginning and an ending effective date. A calculation will use all bill items where the calculation bill effective date falls between the beginning and ending effective date of a bill item.
■ Material Unit Cost Data Set. This is the data set that contains the data for the material unit costs referenced in a bill.
■ Activity Rate Data Set. This is the data set that contains the data for the activity rates referenced in a bill.
■ Consumption Quantities Data Set. This is the data set that contains the data for the bill item consumption quantities.
■ Target Data Set. The target data set is used to post the results of the calculation. If you are computing a mixed bill type, the source of your mixed bill unit costs must not specified as the target dataset. This is because the calculation deletes the previous results in a target data set as the first step in a calculation. A target data set can only contain unit cost information for a single bill type.
Calculating Cost Object Unit Costs 8-29

Specifying Cost Object Unit Costs Calculation Parameters
You can also specify the following optional calculation parameters:
■ Cost Object ID. You can specify a cost object ID if you want to run a calculation for a single cost object. If this field is left blank, Oracle ABM will run the calculation for all bills of the specified bill type.
■ Bill Type Data Set (4 occurrences). The cost object unit costs calculation can compute mixed bill type bills. You use this parameter to identify a source data set for the costs that correspond to any cross bill type cost object selections. You can specify up to four different bill type and data set combinations.
■ Cost Object Data Set (14 occurrences). The cost object unit costs calculation can compute cross model bills. You use this parameter to identify the source data set for the costs that correspond to any cross model cost object selections. You can specify up to fourteen different model and data set combinations.
Note: When a cost object unit costs calculation executes, all prior calculation results in the target data set for each cost object are deleted, even if they were created by a different calculation. If you want to store the results of different calculations for the same period, you must create and specify a different target data set (such as January Actual or January Budget) before you run a calculation. If you are rerunning a calculation for a single cost object after running the calculation for all bills of a given bill type, only the information for the one cost object will be overwritten.
8-30 Oracle Activity-Based Management User Guide

Running Cost Object Unit Costs Calculations
Cost object unit costs calculation parameters are captured on the Calculate Cost Object Unit Costs Details window which you can access from the Cost Object Unit Costs calculation inspector panel List tab.
Refer to "Creating and Running Calculations"in Chapter 2 for information on creating a calculation instance, specifying calculation parameters, and executing a calculation.
Running Cost Object Unit Costs CalculationsWhen a cost objects unit costs calculation is run, it will reference the effective dates, data sets, and other parameters you specify in calculation parameters.
The calculation multiplies the activity rates, material unit costs, and other (child) cost object unit costs by the item consumption quantities for each active bill item related to the parent cost object. Before you run the cost object unit costs calculation, you must calculate the activity rates and other (child) cost object unit costs that will be included in the calculation. You must also capture or calculate your material unit costs, and capture bill item consumption quantities.
After you run a cost object unit costs calculation to calculate unit costs for all bills of a specified bill type, you can make changes to an individual bill and rerun the calculation for just that bill. You can update calculation parameters to specify the cost object ID, but you must not change any other calculation parameters.
Calculating Cost Object Unit Costs 8-31

Using Dynamic Consumption Quantities
If you want to change other calculation parameters, you must select a different target data set. If you change calculation parameters, but do not specify a different target data set, the recalculation for the one bill will fail.
Cost Object Unit Costs calculations are run from the Cost Object Unit Costs calculation inspector panel List tab.
Refer to "Creating and Running Calculations"in Chapter 2 for information on creating a calculation instance, specifying calculation parameters, and executing a calculation.
Viewing Cost Object Unit Costs Calculation ResultsYou can view the results of an activity rate calculation in three windows:
■ Cost Object Unit Costs Calculation Results tab
■ Cost Object Unit Costs inspector panel
■ Bill inspector panel Results tab
If you specify a target data set in your calculation parameters that is different from the data set you specified in user preferences for the current session, you must change the user preferences value to match the target data set value of your calculation in order to view calculation results.
Using Dynamic Consumption QuantitiesYou can elect to generate a consumption cost for an activity bill item each time you run the cost object unit costs calculation by using a dynamic consumption quantity.
A dynamic consumption quantity refers to a bill item quantity that is determined by Oracle ABM based on the costs of other items in a bill (activities and / or materials). A bill item is linked to other bill items through the selection of a dynamic consumption quantity calculation option. A calculation option specifies criteria for selecting the cost of other activities and / or materials as the basis of a consumption cost calculation. Oracle ABM sums the costs of other bill items based on the option you choose, then multiplies those costs times an activity rate associated with the bill item. As rates or costs for the other bill items change, the consumption costs for a bill item will change automatically each time a calculation is run.
You specify the use of a dynamic consumption quantity option for an activity rate set rate. When you relate activity rates to an activity rate set, you have the option of selecting one of six dynamic consumption quantity calculation options from a list in an activity rate set rates details window.
8-32 Oracle Activity-Based Management User Guide

Using Dynamic Consumption Quantities
You can also select a dynamic consumption quantity calculation option after an activity rate set rate is created. See "Relating Activity Rates to an Activity Rate Set" in Chapter 7 for more information.
The calculation options are identified as follows:
■ LOCACT. Sum all local activity costs at the specified level in the bill and multiply by the indicated activity rate.
■ LOCMAT. Sum all local material costs at the specified level in the bill and multiply by the indicated activity rate.
■ LOCTOT. Sum all local activity and material costs at the specified level in the bill and multiply by the indicated activity rate.
■ RUACT. Sum all rolled-up activity costs at the specified level in the bill and multiply by the indicated activity rate.
■ RUMAT. Sum all rolled-up material costs at the specified level in the bill and multiply by the indicated activity rate.
■ RUTOT. Sum all rolled-up activity and material costs at the specified level in the bill and multiply by the indicated activity rate.
Also refer to "Using Local and Rolled-Up Activity Rates" in Chapter 7 for information on this topic.
◗◗To select a dynamic consumption quantity calculation option: 1. Navigate to the to the Details: Department Activity Rate Set Rates window. You
can access this window from the Step 3 screen of the Department Activity Rate Set Rates Wizard when you are relating department activity rates to an activity rate set, or you can access the details window from the Department Activity Rate Set Rates inspector panel.
2. Select an activity rate item by clicking anywhere on an item row in order to highlight it, and choose the Details button.
Calculating Cost Object Unit Costs 8-33

Using Dynamic Consumption Quantities
3. Click on the arrow in the Auto Calc Tag ID field to display a list of calculation options. Click on a calculation option in order to select it.
4. Choose the OK button on the Details window to save the update.
8-34 Oracle Activity-Based Management User Guide

Activity-Based Budg
9
Activity-Based BudgetingThis chapter describes how to set up and use Oracle ABM to perform activity-based budgeting. It includes the following major topics:
■ Deriving Bill Quantities
■ Updating Flex Percentages
■ Deriving Activity Cost Elements
■ Deriving Department Accounts
OverviewOracle ABM activity-based budgeting functionality supports the development of departmental expense account budgets, purchased material budgets and volumes, and production budgets and volumes. The budgeting process in Oracle ABM follows three calculation steps:
1. Calculating the volumes of activity drivers, material usage, and cost object production (components and subassemblies) based on forecast production volumes for your cost objects. This is referred to as the back-flush calculation.
2. Calculating activity costs that are based on the budgeted activity driver volumes, and historical activity driver volumes and historical activity costs. This is referred to as the flexible budgeting calculation.
3. Calculating the budgeted department account values based on the budgeted activity costs.
Transactions resulting from each these calculations will be assigned an origin code of Derived. Each of these calculations can be run independently of each other, and depending on your particular requirements, you do not need to use all calculation
eting 9-1

Deriving Bill Quantities
steps. Required source information for a particular calculation can also be entered directly.
Oracle ABM can be used to develop departmental, account, and activity budgets. These budgets can be adjusted each period based on variations to production forecasts, cost driver quantities, activity rates, inflation factors, and user-defined flex (flexible) percentages. This allows you to create a financial plan starting with a quantitative forecast of production volumes for your cost objects, and working backwards through your model to arrive at a bottom-up financial plan.
Deriving Bill QuantitiesIn this calculation, a model cost object department statistic is used to back-flush through a bill to calculate the activity driver volumes and material and bill item quantities that will be required to support a predetermined level of production requirements. These calculated quantities are then stored in a user-specified data set for use in subsequent calculations and reporting.
Before this calculation can be executed, a model cost object department statistic should be entered for each cost object bill that will be included in a back-flush calculation. This statistic will represent the planned, budgeted, forecasted, or similar volume for a cost object bill. Refer to "Entering Model Statistic Data" in Chapter 5 for more information.
Creating and Running a Derive Bill Quantities CalculationYou can create and run a calculation from the Derive Bill Quantities Calculation inspector panel List tab.
Refer to "Creating and Running Calculations"in Chapter 2 for information on creating a calculation instance, specifying calculation parameters, and executing a calculation.
You can view the results of a calculation in the Derive Bill Quantities Calculation inspector panel Results tab.
Derive Bill Quantities Calculation ParametersParameters you must specify to run the Derive Bill Quantities calculation include:
■ Cost Object Department Statistic. This is the back-flush statistic which represents the planned quantity of a cost object.
9-2 Oracle Activity-Based Management User Guide

Deriving Bill Quantities
■ Cost Object Department Statistic Data Set. This is the data set that contains the cost object department statistics that represent your planned production volumes.
■ Bill Type. Specify a bill type to be used in the calculation.
■ Bill Effective Date. Specify a bill effective date in order to select the correct items on your bill.
■ Activity Rate Set. Specify the activity rate set to be used in the calculation. This is the rate set containing the activity drivers that you want to use in your calculation.
■ Activity Rate Set Effective Date. Specify the effective date for rates in the activity rate set.
■ Cost Object Target Department Statistic. Specify a statistic which will represent the derived, or back-flushed quantity for your cost objects. You should select a statistic that is different from the one that was used to capture your planned production volumes.
■ Material Target Department Statistic. Specify a statistic which will represent the derived, or back-flushed quantity for your materials.
■ Target Data Set. Specify the data set where the derived activity driver volumes, material statistics, and cost object statistics will be posted.
■ Create Target Department Statistic. You can specify a yes or no value for this parameter. A yes will cause the specified material and cost object target statistics to be automatically related to each material or cost object which have a result from the calculation. A no will prevent calculation results from being captured
Note: Any child bill whose top level parent has a back-flush statistic quantity will have a result calculated for this statistic.
Note: It is recommended that you use a unique data set to capture the results of the your activity-based budgeting calculations. This will prevent your budget data from being mixed with other data, and from being overwritten, or deleted, by other calculations. You can use the same data set to capture the results of all three activity-based budgeting calculations (such as 2000 Budget).
Activity-Based Budgeting 9-3
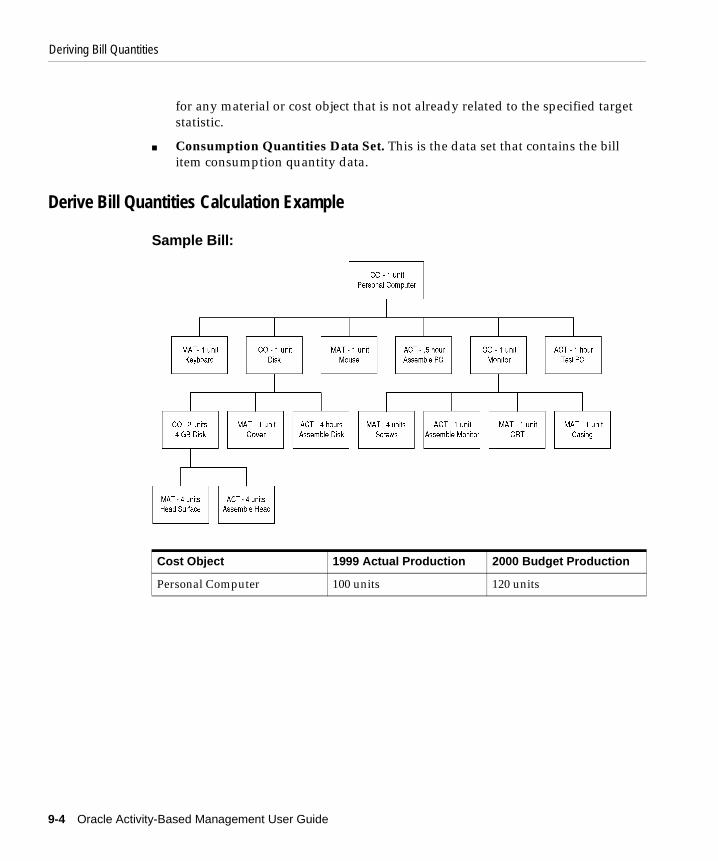
Deriving Bill Quantities
for any material or cost object that is not already related to the specified target statistic.
■ Consumption Quantities Data Set. This is the data set that contains the bill item consumption quantity data.
Derive Bill Quantities Calculation Example
Sample Bill:
Cost Object 1999 Actual Production 2000 Budget Production
Personal Computer 100 units 120 units
9-4 Oracle Activity-Based Management User Guide

Deriving Bill Quantities
Sample Calculated Data:Material Consumption
Cost Object Consumption
Activity Driver Volumes
Item 2000 Budget Budget Calculation Detail
Keyboard 120 120 x 1
Mouse 120 120 x 1
Cover 120 120 x 1 x 1
Screws 480 120 x 1 x 4
CRT 120 120 x 1 x 1
Casing 120 120 x 1 x 1
Head Surface 960 120 x 1 x 2 x 4
Item 2000 Budget Budget Calculation Detail
Disk 120 120 x 1
Monitor 120 120 x 1
4 GB Disk 240 120 x 1 x 2
Activity Driver Data Set
Maximum Derived Driver Amount
Budget Calculation Detail
Assemble PC Hour 60 60 120 x .5
Test PC Hour 120 180 120 x 1
Assemble Disk Hour 480 660 120 x 1 x 4
Assemble Monitor Unit 120 120 120 x 1 x 1
Assemble Head Unit 960 1080 120 x 1 x 2 x 4
Activity-Based Budgeting 9-5
Updating Flex Percentages
Updating Flex PercentagesWhen an activity driver volume changes from period to period, it is expected that the total activity cost will also change. However, some costs may be more or less variable than other costs for an activity. To handle this situation, Oracle ABM allows you to specify a flex (flexible) percentage to each activity account that is used to derive a budgeted activity cost. A flex percentage is used to specify the extent to which a change in activity driver volume will result in a change in cost for an activity account. For example, a value of 80 entered in the Flex % field would be interpreted as 80 percent variable (or flexible) and 20 percent fixed. A blank in this field is treated as 100 percent variable.
Oracle ABM also allows you to enter a separate inflation percentage for each activity account. This factor allows you to separately adjust your activity costs for the effects of inflation. The percentage can be either positive or negative. Once the variable portion of an activity account has been flexed based on a change in activity driver volume, it is added to the fixed portion, and then adjusted up or down in total by the inflation percentage.
Flex percentages are assigned to an activity account that is associated with an activity rate from a specified activity rate set. Activity rate set rates are used as the source of the historical activity costs and the historical activity driver volumes which are used in the Derive Activity Cost Elements calculation. See the following caption "Deriving Activity Cost Elements" for more information.
Flex Percentage Inspector PanelFlex percentages can be viewed and updated from the Flex Percentage inspector panel.
Note: Oracle ABM defaults the flex percentage for an activity account to a null value. A null in the Flex % field signifies that the account is classified as 100 percent variable. A blank in the Flex Inflation field signifies no additional increase or decrease. You can leave these fields blank, or populate them as necessary.
9-6 Oracle Activity-Based Management User Guide

Updating Flex Percentages
When you navigate to the Flex Percentage inspector panel, a list of activity rate set rates will be displayed in the upper grid. The lower grid will display activity accounts for an activity rate that is highlighted in the upper grid.
Updating a Flex Percentage FactorMass updates to the Flex % and Inflation % fields for activity accounts in activity- based budgeting are now available. This feature is available via two navigation paths:
■ Calculations > Other Calcs > Activity-Based Budgeting > Derive Activity Cost Elements > Results Tab
Note: The activity rates displayed in the Flex Percentage inspector panel are based on the activity rate set specified in the User Preferences window for the current session. You must change your user preferences if you want to work with a different activity rate set data set.
Activity-Based Budgeting 9-7

Updating Flex Percentages
■ Objects > Model > Department > Activities > Flex Percentage
This feature allows the user to fill flex percentages and inflation factors for multiple activity accounts with a single operation. Previously, the user had to select an activity rate from the top inspector, select a single activity account row, press the detail button, and then enter a single value for the selected row. This action was repeated for each account within an activity.
To use this feature, select an activity rate from the top inspector, displaying the related activity accounts in the lower inspector. Optionally, the accounts in the lower inspector may be filtered using the find control after setting focus to the lower inspector. After the desired row or rows are selected, the Fill button is used to invoke the fill dialog. Enter the appropriate values in the Fill dialog and then press the Fill button to fill the selected accounts with the entered values.
Following is an example of the Flex Percentage and Inflation Percentage Fill dialog.
9-8 Oracle Activity-Based Management User Guide

Deriving Activity Cost Elements
◗◗ To update a flex percentage factor:1. Navigate to the Flex Percentage inspector panel.
2. To display activity accounts for an activity rate, highlight an activity rate in the upper grid by clicking on a an activity rate row. A list of activity accounts associated with the activity rate will be displayed in the lower grid.
3. To select an activity account to update, highlight an activity account in the lower grid by clicking on an account row. Choose the Details button to open a Details window for an activity account.
4. Enter a whole number factor in the Flex % and Flex Inflation fields.
5. Choose OK to save the update.
Deriving Activity Cost ElementsAfter the back-flush calculation has been run successfully, a calculated activity driver volume will be stored in the target data set specified in the Derive Bill Quantities calculation parameters. These activity drivers can be used in the Derive Activity Cost Elements calculation to derive a budgeted activity cost.
This calculation uses the flex percentage and inflation percentage as the primary component of the Activity Cost Elements calculation. When the Derive Activity Cost Elements calculation is run, it executes the following formula for each activity account item:
■ (Historical Cost x Flex % Adjustment) x Inflation Adjustment = Budget Activity Cost
Note: Use whole numbers to enter your percentage factors. Oracle ABM will automatically convert these numbers to decimals in a calculation. For example, 95 will be interpreted as .95 by Oracle ABM.
Note: Convert percent amounts to decimal equivalents in the following explanation of the Derive Activity Cost Elements calculation.
Activity-Based Budgeting 9-9

Deriving Activity Cost Elements
– Historical Cost. Is the cost for an activity account that is associated with the activity rate in the activity rate set specified in calculation parameters. The specified activity rate set data set is used to determine the activity cost and activity drivers used to calculate the selected rate. This amount reflects the historical (or base) activity cost for the calculation.
– Flex % Adjustment. Is determined by the sum of two factors:
– The factor representing the fixed component of the activity cost. It is determined using the Flex % value. It is calculated as follows:
(1 - Flex %)
– The factor representing the flexible or variable component of the activity cost. It is determined by multiplying the Flex % value by the ratio of the budgeted activity driver volume divided by the historical (or base) activity driver volume. It is calculated as follows:
(Flex % x (Budget Driver Volume / Historical Driver Volume)
– Inflation Adjustment. Is determined using the Flex Inflation value. It is calculated as follows:
(1 + Inflation %)
The expanded formula for this calculation is as follows:
■ {Base Cost x [(1-Flex %) + (Flex % x (Budget Driver Volume/Historical Driver Volume))]} x (1 + Inflation %) = Budget Activity Cost
The result of this calculation is a budgeted activity account cost that is derived from the back-flushed activity driver volume and the historical activity costs.
Creating and Running a Derive Activity Cost Elements CalculationYou can create and run a calculation from the Derive Activity Cost Elements calculation inspector panel List tab.
Refer to "Creating and Running Calculations"in Chapter 2 for information on creating a calculation instance, specifying calculation parameters, and executing a calculation.
You can view the results of a calculation in the Derive Activity Cost Elements calculation inspector panel Results tab.
9-10 Oracle Activity-Based Management User Guide

Deriving Activity Cost Elements
Derive Activity Cost Elements Calculation ParametersParameters you must specify to run the Derive Activity Cost Elements calculation include:
■ Driver Volume Data Set. Specify the data set where the budgeted activity driver volumes are stored. If the Derive Bill Quantities calculation was used to derive these volumes, then the data set specified as the target data set in that calculation should referenced here.
■ Activity Rate Data Set. Specify the data set where the activity account values are stored which were used to calculate the historical activity rate.
■ Flex % Data Set. Specify the data set where the flex percentage and inflation factors are stored.
■ Flex % Activity Rate Set. Specify the activity rate set used to capture the flex percentage and inflation factors.
■ Flex % Rate Set Effective Date. Specify the effective date for the activity rates used to capture the flex percentage and inflation factors.
■ Target Data Set. Specify the data set where the calculation results will be posted.
Derive Activity Cost Elements Calculation Example
Sample Data–Calculated in a Back-Flush:
Note: It is recommended that you use a unique data set to capture the results of the your activity-based budgeting calculations. This will prevent your budget data from being mixed with other data, and from being overwritten, or deleted, by other calculations. You can use the same data set to capture the results of all three activity-based budgeting calculations (such as 2000 Budget).
Activity Driver Budgeted Data Set Base Data Set
Hours 660 500
Units 1080 2000
Activity-Based Budgeting 9-11

Deriving Activity Cost Elements
Sample Data–Local or Rolled-up Activity Cost Data and Flexible Percentage Data:
Activity–Assemble PC–Rolled-up Cost (Hours)
Activity–Test PC–Rolled-up Cost (Hours)
Dept Account NameBase Amount Flex %
Inflation %
Derived Amount
Dpt1 ACCT1 Wages 10,000 100 5 13,860
Dpt1 ACCT2 Benefits 5,000 90 2 6,569
Dpt1 ACCT3 Supplies 1,000 50 0 1,160
Total 16,000 21,589
Dept Account NameBase Amount Flex %
Inflation %
Derived Amount
Dpt1 ACCT1 Wages 5,000 100 5 6,930
Dpt1 ACCT2 Benefits 2,000 90 2 2,628
Dpt1 ACCT3 Supplies 1,000 50 0 1,160
Dpt1 ACCT4 Travel 1,000 100 10 1,452
Total 9,000 12,170
9-12 Oracle Activity-Based Management User Guide

Deriving Activity Cost Elements
Activity–Assemble Disk–Local Cost (Hours)
Activity–Assemble Monitor–Rolled-up Cost (Units)
Activity–Assemble Head–Local Cost (Units)
Sample Calculation for Activity–Assemble PC–Rolled-up Cost (Hours):Line 1. {10,000 x [(1 - 1) + (1 x 660/500)]} x (1 + .05) = 13,860
Line 2. {5,000 x [(1 - .9) + (.9 x 660/500)]} x (1 + .02) = 6,569
Line 3. {1,000 x [(1 - .5) + (.5 x 660/500)]} x (1 + 0) = 1,160
Dept Account NameBase Amount Flex %
Inflation %
Derived Amount
Dpt1 ACCT1 Wages 3,000 100 4 4,118
Dpt1 ACCT2 Benefits 2,000 80 2 2,562
Total 5,000 6,680
Dept Account NameBase Amount Flex %
Inflation %
Derived Amount
Dpt1 ACCT1 Wages 5,000 100 4 2,808
Dpt1 ACCT2 Benefits 2,000 90 -2 1,149
Dpt1 ACCT4 Travel 2,000 50 0 1,540
Dpt1 ACCT6 Depreciation 1,000 0 10 1,100
Total 10,000 6,597
Dept Account NameBase Amount Flex %
Inflation %
Derived Amount
Dpt1 ACCT1 Wages 10,000 100 5 5,670
Dpt1 ACCT6 Depreciation 5,000 0 10 5,500
Total 15,000 11,170
Activity-Based Budgeting 9-13

Deriving Department Accounts
Deriving Department AccountsAfter the Derive Activity Cost Elements calculation has been run successfully, budgeted activity costs at the activity account level are stored in the target data set specified in the Derive Activity Cost Elements calculation parameters. The final step in the activity-based budgeting process is to sum the activity account values by department in order to derive the department account budget values.
This calculation will result in Department Account values being derived from the Activity Account values previously calculated.
Creating and Running a Derive Department Accounts CalculationYou can create and run a calculation from the Derive Department Accounts calculation inspector panel List tab.
Refer to "Creating and Running Calculations"in Chapter 2 for information on creating a calculation instance, specifying calculation parameters, and executing a calculation.
You can view the results of a calculation in the Derive Department Accounts calculation inspector panel Results tab.
Derive Department Accounts Calculation ParametersYou must specify the following parameters in order to run the Derive Department Accounts calculation:
■ Activity Cost Data Set. Specify the data set where the budgeted activity cost detail is stored. If the Derive Activity Cost Elements calculation was used to derive these costs, then the target data set specified in the calculation parameters should be used here.
■ Activity Rate Set. Specify the activity rate set that is related to the activities with budgeted costs. This rate set is used to select the activity accounts to sum up.
■ Activity Rate Set Effective Date. Specify the effective date for the activity rate set.
■ Target Data Set. Specify the data set where the calculation results will be posted.
It is recommended that you use a unique data set to capture the results of the your activity-based budgeting calculations. This will prevent your budget data from being mixed with other data, and from being overwritten, or deleted, by other
9-14 Oracle Activity-Based Management User Guide

Deriving Department Accounts
calculations. You can use the same data set to capture the results of all three activity-based budgeting calculations (such as 2000 Budget).
Derive Department Accounts Calculation Example
Sample Activity Account Data:Rolled-up Activity Account Cost
Activity Department Account Name
Derived Rolled-up Cost Amount
Assemble PC Dpt1 ACCT1 Wages 13,860
Assemble PC Dpt1 ACCT2 Benefits 6,569
Assemble PC Dpt1 ACCT3 Supplies 1,160
Test PC Dpt1 ACCT1 Wages 6,930
Test PC Dpt1 ACCT2 Benefits 2,628
Test PC Dpt1 ACCT3 Supplies 1,160
Test PC Dpt1 ACCT4 Travel 1,452
Assemble Monitor Dpt1 ACCT1 Wages 2,808
Assemble Monitor Dpt1 ACCT2 Benefits 1,149
Assemble Monitor Dpt1 ACCT4 Travel 1,540
Assemble Monitor Dpt1 ACCT6 Depreciation 1,100
Activity-Based Budgeting 9-15

Deriving Department Accounts
Local Activity Account Cost
Sample Department Account Data:Dpt1 ACCT1
Dpt1 ACCT2
Activity Department Account NameDerived Local Cost Amount
Assemble Head Dpt1 ACCT1 Wages 5,670
Assemble Head Dpt1 ACCT6 Depreciation 5,500
Assemble Disk Dpt1 ACCT1 Wages 4,118
Assemble Disk Dpt1 ACCT2 Benefits 2,562
Activity Department Account NameDerived Amount
Assemble PC Dpt1 ACCT1 Wages 13,860
Test PC Dpt1 ACCT1 Wages 6,930
Assemble Monitor Dpt1 ACCT1 Wages 2,808
Assemble Head Dpt1 ACCT1 Wages 5,670
Assemble Disk Dpt1 ACCT1 Wages 4,118
Total 33,386
Activity Department Account NameDerived Amount
Assemble PC Dpt1 ACCT2 Benefits 6,569
Test PC Dpt1 ACCT2 Benefits 2,628
Assemble Monitor Dpt1 ACCT2 Benefits 1,149
Assemble Disk Dpt1 ACCT2 Benefits 2,562
Total 12,908
9-16 Oracle Activity-Based Management User Guide
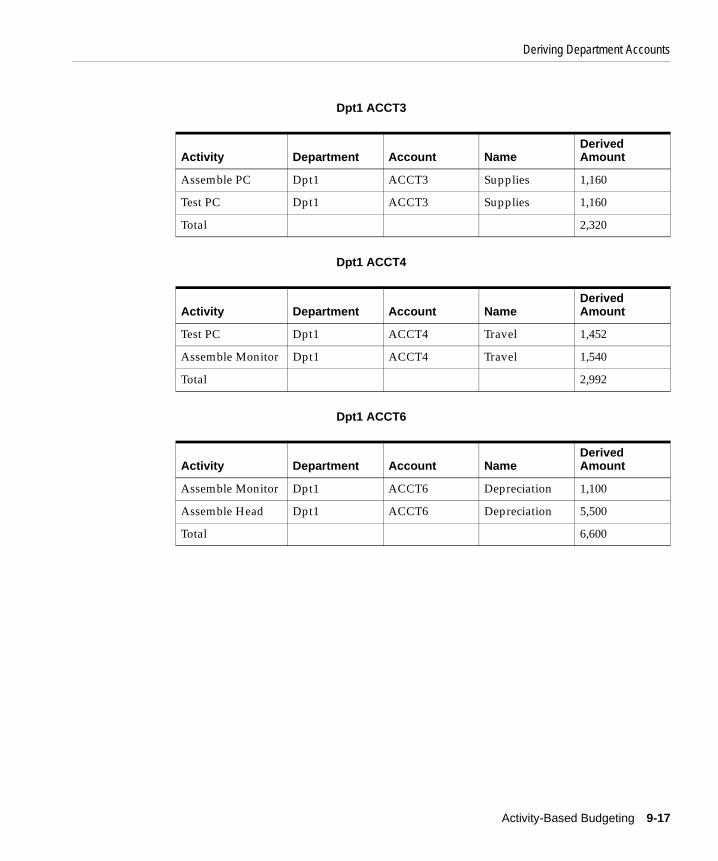
Deriving Department Accounts
Dpt1 ACCT3
Dpt1 ACCT4
Dpt1 ACCT6
Activity Department Account NameDerived Amount
Assemble PC Dpt1 ACCT3 Supplies 1,160
Test PC Dpt1 ACCT3 Supplies 1,160
Total 2,320
Activity Department Account NameDerived Amount
Test PC Dpt1 ACCT4 Travel 1,452
Assemble Monitor Dpt1 ACCT4 Travel 1,540
Total 2,992
Activity Department Account NameDerived Amount
Assemble Monitor Dpt1 ACCT6 Depreciation 1,100
Assemble Head Dpt1 ACCT6 Depreciation 5,500
Total 6,600
Activity-Based Budgeting 9-17

Deriving Department Accounts
9-18 Oracle Activity-Based Management User Guide

Impo
10
ImportingThis chapter describes how to import objects and data into Oracle ABM. It includes the following topics:
■ Using Spreadsheet Import
■ Using Staging Area Import
OverviewOracle ABM import processes provide you with a flexible and easy to use means of creating model objects and populating a model with data. Oracle ABM importing functionality allows you to import:
■ Master list objects
■ Model objects
■ Model data
■ Mapping rules
■ Materials data
■ Bill (cost object) data
There are two methods of importing data into Oracle ABM:
■ Entering data in Oracle ABM spreadsheet templates
■ Loading data into Oracle ABM staging areas
rting 10-1

Using Spreadsheet Import
Using Spreadsheet ImportOracle ABM import spreadsheets can be used to capture master list objects, model objects, model data, mapping rule information, and bill information.
Spreadsheet Import ChoicesThere is a variety of spreadsheet formats that you can choose from to import the following Oracle ABM objects and data items:
■ Master List Objects:
■ Departments
■ Department Accounts
■ Department Statistics
■ Department Activities
■ Department Activity Drivers
■ Accounts
■ Statistics
■ Activities
■ Activity Drivers
■ Materials
■ Cost Objects
■ Model Objects and Data:
■ Department Account Data
■ Department Statistic Data
■ Department Activities
■ Department Activity Department Account Data
■ Department Activity Statistic Data
■ Department Activity Drivers
■ Department Activity Hierarchy
■ Department Activity Driver Data
10-2 Oracle Activity-Based Management User Guide

Using Spreadsheet Import
■ Department Hierarchy
■ Cost Object Account Data
■ Cost Object Statistic Data
■ Bill Header Data
■ Bill Items
■ Material Account Data
■ Material Statistic Data
■ Material Unit Cost
■ Mapping Rule Information and Data:
■ Department Redistribution by Department Statistic
■ Department to Activity Mapping by Activity Statistic
■ Department Activity to Department Activity by Activity Statistic
■ Department Activity to Department by Department Statistic
See Appendix A for tables that describe the file layouts and field formats for each of the import spreadsheets. Where applicable, each table identifies the data elements that are required if you want to create master list and model structures using the imported objects and data.
Creating Master List and Model StructuresDepending on the item being imported, you can use the objects captured during an import to generate master list and model structures. This functionality is extremely useful when you have a large number of new objects and data items to capture. For example, when you are importing model department account data for new departments and new accounts, you can select the option to Create Master List and Model Structures on the Model Department Account Data import spreadsheet inspector panel. Based on this selection, Oracle ABM will create the following objects for each import item:
■ Master list department
■ Master list account
■ Master list department account relationship
■ Model department relationship
Importing 10-3

Using Spreadsheet Import
■ Model department account relationship
Using the Create Master List and Model Structures option does not trigger an error condition for objects that already exist in the application. If an object already exists, Oracle ABM will ignore the object for purposes of creating a new master list or model object, but will use the objects to create other master list and model structures as required. For example, if you are importing model department account data for an existing model department, but are specifying a new account, Oracle ABM will create only the following objects:
■ Master list account
■ Master list department account
■ Model department account
Spreadsheet FeaturesOracle ABM import spreadsheets are based on Microsoft Excel 97 and can be downloaded to and retrieved from an Excel 97 environment. All import spreadsheets use the same basic layout and format.
The process for entering and importing spreadsheet information is the same for all spreadsheet items. Model department accounts are being used in this spreadsheet documentation for an example.
10-4 Oracle Activity-Based Management User Guide

Using Spreadsheet Import
Each spreadsheet includes file open, file save, cut, copy and paste capabilities. Data element field names are captured as column headings in the first row of each spreadsheet. The last two spreadsheet columns are used to display information and error messages during import execution. The import spreadsheets include all of the fields that are necessary to create master list objects and model objects, and to capture data.
Oracle ABM master list spreadsheets include columns for all attributes (if any) that are set up in the application. In that regard, the spreadsheet layouts are dynamically updated. Whenever you open a spreadsheet template for an object, it will include columns for all attributes that are currently defined for that object.
Each spreadsheet has a checkbox that you can select in order to cause Oracle ABM to create master list and model structures while you are importing objects and data. If you choose to have Oracle ABM create master list and model structures, it will create all required objects and relationships based on the type of information you are importing. For spreadsheet items that do not involve the capture of data, such as master list and mapping spreadsheets, the checkbox will be pre-selected and disabled.
Entering Spreadsheet InformationYou have two options for working with an Oracle ABM spreadsheet. You can input your information and data directly into a spreadsheet from within the Oracle ABM environment, or you can download a blank spreadsheet to a Microsoft Excel environment and work with it in Excel. Oracle ABM can read any file that is in Microsoft Excel 97 format.
A blank spreadsheet can be downloaded by saving the spreadsheet from Oracle ABM to a folder on a local or network drive that is mapped to your computer. Spreadsheets that have been downloaded can be opened and updated directly in Excel. After you enter information using Excel, you can retrieve the spreadsheet in Oracle ABM and execute the import process.
Importing 10-5

Using Spreadsheet Import
◗◗To access import spreadsheets and enter information: 1. Navigate to the inspector panel for the spreadsheet that you want to use to
capture objects and / or data. To work with a spreadsheet in Microsoft Excel, choose the Save icon on the spreadsheet toolbar and specify a drive, folder, and filename to define a spreadsheet file, and choose the Save button.
After saving the spreadsheet as a file, navigate to a Microsoft Excel environment and reopen the spreadsheet from the specified drive and folder.
2. Enter information for each object or data item in a separate row according to the column heading descriptions. See Appendix A for information on spreadsheet layouts and the requirements for each field.
3. If you enter your spreadsheet information directly into Oracle ABM, you do not need to save the spreadsheet if you intend to immediately execute an import. However, if you intend to execute the import at a later time, or if you want to be able to access the spreadsheet information at a later date, you must save the populated spreadsheet as a file on a local or network drive.
If you entered your spreadsheet information in a Microsoft Excel environment, you must save the updated spreadsheet file on your local or network drive in order to retrieve it later from within Oracle ABM.
10-6 Oracle Activity-Based Management User Guide

Using Spreadsheet Import
Executing a Spreadsheet ImportIf you entered your import information and data using Microsoft Excel, you must open the spreadsheet from within Oracle ABM in order to execute the import.
◗◗To retrieve saved import spreadsheets: 1. Navigate to the inspector panel for the spreadsheet that you want to use to
import your information and / or data.
2. Open the spreadsheet by choosing the Open icon on the spreadsheet toolbar, and by specifying the drive, folder, and filename used to save the spreadsheet. Choose the Open button to retrieve the file.
◗◗To execute a spreadsheet import:
Once a spreadsheet is open in Oracle ABM and populated with your object and data information, you can execute the import process.
1. If the option is available, and if you want to create master list and model structures using the objects from the import transactions, click on the Create Master List and Model Structures checkbox at the bottom of the spreadsheet. See "Creating Master List and Model Structures" on page 10-3 for a discussion on how Oracle ABM creates master list and model structures when importing information.
2. Choose the Import button to execute the import process. Choose the Stop button if you want to suspend an executed import process.
Importing 10-7

Using Spreadsheet Import
3. View the error messages columns to review the results of the import.
A new workbook has been added to the set of ABM Analyzer workbooks, and provides the ability to view and save data from an existing ABM model in the same format as the spreadsheet imports. This feature provides the ability to extract model data and structure, and then easily import into another model or separate ABM instance. To perform the extract, select Save As from the File menu in Discoverer Plus, or Export from the Discoverer i-viewer, and then save to a tab-delimited file that can be subsequently reimported into ABM.
During import, records are committed to the database every 100 records. Once the import process is complete, you can immediately view successfully imported data in the inspector panels, and you can use the data in calculations and reports.
Note: Master list objects, model objects, model data, and activity rate information will be imported into the master list, model, data set, and activity rate set specified in the User Preferences window for the current session. You should verify that you have specified the correct session values before you execute an import. See "User Preferences Window" in Chapter 3 for more information.
Spreadsheet import transactions are assigned an origin code of E (Entered). Spreadsheet transactions will overwrite existing Entered transactions. However, they will not overwrite transactions with other origin codes.
10-8 Oracle Activity-Based Management User Guide

Using Spreadsheet Import
Spreadsheet Import ErrorsWhen you execute a spreadsheet import, Oracle ABM verifies that the spreadsheet format you are using matches the node you have selected in the navigator. If the column headings in the spreadsheet do not match the required headings for a node, the import will fail.
Oracle ABM checks each import row to verify that the information in each field is formatted properly, and that all required fields contain valid objects or data. If you do not select the option to create master list and model structures, you can only reference existing master list and model objects in your spreadsheet. Otherwise, the import for a row will fail. See "Spreadsheet Layouts" in Appendix A for information on the requirements for each spreadsheet field.
Oracle ABM displays error messages in the last two columns of the spreadsheet layout. You should review these columns after executing an import to check for errors that may have occurred during the import process. When the import process is complete, Oracle ABM will display the number of rows that are successfully imported at the bottom of the spreadsheet grid.
Note: If you are reusing a master list spreadsheet template that you have saved to a local drive on your computer or network, you should verify that the column headings in the saved version agree with the current spreadsheet column definitions in Oracle ABM. Because adding and deleting attributes dynamically adds and deletes spreadsheet columns, the layout of a previously used spreadsheet can become obsolete. If a spreadsheet layout is obsolete, you must either modify the saved spreadsheet to match the current Oracle ABM layout, or create a new version using the current layout.
Importing 10-9

Using Staging Area Import
Using Staging Area ImportStaging area import functionality is useful when you can use automated queries to extract source data from other systems. The staging area import process is well suited for importing large quantities of data on a recurring basis.
Staging Area Import ChoicesThere are eight types of data that you can import using staging areas:
■ (Model) Department Account Data
■ (Model) Department Statistic Data
■ (Model) Department Activity Statistic Data
■ (Model) Material (Account and Statistic) Data
■ (Model) Cost Object Quantity (Cost Object Account and Statistic) Data
■ Bill Header
■ Bill Items
■ Department Activity Driver Data
See Appendix A for descriptions of the staging area table layouts and specifications.
Staging Area FeaturesStaging areas are temporary holding tables in Oracle ABM, which the application can use as a source for importing data. Staging areas provide you with a repository that you can use to capture import information and data that you extract from external systems using automated queries.
Oracle ABM does not provide a process to populate the staging area tables. It is a user responsibility to develop and execute the processes that are required to extract import information from external systems and to populate the Oracle ABM tables. See your Oracle ABM system administrator for more information.
Staging area transactions are distinguished by an import source and a balance, or transaction date that you must attach to each transaction (the balance date and transaction date are used for the same purpose, but are named differently in different imports). An import source is a user-defined element that also identifies the type of data in a transaction (such as department account, department statistic, etc.). When you execute an import, you select import transactions by specifying an import source and a balance/transaction date.
10-10 Oracle Activity-Based Management User Guide

Using Staging Area Import
Staging area functionality allows you to edit and delete transactions that are captured in a staging area, and you can manually create and add new transactions if needed. Captured transactions will remain in a staging area table and be visible in the staging area inspector panels until they are imported or deleted. Transactions are automatically removed from the staging area tables when they are successfully imported.
As with spreadsheet imports, you can use the information captured in a staging area import to generate master list and model structures. See "Creating Master List and Model Structures" on page 10-3 for a discussion on how Oracle ABM creates master list and model structures when importing information.
Defining Staging Area Import OptionsIn order to use staging area functionality you must create values for the following data elements in Oracle ABM, and attach these elements to your staging area transactions:
■ Import Source: All staging area import transactions must have a valid import source as defined on the Import Sources inspector panel.
■ Import Currency: All account transactions must have a valid currency as defined on the Import Currencies inspector panel.
■ Import Unit of Measure: All material and cost object quantity statistic transactions must have a valid unit of measure as defined on the Import Units of Measure inspector panel.
Depending on the unit of measure definitions you use in your staging area transactions, you may also need to create unit of measure conversion rules, as defined on an Import Units of Measure Conversion Rules inspector panel.
Importing 10-11

Using Staging Area Import
Defining Import SourcesAn import source is a user-defined label that is used to identify a grouping of staging area transactions. You create an import source by defining a unique name, and by associating the import source ID with an import source type. An import source type is used to identify the type of staging area data. See the following Table 10–1 for a list of the five import source types.
Defining an import source also creates a securable object which you can reference in an interface security profile. This allows you to create security rules that control access to staging area imports. See "Setting Up Security" in Chapter 14 for more information.
You must attach an import source ID to each transaction that you want to capture in a staging area table. The import source type associated with an import source determines the appropriate staging area table to populate. You also use the import source ID along with a balance/transaction date, in your selection criteria when you select staging area transactions to import.
Table 10–1
Import Source Type Staging Area Import
ACCTSRC (Model) Department Account Data
STATSRC (Model) Department Statistic Data
ACTSTATSRC (Model) Department Activity Statistic Data
MATXACTSRC (Model) Material (Account and Statistic) Data
COXACTSRC (Model) Cost Object Quantity (Cost Object Account and Statistic) Data
BILLHEADERSRC Bill Header Data
BILLLINESRC Bill Line Data
DRVDATASRC Activity Driver Data
10-12 Oracle Activity-Based Management User Guide

Using Staging Area Import
◗◗To define an import source: Navigate to the Import Sources inspector panel.
Choose the New icon on the toolbar to open the Import Sources Wizard. Choose the Next button on the wizard welcome screen to begin the setup process.
Importing 10-13

Using Staging Area Import
Step 1 Enter the required data
Select an import source type from the drop-down list. Enter a unique import source ID and name. Entering a description is optional. Choose the New button if you want to define more than one import source in the same update. When finished, choose Next to continue to the Step 2 screen.
Step 2 Press finish to create import sourcesReview the displayed results. If necessary, choose the back button to return to the previous screen in order to make changes. Choose Finish to save the update when you are satisfied with the results.
10-14 Oracle Activity-Based Management User Guide

Using Staging Area Import
Defining Import CurrenciesImport currencies are used to define valid currencies for account data imports. Each account transaction loaded into a staging area must include an import currency.
If an import currency does not also exist in Oracle ABM, you must include an exchange rate as part of an import transaction.
◗◗To define an import currency: Navigate to the Import Currencies inspector panel.
Choose the New icon on the toolbar to open the Import Currencies Wizard. Choose the Next button on the wizard welcome screen to begin the setup process.
Importing 10-15
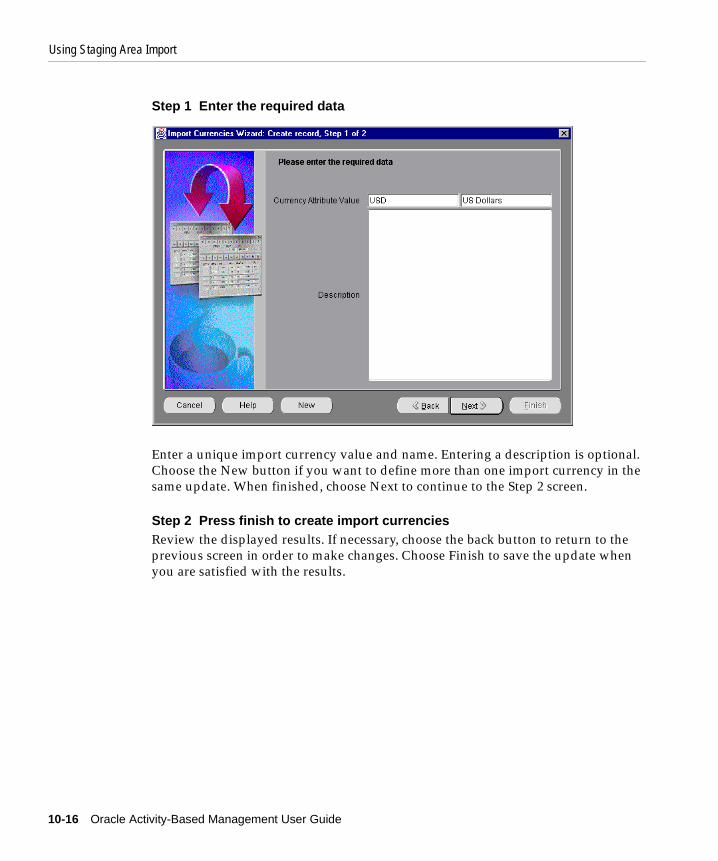
Using Staging Area Import
Step 1 Enter the required data
Enter a unique import currency value and name. Entering a description is optional. Choose the New button if you want to define more than one import currency in the same update. When finished, choose Next to continue to the Step 2 screen.
Step 2 Press finish to create import currenciesReview the displayed results. If necessary, choose the back button to return to the previous screen in order to make changes. Choose Finish to save the update when you are satisfied with the results.
10-16 Oracle Activity-Based Management User Guide

Using Staging Area Import
Defining Import Units of MeasureImport units of measure are used to define valid units of measure for material and cost object quantity (cost object) statistic data imports. Each material and cost object statistic transaction loaded into a staging area must reference a valid import unit of measure.
Unless you are converting an import unit of measure value to another valid unit of measure basis using an import unit of measure conversion rule, the import unit of measure must also exist on the Oracle ABM Units of Measure inspector panel at the time you execute an import. See the following caption "Defining Import Units of Measure Conversion Rules", and "Units of Measure" in Chapter 3 for more information.
◗◗To define an import unit of measure: Navigate to the Import Units of Measure inspector panel.
Choose the New icon on the toolbar to open the Import Units of Measure Wizard. Choose the Next button on the wizard welcome screen to begin the setup process.
Importing 10-17
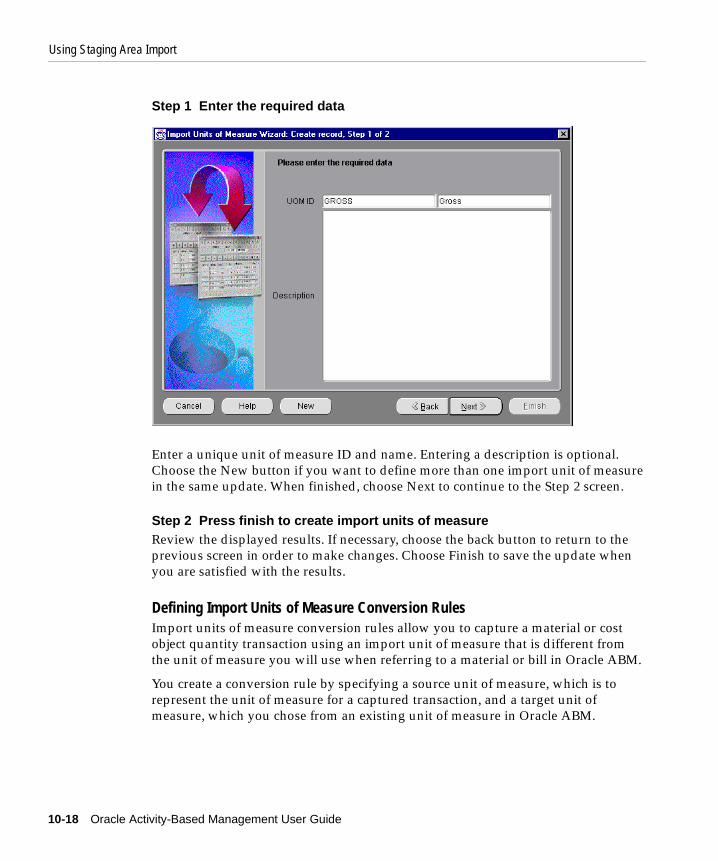
Using Staging Area Import
Step 1 Enter the required data
Enter a unique unit of measure ID and name. Entering a description is optional. Choose the New button if you want to define more than one import unit of measure in the same update. When finished, choose Next to continue to the Step 2 screen.
Step 2 Press finish to create import units of measureReview the displayed results. If necessary, choose the back button to return to the previous screen in order to make changes. Choose Finish to save the update when you are satisfied with the results.
Defining Import Units of Measure Conversion RulesImport units of measure conversion rules allow you to capture a material or cost object quantity transaction using an import unit of measure that is different from the unit of measure you will use when referring to a material or bill in Oracle ABM.
You create a conversion rule by specifying a source unit of measure, which is to represent the unit of measure for a captured transaction, and a target unit of measure, which you chose from an existing unit of measure in Oracle ABM.
10-18 Oracle Activity-Based Management User Guide

Using Staging Area Import
You define a conversion rate by specifying the number of source units that make up a target unit. For example, you may buy ball bearings by the gross, and then call them out on a bill individually in a unit of measure of each. In this situation, your source unit of measure is gross, your target unit of measure is each, and your conversion rate is 144 (each for every gross).
The source unit of measure must be a valid unit of measure on the Import Units of Measure inspector panel, but it does not have to exist on the Oracle ABM Units of Measure inspector panel. The target unit of measure must exist on the Oracle ABM Units of Measure inspector panel.
◗◗To define an import units of measure conversion rule: Navigate to the Import Units of Measure Conversion Rules inspector panel.
Choose the New icon on the toolbar to open the Import Units of Measure Conversion Rules Wizard. Choose the Next button on the wizard welcome screen to begin the setup process.
Importing 10-19

Using Staging Area Import
Step 1 Enter the required data
Select a target unit of measure value and a source unit of measure value from the drop-down lists. Enter a conversion rate that represents the number of source units that comprise a target unit. Choose the New button if you want to define more than one import unit of measure conversion rule in the same update. When finished, choose Next to continue to the Step 2 screen.
Step 2 Press finish to create import units of measure conversion rulesReview the displayed results. If necessary, choose the back button to return to the previous screen in order to make changes. Choose Finish to save the update when you are satisfied with the results.
10-20 Oracle Activity-Based Management User Guide

Using Staging Area Import
Using Staging Area Inspector PanelsBefore executing a staging area import, you can view and update existing staging area transactions, and manually create new transactions from a staging area inspector panel.
Department Account, Statistic, and Activity Statistic DataDepartment accounts, department statistics, and department activity statistics staging area inspector panels use a single inspector panel grid to display all transactions that exist in a staging area table. From a department account, department statistic, and department activity statistic staging area inspector panel, you can view and update information for a single transaction, and execute imports.
Note: Department statistic screens are being used in this staging area documentation for an example.
Importing 10-21

Using Staging Area Import
To access detail information for a single transaction, select a transaction by clicking anywhere on a transaction row in order to highlight it and choose the Details button.
Material and Cost Object Quantity Data
Oracle ABM uses a material or cost object quantity statistic staging area transaction in order to capture both statistic and account information for materials and cost objects. This allows you to load multiple transactions that may reflect things like accounts payable or purchasing transactions for materials, or accounts receivable or order entry for cost objects.
You must create a parent statistic transaction in order to capture statistic data, and both a parent statistic transaction and a child account transaction to capture account data. You can either enter both types of import data on the same transaction, or only the information that is necessary to record one type of transaction. When capturing staging area account data, Oracle ABM uses a parent statistic transaction to capture an account currency and optional exchange rate information. See "Staging Area Tables" in Appendix A for information on material and cost object quantity staging area table layouts.
Note: Material and cost object quantity data staging area inspector panels use the same format to display information. Material screens are being used in this staging area documentation for an example.
10-22 Oracle Activity-Based Management User Guide

Using Staging Area Import
Accordingly, material and cost object quantity data staging area inspector panels use two grids to display parent statistic and child account transaction rows. From a staging area inspector panel, you can view and update information for a single transaction, and execute imports.
The upper grid of a material or cost object quantity data staging area inspector panel displays the parent statistic transaction records. The lower grid displays child account records, if any, for a statistic item highlighted in the upper grid. You do not need to enter statistic data in a transaction in order to capture account information, but you must create a parent transaction using a statistic ID in order to enter account information.
For statistics or accounts, you must always enter a unit of measure. You may then enter statistic data without account data, and vice versa. If you only enter statistic data, then the associated child grid will be blank. If you only enter account data, then statistic values in the upper grid are not required. If you enter both statistics and account data, you must enter the appropriate values for both objects.
Importing 10-23
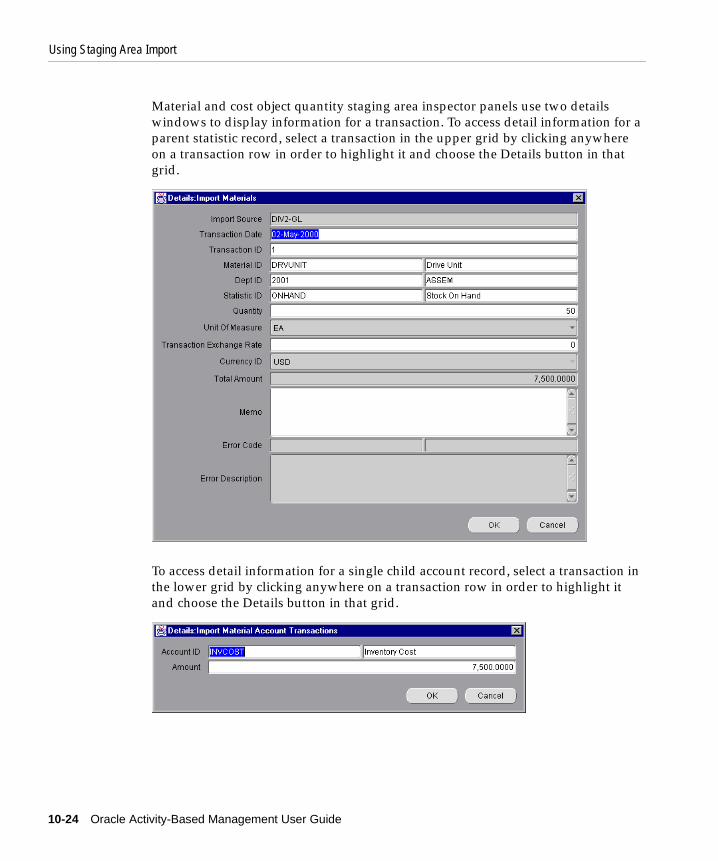
Using Staging Area Import
Material and cost object quantity staging area inspector panels use two details windows to display information for a transaction. To access detail information for a parent statistic record, select a transaction in the upper grid by clicking anywhere on a transaction row in order to highlight it and choose the Details button in that grid.
To access detail information for a single child account record, select a transaction in the lower grid by clicking anywhere on a transaction row in order to highlight it and choose the Details button in that grid.
10-24 Oracle Activity-Based Management User Guide

Using Staging Area Import
Updating Staging Area TransactionsYou can update a staging area transaction by navigating to a Details window for a transaction.
◗◗To update staging area transactions: 1. Navigate to a staging area inspector panel.
2. Select a transaction by clicking anywhere on a transaction row in order to highlight it and press the Details button. You must navigate to the account grid in the material or cost object quantity staging area inspector panel and press the Details button in that grid in order to update material or cost object account information.
3. To edit each field, either input a new value, select a new value from a drop-down list, or select a check box item as appropriate. Oracle ABM allows you to update all staging area transaction values except the import source and error message information.
4. Choose the OK button to save any updates.
Manually Creating Staging Area TransactionsYou can manually create and add transactions to a staging area table by using an import wizard that is accessed from a staging area inspector panel.
If you are creating material or cost object quantity account staging area transactions, you must use an additional wizard to enter account information. See the following caption "Manually Creating Material and Cost Object Quantity Account Transactions" for more information.
◗◗To create a new staging area transaction:
Navigate to the appropriate staging area inspector panel and choose the New icon on the toolbar to open the import wizard for a staging area data item. Choose the Next button on the wizard welcome screen to begin the create process.
Note: Staging area transaction details windows are also used to display error messages for imports rows that fail. See "Staging Area Import Errors" on page 10-30 for more information.
Importing 10-25

Using Staging Area Import
Step 1 Enter the required data
Select an import source from the drop-down list. For all other fields, input values or select values from a drop-down list, or select a check box item, as appropriate. See "Staging Area Tables" in Appendix A for information on the requirements for each staging area transaction field. Choose the New button if you want to create more than one staging area transaction in the same update. When finished, choose Next to continue to the Step 2 screen.
Step 2 Press finish to create staging area transactionsReview the displayed results. If necessary, choose the back button to return to the previous screen in order to make changes. Choose Finish to save the update when you are satisfied with the results.
10-26 Oracle Activity-Based Management User Guide
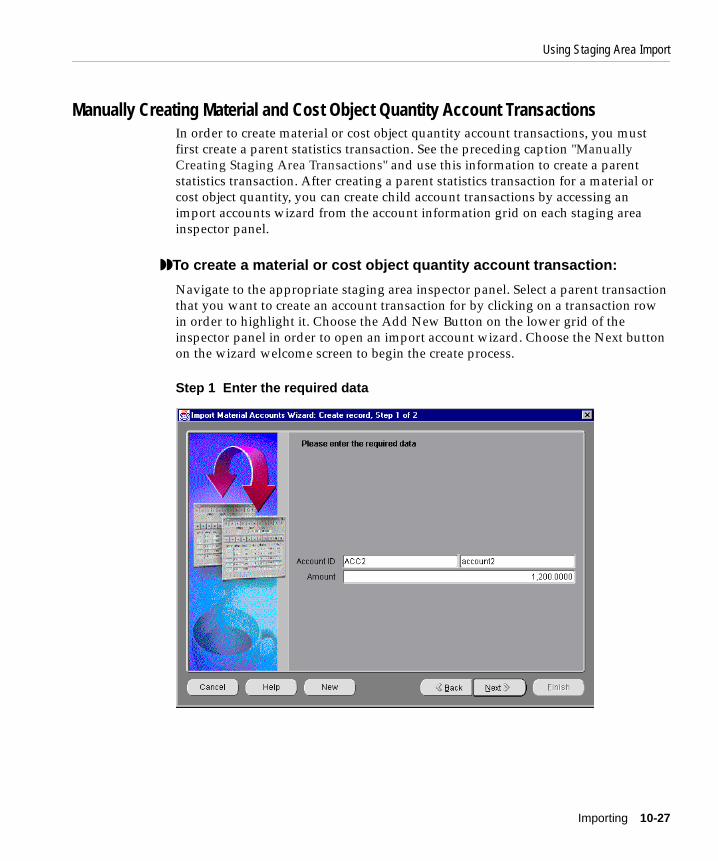
Using Staging Area Import
Manually Creating Material and Cost Object Quantity Account TransactionsIn order to create material or cost object quantity account transactions, you must first create a parent statistics transaction. See the preceding caption "Manually Creating Staging Area Transactions" and use this information to create a parent statistics transaction. After creating a parent statistics transaction for a material or cost object quantity, you can create child account transactions by accessing an import accounts wizard from the account information grid on each staging area inspector panel.
◗◗To create a material or cost object quantity account transaction:
Navigate to the appropriate staging area inspector panel. Select a parent transaction that you want to create an account transaction for by clicking on a transaction row in order to highlight it. Choose the Add New Button on the lower grid of the inspector panel in order to open an import account wizard. Choose the Next button on the wizard welcome screen to begin the create process.
Step 1 Enter the required data
Importing 10-27

Using Staging Area Import
Enter an account ID, and an account name as appropriate. See "Staging Area Tables" in Appendix A for information on the requirements for each staging area transaction field. Enter a transaction amount. Choose the New button if you want to create more than one staging area account transaction in the same update. When finished, choose Next to continue to the Step 2 screen.
Step 2 Press finish to create material or cost object quantity account transactionsReview the displayed results. If necessary, choose the back button to return to the previous screen in order to make changes. Choose Finish to save the update when you are satisfied with the results.
Executing a Staging Area ImportYou can execute a staging area import from one of the staging area data inspector panels.
◗◗To execute a staging area import: 1. Navigate to the staging area inspector panel for the data type that you want to
import and choose the Import button to open an Execute Import window.
10-28 Oracle Activity-Based Management User Guide

Using Staging Area Import
2. The target master list and model fields of the Execute Import window will be populated based on the values you have specified in the User Preferences window for the current session. Use the following steps to update the designated field type in an Execute Import window:
– Target Data Set: Click on the arrow in the target data set field to display a list of data set values. Select a data set by clicking on a value.
– Import Source: Click on the arrow in the import source field to display a list of import source values. Select an import source by clicking on a value.
– Import Transactions Date Range: Enter a date range (mm-ddd-yyyy).
– Import Transactions for Dept ID (optional): If present, enter a valid department ID, if desired.
3. Click the Model Department Accounts, Model Department Statistics, Model Activity Statistics, Model Material Accounts, or Model Cost Object Accounts checkbox, as appropriate, if you want to create master list and model structures using the objects from the import transaction information. See "Creating Master List and Model Structures" on page 10-3 for a discussion on how Oracle ABM creates master list and model structures when importing information.
4. Click on an origin code to specify whether the imported transactions should be classified as Entered or Interfaced.
5. Choose the Begin Import button to execute the import process. You cannot stop an import process once it is executed.
Note: Importing data from staging areas overwrites data set values for accounts, department statistics, and activity statistics, and adds new transactions for materials and cost objects. You can update transactions with an origin code of E (Entered) after they are imported. You cannot update transactions with an origin code of I (Interfaced).
Importing 10-29

Using Staging Area Import
6. View the Import Results window to review the results of the import process.
Once the import process is complete, data that is successfully imported can be viewed immediately in inspector panels, and used in calculations and reports.
Staging Area Import ErrorsWhen you execute a staging area import, Oracle ABM checks each import row to verify that the information in each field is formatted properly, and that all required fields contain valid objects or data. If you do not select the option to create master list and model structures, you can only reference existing master list and model objects in your staging area transactions. Otherwise, the import for a transaction will fail. See "Staging Area Tables" in Appendix A for information on the requirements for each staging area transaction field.
Transaction rows that do not import successfully will remain visible on a staging area inspector panel. To view import error messages, you must navigate to the Details window for a staging area transaction item. See "Using Staging Area Inspector Panels" on page 10-21 for information on accessing details windows for staging area transactions.
10-30 Oracle Activity-Based Management User Guide

Repo
11
ReportingThis chapter addresses Oracle ABM reporting functionality. It includes the following topics:
■ Report Definitions
■ Creating Reports
■ Running Reports
OverviewOracle ABM provides you with twelve pre-defined report templates that you can use to generate reports. Oracle ABM reporting functionality is based on a flexible report creation process that allows you to create and maintain multiple versions of a report by creating report instances that are based on the report templates. The process used to create and run Oracle ABM reports is similar to the process used to create and run calculations.
Report instances allow you to define and save unique report definitions based on different combinations of report parameters. Each report template has a pre-defined list of required and optional parameters to which you can assign values in order to define a unique report. A report instance can be used more than once and it can be modified at any time by updating the report parameters. Additionally, when you define report parameters, you can select the Publish Flag checkbox in order to make your generated reports available from the Oracle Applications Self-Service environment. This feature allows a user with an Oracle Applications ABM Web Reports responsibility to access Oracle ABM reports without having to log on to Oracle ABM.
rting 11-1

Report Definitions
Report DefinitionsThe following sections define each of the Oracle ABM report templates.
Activity Cost ReportThis report can be used to review the results of mapping to activities. There are two columns for each data set parameter, local and rolled-up. The local costs are the result of mapping (or direct entry of amounts for an activity). See "Activity Cost Rollup Calculation" in Chapter 13 for information on generating rolled-up activity costs.
Parameters required to run this report include: Main Data Set
Activity Cost Report—Graph by Activity TagThis report can be used to review the results of mapping. This report displays activity costs in a bar chart format with each bar representing an activity attribute. You can use this report as a variance report. For example, you can run this report at the end of each reporting period and compare it to the previous period to isolate variances in your activity costs. This report consists of the following components:
■ Graph by activity attribute
■ Tabular detail of activity attribute data
■ Drill down graph by department
■ Tabular detail of drill down by department
■ Drill down graph by activity
■ Tabular detail of drill down by activity
Parameters required to run this report include:
■ Main Data Set
■ Compare Data Set
■ Activity Attribute
■ Activity or Department Graph Y or N variable, where Y means graph activity and N signifies graph department.
11-2 Oracle Activity-Based Management User Guide

Report Definitions
Activity Cost Report—Graph by Driver TagThis report displays all activities, and the corresponding activity drivers and activity amounts for a given model and data set. The report is used to compare activity amounts across two data sets. The report is grouped by activity driver attribute.
Parameters required to run this report include:
■ Main Data Set
■ Compare Data Set
■ Activity Rate Set
■ Activity Rate Set Effective Date
■ Activity Driver Attribute
■ Activity Driver Graph Y or N variable, where Y means graph activity and N signifies graph department (allows for drill-down on Y/N variable).
Account Mapping Summary ReportThis report will show mapping method, including total amount, mapped amount, and destination, for a selected department.
Parameters required to run this report include:
■ Source Data Set
■ Target Data Set
■ Department
Cost Object Comparison ReportThe Cost Object Comparison Report compares two cost objects and breaks out the associated cost differences by reason. The causes of cost difference include consumption quantity difference, rate difference, and substitution difference.
Parameters required to run this report include:
■ Cost Object (A) ID
■ Cost Object (A) Bill Type
■ Cost Object (A) Model/Unit Cost Data Set
■ Cost Object (B) ID
Reporting 11-3

Report Definitions
■ Cost Object (B) Bill Type
■ Cost Object (B) Model/Unit Cost Data Set
■ Inventoriable Cost Only Y or N variable
Cost Object Detail ReportThis report shows all costs associated with each material and activity in a cost object. The report will display the details for all levels of a bill. A report will be produced for each child cost object detailing the activities, materials, and cost objects at that level. The report uses data and several parameters from the Cost Object Unit Costs calculation. In order for this report to run, you must have executed the Cost Object Unit Cost calculation.
Parameters required to run this report include:
■ Cost Object ID
■ Bill Type
■ Effective Date
■ Unit Cost Data Set
■ Activity Rate Set
■ Activity Rate Set Effective Date
■ Inventory Y or N variable
Extended Cost Object ReportThis report is a listing of cost object unit costs extended by a quantity.
Parameters required to run this report include:
■ Unit Cost Data Set
■ Department Statistic
■ Department Statistic Data Set
■ Inventoriable Cost Only Y or N variable
11-4 Oracle Activity-Based Management User Guide

Report Definitions
Extended Cost Object Comparison ReportThis report is similar to the Extended Cost Object Report. It is a comparison of cost object unit costs for two cost objects extended by a quantity.
Parameters required to run this report include:
■ Unit Cost Data Set (A)
■ Department Statistic Data Set (A)
■ Unit Cost Data Set (B)
■ Department Statistic Data Set (B)
■ Department Statistic
■ Inventoriable Cost Only Y or N variable
Extended Material Cost ReportThis report will show a Material Unit Cost extended by an optional Department Statistic.
Parameters required to run this report include:
■ Unit Cost Data Set
■ Inventoriable Cost Only Y or N variable
Mapping Redistribution and Reconciliation ReportThis report is used to show how costs are distributed in a mapping calculation. This report does not show you where costs ended up, but rather it shows the different methods used to map the original source amounts. This report is a helpful analysis tool when running the mapping process. You should review this report each time you run a mapping calculation. The following is a description of each report column:
■ Total Amount: Includes entered, interfaced, or derived values.
■ Redistributions In: Redistributions in from both departments and activities.
■ Redistributions Out: Redistributions out to other departments (there are no outs when mapping to activities).
■ Mapped to Activities: Total amounts mapped from departments to activities.
■ Difference: Unmapped account values.
Reporting 11-5

Creating Reports
■ Entered by Activity: Amounts entered by activity.
■ Mapped In to Activity: Activity to activity mapping.
■ Mapped Out from Activity: Activity to activity mapping.
When you redistribute costs from one department to another, costs are assigned from a source department to a target department. From this point forward, the target department is maintained through mapping to activities (even if the activity is in another department), and in activity to activity mapping.
The parameters required to run this report are Main Data Set.
Department Comparison Report—AccountsThis report will show a comparison of department accounts.
Parameters required to run this report include:
■ Main Data Set
■ Inventoriable Cost Only Y or N variable
Department Comparison Report StatisticsThis report compares statistical data by department for two data sets. The statistics can be sorted within each department by a statistic attribute. The report does not total or subtotal statistics.
Parameters required to run this report include: Main Data Set
Creating ReportsIn order to create an Oracle ABM report you must create a report instance and specify report parameters. A report instance consists of a user-defined report name and identifies the Oracle ABM report template on which the report will be based. Report parameters define the specific data sets, departments, activities, statistics, and other Oracle ABM data elements which will drive the information in your report.
11-6 Oracle Activity-Based Management User Guide

Creating Reports
Restrictions for Characters in Report NamesYou should not use the following characters as part of report names that you define in Oracle ABM:
%, ", >, <, ^, {, }, [, ], í, |, ~, /, #, ?, &, =, $, (, ), :, ;, +, ", *, @, !
Spaces in report names are not recommended. Each report has links to other reports and will not work properly if the linked report has spaces in the name.
Creating a Report InstanceYou use the Reports Wizard to create a report instance. You access the wizard from a Report Instances inspector panel.
Choose the New icon on a Report Instances inspector panel to open the Reports Wizard. Choose the Next button on the wizard welcome screen to begin the setup process.
Reporting 11-7

Creating Reports
Step 1 Enter the required data
Enter a unique report name. Entering a description is optional. Click the Publish Flag check box if you want a generated report to be available (or published) on the ABM Web Reports menu in the Oracle Applications Self-Service environment. The Report Group field is used by Oracle ABM to specify the ABM Web Reports menu where the report will be listed. Choose the New button if you want to add more than one report instance in the same update. When finished, choose Next to continue to the Step 2 screen.
Step 2 Press finish to create new reportsReview the displayed results. If necessary, choose the Back button to return to the previous screen in order to make changes. Choose Finish to save the update when you are satisfied with the results. The saved report will appear on the Report Instances inspector panel.
Once you create a report instance, you must specify report parameters in order to run the report.
11-8 Oracle Activity-Based Management User Guide

Creating Reports
Specifying Report ParametersYou use a report Details window to specify report parameters. You access a report Details window from a Report Instances inspector panel.
◗◗To specify report parameters: 1. Navigate to a Report Instances inspector panel.
2. Select a report by clicking anywhere on a report row in order to highlight it and choose the Details button.
3. Select an item you want to update by clicking anywhere on a parameter row in order to highlight it. Choose the Value button to begin the update process.
4. Specify parameter values. Depending on the individual parameter, Oracle ABM uses different methods for specifying parameter values. For example:
– Effective date fields are typically an input field where you enter a date using the following format: dd-mmm-yyyy.
– Items such as data sets and attributes use lists of values to display parameter value options. For these items, you select a value by clicking anywhere on a value or a value row in order to highlight it.
Reporting 11-9

Running Reports
– The Publish Flag is presented in the form of a checkbox, which you click on in order to make a selection.
5. After specifying a parameter value, if available, you must choose the OK button on the parameter value screen in order to confirm the selection and return to the Details window. Repeat Steps 3 - 5 as necessary for each report parameter.
6. Choose OK on the report Details window in order to save the parameter update once you have finished specifying values. All required parameters must be specified before the Details windows will close.
Running ReportsOnce you have created a report instance and specify report parameters, you can run an Oracle ABM report.
Executing a ReportReports are run from a Report Instances inspector panel.
◗◗To execute a report: 1. Navigate to a Report Instances inspector panel.
2. Highlight a report you want to run by clicking on a report row in order to highlight it and choose the Execute button.
Viewing ReportsWhen you execute a report, it will run immediately using the parameters specified in a reports Details window, and will be displayed on your screen. If you selected the Publish Flag checkbox in report parameters, the report will also be added to the appropriate ABM Web Reports menu (Activity, Cost Object, Material, or Department) in the Oracle Applications Self-Service environment.
Note: Oracle ABM allows you to use offsets to specify data set parameter values. The process for specifying data set offset values for Oracle ABM report parameters is the same process used to specify offset values for Oracle ABM calculations. See "Using Offsets to Define Calculation Data Set Parameters" in Chapter 2 for information on this topic.
11-10 Oracle Activity-Based Management User Guide

Running Reports
Reports listed on an ABM Web Reports menu can be selected and viewed directly from the Self-Service environment without having to log on to Oracle ABM. When you run an Oracle ABM report that already exists on the ABM Web Reports menu, users will then be able to access the most current version.
Printing ReportsReports can only be printed from a browser session. All reports are landscape-oriented and your browser font settings may need to be adjusted so that reports print properly.
Report LinksEach Oracle ABM report includes a section at the bottom that allows you to launch a related report directly from the HTML output. This provides the ability to navigate between reports without ever returning to the application. To launch a related report, pick the desired report from the drop down, and then select Execute.
Report ErrorsThere can be two causes of a report error:
■ A report may be run against wrong user preference settings. In addition to the parameters you specify for a report instance, Oracle ABM also uses user preferences settings to generate data for a report. The list of reports is not delimited by user preferences so it is possible to run a report that has parameters specified for another master list or model. This situation will result in a blank report.
■ If reports do not run at all (as when the message URL not found displays), check to make sure your reports server is running.
Note: You must have an ABM Web Reports responsibility in Oracle Applications in order to run Oracle ABM reports from the Oracle Applications Self Service environment. See Chapter 14, "System Administration" for information on Oracle Application responsibilities.
Reporting 11-11

Running Reports
11-12 Oracle Activity-Based Management User Guide
Visual Tracing and Searching
12
Visual Tracing and Searching DataThis chapter addresses the following Oracle ABM features:
■ Visual Tracing
■ Search Data
OverviewABM provides the ability to trace a calculation from its point of the result back to its original source value, or to search for data that meets certain criteria from your complete set of data. These features can be accessed from the Oracle ABM toolbar.
Visual TracingVisual tracing is a feature that allows you to select a monetary or statistical value from an inspector grid and trace that value back to its origin. It is an extremely powerful feature when investigating the details or results that are part of your activity-based costing model. If asked where a particular number came from, you can use visual tracing to get the answer.
General ConceptsTo activate visual tracing, you must select a value in the inspector grid, and then select the submenu from the tools icon for either Trace Cost or Trace Total. Once the tracing window is displayed, you will notice that it is comprised of two sections, a trace stack in the top section and a trace details in the lower section.
The initial dialog displays the row that you selected from the inspector grid in the top section, and the components in the bottom window.
Data 12-1

Visual Tracing
You can select a row in the bottom grid, and then select the trace button to continue to trace through your model back to the source values. Each time you drill deeper into your trace, your trace levels are saved in the upper window, which is referred to as the trace stack. At any time, you can select a row in your trace stack to “back up” to a previous level and select a different row to navigate a different path back through your data.
A traceable row is indicated by an asterisk (*) in the left most column of each row in the lower grid. Once you get to the root value in your trace, you will not be able to continue. At this point, there will no longer be an asterisk in the left most column.
The trace function uses the calculation log to navigate back through your model and back through the calculations that were used to compute the values in your model. At any time in the process, you can select a row in the lower section of the trace dialog, and display the details for the row that is being traced, including the calculation log details related to the selected row.
Because visual tracing depends heavily on the calculation log, an inconsistent calculation log will result in inaccurate results being displayed. Make sure your calculation log and sequence of calculations is consistent before utilizing visual tracing.
The following is a description of the types of visual tracing: Trace Cost and Trace Total.
Trace CostTrace Cost provides you the ability to show a selected value in terms of its cost consumption through each stage of the calculation process. For example, if you trace on an activity rate, it will show you the same value back through your calculations, or its cost contribution at each level in the calculation. This is useful when you want to see the final cost contribution in relation to the starting source values in your model.
Trace TotalUsing Trace Total, you can see the cost components, factors, or dividends and divisors that were used to compute the results in your model. For example, if you trace on a cost object unit cost, your initial window will show all of the materials, activities and sub-component cost objects from the bill associated with the selected cost object. If you drill into an activity rate, the subsequent trace details grid will display the total activity cost and the value for the driver that was used to compute the activity rate.
12-2 Oracle Activity-Based Management User Guide

Search Data
Traceable ObjectsYou can trace results from the following calculations:
■ Mapping
■ Activity Rates
■ All Material Unit Costs
■ All Extended Material Costs
■ Activity Cost Rollup
■ Activity Statistic Rollup
■ Driver Volume Calculation
■ Cost Object Unit Costs
■ All Extended Cost Object Costs
■ Compute Bill Items - Specific Departments
■ Compute Bill Items - Summarize Departments
■ Compute Bill Items - All Departments
■ Compute Department Account or Statistic Values -Specific Department
■ Compute Department Account or Statistic Values - All Departments
Limitations Visual Tracing is not provided for the following objects:
■ Cross model sub-components on a bill.
■ Derived Values
Search DataIn Oracle ABM, your model data is displayed in each inspector panel in a data grid format. In many cases, you will have more data than will fit within the displayed rows in the inspector grid. To locate a desired row, you can scroll through the data by using the arrow keys or drag the scroll bar up and down. To make it easier to locate a row, you can use the search data feature to find your selection.
Visual Tracing and Searching Data 12-3

Search Data
Searching For DataThe search data feature allows you to filter the data that is displayed in an inspector panel, or wizard step by entering a search criteria in the Find Dialog window. To open the Find Dialog window from an inspector panel, navigate to the desired inspector, and then select the Search Data button from the toolbar. From within a wizard, select the Search button.
The Find Dialog window allows you to enter a criteria for each available field in the selected inspector. You can enter a value for a single field, or you can enter values for multiple fields to further refine your search. The buttons on the search dialog provide the following functionality:
■ Find. Executes your specified search.
■ OR. Adds a tab to your search criteria. All tabs are considered when executing the search, and multiple criteria are considered as “OR” conditions.
■ Remove. Removes the tab that is in focus.
■ Remove All. Removes all tabs except for the tab labeled as Criteria 1
■ Reset. Removes all values you have entered as a search criteria. This allows you to start over with a blank criteria.
■ Close. Closes the search dialog.
The Find Dialog window remains visible until you are satisfied with your search. This means that you can continue to refine your search without closing and reopening this window.
The criteria fields are case-sensitive. Make sure you specify your criteria exactly as enterd in the inspector panels.
12-4 Oracle Activity-Based Management User Guide

Search Data
Using the Find Control in ABMABM uses a grid control to display model structures and the related data. The selection of a node in the launch pad tree will display all rows for the indicated data grid. The time required to display the result set in the data inspector is directly related to the size of the result set returned by the application. (Large result sets take longer to return that smaller result sets.)
To limit the number of rows returned to the data inspector, ABM includes modifications to provide the user with more control over the result set that is initially displayed in the inspector grid and/or wizard steps. This allows the user to select a subset of the data, which is easier to manage and quicker to display in the data grid.
For selected areas of the application that may result in a large result set, an empty data grid will initially be displayed. From this starting point, the user may either select the New button to create a new record with the wizard, or use the Find Control button from the tool bar to enter a search criteria to define and select the desired result set. This functionality is included for the following inspectors:
■ Model Department Account Data
■ Model Department Statistic Data
■ Model Department Activity Account Data
■ Model Department Activity Statistic Data
Visual Tracing and Searching Data 12-5

Search Data
The Initial Inspector Display
In addition to the set of data inspectors, this functionality is also included as part of the mapping inspector and the mapping wizard.
12-6 Oracle Activity-Based Management User Guide

Search Data
Mapping InspectorThe mapping inspector is divided into three tabs; the list tab, rules tab and results tab. Each tab initially displays a blank screen and includes a find control to manage the selection of records for each inspector tab.
Visual Tracing and Searching Data 12-7

Search Data
List TabThe mapping list tab displays the list of calculations in the top inspector, and a blank rules inspector in the lower half. Selecting the search button on the lower inspector will open the find control to allow the entry of a search criteria for the selection of the desired mapping rules for the selected mapping calculation.
12-8 Oracle Activity-Based Management User Guide

Search Data
Rules TabBoth inspectors in the rules tab are empty on initial navigation. Selection of the Search Data button in the tool bar will open the find dialog and allow entry and selection of data for the top grid. The display in the lower grid may be further refined by using the Search button on the lower grid.
Result TabA search button is provided for both grids on the result tab.
Mapping WizardTo enhance the performance of the mapping wizard, the find dialog is implemented on steps 2, 4 and 4a. To open the find dialog, select the Search button on each of these steps.
Find ControlWhen using the find control, it is possible to enter a criteria that will return the full result set for the selected inspector. Please remember that the time required to
Visual Tracing and Searching Data 12-9

Search Data
return the selected result set is based on the number of records returned by the find control, and larger sets of data take longer to return than smaller sets of data.
The Find dialog must be used to set the selection criteria to see any new rows created with a wizard. The new rows will only be displayed if the filter criteria has been previously set, or a new filter is performed.
Hints and TipsIn searching for data, consider the following:
■ Saved search criteria. The selection criteria entered in the Find dialog is persistent between operations. However, the operator LIKE may be appended to text entries in some situations, and the equal sign (=) is appended to numeric entries when the Find dialog is re-opened for an inspector. Re-running the filter will result in an error if the extra text is not removed from the indicated fields.
■ Sorting on an empty data inspector. A data inspector may be sorted by the selection of a column header in a data inspector. If the data inspector is empty and a filter has not been applied, this action will result in all rows returned for the inspector.
■ Sequence Number and Enabled Flag as mapping filter criteria. The mapping rule sequence number and the enabled flag are specific to each calculation for a mapping rule set. Selection using either of these fields for one calculation may not return rows for a different calculation within the selected mapping rule set. This is evident when you use the Find control on the mapping list tab, and then select different mapping calculations in the top grid of that tab. Setting a filter on either of these fields, then creating a new mapping calculation, or navigation back into the mapping inspector, will show slower performance than performing these same operations after setting a filter different fields.
■ Details Dialog and Rollback. The selection of a row in a data inspector, selection of the details button and then selection of the cancel or save button from the details dialog, will cause all rows for that inspector to be returned if you immediately select the Refresh button from the toolbar as your next action. (After this action, navigation to other previously opened inspectors will also return all rows.) Selection of the details button two times for an inspector will prevent this behavior.
■ Enabled Flag. To select a mapping rule in the list tab via the enabled flag, use Y for enabled and N for disabled.
12-10 Oracle Activity-Based Management User Guide

Search Data
■ Mapping rules and Target Mode. The functionality to initially display an empty inspector has not been implemented if you select Target Mode in the mapping rules inspector.
■ Destination First Mapping Rule Creation. The selection Destination First as the sequence for creating mapping rules will display all related methods for the selected destination, rather than just the destinations that have the same method for each destination. Because of this, the performance of step 4B in the mapping wizard may be slower using Destination First rather than Method First.
Visual Tracing and Searching Data 12-11

Search Data
12-12 Oracle Activity-Based Management User Guide
Advanced Modeling and Calcula
13
Advanced Modeling and CalculationsThis chapter describes how to set up and use Oracle ABM advanced modeling features and functions. It includes the following major topics:
■ Building a Department Hierarchy
■ Building an Activity Hierarchy
■ Calculations and Computations:
■ Activity Cost Rollup Calculation
■ Activity Statistic Rollup Calculation
■ All Material Unit Costs Calculation
■ All Extended Cost Object Costs Calculation
■ All Extended Material Costs Calculation
■ Compute Bill Items
■ Compute Department Account or Statistic Values
■ Cross Data Set Operations
■ Delete Data Processes:
■ Deleting Data Sets
■ Deleting Mapping Rule Sets
■ Deleting Activity Rate Sets
tions 13-1

Overview
OverviewThis chapter describes Oracle ABM hierarchies, advanced calculations, and delete data processes. Hierarchies are structures which you can use to organize your model data for analysis purposes and to perform calculations. Oracle ABM advanced calculations allow you to perform arithmetical operations using the account, statistic and volume data captured in your models. These calculations enable you to maximize the use of your Oracle ABM model data beyond the determination of a cost object unit cost. Oracle ABM delete data processes provide you with the ability to selectively purge model structures and data when it is no longer necessary to preserve this information in the application.
Building a Department HierarchyA department hierarchy is a structure made up of a list of model departments. Department hierarchies are used to roll up several model departments into a summary entity.
Before you can define a department hierarchy, you must define a department hierarchy ID and name, and specify it in the User Preferences window. See "Department Hierarchy" in Chapter 3 for more information.
13-2 Oracle Activity-Based Management User Guide

Building a Department Hierarchy
◗◗To create a department hierarchy Navigate to the Department Hierarchy Rules inspector panel.
Choose the New icon on the toolbar to open the Department Hierarchy Wizard. Choose the Next button on the wizard welcome screen to begin the relating process.
Advanced Modeling and Calculations 13-3

Building a Department Hierarchy
Step 1 Select parent departments to relate
Highlight a model department you want to relate by clicking anywhere on a department row. This will represent the parent department for the hierarchy.
If necessary, you can set up new model departments during this step. Choose the New button to open the setup wizard that guides you through the process of creating model departments. See "Model Departments" in Chapter 5 for more information. Once you have finished setting up new model departments, you will be returned to the Department Hierarchy Wizard so that you can continue the relating process. When finished, choose Next to continue to the Step 2 screen.
13-4 Oracle Activity-Based Management User Guide

Building a Department Hierarchy
Step 2 Select child departments to relate
Highlight a model department you want to relate by clicking anywhere on a department row. You can select more than one model department to relate during this step. Use your [Ctrl] and [Shift] keys, as appropriate, to select more than one department row. This selection will represent the child department(s) for the hierarchy.
If necessary, you can set up new model departments during this step. Choose the New button to open the setup wizard that guides you through the process of creating model departments. Once you have finished setting up new model departments, you will be returned to the Department Hierarchy Wizard so that you can continue the relating process. If necessary, choose the Back button to return to the previous screen in order to make changes. When finished, choose Next to continue to the Step 3 screen.
Step 3 Select finish to create the department hierarchy linesReview the displayed results. If necessary, choose the Back button to return to the previous screens in order to make changes. Choose Finish to save the update when you are satisfied with the results.
Advanced Modeling and Calculations 13-5

Building an Activity Hierarchy
Building an Activity HierarchyAn activity hierarchy is a structure made up of a list of model department activities. Activity hierarchies are used in the Activity Cost Rollup calculation and the Activity Statistic Rollup calculation to sum account costs and statistical quantities associated with several related activities, into a total, or rolled-up, amount or quantity. See "Activity Cost Rollup Calculation" on page 13-11 and "Activity Statistic Rollup Calculation" on page 13-12 for more information.
Before you can define an activity hierarchy, you must define an activity hierarchy ID and name and specify it in the User Preferences window. See "Activity Hierarchy" in Chapter 3 for more information.
Note: Department hierarchy lines have a beginning and ending effective date. The beginning effective date is based on the effective date in user preferences at the time the line is created. Oracle ABM assigns a default ending effective date of 31-Dec-9999. You can update the ending effective date at any time after the line is created, by navigating to the Details window for a line item from the Department Hierarchy Rules inspector panel.
13-6 Oracle Activity-Based Management User Guide

Building an Activity Hierarchy
◗◗To create an activity hierarchy Navigate to the Activity Hierarchy Rules inspector panel.
Choose the New icon on the toolbar to open the Activity Hierarchy Wizard. Choose the Next button on the wizard welcome screen to begin the relating process.
Advanced Modeling and Calculations 13-7

Building an Activity Hierarchy
Step 1 Select parent activities to relate
Highlight a model department activity you want to relate by clicking anywhere on an activity row. This will represent the parent activity for the hierarchy.
If necessary, you can set up new model department activities during this step. Choose the New button to open the setup wizard that guides you through the process of creating model department activities. See "Model Department Activities" in Chapter 5 for more information. Once you have finished setting up new model department activities, you will be returned to the Activity Hierarchy Wizard so that you can continue the relating process. When finished, choose Next to continue to the Step 2 screen.
Note: A parent activity can be an existing activity, or a summary activity that is created specifically to represent a roll-up.
13-8 Oracle Activity-Based Management User Guide

Building an Activity Hierarchy
Step 2 Select child activities to relate
Highlight a model department activity you want to relate by clicking anywhere on an activity You can select more than one model department activity to relate during this step. Use your [Ctrl] and [Shift] keys, as appropriate, to select more than one activity row. This selection will represent the child activity, or activities for the hierarchy.
If necessary, you can set up new model department activities during this step. Choose the New button to open the setup wizard that guides you through the process of creating model departments. Once you have finished setting up new model department activities, you will be returned to the Activity Hierarchy Wizard so that you can continue the relating process. If necessary, choose the Back button to return to the previous screen in order to make changes. When finished, choose Next to continue to the Step 3 screen.
Step 3 Select finish to create activity hierarchy linesReview the displayed results. If necessary, choose the Back button to return to the previous screens in order to make changes. Choose Finish to save the update when you are satisfied with the results.
Advanced Modeling and Calculations 13-9

Calculations and Computations
Calculations and ComputationsIn addition to the calculations provided to perform mapping, activity rate, cost object unit costs, and budgeting calculations, Oracle ABM provides a variety of calculations which enable you to use your model data for cost accounting, cost management, and performance measurement. These calculations include:
■ Activity Cost Rollup Calculation
■ Activity Statistic Rollup Calculation
■ All Material Unit Costs Calculation
■ All Extended Cost Object Costs Calculation
■ All Extended Material Costs Calculation
■ Compute Bill Items:
■ Specific Department
■ Summarize Departments
■ All Departments
■ Compute Department Account or Statistic Values
■ Specific Department
■ All Departments
■ Cross Data Set Operations
■ Data Set Consolidation
■ Bill Item Accounts
■ Bill Item Statistics
Note: Activity hierarchy lines have a beginning and ending effective date. The beginning effective date is based on the effective date in user preferences at the time the line is created. Oracle ABM assigns a default ending effective date of 31-Dec-9999. You can update the ending effective date at any time after the line is created, by navigating to the Details window for a line item from the Activity Hierarchy Rules inspector panel.
13-10 Oracle Activity-Based Management User Guide

Activity Cost Rollup Calculation
Activity Cost Rollup CalculationThis calculation rolls up activity costs based on an activity hierarchy existing as of a specific model date. It stores rolled-up activity costs and retains account level detail so that you can trace a rolled-up activity cost back to the department account detail from which it originated. This calculation sums the local cost of each activity on a hierarchy and the local cost of all its descendants to the lowest activity on the hierarchy. If an activity is the lowest level on a hierarchy, the activity’s local cost will equal its rolled-up cost. The results of a calculation can be viewed at the department account level on the Activity Cost Rollup inspector panel Results tab, and summarized on the Activity Cost Report.
You can access the inspector panel for this calculation using the following navigation path:
Calculations > Activity Cost Rollup
Activity Cost Rollup Calculation ParametersParameters you must specify to run this calculation include:
■ Activity Hierarchy Structure. Specify the ID of the activity hierarchy to be used in the calculation.
■ Source Data Set. This is the data set containing the activity costs to rolled-up.
■ Target Data Set. Specify the data set where the calculation results will be posted.
■ Effective Date. Specify an effective date in order to select the correct version of an activity hierarchy. Only those hierarchy components that are effective on the selected effective date will be included in the rollup calculation.
Note: The following sections describe each of the above calculations and the parameters that are required to run them. Refer to "Creating and Running Calculations" in Chapter 2 for information on how to create a calculation instance, specify calculation parameters, and execute a calculation.
Advanced Modeling and Calculations 13-11

Activity Statistic Rollup Calculation
Activity Statistic Rollup CalculationThis calculation is similar to the Activity Cost Rollup calculation. It adds up the local statistic values and all statistic values for its children and all descendants. The results of this calculation can be viewed on the Activity Statistic Rollup inspector panel Results tab. This inspector panel can be accessed from the Objects menu for department activities and from the Other Calculations menu. These results are not used in any other calculation or report in the application.
You can access the inspector panel for this calculation using the following navigation path:
Calculations > Other Calculations > Activity Statistic Rollup
Activity Statistic Rollup Calculation ParametersParameters you must specify to run this calculation include:
■ Activity Hierarchy Structure. Specify the ID of the activity hierarchy to be used in the calculation.
■ Source Data Set. This is the data set containing the activity costs to rolled-up.
■ Target Data Set. Specify the data set where the calculation results will be posted.
■ Effective Date. Specify an effective date in order to select the correct version of an activity hierarchy. Only those hierarchy components that are effective on the selected effective date will be included in the rollup calculation.
All Material Unit Costs CalculationThis calculation is used to calculate the average unit cost of materials for a time period. This calculation takes the sum of all material cost elements and divides it by a material department statistic. The calculation separates unit costs into inventoriable and non-inventoriable components. The calculation runs across all material items that match the source and target data sources. The basic formula for this calculation is:
Total Cost of a Material Item / Material Department Statistic = Material Unit Cost
The results of a calculation can be viewed on the Material Unit Costs inspector panel.
13-12 Oracle Activity-Based Management User Guide

All Extended Cost Object Costs Calculation
You can access the inspector panel for this calculation using the following navigation path:
Calculations > Other Calculations > All Material Unit Costs
All Material Unit Costs Calculation ParametersParameters you must specify to run this calculation include:
■ Material Cost Data Set. This is the data set containing the material costs that will be used in the calculation.
■ Department Statistic. This is a department statistic that has been related to your materials.
■ Department Statistic Data Set. This is the data set containing the department statistic to be used in the calculation.
■ Target Data Set. Specify the data set where the calculation results will be posted.
All Extended Cost Object Costs CalculationThis calculation is used to perform extensions for cost accounting purposes such as cost of sales or inventory valuation. It is used to extend a cost object unit cost by a cost object statistic. This calculation multiplies a cost object unit cost by a cost object department statistic and stores the result in a cost object department account. The basic formula for this calculation is:
Cost Object Unit Cost x Cost Object Department Statistic = Cost Object Department Account
You can access the inspector panel for this calculation using the following navigation path:
Calculations > Other Calculations > Extensions > All Extended Cost Object Costs
Note: Oracle ABM will allow you to override a calculated material unit cost with an entered value. This is the only place in Oracle ABM where you can type over or change a value with an origin code of Calculated. If you want to prevent this override capability, you must secure this window with the securable object Material Unit Costs by granting no more than view access.
Advanced Modeling and Calculations 13-13

All Extended Material Costs Calculation
All Extended Cost Object Costs Calculation ParametersParameters you must specify to run this calculation include:
■ Unit Cost Data Set. This is the data set containing the cost object unit costs that will be used in the calculation.
■ Department Statistic. This is a department statistic that has been related to each of your cost objects.
■ Department Statistic Data Set. This is the data set containing the department statistic to be used in the calculation.
■ Target Department Account. The results of the calculation will create a cost object department account as specified in this parameter.
■ Target Data Set. Specify the data set where the calculation results will be posted.
■ Create Target Department Account. Specify Y (yes) or N (no) to indicate if you want the calculation to create the account for the cost object if it does not exist.
All Extended Material Costs CalculationThis calculation is used to perform extensions for cost accounting purposes such as scrap valuation, inventory valuation, etc. It is used to extend a material cost by a material statistic. This calculation multiplies a material unit cost by a material department statistic and posts the results to a material department account. The account can either be a cost or non-cost account. This calculation cannot target a statistic. The basic formula for this calculation is:
Material Unit Cost x Material Department Statistic = Material Department Account
You can access the inspector panel for this calculation using the following navigation path:
Calculations > Other Calculations > Extensions > All Extended Material Costs
All Extended Material Costs Calculation ParametersParameters you must specify to run this calculation include:
■ Unit Cost Data Set. This is the data set containing the material unit costs that will be used in the calculation.
■ Department Statistic. This is a department statistic that has been related to your materials.
13-14 Oracle Activity-Based Management User Guide

Compute Bill Items
■ Department Statistic Data Set. This is the data set containing the department statistic to be used in the calculation.
■ Target Department Account. The results of the calculation will create a material department account as specified in this parameter.
■ Target Data Set. Specify the data set where the calculation results will be posted.
■ Create Target Department Account. Specify Y (yes) or N (no) to indicate if you want the calculation to create the account for the material if it does not exist.
■ Match Account Inventory Type Only. Specify Y (yes) to indicate you want the calculation to only pick up those accounts classified as Inventoriable. If set to N (no), then inventoriable and non-inventoriable accounts will be selected.
Compute Bill ItemsThere are three separate calculations for this calculation type.
Specific DepartmentThe Specific Department calculation is used to add, subtract, multiply, or divide department accounts and/or department statistics for activities, materials, or cost objects. It is specific to a selected bill item type, and further delimited by the selected department and account/statistic.
The result is a department account or department statistic for the selected bill type-activity, material or cost object.
This calculation is useful when you want to compute values that cross departments and require a combination of accounts and statistics.
Use this calculation instead of the All Departments calculation in the following circumstances:
■ When the department does not match across all three variables in the formula.
■ When you want the calculation to run for one department and there are other departments with the same variables.
■ If you are uncertain if you should use this calculation, or the one for all departments.
Advanced Modeling and Calculations 13-15

Compute Bill Items
Use the All Departments calculation in the following circumstances:
■ When the department in all three variables must be the same.
■ When you have the same variables in multiple departments, and you want to run a common calculation across all departments.
You can access the inspector panel for this calculation using the following navigation path:
Calculations > Other Calculations > Compute Bill Items > Specific Department
Compute Bill Items-Specific Department Calculation ParametersParameters you must specify to run this calculation include:
■ Bill Item Type. Specify A (activity), M (material), or C (cost object).
■ Department Account or Statistic 1. Specify a department account or department statistic that will be used in the calculation.
■ Department Account or Statistic 1 Data Set. Specify the data set containing the department account or department statistic value that will be used in the calculation.
■ Operator. Specify an operator for the calculation of * (multiply), / (divide), + (add), or - (subtract).
■ Department Account or Statistic 2. Specify a second department account or department statistic that will be used in the calculation.
■ Department Account or Statistic 2 Data Set. Specify the data set containing the second department account or department statistic value that will be used in the calculation.
■ Target Department Account or Statistic. Specify a department account or statistic to capture the results of the calculation. The calculation will create a department account or department statistic for an activity, material, or cost object as determined by the bill item type parameter.
■ Target Data Set. Specify the data set where the calculation results will be posted.
■ Create Target Department Account or Statistic. Specify Y (yes) or N (no) to indicate if you want the calculation to create the department account or department statistic for the activity, material, or cost object if it does not exist.
13-16 Oracle Activity-Based Management User Guide

Compute Bill Items
Summarize DepartmentsThis calculation adds up a selected account or statistic across departments for the selected bill item type of account, material, or cost object. For example, if you specify a bill item type of Activity, and select an account value of Salary, this calculation will add up all of the salary accounts across all activities, resulting in a total amount for the Salary account.
You can access the inspector panel for this calculation using the following navigation path:
Calculations > Other Calculations > Compute Bill Items > Summarize Departments
Compute Bill Items-Summarize Departments Calculation ParametersParameters you must specify to run this calculation include:
■ Bill Item Type. Specify A (activity), M (material), or C (cost object).
■ Account or Statistic. Specify an account or statistic that will be used in the calculation.
■ Account or Statistic Data Set. Specify the data set containing the account or statistic value that will be used in the calculation.
■ Target Department Account or Statistic. Specify a department account or statistic to capture the results of the calculation. The calculation will create a department account or department statistic for an activity, material, or cost object as determined by the bill item type parameter.
■ Target Data Set. Specify the data set where the calculation results will be posted.
■ Create Target Department Account or Statistic. Specify Y (yes) or N (no) to indicate if you want the calculation to create the department account or department statistic for the activity, material, or cost object if it does not exist.
Advanced Modeling and Calculations 13-17

Compute Bill Items
All DepartmentsThe All Departments calculation is similar to the Specific Department calculation except that it runs for all departments. The calculation will run across all departments wherever it matches the three variables provided in the set of parameters. The calculation will run for activities, materials, or cost objects.
You can access the inspector panel for this calculation using the following navigation path:
Calculations > Other Calculations > Compute Bill Items > All Departments
Compute Bill Items-All Departments Calculation ParametersParameters you must specify to run this calculation include:
■ Bill Item Type. Specify A (activity), M (material), or C (cost object).
■ Account or Statistic 1. Specify an account or statistic that will be used in the calculation.
■ Account or Statistic 1 Data Set. Specify the data set containing the account or statistic value that will be used in the calculation.
■ Operator. Specify an operator for the calculation of * (multiply), / (divide), + (add), or - (subtract).
■ Account or Statistic 2. Specify a second account or statistic that will be used in the calculation.
■ Account or Statistic 2 Data Set. Specify the data set containing the second account or statistic value that will be used in the calculation.
■ Target Department Account or Statistic. Specify a department account or statistic to capture the results of the calculation. The calculation will create a department account or department statistic for an activity, material, or cost object as determined by the bill item type parameter.
■ Target Data Set. Specify the data set where the calculation results will be posted.
■ Create Target Department Account or Statistic. Specify Y (yes) or N (no) to indicate if you want the calculation to create the department account or department statistic for the activity, material, or cost object if it does not exist.
13-18 Oracle Activity-Based Management User Guide

Compute Department Account or Statistic Values
Compute Department Account or Statistic ValuesThere are two separate calculations for this calculation type.
Specific DepartmentThis calculation allows for the computation of a specific department account or statistic with a second specific department account or statistic. It allows for the multiplication, division, addition, or subtraction between any department accounts or statistics. The result is placed in a user-defined department account or statistic.
You can access the inspector panel for this calculation using the following navigation path:
Calculations > Other Calculations > Compute Dept. Acct. or Statistic Values > Specific Department
Department Account or Statistic Values-Specific Department Calculation ParametersParameters you must specify to run this calculation include:
■ Department Account or Statistic 1. Specify a department account or department statistic that will be used in the calculation.
■ Department Account or Statistic 1 Data Set. Specify the data set containing the department account or department statistic value that will be used in the calculation.
■ Operator. Specify an operator for the calculation of * (multiply), / (divide), + (add), or - (subtract).
■ Department Account or Statistic 2. Specify a second department account or department statistic that will be used in the calculation.
■ Department Account or Statistic 2 Data Set. Specify the data set containing the second department account or department statistic value that will be used in the calculation.
■ Target Department Account or Statistic. Specify a department account or statistic to capture the results of the calculation.
■ Target Data Set. Specify the data set where the calculation results will be posted.
Advanced Modeling and Calculations 13-19

Compute Department Account or Statistic Values
■ Create Target Department Account or Statistic. Specify Y (yes) or N (no) to indicate if you want the calculation to create the department account or department statistic if it does not exist.
All DepartmentsThis calculation is the same as the Specific Department calculation, but it is run across all departments.
You can access the inspector panel for this calculation using the following navigation path:
Calculations > Other Calculations > Compute Dept. Acct. or Statistic Values > All Departments
Compute Calculation ParametersTo compute department account or statistic values–all departments calculations parameters, you must specify these parameters to run this calculation:
■ Account or Statistic 1. Specify an account or statistic that will be used in the calculation.
■ Account or Statistic 1 Data Set. Specify the data set containing the account or statistic value that will be used in the calculation.
■ Operator. Specify an operator for the calculation of * (multiply), / (divide), + (add), or - (subtract).
■ Account or Statistic 2. Specify a second account or statistic that will be used in the calculation.
■ Account or Statistic 2 Data Set. Specify the data set containing the second account or statistic value that will be used in the calculation.
■ Target Department Account or Statistic. Specify a department account or statistic to capture the results of the calculation.
■ Target Data Set. Specify the data set where the calculation results will be posted.
■ Create Target Department Account or Statistic. Specify Y (yes) or N (no) to indicate if you want the calculation to create the department account or department statistic if it does not exist.
13-20 Oracle Activity-Based Management User Guide

Cross Data Set Operations
Cross Data Set OperationsThere are three separate calculations for this calculation type.
Data Set ConsolidationThis calculation is used to combine two data sets into a third resultant data set. You may combine department accounts, department statistics, or both. Note that you can only perform operations within department accounts and department statistics, and not across them. For example, you cannot multiply an account by a statistic.
You can access the inspector panel for this calculation using the following navigation path:
Calculations > Other Calculations > Cross Data Set Operations > Data Set Consolidation
Cross Data Set Operations-Data Set Consolidation Calculation ParametersParameters you must specify to run this calculation include:
■ Data Set 1. Specify the data set containing the account and / or statistic values that will be used in the calculation.
■ Operator. Specify an operator for the calculation of * (multiply), / (divide), + (add), or - (subtract).
■ Data Set 2. Specify the data set containing the second account and / or statistic values that will be used in the calculation.
■ Target Data Set. Specify the data set where the calculation results will be posted.
Specifying a value for the following parameter is optional.
■ Account or Statistic Type. This parameter is not required. If you leave it blank, the calculation will consolidate accounts and statistics.
Advanced Modeling and Calculations 13-21

Cross Data Set Operations
Bill Item AccountsThis operation creates department account values for activities, materials, and cost objects based on department values for the selected bill item type, from the two source data sets. It can be used to compute the variance between activity costs or to accumulate activity costs across data sets. It can be used to compute the variance between material costs or to accumulate material costs across data sets. It can be used to compute the variance between cost object costs or to accumulate cost object costs across data sets. This calculation operates on all accounts within the selected bill item type.
You can access the inspector panel for this calculation using the following navigation path:
Calculations > Other Calculations > Cross Data Set Operations > Bill Item Accounts
Cross Data Set Operations-Bill Item Accounts Calculation ParametersParameters you must specify to run this calculation include:
■ Bill Item Type. Specify A (activity), M (material), or C (cost object).
■ Data Set 1. Specify a source data set containing activity, material, or cost object account values to be used in the calculation.
■ Operator. Specify an operator for the calculation of * (multiply), / (divide), + (add), or - (subtract).
■ Data Set 2. Specify a second source data set containing activity, material, or cost object account values to be used in the calculation.
■ Target Data Set. Specify the data set where the calculation results will be posted.
Bill Item StatisticsThis operation creates statistical values for activities, materials, and cost objects in a third data set as a result of corresponding values in two different data sets. It can be used to compute the variance between activity statistics or to accumulate activity statistics across data sets. It can be used to compute the variance between material statistics or to accumulate material statistics across data sets. It can be used to compute the variance between cost object statistics or to accumulate cost object statistics across data sets. This calculation operates on all statistics within the selected bill item type.
13-22 Oracle Activity-Based Management User Guide

Delete Data Processes
You can access the inspector panel for this calculation using the following navigation path:
Calculations > Other Calculations > Cross Data Set Operations > Bill Item Statistics
Cross Data Set Operations-Bill Item Statistics Calculation ParametersParameters you must specify to run this calculation include:
■ Bill Item Type. Specify A (activity), M (material), or C (cost object).
■ Data Set 1. Specify a source data set containing activity, material, or cost object statistic values to be used in the calculation.
■ Operator. Specify an operator for the calculation of * (multiply), / (divide), + (add), or - (subtract).
■ Data Set 2. Specify a second source data set containing activity, material, or cost object statistic values to be used in the calculation.
■ Target Data Set. Specify the data set where the calculation results will be posted.
Delete Data ProcessesOracle ABM provides three automated processes for deleting model data and selected model structures. These processes provide you with the ability to selectively purge data set information, and mapping rule set and activity rate set information, when it is no longer necessary to maintain this information in the application.
You must have System Administrator privileges in order to delete data set information.
Caution: Each of the delete data processes removes data from Oracle ABM tables immediately and permanently. Be extremely careful when using any of these options. Deleting data set, mapping rule set, and activity rate set information will prevent you from accessing data for any calculations or processes that rely on the deleted data.
Advanced Modeling and Calculations 13-23

Delete Data Processes
You must have System Administrator privileges, or an Oracle ABM responsibility with a security profile that allows you to update mapping rule set or activity rate set information, in order to use the delete processes for these items.
See your Oracle ABM System Administrator and Chapter 14 for information on Oracle ABM responsibilities and security profiles.
Deleting Data SetsThe Delete Data Set option provides a very flexible, but extremely powerful tool for purging data set information. Using this option, you select data to delete by specifying data set origin codes for a data set data type. You can choose to selectively delete data for a combination of entered and interfaced data, a combination of calculated and derived data, or for all four origin codes simultaneously. Refer to the following Table 13–1 for a list of data set data types and origin code deletion options.
Note: You cannot delete data set information for a data set that has a lock status of Closed. See "Closing and Opening Data Sets" in Chapter 3 for information on this topic.
Table 13–1 Delete Data Set Options
Data Set Data Type
Entered and Interfaced Data
Calculated and Derived Data
Department Account Data X X
Department Statistic Data X X
Mapping Results X
Activity Account Data X X
Activity Statistic Data X X
Flex Percentages X
Activity Driver Data X X
Activity Rates X
Activity Rolled Up Cost X
Activity Rolled Up Statistic X
13-24 Oracle Activity-Based Management User Guide

Delete Data Processes
◗◗To delete data set information: 1. Navigate to the Data Sets inspector panel.
2. Select a data set by clicking on a data set row in order to highlight it. Choose the Delete Data Set button to open the Delete Data Set window.
3. Select data to delete by clicking on an Ent/Inter (Entered/Interfaced origin codes) check box and / or a Calc/DerivStatus (Calculated/Derived origin codes) check box for each item. You can select multiple combinations of data items and origin codes for deletion. Use the Select All button to select all options. Use the Deselect All button if you want to clear your selections.
4. Choose the Delete button to immediately execute the delete process.
Once the process has run, Oracle ABM will display status information next to each data set item indicating the number of data rows that were successfully deleted.
Material Account Data X X
Material Statistic Data X X
Material Unit Costs X X
Cost Object Account Data X X
Cost Object Statistic Data X X
Cost Object Unit Costs X
Cost Object Line Costs X
Derived/Activity/Material/Cost Object Quantities X
Derived Activity Costs X
Derived Department Account Data X
Currency Rates X
Note: Choosing the Delete button starts the delete process immediately and cannot be undone!
Table 13–1 Delete Data Set Options
Data Set Data Type
Entered and Interfaced Data
Calculated and Derived Data
Advanced Modeling and Calculations 13-25

Delete Data Processes
Deleting Mapping Rule SetsThe Delete Mapping Rule Set option allows you to delete all components of a mapping rule set including calculation instances, calculation parameters, and mapping rules. Like the Delete Data Set option, this is a very powerful tool. Executing the Delete Mapping Rule Set option removes data from Oracle ABM tables immediately and permanently. You should use extreme care when using this option. Deleting mapping rule set information will prevent you from accessing data for any other calculations or processes that rely on the deleted data.
◗◗To delete mapping rule set information: 1. Navigate to the Mapping Rule Sets inspector panel.
2. Select a mapping rule set by clicking on a mapping rule set ID or name in order to highlight it.
3. Choose the Delete Mapping Rule Set button to initiate the delete process.
4. Choose Yes in the Caution message box to confirm execution of the deletion process, or No to cancel.
Once the process has run, Oracle ABM will display a confirmation message to advise you of the results of the delete process.
Deleting Activity Rate SetsThe Delete Activity Rate Set option removes all of the rates from an activity rate set.
This delete process is very similar to the Delete Mapping Rule Set process. Executing the Delete Activity Rate Set option removes data from Oracle ABM tables immediately and permanently. You should use extreme care when using this option. Deleting activity rate set information will prevent you from accessing data for any other calculations or processes that rely on the deleted data.
Caution: Choosing the Yes button starts the delete process immediately and cannot be undone!
13-26 Oracle Activity-Based Management User Guide

Delete Data Processes
◗◗To delete activity rate set information: 1. Navigate to the Activity Rate Sets inspector panel.
2. Select an activity rate set by clicking on an activity rate set ID or name in order to highlight it.
3. Choose the Delete Activity Rate Set button to initiate the delete process.
4. Choose Yes in the Caution message box to confirm execution of the deletion process, or No to cancel.
Once the process is run, Oracle ABM will display a confirmation message to advise you of the results of the delete process.
Caution: Choosing the Yes button starts the delete process immediately and cannot be undone!
Advanced Modeling and Calculations 13-27

Delete Data Processes
13-28 Oracle Activity-Based Management User Guide

System Admin
14
System AdministrationThis chapter addresses Oracle ABM system administration functions. It includes the following topics:
■ Setting Up Users
■ Setting Up Security
■ Running Concurrent Programs and Reports
OverviewSystem administration functions in Oracle ABM include the processes involved with setting up users, creating application security, and running concurrent programs and reports from the Oracle Applications Self Service environment.
Access to Oracle ABM is controlled from Oracle Applications. In order to access Oracle ABM features and functions a user must have an Oracle Applications user name and password, and access rights to Oracle ABM application responsibilities from Oracle Applications.
Oracle ABM security functionality is built entirely into the application. That is, Oracle ABM does not use Oracle Applications security profiles and roles in order to enforce Oracle ABM security. Once a user has access to Oracle ABM from Oracle Applications, the user must be associated to a responsibility within Oracle ABM. In Oracle ABM, a responsibility is used to associate a user with Oracle ABM security profiles, master list profiles, and model profiles. Security profiles define access rights to objects. Master list profiles and model profiles grant access to specific master lists, models, and model information.
System administration functions also include running concurrent programs and reports directly from the Oracle Applications Self Service environment.
istration 14-1

Setting Up Users
Setting Up UsersTo grant a user access to Oracle ABM features and functions you must:
■ Obtain an Oracle Applications user name and password with access rights to an Oracle ABM application responsibility.
■ Create a responsibility for the user in Oracle ABM.
■ Relate the Oracle ABM responsibility to the Oracle Applications user name.
Obtaining Access from Oracle ApplicationsAn Oracle Applications user name can be associated with any or all of the following Oracle Applications-defined responsibilities for Oracle ABM:
■ ABM Manager. This responsibility provides direct access to Oracle ABM and to Oracle ABM Analyzer workbooks.
■ ABM Supervisor. The main purpose of this responsibility is to provide the ability to launch Oracle ABM calculations and other concurrent programs from outside of Oracle ABM. This is also the responsibility that is used to perform the data migration task when you are upgrading from an Activa 3.02 database to Oracle ABM. For information on migrating data from Activa 3.02, see the Oracle Activity-Based Management Installation Guide.
■ ABM Web Reports. This responsibility provides the ability to launch Oracle ABM reports directly from the Oracle Applications Self Service environment.
See Appendix B for more information on Oracle Applications responsibility definitions for Oracle ABM. Refer to the Oracle Applications User’s Guide for additional information on accessing Oracle Applications.
See your Oracle Applications system administrator for information about obtaining an Oracle Applications user name and password, and about obtaining access to an Oracle ABM application responsibility.
Creating Responsibilities in Oracle ABMAn Oracle ABM responsibility represents a level of authority that defines the objects and data a user can access, and the operations that a user can perform in the application. You define a level of authority for a responsibility by associating it with security profiles, master list profiles and model profiles, and defining a system administrator status.
14-2 Oracle Activity-Based Management User Guide

Setting Up Users
Oracle ABM responsibilities can only be created by an Oracle ABM system administrator with a Sysmgr responsibility.
Sysmgr ResponsibilityOne of the first steps in setting up Oracle ABM is to establish a system administrator. As with any Oracle ABM user, a system administrator must have an Oracle Applications user name and password, and access to Oracle ABM from Oracle Applications. Oracle ABM comes seeded with a pre-defined system administrator user name (Sysadmin) that is associated with a pre-defined Sysmgr responsibility. Sysmgr is the default responsibility ID for an Oracle ABM system administrator which grants unlimited access rights in the application. Sysmgr responsibility allows you to set up and maintain users, application security, objects, and data. It also allows you to run Oracle ABM processes, and control the use and deletion of critical objects and data. You must have Sysmgr responsibility in order to perform the following tasks:
■ Create responsibilities in Oracle ABM.
■ Relate Oracle Applications user names to Oracle ABM responsibilities.
■ Grant (limited) system administrator privileges to other users.
System Administrator PrivilegesOracle ABM allows the Sysmgr responsibility to grant limited system administrator privileges to other, non-Sysmgr responsibilities. System administrator privileges allow you to:
■ Create new security profiles and security rules.
■ Assign security profiles to responsibilities.
■ Access all Oracle ABM objects and data (without security profiles assigned).
■ Close, open, and delete data sets.
■ Lock and unlock attributes.
See "Closing and Opening Data Sets" and "Locking Attributes"in Chapter 3, and "Deleting Data Sets" in Chapter 13 for more information on these topics.
Granting system administrator privileges eliminates the need to assign security, master list, and model profiles to a responsibility. Updating a responsibility to system administrator status overrides any existing profile assignments.
System Administration 14-3

Setting Up Users
You do not need to remove existing profile assignments in order to grant system administrator privileges. It is recommended that you leave existing profile assignments in place, especially if system administrator privileges are granted on a temporary basis.
◗◗To create a responsibility in Oracle ABM: Navigate to the Security Responsibilities inspector panel.
Choose the New icon on the toolbar to open the Security Responsibilities Wizard. Choose the Next button on the wizard welcome screen to begin the setup process.
Note: You must first create and save a responsibility before you can grant system administrator privileges. Oracle ABM will not allow you to add system administrator privileges while you are creating a new responsibility. You can grant or remove system administrator privileges at any time after you create a responsibility.
14-4 Oracle Activity-Based Management User Guide

Setting Up Users
Step 1 Enter the required data
Enter a unique responsibility ID and a responsibility name. Entering a description is optional. If desired, you can assign an installation security profile and an interface security profile from the drop-down lists. See "Assigning Security Profiles" on page 14-10 for additional information on these two profile types. Choose the New button if you want to add more than one responsibility in the same update. When finished, choose Next to continue to the Step 2 screen.
Step 2 Press finish to create security responsibilitiesReview the displayed results. If necessary, choose the Back button to return to the previous screen in order to make changes. Choose Finish to save the update when you are satisfied with the results.
System Administration 14-5

Setting Up Users
◗◗To update system administrator privileges for a responsibility: 1. Navigate to the Security Responsibilities inspector panel.
2. Select a responsibility by clicking anywhere on a responsibility row in order to highlight it and choose the Details button.
3. Click on the System Administrator checkbox to grant (checked) or remove (unchecked) system administrator privileges.
4. Choose OK to save the update.
Relating Oracle Applications User Names to Oracle ABM ResponsibilitiesRelating an Oracle Applications user name to an Oracle ABM responsibility associates a user with specific security, master list, and model profiles, and identifies a system administrator status. You must relate an Oracle Applications user name to an Oracle ABM responsibility in order to establish access rights for a user. A user cannot access Oracle ABM features, functions, objects and data until their user name is related to an Oracle ABM responsibility.
In addition to controlling access to objects and data, the security, master list, and model profiles associated with a responsibility also determine the lists of values that are displayed when a user is specifying values in the User Preferences window. Oracle ABM will only display values for the objects and attributes to which a responsibility has access. At a minimum, the security, master list, and model profiles associated with a responsibility must allow view access to the objects and attributes that a user must specify in the User Preferences window in order to use the application.
14-6 Oracle Activity-Based Management User Guide

Setting Up Users
Oracle ABM associates user preferences settings with a responsibility, not with a user name. It is strongly recommended that you associate each non-Sysmgr user with a unique responsibility ID in order to prevent conflicts between users when specifying or changing user preferences settings.
◗◗To relate a user name to an Oracle ABM responsibility: 1. Navigate to the Oracle Application User ABM Responsibility Assignment
inspector panel.
2. Select a user name by clicking anywhere on a user name row in order to highlight it and choose the Details button.
System Administration 14-7

Setting Up Security
3. Click on the button to the right of the Responsibility ID field in order to display a list of Oracle ABM responsibilities.
4. Select a responsibility by clicking anywhere on a responsibility row in order to highlight it. Choose the OK button to return to the Details window after making a selection.
5. Choose OK on the Details window to save your selection.
Setting Up SecuritySecurity in Oracle ABM is based on security profiles, master list profiles, and model profiles that you associate with an Oracle ABM responsibility. Security profiles defines access rights to all Oracle ABM objects (such as master lists, models, data sets, calculations, mapping rule sets, etc.). Master list and model profiles define access to Oracle ABM data. You use master list and model profiles to define the specific master lists, models, and model elements (bill types, activity rate sets, mapping rule sets, and data sets) that a responsibility has access to, and for each of these, which security profile applies.
Creating Security ProfilesA security profile is a list of security rules that define view and update access for a grouping of Oracle ABM objects. You create a security profile by creating a security profile name and by associating the profile name with a security profile type. Security profile types are pre-defined groupings, or lists, of Oracle ABM objects. You use the list of objects associated with each profile type to define security rules.
14-8 Oracle Activity-Based Management User Guide

Setting Up Security
Security Profile TypesThere are eight security profile types including:
■ Installation
■ Interface
■ Master List
■ Model
■ Bill Type
■ Activity Rate Set
■ Mapping Rule Sets
■ Data Set
See Appendix D, "Securable Objects List" for a table that lists the Oracle ABM objects that correspond to each profile type.
Security RulesA security rule is comprised of an object and a security code. You define security rules by assigning a security code to each of the objects associated with a security profile type. Security codes define whether a profile will grant view access (V), update access (U), or no access (a blank designation) to an object. When you create a security profile, the security codes for all security rules will be blank, signifying no access rights. You must update each security rule and assign a view or update security code if you want to allow access to an object.
Many Oracle ABM windows contain more than one securable object. In these cases, certain windows will automatically upgrade security from no access to view access, if a user needs access to another dependent securable object. For example, on the account data window there are two securable objects, the model department account and account data. If a responsibility has view access to account data, but no defined access to model department accounts, Oracle ABM will allow the user view access to model department accounts. This enables a responsibility to view the model department accounts associated with the account data. No security access is ever automatically upgraded to update access.
System Administration 14-9

Setting Up Security
Assigning Security Profiles■ Installation and Interface security profiles are associated directly with a
responsibility. You can specify Installation and Interface profiles at the time a responsibility is created. Installation and Interface profiles can also be assigned or changed anytime after a responsibility is set up.
– Installation profiles define access to all objects which reside outside master lists and models (such as master list IDs, currencies, attributes).
– Interface profiles define which staging area import sources a user has access to in order to import information into the system.
■ Master Lists and Model security profiles are associated with a responsibility and with specific master lists and models. You create Master List and Model profiles by selecting a responsibility, and the master lists and models that a responsibility can access. You select master lists and models by assigning a master list or model security profile to a master list or model item. The security profile assigned to a master list or model define the access rights that a responsibility has for that specific master list or model item.
■ Activity Rate Set, Bill Type, Mapping Rule Sets, and Data Set security profiles are associated with a responsibility and with a model profile. When you create model profiles, you also select the bill types, activity rate sets, mapping rule sets, and data sets that a responsibility can access within a model. You make a selection by assigning a bill type, activity rate set, mapping rule sets, or data set security profile to each respective bill type, activity rate set, mapping rule set, or data set item. The security profiles assigned to each model element define the access rights that a responsibility has for that specific item.
14-10 Oracle Activity-Based Management User Guide

Setting Up Security
Using the Security Profiles Inspector PanelYou use the Security Profiles inspector panel to create, update, and view security profiles and security rules.
Security Profiles Grid The Security Profiles grid of the inspector panel displays all security profiles that have been created in Oracle ABM. From the Security Profiles grid you can access description information for a single profile. To access the Details window for a security profile, click anywhere on a profile row in order to highlight it and choose the Details button.
◗◗To edit a security profile: You can only update description information in the Details:Security Profiles window. Choose the OK button to save any changes.
Security Rules Grid The Security Rules grid of the inspector panel displays the list of security rules that are associated with a highlighted security profile. The list of objects displayed for each profile is based on the profile type. From the Security Rules grid you can view and update security codes for one or more rules.
System Administration 14-11

Setting Up Security
You can use the Fill button option on the Security Rules grid when you want to update security codes for more than one rule using the same code. See "Using the Fill Button to Update Security Codes" on page 14-14 for information.
You can use the Clear Access button option when you want to remove security codes for one or more security rules. See "Using the Clear Access Button to Clear Security Codes" on page 14-14 for information.
You can use the Details window to change a security code for a single rule. To access the Details window for a security rule, click anywhere on a security rule row in order to highlight it, and choose the Details button.
◗◗To edit a security rule: To update the security code for a security rule, click on the button next to the Update All or View All options to make a selection. Choose the OK button to save any changes.
◗◗To create a security profile: Navigate to the Security Profiles inspector panel. Choose the New icon on the toolbar to open the Security Profiles Wizard. Choose the Next button on the wizard welcome screen to begin the setup process.
14-12 Oracle Activity-Based Management User Guide

Setting Up Security
Step 1 Enter the required data
You must select a security profile type from the drop-down list. Enter a unique security profile ID and a profile name. Entering a description is optional. Choose the New button if you want to add more than one profile in the same update. When finished, choose Next to continue to the Step 2 screen.
Step 2 Press finish to create security profilesReview the displayed results. If necessary, choose the Back button to return to the previous screen in order to make changes. Choose Finish to save the update when you are satisfied with the results.
When you create a security profile, the security code field for all objects listed in security rules will be blank. A blank designation signifies no access rights to an object. If you want a profile to allow access to an object, you must update a security rule and assign a security code of either View (V) or Update (U). You can update security rules one at a time by navigating to the Details window for each rule. See the preceding caption "Using the Security Profiles Inspector Panel" for information. You can update several rules at a time with the same security code by using the Fill button option. See the following caption "Using the Fill Button to Update Security Codes" for information.
System Administration 14-13

Setting Up Security
Using the Fill Button to Update Security CodesUse the Fill button option on the Security Rules grid when you want to update more than one security rule with the same security code.
◗◗To update security codes using the Fill button:
1. Navigate to the Security Rules grid in the Security Profiles inspector panel.
2. Highlight the security rules you want to update by clicking anywhere on a row, and by using your [Ctrl] and [Shift] keys, as appropriate. Choose the Fill button to open the Details:Security Rules window.
3. The Details:Security Rules window will display the first record highlighted in Step 2. Select a security code option by clicking on the button next to the Update All or View All options.
4. Choose the OK button to apply the update to all of the rules you selected in Step 2.
Using the Clear Access Button to Clear Security CodesYou can use the Clear Access button option when you want to remove view and / or update access for one or more security rules.
◗◗To clear security codes using the Clear Access button:
1. Navigate to the Security Rules grid in the Security Profiles inspector panel.
2. Highlight one or more security rules you want to update by clicking on a rule in order to highlight it, and by using your [Ctrl] and [Shift] Keys, as appropriate. Choose the Clear Access button to clear the security codes for the selected rules.
3. Choose the Save icon on the toolbar to save the update.
14-14 Oracle Activity-Based Management User Guide

Setting Up Security
Creating Master List ProfilesMaster list profiles identify the master lists and models that a responsibility can access, and the master list and model security profiles that apply to each master list or model item. You must specifically identify each master list and model that a responsibility can access and assign each master list and model an appropriate security profile.
You can assign different security profiles to each master list or model occurrence. For example, one master list can be associated with a security profile that allows update access, while another master list can be associated with a profile that allows only view access.
You create a master list profile by:
■ Selecting a responsibility ID.
■ Identifying a specific master list and model item.
■ Assigning a master list or model security profile to the master list or model item.
Using the Master List Profiles Inspector PanelYou use the Master List Profiles inspector panel to create, update, and view master list profiles and model profiles for a single responsibility.
When you open the Master List Profiles inspector panel all fields will be blank.
System Administration 14-15
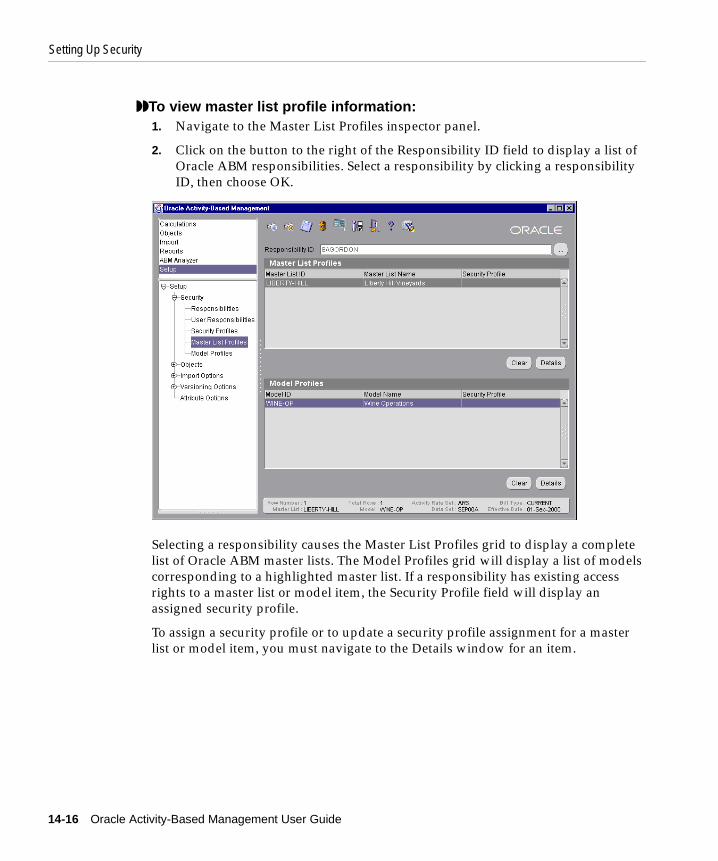
Setting Up Security
◗◗To view master list profile information: 1. Navigate to the Master List Profiles inspector panel.
2. Click on the button to the right of the Responsibility ID field to display a list of Oracle ABM responsibilities. Select a responsibility by clicking a responsibility ID, then choose OK.
Selecting a responsibility causes the Master List Profiles grid to display a complete list of Oracle ABM master lists. The Model Profiles grid will display a list of models corresponding to a highlighted master list. If a responsibility has existing access rights to a master list or model item, the Security Profile field will display an assigned security profile.
To assign a security profile or to update a security profile assignment for a master list or model item, you must navigate to the Details window for an item.
14-16 Oracle Activity-Based Management User Guide
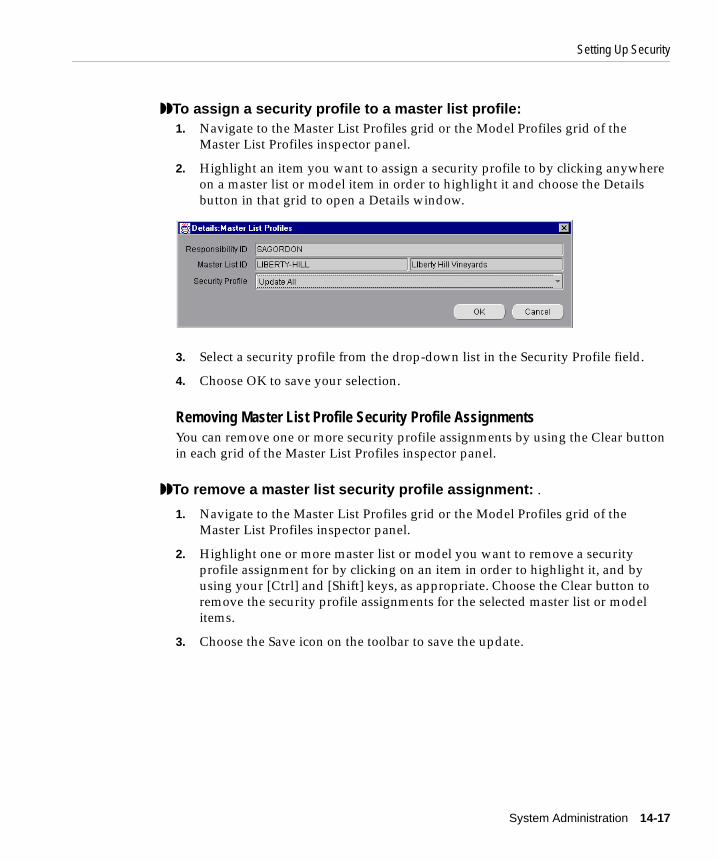
Setting Up Security
◗◗To assign a security profile to a master list profile: 1. Navigate to the Master List Profiles grid or the Model Profiles grid of the
Master List Profiles inspector panel.
2. Highlight an item you want to assign a security profile to by clicking anywhere on a master list or model item in order to highlight it and choose the Details button in that grid to open a Details window.
3. Select a security profile from the drop-down list in the Security Profile field.
4. Choose OK to save your selection.
Removing Master List Profile Security Profile AssignmentsYou can remove one or more security profile assignments by using the Clear button in each grid of the Master List Profiles inspector panel.
◗◗To remove a master list security profile assignment: .
1. Navigate to the Master List Profiles grid or the Model Profiles grid of the Master List Profiles inspector panel.
2. Highlight one or more master list or model you want to remove a security profile assignment for by clicking on an item in order to highlight it, and by using your [Ctrl] and [Shift] keys, as appropriate. Choose the Clear button to remove the security profile assignments for the selected master list or model items.
3. Choose the Save icon on the toolbar to save the update.
System Administration 14-17

Setting Up Security
Creating Model ProfilesAfter you identify the models a responsibility can access and have assigned model profiles, you must assign additional security profiles to each model in order to grant access to four of the functional elements of a model:
■ Bill types
■ Activity rate sets
■ Mapping rule sets
■ Data sets
You must identify each model element that a responsibility can access and assign an appropriate security profile to each item. A responsibility can access only those model elements to which access has been specifically granted. You can assign different security profiles to each occurrence of a model element. For example, one mapping rule set can be associated with a security profile that allows update access, while another mapping rule set can be associated with a security profile that allows only view access.
You create a model profile by:
■ Selecting a responsibility ID.
■ Identifying a specific master list and model item.
■ Navigating to the appropriate model profile inspector panel tab and assigning a bill type, activity rate set, mapping rule set, or data set security profile to each item.
Using the Model Profiles Inspector PanelThe Model Profiles inspector panel consists of four tabs:
■ Bill Types
■ Activity Rate Set
■ Mapping Rule Sets
■ Data Sets
You use the Model Profiles inspector panel to create, update, and view security profiles for bill types, activity rate sets, mapping rules, and data sets for model profiles. The Bill Types tab is the default tab that opens when you navigate to the Model Profiles inspector panel.
14-18 Oracle Activity-Based Management User Guide
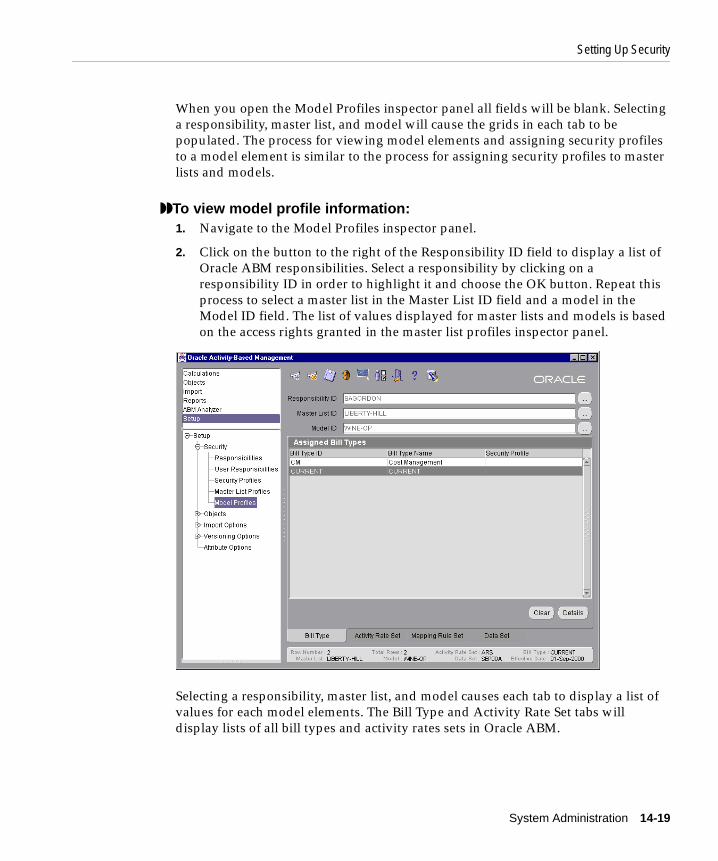
Setting Up Security
When you open the Model Profiles inspector panel all fields will be blank. Selecting a responsibility, master list, and model will cause the grids in each tab to be populated. The process for viewing model elements and assigning security profiles to a model element is similar to the process for assigning security profiles to master lists and models.
◗◗To view model profile information: 1. Navigate to the Model Profiles inspector panel.
2. Click on the button to the right of the Responsibility ID field to display a list of Oracle ABM responsibilities. Select a responsibility by clicking on a responsibility ID in order to highlight it and choose the OK button. Repeat this process to select a master list in the Master List ID field and a model in the Model ID field. The list of values displayed for master lists and models is based on the access rights granted in the master list profiles inspector panel.
Selecting a responsibility, master list, and model causes each tab to display a list of values for each model elements. The Bill Type and Activity Rate Set tabs will display lists of all bill types and activity rates sets in Oracle ABM.
System Administration 14-19

Setting Up Security
The Mapping Rule Set and Data Set tabs will display the mapping rule sets and data sets that are associated with the designated model. If a responsibility has existing access rights to a model element, the Security Profile field will display an assigned security profile.
To assign a security profile or to update a security profile assignment for a model element, you must navigate to the Details window for an item.
◗◗To assign a security profile to a model profile element: 1. Navigate to one of the four tabs of the Model Profiles inspector panel.
2. Highlight an item you want to assign a security profile to by clicking anywhere on a bill type, activity rate set, mapping rule set, or data set item in order to highlight it. Choose the Details button to open a Details window.
3. Select a security profile from the drop-down list in the Security Profile field.
4. Choose OK to save your selection.
Using the Clear Button to Remove Model Profile Security Profile AssignmentsYou can remove one or more security profile assignments by using the Clear button in each tab of the Model Profiles inspector panel.
◗◗To remove a model profile security profile assignment: .
1. Navigate to one of the four tabs of the Model Profiles inspector panel.
2. Highlight one or more bill types, activity rates sets, mapping rule sets, or data set items by clicking on a an item in order to highlight it and by using your [Ctrl] and [Shift] keys, as appropriate. Choose the Clear button to remove the security profile assignments for the selected model elements.
3. Choose the Save icon on the toolbar to save the update.
14-20 Oracle Activity-Based Management User Guide

Running Concurrent Programs and Reports
Running Concurrent Programs and ReportsYou can run Oracle ABM calculations and other concurrent programs from the Oracle Applications Self Service environment if you have an ABM Supervisor responsibility in Oracle Applications. The main purpose of this responsibility is to provide the ability to launch Oracle ABM calculations and other concurrent programs without having to sign-on to Oracle ABM. This is also the responsibility that is used to perform the data migration task when you are upgrading from an Activa 3.02 database to Oracle ABM.
You can run Oracle ABM reports from the Oracle Applications Self Service environment if you have an ABM Web Reports responsibility in Oracle Applications. The purpose of this responsibility is to provide the ability to run Oracle ABM reports without having to sign-on to Oracle ABM.
See Appendix B for more information on Oracle Applications responsibility definitions for Oracle ABM. See Appendix C for a list of concurrent programs and the parameters required to run each. Refer to the Oracle Applications User’s Guide for information on running concurrent programs. For information on migrating data from Activa 3.02, see the Oracle Activity-Based Management Installation Guide.
Note: To run Oracle ABM calculations from the Self Service environment, a user must also have an Oracle ABM responsibility, and have specified any user preferences settings in Oracle ABM that are required to run the calculation.
Note: To make a report available for selection in the ABM Web Reports menu, the Publish Flag for a report must be selected (checked) at the time the report is generated. See Chapter 11, "Reporting" for more information.
System Administration 14-21

Installation-Specific Date and Number Formats
Installation-Specific Date and Number FormatsThe currency, numeric, date, and date/time format is defined by an ABM profile option maintained within Oracle Applications.
◗◗To find the profile option: 1. Log in to Oracle Applications as SYSADMIN–APPS Responsibility: System
Administrator.
2. Navigate to Profile > System
3. Search on ABM%.
The specific profile option and default values are listed in the following table:
◗◗To change a format:
1. Log on to Oracle Applications
2. Select the Profile menu option, then select the profile option for the format that you want.
3. After the entry has been saved, you must stop and restart the middle tier processes for them to take effect.
The profile options represent Java date formats, which are different from the set of Oracle date formats.
4. To see a complete list of valid Java date formats:
a. Navigate to http://java.sun.com/products/jdk/1.2/docs/api/
b. Scroll to find the entries for DecimalFormat, NumberFormat and SimpleDateFormat.
Blank profile options will default to the format specified for the selected installation locale.
Profile Option Default Format
ABM: Java Currency Format String ##,###,###,##0.00000
ABM: Java Date Format String dd-MMM-yyyy
ABM: Java Date Time Format String dd-MMM-yyyy hh:mm:ss
ABM: Java Numeric Format String ##,###,##0.#####
14-22 Oracle Activity-Based Management User Guide

Installation-Specific Date and Number Formats
Special Considerations for European and Similar LocalesMany European locales use the period character (.) as the thousands separator and the comma (,) as the decimal separator for numeric and currency formats. ABM uses the Java format and the comma to indicate the location for the thousands separator, and the period as the location of the decimal separator.
When displaying the format in the application, ABM checks the selected locale and replaces the thousands and decimal separator characters as defined by the Java format, with the character specified by the selected locale.
For example, when the following conditions are present, currencies will display as 100.000.000,00000:
■ ABM: Java Currency Format String is set to the default as stated previously
■ The selected locale is France
■ The period is the chosen thousands separator and the comma is the chosen decimal separator for the French locale
Profile Options for Numeric, Currency, and Date Formats in Web ReportsPrior to setting formats for Web reports, the System Administrator must grant the Preferences user responsibility through Oracle Applications.
◗◗To grant the Preferences user responsibility:
1. Log in to Oracle Applications as the System Administrator, then navigate to Security > User > Define.
2. Select a user and then select the Responsibilities tab.
3. Add the Preferences responsibility to the user, then save your changes.
Note: ABM messages will not be displayed until ABM has been translated into other locales. It is recommended that you use unformatted numbers with a period as the decimal indicator for spreadsheet imports.
System Administration 14-23

Installation-Specific Date and Number Formats
Numeric and Date FormatsNumeric formats in Web reports use the Oracle Applications locale setting as the default display format.
Date formats in Web reports use the Oracle Applications standard format of dd-mmm-yyyy.
◗◗To change the numeric format:
1. Select the Preferences responsibility in Self-Service.
2. Navigate to Preferences > General Preferences, select the Number Format you want to see displayed in Web Reports, and then select Apply.
The new Number Format will display the next time a report is executed.
◗◗To change the date format:
1. Selecting the Preferences responsibility in Self-Service.
2. Navigate to Preferences 17 > General Preferences, select the Date Format that you want to see displayed in Web Reports, and then click Apply.
The new Date Format will display the next time a report is executed.
Currency FormatsCurrency formats in Web reports are managed by the following Oracle Applications profile options:
Profile Option Default Format
Currency: Mixed Currency Precision None. Enter a numeric value that represents the precision
Currency: Negative Format None. Selections are (xxx), <xxx>, -xxx, xxx-
Currency: Positive Format None. Selections are xxx, +xxx, xxx+
Currency: Thousands Separator None. Selections are Yes or No.
14-24 Oracle Activity-Based Management User Guide

Customizing UI Labels
◗◗To set currency formats:
1. Log in to Oracle Applications as the System Administrator.
2. Navigate to Profile > Personal. In the Find Personal Profiles Values window, enter CURR%.
The thousands separator character and the decimal character are specified by the locale setting in Oracle Applications.
Customizing UI LabelsOracle ABM and related Web reports share field label text used for their respective user interfaces. These text values are dynamically retrieved from the Oracle Applications Database. This feature gives you the flexibility to change label text in a central location, for use by the ABM application and as well as Web reports.
ABM label values are stored in the FND_LOOKUP_VALUES table. This table is owned by the APPLSYS schema in the Oracle Applications database. Each label has a lookup type, lookup code, and an associated meaning. To change or update the meaning of a label, you must know the lookup type associated with the ABM Label, which can be obtained by querying the FND_LOOKUP_VALUES table in the Oracle Applications Database.
The following table lists the UI-related lookup types and their descriptions. These lookup types identify the types related to ABM and facilitates the search for a particular ABM label.
LOOKUP_TYPE Description
ABM_UI_ANALYZER Labels for ABM Analyzer
ABM_UI_ATTRIBUTE_LABEL Column header labels
ABM_UI_BOR_WIZ_TREE_LABEL BOR hierarchy labels
ABM_UI_CALC_LP_LABEL Calculation Launch pad labels.
ABM_UI_ENTITY_LP_LABEL Objects launch pad labels.
ABM_UI_HIERARCHY_LABEL Activity and Dept. hierarchy labels.
ABM_UI_IMPORT_LP_LABEL Imports launch pad labels
ABM_UI_LABEL All other UI labels.
ABM_UI_MENU Menu labels.
System Administration 14-25

Customizing UI Labels
Once you determine the lookup type, you can use the Oracle Applications forms interface to change the meaning of a label.
ABM_UI_PANELTITLE Panel titles.
ABM_UI_REPORTS_LP_LABEL Reports launch pad labels
ABM_UI_SETUP_LP_LABEL Setup launch pad labels
ABM_UI_VT_LABEL Visual Tracing labels
ABM_UI_WIZPAGEDESC Wizard page description.
ABM_UI_WIZPAGETITLE Wizard page titles
ABM_UI_WIZTITLE Wizard titles
ABM_UI_WIZWELCOMETEXT Wizard welcome texts
HTML_NAVIGATION_ICONS General Report info labels
Note: to perform the following procedure, you must have the ABM Supervisor responsibility assigned to your Oracle Self Service Applications user ID.
LOOKUP_TYPE Description
14-26 Oracle Activity-Based Management User Guide

Customizing UI Labels
◗◗To change label text:
1. All users must be logged off the system.
2. Shut down the ABM middle tier process.
3. Log into Oracle Self Service Application with ABM Supervisor privileges.
4. Select the ABM Supervisor responsibility. This launches the Oracle forms interface.
5. Select Lookups from the Oracle Navigator forms. This launches the ABM lookups form.
System Administration 14-27

Customizing UI Labels
6. Select the Type field. Then select View menu and choose Find.
7. Pick the lookup type value selected earlier in the list of values provided by Find.
8. Enter OK and all available lookup codes for that lookup type will be displayed.
9. This list can further be narrowed down by filtering the Code column.
10. Select the appropriate lookup code to be changed in the Detail form and change the value of the Meaning field.
11. Save the changes. This updates the meaning for the specified lookup code within a lookup type in ABM.
12. Restart the ABM middle tier process. Please see the ABM Installation Guide for instructions.
Note: Any ABM patches installed after the initial ABM installation will overwrite data in the FND_LOOKUP_VALUES table. All user changes will be lost. ABM does not use the Description, Tag, Effective Dates, and Enabled fields shown in the illustration.
14-28 Oracle Activity-Based Management User Guide

Import Specifica
A
Import SpecificationsThis appendix describes the formats and layouts for Oracle ABM import spreadsheets and staging areas.
Format DefinitionsThese format definitions are used in the following tables:
■ varchar2(n). Means a field can contain variable characters, and can be alphanumeric and symbol, where (n) equals the maximum field length.
■ number(n,n). The field can contain a whole number with or without decimal places. The first occurrence of (n) denotes the maximum length of the whole number, and the second occurrence of (n) denotes the maximum number of decimal places. For example, number(38,10) can be a 38 digit whole number with 10 decimal places.
■ date. The field contains a date in the format dd-mmm-yyyy, where dd equals the numeric day, mmm equals the first three letters of a calendar month, and yyyy equals the numeric year.
Note: When specifying attributes, only alpha and numeric characters may be used for attribute IDs. Additionally, attribute IDs must be in English with no embedded special characters.
tions A-1
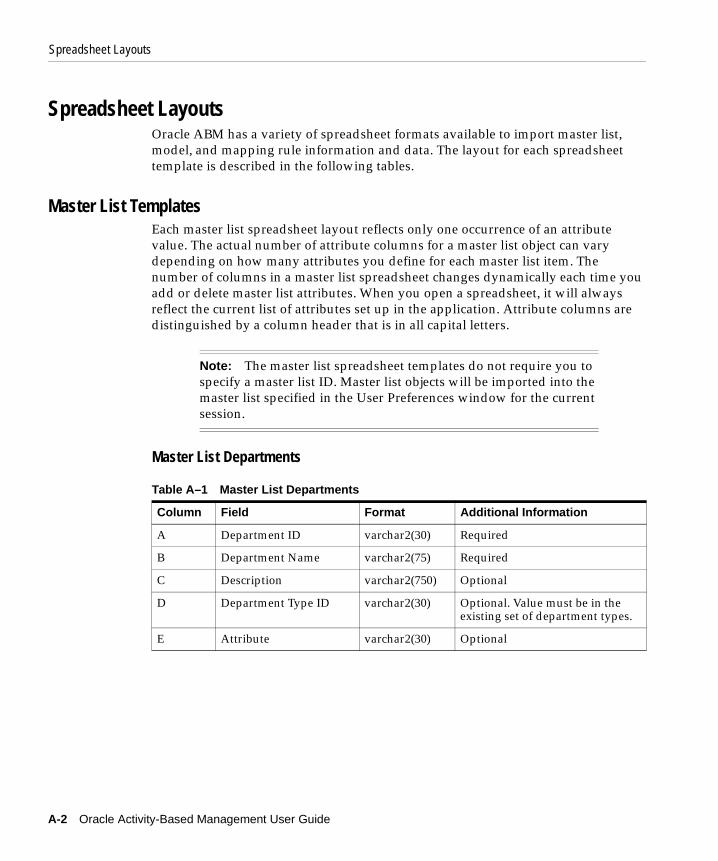
Spreadsheet Layouts
Spreadsheet LayoutsOracle ABM has a variety of spreadsheet formats available to import master list, model, and mapping rule information and data. The layout for each spreadsheet template is described in the following tables.
Master List TemplatesEach master list spreadsheet layout reflects only one occurrence of an attribute value. The actual number of attribute columns for a master list object can vary depending on how many attributes you define for each master list item. The number of columns in a master list spreadsheet changes dynamically each time you add or delete master list attributes. When you open a spreadsheet, it will always reflect the current list of attributes set up in the application. Attribute columns are distinguished by a column header that is in all capital letters.
Master List Departments
Note: The master list spreadsheet templates do not require you to specify a master list ID. Master list objects will be imported into the master list specified in the User Preferences window for the current session.
Table A–1 Master List Departments
Column Field Format Additional Information
A Department ID varchar2(30) Required
B Department Name varchar2(75) Required
C Description varchar2(750) Optional
D Department Type ID varchar2(30) Optional. Value must be in the existing set of department types.
E Attribute varchar2(30) Optional
A-2 Oracle Activity-Based Management User Guide

Spreadsheet Layouts
Master List Department Accounts
Master List Department Statistics
Table A–2 Master List Department Accounts
Column Field Format Additional Information
A Department ID varchar2(30) Required
B Department Name varchar2(75) Required if department is new. Not required if department exists in system.
C Description varchar2(750) Optional
D Account ID varchar2(90) Required
E Account Name varchar2(75) Required if account is new. Not required if account exists in system.
F Description varchar2(750) Optional
G Attribute varchar2(30) Optional
Table A–3 Master List Department Statistics
Column Field Format Additional Information
A Department ID varchar2(30) Required
B Department Name varchar2(75) Required if department is new. Not required if department exists in system.
C Description varchar2(750) Optional
D Statistic ID varchar2(90) Required
E Statistic Name varchar2(75) Required if statistic is new. Not required if statistic exists in system.
F Description varchar2(750) Optional
G Attribute varchar2(30) Optional
Import Specifications A-3

Spreadsheet Layouts
Master List Department Activities
Master List Department Activity Drivers
Table A–4 Master List Department Activities
Column Field Format Additional Information
A Department ID varchar2(30) Required
B Department Name varchar2(75) Required if department is new. Not required if department exists in system.
C Description varchar2(750) Optional
D Activity ID varchar2(15) Required
E Activity Name varchar2(75) Required if activity is new. Not required if activity exists in system.
F Description varchar2(750) Optional
G Attribute varchar2(30) Optional
Table A–5 Master List Department Activity Drivers
Column Field Format Additional Information
A Department ID varchar2(30) Required
B Department Name varchar2(75) Required if department is new. Not required if department exists in system.
C Description varchar2(750) Optional
D Activity Driver ID varchar2(90) Required
E Activity Driver Name varchar2(75) Required if activity driver is new. Not required if activity driver exists in system.
F Description varchar2(750) Optional
G Attribute varchar2(30) Optional
A-4 Oracle Activity-Based Management User Guide

Spreadsheet Layouts
Master List Accounts
Master List Statistics
Master List Activities
Table A–6 Master List Accounts
Column Field Format Additional Information
A Account ID varchar2(90) Required
B Account Name varchar2(75) Required
C Reconciling Code varchar2(3) Optional. This is a Y (yes) or N (no) flag.
D Description varchar2(750) Optional
E Attribute varchar2(30) Optional
Table A–7 Master List Statistics
Column Field Format Additional Information
A Statistic ID varchar2(90) Required
B Statistic Name varchar2(75) Required
C Description varchar2(750) Optional
D Attribute varchar2(30) Optional
Table A–8 Master List Activities
Column Field Format Additional Information
A Activity ID varchar2(15) Required
B Activity Name varchar2(75) Required
C Description varchar2(750) Optional
D Attribute varchar2(30) Optional
Import Specifications A-5

Spreadsheet Layouts
Master List Activity Drivers
Master List Materials
Master List Cost Objects
Table A–9 Master List Activity Drivers
Column Field Format Additional Information
A Activity Driver ID varchar2(90) Required
B Activity Driver Name varchar2(75) Required
C Description varchar2(750) Optional
D Attribute varchar2(30) Optional
Table A–10 Master List Materials
Column Field Format Additional Information
A Material ID varchar2(120) Required
B Material Name varchar2(75) Required
C Description varchar2(750) Optional
D UOM ID varchar2(30) Required. Must be a valid unit of measure.
E Attribute varchar2(30) Optional
Table A–11 Master List Cost Objects
Column Field Format Additional Information
A Cost Object ID varchar2(120) Required
B Cost Object Name varchar2(75) Required
C Description varchar2(750) Optional
D UOM ID varchar2(30) Required. Must be a valid unit of measure.
E Attribute varchar2(30) Optional
A-6 Oracle Activity-Based Management User Guide

Spreadsheet Layouts
Model TemplatesData will be imported into the application for the master list, model and data set specified in your user preferences, unless it is explicitly specified in an import template.
Model Department Account Data
Table A–12 Model Department Account Data
Column Field Format Additional Information
A Department ID varchar2(30) Required
B Department Name varchar2(75) Required if department is new. Not required if department exists in system.
C Description varchar2(750) Optional
D Account ID varchar2(90) Required
E Account Name varchar2(75) Required if account is new. Not required if account exists in system.
F Cost Type varchar2(3) Optional. Defaults to C (cost) if not specified. Can also specify N (non-cost) or R (revenue).
G Description varchar2(750) Optional
H Amount number(38,10) Required
Import Specifications A-7

Spreadsheet Layouts
Model Department Statistic Data
Model Department Activities
Table A–13 Model Department Statistic Data
Column Field Format Additional Information
A Department ID varchar2(30) Required
B Department Name varchar2(75) Required if department is new. Not required if department exists in system.
C Description varchar2(750) Optional
D Statistic ID varchar2(90) Required
E Statistic Name varchar2(75) Required if statistic is new. Not required if statistic exists in system.
F Description varchar2(750) Optional
G Quantity number(38,10) Required
Table A–14 Model Department Activities
Column Field Format Additional Information
A Department ID varchar2(30) Required
B Department Name varchar2(75) Required if department is new. Not required if department exists in system.
C Description varchar2(750) Optional
D Activity ID varchar2(15) Required
E Activity Name varchar2(75) Required if activity is new. Not required if activity exists in system.
F Description varchar2(750) Optional
A-8 Oracle Activity-Based Management User Guide

Spreadsheet Layouts
Model Department Activity Department Account Data
Table A–15 Model Department Activity Department Account Data
Column Field Format Additional Information
A Department ID varchar2(30) Required
B Department Name varchar2(75) Required if department is new. Not required if department exists in system.
C Description varchar2(750) Optional
D Activity ID varchar2(15) Required
E Activity Name varchar2(75) Required if activity is new. Not required if activity exists in system.
F Description varchar2(750) Optional
G Department ID varchar2(30) Required
H Department Name varchar2(75) Required if department is new. Not required if department exists in system.
I Description varchar2(750) Optional
J Account ID varchar2(90) Required
K Account Name varchar2(75) Required if account is new. Not required if account exists in system.
L Description varchar2(750) Optional
M Amount number(38,10) Required
Note: Accounts created via the model department activity department account data import will be assigned a cost type of C (cost).
Import Specifications A-9

Spreadsheet Layouts
Model Department Activity Statistic Data
Table A–16 Model Department Activity Statistic Data
Column Field Format Additional Information
A Department ID varchar2(30) Required
B Department Name varchar2(75) Required if department is new. Not required if department exists in system.
C Description varchar2(750) Optional
D Activity ID varchar2(15) Required
E Activity Name varchar2(75) Required if activity is new. Not required if activity exists in system.
F Description varchar2(750) Optional
G Department ID varchar2(30) Required
H Department Name varchar2(75) Required if department is new. Not required if department exists in system.
I Description varchar2(750) Optional
J Statistic ID varchar2(90) Required
K Statistic Name varchar2(75) Required if statistic is new. Not required if statistic exists in system.
L Description varchar2(750) Optional
M Quantity number(38,10) Required
A-10 Oracle Activity-Based Management User Guide

Spreadsheet Layouts
Model Department Activity Drivers
Table A–17 Model Department Activity Drivers
Column Field Format Additional Information
A Department ID varchar2(30) Required
B Department Name varchar2(75) Required if department is new. Not required if department exists in system.
C Description varchar2(750) Optional
D Activity ID varchar2(15) Required
E Activity Name varchar2(75) Required if activity is new. Not required if activity exists in system.
F Description varchar2(750) Optional
G Department ID varchar2(30) Required
H Department Name varchar2(75) Required if department is new. Not required if department exists in system.
I Description varchar2(750) Optional
J Activity Driver ID varchar2(90) Required
K Activity Driver Name varchar2(75) Required if activity driver is new. Not required if activity driver exists in system.
L Description varchar2(750) Optional
Note: The activity rate definitions created by the model department activity drivers import will be added to the activity rate set specified in the User Preferences window. If an activity rate set is not specified in user preferences, rates will not be added to a rate set
Import Specifications A-11

Spreadsheet Layouts
Model Department Activity Hierarchy
Model Department Activity Driver Data
Model Department Hierarchy
Table A–18 Model Department Activity Hierarchy
Column Field Format Additional Information
A Department ID (parent) varchar2(30) Required
B Activity ID (parent) varchar2(15) Required
C Department ID (child) varchar2(30) Required
D Activity ID (child) varchar2(15) Required
Table A–19 Model Department Activity Driver Data
Column Field Format Additional Information
A Department ID varchar2(30) Required
B Department Name varchar2(75) Required if department is new. Not required if department exists in system.
C Description varchar2(750) Optional
D Activity Driver ID varchar2(90) Required
E Activity Driver Name varchar2(75) Required if activity driver is new. Not required if activity driver exists in system.
F Description varchar2(750) Optional
G Total number(38,10) Required
Table A–20 Model Department Hierarchy
Column Field Format Additional Information
A Model ID (parent) varchar2(15) Required
B Department ID (parent) varchar2(30) Required
C Model ID (child) varchar2(15) Required
D Department ID (child) varchar2(30) Required
A-12 Oracle Activity-Based Management User Guide
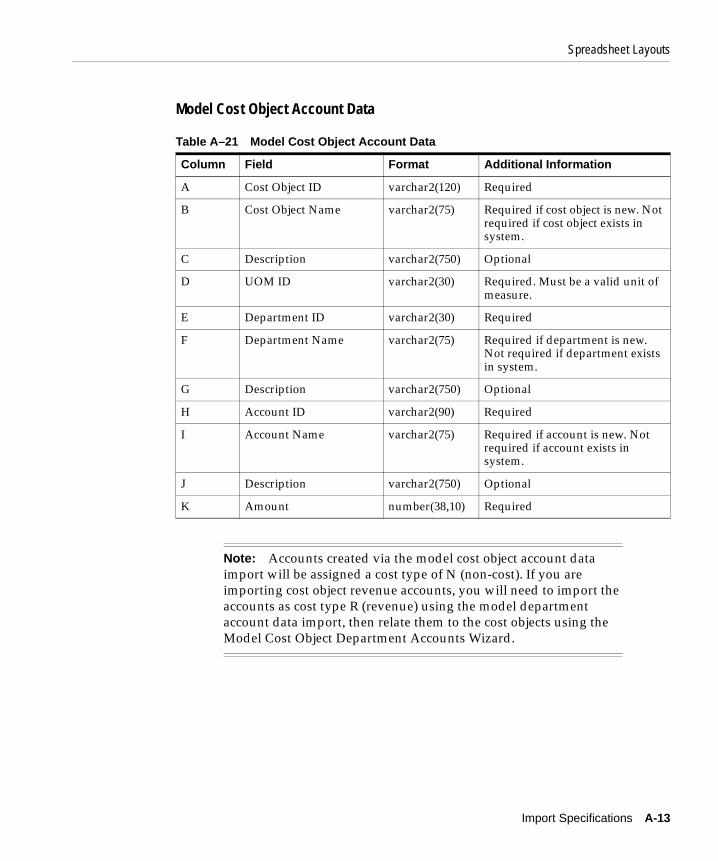
Spreadsheet Layouts
Model Cost Object Account Data
Table A–21 Model Cost Object Account Data
Column Field Format Additional Information
A Cost Object ID varchar2(120) Required
B Cost Object Name varchar2(75) Required if cost object is new. Not required if cost object exists in system.
C Description varchar2(750) Optional
D UOM ID varchar2(30) Required. Must be a valid unit of measure.
E Department ID varchar2(30) Required
F Department Name varchar2(75) Required if department is new. Not required if department exists in system.
G Description varchar2(750) Optional
H Account ID varchar2(90) Required
I Account Name varchar2(75) Required if account is new. Not required if account exists in system.
J Description varchar2(750) Optional
K Amount number(38,10) Required
Note: Accounts created via the model cost object account data import will be assigned a cost type of N (non-cost). If you are importing cost object revenue accounts, you will need to import the accounts as cost type R (revenue) using the model department account data import, then relate them to the cost objects using the Model Cost Object Department Accounts Wizard.
Import Specifications A-13

Spreadsheet Layouts
Model Cost Object Statistic Data
Table A–22 Model Cost Object Statistic Data
Column Field Format Additional Information
A Cost Object ID varchar2(120) Required
B Cost Object Name varchar2(75) Required if cost object is new. Not required if cost object exists in system.
C Description varchar2(750) Optional
D UOM ID varchar2(30) Required. Must be a valid unit of measure.
E Department ID varchar2(30) Required
F Department Name varchar2(75) Required if department is new. Not required if department exists in system.
G Description varchar2(750) Optional
H Statistic ID varchar2(90) Required
I Statistic Name varchar2(75) Required if statistic is new. Not required if statistic exists in system.
J Description varchar2(750) Optional
K Quantity number(38,10) Required
A-14 Oracle Activity-Based Management User Guide
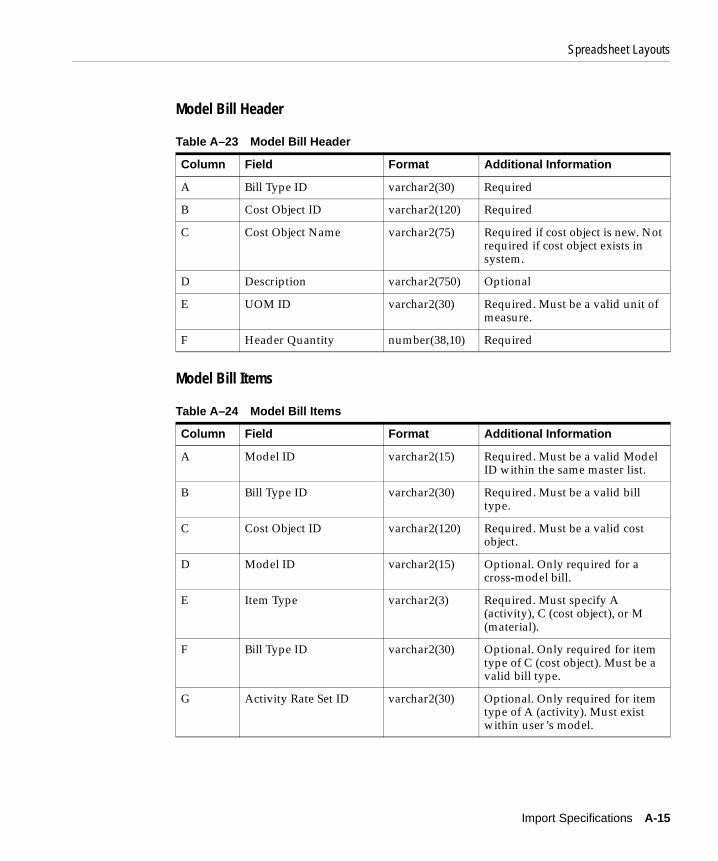
Spreadsheet Layouts
Model Bill Header
Model Bill Items
Table A–23 Model Bill Header
Column Field Format Additional Information
A Bill Type ID varchar2(30) Required
B Cost Object ID varchar2(120) Required
C Cost Object Name varchar2(75) Required if cost object is new. Not required if cost object exists in system.
D Description varchar2(750) Optional
E UOM ID varchar2(30) Required. Must be a valid unit of measure.
F Header Quantity number(38,10) Required
Table A–24 Model Bill Items
Column Field Format Additional Information
A Model ID varchar2(15) Required. Must be a valid Model ID within the same master list.
B Bill Type ID varchar2(30) Required. Must be a valid bill type.
C Cost Object ID varchar2(120) Required. Must be a valid cost object.
D Model ID varchar2(15) Optional. Only required for a cross-model bill.
E Item Type varchar2(3) Required. Must specify A (activity), C (cost object), or M (material).
F Bill Type ID varchar2(30) Optional. Only required for item type of C (cost object). Must be a valid bill type.
G Activity Rate Set ID varchar2(30) Optional. Only required for item type of A (activity). Must exist within user ’s model.
Import Specifications A-15

Spreadsheet Layouts
H Begin Date date Optional. Only required for item type of A (activity). The begin date must exactly match the begin date for the rate in the specified rate set.
I Sequence Number number(38,10) Required. Must be a valid number. Used to differentiate multiple occurrences of the same item on a bill. If you do not explicitly set the sequence numbers, the system will automatically create the next sequential number for each imported bill item.
J Item ID varchar2(120) Required. Must be a valid resource ID. For activities, this is the concatenation of a department Id and an activity ID separated by a dash.
K Item Quantity number(38,10) Optional. Defaults to a value of 1.
L Header Quantity number(38,10) Optional. Defaults to a value of 1.
M Yield % number(38,4) Optional. Defaults to a value of 100%.
N ECO Number varchar2(30) Optional
O BOM Line varchar2(45) Optional
Table A–24 Model Bill Items
Column Field Format Additional Information
A-16 Oracle Activity-Based Management User Guide

Spreadsheet Layouts
Model Material Account Data
Table A–25 Model Material Account Data
Column Field Format Additional Information
A Material ID varchar2(120) Required
B Material Name varchar2(75) Required if material is new. Not required if material exists in system.
C Description varchar2(750) Optional
D UOM ID varchar2(30) Required. Must be a valid unit of measure.
E Department ID varchar2(30) Required
F Department Name varchar2(75) Required if department is new. Not required if department exists in system.
G Description varchar2(750) Optional
H Account ID varchar2(90) Required
I Account Name varchar2(75) Required if account is new. Not required if account exists in system.
J Description varchar2(750) Optional
K Amount number(38,10) Required
Note: Accounts created via the model material account data import will be classified as inventoriable.
Import Specifications A-17

Spreadsheet Layouts
Model Material Statistic Data
Table A–26 Model Material Statistic Data
Column Field Format Additional Information
A Material ID varchar2(120) Required
B Material Name varchar2(75) Required if material is new. Not required if material exists in system.
C Description varchar2(750) Optional
D UOM ID varchar2(30) Required. Must be a valid unit of measure.
E Department ID varchar2(30) Required
F Department Name varchar2(75) Required if department is new. Not required if department exists in system.
G Description varchar2(750) Optional
H Statistic ID varchar2(90) Required
I Statistic Name varchar2(75) Required if statistic is new. Not required if statistic exists in system.
J Description varchar2(750) Optional
K Quantity number(38,10) Required
A-18 Oracle Activity-Based Management User Guide

Spreadsheet Layouts
Model Material Unit Cost
Table A–27 Model Material Unit Cost
Column Field Format Additional Information
A Material ID varchar2(120) Required
B Material Name varchar2(75) Required if material is new. Not required if material exists in system.
C Description varchar2(750) Optional
D UOM ID varchar2(30) Required. Must be a valid unit of measure.
E Inventoriable Amount number(38,10) Required
F Non-inventoriable Amount
number(38,10) Optional
Import Specifications A-19

Spreadsheet Layouts
Mapping Rule Templates
Department Redistribution by Department Statistic
Table A–28 Department Redistribution by Department Statistic
Column Field Format Additional Information
A Mapping Rule Set ID varchar2(15) Required
B Calculation Name varchar2(90) Required
C Group Id Number(38,10) Required. Use a unique group ID to identify a group of rules for a source that has multiple targets. For example, a source department account may target 10 accounts. In this situation, you will have 10 input lines in your spreadsheet. The same group ID should be used for each of the 10 lines.
D Sequence Number Number(38,10) Required
E Source Department Id varchar2(30) Required
F Source Account Id varchar2(90) Required
G Target Department Id varchar2(30) Required
H Target Account Id varchar2(90) Optional
I Statistic ID varchar2(90) Required
J Begin Date date Optional
K End Date date Optional
A-20 Oracle Activity-Based Management User Guide

Spreadsheet Layouts
Department to Activity Mapping by Activity Statistic
Table A–29 Department to Activity Mapping by Activity Statistic
Column Field Format Additional Information
A Mapping Rule Set ID varchar2(15) Required
B Calculation Name varchar2(90) Required
C Group Id Number(38,10) Required. Use a unique group ID to identify a group of rules for a source that has multiple targets.
D Sequence Number Number(38,10) Required
E Source Department Id varchar2(30) Required
F Source Account Id varchar2(90) Required
G Target Department Id varchar2(30) Required
H Target Activity Id varchar2(120) Required
I Target Account Id varchar2(90) Optional
J Department Id varchar2(30) Required
K Statistic ID varchar2(90) Optional
L Begin Date date Optional
M End Date date Optional
N Override Rate Data Set varchar2(30) Optional
O Override Distribution Data Set
varchar2(30) Optional
Import Specifications A-21

Spreadsheet Layouts
Table A–30 Activity to Activity Mapping by Statistic Method
Column Field Format Additional Information
A Mapping Rule Set ID varchar2(15) Required. Must be a valid mapping rule set for master list and model selected in user preferences.
B Calculation Name varchar2(150) Required. Must be a valid calculation for the specified mapping rule set.
C Group Id varchar2(30) Required. The group ID is used to indicate a group of similar sources. When a different group ID is encountered, it is assumed that the source has changed, and the previous rule is saved, and processing for a new rule is initiated.
D Sequence Number number Required. Identifies the sequence of the rule in the specified mapping rule set.
E Source Dept Activity Id varchar2(30) Required. Must be a valid department in the model.
F Source Activity Id varchar2(90) Required. Must be a valid activity for the specified department.
G Target Dept Id varchar2(30) Required. Must be a valid department in the model.
H Target Activity Id varchar2(90) Required. Must be a valid activity for the indicated department.
I Target Account Id varchar2(90) Optional.
J Dept Id varchar2(30) Required. Used in conjunction with statistic ID. Must be a valid department activity department statistic combination. (The statistic must exist at the department activity level in the model.)
A-22 Oracle Activity-Based Management User Guide

Spreadsheet Layouts
K Statistic Id varchar2(90) Required. Used in conjunction with statistic ID. Must be a valid department activity department statistic combination. (The statistic must exist at the department activity level in the model.)
L Begin Date date Optional. If specified, overrides the user preference date.
M End Date date Optional. If specified, overrides the specification for system high date.
N Override Rate Data Set varchar2(30) Optional. Must be a valid data set in the specified model. This value overrides the calculation level value.
O Override Distribution Data Set
varchar2(30) Optional. Must be a valid data set in the specified model. This value overrides the calculation level value.
P Error Code System use only. Displays code of related error message.
Q Error/Warning Message System use only. Displays error text of related error code.
Table A–30 Activity to Activity Mapping by Statistic Method
Column Field Format Additional Information
Import Specifications A-23

Spreadsheet Layouts
Table A–31 Activity to Department Mapping by Statistic Method
Column Field Format Additional Information
A Mapping Rule Set ID varchar2(15) Required. Must be a valid mapping rule set for master list and model selected in user preferences.
B Calculation Name varchar2(150) Required. Must be a valid calculation for the specified mapping rule set.
C Group Id varchar2(30) Required. The group ID is used to indicate a group of similar sources. When a different group ID is encountered, it is assumed that the source has changed, and the previous rule is saved, and processing for a new rule is initiated.
D Sequence Number number Required. Identifies the sequence of the rule in the specified mapping rule set.
E Source Dept Activity Id varchar2(30) Required. Must be a valid department in the model.
F Source Activity Id varchar2(90) Required. Must be a valid activity for the specified department.
G Target Dept Id varchar2(30) Required. Must be a valid department in the model.
H Target Account Id varchar2(90) Optional. If specified, activity accounts are pooled into this account.
I Statistic ID varchar2(90) Required. The statistic must exist in the model for the specified target department.
J Begin Date date Optional. If specified, overrides the user preference date.
K End Date date Optional. If specified, overrides the specification for system high date.
A-24 Oracle Activity-Based Management User Guide

Spreadsheet Layouts
L Override Rate Data Set varchar2(30) Optional. Must be a valid data set in the specified model. This value overrides the calculation level value.
M Override Distribution Data Set
varchar2(30) Optional. Must be a valid data set in the specified model. This value overrides the calculation level value.
N Error Code System use only. Displays code of related error message.
O Error/Warning Message System use only. Displays error text of related error code.
Table A–31 Activity to Department Mapping by Statistic Method
Column Field Format Additional Information
Import Specifications A-25

Staging Area Tables
Staging Area TablesStaging area information and data is captured in four database tables. The table below associates staging area data and import source types with each of the database tables.
The following tables describe the layout and format definitions for each staging area database table.
Table A–32 Staging Area Tables
Staging Area DataImport Source Type Database Table Name
Department Account Data ACCTSRC ABM_IMP_RE_ACC_DAT
Department Statistic Data STATSRC ABM_IMP_RE_STA_DAT
Department Activity Statistic Data ACTSTATSRC ABM_IMP_RES_TRANS
Material Statistic Data (parent transaction) MATXACTSRC ABM_IMP_RES_TRANS
Material Account Data (child transaction) MATXACTSRC ABM_IMP_RES_RE_ACCS
Bill Item Quantity (Cost Object) Statistic Data (parent transaction)
COXACTSRC ABM_IMP_RES_TRANS
Bill Item Quantity (Cost Object) Account Data (child transaction)
COXACTSRC ABM_IMP_RES_RE_ACCS
Table A–33 Database Table: ABM_IMP_RE_ACC_DAT
Column Format Additional Information
SYN_N07_INTERFACE_ID varchar2(30) Required. Value must be ACCTSRC.
SYN_N06_INTERFACE_ID varchar2(30) Required. Set the value to an import source that is defined in Oracle ABM.
008_REPORTING_ENTITY_ID varchar2(30) Required. Department ID
002_DATA_SOURCE_ID varchar2(90) Required. Account ID
DESCRIPTION_TEXT varchar2(750) Optional. Description
SOURCE_SYSTEM_ID varchar2(150) Optional. User defined.
M60_AMOUNT number Required. Amount
A-26 Oracle Activity-Based Management User Guide

Staging Area Tables
SYN_N07_CURRENCY_ID varchar2(30) Required. Value must be CURRENCY.
SYN_N06_CURRENCY_ID varchar2(30) Required. Set the value to the import currency.
TRANSACTION_EXCHANGE_RATE
number Optional. Override Exchange Rate. If the currency ID does not exist in Oracle ABM, you must enter the exchange rate.
MAINT_USER_ID varchar2(11) Optional. System.
MAINT_EFFECT_CODE varchar2(1) Optional. System.
MAINT_TIMESTAMP date Optional. System.
SYN_SOURCE_008_RE_ID varchar2(30) Optional. Used for error handling.
SYN_SOURCE_002_DS_ID varchar2(30) Optional. Used for error handling.
SYN_SOURCE_DESC_TEXT varchar2(750) Optional. Used for error handling.
SYN_SOURCE_M60_AMT number Optional. Used for error handling.
SYN_N07_SOURCE_CURR_ID varchar2(30) Optional. Used for error handling.
SYN_N06_SOURCE_CURR_ID varchar2(30) Optional. Used for error handling.
SYN_SOURCE_XACT_EXCH_RT number Optional. Used for error handling.
SYN_N06_EXCEPTION_ID varchar2(30) Optional. Used for error handling.
SYN_N07_EXCEPTION_ID varchar2(30) Optional. Used for error handling.
N02_BALANCE_DATE date Required. Balance Date.
INVENTORIABLE_CODE varchar2(3) Required. I for inventoriable. N for non-inventoriable.
SYN_SOURCE_INV_CODE varchar2(3) Optional. System.
CREATION_DATE valid date Required. Can specify any valid date.
CREATED_BY FND_USER_ID Required. FND_USER_ID for a valid apps user.
LAST_UPDATE_DATE valid date Required. Can specify any valid date.
Table A–33 Database Table: ABM_IMP_RE_ACC_DAT
Column Format Additional Information
Import Specifications A-27

Staging Area Tables
LAST_UPDATED_BY FND_USER_ID Required. FND_USER_ID for a valid apps user.
LAST_UPDATE_LOGIN number(15) Required. Set to 0.
Table A–34 Database Table: ABM_IMP_RE_STA_DAT
Column Format Additional Information
SYN_N07_INTERFACE_ID varchar2(30) Required. Value must be STATSRC.
SYN_N06_INTERFACE_ID varchar2(30) Required. Set the value to an import source that is defined in Oracle ABM.
008_REPORTING_ENTITY_ID varchar2(30) Required. Department ID.
002_DATA_SOURCE_ID varchar2(90) Required. Statistic ID.
DESCRIPTION_TEXT varchar2(750) Optional. Description.
SOURCE_SYSTEM_ID varchar2(150) Optional. User-defined.
M13_QUANTITY number Required. Quantity.
MAINT_USER_ID varchar2(11) Optional. System.
MAINT_EFFECT_CODE varchar2(1) Optional. System.
MAINT_TIMESTAMP date Optional. System.
SYN_SOURCE_008_RE_ID varchar2(30) Optional. Used for error handling.
SYN_SOURCE_002_DS_ID varchar2(30) Optional. Used for error handling.
SYN_SOURCE_DESC_TEXT varchar2(750) Optional. Used for error handling.
SYN_SOURCE_M13_QTY number Optional. Used for error handling.
SYN_N07_EXCEPTION_ID varchar2(30) Optional. Used for error handling.
SYN_N06_EXCEPTION_ID varchar2(30) Optional. Used for error handling.
N03_BALANCE_DATE date Required. Balance Date
CREATION_DATE valid date Required. Can specify any valid date.
CREATED_BY FND_USER_ID Required. FND_USER_ID for a valid apse user.
Table A–33 Database Table: ABM_IMP_RE_ACC_DAT
Column Format Additional Information
A-28 Oracle Activity-Based Management User Guide

Staging Area Tables
LAST_UPDATE_DATE valid date Required. Can specify any valid date.
LAST_UPDATED_BY FND_USER_ID Required. FND_USER_ID for a valid apps user.
LAST_UPDATE_LOGIN number(15) Required. Set to 0.
Table A–35 Database Table: ABM_IMP_RES_TRANS
Column Format Additional Information
SYN_N07_INTERFACE_ID varchar2(30) Required. Value is MATXACTSRC for materials, COXACTSRC for cost objects, and ACTSTATSRC for activity statistics.
SYN_N06_INTERFACE_ID varchar2(30) Required. Set the value to an import source that is defined in Oracle ABM for the respective source type.
N12_RESOURCE_TYPE_CODE varchar2(3) Required. M for materials, C for cost objects, A for activities.
N12_SEQUENCE_NUMBER number Required. Corresponds to account transactions in ABM_IMP_RES_RE_ACCS.
N12_TRANSACTION_DATE date Required. Transaction date (similar to Balance Date).
N12_TRANSACTION_ID varchar2(60) Optional. User Defined.
009_RESOURCE_ID varchar2(120) Required. Material ID for M, Cost Object ID for C, and Activity ID for A.
009_NAME varchar2(75) Optional. Material, cost object, or activity name.
008_REPORTING_ENTITY_ID varchar2(30) Required. Department ID.
008_NAME varchar2(75) Optional. Department Name.
SYN_002_ID_STAT varchar2(30) Optional. Statistic ID.
SYN_002_NAME_STAT varchar2(75) Optional. Statistic Name.
Table A–34 Database Table: ABM_IMP_RE_STA_DAT
Column Format Additional Information
Import Specifications A-29

Staging Area Tables
M17_QUANTITY number Optional. Quantity. Required for statistics.
SYN_N07_CURRENCY_ID varchar2(30) Optional. Value must be CURRENCY.
SYN_N06_CURRENCY_ID varchar2(30) Optional. Set the value to the import currency.
TRANSACTION_EXCHANGE_RATE
number Optional. Override Exchange Rate. If the currency ID does not exist in Oracle ABM, you must enter an exchange rate.
SYN_N07_UM_ID varchar2(30) Optional. Value must be UOM for cost objects and materials. Leave blank for activities.
SYN_N06_UM_ID varchar2(30) Optional. Specify the appropriate UOM for cost object and mateials. Leave blank for activities.
MEMO varchar2(390) Optional. Description.
SYN_SOURCE_N12_TRAN_DATE date Optional. Used for error handling.
SYN_SOURCE_N12_TRAN_ID varchar2(60) Optional. Used for error handling.
SYN_SOURCE_009_RES_ID varchar2(120) Optional. Used for error handling.
SYN_SOURCE_008_RE_ID varchar2(30) Optional. Used for error handling.
SYN_SOURCE_002_ID_STAT varchar2(30) Optional. Used for error handling.
SYN_SOURCE_M17_QUANTITY number Optional. Used for error handling.
SYN_SOURCE_N07_CURR_ID varchar2(30) Optional. Used for error handling.
SYN_SOURCE_N06_CURR_ID varchar2(30) Optional. Used for error handling.
SYN_SOURCE_XACT_EXCH_RT number Optional. Used for error handling.
SYN_SOURCE_N07_UM_ID varchar2(30) Optional. Used for error handling.
SYN_SOURCE_N06_UM_ID varchar2(30) Optional. Used for error handling.
SYN_N07_EXCEPTION_ID varchar2(30) Optional. Used for error handling.
SYN_N06_EXCEPTION_ID varchar2(30) Optional. Used for error handling.
Table A–35 Database Table: ABM_IMP_RES_TRANS
Column Format Additional Information
A-30 Oracle Activity-Based Management User Guide

Staging Area Tables
MAINT_USER_ID varchar2(11) Optional. System.
MAINT_EFFECT_CODE varchar2(1) Optional. System.
MAINT_TIMESTAMP date Optional. System.
HOLD_FLAG varchar2(3) Optional. System.
M16_AMOUNT number Optional. System.
SYN_SOURCE_M16_AMOUNT number Optional. System.
CREATION_DATE valid date Required. Can specify any valid date.
CREATED_BY FND_USER_ID Required. FND_USER_ID for a valid apps user.
LAST_UPDATE_DATE valid date Required. Can specify any valid date.
LAST_UPDATED_BY FND_USER_ID Required. FND_USER_ID for a valid apps user.
LAST_UPDATE_LOGIN number(15) Required. Set to 0.
Table A–36 Database Table: ABM_IMP_RES_RE_ACCS. This is an optional table populated when importing material or cost object account data. There must be a corresponding N12_SEQUENCE_NUMBER entry in the ABM_IMP_RES_TRANS table.
Column Format Additional Information
SYN_N07_INTERFACE_ID varchar2(30) Required. Value is MATXACTSRC for materials and COXACTSRC for cost objects.
SYN_N06_INTERFACE_ID varchar2(30) Required. Set the value to an import source that is defined in Oracle ABM for the respective source type.
N12_RESOURCE_TYPE_CODE varchar2(3) Required. M for materials, C for cost objects.
N12_SEQUENCE_NUMBER number Required. Corresponds to N12_SEQUENCE_NUMBER for account transactions line in ABM_IMP_RES_TRANS.
Table A–35 Database Table: ABM_IMP_RES_TRANS
Column Format Additional Information
Import Specifications A-31

Staging Area Tables
002_DATA_SOURCE_ID varchar2(90) Required. Account ID.
002_NAME varchar2(75) Optional. Account Name.
M16_AMOUNT number Optional. Amount.
SYN_SOURCE_002_DS_ID varchar2(30) Optional. Used for error handling.
SYN_SOURCE_M16_AMOUNT number Optional. Used for error handling.
MAINT_USER_ID varchar2(11) Optional. System.
MAINT_EFFECT_CODE varchar2(1) Optional. System.
MAINT_TIMESTAMP date Optional. System.
CREATION_DATE valid date Required. Can specify any valid date.
CREATED_BY FND_USER_ID Required. FND_USER_ID for a valid apps user.
LAST_UPDATE_DATE valid date Required. Can specify any valid date.
LAST_UPDATED_BY FND_USER_ID Required. FND_USER_ID for a valid apps user.
LAST_UPDATE_LOGIN number(15) Required. Set to 0.
Table A–37 Database Table: ABM_IMP_BILL_HEADER
Column Format Additional Information
SYN_NO7_INTERFACE_ID varchar2(30) Required. Value must be BILLHEADERSRC
SYN_N06_INTERFACE_ID varchar2(30) Required. Set the value to an import source that is defined in Oracle ABM for the bill header source.
M18_BOR_TYPE_ID varchar2(120) Required. Valid bill type from ABM.
O09_RESOURCE_ID varchar2(30) Required. Valid cost object ID.
Table A–36 Database Table: ABM_IMP_RES_RE_ACCS. This is an optional table populated when importing material or cost object account data. There must be a corresponding N12_SEQUENCE_NUMBER entry in the ABM_IMP_RES_TRANS table.
Column Format Additional Information
A-32 Oracle Activity-Based Management User Guide

Staging Area Tables
O09_NAME varchar2(75) Optional. Cost Object Name required if creating new cost object.
DESCRIPTION_TEXT varchar2(750) Optional. Only used when creating cost object.
I01_TAG_ID varchar2(30) Required. Valid UOM from ABM.
M37_CO_REF_QTY number Optional. Cost object reference quantity defaults to 1 if not included.
SYN_N06_EXCEPTION_ID varchar2(30) Do not use. For error handling only.
SYN_N07_EXCEPTION_ID varchar2(30) Do not use. For error handling only.
N02_BALANCE_DATE date(7) Required.
CREATION_DATE date Required. Date record was created.
CREATED_BY number(15) Required. Valid Apps ID.
LAST_UPDATE_DATE date Required. Date last updated.
LAST_UPDATED_BY number (15) Required. Apps ID of user to last update.
LAST_UPDATE_LOGIN number(15) Required. Set to 0.
Table A–38 Database Table: ABM_IMP_BILL_LINES
Column Format Additional Information
SYN_NO7_INTERFACE_ID varchar2(30) Required. Value must be BILLLINESRC
SYN_N06_INTERFACE_ID varchar2(30) Required. Set the value to an import source that is defined in Oracle ABM for the bill line source.
O09_RESOURCE_ID varchar2(30) Required. Valid cost object ID.
M18_BOR_TYPE_ID varchar2(120) Required. Valid bill type from ABM.
DFK_O09_TYPE_CODE varchar2(3) Required. A for activity, C for cost object and M for material.
Table A–37 Database Table: ABM_IMP_BILL_HEADER
Column Format Additional Information
Import Specifications A-33

Staging Area Tables
SEQ_NBR number Required. Each item has a unique sequence number for the specified parent cost object. The same item id may be specified for the same parent cost object as long as the sequence number will make the entry unique.
DFK_O09_RESOURCE_ID varchar2(120) Required. Item id for specified type code. (DFK_O09_TYPE_CODE.) If type code is specified as A, then the item id must be a concatenation of department and activity, delimited by a dash "-". Example. The DFK_O09_RESOURCE_ID for ACTIVITY1 in DEPT1 would be specified as DEPT1-ACTIVITY1. Please note that this is the same format as defined for the bill item spreadsheet import.
M70_RESOURCE_CONSUMPTION_QTY
number Optional. Null value defaulted to 1.
M70_OVERRIDE_CO_REF_QTY number Optional. Null value defaulted to 1.
DFK_M25_MODEL_ID varchar2(15) Optional. Required for cross model bill hierarchies and type code of C.
DFK_M18_BOR_TYPE_ID varchar2(30) Optional. Specifies child bill type for mixed bill hierarchy. Only valid for type code of C. Parent bill type must be specified as mixed bill type.
DFK_I01_DRIVER_SET_ID varchar2(30) Required for type code of A. Specifies the rate set for the indicated activity rate.
DFK_M14_ACT_DRV_SET_BEGIN_DATE
date Required for type code of A. Specified item id must exist in the specified rate set for this date. (The specified item id is valid, if the rate exists in the rate set, and the date falls between the begin and end effective dates.
Table A–38 Database Table: ABM_IMP_BILL_LINES
Column Format Additional Information
A-34 Oracle Activity-Based Management User Guide

Staging Area Tables
M70_UNIT_YIELD_FACTOR_QTY number Optional. Must be between 0 and 100. Null defaults to 100.
ECO_NUMBER varchar2(30) Optional.
BOM_LINE varchar2(45) Optional.
SYN_N07_EXCEPTION_ID varchar2(30) Do not use. For error handling only.
SYN_N06_EXCEPTION_ID varchar2(30) Do not use. For error handling only.
N02_BALANCE_DATE date(7) Required.
CREATION_DATE date Required. Date record was created.
CREATED_BY number(15) Required. Value Apps user ID.
LAST_UPDATE_DATE date Required. Date last updated.
LAST_UPDATED_BY number (15) Required. Apps ID of user to last update.
LAST_UPDATE_LOGIN number(15) Required. Set to 0.
Table A–39 Database Table: ABM_IMP_DRV_DAT
Column Format Additional Information
SYN_NO7_INTERFACE_ID varchar2(30) Required. Value must be DRVDATASRC
SYN_N06_INTERFACE_ID varchar2(30) Required. Set the value to an import source that is defined for the specified driver data source.
BALANCE_DATE date(7) Required.
O08_REPORTING_ENTITY_ID varchar2(30) Required. Department ID.
O08_NAME varchar2(75) Required. Department Name.
O02_DATA_SOURCE_ID varchar2(90) Required. Activity Driver ID.
O02_NAME varchar2(75) Optionally required if creating activity driver.
DESCRIPTION_TEXT varchar2(750) Optional
Table A–38 Database Table: ABM_IMP_BILL_LINES
Column Format Additional Information
Import Specifications A-35

Staging Area Tables
SOURCE_SYSTEM_ID varchar2(150) Optional
M15_QUANTITY number Required. Driver quantity.
SOURCE_O08_RE_ID varchar2(30) Do not use. Reserved for future use.
SOURCE_O02_DS_ID varchar2(30) Do not use. Reserved for future use.
SOURCE_DESC_TEXT varchar2(750) Do not use. Reserved for future use.
SOURCE_M15_QTY number Do not use. Reserved for future use.
SYN_N07_EXCEPTION_ID varchar2(30) Do not use. For error handling only
SYN_N06_EXCEPTION_ID varchar2(30) Do not use. For error handling only.
CREATION_DATE date Required. Date record was created.
CREATED_BY number(15) Required. Valid Apps ID.
LAST_UPDATE_DATE date Required. Date last updated.
LAST_UPDATED_BY number (15) Required. Apps ID of user to last update.
LAST_UPDATE_LOGIN number(15) Required. Set to 0.
Table A–39 Database Table: ABM_IMP_DRV_DAT
Column Format Additional Information
A-36 Oracle Activity-Based Management User Guide
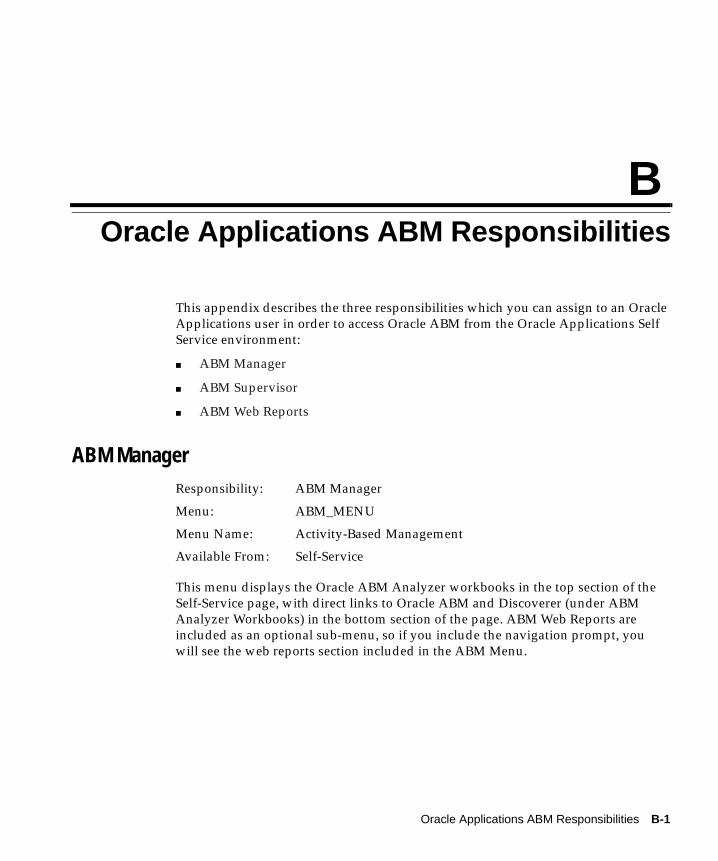
Oracle Applications ABM Responsib
B
Oracle Applications ABM ResponsibilitiesThis appendix describes the three responsibilities which you can assign to an Oracle Applications user in order to access Oracle ABM from the Oracle Applications Self Service environment:
■ ABM Manager
■ ABM Supervisor
■ ABM Web Reports
ABM Manager
This menu displays the Oracle ABM Analyzer workbooks in the top section of the Self-Service page, with direct links to Oracle ABM and Discoverer (under ABM Analyzer Workbooks) in the bottom section of the page. ABM Web Reports are included as an optional sub-menu, so if you include the navigation prompt, you will see the web reports section included in the ABM Menu.
Responsibility: ABM Manager
Menu: ABM_MENU
Menu Name: Activity-Based Management
Available From: Self-Service
ilities B-1

ABM Supervisor
ABM Supervisor
Selecting this responsibility will launch Oracle Applications and display the menu items in the table shown above. The main purpose of the ABM Supervisor Responsibility is to provide the ability to launch concurrent programs and enable the execution of calculations from outside Oracle ABM. The ABM Supervisor has access to all of the ABM-related concurrent programs, and may submit them for execution, or may set them up in a request set and schedule the request at a specific time.
This is also the responsibility that is used to perform the data migration task when upgrading from an Activa 3.02 database.
Table B–1 ABM Manager Menu Details
SeqNavigation Prompt Sub-Menu Function
1 Activity-Based Management
2 Workbooks ABM Analyzer Workbooks
3 ABM Web Reports
9 ABM Analyzer Workbooks
Responsibility: ABM Supervisor
Menu: ABM MENU - SUPERVISOR
Menu Name: ABM MENU - SUPERVISOR
Available From: Oracle Applications
Table B–2 ABM Supervisor Menu Details
SeqNavigation Prompt Sub-Menu Function
1 Requests Request Menu - Other Responsibilities
2 Concurrent Concurrent Requests - View All
3 Lookups Lookups - Activity-Based Management
B-2 Oracle Activity-Based Management User Guide

ABM Web Reports
ABM Web Reports
The ABM Web Reports responsibility provides the ability to launch Oracle ABM reports directly from Self-Service, with reports grouped into these sections. In order to display the list of available reports, the publish flag must be enabled for each report from within Oracle ABM, and the concurrent program to publish reports to the Self Service environment must be executed successfully.
Responsibility: ABM Web Reports
Menu: ABM_WEB_REPORTS
Menu Name: ABM Web Reports
Available From: Self-Service
Table B–3 ABM Web Reports Menu Details
SeqNavigation Prompt Sub-Menu Function
1 Activities Activities
2 Cost Objects Cost Objects
3 Materials Materials
4 Departments Departments
Oracle Applications ABM Responsibilities B-3

ABM Web Reports
B-4 Oracle Activity-Based Management User Guide

Concurrent Prog
C
Concurrent ProgramsThis appendix lists the Oracle ABM concurrent programs that you can run from the Oracle Applications Self Service environment using the ABM Supervisor responsibility. Refer to the Oracle Applications User’s Guide for more information on concurrent programs.
Program Parameters Description
ABM: Delete Model API Model ID, Delete Structures Flag-Y/N
Deletes the specified model data. If Flag is set to ’Y’, it will also delete model structures.
ABM: Publish Reports Menu None Publishes web reports to be visible from Self-Service and updates the list of available reports. If the publish flag is enabled for a report, this program will create a link to those reports.
ABM: Activity Cost Rollup Calculation Name Executes the named calculation.
ABM: Activity Rate Calculation Calculation Name Executes the named calculation.
ABM: Activity Statistic Rollup Calculation
Calculation Name Executes the named calculation.
ABM: Calculate All Extended Cost Object Costs
Calculation Name Executes the named calculation.
ABM: Calculate All Extended Material Costs
Calculation Name Executes the named calculation.
ABM: Calculate All Material Costs
Calculation Name Executes the named calculation.
rams C-1

ABM: Calculate Cost Object Unit Costs
Calculation Name Executes the named calculation.
ABM: Compute Bill Item - Specific Department
Calculation Name Executes the named calculation.
ABM: Compute Bill Item - Summarize Department
Calculation Name Executes the named calculation.
ABM: Compute Department Account or Statistic - All Departments
Calculation Name Executes the named calculation.
ABM: Compute Bill Item - All Departments
Calculation Name Executes the named calculation.
ABM: Compute Department Account or Statistic - Specific Department
Calculation Name Executes the named calculation.
ABM: Derive All Activity Cost Elements Calculation
Calculation Name Executes the named calculation.
ABM: Derive Department Accounts
Calculation Name Executes the named calculation.
ABM: Derive Bill Quantities Calculation Name Executes the named calculation.
ABM: Driver Volume Calculation
Calculation Name Executes the named calculation.
ABM: Mapping Calculation Calculation Name Executes the named calculation.
ABM: Migrate Date from Activa 3.x
Model, Data Set Effective Begin Date, Default Data Set Name, Default Activity Hierarchy
Used to migrate data from a 3.x data base to Oracle ABM 11i.
ABM: Batch Program Scheduler Batch Calc ID All ABM calculations run using this concurrent program. (It is automatically called for each calculation instance.)
Program Parameters Description
C-2 Oracle Activity-Based Management User Guide

Securable Object
D
Securable Objects ListThis appendix lists the Oracle ABM objects that are associated with each of the eight Oracle ABM security profile types.
Profile Type Securable Object ID Securable Object Description
Activity Rate Set
Activity Rate Sets Activity Rate Sets
Bill Type Bills Bills
Installation Navigation Procedures
Attribute Values
Attributes
Master Lists
Currency
Reports
Bill Types
Periods
Navigation Procedures
Attribute Values
Attributes
Master Lists
Currency
Reports
Bill Types
Periods
Interface Based on Import Source definitions
Interface profile objects are based on the list of staging area import sources that you define in the application. When you create an import source, you also create a securable object to which you can assign a security code in an interface security profile. The list of interface profile objects is dynamic and will change as you add or delete import source definitions. See "Using Staging Area Import" in Chapter 10 for information on import sources.
s List D-1

Master List Accounts
Departments
Statistics
Activities
Activity Drivers
Materials
Cost Objects
Dept Accounts
Dept Statistics
Dept Activities
Dept Activity Drivers
Models
Master List Accounts
Master List Departments
Master List Statistics
Master List Activities
Master List Activity Drivers
Master List Materials
Master List Cost Objects
Master List Department Accounts
Master List Department Statistics
Master List Department Activities
Master List Department Activity Drivers
Models
Model Data Sets
Mapping Rule Sets
Model Departments
Model Dept Accounts
Model Dept Statistics
Model Dept Activities
Dept Hierarchy
Model Activity Drivers
Model Materials
Model Cost Objects
Activity Dept Accounts
Activity Dept Statistics
Material Dept Accounts
Material Dept Statistics
Cost Object Dept Accounts
Cost Object Dept Statistics
Activity Rates
Activity Hierarchy
Calculations
Data Sets
Mapping Rule Sets
Model Departments
Model Department Accounts
Model Department Statistics
Model Department Activities
Model Department Hierarchy
Model Department Activity Drivers
Model Materials
Model Cost Objects
Model Department Activity Department Accounts
Model Department Activity Statistics
Model Material Department Accounts
Model Material Department Statistics
Model Cost Object Department Accounts
Model Cost Object Department Statistics
Activity Rates
Model Department Activity Hierarchy
Calculations
Profile Type Securable Object ID Securable Object Description
D-2 Oracle Activity-Based Management User Guide

Mapping Rule Sets
Mapping Rules
Mapping Calculations
Mapping Rules
Mapping Calculations
Data Set Account Data
Statistic Data
Activity Account Data
Activity Statistic Data
Activity Driver Data
Material Unit Costs
Material Account Data
Material Statistic Data
Cost Object Account Data
Cost Object Statistic Data
Cost Object Unit Costs
Activity Costs
Activity Rate Data
Flex Percentage
Exchange Rate Data
Consumption Quantities
Model Department Account Data
Model Department Statistic Data
Model Department Activity Department Account Data
Model Department Activity Statistic Data
Model Department Activity Driver Data
Model Material Unit Costs
Model Material Department Account Data
Model Material Department Statistic Data
Model Cost Object Department Account Data
Model Cost Object Department Statistic Data
Cost Object Unit Costs
Activity Costs
Activity Rate Data
Flex Percentage
Exchange Rate Data
Bill Item Quantities
Profile Type Securable Object ID Securable Object Description
Securable Objects List D-3

D-4 Oracle Activity-Based Management User Guide

Index
AABM manager responsibility, B-1ABM supervisor responsibility, B-2ABM Web reports responsibility, B-3access, obtaining, 14-2account cost typeand inventoriable classification, 5-13updating, 5-15
activity costelement, 9-9, 9-11report, 11-2
activity driversources, 7-20, 7-25volume, 7-18, 7-27
activity hierarchy, 3-29, 13-6activity rate
calculationcreating, 7-14running, 7-17specifying parameters, 7-15viewing, 7-18
defining, 7-3relating to rate set, 7-7
activity rate setcreating, 7-7defining, 3-27deleting, 13-26smooth updates, 7-11specifying effective dates, 7-11updating parameters, 7-13
activity-based budgeting, 9-1activity-based management
components of, 1-1
concepts of, 1-2Activity-Based Management, Oracle
See Oracle Activity-Based Managementattribute
defining an, 3-22entities, 3-19, 3-20locking or unlocking an, 3-25values, 3-23
Bbill
creating, 8-15deriving quantities, 9-2effective dates, 8-25inspector panel, 8-4, 8-7items
accounts, 13-22computing, 13-15statistics, 13-22
parameters, 8-20, 8-22search window, 8-5smooth update, 8-25terms and components, 8-2types, 3-28
Ccalculations
activity cost rollup, 13-11activity driver, 7-27activity rate, 7-14, 7-17, 7-18activity statistic rollup, 13-12cost object, 8-28, 8-29, 8-31
Index-1

creating and running, 2-18, 2-20, 2-24extended cost object costs, 13-13extended material costs, 13-14mapping, 6-8, 6-16, 6-41material unit costs, 13-12specifying parameters in, 2-21, 7-15using offsets in, 2-23viewing results of, 2-25
computing bill items, 13-15concurrent programs, C-1consumption quantities, dynamic, 8-32cost object
calculation, 8-28, 8-29, 8-31defining, 8-15
costing modelSee model, costing
cross data set operations, 13-21currencies
defining, 3-5using in models, 3-5
Ddata sets
classes and types of, 3-11closing or opening, 3-14consolidation, 13-21creating, 3-13deleting, 13-24overview of, 3-8
departmentaccounts, 9-14, 13-19hierarchy, 3-31, 13-2types, 3-16
details windowSee inspector panels
Eexchange rates
defining, 3-18inspector panel, 3-18overview of, 3-17
Ffind control, 12-5, 12-9flex percentage
inspector panel, 9-6updating, 9-6
format definitions, A-1
Hhierarchy
activity, 3-29, 13-6department, 3-31, 13-2navigator, 2-2, 2-4
Iimport specifications
format definitions, A-1mapping rule templates, A-20master list templates, A-2spreadsheet layouts, A-2staging area tables, A-26
importingdefining currencies, 10-15inspector panels, 10-21options, 10-11overview, 10-1staging area, 10-28use of spreadsheet in, 10-2, 10-7, 10-9
inspector panelsbill, 8-4, 8-7details window of, 2-8exchange rate, 3-18flex percentage, 9-6grid of, 2-7mapping, 6-6model account, 5-55model statistic, 5-60overview of, 2-5staging area import, 10-21
Llaunchpad, 2-2, 2-3
Index-2

Mmapping
calculation, 6-8creating, 6-16parameters, 6-17, 6-19running, 6-41
inspector panel, 6-6, 12-7overview of, 6-1rule set
creating, 6-16defining, 3-26deleting, 13-26window display, 6-7, 6-11
rulescreating, 6-20, 6-22parameters, 6-31, 6-35, 6-37templates, A-20window display, 6-9, 6-11, 6-35
sources, 6-12targets
creating, 6-20, 6-39option, 6-26, 6-28, 6-30window display, 6-13
terminology, 6-3transactional, 6-41types of, 6-5viewing results, 6-41wizard, 6-20, 12-9
master listsobjects
defining, 4-3overview of, 4-1relating to a model, 5-8relating to master list departments, 5-2setup requirements, 4-8terminology, 4-2
overview of, 3-3templates, A-2
modelcost object, 5-29, 5-46, 5-50costing
defining, 3-7prerequisites, 3-2steps to building, 1-2
dataentering, 5-53, 5-59, 5-63inspector panels and, 5-55, 5-60origin codes in, 5-54
departmentaccounts, 5-11, 5-39activity, 5-19, 5-23, 5-32, 5-36creating, 5-9statistics, 5-16, 5-43
materials, 5-26
Nnavigation procedures, 2-16navigator, 2-2, 2-3
OOracle Activity-Based Management
description of, 1-1integrating with Oracle Performance
Analyzer, 1-5
Pperiod types, 3-9periods, 3-10
Rreporting
account mapping summary, 11-3activity cost, 11-2cost object comparison, 11-3definitions, 11-2overview of, 11-1
responsibilityABM manager, B-1ABM supervisor, B-2ABM Web reports, B-3creating, 14-2system administrator, 14-3
Ssearching for data, 12-4
Index-3

smooth updatebill item, 8-25
smooth updatesactivity rate, 7-11
spreadsheetfeatures of, 10-4import, 10-2, 10-7import errors, 10-9layouts, A-2
staging areatables, A-26transactions, 10-25
statistic values, 13-19status bar, 2-10
Ttab key function, 2-8tables, staging area, A-26text boxes, 2-8toolbar, 2-9tracing
limitations of, 12-3objects, 12-3search data, 12-3tools, 12-2visual, 12-1
transactions, manually creating, 10-27
Uunits of measure, 3-15user preferences
specifying, 3-35window, 3-32
users, setting up, 14-2
Wwizards
ID and name fields in, 2-9mapping, 6-20, 12-9overview of, 2-1, 2-11step screens, 2-15summary screen, 2-16
welcome screen, 2-14
Index-4