Embed Size (px)
Citation preview

Rear-tine Tiller Models 640C— Tuffy® CRT644A — Super BroncoTM CRT
Model 644A Shown
Operator’s Manual
PRINTED IN U.S.A. 769-00585C OM.fm9/15/04
FORM NO.
IMPORTANT: Read safety rules and instructions carefully before operating equipment.
Warning: This unit is equipped with an internal combustion engine and should not be used on or near any unimproved forest-covered, brush-covered or grass-covered land unless the engine’s exhaust system is equipped with a spark arrester meeting applicable local or state laws (if any). If a spark arrester is used, it should be maintained in effective working order by the operator. In the State of California the above is required by law (Section 4442 of the California Public Resources Code). Other states may have similar laws. Federal laws apply on federal lands. A spark arrester for the muffler is available through your nearest engine authorized service dealer or contact the service department, P.O. Box 361131 Cleveland, Ohio 44136-0019.
Troy-Bilt LLC, P.O. BOX 361131 CLEVELAND, OHIO 44136-0019

TABLE OF CONTENTS
This unit f
If youthis u
ww
Content PageCustomer Support 2Safety 3Assembly 6Features and Controls 10Operation 12
MOTPW
C
FINDING MOOperator’s Manual is an important part of your new lawor best performance. Please read and understand wha
Before you start assembling your new equipmcopy the information from it in the space providedlocate the model plate by looking at the rear of thmanufacturer’s web site and/or help from the Cu
CUSTOMEPlease do NOT return the unit to the retaile
have difficulty assembling this product or have any qunit, you can seek help from the experts. Choose from
Visit troy-bilt.com for many useful suggewill get the four options reproduced here. immediately available.
If you prefer to reach a Customer Support
The engine manufacturer is responsible fperformance, power-rating, specificationsmanufacturer’s Owner’s/Operator’s Manuinformation.
Copy the model
Copy the serial nw.troybilt.com
TROY-BILT LLCP. O. BOX 361131CLEVELAND, OH 44136
1-800-520-5520330-558-7220
The answer you arelooking for could be justa mouse click away!
EngineManual
aintenance 17ff-season Storage 21roubleshooting 22arts List 23arranty Back Cover
ontent Page
2
DEL NUMBERn tractor. It will help you assemble, prepare and maintain the t it says.
ent, please locate the model plate on the equipment and below. A sample model plate is also given below. You can
e tine shield. This information will be necessary to use the stomer Support Department or an authorized service dealer.
R SUPPORTr without first contacting Customer Support.
estions regarding the controls, operation or maintenance of the options below:
stions. Click on Customer Support button and you Click on the appropriate button and help is
Representative, please call 1(800) 520-5520.
or all engine-related issues with regard to , warranty and service. Please refer to the engine al, packed separately with your unit, for more
number here:
umber here:
The answer you arelooking for could be justa mouse click away!

Figure 1-1: Tiller features and controls. See separate Engine Owner’s Manual to identify engine controls.
The engine exhaust from this product contains chemicals known to the State of California to cause cancer, birth defects or other reproduc-
This machine meets voluntary safety stan-dard B71.8 – 1996, which is sponsored by the Outdoor Power Equipment Institute, Inc., and is published by the American National Standards Institute.
Safety Alert SymbolThis is a safety alert symbol. It is used in this manual and on the unit to alert you to potential hazards. When you see this symbol, read and obey the message that follows it. Failure to obey safety messages could result in personal injury or property damage.
WARNINGForward Clutch Bail
Depth Regulator
Tine Hood Flap
Standard-Rotating-Tines (CRT)
Wheel Drive Pin
Reverse Clutch Control (Models 644A)
3
Training1. Carefully read this Own-er’s Manual, the separate Engine Owner’s Manual,
and any other literature you may receive. Be thoroughly familiar with the controls and the proper use of the tiller and its en-gine. Know how to stop the unit and disen-gage the controls quickly.2. Never allow children to operate the tiller. Never allow adults to operate the tiller without proper instruction.3. Keep the area of operation clear of all persons, particularly children and pets.4. Keep in mind that the operator or user is responsible for accidents or hazards oc-curring to other people, their property, and themselves.
Preparation1. Thoroughly inspect the area where the tiller is to be used and remove all foreign objects.2. Be sure all tiller controls are releasedand both wheels are in the Wheel Drive po-sition before starting the engine.
3. Do not operate the tiller without wearing adequate outer garments. Avoid loose gar-ments or jewelry that could get caught in moving parts.4. Do not operate the tiller when barefoot or wearing sandals, sneakers, or light foot-wear. Wear protective footwear that will improve footing on slippery surfaces.5. Do not till near underground electric ca-bles, telephone lines, pipes or hoses. If in doubt, contact your telephone or utility company.6. Warning: Handle fuel with care; it is highly flammable and its vapors are explo-sive. Take the following precautions:
a. Store fuel in containers specifically designed for this purpose.
b. The gas cap shall never be removed or fuel added while the engine is running. Allow the engine to cool for several minutes before adding fuel.
c. Keep matches, cigarettes, cigars, pipes, open flames and sparks away from the fuel tank and fuel container.
d. Fill fuel tank outdoors with extremecare. Never fill fuel tank indoors. Usea funnel or spout to prevent spillage.
e. Replace all fuel tank and container caps securely.
f. If fuel is spilled, do not attempt to start the engine, but move the ma-chine away from the area of spillage and avoid creating any source of ig-nition until fuel vapors have dissi-pated.
7. Never make adjustments when engine is running (unless recommended by manu-facturer).
Operation1. Do not put hands or feet near or under rotating parts.2. Exercise extreme caution when on or crossing gravel drives, walks, or roads. Stay alert for hidden hazards or traffic. Do not carry passengers.3. After striking a foreign object, stop the engine, remove the wire from the spark plug wire and prevent it from touching the spark plug. Thoroughly inspect the ma-chine for any damage and repair the dam-age before restarting and operating the machine.
SECTION 1: SAFETY

4
4. Exercise caution to avoid slipping or fall-ing.5. If the unit should start to vibrate abnor-mally, stop the engine, disconnect the spark plug wire and prevent it from touch-ing the spark plug, and check immediately for the cause. Vibration is generally a warning of trouble.6. Stop the engine, disconnect the spark plug wire and prevent it from touching the spark plug, whenever you leave the operat-ing position, before unclogging the tines, or when making any repairs, adjustments or inspections.7. Take all possible precautions when leav-ing the machine unattended. Stop the en-gine. Disconnect the spark plug wire and move it away from the spark plug. Be sure that both wheels are in the Wheel Drive po-sition. 8. Before cleaning, repairing, or inspect-ing, stop the engine and make certain all moving parts have stopped. Disconnect the spark plug wire and prevent it from touching the spark plug to prevent acci-dental starting. 9. The flap on the tine hood must be down when operating the tiller.10. Never use the tiller unless proper guards, plates, or other safety protective devices are in place.11. Do not run the engine in an enclosed area. Engine exhaust contains carbon monoxide gas, a deadly poison that is odorless, colorless, and tasteless.12. Keep children and pets away.13. Never operate the tiller under engine power if the wheels are in the Freewheel position. In the Freewheel position, the wheels will not hold the tiller back and the revolving tines could propel the tiller rapid-ly, possibly causing loss of control. Always engage the wheels with the wheel drive pins in the Wheel Drive position before starting the engine or engaging the tines⁄wheels with the Forward Clutch Bail (all models) or the Reverse Clutch control (Model 644A only).14. Be aware that the tiller may unex-pectedly bounce upward or jump forward if the tines should strike extremely hard packed soil, frozen ground, or buried ob-stacles like large stones, roots, or stumps.
If in doubt about the tilling conditions, al-ways use the following operating precau-tions to assist you in maintaining control of the tiller:
a. Walk behind and to one side of thetiller, using one hand on the handlebars Relax your arm, but use a secure hand grip.
b. Use shallower depth regulator settings, working gradually deeperwith each pass.
c. Use slower engine speeds.d. Clear the tilling area of all large
stones, roots or other debris. e. Avoid using downward pressure on
the handlebars. If need be, useslight upward pressure to keep thetines from digging too deeply.
f. Before contacting hard packed soilat the end of a row, reduce enginespeed and lift the handlebars toraise the tines out of the soil.
g. In an emergency, stop the tines andwheels by releasing whicheverclutch control is engaged. Do notattempt to restrain the tiller.
15. Do not overload the tiller’s capacity by attempting to till too deeply at too fast a rate.
16. Never operate the tiller at high trans-port speeds on hard or slippery surfaces. Look behind and use care when backing up.17. Do not operate the tiller on a slope that is too steep for safety. When on slopes, slow down and make sure you have good footing. Never permit the tiller to freewheel down slopes.18. Never allow bystanders near the unit.19. Only use attachments and accessories that are approved by the manufacturer of the tiller.20. Use tiller attachments and accessories when recommended.21. Never operate the tiller without good visibility or light.22. Never operate the tiller if you are tired; or under the influence of alcohol, drugs or medication.23. Operators shall not tamper with the en-gine-governor settings on the machine; the governor controls the maximum safe operating speed to protect the engine and all moving parts from damage caused by overspeed. Authorized service shall be sought if a problem exists.
24. Do not touch engine parts which may be hot from operation. Let parts cool down sufficiently.25. Please remember: You can always stop the tines and wheels by releasing the For-ward Clutch Bail or on Model 644A the Re-verse Clutch control, (whichever control is engaged), or by moving the ignition switch and⁄or throttle control lever on the engine to “OFF” or “STOP”.26. To load or unload the tiller, see the in-structions in Section 4 of this Manual.27. Use extreme caution when reversing or pulling the machine towards you.28. Start the engine carefully according to instructions and with feet well away from the tines.29. Never pick up or carry a machine while the engine is running.
Maintenance and Storage1. Keep the tiller, attachments and acces-sories in safe working condition.2. Check all nuts, bolts, and screws for proper tightness to be sure the equipment is in safe working condition.3. Never store the tiller with fuel in the fuel tank inside a building where ignition sourc-es are present such as hot water and space heaters, furnaces, clothes dryers, stoves, electric motors, etc.). Allow the engine to cool before storing the unit in any enclo-sure.4. To reduce the chances of a fire hazard, keep the engine free of grass, leaves, or ex-cessive grease.5. Store gasoline in a cool, well-ventilated area, safely away from any spark- or flame-producing equipment. Store gaso-line in an approved container, safely away from the reach of children.6. Refer to the Maintenance sections of this Manual and the separate Engine Own-er’s Manual for instructions if the unit is to be stored for an extended period.7. Never perform maintenance while the engine is running or the spark plug wire is connected, except when specifically in-structed to do so.8. If the fuel tank has to be drained, do this outdoors.

5
DecalsFor your safety and the safety of others, vari-ous safety and operational decals are located on your unit (see Figure 1-2).
Keep the decals clean and legible at all times. Contact your local service dealer or the factory for replacements if any decals are damaged or missing.
Refer to the Parts List pages in this Manual for decal locations, descriptions and part num-bers.
Figure 1-2: Location of safety and operating decals.
TO AVOID SERIOUS INJURY:• READ THE OWNER’S MANUAL.
• KNOW LOCATIONS AND FUNCTIONS OF ALL CONTROLS. • KEEP ALL SAFETY DEVICES AND SHIELDS IN PLACE AND WORKING. • NEVER ALLOW CHILDREN OR UNINSTRUCTED ADULTS TO OPERATE TILLER. • SHUT OFF ENGINE AND DISCONNECT SPARK PLUG WIRE BEFORE MANUALLY UN-
CLOGGING TINES OR MAKING REPAIRS. • KEEP BYSTANDERS AWAY FROM MACHINE.
• KEEP AWAY FROM ROTATING PARTS. • USE EXTREME CAUTION WHEN REVERSING OR PULLING THE MACHINE TOWARDS
YOU.
Operating SymbolsVarious symbols (shown here, with word descriptions) may be used on the tiller and engine. NOTE: Your unit may not have all of the symbols.
Forward Clutch Bail
Starting Stabilization Message (on engine)
Hot Surfaces Warning
Warning Messages
Reverse Clutch ControlOperating Instruction(Models 644A)
FAST SLOW STOP TILLER DIRECTION LEVER DIRECTION
ROTATING TINESREVERSE
BAILDISENGAGED
BAILENGAGED
R
WARNING
CHOKEOFF
CHOKEON

6
WARNING: To prevent personal injury or property damage, do not start the engine until all assembly steps are complete and you have read and understand the safety and operating instructions in this manual.
INTRODUCTIONCarefully follow these assembly steps to correctly prepare your tiller for use. It is recommended that you read this Section in its entirety before beginning assembly.
NOTE: Various tiller models arepresented in this Manual. Use only theinformation appropriate for your tillermodel. Engine styles vary by model. Yourengine may appear differently than thoseillustrated in this manual.
INSPECT UNITInspect the unit and carton for damage im-mediately after delivery. Contact the carrier (trucking company) if you find or suspect damage. Inform them of the damage and request instructions for filing a claim. To protect your rights, put your claim in writ-ing and mail a copy to the carrier within 15 days after the unit has been delivered. Contact Troy-Bilt LLC if you need assis-tance in this matter.
TOOLS / MATERIALS NEEDED(2) 1/2” open-end wrench*(2) 9/16" open-end wrench*(1) 3/8" open-end wrench*(1) Large adjustable wrench
(Models 644A only)(1) Scissors (to trim plastic ties)(1) Ruler (for belt tension check)(1) Block of wood (to support tiller when
removing wheels)(1) Tire pressure gauge (for models with
pneumatic tires)(1) Clean oil funnel(1) Motor oil. Refer to the Engine Owner’s
Manual for oil specifications andquantity required.
* Adjustable wrenches may be used.
ASSEMBLY STEPS
STEP 1: UNPACKING INSTRUCTIONSNOTE: While unpacking, do not severely bend any control cables.
1. The tiller weighs approximately 133 lbs. Do not attempt to remove it from the ship-ping platform until instructed to do so in these Assembly steps. 2. Remove any packaging material from the carton. Remove any staples from the bottom of the carton and remove the car-ton from the shipping platform.3. Remove all unassembled parts and the separate hardware bag from the carton. Check that you have the items listed in the Loose Parts List (contact your local dealer or the factory items are missing or dam-aged).
NOTE: Use the screw length template(Fig. 2-1) to identify screws.
Loose Parts List
Qty. Description1 Handlebar Support (see A, Fig. 2-2)1 Handlebar Assembly (see K, Fig. 2-2)
Hardware bag contents:4 Hex hd. screw, 5/16-18 x 1-1/2"2 Hex hd. screw, 3/8-16 x 3/4"2 Flat Washer, 3/8"4 Split lock washer, 5/16"4 Hex nut, 5/16"-182 Hex locknut, 3⁄8"-16*Model 644A onlyIMPORTANT: Motor oil must be added to the engine crankcase before the engine is started. Follow the instructions in this Section and in the separate Engine Owner’s Manual.
NOTE: LEFT and RIGHT sides of the tillerare as viewed from the operator’s positionbehind the handlebars.
STEP 2: ATTACH HANDLEBAR
1. Loosely attach the legs of the handlebar support (A, Fig. 2-2) to the inner sides of the tiller frame using two 3/8"-16 x 3/4" hex hd. screws (B), 3/8" flat washers (C), and 3/8"-16 hex locknuts (D).
2. Using two 5/16"-18 x 1-1/2" screws (G), 5/16" split lock washers (H) and 5/16"-18 hex nuts (I), loosely attach the handlebar support (A) using the upper holes. Tighten the two screws securely.3. There are three height adjustment holes in the two handlebar support brackets (E and F, Fig. 2-2). Use a setting that will po-sition the handlebars at approximately waist level when the tines are 3"-4" into the soil. Loosely attach the support brackets to the outside of the handlebar assembly (K) using two 5/16"-18 x 1-1/2” screws (G), 5/16" split lock washers (H) and 5/16"-18 hex nuts (I). NOTE: If a support bracket will not move, loosen attaching screw (J) and nut.
IMPORTANT: The support brackets must be assembled to the outside of the handlebar assembly.
4. Tighten all handlebar mounting hard-ware securely.
STEP 3: MOVE TILLER OFF CRATETo roll the tiller off the shipping platform, put the wheels in freewheel, as follows:
1. Place a sturdy block under the transmis-sion to raise one wheel about 1" off the ground.2. Remove the hairpin cotter (L, Fig. 2-3) and wheel drive pin (M) from the wheel hub (O) and wheel shaft (N). 3. Slide the wheel fully inward on the wheel shaft (N, Fig. 2-3). Reinstall the wheel
1
2
1
2Figure 2-1: To identify length of screws, place screw on template as shown and measure dis-tance between bottom of screw head and tip of screw.
SECTION 2: ASSEMBLY

7
drive pin (M) through the wheel shaft only (not through the wheel hub). Secure the wheel drive pin with the hairpin cotter (L), pushing the hairpin cotter in as far as it will go. The wheel should now spin freely (freewheel) on the wheel shaft. Repeat with the other wheel.4. Use the handlebar to roll the tiller to a flat area.
IMPORTANT: Before starting the engine, the wheels must be placed in the WHEEL DRIVE position (pins through wheel hubs and wheel shaft). This procedure is described in Wheel Drive Pins in Section 3.
STEP 4: INSTALL FORWARD CLUTCH CABLE1. Carefully unwrap the forward clutch ca-ble (cable without an attached knob) from its shipping position and slide the thin ca-ble wire (T, Fig. 2-4) into the slot in the ca-ble bracket. Push the cable connector (U, Fig. 2-4) up through the hole in the bracket until the groove in the connector snaps into place. 2. Thread the #10-24 hex nut (Z, Fig. 2-5) halfway onto the screw (V) which runs through the spring (W, Fig. 2-5). 3. Thread the screw (V) into the cable ad-juster (X).
G
G
J
B
AHI
F
E
K
D
C
F
Fig. 2-3: Wheel in FREEWHEEL position
N
M
O
L
Fig. 2-4: Installing forward clutch cable bracket and cable.
Fig. 2.2: Attach handlebar.
T
U
T

8
4. Check for correct tension on the forward drive belt by taking two measurements of the cable spring, as follows:a. With the Forward Clutch Bail (Y, Fig. 2-6) in an open (released) position, measure the length of the cable spring (W) from the outermost coil to the outermost coil.b. Squeeze the Forward Clutch Bail against the handlebar (see Fig. 2-7) and re-mea-sure the spring length. The belt tension is correct if this second measurement is be-tween 1/16" to 3/16" longer than the first measurement. If so, turn the hex nut (Z, Fig. 2-7) tightly against the cable adjuster (X) while preventing the cable adjuster from turning.c. If the spring length is incorrect, you must adjust the cable tension as described in Checking and Adjusting Forward Drive Belt Tension in Section 5. Incorrect cable tension can result in belt slippage (cable tension too loose), or unintentional tine movement when the clutch bail is in Neu-tral (cable tension too tight).
STEP 5: INSTALL REVERSE CLUTCH CABLE (MODEL 644A ONLY)1. Unwrap the reverse clutch cable (CC, Fig. 2-8 and Fig. 2-9) from its shipping po-sition and route it up to the handlebar. Be sure that the cable is routed beneath the Forward Clutch Bail.2. Insert the cable (CC, Fig. 2-8) through the slot in the cable bracket and position the flat side of the threaded assembly next to the flat side of the hole. Slide the hex nut (DD) up the cable and tighten it securely. 3. Fasten the reverse clutch cable to the left side handlebar with a cable tie (EE, Fig. 2-9). 4. Test the function of the reverse clutch by pulling out and releasing the cable knob. The knob should return to its neutral posi-tion (resting against bracket). If it doesn’t, contact your local dealer or Troy-Bilt LLC for technical assistance.
W
VZ
X
Fig. 2-6: Attach forward clutch cable spring to forward clutch bail.
Fig. 2-5: Cable spring and adjuster.
1
2
3
4
5
6
Hold bail against handlebar whiletaking second measurement of spring
ZX
Fig. 2-8: Install reverse cable bracket and reverse clutch cable.
Fig. 2-9: Route reverse clutch cable (CC) as shown. Attach with cable tie (EE).
BRONCO
CC
EE
Y
W
Fig. 2-7: To check forward belt tension, take two measurements of the length of the coils in the spring — first with the bail open, then with the bail held against the handlebar.
BB
DDCC
Flat Side

9
STEP 6: CHECK TRANSMISSION OIL LEVEL The transmission was filled with gear oil at the factory. However, you should check the gear oil level at this time to make certain it is correct.IMPORTANT: Do not operate the tiller if the gear oil level is low. Doing so will result in severe damage to the transmission com-ponents. 1. With the tiller on level ground, pull the Depth Regulator Lever (FF, Fig. 2-10) back and then all the way up until the lowest notch in the lever is engaged.2. Remove the oil fill plug (GG, Fig. 2-11) from the transmission housing cover and locate the main drive shaft situated inside the housing.3. The gear oil level is correct if the gear oil is approximately halfway up the side of the main drive shaft.4. If the oil level is low, add gear oil by re-ferring to A. To Check the Transmission Gear Oil Level in Section 5.
STEP 7: ADD MOTOR OIL The tiller is shipped without oil in the en-gine. IMPORTANT: Do not start the engine with-out first adding motor oil. Severe engine damage will result if the engine is run with-out oil.1. Refer to the separate Engine Owner’s Manual for engine oil specifications and capacities. 2. With the tiller on level ground, move the Depth Regulator Lever (FF, Fig. 2-10) up or down until the engine is level.3. Add motor oil as described in the En-gine Owner’s Manual.4. Move the Depth Regulator Lever all the way down until the highest notch is en-gaged. This places the tines in the “travel” position, which allows the tiller to be moved without the tines touching the ground.
STEP 8: CHECK HARDWARE Check all nuts and screws for tightness.
STEP 9: CHECK AIR PRESSURE IN TIRES (units with pneumatic tires)Check the air pressure with a tire gauge. Deflate or inflate the tires equally to be-tween 15 PSI and 20 PSI (pounds per square inch). Be sure that both tires are in-flated equally or the unit will pull to one side.
Fig. 2-10: Adjust Depth Regulator Lever.
FF
Fig. 2-11: Remove gear oil fill plug.
IMPORTANT: This completes the assembly steps. Be-fore operating your tiller, make sure you read the follow-ing sections in this Manual, as well as the separate Engine Owner’s Manual:
• Section 1: Safety• Section 3: Features and Controls• Section 4: Operation
GG
10
WARNING: Before operating your machine, carefully read and understand all safety, controls and operating instructions in this Manual, the separate Engine Owner’s Manual, and on the decals on the machine.Failure to follow these instructions can result in serious personal injury.
INTRODUCTIONThis Section describes the location and function of the controls on your tiller. Refer to the following Section, Operation for de-tailed operating instructions.Practice using these controls, with the en-gine shut off, until you understand the op-eration of the controls and feel confident with each of them.
ENGINE CONTROLSRefer to the engine manufacturer’s Engine Owner’s Manual (included in the tiller liter-ature package) to identify the controls on your engine. IMPORTANT: The control for stopping the engine is located on the engine.
WHEEL DRIVE PINS Each wheel is equipped with a wheel drive pin (A, Figures 3-2 and 3-3) that secures the wheel to the wheel shaft (B). The wheels can be positioned in either a WHEEL DRIVE or a FREEWHEEL mode.
WARNING: Never allow either of the wheels to be in the FREEWHEEL position when the engine is running. Always put both wheels in the WHEEL DRIVE position before starting the engine.Failure to comply could cause loss of tiller control, property damage, or personal injury.
Before starting the engine, put both wheels in the WHEEL DRIVE position by inserting the wheel drive pins through the wheel hubs and the wheel shaft. Doing so “locks” the wheels to the wheel shaft, causing the wheels to turn when either the
Forward Clutch Bail (all models) or the Re-verse Clutch Control (Model 644A) is en-gaged.Use the FREEWHEEL mode only when the engine is not running. In FREEWHEEL, the wheel drive pins are placed only through the holes in the wheel shaft (not the wheel hubs), thus allowing the wheels to turn freely when you manually move the tiller.
To place the wheels in WHEEL DRIVE or FREEWHEEL:1. Stop engine, disconnect spark plug wire from spark plug and allow engine to cool.
WARNING: Do not place tiller on its side when changing wheel drive positions. Doing so could result in gasoline leaking from the fuel tank.Failure to follow this instruction could result in personal injury or property damage.
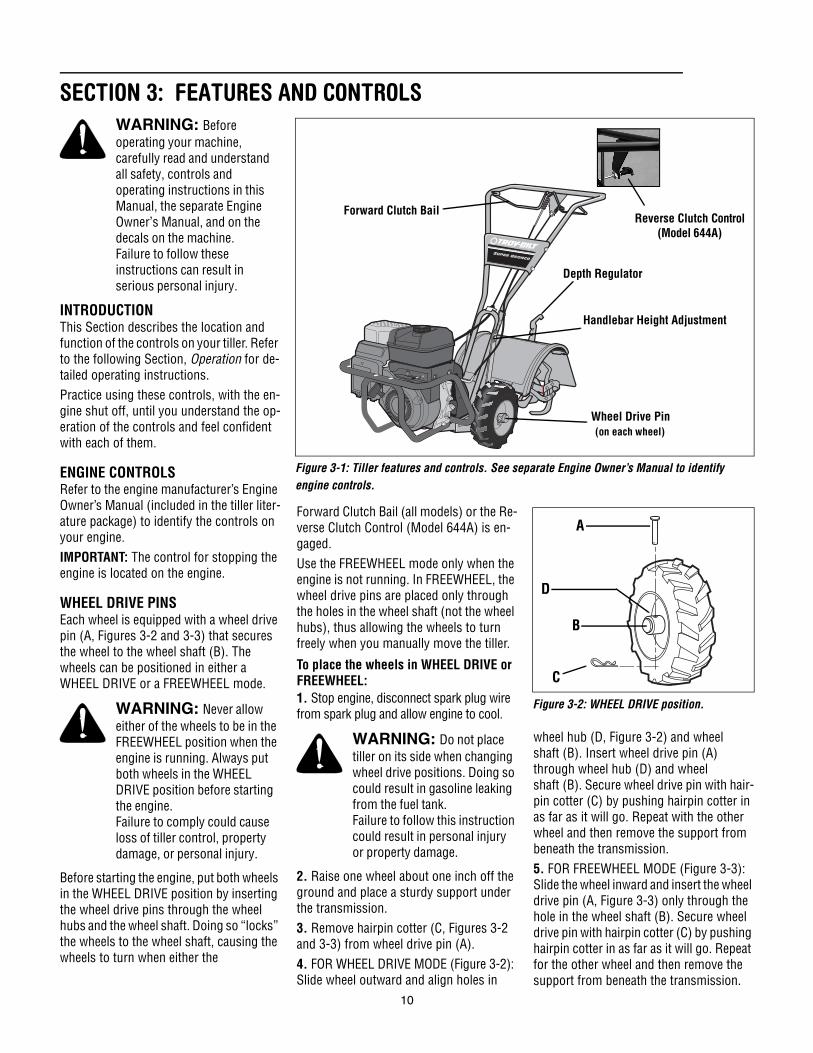
2. Raise one wheel about one inch off the ground and place a sturdy support under the transmission.3. Remove hairpin cotter (C, Figures 3-2 and 3-3) from wheel drive pin (A).4. FOR WHEEL DRIVE MODE (Figure 3-2): Slide wheel outward and align holes in
wheel hub (D, Figure 3-2) and wheel shaft (B). Insert wheel drive pin (A) through wheel hub (D) and wheel shaft (B). Secure wheel drive pin with hair-pin cotter (C) by pushing hairpin cotter in as far as it will go. Repeat with the other wheel and then remove the support from beneath the transmission.5. FOR FREEWHEEL MODE (Figure 3-3): Slide the wheel inward and insert the wheel drive pin (A, Figure 3-3) only through the hole in the wheel shaft (B). Secure wheel drive pin with hairpin cotter (C) by pushing hairpin cotter in as far as it will go. Repeat for the other wheel and then remove the support from beneath the transmission.
Forward Clutch Bail
Depth Regulator
Handlebar Height Adjustment
Reverse Clutch Control (Model 644A)
Wheel Drive Pin(on each wheel)
Figure 3-2: WHEEL DRIVE position.
A
D
B
C
Figure 3-1: Tiller features and controls. See separate Engine Owner’s Manual to identify engine controls.
SECTION 3: FEATURES AND CONTROLS

11
WARNING: Before starting engine, be sure that both wheels are in WHEEL DRIVE position. See Wheels Drive Pins for instructions.Engaging the Forward Clutch Bail or Reverse Clutch Control (if equipped) when the wheels are not in WHEEL DRIVE could allow the tines to rapidly propel the tiller forward or backward.Failure to comply could cause loss of tiller control, property damage, or personal injury.
FORWARD CLUTCH BAIL
The Forward Clutch Bail (E, Figure 3-4) controls the engagement of forward drive to the wheels and tines.To operate the Forward Clutch Bail:1. Put wheels in WHEEL DRIVE position (see “WARNING” statement above).2. Lift and hold the clutch bail (E, Figure 3-4) against the handlebar to start the wheels and tines rotating in a forward direction.3. Release the clutch bail to disengage (stop) the wheels and tines (the engine will continue to run).
REVERSE CLUTCH CONTROL (Model 644A only)The Reverse Clutch Control (F, Figure 3-4) controls the engagement of reverse drive to the wheels and tines. The reversing fea-ture is used for maneuvering the tiller only — never engage the tines in the ground while operating in reverse.
WARNING: Use extreme caution when reversing or pulling the machine towards you. Look behind to avoid obstacles. Never attempt to till in reverse.Failure to follow this warning could result in personal injury or property damage.
To operate the Reverse Clutch Control:1. Put wheels in WHEEL DRIVE position (see “WARNING” statement at the left).2. Stop all tiller motion by releasing the Forward Clutch Bail. 3. Lift the handlebar until the tines clear the ground, look behind you to avoid any obstacles, and then pull the control knob (F, Figure 3-4) out. The wheels and tines will rotate in a reverse direction.4. Release the control knob to disengage (stop) the wheels and tines (the engine will continue to run).
DEPTH REGULATOR LEVERThis lever (G, Figure 3-5) controls the till-ing depth of the tines. Pull the lever back and slide it up or down to engage the notched height settings.
The “travel position” (highest notch) raises the tines approximately 1-1/2" off the ground, allowing the tiller to be moved without the tines contacting the ground. This setting should also be used when starting the engine.
Moving the lever upward will increase the tilling depth. The lowest notch allows a till-ing depth of approximately 6”, depending on soil conditions. For best results, always
begin tilling at a very shallow depth setting and gradually increase the tilling depth.
WARNING: Do not attempt to till too deeply too quickly. Gradually work down to deeper tilling depths.Place the Depth Regulator Lever in the “travel” position before starting the engine. This position prevents the tines from touching the ground until you are ready to begin tilling.Failure to follow this warning could result in personal injury or property damage.
HANDLEBAR HEIGHT ADJUSTMENTThe handlebar height is adjustable to three different settings (Figure 3-6). In general, adjust the handlebars so they are at waist level when the tines are 3"-4" in the soil.To adjust the handlebars:1. Stop engine, disconnect spark plug wire from spark plug and allow engine to cool.2. Remove hardware, reposition handle-bars, and reinstall hardware securely.
Figure 3-3: FREEWHEEL position.
Figure 3-4: All models have a Forward Clutch Bail (E). Only Model 644A have a Reverse Clutch Control (F).
E
F
G
Deep
Travel Position
ShallowSettings
Settings
Figure 3-6: Handlebar height adjustment.
Medium
High
Low
B
A
D
C
Figure 3-5: Depth Regulator Lever (G).

12
WARNING: Before operating your machine, carefully read and understand all safety (Section 1), controls (Section 3) and operating instructions (Section 4) in this Manual, the separate Engine Owner’s Manual, and on the decals on the machine. Failure to follow these instructions can result in serious personal injury.
INTRODUCTIONRead this Operation Section and the sepa-rate Engine Owner’s Manual before you start the engine. Then, take the time to fa-miliarize yourself with the basic operation of the tiller before using it in the garden. Find an open, level area and practice using the tiller controls without the tines engag-ing the soil (put tines in “travel” setting). Only after you’ve become completely fa-miliar with the tiller should you begin using it in the garden.
BREAK-IN OPERATIONPerform the following maintenance after the first two (2) hours of new operation (see Maintenance Section in this manual and in the Engine Owner’s Manual).1. Change engine oil.2. Check for loose or missing hardware on unit. Tighten or replace as needed.3. Check tension on forward drive belt.4. Check transmission gear oil level.
STARTING AND STOPPING Pre-Start ChecklistWith the spark plug wire disconnected from the spark plug, perform the following checks and services before each use:1. Read the Safety and Controls Sections in this manual. Read the separate Engine Owner’s Manual provided with the unit.2. Put the wheels in the WHEEL DRIVE po-sition (wheel pins must be through holes in wheel hubs and wheel shaft).3. Check unit for loose or missing hard-ware. Service as required.4. Check engine oil level. See Engine Own-er’s Manual.
5. Check that all safety guards and covers are in place.6. Check air cleaner and engine cooling system. See Engine Owner’s Manual.
WARNING: GASOLINE IS HIGHLY FLAMMABLE AND ITS VAPORS ARE EXPLOSIVE. Follow gasoline safety rules in this Manual (see Section 1) and in the separate Engine Owner’s Manual.Failure to follow gasoline safety instructions can result in serious personal injury and property damage.
7. Fill the fuel tank with gasoline according to the directions in the separate Engine Owner’s Manual. Follow all instructions and safety rules carefully.8. Attach spark plug wire to spark plug.
Starting the Engine
The following steps describe how to start and stop the engine.
WARNING: Do not attempt to engage the tines or wheels until you have read all of the operating instructions in this Section. Also, review the safety rules in Section 1: Safety, and the tiller and engine controls information in Section 3: Features and Controls.
1. Complete the Pre-Start Checklist on this page. 2. Put the wheels in the WHEEL DRIVE po-sition (see Wheel Drive Pins in Section 3 of this manual).
WARNING: To help prevent serious personal injury or damage to equipment:
• Before starting engine, put bothwheels in the WHEEL DRIVE position.Never have wheels in FREEWHEEL po-sition when engine is running. Whenthe wheels are in FREEWHEEL, they donot hold back the tiller and the tinescould propel the tiller rapidly forward or backward.
• Before starting engine, put ForwardClutch Bail (all models) and ReverseClutch Control (Model 644A only) inneutral (disengaged) positions by re-leasing levers.
• Never run engine indoors or in en-closed, poorly ventilated areas. Engineexhaust contains carbon monoxide, anodorless and deadly gas.
• Avoid engine muffler and nearby areas.Temperatures in these areas may ex-ceed 150° F.
3. Move the Depth Regulator Lever all the way down to the “travel” position, so that the tines clear the ground.4. Release all controls on the tiller.5. On engine’s with a fuel shut-off valve, turn valve to open position, as instructed in the separate Engine Owner’s Manual.6. Put ignition switch and/or throttle con-trol lever located on engine in the “ON”, “RUN”, “FAST” or “START” position, as in-structed in the Engine Owner’s Manual.7. Choke or prime engine, as instructed in Engine Owner’s Manual.8. Put one hand on fuel tank to stabilize unit when pulling starter rope handle. Then use recoil starter to start engine, as in-structed in the Engine Owner’s Manual. When engine starts, gradually move choke lever (if so equipped) to “NO CHOKE”, “CHOKE OFF” or “RUN” position.9. Use the “FAST” throttle speed setting when tilling.
Fig. 4-1
Wheel Drive Pin
Depth Regulator
ForwardClutch Bail
Reverse Clutch Control (Model 644A)
SECTION 4: OPERATION

13
Stopping the Engine and Tiller1. To stop the wheels and tines, release the Forward Clutch Bail (all models) or the Re-verse Clutch Control (Model 644A) — whichever control is in use.2. To stop the engine, put the ignition switch and/or the throttle control lever in the “OFF” or “STOP” position.
OPERATING THE TILLERThe following operating instructions pro-vide guidelines to using your tiller effec-tively and safely. Be sure to read Tilling Tips & Techniques in this Section before actually putting the tines into the soil.
This is a “Counter-Rotating-Tine” (CRT) tiller. It operates differently from “Stan-dard-Rotating-Tine” (SRT) tillers. As the wheels pull forward, the tines rotate back-ward, creating an “uppercut” action which digs deeply, uprooting soil and weeds.
1. Follow the Pre-Start Checklist at the be-ginning of this Section. Be sure that the wheels are in the WHEEL DRIVE position.2. Move the Depth Regulator Lever all the way down, so that the tines clear the ground. Use this position when practicing with the tiller and when traveling between tilling sites. Before actually tilling, move the lever to the desired depth setting (see Tilling Tips & Techniques).
3. Start engine and allow it to warm up. Then put throttle in “FAST” setting.4. For forward motion of the wheels and power to the tines:(a) Pull Forward Clutch Bail (Fig. 4-1) up against handlebar. Release bail to stop for-ward motion of wheels and tines.(b) When tilling, relax and let the wheels pull the unit while the tines dig. Walk be-hind and a little to one side of the unit. Use one hand, yet keep a light—but secure—grip on the handlebar (while keeping your arm loose). See Fig. 4-2. Let the unit move at its own pace and do not push down on the handlebars to try and force the tines to dig deeper — this takes weight off the wheels and reduces traction.
WARNING: Do not push down on the handlebars to try to make the tiller till more deeply. This prevents the wheels from holding the tiller back and can allow the tines to rapidly propel the tiller forward, which could result in loss of control, property damage, or personal injury.
5. For reverse motion of the wheels and tines (Model 644A only):(a) Look behind and exercise caution when operating in reverse. Do not till while in reverse.(b) Stop all forward motion. Lift handlebar with one hand until tines are off the ground and then pull Reverse Clutch Control knob out (see Fig. 4-3). To stop reversing, let go of Reverse Clutch Control knob.
6. To move the Model 640C in reverse for short distances:(a) Release forward Clutch Bail. Then lift handlebar until tines are off the ground.
(b) Swing the handlebar to the left so the right wheel takes a “step” backward. Next swing the handlebar to the right so the left wheel “steps” backward. Repeat as needed.(c) If longer distances need to be covered in reverse, shut off the engine, then place the two wheels in FREEWHEEL.7. To Turn the Tiller Around:(a) Practice turning the tiller in a level, open area. Be very careful to keep your feet and legs away from the tines.(b) To begin a turn, lift the handlebars until the tines are out of the ground and the engine and tines are balanced over the wheels (Fig. 4-4). (c) With tiller balanced, push sideways on handlebar to steer in direction of turn (Fig. 4-5). After turning, slowly lower tines into soil to resume tilling.
Stopping the Tiller and Engine1. To stop the wheels and tines, release the Forward Clutch Bail (all models) or the Re-verse Clutch Control (Model 644A) — whichever control is in use.2. To stop the engine, put the ignition switch and⁄or the throttle control lever in the “OFF” or “STOP” position.
Fig. 4-2: Use one hand to guide tiller when moving forward.
Fig. 4-3: Raise tines off ground and look behind when moving in reverse.
Fig. 4-4: To begin turn, lift handlebars until tines are out of ground and unit is balanced.
Fig. 4-5: With tines out of ground, push han-dlebars sideways to turn tiller.

14
Preparing Seedbeds
Tilling wet soil often results in large, hardclumps of soil that can interfere with plant-ing. If time permits, wait a day or two afterheavy rains to allow the soil to dry beforetilling. Test soil by squeezing it into a ball. Ifit compresses too easily, it is too wet to till.
Avoid Tilling Soggy, Wet Soil
Whenever possible, walk on the untilledside of the unit to avoid making footprints inyour freshly tilled or cultivated soil. Foot-prints cause soil compaction that can ham-per root penetration and contribute to soilerosion. They can also “plant” unwantedweed seeds back into the freshly tilledground.
While tilling, relax and let the wheels pull thetiller along while the tines do the digging.Walk on the side that is not yet finished (toavoid making footprints in the freshly tilledsoil) and lightly, but securely grip the han-dlebar with just one hand.
Let the Tiller Do the Work Avoid Making Footprints
• This is a CRT (counter-rotating tine) tiller. As the wheels pull forward, the tines rotate back-ward. This creates an “uppercut” tine action which digs deeply, uprooting soil and weeds.Don’t overload the engine, but dig as deeply as possible on each pass. On later passes, thewheels may tend to spin in the soft dirt. Help them along by lifting up slightly on the handlebar(one hand, palm up, works most easily).
• Avoid the temptation to push down on the handlebars in an attempt to force the tiller to dig deeper. Doing so takes the weight off the powered wheels, causing them to lose traction. Without the wheels to hold the tiller back, the tines will attempt to propel the tiller backward, towards the operator. (Sometimes, slight downward pressure on the handlebars will help get through a particularly tough section of sod or unbroken ground, but in most cases this won’t be necessary.)
With experience, you will find the “just right” tilling depth and tilling speed combinationthat is best for your garden.
Set the engine throttle lever at a speed to give the engine adequate power and yet allow it to operate at the slowest possible speed...at leastuntil you have achieved the maximum tilling depth you desire. Faster engine speeds may be desirable when making final passes throughthe seedbed or when cultivating. Selection of the correct engine speed, in relation to the tilling depth, will ensure a sufficient power level todo the job without causing the engine to labor.
Choosing Correct Wheel & Tine Speeds
WARNING: Before tilling, contact your telephone or utilities company and inquire if underground equipment or lines are used on your property. Do not till near buried electric cables, telephone lines, pipes or hoses.
Tilling Depths
• When cultivating (breaking up surface soil around plants to destroy weeds, see Fig. 4-9), a just the tines to dig only 1" to 2" deep. Usingshallow tilling depths helps prevent injury to plants whose roots often grow close to the surface. If needed, lift up on the handlebarsslightly to prevent the tines from digging too deeply. (Cultivating on a regular basis not only eliminates weeds, it also loosens and aeratesthe soil for better moisture absorption and faster plant growth.) Watering the garden area a few days prior to tilling will make tilling easier,as will letting the newly worked soil set for a day or two before making a final, deep tilling pass.
• When preparing a seedbed, go over the same path twice in the first row, then over-lap one-half the tiller width on the rest of the passes (see Fig. 6). When finished inone direction, make a second pass at a right angle, as shown in Fig. 4-7. Overlapeach pass for best results (in very hard ground, it may take three or four passes tothoroughly pulverize the soil.)
• If the garden size will not permit lengthwise and then crosswise tilling, then over-lap the first passes by one-half a tiller width, followed by successive passes at one-quarter width (see Fig. 4-8).
With planning, you canallow enough room between rows to cultivate(see Fig. 4-9). Leave roomfor the hood width,plus enough extraroom for future plantgrowth.
Fig. 4-8
Cultivating
Fig. 4-9
Fig. 4-6 Fig. 4-7
TILLING TIPS & TECHNIQUES
12
3

15
Tilling On Slopes
Read the following recommendations before tilling on slopes:
If you must garden on a moderate slope, please follow two very important guidelines:
1. Till only on moderate slopes, never on steep ground where footing is difficult (review safe-ty rules in Section 1: Safety of this manual).
2. We recommend tilling up and down slopes rather than terracing. Tilling vertically on aslope allows maximum planting area and also leaves room for cultivating.
IMPORTANT: When tilling on slopes, be sure the correct oil level is maintained in the engine(check every one-half hour of operation). The incline of the slope will cause the oil to slantaway from its normal level and this can starve engine parts of required lubrication. Keep themotor oil level at the full point at all times!
Tilling Up and Down Slopes (Vertical Tilling)
• To keep soil erosion to a minimum, be sure to add enough organic matter to the soil so that it has good moisture-holding texture and tryto avoid leaving footprints or wheel marks.
• When tilling vertically, try to make the first pass uphill as the tiller digs more deeply going uphill than it does downhill. In soft soil or weeds, you may have to lift the handlebars slightly while going uphill. When going downhill, overlap the first pass by about one-half the width of the tiller.
WARNING: Do not operate tiller on a slope too steep for safe operation. Till slowly and be sure you have good footing. Never permit tiller to freewheel down slopes. Failure to follow this warning could result in personal injury.
The tines have a self-clearing action which eliminates most tangling of debris in thetines. However, occasionally dry grass, stringy stalks or tough vines may become tan-gled. Follow these procedures to help avoid tangling and to clean the tines, if neces-sary.• To reduce tangling, set the depth regulator deep enough to get maximum “chopping”action as the tines chop the material against the ground. Also, try to till under cropresidues or cover crops while they are green, moist and tender.• While tilling, try swaying the handlebars from side to side (about 6" to 12"). This“fishtailing” action often clears the tines of debris.• If tangling occurs, lift the tines out of the soil and run the tiller in reverse (if unit isequipped with powered reverse) for a few feet. This reversing action should unwind agood deal of debris.
• It may be necessary to remove the debris by hand (apocket knife will help you to cut away the material). Besure to stop the engine and disconnect the spark plugwire before clearing the tines by hand.
WARNING: Before clearing the tines by hand, stop the engine, allow all moving parts to stop and disconnect the spark plug wire. Remove the ignition key on electric start models.Failure to follow this warning could result in personal injury.
Clearing the Tines
Loading and Unloading the Tiller
WARNING: Loading and unloading the tiller into a vehicle is potentially hazardous and we don’t recommend doing so unless absolutely necessary, as this could result in personal injury or property damage.However, if you must load or unload the tiller, follow the guidelines given next.
• Before loading or unloading, stop the engine, wait for all parts to stop moving, disconnect the spark plug wire and let the en-gine and muffler cool. • The tiller is too heavy and bulky to lift safely by one person. Two or more people should share the load.
• Use sturdy ramps and manually (engine shut off) roll the tiller into and out of the vehicle. Two or more people are needed to do this.• The ramps must be strong enough to support the combined weight of the tiller and any han-dlers. The ramps should provide good traction to prevent slipping; they should have side rails to guide the tiller along the ramps; and they should have a locking device to secure them to the vehicle.• The handlers should wear sturdy footwear that will help to prevent slipping.• Position the loading vehicle so that the ramp angle is as flat as possible (the less incline to the ramp, the better). Turn the vehicle’s engine off and apply its parking brake.
• When going up ramps, stand in the normal operating position and push the tiller ahead of you. Have a person at each side to turn the wheels.• When going down ramps, walk backward with the tiller following you. Keep alert for any obstacles behind you. Position a person at each wheel to control the speed of the tiller. Never go down ramps tiller-first, as the tiller could tip forward.• Place wooden blocks on the downhill side of the wheels if you need to stop the tiller from rolling down the ramp. Also, use the blocks to temporarily keep the tiller in place on the ramps (if necessary), and to chock the wheels in place after the tiller is in the vehicle.• After loading the tiller, prevent it from rolling by engaging the wheels in the WHEEL DRIVE position. Chock the wheels with blocks and se-curely tie the tiller down.
TILLING TIPS & TECHNIQUES (CON’T)

16
Terrace Gardening (continued)
• To create a terrace, start at the top of the slope and work down. Go back andforth across the first row as shown in Fig. 4-10.
• Each succeeding lower terrace is started by walking below the terrace you’repreparing. For added stability of the tiller, always keep the uphill wheel in the soft,newly tilled soil. Do not till the last 12" or more of the downhill outside edge ofeach terrace. This untilled strip helps prevents the terraces from breaking apartand washing downhill. It also provides a walking path between rows.
Fig. 4-10
LOADING AND UNLOADINGTHE TILLER
WARNING: Loading and unloading the tiller into a vehicle is potentially hazardous and we don’t recommend doing so unless absolutely necessary, as this could result in personal injury or property damage.However, if you must load or unload the tiller, follow the guidelines given next.
• Before loading or unloading, stop the en-gine, wait for all parts to stop moving, disconnect the spark plug wire and let the engine and muffler cool. • The tiller is too heavy and bulky to lift safely by one person. Two or more people should share the load.
• Use sturdy ramps and manually (engine shut off) roll the tiller into and out of the vehicle. Two or more people are needed to do this.• The ramps must be strong enough to support the combined weight of the tiller and any handlers. The ramps should pro-vide good traction to prevent slipping; they should have side rails to guide the tiller along the ramps; and they should have a locking device to secure them to the vehicle.• The handlers should wear sturdy footwear that will help to prevent slipping.• Position the loading vehicle so that the ramp angle is as flat as possible (the less incline to the ramp, the better). Turn the vehicle’s engine off and apply its parking brake.
• When going up ramps, stand in the normal operating position and push the tiller ahead of you. Have a person at each side to turn the wheels.• When going down ramps, walk backward with the tiller following you. Keep alert for any obstacles behind you. Position a per-son at each wheel to control the speed of the tiller. Never go down ramps tiller-first, as the tiller could tip forward.• Place wooden blocks on the downhill side of the wheels if you need to stop the tiller from rolling down the ramp. Also, use the blocks to temporarily keep the tiller in place on the ramps (if necessary), and to chock the wheels in place after the tiller is in the vehicle.• After loading the tiller, prevent it from rolling by engaging the wheels in the WHEEL DRIVE position. Chock the wheels with blocks and securely tie the tiller down.
TILLING TIPS & TECHNIQUES (CON’T)

SECTION 5: MAINTENANCE
17
WARNING: Before inspecting, cleaning or servicing the machine, shut off engine, wait for all moving parts to come to a complete stop, disconnect spark plug wire and move wire away from spark plug. Remove ignition key on electric start models.Failure to follow these instructions can result in serious personal injury or property damage.
NOTES1 - Check after first 2 hours of break-in operation.2 - Before each use.3 - Every 5 operating hours.4 - Every 10 operating hours.5 - Every 30 operating hours.6 - Change more frequently in dusty conditions.7 - See Engine Owner’s Manual for service
recommendations.8 - Whichever time interval occurs first.9 - Change after first 2 hours of break-in
MAINTENANCE SCHEDULE
PROCEDURE NOTES
Check motor oil level 2, 3
Clean engine 2, 7
Check drive belt tension 1, 4
Check nuts and bolts 1, 4
Change motor oil 4, 6, 9
Lubricate tiller 4
Service engine air cleaner system 7
Check gear oil level in transmission 1, 5
Check tines for wear 5
Check air pressure in tires (if unit has pneumatic tires)
5
Service spark plug 7
TILLER LUBRICATIONAfter every 10 operating hours, oil or grease the lubrication points shown in Figure 5-1 and described below.
Use clean lubricating oil (#30 weight motor oil is suitable) and clean general purpose grease (grease containing a metal lubricant is preferred, if available).
• Remove the wheels, clean the wheel shaft (A, Fig. 5-1) and apply a thin coating of grease to the wheel shaft.
• Grease the back, front and sides of the depth regulator lever (B, Fig. 5-1).
• Remove the tines and clean the tine shaft (C, Fig. 5-1). Use a file or sandpaper to gen-tly remove any rust, burrs or rough spots (especially around holes in shaft). Apply grease to ends of shaft before installing tines.
• Oil the threads on the handlebar height adjustment screws and the handlebar attaching screws (D, Fig. 5-1).
BD
A C
Figure 5-1
If a cover is leaking, check for loose screws. If the screws are tight, a new gasket or oil seal may be required. If the leak is from around a shaft and oil seal, the oil seal probably needs to be replaced. See your authorized dealer or contact the factory for service or advice.IMPORTANT: Never operate the tiller if the transmission is low on oil. Check the oil level after every 30 hours of operation and whenever there is any oil leakage.
CHECK HARDWARECheck for loose or missing hardware af-ter every 10 operating hours and tighten or replace (as needed) before reusing tiller
Be sure to check the screws underneath the tiller hood that secure the transmis-sion cover and the Depth Regulator Lever to the transmission.
CHECK TIRE PRESSURE(Models with pneumatic tires)Check the air pressure in both tires. The air pressure should be between 15 PSI and 20 PSI (pounds per square inch).
Keep both tires equally inflated to help prevent machine from pulling to one side.
TRANSMISSIONGEAR OIL SERVICECheck the transmission gear oil level after every 30 hours of operation or whenever you notice any oil leak. Oper-ating the tiller when the transmission is low on oil can result in severe damage.
A. To Check the Transmission Gear Oil Level:1. Check the gear oil level when the transmission is cool. Gear oil will expand in warm operating temperatures and this expansion will provide an incor-rect oil level reading.2. With the tiller on level ground, pull the Depth Regulator Lever all the way up.3. Remove the oil fill plug (A, Fig. 5-2) from the transmission housing and look inside the oil fill hole to locate the main drive shaft situated below the hole.
CHECK FOR OIL LEAKSBefore each use, check the tiller for signs of an oil leak — usually a dirty, oily accumu-lation either on the unit or on the floor.A little seepage around a cover or an oil seal is usually not a cause for alarm. How-ever, if the oil drips overnight, then imme-diate attention is needed. Ignoring an oil leak can result in severe transmission damage!

18
4. The gear oil level is correct if the gear oil is approximately halfway up the side of the main drive shaft.5. If the gear oil level is low, add gear oil as described next. If the gear oil level is okay, securely replace the oil fill plug.IMPORTANT: Do not operate the tiller if the gear oil level is low. Doing so will result in severe damage to the transmission com-ponents.
6. If adding only a few ounces of gear oil, use API rated GL-4 or GL-5 gear oil having a viscosity of SAE 140, SAE 85W-140 or SAE 80W-90. If refilling an empty trans-mission, use only GL-4 gear oil having a viscosity of SAE 85W-140 or SAE 140.IMPORTANT: Do not use automatic trans-mission fluid or motor oil in the transmis-sion.7. While checking frequently to avoid over-filling, slowly add gear oil into the oil fill hole until it reaches the halfway point on the drive shaft. 8. Securely replace the oil fill plug.
B. To Drain the Transmission Gear Oil:The transmission gear oil does not need to be changed unless it has been contaminat-ed with dirt, sand or metal particles. 1. Drain gasoline from the fuel tank or run the engine until the fuel tank is empty. See “DANGER” statement below.
WARNING: Gasoline is highly flammable and its vapors are explosive. Follow these safety practices to prevent personal injury or property damage from fire or explosion.
• Allow the engine and muffler to coolfor at least two minutes before drain-ing the tiller’s gasoline tank.
• Do not allow open flames, sparks,matches or smoking in the area.
• Wipe away spills and push tiller awayfrom spilled fuel.
• Use only an approved fuel containerand store it safely out of the reach ofchildren.
• Do not store gasoline in an area whereits vapors could reach an open flameor spark, or where ignition sources arepresent (such as hot water and spaceheaters, furnaces, clothes dryers,stoves, electric motors, etc.)
2. Drain the oil from the engine.3. Remove four screws (B, Figure 5-2) and remove transmission cover and gasket.4. Remove the left-side wheel.5. Tilt the left-side wheel shaft into a drain pan and allow the gear oil to drain through the top of the transmission.6. Reinstall the wheel. 7. Install a new gasket (do not reuse old gasket) and reinstall the transmission cov-er. 8. Refill the transmission using GL-4 gear oil (SAE 85W-140 or SAE 140).9. Refill the engine with motor oil and re-plenish the fuel tank with gasoline.
BOLO TINESThe bolo tines will wear with use and should be inspected at the beginning of each tilling season and after every 30 oper-ating hours. The tines can be replaced ei-ther individually or as a complete set. See the Parts List pages for tine identification and part numbers.
A. Tine Inspection:With use, the tines will become shorter, narrower and pointed. Badly worn tines will result in a loss of tilling depth, and re-duced effectiveness when chopping up and turning under organic matter.
B. Removing⁄Installing a Single Tine:1. With the engine shut off and the spark plug wire disconnected, remove the two screws (A, Figure 5-3) and nuts (B) that at-tach a single tine to a tine holder. If needed, use penetrating oil on the nuts.2. When installing a single tine, be sure to position it so that its cutting edge (sharp) will enter the soil first as the tiller moves forward.
C. Removing⁄Installing a Tine Assembly:1. A tine assembly consists of eight tines mounted on a tine holder.2. If removing both tine assemblies, mark them “left” and “right” before removal. Re-move the screw (C, Figure 5-3) and lock-nut (D) that secure the tine assembly to the tine shaft. If necessary, use a rubber mallet to tap the tine assembly outward off the shaft.3. Before reinstalling the tine assembly, in-spect the tine shaft for rust, rough spots or burrs. Lightly file or sand, as needed. Ap-ply a thin coat of grease to the shaft.4. Install each tine assembly so that the cutting (sharp) edge of the tines will enter the soil first when the tiller moves forward. Secure the tine assembly to the tine shaft using the screw and locknut
Figure 5-2: Remove oil fill plug (A) to check gear oil level and to add gear oil. Remove four cover screws (B) to drain gear oil.
WARNING: Before inspecting, cleaning or servicing the machine, shut off engine, wait for all moving parts to come to a complete stop, disconnect spark plug wire and move wire away from spark plug. Failure to follow these instructions can result in serious personal injury or property damage.
AB
B

19
CHECKING AND ADJUSTING FORWARD DRIVE BELT TENSIONIt is important to maintain correct tension on the forward drive belt. A loose belt will cause the tines and wheels to slow down — or stop completely — even though the en-gine is running at full speed. A too tight belt can result in unintentional tine move-ment when the clutch bail is in the Neutral (released) position.• Check belt tension after the first two hours of break-in operation and after every 10 operating hours.• At the end of each tilling season, check the belt for cracks, cuts or frayed edges and replace it as soon as possible.
To Check Forward Belt Tension:1. Stop engine, wait for all parts to stop moving and disconnect spark plug wire.2. With the Forward Clutch Bail in an open (released) position, measure and note the overall length of the cable spring (A, Figure 5-4) by measuring from the outermost coil to the outermost coil.3. Squeeze the Forward Clutch Bail against the handlebar (see Figure 5-4) and re-measure the length of the coils. The belt
tension is correct if this second measure-ment is between 1/6" -to- 3/16" longer than the first measurement.4. If the spring is too short (less than 1/16"), the tension is too loose. If the spring is too long (more than 3/16"), the tension is too tight.5. To adjust the length of the spring:
a. Release the Forward Clutch Bail.
b. Unthread the hex nut (C, Figure 5-4) halfway up the adjustment screw (D).
c. Unhook the top of the spring from the Forward Clutch Bail.
d. Use pliers to prevent the adjuster (B) from turning and turn the slotted screw lo-cated inside the spring clockwise (viewed from operator’s position) to increase ten-sion on the spring. Turn the screw counter-clockwise to decrease tension. Once adjusted, reattach the spring to the For-ward Clutch Bail.
e. Repeat Steps 2 and 3 to re-measure the length of the spring. When the second mea-surement is between 1/16" -to- 3/16" longer than the first measurement, retighten the hex nut (C) against the top of the adjuster (B).
Replacement Belt InformationIf the drive belt needs to be replaced, see your local authorized dealer or refer to the Parts List for ordering information. Use only a factory-authorized belt as an “over- the-counter” belt may not perform satis-factorily. The procedure requires average mechanical ability and commonly available tools.
Figure 5-3: Install tines so that cutting edge of tines enter soil first when tiller moves forward.
C
D
BAFORWARD
Figure 5-4: To check forward belt tension, take two measurements of the overall length of the coils in the spring — first with the clutch bail open, then with the clutch bail closed against the handlebar.
WARNING: Before inspecting, cleaning or servicing the machine, shut off engine, wait for all moving parts to come to a complete stop, disconnect spark plug wire and move wire away from spark plug. Failure to follow these instructions can result in serious personal injury or property damage.
1
2
3
4
5
Hold bail against handlebar whiletaking second measurement of spring
CB
A
D

WARNING: Before inspecting, cleaning or servicing the machine, shut off engine, wait for all moving parts to come to a complete stop, disconnect spark plug wire and move wire away from spark plug. Failure to follow these instructions can result in serious personal injury or property damage.
20
FORWARD CLUTCH BAIL ADJUSTMENTIf the Forward Clutch Bail does not func-tion properly, first check that the forward drive belt is adjusted properly (see Check-ing and Adjusting Forward Drive Belt Ten-sion). If this fails to correct the problem, contact Troy-Bilt LLC or your authorized dealer for service advice.
CHECKING AND ADJUSTING RE-VERSE DRIVE BELT TENSION (Model 644A only)It is important to maintain correct tension on the reverse drive belt. A loose belt will cause the tines and wheels to slow down – or stop completely – even though the en-gine is running at full speed. When checking belt tension, also check the belt for cracks, cuts or frayed edges and replace it as soon as possible. • Check belt tension after the first two hours of break-in operation and after every 10 operating hours.
To Check Reverse Belt Tension:1. Stop engine, wait for all parts to stop moving and disconnect spark plug wire.2. Remove screw in plastic belt cover and slide belt cover (which is attached to for-ward clutch cable) out of the way.3. Have an assistant pull the Reverse Clutch Control knob all the way out and hold it in that position. Measure the length of the cable wire between the end of the threaded cable adjuster (A, Figure 5-5) and the end of the Z-fitting (B) to which the ca-ble wire is attached. 4. The belt tension is ideal if the cable wire length measures between 1/8" to 1/4". If it is less than 1/8" (and if there is no reverse ac-tion when the tiller is running), then make the following adjustments NOTE: If the length is more than 1/4", no ad-justment is needed—as long as the reverse action functions properly.
5. Release the Reverse Clutch Control knob.and then unthread the inner jam nut (C, Figure 5-6) one to two turns. Pull the threaded cable adjuster (A, Figure 5-6) to the left until the inner jam nut (C) touches the bracket. 6. Prevent the inner jam nut (C) from turn-ing and tighten the outer jam nut (D) against the bracket. Prevent the outer jam nut (D) from turning and tighten the inner jam nut (C) against the bracket.7. Measure the gap by repeating Step 3. Readjust as needed by repeating Steps 5 and 6.8. Reinstall the belt cover.
Replacement Belt InformationIf the drive belt needs to be replaced, see your local authorized dealer or refer to the Parts List for ordering information. Use only a factory-authorized belt as an “over-the-counter” belt may not perform satis-factorily. The procedure requires average mechanical ability and commonly available tools.
ENGINE CLEANINGKeeping the engine clean will help to en-sure smooth operation and prevent dam-age from overheating. Refer to the Engine Owner’s Manual for engine cleaning ser-vice intervals and instructions. Be sure that the muffler is cool before servicing the engine.
AIR CLEANER SERVICEThe air cleaner filters dirt and dust out of the air before it enters the carburetor. Op-erating the engine with a dirty, clogged air filter can cause poor performance and damage to the engine. Never operate the engine without the air cleaner installed. In-spect and service the air cleaner more of-ten if operating in very dusty or dirty conditions. Refer to the engine Owner’s Manual for air cleaner service intervals and instructions.
ENGINE OIL SERVICECheck the engine oil level before each use and after every five hours of continuous operation. Running the engine when it is low on oil will quickly ruin the engine.It is recommended that you change the motor oil after every 10 hours of operation and even sooner when operating in ex-tremely dirty or dusty conditions. Refer to the Engine Owner’s Manual for detailed service instructions.A. To Check the Engine Oil Level:1. Park the tiller on a level area and shut off the engine.2. Level the engine (use the Depth Regula-tor Lever to adjust the engine angle).
Figure 5-5: Measure cable wire length to check for correct reverse belt tension.
D
Figure 5-6: Move threaded adjuster (A) to left to increase belt tension.
C A
A B

WARNING: Before inspecting, cleaning or servicing the machine, shut off engine, wait for all moving parts to come to a complete stop, disconnect spark plug wire and move wire away from spark plug. Failure to follow these instructions can result in serious personal injury or property damage.
21
3. Clean around the oil dipstick or oil fill tube (whichever applies) to prevent dirt from falling into the crankcase. 4. On engines with an oil fill tube, remove the fill cap and add oil (if required) until it reaches the top of the fill tube. Reinstall the fill cap. 5. On engines with a dipstick, remove it and wipe it clean. Reinsert the dipstick, tighten it securely, and remove it. Add oil as needed to bring the level up to the FULL mark. Wipe dipstick clean each time oil level is checked. Do not overfill. Tighten dipstick securely.B. To Change the Engine Oil:Change the engine oil as instructed in the Engine Owner’s Manual.
SPARK PLUG SERVICEInspect and clean or replace the spark plug after every 100 operating hours or annual-ly. Refer to the Engine Owner’s Manual for spark plug service instructions. In some areas, local law requires using re-sistor spark plugs to suppress ignition sig-nals. If the engine was originally equipped with a resistor spark plug, use the same type for replacement.
SPARK ARRESTER SCREEN SERVICEIf the engine muffler is equipped with a spark arrester screen, remove and clean it according to the service intervals and in-structions in the Engine Owner’s Manual.
THROTTLE LEVER ADJUSTMENTIf the engine does not respond to various throttle lever settings, refer to the Engine Owner’s Manual for service information or contact your local authorized engine deal-er.
WARNING: Operators shall not tamper with the engine governor settings on the machine; the governor controls the maximum safe operating speed to protect the engine and all moving parts from damage caused by overspeed. Authorized service shall be sought if a problem exists.
CARBURETOR/GOVERNOR CONTROL ADJUSTMENTSThe carburetor was adjusted at the factory for best operating speed. Refer to the En-gine Owner’s Manual for any adjustment information or see your authorized engine dealer. The governor controls the maximum safe operating speed and protects the engine and all moving parts from damage caused by overspeeding. Do not tamper with the engine governor settings.
OFF-SEASON STORAGEWhen the tiller won’t be used for an ex-tended period, prepare it for storage as fol-lows:
1. Clean the tiller and engine.2. Do routine tiller lubrication and check for loose parts and hardware.3. Protect the engine and perform recom-mended engine maintenance by following the storage instructions found in the En-gine Owner’s Manual. Be sure to protect the fuel lines, carburetor and fuel tank from gum deposits by removing fuel or by treating fuel with a fuel stabilizer (follow engine manufacturer’s recommendations). 4. Store unit in a clean, dry area. 5. Never store the tiller with fuel in the fuel tank in an enclosed area where gas fumes could reach an open flame or spark, or where ignition sources are present (space heaters, hot water heaters, furnaces, etc.).

22
TROUBLESHOOTING
PROBLEM POSSIBLE CAUSE CORRECTION
Engine does not start 1. Spark plug wire disconnected. 1. Reconnect wire.
2. Engine Throttle Control Lever incorrectly set. 2. Put lever in START position.
3. Fuel tank empty. 3. Add fuel.
4. Choke control (if so equipped) in incorrect position. 4. See Engine Owner’s Manual.
5. Stale gasoline. 5. Drain fuel and add fresh fuel.
6. Dirty air filter. 6. Clean or replace filter.
7. Defective or incorrectly gapped spark plug. 7. Inspect spark plug.
8. Carburetor out of adjustment. 8. See Engine Service Dealer.
9. Misadjusted throttle control. 9. See Engine Service Dealer
10. Dirt or water in fuel tank. 10. See Engine Service Dealer.
Engine runs poorly. 1. Defective or incorrectly gapped spark plug. 1. Inspect spark plug (see Engine Owner’s Manual).
2. Dirty air filter(s). 2. Clean or replace (see Engine Owner’s Manual).
3. Carburetor out of adjustment. 3. See Engine Service Dealer.
4. Stale gasoline. 4. Replace with fresh gasoline.
5. Dirt or water in fuel tank. 5. See Engine Service Dealer.
6. Engine cooling system clogged. 6. Clean air cooling system (see Engine Owner’s Manual).
Engine overheats. 1. Engine cooling system clogged. 1. Clean air cooling area (see Engine Owner’s Manual).
2. Carburetor out of adjustment. 2. See Engine Service Dealer.
3. Oil level is low. 3. Check oil level (see Engine Owner’s Manual).
Engine does not shut off 1. Misadjusted throttle control or ignition switch. 1. See Engine Owner’s Manual or Engine Service Dealer.
Wheels and Tines will not turn 1. Improper use of controls. 1. Review Sections 3 and 4.
2. Worn, broken, or misadjusted drive belt(s). 2. See “Checking Drive Belt Tension,” Section 5.
3. Internal transmission wear or damage. 3. Contact local dealer or the factory.
4. Bolt loose in transmission pulley. 4. Tighten bolt.
Tines turn, but wheels don’t. 1. Wheel Drive Pins not in WHEEL DRIVE. 1. See “Wheel Drive Pins” in Section 3.
2. Bolt loose in transmission pulley. 2. Tighten bolt.
3. Internal transmission wear or damage. 3. Contact local Dealer or the Factory.
Wheels Turn, but Tines Don’t. 1. Tine holder mounting hardware missing. 1. Replace hardware.
2. Bolt loose in transmission pulley. 2. Tighten bolt.
3. Internal transmission wear or damage. 3. Contact local Dealer or the Factory.
Poor tilling performance. 1. Worn tines. 1. See “Bolo Tines” (Section 5).
2. Improper Depth Regulator setting. 2. See “Tilling Tips & Techniques,” Section 4.
3. Incorrect throttle setting. 3. See Section 4.
4. Forward Drive Belt slipping. 4. See “Checking Forward Drive Belt Tension,” Section 5.
WARNING: Before inspecting, cleaning or servicing the machine, shut off engine, wait for all moving parts to come to a complete stop, disconnect spark plug wire and move wire away from spark plug. Failure to follow these instructions can result in serious personal injury or property damage.

Section
6 Parts List5
1
3
14
211
181716
10
97
4
15
12
6
415
1
7
97
19
20
13
7 21
2224
23
(A) For Model 640C(B) For Model 644A
REF NO. PART NO. DESCRIPTION
1 715-0108 Spirol Pin2 710-0597 Hex Hd. Screw, 1/4-20 x 13 710-0599 Screw, Self-Tapping,1/4-20 x 1/24 710-0874 Hex Hd. Screw, 5/16-18 x 1-1/45 710-3008 Hex Hd. Screw, 5/16-18 x .756 712-04064 Hex Lock Nut, Nylon, 1/4-207 712-04063 Hex Lock Nut, Nylon, 5/16-188 1916707 Channel Support Bracket9 736-0119 Lock Washer, 5/1610 GW-55013-1 Hood Bracket, Left Hand11 GW-55013-2 Hood Bracket, Right Hand12 GW-55015 Drag Bar13 GW-55018 Depth Regulator Lever
1
11111
22222
RN
4 686-04043 Tine Hood Assembly (A)686-04041 Tine Hood Assembly (B)5 GW-55088 Bushing6 GW-9384 Spring, Depth Regulator7 GW-9534 Spacer 8 710-04048 Hex Hd. Flange Screw, 5/16-18 x 1 9 618-04254 Transmission Assembly (A)
618-04046 Transmission Assembly (B)0 786-04191 Flap Stop Bracket1 1916570 Reverse Stop Arm2 710-0395 Hex Screw, 5/16-18 x 2.253 1916771 Spacer, .462 x .328 x 1.634 736-0275 Flat Washer, 5/16
EF O. PART NO. DESCRIPTION
23

24
MODELS 640C & 644A
5
10
2
5
15
1
1216
21
3
13
20
4
17
11
22
725
8
6
2314
18
18
7
9

25
MODELS 640C & 644A
REF NO. PART NO. DESCRIPTION
1 749-04193 Bumper (B)2 710-0395 Hex Screw, 5/16-18 x 2-1/4, Gr5 (B)3 726-0201 Nut, Speed, 5/16-18 (B)4 712-04063 Hex Lock Nut, Nylon, 5/16-18 (B)
1 4
3
2
REF NO. PART NO. DESCRIPTION
1 1916719 Cable Assembly, Reverse Clutch (B)2 1916755 Upper Handlebar3 747-04210 Bail, Forward Clutch4 1918745 Cable Assembly, Forward Clutch5 710-0599 Screw, Self-Tapping,1/4-20 x 1/26 710-3008 Screw, Hex, 5/16-18 x 3/47 712-3009 Hex Lock Nut, 5/16-188 786-04188 Handlebar Support9 GW-55043 Lower Handlebar10 786-04200 Panel11 GW-55044 Tab, Conduit Mount12 GW-9855 Screw, #10-24 x 213 725-0157 Cable Tie14 736-3050 Flat Washer, 3/815 732-04040 Bracket, Reverse Clutch Cable (B)16 732-04185 Spring, Forward Clutch17 710-0106 Hex Hd. Screw, 1/4-20 x 1-1/418 710-0216 Screw, Hex, 3/8-16 x 3/420 710-0805 Screw, Hex, 5/16-18 x 1-1/221 712-0121 Hex Nut, #10-2422 712-0291 Hex Lock Nut, 1/4-2023 712-3000 Hex Nut, 3/8-1625 736-0119 Lock Washer, 5/16
(A) For Model 640C(B) For Model 644A

26
MODELS 640C & 644A
* Use as required to obtain between .005” and .015” allowable end-play.
REF NO. PART NO. DESCRIPTION
1 GW-9517 Snap Ring2 GW-1714 Bearing, Tapered Roller (with race)3 GW-50043 Support Washer, Rear4 711-04110 Drive Shaft5 GW-1224-1* Shim, Rear Bearing Cap, .010" thick
GW-1224-2* Shim, same as above, except .030" thickGW-1224-3* Shim, same as above, except .005" thickGW-1224-4* Shim, same as above, except .062" thick
— GW-1325C Shim Set (Incl. the following shims: two #1224-1, two 1224-2 & one #1224-4)
3
4
5
2
2
1
2
2
1
5
4
6
6
8
8
910
1012
314
13
11*
7
*Included with transmission when purchased as an assembly only.Remove and discard when installing the transmission on tiller.
REF NO. PART NO. DESCRIPTION
1 GW-9727 Plug, Transmission Oil Fill2 710-04049 Hex Hd. Flange Screw, 5/16-18 x 5/8,Gr. 53 736-0119 Lock Washer, 5/164 1918377 Rear Cover, Transmission5 1916641 Front Cover, Transmission6 GW-50032 Gasket, Housing Cover7 721-04030 Oil Seal, Drive Shaft8 721-04031 Oil Seal, Wheel Shaft9 619-04013 Transmission Housing Assembly10 721-04036 Oil Seal, Tine Shaft 11 736-3008* Washer, Flat, .344 x .750 x .120 12 718-04008 Rear Bearing Cap 13 710-04048 Hex Hd. Flange Screw, 5/16-18 x 1 14 710-3008 Hex Hd. Flange Screw, 5/16-18 x 3/4

27
MODELS 640C & 644A
* Use as required to obtain between .005” and .030” allowable end-play.
REF NO. PART NO. DESCRIPTION
1 GW-9512 Retainer, Snap Ring, “E” Type2 1909950 Retainer, Snap Ring3 GW-1166-1* Shim, 0.062" thick
GW-1166-2* Shim, 0.030" thickGW-1166-3* Shim, 0.015" thickGW-1166-4* Shim, 0.010" thickGW-1166-5* Shim, 0.005" thick
4 GW-1086 Bronze Bushing5 711-04088 Wheel Shaft (A)
711-04092 Wheel Shaft (B)6 GW-9305 Key, Hi-Pro, 1/4 x 17 GW-1132-2 Spacer8 1904278 Worm Gear, Wheel Shaft9 711-04078 Tiller Shaft10 GW-1104 Woodruff Key11 1916542 Worm Gear, Tiller Shaft
12
34
7
7
4
32
FRONT
9
5
6
10
11
8
(A) For Model 640C(B) For Model 644A

28
MODELS 640C & 644A
9
24
28
20
30
25
271
111
5
17
1928
1
12
10
14
16
38
3231
32
7
8
371939
33
4
38
34FORWARD
CLUTCH CABLE
35
41
28
24 22
22
246
13
21 28
16
29
18
3623
40
REVERSECLUTCH CABLE
15
28
26
42
43

MODELS 640C & 640A
REF NO. PART NO. DESCRIPTION
1 736-0159 Flat Washer, 5/162 714-0139 Key, 3/16" x 2" (A)
1108841 Key, 3/16" x 1-1/2" (B)3 1916351 Pulley, Engine Drive4 656-04023 Transmission Pulley (A)
656-04005 Transmission Pulley (B)5 1916535 Pulley, Reverse Idler (B)6 1916652 Guard, Belts/Pulleys7 1916657 Forward Drive Belt8 1916658 Reverse Drive Belt (B)9 1916660 Belt Cover10 1916724 Reverse Return Spring (B)11 1916725 Belt Guide (B)12 1916726 Forward Belt Guide13 1916794 Engine Bracket, Left14 1916795 Engine Bracket, Right15 1917326 Bracket, Belt Cover16 1917746 Shoulder Washer17 1918731 Reverse Idler Arm (B)18 1918744 Forward Idler Lever19 710-0627 Hex Hd. Screw, 5/16-24 x 1.25 (A)
710-0117 Hex Hd. Screw, 5/16-24 x 1 (B)20 710-0237 Hex Hd. Screw, 5/16-24 x 5⁄8 21 710-0376 Hex Hd. Screw, 5/16-18 x 1
2222222233333333334444
RN
(A) For Model 640C(B) For Model 644A
2 710-04049 Hex Hd. Screw, 5/16-18 x 5/83 710-0347 Hex Hd. Screw, 3/8-16 x 1-3/44 710-0599 Screw, Self-Tapping, 1/4-20 x 1/25 710-3103 Hex Hd. Screw, 5/16-18 x 2 (B)6 712-3000 Lock Nut, 3/8-167 712-3009 Lock Nut, 5/16-188 736-0119 Lock Washer, 5/169 750-0535 Spacer, .380 ID x .625 OD x .210 736-3090 Flat Washer1 736-0452 Bell Washer2 710-0151 Hex Hd. Screw, 3/8-24 x 2.0, GR53 GW-50027 Support Washer4 GW-55034 Forward Return Spring5 GW-55049 Bracket, Cable Mounting6 GW-9090 Forward Idler Pulley7 GW-9301 Key, 3/16" x 1"8 736-3078 Flat Washer9 GW-9944 Belleville Washer0 710-0395 Hex Screw, 5/16-18 x 2.25 Gr5 (A)1 712-3010 Nut, Hex Lock, 5/16-18 (A)2 750-0258 Spacer, Shoulder (A)3 736-0315 Washer, Flat, .75 x 1.5 x .125 (A)
GW-1138-2 Shim, 1.0 x .765 x .031 (B)
EF O. PART NO. DESCRIPTION
29

30
FORWARD
MODELS 640C & 644A
REF NO. PART NO. DESCRIPTION
1 710-0514 Hex Hd. Screw, 3/8-16 x 1, Grade 52 GW-50049-02 Single Bolo Tine - Left Hand3 712-3000 Hex Lock Nut, 3/8-164 710-0347 Hex Hd. Screw, 3/8-16 x 1-3/45 GW-50049-01 Single Bolo Tine - Right Hand6 1915075 Tine Holder (A)
1916747 Tine Holder (B) 7 1917486 Wheel & Tire Ass’y — Left/Right Side(B)
734-04162 Wheel & Tire Ass’y — Left Side Only (A)8 734-04161 Wheel & Tire Ass’y — Right Side Only (A)9 GW-9380 Clevis Pin, .312" x 1-3/4"10 GW-9338 Hair Pin Cotter— GW-1901 Bolo Tine Replacement Set (Incl. eight
right-hand tines, eight left-hand tines and required hardware. (A) (B)
9
9
10
7, 8
3
2
TINE SHAFT
1
4
5
1
3
3
5
7
2
(A) For Model 640C(B) For Model 644A
Hold Tines With Blunt End Toward You
RIGHT-HAND TINE LEFT-HAND TINE
NOTE: Identify Left and Right sides of tiller by standing in operator position and facing direction of forward travel.

31
NOTES

TROY-BILT TILLER LIFETIME LIMITED WARRANTY
WHAT PRODUCT All Troy-Bilt branded rear tine walk-behind tillers with gear drive transmissions.IS COVERED This warranty begins on the date of purchase and is warranted by Troy-Bilt LLC for the life of the
tiller, to the original purchaser only.
WHAT IS COVERED Troy-Bilt LLC will, at its option, repair or replace any part found to be defective in material or BY THIS WARRANTY workmanship without charge for parts and labor
This limited lifetime warranty also applies to non-powered attachments and accessories. Powered attachments and accessories are warranted separately by their manufacturers. Referto the applicable manufacturer’s warranty on these items for terms and conditions.
WHAT IS NOT This warranty does not apply to parts that have been damaged by accident, alteration, misuse, COVERED BY THIS abuse, neglect, improper maintenance, vandalism, theft, fire, water, or damage because of peril WARRANTY or other natural disaster.
The following items are not covered after the first year of this residential use limited warranty:belts, batteries, bushings, seals, tines, tires, wheels, paint, appearance items, and similar itemsthat are normally replaced through periodic maintenance.
Charges for pick-up, delivery, and service calls are not covered by this warranty.
Service completed by someone other than an authorized service dealer is not covered by thiswarranty.
Parts that are not genuine Troy-Bilt LLC service parts are not covered by this warranty.
The engine is warranted separately by the engine manufacturer. Refer to the enginemanufacturer’s warranty for terms and conditions.
LIMITED If used for commercial, institutional, industrial, rental, or demonstrator purposes, the warranty COMMERCIAL on the tiller is limited in duration to 90 days from the date of purchase. USE WARRANTY
This warranty does not apply to parts that have been damaged by accident, alteration, misuse, abuse, neglect, improper maintenance, vandalism, theft, fire, water, or damage because ofperil or other natural disaster.
HOW TO OBTAIN Warranty service is available, with proof of purchase, through your local authorized service SERVICE dealer. To locate a dealer in your area, consult your Yellow Pages, or contact Troy-Bilt LLC at
P.O. Box 361131, Cleveland, Ohio 44136-0019, 1-866-520-5220, or log on to our Web site atwww.troybilt.com.
The provisions set forth in this warranty provide the sole and exclusive remedy arising from the sale. Troy-Bilt LLC shall not be liable for any incidental or consequential damage or expense of any kind, including but not limited to cost of equipment rental, loss of profits, or costs of hiring services to perform tasks normally performed by the equipment.
Any implied warranties, including any implied warranty of merchantability or fitness for a particular purpose, shall be limited in duration to the period of ownership by the original purchaser (and a maximum of 90 days from the date of sale if the tiller is
purchased for commercial or other non-residential use).
Some states do not allow the exclusion or limitation of incidental or consequential damages, or limitations on how long an implied warranty lasts, so the above exclusions or limitations may not apply to you.
This limited warranty gives you specific legal rights, and you may also have other rights which vary from state to state.
For customer assistance, contact your nearest authorized dealer, or contact us at:
TROY-BILT LLC, P.O. Box 361131, Cleveland, Ohio 44136-0019, 1-866-840-6483