Embed Size (px)
Citation preview

O P E R A T O R ’ S M A N U A L
www.arcticcat.com
400450
UNDER
16
! WARNINGOperating this ATV if you are underthe age of 16 increases your chanceof severe injury or death.
NEVER operate this ATV if you areunder 16.
Do not remove this Operator’s Manual from this ATVaccording to the guidelines and agreement with the U.S.Consumer Product Safety Commission.Read this manual carefully.It contains important safety information.

Your ATV can be hazardous to operate.A collision or rollover can occur quickly, even during routine maneuvers such asturning and driving on hills or over obstacles, if you fail to take proper precautions.
For your safety, it is important to understand and follow all of the warnings containedin this Operator’s Manual and the labels on your ATV prior to riding.
Keep this Operator’s Manual with your ATV at all times. This Arctic Cat ATV Oper-ator’s Manual should be considered a permanent part of the ATV and must remainwith the ATV at the time of resale. If the ATV changes ownership more than once,contact Arctic Cat Inc., Service Department, P.O. Box 810, Thief River Falls, MN56701, for proper registration information.
Labels should be considered as permanent parts of the ATV. If a label comes off orbecomes hard to read, contact your Arctic Cat dealer for a replacement.
FAILURE TO FOLLOW THE WARNINGS CONTAINED IN THIS MANUALCAN RESULT IN SERIOUS INJURY OR DEATH.
For your safety, it is important all operators be properly trained to operate an ATV.Training is available: U.S. owners, call 800-887-2887; Canadian owners, call 613-739-1535.
Pour votre sécurité, il est importante que tout opérateur est formé correctement pouropérer un VTT. Un cours d’instruction est disponible: pour les propriétaires canadiens,composez le 613-739-1535.
Particularly important information is distinguished in this manual by the followingnotations:
California Proposition 65
!The Safety Alert Symbol means ATTENTION! BE ALERT! YOUR SAFETY IS INVOLVED.
! WARNING WARNING indicates a hazardous situation which, if not avoided, could result in death or serious injury.
CAUTION CAUTION, without the safety alert symbol, is used to address practices not related to personal injury.
NOTE: A NOTE provides key information to make procedures easier or more clear.
! WARNINGThis product contains or emits chemicals known to the State of Californiato cause cancer and birth defects or other reproductive harm.

ForewordCongratulations and thank you from Arc-tic Cat Inc. for purchasing an ARCTICCAT® All-Terrain Vehicle (ATV). Builtwith American engineering and manufac-turing know-how, it is designed to pro-vide superior ride, comfort, utility, anddependable service.
This Operator’s Manual is furnished toensure that the operator is aware of safeoperating procedures. It also includesinformation about the general care andmaintenance of your ATV.
Carefully read the following pages. Ifyou have any questions regarding thisATV, contact an authorized Arctic CatATV dealer for assistance. Remember,only authorized Arctic Cat ATV dealershave the knowledge and facilities to pro-vide you with the best service possible.
• Know all local, state/provincial ridinglaws,
• Respect your ATV,• Respect the environment, and• You will gain the respect of others.
We also advise you to strictly follow therecommended maintenance program asoutlined. This preventive maintenanceprogram is designed to ensure that allcritical components on this ATV are thor-oughly inspected at various intervals.
All information in this manual is basedon the latest product data and specifica-tions available at the time of printing.Arctic Cat Inc. reserves the right to makeproduct changes and improvementswhich may affect illustrations or explana-tions without notice.
Division II of this manual covers opera-tor-related maintenance, operatinginstructions, and storage instructions. Ifmajor repair or service is ever required,contact an authorized Arctic Cat ATVdealer for professional service.
At the time of publication, all informa-tion and illustrations in this manual weretechnically correct. Some illustrationsused in this manual are used for claritypurposes only and are not designed todepict actual conditions. Because ArcticCat Inc. constantly refines and improvesits products, no retroactive obligation isincurred.
Arctic Cat and the ATV Safety Instituterecommend that all ATV operators ridethe appropriate-sized ATV according toage.
Protect Your Sport
Parts and Accessories
When in need of replacement parts, oil,or accessories for your Arctic CatATV, be sure to use only GENUINEARCTIC CAT PARTS, OIL, ANDACCESSORIES. Only genuine ArcticCat parts, oil, and accessories are engi-neered to meet the standards andrequirements of your Arctic Cat ATV.For a complete list of accessories, referto the current Arctic Cat ATV Acces-sory Catalog.
To aid in service and maintenance pro-cedures on this ATV, a Service Manualand an Illustrated Parts Manual areavailable through your local Arctic CatATV dealer.
Category Age (Years)
Speed Limitations
(MPH)NOTES
Y-12+ 12 or Older
15 - Limited30 - Maximum
Operate Under Adult Supervision
T-14 14 or Older
20 - Limited30 - Limited
38 - Maximum
Operate Under Adult Supervision
G & S 16 or Older
According to Local
Regulations
—
1

Table of ContentsForeword.................................................1Parts and Accessories ..........................1
DIVISION I - SAFETYATV Safety Alert.....................................4Rider Training Course ...........................5Hangtags ................................................6Warning Labels & Information..............7Warnings ...........................................8-15Prevention .......................................16-19
Safe Riding Clothing and Gear.............. 16Condition of the ATV............................... 17
T-CLOC........................................... 17First Aid and Survival.............................. 18
Active Riding........................................20Sound Judgment ............................21-25
Environment............................................ 21Those Around You.................................. 22Equipment............................................... 23Load Capacity Ratings........................... 24Personal Choices.................................... 24
SIPDE............................................. 25Supervision ..........................................26
Taking Responsibility.............................. 26Inexperienced Riders..................... 26Experienced Riders ....................... 26
DIVISION II - OPERATION/ MAINTENANCEATV Specifications ..............................27Location of Parts and Controls ..........28ATV Operation.................................29-39
Basic Operating Maneuvers................... 29Starting the Engine........................ 29BONE-C ......................................... 29Starting A Cold Engine (400) ........ 29Starting A Cold Engine (450) ........ 30
How to Handle the ATV (Active Riding Techniques) .....................................31
Tips.......................................................... 37General Information........................40-50
ATV Identification Numbers.................... 40Ignition Switch Key.................................. 40Control Locations and Functions........... 40LCD Gauge (400)................................... 43Primer - Cold Start (400)........................ 46Gas/Vent Hoses...................................... 46Carburetor Float Bowl Drain (400)......... 46Electric Fuel Pump (450)........................ 47Oil Level Stick.......................................... 47Seat Latch............................................... 47
Safety Flag Bracket.................................48Rack Loading (Front and Rear)..............48Trailering and Towing ..............................48Transporting ATV.....................................48Gasoline-Oil-Lubricant............................49Engine Break-In.......................................50Burnishing Brake Pads ...........................50
General Maintenance..................... 51-65Maintenance Schedule...........................51Oil Cooler (400).......................................52Liquid Cooling System (450) ..................52Shock Absorbers.....................................53General Lubrication.................................53Hydraulic Hand Brake.............................55
Brake Fluid......................................55Brake Lever Lock............................55Brake Hoses...................................55Brake Pads .....................................55
Rear Foot Brake......................................56Protective Rubber Boots.........................56Battery......................................................57Spark Plug...............................................60Engine Idle RPM Adjustment (400) .......60Throttle Cable Adjustment......................61Air Filter....................................................61Air Filter Housing Drain...........................62Draining V-Belt Cover..............................62Tires .........................................................62Wheels.....................................................63Muffler/Spark Arrester.............................63Light Bulb Replacement .........................63Checking/Adjusting Headlight Aim.........64Fuses .......................................................65Tools.........................................................65
Preparation for Storage.......................66Preparation after Storage....................67Limited Warranty..................................68Warranty Procedure/Owner
Responsibility...................................69Arctic Cat Emission Control System
Limited Warranty..............................70U.S. EPA Emission Control
Statement/Warranty Coverage - ATV (U.S. Only) ..........................71
Arctic Cat ATV Emission Control Warranty Statement .........................72
Change of Address, Ownership, or Warranty Transfer.............................73
Maintenance Record............................75Declaration Of Conformity ..................76Identification Numbers Record.... Inside
Back Cover
2

DIVISION I - SAFETYAn ATV is not a toy and can be hazardous to operate.
• Always go slowly and be extra careful when operating on unfamiliar terrain. Alwaysbe alert to changing terrain conditions when operating the ATV.
• Never operate on excessively rough, slippery, or loose terrain.• Always follow proper procedures for turning as described in this manual. Practice
turning at slow speeds before attempting to turn at faster speeds. Do not turn atexcessive speed.
• Always have the ATV checked by an authorized Arctic Cat ATV dealer if it has beeninvolved in an accident.
• Never operate the ATV on hills too steep for the ATV or for your abilities. Practice onsmaller hills before attempting larger hills.
• Always follow proper procedures for climbing hills as described in this manual.Check the terrain carefully before you start up any hill. Never climb hills with slip-pery or loose surfaces. Shift your weight forward. Never open the throttle suddenlyor make sudden gear changes. Never go over the top of any hill at high speed.
• Always follow proper procedures for going down hills and for braking on hills asdescribed in this manual. Check the terrain carefully before you start down any hill.Shift your weight backward. Never go down a hill at high speed. Avoid going down ahill at an angle which would cause the ATV to lean sharply to one side. Go straightdown the hill where possible.
• Always be sure there are no obstacles or people behind you when you operate inreverse. When it is safe to proceed in reverse, go slowly. Avoid turning at sharpangles in reverse.
• Always follow proper procedures for crossing the side of a hill as described in thismanual. Avoid hills with slippery or loose surfaces. Shift your weight to the uphillside of the ATV. Never attempt to turn the ATV around on any hill until you havemastered the turning techniques described in this manual on level ground. Avoidcrossing the side of a steep hill if possible.
• Always use proper procedures if you stall or roll backward when climbing a hill. Toavoid stalling, maintain a steady speed when climbing a hill. If you stall or roll back-wards, follow the special procedure for braking described in this manual. Dismounton the uphill side or to either side if pointed straight uphill. Turn the ATV around andmount following the procedure described in this manual.
• Always check for obstacles before operating in a new area. Never attempt to oper-ate over large obstacles, such as large rocks or fallen trees. Always follow properprocedures when operating over obstacles as described in this manual.
• Always be careful of skidding or sliding. On slippery surfaces, such as ice, go slowlyand be very cautious in order to reduce the chance of skidding or sliding out of con-trol.
• Never operate an ATV in fast flowing water or in water deeper than the footrests.Remember that wet brakes may have reduced stopping capability. Test your brakesafter leaving water. If necessary, apply them lightly several times to let friction dryout the pads.
• Always use the size and type tires specified in this manual. Always maintain propertire pressure as described in this manual.
• Never improperly install or improperly use accessories on this ATV.• Never install a twist grip throttle on this ATV.• Never exceed the stated load capacity for an ATV. Cargo should be properly distrib-
uted and securely attached. Reduce speed and follow instructions in this manual forcarrying cargo or pulling a trailer and allow greater distance for braking.
• No one under the age of 16 should operate this ATV. Some operators at the age of16 may not be able to operate an ATV safely. Parents should supervise the use ofthe ATV at all times. Parents should permit continued use only if they determine thatthe operator has the ability to operate the ATV safely.
FOR MORE INFORMATION ABOUT ATV SAFETY, call the ATV SafetyInstitute at 1-800-887-2887 (U.S.) or 1-613-739-1535 (Canada).
! WARNING Indicates a hazardous situation which, if not avoided, could result in death or serious injury. 3

ATV Safety AlertThe Consumer Product Safety Commis-sion has concluded that ALL-TERRAINVEHICLES (ATV’s) may present a riskof SERIOUS INJURY or DEATH in cer-tain circumstances. Accidents may occurfor many reasons:
* Over 2342 people, including manychildren, have died in accidentsassociated with ATV’s since 2007.
* Many people have become severelyparalyzed or suffered serious inter-nal injuries as a result of accidentsassociated with ATV’s.
* Every month thousands of peopleare treated in hospital emergencyrooms for injuries received whileriding an ATV.
You should be aware that AN ATV ISNOT A TOY AND CAN BE HAZARD-OUS TO OPERATE. An ATV handlesdifferently from other vehicles, includingmotorcycles and cars. A collision or roll-over can occur quickly, even during rou-tine maneuvers such as turning anddriving on hills and over obstacles, if youfail to take proper precautions.
TO AVOID SERIOUS INJURY OR DEATH:
* Always read the Operator’s Manualcarefully and follow the operatingprocedures described. Pay specialattention to the warnings containedin the manual and on all labels.
* Never operate an ATV withoutproper instruction. Take a trainingcourse. Beginners should complete atraining course.
* Always follow these age recommen-dations:
• A Y-12+ is intended for use by chil-dren age 12 or older, and a T-14 isintended for use by an operator age14 or older.
• A child under 16 years old shouldnever operate an ATV without adultsupervision. Children need to beobserved carefully because not allchildren have the strength, size,skills, or judgment to operate an ATVsafely.
* Never carry a passenger on an ATV.Carrying a passenger may upset thebalance of the ATV and may cause itto go out of control.
* Always avoid paved surfaces.ATV’s are not designed to be usedon paved surfaces and may seriouslyaffect handling and control.
* Never operate an ATV on a publicroad, even a dirt or gravel one,because you may not be able toavoid colliding with other vehicles.Also, operating an ATV on a publicroad may be against the law.
* Never operate an ATV without anapproved motorcycle helmet, eyeprotection, boots, gloves, long pants,and a long-sleeved shirt or jacket.
* Never consume alcohol or drugsbefore or while operating an ATV.
* Never operate an ATV at excessivespeeds. Go at a speed which isproper for the terrain, visibility con-ditions, and your experience.
* Never attempt to do wheelies,jumps, or other stunts.
* Always be careful when operatingan ATV, especially when approach-ing hills, turns, and obstacles andwhen operating on unfamiliar orrough terrain.
* Never lend an ATV to anyone whohas not taken a training course orhas not been driving an ATV for atleast a year.
! WARNING Indicates a hazardous situation which, if not avoided, could result in death or serious injury.4

Rider Training CourseArctic Cat sponsors a free Rider TrainingCourse to teach ATV riding skills or toreinforce current riding skills. First-timepurchasers without any previous ATVriding experience will receive a $100.00coupon from Arctic Cat through theSVIA/ASI after completing the trainingcourse (U.S. owners only, one incentive,and free rider training courses for appro-priate immediate family members perATV purchase). See an authorized ArcticCat ATV dealer for details or call (800)887-2887 for training course information.
In Canada, the Canada Safety Council(CSC) provides an ATV Rider’s Courseto teach safe ATV operating skills. Theyalso provide a special ATV Rider’sCourse for children under 14 years of agewith parental supervision. Call the CSCat 1-613-739-1535 ext. 227 for moredetails. Also available is a bilingual com-puter-based safety training program on aCD-ROM from CATV - call toll-free at1-877-470-2288.
Au canada, le conseil canadien de lasécurité (CSC) offre un cours de conduitede VTT pour enseigner les habiletésd’opération sécuritaires de VTT. Uncours spécial de conduite de VTT estégalement offert aux enfants de moins de14 ans avec la surveillance d’un parent.Communiquez avec le CSC en com-posant le: 1-613-739-1535, poste 227pour de plus amples informations. Unprogramme de formation bilingue infor-matisé sur la sécurité est aussi disponiblesur disque optique compact par CATV;composez sans frais le: 1-877-470-2288.
FOR MORE INFORMATIONABOUT ATV SAFETY, in the U.S.,call the Consumer Product SafetyCommission at (800) 638-2772 or theATV Distibutors’ Safety Hotline at(800) 852-5344 or in Canada, call theCanada Safety Council at 1-613-739-1535 ext. 227.
Visit the Arctic Cat Inc. website atwww.arcticcat.com for additional prod-uct information.
! WARNING Indicates a hazardous situation which, if not avoided, could result in death or serious injury. 5

Hangtags An Arctic Cat ATV comes with hangtagscontaining important safety information.Anyone who rides the ATV should readand understand this information beforeriding.
Pour commander des Etiquettes de Mise en Garde gratuites, voyez votre détaillantde autorisé VTT Arctic Cat pour le numéro de pièce 2436-149.
2257-220 2258-133
(400)
! WARNING Indicates a hazardous situation which, if not avoided, could result in death or serious injury.6

Warning Labels & InformationAn Arctic Cat ATV comes with several labels containing important safety informa-tion. Anyone who rides the ATV should read and understand this informationbefore riding.
The labels should be considered as permanent parts of the ATV. If a label comes offor becomes hard to read, contact your Arctic Cat ATV dealer for a replacement.
NOTE: The location and content of labels on the ATV you have pur-chased may differ from those shown on this page.
! WARNING Indicates a hazardous situation which, if not avoided, could result in death or serious injury. 7

Warnings! WARNING
POTENTIAL HAZARD Operating this ATV without proper instruction.
WHAT CAN HAPPENThe risk of an accident is greatly increased if the operator does not know how tooperate the ATV properly in different situations and on different types of terrain.
HOW TO AVOID THE HAZARDBeginning and inexperienced operators should complete the certified trainingcourse offered. They should then regularly practice the skills learned in the courseand the operating techniques described in this Operator’s Manual.For more information about the training course, contact an authorized Arctic CatATV dealer or call 1-800-887-2887 (U.S.) or 1-613-739-1535 (Canada).
! WARNINGPOTENTIAL HAZARDAllowing anyone under age 16 to operate this ATV.
WHAT CAN HAPPENUse of an ATV by children can lead to serious injury or death of the child.Children under the age of 16 may not have the skills, abilities, or judgment neededto operate the ATV safely and may be involved in a serious accident.
HOW TO AVOID THE HAZARDA child under 16 should never operate this ATV.
! WARNINGPOTENTIAL HAZARDCarrying a passenger on this ATV.
WHAT CAN HAPPENGreatly reduces your ability to balance and control thisATV.Could cause an accident, resulting in injury or death toyou and/or your passenger.
HOW TO AVOID THE HAZARDNever carry a passenger. The long seat is to allow theoperator to shift positions as needed during operation. It is not for carrying passen-gers.
! WARNINGPOTENTIAL HAZARDOperating this ATV on paved surfaces.
WHAT CAN HAPPENThe ATV’s tires are designed for off-road use only, notfor use on pavement. Paved surfaces may seriouslyaffect handling and control of the ATV and may causethe ATV to go out of control.
HOW TO AVOID THE HAZARDNever operate the ATV on any paved surfaces, including sidewalks, driveways, park-ing lots, and streets.
! WARNING Indicates a hazardous situation which, if not avoided, could result in death or serious injury.8

Warnings! WARNING
POTENTIAL HAZARDOperating this ATV on public streets, roads, or high-ways.
WHAT CAN HAPPENYou can collide with another vehicle.
HOW TO AVOID THE HAZARDNever operate this ATV on any public street, road, orhighway, even a dirt or gravel one.In many states it is illegal to operate an ATV on publicstreets, roads, or highways.
! WARNINGPOTENTIAL HAZARDOperating this ATV without wearing an approved hel-met, eye protection, and protective clothing.
WHAT CAN HAPPENOperating without an approved helmet increases yourchances of a serious head injury or death in the eventof an accident.Operating without eye protection can result in an acci-dent and increases your chances of a serious injury inthe event of an accident.Operating without protective clothing increases yourchances of serious injury in the event of an accident.
HOW TO AVOID THE HMAZARDAlways wear an approved helmet that fits properly.You should also wear: Eye protection (goggles or face shield)
GlovesBootsLong sleeved shirt or jacketLong pants
! WARNINGPOTENTIAL HAZARDGoing down a hill improperly.
WHAT CAN HAPPENCould cause loss of control or cause the ATV to over-turn.
HOW TO AVOID THE HAZARDAlways follow proper procedures for going down hillsas described in this Operator’s Manual.Always check the terrain carefully before you startdown any hill.Shift your weight backward.Never go down a hill at high speed.Avoid going down a hill at an angle that would cause the ATV to lean sharply to oneside. Go straight down the hill where possible.
! WARNING Indicates a hazardous situation which, if not avoided, could result in death or serious injury. 9

Warnings! WARNING
POTENTIAL HAZARDOperating this ATV after or while consuming alcohol or drugs.
WHAT CAN HAPPENCould seriously affect your judgment.Could cause you to react more slowly.Could affect your balance and perception.Could result in an accident.
HOW TO AVOID THE HAZARDNever consume alcohol or drugs before or while driving this ATV.
! WARNINGPOTENTIAL HAZARDOperating this ATV at excessive speeds.
WHAT CAN HAPPENIncreases your chances or losing control of the ATV, which can result in an accident.
HOW TO AVOID THE HAZARDAlways ride at a speed that is proper for the terrain, visibility and operating condi-tions, and your experience.
! WARNINGPOTENTIAL HAZARDAttempting wheelies, jumps, and other stunts.
WHAT CAN HAPPENIncreases the chance of an accident including a roll-over.
HOW TO AVOID THE HAZARDNever attempt stunts, such as wheelies or jumps.Don’t try to show off.
! WARNINGPOTENTIAL HAZARDFailure to inspect the ATV before operating.Failure to properly maintain the ATV.
WHAT CAN HAPPENIncreases the possibility of an accident or equipment damage.
HOW TO AVOID THE HAZARDAlways inspect your ATV each time you use it to make sure the ATV is in safe oper-ating condition.Always follow the inspection and maintenance procedures and schedules describedin this Operator’s Manual.
! WARNING Indicates a hazardous situation which, if not avoided, could result in death or serious injury.10

Warnings! WARNING
POTENTIAL HAZARDRemoving hands from handlebars or feet from footrests during operation.
WHAT CAN HAPPENRemoving even one hand or foot can reduce your ability to control the ATV or couldcause you to lose your balance and fall off the ATV. If you remove a foot from a foot-rest, your foot or leg may come into contact with the wheels, which could injure youor cause an accident.
HOW TO AVOID THE HAZARDAlways keep both hands on the handlebars and both feet on the footrests of yourATV during operation.
! WARNINGPOTENTIAL HAZARDFailure to use extra care when operating the ATV onunfamiliar terrain.
WHAT CAN HAPPENYou can come upon hidden rocks, bumps, or holeswithout enough time to react.Could result in the ATV overturning or going out ofcontrol.
HOW TO AVOID THE HAZARDGo slowly and be extra careful when operating on unfamiliar terrain.Always be alert to changing terrain conditions when operating the ATV.
! WARNINGPOTENTIAL HAZARDFailure to use extra care when operating on rough,slippery, or loose terrain.
WHAT CAN HAPPENCould cause loss of traction or ATV control, whichcould result in an accident including a rollover.
HOW TO AVOID THE HAZARDDo not operate on rough, slippery, or loose terrain untilyou have learned and practiced the skills necessary tocontrol the ATV on such terrain.Always be especially cautious on these kinds of terrain.
! WARNINGPOTENTIAL HAZARDTurning improperly.
WHAT CAN HAPPENATV could go out of control, causing a collision or rollover.
HOW TO AVOID THE HAZARDAlways follow proper procedures for turning as described in this Operator’s Manual.Practice turning at slow speeds before attempting to turn at faster speeds.Do not turn at excessive speed.
! WARNING Indicates a hazardous situation which, if not avoided, could result in death or serious injury. 11

Warnings! WARNING
POTENTIAL HAZARDOperating on steep hills.
WHAT CAN HAPPENThe ATV can overturn more easily on steep hills thanon level surfaces or small hills.
HOW TO AVOID THE HAZARDNever operate the ATV on hills too steep for the ATV orfor your abilities.Practice on smaller hills before attempting larger hills.
! WARNINGPOTENTIAL HAZARDOverloading the ATV or carrying or towing cargo improperly.
WHAT CAN HAPPENCould cause changes in ATV handling, which could lead to an accident.
HOW TO AVOID THE HAZARDNever exceed the stated load capacity for the ATV.Cargo should be properly distributed and securely attached.Reduce speed when carrying cargo or pulling a trailer. Allow greater distance for braking.Always follow the instructions in this Operator’s Manual for carrying cargo or pulling atrailer.
! WARNINGPOTENTIAL HAZARDImproperly crossing hills or turning on hills.
WHAT CAN HAPPENCould cause loss of control or cause the ATV to overturn.
HOW TO AVOID THE HAZARDNever attempt to turn the ATV around on any hill until youhave mastered the turning technique as described in thisOperator’s Manual. Practice first on level ground. Be verycareful when turning on any hill.Avoid crossing the side of a steep hill, if possible.When crossing the side of a hill:Always follow proper procedures as described in this Operator’s Manual.Avoid hills with slippery or loose surfaces.Shift your weight to the uphill side of the ATV.
! WARNINGPOTENTIAL HAZARDImproperly operating in reverse.
WHAT CAN HAPPENYou could hit an obstacle or person behind you, resulting in serious injury.
HOW TO AVOID THE HAZARDBefore you engage reverse gear, make sure there are no obstacles or peoplebehind you. When it is safe to proceed, go slowly.
! WARNING Indicates a hazardous situation which, if not avoided, could result in death or serious injury.12

! WARNING
Warnings
NEVER OPERATETHAN 25°
POTENTIAL HAZAClimbing hills improperly.
WHAT CAN HAPPCould cause loss of controlturn.
HOW TO AVOID TAlways follow proper procedManual.Always check the terrain carNever climb hills with slipperShift your weight forward.Never open the throttle suddover backwards.Never go over the top of aanother vehicle or person co
POTENTIAL HAZAStalling, rolling backwards, while climbing a hill.
WHAT CAN HAPPCould result in the ATV over
HOW TO AVOID TUse proper gear and mainclimbing a hill.If you lose all forward speed
Keep weight uphill.Apply the brakes.Engage the brake lever
If you begin rolling backwardKeep weight uphill.Apply the brakes while When fully stopped, engDismount on uphill sideTurn the ATV around anOperator’s Manual.
UP OR DOWN HILLS STEEPER
! WARNINGRD
EN or cause the ATV to over-
HE HAZARDures for climbing hills as described in this Operator’s
efully before you start up any hill.y or loose surfaces.
enly or make sudden gear changes. The ATV could flip
ny hill at high speed. An obstacle, a sharp drop, oruld be on the other side of the hill.
! WARNINGRD
or improperly dismounting
ENturning.
HE HAZARDtain steady speed when
:
Indicates a hazardous situation which, if not avoided, could result in death or serious injury. 13
lock after you are stopped.s:
rolling backwards.age the brake lever lock.
or to a side if pointed straight uphill.d mount following the procedure described in this

Warnings! WARNING
POTENTIAL HAZARDImproperly operating over obstacles.
WHAT CAN HAPPENCould cause loss of control or a collision. Could cause the ATV to overturn.
HOW TO AVOID THE HAZARDBefore operating in a new area, check for obstacles.Never attempt to ride over large obstacles, such as large rocks or fallen trees.When you go over obstacles, always follow proper procedures as described in thisOperator’s Manual.
! WARNINGPOTENTIAL HAZARDSkidding or sliding.
WHAT CAN HAPPENYou may lose control of the ATV.You may also regain traction unexpectedly, which may cause the ATV to overturn.
HOW TO AVOID THE HAZARDLearn to safely control skidding or sliding by practicing at slow speeds and on level,smooth terrain.On extremely slippery surfaces, such as ice, go slowly and be very cautious in orderto reduce the chance of skidding or sliding out of control.
! WARNINGPOTENTIAL HAZARDOperating the ATV through deep or fast flowing water.
WHAT CAN HAPPENTires may float, causing loss of traction and loss of control, which could lead to anaccident.
HOW TO AVOID THE HAZARDNever operate the ATV in fast flowing water or in water deeper than the footrests.Remember that wet brakes may have reduced stopping capability.Test your brakes after leaving water. If necessary, apply them several times to dryout the pads.
! WARNINGPOTENTIAL HAZARDOperating the ATV with improper tires or with improper or uneven tire pressure.
WHAT CAN HAPPENUse of improper tires on the ATV, or operation of the ATV with improper or uneventire pressure, may cause loss of control increasing your risk of accident.
HOW TO AVOID THE HAZARDAlways use the size and type tires specified in this Operator’s Manual for this ATV.Always maintain proper tire pressure as described in this Operator’s Manual.
! WARNING Indicates a hazardous situation which, if not avoided, could result in death or serious injury.14

Warnings! WARNING
POTENTIAL HAZARDOperating the ATV with improper modifications.
WHAT CAN HAPPENImproper installation of accessories or modification of the ATV may cause changesin handling which, in some situations, could lead to an accident.
HOW TO AVOID THE HAZARDNever modify the ATV through improper installation or improper use of accessories.All parts and accessories added to this ATV should be genuine Arctic Cat ATV com-ponents designed for use on the ATV and should be installed and used according toinstructions. Never install a twist grip throttle. If you have questions, consult anauthorized Arctic Cat ATV dealer.
! WARNINGPOTENTIAL HAZARDFailure to release the brake lever lock before driving the ATV
WHAT CAN HAPPENDriving the ATV with the brake lever lock engaged could cause a change inhandling or loss of brakes and cause an accident.
HOW TO AVOID THE HAZARDAlways release the brake lever lock before driving the ATV.
! WARNING Indicates a hazardous situation which, if not avoided, could result in death or serious injury. 15

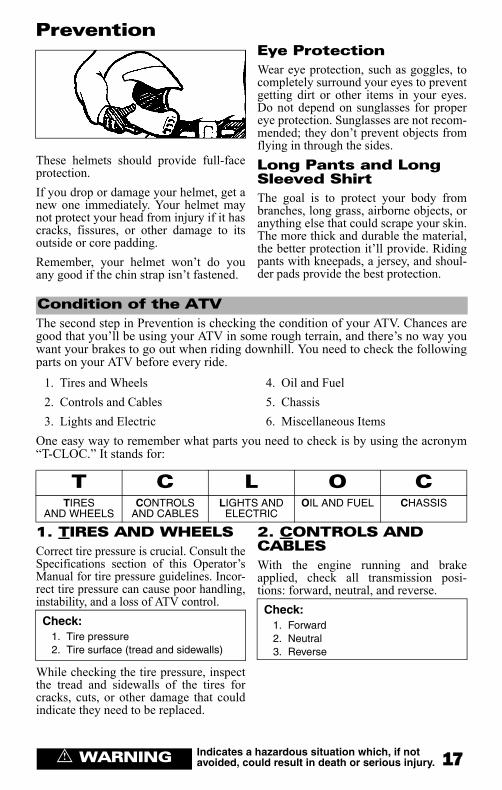
PreventionOverviewWhen using an ATV, prevention is thename of the game. “Had you onlyknown” something could go wrong, youwould have prevented it. If you don’tnotice your conditions and surroundingsbefore riding your ATV, you give up con-trol over the situation. Using ATV pre-vention techniques helps you forecastpotential hazards before they injure youor damage your ATV.
Following the safety instructions andwarnings in this manual will help you“P.A.S.S.” the safety test. P.A.S.S. standsfor “Prevention,” “Active Riding,”“Sound Judgment,” and “Supervision.”Remembering P.A.S.S. and what it standsfor will help you have a safe, predictableride every time you go out on your ATV.
Always wear clothing suited to the typeof riding you are doing. ATV ridingrequires special protective clothingwhich will make you feel more comfort-able and reduce chances of injury.
You’ll find it important to dress correctlyfor ATV riding in order to prevent scrapedskin and serious head injuries. It’s easyand could save you time in the long runnot having to contend with an injury. Ofcourse, it also makes sense to rememberthe seasons. Wear a hat under your helmetand a snowmobile suit in the winter andlighter, protective clothing in the summer.Following is the minimum protection youneed to wear during every ride.
ATV-0004
GlovesYour hands are targets for flying objects andbranches. Along with providing skin protec-tion, gloves will shield your hands fromharsh weather. Wear gloves that are weatherresistant and have a gripping surface to keepthem from sliding off the handlebar. Off-road style gloves with knuckle pads are thebest for comfort and protection.
Boots/Ankle ProtectionWear a boot that covers the largest possi-ble area of your leg (preferably up toyour knee) and can handle significantimpact. Choosing boots with low heelsand a good tread will help prevent yourfeet from slipping off the footrests in wetor rugged conditions or getting hurt ifthey get hit by rocks, dirt, or branches.
HelmetYour helmet is the most important piece ofprotective gear for safe riding. A helmetcan prevent a serious head injury. There areseveral types of helmets on the market, butmake sure you wear a helmet that complieswith the current standards of the U.S.Department of Transportation (DOT), TheSnell Memorial Foundation, or the Ameri-can National Standards Institute (ANSI).Helmets that comply with one or more ofthese agency’s standards have a sticker onthe inside or outside of the helmet.
Safe Riding Clothing and Gear
TESTIMONIALDOCUMENT#: N490117A1CITY/STATE: N. HUNTINGDON, PASEX: MAGE: 6BODY PART: HEADDATE ACCIDENT: 06-14-94DISPOSITION: DOASYNOPSIS: The 6 year old male victim died from blunt force trauma to the head when the 4-wheel ATV on which he was a passenger struck a rock on a hill connecting two roads and flipped over backwards onto the victim, shattering his bicycle helmet. The victim was life-flighted to the hospital and died that night. The driver of the ATV, the victim’s 29 year old father, sustained minor injuries, but wasn’t treated.
Helmets should have one of these:1. DOT label2. Snell label3. ANSI Z90.1 label
! WARNING Indicates a hazardous situation which, if not avoided, could result in death or serious injury.16
Prevention
These helmets should provide full-faceprotection.
If you drop or damage your helmet, get anew one immediately. Your helmet maynot protect your head from injury if it hascracks, fissures, or other damage to itsoutside or core padding.
Remember, your helmet won’t do youany good if the chin strap isn’t fastened.
Eye ProtectionWear eye protection, such as goggles, tocompletely surround your eyes to preventgetting dirt or other items in your eyes.Do not depend on sunglasses for propereye protection. Sunglasses are not recom-mended; they don’t prevent objects fromflying in through the sides.
Long Pants and Long Sleeved ShirtThe goal is to protect your body frombranches, long grass, airborne objects, oranything else that could scrape your skin.The more thick and durable the material,the better protection it’ll provide. Ridingpants with kneepads, a jersey, and shoul-der pads provide the best protection.
The second step in Prevention is checking the condition of your ATV. Chances aregood that you’ll be using your ATV in some rough terrain, and there’s no way youwant your brakes to go out when riding downhill. You need to check the followingparts on your ATV before every ride.
1. Tires and Wheels
2. Controls and Cables
3. Lights and Electric
4. Oil and Fuel
5. Chassis
6. Miscellaneous Items
One easy way to remember what parts you need to check is by using the acronym“T-CLOC.” It stands for:
1. TIRES AND WHEELSCorrect tire pressure is crucial. Consult theSpecifications section of this Operator’sManual for tire pressure guidelines. Incor-rect tire pressure can cause poor handling,instability, and a loss of ATV control.
While checking the tire pressure, inspectthe tread and sidewalls of the tires forcracks, cuts, or other damage that couldindicate they need to be replaced.
2. CONTROLS AND CABLESWith the engine running and brakeapplied, check all transmission posi-tions: forward, neutral, and reverse.
Condition of the ATV
T C L O CTIRES
AND WHEELSCONTROLS
AND CABLESLIGHTS AND
ELECTRICOIL AND FUEL CHASSIS
Check:1. Tire pressure2. Tire surface (tread and sidewalls)
Check:1. Forward2. Neutral3. Reverse
! WARNING Indicates a hazardous situation which, if not avoided, could result in death or serious injury. 17

PreventionA. Brakes
Squeeze the hand brake lever. If it feelssoft or “squishy,” it could be low on fluidor have a leak — refer to the GeneralMaintenance section of this Operator’sManual for instructions. Don’t use theATV until the brakes are operating nor-mally.
Test the brake lever lock and see if itlocks the hand brake lever into position;then disengage it to release the brake. Besure the rear foot brake near the footrestis working; your brakes could fail duringa ride if they’re not maintained.
B. Throttle
The throttle should have a free, smoothrange of motion. If it seems to “stick” atany point, refer to the General Mainte-nance section of this Operator’s Manualfor instructions. Driving your ATV with asticking throttle can turn your leisurelyride into an unwelcome accident. Don’tdrive your ATV if the throttle sticks.
3. LIGHTS AND ELECTRICTurn the hi-beam and lo-beam on and offto make sure they work. At the sametime, check that the taillight and brake-light work. Also, check the status/warn-ing indicators (reverse, neutral, and hi-lobeam) on the handlebars when you startthe ATV. Don’t drive the ATV unless allsystems are working. Check the ignitionswitch and engine stop switch.
4. OIL AND FUELStart with a full tank of gas before everyride, and while you’re at it, top off the oil.Don’t forget to check for fluid leaksaround the ATV. Watch the overheat indi-cator to ensure the engine coolant level isadequate.
5. CHASSISGrass and leaves can gum-up your sus-pension and shocks. Clear and clean thesuspension arms, shock springs, andfenders. Check smoothness by turningthe handlebar full-left and full-right.Check that there is no binding, restric-tions, free-play, or looseness in steeringcomponents.
6. MISCELLANEOUS ITEMSInspect your air filter. Look for debris ordamage that may indicate you need toreplace it. A clogged filter can stop anengine. Check your battery terminals forcorrosion. Also, be sure to tighten anyloose parts, nuts, or bolts.
You need to prepare for the unexpected.Emergencies and accidents are traumaticenough, but they’re even worse whenyou’re not prepared for them. At the min-imum during every ATV ride, you shouldhave the following items on board:
Check:1. Hand brake lever2. Rear foot brake 3. Brake lever lock
Check:1. Free, smooth range of motion
Check:1. Hi-beam2. Lo-beam3. Taillight/brakelight4. Status/warning indicators5. Ignition switch6. Engine stop switch
First Aid and Survival
Check:1. Gas2. Oil3. Fluid leaks
Check:1. Suspension arms2. Shock springs3. Fenders4. Steering
Check:1. Air filter2. Battery3. Tighten parts, nuts, and bolts
! WARNING Indicates a hazardous situation which, if not avoided, could result in death or serious injury.18

Prevention• Tools• Water• Identification• First Aid Kit
For rides that are longer in duration anddistance, the following additional itemsare recommended:
• Cellular Phone• Maps/GPS• Emergency Kit with Flashlight and
First Aid Kit
ToolsRoutine maintenance will generally elim-inate the need for emergency repairs.Riding on rough terrain could cause loos-ening of nuts, bolts, and fasteners. Espe-cially on long rides, carrying the righttools can prevent an inconvenience frombecoming a crisis.
WaterWater is so important that you need tocarry it regardless of the duration of yourride. Heat exhaustion and heat stroke cancreep up suddenly and can take you outof commission. If you become dehy-drated, you could find yourself physi-cally unable to safely operate your ATV.
IdentificationIf something does happen to you, theemergency personnel will want to knowwho you are and whom to contact. It’spossible you may be in no condition togive them that information. Put your I.D.in your pocket before you ride. Withoutit, you’re anonymous.
Cellular PhoneIt may be necessary to make an urgentphone call.
Maps/GPS (Global Positioning System)Maps may be unnecessary when you’refamiliar with the area. But when you’reriding on unfamiliar trails, it’s good toknow where you are, what’s coming up,and how to get back.
Emergency Kit with Flashlight and First Aid KitYou’ll need several items in your Emer-gency Kit including a flashlight. Thematches will come in handy if you needto start a fire to stay warm. Flares areappropriate for signaling help. A first aidkit is very important if an injury of sometype should happen. A good First Aid Kitshould include bandages, antisepticspray, gauze, tape, etc.
Carry these items on your ATV:1. Bulbs2. Duct tape3. Rope4. Spark plugs5. Spare parts6. Tool Kit
Carry these items:1. Flashlight2. Matches3. Flares4. First Aid Kit5. Money
! WARNING Indicates a hazardous situation which, if not avoided, could result in death or serious injury. 19

Active RidingOverview“Active Riding” is the second part of “P.A.S.S.” It involves an understanding of howyour body weight, balance, gravity, and physical forces affect the handling of theATV. For example, when you drive a car quickly into a sharp turn, your body is pulledto the outside of the vehicle by centrifugal force. Although a car is relatively stable,enough centrifugal force can cause an ATV to overturn. Constantly shifting yourweight is one major difference between driving a car and riding an ATV. Knowinghow to shift your weight is necessary to avoid rolling or flipping the ATV.
For complete operating instructions, see ATV OPERATION section in this manual.
! WARNING Indicates a hazardous situation which, if not avoided, could result in death or serious injury.20
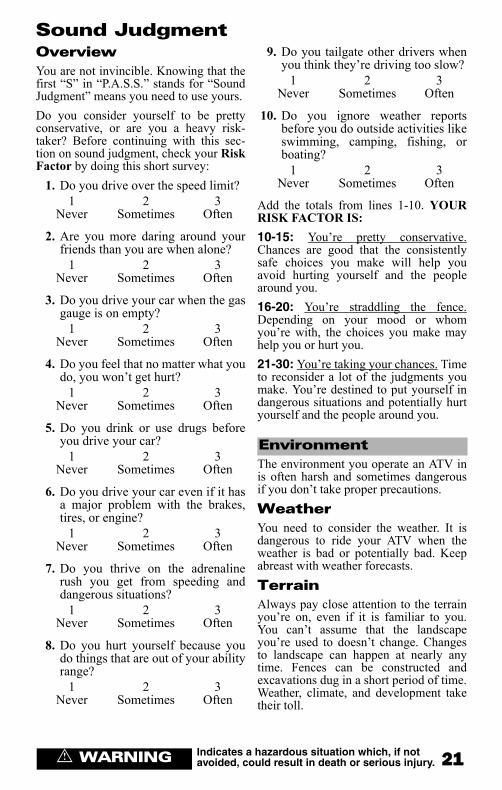
Sound JudgmentOverviewYou are not invincible. Knowing that thefirst “S” in “P.A.S.S.” stands for “SoundJudgment” means you need to use yours.
Do you consider yourself to be prettyconservative, or are you a heavy risk-taker? Before continuing with this sec-tion on sound judgment, check your RiskFactor by doing this short survey:
1. Do you drive over the speed limit?1 2 3
Never Sometimes Often
2. Are you more daring around yourfriends than you are when alone?
1 2 3Never Sometimes Often
3. Do you drive your car when the gasgauge is on empty?
1 2 3Never Sometimes Often
4. Do you feel that no matter what youdo, you won’t get hurt?
1 2 3Never Sometimes Often
5. Do you drink or use drugs beforeyou drive your car?
1 2 3Never Sometimes Often
6. Do you drive your car even if it hasa major problem with the brakes,tires, or engine?
1 2 3Never Sometimes Often
7. Do you thrive on the adrenalinerush you get from speeding anddangerous situations?
1 2 3Never Sometimes Often
8. Do you hurt yourself because youdo things that are out of your abilityrange?
1 2 3Never Sometimes Often
9. Do you tailgate other drivers whenyou think they’re driving too slow?
1 2 3Never Sometimes Often
10. Do you ignore weather reportsbefore you do outside activities likeswimming, camping, fishing, orboating?
1 2 3Never Sometimes Often
Add the totals from lines 1-10. YOURRISK FACTOR IS:
10-15: You’re pretty conservative.Chances are good that the consistentlysafe choices you make will help youavoid hurting yourself and the peoplearound you.
16-20: You’re straddling the fence.Depending on your mood or whomyou’re with, the choices you make mayhelp you or hurt you.
21-30: You’re taking your chances. Timeto reconsider a lot of the judgments youmake. You’re destined to put yourself indangerous situations and potentially hurtyourself and the people around you.
The environment you operate an ATV inis often harsh and sometimes dangerousif you don’t take proper precautions.
WeatherYou need to consider the weather. It isdangerous to ride your ATV when theweather is bad or potentially bad. Keepabreast with weather forecasts.
TerrainAlways pay close attention to the terrainyou’re on, even if it is familiar to you.You can’t assume that the landscapeyou’re used to doesn’t change. Changesto landscape can happen at nearly anytime. Fences can be constructed andexcavations dug in a short period of time.Weather, climate, and development taketheir toll.
Environment
! WARNING Indicates a hazardous situation which, if not avoided, could result in death or serious injury. 21

Sound JudgmentThe thing about terrain is that sometimesyou don’t know it’s changed until you getthere. Whether it’s familiar or not, checkout your surroundings before and duringyour ride.
Night RidingRiding at night can be very hazardous.Obstacles and other hazards (that are eas-ily identified during daytime) are muchmore difficult to see and avoid. Whennight riding, make sure the lights areproperly adjusted and in good workingorder. Reduce speed; do not over-drivethe headlights. Never travel in an unfa-miliar area or blaze a new trail at night.Always carry a flashlight or flare for sig-naling an emergency.
Paved SurfacesTry to avoid it. The ATV isn’t designedfor pavement. Its handling becomes moredifficult on paved surfaces.
Trail RidingUse sound judgment when trail riding;that means riding on a trail that fits yourability level. If the trail is pretty rugged,standing up on your footrests will make iteasier for you to endure the rough terrain.
Make yourself visible by using head-lights and taillights, and pull completelyoff the trail if you need to stop.
Outsloped trails (trails that slant to allowrain to run off) make trail riding a bitmore challenging. Keep your weightshifted into the slope.
It also helps to know which trails you canlegally ride and who else might be onthose same trails. These are signs cur-rently used in some areas to designatetrail types and restrictions.
ATV-0068
People do all kinds of things that youcan’t predict or control.
Riding CompanionsLeave a lot of space between you andother riders, especially in dusty and dirtyconditions, because it’ll be difficult to seethe riders in front of you stopping.
Do not carry a passenger on any ATVdesigned for single-rider use. TheseATV’s do not have appropriate equip-ment (hand-holds, footrests, etc) toaccommodate riders. Additionally, theadded weight and weight shift can makethe vehicle difficult to control.
Those Around You
Trail Signs
! WARNING Indicates a hazardous situation which, if not avoided, could result in death or serious injury.22

Sound JudgmentOther VehiclesDepending on where you’re riding, youmight encounter other ATV’s, bikes, ormotor vehicles on public lands. Respectthe presence of cars if you’re crossingroads or riding in public areas and makeyourself be seen. If you can’t see othervehicles coming, that means you’reinvisible, too.
HikersWith the renewed interest in hiking,camping, and other outdoor activities,people can show up in remote areaswhere you would never expect them. Fortheir sake, keep your eyes open.
Animals and NatureRespect the outdoors that you love. Don’tuse your ATV to chase animals or birds.Drive around young trees rather thanover them. Keep clear of streams andditches with standing water.
Tread Lightly and leave it as you foundit.
The last thing you expected was that yourATV would break down in the middle ofthe field... it’s usually so reliable thatsometimes you forget the ATV has itslimits.
ATV MaintenanceYou have to maintain your ATV. TheGeneral Maintenance section of thisOperator’s Manual tells you about takingcare of your ATV. If, at any time, abnor-mal noises, vibrations, or improper func-tioning of any component of this ATV isdetected, DO NOT OPERATE THEATV. Take the ATV to an authorized Arc-tic Cat ATV dealer for inspection andadjustment or repair.
Cargo LimitationsOne reason why passengers are prohib-ited on ATV’s is because their presencethrows off the weight and balance of theATV. Cargo can do the same if it weighstoo much. Limit the ATV to the loadcapacity ratings identified in the follow-ing chart for the particular model beingoperated. So if you’re weighing in at over200 lb (91 kg) when you ride, leave someof that extra cargo at home. The com-bined weight limit, including you, yourrack cargo, and your trailer, is a specifiedamount, so consult the ATV Load Capac-ity Ratings chart and monitor it carefully.
Extra weight on the ATV will also throwyou off balance if it’s not distributedevenly, side-to-side and front-to-rear. Ifyou have 150 lb (68 kg) on the rear rackonly and you’re heading up an incline,shifting your own weight forward isn’tgoing to do enough to compensate forthat cargo sitting over the back tires.
Cargo has such a huge affect on ATVhandling that you need to pay a lot ofattention to your speed. Even on reallylevel areas, you should keep it under 10mph (16 kph) if you’ve got a trailerattached. Avoid uneven terrain. Also,consider that your braking distance isgoing to increase with the more weightyou carry.
Equipment
TESTIMONIALDOCUMENT#: N380310A1CITY/STATE: NEW CUMBERLAND, WVSEX: MAGE: 18BODY PART: HEADDATE ACCIDENT: 7-30-93DISPOSITION: DOASYNOPSIS: An 18 year old male died as the result of injuries which he sustained in an accident while driving a 4-wheel ATV on a gravel public road. The victim lost control of the ATV when he suddenly applied the brakes to avoid a dog crossing the road. During the accident, the ATV’s brake lever penetrated the victim’s brain through his right eye resulting in death. The victim was not wearing a helmet.
Think about these when dealing with cargo:
1. Rack weight limit2. Trailer weight limit3. Weight distribution 4. ATV speed
! WARNING Indicates a hazardous situation which, if not avoided, could result in death or serious injury. 23

Sound JudgmentLoad Capacity Ratings
Vehicle Load Capacity - Total weight ofoperator, accessories, tongue weight, andcargo on front and rear racks.
Tongue Weight - Weight on trailertongue.
Rear Rack and Tongue Weight - Totalweight on trailer tongue and rear rack.
Towing Capacity - Total weight oftrailer and all cargo in the trailer.
NOTE: Tongue and accessoryweight (winch, etc.) must beincluded as part of the front andrear rack weights.
NOTE: Use extra caution whenoperating an ATV with additionalloads such as accessories and/orcargo. Handling of the ATV may beadversely affected. Reduce speedwhen adding additional loads.
A safe, enjoyable ride is dependent onmany personal choices. An ATV, like allmotorized vehicles, can be dangerous tooperate if you choose to ignore safetyprecautions, take unnecessary chances, orride beyond your ability or yourmachine’s capability. Don’t allow thethrill of freedom or adventure to affectyour ability to make good, safe choices.
Alcohol and Drug ConsumptionIt’s extremely dangerous and often illegalto drink alcoholic beverages and ride...it’s also very foolish.
Arctic Cat ATV Load Capacity Ratings
Item Specifications
(lb) (kg)
Vehicle Load Capacity 450 204
Front Rack (max) 75 34
Rear Rack (max) 150 68
Tongue Weight 35 16
Rear Rack and Tongue Weight (max)
150 68
Towing Capacity 1050 477
! WARNINGPOTENTIAL HAZARDOverloading the ATV or carrying or tow-ing cargo improperly.
WHAT CAN HAPPENCould cause changes in ATV handling,which could lead to an accident.
HOW TO AVOID THE HAZARDNever exceed the stated load capacityfor the ATV.Cargo should be properly distributedand securely attached.Reduce speed when carrying cargo orpulling a trailer. Allow greater distancefor braking.Always follow the instructions in thisOperator’s Manual for carrying cargo orpulling a trailer.
Personal Choices
Substances to avoid when riding:1. Alcohol2. Over-the-counter or prescription
drugs
! WARNING Indicates a hazardous situation which, if not avoided, could result in death or serious injury.24

Sound Judgment Be aware of prescription and over-the-counter medications. Drowsiness andimpaired judgment can be caused by awide variety of medications. The same istrue of allergy, cold, flu, and headachemedications. Your physical size andweight can’t protect you... just one anti-histamine tablet can affect your judg-ment.
Don’t use alcohol or drugs before or dur-ing your ATV ride.
Your Physical ConditionYour physical condition is critical to safeATV operation. Don’t ride whenextremely tired and consider your healthwhen planning longer rides.
Reckless RidingWhere excessive or high speed is a fac-tor, the potential for personal injury isgreatly increased. Ride within reason andyour skill level. Avoid maneuvers that arereckless. Don’t show off.
Laws and RegulationsAny police officer will tell you that igno-rance of the law is no defense. Your bestdefense is to check out your local, state,or provincial ATV laws before riding.It’ll also make sure that you can continueto ride in your favorite areas. The quick-est way to have a land area closed is byriding over the regulations.
Group BehaviorWhen riding in a group, it is humannature to try to keep up with or out-dothose around you. We can all be competi-tive and that can lead to risk takingresulting in serious injury or equipmentdamage. Know your limitations and don'tbe afraid to slow the pace down.
SIPDEBy themselves, none of these safe behav-iors and sound judgments will go veryfar. But when you put them all together...when you’re paying attention to how youfeel, when you’re monitoring the move-ments of your ATV, and when you’reconstantly evaluating your environment,then you’re practicing SIPDE. SIPDE isan acronym that stands for:
THE EFFECTS OF ALCOHOL*
The Number of Drinks that Impair Mental and Physical Abilities
1-2 DRINKS
Mental processes such as restraint,awareness, concentration, and judg-ment affected; reaction time slowed;inability to perform complicated tasks.
3-4 DRINKS
Depth perception, glare recovery, eyemovement, and focus affected;decreased judgment and control.
5+ DRINKS
Coordination deteriorates, loss of criti-cal judgment, and impaired memoryand comprehension.
*According to the ATV Safety Institute.
Don’t ride:1. When you’re tired
S I P D ESCAN/
SEARCHIDENTIFY HAZARDS
PREDICT WHAT WILL HAPPEN
DECIDE WHAT TO DO
EXECUTE THE DECISION
! WARNING Indicates a hazardous situation which, if not avoided, could result in death or serious injury. 25

SupervisionOverviewYou’re responsible for supervising thosewho ride your ATV. Your wisdom is valu-able... it’ll bring them all back safely—your friends, your family, your relatives,and your ATV. It’s crucial that you con-sider yourself a supervisor for all riders ofyour ATV. Whether you accept responsi-bility or not, the truth is that you areresponsible for others riding your ATV.
You’re to the last letter in “PASS”...“Supervision.” You’ve just gone throughthe manual, and you’ve seen what’sinvolved. That puts you in a good posi-tion to be confident about what youknow. So now it’s time to use yourknowledge and supervise others who rideyour ATV.
Inexperienced/Untrained RidersYou can’t let people ride your ATV whodon’t know what they’re doing. Unlessthey’ve had over a year of experience withATV riding or taken an ATV trainingcourse, it’s your responsibility to keepthem off your ATV. It can be dangerous(especially for underaged children) — allthe more reason for you to be firm.
Experienced/Trained RidersIf anyone is going to borrow your ATV,you are responsible for their supervision.Before they ride, have them take thetraining course, have them watch thesafety video, and have them read theOperator’s Manual. You train them. Itdoesn’t matter how you do it, as long asyou do it.
ATV’s are all a little different from thehandling to the stability to the controls.So regardless of how much experienceyour family members have with ATV’s,they don’t have experience with yourATV. Let experienced riders get familiarwith your ATV—show them the basicsbefore they take off. You don’t want it onyour conscience that someone got hurtbecause you didn’t tell them how to useyour ATV.
Remember that regardless of experi-ence, you should never let anyoneunder the age of 16 operate yourATV.
Arctic Cat and the ATV Safety Instituterecommend that all ATV operators ridethe appropriate-sized ATV according toage.
Taking Responsibility
TESTIMONIALDOCUMENT#: N37023A1CITY/STATE: MOOERSFORKS, NYSEX: FAGE: 5BODY PART: UPPER TRUNKDATE ACCIDENT: 6-29-93DISPOSITION: DOASYNOPSIS: The victim of this incident, a five year old female, was operating a four wheeled all terrain vehicle (ATV) in the front yard of her parents’ house, under the supervision of her father. The victim drove the ATV down an area where the only way to turn around was around a grain silo. The victim was executing a right hand turn when the vehicle tipped over to the right and fell onto her body. The victim was transported to a local hospital where she was pronounced dead on arrival. Photographs of the incident were not taken by law enforcement officials.
Category Age (Years)
Speed Limitations
(MPH)NOTES
Y-12+ 12 or Older
15 - Limited30 - Maximum
Operate Under Adult Supervision
T-14 14 or Older
20 - Limited30 - Limited
38 - Maximum
Operate Under Adult Supervision
G & S 16 or Older
According to Local
Regulations
—
! WARNING Indicates a hazardous situation which, if not avoided, could result in death or serious injury.26

DIVISION II - OPERATION/MAINTENANCEATV Specifications
Specifications subject to change without notice.
ENGINE 400 450
Type Four-Cycle/Oil Cooled Four-Cycle/Liquid Cooled
Bore x Stroke 81 mm x 71.2 mm (3.19 x 2.80 in.)
89 mm x 71.12 mm (3.5 x 2.8 in.)
Displacement 366 cc (22.33 cu in.) 442 cc (27 cu in.)
Spark Plug Type NGK CPR8E NGK CR7E
Spark Plug Gap 0.5-0.6 mm (0.019-0.024 in.) 0.7-0.8 mm (0.028-0.031 in.)
Brake Type Hydraulic w/Brake Lever Lock and Rear Foot Brake
CHASSIS
Length (Overall) 211.6 cm (83.3 in.)
Height (Overall) 116.8 cm (46.0 in.) 117.6 cm (46.3 in.)
Width (Overall) 111.7 cm (44.0 in.)
Suspension Travel (Front/Rear)
17.7 cm (7.0 in.)
Tire Size (Front) 24 x 8-12 25 x 8-12
Tire Size (Rear) 24 x 10-12 25 x 10-12
Tire Inflation Pressure 27.6 kPa (4.0 psi)
MISCELLANY
Dry Weight (Approx) 265.4 kg (585 lb) 276.7 kg (610 lb)
Gas Tank Capacity (Rated) 15.1 L (4.0 U.S. gal.)
Differential Capacity 275 ml (9.3 fl oz)
Coolant Capacity N/A 2.9 L (3.0 U.S. qt)
Rear Drive Capacity 250 ml (8.5 fl oz)
Engine Oil Capacity (Approx)
2.8 L (3.0 U.S. qt)
Gasoline (Recommended) 87 Octane Regular Unleaded
Engine Oil (Recommended) Arctic Cat ACX All Weather (Synthetic)
Differential/Rear Drive Lubricant
SAE Approved 80W-90 Hypoid
Taillight/Brakelight 12V/5W/21W
Headlight 12V/35W (4)
Starting System Electric
27

Location of Parts and Controls
KC344C
KC354B
KC353C
1. Battery
2. Headlights
3. Hand Brake Lever
4. Power Distribution Module
5. Electrical Access Panel
6. Seat Latch
7. Storage Compartment
8. Reverse Override Switch
9. Rear Foot Brake
10. Brake Lever Lock
11. Key Switch
12. Shift Lever
13. Throttle Limiter
14. Throttle Lever
15. DC Power Outlet
16. Taillight/Brakelight
17. Operator’s Manual Location
18. Headlight HI/LO Switch
19. Starter Button
20. Engine Stop Switch
21. Gas Tank Valve (400)
22. Drive Select Switch
NOTE: The ATV you have pur-chased may differ slightly fromthose shown in the figures of thismanual.
1
9
21
156
17 4
5
13
2
28

ATV Operation
Active riding and basic maneuvers arethe foundation of your ATV ride. Withoutbasic skills, it’s impossible to move tothis level— active riding. These are yourbasic maneuvers:
• Mounting the ATV• Starting the Engine• Starting a Cold Engine• Braking/Stopping• Shifting• Parking• Dismounting the ATV
Mounting the ATV1. From the left side, grab the left-side
handlebar, apply the brake, and putyour left foot on the footrest.
2. Grab the right-side handlebar.
3. Swing your leg over the seat and setyour right foot down on the right-side footrest.
4. Get seated in a comfortable position.
5. Always keep your feet planted onthe footrests.
Starting the EngineAlways start with the ATV on a flat, levelsurface. Carbon monoxide poisoning cankill you, so keep your ATV outside whileit’s running. Follow these steps to start itup:
1. Mount the ATV and sit down.
2. Engage the brake lever lock.
3. Turn on the ignition.
4. Shift into neutral.
5. Move the engine stop switch toRUN.
6. Press the starter button.
7. Let the engine warm up.
Another way to remember the starting procedure is by using the acronym “BONE-C.” It stands for:
Starting A Cold Engine (400)NOTE: It is very important not totouch or compress the throttle leverduring the starting procedures.
1. Turn off all electrical accessories(hand warmer, lights, etc.); thenrotate the ignition switch key to thefirst position (ON) leaving the head-lights OFF. Note that the N is indi-cated on the LCD.
NOTE: Pump the primer threetimes when the temperature is at 0°C (32° F) or colder. To access theprimer, the seat and right-side heatshield must be removed.
735-887C
Basic Operating Maneuvers
CAUTIONDo not run the starter motor formore than eight seconds per start-ing attempt. The starter motor mayoverheat causing severe startermotor damage. Allow 15 secondsbetween starting attempts to allowthe starter motor to cool.
B O N E CBRAKES LOCKED
IGNITION SWITCH ON
NEUTRAL TRANSMISSION
ENGINE SWITCH
AUTOMATIC CHOKE
29

ATV Operation
738-436A
2. Press the starter button.
3. If the engine does not start, press thestarter button again for eight sec-onds.
NOTE: At this point if the enginedoes not start, pump the primerthree more times; then press thestarter button again.
4. Allow the engine to warm up forapproximately 2-3 minutes or untilthe ATV will accelerate without hes-itating.
Starting A Cold Engine (450)NOTE: It is very important not totouch or compress the throttle leverduring the starting procedures.
1. Turn off all electrical accessories(hand warmer, lights, etc.); thenrotate the ignition switch key to thefirst position (ON) leaving the head-lights OFF. Note that the N is indi-cated on the LCD.
2. Press on the starter button.
NOTE: Do not touch the throttlelever until the engine has run for atleast 3 minutes.
3. Allow the engine to warm up forapproximately 2-3 minutes or until theATV will accelerate without hesitating.
Braking/StoppingAlways allow plenty of room and time tostop safely. Sometimes quick stops areinevitable, so always be prepared.Whether you’re stopping slowly or stop-ping quickly, do this:
1. Squeeze the brake lever on the lefthandlebar to apply both the front andrear brakes.
2. If your wheels lock, release them fora second; then apply them again.
3. Never “ride” the brake. Even main-taining minimal pressure on thebrake lever will cause the brake padsto drag on the disc and may overheatthe brake fluid.
CAUTIONDo not run the starter motor formore than eight seconds per start-ing attempt. The starter motor mayoverheat causing severe startermotor damage. Allow 15 secondsbetween starting attempts to allowthe starter motor to cool.
CAUTIONDo not run the starter motor for morethan eight seconds per startingattempt. The starter motor may over-heat causing severe starter motordamage. Allow 15 seconds betweenstarting attempts to allow the startermotor to cool.
! WARNINGExcessive repetitive use of thehydraulic brake for high speed stopswill cause overheating of the brakefluid and premature brake pad wearwhich will result in an unexpectedloss of brakes.
! WARNINGUse only Arctic Cat approved brakefluid. Never substitute or mix differ-ent types or grades of brake fluid.Brake loss can result. Check brakefluid level and pad wear before eachuse. Brake loss can result in seriousinjury or death.
30

ATV OperationShiftingTo shift the ATV, follow these steps:
CF130B
1. To engage the high range from neu-tral, move the shift lever forward.
2. To engage the low range from highrange, move the shift lever outwardand forward.
NOTE: The high range is for nor-mal riding with light loads. The lowrange is for carrying heavy loads ortrailer towing. Compared to HIGHrange, the LOW range position pro-vides slower speed and greatertorque to the wheels.
3. To engage reverse gear from neutral,move the shift lever outward andrearward into the R position.
ParkingParking involves following the previousrules for braking; then:
1. After the ATV stops, shift into neu-tral.
2. Stop the engine using the enginestop switch.
3. Turn off the ignition.
4. If you have to park on a hill, shift theATV into low gear; otherwise, try topark only on level surfaces.
5. Engage the brake lever lock.
Dismounting the ATVAfter you’ve followed the procedure forparking, it’s time to dismount:
1. Double check that the brake leverlock is engaged.
2. Swing your right leg over to the leftside of the seat.
3. Step to the ground on the left side ofthe ATV.
Active riding involves moving yourbody. You must learn to lean and shiftyour weight into your turns to maintaincontrol.
Your safety depends on using safe ridingtechniques. Statistics from the U.S. Con-sumer Product Safety Commission(CPSC) say that inexperienced riderswho don’t use safe riding techniques are13 times more likely to have anATV accident than riders who haveover 1 month of experience.
Safe riding techniques include:
• Riding• Leaning, Weight Shift, and Balance• Wide Turns• Sharp Turns• Quick Turns• K-Turns• Riding Uphill• Riding Downhill• Sidehilling/Traversing• Swerving• Crossing Obstacles
CAUTIONAlways shift into low range whenoperating on wet or uneven terrain,when towing or pushing heavy loads,and when using a plow. Failure to fol-low this caution may result in prema-ture V-belt failure or in damage torelated drive system components.
CAUTIONAlways come to a complete stop beforeattempting to shift from one range tothe other or into reverse. Always shifton level ground, or engage the brakelever lock before shifting into anotherrange or into reverse.
How to Handle the ATV (Active Riding Techniques)
31

ATV OperationRidingOnce the engine’s warm, the ATV isready to go.
ATV-0012
1. Keep your feet on the footrests andboth hands on the handlebar.
2. Hold the brake lever, and release thebrake lever lock.
3. Shift into gear.
4. Release the brake slowly and applythe throttle.
Leaning, Weight Shift, and BalanceWhen you turn, the trick is to move for-ward and slide over to the side of the seatthat’s on the inside of the turn. Supportyour body weight on the outside footrest.At the same time, lean your body to theinside of the turn. Pay attention to thehandling—if you feel the tires coming offthe ground, reduce speed, shift more ofyour body weight to the side that’s lift-ing, and make the turn wider if possible.
ATV-0013
ATV-0024
ATV-0025
Wide TurnsAbout 20% of ATV accidents happenduring turns. If you don’t understandturning techniques, it’s easy for the ATVto get away from you by losing traction,plowing, or tipping. Use this method forwide turns:
ATV-0046
ATV-0045
32

ATV Operation
ATV-0044
1. Ease off the throttle as you approachthe turn to slow down.
2. Use the principles of leaning, weightshifting, and balancing—shift yourbody weight to the inside of the turn.
3. Gradually increase your speed asyou come out of the turn.
Sharp TurnsAfter mastering wide turns, practice theadvanced skill of sharp turns.
ATV-202
1. Ease off the throttle as you approachthe turn to slow down.
2. Use the principles of leaning, weightshifting, and balancing—shift yourbody weight to the inside of the turn.
3. You might have to lean into the turnmore than you do in a wide turn.
4. If shifting your weight and balancearen’t enough to keep the ATV tireson the ground, straighten out thehandlebar as much as you can.
5. Gradually increase your speed asyou come out of the turn.
Quick TurnsQuick turns are the most difficult turnsand should only be done after you areexperienced with your ATV.
ATV-203
1. Ease off the throttle as you approachthe turn to slow down.
2. Turn the handlebar, shift your weight,and balance at the same time as youenter the turn (use the principles ofleaning, weight shifting, and balanc-ing—shift your body weight to theinside of the turn).
3. Follow this with slight acceleration.
4. For multiple turns, repeat this move-ment as needed.
33

ATV Operation5. To make your turn quicker, try rais-
ing yourself off the seat a few inchesas you shift your weight.
K-TurnsUse K-turns if you accidentally stallwhile riding uphill; you need to takeaction before the ATV rolls backwarddown the hill.
ATV-204
1. Stop where you are, apply thebrakes, and shift to neutral.
2. Shut off the engine.
3. Keep your body weight shifted for-ward.
4. Get off the ATV on the uphill side.
5. If you’re to the left of the ATV, turnthe handlebar all the way left.
6. Partially release the brake, butlightly hold the brake lever.
7. Let the ATV roll to your right sideuntil it faces slightly downhill.
8. Reapply the brakes.
9. Get back on the ATV from the uphillside, and keep your weight shifteduphill when you sit down.
10. Start the engine and follow themethod for riding downhill.
Riding UphillRoughly 20% of accidents happen whileriding on hills and as a result of the ATVrolling or flipping. So, obviously, useextreme caution and follow this methodfor riding uphill.
ATV-0019
ATV-0032
34

ATV Operatio
1. Shift down and accelyou start climbing; thensteady pace.
2. Lean as far forward as psteeper hills, come off stand and lean forward.
3. If you lose speed, quiclow range. At the same the throttle (so your frolift), OR
4. If that doesn’t work ahave forward motion anpermits, do a U-turn, goand try climbing again,
5. If you have lost all forwfollow the K-turn proced
Never Operate UDown Hills SteepThan 25°
Riding DownhillSuccess in riding downhill how well you know your braeasy on them, or you could f
n
ATV-0033
erate before maintain a
ossible. Foryour seat to
kly shift totime, releasent tires don’t
nd you stilld the terrain back down,OR
ard motion,ure.
p Or er
depends onkes—take it
lip over.
ATV-205
1. Shift your body weight as far backon the seat as possible.
2. Keep it in a low range; stay out ofneutral.
3. Lightly apply the brake and ease upon the throttle.
35

ATV OperationSidehilling/TraversingSidehilling is considered an advancedskill; it’s really tricky and unpredictable.So, whether your skills are advanced ornot, try to avoid this kind of riding. Ifyou’re in a situation where you abso-lutely have to sidehill, follow thismethod:
ATV-0017
ATV-0028
ATV-0029
1. Keep your speed low and consistent.
2. Shift all your body weight to theuphill side of the seat; also, supportyour weight on the uphill footrest.
3. Steer like you’re driving into thehill.
4. If the ATV feels like it’s tipping,turn the handlebar downhill. If that’snot possible because of the terrain orother conditions or if it just doesn’twork, stop and get off. Dismount theATV on the uphill side.
SwervingSwerving is usually an emergency reac-tion to avoid an obstacle but is similar toquick turns. The difference is that quickturns involve slight acceleration in theturn; don’t accelerate if you swerve.
ATV-206
1. Ease off the throttle as you approachthe obstacle.
2. Turn the handlebar. At the sametime, shift your weight and balanceas you swerve. Use the principles ofleaning, weight shifting, and balanc-ing—shift your body weight to theinside of the turn.
3. Keep your hand off the brake untilthe emergency is over and you’reback in control.
36

ATV OperationCrossing ObstaclesCrossing obstacles is risky; avoid it ifpossible. Riding over logs, rocks, andruts means combining all the active rid-ing skills into one big motion. Your ATVwill respond differently for differentobstacles (logs, ruts, etc.), but these aregeneral guidelines for overcoming two-track (both tires contacting the obstacle atthe same time) obstacles:
ATV-0016
ATV-0026
ATV-0027
1. Keep your speed way down; lessthan 5 mph.
2. Approach the obstacle head-on.
3. Come up off the seat.
4. Keep your weight on the footrests.
5. Apply a little throttle when the fronttires make contact with the obstacle.
6. Lean forward and release the throttlewhen the front tires clear the obsta-cle.
7. Keep your body loose to absorb anyshock.
8. If the ATV starts tipping, shift yourweight to keep it in balance.
To clear a single-track (only one tire con-tacts) obstacle, follow the same rulesexcept:
1. Use the ATV’s momentum to clearthe obstacle.
2. Don’t pull up on the handlebar.
3. Don’t apply the throttle.
Driving an ATV and a car have somesimilarities; however, there are a few sit-uations that require special attention:
• Reversing• Skidding or Sliding• Parking on a Hill• Stalling on a Hill• Crossing Water• Crossing Roads• Driving in Cold Weather• Stopping the ATV• Stopping the Engine
ReversingIt’s tough to see things behind you.
1. Go slowly. It’s hard to see behindyou.
2. Keep your handlebar straight.
3. Backing down hills is a bad idea; doa U-turn or K-turn instead to turnaround.
Skidding or SlidingIf you lose control after hitting sand, ice,mud, or water:
1. Turn your handlebar into the direc-tion of the slide.
2. Keep your hand off the brakes untilyou’re out of the skid.
3. Shift your weight forward.
Sometimes your ATV may not respondand goes straight ahead instead of lettingyou turn. Here’s how to handle it:
Tips
37

ATV Operation1. Slow down.
2. Move forward on the seat.
3. Lean to inside of turn.
4. Turn handlebar.
Parking on a HillThis shouldn’t be necessary, but if it is:
1. Keep it in gear.
2. Engage the brake lever lock.
3. Find something to block the reartires.
Stalling on a HillIf you use the right method for ridinguphill, this shouldn’t happen. But if youhave a problem, do this:
1. If the ATV hasn’t started rollingbackwards yet, follow the proce-dure for the K-Turn, OR
2. If the ATV is already rolling back-ward, lean as far forward as possiblestanding up on the footrests.
3. Nice and easy, apply the hand brakelever.
4. When you come to a stop, follow theprocedure for the K-turn.
5. If the ATV continues to roll back-ward, dismount immediately on theuphill side.
Crossing WaterYour ATV can only handle water up to itsfootrests. Any more than that and yourisk engine damage and/or injury. Stayaway from fast moving rivers. ATV tirescan be buoyant, so if the water is toodeep, you might find the ATV suddenlyafloat.
NOTE: Engine damage caused bywater ingestion or immersion willnot be covered by Arctic Cat war-ranty.
1. Physically check the depth and cur-rent of the water, especially if youcan’t see the bottom. You’re alsochecking for boulders, logs, or anyother hidden obstacles.
2. Keep your speed slow.
3. Make sure you have a way out onthe other side of the water.
4. If you get stuck in the sludge ormud, try rocking the ATV from sideto side.
5. Once you’ve cleared the water,briefly apply the brakes to make surethey work.
Crossing RoadsCrossing roads on your ATV is also a badidea, so avoid it. If you can’t:
1. Stop completely on the shoulder ofthe road.
2. Check both directions for traffic.
3. Crossing near a blind corner or inter-section is dangerous; don’t do it.
4. Drive straight across to the oppositeshoulder.
5. Take into account that your ATVcould stall while crossing; giveyourself enough time to get off theroad.
6. You have to assume that oncomingcars don’t see you, and if they do,they won’t be able to predict youractions.
7. It’s illegal to cross public roads insome places. Know your local laws.CAUTION
Riding through water deeper thanthe footrests may lead to severeengine damage due to water inges-tion.
38

ATV OperationDriving In Cold WeatherNOTE: Check that all controllevers move freely. Make sure thatthe footrest, shift lever, and rearfoot brake are free of ice and snow.
1. With the transmission in neutral,move the ATV forward and back-ward to check that the wheels rollfreely. If the ATV will not roll, thetires may be frozen to the ground orthe brake pads may be frozen to thediscs.
2. If the tires are frozen to the ground,pour warm water around them tomelt the ice.
3. If the brakes are frozen, take theATV to a warmer area to thaw outthe brakes.
NOTE: After the brakes thaw, drythem by applying them severaltimes while riding slowly.
NOTE: After riding through water,mud, snow, or slush, it is importantto dry both brake systems beforeparking the ATV.
4. Practice driving in an open snow-covered or ice-covered area at slowspeeds before driving on snow-cov-ered or ice-covered trails.
5. Learn how the ATV responds tosteering and braking on the type ofterrain to be encountered on the ride.
Stopping The ATVTo stop the ATV, first release the throttlelever. Next, apply the brake.
Stopping The EngineTo stop the engine, turn the ignitionswitch key to the OFF position or set theengine stop switch to the OFF position.
NOTE: Leaving the ignitionswitch key in the ON position couldresult in a discharged battery.
! WARNINGFor your personal safety, it is veryimportant to wear the type andamount of cold-weather clothingaccording to the coldest anticipatedtemperatures.
CAUTIONBefore riding, manually move theATV forward and backward to makecertain that all wheels roll freely.
! WARNINGDo not attempt to free frozen brakesby pouring warm water on the brakepads and housings.
! WARNINGGo slowly and be extra careful whenriding on snow-covered or ice-cov-ered terrain. Always be alert tochanging terrain conditions whenoperating the ATV.
39

General InformationATV Identification NumbersThe Arctic Cat ATV has two identificationnumbers: Vehicle Identification Number(VIN) and Engine Serial Number (ESN).
The VIN is located on the lower-frontcrossmember.
KC0055A
The ESN is located on the rear of the enginecrankcase and is visible from the side.
KC287B
These numbers are required by the dealerto complete warranty claims properly. Nowarranty will be allowed by Arctic Cat ifthe VIN or ESN is removed or mutilatedin any way.
Always provide the ATV name, VehicleIdentification Number, and Engine SerialNumber when contacting an authorizedArctic Cat ATV dealer for parts, service,accessories, or warranty. If a completeengine must be replaced, ask the dealer tonotify Arctic Cat for correct registrationinformation.
Ignition Switch KeyTwo keys come with the ATV. Keep thespare key in a safe place. An identifyingnumber is stamped on each key. Use thisnumber when ordering a replacementkey.
ATV-0055
Control Locations and FunctionsIgnition Switch
The ignition switch has three positions.
ATV-0056
OFF position — All electrical circuitsexcept the accessory plug are off. Theengine will not start. The key can beremoved in this position.
NOTE: The accessory plug ispowered by the battery at all times.
ON position — The ignition circuit iscomplete and the engine can run. The keycannot be removed in this position.
LIGHTS position — The ignition circuitis complete and the headlights and tail-light are on. The key cannot be removedin this position.
CAUTIONLeaving the ignition switch in the ONor LIGHTS position for a long periodof time when the engine is not run-ning may cause the battery to dis-charge. Always leave the ignitionswitch in the OFF position whenengine is not running.
40

Gas Tank Valve (400)
The gas tank valve is incorporated in thegas tank. There are three positions: ON,RES, and OFF.
In the OFF position, the valve will notallow gasoline to flow to the carburetor.In the ON position (the normal operatingposition), gasoline will flow from thetank to the carburetor. In this position,2.46 L (0.65 U.S. gal.) will remain in thetank as a reserve quantity.
Moving the valve to the reserve (RES)position will allow the operator to use theremaining gasoline in the tank. Whenturning the valve to any of the three posi-tions, be sure the indicator is pointeddirectly at the position desired.
Shift Lever
CF130B
This ATV has a dual-range automatictransmission with reverse.
Hand Brake Lever/Brake Lever Lock
738-420B
The hand brake is considered to be thenormal operating (main) brake. It shouldbe applied whenever a braking situationis needed.
Apply the brake by compressing thebrake lever toward the handlebar.
To engage and release the brake leverlock, use the following procedure.
1. Squeeze the hand brake lever two orthree times and release it.
2. Depress and hold the brake leverlock.
3. While holding in on the brake leverlock, squeeze the brake lever.
NOTE: It will click as it engagesand the brake lever will not return toits released position.
4. Release the brake lever lock bysqueezing the brake lever. It willreturn to its released position.
Check to make sure the brake lever lockengages properly and that the brake(when engaged) locks the wheels.
1. Pump the brake lever 2 or 3 times.
2. Engage the brake lever lock.
3. Attempt to push the ATV.
NOTE: The brake lever lock mustlock the wheels. If it doesn’t, takethe ATV to an authorized Arctic CatATV dealer for service.
! WARNINGNever leave the valve in the ON orRES position when the engine is notrunning.
! WARNINGAlways check to be sure that thebrake lever lock has been disen-gaged before operating the ATV. Anaccident could result if the brakelever lock is left engaged while theATV is operated. The brake mayrelax if left engaged for a long periodof time. This could cause an acci-dent; therefore, do not leave the ATVon a hill depending on the brakelever lock. Always block the down-hill side of the wheels if leaving theATV on a hill or park the ATV in asidehill position.
41

Rear Foot Brake
CF117
Pressing the rear foot brake downwardwill apply the brake to the rear wheels.
Headlight HI/LO Switch
KM850A
Use the headlight HI/LO switch to selectthe high or low headlight beam when theignition switch is in the LIGHTS posi-tion. When the switch is in the HI posi-tion, the high beam will illuminate. Whenthe switch is in the LO position, the lowbeam will illuminate. When the switch isin the Running Light position, the tail-lights and running lights will illuminate.
Engine Stop Switch
OFF position — The ignition circuit isoff. The engine cannot be started or willnot run. If the engine stop switch is usedto stop engine without turning off igni-tion switch, the battery may discharge.
RUN position — The ignition circuit ison. The engine can start and run.
Starter Button
Pushing in on this button activates thestarter motor. Before starting the engine,make sure the ignition switch is in theON position, the transmission is in neu-tral, and the brake lever lock is engaged.
NOTE: This ATV has safety inter-lock switches which prevent thestarter motor from activating whenthe transmission is not in neutral.
Drive Select Switch
KC342B
This switch allows the operator to oper-ate the ATV in either two-wheel drive(rear wheels) or four-wheel drive (allwheels). For normal riding on flat, dry,hard surfaces, two-wheel drive should besufficient. In situations of aggressive trailconditions, four-wheel drive would bethe desired choice.
To either engage or disengage the frontwheels, move the switch to the 4WDposition or to the 2WD position.
Reverse Override Switch
This ATV is equipped with a reversespeed limiter system. When additionalRPM is needed in reverse, depress andhold the override switch.
Throttle Lever
KC342A
! WARNINGNever activate the override switchwhile the throttle is open as a loss ofcontrol may result.
42

Control engine RPM with the position ofthe throttle lever. Operate this lever withthe thumb. Pushing it forward increasesengine RPM and allowing it to retractdecreases engine RPM.
Throttle Limiter Screw
ATV-0053
Throttle lever travel may be limited byadjusting the throttle limiter screw. Thethrottle limiter should be adjustedaccording to the operator’s skill andexperience. To adjust the throttle limiter,use the following procedure.
1. Loosen the jam nut.
2. Turn the throttle limiter screw clock-wise to decrease engine RPM maxi-mum or counterclockwise toincrease engine RPM maximum.
3. Tighten the jam nut securely.
NOTE: The ATV is equipped withan RPM limiter that retards ignitiontiming when maximum RPM isapproached. When the RPM limiteris activated, it could be misinter-preted as a high-speed misfire.
LCD Gauge (400)NOTE: All segments of the LCDwill activate for approximately twoseconds when the ignition switch isrotated to the ON position.
CF236B
1. Clock/Engine Hour Meter - Theclock function indicates time in the12-hour mode; the hour meter indi-cates the total time the ATV has runand cannot be reset to zero. To setthe clock, use the following proce-dure.
A. With the ignition switch ON,press and release the Mode But-ton (3) until the Clock/EngineHour Meter (1) is displayed; then(if necessary) press and releasethe Set/Reset Button (4) to selectthe clock display.
B. Press and hold the Set/Reset But-ton (4) until the minutes stopscrolling and the hour display startsto scroll. Momentarily releasewhen the correct hour is displayed;then repeatedly press and releasethe Set/Reset Button (4) until thecorrect minutes are displayed.
NOTE: Clock memory power issupplied through the 15-amp acces-sory fuse and verified during gauge“power-up” and reset. In the eventof clock memory power failure(blown fuse, etc.), the gauge will“power-up,” reset, and shut downrepeatedly until clock memorypower is restored. Always check the15-amp accessory fuse if thisgauge condition is noted.
NOTE: The engine hour meter willnot activate until engine speedexceeds 500 RPM.
2. Temperature Indicator - If the enginecoolant temperature exceeds the normaloperating range, the temperature iconwill begin flashing and the LCD will goblank for 30 seconds; then the LCD willreturn to normal. However, the temper-ature icon will continue to flash.
CAUTIONContinued operation with high enginetemperature may result in enginedamage or premature wear.
43

NOTE: High engine RPM, low vehi-cle speed, or heavy load can raiseengine temperature. Decreasingengine RPM, reducing load, andselecting an appropriate transmis-sion gear can lower the temperature.
NOTE: Debris in front of theengine (or packed between thecooling fins of the radiator) canreduce cooling capacity. Using agarden hose, wash the radiator andthe engine to remove any debrisrestricting air flow.
3. Mode Button - Shifts the gaugethrough three set-up modes: speed-ometer/tachometer, distance, andtime.
NOTE: The Mode Button must bepressed and released to shiftmodes. Approximately two secondsafter the Mode Button is released,the digital gauge will return to fulldisplay.
4. Set/Reset Button - In conjunctionwith the Mode Button, sets and resetsvarious displays on the digital gauge.Also used to shift from speedometerfunction to tachometer function onthe speedometer/tachometer gauge.
5. Fuel Level Indicator - Indicatesapproximate amount of gasoline inthe gas tank.
NOTE: When the bottom seg-ment flashes, approximately 3.5 L(0.92 U.S. gal.) of gasoline remainsin the tank.
6. Low Oil Pressure - Will be displayedduring self-test at start-up. It will notbe displayed during normal operationas oil pressure is not monitored onthese models.
7. Odometer/Trip Meter - Odometer reg-isters the total distance the vehicle hastraveled. The trip meter is resetableand can be used to measure trip or triplegs. The odometer cannot be reset.
NOTE: To shift between the odom-eter (ODO) or trip meter (TRIP),press the Mode Button (3) to selectthe distance mode; then press theSet/Reset Button (4) to select thedesired display. Hold the Set/ResetButton down to reset the trip meter.
8. Gear Position Indicator - Indicateswhich gear position is selected.
• R (reverse)/N (neutral)/L (low range)/H(high range)
NOTE: An E will be displayed ifthere is an error caused by a no-shift position signal.
9. High Beam Indicator - The HighBeam icon will appear only when theheadlights are on high beam.
10. 4WD Lock Indicator - DisplaysLOCK when the front differentiallock has been engaged. Not utilizedon this model.
11. Speedometer - Indicates the approxi-mate vehicle speed in miles per hour(MPH) or kilometers per hour (km/h).
NOTE: To change mph/km/h dis-play, press and release Mode But-ton (3) until the icon (MPH/km/h)appears; then press the Set Button(4) to change the display.
Speedometer/LCD Gauge (Digital)
1. Clock/Engine Hour Meter - Theclock function indicates time in the12-hour mode; the hour meter indi-cates the total time the ATV has runand cannot be reset to zero. To setthe clock, use the following proce-dure.
CAUTIONArctic Cat does not recommendusing a pressure washer to clean theradiator core. The pressure may bendor flatten the fins causing restrictedair flow, and electrical componentson the radiator could be damaged.Use only a garden hose with spraynozzle at normal tap pressure.
44

EFI-011A
A. With the ignition switch ON,press and release the Set Button(4) until the Clock (1) is dis-played; then press and hold theSet Button (4) to activate the setmode (clock display flashing).
B. Press and release the Set Button(4) to set minutes or the ModeButton (3) to set hours. Holdingthe respective button down willscroll the display.
NOTE: Clock memory power issupplied through the 15-amp acces-sory fuse and verified during gauge“power-up” and reset. In the event ofclock memory power failure (blownfuse, etc.), the gauge will “power-up,” reset, and shut down repeatedlyuntil clock memory power isrestored. Always check the 15-ampaccessory fuse if this gauge condi-tion is noted.
NOTE: The engine hour meter willnot activate until engine speedexceeds 500 RPM.
2. Temperature Indicator - If the enginecoolant temperature exceeds the nor-mal operating range, the temperatureicon will begin flashing and the LCDwill go blank for 30 seconds; then theLCD will return to normal. However,the temperature icon will continue toflash.
NOTE: High engine RPM, low vehi-cle speed, or heavy load can raiseengine temperature. Decreasingengine RPM, reducing load, andselecting an appropriate transmis-sion gear can lower the temperature.
NOTE: Debris in front of theengine (or packed between thecooling fins of the radiator) canreduce cooling capacity. Using agarden hose, wash the radiator andthe engine to remove any debrisrestricting air flow.
3. Mode Button - Shifts the gaugethrough two operating modes:speedometer/tachometer and MPH/KPH.
NOTE: The Mode Button must bepressed and released to shiftspeedometer/tachometer modes. Itmust be pressed and held to shiftMPH/KPH modes.
4. Set Button - The Set Button is usedto select the gauge display of clock,hour meter, trip 1, trip 2, and odome-ter. It is also used to activate theclock set function and adjust theminute display on the clock.
5. Fuel Level Indicator - Indicatesapproximate amount of gasoline inthe gas tank.
NOTE: When the bottom seg-ment flashes, approximately 3.5 L(0.92 U.S. gal.) of gasoline remainsin the tank.
6. Oil Pressure Indicator - Will be dis-played during self-test at start-up. Itwill not be displayed during normaloperation as oil pressure is not moni-tored on these models.
CAUTIONContinued operation with highengine temperature may result inengine damage or premature wear.
CAUTIONArctic Cat does not recommendusing a pressure washer to clean theradiator core. The pressure maybend or flatten the fins causingrestricted air flow, and electricalcomponents on the radiator couldbe damaged. Use only a garden hosewith spray nozzle at normal tap pres-sure.
45

7. Odometer/Trip Meter - Odometerregisters the total distance the vehi-cle has traveled. The trip meter isresetable and can be used to measuretrip or trip legs. The odometer can-not be reset.
8. Gear Position Indicator - Indicateswhich gear is currently selected - R(reverse)/N (neutral)/L (low range)/H (high range).
9. High Beam Indicator - The HighBeam icon will appear only whenthe headlights are on high beam.
10. 4WD Lock Indicator - DisplaysLOCK when the front differentiallock has been engaged. Not utilizedon this model.
11. Drive Select Indicator - Displays4WD when selected by the driveselect switch or when the 4WD lockis engaged. The display is blankwhen in 2WD.
12. Speedometer/Tachometer - Indicatesthe approximate vehicle speed in milesper hour (MPH), kilometers per hour(KPH), or RPM.
Condition Warning Display - Uses odom-eter/trip meter display of the LCD towarn of a system error condition requir-ing attention.
A. Volt - The LCD will go blankexcept the word VOLT will flashon the LCD whenever a low volt-age (<9 DC volts) or a high volt-age (>16 DC volts) is detected.When voltage returns to normal,the gauge must be reset by turningthe ignition key to the OFF posi-tion and then to the ON position.
B. EFI - The LCD will go blankexcept a diagnostic trouble code(DTC) code will flash on theLCD and a wrench icon will bedisplayed whenever an elec-tronic fuel injection malfunctionis detected. After 30 seconds,the LCD will return to normal;however, the DTC and wrenchicon will continue to be dis-played until the malfunction iscorrected.
NOTE: Take the ATV to an autho-rized Arctic Cat ATV dealer to havethe EFI error corrected and to havethe ECM reset as soon as possible.
Primer - Cold Start (400)
CF123A
The primer is located on the carburetor.Depress and release the lever several timesprior to attempting to start a cold engine.
Gas/Vent HosesReplace the gas hose every two years. Dam-age from aging may not always be visible.
On the 400, do not bend or obstruct therouting of the carburetor vent hose. Makecertain that the vent hose is securely con-nected to the carburetor and hose holderand the opposite end is always open.
Carburetor Float Bowl Drain (400)
AF925
Periodically, the float bowl should bedrained to remove condensation. To drainthe float bowl, use the following procedure.
1. Direct the hose from the float bowldrain into a container.
46

2. Loosen the drain screw and allow thegasoline and condensation to flow out.
3. Tighten the drain screw securely andremove the hose.
Electric Fuel Pump (450)An electric fuel pump is incorporated inthe gas tank to deliver gasoline to the fuelinjector. The fuel pump is activated whenthe ignition switch is in the ON position.
NOTE: Both the ignition and fuelpump functions will be interruptedby the Tilt Sensor if the ATV tips overpast 60°-70°. Righting the ATV willreactivate the ignition and fuel pump.
Oil Level Stick
ATV-0100AA
KC0051A
There is an oil level stick for checkingthe engine oil level. To check the oillevel, use the following procedure.
NOTE: The ATV should be onlevel ground when checking theengine oil level.
1. Unscrew the oil level stick and wipeit with a clean cloth.
2. Install the oil level stick and thread itinto the engine case.
3. Remove the oil level stick; theengine oil level should be above the“L” mark but not higher than the “F”mark.
Seat Latch
AL676A
1. To remove the seat, lift up on thelatch release (located at the rear ofthe seat); then raise the rear of theseat and slide it rearward.
2. To lock the seat into position, slidethe front of the seat into the seatretainers and push down firmly onthe rear of seat. The seat shouldautomatically lock into position.
! WARNINGDo not drain float bowl contents directlyonto the engine. Gasoline is highlyflammable and could ignite. Use a hose.
! WARNINGIt is very important that the drainscrew be tightened securely. If it isnot tightened securely, gasolinecould drip onto the engine. CAUTION
Do not overfill the engine with oil.Always make sure the oil level isabove the “L” mark but not higherthan the “F” mark.
! WARNINGMake sure the seat is secure beforemounting the ATV. Serious injurymay result if the seat is not properlysecured.
47

Safety Flag BracketA bracket is provided for mounting a flagat the rear of the ATV.
Rack Loading (Front and Rear)The front rack and rear rack are designedto carry specified load capacities. Alwaysrefer to the ATV Load Capacity Ratingschart for proper capacities.
Trailering and Towing
Arctic Cat ATV’s are equipped with aframe-mounted receiver for a standard5.1 cm (2 in.) receiver hitch. The stan-dard receiver hitch must be purchasedseparately.
738-424A
When loading a trailer properly, twoitems are critical: Gross Trailer Weight(the weight of the trailer plus cargo) andTrailer Tongue Weight.
Trailer Tongue Weight is the downwardforce exerted on the hitch by the trailercoupler when the trailer is fully loadedand the coupler is at its normal towingheight. Refer to the Load Capacity Rat-ings chart for tongue weight information.
Always maintain a slow speed whentrailering and towing and avoid suddenaccelerations, quick maneuvers, and sud-den stops. Braking distance will beaffected when towing a trailer. Whentowing a trailer, always maintain slowspeed and allow more stopping distancethan when not towing a trailer.
Transporting ATVWhen transporting the ATV, Arctic Catrecommends that the ATV be in its normaloperating position (on all four wheels) andthe following procedure be used.
1. Engage the brake lever lock andplace the transmission in gear.
2. Secure the ATV with load ratedhold-down straps.
! WARNINGMake sure the loads on the front andrear racks will not interfere with theATV controls or obstruct the view ofthe operator. Also, make sure theloads are evenly distributed, prop-erly secured, and will not shift whileoperating the ATV.
! WARNINGNever use the racks as a towing ortrailering point.
! WARNINGMake sure that the load in the traileris properly secured and will not shiftwhile moving. Also, do not overloadthe trailer.
! WARNINGNever exceed any of the ATV weightrestrictions.
! WARNINGRiding an ATV without extra cautionwhen towing a trailer will be hazard-ous. Trailer towing can affect thehandling and braking of the ATV.Never tow a trailer without a rigidtongue and never exceed 10 mph.Avoid sudden accelerations andstopping of the ATV. Do not makequick maneuvers. Avoid uneven sur-faces and do not tow on hills. Nevercarry passengers in a trailer unlessthe trailer is designed for such use.Allow more stopping distance thanwhen not towing a trailer.
CAUTIONFailure to engage the brake leverlock and place the transmission ingear could result in the ATV rollingoff the trailer in the event of tie-down strap failure.
48

NOTE: Suitable hold-down strapsare available from your Arctic CatATV dealer. Ordinary rope is notrecommended because it canstretch under load.
Gasoline-Oil-LubricantRecommended Gasoline
The recommended gasoline to use in thisATV is 87 minimum octane regularunleaded. In many areas, oxygenates areadded to the gasoline. Oxygenated gaso-lines containing up to 10% ethanol or 5%methane are acceptable gasolines.
When using ethanol blended gasoline, it isnot necessary to add a gasoline antifreezesince ethanol will prevent the accumula-tion of moisture in the fuel system.
Recommended Engine/Transmission Oil
The recommended oil to use is Arctic CatACX All Weather synthetic engine oil,which has been specifically formulatedfor use in this Arctic Cat engine.Although Arctic Cat ACX All Weathersynthetic engine oil is the only oil recom-mended for use in this engine, use of anyAPI certified SM 0W-40 oil is acceptable.
OILCHART J
Recommended Front Differential/Rear Drive Lubricant
NOTE: Arctic Cat recommendsthe use of genuine Arctic Cat lubri-cants.The recommended lubricant(front differential and rear drive) isSAE approved 80W-90 hypoid. Thislubricant meets all of the lubricationrequirements of the Arctic Cat ATV.
Filling Gas Tank
Since gasoline expands as its temperatureincreases, the gas tank must be filled toits rated capacity only. Expansion roommust be maintained in the tank particu-larly if the tank is filled with cold gaso-line and then moved to a warm area.
CAUTIONWhen using hold-down straps, caremust be taken not to damage theATV.
CAUTIONDo not use white gas. Only ArcticCat approved gasoline additivesshould be used.
CAUTIONAny oil used in place of the recom-mended oil could cause seriousengine damage. Do not use oilswhich contain graphite or molybde-num additives. These oils canadversely affect clutch operation.Also, not recommended are racing,vegetable, non-detergent, and cas-tor-based oils.
CAUTIONAny lubricant used in place of therecommended lubricant could causeserious front differential/rear drivedamage.
! WARNINGAlways fill the gas tank in a well-venti-lated area. Never add gasoline to theATV gas tank near any open flames orwith the engine running or hot. DONOT SMOKE while filling the gas tank.
49

ATV0049D
Allow the engine to cool before filling thegas tank. Care must be taken not to over-fill the tank. If overfilled, gas may leakonto the engine creating a fire hazard.
Tighten the gas tank cap securely afterfilling the tank.
Engine Break-In After the completion of the break-inperiod, the engine oil and oil filter shouldbe changed. Other maintenance afterbreak-in should include checking of allprescribed adjustments and tightening ofall fasteners. At the discretion andexpense of the owner/operator, the ATVmay be taken to an authorized Arctic CatATV dealer for this initial service.
New ATV’s and renewed ATV enginesrequire a “break-in” period. The firstmonth is most critical to the life of thisATV. Proper operation during this break-in period will help assure maximum lifeand performance from the ATV.
During the first 10 hours of operation,always use less than ½ throttle. Varyingthe engine RPM during the break-inperiod allows the components to “load”(aiding the engine/transmission compo-nent mating process) and then “unload”(allowing components to cool). Althoughit is essential to place some stress on theengine components during break-in, careshould be taken not to overload theengine too often. Do not pull a trailerduring the break-in period.
When the engine starts, allow it to warmup properly. Idle the engine several min-utes until the engine has reached normaloperating temperature. Do not idle theengine for excessively long periods oftime.
Burnishing Brake PadsBrake pads must be burnished to achievefull braking effectiveness. Braking dis-tance will be extended until brake padsare properly burnished.
To properly burnish the brakes, use fol-lowing procedure:
1. Choose an area sufficiently large tosafely accelerate ATV to 30 mph andto brake to a stop.
2. Accelerate to 30 mph; then com-press brake lever to decelerate to 0-5mph.
3. Repeat procedure twenty times.
! WARNINGDo not over-flow gasoline when fill-ing the gas tank. A fire hazard couldmaterialize. Always allow the engineto cool before filling the gas tank.
! WARNINGDo not overfill the gas tank.
! WARNINGDo not attempt sudden stops or putyourself into a situation where asudden stop will be required untilthe brake pads are properly bur-nished.
50

General MaintenanceNOTE: Proper maintenance of theATV is important for optimum perfor-mance. Follow the MaintenanceSchedule and all ensuing maintenanceand care instructions/information.
NOTE: Proper maintenance proce-dures for each item can be found onthe corresponding page indicated.
If, at any time, abnormal noises, vibrations,or improper functioning of any componentof this ATV is detected, DO NOT OPER-ATE THE ATV. Take the ATV to an autho-rized Arctic Cat ATV dealer for inspectionand adjustment or repair.
If the owner/operator does not feel qualifiedto perform any of these maintenance proce-dures or checks, take the ATV to an autho-rized Arctic Cat ATV dealer forprofessional service.
I = Inspect and clean, adjust, lubricate, replace as necessary T = Tighten R = Replace C = Clean * Dealer maintenance ** When using Arctic Cat ACX All Weather synthetic oil, oil change interval can be increased to every 1,000 miles or every year.
Maintenance Schedule
Item PageInitial 100 miles after
break-in
Every 100 miles or 1
month
Every 300 miles or 3 months
Every 500 miles or 6 months
Battery 57 I I* Engine nuts and bolts - I I* Valve clearance - I ISpark plug 60 I I I
60 Replace every 4000 miles or 18 monthsOil cooler (400) 52 I I ILiquid Cooling System (450) 52 I Inspect every time before ridingIdle RPM (400) 60 I IThrottle cable 61 I Inspect every time before ridingGas/vent hoses 46 I Inspect every time before riding
46 Replace every 2 yearsEngine/transmission oil and filter 53 R R**Air filter 61 I IAir filter housing drain 62 I Inspect every time before ridingGear lubricant (Front differential - rear drive)
54 I I54 Replace every 4 years
V-Belt 62 I IMuffler/spark arrester 63 CTires/air pressure 62/27 I Inspect every time before riding* Brake components 55/56 I Inspect every time before ridingBrake fluid 55 I *Replace every 2 yearsBrake hoses 55 I *Replace every 4 years* Steering - I Inspect every time before riding* Suspension (Ball joint boots, drive axle boots front and rear, tie rods, differential and rear drive bellows) - I Inspect every time before riding* Chassis nuts and bolts - I TFrame/welds/racks - I IElectrical connections - I IHeadlight/taillight-brakelight 63 I Inspect every time before ridingWheel nuts 63 I I
51

Oil Cooler (400)
KC0083
NOTE: Dirt and debris must becleaned from the cooling fins regu-larly to ensure proper engine oilcooling.
NOTE: High engine RPM, low vehi-cle speed, or heavy load can raiseengine temperature. Decreasingengine RPM, reducing load, andselecting an appropriate transmis-sion gear can lower the temperature.
Liquid Cooling System (450)NOTE: Debris in front of theengine or packed between the cool-ing fins of the radiator can reducecooling capability. Using a gardenhose, wash the radiator to removeany debris preventing air flow.
The cooling system capacity can befound in the specifications chart. Thecooling system should be inspected dailyfor leakage and damage. If leakage ordamage is detected, take the ATV to anauthorized Arctic Cat ATV dealer for ser-vice. Also, the coolant level should bechecked periodically.
NOTE: High engine RPM, low vehi-cle speed, or heavy load can raiseengine temperature. Decreasingengine RPM, reducing load, andselecting an appropriate transmis-sion gear can lower the temperature.
When filling the cooling system, use acoolant/water mixture which will satisfythe coldest anticipated weather condi-tions of the area in accordance with thecoolant manufacturer’s recommenda-tions. While the cooling system is beingfilled, air pockets may develop; there-fore, run the engine for five minutes afterthe initial fill, shut the engine off, andthen fill the cooling system to the bottomof the stand pipe in the radiator neck.
Checking/Filling1. Locate the coolant reservoir on the
right side behind the radiator.
KC338B
2. Remove the cap and fill with theappropriate coolant until coolantlevel is between the LOW andFULL lines. Do not overfill.
3. Install the cap on the reservoir.
CAUTIONContinued operation of the ATV withhigh engine temperature may resultin engine damage or premature wear.
CAUTIONArctic Cat does not recommendusing a pressure washer to clean theradiator core. The pressure may bendor flatten the fins causing restrictedair flow, and electrical componentson the radiator could be damaged.Use only a garden hose with spraynozzle at normal tap pressure.
CAUTIONContinued operation of the ATV withhigh engine temperature may resultin engine damage or premature wear.
52

4. Remove the radiator access panel;then remove the radiator cap and addcoolant as necessary until coolant isvisible in the fill tank.
KC339A
5. Install the radiator cap and accesspanel.
Shock AbsorbersEach shock absorber should be visiblychecked weekly for excessive fluid leak-age (some seal leakage may be observedbut it does not indicate the shock is inneed of replacement), cracks or breaks inthe lower case, or a bent shock rod. If anyone of these conditions is detected,replacement is necessary.
NOTE: When the ATV is operatedin extremely cold weather (-23°C/-10°F or colder), a small amount ofleakage may be present. Unless theleakage is excessive, replacementis not necessary.
The shock absorber has a spring forceadjustment sleeve with five adjustmentpositions to allow the spring to beadjusted for different riding and loadingconditions. If the spring action is too softor too stiff, adjust it according to thechart.
KC0102
NOTE: Before attempting toadjust suspension, clean dirt anddebris from the sleeve and removeload from the suspension; then usethe spanner wrench to adjust thesleeve to the desired position.
General LubricationCables
None of the cables require lubrication;however, it is advisable to lubricate theends of the cables periodically with agood cable lubricant.
Engine/Transmission Oil and Filter
NOTE: Refer to the recommendedoil viscosity chart (on page 49) inthis manual for the proper engineoil.
Change the engine oil and oil filter at thescheduled intervals. The engine shouldalways be warm when the oil is changedso the oil will drain easily and com-pletely.
1. Park the ATV on level ground.
2. Remove the oil level stick. Be care-ful not to allow contaminates toenter the opening.
KC0051A
Position Spring Force Setting Load
1
Stronger
Soft
Stiff
Light
Heavy
2
3
4
5
53

3. Remove the drain plug from the bot-tom of the engine and drain the oilinto a drain pan.
733-441A
4. Remove the oil filter plug from thefilter mounting boss (located on thefront-right side of the transmissioncase) and allow the filter to draincompletely.
5. Using the oil filter wrench and aratchet handle (or a socket or box-end wrench), remove the old oil fil-ter and dispose of properly. Do notre-use oil filter.
NOTE: Clean up any excess oilafter removing the filter.
6. Apply oil to the new filter O-ringand check to make sure it is posi-tioned correctly; then install the newoil filter. Tighten securely.
7. Install the oil filter drain plug andtighten securely.
8. Install the engine drain plug andtighten it securely. Pour the recom-mended oil in the filler hole. Installfiller plug.
9. Start the engine (while the ATV isoutside on level ground) and allow itto idle for a few minutes.
10. Turn the engine off and wait approx-imately one minute. Recheck the oillevel.
11. Inspect the area around the drainplug and oil filter for leaks.
Front Differential and Rear Drive Gear Lubricant (Inspecting/Changing)
Inspect and change the gear lubricant ineach according to the MaintenanceSchedule. When changing the lubricant,use approved SAE 80W-90 hypoid oiland use the following procedure.
1. Place the ATV on level ground.
2. Remove each oil filler plug.
3. Drain the oil into a drain pan by remov-ing in turn the drain plug from each.
CF107B
CF106C
4. After all the oil has been drained,install the drain plugs and tightensecurely.
5. Pour recommended oil into eachfiller hole.
NOTE: If the gear case has a levelplug, fill to the threads of the levelplug. If the gear case has only a fillplug, fill to within 1 in. of thethreads of the fill plug.
CAUTIONInspect the oil for any signs of metalfilings or water. If found, take theATV to an authorized Arctic Cat ATVdealer for servicing.
54

CF113A
CF116A
NOTE: Arctic Cat recommendsthe use of genuine Arctic Cat lubri-cants.
6. Install the filler plugs and levelplugs.
Hydraulic Hand Brake
738-420B
Brake Fluid
Check the brake fluid level in the brakefluid reservoir. If the level in the reser-voir is not visible in the sight glass, addDOT 4 brake fluid.
738-420A
NOTE: If the sight glass appearsdark, there is a sufficient amount offluid in the reservoir.
Brake Lever Lock
Check to make sure the brake lever lockengages properly and that the brake(when engaged) locks the wheels.
1. Pump the brake lever 2 or 3 times.
2. Engage the brake lever lock.
3. Attempt to push the ATV.
NOTE: The brake lever lock mustlock the wheels. If it doesn’t, takethe ATV to an authorized Arctic CatATV dealer for service.
Brake Hoses
Carefully inspect the hydraulic brakehoses for cracks or other damage. Iffound, take the ATV to an authorizedArctic Cat ATV dealer to have the brakehoses replaced.
Brake Pads
The clearance between the brake padsand brake discs is adjusted automaticallyas the brake pads wear. The only mainte-nance that is required is replacement ofthe brake pads when they show excessivewear. Check the thickness of each of thebrake pads as follows:
1. Remove a front wheel.
2. Measure the thickness of each brakepad.
! WARNINGBe sure to inspect the hydraulicbrake system before each use.Always maintain brakes accordingto the Maintenance Schedule.
CF113A
CAUTIONBe careful not to spill any fluid whenfilling the brake fluid reservoir. Wipeaway spilled fluid immediately.
55

3. If thickness of either brake pad isless than 1.0 mm (0.039 in.), take theATV to an authorized Arctic CatATV dealer to have brake padsreplaced.
PR376B
4. Install the wheel and tighten using acrisscross pattern to 40 ft-lb (steelwheels) or 80 ft-lb (aluminumwheels).
Rear Foot BrakeThe rear foot brake must be maintainedto be fully functional.
1. Check the brake fluid level in thereservoir. The fluid level must bemaintained between the MAX andMIN level marks. If the level in thereservoir is low, add DOT 4 brakefluid.
CD474A
NOTE: The brake fluid reservoir islocated under the seat.
2. Press the rear foot brake pedal sev-eral times to check for firmness.
3. If the brake is not firm, the systemmust be bled.
NOTE: Take the ATV to an autho-rized Arctic Cat ATV dealer for thisservice.
Protective Rubber BootsThe protective boots should be inspectedperiodically according to the Mainte-nance Schedule.
Ball Joint Boots (Upper and Lower/Right and Left)
CC791
1. Secure the ATV on a support standto elevate the front wheels.
2. Remove both front wheels.
3. Inspect the four ball joint boots forcracks, tears, or perforations.
4. Check the ball joint for free-play bygrasping the steering knuckle andturning it from side to side and upand down.
5. If boot damage is present or balljoint free-play seems excessive, con-tact an authorized Arctic Cat ATVdealer for service.
Tie Rod Boots (Inner and Outer/Right and Left)
CC792
! WARNINGBe sure to inspect the rear footbrake system before each use.Always maintain brakes accordingto the Maintenance Schedule.
56

1. Secure the ATV on a support standto elevate the front wheels.
2. Remove both front wheels.
3. Inspect the four tie rod boots forcracks, tears, or perforations.
4. Check the tie rod end free-play bygrasping the tie rod near the end andattempting to move it up and down.
5. If boot damage is present or tie rodend free-play seems excessive, con-tact an authorized Arctic Cat ATVdealer for service.
Drive Axle Boots
CC793
CF125A
1. Inspect all drive axle boots forcracks, tears, or perforations.
2. If boot damage is present, contact anauthorized Arctic Cat ATV dealerfor service.
BatteryThe battery is located under the seat.
After being in service, batteries requireregular cleaning and recharging in orderto deliver peak performance and maxi-mum service life. The following proce-dures are recommended for cleaning andmaintaining batteries. Always read andfollow instructions provided with batterychargers and battery products.
NOTE: Refer to all warnings andcautions provided with the batteryor battery maintainer/charger.
Loss of battery charge may be caused byambient temperature, ignition OFF cur-rent draw, corroded terminals, self dis-charge, frequent start/stops, and shortengine run times. Frequent winch usage,snowplowing, extended low RPM opera-tion, short trips, and high amperageaccessory usage are also reasons for bat-tery discharge.
Maintenance Charging
NOTE: Arctic Cat recommendsthe use of the CTEK Multi US 800or the CTEK Multi US 3300 for bat-tery maintenance charging. Main-tenance charging is required on allbatteries not used for more thantwo weeks or as required by bat-tery drain.
1. When charging a battery in the vehi-cle, be sure the ignition switch is inthe OFF position.
NOTE: On the 400, be sure tomaintain the fluid of the battery atthe UPPER LEVEL. Use only dis-tilled water when adding fluid tothese batteries.
NOTE: On the 450, the sealingstrip should NOT be removed andNO fluid should be added.
2. Clean the battery terminals with asolution of baking soda and water.
3. Be sure the charger and battery are ina well-ventilated area and ensure thebattery charger cables will not contactany battery acid. Be sure the chargeris unplugged from the 110-volt elec-trical outlet.
4. Connect the red terminal lead fromthe charger to the positive terminalof the battery; then connect the blackterminal lead of the charger to thenegative terminal of the battery.
57

NOTE: Optional battery chargingadapters are available from yourauthorized Arctic Cat dealer to con-nect directly to your vehicle from therecommended chargers to simplifythe maintenance charging process.Check with your authorized ArcticCat dealer for proper installation ofthese charging adapter connectors.
5. Plug the battery charger into a 110-volt electrical outlet.
6. If using the CTEK Multi US 800,there are no further buttons to push.If using the CTEK Multi US 3300,press the Mode button (A) at the leftof the charger until the MaintenanceCharge Icon (B) at the bottom illu-minates. The Normal Charge Indica-tor (C) should illuminate on theupper portion of the battery charger.
800E
NOTE: The maintainer/chargerwill charge the battery to 95%capacity at which time the Mainte-nance Charge Indicator (D) will illu-minate and the maintainer/chargerwill change to pulse/float mainte-nance. If the battery falls below 12.9DC volts, the charger will automati-cally start again at the first step ofthe charge sequence.
3300A
NOTE: Not using a battery char-ger with the proper float mainte-nance will damage the battery ifconnected over extended periods.
Charging
NOTE: Arctic Cat recommendsthe use of the CTEK Multi US 800 orthe CTEK Multi US 3300 for batterymaintenance charging.
1. Be sure the battery and terminalshave been cleaned with a bakingsoda and water solution.
2. Be sure the charger and battery arein a well-ventilated area and ensurethe battery charger cables will notcontact any battery acid. Be sure thecharger is unplugged from the 110-volt electrical outlet.
3. Connect the red terminal lead fromthe charger to the positive terminalof the battery; then connect the blackterminal lead of the charger to thenegative terminal of the battery.
4. Plug the charger into a 110-volt elec-trical outlet.
5. By pushing the Mode button (A) onthe left side of the charger, select theNormal Charge Icon (E). The Nor-mal Charge Indicator (C) shouldilluminate on the upper left portionof the charger.
6. The battery will charge to 95% of itscapacity at which time the MaintenanceCharge Indicator (D) will illuminate.
NOTE: For optimal charge andperformance, leave the chargerconnected to the battery for a mini-mum 1 hour after the MaintenanceCharge Indicator (D) illuminates. Ifthe battery becomes hot to thetouch, stop charging. Resume afterit has cooled.
7. Once the battery has reached fullcharge, unplug the charger from the110-volt electrical outlet.
NOTE: If, after charging, the bat-tery does not perform to operatorexpectations, bring the battery toan authorized Arctic Cat dealer forfurther troubleshooting.
58

Jump-Starting
NOTE: Arctic Cat does not recom-mend jump-starting a vehicle with adead battery but rather to removethe battery, service it, and correctlycharge it; however, in an emer-gency, it may be necessary to jump-start a vehicle. If so, use the follow-ing procedure to carefully andsafely complete this procedure.
1. On the vehicle to be jump-started,remove the battery cover and anyterminal boots.
2. Inspect the battery for any signs ofelectrolyte leaks, loose terminals, orbulging sides. Leaking or bulgingbattery cases may indicate a frozenor shorted battery.
3. Inspect the vehicle to be used forjump-starting to determine if voltageand ground polarity are compatible.The vehicle must have a 12-volt DC,negative ground electrical system.
4. Move the vehicle to be used for thejump-start close enough to ensure thejumper cables easily reach; then shiftinto neutral, set and lock the brakes,shut off all electrical accessories, andturn the ignition switch OFF.
NOTE: Make sure all switches onthe vehicle to be jump-started areturned OFF.
5. Disconnect all external accessoriessuch as cell phones, GPS units, andradios on both vehicles.
6. Attach one clamp of the positive(red) jumper cable to the positive (+)terminal (1) of the dead battery (C)being careful not to touch any metalwith the other clamp; then attach theother clamp of the positive (red)jumper cable to the positive (+) ter-minal (2) of the good battery (B).
0744-527
NOTE: Some jumper cables maybe the same color but the clamps orends will be color-coded red andblack.
! WARNINGImproper handling or connecting ofa battery may result in serious injuryincluding acid burns, electricalburns, or blindness as a result of anexplosion. Always remove rings andwatches.
! WARNINGAny time service is performed on abattery, the following must beobserved: keep sparks, open flame,cigarettes, or any other flame away.Always wear safety glasses. Protectskin and clothing when handling abattery. When servicing battery inenclosed space, keep the area well-ventilated. Make sure battery vent-ing is not obstructed.
! WARNINGIf any of these conditions exist, DONOT attempt a jump-start, boost, orcharge the battery. An explosioncould occur causing serious injury.
CAUTIONAlways make sure the electrical sys-tems are of the same voltage andground polarity prior to connectingjumper cables. If not, severe electri-cal damage may occur.
CAUTIONFailure to disconnect electronicaccessories during jump-startingmay cause system damage due topower spikes.
59

7. Attach one clamp of the negative(black) jumper cable to the negative(-) terminal (3) of the good battery(B); then attach the other clamp ofthe negative (black) jumper cable (4)to an unpainted metal surface (A) onthe engine or frame well away fromthe dead battery and fuel systemcomponents.
8. Stand well away from the dead bat-tery and start the vehicle with thegood battery. Allow the vehicle torun for several minutes applyingsome charge to the dead battery.
9. Start the vehicle with the dead bat-tery and allow it to run for severalminutes before disconnecting thejumper cables.
10. Remove the jumper cables in oppo-site order of hook-up (4, 3, 2, 1). Becareful not to short cables againstbare metal.
NOTE: Have the battery and elec-trical system checked prior to oper-ating the vehicle again.
Spark PlugThe ATV comes equipped with a specifiedspark plug. See the Specifications chart forthe correct spark plug and the correct gap.A light brown insulator indicates that theplug is correct. A white or dark insulatorindicates that the engine may need to beserviced or the carburetor (on the 400) mayneed to be adjusted. Consult an authorizedArctic Cat ATV dealer if the plug insulatoris not a light brown color.
To help prevent cold weather fouling,make sure to thoroughly warm up theengine before operating. To maintain a hot,strong spark, keep the plug free of carbon.
Before removing the spark plug, be sureto clean the area around the spark plug. Ifyou do not, dirt could enter engine whenremoving or installing the spark plug.
Adjust to the recommended gap forproper ignition. Use a wire-type feelergauge to check the gap.
ATV-0052
When installing the spark plug, be sure totighten it securely. A new spark plugshould be tightened 1/2 turn once thewasher contacts the cylinder head. Aused spark plug should be tightened 1/8-1/4 turn once the washer contacts the cyl-inder head.
Engine Idle RPM Adjustment (400)To properly adjust the idle, a tachometer isnecessary. If one is not available, take theATV to an authorized Arctic Cat ATV dealer.
1. Start the engine and warm it up tonormal operating temperature.
2. Remove the seat; then turn the idleadjustment screw in or out until theengine idles at 1250-1350 RPM.
KC356A
! WARNINGNever make the final connection to abattery as a spark could ignite hydro-gen gases causing an explosion ofthe battery resulting in acid burns orblindness.
! WARNINGAdjust the idle to the correct RPM.Make sure the engine is at normaloperating temperature before adjust-ing the idle RPM.
60

Throttle Cable AdjustmentTo adjust the throttle cable free-play:
1. Loosen the jam nut from the throttlecable adjuster.
2. Slide the rubber boot away and turnthe adjuster until the throttle leverhas the proper free-play of 3-6 mm(1/8-1/4 in.).
ATV-0047
3. Tighten the knurled nut against thethrottle cable adjuster securely; thenslide the rubber boot over theadjuster.
Air FilterThe air filter inside the air filter housingmust be kept clean to provide goodengine power and gas mileage. If theATV is used under normal conditions,service the filter at the intervals speci-fied. If operated in dusty, wet, or muddyconditions, inspect and service the filtermore frequently. Use the following pro-cedure to remove the filter and inspectand/or clean it.
1. Rotate the three latches to releasethe filter housing cover; then loosenthe inlet boot clamp.
KC0056A
KC0056B
2. Remove the filter housing cover andair filter element.
3. Fill a wash pan larger than the ele-ment with a non-flammable solvent;then dip the element in the solventand wash it.
4. Squeeze the element by pressing itbetween the palms of both hands toremove excess solvent. Do not twistor ring the element or it will developcracks.
5. Dry the element.
6. Put the element in a plastic bag; thenpour in air filter oil and work the oilinto the element.
7. Squeeze the element to removeexcess oil.
8. Clean any dirt or debris from insidethe air cleaner. Be sure no dirt entersthe carburetor/throttle body.
9. Install the air filter and cover.
10. Connect the inlet boot and tightenthe clamp securely.
CAUTIONA torn air filter can cause damage tothe ATV engine. Dirt and dust mayget inside the engine if the elementis torn. Carefully examine the ele-ment for tears before and aftercleaning it. Replace the element witha new one if it is torn.
61

KC0056B
Air Filter Housing DrainInspect the “duck bill” drain in front ofthe main housing for debris and forproper sealing.
KC0056C
Draining V-Belt Cover
KC0049A
NOTE: If the ATV has been driventhrough water, the V-belt covermust be drained of any water.
1. Place the ATV on a level surface.
2. Remove the drain bolt from thecover and allow the water to drainout.
3. Shift the range lever to the neutralposition; then start the engine.
4. Increase and decrease engine RPMseveral times to “blow out” anywater; then stop the engine.
5. Install the drain bolt and tightensecurely.
NOTE: The V-belt and pulleysshould be inspected every 500miles and the belt replaced (if nec-essary).
Tires
Tire Tread Condition
The use of worn-out tires on an ATV isvery dangerous. A tire is considered to beworn out when the depth of the tread isless than 3 mm (1/8 in.). Be sure toreplace the tires before reaching this min-imum specification.
0732-649
Tire Replacement
The ATV has low-pressure tubeless tires.Air is sealed by the contact surfaces ofthe inner wheel rim and the tire bead. Ifeither the inner wheel rim or tire bead isdamaged, air may leak. Be extremelycareful not to damage these areas whenreplacing tires.
! WARNINGAlways use the size and type of tiresas specified. Refer to the Specifica-tions chart for proper tire inflationpressure, and always maintainproper tire inflation pressure.
! WARNINGThe use of worn-out tires is danger-ous and can increase the risk of anaccident.
62

It is very important to use the propertools when repairing or replacing tires toprevent damage to the tire bead or wheelrims. If proper tools and related items arenot available, have this maintenance per-formed by an authorized Arctic Cat ATVdealer or a qualified tire repair station.
Tubeless Tire Repair
Should a leak or flat tire occur due to apuncture, the tire may be repaired using aplug-type repair. If the damage is from acut or if the puncture cannot be repairedusing a plug, the tire must be replaced.When operating the ATV in areas wheretransportation or service facilities are notreadily available, it is strongly recom-mended to carry a plug-type repair kitand a tire pump along.
Wheels1. Park the ATV on level ground and
engage the brake lever lock.
2. Loosen the lug nuts on the wheel tobe removed.
3. Elevate the ATV.
4. Remove the lug nuts.
5. Remove the wheel.
6. Install the wheel and install the lugnuts.
7. Tighten the nuts in a crisscross pat-tern to 40 ft-lb (steel wheels) or 80ft-lb (aluminum wheels).
8. Remove the jack.
Muffler/Spark ArresterThe muffler has a spark arrester whichmust be periodically cleaned. At theintervals shown in the MaintenanceSchedule, clean the spark arrester usingthe following procedure.
1. Remove the cap screws securing thespark arrester assembly to the muf-fler; then remove the spark arrester.
KC334A
2. Using a suitable brush, clean the car-bon deposits from the screen takingcare not to damage the screen.
NOTE: If the screen or gasket isdamaged in any way, it must bereplaced.
3. Install the spark arrester assemblyand secure with the cap screws.Tighten securely.
Light Bulb ReplacementThe wattage rating of each bulb is shownin the chart. When replacing a burnedbulb, always use the same wattage rating.
CAUTIONWhen breaking the tire bead loosefrom the wheel, be extremely carefulnot to damage the inner wheel sur-face or the tire bead.
! WARNINGUse only Arctic Cat approved tireswhen replacing tires. Failure to doso could result in unstable ATVoperation.
! WARNINGWait until the muffler cools to avoidburns.
Headlight 12V/35W (4)
Taillight/Brakelight 12V/5W/21W
CAUTIONUse only specified bulbs indicated inthe chart as replacement bulbs.
63

NOTE: The bulb portion of theheadlight is fragile. HANDLE WITHCARE. When replacing the head-light bulb, do not touch the glassportion of the bulb. If the glass istouched, it must be cleaned with adry cloth before installing. Skin oilresidue on the bulb will shorten thelife of the bulb.
To replace the headlight bulb, use the fol-lowing procedure.
1. Remove the wiring harness connec-tor from the back of the headlight.
2. Grasp the bulb housing, turn it coun-terclockwise, and remove the bulb.
3. Install the new bulb into the housingand rotate it completely clockwise.
4. Install the wiring harness connector.
To replace the taillight/brakelight bulb,use the following procedure.
1. Rotate the socket counterclockwiseand remove it from the housing.
2. To remove the bulb from the socket,push in and rotate counterclockwise.
3. To install the bulb, push in and turnclockwise.
4. Insert the socket into the housingand rotate it clockwise.
To replace the running lights, use the fol-lowing procedure.
1. Pull the bulb socket from the run-ning light housing and remove thebulb by pulling it from the socket.
2. Push a new bulb into the socket andpress the socket into the runninglight housing.
Checking/Adjusting Headlight AimThe headlights can be adjusted verticallyand horizontally. The geometric center ofthe HIGH beam light zone is to be usedfor vertical and horizontal aiming.
1. Position the ATV on a level floor sothe headlights are approximately 6.1m (20 ft) from an aiming surface(wall or similar aiming surface).
ATV-0070
NOTE: There should be an aver-age operating load on the ATV whenadjusting the headlight aim.
2. Measure the distance from the floorto the mid-point of each headlight.
3. Using the measurements obtained instep 2, make horizontal marks on theaiming surface.
4. Make vertical marks which intersectthe horizontal marks on the aimingsurface directly in front of the head-lights.
5. Switch on the lights. Make sure theHIGH beam is on. DO NOT USELOW BEAM.
6. Observe each headlight beam aim.Proper aim is when the most intensebeam is centered on the verticalmark 5 cm (2 in.) below the horizon-tal mark on the aiming surface.
7. Adjust each headlight until correctaim is obtained by turning theadjuster clockwise to lower or coun-terclockwise to raise the beam.
KC0108A
CAUTIONWhen replacing the headlight bulb,be careful not to touch the glassportion of the bulb. Grasp the newbulb with a clean cloth.
64

FusesThe fuses are located in a power distribu-tion module in front of the steering postunder the electrical access panel. If thereis any type of electrical system failure,always check the fuses first.
NOTE: To remove the fuse, com-press the locking tabs on eitherside of the fuse cover and lift out.
400
2411-565
450
2411-566
ToolsA basic tool kit is provided with the ATV.Maintain the tool kit with the ATV at alltimes.
KC0042B
CAUTIONAlways replace a blown fuse with afuse of the same type and rating. Ifthe new fuse blows after a shortperiod of use, consult an authorizedArctic Cat ATV dealer immediately.
65

Preparation for Storage
Arctic Cat recommends the followingprocedure to prepare the ATV for storage.An authorized Arctic Cat ATV dealershould perform this service; however, theowner/operator may perform this serviceif desired.
1. Clean the seat cushion (cover andbase) with a damp cloth and allow todry.
2. Clean the ATV thoroughly by wash-ing dirt, oil, grass, and other foreignmatter from the entire ATV. Allowthe ATV to dry thoroughly. DONOT get water into any part of theengine or air intake.
3. Either drain the gas tank or add afuel stabilizer to the gas in the gastank. Remove the air filter housingcover and air filter. Start the engineand allow it to idle; then using Arc-tic Cat Engine Preserver, rapidlyinject the preserver into the air filteropening for a period of 10 to 20 sec-onds. Install the air filter and hous-ing cover.
4. On the 400, drain the carburetorfloat bowl and turn off the fuel valve(located on the right side of the gastank).
5. Plug the hole in the exhaust systemwith a clean cloth.
6. Apply light oil to the upper steeringpost bushing and plungers of theshock absorbers.
7. Tighten all nuts, bolts, cap screws,and screws. Make sure rivets hold-ing components together are tight.Replace all loose rivets. Care mustbe taken that all calibrated nuts, capscrews, and bolts are tightened tospecifications.
8. On the 450, fill the cooling systemto the bottom of the stand pipe in theradiator neck with properly mixedcoolant.
NOTE: For storage, use a batterymaintainer or make sure the batteryis fully charged (see Battery sectionin this manual).
9. Disconnect the battery cables (nega-tive cable first); then remove the bat-tery, clean the battery posts andcables, and store in a clean, dry area.
10. Store the ATV indoors in a levelposition.
CAUTIONPrior to storing the ATV, it must beproperly serviced to prevent rustingand component deterioration.
CAUTIONIf the interior of the air filter housingis dirty, clean the area before start-ing the engine.
CAUTIONAvoid storing outside in direct sun-light and avoid using a plastic coveras moisture will collect on the ATVcausing rusting.
66

Preparation after Storage Taking the ATV out of storage and cor-rectly preparing it will assure many milesand hours of trouble-free riding. ArcticCat recommends the following procedureto prepare the ATV.
1. Clean the ATV thoroughly.
2. Clean the engine. Remove the clothfrom the exhaust system.
3. Check all control wires and cablesfor signs of wear or fraying. Replaceif necessary.
4. Change the engine/transmission oiland filter.
5. On the 425, check the coolant leveland add properly mixed coolant asnecessary.
6. Charge the battery; then install. Con-nect the battery cables making sureto connect the positive cable first.
7. Check the entire brake systems(fluid level, pads, etc.), all controls,headlights, taillight, brakelight, andheadlight aim; adjust or replace ifnecessary.
8. Check the tire pressure. Inflate torecommended pressure as necessary.
9. Tighten all nuts, bolts, cap screws,and screws making sure all cali-brated nuts, cap screws, and boltsare tightened to specifications.
10. Make sure the steering moves freelyand does not bind.
11. Check the spark plug. Clean orreplace as necessary.
12. Follow the recommendations foundin the pre-start inspection.
CAUTIONBefore installing the battery, makesure the ignition switch is in the OFFposition.
67

Limited WarrantyArctic Cat Inc. (hereinafter referred to as Arctic Cat) extends a limited warranty as described below oneach new Arctic Cat ATV it assembles and on each genuine Arctic Cat ATV part and accessoryassembled and sold by an authorized Arctic Cat ATV dealer. The limited warranty on an Arctic Cat ATVis extended to the original retail purchaser for the time periods described below; however, the balanceof the remaining warranty may be transferred to another party unless the purchase is for commercialuse (see below). Warranty coverage is only available in the country in which the original retail purchaseoccurs to the original retail purchaser resident in that country or to a transferee resident in that countryof the balance of the remaining warranty.
Arctic Cat warrants only the products it assembles and/or sells and does not warrant that otherproducts will function properly when used with an Arctic Cat ATV or will not damage the ATV. Arctic Catdoes not assume any liability for incidental or consequential damages.
Arctic Cat will repair or replace, at its option, free of charge (including any related labor charges), anyparts that are found to be warrantable in material or workmanship. This repair work MUST be done byan authorized Arctic Cat ATV dealer. No transportation charges, rental charges, or inconvenience costswill be paid by Arctic Cat. The warranty is validated upon examination of said parts by Arctic Cat or anauthorized Arctic Cat ATV dealer. Arctic Cat reserves the right to inspect such parts at its factory forfinal determination if warranty should apply.
The warranty periods are as follows:
1. Six months from the date of sale — for an Arctic Cat ATV used for recreational purposes.
2. Ninety days from date of invoice — for an Arctic Cat ATV used for commercial purposes, includingrental operations (non-transferable).
3. Thirty days from date of sale of ATV on Arctic Cat supplied batteries.
Exclusions to this warranty include normal wear, abuse, or corrosion and the following parts anditems:
Tires CV Boots Torn or Punctured UpholsteryOil Filter Drive Belt Cracks or Gouges in Body PanelsAir Filter Brake Pads Drive/Driven Clutch Wear PartsLight Bulbs Spark Plug(s)
The following will VOID Arctic Cat’s warranty:
1. Failure to perform the proper break-in procedure and all related maintenance, storage procedures(if stored for extended periods), and/or service as recommended in the Operator’s Manual.
2. Repairs and/or adjustments by anyone other than an authorized Arctic Cat ATV dealer.
3. Use of improper carburetor jets.
4. Use of improper gasoline, lubricating oils, or spark plug(s).
5. An accident or subjecting the ATV to misuse, abuse, or negligent operation.
6. Any modification, addition, or removal of parts unless instructed to do so by Arctic Cat.
7. Use of the ATV in any way for racing purposes.
8. Removal of the engine for use in another vehicle.
9. Removal or mutilation of the Vehicle Identification Number or Engine Serial Number.
10. Use of parts not sold or approved by Arctic Cat.
11. Damage due to improper transportation.
Arctic Cat shall not be responsible for and this limited warranty excludes recovery of economic,punitive, consequential and incidental damages, lost profits, and loss of use. Some states orprovinces do not allow the exclusion or limitation of incidental or consequential damages, sothe above limitation may not apply to you. Arctic Cat’s aggregate liability may not exceed theprice of the product. The law of the State of Minnesota shall apply to all claims or disputes,exclusive of its conflicts of law provisions.IMPLIED WARRANTY EXCLUSION AND DISCLAIMERTo the fullest extent permitted by law, Arctic Cat excludes and disclaims all implied warrantiesof merchantability and fitness for a particular purpose.If you are not satisfied with warranty service or repairs, you should contact Arctic Cat at (U.S.)1-218-681-9851 or (Canada) 1-204-982-1656.
68

Warranty Procedure/Owner ResponsibilityAt the time of sale, an ATV Rider Training Certificate and Owner Registration form is to becompleted by the selling dealer and consumer. The receipt of the form by Arctic Cat is acondition precedent to warranty coverage. It is the selling dealer’s responsibility to retainand/or submit appropriate copies of the form to the appropriate place(s) to initiate war-ranty coverage.
The dealer will furnish to the consumer a signed copy of the form which must be pre-sented to the dealer when requesting warranty service. The registration form is the con-sumer’s proof of ownership and warranty eligibility. The form is used by the dealer tovalidate the warranty claim. Retain your copy of the form and keep it in a safe place.
When warranty repair is suspected, the ATV should be taken to the selling dealer, who hasthe primary responsibility to perform warranty repairs. Subject to the limitations set forth inthe Limited Warranty, in the event the selling dealer has ceased to do business, you havemoved, or you are in a location away from your selling dealer, warranty may be performedby any authorized Arctic Cat ATV dealer.
The authorized Arctic Cat ATV dealer will examine the ATV or part to determine if, in hisopinion, a warrantable condition exists. If a warrantable condition appears to exist, thedealer will repair or replace, at Arctic Cat’s option, free of charge, including any relatedlabor costs, all parts that are found to be warrantable and any other parts which the war-rantable part caused to be damaged. You, the owner, will then be asked to sign a warrantyform to ensure Arctic Cat that the warranty work was actually performed.
It is the owner’s responsibility to maintain and service the ATV in accordance with ArcticCat’s recommendations in the Operator’s Manual. To protect yourself and your ATV, followall safety and service tips. Arctic Cat will NOT warrant repairs required as a result of notperforming standard operator maintenance, storage procedures, and service as outlinedin the Operator’s Manual.
Should you have any questions concerning the warranty, contact an authorized Arctic CatATV dealer.
69

Arctic Cat Emission Control System Limited Warranty
Arctic Cat Inc., P.O. Box 810, Thief River Falls, MN 56701 (hereinafter referred to as Arctic Cat) warrantsthat this new Arctic Cat ATV manufactured on or after January 1st, 1997:
A. Is designed, built, and equipped so as to conform at the time of initial purchase with all applicableregulations of the California Air Resources Board and
B. Is free from defects in material and workmanship which could cause such ATV to fail to conformwith applicable regulations of the California Air Resources Board for a period of use of two (2)years from the date of initial retail delivery.
CoverageWarranty defects shall be remedied during customary business hours at any authorized Arctic Cat ATVdealer located within the state of California in compliance with applicable regulations of the California AirResources Board. Any component or components replaced under this warranty shall become the prop-erty of Arctic Cat.In California, emission related warranted components are specifically defined by the state’s EmissionWarranty Parts List. These warranted components are carburetor and internal components, intake mani-fold, fuel injection system, spark advance mechanism, crankcase breather, air cutoff valve, fuel/vaporseparator, canister, igniters, breaker governors, ignition coils, ignition wires, ignition points, condensersand spark plugs if failure occurs prior to the first scheduled replacement, and hoses, clamps, and fittingsused directly in these parts. Since emission related components may vary from model to model, certainmodels may not contain all of these components, and certain models may contain functionally equivalentcomponents.In California, emission control system emergency repairs, as provided for in the California AdministrativeCode, may also be performed by other than an authorized Arctic Cat ATV dealer. An emergency situationoccurs when an authorized Arctic Cat ATV dealer is not reasonably available, a component is not avail-able within thirty (30) days, or a repair is not complete within thirty (30) days. Any replacement componentcan be used in an emergency repair. Arctic Cat will reimburse the owner for the expenses, including diag-nosis, not to exceed suggested retail price as set forth by Arctic Cat for all warranted componentsreplaced and labor charges based on the recommended time allowance set forth by Arctic Cat for thewarranty repair and the geographically appropriate hourly labor rate. The owner may be required to keepreceipts and failed components in order to receive compensation.
LimitationsThis Emission Control System Warranty shall not cover any of the following:
A. Repair or replacement required as a result of(1) accident,(2) misuse,(3) lack of required maintenance,(4) repairs improperly performed or replacements improperly installed,(5) use of replacement components or accessories not conforming to Arctic Cat specifications
which adversely affect performance, and/or(6) use in competitive racing or related events.
B. Inspections, replacement of components, and other services or adjustments necessary forrequired maintenance.
Limited LiabilityThe liability of Arctic Cat under this Emission Control System Warranty is limited solely to the remedyingof defects in material and workmanship by an authorized Arctic Cat ATV dealer at its place of businessduring customary business hours. This warranty does not cover inconvenience or loss of use of the ATVor transportation of the ATV to or from the Arctic Cat ATV dealer.ARCTIC CAT SHALL NOT BE LIABLE FOR ANY OTHER EXPENSES, LOSS, OR DAMAGE, WHETHERDIRECT, INCIDENTAL, CONSEQUENTIAL, OR EXEMPLARY, ARISING IN CONNECTION WITH THESALE OR USE OF, OR INABILITY TO USE THE ARCTIC CAT ATV FOR ANY PURPOSE. SOMESTATES DO NOT ALLOW THE EXCLUSION OR LIMITATION OF ANY INCIDENTAL OR CONSEQUEN-TIAL DAMAGES, SO THE ABOVE MAY NOT APPLY TO YOU.NO EXPRESS EMISSION CONTROL SYSTEM WARRANTY IS GIVEN BY ARCTIC CAT EXCEPT ASSPECIFICALLY SET FORTH HEREIN. ANY EMISSION CONTROL SYSTEM WARRANTY IMPLIED BYLAW, INCLUDING ANY WARRANTY OF MERCHANT-ABILITY OR FITNESS FOR A PARTICULARPURPOSE, IS LIMITED TO THE EXPRESS EMISSION CONTROL SYSTEM WARRANTY TERMSSTATED IN THIS WARRANTY. THE FOREGOING STATEMENTS OF WARRANTY ARE EXCLUSIVEAND IN LIEU OF ALL OTHER REMEDIES.No dealer is authorized to modify this Arctic Cat Inc. Limited Emission Control System Warranty.
Legal RightsTHIS WARRANTY GIVES YOU SPECIFIC LEGAL RIGHTS, AND YOU MAY ALSO HAVE OTHERRIGHTS WHICH VARY FROM STATE TO STATE.THIS WARRANTY IS IN ADDITION TO THE ARCTIC CAT INC. LIMITED ATV WARRANTY.
Additional InformationAny replacement component that is equivalent in performance and durability may be used in the performanceof any maintenance or repairs. However, Arctic Cat is not liable for these components. The owner is responsi-ble for the performance of all required maintenance. Such maintenance may be performed at a service estab-lishment or by any individual. The warranty period begins on the date the ATV is delivered to the owner.
70

U.S. EPA Emission Control Statement/Warranty Coverage - ATV
(U.S. Only)Statement/WarrantyArctic Cat warrants to the original retail purchaser, and each subsequent purchaser, thatall U.S. EPA-certified Arctic Cat ATV’s are designed, built, and equipped to conform to allU.S. EPA Emission Control Regulations. Please read the following information completely.
Your authorized Arctic Cat ATV dealer will repair or replace any defective emission-relatedcomponent at no cost to you during the warranty period. You may have non-warranty ser-vice performed by any repair establishment that uses equivalent components. The regula-tions provide significant civil penalties for tampering that causes your ATV to no longermeet U.S. EPA emission standards.
Arctic Cat further warrants that the engine and its emission-related components are freefrom defects in materials or workmanship that could cause the engine to fail to complywith applicable regulations during the warranty period.
If you have any questions about this information, or the emission warranty coverage state-ment, contact your local authorized Arctic Cat ATV dealer.
Warranty PeriodThe emission warranty period for this ATV begins on the same date as the standard war-ranty coverage and continues for 30 months or 3100 miles, whichever comes first.
Components CoveredThe emissions warranty covers major emissions control components and emission-related components listed as follows:
Engine Management and Sensors Fuel/Air SystemBarometric Pressure Sensor Fuel InjectorsCamshaft Position Sensor Fuel Pressure RegulatorEngine Control Module (ECM) Fuel PumpEngine Coolant Temperature Sensor Carburetor(s)Intake Air Temperature Sensor Turbocharger AssemblyManifold Absolute Pressure Sensor Air Bypass ValveOxygen Sensor Turbo Waste Gate Control ValveThrottle Position Sensor Crankcase Ventilation SystemCrankshaft Position Sensor ISC ValveExhaust Temperature SensorCrankshaft Position Sensor
Ignition System Miscellaneous Items Used in Ignition Coil Aforementioned SystemsKnock Sensor System ConnectorsSpark Plugs SwitchesCapacitive Discharge Ignition (CDI) Module GrommetsMagneto Pick-Up Clamps
HosesTiesGasketsWiring
Owner’s ResponsibilitiesThe owner of any ATV warranted under this Arctic Cat Emission Control Statement is responsible forthe proper maintenance and use of the ATV as stated in the Operator's Manual. Proper maintenancegenerally includes replacement and service, at the owner's choosing, such items as air filter, oil and oilfilter, or any other part, item, or device related to emissions control as specified in the Operator's Man-ual. It is the owner's responsibility to ensure that the ATV is used in a manner for which it was designed.
71

Arctic Cat ATV Emission Control Warranty Statement
Warranty Rights and ObligationsArctic Cat Inc. (hereinafter referred to as Arctic Cat) and the California Air ResourcesBoard are pleased to explain the emission control system warranty for each new ArcticCat ATV sold in the state of California. In California, a new ATV must be designed, built,and equipped to meet the state’s stringent anti-smog standards.
Arctic Cat warrants the emission control system on the Arctic Cat ATV for the periodslisted below provided there has been no abuse, neglect, or improper maintenance of theATV.
The emission control system may include components such as the carburetor, ignitionsystem, and crankcase ventilation system. Also included may be hoses, belts, connectors,and other emission-related assemblies.
When a warrantable condition exists, Arctic Cat will repair the ATV at no cost to the owner,including diagnosis, parts, and labor.
Emission Control Warranty CoverageA new Arctic Cat ATV manufactured after January 1, 1997 has a two (2) year warranty onits emissions control components.
If an emission-related component on the ATV is defective, the component will be repairedor replaced by any authorized Arctic Cat ATV dealer.
Owner’s Emission Control Warranty ResponsibilitiesIt is the owner’s responsibility to perform the required maintenance listed in the Operator’sManual. Arctic Cat recommends the retention of all receipts covering maintenance per-formed on the ATV, but Arctic Cat cannot deny warranty solely for the lack of receipts or forfailure to ensure the performance of all scheduled maintenance on the emission controlsystem.
It is the owner’s responsibility to present the ATV to an authorized Arctic Cat ATV dealeras soon as a problem exists. The undisputed warranty repairs should be completed withina reasonable period of time, not to exceed thirty days.
The ATV owner should be aware that Arctic Cat may deny warranty coverage if either theATV or a component has failed due to abuse, neglect, improper maintenance, or anyunapproved modifications.
If you have any questions regarding your warranty rights and responsibilities, contacteither Arctic Cat Inc, P.O. Box 810, Thief River Falls, MN 56701, (218) 681-4999 or theCalifornia Air Resources Board, 9528 Telstar Avenue, El Monte, CA 91731, (818) 575-6800.
72

Change of Add
Arctic Cat Inc. keeps onthis vehicle. This allowimportant safety informfrom personal injury or form is completed andvehicle is sold to anothe
This form may also bewarranty to a second pcompletely; then returnthen process the applicremaining of the originthe country in which thepurchaser resident in thof the balance of the re
CHANGE WAR
Name ____________
Address __________
City/State (Province)/Z
Phone # ( ) ______
Email _____________
Year and Model ____
Vehicle Identification N
Before operating, you should force your current good riding ATV Rider Course nearest youcharge a small fee for each pe
ress, Ownership, or Warranty Transfer
file the current name and address of the owner ofs Arctic Cat to reach the current owner with anyation which may be necessary to protect customersproperty damage. Please make sure a copy of this returned to Arctic Cat Inc. if you move or if ther party.
used to transfer the unused portion of the originalarty. In order to transfer warranty, fill out this form a copy of this form to Arctic Cat Inc. Arctic Cat willation and issue warranty for the balance of the timeal warranty. Warranty coverage is only available in original retail purchase occurs to the original retailat country or to a transferee resident in that countrymaining warranty.
Address Change
Ownership Change
Warranty Transfer
OF ADDRESS/OWNERSHIP/RANTY TRANSFER TO:
_____________________________
_____________________________
ip Code (Postal Code)___________
_____________________________
_____________________________
_____________________________
73
umber (VIN) __________________
take an ATV Rider Course to learn ATV riding skills or rein-skills. In U.S.A., call 1-800-887-2887 to enroll in the half-day or ask your dealer for assistance. The course instructor willrson taking the course. In Canada, call (613) 739-1535.

PlaceStampHere
Fold Back
CHANGE OF ADDRESS/OWNERSHIP
ARCTIC CAT INC.PRODUCT SERVICE ANDWARRANTY DEPT.P.O. BOX 810THIEF RIVER FALLS, MN 56701

Maintenance RecordDATE MILEAGE SERVICE PERFORMED/NOTES
75

Declaration Of Conformity
I, the undersigned, hereby declare that the equipment specified above conforms to thedirective(s) and standard(s) as specified.
Brad DarlingVice President/General Manager
Application of council directives: EMC Directive 97/24/ECDate of Issue: June, 1997EC Machinery Directive 2006/42/ECDate of Issue: May, 2006
Issued by European Commission.
Type of Equipment: All-Terrain Vehicles
Brand Name: Arctic Cat
Model: 400 4x4 450 4x4Standards to which conformity is declared: EN 61000-6-2:2005
EN 55012:2007Manufacturer (if not issuing agent): Arctic Cat Inc.
601 Brooks Ave S.Thief River Falls, MN56701 USA
76

Identification Numbers Record
1. KEY IDENTIFICATION NUMBER:
The key identification number is stamped on the key as shown in the illustration.Record this number in the space provided for reference if you ever need a new key.
2. VEHICLE IDENTIFICATION NUMBER:
3. ENGINE SERIAL NUMBER:
Record the Vehicle Identification Number and Engine Serial Number in the spacesprovided to assist you in ordering parts from your authorized Arctic Cat ATVdealer or for reference in case the ATV is stolen.

Improper ATV use can result in SEVERE INJURY or DEATH
ALWAYS USE AN APPROVEDHELMET AND PROTECTIVE GEAR
NEVER USEON PUBLIC ROADS
NEVER CARRY PASSENGERS
NEVER USEWITH DRUGSOR ALCOHOL
NEVER operate:
• without proper training or instruction
• at speeds too fast for your skills or the conditions
• on public roads - a collision can occur with another vehicle
• with a passenger - passengers affect balance and steering and increase risk of losing control
• use proper riding techniques to avoid vehicle overturns on hills and rough terrain and in turns
• avoid paved surfaces - pavement may seriously affect handling and control
LOCATE AND READ OPERATOR’S MANUALFOLLOW ALL INSTRUCTIONS AND WARNINGS
ALWAYS:
! WARNING
©2014 Arctic Cat Inc. ®™ Trademarks of Arctic Cat Inc., Thief River Falls, MN 56701
(218) 681-9851 - U.S. (204) 982-1656 - Canada p/n 2260-284