Embed Size (px)
Citation preview
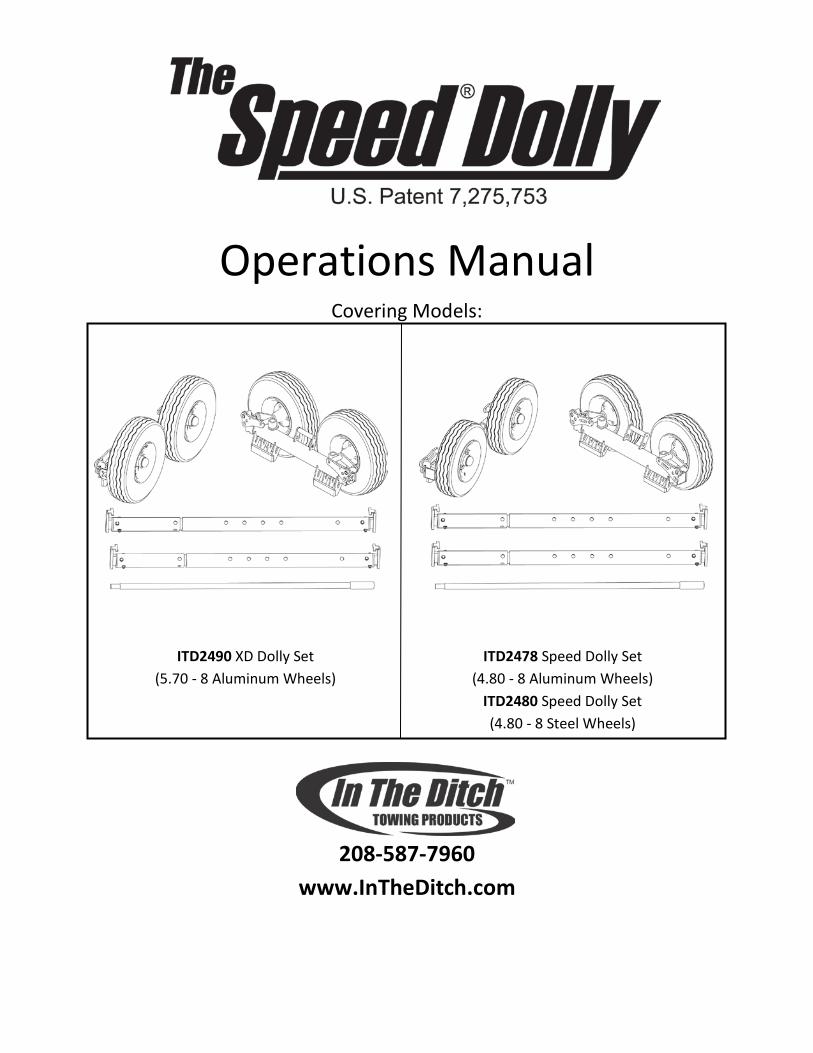
Operations Manual Covering Models:
ITD2490 XD Dolly Set ITD2478 Speed Dolly Set (5.70 - 8 Aluminum Wheels) (4.80 - 8 Aluminum Wheels) ITD2480 Speed Dolly Set (4.80 - 8 Steel Wheels)
208-587-7960 www.InTheDitch.com

This page is intentionally left blank.
Operations Manual 1
TABLE OF CONTENTS TABLE OF CONTENTS ..................................................................................................................................... 1
WARRANTY INFORMATION........................................................................................................................... 2
Limited Warranty ...................................................................................................................................... 2 Notice to Owner or User ........................................................................................................................... 3
PARTS & ACCESSORIES .................................................................................................................................. 4
ITD1480 (steel wheel)/ITD1478 (aluminum wheel) Speed Dolly Parts ..................................................... 4 ITD1490 XD Dolly Parts ............................................................................................................................. 5 ITD1400 Aluminum Telescoping Axle Parts .............................................................................................. 6 ITD1452 Break-over Bar Parts ................................................................................................................... 6
SAFETY & PRECAUTIONS ............................................................................................................................... 7
Precautions ............................................................................................................................................... 7 Load Ratings .............................................................................................................................................. 7
DOLLY MAINTENANCE .................................................................................................................................. 8
Visual Inspection ....................................................................................................................................... 8 Maintenance (Each Use) ........................................................................................................................... 8 Maintenance (3 Months) .......................................................................................................................... 8 Aluminum Wheel Care .............................................................................................................................. 8 Grease Points ............................................................................................................................................ 8
DOLLY OPERATIONS ...................................................................................................................................... 9
Basic Lifting ............................................................................................................................................... 9 Transporting ............................................................................................................................................ 13 Lowering .................................................................................................................................................. 13 Tips & Tricks ............................................................................................................................................ 15
OWNER RECORDS ....................................................................................................................................... 17
TABLE OF CONTENTS - 1

Operations Manual 2
WARRANTY INFORMATION
Limited Warranty In The Ditch Towing Products (ITD) warrants to the original purchaser that each new ITD manufactured goods will be free from defects in material and workmanship for a period of twelve (12) months from date placed in service. The purchaser must promptly notify ITD in writing of any failure in material or workmanship. In no event shall ITD accept such notification later than twelve (12) months from date placed in service.
ITD obligation under this warranty, statutory or otherwise, is limited to the repair or replacement at the ITD factory, or at a point designated by ITD, of such part or parts as shall appear upon inspection by ITD to be defective in material or workmanship. This warranty is not transferable. This warranty does not obligate ITD to bear the cost of labor or transportation charges in connection with the repair or replacement of any parts found to be defective, nor shall it apply to a product upon which repairs or alterations have been made unless authorized by ITD.
Except as expressly set forth in this warranty, ITD makes no other warranty, expressed or implied, and hereby disclaims all other warranties including, but not limited to, the implied warranties of merchantability and fitness for a particular purpose. ITD shall in no event be liable for claimed downtime, claimed loss of profits or good will, or any other special, incidental, indirect, or consequential damages concerning or relating to any product or parts, whether based on negligence, strict liability, breach of contract, breach of warranty, misrepresentation, or any other legal theory, regardless of whether the loss resulted from any general or particular requirement which ITD knew or had reason to know about at the time of sale.
ITD makes no warranty, express or implied, as to the finished products manufactured or supplied by another manufacturer and supplied by ITD to purchaser, including, but not limited to, any vehicle to which an ITD product may be affixed or any accessories, and ITD expressly disclaims any implied warranties of merchantability and fitness for a particular purpose as to such equipment or products. This language shall in no way affect or diminish the rights of the purchaser to rely on such warranties as are extended by such manufacturers or supplies. IWS shall, to the extent permitted under applicable law, pass on to the purchaser such manufacturer’s or seller’s warranty.
The customer must obtain and present a written authorization number from ITD prior to any work beginning, and the customer agrees to bear all costs. Please Note: Merchandise covered by a manufacturer’s warranty must be sent directly to the manufacturer for replacement or repair. ITD, whose policy is one of continuous improvement, reserves the right to improve its products through changes in design or materials as it may deem desirable without being obligated to incorporate such changes in products previously sold.
This warranty is not intended to cover or include the following items, which are set forth by way of example and not limitation: normal deterioration of trim, paint, lettering, appearance of items due to wear or exposure to weather, road conditions, road treatments, etc.; any damage or defect due to accident, misuse, abuse, operation exceeding rated loads, improper or unauthorized repairs, failure to
WARRANTY INFORMATION - 2

Operations Manual 3 provide reasonable and necessary maintenance, or uses of which the equipment was not designed or intended; alterations or modifications that affect performance, operations, or reliability.
It is expressly understood that ITD makes no implied warranty that ITD manufactured goods shall be fit for the purpose of lifting or moving people or for any other improper use. Field modification of this unit without the advice and consent of our Engineering Department will void all warranties and any guarantees pertaining to both purchased components used in the manufacture of this unit, as well as structurally fabricated parts supplied by us. Use of other than factory or factory authorized parts will render the warranty void.
Notice to Owner or User Please fill out the Warranty Registration Transfer (see Appendix page 18) and mail it to ITD within 15 days after purchase. This validates the warranty transfer and is essential for your protection. If ITD should ever need to contact you concerning compliance of your ITD equipment with any applicable safety standards, the information you have provided on the Warranty Registration Transfer will ensure your immediate notification.
WARRANTY INFORMATION - 3

Operations Manual 4
PARTS & ACCESSORIES
ITD1480 (steel wheel)/ITD1478 (aluminum wheel) Speed Dolly Parts
Item # Part # Description 1 ITD1480 Speed Dolly Assembly (Steel Wheels) ITD1478 Speed Dolly Assembly (Aluminum Wheels)
2 ITD7001 Camlock Rebuild Kit 3 ITD7011 Grease Seal 4 ITD7118 Replacement Bearing & Race 5 ITD7003 4 on 4” Hub 6 ITD7005 Washer 7 ITD7004 Castle Nut 8 ITD7006 Cotter Pin 9 ITD7013 Dust Cap
10 ITD7097 Chrome Acorn Lug Nut 11 ITD1144 4.80x8 Steel Wheel Tire Package
ITD7017 Steel Wheel Only ITD7098 4.80x8 Aluminum Wheel Tire Package ITD7094 Aluminum Wheel Only ITD7009 4.80x8 Load Range C Tire Only
12 ITD6562 Aluminum Handle 13 ITD1482 Speed Dolly Frame (Bare) 14 ITD6813 Left Hand Replacement Spindle Assembly 15 ITD6814 Right Hand Replacement Spindle Assembly
PARTS & ACCESSORIES - 4
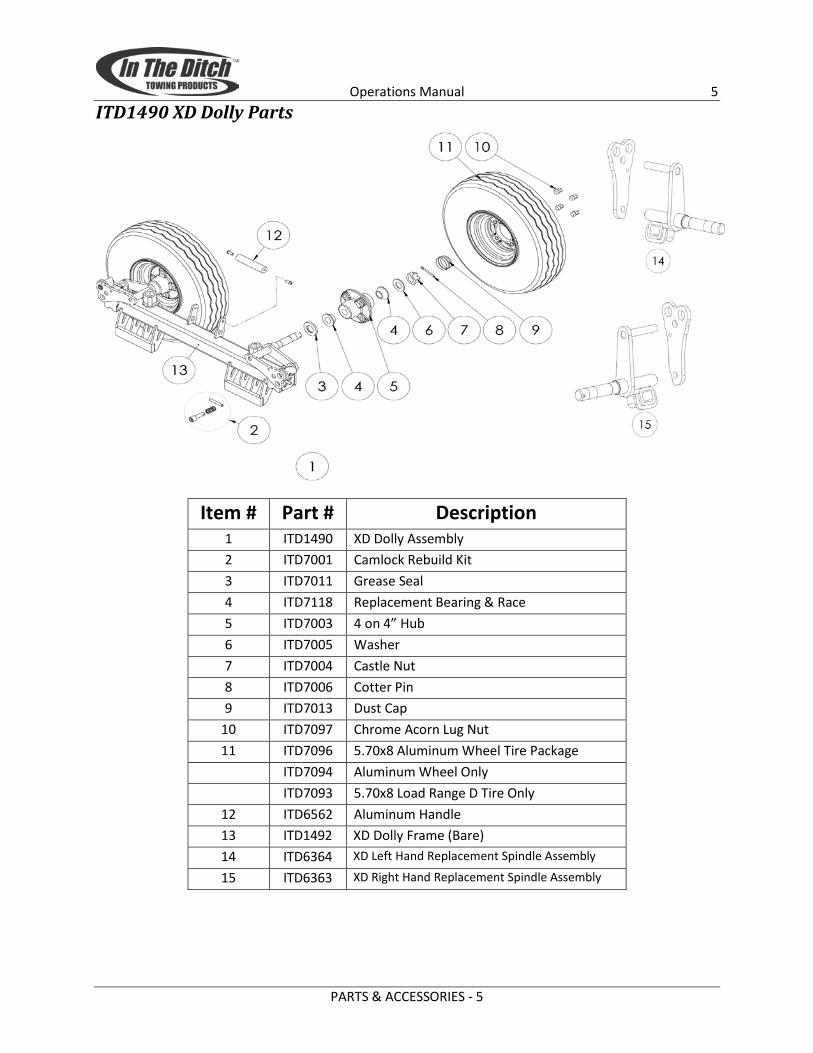
Operations Manual 5 ITD1490 XD Dolly Parts
Item # Part # Description 1 ITD1490 XD Dolly Assembly 2 ITD7001 Camlock Rebuild Kit 3 ITD7011 Grease Seal 4 ITD7118 Replacement Bearing & Race 5 ITD7003 4 on 4” Hub 6 ITD7005 Washer 7 ITD7004 Castle Nut 8 ITD7006 Cotter Pin 9 ITD7013 Dust Cap
10 ITD7097 Chrome Acorn Lug Nut 11 ITD7096 5.70x8 Aluminum Wheel Tire Package
ITD7094 Aluminum Wheel Only ITD7093 5.70x8 Load Range D Tire Only
12 ITD6562 Aluminum Handle 13 14 15
ITD1492 XD Dolly Frame (Bare) ITD6364 XD Left Hand Replacement Spindle Assembly
ITD6363 XD Right Hand Replacement Spindle Assembly
PARTS & ACCESSORIES - 5
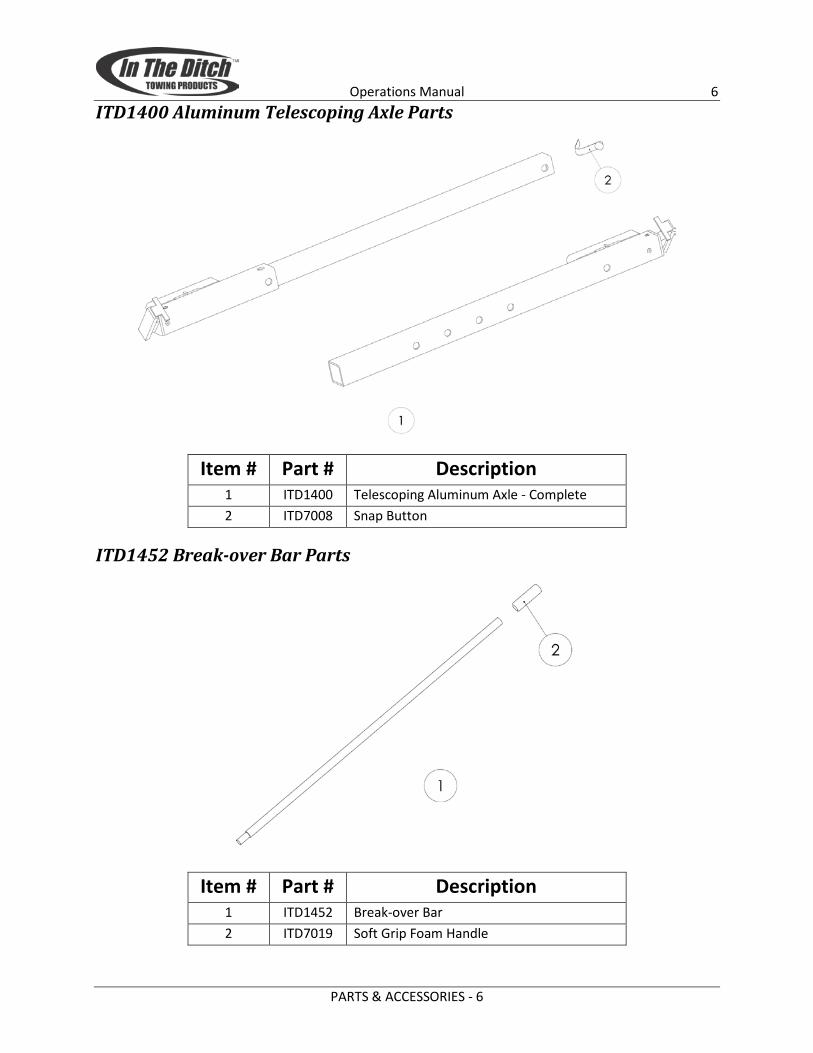
Operations Manual 6 ITD1400 Aluminum Telescoping Axle Parts
Item # Part # Description 1 ITD1400 Telescoping Aluminum Axle - Complete 2 ITD7008 Snap Button
ITD1452 Break-over Bar Parts
Item # Part # Description 1 ITD1452 Break-over Bar 2 ITD7019 Soft Grip Foam Handle
PARTS & ACCESSORIES - 6
Operations Manual 7
SAFETY & PRECAUTIONS This manual is supplied with the ITD unit to better familiarize the owner/operator with proper operation and maintenance procedures. The information contained in this manual must be thoroughly understood by all operating and maintenance personnel to insure the protection of the operator of this unit and to prolong the unit’s working life.
Precautions • Please note that the Speed Dolly is NOT a prime mover. It is designed to transport the disabled
vehicle to the nearest safe haven for placement on a vehicle carrier.
• Before operating, perform a thorough visual inspection of the unit and accessories. Specific visual inspection recommendations are listed below under Speed Dolly Operations.
• Before operating the Speed Dolly, refer to the capacity labels on the main tube near the Dolly Handle.
• Do not use the Speed Dolly for the movement or transportation of humans or livestock animals.
• During operation, always wear protective items such as safety glasses, gloves, reflective clothing and safety shoes.
THE SAME PERSON TO LOAD/ENGAGE THE DOLLY MUST UNLOAD/DISENGAGE THE DOLLY. CHANGING OPERATORS MAY RESULT IN SERIOUS INJURY
Load Ratings
Speed Dolly (ITD1480/ITD1478) Do not exceed loads of 3040 lbs (1368 kg). It is always dangerous to apply any load which is greater than the rated load shown on the decal. If unsure of the vehicle weight, consult the AAA manual.
XD Dolly (ITD1490) Do not exceed loads of 4000 lbs (1814 kg)*. It is always dangerous to apply any load which is greater than the rated load shown on the decal. If unsure of the vehicle weight, consult the AAA manual.
*The wheels supplied with the XD Dolly unit have been specifically designed to handle the required load rating. If wheels or tires have been replaced with aftermarket units, load rating may be decreased to that of the lowest rated piece (i.e. wheel or tire).
SAFETY & PRECAUTIONS - 7
Operations Manual 8
DOLLY MAINTENANCE
Visual Inspection Before each use, perform a thorough visual inspection of the unit and all accessories. Inspect for:
• Evidence of physical damage such as cracking • Bending • Deformation of plates and welds • Cracking or flaking of paint • Fraying or deterioration of tie-downs or their mechanical members • Loose rivets or missing end caps from the Dolly Axles
If any of these conditions exist, contact ITD and remove the equipment from service immediately. Repair or replace the necessary components with ITD certified parts.
Maintenance (Each Use) Always perform regular maintenance of the Speed Dolly and its parts. Prior to each use:
• Check the tire pressure to assure it is at the recommended pressure listed on the tire side wall. • Inspect Tie-Downs for frays, kinks, and defects. Replace immediately if any damage exists. • Inspect the Break-over Bar for deformation. Replace if necessary with a Break-over Bar from ITD.
Maintenance (3 Months) • Check ½ inch Lug Nuts on Dolly Wheels. Tighten to recommended 95 ft-lbs torque. • Inspect wheel bearings.
o Under normal use inspect and repack the wheel bearings once every three months. o Under severe use, repack monthly.
Aluminum Wheel Care ITD aluminum wheels are coated with a durable clear coat to allow for a long lasting finish, to clean simply use soap and water. DO NOT use any abrasive polish or cleaner, doing so may lead to damage to the wheel finish. If additional protection is required apply an additional coat of a mild car wax.
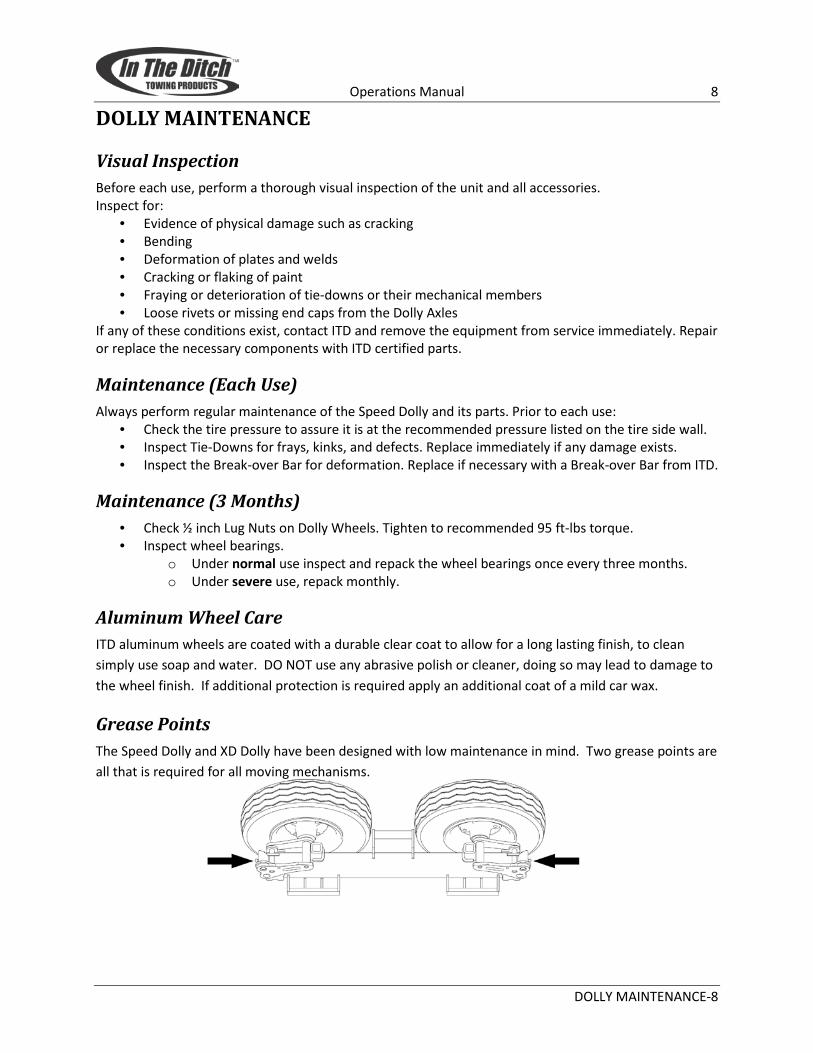
Grease Points The Speed Dolly and XD Dolly have been designed with low maintenance in mind. Two grease points are all that is required for all moving mechanisms.
DOLLY MAINTENANCE-8
Operations Manual 9
DOLLY OPERATIONS
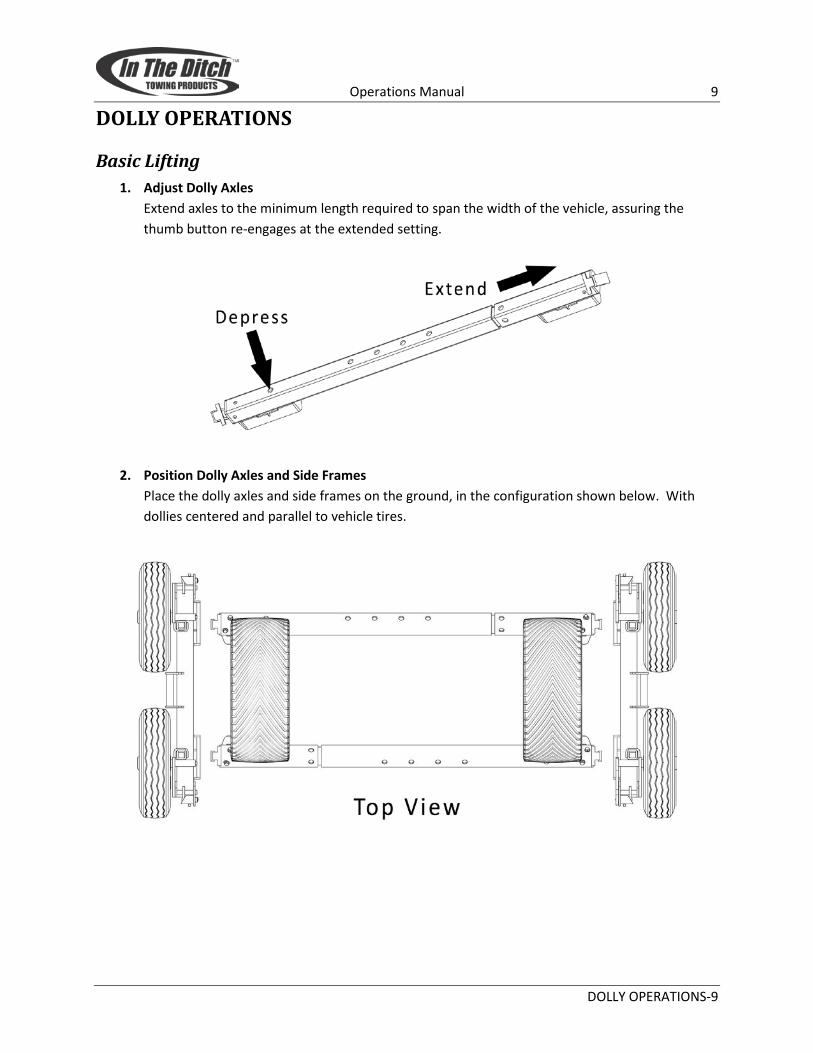
Basic Lifting 1. Adjust Dolly Axles
Extend axles to the minimum length required to span the width of the vehicle, assuring the thumb button re-engages at the extended setting.
2. Position Dolly Axles and Side Frames
Place the dolly axles and side frames on the ground, in the configuration shown below. With dollies centered and parallel to vehicle tires.
DOLLY OPERATIONS-9
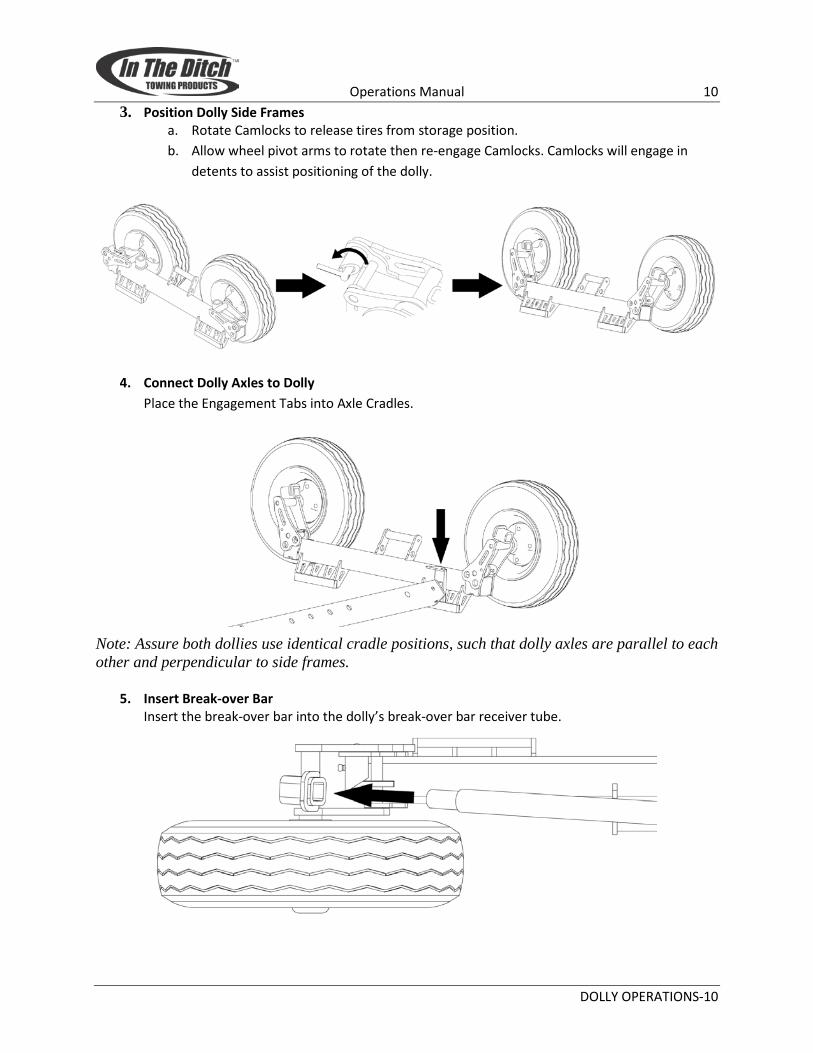
Operations Manual 10 3. Position Dolly Side Frames
a. Rotate Camlocks to release tires from storage position. b. Allow wheel pivot arms to rotate then re-engage Camlocks. Camlocks will engage in
detents to assist positioning of the dolly.
4. Connect Dolly Axles to Dolly Place the Engagement Tabs into Axle Cradles.
Note: Assure both dollies use identical cradle positions, such that dolly axles are parallel to each other and perpendicular to side frames.
5. Insert Break-over Bar Insert the break-over bar into the dolly’s break-over bar receiver tube.
DOLLY OPERATIONS-10
Operations Manual 11
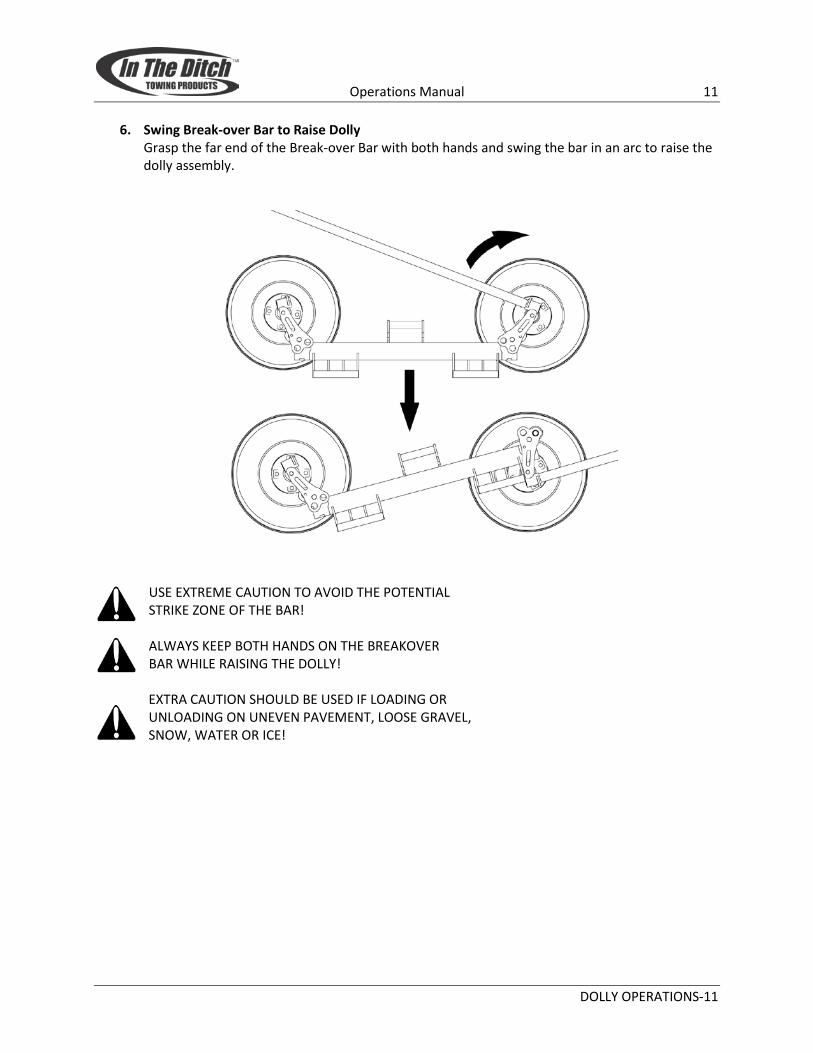
6. Swing Break-over Bar to Raise Dolly Grasp the far end of the Break-over Bar with both hands and swing the bar in an arc to raise the dolly assembly.
USE EXTREME CAUTION TO AVOID THE POTENTIAL STRIKE ZONE OF THE BAR! ALWAYS KEEP BOTH HANDS ON THE BREAKOVER BAR WHILE RAISING THE DOLLY! EXTRA CAUTION SHOULD BE USED IF LOADING OR UNLOADING ON UNEVEN PAVEMENT, LOOSE GRAVEL, SNOW, WATER OR ICE!
DOLLY OPERATIONS-11
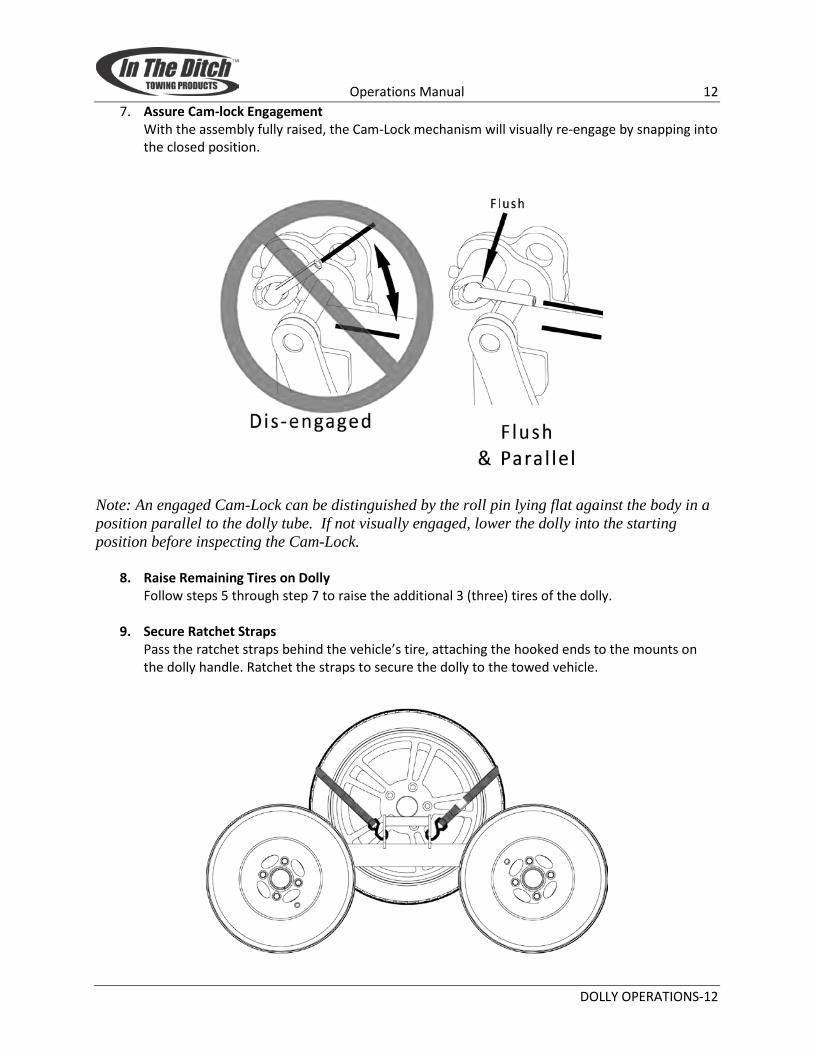
Operations Manual 12 7. Assure Cam-lock Engagement
With the assembly fully raised, the Cam-Lock mechanism will visually re-engage by snapping into the closed position.
Note: An engaged Cam-Lock can be distinguished by the roll pin lying flat against the body in a position parallel to the dolly tube. If not visually engaged, lower the dolly into the starting position before inspecting the Cam-Lock.
8. Raise Remaining Tires on Dolly Follow steps 5 through step 7 to raise the additional 3 (three) tires of the dolly.
9. Secure Ratchet Straps
Pass the ratchet straps behind the vehicle’s tire, attaching the hooked ends to the mounts on the dolly handle. Ratchet the straps to secure the dolly to the towed vehicle.
DOLLY OPERATIONS-12

Operations Manual 13
Transporting WHILE TOWING A VEHICLE ON DOLLIES, DO NOT EXCEED 50 MPH!
• ITD dollies are designed for on-road use only, and are not approved for freeway driving. • Potholes should be approached at a low rate of speed. • ITD recommends while towing with dollies to place the car in neutral to allow tire to move with
the dolly.
Lowering
THE SAME OPERATOR MUST LOAD AND UNLOAD THE DOLLY. CHANGES IN OPERATORS WILL RESULT IN UNFAMILIAR LOADS WHICH MAY RESULT IN SERIOUS INJURY!
1. Remove Tie-Down Straps
2. Disengage Cam-lock Keeping one hand on the Break-over Bar and respecting the bar’s potential “strike zone”, disengage the Cam-lock by rotating the handle.
3. Disengage Cam-lock Rotate the handle of the cam-lock to disengage. The dolly is designed such that on level ground the dolly wheel will not fall until moved by the break-over bar.
DOLLY OPERATIONS-13

Operations Manual 14 4. Re-Insert Break-Over Bar
Keeping both hands on the break-over bar, insert into the receiver tube on the dolly.
5. Swing Break-over Bar to Lower the Dolly With two hands on the bar, walk the Break-over Bar in an arc to gently lower one end of the dolly side frame.
ALWAYS KEEP BOTH HANDS ON THE BREAKOVER BAR WHILE LOWERING THE DOLLY!
6. Lower the Remaining Dolly Sides
Repeat steps one (1) through three (3) to fully lower both dollies.
7. Remove and Collapse Dolly Axles
8. Re-engage Dolly Cam-locks Rotate the tires upward on the dollies. Re-engage the Cam-Locks to secure the tires and ease transportation of the dollies.
DOLLY OPERATIONS-14

Operations Manual 15
Tips & Tricks The Crunch Zone
A simple little tip when you find yourself in the crunch zone. The crunch zone is anytime you are up against an obstacle such that you cannot fully raise the dolly using the break-over bar. Here is how to get is accomplished with any of the ITD dolly products.
To Get Out of the “Crunch Zone”:
1. Fully load the dolly tire that has full access for the break-over bar.
2. Insert the break-over bar into the BACK SIDE of the receiver tube.
3. Re-engage the Cam-lock and pull the bar towards the frame to lock it into the stowed position. This will raise the vehicle tire up just enough such that you can pull away from the wall.
4. Repeat steps 1 thru 3 on other side of dolly.
5. Once away from the obstacle, re-install the break-over bar in the stowed wheel receiver.
6. Apply a small amount of pressure forward to allow disengage of cam-lock.
7. Load dolly as normal and attached tie downs.
DOLLY OPERATIONS-15

Operations Manual 16 Walking the Dolly
With the ability to lock the dolly wheels in the stowed position, the ITD dollies have the unique feature of “walking” using the break-over bar. The advantage of walking the dolly is the reduce weight and back strain.
To “Walk the Dolly”:
1. Set the dollies on the ground
2. Insert the break-over bar
3. Walk them back to the towed vehicle.
Quick Extend Axles
ITD aluminum telescoping axles have been designed with large corner radiuses and a domed snap button to allow for a quick extension of the axles.
Quick Extend:
1. Depressing the snap button
2. Place a foot on the a axle cap to keep the axle steady
3. Rotate axle pieces
4. Extend swiftly
With a little practice extending axles to the correct hole can be quick and easy.
Reducing Lifting Load
When loading or unloading a vehicle in excess of 3000lbs (XD model only), it is helpful to place a piece of lumber under the vehicle tire. This reduces the load felt by the operator when operating the dolly.
THIS IS HIGHLY SUGGESTED WHEN LOADING LARGE VEHICLES!
DOLLY OPERATIONS-16
OWNER RECORDS Name of owner or user._________________________________________
Street Address_______________________________________________
City ___________________________State _____ Zip _______
Phone ( )__________________
Date of Purchase _______/_______/________
Date put into Service _______/_______/________
Purchased from (Dealer)_____________________________________
City ______________________________ State _____ Zip___________
Type and Model of Equipment Purchased________________________________________________
CUT ALONG SOLID LINE
WARRANTY REGISTRATION TRANSFER
Please Print Clearly!
Name of owner or user.___________________________________
Street Address_______________________________________________
City ___________________________State _____ Zip _______
Phone ( )__________________
Date of Purchase _______/_______/________
Date put into Service _______/_______/________
Purchased from (Dealer)_____________________________________
City ___________________________State _____ Zip___________
Type and Model of Equipment Purchased _______________________________________________
Mail To:
In The Ditch Towing Products Attn: Warranty Dept 3195 Industrial Way Mountain Home, ID 83647 (888) 993-4824 (208) 587-7960 Fax: (208) 580-1900

CONTACT INFORMATION In The Ditch Towing Products
3195 Industrial Way Mountain Home, ID 83647
888-993-4824 Toll Free (208) 587-7960
Fax: (208) 580-1900
WWW.INTHEDITCH.COM
CUT ALONG SOLID LINE
CONTACT INFORMATION In The Ditch Towing Products
3195 Industrial Way Mountain Home, ID 83647
888-993-4824 Toll Free (208) 587-7960
Fax: (208) 580-1900
WWW.INTHEDITCH.COM
ITD0163-R2


![[FA/FW STANDARD FEATURES] [FA/FW POPULAR … & SSR UTility 02 Extruded Aluminum Decking (FA Models) 5/4” Pressure Treated Decking (FW Models) Aluminum Spoke Wheels Removable Aluminum](https://img.dokumen.tips/doc/110x75/5af81d377f8b9a44658bf14e/fafw-standard-features-fafw-popular-ssr-utility-02-extruded-aluminum-decking.jpg)