Embed Size (px)
Citation preview

Operation manual
1
Operation manual Thanks very much for purchasing our cutting
plotter.
For ensuring you to make best use of your machine,
Please reading this manual carefully and
thorughtly before starting to use it.
Please ruen off the power quickly if you
encounter any problems, and refer to this manual
or contact your dealer.
Special Declaration
1. Manufacturer keeps the right of changing
product specification without prior notice;
2. Manufacturer only takes the legal duty of
product.

Operation manual
2
Contents
Chap1. Attention---------------------------------------------------------(3)
Chap2. Installation-------------------------------------------------------(4)
2-1 Packing box-------------------------------------------------(4)
2-2 Accessories--------------------------------------------------(4)
2-3 Parts of stand------------------------------------------------(4)
2-4 Assembly of machine stand-------------------------------(5)
Chap3 Basic Operation--------------------------------------------------(6)
3-1 Installation and connection--------------------------------(6)
3-2 Installation of tool------------------------------------------(6)
Chap4 USB port Setting-------------------------------------------------(8)
Chap5 Operating Instruction-------------------------------------------(12)
5-1 Names and functions of the parts------------------------(16)
5-2 Basic operation---------------------------------------------(15)
5-3Operationg instructions------------------------------------(18)
5-4 Parameters Table-------------------------------------------(23)
Chap. 6 Troubleshooting------------------------------------------------(25)
Operation manual
3
Chap. 1 Attention
Please read the attention carefully before operating the machine.
1. No magnetic devices should be placed in the vicinity of the plotter,
specifically the carriage.
2. Prevent from dropping foreign matters into cracks such as pins, little
screws, etc.
3. Please pull out the power plug if not using during a long time.
4. Don’t plug or unplug serial/parallel/usb cables on plotter while the power
is on
5. Don’t leave pinch rollers pressed down while machine is not in use.
6. Always connect the power cord to a grounded outlet.
7. Don’t move the carriage manually.
8. Don’t touch carriage, metal roller, cutter and all moving devices when the
machine is working.
9. Place machine in a stable area that is free of strong vibrations,
electromagnetic field, dust, moisture and /or direct sunlight.
10. Don’t press top beam or lift up black rail.
Chap. 2 Installation

Operation manual
4
2-1 Packing-box
Please carefully check up the goods after opening the packing box, and in
every box there should be as following:
1. A main machine.
2. A packet of accessories.
3. A set of parts of machine stand.
2-2 Accessories
NO. Item Quantity
1 Power cord 1
2 Operation manual 1
3 Cutter holder 1
4 Cutter 3
5 Plotter holder 1
6 Allen wrench 1
7 Serial cable 1
8 Parallel cable(optional) 1
9 USB cable (optional) 1
10 Plotter protective cover 1
11 Driver disk for CorelDraw and USB port 1
12 Artcut 2009 CD (optional) 1
2-3 Parts of stand
NO. Item Quantity NO. Item Quantity
1 Left column 1 6 Paper roller 2
2 Right column 1 7 Paper hanger 2
3 Crossbeam 1 8 Connection board 2
4 Pillar-bars 2 9 Screw M4×20 10/12
5 Pillars/wheels 4 10 Screw M4×8 8
Operation manual
5
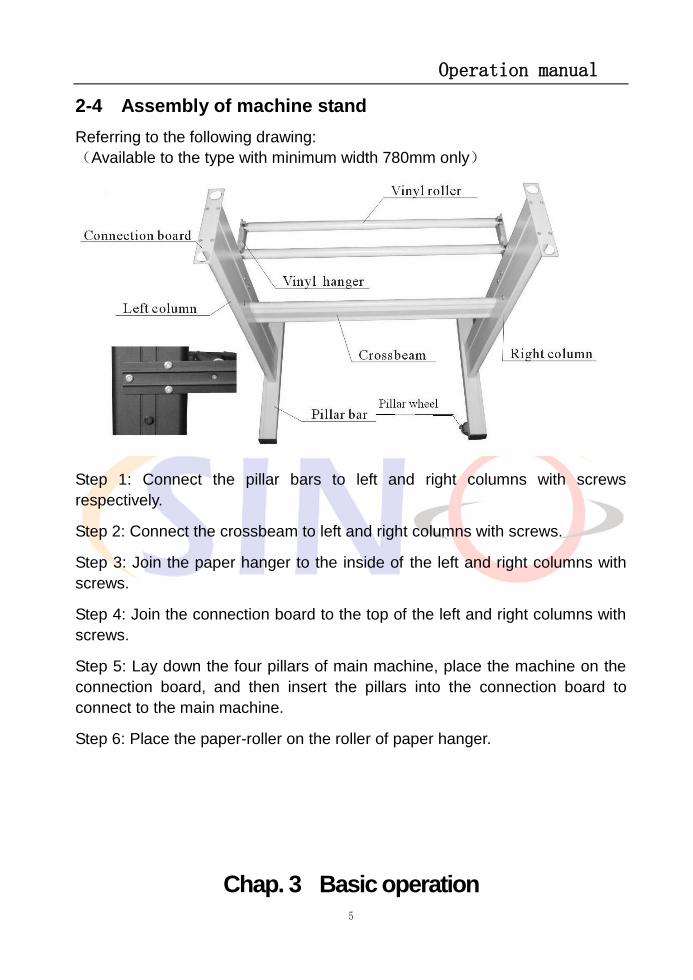
2-4 Assembly of machine stand
Referring to the following drawing:
(Available to the type with minimum width 780mm only)
Step 1: Connect the pillar bars to left and right columns with screws
respectively.
Step 2: Connect the crossbeam to left and right columns with screws.
Step 3: Join the paper hanger to the inside of the left and right columns with
screws.
Step 4: Join the connection board to the top of the left and right columns with
screws.
Step 5: Lay down the four pillars of main machine, place the machine on the
connection board, and then insert the pillars into the connection board to
connect to the main machine.
Step 6: Place the paper-roller on the roller of paper hanger.
Chap. 3 Basic operation

Operation manual
6
3-1 Installation and connction
1 Place the machine in a plane and roomy place
2 Connect the signal cable to the COM1,COM2 /USB port of the computer
3 Check voltage of the power source and whether it is grounded, do not connect the power utill
all are in a good condition
3-2 Installation of tool
3-2.1 Structure of cutter holder and items of components
Rotate the cutter ajusting screw to adjust the
out-stretching length of the cutter as to ensure that
it doesn’t cut off the bottom layer of stickiness.
1. Cutter (diameter is 2mm)
2. Cutter holder shell
3. Cutter ajusting screw
4. Cutter holder body
3-2.2 Installation and adjustment of blade
1.Before installing the cutter, you must carefully clean the cutter holder body,
the cutter and your hands. Even very slight dirt can affect the performance of
the cutter. Use a flexible plastic or rubber grip to hold the blade in your hand.
Carefully insert the blade into the cutter holder body and it should
magnetically attach.
2 Rotate the shell of the cutter holder and make the out-stretching length of
the blade tip not longer than the thickness of the sticker
3. Don't touch the blade top with your finger to prevent injury
3-2.3 Structure of Plotter holder and items of components

Operation manual
7
Fit the the ball pen into the plotter holder , the structure is as
shows in the following drawing .
1. Rotate the lid.
2. Insert a ballpoint pen and let the pen tip out of proper length.
3. Cover the pen with the lid then rotate them into the shell
3-2.4 Installation
1. Turn off the power
2. Loosen the locking screw of the tool carrier , then put the cutter holder or
plotter holder in the tool carrier When the tool are in appropriate .position ,
fasten the locking screw clockwise at last.
3-2.5 Using life of the cutter
Cutter’s using life is limited, but you can use it as long as possible.
Note:
1. More longer the out-stretching length of the cutter, more shorter the using
life. Please avoid cutting off the bottom layer during the process of cutting.
2. The more cutting force, the shorter the using life.
3. As for different materials, the requirement to the cutter sharpness is
different.
4. Set the cutting force as little as possible; only increase it when the cutter
feels blunt.
5. As for the cutters from different factories, the using life is also very different.
6. Renew the cutter timely when it is blunt in case of affecting the machine
performance. As an urgent method, a piece of leather can be used to sharpen
the blade tip just like sharpening a razor.
Chap. 4 USB Port Setting
Operation manual
8
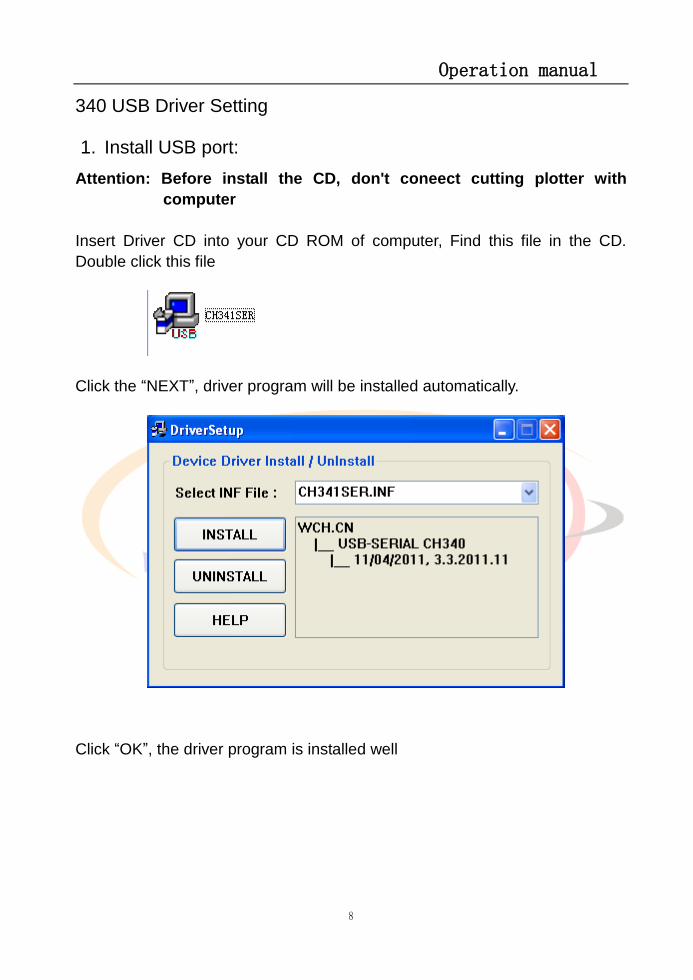
340 USB Driver Setting
1. Install USB port:
Attention: Before install the CD, don't coneect cutting plotter with
computer
Insert Driver CD into your CD ROM of computer, Find this file in the CD.
Double click this file
Click the “NEXT”, driver program will be installed automatically.
Click “OK”, the driver program is installed well

Operation manual
9
Now connect USB cable of the cutting plotter with USB port of computer . The
USB device will be found as “COM3” from “ Device Manager”. It testifies that
the machine is connected with computer successfully
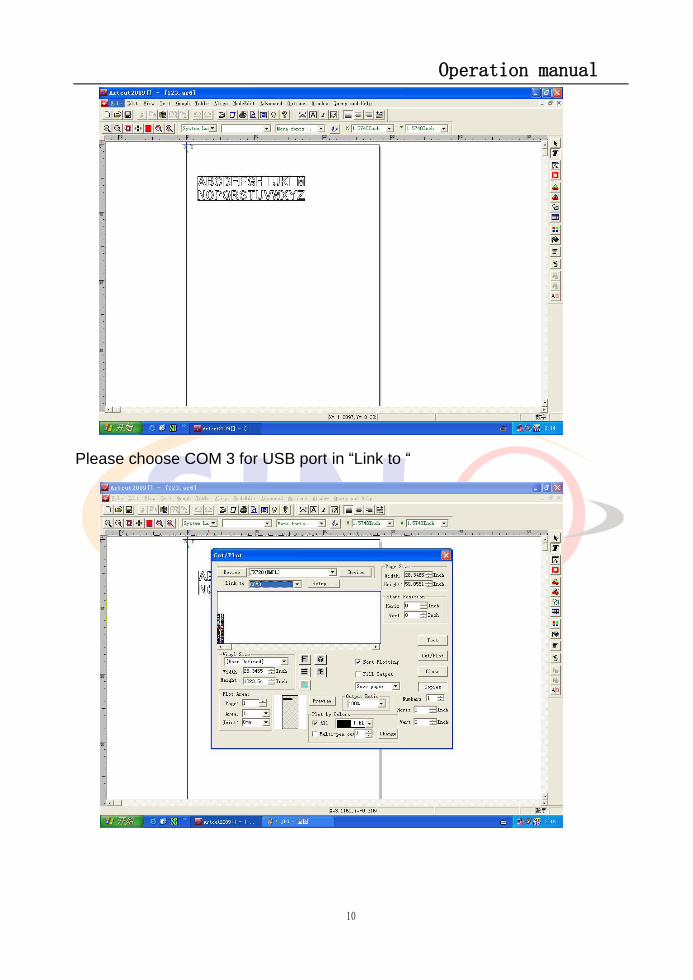
2. Set port in Artcut software
Operation manual
10
Please choose COM 3 for USB port in “Link to “
Operation manual
11
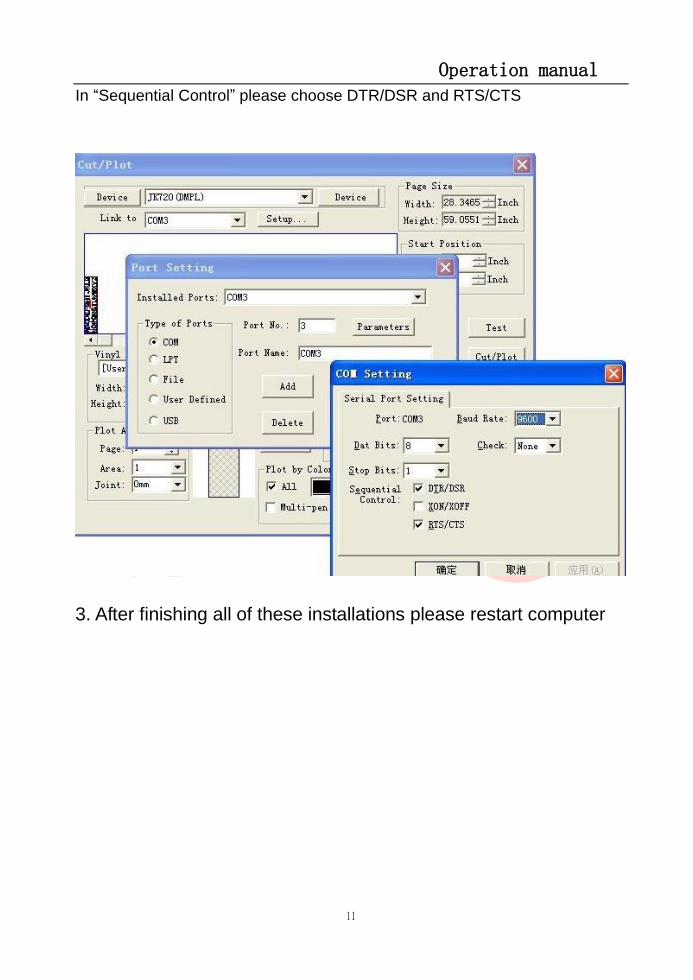
In “Sequential Control” please choose DTR/DSR and RTS/CTS
3. After finishing all of these installations please restart computer
Operation manual
12
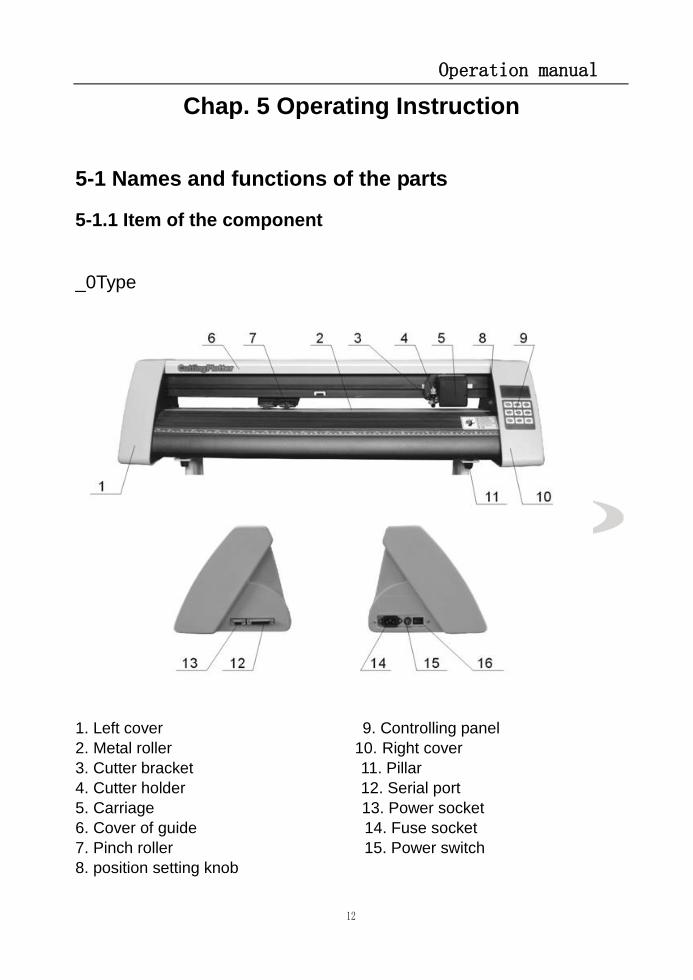
Chap. 5 Operating Instruction
5-1 Names and functions of the parts
5-1.1 Item of the component
_0Type
1. Left cover 9. Controlling panel
2. Metal roller 10. Right cover
3. Cutter bracket 11. Pillar
4. Cutter holder 12. Serial port
5. Carriage 13. Power socket
6. Cover of guide 14. Fuse socket
7. Pinch roller 15. Power switch
8. position setting knob

Operation manual
13
_1 Types
1. Left cover 10. Right cover
2. Metal roller 11. Pillar
3. Cutter bracket 12. Power socket
4. Cutter holder 13. Fuse socket
5. Carriage 14. Power switch
6. Cover of guide 15 .USB to serial adapter port (optional)
7. Pinch roller 16. Serial port
8. Controlling panel 17. Parallel port (optional)
9. Position setting knob
5-1.2 Control Panel

Operation manual
14
_0 Type
_1 Type
1. LCD display 6. origin setting button
2. Reset 7. Force +
3. Offline / Pause 8.Value –
4. Setup 9.Value +
5. Test 10. Force -

Operation manual
15
5-2 Basic Operation
5-2.1 Turn on the machine
1. . Check whether the power is in OFF position
2.. Plug the power cable into the power socket of the machine , and then
press the switch on / off on the left
3. LCD in the control panel is on and displays the initializing process and
shows following information
4 When the initializing is over , the red light is on, the machine is in online
state and connectable with the computer to be operable
Operation manual
16
5-2.2 Installation of the cutting media
1 Loading the cutting media
1. Lift the pinch-roller handles and let it away from the metal rollers.
2. Insert the vinyl between metal rollers and pinch rollers of the machine from
behind to front.
3. Carefully check the vinyl before cutting, since if vinyl is not well placed,
serious deviation will occur. If the vinyl is uneven lift the pinch rollers on one
side to adjust and then press down pinch rollers. It is necessary to trial-run the
vinyl several times to attain minimum deviation before cutting work.
2 Adjust the place of pinch rollers according to paper width
Cutting plotter has 2 to 4 pinch rollers and they can be moved along the guide
rail. The handles of pinch rollers must be lifted before moving pinch rollers,
hold the back of the roller and push it to the left or the right. Please don’t pull
the roller bars in the front, otherwise the machine precision will be affected.
3 The place of the rollers must ensure:
1.Pinch rollers should be in the place out of the scope of the pattern.
2.Pinch rollers should be 10 to 50mm away from the edges of the paper.
3.Pinch rollers shouldn’t be let down on the conjunction of two connecting
metal rollers.

Operation manual
17
5.2.3 Trial run (adjusting the force and tool)
1 Test Cut
Once the blade/plotter is installed and the vinyl is inserted, preliminary test-cut
should be carried out to check the force of the blade/plotter if it is acceptable.
To do so, press the TEST key. and shows as following . Then the machine will
automatically cut a pattern
2 Force Adjustment
Take off the cutted pattern , if you fail, the pattern need to be further cut ,
because the force is too low or the protruding length of the blade top is too
short . If the base paper is pierced through, it signifies that the protruding
length of the blade top is too long and the force is too big. The protruding
portion of the blade tip should be about 0.5mm or less in length normally
which is 2/3 of the thickness of vinyl. Adjust the protruding length of the blade
top and forcess according to result of test
By pressing F+ or F- the force of the blade will be increased or decreased by
one level..
Caution:
Always test cut every time you use a new type of vinyl to check the
cutting force
Operation manual
18
5-3 Operating instruction
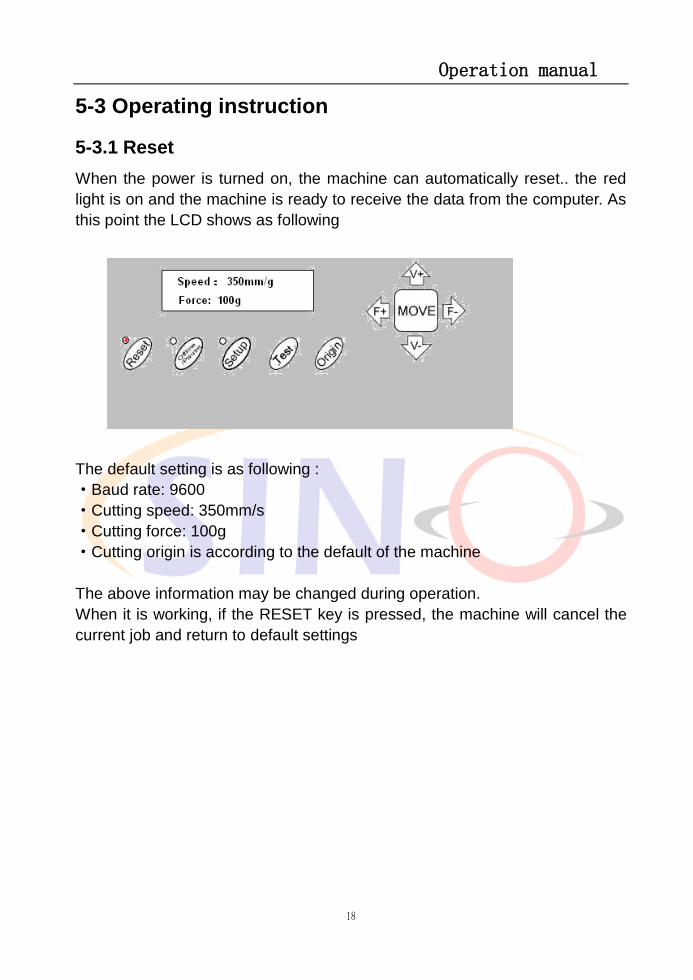
5-3.1 Reset
When the power is turned on, the machine can automatically reset.. the red
light is on and the machine is ready to receive the data from the computer. As
this point the LCD shows as following
The default setting is as following :
·Baud rate: 9600
·Cutting speed: 350mm/s
·Cutting force: 100g
·Cutting origin is according to the default of the machine
The above information may be changed during operation.
When it is working, if the RESET key is pressed, the machine will cancel the
current job and return to default settings

Operation manual
19
5-3.2 Online
After the machine is reset, the red light (reset indicator) should be on. When
the machine receives date from the computer, it is in online mode.
In this moment you can change the cutting speed by pressing V+ or V-
adjust the cutting force by pressing F+ or F
When it is working, if the RESET key is pressed, the machine will return to
default settings and reset mode---clear up all information, and get ready for
new work.

Operation manual
20
5-3.3 Offline /Pause
Press the OFFLINE key to enter offline mode. The yellow light is on.
Meanwhile, “Motion, X= xxx, Y= yyy” will appear on LCD, which shows the
coordinates location of the blade at the moment.
Press the key V+ or V- the carriage can be moved left or right. Press the key
F+ or F- the vinyl can be moved forward or backward., In this state you you
can move the blade top to the starting position. the step value of “X, Y” in the
LCD will change accordingly
When it is working you press the Pause Key , the machine will stop working
and if you press again the machine will cantinue working

Operation manual
21
5-3.4 Setting origin of plotting
When move the blade top to the starting position , press the Origin button the
setting of the new origin is completed , The machine will start plotting from the
new origin.
5-3.5 Setup
In ONLINE status, when you press the SETUP key, the green light is on, and
the baud rate of serial port can be changed. If you press SETUP key again, it
will restore to online status.
Caution:
Unless professional technicians, you’re not suggested to change this
setting.
Operation manual
22
5-3.6 Copy Function
Press the OFFLINE, SETUP and ORIGIN keys the machine will re-cut all the
data output of the last setting. The machine won’t re-cut if the green RESET
light is flashing, it means the output data is more than the buffer capacity. In
this case press RESET to restart the cutting work.
Caution:
If something unusual accurs and you are unable to stop the cutter, turn
the power off or unplug it
5-3.7 After work is over
After work is over…
1.Remove the paper.
2.Remove the cutter holder or plotter holder, then wipe it clean with a
soft-cloth and keep it properly.
3.Turn off the power, and pull the power cord out if not using during a long
time.
4.Cover the machine with a cloth or a cover.
Operation manual
23
5-4 Parameters Table
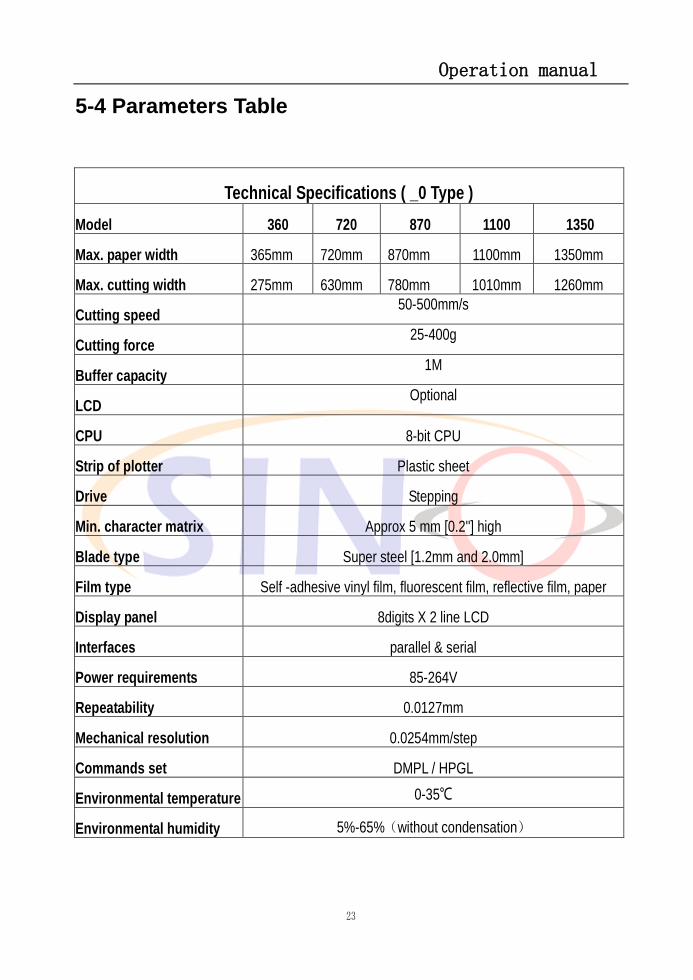
Technical Specifications ( _0 Type )
Model 360 720 870 1100 1350
Max. paper width 365mm 720mm 870mm 1100mm 1350mm
Max. cutting width 275mm 630mm 780mm 1010mm 1260mm
Cutting speed 50-500mm/s
50-800mm/s 50-800mm/s 50-800mm/s
Cutting force 25-400g
50-500g 50-500g 50-500g
Buffer capacity 1M
1M 1M 1M
LCD Optional
Optional Optional Optional
CPU 8-bit CPU
Strip of plotter Plastic sheet
Drive Stepping
Min. character matrix Approx 5 mm [0.2''] high
Blade type Super steel [1.2mm and 2.0mm]
Film type Self -adhesive vinyl film, fluorescent film, reflective film, paper
Display panel 8digits X 2 line LCD
Interfaces parallel & serial
Power requirements 85-264V
Repeatability 0.0127mm
Mechanical resolution 0.0254mm/step
Commands set DMPL / HPGL
Environmental temperature 0-35℃
Environmental humidity 5%-65%(without condensation)

Operation manual
24
Technical Specifications ( _1 Type )
Model 361 721 871 1101 1351
Max. paper width 365mm 720mm 870mm 1100mm 1350mm
Max. cutting width 275mm 630mm 780mm 1010mm 1260mm
Cutting speed 10-800mm/s
Cutting force 10-500g
Buffer capacity 1-4M
LCD YES
CPU 8-bit CPU
Special setting Dual cutter position, dual strips
Strip of plotter Double sheet(soft sheet and plastic sheet)
Drive Stepping
Min. character matrix Approx. 5 mm [0.2''] high
Blade type Super steel [1.2mm and 2.0mm]
Film type Self -adhesive vinyl film, fluorescent film, reflective film, paper
Display panel 8digits X 2 line LCD
Interfaces Parallel & serial, USB
Power requirements 85-264V
Repeatability 0.0127mm
Mechanical resolution 0.0254mm/step
Commands set DMPL / HPGL
Environmental temperature 0-35℃
Environmental humidity 5%-65%(without condensation)
Operation manual
25
Chap. 6 Troubleshooting
Why is the pattern deformed or incomplete?
1. More pressure or too long blade tip or too dirty platen or too soft
stickiness, all of these factors can cause more resistance to the two
faces of paper and make it fall behind the roller rotating, thus result in
deformed pattern.
2. The software setting isn’t proper. (The tool compensation value is too
big)
3. The carriage belt is too loose, or the metal roller can’t exactly follow
the motor running.
4. The motor doesn’t run all the steps.
5. The pattern is normal but not complete, this may be resulted from too
small tool compensation value.
Why does the machine plot abnormally?
1. Software setting is not matched to the machine, so you must adopt
proper commands set or set proper tool compensation value.
2. The plotting software is suddenly broken up.
3. Plotting software has been damaged or there is virus in computer.
Why does the paper run deviation?
1. The stickiness isn’t placed right.
2. The platen is too dirty so that the resistance from two sides can’t be
balanced when the paper is moving.
3. The pinch rollers have been deformed or don’t match to each other.
4. The pressure of the pinch roller is a little smaller and the paper is very
sensitive to the external force.
5. The balance of the stickiness weight isn’t very good.

Operation manual
26
Why some parts of letters are missing?
1. The vinyl is too heavy or too tightly wrapped. Metal roller might be
soiled by some foreign substance or by vinyl chips.
2. Cutting speed is too fast, cutting force is too great, or cutter tip is too
long.
3. Synchromesh belt is too tight, or pinch roller is under too much
pressure.
4. Metal roller is faulty. Contact local distributor for repairs and
replacement.
Why different letters on the same line are cut to different depths?
1. Cutter holder is not tightly attached. It should be tightened.
2. Cutter blade is not tightly set in the holder.
Why letters appear to have ripples?
1. Cutting speed is too fast. Except for cutting large letters, speed should
not exceed 480mm/s.
2. Cutting blade is of poor quality, or it has been damaged. Replace it.
3. Cutter holder is not tightly installed. Tighten screw.
Cutting small letters
When cutting small letters, cutting speed and force should be adjusted to
the lowest setting. Similarly cutter tip should be adjusted to as short as
possible.
Cutting large letters
Cutting speed and force may be increased to higher settings. When
cutting large letters Sharp Angle in Artcut software may be ignored.