Embed Size (px)
Citation preview

CHAD 50 PSI COMPRESSORPATIENT INSTRUCTIONS
MODEL # 18450

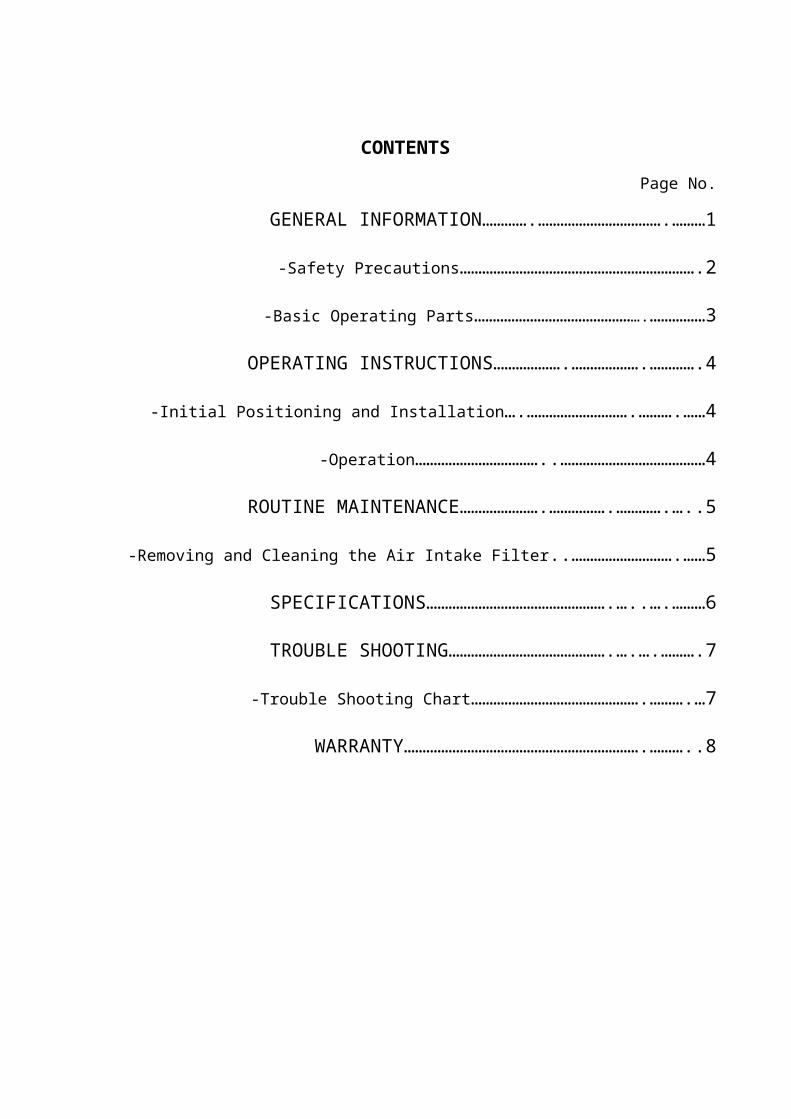
CONTENTSPage No.
GENERAL INFORMATION………….…………………………….………1-Safety Precautions……………………………………………………….2-Basic Operating Parts……………………………………….……………3
OPERATING INSTRUCTIONS……………….……………….………….4-Initial Positioning and Installation….……………………….……….……4-Operation……………………………..…………………………………4
ROUTINE MAINTENANCE………………….…………….………….…..5-Removing and Cleaning the Air Intake Filter..……………………….……5
SPECIFICATIONS………………………………………….…..….………6TROUBLE SHOOTING…………………………………….….….……….7
-Trouble Shooting Chart……………………………………….……….…7WARRANTY……………………………………………………….………..8
i
GENERAL INFORMATION
This manual provides information necessary to operate the 50 PSI Compressor. This unit is designed for the most efficient, continuous high pressure performance.The compressor provides the high pressure which clinical studies have indicated are required for optimal particle size (2 microns or less) .It operates quietly and effectively due to the unique design of the WOB-L piston. Easy to clean, very low maintenance, compact, light-weight, and portable.Powered by standard home current makes it’s operation easy and practical for home and hospital use with most makes of aerosol generators such as:
-Compatible with hand-held nebulizer system.-Heated nebulizer.-Dual action humidifier/nebulizer.-Pediatric mist tent.-High output pneumatic nebulizer .-Deluxe nebulizer with oxygen diluter.-Child / adult mist tent.
1

SAFETY PRECAUTIONS
When using electrical products, especially when children are present, basic safety precautions should always be followed. Read all instructions before using.Important information is highlighted by these terms:
DANGERUrgent safety information for hazards that will cause serious injury or death.
WARNINGImportant safety information for hazards that might cause serious injury.
CAUTIONInformation for preventing damage to the product.
NOTEInformation to which you should pay special attention.
READ ALL USER’S MANUAL BEFORE USING.
SAVE USER’S MANUAL
Note Connect power cord and plug to properly grounded wall outlet or adapter.
NoteUnplug the power cord when it is necessary to disconnect AC power source.
NoteThe compressor is not designed to drive ventilators.
NoteFollow the national requirement to dispose unit.
CautionIngestion of aerosols into the compressor may result in damage to the unit and void the
warranty.
2

BASIC OPERATION PARTS
FIGURE 1
3
HANDLE
REGULATORdeterminesPressure output
POWER RESETrestarts unitafter overload
INTAKE FILTEROUTLET
PRESSURE GAUGEIndicates pressure output
POWER CORD
ON/OFF SWITCHstarts and stops unit
"On" position
"Off" position

OPERATING INSTRUCTIONS
INITIAL POSITIONING AND INSTALLATION
1. Select a suitable location for the unit near a 120 VAC / 230VAC, grounded power Outlet.
2. Grasp handle on top of cabinet and position the unit so that operating controls are Accessible to the user and back of unit is away from wall.
3. Make certain that the power switch located in the center of the control panel is in the OFF position and plug power cord into grounded power outlet or grounded adapter.
4. Be certain that all connections to outlet ( i.e. tubing , nebulizers , etc.) are snug and not leaking aerosol.
5. When used in conjunction with mist tents, etc., place unit outside of tent and place unit at a level below discharge end of the delivery tubing.
OPERATION
1. Press Power On/Off switch to ON position.
2. To check the pressure that the compressor is delivering occluded outlet or connect equipment you intend to use with the compressor . Pressure can be adjusted with regulator and observing pressure gauge as follows :
a. Pull regulator knob out to unlock adjustment.
b. Turn dial of regulator to desired pressure.-clockwise – increase pressure -counterclockwise – decrease pressure
c. Push knob towards unit locking regulator pressure.
4

ROUTINE MAINTENANCE
REMOVING AND CLEANING THE FILTER
Pull air intake filter out from front of unit and replace with a new one when dirty. Do not wash it.
Pull filter out from back of unit and wash in warm soapy water and rinse Weekly. Use a soft absorbent towel to remove excess water and place filter back in unit.
User is requested to perform and record when the filter is cleaned.
CautionDo not submerge in water as this will result in damage to the vacuum pump.
5

SPECIFICATIONS / CLASSIFICATIONS / Symbols
Size (L) x (W) x (H) : 15” x 10-5/8” x 18.1”
Weight : 17.2 lbs
Model 18450
Electrical Requirements115 VAC 60Hz
Flowrate @ Pressure01020304050
413427221611
Power Consumption (W) @ 0 PSI
170
Operating Temperature range 50° F~ 104° F
Operating Relative Humidity 95%
Storage & Transport Temperature/Relative Range room condition preferred
Circuit Breaker 5A 125/250 VAC
Equipment Classifications With respect to protection from Electrical shock ClassΠ
Electrical hazard protection class: Type BDegree of protection against the ingress of water: IPX0- Protection is not provided.
No AP/APG: Equipment not suitable for use in the presence of a flammable anaesthetic mixture with air/oxygen or nitrous oxide.
6

TROUBLE SHOOTING
If the compressor malfunctions, refer to the trouble shooting chart below for probable cause and remedy . If you can not get the machine to operate, call your home care provider .
TROUBLE SHOOTING CHART
TROUBLEPROBABLE
CAUSEREMEDY
A. Unit not operating 1. Plug not firmly in wall.2. No power at wall outlet
1. Check plug at outlet .2. Check power source, fuse in house
B. Limited air flow 1. Faulty Delivery Tubing.
2. Leak
3. Blocked intake filte.
1. Disconnect delivery tubing at outlet . If proper flow is restored, check equipment and tubing for obstructions or kinks. Replace if needed.2. Check fitting at outlet and tubing.3. Clean air intake filter. If flow is not restored, call your home care provider.
C. All other problems1. Call your home care provider.
7

1 YEAR LIMITED WARRANTY
Your Drive brand product is warranted to be free of defects in materials and
workmanship for one (1) year of the original consumer purchaser.
This device was built to exacting standards and carefully inspected prior to shipment.
This 1 Year Limited Warranty is an expression of our confidence in the materials and
workmanship of our products and our assurance to the consumer of years of
dependable service.
This warranty does not cover device failure due to owner misuse or negligence, or
normal wear and tear. The warranty does not extend to non-durable components, such
as rubber accessories, casters, and grips, which are subject to normal wear and need
periodic replacement.
If you have a question about your Drive device or this warranty, please contact an authorized Drive dealer.
8
Drive Medical Design & Manufacturing99 Seaview Boulevard
Port Washington, NY 11050Phone: 516.998.4600 Fax: 516.998.4601
www.drivemedical.com