Embed Size (px)
Citation preview
NE C1153
4
BB
1
Convection
Start
Prog Lock Beep
Microwave
Stop / Reset
Cooling
Lamp
Preheat
4
%
21
3
PROGRAMTIMEMICRO
CONV PREHEAT
STAGE
2
6
5 0
9
7
3 8
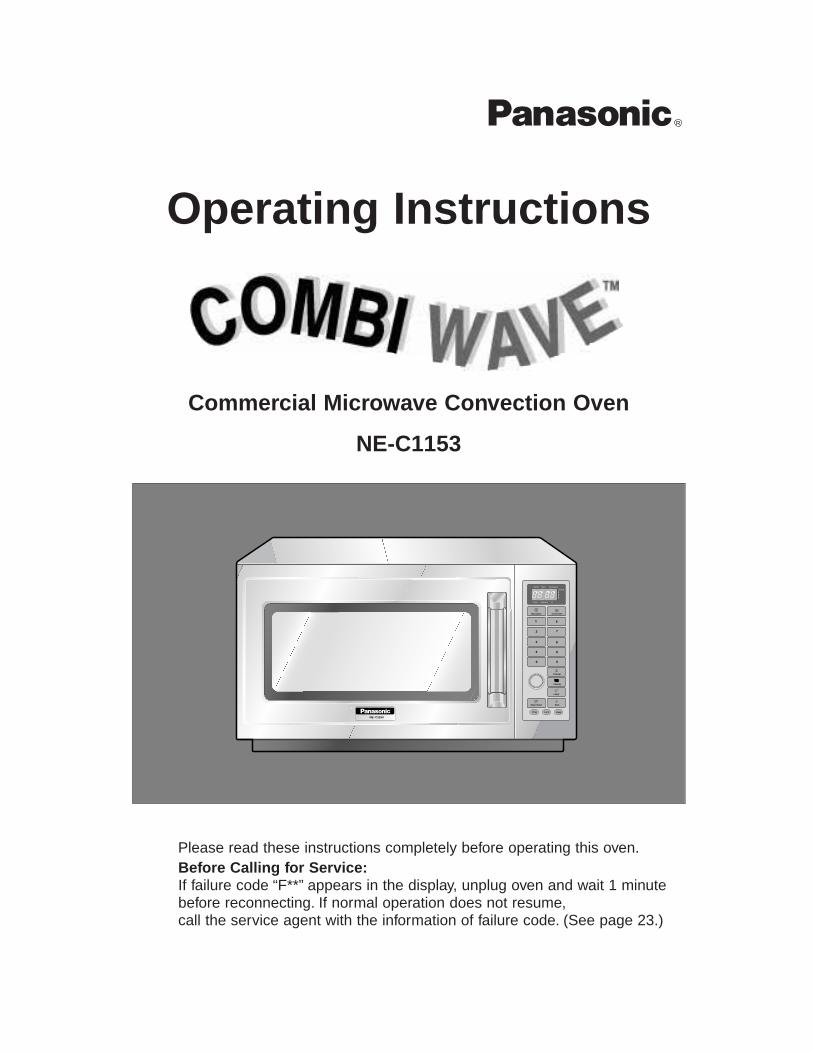
Operating Instructions
R
Please read these instructions completely before operating this oven.
NE-C1153
Commercial Microwave Convection Oven
Before Calling for Service:If failure code “F**” appears in the display, unplug oven and wait 1 minutebefore reconnecting. If normal operation does not resume, call the service agent with the information of failure code. (See page 23.)

Owner’s RecordModel No.Serial No.
The serial number of this product can be
found on the lower right hand side of the oven.
Dealer’s NameDealer’s AddressDate of Purchase
See page 23 before calling
Toll FreeService InformationTo locate a convenient service agent call
1-888-350-9590Chef Support: 201-348-7305www.panasonic.com/cmo
Virtual Test Kitchens
- 2 -
Contents
PRECAUTIONS TO AVOID POSSIBLE EXPOSURE TO EXCESSIVEMICROWAVE ENERGY . . . . . . . . . . . . . . . . . . . . . . . . . . . . . . . . . . . . . . . . . . . . . . . . . . .3IMPORTANT SAFETY INSTRUCTIONS . . . . . . . . . . . . . . . . . . . . . . . . . . . . . . . . . . . . . . .3Installation and Grounding Instructions . . . . . . . . . . . . . . . . . . . . . . . . . . . . . . . . . . . . . . . .4Caution . . . . . . . . . . . . . . . . . . . . . . . . . . . . . . . . . . . . . . . . . . . . . . . . . . . . . . . . . . . . . . .5How to install the Air Screen . . . . . . . . . . . . . . . . . . . . . . . . . . . . . . . . . . . . . . . . . . . . . . .5Outline Diagram . . . . . . . . . . . . . . . . . . . . . . . . . . . . . . . . . . . . . . . . . . . . . . . . . . . . . . . . .6
Accesorries Supplied . . . . . . . . . . . . . . . . . . . . . . . . . . . . . . . . . . . . . . . . . . . . . . . . . . .6Display Window . . . . . . . . . . . . . . . . . . . . . . . . . . . . . . . . . . . . . . . . . . . . . . . . . . . . . . .7Control Panel . . . . . . . . . . . . . . . . . . . . . . . . . . . . . . . . . . . . . . . . . . . . . . . . . . . . . . . . .7
How to OperateOperating Oven in Microwave mode . . . . . . . . . . . . . . . . . . . . . . . . . . . . . . . . . . . . . . . .8Operating Oven in Convection mode . . . . . . . . . . . . . . . . . . . . . . . . . . . . . . . . . . . . . .10Operating Oven in Combination mode . . . . . . . . . . . . . . . . . . . . . . . . . . . . . . . . . . . . .12Setting the Memory Programs . . . . . . . . . . . . . . . . . . . . . . . . . . . . . . . . . . . . . . . . . . .14Using the Memory Programs . . . . . . . . . . . . . . . . . . . . . . . . . . . . . . . . . . . . . . . . . . . .15How to activate the Program Lock . . . . . . . . . . . . . . . . . . . . . . . . . . . . . . . . . . . . . . . .16How to release the Program Lock . . . . . . . . . . . . . . . . . . . . . . . . . . . . . . . . . . . . . . . .17How to read the Program List . . . . . . . . . . . . . . . . . . . . . . . . . . . . . . . . . . . . . . . . . . . .17Keeping the Oven Hot . . . . . . . . . . . . . . . . . . . . . . . . . . . . . . . . . . . . . . . . . . . . . . . . .18Cooling the Oven quickly . . . . . . . . . . . . . . . . . . . . . . . . . . . . . . . . . . . . . . . . . . . . . . .19How to change the Beep Tone . . . . . . . . . . . . . . . . . . . . . . . . . . . . . . . . . . . . . . . . . . .20How to read the Cycle Counter . . . . . . . . . . . . . . . . . . . . . . . . . . . . . . . . . . . . . . . . . .21How to program for Scheduled Cleaning Service . . . . . . . . . . . . . . . . . . . . . . . . . . . . .22
Sanitary Counter Top Seal . . . . . . . . . . . . . . . . . . . . . . . . . . . . . . . . . . . . . . . . . . . . . . . .23Self Diagnostics Failure Code Explanation . . . . . . . . . . . . . . . . . . . . . . . . . . . . . . . . . . . .23Taking Care of Your Oven . . . . . . . . . . . . . . . . . . . . . . . . . . . . . . . . . . . . . . . . . . . . . . . . .24How Does The Microwave Work? . . . . . . . . . . . . . . . . . . . . . . . . . . . . . . . . . . . . . . . . . . .27Types of Containers to use . . . . . . . . . . . . . . . . . . . . . . . . . . . . . . . . . . . . . . . . . . . . . . . .28Cooking Instructions . . . . . . . . . . . . . . . . . . . . . . . . . . . . . . . . . . . . . . . . . . . . . . . . . . . . .29Technical Specifications . . . . . . . . . . . . . . . . . . . . . . . . . . . . . . . . . . . . . . . . . . . . . . . . . .30

WARNING–To reduce the risk of burns, electric shock, fire,injury to persons, or exposure to excessive microwave energy:1. Read all instructions before using the appliance.2. Read and follow “PRECAUTIONS TO AVOID
POSSIBLE EXPOSURE TO EXCESSIVEMICROWAVE ENERGY,” above on this page.
3. This appliance must be grounded. Connect only to aproperly grounded outlet. See “GroundingInstructions” found on page 4.
4. Install or locate this appliance only in accordance withthe provided installation instructions, found on page 4.
5. Do not cover or block any openings on this appliance.6. Do not store or use this appliance outdoors. Do not
use this product near water for example, near akitchen sink, in a wet basement, or near aswimming pool, and the like.
7. Use this appliance only for its intended use asdescribed in this manual. DO NOT use corrosivechemicals, vapors, or non-food products in thisappliance. This type of oven is specifically designedto heat or cook. It is not designed for industrial orlaboratory use. The use of corrosive chemicals inheating or cleaning will damage the appliance andmay result in radiation leaks.
8. When cleaning surfaces of door and oven thatcome together on closing the door, use only mild,non-abrasive soaps or detergents applied with asponge or soft cloth.
9. Do not allow children to use this appliance, unlessclosely supervised by an adult.
10. Do not operate this appliance if it has a damagedcord or plug, if it is not working properly, or if it hasbeen damaged or dropped.
11. Do not immerse cord or plug in water.12. Keep cord away from heated surfaces.13. Do not let cord hang over edge of table or counter.14. This appliance should be serviced only by qualified
service personnel. Contact the nearest authorizedservice facility for examination, repair or adjustment.
15. Some products such as whole eggs, narrow neckbottles and sealed containers - for example, closed
glass jars - may explode and should not be heatedin this oven.
16. To reduce the risk of fire in the oven cavity:(a) Do not overcook food. Carefully attend appliance
if paper, plastic, or other combustible materialsare placed inside the oven to facilitate cooking.
(b) Remove wire twist-ties from paper or plastic bagsbefore placing bag in oven.
(c) If materials inside the oven should ignite,keep oven door closed, turn oven off, anddisconnect the power cord, or shut off powerat the fuse or circuit breaker panel.
(d) Do not use the cavity for storage purposes.Do not leave paper products, cooking utensils, orfood in the cavity when not in use.
17. Liquids, such as water, coffee, or tea are able to beoverheated beyond the boiling point withoutappearing to be boiling due to surface tension of theliquid. Visible bubbling or boiling when the containeris removed from the microwave oven is not alwayspresent. THIS COULD RESULT IN VERY HOTLIQUIDS SUDDENLY BOILING OVER WHEN ASPOON OR OTHER UTENSIL IS INSERTED INTOTHE LIQUID. To reduce the risk of injury to persons:
(a) Do not overheat the liquid.(b) Stir the liquid both before and halfway through
heating it.(c) Do not use straight-sided containers with narrow
necks.(d) After heating, allow the container to stand in the
microwave oven for a short time before removingthe container.
(e) Use extreme care when inserting a spoon orother utensil into the container.
18. The outside of microwave oven becomes very hotwhen the convection and combination stages arebeing used. With the exception of the door handleand control panel, DO NOT touch the outsidesurface of the microwave oven, including the frontdoor, while the convection and combination stagesare being used.
SAVE THESE INSTRUCTIONSFor proper use of your oven read remaining safety cautions and operating instructions.
Your microwave oven is a cooking device and you should use as much care as you use with a stove or any othercooking device. When using this electric appliance, basic safety precautions should be followed, including the following:
IMPORTANT SAFETY INSTRUCTIONS
- 3 -
PRECAUTIONSTO AVOID POSSIBLE EXPOSURE
TO EXCESSIVE MICROWAVE ENERGY(a) Do not attempt to operate this oven with
the door open since open-door operation canresult in harmful exposure to microwave energy.It is important not to defeat or tamper with thesafety interlocks. Under normal conditions, theoven will not operate with the door open.
(b) Do not place any object between the ovenfront face and the door, or allow soil or cleanerresidue to accumulate on sealing surfaces.
(c) Do not operate the oven if it is damaged. It isparticularly important that the oven door closesproperly and that there is no damage to the :(1) door (bent)(2) hinges and latches (broken or loose)(3) door seals and sealing surfaces.
(d) The oven should not be adjusted or repairedby anyone except properly qualified servicepersonnel. (See page 2.)
- 4 -
Examine your OvenUnpack oven, retain all packing material, and examinethe oven for any damage such as dents, broken doorlatches or cracks in the door. Notify supplierimmediately if unit is damaged. DO NOT install if unit isdamaged.Note: The appliance should be inspected for damageto the door seals and door seal areas and if theseareas are damaged, the appliance should not beoperated, until it has been repaired by a servicetechnician trained by the manufacturer.
Removal of Protective FilmA protective film is used to prevent scratching of theouter case during transportation. Remove this filmbefore installation or use.
Placement of the OvenOven must be placed on a flat, stable surface. Forproper operation, the oven must have sufficient air flow.A gap of at least 2 inches must be available at the right,left sides and back wall of the oven. A minimum spaceof 8 inches must be left above the oven and the 2exhaust vents at the rear.There should be no gap between the table surface andthe bottom of the oven. (See instructions “SanitaryCounter Top Seal” on page 23.) Do not place the ovenin a hot or damp area, ie. near a stove, sink or directlyabove heat lamps on a serving line. There is apossibility of a small amount of interference with weakbroadcast signals if the microwave oven is located tooclose to a radio or TV.
Air ventsThis oven requires free airflow at the back for maximumcooling efficiency.Do not block the air vents.
Maximum room temperatureDo not operate the oven when the room temperature ishigher than 105˚F and/or the humidity is higher than90%. Free airflow around the oven is important.
Outdoor useDo not use this oven outdoors.
ShelvesDo not place the oven directly above or beside a gas orelectric range, the oven may be damaged. It isdangerous to position this oven on a shelf which is sohigh that food and accessories cannot be safelyinserted or removed by the user.
StackingDO NOT attempt to stack these ovens.
Grounding InstructionsThis oven must be electrically grounded. In the event ofan electrical short circuit, grounding reduces the risk ofelectric shock by providing an escape wire for theelectric current. The appliance is equipped with a cordhaving a grounding wire with a grounding plug. Theplug must be plugged into an outlet that is properlyinstalled and grounded.WARNING Improper use of the grounding plug canresult in a risk of electric shock.Consult a qualified electrician or service person if thegrounding instructions are not completely understood,or if doubt exists as to whether the appliance isproperly connected.Do not use an extension cord. If the power supply cordis too short, have a qualified electrician or servicemaninstall an outlet near the appliance.
Wiring RequirementsNo other appliance should share the circuit with themicrowave convection oven. If it does, the branch circuitfuse may overload and either cause the oven toproduce lower power output or blow the fuse.
1.This oven must be operated on a dedicated, separate60 Hz GROUNDED CIRCUIT - minimum 20 amps.
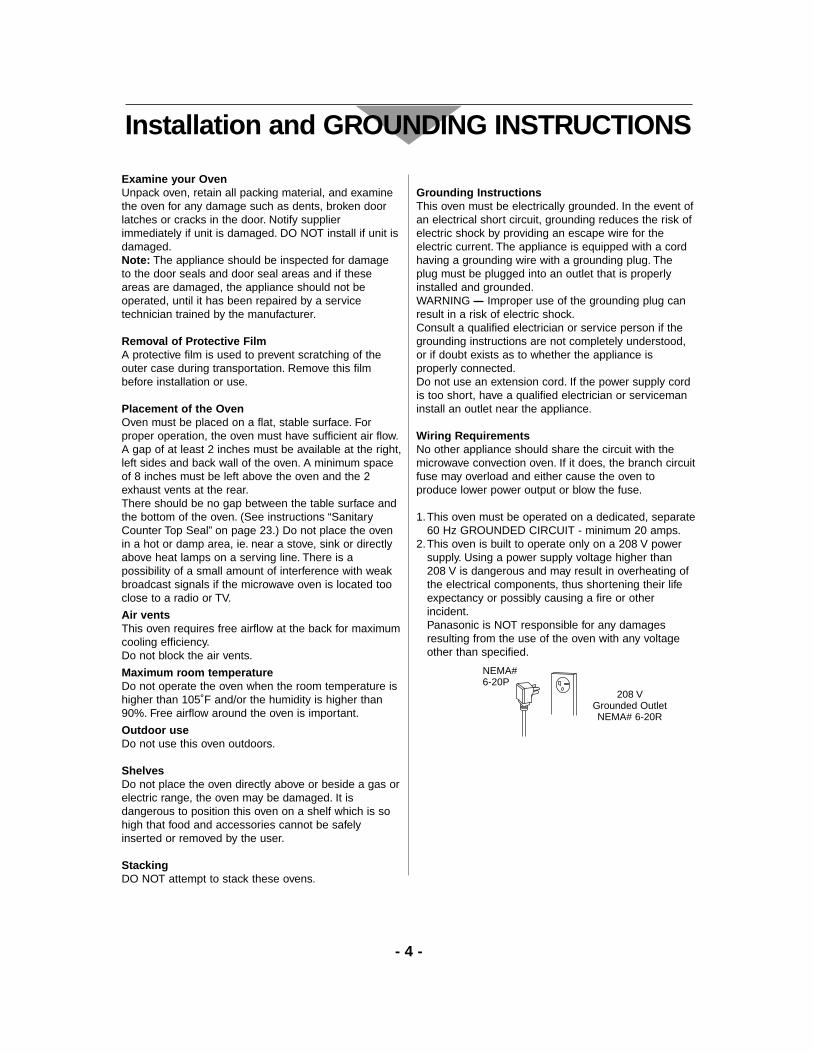
2.This oven is built to operate only on a 208 V powersupply. Using a power supply voltage higher than 208 V is dangerous and may result in overheating ofthe electrical components, thus shortening their lifeexpectancy or possibly causing a fire or otherincident.Panasonic is NOT responsible for any damagesresulting from the use of the oven with any voltageother than specified.
Installation and GROUNDING INSTRUCTIONS
NEMA#6-20P
208 VGrounded Outlet NEMA# 6-20R
- 5 -
Caution
Before UseBefore using CONVECTION or COMBINATION functionfor the first time, operate this oven without food onConvection 500˚F for 20 minutes, removing allaccessories from the oven.This will cause the oil that isused for rust protection to be burned off.
Operation when emptyDO NOT operate the oven empty in the microwave mode.The microwave energy will reflect continuouslythroughout the oven causing overheating, if food orwater is not present to absorb energy. This coulddamage the oven and result in a risk of fire.
ServiceDO NOT tamper with or make any adjustments orrepairs to door, control panel housing, safety interlockswitches or any other part of the oven.DO NOT remove outer panel from oven. Repairs mustbe done only by a qualified service person.
Smoke/FireIf a fire occurs in the oven, press the Stop/Reset Padand KEEP THE DOOR CLOSED.Disconnect the power cord, or shut off the power at thefuse or circuit breaker panel.
Hot SurfacesExterior oven surfaces, including air vents on thecabinet and the oven door will get hot during use.(Convection and Combination) Take care when openingor closing door and when inserting or removing foodand accessories.The oven has heaters situated in the back of the oven.After use, the ceiling, walls and floor will be very hot.
Fan Motor OperationAfter using MICROWAVE, CONVECTION andCOMBINATION, the fan motor always rotates forapprox. 5 minutes to cool the electric components. Thisis normal and you can take out food even though thefan motor is operating.
Storage of AccessoriesWhen the oven is not being used, do not store anyobjects other than oven accessories inside the oven incase it is accidentally turned on. In case of electronicfailure, the oven can only be turned off at the wallsocket or breaker.
InterferenceThere is a possibility of a small amount of interferencewith weak broadcast signals if the oven is too close to aradio or TV.
General UseDO NOT dry clothes, newspapers or other materials inoven, or use newspapaers or paper bags for cooking.Fire could result.
DO NOT use recycled paper products unless the paperproduct is labeled as safe for microwave oven use.Recycled paper products may contain impurities whichmay cause sparks, and result in fires when used.
DO NOT hit or strike control panel. Damage to controlsmay occur. Fire could result.
POT HOLDERS should always be used when removingitems from the oven. Heat is transferred from the HOTfood to the cooking container.
DO NOT store flammable materials next to, on top of,or in the oven. These could be fire hazards.
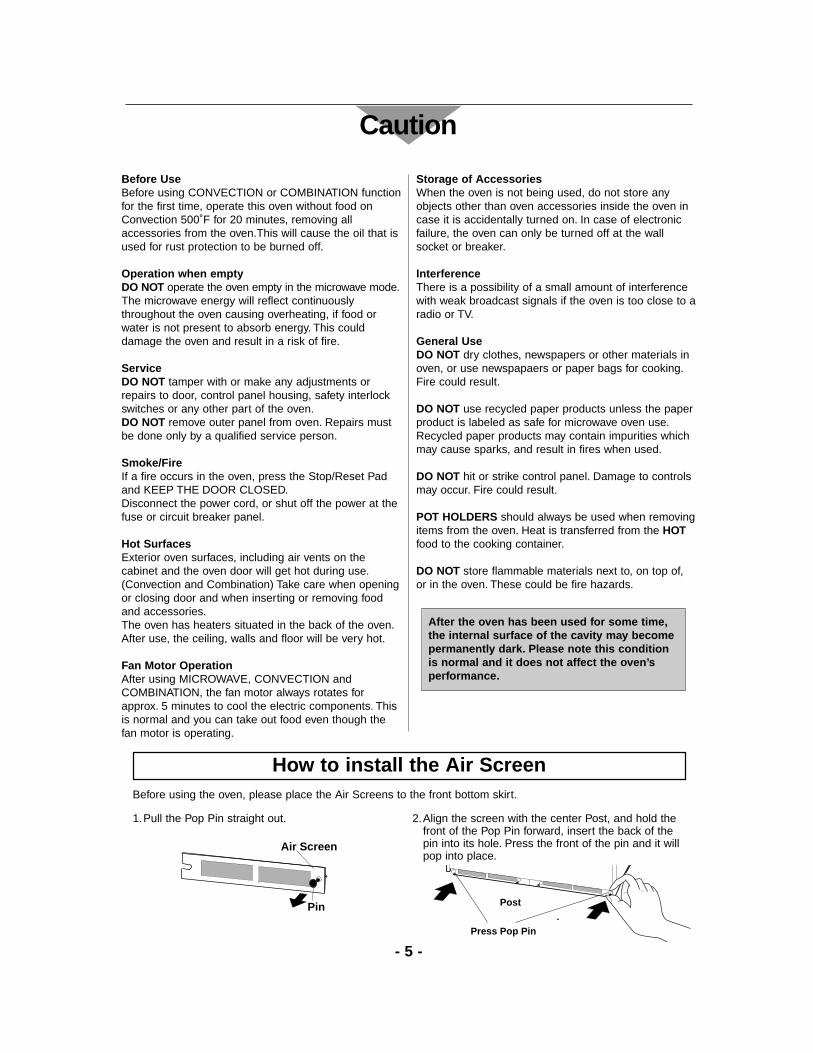
How to install the Air Screen
1.Pull the Pop Pin straight out.
Air Screen
Pin Post
Press Pop Pin
2.Align the screen with the center Post, and hold the front of the Pop Pin forward, insert the back of the pin into its hole. Press the front of the pin and it will pop into place.
Before using the oven, please place the Air Screens to the front bottom skirt.
After the oven has been used for some time,the internal surface of the cavity may becomepermanently dark. Please note this conditionis normal and it does not affect the oven’sperformance.
- 6 -
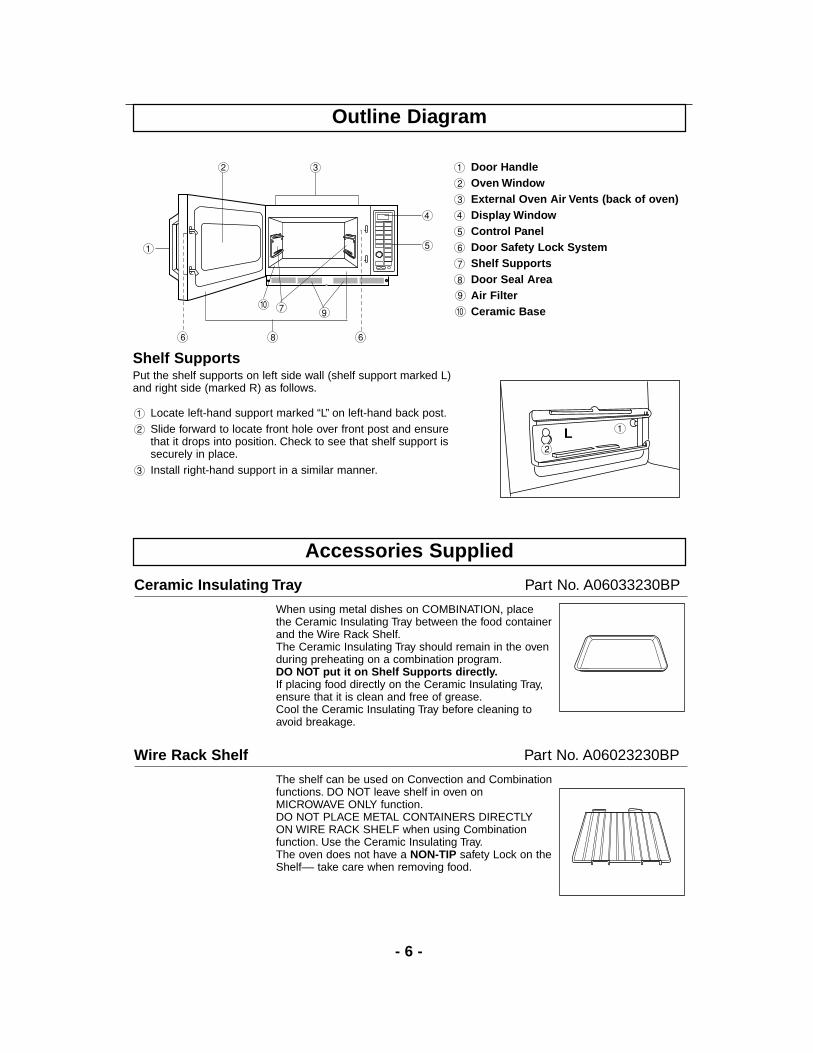
Shelf SupportsPut the shelf supports on left side wall (shelf support marked L)and right side (marked R) as follows.
Locate left-hand support marked “L” on left-hand back post.Slide forward to locate front hole over front post and ensurethat it drops into position. Check to see that shelf support issecurely in place.Install right-hand support in a similar manner.
Accessories Supplied
Ceramic Insulating Tray Part No. A06033230BP
When using metal dishes on COMBINATION, placethe Ceramic Insulating Tray between the food containerand the Wire Rack Shelf.The Ceramic Insulating Tray should remain in the ovenduring preheating on a combination program.DO NOT put it on Shelf Supports directly.If placing food directly on the Ceramic Insulating Tray,ensure that it is clean and free of grease.Cool the Ceramic Insulating Tray before cleaning toavoid breakage.
Wire Rack Shelf Part No. A06023230BP
The shelf can be used on Convection and Combinationfunctions. DO NOT leave shelf in oven onMICROWAVE ONLY function.DO NOT PLACE METAL CONTAINERS DIRECTLYON WIRE RACK SHELF when using Combinationfunction. Use the Ceramic Insulating Tray.The oven does not have a NON-TIP safety Lock on theShelf–– take care when removing food.
Door HandleOven WindowExternal Oven Air Vents (back of oven)Display WindowControl PanelDoor Safety Lock SystemShelf SupportsDoor Seal AreaAir FilterCeramic Base
L
Outline Diagram

- 7 -
Display Window
The cursor will illuminate and flash to indicate the function being set. Always check the cursorposition before you press Start Pad.
PROGRAM
123
TIMEMICRO
%PREHEATCONV
STAGE
Control Panel
8
7
6
5
3
2
9
Convection
Start
Microwave
Stop
Cooling
Lamp
Preheat
4
1
0
Prog Lock Beep
Reset/
Microwave PowerConvectionTimePreheatProgramMicrowave Power Level %Cooking Stage Indicator
Microwave Pad
Convection Pad
Number Pads
Preheat Pad
Cooling Pad
Lamp Pad
Timer Dial
Stop/Reset Pad
Start Pad
Program Key
Program Lock Key
Beep Key

- 8 -
CONTROLS TO USE
8
7
6
5
3
2
9
Convection
Start
Microwave
Stop
Cooling
Lamp
Preheat
4
1
0
Prog Lock Beep
Reset/
INFORMATIONACTION DISPLAY1 Open Door.
Put in Food.
Close Door.
The oven lamp will come on.
Oven lamp turns off.
2 Press. Press Microwave Pad.
When heating at 100 % power, skip step 3.
4 Select Time. Turn Timer Dial to set aheating time.
Max time you can set:100-60 % 15 min50-10 % 60 min
5 Press Start Pad. Display will count down time.
The fan will be turned on.
PROGRAM
123
TIMEMICRO
%PREHEATCONV
STAGE
At end of cooking, ovenbeeps, and “0” flashes indisplay window until door isopened.
Remove food.
Display repeats programpreviously set.
6 Open Door.
ACCESSORIES TO USE
Do not use the Wire Rack Shelf orCeramic Insulating Tray whencooking in microwave mode.
PRESSNumber
pad
-----
DISPLAY
(%)
100
90
80
70
60
WATTS
(W)
1100
990
880
770
660
Note:! The display window will go blank, one minute after cooking or during
setting when the door is closed.
Microwave
Start
End of Program
Open Door
PROGRAM
123
TIMEMICRO
%PREHEATCONV
STAGE
PROGRAM
123
TIMEMICRO
%PREHEATCONV
STAGE
PROGRAM
123
TIMEMICRO
%PREHEATCONV
STAGE
PROGRAM
123
TIMEMICRO
%PREHEATCONV
STAGE
PROGRAM
123
TIMEMICRO
%PREHEATCONV
STAGE
3 SelectPower.
Press Number Pad.
6
PROGRAM
123
TIMEMICRO
%PREHEATCONV
STAGE
DISPLAY
(%)
50
40
30
20
10
WATTS
(W)
550
440
330
220
110
PRESSNumber
pad
Operating Oven in Microwave mode
9
8
7
6
5
4
3
2
1
Example: To cook food at 60 % power for 4 min 30 sec

- 9 -
Multi-Stage (Sequential) Heating
The oven can be programmed with up to 3 differentfunctions to operate in sequence. These can beMICROWAVE, CONVECTION or COMBINATIONprograms. If a required heating time is greater than 15minutes on 100-60 % power, use 2 stageprogramming.For 2 stage programming:Repeat steps 1-4 on page 8 before then enter the nextheating program, then press Start Pad.For 3 stage programming:Follow 2 stage programming and enter a 3rd heatingprogram before pressing Start Pad.
Changing the Heating Time
The heating time can be increased or decreasedduring cooking by turning Timer Dial.
Oven Lamp
The Oven Lamp switches off when the door is closed.If you want to check the food, press Lamp Pad, it willthen illuminate for 10 seconds.The Oven Lamp turns on and illuminates for 1 minutewhenever the door is opened.
Repeat Feature
You can repeat the same heating program if you pressStart Pad within 1 minute of the previous programfinishing.After 1 minute, if Start Pad is not pressed, the displayreturns to “0”, or goes blank if the oven door is closed.
Stop/Reset Pad
Before heating: One tap clears the display.During heating: One tap stops the heating cycle and
two taps clears the display.Note: See page 16 for operation while in Program Lock.
PROGRAM
123
TIMEMICRO
%PREHEATCONV
STAGE
PROGRAM
123
TIMEMICRO
%PREHEATCONV
STAGE
Start
Lamp
Stop Reset/
Operating Oven in Microwave mode
2 stage programming
3 stage programming
- 10 -
CONTROLS TO USE
8
7
5
3
2
9
Convection
Start
Microwave
Stop
Cooling
Lamp
Preheat
4
1
0
Prog Lock Beep
Reset/
6
INFORMATIONACTION DISPLAY
1 Open Door.Put in Food.
Close Door.
The oven lamp will come on.
Oven lamp turns off.
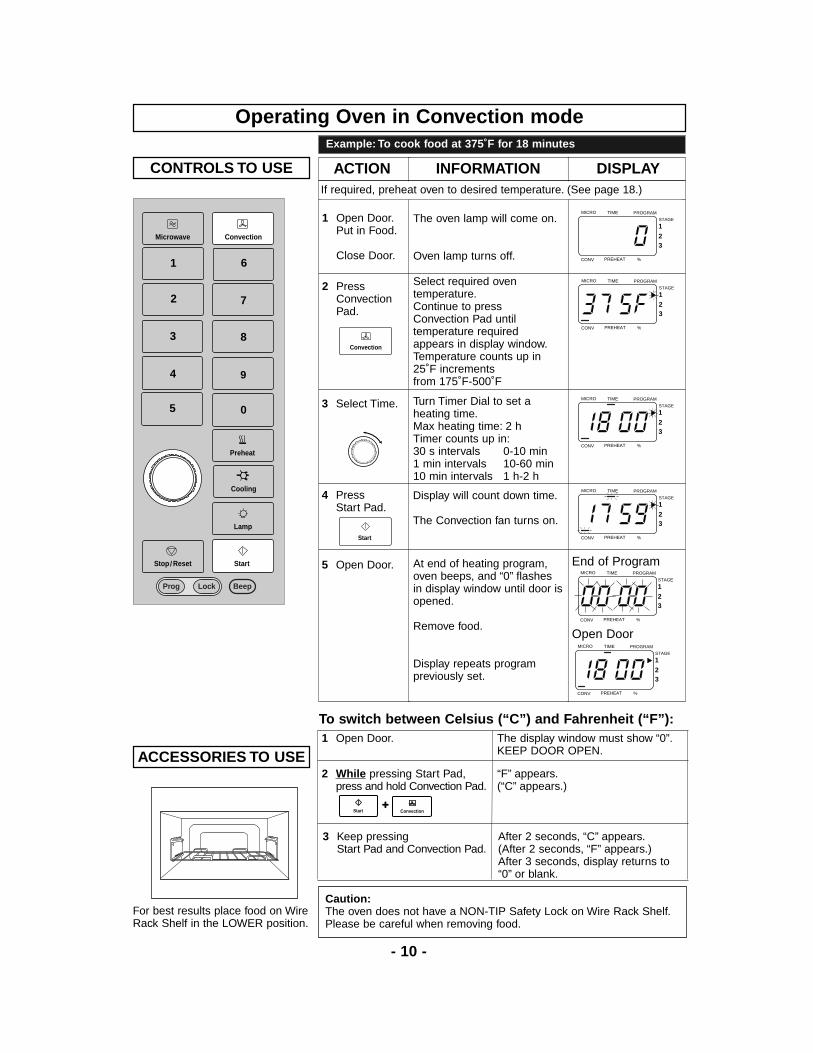
2 PressConvectionPad.
Select required oven temperature.Continue to press Convection Pad until temperature required appears in display window.Temperature counts up in 25˚F increments from 175˚F-500˚F
3 Select Time. Turn Timer Dial to set aheating time.Max heating time: 2 hTimer counts up in:30 s intervals 0-10 min1 min intervals 10-60 min10 min intervals 1 h-2 h
4 Press Start Pad.
Display will count down time.
The Convection fan turns on.
At end of heating program,oven beeps, and “0” flashesin display window until door isopened.
Remove food.
Display repeats programpreviously set.
5 Open Door.
ACCESSORIES TO USE
For best results place food on WireRack Shelf in the LOWER position.
Caution:The oven does not have a NON-TIP Safety Lock on Wire Rack Shelf.Please be careful when removing food.
Convection
Start
End of Program
Open Door
PROGRAM
123
TIMEMICRO
%PREHEATCONV
STAGE
PROGRAM
123
TIMEMICRO
%PREHEATCONV
STAGE
PROGRAM
123
TIMEMICRO
%PREHEATCONV
STAGE
PROGRAM
123
TIMEMICRO
%PREHEATCONV
STAGE
PROGRAM
123
TIMEMICRO
%PREHEATCONV
STAGE
PROGRAM
123
TIMEMICRO
%PREHEATCONV
STAGE
To switch between Celsius (“C”) and Fahrenheit (“F”):1 Open Door. The display window must show “0”.
KEEP DOOR OPEN.
2 While pressing Start Pad,press and hold Convection Pad.
“F” appears.(“C” appears.)
+Start Convection
3 Keep pressingStart Pad and Convection Pad.
After 2 seconds, “C” appears.(After 2 seconds, “F” appears.)After 3 seconds, display returns to “0” or blank.
Operating Oven in Convection modeExample: To cook food at 375˚F for 18 minutes
If required, preheat oven to desired temperature. (See page 18.)

- 11 -
Hot Surfaces
Exterior oven surface and the oven door is very hotafter heating. Take great care when removing hot food.Use oven gloves.
Multi-Stage (Sequential) Heating
The oven can be programmed with up to 3 differentfunctions to operate in sequence. These can beMICROWAVE, CONVECTION or COMBINATIONprograms.For 2 stage programming:Repeat steps 1-3 on page 10, enter the next heatingprogram, then press Start Pad.For 3 stage programming:Follow 2 stage programming and enter a 3rd heatingprogram before pressing Start Pad.
Changing the Heating Time
The heating time can be increased or decreasedduring cooking by turning Timer Dial.
Recalling Set Temperature
The temperature selected can be checked duringoperation by pressing the Convection Pad. Thetemperature will be displayed in the display windowbefore returning to the remaining heating time, whenpressing the pad.The temperature cannot be altered during a program.
Oven Lamp
The Oven Lamp switches off when the door is closed.If you want to check the food, press Lamp Pad, it willthen illuminate for 10 seconds.The Oven Lamp turns on and illuminates for 1 minutewhenever the door is opened.
Repeat Feature
You can repeat the same heating program if you pressStart Pad within 1 minute of the previous programfinishing.After 1 minute, if Start Pad is not pressed, the displayreturns to “0”, or goes blank if the oven door is closed.
Stop/Reset Pad
Before heating: One tap clears the display.During heating: One tap stops the heating cycle and
two taps clears the display.Note: See page 16 for operation while in Program Lock.
Preheat
For best results in convection mode the oven shouldbe preheated. (See page 18.)It is useful to keep the oven condition fixed.
PROGRAM
123
TIMEMICRO
%PREHEATCONV
STAGE
PROGRAM
123
TIMEMICRO
%PREHEATCONV
STAGE
Lamp
Convection
Start
Stop Reset/
Preheat
Operating Oven in Convection mode
2 stage programming
3 stage programming

- 12 -
CONTROLS TO USE
8
7
6
5
3
2
9
Convection
Start
Microwave
Stop
Cooling
Lamp
Preheat
4
1
0
Prog Lock Beep
Reset/
INFORMATIONACTION DISPLAY
1 Open Door.Put in Food.
Close Door.
The oven lamp will come on.
Oven lamp turns off.
2 PressConvection Pad.
Press Convection Pad untilrequired temperature appearsin display window.
3 Press.
SelectPower.
Select Microwave power.
Note: It is NOT possible toselect 100-60 % power.
5 PressStart Pad.
Display will count down time.The fan turns on.
At end of heating program,oven beeps, and “0” flashesin display window until door isopened.
Remove food.
Display repeats programpreviously set.
6 Open Door.
ACCESSORIES TO USE
The Ceramic Insulating Tray MUSTbe used if the cooking container ismetal, NEVER place a metalcontainer directly onto the WireRack Shelf if cooking byCOMBINATION as arcing mayoccur and damage the dish/oven.
Convection
Microwave
Start
End of Program
Open Door
PROGRAM
123
TIMEMICRO
%PREHEATCONV
STAGE
PROGRAM
123
TIMEMICRO
%PREHEATCONV
STAGE
PROGRAM
123
TIMEMICRO
%PREHEATCONV
STAGE
PROGRAM
123
TIMEMICRO
%PREHEATCONV
STAGE
PROGRAM
123
TIMEMICRO
%PREHEATCONV
STAGE
PROGRAM
123
TIMEMICRO
%PREHEATCONV
STAGE
4 Select Time. Turn Timer Dial to set aheating time.
Max heating time is: 1 hTimer counts up in:30 s intervals 0-10 min1 min intervals 10-60 min
PROGRAM
123
TIMEMICRO
%PREHEATCONV
STAG
3
Operating Oven in Combination modeExample: To cook food at 375˚F and 30 % power for 12 minutes
If required, preheat oven to desired temperature. (See page 18.)

- 13 -
Multi-Stage (Sequential) Heating
The oven can be programmed with up to 3 differentfunctions to operate in sequence. These can beMICROWAVE, CONVECTION or COMBINATIONprograms.For 2 stage programming:Repeat steps 1-3 on page 12, enter the next heatingprogram, then press Start Pad.For 3 stage programming:Follow 2 stage programming and enter a 3rd heatingprogram before pressing Start Pad.
Changing the Heating Time
The heating time can be increased or decreasedduring cooking by turning Timer Dial.
Oven Lamp
The Oven Lamp switches off when the door is closed.If you want to check the food, press Lamp Pad, it willthen illuminate for 10 seconds.The Oven Lamp turns on and illuminates for 1 minutewhenever the door is opened.
Repeat Feature
You can repeat the same heating program if you pressStart Pad within 1 minute of the previous programfinishing.After 1 minute, if Start Pad is not pressed, the displayreturns to “0”, or goes blank, if the oven door is closed.
Stop/Reset Pad
Before heating: One tap clears the display.During heating: One tap stops the heating cycle and
two taps clears the display.Note: See page 16 for operation while in Program Lock.
Preheat
For best results in combination mode the oven shouldbe preheated. (See page 18.)It is useful to keep the oven condition fixed.For recalling set temperature see page 11.
PROGRAM
123
TIMEMICRO
%PREHEATCONV
STAGE
PROGRAM
123
TIMEMICRO
%PREHEATCONV
STAGE
Start
Lamp
Stop Reset/
Preheat
Caution:The oven does not have a NON-TIP Safety Lock on Wire Rack Shelf.Please be careful when removing food.
Operating Oven in Combination mode
2 stage programming
3 stage programming
- 14 -
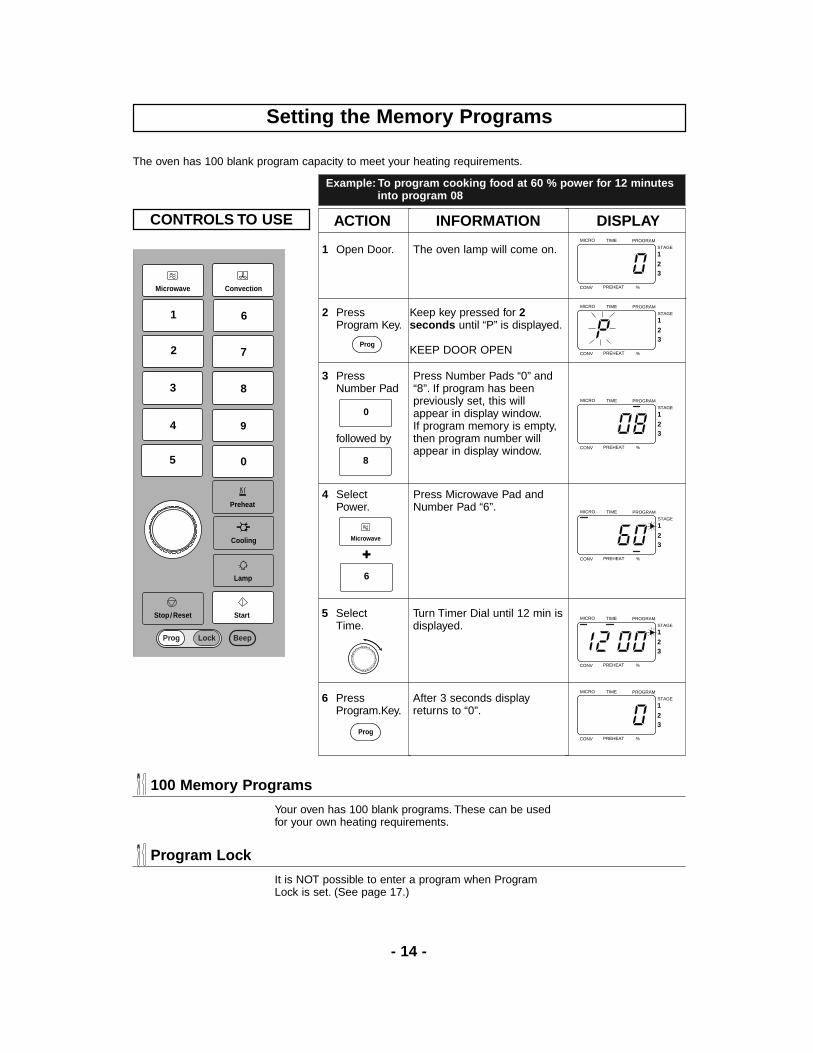
The oven has 100 blank program capacity to meet your heating requirements.
CONTROLS TO USE
8
7
6
5
3
2
9
Convection
Start
Microwave
Stop
Cooling
Lamp
Preheat
4
1
0
Prog Lock Beep
Reset/
INFORMATIONACTION DISPLAY
1 Open Door. The oven lamp will come on.
2 PressProgram Key.
Keep key pressed for 2seconds until “P” is displayed.
KEEP DOOR OPEN
3 Press Number Pad
followed by
Press Number Pads “0” and“8”. If program has beenpreviously set, this willappear in display window.If program memory is empty,then program number willappear in display window.
5 SelectTime.
Turn Timer Dial until 12 min isdisplayed.
After 3 seconds displayreturns to “0”.
6 PressProgram.Key.
Prog
0
PROGRAM
123
TIMEMICRO
%PREHEATCONV
STAGE
PROGRAM
123
TIMEMICRO
%PREHEATCONV
STAGE
PROGRAM
123
TIMEMICRO
%PREHEATCONV
STAGE
PROGRAM
123
TIMEMICRO
%PREHEATCONV
STAGE
4 Select Power.
Press Microwave Pad andNumber Pad “6”.
Microwave
PROGRAM
123
TIMEMICRO
%PREHEATCONV
STAGE
100 Memory Programs
Your oven has 100 blank programs. These can be usedfor your own heating requirements.
Program Lock
It is NOT possible to enter a program when ProgramLock is set. (See page 17.)
PROGRAM
123
TIMEMICRO
%PREHEATCONV
STAGE
Prog
8
+
6
Setting the Memory Programs
Example: To program cooking food at 60 % power for 12 minutesinto program 08

- 15 -
Multi-Stage (Sequential) Cooking
It is possible to program into the memory 2 or 3 stageprogram using MICROWAVE, CONVECTION, orCOMBINATION.
Changing a Memory Program
To change a program simply follow steps 1-6 asbefore, entering your new program.
INFORMATIONACTION1 Open Door.
Put in Food.
Close Door
The oven lamp will come on.
Oven lamp turns off.
2 PressNumber Pad
followed by
Press Number Pads “0” and “8”.
3 Press Start Pad. Display will count down time.
DISPLAY
PROGRAM
123
TIMEMICRO
%PREHEATCONV
STAGE
PROGRAM
123
TIMEMICRO
%PREHEATCONV
STAGE
PROGRAM
123
TIMEMICRO
%PREHEATCONV
STAGE
Program Lock
If program lock is activated, cooking program startsimmediately. There is no need to press Start Pad.(See page 16.) LOCKLock
Start
0
8
Setting the Memory Programs
Using the Memory Programs
Example: To select program “08” in which your desired heating program (at 60 % powerfor 12 minutes) is set
- 16 -
CONTROLS TO USE
8
7
6
5
3
9
Convection
Start
Microwave
Stop
Cooling
Lamp
Preheat
4
1
0
Prog Lock Beep
Reset/
2
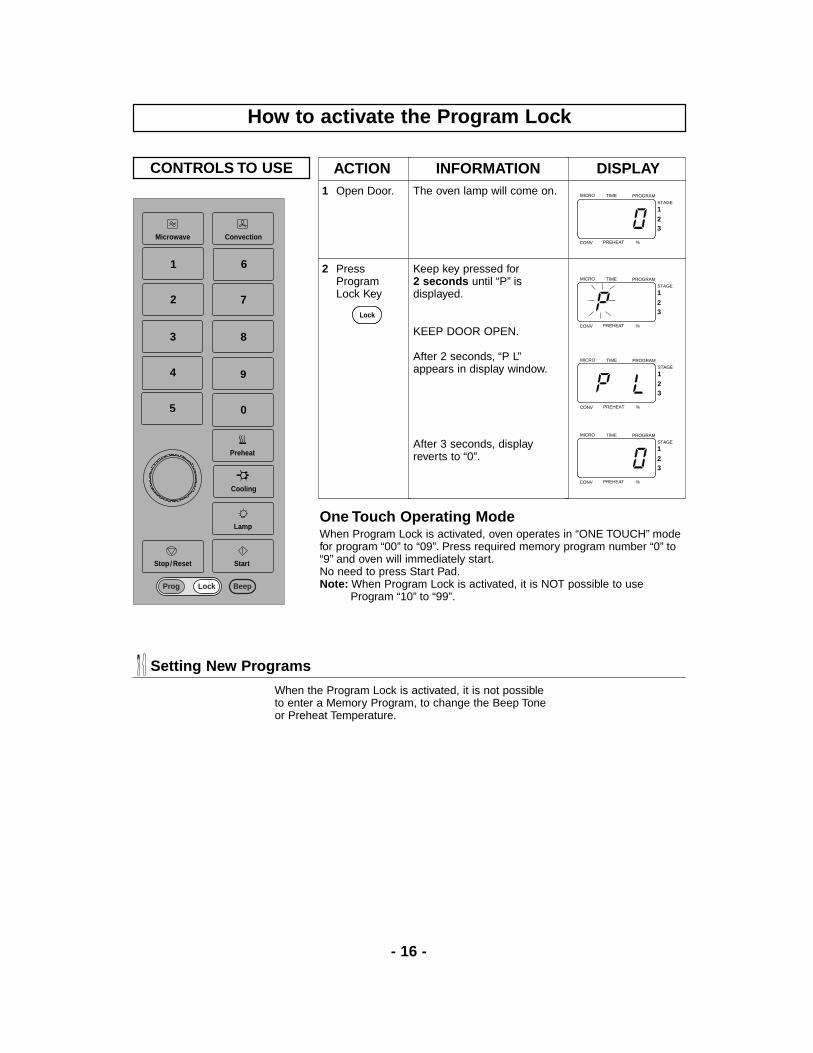
INFORMATIONACTION DISPLAY1 Open Door. The oven lamp will come on.
2 PressProgramLock Key
Keep key pressed for 2 seconds until “P” isdisplayed.
KEEP DOOR OPEN.
After 2 seconds, “P L”appears in display window.
After 3 seconds, displayreverts to “0”.
PROGRAM
123
TIMEMICRO
%PREHEATCONV
STAGE
PROGRAM
123
TIMEMICRO
%PREHEATCONV
STAGE
PROGRAM
123
TIMEMICRO
%PREHEATCONV
STAGE
PROGRAM
123
TIMEMICRO
%PREHEATCONV
STAGE
One Touch Operating ModeWhen Program Lock is activated, oven operates in “ONE TOUCH” modefor program “00” to “09”. Press required memory program number “0” to“9” and oven will immediately start.No need to press Start Pad.Note: When Program Lock is activated, it is NOT possible to use
Program “10” to “99”.
Setting New Programs
When the Program Lock is activated, it is not possibleto enter a Memory Program, to change the Beep Toneor Preheat Temperature.
LOCKLock
How to activate the Program Lock

- 17 -
INFORMATIONACTION1 Open Door. The oven lamp will come on.
2 PressProgram Lock Key.
Keep key pressed for 2 seconds until “P L” isdisplayed.
KEEP DOOR OPEN.
After 2 seconds, “P” appears in display window.
After 3 seconds, display reverts to “o”.
LOCKLock
DISPLAY
PROGRAM
123
TIMEMICRO
%PREHEATCONV
STAGE
PROGRAM
123
TIMEMICRO
%PREHEATCONV
STAGE
Two Touch Operating Mode
The oven reverts to 2 Touch Operating mode forprogram “00” to “09”.Press required memory program number then pressStart Pad.
Setting New Programs
Once Program Lock is released, you can again enternew heating programs, change the Beep Tone andPreheat Temperature.
PROGRAM
123
TIMEMICRO
%PREHEATCONV
STAGE
PROGRAM
123
TIMEMICRO
%PREHEATCONV
STAGE
It is possible to check the programs that have been entered into the oven’s 100 memory programs. With thedoor open, press Start Pad and Number Pad “1” simultaneously (the oven will make an acknowledging beep).After 2 seconds the display window will show each individual stage of each memory program in the order 00,01, 02 etc. Finally it will display the Beep Tone setting ,the program lock symbol (P L) and programed hours forSchedule Cleaning Service (see page 22) before clearing to “0”.* For example if you want to know what mode is programmed in 78,1. After starting to show in the display from “00” press Stop/Reset Pad.2. Press Number Pads “7” and “8”.3. Press Start Pad. (The display will show from program 78 through the following Program number.)
How to release the Program Lock
How to read the Program List

- 18 -
Notes on Preheat and Cooling:! AFTER heating function has completed, oven will revert to PREHEAT function automatically.! If you want to cancel PREHEAT function, keep Stop/Reset Pad pressed for 2 seconds.! During PREHEAT or COOLING, if you have started from a blank display and want to select another function
pad, open the door first before selecting a function.
CONTROLS TO USE
8
7
6
5
3
2
9
Convection
Start
Microwave
Stop
Cooling
Lamp
Preheat
4
1
0
Prog Lock Beep
Reset/
INFORMATIONACTION DISPLAY1 Press
Preheat Pad.Select the required PreheatTemperature when display isblank or “0”.eg. 350˚F
1 press 425˚F2 presses 400˚F3 presses 350˚F
2 PressStart Pad.
Preheat Temperature will bemaintained at the selectedtemperature.If not used, oven willautomatically switch off after1 hour. (Door must remainCLOSED.) Once oven hasreached PreheatTemperature, “P” flashes andbeep sounds.
3 Open Door.
Close Door
Press Start Pad.
Place food in oven.
Select program.eg. Convection 375˚F 15 min
Display will count down time.
At end of heating program, “0”flashes in display window andbeep sounds until door isopened.
Start
PROGRAM
123
TIMEMICRO
%PREHEATCONV
STAGE
PROGRAM
123
TIMEMICRO
%PREHEATCONV
STAGE
4 Open Door. Display window repeatsprogram previously set.
If Start Pad is not pressedwithin 1 minute, oven revertsto PREHEAT.
Preheat
Start
PROGRAM
123
TIMEMICRO
%PREHEATCONV
STAGE
PROGRAM
123
TIMEMICRO
%PREHEATCONV
STAGE
PROGRAM
123
TIMEMICRO
%PREHEATCONV
STAGE
PROGRAM
123
TIMEMICRO
%PREHEATCONV
STAGE
PROGRAM
123
TIMEMICRO
%PREHEATCONV
STAGE
PROGRAM
123
TIMEMICRO
%PREHEATCONV
STAGE
PROGRAM
123
TIMEMICRO
%PREHEATCONV
STAGE
After 1 minute
Caution:The oven does not have a NON-TIP Safety Lock on Wire RackShelf. Please be careful whenremoving food.
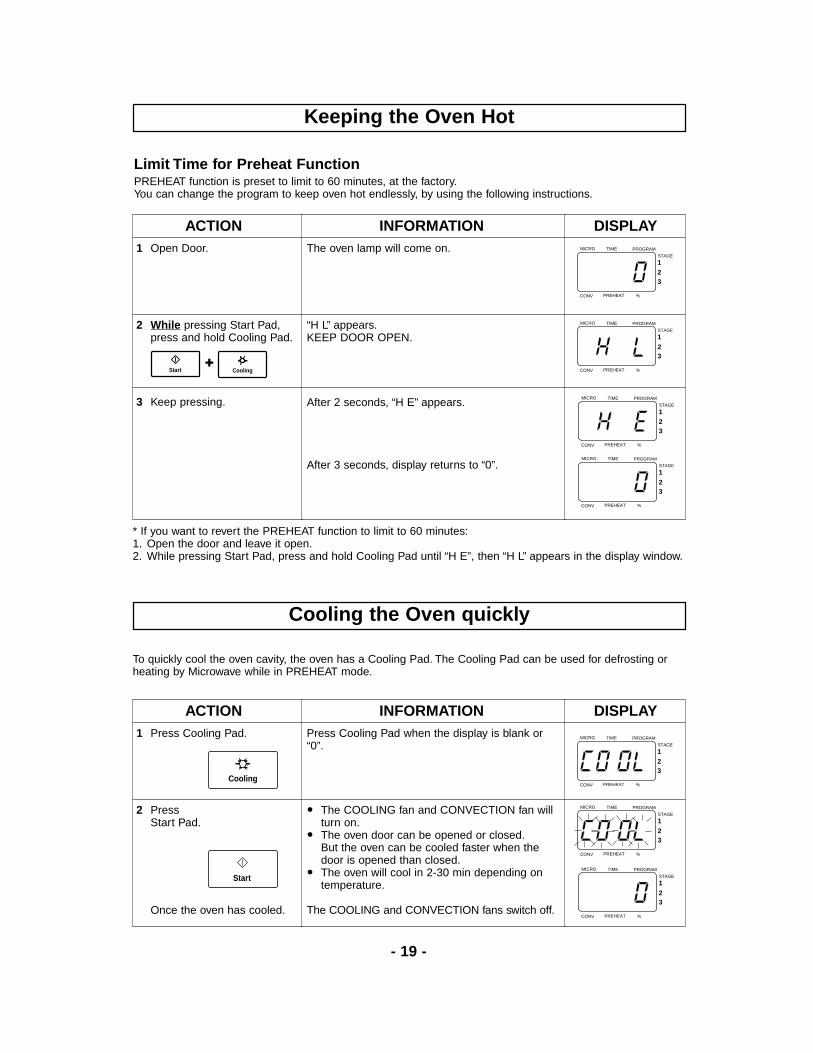
Keeping the Oven Hot
To assist in faster heating and browning results, the PREHEAT feature is designed to keep your oven at 425˚F, 400˚F or 350˚F for a hot start before using CONVECTION or COMBINATION function.
- 19 -
To quickly cool the oven cavity, the oven has a Cooling Pad. The Cooling Pad can be used for defrosting orheating by Microwave while in PREHEAT mode.
INFORMATIONACTION1 Press Cooling Pad. Press Cooling Pad when the display is blank or
“0”.
2 PressStart Pad.
Once the oven has cooled.
! The COOLING fan and CONVECTION fan willturn on.
! The oven door can be opened or closed.But the oven can be cooled faster when thedoor is opened than closed.
! The oven will cool in 2-30 min depending ontemperature.
The COOLING and CONVECTION fans switch off.
DISPLAY
PROGRAM
123
TIMEMICRO
%PREHEATCONV
STAGE
PROGRAM
123
TIMEMICRO
%PREHEATCONV
STAGE
PROGRAM
123
TIMEMICRO
%PREHEATCONV
STAGEStart
Cooling
Cooling the Oven quickly
Keeping the Oven Hot
Limit Time for Preheat FunctionPREHEAT function is preset to limit to 60 minutes, at the factory.You can change the program to keep oven hot endlessly, by using the following instructions.
INFORMATIONACTION1 Open Door. The oven lamp will come on.
2 While pressing Start Pad,press and hold Cooling Pad.
“H L” appears.KEEP DOOR OPEN.
DISPLAYPROGRAM
123
TIMEMICRO
%PREHEATCONV
STAGE
PROGRAM
123
TIMEMICRO
%PREHEATCONV
STAGE
PROGRAM
123
TIMEMICRO
%PREHEATCONV
STAGE
+Start Cooling
PROGRAM
123
TIMEMICRO
%PREHEATCONV
STAGE
After 2 seconds, “H E” appears.
After 3 seconds, display returns to “0”.
3 Keep pressing.
* If you want to revert the PREHEAT function to limit to 60 minutes:1. Open the door and leave it open.2. While pressing Start Pad, press and hold Cooling Pad until “H E”, then “H L” appears in the display window.

- 20 -
When Program Lock is activated, you can not change the Beep Tone.Please release the Program Lock. (See page 17.)
INFORMATIONACTION1 Open Door. The oven lamp will come on.
2 PressProgram Key.
Keep key pressed for 2 seconds until “P” isdisplayed.
KEEP DOOR OPEN.Prog
DISPLAY
PROGRAM
123
TIMEMICRO
%PREHEATCONV
STAGE
PROGRAM
123
TIMEMICRO
%PREHEATCONV
STAGE
3 PressBeep Key.
Press Beep Key to choose loudness and durationrequired. (See below.)(eg. twice)
Beep
PROGRAM
123
TIMEMICRO
%PREHEATCONV
STAGE
PROGRAM
123
TIMEMICRO
%PREHEATCONV
STAGE
PROGRAM
123
TIMEMICRO
%PREHEATCONV
STAGE
After 3 seconds
4 PressProgram Key.
After 3 secondsDisplay returns to “0”.
Prog
The loudness of Beep Tone and its duration at the end of heating cycle can be set.There are four levels of the loudness and three levels of duration.The 3b-1 is preset at factory.
How to change the Beep Tone
No.Presses
12345678910
Display
3b-13b-23b-32b-12b-22b-31b-11b-21b-30b
loudness
LoudestLoudestLoudestMiddleMiddleMiddle
QuietestQuietestQuietest
Silent
duration
beeps for 60 secondsshort beeps 3 timeslong beeps 3 times
beeps for 60 secondsshort beeps 3 timeslong beeps 3 times
beeps for 60 secondsshort beeps 3 timeslong beeps 3 times
---
Beep
- 21 -
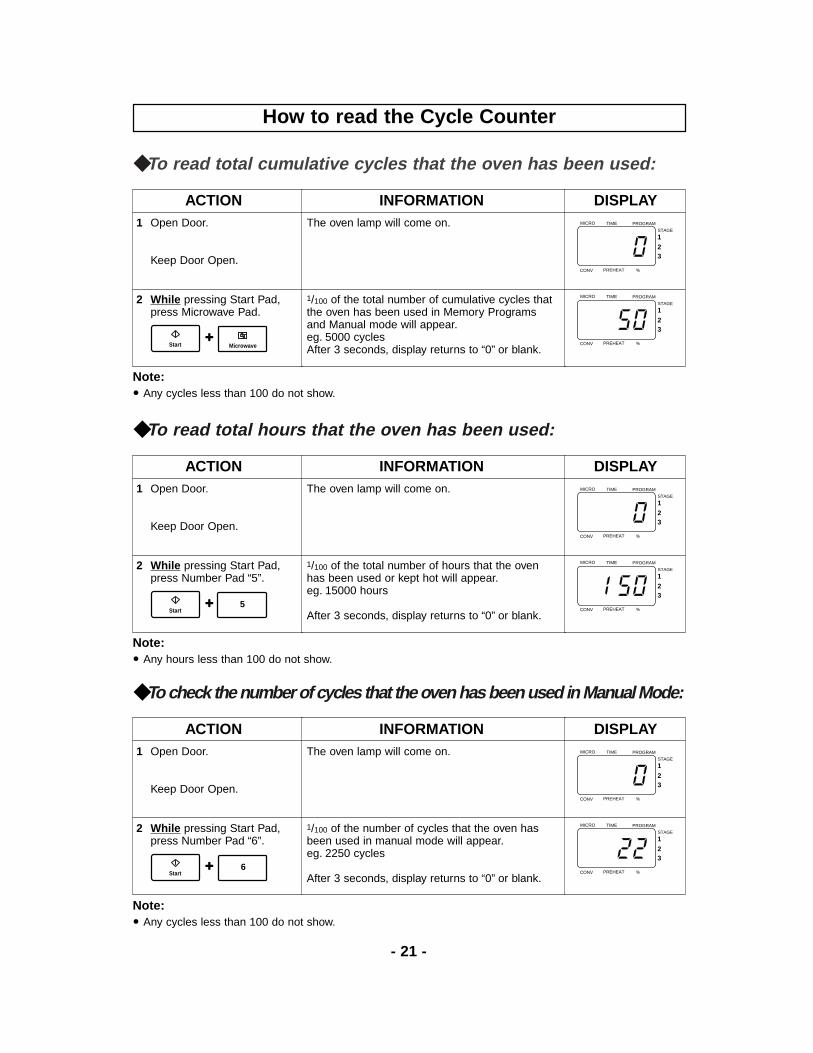
How to read the Cycle Counter
◆ To read total cumulative cycles that the oven has been used:
INFORMATIONACTION1 Open Door.
Keep Door Open.
The oven lamp will come on.
2 While pressing Start Pad,press Microwave Pad.
1/100 of the total number of cumulative cycles that the oven has been used in Memory Programs and Manual mode will appear.eg. 5000 cyclesAfter 3 seconds, display returns to “0” or blank.
DISPLAYPROGRAM
123
TIMEMICRO
%PREHEATCONV
STAGE
PROGRAM
123
TIMEMICRO
%PREHEATCONV
STAGE
+Start Microwave
Note:! Any cycles less than 100 do not show.
◆ To read total hours that the oven has been used:
INFORMATIONACTION1 Open Door.
Keep Door Open.
The oven lamp will come on.
2 While pressing Start Pad,press Number Pad “5”.
1/100 of the total number of hours that the oven has been used or kept hot will appear.eg. 15000 hours
After 3 seconds, display returns to “0” or blank.
DISPLAYPROGRAM
123
TIMEMICRO
%PREHEATCONV
STAGE
PROGRAM
123
TIMEMICRO
%PREHEATCONV
STAGE
+Start
5
Note:! Any hours less than 100 do not show.
◆ To check the number of cycles that the oven has been used in Manual Mode:
INFORMATIONACTION1 Open Door.
Keep Door Open.
The oven lamp will come on.
2 While pressing Start Pad,press Number Pad “6”.
1/100 of the number of cycles that the oven has been used in manual mode will appear.eg. 2250 cycles
After 3 seconds, display returns to “0” or blank.
DISPLAYPROGRAM
123
TIMEMICRO
%PREHEATCONV
STAGE
PROGRAM
123
TIMEMICRO
%PREHEATCONV
STAGE
+Start
6
Note:! Any cycles less than 100 do not show.

- 22 -
How to program for Scheduled Cleaning Service
INFORMATIONACTION1 Open Door. The oven lamp will come on.
2 While pressing Start Pad,close and open Door.
DISPLAYPROGRAM
123
TIMEMICRO
%PREHEATCONV
STAGE
PROGRAM
123
TIMEMICRO
%PREHEATCONV
STAGE
Start
Notes:! 30000 hours is preset for Scheduled Cleaning Service at the factory.
3 Press Number Pad “3”. 1/100 of the currently programmed hours will appear.eg. 30000 hours
PROGRAM
123
TIMEMICRO
%PREHEATCONV
STAGE
3
4 Select time. Turn Timer Dial to set desired hours for scheduled cleaning service.eg. 1500 hours
PROGRAM
123
TIMEMICRO
%PREHEATCONV
STAGE
Schedule Cleaning ServiceFor the Exhaust Duct, Heater Unit and Oil Pan inside the oven, it is recommended to schedule CleaningService. (See page 26.)When “FC 9” sign appears in the display window, have cleaning service performed by an authorized serviceperson.
◆ To program hours for scheduled cleaning service:
5 Press Program Key. 3 seconds later, display reverts to “0” or blank.PROGRAM
123
TIMEMICRO
%PREHEATCONV
STAGE
Prog
INFORMATIONACTION
1 While pressing Start Pad,press Number Pad “5”.
Display reverts to blank.
DISPLAY
PROGRAM
123
TIMEMICRO
%PREHEATCONV
STAGE
◆ To clear “FC 9” sign the total hours counter:
PROGRAM
123
TIMEMICRO
%PREHEATCONV
STAGE
PROGRAM
123
TIMEMICRO
%PREHEATCONV
STAGE
+Start
5
- 23 -
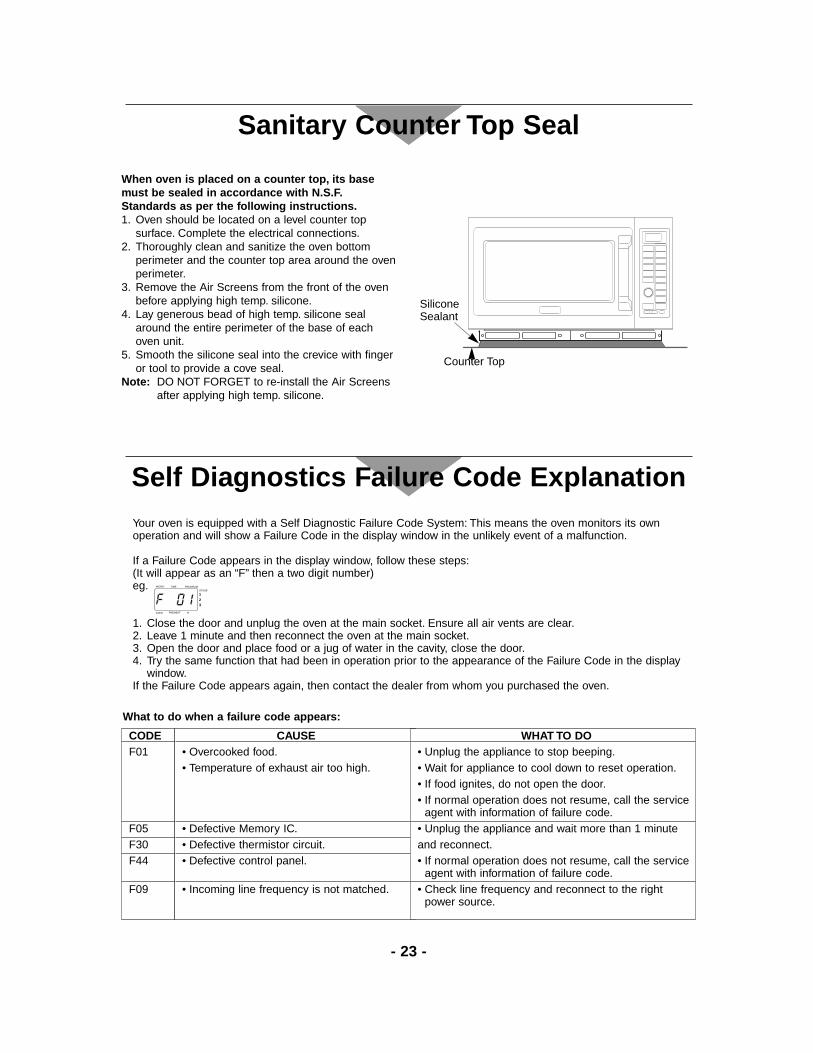
When oven is placed on a counter top, its base must be sealed in accordance with N.S.F.Standards as per the following instructions.1. Oven should be located on a level counter top
surface. Complete the electrical connections.2. Thoroughly clean and sanitize the oven bottom
perimeter and the counter top area around the ovenperimeter.
3. Remove the Air Screens from the front of the ovenbefore applying high temp. silicone.
4. Lay generous bead of high temp. silicone sealaround the entire perimeter of the base of eachoven unit.
5. Smooth the silicone seal into the crevice with fingeror tool to provide a cove seal.
Note: DO NOT FORGET to re-install the Air Screensafter applying high temp. silicone.
Sanitary Counter Top Seal
SiliconeSealant
Counter Top
Self Diagnostics Failure Code ExplanationYour oven is equipped with a Self Diagnostic Failure Code System: This means the oven monitors its ownoperation and will show a Failure Code in the display window in the unlikely event of a malfunction.
If a Failure Code appears in the display window, follow these steps:(It will appear as an “F” then a two digit number)eg.
1. Close the door and unplug the oven at the main socket. Ensure all air vents are clear.2. Leave 1 minute and then reconnect the oven at the main socket.3. Open the door and place food or a jug of water in the cavity, close the door.4. Try the same function that had been in operation prior to the appearance of the Failure Code in the display
window.If the Failure Code appears again, then contact the dealer from whom you purchased the oven.
What to do when a failure code appears:
CODEF01
F05F30F44
F09
CAUSE• Overcooked food.• Temperature of exhaust air too high.
• Defective Memory IC.• Defective thermistor circuit.• Defective control panel.
• Incoming line frequency is not matched.
WHAT TO DO• Unplug the appliance to stop beeping.• Wait for appliance to cool down to reset operation.• If food ignites, do not open the door.• If normal operation does not resume, call the service
agent with information of failure code.• Unplug the appliance and wait more than 1 minute and reconnect.• If normal operation does not resume, call the service
agent with information of failure code.• Check line frequency and reconnect to the right
power source.
PROGRAM
123
TIMEMICRO
%PREHEATCONV
STAGE

- 24 -
Taking Care of Your Oven
It is essential that you follow these points to get the maximum use from your oven. Microwaves are attracted tomoisture and grease: therefore a dirty oven does not cook EFFICIENTLY.Caution: Do not clean this oven with any product that is labeled as containing corrosive chemicals.
The heating of corrosive chemicals in this oven may cause microwave radiation leaks.DO NOT clean this oven by spraying with water.
1. Before Cleaning
Unplug the oven at the socket.
2. Door Seals
Pay special attention to cleaning the door seals anddoor seal areas.Regularly wipe the Drip Ledge to avoid a build up ofmoisture and grease.
3. Door
Keep the inside glass of the door clean by wipingregularly with a soft damp cloth. Small amounts ofoven cleaner can be used––DO NOT SPRAYDIRECTLY onto door––spray onto a cloth and wipeoven. Do not use harsh detergents or abrasives.
4. Oven Walls
The walls should be wiped regularly with a soft dampcloth. Small amounts of oven cleaner can beused––DO NOT SPRAY DIRECTLY onto walls––sprayonto a cloth and wipe.DO NOT ALLOW OVEN CLEANER NEAR THEHOLES IN THE WALL OF THE OVEN. If corrosivecleaner gets behind the oven wall, your oven could bedamaged. Do not allow cleaning liquids to seep intoopenings.Excess grease can be softened for ease of cleaning byplacing 500 - 800 ml of hot water in a microwave-safebowl with a chopped fresh lemon. Heat on High Powerfor 15 - 20 min. The moisture produced on the wallsshould be wiped with a soapy cloth.
5. Oven Floor
The wave guides are situated beneath the ceramicbase of the oven. Any spills must therefore be wipedclean to ensure even heating. Do not use harshdetergents or abrasives.
- 25 -
Taking Care of Your Oven
6. Ceiling
Before cleaning, ensure oven has cooled to avoidburns. Wipe the ceiling regularly with a damp cloth tominimize build up of grease and smoke.
7. Control Panel
If the Control Panel becomes dirty, clean with a soft,dry cloth. Do not use harsh detergents or abrasives onControl Panel. Do not use a saturated cloth as theremaining moisture may damage the panel. Whencleaning the Control Panel, keep the oven door opento prevent the oven from accidentally turning on. Aftercleaning touch Stop/Reset Pad to clear displaywindow.
8. Accessories
The accessories should be cleaned regularly tomaximize efficiency of the oven.WARNING: DO NOT place hot Ceramic Insulating
Tray directly under a cold tap––the traywill shatter.
Wire Rack Shelf––This should be cleaned every day.Do not use harsh abrasives.
9. Shelf Supports
Remove the shelf supports and clean regularly. Do notforget to clean oven walls behind supports.If food splashes are not cleaned off from shelfsupports they will be carbonized during further heatingand may cause ARCING during microwave mode.
10.Replacement of the Oven Lamp
If the Oven Lamp burns out, it can be replaced byfollowing these directions.1. Unplug the oven.2. Remove the screw and the Oven Lamp Cover which
is located on the left side of the cabinet.3. Replace the old bulb with a new one.
(use 220/240 V, 25 W max.,E-14 lamp.)4. Reinstall the Oven Lamp Cover.Caution:Remove the plug from the electrical socket
before replacement of the Oven Lamp Bulb.

- 26 -
Taking Care of Your Oven
11.Cleaning the Air Screen
Clean the Air Screens occasionally according to thefollowing instructions. Problems may occur with theoven if the filters become clogged with dirt or dust.*1. Remove the right Air Screen from the front bottom
skirt by pulling the Right Pop Pin straight out. Then slide the screen to the right and lift it off the post at the center.Remove the left Air Screen the same as right one.
2. Wash the filters with soap and water.3. To replace, align the screen with the center post,
and hold the front of the Pop Pin forward, insert the back of the pin into its hole. Press the front of the pin and it will pop into place. Be sure to replace the Air Screens before using the oven.
*If the Air Screen becomes clogged with dust or grease,it may cause an overheating problem in the oven.
12.Cleaning Service Schedule
For the Exhaust Duct, Heater Unit and Oil Pan insidethe oven, it is recommended to schedule CleaningService by an authorized service person every 6 months, or when a heavy grease buildup is seen onthe back of the oven cavity. This is NOT covered underwarranty.
Post
Pop Pin Pop Pin

- 27 -
How does the Microwave work?
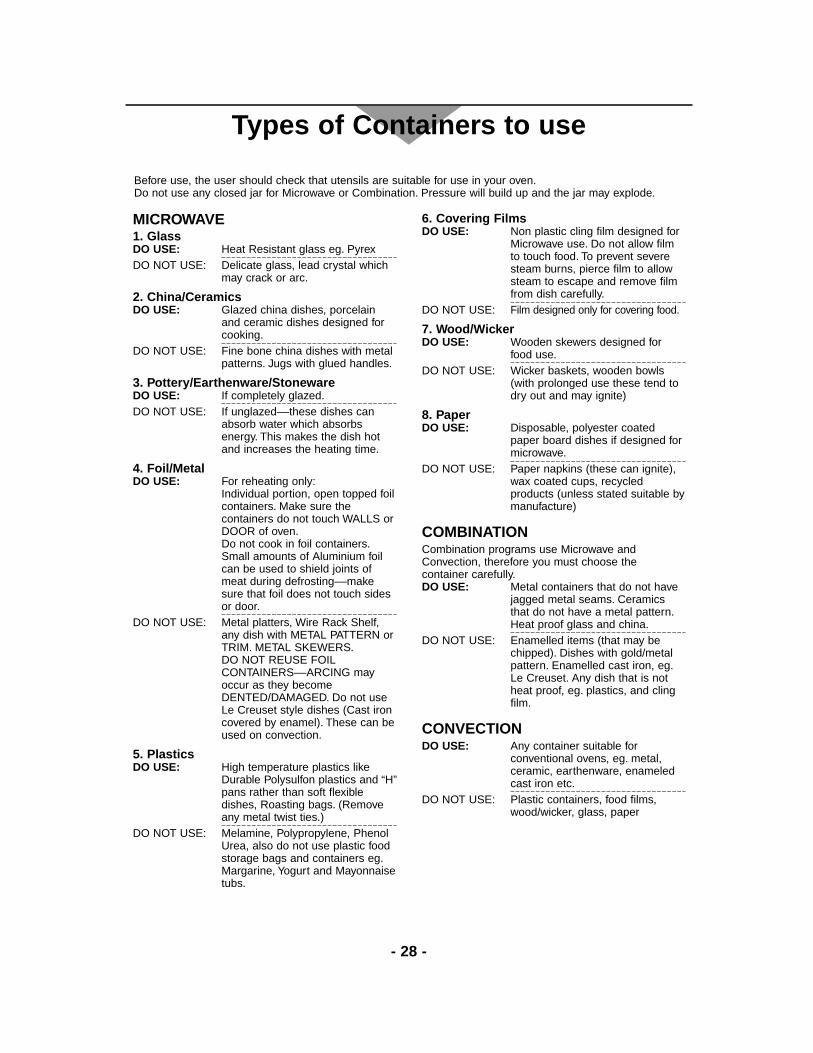
Microwaves are a form of high frequency radio waves similarto those used by a radio including AM, FM and CB. Theyare, however, much shorter than radio waves; approximatelyfive inches in length. Electricity is converted into microwaveenergy by the magnetron tube. From the magnetron tube,microwave energy is transmitted to the oven cavity where it is:reflected, transmitted and absorbed.
1. ReflectionThey will REFLECT off metal. The inner walls of your ovenare made of stainless steel, so that the microwave energycan bounce evenly around the cavity. Of course, themicrowaves will also reflect off metal cooking containers andaccessories, such as saucepans and platters. For thisreason, NEVER use the Wire Rack Shelf on microwave only.
2. TransmissionThe microwaves will TRANSMIT through paper, plastic,glass and china, therefore, containers made of thesesubstances should be used in microwave cookery.
3. AbsorptionThe microwave energy is ABSORBED by the food. Theenergy penetrates the food causing the molecules to vibrateover 2,450,000,000 times a second. This vibration causesthe water molecules to rub against each other producingfrictional heat which cooks the outer part of the food; theheat is then conducted through the food to cook the center.
1. Reflection
3. Absorption
2. Transmission
- 28 -
Types of Containers to use
MICROWAVE1. GlassDO USE: Heat Resistant glass eg. PyrexDO NOT USE: Delicate glass, lead crystal which
may crack or arc.
2. China/CeramicsDO USE: Glazed china dishes, porcelain
and ceramic dishes designed forcooking.
DO NOT USE: Fine bone china dishes with metalpatterns. Jugs with glued handles.
3. Pottery/Earthenware/StonewareDO USE: If completely glazed.DO NOT USE: If unglazed––these dishes can
absorb water which absorbsenergy. This makes the dish hotand increases the heating time.
4. Foil/MetalDO USE: For reheating only:
Individual portion, open topped foilcontainers. Make sure thecontainers do not touch WALLS orDOOR of oven.Do not cook in foil containers.Small amounts of Aluminium foilcan be used to shield joints ofmeat during defrosting––makesure that foil does not touch sidesor door.
DO NOT USE: Metal platters, Wire Rack Shelf,any dish with METAL PATTERN orTRIM. METAL SKEWERS.DO NOT REUSE FOILCONTAINERS––ARCING mayoccur as they becomeDENTED/DAMAGED. Do not useLe Creuset style dishes (Cast ironcovered by enamel). These can beused on convection.
5. PlasticsDO USE: High temperature plastics like
Durable Polysulfon plastics and “H”pans rather than soft flexibledishes, Roasting bags. (Removeany metal twist ties.)
DO NOT USE: Melamine, Polypropylene, PhenolUrea, also do not use plastic foodstorage bags and containers eg.Margarine, Yogurt and Mayonnaisetubs.
6. Covering FilmsDO USE: Non plastic cling film designed for
Microwave use. Do not allow filmto touch food. To prevent severesteam burns, pierce film to allowsteam to escape and remove filmfrom dish carefully.
DO NOT USE: Film designed only for covering food.
7. Wood/WickerDO USE: Wooden skewers designed for
food use.DO NOT USE: Wicker baskets, wooden bowls
(with prolonged use these tend todry out and may ignite)
8. PaperDO USE: Disposable, polyester coated
paper board dishes if designed formicrowave.
DO NOT USE: Paper napkins (these can ignite),wax coated cups, recycledproducts (unless stated suitable bymanufacture)
COMBINATIONCombination programs use Microwave andConvection, therefore you must choose thecontainer carefully.DO USE: Metal containers that do not have
jagged metal seams. Ceramicsthat do not have a metal pattern.Heat proof glass and china.
DO NOT USE: Enamelled items (that may bechipped). Dishes with gold/metalpattern. Enamelled cast iron, eg.Le Creuset. Any dish that is notheat proof, eg. plastics, and clingfilm.
CONVECTIONDO USE: Any container suitable for
conventional ovens, eg. metal,ceramic, earthenware, enameledcast iron etc.
DO NOT USE: Plastic containers, food films,wood/wicker, glass, paper
Before use, the user should check that utensils are suitable for use in your oven.Do not use any closed jar for Microwave or Combination. Pressure will build up and the jar may explode.

- 29 -
COOKING BASICSFundamental principles determine the success ofmicrowave food preparation.They include:1. Always cook or heat foods in covered containers.
- This will accomplish the following;a) Retain steam to keep foods moist.b) Even cooking temperatures.c) Keep the interior of the oven clean.
2. TEMPERATURE OF FOODS – Frozen food itemswill require longer heating times to reach a desiredserving temperature than foods that are refrigerated.
3. FOOD COMPONENTS – Foods high in sugar, salt,fats and moisture content heat faster because theseproperties attract microwave energy. Denser foodshigh in protein and fiber, absorb microwave energyslower which means a lengthier heating time.
4. BULK/VOLUME – The greater the mass of food,the longer it takes to heat.
5. CONTAINERS – Ceramic, paper, china, styrofoam,glass and plastic are suitable for use in microwaveovens with the following caution.DO NOT HEAT foods in a SEALED container orbag. Foods expand when heated and can break thecontainer or bag.
6. DO NOT USE HIGH-SIDED METAL CONTAINERSbecause it “bounces” the microwaves, causinguneven heating and sometimes even flashes, whichmay pit or mark the interior of the oven, the metalcontainer or plate trim. Use 1/4 size sheet pans orother low-sided containers.
7. Heated liquids can erupt if not mixed with air. Donot heat liquids in your microwave oven without firststirring. (See #1)
Heating foods with either high sugar or high fatcontent should be done ONLY in hightemperature-resistant containers since thesefoods get very hot. Using styrofoam containers forthese foods will cause the styrofoam to warp.Other low temperature restaurant glass or plasticplatters may crack or warp under similar conditions.
GENERAL GUIDELINES FORSTEAMING IN A PANASONICCOMBI - WAVEPlease refer to the USDA/FDA Food Code guidelines.
COOKING FOODS FROM REFRIGERATED TEMPERATURE
Foods stored in the refrigerator (40˚F) should becovered before reheating with the exception of breads,pastries or any breaded product, which should beheated uncovered to prevent sogginess.
Most conventionally prepared foods should be slightlyundercooked, and held in the refrigerator, so thatovercooking does not occur during microwave cooking. *Cooked items, such as vegetables, may be portionplated and covered for reheating without loss of color,texture or nutritional content.
COOKING FOODS FROM ROOM TEMPERATUREFood items such as canned entrees, vegetables, etc.will require significantly less cooking time than thosefrom refrigerated temperatures.
IMPORTANT RECOMMENDATIONS1. For best results it is recommended that foods
conventionally prepared be slightly undercookedwhen subsequently heated in this oven. *
2. REMEMBER that after the cooking cycle has beencompleted, internal food temperatures continue torise slightly in foods heated in this oven.
3. A major mis-use of microwave applications is thecategory of breads, pastries and pies. Their crustsand outsides are drier than insides or fillings, theyheat more slowly. Therefore, baked goods shouldONLY be heated until the crust is warm to the touch(120˚F-130˚F). *
4. DO NOT OVERHEAT YOUR FOOD: 99% of allfood quality complaints of microwave heatedfoods can be traced to overheating.
*For only non “Potentially Hazardous Foods”(PHF) vegetables, etc. - Please always adhere toUSDA/FDA guidelines when cooking and reheatingPHF.
Cooking Instructions
TM
Recipes available on www.panasonic.com/cmo (See page 2 for Chef Support)

- 30 -
Technical Specifications
NE-C1153
208 V / 60 Hz, single phase
3900 W / 18.8 AMicrowave: 1100 W (IEC 705-88)Convection Heater: 2800 W
2450 MHz
235/8”x 207/16” x 153/16” (600 mm x 519 mm x 385 mm)
16”x 131/4” x 89/16” (406 mm x 336 mm x 217 mm)
88 lbs (40 kg)
Microwave:100 - 60 % power 15 minutes
50 - 10 % power 60 minutes
Convection: 2 hours Combination: 1 hour
100 Memory Programs
66
15
22 13/16
23 5/8
7 /16 7 /16"
"
" "
39 3 /16"
14 15 /16"
2 3 /8 " 20 7 /16"
16 15 /16" 3 1/2"
/16
3''
Specifications subject to change without notice.For the voltage requirements, the production year and month, country and serial number, please refer to theidentification plate on the Microwave Convection Oven.
Model
Power Source
Required PowerOutput
Frequency
Outer Dimensions (W x D x H)
Cavity Dimensions (W x D x H)
Net Weight
Timer
Maximum Setting Time
Memory Programs

Memo
- 31 -

www.panasonic.com/cmoPANASONIC HOME AND COMMERCIALPRODUCTS COMPANY, DIVISION OFMATSUSHITA ELECTRIC CORPORATIONOF AMERICAOne Panasonic Way 4A-4Secaucus, NJ07094Or Call (201) 348-5377
A00033840APF1101-0
Printed in Japan
R