Embed Size (px)
Citation preview

Operating Instructions
Thank you for purchasing a Panasonic product.Please read this document before using the product and save it for future reference.
Carefully read the information found in the section titled "For your safety" in particular.
Installation Guide is supplied separately.
This system is an auxiliary system; it is not designed to provide complete protection from property loss. Panasonic will not be
held responsible in the event that property loss occurs while this system is in operation.
VL-MW274
VL-SW274
Model Name Model No.
Wireless Video Intercom System
Main Monitor Station

1. IntroductionIntroduction
1.1 Model composition ........................................31.2 Accessory information ...................................31.3 Additional/replacement accessories ..............41.4 General information .......................................51.5 Symbols, expressions, and styles .................61.6 Trademarks and registered
trademarks ....................................................6
2. Important informationImportant information
2.1 For your safety ..............................................72.2 Important safety instructions .........................82.3 For best performance ....................................82.4 Other important information ..........................82.5 For India only ................................................9
3. PreparationPreparation
3.1 Controls .......................................................103.2 Using the display .........................................123.3 Charging the sub monitor ............................133.4 Setting the language, date and time ...........143.5 Wide/zoom settings and zoom position
settings ........................................................14
4. Talking and monitoringTalking and monitoring
4.1 Answering doorphone calls .........................164.2 Transferring doorphone calls ......................164.3 Monitoring the outside with the
doorphone ...................................................174.4 Talking with other devices ...........................17
5. Recording and playingRecording and playing
5.1 Recording doorphone images .....................185.2 Playing recorded images (main monitor and
extension monitor only) ...............................18
6. Using electric locks and PBXsUsing electric locks and PBXs
6.1 Using electric locks .....................................206.2 Panasonic PBX integration .........................20
7. Incoming call operationsIncoming call operations
7.1 When another incoming call isreceived .......................................................21
8. Additional functionsAdditional functions
8.1 Zooming in and out (wide/zoom, pan/tilt; mainmonitor and extension monitor only) ...........22
8.2 Sound and display settings for calls andmonitoring ...................................................22
8.3 Ringtone settings ........................................238.4 Main monitor/extension monitor - function
settings list ..................................................238.5 Sub monitor - function settings list ..............25
9. Expanding the systemExpanding the system
9.1 Registering sub monitors and extensionmonitors ......................................................27
9.2 Using repeaters ...........................................279.3 Cancelling devices (main monitor/extension
monitor) .......................................................28
10.General informationGeneral information
10.1 Cleaning ......................................................2910.2 Specifications ..............................................29
11.TroubleshootingTroubleshooting
11.1 Troubleshooting ..........................................3111.2 Error messages - main monitor ...................3411.3 Error messages - extension monitor ...........3411.4 Error messages - sub monitor .....................34
12.VL-V900 basic operationsVL-V900 basic operations
12.1 Controls .......................................................3512.2 Lobby station operations .............................3512.3 Main monitor operations with the lobby
station ..........................................................3612.4 System conditions and limitations ...............37
2
Table of Contents

1.1 Model composition
Model composition
Main Monitor Station*1
(Main monitor*2)Wireless monitor station
(Sub monitor*2)Door Station
(Doorphone*2)
VL-SW274 VL-MW274 VL-W617 VL-V522LVL-MW274 VL-MW274 - -
*1 Can be configured to be used as an extension monitor.*2 Product names used in this document.
Caution:R Before attempting to connect or operate this product, please read the label on the rear of the main monitor.
1.2 Accessory information
1.2.1 Supplied accessories
For the sub monitor
Accessoryitem
AC adaptor Battery Charger Charger standQuantity 1 1 1 1
Note:R Accessories for installing the main monitor and the doorphone are described in the supplied Installation Guide.
3
1. . Introduction
1. Introduction

1.3 Additional/replacement accessoriesPlease contact your Panasonic dealer for sales information.
As of October, 2017
Accessory item Order number Number of devices that can beconnected
Rechargeable battery(for the sub monitor)
HHR-P103Battery type:– Nickel metal hydride (Ni-MH)
-
Door Station VL-V555 (surface mount)
Max. of 2
(referred to as "doorphone" inthis document)
VL-V554 (surface mount)VL-V554U (flush mount)VL-V522L (surface mount)
Lobby Station*1 VL-V591
Video Intercom System forApartment Complexes*1
VL-V900 and VL-V700 series Contact your building managerfor more information.
Sub monitor*2 VL-W617 Max. of 6
Extension monitor*2 VL-MW274 Max. of 3 (not including the mainmonitor)
Repeater VL-FAN2 Max. of 2
*1 Contact your building manager for more information.*2 When sub monitors and extension monitors are used together, a combined maximum of 6 sub monitors and
extension monitors can be registered.
Note:R The specifications differ depending on the models of doorphone and lobby station. The following functions are not
available for the VL-V522L (supplied doorphone) and VL-V591.– VL-V591: Monitoring the outside with the doorphone (page 17)– VL-V591: Doorphone LED lights' illumination settings (page 22)– VL-V591: Doorphone backlight compensation settings (page 22)– VL-V522L/VL-V591: Wide/zoom settings and zoom position settings (page 14)
1.3.1 Compatible Panasonic PBXsThis unit can be used with Panasonic PBXs (page 20). Consult your dealer for more information.
Compatible Panasonic PBXs*1
– KX-TDA30/TDA100/TDA100D/TDA200/TDA600 series– KX-TDE100/TDE200/TDE600 series– KX-NS300/NS500/NS700/NS1000 series– KX-NSX1000/NSX2000 series
*1 As of October, 2017.
4
1. Introduction

1.4 General informationR In the event of problems, you should contact your equipment supplier in the first instance.R The available products differ depending on your region. For more information, please consult your dealer.R In this document, the suffix of each model number (e.g., the "BX" in "VL-SW274BX") is omitted unless necessary.
When the suffixes are used to describe models (e.g., "BX models"), the suffixes refer to all models in the series.R All the functions listed in this document are available for the supplied main monitor. However, the functions
available for the doorphone and lobby station differ depending on the model of the doorphone and lobby station.For more information about optional doorphone and lobby station, see "1.3 Additional/replacementaccessories" on page 4.
R Design and specifications are subject to change without notice.R The illustrations in the supplied document(s) may vary slightly from the actual product.
House mode and Apartment modeThe main monitor can be configured to be used in two modes: House mode and Apartment mode.R House mode refers to when the main monitor is used as a stand-alone system and is not connected to a larger
system comprised of a VL-V900 lobby station. This document describes the operations for House mode.R Apartment mode refers to when the main monitor is used connected to a larger system comprised of a VL-V900
lobby station, such as in apartment complexes. Operations for Apartment mode are described in 12 VL-V900basic operations (Page 35) of this document as well as the Supplemental Information. The SupplementalInformation can be accessed from the following Web site.https://panasonic.net/cns/pcc/support/intercom/v900
Graphical symbols for use on equipment and their descriptions
1 2 3 4 5 6
7 8 9 10 11 12
1. Alternating current (A.C.) 2. Direct current (D.C.) 3. Protective earth 4. Protective bonding earth 5. Functional earth6. For indoor use only 7. Class P equipment (equipment in which protection against electric shock relies on DoubleInsulation or Reinforced Insulation) 8. "ON" (power) 9. "OFF" (power) 10. Stand-by (power) 11. "ON"/"OFF" (power;push-push) 12. Caution, risk of electric shock
5
1. Introduction

1.5 Symbols, expressions, and stylesThe following symbols, expressions, and styles are used in this document.
Item How it is expressed Example
Text displayed on theproduct’s display
Text is displayed in a special font,usually enclosed in quotationmarks
“Initial settings”
Icons displayed on theproduct’s display
Black-and-white illustration oficon is used
Buttons with printing onthem or near them
Button printing is displayed,usually wrapped in thick brackets
M N
M N
Soft keys Black-and-white illustration of thecorresponding soft key icon isused
Navigator key (submonitor only)
Either referred to by name, orwith a black-and-white illustration
R "Use the navigator key to select..."
R "Press to select..."
R "Select..."Procedures Usually written in an abbreviated
style. The verb may be omitted.Unless otherwise stated, allprocedures are for both the mainmonitor, extension monitor, andsub monitor.
Main monitor/extension monitor example ® “Display” ® ®
“Brightness”R Meaning:
Press the soft key under the displayed soft key icon, press the soft keys
under the displayed and soft key icons to select “Display”, press thesoft key under the displayed soft keyicon, and then press to select“Brightness”.
Sub monitor example
M N ® “BRIGHTNESS” ® (OK) ®select the desired setting.R Meaning:
Press the M N button, use the navigatorkey to select “BRIGHTNESS” on the display,
and then press the navigator key (OK).
1.6 Trademarks and registered trademarksR The software of this product is based in part on the work of the Independent JPEG Group.R All other trademarks identified herein are the property of their respective owners.
6
1. Introduction

2.1 For your safetyTo prevent severe injury and loss of life/property, readthis section carefully before using the product to ensureproper and safe operation of your product.
WARNING
Preventing fire and electric shockR Use only the power source marked on the product. If
you are not sure of the type of power supplied to yourhome, consult your dealer or local power company.
R Use only the specified AC adaptor.R Do not attempt to disassemble or modify this product.
Contact an authorised service centre for repairs.R Never touch the AC adaptor and power plug with wet
hands.R Do not touch the AC adaptor and power plug during
an electrical storm.R Do not use the product (excluding the doorphone) in
areas that are exposed to rain, moisture, steam, oroily smoke, or areas that have excessive dust.
R Do not perform any actions (such as fabricating,twisting, stretching, bundling, forcibly bending,damaging, altering, exposing to heat sources, orplacing heavy objects on the power cable and the ACadaptor) that may damage the power cable and theAC adaptor. Using the product with a damaged powercable or AC adaptor may cause electric shock, shortcircuits, or fire. Contact an authorised service centrefor repairs.
R Do not overload the power outlet or wiring above thespecified levels. Overloading by having manyconnections on one power outlet may cause heatgeneration, resulting in a fire.
R Never put metal objects inside the product. Neverspill any liquid on the product (excluding thedoorphone).If metal objects enter the product or the productbecomes wet, unplug the product from the poweroutlet and contact an authorised service centre.
R Do not use a microwave oven or other devices, suchas electromagnetic cookers, to speed up the dryingprocess of any parts of the product.
R Completely insert the AC adaptor and power plug intothe power outlets. Failure to do so may cause electricshock and/or excessive heat resulting in a fire. Do notuse damaged AC adaptor, power plug, or poweroutlets.
R Regularly remove any dust, etc., from the AC adaptorand power plug by unplugging them from the poweroutlets, then wiping them with a dry cloth.Accumulated dust may cause an insulation defectfrom moisture, etc., resulting in a fire.
R Unplug the product from the power outlet if theproduct emits smoke, an abnormal smell or makesunusual noise, or if the product has been dropped orphysically damaged. These conditions can cause fire
or electric shock. Confirm that smoke has stoppedemitting and contact an authorised service centre.
R Hold the main body (not the metal parts) of the ACadaptor and power plug when unplugging them.Unplugging the AC adaptor and power plug whileholding their cords or cords’ plugs may result in fire,electric shock, or injury.
Preventing accidentsR Do not use the product in health care facilities if any
regulations posted in the area instruct you not to doso. Hospitals or health care facilities may be usingequipment that could be sensitive to external RF(radio frequency) energy.
R Do not install or use this product near automaticallycontrolled devices such as automatic doors and firealarms. Radio waves emitted from this product maycause such devices to malfunction, resulting in anaccident.
R Consult the manufacturer of any personal medicaldevices, such as pacemakers or hearing aids, todetermine if they are adequately shielded fromexternal RF (radio frequency) energy. (The productoperates in the frequency range of 2.4 GHz and2.48 GHz with a peak transmission power of100 mW (max.).)
CAUTION
Preventing accidents, injuries, and property damageR Do not use the product in unstable areas or areas
prone to strong vibrations. This may cause theproduct to fall, resulting in damage to the product orinjury.
R Do not put your ear(s) near the speaker, as loudsounds emitted from the speaker may cause hearingimpairment.
Sub monitor batteriesPreventing leakage, heat generation, rupture, oraccidentsR Use only the battery(ies) specified.R Do not open or mutilate the batteries. Released
electrolyte from the batteries is corrosive and maycause burns or injury to the eyes or skin. Theelectrolyte is toxic and may be harmful if swallowed.
R Charge the batteries provided or identified for usewith the product only, in accordance with theinstructions and limitations specified in thisdocument.
R Do not heat batteries or dispose of batteries in a fire.R Do not touch the ends of batteries ( , ) with metal
objects.R Handle the batteries with care. Do not allow
conductive materials such as rings, bracelets or keysto touch the batteries, otherwise a short circuit maycause the batteries and/or the conductive material tooverheat and cause burns.
7
2. . Important information
2. Important information

R Only use the specified charger and AC adaptor tocharge the batteries. Failure to follow theseinstructions may cause the batteries to swell orexplode.
2.2 Important safety instructionsWhen using this product, basic safety precautions shouldalways be followed to reduce the risk of fire, electricshock, or personal injury.1. Do not use this product near water. For example,
near a bathtub, wash bowl, kitchen sink, or laundrytub, in a wet basement, or near a swimming pool, etc.
2. Use only the power cable, AC adaptor, and batteriesindicated in this document.Do not dispose of the battery(ies) in a fire. They mayexplode. Check with local codes for possible specialdisposal instructions.
SAVE THESE INSTRUCTIONS
2.3 For best performanceLocation/avoiding noise (main monitor/sub monitor)The main monitor, sub monitor, and other compatiblePanasonic units use radio waves to communicate witheach other. (The product operates in the frequency rangeof 2.4 GHz and 2.48 GHz with a peak transmission powerof 100 mW (max.).)R For maximum coverage (approx. 100 m) and
noise-free communications, install your mainmonitor:– at a convenient, high, and central location with no
obstructions between the sub monitor and mainmonitor in an indoor environment.
– away from electronic appliances such as TVs,radios, personal computers, wireless devices, ordigital cordless phones.
– facing away from radio frequency transmitters,such as external antennas of mobile phonestations. (Avoid installing the main monitor neara window.)
R If you use the sub monitor near a microwave ovenwhich is being used, noise may be heard. Move awayfrom the microwave oven and closer to the mainmonitor.
R Coverage and voice quality depends on the localenvironmental conditions.
Environment (main monitor/sub monitor)R Keep the unit (main monitor/extension monitor and
sub monitor) away from electrical noise generatingdevices, such as fluorescent lamps and motors.
R The unit should not be exposed to direct sunlight.R The unit should be kept away from heat sources such
as radiators, cookers, etc. It should not be placed inrooms where the temperature is less than 0 °C orgreater than 40 °C. Damp basements should also beavoided.
R Do not install the product in locations that are suspectto sudden changes in temperature. Failure to do somay cause condensation to form on the productcausing malfunction.
R Even when the main monitor and sub monitor areused within 100 m of each other, obstructions cancause weak signals, noise, interruptedtransmissions, distorted images and slow imagerefresh rates. Obstructions can include:– Metal doors or metal shutters.– Heat insulation including aluminium foil.– Concrete walls or walls made of galvanized iron
sheet.– If the sub monitor is being used in a different
building, or a different part of the house, i.e. adifferent floor to the where the main monitor hasbeen installed.
– Many walls.– Double insulated glass windows.
R Some types of hearing aids may receive noise fromwireless communications between the main monitor,sub monitor, and other compatible Panasonic units.
R Operating the unit near electrical appliances maycause interference. Move away from the electricalappliances.
R In areas surrounded by a high electrical field,disturbances may occur in the unit's image or sound.
2.4 Other important informationR The AC adaptor is used as the main disconnect
device. Ensure that the power outlet is installed nearthe product and is easily accessible.
Caution:R Risk of explosion if battery is replaced by
incorrect types. Dispose of used batteriesaccording to the instructions.
TappingThis product uses digital wireless technology so that acall is rarely intercepted. However, calls may be tappedby a third party because the product also communicatesusing radio waves.R "Tapping" means that the other party intercepts a
radio message intentionally or accidentally by usinga receiver.
Privacy and rights of portraitWhen installing or using the doorphone, please take intoconsideration the rights of others with regard to privacy.R It is generally said that "privacy" means the ability of
an individual or group to stop information aboutthemselves from becoming known to people otherthan those whom they choose to give the information."Rights of portrait" means the right to be safe fromhaving your own image taken and usedindiscriminately without consent.
8
2. Important information

Personal informationThe main monitor's/extension monitor's internal memoryrecords personal information (image recordings ofvisitors, etc.). Panasonic assumes no liability for anyunforeseen damages arising from the exposure of therecorded information.R Disclaimer
Recorded data may be altered or deleted as a resultof incorrect operations, exposure to static electricity,accidents, malfunction, repairs or other operations.Panasonic assumes no liability for any direct orindirect damages resulting from the loss or alterationof recorded images.
Requesting repairs for the productR Before submitting the main monitor/extension
monitor and sub monitor for repair, initialize them.This will delete all information saved in the mainmonitor/extension monitor and sub monitor.*1
R Even if the product is sent for repairs without beinginitialized, the memory (including recorded data andsettings) for the main monitor/extension monitor orsub monitor may be cleared and set to factory defaultafter repair.
R If operations cannot be performed due to the mainmonitor/extension monitor or sub monitormalfunction, consult with the place of purchase forappropriate action.
Note for product disposal, transfer, or returnR This product can store your private/confidential
information.To protect your privacy/confidentiality, werecommend that you erase the information (recordedimages) from the memory before you dispose of,transfer or return the product.All the recorded images can be erased at once byinitializing the main monitor/extension monitor*1
*1 Main monitor/extension monitor: perform “FactorySetting” in “Initialize settings”(page 25).
Information on Disposal in other Countries outsidethe European Union
These symbols are only valid in the European Union. Ifyou wish to discard these items, please contact your localauthorities or dealer and ask for the correct method ofdisposal.
OthersR It is prohibited to disassemble or modify this product.
Contact the dealer where you purchased this productfor repair.
R When power fails, this product cannot be used.
R For the recorded image:The recorded image may be lost when:– Mishandled– Electric shock or radio wave interference occurs.– The power is turned off during use.
R Panasonic may not be liable for damages due toexternal factors such as power failures.
R If you stop using the main monitor/extension monitorand the doorphone, remove the main monitor/extension monitor and the doorphone from the wallsto prevent them from falling off. (Consult your dealerfor information about removing the product.)
2.5 For India onlyDeclaration of Conformity with the requirements ofthe E-Waste (Management) RulesThe Product is in conformity with the requirements of thereduction of hazardous substances of the E-WasteRules.The content of hazardous substance with the exemptionof the applications listed in SCHEDULE II of the E-WasteRules:1. Lead (Pb) – not over 0.1% by weight;2. Cadmium (Cd) – not over 0.01% by weight;3. Mercury (Hg) – not over 0.1% by weight;4. Hexavalent chromium (Cr6+) – not over 0.1% by
weight;5. Polybrominated biphenyls (PBBs) – not over 0.1% by
weight;6. Polybrominated diphenyl ethers (PBDEs) – not over
0.1% by weight.
Disposal information
For the purpose of recycling to facilitate effectiveutilization of resources, please return this product to anearby authorized collection centre, registereddismantler or recycler, or Panasonic service centre whendisposing of this product.Please see the Panasonic website for further informationon collection centres, etc., or call the toll-free numberbelow.
Website:http://www.panasonic.com/in/corporate/sustainability/panasonic-india-i-recycle-program.htmlService helpline: 1800 103 1333 or 1800 108 1333
9
2. Important information

3.1 Controls
3.1.1 Doorphone
A
D
E
F
G
CB
Lens cover
Camera lens
LED lightsUsed to illuminate the visitor’s face or the area in frontof the doorphone so that the visitor's face can be seenin the dark.Call button and indicator (red)Lights in red when the power is on.Microphone
Speaker
Water drain holesThese holes allow rain water to drain. Do not coverthem.
Doorphone image qualityThe quality of doorphone images may change dependingon the installation environment, settings, lightingconditions, the time of day, etc.See page 31 for more information.
3.1.2 Main monitor/extension monitor
A
BJC
D
EF G HI
K
L
Display (page 12)
Speaker
Play lamp (blue)Lights when there is an unplayed image. Theindicator turns off when the unplayed image isdisplayed.TALK button (M N)
Play button (M N)Press to display the image playing screen when themain monitor is idle.It can also be used as a soft key (page 11).
Page button (M N)Press to page sub monitors or extension monitorswhen the main monitor is idle or transfer calls.It can also be used as a soft key (page 11).
Information button (M N)Press to display the information screen when themain monitor is idle.It can also be used as a soft key (page 11).Menu button (M N)Press to display the setting screen when the mainmonitor is idle.It can also be used as a soft key (page 11).
Monitor button (M N)Press to monitor the outside when the main monitoris idle.It can also be used as a soft key (page 11).Microphone
OFF button (M N)
RESET buttonIf the main monitor cannot be correctly operated,press the MRESETN button with a pointed object toreset the main monitor. (Recorded images andconfigured settings are not affected.)
10
3. . Preparation
3. Preparation

Soft keys
A
B
Soft key iconsIndicate the item that will be selected when you pressthe soft key directly under each icon. The icons thatare displayed vary depending on current screen andoperation.Soft keysSelect the items displayed on the screen directlyabove each soft key.
3.1.3 Sub monitor
A L
N
BCD
K
J
HI
FG
E
M
Display (page 12)
M N buttonR Allows you to open the door when connecting the
Electric lock (sold separately) to the mainmonitor. (page 20)
M N buttonR Press to change the function settings.
(page 25)R Press to adjust the brightness of displayed
images. (page 22)OFF button (M N)R Press to end an operation.R Press during standby to turn on the monitor
display.Microphone
TALK button (M N)R Press to answer a call and/or speak to a visitor
(page 16).TALK indicatorR Flashes while the doorphone or the main monitor
is calling. Lights up solid while talking.CHARGE indicatorR Lights up while charging. Turns off when charging
is complete. (page 14)
Navigator key(It is also used for operating the features shown onthe display: page 13)
R Adjusts the volume. (page 22)
R Press to scroll the displayed imageslightly to the right or left. (page 22)
R Records an image. (page 18)
Monitor button (M N)R Press to monitor the sound and image taken by
the doorphone (page 17).PAGE button (M N)R Press to page the main monitor or another sub
monitor (page 16, 17).Speaker
Antenna (built-in)Do not cover the antenna with your hand when usingthe sub monitor. (Radio waves may weaken.)Charge contacts (Metallic parts)
n ChargerR To assemble the charger stand, see page 13.
A
C
B
Charger
Charge contacts (Metallic parts)
Charger stand
11
3. Preparation

3.2 Using the display
3.2.1 Main monitor - display information
Image viewing screen
11 PPA
B
Status icons (page 12)
Soft key icons (page 11)
Status icons (main monitor)
1 Indicates which doorphone is calling,monitoring, or on a call.("1" indicates the device number.)Indicates there is a call from the doorphonewhen monitoring or on a call with anotherdevice (page 21).Indicates that the main monitor is on a call.
Indicates that a doorphone and a PBXextension are talking.Indicates that the main monitor ismonitoring.Indicates that images are being recorded(page 18).Indicates that the doorphone's LED lightsare on (page 22).Indicates that "Press-to-talk" mode is on(page 16).
Information screenThe information screen can be displayed by pressingM N when the main monitor is idle. The informationscreen is used to display information such as the currentstatus of the main monitor.
3.2.2 Sub monitor - monitor displayImage viewing screenThe following display is an example for descriptionpurposes, and it may differ from the actual display.R The monitor display is turned off during standby.
When you press M N, the information displayappears.
H
I
J
AB CDEFG
Indicates the battery level
Estimated operating time after chargingthe battery for 7 hours.(When surrounding temperature is 20 °C)
¯ R Continuous operating time:Approx. 2.5 hours
R Standby time: Approx. 200 hours(When the sub monitor is off the chargerand is not in use after the battery is fullycharged.)– While “OUT OF RANGE” is displayed
(page 13), the standby time isshortened.
¯
Recharge the battery immediately.
R While in use:2 beeps sound every 4seconds and a call isdisconnected within about60 seconds.
(flashing)
R During standby:“RECHARGE BATTERY” is displayed.(The battery needs to be recharged.)
Indicates which doorphone calling, monitoring, or in
a call. Also indicates which doorphone took the image
while viewing it.
Example:
Doorphone 1
12
3. Preparation

Indicates which doorphone is calling while talking or
monitoring.
Example:
Doorphone 2
Indicates that the door is opened when the Electric
lock (sold separately) is connected to the main
monitor. (page 20)
Indicates that the "Press-to-talk" mode is on.
(page 16)
Indicates the voice changer mode is on. (page 22)
Indicates the level of the reception.
Use within this range.
Strong
Weak
R When the sub monitor is out of range of the mainmonitor, flashes and “OUT OF RANGE” isdisplayed. (Move closer to the main monitor.)
Indicates the registration number of the sub monitor.
Indicates that the ringer volume for the doorphone is
set to "OFF".
Indicates the operation of the navigation key.
(The display varies depending on the operation.)Example: menu setting
Press{f}(BACK).
Press{D} (OK).
3.3 Charging the sub monitorOnly connect the charger with the supplied PanasonicAC adaptor (page 3).
1 Insert the battery.Remove the battery cover, align the terminals and
insert.
Close the battery cover.
R The battery level is displayed as .
A B
2 Assemble the charger stand.n To assemble the charger stand
Plug the connector of the AC adaptor into the jack
on the charger.R You can pull out the AC adaptor cord to the
left or right side.Attach the charger stand.
A
B
n To remove the charger standPressing the tab, pull the charger stand to detach.
13
3. Preparation

3 Plug the AC adaptor into the power outlet, place thesub monitor on the charger, and charge the battery.
A
While charging: The CHARGE indicator (A) lightsup.When charging is complete: The CHARGE indicator(A) turns off.
R At the first time of charging or after batteryreplacement, it takes about 7 hours to completecharging.
R If you use the sub monitor while charging, thecharging time becomes longer.
R Locate the charger where "OUT OF RANGE" is notdisplayed on the sub monitor.(The charging time becomes longer where the submonitor is out of range of the main monitor.)
R Even after the sub monitor is fully charged, the submonitor can be left on the charger without any ill effecton the batteries.
Important:R Use only the included AC adaptor.R When the sub monitor is off the charger or the AC
adaptor is disconnected for 1 week or more,remove the battery in order to maintain thebattery performance and prevent the battery fromdischarging.
– Recharge the battery before using the submonitor again.
3.4 Setting the language, date andtimeWhen you use the main monitor for the first time, you willbe prompted to set the display language, date, and timesettings.R The play lamp lights if these settings are not
configured.
1 Press the M N button to turn on the display.
2 Press the soft keys under the and soft key icons to select the desired language.
3 Press .
4 Press again.
5 Set the date and time.R Press to select an item (i.e., year, month,
day, etc.).R Press or to change the setting.
6 When finished, press .R A beep sounds and the display turns off.
Changing the language, date and timeYou change the language, date, and time settings laterif desired. Press the M N button, use the ,
, and soft keys to navigate to “Initialsettings”.
Note:R The date and time settings may be deleted when
there is a power outage. In this case, reconfigure thesettings.
R The time may become out of sync over time (about60 seconds per month).
3.5 Wide/zoom settings and zoomposition settingsThese functions are not available for the supplieddoorphone (VL-V522L). You can use these functionswith optional doorphones (page 4).You can configure how doorphone images are initiallydisplayed on the main monitor. Images can be displayedin wide mode or in zoom mode. You can choose differentsettings for when visitors call you, and for when you aremonitoring.
Wide mode(default setting) Zoom mode
14
3. Preparation

Wide mode(default setting) Zoom mode
Images are not zoomed.The full camera image isdisplayed.
Images are zoomed.Images are displayed 2times larger than widedisplay.
Note:R The zoom feature uses a digital zoom. As a result,
the image quality of zoomed images is lower thanwide display images.
R You can switch between wide and zoom modes andadjust the zoom position while monitoring or on a call.See page 22.
Selecting wide or zoom1. Press M N ® select “Initial settings” ®
.
2. Select “Wide/Zoom settings” ® .R If there are multiple doorphones, select the
doorphone to be configured ® .
3. Select the desired setting ® .– “When visitors come”: Your settings will be
used when you answer calls from visitors.– “When monitoring”: Your settings will be used
when you are monitoring.4. Select the desired display mode ® .R A beep sounds and the settings are changed.
5. When finished, press M N.
Note:R If you select “Zoom”, adjust the zoom position so that
people or objects that you want to view are displayedcentrally in the screen.
R When images are recorded in zoom mode, only thezoomed area is recorded.
Selecting the zoom position (pan/tilt position)You can select which area of the image is displayedwhen displaying zoomed images.1. Press M N ® select “Initial settings” ®
.
2. Select “Zoom position settings” ® .R If there are multiple doorphones, select the
doorphone to be configured ® .R A zoomed image from the doorphone is
displayed.3. Select the desired zoom position ® .R A beep sounds, the settings are changed, and the
display turns off.
Note:R If you do not perform any operations for 90 seconds
while changing this setting, the setting is cancelledand the screen turns off.
15
3. Preparation

4.1 Answering doorphone callsWhen you receive a call from a doorphone, the mainmonitor, extension monitor, and sub monitor ring, anddisplay an image from the doorphone.To answer the callPress M N.R Speak within about 50 cm of the microphone.R Speak alternatively with the visitor. If you and the
visitor speak at the same time, you will not hear eachother.
R You can talk for up to about 90 seconds.To end the callPress M N.
Note:R The display will turn off if you do not answer a call
within about 30 seconds.R The displayed images are automatically recorded to
the main monitor (page 18).
Features available during incoming calls– Monitoring feature (page 17)
Features available while talking– Adjusting wide/zoom and pan/tilt settings
(page 22)*1
– Turn on or off the operation guide (page 22)– Adjusting sound and display settings (page 22)– Using "press-to-talk" (page 16)– Transferring calls to other devices (page 16)*1 These functions are not available for the supplied
doorphone (VL-V522L). You can use thesefunctions with optional doorphones (page 4).
Press-to-talk modeIf it is difficult for you and the visitor to hear each otherdue to noise, the "press-to-talk" mode can makeconversations easier to hear.1. While talking, activate press-to-talk mode by
pressing and holding M N for about 2 seconds.R A beep sounds and is displayed.
2. To speak to the visitorSpeak while pressing and holding M N.To listen to the visitorRelease M N.
Note:R Press-to-talk mode is cancelled when the call ends.
Voice answer mode (Answering a call by voicesensor; sub monitor only)This mode allows you to answer a call by voice withoutpressing M N on the sub monitor.Voice answer must be set “ON” beforehand (page 26).1. When a ringer tone is heard, answer with a clear
voice such as “Yes?” or “Hello?”.R When a beep sounds, you can talk to the visitor.
Note:R Make sure you are within about 50 cm of the sub
monitor.R The visitor cannot hear your initial reply when you
answer with voice.R Your initial reply should be brief (less than 1 second),
otherwise the voice answer mode will not start.R If a visitor calls you, a loud, brief sound (such as a
dog’s bark) may start the voice answer mode eventhough you have not replied by voice.
R When you locate the sub monitor near the mainmonitor, the voice answer mode may be started by aringer tone.
R The voice answer mode is also available for pagingcalls.
4.2 Transferring doorphone callsYou can transfer a doorphone call between the mainmonitor, sub monitor, and extension monitor.
To transfer a call1. While talking with the visitor at the doorphone, pressM N. (M N for the sub monitor.)
2. If there are multiple devices, select the device totransfer the call to ® . ( (OK) for the submonitor.)R To page all devices, select “Call all
together” ® . (“ALL” ® (OK) forthe sub monitor.)
3. Page the other party.4. When the paged party answers, ask them to receive
the call from the doorphone ® M N.R To cancel transferring the call and talk to the
visitor again, press M N.
To receive a call1. When the intercom call is received, press M N to
talk to the paging party.2. When the image from the doorphone is displayed,
talk to the visitor.3. When finished, press M N.
Note:R The visitor cannot hear voices during paging.R When using the sub monitor to transfer calls or
receive transferred calls, extension monitors aredisplayed as sub monitors in the list of availabledevices and for the device name of incoming calls.For example, “Extension monitor 1” isdisplayed as “SUB 1”.
16
4. . Talking and monitoring
4. Talking and monitoring

4.3 Monitoring the outside withthe doorphoneYou can monitor the sounds and images from thedoorphone using the main monitor, extension monitor,and sub monitor.
1 Press M N. (M N for the sub monitor.)R If there are multiple doorphones, select the
desired doorphone ® . ( (OK) for thesub monitor.)
R The images from the doorphone are displayed.
2 Monitor the sound and image.R You can talk to the monitored party by pressingM N.
3 When finished, press M N.
Note:R The sound from your end will not be heard at the
doorphone.R You can monitor for up to about 3 minutes.
Features available while monitoring– Recording doorphone images (page 18)– Adjusting wide/zoom and pan/tilt settings
(page 22)*1
– Turn on or off the operation guide (page 22)– Adjusting sound and display settings (page 22)– Scrolling an image right or left on the sub monitor
(page 22)*1 These functions are not available for the supplied
doorphone (VL-V522L). You can use thesefunctions with optional doorphones (page 4).
4.4 Talking with other devicesYou can make intercom calls between the main monitor,sub monitor, and extension monitor.
To make a call1. Press M N. (M N for the sub monitor.)2. If there are multiple devices, select the device to page
® . ( (OK) for the sub monitor.)
R To page all devices, select “Call alltogether” ® . (“ALL” ® (OK) forthe sub monitor.)
3. Page the other party.4. Talk with the paged party when they answer the call.5. When finished, press M N.
To receive a call1. When the intercom call is received, press M N to
talk to the paging party.2. When finished, press M N.
Note:R Paging automatically ends after about 30 seconds
and intercom calls automatically end after about 90seconds.
R When using the sub monitor to make or receiveintercom calls, extension monitors are displayed assub monitors in the list of available devices and forthe device name of incoming calls. For example,“Extension monitor 1” is displayed as “SUB1”.
17
4. Talking and monitoring

5.1 Recording doorphone imagesThe main monitor and extension monitor can recorddoorphone images (still images). They can save imagesfrom up to 50 doorphone calls or monitoring sessions.Each time new images are recorded, they are saved inan image set of up to 8 images.
Note:R Sub monitors can manually record images while
monitoring (page 18).
5.1.1 Recording automatically (recording areceived call; main monitor and extensionmonitor only)When a visitor calls you, the main monitor and extensionmonitor record 8 images automatically (whether youanswer the call or not). Recording starts about 2 secondsafter you receive the call.
When you do not answer a callThe recorded images are saved as unplayed images,and the play lamp lights.
When there are multiple doorphonesR When you are talking or monitoring and there is an
incoming call from another doorphone, images fromthe incoming call will not be displayed and recorded.In order to display and record incoming calls, youmust end the current call or stop monitoring.
R If there is an incoming call from another doorphonewhile receiving an incoming call, the number ofrecorded images from the 1st caller (8 images) arereduced.
When the memory is full (auto image updating)When the memory is full, new images overwrite theoldest images automatically. This occurs even if theoldest images are unplayed images.
5.1.2 Recording manually (recording whilemonitoring)The main monitor, extension monitor, and sub monitorcan manually record images while monitoring.R Main monitor/extension monitor:
While monitoring, press . Up to 8 images willbe recorded.– is displayed on the screen when
recording.R Sub monitor:
While monitoring, press (REC). Up to 8 imageswill be recorded.– “RECORDING” is displayed on the screen when
recording.
5.2 Playing recorded images(main monitor and extensionmonitor only)When there are new (i.e., unplayed) images recorded,the play lamp (page 10) lights.
Note:R Sub monitors cannot play images. Images recorded
by sub monitors can only be played on the mainmonitor.
R Images manually recorded by the main monitor andextension monitor can only be played by the devicethat recorded the images.
1 Press M N.R “Recorded image list” screen is displayed.
2 Select “Unplayed images” (for new images) or“Played images” (for images that have beenplayed) ® .R The most recent image set of the selected type is
displayed.
3 Browse the image sets and images.R The following operations are available when
browsing images.R See page 19 for a list of all available operations.
Plays back all images in animage set continuouslyBrowses image sets, from olderones to newer onesBrowses image sets, fromnewer ones to older onesDisplays the options menu
Returns to the previous screen
4 When finished, press M N.
Note:R The play lamp turns off when the unplayed image is
displayed.
5.2.1 Image playing screenImage playing screen
[4] 22 December 2017 9:18
11A
C
B
ED
Device number
18
5. . Recording and playing
5. Recording and playing

Image set number
Image position within a image set
Indicates that the image has not been played.
Recording date and time
Status icons
1 Indicates the number of the doorphone thatrecorded the image.Indicates that the image is protected (i.e.,cannot be deleted)
Available soft keys
Plays back all images in an image setcontinuouslyBrowses image sets, from older ones tonewer onesBrowses image sets, from newer ones toolder onesDisplays the options menu
Returns to the previous screen
Pauses continuous playback
Plays the previous image in an image setwhen continuous play is pausedPlays the next image in an image set whencontinuous play is paused
5.2.2 Options available when playing images
While playing images, you can press to displaythe options menu and change the following settings.To turn off the operation guide
® select “Guide off” ® .R While the guide is turned off, the soft keys do not
operate their respective features. Press any soft keyto display the guide again briefly. During this time, thesoft keys can be operated as normal.
To turn on the operation guidePress any soft key to display the guide ® ®select “Guide on” ® .To turn protection on and off
® select “Protect” (to turn protection on) or“Remove protection” (to turn protection off) ®
.R When “Protect” is selected, the image cannot be
deleted.R A maximum of 20 image sets can be protected.To delete the current image
® select “Delete” ® ® .R You can use “Delete all images” to delete all
images in one operation. See page 25.To adjust the screen brightness
® select “Brightness” ® adjust thebrightness.
19
5. Recording and playing

6.1 Using electric locksWhen a commercially available electric lock is connectedto the main monitor, you can unlock a door using themain monitor, extension monitor, or sub monitor. Youcan also select the length of time control signals are sentfor to unlock the door. (How long the door remainsunlocked depends on each electric lock's specification.)R A maximum of 2 electric locks can be connected to
the main monitor.R For detailed information about connections, see the
operating instructions included with the electric lockand the Installation Guide of this product.
6.1.1 Configuring electric locks
1 Press M N.
2 Select “Connected devices” ® .
3 Select “Electric lock” ® .
4 Select the doorphone (“Doorphone 1” or“Doorphone 2”) that you want to assign the electriclock to ® .
5 Select the unlocking time ® .
6 When finished, press M N.
Electric lock settingsOptions listed below are available.“Unlocking buzzer sound”:Determines whether the doorphone sounds a buzzerwhen the electric lock is unlocked. See page 24.“View extension after unlocking”:Determines whether to extend the displaying time of thedoorphone image when the electric lock is unlocked. Seepage 24.
6.1.2 Unlocking electric locksMain monitor/extension monitor:1. Press while talking or monitoring.
Sub monitor:1. Press M N while talking or monitoring.
R When the door is opened, is displayed.
Note:R You can only unlock the door when talking or
monitoring.
6.2 Panasonic PBX integrationConnecting the main monitor to a PBX allows you to usePBX extensions to answer doorphone calls.Please use only a Panasonic PBX (page 4).R For detailed information about connections, see the
operating instructions included with the PBX and theInstallation Guide of this product.
Note:R If you answer a doorphone call with a PBX extension,
the doorphone camera image will be displayed on themain monitor, and is displayed to indicate thata PBX extension is on the call.
R While is displayed, you cannot answer callsusing the main monitor.
R The display will turn off when the call between thedoorphone and the PBX extension ends, or after 3minutes.
R If you answer a doorphone call with the main monitor,the call will continue to ring at the extension for about15 to 30 seconds. After you answer the call, theextension user cannot answer the call or join the call,even if the extension is ringing.
When using two doorphones (excluding an optionalVL-V591 lobby station; page 4)From the PBX extension, you can only call thedoorphone that you last received call from or talked with.
20
6. . Using electric locks and PBXs
6. Using electric locks and PBXs

7.1 When another incoming call is receivedWhen another incoming call is received while talking, monitoring, or receiving an incoming call, the ringtone soundsand notifications are received in the following manner for the main monitor, extension monitor, and sub monitor.
Main monitor example:When there is an incoming call from doorphone 2 whiletalking with doorphone 1.
Main monitor example:When there is an incoming call from a doorphone duringan intercom call.
11
1
Page
TalkingSub monitor 1
1
A Incoming call’s icon
Receive an incoming call when Next action
Already receiving an incoming callfrom a doorphone
The display changes to the new incoming call, and the previous incomingcall is terminated.
R Talking or monitoring with adoorphone
R Talking on an intercom call
The ringtone sounds and the incoming call’s icon is displayed (A).
To answer the incoming call:R Press M N.
– The original call or monitoring is terminated and the displayedimage is changed.
– Press M N to talk with the visitor at the doorphone.Transferring a doorphone call The ringtone sounds and the incoming call’s icon is displayed (A).
To answer the incoming call:R Press M N.
– Transferring is terminated, and then the original call's image isdisplayed and you can talk to the original caller.
– Press M N again to display the new incoming call's image.– Press M N to talk with the visitor at the doorphone.
21
7. . Incoming call operations
7. Incoming call operations

8.1 Zooming in and out (wide/zoom, pan/tilt; main monitor andextension monitor only)These functions are not available for the supplieddoorphone (VL-V522L). You can use these functionswith optional doorphones (page 4).When on a call or monitoring, you can display images inwide mode or in zoom mode. During zoom mode, youcan change the zoom position (also called "pan/tilt").To switch from wide mode to zoom modePress .To switch from zoom mode to wide modePress .To change the zoom position in zoom mode
® “Pan/tilt” ® ® press or
Note:R See page 14 for examples of wide mode and zoom
mode.R The zoom feature uses a digital zoom. As a result,
the image quality of zoomed images is lower thanwide display images.
R When images are recorded in zoom mode, only thezoomed area is recorded.
R If you adjust these settings, the settings will becancelled the next time you display an image. Tochange how doorphone images are initially displayedon the main monitor, see page 14.
8.2 Sound and display settings forcalls and monitoringWhile monitoring or on a call, you can press (M N or other buttons for the sub monitor) to displaythe options menu and change sound and displaysettings.
To adjust the incoming call volume*1
R Main monitor/extension monitor: ® “Sound” ® ® “Receiver
volume” ® adjust the volume.R Sub monitor:
Adjust the volume .
To adjust the volume heard at the doorphone*1 (mainmonitor and extension monitor only)
® “Sound” ® ® “Owner’s voicevolume” ® select the desired setting.
To use the voice changer*1 (makes the voice heardat the doorphone sound deeper)R Main monitor/extension monitor:
® “Sound” ® ® “Voicechanger” ® select the desired setting.
R Sub monitor:
M N ® “VOICE CHANGER” ® (OK).
To turn off the operation guide (main monitor andextension monitor only)
® “Guide off” ® .R While the guide is turned off, the soft keys do not
operate their respective features. Press a soft keyother than M N to display the guide again briefly.During this time, the soft keys can be operated asnormal.
To turn on the operation guide (main monitor andextension monitor only)Press a soft key other than M N to display the guide® ® “Guide on” ® .
To adjust the screen brightnessR Main monitor/extension monitor:
® “Display” ® ®“Brightness” ® select the desired setting.
R Sub monitor:
M N ® “BRIGHTNESS” ® (OK) ® selectthe desired setting.
To adjust backlight compensation (main monitorand extension monitor only)
® “Display” ® ® “Backlightcompensation” ® select the desired setting.
To turn the LED lights on or off (main monitor andextension monitor only)
® “Display” ® ®“Illumination” ® select the desired setting.R is displayed when the LED lights are on.
Scrolling an image right or left (sub monitor only)
Press .
R The displayed image is scrolled slightly to the right orleft.
*1 These settings cannot be changed during anincoming call.
22
8. . Additional functions
8. Additional functions

8.3 Ringtone settingsYou can change the ringtone type and volume that is heard during an incoming call.– For information about how to configure settings, see page 23 for the main monitor/extension monitor and
page 26 for the sub monitor.
8.4 Main monitor/extension monitor - function settings listYou can change the settings to match how the main monitor or extension monitor is used.
1 Press M N.
2 Select the desired item ® .R Repeat this step as necessary to navigate to the desired setting.
3 Select the desired setting ® .
4 Press M N.
Note:R If you do not perform any operations for 90 seconds while changing these settings, or if an incoming call is received,
the setting is cancelled and the screen turns off.R In the following table, default settings are indicated by < >.R While changing settings, “U” is displayed to the left of the currently selected item.
Item name: “Initial settings”
Sub-menuSettings
1 2 3
Time and datesettings*2
– – 2017-1-1 0:00
Zoom positionsettings*1, *3
Doorphone 1- 2
– –
For details seepage 22.
Wide/Zoomsettings*1, *3
Doorphone 1- 2
Whenvisitorscome/Whenmonitoring
Zoom, <Wide>
Power supplyfrequency*1
– – <50 Hz>, 60 Hz– To prevent mottled or uneven colour from
being displayed, choose the appropriatepower supply frequency for your area.
Select language*2 – – <English>, العربية
*1 These functions are not available for the extension monitor.*2 When using the product for the first time, follow the on-screen instructions to configure this setting (page 14).*3 These functions are not available for the supplied doorphone (VL-V522L). You can use these functions with
optional doorphones (page 4).
Item name: “Ringtone”
Sub-menuSettings
1 2
Ring volume Doorphone Extra loud, <Loud>, Normal, Quiet, MutePage Extra loud, <Loud>, Normal, Quiet
Ringtone Doorphone 1 <Sound 1>, Sound 2, Sound 3 <Normal>, RepeatDoorphone 2 Sound 1, <Sound 2>, Sound 3 <Normal>, Repeat
23
8. Additional functions

Item name: “Connected devices”*1
Sub-menuSettings
1 2 3 4
Doorphoneconnection*2
Doorphone 1 – – <Device connected>, Autodetection, Device notconnected
Doorphone 2 – – Device connected, <Autodetection>, Device notconnected
Electriclock
Doorphone 1- 2
– – Unlock for 1 second -Unlock for 7 seconds, <Noconnection>
Unlockingbuzzer sound
– – <On>, Off
For details seepage 20.
Viewextensionafterunlocking*5
– – Enable,<Disable>
Automaticillumination*3
Doorphone 1- 2
Whenvisitorscome/Whenmonitoring
– <Enable>, Disable
Lobbyconnection*4, *5
– – – Device connected, <Devicenot connected>
*1 These functions are not available for the extension monitor.*2 Select “Device not connected” for doorphones that are no longer used.*3 With this setting, you can select whether or not to automatically turn on the LED lights when the area surrounding
the doorphone is dark.*4 Only used for the VL-V591 lobby station.*5 These functions are not available for Apartment mode.
Item name: “Register/Cancel”
Sub-menuSettings
1 2 3 4
Register Main monitor Sub monitor*1 – Sub monitor 1 - Submonitor 6
Extensionmonitor
– Extension monitor1 - Extensionmonitor 6
Repeater*1 Repeater 1 -2
–
Extensionmonitor
Yes Extensionmonitor 1 -Extensionmonitor 6
–
No – –
24
8. Additional functions

Sub-menuSettings
1 2 3 4
Cancel Sub monitor*1/Extensionmonitor,Repeater*1
– – –
*1 These functions are not available for the extension monitor.
Item name: “Other”
Sub-menuSettings
1 2
Play lamp – <Enable>, DisableDelete all images Delete all images/Delete
Non-protected imagesYes, No
Initialize settings Default setting*1/Factorysetting*3
– Select “Factory setting”when disposing, transferring, orreturning the product.
Yes, No
Demo mode*2, *3 – On, <Off>
*1 The following settings are not initialized.– “Power supply frequency”, “Select language”, and “Electric lock” settings.– Registration information of devices registered to the main monitor. (All devices remain registered to the main
monitor even after initialization.)*2 These functions are not available for the extension monitor.*3 These functions are not available for Apartment mode.
Item name: “Operating instructions”
Sub-menuSettings
1
Operating instructions Displays the Web site for downloading the Operating Instructions.
8.5 Sub monitor - function settings listYou can change the settings to match how the sub monitor is used.
1 Press M N.
2 Select the desired item ® (OK).
R In some functions, repeat this operation according to the display instructions.
3 Select the desired setting ® (OK).
4 Press M N.
Note:R If you do not perform any operations for 90 seconds while changing these settings, or if an incoming call is received,
the setting is cancelled and the screen turns off.R In the following table, default settings are indicated by < >.
25
8. Additional functions
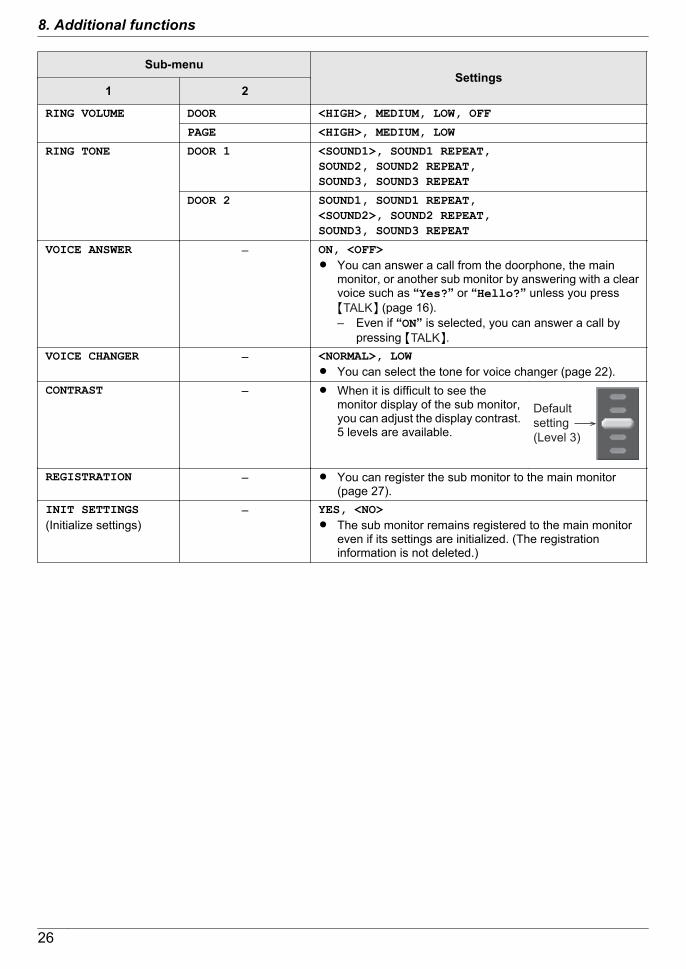
Sub-menuSettings
1 2
RING VOLUME DOOR <HIGH>, MEDIUM, LOW, OFFPAGE <HIGH>, MEDIUM, LOW
RING TONE DOOR 1 <SOUND1>, SOUND1 REPEAT,SOUND2, SOUND2 REPEAT,SOUND3, SOUND3 REPEAT
DOOR 2 SOUND1, SOUND1 REPEAT,<SOUND2>, SOUND2 REPEAT,SOUND3, SOUND3 REPEAT
VOICE ANSWER – ON, <OFF>R You can answer a call from the doorphone, the main
monitor, or another sub monitor by answering with a clearvoice such as “Yes?” or “Hello?” unless you pressM N (page 16).– Even if “ON” is selected, you can answer a call by
pressing M N.VOICE CHANGER – <NORMAL>, LOW
R You can select the tone for voice changer (page 22).CONTRAST – R When it is difficult to see the
monitor display of the sub monitor,you can adjust the display contrast.5 levels are available.
Default
setting
(Level 3)
REGISTRATION – R You can register the sub monitor to the main monitor(page 27).
INIT SETTINGS(Initialize settings)
– YES, <NO>R The sub monitor remains registered to the main monitor
even if its settings are initialized. (The registrationinformation is not deleted.)
26
8. Additional functions

9.1 Registering sub monitors andextension monitorsExtension monitors and additional sub monitors can beregistered to the main monitor.
9.1.1 Registering sub monitors (mainmonitor and sub monitors only)
1 Main monitor:Press M N ® select “Register/Cancel” ®
.
2 Select “Register” ® .R When you are prompted to register your main
monitor, select “Main monitor” ® .
3 Select “Sub monitor” ® .
4 Select the registration number of the sub monitor tobe registered ® .R Complete the following operations within about 2
minutes.
5 Sub monitor:R To register a sub monitor for the first time:
When “UNREGISTERED” is displayed on the
screen, press M N ® (OK).
– “REGISTERED” is displayed.R To re-register a sub monitor:
Press M N ® select “REGISTRATION” ®
(OK) ® (OK).
– “REGISTERED” is displayed.
6 Main monitor:Press M N.
9.1.2 Registering extension monitors
1 Main monitor:Press M N ® select “Register/Cancel” ®
.
2 Select “Register” ® .R When you are prompted to register your main
monitor, select “Main monitor” ® .
3 Select “Extension monitor” ® .
4 Select the registration number of the extensionmonitor to be registered ® .
5 Extension monitor:Press M N ® select “Register/Cancel” ®
.
6 Select “Register” ® .R When you are prompted to register your
extension monitor, select “Extensionmonitor” ® ® .
7 Select the registration number of the extensionmonitor to be registered ® .R Make sure to select the same registration number
that was selected on the main monitor.R Registration is complete when the extension
monitor restarts.
8 Main monitor:Press M N.
9.2 Using repeatersIf the sub monitor is used away from the main monitor,or if there are obstructions (page 8) between the submonitor and the main monitor, the following problemsmay occur. In these cases, using a repeater (additionalaccessory; page 4) may improve transmissions betweenthe devices.– calls with the sub monitor cut out and images are
distorted– when is displayed in the sub monitor and the main
monitor cannot connect to the sub monitor
Note:R A maximum of 2 repeaters can be used. A single
repeater can be used to send signals to multiple submonitors.
R Signal range differs depending on factors such as thestructure of rooms or the types of walls used. Afterregistering devices to the main monitor (page 28),see the repeater's Getting Started for informationabout appropriate installation locations.
Signal range and repeater installation example
This extends signals away from the main monitor. Thisis useful when you want to extend the range around themain monitor and connect to sub monitors over shorterdistances.
When repeaters are not used:
27
9. . Expanding the system
9. Expanding the system

When repeaters are used:
9.2.1 Registering repeaters
1 Main monitor:M N ® select “Register/Cancel” ® .
2 Select “Register” ® .R If you are prompted to register your main monitor,
select “Main monitor” ® .
3 Select “Repeater” ® .
4 Select the number of the repeater to be registered® .R Complete the following operations within about 2
minutes.
5 Repeater:While the power is on, press and holdMPROGRAMN (A) for about 3 seconds.R The STATUS indicator (B) flashes in green.R After completing the registration, the indicator
lights up solid.
STATUS
IN USE (LED)
PROGRAM
PROGRAM
AB
6 Main monitor:Press M N.
Note:R If you register two repeaters, please separate them
more than 3 meters to avoid electrical noise.R When using devices in separate buildings or over
long distances, cut outs and image distortions maynot be improved even if a repeater is used.
9.3 Cancelling devices (mainmonitor/extension monitor)1 M N ® select “Register/Cancel” ® .
2 Select “Cancel” ® .
3 Select the type of device to cancel*1 ® .
4 Select the device to cancel*1 ® *1 ®.
R A beep sounds and “Cancel completed” isdisplayed.
*1 Not displayed when using as an extension monitor.
Important:R To prevent incorrect operations, remove the
batteries from cancelled sub monitors.
Note:R When you want to change an extension monitor's
registration number or re-register an extensionmonitor, first use the extension monitor to cancelitself, and then re-register it again as an extensionmonitor. (Extension monitors become main monitorsagain when they are cancelled.)
28
9. Expanding the system

10.1 CleaningWipe the product with a soft, dry cloth.For excessive dirt, wipe the product with a moist cloth.
Important:R Do not use any cleaning products that contain
alcohol, polish powder, powder soap, benzine,thinner, wax, petroleum, or boiling water. Also donot spray the product with insecticide, glasscleaner, or hair spray. This may cause a changein colour or quality of the product.
Cleaning the charger:For safety, disconnect the charger from the power supplybefore cleaning.
Cleaning the sub monitor:To avoid mistakenly operating the sub monitor, removeits batteries before cleaning.
10.2 SpecificationsMain monitor (VL-MW274)
Power source 220-240 V AC, 50/60 HzPowerconsumption
Standby: 1.9 WDuring operation: 10 W
Dimensions(mm) (height ´width ´ depth)
Approx. 158´243´29.5(excluding protruding sections)
Mass (weight) R VL-MW274BX:approx. 825 g
R VL-MW274SX:approx. 850 g
Operatingenvironment
Ambient temperature: approx.0 °C to +40 °CRelative humidity(non-condensing): up to 90 %
Display Approx. 17.8 cm (7.0 incheswide colour display)
Talking method Hands-freeInstallationmethod
Wall mount (mounting bracketsupplied)
Frequencyrange
2.4 GHz to 2.48 GHz
RF transmissionpower
100 mW (max.)
Doorphone (VL-V522L)
Power source Power supplied by the mainmonitor
Dimensions(mm) (height ´width ´ depth)
Approx. 131´99´36.5(excluding protruding sections)
Mass (weight) Approx. 200 g
Operatingenvironment
Ambient temperature: approx.-15 °C to +55 °CRelative humidity(non-condensing): up to 90 %
Viewing angle Horizontally: approx. 87°Vertically: approx. 66°
Installationmethod
Wall mount (mounting basesupplied)
Minimumilluminancerequired
1 lx(within approx. 50 cm from thecamera lens)
Lighting method LED lights
Sub monitor (VL-W617)n Main body
Power source Ni-MH battery (3.6 V DC /650 mAh)
Dimensions(mm) (height ´width ´ depth)
Approx. 157´52´35(excluding protruding sections)
Mass (weight) Approx. 175 g (including thebatteries)
Operatingenvironment
Ambient temperature: approx.0 °C to +40 °CRelative humidity(non-condensing): up to 90 %
Display Approx. 4.6 cm (1.8 inches,colour display)
Frequencyrange
2.4 GHz to 2.48 GHz
RF transmissionpower
100 mW (max.)
*1 When used fully charged in an operatingtemperature of 20 °C.
*2 When the operating temperature is 20 °C. Thecharging time may increase when the operatingtemperature is lower than this.
n Charger
Power source AC adaptor (PQLV219)6.5 V DC, 0.5 A
Powerconsumption
Standby: 0.07 W(when the sub monitor is notplaced in the charger)During charging: 1.8 W
Dimensions(mm) (height ´width ´ depth)
Approx. 115´76´90 (using withthe stand)(excluding protruding sections)Approx. 105´76´48 (usingwithout the stand)(excluding protruding sections)
29
10. . General information
10. General information

Mass (weight) Approx. 115 g (including thestand)Approx. 180 g (including the ACadaptor)
Operatingenvironment
Ambient temperature: approx.0 °C to +40 °CRelative humidity(non-condensing): up to 90 %
30
10. General information

11.1 TroubleshootingMonitor display (doorphone images)
Problem Cause & Solution Page
Images appear distorted. R Images may appear distorted because of the characteristics of thecamera lens. This is not a malfunction. –
The image of the subjectis displayed in black andwhite (or bluish-purple).
R At night or when there is poor light in the area around the doorphone,the image of the subject may be displayed in black and white (orbluish-purple).– When using a doorphone equipped with LED lights
The doorphone's LED lights may be turned off.Turn on the LED lights when it is dark.
– When using a doorphone not equipped with LED lightsWe recommend installing extra lights in the area around thedoorphone.
2224
The background appearsgreenish.
R At night or when there is poor light in the area around the doorphone,lights or white objects near the doorphone may appear greenish. Thisis not a malfunction.
–
Images at night are darkand faces cannot beidentified.
R “Automatic illumination” is set to “Disable”.→ Change the setting to “Enable”. 24
R Even when the doorphone's LED lights are lit, because the light fromthe LED lights cannot illuminate the edges of the visible area (the areasdirectly next to the doorphone), faces of people may not be identifiableeven when they are close to the doorphone.→ We recommend installing extra lights in the area around the
doorphone.
–
The images of people'sfaces are dark.
R Images of people's faces appear dark when there is strong sunlight ora backlight in the area around the doorphone.→ Use the backlight compensation function.
22
Images are dirty orunclear.R Images are not in
focus.
R There is dirt on the surface of the doorphone's lens.→ Wipe the lens with a soft, dry cloth. 29
R There is water condensation on the surface of the doorphone's lens.→ Wait for the condensation to evaporate. –
Images are white orblack.
R The brightness of the display is not correctly adjusted.→ Adjust the brightness when images are displayed. 19
Images are white, orwhite lines or circles areshown on the display.
R Strong light such as sunlight is shining into the lens of the doorphonecausing images to be difficult to see on the display. (This is not amalfunction.)→ Locating the doorphone away from direct sunlight or changing the
angle that the doorphone is installed may help reduce this problem.
–
There is a small black dotin the background.
R If the sun can be seen, its centre appears as a black dot. This is not amalfunction. –
Images are flickering. R AC (alternating current) lights such as fluorescent lights are used nearthe doorphone.→ AC (alternating current) lights such as fluorescent lights may cause
flickering in dark environments. (This is not a malfunction.)
–
Images of the area youwant to view in the zoomscreen are not displayedcorrectly.*1
R Change the zoom position setting to a suitable position.→ Configure the “Zoom position settings” settings. 14
31
11. . Troubleshooting
11. Troubleshooting

Problem Cause & Solution Page
Images displayed on thesub monitor distort or aredisplayed slowly. (It takes5 seconds or more to bedisplayed.)
R The top part of the sub monitor (where the antenna is located) is beingcovered with your hand.→ Do not cover it.
R The sub monitor is too far from the main monitor, or there is an objectsuch as a concrete wall obstructing the signal.→ Move the sub monitor closer to the main monitor or to an area that
does not have any obstructions.
118
*1 The wide/zoom setting is not available for the supplied doorphone (VL-V522L).
Ringtone
Problem Cause & Solution Page
The ringtone for thedoorphone does notsound.
R The ringtone volume is muted.→ Activate the sound for the ringtone.
R The sub monitor's batteries are discharged.→ Charge the batteries.
23
Calls
Problem Cause & Solution Page
Sound cuts in/out orfades.
R The area surrounding the main monitor, extension monitor, submonitor, or doorphone are noisy, causing the sound to cut out or fade.→ Try using the "Press-to-talk" mode.
16
R When talking with the sub monitor:The top part of the sub monitor (where the antenna is located) on thesub monitor is being covered with your hand.→ Do not cover it.
11
R When talking with the sub monitor:The sub monitor is too far from the main monitor, or there is an objectsuch as a concrete wall obstructing the signal.→ Move the sub monitor closer to the main monitor or to an area that
does not have any obstructions.If the sub monitor cannot be moved to another area, installing arepeater (additional accessory) may improve the signal.
827
Calls cannot be heardbecause of noise orfeedback.
R Noise or feedback may occur when you are too close to the other party.→ Move away from the other party. -
Your voice cannot beheard by the visitor butthe visitor’s voice can beheard.
R You are using the "Press-to-talk" mode. ( is displayed on the mainmonitor/extension monitor and the sub monitor.)→ When using the "Press-to-talk" mode, the visitor can hear your
voice only while you are pressing M N.
16
Voice answer mode doesnot operate properly.
Your voice is not loud enough or your initial reply is too long (must be lessthan 1 second).→ Try a different voice volume or change the length of your answer until
the sub monitor beeps.
16
32
11. Troubleshooting

Sub monitor (charging)
Problem Cause & Solution Page
flashes and 2 shortbeeps sound.
R The battery level is very low.→ Charge the batteries immediately.
13
Even if you place the submonitor on the charger,the charge indicator doesnot light up.
R The AC adaptor is disconnected from the power outlet.→ Plug the AC adaptor into the power outlet firmly.
R The sub monitor is not placed on the charger correctly.→ Replace the sub monitor securely. (The charge indicator lights in
red.)R The charge contacts are dirty. Clean them with a soft, dry cloth.R The batteries are new or discharged.
→ Place the sub monitor on the charger and wait for a few minutes.The charge indicatordoes not go off after thebatteries have beencharged for about 7hours.
R When the power of the main monitor is turned off or “OUT OFRANGE” is displayed on the sub monitor, the charging time will becomelonger.→ Make sure the power of the main monitor is turned on, and charge
the sub monitor in a location near the main monitor where “OUTOF RANGE” disappears.
813
Even if the sub monitorhas been charged, flashes after using it a fewtimes.
R The battery is at the end of its life.R Replace the battery with a new one. 12
The sub monitor, the ACadaptor, or the charger iswarm.
R This is normal. (It may feel a little warmer in summer than in winter.)→ If it feels very hot, disconnect the AC adaptor from the power outlet
and contact an authorised service centre.-
Others
Problem Cause & Solution Page
R “Demo mode” isdisplayed on thescreen.
R The ringtone regularlysounds.
R You cannot talk ormake calls.
R The “Demo mode” feature is enabled.→ Set “Demo mode” to “Off”.
25
The product does notwork with correctoperations.The product does notwork properly.
Perform the following operations.R Main monitor/extension monitor:
→ Press the MRESETN button on the bottom side of the main monitorwith a pointed object. (Recorded images and configured settingsare not affected.)
R Sub monitor:→ Remove the battery and insert it again. (Recorded images and
configured settings are not affected.)
10
The main monitor doesnot work properly.R Nothing is displayed
on the monitor.R The ringtone does not
sound.R Voices cannot be
heard.
R Check the power connection.
–
R If the power is connected, there may be a problem with the electricalwiring.→ Contact an authorised service centre.
33
11. Troubleshooting

11.2 Error messages - main monitorError messages can be viewed by pressing M N.
Display Cause & Solution Page
“Cannot register.” R Registration failed because it was not completed within the specifiedtime.→ Check that the devices to be registered are correctly connected
and receiving power, and then try again.
2728
“Cannot be used.” R The wiring between the main monitor and extension monitor is notconnected.→ Check the wiring connections.
R The registration number used for the extension monitor is different onthe main monitor and extension monitor.→ Use the same registration number on the main monitor and
extension monitor.R 2 extension monitors are using the same registration number.
→ Cancel 1 of the extension monitors so that it becomes a mainmonitor again and then re-register it with a different registrationnumber.
R Power is not connected to the extension monitor.→ Connect power to the extension monitor.
27
28
“Not registered.” R The extension monitor has not been registered on the main monitor. 27
11.3 Error messages - extension monitorError messages can be viewed by pressing M N.
Display Cause & Solution Page
“Cannot connect tothe main monitor.Please check theconnection or theregistration ofthe main monitor.”
R The wiring between the main monitor and extension monitor is notconnected.→ Check the wiring connections.
R The extension monitor has not been registered on the main monitor.→ Register the extension monitor on the main monitor.
R The registration number used for the extension monitor is different onthe main monitor and extension monitor.→ Use the same registration number on the main monitor and
extension monitor.
27
11.4 Error messages - sub monitorDisplay Cause & Solution Page
“CAN NOT CONNECT” R The sub monitor is too far from the main monitor, or there is an objectsuch as a concrete wall obstructing the signal.→ Move the sub monitor closer to the main monitor or to an area that
does not have any obstructions.R A microwave or wireless LAN appliance is in use. Move closer to the
main monitor or use a sub monitor located away from thoseappliances. Try again.
8
“REGISTRATIONERROR”
R Registration to the main monitor has not been completed. Bring thesub monitor closer to the main monitor and try registering again. -
34
11. Troubleshooting

This section explains the basic operations of the VL-V900 lobby station (Video Intercom System for ApartmentComplexes) when used with the VL-MW274 main monitor.https://panasonic.net/cns/pcc/support/intercom/v900
12.1 Controls
12.1.1 Lobby station
G
H
I
JK
A
CB
D
E
F
A Heat sensorTurns on the display when a visitor is detected.
B Lens coverC Light
Illuminates subjects in dark environments.D DisplayE KeypadF SpeakerG Camera lensH MicrophoneI Search buttons ( and )
Used to select items shown on the display.J Cancel button ( )K Call button ( )
12.2 Lobby station operations
12.2.1 Calling a resident
Entering a room number1. Enter the resident’s room number.2. Press M N to call.
Searching by first letter of the name1. Press M N.2. Use the keypad to enter the first letter of the resident’s name.R Press a key repeatedly to scroll through the letters assigned to that key.R Note the hints displayed at the bottom of the screen.
3. Press M N or M N to search for the desired name.4. Press M N to call.
Searching through all names1. Press M N.2. Press M N or M N to search for the desired name.3. Press M N to call.
Switching the image displayed on the main monitorWhile talking to the main monitor, press M#N to switch the image displayed on the main monitor from the lobby stationto the camera. To return to the lobby image, press M N.
12.2.2 Calling a receptionist
1 Press M N.
35
12. . VL-V900 basic operations
12. VL-V900 basic operations

2 Press M N or M N to search for the receptionist.
3 Press M N to call.
12.2.3 Opening the door by entering an unlock code
1 Press M#N.
2 Enter the 4-digit unlock code.
3 Press M N.
12.3 Main monitor operations with the lobby station
12.3.1 Image viewing screen of the main monitor
Image from lobby station Image from camera
Camera
1 1
Lobby
Status icons
1 Indicates which lobby station is calling, monitoring, or talking. ("1" indicates the device number.)
1 Indicates which camera is monitoring. ("1" indicates the device number.)
Indicates that the main monitor is talking.
Indicates that the main monitor is monitoring.
12.3.2 Monitoring the outside with the lobby station or camera
1 Press M N.R If there are multiple devices, select the desired device ® .R The images from the device are displayed.R If a camera is connected to the lobby station, you can alternate monitoring between the lobby station and
camera by pressing Camera or Lobby .
2 When finished, press M N.
Note:R Depending on the composition of the system that the VL-V900 lobby station is connected to, monitoring may not
be available.
12.3.3 Opening entrance doorsYou can open the entrance door while talking to a visitor or monitoring with a lobby station or camera.To open the entrance door while talking or monitoring, press .
12.3.4 Calling extension telephones
1 Press M N.
36
12. VL-V900 basic operations

2 Select the desired extension telephone.R Up to 4 extension telephones may be displayed.
3 Press ® .
4 When finished, press M N.
12.3.5 Door bellsA door bell may be connected to your main monitor. In this case, the main monitor will ring when the door bell buttonis pressed.
12.4 System conditions and limitationsPlease note the following system conditions and limitations.R Only one call or monitoring session can be handled at a time.
Subsequent calls will disconnect the current call (if the current call has lower priority), or will not be connected (ifthe current call has higher priority).Low priority: MonitoringMedium priority: General calls (lobby station to main monitor, main monitor to PBX extension, etc.)High priority: Emergency calls
R All calls and monitoring sessions are disconnected after the pre-programmed "timeout" time elapses.R In order to perform the above operations, optional devices and configuration for those devices are required.
Contact your building manager for more information.
37
12. VL-V900 basic operations

38
Notes

39
Notes

© Panasonic Corporation 2017
1006, Oaza Kadoma, Kadoma-shi, Osaka 571-8501, Japan
http://www.panasonic.com
PNQP1377ZA C0917MM0


![Video Intercom App Guide (Dutch)csj.psn-web.net/videointercom/manual/VL-SVN511_MVN511/...U kunt de app [Video-intercom] (toepassing Video Intercom voor smartphones) op uw mobiele apparaten](https://img.dokumen.tips/doc/110x75/5f849e854f77917c7155a4d4/video-intercom-app-guide-dutchcsjpsn-webnetvideointercommanualvl-svn511mvn511.jpg)


