Embed Size (px)
Citation preview

LM-500 Rev 1.0.doc
�������������� ��� ������������������������������
��������� !�"�#$% ������&�'����� !�"��$�# ��Web: http://www.cryomagnetics.com
WARNING!
DO NOT ATTEMPT TO OPERATE THIS EQUIPMENT BEFORE YOU HAVE THOROUGHLY READ THIS INSTRUCTION MANUAL.
OPERATING INSTRUCTION MANUAL
FOR THE
MODEL LM-500 CRYOGENIC LIQUID
LEVEL MONITOR


CE MANUFACTURER'S DECLARATION OF CONFORMITY
According to lSO / IEC Guide 22 and EN45014 Manufacturer's Name: Cryomagnetics, Inc. Manufacturer's Address: 1006 Alvin Weinberg Drive Oak Ridge, TN 37830 Declares. the product
Product Name: Liquid Cryogen Level Monitor Model Number: LM-500 Product Options: All Options
Conforms to the following Product Specifications: Safety: EN61010-1 (95) EN61326-1 (97)
EMC: EN61326-1 (97) Electrical Equipment for Measurement, Control and Lab use – EMC Requirements
EN61000-4-2 (95) Electrostatic Discharge Immunity Test EN61000-4-3 (96) Radiated Electromagnetic Fields EN61000-4-4 (95) Electrical Fast Transient/Burst
EN61000-4-5 (95) Amendment A-Surge Immunity Test EN61000-4-6 (96) Amendment A-Immunity to Conducted
Disturbances EN61000-4-11 (94) Voltage Dips, Short Interruptions and
Voltage Variations Application of Council Directives:
The product complies with the requirements of the Low Voltage Directive 73/23/EEC as amended by 93/68/EEC and the EMC Directive 89/336/EEC as amended by 93/68/EEC.
D.M. Coffey, President Cryomagnetics, Inc Oak Ridge Tennessee May 27th, 2004


TABLE OF CONTENTS
1.0 Introduction ............................................................................................................................... 1
2.0 Factory Calibrations, Installed Options and Certification .......................................................... 3
3.0 Setup ........................................................................................................................................ 5
3.1 Line Voltage and Fuse .......................................................................................................... 5
3.2 Connecting Sensors.............................................................................................................. 6
3.3 LHe Sensor Calibration ......................................................................................................... 8
3.4 LN2 Sensor Calibration ......................................................................................................... 9
3.5 Factory Calibration .............................................................................................................. 10
3.5.1 Factory Calibration of a Liquid Helium Channel........................................................... 11
3.5.2 Factory Calibration of a Liquid Nitrogen Channel ........................................................ 12
3.5.3 Factory Calibration of the Analog Output Option ......................................................... 13
4.0 Operation and Menus ............................................................................................................. 15
4.1 Liquid Helium Level Monitor Menu Options ........................................................................ 16
4.1.1 Mode ............................................................................................................................ 16
4.1.2 Limits............................................................................................................................ 16
4.1.3 Fill ................................................................................................................................ 17
4.1.4 Interval ......................................................................................................................... 17
4.1.5 Units............................................................................................................................. 17
4.1.6 Boost............................................................................................................................ 17
4.1.7 Ports............................................................................................................................. 18
4.1.8 Calibrate....................................................................................................................... 18
4.2 Liquid Nitrogen Level Monitor Menu Options: ..................................................................... 19
4.2.1 Limits............................................................................................................................ 19
4.2.2 Fill ................................................................................................................................ 19
4.2.3 Units............................................................................................................................. 20
4.2.4 Ports............................................................................................................................. 20
4.2.5 Calibrate....................................................................................................................... 20
5.0 Interfacing................................................................................................................................... 21
5.1 RS-232 Computer Interface.................................................................................................... 21
5.2 IEEE-488.2 Computer Interface.......................................................................................... 22
5.3 Analog Output ..................................................................................................................... 22
5.4 Audible Alarm...................................................................................................................... 22
5.5 Automatic Refill ................................................................................................................... 23

6.0 Theory of Operation................................................................................................................ 27
6.1 Liquid Helium Level Sensing (Superconductive Filament Probes) ..................................... 27
6.2 Liquid Nitrogen Level Sensing (Capacitive Probes)............................................................ 28
6.3 LM-500 Circuit Description.................................................................................................. 28
7.0 Limited Warranty Policy.......................................................................................................... 31
Appendix A Computer Interface Command Reference ................................................................. 33
Appendix B Line Voltage Controller Module - Option 5.................................................................. 49
Cryomagnetics Model LM-500 Operating Instruction Manual 1
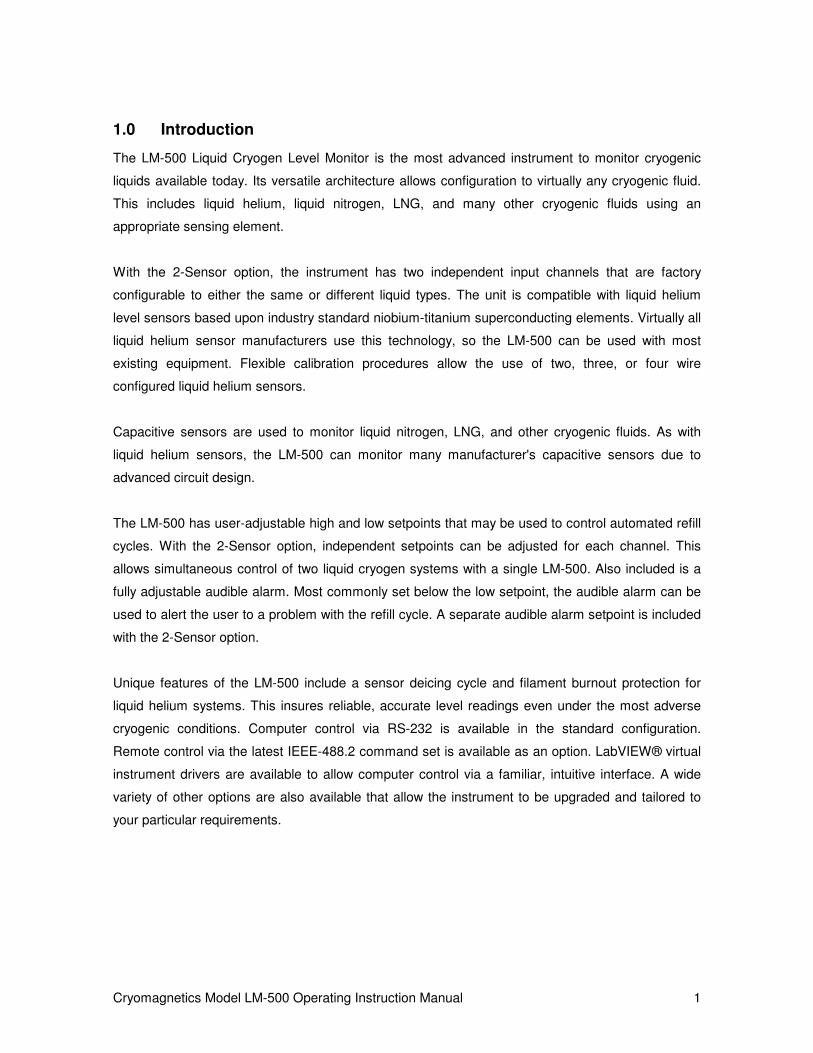
1.0 Introduction
The LM-500 Liquid Cryogen Level Monitor is the most advanced instrument to monitor cryogenic
liquids available today. Its versatile architecture allows configuration to virtually any cryogenic fluid.
This includes liquid helium, liquid nitrogen, LNG, and many other cryogenic fluids using an
appropriate sensing element.
With the 2-Sensor option, the instrument has two independent input channels that are factory
configurable to either the same or different liquid types. The unit is compatible with liquid helium
level sensors based upon industry standard niobium-titanium superconducting elements. Virtually all
liquid helium sensor manufacturers use this technology, so the LM-500 can be used with most
existing equipment. Flexible calibration procedures allow the use of two, three, or four wire
configured liquid helium sensors.
Capacitive sensors are used to monitor liquid nitrogen, LNG, and other cryogenic fluids. As with
liquid helium sensors, the LM-500 can monitor many manufacturer's capacitive sensors due to
advanced circuit design.
The LM-500 has user-adjustable high and low setpoints that may be used to control automated refill
cycles. With the 2-Sensor option, independent setpoints can be adjusted for each channel. This
allows simultaneous control of two liquid cryogen systems with a single LM-500. Also included is a
fully adjustable audible alarm. Most commonly set below the low setpoint, the audible alarm can be
used to alert the user to a problem with the refill cycle. A separate audible alarm setpoint is included
with the 2-Sensor option.
Unique features of the LM-500 include a sensor deicing cycle and filament burnout protection for
liquid helium systems. This insures reliable, accurate level readings even under the most adverse
cryogenic conditions. Computer control via RS-232 is available in the standard configuration.
Remote control via the latest IEEE-488.2 command set is available as an option. LabVIEW® virtual
instrument drivers are available to allow computer control via a familiar, intuitive interface. A wide
variety of other options are also available that allow the instrument to be upgraded and tailored to
your particular requirements.

Cryomagnetics Model LM-500 Operating Instruction Manual 2
This Page Intentionally Left Blank

Cryomagnetics Model LM-500 Operating Instruction Manual 3
2.0 Factory Calibrations, Installed Options and Certification
LM-500 Serial Number:
Input Voltage: 100 VAC: 115 VAC: 230 VAC:
Input Channel 1:
Type: LHe LN2 Other:
Calibration: Sensor Manufacturer / Serial No:
Sensor Length:
Characteristic Resistance/Voltage:
Lead Resistance:
Control Output: TTL: Open Collector: ________ Other: __________
Input Channel 2 (Option 3): Not Installed:
Type: LHe LN2 Other:
Calibration: Sensor Manufacturer / Serial No:
Sensor Length:
Characteristic Resistance/Voltage:
Lead Resistance:
Control Output: TTL: Open Collector: _______ Other:
Analog Output (Option 1): Not Installed:
Type: 0-1 Volt: 4-20mA:
Computer Interface Installed: RS-232: X IEEE-488.2 (Option 2):
Notes:
Certified:
Date:

Cryomagnetics Model LM-500 Operating Instruction Manual 4
This Page Intentionally Left Blank

Cryomagnetics Model LM-500 Operating Instruction Manual 5
3.0 Setup
The LM-500 is delivered to you fully tested and ready to operate. This includes sensor calibration if
Cryomagnetics supplied the sensor(s) with the instrument. Calibration will also be complete if the
active sensing length of an existing sensor(s) was specified at the time of order.
3.1 Line Voltage and Fuse
Unless otherwise specified, the LM-500 is configured for operation using 115 VAC +/- 10%, 50/60
Hz input power. The serial number tag on the rear panel of the unit indicates the factory voltage
setting.
The line voltage setting can be changed to 100 or 230 VAC if desired. Always disconnect the power
cord from the unit prior to opening the case. To open the LM-500, remove the two screws from the
rear panel of the unit. Also remove the screws on the RS-232 and Sensor(s)/IO connectors. The
rear panel can then be pulled back and the cover of the LM-500 can be slid off. Figure 3.0 indicates
the changes in circuit board jumpers inside the unit used to make a change in line voltage.
Figure 3.0 - Line Voltage Jumper Settings
Transformer Primary Jumpers
Line Voltage JP1 JP2 JP3 JP4100V, 115V Short Open Short Open200V, 230V Open Short Open Short
* For almost all configurations of the LM-500, the gray connection to WP11 is used and the orange
lead is not connected. The orange lead is connected to WP11 instead of the gray ONLY if the unit is
to be used with 100V/50Hz or 200V/50Hz power AND with liquid helium level sensors having an
active sensing length of more than 80 cm.

Cryomagnetics Model LM-500 Operating Instruction Manual 6
The fuse for the LM-500 is mounted on the main circuit board inside the unit. Should the fuse need
to be changed, open the LM-500 as described above. Locate the fuse - it is a cylindrical device
labeled F1 and can be found on the right side of the unit near the main transformer. Replace the
fuse only with another fuse of the same type. Use only Wickmann part number 19374-035-K (250V,
0.25A, time lag). Never replace the fuse with a wire.
3.2 Connecting Sensors
Sensors connect to the LM-500 through the rear panel DB-15F connector labeled “Sensor(s)/IO”.
This connector provides service not only to the sensors, but also to the automatic refill signals
generated by the LM-500 and the 4-20mA analog output signal. Figure 3.1 indicates the pin
designations for the Sensor(s)/IO connector.
********** IMPORTANT ***********
1) Connections should NEVER be made directly to the connector on the rear panel. Always
solder to a mating connector that is not attached to the unit. Connections should be double-
checked for accuracy prior to attaching to the LM-500 and powering the unit ON since liquid
helium level sensors are driven by high voltages (up to 100 volts DC). These high voltages
could damage liquid nitrogen sensors or other sensors (such as temperature sensors or hall
probes) should these be accidentally connected.
2) NEVER connect/disconnect the sensors with the LM-500 powered ON.
************************************************

Cryomagnetics Model LM-500 Operating Instruction Manual 7
Figure 3.1 - Sensor Connector Wiring - DB-15F
View Facing Rear Panel Connector
Pin # Function: LHe / LN2 Pin # Function: LHe / LN2
1 Sensor 1: I+ / VCC (+10.6V) 9 Sensor 2 (Optional): I+ / VCC (+10.6V)
2 Sensor 1: I- / GND 10 Sensor 2 (Optional): I- / GND
3 Sensor 1: V+ / Vsensor 11 Sensor 2 (Optional): V+ / Vsensor
4 Sensor 1: V- / GND 12 Sensor 2 (Optional): V- / GND
5 Analog Output (Optional) 4-20 mA I- 13 Sensor 2 (Optional): Control Output
6 Analog Output (Optional) 4-20 mA I+ 14 Sensor 1: Control Output
7 Analog Output (Optional) Sensor Select 15 GND
8 N/C
Cryomagnetics, Inc. liquid helium level sensors have four (4) lead wires and use either #30 AWG
Teflon insulated lead wires or color coded phosphor-bronze lead wires (either option may be
specified when the sensor is ordered). The standard color codes for lead wires is shown in Figure
3.2.
Figure 3.2 - LHe Level Sensor Color Codes
Lead Function Teflon Color Phosphor-Bronze Color
I+ Red Clear
I− Black Black
V+ Blue Yellow
V− Yellow Green
Some liquid helium level sensors made by Cryomagnetics may have only 2 or 3 lead wires. If the
sensor has 3 lead wires, the I- and V- leads are typically combined into a single black lead. If the
sensor has 2 lead wires, the I- and V- leads are combined into a single black lead and the V+ lead is
not used. The V+ connection at the input to the LM-500 should be connected to the I+ terminal in
this case.

Cryomagnetics Model LM-500 Operating Instruction Manual 8
Cabling between the liquid helium level sensor and the LM-500 should be of appropriate size such
that high voltage drop across the I+ and I- leads does not occur. It is recommended that cables up
to 5 meters in length be #18 AWG wire minimum. Cables from 5 to 15 meters in length should be
#16 AWG minimum, and cables from 15 to 30 meters should be #14 AWG minimum. Unshielded
cable may be used where no significant use of SCR-controlled equipment or intense electrostatic
field sources are present. Otherwise, it is recommended that shielded cable be used.
3.3 LHe Sensor Calibration
Calibration of liquid helium level sensors is performed through the front panel keypad of the LM-500.
Calibration can not be performed through the LM-500 computer interfaces.
To calibrate a sensor, power ON the LM-500 (the sensor does not need to be connected). If the 2-
sensor option is installed, use the UP or DOWN arrow keys to highlight the sensor channel to be
calibrated and press the MENU key. Again use the UP or DOWN arrow keys to select CAL from the
opening menu. When CAL is highlighted, the LM-500 will show the present calibration settings for
the sensor on the second line. In particular, the unit displays the sensor’s active sensing length,
characteristic resistance, and the lead resistance. Press ENTER to access the calibration values.
The LM-500 indicates “Ch# Sensor Length:” on the first line of the display, and the present setting
for the sensor length on the second line. The sensor length should be set to the actual length of the
sensing filament in the sensor. This is usually the overall length of the sensor less any dead space
on the ends of the sensor. Cryomagnetics’ sensors typically have 1 cm of dead space on each end.
If the unit is to be used with a Cryomagnetics’ sensor that can not be accessed to measure the
active sensing length, the value can be determined by measuring the resistance of the sensing
filament. Cryomagnetics’ sensors typically have a characteristic resistance at room temperature of
about 5.46 ohms/cm (or 4.55 ohms/cm at 20 Kelvin). The sensing length may be adjusted by using
the UP and DOWN arrow keys. Press ENTER to accept and save the displayed value, or MENU to
exit without saving the value.
Next, the LM-500 will indicate ”Sensor # Resistance” on the first line of the display, and the present
setting of the characteristic resistance of the superconductive filament in ohms/unit length on the
second line. Use the UP or DOWN arrow keys to adjust the setting of the characteristic resistance
for the sensor (use the characteristic resistance at 20K, not at room temperature). Press ENTER to
accept and save the value, or MENU to exit without saving.
Finally, the LM-500 will indicate “Ch# Lead Resistance” on the first line of the display, and the

Cryomagnetics Model LM-500 Operating Instruction Manual 9
present setting for the lead wire resistance on the second line. The lead resistance should be set to
zero if a 4-wire sensor is being used. If a 2 or 3 wire sensor is being used, the resistance of the
leads can be entered and will be removed from the sensed value. For a 2-wire sensor the lead
resistance will be the measured resistance from the I+/V+ lead to the I-/V- lead, less the resistance
of the active sensing filament (4.55 ohms/cm * active sensing length in cm for Cryomagnetics’
sensors). For a 3-wire sensor the lead resistance will usually be the measured value of resistance
between the V+ lead and the I- lead, less the resistance of the active sensing filament, divided by
two (since you only need to subtract out the lead resistance of the I- lead, not both the I- and V+
leads). To change the lead resistance setting, use the UP and DOWN arrow keys to adjust the
value. Press ENTER to accept and save the value, or MENU to exit without saving.
3.4 LN2 Sensor Calibration
Liquid nitrogen sensors are calibrated through the LM-500 menus in a manner that is similar to liquid
helium level sensors. However, since LN2 sensors are capacitive and return a small voltage signal
to the LM-500, characteristic resistances are not used. Instead, voltages that are measured at the
empty and full points are entered directly. Calibration of liquid nitrogen level sensors is performed
through the front panel keypad of the LM-500. Calibration can not be performed through the LM-500
computer interfaces.
To calibrate a sensor, power ON the LM-500 (the sensor does not need to be connected). If the 2-
sensor option is installed, use the UP or DOWN arrow keys to highlight the sensor channel to be
calibrated and press the MENU key. Again use the UP or DOWN arrow keys to select CAL from the
opening menu. When CAL is highlighted, the LM-500 will show the sensor’s active sensing length
on the second line. Press ENTER to access the calibration values.
The LM-500 indicates "LN2 Calibration" on the first line of the display, and calibration options
"Length Zero Full" on the second line. Access the Length parameter by pressing the ENTER key
with Length selected. The LM-500 indicates “Ch# Sensor Length:” on the first line of the display,
and the present setting for the sensor length on the second line. The sensor length should be set to
the actual length of the sensing portion of the sensor. This is usually the overall length of the sensor
less any dead space on the ends of the sensor. Cryomagnetics’ sensors typically have 1.5 cm of
dead space on each end. The sensing length may be adjusted by using the UP and DOWN arrow
keys. Press ENTER to accept and save the displayed value, or MENU to exit without saving the
value. The options of "Length Zero Full" will be again be presented.
If the instrument does not indicate 0.0 when the LN2 is empty and the sensor is at LN2 temperature,

Cryomagnetics Model LM-500 Operating Instruction Manual 10
the "Zero" setting needs to be corrected. This may be done selecting "Zero" using the UP, DOWN,
and Enter keys. The LM-500 will indicate ”Zero Point Cal” on the first line of the display, and
"Measure Adjust" options on the second line. If the sensor is connected and the LN2 is near empty,
select Measure to automatically measure and reset the zero point. If the zero calibration point was
inadvertently changed, the original value may be entered manually by selecting the "Adjust" option.
If the sensor and instrument were factory calibrated, the value entered at factory may be found on
page 2 of the manual. Use the UP or DOWN arrow keys to adjust the setting to the correct voltage
(use the value obtained when the sensor is cold and in an atmosphere of nitrogen gas – not at room
temperature and in air). Press ENTER to accept and save the value, or MENU to exit without
saving.
If the instrument does not indicate the full sensor length when the LN2 is full, the "Full" setting needs
to be corrected. This may be done selecting "Full" using the UP, DOWN, and Enter keys. The LM-
500 will indicate ”Full Scale Cal” on the first line of the display, and "Measure Adjust" options on the
second line. If the sensor is connected and the LN2 is full, select Measure to automatically measure
and reset the full point. If the full calibration point was inadvertently changed, the original value may
be entered manually by selecting the "Adjust" option. If the sensor and instrument were factory
calibrated, the value entered at factory may be found on page 2 of the manual. Use the UP or
DOWN arrow keys to adjust the setting to the correct value. Press ENTER to accept and save the
value, or MENU to exit without saving.
The audible alarm and auto refill limits should be reset to the desired levels after any calibration
changes.
3.5 Factory Calibration
The LM-500 Factory Calibration is used to establish sensor excitation levels, hardware calibration,
and in the case of an LN2 channel, automate sensor calibration. If these procedures are not
carefully performed the instrument may not function properly.
********** WARNING **********
Dangerous voltages and currents are used in this procedure.
Proper care must be exercised to ensure safety of personnel and equipment.
Load resistors and/or Sensors must be attached to perform the calibration in most cases.
Power MUST be removed while making ALL connections.
************************************

Cryomagnetics Model LM-500 Operating Instruction Manual 11
The factory calibration menu is invoked by holding the MENU and ENTER keys while power is
applied to the unit. The display will show
or,
if the analog output option is installed. If the analog output is installed, it must be recalibrated after
the Ch1 factory calibration is performed. Use the UP and DOWN keys to select the calibration to be
performed, and press ENTER to begin the calibration.
3.5.1 Factory Calibration of a Liquid Helium Channel
Factory calibration of a liquid helium channel requires a known calibration resistor to be connected.
Since the calibration is performed at a constant current of 70 mA, the wattage of the resistor must
be considered. 25 ohms at 1/4 watt or 100 ohms at 1 watt are acceptable values. Connect I+/V+ to
one terminal of the resistor, and I-/V- to the other terminal. Once all sensor connections have been
made, enter the factory calibration menu as described in section 3.5 above.
Select the appropriate sensor channel using the up or down arrow keys and press ENTER. The
value of the LM-500’s internal current sense resistor will be displayed. The value should not need to
be changed. Press ENTER to accept the value of the current sense resistor.
The value of the calibration resistor will next be displayed. Use the up or down arrow keys to make
this display the known resistance of the calibration resistor attached above and press Enter to
accept the value.
The LM-500 now will display:
Ignore this message (since the cal resistor should already be attached), and press ENTER to begin
calibration. The subsequent prompts allow the sensor length, sensor sensitivity, and lead resistance
Instrument Cal >Abort< Ch1 Ch2
Instrument Cal >Abort< Ch1 Ch2 Anlg
Attach Cal Resistor <Enter> when ready

Cryomagnetics Model LM-500 Operating Instruction Manual 12
to be set. The procedure for setting these values is provided in Section 3.3. Note that these values
may also be also set in the standard calibration menu.
3.5.2 Factory Calibration of a Liquid Nitrogen Channel
Factory calibration of a liquid nitrogen channel requires the sensor to be connected and operated in
known levels of liquid nitrogen. When the channel is selected from the factory calibration menu and
ENTER is pressed the value of the LM-500’s internal current sense resistor will be displayed. The
value should not need to be changed. Press ENTER to accept the value of the current sense
resistor.
The display will show:
At this point the LN2 sensor should be immersed in LN2 to ensure that it is cold. Press ENTER to
initiate the calibration. The LM-500 applies power to the oscillator (about 10.6 volts) and a timer
gives the system approximately one minute to thermally and electrically stabilize. No actual
readings are taken during this period. When the stabilizing delay is complete, the LM-500 display
will indicate:
The LN2 sensor should be raised out of the liquid in preparation for setting the zero level calibration
point. If possible, leave the 1 cm dead space at the bottom of the sensor in the LN2 to ensure that
the sensor remains cold. The sensor must be suspended by the cable since any contact with the
sensor itself will affect the zero calibration. Press ENTER and continue to maintain the 1 cm level
for a few seconds (until the reading is complete).
The display will now show:
The voltage may be adjusted to match the sensor output by using the UP/DOWN arrows and
accepting the final value by pressing ENTER.
Attach Sensor (80°°°°K) <Enter> when ready
Position Sensor <Enter> when ready
Ch 2 Sensor Output 4.373 Volts

Cryomagnetics Model LM-500 Operating Instruction Manual 13
The active sensor length will be displayed, and may be adjusted if needed by using the UP/DOWN
arrows and pressing ENTER when done:
Now the sensor should be lowered into a bath of LN2. Using the up and down arrow keys, enter the
overall active length of the sensor and press Enter. The LM-500 will indicate:
Using the up and down arrow keys, set this value to the level of LN2 currently on the sensor. This
feature allows the sensor to be calibrated in a known level of LN2 that is less than the overall sensor
length. When the correct level is displayed, press Enter. The display will show:
Ignore this message (since the sensor is already attached). Press ENTER. The LM-500 will take a
final reading, which completes the calibration.
The LN2 level used to calibrate the sensor should be measured carefully to avoid errors. Preferably,
the level should be at or near the top of the sensor. Calibrating with low LN2 can cause small errors
in the calibration to be amplified when the sensor is operated near full scale.
3.5.3 Factory Calibration of the Analog Output Option
The LM-500’s Analog Output must be recalibrated whenever the Ch 1 factory calibration is changed.
In preparation for calibrating the analog output, the sensor(s) must be connected to the LM-500. If
the Analog Output is configured to for 0-1 Volt Output, no load is required at the analog output. If
the Analog Output is configured to be a 4-20mA Output, either a load resistor of less than 600 ohms
or the actual current loop itself must be attached to pins 5 and 6 of the rear panel DB15 connector
(current must be able to flow in order for the calibration to be made). The value of the resistor is not
important.
Select ANLG on the Factory Calibration Menu and press Enter. The Analog Output calibration is
automatic and will be completed in about 3 seconds.
Ch 2 Sensor Length: 50.0 cm
Ch 2 LN2 Level: 50.0 cm
Attach Sensor in LN2 <Enter> when ready

Cryomagnetics Model LM-500 Operating Instruction Manual 14
This Page Intentionally Left Blank

Cryomagnetics Model LM-500 Operating Instruction Manual 15
4.0 Operation and Menus
Setup of the LM-500 can be performed either through the front panel keypad and simple menu
instructions or through remote computer interface (RS-232 or IEEE-488.2). Calibration is only
supported through the front panel keypad. In the following sections there are detailed descriptions
of how to recalibrate for different sensor lengths, set the audible alarm, and configure the controller
functions.
Before connecting any level sensors or other cabling to the LM-500, connect the power cord
provided with your LM-500 to an appropriate power source. Power the instrument ON and
familiarize yourself with the display. If your LM-500 is configured for dual sensor inputs, the first line
of the display will indicate Sensor #1 and the second line will indicate Sensor #2. If your LM-500 is
configured for a single sensor input, the display will only indicate one level.
Symbols to the right of the liquid level provide an indication of the status of the sensor channel:
���� Indicates a sample is in progress for a liquid helium level sensor.
���� Indicates the limits are exceeded for the channel.
F Indicates a fill cycle is in progress for the channel (Flashing indicates the fill cycle
timed out rather than completed with the high level being achieved.)
A Indicates the level is below the alarm level.
A liquid helium level channel may indicate the words "Open" or "BO Protect" instead of a level.
Either indication will immediately abort further attempts to sense the liquid helium level until the
MENU is entered and the mode is changed from DISABLED. "Open" will appear if no current flows
when a reading is being taken, indicating that the sensor is not connected, or a connection is broken
in the current path. "BO Protect" will appear if the LHe sensor resistance is measured at more than
130 percent of the sensor in gas, which prevents sensor burnout, should the sensor be energized in
a vacuum.
For dual input units, an arrow is displayed to the left of the Sensor #1 or Sensor #2 display line.
Using the UP or DOWN arrow keys on the front panel, this arrow can be toggled between the two
display lines (sensors). To change the calibration, set alarm points, set computer communication
parameters, set up the level units, or any other user-settable options, you must first set the arrow so
it points to the appropriate sensor and the press the MENU key. Depending upon whether the
LHe 87.5 cm ���� A LN2 95.3 %%%% ����F

Cryomagnetics Model LM-500 Operating Instruction Manual 16
selected sensor is a liquid helium level sensor or a liquid nitrogen level sensor, different menu
options will appear.
4.1 Liquid Helium Level Monitor Menu Options
There are several user-adjustable options available for liquid helium level monitoring. The following
diagram indicates options and the menu headings under which they are found.
4.1.1 Mode
Under the Mode menu item, the user can select either Sample/Hold or Continuous operational
mode. This item appears first in the menu list since it may be changed frequently in a system that is
left in Sample/Hold mode normally, but is switched to Continuous mode during liquid helium refills.
Pressing ENTER while “Mode” is selected toggles the unit between Sample/Hold and Continuous
modes. The display will indicate the selected mode.
4.1.2 Limits
The LM-500 has an internal audible alarm that can be set to activate when the liquid helium falls
below a user-settable threshold. It also has an external “auto-refill” signal that can be used to
automatically maintain liquid helium level between high and low limits (using the appropriate transfer
hardware). The set points for the high and low limits and the audible alarm are set in the “Limits”
menu. Both the alarm and refill functions give front panel display indications when they are
activated - “A” appears when an alarm indication is present, and “F” appears when the unit’s
controller output signal is active. The audible alarm can be silenced by pressing any front panel key
on the LM-500; however, the visual indication of the alarm condition, “A” on the display, is
LHe Menu 4.1
Limits 4.1.2
Mode 4.1.1
Fill 4.1.3
Interval 4.1.4
Boost 4.1.6
Units 4.1.5
Ports 4.1.7
Cal 4.1.8
S/H
Cont
Low
High
Alarm
Timeout
Manual
Time Pct
cm
in
Off
On
Smart
RS232
GPIB
Analog

Cryomagnetics Model LM-500 Operating Instruction Manual 17
maintained until the liquid level is read by the LM-500 and is found to be above the alarm level set
point. The visual indication can also be removed manually if the user enters the menu system and
then exits again. Separate indicators are displayed for each channel if the 2-Sensor option is
installed.
For additional information on interfacing the LM-500 for automatic refill, please refer to section 5.5
and Appendix B.
4.1.3 Fill
The Fill menu item displays the fill timeout value, and allows a fill cycle to be started manually. With
"Fill" selected, press ENTER to display the options Timeout and Auto. Select Timeout to change the
fill timeout value, or set it to zero to disable fill timeout. Select Auto to toggle to the Start fill option.
Pressing ENTER with Start displayed will start a fill cycle when the menu is exited regardless of
level. The fill cycle will end when the level reaches the high limit, when the fill timeout expires, or
when MENU is selected.
4.1.4 Interval
The Interval (Intvl) menu item allows the user to select the interval of time between readings of the
liquid helium level sensor in Sample/Hold mode. With “Intvl” selected, press ENTER to bring up the
interval setting display. Then use the UP or DOWN arrow keys to bring the sample interval to the
desired time. Press ENTER again when the correct time is displayed, or MENU to escape without
changing the interval.
4.1.5 Units
The Units menu item allows the user to set the display units of the LM-500 for this particular
channel. Available options are percent (%), centimeters (cm), or inches (in). Note that sensor
lengths under the Calibrate menu item must be entered in either centimeters or inches - depending
upon the setting of the units. If percent is the unit of display for the LM-500, calibration data must be
entered in centimeters.
4.1.6 Boost
The “Boost” menu item allows the user to set the sensor de-ice mode of the LM-500 on this
particular channel according to the system’s requirements. Options under this item are:
OFF Current to the sensor is never boosted to a higher setting to clear contaminants on
the sensing filament.

Cryomagnetics Model LM-500 Operating Instruction Manual 18
ON Current to the sensor is briefly boosted to a higher setting at the beginning of each
liquid level reading to clear contaminants on the sensing filament.
SMART Current to the sensor is only boosted to a higher setting at the beginning of a liquid
level reading to clear contaminants if the sensor has not been activated within the
past five minutes of operation.
4.1.7 Ports
The Ports menu item allows the user to set the analog output mode of the LM-500 (if this option is
installed), select the computer interface which is active (RS-232 or IEEE-488.2 - if installed), and to
set up the parameters of the computer interface such as baud rate, address, etc. When the Ports
menu item is highlighted, the current setting of the analog and computer interfaces are displayed on
the second line. To change any of the Port options, press enter when “Ports” is highlighted. Then
select the option that is to be changed:
RS-232 Baud rate may be set to 9600, 4800, 2400, or 1200. Factory default is 9600.
IEEE-488.2 Device address may be selected from 0 - 31. Factory default is 0.
AO The sensor input channel controlling the analog output port is selected. The analog
output of the LM-500 may be configured to be proportional to the level reading on
Channel 1, Channel 2, or Remote. The Remote setting allows the user to supply a
digital signal to the LM-500 to select which channel is controlling the analog output.
This allows the user to monitor both channels without computer commands.
4.1.8 Calibrate
Under the Calibrate (Cal) menu item, the user can set the parameters of the sensor being used on
this channel. When “Cal” is highlighted, a summary of the present sensor settings is shown on the
second line of the display. The units used by the LM-500 (cm or inches) for calibration is set with
the Units menu item. Pressing Enter while “Cal” is highlighted allows the user to set sensor length,
sensitivity, and lead resistance. Refer to section 3.3 for LHe sensor calibration procedures.

Cryomagnetics Model LM-500 Operating Instruction Manual 19
4.2 Liquid Nitrogen Level Monitor Menu Options:
There are several user-adjustable options available for liquid nitrogen level monitoring. The
following diagram indicates options and the menu headings under which they are found.
L N2 M enu4.2
L im its4.2.1
F ill4.2 .2
Un its4.2.3
Po rts4.2.4
C al4.2.5
Low
H igh
A larm
T im e
S tart
Pct
cm
in
R S232
G P IB
Analog
4.2.1 Limits
In the Limits menu, the user can adjust the (A)larm set point for the sensor as well as the (L)ow and
(H)igh set points. Typically, the alarm is used to generate an audible alarm and digital signal output
should the liquid level fall below the alarm set point. The low and high set points can be used in a
similar manner, or they can be used in conjunction with each other to drive an automatic refill
system. See section 5.5 for information on interfacing the LM-500 with an automatic liquid nitrogen
refill system.
4.2.2 Fill
The Fill menu item displays the fill timeout value, and allows a fill cycle to be started manually. With
"Fill" selected, press ENTER to display the options Timeout and Auto. Select Timeout to change the
fill timeout value, or set it to zero to disable fill timeout. Select Auto to toggle to the Start fill option.
Pressing ENTER with Start displayed will start a fill cycle when the menu is exited regardless of
level. The fill cycle will end when the level reaches the high limit, when the fill timeout expires, or
when MENU is selected.

Cryomagnetics Model LM-500 Operating Instruction Manual 20
4.2.3 Units
The “Units” menu item allows the user to set the display units of this channel of the LM-500.
Available options are percent (%), centimeters (cm), or inches (in). Note that sensor lengths under
the “Cal” menu item must be entered in either centimeters or inches - depending upon the setting of
the units.
4.2.4 Ports
The Ports menu item allows the user to set configure the I/O of the LM-500. When the Ports menu
item is highlighted, the current setting of the analog and computer interfaces are displayed on the
second line. See section 4.1.7 for further information about setting port options.
4.2.5 Calibrate
Under the Calibrate (Cal) menu item, the user can set the parameters of the sensor being used.
When Cal is highlighted, a summary of the present sensor settings is shown on the second line of
the display. Pressing Enter while Cal is highlighted allows the user to set the sensor length,
characteristic voltage of the sensor, and zero offset. Refer to section 3.4 for calibration procedures.

Cryomagnetics Model LM-500 Operating Instruction Manual 21
5.0 Interfacing
The LM-500 comes standard with an RS-232 computer interface. All front panel functions, except
calibration functions, may be accessed using the corresponding command string over the RS-232
port. In addition, an IEEE-488.2 port is available as an option. This port conforms to the IEEE-
488.2-1992 standard.
5.1 RS-232 Computer Interface
An RS-232 computer interface port is provided as standard equipment on all LM-500s. The port
accessed through the DB-9F connector on the rear panel of the instrument. The interface is factory
configured for 9600 baud, 8 data bits, 1 stop bit, and no parity. Figure 5.0 indicates the proper pin
designations for the port. Figure 5.1 details available RS-232 port commands.
Figure 5.0 - RS-232 Port Connector Wiring
View Facing Rear Panel Connector
Pin # LM-500 Pin Function
1, 4, 6, 7, 8, 9 N/C
2 RS-232 Transmit
3 RS-232 Receive
5 Ground
Commands available to the LM-500 operator over the RS-232 computer interface are given in
Appendix A. The commands available through RS-232 are identical to those available through
IEEE-488.2; however, some commands may be IEEE-488.2 specific and may not provide
responses consistent with the RS-232 interface.
Command strings are normally limited to 30 characters when the RS-232 interface is used. A
<RETURN> will be generated internally when lines longer than the maximum are encountered, and
any valid commands in the received line will be processed. An output buffer of 32 characters is

Cryomagnetics Model LM-500 Operating Instruction Manual 22
used although longer responses can be successfully generated. All remote commands are case
insensitive, allowing upper or lower case to be used without affecting operation of the commands.
When the RS-232 interface is selected all commands sent to the instrument will be echoed including
the terminating ASCII <RETURN> character, followed by a <NEWLINE> character when command
processing is complete.
5.2 IEEE-488.2 Computer Interface
The LM-500 may have an optional IEEE-488.2 computer interface (Option 2). The LM-500
implements SH1, AH1, T6, L4, SR1, RL0, PP0, DC1, DT0, C0, and E1 options. The commands are
compliant with the IEEE-488.2 standard.
Reference: IEEE Standard Codes, Formats, Protocols, and Common Commands (IEEE Std 488.2-
1992) provides a detailed description of the IEEE common commands (identifiable in the command
list by the asterisk as the first character.)
The command list and structure is identical to the RS-232 command set. Reference Appendix A for
a detailed description.
5.3 Analog Output
An analog output from the LM-500 is available as an option (Option 1). This output can be specified
at the time of purchase to be either 4-20mA or 0-1V. If the 4-20 mA option is installed, the signal is
found on the LM-500 rear panel DB-15F connector, pins 5 and 6 (see Figure 3.1). If the 0-1V
analog output option is installed, the signal is found on the LM-500 rear panel BNC connector. In
either case, the analog output signal is linear and proportional to the sensor reading. If the 2-Sensor
option is installed, the sensor having control of the analog output may be selected through the LM-
500 rear panel DB-15F, pin 7 (see Figure 3.1). This is a TTL compatible (0-5V nominal) input. A
low level on this pin selects Sensor 1, and a high level or an open connection selects Sensor 2.
5.4 Audible Alarm
A user-adjustable audible alarm is standard on the LM-500. The alarm may be set through the
front panel menu system (see sections 4.1.2 and 4.2.1). The alarm gives the user an audible
indication if the measured cryogen level fall below the alarm set point. If the 2-Sensor option is
installed, the audible alarm will activate if either sensor input falls below its respective set point.
Once the alarm is activated, it may be silenced by any front panel keystroke. It will only be
reactivated after a normal reading (i.e., one above the alarm setpoint) is detected by the LM-500,

Cryomagnetics Model LM-500 Operating Instruction Manual 23
followed by another reading in which an alarm condition again exists. The audible alarm may be
disabled by setting it to 0.0.
5.5 Automatic Refill
The LM-500 in its standard configuration is capable of controlling an automatic liquid cryogen refill
system. Since many different types of valves, transfer lines and cryogen handling systems are
possible, additional interfaces are necessary to implement the refill system. In particular, Figure
5.2 shows a typical automatic liquid cryogen refill system. Note that the system consists not only of
the LM-500, but also a Line Voltage Controller Module (Option 5), a cryogen transfer line, a
solenoid valve, the level sensor, and any additional venting/plumbing needed to handle off-gas.
Figure 5.2
Typical Automatic Cryogen Refill System

Cryomagnetics Model LM-500 Operating Instruction Manual 24
In an automatic refill system, the LM-500 monitors the cryogen liquid level in the cryostat. If that
level is determined to fall below the “low limit” setpoint, the LM-500 activates the automatic refill
control output which opens a vent valve on the cryostat and a solenoid valve on the storage dewar
beginning a cryogen transfer. The LM-500 output remains activated (holding the valves open) until it
detects that the cryogen level in the cryostat has risen above the “high limit” setpoint. Once the
liquid level reaches the high limit, the control output is deactivated closing both valves. Thus the
LM-500 maintains the liquid level between minimum and maximum levels. An auxiliary timeout may
be set to abort cryogen transfers that run longer than the operator feels is appropriate. The feature
helps minimize overflow of a system having an error in its calibration or prevention of transferring
warm gas for lengthy periods of time in the event that the source dewar empties before the high limit
is reached. If your LM-500 has the 2-Sensor option is installed (Option 3), two totally independent
cryogenic systems can be under automatic refill control by a single LM-500.
The control output(s) of the LM-500 may be set to be either “open collector” or “0-5V”. Refer to
Section 2.0 of this manual for the factory settings of your particular LM-500. Figure 3.1 indicates the
output pins designated to carry the Control Output signals, and Figure 5.3 indicates the jumper
settings to change the configuration.
Figure 5.3
Control Output Format Setting
Sensor / Jumper TTL Compatible Open CollectorSensor 1 / JP22 Short OpenSensor 2 / JP20 Short Open
If the output(s) are to be used for automatic refill (and will consequently be driving a solenoid valve
or relay), the output(s) will typically be configured as open collector. If other equipment (e.g., a
computer) is simply monitoring the control output(s), the output(s) should be configured as TTL
Compatible (0-5V).
When the LM-500 is used in conjunction with Option 5, the Line Voltage Controller Module, as
shown in Figure 5.2, the unit is capable of driving solenoid valves requiring 115V/230V AC. Option 5
provides the user with two independent channels with fused and opto-isolated line voltage outputs.
Refer to Appendix B for a technical description of Option 5.

Cryomagnetics Model LM-500 Operating Instruction Manual 25
In order for the automatic refill to operate properly, several precautions should be taken in setting up
the system:
1. The Cryogen Storage Dewar should have a regulated pressure maintained which is compatible
with the Cryogenic Solenoid Valve, Transfer Line, Cryostat and any equipment installed within the
Cryostat (such as a superconducting magnet or a variable temperature insert). For most systems,
the Cryogen Storage Dewar should be held at about 2-3 PSI above the pressure in the Cryostat. If
the Cryogen Storage Dewar has a very high pressure inside when the refill cycle is begun, some
system components could be damaged by the surge in pressure that occurs when transfer is begun.
2. The Vent Valve in some systems can be bypassed if there is adequate venting available from the
Cryostat through other pressure relief valves. Again, care should be taken that venting through a
fixed pressure relief valve does not cause excessively high back pressure in the Cryostat. Also,
when an automatic refill cycle is completed, one must be sure the cryostat is sealed properly with
appropriate and working pressure relief valves. Refill cycles usually result in significant frost at the
vent port of the Cryostat. This can frequently result in a pop-off valve becoming frozen in the open
position and may allow air or water to be drawn into the Cryostat resulting in damage.
3. If the wiring between the LM-500, Line Voltage Controller Module, Valves, and/or Sensors is long
and in an electrically noisy environment, false signals can be picked up by the LM-500 causing a
spurious refill cycle to start. In general, any cabling over 5 meters long should be shielded cables to
avoid this problem, although even shorter cables may require shielded lines in some cases.
4. The control output(s) of the LM-500 may be disabled by setting the low limit(s) to 0.0.
5. The Timeout setting of the LM-500 should be set to a value which the user is confident is beyond
the time needed for a worst-case cryogen transfer, but no further. Should the Cryogen Storage
Dewar run out of liquid during a refill cycle, this feature will stop the transfer rather than let it run all
night long blowing warm gas into the Cryostat.

Cryomagnetics Model LM-500 Operating Instruction Manual 26
This Page Intentionally Left Blank

Cryomagnetics Model LM-500 Operating Instruction Manual 27
6.0 Theory of Operation
Depending upon how your LM-500 is configured, it may be compatible with superconductive filament
liquid helium level sensors, capacitive sensors used for liquid nitrogen, LNG, etc., or a combination
of the two. It can be configured for single sensor input or dual sensor inputs. Since liquid helium
level sensors and capacitive sensors operate on completely different principles, the unit must be
factory configured to the options chosen. Changing the sensor configuration of an LM-500 from LHe
to LN2 sensor inputs or vice versa is possible by returning the unit to Cryomagnetics. Consult the
factory if this is necessary.
6.1 Liquid Helium Level Sensing (Superconductive Filament Probes)
If at least one input of the LM-500 is configured for liquid helium level sensors, the unit may be used
with 2, 3 or 4 wire superconductive filament level sensors for monitoring liquid helium (an industry
standard). These sensors use a single filament of NbTi as the level-sensing element. The sensor
has a small heater installed near the top of the filament. When a current is passed from I+ to I-, that
is, through the heater and superconductive filament, the top of the
filament is forced into the resistive state by the heater. The normal
zone of the filament propagates down the length of the filament until
it encounters the liquid helium surface. Unable to propagate through
the liquid, the normal zone stops. By activating the sensors with a
constant current, the voltage measured across the filament is
proportional to the length of filament that is in the helium gas. The
portion of the filament in the liquid remains superconducting, and
therefore has no voltage developed across it. The LM-500
measures the voltage across the filament and converts it, according
to the instrument's calibration, into a liquid level which is then
displayed.
Sensors operating in a 3-wire configuration typically combine the leads I- and V- into a single lead.
Doing so adds some lead resistance to the liquid level measurement that would show up as errors in
the reading in most helium level monitors. The LM-500, however, has provisions for subtracting out
lead resistance in 3-wire sensing systems.
Likewise, sensors operating with only 2 wires combine I+/V+ into a single lead, and I-/V- into a single
lead. Therefore two wire sensors have not only the resistive error induced by two leads, but also
the error induced by the heater in the sensor. The LM-500 can easily subtract out all of these
Heater
Superconductive Filament

Cryomagnetics Model LM-500 Operating Instruction Manual 28
errors to give a stable, accurate reading of liquid helium level.
The LM-500 contains circuitry allowing it to sample a liquid helium level sensor at a predetermined
interval or on demand. Sampling the liquid helium level minimizes the amount of heat input to the
cryogenic system through the sensor - thereby minimizing cryogen boil-off. During a sampling
period, the helium level sensor is activated only long enough to obtain a valid reading of the helium
level. The sensor is then turned off and the instrument display is updated and held until the next
sample time. The LM-500 configured for liquid helium level monitoring also provides a unique
sensor deicing cycle within the sensor-reading period. Deicing, which may be necessary if the liquid
helium environment has become corrupt from impurities, prevents false readings of liquid level
should the sensing filament become contaminated with ice. During the de-ice portion of the sensor
sampling, the sensor's current is briefly pulsed to a higher than normal level to clear any ice
blockages which may have formed on the sensing filament. This insures an accurate reading of the
liquid level even when refilling the cryostat. The sensor deicing part of the sampling cycle can be
disabled if desired.
6.2 Liquid Nitrogen Level Sensing (Capacitive Probes)
If one or both channels of the LM-500 is configured for capacitive liquid level sensors (such as liquid
nitrogen sensors), the unit is configured to provide a supply voltage to the sensor and receive back
an analog voltage from the sensor that is proportional to liquid level. Capacitive sensors are typically
based upon a sensing element comprised of two parallel
conductors (usually stainless steel tubes) separated by a space
which is open to the cryogenic fluid. The sensor uses the
difference in dielectric constant between the liquid and gas
phases of the fluid to determine the liquid level. Sensors usually
consist of the parallel conductors - which are part of a tuned
oscillator circuit - and an “oscillator” used to convert the
oscillation frequency of the sensor to a voltage proportional to the
capacitance of the sensor. For these types of sensors, the LM-
500 continuously energizes the sensor (since this does not
represent a significant heat load on the cryogenic system), and
continuously updates the display according to the analog signal it
receives back from the sensor.
6.3 LM-500 Circuit Description
The LM-500 is a 68HC11 microprocessor-based instrument. This microprocessor has built-in
EEPROM that is used to hold factory calibration and configuration data, as well as user entered
Oscillator F/V Converter

Cryomagnetics Model LM-500 Operating Instruction Manual 29
calibration and setup information. Consequently, it is not possible to simply change the processor
with another 68HC11. The unit will not work properly with a new processor until the factory has
initialized it.
The processor controls virtually all aspects of the LM-500 including the display, keypad, a precision
constant current or constant voltage source (depending upon what type of sensor the instrument is
configured for), and the high stability, 21-bit analog-to-digital converter used to monitor sensor
voltages. Due to the flexibility and stability of the LM-500’s circuits, very high resolution and
accuracy is achieved.
The LM-500’s display is a bright, vacuum fluorescent unit having high contrast. It is capable of full
alphanumerics and can clearly be read from a significant distance.
In units configured for use as liquid helium level monitors, high voltages are possible in the output
stage. Typically, helium level sensors will have characteristic resistances of the sensing element of
about 4.5 ohms/cm and optimally run at about 70 mA. Therefore, it is not unusual for a sensor to
have as much as 50 volts DC or more across it while the sensor is active. Great care must be taken
to avoid shock if any changes are being made inside the unit.

Cryomagnetics Model LM-500 Operating Instruction Manual 30
This Page Intentionally Left Blank

Cryomagnetics Model LM-500 Operating Instruction Manual 31
7.0 Limited Warranty Policy
Cryomagnetics, Inc. warrants its products to be free from defects in materials and workmanship.
This warranty shall be effective for one (1) year after the date of shipment from Cryomagnetics.
Cryomagnetics reserves the right to elect to repair, replace, or give credit for the purchase price of
any product subject to warranty adjustment. Return of all products for warranty adjustment shall be
FOB Oak Ridge, TN, and must have prior authorization for such return from an authorized
Cryomagnetics, Inc. representative.
This warranty shall not apply to any product which has been determined by Cryomagnetics, Inc.
inspection to have become defective due to abuse, mishandling, accident, alteration, improper
installation or other causes. Cryomagnetics, Inc. products are designed for use by knowledgeable,
competent technical personnel.
In any event, the liability of Cryomagnetics, Inc. is strictly limited to the purchase price of the
equipment supplied by Cryomagnetics, Inc. Cryomagnetics, Inc. shall not assume liability for any
consequential damages associated with use or misuse of its equipment.

Cryomagnetics Model LM-500 Operating Instruction Manual 32
This Page Intentionally Left Blank

Cryomagnetics Model LM-500 Operating Instruction Manual 33
Appendix A
Computer Interface Command Reference
Commands available over the computer interface are separated into commands that are IEEE 488.2
specific, commands that are inhibited when the operator menu is accessed, and commands that are
always available. All command mnemonics that elicit a response from the instrument end with a
question (?) character. The general command format is as follows:
<Subcommand1>;<subcommand2>;<subcommand3><RETURN>
where a subcommand is formatted
<Command Mnemonic><SPACE><Parameter>
Example:
*IDN?;CHAN 2;UNITS CM;UNITS?<RETURN>
Semicolons separate responses to each subcommand. The above example would return:
*IDN?;CHAN 2;UNITS CM;UNITS?<RETURN><LINEFEED>
Cryomagnetics,LM-500,2002,2.00;cm<RETURN><LINEFEED>
where the serial number is 2002 and the firmware version number is 2.00.
Error Handling and Command Availability
The ERROR command allows error messages to be enabled or disabled when the RS-232 interface
is used. The IEEE-488.2 status mechanisms may always be used to determine if an error occurred
processing a command, and the category of the error. Some commands are unavailable if an
operator at the instrument is accessing the instrument menu. If a command available only in
operate mode is received while the menus are being accessed, a device dependent error is reported
in the Extended Status Register (ESR), and the message "Blocked by menu" will be returned if error
reporting is enabled when using the RS-232 interface. If commands that are specific to a Liquid
Helium Level Sensor are addressed to a Liquid Nitrogen channel, a device dependent error is
reported in the ESR, and message "Parameter error" will be returned if error reporting is enabled
when using the RS-232 interface.

Cryomagnetics Model LM-500 Operating Instruction Manual 34
The following table lists the LM-500 commands, shows the LM-500 mode and channel where the
command may be used, and provides a short command description. Command details are provided
in the reference that follows.
Command Available Description
ALARM Operate Set audible alarm threshold
ALARM? Operate Query audible alarm threshold
BOOST LHe Operate Set Liquid Helium Level Meter BOOST mode
BOOST? LHe Operate Query Liquid Helium Level Meter BOOST mode
CHAN Operate Select instrument channel for computer commands
CHAN? Operate Query selected channel
ERROR Operate Set error response mode for RS-232 interface
ERROR? Always Query error response mode
FILL Operate Start automated refill
FILL? Always Query automated refill status/elapsed fill time
HIGH Operate Set high threshold for automated refill completion
HIGH? Operate Query high threshold for automated refill completion
INTVL LHe Operate Set Liquid Helium Level Meter sample interval
INTVL? LHe Operate Query Liquid Helium Level Meter sample interval
LNGTH? Operate Query sensor length
LOW Operate Set low threshold for automated refill activation
LOW? Operate Query low threshold for automated refill activation
MEAS Operate Start measurement on selected channel
MEAS? Operate Query last completed measurement on selected channel
MODE LHe Operate Set Liquid Helium Level Meter sample mode
MODE? LHe Operate Query Liquid Helium Level Meter sample mode
OUT Operate Select channel for analog output
OUT? Operate Query selected channel for analog output
STAT? Always Query instrument status
TYPE? Operate Query channel type for selected channel
UNITS Operate Select units for selected channel
UNITS? Operate Query selected units for selected channel
Command Available Description
*CLS Always Clear Status Command
*ESE Always Standard Event Status Enable Command
*ESE? Always Standard Event Status Enable Query

Cryomagnetics Model LM-500 Operating Instruction Manual 35
*ESR? Always Standard Event Status Register Query
*IDN? Always Identification Query
*OPC Always Operation Complete Command
*OPC? Always Operation Complete Query
*RST Always Reset Command
*SRE Always Service Request Enable Command
*SRE? Always Service Request Enable Query
*STB? Always Read Status Byte Query
*TST? Always Self-Test Query
*WAI Operate Wait-to Continue Command
Command Reference
This section describes how each LM-500 command is used and provides a cross-reference to
related commands. The command syntax sections show required elements enclosed in <angle
brackets> and optional parameters enclosed in [square brackets]. All numbers are decimal (base
10).
ALARM Set audible alarm threshold
Availability: Operate Mode
Command Syntax: ALARM [Alarm Level]
Example: ALARM 65.0
Default Parameter: 0.0 (Off) Parameter Range: 0 to Sensor Length
Description: The ALARM command sets the threshold for the audible alarm in the present units
for the selected channel. If the liquid level falls below the threshold the audible alarm will sound.
The alarm will be disabled if the threshold is set to 0.
Related Commands: ALARM?, CHAN, CHAN?, LNGTH?, UNITS, UNITS?
ALARM? Query audible alarm threshold
Availability: Operate Mode
Command Syntax: ALARM?
Response: <Alarm Level> <Units>
Response Example: 15.0 cm Response Range: 0 to Sensor Length
Description: The ALARM? query returns the audible alarm threshold in the present units for the
selected channel. If the liquid level falls below the threshold the audible alarm will sound. The alarm
is disabled if the threshold is set to 0.

Cryomagnetics Model LM-500 Operating Instruction Manual 36
Related Commands: ALARM, CHAN, CHAN?, LNGTH?, UNITS, UNITS?
BOOST Set Liquid Helium Level Meter BOOST mode
Availability: Liquid Helium Level Channel in Operate Mode
Command Syntax: BOOST <Boost Mode>
Example: BOOST SMART
Parameter Range: OFF, ON, SMART
Description: The BOOST command sets the operating mode for the boost portion of a sensor
read cycle. BOOST OFF will eliminate the boost portion of the read cycle, BOOST ON enables the
boost portion on every read cycle, and BOOST SMART enables a boost cycle if no readings have
been taken in the previous 5 minutes.
Related Commands: BOOST?, CHAN, CHAN?
BOOST? Query Liquid Helium Level Meter BOOST mode
Availability: Liquid Helium Level Channel in Operate Mode
Command Syntax: BOOST?
Response: <Boost Mode>
Response Example: Smart Response Range: Off, On, or Smart
Description: The BOOST? query returns the operating mode for the boost portion of a sensor read
cycle. BOOST OFF will eliminate the boost portion of the read cycle, BOOST ON enables the boost
portion on every read cycle, and BOOST SMART enables a boost cycle if no readings have been
taken in the previous 5 minutes.
Related Commands: BOOST, CHAN, CHAN?
CHAN Select instrument channel for computer commands
Availability: Operate Mode
Command Syntax: CHAN <Selected Channel>
Example: CHAN 2
Parameter Range: 1 or 2
Description: The CHAN command selects the default channel for future computer commands.
The default channel is set to 1 when power is applied or when the *RST command is sent.
Related Commands: ALARM, ALARM?, BOOST, BOOST?, CHAN?, FILL, FILL?, HIGH, HIGH?,
INTVL, INTVL?, LNGTH?, LOW, LOW?, MODE, MODE?, MEAS, MEAS?, TYPE?, UNITS, UNITS?,
*RST
CHAN? Query selected channel

Cryomagnetics Model LM-500 Operating Instruction Manual 37
Availability: Operate Mode
Command Syntax: CHAN?
Response: <Channel number>
Response Example: 1 Response Range: 1 or 2
Description: The CHAN? query returns the default channel for future computer commands. The
default channel is set to 1 when power is applied or when the *RST command is sent.
Related Commands: ALARM, ALARM?, BOOST, BOOST?, CHAN, FILL, FILL?, HIGH, HIGH?,
INTVL, INTVL?, LNGTH?, LOW, LOW?, MODE, MODE?, MEAS, MEAS?, TYPE?, UNITS, UNITS?,
*RST
ERROR Set error response mode for RS-232 interface
Availability: Operate Mode
Command Syntax: ERROR <Error Mode>
Example: ERROR 1
Parameter Range: 0 or 1 (0 - disable error reporting, 1 - enable error reporting)
Description: The ERROR command enables or disables error messages when the RS-232
interfaced is used. It is much easier to handle errors under program control when using the RS-232
interface if error messages are disabled, but it is desirable to enable error messages if a terminal
program is used to interactively control and query the LM-500.
Related Commands: ERROR?
ERROR? Query error response mode
Availability: Always
Command Syntax: ERROR?
Response: <Error Mode>
Response Example: 0 Response Range: 0 or 1
Description: The ERROR? query returns the selected error reporting mode.
Related Commands: ERROR
FILL Start automated refill
Availability: Operate Mode
Command Syntax: FILL [Channel]
Example: FILL 2
Default Parameter: Default Channel (See CHAN) Parameter Range: 1 to 2
Description: The FILL command starts a refill on the selected channel if refill is not active, if the

Cryomagnetics Model LM-500 Operating Instruction Manual 38
LOW limit is not set to zero, and if a refill timeout has not occurred. The LM-500 will start sampling
the refill channel as in continuous mode until the HIGH limit is exceeded, the timeout set in the FILL
menu is exceeded, a *RST command is received, or MENU is selected on the LM-500 front panel.
If refill is inhibited by the refill timeout having been exceeded, the *RST command can be sent to
allow a FILL command to start an automatic refill.
Related Commands: CHAN, CHAN?, FILL?, LOW, LOW?, HIGH, HIGH?, MODE, MODE?, *RST
FILL? Query automated refill status/elapsed fill time
Availability: Always
Command Syntax: FILL? [Channel]
Example: FILL? 2
Default Parameter: Default Channel (See CHAN) Parameter Range: 1 to 2
Response: <Mode> or <Refill Time>
Response Examples: Off
15 min
Timeout
Description: The FILL? query returns the refill status if refill is not active, or the time in minutes
since refill started if the refill is active. "Off" indicates that a refill timeout has not occurred.
"Timeout" indicates that the HIGH limit was not reached before the maximum refill time was
exceeded, and that refill is inhibited until the operator resets the refill timeout by selecting MENU on
the LM-500, or a *RST is entered via the computer interface. The timeout can be inhibited by setting
the value to zero in the fill menu for the channel.
Related Commands: CHAN, CHAN?, FILL, LOW, LOW?, HIGH, HIGH?, MODE, MODE?, *RST
HIGH Set high threshold for automated refill completion
Availability: Operate Mode
Command Syntax: HIGH [Level]
Example: HIGH 65.0
Default Parameter: 0.0 Parameter Range: 0 to Sensor Length
Description: The HIGH command sets the high threshold for automated refill completion. The
present units for the selected channel are implied. A refill cycle is started when a reading is taken
that is below the LOW limit. A refill cycle is completed when a reading is taken that is above the
HIGH limit, or when the refill timeout configured in the FILL menu is exceeded. A sensor is sampled
as in continuous mode during refill, but when the HIGH limit is reach the selected sample interval will
be used for future readings.
Related Commands: CHAN, CHAN?, FILL, FILL?, HIGH?, LNGTH?, LOW, LOW?, MODE,
MODE?

Cryomagnetics Model LM-500 Operating Instruction Manual 39
HIGH? Query high threshold for automated refill completion
Availability: Operate Mode
Command Syntax: HIGH?
Response: <High Level> <Units>
Response Example: 65.0 cm Response Range: 0.0 to Sensor Length
Description: The HIGH? query returns the high threshold for automated refill completion in the
present units for the selected channel.
Related Commands: CHAN, CHAN?, FILL, FILL?, HIGH, LNGTH?, LOW, LOW?
INTVL Set Liquid Helium Level Meter sample interval
Availability: Liquid Helium Level Channel in Operate Mode
Command Syntax: INTVL [Sample Interval ([HH[:MM[:SS]]]]
Example: INTVL 24:00:00
Default Parameter: 0 (Sample Continuously) Parameter Range: 00:00:00 to 99:59:59
Description: The INTVL command sets the time between samples for the selected Liquid Helium
Level Meter channel. Time is in hours, minutes, and seconds.
Related Commands: CHAN, CHAN?, INTVL?
INTVL? Query Liquid Helium Level Meter sample interval
Availability: Liquid Helium Level Channel in Operate Mode
Command Syntax: INTVL?
Response: HH:MM:SS
Response Example: 23:59:59 Response Range: 00:00:00 to 99:59:59
Description: The INTVL? query returns the time between samples for the selected Liquid Helium
Level Meter channel. Time is in hours, minutes, and seconds.
Related Commands: CHAN, CHAN?, INTVL
LNGTH? Query sensor length
Availability: Operate Mode
Command Syntax: LNGTH?
Response: <Active Sensor Length> <Units>
Response Example: 120.0 cm Response Range: 0.0 to Sensor Length
Description: The LNGTH? query returns the active sensor length in the present units for the
selected channel. The length is returned in centimeters if percent is the present unit selection.

Cryomagnetics Model LM-500 Operating Instruction Manual 40
Related Commands: ALARM, LOW, HIGH, UNITS, UNITS?
LOW Set low threshold for automated refill activation
Availability: Operate Mode
Command Syntax: LOW [Level]
Example: LOW 45.0
Default Parameter: 0.0 Parameter Range: 0 to Sensor Length
Description: The LOW command sets the low threshold for automated refill activation. The
present units for the selected channel are implied. A refill cycle is started when a reading is taken
that is below the LOW limit, and the sensor will be sampled as in Continuous mode until the High
limit is reached. A refill cycle is completed when a reading is taken that is above the HIGH limit, or
when the refill timeout configured in the FILL menu is exceeded.
Related Commands: CHAN, CHAN?, FILL, FILL?, HIGH, HIGH?, LNGTH?, LOW?, MODE,
MODE?
LOW? Query low threshold for automated refill activation
Availability: Operate Mode
Command Syntax: LOW?
Response: <Low Level> <Units>
Response Example: 45.0 % Response Range: 0.0 to Sensor Length
Description: The LOW? query returns the low threshold for automated refill activation in the
present units for the selected channel.
Related Commands: CHAN, CHAN?, FILL, FILL?, HIGH, HIGH?, LNGTH?, LOW
MEAS Start measurement on selected channel
Availability: Operate Mode
Command Syntax: MEAS [Channel #]
Example: MEAS 2
Default Parameter: Default Channel (See CHAN) Parameter Range: 1 to 2
Description: The MEAS command starts a measurement on the selected channel. The DATA
READY bit for the selected channel will be set in the status byte returned by the *STB? command
when the measurement is complete.
Related Commands: CHAN, CHAN?, MEAS?, *STB?
MEAS? Query last completed measurement on selected channel
Availability: Operate Mode

Cryomagnetics Model LM-500 Operating Instruction Manual 41
Command Syntax: MEAS? [Channel #]
Example: MEAS? 2
Default Parameter: Default Channel (See CHAN) Parameter Range: 1 to 2
Response: <Measured Level> <Units>
Response Example: 15.0 cm
Description: The MEAS? query returns latest reading in the present units for the selected channel.
If a reading for the selected channel is in progress, the previous reading is returned.
Related Commands: CHAN, CHAN?, MEAS, *STB?
MODE Set Liquid Helium Level Meter sample mode
Availability: Liquid Helium Level Channel in Operate Mode
Command Syntax: MODE <Sample Mode>
Example: MODE S
Default Parameter: 0.0 (Off) Parameter Range: S or C
Description: The MODE command sets the sample mode for the selected channel. In
Sample/Hold mode the measurements are taken when a MEAS command is sent via the computer
interface, the <Enter> button is pressed on the front panel, or when the delay between samples set
by the INTVL command expires. The interval timer is reset on each measurement, regardless of
source of the measurement request. In Continuous mode measurements are taken as frequently as
possible. The channel will also operate as in continuous mode any time a refill cycle has been
activated by the level dropping below the low threshold until the refill cycle is completed by the HIGH
threshold being exceeded or a *RST command.
Related Commands: CHAN, CHAN?, FILL, FILL?, INTVL, INTVL?, MODE?
MODE? Query Liquid Helium Level Meter sample mode
Availability: Liquid Helium Level Channel in Operate Mode
Command Syntax: MODE?
Response: <Sample Mode>
Response Examples: Sample/Hold
Continuous
Disabled
Description: The MODE? query returns the sample mode for the previously selected channel. The
sample mode may have been set by a MODE command, the front panel menu, or set to Disabled by
the LM-500 if an open sensor was detected. Once the mode is set to Disabled it will remain
Disabled until changed by the front panel or the MODE command.
Related Commands: CHAN, CHAN?, INTVL, INTVL?, MODE
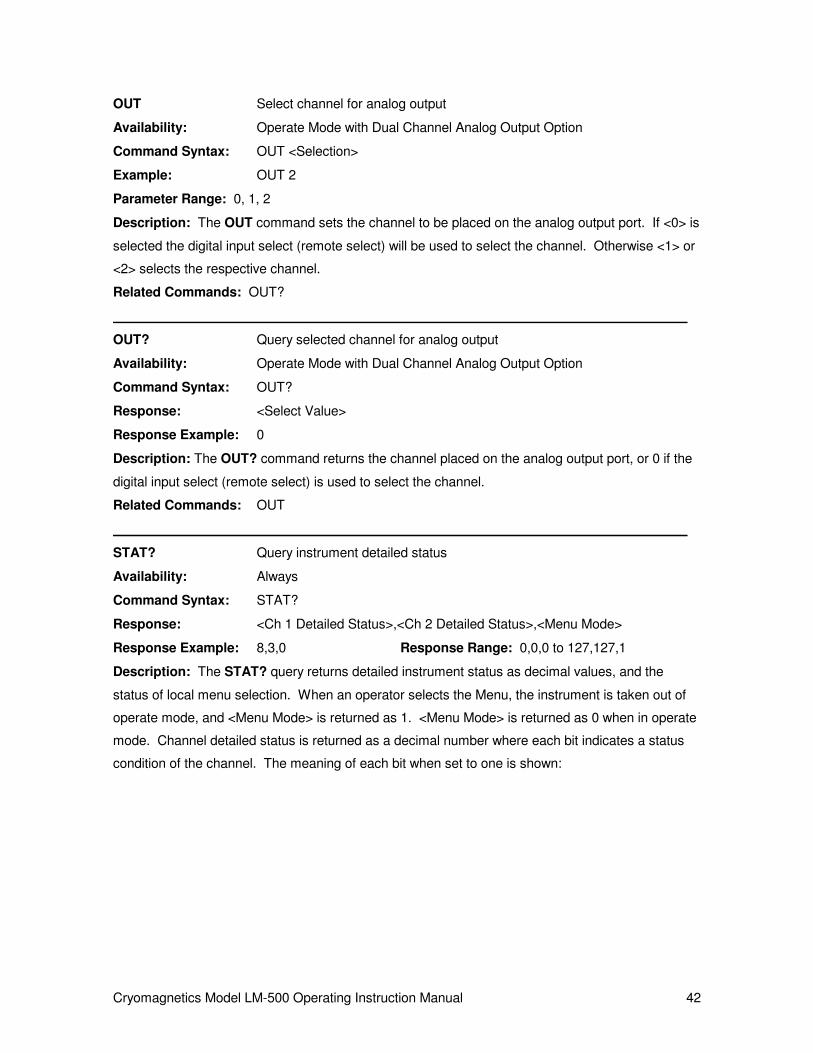
Cryomagnetics Model LM-500 Operating Instruction Manual 42
OUT Select channel for analog output
Availability: Operate Mode with Dual Channel Analog Output Option
Command Syntax: OUT <Selection>
Example: OUT 2
Parameter Range: 0, 1, 2
Description: The OUT command sets the channel to be placed on the analog output port. If <0> is
selected the digital input select (remote select) will be used to select the channel. Otherwise <1> or
<2> selects the respective channel.
Related Commands: OUT?
OUT? Query selected channel for analog output
Availability: Operate Mode with Dual Channel Analog Output Option
Command Syntax: OUT?
Response: <Select Value>
Response Example: 0
Description: The OUT? command returns the channel placed on the analog output port, or 0 if the
digital input select (remote select) is used to select the channel.
Related Commands: OUT
STAT? Query instrument detailed status
Availability: Always
Command Syntax: STAT?
Response: <Ch 1 Detailed Status>,<Ch 2 Detailed Status>,<Menu Mode>
Response Example: 8,3,0 Response Range: 0,0,0 to 127,127,1
Description: The STAT? query returns detailed instrument status as decimal values, and the
status of local menu selection. When an operator selects the Menu, the instrument is taken out of
operate mode, and <Menu Mode> is returned as 1. <Menu Mode> is returned as 0 when in operate
mode. Channel detailed status is returned as a decimal number where each bit indicates a status
condition of the channel. The meaning of each bit when set to one is shown:
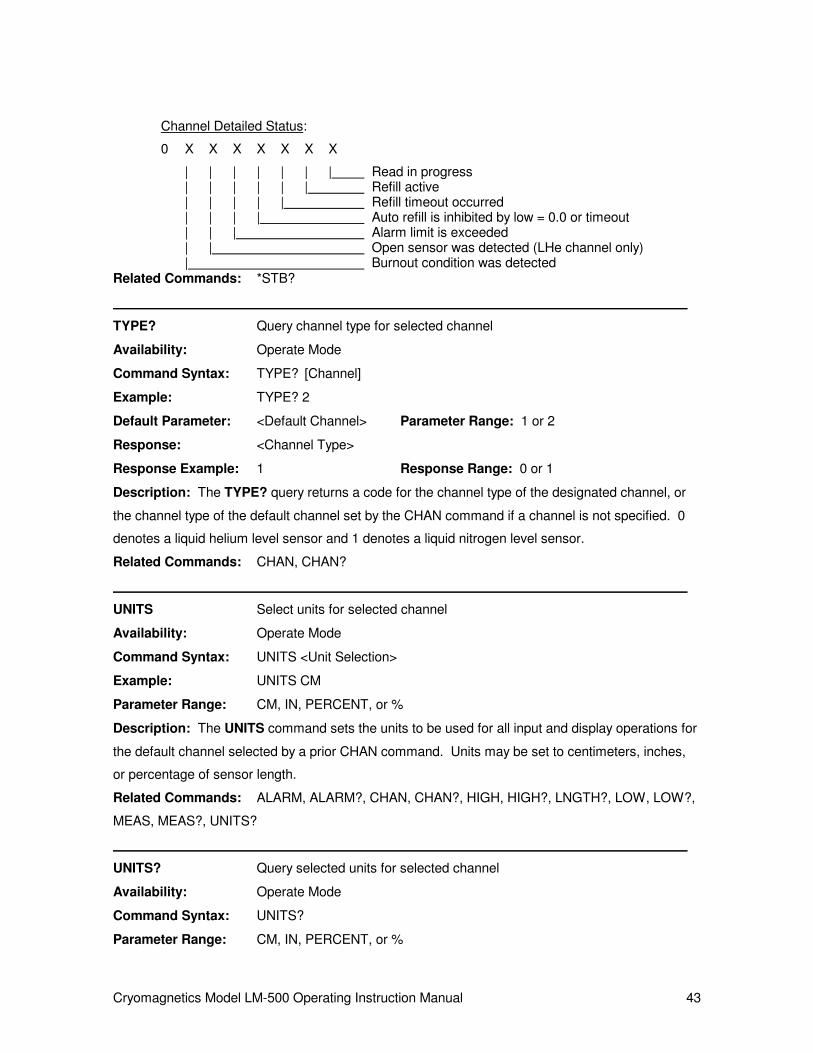
Cryomagnetics Model LM-500 Operating Instruction Manual 43
Channel Detailed Status:
0 X X X X X X X
| | | | | | | Read in progress | | | | | | Refill active | | | | | Refill timeout occurred | | | | Auto refill is inhibited by low = 0.0 or timeout | | | Alarm limit is exceeded | | Open sensor was detected (LHe channel only) | Burnout condition was detected Related Commands: *STB?
TYPE? Query channel type for selected channel
Availability: Operate Mode
Command Syntax: TYPE? [Channel]
Example: TYPE? 2
Default Parameter: <Default Channel> Parameter Range: 1 or 2
Response: <Channel Type>
Response Example: 1 Response Range: 0 or 1
Description: The TYPE? query returns a code for the channel type of the designated channel, or
the channel type of the default channel set by the CHAN command if a channel is not specified. 0
denotes a liquid helium level sensor and 1 denotes a liquid nitrogen level sensor.
Related Commands: CHAN, CHAN?
UNITS Select units for selected channel
Availability: Operate Mode
Command Syntax: UNITS <Unit Selection>
Example: UNITS CM
Parameter Range: CM, IN, PERCENT, or %
Description: The UNITS command sets the units to be used for all input and display operations for
the default channel selected by a prior CHAN command. Units may be set to centimeters, inches,
or percentage of sensor length.
Related Commands: ALARM, ALARM?, CHAN, CHAN?, HIGH, HIGH?, LNGTH?, LOW, LOW?,
MEAS, MEAS?, UNITS?
UNITS? Query selected units for selected channel
Availability: Operate Mode
Command Syntax: UNITS?
Parameter Range: CM, IN, PERCENT, or %

Cryomagnetics Model LM-500 Operating Instruction Manual 44
Response: <Selected Units>
Response Example: cm Response Range: cm, in, or %
Description: The UNITS? command returns the units used for all input and display operations for
the default channel selected by a prior CHAN command. Units may be set to centimeters, inches,
or percentage of sensor length.
Related Commands: ALARM, ALARM?, CHAN, CHAN?, HIGH, HIGH?, LNGTH?, LOW, LOW?,
MEAS, MEAS?, UNITS
*CLS Clear Status Command
Availability: Always
Command Syntax: *CLS
Description: The *CLS command operates per IEEE Std 488.2-1992 by clearing the Standard
Event Status Register (ESR) and resetting the MAV bit in the Status Byte Register (STB).
Related Commands: None
*ESE Standard Event Status Enable Command
Availability: Always
Command Syntax: *ESE <mask>
Example: *ESE 255
Default Parameter: 0 Parameter Range: 0 to 255
Description: The *ESE command operates per IEEE Std 488.2-1992 by setting the specified mask
into the Standard Event Status Enable Register (ESE).
Related Commands: *ESE?
*ESE? Standard Event Status Enable Query
Availability: Always
Command Syntax: *ESE?
Response: <ESE Mask>
Response Example: 255 Response Range: 0 to 255
Description: The *ESE? command operates per IEEE Std 488.2-1992 by returning the mask set in
the Standard Event Status Enable Register (ESE) by a prior *ESE command.
Related Commands: *ESE
*ESR? Standard Event Status Register Query
Availability: Always
Command Syntax: *ESR?

Cryomagnetics Model LM-500 Operating Instruction Manual 45
Response: <Standard Event Status Register>
Response Example: 128 Response Range: 0 to 255
Description: The *ESR? command operates per IEEE Std 488.2-1992 by returning the contents of
the Standard Event Status Register and then clearing the register.
Status Byte Bit Allocations:
X X X X X X 0 1
| | | | | | | | Operation Complete | | | | | | | Request Control | | | | | | Query Error | | | | | Device Dependent Error | | | | Execution Error | | | Command Error | | User Request | Power On Related Commands: *ESE, *ESE?
*IDN? Identification Query
Availability: Always
Command Syntax: *IDN?
Response: <Manufacturer>,<Model>,<Serial #>,<Firmware Level>
Response Example: Cryomagnetics,LM-500,2002,2.00
Serial # Range: 2000 to 9999 Firmware Level Range: 1.00 to 9.99
Description: The *IDN? command operates per IEEE Std 488.2-1992 by returning the LM-500
manufacturer, model, serial number and firmware level.
Related Commands: None
*OPC Operation Complete Command
Availability: Always
Command Syntax: *OPC
Description: The *OPC command operates per IEEE Std 488.2-1992 by placing the Operation
Complete message in the Standard Event Status Register (ESR). The LM-500 processes each
command as it is received and does not defer any commands for later processing.
Related Commands: *OPC?
*OPC? Operation Complete Query
Availability: Always
Command Syntax: *OPC?
Description: The *OPC command operates per IEEE Std 488.2-1992 by placing an ASCII
character "1" in the output queue since the LM-500 does not defer any commands for later

Cryomagnetics Model LM-500 Operating Instruction Manual 46
processing.
Related Commands: *OPC
*RST Reset Command
Availability: Always
Command Syntax: *RST
Description: The *RST command operates per IEEE Std 488.2-1992 by returning the LM-500 to its
power up configuration. This selects channel 1 as the default channel, terminates any refill
sequence in progress, and clears any refill timeouts that may have occurred.
Related Commands: None
*SRE Service Request Enable Command
Availability: Always
Command Syntax: *SRE <mask>
Example: *SRE 255
Default Parameter: 0 Parameter Range: 0 to 255
Description: The *SRE command operates per IEEE Std 488.2-1992 by setting the specified mask
into the Service Request Enable Register (SRE).
Related Commands: *SRE?
*SRE? Service Request Enable Query
Availability: Always
Command Syntax: *SRE?
Response: <SRE Mask>
Response Example: 255 Response Range: 0 to 255
Description: The *SRE? command operates per IEEE Std 488.2-1992 by returning the mask set in
the Service Request Enable Register (SRE) by a prior *SRE command.
Related Commands: *SRE
*STB? Read Status Byte Query
Availability: Always
Command Syntax: *STB?
Response: <Status Byte>
Response Example: 65 Response Range: 0 to 255
Description: The *STB? command operates per IEEE Std 488.2-1992 by returning the Status
Byte.

Cryomagnetics Model LM-500 Operating Instruction Manual 47
Status Byte Bit Allocations:
X X X X X X X X
| | | | | | | | Ch1 Data Ready | | | | | | | Ch1 Fill Active | | | | | | Ch2 Data Ready | | | | | Ch2 Fill Active | | | | MAV (Message Available) | | | ESB (Extended Status Byte) | | MSS (Master Summary Status) | Menu Selected
* TST? Self-Test Query
Availability: Always
Command Syntax: *TST?
Response: <Self test status>
Response Example: 1 Response Range: 1
Description: The *TST? command operates per IEEE Std 488.2-1992 by returning the self-test
status. Explicit tests are not performed in response to this command, but a 1 is returned for
compliance with the specification.
Related Commands: None
* WAI Wait-to-Continue Command
Availability: Always
Command Syntax: *WAI
Description: The *WAI? command operates per IEEE Std 488.2-1992 by accepting the command
without generating an error. Since the LM-500 only implements sequential commands the no-
operation-pending flag is always TRUE.
Related Commands: OPC, *OPC?

Cryomagnetics Model LM-500 Operating Instruction Manual 48
This Page Intentionally Left Blank

Cryomagnetics Model LM-500 Operating Instruction Manual 49
Appendix B
Line Voltage Controller Module – Option 5
Overview
The Line Voltage Controller Module enables the LM-500 to control one or two 115/230 VAC loads up
to 1 Amp each using the LM-500 Low and High setpoints. Section 5.5, Automatic Refill, describes
operation of the LM-500 in automatic refill applications. The outputs are labeled channel 1 and
channel 2, and are controlled by the respective channels of the LM-500.
Connections
An interconnection cable is provided with the Line Voltage Controller Module to connect the LM-500
to the Line Voltage Controller Module and to the sensors. The DB-15M connector attaches to the
LM-500, the DB-9F attaches to the Line Voltage Controller Output Module. Individual sensor
connectors on the cable for channel 1 and channel 2 are labeled. Output connections are standard
115V or 230V output sockets as specified per order.
DB-9M Pinout
Pin 1 - Channel 1 control input (0V - enabled, open - disabled)
Pin 3 - Channel 2 control input (0V - enabled, open - disabled)
Pin 6 - +15V input (10 ma max)
Pin 9 - Ground
Fuses
Each output is individually fused on the rear panel of the module with a user replaceable 2 amp
250VAC fuse. Slow blow fuses should not be used.
Theory of Operation
The 'hot' side of each output is individually switched using an opto-isolated solid state switch rated
for 20-500Hz operation. These switches exhibit a 1 mA off-state leakage current, which will be
observed as 90-100 VAC if the output is checked with a voltmeter with no load attached to the
output.

Cryomagnetics Model LM-500 Operating Instruction Manual 50
This Page Intentionally Left Blank