Embed Size (px)
Citation preview

Opening the Door to Curtain Walls in AutoCAD®
Architecture, Part II David Driver, President 4D Architects, Ltd.
AB214-3 This class builds on Part I. In this session, you’ll learn the appropriate use of overrides and how to add custom blocks to any portion of the Curtain Wall. We’ll also build a custom door/window assembly to illustrate the extreme flexibility of this object. A tips-and-tricks section will cover how to use the Curtain Wall objects to create entirely new types of objects such as casework and parking stalls.
About the Speaker: David is a registered architect, and has worked in architectural firms since 1984. He has experience on a range of projects including civic, commercial, and single and multifamily housing. In addition to ongoing production work, David is a consultant on CAD standards and the implementation of Autodesk Building Information Modeling products. An Autodesk Certified Instructor since 1997, David teaches intensive short courses at several Autodesk Authorized Training Centers throughout the U.S. His continuing practice of architecture guarantees his class will target the common tasks and problems encountered in daily office routines. [email protected]

www.davidddriver.com 2
Opening the Door to Curtain Walls in AutoCAD® Architecture, Part II
Introduction and Outline The Curtain Wall object has been around for years in AutoCAD Architecture (ACA) (Ahhh yes, the software formerly known as Architectural Desktop (ADT)). As with most objects in ACA, the more complex the style the more powerful the object. Last Year, I taught this class as one session. In response to various feedback items, I have split this year’s class into two parts. Part 1 (AB210-3 if you missed it and want to download the Lecture notes and dataset) covered the kit of parts and set of rules basics ideas and terminology of a curtain wall. Part II (this class) will add to that information /set of rules methodology to create a door/window assembly from linework that utilizes overrides directly for the definition of the finished product. A brief outline for this class is:
5 minutes Quick review of kit of parts, set of rules
Kit of Parts: Frames, Mullions, Infills, Divisions
Set of Rules: Grids and Nested Grids
Curtain Walls and Door/Window Assemblies are the third most complex thing in ACA following the display system and schedules. As such they are extremely customizable. They are a very efficient way to get your design intent into 3D, but are frustrating if you do not understand the basic parts and rules that control them.
10 minutes Review of creating a curtain Wall from Scratch
Brother/Sister objects to the Curtain Wall Style
15 minutes Overrides Happen Different overrides and how to use them effectively including; A Brief development of overrides (why so many ways?). Overrides as part of adding to face of mass object. Direct Overrides by using door/window tool. Right click overrides Vs “do something more grip” (infills, divisions, mullions/frames) overrides.
10 minutes Customizing Parts Profiles and custom blocks
15 minutes Creating a Door/Window Assembly from line work
This exercise leads you through creating a door/window assembly from some linework. While the example is residential in nature, the idea can be applied to curtain walls, or curtain Wall Units as well. This exercise also covers the ever mysterious “Design Rules>transfer to object” function.
10 minutes Common Curtain Wall Blues
Corners, Schedules, Display and best use issues
15 minutes Beyond the Storefront: Examples that push the envelope
Glass Block Walls, Stained Glass, Shelving Units, Parking Spaces
Please feel free to ask questions during class. I do have a plan of attack and may ask to defer the question if I think I will cover it later on. Of course if I do not answer a question in class feel free to email me: [email protected]

www.davidddriver.com 3
Opening the Door to Curtain Walls in AutoCAD® Architecture, Part II
Quick review of kit of parts, set of rules Kit of Parts = Frames, Mullions, Infills, Divisions Set of Rules = Grids and Nested Grids. For basic terminology as well as an exercise that leads you though creating a curtain wall style from scratch, refer to the handout for AB210.
Overrides Happen A discussion of curtain walls cannot be complete without overrides. There are many ways to override portions of the curtain wall. The reason for the many ways is that the curtain wall object has been around for a long time. As ACA developed, the ways you available to interact and override the curtain wall object developed as well. In more or less historical order:
□ Right click overrides
□ Direct Overrides by using door/window tool.
□ “Do something more grip” (infills, divisions, mullions/frames) overrides.
□ Overrides as part of assigning curtain wall to face of mass object.
Direct Overrides: Direct Overrides allow you to add a Window, Door, Door/Window Assembly just use the tool, and then select the curtain wall
Note when you use the tool to add another object into the curtain wall, it creates the infill definition needed for the override.
A door added by the same method will only fill in the available space and will not let you add into 2 cells, the cell must be merged first which brings us to: Right click overrides
Of note, although you can apply a window, door or door/window assembly in this manner, you cannot add in a curtain wall unit like this using a tool palette tool directly.

www.davidddriver.com 4
Opening the Door to Curtain Walls in AutoCAD® Architecture, Part II
Right Click Overrides
Utilizing the curtain wall context sensitive right click:
Infill > Show Markers
Then
Infill > Merge
Allows you to create a space within the grid for a door or storefront (Door/Window Assembly)
Combined, the right click infill tools along with the tool palette actions will get the job done many times.
“Do Something More” Grip
Somewhere around about version 2006, the “do something else” grip showed up. While not the official name, this grip appears as a round circle on many of the ACA objects. For a curtain wall, this is the “Edit Grid” grip and will start a session not unlike an edit in place mode (but not really like any other edit in place mode of ACA).
The key is to understand that this is as much a command line session as a graphic one
The Edit Grid mode was one of the last tools developed and has many more options than are available with a right click override. This tool allows you to manipulate the Divisions of the curtain wall in addition to the standard cell and frame/mullion tools available from the right click menu. BE CAREFUL! It is very easy to do a lot of damage to your curtain wall in a short amount of time with this command.
Overrides on Curtain Walls Applied to Mass Elements Just a note here if you add curtain walls by face to mass elements the entire curtain wall is composed of overrides. Be careful with the “add selected” feature if you are working with this type of curtain wall.

www.davidddriver.com 5
Opening the Door to Curtain Walls in AutoCAD® Architecture, Part II
Overrides Exercise: Edit In Place and Overrides on curtain walls:
Select the curtain wall, right click > Infills > show markers
Select the curtain wall, right click > Infills > merge
This may take several merges.
Enter thankfully will repeat this command so you don’t have to right click many times.
Using the Door/ Window assembly tool you can now just select this merged cell

www.davidddriver.com 6
Opening the Door to Curtain Walls in AutoCAD® Architecture, Part II
Custom Curtain Wall Parts With Profiles and Custom Blocks you can create almost anything with a curtain wall.
Profiles for mullions and frames
Draw a polyline and convert it to a profile using the right click menu
Edit the Curtain Wall Style to define a new mullion or frame
Assign the mullion to the style or use override.

www.davidddriver.com 7
Opening the Door to Curtain Walls in AutoCAD® Architecture, Part II
Adding Custom Blocks to a Curtain Wall Custom Blocks can be used to replace any portion of a curtain wall.
In the example here, the columns were originally laid out as an infill called Column.
A single booleaned mass element was created to replace the infill simple panel
Create a block out of the column
I use the very bottom and center of the column as the insertion point. This makes it easier for me to place the column. Also, I make the column as close to the real size as possible.
Edit the curtain Wall style and assign a style override to the model representation.

www.davidddriver.com 8
Opening the Door to Curtain Walls in AutoCAD® Architecture, Part II
Click the Add Button on the Other tab of the model Display properties
Set the component type to the definition type you wish to replace. (frame, mullion or infill) Click the Select Element button and pick the infill definition to replace
Check draw custom graphics to enable you to replace graphics (checkbox) and select the block you just created.
Because I have drawn the column to size I will scale it to fit
The insertion point is all about matching the insertion point of the block you created. Center bottom is how I made my block
The columns are now part of the definition of the curtain wall style

www.davidddriver.com 9
Opening the Door to Curtain Walls in AutoCAD® Architecture, Part II
Creating a Custom Window Assembly From Lines with Overrides
This exercise will create a Door Window Assembly as shown in the illustration below.
The finished product of this exercise will look something like
this
I was on the team that produced the Autodesk Architectural Learning Assistant that was part of ACA’s release 3.3 cycle. I believe that a similar exercise was published on that CD as part of the ALA, but I do not have a copy any more to confirm this. It is an exercise I work through in my intermediate classes and have been updating it each year a new release comes out. With the added functionality of the last several releases, this has changed substantially from the original 3.3 exercise.
There are 5 general tasks in this exercise. 1) Create the window assembly from the lines
2) Save as a style
3) Create the style’s element definitions.
Establish all the different definitions within the style that we need to complete the window assembly. This will entail creating definitions for infills, mullions and frames.
4) Override the parts of the Custom Door/Window Assembly style.
This is the area that has changed most in the last 3 releases. There are now 3 distinct ways to override assignments of a Curtain Wall or Door/Window Assembly Style.
In practice with a small custom assembly like this I will usually just use the right click overrides. However as a teaching tool I will add the steps to utilize the edit in place functions as well as the adding elements directly from the toolbar.
5) Save and write the overrides into the assembly style.
Terminology Frame (the outer component of the window assembly)
Mullion – Any of the internal divisions
Infill – what happens inside each of the areas formed by the mullions and frames.
RC indicates Right Click access to shortcut menu
[Enter] indicates press the enter key or right click and select enter from the right click menu.
Assembly – Door/Window Assembly

www.davidddriver.com 10
Opening the Door to Curtain Walls in AutoCAD® Architecture, Part II
Exercise: Custom Assembly Task 1) Create Window Assembly From Lines: Step Image / comments Comments
Open …\ BD32-2 Curtains Part 2.dwg
This is part of the dataset you can download from
www.autodesk.com/auonline
Or my own site
www.davidddriver.com
This drawing was created with the Aec Model (Imperial Ctb).dwt
This drawing has some elements already within it:
Linework from which you will create the assembly style
A wall with a standard assembly placed in it with the same
dimensions as the Linework (10’-6” high x 9’-0” wide)
Some material definitions to use on the style
This drawing also contains the final product of the exercise as a style with the name CustomDone
This drawing has some styles already defined that will be used with the exercise. These Styles will be used as infills overrides
for the window assembly.
Windows:
WindAssmbly_DBLHung window style with the frame turned off
WindAssmbly_Arched window style with the frame turned off
Door:
WindAssmbly_SingleFullLight Single Hinged door style with
frame turned off
Verify the left viewport of the Exercise Layout tab is current
On the Design palette, Right click on the door/window
assembly tool and select Apply tool properties to>Elevation
sketch
Select the linework in the lower left of the drawing, [Enter] [Enter]
[Enter]
The assembly is placed in the drawing.
You should now have an assembly in the drawing that
looks like this.
YOU ARE IN EDIT IN PLACE MODE! The first thing we need to do is to save this as a new style.

www.davidddriver.com 11
Opening the Door to Curtain Walls in AutoCAD® Architecture, Part II
Exercise: Custom Assembly Continued, Task 2) Save as a new style: Step Image / comments Comments
Select the window assembly, RC > Design Rules> Save to style.
Pick the new button
Give it the name 01Custom
Pick the OK button
Pick the OK button again.
You should be back in the drawing The window assembly is
now a style we can use.
Select the Assembly that is in place in the wall and use the properties to change it to this
new Assembly style
Exercise: Custom Assembly Continued, Task 3) Create the style’s element definitions: Just as it is when you create a curtain wall style, you create the kit of parts first. It is easiest to do this here also. For this Assembly will need the following for which the steps are provided on the next page:
Infills
“Door” based on the door style WindAssmbly_SingleFullLight
“SideWindow” based on the window style
WindAssmbly_DBLHung
If you are ahead of the game, go ahead and create another infill
called ‘top window’ based on the window style
WindAssmbly_Arched
Mullions
A mullion that has a width of 2 and a depth of 6
A Mullion called “Plus1x” with an offset of you guessed it 1”
A mullion called “Less1x” with an offset of you guessed it -1”
These two last mullions will be used to align the mullions with
the frames
Frames
A frame called ‘threshold’ that has a width of .25 and a depth of
6
A frame W=2, Depth=6

www.davidddriver.com 12
Opening the Door to Curtain Walls in AutoCAD® Architecture, Part II
Step Image / comments Comments
Establish Infill styles
Select the Assembly, RC > Edit Style
Pick the design rules tab
On the left, select the element definition Infills
on the left
Pick the new infill icon (midway down below where it says ‘default
infill’) This creates a new infill, give it
the name Door
Change infill type to Style
On the lower right, expand door styles and highlight
WindAssmbly_SingleHung
Repeat this creating infill SideWindow based on the
window style WindAssmbly_DBLHung
Establish Mullions
Select the element definition Mullions on the left
Change the default mullion settings to:
Width = 2
Depth = 6

www.davidddriver.com 13
Opening the Door to Curtain Walls in AutoCAD® Architecture, Part II
Create a new mullion with an offset
The mullions created in this next step will be assigned as an
override to the interior mullions to get them to align with the
frame.
By default the mullions are center justified and the frame is
justified to the outside of the lines used to generate the
Assembly.
Note. In general the offsets will work as follows; positive x offset will move the mullion in the positive X direction. If the window assembly is placed backwards in the wall, then these directions will reverse themselves. I know that in previous releases (it may have been a while) the direction of the original line work for assembly would affect this also. I have just become so accustom to drawing vertical lines from bottom to top and horizontal lines from left to right.
Pick the new Mullion icon This creates a new mullion, give
it the name Plus 1x
Set:
Width = 2,
Depth = 6
and over on the right side, enter 1 for the x offset
Repeat, creating a mullion Less 1x with a negative x offset of 1” (-
1”)
Establish Frame Styles
Select the element definition Frames on the left
Change the default mullion settings to:
Width = 2
Depth = 6
Pick the new Frame icon
Name the new frame Threshold and give it a width of .25 and a
depth of 6
Note if you wanted to create a threshold that was sloped, you could draw a closed polylines, create a profile and assign the profile to the ‘threshold’ frame
www.davidddriver.com 14
Opening the Door to Curtain Walls in AutoCAD® Architecture, Part II
definition here
Click OK button to return to the drawing.
Save your work.
The frames and mullions changes we made to defaults are
reflected in the drawing
Exercise: Custom Assembly Continued, Task 4) Overriding the parts of the Custom Door/Window Assembly style: This section is broken down into 3 sub sections to illustrate the different ways of overriding a curtain wall or as in this case a door/window assembly style. These three methods are:
□ Using the right click overrides
□ Adding styles directly from the tools on the toolbar
□ Using the edit in place grip function on these objects
Important! In all of these cases if you are working on a style you will want to transfer the design rules onto the object so that your modifications can be pushed back into the style. Sub Section 1) Using the right click override to merge cells and change the mullion assignments
Step Image / comments Comments
Merge the cells for the door
Make the right lower viewport active
Select the assembly
RC > Design Rules > Transfer to Object
In the right side viewport Select the window assembly
RC>Infill>Show Markers
Markers will appear in the cells of the assembly to aid you in selecting a cell to merge or
override
Again from the assemblies right click menu select Infill > Merge
Click the lowest cell (Cell A)
Click the cell in the center (Cell B)
The two cells are now merged, creating a space to put the door
Change the mullion assignments

www.davidddriver.com 15
Opening the Door to Curtain Walls in AutoCAD® Architecture, Part II
Again from the assembly’s right click menu select
Frame/Mullion> Override Assignement
Click the right inner lower mullion
Select the Less 1x definition from the drop down
The mullion definition is replaced with the definition you created in
the first part of this exercise.
Repeat for the left side using the Plus 1x mullion
Repeat the process for the two vertical mullions above the door
The frames and mullions on each side of the door are now
aligned
Repeat this process one more time and replace the bottom
frame with the threshold definition
The right click menu of a curtain wall, unit or door/window assembly allows you to directly override definitions of these objects in the drawing. You could complete this exercise using only the Right click override functions:
Right Click>Infill> Right Click>Frame/Mullion> Right Click>Division>
However, because this is a learning experience we will add the door by using the door tool instead. Sub Section 2) Adding a door with the door tool.
Step Image / comments Comments

www.davidddriver.com 16
Opening the Door to Curtain Walls in AutoCAD® Architecture, Part II
Click the standard door tool on the design palette
In the properties change the door style to
WindAssmbly_SingleFullLight
Click the window assembly
Click the cell marker in elevation where the door is to be placed
Click Add as Cell Assignment.
Note that this bypasses our definition defined in the style. We
could override that existing definition if we wished.
Repeat this process and add a window of the style
WindAssmbly_DBLHung to the right side of the assembly
The object we have been working on has all the overrides.
Any other objects of the same style will NOT have these
overrides in place.
TIP: The dialog box that appears when you add a style based tool also is a handy frame removal tool when used for placing Assemblies in curtain walls (storefront in a curtain wall).
Before move on to using the edit in place grip, it is important to now transfer these overrides back into the style.

www.davidddriver.com 17
Opening the Door to Curtain Walls in AutoCAD® Architecture, Part II
Select the Assembly
RC > Design Rules > Transfer to style
Check all available check boxes
Click OK
Sub Section 3) Edit In Place.
The last section looks adds the remaining window using the Edit in Place grip
Step Image / comments Comments
Select the assembly in the right lower viewport
Do NOT pick on the door or the window, pick on a frame or cell
marker of the assembly.
Click the round grey grip that appears at the bottom of the
assembly.
You are now in the Curtain Wall-DoorWindowAssembly edit in place mode. Unlike many of
ACA’s edit in place mode this is very command line or right click
driven.
Note the command line options
Right click and click Cell
Click the window area on the left
Click Assign Infill and use the drop down to select SideWindow

www.davidddriver.com 18
Opening the Door to Curtain Walls in AutoCAD® Architecture, Part II
Click OK
Done!
The downloadable dataset has a drawing with the completed style in it.
Etcetera: After you add doors and windows, the door and window will be accessible directly in the drawing. When you right click on a door, you will not get the window assembly shortcut menu. Make sure you select the window assembly not a door or a window after they are added.
Do not mix and match editing in place (grip) with overriding. Remember to save your changes back to the style before you edit in place
Common Curtain Wall Blues
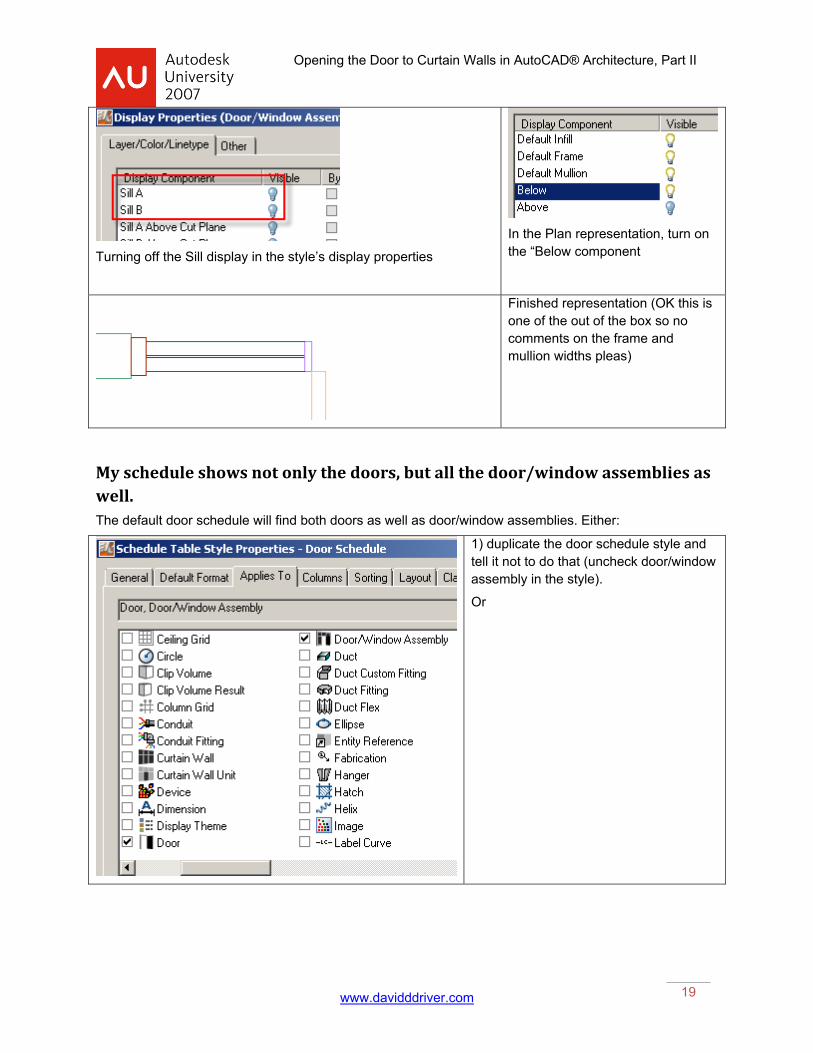
The sill plan does not look right (door/window Assembly) By default, the sill representation is turned on.
The cut plane will only show at cut height default of the display configuration
www.davidddriver.com 19
Opening the Door to Curtain Walls in AutoCAD® Architecture, Part II
Turning off the Sill display in the style’s display properties
In the Plan representation, turn on the “Below component
Finished representation (OK this is one of the out of the box so no comments on the frame and mullion widths pleas)
My schedule shows not only the doors, but all the door/window assemblies as well. The default door schedule will find both doors as well as door/window assemblies. Either:
1) duplicate the door schedule style and tell it not to do that (uncheck door/window assembly in the style).
Or

www.davidddriver.com 20
Opening the Door to Curtain Walls in AutoCAD® Architecture, Part II
2) Filter the schedule in the properties to only show *door*. Door/window assemblies by default are placed on layer A-Glaz-Std-Assm. And will not be shown in the schedule.
My Curtain walls do not miter. The right click tool set miter angle not miter the vertical components. Instead create a new frame on one (either square, or a mitred one using a profile). Override both edges as needed.
Beyond the Storefront: Examples that push the envelope Most of the examples here were gleaned from other sources including the newsgroup and Autodesk’s Style downloads.
Glass block curtain walls
Shelving units
Downloaded from newsgroup, I forget who posted these, if it was you, email me and I will put your
name here!
Chad Ames’ quoins and stained
glass window
www.davidddriver.com 21
Opening the Door to Curtain Walls in AutoCAD® Architecture, Part II
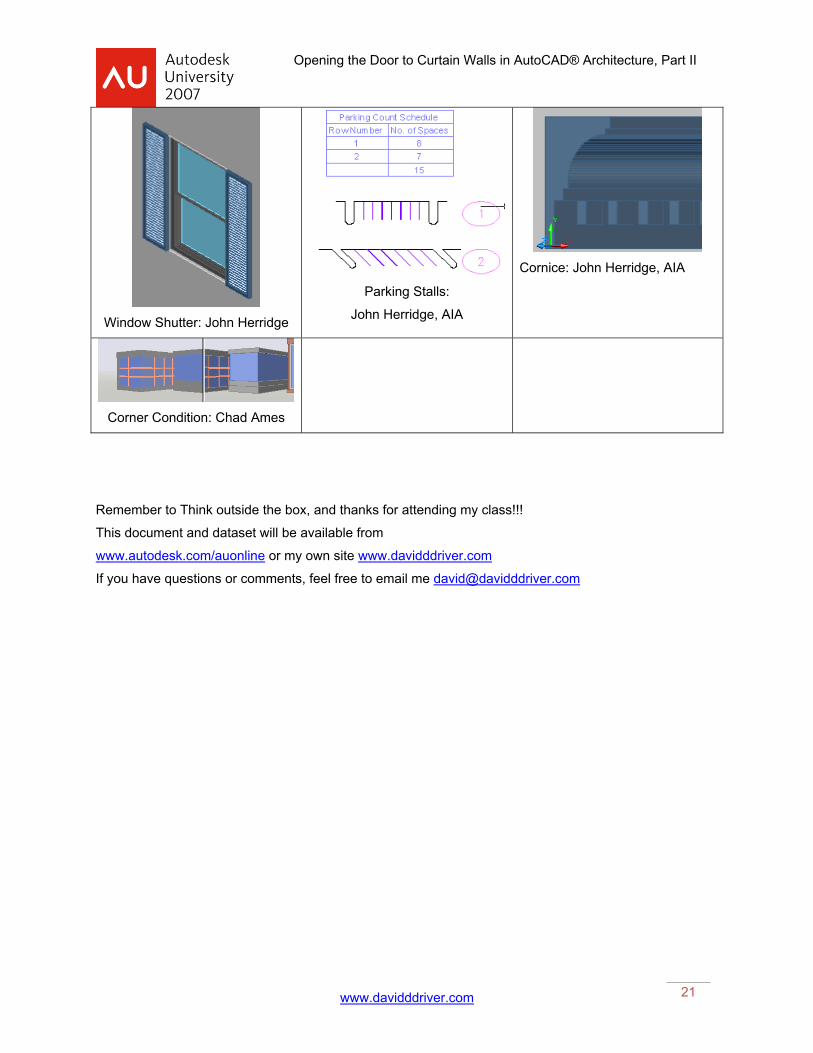
Window Shutter: John Herridge
Parking Stalls:
John Herridge, AIA
Cornice: John Herridge, AIA
Corner Condition: Chad Ames
Remember to Think outside the box, and thanks for attending my class!!!
This document and dataset will be available from
www.autodesk.com/auonline or my own site www.davidddriver.com
If you have questions or comments, feel free to email me [email protected]

www.davidddriver.com 22
Opening the Door to Curtain Walls in AutoCAD® Architecture, Part II

![Metal curtain walls · Title: Metal curtain walls Author: National Research Council [U.S.]. Building Research Institute](https://img.dokumen.tips/doc/110x75/5f759c16afe77a357c2866be/metal-curtain-walls-title-metal-curtain-walls-author-national-research-council.jpg)