Embed Size (px)
Citation preview

Operator’s ManualOneWASH™ Power Washer
www.generac.com or 1-888-436-3722

ii

iii
Table of ContentsSection 1 - Introduction............................................. 11.1 Introduction .......................................................... 1
Section 2 - Safety ....................................................... 32.1 Safety Rules......................................................... 3
Section 3 - General Information................................ 73.1 Know Your Power Washer................................... 73.2 Product Specifications ......................................... 83.3 Emissions Information.......................................... 83.4 High Altitude Operation........................................ 83.5 Unpacking ............................................................ 9
Section 4 - Set-up..................................................... 114.1 Assembly ........................................................... 114.2 Add Engine Oil ................................................... 124.3 Add Fuel............................................................. 134.4 Connect Hose and Water Supply to Pump ........ 134.5 How to Use Nozzles........................................... 15
Section 5 - Operation............................................... 195.1 Operation ........................................................... 195.2 Power Washer Location..................................... 195.3 Checklist Before Starting Engine ....................... 195.4 How to Start Your Power Washer ...................... 195.5 Automatic Cool Down System
(Thermal Relief) ................................................. 215.6 How to Stop Your Power Washer ...................... 21
Section 6 - Maintenance.......................................... 236.1 Maintenance Recommendations ....................... 236.2 Maintenance Schedule ...................................... 236.3 Pump Oil ............................................................ 246.4 Emissions Control .............................................. 246.5 Power Dial Settings ........................................... 246.6 Power Washer Maintenance.............................. 246.7 Check and Clean Inlet Screen ........................... 246.8 Check High Pressure Hoses.............................. 246.9 Check Detergent Siphoning Tube...................... 246.10 Check Spray Gun .............................................. 246.11 Chemical Tank Maintenance ............................. 246.12 Nozzle Maintenance .......................................... 256.13 Engine Maintenance .......................................... 266.14 Engine Oil Recommendations ........................... 266.15 Service Air Cleaner............................................ 276.16 Service Spark Plug ............................................ 286.17 Inspect Muffler and Spark Arrester .................... 286.18 After Each Use................................................... 296.19 Winter Storage................................................... 296.20 Long Term Storage............................................ 296.21 Other Storage Instructions................................. 306.22 Transporting/Tipping of the Unit ........................ 30
Section 7 - Troubleshooting ................................... 317.1 Troubleshooting Guide ...................................... 31

iv
This page intentionally left blank.

OneWASH™ Power Washer 1
1.1 — INTRODUCTIONThank you for purchasing this power washer manufac-tured by Generac Power Systems, Inc. This model is a high performance, air-cooled, engine-driven power washer that operates at 3100 psi.The units feature cus-tom designed wheels, axial cam pump with stainless steel pistons, automatic cool down system, quick connect nozzles, high pressure hose, detergent siphoning hose and chemical tank.Common sense and strict compliance with the spe-cial instructions are essential to preventing acci-dents. The operator must read this manual and thoroughly understand all of the instructions and warn-ings before using the equipment. If any portion of the manual is not understood, contact the nearest Authorized Dealer for starting, operating and servicing procedures. The owner is responsible for proper and safe use of the equipment.The power washer can operate safely, efficiently and reli-ably only if it is properly located, operated and main-tained. Before operating, servicing or storing:• Study all warnings in this manual and on the product
carefully.• Become familiar with this manual and the unit before
use.• Refer to the Assembly section of the manual for
instructions on final assembly procedures. Follow the instructions completely.
The manufacturer cannot anticipate every possible cir-cumstance that might involve a hazard. The warnings in this manual, and on tags and decals affixed to the unit are, therefore, not all inclusive. If using a procedure, work method or operating technique that the manufacturer does not specifically recommend, ensure that it is safe for others. Also make sure the procedure, work method or operating technique utilized does not render the power washer unsafe.THE INFORMATION CONTAINED HEREIN WAS BASED ON MACHINES IN PRODUCTION AT THE TIME OF PUBLICATION. GENERAC RESERVES THE RIGHT TO MODIFY THIS MANUAL AT ANY TIME.Save these instructions for future reference. If you loan this device to someone, always loan these instructions and the Owner's Manual to the individ-ual as well.
1.1.1 — Where to Find UsYou can contact Generac Customer Service by phone at 1-888-436-3722, or on the internet at www.generac.com. Record the important information of the unit in the follow-ing chart for future reference and/or service inquiries.
Model Number
Serial Number
Date Purchased
Section 1 Introduction

2 OneWASH™ Power Washer
This page intentionally left blank.
Introduction

OneWASH™ Power Washer 3
2.1 — SAFETY RULESThroughout this publication, and on tags and decals affixed to the power washer, DANGER, WARNING, CAU-TION and NOTE blocks are used to alert personnel to special instructions about a particular operation that may be hazardous if performed incorrectly or carelessly. Observe them carefully. Their definitions are as follows:
Indicates a hazardous situation or action which, if not avoided, will result in death or serious injury.
Indicates a hazardous situation or action which, if not avoided, could result in death or serious injury.
Indicates a hazardous situation or action which, if not avoided, could result in minor or moderate injury.
NOTE:Notes contain additional information important to a procedure and will be found within the regular text body of this manual.These safety warnings cannot eliminate the hazards that they indicate. Common sense and strict compliance with the special instructions while performing the action or service are essential to preventing accidents.Safety Symbols and Meanings.
2.1.1 — Exhaust Hazards
Carbon monoxide produced during use can kill in minutes. NEVER use indoors, in a vehi-cle, or in other sheltered areas, EVEN IF doors and windows are open. Only use OUTSIDE and far away from windows, doors and vents.
Some chemicals or detergents may be harm-ful if inhaled or ingested, causing severe nau-sea, fainting, or poisoning.
• Operate power washer ONLY outdoors.• A running engine gives off carbon monoxide.• Carbon monoxide is an odorless, colorless, poisonous
gas. Breathing carbon monoxide can cause headache, fatigue, dizziness, vomiting, confusion, seizures, nau-sea, fainting or death. If you start experiencing any of these symptoms, IMMEDIATELY move to fresh air. Seek medical attention.
Section 2 Safety

Safety
4 OneWASH™ Power Washer
• Keep exhaust gas from entering a confined area through windows, doors, ventilation intakes, or other openings. Warn any occupants inside about the symp-toms of carbon monoxide so they know to move to fresh air if they begin to feel ill.
• The use of a carbon monoxide detector inside any occupied premises between the power washer and the occupant is recommended.
• NEVER start or run engine indoors, in a vehicle, or in an enclosed area, even if windows and doors are open.
• Use a respirator or mask whenever there is a chance that harmful gas or vapors may be inhaled.
• Read all instructions with respirator or mask so you are certain the respirator or mask will provide the neces-sary protection against inhaling harmful gas or vapors. If you begin to experience any of the CO symptoms listed above, IMMEDIATELY move to fresh air.
2.1.2 — Fluid Injection Hazard
NEVER aim spray gun at people, animals, or electrical devices. Serious injury or death will result. ALWAYS point spray gun in safe direc-tion, squeeze spray gun trigger to release high pressure, every time you stop engine. Engage trigger lock when not in use.
• The high pressure stream of water that this equipment produces can cut through skin and its underlying tis-sues, leading to serious injury, possible amputation or death. Spray gun traps high water pressure, even when engine is stopped and water is disconnected, which can cause injury.
• NEVER allow CHILDREN to operate power washer or play nearby. This is NOT a toy.
• NEVER repair high pressure hose. Replace it.• NEVER repair leaking connections with sealant of any
kind. Replace o-ring or seal.• NEVER connect high pressure hose to nozzle exten-
sion.• Keep high pressure hose connected to pump and
spray gun while system is pressurized.• NEVER secure spray gun in open position.• NEVER leave spray gun unattended while machine is
running.• NEVER use a spray gun which does not have a trigger
lock or trigger guard in place and in working order.• Always be certain spray gun, nozzles and accessories
are correctly attached.
2.1.3 — Electrical Shock Hazard
Risk of electrocution.
Contact with power source can cause electric shock or burn.
• NEVER spray near power source.
2.1.4 — Hot Surfaces Hazard
Contact with muffler area can result in serious burns. Exhaust heat/gases can ignite combustibles, structures or damage fuel tank causing a fire.
• DO NOT touch hot parts and AVOID hot exhaust gases.
• Allow equipment to cool before touching.• Keep at least five (5) feet (152 cm) of clearance on all
sides of power washer including overhead.• It is a violation of California Public Resource Code,
Section 4442, to use or operate the engine on any for-est-covered, brush-covered, or grass-covered land unless the exhaust system is equipped with a spark arrester, as defined in Section 4442, maintained in effective working order. Other states or federal jurisdic-tions may have similar laws. Contact the original equip-ment manufacturer, retailer, or dealer to obtain a spark arrester designed for the exhaust system installed on this engine.
• Replacement parts must be the same and installed in the same position as the original parts.

Safety
OneWASH™ Power Washer 5
2.1.5 — Fire Hazards
Fuel and its vapors are extremely flam-mable and explosive. Fire or explosion can cause severe burns or death.
WHEN ADDING OR DRAINING FUEL• Turn power washer OFF and let it cool at least two (2)
minutes before removing fuel cap. Loosen cap slowly to relieve pressure in tank.
• Fill or drain fuel tank outdoors.• DO NOT overfill tank. Allow space for fuel expansion.• If fuel spills, wait until it evaporates before starting
engine.• Keep fuel away from sparks, open flames, pilot lights,
heat, and other ignition sources.• DO NOT light a cigarette or smoke.WHEN STARTING EQUIPMENT• Ensure spark plug, muffler, fuel cap, and air cleaner
are in place.• DO NOT crank engine with spark plug removed.WHEN OPERATING EQUIPMENT• DO NOT tip engine or equipment at angle which
causes fuel to spill.• DO NOT spray flammable liquids.WHEN TRANSPORTING OR REPAIRING EQUIPMENT• Transport/repair with fuel tank EMPTY.• Disconnect spark plug wire.WHEN STORING FUEL OR EQUIPMENT WITH FUEL IN TANK• Store away from furnaces, stoves, water heaters,
clothes dryers, or other appliances that have pilot light or other ignition source because they can ignite fuel vapors.
2.1.6 — Hearing Protection Hazard
Hearing Protection Recommended.
2.1.7 — Fall Hazard
Use of power washer can create pud-dles and slippery surfaces. Kickback from spray gun can cause you to fall.
• Use only on a level surface.• The cleaning area should have adequate slopes and
drainage to reduce the possibility of a fall due to slip-pery surfaces.
• Do not use on elevated surfaces where chance of kick-back could result in a serious fall.
• Firmly grasp spray gun with both hands when using high pressure spray to avoid injury when spray gun kicks back.
2.1.8 — Moving Parts Hazard
Starter and other rotating parts can entangle hands, hair, clothing, or accessories.
• NEVER operate power washer without protective housing or covers.
• DO NOT wear loose clothing, jewelry or anything that may be caught in the starter or other rotating parts.
• Tie up long hair and remove jewelry.
2.1.9 — Kickback Hazard
Starter cord kickback (rapid retraction) can result in bodily injury. Kickback will pull hand and arm toward engine faster than you can let go. Broken bones, fractures, bruises, or sprains could result.
• NEVER pull starter cord without first relieving spray gun pressure.
• To relieve trapped pressure, point gun in safe direction and release pressure by pulling/actuating trigger on spray gun.
• When starting engine, pull cord slowly until resistance is felt and then pull rapidly to avoid kickback.
• After each starting attempt, where engine fails to run, always point spray gun in safe direction, and squeeze spray gun trigger to release high pressure.
• Firmly grasp spray gun with both hands when using high pressure spray to avoid injury when spray gun kicks back.

Safety
6 OneWASH™ Power Washer
2.1.10 — Spark Hazards
Unintentional sparking can result in fire or electric shock.
WHEN ADJUSTING OR MAKING REPAIRS TO YOUR Power washer.
• Disconnect the spark plug wire from the spark plug and place the wire where it cannot contact spark plug.
WHEN TESTING FOR ENGINE SPARK• Use approved spark plug tester.• DO NOT check for spark with spark plug removed.
2.1.11 — Splash Hazards
Risk of eye injury. Spray can splash back or propel objects.
• Always wear safety goggles when using this equip-ment or in vicinity of where equipment is in use.
• Before starting the power washer, be sure you are wearing adequate safety goggles.
• NEVER substitute safety glasses for safety goggles.NOTE:
High pressure spray may damage fragile items including glass.• DO NOT point spray gun at glass when using red (0°)
MAX nozzle.• NEVER aim spray gun at people, animals, electrical
devices or plants.NOTE:
Improper treatment of power washer can damage it and shorten its life.• If you have questions about intended use, ask dealer
or contact qualified service center.• NEVER operate units with broken or missing parts, or
without protective housing or covers.• DO NOT by-pass any safety device on this machine.• DO NOT operate power washer above rated pressure.• DO NOT modify power washer in any way.• Before starting power washer in cold weather, check all
parts of the equipment to be sure ice has not formed there.
• NEVER move machine by pulling on hoses. Use han-dle provided on unit.
• Check fuel system for leaks or signs of deterioration, such as chafed or spongy hose, loose or missing clamps, or damaged tank or cap. Correct all defects before operating power washer.
• This equipment is designed to be used with Generac authorized parts ONLY. If equipment is used with parts that DO NOT comply with minimum specifications, user assumes all risks and liabilities.

OneWASH™ Power Washer 7
3.1 — KNOW YOUR POWER WASHERRead this owner’s manual and safety rules before operat-ing your high power washer. If you loan this device to someone, ALWAYS loan these instructions AND the owner’s manual to the individual as well. Compare the illustrations with your high power washer to familiarize yourself with the locations of various controls (Figure 3-1). Save this manual for future reference. Replacement owner’s manuals can be printed from the Generac Web site.A -Spray Gun – Controls the application of water onto
the cleaning surface with trigger device. Includes a trigger lock.
B -Lance with Quick Connect – Allows you to switch between different nozzles.
C -High Pressure Hose – Connect one end to water pump and the other to the spray gun.
D -Recoil Starter – Use for starting the engine.E -Oil Fill – Check and add engine oil.F -Air Filter – Protects engine by filtering dust and
debris out of the intake air.G -Pump – Develops high pressure.H -Thermal Relief Valve – Cycles water through the
pump when water reaches 125°F warm water will discharge from pump onto ground. This prevents internal pump damage.
I -Engine On/Off Switch – Turn this switch to “ON” before using the recoil starter. Turn the switch to “OFF” to stop the engine.
J -Unloader Valve – Controls the high pressure output.K -High Pressure Outlet – Connection for high pres-
sure hose.L -Water Inlet – Connection for Garden Hose.M -Fuel Tank – Fill tank with regular unleaded fuel.
Always leave room for fuel expansion.O -Choke – Prepares a cold engine for starting.P -Power Dial – Provides optimal cleaning power for
each desired application.Q -Nozzles – Chemical injection, Blast (0°), Wash (25°),
Detergent for various high pressure cleaning applica-tions.
R -Chemical Tank – A drain-able tank used to hold power washer safe detergents to be siphoned into the low pressure stream.
S -Prepare/Start Instruction – Identifies proper proce-dure to set up and start/stop power washer.
T -Drain Plug – Used to drain engine oil.U -Serial Number LocationV -Chemical Tank Fill CapW -Chemical Tank Drain Cap
Figure 3-1. Features and Controls
Section 3 General Information

General Information
8 OneWASH™ Power Washer
3.1.1 — ITEMS NOT SHOWNIdentification Label (on engine blower housing) – Provides model and serial number of power washer. Please have these readily available if calling for assis-tance.Detergent Siphoning Tube/Filter – Use to siphon power washer safe detergents into the low pressure stream.
3.2 — PRODUCT SPECIFICATIONSPressure - (PSI / BAR) .............................. 3100/213 MaxFlow Rate - (GPM / LPM) ............................ 2.8/10.6 MaxWater supply temperature - (°F / C°) ............. 100/38 MaxHose length - (Feet / Meters).................................. 30/9.1Chemical Tank(s) - Number per unit............................... 1Chemical Tank - Capacity (Gal) N/A.......................... 0.75Nozzles - Number per unit.............................................. 3Lance Length (Inches / cm) ..................................... 20/51Gun.....................................................................StandardEngine Displacement - (Cubic Inch / cc) ............ 12.9/212Spark Plug Type .................................F7TC or equivalentSpark Plug Gap - (Inches / mm) ....0.028-0.031/0.70-0.80Fuel Capacity - (Quarts / Liters) ............................ 3.7/3.5Oil Capacity - (Oz / Liters) ...................................... 20/0.6On/Off Switch ............................................................. Yes
3.3 — EMISSIONS INFORMATIONThe U.S. Environmental Protection Agency (and Califor-nia Air Resource Board for equipment certified to CA standards) requires that this engine comply with exhaust and evaporative emission standards. Locate the emis-sions compliance decal on the engine to determine what standards the engine meets, and to determine which emissions warranty applies. The engine is certified to meet the applicable emission standards on gasoline. It is important to follow the maintenance specifications in the Maintenance section to ensure that the engine complies with the applicable emission standards for the duration of the product’s life. This engine utilizes lean carburetion settings and other systems to reduce emissions. Tamper-ing with or altering the emission control system may increase emissions and may be a violation of Federal or California Law. Acts that constitute tampering include but are not limited to:• Removal or alteration of any part of the intake, fuel, or
exhaust systems• Altering or defeating the governor linkage or speed-
adjusting mechanism to cause the engine to operate outside its design parameters
If you are aware of any of the following symptoms, have your engine inspected and repaired by your servicing dealer:
• Hard starting or stalling after starting• Rough idle• Misfiring or backfiring under load• Afterburning (backfiring)• Black exhaust smoke or high fuel consumption
3.4 — HIGH ALTITUDE OPERATIONThe fuel system on this engine may be influenced by operation at higher altitudes. Proper operation can be ensured by installing an altitude kit when required. See the table below to determine when an altitude kit is required. Operating this engine without the proper alti-tude kit installed may increase the engine’s emissions and decrease fuel economy and performance. Kits may be obtained from any Dealer and should be installed by a qualified individual.
NOTE:If the altitude kit has been installed and the engine will be operated at an altitude where the kit is not required, the engine should be returned to the origi-nal factory configuration. Operating the engine at lower altitudes with the kit installed may cause the engine to overheat and result in serious engine dam-age, and may result in decreased performance and increased emissions.
Altitude* Kit Number PSI
0 - 5000 Feet Not Required 3100
5000 - 7000 Feet 0K2016 3100
* Elevation above sea level.

General Information
OneWASH™ Power Washer 9
3.5 — UNPACKING1. Remove the parts bag, accessories, and inserts
included with power washer.2. Open carton completely by cutting each corner from
top to bottom.3. Ensure you have all included items prior to assembly.
• Main Unit• Handle Assembly• High Pressure Hose• Siphon Hose & Filter• Spray Gun• Lance with Quick Connect Fitting• Oil Bottle• Hose Hook Wire form• Parts Bag (which includes the following):
— Operator’s Manual— Warranty Statement— Emission Warranty Statement— CARB Emission Warranty Statement— Owner’s Registration Card— Bag containing Color-coded Nozzles— 4mm Allen wrench— Screw (Qty 4)— Tree clips (Qty 4)— Plastic Gun Holder— Plastic Lance Holder
4. If you are missing any items from your carton, please call Generac Customer Service at 1-888-436-3722. When calling for assistance, please have the model and serial number from the data tag available.
5. Fill out and send in registration card. Write Model number, Serial number & date of purchase in the table located in the “Where to Find Us” section.

10 OneWASH™ Power Washer
This page intentionally left blank.
General Information

OneWASH™ Power Washer 11
4.1 — ASSEMBLYRead entire operator’s manual before you attempt to assemble or if you have any problems with the assembly of your power washer, please call Generac Customer Service at 1-888-436-3722. When calling for assistance, please have the model and serial number from the data tag available.
1. Install gun hook to handle assembly using the (2) supplied tree clips. Align holes and push the tree clips into holes until they sit flush with gun hook (Figure 4-1).
Figure 4-1. Attach Gun Hook to Handle Assembly
2. Install lance hook to unit frame using (2) supplied tree clips. Align holes and push the tree clips into holes until they sit flush with gun hook (Figure 4-2).
Figure 4-2. Attach Lance Hook to Unit
3. Place handle assembly (A) onto cradle supports (B). Allow handle to slide into position. Locate the (4) screws and Allen wrench. Install the four screws using supplied Allen wrench as shown in (Figure 4-3).
Figure 4-3. Attach Handle to Unit
Section 4 Set-up

Set-up
12 OneWASH™ Power Washer
4. Install hose hook (Figure 4-4).
Figure 4-4. Install Hose Hook
5. Insert color–colored nozzles in spaces provided in front panel (Figure 4-5).
Figure 4-5. Insert Nozzles
6. Place spray gun/lance extension onto spray gun holder as shown (Figure 4-6).
Figure 4-6. Gun/Lance
7. Place recoil rope into holder as shown (Figure 4-7).
Figure 4-7. Recoil Rope Hook
8. Attach siphon tube to location A (Figure 4-8).
Figure 4-8. Siphon Tube Location
4.2 — ADD ENGINE OIL1. Place power washer on a flat, level surface.2. Clean area around oil fill and remove orange oil fill
cap/dipstick.3. Using oil funnel, slowly pour oil into fill opening. See
“Maintenance” section for oil type recommendation.NOTE:
On some units there is more than one oil fill location. In these instances it is only necessary to use one of the oil fill points.4. Check periodically until the oil level is between “L”
and “H” on the dipstick (Figure 4-9). Do not overfill.
Set-up
OneWASH™ Power Washer 13
Figure 4-9. Dipstick
NOTE:Any attempt to crank or start the engine before it has been properly serviced with the recommend oil may result in engine failure.5. Replace oil fill cap/dipstick and fully tighten.
4.3 — FUELFuel must meet these requirements:• Clean, fresh, unleaded gasoline.• A minimum of 87 octane/87 AKI (91 RON).• Gasoline with up to 10% ethanol (gasohol) is accept-
able.NOTE:
Avoid power washer damage. Failure to follow Oper-ator’s Manual for fuel recommendations voids war-ranty.• DO NOT use unapproved gasoline such as E85.• DO NOT mix oil in gasoline.• DO NOT modify engine to run on alternate fuels.To protect the fuel system from gelling, mix in a fuel stabi-lizer when adding fuel. See Storage. All fuel is not the same. If you experience starting or performance prob-lems after using fuel, switch to a different fuel provider or change brands.
Fuel and its vapors are extremely flamma-ble and explosive. Fire or explosion can cause severe burns or death.
4.3.1 — WHEN ADDING FUEL• Turn power washer OFF and let it cool at least two (2)
minutes before removing fuel cap. Loosen cap slowly to relieve pressure in tank.
• Fill fuel tank outdoors.• DO NOT overfill tank. Allow space for fuel expansion.• If fuel spills, wait until it evaporates before starting
engine.• Keep fuel away from sparks, open flames, pilot lights,
heat, and other ignition sources.• DO NOT light a cigarette or smoke.
1. Clean area around fuel fill cap, remove cap.2. Slowly add regular unleaded fuel to fuel tank. Be
careful not to overfill. Fill to bottom of filter screen, this will allow for fuel expansion (Figure 4-10).
3. Install fuel cap and let any spilled fuel evaporate before starting engine.
Figure 4-10. Adding Fuel
4.4 — CONNECT HOSE AND WATERSUPPLY TO PUMP
NOTE:DO NOT run the pump without the water supply con-nected and turned on. Damage to equipment result-ing from failure to follow this instruction will void warranty.
NOTE:Remove and discard the shipping cap from the pump’s water inlet before attaching hose.
1. Run water through your garden hose for 30 seconds to clean out any debris.
2. Before connecting garden hose to water inlet, inspect inlet screen (A) (Figure 4-11). Clean screen if it con-tains debris or have it replaced if damaged. DO NOT run power washer if inlet screen is damaged.

Set-up
14 OneWASH™ Power Washer
IMPORTANT: DO NOT siphon standing water for the water supply. Use ONLY cold water (less than 100°F). Water supply must be adequate to handle greater than 3.8 gallons per minute and no less than 30 psi.
NOTE:Using a One Way Valve (vacuum breaker or check valve) at pump inlet can cause pump or inlet connec-tor damage.• There MUST be at least ten feet of unrestricted garden
hose between the power washer inlet and any device, such as a vacuum breaker or check valve.
• Damage to equipment resulting from failure to follow this instruction will void warranty.
Figure 4-11. Inspect Inlet Screen
3. Connect the garden hose (not to exceed 50 feet in length) to the water inlet (Figure 4-12). Tighten by hand.
Figure 4-12. Connect Garden Hose
Risk of eye injury. Spray can splash back or propel objects.
• Always wear safety goggles when using this equip-ment or in vicinity of equipment in use.
• Before starting the power washer, be sure you are wearing adequate safety goggles.
• NEVER substitute safety glasses for safety goggles.4. Connect lance to spray gun (Figure 4-13). Tighten by
hand.
Figure 4-13. Attach Lance
5. Attach end of high pressure hose to base of spray gun (Figure 4-14). Tighten by hand.
Figure 4-14. Connect Hose to Spray Gun
The high pressure stream of water that this equipment produces can cut through skin and its underlying tissues, leading to serious injury and possible amputation.
• NEVER connect high pressure hose to lance.• Keep high pressure hose connected to pump and
spray gun while system is pressurized.• Always be certain spray gun, nozzles and accessories
are correctly attached.
Set-up
OneWASH™ Power Washer 15
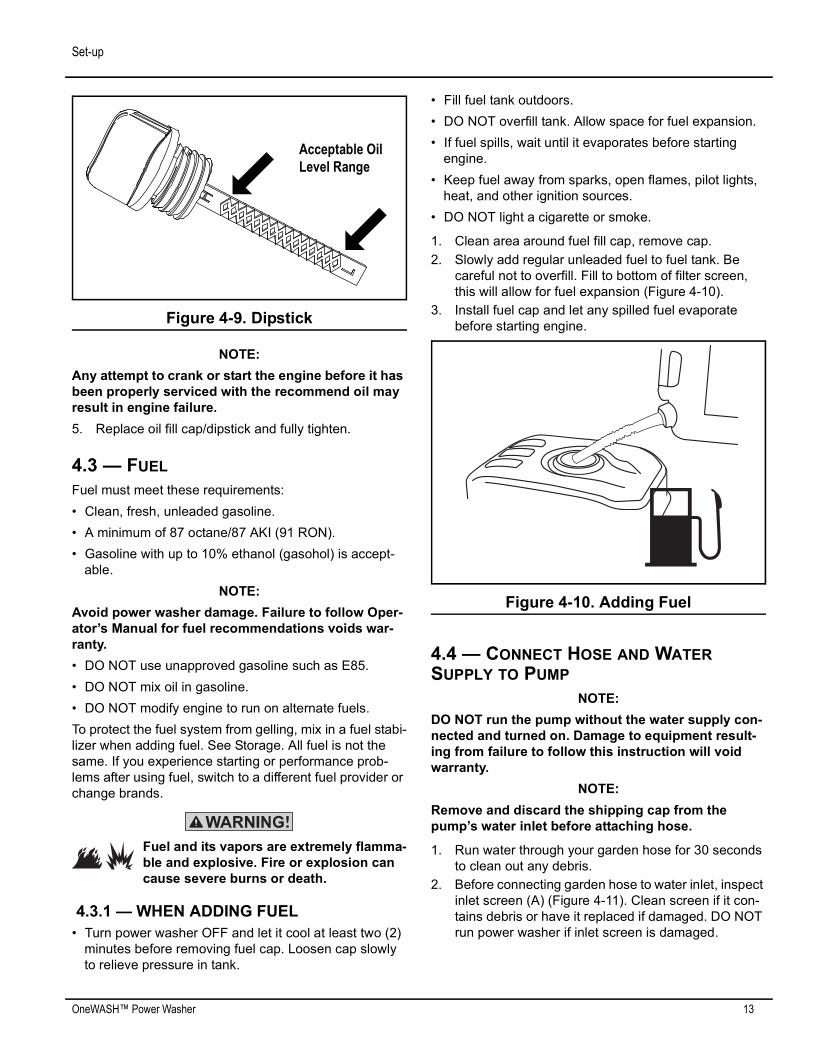
6. Connect high pressure hose to pump (uncoil hose before connecting to pump or spray gun) (Figure 4-15). Tighten by hand.
The hose can be damaged if it comes in con-tact with a hot engine or muffler.
Figure 4-15. Connect High Pressure Hose to Pump
7. Turn ON the water, squeeze the trigger to purge the pump system of air (Figure 4-16).
Figure 4-16. Squeeze Trigger
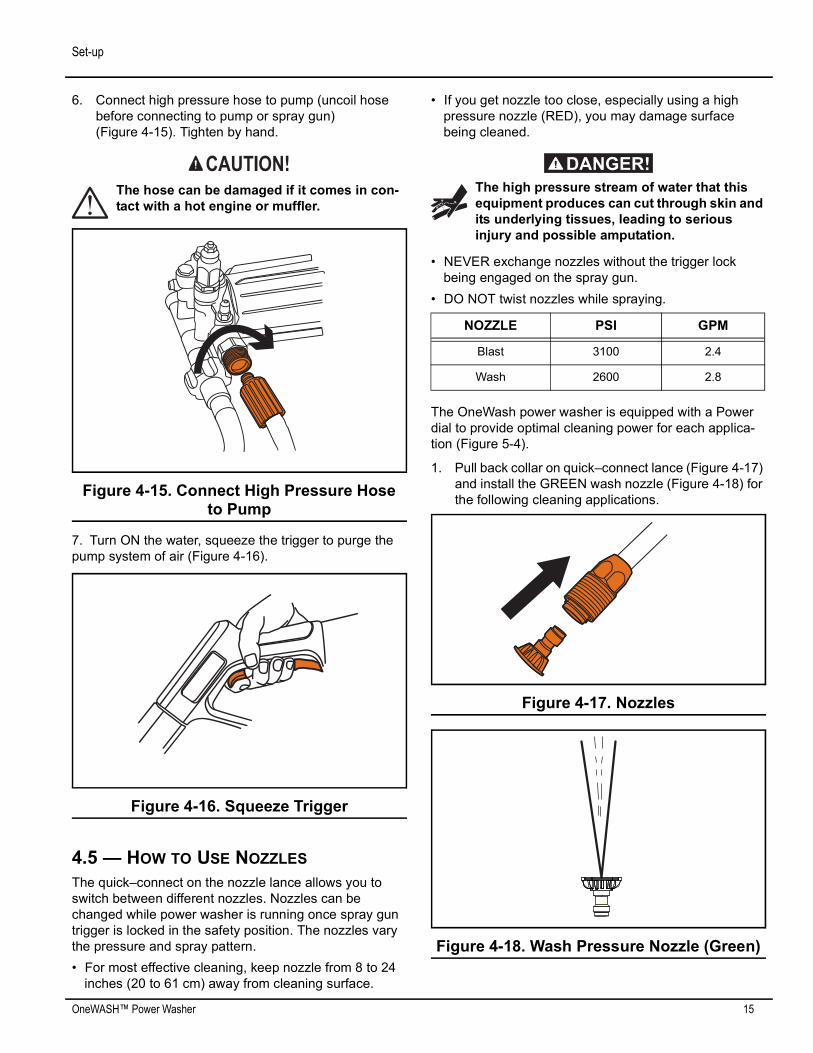
4.5 — HOW TO USE NOZZLESThe quick–connect on the nozzle lance allows you to switch between different nozzles. Nozzles can be changed while power washer is running once spray gun trigger is locked in the safety position. The nozzles vary the pressure and spray pattern.• For most effective cleaning, keep nozzle from 8 to 24
inches (20 to 61 cm) away from cleaning surface.
• If you get nozzle too close, especially using a high pressure nozzle (RED), you may damage surface being cleaned.
The high pressure stream of water that this equipment produces can cut through skin and its underlying tissues, leading to serious injury and possible amputation.
• NEVER exchange nozzles without the trigger lock being engaged on the spray gun.
• DO NOT twist nozzles while spraying.
The OneWash power washer is equipped with a Power dial to provide optimal cleaning power for each applica-tion (Figure 5-4).
1. Pull back collar on quick–connect lance (Figure 4-17) and install the GREEN wash nozzle (Figure 4-18) for the following cleaning applications.
Figure 4-17. Nozzles
Figure 4-18. Wash Pressure Nozzle (Green)
NOZZLE PSI GPM
Blast 3100 2.4
Wash 2600 2.8

Set-up
16 OneWASH™ Power Washer
2. Turn the Power Dial so that it matches the material you would like to clean (Figure 4-19).
Car icon - This setting is best for cleaning cars, boats and RV’s as it delivers the right balance of power and flow to clean these types of surfaces effectively.House Icon - This setting is best for clean-ing vinyl and aluminum siding on your home, as it delivers the right balance of power and flow to clean these types of sur-faces effectively.Wood Fence Icon - This setting is best for cleaning wood decks fences and siding on your home, as it delivers the right balance of power and flow to clean these types of surfaces effectively.Brick Icon - This setting is best for clean-ing brick, concrete and masonry materials, as it delivers the right balance of power and flow to clean these types of surfaces effec-tively.
Figure 4-19. Power Dial
3. To remove persistent stains on concrete or masonry surfaces, use the red blast nozzle within the stained area (Figure 4-20).
This tip (Red Nozzle) can damage work sur-face if it is too close or held in one position for an extended time.
Figure 4-20. Blast Pressure Nozzle (Red)
• When applying detergent, use only the black nozzle (Figure 4-21). Only use power washer safe detergents/soaps to help break down stubborn dirt and grime on a variety of surfaces.
Figure 4-21. Detergent Nozzle (Black)
Set-up
OneWASH™ Power Washer 17
4.5.1 — Cleaning and Applying Detergent
Chemicals can cause bodily injury, and/or property damage.
• NEVER use caustic liquid with power washer.• Use ONLY power washer safe detergents/soaps. Fol-
low all manufacturer's instructions.To apply detergent, follow these steps:
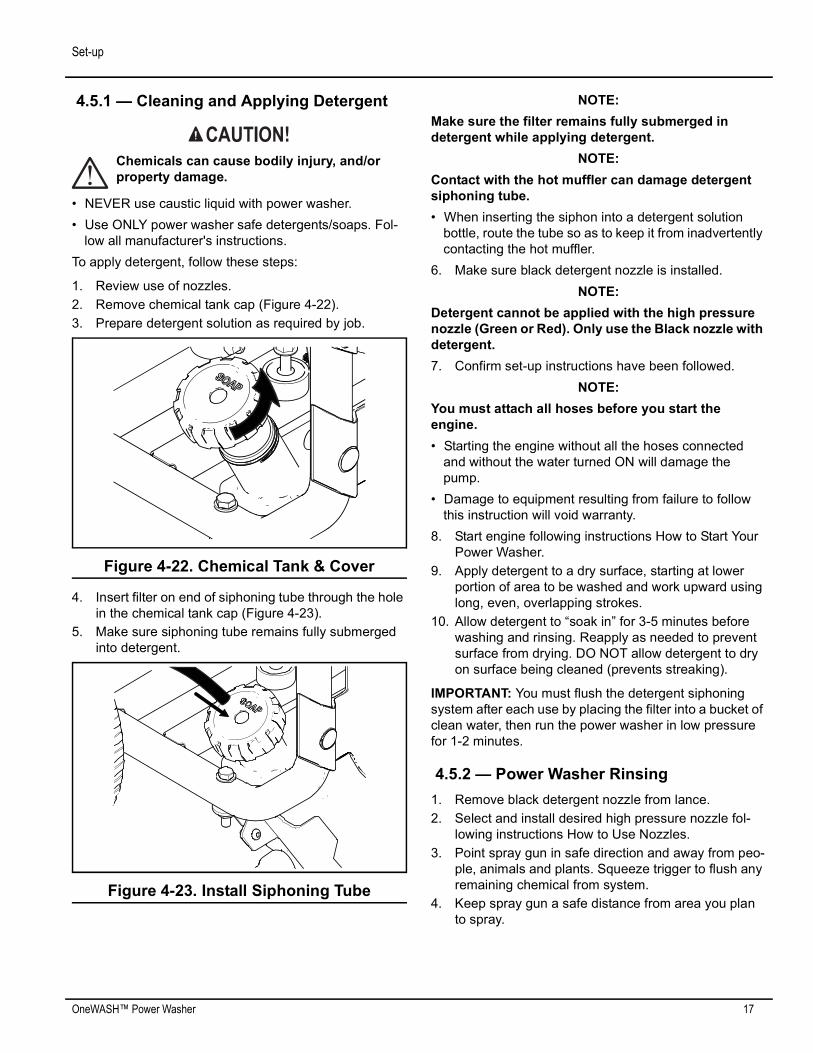
1. Review use of nozzles.2. Remove chemical tank cap (Figure 4-22).3. Prepare detergent solution as required by job.
Figure 4-22. Chemical Tank & Cover
4. Insert filter on end of siphoning tube through the hole in the chemical tank cap (Figure 4-23).
5. Make sure siphoning tube remains fully submerged into detergent.
Figure 4-23. Install Siphoning Tube
NOTE:Make sure the filter remains fully submerged in detergent while applying detergent.
NOTE:Contact with the hot muffler can damage detergent siphoning tube.• When inserting the siphon into a detergent solution
bottle, route the tube so as to keep it from inadvertently contacting the hot muffler.
6. Make sure black detergent nozzle is installed.NOTE:
Detergent cannot be applied with the high pressure nozzle (Green or Red). Only use the Black nozzle with detergent.7. Confirm set-up instructions have been followed.
NOTE:You must attach all hoses before you start the engine.• Starting the engine without all the hoses connected
and without the water turned ON will damage the pump.
• Damage to equipment resulting from failure to follow this instruction will void warranty.
8. Start engine following instructions How to Start Your Power Washer.
9. Apply detergent to a dry surface, starting at lower portion of area to be washed and work upward using long, even, overlapping strokes.
10. Allow detergent to “soak in” for 3-5 minutes before washing and rinsing. Reapply as needed to prevent surface from drying. DO NOT allow detergent to dry on surface being cleaned (prevents streaking).
IMPORTANT: You must flush the detergent siphoning system after each use by placing the filter into a bucket of clean water, then run the power washer in low pressure for 1-2 minutes.
4.5.2 — Power Washer Rinsing1. Remove black detergent nozzle from lance.2. Select and install desired high pressure nozzle fol-
lowing instructions How to Use Nozzles.3. Point spray gun in safe direction and away from peo-
ple, animals and plants. Squeeze trigger to flush any remaining chemical from system.
4. Keep spray gun a safe distance from area you plan to spray.

Set-up
18 OneWASH™ Power Washer
Kickback from spray gun can cause you to fall.
• Use only on a level surface.• Do not use on elevated surface to prevent the risk of a
serious fall.• Firmly grasp spray gun with both hands when using
high pressure spray to avoid injury when spray gun kicks back.
5. Apply a high pressure spray to a small area and then check surface for damage. If no damage is found, you can assume it is okay to continue rinsing.
6. Start at top of area to be rinsed, working down with same overlapping strokes as you used for cleaning.
4.5.3 — Cleaning Detergent Siphoning TubeIf you used the detergent siphoning tube, you must flush it with clean water before stopping the engine.
1. Place detergent siphoning tube/filter in a bucket full of clean water.
2. Remove high pressure nozzle from nozzle extension.3. Select and install black detergent nozzle following
instructions “How to Use Nozzles”.4. Flush for 1-2 minutes.5. Shut off engine following instructions How to Stop
Power Washer and turn off water supply.6. ALWAYS point spray gun in a safe direction, squeeze
spray gun trigger to release retained high water pres-sure. Engage trigger lock when not in use.
IMPORTANT: Spray gun traps high water pressure, even when engine is stopped and water is disconnected.
The high pressure stream of water that this equipment produces can cut through skin and its underlying tissues, leading to serious injury and possible amputation. Spray gun traps high water pressure, even when engine is stopped and water is disconnected, which can cause injury.
• Keep high pressure hose connected to pump and spray gun while system is pressurized.
• ALWAYS point spray gun in safe direction, and squeeze spray gun trigger to release high pressure, every time you stop engine. Engage trigger lock when not in use.

OneWASH™ Power Washer 19
5.1 — OPERATIONIf you have any problems operating your power washer, please call Generac customer service at 1-888-436-3722.
5.2 — POWER WASHER LOCATION
5.2.1 — Clearances and Air Movement
Running engine gives off carbon monoxide, an odorless, colorless, poisonous gas. Breathing carbon monoxide can cause head-ache, fatigue, dizziness, vomiting, confusion, seizures, nausea, fainting or death. For more information, reference the CO warnings in the “Safety” section.
Place power washer outdoors in an area that will not accumulate deadly exhaust gas. NEVER place power washer where exhaust gas could accumulate and enter inside or be drawn into a potentially occupied building. Ensure exhaust gas is kept away from any windows, doors, ventilation intakes, or other openings that can allow exhaust gas to collect in a confined area. Prevailing winds and air currents should be taken into consideration when positioning power washer (Figure 5-1).• Operate power washer ONLY outdoors.• Keep exhaust gas from entering a confined area
through windows, doors, ventilation intakes, or other openings.
• NEVER start or run engine indoors, in a vehicle or in an enclosed area, EVEN if windows and doors are open.
Exhaust heat/gases can ignite combus-tibles, structures or damage fuel tank causing a fire.
• Keep at least 5 ft. (152 cm) clearance on all sides of power washer including overhead.
Figure 5-1. Building Clearances
5.3 — CHECKLIST BEFORE STARTINGENGINE1. Be sure to read and understand the “Safety” section
and “Operation” section before using power washer.2. Check that the oil is at the full mark on the dipstick,
and that fuel has been added to the fuel tank.3. Review the unit’s assembly and ensure fitting are
properly secured and make sure there are no kinks, cuts, or damage to high pressure hose.
4. Provide a proper water supply at an adequate flow, clear screens of debris, and confirm that the system is purged of air.
5. Confirm unit is secure on level ground and surround-ing work area is clear.
5.4 — HOW TO START YOUR POWERWASHER
NOTE:DO NOT run the pump without the water supply con-nected and turned on. Damage to equipment result-ing from failure to follow this instruction will void warranty.
Section 5 Operation

Operation
20 OneWASH™ Power Washer
1. Turn the ON/OFF switch to the “ON” position (Figure 5-2).
Figure 5-2. ON/OFF Switch
2. Rotate pressure control knob to the position shown on “Start” decal (Item #2) (Figure 5-3).
Figure 5-3. Power Dial
3. Choke the engine by slowly pulling out on the choke knob until it stops in the “ON” position (Figure 5-4).
Hearing Protection Recommended.
NOTE:For a warm engine, push the choke knob down until it stops in the “OFF” position (Figure 5-4).
Figure 5-4. Choke Knob
4. Secure unit from movement when pulling recoil.5. When starting the engine, grasp starter grip handle
(Figure 5-5) and pull slowly until you feel some resis-tance. Then pull rapidly to start engine.
Figure 5-5. Starting the Engine
6. Return starter grip handle slowly. DO NOT let rope “snap back” against holder.
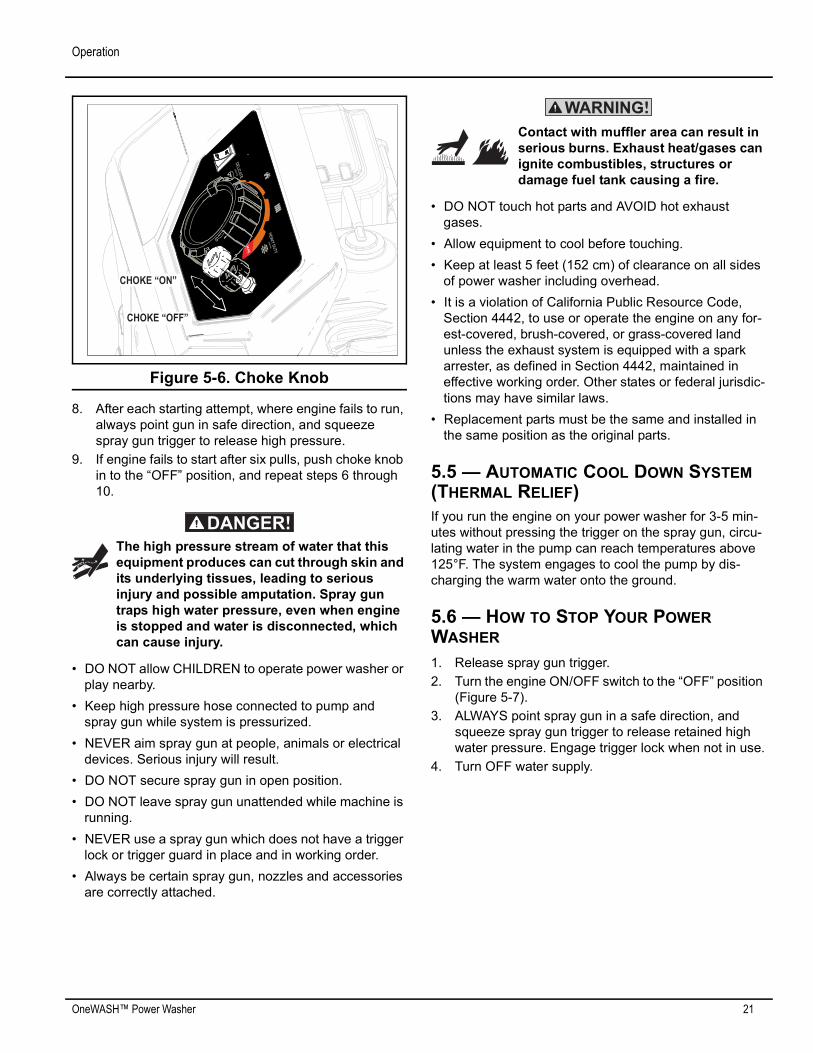
7. When engine starts, slowly push the choke knob in to the “OFF” position as engine warms. If engine falters, pull choke knob out to the “ON” position, then push in to the “OFF” position (Figure 5-6).
Operation
OneWASH™ Power Washer 21
Figure 5-6. Choke Knob
8. After each starting attempt, where engine fails to run, always point gun in safe direction, and squeeze spray gun trigger to release high pressure.
9. If engine fails to start after six pulls, push choke knob in to the “OFF” position, and repeat steps 6 through 10.
The high pressure stream of water that this equipment produces can cut through skin and its underlying tissues, leading to serious injury and possible amputation. Spray gun traps high water pressure, even when engine is stopped and water is disconnected, which can cause injury.
• DO NOT allow CHILDREN to operate power washer or play nearby.
• Keep high pressure hose connected to pump and spray gun while system is pressurized.
• NEVER aim spray gun at people, animals or electrical devices. Serious injury will result.
• DO NOT secure spray gun in open position.• DO NOT leave spray gun unattended while machine is
running.• NEVER use a spray gun which does not have a trigger
lock or trigger guard in place and in working order.• Always be certain spray gun, nozzles and accessories
are correctly attached.
Contact with muffler area can result in serious burns. Exhaust heat/gases can ignite combustibles, structures or damage fuel tank causing a fire.
• DO NOT touch hot parts and AVOID hot exhaust gases.
• Allow equipment to cool before touching.• Keep at least 5 feet (152 cm) of clearance on all sides
of power washer including overhead.• It is a violation of California Public Resource Code,
Section 4442, to use or operate the engine on any for-est-covered, brush-covered, or grass-covered land unless the exhaust system is equipped with a spark arrester, as defined in Section 4442, maintained in effective working order. Other states or federal jurisdic-tions may have similar laws.
• Replacement parts must be the same and installed in the same position as the original parts.
5.5 — AUTOMATIC COOL DOWN SYSTEM(THERMAL RELIEF)If you run the engine on your power washer for 3-5 min-utes without pressing the trigger on the spray gun, circu-lating water in the pump can reach temperatures above 125°F. The system engages to cool the pump by dis-charging the warm water onto the ground.
5.6 — HOW TO STOP YOUR POWERWASHER1. Release spray gun trigger.2. Turn the engine ON/OFF switch to the “OFF” position
(Figure 5-7).3. ALWAYS point spray gun in a safe direction, and
squeeze spray gun trigger to release retained high water pressure. Engage trigger lock when not in use.
4. Turn OFF water supply.

Operation
22 OneWASH™ Power Washer
Figure 5-7. ON/OFF Switch
IMPORTANT: Spray gun traps high water pressure, even when engine is stopped and water is disconnected.
The high pressure stream of water that this equipment produces can cut through skin and its underlying tissues, leading to serious injury and possible amputation. Spray gun traps high water pressure, even when engine is stopped and water is disconnected, which can cause injury.
• Keep high pressure hose connected to pump and spray gun while system is pressurized.
• ALWAYS point spray gun in safe direction, squeeze spray gun trigger to release high pressure, every time you stop engine. Engage trigger lock when not in use.

OneWASH™ Power Washer 23
6.1 — MAINTENANCE RECOMMENDATIONSRegular maintenance will improve the performance and extend the life of the power washer. See any qualified dealer for service.The power washer’s warranty does not cover items that have been subjected to operator abuse or negligence. To receive full value from the warranty, the operator must maintain the power washer as instructed in this manual, including proper storage as detailed in “Winter Storage” and “Long Term Storage”.
NOTE:Should you have questions about replacing compo-nents on your power washer, please call 1-888-436-3722 for assistance.Some adjustments will need to be made periodically to properly maintain your power washer.All service and adjustments should be made at least once each season. Follow the requirements in the “Main-tenance Schedule” chart.
NOTE:Once a year you should clean or replace the spark plug, clean or replace the air filter, and check the spray gun and nozzle extension assembly for wear. A new spark plug and clean air filter assure proper fuel-air mixture and help your engine run better and last longer.
6.2 — MAINTENANCE SCHEDULEFollow the hourly or calendar intervals, whichever occurs first. More frequent service is required when operating in adverse conditions.
First 5 Hours
Change engine oil
Every 8 Hours or Daily
Check/clean water inlet screen*
Check high pressure hose
Check detergent siphoning hose/filter
Check spray gun and assembly for leaks
Clean debris
Check engine oil level
Every 20 Hours or Every Season
Change engine oil**
Every 50 Hours or Every Season
Check/clean air cleaner filter**
Inspect muffler and spark arrester*
Every 100 Hours or Every Season
Service spark plug
* Clean if clogged. Replace if perforated or torn.** Service more often under dirty or dusty conditions.
Section 6 Maintenance

Maintenance
24 OneWASH™ Power Washer
6.3 — PUMP OILDO NOT attempt any oil maintenance on this pump. The pump is pre-lubricated and sealed from the factory, requiring no additional maintenance for the life of the pump.
6.4 — EMISSIONS CONTROLMaintenance, replacement, or repair of the emissions control devices and systems may be performed by any non-road engine repair establishment or individ-ual. However, to obtain “no charge” emissions control service, the work must be performed by a factory autho-rized dealer. See the Emissions Warranty.
6.5 — POWER DIAL SETTINGSTampering, maintenance, adjustment or replacement of the throttle settings will impact the performance and may void the warranty of the unit.
6.6 — POWER WASHER MAINTENANCE
6.6.1 — Clean DebrisDaily or before use, clean accumulated debris from cleaning system. Keep linkage, spring and controls clean. Keep area around and behind muffler free from any combustible debris. Inspect cooling air slots and openings on the power washer. These openings must be kept clean and unobstructed.Power washer parts should be kept clean to reduce the risk of overheating and ignition of accumulated debris.• Use a damp cloth to wipe exterior surfaces clean.
NOTE:Improper treatment of power washer can damage it and shorten its life.• DO NOT insert any objects through cooling slots.• Use a soft bristle brush to loosen caked on dirt, oil, etc.• Use a vacuum cleaner to pick up loose dirt and debris.
6.7 — CHECK AND CLEAN INLET SCREENExamine the screen on the pump’s water inlet. Clean it if the screen is clogged or replace it if screen is damaged.
6.8 — CHECK HIGH PRESSURE HOSESThe high pressure hoses can develop leaks from wear, kinking, or abuse. Inspect the hoses each time before using them. Check for cuts, leaks, abrasions or bulging of cover, damage or movement of couplings. If any of these conditions exist, replace the hose immediately.
The high pressure stream of water that this equipment produces can cut through skin and its underlying tissues, leading to serious injury and possible amputation.
• NEVER repair high pressure hose. Replace it.• Replacement hose rating MUST meet or exceed maxi-
mum pressure rating of unit.
6.9 — CHECK DETERGENT SIPHONINGTUBEExamine the filter on the detergent tube and clean if clogged. The tube should fit tightly on the barbed fitting. Examine the tube for leaks or tears. Replace the filter or tube if either is damaged.
6.10 — CHECK SPRAY GUNExamine the hose connection to the spray gun and make sure it is secure. Test the trigger by pressing the trigger, it “springs back” into place when you release it. Replace spray gun immediately if it fails to “spring back”.
6.11 — CHEMICAL TANK MAINTENANCEPeriodically you will need to drain and clean the chemical tank.Use the following these instructions:
1. Shut off engine and turn off water supply.2. ALWAYS point spray gun in a safe direction, squeeze
spray gun trigger to release retained high water pres-sure.
3. Remove chemical fill cap and siphon hose (Figure 6-1).
4. Obtain a container to drain the excess chemical into.

Maintenance
OneWASH™ Power Washer 25
Figure 6-1. Chemical Cap/Siphon Hose
5. Place container under the chemical tank drain. (Figure 6-2).
6. Remove drain cap and allow chemical to drain.7. Insert garden hose into fill neck allow water to flush
out tank.8. Once tank is clean re install drain cap with gasket, do
not over tighten.
Figure 6-2. Chemical Drain Cap
6.12 — NOZZLE MAINTENANCEA pulsing sensation felt while squeezing the spray gun trigger may be caused by excessive pump pressure. The principal cause of excessive pump pressure is a nozzle clogged or restricted with foreign materials, such as dirt, etc. To correct the problem, immediately clean the nozzle following these instructions:
1. Shut off engine and turn off water supply.2. ALWAYS point spray gun in a safe direction, squeeze
spray gun trigger to release retained high water pres-sure.
The high pressure stream of water that this equipment produces can cut through skin and its underlying tissues, leading to serious injury and possible amputation. Spray gun traps high water pressure, even when engine is stopped and water is disconnected, which can cause injury.
• Keep high pressure hose connected to pump and spray gun while system is pressurized.
• ALWAYS point spray gun in safe direction, and squeeze spray gun trigger to release high pressure every time you stop engine. Engage trigger lock when not in use.
3. Remove nozzle from end of nozzle extension.4. Use a small paper clip to free any foreign material
clogging or restricting nozzle (Figure 6-3).5. Remove lance from spray gun.
Figure 6-3. Free Foreign Material
6. Using a garden hose, remove additional debris by back flushing water through lance (Figure 6-4). Back flush between 30 to 60 seconds.
Figure 6-4. Back Flush Lance
7. Reinstall nozzle into lance.8. Reconnect lance to spray gun.9. Make sure garden hose is connected to pump water
inlet. Check that high pressure hose is connected to spray gun and pump. Turn on water.
Maintenance
26 OneWASH™ Power Washer
10. Start engine following instructions “How to Start Your Power Washer”.
11. Test power washer by operating with each quick con-nect nozzle.
6.13 — ENGINE MAINTENANCE
Unintentional sparking can result in fire or electric shock.
WHEN ADJUSTING OR MAKING REPAIRS TO YOUR POWER WASHER• Disconnect the spark plug wire from the spark plug and
place the wire where it cannot contact spark plug.WHEN TESTING FOR ENGINE SPARK• Use approved spark plug tester.• DO NOT check for spark with spark plug removed.
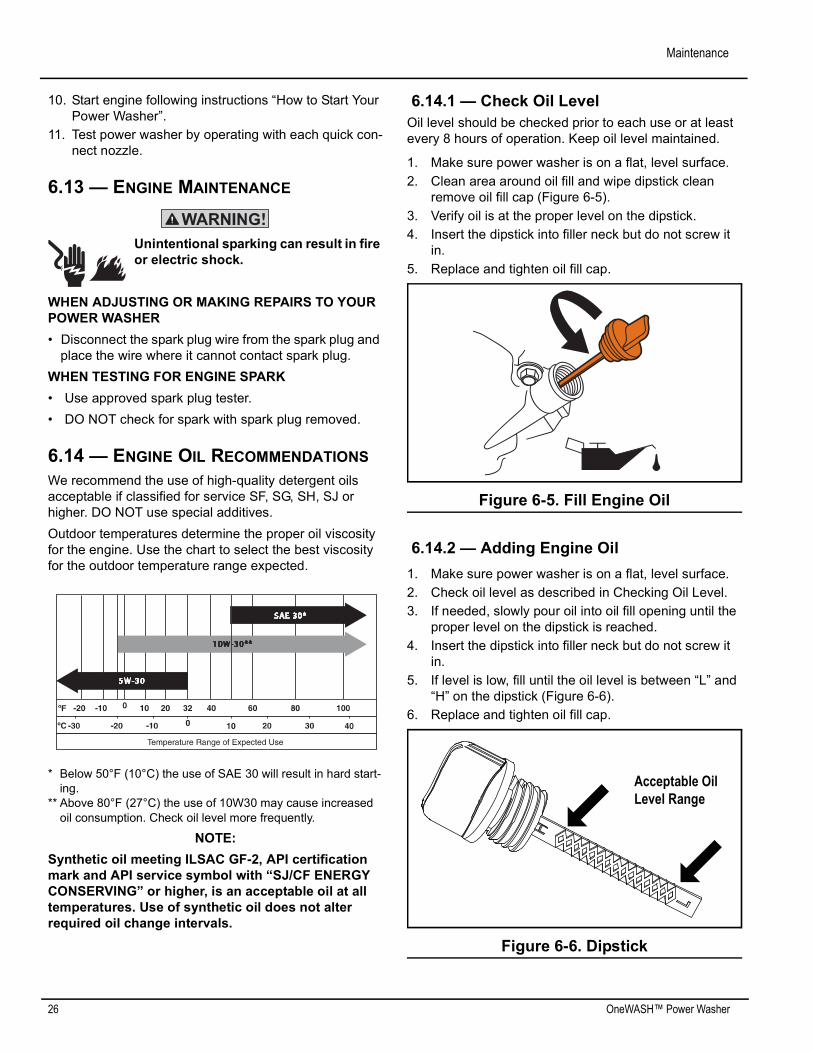
6.14 — ENGINE OIL RECOMMENDATIONSWe recommend the use of high-quality detergent oils acceptable if classified for service SF, SG, SH, SJ or higher. DO NOT use special additives.Outdoor temperatures determine the proper oil viscosity for the engine. Use the chart to select the best viscosity for the outdoor temperature range expected.
* Below 50°F (10°C) the use of SAE 30 will result in hard start-ing.
** Above 80°F (27°C) the use of 10W30 may cause increased oil consumption. Check oil level more frequently.
NOTE:Synthetic oil meeting ILSAC GF-2, API certification mark and API service symbol with “SJ/CF ENERGY CONSERVING” or higher, is an acceptable oil at all temperatures. Use of synthetic oil does not alter required oil change intervals.
6.14.1 — Check Oil LevelOil level should be checked prior to each use or at least every 8 hours of operation. Keep oil level maintained.
1. Make sure power washer is on a flat, level surface.2. Clean area around oil fill and wipe dipstick clean
remove oil fill cap (Figure 6-5).3. Verify oil is at the proper level on the dipstick.4. Insert the dipstick into filler neck but do not screw it
in.5. Replace and tighten oil fill cap.
Figure 6-5. Fill Engine Oil
6.14.2 — Adding Engine Oil1. Make sure power washer is on a flat, level surface.2. Check oil level as described in Checking Oil Level.3. If needed, slowly pour oil into oil fill opening until the
proper level on the dipstick is reached.4. Insert the dipstick into filler neck but do not screw it
in.5. If level is low, fill until the oil level is between “L” and
“H” on the dipstick (Figure 6-6).6. Replace and tighten oil fill cap.
Figure 6-6. Dipstick

Maintenance
OneWASH™ Power Washer 27
6.14.3 — Changing Engine OilIf you are using your power washer under extremely dirty or dusty conditions, or in extremely hot weather, change the oil more often.
Avoid prolonged or repeated skin contact with used motor oil.
• Used motor oil has been shown to cause skin cancer in certain laboratory animals.
• Thoroughly wash exposed areas with soap and water.
KEEP OUT OF REACH OF CHILDREN.
• Don’t pollute. Conserve resources. Return used oil to collection centers.
Allow the engine to cool down and then change oil as fol-lows:
1. Make sure power washer is on a flat, level surface.2. Disconnect the spark plug wire from the spark plug
and place the wire where it cannot contact spark plug.
3. Clean area around oil drain plug (A) (Figure 6-7). The oil drain plug is located at base of engine, opposite carburetor.
4. Remove oil fill cap (Figure 6-6).5. Remove oil drain plug and drain oil completely into a
suitable container.6. Reinstall oil drain plug and tighten securely.7. Slowly pour oil (about 20 oz.) into oil fill opening to
the proper level on the dipstick. DO NOT overfill.8. Reinstall oil fill cap. Finger tighten cap securely.9. Wipe up any spilled oil.10. Properly dispose of oil in an accordance with all local
regulations.
Figure 6-7. Oil Drain Plug
6.15 — SERVICE AIR CLEANERYour engine will not run properly and may be damaged if you run it with a dirty air cleaner. Service more often if operating under dirty or dusty conditions.To service the air cleaner, follow these steps:
1. Pull on air cleaner cover latch and remove cover (Figure 6-8).
Figure 6-8. Service the Air Cleaner
2. Loosen wing nut.3. Carefully remove filter assembly.4. Remove foam filter.5. To clean cartridge, gently tap on a flat surface.6. Reinstall foam filter.7. Reinstall clean or new cartridge assembly.8. Reinstall wing nut and tighten.9. Install cover by snapping latch closed.

Maintenance
28 OneWASH™ Power Washer
6.16 — SERVICE SPARK PLUGChanging the spark plug will help your engine to start easier and run better.
1. Clean area around spark plug.2. Remove and inspect spark plug (Figure 6-9).3. Check electrode gap with wire feeler gauge and reset
spark plug gap to recommended gap if necessary (see Specifications).
4. Replace spark plug if electrodes are pitted, burned or porcelain is cracked. Use the recommended replace-ment plug. See Specifications.
5. Install spark plug and tighten firmly.
Figure 6-9. Change the Spark Plug
6.17 — INSPECT MUFFLER AND SPARKARRESTERInspect the muffler for cracks, corrosion, or other dam-age. Remove the spark arrester, if equipped, and inspect for damage or carbon blockage. If replacement parts are required, make sure to use only original equipment replacement parts.
6.17.1 — Remove Spark Arrester ScreenTools Required: 8mm Box Wrench
1. Remove heat shield from the muffler by loosening the four (4) Bolts (A) (Figure 6-10).
2. Remove the spark arrester from the muffler by loos-ening the two (2) Bolts (B) (Figure 6-11).
3. Inspect the spark arrester, replace if torn, perforated or otherwise damaged (part number 0K1851). DO NOT USE A DEFECTIVE SCREEN.
4. If screen is not damaged, clean it with a commercial solvent and replace.
Figure 6-10. Remove Heat Shield
Figure 6-11. Remove Spark Arrester
Contact with muffler area can result in serious burns. Exhaust heat/gases can ignite combustibles, structures or dam-age fuel tank causing a fire.
• DO NOT touch hot parts and AVOID hot exhaust gases.
• Allow equipment to cool before touching.• Keep at least 5 feet (152 cm) of clearance on all sides
of power washer including overhead.

Maintenance
OneWASH™ Power Washer 29
• It is a violation of California Public Resource Code, Section 4442, to use or operate the engine on any for-est-covered, brush-covered, or grass-covered land unless the exhaust system is equipped with a spark arrester, as defined in Section 4442, maintained in effective working order. Other states or federal jurisdic-tions may have similar laws. Contact the original equip-ment manufacturer, retailer, or dealer to obtain a spark arrester designed for the exhaust system installed on this engine.
• Replacement parts must be the same and installed in the same position as the original parts.
6.18 — AFTER EACH USEWater should not remain in the unit for long periods of time. Sediments or minerals can deposit on pump parts and freeze pump action. Follow these procedures after every use:
1. Shut off engine, turn off water supply, point gun in a safe direction, and squeeze trigger to relieve trapped pressure, and let engine cool.
The high pressure stream of water that this equipment produces can cut through skin and its underlying tissues, leading to serious injury and possible amputation. Spray gun traps high water pressure, even when engine is stopped and water is disconnected, which can cause injury.
• Keep high pressure hose connected to pump and spray gun while system is pressurized.
• ALWAYS point spray gun in safe direction and squeeze spray gun trigger, to release high pressure, every time you stop engine. Engage trigger lock when not in use.
2. Disconnect hoses from spray gun and high pressure outlet on pump. Drain water from hoses, spray gun, and lance. Use a rag to wipe off the hose.
3. Empty pump of all pumped liquids. Check that the engine ON/OFF switch is in the OFF position. Then pull the recoil handle about six times. This should remove most liquid in pump.
4. Store unit in a clean, dry area.5. If storing for more than 30 days, see the “Long Term
Storage” on page 29.
Fuel and its vapors are extremely flam-mable and explosive. Fire or explosion can cause severe burns or death.
WHEN STORING FUEL OR EQUIPMENT WITH FUEL IN TANK• Store away from furnaces, stoves, water heaters,
clothes dryers, or other appliances that have pilot light or other ignition source because they can ignite fuel vapors.
6.19 — WINTER STORAGENOTE:
You must protect your unit from freezing tempera-tures.• Failure to do so will permanently damage your pump
and render your unit inoperable.• Freeze damage is not covered under warranty.To protect the unit from freezing temperatures:
1. Follow steps 1-3 in the previous section “After Each Use”.
2. Use pump saver to treat pump. This minimizes freeze damage and lubricates pistons and seals.
3. If pump saver is not available, connect a 3-foot sec-tion of garden hose to water inlet adapter. Pour RV-antifreeze (antifreeze without alcohol) into hose. Pull recoil handle twice. Disconnect 3-foot hose.
4. Store unit in a clean, dry area.
6.20 — LONG TERM STORAGEIf you do not plan to use the power washer for more than 30 days, you must prepare the engine and pump for long term storage.

Maintenance
30 OneWASH™ Power Washer
6.20.1 — Protect Fuel SystemFuel can become stale when stored over 30 days. Stale fuel causes acid and gum deposits to form in the fuel sys-tem or on essential carburetor parts. To keep fuel fresh, use a fuel stabilizer, available as a liquid additive or a drip concentrate cartridge.There is no need to drain gasoline from the engine if a fuel stabilizer is added according to instructions. Run the engine for 2 minutes to circulate the stabilizer throughout the fuel system. The engine and fuel can then be stored up to 24 months.If gasoline in the engine has not been treated with a fuel stabilizer, it must be drained into an approved container. Run the engine until it stops from lack of fuel. The use of a fuel stabilizer in the storage container is recommended to maintain freshness.
Hearing Protection Recommended.
6.20.2 — Protect Engine1. Change engine oil.2. Remove spark plug.3. Pour a tablespoon (5-10 cc) of clean engine oil into
the cylinder.4. Pull the starter rope several times to distribute the oil
in the cylinder.5. Reinstall the spark plug.6. Pull the starter rope slowly until resistance is felt.
This will close the valves so moisture cannot enter the engine cylinder. Return the starter rope gently.
6.20.3 — Change OilAllow the engine to cool down and then drain oil from crankcase. Refill with recommended grade. See “Chang-ing Engine Oil” on page 27.
Hot oil may cause burns. Allow engine to cool before draining oil. Avoid prolonged or repeated skin exposure with used oil. Thor-oughly wash exposed areas with soap.
6.20.4 — Protecting the PumpTo protect the pump from damage caused by mineral deposits or freezing, use PumpSaver or RV-antifreeze to treat the pump. This prevents freeze damage and lubri-cates pistons and seals.• Failure to do so will permanently damage your pump
and render your unit inoperable.
• Freeze damage is not covered under warranty.To protect the unit from freezing temperatures:
1. Follow steps 1-3 in the previous section “After Each Use” on page 29.
2. Use pump saver to treat pump. This minimizes freeze damage and lubricates pistons and seals.
3. If pump saver is not available, connect a 3-foot sec-tion of garden hose to water inlet adapter. Pour RV-antifreeze (antifreeze without alcohol) into hose. Pull recoil handle twice. Disconnect 3-foot hose.
4. Store unit in a clean, dry area.
6.21 — OTHER STORAGE INSTRUCTIONS1. DO NOT store fuel from one season to another
unless it has been treated as described in Protect Fuel System.
2. Replace fuel container if it starts to rust. Rust and/or dirt in fuel can cause problems if it’s used with this unit.
3. Cover unit with a suitable protective cover that does not retain moisture.
Storage covers can be flammable.
• DO NOT place a storage cover over a hot power washer.
• Let equipment cool for a sufficient time before placing the cover on the equipment.
4. Store unit in a clean and dry area.
6.22 — TRANSPORTING/TIPPING OF THEUNITDo not operate, store or transport the unit at an angle greater than 15 degrees.
OneWASH™ Power Washer 31
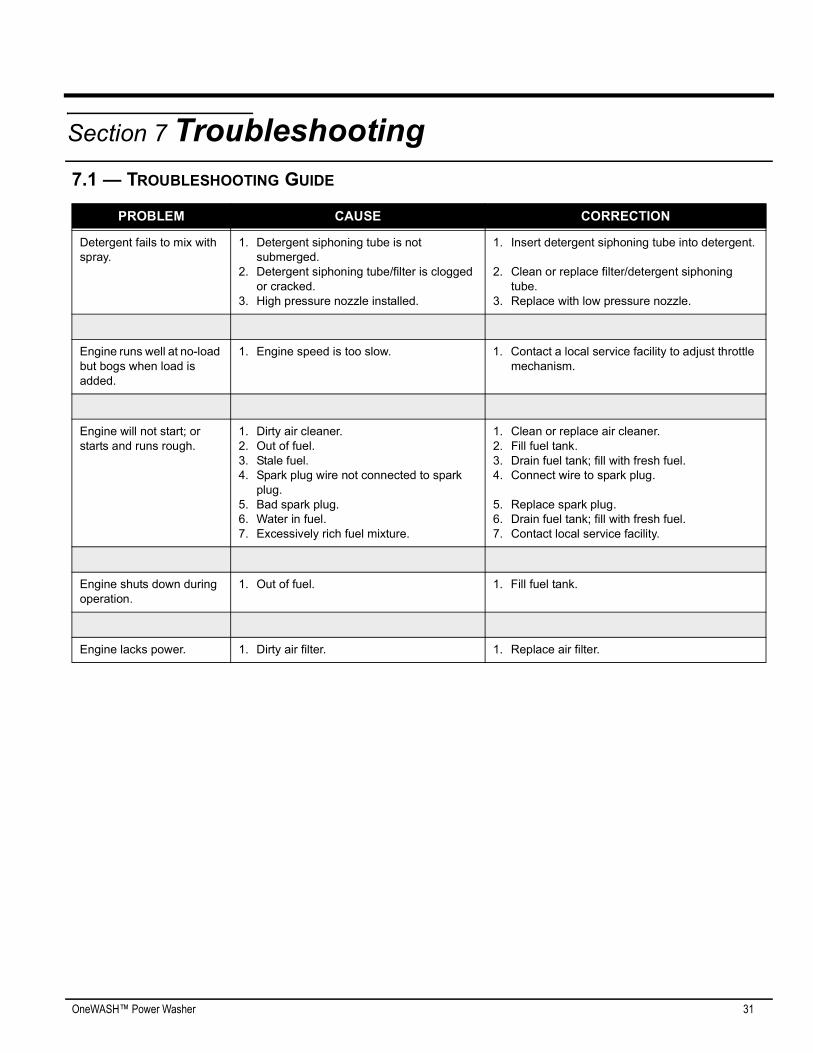
7.1 — TROUBLESHOOTING GUIDE
PROBLEM CAUSE CORRECTION
Detergent fails to mix with spray.
1. Detergent siphoning tube is not submerged.
2. Detergent siphoning tube/filter is clogged or cracked.
3. High pressure nozzle installed.
1. Insert detergent siphoning tube into detergent.
2. Clean or replace filter/detergent siphoning tube.
3. Replace with low pressure nozzle.
Engine runs well at no-load but bogs when load is added.
1. Engine speed is too slow. 1. Contact a local service facility to adjust throttle mechanism.
Engine will not start; or starts and runs rough.
1. Dirty air cleaner.2. Out of fuel.3. Stale fuel.4. Spark plug wire not connected to spark
plug.5. Bad spark plug.6. Water in fuel.7. Excessively rich fuel mixture.
1. Clean or replace air cleaner.2. Fill fuel tank.3. Drain fuel tank; fill with fresh fuel.4. Connect wire to spark plug.
5. Replace spark plug.6. Drain fuel tank; fill with fresh fuel.7. Contact local service facility.
Engine shuts down during operation.
1. Out of fuel. 1. Fill fuel tank.
Engine lacks power. 1. Dirty air filter. 1. Replace air filter.
Section 7 Troubleshooting

Part No. 0K6212 Rev B 02/12/14© Generac Power Systems, Inc. All rights reservedSpecifications are subject to change without notice.No reproduction allowed in any form without prior written consent from Generac Power Systems, Inc.
Generac Power Systems, Inc.S45 W29290 Hwy. 59Waukesha, WI 53189
1-888-GENERAC (1-888-436-3722)generac.com