Embed Size (px)
Citation preview

Installation Guide PUBLIC
Software Provisioning Manager 1.0 SP22Document Version: 2.6.1 – 2018-03-01
Installation of SAP Systems Based on the Application Server Java of SAP NetWeaver 7.3 to 7.5 on Windows: SAP Adaptive Server Enterprise

Content
1 About this Document. . . . . . . . . . . . . . . . . . . . . . . . . . . . . . . . . . . . . . . . . . . . . . . . . . . . . . . . . 91.1 Naming Conventions. . . . . . . . . . . . . . . . . . . . . . . . . . . . . . . . . . . . . . . . . . . . . . . . . . . . . . . . . . 91.2 Constraints. . . . . . . . . . . . . . . . . . . . . . . . . . . . . . . . . . . . . . . . . . . . . . . . . . . . . . . . . . . . . . . . . 111.3 Before You Start. . . . . . . . . . . . . . . . . . . . . . . . . . . . . . . . . . . . . . . . . . . . . . . . . . . . . . . . . . . . . 111.4 SAP Notes for the Installation. . . . . . . . . . . . . . . . . . . . . . . . . . . . . . . . . . . . . . . . . . . . . . . . . . . . 121.5 New Features. . . . . . . . . . . . . . . . . . . . . . . . . . . . . . . . . . . . . . . . . . . . . . . . . . . . . . . . . . . . . . . 14
New Features - Software Provisioning Manager 1.0 SP22. . . . . . . . . . . . . . . . . . . . . . . . . . . . . . 14New Features - Software Provisioning Manager 1.0 SP21 and Lower. . . . . . . . . . . . . . . . . . . . . . .15
2 Installation Options Covered by this Guide. . . . . . . . . . . . . . . . . . . . . . . . . . . . . . . . . . . . . . . . 192.1 Standard System. . . . . . . . . . . . . . . . . . . . . . . . . . . . . . . . . . . . . . . . . . . . . . . . . . . . . . . . . . . . 192.2 Distributed System. . . . . . . . . . . . . . . . . . . . . . . . . . . . . . . . . . . . . . . . . . . . . . . . . . . . . . . . . . .202.3 High Availability System. . . . . . . . . . . . . . . . . . . . . . . . . . . . . . . . . . . . . . . . . . . . . . . . . . . . . . . .212.4 Additional Application Server Instance. . . . . . . . . . . . . . . . . . . . . . . . . . . . . . . . . . . . . . . . . . . . . 212.5 SCS Instance with Integrated SAP Web Dispatcher . . . . . . . . . . . . . . . . . . . . . . . . . . . . . . . . . . . . 232.6 SAP Host Agent as a Separate Installation. . . . . . . . . . . . . . . . . . . . . . . . . . . . . . . . . . . . . . . . . . .25
3 Planning. . . . . . . . . . . . . . . . . . . . . . . . . . . . . . . . . . . . . . . . . . . . . . . . . . . . . . . . . . . . . . . . . . 263.1 Planning Checklist. . . . . . . . . . . . . . . . . . . . . . . . . . . . . . . . . . . . . . . . . . . . . . . . . . . . . . . . . . . 263.2 Changed File System Structure and Profiles for SAP Systems Based on SAP NetWeaver 7.1 and
Higher. . . . . . . . . . . . . . . . . . . . . . . . . . . . . . . . . . . . . . . . . . . . . . . . . . . . . . . . . . . . . . . . . . . . 273.3 Installation Using a Stack Configuration File. . . . . . . . . . . . . . . . . . . . . . . . . . . . . . . . . . . . . . . . . 283.4 Hardware and Software Requirements. . . . . . . . . . . . . . . . . . . . . . . . . . . . . . . . . . . . . . . . . . . . . 30
Running the Prerequisites Check in Standalone Mode (Optional). . . . . . . . . . . . . . . . . . . . . . . . 31Requirements for the SAP System Hosts. . . . . . . . . . . . . . . . . . . . . . . . . . . . . . . . . . . . . . . . . 32
3.5 Planning User and Access Management. . . . . . . . . . . . . . . . . . . . . . . . . . . . . . . . . . . . . . . . . . . . 393.6 Domain or Local Installation. . . . . . . . . . . . . . . . . . . . . . . . . . . . . . . . . . . . . . . . . . . . . . . . . . . . 403.7 Basic Installation Parameters. . . . . . . . . . . . . . . . . . . . . . . . . . . . . . . . . . . . . . . . . . . . . . . . . . . . 41
SAP System Parameters. . . . . . . . . . . . . . . . . . . . . . . . . . . . . . . . . . . . . . . . . . . . . . . . . . . . 42SAP System Database Parameters. . . . . . . . . . . . . . . . . . . . . . . . . . . . . . . . . . . . . . . . . . . . . 52
3.8 Setup of Database Layout. . . . . . . . . . . . . . . . . . . . . . . . . . . . . . . . . . . . . . . . . . . . . . . . . . . . . . 533.9 SAP System Transport Host. . . . . . . . . . . . . . . . . . . . . . . . . . . . . . . . . . . . . . . . . . . . . . . . . . . . .54
4 Preparation. . . . . . . . . . . . . . . . . . . . . . . . . . . . . . . . . . . . . . . . . . . . . . . . . . . . . . . . . . . . . . . 554.1 Preparation Checklist. . . . . . . . . . . . . . . . . . . . . . . . . . . . . . . . . . . . . . . . . . . . . . . . . . . . . . . . . 554.2 Disabling the Windows Server Firewall on Windows Server 2008 (R2) and Higher. . . . . . . . . . . . . . . 564.3 Performing Basic Windows Preparation Steps. . . . . . . . . . . . . . . . . . . . . . . . . . . . . . . . . . . . . . . . 574.4 Required User Authorization for Running the Installer. . . . . . . . . . . . . . . . . . . . . . . . . . . . . . . . . . 58
2 P U B L I C
Installation of SAP Systems Based on the Application Server Java of SAP NetWeaver 7.3 to 7.5 on Windows: SAP Adaptive Server Enterprise
Content

4.5 Using Virtual Host Names. . . . . . . . . . . . . . . . . . . . . . . . . . . . . . . . . . . . . . . . . . . . . . . . . . . . . . 604.6 Preparing the SAP System Transport Host. . . . . . . . . . . . . . . . . . . . . . . . . . . . . . . . . . . . . . . . . . . 614.7 Preparing an External ABAP System as Source for User Data. . . . . . . . . . . . . . . . . . . . . . . . . . . . . 624.8 Preparing the Installation Media. . . . . . . . . . . . . . . . . . . . . . . . . . . . . . . . . . . . . . . . . . . . . . . . . . 65
Downloading and Extracting the Software Provisioning Manager 1.0 Archive. . . . . . . . . . . . . . . . 66Using the Physical Media from the Installation Package. . . . . . . . . . . . . . . . . . . . . . . . . . . . . . . 67Downloading SAP Kernel Archives (Archive-Based Installation). . . . . . . . . . . . . . . . . . . . . . . . . 69Downloading Complete Installation Media. . . . . . . . . . . . . . . . . . . . . . . . . . . . . . . . . . . . . . . . 72
5 Installation. . . . . . . . . . . . . . . . . . . . . . . . . . . . . . . . . . . . . . . . . . . . . . . . . . . . . . . . . . . . . . . . 745.1 Installation Checklist. . . . . . . . . . . . . . . . . . . . . . . . . . . . . . . . . . . . . . . . . . . . . . . . . . . . . . . . . . 745.2 Specifying the Initial Data Source of the User Management Engine. . . . . . . . . . . . . . . . . . . . . . . . . 765.3 Prerequisites for Running the Installer. . . . . . . . . . . . . . . . . . . . . . . . . . . . . . . . . . . . . . . . . . . . . .765.4 Running the Installer. . . . . . . . . . . . . . . . . . . . . . . . . . . . . . . . . . . . . . . . . . . . . . . . . . . . . . . . . . 785.5 Additional Information About the Installer. . . . . . . . . . . . . . . . . . . . . . . . . . . . . . . . . . . . . . . . . . . 81
Useful Information About the Installer. . . . . . . . . . . . . . . . . . . . . . . . . . . . . . . . . . . . . . . . . . . 82How to Avoid Automatic Logoff by the Installer. . . . . . . . . . . . . . . . . . . . . . . . . . . . . . . . . . . . . 83Interrupted Processing of the Installer. . . . . . . . . . . . . . . . . . . . . . . . . . . . . . . . . . . . . . . . . . . 84Entries in the Services File Created by the Installer. . . . . . . . . . . . . . . . . . . . . . . . . . . . . . . . . . 87Troubleshooting with the Installer. . . . . . . . . . . . . . . . . . . . . . . . . . . . . . . . . . . . . . . . . . . . . . 88Using the Step State Editor (SAP Support Experts Only). . . . . . . . . . . . . . . . . . . . . . . . . . . . . . 89
6 Post-Installation. . . . . . . . . . . . . . . . . . . . . . . . . . . . . . . . . . . . . . . . . . . . . . . . . . . . . . . . . . . .906.1 Post-Installation Checklist. . . . . . . . . . . . . . . . . . . . . . . . . . . . . . . . . . . . . . . . . . . . . . . . . . . . . . 906.2 Logging On to the Application Server Java. . . . . . . . . . . . . . . . . . . . . . . . . . . . . . . . . . . . . . . . . . . 916.3 Logging On to the SAP Enterprise Portal. . . . . . . . . . . . . . . . . . . . . . . . . . . . . . . . . . . . . . . . . . . . 936.4 Logging On to the Development Infrastructure. . . . . . . . . . . . . . . . . . . . . . . . . . . . . . . . . . . . . . . 946.5 Providing Access to the SAP NetWeaver Administrator. . . . . . . . . . . . . . . . . . . . . . . . . . . . . . . . . .956.6 Installing the SAP License. . . . . . . . . . . . . . . . . . . . . . . . . . . . . . . . . . . . . . . . . . . . . . . . . . . . . . 956.7 High Availability: Setting Up Licenses. . . . . . . . . . . . . . . . . . . . . . . . . . . . . . . . . . . . . . . . . . . . . . 976.8 Configuring the Remote Connection to SAP Support. . . . . . . . . . . . . . . . . . . . . . . . . . . . . . . . . . . 986.9 Creating Symbolic Links on Windows Server 2008 (R2) and Higher for Application Servers. . . . . . . . 986.10 Connecting the System to SAP Solution Manager. . . . . . . . . . . . . . . . . . . . . . . . . . . . . . . . . . . . 1006.11 Applying the Latest Kernel and Support Package Stacks. . . . . . . . . . . . . . . . . . . . . . . . . . . . . . . . 1016.12 PI 7.5 Only: Configuring the Process Integration System After the Installation. . . . . . . . . . . . . . . . . 1026.13 PI-PCK, PI-AF, PI-AEX, PI-CP Only: System Configuration After the Installation. . . . . . . . . . . . . . . . 1036.14 Configuring the User Management. . . . . . . . . . . . . . . . . . . . . . . . . . . . . . . . . . . . . . . . . . . . . . . 1076.15 Ensuring User Security. . . . . . . . . . . . . . . . . . . . . . . . . . . . . . . . . . . . . . . . . . . . . . . . . . . . . . . 1086.16 Performing Automated Configuration. . . . . . . . . . . . . . . . . . . . . . . . . . . . . . . . . . . . . . . . . . . . . .1116.17 Clearing the SLD Data Cache after Installing a Non-central Advanced Adapter Engine (Optional
Standalone Unit). . . . . . . . . . . . . . . . . . . . . . . . . . . . . . . . . . . . . . . . . . . . . . . . . . . . . . . . . . . . 1126.18 Enabling the Database. . . . . . . . . . . . . . . . . . . . . . . . . . . . . . . . . . . . . . . . . . . . . . . . . . . . . . . . 112
Installation of SAP Systems Based on the Application Server Java of SAP NetWeaver 7.3 to 7.5 on Windows: SAP Adaptive Server EnterpriseContent P U B L I C 3

6.19 Performing a Full System Backup. . . . . . . . . . . . . . . . . . . . . . . . . . . . . . . . . . . . . . . . . . . . . . . . 1136.20 Logging on to the SAP Web Dispatcher Management Console. . . . . . . . . . . . . . . . . . . . . . . . . . . . 1146.21 SAP Web Dispatcher Configuration (Optional). . . . . . . . . . . . . . . . . . . . . . . . . . . . . . . . . . . . . . . 115
7 SAP ASE 15.7: Disaster Recovery Setup with SAP Replication Server. . . . . . . . . . . . . . . . . . . . 1177.1 Disaster Recovery Setup with SAP Replication Server. . . . . . . . . . . . . . . . . . . . . . . . . . . . . . . . . . 1177.2 Implementation Considerations. . . . . . . . . . . . . . . . . . . . . . . . . . . . . . . . . . . . . . . . . . . . . . . . . 1197.3 Prerequisites. . . . . . . . . . . . . . . . . . . . . . . . . . . . . . . . . . . . . . . . . . . . . . . . . . . . . . . . . . . . . . . 1197.4 Installing the Replication Environment. . . . . . . . . . . . . . . . . . . . . . . . . . . . . . . . . . . . . . . . . . . . . 121
Co-Located Replication Topology: Central Instance at the Primary Site. . . . . . . . . . . . . . . . . . . 121Co-Located Replication Topology: PAS on a Separate Server. . . . . . . . . . . . . . . . . . . . . . . . . . .123Dislocated Replication Topology: Central Instance on a Separate Server. . . . . . . . . . . . . . . . . . 125Materializing Databases. . . . . . . . . . . . . . . . . . . . . . . . . . . . . . . . . . . . . . . . . . . . . . . . . . . . 127
7.5 Starting and Stopping the DR Agent and the Replication Server. . . . . . . . . . . . . . . . . . . . . . . . . . . 1307.6 Removing the Replication Environment. . . . . . . . . . . . . . . . . . . . . . . . . . . . . . . . . . . . . . . . . . . . 1317.7 Integration of the SAP Replication Server into an OS Cluster Environment. . . . . . . . . . . . . . . . . . . 1337.8 Defining Dependencies. . . . . . . . . . . . . . . . . . . . . . . . . . . . . . . . . . . . . . . . . . . . . . . . . . . . . . . 1337.9 Defining Node Failure Criteria. . . . . . . . . . . . . . . . . . . . . . . . . . . . . . . . . . . . . . . . . . . . . . . . . . . 134
8 SAP ASE 16.0: Disaster Recovery Setup with SAP Replication Server. . . . . . . . . . . . . . . . . . . 1358.1 Disaster Recovery Setup with SAP Business Suite on SAP ASE 16.0. . . . . . . . . . . . . . . . . . . . . . . . 135
9 High Availability with Microsoft Failover Clustering. . . . . . . . . . . . . . . . . . . . . . . . . . . . . . . . 1369.1 Checklist for a High-Availability System. . . . . . . . . . . . . . . . . . . . . . . . . . . . . . . . . . . . . . . . . . . . 1389.2 Planning. . . . . . . . . . . . . . . . . . . . . . . . . . . . . . . . . . . . . . . . . . . . . . . . . . . . . . . . . . . . . . . . . . 139
System Configuration with Microsoft Failover Clustering. . . . . . . . . . . . . . . . . . . . . . . . . . . . . 139Distribution of SAP System Components to Disks for Failover Clustering. . . . . . . . . . . . . . . . . . 146Directories in a Microsoft Failover Cluster Configuration. . . . . . . . . . . . . . . . . . . . . . . . . . . . . .148IP Addresses in a Failover Cluster Configuration. . . . . . . . . . . . . . . . . . . . . . . . . . . . . . . . . . . 149Obtaining IP Addresses for a Microsoft Failover Cluster Configuration. . . . . . . . . . . . . . . . . . . . 152
9.3 Preparation. . . . . . . . . . . . . . . . . . . . . . . . . . . . . . . . . . . . . . . . . . . . . . . . . . . . . . . . . . . . . . . .1549.4 Installation. . . . . . . . . . . . . . . . . . . . . . . . . . . . . . . . . . . . . . . . . . . . . . . . . . . . . . . . . . . . . . . . 154
Configuring the First Cluster Node. . . . . . . . . . . . . . . . . . . . . . . . . . . . . . . . . . . . . . . . . . . . . 154Installing the Database Instance. . . . . . . . . . . . . . . . . . . . . . . . . . . . . . . . . . . . . . . . . . . . . . 156Configuring the Database on the Additional Node. . . . . . . . . . . . . . . . . . . . . . . . . . . . . . . . . . 156Configuring the Additional Cluster Node. . . . . . . . . . . . . . . . . . . . . . . . . . . . . . . . . . . . . . . . . 157Installing the Primary Application Server Instance. . . . . . . . . . . . . . . . . . . . . . . . . . . . . . . . . . 158Installing the Additional Application Server Instance. . . . . . . . . . . . . . . . . . . . . . . . . . . . . . . . 159
9.5 Post-Installation. . . . . . . . . . . . . . . . . . . . . . . . . . . . . . . . . . . . . . . . . . . . . . . . . . . . . . . . . . . . 1609.6 Additional Information. . . . . . . . . . . . . . . . . . . . . . . . . . . . . . . . . . . . . . . . . . . . . . . . . . . . . . . . 160
Moving Cluster Groups, or Services and Applications, or Roles. . . . . . . . . . . . . . . . . . . . . . . . . 161Starting and Stopping the SAP System in a Microsoft Failover Cluster Configuration. . . . . . . . . .162
4 P U B L I C
Installation of SAP Systems Based on the Application Server Java of SAP NetWeaver 7.3 to 7.5 on Windows: SAP Adaptive Server Enterprise
Content

10 Additional Information. . . . . . . . . . . . . . . . . . . . . . . . . . . . . . . . . . . . . . . . . . . . . . . . . . . . . . 16510.1 Additional Information. . . . . . . . . . . . . . . . . . . . . . . . . . . . . . . . . . . . . . . . . . . . . . . . . . . . . . . . 16510.2 SAP Directories. . . . . . . . . . . . . . . . . . . . . . . . . . . . . . . . . . . . . . . . . . . . . . . . . . . . . . . . . . . . .16610.3 Checking and Changing the Paging File Settings on Windows Server 2012 (R2) and Higher. . . . . . . 16910.4 Performing a Domain Installation Without Being a Domain Administrator. . . . . . . . . . . . . . . . . . . . 17110.5 Integration of LDAP Directory Services. . . . . . . . . . . . . . . . . . . . . . . . . . . . . . . . . . . . . . . . . . . . 17410.6 Preparing an External ABAP System as Source for User Data. . . . . . . . . . . . . . . . . . . . . . . . . . . . . 17810.7 Installing the SAP Host Agent Separately. . . . . . . . . . . . . . . . . . . . . . . . . . . . . . . . . . . . . . . . . . . 18110.8 Starting and Stopping the SAP System. . . . . . . . . . . . . . . . . . . . . . . . . . . . . . . . . . . . . . . . . . . . 18310.9 Configuring the Windows Server Firewall on Windows Server 2008 (R2) and higher (Optional)
. . . . . . . . . . . . . . . . . . . . . . . . . . . . . . . . . . . . . . . . . . . . . . . . . . . . . . . . . . . . . . . . . . . . . . . . 18510.10 Enabling SSL Encrypted Data Transfer. . . . . . . . . . . . . . . . . . . . . . . . . . . . . . . . . . . . . . . . . . . . 18610.11 SAP System Security on Windows. . . . . . . . . . . . . . . . . . . . . . . . . . . . . . . . . . . . . . . . . . . . . . . .18710.12 Automatic Creation of Accounts and Groups. . . . . . . . . . . . . . . . . . . . . . . . . . . . . . . . . . . . . . . . 18910.13 Deleting an SAP System or Single Instances. . . . . . . . . . . . . . . . . . . . . . . . . . . . . . . . . . . . . . . . 190
A Appendix. . . . . . . . . . . . . . . . . . . . . . . . . . . . . . . . . . . . . . . . . . . . . . . . . . . . . . . . . . . . . . . . 194A.1 Online Information from SAP. . . . . . . . . . . . . . . . . . . . . . . . . . . . . . . . . . . . . . . . . . . . . . . . . . . 194A.2 Using PowerShell. . . . . . . . . . . . . . . . . . . . . . . . . . . . . . . . . . . . . . . . . . . . . . . . . . . . . . . . . . . 194
Installation of SAP Systems Based on the Application Server Java of SAP NetWeaver 7.3 to 7.5 on Windows: SAP Adaptive Server EnterpriseContent P U B L I C 5

Document History
NoteBefore you start the implementation, make sure you have the latest version of this document, which is available at https://support.sap.com/sltoolset System Provisioning Installation Option of Software Provisioning Manager .
The following table provides an overview on the most important document changes:
Version Date Description
1.0 2012-12-17 First version for Software Provisioning Manager 1.0
1.1 - 1.3 2013-04-02 - 2013-10-28
Updated Versions:
SL Toolset 1.0 SPS 07 - SPS 09
1.4 2014-03-17 Instead of a separate installation guide for each UNIX-based operating system, we now deliver a single installation guide for all UNIX-based operating systems. Sections that are only relevant for one or more operating systems are highlighted accordingly.
1.5 - 2.1 2014-07-07 - 2016-06-06
Updated Versions:
SL Toolset 1.0 SPS 11 - SPS 17
2.2 2016-10-07 Updated version for software provisioning manager 1.0 SP18 (SL Toolset 1.0 SP18):
● Support for synchronous, near-synchronous and asynchronous replication for SAP Business Suite on SAP ASE 16.0.For more information, see Disaster Recovery Setup with SAP Business Suite on SAP ASE 16.0 [page 135] .
2.3 2017-02-06 Updated version for software provisioning manager 1.0 SP19 (SL Toolset 1.0 SP19)
2.4 2017-05-22 Updated version for software provisioning manager 1.0 SP20 (SL Toolset 1.0 SP20)
● New Features:○ New SAPUI5-based graphical user interface (GUI) “SL Common GUI”,
documented in: Prerequisites for Running the Installer, Running the Installer, Useful Information About the Installer
6 P U B L I C
Installation of SAP Systems Based on the Application Server Java of SAP NetWeaver 7.3 to 7.5 on Windows: SAP Adaptive Server Enterprise
Document History

Version Date Description
2.5 2017-09-11 Updated version for software provisioning manager 1.0 SP21 (SL Toolset 1.0 SP21)
● New Features:○ Media Signature Check, documented in: New Features, Running the Instal
ler, Preparing the Installation Media .This feature implies that section Creating Kernel Archives from an Existing SAP System has been deleted from this documentation because the related option in the installer had to be removed.
○ Download Media for a Maintenance Plan, documented in: New Features, Downloading Media for a Maintenance Plan
○ SAP Host Agent Upgrade , documented in: New Features, SAP System Parameters, Downloading SAP Kernel Archives (Archive-Based Installation)
○ Support of SSL, documented in: New Features, Enabling SSL encrypted data transfer.
Installation of SAP Systems Based on the Application Server Java of SAP NetWeaver 7.3 to 7.5 on Windows: SAP Adaptive Server EnterpriseDocument History P U B L I C 7

Version Date Description
2.6 2018-01-15 Updated version for Software Provisioning Manager 1.0 SP22 (SL Toolset 1.0 SP22)
● New Features:○ Signature check for installation archives, documented in: New Features,
Downloading SAP Kernel Archives (Archive-Based Installation) Archive-Based Installation for Diagnostics Agent, Downloading the SAP Kernel Archives Required for the Dual-Stack Split (Without Operating System and Database Migration), Downloading the SAP Kernel Archives Required for Operating System and Database Migration
○ Installer Log Files Improvements, documented in: New Features, Useful Information about the Installer, Troubleshooting with the Installer
○ Enabling IPv6, documented in: New Features, Prerequisites for Running the Installer
● New Features section restructured: As of SP22, a dedicated subsection for each new SP has been created. New features below SP22 remain in a common table.
● The Java SDT GUI - which was in the SP21 version still available in parallel to the SL Common GUI - has been deprecated with SP22. As of SP22, SL Common GUI is the only available installer GUI:○ The following sections which were explicitely related to Java SDT GUI were
completely removed from this documentation: Performing a Remote Installation Remote Processing of the Installer ( Java SDT GUI only), Starting the Java SDT GUI Separately, Running the Installer in Accessibility Mode (general accessibility information was moved to Useful Information About the Installer).
○ The Java SDT GUI-specific information was removed from the common installer sections: Running the Installer, Useful Information About the Installer, Interrupted Processing of the Installer, Troubleshooting with the Installer, Deleting an SAP System or Single Instances
● New section Using the Step State Editor (SAP Support Experts Only) was added to section Additional Information About the Installer
● Option to install the SCS instance with an integrated SAP Web Dispatcher , documented in: New Features, SCS Instance with Integrated SAP Web Dispatcher, Additional Parameters for an SAP Web Dispatcher Installation Integrated in the SCS Instance (Optional)
NoteThis feature was retroactively released on 2018-02-12.
2.6.1 2018-02-12 Updated version for Software Provisioning Manager 1.0 SP22 (SL Toolset 1.0 SP22): ): New Feature Option to install the SCS instance with an integrated SAP Web Dispatcher was retroactively released on 2018-02-12 and documented in this guide.
8 P U B L I C
Installation of SAP Systems Based on the Application Server Java of SAP NetWeaver 7.3 to 7.5 on Windows: SAP Adaptive Server Enterprise
Document History

1 About this Document
This installation guide describes how to install an SAP system based on the application server Java of SAP NetWeaver 7.3 to 7.5 using the installation tool Software Provisioning Manager 1.0 SP22 (“installer” for short), which is part of SL Toolset 1.0 SP22.
NoteAs an alternative to using Software Provisioning Manager, you can install your system with a completely automated end-to-end framework available using SAP Landscape Management. For more information, see SAP Note 1709155 and https://help.sap.com/lama .
This guide covers the SAP system products and releases listed in SAP Note 1554717 .
For information about supported operating system and database platforms for the SAP product you want to install, see the Product Availability Matrix at http://support.sap.com/pam
CautionMake sure you have read Before You Start [page 11] before you continue with this installation guide.
Related Information
Naming Conventions [page 9]Constraints [page 11]Before You Start [page 11]SAP Notes for the Installation [page 12]New Features [page 14]
1.1 Naming Conventions
● Software Provisioning Manager 1.0 is the successor of the product- and release-specific delivery of provisioning tools, such as “SAPinst”.Before you perform an installation from scratch or a target system installation in the context of a system copy, we strongly recommend that you always download the latest version of the Software Provisioning Manager 1.0 which is part of the Software Logistics Toolset 1.0 (“SL Toolset” for short). For more information, see Preparing the Installation Media [page 65].This way, you automatically get the latest version with the latest fixes of the tool and supported processes. For more information about Software Provisioning Manager 1.0 as well as products and releases supported
Installation of SAP Systems Based on the Application Server Java of SAP NetWeaver 7.3 to 7.5 on Windows: SAP Adaptive Server EnterpriseAbout this Document P U B L I C 9

by it, see SAP Note 1680045 and https://wiki.scn.sap.com/wiki/display/SL/Software+Provisioning+Manager+1.0 .“SAPinst” has been renamed to “Software Provisioning Manager” (“installer” for short) in this documentation, but the terms “SAPinst” and “sapinst” are still used in:○ The name of the technical framework of Software Provisioning Manager. For more information about
the SAPinst Framework, see SAP Note 2393060 .○ Texts and screen elements in the Software Provisioning Manager GUI○ Names of executables, for example sapinst.exe○ Names of command line parameters, for example SAPINST_USE_HOSTNAME
● “usage type”, “technical usage”, and “product instance”As of Software Provisioning Manager 1.0 SP07 (SL Toolset 1.0 SP12), the term “product instance” replaces the terms “ usage type” and “technical usage” for SAP systems based on SAP NetWeaver 7.3 including enhancement package 1 and higher. For more information, see SAP Note 1970349 . Note that there is no terminology change for older releases and all mentioned terms can be used as synonyms. As this guide is a generic document, the currently used terms remain but only “product instance” is used from now on when referring to SAP NetWeaver 7.3 EHP1 and higher.For more information, see New Features [page 14].
● “installer” refers to “Software Provisioning Manager”.● “SAP system” refers to SAP system based on the application server of SAP NetWeaver 7.3 / 7.3 including
Enhancement Package 1 / SAP NetWeaver 7.4 / SAP NetWeaver 7.5.● “Java system” refers to SAP system based on the application server Java of SAP NetWeaver 7.3 / 7.3
including Enhancement Package 1 / SAP NetWeaver 7.4 / 7.4 SR1 / SAP NetWeaver 7.5.● “Diagnostics Agent” refers to the SAP Solution Manager Diagnostics Agent which is the remote component
of End-to-End Root Cause Analysis. It allows having a connection between SAP Solution Manager and managed systems, and then to collect information from the managed systems for reporting purposes.
● Operating System NamesIn this document, “Windows Server 2008 (R2) or Windows Server 2012 (R2)” – with (R2) written in parentheses – means that the information applies to both Windows Server 2008 and Windows Server 2008 R2, or Windows Server 2012 and Windows Server 2012 R2.
● Only valid for Microsoft Failover Clustering: As of Windows Server 2008 the cluster feature is called Failover Clustering. For practical reasons we are continuing to use the previous terminology Microsoft Cluster Service and abbreviation MSCS in some sections of this guide and the corresponding installation documentation of your release.
● Profiling for High AvailabilityOnly valid for 'High Availability': HA (Windows)The profile bars with the wording Only valid for: HA (MSCS) – for example, as in this section – refer to content that is only valid if you are installing a high-availability (HA) system with Microsoft Failover Clustering. The Windows Server Failover Clustering feature was previously called Microsoft Cluster Service (MSCS). For practical reasons we are continuing to use the abbreviation MSCS in the profile bars and in some sections of this guide.End of 'High Availability': HA (Windows)
10 P U B L I C
Installation of SAP Systems Based on the Application Server Java of SAP NetWeaver 7.3 to 7.5 on Windows: SAP Adaptive Server Enterprise
About this Document

1.2 Constraints
● The Dual Stack option, which integrates an AS ABAP and AS Java in a single system (common System ID <SAPSID>, common startup framework, common database), is no longer supported in SAP systems based on SAP NetWeaver 7.5. So if you want to install a new SAP NetWeaver 7.5 Process Integration (PI) system which is based on SAP NetWeaver 7.5, do not use the documentation Installation Guide - SAP Systems Based on the Application Server ABAP+Java of SAP NetWeaver on <OS>: <DB>. Instead, use the Installation Guide - SAP Systems Based on the Application Server ABAP of SAP NetWeaver on <OS>: <DB> to install the ABAP stack with its own <SAPSID> and the Installation Guide - SAP Systems Based on the Application Server Java of SAP NetWeaver on <OS>: <DB> to install the Java stack with its own <SAPSID>. For more information, see the implementation sequence in the Master Guide - SAP NetWeaver 7.5 at http://help.sap.com/netweaver <Release> Installation and Upgrade .
● Not all SAP NetWeaver releases or SAP Business Suite applications that are available in Software Provisioning Manager 1.0 and are described in this installation guide have already been released. Always check SAP Note 1680045 to ensure that the installation options you want to perform are already supported. For information about supported operating system and database platforms, see the Product Availability Matrix at http://support.sap.com/pam .
● Note that a complete system installation from scratch is not available for every product. For some products - such as SAP NetWeaver 7.4 - a complete new system installation from scratch is only provided for the highest support release. If there are one or more support releases, then a complete system installation is only available for the highest of these support releases. As for the lower support releases, only options for system copy and additional application server instances are provided.
● Your operating system platform must be 64-bit.● The SAP Adaptive Server Enterprise Cluster Edition is not supported.● Raw devices are not supported.
1.3 Before You Start
Make sure that you have read the release-specific “Master Guide” for your SAP Business Suite application, SAP NetWeaver application , or SAP Solution Manager system before you continue with this installation guide.
The “Master Guide” is the central document leading you through the overall implementation process for your SAP system installation. It contains crucial information about the overall implementation sequence, that is activities you have to perform before and after the installation process described in this installation guide.
You can find a printed version of this guide in your installation package or you can download the latest version from https://help.sap.com.
Installation of SAP Systems Based on the Application Server Java of SAP NetWeaver 7.3 to 7.5 on Windows: SAP Adaptive Server EnterpriseAbout this Document P U B L I C 11

The following table lists the “Master Guide” of the SAP system application for which you can use this installation guide, along with the available quick link or path to the appropriate download location:
Document Internet Address
Master Guide – SAP NetWeaver 7.5 http://help.sap.com/nw75
Installation and Upgrade
Master Guide – SAP Solution Manager 7.2 http://help.sap.com/solutionmanager
7.2 <SP> Installation and Upgrade
Master Guide – SAP NetWeaver 7.4 http://help.sap.com/nw74
Installation and Upgrade
Master Guide SAP Supply Chain Management 7.0 <Including SAP Enhancement Package <Number> Powered by SAP NetWeaver
http://help.sap.com/scm
<Release> Installation and Upgrade
Master Guide (Including Upgrade Information) - SAP Customer Relationship Management 7.0 <Including SAP Enhancement Package <Number>
http://help.sap.com/crm
<Release> Installation and Upgrade
Master Guide (Including Upgrade Information) - SAP Supplier Relationship Management 7.0 <Including SAP Enhancement Package <Number>
http://help.sap.com/srm
<Release> Installation and Upgrade
Master Guide - SAP Enhancement Package <Number> for SAP ERP 6.0
http://help.sap.com/erp
<Release> Installation and Upgrade
Master Guide – SAP Enhancement Package 1 for SAP NetWeaver 7.3
http://help.sap.com/nw73
Installation and Upgrade
Master Guide – SAP NetWeaver 7.3 http://help.sap.com/nw73
Installation and Upgrade
1.4 SAP Notes for the InstallationThis section lists the most important SAP Notes relevant for an installation using Software Provisioning Manager
You must read the following SAP Notes before you start the installation. These SAP Notes contain the most recent information on the installation, as well as corrections to the installation documentation.
12 P U B L I C
Installation of SAP Systems Based on the Application Server Java of SAP NetWeaver 7.3 to 7.5 on Windows: SAP Adaptive Server Enterprise
About this Document

Make sure that you have the up-to-date version of each SAP Note, which you can find at https://support.sap.com/notes .
SAP Notes for the Installation
SAP Note Number Title Description
1680045 Release Note for Software Provisioning Manager 1.0
Software Provisioning Manager 1.0 with installation and system copy for SAP NetWeaver-based systems
1710950 Inst. SAP Systems Based on SAP NetWeaver 7.1 and higher: Windows
Windows-specific information about the SAP system installation and corrections to this documentation
1748888 Inst. Systems Based on SAP NetWeaver 7.3 and higher: SAP ASE
Software Provisioning Manager 1.0: SAP NetWeaver 7.3 and higher
1554717 Planning Information for SAP on ASE SAP release information for customers deploying SAP on ASE
1619967 SYB: DBA Cockpit Correction Collection SAP Basis 7.31
The implementation of SAP Note 1619967 directly after the installation is strongly recommended.
1882376 SYB: DBA Cockpit Correction Collection SAP Basis 7.4
The implementation of SAP Note 1882376 directly after the installation is strongly recommended.
2293673 SYB: DBA Cockpit Correction Collection SAP Basis 7.5
The implementation of SAP Note 2293673 directly after the installation is strongly recommended.
2380028 SYB: DBA Cockpit Correction Collection SAP Basis 7.51
The implementation of SAP Note 2380028 directly after the installation is strongly recommended.
1245200 ICF Service Activation for Web Dynpro DBA Cockpit
The Web browser-based version of the DBA Cockpit does not start correctly.
1585981 Backup Instructions for SAP on ASE Information about backup and recovery
1650511 High Availability Offerings with SAP ASE Information about high availability cluster solutions for SAP ASE
1732161 SAP Systems on Windows Server 2012 (R2) Windows Server 2012 (R2)-specific information for the SAP system installation
737368 Hardware requirements of Java Development Infrastructure
Information on the hardware requirements for Java Development Infrastructure, which depends on the size of your development team
Installation of SAP Systems Based on the Application Server Java of SAP NetWeaver 7.3 to 7.5 on Windows: SAP Adaptive Server EnterpriseAbout this Document P U B L I C 13

SAP Note Number Title Description
73606 Supported Languages and Code Pages Information on possible languages and language combinations in SAP systems
1067221 Composite SAP Note for heterogeneous installation
This SAP Note and its related SAP Notes describe the released operating system and database combinations for heterogeneous SAP systems landscapes.
2384179 Planned support of Windows Server 2016 for SAP products
Support of Windows Server 2016 specific for SAP Products information for the SAP system information.
1.5 New Features
The sections below provide an overview of the new features in Software Provisioning Manager 1.0 (the“ installer” for short).
Make sure that you also read the Release Notes for your SAP product at https://help.sap.com <Search your SAP Product> <Select your SAP Product Version> What’s New .
New Features - Software Provisioning Manager 1.0 SP22 [page 14]The table in this section provides an overview of the new features in Software Provisioning Manager 1.0 available as of SP22 (SL Toolset 1.0 SP22).
New Features - Software Provisioning Manager 1.0 SP21 and Lower [page 15]The table in this section provides an overview of the new features in Software Provisioning Manager 1.0 available as of SP21 (SL Toolset 1.0 SP21) and lower.
1.5.1 New Features - Software Provisioning Manager 1.0 SP22
The table in this section provides an overview of the new features in Software Provisioning Manager 1.0 available as of SP22 (SL Toolset 1.0 SP22).
Make sure that you also read the Release Notes for your SAP product at https://help.sap.com <Search your SAP Product> <Select your SAP Product Version> What’s New .
Feature Description
Installer Log Files Improvements Installer log files are now available immediately after the installer has been started, that is before a product has been selected on the Welcome screen. For more information, see Useful Information About the Installer [page 82] and Troubleshooting with the Installer [page 88].
14 P U B L I C
Installation of SAP Systems Based on the Application Server Java of SAP NetWeaver 7.3 to 7.5 on Windows: SAP Adaptive Server Enterprise
About this Document

Feature Description
Signature Check of Installation Archives The signature of installation archives is checked automatically by the installer during the Define Parameters phase while processing the Software Package Browser screens. As of now the installer only accepts archives whose signature has been checked. For more information, see Downloading SAP Kernel Archives (Archive-Based Installation) [page 69] and SAP Note 2541751 - SYB: SWPM RDBMS content has been tampered .
Enabling IPv6 You can now set up a new SAP system or SAP system instance using Internet Protocol Version 6 (IPv6).
For more information, see Prerequisites for Running the Installer [page 76].
Option to install an SCS instance with integrated SAP Web Dispatcher
You can now install an SAP Web Dispatcher in an SCS instance. You can choose this option while running the SCS instance installation.
For more information, see SCS Instance with Integrated SAP Web Dispatcher [page 23]
1.5.2 New Features - Software Provisioning Manager 1.0 SP21 and Lower
The table in this section provides an overview of the new features in Software Provisioning Manager 1.0 available as of SP21 (SL Toolset 1.0 SP21) and lower.
Make sure that you also read the Release Notes for your SAP product at https://help.sap.com <Search your SAP Product> <Select your SAP Product Version> What’s New .
Feature Description Availability
Media Signature Check
The signature of media is checked automatically by the installer during the Define Parameters phase while processing the Media Browser screens. As of now the installer only accepts media whose signature has been checked. See also the description of this new security feature in SAP Note 2393060 .
For more information, see Preparing the Installation Media [page 65] and Running the Installer [page 78].
Software Provisioning Manager 1.0 SP21 (SL Toolset 1.0 SP21)
SAP Host Agent Upgrade During the Installation (Optional)
During the Define Parameters phase of the installation, the installer prompts you whether you want to upgrade an existing version of the SAP Host Agent on the installation host. If there is no SAP Host Agent on the installation host, it is installed automatically without prompt. For more information, see the General Parameters table in SAP System Parameters [page 42] .
Software Provisioning Manager 1.0 SP21 (SL Toolset 1.0 SP21)
Installation of SAP Systems Based on the Application Server Java of SAP NetWeaver 7.3 to 7.5 on Windows: SAP Adaptive Server EnterpriseAbout this Document P U B L I C 15

Feature Description Availability
Secure Sockets Layer (SSL) encrypted data transfer
The feature SSL encrypted data transfer is available for SAP ASE 16.0 SP02 starting with PL6. For general limitations and prerequisites refer to SAP Note 2481596 - SYB: Encrypted data transfer between SAP System and SAP ASE database. The SAP installer offers the possibility to enable the SSL encrypted data transfer via a checkbox. The SSL certificates are generated by the SAP installer and enabled for the database server and the SAP application server. There are no manual steps necessary to configure the usage of SSL for the purpose of encrypted data transfer. For more information see Enabling SSL Encrypted Data Transfer [page 186]
Software Provisioning Manager 1.0 SP21 (SL Toolset 1.0 SP21)
SL Common GUI with SAPINST 7.49
With the new installer framework version SAPINST 7.49, you can now use the new SAPUI5-based graphical user interface (GUI) “SL Common GUI”. For more information, see Useful Information About the Installer [page 82], Running the Installer [page 78] .
Software Provisioning Manager 1.0 SP20 (SL Toolset 1.0 SP20)
Verification of Integrity of Data Units in Software Provisioning Manager
The integrity of data units extracted from the Software Provisioning Manager archive is verified. For more information, see Downloading and Extracting the Software Provisioning Manager 1.0 Archive [page 66] .
In addition, check SAP Note 1680045 whether additional information is available.
Software Provisioning Manager 1.0 SP19 (SL Toolset 1.0 SP19)
Archive-Based Installation
You can now download the required installation archives instead of the complete SAP kernel installation media. For more information, see section Downloading Specific Installation Archives (Archive-Based Installation) in Preparing the Installation Media [page 65] .
Software Provisioning Manager 1.0 SP17 (SL Toolset 1.0 SP17)
Diagnostics Agent The Diagnostics Agent is no longer installed automatically with the SAP system. The Install Diagnostics Agent check box on the Install Diagnostics Agent screen is no longer available.
You now have to install the Diagnostics Agent always separately. We recommend that you install it prior to the installation of your SAP system(s).
For more information, see the Diagnostics Agent Installation Strategy attached to SAP Note 1365123 , to SAP Note 1833501
, and to SAP Note 1858920 and the attached Diagnostics Agent Setup Guide.
Software Provisioning Manager 1.0 SP10 (SL Toolset 1.0 SP16)
16 P U B L I C
Installation of SAP Systems Based on the Application Server Java of SAP NetWeaver 7.3 to 7.5 on Windows: SAP Adaptive Server Enterprise
About this Document

Feature Description Availability
System Provisioning for SAP NetWeaver 7.5 and SAP NetWeaver 7.5-based Products
All system provisioning tasks (installation, system copy, system rename) are available for the new SAP NetWeaver 7.5 release.
The Dual Stack option, which integrates an AS ABAP and AS Java in a single system (common System ID <SAPSID>, common startup framework, common database), is no longer supported in SAP systems based on SAP NetWeaver 7.5.
After upgrading to SAP NetWeaver 7.5 PI, you first have to split the still existing dual stack-system before you can use SAP NetWeaver 7.5 PI productively.
For more information, see the Upgrade Master Guide - SAP Net
Weaver 7.5 at: http://help.sap.com/nw75 Installation and
Upgrade
Software Provisioning Manager 1.0 SP09 (SL Toolset 1.0 SP15)
System Provisioning for SAP Solution Manager 7.2
All system provisioning tasks (installation, system copy, system rename) are available for the new SAP Solution Manager 7.2 release. Compared to previous SAP Solution Manager releases, SAP Solution Manager 7.2 is no longer provided as a classical dual-stack system (ABAP system with Java Add-in), but consists of a separate ABAP and Java stack.
Software Provisioning Manager 1.0 SP09 (SL Toolset 1.0 SP15)
Windows Domain Organizational Units
You can now specify an optional organizational unit (OU) within the Windows domain where you want the installer to create the SAP system accounts.
For more information, see SAP System Parameters [page 42].
Software Provisioning Manager 1.0 SP09 (SL Toolset 1.0 SP14)
Creating Kernel Archives from existing SAP System
You can reuse the binaries of a dedicated SAP system for a new SAP system installation or target system installation in the context of a system copy by creating *.SAR archives based on the *.lst files from the executable (exe) directories of the source SAP system.
NoteThis feature is only available for Unicode systems.
CautionThis feature has been deprecated with Software Provisioning Manager 1.0 SP21 (SL Toolset 1.0 SP21) and the related option has been removed from the Welcome screen. This deprecation has been accomplished to ensure compliancy with the new feature “Media Signature Check” of Software Provisioning Manager 1.0 SP21 (SL Toolset 1.0 SP21) described above in this table.
Software Provisioning Manager 1.0 SP09 (SL Toolset 1.0 SP14)
Installation of SAP Systems Based on the Application Server Java of SAP NetWeaver 7.3 to 7.5 on Windows: SAP Adaptive Server EnterpriseAbout this Document P U B L I C 17

Feature Description Availability
Usage Type Library Deprecation for SAP Systems Based on SAP NetWeaver 7.3 EHP1 and Higher
Software Provisioning Manager 1.0 no longer uses the “Usage Types” definitions in its business logic for SAP systems based on SAP NetWeaver 7.3 EHP1 and higher. This is done to unify modeling and terminology across all SAP tools used during the planning, installation and maintenance activities. The “Product Instance” definition replaces “Usage Types” regarding product modeling. For more information, see SAP Notes 1970349 and 1877731 .
Software Provisioning Manager 1.0 SP07 (SL Toolset 1.0 SP12)
Adaptive Installation You can assign virtual host names to SAP system instances during the input phase of the installation directly on the screens where you define the instance parameters.
Software Provisioning Manager 1.0 SP07 (SL Toolset 1.0 SP12)
Feedback Evaluation Form
SAP SE’s aim is to provide fast and efficient procedures. To evaluate the procedure you just carried out, we need information generated by the tool during process execution and your experience with the tool itself. A new evaluation form contains a simple questionnaire and XML data generated during the procedure.
Port 4239 is used for displaying the feedback evaluation form. For more information, see Prerequisites for Running the Installer [page 76].
Software Provisioning Manager 1.0 SP07 (SL Toolset 1.0 SP12)
Option Verify Signed Media
The digital signature ensures that the signatory of a digital document can be identified unambiguously and signatory’s name is documented together with the signed document, the date, and the time.
For more information, see SAP Note 1979965 .
Software Provisioning Manager 1.0 SP06 (SL Toolset 1.0 SP11)
Valid only for SAP NetWeaver Composition Environment 7.1:
Enterprise Services Repository
You can install Enterprise Services Repository in an existing SAP NetWeaver Composition Environment 7.1 system using the Add ESR Capability installation option, which is available on the
Welcome screen at: SAP NetWeaver Composition Environment
(CE) 7.1 <Database> SAP Systems Application Server
Java Enterprise Services Repository Add-On
Software Provisioning Manager 1.0 SP05 (SL Toolset 1.0 SP10)
18 P U B L I C
Installation of SAP Systems Based on the Application Server Java of SAP NetWeaver 7.3 to 7.5 on Windows: SAP Adaptive Server Enterprise
About this Document

2 Installation Options Covered by this Guide
This section shows the installation options covered by this installation guide. You have to decide what exactly you want to install because the steps you have to perform vary according to the installation option you choose.
After you have decided on the installation option that you want to use, continue with Planning [page 26].
Related Information
Standard System [page 19]Distributed System [page 20]High Availability System [page 21]Additional Application Server Instance [page 21]SCS Instance with Integrated SAP Web Dispatcher [page 23]SAP Host Agent as a Separate Installation [page 25]
2.1 Standard System
You can install a standard system on a single host.
In a standard system, all main instances run on a single host.
There are the following instances:
● Central services instance (SCS instance)Contains the Java message server and the Java enqueue serverOptionally, you can install the SCS instance with an integrated SAP Web Dispatcher. For more information, see SCS Instance with Integrated SAP Web Dispatcher [page 23].
● Database instance (DB)● Primary application server instance (PAS instance)
Additionally, you can install one or more additional application server instances. For more information, see Additional Application Server Instance [page 21].
Installation of SAP Systems Based on the Application Server Java of SAP NetWeaver 7.3 to 7.5 on Windows: SAP Adaptive Server EnterpriseInstallation Options Covered by this Guide P U B L I C 19

Standard Java System
2.2 Distributed System
You can install a system distributed over several hosts.
An SAP system consists of SAP instances. An SAP instance is a group of processes that are started and stopped at the same time.
In a distributed system, every instance can run on a separate host.
NoteWe strongly recommend installing the ASCS instance on the same host as the primary application server. The installation of the ASCS instance on a separate host is reserved for high-availability configurations on Windows that are not using Microsoft Failover Clustering.
● Central services instance (SCS instance)Contains the Java message server and the Java enqueue serverOptionally, you can install the SCS instance with an integrated SAP Web Dispatcher. For more information, see SCS Instance with Integrated SAP Web Dispatcher [page 23].
● Database instance (DB)The Java stack uses its own database schema in the database.
● Primary application server instance (PAS)
The following figure assumes the following:
● The SCS instance runs on the SAP global host.● The global transport directory resides on a separate SAP transport host.
Optionally, you can install one or more additional application server instances. For more information, see Installation of an Additional Application Server Instance [page 21].
20 P U B L I C
Installation of SAP Systems Based on the Application Server Java of SAP NetWeaver 7.3 to 7.5 on Windows: SAP Adaptive Server Enterprise
Installation Options Covered by this Guide

Distributed Java System
2.3 High Availability SystemFor more information about the system components you have to install and how to distribute them on the specific hosts, see System Configuration with Microsoft Failover Clustering [page 139].
2.4 Additional Application Server InstanceYou can install one or more additional application server instances for an existing SAP system. Additional application server instances are optional and can be installed on separate hosts.
An additional application server instance can run on:
● The host of any instance of the existing SAP system● On a dedicated host
NoteWe do not recommend installing additional application server instances on the SAP global host.
NoteIf you want to install an additional application server instance on an existing SAP system, you must perform a domain installation. You must also make sure that your existing SAP system was installed as a domain installation. For more information, see Domain or Local Installation [page 40].
Installation of SAP Systems Based on the Application Server Java of SAP NetWeaver 7.3 to 7.5 on Windows: SAP Adaptive Server EnterpriseInstallation Options Covered by this Guide P U B L I C 21

Additional Application Server Instance for a Standard System
The following figure shows additional application server instances that are running on dedicated hosts.
Additional Application Server Instance for a Standard Java System
For more information, see Standard System [page 19].
Additional Application Server Instance for a Distributed System
The following figure shows additional application server instances that are running on dedicated hosts.
22 P U B L I C
Installation of SAP Systems Based on the Application Server Java of SAP NetWeaver 7.3 to 7.5 on Windows: SAP Adaptive Server Enterprise
Installation Options Covered by this Guide

Additional Application Server Instance for a Distributed Java System
For more information, see Distributed System [page 20].
Only valid for 'High Availability': HA (Windows)
Additional Application Server Instance for a High-Availability System
In a high-availability system, you require, apart from the primary application server instance, at least one additional application server instance. For more information about how to install and distribute the application servers in an HA configuration, see section System Configuration with Microsoft Failover Clustering [page 139].
End of 'High Availability': HA (Windows)
2.5 SCS Instance with Integrated SAP Web Dispatcher
You can install an SAP Web Dispatcher integrated in the SCS instance.
If you select this option, an SAP Web Dispatcher is installed running within the SCS instance. No separate SAP Web Dispatcher instance and no dedicated <SAPSID> are created for the SAP Web Dispatcher. We recommend this if you want to use the SAP Web Dispatcher for the system to which the SCS instance belongs.
Installation of SAP Systems Based on the Application Server Java of SAP NetWeaver 7.3 to 7.5 on Windows: SAP Adaptive Server EnterpriseInstallation Options Covered by this Guide P U B L I C 23

Note
We only recommend this option for special scenarios. For more information, see SAP Note 908097 . For an SAP Web Dispatcher installation, a standalone installation (see below) continues to be the default scenario.
SCS Instance with Integrated SAP Web Dispatcher
The SAP Web Dispatcher is located between the Web client (browser) and your SAP system that is running the Web application.
It acts as single point of entry for incoming requests (HTTP, HTTPS), defined by the IP address, port, and URL, and forwards them in turn to the application server (AS) of the SAP system.
The SAP Web Dispatcher receives information about the SAP system that it needs for load distribution (load balancing) from the message server and application server via HTTP.
Installation of “Standalone” SAP Web Dispatcher with its own <SAPSID> and Instance
If you want to install an SAP Web Dispatcher for another system - that is not for the system for which you use the SCS instance and with its own SAP system ID and instance number - you have to install SAP Web Dispatcher separately as described in the documentation which you can find under http://support.sap.com/sltoolset System Provisioning Installation Option of Software Provisioning Manager Guide for SAP Web Dispatcher for SAP NetWeaver 7.0 or Higher .
24 P U B L I C
Installation of SAP Systems Based on the Application Server Java of SAP NetWeaver 7.3 to 7.5 on Windows: SAP Adaptive Server Enterprise
Installation Options Covered by this Guide

More Information
For more information about the architecture and the functions of SAP Web Dispatcher, see the SAP Web Dispatcher documentation in the SAP LibrarySAP Library at:
SAP Release and SAP Library Quicklink SAP Library Path (Continued)
● SAP NetWeaver 7.3http://help.sap.com/nw73
● SAP NetWeaver 7.3 including Enhancement Package 1http://help.sap.com/nw731
● SAP NetWeaver 7.4http://help.sap.com/nw74
● SAP NetWeaver 7.5http://help.sap.com/nw75
Application Help Function-Oriented View Application
Server Infrastructure Components of SAP NetWeaver
Application Server SAP Web Dispatcher
2.6 SAP Host Agent as a Separate Installation
Under certain circumstances you need to install SAP Host Agent separately.
SAP Host Agent is an agent that can accomplish several life-cycle management tasks, such as operating system monitoring, database monitoring, system instance control and provisioning. When you install a new SAP system or instance, the SAP Host Agent is in most cases installed automatically on the SAP system or instance host.
It is only required to install the SAP Host Agent separately if one of the following is true:
● There is no SAP system or instance on the host.● The SAP system or instance running on the host has a kernel release lower than SAP kernel 7.20 and the
host does not yet have an SAP Host Agent. During the installation of new SAP instances with SAP kernel 7.20 or higher, the SAP Host Agent is installed automatically (integrated installation).
● You have upgraded your SAP system to a release with a kernel release lower than SAP kernel 7.20 and the host of the upgraded system or instance does not yet have an SAP Host Agent.
The section Installing the SAP Host Agent Separately [page 181] describes how to perform the installation.
Installation of SAP Systems Based on the Application Server Java of SAP NetWeaver 7.3 to 7.5 on Windows: SAP Adaptive Server EnterpriseInstallation Options Covered by this Guide P U B L I C 25

3 Planning
3.1 Planning Checklist
This section includes the planning steps that you have to complete for the following installation options.
● Standard, distributed, or high-availability system● Additional application server instance
Detailed information about the steps are available in the linked sections.
Prerequisites
1. You have planned your SAP system landscape according to the Master Guide available at the appropriate download location as described in Before You Start [page 11] .
2. You have decided on your installation option (see Installation Options Covered by this Guide [page 19]).
Standard, Distributed, or High-Availability System
NoteIn a standard system, all mandatory instances are installed on one host. Therefore, if you are installing a standard system, you can ignore references to other hosts.
1. Make yourself familiar with the changed file system structure and profiles for SAP systems based on SAP NetWeaver 7.1 and higher compared to SAP systems based on lower SAP NetWeaver releases. For more information, see Changed File System Structure and Profiles for SAP Systems Based on SAP NetWeaver 7.1 and Higher [page 27].
2. If you want to install an SAP Java system along with the required Support Package stack in one implementation run, you need to plan the desired installation target using the maintenance planner at https://apps.support.sap.com/sap/support/mp .In the maintenance planner, a stack XML file with the desired Support Package stack and Add-On information is generated, which you then hand over to Software Provisioning Manager (the “installer” for short) by calling it with command line parameter SAPINST_STACK_XML=<Absolute_Path_To_Stack_XML_File>. Included constraints and defaults defined in the stack XML file are then used for the initial installation by Software Provisioning Manager and for the application of Support Package stacks and Add-Ons by the Software Update Manager (SUM).For more information, see Installation Using a Stack Configuration File (Optional) [page 28].
26 P U B L I C
Installation of SAP Systems Based on the Application Server Java of SAP NetWeaver 7.3 to 7.5 on Windows: SAP Adaptive Server Enterprise
Planning

RecommendationWe recommend that you perform the installation using a stack configuration file for all new products such as SAP S/4HANASAP on Premise.
3. You check the hardware and software requirements [page 30] on every installation host.4. You plan how to set up user and access management [page 39].5. You identify Basic SAP System Installation Parameters [page 41].6. You decide whether you want to perform a domain or local installation [page 40].7. You carefully plan the setup of your database [page 53].8. You decide on the transport host to use [page 54].9. You decide whether you want to integrate LDAP Directory Services in your SAP system [page 174].10. Only valid for 'High Availability': HA (Windows)
To install a high-availability system with Microsoft Failover Clustering, you perform the HA-specific planning steps [page 138].End of 'High Availability': HA (Windows)
11. Continue with Preparation [page 55].
Additional Application Server Instance
1. You check the hardware and software requirements [page 30] for every installation host on which you want to install one or more additional application server instances.
2. You identify Basic SAP System Installation Parameters [page 41].3. Continue with Preparation [page 55].
3.2 Changed File System Structure and Profiles for SAP Systems Based on SAP NetWeaver 7.1 and Higher
File system structure
● For SAP system releases based on SAP NetWeaver 7.1 and higher, the directory structure was changed compared to SAP NetWeaver 7.0, in order to support heterogeneous system installations and updates more efficiently.
CautionThe directory structure of systems based on SAP NetWeaver 7.1 or higher is not supported on systems based on SAP NetWeaver 7.0 including Enhancement Packages.
● For a manual switch, see the details about targeted file system structure in this documentation and adjust your file system accordingly to avoid later issues for system transformation such as system copy and system rename.
Installation of SAP Systems Based on the Application Server Java of SAP NetWeaver 7.3 to 7.5 on Windows: SAP Adaptive Server EnterprisePlanning P U B L I C 27

Profiles
● As of SAP NetWeaver 7.3, the start profile as separate file has been removed. In earlier versions of SAP NetWeaver there was one default profile per SAP system, one start profile per Instance and one Instance profile per instance. Now the start profile contents are merged with the instance profile. With the help of the new instance profile, SAP processes are started and at the same time instance-specific parameters are read. This reduces the total number of profile files to one default profile per SAP System, and one instance profile per instance.For more information, see the SCN blog What's new in SAP NetWeaver 7.3 - A Basis perspective at: https://blogs.sap.com/2012/05/22/whats-new-in-sap-netweaver-73-a-basis-perspective/ .
CautionThe merged profiles are not supported for SAP NetWeaver 7.0 including Enhancement Packages because this could lead to issues for SAP system copy. If you are not sure which SAP NetWeaver product version you have, see SAP Note 1877731 for more information.
● For more information about merging the start profile with the instance profiles, see SAP Note 1528297 .● Additional application server instances: Double-check the values with the profile values from the primary
application server - for example for parameters DIR_CT_RUN , DIR_EXECUTABLE, DIR_SAPJVM - to avoid startup issues.
3.3 Installation Using a Stack Configuration File
The option to perform an installation using a stack configuration file (also called “up-to-date installation”) improves the process of provisioning an up-to-date SAP system by creating a unified consumption experience and a direct close collaboration between the involved tools, namely:
● Maintenance Planner, accessible at https://apps.support.sap.com/sap/support/mp● LMDB in SAP Solution Manager● Software Provisioning Manager (the “installer” for short)● Software Update Manager (“SUM”)
The installer then can take over more default settings that are already predefined in the Maintenance Planner.
RecommendationWe recommend to perform the installation using a stack configuration file for new products, such as SAP S/4HANA or SAP Solution Manager 7.2.
28 P U B L I C
Installation of SAP Systems Based on the Application Server Java of SAP NetWeaver 7.3 to 7.5 on Windows: SAP Adaptive Server Enterprise
Planning

Prerequisites
● To be able to use the Maintenance Planner at https://apps.support.sap.com/sap/support/mp , your SAP Solution Manager system must have at least one of the following release and Support Package (SP) level:○ SAP Solution Manager 7.2○ SAP Solution Manager 7.1 SP06 or higher○ SAP Solution Manager 7.0 SP 23 and you must have applied the following SAP Notes: 1646604 ,
1783371 , 1743695● You must have implemented SAP Note 1940845 in your SAP Solution Manager system.● For additional information about involved tools and supported SAP system releases, see SAP Note 2277574
for additional information about involved tools and supported SAP system releases.
Features
An installation using a stack configuration file provides the following features:
● You can use a stack configuration file generated by the Maintenance Planner at https://apps.support.sap.com/sap/support/mp . The parameters contained in the stack configuration file can then be processed by the installer to get better integrated with SUM and to simplify the process of installation for a new system on a target software level. This makes IT administration easier by reducing the efforts in Total Cost of Ownership (TCO). For more information, see the Best Practice Guide to Planning Landscape Changes at https://wiki.scn.sap.com/wiki/display/SL/Landscape+Management+-+the+Process .
● When processing a stack configuration file, the installer can take over more default settings that are already predefined in the Maintenance Planner and offers more possibilities for automation as compared to when running without it. For more information about the benefits by comparing the existing process with the new improved process, see Up-To-Date Installation at https://blogs.sap.com/2016/10/21/up-to-date-installation-2/ .
Integration
In addition, each section in this guide describing steps that are completely or at least partially automatized when using a stack configuration files is marked with an appropriate note at the beginning. These are the following sections as listed in the adjacent section Related Information:
Related Information
Preparing the Installation Media [page 65]Running the Installer [page 78]Applying the Latest Kernel and Support Package Stacks [page 101]
Installation of SAP Systems Based on the Application Server Java of SAP NetWeaver 7.3 to 7.5 on Windows: SAP Adaptive Server EnterprisePlanning P U B L I C 29

3.4 Hardware and Software Requirements
Ensure that your hosts meet the hardware and software requirements for your operating system and the SAP instances. Otherwise you might experience problems when working with the SAP system.
Prerequisites
● Make sure that the host name meets the requirements listed in SAP Note 611361 .● Contact your OS vendor for the latest OS patches.
Procedure
1. Check the Product Availability Matrix at http://support.sap.com/pam for supported operating system releases.
2. Check the hardware and software requirements using:○ The Prerequisite Checker:
○ Standalone (optional) before the installation processFor more information, see Running the Prerequisites Check Standalone [page 31].
○ Integrated in the installation tool (mandatory) as part of the installation processFor more information, see Running the Installer [page 78].
○ The hardware and software requirements tables in Requirements for the SAP System Hosts [page 32]
3. If you want to install a production system, the values provided by the Prerequisite Checker and the hardware and software requirements checklists are not sufficient. In addition, do the following:
○ You use the Quick Sizer tool available at http://sap.com/sizing .
Note
If you want to install usage type Development Infrastructure (DI), also check SAP Note 737368for system requirements and sizing.
○ You contact your hardware vendor, who can analyze the load and calculate suitable hardware sizing depending on:○ The set of applications to be deployed○ How intensively the applications are to be used○ The number of users
30 P U B L I C
Installation of SAP Systems Based on the Application Server Java of SAP NetWeaver 7.3 to 7.5 on Windows: SAP Adaptive Server Enterprise
Planning

3.4.1 Running the Prerequisites Check in Standalone Mode (Optional)
This section describes how to run the prerequisites check in standalone mode. Running the prerequisites check in standalone mode is optional.
Context
When you install an SAP system, the installer automatically starts the prerequisites check and checks the hardware and software requirements in the background. As an optional step during planning, you can also run the prerequisites check in standalone mode to check the hardware and software requirements for your operating system and the SAP instances before the actual installation.
RecommendationWe recommend that you use both the prerequisites check and the requirements tables for reference.
Procedure
1. Download and unpack the Software Provisioning Manager archive to a local directory as described in Downloading and Extracting the Software Provisioning Manager 1.0 Archive [page 66] .
2. Make either the separate SAPEXE<Version>.SAR archive or the complete kernel medium available as described in Preparing the Installation Media [page 65] .
3. Start the installer as described in Running the Installer [page 78].
4. On the Welcome screen, choose <SAP_Product> <Database> Preparations Prerequisites Check .
5. Follow the instructions in the installer dialogs and enter the required parameters.
NoteTo find more information on each parameter during the Define Parameters phase, position the cursor on the required parameter input field , and choose either F1 or the HELP tab. Then the available help text is displayed in the HELP tab.
After you have finished, the Parameter Summary screen appears. This screen summarizes all parameters that you have entered and that you want to have checked. If you want to make a change, select the relevant parameters and choose Revise.
6. To start the prerequisites check, choose Next.
Installation of SAP Systems Based on the Application Server Java of SAP NetWeaver 7.3 to 7.5 on Windows: SAP Adaptive Server EnterprisePlanning P U B L I C 31

Results
The Prerequisite Checker Results screen displays the results found. If required, you can also check the results in file prerequisite_checker_results.html, which you can find in the installation directory.
Related Information
Downloading and Extracting the Software Provisioning Manager 1.0 Archive [page 66]Preparing the Installation Media [page 65]
3.4.2 Requirements for the SAP System Hosts
This section provides information about the hardware and software requirements for the:
● Central services instance (SCS)● Database instance● Primary application server instance● Additional application server instance
NoteThe additional application server instance is optional in a non-HA system, but mandatory in an HA system.
● Only valid for 'High Availability': HA (Windows)High Availability only: Enqueue Replication Server instance (ERS)End of 'High Availability': HA (Windows)
● SAP Host Agent
Only valid for 'High Availability': HA (Windows)
General Requirements for a High-Availability System
● Windows Server 2012 (R2) and higher:1. Check that your cluster hardware is certified for Windows Server 2012 (R2) or Windows 2016 and has
the Windows Server 2012 (R2) or Windows 2016 logo.2. You must validate your failover cluster configuration by running the command test-cluster in a
PowerShell.The Failover Cluster Validation Report must not show any errors.
● Windows Server 2008 (R2):1. Check that your cluster hardware is certified for Windows Server 2008 (R2) and has the Windows
Server 2008 (R2) logo.
32 P U B L I C
Installation of SAP Systems Based on the Application Server Java of SAP NetWeaver 7.3 to 7.5 on Windows: SAP Adaptive Server Enterprise
Planning

2. You must validate your failover cluster configuration by running the Validate a Configuration Wizard, which is included in the Failover Cluster Management snap-in. This must not show any errors.
● The cluster nodes of the cluster must be connected by a private and public network:○ The public network enables communication from the cluster nodes of the cluster to other resources in
the local area network (LAN).○ The private network enables internal communication between the cluster nodes. In particular, it
enables the Cluster Service running on all cluster nodes to regularly exchange messages on the state of the cluster nodes so that the failure of resources is quickly detected.
● Each of the cluster nodes in the cluster must have its own local disks and have access to shared disks that can be reached by the cluster nodes via a shared bus.The database software is stored on a shared disk.One of the shared disks must be used exclusively by the quorum (if a single quorum device cluster is used) that stores the cluster registry and records information about the state of the cluster.For more information about the distribution of components to local and shared disk, see Distribution of SAP System Components to Disks for Failover Clustering [page 146].
● All disk controllers must be able to support hardware-based RAID.
CautionYou cannot use a host with a domain controller as a cluster node.
End of 'High Availability': HA (Windows)
Hardware and Software Requirements
The following tables show the hardware and software requirements. Most of the requirements are valid for every installation host whereas some requirements are instance-specific and are marked accordingly.
Note● The listed values are sufficient for development systems or quality assurance systems but not for
production systems.● If you install several SAP instances on one host, you need to add up the requirements.● Only valid for 'High Availability': HA (Windows)
If you install multiple SAP systems in one MS cluster, make sure that together with your hardware partner you have set up the correct sizing for your system configuration.End of 'High Availability': HA (Windows)
● For up-to-date information on the released and supported operating system versions for your SAP product and database, see the Product Availability Matrix (PAM) at:http://support.sap.com/pam .
Installation of SAP Systems Based on the Application Server Java of SAP NetWeaver 7.3 to 7.5 on Windows: SAP Adaptive Server EnterprisePlanning P U B L I C 33

Hardware Requirements
Hardware Requirement
Requirement How to Check
Minimum disk space
● Central services instance (SCS) (not including paging file):5 GB (x64)If you install the SCS instance with an integrated SAP Web Dispatcher, for the installation as such you require at least 1 GB of hard disk space in addition. For productive use of the SAP Web Dispatcher, you need to reserve at least 5 GB.
● Database instanceFor more information about the required disk space, see SAP Note 1748888 .
NoteFor safety reasons (system failure), the file systems must be distributed physically over several disks, or RAID-technology must be used.
● Only valid for 'High Availability': HA (Windows)High Availability only: Enqueue replication server instance (ERS) (not including paging file):5 GB (x64)End of 'High Availability': HA (Windows)
● Primary application server instance (not including paging file):5 GB (x64)○ In addition, you require 4 GB (x64) per additional platform.○ Up to 2 GB for each usage type or software unit you want to in
stall.● Additional application server instance (not including paging file):
2.5 GB (x64)● SAP Host Agent:
256 MB● Temporary disk space for every required installation medium that
you have to copy to a local hard disk:Up to 6 GB
To check disk space:
● Windows Server 2012 (R2) and higher:1. Open PowerShell
in elevated mode, and enter the following command:get-volume
2. Check the value SizeRemaining of the disk you want to install on.
● Windows Server 2008 (R2):
1. Choose Start
All ProgramsAdministrative
Tools Storage
Computer
ManagementDisk
Management .2. Right-click the
drive and choose Properties.
34 P U B L I C
Installation of SAP Systems Based on the Application Server Java of SAP NetWeaver 7.3 to 7.5 on Windows: SAP Adaptive Server Enterprise
Planning

Hardware Requirement
Requirement How to Check
Minimum RAM ● All instances, except SAP Host Agent:4 GB
● SAP Host Agent:0.5 GB
To check RAM:
● Windows Server 2012 (R2) and higher:Open PowerShell in elevated mode, and enter the following command:Get-WmiObject Win32_ComputerSystem
● Windows Server 2008 (R2):
Choose Start
Control Panel
System .
NoteIf System is not visible, change View by: from Category into Large icons.
If you want to install usage type BI Java, see SAP Note 927530 for current information on hardware sizing.
Installation of SAP Systems Based on the Application Server Java of SAP NetWeaver 7.3 to 7.5 on Windows: SAP Adaptive Server EnterprisePlanning P U B L I C 35

Hardware Requirement
Requirement How to Check
Paging file size For more information, see SAP Note 1518419 . To check paging file size:
● Windows Server 2012 (R2) and higher:For more information, see Checking and Changing the Paging File Settings on Windows Server 2012 (R2) [page 169]
● Windows Server 2008 (R2):
1. Choose Start
Control Panel
System .
NoteIf System is not visible, change View by: from Category into Large icons.
2. Choose Advanced system settings.
3. In section Performance, se
lect Settings...
Advanced .4. If required, in
section Virtual memory, choose Change.
NoteDo not select Automatically managed paging file size for all drives.
36 P U B L I C
Installation of SAP Systems Based on the Application Server Java of SAP NetWeaver 7.3 to 7.5 on Windows: SAP Adaptive Server Enterprise
Planning

Hardware Requirement
Requirement How to Check
Only valid for 'High Availability': HA (Windows)
NoteHigh Availability only: You must adjust the size of the paging file on all cluster nodes.
End of 'High Availability': HA (Windows)
Processing units For application server instances and database instances:
The number of physical or virtual processing units usable by the operating system image must be equal to or greater than 2.
For an SCS instance running on a separate host: One physical or virtual processing unit usable by the operating system image might be suffi-cient.
Examples of processing units are processor cores or hardware threads (multithreading).
In a virtualized environment, ensure that adequate processor resources are available to support the workloads of the running SAP systems.
Suitable backup system
Installation of SAP Systems Based on the Application Server Java of SAP NetWeaver 7.3 to 7.5 on Windows: SAP Adaptive Server EnterprisePlanning P U B L I C 37

Software Requirements
Software Requirement Requirement How to Check
Windows operating system
● 64-bit version of one of the following Windows Server Editions:○ Windows Server 2012 (R2) and higher:
○ Windows Server Standard Edition○ Windows Server Datacenter Edi
tion○ Windows Server 2008 (R2) Service
Pack 1○ Only valid for 'High Availability': non-HA
Windows Server Standard EditionEnd of 'High Availability': non-HA
○ Windows Server Enterprise Edition○ Windows Server Datacenter Edi
tion
CautionFor up-to-date information on the released and supported operating system versions for your SAP product and database, see the Product Availability Matrix (PAM) at http://support.sap.com/pam
.
CautionMake sure that you install the English language pack so that your support requests can be handled quickly.
● For any version of Windows Server, you need the latest supported service pack
To check your Windows version:
● Windows Server 2012 (R2) and higher:Open PowerShell in elevated mode, and enter the following command:Get-WmiObject Win32_OperatingSystem | select caption
● Windows Server 2008 (R2):
1. Choose Start All Programs
Accessories Command Prompt2. Enter the command winver
Only valid for 'High Availability': HA (Windows)
Note● You must add the operating system
feature Failover Clustering on all cluster nodes.
End of 'High Availability': HA (Windows)
Windows regional settings
English (United States) must be set by default. For more information about localized Windows versions, see SAP Note 362379 .
You can install additional languages but the default setting for new users must always be English (United States).
Choose Start Control Panel Clock,
Language, and Region Language .
38 P U B L I C
Installation of SAP Systems Based on the Application Server Java of SAP NetWeaver 7.3 to 7.5 on Windows: SAP Adaptive Server Enterprise
Planning

Software Requirement Requirement How to Check
Minimum Web Browser Make sure that you have at least one of the following web browsers installed on the host where you run the installer GUI:
● Microsoft Internet Explorer 11 or higher● Microsoft Edge● Mozilla Firefox● Google Chrome
Always use the latest version of these web browsers.
You need a web browser to be able to run the SL Common GUI, and to display the Evaluation Form and send it to SAP.
Choose Start Control Panel Programs
and Features .
3.5 Planning User and Access Management
You have to plan how to configure user and access management for the SAP system to be installed.
Before you add a newly installed SAP system to your system landscape, you must decide which kind of user management you want to use:
● The database of AS Java.● An external ABAP system as the data source for user data● An LDAP directory as the data source for user data
NoteIf you want to install an Advanced Adapter Engine Extended (AEX), you can only use the database of AS Java for the user management. After the installation has finished, you cannot change the user management configuration.
You cannot configure the AS Java to simultaneously access an LDAP directory and an AS ABAP as the data source. The AS Java can also use its own database as the data source.
Procedure
To specify the initial data source of the User Management Engine (UME), proceed as described in Specifying the Initial Data Source of the User Management Engine [page 76].
Installation of SAP Systems Based on the Application Server Java of SAP NetWeaver 7.3 to 7.5 on Windows: SAP Adaptive Server EnterprisePlanning P U B L I C 39

More Information
For more information about configuring the user management of your SAP system to be installed, see the SAP Library at:
SAP Release and SAP Library Quicklink SAP Library Path (Continued)
● SAP NetWeaver 7.3http://help.sap.com/nw73
● SAP NetWeaver 7.3 including Enhancement Package 1http://help.sap.com/nw731
● SAP NetWeaver 7.4http://help.sap.com/nw74
● SAP NetWeaver 7.5http://help.sap.com/nw75
Application Help SAP NetWeaver Library: Function-
Oriented View Security Identity Management User
Management of SAP NetWeaver AS for Java
3.6 Domain or Local Installation
Use
Before you install the SAP system, you have to decide whether you want to perform a domain or local installation, since this affects how the user account information is stored and accessed.
For more information about the differences between a local and domain installation, go to Start Help and Support and search for What is the difference between a domain and a workgroup?.
Domain Installation
In a domain installation, the user account information is stored centrally in one database on the domain controller and is accessible to all hosts in the system.
You have to perform a domain installation if one of the following applies:
● You install a distributed system.● Only valid for 'High Availability': HA (Windows)
You install a high-availability system with Microsoft Failover Clustering.End of 'High Availability': HA (Windows)
● You use a common transport host for several SAP systems running on different computers.
Local Installation
In a local installation, all Windows account information is stored locally on one host and is not visible to any other hosts in the system.
If the SAP system is to run on a single machine (standard system), you can perform a local installation.
40 P U B L I C
Installation of SAP Systems Based on the Application Server Java of SAP NetWeaver 7.3 to 7.5 on Windows: SAP Adaptive Server Enterprise
Planning

NoteIf your SAP system was installed as a local installation and you want to later change to a domain installation, you can use the system rename option. For more information, see the System Rename Guide for your SAP system at:
https://support.sap.com/sltoolset System Provisioning
More Information
Required User Authorization for Running the Installer [page 58]
3.7 Basic Installation Parameters
The installer prompts for input parameters during the Define Parameters phase of the installation.
You can install your SAP system either in Typical or Custom mode:
● TypicalIf you choose Typical, the installation is performed with default settings. This means that the installer prompts you only for a small selection of installation parameters. These parameters include at least the following:○ SAP system ID and database connectivity parameters○ Master password○ JCE Unlimited Strength Jurisdiction Policy files archive (only prompted if you install Adobe Document
Services)○ SAP system profile directory – only for systems with instances on separate hosts○ User Management Engine (UME) Configuration
NoteIf you want to install an optional standalone unit - Advanced Adapter Engine (AAE) , Advanced Adapter Engine Extended (AEX), or Process Integration and Orchestration (PI-CP) - you are not prompted for UME Configuration. Instead, optional standalone units are automatically configured to store the SAP system users in the Java database (see also section User Management Engine Parameters in SAP System Parameters [page 42]).
For more information about the installation parameters, see the corresponding tables below in this document. If you want to change any of the default settings, you can do so on the Parameter Summary screen.
● CustomIf you choose Custom, you are prompted for all parameters. At the end, you can still change any of these parameters on the Parameter Summary screen.
Installation of SAP Systems Based on the Application Server Java of SAP NetWeaver 7.3 to 7.5 on Windows: SAP Adaptive Server EnterprisePlanning P U B L I C 41

NoteYou cannot change from Custom to Typical mode or from Typical to Custom mode on the Parameter Summary screen.
The tables in the sections below list the basic SAP system installation parameters that you need to specify before installing your SAP system. For all other installation parameters, use the tool help on the installer screens.
Related Information
SAP System Parameters [page 42]SAP System Database Parameters [page 52]
3.7.1 SAP System Parameters
The tables in this section lists the basic SAP system installation parameters that you need to specify before installing your SAP system. For all other installation parameters, use the tool help on the installer screens.
General Parameters
Parameter Description
Unicode System A Java standalone system is always a Unicode system.
42 P U B L I C
Installation of SAP Systems Based on the Application Server Java of SAP NetWeaver 7.3 to 7.5 on Windows: SAP Adaptive Server Enterprise
Planning

Parameter Description
SAP System ID <SAPSID>
The SAP system ID <SAPSID> identifies the entire SAP system.
The installer prompts you for the <SAPSID> when you execute the first installation option to install a new SAP system.
If there are further installation options to be executed, the installer prompts you for the profile directory. For more information, see the description of the parameter SAP System Profile Directory.
ExampleThis prompt appears when you install the SCS instance, which is the first instance to be installed in a distributed system.
CautionChoose your SAP system ID carefully since renaming requires considerable effort.
Make sure that your SAP system ID:
● Is unique throughout your organization. Do not use an existing <SAPSID> when installing a new SAP system.
ExampleIf you have already installed an ABAP system and you want to install a new Java system on the same host, make sure that you enter a <SAPSID> that is different from the <SAPSID> of the existing ABAP system. The <SAPSID> of a Java stack can only by equal to the <SAPSID> of an ABAP stack if they form a dual-stack system.
Dual stack is no longer supported in SAP systems based on SAP NetWeaver 7.5 or higher.
● Consists of exactly three alphanumeric characters● Contains only uppercase letters● Has a letter for the first character
● Does not include any of the reserved IDs listed in SAP Note 1979280 .● If you want to install an additional application server instance, make sure that no Gateway instance
with the same SAP System ID (SAPSID) exists in your SAP system landscape.
Installation of SAP Systems Based on the Application Server Java of SAP NetWeaver 7.3 to 7.5 on Windows: SAP Adaptive Server EnterprisePlanning P U B L I C 43

Parameter Description
SAP System Instance Numbers
Technical identifier for internal processes. It consists of a two-digit number from 00 to 97.
The instance number must be unique on a host. That is, if more than one SAP instance is running on the same host, these instances must be assigned different numbers.
If you do not enter a specific value, the instance number is set automatically to the next free and valid instance number that has not yet been assigned to the SAP system to be installed or to SAP systems that already exist on the installation host.
Only valid for 'High Availability': HA (Windows)
NoteIf you install the central instance and the dialog instances on the cluster nodes of a Microsoft failover cluster, SAPinst by default assigns the same instance number.
If you install the central instance and the dialog instances on hosts that are not part of a Microsoft failover cluster, we recommend that you use the same instance number for them. If the instance number is already used on other hosts, you have to assign a different instance number for the central instance and the dialog instances.
End of 'High Availability': HA (Windows)
To find out the instance numbers of SAP systems that already exist on the installation host, look for subdirectories ending with <Instance_Number> of local \usr\sap\<SAPSID> directories.
For more information, see SAP Directories [page 166].
Caution
Virtual Host Name
Virtual host name (network name) of the SAP<SAPSID> cluster group
You can assign a virtual host name to an SAP instance in one of the following ways:
● You can provide a virtual host name in the <Instance_Name> Virtual Host field on the installer screen of the relevant instance. Then this instance is installed with the given virtual host name.
● Alternatively you can assign virtual host names also by starting the installer with the SAPINST_USE_HOSTNAME property. For more information, see Running the Installer [page 78].
After the installation has completed, all application servers can use this virtual host name to connect to the instance. The virtual host name is also a global host name. If you do not provide the virtual host name, the instance is installed automatically using its physical host name.
You must have already reserved the virtual host name (network name) and its IP address on a DNS server before you run the installer. For more information, see Using Virtual Host Names [page 60].
NoteFully qualified host names, IPv4, IPv6 are not accepted as virtual host names.
44 P U B L I C
Installation of SAP Systems Based on the Application Server Java of SAP NetWeaver 7.3 to 7.5 on Windows: SAP Adaptive Server Enterprise
Planning

Parameter Description
SAP System Profile Directory
\\<SAPGLOBALHOST>\sapmnt\<SAPSID>\SYS\profile
The installer retrieves parameters from the SAP system profile directory of an existing SAP system.
SAP profiles are operating system files that contain instance configuration information.
The installer prompts you to enter the location of the profile directory when the installation option that you execute is not the first one belonging to your SAP system installation, for example if you are installing a distributed system or an additional application server instance to an existing SAP system. See also the description of the parameters SAP System ID and Database ID.
Destination drive Base directory for the SAP system.
NoteIf you install a subsequent SAP system, the saploc share already exists and you cannot select the installation drive. The installer uses the installation drive where the saploc share points to.
Installation of SAP Systems Based on the Application Server Java of SAP NetWeaver 7.3 to 7.5 on Windows: SAP Adaptive Server EnterprisePlanning P U B L I C 45

Parameter Description
Master Password
Common password for all users that are created during the installation:
● Operating system users (for example <sapsid>adm, SAPService<sapsid>)
CautionIf you did not create the operating system users manually before the installation, the installer creates them with the common master password (see Operating System Users). In this case, make sure that the master password meets the requirements of your operating system.
● Java users(for example Administrator)
● Secure Store key phraseSAP systems based on SAP NetWeaver lower than 7.4: For more information, see line Key Phrase for Secure Store Settings in this table.
CautionThe installer applies the master password to users SAP*and DDIC for SAP system clients 000 and 001 only, but not to users SAP*, DDIC, and EARLYWATCH in SAP system client 066.
Instead, the installer always assigns the following passwords to these users in client 066:
SAP*: 06071992
EARLYWATCH: support
See also Ensuring User Security.
NoteIf a user already exists, you are prompted to confirm the password for this user.
Basic Password policy
The master password must meet the following requirements:
● It must be 8 to 14 characters long● It must contain at least one letter (a-z, A-Z)● It must contain at least one digit (0-9)● It must not contain \ (backslash) or " (double quote).
Additional restrictions depending on Windows:
● If a user already exists, you are prompted to confirm the password for this user.● Depending on the configuration of the password policy, additional restrictions might apply.
Additional restrictions depending on SAP Adaptive Server Enterprise:
● It must be at least 6 characters long● It can only contain the following characters: a-z, A-Z, 0-9, <space>, !#$%&'()*+,-./:<=>?
@[]^_`{|}~
Depending on the installation option, additional restrictions may apply.
46 P U B L I C
Installation of SAP Systems Based on the Application Server Java of SAP NetWeaver 7.3 to 7.5 on Windows: SAP Adaptive Server Enterprise
Planning

Parameter Description
ExampleThe master password must not contain the name of a Java user created during the installation).
Message Server Access Control List
You can specify if you want to have a message server Access Control List (ACL) created.
The ACL is created as a file in the /<sapmnt>/<SAPSID>/global directory. If it exists, it defines the hosts from which the message server accepts requests.
CautionOnly trigger the creation of this file if you do not plan to install any additional instances for this system. With the creation of this ACL, you overwrite existing settings and prevent instances from being installed on additional hosts. If you decide to install an additional instance later, you need to remove this file manually before the installation and create it again after the installation of the additional instance.
For more information, see the information about ms/acl_info in SAP Notes 1495075 and 826779
.
Java(TM) Cryptography Extension (JCE) Unlimited Strength Jurisdiction Policy Files Archive
If you want to install Adobe Document Services, make sure that you download the unlimited version of the JCE Jurisdiction Policy Files archive. For more information about where to download it, see SAP Note 1240081 .
Key Phrase for Secure Store Settings
This is a random word or phrase that is used to encrypt the secure store.
The Java EE engine uses this phrase to generate the key that is used to encrypt the data.
The uniqueness of the phrase you use contributes to the uniqueness of the resulting key.
RecommendationUse a long key phrase that cannot be guessed easily. Use both uppercase and lowercase letters in the phrase and include special characters.
NoteIf you choose Typical mode, the installer sets the master password for the key phrase. In this case, make sure that you replace the master password with the required unique key phrase either on the Parameter Summary screen or after the installation has finished.
Installation of SAP Systems Based on the Application Server Java of SAP NetWeaver 7.3 to 7.5 on Windows: SAP Adaptive Server EnterprisePlanning P U B L I C 47

Parameter Description
DNS Domain Name for SAP System
If you want to use HTTP-based URL frameworks such as Web Dynpro applications, you have to specify the DNS domain name for the SAP system.
The DNS Domain Name is used to calculate the Fully Qualified Domain Name (FQDN), which is config-ured in profile parameter SAPLOCALHOSTFULL. FQDN is the fully qualified domain name for an IP address. It consists of the host name and the domain name:
<Host_Name>.<Domain_Name>
The DNS Domain Name is needed to define the URLs for the Java application servers. It is appended to the server name to calculate the FQDN.
For more information, see SAP Note 654982 .
ExampleIf your application server host is called kirk.wdf.sap.com, the DNS Domain Name is wdf.sap.com.
SAP Host Agent Upgrade (Optional)
If there already exists an SAP Host Agent on the installation host, the installer asks you if you want to upgrade it to a newer patch level version. If you want the existing version to be upgraded, you must provide the new target version of the SAPHOSTAGENT<Version>.SAR archive.
For more information, see Downloading SAP Kernel Archives (Archive-Based Installation) [page 69]
Ports
Parameter Description
Java Message Server Port CautionThe message server port number must be unique on the host where the message server for the SAP system is running. If there are several message servers running on one host, the message server ports must all be unique.
The SCS instance profile contains the configuration for the Java message server.
The Java message server port uses the parameter rdisp/msserv_internal with default value 39<SCS_Instance_Number>.
For more information about the parameters used for message server ports, see SAP Note 821875 .
48 P U B L I C
Installation of SAP Systems Based on the Application Server Java of SAP NetWeaver 7.3 to 7.5 on Windows: SAP Adaptive Server Enterprise
Planning

Operating System Users
Parameter Definition
Password of Operating System Users The passwords of the operating system users must comply with the Windows password policy. The installer processes the passwords of operating system users as follows:
● If the operating system users do not exist, SAP creates the following users:○ <sapsid>adm
This user is the SAP system administrator user. It is a member of the local Administrators group.
○ SAPService<SAPSID>This user is the Windows account to run the SAP system. It is not a member of the local Administrators group.
○ sapadmThe SAP Host Agent user sapadm is used for central monitoring services. The installer creates this user by default as a local user although it is not a member of the local Administrators group.If required, you can change this user to become a domain user on the Parameter Summary screen. For more information, see Performing a Domain Installation Without Being a Domain Administrator [page 171]. For security reasons, however, SAP strongly recommends you to create this user as a local user.
The installer sets the master password for these users by default. You can overwrite and change the passwords either by using the parameter mode Custom or by changing them on the Parameter Summary screen.
● If the operating system users already exist, the installer prompts you for the existing password, except the password of these users is the same as the master password.
CautionMake sure that you have the required user authorization [page 58] for these accounts before you start the installation.
Windows Domain Organizational Units You can choose the organizational units (OUs) within the Windows domain where you want to create the SAP system accounts.
By default, the installer creates the domain users SAPService<SAPSID>, <SAPSID>adm, and the domain group SAP_<SAPSID>_Globaladmin in the domain Users container. Here you can specify an optional organizational unit where the installer creates these domain users and group. The user who performs the installation needs read and write permissions to this organizational unit.
The OU feature is only available when you select Custom mode in SWPM and choose Use Domain of current user. For more information, see SAP Note 2247673
.
Installation of SAP Systems Based on the Application Server Java of SAP NetWeaver 7.3 to 7.5 on Windows: SAP Adaptive Server EnterprisePlanning P U B L I C 49

User Management Engine Parameters
Parameter Definition
Using the Java Database:
Administrator User The installer sets the user name Administrator and the master password by default.
If required, you can choose another user name and password according to your requirements.
Guest User The installer sets the user name Guest and the master password by default.
The guest user is a user for anonymous access.
Using an External ABAP System – Parameters for the ABAP Connection:
Application Server Instance Number This is the instance number on the application server of the central ABAP system to which you want to connect the Application Server Java.
To find out the number on the host of the primary application server instance, look in the following SAP directory:
● SAP systems based on SAP NetWeaver 7.1 to 7.4:/usr/sap/<SAPSID>/DVEBMGS<Instance_Number>
● SAP systems based on SAP NetWeaver 7.5:/usr/sap/<SAPSID>/D<Instance_Number>
Application Server Host This is the host name of the relevant application server instance.
To find out the host name, enter hostname at the command prompt of the host running the primary application server instance.
Communication User This is the name and password of the existing ABAP communication user. You must have created this user manually on the external ABAP system.
The default user name is SAPJSF
NoteIf you are installing a SAP NetWeaver 7.5 Process Integration (PI) or a SAP Solution Manager 7.2 system, this user has been created during the installation of the SAP NetWeaver 7.5 PI application server ABAP.
Using an External ABAP System – Parameters for the Application Server Java Connection:
50 P U B L I C
Installation of SAP Systems Based on the Application Server Java of SAP NetWeaver 7.3 to 7.5 on Windows: SAP Adaptive Server Enterprise
Planning

Parameter Definition
Administrator User This is the name and password of the administrator user that you created on the external ABAP system.
The default user name is J2EE_ADMIN
NoteIf you are installing a SAP NetWeaver 7.5 Process Integration (PI) or a SAP Solution Manager 7.2 system, this user has been created during the installation of the Application Server ABAP.
Administrator Role The role SAP_J2EE_ADMIN must exist on the external ABAP system.
Guest User This is the name and password of the guest user that you created on the external ABAP system.
The guest user is a user for anonymous access.
The default user name is J2EE_GUEST
NoteIf you are installing a SAP NetWeaver 7.5 Process Integration (PI) or an SAP Solution Manager 7.2 system, this user has been created during the installation of the Application Server ABAP.
Guest Role The role SAP_J2EE_GUEST must exist on the external ABAP system.
System Landscape Directory
Parameter Definition
SLD Destination for the System The System Landscape Directory (SLD) registers the systems and the installed software of your entire system landscape.
You can choose between the following options:
● Register in existing SLDChoose this option to register the SAP system you are installing in an existing SAP System Landscape Directory (SLD) by specifying the SLD connection parameters listed below in this table.
● No SLD destinationChoose this option if you do not want to register the SAP system you are installing in an existing SAP System Landscape Directory (SLD).You then have to configure the SLD destination manually after the installation has finished.
Installation of SAP Systems Based on the Application Server Java of SAP NetWeaver 7.3 to 7.5 on Windows: SAP Adaptive Server EnterprisePlanning P U B L I C 51

Parameter Definition
SLD Host The host name of the existing SLD.
SLD HTTP(S) Port HTTP port of the SAP system based on AS Java on which the System Landscape Directory (SLD) resides. The following naming convention applies: 5<Primary_Application_Server_Instance_Number>00.
ExampleIf the primary application server instance number of the AS Java on which the System Landscape Directory (SLD) resides is 01, the SLD HTTP Port is 50100.
SLD Data Supplier User and password
The existing SLD Data Supplier user and password of the existing SLD
3.7.2 SAP System Database Parameters
Parameters Description
Database ID <DBSID> The <DBSID> identifies the database instance. The installer prompts you for the <DBSID> when you are installing the database instance.
The <DBSID> can be the same as the <SAPSID>.
CautionChoose your database ID carefully. Renaming is difficult and requires you to reinstall the SAP system.
● If you want to install a new database:Make sure that your database ID:○ Is unique throughout your organization○ Consists of exactly three alphanumeric characters○ Contains only uppercase letters○ Has a letter for the first character
○ Does not include any of the reserved IDs listed in SAP Note 1979280 .
Java Database User (SAPSR3DB)
The user name corresponds to the owner of the database tables.
Database user for database system administration (sapsa)
This is the default user for database monitoring and administration.
52 P U B L I C
Installation of SAP Systems Based on the Application Server Java of SAP NetWeaver 7.3 to 7.5 on Windows: SAP Adaptive Server Enterprise
Planning

Parameters Description
Database user for database system security tasks (sapsso)
This is the default user for security relevant tasks such as user creation and password setup.
3.8 Setup of Database Layout
NoteThe following sections apply especially to the installation of a production system.
When you plan your SAP system installation, it is essential to consider the setup of your database layout with regard to the distribution of SAP directories or database file systems to disks. The distribution depends on your specific environment and you must take factors into consideration, such as storage consumption of the software components involved, safety requirements and expected workload.
Required File Systems for SAP ASE
To ensure that your SAP system performs well in a production environment, you have to define and control the distribution of the database directories to physical disks. You do this by creating separate file systems manually for the directories listed in the following table before you start the installer.
During the installation of your SAP system, you can specify the number and names of the sapdata and saplog directories. You can create additional sapdata and saplog directories before you start the installer.
The following table lists the file systems that are required by the SAP ASE database:
File System / Logical Volume Description
<drive>:\sybase\<DBSID> SAP ASE software ($SYBASE)
Size: at least 4 GB
<drive>:\sybase\<DBSID>\sybsystem Location for devices master.dat, sybmgmtdb.dat, sybsysdb.dat, sysprocs.dat
Size: at least 1 GB
<drive>:\sybase\<DBSID>\sybtemp Location for device tempdb
Size: at least 3 GB
Installation of SAP Systems Based on the Application Server Java of SAP NetWeaver 7.3 to 7.5 on Windows: SAP Adaptive Server EnterprisePlanning P U B L I C 53

File System / Logical Volume Description
<drive>:\sybase\<DBSID>\sapdiag Location for devices containing the database saptools
Size: at least 3 GB
<drive>:\sybase\<DBSID>\sapdata_<n> Location for devices containing data
For more information, see SAP Note 1748888 .
<drive>:\sybase\<DBSID>\saplog_<n> Location for devices containing logs
For more information, see SAP Note 1748888 .
<drive>:\sybase\<DBSID>\sybsecurity Location for devices containing the database sybsecurity
Size: at least 1 GB
For information about SAP file systems, see SAP Directories [page 166].
3.9 SAP System Transport Host
The transport host contains the transport directory used by the SAP transport system to store transport data and change SAP system information, such as software programs, write dictionary data, or customizing data. If you have several SAP systems it depends on your security requirements whether you want them to share a transport directory or whether you use separate directories.
When you install an SAP system, you have to decide which transport host and directory you want to use for your SAP system:
● Use the transport directory that the installer creates during the installation of the SAP system by default on the global host.The installer by default creates the transport directory on the global host in \usr\sap\trans.
● Use a transport directory located on a host other than the default host:○ You can use an existing transport directory and host in your SAP system landscape.○ You can set up a new transport directory on a different host.
In either case, you must prepare this host for use by the new SAP system [page 61].
More Information
● SAP Directories [page 166]
54 P U B L I C
Installation of SAP Systems Based on the Application Server Java of SAP NetWeaver 7.3 to 7.5 on Windows: SAP Adaptive Server Enterprise
Planning

4 Preparation
4.1 Preparation Checklist
This section includes the preparation steps that you have to perform for the following installation options:
● Standard, distributed, or high-availability system● Additional application server instance
Detailed information about the steps are available in the linked sections.
Standard, Distributed, or High-Availability System
NoteIn a standard system, all mandatory instances are installed on one host. Therefore, if you are installing a standard system, you can ignore references to other hosts.
1. Windows Server 2008 (R2) or higher: you disable the Windows Server firewall [page 56] on each host.2. You perform basic preparations on Windows [page 57].3. You check that you have the required user authorization for running the installer [page 58].4. If required, you prepare the SAP system transport host [page 61] for your SAP system.5. If you need to configure the User Management Engine (UME) of Application Server Java for the user
management of a separate ABAP system, you have to prepare user management for an external ABAP System [page 62].
NoteIf you want to install an optional standalone unit - Advanced Adapter Engine (AAE) , Advanced Adapter Engine Extended (AEX), or Process Integration and Orchestration (PI-CP) - you can skip this section because you are not prompted for UME Configuration. Optional standalone units are automatically configured during the installation to store the SAP system users in the Java database.
6. You check that the required installation media [page 65] are available on each host.7. Only valid for 'High Availability': HA (Windows)
To install a high-availability system with Microsoft Failover Clustering, you also perform the HA-specific preparation steps [page 138].End of 'High Availability': HA (Windows)
8. You continue with Installation [page 74].
Installation of SAP Systems Based on the Application Server Java of SAP NetWeaver 7.3 to 7.5 on Windows: SAP Adaptive Server EnterprisePreparation P U B L I C 55

Additional Application Server Instance
You have to perform the following preparations on the host where you install the additional application server instances:
1. Windows Server 2008 (R2) or higher: you disable the Windows Server firewall [page 56] on each host.2. You perform basic preparations on Windows [page 57].3. You check that you have the required user authorization for running the installer [page 58].4. If required, you prepare the SAP system transport host [page 61].5. You check that the required installation media [page 65] are available.6. You continue with Installation [page 74].
4.2 Disabling the Windows Server Firewall on Windows Server 2008 (R2) and Higher
Use
The Windows firewall – which is turned on by default as of Windows Server 2008 (R2) – is configured to allow only a small set of Windows-specific inbound IP connections. By default, outbound connections are not limited to rules and are therefore not restricted by the firewall.
The default firewall settings are valid for the out-of-the-box installation of Windows Server 2008 (R2) and higher. These settings apply to local policies. For domain policies that override local policies, other rules might apply.
To avoid any problems with non-configured TCP/IP ports that are used by the SAP system, you need to disable the firewall on all Windows hosts before you install the SAP system with the installer. We recommend that you secure network access to the SAP application servers with a real physical firewall or use a router Access Control List (ACL).
Procedure
Only valid for 'High Availability': HA (Windows)
NoteIn a high-availability system, you have to disable the firewall on all failover cluster nodes.
End of 'High Availability': HA (Windows)
● Windows Server 2012 (R2) and higher:Open PowerShell in elevated mode, and enter the following command:Set-NetFirewallProfile -enabled false
56 P U B L I C
Installation of SAP Systems Based on the Application Server Java of SAP NetWeaver 7.3 to 7.5 on Windows: SAP Adaptive Server Enterprise
Preparation

● Windows Server 2008 (R2):
1. Choose Start Administrative Tools Windows Firewall with Advanced Security .2. Right-click Windows Firewall with Advanced Security and choose Properties.3. Choose the relevant profile (in most cases Domain Profile) and set the Firewall state to Off.
4.3 Performing Basic Windows Preparation Steps
Use
This section informs you about basic preparation steps that you have to perform before you install the SAP system, including the following:
● Checking the Windows file system● Checking the Windows domain structure (domain installation only)● Deciding whether you want to use organizational units (OUs) in the Windows domain (domain installation
only)
Procedure
Checking the Windows File System
You need to check which Windows file system you are using on hosts where you want to install the SAP system.
As of Windows Server 2012 R2, you should use the Windows file system ReFs or NTFS. Older Windows Server versions must use NTFS.
NoteDo not install the SAP system on a FAT partition.
Perform the check as follows:
● Windows Server 2012 R2 and higher:1. Open PowerShell in elevated mode, and enter the following command:
get-volume2. Check that the value FileSystem is ReFs or NTFS.
● Windows Server 2008 (R2) and Windows Server 2012:1. Open the Windows Explorer.2. Select the relevant disk.
3. Choose Properties General .The system displays the type of file system in use.
4. Check that the file system is NTFS.
Checking the Windows Domain Structure
Installation of SAP Systems Based on the Application Server Java of SAP NetWeaver 7.3 to 7.5 on Windows: SAP Adaptive Server EnterprisePreparation P U B L I C 57
NoteYou do not need this step for a local installation.
For a domain installation, we recommend that you check that all SAP system hosts are members of a single Windows domain. We recommend this for all SAP system setups.
We assume that you are familiar with checking Windows domain structures. For more information, see the Windows documentation.
In Windows, you can implement either of the following domain models for the SAP system:
● Extra domainIn this model, the SAP system is embedded in its own domain, which is specially defined for SAP. A second domain exists for the user accounts.In Windows, the SAP domain and user domain must be incorporated in a domain tree. In this tree, the user accounts must form the root domain and the SAP domain must be a child domain of this.
● Single domainIn this model, the SAP system, and the user accounts are included in a single domain.
Deciding Whether to Use Organizational Units (OUs) in the Windows Domain
NoteYou do not need this step for a local installation.
For a domain installation, the installer needs to create certain OS users for SAP and database operations in the Windows domain, also called the “Active Directory” (AD). These users are created by default in the AD container “Users”.
Depending on a customer's AD landscape and security policy, there are certain restrictions on where to store users and groups in AD. Contact the administrator of your AD infrastructure to understand where to store all SAP and database-related domain users and domain groups.
The SAP installer offers to define an existing OU in AD to create all needed SAP and database users in this OU.
There are many different scenarios and prerequisites concerning how to use OUs. For more information, see SAP Note 2247673 , which explains these issues in detail and shows some examples of how to use them.
CautionThe installer does not create OUs. The installer does not move existing domain users or groups. The installer does not delete existing users, groups, OUs, nor any other object in a Windows domain.
The only exception to this rule is the Uninstall option in SWPM.
4.4 Required User Authorization for Running the Installer
Although the installer automatically grants the rights required for the installation to the user account used for the installation, you have to check whether this account has the required authorization to perform the
58 P U B L I C
Installation of SAP Systems Based on the Application Server Java of SAP NetWeaver 7.3 to 7.5 on Windows: SAP Adaptive Server Enterprise
Preparation

installation. The authorization required depends on whether you intend to perform a domain or local installation. If necessary, you have to ask the system administrator to grant the account the necessary authorization before you start the installation. If you attempt the installation with an account that does not have the required authorization, the installation aborts.
This section informs you about the authorization required for a domain and a local installation.
Procedure
CautionDo not use the user <sapsid>adm for the installation of the SAP system.
Domain Installation
For a domain installation the account used for the installation needs to be a member of the local Administrators and the domain Admins group of the relevant domain. All machines in the system must belong to the same domain. In a domain installation, the user information is stored centrally on the domain controller and is accessible to all hosts in the system.
If the SAP system is to be distributed across more than one machine, SAP strongly recommends you to perform a domain installation to avoid authorization problems.
Caution● If you install a distributed system as a local installation, this can lead to authorization problems for the
operating system users <sapsid>adm and SAPService<SAPSID>. It can also lead to problems with the transport directory, which is usually shared by several SAP systems. SAP does not support distributed SAP systems running with local user accounts.
● Only valid for 'High Availability': HA (Windows)In a high-availability configuration, you always have to perform a domain installation.End of 'High Availability': HA (Windows)
● For performance and security reasons, SAP does not support an SAP system installation on a domain controller.
● If for any reason, the account used for the installation is not a member of the domain Admins group, you can perform the installation with a domain user who is a member of the local Administrators group. However, the domain administrator has to prepare the system appropriately for you.For more information, see Performing a Domain Installation without being a Domain Administrator [page 171].
For a domain installation, you need to:
1. Check that the account used for the installation is a member of the domain Admins group.2. If required, obtain these rights by asking the system administrator to enter the account as a member of the
domain Admins group.
Local Installation
Installation of SAP Systems Based on the Application Server Java of SAP NetWeaver 7.3 to 7.5 on Windows: SAP Adaptive Server EnterprisePreparation P U B L I C 59

For a local installation the account used for the installation needs to be a member of the local Administrators group of the machine involved. In a local installation, all Windows account information is stored locally on one host and is not visible to any other hosts in the system.
If the SAP system is to run on a single machine, you can perform a local installation.
CautionDo not use the Windows built-in account Administrator or the renamed built-in account to install your SAP system. The built-in account only has restricted network access rights that are required by the installer. If you renamed the built-in account Administrator, do not create a new account named Administrator.
For a local installation, you need to:
1. Check that the account used for the installation is a member of the local Administrators group.2. If required, obtain these rights by asking the system administrator to enter the account as a member of the
local Administrators group.
Related Information
Performing a Domain Installation Without Being a Domain Administrator [page 171]
4.5 Using Virtual Host Names
You can use one or more virtual TCP/IP host names for SAP servers within an SAP server landscape to hide their physical network identities from each other. This can be useful when quickly moving SAP servers or complete server landscapes to alternative hardware since you do not need to reinstall or reconfigure.
Prerequisites
● Make sure that the virtual host name can be correctly resolved in your Domain Name System (DNS) setup.● Make sure that you configured the Windows operating system properly to use virtual host names. For more
information, see SAP Note 1564275 .
60 P U B L I C
Installation of SAP Systems Based on the Application Server Java of SAP NetWeaver 7.3 to 7.5 on Windows: SAP Adaptive Server Enterprise
Preparation

Context
Only valid for 'High Availability': HA (Windows)
CautionHigh Availability only:
● Only use virtual host names if this is explicitly stated in the parts of this installation guide specific to high availability. Otherwise, use the physical host name.
● Do not start the installer with the command line parameter SAPINST_USE_HOSTNAME=<virtual hostname> on failover cluster nodes.
End of 'High Availability': HA (Windows)
Procedure
To install a non-high-availability system, proceed as described in SAP Note 1564275 .
4.6 Preparing the SAP System Transport Host
The transport host has a directory structure that is used by the SAP transport system to store transport data and metadata.
Context
When you install an SAP system, the installer by default creates the transport directory on the global host in \usr\sap\trans.
If you do not intend to use the directory structure of the system you are going to install, but want to use another new transport directory on another host, or an existing transport directory in your system landscape, you need to prepare that transport host:
● If the directory structure already exists, you must set up its security to allow the new system to write to it.● If it does not yet exist, you must create the core directory structure and a share to export it for other
computers as well as set the security on it.
Procedure
1. If the transport directory does not yet exist, do the following:
Installation of SAP Systems Based on the Application Server Java of SAP NetWeaver 7.3 to 7.5 on Windows: SAP Adaptive Server EnterprisePreparation P U B L I C 61

a. Create the directory \usr\sap\trans on the host to be used as the transport host.b. Share the usr\sap directory on the transport host as SAPMNT and set the permission for Everyone to
Full Control for this share.This enables the installer to address the transport directory in the standard way as \\SAPTRANSHOST\SAPMNT\trans.
2. Grant Everyone the permission Full Control for the transport directory.
CautionRemove the Full Control to Everyone permission after you have finished the installation and only grant Full Control on this directory to the SAP_<SAPSID>_GlobalAdmin groups of all the systems that are part of your transport infrastructure. The installer assigns the appropriate rights with the help of an additional SAP_LocalAdmin group. For more information, see Automatic Creation of Accounts and Groups [page 189].
4.7 Preparing an External ABAP System as Source for User Data
You can use an external ABAP system as the data source for user data for the Application Server Java of your SAP Java system to be installed. To do so, you configure the User Management Engine (UME) of the AS Java for the user management of this external ABAP system.
Prerequisites
The ABAP system is based on at least SAP Web AS ABAP release 6.20 SP25.
Context
NoteIf you want to install an optional standalone unit - Advanced Adapter Engine (AAE) , Advanced Adapter Engine Extended (AEX), or Process Integration and Orchestration (PI-CP) - you can skip this section because you are not prompted for UME Configuration. Optional standalone units are automatically configured during the installation to store the SAP system users in the Java database.
If you want to connect more than one Java system to the same ABAP system, you need to work out a concept for the communication, administrator, and guest users for each system.
NoteIf you want to install the application server Java for an SAP NetWeaver 7.5 Process Integration (PI) system or for an SAP Solution Manager 7.2 system, you must use the already installed Application Server ABAP
62 P U B L I C
Installation of SAP Systems Based on the Application Server Java of SAP NetWeaver 7.3 to 7.5 on Windows: SAP Adaptive Server Enterprise
Preparation

(AS ABAP) as the data source for user data for the Application Server Java to be installed. In this case, the required users were already created during the installation of the Application Server ABAP and you are prompted to enter these users during the installation of the Application Server Java.
You can take one of the following approaches when using an external ABAP system as source for user data:
Approach Advantages Disadvantages
Each Java system uses different users
No interdependencies between the connected engines
Initially more administration to create the users in the ABAP system
All Java systems use the same configuration
You create the users only once and enter the same information for every Java system that you install.
Interdependencies between the connected engines:
● If you change the password of any of the users on the ABAP system, this change affects all connected engines.
● If you change the administrator user’s password, you must also change the password in secure storage on all of the connected Java EE Engines
RecommendationFor security reasons, we recommend the first approach.
The procedures below assume that you are using the first approach.
More InformationFor more information about SAP NetWeaver AS for ABAP user management as data source, see the SAP Library at:
SAP Release and SAP Library Quick Link SAP Library Path (Continued)
● SAP NetWeaver 7.3http://help.sap.com/nw73
● SAP NetWeaver 7.3 including Enhancement Package 1http://help.sap.com/nw731
● SAP NetWeaver 7.4http://help.sap.com/nw74
● SAP NetWeaver 7.5http://help.sap.com/nw75
● SAP NetWeaver AS for ABAP 7.51 innovation packagehttps://help.sap.com/nw751abap
● SAP NetWeaver AS for ABAP 7.52https://help.sap.com/nw752abap
Application Help SAP NetWeaver Library: Function-
Oriented View Security Identity Management User
Management of SAP NetWeaver AS for Java Configuring
User Management UME Data Sources User
Management of Application Server ABAP as Data Source
Installation of SAP Systems Based on the Application Server Java of SAP NetWeaver 7.3 to 7.5 on Windows: SAP Adaptive Server EnterprisePreparation P U B L I C 63
Procedure
● The following procedures describe the activities you have to perform in the existing ABAP system and for the Java system to be installed.
● Perform the following steps in the existing ABAP system:a. Call transaction PFCG to do the following:
○ Check that the roles SAP_BC_JSF_COMMUNICATION and SAP_BC_JSF_COMMUNICATION_RO exist and make sure that their profiles are generated.
○ Check that the roles SAP_J2EE_ADMIN, SAP_J2EE_GUEST, and SAP_BC_FP_ICF exist. Neither role contains any ABAP permissions, so you do not need to generate any profiles.
b. Call transaction SU01 to do the following:
○ Create a new communication user and assign it to the role SAP_BC_JSF_COMMUNICATION_RO. We recommend that you do the following:○ Name this user SAPJSF. You can use any password.○ Assign this user the role SAP_BC_JSF_COMMUNICATION_RO for read-only (display) access to
user data with Java tools. If you intend to maintain user data (that is, to change, create, or delete users) with Java tools, you need to assign the role SAP_BC_JSF_COMMUNICATION instead.
○ Assign this user the type Communications under Logon data to make sure that it can only be used for communication connections between systems and not as a dialog user.
○ Create a new administrator user for the J2EE engine and assign it to role SAP_J2EE_ADMIN. We recommend that you name this user J2EE_ADM_<SAPSID_Java_System>. You can use any password.
○ Create a new guest user for the J2EE engine and assign it to role SAP_J2EE_GUEST. We recommend that you name this user J2EE_GST_<SAPSID_Java_System>. You can use any password.Since this user is only used for anonymous access to the system, we recommend you to deactivate the password and, if required, lock it after installation to prevent anyone from using it for explicit named logons.
c. Make sure that you change the initial passwords of these users and take the precautions described in the relevant SAP security guide before you start the installation of the Java system. You can find the security guide in the Security section of the product page for your SAP product at https://help.sap.com/ .
● Perform the following steps in the Java System:a. Before the installation of the Java system, make sure that you have the correct user names and
passwords of the users listed above for the separate ABAP system.b. During the installation of the Java system, make sure that you enter the correct users and passwords
in the corresponding installer dialogs.
64 P U B L I C
Installation of SAP Systems Based on the Application Server Java of SAP NetWeaver 7.3 to 7.5 on Windows: SAP Adaptive Server Enterprise
Preparation

4.8 Preparing the Installation Media
This section describes how to prepare the installation media.
Installation media are available as follows:
● The Software Provisioning Manager 1.0 archive containing the installerYou always have to download the latest version of the Software Provisioning Manager 1.0 archive.
● The complete media or dedicated installation archives (SAR files) containing the software to be installed, which are available as follows:○ You can use the physical installation media as part of the installation package as described in Using the
Physical Media from the Installation Package [page 67].○ You download the complete installation media as described in Downloading Complete Installation
Media [page 72].○ As an alternative to downloading the complete SAP kernel media, you can do one of the following:
○ Download the SAP kernel archives (SAR files). For more information, see Downloading SAP Kernel Archives (Archive-Based Installation) [page 69].
NoteIf you perform an additional application server installation, kernel archives - such as SAPEXE<Version>.SAR, SAPEXEDB<Version>.SAR, IGSEXE<Version>.SAR, igshelper<version>.sar, SAPJVM<Version>.SAR - are only prompted if they cannot be retrieved from the primary application server instance or the SCS instance of the existing SAP system.
NoteEven if you use the complete SAP kernel media, the installer might prompt you during the provisioning process for additional archives (*.SAR files) due to special Patch Level (PL) requirements depending on categories such as the product, operating system, and database platform at the end of this section.
For example: The installer might require a certain PL of <X> of the SAPEXEDB.SAR (for DBTYPE <Y>), but this PL of the SAPEXEDB.SAR is not contained in the SAP kernel media . In this case you have to download the required PL from https://launchpad.support.sap.com/#/softwarecenter following the instructions in Downloading SAP Kernel Archives (Archive-Based Installation) [page 69].
NoteIf you are using a stack configuration file (see Installation Using a Stack Configuration File [page 28]), you have the installation media defined when generating the Landscape Plan. The media link provided in the Landscape Plan guides you to the location in the SAP Software Download Center at https://launchpad.support.sap.com/#/softwarecenter where you can download the installation media required for your SAP product, operating system and database.
For more information about which kernel version to use, see SAP Note 1680045 . In addition, check the Product Availability Matrix at: http://support.sap.com/pam .
Installation of SAP Systems Based on the Application Server Java of SAP NetWeaver 7.3 to 7.5 on Windows: SAP Adaptive Server EnterprisePreparation P U B L I C 65

Related Information
Downloading and Extracting the Software Provisioning Manager 1.0 Archive [page 66]Using the Physical Media from the Installation Package [page 67]Downloading SAP Kernel Archives (Archive-Based Installation) [page 69]Downloading Complete Installation Media [page 72]
4.8.1 Downloading and Extracting the Software Provisioning Manager 1.0 Archive
You must always download and extract the Software Provisioning Manager 1.0 archive from the SAP Software Download Center because you must use the latest version.
Procedure
1. Download the latest version of the Software Provisioning Manager 1.0 archive SWPM10SP<Support_Package_Number>_<Version_Number>.SAR from:
https://support.sap.com/sltoolset System Provisioning Download Software Provisioning Manager
2. Make sure that you use the latest version of the SAPCAR tool when manually extracting the Software Provisioning Manager archive.
NoteAn older SAPCAR version might extract archive files in a wrong way and this could prevent the installer from working consistently.
Proceed as follows to get the latest version of SAPCAR:
a. Go to https://launchpad.support.sap.com/#/softwarecenter SUPPORT PACKAGES & PATCHES and search for “sapcar”.
b. Select the archive file for your operating system and download it to an empty directory.c. To check the validity of the downloaded executable, right-click the executable and choose Properties.
On the Digital Signatures tab you can find information about the SAP signature with which the executable was signed.
d. Rename the executable to sapcar.exe.
For more information about SAPCAR, see SAP Note 212876 .
3. Using the latest version of SAPCAR, you can verify the signature of the downloaded SWPM10SP<Support_Package_Number>_<Version_Number>.SAR archive as follows:
a. Get the latest version of the SAPCRYPTOLIB archive to your installation host as follows:
66 P U B L I C
Installation of SAP Systems Based on the Application Server Java of SAP NetWeaver 7.3 to 7.5 on Windows: SAP Adaptive Server Enterprise
Preparation

1. Go to https://launchpad.support.sap.com/#/softwarecenter SUPPORT PACKAGES & PATCHES and search for “sapcryptolib”.
2. Select the archive file for your operating system and download it to the same directory where you have put the SAPCAR executable.
3. Use the following command to extract the SAPCRYPTOLIB archive to the same directory where you have put the SAPCAR executable:sapcar –xvf sapcryptolibp_84…sar –R <target directory>
4. Download the Certificate Revocation List from https://tcs.mysap.com/crl/crlbag.p7s and move it to the same directory.
b. Verify the signature of the downloaded SWPM10SP<Support_Package_Number>_<Version_Number>.SAR archive by executing the following command:
NoteCheck SAP Notes 2178665 and 1680045 whether additional information is available.
<Path to SAPCAR>\sapcar.exe -tvVf<Path to Download Directory>\SWPM10SP<Support_Package_Number>_<Version_Number>.SAR -crl<file name of revocation list>
4. Unpack the Software Provisioning Manager archive to a local directory using the following command:
<Path to SAPCAR>\sapcar.exe -xvf <Path to Download Directory>\SWPM10SP<Support_Package_Number>_<Version_Number>.SAR <Path to Unpack Directory>
NoteMake sure that all users have read permissions for the directory where you want to unpack the installer.
CautionMake sure that you unpack the Software Provisioning Manager archive to a dedicated folder. Do not unpack it to the same folder as other installation media.
4.8.2 Using the Physical Media from the Installation Package
This section describes how you use the physical installation media as part of the installation package.
Context
The signature of media is checked automatically by the installer during the Define Parameters phase while the Media Browser screens are processed (see also Running the Installer [page 78] ). The installer only accepts media whose signature has been checked. For more information, see SAP Note 2393060 .
Installation of SAP Systems Based on the Application Server Java of SAP NetWeaver 7.3 to 7.5 on Windows: SAP Adaptive Server EnterprisePreparation P U B L I C 67

Procedure
1. Identify the required media for your installation [page 19] as listed below.
Every installation of an SAP system on SAP Adaptive Server Enterprise is Unicode.
SAP Instance Installation
Required Software Packages from Installation Media
Central services instance (SCS instance)
○ Software Provisioning Manager 1.0 archive○ UC Kernel (folder K_<Version>_U_<OS>) where U means Unicode.
Database instance
○ Software Provisioning Manager 1.0 archive○ UC Kernel (folder K_<Version>_U_<OS>) where U means Unicode.
○ Database software○ SAP Business Suite Java Applications only: SAP Business Suite Java Content (folders
JAVA_*)
Enqueue Replication Server
○ Software Provisioning Manager 1.0 archive○ UC Kernel (folder K_<Version>_U_<OS>) where U means Unicode.
Primary application server instance
○ Software Provisioning Manager 1.0 archive○ UC Kernel (folder K_<Version>_U_<OS>) where U means Unicode.
○ SAP NetWeaver AS for Java Component (folders JAVA_*)
○ SAP Business Suite Java Applications only: SAP Business Suite Java Content (folders JAVA_*)
○ Database Client Software
Additional application server instance
○ Software Provisioning Manager 1.0 archive○ UC Kernel (folder K_<Version>_U_<OS>) where U means Unicode.
○ SAP NetWeaver AS for Java Component (folders JAVA_*)
○ SAP Business Suite Java Applications only: SAP Business Suite Java Content (folders JAVA_*)
○ Database Client Software
SAP Host Agent (Separate Installation Only)
SAP Instance Installation Required Media
SAP Host Agent (separate installation only) ○ Software provisioning manager 1.0 archive
2. Make the installation media available on each installation host as follows:a. Download and unpack the latest version of Software Provisioning Manager as described in
Downloading and Extracting the Software Provisioning Manager 1.0 Archive [page 66].
b. Make the media containing the software to be installed available.
You can do this in one of the following ways:
○ Copy the required media folders directly to the installation hosts.
68 P U B L I C
Installation of SAP Systems Based on the Application Server Java of SAP NetWeaver 7.3 to 7.5 on Windows: SAP Adaptive Server Enterprise
Preparation

○ Mount the media on a central media server that can be accessed from the installation hosts.
Caution○ If you copy the media to disk, make sure that the paths to the destination location of the copied
media do not contain any blanks.○ If you perform a domain installation and do not want to copy the media but use network drives
for mapping the installation media, make sure that the <sapsid>adm user has access to the UNC paths of the network drives.If the user does not yet exist, you have to create the user manually before you install the SAP system.
Related Information
Downloading and Extracting the Software Provisioning Manager 1.0 Archive [page 66]
4.8.3 Downloading SAP Kernel Archives (Archive-Based Installation)
As an alternative to downloading the complete SAP kernel media, you can also download exactly the SAP kernel archives that are required for your installation. During the installation, you can either specify the path to each archive separately, or provide the path to a download basket with all downloaded archives.
Context
The signature of installation archives is checked automatically by the installer [page 78] during the Define Parameters phase while processing the Software Package Browser screens. The installer only accepts archives whose signature has been checked. After scanning the archives and verifying the signature, an info file is written where you can find detailed information about matching and non-matching archive files. You can access this info file by choosing the info file link in the Archive Scanning Result section of the Software Package Browser screen. The info file contains only the results of the latest archive scan. For more information, see SAP Note 2393060 .
Procedure
1. Download and unpack the latest version of Software Provisioning Manager as described in Downloading and Extracting the Software Provisioning Manager 1.0 Archive [page 66].
2. Go to https://launchpad.support.sap.com/#/softwarecenter SUPPORT PACKAGES & PATCHES By Category
Installation of SAP Systems Based on the Application Server Java of SAP NetWeaver 7.3 to 7.5 on Windows: SAP Adaptive Server EnterprisePreparation P U B L I C 69
3. Choose the required software component, release, and technical stack:
○ If you want to install SAP S/4HANA <Release> Server , choose SAP APPLICATION COMPONENTSSAP S/4HANA SAP S/4HANA <Release> SAP S/4HANA SERVER
○ If you want to install SAP S/4HANA <Release> Java , choose SAP NetWeaver and complementary products SAP NETWEAVER SAP NETWEAVER 7.5 Application Server Java
○ If you want to install SAP NetWeaver Composition Environment 7.1 or 7.2, choose SAP NetWeaver and complementary products SAP NETWEAVER CE 7.1X <Release> Entry by Component
○ If you want to install an SAP NetWeaver Java system or optional standalone unit, choose SAP NetWeaver and complementary products SAP NetWeaver <Release> [For releases lower than 7.5: Entry by Component] Application Server Java
○ If you want to install an SAP Business Suite system based on SAP NetWeaver, choose SAP Application Components <SAP CRM | SAP ERP | SAP SCM | SAP SRM> <Release> Entry by Component <Java Product Instance>
4. Choose the required package:
NoteIf you perform an additional application server installation, kernel archives - such as SAPEXE<Version>.SAR, SAPEXEDB<Version>.SAR, IGSEXE<Version>.SAR, igshelper<version>.sar, SAPJVM<Version>.SAR - are only prompted if they cannot be retrieved from the primary application server instance or the SCS instance of the existing SAP system.
Caution○ Make sure that you always use the highest available patch level unless special patch levels are
specified for the relevant package in SAP Note 1680045 .○ Make sure that you always choose SAPEXE<Version>.SAR, SAPEXEDB<Version>.SAR of the
same SAP kernel release and extension.
Example○ If SAPEXE<Version>.SAR is of version 7.42 EXT, then SAPEXEDB<Version>.SAR must
also be of version 7.42 EXT.○ If SAPEXE<Version>.SAR is of version 7.45, then SAPEXEDB<Version>.SAR must also be
of version 7.45.
○ If you provide the archives in one download folder, and there is more than one version of the same archive available - for example SAPEXE<Version>.SAR - and these versions match the product-specific requirements, the installer selects one of these archive versions. If you want a specific archive version to be used, make sure that this is the only version available in the download folder. When running system provisioning in GUI mode, you can also check in the GUI which archive is being used. So even if there is more than one version of the same archive available in the download folder, you can select the exact archive version you want to use and enter the exact path to the required archive file.
○ SAPEXE<Version>.SARSAP KERNEL <Version> <UC> <Operating System> #DATABASE INDEPENDENT
70 P U B L I C
Installation of SAP Systems Based on the Application Server Java of SAP NetWeaver 7.3 to 7.5 on Windows: SAP Adaptive Server Enterprise
Preparation

○ If you want to install an SAP system based on SAP NetWeaver 7.5, you can either choose 7.45 or 7.49 UNICODE for SAP KERNEL <Version>.
○ If you want to install an SAP system based on SAP NetWeaver 7.4, you can choose either 7.45 or 7.42 for SAP KERNEL <Version>.
○ If you want to install an SAP system based on SAP NetWeaver 7.3 EHP1 or lower, choose 7.21 EXT for SAP KERNEL <Version>.
○ SAPEXEDB<Version>.SARChoose the version corresponding to the SAPEXE<Version>.SAR from SAP KERNEL <Version> <UC> <Operating System> <DATABASE>
○ igsexe<version>.sarSAP IGS <Version> <Operating System>
○ If you want to install an SAP system based on SAP NetWeaver 7.5, choose SAP IGS <7.45 or 7.49> # OS independent , depending on your SAPEXE<Version>.SAR version.
○ If you want to install an SAP system based on SAP NetWeaver 7.4 and your SAPEXE<Version>.SAR is of version <7.45 or 7.49>, then choose SAP IGS <7.45 or 7.49> # OS independent , depending on your SAPEXE<Version>.SAR version.. Otherwise, choose SAP IGS 7.20_EXT # OS independent
○ If you want to install an SAP system based on SAP NetWeaver 7.3 EHP1, choose SAP IGS 7.20_EXT # OS independent
○ If you want to install an SAP system based on SAP NetWeaver 7.3 or lower and use SAP kernel 7.21_EXT, choose SAP IGS 7.20_EXT <Operating System>
○ If you want to install an SAP system based on SAP NetWeaver 7.3 or lower and use SAP kernel 7.21, choose SAP IGS 7.20 <Operating System>
○ igshelper<version>.sar○ If you want to install an SAP system based on SAP NetWeaver 7.3 EHP1 or higher, choose SAP
IGS HELPER # OS independent
○ If you want to install an SAP system based on SAP NetWeaver 7.3 or lower, choose SAP IGS 7.20<Operating System>
○ SAPJVM<Version>.SAR:SAP JVM <Version> <Operating System>
○ If you want to install an SAP system based on SAP NetWeaver 7.5 or higher, choose SAP JVM 8.1.<Version> <Select your operating system>
○ If you want to install an SAP system based on SAP NetWeaver 7.4 or lower, choose SAP JVM 6.1.<Version> <Select your operating system>
○ SAPHOSTAGENT<Version>.SARSAP HOST AGENT 7.21 <Operating System>
RecommendationIt is highly recommended that you always choose the highest SP version of the SAPHOSTAGENT<SP-version>.SAR archive.
Installation of SAP Systems Based on the Application Server Java of SAP NetWeaver 7.3 to 7.5 on Windows: SAP Adaptive Server EnterprisePreparation P U B L I C 71

NoteThe SAPHOSTAGENT<Version>.SAR archive is only prompted if there is either no SAP Host Agent available on the installation host or you specified during the Define Parameters phase that you want to upgrade an existing version of the SAP Host Agent already available on the installation host. In the latter case, you must specify a higher version of the SAPHOSTAGENT<Version>.SAR .Otherwise the existing SAP Host Agent is not upgraded.
5. If you want to install an SAP system based on SAP NetWeaver 7.3 EHP1 or lower - that is you have to use SAP kernel 7.21 - download the latest patch level of SAPCRYPTOLIB <Version>.SAR from the following path:
https://launchpad.support.sap.com/#/softwarecenter Support Packages and Patches By CategoryAdditional Components SAPCRYPTOLIB COMMONCRYPTOLIB<Version> <Operating
System>6. If you want to install Adobe Document Services, download the unlimited version of the JCE Jurisdiction
Policy Files archive. For more information about where to download it, see SAP Note 1240081 (see also SAP System Parameters [page 42]).
7. Make the physical media required for the database installation available either by using physical media as described in Using the Physical Media from the Installation Package [page 67] or by downloading them as described in Downloading Complete Installation Media [page 72].
4.8.4 Downloading Complete Installation Media
This section describes how you can download complete media from the SAP Software Download Center.
Procedure
1. Download and unpack the latest version of Software Provisioning Manager as described in Downloading and Extracting the Software Provisioning Manager 1.0 Archive [page 66].
2. Create a download directory on the host where you want to run the installer.3. You identify the required media als listed in Using the Physical Media from the Installation Package [page
67] .4. Identify all download objects that belong to one medium according to one of the following:
NoteInstallation media might be split into several files. In this case, you have to reassemble the required files after the download.
○ Download path or location:
○ To download the complete kernel media, go to https://support.sap.com/sltoolset System Provisioning Software Provisioning Manager 1.0 SP<Current Version> Download Kernel
72 P U B L I C
Installation of SAP Systems Based on the Application Server Java of SAP NetWeaver 7.3 to 7.5 on Windows: SAP Adaptive Server Enterprise
Preparation

releases delivered for SL Toolset SL TOOLSET 1.0 (INSTALLATIONS AND UPGRADES) KERNEL FOR INSTALLATION/SWPM .
○ To download all media required for your SAP product, you can use one of the following navigation paths:
○ https://launchpad.support.sap.com/#/softwarecenter INSTALLATIONS & UPGRADESBy Category SAP NETWEAVER AND COMPLEMENTARY PRODUCTS <Product><Product Release>
○ https://launchpad.support.sap.com/#/softwarecenter INSTALLATIONS & UPGRADESBy Alphabetical Index (A-Z) <First Letter of Product> <Product> <Product Release>
○ Material numberAll download objects that are part of an installation medium have the same material number and an individual sequence number:<Material_Number>_<Sequence_Number>
Example51031387_1
51031387_2
...
○ TitleAll objects that are part of an installation medium have the same title, such as <Solution><Media_Name><OS> or <Database>RDBMS<OS> for database media.
5. Download the objects to the download directory.6. To correctly re-combine the media that are split into small parts, unpack all parts into the same directory.
In the unpacking directory, the system creates a subdirectory with a short text describing the medium and copies the data into it. The data is now all in the correct directory, the same as on the medium that was physically produced. For more information, see SAP Note 1258173 .
CautionMake sure that you unpack each installation media to a separate folder. Do not unpack installation media to the same folder where you unpack the Software Provisioning Manager archive.
Do not unpack installation media to the same folder where you unpack the SAP kernel archives for archive-based installation.
Installation of SAP Systems Based on the Application Server Java of SAP NetWeaver 7.3 to 7.5 on Windows: SAP Adaptive Server EnterprisePreparation P U B L I C 73

5 Installation
5.1 Installation Checklist
This section includes the installation steps for the following:
● Standard system● Distributed system● High-availability system● Additional application server instance
Detailed information about the steps are available in the linked sections.
NoteSAP ASE is installed silently as part of the installation of the respective SAP product. Do not install the database software separately prior to the SAP installation.
Standard System
NoteIn a standard system, all mandatory instances are installed on one host. Therefore, if you are installing a standard system, you can ignore references to other hosts.
1. You check the prerequisites [page 76] and run the installer [page 78] to install the SAP system.
NoteIn a standard system, all mandatory instances are installed on one host in one installation run.
2. You continue with Post-Installation [page 90].
Distributed System
1. On the SCS instance host, you check the prerequisites [page 76] and run the installer [page 78] to install the central services instance.
NoteIf you want to install an SCS instance with integrated SAP Web Dispatcher [page 23] , you must choose the Custom parameter mode.
74 P U B L I C
Installation of SAP Systems Based on the Application Server Java of SAP NetWeaver 7.3 to 7.5 on Windows: SAP Adaptive Server Enterprise
Installation

When processing the screens for the SCS instance installation, you are prompted to mark the corresponding checkbox on the screen Additional Components to be Included in the SCS Instance.
If you mark the checkbox for SAP Web Dispatcher, you are prompted for the additional parameters required for the SAP Web Dispatcher installation on the subsequent screens.
2. On the database instance host, you check the prerequisites [page 76] and run the installer [page 78] to install the database instance.
3. On the primary application server instance host, you check the prerequisites [page 76] and run the installer [page 78] to install the primary application server instance.
4. If required, you install 1 to <N> additional application server instances on the respective hosts, as described later in this section.
5. You continue with Post-Installation [page 90].
Only valid for 'High Availability': HA (Windows)
High-Availability System
1. To install a high-availability system with Microsoft Failover Clustering, you perform the HA-specific installation steps [page 138].
2. You continue with Post-Installation [page 90].End of 'High Availability': HA (Windows)
Additional Application Server Instance
You perform the following steps on each host where you install the additional application server instances.
1. You check the prerequisites [page 76] and run the installer [page 78] to install the additional application server instances.Only valid for 'High Availability': HA (Windows)
CautionIn a high-availability system, you must install at least one additional application server instance.
End of 'High Availability': HA (Windows)
2. You continue with Post-Installation [page 90].
Installation of SAP Systems Based on the Application Server Java of SAP NetWeaver 7.3 to 7.5 on Windows: SAP Adaptive Server EnterpriseInstallation P U B L I C 75

5.2 Specifying the Initial Data Source of the User Management Engine
During the installation of your SAP system, you have to specify the initial data source of the User Management Engine (UME).
Prerequisites
You have planned how you want to configure user and access management for your SAP system to be installed as described in Planning User and Access Management [page 39].
Procedure
Using the Database of AS JavaYou install your SAP system as described in this installation guide. During the installation, you specify the Java database as data source for the User Management Engine (UME) (see SAP System Parameters [page 42]).
During the installation, the SAP system is automatically configured to use the Java database as data source for the UME.
After the installation has finished, you can still change the user management configuration. For more information, see Configuring User Management [page 107].
Using an LDAP directory as Source for User Data1. You install your SAP system as described in this installation guide.2. Configure the user management of the newly installed SAP system to use an LDAP directory.
For more information, see Configuring User Management [page 107].
5.3 Prerequisites for Running the Installer
Make sure you fulfil the following prerequisites before running the installer.
● For the SL Common GUI, make sure that the following web browser requirements are met:○ You have one of the following supported browsers on the device where you want to run the SL
Common GUI: Google Chrome, Mozilla Firefox, Microsoft Edge, or Microsoft Internet Explorer 11. Always use the latest version of these web browsers.
RecommendationWe recommend using Google Chrome.
76 P U B L I C
Installation of SAP Systems Based on the Application Server Java of SAP NetWeaver 7.3 to 7.5 on Windows: SAP Adaptive Server Enterprise
Installation

○ If you copy the SL Common GUI URL manually in the browser window, make sure that you open a new Web browser window in private browsing mode (Internet Explorer), incognito mode (Chrome) or private browsing mode (Firefox). This is to prevent Web browser plugins and settings from interfering with the SL Common GUI.
For more information about the SL Common GUI, see Useful Information About the Installer [page 82].
● If you want to enable Internet Protocol Version 6 (IPv6), make sure that you set SAP_IPv6_ACTIVE=1 in the environment of the user with the required authorization [page 58] to run the installer. While running the installer, this setting is then also added to the environment of the <sapsid>adm user.
NoteBy applying this setting the SAP system administrator is responsible for configuring the IP version on each host of the system landscape, before installing any additional instance to it.
● You need at least 300 MB of free space in the installation directory for each installation option. In addition, you need 300 MB free space for the installer executables.
● Make sure that you have defined the most important SAP system parameters as described in Basic Installation Parameters [page 41] before you start the installation.
● Check that your installation host meets the requirements for the installation options that you want to install.For more information, see Running the Prerequisite Checker [page 31].
● If you want to install an additional application server instance in an existing SAP system, make sure that:○ The service definitions for the SAP start services are configured correctly and refer to the correct
profile files.○ There are no profile backup files with an underscore “_” in their profile name. If so, replace the “_” with
a “.”.
ExampleRename <Drive>:\usr\sap\S14\SYS\profile\S14_J20_wsi6408_12 to <Drive>:\usr\sap\S14\SYS\profile\S14_J20_wsi6408.12.
● Make sure that the following ports are not used by other processes:○ Port 4237 is used by default as HTTPS port for communication between the installer and the SL
Common GUI.If this port cannot be used, you can assign a free port number by executing sapinst.exe with the following command line parameter:SAPINST_HTTPS_PORT=<Free Port Number>
○ Port 4239 is used by default for displaying the feedback evaluation form at the end of the installer processing.The filled-out evaluation form is then sent to SAP using HTTPS.If this port cannot be used, you can assign a free port number by executing sapinst.exe with the following command line parameter:SAPINST_HTTP_PORT=<Free Port Number>
Installation of SAP Systems Based on the Application Server Java of SAP NetWeaver 7.3 to 7.5 on Windows: SAP Adaptive Server EnterpriseInstallation P U B L I C 77

5.4 Running the Installer
This section describes how to run the installation tool Software Provisioning Manager (the “installer” for short).
Prerequisites
For more information, see Prerequisites for Running the Installer [page 76].
Context
Software Provisioning Manager (the “installer” for short) has a web browser-based GUI named “SL Common GUI of the Software Provisioning Manager” - “SL Common GUI” for short.
This procedure describes an installation where you run the installer and use the SL Common GUI, that is you can control the processing of the installer from a browser running on any device.
For more information about the SL Common GUI, see Useful Information About the Installer [page 82].
Procedure
1. Log on to the installation host using an account with the required user authorization to run the Installer [page 58].
CautionDo not use an existing <sapsid>adm user.
If your security policy requires that the person running the installer is not allowed to know administrator credentials on the installation host, you can specify another operating system user for authentication purposes. You do this using the SAPINST_REMOTE_ACCESS_USER parameter when starting sapinst.exe from the command line. You have to confirm that the user is a trusted one. For more information, see SAP Note 1745524 .
2. Make the installation media available.
For more information, see Preparing the Installation Media [page 65] .
NoteEven if you use the complete SAP kernel media, the installer might prompt you during the provisioning process for additional archives (*.SAR files) due to special Patch Level (PL) requirements depending on categories such as the product, operating system, and database platform.
For example: The installer might require a certain PL of <X> of the SAPEXEDB.SAR (for DBTYPE <Y>), but this PL of the SAPEXEDB.SAR is not contained in the SAP kernel media . In this case you have to
78 P U B L I C
Installation of SAP Systems Based on the Application Server Java of SAP NetWeaver 7.3 to 7.5 on Windows: SAP Adaptive Server Enterprise
Installation

download the required PL from https://launchpad.support.sap.com/#/softwarecenter following the instructions given in Downloading SAP Kernel Archives (Archive-Based Installation) [page 69].
3. Start the installer by double-clicking sapinst.exe from the directory to which you unpacked the Software Provisioning Manager archive.By default, the SL Common GUI uses the default browser defined for the host where you run the installer. However, you can also specify another supported web browser available on the host where you start the installer. You can do this by starting the sapinst executable with command line option SAPINST_BROWSER=<Path to Browser Executable>, for example SAPINST_BROWSER=firefox.exe.
NoteIf you are using a stack configuration file (see Installation Using a Stack Configuration File (Optional) [page 28]), you have to call sapinst.exe with command line parameter SAPINST_STACK_XML=<Absolute_Path_To_Stack_XML_File>:
sapinst.exe SAPINST_STACK_XML=<Absolute_Path_To_Stack_XML_File> (in a command prompt)
.\sapinst.exe SAPINST_STACK_XML=<Absolute_Path_To_Stack_XML_File> (in PowerShell)
NoteIf you need to assign a virtual host name to the instance to be installed and you do not want to assign it by entering it as a parameter using the installer screens (see SAP System Parameters [page 42]), you can alternatively assign it as follows:
1. Open a command prompt or PowerShell window in elevated mode and change to the directory to which you unpacked the Software Provisioning Manager archive.
2. Start the installer with the following command:sapinst.exe SAPINST_USE_HOSTNAME=<Virtual_Host_Name> (in a command prompt).\sapinst.exe SAPINST_USE_HOSTNAME=<Virtual_Host_Name> (in PowerShell)
For more information, see Using Virtual Host Names [page 60].
4. The installer is starting up.
The installer now starts and waits for the connection with the SL Common GUI. If you have a supported web browser (see Prerequisites for Running the Installer [page 76]) installed on the host where you run the installer, the SL Common GUI starts automatically by displaying the Welcome screen.
If the SL Common GUI does not open automatically, you can find the URL you require to access the SL Common GUI at the bottom of the Program Starter window of the installer. You find the icon of the Program Starter window in the taskbar of your Windows host. Open a supported web browser and run the URL from there.
...************************************************************************Open your browser and paste the following URL address to access the GUI https://[<hostname>]:4237/sapinst/docs/index.html Logon users: [<users>] ************************************************************************...
Installation of SAP Systems Based on the Application Server Java of SAP NetWeaver 7.3 to 7.5 on Windows: SAP Adaptive Server EnterpriseInstallation P U B L I C 79

The SL Common GUI opens in the browser by displaying the Welcome screen.
NoteBefore you reach the Welcome screen, your browser might warn you that the certificate of the sapinst process on this computer could not be verified. Accept this warning to inform your browser that it can trust this site, even if the certificate could not be verified.
5. On the Welcome screen, choose the required option:○ Perform preparations
Go to Generic Options <Database> Preparations and choose the required task.○ Install an SAP system or an optional standalone unit (Advanced Adapter Engine, Advanced Adapter
Engine Extended, or Process Orchestration):○ To install an SAP system based on SAP NetWeaver Application Server for Java, choose
<Product> <Database> Installation Application Server Java <System Variant> .○ To install the application server Java for an SAP Process Integration system based on SAP
NetWeaver 7.5, choose SAP NetWeaver 7.5 <Database> Installation Application Server Java for SAP Process Integration <System Variant> .
○ To install the application server Java for an SAP Solution Manager 7.2 system, choose SAP Solution Manager 7.2 <Support_Release> SAP Solution Manager 7.2 Java <Support_Release> <Database> SAP System Application Server Java <System Variant> .
○ To install an optional standalone unit, choose <Product> <Database> InstallationOptional Standalone Units <Advanced Adapter Engine | Advanced Adapter Engine Extended | Process Orchestration> <System Variant> .
○ Install an additional application server instanceGo to <Product> <Database> Additional SAP System Instances Additional Application Server Instance .
○ Perform other tasks or install additional componentsGo to Generic Options <Database> and choose the required task.
6. Choose Next.
NoteIf there are errors during the self-extraction process of the installer, you can find the log file dev_selfex.out in the temporary directory.
7. If the installer prompts you to log off from your system, log off and log on again.The installer restarts automatically.
8. Follow the instructions on the installer screens and enter the required parameters.
NoteTo find more information on each parameter during the Define Parameters phase, position the cursor on the required parameter input field , and choose either F1 or the HELP tab. Then the available help text is displayed in the HELP tab.
80 P U B L I C
Installation of SAP Systems Based on the Application Server Java of SAP NetWeaver 7.3 to 7.5 on Windows: SAP Adaptive Server Enterprise
Installation

○ Only valid for 'High Availability': HA (Windows)High Availability only: If you decide to install an SAP Web Dispatcher or a Gateway in the ASCS instance, note that a failure of the SAP Web Dispatcher or the Gateway causes failover of the ASCS instance to another cluster node. The failover cluster monitors all processes that are started by the SAP start service (sapstartsrv.exe). For an ASCS instance this is: msg_server.exe (message server), enserver.exe (enqueue server), gwrd.exe (Gateway), and sapwebdisp.exe (SAP Web Dispatcher). To prevent failover, see SAP Note 2375999 .End of 'High Availability': HA (Windows)
CautionThe signature of media and installation archives is checked automatically during the Define Parameters phase while processing the Media Browser and - if you perform an archive-based installation - the Software Package Browser screens.
Keep in mind that this automatic check is only committed once and not repeated if you modify artefacts such as SAR archives or files on the media after the initial check has been done. This means that - if you modify artefacts later on either during the remaining Define Parameters phase or later on during the Execute Service phase - the signature is not checked again.
See also the description of this new security feature in SAP Note 2393060 .
After you have entered all requested input parameters, the installer displays the Parameter Summary screen. This screen shows both the parameters that you entered and those that the installer set by default. If required, you can revise the parameters before starting the installation.
9. To start the installation, choose Next.
The installer starts the installation and displays the progress of the installation. When the installation has finished, the installer shows the message: Execution of <Option_Name> has completed.
NoteDuring the last restart of Application Server Java performed by the installer, the portal starts the processing and upload of the new portal archives. It takes approximately 15 to 90 minutes before the deployment is completed and the portal is launched.
Do not stop the installer or Application Server Java during this phase.
10. If required install an additional application server instance for a standard (central) or distributed system.11. For security reasons, we recommend that you delete the .sapinst directory within the home directory of
the user with which you ran the installer:
%userprofile%\.sapinst\12. If you copied the installer software to your hard disk, you can delete these files when the installation has
successfully completed.
5.5 Additional Information About the Installer
The following sections provide additional information about the installer.
Installation of SAP Systems Based on the Application Server Java of SAP NetWeaver 7.3 to 7.5 on Windows: SAP Adaptive Server EnterpriseInstallation P U B L I C 81

Useful Information About the Installer [page 82]This section contains some useful technical background information about the installer and the installer GUI.
How to Avoid Automatic Logoff by the Installer [page 83]
Interrupted Processing of the Installer [page 84]Here you find information about how to restart the installer if its processing has been interrupted.
Entries in the Services File Created by the Installer [page 87]
Troubleshooting with the Installer [page 88]This section tells you how to proceed when errors occur while the installer is running.
Using the Step State Editor (SAP Support Experts Only) [page 89]This section describes how to use the Step State Editor available in the installer.
5.5.1 Useful Information About the Installer
This section contains some useful technical background information about the installer and the installer GUI.
● Software Provisioning Manager (the “installer” for short) has the web browser-based “SL Common GUI of the Software Provisioning Manager” - “SL Common GUI” for short.The SL Common GUI uses the SAP UI Development Toolkit for HTML5 - also known as SAPUI5 - a client-side HTML5 rendering library based on JavaScript. The benefits of this new user interface technology for the user are:○ Zero foot print, since only a web browser is required on the client○ New controls and functionality, for example, view logs in web browser.
The SL Common GUI connects the web browser on a client with the sapinst executable - which is part of Software Provisioning Manager - running on the installation host using the standard protocol HTTPS.For the SL Common GUI, the installer provides a pre-generated URL in the Program Starter window. If you have a supported web browser installed on the host where you run the installer, the SL Common GUI starts automatically.By default, the SL Common GUI uses the default browser defined for the host where you run the installer. However, you can also specify another supported web browser available on the host where you start the installer. You can do this by starting the sapinst executable with command line option SAPINST_BROWSER=<Path to Browser Executable>, for example SAPINST_BROWSER=firefox.exe.Alternatively you can open a supported web browser on any device and run the URL from there.For more information about supported web browsers see Prerequisites for Running the Installer [page 76].If you need to run the SL Common GUI in accessibility mode, apply the standard accessibility functions of your web browser.
● As soon as you have started the sapinst.exe executable, the installer creates a .sapinst directory underneath the <Drive>:\Users\<User> directory where it keeps its log files. <User> is the user which you used to start the installer.After you have reached the Welcome screen and selected the relevant installer option for the SAP system or instance to be installed , the installer creates a directory sapinst_instdir, where it keeps its log files, and which is located directly in the %ProgramFiles% directory. If the installer is not able to create sapinst_instdir there, it tries to create sapinst_instdir in the directory defined by the TEMP environment variable.
82 P U B L I C
Installation of SAP Systems Based on the Application Server Java of SAP NetWeaver 7.3 to 7.5 on Windows: SAP Adaptive Server Enterprise
Installation

All log files which have been stored so far in the .sapinst folder are moved to the sapinst_instdir directory as soon as the latter has been created.
RecommendationWe recommend that you keep all installation directories until the system is completely and correctly installed.
● The installer extracts itself to a temporary directory (TEMP, TMP, TMPDIR, or SystemRoot). These executables are deleted after the installer has stopped running.Directories called sapinst_exe.xxxxxx.xxxx sometimes remain in the temporary directory after the installer has finished. You can safely delete them.The temporary directory also contains the log file dev_selfex.out from the self-extraction process of the installer, which might be useful if an error occurs.
CautionIf the installer cannot find a temporary directory, the installation terminates with the error FCO-00058.
● To see a list of all available installer properties, go to the directory %TEMP%\sapinst_exe.xxxxxx.xxxx after you have started the installer, and enter the following command:sapinst.exe -p
● If you want to perform an installation in unattended mode, see SAP Note 2230669 which describes an improved procedure using inifile.params.
● If required, stop the installer by choosing the Cancel button.
Note
If you need to terminate the installer, choose File Exit in the menu of the Program Starter window.
5.5.2 How to Avoid Automatic Logoff by the Installer
When you install the SAP system, the installation tool checks whether the user account used for the installation has the required privileges and authorization.
For a domain installation, the account needs to be both a member of the local Administrators group and the domain Admins group. For a local installation, the account needs to be a member of the local group Administrators group.
In both cases, the user account must be authorized to do the following:
● Act as part of the operating system● Adjust memory quotas for a process● Replace a process level token
If the user account does not have these rights assigned, the installer assigns them and automatically logs the account off to activate them. To avoid the installer logging the account off, you can set these rights manually before you start the installation.
Installation of SAP Systems Based on the Application Server Java of SAP NetWeaver 7.3 to 7.5 on Windows: SAP Adaptive Server EnterpriseInstallation P U B L I C 83

Procedure
You perform the following steps to assign these rights to the user account used for the installation.
CautionBe aware that domain policies override locally defined policies. This means that if you want to grant domain administrator rights to a user who belongs to the local Administrators group, make sure that you have also defined domain administrator rights for this user on domain level.
1. Windows Server 2012 (R2) and higher: Press Ctrl + Esc and choose Administrative Tools Local Security Policy .
2. Windows Server 2008 (R2): Choose Start Control Panel Administrative Tools Local Security Policy .
3. In the Local Security Settings window, choose Local Policies User Rights Assignment. .4. Double-click the required right under Policy and choose Add User or Group.5. In the Select Users and Groups window, choose the required user and choose Add.
The selected user appears in the box below.6. Confirm your entry and then repeat the steps for each remaining policy that the user requires for the
installation.7. Log off and log on again to apply the changes.
More Information
Required User Authorization for Running the Installer [page 58]
5.5.3 Interrupted Processing of the Installer
Here you find information about how to restart the installer if its processing has been interrupted.
Context
The processing of the installer might be interrupted for one of the following reasons:
● An error occurred during the Define Parameters or Execute phase:The installer does not abort the installation in error situations. If an error occurs, the installation pauses and a dialog box appears. The dialog box contains a short description of the choices listed in the table below as well as a path to a log file that contains detailed information about the error.
● You interrupted the processing of the installer by choosing Cancel in the SL Common GUI.
84 P U B L I C
Installation of SAP Systems Based on the Application Server Java of SAP NetWeaver 7.3 to 7.5 on Windows: SAP Adaptive Server Enterprise
Installation

CautionIf you stop an option in the Execute phase, any system or component installed by this option is incomplete and not ready to be used. Any system or component uninstalled by this option is not completely uninstalled.
The following table describes the options in the dialog box:
Option Definition
Retry The installer retries the installation from the point of failure without repeating any of the previous steps.
This is possible because the installer records the installation progress in the keydb.xml file.
We recommend that you view the entries in the log files, try to solve the problem, and then choose Retry.
If the same or a different error occurs, the installer displays the same dialog box again.
Stop The installer stops the installation, closing the dialog box, the installer GUI, and the GUI server.
The installer records the installation progress in the keydb.xml file. Therefore, you can continue the installation from the point of failure without repeating any of the previous steps. See the procedure below.
Continue The installer continues the installation from the current point.
View Log Access installation log files.
The following procedure describes the steps to restart an installation, which you stopped by choosing Stop, or to continue an interrupted installation after an error situation.
Procedure
1. Log on to the installation host as a user with the required permissions as described in Running the Installer [page 78] .
2. Make sure that the installation media are still available.
For more information, see Preparing the Installation Media [page 65] .
RecommendationMake the installation media available locally. For example, if you use remote file shares on other Windows hosts, CIFS shares on third-party SMB-servers, or Network File System (NFS), reading from media mounted with NFS might fail.
Installation of SAP Systems Based on the Application Server Java of SAP NetWeaver 7.3 to 7.5 on Windows: SAP Adaptive Server EnterpriseInstallation P U B L I C 85

3. Make sure that the installation media are still available.
For more information, see Preparing the Installation Media [page 65] .
RecommendationMake the installation media available locally. For example, if you use remote file shares on other Windows hosts, CIFS shares on third-party SMB-servers, or Network File System (NFS), reading from media mounted with NFS might fail.
4. Restart the installer by double-clicking sapinst.exe from the directory to which you unpacked the Software Provisioning Manager archive.By default, the SL Common GUI uses the default browser defined for the host where you run the installer. However, you can also specify another supported web browser available on the host where you start the installer. You can do this by starting the sapinst executable with command line option SAPINST_BROWSER=<Path to Browser Executable>, for example SAPINST_BROWSER=firefox.exe.
5. The installer is restarting.
The installer now starts and waits for the connection with the SL Common GUI. If you have a supported web browser (see Prerequisites for Running the Installer [page 76]) installed on the host where you run the installer, the SL Common GUI starts automatically by displaying the Welcome screen.
If the SL Common GUI does not open automatically, you can find the URL you require to access the SL Common GUI at the bottom of the Program Starter window of the installer. You find the icon of the Program Starter window in the taskbar of your Windows host. Open a supported web browser and run the URL from there.
...************************************************************************Open your browser and paste the following URL address to access the GUI https://[<hostname>]:4237/sapinst/docs/index.html Logon users: [<users>] ************************************************************************...
The SL Common GUI opens in the browser by displaying the Welcome screen.
NoteBefore you reach the Welcome screen, your browser might warn you that the certificate of the sapinst process on this computer could not be verified. Accept this warning to inform your browser that it can trust this site, even if the certificate could not be verified.
6. From the tree structure on the Welcome screen, select the installation option that you want to continue and choose Next.
The What do you want to do? screen appears.7. On the What do you want to do? screen, decide between the following alternatives and continue with Next:
86 P U B L I C
Installation of SAP Systems Based on the Application Server Java of SAP NetWeaver 7.3 to 7.5 on Windows: SAP Adaptive Server Enterprise
Installation

Alternative Behavior
Perform a new run The installer does not continue the interrupted installation option. Instead, it moves the content of the old installer directory and all installer-specific files to a backup directory. Afterwards, you can no longer continue the old option.
The following naming convention is used for the backup directory:
log_<Day>_<Month>_<Year>_<Hours>_<Minutes>_<Seconds>
Examplelog_01_Oct_2016_13_47_56
NoteAll actions taken by the installation before you stopped it (such as creating directories or users) are not revoked.
CautionThe installer moves all the files and folders to a new log directory, even if these files and folders are owned by other users. If there are any processes currently running on these files and folders, they might no longer function properly.
Continue with the existing one The installer continues the interrupted installation from the point of failure.
5.5.4 Entries in the Services File Created by the Installer
After the installation has finished successfully, the installer has created the following entries for port names in <Drive>:\WINDOWS\system32\drivers\etc\services:
sapdp<Instance_Number> = 32<Instance_Number>/tcp
sapdp<Instance_Number>s = 47<Instance_Number>/tcp
sapgw<Instance_Number> = 33<Instance_Number>/tcp
sapgw<Instance_Number>s = 48<Instance_Number>/tcp
Note● There is a port created for every possible instance number, regardless of which instance number you
specified during the installation. For example, for sapgw<Instance_Number> = 33<Instance_Number>/tcp the following range of entries is created:sapgw00 = 3300/tcpsapgw01 = 3301/tcpsapgw02 = 3302/tcp[...]
Installation of SAP Systems Based on the Application Server Java of SAP NetWeaver 7.3 to 7.5 on Windows: SAP Adaptive Server EnterpriseInstallation P U B L I C 87

sapgw98 = 3398/tcpsapgw99 = 3399/tcp
● If there is more than one entry for the same port number, this is not an error.
5.5.5 Troubleshooting with the Installer
This section tells you how to proceed when errors occur while the installer is running.
Context
If an error occurs, the installer:
● Stops processing● Displays a dialog informing you about the error
Procedure
1. Check SAP Note 1548438 for known installer issues.2. If an error occurs during the Define Parameters or the Execute Service phase, do one of the following:
○ Try to solve the problem:○ To check the installer log files (sapinst.log and sapinst_dev.log) for errors, choose the LOG
FILES tab.
NoteThe LOG FILES tab is only available if you have selected on the Welcome screen the relevant installer option for the SAP product to be installed .
If you need to access the log files before you have done this selection, you can find the files in the .sapinst directory underneath the <Drive>:\Users\<User> directory, where <User> is the user which you used to start the installer.
Fore more information, see Useful Information About the Installer [page 82].
○ To check the log and trace files of the installer GUI for errors, go to the directory %userprofile%\.sapinst\
○ Then continue by choosing Retry.○ If required, abort the installer by choosing Cancel in the tool menu and restart the installer. For more
information, see Interrupted Processing of the Installer [page 84].3. If you cannot resolve the problem, report an incident using the appropriate subcomponent of BC-INS*.
For more information about using subcomponents of BC-INS*, see SAP Note 1669327 .
88 P U B L I C
Installation of SAP Systems Based on the Application Server Java of SAP NetWeaver 7.3 to 7.5 on Windows: SAP Adaptive Server Enterprise
Installation

5.5.6 Using the Step State Editor (SAP Support Experts Only)
This section describes how to use the Step State Editor available in the installer.
NoteOnly use the Step State Editor if the SAP Support requests you to do so, for example to resolve a customer incident.
Prerequisites
● SAP Support requests you to use the Step State Editor.● Make sure that the host where you run the installer meets the requirements listed in Prerequisites for
Running the Installer [page 76].
Procedure
1. Start the installer from the command line as described in Running the Installer [page 78] with the additional command line parameter SAPINST_SET_STEPSTATE=true
2. Follow the instructions on the installer screens and fill in the parameters prompted during the Define Parameters phase until you reach the Parameter Summary screen.
3. Choose Next.
The Step State Editor opens as an additional dialog. Within this dialog you see a list of all steps to be executed by the installer during the Execute Service phase. By default all steps are in an initial state. Underneath each step, you see the assigned installer component. For each step you have a Skip and a Break option.
○ Mark the checkbox in front of the Break option of the steps where you want the installer to pause.○ Mark the checkbox in front of the Skip option of the steps which you want the installer to skip.
4. After you have marked all required steps with either the Break or the Skip option, choose OK on the Step State Editor dialog.
The installer starts processing the Execute Service phase and pauses one after another when reaching each step whose Break option you have marked. You can now choose one of the following:
○ Choose OK to continue with this step.○ Choose Step State Editor to return to the Step State Editor and make changes, for example you
can repeat the step by marking the checkbox in front of the Repeat option.○ Choose Cancel to abort the installer.
5. Continue until you have run through all the steps of the Execute Service phase of the installer.
Installation of SAP Systems Based on the Application Server Java of SAP NetWeaver 7.3 to 7.5 on Windows: SAP Adaptive Server EnterpriseInstallation P U B L I C 89

6 Post-Installation
6.1 Post-Installation Checklist
This section includes the post-installation steps that you have to perform for the following:
● Standard, distributed, or high-availability system● Additional application server instance
Detailed information about the steps are available in the linked sections.
Standard, Distributed, or High-Availability System
NoteIn a standard system, all mandatory instances are installed on one host. Therefore, if you are installing a standard system, you can ignore references to other hosts.
1. If required, you perform a full system backup [page 113] immediately after the installation has finished.2. You check whether you can log on to the Application Server Java [page 91].3. You install the SAP license [page 95].4. You configure the remote connection to SAP support [page 98].5. If required, you set up symbolic links for application servers [page 98].6. For production systems it is highly recommended that you connect the system to SAP Solution Manager
[page 100].7. You apply the latest kernel and Support Packages [page 101].8. You configure the Process Integration system after installation [page 102].
NoteThis post-installation step is only relevant if you have installed an SAP NetWeaver 7.5 Process Integration (PI) system.
9. You ensure user security [page 108].10. You run automated configuration [page 111].11. If you have installed a non-central Advanced Adapter Engine as an optional standalone unit, you clear the
SLD Data Cache [page 112].12. You enable the database [page 112].13. You perform a full system backup [page 113].14. If you chose to install an integrated SAP Web Dispatcher within the SCS instance, you log on to the SAP
Web Dispatcher Management Console [page 114]15. If you chose to install an integrated SAP Web Dispatcher within the SCS instance, you configure the SAP
Web Dispatcher [page 115]
90 P U B L I C
Installation of SAP Systems Based on the Application Server Java of SAP NetWeaver 7.3 to 7.5 on Windows: SAP Adaptive Server Enterprise
Post-Installation

16. You check the Master Guide for your SAP Business Suite application or SAP NetWeaver application (chapter Configuration of Systems and Follow-Up Activities) for further implementation and configuration steps, such as language installation, monitoring, work processes, transports, SAP license, printers, system logs, and connectivity to system landscape directory (SLD).
Additional Application Server Instance
1. If required, you perform a full system backup [page 113] immediately after the installation has finished.2. You check whether you can log on to the Application Server Java [page 91].3. You ensure user security [page 108].4. If required, you set up symbolic links for application servers [page 98].5. You perform a full system backup [page 113].
6.2 Logging On to the Application Server Java
You need to check that you can log on to the Application Server Java with the appropriate administrator user, given in the table below.
Prerequisites
● The SAP system is up and running.● For the Application Server Java of an SAP Process Integration (PI) 7.5 system or SAP Solution Manager 7.2
system, you must have configured the connection to the ABAP system.
Context
NoteIn a distributed or high-availability system, you check whether you can log on to every instance of the SAP system that you installed.
Java User in a Dual-Stack System (SAP Process Integration (PI) 7.5 system or SAP Solution Manager 7.2 system only)
User User Name Storage: ABAP System
Administrator J2EE_ADMIN (default) or the name you gave this user during the installation process.
Installation of SAP Systems Based on the Application Server Java of SAP NetWeaver 7.3 to 7.5 on Windows: SAP Adaptive Server EnterprisePost-Installation P U B L I C 91

Depending on your SAP system installation, the administrator user can either reside in the database of your Java system or in an external ABAP system.
Java Standalone User
User User Name Storage:
Database
User Name Storage:
External ABAP System
Administrator Administrator The user that you created manually in the external ABAP system. The recommended name is J2EE_ADM_<SAPSID_Java_System>
You access AS Java with a URL using a web browser from your client machines. To log on to the application server Java, proceed as follows:
Procedure
1. Start a web browser and enter the following URL:
http://<Hostname_of_AS_Java_Server>:5<Instance_Number>00
NoteYou must always enter a two-digit number for <Instance_Number>. For example, do not enter 1 but instead enter 01.
ExampleIf you installed SAP NetWeaver Application Server for Java on host saphost06 and the instance number of your SAP NetWeaver Application Server for Java is 04, enter the following URL:
http://saphost06:50400
The start page of the SAP NetWeaver Application Server for Java appears in the web browser.2. Log on by pressing the link of any of the provided applications, for example SAP NetWeaver Administrator
or System Information.
Related Information
Preparing an External ABAP System as Source for User Data [page 62]
92 P U B L I C
Installation of SAP Systems Based on the Application Server Java of SAP NetWeaver 7.3 to 7.5 on Windows: SAP Adaptive Server Enterprise
Post-Installation

6.3 Logging On to the SAP Enterprise Portal
You need to check that you can log on to the application server using the following standard users. This procedure applies when you have installed EP Core - Application Portal only and when you have installed it together with Enterprise Portal (EP).
Prerequisites
The SAP system is up and running.
Context
Java Standalone User
User User Name Storage:
Database
User Name Storage:
External ABAP System
Administrator Administrator The user that you created manually in the external ABAP system. The recommended name is J2EE_ADM_<SAPSID_Java_System>
You access the SAP Enterprise Portal with a URL using a web browser from your client machines.
The default URL consists of the installation host name and the port on which the portal is listening. You can use the HTTP or HTTPS protocol. HTTPS is relevant if you are using Secure Sockets Layer (SSL) communication.
Procedure
1. Start a web browser and enter the following URL: http://<Hostname_of_AS_Java_Server>:5<Instance_Number>00/irj
NoteYou must always enter a two-digit number for <Instance_Number>. For example, do not enter 1 but instead enter 01.
Installation of SAP Systems Based on the Application Server Java of SAP NetWeaver 7.3 to 7.5 on Windows: SAP Adaptive Server EnterprisePost-Installation P U B L I C 93

ExampleIf you installed the SAP Enterprise Portal on host saphost06 and the instance number of your Application Server Java is 04, enter the following URL:
http://saphost06:50400/irj
2. Log on by entering the required user and password.
6.4 Logging On to the Development Infrastructure
If you have installed Development Infrastructure (DI), you have to log on to the services of the Development Infrastructure to check whether the installation of the DI was successful.
Procedure
1. Start a web browser and enter the following URL: http://<Hostname_of_AS_Java_Server>:5<Instance_Number>00/devinf
NoteYou must always enter a 2-digit number for <Instance_Number>. For example, do not enter 1 but instead enter 01.
ExampleIf you installed SAP NetWeaver Application Server for Java with DI on host saphost06 and the instance number of your SAP NetWeaver Application Server for Java is 04, enter the following URL:
http://saphost06:50400
2. Log on with the NWDI_ADM user.
The start page SAP NetWeaver Development Infrastructure appears in the web browser.
The following links appear:
○ Design Time Repository○ Component Build Service○ Change Management Service○ System Landscape Directory
3. Log on to these services one after another by clicking the appropriate link:a. When you click Design Time Repository, the Design Time Repository page with the Repository Browser
overview appears.b. When you click Component Build Service, the Component Build Service page with the CBS Buildspace
Information appears.
94 P U B L I C
Installation of SAP Systems Based on the Application Server Java of SAP NetWeaver 7.3 to 7.5 on Windows: SAP Adaptive Server Enterprise
Post-Installation

c. When you click Change Management Service, the Change Management Service page with the CBS Buildspace Information appears.
d. When you click System Landscape Directory, you should see the System Landscape Directory start page.
NoteThe tables displayed on the pages might be empty. They are filled when you configure the development infrastructure either by running the Configuration Wizard or by configuring your system manually.
6.5 Providing Access to the SAP NetWeaver Administrator
To be able to log on the SAP NetWeaver Administrator, you must allow access to administration URLs of the NetWeaver Administrator in the Internet Communication Manager (ICM).
Context
Due to security restrictions, the SAP NetWeaver Administrator can only be accessed locally via http://<Hostname_of_AS_Java_Server>:5<Instance_Number>00/nwa after the installation has finished.
Procedure
Allow access to administration requests for the required network segments as described in SAP Note 1451753.
6.6 Installing the SAP License
You must install a permanent SAP license. When you install your SAP system, a temporary license is automatically installed.
Context
CautionBefore the temporary license expires, you must apply for a permanent license key from SAP.
Installation of SAP Systems Based on the Application Server Java of SAP NetWeaver 7.3 to 7.5 on Windows: SAP Adaptive Server EnterprisePost-Installation P U B L I C 95

We recommend that you apply for a permanent license key as soon as possible after installing your system.Only valid for 'High Availability': HA (Windows)
High Availabiltiy only: If you do a failover of the SAP (A)SCS instance from one cluster node to another node, and you do not have a permanent license on this node, the generated temporary license is only valid for 30 minutes. Java application servers automatically shut down after 30 minutes of operation. To avoid this, apply a permanent license key as soon as possible.End of 'High Availability': HA (Windows)
NoteThe license key is bound to the hardware key of the host where the message server is running.
High Availabiltiy only:
In a high-availability system with Microsoft Failover Clustering, the message server is part of the (A)SCS instance that can run on a different cluster node. Therefore you must install the SAP license on both nodes.
You have to do failover from the first cluster node where the (A)SCS instance is installed to the second cluster node. Use the hardware key of the second cluster node for the installation of the second SAP license.
For more information about SAP license keys and how to obtain them, see http://support.sap.com/licensekey.
Procedure
Install the SAP license as described in the SAP Library at:
SAP Release and SAP Library Quick Link SAP Library Path (Continued)
○ SAP NetWeaver 7.3http://help.sap.com/nw73
○ SAP NetWeaver 7.3 including Enhancement Package 1http://help.sap.com/nw731
○ SAP NetWeaver 7.4http://help.sap.com/nw74
○ SAP NetWeaver 7.5http://help.sap.com/nw75
Application Help Function-Oriented View: English Solution
Life Cycle Management SAP Licenses
96 P U B L I C
Installation of SAP Systems Based on the Application Server Java of SAP NetWeaver 7.3 to 7.5 on Windows: SAP Adaptive Server Enterprise
Post-Installation

6.7 High Availability: Setting Up Licenses
You need to install a permanent license, which is determined by the hardware environment of the message server.
Prerequisites
The SAP system is up and running.
Context
SAP has implemented a license mechanism for switchover solutions and clustered environments. Your customer key is calculated on the basis of local information on the message server host. This is the host machine where the central services instance (SCS instance) runs.
To be able to perform a switchover, the temporary license that is installed automatically with the SCS instance is not sufficient. You first need to install a permanent license, which is determined by the hardware environment of the message server. Since SAP's high-availability (HA) solution stipulates two or more cluster nodes (host machines) where the message server is enabled to run, you have to order as many license keys [page 95] as you have cluster nodes.
When we receive confirmation from your vendor that you are implementing a switchover environment, we provide the required license keys for your system, one key for each machine.
Procedure
1. To find the hardware key of the primary host, run the SAP NetWeaver Administrator (NWA) on any application server instance and choose Configuration Management Infrastructure ManagementLicenses .
The hardware key is displayed in the NWA.2. Perform a switchover of the central services instance (SCS) to another node in the cluster and repeat the
previous step.
Repeat this for all remaining nodes in the cluster.3. To obtain the two license keys, enter the hardware IDs for each cluster node, where message server is
enabled to run: http://support.sap.com/licensekey4. To import the files containing the two licenses to the primary cluster node, run the NWA on any application
server instance and choose:
Configuration Management Infrastructure Management Licenses5. Perform a switchover of the central services instance (SCS) to another node in the cluster and repeat the
previous step.
Installation of SAP Systems Based on the Application Server Java of SAP NetWeaver 7.3 to 7.5 on Windows: SAP Adaptive Server EnterprisePost-Installation P U B L I C 97

Repeat this for all remaining nodes in the cluster.
Results
The license is no longer a problem during switchover. This means you do not need to call saplicense in your switchover scripts.
6.8 Configuring the Remote Connection to SAP Support
SAP offers its customers access to support and a number of remote services such as the Early Watch Service or the GoingLive Service. Therefore, you have to set up a remote network connection to SAP.
For more information, see SAP Support Portal at https://support.sap.com/remote-support.html .
6.9 Creating Symbolic Links on Windows Server 2008 (R2) and Higher for Application Servers
Use
As of Windows Server 2008 (R2) you can create symbolic links for additional application server instances to simplify their administration.
Only valid for 'High Availability': HA (Windows)
In a high-availability system, you can additionally create symbolic links for the primary application server instance.
End of 'High Availability': HA (Windows)
Symbolic links for application servers let you access from your local host the SYS directory that is located on the global host, without having to specify its UNC path. Instead you can browse, for example, in the Windows explorer on your local host to the SYS directory and its subdirectories on the global host.
Procedure
Windows Server 2012 (R2) and higher
98 P U B L I C
Installation of SAP Systems Based on the Application Server Java of SAP NetWeaver 7.3 to 7.5 on Windows: SAP Adaptive Server Enterprise
Post-Installation

To create symbolic links, perform the following steps:
1. Open a PowerShell command in elevated mode, and enter the following PowerShell command in a single line:cmd /c mklink /d <localdisk>:\usr\sap\<SAPSID>\SYS \\<sapglobalhost>\sapmnt\<SAPSID>\SYS
NoteEnter a blank before \\<sapglobalhost>\....
2. If you use a central transport directory, you can also create the following link in PowerShell:cmd /c mklink /d <localdisk>:\usr\sap\trans \\<trans_dir_host>\sapmnt\trans
NoteThe transport directory host <trans_dir_host> and the <sapglobalhost> can be identical.
CautionThe command mklink creates the link without checking whether the link target exists or is accessible. If the link does not work after you created it, make sure that it exists and check the accessibility of the UNC path.
Windows Server 2008 (R2)
To create symbolic links, perform the following steps:
1. In the Start menu, right-click on Command Prompt and choose Run as administrator.2. Enter the following command in a single line:
mklink /d <localdisk>:\usr\sap\<SAPSID>\SYS \\<sapglobalhost>\sapmnt\<SAPSID>\SYS
NoteEnter a blank before \\<sapglobalhost>\....
3. If you use a central transport directory, you can also create the following link:mklink /d <localdisk>:\usr\sap\trans \\<trans_dir_host>\sapmnt\trans
NoteThe transport directory host <trans_dir_host> and the <sapglobalhost> can be identical.
CautionThe command mklink creates the link without checking whether the link target exists or can be accessed. If the link does not work after you created it, make sure that it exists and check that the UNC path can be accessed.
Installation of SAP Systems Based on the Application Server Java of SAP NetWeaver 7.3 to 7.5 on Windows: SAP Adaptive Server EnterprisePost-Installation P U B L I C 99

6.10 Connecting the System to SAP Solution Manager
Here you find information about how to connect your newly installed SAP system to SAP Solution Manager.
Prerequisites
An SAP Solution Manager system must be available in your system landscape. For more information, see http://help.sap.com/solutionmanager .
Context
SAP Solution Manager gives you central access to tools, methods, and preconfigured content that you can use to evaluate and implement your solutions.
When your implementation is running, you can use SAP Solution Manager to manage, monitor, and update systems and business processes in your solution landscape, and also to set up and operate your own solution support.
Procedure
You connect a technical system to SAP Solution Manager by the following steps:1. On the technical systems of your landscape, data suppliers are implemented, for example, with
transaction RZ70 for Application Server ABAP and with Visual Administrator for Application Server Java.
For more information, see the SAP Solution Manager Application Help:
○ If your SAP Solution Manager release is 7.1:http://help.sap.com/solutionmanager Version 7.1 SPS <No> Application Help (English) SAP Solution Manager Operations Managing System Landscape Information Managing Technical System Information Register Technical Systems Automatically by Data Suppliers
○ If your SAP Solution Manager release is 7.2:http://help.sap.com/solutionmanager Version 7.2 SPS <No> Application Help (English)Technical Infrastructures Landscape Management Database (LMDB) Managing Technical System Information Registering Technical Systems Automatically by Data Suppliers
2. The data suppliers send information about the hardware and installed software to a central System Landscape Directory (SLD). Updates are sent to the SLD as well.For more information, see the Planning Guide - System Landscape Directory in the SAP Community Network at System Landscape Directory (SLD) - Overview
3. From the SLD, this information is regularly synchronized with SAP Solution Manager where it is managed in the Landscape Management Database (LMDB).
100 P U B L I C
Installation of SAP Systems Based on the Application Server Java of SAP NetWeaver 7.3 to 7.5 on Windows: SAP Adaptive Server Enterprise
Post-Installation

For more information, see the SAP Solution Manager Application Help:
○ If your SAP Solution Manager release is 7.1:http://help.sap.com/solutionmanager Version 7.1 SPS <No> Application Help (English) SAP Solution Manager Operations Managing System Landscape Information Setting Up the Landscape Management Infrastructure Connecting LMDB to System Landscape Directory (SLD)
○ If your SAP Solution Manager release is 7.2:http://help.sap.com/solutionmanager Version 7.2 SPS <No> Application Help (English)Technical Infrastructures Landscape Management Database (LMDB) Setting Up the Landscape Management Infrastructure Connecting LMDB to System Landscape Directory (SLD)
4. In the LMDB, you complete the information from the SLD manually.
For more information, see the SAP Solution Manager Application Help:
○ If your SAP Solution Manager release is 7.1:Managing Technical System Information and Managing Product System Information at http://help.sap.com/solutionmanager Version 7.1 SPS <No> Application Help (English) SAP Solution Manager Operations Managing System Landscape Information
○ If your SAP Solution Manager release is 7.2:http://help.sap.com/solutionmanager Version 7.2 SPS <No> Application Help (English)Technical Infrastructures Landscape Management Database (LMDB) Managing Technical System Information
Next Steps
For more information, see the following pages in the SAP Community Network:
● System Landscape Directory (SLD) - Overview● Documentation for Landscape Management Database - LMDB
6.11 Applying the Latest Kernel and Support Package Stacks
We strongly recommend that you apply the latest kernel and Support Package stacks before you start configuring your SAP system.
NoteIf you are using a stack configuration file (see Installation Using a Stack Configuration File (Optional) [page 28]), you already downloaded the stack.xml file and the delta archives using the Maintenance Optimizer in your SAP Solution Manager. If you then already called the Software Update Manager (SUM) from the installer and applied the Support Package Stacks after the installation had finished, you can skip this section.
Installation of SAP Systems Based on the Application Server Java of SAP NetWeaver 7.3 to 7.5 on Windows: SAP Adaptive Server EnterprisePost-Installation P U B L I C 101

Context
NoteIf you have installed an SAP Solution Manager 7.2 system, you must apply at least Support Package Stack (SPS) 01. You cannot use SAP Solution Manager 7.2 with SPS 00.
Procedure
● Download and apply the latest Kernel and Support Package stacks using the Software Update Manager (SUM) as described in the documentation Updating SAP Systems Using Software Update Manager <Release> available at https://support.sap.com/sltoolset System Maintenance Software Update Manager (SUM) scenarios Software Update/Upgrade with SUM <Release>
● If you want to update the kernel manually, proceed as described below:a. Log on as user <sapsid>adm to the hosts of the SAP system instances to be updated.b. Download the latest kernel for your operating system and database platform as described in SAP Note
19466 .c. Back up the kernel directory that is specified by the profile parameter DIR_CT_RUN.d. Extract the SAR files of the kernel Support Packages of the target SP level to a temporary directory
using the SAPCAR tool.e. Copy or move the extracted programs from the temporary directory to the local kernel directory.
6.12 PI 7.5 Only: Configuring the Process Integration System After the Installation
To configure your SAP Process Integration 7.5 (SAP PI 7.5) system after installation, execute the Central Technical Configuration (CTC) Wizard.
Procedure
To configure your SAP PI 7.5 system, execute the “SAP NetWeaver initial setup” CTC Wizard described in SAP Note 1309239 .
NoteThe CTC Wizard automatically executes all required technical configuration steps.
102 P U B L I C
Installation of SAP Systems Based on the Application Server Java of SAP NetWeaver 7.3 to 7.5 on Windows: SAP Adaptive Server Enterprise
Post-Installation

For more details about all single configuration steps executed by the CTC Wizard and how to apply them manually, see the SAP Library at:
SAP Release and SAP Library Quick Link SAP Library Path (Continued)
SAP NetWeaver 7.5
http://help.sap.com/nw75
Application Help Function-Oriented View:
English Process Integration Configuring
Process Integration After InstallationConfiguring Process Integration (PI) Dual Usage
Type Basic Configuration for SAP Process
Integration (PI)
6.13 PI-PCK, PI-AF, PI-AEX, PI-CP Only: System Configuration After the Installation
The CTC Wizards or Functional Unit Configurations execute automatically all required technical configuration steps.
CTC Wizards or Functional Unit Configurations
SAP Note 1362909 collects all notes that describe the CTC Wizards or Functional Unit Configurations, which must be executed in each of the following systems after the installation:
● Composition Environment (CE)● Advanced Adapter Engine Extended (PI-AEX)● Advanced Adapter Engine (PI-AF)● Partner Connectivity Kit (PI-PCK)● Process Orchestration (PI-CP)
SAP NetWeaver 7.30: Configuring the Partner Connectivity Kit (PI-PCK)
To configure your PI-PCK system after the installation, execute the “PI-PCK initial setup” CTC Wizard described in SAP Note 1319008 .
For more information about all single configuration steps executed by the CTC Wizard and how to apply them manually, see the SAP Library at:
http://help.sap.com/nw73 Application Help Function-Oriented View: English Process IntegrationConfiguring Process Integration (PI) After Installation Basic Configuration (CTC Wizard-Assisted and Manual)Configuring the Partner Connectivity Kit Wizard-Based Configuration for the PCK
Installation of SAP Systems Based on the Application Server Java of SAP NetWeaver 7.3 to 7.5 on Windows: SAP Adaptive Server EnterprisePost-Installation P U B L I C 103

Configuring the Adapter Engine (PI-AF)
To configure your PI-AF system after the installation execute “PI-AF initial setup” CTC Wizard described in SAP Note 1314855 .
For more information about all single configuration steps executed by the CTC Wizard and how to apply them manually, see the SAP Library at:
SAP Release and SAP Library Quick Link SAP Library Path (Continued)
● SAP NetWeaver Process Integration 7.1http://help.sap.com/nwpi71
● SAP NetWeaver Process Integration 7.1 Including Enhancement Package 1http://help.sap.com/nwpi711
Application Help SAP Library: English SAP NetWeaver
Process Integration Library Administrator’s Guide
Configuration of SAP NetWeaver Configuration of the
Standalone Engines Configuring the Non-Central Advanced
Adapter Engine Wizard-Based Basic Configuration
● SAP NetWeaver 7.3http://help.sap.com/nw73
If you want to connect PI-AF to a PI system:
Application Help Function-Oriented View: English Process
Integration Configuring Process Integration (PI) After
Installation Basic Configuration (CTC Wizard-Assisted and
Manual) Configuring the Non-Central Advanced Adapter Engine
Wizard-Based Basic Configuration
If you want to connect PI-AF to a PI-AEX system:
Application Help Function-Oriented View: English Process
Integration Configuring Process Integration (PI) After
Installation Basic Configuration (CTC Wizard-Assisted and
Manual) Configuring the Non-Central Advanced Adapter
Engine
104 P U B L I C
Installation of SAP Systems Based on the Application Server Java of SAP NetWeaver 7.3 to 7.5 on Windows: SAP Adaptive Server Enterprise
Post-Installation

SAP Release and SAP Library Quick Link SAP Library Path (Continued)
SAP NetWeaver 7.3 including Enhancement Package 1
http://help.sap.com/nw731
If you want to connect PI-AF to a PI system:
Application Help Function-Oriented View: English Process
Integration Configuring Process Integration After Installation
Configuring Process Integration Dual Stack Basic Configuration
for SAP NetWeaver Process Integration (PI) Configuring the
Non-Central Advanced Adapter Engine (PI-AF) Manual
Configuration of Non-Central Advanced Adapter Engine (PI-AF)
If you want to connect PI-AF to a PI-AEX or PI-CP system:
Application Help Function-Oriented View: English Process
Integration Configuring Process Integration After Installation
Configuring Advanced Adapter Engine Extended (PI-AEX) Basic Configuration for SAP NetWeaver PI Advanced Adapter Engine
Extended Configuring the Non-Central Advanced Adapter
Engine (PI-AF) for AEX
SAP NetWeaver 7.4
http://help.sap.com/nw74
If you want to connect PI-AF to a PI system:
Application Help Function-Oriented View: English Process
Integration Configuring Process Integration After Installation
Configuring Process Integration Dual Stack Basic Configuration
for SAP Process Integration (PI) Configuring the Non-Central
Advanced Adapter Engine (PI-AF) Manual Configuration of Non-
Central Advanced Adapter Engine (PI-AF)
If you want to connect PI-AF to a PI-AEX or PI-CP system:
Application Help Function-Oriented View: English Process
Integration Configuring Process Integration After Installation
Configuring Advanced Adapter Engine Extended (PI-AEX) Basic
Configuration for SAP PI Advanced Adapter Engine ExtendedConfiguring the Non-Central Advanced Adapter Engine (PI-AF) for
AEX
Installation of SAP Systems Based on the Application Server Java of SAP NetWeaver 7.3 to 7.5 on Windows: SAP Adaptive Server EnterprisePost-Installation P U B L I C 105

SAP Release and SAP Library Quick Link SAP Library Path (Continued)
SAP NetWeaver 7.5
http://help.sap.com/nw75
If you want to connect PI-AF to a PI system:
Application Help Function-Oriented View: English Process
Integration Configuring Process Integration After Installation
Configuring Process Integration (PI) Dual Usage Type Basic
Configuration for SAP Process Integration (PI) Configuring the
Non-Central Advanced Adapter Engine (PI-AF) Manual
Configuration of Non-Central Advanced Adapter Engine (PI-AF)
If you want to connect PI-AF to a PI-AEX or PI-CP system:
Application Help Function-Oriented View: English Process
Integration Configuring Process Integration After Installation
Configuring Advanced Adapter Engine Extended (PI-AEX) Basic
Configuration for SAP PI Advanced Adapter Engine ExtendedConfiguring the Non-Central Advanced Adapter Engine (PI-AF) for
AEX
SAP NetWeaver 7.30 or Higher: Configuring the Advanced Adapter Engine Extended (PI-AEX)
To configure your PI-AEX system after the installation, execute the “PI-AEX initial setup” CTC Wizard described in SAP Note 1414465 .
For more information about all single configuration steps executed by the CTC Wizard and how to apply them manually, see the SAP Library at:
SAP Release and SAP Library Quick Link SAP Library Path (Continued)
● SAP NetWeaver 7.3http://help.sap.com/nw73
Application Help Function-Oriented View: English
Process Integration Configuring Process Integration (PI)
After Installation Basic Configuration (CTC Wizard-
Assisted and Manual) Basic Configuration for SAP
NetWeaver PI Advanced Adapter Engine Extended
106 P U B L I C
Installation of SAP Systems Based on the Application Server Java of SAP NetWeaver 7.3 to 7.5 on Windows: SAP Adaptive Server Enterprise
Post-Installation

SAP Release and SAP Library Quick Link SAP Library Path (Continued)
● SAP NetWeaver 7.3 including Enhancement Package 1http://help.sap.com/nw731
● SAP NetWeaver 7.4http://help.sap.com/nw74
● SAP NetWeaver 7.5http://help.sap.com/nw75
Application Help Function-Oriented View: English
Process Integration Configuring Process Integration After
Installation Configuring Advanced Adapter Engine
Extended (PI-AEX)
SAP NetWeaver 7.30 Including Enhancement Package 1 and Higher: Configuring the Process Orchestration (PI-CP)
To configure your PI-CP system after the installation, execute the “PI-CP initial setup” CTC Wizard described in SAP Note 1548120 .
For more information about all single configuration steps executed by the CTC Wizard and how to apply them manually, see the SAP Library at:
SAP Release and SAP Library Quick Link SAP Library Path (Continued)
● SAP NetWeaver 7.3 including Enhancement Package 1http://help.sap.com/nw731
● SAP NetWeaver 7.4http://help.sap.com/nw74
● SAP NetWeaver 7.5http://help.sap.com/nw75
Application Help Function-Oriented View: English
Process Integration Configuring Process Integration After
Installation Configuring Process Orchestration (PI-CP)
6.14 Configuring the User Management
After the installation has completed, configure the user management of your SAP system.
Procedure
During the installation of your SAP system, you specified one of the following initial data sources of the User Management Engine (UME) (for more information, see SAP System Parameters [page 42]):○ Database of the Application Server Java○ External ABAP system
Installation of SAP Systems Based on the Application Server Java of SAP NetWeaver 7.3 to 7.5 on Windows: SAP Adaptive Server EnterprisePost-Installation P U B L I C 107

After the installation of your SAP system has finished, you can still change the data source of the UME. The following changes of data source are supported:
○ From the database of the Application Server Java to user management of an external ABAP system○ From the database of the Application Server Java to a directory service
CautionThis is not valid for an Advanced Adapter Engine (AEX) installation.
For more information about changing the data source after installation and about related restrictions, see the SAP Library at:
SAP Release and SAP Library Quick Link SAP Library Path (Continued)
○ SAP NetWeaver 7.3https://help.sap.com/nw73
○ SAP NetWeaver 7.3 including Enhancement Package 1https://help.sap.com/nw731
○ SAP NetWeaver 7.4https://help.sap.com/nw74
○ SAP NetWeaver 7.5https://help.sap.com/nw75
Application Help Function-Oriented View: English
Security Identity Management User Management of the
Application Server Java Configuring User Management
UME Data Sources
6.15 Ensuring User Security
You need to ensure the security of the users that the installer created during the installation.
The tables below at the end of this section list the following users:
● Operating system users● SAP system users
During the installation, the installer by default assigned the master password to all users created during the installation unless you specified other passwords.
RecommendationIn all cases, the user ID and password are encoded only when transported across the network. Therefore, we recommend using encryption at the network layer, either by using the Secure Sockets Layer (SSL) protocol for HTTP connections, or Secure Network Communications (SNC) for the SAP protocols dialog and RFC.
CautionMake sure that you perform this procedure before the newly installed SAP system goes into production.
For the users listed below, take the precautions described in the relevant SAP security guide.
108 P U B L I C
Installation of SAP Systems Based on the Application Server Java of SAP NetWeaver 7.3 to 7.5 on Windows: SAP Adaptive Server Enterprise
Post-Installation

You can find the security guide in the Security section of the product page for your SAP product at https://help.sap.com/
Operating System and Database Users
After the installation, operating system users for SAP system, database, and SAP Host Agent are available as listed in the following table:
Operating System Users
User Comment
SAP system administrator <sapsid>adm SAP system administrator
syb<dbsid> Database administrator
SAPService<sapsid> SAP service user
SAP Host Agent User
User Type User Comment
Operating system user sapadm SAP Host Agent administrator is the user for central monitoring services.
You do not need to change the password of this user after the installation.
This user is for administration purposes only.
You are not able to log on as sapadm as this user is locked.
SAP System Users
Depending on the UME (User Management Engine) configuration that you specified during the installation, the following UME users are available after the installation:
● If you have chosen option Use Java Database, UME users are stored in the database (Java UME) – see table Users Stored in the Java Database below.You can manage users and groups with the UME Web admin tool and the SAP NetWeaver Administrator only.
● If you have chosen option Use ABAP, UME users are stored in an external ABAP system (ABAP UME) – see table Users Stored in an External ABAP System below.For more information, see Preparing an External ABAP System as Source for User Data [page 62].
Installation of SAP Systems Based on the Application Server Java of SAP NetWeaver 7.3 to 7.5 on Windows: SAP Adaptive Server EnterprisePost-Installation P U B L I C 109

The following tables show these users together with recommendations on how you can ensure the security of these users:
SAP System Users Stored in an External ABAP System
User User Name Storage: External ABAP System
Comment
Application Server Java Administrator
The name that you gave this user when you created it manually in the external ABAP system (see Preparing an External ABAP System as Source for User Data [page 62])
This user’s password is stored in secure storage.
Therefore, whenever you change the administrator’s password, you must also change the password in secure storage with the Config Tool.
RecommendationWe recommend that you use strong password and auditing policies for this user.
Application Server Java Guest The name that you gave this user when you created it manually in the external ABAP system (see Preparing an External ABAP System as Source for User Data [page 62])
Lock this user for interactive logon.
Communication user for Application Server Java
The name that you gave this user when you created it manually in the external ABAP system (see Preparing an External ABAP System as Source for User Data [page 62])
Specify this user as a Communications user and not as a dialog user.
This user exists in at least the SAP system client that you specified during the installation.
SAP System Users Stored in the Database
User User Name Storage: Database Comment
Administrator The name that you gave this user during the installation or the default name Administrator
This user’s password is stored in secure storage. Therefore, whenever you change the administrator’s password, you must also change the password in secure storage with the AS Java Config Tool.
RecommendationWe recommend that you use strong password and auditing policies for this user.
Guest The name that you gave this user during the installation or the default name Guest
This user is used for anonymous access.
Lock this user for interactive logon.
110 P U B L I C
Installation of SAP Systems Based on the Application Server Java of SAP NetWeaver 7.3 to 7.5 on Windows: SAP Adaptive Server Enterprise
Post-Installation

6.16 Performing Automated Configuration
This section provides references to documentation about how to run automated configuration tasks for the initial configuration of SAP NetWeaver functional units.
CautionDo not use the functional unit configuration tool to configure functional units that have already been enabled after:
● Upgrade● Update● System copy
If you need to change the configuration of functional units that have already been enabled, then you must execute the configuration steps manually.
If you want to use a functional unit that has not previously been enabled, you can either use the functional unit configuration tool or execute the steps manually.
To initially configure an SAP NetWeaver functional unit, proceed as described in the SAP Library for the SAP NetWeaver release your application is based on:
SAP Release and SAP Library Quick Link SAP Library Path (Continued)
● SAP NetWeaver 7.3https://help.sap.com/nw73
● SAP NetWeaver 7.3 including Enhancement Package 1https://help.sap.com/nw731
● SAP NetWeaver 7.4https://help.sap.com/nw74
● SAP NetWeaver 7.5http://help.sap.com/nw75
Application Help SAP NetWeaver Library: Function-Oriented View
Solution Life Cycle Management SAP NetWeaver Configuration
Configuration Wizard
Installation of SAP Systems Based on the Application Server Java of SAP NetWeaver 7.3 to 7.5 on Windows: SAP Adaptive Server EnterprisePost-Installation P U B L I C 111

6.17 Clearing the SLD Data Cache after Installing a Non-central Advanced Adapter Engine (Optional Standalone Unit)
When you have installed a non-central Advanced Adapter Engine, you need to manually clear the SLD Data Cache in the Integration Builder to make it visible and selectable in the communication channels.
Procedure
1. After SAPinst has finished, open the Integration Builder of your PI system at http://<host>:<port>/dir/start/index.jsp Integration Directory and logon as a user with the ABAP role SAP_XI_CONFIGURATOR assigned.
2. In the Integration Builder, choose Environment.3. From the drop-down list, choose Clear SLD Data Cache.
6.18 Enabling the Database
Use
After the SAP system installation, you must enable the database.
Procedure
CautionThe DBA Cockpit is not available in a Java-only system. To monitor the ASE database of your Java stack, connect it to a DBA Cockpit of an ABAP system in your system landscape.
1. Make sure that the version of your database is still supported, and check if there are newer versions available. For more information, see SAP Notes 1554717 and 1590719 .
2. You must enable the database for monitoring by setting up a DBA Cockpit Framework (DCF) after the SAP system installation. The DCF provides a time-based collection and evaluation of performance, configuration, and space-related data. In your SAP system, call transaction DBACOCKPIT to start the DBA Cockpit. Calling the DBA Cockpit automatically checks the existence of the DCF.
112 P U B L I C
Installation of SAP Systems Based on the Application Server Java of SAP NetWeaver 7.3 to 7.5 on Windows: SAP Adaptive Server Enterprise
Post-Installation

Recommendation
To make sure that the DCF was set up correctly, we recommend that you go to Configuration Data Collectors and Admin Procedures in the DBA Cockpit.
For further details, refer to the database administration guide. You can find the administration guide in the Service Marketplace: http://service.sap.com/instguides SAP NetWeaver SAP NetWeaver <Release> Operations Database-Specific Guides
3. Apply the latest patches for the DBA Cockpit. For more information, see SAP Note 1558958 .4. Set up Automatic Table Maintenance in the DBA Cockpit. Read the article DBA Cockpit: Automatic Table
Maintenance for SAP ASE (http://scn.sap.com/docs/DOC-15162 ).5. Check SAP Note 1539124 to make sure that the database configuration for your SAP installation
complies with SAP's requirements and recommendations.6. For systems with high load, refer to SAP Note 1722359 .
6.19 Performing a Full System Backup
You must perform a full system backup, including the operating system disk, system state, and all other disks, after the configuration of your SAP system. If required, you can also perform a full system backup after the installation (recommended). In addition, we recommend you to regularly back up your database.
Prerequisites
● You are logged on as user <sapsid>adm.● You have shut down the SAP system and database.
Installation of SAP Systems Based on the Application Server Java of SAP NetWeaver 7.3 to 7.5 on Windows: SAP Adaptive Server EnterprisePost-Installation P U B L I C 113

Procedure
For more information about backing up your SAP system on Windows, see the SAP Library at:
SAP Release and SAP Library Quick Link SAP Library Path (Continued)
● SAP NetWeaver 7.3http://help.sap.com/nw73
● SAP NetWeaver 7.3 including Enhancement Package 1http://help.sap.com/nw731
● SAP NetWeaver 7.4http://help.sap.com/nw74
● SAP NetWeaver 7.5http://help.sap.com/nw75
Application Help Function-Oriented View: English
Solution Life Cycle Management Backup and Recovery
Backing Up and Restoring your SAP System on Windows
More Information:
http://service.sap.com/instguides SAP NetWeaver SAP NetWeaver <Release> OperationsDatabase-Specific Guides SAP DBA Guide: SAP Adaptive Server Enterprise
6.20 Logging on to the SAP Web Dispatcher Management Console
This section describes how to log on to the SAP Web Dispatcher.
Context
You must log on to the SAP Web Dispatcher Management Console to do the following:
● Check whether the SAP Web Dispatcher was installed successfully,● Change the password of the webadm user,● Access monitoring and administration tools.
Procedure
1. Open a web browser.2. Enter the following URL, depending on whether you use HTTP or HTTPS:
http(s)://<Webdispatcher_Host>:<HTTP(S)_PORT>/sap/wdisp/admin/public/default.html
114 P U B L I C
Installation of SAP Systems Based on the Application Server Java of SAP NetWeaver 7.3 to 7.5 on Windows: SAP Adaptive Server Enterprise
Post-Installation

Examplehttps://plx282:44300/sap/wdisp/admin/public/default.html
3. Log on as user webadm with the password that you entered during the input phase of the installation.
The SAP Web Dispatcher Monitor screen appears.4. We recommend that you change the password of webadm immediately after the installation for security
reasons.
For more information on how to change passwords of existing users using the Admin Handler, see the SAP Library at:
Related Information
SCS Instance with Integrated SAP Web Dispatcher [page 23]
6.21 SAP Web Dispatcher Configuration (Optional)
After installing SAP Web Dispatcher, you must configure it to be able to use it.
NoteThis step is only required if you chose to install an integrated SAP Web Dispatcher instance within the SCS instance.
You can find the configuration information in the SAP Library at:
SAP Release and SAP Library Quicklink SAP Library Path (Continued)
● SAP NetWeaver 7.3http://help.sap.com/nw73
● SAP NetWeaver 7.3 including Enhancement Package 1http://help.sap.com/nw731
● SAP NetWeaver 7.4http://help.sap.com/nw74
● SAP NetWeaver 7.5http://help.sap.com/nw75
Application Help Function-Oriented View Application
Server Infrastructure Components of SAP NetWeaver
Application Server SAP Web Dispatcher
Installation of SAP Systems Based on the Application Server Java of SAP NetWeaver 7.3 to 7.5 on Windows: SAP Adaptive Server EnterprisePost-Installation P U B L I C 115

Related Information
SCS Instance with Integrated SAP Web Dispatcher [page 23]
116 P U B L I C
Installation of SAP Systems Based on the Application Server Java of SAP NetWeaver 7.3 to 7.5 on Windows: SAP Adaptive Server Enterprise
Post-Installation

7 SAP ASE 15.7: Disaster Recovery Setup with SAP Replication Server
7.1 Disaster Recovery Setup with SAP Replication Server
In the following chapters you will learn how to set up a disaster recovery solution using SAP ASE 15.7, the SAP Replication Server and the Disaster Recovery Agent Management utility.
CautionCarefully follow the instructions outlined in the following chapters. This is the only supported installation method to set up a disaster recovery solution with the SAP Replication Server!
This solution is not designed to support high availability, reporting, or other solutions that might be supported by replication tools.
In a typical replication scenario, the SAP system updates data on the primary database. Transactions are replicated automatically to the standby database by the replication software. In a failover scenario, the SAP application connections are switched to the standby database. Transactions generated on the standby database continue to be saved by the replication server until the primary database comes back online. Once the primary database returns to service, the saved standby database transactions are released and applied to the primary host. Both databases are resynchronized.
The figure below illustrates the replication architecture. It consists of the primary and the standby environments. The database and replication servers need to be run on the same hardware platform and operating system at both sites. The hosts can be virtual or physical machines, or a mix of both.
Installation of SAP Systems Based on the Application Server Java of SAP NetWeaver 7.3 to 7.5 on Windows: SAP Adaptive Server EnterpriseSAP ASE 15.7: Disaster Recovery Setup with SAP Replication Server P U B L I C 117

Disaster Recovery Solution Using SAP ASE, the SAP Replication Server and the Disaster Recovery Agent Management Utility
All components of a primary or standby environment can run on the same host (co-located environment). It is also possible to separate the database and the Replication Server (dis-located environment). The Replication Server and Disaster Recovery Agent must run on the same host.
CautionThe installation and uninstallation processes of the Replication Server software require having the corresponding SAP system directory (\\<SAPGLOBALHOST>\sapmnt) available on that host.
For more information, see SAP Directories [page 166].
Replication is set up to support a replication in both directions between the primary and the standby site, although only one direction is available at any one point in time. Two databases are replicated between the primary and the standby site:
● SAP application database● SAP ASE master database
Initially, the SAP Business Suite product must be installed with the SAP ASE database on the primary site. The SAP NetWeaver Application Server can be installed on the database host or a separate host. The standby database must be a copy of the database instance of the primary site. In case of a failover, the work processes of the SAP NetWeaver Application Server will automatically reconnect to the standby database.
CautionDo not enable a replication environment if you are not familiar with the SAP Replication Server product. Particularly in outage situations, the database log of the primary database can run out of space and the SAP system could face downtime as a result. Stopping the replication in an inappropriate manner may require rematerialization of the standby database.
Read SAP Note 1891560 before you start the installation. This SAP Note contains the most recent information on the installation, as well as corrections to the installation documentation.
118 P U B L I C
Installation of SAP Systems Based on the Application Server Java of SAP NetWeaver 7.3 to 7.5 on Windows: SAP Adaptive Server Enterprise
SAP ASE 15.7: Disaster Recovery Setup with SAP Replication Server

For more information, see the following guides: :
● Rolling Database Update in an SAP ASE and SAP Replication Server Environment:http://scn.sap.com/docs/DOC-66707
● HADR Users Guide:http://scn.sap.com/docs/DOC-65921
7.2 Implementation Considerations
The standby database requires the same levels of protection and scheduled maintenance as the primary database. Periodic reorganizations, generation of statistics, and other housekeeping tasks are also required on the standby site. The standby site requires its own backup and recovery process. This includes disk-based file backup and recovery, as well as dump creation and archiving at database level.
As a result of the logical replication method, the standby database might need more device space than the primary site. Dump files from the primary host cannot be used for recovery of the standby site. Once replication begins, the physical attributes of the primary and standby databases are no longer equivalent and they cannot share the same dump and load files for recovery.
During replication, additional information is written to the database transaction log for each database. The transaction log volume will increase by 40 to 50%.
The master database will always be replicated. It is not possible to exclude it.
7.3 Prerequisites
The following prerequisites must be fulfilled before you set up a disaster recovery solution:
Area: Requirements:
Software SAP recommends to install the latest versions of SAP ASE and of the SAP Replication Server:
For more information on the latest versions and the certified combinations of SAP ASE and SAP Replication Server, see SAP Note 1891560 .
Hardware Database and replication server must use the same hardware platform. SAP recommends installing the replication server on a separate host to keep the impact on the database as low as possible.
ASE Server Names The SAP ASE server name is based on the <SID> value and is the same on both primary and standby sites.
The SAP database name is the same on both sites.
Installation of SAP Systems Based on the Application Server Java of SAP NetWeaver 7.3 to 7.5 on Windows: SAP Adaptive Server EnterpriseSAP ASE 15.7: Disaster Recovery Setup with SAP Replication Server P U B L I C 119

Area: Requirements:
Directories For an SAP installation, the replication environment must be installed in the following directory:
<drive:>\sybase\<SID>_REP
Reserve at least 6 GB free space for software and configuration files.
The initial replication server partition file is placed in a folder at:
<drive:>\sybase\<SID>_REP\repdata_1
You can specify another folder for placing replication server partition files during installation. This allows distribution of disk I/O to several disks.
The initial size of the partition file should be at least factor 1.5 of the log size of the SAP application database. Reserve additional 2 GB for replication server usage in this folder.
TCP/IP ports In addition to the ASE TCP/IP ports, the following ports are required for the replication environment:
● Replication server: 4905● Replication server system database: 4906● Replication server system database replication agent: 4907● DR agent RMI: 4908● DR agent: 4909
The values for the TCP/IP ports are default values. It is possible to customize the port numbers.
The primary and the standby site can use the same port numbers.
Database Time Synchronization
Both primary and standby databases must have the same UTC time. Otherwise the SAP application will not work properly, if the SAP system is using the standby database.
Database User The following users are required on both sites:
● sapsa● sapsso● Replication user (<SID>_maint)
● DR agent administrator (DR_admin)
The sapsa and sapsso logins and their passwords must be identical across both databases. The replication user and the DR agent administrator are created by the SAP installer.
Be aware that the database user DR_admin is included in the secure storage of the SAP system, should you want to change the password.
Operating system user
The replication server and the DR agent are started with OS user syb<dbsid>. All operating system users and groups need to have the same user and group ID on all servers.
Windows services are set up for the replication server and the DR agent. The services are installed with the logon information of OS user syb<dbsid>. Whenever the password of OS user syb<dbsid> is changed, you also have to change the services accordingly.
120 P U B L I C
Installation of SAP Systems Based on the Application Server Java of SAP NetWeaver 7.3 to 7.5 on Windows: SAP Adaptive Server Enterprise
SAP ASE 15.7: Disaster Recovery Setup with SAP Replication Server

7.4 Installing the Replication Environment
Choose one of the following topologies and perform the appropriate installation steps to enable replication of an SAP system:
● Co-Located Replication Topology: PAS at the Primary Site [page 121]● Co-Located Replication Topology: PAS on a Separate Server [page 123]● Dis-Located Replication Topology: PAS on a Separate Server [page 125]
Caution● SRS is installed silently as part of the installation of the respective SAP product. Do not install the SRS
separately.● If you use virtual host names, choose parameter mode Custom during the installation. The installer will
ask for the server names of SAP ASE and SRS. Enter the virtual host names not the physical host names. If the databases are located in different networks, specify the fully qualified DNS Domain Name (FQDN).
● The DR agent will tune the SRS memory parameters based on the Physical Memory value of the SRS. If the values need to be changed after the installation, run the DR_agent command sap_tune_rs again on both sites.
7.4.1 Co-Located Replication Topology: Central Instance at the Primary Site
The following replication topology shows a co-located scenario. The database and the SAP Replication Server are installed on the same server. In this scenario the Primary Application Server (PAS) is also installed on one of the database servers.
Installation of SAP Systems Based on the Application Server Java of SAP NetWeaver 7.3 to 7.5 on Windows: SAP Adaptive Server EnterpriseSAP ASE 15.7: Disaster Recovery Setup with SAP Replication Server P U B L I C 121

Co-Located Replication Topology: Primary Application Server at the Primary Site
Prerequisites
You have installed an SAP application on SAP ASE. The Primary Application Server (PAS) and ASE 1 are installed on host 1 according to the SAP Installation Guide.
Installation Steps
Proceed as follows to install an additional replication environment to ensure high availability:
NoteThe following procedure describes the installation steps for a replication environment. Standard inquiries for the software location and the password need to be filled out as well.
● Step 1: Install the SAP Replication Server software on host 1.● Step 2: Install the secondary ASE database and SAP Replication Server on host 2. Configure the replication
environment on host 2.
Step 1: Install the SAP Replication Server software on host 1.
1. Run the installer with the following option: SAP NetWeaver <Version> SAP ASE Database ReplicationSetup of Replication Environment ..
2. Follow the instructions in the installation dialog. Select the following options:1. Select Install the replication server software.
122 P U B L I C
Installation of SAP Systems Based on the Application Server Java of SAP NetWeaver 7.3 to 7.5 on Windows: SAP Adaptive Server Enterprise
SAP ASE 15.7: Disaster Recovery Setup with SAP Replication Server

2. Finish the installation process.
Step 2: Install the secondary ASE database and SAP Replication Server on host 2. Configure the replication environment on host 2.
1. Run the installer with the following option: SAP NetWeaver <Release> SAP ASE Database ReplicationSetup of Replication Environment ..
2. Follow the instructions in the installation dialog. Select the following options:○ Set up a secondary database instance○ Install the replication server software○ Configure the replication system○ Materialize the secondary databases
Select the desired materialization method.The materialization step performs the initial copy of database content from one site to the other. Once completed, the replication software will maintain the data integrity of the target site by continuously applying changes that occur after completion of the materialization process. The procedure for materialization is dependent on the type and size of the database being materialized (see section Materializing Databases). The installer provides user interaction points that are used to synchronize the replication environment with the end user's manual dump and load activities.
3. Finish the installation process.
7.4.2 Co-Located Replication Topology: PAS on a Separate Server
The following replication topology shows a co-located scenario. The database and the SAP Replication Server are installed on one server. The Primary Application Server (PAS) is installed on a separate server.
Installation of SAP Systems Based on the Application Server Java of SAP NetWeaver 7.3 to 7.5 on Windows: SAP Adaptive Server EnterpriseSAP ASE 15.7: Disaster Recovery Setup with SAP Replication Server P U B L I C 123

Co-Located Replication Topology: PAS on a Separate Server
Prerequisites
You have installed an SAP application on SAP ASE. The Primary Application Server (PAS) and ASE 1 are installed on host 1 according to the SAP Installation Guide.
SAP system folder (\sapmnt\<SID>) of host 3 is mapped on host 1.
The SAP central instance and the application server are installed on host 3.
ASE 1 is installed as a distributed database instance on host 1.
Installation Steps
The following procedure describes the installation steps for a replication environment to ensure high availability. Standard inquiries for the software location and the password need to be filled out as well.
● Step 1: Install the SAP Replication Server software on host 1.● Step 2: Install the secondary ASE database and SAP Replication Server on host 2. Configure the replication
environment on host 2.
124 P U B L I C
Installation of SAP Systems Based on the Application Server Java of SAP NetWeaver 7.3 to 7.5 on Windows: SAP Adaptive Server Enterprise
SAP ASE 15.7: Disaster Recovery Setup with SAP Replication Server

Step 1: Install the SAP Replication Server software on host 1.
1. Run the installer with the following option: SAP NetWeaver <Release> SAP ASE Database ReplicationSetup of Replication Environment ..
2. Follow the instructions in the installation dialog. Select the following options:1. Select Install the Replication Server software.2. Finish the installation process.
Step 2: Install the secondary ASE database and SAP Replication Server on host 2. Configure the replication environment on host 2.
1. Run the installer with the following option: SAP NetWeaver <Release> SAP ASE Database ReplicationSetup of Replication Environment ..
2. Follow the instructions in the installation dialog. Select the following options:○ Set up a secondary database instance○ Install the replication server software○ Configure the replication system○ Materialize the secondary databases
Select the desired materialization method.The materialization step performs the initial copy of database content from one site to the other. Once completed, the replication software will maintain the data integrity of the target site by continuously applying changes that occur after completion of the materialization process.The procedure for materialization is dependent on the type and size of the database being materialized (see section Materializing Databases).The installer provides user interaction points that are used to synchronize the replication environment with the end user's manual dump and load activities.
3. Finish the installation process.
7.4.3 Dislocated Replication Topology: Central Instance on a Separate Server
The following replication topology shows a dislocated scenario. The database, the SAP Replication Server, and the Primary Application Server (PAS) are installed on separate hosts.
Installation of SAP Systems Based on the Application Server Java of SAP NetWeaver 7.3 to 7.5 on Windows: SAP Adaptive Server EnterpriseSAP ASE 15.7: Disaster Recovery Setup with SAP Replication Server P U B L I C 125

Dislocated Replication Topology
Prerequisites:
● You have installed an SAP application on SAP ASE. You want to install an additional replication environment to ensure high availability.
● SAP system folder (\sapmnt\<SID>) of host 3 is mapped on host 1.● The SAP central instance and the application server are installed on host 5.● ASE 1 is installed as a distributed database instance on host 1.
Installation Steps
The following procedure describes the installation steps for a replication environment to ensure high availability. Standard inquiries for the software location and the password need to be filled out as well.
● Step 1: Install the SAP Replication Server software on host 3.● Step 2: Install the secondary ASE database on host 2.● Step 3: Install the SAP Replication Server and configure the replication environment on host 4.
Step 1: Install the SAP Replication Server software on host 3.
Procedure:
1. Run the installer with the following option: SAP NetWeaver <Release> SAP ASE Database ReplicationSetup of Replication Environment ..
126 P U B L I C
Installation of SAP Systems Based on the Application Server Java of SAP NetWeaver 7.3 to 7.5 on Windows: SAP Adaptive Server Enterprise
SAP ASE 15.7: Disaster Recovery Setup with SAP Replication Server

2. Follow the instructions in the installation dialog.Select the following option:Install the replication server softwareFinish the installation process.
Step 2: Install the secondary ASE database on host 2.
Procedure:
1. Run the installer with the following option: SAP NetWeaver <Release> SAP ASE Database ReplicationSetup of Replication Environment ..
2. Follow the instructions in the installation dialog using the installation option Custom.Select the following option:Set up a secondary database instanceFinish the installation process.
Step 3: Install the SAP Replication Server. Configure the replication environment on host 4.
1. Run the installer with the following option: SAP NetWeaver <Release> SAP ASE Database ReplicationSetup of Replication Environment ..
2. Follow the instructions in the installation dialog. Select the following options:○ Install the replication server software○ Configure the replication system○ Materialize the secondary databases
Select the desired materialization method.The materialization step performs the initial copy of database content from one site to the other. Once completed, the replication software will maintain the data integrity of the target site by continuously applying changes that occur after completion of the materialization process.The procedure for materialization is dependent on the type and size of the database being materialized (see section Materializing Databases).The installer provides user interaction points that are used to synchronize the replication environment with the end user's manual dump and load activities.
3. Finish the installation process.
7.4.4 Materializing Databases
This section describes how to materialize the following databases:
● Master database● SAP database
Installation of SAP Systems Based on the Application Server Java of SAP NetWeaver 7.3 to 7.5 on Windows: SAP Adaptive Server EnterpriseSAP ASE 15.7: Disaster Recovery Setup with SAP Replication Server P U B L I C 127

Materialize the Master Database
Some information in the master database is site-specific. The only master database changes that are replicated are logins and roles for synchronizing users and credentials between the two sites. The DR agent facilitates materialization of the master database providing an automated materialization function.
The SAP installer materializes the master database automatically.
Materialize the SAP Database
The SAP installer, by default, offers automatic database materialization through database dump and load. This is the easiest method to materialize the SAP application database on the standby site. In this case, the installer will execute the dump database and load database commands without the interaction of a database administrator. Large databases may not fit for automatic materialization. Their size requires timing and control that is best left to the attention of the administrator. Therefore It is also possible to perform a customized database materialization. The SAP installer provides user interaction points that are used to synchronize the replication environment with the end user's manual database actions.
To guarantee recoverability, read SAP Note 1585981 .
7.4.4.1 Manual Materialization
The following methods are available:
● Using Single Database Dump and Load● Using Database and Transaction Dump and Load● Using Snapshot Materialization
Using Single Database Dump and Load
If the database is small enough to support materialization using a single database dump file, the sequence for performing this process is as follows:
1. The installer stops for manual loading of the standby database. The primary database contains the necessary replication markers at this time.
2. Dump the database using the command dump database in the primary database server.3. Copy the dump file to the standby site. You can use shared storage or FTP to make a copy of the dump file
available at the standby site.4. Load the SAP database using the ASE command load database in the standby database server.5. Bring the standby database online using the command online database to make the database available
for use in the standby system.6. Confirm the installer dialog. The database will be checked for the dump marker.
128 P U B L I C
Installation of SAP Systems Based on the Application Server Java of SAP NetWeaver 7.3 to 7.5 on Windows: SAP Adaptive Server Enterprise
SAP ASE 15.7: Disaster Recovery Setup with SAP Replication Server

Using Database and Transaction Dump and Load
For large databases, it may be impractical to create a new dump of the entire database. Or the time required to dump the database might create a backlog of hours or days that replication would need to apply in order to get back in sync. To facilitate materialization for large databases, the dump can be done in advance and transferred to the target side before the replication is started. Using this method, which includes transaction dumps, means that the replication delay and backlog are kept to a minimum.
The key difference in this technique is that the SAP installer is not involved until just before the last transaction dump is to be created. This allows the replication products to only address activity that occurs after the last transaction dump.
The sequence for performing materialization using transaction dump and load is as follows:
1. Dump the database on the primary database server. This can be a new dump or an existing dump if your system is already configured to perform periodic dumps of the entire database. If you are creating a new dump, use the ASE command dump database in the primary database server to create a dump of the entire database. Transfer the database dump to the standby site.
2. Install the SAP Replication Server software and perform the configuration on the primary site just before you intent to do the last transaction dump/load.
3. The installer stops for manual loading of the standby database. The primary database now contains the necessary replication markers.
NoteMake sure that there is no automatic dump database or dump transaction enabled at that time. Once you start the installer on the primary site to install and configure the replication server no automatic/manual dump should occur.
4. Load the database on the standby database server. Use the ASE command load database in the standby database server to load the dump.
5. Apply the necessary transaction log dumps to the standby database with the ASE command load transaction.
6. Dump the final transaction log of the SAP database which contains the replication marker. Use the ASE command dump transaction in the primary database server to create the last dump of the ASE transaction log.
7. Load the last transaction log dump.8. Bring the standby database online using the ASE command online database to make the database
available for use.9. Confirm the installer dialog. The database will be checked for the dump marker.
Using Snapshot Materialization
It is possible to materialize the standby database by using a snapshot of the primary database files with the help of a hardware mirroring product.
The sequence for performing materialization using database device files is as follows:
1. The installer stops for manual materialization of the standby database. The primary database contains the necessary replication markers at this time.
Installation of SAP Systems Based on the Application Server Java of SAP NetWeaver 7.3 to 7.5 on Windows: SAP Adaptive Server EnterpriseSAP ASE 15.7: Disaster Recovery Setup with SAP Replication Server P U B L I C 129

2. Quiesce the primary database.Use the ASE command quiesce database to freeze the database by suspending all disk write activities.
3. Generate a snapshot of the database files. The action to be performed depends on the hardware mirror product you are using. You could also just copy the files, use shared storage or FTP to make a copy of the dump file available at the standby site.
4. Unquiesce the primary database.Use the ASE command quiesce database … release to enable disk write activities on the primary database again.
5. Load the standby database with the snapshot files.Use the ASE command mount database in the standby database to mount the database content.
6. Bring the database online using the ASE command online database in the standby database server to make the database available for use.
7. Confirm the installer dialog. The database will be checked for the dump marker.
7.5 Starting and Stopping the DR Agent and the Replication Server
To be able to stop and start the DR agent and the replication server, you must have the credentials of OS user syb<dbsid>.
NoteASE, the DR agent and the replication server can also be started and stopped using startdb, stopbd, sapdbctrl, or saphostctrl. For more information, see SAP Note 1899185 : SAP ASE and SAP Replication Server: startdb & stopdb”.
Connecting to the DR Agent
Although there are two DR agents (one in primary and another in the standby environment), you will only need to enter commands at one of the DR agents. The DR agents can connect to each other in order to share configuration information or to execute any activity that requires local access to the host. To set up and monitor replication, log on to the DR agent on the primary environment.
Use the DR agent’s host and port and the DR agent administrator’s security credentials to establish a connection to the DR agent. The following example illustrates the use of ISQL to connect to the DR agent. Open a command shell for OS user syb<dbsid>:
Exampleisql -X -U DR_admin -S <hostname>:<DR agent port>
The DR agent does not store its own security credentials, but rather, enforces authentication by pass-through authentication to the database server, or replication server.
130 P U B L I C
Installation of SAP Systems Based on the Application Server Java of SAP NetWeaver 7.3 to 7.5 on Windows: SAP Adaptive Server Enterprise
SAP ASE 15.7: Disaster Recovery Setup with SAP Replication Server

Starting the DR Agent
Start the Windows Service named DRAgent_<SID>.
Stopping the DR Agent
Stop the Windows Service named DRAgent_<SID>.
If you are using Microsoft Cluster Services, both the replication server and DR agent must be represented by Windows Services, and they must be defined as services in all nodes of the cluster. If the services are not defined on all nodes, attempts to fail-over will not be successful.
Starting the Replication Server
Start the Windows service named SYBREP_<SID>_REP.
Stopping the Replication Server
Stop the Windows service named SYBREP_<SID>_REP.
7.6 Removing the Replication Environment
The installer provides installation options for teardown and removal of a replication environment.
Start with the uninstallation of the current primary environment. Otherwise database connects will be redirected and the installer will not be able to execute the necessary cleanup in the database.
As soon as the primary replication environment is removed, it is possible to uninstall the standby replication environment.
Choose the following installer options to disable replication and remove the replication software on the hosts running the replication servers.
<SAP product> Software Lifecycle Options Database Tools SAP ASE Database Replication Removal of Replication Environment
Specify the kind of removal. Choose one of the following options:
● Tear down replication systemThis option○ disables replication in the ASE servers
Installation of SAP Systems Based on the Application Server Java of SAP NetWeaver 7.3 to 7.5 on Windows: SAP Adaptive Server EnterpriseSAP ASE 15.7: Disaster Recovery Setup with SAP Replication Server P U B L I C 131

○ stops the replication servers○ deletes all directories and files created during setup, including the replication server instances
Data that was replicated to the standby databases will not be modified. The databases on the primary and standby hosts will not be “unmarked” for replication. The state of the environment after teardown will allow the immediate recreation of the replication environment. Materialization will again be required after setup.
NoteYou can only tear down the replication environment if the DR Agent is up and running.
● Unmark databases for replication and remove replication softwareThis option○ unmarks the databases○ drops the database users for replication○ removes the replication software
If the replication server was running on a separate host, it is possible to clean up remaining SAP standalone units using the installer option Deleting an SAP System or Single Instances.
132 P U B L I C
Installation of SAP Systems Based on the Application Server Java of SAP NetWeaver 7.3 to 7.5 on Windows: SAP Adaptive Server Enterprise
SAP ASE 15.7: Disaster Recovery Setup with SAP Replication Server

7.7 Integration of the SAP Replication Server into an OS Cluster Environment
Installing the SAP Replication Server on the same host as the SAP ASE database is not supported in an OS cluster environment. The only supported option is to install the SAP Replication Server on its own host as shown below:
7.8 Defining Dependencies
Both resources for replication – the replication server and the DR agent resource – will have the same dependencies. Each will be dependent on:
● The shared disk resource(s)● The IP Address handling resource
Use the appropriate commands for your cluster software to add these dependencies to both the replication server and DR agent resources.
Installation of SAP Systems Based on the Application Server Java of SAP NetWeaver 7.3 to 7.5 on Windows: SAP Adaptive Server EnterpriseSAP ASE 15.7: Disaster Recovery Setup with SAP Replication Server P U B L I C 133

NoteThere is no dependency between the replication server and DR agent. They can execute independently of each other.
7.9 Defining Node Failure Criteria
Most cluster software allows the state of the different cluster resources to trigger an automatic fail-over from one node in the cluster to another. The replication server and DR agent resource availability should not be used to trigger cluster fail-over.
Since the replication server processing is considered part of the SAP ASE database solution, no separate fault monitoring is required. If your existing hardware server or ASE monitoring determines that fail-over should occur, this is sufficient for replication to participate. It is not suggested that you add replication availability as a monitor for cluster node or ASE availability.
A failure by either of the replication resources will not affect the availability of your SAP application. However, a failure of your ASE resources does affect your SAP application availability. It is recommended that node failure continue to be triggered by ASE, but not include replication availability.
134 P U B L I C
Installation of SAP Systems Based on the Application Server Java of SAP NetWeaver 7.3 to 7.5 on Windows: SAP Adaptive Server Enterprise
SAP ASE 15.7: Disaster Recovery Setup with SAP Replication Server

8 SAP ASE 16.0: Disaster Recovery Setup with SAP Replication Server
8.1 Disaster Recovery Setup with SAP Business Suite on SAP ASE 16.0
The Disaster Recovery setup for SAP ASE 16.0 offers the following replication modes:
● Synchronous Replication (Hot Standby)● Near-Synchronous Replication (Hot Standby)● Asynchronous Replication (Warm Standby)
SAP recommends to always install the latest versions of SAP ASE and of the SAP Replication Server. For more information on the latest versions and the certified combinations of SAP ASE and SAP Replication Server, see SAP Note 1891560 .
The DR setup with SAP ASE 16.0 provides additional features for monitoring the SAP Replication Server using the Replication Management Agent (RMA).
You can install the SAP Replication Server on the same host as SAP ASE 16.0 (co-located scenario).
For more information, see the HADR Users Guide for SAP ASE 16.0 , Chapter 4, Installing HADR for SAP Business Suite and SAP Note 1891560 , section Additional Information.
Installation of SAP Systems Based on the Application Server Java of SAP NetWeaver 7.3 to 7.5 on Windows: SAP Adaptive Server EnterpriseSAP ASE 16.0: Disaster Recovery Setup with SAP Replication Server P U B L I C 135

9 High Availability with Microsoft Failover Clustering
You can install a high-availability SAP system with Microsoft Failover Clustering. The Failover Clustering software improves the availability of the system and protects it against failure and unplanned downtime, enabling 24-hour operation, 365 days a year.
With high availability you enable critical system components, known as “Single Points of Failure (SPOFs)”, to be automatically switched from one machine to the other, if hardware or software problems arise on one machine. With the help of this switchover – or failover – the system can continue functioning.
Apart from enabling failover when hardware problems occur, you can also use Failover Clustering to avoid downtime when you perform essential system maintenance. If you need to maintain one host (failover cluster node), you can deliberately switch the cluster resources to the other host (failover cluster node) and temporarily operate it there while maintenance is in progress. When maintenance work is finished you can easily move the resources back to their original node and continue operating them there.
NoteDual stack with one <SAPSID> for Microsoft Failover Clustering is no longer supported in SAP systems based on SAP NetWeaver 7.5. So if you want to install an SAP NetWeaver 7.5 Process Integration (PI) system based on SAP NetWeaver 7.5, do not use the documentation Installation Guide - SAP Systems Based on the Application Server ABAP+Java of SAP NetWeaver on <OS>: <DB>.
Instead, use Installation Guide - SAP Systems Based on the Application Server ABAP of SAP NetWeaver on <OS>: <DB> to install the ABAP stack with its own <SAPSID> plus Installation Guide - SAP Systems Based on the Application Server Java of SAP NetWeaver on <OS>: <DB> to install the Java stack with its own <SAPSID>. For more information, see the implementation sequence in the Master Guide - SAP NetWeaver 7.5 at http://help.sap.com/nw75.
When you are setting up the SAP system with Microsoft Failover Clustering, you combine standard installation steps, described earlier in this documentation, with cluster-specific steps, described here.
You have the following options to install a high-availability SAP system with Microsoft Failover Clustering:
● You install one SAP system in one Microsoft failover cluster.● You install one SAP system in two Microsoft failover clusters.● You install several SAP systems in one or more Microsoft failover clusters with two and more Microsoft
failover cluster nodes.
You have the following options to install the database instance with a high-availability SAP system:
● You install the database instance in the same failover cluster as the SAP system.● You install the database instance on a different host or cluster on either the same or a different operating
system.● You use third-party high-availability solutions to improve the availability of your database instance.
136 P U B L I C
Installation of SAP Systems Based on the Application Server Java of SAP NetWeaver 7.3 to 7.5 on Windows: SAP Adaptive Server Enterprise
High Availability with Microsoft Failover Clustering

Important Information
To install a new SAP system with Microsoft Failover Clustering, you have to perform a number of extra steps specially required for the cluster and configure the SAP system so that it can take advantage of the cluster functionality:
● Since the correct configuration of network addresses is absolutely essential for the cluster to function properly, you have to perform a number of additional steps that are necessary to set up and check address resolution.
● Since the cluster hardware has at least two nodes that have access to all local and shared storage devices, you have to install some components on all nodes and pay attention to special rules for distributing components to local or shared disks.
● You have to install and configure the SCS instance to run on two cluster nodes in one Microsoft failover cluster.
NoteIf you have an existing SAP system and plan to migrate to a failover cluster with new hardware, you install the SAP system using a system copy.
For more information about the system copy, see the System Copy Guide for your SAP system at:
http://support.sap.com/sltoolset System Provisioning System Copy Option
The system copy guide does not include the cluster-specific information, which is described here.
Terminology
● In this documentation the hosts in a Microsoft failover cluster are referred to as first cluster node and additional cluster node(s):○ The first cluster node is the cluster node where you perform the general installation of an SAP system,
for example where the database or (A)SCS instance is to be installed.○ The additional cluster node is the node where you configure the already installed SAP instances to run
in Microsoft Failover Clustering.● As of Windows Server 2008 there are the following terminology changes for a cluster configuration:
○ The cluster feature is called Failover Clustering. You might still find the previous terminology Microsoft Cluster Service and abbreviation MSCS in some sections of this guide.
○ Cluster groups are called services and applications (Windows Server 2008 (R2)), or roles (Windows Server 2012 (R2) and higher).In some sections we are continuing to use the old term. In this case, “cluster group” also means “service and application”, or “role”.
○ The Cluster Administrator is called Failover Cluster Manager.
Installation of SAP Systems Based on the Application Server Java of SAP NetWeaver 7.3 to 7.5 on Windows: SAP Adaptive Server EnterpriseHigh Availability with Microsoft Failover Clustering P U B L I C 137

9.1 Checklist for a High-Availability System
This section includes the steps that you have to perform for your SAP system using Microsoft Failover Clustering. Detailed information about the steps is available in the relevant section.
Planning
1. You check that you have completed the same planning activites as for a non-HA system.2. You decide how to set up your SAP system components in an HA configuration [page 139].3. You decide how to distribute SAP system components to disks for HA [page 146].4. You read Directories in an HA Configuration [page 148].5. You read IP Addresses in an HA Configuration [page 149].6. You obtain IP addresses for HA [page 152].
Preparation
1. You check that you have completed the same preparations [page 55] as for a non-HA system.2. To make sure that all preparation steps have been correctly performed, check that you can move the disk
resources from one cluster node to another so that they are only accessible from a single node at any time.
Installation
1. You make sure that:1. You are logged on as domain administrator, unless otherwise specified.2. You do not use the user <sapsid>adm unless specified.3. If you are prompted during the installation process, log off and log on again.
2. You configure the first cluster node [page 154].3. You install the database instance on the first cluster node [page 156] of the host where the database
instance is to run.4. You configure the database on the additional node. [page 156]5. You configure the additional cluster node [page 157].6. You install the primary application server instance [page 158].7. You install at least one additional application server instance [page 159].
138 P U B L I C
Installation of SAP Systems Based on the Application Server Java of SAP NetWeaver 7.3 to 7.5 on Windows: SAP Adaptive Server Enterprise
High Availability with Microsoft Failover Clustering

Post-Installation
1. You install the permanent SAP licenses on all cluster nodes.2. You perform the post-installation checks for the enqueue replication server.3. You perform the same post-Installation steps [page 90] as for a non-HA system.
Additional Information
● Moving Cluster Groups, or Services and Applications, or Roles [page 161]● Starting and Stopping the SAP System in a HA Configuration [page 162].
9.2 Planning
The following sections provide information about how to plan the installation of the SAP system for Microsoft Failover Clustering. For a complete list of all steps, see section Planning in the Installation Checklist for a High-Availability System [page 138].
9.2.1 System Configuration with Microsoft Failover Clustering
The following chapters provide information about the configuration of your SAP system configuration with Microsoft Failover Clustering. It describes the components you have to install for an SAP system running in a Microsoft failover cluster, and how to distribute them on the specific host. For more information, see:
● SAP System Components in a Microsoft Failover Cluster [page 140]● Multiple SAP Systems in One Microsoft Failover Cluster [page 143]● Multiple SAP Systems in Multiple Microsoft Failover Clusters [page 144]● Enqueue Replication Server in a Microsoft Failover Cluster [page 145]
Installation of SAP Systems Based on the Application Server Java of SAP NetWeaver 7.3 to 7.5 on Windows: SAP Adaptive Server EnterpriseHigh Availability with Microsoft Failover Clustering P U B L I C 139

9.2.1.1 SAP System Components in a Microsoft Failover Cluster
In a Microsoft Failover Cluster configuration you have the following mandatory components for your SAP system:
SAP System Components in an Failover Cluster Configuration
Component Number of Components per SAP System
Single Point of Failure
SCS instance (message services and enqueue services)
1 yes
Application server instance (primary application server, additional application server)
1-<n> no
(*) the database instance can also be installed outside the Microsoft failover cluster.
● To protect the SPOFs ((A)SCS instance and database instance) you have to use Microsoft Failover Clustering.If a hardware or software problem occurs on the first cluster node, the clustered (A)SCS instance and the clustered database automatically fail over to another node.If you need to maintain the cluster node where the (A)SCS instance and database are running you can switch these instances to another node. When maintenance work is finished you move the (A)SCS and database instance back to the original node.
● To protect system components that are non-SPOFs, for example application servers, you have to install them as multiple components. In this case you must install at least two application servers (the primary application server instance and one additional application server instance) on two different hosts. You have the following options:○ You install the primary application server and the additional application server instance on the cluster
nodes of a Microsoft failover cluster. You install them on a local disk. Any additional application server instances are installed on hosts outside of the Microsoft failover cluster.If you have to maintain a cluster node, you have to stop the primary application server or the additional application server instance on that node. When you have finished maintenance, you restart the instances.
NoteIf you install the primary application server and the additional application server instance on the cluster nodes, you must perform the hardware sizing for the failover cluster host, as in this case the application server is always running on this host. This increases system load and might impact performance.
Note that, as usual in a failover cluster setup, the (A)SCS and database instances also switch to run on the failover cluster host in the event of failover, which temporarily also increases system load.
○ You install the primary application server and all additional application server instances on hosts, which are not part of a Microsoft failover cluster.
140 P U B L I C
Installation of SAP Systems Based on the Application Server Java of SAP NetWeaver 7.3 to 7.5 on Windows: SAP Adaptive Server Enterprise
High Availability with Microsoft Failover Clustering

SAP System Components in One Microsoft Failover Cluster
The following figures show examples for the installation of SPOFs and non-SPOFs of an SAP system in one Microsoft failover cluster with two nodes.
The first figure shows an Microsoft failover cluster configuration where the non-SPOFs components (primary application server instance, additional application server instance) are installed locally on the cluster nodes. Any additional application server instances are installed outside the Microsoft failover cluster on separate hosts.
Java System
The following figure shows an HA configuration, where the non-SPOFs components (primary application server instance, additional application server instance) are installed on separate hosts that are not part of the failover cluster.
Installation of SAP Systems Based on the Application Server Java of SAP NetWeaver 7.3 to 7.5 on Windows: SAP Adaptive Server EnterpriseHigh Availability with Microsoft Failover Clustering P U B L I C 141

Java System
SAP System Components in Two Microsoft Failover Clusters
Besides installing your SAP system in one Microsoft failover cluster, you can also set up two failover clusters and distribute the SPOF system components on these clusters to protect them against system failure.
The following figure shows an example where the database instance for the SAP system is installed in one Microsoft failover cluster, and the (A)SCS instance is installed on the second failover cluster. The application servers (primary application server instance, additional application server instance) can either be installed on a local disk on the cluster nodes or on separate hosts that are not part of the Microsoft failover cluster.
142 P U B L I C
Installation of SAP Systems Based on the Application Server Java of SAP NetWeaver 7.3 to 7.5 on Windows: SAP Adaptive Server Enterprise
High Availability with Microsoft Failover Clustering

Java System
9.2.1.2 Multiple SAP Systems In One Microsoft Failover Cluster
Before SAP NetWeaver 7.0, SAP only supported the installation of one clustered SAP system in one Microsoft Failover Cluster with two cluster nodes. The reason was that the cluster share sapmnt resource could only be assigned to one cluster group and could only point to one shared drive.
The solution was to rename the cluster share sapmnt resource into sapmnt<SAPSID>, and use junctions, which pointed to the local disk. This is no longer required.
CautionAll additional local instances such as an enqueue replication server, primary or additional application server instance are installed on the local disk where the saploc share is pointing to. Make sure that you have enough space on this local disk.
Every SAP system is placed in a separate cluster group with the unique name SAP <SAPSID>. Each SAP cluster group has its own shared disk, IP address, network name, sapmnt share, as well as the SAP service resource (or generic service resource), and the SAP instance resource.
If you have an HA configuration with three or more cluster nodes, the following restrictions apply:
● The (A)SCS instance must be configured to run on two cluster nodes in one Microsoft failover cluster.For more information, see SAP Note 1634991 .
Installation of SAP Systems Based on the Application Server Java of SAP NetWeaver 7.3 to 7.5 on Windows: SAP Adaptive Server EnterpriseHigh Availability with Microsoft Failover Clustering P U B L I C 143

● If the database supports the installation on several cluster nodes, the database instance can be installed on more than two cluster nodes in one Microsoft failover cluster.
The following figure shows the installation of multiple SAP systems in one Microsoft failover cluster. For each SAP system you have to install one primary and at least one additional application server.
Multiple SAP Systems in one Microsoft Failover Cluster
9.2.1.3 Multiple SAP Systems In Multiple Microsoft Failover Clusters
Besides installing multiple SAP systems in one Microsoft failover cluster, you can also install multiple SAP systems in several Microsoft failover clusters with two or more cluster nodes.
NoteAs of Windows Server 2012, the Microsoft Failover Clustering software supports up to 64 cluster nodes.
For this failover cluster configuration the following restrictions apply:
● The (A)SCS instance must be configured to run on two cluster nodes in one Microsoft failover cluster.For more information, see SAP Note 1634991 .
● If the database supports the installation on several cluster nodes, the database instance can be installed on more than two cluster nodes in one Microsoft failover cluster.
144 P U B L I C
Installation of SAP Systems Based on the Application Server Java of SAP NetWeaver 7.3 to 7.5 on Windows: SAP Adaptive Server Enterprise
High Availability with Microsoft Failover Clustering

The following figure shows the installation of multiple SAP systems in two Microsoft failover clusters with three cluster nodes, called Node A, B, and C. In this example, the SCS and ASCS instances are installed in the first Microsoft failover cluster, and the database instances for the two SAP systems are installed on the second Microsoft failover cluster. The application servers can be either installed on a local disk on the cluster nodes or outside the Microsoft failover cluster on separate hosts.
NoteIf you use an enqueue replication server, you must configure the enqueue replication server, and the (A)SCS instance on two nodes.
For more information, see SAP Note 1634991 .
Multiple SAP Systems in Two Microsoft Failover Clusters
9.2.1.4 Enqueue Replication Server in a Microsoft Failover Cluster
The enqueue replication server contains a replica of the lock table (replication table) and is an essential component in a high-availability setup. It is installed on the two cluster nodes where the (A)SCS instance is installed and configured to run, even if you have more than two cluster nodes.
In normal operation the enqueue replication server is always active on the host where the (A)SCS instance is not running.
Installation of SAP Systems Based on the Application Server Java of SAP NetWeaver 7.3 to 7.5 on Windows: SAP Adaptive Server EnterpriseHigh Availability with Microsoft Failover Clustering P U B L I C 145

If an enqueue server in a Microsoft failover cluster with two nodes fails on the first cluster node, the enqueue server on the additional cluster node is started. It retrieves the data from the replication table on that node and writes it in its lock table. The enqueue replication server on the second cluster node then becomes inactive. If the first cluster node is available again, the enqueue replication server on the second cluster node becomes active again.
The following figure shows the enqueue replication server mechanism in an Microsoft failover cluster configuration with two nodes:
Enqueue Replication Server Mechanism on One Microsoft Failover Cluster with Two Nodes
9.2.2 Distribution of SAP System Components to Disks for Failover Clustering
When planning the Microsoft failover cluster installation, keep in mind that the cluster hardware has two different sets of disks:
● Local disks that are connected directly to the cluster nodes● Shared disks that can be accessed by all cluster nodes via a shared interconnect
NoteShared disk is a synonym for the cluster resource of Resource type Physical disk.
You need to install the SAP system components in both the following ways:
● Separately on all cluster nodes to use the local storage on each node● On the shared storage used in common by all cluster nodes
You install the following on different shared disks:○ Database instance files, if the database instance is installed in the failover cluster○ (A)SCS instance○ SAP system executables○ Single quorum device, if used
146 P U B L I C
Installation of SAP Systems Based on the Application Server Java of SAP NetWeaver 7.3 to 7.5 on Windows: SAP Adaptive Server Enterprise
High Availability with Microsoft Failover Clustering

CautionYou must not install any SAP components on the quorum disk.
Distribution of SAP System Components For One SAP System in a Failover Cluster
Quorum Configurations on Windows
On Windows there are several quorum configurations available. The configuration to use mainly depends on the cluster setup, such as the number of cluster nodes, the storage type (single or distributed), and the number of data centers. For more information, see the Windows documentation.
The default quorum configuration is called Node and Disk Majority for clusters with more than two nodes.
With this quorum configuration, each node and the witness disk maintain its own copy of the cluster configuration data. This ensures that the cluster configuration is kept running even if the witness disk fails or is offline.
NoteThe disk layout of the Node and Disk Majority and the Single Quorum Device Cluster is identical.
CautionIf you do not use the default quorum configuration for your operating system, contact your hardware partner, who can help you to analyze your needs and set up your cluster model. SAP supports these configurations if they are part of a cluster solution offered by your Original Equipment Manufacturer (OEM), or Independent Hardware Vendor (IHV).
Installation of SAP Systems Based on the Application Server Java of SAP NetWeaver 7.3 to 7.5 on Windows: SAP Adaptive Server EnterpriseHigh Availability with Microsoft Failover Clustering P U B L I C 147

Geographically Dispersed Cluster (Geospan)
The standard cluster configuration consists of two cluster nodes and a shared disk storage with all technical components located in the same data center. In a geographically dispersed cluster, also know as a geospan cluster, the cluster nodes are distributed across at least two data centers to avoid the full outage of a data center in the event of disaster.
A geospan configuration requires a more sophisticated disk storage architecture since a shared disk storage can only be located in one data center and might therefore be a single point of failure (SPOF). To prevent the disk storage becoming a SPOF, you have to configure the storage system in each data center and to replicate its content to the storage system of the other data center.
Replication can either be synchronous or asynchronous, depending on the:
● Functionality of the disk storage subsystem● Acceptable amount of data loss during a failover● Physical layout of the disk storage area network
This includes the distance between the storage systems, signal latency, capacity, and speed of the network connection.
● Customer budget
The database components in geospan configurations are often no longer part of the cluster and the database is replicated by pure database techniques, such as shadow database, log shipping, and mirrored database.
Caution● Currently, it is only possible to configure geospan clusters in the same subnet since on Windows Server
2008 (R2), you must not change a virtual IP address during failover.● The numerous variants with geospan cluster configurations and the complex technical requirements are
the reasons why the installation and configuration of such high-availability (HA) systems are not directly supported by SAP. Instead, the hardware vendors of this cluster configuration are responsible for the installation, configuration, and operation of the HA components running in geospan clusters. SAP only supports the standard operation and function of the SAP components running in such cluster configurations.
All functionality to set up geospan clusters is available as of Windows Server 2008 (R2).
9.2.3 Directories in a Microsoft Failover Cluster Configuration
The following tables show the directories where the main software components for a high-availability system are stored:
Directories on Local Disks on Cluster Nodes
Component Default Directory
A supported operating system %windir%
148 P U B L I C
Installation of SAP Systems Based on the Application Server Java of SAP NetWeaver 7.3 to 7.5 on Windows: SAP Adaptive Server Enterprise
High Availability with Microsoft Failover Clustering

Component Default Directory
Microsoft Failover Clustering software %windir%\Cluster
Application server (if installed locally) <Local_Drive>:\usr\sap\<SAPSID>\<Instance>
Enqueue replication server <Local_Drive>:\usr\sap\<SAPSID>\ERS<Instance_Number>
Diagnostics Agent (optional) <Local_Drive>:\usr\sap\<DASID>\SMDA<Instance_Number>
SAP Host Agent %ProgramFiles%\SAP\hostctrl
Directories on Shared Disks
Component Default Directory
Cluster quorum resource (if used) <Drive>:\Cluster
SAP global and instance directories <Drive>:\usr\sap ...
9.2.4 IP Addresses in a Failover Cluster Configuration
A part of the installation process that is unique to Microsoft Failover Clustering is the configuration of host names and IP addresses in the network. This is a particularly important task because the addressing plays a key role in the switchover procedure. Addressing must be set up correctly so that the system can take advantage of the cluster functionality and switch between nodes when hardware problems arise.
This section explains the different types of IP addresses and their function in the switchover mechanism of one Microsoft failover cluster with two cluster nodes.
NoteAs of Windows Server 2008, besides static IP addresses, you can also have DHCP-based (dynamic) IP addresses.
Currently DHCP-based IP configurations are not supported for high-availability SAP systems. If the virtual IP address of the SAP cluster group changes during a failover, your clients can no longer reach the system due to DNS caching.
Types of IP Addresses
In a proper configured cluster with at least two nodes, there are at least seven IP addresses and corresponding host names for your SAP system. You have two IP addresses for each cluster node, one IP address for the cluster, one address for the SAP cluster group and one for the database cluster group.
Installation of SAP Systems Based on the Application Server Java of SAP NetWeaver 7.3 to 7.5 on Windows: SAP Adaptive Server EnterpriseHigh Availability with Microsoft Failover Clustering P U B L I C 149

Some of the addresses are assigned to the network adapters (network interface card, NIC) whereas others are virtual IP addresses that are assigned to the cluster groups.
Physical IP Addresses Assigned to Network Adapters
A Microsoft failover cluster configuration has two networks:
● A public network that is used for the communication between the primary application server, additional application servers, and the LAN.
● A private network that is used internally for communication between the nodes of the cluster, also called heartbeat.
The following figure shows a Microsoft failover cluster with two nodes and illustrates the adapters required for the public and private networks, and their corresponding physical IP addresses. A physical IP address, in contrast to a virtual one, is stationary and permanently mapped to the same adapter.
Adapters and IP Addresses Required for Public and Private Networks in an Microsoft Failover Cluster with Two Nodes
Host Names Assigned to Network Adapters
Each of the physical IP addresses of the network adapters must have a corresponding host name. For example, on the left-hand node in the figure above, you might assign the IP addresses of the public and private network adapters as follows:
IP Addresses and Host Names
Network Adapter IP Address Host Name
Adapter 1 (private network) 10.1.1.1 clusA_priv
Adapter 3 (heartbeat network) 192.168.1.1 clusA
Caution● The IP address and host name of the public network adapter is also the IP address and name of the
machine. In our example, this means that the machine that is the cluster node on the left in the figure has the name clusA.
150 P U B L I C
Installation of SAP Systems Based on the Application Server Java of SAP NetWeaver 7.3 to 7.5 on Windows: SAP Adaptive Server Enterprise
High Availability with Microsoft Failover Clustering

● Do not confuse the host name with the computer name. Each node also has a computer name, which is often the same as the host name.The computer name is displayed in the node column of the Failover Cluster Management. However, it is not required for the TCP/IP communication in the cluster. When you configure IP addresses and corresponding names, keep in mind that it is the host names that are important for the cluster, not the computer names.
Virtual IP Addresses Assigned to Cluster Groups
After you have installed the SAP system and fully configured the cluster, the critical system resources are bound together in three different groups.
Each of these groups requires a virtual IP address and network name that is permanently mapped to the group and not to a particular node. The advantage of this is that, whenever a group is moved between nodes, its IP address and network name move together with the group.
An HA configuration has the following groups:
● SAP cluster group for each clustered SAP system● Cluster group
The following figure illustrates how the virtual IP addresses of the database group and SAP group can move from one node to the other during a failover.
Failover of Virtual IP Addresses
Installation of SAP Systems Based on the Application Server Java of SAP NetWeaver 7.3 to 7.5 on Windows: SAP Adaptive Server EnterpriseHigh Availability with Microsoft Failover Clustering P U B L I C 151

9.2.5 Obtaining IP Addresses for a Microsoft Failover Cluster Configuration
This chapter describes how to obtain the IP addresses for the network adapters (cards) that are required to install and run your high-availability system.
Context
For a clustered system, you have to configure IP addresses correctly. During the installation procedure you have to assign at least seven IP addresses and host names. You normally obtain these names and addresses from the system administrator.
Procedure
Ask the system administrator to give you the addresses and host names listed in the tables below, which show an example for a configuration with one Microsoft failover cluster with two nodes. You need to enter the addresses and host names later during the installation process.
The column Defined During indicates at which stage of the installation of the operating system and the SAP system the addresses are defined in the system.
CautionUse the names exactly as specified by the system administrator.
NoteNote: In the following tables we are still using the terminology cluster group, and not the Windows Server 2008 (R2) terminology services and applications or the Windows Server 2012 (R2) terminology Roles.
Physical IP Addresses
Component Example for Physical IP Address
Example for Physical Host Name
Purpose Defined During
First cluster node:
adapter for heartbeat network
10.1.1.1 clusA_priv Address for internode communication on the heartbeat network
Windows installation
152 P U B L I C
Installation of SAP Systems Based on the Application Server Java of SAP NetWeaver 7.3 to 7.5 on Windows: SAP Adaptive Server Enterprise
High Availability with Microsoft Failover Clustering

Component Example for Physical IP Address
Example for Physical Host Name
Purpose Defined During
First cluster node:
adapter for public network
129.20.5.1 clusA Address of the first cluster node for communication with application servers and LAN (this is the same as the address of the first cluster node)
Windows installation
Additional cluster node:
adapter for heartbeat network
10.1.1.2 clusB_priv Address for internode communication on the heartbeat network
Windows installation
Additional cluster node:
adapter for public network
129.20.5.2 clusB Address of the additional cluster node for communication with application servers and LAN (this is the same as the address of the additional cluster node)
Windows installation
Virtual IP Addresses
Component Example for Virtual IP Address
Example for Host Name
Purpose Defined During
Cluster group 129.20.5.3 clusgrp Virtual address and name of the cluster group. It identifies the cluster and is used for administration purposes.
Failover cluster software installation
SAP cluster group 129.20.5.4 sapgrp Virtual address and name for accessing the group of SAP resources, regardless of the node it is running on
Configuration of SAP system for high availability with the installer on the first node
Installation of SAP Systems Based on the Application Server Java of SAP NetWeaver 7.3 to 7.5 on Windows: SAP Adaptive Server EnterpriseHigh Availability with Microsoft Failover Clustering P U B L I C 153

Component Example for Virtual IP Address
Example for Host Name
Purpose Defined During
Database cluster group
129.20.5.5 dbgrp Virtual address and name for accessing the group of database resources, regardless of the node it is running on
Execution of HA-wizard or database-specific cluster scripts
9.3 Preparation
This section provide information about how to prepare the installation of the SAP system for Microsoft Failover Clustering. For a complete list of all steps, see section Preparation in the Installation Checklist for a High-Availability System [page 138].
1. You check that you have completed the same preparations [page 55] as for a non-HA system.2. To make sure that all preparation steps have been correctly performed, check that you can move the disk
resources from one cluster node to another so that they are accessible from a single node at any time.
9.4 Installation
The following sections provide information about how to install the SAP system in a high-availability environment. For a complete list of all steps, see section Installation in the Installation Checklist for a High-Availability System [page 138].
Due to a SAP MaxDB technical restriction, the use of passwords longer than nine characters is not possible in an MSCS environment. For more information, see SAP Note 2319006 .
.
9.4.1 Configuring the First Cluster Node
When you run the First Cluster Node option it:
● Creates the saploc share, pointing to a local disk● Creates the sapmnt share, pointing to a local disk● Installs the central services instance (SCS) and prepares this host as the SAP global host● Creates the SAP cluster group and adds the SCS instance to the SAP cluster group● Installs the enqueue replication server instance (ERS instance) for the SCS instance● Installs the SAP Host Agent
154 P U B L I C
Installation of SAP Systems Based on the Application Server Java of SAP NetWeaver 7.3 to 7.5 on Windows: SAP Adaptive Server Enterprise
High Availability with Microsoft Failover Clustering

CautionWhen you reboot during the conversion to Failover Clustering, resources fail over to the other cluster node. Therefore, after each reboot you have to return the system to the state it was in before the reboot.
Prerequisites
● You are logged on to the first cluster node as domain administrator or as a local user with domain administration rights. For more information, see Performing a Domain Installation without being a Domain Administrator [page 171].
● You must install the SCS instance on a shared disk, and the ERS instance and SAP Host Agent on a local disk.
NoteIf you are installing the Java stack for a SAP NetWeaver 7.5 Process Integration (PI) system, make sure that you install the SCS instance on a separate shared cluster disk from the ASCS instance.
Procedure
1. Run the installer [page 78] and on the Welcome screen, choose <Product> <Database> SAP Systems <System> High-Availability System First Cluster Node .
NoteIf the installer prompts you to log off from your system, log off and log on again.
2. Enter the required parameter values.
Note○ For more information about the input parameters, position the cursor on a parameter and press F1
in the installer.○ If you have a Microsoft cluster configuration with more than two nodes in one cluster, apply SAP
Note 1634991 .
More Information
Moving Cluster Groups, or Services and Applications, or Roles [page 161]
Installation of SAP Systems Based on the Application Server Java of SAP NetWeaver 7.3 to 7.5 on Windows: SAP Adaptive Server EnterpriseHigh Availability with Microsoft Failover Clustering P U B L I C 155

9.4.2 Installing the Database Instance
Use
This procedure describes how to install the database instance on the first cluster node.
Prerequisites
● The SAP cluster group is Online on the first cluster node.● The DB cluster group is Online on the first cluster node.
Procedure
Perform the following steps on the first cluster node.
1. Run the installer [page 78] and on the Welcome screen, choose <Product> <Database> SAP Systems <System> High-Availability System Database Instance .
2. Follow the instructions in the installer dialogs and enter the required parameter values.1. For the profile directory you have to use the UNC path of the virtual (A)SCS host name, for example:
\\<SAPGLOBALHOST>\sapmnt\<SAPSID>\SYS\profile.In an HA-system, the virtual host name of the (A)SCS instance is the same as the SAP global host name.
2. When the installer prompts you for the database host, make sure that you enter the virtual database host name.
NoteFor more information about the input parameters, position the cursor on a parameter and press the F1 key in the installer.
9.4.3 Configuring the Database on the Additional Node
Perform the steps below to configure the database on the additional cluster node.
1. On the additional cluster node, run the installer [page 78] and in the Welcome screen, choose <Product><Database> SAP Systems <System> High-Availability System Additional Database Cluster
Node .2. Follow the instructions in the installer dialogs and enter the required parameter values.
156 P U B L I C
Installation of SAP Systems Based on the Application Server Java of SAP NetWeaver 7.3 to 7.5 on Windows: SAP Adaptive Server Enterprise
High Availability with Microsoft Failover Clustering

Caution○ Make sure that you enter the same drive as you did on the first database node.○ Make sure that you distribute the SAP ASE software and logs correctly to local and shared disks as
described in Directories in a Microsoft Failover Cluster Configuration [page 148].
NoteFor more information about the input parameters, position the cursor on a parameter and press the F1 key in the installer.
9.4.4 Configuring the Additional Cluster Node
Use
When you run the Additional Cluster Node option it:
● Configures the additional cluster node to run the SAP cluster group● Creates the saploc share, pointing to a local disk● Installs the enqueue replication server instance (ERS) for the SCS instance● Installs the SAP Host Agent
CautionYou must install the ERS and SAP Host Agent on a local disk.
Prerequisites
● You are logged on to the additional cluster node as domain administrator or as a domain user who is a local administrator on all cluster nodes. For more information, see Performing a Domain Installation without being a Domain Administrator [page 171].
● You have already performed the First Cluster Node [page 154] option.
Procedure
1. Run the installer [page 78] and on the Welcome screen, choose <Product> <Database> SAP Systems <System> High-Availability System Additional Cluster Node .
NoteIf the installer prompts you to log off from your system, log off and log on again.
Installation of SAP Systems Based on the Application Server Java of SAP NetWeaver 7.3 to 7.5 on Windows: SAP Adaptive Server EnterpriseHigh Availability with Microsoft Failover Clustering P U B L I C 157

2. Enter the required parameter values.
NoteFor more information about the input parameters, position the cursor on the parameter and press F1 in the installer.
9.4.5 Installing the Primary Application Server Instance
Use
You have the following options to install the primary application server instance:
● You install the primary application server instance on a cluster node.● You install the primary application server instance on a host outside of Microsoft failover cluster.
Procedure
1. Run the installer [page 78] and on the Welcome screen, choose <Product> <Database> SAP Systems <System> High-Availability System Primary Application Server Instance .
2. If the installer prompts you to log off, choose OK and log on again.3. Follow the instructions in the installer dialogs and enter the required parameter values.
Note○ For more information about the input parameters, position the cursor on a parameter and press F1
in the installer.○ If you install the primary application server instance on an cluster node, make sure that on the
screen General SAP System Parameters for the:○ Profile Directory, you use the UNC path (not the local path) of the virtual (A)SCS host name, for
example:\\<SAPGLOBALHOST>\sapmnt\<SAPSID>\SYS\profile.In a high availability system, the virtual host name of the (A)SCS instance is the same as the SAP global host name.
NoteIf you are installing a SAP NetWeaver 7.5 Process Integration (PI) system, make sure that the virtual host names for the ASCS instance and the SCS instance are different.
○ Installation Drive, you choose the local disk where you want to install the primary application server instance.
4. Check that the primary application server instance is running.
158 P U B L I C
Installation of SAP Systems Based on the Application Server Java of SAP NetWeaver 7.3 to 7.5 on Windows: SAP Adaptive Server Enterprise
High Availability with Microsoft Failover Clustering
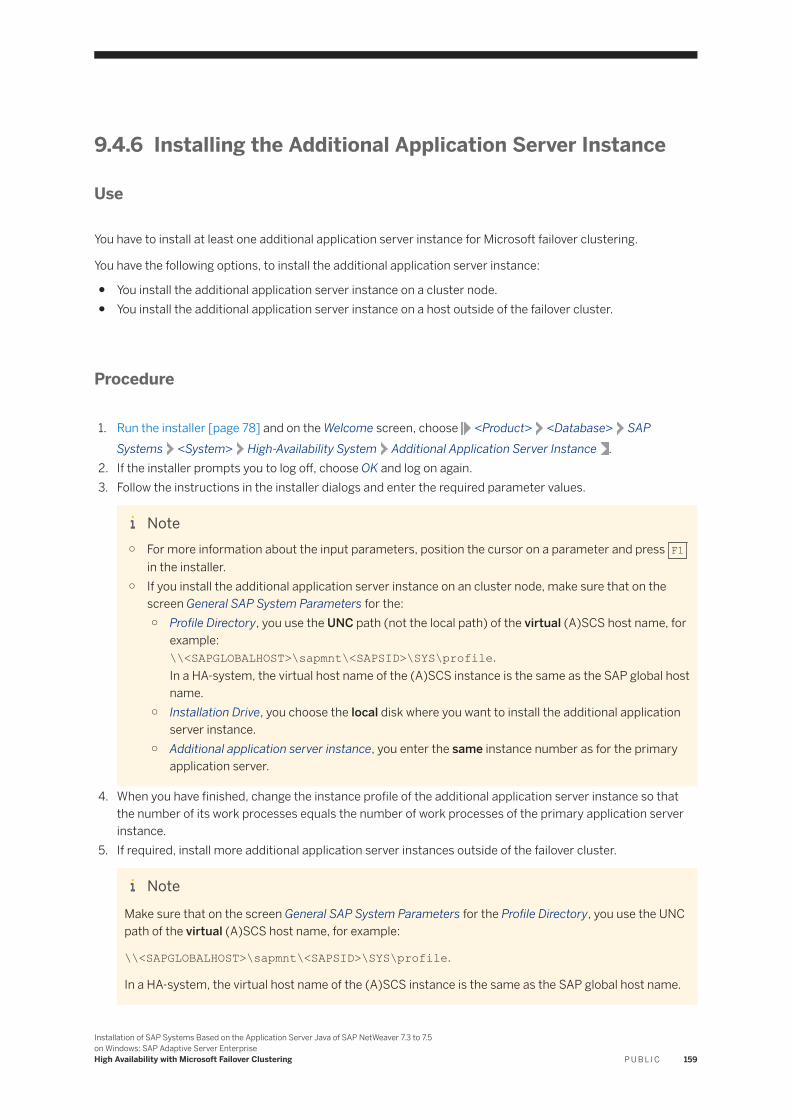
9.4.6 Installing the Additional Application Server Instance
Use
You have to install at least one additional application server instance for Microsoft failover clustering.
You have the following options, to install the additional application server instance:
● You install the additional application server instance on a cluster node.● You install the additional application server instance on a host outside of the failover cluster.
Procedure
1. Run the installer [page 78] and on the Welcome screen, choose <Product> <Database> SAP Systems <System> High-Availability System Additional Application Server Instance .
2. If the installer prompts you to log off, choose OK and log on again.3. Follow the instructions in the installer dialogs and enter the required parameter values.
Note○ For more information about the input parameters, position the cursor on a parameter and press F1
in the installer.○ If you install the additional application server instance on an cluster node, make sure that on the
screen General SAP System Parameters for the:○ Profile Directory, you use the UNC path (not the local path) of the virtual (A)SCS host name, for
example:\\<SAPGLOBALHOST>\sapmnt\<SAPSID>\SYS\profile.In a HA-system, the virtual host name of the (A)SCS instance is the same as the SAP global host name.
○ Installation Drive, you choose the local disk where you want to install the additional application server instance.
○ Additional application server instance, you enter the same instance number as for the primary application server.
4. When you have finished, change the instance profile of the additional application server instance so that the number of its work processes equals the number of work processes of the primary application server instance.
5. If required, install more additional application server instances outside of the failover cluster.
NoteMake sure that on the screen General SAP System Parameters for the Profile Directory, you use the UNC path of the virtual (A)SCS host name, for example:
\\<SAPGLOBALHOST>\sapmnt\<SAPSID>\SYS\profile.
In a HA-system, the virtual host name of the (A)SCS instance is the same as the SAP global host name.
Installation of SAP Systems Based on the Application Server Java of SAP NetWeaver 7.3 to 7.5 on Windows: SAP Adaptive Server EnterpriseHigh Availability with Microsoft Failover Clustering P U B L I C 159

9.5 Post-Installation
To complete and check the installation of the SAP system for a high-availability configuration, you need to perform the following steps:
1. You install the permanent SAP licenses on all cluster nodes.2. After a new installation of a clustered (A)SCS instance, make sure that you update the saprc.dll (part of
the NTCLUST.SAR) package in c:\windows\system32 as soon as possible. For more information, see SAP Note 1596496 .
3. For information about Rolling Kernel Switch on Windows Failover Clusters, see SAP Note 2199317 .4. You perform the post-installation checks for the enqueue replication server.
For more information, see the SAP Library at:
SAP Release and SAP Library Quick Link SAP Library Path (Continued)
○ SAP NetWeaver 7.3http://help.sap.com/nw73
○ SAP NetWeaver 7.3 including Enhancement Package 1http://help.sap.com/nw731
Application Help Function-Oriented View Application
Server Application Server Infrastructure Standalone
Enqueue Server Installing the Standalone Enqueue Server
Replication Server: Check Installation
○ SAP NetWeaver 7.4http://help.sap.com/nw74
○ SAP NetWeaver 7.5http://help.sap.com/nw75
Application Help Function-Oriented View Application
Server Application Server Infrastructure Components of
SAP NetWeaver Application Server Standalone Enqueue
Server Installing the Standalone Enqueue Server
Replication Server: Check Installation
5. If required, you perform the general post-Installation steps [page 90] listed in this guide.
9.6 Additional Information
The following sections provide additional information about:
● Moving Cluster Groups, or Services and Applications, or Roles [page 161]● Starting and Stopping the SAP System in a Microsoft Failover Cluster Configuration [page 162].
160 P U B L I C
Installation of SAP Systems Based on the Application Server Java of SAP NetWeaver 7.3 to 7.5 on Windows: SAP Adaptive Server Enterprise
High Availability with Microsoft Failover Clustering

9.6.1 Moving Cluster Groups, or Services and Applications, or Roles
Use
When you reboot during the conversion to Microsoft Failover Clustering, cluster resources fail over to the other cluster node. Therefore, you have to return the system to the state it was in before the reboot, and move the resources back to the original node.
To move the database, SAP, or disk cluster groups from one cluster node to the other, you use the following:
● PowerShell (Windows Server 2012 (R2) and higher)● Failover Cluster Manager (Windows Server 2008 (R2))
NoteAs of Windows Server 2008 (R2) there are the following terminology changes:
● Cluster groups are called services and applications (Windows Server 2008 (R2), or Roles (Windows Server 2012 (R2) and higher)We do not always use all names in this section.
● The Cluster Administrator is now called Failover Cluster Manager.
Prerequisites
Windows Server 2008 (R2):
The services or applications you want to move are configured and are visible in the Failover Cluster Manager.
Procedure
Moving Roles, or Services and Applications, or Groups
To move the roles (Windows Server 2012 (R2) and higher) or services and applications (Windows Server 2008 (R2)), proceed as follows:
● Windows Server 2012 (R2) and higher:1. To move a role, open PowerShell in elevated mode, and enter the following command:
move-clustergroup "<role name>"2. Repeat these steps for each role that you want to move.
● Windows Server 2008 (R2):
1. Start the Failover Cluster Manager with Start Administrative Tools Failover Cluster Manager .2. In the Failover Cluster Manager, right-click the service and application you want to move.
3. Choose Move this service or application to another node Move to <relevant node> .
Installation of SAP Systems Based on the Application Server Java of SAP NetWeaver 7.3 to 7.5 on Windows: SAP Adaptive Server EnterpriseHigh Availability with Microsoft Failover Clustering P U B L I C 161

4. Repeat the previous step for each service and application that you want to move.
NoteYou can only move disks that are assigned to Services and Applications (Windows Server 2008 (R2)) or Roles (Windows Server 2012 (R2)and higher).
The disks that are added to the cluster are automatically added to a group named Available Storage. Although the groups Available Storage and Cluster Group exist in a failover cluster on Windows Server 2008 (R2) or higher, they are not visible under Services and Applications (Windows Server 2008 (R2)) or Roles (Windows Server 2012 (R2) and higher). Therefore, you cannot move these groups with the Failover Cluster Manager.
● If you use Windows Server 2012 (R2) and higher, proceed as follows:○ To move Cluster Group, open PowerShell in elevated mode, and enter the following command:
move-clustergroup "cluster group"○ To move Available Storage, open PowerShell in elevated mode, and enter the following command:
move-clustergroup “Available Storage”● If you use Windows Server 2008 (R2) proceed as follows:
○ To move Cluster Group, open a command prompt and enter:cluster group “cluster group” /move
○ To move Available Storage, open a command prompt and enter:cluster group “Available Storage” /move
9.6.2 Starting and Stopping the SAP System in a Microsoft Failover Cluster Configuration
Use
An SAP System in an HA configuration is typically configured into two HA groups: one cluster resource group contains the database resources, the other group contains the SAP (A)SCS instance.
NoteWhen starting a whole SAP system, you first need to start the database instance and then the remaining SAP instances.
When stopping a whole SAP system, you first need first to stop all SAP instances and then the database instance.
With the SAP MMC, or SAPControl you can start and stop all SAP instances whether they are clustered or not, except the database instance.
With certain HA administration tools (Cluster Administrator , Failover Cluster Manager , or PowerShell), you can only start or stop a clustered SAP instances, such as the (A)SCS instance or the database instance.
162 P U B L I C
Installation of SAP Systems Based on the Application Server Java of SAP NetWeaver 7.3 to 7.5 on Windows: SAP Adaptive Server Enterprise
High Availability with Microsoft Failover Clustering

Procedure
Starting and Stopping a Complete System or a Single Instance with SAP MMC or SAPControl
With the SAP MMC, or the command line tool SAPControl, you can start or stop the complete SAP system or a single clustered or non-clustered SAP instance, except the database instance.
To start or stop the database instance, you have to use the tools described in “Starting and Stopping the clustered (A)SCS and Database Instance”.
For more information about SAP MMC or SAPControl, see Starting and Stopping the SAP System [page 183].
Note● To use SAP MMC or SAPControl for starting or stopping a clustered SAP instance, the "SAP <SAPSID>
<Instance_Number> Service" resource of the clustered instance must be online. Therefore, SAP recommends keeping the "SAP <SAPSID> <Instance_Number> Service" cluster resource always online, and using the SAP MMC or SAPControl to start or stop a clustered instance.
● You can also start SAPControl in the PowerShell.● The SAP MMC is not available on the Server Core for Windows Server 2012 (R2) and higher.
Starting and Stopping the clustered (A)SCS and Database Instance
With certain HA administration tools, such as PowerShell (Windows Server 2012 (R2) and higher), Failover Cluster Manager or (Windows Server 2008 (R2)), you can only start or stop a clustered SAP instances, such as the (A)SCS instance or the database instance. For all other non-clustered instances, such as additional application server instances or the primary application server instance, you must use the SAP MMC or SAPControl.
NoteYou first have to start the (A)SCS instance and then the database instance, whereas you first have to stop the database instance and then the (A)SCS instance.
● Using PowerShell (Windows Server 2012 (R2) and higher)To start or stop the clustered (A)SCS instance or the database instance with PowerShell do the following:1. To start the clustered database instance, open PowerShell in elevated mode, and enter the following
command:start-clusterresource <database resource>
2. To start the clustered (A)SCS instance, open PowerShell in elevated mode, and enter the following command:start-clusterresource "SAP <SAPSID> <Instance_Number> Instance"
3. To stop the clustered (A)SCS instance, open PowerShell in elevated mode, and enter the following command:stop-clusterresource "SAP <SAPSID> <Instance_Number> Instance"
4. To stop the clustered database instance, open PowerShell in elevated mode, and enter the following command:stop-clusterresource <database resource>
● Using the Failover Cluster Manager (Windows Server 2008 (R2))With the Failover Cluster Manager, you can only start or stop clustered instances such as the (A)SCS instance or the database instance.
Installation of SAP Systems Based on the Application Server Java of SAP NetWeaver 7.3 to 7.5 on Windows: SAP Adaptive Server EnterpriseHigh Availability with Microsoft Failover Clustering P U B L I C 163

For all other non-clustered instances, such as additional application server instances or the primary application server instance, you must use the SAP MMC or SAPControl.To start or stop the clustered (A)SCS instance or the database instance with the Failover Cluster Manager do the following:
1. Start the Failover Cluster Manager by choosing Start Administrative Tools Failover Cluster Manager .
2. To start the database instance, right-click the database instance <database_resource>, and choose Bring this resource online.
3. To start the (A)SCS instance, select the relevant service and application SAP <SAPSID>.In the right-hand pane, under Other Resources, right-click the resource SAP <SAPSID> <Instance_Number> Instance, and choose Bring this resource online.
4. To stop the (A)SCS instance, select the relevant service and application SAP <SAPSID>.In the right-hand pane, under Other Resources, right-click the resource SAP <SAPSID> <Instance_Number> Instance, and choose Take this resource offline.
5. To stop the database instance, right-click the database instance <database_resource>, and choose Take this resource offline.
164 P U B L I C
Installation of SAP Systems Based on the Application Server Java of SAP NetWeaver 7.3 to 7.5 on Windows: SAP Adaptive Server Enterprise
High Availability with Microsoft Failover Clustering

10 Additional Information
10.1 Additional Information
The following sections provide additional information about optional preparation, installation, and post-installation tasks.
There is also a section describing how to delete an SAP system.
Planning
SAP Directories [page 166]
Preparation
● Performing a Domain Installation Without Being a Domain Administrator [page 171]● Integration of LDAP Directory Services [page 174]● Preparing an External ABAP System as Source for User Data [page 62]
Installation
● Installing the Host Agent Separately [page 181]
Post-Installation
● Starting and Stopping the SAP System [page 183]● Configuring the Windows Server 2008 (R2) Firewall [page 185].● SAP System Security on Windows [page 187]● Automatic Creation of Accounts and Groups [page 189]
Installation of SAP Systems Based on the Application Server Java of SAP NetWeaver 7.3 to 7.5 on Windows: SAP Adaptive Server EnterpriseAdditional Information P U B L I C 165

Deleting an SAP System or SAP Instance
● Deleting an SAP System [page 190]
10.2 SAP Directories
This section describes the directories that are available in an SAP system.Only valid for 'High Availability': HA (Windows)
If you want to install a high-availability system, see also Directories in a Microsoft Failover Cluster Configuration [page 148].End of 'High Availability': HA (Windows)
The installer automatically creates the following directories during the installation:
● \usr\sapThis directory is created on the:○ Global host and shared with the network share sapmnt
Only valid for 'High Availability': non-HAIn a non-high-availability-system, you can install the primary application server instance or the (A)SCS instance on the global host or on any other host.End of 'High Availability': non-HA
Only valid for 'High Availability': HA (Windows)In a high-availability system, the SCS instance is installed on the global host.End of 'High Availability': HA (Windows)On global hosts, the \usr\sap directory contains general SAP software, global, and local (instance-specific) data.For this, the installer creates the global directory usr\sap\<SAPSID>\SYS, which physically exists only once for each SAP system. It consists of the following subdirectories:○ global – contains globally shared data○ profile – contains the profiles for all instances○ exe – contains executable replication directory for all instances and platforms
○ Local host and shared with the name saploc.Only valid for 'High Availability': HA (Windows)In a high availability system this directory is located on a local disk. You have at least two disk drives with a usr\sap directory structure.End of 'High Availability': HA (Windows)On local hosts, the \usr\sap\<SAPSID>\<Instance_Name> directory contains copies of the SAP software and local (instance-specific) data.
Note○ Since SAP traces for the instance are created in \usr\sap, make sure that there is sufficient
space available in this directory. Changes in SAP profiles can also affect the disk space.○ The executables on the local host are replicated from those on the global host every time the
local instance is started. The SAP copy program sapcpe compares the binaries in the
166 P U B L I C
Installation of SAP Systems Based on the Application Server Java of SAP NetWeaver 7.3 to 7.5 on Windows: SAP Adaptive Server Enterprise
Additional Information

<Platform> directory on the global host and the binaries in the exe directory on the application server. If the binaries in the exe directory are older than those in the <Platform> directory, sapcpe replaces them with the newer version of the global host.
Other application servers access the global data using the Universal Naming Convention (UNC) path \\<SAPGLOBALHOST>\sapmnt. The SAP programs access their instance-specific data with the UNC path \\<SAPLOCALHOST>\saploc. If the UNC path points to a local directory, the local path (and not the UNC path) is used to access the directory.The parameters SAPGLOBALHOST and SAPLOCALHOST have the same values on the global host.Only valid for 'High Availability': HA (Windows)
NoteWindows Server 2008 (R2) and higher:
In a high-availability system, file shares pointing to directories on shared disks are only visible or can be accessed with the virtual host name of the cluster group the shared disks belong to.
This lets you have several shares with the same name pointing to different disks (multi-SID).
End of 'High Availability': HA (Windows)
● \usr\sap\transThe transport directory contains SAP software for the transport of objects between SAP systems. The installer by default creates it on the SAPGLOBALHOST.If you want to have it created on another host, or if you want to use an already existing transport host of your SAP system landscape, you can specify another host during the installation. In this case, you have to prepare that host to allow the new SAP system to use it as transport host. For more information, see Preparing the SAP System Transport Host [page 61].
Directory Structure
The following figures show how the physical directory \usr\sap is shared on the global host in a standard and in a distributed system. In both cases, the UNC paths are used as follows:
● \\<SAPGLOBALHOST>\sapmnt to access global directories● \\<SAPLOCALHOST>\saploc to access local instance-specific data
NoteThere are the following instance names available in an SAP system:
Central services instance: SCS<Instance_Number>
Primary application server instance: J<Instance_Number>
Additional application server instance: J<Instance_Number>.
Installation of SAP Systems Based on the Application Server Java of SAP NetWeaver 7.3 to 7.5 on Windows: SAP Adaptive Server EnterpriseAdditional Information P U B L I C 167

Only valid for 'High Availability': HA (Windows)
High Availability only: Enqueue Replication Server instance: ERS<Instance_Number>End of 'High Availability': HA (Windows)
Directory Structure on the Global Host in a Standard (Central) Java System
Directory Structure for a Distributed Java System
168 P U B L I C
Installation of SAP Systems Based on the Application Server Java of SAP NetWeaver 7.3 to 7.5 on Windows: SAP Adaptive Server Enterprise
Additional Information

Directory Structure for a High-Availability Java System
10.3 Checking and Changing the Paging File Settings on Windows Server 2012 (R2) and Higher
Use
This section describes how to check and change the paging file size on Windows Server 2012 (R2) and higher with PowerShell.
The PowerShell commands also work in previous Windows versions where PowerShell is available.
NoteSome paging file operations require a reboot of the server to activate the changes you made. Wmi-commands do not indicate whether a reboot is required or not. Therefore, we recommend rebooting your system every time you change the paging file settings with PowerShell.
Prerequisites
Always start the PowerShell in elevated mode (run as administrator).
Procedure
Checking the Size of a Paging File
Installation of SAP Systems Based on the Application Server Java of SAP NetWeaver 7.3 to 7.5 on Windows: SAP Adaptive Server EnterpriseAdditional Information P U B L I C 169

1. Start Windows PowerShell.2. Check whether the default value Automatic manage pagefile size for all devices is activated.
NoteWe do not support automatically managed page file sizes.
To check this, enter the following command:(Get-WmiObject Win32_Pagefile) –eq $nullIf Automatic manage pagefile size for all devices is enabled, the output value is True.If necessary, disable Automatic manage pagefile size for all devices with the following command:$sys = Get-WmiObject Win32_Computersystem –EnableAllPrivileges$sys.AutomaticManagedPagefile = $false$sys.put()
3. Check the size of the paging files with the following command:Get-WmiObject WIN32_Pagefile | Select-Object Name, InitialSize, MaximumSize, FileSizeThe output looks like the following:
Name InitialSize MaximumSize FileSize ---- ----------- ----------- -------- C:\pagefile.sys 0 0 41943040000 E:\pagefile.sys 40000 80000 41943040000
In this example, in the first line, the InitialSize and MaximumSize values of a paging file are 0, which means that the paging file size is system managed (not recommended).In the second line, the paging file size has a minimum and a maximum size (recommended).
Changing the Size of a Single Paging File
Changing the InitialSize and MaximumSize values of a paging file to a size other than 0, will automatically switch off system managed size.
In the following example, we change the size of the paging file on C: to the InitialSize of 40 GB and to the MaximumSize of 80 GB.
Use the following commands in a PowerShell:
$Pagefile = Get-WmiObject Win32_PagefileSetting | Where-Object {$_.name -eq “C:\pagefile.sys”}
$Pagefile.InitialSize = 40000
$Pagefile.MaximumSize = 80000
$Pagefile.put()
Typically, you choose the same value for InitialSize and MaximumSize.
170 P U B L I C
Installation of SAP Systems Based on the Application Server Java of SAP NetWeaver 7.3 to 7.5 on Windows: SAP Adaptive Server Enterprise
Additional Information

NoteThe sum of all paging files InitialSize values must be equal to or higher than the value recommended for your SAP system.
Creating a Second Paging File on Another Disk
You might want to create a second or additional paging files to improve system performance, or if your disk does not have enough space.
To do so, enter the following commands in a PowerShell:
$Pagefile = Get-WmiObject Win32_PagefileSetting
$pagefile.Name = “E:\pagefile.sys”
$pagefile.Caption = “E:\pagefile.sys”
$pagefile.Description = “’pagefile.sys’ @ E:\”
$pagefile.SettingID =”pagefile.sys @ E:”
$pagefile.InitialSize = 80000
$pagefile.MaximumSize = 80000
$pagefile.put()
Deleting a Paging File on a Specific Device
To delete a paging file, enter the following commands in a PowerShell:
$pagefile = Get-WmiObject Win32_PagefileSetting | Where-Object {$_.name -eq “E:\pagefile.sys”}
$pagefile.delete()
10.4 Performing a Domain Installation Without Being a Domain Administrator
You normally perform a domain installation of the SAP system with a user who is a member of the domain Admins group, as described in Required User Authorization for Running the Installer [page 58]. If for any reason, the account used for the installation is not a member of the domain Admins group, you can perform the installation with a domain user who is a member of the local Administrators group. In this case, the domain administrator has to prepare the system appropriately for you. The domain administrator can perform the following steps either using the installer or manually:
1. Create the new global group SAP_<SAPSID>_GlobalAdmin.2. Create the two new SAP system users <sapsid>adm and SAPService<SAPSID>.3. Add the users <sapsid>adm and SAPService<SAPSID> to the newly created group
SAP_<SAPSID>_GlobalAdmin.
Installation of SAP Systems Based on the Application Server Java of SAP NetWeaver 7.3 to 7.5 on Windows: SAP Adaptive Server EnterpriseAdditional Information P U B L I C 171

NoteThe installer creates the operating system user for the SAP Host Agent by default as a local user that is not a member of the local Administrators group. If you want to create this user manually as a domain user, you must perform the following steps:
Creating the SAP Host Agent User and Group Manually
1. Create the new global group SAP_SAP_GlobalAdmin.2. Create the SAP system user sapadm.3. Add the user sapadm to the newly created group SAP_SAP_GlobalAdmin.
However, for security reasons we strongly recommend you to create this user as a local user.
Prerequisites
● You must be domain administrator to perform the required steps.● You must have installed the feature Remote Server Administration Tools as follows:
○ Windows Server 2012 (R2) and higher:Open PowerShell in elevated mode, and enter the following command:add-windowsfeature RSAT-ADDS
○ Windows Server 2008 (R2):
1. Choose Start Administrative Tools Server Manager .2. In the Server Manager window, select Features.
3. Select the feature Remote Server Administration Tools Role Administration Tools Active Directory Domain Services Tools .
Procedure
Creating the Required Users and Groups Using the Installer
On the host where the SAP system is to be installed, the domain administrator starts the installer as described in Running the Installer [page 78] and chooses Generic Installation Options <Database> Preparations Operating System Users and Groups to have the group and users created automatically.
Creating the Required Users and Groups Manually
NoteTo create the users and groups specific to the SAP Host Agent, you must follow the procedure below, and replace the users and groups with those for the SAP Host Agent.
Creating the New Global Group SAP_<SAPSID>_GlobalAdmin
172 P U B L I C
Installation of SAP Systems Based on the Application Server Java of SAP NetWeaver 7.3 to 7.5 on Windows: SAP Adaptive Server Enterprise
Additional Information

Perform the following steps:
● Windows Server 2012 (R2) and higher:Open PowerShell in elevated mode, and enter the following command:net group SAP_<SAPSID>_GlobalAdmin /add /domain
● Windows Server 2008 (R2):1. Log on as domain administrator.2. Start the Active Directory Users and Computers Console by choosing:
Start Control Panel Administrative Tools Active Directory Users and Computers .
3. Right-click Users in Tree, and choose New Group .4. Enter the following:
Group name: SAP_<SAPSID>_GlobalAdmin5. Select the following:
1. Group scope: Global2. Group type: Security
6. Choose OK.
Creating the New SAP System Users <sapsid>adm and SAPService<SAPSID>
Perform the following steps:
● Windows Server 2012 (R2) and higher:1. Open PowerShell in elevated mode.2. Create the <sapsid>adm user with the following command:
net user <sapsid>adm <Password> /add /domain3. Create the SAPService<SAPSID> user with the following command:
net user SAPService<SAPSID> <Password> /add /domain● Windows Server 2008 (R2):
1. In Active Directory Users and Computers Console, right-click Users in Tree and choose:New User
2. Enter the following:
Field Input for <sapsid>adm Input for SAPService<SAPSID>
First name: None None
Initials: None None
Last name: None None
3. Choose Next and enter the following:Password: <Password>Confirm password: <Password>
4. Select Password never expires.
NoteMake sure that no other options are selected.
Installation of SAP Systems Based on the Application Server Java of SAP NetWeaver 7.3 to 7.5 on Windows: SAP Adaptive Server EnterpriseAdditional Information P U B L I C 173

5. Choose Next Finish .
Adding the Manually Created Users to Groups
NoteTo add the users specific to the SAP Host Agent to the relevant groups, you must follow the procedure below, and replace the users and groups with those for the SAP Host Agent.
Adding the <sapsid>adm User to the SAP_<SAPSID>_GlobalAdmin Group
● Windows Server 2012 (R2) and higher:Open PowerShell in elevated mode, and enter the following command:net group SAP_<SAPSID>_GlobalAdmin <sapsid>adm /add /domain
● Windows Server 2008 (R2):1. In the Users folder, double-click the newly created user account <sapsid>adm in the list on the right.
2. Choose Member Add .3. Select the new SAP_<SAPSID>_GlobalAdmin group and choose Add to add it to the list.
NoteBy default, the user is also a member of the Domain Users group.
4. Choose OK twice.
Adding the SAPService<SAPSID> User to the SAP_<SAPSID>_GlobalAdmin Group
● Windows Server 2012 (R2) and higher:Open PowerShell in elevated mode, and enter the following command:net group SAP_<SAPSID>_GlobalAdmin SAPService<SAPSID> /add /domain
● Windows Server 2008 (R2):1. In the Users folder, double-click the newly created user account SAPService<SAPSID> in the list on the
right.
2. Choose Member Add .3. Select the new SAP_<SAPSID>_GlobalAdmin group.4. Choose Add to add it to the list, and then OK.5. Choose OK to close SAPService<SAPSID>Properties.6. Close the Active Directory Users and Computers Management Console.
10.5 Integration of LDAP Directory Services
This section explains the benefits of using the SAP system with the Lightweight Directory Access Protocol (LDAP) directory and gives an overview of the configuration steps required to use an SAP system with the directory.
LDAP defines a standard protocol for accessing directory services, which is supported by various directory products such as Microsoft Active Directory, and OpenLDAP slapd. Using directory services enables important information in a corporate network to be stored centrally on a server. The advantage of storing
174 P U B L I C
Installation of SAP Systems Based on the Application Server Java of SAP NetWeaver 7.3 to 7.5 on Windows: SAP Adaptive Server Enterprise
Additional Information

information centrally for the entire network is that you only have to maintain data once, which avoids redundancy and inconsistency.
If an LDAP directory is available in your corporate network, you can configure the SAP system to use this feature. For example, a correctly configured SAP system can read information from the directory and also store information there.
NoteThe SAP system can interact with the Active Directory using the LDAP protocol, which defines:
● The communication protocol between the SAP system and the directory● How data in the directory is structured, accessed, or modified
If a directory other than the Active Directory also supports the LDAP protocol, the SAP system can take advantage of the information stored there. For example, if there is an LDAP directory on a UNIX or Windows server, you can configure the SAP system to use the information available there. In the following text, directories other than the Active Directory that implement the LDAP protocol are called generic LDAP directories.
Prerequisites
You can only configure the SAP system for Active Directory services or other LDAP directories if these are already available on the network. As of Windows 2000 or higher, the Active Directory is automatically available on all domain controllers. A generic LDAP directory is an additional component that you have to install separately on a UNIX or Windows server.
Features
In the SAP environment, you can exploit the information stored in an Active Directory or generic LDAP directory by using:
● SAP Logon● The SAP Microsoft Management Console (SAP MMC)
For more information about the automatic registration of SAP components in LDAP directories and the benefits of using it in SAP Logon and SAP MMC, see the documentation SAP System Information in Directory Services at:https://archive.sap.com/documents/docs/DOC-14384
● The SAP Management Console (SAP MC)
SAP Logon
Instead of using a fixed list of systems and message servers, you can configure SAP Logon in the sapmsg.ini configuration file to find SAP systems and their message servers from the directory. If you configure SAP logon to use the LDAP directory, it queries the directory each time Server or Group selection is chosen to fetch up-to-date information on available SAP systems.
Installation of SAP Systems Based on the Application Server Java of SAP NetWeaver 7.3 to 7.5 on Windows: SAP Adaptive Server EnterpriseAdditional Information P U B L I C 175

To use LDAP operation mode, check that the sapmsg.ini file contains the following:
[Address]
Mode=LDAPdirectory
LDAPserver=
LDAPnode=
LDAPoptions=
Distinguish the following cases:
● If you use an Active Directory, you must set LDAPoptions=“DirType=NT5ADS”. For more information, see the SAP system profile parameter ldap/options.
● You must specify the directory servers (for example, LDAPserver=pcintel6 p24709) if one of the following is true:○ The client is not located in the same domain forest as the Active Directory○ The operating system does not have a directory service client (Windows NT and Windows 9X without
installed dsclient).For more information, see the SAP system profile parameter ldap/servers.
● For other directory services, you can use LDAPnode to specify the distinguished name of the SAP root node. For more information, see the SAP system profile parameter ldap/saproot.
SAP MMCThe SAP MMC is a graphical user interface (GUI) for administering and monitoring SAP systems from a central location. It is automatically set up when you install an SAP system on Windows. If the SAP system has been prepared correctly, the SAP MMC presents and analyzes system information that it gathers from various sources, including the Active Directory.
Integrating the Active Directory as a source of information has advantages for the SAP MMC. It can read system information straight from the directory that automatically registers changes to the system landscape. As a result, up-to-date information about all SAP application servers, their status, and parameter settings is always available in the SAP MMC.
If you need to administer distributed systems, we especially recommend that you use the SAP MMC together with Active Directory services. You can keep track of significant events in all of the systems from a single SAP MMC interface. You do not need to manually register changes in the system configuration. Instead, such changes are automatically updated in the directory and subsequently reflected in the SAP MMC.
If your SAP system is part of a heterogeneous SAP system landscape that comprises systems or instances both on Unix and Windows operating systems, you can also use the SAP MMC for operating and monitoring the instances running on Unix.
SAP MCYou can also use the SAP Management Console (SAP MC) for administering and monitoring SAP systems from a central location.
176 P U B L I C
Installation of SAP Systems Based on the Application Server Java of SAP NetWeaver 7.3 to 7.5 on Windows: SAP Adaptive Server Enterprise
Additional Information

For more information about the SAP MC and about how to configure it to access LDAP directories, see the documentation SAP Management Console in the SAP Library at:
SAP Release and SAP Library Quick Link SAP Library Path (Continued)
● SAP NetWeaver 7.3http://help.sap.com/nw73
● SAP NetWeaver 7.3 including Enhancement Package 1http://help.sap.com/nw731
● SAP NetWeaver 7.4http://help.sap.com/nw74
● SAP NetWeaver 7.5http://help.sap.com/nw75
Application Help Function-Oriented View: English
Solution Life Cycle Management SAP Management
Console
Configuration Tasks for LDAP Directories
This section describes the configuration tasks for the Active Directory or other (generic) LDAP directories.
● Configuration Tasks for Active DirectoryTo enable an SAP system to use the features offered by the Active Directory, you have to configure the Active Directory so that it can store SAP system data.To prepare the directory, you use the installer to automatically:○ Extend the Active Directory schema to include the SAP-specific data types○ Create the domain accounts required to enable the SAP system to access and modify the Active
Directory. These are the group SAP_LDAP and the user sapldap.○ Create the root container where information related to SAP is stored○ Control access to the container for SAP data by giving members of the SAP_LDAP group permission to
read and write to the directory
You do this by running the installer [page 78] and choosing: Generic Installation Options <Database>Preparations LDAP Registration Active Directory Configuration .
NoteYou have to configure the directory server only once. Then all SAP systems that need to register in this directory server can use this setup.
● Configuration Tasks for Generic LDAP DirectoriesTo configure other LDAP directories, refer to the documentation of your directory vendor. The installer software contains schema extensions for directory servers Netscape/iPlanet (ldregns4.txt, ldregns5.txt) and OpenLDAP slapd (ldregslapd.schema). Both files are located in the directory \<Unpack_Directory>\COMMON\ADS. After you have applied the schema extension, you need to create a root container to store the SAP-related information and create a directory user that the SAP application server can use to write information to the directory.For more information about how to set up a Netscape/iPlanet directory server, see the documentation SAP System Information in Directory Services at:https://archive.sap.com/documents/docs/DOC-14384
● Enabling the SAP System LDAP RegistrationOnce you have correctly configured your directory server, you can enable the LDAP registration of the SAP system by setting some profile parameters in the default profile.
Installation of SAP Systems Based on the Application Server Java of SAP NetWeaver 7.3 to 7.5 on Windows: SAP Adaptive Server EnterpriseAdditional Information P U B L I C 177

To do this, run the installer [page 78] once for your system and choose:Generic Installation Options <Database> Preparations LDAP Registration LDAP Support
If you use a directory server other than Microsoft Active Directory and/or non-Windows application servers, you have to store the directory user and password information by using ldappasswd pf=<any_instance_profile>. The information is encrypted for storage in DIR_GLOBAL and is therefore valid for all application servers. After restarting all application servers and start services, the system is registered in your directory server. The registration protocols of the components are dev_ldap*. The registration is updated every time a component starts.
10.6 Preparing an External ABAP System as Source for User Data
You can use an external ABAP system as the data source for user data for the Application Server Java of your SAP Java system to be installed. To do so, you configure the User Management Engine (UME) of the AS Java for the user management of this external ABAP system.
Prerequisites
The ABAP system is based on at least SAP Web AS ABAP release 6.20 SP25.
Context
NoteIf you want to install an optional standalone unit - Advanced Adapter Engine (AAE) , Advanced Adapter Engine Extended (AEX), or Process Integration and Orchestration (PI-CP) - you can skip this section because you are not prompted for UME Configuration. Optional standalone units are automatically configured during the installation to store the SAP system users in the Java database.
If you want to connect more than one Java system to the same ABAP system, you need to work out a concept for the communication, administrator, and guest users for each system.
NoteIf you want to install the application server Java for an SAP NetWeaver 7.5 Process Integration (PI) system or for an SAP Solution Manager 7.2 system, you must use the already installed Application Server ABAP (AS ABAP) as the data source for user data for the Application Server Java to be installed. In this case, the required users were already created during the installation of the Application Server ABAP and you are prompted to enter these users during the installation of the Application Server Java.
178 P U B L I C
Installation of SAP Systems Based on the Application Server Java of SAP NetWeaver 7.3 to 7.5 on Windows: SAP Adaptive Server Enterprise
Additional Information

You can take one of the following approaches when using an external ABAP system as source for user data:
Approach Advantages Disadvantages
Each Java system uses different users
No interdependencies between the connected engines
Initially more administration to create the users in the ABAP system
All Java systems use the same configuration
You create the users only once and enter the same information for every Java system that you install.
Interdependencies between the connected engines:
● If you change the password of any of the users on the ABAP system, this change affects all connected engines.
● If you change the administrator user’s password, you must also change the password in secure storage on all of the connected Java EE Engines
RecommendationFor security reasons, we recommend the first approach.
The procedures below assume that you are using the first approach.
More Information
For more information about SAP NetWeaver AS for ABAP user management as data source, see the SAP Library at:
SAP Release and SAP Library Quick Link SAP Library Path (Continued)
● SAP NetWeaver 7.3http://help.sap.com/nw73
● SAP NetWeaver 7.3 including Enhancement Package 1http://help.sap.com/nw731
● SAP NetWeaver 7.4http://help.sap.com/nw74
● SAP NetWeaver 7.5http://help.sap.com/nw75
● SAP NetWeaver AS for ABAP 7.51 innovation packagehttps://help.sap.com/nw751abap
● SAP NetWeaver AS for ABAP 7.52https://help.sap.com/nw752abap
Application Help SAP NetWeaver Library: Function-
Oriented View Security Identity Management User
Management of SAP NetWeaver AS for Java Configuring
User Management UME Data Sources User
Management of Application Server ABAP as Data Source
Procedure
● The following procedures describe the activities you have to perform in the existing ABAP system and for the Java system to be installed.
● Perform the following steps in the existing ABAP system:
Installation of SAP Systems Based on the Application Server Java of SAP NetWeaver 7.3 to 7.5 on Windows: SAP Adaptive Server EnterpriseAdditional Information P U B L I C 179

a. Call transaction PFCG to do the following:
○ Check that the roles SAP_BC_JSF_COMMUNICATION and SAP_BC_JSF_COMMUNICATION_RO exist and make sure that their profiles are generated.
○ Check that the roles SAP_J2EE_ADMIN, SAP_J2EE_GUEST, and SAP_BC_FP_ICF exist. Neither role contains any ABAP permissions, so you do not need to generate any profiles.
b. Call transaction SU01 to do the following:
○ Create a new communication user and assign it to the role SAP_BC_JSF_COMMUNICATION_RO. We recommend that you do the following:○ Name this user SAPJSF. You can use any password.○ Assign this user the role SAP_BC_JSF_COMMUNICATION_RO for read-only (display) access to
user data with Java tools. If you intend to maintain user data (that is, to change, create, or delete users) with Java tools, you need to assign the role SAP_BC_JSF_COMMUNICATION instead.
○ Assign this user the type Communications under Logon data to make sure that it can only be used for communication connections between systems and not as a dialog user.
○ Create a new administrator user for the J2EE engine and assign it to role SAP_J2EE_ADMIN. We recommend that you name this user J2EE_ADM_<SAPSID_Java_System>. You can use any password.
○ Create a new guest user for the J2EE engine and assign it to role SAP_J2EE_GUEST. We recommend that you name this user J2EE_GST_<SAPSID_Java_System>. You can use any password.Since this user is only used for anonymous access to the system, we recommend you to deactivate the password and, if required, lock it after installation to prevent anyone from using it for explicit named logons.
c. Make sure that you change the initial passwords of these users and take the precautions described in the relevant SAP security guide before you start the installation of the Java system. You can find the security guide in the Security section of the product page for your SAP product at https://help.sap.com/ .
● Perform the following steps in the Java System:a. Before the installation of the Java system, make sure that you have the correct user names and
passwords of the users listed above for the separate ABAP system.b. During the installation of the Java system, make sure that you enter the correct users and passwords
in the corresponding installer dialogs.
180 P U B L I C
Installation of SAP Systems Based on the Application Server Java of SAP NetWeaver 7.3 to 7.5 on Windows: SAP Adaptive Server Enterprise
Additional Information

10.7 Installing the SAP Host Agent Separately
This procedure tells you how to install an SAP Host Agent separately.
Context
The SAP Host Agent is installed automatically during the installation of new SAP instances with SAP kernel 7.20 or higher (integrated installation). This procedure is only for hosts with no SAP Host Agent running on them, due to the following reasons:
● There is no SAP system or instance on the host.● The SAP system or instance running on the host has a kernel release lower than SAP kernel 7.20 and the
host does not yet have an SAP Host Agent.● You have upgraded your SAP system to a release with a kernel release lower than SAP kernel 7.20 and the
host of the upgraded system or instance does not yet have an SAP Host Agent.
SAP Host Agent has the following executable programs and services:
● The SAPHostExec service● The sapstartsrv service SAPHostControl● The operating system collector saposcol
NoteThe installed programs are automatically started when the host is booted.
On Microsoft Windows hosts, the services SAPHostControl and SAPHostExec start the installed programs automatically.
The following procedure describes the steps you have to perform on the host where you install the SAP Host Agent separately.
Procedure
1. Perform basic preparations on Windows [page 57].2. Check that you have the required user authorization for running the installer [page 58].3. Download and unpack the Software Provisioning Manager archive on the host where you want to install the
SAP Host Agent as described in Downloading and Extracting the Software Provisioning Manager 1.0 Archive [page 66].
4. Make the latest patch level of the SAPHOSTAGENT <Version>.SAR file available on the host where you want to install the SAP Host Agent.
Installation of SAP Systems Based on the Application Server Java of SAP NetWeaver 7.3 to 7.5 on Windows: SAP Adaptive Server EnterpriseAdditional Information P U B L I C 181

You can do this in the following ways:
○ Download it from the following path: https://launchpad.support.sap.com/#/softwarecenter SUPPORT PACKAGES & PATCHES By Category SAP Technology Components SAP HOST AGENT SAP HOST AGENT 7.21 <Operating System>
○ Alternatively, you can also copy it from the UC kernel medium (folder K_<Version>_U_<OS>), where “_U_” means Unicode.You can either use the physical UC kernel medium from the installation package of your SAP system, or download the kernel medium from https://launchpad.support.sap.com/#/softwarecenter . For more information, see Downloading Complete Installation Media [page 72] .
RecommendationIt is highly recommended that you always choose the highest SP version of the SAPHOSTAGENT<SP-version>.SAR archive.
5. To install the SAP Host Agent, you start the installer [page 78] and choose Generic Installation Options<Database> Preparations SAP Host Agent on the Welcome screen of the installer.
6. Check whether the installed services are available:a. Log on as a member of the local Administrators group .
NoteWhen the host is booted, the services SAPHostControl and SAPHostExec automatically start the installed programs
b. Check whether the following services are available:○ The control program saphostexec○ The SAP NetWeaver Management agent SAPHostControl (sapstartsrv in host mode)
Next Steps
For more information about the SAP Host Agent, see the following documentation:
SAP Release and SAP Library Quick Link SAP Library Path (Continued)
● SAP NetWeaver 7.3http://help.sap.com/nw73
● SAP NetWeaver 7.3 including Enhancement Package 1http://help.sap.com/nw731
● SAP NetWeaver 7.4http://help.sap.com/nw74
● SAP NetWeaver 7.5http://help.sap.com/nw75
Application Help Function-Oriented View: English
Solution Life Cycle Management SAP Host Agent
182 P U B L I C
Installation of SAP Systems Based on the Application Server Java of SAP NetWeaver 7.3 to 7.5 on Windows: SAP Adaptive Server Enterprise
Additional Information

10.8 Starting and Stopping the SAP System
You use this procedure to start and stop the SAP system or single instances after the installation with the SAP Microsoft Management Console (SAP MMC) or SAPControl.
CautionNote the following restrictions about starting and stopping the database instance with the SAP MMC or SAPControl:
Only valid for 'High Availability': non-HA
In a non-high-availability system, you can use the SAP MMC or SAPControl to start the database instance. To stop the database instance, however, you must use the relevant database administration tools.
End of 'High Availability': non-HA
Only valid for 'High Availability': HA (Windows)
In a high-availability system, you can neither start nor stop the database instance with the SAP MMC or SAPControl. For more information, see Starting and Stopping the SAP System in an HA Configuration [page 162].
End of 'High Availability': HA (Windows)
Prerequisites
The user who wants to start and stop the SAP system with the SAP MMC, must be a member of the local administrators group.
Procedure
Starting and Stopping the SAP System with the SAP MMC
With the SAP MMC, you can start or stop installed SAP instances – except the database instance – locally on the host that you are logged on to. If the SAP MMC is configured for central system administration, you can start or stop the entire system from a single host.
Note● To stop the database instance you must use the relevant database administration tools.● You can also start and stop a UNIX system with the SAP MMC.● The SAP MMC is not available on Server Core for Windows Server 2012 (R2) and higher.
Installation of SAP Systems Based on the Application Server Java of SAP NetWeaver 7.3 to 7.5 on Windows: SAP Adaptive Server EnterpriseAdditional Information P U B L I C 183

For more information about the SAP MMC, see the SAP Library at:
SAP Release and SAP Library Quick Link SAP Library Path (Continued)
● SAP NetWeaver 7.3http://help.sap.com/nw73
● SAP NetWeaver 7.3 including Enhancement Package 1http://help.sap.com/nw731
● SAP NetWeaver 7.4http://help.sap.com/nw74
● SAP NetWeaver 7.5http://help.sap.com/nw75
Application Help Function-Oriented View: English
Solution Life Cycle Management SAP Microsoft
Management Console: Windows
To start or stop the SAP system – except the database instance – with the SAP MMC, perform the following steps:
1. Start the SAP MMC on the SAP system host.2. Right-click the SAP system node and choose Start or Stop.
All SAP instances listed under the system node start or stop in the correct order.3. To stop the database instance, use the relevant database administration tools.4. If the SAP system is installed on multiple hosts, you have the following options to start or stop your system:
○ You start or stop the SAP instances – except the database instance – using the SAP MMC on each host.
○ You add the remote instances to the SAP MMC configuration to start or stop all instances from a single SAP MMC.To do so, do one of the following:○ You configure the SAP MMC manually. For more information, see Changing the Configuration of the
SAP MMC in the SAP MMC documentation.○ You use the automatic LDAP registration. For more information, see Configuring SAP MMC for
Active Directory Services in the SAP MMC documentation.
Starting and Stopping the SAP System with SAPControl
To start or stop the SAP system – except the database instance – with SAPControl (sapcontrol.exe), perform the following steps:
● To start or stop the complete SAP system with SAPControl, open a PowerShell in elevated mode, and enter the following command:sapcontrol -prot PIPE -nr <Instance_Number> -function StartSystemsapcontrol -prot PIPE -nr <Instance_Number> -function StopSystem
● To start or stop a single instance with SAPControl, open a PowerShell in elevated mode, and enter the following command:sapcontrol -prot PIPE -nr <Instance_Number> -function Startsapcontrol -prot PIPE -nr <Instance_Number> -function Stop
● To stop the database instance, use the relevant database administration tools.
184 P U B L I C
Installation of SAP Systems Based on the Application Server Java of SAP NetWeaver 7.3 to 7.5 on Windows: SAP Adaptive Server Enterprise
Additional Information

10.9 Configuring the Windows Server Firewall on Windows Server 2008 (R2) and higher (Optional)
Use
As of Windows Server 2008 (R2), the firewall is configured to allow only a small set of Windows-specific inbound IP connections.
Therefore, we recommend that you do not turn on the Windows firewall after you have installed your SAP system. Instead, we recommend that you secure network access to your SAP system with the physical firewall or a router Access Control List (ACL) within your datacenter.
If, for some reason, you want to use the Windows Server firewall, you have to configure the Windows firewall and define a set of Inbound Rules for the TCP/IP port numbers that are used by your system. Otherwise, your SAP system might not operate.
For more information about the port numbers used, see the documentation TCP/IP Ports of All SAP Products at:https://help.sap.com/viewer/ports.
Ports listed with the default value Not active in this document are not configured.Only valid for 'High Availability': HA (Windows)
CautionIn a high-availability system, you have to configure the firewall on all cluster nodes.
End of 'High Availability': HA (Windows)
Prerequisites
You turn on the disabled firewall [page 56] as follows:
● Windows Server 2012 (R2) and higher:Open Windows PowerShell in elevated mode, and enter the following command:Set-NetFirewallProfile "public","domain","private" -enabled true
● Windows Server 2008 (R2):
1. Choose Start Administrative Tools Windows Firewall with Advanced Security .2. Right-click Windows Firewall with Advanced Security and choose Properties.3. Set the Firewall state to On.
Installation of SAP Systems Based on the Application Server Java of SAP NetWeaver 7.3 to 7.5 on Windows: SAP Adaptive Server EnterpriseAdditional Information P U B L I C 185

Procedure
This procedure provides an example how to set Inbound Rules for the ports of an ABAP server that was installed with the following settings:
Instance number 00
Port type TCP
Ports 3200, 3300, 4800, 8000, 3600, 50013, 1433, 1434
● Windows Server 2012 (R2) and higher:Open Windows PowerShell in elevated mode, and enter the following command:New-NetFirewallRule -DisplayName “SAP ABAP Server 00" -Direction Inbound -Protocol TCP -LocalPort 3200,3300,4800,8000,3600,50013,1433,1434 -Action Allow
● Windows Server 2008 (R2):
1. Choose Start Administrative Tools Windows Firewall with Advanced Security .2. Right-click Inbound Rules and choose New Rule.
The New Inbound Rule Wizard starts.3. For Rule Type, select Port and choose Next.4. For Protocol and Ports, select port type TCP or UDP depending on the port type used.
Note that the final two digits of the port number correspond to the instance number.5. Choose Next.6. For Action, select Allow the connection, and choose Next.7. For Profile, keep Domain, Private and Public selected, and choose Next.
For more information, see the link Learn more about profiles on this screen.8. Enter the Name, for example SAP ABAP Server 00, and Description for the new rule.9. Choose Next.10. Choose Finish to save the rule.
The new inbound rule appears in the Inbound Rules list. To modify the settings, right-click on the rule and choose Properties.
NoteIf you want to use, for example, a different IP scope for port 50013, which is used by the connection SAP Start Service – SAP Management Console, you can restrict the IP access to a small number of SAP administrators. Then delete this port from the SAP ABAP Server 00 rule and create a new rule for port 50013 with a more restrictive scope.
10.10 Enabling SSL Encrypted Data Transfer
Secure Sockets Layer (SSL) encrypted data transfer is available for SAP ASE 16.0 SP02 starting with PL6.
For general limitations and prerequisites refer to SAP Note 2481596 - SYB: Encrypted data transfer between SAP System and SAP ASE database.
186 P U B L I C
Installation of SAP Systems Based on the Application Server Java of SAP NetWeaver 7.3 to 7.5 on Windows: SAP Adaptive Server Enterprise
Additional Information

The SAP installer offers the possibility to enable the SSL encrypted data transfer via a checkbox. The SSL certificates are generated by the SAP installer and enabled for the database server and the SAP application server.
There are no manual steps necessary to configure the usage of SSL for the purpose of encrypted data transfer.
NoteThe SAP installer adds the profile parameter dbs/syb/ssl = 1 to the SAP System DEFAULT profile and configures the environment variable dbs_syb_ssl = 1 for the OS user <sid>adm.
The SAP ASE interface file contains the keyword ssl in the TCP/IP connection string.
10.11 SAP System Security on Windows
In a standard SAP system installation, the installer automatically performs all steps relevant for security. Although the installer makes sure that the system is protected against unauthorized access, you must still check that no security breaches can occur.
For central and straightforward administration of the SAP system, you have to install distributed SAP systems with multiple application servers in a Windows domain. This section describes the user accounts and groups that the installer creates during a domain installation and shows how these are related to the SAP directories.
User Accounts
The installer creates the following accounts for SAP system administration:
User account Description
<sapsid>adm This is the SAP system administrator account that enables interactive administration of the system.
sapadm This is the user for the SAP Host Agent. By default it is a local user and not a member of the local Administrators group. You can change this user into a domain user on the Parameter Summary screen. For security reasons, however, SAP strongly recommends to create this user as a local user.
The SAP Host Agent contains all of the required elements for centrally monitoring any host with the Alert Monitor or the SAP NetWeaver Administrator.
Domain and Local Groups
The only function of a domain group is to group users at the domain level so that they can be placed in the appropriate local groups.
Only local groups are created and maintained on each local host. A local group can only be given permissions and rights to the system where it is located. The system is part of a particular domain, and the local group can contain users and domain (global) groups from this domain.
Installation of SAP Systems Based on the Application Server Java of SAP NetWeaver 7.3 to 7.5 on Windows: SAP Adaptive Server EnterpriseAdditional Information P U B L I C 187

During a domain installation, the installer creates the following domain and local groups:
Group Description
SAP_<SAPSID>_GlobalAdmin This domain (global) group is a domain-level SAP administration group for organizing SAP system administrators.
SAP_SAP_GlobalAdmin This domain group for the SAP Host Agent is only created if you create the SAP Host Agent user sapadm as a domain user.
SAP_<SAPSID>_LocalAdmin This local group is created on each host.
SAP_SAP_LocalAdmin If you create the SAP Host Agent user as domain user, the group SAP_SAP_LocalAdmin is also created.
SAP_LocalAdmin This local group is created on all hosts, but is particularly important for the transport host. Members of the group have full control over the transport directory (\usr\sap\trans) that allows transports to take place between systems.
SAP Directories
The installer protects the SAP directories under \usr\sap\<SAPSID> by only granting the group SAP_<SAPSID>_LocalAdmin full control over these directories.
The following graphic illustrates the users and groups that are created by the installer for the <sapsid>adm and SAPService<SAPSID> users in a system infrastructure consisting of two SAP systems.
User Groups and Accounts
NoteAn access control list (ACL) controls access to SAP system objects. For maximum security in the SAP system, only the following are members of all SAP system object ACLs:
● Local group SAP_<SAPSID>_LocalAdmin
188 P U B L I C
Installation of SAP Systems Based on the Application Server Java of SAP NetWeaver 7.3 to 7.5 on Windows: SAP Adaptive Server Enterprise
Additional Information
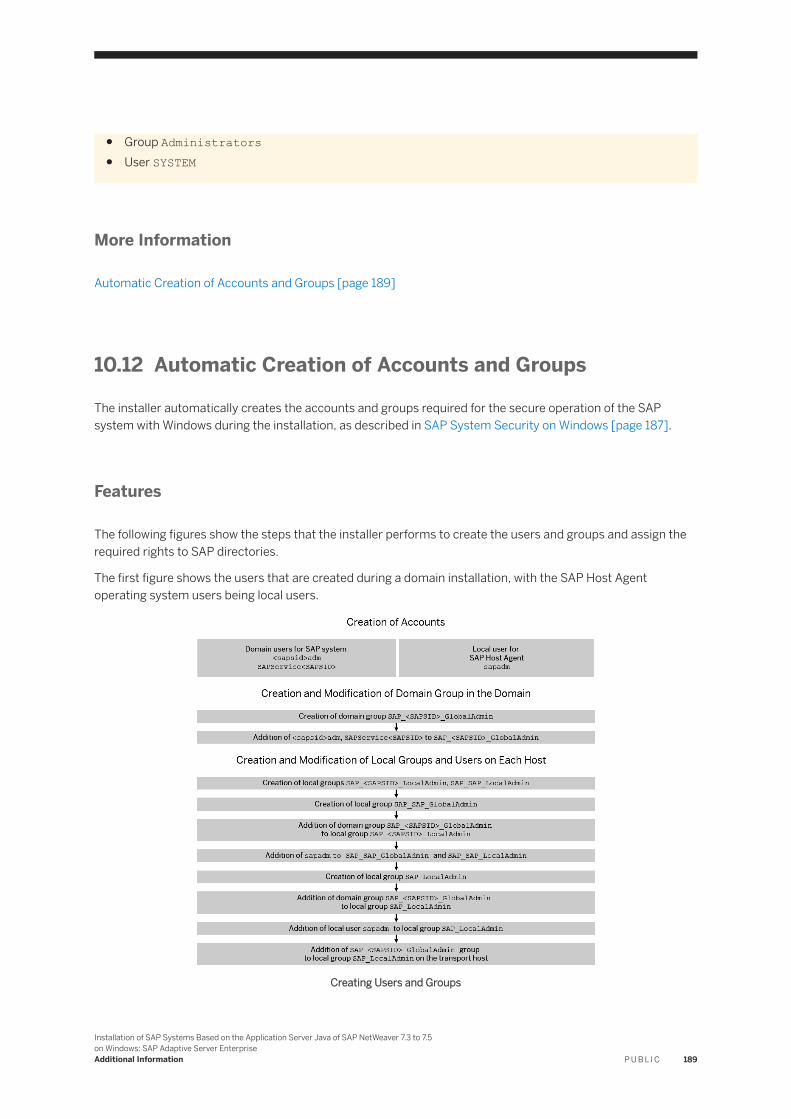
● Group Administrators● User SYSTEM
More Information
Automatic Creation of Accounts and Groups [page 189]
10.12 Automatic Creation of Accounts and Groups
The installer automatically creates the accounts and groups required for the secure operation of the SAP system with Windows during the installation, as described in SAP System Security on Windows [page 187].
Features
The following figures show the steps that the installer performs to create the users and groups and assign the required rights to SAP directories.
The first figure shows the users that are created during a domain installation, with the SAP Host Agent operating system users being local users.
Creating Users and Groups
Installation of SAP Systems Based on the Application Server Java of SAP NetWeaver 7.3 to 7.5 on Windows: SAP Adaptive Server EnterpriseAdditional Information P U B L I C 189

Assigning Rights to SAP Directories
10.13 Deleting an SAP System or Single Instances
This section describes how to delete a complete SAP system or single SAP instances with the Uninstall option of the installer.
Prerequisites
● You have installed your SAP system with standard SAP tools according to the installation documentation.● You are logged on with a user account that has the required authorization to run the installer and the SAP
system. For more information, see Required User Authorization for Running the Installer [page 58].
CautionDo not use the <sapsid>adm user to delete the SAP system.
● Make sure that the SAP system, or single instance, or standalone engine, or optional standalone unit to be deleted is down and that you are not logged on as one of the SAP system users. Also check that all SAP-related processes are stopped. If there is a lock on one of the SAP system objects, the uninstall fails.
NoteYou do not have to stop the SAP Host Agent. The SAP Host Agent is stopped automatically during the uninstall process.
● When starting the uninstall, make sure that there are no SAP system user sessions still open.
190 P U B L I C
Installation of SAP Systems Based on the Application Server Java of SAP NetWeaver 7.3 to 7.5 on Windows: SAP Adaptive Server Enterprise
Additional Information

Context
Note the following when deleting an SAP system or single instances:
● You cannot delete an SAP system remotely.● During the uninstall process, all file systems and subdirectories of the selected SAP system or single
instance are deleted. Before you start uninstalling, check that you have saved a copy of all files and directories that you want to keep to a secure location.
● The uninstall process is designed to remove as much as possible of the SAP system to be deleted. If an item cannot be removed, a message informs you that you have to remove this item manually. You can do this either at once or after the uninstall process has finished. As soon as you confirm the message, the uninstall process continues.
● If you uninstall an SAP instance and you plan to install another SAP instance with the same System ID, first reboot the Windows host to clear all user cached information. For more information, see SAP Note 2296310 .
Procedure
1. Start the installer as described in Running the Installer [page 78].2. On the Welcome screen, choose:
Generic Installation Options <Database> Uninstall Uninstall SAP Systems or Single Instances
3. Follow the instructions on the installer screens to delete a complete SAP system or single instances.
NoteTo find more information on each parameter during the Define Parameters phase, position the cursor on the required parameter input field , and choose either F1 or the HELP tab. Then the available help text is displayed in the HELP tab.
The following table provides information about deleting a complete system or single instances with the installer.
Deletion of Remarks
Standard system You can delete a standard system (where all instances reside on the same host) in one installer run.
Installation of SAP Systems Based on the Application Server Java of SAP NetWeaver 7.3 to 7.5 on Windows: SAP Adaptive Server EnterpriseAdditional Information P U B L I C 191

Deletion of Remarks
Distributed or high-availability system
If you want to delete a distributed or high-availability system, you have to run the installer to delete the required instances locally on each of the hosts belonging to the SAP system in the following sequence:
1. Additional application server instances, if there are any
CautionDo not select checkbox Uninstall all instances of the SAP system from this host if you do not want to uninstall the complete SAP system or standalone engine. For example, do not select this checkbox if you only want to uninstall an additional application server instance of an existing SAP system distributed over several hosts. Otherwise the contents of mounted global directories under /<sapmnt>/<SAPSID>/, such as instance profiles and kernel executables, are also deleted.
2. Primary application server instanceIf the installer stops responding while trying to delete the primary application server instance, close the installer with Cancel and Exit. Log off and log on again. To complete the uninstall process of the primary application server instance, restart the installer.
3. Database instanceSince the installer only stops local instances automatically, make sure that before deleting the database instance of a distributed system, you stop all remaining instances. You must stop the instance with the message server only after having entered all installer parameters for the deletion of the database instance.
4. Central services instance (SCS)
Additional application server If you want to delete additional application server instances of an existing SAP system, you have to run the installer to delete them locally on each additional application server instance host.
Standalone SAP Host Agent The SAP Host Agent is automatically uninstalled from a host together with the last remaining SAP system instance.
If you want to uninstall a standalone SAP Host Agent, deselect Profiles Available and select Uninstall Standalone SAP Host Agent on the General SAP System Parameters screen.
4. When you have finished, delete the relevant directory structure on the global host.5. Delete the local user group SAP_<SAPSID>_LocalAdmin manually as follows:
○ Windows Server 2012 (R2) and higher:Open a PowerShell in elevated mode and enter the following command:net localgroup SAP_<SAPSID>_LocalAdmin /delete
○ Windows Server 2008 (R2):
1. Choose Start Programs Administrative Tools Computer Management .
2. Choose Local Users and Groups Groups .3. Right-click the local group SAP_<SAPSID>_LocalAdmin and choose Delete.
192 P U B L I C
Installation of SAP Systems Based on the Application Server Java of SAP NetWeaver 7.3 to 7.5 on Windows: SAP Adaptive Server Enterprise
Additional Information

6. If required, you can delete the directory \usr\sap\trans and its contents manually.
The installer does not delete \usr\sap\trans because it might be shared.
7. To remove obsolete SLD data, see the following document: https://wiki.scn.sap.com/wiki/display/SL/More+on+System+Landscape+Directory How-to Manage House-Cleaning in the System Landscape Directory - Duplicate System Entries
Installation of SAP Systems Based on the Application Server Java of SAP NetWeaver 7.3 to 7.5 on Windows: SAP Adaptive Server EnterpriseAdditional Information P U B L I C 193

A Appendix
A.1 Online Information from SAP
More information is available online as follows:
Documentation
Titel Internet Address
Database Administration Guide: SAP Applications on SAP Adaptive Server Enterprise
https://help.sap.com/viewer/ase_admin
Security Guide for SAP Application on SAP Adaptive Server Enterprise
https://help.sap.com/viewer/ase_security
A.2 Using PowerShell
SAP uses Windows PowerShell to run and describe Windows commands.
For Windows Server 2012 (R2) and higher, SAP only uses Windows PowerShell to run and describe Windows commands.
Windows PowerShell is a powerful tool integrated in the Windows operating system. It uses object-oriented methodology, which allows fast and stable script development.
For more information about the Windows PowerShell, see:
http://technet.microsoft.com/en-us/scriptcenter/dd742419.aspx
There you can find links to the online help, online documentation, scripting repository, downloads, and blogs.
If you want to use the PowerShell feature, note the following:
● Windows Server 2016Windows Server 2016 contains PowerShell 5.0You can update to PowerShell 5.0 (search the internet for Windows Management Framework 5.0).
● Windows Server 2012 R2Windows Server 2012 R2 contains PowerShell 4.0.
● Windows Server 2012Windows Server 2012 contains PowerShell 3.0.You can update to PowerShell 4.0 (search the internet for Windows Management Framework 4.0).
● Windows Server 2008 R2Windows Server 2008 R2 contains PowerShell 2.0.For more information about PowerShell 2.0, see http://support.microsoft.com/kb/968929 .
194 P U B L I C
Installation of SAP Systems Based on the Application Server Java of SAP NetWeaver 7.3 to 7.5 on Windows: SAP Adaptive Server Enterprise
Appendix

You can update to PowerShell 3.0 or 4.0 (search the internet for Windows Management Framework 3.0 or Windows Management Framework 4.0).
● Windows Server 2008Windows Server 2008 contains PowerShell 1.0.You have to activate the PowerShell feature with Start Administrative Tools Server ManagerFeatures .On Windows Server 2008, you can update to PowerShell 3.0 (search the internet for Windows Management Framework 3.0).
How to Start PowerShell
CautionMake sure that you start the PowerShell in administrator mode.
● Windows Server 2012 (R2) and higherOpen the command prompt and enter the command:powershell.exe
To start PowerShell on Windows Server 2008 (R2), you have the following options:
● From the command prompt, by entering the command:powershell.exe
● From the Start Menu:○ PowerShell 1.0:
Choose Start All Programs Windows PowerShell 1.0 Windows PowerShell .○ PowerShell 2.0:
Choose Start All Programs Windows PowerShell Windows PowerShell .
How to Work with PowerShell
Most commands that are used in cmd.exe are also available in the PowerShell (defined as aliases).
You can use well-known commands, such as cd, type, copy, move, mkdir, delete, rmdir. There is also online help available, which you can access by typing the command: help (or help <command>).
This is a list of differences between PowerShell and cmd.exe:
● Before you can run PowerShells scripts (text files with the file extension .ps1 that contain PowerShell statements), you might have to change the default security setting to allow the execution of non-signed scripts as follows:set-executionpolicy ("unrestricted")
● By default, when double-clicking PowerShell scripts (.PS1 files) in the Windows explorer, this does not execute the script as is the default for .cmd files, but opens the script in an editor. If you want to activate automatic script execution after a double-click, you have to change the value HKEY_CLASSES_ROOT
Installation of SAP Systems Based on the Application Server Java of SAP NetWeaver 7.3 to 7.5 on Windows: SAP Adaptive Server EnterpriseAppendix P U B L I C 195

\Microsoft.Powershellscript.1\Shell\Open\Command from notepad.exe to the full path of the PowerShell executable.
● The output of PIPE commands is not just a stream of characters (strings) but a stream of objects. You can easily access the properties and methods for these objects (see the process list DLL example below).
● The current working directory is not part of the directory search path that the PowerShell looks at for scripts and programs. The PowerShell only searches directories listed in the environment variable path. Therefore, you might have to run a local program with ./sapcontrol.exe or specify its full path.
● You can use the UNIX-like directory delimiters, such as cd /usr/sap/C11.● You can have your current working directory in a UNC path (cd \\sapglobalhost\sapmnt).● The shell distinguishes between environment variables and shell variables:
○ Use of shell variables:Definition: $x="hello"Reference: write-host $x
○ Use of an environment variable:Definition: $env:x="hello"Reference: write-host $env:x
● The PowerShell has an interesting container concept called ps-drives. Within ps-drives you can navigate in other objects, such as the registry or shell internal lists in the same way as you typically navigate in a file system (cd, dir, del, and so on).dir env: to get a list of environment variablesdir variable: to get the list of shell variablesdir HKLM: to get a list of registry keys in HKEY_LOCAL_MACHINEget-psdrive to get a list of available ps-drives
● Windows PowerShell has full access to the .NET runtime. You can directly access missing functions in the PowerShell via .NET.
● With Windows PowerShell, you can create GUI-class user interfaces using Windows forms.
PowerShell Commands
The following table lists some PowerShell commands that are available on Windows Server 2012 (R2) and higher:
Command Explanation
stop-service sap* Stops all Windows services with service name starting with “SAP”
get-process Lists currently started processes on your system
get-process | sort starttime | select -last 1
Lists the last started process on your computer
get-process | sort starttime | select -last 1 | format-list -proper *
Lists all properties of the last started process
196 P U B L I C
Installation of SAP Systems Based on the Application Server Java of SAP NetWeaver 7.3 to 7.5 on Windows: SAP Adaptive Server Enterprise
Appendix
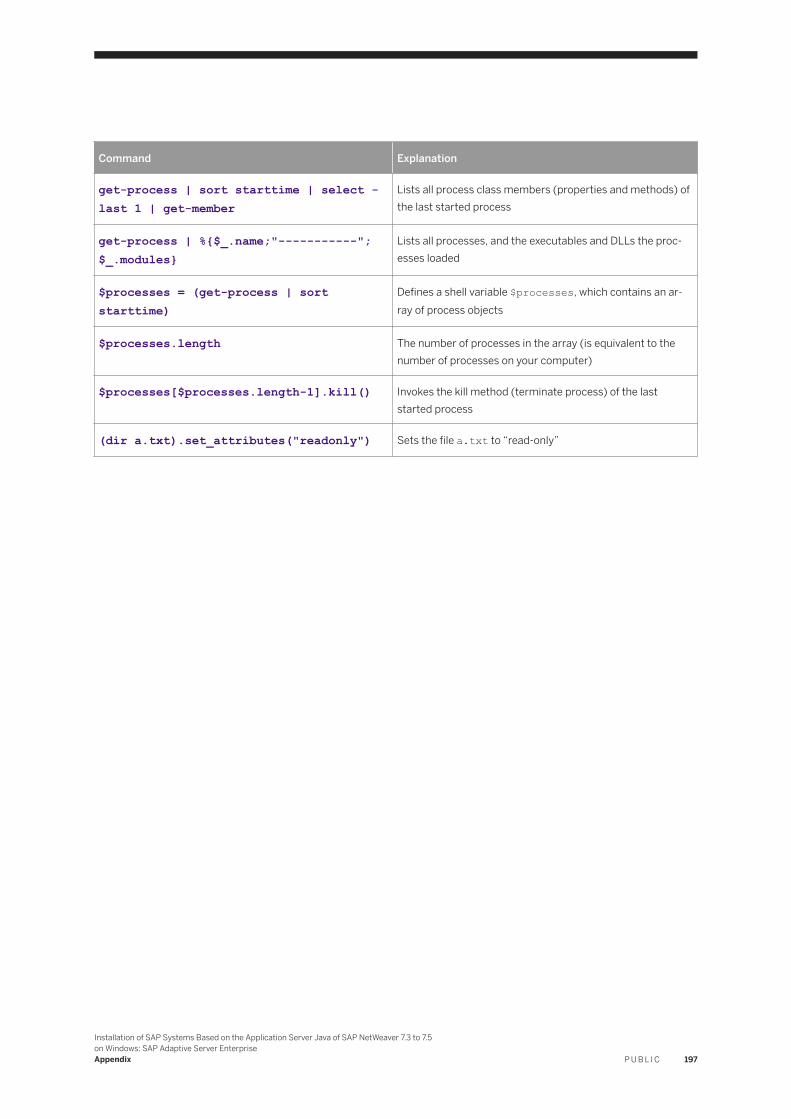
Command Explanation
get-process | sort starttime | select -last 1 | get-member
Lists all process class members (properties and methods) of the last started process
get-process | %{$_.name;"-----------";$_.modules}
Lists all processes, and the executables and DLLs the processes loaded
$processes = (get-process | sort starttime)
Defines a shell variable $processes, which contains an array of process objects
$processes.length The number of processes in the array (is equivalent to the number of processes on your computer)
$processes[$processes.length-1].kill() Invokes the kill method (terminate process) of the last started process
(dir a.txt).set_attributes("readonly") Sets the file a.txt to “read-only”
Installation of SAP Systems Based on the Application Server Java of SAP NetWeaver 7.3 to 7.5 on Windows: SAP Adaptive Server EnterpriseAppendix P U B L I C 197

Important Disclaimers and Legal Information
Coding SamplesAny software coding and/or code lines / strings ("Code") included in this documentation are only examples and are not intended to be used in a productive system environment. The Code is only intended to better explain and visualize the syntax and phrasing rules of certain coding. SAP does not warrant the correctness and completeness of the Code given herein, and SAP shall not be liable for errors or damages caused by the usage of the Code, unless damages were caused by SAP intentionally or by SAP's gross negligence.
Gender-Neutral LanguageAs far as possible, SAP documentation is gender neutral. Depending on the context, the reader is addressed directly with "you", or a gender-neutral noun (such as "sales person" or "working days") is used. If when referring to members of both sexes, however, the third-person singular cannot be avoided or a gender-neutral noun does not exist, SAP reserves the right to use the masculine form of the noun and pronoun. This is to ensure that the documentation remains comprehensible.
Internet HyperlinksThe SAP documentation may contain hyperlinks to the Internet. These hyperlinks are intended to serve as a hint about where to find related information. SAP does not warrant the availability and correctness of this related information or the ability of this information to serve a particular purpose. SAP shall not be liable for any damages caused by the use of related information unless damages have been caused by SAP's gross negligence or willful misconduct. All links are categorized for transparency (see: https://help.sap.com/viewer/disclaimer).
198 P U B L I C
Installation of SAP Systems Based on the Application Server Java of SAP NetWeaver 7.3 to 7.5 on Windows: SAP Adaptive Server Enterprise
Important Disclaimers and Legal Information

Installation of SAP Systems Based on the Application Server Java of SAP NetWeaver 7.3 to 7.5 on Windows: SAP Adaptive Server EnterpriseImportant Disclaimers and Legal Information P U B L I C 199

go.sap.com/registration/contact.html
© 2018 SAP SE or an SAP affiliate company. All rights reserved.No part of this publication may be reproduced or transmitted in any form or for any purpose without the express permission of SAP SE or an SAP affiliate company. The information contained herein may be changed without prior notice.Some software products marketed by SAP SE and its distributors contain proprietary software components of other software vendors. National product specifications may vary.These materials are provided by SAP SE or an SAP affiliate company for informational purposes only, without representation or warranty of any kind, and SAP or its affiliated companies shall not be liable for errors or omissions with respect to the materials. The only warranties for SAP or SAP affiliate company products and services are those that are set forth in the express warranty statements accompanying such products and services, if any. Nothing herein should be construed as constituting an additional warranty.SAP and other SAP products and services mentioned herein as well as their respective logos are trademarks or registered trademarks of SAP SE (or an SAP affiliate company) in Germany and other countries. All other product and service names mentioned are the trademarks of their respective companies.Please see https://www.sap.com/corporate/en/legal/copyright.html for additional trademark information and notices.