Embed Size (px)
Citation preview

On-line Time Collection (OTC)
Client Training Manual

Table of Contents
Section 1: Logging into Online Time Collection Section 2: How to Change My Profile Section 3: Accessing Online Time Sheet Approval Section 4: How to Approve Pending Timesheets Section 5: How to Reject a Timesheet Section 6: How to Approve or Reject a Timesheet after your Consultant has Adjusted Rejected Hours
Section 7: How to Manage Alternative Approvers
Section 8: How to View Timesheet History
Section 1: Logging Into Online Time Collection
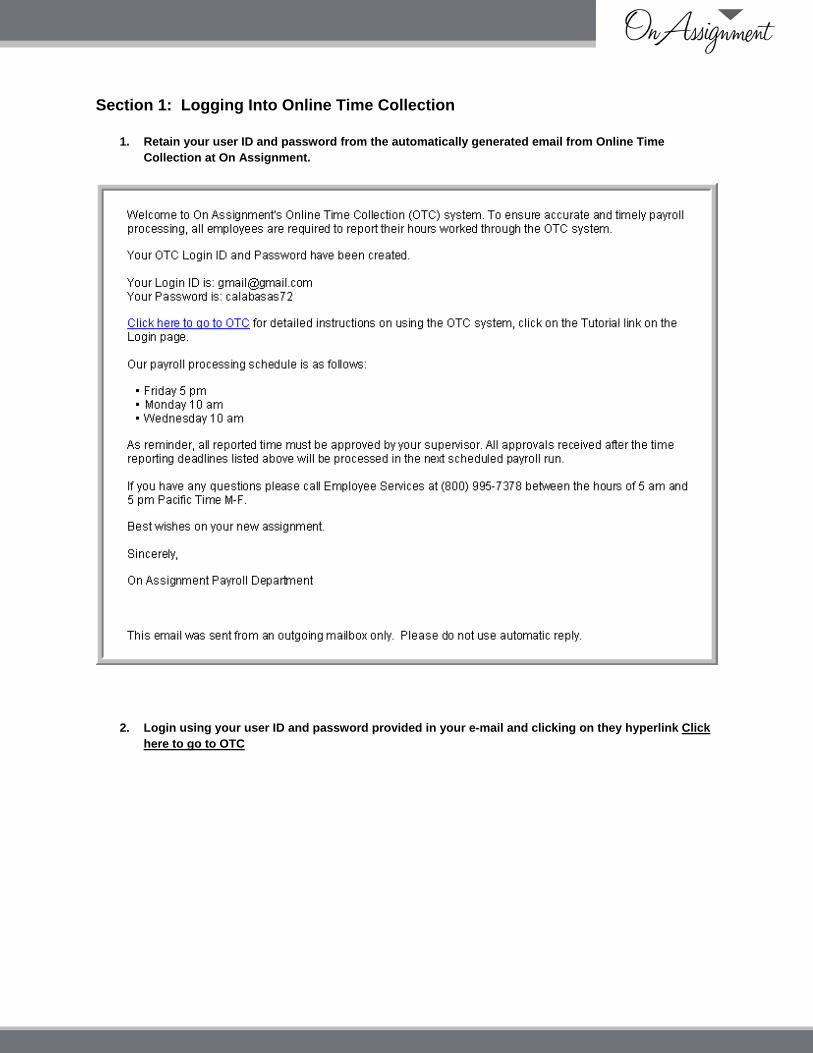
1. Retain your user ID and password from the automatically generated email from Online Time Collection at On Assignment.
2. Login using your user ID and password provided in your e-mail and clicking on they hyperlink Click here to go to OTC

3. You will be launched directly to the set up a password retrieval Question and Answer page.
4. Here you can select your password help question from the drop down. Next, enter your response to your password security question in the Response section. Choose from the following questions:
a. What city were you born in?
b. What is the first name of your oldest child?
c. What was the make of your first car?

5. Once you are done click on the button.

Section 2: How to Change My Profile
1. You can update your profile settings from the Menu section on the left corner menu bar by clicking Change Email Address, Password.
2. Your email address will display. 3. To change your password click Change Password.
4. Enter your Current Password, the New Password and Confirm the New Password. Click OK.

5. To change or set up a forgotten password, click Change or set up forgotten password help.
6. Select from the following three security questions: a. What city were you born in? b. What is the name of your oldest child? c. What was the make of your first car?
7. Enter the correct response and click OK. An email will be sent to your account to with your password within the text.

Section 3: Accessing Online Timesheet Approval
1. You will receive an e-mail notification when a consultant has submitted hours to be approved.
2. Click on the blue hyperlink stating click here to login to OTC. You will be brought to the Time Entry & Time Approval Site.
3. Login to the Time Entry & Timesheet Approver Site by entering your User ID and Password.

4. If you do not have any pending timesheets submitted for approval, your screen will only display the Menu bar on the left side of your page. You will also see a message stating There are no timesheets pending approval.
5. If you have one or more pending timesheets, you will be brought to the Timesheets Pending Approval page.

Section 4: How to Approve Pending Timesheets
1. The list of pending timesheets for approval provides you with the Consultant name, Job Title, Pay Period dates, Timesheet status and the Hours submitted for approval. Here you have the option to approve the selected hours. You can select one or as many as you want by clicking in the box displayed to the left of the consultant name.
2. If one or more of the consultant's names have a check box marked, you can approve and submit the
hours by clicking on the button.
3. Once you click on the button you will be brought to a page to confirm the approved
can cconsultants hours. You onfirm the approved hours by clicking the button.
4. If all the pending approval timesheets were approved the page will refresh and display with a note stating There are no timesheets pending approval.
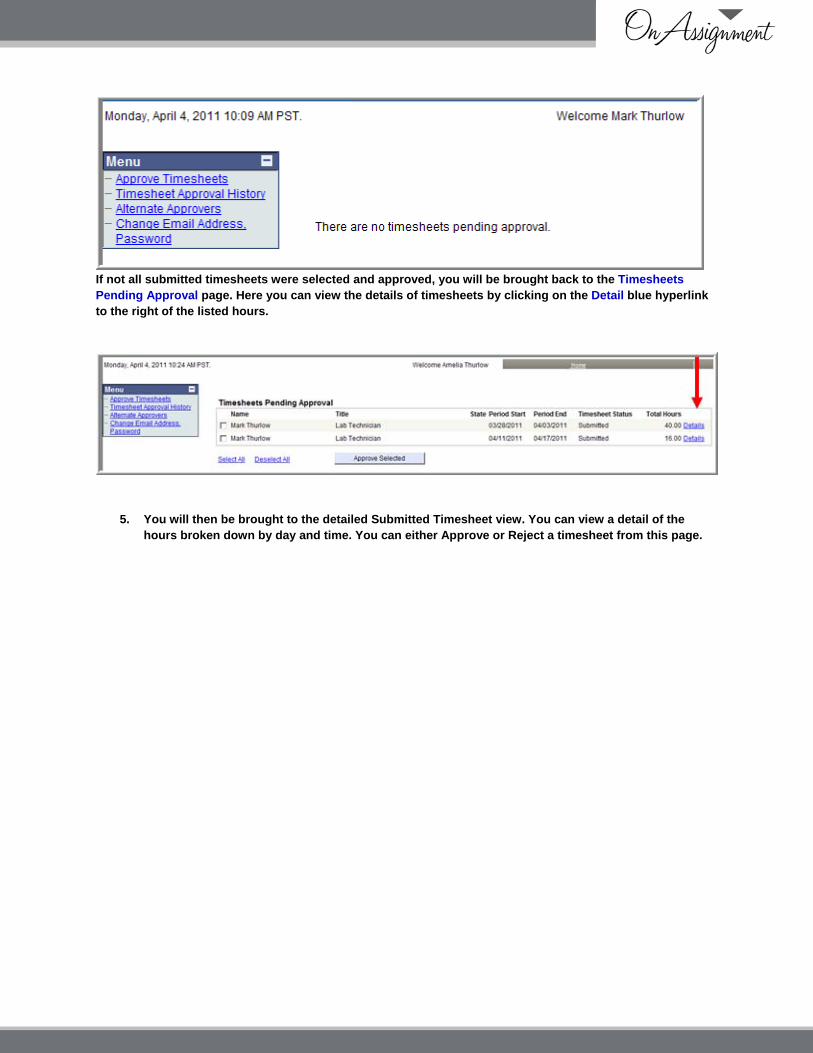
If not all submitted timesheets were selected and approved, you will be brought back to the Timesheets Pending Approval page. Here you can view the details of timesheets by clicking on the Detail blue hyperlink to the right of the listed hours.
5. You will then be brought to the detailed Submitted Timesheet view. You can view a detail of the hours broken down by day and time. You can either Approve or Reject a timesheet from this page.
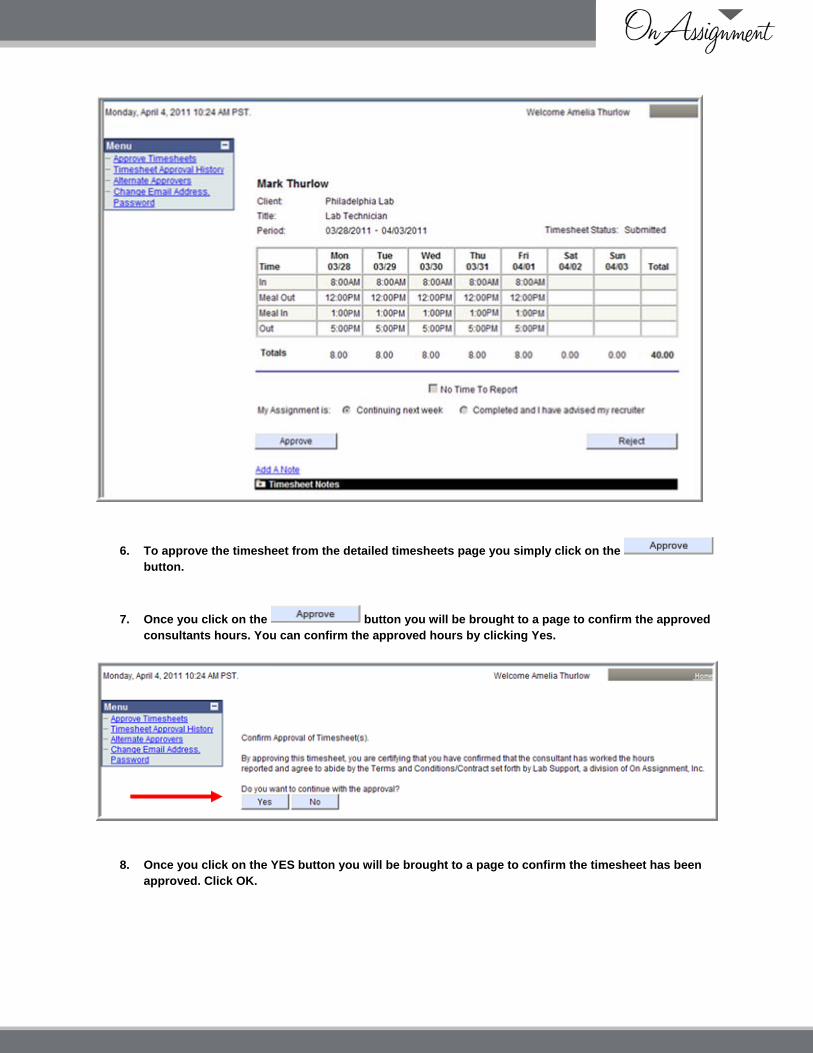
6. To approve the timesheet from the detailed timesheets page you simply click on the button.
7. Once you click on the button you will be brought to a page to confirm the approved consultants hours. You can confirm the approved hours by clicking Yes.
8. Once you click on the YES button you will be brought to a page to confirm the timesheet has been approved. Click OK.

9. Once you click okay you will be brought to the timesheet list view. If there are no timesheets pending, you will see the statement below.

Section 5: How to Reject a Timesheet
d timesheet page. 1. You can Reject a timesheet from the detaile
2. Note: You must add a note in order to Reject a timesheet. If you attempt to click on the
button before adding a note you will receive a pop up informing you to enter notes before Rejecting a timesheet.
3. To add a note click on the Add A Note blue hyperlink

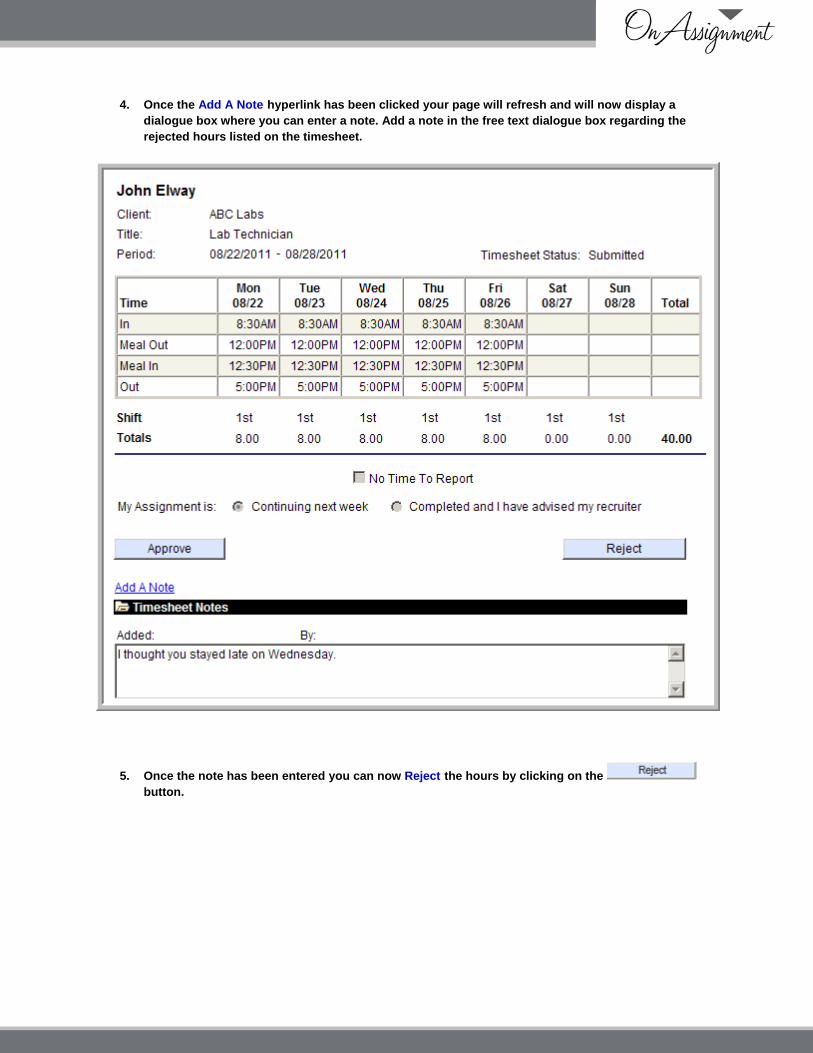
4. Once the Add A Note hyperlink has been clicked your page will refresh and will now display a dialogue box where you can enter a note. Add a note in the free text dialogue box regarding the rejected hours listed on the timesheet.
5. Once the note has been entered you can now Reject the hours by clicking on the button.
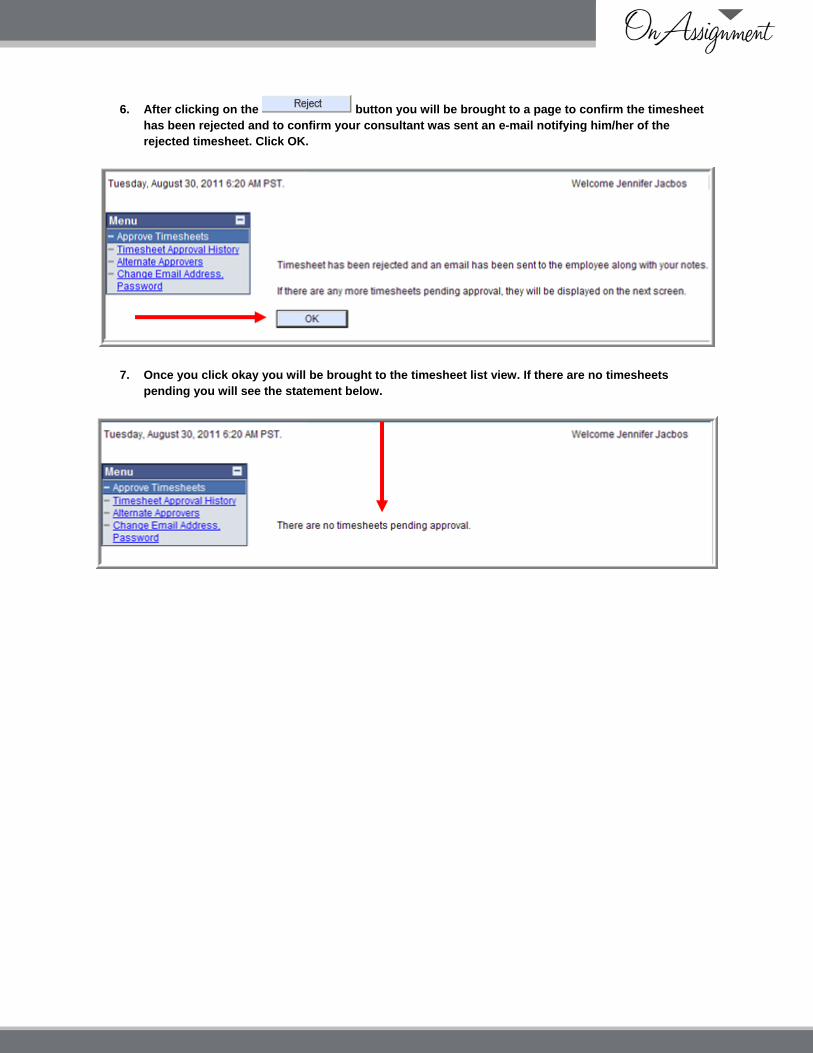
6. After clicking on the button you will be brought to a page to confir timesheethas beenre
m the rejected and to confirm your consultant was sent an e-mail notifying him/her of the
jected timesheet. Click OK.
7. Once you click okay you will be brought to the timesheet list view. If there are no timesheets pending you will see the statement below.

Section 6: How to Approve or Reject Hours After Your Consultant has
1. You will receive an e-mail notification when a consultant has submitted hours to be approved.
Adjusted Rejected Hours
2. Click on the blue hyperlink stating click here to login to OTC. You will be brought to the Time Entry & Time Approval Site.
3. Login to the Time Entry & Timesheet Approver Site by entering your User ID and Password.

4. After logging into the system, click on Approve Timesheets to view and manage the pending timesheets
5. Once you are logged in you can approve hours two ways. You can approve the hours from the Timesheet Pending Approval page. You do this by clicking in the box next to the consultant's name
and then clicking the button.
6. The second way to approve a revised timesheet is from the consultant's detailed timesheet page. Click the Details hyperlink associated with the timecard you wish to view.

7. To view any notes you or your consultant have entered on the timesheet, simply refer to the Timesheet Notes section.
8. If you would like to approve the hours listed then click on button.

9. Once you click on the button you will be brought to a page to confirm the approvedconsultants hours. You can confirm the approved hours by clicking Yes.
10. Once you click on the YES button you will be brought to a page to confirm the timesheet has been approved. Click OK.

11. If the hours are still incorrect follow the same steps listed under the How to Reject a Timesheet section.

Section 7: How to Manage Alternative Approvers
1. From the left menu tool bar, click on the blue hyperlink Alternate Approvers.
2 Y. ou will then be brought to the Manage Alternate Approvers page. If a person has already been created, you can simply check off their name and click Save.
3. To enter or add an Alternate Approver fill in the required name, e-mail address and phone # of the Alternate Approver.

4. If you'd like to set a specific timeframe for which the Alternate Approver is authorized to approve timecards, simply enter the dates in the Starting and Ending time fields. You can manually enter the dates or you can choose the dates from the calendar by clicking on the calendar image to the right of the date fields.
6. A calendar will pop up. Select a date by clicking on the date of the month. Switch months and years by using the dropdown menus.

7. The calendar will disappear and the date will now be listed in the Starting box.
8. Follow the same instructions to enter the Ending date.

9. Once you are done entering an Alternate Approver and dates click the button.
10. After you save an Alternate Approver the information will appear with a green check mark in the box to the left of the Alternate Approvers name indicating they are currently authorized to approve hours. You still have the ability to uncheck the box or edit the dates as needed.
11. If you wish to remove an Alternate Approver from being authorized to approve hours simply click in the box to the left of the Alternate approvers name to remove the check box.

12. Click the button to save all changes made.

Section 8: How to View Timesheet History
1. Click on Timesheet Approval History from the left hand tool bar.
2. You will be brought to the Historical Timesheet List.
3. You can sort the Historical Time sheet list by clicking on one of the underlined items (Name, Period Start, Period End, Timesheet Status, Total Hours).
4. Click on the blue hyperlink of the details from the Historical Timesheet you would like to view.

5. You will then be brought to the printable timesheet view. Here you can simply view, print and/or email a copy of the respective timesheet.