Embed Size (px)
Citation preview

SITECATALYST® AND MERKLE INTEGRATION AND IMPLEMENTATION GUIDE 1
Omniture® and Merkle —
Dynamic Remarketing Segments for More Accurate Target Marketing
Combining behavioral information from SiteCatalyst® with Merkle e-mail marketing creates a powerful tool for
targeting audiences that are otherwise untapped. Delivering relevant email messages to these market segments can
result in entirely new revenue opportunities, driving increased conversion and revenue among new and existing email
campaigns. For example, delivering relevant email messages based on products that were viewed during a visit or
products that were left in an abandoned shopping cart can have dramatic impact on revenue with minimal impact on
cost since this is simply leveraging visitors your site is already getting. This increase in marketing efficiency is one of
the key benefits of integrating SiteCatalyst with Merkle. Additionally, this integration will automatically synchronize
Merkle e-mail metrics with SiteCatalyst data for closed-loop reporting and remarketing.
Key Benefits Include: o Consolidate e-mail marketing and analytics data into one reporting interface
o Optimize e-mail campaigns by conversion and contribution to revenue and site success
o Remarket to key visitors and market segments based on dynamic marketing segments spanning current
and historical data (up to 90 days prior to activation)
Dynamic Marketing Segments Include: o Purchase Profiles - Increase repeat orders and average order value through campaigns targeted by
visitor purchase patterns
o Product/Content View Behavioral Profile – Reach prospective customers through marketing
segments based on product views and content access profiling
o Cart Abandonment Profile – Help visitors convert to customers through fine tuned campaigns
specifically designed for those who are hesitant to complete carts
Integration Procedure and Prerequisites: Using a ―plug and play‖ wizard, intuitive step-by-step processes will walk you through points of system
synchronization and initialize the integration.
Omniture Prerequisites: Merkle Prerequisites:
o Omniture Data Warehouse™
o JavaScript Plug-in to capture campaign elements
o Available and configured SiteCatalyst variables
o Must be using Alterian Dynamic Messenger System
Pricing: Omniture: Merkle:
o There are fees associated with this
integration. Please contact your account
representative for pricing details.
o There are fees associated with this
integration. Please contact your Merkle account
representative for pricing details.
For further details, see the remainder of this document or contact Omniture or Merkle.

SITECATALYST® AND MERKLE
SITECATALYST® AND MERKLE INTEGRATION AND IMPLEMENTATION GUIDE 2
What You Should Know Before Activating This Integration
Before activating this integration, review the following items against your deployments of Omniture SiteCatalyst® and
Merkle. Doing so will ensure the appropriate best practices or pre-requisites are in place prior to activation thus
resulting in an optimal and successful integration.
Omniture SiteCatalyst: o Report Suite Specific. Be advised this integration is report suite specific. Ensure you have selected
the desired report suite prior to activating the integration.
o Authorized Representative. Be advised this integration will incur fees as described above. By
activating this integration, you represent you are an authorized representative of your company and you
agree to pay the fees, as described above, associated with this integration.
o Current Customer of Merkle. This integration requires you to be a customer of both Omniture and
Merkle. If you are not currently a customer of Merkle, you will not have the information necessary to
complete the integration wizard (visit the Genesis Showcase to learn more about Merkle). If you are
currently a customer of Merkle, you will need your Merkle Account ID, or the unique identifier assigned
to your organization by Merkle, in order to complete the integration wizard.
o Omniture Data Warehouse™. This integration requires the Omniture Data Warehouse to be enabled
in order to generate remarketing segments. If you have not enabled the Omniture Data Warehouse,
contact Omniture LiveSupport for details.
o Visitor ID. If you’re not currently following the best practice of capturing a ―Visitor ID‖ within a Custom
Commerce Variable (eVar), you’ll want to do so prior to activating the integration. Otherwise, the
integration system will be unable to generate remarketing segments. Ideally, this Visitor ID should be
the same Visitor ID used by Merkle (if not, see ―Recipient ID‖ below).
o Recipient ID. If you use a different Visitor ID than Merkle, you must identify a separate eVar in which to
capture the Merkle Visitor ID, sometimes called the ―Recipient ID,‖ and select it when prompted by the
integration wizard.
o External Tracking. If you’re not currently following the best practice of enabling external tracking for
each e-mail campaign you send, you must do so to ensure a successful integration. See the Merkle
section below for details.
o SiteCatalyst Plug-In. If you haven’t already done so, you must install the SiteCatalyst plug-in below
(simply copy these few lines of code and add them to the SiteCatalyst code on your pages). This plug-
in will enable SiteCatalyst to automatically identify and capture incoming traffic resulting from Merkle-
produced e-mail campaigns appropriately.
o SiteCatalyst Plug-In:
/*
* Plugin: getQueryParam 2.3
*/
s.getQueryParam=new Function("p","d","u",""
+"var
s=this,v='',i,t;d=d?d:'';u=u?u:(s.pageURL?s.pageURL:s.wd.locati"
+"on);if(u=='f')u=s.gtfs().location;while(p){i=p.indexOf(',');i=i
<0?p"
+".length:i;t=s.p_gpv(p.substring(0,i),u+'');if(t){t=t.indexOf('#
')>-"
+"1?t.substring(0,t.indexOf('#')):t;}if(t)v+=v?d+t:t;p=p.substrin
g(i="
+"=p.length?i:i+1)}return v");
s.p_gpv=new Function("k","u",""

SITECATALYST® AND MERKLE
SITECATALYST® AND MERKLE INTEGRATION AND IMPLEMENTATION GUIDE 3
+"var s=this,v='',i=u.indexOf('?'),q;if(k&&i>-
1){q=u.substring(i+1);v"
+"=s.pt(q,'&','p_gvf',k)}return v");
s.p_gvf=new Function("t","k",""
+"if(t){var
s=this,i=t.indexOf('='),p=i<0?t:t.substring(0,i),v=i<0?'T"
+"rue':t.substring(i+1);if(p.toLowerCase()==k.toLowerCase())retur
n s."
+"epa(v)}return ''");
/*in the s_doPlugins function
s.campaign=s.getQueryParam("SP_MID"); //places query param value from cid in
campaign variable s.eVar2=s.getQueryParam("SP_RID"); //places query param value
from rid in eVar2 variable
NOTE: The plug-in above assumes certain Custom Commerce Variables (eVars) are
available. If the variables specified in the plug-in above are not available within your
SiteCatalyst deployment, simply replace them with those that are available.
o Privacy Compliance. You should understand that by enabling "Visitor ID" tracking, this feature may
track personally identifiable information of your site visitors. This has privacy implications requiring the
implementation of appropriate procedures by your organization, such as providing notice to, and
consent of, your site visitors.

SITECATALYST® AND MERKLE
SITECATALYST® AND MERKLE INTEGRATION AND IMPLEMENTATION GUIDE 4
Configuring the Omniture/Merkle Integration
SiteCatalyst® / Merkle – An Overview
Omniture SiteCatalyst® provides organizations with actionable, real-time intelligence regarding their online
strategies and marketing initiatives. Improve target marketing and understand campaign effectiveness through
seamless integration of Merkle and SiteCatalyst web analytics data.
Setup
Before you can configure the integration for your Merkle account, you will need to have the following in place:
Plug-in (see page 2) to automatically identify and capture incoming traffic resulting from Merkle-
produced e-mail campaigns
Know which E-mail address you wish to use to receive notification concerning the integrated operations.
Know your Account ID (the unique identifier assigned to your organization by Merkle.
Identify the custom variable within SiteCatalyst that holds your campaign information. This is commonly
the ―Tracking Code‖ for many organizations; however it may be something different in your organization.
Identify the custom variable within SiteCatalyst that holds your Visitor ID (or Recipient ID) information.
Determine which events into which you would like to place your email event data. Depending upon your
reporting needs, you may want to use five or more events. You may want to rename those Events
appropriately.
SITECATALYST® AND MERKLE
SITECATALYST® AND MERKLE INTEGRATION AND IMPLEMENTATION GUIDE 5
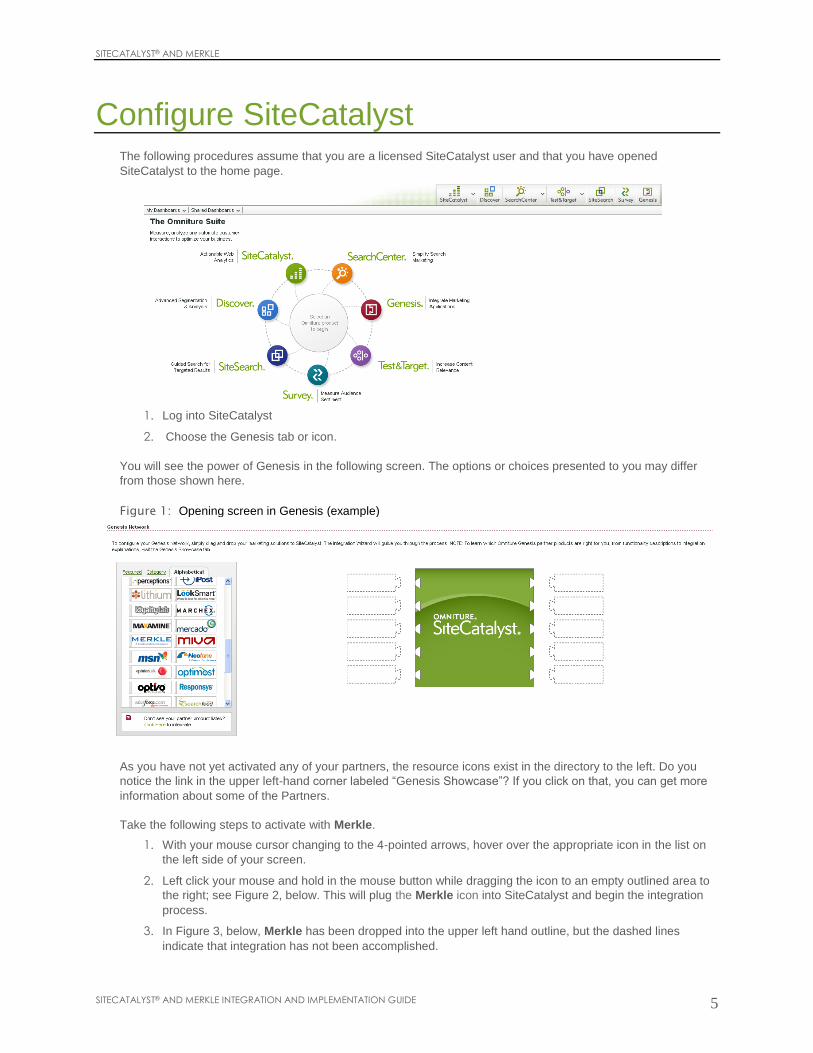
Configure SiteCatalyst The following procedures assume that you are a licensed SiteCatalyst user and that you have opened
SiteCatalyst to the home page.
1. Log into SiteCatalyst
2. Choose the Genesis tab or icon.
You will see the power of Genesis in the following screen. The options or choices presented to you may differ
from those shown here.
Figure 1: Opening screen in Genesis (example)
As you have not yet activated any of your partners, the resource icons exist in the directory to the left. Do you
notice the link in the upper left-hand corner labeled ―Genesis Showcase‖? If you click on that, you can get more
information about some of the Partners.
Take the following steps to activate with Merkle.
1. With your mouse cursor changing to the 4-pointed arrows, hover over the appropriate icon in the list on
the left side of your screen.
2. Left click your mouse and hold in the mouse button while dragging the icon to an empty outlined area to
the right; see Figure 2, below. This will plug the Merkle icon into SiteCatalyst and begin the integration
process.
3. In Figure 3, below, Merkle has been dropped into the upper left hand outline, but the dashed lines
indicate that integration has not been accomplished.

SITECATALYST® AND MERKLE
SITECATALYST® AND MERKLE INTEGRATION AND IMPLEMENTATION GUIDE 6
4. When Integration is complete, not only does the Icon appear firmly locked in place but it appears in the
table at the bottom of the screen in the Genesis list. From the list you have link options to Edit or to
Deactivate the Merkle application.
Figure 2: Dragging the Merkle icon into place (example)
When the icon clicks into place, it will stay in place but the outline remains dotted and unconnected, as
shown below by example in Figure 3.
Figure 3: Icon dropped to begin Activation (example)
5. As soon as the Merkle icon is dropped into place, a series of popups will appear. Complete the
information and confirmation steps in these popups to activate your new Integration.

SITECATALYST® AND MERKLE
SITECATALYST® AND MERKLE INTEGRATION AND IMPLEMENTATION GUIDE 7
Activate a Merkle Integration
Create an integration to import the relevant information from Merkle.
The following information, steps and screens will walk you through your activation process.
The first popup, shown below in Figure 5, starts off with a question and then answers that question as follows:
WHY INTEGRATE WITH MERKLE?
Current Merkle customers can increase returns from e-mail marketing. Understand campaign effectiveness
from almost any angle, then remarket to customers based on cart abandonment, product purchases, product
views and more. This integration will automatically synchronize e-mail metrics with Omniture metrics for
closed-loop marketing to the right audience with maximum effectiveness.
Consolidate e-mail marketing and analytics data into one reporting interface
Optimize e-mail campaigns by conversion and contribution to revenue and site success
Remarket to key visitors and market segments based on cart abandonment, product
purchases, product views, and much more spanning current and historical data (up to 90 days prior to
activation)
The preceding information was taken from top part of the following screen. Further information is provided in
Figure 5, below.
Figure 4: Prepare for the Integration Wizard
1. Read and understand all the information, both on the popup and at the links.
SITECATALYST® AND MERKLE
SITECATALYST® AND MERKLE INTEGRATION AND IMPLEMENTATION GUIDE 8
a. Click on the link for ―Executive Overview with Pre-Requisites‖ and be sure you understand and can
agree with them.
b. Click on the link for ―Fees Associated with This Integration.‖
c. If you need more information about the application before proceeding, click on ―Click Here‖ to learn
more about Merkle.
2. To proceed with activation, click in the Acceptance check box, then click on the Next > button. (The text
from that statement is repeated in the Caution note placed below this figure.) If you are not ready to
proceed at this time, click the Cancel button in the lower right-hand corner.
Your next popup screen is labeled Step 1 of 7. From here you are performing the actual integration
procedures.
CAUTION: Do NOT check this box and then click the Next> button until you are in full agreement with the terms
discussed above and with the following statement which appears next to the checkbox:
―By activating the integration, I understand my company may incur fees as described above (see Fees
Associated with This Integration). As an authorized representative of my company, I agree to the
accompanying terms and to pay any applicable fees associated with this integration.‖
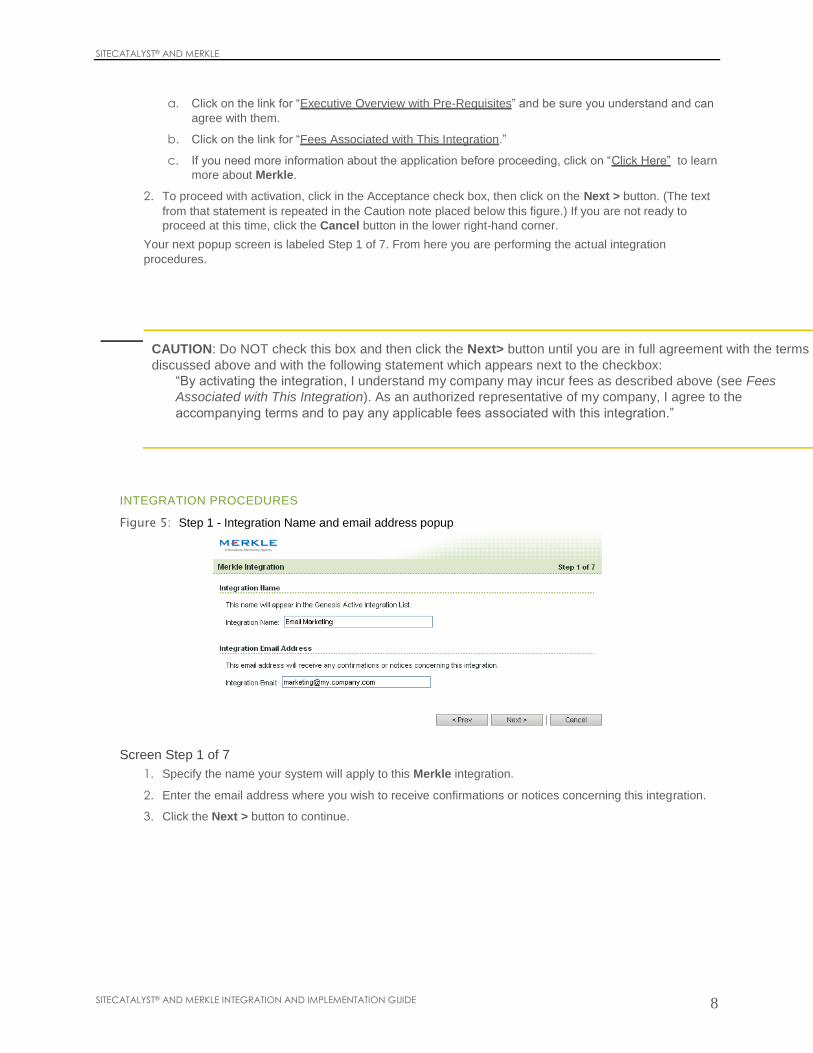
INTEGRATION PROCEDURES
Figure 5: Step 1 - Integration Name and email address popup
Screen Step 1 of 7
1. Specify the name your system will apply to this Merkle integration.
2. Enter the email address where you wish to receive confirmations or notices concerning this integration.
3. Click the Next > button to continue.

SITECATALYST® AND MERKLE
SITECATALYST® AND MERKLE INTEGRATION AND IMPLEMENTATION GUIDE 9
Figure 6: Step 2 - Merkle Account ID
Screen Step 2 of 7
4. Specify your Account ID for this Merkle account.
5. Click the Next> button to proceed.
Figure 7: Designate Visitor ID Variable
Screen Step 3 of 7
Here you will match Visitor IDs with an appropriate SiteCatalyst eVar.
6. Use the drop-down box to identify which SiteCatalyst eVar will be used for tracking the Merkle Visitor
ID.

SITECATALYST® AND MERKLE
SITECATALYST® AND MERKLE INTEGRATION AND IMPLEMENTATION GUIDE 10
7. Check the box confirming that you agree with and understand the statement: ―I understand that by
enabling "Visitor ID" tracking, this feature may track personally identifiable information of our site visitors.
This has privacy implications requiring the implementation of appropriate procedures by my organization,
such as providing notice to, and consent of, our site visitors.‖
8. Should you wish to participate in the Remarketing Segments program, check the box beside each one
you wish to have.
9. Click on the Next > button.
Figure 8: Designate E-mail Message ID Variable
Screen Step 4 of 7
10. Use the drop-down box to identify and specify which eVar will be used for tracking the E-Mail Message
ID.
11. Click on the Next > button.
Figure 9: Map E-mail Metrics to SiteCatalyst Events
Screen Step 5 of 7
12. Click in the checkbox for each E-Mail Metric you wish to map to an established SiteCatalyst Event.
13. Use the drop-down box to identify and specify which SiteCatalyst Event should be mapped to the
chosen E-mail Metric.

SITECATALYST® AND MERKLE
SITECATALYST® AND MERKLE INTEGRATION AND IMPLEMENTATION GUIDE 11
Figure 10: Integration Summary
Screen Step 6 of 7
This screen confirms your integration configuration. If there is anything you have entered that you need to
change, do it now by clicking the <Back button until you reach the affected screen.
14. Click the Save button to finish your Merkle Integration process.
Figure 11: E-Mail Marketing Integration Complete
Screen Step 7 of 7
Confirms that all of your steps have been completely and correctly performed. Also informs that ―You will
receive an e-mail notification when the e-mail metrics have been imported into SiteCatalyst.
―If you selected a remarketing segment(s) you will receive an additional e-mail notification upon completion
of initial processing ... and delivery to your E-mail Service provider.‖
15. Click the Close button to accept the confirmation.

SITECATALYST® AND MERKLE
SITECATALYST® AND MERKLE INTEGRATION AND IMPLEMENTATION GUIDE 12
Figure 12: Fully Integrated with SiteCatalyst (example)
At the SiteCatalyst Genesis screen, you will find the Merkle icon locked into place, again confirming that the
integration process was completed satisfactorily.
The integration process is now complete. You should see Merkle listed at the bottom of the Genesis screen.
To edit or to deactivate Merkle, click on the appropriate link in the list.

SITECATALYST® AND MERKLE
SITECATALYST® AND MERKLE INTEGRATION AND IMPLEMENTATION GUIDE 13
Integrated Reporting within SiteCatalyst Figure 13: Typical Reports from your E-Mail Marketing Integration with Merkle.
The reports in Figure 13, above, presents information only available with an E-Mail Marketing Integration, such
as with Merkle.


![Omniture Site Catalyst User Training[1] Copy](https://img.dokumen.tips/doc/110x75/5402da75dab5cafa2c8b479e/omniture-site-catalyst-user-training1-copy.jpg)