Embed Size (px)
Citation preview

OMNIBUS S U R V E Y
u s e r g u I d e
United Nations Convention against
CorrupTIon
United Nations Convention against
TransnaTIonal organIZed CrIme
and the Protocols thereto
s e l f - a s s e s s m e n T C h e C k l I s Ton the implementation of the

For any queries regarding the software, please contact [email protected] (for matters related to the United Nations Convention against Corruption) or [email protected] (for matters related to the United Nations Convention against Transnational Organized Crime and the Protocols thereto).

Table of ConTenTs
1 InsTallaTIon of The sofTware 1
2 assIsTanCe In operaTIng The omnIbus survey sofTware 2
3 CreaTIng a self-assessmenT 2 3.1 The portal ...........................................................................................2 3.2 Start new self-assessment ....................................................................3
4 workIng on a self-assessmenT ......................................... 4 4.1 Opening a self-assessment ..................................................................4 4.2 Conducting a self-assessment ..............................................................5 4.3 Provisions List ......................................................................................5 4.3.1 Assessing only provisions of a certain level of legal obligation ....6 4.3.2 Assessing only provisions related to a certain theme ...................6 4.3.3 Search for articles ......................................................................6 4.4 Provision Text .......................................................................................6 4.5 Assessor’s comments ...........................................................................6 4.6 Answered Questions ............................................................................7 4.7 Cross-references .................................................................................7 4.8 Progress Icons ....................................................................................7 4.9 Open several self-assessments at the same time ..................................7 4.10 Compulsory and non-compulsory questions .........................................7 4.11 Answering a free-text question ............................................................7 4.12 Attaching documents ...........................................................................8 4.13 Saving answers....................................................................................9 4.14 Proceeding to the next provision ..........................................................9 4.15 Changing answers ...............................................................................9 4.16 Copy answers already provided in the self-assessment of another treaty ....9 4.17 Set a provision for review ..................................................................10 4.18 Delete answers ..................................................................................11 4.19 Merge self-assessments .....................................................................11 4.19.1 Users’ job ..............................................................................11 4.19.2 Focal point’s job ....................................................................11 4.20 Import attachments ...........................................................................14
5 generaTe reporTs and submIT Them To unodC ............. 14 5.1 Preview self-assessment report...........................................................14 5.2 Print self-assessment report ...............................................................14 5.3 Save self-assessment report as PDF ....................................................15 5.4 Save self-assessment report as XML/DAT ............................................15 5.5 Submit self-assessment report to UNODC ..........................................15
6 gap analysIs reporT ........................................................... 16
7 deleTe self-assessmenTs .................................................... 16

1 2
1 InsTallaTIon of The sofTware
1. In order to install the software on your computer, make sure that you have administrator rights on your machine (e.g. private laptop or personal computer).
2. If your computer is part of a network (such as most work computers), seek assistance from your network administrator.
2 assIsTanCe In operaTIng The omnIbus survey sofTware
The CD containing the Omnibus Survey Software also includes video clips featuring all the passages of the self-assessment process. In addition, such video clips are also available for download from the UNODC website (www.unodc.org/unodc/en/treaties/CAC/self-assessment.html).The video clips are named and sequenced in order to reflect the content of this User Guide.

1 2
3 CreaTIng a self-assessmenT
3.1 The porTal1. From the portal of the software, you can start self-assessments of UNCAC, UNTOC
and its Protocols. 2. The 2. The button, which remains visible throughout the whole self-assessment,
contains an electronic version of this User Guide.3. Click on “UNODC Contact details” to see the contact details of your UNODC
counterparts in the reporting exercise.

3 4
3.2 sTarT new self-assessmenT 1. From the portal, click on the button “Start self-assessment…” of the treaty you
wish to assess. 2. The Self-assessments List window appears
3. Click on 3. Click on , which opens the Self-assessment details window
4. Enter the requisite information and click on 4. Enter the requisite information and click on 4. Enter the requisite information and click on . Your self-assessment will be automatically loaded.
Note: Fields marked with an asterisk(*) are mandatory fields. You have to fill in these fields to create a self-assessment.

3 4
4 workIng on a self-assessmenT
4.1 openIng a self-assessmenT already CreaTed 1. From the portal, click on “Start Self-Assessment…”. 2. The Self-assessments List window appears with all your existing self-assessments
of the treaty you are about to assess in the application3. Click on the self-assessment you wish to open4. The title of the self-assessment selected is highlighted in the Self-assessments
List window.
5. Click on 5. Click on . The software will display the self-assessment you have selected.

5 6
4.2 ConduCTIng a self-assessmenTThis is the screen you see while conducting your self-assessment:
PROVISION TEXT
CURRENT QUESTION
ANSWERED QUESTIONS
CROSS-REFERENCES
ASSESSOR’S COMMENTS
PROGRESS ICON
PROVISIONS LIST
4.3 provIsIons lIsT In the Provisions List at the left-hand side of your screen, you see all the provisions to be reviewed.
1. By clicking on 1. By clicking on (above the Provisions List), you will minimize all the provisions and see only the Chapters of the treaty (if it is structured in chapters) to be reviewed.
2. In the Provisions List, click on the first provision you wish to assess.
Before any of the questions related to the provision under review are answered, the symbol next to the provision appears in red . If at least one of the questions has been answered, it changes to amber . Once all questions related to the provision under review have been answered, the provision is marked with a green symbol .

5 6
4.3.1 I wanT To assess only provIsIons wITh a CerTaIn level of legal oblIgaTIon
1. Above the Provisions List, you will see three checkboxes indicating the levels of legal obligation of the provisions (“Mandatory” provisions, obligation to consider “Consideration” and “Optional” provisions).
2. If you want to isolate and review only provisions with a certain level of legal obligation (e.g., only mandatory provisions), check the respective boxes and uncheck the
boxes of the level of obligation you do not want to assess. In our example: boxes of the level of obligation you do not want to assess. In our example:
3. The Provisions List now shows only the provisions which have the level of legal obliga-tion you decided to assess (In our example, you will only see mandatory provisions).
4. To return to assessing your compliance with the whole treaty, check all boxes.
4.3.2 I wanT To assess only provIsIons relaTed To a CerTaIn TopIC
1. To assess only provisions related to certain topics (e.g. prevention, criminali-zation, international cooperation, etc.), click on the pull-down arrow
1. To assess only provisions related to certain topics (e.g. prevention, criminali-zation, international cooperation, etc.), click on the pull-down arrow next to zation, international cooperation, etc.), click on the pull-down arrow
above the Provisions List. 2. Check the boxes corresponding to the themes you wish to assess, then click on
“OK”. The list of provisions on the left-hand side of your screen now displays only provisions related to the topic/s you have chosen.
4.3.3 Can I searCh for an arTICle?You can search for any article of the treaty under review by using the You can search for any article of the treaty under review by using the
field. For example, to look for article 8, simply type 8 in the text box. The software will take you to article 8.
4.4 provIsIon TeXTThe text of the provision under review is displayed in the Provision Text box. 1. Once you have clicked on the first provision you want to assess in the Provisions
List, the text of the selected provision appears in the Provision Text box. The questions to be answered appear in the middle of the screen. The key words of the provision under review are marked in bold and hyperlinked in the Provision Text box.
2. By clicking on the highlighted keywords, a separate window appears, explaining the significance of such key words and of the provision under review.
4.5 assessor’s CommenTsWhile assessing your compliance with the provision under review, you can leave comments in the Assessor’s comments box.

7 8
4.6 answered QuesTIonsAll answered questions related to the provision under review are displayed in the Answered Questions list. To see and amend your answers to any given question, click on the question in this list. The question is then displayed in the Current Question field. You are able to amend your answers as required.
4.7 Cross-referenCesCross-references to other crime-related treaties are displayed in the Cross-References box. Click on the name of the cross-references to see the text of the related provision.
4.8 progress ICons
As you proceed through your self-assessment, the icons move to the right-hand side of your screen. The closer you get to the end of your self-assessment, the more the icons move rightward.
4.9 openIng several self-assessmenTs aT The same TIme
1. If you want to compare your answers with answers provided in previous years or work on several self-assessments in parallel, use the
1. If you want to compare your answers with answers provided in previous years or work on several self-assessments in parallel, use the tab available from the top left-hand side of your screen to go back to the portal and open other self-assessments.
2. You are able to navigate between all opened self-assessments by clicking on the corresponding tabs on the top of your screen.
the corresponding tabs on the top of your screen.
4.10 Compulsory and non-Compulsory QuesTIons 1. Questions marked with this symbol are compulsory to answer. The software
does not allow you to proceed to the next question unless you have answered the previous compulsory one.
2. If you have opened one provision but do not wish to answer any question, you can proceed to the self-assessment of any other provision by selecting it manually from the Provisions List.
4.11 answerIng a free-TeXT QuesTIon1. Whenever a free-text question appears, please click on this icon 1. Whenever a free-text question appears, please click on this icon to answer
the question.
7 8
2. For most of the free-text questions, UNODC has prepared templates of answers, which you can use by clicking on the
2. For most of the free-text questions, UNODC has prepared templates of answers, which you can use by clicking on the button which appears in the answering dialog box.
3. Replace the text contained in the square brackets (e.g. [DATE], with the appropriate date) to complete the answer.
4. The templates work like any Word document. You can delete pre-filled information, overwrite, etc.
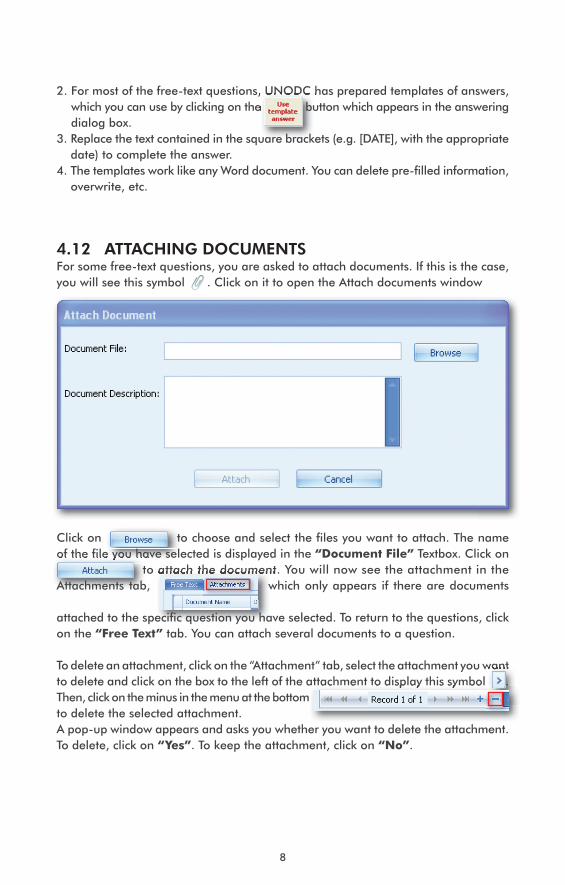
4.12 aTTaChIng doCumenTsFor some free-text questions, you are asked to attach documents. If this is the case, you will see this symbol . Click on it to open the Attach documents window
Click on to choose and select the files you want to attach. The name of the file you have selected is displayed in the “Document File” Textbox. Click on of the file you have selected is displayed in the of the file you have selected is displayed in the
to attach the document. You will now see the attachment in the Attachments tab,
to attach the document. You will now see the attachment in the which only appears if there are documents
attached to the specific question you have selected. To return to the questions, click on the “Free Text” tab. You can attach several documents to a question.
To delete an attachment, click on the “Attachment” tab, select the attachment you want to delete and click on the box to the left of the attachment to display this symbol To delete an attachment, click on the “Attachment” tab, select the attachment you want to delete and click on the box to the left of the attachment to display this symbol . Then, click on the minus in the menu at the bottom to delete and click on the box to the left of the attachment to display this symbol to delete and click on the box to the left of the attachment to display this symbol Then, click on the minus in the menu at the bottom to delete the selected attachment. A pop-up window appears and asks you whether you want to delete the attachment. To delete, click on “Yes”. To keep the attachment, click on “No”.

9 10
4.13 savIng answersAfter answering a question, click on this symbol to proceed to the next one. The software automatically saves your answers.
4.14 proCeedIng To The neXT provIsIon1. After answering the last question of the provision under review, a dialogue box
appears
2. By clicking on “Yes”, you will be automatically taken to the next provision. 3. By clicking on “No”, you will have to manually select the next provision to review
from the Provisions List.
4.15 ChangIng answers1. Every answer can be changed at any time2. In the Answered Questions list, you can click on any of the questions you have
previously answered. This takes you back to the question and you can modify your answer/s.
4.16 Copy answers already provIded In The self-assessmenT of anoTher TreaTy
Some provisions of UNTOC are similar to those of UNCAC, and vice versa. I have already provided information on the provision of one treaty (e.g. UNTOC) and I think that this information can also be useful to assess my compliance with the provision of another treaty (e.g. UNCAC). Can I import information from one self-assessment to another?
In case you have already provided information on the provision of one treaty which is similar to the provision of another treaty, the software will alert you.
1. A dialog box will show you the details (name, year and instrument) of the self-assessment through which you have already provided similar information that you may want to reuse for the self-assessment you are conducting now.

9 10
TEXT BOX 2TEXT BOX 1
2. By clicking on the text boxes, you are able to see the provisions of other treaties which have already been assessed and are similar to the one you are reviewing.
3. Click on the text box from which you want to import information, then click on “Copy answers”. You will now see the answers you have given in a previous self-assessment copied into your present self-assessment.
4. Once you have imported information from another self-assessment, you can still amend or update it as you see fit.
Note: Please note that this function is only available for copying answers provided in self-assessments of crime-related treaties supported by UNODC (UNCAC, UNTOC and the Protocols thereto). To be able to copy answers, the self-assessment from which you want to copy needs to be included in the Self-assessments Lists on your computer (see point 4.19.2.1)
4.17 seT a provIsIon for revIewIf you want to be reminded to return to a provision and complete or change the answers provided, you can set the provision for review. 1. Right-click on the provision in the Provisions List. 2. In the context menu that appears, click on “Set provision for review”.3. You can type comments for your colleagues who will be working on this provision
or reminders for yourself in the blank text box. 4. Click on
or reminders for yourself in the blank text box. 4. Click on to save your remarks.
A provision set for review is marked with this symbol . 5. By clicking on the symbol , you will see the remarks you have typed. 6. If you wish to remove your comments and the symbol, right-click on the provision
and then click on “Delete review flag”. Your answers to the questions will remain, while the symbol and your remarks will be removed.

11 12
4.18 deleTe answersYou can always delete the answers you have provided against a provision.1. Right-click on the provision in the Provisions List. 2. In the context menu that appears, click on “Delete Answers”.3. A message window appears. If you confirm that you want to delete your answers,
the software will do so.
4.19 merge self-assessmenTsMore users need to work on different portions of the self-assessment report (or the same user has created different self-assessment versions). In this case, all users concerned have to install the software on their computer (see point 1 above), agree on the division of labor (who answers what) and designate a focal point.
4.19.1 users’ Job1. After completing their portions of the self-assessment, the users have to send
them electronically, as XML/DAT files (see point 5.4 below) to the focal point (users are also encouraged to send the PDF files to the focal point - see point 5.3 above - for the latter to be able to visualize the narrative version of the report prepared by the former). If the attachments exceed your email system’s limitations, please transmit them to the focal point or UNODC by means of a removable drive (e.g. a CD). The focal point can then import the attachments separately (please see point 4.20 below).
4.19.2 foCal poInT’s Job
4.19.2.1 IMPORT ALL PORTIONS OF THE SELF-ASSESSMENT
Option a1. The focal point has to save, in the same folder of his/her local drive, all XML/DAT
files received. If the DAT file is too large to be sent by email, it has to be provided to the focal point on a removable drive (e.g. CD/USB drive).
2. From the portal, the focal point should click on “Start Self-Assessment” of the treaty he/she wishes to work on.
3. The Self-assessments List window appears, in which the focal point should click on “Import Self-assessment”.
11 12
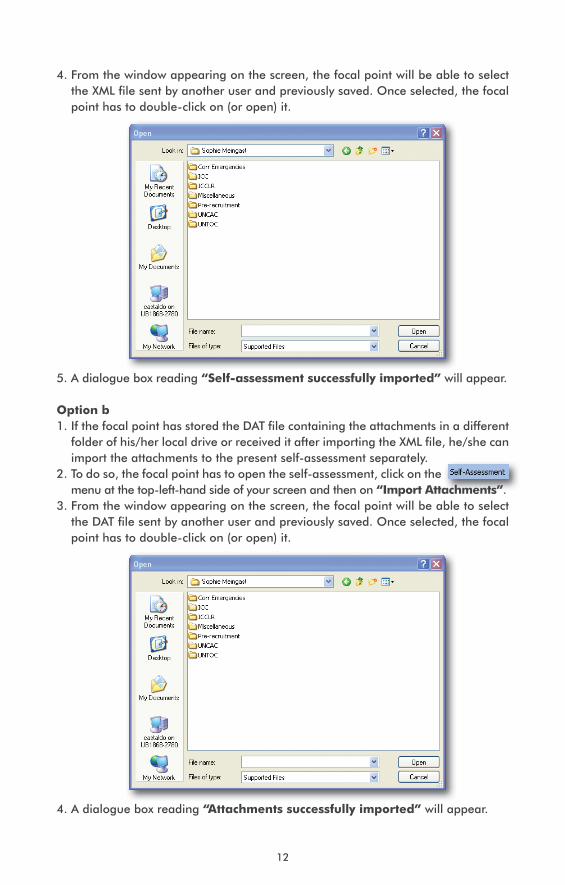
4. From the window appearing on the screen, the focal point will be able to select the XML file sent by another user and previously saved. Once selected, the focal point has to double-click on (or open) it.
5. A dialogue box reading “Self-assessment successfully imported” will appear.
Option b1. If the focal point has stored the DAT file containing the attachments in a different
folder of his/her local drive or received it after importing the XML file, he/she can import the attachments to the present self-assessment separately.
2. To do so, the focal point has to open the self-assessment, click on the 2. To do so, the focal point has to open the self-assessment, click on the menu at the top-left-hand side of your screen and then on “Import Attachments”.
3. From the window appearing on the screen, the focal point will be able to select the DAT file sent by another user and previously saved. Once selected, the focal point has to double-click on (or open) it.
4. A dialogue box reading “Attachments successfully imported” will appear.
13 14
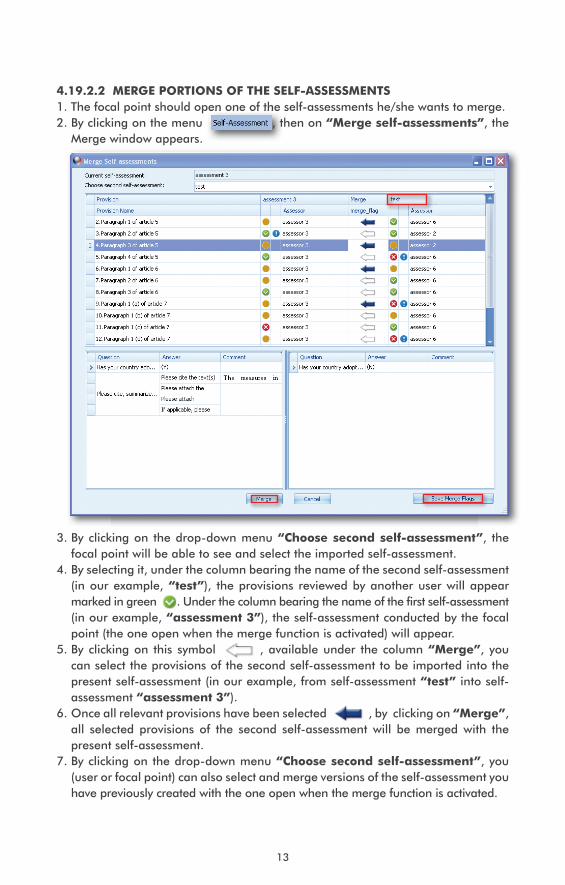
4.19.2.2 MERGE PORTIONS OF THE SELF-ASSESSMENTS1. The focal point should open one of the self-assessments he/she wants to merge. 2. By clicking on the menu 1. The focal point should open one of the self-assessments he/she wants to merge. 2. By clicking on the menu , then on “Merge self-assessments”, the
Merge window appears.
3. By clicking on the drop-down menu “Choose second self-assessment”, the focal point will be able to see and select the imported self-assessment.
4. By selecting it, under the column bearing the name of the second self-assessment (in our example, “test”), the provisions reviewed by another user will appear marked in green . Under the column bearing the name of the first self-assessment (in our example, “assessment 3”), the self-assessment conducted by the focal point (the one open when the merge function is activated) will appear.
5. By clicking on this symbol , available under the column “Merge”, you can select the provisions of the second self-assessment to be imported into the present self-assessment (in our example, from self-assessment “test” into self-assessment “assessment 3”).
6. Once all relevant provisions have been selected , by clicking on “Merge”, all selected provisions of the second self-assessment will be merged with the present self-assessment.
7. By clicking on the drop-down menu “Choose second self-assessment”, you (user or focal point) can also select and merge versions of the self-assessment you have previously created with the one open when the merge function is activated.

13 14
8. The merge function can be activated as many times as needed by the focal point (or user) for various portions of the self-assessment to converge into the final report.
9. If the focal point has not worked on any portion of the report, exclusively retaining coordinating functions, he/she has to receive electronically, and save on the local drive as XML/DAT files, the portions of the self-assessment/s prepared by other users. Then, he/she has to import the self-assessments (see point 4.19.2.1 above). Once all self-assessments have been imported, the focal point can continue as outlined in point 4.19.2.2 above.
10. If the focal point wants to exit the merge window or the application before completing the merging process, he/she can click on “Save Merge Flags” to save the work already done. When re-opening the merge window and selecting the relevant second self-assessment, the selections previously made will appear in blue and the process can be completed as outlined above.
4.20 ImporT aTTaChmenTsIf the size of the attachments to your self-assessment exceeds the limit of your email system, please send the XML file to your focal point or to UNODC (see point 5.4) and save the DAT file on a removable drive (for example a CD or a memory stick - see point 5.4). Then, transmit the removable drive containing the DAT file to your focal point or UNODC. 1. If you are the focal point, please import the XML file (see point 4.19.2.1 option a).
Then, save the DAT file on your PC and open the self-assessment that you have imported.
2. From the menu “Self-Assessment” at the top of the screen, click on “Import Attachments” and choose the DAT file you want to import, then click on “Open”
3. All attachments will now be included in your self-assessment. You can delete or add attachments as you see fit.
5. generaTe self-assessmenT reporTs and submIT Them To undoC
5.1 prevIew self-assessmenT reporT1. From the menu “Self-Assessment” at the top of the screen, click on “Preview
Report”.2. A separate window opens and displays the self-assessment report.
5.2 prInT self-assessmenT reporT1. From the menu “Self-Assessment” at the top of the screen, click on “Print
Report”.2. Your printer window opens and you can print the self-assessment report like any
other Word document.

15 16
5.3 save self-assessmenT reporT as pdf1. From the menu “Self-Assessment” at the top of the screen, click on “Save as
PDF”.2. To save your self-assessment report, you can choose to keep the name suggested
or rename the document.
5.4 save self-assessmenT reporT as Xml/daT1. From the menu “Self-Assessment” at the top of the screen, click on “Save as
XML/DAT”.2. To save your self-assessment report, you can choose to keep the name suggested
or rename the document. Your self-assessment will be saved as two files, one XML file containing your answers and one DAT file containing all the attachments you have made. Whenever you send your self-assessment to somebody by email, please make sure to attach both the XML and the DAT file.
5.5 submIT self-assessmenT reporT To unodC1. From the menu “Self-Assessment” at the top of the screen, click on “Send to
UNODC”. 2. Your e-mail application will be automatically launched and three files, PDF and
XML/DAT, will be automatically attached. 3. Since not all e-mail applications support this function, before sending the e-mail
to UNODC, make sure that the three files are attached. If not, save them on your local drive (see points 5.3 and 4 above) and attach them manually.

15 16
6. gap analysIs reporT
To generate a preliminary gap analysis, the software can produce a report contain-ing only the information provided in relation to those provisions that you have as-sessed to be partially or not implemented in your country.
1. From the menu “Self-Assessment” at the top of the screen, click on “Gap analysis report”. A preview of your gap analysis report is displayed.
2. To save your gap analysis report, click on . A preview of your gap analysis report is displayed.
2. To save your gap analysis report, click on and save the document on your PC.3. If you prefer to see your responses organized in an excel sheet rather than in a
PDF document, click on “Self-Assessment” at the top of the screen and then on “Gap analysis report-Grid”. By clicking on “Excel”, you can save the document on your PC.
7. deleTe self-assessmenTs
1. If you wish to delete any of your self-assessments, click on the “Start Self-Assessment…” button on the portal.
2. In the Self-assessments List, click on the self-assessment you want to delete and then on
2. In the Self-assessments List, click on the self-assessment you want to delete and then on .

17