Embed Size (px)
Citation preview

Quick Start Setup GuideFor part numbers: 2001-00382-000, 2001-00383 -000,
2001-00466-000, 2001-00467-000
Omnia.11 Audio Processor Powerful Audio Processing for FM or FM+HD
Now with G-Force™ Technology Dynamics
ATTENTION! This quick start guide is intended to aid with basic deployment of the Omnia.11.For further support and/or questions please contact [email protected]
1490-00099-002 QUICK START GUIDEOmnia Audio • 1241 Superior Ave. • Cleveland, Ohio, 44114, USA • +1.216.241.7225 • TelosAlliance.com

We know you’re eager to get your new gear up and running. But first, The Telos Alliance strongly suggests you use an Uninterruptible Power Supply (UPS), with power line filtering, to prevent damage in case of electrical storms or power surges. Your Product Warranty (found in the User Manual) does not cover lightning damage!
Information about lightning protection can be found at: http://blogs.telosalliance.com/tech/surge-suppression-pointers
IMPORTANT SAFETY INFORMATION ABOUT YOUR NEW PRODUCT
This Warranty covers “the Products,” which are defined as the various audio equipment, parts, software and accessories manufactured, sold and/or distributed by or on behalf of TLS Corp. and its affiliated companies, collectively doing business as The Telos Alliance (hereinafter “Telos”).
With the exception of software-only items, the Products are warranted to be free from defects in material and workmanship for a period of five (5) years from the date of receipt of such Product by the end-user (such date of receipt the “Receipt Date”). Software-only items are warranted to be free from defects in material and work-manship for a period of 90 days from the Receipt Date. Telos will repair or replace (in its discretion) defective Products returned to Telos within the warranty period, subject to the provisions and limitations set forth herein.
This warranty will be void if the Product: (i) has been subjected, directly or indirectly, to Acts of God, including (without limitation) lightning strikes or resultant power surges; (ii) has been improperly installed or misused, including (without limitation) the failure to use telephone and power line surge protection devices; (iii) has been damaged by accident or neglect. As with all sensitive electronic equipment, to help prevent damage and or loss of data, we strongly recommend the use of an uninterruptible power supply (UPS) with all of our Products. Telos products are to be used with registered protective interface devices which satisfy regulatory requirements in their country of use.
This Warranty is void if the associated equipment was purchased or otherwise obtained through sales channels not authorized by Telos.
EXCEPT FOR THE ABOVE-STATED EXPRESS WARRANTY, TELOS MAKES NO WARRANTIES, EXPRESS OR IMPLIED (INCLUDING IMPLIED WARRANTIES OF MERCHANTABILITY AND FITNESS FOR A PARTICULAR PURPOSE).
In no event will Telos, its directors, officers, employees, agents, owners, consultants or advisors (its “Affiliates”), or authorized dealers or their respective Affiliates, be liable for incidental or consequential damages, or for loss, damage, or expense directly or indirectly arising from the use of any Product or the inability to use any Product either separately or in combination with other equipment or materials, or from any other cause.
In order to invoke this Warranty, the Product must be registered via Telos’ website (found at: http://telosalliance.com/legal/warranty) at time of receipt by end-user and notice of a warranty claim must be received by Telos within the above stated warranty period and warranty coverage must be authorized by Telos. Contact may be made via email: [email protected] or via telephone: (+1) 216-241-7225. If Telos authorizes the perfor-mance of warranty service, the defective Product must be delivered to: Telos, 1241 Superior Avenue, Cleveland, Ohio 44114 or other company repair center as may be specified by Telos at the time of claim.
Shipping Costs and Warranty Service:
If the date the customer’s notice of warranty claim is received by Telos (such date the “Warranty Claim Notice Date”) is within the first 90 days following the Receipt Date, Telos will pay the costs of shipping such warranted Product to and from the end user’s location, and the cost of repair or replacement of such warranted Product.
If the Warranty Claim Notice Date occurs after the first 90 days following the Receipt Date and before the end of the second (2nd) year, the customer will pay the freight to return the warranted Product to Telos. Telos will then, at its sole discretion, repair or replace the warranted Product and return it to the end user at Telos’ expense.
If the Warranty Claim Notice Date occurs between the end of the second (2nd) year following the Receipt Date and the completion of the fifth (5th) year, the customer will pay the costs of shipping such warranted Product to and from the end user’s location. Telos will then, in its sole discretion, repair or replace the warranted Product at Telos’ expense. Telos also reserves the right, if it is not economically justifiable to repair the warranted Product, to offer a replacement product of comparable performance and condition direct to the customer at a discounted price, accepting the failed warranted Product as a trade-in.
The end user will in all cases be responsible for all duties and taxes associated with the shipment, return and servicing of the warranted Product.
No distributor, dealer, or reseller of Telos products is authorized under any circumstances to extend, expand or otherwise modify in any way the warranty provided by Telos, and any attempt to do so is null and void and shall not be effective as against Telos or its Affiliates.
Out of warranty units returned to the factory for repair may be subject to a $500 evaluation fee, which fee must be prepaid prior to shipping the unit to Telos. If no repairs are required, the $500 fee will be retained by Telos as an evaluation charge. If repairs are required, the $500 fee will be applied to the total cost of the repair.
Telos Alliance Limited Warranty
We know that you’re probably in a hurry to begin using your new Omnia.11. This Quick-Start Setup Guide below will get you up and running as quickly as possible. Since it covers only the bare minimum needed to get you going, we strongly suggest reading the entire user manual in order to get the most out of your new Omnia.11. The latest version is always available for download in .pdf format from the Omnia.11 product page here:
http://www.telosalliance.com/Omnia/Omnia11 by clicking on the “Manual” link to the right.
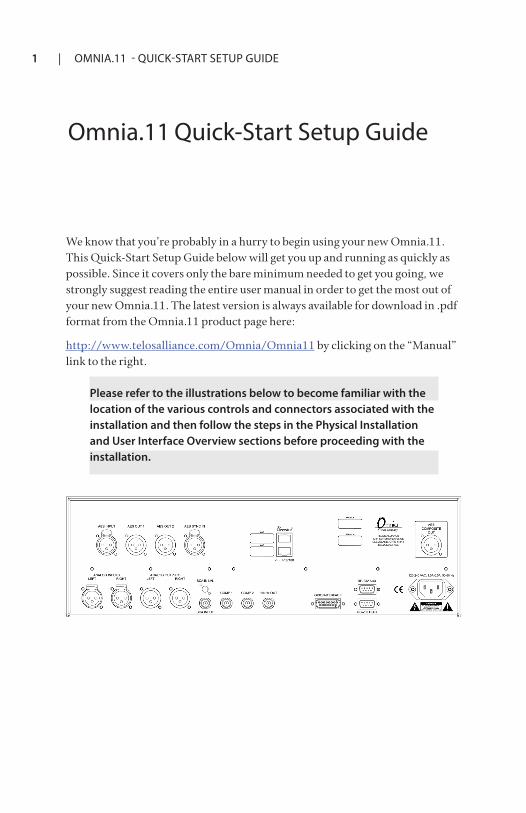
Please refer to the illustrations below to become familiar with the location of the various controls and connectors associated with the installation and then follow the steps in the Physical Installation and User Interface Overview sections before proceeding with the installation.
Omnia.11 Quick-Start Setup Guide
1 | OMNIA.11 - QUICK-START SETUP GUIDE
Physical Installation:The Omnia.11 is a large unit so it would be advisable to have the help of an assistant when installing it in the rack. Find the release pin located on the inside top of each handle. Slide and hold this outwards and then pull the handle towards you until you hear a click. Make sure each handle is securely locked into place. Using the handles, install the Omnia.11 in the equipment rack using all four rack screws. Once secured to the rack, slide the release pin toward you and fold the rack handles back to their normal position.
1. Connect the audio inputs that are appropriate for your installation. The Omnia.11 accepts balanced professional line-level analog audio or AES/EBU digital audio on standard XLR connectors. If you have an existing Livewire system, the single Livewire Ethernet connection is all that is needed for audio I/O (except for the composite MPX outputs). Please note that the two Ethernet jacks are ports on the same internal switch so they both have the same functionality. Either can be used for remote control and Livewire. IMPORTANT NOTE: Be sure that Livewire is disabled in the Setup menu (see Step 4 below) if you are not installing the Omnia in a Livewire system.
2. Connect the outputs that are appropriate for your installation. NOTE: A direct composite MPX connection (BNC analog or Omnia Direct AES composite digital if your exciter or STL supports it) between the Omnia and the FM exciter at the transmitter site is always best! This will allow taking full advantage of the Omnia’s superior built-in stereo generator and ensure the best possible overshoot performance and sound quality.) If you will be using conventional AES/EBU L/R digital audio to feed your STL or FM exciter, be sure any pre-emphasis and limiters (if present) are fully defeated in the exciter. The Omnia must be the only device providing the pre-emphasis so its own de-emphasis on the AES/EBU output being used must also be “Off”. Also note that if the STL uses a codec (is not lin-ear), the Omnia must be located at the transmitter site for best performance and sound quality. Please contact Omnia Support if you have any questions.
3. Be sure there is nothing plugged into the rear panel Ethernet jacks at this point and connect AC power to the unit (there is no power switch!). You will see lines of text as the unit boots up, followed by the main GUI touch screen interface as shown below.
2 | OMNIA.11 - QUICK-START SETUP GUIDE
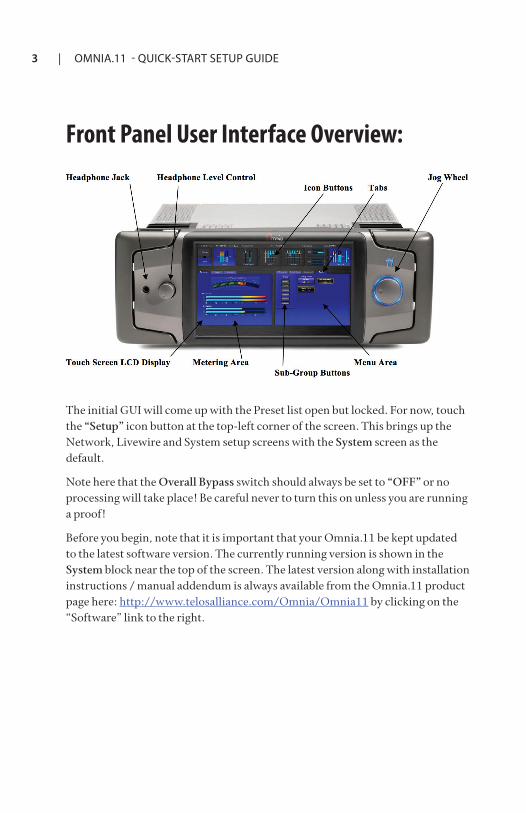
Front Panel User Interface Overview:
The initial GUI will come up with the Preset list open but locked. For now, touch the “Setup” icon button at the top-left corner of the screen. This brings up the Network, Livewire and System setup screens with the System screen as the default.
Note here that the Overall Bypass switch should always be set to “OFF” or no processing will take place! Be careful never to turn this on unless you are running a proof!
Before you begin, note that it is important that your Omnia.11 be kept updated to the latest software version. The currently running version is shown in the System block near the top of the screen. The latest version along with installation instructions / manual addendum is always available from the Omnia.11 product page here: http://www.telosalliance.com/Omnia/Omnia11 by clicking on the “Software” link to the right.
3 | OMNIA.11 - QUICK-START SETUP GUIDE

4. Touch the appropriate icon buttons to setup your network parameters, activate Livewire (only if needed), activate static RDS (if needed) and change the unit’s password (default is “omnia” without the quotes). NOTE: The same password is used for both front panel and remote browser access.
IMPORTANT NOTE:
The Omnia.11 requires 2 free IP addresses on your network, the one that you enter and the one directly above the one that you enter. So be sure that both consecutive IP addresses are free on your network. For more information please see Network Parameter Setup in Chapter 3 on Page 15 of the full user manual.
5. Touch the “ADJ” icon button near the top-left of the screen to return to the main screen and then touch “Input” to bring up the Input menu and metering. If the “Basic” tab is not selected, touch it to select it. From the “Input Source” drop-down, select the Analog, AES/EBU or Livewire input as appropriate for your installation. If your audio source is providing an audio feed you should then see meter activity on the bargraph meters.
6. While driving the inputs with typical program material at normal operating level, adjust the appropriate “Master” Input Gain control until the peak-reading input bargraph meters are reading just “into the yellow” (about –15 to –12 dBFS or so). If the left/right audio levels coming into the Omnia.11 are somewhat unbalanced, you can adjust the “Right Trim” control to adjust the level of the right channel alone over a limited range.
4 | OMNIA.11 - QUICK-START SETUP GUIDE

7. Touch the “Output” icon button at the top-right of the screen to bring up the Output menu and metering. If the “Basic” tab is not selected, touch it to select it. Touch the “FM Options” button on the left side of the Menu Area and ensure that the Pre-Emphasis, Diversity Delay (if present) and BS-412 settings are correct for your system and your location.
8. Now touch the appropriate button above the “FM Options” button to select the group of output controls for the output you will be using. All outputs are active simultaneously. NOTE: If you are using a conventional AES/EBU L/R digital output to feed an FM exciter or linear STL, touch the “AES/EBU” but-ton and be sure the “Output Selection” is set to “FM” and the “De-emphasis” is turned “OFF” for the output being used. For access to the composite MPX stereo generator output level and stereo pilot controls, touch the “Com-posite” button. Note that these controls simultaneously adjust the Omnia Direct output levels as well. Finally, adjust the appropriate control so that the peak output/modulation level is correct for the equipment that follows the Omnia.11.
9. Touch the “FM” icon button and then touch the “Preset” tab to display the list of factory processing presets. If the preset list is locked (grayed-out), touch the “padlock” icon to unlock it. Once unlocked, simply touch the desired preset name in the list and it will be put directly “on the air”.
5 | OMNIA.11 - QUICK-START SETUP GUIDE
10. We strongly suggest listening to all the factory presets, regardless of their name, to get a feel for their differences and then select one to start with. Note that when running GForce, presets from earlier non-GForce versions cannot be used and you’ll need to start fresh. (Trust us, it’s worth it!) Note however that you can revert to the earlier “orange” mode from the remote control web interface if necessary. Once you have your starting preset selected, touch the “Quick Setup” tab and adjust the following controls to set the basic loudness, bass and brightness sound desired. Adjust the “Clipper Drive” control as low as possible for the loudness need-ed. This controls the primary loudness vs. distortion tradeoff. Turning it up makes the sound louder (but more distorted) while turning it down makes the sound cleaner but not as loud. The goal is to find the right compromise. Try adjusting it down in 0.5 dB steps until the loudness just falls off a little too much, then bring it back up a notch or two from there. It should always be set as low as possible for the needed level of loudness. The overall amount of bass is set using the “Bass” control. At higher settings of the “Bass Thump” control, the “kick” or “Thump” action of bass material is emphasized. The basic brightness of a preset is set by using the “Presence”, “Treble” and “Sparkle” controls. Note that these three controls only boost the brightness. A setting of “0.0” is “flat” or the minimum amount of boost for the particular preset that is currently selected. Reducing brightness can be done, for one example, by reducing the higher bands of the AGC or Limiter mixers.
6 | OMNIA.11 - QUICK-START SETUP GUIDE

The Omnia.11 Quick-Start Setup is now complete! Please read the User Manual to learn all about the features that make the Omnia.11 unique, for additional details on proper installation (Chapter 1), remote control (Appendix C) and for full details on the operation and adjustment of every control function (Chapters 4 & 5).
The latest version of the manual is always available for download in .pdf format from the Omnia.11 product page here:
http://www.telosalliance.com/Omnia/Omnia11
If you’d like to contact our Customer Support department, personnel are available in the Cleveland, Ohio, USA office Monday through Friday between 9:00 A.M. and 5:00 P.M., Eastern Time by phone at +1.216.241.7225 , via email to [email protected] or via the customer support form on our website here:
http://www.telosalliance.com/support-request
After-hours emergency support is available 24/7 by phone at +1.216.622.0247.
If you are outside the U.S.A. and non-English speaking, please contact the dealer you purchased your Omnia from first.
Thank you for choosing Omnia!
7 | OMNIA.11 - QUICK-START SETUP GUIDE


Omnia Audio • 1241 Superior Ave. • Cleveland, Ohio, 44114, USA • +1.216.241.7225 • TelosAlliance.comOmnia Audio • 1241 Superior Ave. • Cleveland, Ohio 44114 USA • +1.216.241.7225 • TelosAlliance.com© 2016 TLS Corp., All Rights Reserved. C16/15034