Embed Size (px)
Citation preview
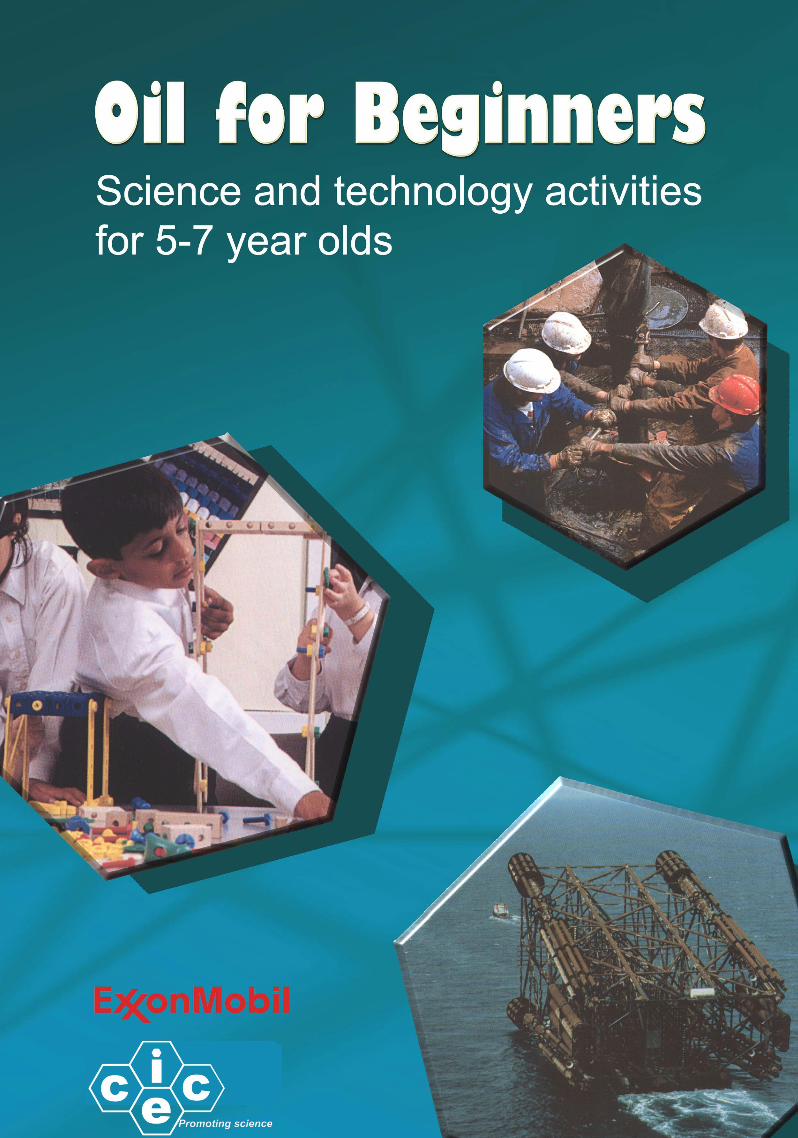


Oil for Beginners
Science and technology activities for 5-7 year olds
This package was developed at the Chemical Industry Education Centre at the: Department of Chemistry University of York Heslington York, YO1 5DD Telephone (01904) 432523 Fax (01904) 434460 Email [email protected] www.ciec.org.uk © Chemical Industry Education Centre First published 1997 Reprinted 2006 ISBN 1 85342 615 6 The contents of this book have limited copyright clearance. They may be photocopied or duplicated for use in connection with teaching within the establishment for which they were purchased. They may not be duplicated for lending, hire or sale.

Contents
Introduction 1 Activity notes 3 Key words 57 Background information 59 Curriculum coverage 63 Resource list 65 Further information 66
Acknowledgements
This book was sponsored by Esso UK plc. I would like to offer my thanks to Martin Tims and Adrian Neal for their support and advice during the development of the resource. Many teachers were involved in trialling activities in the resource, and I would like to offer my thanks to them, and in particular: Anna Watson Bolton Royd Primary School, Leeds Joan Emsley former primary teacher, London Clive Hallett Wheatley CE Primary School, Oxford Jeremy Kirk-Alton Lambourn CE Primary School Pam Larkins Wheatley CE Primary School, Oxford Barbara Pollard Hawes Down Infant School, Kent Catherine Sinclair McLean Primary School, Fife Jennifer Sweet Crossgates Primary School, Fife Agnes Thomson Camdean Primary School, Fife. Photographs on oil production were supplied courtesy of Esso-Shell. Cover photography of the children by Graham Mathers. Cover design by Heather Niven, University of York Artwork by Clare Wake. Featured on the cover are Joel Askham, Vinsum Leung, Absher Ifham Muhammed and Iram Riaz of Pudsey Bolton Royd Primary School, Leeds.
Joy Parvin, Primary Projects Manager
Introduction
1
Introduction The activities in this book tell a simple story of oil, beginning
with its recovery from beneath the sea bed, to its use as a lubricant and fuel. They are written for use with 5-7 year olds, though can be adapted for use with other children, and can be incorporated into topic work on liquids or materials. The number of activities, and their sequence, can be varied according to the needs of the teacher, children, and areas of the curriculum being studied.
Curriculum links All the activities are linked to science and technology
curriculum documents, and these links are shown on pages 63-64. The children have the opportunity to engage in both structured and open-ended investigations and problem-solving. Ideas for differentiation are suggested where appropriate.
Resources Most of the resources needed for the activities are readily
available in schools or easily collected by children. Educational construction kits are required for some of the activities. Resources are listed with the relevant teachers' notes. In addition, a comprehensive list can be found on page 65.
Group work The activities can be used to develop co-operative group
work skills. To give all the children opportunity to do something, they should work in groups of 3 or 4. The role of each child in the group should be agreed with the teacher before they begin.
Varying the task For some of the activities, resources will limit the number of
children who will be able to carry out the tasks simultaneously (construction work, for example). In these instances, rotate groups of children until they have all completed the task. Suggestions are given for modifying each activity, to allow for the differing abilities of children, and so children who have seen others carry out a task before them will remain motivated to take part.
Activity sheets Activity sheets are provided to accompany the activities.
The majority of these are intended to provide a stimulus for discussion, and a small number have been provided to aid children with recording (key words for children are listed on page 57). These sheets should be selected according to the age and ability of the children, and can be adapted to suit each group's needs.

Introduction
2
Visitors from industry This project can be enhanced by inviting industrialists into school to talk to and work alongside the children on activities from this pack. The Chemical Industry Education Centre has information on how to contact and establish links with industry, see page 66 for the address.
Activity summary The table below summarises the activities in this book.
Activities can either be followed sequentially, or a smaller selection carried out to meet the needs of the children and the planned curriculum.
title description page
1 Oil. Children’s knowledge about oil is established and they are introduced to an ‘oil rig’.
3
2 A model platform.
Children build a model platform which must be a stable and rigid structure.
9
3 Sinking in sand.
An investigation into the effect of the size of feet on the stability of the platform.
19
4 Hard or soft?
Classification of objects and materials according to their properties.
25
5 Making holes.
Children explore the effectiveness of a variety of tools to make holes in different materials.
26
6 Move that
water!
A problem-solving approach to moving water from one place to another.
39
7 Pouring oil.
Children observe the ‘runniness’ of different liquids and investigate shapes for ‘oil pourers’.
49
8 So, what’s it
for?
Children carry out a ‘squeak hunt’ in school and hinges and other squeaky things are oiled; they also observe the use of oil as a fuel.
55

Activity notes
3
Activity 1 Oil Objectives To establish children’s knowledge about oil and introduce
them to the oil platform and its use for recovering oil from the sea bed.
Suggested resources Motor oil Cooking oils (optional) Bicycle oil Essential oils (optional) Mini pop bottles Massage oil (optional) Activity sheet 1 Cotton wool buds
Discussion & class task Depending on the age of the children, this discussion may best be carried out in two stages on consecutive days, to maintain children's interest and attention.
Before showing children the range of oils, ask them what
they know about oil. When children have offered all they can to this open-ended question, further discussion can be stimulated, using questions such as:
• What do we use oil for? • What different types of oil are there? • What different jobs do these oils do? • How would you describe these oils? • What do the different oils look/smell/feel like? • What is the same about all the oils? • What is different about the oils? • Imagine that we had no oil, what would you not be able to
do? Children's ideas can be recorded before showing them the
oils (see the section on recording, page 4). Only discuss types of oil that children have mentioned. Introducing ‘new’ oils may confuse them.
Note: Pour the motor oil and bicycle oil into transparent
containers, such as mini pop bottles, and screw the lids on tightly. The children will then be able to see them clearly. The original containers can be shown alongside the samples.
Ask children where the different types of oil come from (the
names and pictures on the labels of cooking oils provide suitable clues). Children should realise that the cooking oils come from nuts, seeds, berries and flowers (more able children may realise these are all parts of plants).
Children can smell the oils, to appreciate the differences
between cooking oils, essential oils and motor/bicycle oils. To do this, dip a cotton wool bud into each type of oil, and pass the bud round for each child to smell, telling children not to touch their clothes with the buds.

Activity notes
4
Essential oils contain concentrated extracts of plants mixed with a base oil, thus providing a range of perfumed oils. This can be demonstrated with children, by mixing a bland or sweet smelling cooking oil (such as almond oil) with a few drops of perfume. Children can thus create their own range of essential oils.
Link to activity 2 The essential oils and the cooking oils are plant-based. Ask
the children where they think the motor/bicycle oils come from. Some children may already have mentioned oil rigs (strictly called 'platforms' - see page 59), as they may have seen them on television programmes, or have relatives working on oil rigs. At this stage, simply discuss the location of oil, i.e. deep in the ground and often beneath the sea bed. Make it as clear as possible that because this oil comes from the sea bed, it is very different to cooking oils and essential oils. Activities 2-5 look more closely at platforms and drilling for oil.
Recording ideas Class responses at various stages of the discussion can be
written on a large piece of paper, and kept as a record of their collective ideas at the start of the topic. This can also be done as a concept-mapping exercise, with the teacher recording responses on the blackboard or on sugar paper. Activity sheet 1 'About oil' (page 7) suggests words to include on the concept map. The teacher can use these words on the class record, the number of words being selected according to the ability of the children. Any key words that children use can also be added. Ask children to link any two words to make sentences about oil.
An example of this exercise, carried out with a class of 5-7
year olds, is given on the next page (words not linked have been omitted).
Children may associate oil with incidents of pollution, as
these receive much media attention. It is important, in creating a balanced picture, to acknowledge this aspect
"The children enjoyed this task. I was amazed at their knowledge and
understanding."
"The discussion was very lively. I introduced it as a game where they had to
find two words which they could link in a sentence."

Activity notes
5
fire
pollution rainbow
machines to work
black
squeaking slippy
sticking
cars work
water
oil
Children may associate oil with incidents of pollution, as these receive much media attention. It is important, in creating a balanced picture, to acknowledge this aspect
along with the many ways in which oil enhances our lives,
such as:
• For cars, buses, etc. to travel to school, work and holiday destinations.
• To heat our homes, schools, and other buildings. • For industry to use for making other products. • To help generate electricity for e.g. heating, lighting,
and cooking.
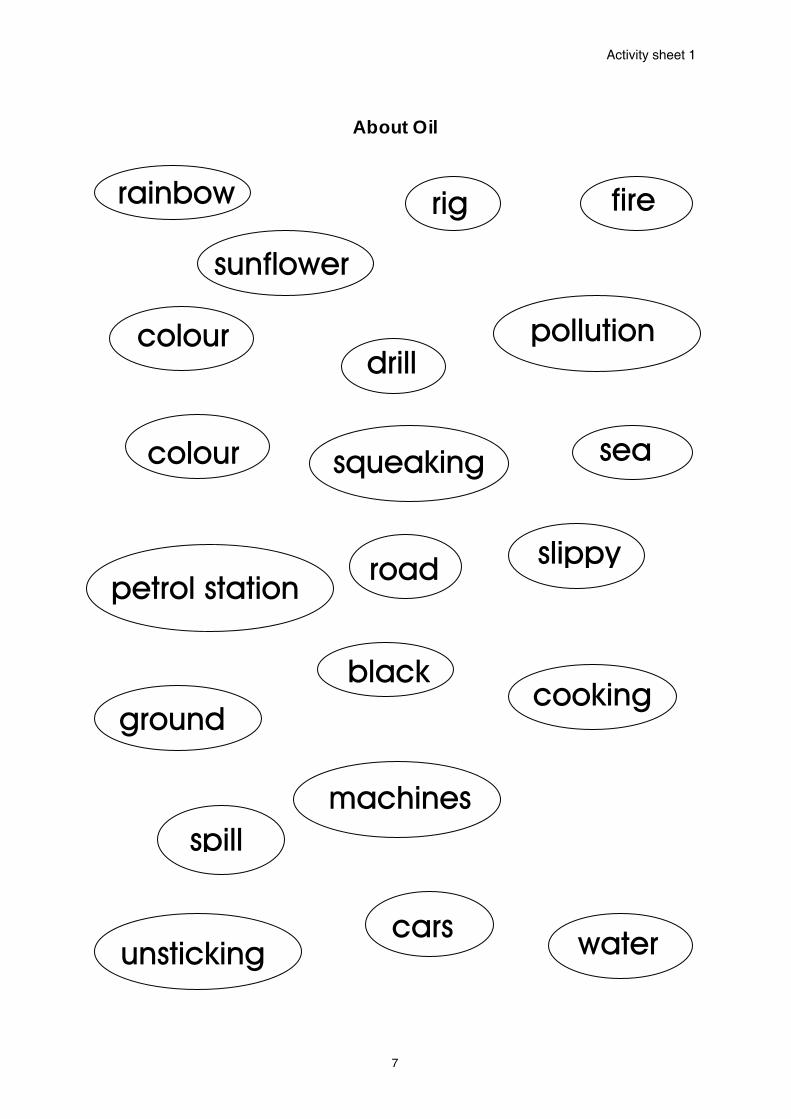
Activity sheet 1
7
About Oil
rainbow
sunflower
fire rig
pollution
squeaking
drill
unsticking
machines
ground
spill
cooking
colour
black
slippy
water
cars
road petrol station
sea
colour

Activity notes
9
Activity 2 A model platform Objectives To build a model platform which meets specific criteria. To
develop skills using construction kits, and learn about strong shapes.
Suggested resources Pictures/posters of oil rigs and platforms Activity sheets 2 - 5 Construction kits* Dowelling (approx. 30 cm lengths) Shoe box Camera (optional)
Discussion Begin by posing the questions:
• How do you think we can get oil from beneath the ground? • What if the ground where we find oil is under the sea?
Show children Activity sheets 2 and 3, and any other pictures, posters or photographs you have which show oil rigs and platforms.
Activity sheet 2 shows an erect platform, and Activity sheet 3
shows a platform being towed out to sea, having been built on land. During discussion of the pictures, ask some of the following questions (see pages 59 to 62 for information to help answer these):
• What is an oil platform for? • How big do you think it is? • Why is it so big? • What is on top of the platform? • How strong would it have to be? Why? • What is it made from? • How many legs has it got? Why? • What is happening in the picture (Activity sheet 3)?
Why is it being towed? • Why is the platform built on land? • What sorts of shapes can you see in the platform? • Why do you think the platform has these shapes?
Task If children are not familiar with the chosen construction kits,
they can begin with an exploratory session, in which they practice joining techniques and make use of the variety of components and tools available. This can also help loosen up tight joints on new construction kits.
Construction kits which allow triangular strengthening are most suitable for this activity. Brio Mec allows some strengthening of this nature. This is available from TTS Group Ltd Nunn Brook Rd, Huthwaite, Nottinghamshire, NG17 2HU tel: 01623 447 800 fax: 01623 447999 sales@ tts-group.co.uk

Activity notes
10
Children are then challenged to make a platform on which
the accommodation, represented by a weighted shoe box or similar, will be built.
The model must meet the criteria which are illustrated on
Activity sheet 4 and listed below: • Stands up by itself. • Have long legs (to reach the sea bed). • Not wobble (be stiff/rigid in all directions). • Be strong, and able to support the weighted shoe box.
You may decide to specify the weight that the model must hold, such as 5 or 10 class dictionaries.
Give the weights to the children at the start of the activity, so
they can continually check the strength and stability of their model.
"Children enjoyed this challenge and worked
enthusiastically on their models. Many models did 'wobble' at first, but children were keen to try out their models and
"Special needs children were able to use their practical skills to make models, which helped increase their
self-esteem."
modify accordingly."
Note: Other resources, such as dowelling, art straws and
rolled newspaper can also be used, but they require greater use of fine motor skills.
Have as many groups working on the challenge as resources
will allow. For example, one set of Brio Mec will resource one group. Each group’s model can be photographed, discussed and tested before it is dismantled. To test the models, place the shoe box on the top of structure. The shoe box will either contain the specified weight, or books will be added one at a time until the structure begins to sway or buckle.
Varying the task The challenge can also be modified for each group, to
maintain the children’s interest and creativity, and for differing ability groups. Modifications can include:
• Specifying 3, 4, 5 or 6 legs. • Specifying the incorporation of shapes (triangles, squares,
rectangles). • Specifying strengthening techniques (reinforcing sections,
using triangular shapes). • Specifying dimensions for the model, thus including
measurement of length (standard or non-standard).
Activity notes
11
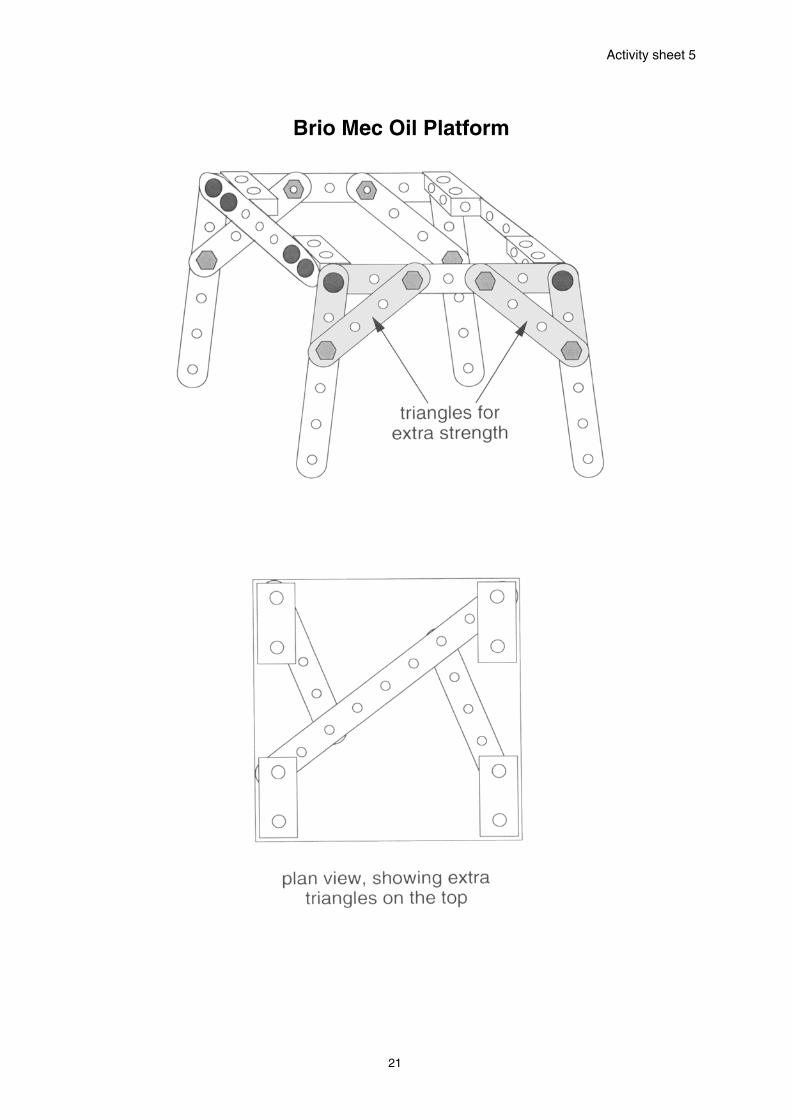
Activity sheet 5 (see page 21) shows a structure that has triangular sections incorporated. This can be used to support discussions with more able children about strengthening a structure. If these children did not add triangular strengtheners to their model, these can be added, tested and their effect discussed. Children can also evaluate the diagram and compare it with their own model. The plan view can be omitted for younger children.
Note: Not all construction kits can be used to add triangular
sections. In these cases, children with developed fine motor skills can try to add pieces of dowelling or rolled newspaper to their structures.


Activity sheet 2
13
An oil platform
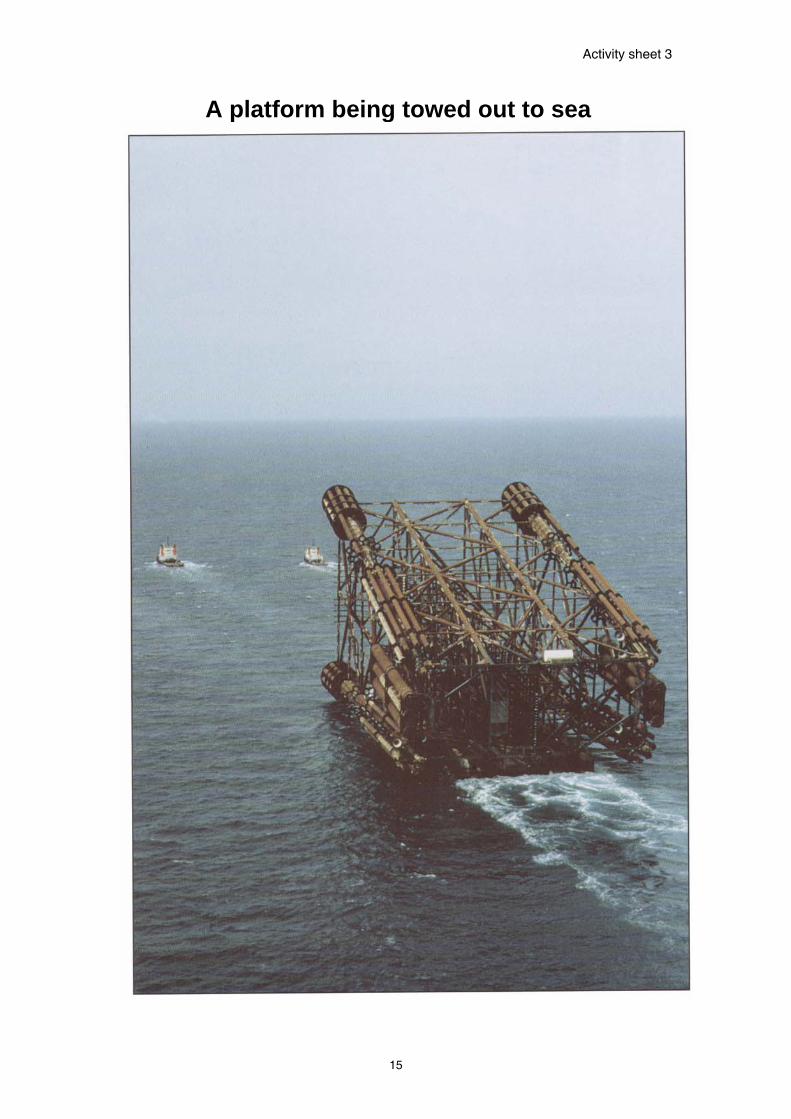
Activity sheet 3
15
A platform being towed out to sea

Activity sheet 4
17
Model oil platform
• it must stand up on its own
• it must not wobble
• it must be strong

Activity notes
19
Activity 3 Sinking in sand Objectives To show that the size (area) of the platform's feet affects how
far into sand it will sink. Suggested resources Model platform 2 or 4-litre milk carton lids
Sand & tray or sand pit Coffee jar lids Card Plasticine or play dough Scissors Shoe box Pop bottle lids Weights (e.g. books) Film canister lids Activity sheets 5 & 6 Card wheel discs
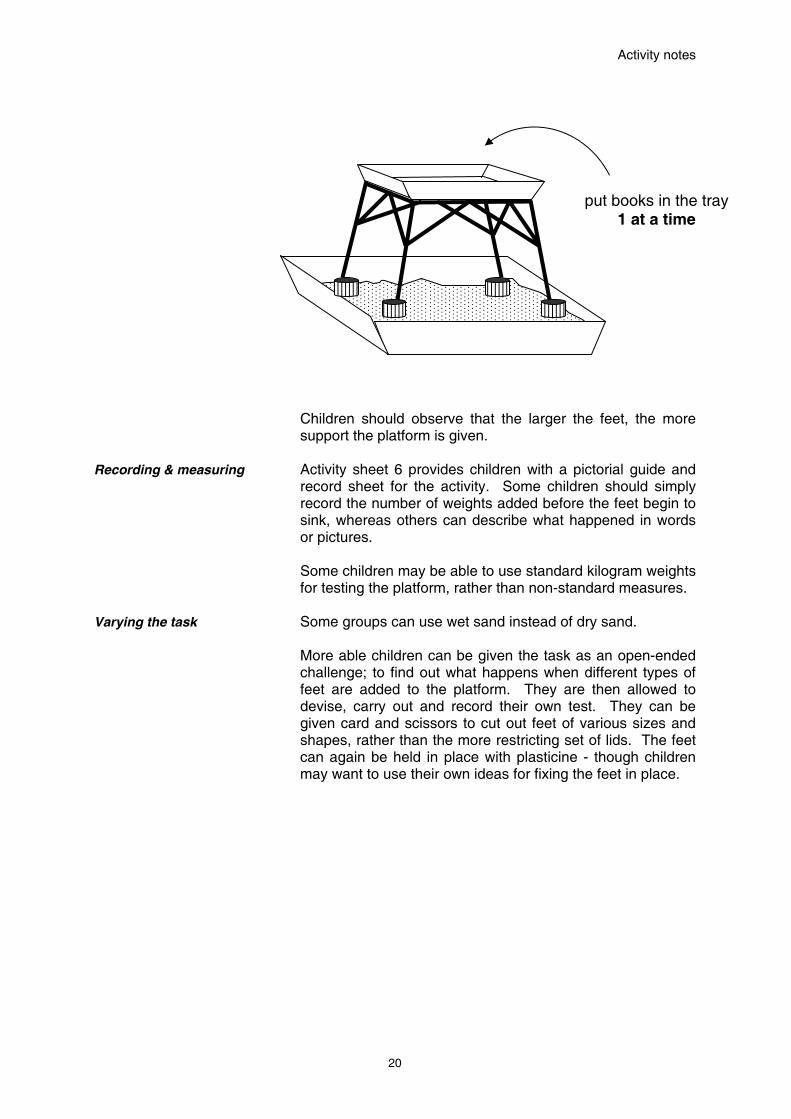
Discussion This provides an extension to activity 2. Prepare a model
platform similar to that shown on Activity sheet 5. Place the model in the sand tray (shake the tray first, to provide as even a surface as possible) and add weights to the shoe box on top of the model. Tell the children to watch what happens to the model as you do this. They will see that the legs of the model quickly sink into the sand.
Ask the children: • What could you do to stop a platform from sinking? Some children may be able to refer back to ideas used in
their own models, especially those who used feet in their design and building. Creative ideas suggested by the children can be tried. Children’s ideas may lead to trying to add 'feet' to the platform.
Task Give children the resources listed above and ask them to
add a set of feet of the same size (e.g. film canister lids). The feet are held in place using plasticine or play dough.
Children test their model in a sand tray by adding weights to
the shoe box until the feet begin to sink into the sand. Heavy books, such as dictionaries, can be used as weights.
"Children were quick to point out that all the
models should be tested with the same books or 'it wouldn't be fair'."
Children repeat this test using another 1 or 2 sets of feet,
each set being a different size (e.g. card wheel discs, milk carton lids and coffee jar lids).
Activity notes
20
Children should observe that the larger the feet, the more
support the platform is given. Recording & measuring Activity sheet 6 provides children with a pictorial guide and
record sheet for the activity. Some children should simply record the number of weights added before the feet begin to sink, whereas others can describe what happened in words or pictures.
Some children may be able to use standard kilogram weights
for testing the platform, rather than non-standard measures. Varying the task Some groups can use wet sand instead of dry sand. More able children can be given the task as an open-ended
challenge; to find out what happens when different types of feet are added to the platform. They are then allowed to devise, carry out and record their own test. They can be given card and scissors to cut out feet of various sizes and shapes, rather than the more restricting set of lids. The feet can again be held in place with plasticine - though children may want to use their own ideas for fixing the feet in place.
put books in the tray 1 at a time
Activity sheet 5
21
Brio Mec Oil Platform

Activity sheet 6
23
Which feet?
pop bottle lid
milk bottle lid
coffee jar lid
plasticine
Put books in the tray 1 at a time
Goldilocks The Three Pigs Puss In Boots
Robin Hood Jack and Jill Alladin
Goldilocks The Three Pigs Puss In Boots
What happened?

Activity notes
25
Activity 4 Hard or soft? Objective To sort and classify materials according to their hardness.
Suggested resources Hard & soft collection: Plasticine Pencil sharpener Sponge Rubber Clay (dry) Piece of lino Tub of soil or mud Piece of carpet Tub of sand Cardboard Powder puff Block of wood/dice Stone, rock Brick Clay (moist, sealed in a transparent bag)
Discussion Discuss the meanings of the words 'soft' and 'hard' with the children. Some items may at first be difficult for the children to sort, and so they can be tested with a finger nail. Soft things can be defined as those your finger or finger nail can make a dent in, whilst hard things can not be dented.
Note: Confusion can arise between softness and flexibility. You may choose to discuss ‘bendiness’ if children begin to query items with this property. Alternatively, you can ask children if the material can be dented rather than bent.
During or after sorting, children can be asked:
• How will you sort things which are soft or hard? • Why are some things soft? • Why are some things hard? • What do we use soft things for? • What do we use hard things for?
Task Children explore hard and soft materials in the classroom. The exploration can be confined to a table-top display, or children can explore the classroom more widely.
The list of items suggested for sorting is by no means exhaustive. You can easily add to this list with items from home or school.
Varying the task To vary the activity for each new group, use a different set of items each time.
Children sort items into P.E. hoops which have labels reading ‘hard’ and ‘soft’. For more able children, items which have both hard and soft parts can be included in the display, such as a pencil with a rubber on the end, a washing up sponge with a handle, a feather duster, a glue stick, etc. Children can be asked where these things should be placed, hopefully leading to the solution of overlapping the P.E. hoops, so items can be placed in the intersection.

Activity notes
26
Activity 5 Making holes Objectives To explore the properties of a range of materials. To
investigate hole-making in materials of varying hardness. Some children may appreciate that tools made from hard materials are needed to make holes in other hard materials.
Safety Note
!Children must be supervised by an
adult when using tools. Consult design and technolgy policies on the safe use of tools with this age group.
Suggested resources
Activity sheets 7 - 11 Needle Plastic tubs/lids Scissors Plasticine Pencil Tub of soil or mud Junior drill Tub of sand Hole-punch Block of wood Hammer Cardboard Nail Piece of carpet Masonry drill (observation only) Piece of lino Clay (moist, sealed in a transparent bag)
Discussion The resources above can be laid out on a table-top to form
an interactive display. At this stage, cover up the tools on the display and focus on the materials. Ask children:
• How can you describe these materials? (hard, soft, etc.) • How could you make neat, round holes in this material
(ask this for several/all materials)? What would you use? • How will you choose which tool to make a hole in this
material (ask this for several/all materials)? • Are some tools more dangerous than others? Why?
How can you use them safely? Task Children are challenged to find how many ways there are to
make neat round holes in a variety of materials. Where possible, children should draw on the knowledge from the previous task about hard and soft materials. Activity sheets 7 or 8 can be used for children to record predictions (see the section titled 'varying the task' on opposite page).
"Children used their prior knowledge to collect their own materials, make their own
suggestions and find their own tools to use."

Activity notes
27
Once children have made predictions, discuss the reasons for their choices. This will provide the opportunity to assess whether children have been able to use any of the information from the previous activity to inform their decisions (e.g. “I think I will drill a hole in the wood because it is very hard, and I couldn’t even dent it with my finger.”).
Children then try to make holes in each material, using their suggested methods. Decide which methods children can attempt safely, and which methods need adult supervision. Consult the school and authority design & technology policy for recommended use of tools with this age group.
Varying the task To modify the activity for rotating groups, provide them with a different combination of tools and materials (hence the two different sample Activity sheets 7 and 8).
If using a different range of materials or tools, draw or stick pictures of them onto sheets similar to those provided.
Some children can be asked which tool is the 'best' for making holes in each material and why.
Recording Children can use Activity sheets 7 or 8 as both recording and prediction sheets. Using a different coloured pencil for each tool, children link the tool with the material they think it will make a hole in. Each tool and material can be linked several times. Children can complete new copies of the Activity sheet once the materials have been tested, or they can write 'yes' or 'no' above each line on their prediction sheets, adding any new lines as dotted ones. Encourage children to use rulers to draw the lines, if they are able to do so.
Alternatively, prediction sheets can be prepared which have pictures of the tools in a row at the top of the sheet. Children can then stick small samples of each material under the tool they predict will make a hole. This format can also be used to make a class record. Using the data from all the groups, the chart is completed by writing, drawing or sticking tested pieces of materials beneath each tool:
drill
pencil
hole
punch
hammer and nail
scissors
plastic lid card plastic lid plastic lid plastic lid
wood sand card wood card
card lino lino sand card
sand sand
Activity notes
28
Discussion Focus the discussion with the following questions:
• Which tool could make holes in the most materials? • Why do you think it was this tool? • Which tool could make the least holes? Why? • Which tools were made from hard materials? Did this
make a difference to what they could make holes in? • Which tools were made from soft materials? Did this
make a difference to what they could make holes in? • What do you think you would need to make holes in
bricks or rocks?
Discuss other factors which affect the ability of each tool to make holes in the materials. Particular reference should be made to tools made from hard materials which may be limited by their design, such as the hole punch and scissors. Suitable questions to ask are:
• Could you make a hole in the wood with the hole punch? How?
• Do the scissors make any marks in the wood? Why? • What are the scissors, hole punch and drill bit made
from? Why? • Why are they shaped differently?
Show children a drill and drill bits for making holes in masonry, and possibly for metal and wood too. Discuss the hardness and shape of these drill bits and the appropriateness for the job.
the use of the drill to the drill used
for oil, but how much bigger it would be."
"They related
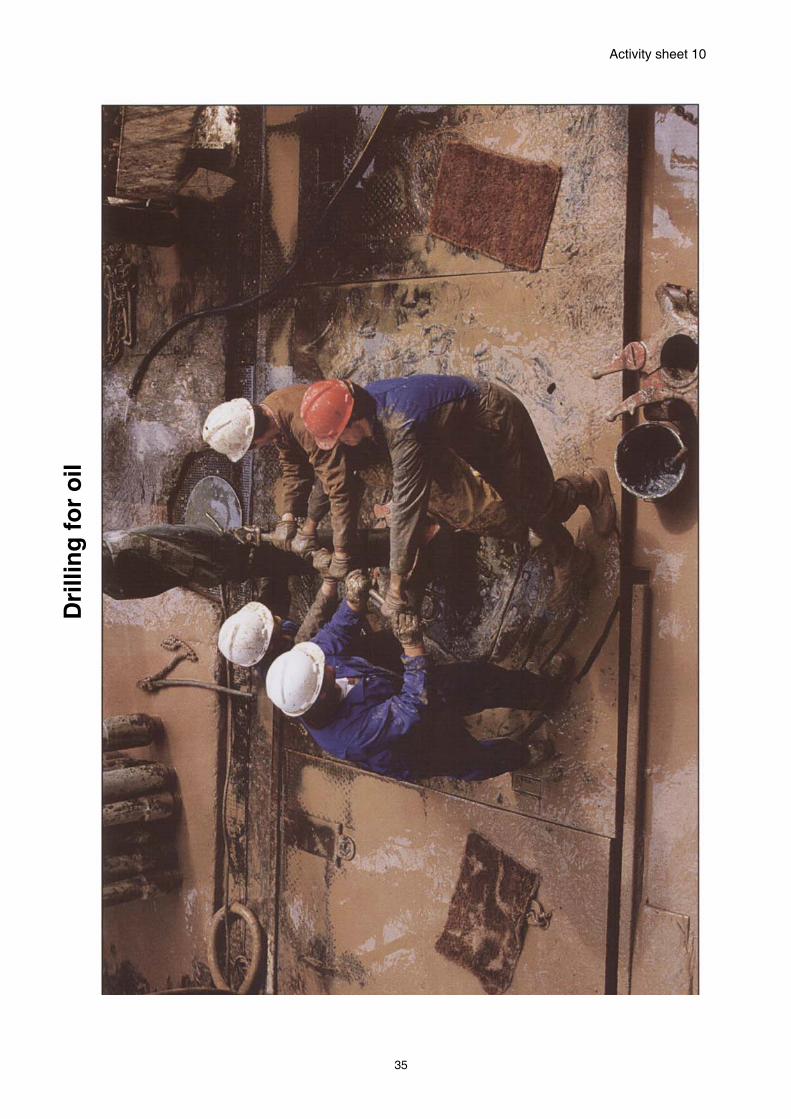
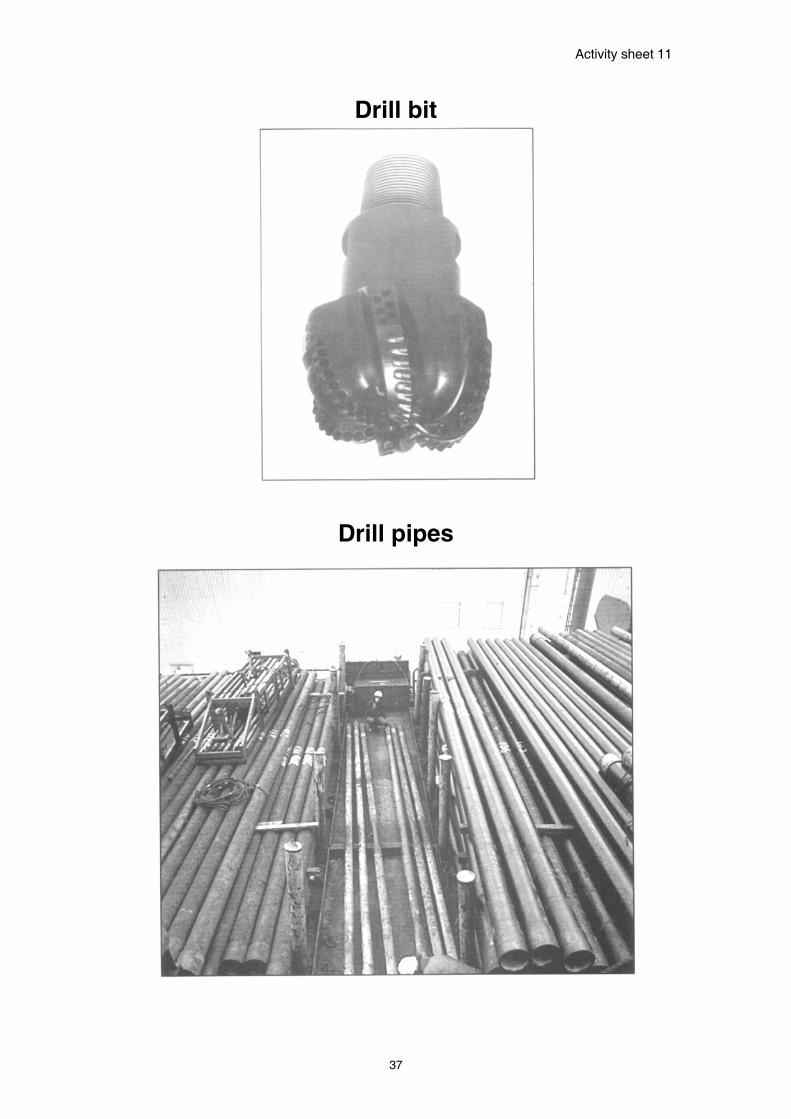
Using Activity sheets 9 - 11 as the stimulus, tell the children
that underneath the soft sand of the sea bed there is hard rock. This hard rock must be drilled through in order to reach the oil.
Activity sheet 9 shows a 'derrick man' handling the upper
end of a series of connected pipes as it is hoisted out or lowered into the hole. Activity sheet 10 shows 'rotary helpers' (also known as floor men, roughnecks or roustabouts) working on the drill floor. It is their job to add new pipe joints as the well is drilled, and to detach joints as the pipes are pulled out to change the bit. Activity sheet 11 shows both the drill bit and sections of pipe which, when connected, form the 'drill string'. The drill bit is made from toughened steel (like the masonry drill) and are about 35 cm wide (diameter) and 35 cm long. The drill head is then attached to the string which drills down to depths up to 6000 metres! This distance can be exemplified by comparing to a familiar landmark 6 km from the school. For further details on the drilling process, see the background information on page 59.

Activity sheet 7
29
Making holes
Join the tool to the material it will make a hole in.
scissors
card
hammer and nail
carpet
pencil
finger
sand
drill
plastic
margarine
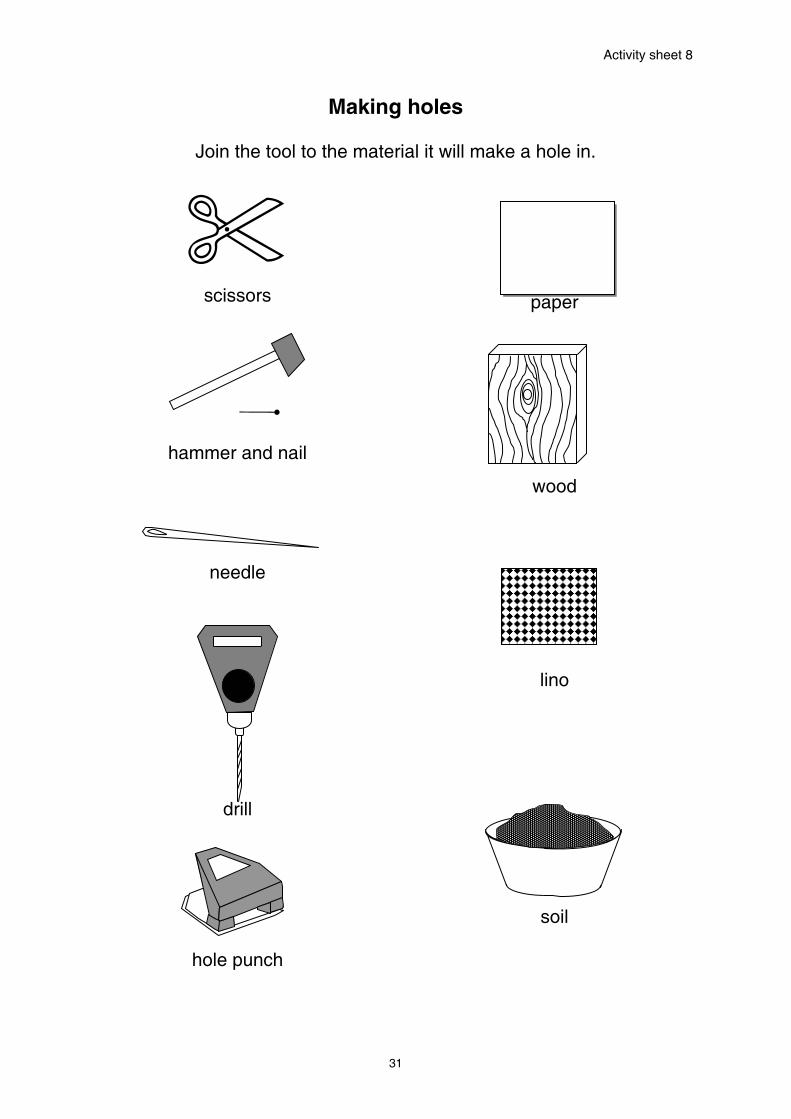
Activity sheet 8
31
Making holes
Join the tool to the material it will make a hole in.
scissors
paper
hammer and nail
wood
needle
lino
drill
hole punch
soil

Activity sheet 9
33
Dri
llin
g f
or
oil
Activity sheet 10
35
Dri
llin
g f
or
oil
Activity sheet 11
37
Drill bit
Drill pipes
Activity notes
39
Activity 6 Move that water!
Objectives To use a problem-solving approach to move water from one place to another.
Suggested resources
Activity sheets 12 - 15 Sponges Large bucket of water Hose pipe/plastic tubing Jugs Funnel Plastic cups Stop watch or sand timer Plastic tubs & lids Guttering Wheeled trolley (or suitable Plasticine construction kit, such as Quadro)
Discussion The challenge of moving a large amount of water is posed to the class to initiate discussion. The children are given criteria to meet:
• As little water as possible must be spilled. • The method used must be safe whilst other people are
working in the classroom. • The method must be quick - within reason (e.g. safety).
Brainstorm ideas with the children - accepting all possibilities, as this will give them more confidence to suggest unusual ideas. You may choose to display the resources available to them, to hint at solutions, or you may decide to find out what children can devise without any additional support.
Ask children to try and rank the suggested methods in order of their likelihood for success, reminding them of the different criteria, and discussing reasons for their choices.
Task Once the class have agreed a rank order, small groups of children can be responsible for trying each method. This can be done whilst the rest of the class watch and time proceedings, or it can be a rotating group activity.
Some methods are most suitably carried out in a wet area or in the playground in warm, dry weather - such as pouring water from the bucket down some guttering. Other feasible methods include:
• Moving filled sponges, cups or jugs of water from a sink to a water tray.
• Attaching a hose-pipe or length of tubing to the tap of the classroom sink to move a given quantity of water.
• Pouring water down a funnel attached to tubing which feeds a bucket (the funnel and start of the tubing should be higher than the end of the tubing, for the water to move along the tubing).
• Using a trolley to move the large container of water.
"We could not obtain piping, so we used the
hose from an old vacuum cleaner."
Activity notes
40
Recording & measuring Timing the activity can be done with either a stop clock or a large sand timer, depending on the ability of the children. If using the sand timer, keep a tally of the number of times it is turned over whilst the water is being moved. The transfer of a fixed volume of water can be timed, e.g. one full bucket.
In addition, the flow rate of water through transparent tubing can be measured. This is done by placing a very small plasticine 'fish' (2-3 mm sphere, in reality) in the tubing and timing how long it takes to reach the other end of the tube. Children can watch the 'fish' as it travels along the tubing.
Varying the task With older or more able children, an additional small group discussion can be added to the activity. They divide into groups to rank the suggested methods from best to worst before coming back together to make a class decision.
Discussion Once all the methods have been tried, the results are collected and ordered from 'fastest' to 'slowest'. Each method can then be discussed according to its safety and the amount of spillage. Methods which resulted in a lot of water being spilled, or were unsafe to other children should be moved to the bottom of the list. Finally, children decide on the most suitable method for moving the water.
Ask the children:
• How do you think large amounts of oil are moved from an oil rig to other places?
Activity sheets 12 - 15 can be used during this discussion, to show that large ships, lorries and pipelines move the oil around the world (Activity sheet 15 shows a stream being diverted, as it crosses the path of a new pipeline).
"The children were fascinated by how the oil gets from under the sea onto the land - this was
discussed exhaustively!"
Children can compare the methods they used for moving the water to those used to move oil. The use of cups or tubs with lids is similar to the road tanker - moving fairly small amounts. This method is used to move 'tanker loads' of oil to a variety of final destinations. The pipeline is similar to a hose pipe or guttering - and is used when a large amount of oil is being transported to a fixed destination, usually from sea to shore. Oil tankers (ships) are used to transport oil around the world. For further details of oil transportation, see the background information on page 59.

Activity sheet 12
41
Ro
ad t
ank
veh
icle
Activity sheet 13
43
Tan
ker

Activity sheet 14
45
Lay
ing
a p
ipel
ine
Activity sheet 15
47
Lay
ing
a p
ipel
ine

Activity notes
49
Activity 7 Pouring oil Objectives To observe the viscosity, or runniness, of different liquids.
To investigate different shapes of 'pourer' to find the best for pouring oil accurately and without spills.
Suggested resources
Activity sheet 16 Syringes Washing up liquid Measuring jugs & cylinders Water Teaspoons, tablespoons Baby oil Washing-up liquid bottles Vegetable oil Droppers/pipettes Bicycle/motor oil Bicycle oil container tray (e.g. tidy tray) Cooking oil container 1-4 stop clocks (optional) Funnels Smartie tube and Vaseline Scissors Aprons Sellotape Thin card, made into funnels Cooking oil, some in (see diagram on page 51) mini pop bottles Adhesive plastic A4 card
Stimulus task A tray has a teaspoonful of each of four liquids placed inside
'rings' on a start line, as shown below. The rings can be made by cutting a Smartie tube into slices and then coating the inside of the rings with Vaseline (to stop the oils absorbing into the cardboard). Washing-up liquid could be used to replace bicycle or motor oil, if desired.
Tell the children that you are going to remove the rings and
tip the tray, and ask them to describe what they think will happen. Their ideas can be recorded for comparison with the outcome.
The rings are removed and the tray is tipped and children
observe the different rates at which the liquids move to the end of the tray.
finish
veg oil
baby oil
motor oil
water
plan view before tipping
start
side view after tipping

Activity notes
50
"The children wanted to remove the rings and tip
the tray themselves. This worked well, as the rings could be removed
at the same time."
Recording & measuring Measuring the time taken for each liquid to reach the finish line in
the tray is not essential, but can give children practice with either a sand timer or a stop clock. Four children can each operate a stop clock, each being responsible for a different liquid. They should start the clocks simultaneously and stop the clock when 'their' liquid reaches the finish line.
Record either the time taken, or the order in which the liquids
reach the finish line. Discussion Talk to children about the runniness of each liquid and how this
affects the time it takes each liquid to move down the slope. Now link the runniness of the oils to the requirements of the
'pourer'. Oil used for lubrication (to stop things sticking together or squeaking) is often needed in small quantities and on a specific spot, so the 'pourer' is important in achieving this. Discuss this, using some of the following questions:
• Can you remember some of the things we said we use oil for? (Prompt with the ideas of unsticking, and preventing squeaking). • What sorts of things do we want to stop squeaking or sticking? (e.g. Hinges on doors and gates, bicycle parts, locks). • Do we need a lot of oil? Why?
Depending on the ability of the children, discussion can also
focus on the best materials to make pourers from, e.g. 'oil can't soak in' (non-absorbent), stiff and not bendy (rigid), etc.
Task Show children the resources, which are best displayed in a wet
area of the classroom. Children should wear aprons to protect their clothing. Adult supervision throughout the task is advised.
Ask children to try using the different pouring devices, to find out
how well they pour cooking oil. They do this by pouring a small amount of oil onto a target, as shown on Activity sheet 16. These targets can be photocopied (and enlarged for younger children), laminated or mounted on small cards and covered in adhesive plastic. Alternatively, the target can be drawn with an indelible pen onto plastic covered card. After pouring each oil and recording the outcome (see the recording section opposite). The children try and add enough oil to fill only the small circle. The ability of pourers to achieve this will depend on the size and shape of the outlet.
Activity notes
51
The wider the opening, the quicker the oil will pour out. This will
make the pourer harder to control.
Together with an adult, the children can decide how to get the oil from the pop-bottle to the target on the sheet, e.g. placing funnels over the top of the bottle, moving liquid with syringes or droppers, etc.
Recording Activity sheet 16 provides a record sheet. A pourer is drawn, or its name recorded in the box. The target is then coloured in, according to the number of circles the oil spread onto during the test. The results of up to 4 pourers can be recorded on this sheet.
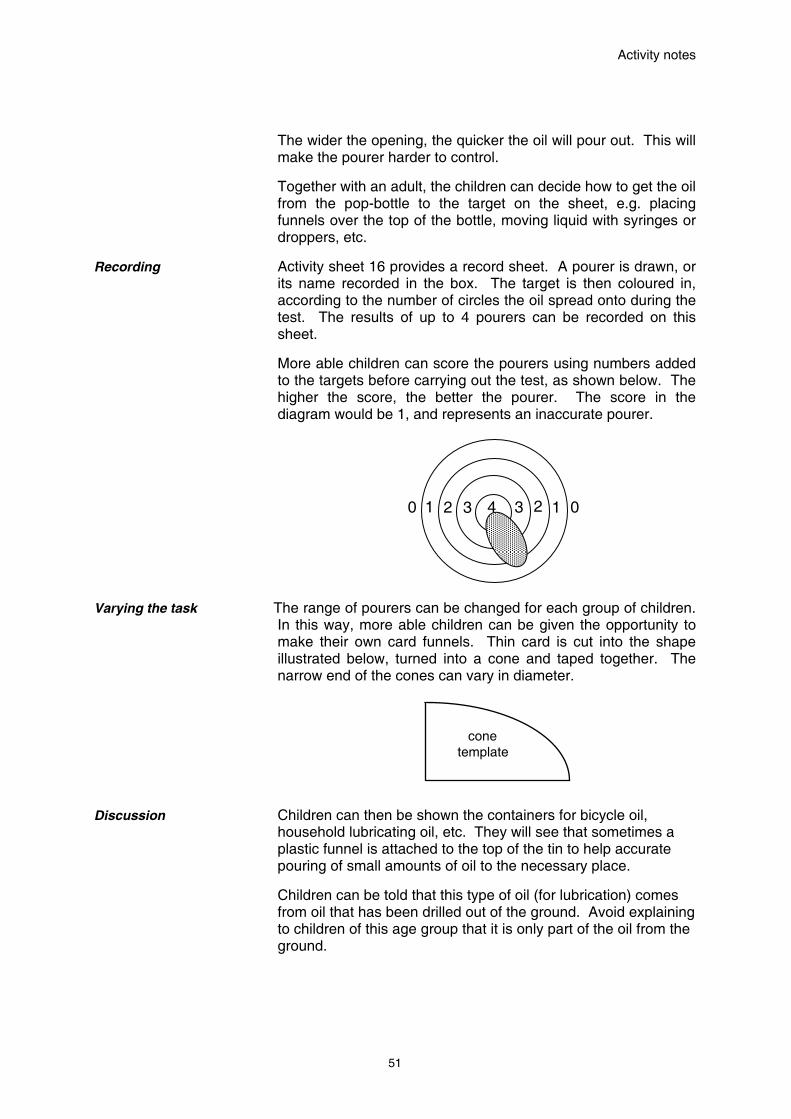
More able children can score the pourers using numbers added to the targets before carrying out the test, as shown below. The higher the score, the better the pourer. The score in the diagram would be 1, and represents an inaccurate pourer.
Varying the task The range of pourers can be changed for each group of children. In this way, more able children can be given the opportunity to make their own card funnels. Thin card is cut into the shape illustrated below, turned into a cone and taped together. The narrow end of the cones can vary in diameter.
cone template
Discussion Children can then be shown the containers for bicycle oil, household lubricating oil, etc. They will see that sometimes a plastic funnel is attached to the top of the tin to help accurate pouring of small amounts of oil to the necessary place.
Children can be told that this type of oil (for lubrication) comes from oil that has been drilled out of the ground. Avoid explaining to children of this age group that it is only part of the oil from the ground.
0 0 2 2 3 3 4 1 1

Activity sheet 16
53
Pouring oil
Write or draw the pourers in the boxes.
Colour the circles that the oil touched.
pourer 1
pourer 2
pourer 3
pourer 4
Activity notes
55
Activity 8 So, what's it for? Objectives To observe oil being used for lubrication and for fuel. Suggested resources
Cooking oil Droppers/pipettes Aluminium foil Metal tins (e.g. travel sweet tins) Wooden blocks String Paper towels Matches Small jar (e.g. 50 g jam pot, Lubricating oil (e.g. '3 in 1' oil) meat paste jar, Marmite jar)
Note: You may wish to explain to the children that they are
using cooking oil for parts of this activity as it is safer and cleaner to use than oils designed specifically for lubrication and as a fuel.
Discussion & class task 1 To begin this activity, each child compares rubbing their
hands together with and without a few drops of cooking oil.
"A blindfold helped children focus their
thoughts on this task."
Children can describe the feeling of each experience.
Language such as smooth, slippery, etc. should be encouraged.
Children then explore the effect of oil on other surfaces, by
rubbing pieces of different materials together with and without oil between them (foil, tins, wooden blocks, etc.). Individuals can be chosen to do this in front of the class. The class can describe the sounds made, and the individual child can describe what it feels like. They should appreciate that the oil reduces the 'stickiness' of the two surfaces, and reduces the noise made. All the language used can be recorded on a class chart.
Class task 2 Either as a whole class or in small groups, children are
accompanied by an adult around the school on a 'squeak hunt'. Children are challenged to find squeaking doors, gates, box lids, trolley wheels, etc. that can be silenced by adding lubricating oil. They should also find the exact location of the squeak, to reinforce the idea of the rubbing metal parts causing the squeak. The adult then lubricates the appropriate mechanism. Children may also be able to appreciate that oiling joints makes them easier to move.

Activity notes
56
"We found the squeaking things, but didn't
have time to oil them. The end of term came too soon, so the
caretaker oiled them!"
Note: You may want to make sure there are some
squeaking hinges, etc. before embarking on this task! Also, if carrying out the task in groups, each group can be limited to a particular section of the school, to ensure they all find something squeaky.
A class list can be drawn up of all the ‘squeaks we made
quiet’, which is then used to discuss what they all have in common.
Class task 3 To show that oil can be used as a fuel providing both heat
and light, a cooking oil candle can be made, as shown in the diagram below. For candle 2, immerse the string in the oil before resting it in the position shown.
Candle 1
Candle 2
Ask the children what they think will happen when you light
both pieces of string. Candle 1 burns out soon after lighting. This shows that it is the oil which is the fuel keeping the candle alight. The cooking oil candle can burn for several hours, but does not smell too pleasant! Odourless lamp oils are available from hardware stores.
Safety Note
! The candle must be lit by an adult, and children must observe the candle in the presence of an adult. The dangers associated with matches can be discussed.
Discuss the use of oil as a fuel in other situations, e.g. some
central-heating systems, paraffin lamps and stoves, cars, buses, lorries, ships and aeroplanes.
String wick
Small jar
String wick
Cooking oil
Small jar

Key words
57
Key words
burn rig
candle runny
drill ship
fuel slip
hard soft
hole squeak
lorry stable
material stick
oil strong
pipe tanker
platform tool
pourer wick

Background information
59
Background information This information is provided as a reference for the teacher. Most of the information is too difficult for 5-7 year olds to understand. Some aspects can be discussed, though these must be carefully selected to provide simple and appropriate discussion points with the children.
The formation of oil Oil is formed from the remains of small sea animals and plants
from 50 million years ago. Immense pressure and heat over time changes these tissues physically and chemically into crude oil and natural gas.
Searching and drilling Nobody knows precisely where oil can be found. for oil Geologists gather information about rock formations to make
intelligent deductions about possible locations, often under the sea. Exploratory drilling then takes place, using a drilling rig. This is a tall structure with suspended steel pipes and a strong steel drill bit. Once oil is reached (sometimes as deep as 6000 metres below the sea bed) the drilling rig is replaced with a production platform - a more permanent structure in which the crew will live and work.
The platform must be strong enough to support its community
and buildings, and withstand the severest storm conditions at sea. The platform is therefore made from a combination of steel and cement.
The North Sea has many oil rigs and platforms which have
been built on the North East coast of Britain, and then towed out to the place where oil production will begin.
Rigs used for exploration are quite different from those erected
for long term oil extraction. There are also a variety of platform designs for extracting the oil, which depend on the sea and weather conditions. For example, floating platforms are anchored in very deep seas. Others can sit on the sea bed with the legs of the structure deeply embedded. ‘Feet’ for a platform can be used on dry land, but the force of the sea water would still move the platform about in the water. For the children's activities, distinctions between different types of platforms are not made.
The rate of drilling depends largely on the hardness of the rock.
In ideal conditions up to 60 metres an hour can be achieved; whereas extremely hard rock can reduce this rate to 60 metres in 24 hours. A typical drill bit varies in diameter from 30 to 60 cm, depending on the drill hole and depth. In very deep holes, the diameter of the drill bit can be as small as 12.5 cm. The bit has many individual teeth which are made from steel that has been toughened by adding chips of tungsten carbide. For exceptionally hard rock, the teeth are toughened using diamond.
Background information
60
To weigh down the drill bit, 'collars' are used. These are each 9
metres long and weigh 1.5 tonnes. Up to 20 in a 'string' can be added. Replacement of a worn drill bit can take 24 hours - 12 hours to bring it up, and 12 to take it down again.
Working on a platform 100-200 people can work on one platform, though small or
'satellite' platforms have less. Due to the difficult travelling to and from work, most staff work 1-2 weeks on the platform, followed by 1-2 weeks on shore. People usually travel by helicopter, whilst supplies can travel by boat or helicopter. One helicopter typically transports 20 people.
The platform functions as a small community, so jobs vary
widely, as in a village or town. As well as the production, maintenance and drilling team, there are cooking staff (head chef, baker, cooks, and stewards), cleaning staff, medical staff, radio operators, etc.
A typical weekly 'shopping list' for the platform crew includes: 100 kg butter 500 kg vegetables 350 kg flour 1,000 kg meat 500 kg fruit 2,000 litres milk In addition to this food, a fresh supply of water must always be
available. For this reason, a platform has its own desalination plant which converts sea water into fresh water. A typical demand for fresh water can be 30,000 litres per day!
Transporting the oil Tankers are used to transport oil around the world. They are
categorised according to the quantity of crude oil they carry. Very large crude oil carriers (VLCCs) can carry 300,000 tonnes, whilst the cargo of ultra large crude oil carriers (ULCCs) can be 500,000 tonnes. The largest tankers are 400 metres long - approximately 5 football pitches placed end-to-end. Often the crew use bicycles to travel around the ship.
These ships are too large to travel through the Suez Canal, and
so their route from the Middle East to Europe takes them around the Cape of Good Hope. This journey takes 60 days, rather than the 40 days needed to travel through the Suez.
The oil is carried in several compartments in the ship. As a
cargo is unloaded (in order to maintain the ship's stability) the compartments are filled with water for the return journey.
Smaller coastal tankers sail between refineries, and usually
carry loads of 20,000 tonnes or less. In addition to tankers, pipelines are used to carry crude oil from
platforms in the North Sea to shore. Oil can be transported from several platforms to the shore by one pipeline. Pipelines
Background information
61
are also used within the UK to transport oil products, such as petrol, to large consumers and distribution centres. For example, nearly 90% of Esso oil and gas products are transported by pipeline. A network of 1100 km of pipelines runs from the Esso refinery near Southampton to centres such as Manchester, London, Birmingham and Gatwick Airport. It is the safest means of transportation, as spillages are rare. It is also environmentally friendly, as pressures on road transport are reduced, and the only visible signs of the pipeline are small markers along its length - similar to those seen on street corners for gas pipelines.
The pipeline consists of sections of steel pipe welded together.
When being laid, the newly-welded joints are cleaned, X-rayed, wrapped and waterproofed before the pipeline is covered over. To ensure no leakage occurs, the entire pipeline is regularly tested by running high pressure water through its length.
Road tank vehicles are used to carry oil products to smaller
distribution centres, such as petrol stations, and to some customers. These tankers can weigh 38 tonnes and carry 35,000 litres of petrol, though smaller vehicles are used for less accessible places.
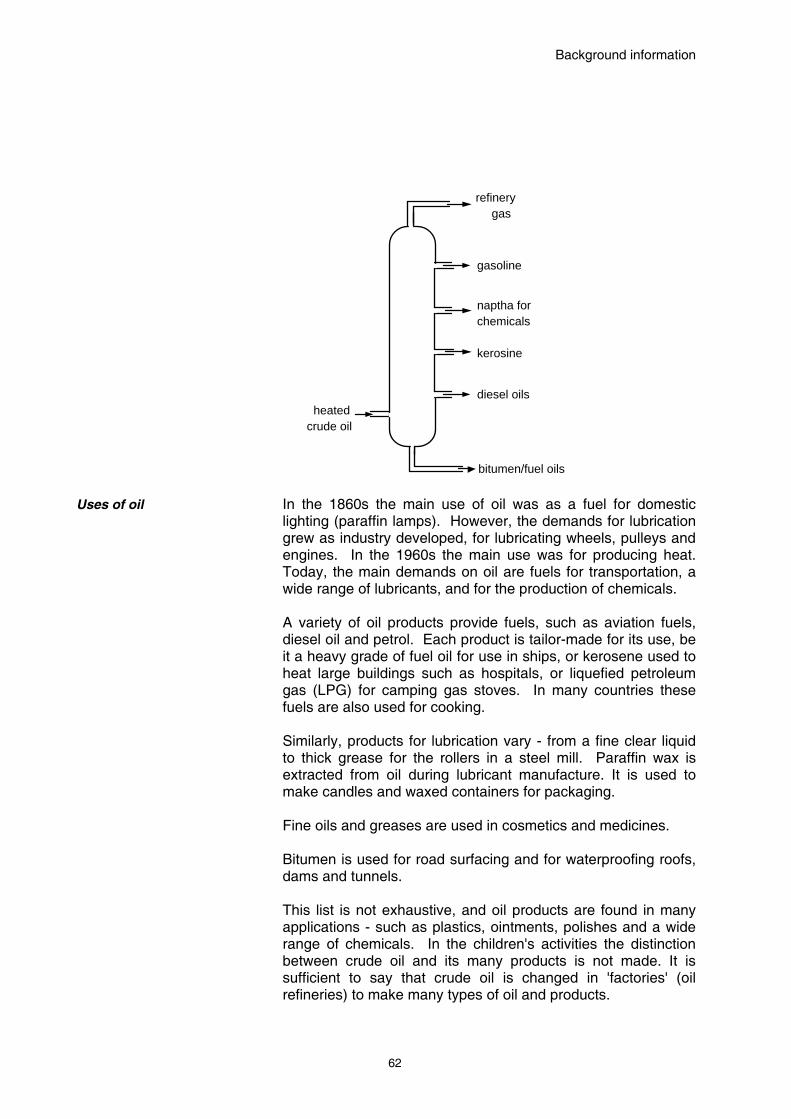
Separating crude oil Crude oil is a mixture of components which can be separated
by heating. This process is called 'distillation'. The process relies on the fact that each component in the mixture changes from a liquid to a gas at a different temperature. The crude oil mixture is heated up to 400°C before being passed into a tall tower (about 80 m high). Some of this mixture is now a liquid, but most of it has turned into gases. As the mixture enters the tower, the liquid falls to the bottom, and the gases rise up the tower. As the gases rise they cool down, and one by one they become liquids. As each gas becomes a liquid, it is drawn away from the tower by pipeline. The diagram overleaf shows the main components of the mixture. These components are often further distilled, or refined, to provide a wider range of products.
Background information
62
refinery gas
naptha for chemicals
kerosine
gasoline
diesel oilsheated
crude oil
bitumen/fuel oils
Uses of oil In the 1860s the main use of oil was as a fuel for domestic lighting (paraffin lamps). However, the demands for lubrication grew as industry developed, for lubricating wheels, pulleys and engines. In the 1960s the main use was for producing heat. Today, the main demands on oil are fuels for transportation, a wide range of lubricants, and for the production of chemicals.
A variety of oil products provide fuels, such as aviation fuels,
diesel oil and petrol. Each product is tailor-made for its use, be it a heavy grade of fuel oil for use in ships, or kerosene used to heat large buildings such as hospitals, or liquefied petroleum gas (LPG) for camping gas stoves. In many countries these fuels are also used for cooking.
Similarly, products for lubrication vary - from a fine clear liquid
to thick grease for the rollers in a steel mill. Paraffin wax is extracted from oil during lubricant manufacture. It is used to make candles and waxed containers for packaging.
Fine oils and greases are used in cosmetics and medicines. Bitumen is used for road surfacing and for waterproofing roofs,
dams and tunnels. This list is not exhaustive, and oil products are found in many
applications - such as plastics, ointments, polishes and a wide range of chemicals. In the children's activities the distinction between crude oil and its many products is not made. It is sufficient to say that crude oil is changed in 'factories' (oil refineries) to make many types of oil and products.
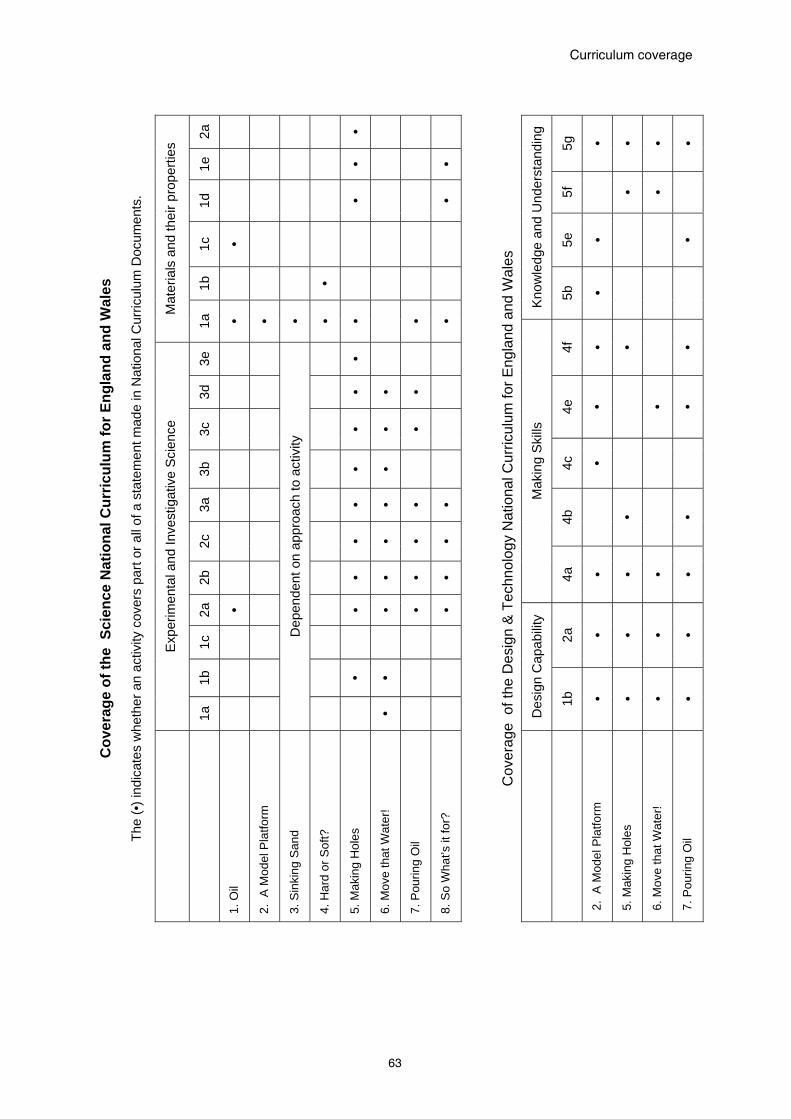
Curriculum coverage
63
2a
•
5g
• • • •
1e
•
•
5f
• •
1d
•
•
1c •
5e
•
•
1b •
Kno
wle
dge
and
Und
erst
andi
ng
5b
•
Mat
eria
ls a
nd th
eir p
rope
rties
1a • • • • • • •
3e
•
4f • •
•
3d
• • •
4e •
• •
3c
• • •
3b
• •
4c •
3a
• • • •
4b
•
•
2c
• • • •
2b
• • • •
Mak
ing
Ski
lls
4a
• • • •
2a •
• • • •
1c
2a
• • • •
1b • •
Exp
erim
enta
l and
Inve
stig
ativ
e S
cien
ce
1a
Dep
ende
nt o
n ap
proa
ch to
act
ivity
•
Des
ign
Cap
abili
ty
1b
• • • •
Cov
erag
e of
the
Sci
ence
Nat
iona
l Cur
ricul
um fo
r Eng
land
and
Wal
es
The
(•) i
ndic
ates
whe
ther
an
activ
ity c
over
s pa
rt or
all
of a
sta
tem
ent m
ade
in N
atio
nal C
urric
ulum
Doc
umen
ts.
1. O
il
2. A
Mod
el P
latfo
rm
3. S
inki
ng S
and
4. H
ard
or S
oft?
5. M
akin
g H
oles
6. M
ove
that
Wat
er!
7. P
ourin
g O
il
8. S
o W
hat’s
it fo
r?
Cov
erag
e o
f the
Des
ign
& T
echn
olog
y N
atio
nal C
urric
ulum
for E
ngla
nd a
nd W
ales
2.
A M
odel
Pla
tform
5. M
akin
g H
oles
6. M
ove
that
Wat
er!
7. P
ourin
g O
il

Curriculum coverage
64
•
•
•
• •
•
B
•
•
• •
•
A
Rev
iew
ing
and
repo
rting
•
•
•
• •
•
B •
•
• •
•
A
Car
ry o
ut
task
•
•
•
• •
•
B
•
•
•
• •
•
A
Pre
pare
fo
r a ta
sk
Des
igni
ng &
Mak
ing
• •
•
B
•
•
A P
roce
sses
• •
B
• •
•
A
Res
ourc
es
•
B
•
A
Nee
ds
K &
U
Tech
nolo
gy
•
C •
• • •
B •
• • •
A
Mat
eria
ls f
rom
E
arth
K &
U: E
arth
an
d S
pace
C •
•
B •
• • •
A
Rev
iew
ing
and
repo
rting
C •
•
•
B •
•
•
• •
A
Car
ryin
g ou
t ta
sks
C •
•
•
B •
•
•
A
Pre
parin
g fo
r ta
sks
Ski
lls in
sci
ence
: Inv
estig
atin
g
Scie
nce
The
(•) d
enot
es w
here
an
activ
ity c
over
s pa
rt of
or a
ll of
a s
tate
men
t mad
e in
the
5-14
doc
umen
ts
K &
U =
Kno
wle
dge
and
Und
erst
andi
ng
Cov
erag
e of
Env
ironm
enta
l Stu
dies
5-1
4 fo
r Sco
tland
8. S
o W
hat's
it
fo
r?
7. P
ourin
g O
il
6. M
ove
that
W
ater
5. M
akin
g H
oles
4. H
ard
or S
oft?
3. S
inki
ng in
S
and
2. A
Mod
el
P
latfo
rm
1. O
il

Resource list
65
Suggested resources
Activity 1 – Oil. motor oil bicycle oil mini pop bottles cooking, essential & massage oils (optional) cotton wool buds Activity 2 - A model platform. pictures/posters of oil rigs and platforms construction kits dowelling (approx. 30 cm lengths) shoe box camera (optional) Activity 3 - Sinking in sand. model platform sand & tray or sand pit card scissors pop bottle lids film canister lids card wheel discs 2 or 4 pint milk carton lids coffee jar lids plasticine or play dough shoe box weights (e.g. books) Activity 4 - Hard or soft? hard & soft collection: plasticine, sponge, clay (dry), clay (moist, sealed in a transparent bag), soil or mud, sand, powder puff, stone, rock, brick, block of wood or dice, cardboard, piece of carpet, piece of lino, rubber, pencil sharpener Activity 5 - Making holes. plasticine clay (moist, sealed in a transparent bag) plastic tubs/lids tub of soil or mud tub of sand block of wood cardboard piece of carpet piece of lino scissors needle nail hammer
Activity 5 (continued) hole-punch junior drill pencil drill for masonry
Activity 6 - Move that water! large bucket of water jugs guttering plastic cups plastic tubs & lids sponges wheeled trolley (or suitable construction kit, such as Quadro) hose pipe or plastic tubing funnel stop watch or sand timer Activity 7 - Pouring oil. cooking oil, some in mini pop bottles washing up liquid baby oil vegetable oil bicycle or motor oil tray (e.g. tidy tray) 1-4 stop clocks Smartie tube & Vaseline aprons scissors Sellotape funnels droppers/pipettes thin card, made into funnels syringes washing-up liquid bottles bicycle oil container cooking oil container Activity 8 - So, what's it for? cooking oil aluminium foil wooden blocks paper towels small jar (e.g. 50 g jam pot, meat paste jar, Marmite jar) droppers/pipettes metal tins (e.g. tobacco) string matches lubricating oil (e.g. '3 in 1' oil)

Further information
66
Further information Children's books The following list of illustrated children's books focus on oil
production and its uses. They are not all for use with 5-7 year olds, though the illustrations and photographs may provide the teacher with a useful addition to this pack.
Note: The book 'Oil Rigs' is no longer in print, but it may be found in school and public libraries.
From oil to plastic by R. Brice. Published by Moonlight Publishing. ISBN 1 85103 019 0 (£2.50 hardback)
Focus on oil by M. Lambert. Published by Wayland Ltd. ISBN 0 85078 637 1 (£6.95 hardback)
Oil by Graham Rickard. Published by Wayland Ltd. ISBN 0 7502 0325 0 (7.95 hardback)
Oil rigs by RJ Stephen. Published by Franklin Watts. ISBN 0 86313 417 3. Other resources Educational resources are produced by some oil companies, a
selection being provided free of charge. Resources are produced for primary and secondary children, and include a range of packs, videos and posters. Three companies are listed below, and they all produce educational catalogues.
Exxon Mobil Information Services PO Box 30 Alton Hampshire GU43 4PY
Tel. 01420 525534 Email: [email protected]
BP Educational Service PO Box 635 Harrow HA1 2GU
Tel. 0870 3330428 Fax. 0870 3330131 Email: [email protected] www.bp.com/bpes 'Harry at the Service Station' is one such free resource from Esso
Information Services. Harry the Hydrocarbon is a character who features in activities in this resource for teachers of the 5-7 age group. The resource includes a teachers' booklet and four charts. Activities and background information focus particularly on science, technology, English and mathematics. Topics include energy, building, structures, transport, the community, and communication.
Visitors from industry The Chemical Industry Education Centre encourages liaison
between schools and industry and runs two programmes which link classroom science with visits to/from industry. These are Children Challenging Industry and the Primary Science Enhancement Programme. For more information on these programmes and written resources, visit www.ciec.org.uk or contact:
Department of Chemistry University of York Heslington York YO1 5DD
Tel. 01904 432523 Fax. 01904 434460 Email: [email protected] www.ciec.org.uk