Embed Size (px)
Citation preview

OIG 11G R2 Training
Oracle Proprietary - Restricted to Personal Use in an Oracle partner training class 1 | P a g e
OIG 11G R2 Field Enablement Training
Appendix-A – How to Create a TaskFlow
Disclaimer: The Virtual Machine Image and other software are provided for use
only during the workshop. Please note that you are responsible for deleting them
from your computers before you leave. If you would like to try out any of the Oracle
products, you may download them from the Oracle Technology Network
(http://www.oracle.com/technology/index.html) or the Oracle E-Delivery WebSite
(http://edelivery.oracle.com)

OIG 11G R2 Training
Oracle Proprietary - Restricted to Personal Use in an Oracle partner training class 2 | P a g e
Table of Contents
Introduction ……………………………………………………………………………………………………… 3
Creating a new taskflow ………………………………………………………………………………………3
Packaging the taskflow ……………………………………………………………………………………….61
UI changes using SandBox…………………………………………………………………………………..63
Grant View Permission on Taskflow …………………………………………………………………..73
Testing the task flow ………………………………………………………………………………………….74
OIG 11G R2 Training
Oracle Proprietary - Restricted to Personal Use in an Oracle partner training class 3 | P a g e
1. Introduction
In Lab 4.1 we have seen the task flow for gathering the additional request information at the cart
level and at the cart item level. In this lab we will take a look at how to create a simple taskflow and
how to hook it up to OIM in order to gather additional information at the cart item level.
We would create a task flow which will have only 2 fields collected. Justification and Office. As with
the Lab4.1 when you save the information. We use the newly introduced AdditionalRequestInfo
class to store the information user has entered.
Note: If you are doing it in the workshop VM environment, please revert to the snapshot taken
before Lab4.1 -PS2-Request-Enhancements. This is recommended as we want to
experience end to end task flow creation and hooking it into OIM. Lab4.1 has already
done hooking the task flow in OIM as part of that Lab.
2. Creating a new Taskflow Using JDeveloper
Note: You can either do this in the workshop VM environment or in your Own JDeveloper.
1. In the VM open a terminal window and create a directory Appedix. We will be creating
our new taskflow in this directory
mkdir /app/dummydata/Appendix
2. Launch the JDeveloper using the launchJDev.sh located in Deskstop/Startup_Scripts

OIG 11G R2 Training
Oracle Proprietary - Restricted to Personal Use in an Oracle partner training class 4 | P a g e
3. In JDeveloper click on New Application
4. Provide the Name as RequestUI and the directory as /app/dummydata/Appendix. The
application is of type Generic Application. Click on Finish

OIG 11G R2 Training
Oracle Proprietary - Restricted to Personal Use in an Oracle partner training class 5 | P a g e
5. Application will create a generic project Project1. We would need to delete this project as
we need to create a ADF project. Right Click on Project1 and click Delete Project

OIG 11G R2 Training
Oracle Proprietary - Restricted to Personal Use in an Oracle partner training class 6 | P a g e
In the Pop up select the following option to delete the project from JDeveloper and from
file system

OIG 11G R2 Training
Oracle Proprietary - Restricted to Personal Use in an Oracle partner training class 7 | P a g e
6. In the Jdeveloper Menu Click on File-> New. Create a project of type ADF View Controller
Project
Click Ok
7. Name the Project as RequestUI and click Finish

OIG 11G R2 Training
Oracle Proprietary - Restricted to Personal Use in an Oracle partner training class 8 | P a g e
8. You should see the following structure in JDeveloper
OIG 11G R2 Training
Oracle Proprietary - Restricted to Personal Use in an Oracle partner training class 9 | P a g e
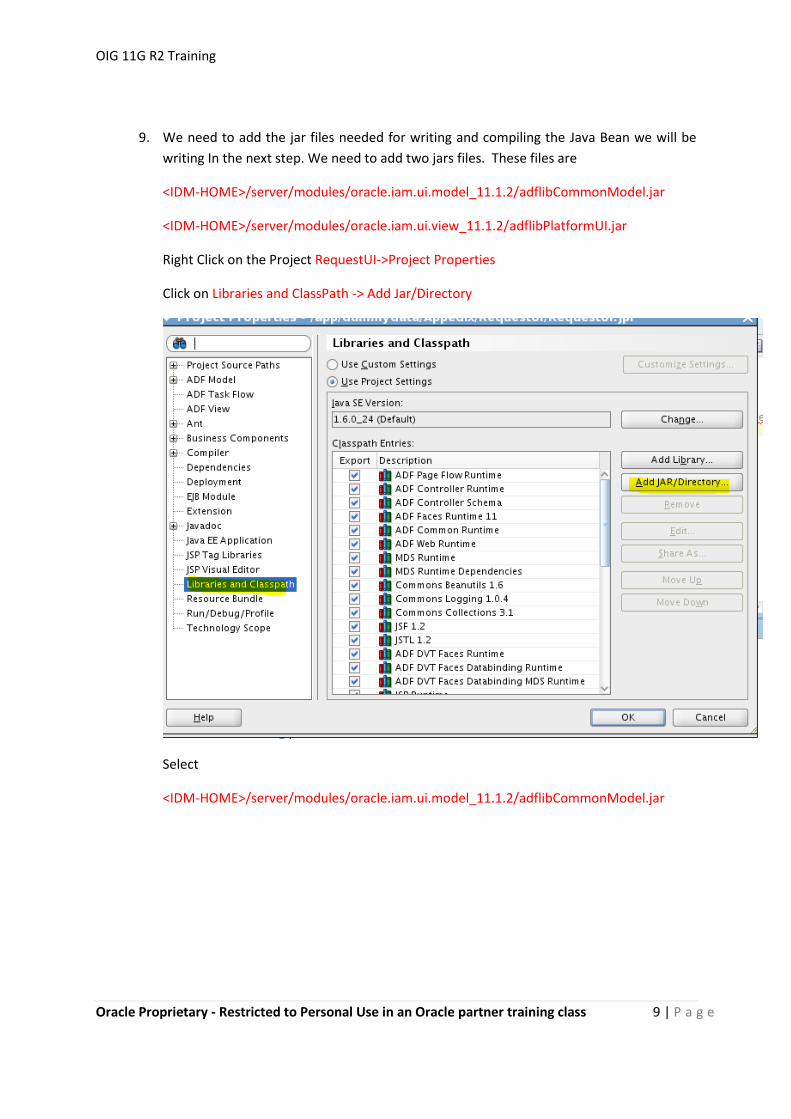
9. We need to add the jar files needed for writing and compiling the Java Bean we will be
writing In the next step. We need to add two jars files. These files are
<IDM-HOME>/server/modules/oracle.iam.ui.model_11.1.2/adflibCommonModel.jar
<IDM-HOME>/server/modules/oracle.iam.ui.view_11.1.2/adflibPlatformUI.jar
Right Click on the Project RequestUI->Project Properties
Click on Libraries and ClassPath -> Add Jar/Directory
Select
<IDM-HOME>/server/modules/oracle.iam.ui.model_11.1.2/adflibCommonModel.jar

OIG 11G R2 Training
Oracle Proprietary - Restricted to Personal Use in an Oracle partner training class 10 | P a g e
Click Select to add the Jar file.
Now Click on Add Jar/Directory Again
Select <IDM-HOME>/server/modules/oracle.iam.ui.view_11.1.2/adflibPlatformUI.jar

OIG 11G R2 Training
Oracle Proprietary - Restricted to Personal Use in an Oracle partner training class 11 | P a g e
Click Select to choose the file
Now you should see the two jars in the list. Click Ok to close the window. Now we should
have the Jars needed for compiling the files later.

OIG 11G R2 Training
Oracle Proprietary - Restricted to Personal Use in an Oracle partner training class 12 | P a g e
10. We first need to create a managed bean. Managed bean is responsible to doing the work
in the backend. In our case the managed bean will collect the information entered in the
two text fields Justification and Office. It will also save the information entered in these
two fields by user when Save button is clicked. We also need a Utility class as well which
will do some supporting functionality for managed bean. Let’s first create the Utility
class.
Right Click on Request UI -> New
11. Click on Java & Select Java Class

OIG 11G R2 Training
Oracle Proprietary - Restricted to Personal Use in an Oracle partner training class 13 | P a g e
12. Specify the name as UIUtil and package as com.oracle.ui.view. Click OK.
It will create a Java file

OIG 11G R2 Training
Oracle Proprietary - Restricted to Personal Use in an Oracle partner training class 14 | P a g e

OIG 11G R2 Training
Oracle Proprietary - Restricted to Personal Use in an Oracle partner training class 15 | P a g e
13. Enter the following lines just under the package
import javax.faces.component.UIComponent;
14. In the java class paste the below code
public static UIComponent findParentComponent(UIComponent component, Class parentClass)
{
UIComponent comp = component;
while ((comp != null) && (!parentClass.isAssignableFrom(comp.getClass()))) {
comp = comp.getParent();
}
return comp;
}

OIG 11G R2 Training
Oracle Proprietary - Restricted to Personal Use in an Oracle partner training class 16 | P a g e
Note: Our taskflow we are creating will open in a new popup window. This code above
will find the parent component ( OIM Main window) so that the taskflow can be closed.
15. Now Let’s create the Managed Bean class. In the JDeveloper From the Menu Click on
File-> New
Click on Java and Select Java Class

OIG 11G R2 Training
Oracle Proprietary - Restricted to Personal Use in an Oracle partner training class 17 | P a g e
16. Specify the name as RequestBean. Package should be populated automatically. Click Ok
You should have the Java Class Created

OIG 11G R2 Training
Oracle Proprietary - Restricted to Personal Use in an Oracle partner training class 18 | P a g e
17. Now Import the following classes in the java fie
import javax.faces.event.ActionEvent;
import oracle.adf.view.rich.component.rich.RichPopup;
import oracle.iam.ui.common.model.catalog.requestdetails.AdditionalRequestInfo;
import oracle.iam.ui.platform.view.RequestFormContext;
18. Now define the following variables in the code.
private String justification;
private String office;
private Boolean readOnly;
private String cartItemId;
private RequestFormContext requestFormContext;
private AdditionalRequestInfo additionalRequestInfo;

OIG 11G R2 Training
Oracle Proprietary - Restricted to Personal Use in an Oracle partner training class 19 | P a g e
19. Since we are writing a managed bean, we need to create setter and getter methods.
Right click from within the java file and select Generate Assessors

OIG 11G R2 Training
Oracle Proprietary - Restricted to Personal Use in an Oracle partner training class 20 | P a g e
20. Select the following to generate these methods

OIG 11G R2 Training
Oracle Proprietary - Restricted to Personal Use in an Oracle partner training class 21 | P a g e

OIG 11G R2 Training
Oracle Proprietary - Restricted to Personal Use in an Oracle partner training class 22 | P a g e
21. You should see the methods generated by JDeveloper
22. Now we need to make this bean Serializable. Import the class first
import java.io.Serializable;

OIG 11G R2 Training
Oracle Proprietary - Restricted to Personal Use in an Oracle partner training class 23 | P a g e
23. Now make the class implement Serializable interface
24. Add two more methods Save and Cancel in the bean. These are called when the user
clicks on Save and Cancel button respectively.
Also Notice that once the data is saved . We hide the pop up window
public void Save(ActionEvent e){
System.out.println(" ---- Inside Save ------");
saveData();
RichPopup popup = (RichPopup)UIUtil.findParentComponent(e.getComponent(),
RichPopup.class);
if (popup != null)
popup.hide();
}
public void Cancel(ActionEvent e){
System.out.println(" ---- Inside Cancel ------");
RichPopup popup = (RichPopup)UIUtil.findParentComponent(e.getComponent(),
RichPopup.class);
if (popup != null)
popup.cancel();
}

OIG 11G R2 Training
Oracle Proprietary - Restricted to Personal Use in an Oracle partner training class 24 | P a g e
25. Now we need to define one more method saveData() which is getting called from Save
as shown able.
public void saveData(){
System.out.println("--- Inside #saveData ---");
if ((this.requestFormContext != null) && (this.additionalRequestInfo != null)) {
this.cartItemId = this.requestFormContext.getUniqueCartItemIdentifier();
System.out.println(" -- Cart Item Id "+cartItemId+" ----");
this.readOnly = Boolean.valueOf((this.requestFormContext.getActionType() !=
RequestFormContext.ActionType.REQUEST) &&
(this.requestFormContext.getActionType() !=
RequestFormContext.ActionType.APPROVAL));
System.out.println(" -- readOnly "+readOnly+" ----");

OIG 11G R2 Training
Oracle Proprietary - Restricted to Personal Use in an Oracle partner training class 25 | P a g e
}
this.additionalRequestInfo.setAttribute(this.cartItemId, "justification",
this.justification);
this.additionalRequestInfo.setAttribute(this.cartItemId, "office", this.office);
System.out.println(" ---Saving Done ----- ");
}
If you look at the above code snippet. Request Context and additionalRequestInfo will
get passed into managed bean automatically.
We can get the cartItem ID once we have these two . The ID will tell us what is getting
requested and based on what is being requested (i.e app instance , role , entitlement) we
can collect different information from user by calling different taskflow. Take a look at
the IdentitySamples -> CatalogUI project for more information. We will keep it simple
here in this task flow.
Once the user enters the information for justification and office in the screen and saves it
. The setters methods are called first which will set the values for these in the bean. The
Save action will call the save method in the bean which in turn is calling saveData()
We call additonRequestInfo.setAttribute method to set these additional values . So that
OIM can save these values and these values will show up In the approval chain as well.
The setAttribute & geAttribute has two types . One as shown above where you pass the
cartItemID which will be useful if you have multiple items in the cart and the
corresponding values needs to be save . The other method without the cart Item Id which
is simpler version.

OIG 11G R2 Training
Oracle Proprietary - Restricted to Personal Use in an Oracle partner training class 26 | P a g e
26. We also need to add an Initialize() method. This method is called first everytime managed
bean is called. This method will call the getAttribute method from AdditonalRequestInfo
interface. So if the values are already selected by the user when he has accessed last time
(i.e the interface is opened by approver where we need to display already selected
value). This initialize() method will get the already set value and display it to the user.
Add the following lines just after the consturtor
public void initialize(){
System.out.println("--- Inside Initialize------");
if (requestFormContext != null && additionalRequestInfo != null) {
// initialize attribute values
this.cartItemId = this.requestFormContext.getUniqueCartItemIdentifier();
System.out.println(" -- Cart Item Id "+cartItemId+" ----");
justification = (String)additionalRequestInfo.getAttribute(cartItemId,"justification");
System.out.println(" --- Jusstification is "+justification + "-------");
office = (String)additionalRequestInfo.getAttribute(cartItemId,"office");
System.out.println(" --- office is "+office + "-------");
// and "mode"
readOnly = requestFormContext.getActionType() != RequestFormContext.ActionType.REQUEST &&
requestFormContext.getActionType() != RequestFormContext.ActionType.APPROVAL;
System.out.println(" --- Read Only is "+readOnly + "-------");
}
}

OIG 11G R2 Training
Oracle Proprietary - Restricted to Personal Use in an Oracle partner training class 27 | P a g e
This completes the Managed Bean code.
27. Right click on the project RequestUI . Click on Rebuild Request UI
Make sure that there are no compilation errors

OIG 11G R2 Training
Oracle Proprietary - Restricted to Personal Use in an Oracle partner training class 28 | P a g e
28. Now we are done with the Bean needed to hold the values we supply in the OIM UI and
we also have the logic to save the values using AdditionalRequestInfo interface. Lets
design the taskflow which will collect the values in the OIM UI.
Right Click on the Project RequestUI -> New
29. Select JSF and make sure ADF Task Flow is selected (default)

OIG 11G R2 Training
Oracle Proprietary - Restricted to Personal Use in an Oracle partner training class 29 | P a g e
Click Ok
30. Enter the name as request-flow. Make sure the task flow is bounded task flow and also
make sure page fragments is selected. Task Flow ID ia automatically populated. Click Ok.

OIG 11G R2 Training
Oracle Proprietary - Restricted to Personal Use in an Oracle partner training class 30 | P a g e
31. You should see the taskflow created.
The project should now look like this

OIG 11G R2 Training
Oracle Proprietary - Restricted to Personal Use in an Oracle partner training class 31 | P a g e
32. Now lets define the elements in taskflow. In the ADF Task-Flow component pallet click
on View and drag and drop to the canvas.
Note: if you don’t see the pallet on right side. Click on View -> Component Pallet
33. You would have the view in the canvas. Change the name to requestData

OIG 11G R2 Training
Oracle Proprietary - Restricted to Personal Use in an Oracle partner training class 32 | P a g e
After the change it should look like this
34. Now we should register our managed bean RequestBean with this taskflow so that the
managed bean can be used to hold the values set by the user and to save the data.
Click on the Overview tab to open it

OIG 11G R2 Training
Oracle Proprietary - Restricted to Personal Use in an Oracle partner training class 33 | P a g e
Click on Managed Beans. Click on + to register the managed bean we created

OIG 11G R2 Training
Oracle Proprietary - Restricted to Personal Use in an Oracle partner training class 34 | P a g e
Enter the following
Name: RequetBean
Class: com.oracle.ui.view.RequestBean
Scope: PageFlow
Click on Parameters
We need to create two input parameters requestFormContext and requestAdditionalInfo.
These will be passed by OIM to bean automatically.
Click on + as shown
Name: requestFormContext
Class: oracle.iam.ui.platform.view.RequestFormContext

OIG 11G R2 Training
Oracle Proprietary - Restricted to Personal Use in an Oracle partner training class 35 | P a g e
For the Value expand and click on the Arrow select Expression Builder
Delete the existing value under Expression

OIG 11G R2 Training
Oracle Proprietary - Restricted to Personal Use in an Oracle partner training class 36 | P a g e
Open ADF Managed Bean -> pageFlowScope -> RequestBean. Select
requestFormContext.
It should populate the Expression box as shown.
Click Ok
Now click on + to define another variable
Enter the following
Name : additionalRequestInfo
Class: oracle.iam.ui.common.model.catalog.requestdetails.AdditionalRequestInfo

OIG 11G R2 Training
Oracle Proprietary - Restricted to Personal Use in an Oracle partner training class 37 | P a g e
For the value click on expand and click Expression Builder.
Clear (Delete) the Expression first
Select ADF Managed Bean -> pageFlowScope -> RequestBean -> additionalRequestInfo
The Expression box should be populated like shown below
Click Ok.
You should have the configuration as shown below. Click on Save All to save.

OIG 11G R2 Training
Oracle Proprietary - Restricted to Personal Use in an Oracle partner training class 38 | P a g e
35. Lets generate jsff page where we can have our fields to collect input from user
Click on the Diagram tab again.
Double click on requestData. It will open up a jsff page creation wizard as shown. Accept
the default and Click Ok

OIG 11G R2 Training
Oracle Proprietary - Restricted to Personal Use in an Oracle partner training class 39 | P a g e
36. It would create a jsff page and you are ready to design the page

OIG 11G R2 Training
Oracle Proprietary - Restricted to Personal Use in an Oracle partner training class 40 | P a g e
37. In the component panel , Locate Panel Group layout under Layout and drag and drop
into canvas
It should look like this
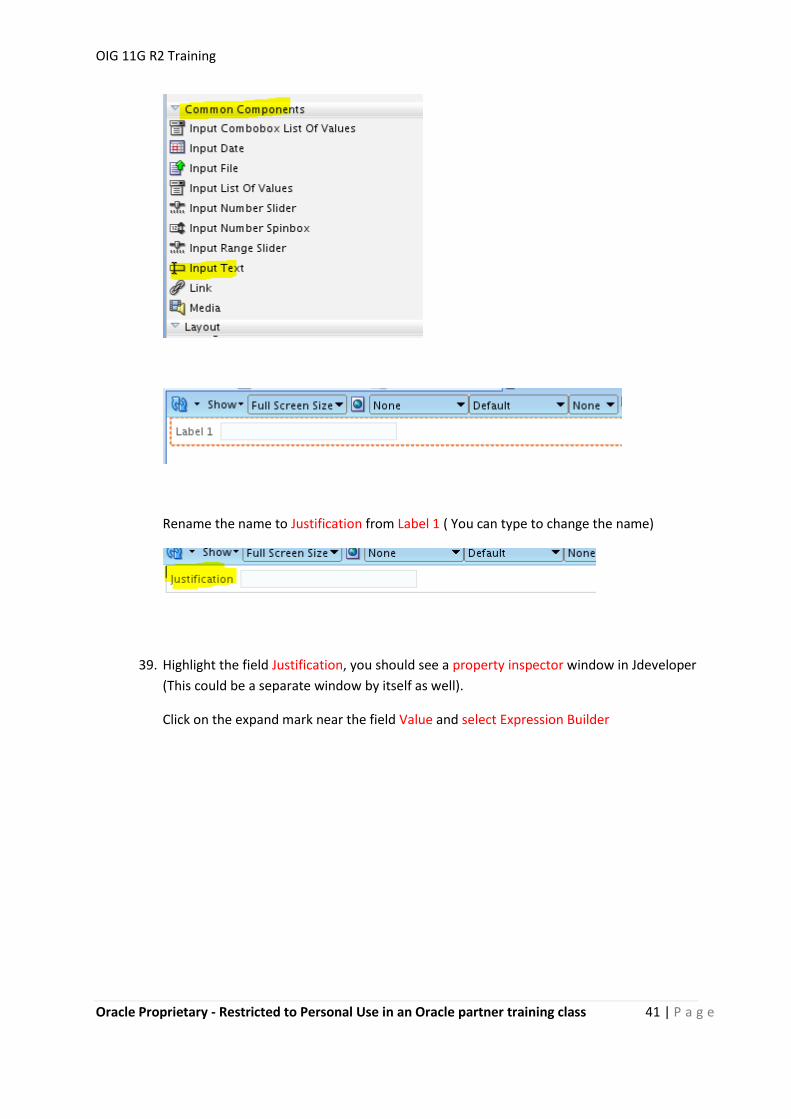
38. Locate Input Text under Common Components and drag and drop inside the group layout
you created.
OIG 11G R2 Training
Oracle Proprietary - Restricted to Personal Use in an Oracle partner training class 41 | P a g e
Rename the name to Justification from Label 1 ( You can type to change the name)
39. Highlight the field Justification, you should see a property inspector window in Jdeveloper
(This could be a separate window by itself as well).
Click on the expand mark near the field Value and select Expression Builder

OIG 11G R2 Training
Oracle Proprietary - Restricted to Personal Use in an Oracle partner training class 42 | P a g e
Navigate to ADF Managed Bean -> pageFlowScope-> RequestBean -> justification.
Select Justification.
The Expression should be populated as shown.
Click Ok

OIG 11G R2 Training
Oracle Proprietary - Restricted to Personal Use in an Oracle partner training class 43 | P a g e
40. Now let’s add one more field. Back under Common component pallet. Drag and Drop an
Select One List Box inside the panel group layout (highlighted by border) .
It will open a pop up for us to define list of values. Click on Create List and then click on +

OIG 11G R2 Training
Oracle Proprietary - Restricted to Personal Use in an Oracle partner training class 44 | P a g e
Add two values as shown below. For the second you need to click on + Again.
Click on Next button
Enter the Label as Office.
Click on next to Value and Method Expression Builder brings up expression Builder.

OIG 11G R2 Training
Oracle Proprietary - Restricted to Personal Use in an Oracle partner training class 45 | P a g e
Navigate ADF Managed Beans -> pageFlowScope-> RequestBean-> office
Select office
Expression text should populate as shown click Ok
Now back on the Select Value list screen it should look like this. Click on Finish

OIG 11G R2 Training
Oracle Proprietary - Restricted to Personal Use in an Oracle partner training class 46 | P a g e
Now the taskflow should look like this
41. Now let’s create two buttons Save and Cancel
Under the common components pallet chose Button and drag and drop on the canvas
inside the Panel Group layout identified by the border
You should see a property pallet for the command button. Change the Text to Save
Scroll down to the Action Listener and click on the Arrow

OIG 11G R2 Training
Oracle Proprietary - Restricted to Personal Use in an Oracle partner training class 47 | P a g e
Click on Edit
In the Dialog Select the Select Following
Managed Bean -> Request Bean
Method -> Save
Click Ok to save the change

OIG 11G R2 Training
Oracle Proprietary - Restricted to Personal Use in an Oracle partner training class 48 | P a g e
You should see the Action Listener Populated
This will call the Save method of the managed bean when the user clicks on Save button.
Back into the Common Component Pallet Drag and drop another button inside the Panel
Group Layout
Change the Text to Cancel

OIG 11G R2 Training
Oracle Proprietary - Restricted to Personal Use in an Oracle partner training class 49 | P a g e
Now Scroll down to Action Listener Section under the property for Button
Select the following
Managed Bean -> Request Bean
Method : Cancel
Click Ok
You should see the Action Listener populated

OIG 11G R2 Training
Oracle Proprietary - Restricted to Personal Use in an Oracle partner training class 50 | P a g e
When the user clicks on the Cancel button cancel method of Bean Request Bean is
getting called.
You should see the page like this below
Click on Save All in JDeveloper to Save the updates

OIG 11G R2 Training
Oracle Proprietary - Restricted to Personal Use in an Oracle partner training class 51 | P a g e
The Project now should look like this.
42. Now we need to call the initialize method designed in the managed bean first from the
ADF task flow. Click on the request-flow.xml tab in jdeveloper to open it

OIG 11G R2 Training
Oracle Proprietary - Restricted to Personal Use in an Oracle partner training class 52 | P a g e
43. From the component pallet drag and drop a method call
44. Change the name to initialize
45. From the component panel select Control Flow Case and connect initialize and
requestData
The Arrow should go from initialize to requestData

OIG 11G R2 Training
Oracle Proprietary - Restricted to Personal Use in an Oracle partner training class 53 | P a g e
46. Now Rename the name of the Arrow to initialized
47. Now we need to associate the manage bean method initialized to the method call we
have created. Double click on initialize method call
Select
Managed Bean -> Request Bean
Method -> initialize
Click Ok

OIG 11G R2 Training
Oracle Proprietary - Restricted to Personal Use in an Oracle partner training class 54 | P a g e
48. Now highlight the method call initialize . You should see the property inspector on the
right hand side
49. For the field Fixed Outcome. Enter initialized. Hit Enter Key to save the change.
50. Once you complete the step you should not see any warning icon in the taskflow for
initialize method

OIG 11G R2 Training
Oracle Proprietary - Restricted to Personal Use in an Oracle partner training class 55 | P a g e
51. Now we need to make the initialize method call as the default activity in the taskflow.
While in the request-flow.xml taskflow. Click on the Overview tab
52. Change the Default Activity to initialize

OIG 11G R2 Training
Oracle Proprietary - Restricted to Personal Use in an Oracle partner training class 56 | P a g e
53. Click Save All in JDeveloper to save all the files
54. Let’s compile the project. Right click on Request UI -> Rebuild
Make sure that that are no errors and project compiles successfully
55. Now our task flow is complete and we should package it as a JAR file.
Right Click on Project RequestUI-> New
Select Deployment Profiles -> ADF Library Jar File

OIG 11G R2 Training
Oracle Proprietary - Restricted to Personal Use in an Oracle partner training class 57 | P a g e
Accept the Default name and click Ok
It will open one more window click Ok

OIG 11G R2 Training
Oracle Proprietary - Restricted to Personal Use in an Oracle partner training class 58 | P a g e
If you see an WAR file listed, Highlight it and click Delete

OIG 11G R2 Training
Oracle Proprietary - Restricted to Personal Use in an Oracle partner training class 59 | P a g e
Now Click Ok

OIG 11G R2 Training
Oracle Proprietary - Restricted to Personal Use in an Oracle partner training class 60 | P a g e
Highlight the Request UI -> Deploy ->adflibRequestUI1
Click Finish
You should see a Deployment tab at the bottom of jdeveloper and it should be successful

OIG 11G R2 Training
Oracle Proprietary - Restricted to Personal Use in an Oracle partner training class 61 | P a g e
The Jar has been created at the following Directory
We are done with the task flow development. You can close the JDeveloper.
3. Packaging the taskflow
OIM out of the box supplies a shell WAR file which allows you to bundle all your
customizations. This war file is called oracle.iam.ui.custom-dev-starter-pack.war. You can
include all your customizations which include your custom taskflow in this WAR file. We
will package our taskflow in this WAR file and distribute to OIM
1. Open a command terminal and navigate to /app/dummydata/Appendix folder
2. Copy the WAR file from server to current directory
cp /app/Middleware/Oracle_IDM1/server/apps/oracle.iam.ui.custom-dev-starter-
pack.war .
3. Extract the war file
unzip –d taskflow oracle.iam.ui.custom-dev-starter-pack.war
4. Now navigate inside taskflow and observe the directory

OIG 11G R2 Training
Oracle Proprietary - Restricted to Personal Use in an Oracle partner training class 62 | P a g e
5. We would be putting our taskflow jar into lib directory inside WEB-INF. Lets create the
directory
6. Now lets copy our file into this directory
cd lib
cp /app/dummydata/Appendix/RequestUI/deploy/adflibRequestUI1.jar .
Make sure the jar is in the lib directory
7. Now lets rezip the jar file again
Go back to taskflow directory
Cd ..
cd..
Make sure you are in directory /app/dummydata/Appendix/taskflow
issue the command
zip –r oracle.iam.ui.custom-dev-starter-pack.war *

OIG 11G R2 Training
Oracle Proprietary - Restricted to Personal Use in an Oracle partner training class 63 | P a g e
You should see the WAR file created in taskflow directory
Copy this file to OIM
cp oracle.iam.ui.custom-dev-starter-pack.war
/app/Middleware/Oracle_IDM1/server/apps/.
Verify the timestamp at target OIM directory to make sure file is copied
4. UI changes using SandBox
Our goal is to provide an Additional Link in the Cart for each item in the cart. When the user
clicks on the link our custom task flow will allow them to enter the value for justification and office
and when user clicks on save he should be able to save the values.
In order for us to do this. We need to create a Sandbox, export it and insert the taskflow invocation,
import and publish the sandbox.

OIG 11G R2 Training
Oracle Proprietary - Restricted to Personal Use in an Oracle partner training class 64 | P a g e
1. Start the OIM Server using ./startOIM.sh
2. Login to Identity console as admin/Oracle123
3. Click on SandBoxes and create a sandbox RequestInfo
4. Click on Catalog Search for Enterprise. Select The Enterprise Directory OUD Add it to
cart and checkout
5. Now Click on Customize. Click on View -> Source on the left Hand Side
6. Now click on the row which has Enterprise Directory Server – OUD in the cart
7. Locate the below section which has the Remove button in it. Click on
panelGroupLayout:Horizontal and click on Add Content

OIG 11G R2 Training
Oracle Proprietary - Restricted to Personal Use in an Oracle partner training class 65 | P a g e
8. Scroll down and locate Web Components and open it

OIG 11G R2 Training
Oracle Proprietary - Restricted to Personal Use in an Oracle partner training class 66 | P a g e
9. Locate the CommandLink and Click on Add
10. Close the components window
11. You should see a Command link getting added
12. Right Click on CommandLink -> Edit
13. Enter the Text as Additional Item Information. Click Apply & OK

OIG 11G R2 Training
Oracle Proprietary - Restricted to Personal Use in an Oracle partner training class 67 | P a g e
14. You should see the newly added command link. Click Close at the top to come out of
composer mode.
15. Close the catalog Tab. Go back to manage Sandboxes tab
16. Highlight the RequestInfo sandbox and click on Export Sandbox

OIG 11G R2 Training
Oracle Proprietary - Restricted to Personal Use in an Oracle partner training class 68 | P a g e
17. Save the file in /app/dummydata/Appendix folder
18. We now need to insert the taskflow invocation in this sandbox (For the Command
Link we created) and import it. Open a terminal and navigate to
/app/dummydata/Appendix
19. Unzip the sandbox
unzip -d sandbox sandbox_RequestInfo.zip
20. Now user gedit to open the file cart-details.jsff located at
/app/dummydata/Appendix/sandbox/oracle/iam/ui/catalog/pages/mdssys/cust/site/site
21. Observe the file. Notice that the commandlink we have added is in this file.

OIG 11G R2 Training
Oracle Proprietary - Restricted to Personal Use in an Oracle partner training class 69 | P a g e
22. Add the following lines at the end of af:commandLink line
actionListener="#{catalogRequestBean.launchAdditionalRequestInfoTaskFlow}"
Note: This ActionListener bean catalogRequestBean is supplied out of the box by OIM. In
order to launch any custom task flow we need to use this link.
23. Remove the closing / tag from CommandLink line since we need to add child tags.
It should be like this
24. Add the following lines in the file inside <ad:CommandLink> Tag & before
</mds:insert> tag.
<af:clientAttribute xmlns:af="http://xmlns.oracle.com/adf/faces/rich" name="taskFlowId" value="/WEB-INF/request-
flow.xml#request-flow"/>
<af:clientAttribute xmlns:af="http://xmlns.oracle.com/adf/faces/rich" name="dialogTitleIcon"
value="/images/request_ena.png"/>
<af:clientAttribute xmlns:af="http://xmlns.oracle.com/adf/faces/rich" name="headerText" value="Additional Cart
item Information"/>
<af:clientAttribute xmlns:af="http://xmlns.oracle.com/adf/faces/rich" name="dialogTitle" value="Please Enter
Additional Information for the Cart Item"/>
</af:commandLink>
OIG 11G R2 Training
Oracle Proprietary - Restricted to Personal Use in an Oracle partner training class 70 | P a g e
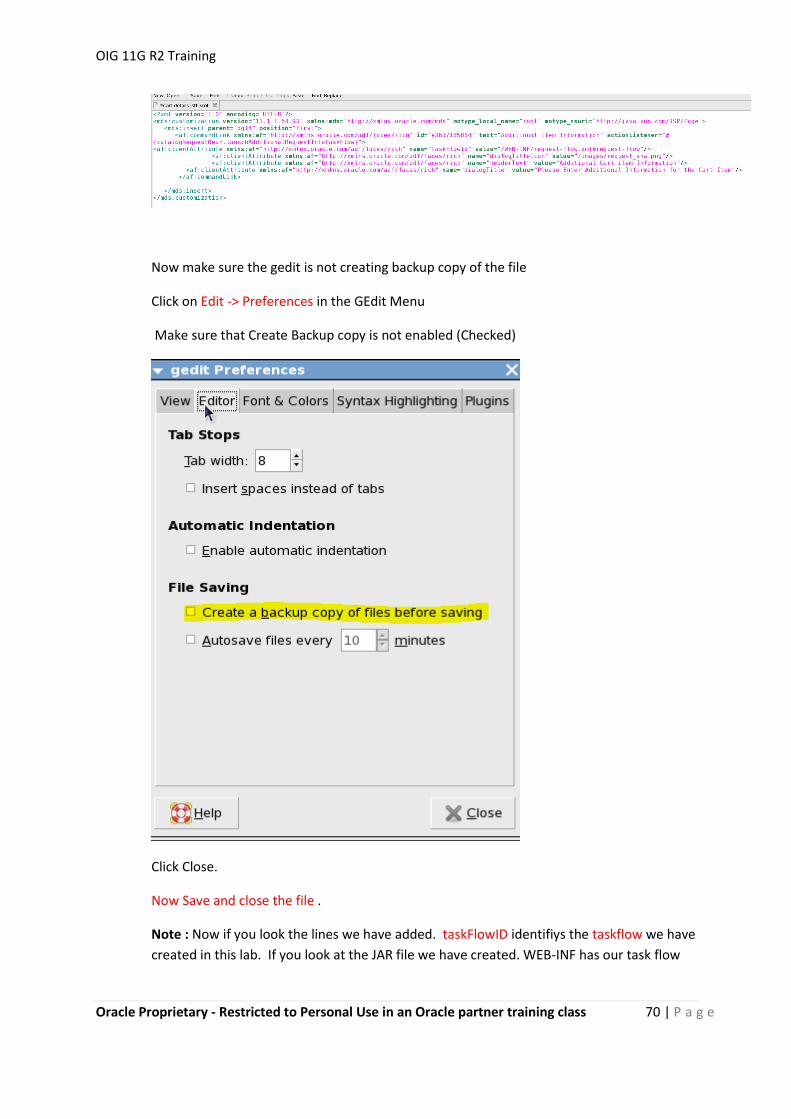
Now make sure the gedit is not creating backup copy of the file
Click on Edit -> Preferences in the GEdit Menu
Make sure that Create Backup copy is not enabled (Checked)
Click Close.
Now Save and close the file .
Note : Now if you look the lines we have added. taskFlowID identifiys the taskflow we have
created in this lab. If you look at the JAR file we have created. WEB-INF has our task flow

OIG 11G R2 Training
Oracle Proprietary - Restricted to Personal Use in an Oracle partner training class 71 | P a g e
request-flow.xml. Within a task flow xml it can have multiple taskflows. We only have one
task flow identified by id request-flow.
This is how you invoke the task flow.
The other items we have added HeaderText and Dialog Title indicate the text that appear in
the dialog when our new task flow is opened.
These could be dynamic values as well. If you would like to make it as dynamic you can
create the values in a managed bean and call it instead of hot coding which will be useful if
different task flows are called for app instance, role & entitlement cart items. Take a look
at the Identity Samples for this code. We would like to keep it simple in this example.
25. Now we will package the sandbox again and import it.
In the command terminal navigate to /app/dummydata/Appendix/sandbox
Issue command
zip –r sandbox.zip *
You should have the sandbox.zip created

OIG 11G R2 Training
Oracle Proprietary - Restricted to Personal Use in an Oracle partner training class 72 | P a g e
26. Let’s import the sandbox. Login to identity console as admin/Oracle123
27. Click on Sandboxes and Import Sandbox
28. Choose the sandbox.zip we created in /app/dummydata/Appendix/sandbox

OIG 11G R2 Training
Oracle Proprietary - Restricted to Personal Use in an Oracle partner training class 73 | P a g e
29. Click Import
30. Now highlight the sandbox RequestInfo and click Publish Sandbox
5. Grant View Permission on Taskflow
In order to execute the taskflow. User needs to have view permission on the
taskflow. The permissions can be granted through either Athorization Policy
Manager (APM) console or through using the WLST. Lets grant the permission using
WLST script.
1. Start the Admin Server by using startAdmin.sh script in Desktop/Startup_Scripts
folder. Wait till the admin server is up and running.
2. Open a terminal and navigate to /app/Middleware/Oracle_IDM1/common/bin
3. Invoke WLST script using ./wlst.sh
4. Connect using connect(‘weblogic’,’Oracle123’)
5. Execute the below command (In single line)
grantPermission(appStripe="OracleIdentityManager",
principalClass="oracle.security.jps.service.policystore.ApplicationRole",
principalName="OIMSysAdmin",
permClass="oracle.adf.controller.security.TaskFlowPermission",
permTarget="/WEB-INF/request-flow.xml#request-flow",
permActions="view")

OIG 11G R2 Training
Oracle Proprietary - Restricted to Personal Use in an Oracle partner training class 74 | P a g e
We are granting the view permission on our taskflow request-flow to
OIMSysAdmin user.
6. Restart the OIM Server.
7. You can stop the Admin Server
6. Testing the TaskFlow
Now that we have our task flow deployed. Let’s test it.
1. Start the SOA Server using the startSOA.sh script in Desktop/Startup_Scripts
folder.
2. Login to Identity console as jkrause/Oracle123
3. Open the Catalog and search for Legal. This is an entitlement
``
4. Add the item to Cart
5. Click on Checkout
6. You should see the Additional Item Information link
7. Click on the link. It should bring up the taskflow you have created

OIG 11G R2 Training
Oracle Proprietary - Restricted to Personal Use in an Oracle partner training class 75 | P a g e
Notice the Dialog title we provided in the sandbox.
If you look at the OIM terminal, you can see that the initialize method is getting
called. Since we have not set the values for the fields yet, there are no values
8. You can enter some information and click on Save
9. You should see the logs in OIM Servers Terminal where the managed bean
is saving the values you have entered.
The Save button click will call the save () method and saveData() method in our
managed bean RequestBean. The saveData() will save the information using the
AdditionalRequestInfo interfaces setAttribute method.

OIG 11G R2 Training
Oracle Proprietary - Restricted to Personal Use in an Oracle partner training class 76 | P a g e
We use cart item ID while saving in this method. Which allows us to save the
additional information even if multiple items are in the cart.
10. Now you can follow just like Lab 4.1 Submit the request.
11. The approval will go to DCRANE as dcrane is the manager of this user. Login
Identity console as dcrane/Oracle123
12. Open the InBox. You should see a request from Joseph Krause. Open the
request
13. Click on the Additional Item Information link. You should see the values
jkrause has set.
14. Check the OIM terminal. You should see the initialize method is getting
called which will bring the values set using the setAttribute method of
AdditionRequestInfo interface using the getAttribute method. You can

OIG 11G R2 Training
Oracle Proprietary - Restricted to Personal Use in an Oracle partner training class 77 | P a g e
approve the request at which point jkrause will be granted with the
entitlement Legal
For more complex use cases including calling different taskflow dynamically please see
the IdentitySamples.
Summary
In this lab we saw how to create a taskflow and how to attach it into OIM. We also saw
how to use the newly introduced AdditionalRequestInfo interface to save and retrieve
the additional information in the request at the cart item level. The same concept can
be extended to call different task flows for different types of cart items dynamically as
well.