Embed Size (px)
Citation preview

Office Routing Plus Instruction Manual
Last Updated 11/25/2010
www.office-routing.com

Office Routing Plus® Instruction Manual
Welcome to Office Routing Plus©, a product of Probitas Solutions, Inc., where we
strive to give you outstanding products and great service. This manual is created
to be used in sequential order; however, you may also click on a section by using
on the links in the table of contents below.
Table of Contents
Getting started…..……………………………………………………………………………….p 3-4
Adding Recipients……………………………………………………………………………….p 5-6
Adding/creating a slip………………………………………………………………………...p 7
Creating a subject/message for your routing slip………………………………….p 8
Resetting the routing slip……………………………………………………………...…….p 10
Appendix 1—Saving recipient lists…………………………………………………….….p 11
Managing your saved recipient lists……………… ……………………….…. p 12
Appendix 2— Deleting or bypassing a recipient……………………………….… …p 13
Appendix 3— Configuration settings…………………………………………………… .p 14
Set email client settings…………………………………………………………… .p 15
Set recipient selection mode…………………………………………………… ..p 16
Manually inserting recipients…………………………………………. ..p 16
Choosing Outlook……………………………………………………………..p 18
Choosing Active Directory……………………………………………… ...p 19
Customize message footer………………………………………………………….p 19
Set the temporary file attachment path (advanced)……………………..p 21
Appendix 4—Taking Office Routing Plus® to the next level……………….…...p 22
Routing Non-Word© /Excel© documents…………..………………………..p 22
Programming Office Routing Plus® With VBA ……………………………...p 25

Office Routing Plus® Instruction Manual
Welcome to Office Routing Plus©, a product of Probitas Solutions, Inc. Follow this easy step-by
-step manual to learn how to use Office Routing Plus©.(ORP) ORP can be used in conjunction
with Microsoft Word© or Excel© documents.
1. Save the document you want routed. Be sure to title it with an appropriate title.
2. In your Word© or Excel© document, click the Add-Ins button.
(MS 2007-2010 view)
(MS 2003 view)
3. After clicking Add-ins, the ORP toolbar will pop up. (After purchase, the word Demo will not
appear.) Click the tab to open ORP.

4. You should see this screen:
5. The initiator can choose specific options such as routing to recipients
sequentially or all at once, and selecting to have the updated file be sent back to the
initiator at each step or when the document has been completely through the routing
process. Selecting “Track Status” will cause the program to send an email with updates
back to the initiator after each person has received and re-routed the document. To do
this, click the desired options.
6. From here the initiator can sequentially add recipient(s) who should receive the document.
To do this, press the “Add Recipient” button.
7. Clicking on the “Add
Recipients” button will bring
up the Global address list
on a drop down menu.
*If your Global address book does not
pop up on the drop down menu, you will
see “Manual List” option or “Active direc-
tory” instead. For instructions on how to
change the “Select Recipient Mode,”
click here.
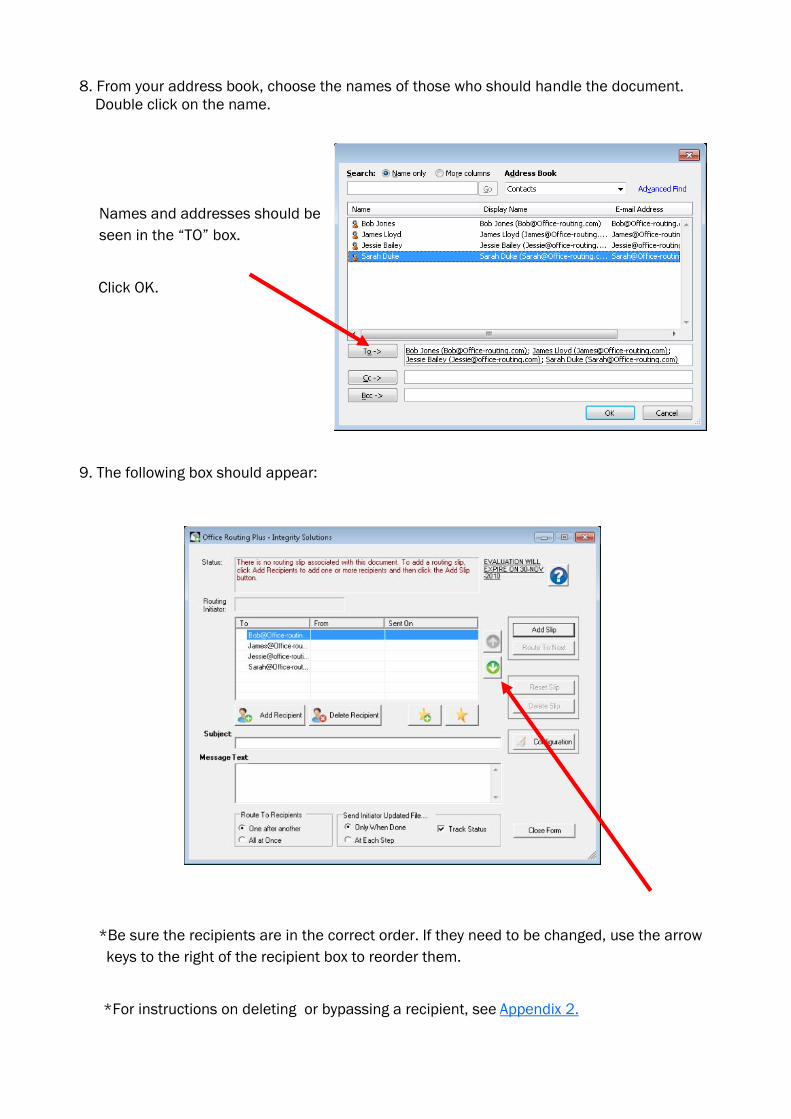
8. From your address book, choose the names of those who should handle the document.
Double click on the name.
Names and addresses should be
seen in the “TO” box.
Click OK.
9. The following box should appear:
*Be sure the recipients are in the correct order. If they need to be changed, use the arrow
keys to the right of the recipient box to reorder them.
*For instructions on deleting or bypassing a recipient, see Appendix 2.

10. At this point, the status will say, “There is no routing slip associated with this document…”
Click the “Add Slip” button.
Then click OK once this screen appears.
You’ll notice that doing this will create alternating colored lines.

11. Enter a meaningful subject in the subject line. And any appropriate message in the
“Message Text” box. These will become the subject and message of the emails sent
through the routing process. *Note, any recipient downstream can change the subject
and/or message accordingly.
12. Click the “Route to Next” button. (A copy of the document should be in the sent box of the
initiator’s email system.) Click OK.

13. The second person in the list will receive an email with a file attached. He or she should
open the attachment to make any necessary changes or to approve the document.
14. The second person can do one of two things. (1) Clicking the Add-Ins button shown in
steps 2-3 will bring up the following screen. Then click the “Route to Next” button.
*Notice the first person in the list has already been checked.
OR
(2) Close the document, in which case the following screen will pop up. Clicking yes
automatically routes the document to the next person.
*Note: Regardless of which of the two options above is chosen to route to the next recipient,
there is no need to save any document changes you have made before routing it. Office
Routing Plus will always route the “in-memory” version of the document—in other words, the
up-to-date file will always be sent.
15. Repeat this process until all recipients have received the document. The last person in
the list should route to next, which sends the document to the initiator. This completes
the routing process.
Reset Slip Instructions
Resetting the slip clears the routing history but saves the names chosen to be
used again at a later date.
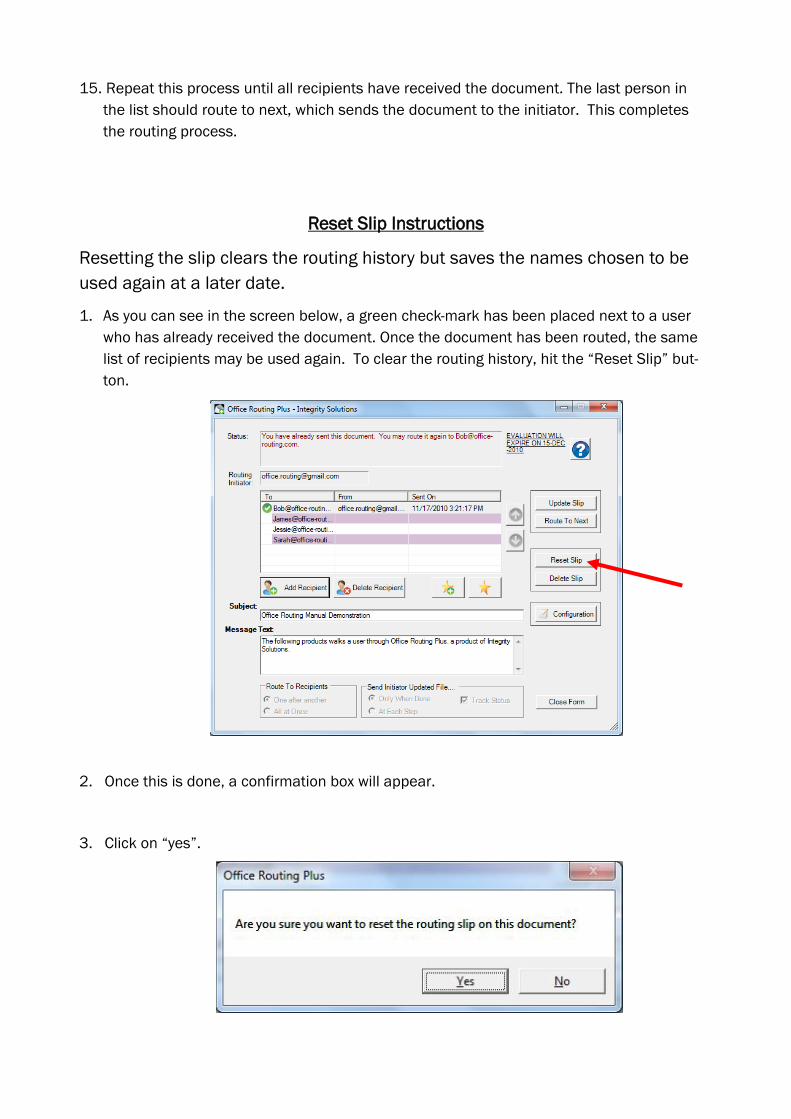
1. As you can see in the screen below, a green check-mark has been placed next to a user
who has already received the document. Once the document has been routed, the same
list of recipients may be used again. To clear the routing history, hit the “Reset Slip” but-
ton.
2. Once this is done, a confirmation box will appear.
3. Click on “yes”.

4. Once completed, you’ll notice the green arrows are gone and your list is ready for the next
time you need to use it to route this document.
Appendix 1
Saving Recipient Lists
Saving Recipient Lists allows you to create a file where specific lists of recipients
are stored in the order you’ve selected them. This allows you to retrieve the en-
tire list of saved recipients in one click for use at a later date.
1. To save the recipients as a list with a file name, click on the Star+ button.
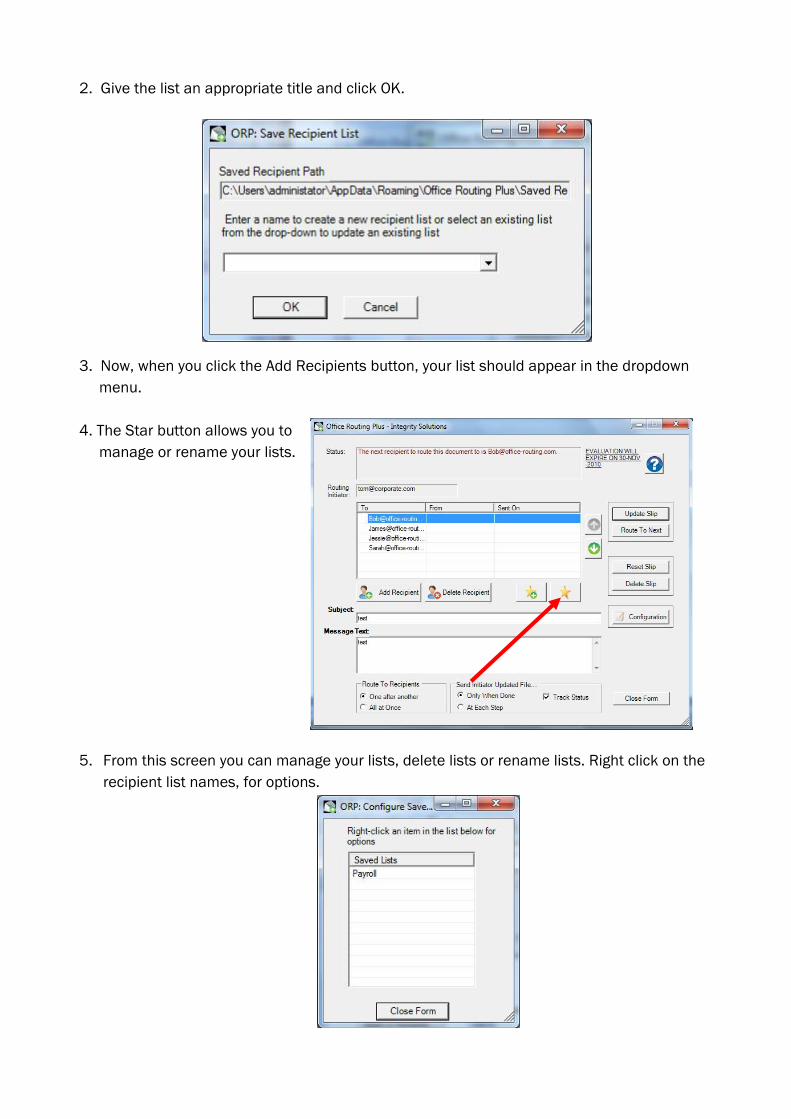
2. Give the list an appropriate title and click OK.
3. Now, when you click the Add Recipients button, your list should appear in the dropdown
menu.
4. The Star button allows you to
manage or rename your lists.
5. From this screen you can manage your lists, delete lists or rename lists. Right click on the
recipient list names, for options.

Appendix 2
Deleting or Bypassing a Recipient
In the case of an “Out of the office” recipient, there may be times when deleting
or bypassing a recipient is necessary.
1. If a recipient needs to be deleted from the list, the initiator (or anyone receiving the routed
document) can do so when setting up the list. Do delete a recipient, highlight the recipient
and click on the “Delete Recipient” button. This should automatically delete the persons
name from the list. *Note: a person who has already received the document through the
routing process may not be deleted. (with the exception shown in #2 below.)
2. In the case of a recipient receiving an “Out of the office” email after routing the document,
bypassing that user will be necessary.
3. In this case, highlight the user and click on the “Delete Recipient” button as shown above.
The following pane should appear: *Note: A user will only be allowed to delete a recipient
who has received the document if he or she has routed the document to that user.

4. The previous pane allows you to personalize a message to the absent recipient. This could
be used to indicate the slip has already been routed and no further steps are necessary by
that recipient.
5. The user must then add an appropriate recipient in place of the absent one. To do this,
follow the add recipient instructions found here. Then use the green arrow keys
to move the recipient up or down in the list as necessary.
(With one recipient missing, a
new user will need to be
added.)
Appendix 3
Configuration Settings
To find the configuration
settings, click on the con
figuration button.
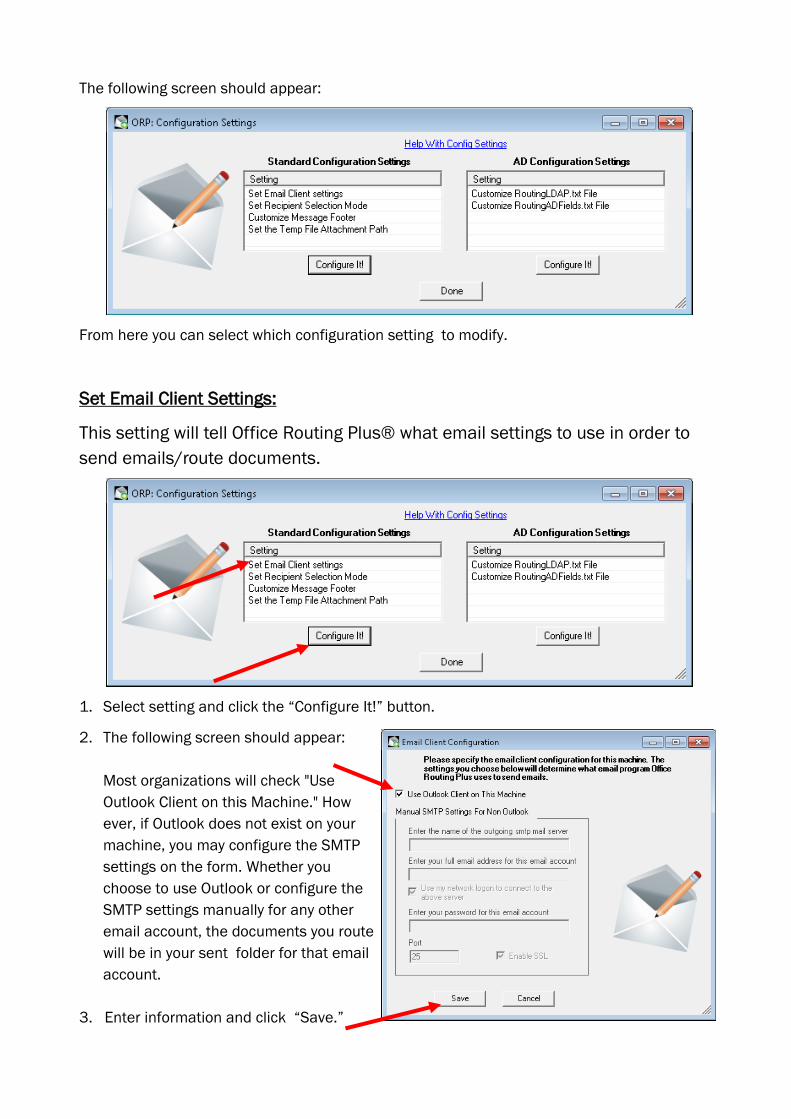
The following screen should appear:
From here you can select which configuration setting to modify.
Set Email Client Settings:
This setting will tell Office Routing Plus® what email settings to use in order to
send emails/route documents.
1. Select setting and click the “Configure It!” button.
2. The following screen should appear:
Most organizations will check "Use
Outlook Client on this Machine." How
ever, if Outlook does not exist on your
machine, you may configure the SMTP
settings on the form. Whether you
choose to use Outlook or configure the
SMTP settings manually for any other
email account, the documents you route
will be in your sent folder for that email
account.
3. Enter information and click “Save.”

Set Recipient Selection Mode
Manually Inserting Recipients
If you need to manually insert recipients into your routing slip, follow these in-
structions.
1. Click on the Configuration
button.
2. Select “Set Recipient Selection Mode.” Then click the “Configure It” button.
3. Select Manually Enter Recipients and click OK.

4. When you click the Add Recipients button and select “Manually” from the drop down list,
the following screen will appear:
5. Type in the email address of the
person who should receive the
document into the Type Name
box. Then click the green arrow
button.
6. The address should now appear in the list to the right. Continue this process until you have
entered all desired addresses. Then click OK.

7. The addresses should now appear in your Routing list.
Choosing Outlook
1. If Outlook is running on your computer, selecting outlook from the “Set Recipients
Selection Mode” will allow you to use Outlook’s global address book.
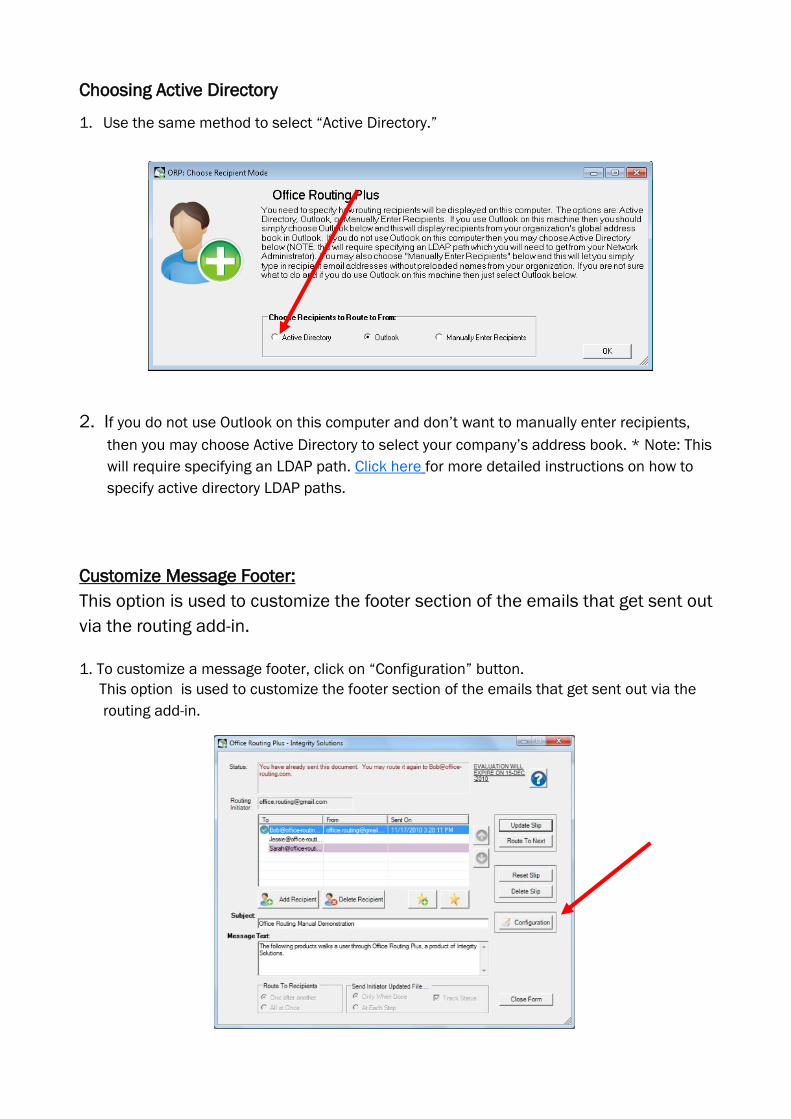
Choosing Active Directory
1. Use the same method to select “Active Directory.”
2. If you do not use Outlook on this computer and don’t want to manually enter recipients,
then you may choose Active Directory to select your company’s address book. * Note: This
will require specifying an LDAP path. Click here for more detailed instructions on how to
specify active directory LDAP paths.
Customize Message Footer:
This option is used to customize the footer section of the emails that get sent out
via the routing add-in.
1. To customize a message footer, click on “Configuration” button.
This option is used to customize the footer section of the emails that get sent out via the
routing add-in.
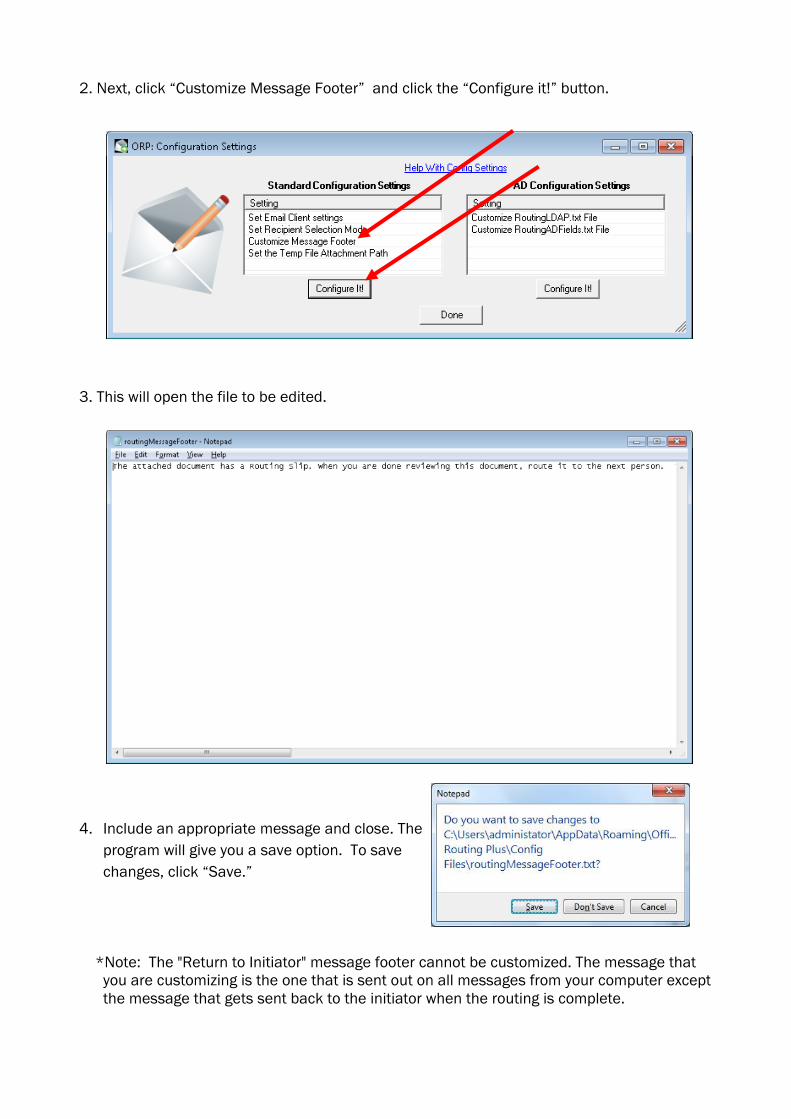
2. Next, click “Customize Message Footer” and click the “Configure it!” button.
3. This will open the file to be edited.
4. Include an appropriate message and close. The
program will give you a save option. To save
changes, click “Save.”
*Note: The "Return to Initiator" message footer cannot be customized. The message that
you are customizing is the one that is sent out on all messages from your computer except
the message that gets sent back to the initiator when the routing is complete.
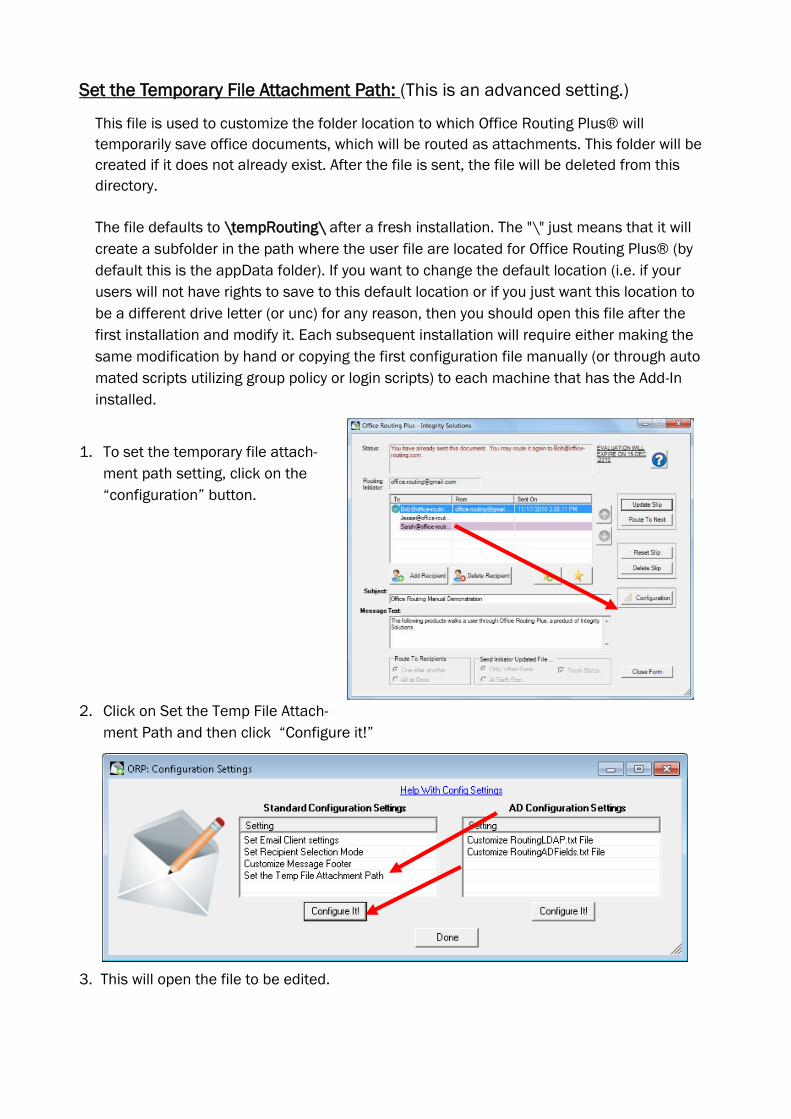
Set the Temporary File Attachment Path: (This is an advanced setting.)
This file is used to customize the folder location to which Office Routing Plus® will
temporarily save office documents, which will be routed as attachments. This folder will be
created if it does not already exist. After the file is sent, the file will be deleted from this
directory.
The file defaults to \tempRouting\ after a fresh installation. The "\" just means that it will
create a subfolder in the path where the user file are located for Office Routing Plus® (by
default this is the appData folder). If you want to change the default location (i.e. if your
users will not have rights to save to this default location or if you just want this location to
be a different drive letter (or unc) for any reason, then you should open this file after the
first installation and modify it. Each subsequent installation will require either making the
same modification by hand or copying the first configuration file manually (or through auto
mated scripts utilizing group policy or login scripts) to each machine that has the Add-In
installed.
1. To set the temporary file attach-
ment path setting, click on the
“configuration” button.
2. Click on Set the Temp File Attach-
ment Path and then click “Configure it!”
3. This will open the file to be edited.

4. Edit the file as necessary and close. The file will bring up a confirmation save box upon
closing. To save the changes, click “Save.”
Appendix 4
Taking Office Routing Plus © to the Next Level
Routing Non-Word© /Excel© documents.
If you want to route documents that are not Excel© or Word© documents (PDF,
bmp, tif, etc), you may still do this with Office Routing Plus©.
Microsoft Office© has a feature allowing you to easily embed any type of document within
a Word© or Excel© document. Once the document has been embedded into the Word© or
Excel© Document, use Office Routing Plus® to route the document as you would any other
document. Use the following instructions to embed an alternate file type into a Word© or
Excel© document.
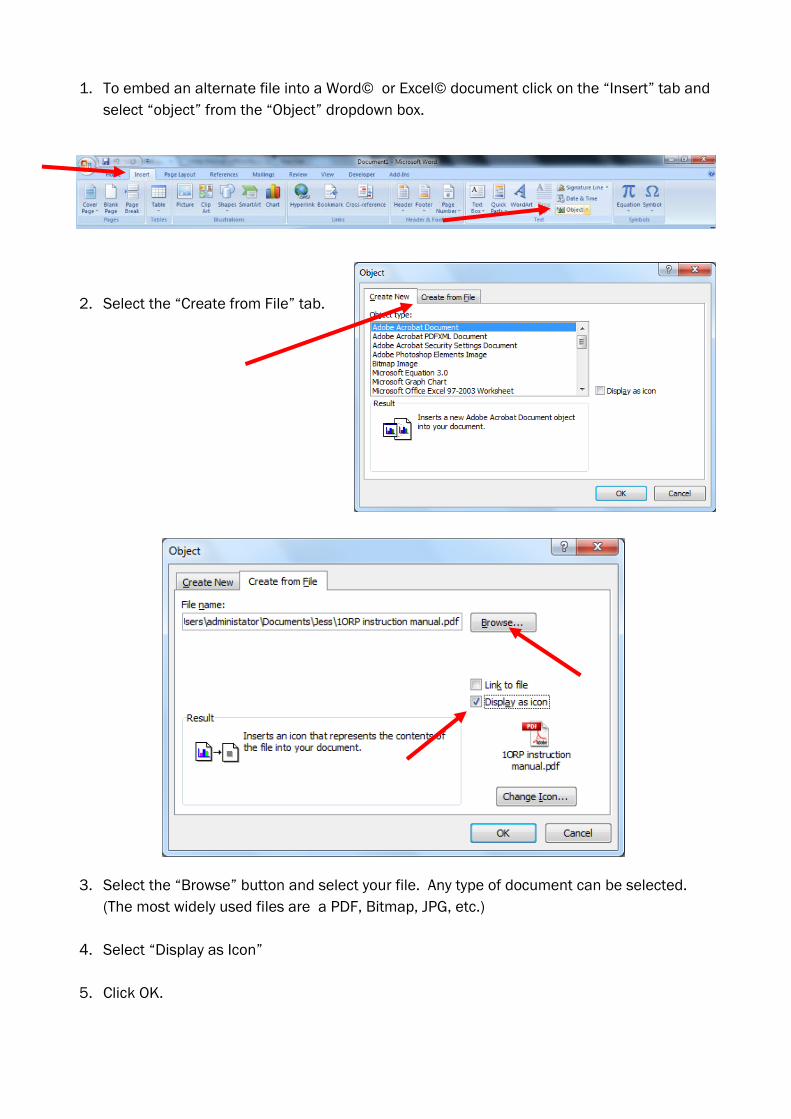
1. To embed an alternate file into a Word© or Excel© document click on the “Insert” tab and
select “object” from the “Object” dropdown box.
2. Select the “Create from File” tab.
3. Select the “Browse” button and select your file. Any type of document can be selected.
(The most widely used files are a PDF, Bitmap, JPG, etc.)
4. Select “Display as Icon”
5. Click OK.

6. Your document should show as an icon as seen below.
7. Double clicking on the icon will open the document. The document will open in whatever
default program is associated with the file type. (In the case below, Adobe Acrobat © was
used.)
8. Now use Office Routing Plus® to add a routing slip to this PDF (or other document type)
and route this document as you would a Word© or Excel©
document.

Programming Office Routing Plus® With VBA
Many organizations may wish to program Office Routing Plus with Visual Basic for Applications
(VBA). Office Routing Plus allows for this, if you have purchased the Office Routing Plus Pro-
gramming API®. Email [email protected] for pricing and further details.
Below are a few scenarios that show the potential power of the Office Routing Plus Program-
ming API®.
1. You have a saved Excel© form that your organization uses for check requests, and you
want users in your organization to be able to download this template from your intranet or
a network location. You do not want the person making the check request to know which
all the recipients of this document because you have a large organization with complex
business rules. It would be nice to have managed code inside the document itself that
could dynamically determine the routing recipients based on criteria in the document. (i.e.
the department the initiator works in, the amount of the request, or the type of request.)
You can design the Excel© form so that each of these pieces of information can be clearly
determined (i.e. by making named references or ensuring that they are put in specific cell
numbers).
A programmer may now write VBA code in the form itself that has logic for looking up the
appropriate recipients to route to based on the user’s department and the amount/type
of check request. This mapping logic could be stored in arrays or simple function in the
Excel© document or it could even be tied into Active Directory or a company database.
Once a programmer has determined the recipients, he could create a button that the user
clicks, which could then easily add these recipients to the document with Office
Routing Plus’ programmable API. The code would simply pass in the current Excel/Word©
document to Office Routing Plus API® and then add the recipients. The document could
also be routed with the API.
2. When a form is filled out on your company website, you may want to write special code to
take the data from this html web form and automate creating a new Excel© or Word©
document (or even a PDF document) with the form’s content. Then you can add recipients
to this document based on the content of the document and route it to the first person.
This could be accomplished by a programmer who knows how to automate creating a
Word/Excel© document from managed code written in a language that can interact with
COM objects (vb.net, c#, etc). Once program automates the creation of the document and
adds the recipients with the Office Routing Plus Programming API, it could route the docu-
ment to the first recipient with one additional line of code.
If your company is interested in purchasing the Office Routing Plus Programming API®,
contact Probitas Solutions Inc. at [email protected].