Embed Size (px)
Citation preview

Office 365 for IT Pros
Fourth edition
Performing a staged migration to Exchange Online
Published by Tony Redmond, Paul Cunningham, Michael Van Horenbeeck, and Ståle Hansen.
© Copyright 2015-2017 by Tony Redmond, Paul Cunningham, Michael Van Horenbeeck, and Ståle Hansen.
All rights reserved. No part of this book may be reproduced or transmitted in any form or by any means
without the written permission of the authors.
The example companies, organizations, products, domain names, email addresses, logos, people, places and
event depicted herein are fictitious. No association with any real company, organization, people, domain
name, email address, logo, person, place, or event is intended or should be inferred. The book expresses the
views and opinions of the authors. The information presented in the book is provided without any express,
statutory, or implied warranties. The authors cannot be held liable for any damages caused or alleged to be
caused either directly or indirectly by this book.
Although the authors are members of Microsoft’s Most Valuable Professional (MVP) program, the content of this
book solely represents their views and opinions about Office 365 and any other technologies mentioned in the
text and is not endorsed in any way by Microsoft Corporation.
Please be respectful of the rights of the authors and do not make copies of this eBook available to
others.
This information supplements the content presented Office 365 for IT Pros, available from
https://practical365.com/ebooks/office-365-for-it-pros.

Contents Introduction .................................................................................................................................................................................................... 4
Preparing for a Staged Migration .......................................................................................................................................................... 4
Adding Domain Names to Office 365 ............................................................................................................................................. 4
Enabling Outlook Anywhere ................................................................................................................................................................ 5
Configure a Migration Service Account and Permissions ........................................................................................................ 7
Preparing Recipients ............................................................................................................................................................................... 7
Implementing Directory Synchronization ...................................................................................................................................... 7
Starting the Staged Migration................................................................................................................................................................. 7
Create a Migration Batch ...................................................................................................................................................................... 7
Monitoring the Migration Batch Progress ..................................................................................................................................... 9
Converting Mailboxes to Mail-Enabled Users ........................................................................................................................... 11
Removing the Migration Batch ....................................................................................................................................................... 13
Completing the Migration ..................................................................................................................................................................... 14

Introduction A staged migration migrates all of the existing user and resource mailboxes from an on-premises Exchange
2003 or 2007 organization into Exchange Online. Staged migrations can be performed for organizations of
any size, allowing them to migrate mailboxes to Office 365 over a period of several weeks or months, with the
eventual result of all mailboxes being hosted in Office 365.
An overview of the staged migration process, along with the pros and cons of this migration method, can be
found in Chapter 7. Before you begin a staged migration, read through the overview and the complete
migration process so that you can understand the steps involved, any limitations, and also to identify any
areas in which a staged migration might be unsuitable for your migration project.
Preparing for a Staged Migration Let’s take a closer look at the steps for a staged migration using the scenario of an Exchange 2007 on-
premises organization. We'll begin with a look at how to prepare an Office 365 tenant for a staged migration.
Adding Domain Names to Office 365 Naturally you need to sign up for an Office 365 tenant before you can perform a staged migration. Set up the
new tenant and follow the steps to add the SMTP domains for your organization as accepted domains for the
Office 365 organization as well.
For example, here are the accepted domains for an Exchange 2007 on-premises organization retrieved by
running the Get-AcceptedDomain cmdlet.
[PS] C:\>Get-AcceptedDomain
Name DomainName DomainType Default
---- ---------- ---------- -------
notrealuniversity.com notrealuniversity.com Authori... True
Log in to the Office 365 administration portal and navigate to Settings and then Domains. Click the Add
domain button to add your domains, as shown in Figure 1.
Figure 1: Adding domains to Office 365
As you run the wizard to add a domain, the wizard will provide you with a domain validation record to add to
your external DNS zone, which proves that you own the domain. Two validation records are offered; an MX
record, and a TXT record. As discussed in chapter 7, I recommend using the TXT record so that you do not
cause any issues with your mail flow by adding an MX record at this stage.
There's also the question of whether to host your DNS in Office 365, or to host and control your own DNS
records separately (Figure 2). For most organizations that already have a public DNS zone and DNS hosting
provider, and who are comfortable making DNS changes themselves, the prospect of moving the zone to

Office 365 offers no particular advantages. For the remainder of this example scenario it will be assumed that
we'll be managing our own DNS records.
Figure 2 Choosing DNS hosting for your domain.
Microsoft then checks your domain for the DNS records that are needed for Office 365 services to work. For a
new domain, or domain that you're already using with an on-premises, most if not all those DNS records
won't exist in the zone. At this stage, do not make any changes to your DNS records. Instead, select the
option to skip this step (Figure 3).
Figure 3 Don't add any DNS records to your zone yet.
Real World: Until the full list of required records is added to the DNS zone for your domain Office 365
will warn you that there are “Service Issues” with your domain. You can ignore this warning until you’ve
completed adding all of the DNS records later.
Enabling Outlook Anywhere In this example the on-premises Exchange 2007 server is already enabled for Outlook Anywhere using the
hostname of mail.notrealuniversity.com, and a valid third party SSL certificate is already installed on the
server.
[PS] C:\> Get-ClientAccessServer | Format-List Name,OutlookAnywhereEnabled
Name : EX2007SRV
OutlookAnywhereEnabled : True

[PS] C:\>Get-OutlookAnywhere | Format-List ServerName,ClientAuthenticatioNmethod,ExternalHostname
ServerName : EX2007SRV
ClientAuthenticationMethod : Ntlm
ExternalHostname : mail.notrealuniversity.com
To test this configuration, we can use the Exchange Remote Connectivity Analyzer to perform an Outlook
Connectivity test (Figure 4).
Figure 4: Microsoft Remote Connectivity Advisor
This test will validate that both Autodiscover and Outlook Anywhere are working correctly for the on-premises
organization, which is important for Office 365 to be able to detect and connect to your on-premises server
during the migration process. It will also validate that the expected firewall ports are open and NATing to the
Exchange server.
Figure 5: A successful test with the Remote Connectivity Advisor
Real World: It is not uncommon to see a “Test Successful with Warnings” result from the Remote
Connectivity Analyzer due to the use of an SSL certificate that will require clients to have downloaded
the root CA updates from Windows Update.

Configure a Migration Service Account and
Permissions For staged migrations, the Office 365 migration service needs a set of user credentials to connect to your on-
premises organization and access mailboxes. The steps for creating a migration service account are covered in
Chapter 7.
Preparing Recipients As discussed in Chapter 7, many preparation and review tasks are recommended for the recipients in your on-
premises organization before beginning the migration:
• Reduce the migration load by reviewing large mailboxes, and large mailbox items
• Review shared mailboxes
• Review the sender authentication setting for mail-enabled groups
• Disable unified messaging
Implementing Directory Synchronization A key requirement of the staged migration approach is to implement directory synchronization. This will
populate the Office 365 tenant with users, groups and contacts based on the objects that exist in the on-
premises Active Directory.
Directory synchronization is an important part of almost all Office 365 migration scenarios, not just the staged
migration approach. Directory synchronization is covered in more detail in Chapter 3. After you have
implemented directory synchronization for your organization you can continue with the next steps in the
staged migration process.
Starting the Staged Migration With all the preparation tasks complete you can create the migration batch and begin migrating mailboxes to
Office 365.
Create a Migration Batch Migration batches for a staged migration are created using a CSV file. The CSV file contains information about
the mailboxes to be migrated. The minimum detail required is the email address of the mailbox. The password
can also be included, and password change can be forced at first logon. However, if you have enabled
password synchronization when you deployed the directory synchronization tool then the password fields are
not required in the CSV.
Here is an example of a CSV file for a small migration batch. The CSV file for a migration batch can have up to
2000 rows. You can run your migration in very large batches like that if you like, as long as you can manage
the logistics in terms of reconfiguring desktops and mobile devices for that many users. A more sensible
approach is to use smaller batches, especially when you consider that Office 365 will perform up to 20
concurrent migrations at a time anyway.
EmailAddress

…
Login to the Office 365 Exchange admin center and navigate to Recipients Migration. Click the + (plus)
button to create a new migration batch (Figure 6), and choose Migrate to Exchange Online.
Figure 6: Creating a migration batch
Select Staged migration from the list of migration types. Click Browse and choose the CSV file you created
earlier (Figure 7). The New Migration Batch wizard will calculate the number of mailboxes in the CSV file.
Figure 7: Specifying the CSV file
Enter the credentials for the service account that you set up earlier with permissions to access the on-
premises mailboxes. Office 365 will use Autodiscover to determine the correct Outlook Anywhere settings for
the migration endpoint that it will create for the migration. If this fails, you will be prompted to manually enter
the server name and RPC proxy server name. The best approach at this point is to use the Microsoft Remote
Connectivity Analyzer to test and troubleshoot Outlook Anywhere access to your Exchange server. If the
Autodiscover process is successful the Exchange server name and RPC proxy server will be automatically
displayed for you, and you can continue the New Migration Batch wizard.
Next, give the migration batch a name. The name has no real impact on the technical success or failure of the
migration batch, and is only useful for your own ease of running the various migration batches for your
organization. So simply choose a name that makes sense to you. Finally, choose a recipient for the migration
batch reports to be sent to, and choose whether to manually or automatically start the migration batch
(Figure 8).
Staged migration batches cause new email for the mailboxes to be redirected to the Exchange Online
mailbox, which means users should begin using their Exchange Online mailbox shortly after the migration
batch starts. The steps to perform after a staged migration batch completes are explained a little later in this
section.
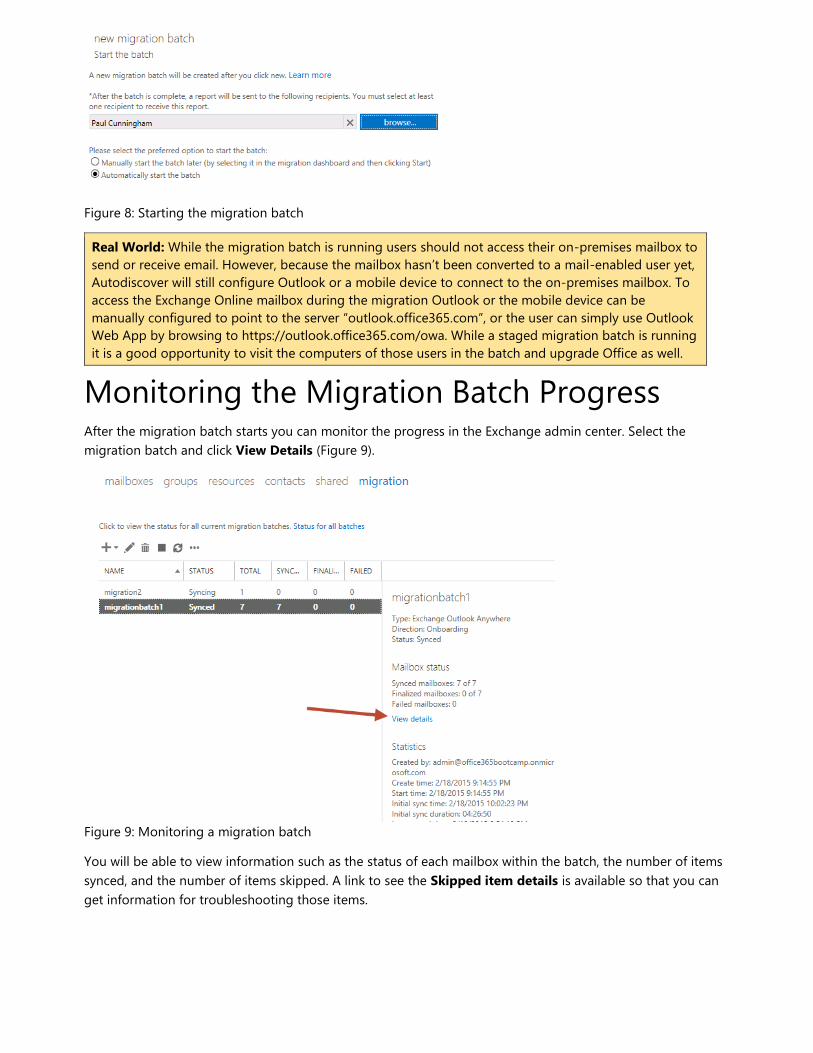
Figure 8: Starting the migration batch
Real World: While the migration batch is running users should not access their on-premises mailbox to
send or receive email. However, because the mailbox hasn’t been converted to a mail-enabled user yet,
Autodiscover will still configure Outlook or a mobile device to connect to the on-premises mailbox. To
access the Exchange Online mailbox during the migration Outlook or the mobile device can be
manually configured to point to the server “outlook.office365.com”, or the user can simply use Outlook
Web App by browsing to https://outlook.office365.com/owa. While a staged migration batch is running
it is a good opportunity to visit the computers of those users in the batch and upgrade Office as well.
Monitoring the Migration Batch Progress After the migration batch starts you can monitor the progress in the Exchange admin center. Select the
migration batch and click View Details (Figure 9).
Figure 9: Monitoring a migration batch
You will be able to view information such as the status of each mailbox within the batch, the number of items
synced, and the number of items skipped. A link to see the Skipped item details is available so that you can
get information for troubleshooting those items.

Figure 10: Viewing the progress of a migration batch
The completion time for the migration batch will depend on the amount of data that needs to be
synchronized. If the batch includes more than 100 mailboxes, you may notice that only 100 mailboxes are
processed simultaneously. This limit may vary though, depending on the current load experienced within the
service. When a staged migration batch completes it has a status of “Synced”, and an email notification is sent
to the recipient you specified earlier.
Figure 11 Notification that the batch job is complete
If the staged migration batch fails for some reason it puts the mailbox in an unfortunate state where new
email is being forwarded to the Exchange Online mailbox, but not all email was copied from the on-premises
mailbox. In this situation, it is not as simple as deleting the Exchange Online mailbox and trying again, nor can
another migration batch be run for the same mailbox. Manual remediation of the missing items is the only
available resolution. This situation is one of the reasons that a hybrid migration or a third-party migration tool
is often a better approach.
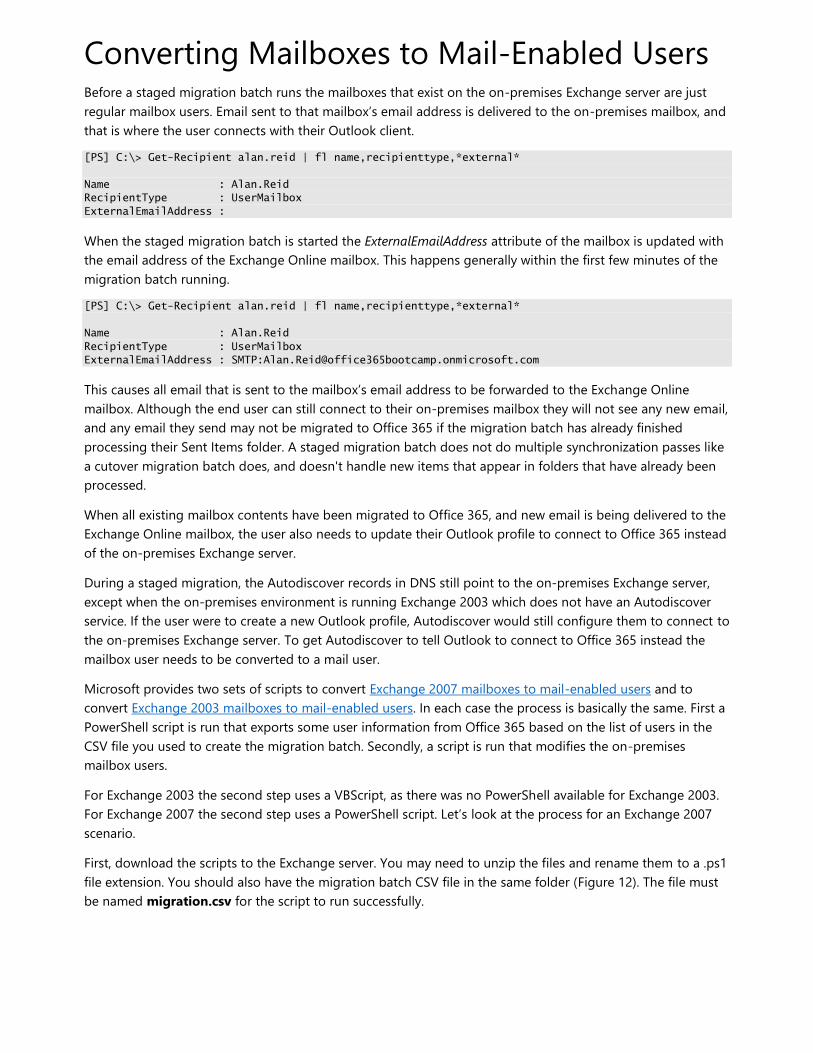
Converting Mailboxes to Mail-Enabled Users Before a staged migration batch runs the mailboxes that exist on the on-premises Exchange server are just
regular mailbox users. Email sent to that mailbox’s email address is delivered to the on-premises mailbox, and
that is where the user connects with their Outlook client.
[PS] C:\> Get-Recipient alan.reid | fl name,recipienttype,*external*
Name : Alan.Reid
RecipientType : UserMailbox
ExternalEmailAddress :
When the staged migration batch is started the ExternalEmailAddress attribute of the mailbox is updated with
the email address of the Exchange Online mailbox. This happens generally within the first few minutes of the
migration batch running.
[PS] C:\> Get-Recipient alan.reid | fl name,recipienttype,*external*
Name : Alan.Reid
RecipientType : UserMailbox
ExternalEmailAddress : SMTP:[email protected]
This causes all email that is sent to the mailbox’s email address to be forwarded to the Exchange Online
mailbox. Although the end user can still connect to their on-premises mailbox they will not see any new email,
and any email they send may not be migrated to Office 365 if the migration batch has already finished
processing their Sent Items folder. A staged migration batch does not do multiple synchronization passes like
a cutover migration batch does, and doesn't handle new items that appear in folders that have already been
processed.
When all existing mailbox contents have been migrated to Office 365, and new email is being delivered to the
Exchange Online mailbox, the user also needs to update their Outlook profile to connect to Office 365 instead
of the on-premises Exchange server.
During a staged migration, the Autodiscover records in DNS still point to the on-premises Exchange server,
except when the on-premises environment is running Exchange 2003 which does not have an Autodiscover
service. If the user were to create a new Outlook profile, Autodiscover would still configure them to connect to
the on-premises Exchange server. To get Autodiscover to tell Outlook to connect to Office 365 instead the
mailbox user needs to be converted to a mail user.
Microsoft provides two sets of scripts to convert Exchange 2007 mailboxes to mail-enabled users and to
convert Exchange 2003 mailboxes to mail-enabled users. In each case the process is basically the same. First a
PowerShell script is run that exports some user information from Office 365 based on the list of users in the
CSV file you used to create the migration batch. Secondly, a script is run that modifies the on-premises
mailbox users.
For Exchange 2003 the second step uses a VBScript, as there was no PowerShell available for Exchange 2003.
For Exchange 2007 the second step uses a PowerShell script. Let’s look at the process for an Exchange 2007
scenario.
First, download the scripts to the Exchange server. You may need to unzip the files and rename them to a .ps1
file extension. You should also have the migration batch CSV file in the same folder (Figure 12). The file must
be named migration.csv for the script to run successfully.

Figure 12: Preparing files for the migration
Open a PowerShell console and run the ExportO365UserInfo.ps1 script.
[PS] C:\Admin> .\ExportO365UserInfo.ps1
You will be prompted to enter your Office 365 administrator credentials. After authenticating the script will
collect the required information and output it to a file named cloud.csv.
The next step is to run the Exchange2007MBtoMEU.ps1 script. This script takes the information in cloud.csv
and uses it to update attributes on the on-premises user objects, and then converts them from mailbox users
to mail users.
The script uses Exchange cmdlets, so it needs to be run from an Exchange Management Shell console. The
name of a domain controller must also be specified.
Warning: Do not run this script until the mailbox has been successfully migrated to Exchange Online.
[PS] C:\Admin> .\Exchange2007MBtoMEU.ps1 -DomainController OBCDC1
At this stage, the user can no longer connect to the on-premises mailbox with Outlook because it has been
removed. The Outlook profile must be recreated so that it is configured to connect to Office 365.
When the new Outlook profile is created the user will be prompted for their Office 365 credentials to connect
to Exchange Online. With password synchronization enabled on the directory synchronization server the
credentials the user enters will be the same as their on-premises credentials – their UPN/email address, and
their password.
Note: To make it easier for end users to remember their username for logging in to Office 365 services
it is recommended to match their UPN with their email address.
Based on the targetAddress attribute of the mail user, which refers to the service domain for the Office 365
tenant (e.g., “[email protected]”), Autodiscover will reconfigure the Outlook
profile to connect to Exchange Online. You can verify that this has occurred by looking at the server name for
the profile. Instead of your previous Exchange server name you will now see a string of characters that looks
like an email address (Figure 13).
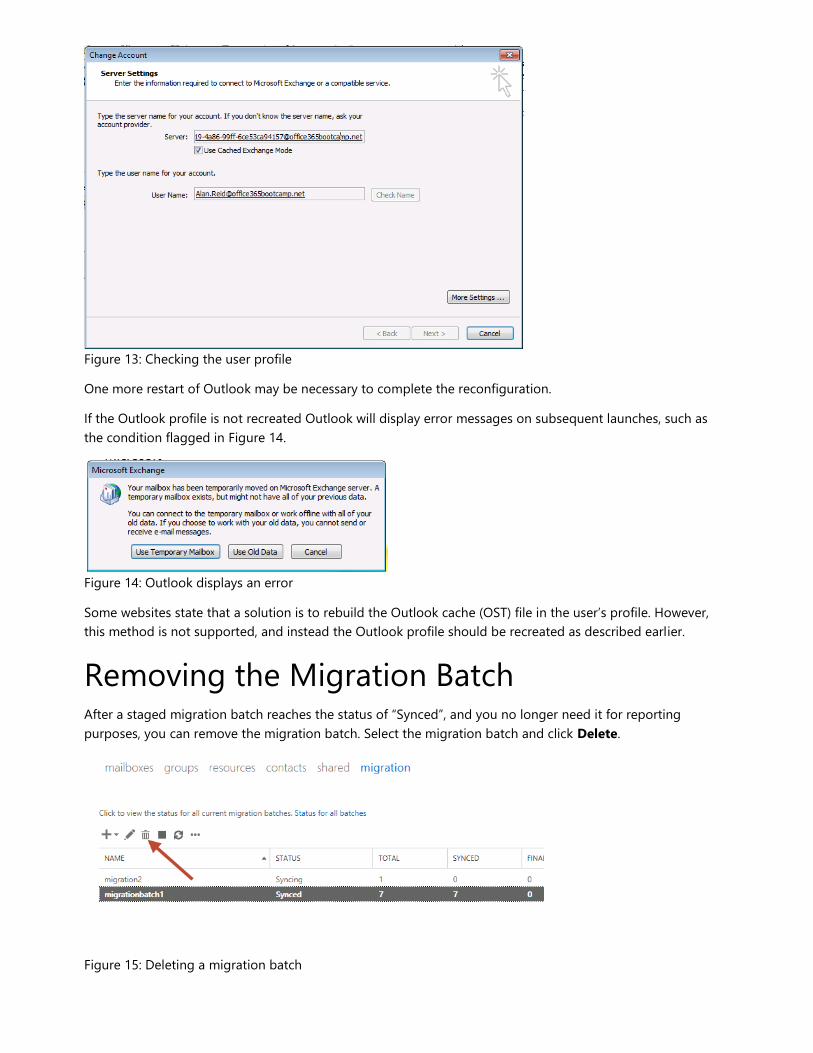
Figure 13: Checking the user profile
One more restart of Outlook may be necessary to complete the reconfiguration.
If the Outlook profile is not recreated Outlook will display error messages on subsequent launches, such as
the condition flagged in Figure 14.
Figure 14: Outlook displays an error
Some websites state that a solution is to rebuild the Outlook cache (OST) file in the user’s profile. However,
this method is not supported, and instead the Outlook profile should be recreated as described earlier.
Removing the Migration Batch After a staged migration batch reaches the status of “Synced”, and you no longer need it for reporting
purposes, you can remove the migration batch. Select the migration batch and click Delete.
Figure 15: Deleting a migration batch

Completing the Migration After all the migration batches have been completed you can perform the post-migration tasks. Refer to
Chapter 7 for more information on these tasks.
• Change the MX records in DNS to direct email to the Exchange Online mailboxes.
• Configure Autodiscover DNS records and the SCP
• Configure other DNS records required for service such as Skype for Business
• Convert shared mailboxes
• Remove restrictions from distribution groups
• Assign licenses to Office 365 users
• Decommission on-premises servers