Embed Size (px)
DESCRIPTION
http://www.odys.de/downloads/manuals/ODYS_Prime23_en.pdf
Citation preview

EN
Content1 Important Safety Instructions..................................................................2 Mounting – dismantling ..........................................................................
2.1 Stand mounting ........................................................................................2.2 Wall mounting...........................................................................................
3 Front and Rear Panel Illustration ............................................................3.1 Front panel and Keyboard ........................................................................3.2 Rear connection board .............................................................................3.3 Remote Control ......................................................................................
4 System Connections ............................................................................4.1 Connecting a USB Devices for playing media files .................................4.2 Connecting to PC ...................................................................................4.3 Connecting to TV-Signal Input ................................................................
5 Input Source Selection .........................................................................6 First commissioning .............................................................................
6.1 Mode selection .......................................................................................6.2 Installation Guide (DVB-T, ATV).............................................................
7 TV operation and system setup............................................................7.1 Channel menu ........................................................................................
7.1.1 Auto Scan ........................................................................................7.1.2 Manual channel tuning .....................................................................7.1.3 Program Edit ....................................................................................7.1.4 Signal information..............................................................................7.1.5 Software Update ..............................................................................7.1.6 PVR (Record functions)......................................................................23
7.2 Picture menu ........................................................................................7.3 Sound menu ...........................................................................................7.4 Time menu .............................................................................................7.5 Option menu .........................................................................................7.6 Lock menu ............................................................................................
8 Other functions.....................................................................................8.1 Hotel Mode.............................................................................................8.2 Program list ............................................................................................8.3 Favorite liste ...........................................................................................8.4 Teletext...................................................................................................8.5 EPG Menu (Electronic Program Guide). .................................................8.6 Program Information...............................................................................8.7 NICAM/A2................................................................................................8.8 Subtitle ...................................................................................................
9 Troubleshooting ...................................................................................
ODYS PRIME
3667889
10121315161718181920202021222222
242526272829292930303132323233
EN
ODYS PRIME
Content
10 Input Source Selection .........................................................................11 First installation guide...........................................................................
11.1 Mode selection ............................................................................................11.2 Installation Guide (DVB-T, ATV).................................................................11.3 Installation Guide (SMART TV) ..................................................................
12 Android Smart TV Operation ................................................................12.1 First Installation wizzard..............................................................................12.2 Main Interface .............................................................................................12.3 Main Menu ..................................................................................................12.4 Main interface configuration........................................................................12.5 Remote Control – Android Functions .........................................................12.6 Using the Remote Control.........................................................................12.7 Using Mouse/Keyboard...............................................................................12.8 Installing Memory Card ...............................................................................12.9 App Manager - Display all Applications ....................................................12.10 Launching the Web browser .......................................................................12.11 Using the Media-Player...............................................................................12.11.1 Video playback functions........................................................................12.11.2 Photo playback functions .........................................................................12.11.3 Music playback functions .........................................................................12.12 Notifications..............................................................................................12.13 System Settings......................................................................................12.13.1 Wifi Settings - Configuring WIFI Connection...........................................12.13.2 Ethernet...................................................................................................12.13.3 Applications..............................................................................................12.13.4 Factory data reset...................................................................................12.13.5 Storage....................................................................................................12.13.6 Language keyboard................................................................................12.13.7 System upgrade.......................................................................................12.13.8 Date& time................................................................................................12.13.9 About device.............................................................................................
34353535363738393939404141424243454546464646474949494949494949
13 Specifications .....................................................................................14 Glossary ............................................................................................15 Warranty condition ...............................................................................
515253

EN
2
ODYS PRIME
EN
3
1 Important Safety Instructions1) Read these instructions.2) Keep these instructions.3) Heed all warnings.4) Follow all instructions.5) Do not use this apparatus near water.6) Clean only with dry cloth.7) Do not block any ventilation openings, install in accordance with the instructions.8) Do not install near any heat sources such as radiations, heat registers, stoves, or other apparatus(including amplifiers) that produce heat.9) Do not defeat the safety purpose of the polarized plug. If theprovided plug does not fit into your outlet, consult an electrician for replacement of the obsolete outlet.10) Protected the power cord from being walked on or pinched particularly at plugs, conveniencereceptacles, and the point where they exit from the apparatus.11) Only use attachments/accessories specified by the manufacturer.12) Unplug this apparatus during lighting storms or when unused for long periods of time.13) Refer all servicing to qualified service personnel. Servicing is required when the apparatus has beendamaged in any way, such as power-supply cord or plug is damaged, liquid has been spilled or objectshave fallen into the apparatus, the apparatus has been exposed to rain or moisture, does not operatenormally, or has been dropped.14) Mains plug is used as the disconnect device, the disconnect device shall remain readily operable.15) The ventilation should not be impeded by covering the ventilation openings with items, such asnewspapers, table-cloth, curtains, etc.16) No naked flame sources, such as lighted candles, should be placed on the apparatus.17) Attention should be drawn to the environmental aspects of battery disposal.18) The use of apparatus in moderate climate.WARNING: To reduce the risk of fire or electric shock, do not expose this apparatus to rain or moisture.WARNING: The batteries shall not be exposed to excessive heat such as sunshine, fire or the like.
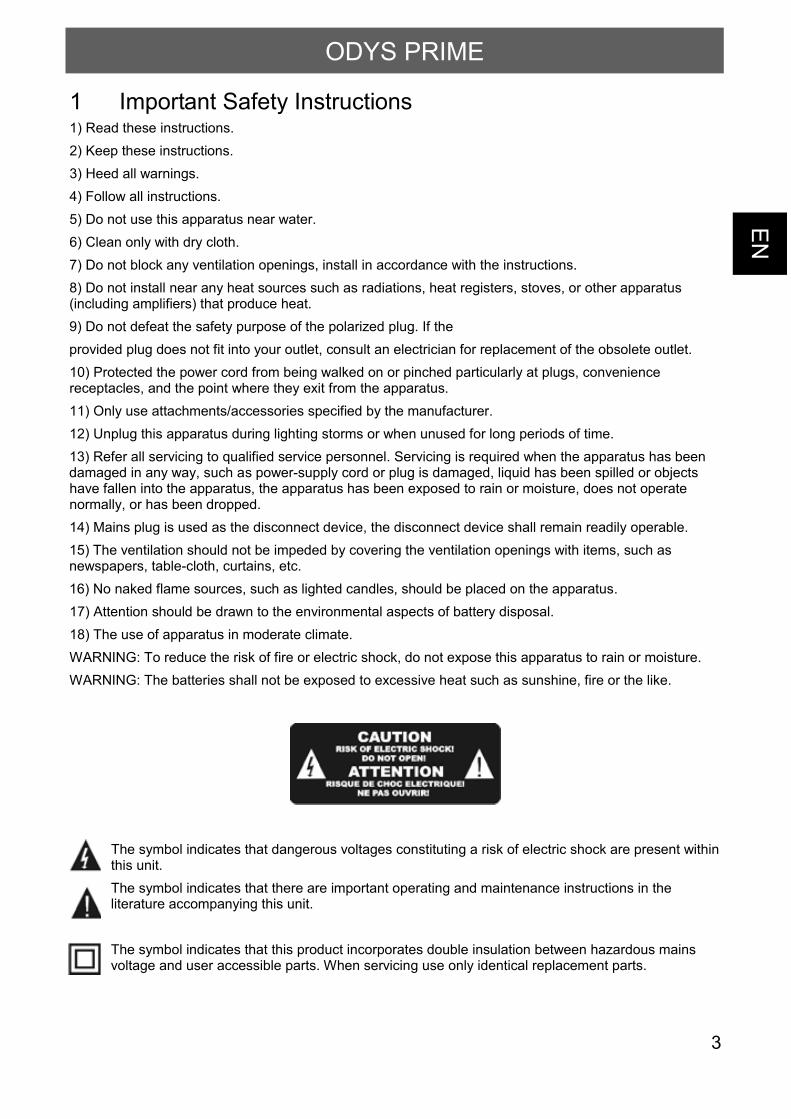
The symbol indicates that dangerous voltages constituting a risk of electric shock are present withinthis unit.The symbol indicates that there are important operating and maintenance instructions in theliterature accompanying this unit.
The symbol indicates that this product incorporates double insulation between hazardous mainsvoltage and user accessible parts. When servicing use only identical replacement parts.
ODYS PRIME
EN
4
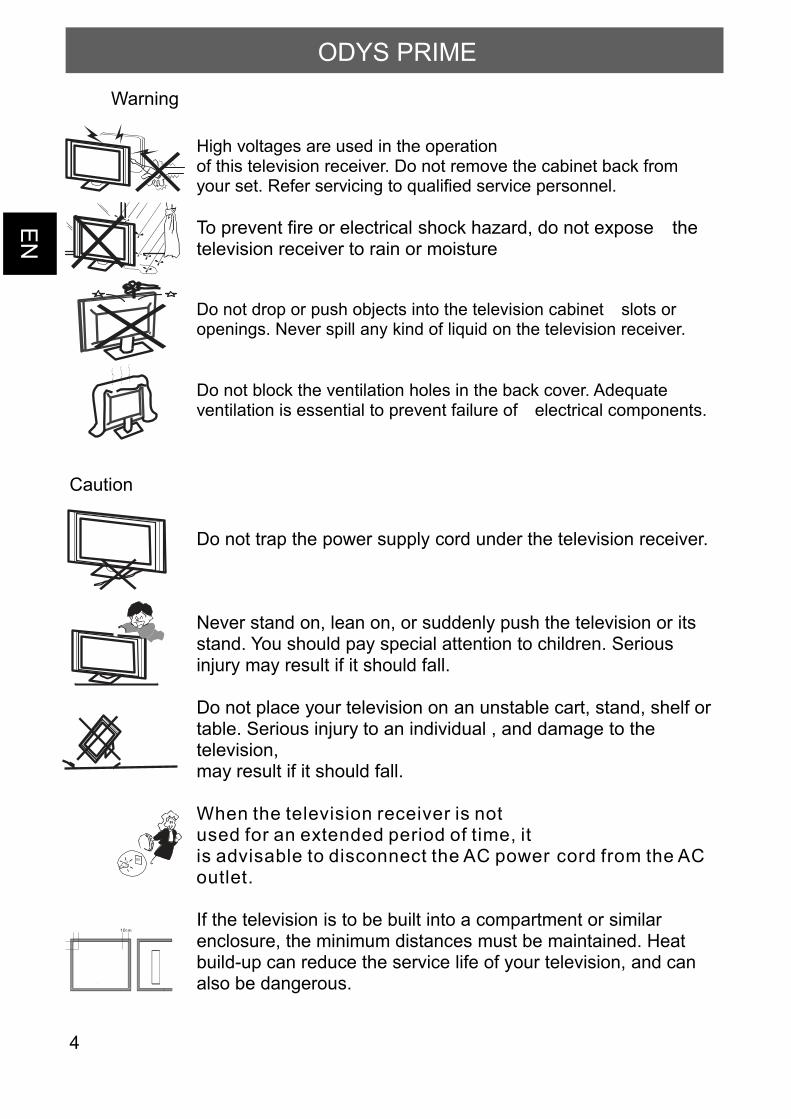
Warning
High voltages are used in the operationof this television receiver. Do not remove the cabinet back fromyour set. Refer servicing to qualified service personnel.
To prevent fire or electrical shock hazard, do not expose thetelevision receiver to rain or moisture
Do not drop or push objects into the television cabinet slots oropenings. Never spill any kind of liquid on the television receiver.
Do not block the ventilation holes in the back cover. Adequateventilation is essential to prevent failure of electrical components.
Caution
Do not trap the power supply cord under the television receiver.
Never stand on, lean on, or suddenly push the television or itsstand. You should pay special attention to children. Seriousinjury may result if it should fall.
Do not place your television on an unstable cart, stand, shelf or table. Serious injury to an individual , and damage to the television,may result if it should fall.
When the television receiver is notused for an extended period of time, itis advisable to disconnect the AC power cord from the ACoutlet.
If the television is to be built into a compartment or similarenclosure, the minimum distances must be maintained. Heatbuild-up can reduce the service life of your television, and canalso be dangerous.
ODYS PRIME

EN
5
Tips regarding environmental protectionAt the end of its operating life, this product may not be disposed of by way of your normalhousehold waste. Instead it must be delivered to a collection point for recycling electrical andelectronic equipment. The icon on the product, in the operating instructions or on thepackaging, indicates this.The materials used in manufacturing this product are recyclable, depending on theiridentifying markings. By recycling this equipment, by recycling its components, or throughother procedures of re-using outdated equipment, you are making an important contributionto protection our environment. Please ask you local municipal administration for the locationof the corresponding recycling point.
Battery Recycling
In order to ensure the environmentally friendly disposal of batteries, please do NOT dispose ofused batteries through normal household waste. Please take the batteries to your local retailor community collection point for recycling.The following may be an indication of a discharged battery: The device cannot be switchedon. The device switches off automatically and "Battery Empty" is shown in the display. Thedevice and or battery do not function properly.
Support
URL: http://www.odys.deSee our website for the latest information on this engine, on other products by our company and on ourcompany itself. If you have questions or problems, please read the FAQs on our website or contact ourcustomer support service [email protected].
Appropriate use
The device is designed for receiving and watching unencrypted and crypted DVB-T and analogue TVchannels for private use. It is exclusively meant for this purpose and must only be used for the same. Thisalso includes paying attention to all information contained in this operating manual, especially in the safetyinstructions. Any other usage is considered to be improper and may lead to material damages and evenpersonal injuries. Moreover, it will result in the immediate loss of guarantee. The manufacturer does notbear any liability for damages caused due to improper use.
ODYS PRIME

EN
6
2 Mounting – dismantling2.1 Stand mounting
1. Put the stand on the foot of the back
2. Mount the stand on the foot of the back with the 2 screws.
ODYS PRIME
EN
7
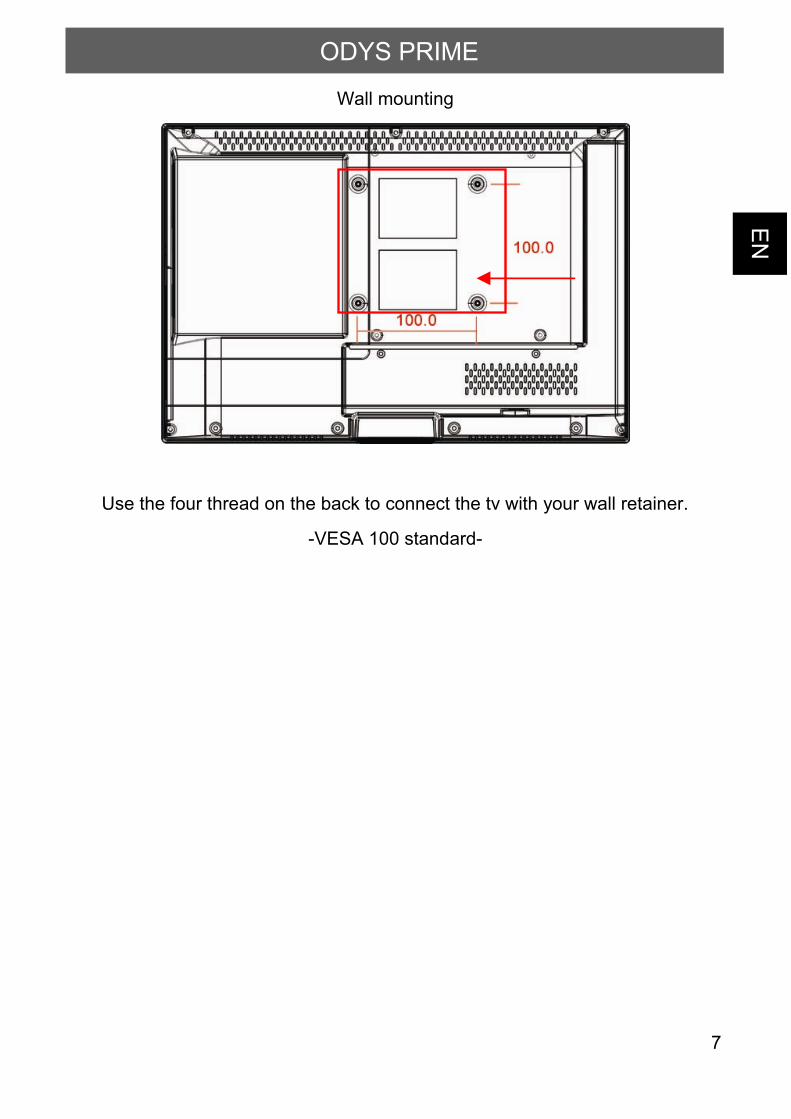
Wall mounting
Use the four thread on the back to connect the tv with your wall retainer.
-VESA 100 standard-
ODYS PRIME

EN
8
3 Front and Rear Panel Illustration3.1 Front panel and Keyboard
1: Remote control sensor.
2: Indicator LED:
GREEN = POWER ONRED = STAND-BY
1 Source Display the input source menu.
2 MENU Display main MENU.
3 CH+/CH-In TV mode press CH+ or CH-to change the channel up anddown.In MENU, press CH+ or CH- toselect items.
4 VOL+/VOL- Adjust sound level.
In MENU, adjust the item thatyou selected.
5 POWER(STANDBY)
ODYS PRIME
LED indicator IR Ontvangstraampje (vrij houden)
MENU CH CH VOL VOL+ SOURCE POWER
12 3 4 5
EN
9
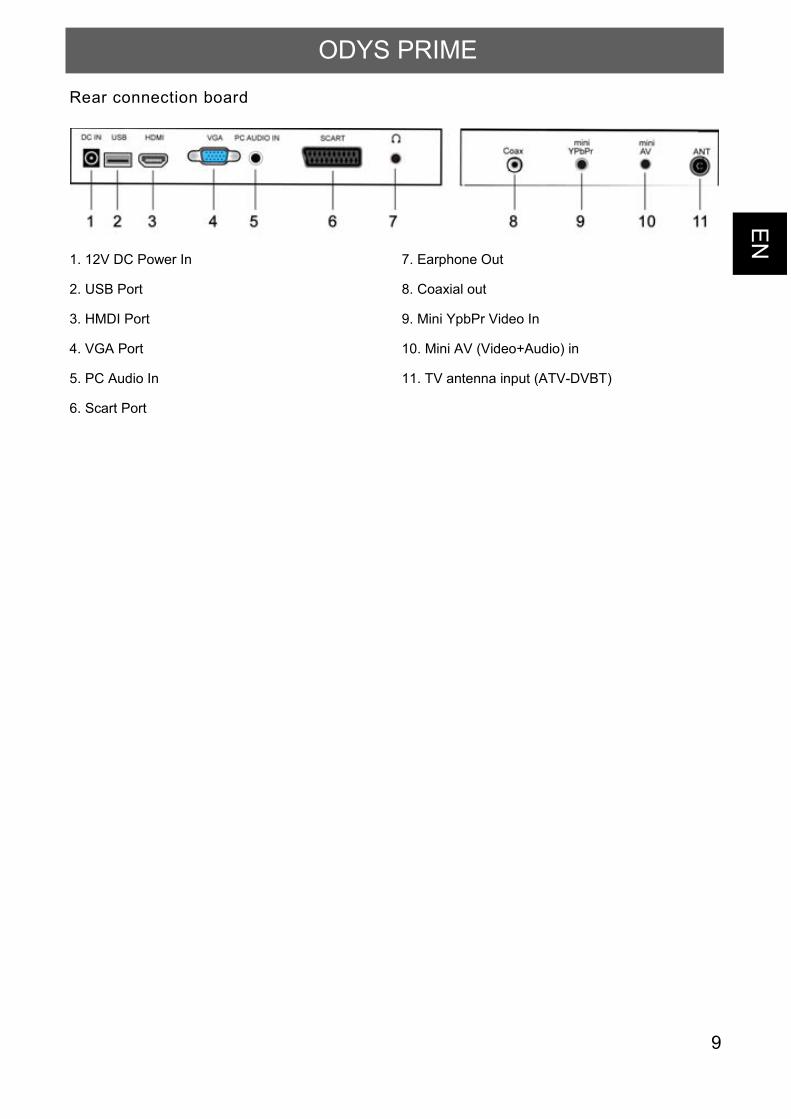
Rear connection board
1. 12V DC Power In
2. USB Port
3. HMDI Port
4. VGA Port
5. PC Audio In
6. Scart Port
7. Earphone Out
8. Coaxial out
9. Mini YpbPr Video In
10. Mini AV (Video+Audio) in
11. TV antenna input (ATV-DVBT)
ODYS PRIME
EN
10
3.2 Remote Control
ODYS PRIME
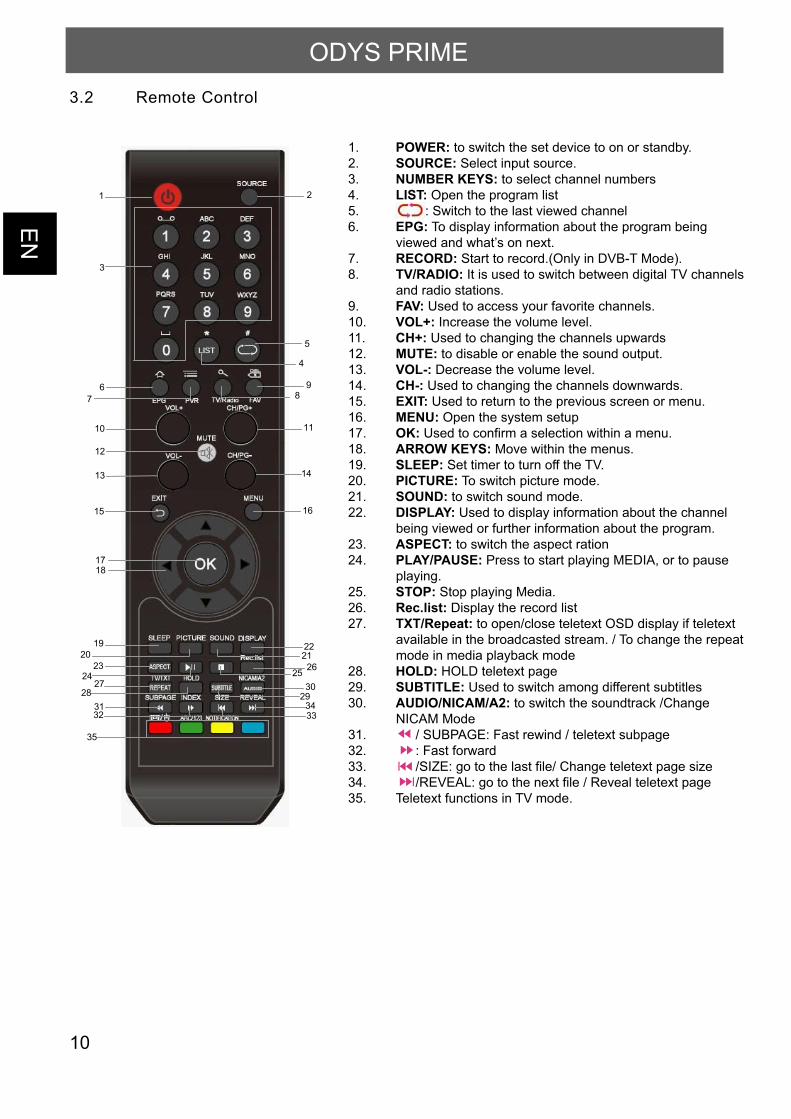
1. POWER: to switch the set device to on or standby.2. SOURCE: Select input source.3. NUMBER KEYS: to select channel numbers4. LIST: Open the program list5. : Switch to the last viewed channel6. EPG: To display information about the program being viewed and what’s on next.7. RECORD: Start to record.(Only in DVB-T Mode).8. TV/RADIO: It is used to switch between digital TV channels and radio stations.9. FAV: Used to access your favorite channels.10. VOL+: Increase the volume level.11. CH+: Used to changing the channels upwards12. MUTE: to disable or enable the sound output.13. VOL-: Decrease the volume level.14. CH-: Used to changing the channels downwards.15. EXIT: Used to return to the previous screen or menu. 16. MENU: Open the system setup17. OK: Used to confirm a selection within a menu.18. ARROW KEYS: Move within the menus.19. SLEEP: Set timer to turn off the TV.20. PICTURE: To switch picture mode.21. SOUND: to switch sound mode.22. DISPLAY: Used to display information about the channel being viewed or further information about the program.23. ASPECT: to switch the aspect ration24. PLAY/PAUSE: Press to start playing MEDIA, or to pause playing. 25. STOP: Stop playing Media.26. Rec.list: Display the record list27. TXT/Repeat: to open/close teletext OSD display if teletext available in the broadcasted stream. / To change the repeat mode in media playback mode28. HOLD: HOLD teletext page29. SUBTITLE: Used to switch among different subtitles30. AUDIO/NICAM/A2: to switch the soundtrack /Change NICAM Mode31. / SUBPAGE: Fast rewind / teletext subpage 32. : Fast forward 33. /SIZE: go to the last file/ Change teletext page size34. /REVEAL: go to the next file / Reveal teletext page35. Teletext functions in TV mode.
1 2
3
4
9
5
6
10 11
13
15 16
1718
12
7
1920 21
8
22
2324 25 26
2728 29
30
3132 33
34
35
14
EN
11
Installing BatteriesInstalling Batteries1. Open the battery compartment cover on the back of the remote control.2. Insert two 1.5V AAA size batteries observing the polarity markings inside the batterycompartment. Don’t mix different types or used batteries with new ones.3. Close the cover.
Notes on batteriesIf the remote control is not used for a long period of time, please remove the battery from thecompartment.Do not heat batteries or dispose of them in fires.Do not dismantle, deform or modify batteries.
- The remote control should be operated within 30 feet(7m) and 300 to the left and right of theIR receive at the front of the TV.
- Used batteries should be disposed properly.
ODYS PRIME
EN
12
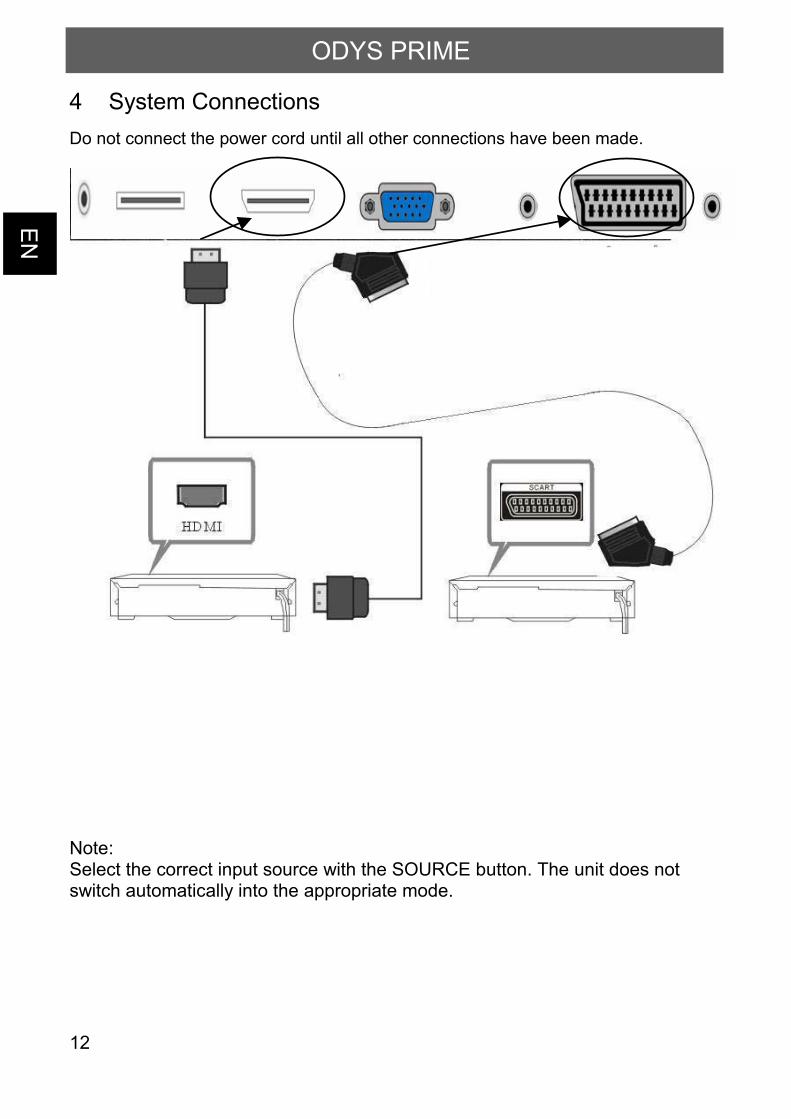
4 System ConnectionsDo not connect the power cord until all other connections have been made.
Note:Select the correct input source with the SOURCE button. The unit does not switch automatically into the appropriate mode.
ODYS PRIME

EN
13
4.1 Connecting a USB Devices for playing media filesThe ODYS-PRIME has an USB Port to upgrade the software and playing media files.
If possible, please connect USB devices directly to the Devices USB interface.If this is not possible, use only USB extension cables not exceeding 25 cm.
Press SOURCE then direction buttons to select USB mode, then press the OK button toconfirm.
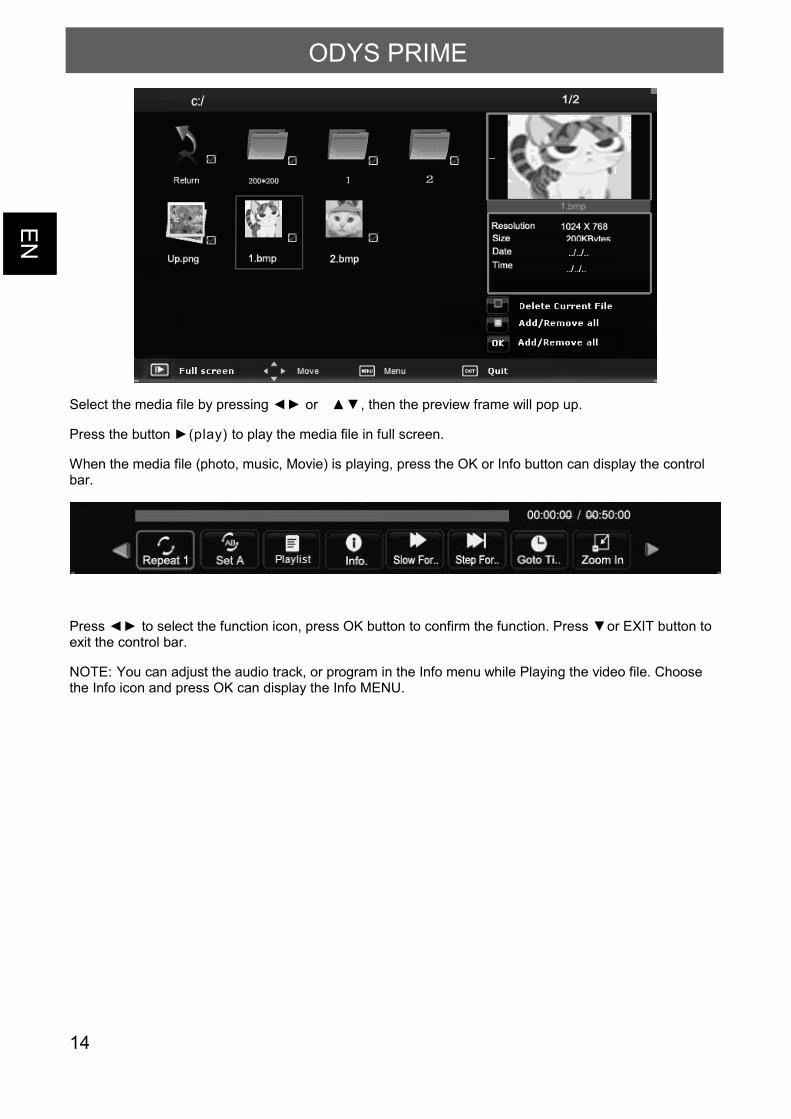
Please make sure that the USB device is plugged in the slot. There are three type mediaitem can be selected, such as photo, music and Movie. Select the type media item bypressing , press OK button to enter the media file selection menu.
ODYS PRIME
EN
14
Select the media file by pressing or , then the preview frame will pop up.
Press the button (play) to play the media file in full screen.
When the media file (photo, music, Movie) is playing, press the OK or Info button can display the controlbar.
Press to select the function icon, press OK button to confirm the function. Press or EXIT button toexit the control bar.
NOTE: You can adjust the audio track, or program in the Info menu while Playing the video file. Choosethe Info icon and press OK can display the Info MENU.
ODYS PRIME
EN
15
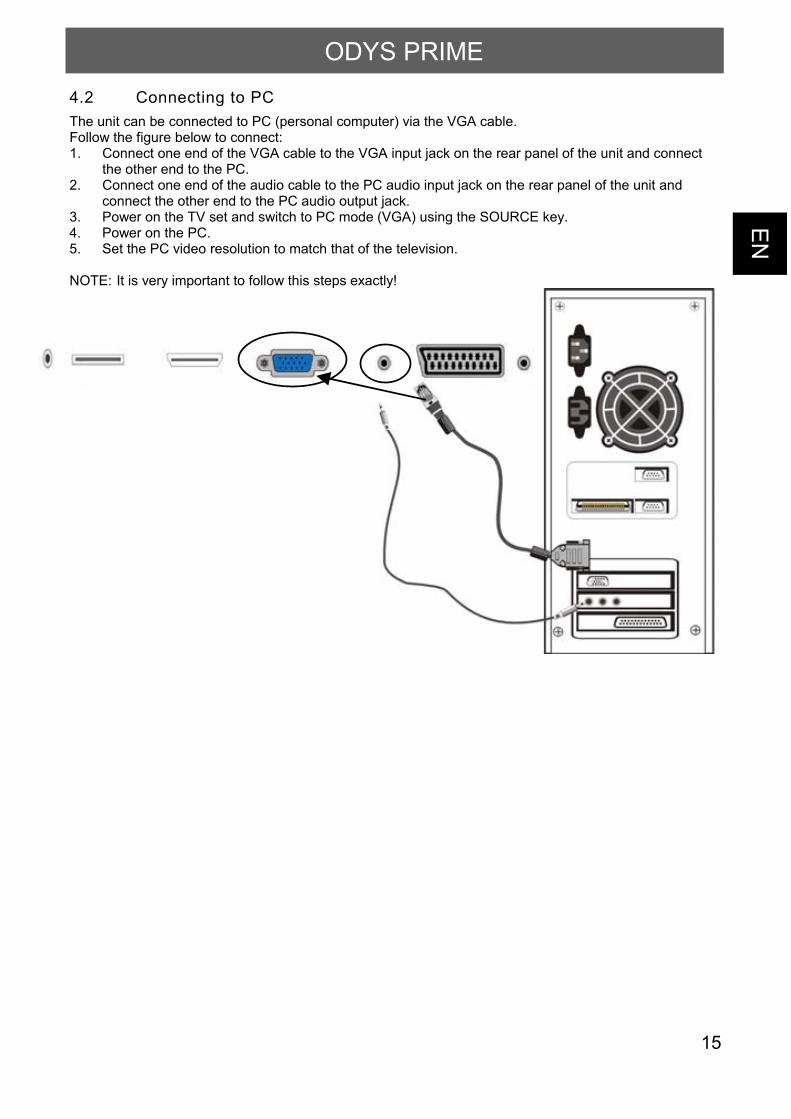
4.2 Connecting to PCThe unit can be connected to PC (personal computer) via the VGA cable.Follow the figure below to connect:1. Connect one end of the VGA cable to the VGA input jack on the rear panel of the unit and connect
the other end to the PC.2. Connect one end of the audio cable to the PC audio input jack on the rear panel of the unit and
connect the other end to the PC audio output jack.3. Power on the TV set and switch to PC mode (VGA) using the SOURCE key.4. Power on the PC.5. Set the PC video resolution to match that of the television.
NOTE: It is very important to follow this steps exactly!
ODYS PRIME
EN
16
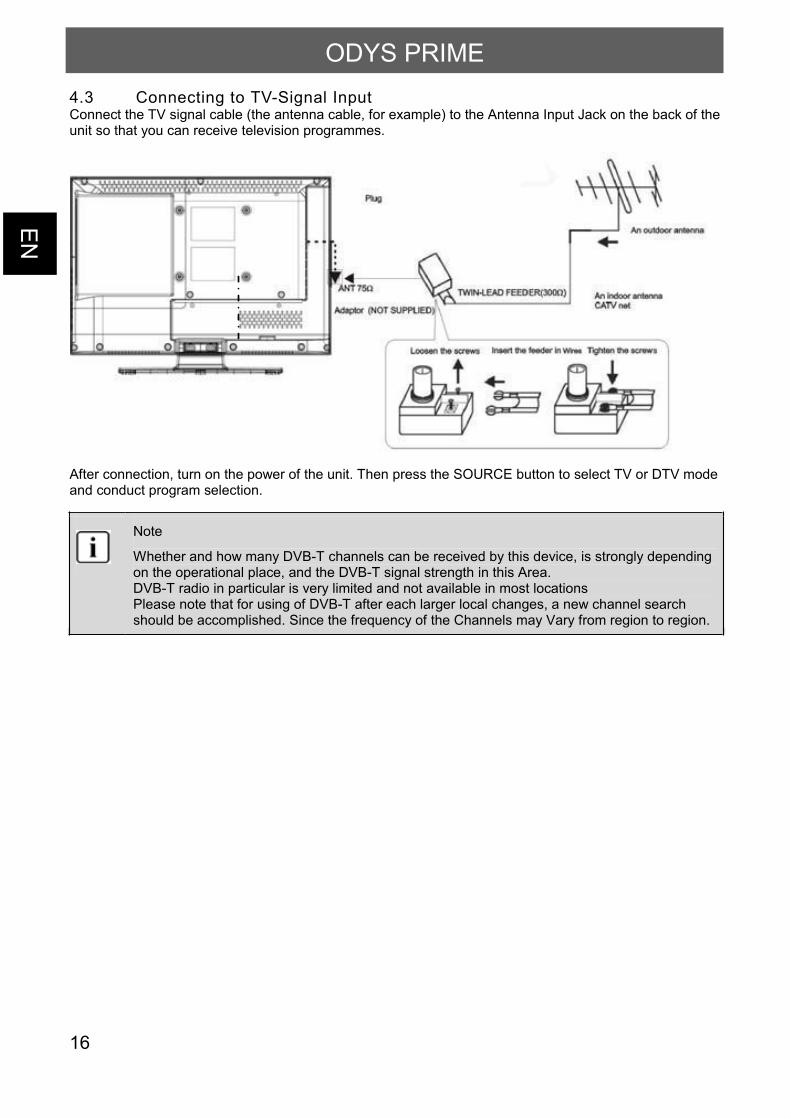
4.3 Connecting to TV-Signal InputConnect the TV signal cable (the antenna cable, for example) to the Antenna Input Jack on the back of theunit so that you can receive television programmes.
After connection, turn on the power of the unit. Then press the SOURCE button to select TV or DTV modeand conduct program selection.
Note
Whether and how many DVB-T channels can be received by this device, is strongly dependingon the operational place, and the DVB-T signal strength in this Area.DVB-T radio in particular is very limited and not available in most locationsPlease note that for using of DVB-T after each larger local changes, a new channel searchshould be accomplished. Since the frequency of the Channels may Vary from region to region.
ODYS PRIME
EN
17
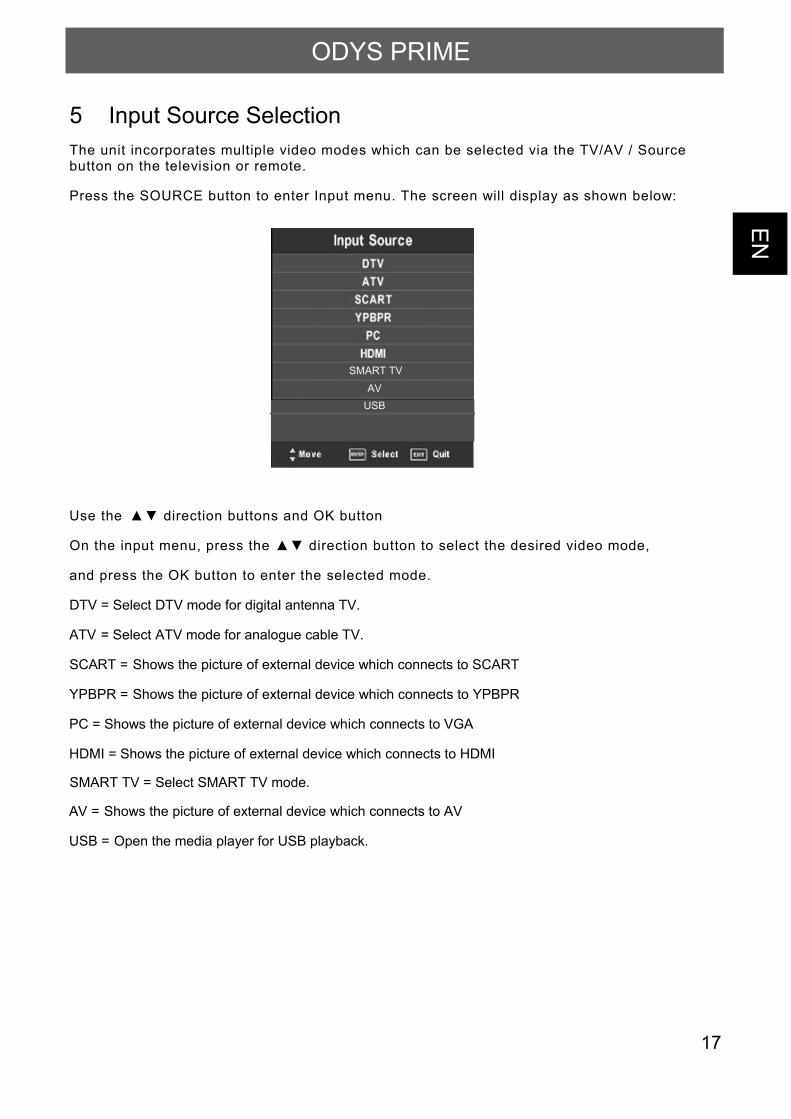
5 Input Source SelectionThe unit incorporates multiple video modes which can be selected via the TV/AV / Sourcebutton on the television or remote.
Press the SOURCE button to enter Input menu. The screen will display as shown below:
Use the direction buttons and OK button
On the input menu, press the direction button to select the desired video mode,
and press the OK button to enter the selected mode.
DTV = Select DTV mode for digital antenna TV.
ATV = Select ATV mode for analogue cable TV.
SCART = Shows the picture of external device which connects to SCART
YPBPR = Shows the picture of external device which connects to YPBPR
PC = Shows the picture of external device which connects to VGA
HDMI = Shows the picture of external device which connects to HDMI
AV = Shows the picture of external device which connects to AV
USB = Open the media player for USB playback.
AVUSB
SMART TV = Select SMART TV mode.
SMART TV
ODYS PRIME

EN
18
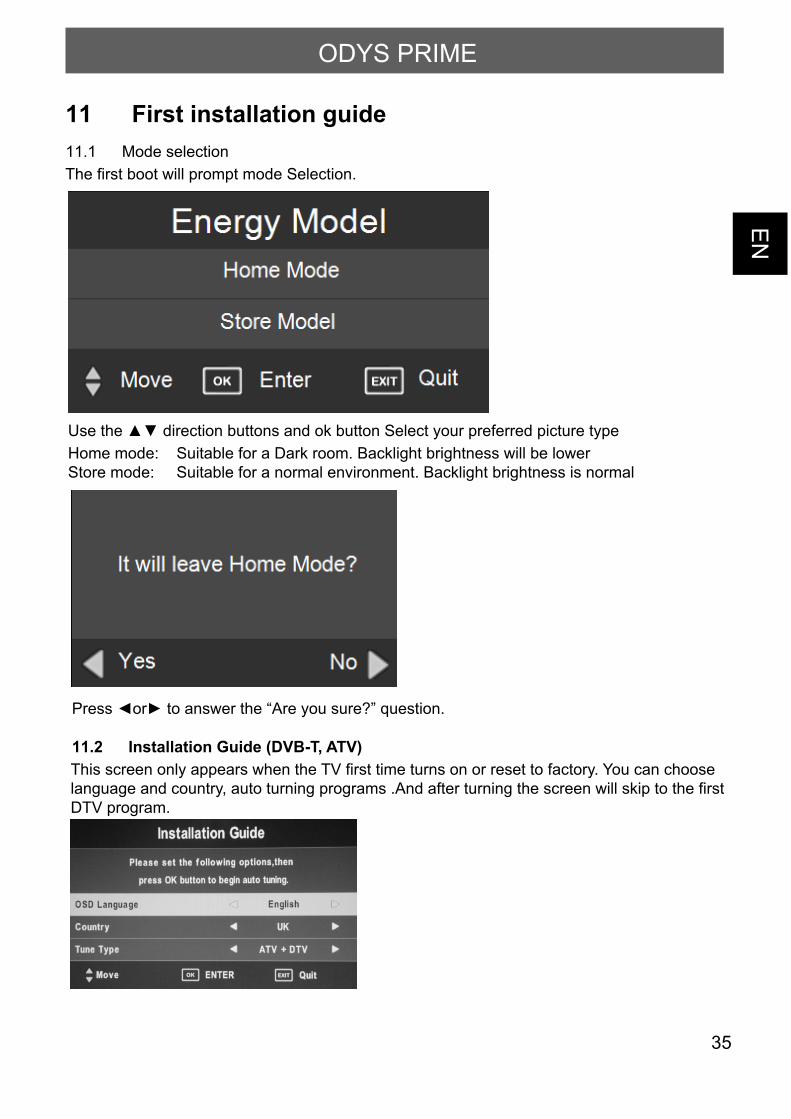
6 First commissioning6.1 Mode selectionThe first boot will prompt mode Selection.
Use the direction buttons and ok button Select your preferred picture type
Home mode: Suitable for a Dark room. Backlight brightness will be lower
Store mode: Suitable for a normal environment. Backlight brightness is normal
Press or to answer the “Are you sure?” question.
ODYS PRIME
EN
19
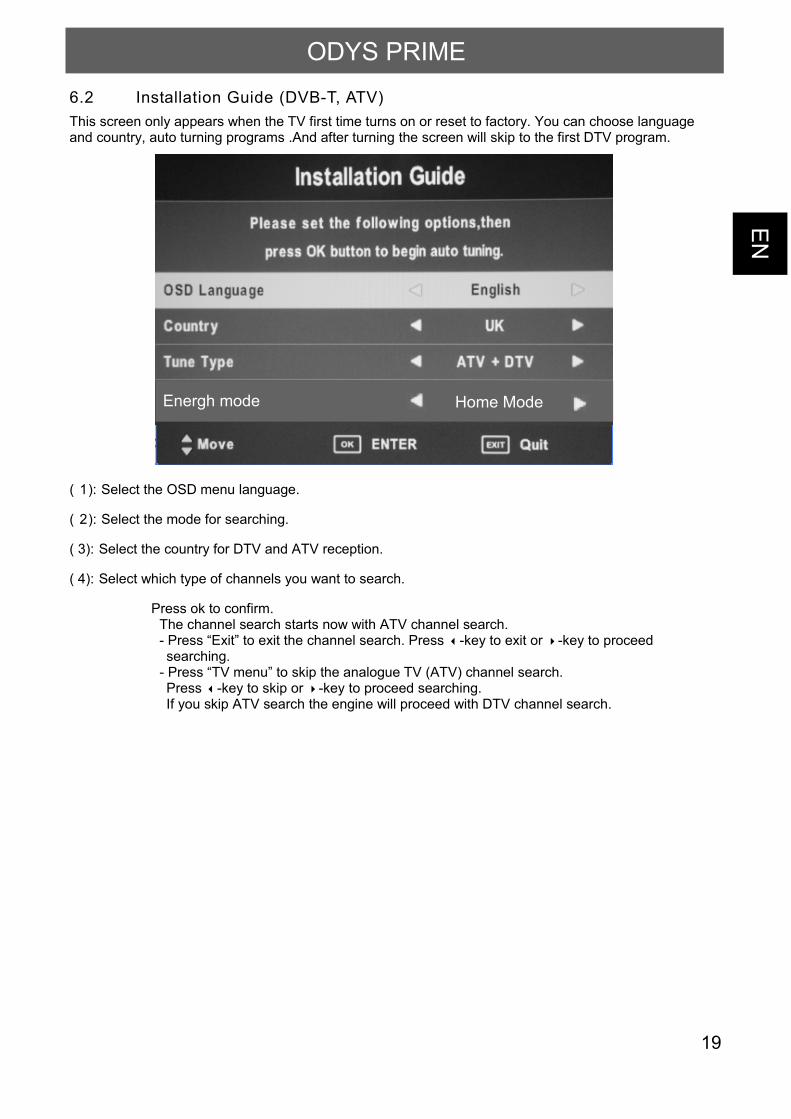
6.2 Installation Guide (DVB-T, ATV)This screen only appears when the TV first time turns on or reset to factory. You can choose languageand country, auto turning programs .And after turning the screen will skip to the first DTV program.
( 1): Select the OSD menu language.
( 2): Select the mode for searching.
( 3): Select the country for DTV and ATV reception.
( 4): Select which type of channels you want to search.
Press ok to confirm. The channel search starts now with ATV channel search. - Press “Exit” to exit the channel search. Press -key to exit or -key to proceed searching. - Press “TV menu” to skip the analogue TV (ATV) channel search. Press -key to skip or -key to proceed searching. If you skip ATV search the engine will proceed with DTV channel search.
Energh mode Home Mode
ODYS PRIME

EN
20
7 TV operation and system setupOSD Settings (Main Operations)
Press / to select the page. Press / to select the setting.
7.1 Channel menuThe first item of the MENU is channel menu( for TV or DTV source only).
7.1.1 Auto ScanSearch all the channels automatically (you can select ATV and DTV)DTV = For digital antenna tv and analoge cable tv.
DTV
1. Select your country.
2. Select the search mode.
ATV = Analogue Programs
DTV = Digital Programs
3. Press OK to start the automatic scan.
Press MENU to skip ATV scan and to confirm.Press to continue the ATV scan.Then the device willsearch DTV.
NOTE:All the channels including ATV, DTV and DTV Radio can betuning by one time, if the Tune Type is DTV+ATV . All thestored channels will be deleted and overwritten after autotuning . After auto tuning, the channel will skip to the firstDTV channel.
ODYS PRIME
EN
21
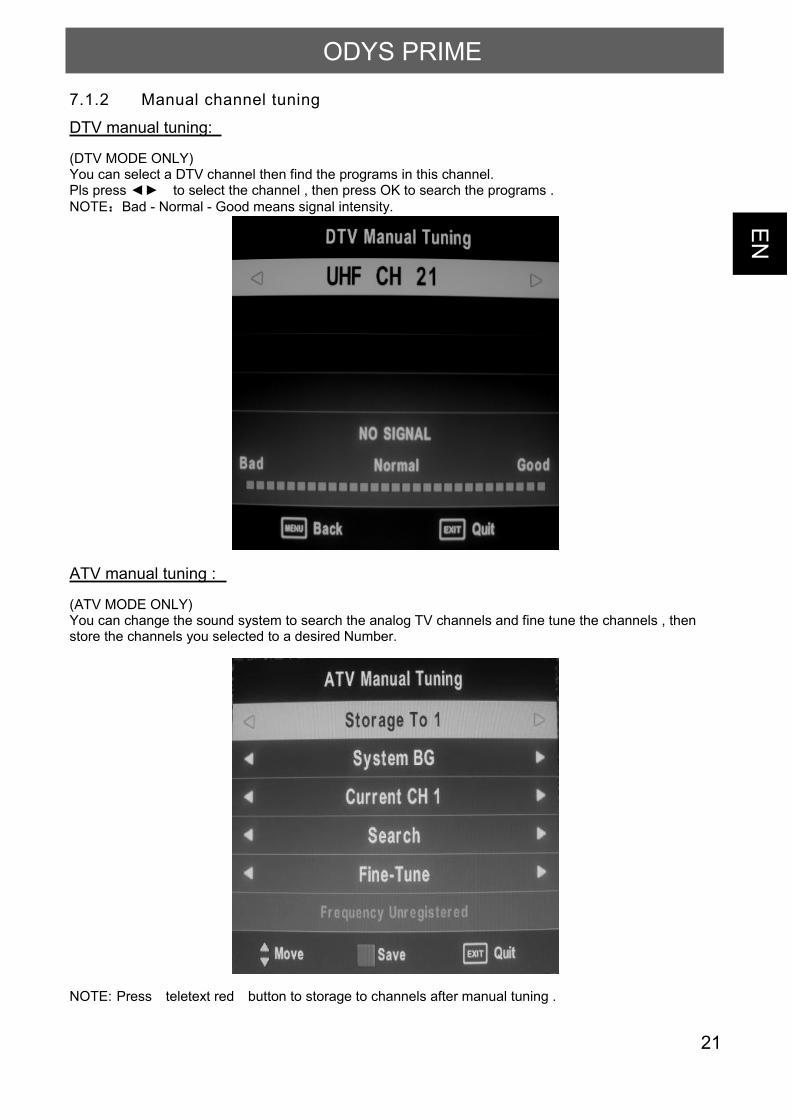
7.1.2 Manual channel tuning
DTV manual tuning:
(DTV MODE ONLY)You can select a DTV channel then find the programs in this channel.Pls press to select the channel , then press OK to search the programs .NOTE Bad - Normal - Good means signal intensity.
ATV manual tuning :
(ATV MODE ONLY)You can change the sound system to search the analog TV channels and fine tune the channels , thenstore the channels you selected to a desired Number.
NOTE: Press teletext red button to storage to channels after manual tuning .
ODYS PRIME

EN
22
7.1.3 Program EditTo edit your program preferences (rename, skip, favourite, move or delete), you will need to enter theProgram Edit Menu.
RED ButtonDelete
Press teletext red button , the program in cursor will be deleted,press red key to confirm.
YELLOW ButtonMove
Move the cursor to the program,press yellow button ,then you can use tomove the program. Press OK to confirm.
BLUE Button Skip Press to choose the program , press teletext blue button to skip thisprogram, The will show on the right side of the program .Choose the skipped program, press blue button again , you can cancel theskip ,The will disappear .
FAV ButtonFavourite
Press to choose the program , press FAV button , it will show on theright side of the program.Choose the FAV program , press FAV button again ,you can cancel the FAV , the will disappear .
7.1.4 Signal InformationHighlight SIGNAL INFORMATION and press OK to display the signal information(DTV mode only).
7.1.5 Software UpdateLet you install a new software version on the device. This of course must be connected to a USB memorystick with the update file in the root directory.
Rename
ODYS PRIME
EN
23
7.1.6 PVR Record Functions
NOTE:Recording is only available in DTT (DVB-T) Mode.
Note: Plese note the following: It´s only possible to use USB 2.0 flash drivers with a maximum capacity of64 GB for recording. External hard drives are not supported.
Record Start
Starts recording of the current channel. You could use the PVR button on the remote control also.
Recorded List
To open a list of made records.
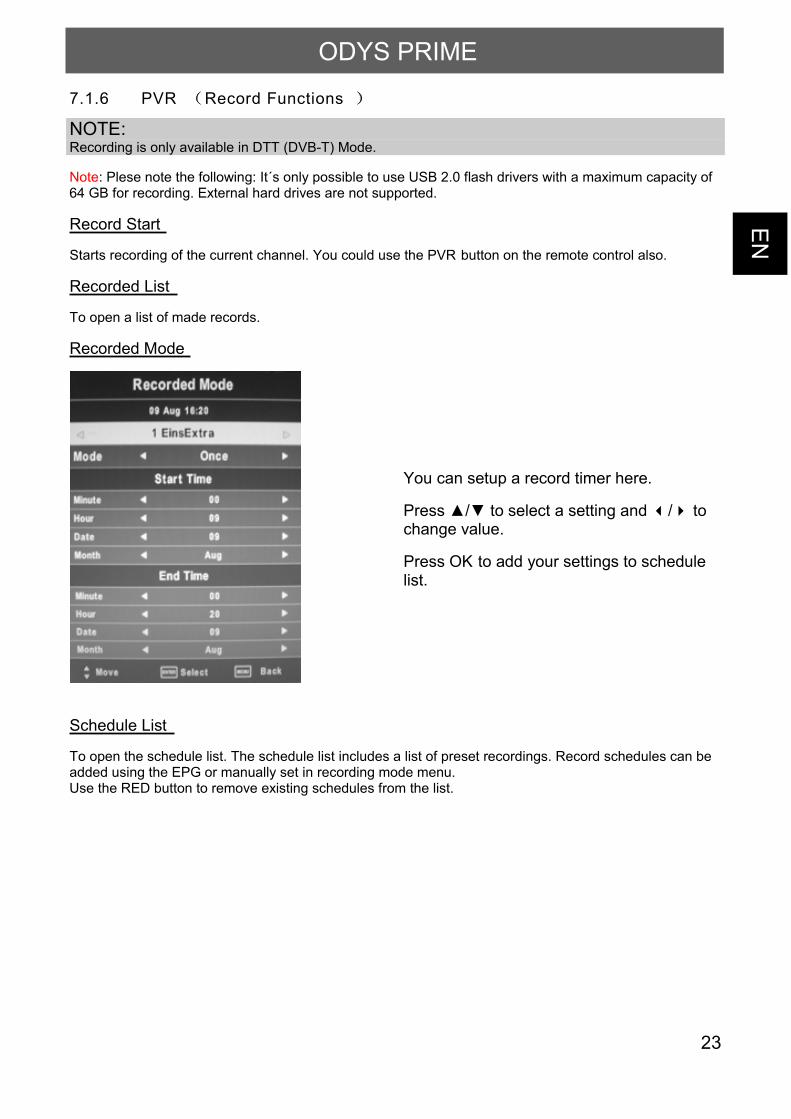
Recorded Mode
You can setup a record timer here.
Press / to select a setting and / tochange value.
Press OK to add your settings to schedulelist.
Schedule List
To open the schedule list. The schedule list includes a list of preset recordings. Record schedules can beadded using the EPG or manually set in recording mode menu.Use the RED button to remove existing schedules from the list.
ODYS PRIME
EN
24
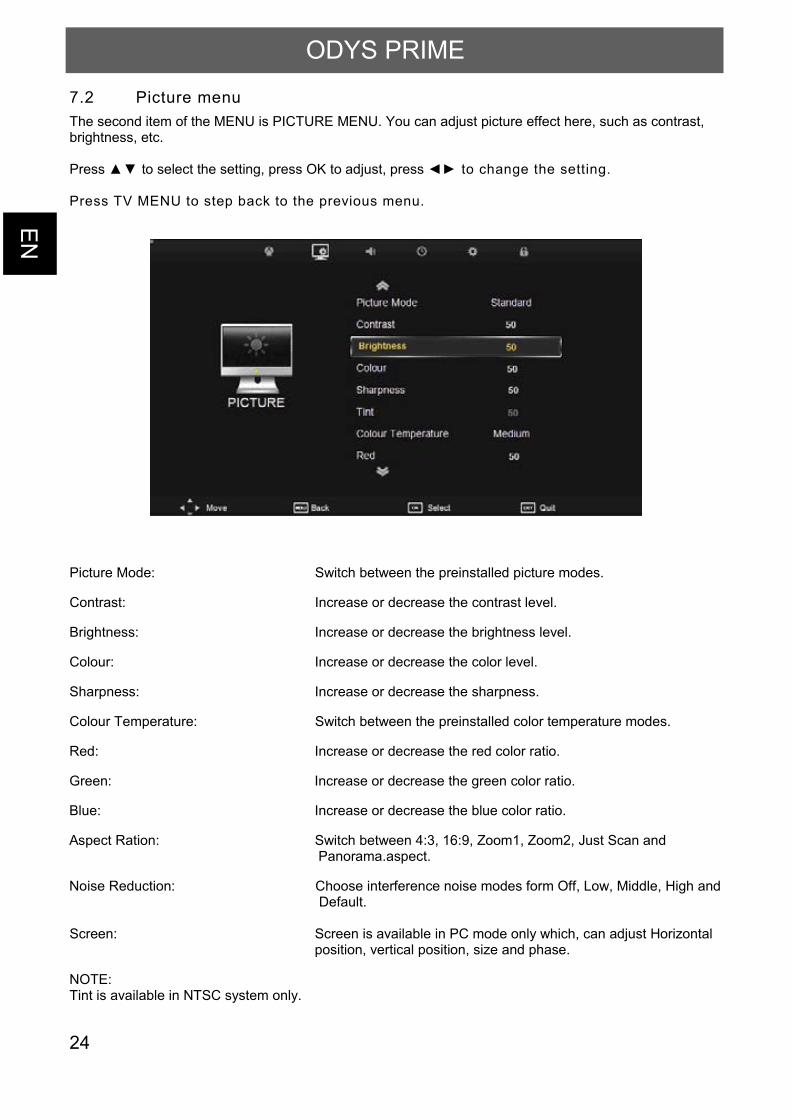
7.2 Picture menuThe second item of the MENU is PICTURE MENU. You can adjust picture effect here, such as contrast,brightness, etc.
Press to select the setting, press OK to adjust, press to change the setting.
Press TV MENU to step back to the previous menu.
Picture Mode: Switch between the preinstalled picture modes.
Contrast: Increase or decrease the contrast level.
Brightness: Increase or decrease the brightness level.
Colour: Increase or decrease the color level.
Sharpness: Increase or decrease the sharpness.
Colour Temperature: Switch between the preinstalled color temperature modes.
Red: Increase or decrease the red color ratio.
Green: Increase or decrease the green color ratio.
Blue: Increase or decrease the blue color ratio.
Aspect Ration: Switch between 4:3, 16:9, Zoom1, Zoom2, Just Scan andPanorama.aspect.
Noise Reduction: Choose interference noise modes form Off, Low, Middle, High andDefault.
Screen: Screen is available in PC mode only which, can adjust Horizontalposition, vertical position, size and phase.
NOTE:Tint is available in NTSC system only.
ODYS PRIME
EN
25
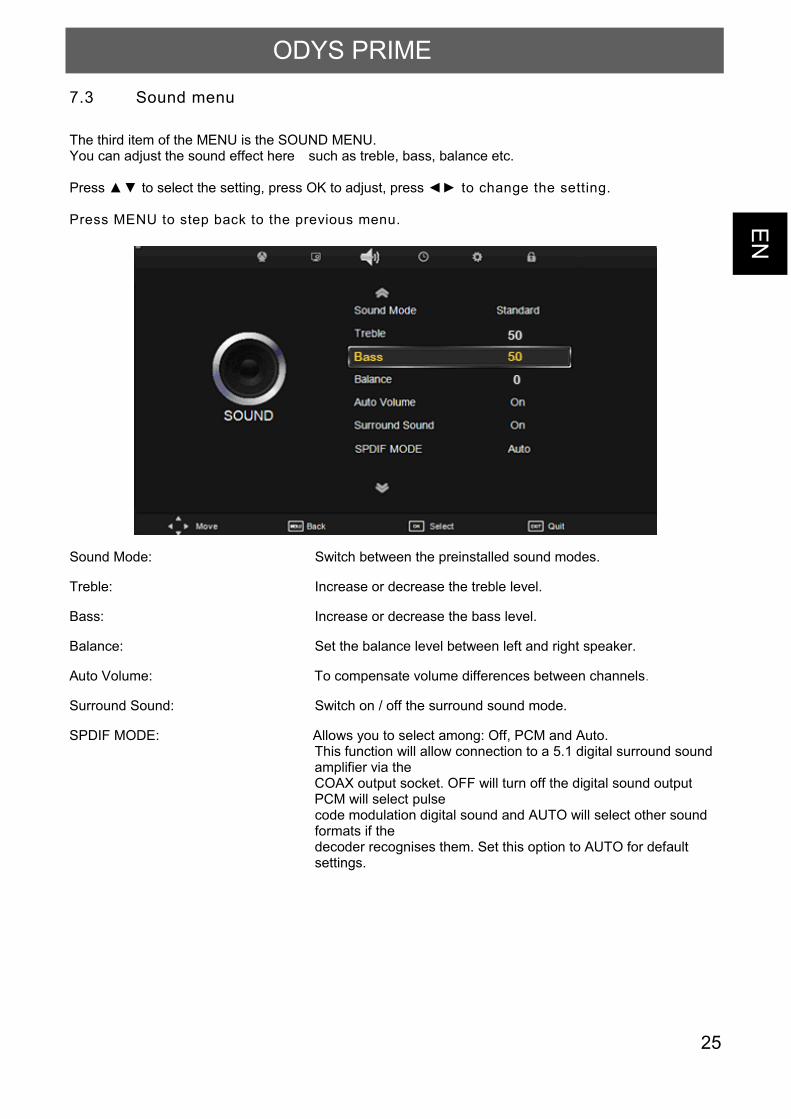
7.3 Sound menu
The third item of the MENU is the SOUND MENU.You can adjust the sound effect here such as treble, bass, balance etc.
Press to select the setting, press OK to adjust, press to change the setting.
Press MENU to step back to the previous menu.
Sound Mode: Switch between the preinstalled sound modes.
Treble: Increase or decrease the treble level.
Bass: Increase or decrease the bass level.
Balance: Set the balance level between left and right speaker.
Auto Volume: To compensate volume differences between channels.
Surround Sound: Switch on / off the surround sound mode.
SPDIF MODE: Allows you to select among: Off, PCM and Auto.This function will allow connection to a 5.1 digital surround soundamplifier via theCOAX output socket. OFF will turn off the digital sound outputPCM will select pulsecode modulation digital sound and AUTO will select other soundformats if thedecoder recognises them. Set this option to AUTO for defaultsettings.
ODYS PRIME

EN
26
7.4 Time menuThe forth item of the menu is the TIME MENU You can adjust the clock, power on/off time, sleep time etc.
Press to select the setting, press OK to adjust, press to select the value to change, pressto change the setting.
Press MENU to step back to the previous menu.
Clock: Set the system time
Off Time: Time adjustment for automatic shutdown
On Time: Time adjustment for automatic power on.
Sleep Timer: Duration adjustment of the automatic shutdown
Auto Sleep: Set the auto sleep time
No Action Auto Standby: According to the latest ERP regulation, this unit will switch off itselfautomatically if no change in status within the last 4 hours of operation.
Time Zone: Set your time zone
ODYS PRIME

EN
27
7.5 Option menuThe fifth item of the MENU is the OPTION MENU. You can adjust the Menu language, Audiolanguage,Subtitle language etc.
Press to select the setting, press OK to adjust, press to select the value to change, pressto change the setting.
Press MENU to step back to the previous menu.
OSD Language: Select the ODS Language.
Audio Languages 1st: Select the first audio language.
Audi Languages 2nd: Select the second audio language.
Subtitle Languages 1st: Select the first subtitle language.
Subtitle Languages 2nd: Select the second subtitle language.
OSD Duration: Set the banner time of osd.
Country: Select your country.
Home Mode: Set the main panel value
Energy Mode: Select the energy mode from Home Mode and Store Mode.
Restore Factory Default: Reset the system to factory default.
ODYS PRIME
EN
28
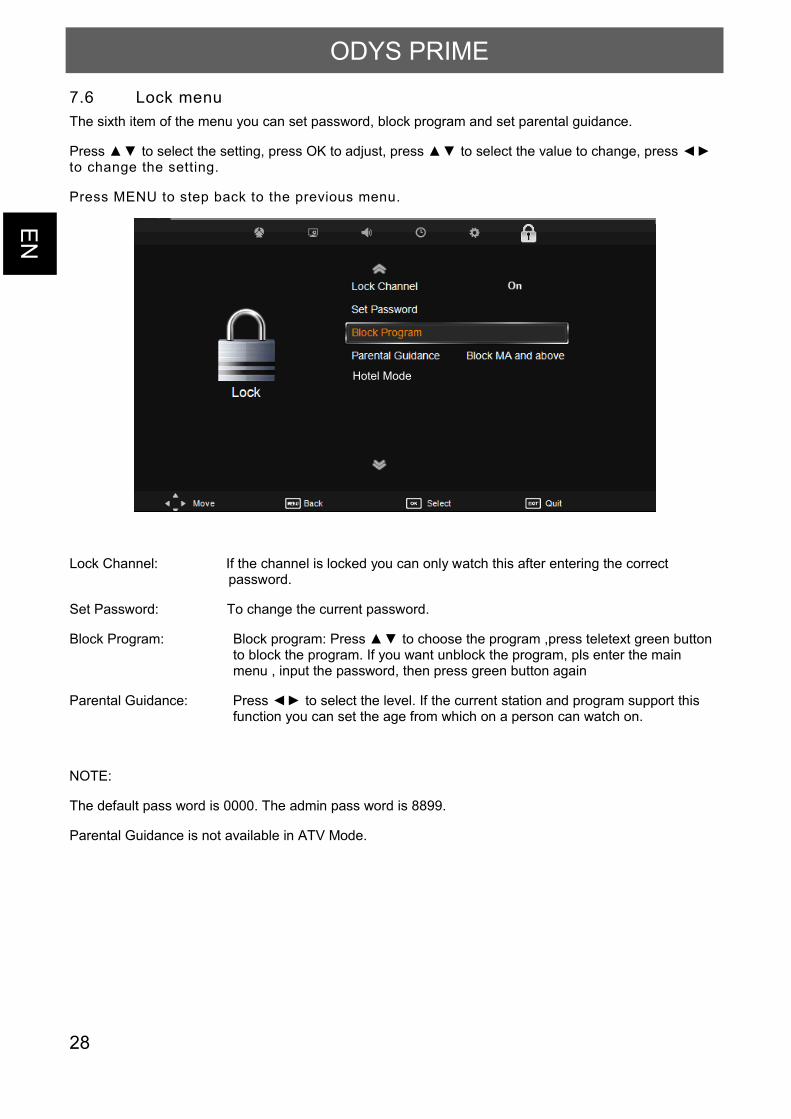
7.6 Lock menuThe sixth item of the menu you can set password, block program and set parental guidance.
Press to select the setting, press OK to adjust, press to select the value to change, pressto change the setting.
Press MENU to step back to the previous menu.
Lock Channel: If the channel is locked you can only watch this after entering the correctpassword.
Set Password: To change the current password.
Block Program: Block program: Press to choose the program ,press teletext green buttonto block the program. If you want unblock the program, pls enter the mainmenu , input the password, then press green button again
Parental Guidance: Press to select the level. If the current station and program support thisfunction you can set the age from which on a person can watch on.
NOTE:
The default pass word is 0000. The admin pass word is 8899.
Parental Guidance is not available in ATV Mode.
Hotel Mode
ODYS PRIME

EN
29
8 Other functions
8.1 Hotel Mode
8.2 Program list
Press the LIST button to enter the channel listwhile watching a program.
Press to switch between all channels (All),only tv channels (DTV), only radio channels(Radio) and data channels (data).
Press the button to move the highlighting,and press OK button to watch the highlightingchannel.
ODYS PRIME

EN
30
8.3 Favorite liste
If you have set a favorite lists, press the FAVbutton to enter the list.
Press the button to select the channel inthe favorite list.
Confirm the choice with OK to show theselected channel.
8.4 Teletext
Teletext is an information system broadcast by certain channels which can beconsulted like a newspaper. It also offers access to subtitles for viewers withhearing problems or who are not familiar with the transmission language(cablenetworks, satellite channels, etc.)
Press: You will obtain:
TTX
This is used to call or exit teletext modes. The summary appears witha list of items that can be accessed. Each item has a corresponding3digit page number. If the channel selected does not broadcastteletext, theindication 100 will be displayed and the screen wil lremain blank (in this case, exit teletext and select another channel).
SELECTING A Enter the number of the page required using the 0 to 9 up/down.Example: page 120, enter 120. The number is displayed top left, thecounter turns and then the page is displayed. Repeat this operation toview another page. If the counter continues to search, this meansthat the page is not transmitted. Select another number.
DIRECT ACCESSTO THE ITEMS
Coloured are as are displayed at the bottom of the screen. The 4coloured keys are used to access the items or corresponding pages. Thecoloured areas flash when the item or the page is not yetavailable.
INDEX This returns to the contents page (usually page 100).
S. PAGE Certain pages contain sub-pages which are automaticallydisplayed successively. This key is used to stop or resume sub- pageacquisition. The indication appears top left.
HOLD To freeze the page.
ODYS PRIME

EN
31
REVEAL To display or hide the concealed information (games solutions).
LIST The user can set four favorite pages to be directly linked to the fourcolor keys. While list mode is activated, it is not possibility to use TOPor FLOF navigation with the colorkeys. The favorite page numbersshould be stored and restored to/from nonvolatile memory for eachchannel by the system software.
8.5 EPG Menu (Electronic Program Guide).The EPG menu is used to look at what is being broadcasted on DTV or Radio channel in the day. Toaccess the EPG menu, press the EPG button, the following menu will be displayed:
The EPG is an on-screen TV guide that shows scheduled programs seven days in advance for everytuned channel. Press the EPG button on the Remote Control to access guide. It will show a list with thecurrent run programms.
Press INDEX and use / to switch between Time / Channel .
Time: An overview will be shown about the broadcast to the selectet date to currenttime from the programms.
- Select the “Date / Timer” display and press to edit the date.
Channel: An overview will be shown about the broadcast course of the selectet channelon day you edit befor.
- Select the programm display and press to switch the channel
Remind: Use GREEN botton to open the reminder setting. Press “Ok” to acknowledgethe edit settings.The made settings will be stored in your schedule list.
Record: Use PVR botton to open the record setting. Pres “Ok” to acknowledge theedit settings.The made settings will be stored in your schedule list.
Schedule: Use YELLOW botton to open the schedule list from your records and remindsettings. Selectet items can be delete with “RED” botton.
ODYS PRIME

EN
32
8.6 Program Information
You can press the DISPLAY button to display the general information of the current channel. And the info
bar will disappear automatically after few seconds or you can press the EXIT button to exit the info bar.
Press to scroll through the text below the information bar.
Press to switch between the current and the next program.
8.7 NICAM/A2
You can select the language you prefer in Audio if the current program is available in multiple audio
languages.
1. Press the NICAM/A2 button.
2. Press the OK button to select the audio language you prefer.
3. Press the EXIT button to close.
8.8 Subtitle
You can select the language for the subtitle if the program provides subtitle information.
1. Press the SUBTITLE button.
2. Select the required subtitle language and press the OK button. The subtitle of the selected language will
be displayed at the bottom of the screen.
ODYS PRIME
EN
33
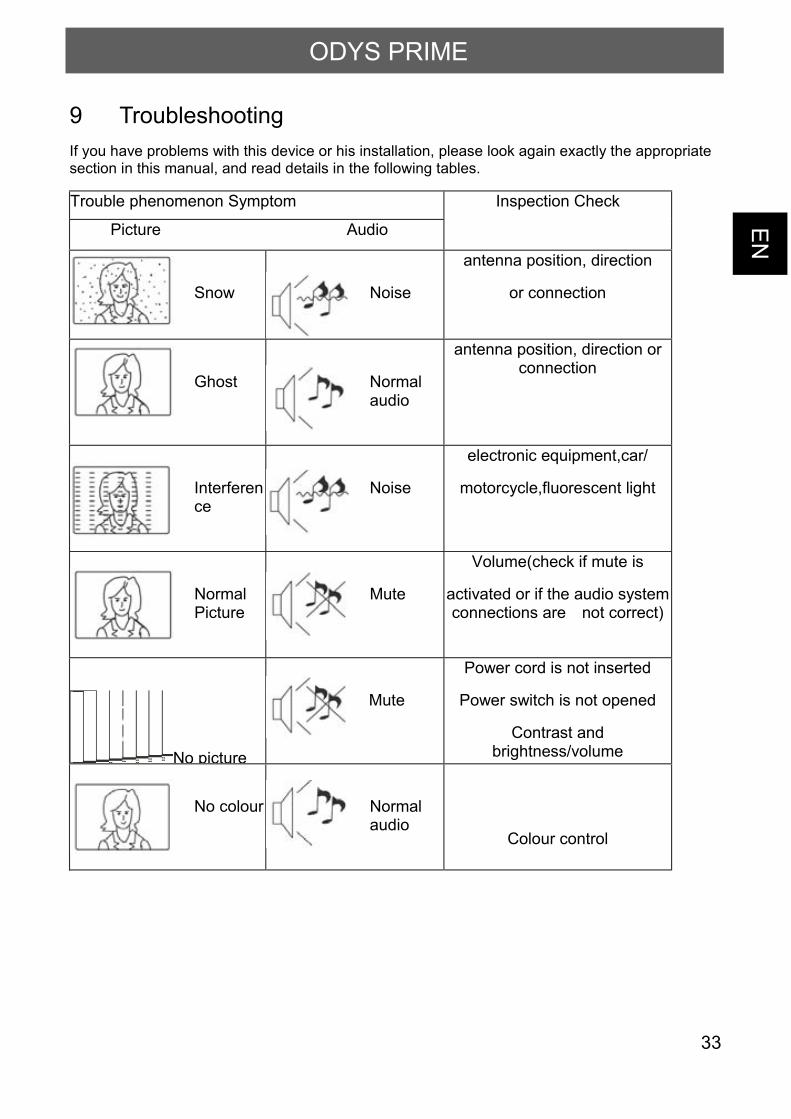
9 TroubleshootingIf you have problems with this device or his installation, please look again exactly the appropriatesection in this manual, and read details in the following tables.
Trouble phenomenon Symptom
Picture Audio
Inspection Check
Snow Noise
antenna position, direction
or connection
Ghost Normalaudio
antenna position, direction orconnection
Interference
Noise
electronic equipment,car/
motorcycle,fluorescent light
NormalPicture
Mute
Volume(check if mute is
activated or if the audio systemconnections are not correct)
No picture
Mute
Power cord is not inserted
Power switch is not opened
Contrast andbrightness/volume
No colour Normalaudio
Colour control
ODYS PRIME
EN
34
ODYS PRIME
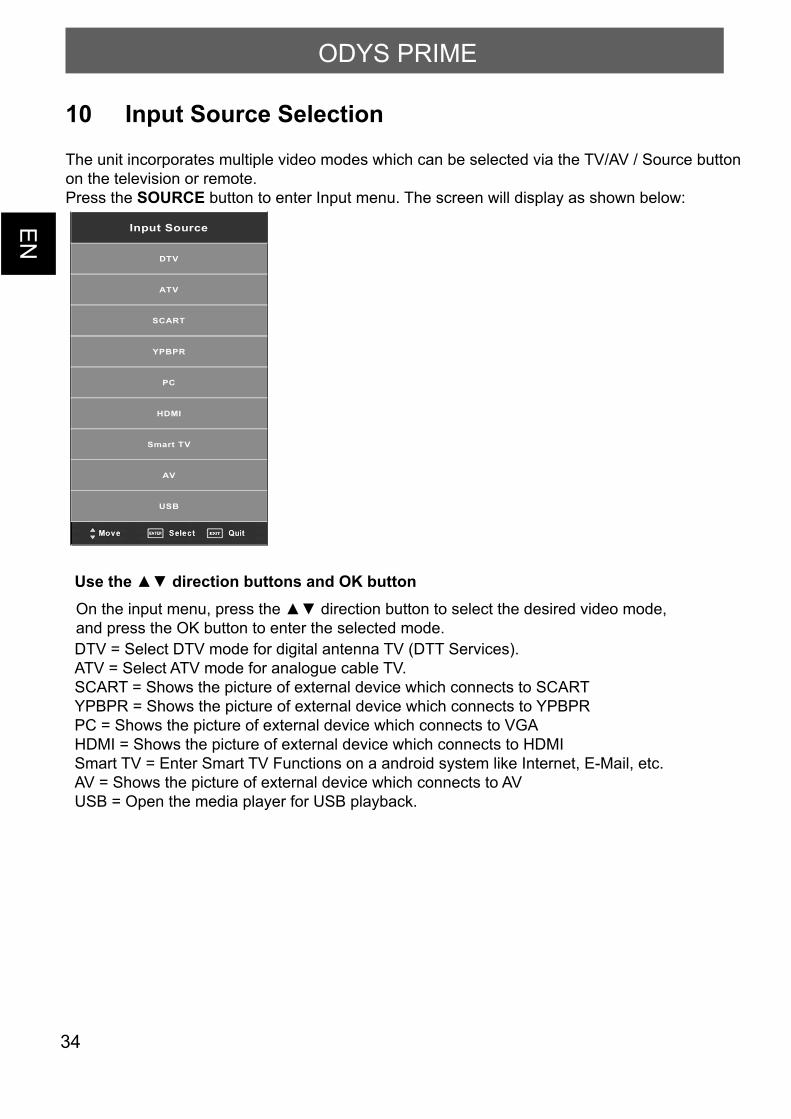
10 Input Source Selection
The unit incorporates multiple video modes which can be selected via the TV/AV / Source button on the television or remote. Press the SOURCE button to enter Input menu. The screen will display as shown below:
Input Source
DTV
ATV
SCART
YPBPR
PC
HDMI
Smart TV
AV
USB
and press the OK button to enter the selected mode.DTV = Select DTV mode for digital antenna TV (DTT Services).ATV = Select ATV mode for analogue cable TV.SCART = Shows the picture of external device which connects to SCARTYPBPR = Shows the picture of external device which connects to YPBPRPC = Shows the picture of external device which connects to VGAHDMI = Shows the picture of external device which connects to HDMISmart TV = Enter Smart TV Functions on a android system like Internet, E-Mail, etc.AV = Shows the picture of external device which connects to AVUSB = Open the media player for USB playback.
EN
35
ODYS PRIME
11 First installation guide11.1 Mode selectionThe first boot will prompt mode Selection.
Store mode:
11.2 Installation Guide (DVB-T, ATV). Y
EN
36
ODYS PRIME
(1): Select the OSD menu language.(2): Select the mode for searching.(3): Select the country for DTV and ATV reception.(4): Select which type of channels you want to search.
Press ok to confirm.The channel search starts now with ATV channel search.
- Press “Exit” to exit the channel search searching. - Press “TV menu” to skip the analogue TV (ATV) channel search.
eed searching. If you skip ATV search the engine will proceed with DTV channel search.
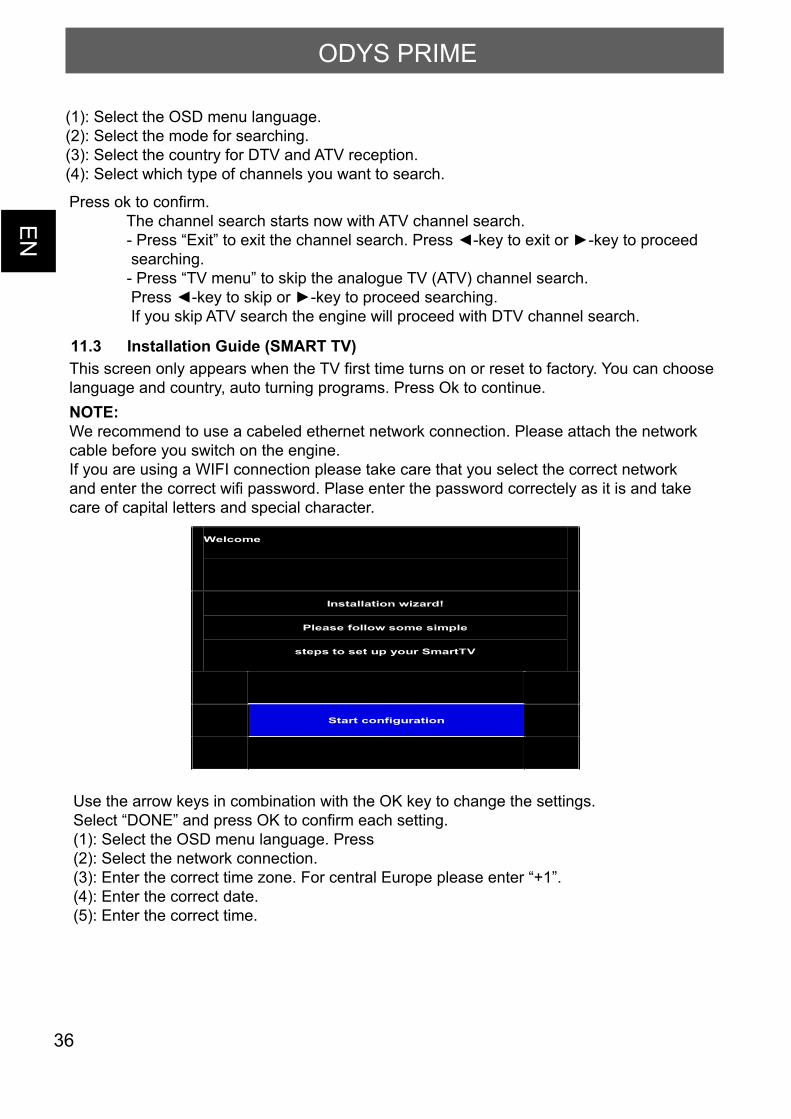
11.3 Installation Guide (SMART TV)This screen only appears when the TV first time turns on or reset to factory. You can choose language and country, auto turning programs. Press Ok to continue.NOTE:We recommend to use a cabeled ethernet network connection. Please attach the network cable before you switch on the engine.If you are using a WIFI connection please take care that you select the correct network and enter the correct wifi password. Plase enter the password correctely as it is and take care of capital letters and special character.
Welcome
Installation wizard!
Please follow some simple
steps to set up your SmartTV
Start configuration
Use the arrow keys in combination with the OK key to change the settings.Select “DONE” and press OK to confirm each setting.(1): Select the OSD menu language. Press(2): Select the network connection. (3): Enter the correct time zone. For central Europe please enter “+1”.(4): Enter the correct date.(5): Enter the correct time.
EN
37
ODYS PRIME
12 Android Smart TV OperationPlease follow the first installation wizard instructions first.
12.1 First Installation wizzardAt the first time you are using the Smart TV part of this device a first installation wizzard will be shown and will guide you the the most important settings.
1 Press the SOURCE key.
2 Select SMART TV from the SOURCE list and press OK to confirm.
Note: Depending on the previous state it may take a while to start up the
android system. Meanwhile you will see the “No Signal” hint.
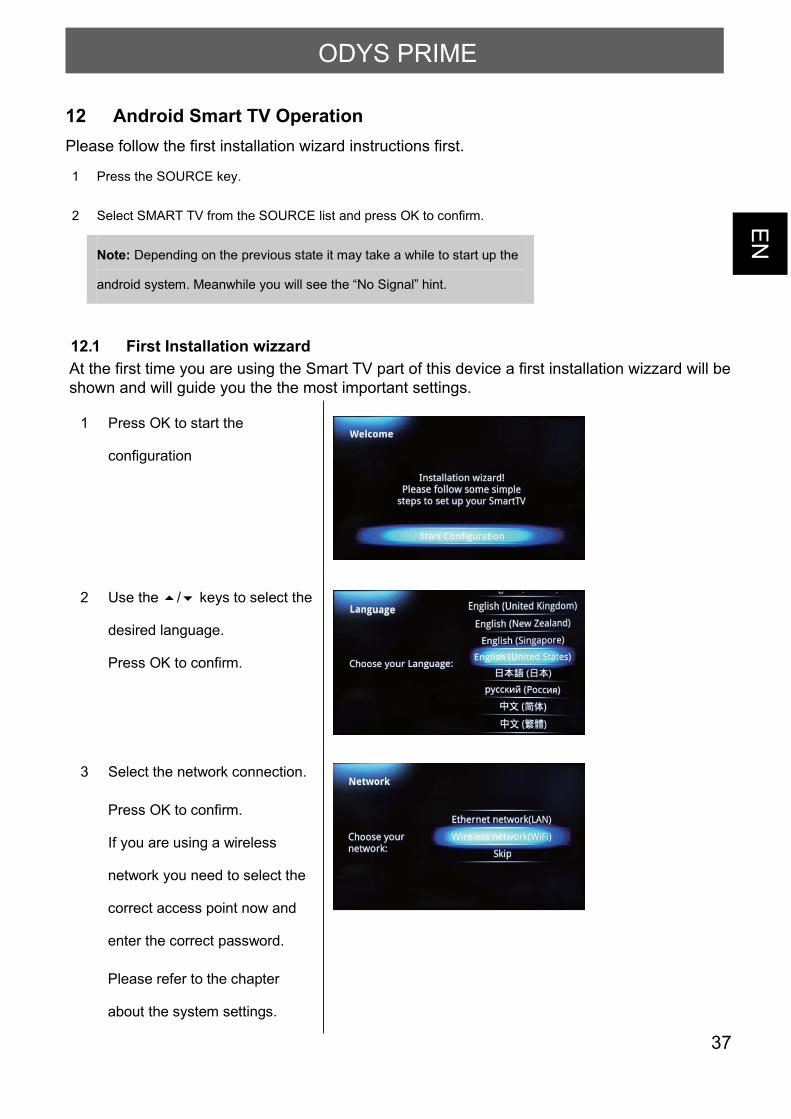
1 Press OK to start the
configuration
2 Use the / keys to select the
desired language.
Press OK to confirm.
3 Select the network connection.
Press OK to confirm.
If you are using a wireless
network you need to select the
correct access point now and
enter the correct password.
Please refer to the chapter
about the system settings.
EN
38
ODYS PRIME
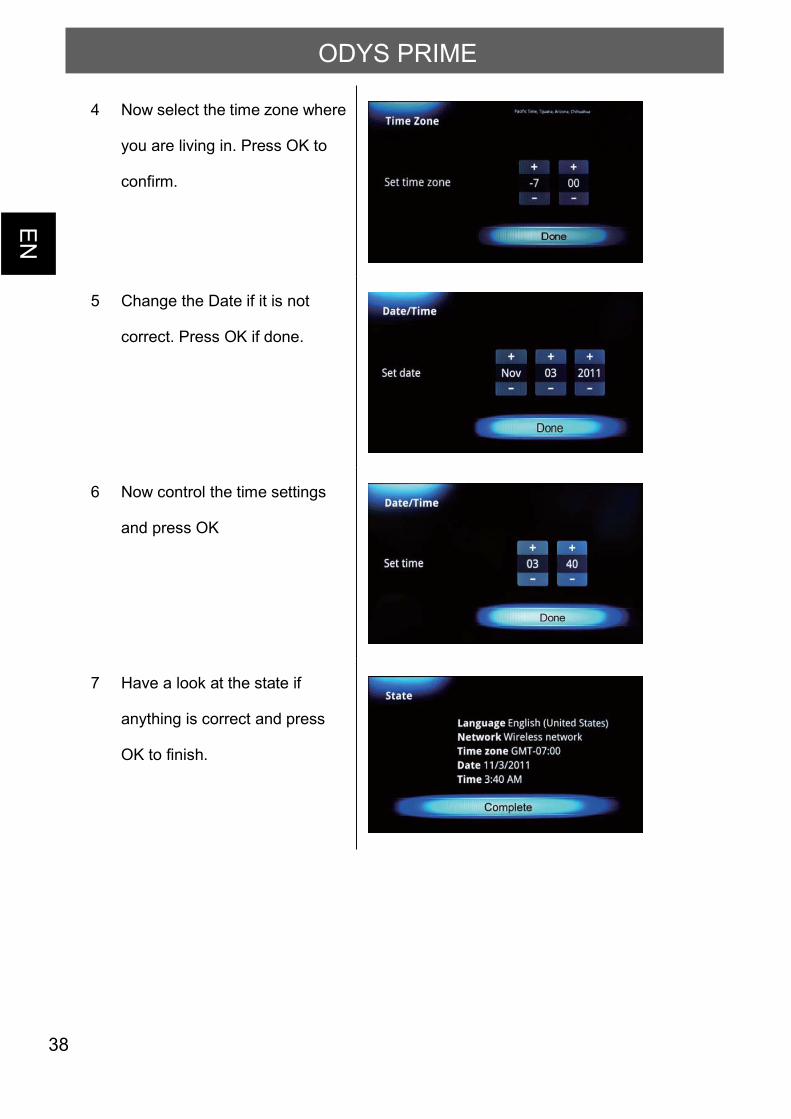
4 Now select the time zone where
you are living in. Press OK to
confirm.
5 Change the Date if it is not
correct. Press OK if done.
6 Now control the time settings
and press OK
7 Have a look at the state if
anything is correct and press
OK to finish.
EN
39
ODYS PRIME
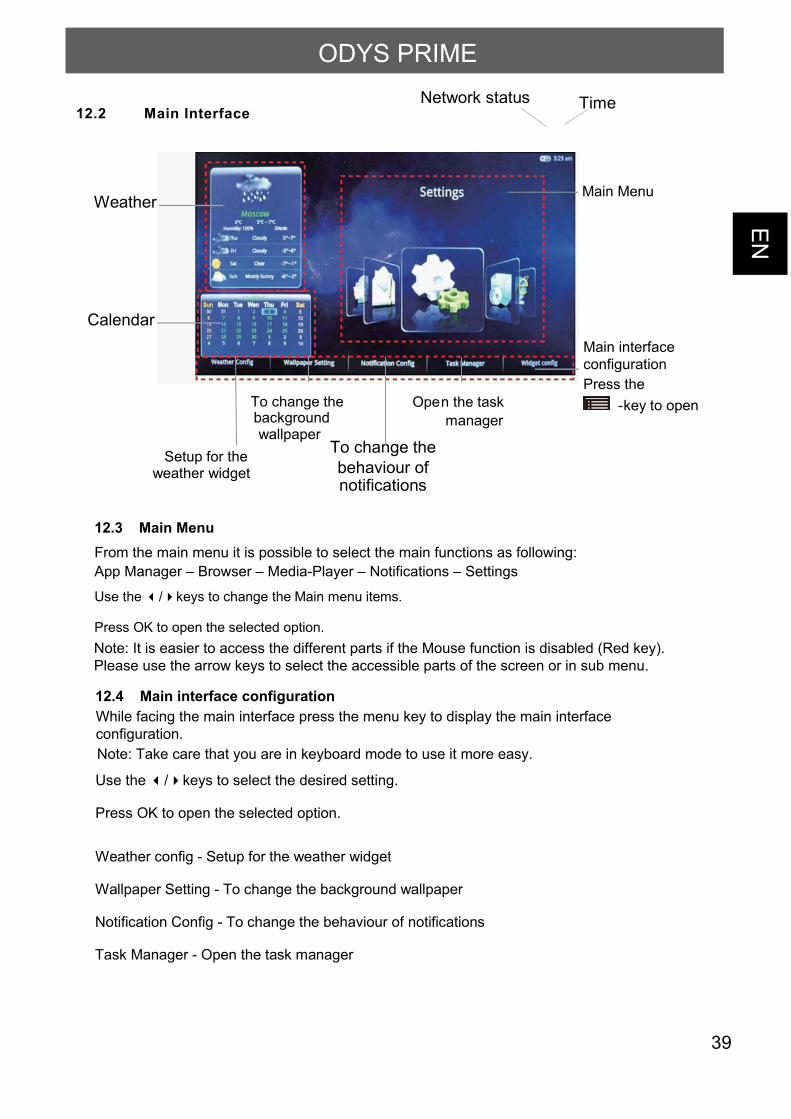
12.2 Main Interface
Weather
Calendar
Main Menu
Main interfaceconfigurationPress the
-key to open
Time
To change thebackgroundwallpaper
To change thebehaviour ofnotifications
Open the taskmanager
Setup for theweather widget
Network status
12.3 Main MenuFrom the main menu it is possible to select the main functions as following:App Manager – Browser – Media-Player – Notifications – Settings
Use the / keys to change the Main menu items.
Press OK to open the selected option.Note: It is easier to access the different parts if the Mouse function is disabled (Red key). Please use the arrow keys to select the accessible parts of the screen or in sub menu.
12.4 Main interface configurationWhile facing the main interface press the menu key to display the main interface configuration.Note: Take care that you are in keyboard mode to use it more easy.
Use the / keys to select the desired setting.
Press OK to open the selected option.
Weather config - Setup for the weather widget
Wallpaper Setting - To change the background wallpaper
Notification Config - To change the behaviour of notifications
Task Manager - Open the task manager
EN
40
ODYS PRIME
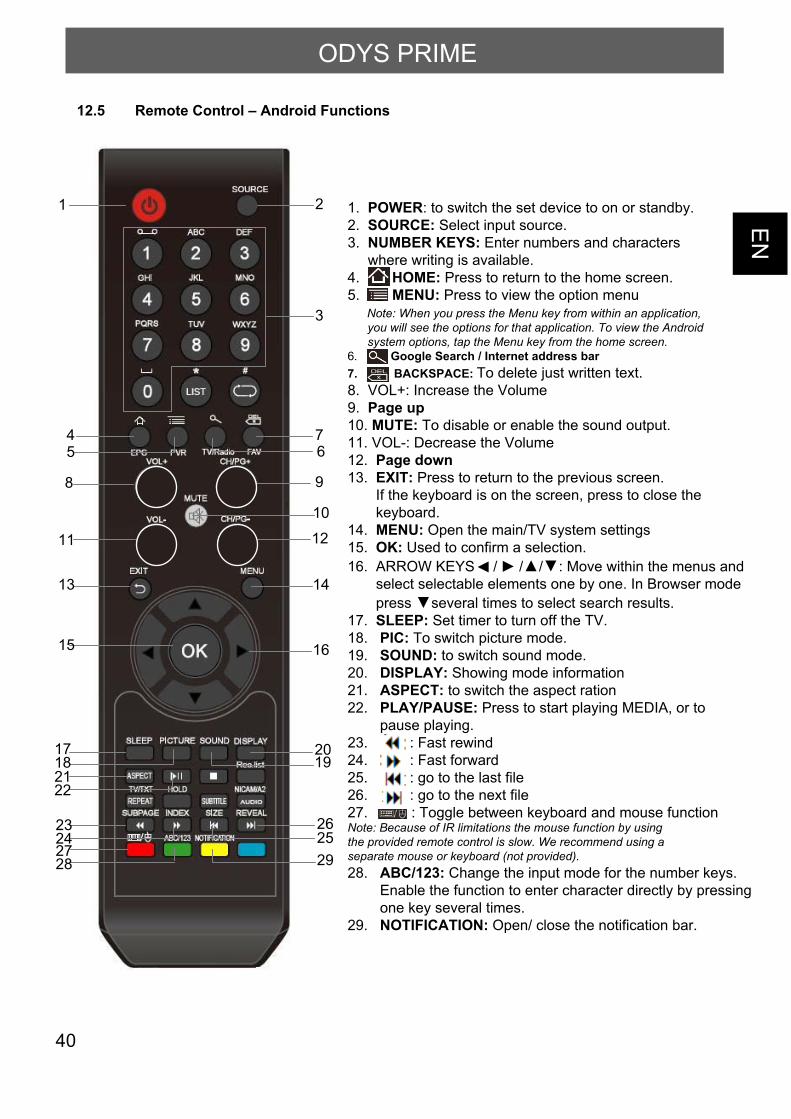
1. POWER: to switch the set device to on or standby.2. SOURCE: Select input source.3. NUMBER KEYS: Enter numbers and characters where writing is available.4. HOME: Press to return to the home screen.5. MENU: Press to view the option menu
Note: When you press the Menu key from within an application, you will see the options for that application. To view the Android system options, tap the Menu key from the home screen.6. Google Search / Internet address bar7. BACKSPACE: To delete just written text.8. VOL+: Increase the Volume9. Page up10. MUTE: To disable or enable the sound output.11. VOL-: Decrease the Volume12. Page down13. EXIT: Press to return to the previous screen. If the keyboard is on the screen, press to close the keyboard.14. MENU: Open the main/TV system settings15. OK: Used to confirm a selection.16. ARROW KEYS / / / : Move within the menus and select selectable elements one by one. In Browser mode press several times to select search results.17. SLEEP: Set timer to turn off the TV.18. PIC: To switch picture mode.19. SOUND: to switch sound mode.20. DISPLAY: Showing mode information21. ASPECT: to switch the aspect ration22. PLAY/PAUSE: Press to start playing MEDIA, or to pause playing.23. : Fast rewind24. : Fast forward25. : go to the last file26. : go to the next file 27. : Toggle between keyboard and mouse functionNote: Because of IR limitations the mouse function by using the provided remote control is slow. We recommend using a separate mouse or keyboard (not provided).28. ABC/123: Change the input mode for the number keys. Enable the function to enter character directly by pressing one key several times.29. NOTIFICATION: Open/ close the notification bar.
12.5 Remote Control – Android Functions
1 2
3
45 6
7
8 9
10
11 12
13 14
15 16
1718 19
20
21
23242728
262529
22
EN
41
ODYS PRIME
12.6 Using the Remote ControlTo control your Android system you can use the provided remote control.Note: Because of the large variety of functions we recommed to use an addtitional Mouse and/or keyboard (not provided).By pressing the red key ( ) you can switch between mouse and keyboard mode.
Mouse Mode
o In mouse mode you can see a cursor at the screen.o Use the arrow keys to control the position of this cursor.o Press OK to confirm.
Note: Because of IR limitations the mouse function by using the provided remote control is slow. Please note, that this is a specification of this engine.
Keyboad Modeo Keyboard mode you can select any access accessible part one by one.o Use the arrow keys to move the selection left / right or up / down.The selection will change in the pressed direction. Please Note that that selection will take place in only one line or column.o Press / to change the column or horizontal selectiono Press / to change the line or vertical selection.o Press OK to confirm.
Note: Depending on the function, application or web page you are currently using it might be difficult to identify the currently selected part. Please watch the screen carefully. If you are not sure please switch to mouse mode.
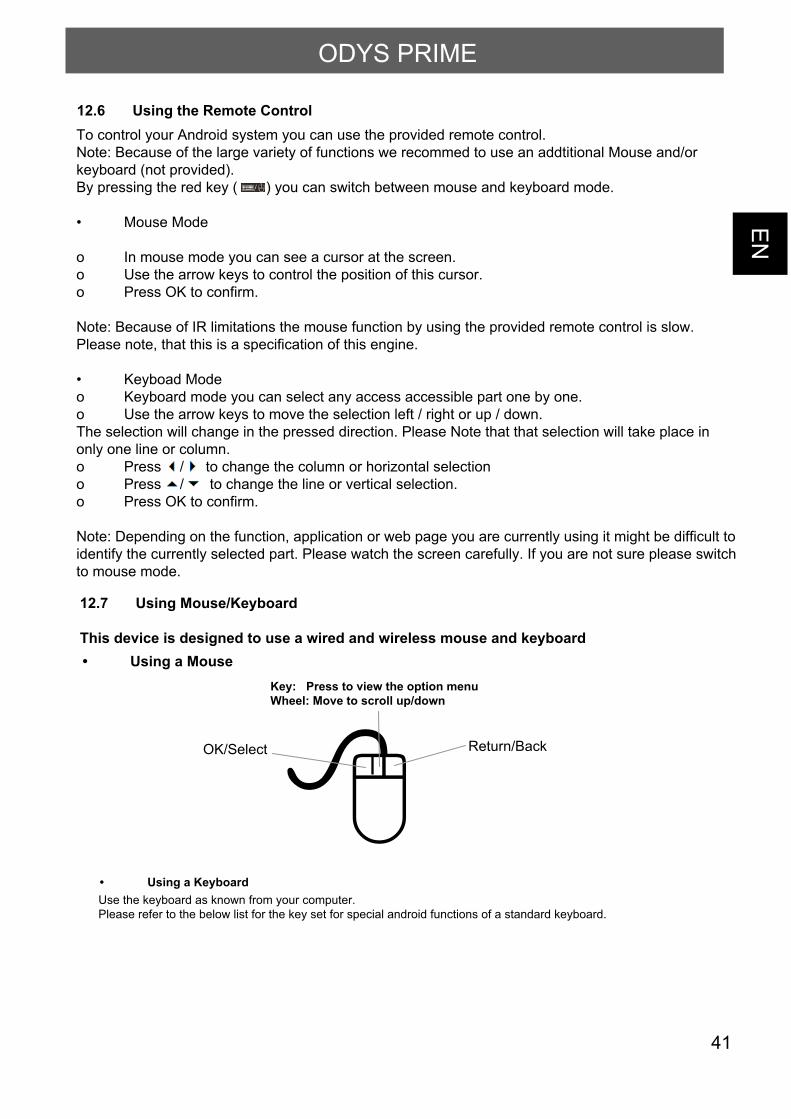
12.7 Using Mouse/Keyboard
This device is designed to use a wired and wireless mouse and keyboardUsing a Mouse
Key: Press to view the option menuWheel: Move to scroll up/down
OK/Select Return/Back
Using a KeyboardUse the keyboard as known from your computer.Please refer to the below list for the key set for special android functions of a standard keyboard.
EN
42
ODYS PRIME
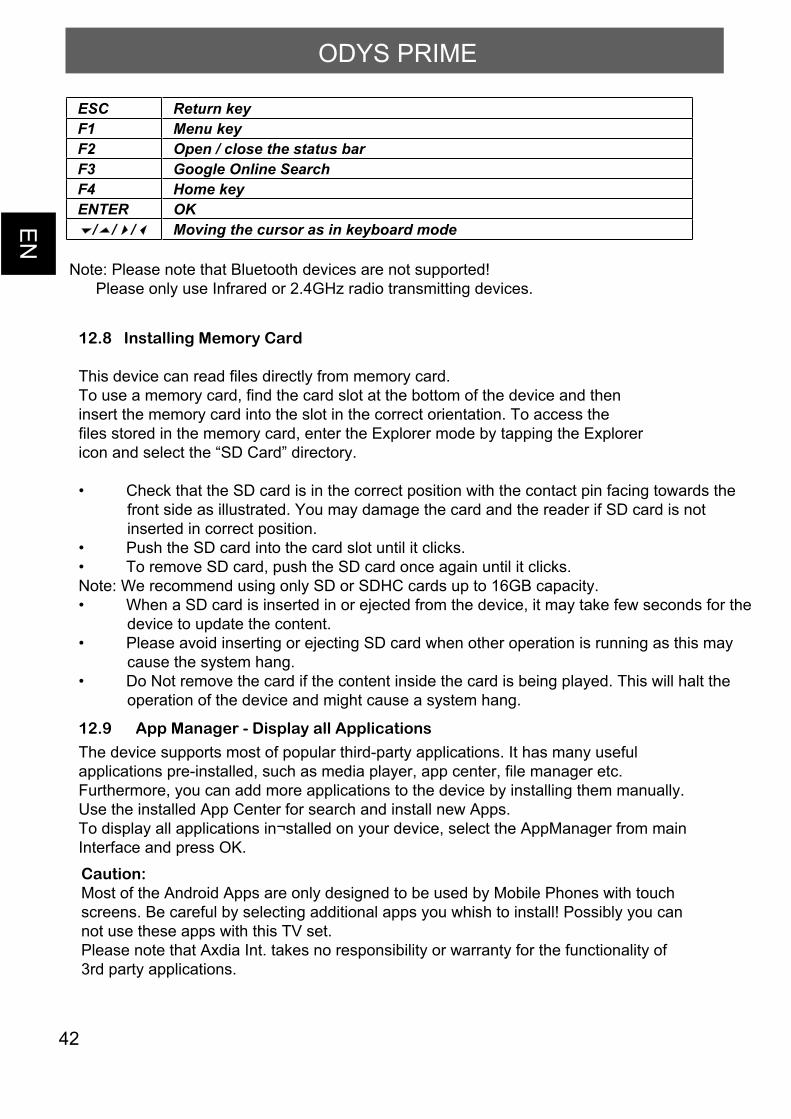
ESC Return keyF1 Menu keyF2 Open / close the status barF3 Google Online SearchF4 Home keyENTER OK/ / / Moving the cursor as in keyboard mode
Note: Please note that Bluetooth devices are not supported! Please only use Infrared or 2.4GHz radio transmitting devices.
12.8 Installing Memory Card
This device can read files directly from memory card. To use a memory card, find the card slot at the bottom of the device and then insert the memory card into the slot in the correct orientation. To access the files stored in the memory card, enter the Explorer mode by tapping the Explorer icon and select the “SD Card” directory.
Check that the SD card is in the correct position with the contact pin facing towards the front side as illustrated. You may damage the card and the reader if SD card is not inserted in correct position.
Push the SD card into the card slot until it clicks.To remove SD card, push the SD card once again until it clicks.
Note: We recommend using only SD or SDHC cards up to 16GB capacity.When a SD card is inserted in or ejected from the device, it may take few seconds for the
device to update the content.Please avoid inserting or ejecting SD card when other operation is running as this may
cause the system hang.Do Not remove the card if the content inside the card is being played. This will halt the
operation of the device and might cause a system hang.
12.9 App Manager - Display all Applications
The device supports most of popular third-party applications. It has many useful applications pre-installed, such as media player, app center, file manager etc. Furthermore, you can add more applications to the device by installing them manually. Use the installed App Center for search and install new Apps.To display all applications in¬stalled on your device, select the AppManager from main Interface and press OK.
Caution:Most of the Android Apps are only designed to be used by Mobile Phones with touch screens. Be careful by selecting additional apps you whish to install! Possibly you can not use these apps with this TV set. Please note that Axdia Int. takes no responsibility or warranty for the functionality of 3rd party applications.

EN
43
ODYS PRIME
12.10 Launching the Web browser
Note: Not all wireless networks offer access to the Internet. Some Wi-Fi net¬works only link several computers together, without any Internet connection.
Select the Browser from the main interface to launch the Web browser.
If you are already connected to a network, the Web browser will simply open and youcan start browsing the Web. To access a new website, Press the Search icon toopen the address bar and input another address.
Now Press / to switch to the virtual keyboard.
Using the Virtual Keyboard
Select any text input field and press ok to open the virtual board. With the virtual keyboard, you can enter a website address or any text required.
Use the arrow keys to select the desired characterPress OK to confirm.Press the Return key to close the virtual keyboard.
Indicationsa. Caps Lock b. Backspace.c. Number and Characters / Letter Keyboard Switch.d. Spacee. Enter
Selecting Input Method
If you have installed more than one input method in this device, you can select one method by choosing “Input Method” and then choosing your desired one.Note: The keyboard layout will change depending on the osd language settings.
Using the Web Browser
Use the -key to switch back from the virtual keyboard to the search bar or toselect one of the displayed search results.
Press the red key ( ) to change the input method.Note: Using the provided remote control the mouse mode is slow. It is recommended to use the keyboard mode and use the Arrow keys for navigation only.
EN
44
ODYS PRIME
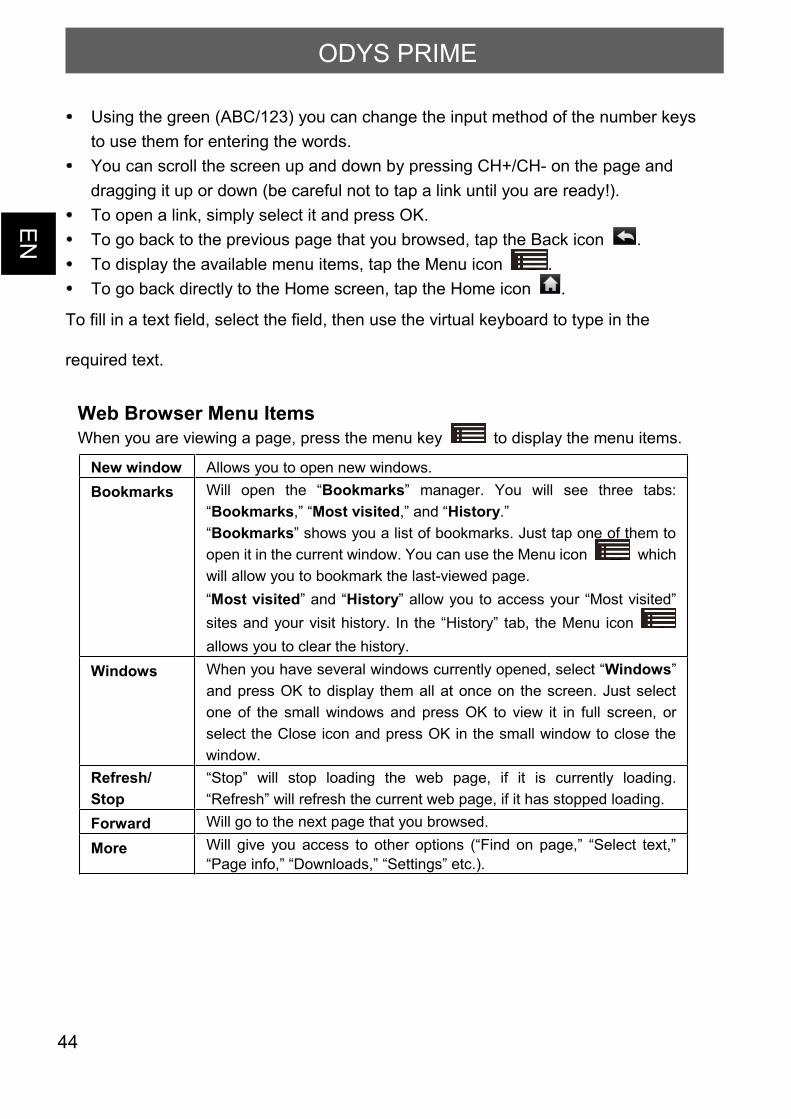
Using the green (ABC/123) you can change the input method of the number keysto use them for entering the words.You can scroll the screen up and down by pressing CH+/CH- on the page anddragging it up or down (be careful not to tap a link until you are ready!).To open a link, simply select it and press OK.To go back to the previous page that you browsed, tap the Back icon .To display the available menu items, tap the Menu icon .To go back directly to the Home screen, tap the Home icon .
To fill in a text field, select the field, then use the virtual keyboard to type in the
required text.
Web Browser Menu ItemsWhen you are viewing a page, press the menu key to display the menu items.
New window Allows you to open new windows.Bookmarks Will open the “Bookmarks” manager. You will see three tabs:
“Bookmarks,” “Most visited,” and “History.”“Bookmarks” shows you a list of bookmarks. Just tap one of them toopen it in the current window. You can use the Menu icon whichwill allow you to bookmark the last-viewed page.“Most visited” and “History” allow you to access your “Most visited”sites and your visit history. In the “History” tab, the Menu iconallows you to clear the history.
Windows When you have several windows currently opened, select “Windows”and press OK to display them all at once on the screen. Just selectone of the small windows and press OK to view it in full screen, orselect the Close icon and press OK in the small window to close thewindow.
Refresh/Stop
“Stop” will stop loading the web page, if it is currently loading.“Refresh” will refresh the current web page, if it has stopped loading.
Forward Will go to the next page that you browsed.
More Will give you access to other options (“Find on page,” “Select text,”“Page info,” “Downloads,” “Settings” etc.).

EN
45
ODYS PRIME
12.11 Using the Media-Player
In the Home Screen, select the Media-Player icon to enter the media player mode.Note: To use this function you must set in a SD card or attach a USB drive containing playable formats that this engine can support, first.
Use the / keys to select the desired file format (Video, Photo, Audio).
- Now use / to select the attached memory where the files you whish to show or
play are stored in.
- Select a Folder by using the / keys and pres OK to open this folder.
- Press Exit to leave the folder to the next higher level.
- Select a file and press OK to play or show it.
12.11.1 Video playback functions
Press to open the function bar.
Select the desired function and press OK to confirm.
/ Play / Pause
Return to the file browser
/ Previous / Next Video file
/ Select and press OK to change the Fast rewind / Fast forward speed
Select and Press OK to return to standard playback speed.
Open additional functions
Display file information’s
Change aspect rate (Full screen, 4:3, 16:9, No Scale UP)
Enable subtitles (if subtitle file is available)
Select the sound track (if different tracks are available)
Turn resume mode on/off
(the system will remember the last viewed file position)
Select the repeat mode
(repeat all – repeat one – no repeat)
Close the additional functions menu
Exit Return to previous state or exit function

EN
46
ODYS PRIME
12.11.2 Photo playback functions
Press Menu key to open the function bar.
Select the desired function and press OK to confirm.
Zoom in the current picture.
Rotate the current picture left or right.
Start /stop picture slideshow.
Exit Return to previous state or exit function
12.11.3 Music playback functions
OK Select the desired function and press OK to confirm.
/ Previous / Next track
Indicate and Change the repeat mode. Select one of the right icons
and press OK to change the repeat mode.
Play all files one time in original order
Repeat all files
Repeat one file
Play all files in random order
Return to the file browser
Exit Return to previous state or exit function
12.12 Notifications
Using this main interface option you can open the android notification bar to show the latest events.Use the arrow keys to select an event to open it or select delete and press OK to clear the list.Press EXIT to close the list without any change.12.13 System Settings
In the Home screen, select “Settings” and press OK. Choose a category: “Wireless
& Networks,” “Sound & Display,” “Date & Time,” etc.
EN
47
ODYS PRIME
When a down arrow appears on the right of a parameter, this means that thissetting includes sub-parameters. Select it ant press OK to display the list ofsub-parameters.When a check box appears on the right of a parameter, select it and press OK toenable or disable this option.When it is possible, you can use the CH+/CH- keys to scroll the screen up anddown to reveal settings that you don’t initially see.
When you have finished adjusting your settings, press Exit to go back to the list of
settings, or Home to go directly to the Home screen. Your settings are saved
instantly.
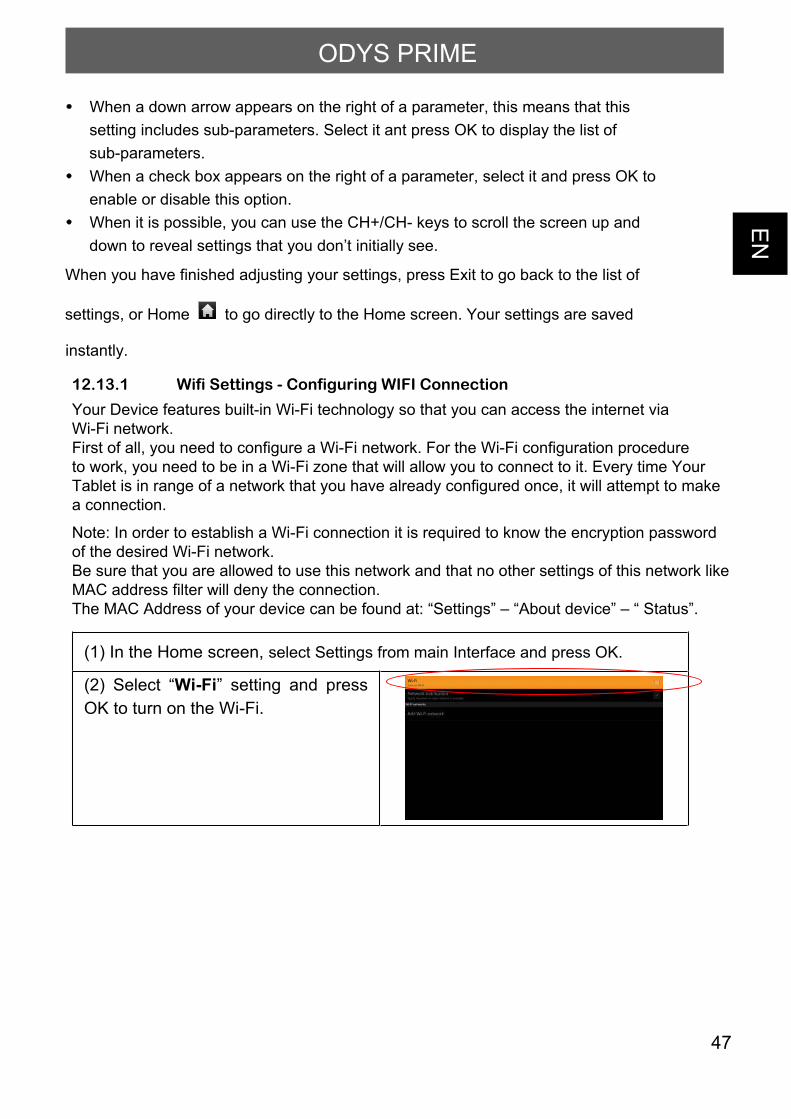
12.13.1 Wifi Settings - Configuring WIFI Connection
Your Device features built-in Wi-Fi technology so that you can access the internet via Wi-Fi network. First of all, you need to configure a Wi-Fi network. For the Wi-Fi configuration procedure to work, you need to be in a Wi-Fi zone that will allow you to connect to it. Every time Your Tablet is in range of a network that you have already configured once, it will attempt to make a connection.
Note: In order to establish a Wi-Fi connection it is required to know the encryption password of the desired Wi-Fi network.Be sure that you are allowed to use this network and that no other settings of this network like MAC address filter will deny the connection.The MAC Address of your device can be found at: “Settings” – “About device” – “ Status”.
(1) In the Home screen, select Settings from main Interface and press OK.
(2) Select “Wi-Fi” setting and pressOK to turn on the Wi-Fi.
EN
48
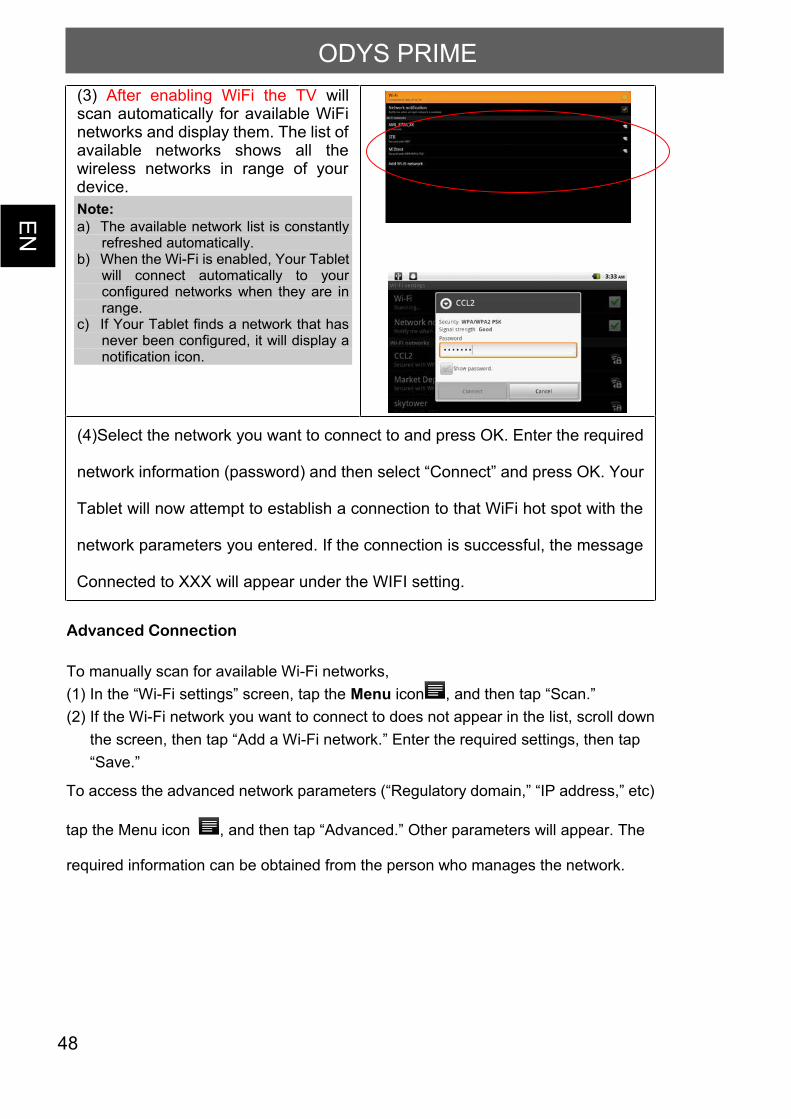
ODYS PRIME(3) After enabling WiFi the TV willscan automatically for available WiFinetworks and display them. The list ofavailable networks shows all thewireless networks in range of yourdevice.Note:a) The available network list is constantly
refreshed automatically.b) When the Wi-Fi is enabled, Your Tablet
will connect automatically to yourconfigured networks when they are inrange.
c) If Your Tablet finds a network that hasnever been configured, it will display anotification icon.
(4)Select the network you want to connect to and press OK. Enter the required
network information (password) and then select “Connect” and press OK. Your
Tablet will now attempt to establish a connection to that WiFi hot spot with the
network parameters you entered. If the connection is successful, the message
Connected to XXX will appear under the WIFI setting.
Advanced Connection
To manually scan for available Wi-Fi networks,(1) In the “Wi-Fi settings” screen, tap the Menu icon , and then tap “Scan.”(2) If the Wi-Fi network you want to connect to does not appear in the list, scroll down
the screen, then tap “Add a Wi-Fi network.” Enter the required settings, then tap“Save.”
To access the advanced network parameters (“Regulatory domain,” “IP address,” etc)
tap the Menu icon , and then tap “Advanced.” Other parameters will appear. The
required information can be obtained from the person who manages the network.

EN
49
ODYS PRIME
12.13.2 Ethernet
Disable / Enable the wired Ethernet network connection.Select the additional Ethernet setting to use customized settings
12.13.3 ApplicationsThis screen allows you to manage your Android™ applications. You can view informa¬tion about all the applications installed on your device.12.13.4 Factory data reset
This setting allows you reset your system settings or data to factory default.
Caution! All old settings will be replaced and all stored data will be lost!
12.13.5 torage
This setting allows you un-mount the SD card or check SD card and internal storage space.
12.13.6 Language keyboard
Set your preferred language and region, and configure text settings for faster and more accurate text input.
12.13.7 System upgrade
If available copy system upgrade files to SD card and follow the attached instructions to upgrade the android system.
12.13.8 Date& timeThis setting allows you set up the date, time, time zone and formats.
12.13.9 About deviceDisplay information about Your Tablet system.
EN
50
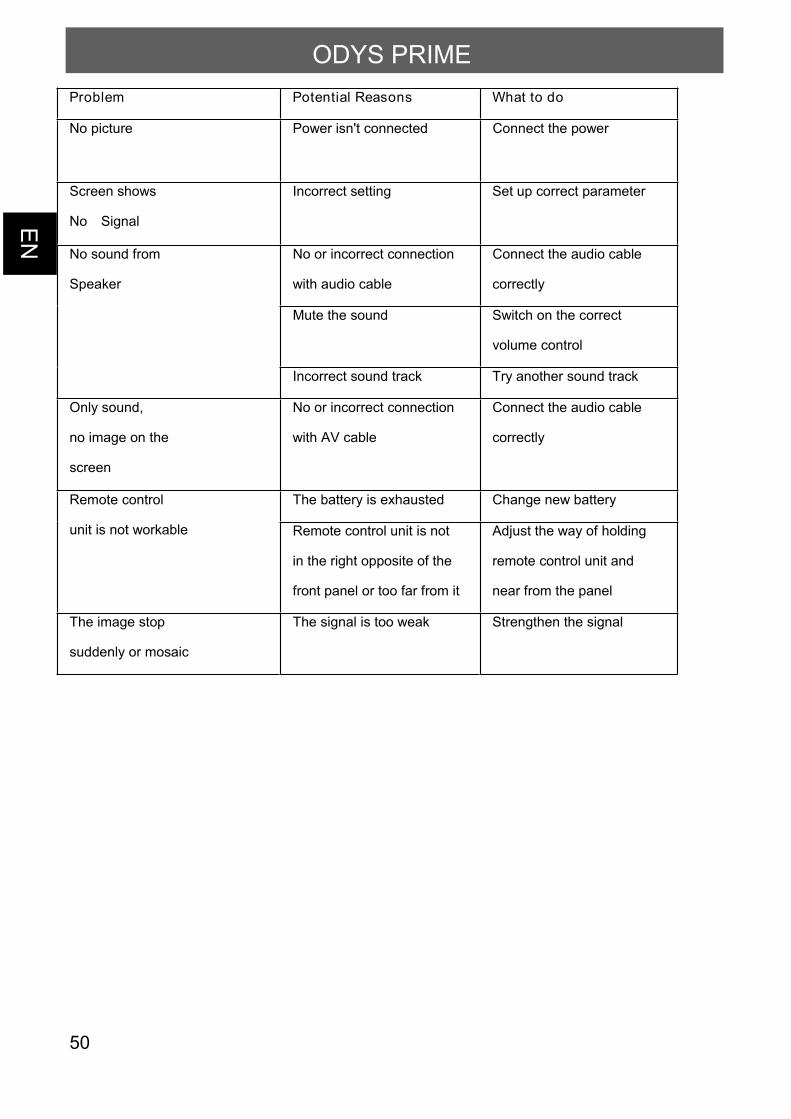
odottahWsnosaeRlaitnetoPmelborP
rewopehttcennoCdetcennoct'nsirewoPerutcipoN
Screen shows
No Signal
Incorrect setting Set up correct parameter
No or incorrect connection
with audio cable
Connect the audio cable
correctly
Mute the sound Switch on the correct
volume control
No sound from
Speaker
Incorrect sound track Try another sound track
Only sound,
no image on the
screen
No or incorrect connection
with AV cable
Connect the audio cable
correctly
The battery is exhausted Change new batteryRemote control
unit is not workable Remote control unit is not
in the right opposite of the
front panel or too far from it
Adjust the way of holding
remote control unit and
near from the panel
The image stop
suddenly or mosaic
The signal is too weak Strengthen the signal
ODYS PRIME
EN
51
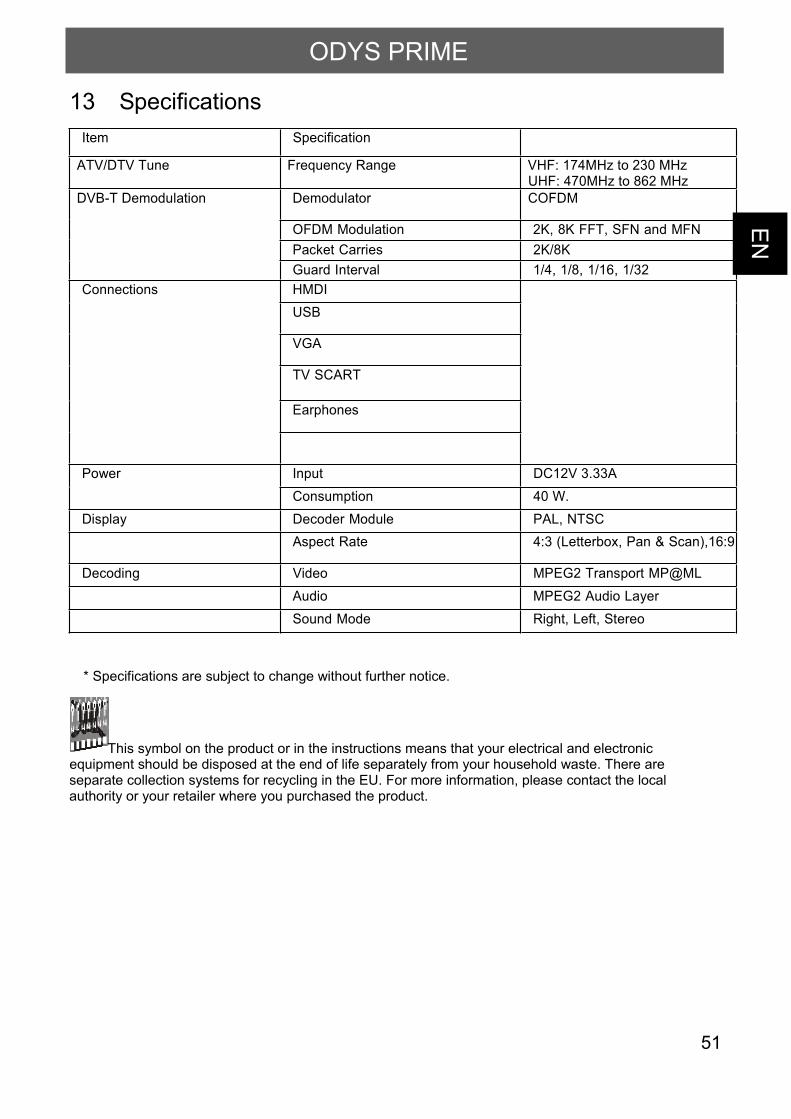
13 SpecificationsnoitacificepSmetI
ATV/DTV Tune Frequency Range VHF: 174MHz to 230 MHzUHF: 470MHz to 862 MHz
MDFOCrotaludomeD
OFDM Modulation 2K, 8K FFT, SFN and MFNK8/K2seirraCtekcaP
DVB-T Demodulation
23/1,61/1,8/1,4/1lavretnIdrauGHMDIUSB
VGA
TV SCART
Earphones
Connections
A33.3V21CDtupnIPower.W04noitpmusnoC
CSTN,LAPeludoMredoceDyalpsiD9:61,)nacS&naP,xobretteL(3:4etaRtcepsA
LM@PMtropsnarT2GEPMoediVgnidoceDreyaLoiduA2GEPMoiduA
oeretS,tfeL,thgiRedoMdnuoS
* Specifications are subject to change without further notice.
This symbol on the product or in the instructions means that your electrical and electronicequipment should be disposed at the end of life separately from your household waste. There areseparate collection systems for recycling in the EU. For more information, please contact the localauthority or your retailer where you purchased the product.
ODYS PRIME
EN
52
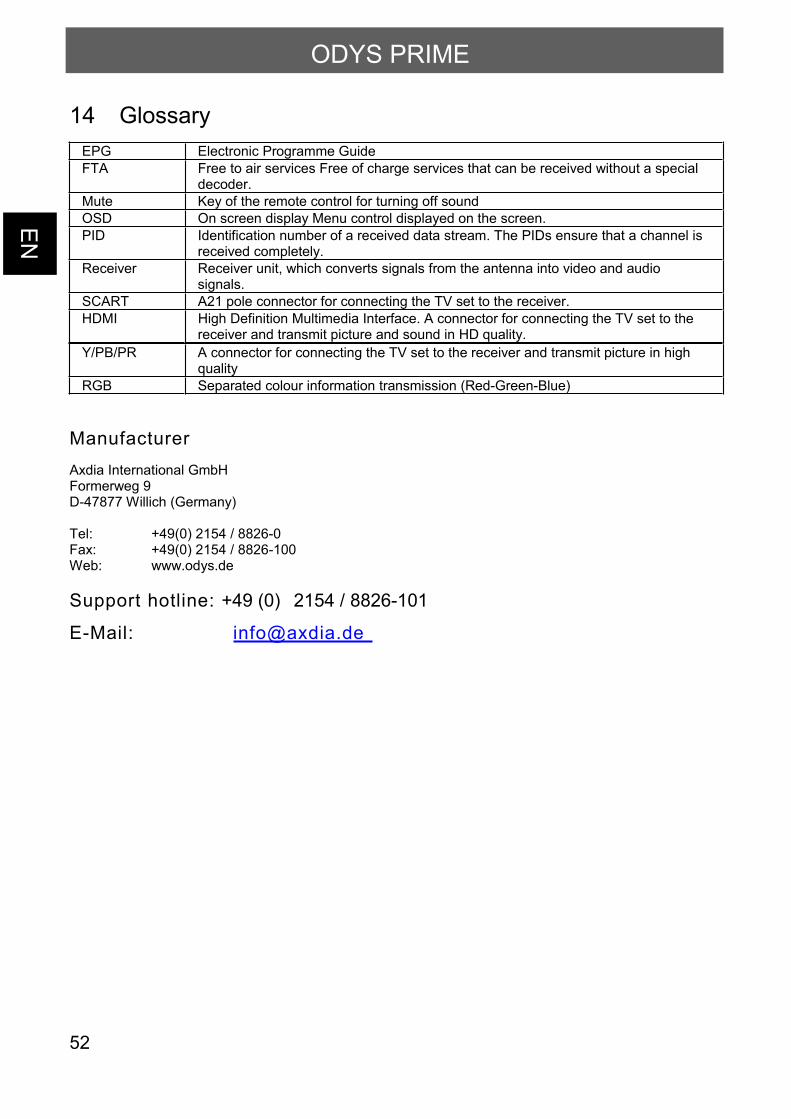
14 GlossaryEPG Electronic Programme GuideFTA Free to air services Free of charge services that can be received without a special
decoder.Mute Key of the remote control for turning off soundOSD On screen display Menu control displayed on the screen.PID Identification number of a received data stream. The PIDs ensure that a channel is
received completely.Receiver Receiver unit, which converts signals from the antenna into video and audio
signals.SCART A21 pole connector for connecting the TV set to the receiver.HDMI High Definition Multimedia Interface. A connector for connecting the TV set to the
receiver and transmit picture and sound in HD quality.Y/PB/PR A connector for connecting the TV set to the receiver and transmit picture in high
qualityRGB Separated colour information transmission (Red-Green-Blue)
ManufacturerAxdia International GmbHFormerweg 9D-47877 Willich (Germany)
Tel: +49(0) 2154 / 8826-0Fax: +49(0) 2154 / 8826-100Web: www.odys.de
Support hotline: +49 (0) 2154 / 8826-101
E-Mail: [email protected]
ODYS PRIME

EN
53
15 Warranty conditionThe following conditions comprise the requirements and scope of our warranty conditions and do notaffect our legal and contractual warranty obligations.
We offer a warranty on our products in accordance with the following conditions:
1. AXDIA products are covered by a 24 month warranty. We will resolve damages or defects onAXDIA products free of charge within 12 months of the purchase date under the followingwarranty conditions. For any damage or defect determined later than 12 months after thepurchase date, proof of a manufacturing fault must be submitted for repair under warranty.
The warranty does not cover batteries and other parts, which are considered consumables, partsthat break easily such as glass or plastic or defects based on normal wear and tear. There is nowarranty obligation in the event of marginal differences compared to the target appearance andworkmanship provided these have a negligible effect on the product's fitness for use, in the eventof damage caused by chemical or electrochemical effects, by water or generally from abnormalconditions.
2. The warranty will be performed in such a way that we shall decide whether to repair the defectiveparts or to replace them with working parts free of charge. AXDIA reserves the right to exchangethe product for a replacement product of equal value if the product that is sent in cannot berepaired within a reasonable time or at reasonable cost. The product can also be exchanged for adifferent model of the same value. Requests cannot be made for repairs to be carried out on site.Parts that have been replaced or exchanged become our property.
3. The warranty claim does not apply if repairs or other work is carried out by unauthorized personsor if our products are equipped with additional parts or accessories that are not approved for ourproducts.
4. Warranties that have been activated do not cause the warranty period to be extended, nor do theytrigger a new warranty period. The warranty period for any replacement parts installed ends withthe warranty period for the entire product.
5. Any other or further claims are excluded, especially those for replacement due to damage causedoutside of the product, provided there is no obligatory legal liability. We therefore accept noliability for accidental, indirect or other consequential damage of any kind, which leads to usagerestrictions, data loss, loss of earnings or interruption to business.
Asserting a warranty claim
1. To make use of the warranty service, you must contact the AXDIA Service Center by e-mail, faxor phone (see below for contact details). You can also use the service form on our website or onthe back of the warranty conditions.
2. AXDIA Service Center will try to diagnose and solve your problem. If it is determined that awarranty claim exists, you will be given an RMA number (Return Material Authorization) and youwill be asked to send the product to AXDIA.
ODYS PRIME
EN
54
IMPORTANT: AXDIA will onl y accept parcels thathave an RMA number.
Please observe the following when sending the product:1. Send the product suitably packaged with carriage and insurance paid. Do not enclose any
accessories with the products (no cables, CD's, memory cards, manuals, etc.), unless the AXDIAService Centre specifies otherwise.
2. Mark the RMA number on the outside of the package in such a way that it is visible and clearlylegible.
3. You must enclose a copy of the sales slip as proof of purchase.4. Once AXDIA has received the product, it will meet its warranty obligations in accordance with the
warranty conditions and will return the product to the sender with carriage and insurance paid.
Service outside of warranty
AXDIA can refuse any service claim made that is not covered by the warranty. If AXDIAagrees to provide a service outside the warranty, the customer will be invoiced for all repairand transport costs.AXDIA will not accept any packages that have not first been approved by AXDIA by meansof an RMA (Return Material Authorization).
ODYS PRIME


